Modeler12
-
Posts
1,716 -
Joined
-
Last visited
Content Type
Profiles
Forums
Gallery
Events
Everything posted by Modeler12
-
 A brief update. I am continuing with the furled sails, braces, halliyards, etc. The mizzen and fore mast parts are done, but I still need install the royal and topgallant furled sails for the main. It is slow going with all the 'corrections' I need to make. I am also leaving the various lines 'untied' so in case I have to make more adjustments I don't have to unglue the belaying knots. For now the lines are held to the deck with some tape. Hence, the braces you see are rather loose. Once the braces are taken care of, I can come back where I left off a few months ago. Namely untangle this mess of lines and work on the topsails.

- 732 replies
-
- 2
-

-
- constitution
- model shipways
- (and 1 more)
-
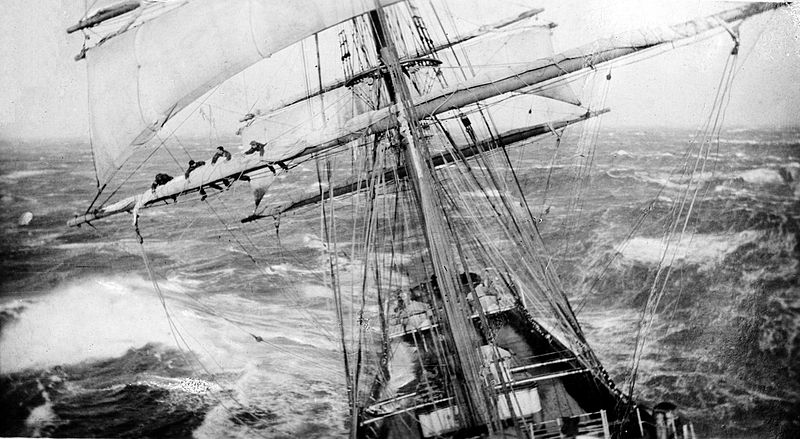
I tend to agree with you, but was confused by the drawing published is great detail by Petersson. When braces (or other lines) go to a mast and down along the front side, they tend to interfere with the sails. If, however, they can go down along the back side of the mast the problem is not as bad. In the case of the mizzen braces, they can go down along the back side of the main, so that should not be a real problem. The plans that came with the kit shows them going to the main. However, I will keep the braces for the fore and main jacks away from the masts as suggested by Petersson. They are arranged to go back from the spars, but should not go down along the front of masts as described above. Below is a photograph of the Connie in Boston and it clearly shows that there are no braces going to the gaff and the braces for the topsail spar are going forward.

-
Thank you Clare for your kind words. Actually I had not 'given up' but just needed a long break (with other commitments to go with that). As I explained above, the reasons for getting a bit frustrated were several, but I think I now have a handle on what needs to be done. Below is another drawing about the mizzen braces. It looks a bit strange to have lines going to the spanker gaff, but there is plenty of room in that area, so I may do that also. BTW the braces for the mizzen royal go forward to the main mast. As long as lines are along the back side of the mast, they do not interfere with the sails. I learn a little every time I do something good or wrong!

-
There is a smaller version which is great for silver soldering thin wire and other tiny stuff. You hold it like a pencil and in less than a second I can make a butt joint. You might want to take a look at the last part of this earlier thread http://modelshipworl...ng-tools/page-2 The little torch, bottle of fuel and the tube of solder/flux would cost about twenty to thirty dollars. Also see this video

-
Thank you Geoff. Let me explain what happened. As I have explained before, I took the approach to do the rigging from the top down. That meant that I had installed the royal and topgallant spars along with their halyards and braces. They were glued in place and the lines belayed on deck etc. When I started the topsail for the mizzen, I found that there were too many lines interfering around the mast. The four brace lines were strung behind the topsail and looked wrong. However, the plans show several going down along the mast. You might have a look at drawing 7 and note the little arrows pointing down. I could see that the problem would be worse for the main and fore royal and topgallant braces. Then along comes Mike with his furled sails idea and I decided to give that a try. But as long as I was going to do that I had to do something about the braces. Besides that, the plans also show that many of the braces are belayed along the rail. When I tried that the platforms were in the way. Below I show two drawings that are in the book by Lennarth Petersson. The first one is for the foremast. You can see that none of the braces come down along the masts. I am now in the process of rigging the foremast braces this way. It involves a lot more line, blocks, etc but I think it will look better. I have not yet decided to redo the mizzen braces, but probably will later. All of this slows down the work on the topsails, but so be it. There is one more drawing for the mizzen braces, but I will show that later.


- 732 replies
-
- 1
-
-
- constitution
- model shipways
- (and 1 more)
-
Steve, I'll take that as a compliment, but the truth is far from that. For example, when I had to remove halyards I had one that was a bit too complicated to replace in total. So, I spliced a new section to it but hid the knot underneath the platform. Until now only I knew. There are a few more 'hick-ups' and I am glad I have a bottle of 'unglue'. But at least I think I am back on track.
- 732 replies
-
- 1
-
-
- constitution
- model shipways
- (and 1 more)
-
Clamps, an old trick revisited
Modeler12 replied to Modeler12's topic in Modeling tools and Workshop Equipment
Kind of like this, Duff? But be sure to use some strong glue, like epoxy, because the peel (or cleavage) strength here is important. (I am not saying epoxy is all that great for peel strength, but it is better than white glue). BTW that is one of my CA glue containers from Micheals'.
-
The first step was to make the new 'furled sails' and add them to the old spars. I took some of the old sail cloth, stitched seams and cut them to the shape shown below. Then I glued the edge to the spar. When that was dried I used tweezers and some water on the muslin cloth to roll and tuck the sail. When it looked right, I started to tie the 'furl-lines', meaning the short threads to hold the cloth to the spar. I also added the sheets for these sails and later connected them to the spar below this one. I know, this gets a bit confusing, but the result, to me, was a lot more like what I wanted. More to come (I hope). Thus far:


- 732 replies
-
- 6
-
-
- constitution
- model shipways
- (and 1 more)
-
Looking at my last entry above, it has been three months since I posted anything new here. Let me update, please. There comes a point in time when other things seem more important than building this model. However, it was not forgotten during these holiday happenings. I did post many comments about 'techniques', and in the process learned a lot myself from others and what I was doing at the time. One of them had to do with 'furled sails', a post by Mike Landlubber (thanks again Mike). It got me going for several reasons: I had made some mistakes in the rigging lines. Although the picture above may look nice, there were a few problems that I had to resolve and it meant tearing down a lot of what you see. One of them was that the spars didn't line up with the sails below. They should have been at an angle such that the ship on a 'starboard tack' has all of its sails and spars pointing in the right direction. There were others, but this was the turning point. I tore down what you see above; unglued the spars from the masts, redid the halyards, etc. Then took the old spars and fitted them with furled sails, as Mike demonstrated. I will go into the details in the next post.

- 732 replies
-
- 2
-
-
- constitution
- model shipways
- (and 1 more)
-
Harvey your work looks great. I like to make one comment about mounting the two boats (or one) on top of the grating. It might be good to make the framework for storing the boats, but I would hold off actually placing them (or it) in place. The reason is that you will have plenty of lines, fingers and tools get in the way while rigging. You don't want to damage the boats. Believe me, there will be plenty of room to place them on the grating afterwards. After all, that is the same amount of space needed when they had to launch the boats.
-
soldering wire to brass
Modeler12 replied to MikeB4's topic in Metal Work, Soldering and Metal Fittings
You might want to take a look at the last part of this earlier thread http://modelshipworld.com/index.php?/topic/1888-silver-soldering-tools/page-2 The little torch, bottle of fuel and the tube of solder/flux would cost about twenty to thirty dollars. Also see this video http://www.youtube.com/watch?v=RuMoGam-Mww -
Bill, the 'Saw Stop' is another gismo that may help but, in my opinion, does not solve the issue of being careful. In fact it may cause the user to think all is well because of this thing. In addition, before the blade really stops a lot of blood and tissue may have been lost. I am a firm believer in several of the issues raised here (and that goes for large or small saws, including band saws): 1. Know your equipment. Be sure the blade is sharp, but don't be afraid to touch it while standing still. 2. Use it as directed and learn how to use it better than the instructions show. 3. By all means use any way you can to keep your fingers out of the way (be it push, pull, or any other means) to slide the work piece through the blade. 4. Let the blade do the work and don't force the issue. 5. Experiment with rather large pieces and find out how far you can go without being afraid. 6. Enjoy the results. If all fails, make sure there is a doctor close by. Been there, done that. But I am still using the same saw with a smile.
-
Clamps, an old trick revisited
Modeler12 replied to Modeler12's topic in Modeling tools and Workshop Equipment
OK, one more and then it is your turn. I use a lot of round toothpicks to apply adhesive. For hard to reach places I have used a clothes pin to hold the toothpick. However, sometimes it has a tendency to slip sideways between the jaws. So, I drilled a small hole in the end of the jaws and now the disposable toothpicks are more steady than my shaking hand.
-
Clamps, an old trick revisited
Modeler12 replied to Modeler12's topic in Modeling tools and Workshop Equipment
Here is another way to use clothes pins. Drill a couple holes in the side, insert a round toothpick and, voila, a clamp for holding planks against the bulkhead. To give the jaws a bit more bite, glue a couple pieces of sandpaper to the jaw faces.

-
Clamps, an old trick revisited
Modeler12 replied to Modeler12's topic in Modeling tools and Workshop Equipment
BTW I also tried this with a couple of the tiny 'clothes-pins' that you can buy at some handy craft places. But the result was marginal. When I reversed a couple they were not all that useful. Note there is not much space to sand the groove for the spring. However, the idea is not all that bad and maybe some thoughtful individual will be able to use those little springs to do the same or make some improvements. One thing about this forum: it makes me think as well as do and try!!
-
This is nothing new, but worth repeating. If you have clothes pins (the admiral may direct you to her supply), modify them to suite your needs. You can sand the ends to taper or make them so you can grab small pieces. Both plastic and wood work well, but I prefer the old fashioned wooden type. Then you can take them apart and reverse the spring to have a different type. You can then refine that by tapering the long faces so they can help with flat surfaces. In this case I also filed the indentation (where the spring fits) a bit deeper and sanded the clamping faces so they would meet. Any other ideas about using these old, but handy gizmoes?


-
Landlubber Mike's technique for furled sails
Modeler12 replied to Landlubber Mike's topic in Masting, rigging and sails
Mike, you started this thread (and great research) for furling sails. Thanks for all that work and, if I may, let me add the following: I have wanted to make some changes to my model and decided to take your approach. The reasons don't matter (later in my built log), but I found your approach good enough to give it a try. However, it did mean taking a lot of my rigging apart with new lines and some blocks. Time consuming but thus far: well spentt!!! If you don't mind, and all credits are going your way, my friend, here are a couple comments with pictures: 1. I did make a few blunders with my mizzen spars, I used too much glue as I tried to 'furl' and gather the sail, No pictures, please. 2. When I did the same procedure with the foremast (my Connie) I decided to add some water to the sail cloth. This made it easier to 'gather' the sail and clamp it for a while. 3. After the moisture died, the sail stayed pretty much in a position that I had clamped it. 4. So the next step was to add the furl lines (or what ever they are called) to hold the sail to the spar. A touch of CA held them in place. I added the sheet lines, but will wait to reeve them through the lower spar sheaves until the spars are in place on the mast. Again, this is your great idea, Mike, and I did not want to impose, but just add to what you have presented.


-
I have used a hand scraper (flat) for many years while making furniture and other 'large' projects. They are great for long strokes, but I have found them to be rather limited for small places such as ship models. Unless the curvature of your deck (or other surfaces) are just about right for the scraper, go at it. But if you have to make several 'adjustments' as you go along, you may be asking for more work than necessary. Keeping a nice curl on a flat one requires some filing or sanding to get a good flat edge, and then a honing iron to put that little curl on the edge. Again, to do that on a curves scraper could be a bit more difficult.
-
Brett, this is very interesting; another 'let's see what Mother Nature has done' and take it from there. The article is fairly new and I wonder if this is going someplace in 'industry'. However, I am in the middle of 'ungluing' a bunch of spars and lines and hate to think of a glue that repairs itself instantaneously.
-
It seems that Timebond is a British product. I have never used it, but when I search it on the web, it sounds interesting. Janet, what do you use to 'thin' it? The rubber based contact adhesives I am familiar with require 'spirits' like acetone. I also have used carpenters glue not only for modeling but lots of furniture I have build over the years. I bet I must have used several gallons by now.
-
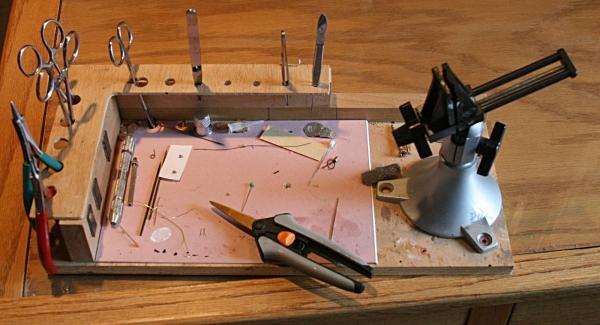
I have my little vise mounted on a 'portable workbench' and use it often with various hand tools.
-
I like to add one more. If your saw has interchangeable inserts for the blade, be sure to use the one with the narrowest slot. I was using the tilted blade for some bevel cuts, didn't change the inserts when I went back to straight cutting, had too big a gap and . . . the rest is history for my left index finger.
-
Landlubber Mike's technique for furled sails
Modeler12 replied to Landlubber Mike's topic in Masting, rigging and sails
I think I understand everything you mentioned. And indeed it does make it a busy show. In my case it gets even more complicated because the three topsails I have going also have additional lines such as the buntlines (one on each side) that are also used to furl the sail. And two more (for the same purpose) along the side edges of the sail (leechlines). Not to mention the bowlines and the reef tackles. It is a real rat's nest where this all comes together at the mizzen mast (that is also where the various lines for the spanker sail join the crowd). -
Landlubber Mike's technique for furled sails
Modeler12 replied to Landlubber Mike's topic in Masting, rigging and sails
Now that is scary!
-
Landlubber Mike's technique for furled sails
Modeler12 replied to Landlubber Mike's topic in Masting, rigging and sails
Mike, the 'seams' are made by stitching a simple line of thread spaced 3/8 inches apart. It is real easy and the most basic stitch on a sewing machine. On my scale that translates to about 29 inches, which is about what a bolt of canvas was back in those days. I also note from your picture that the furled sail sits on top of the spar. I had mine going to the front. So, a bit more gathering and adjusting to do. Notice also that the upper sail has a line (the sheet) going at an angle from the clew towards the tip of the spar below. There it would go through a sheave and then back to the mast. You can see this same sheet underneath the spar where the men are standing. The other line going straight down would be the clewline after it had passed through the block on top of the spar.