Modeler12
-
Posts
1,716 -
Joined
-
Last visited
Content Type
Profiles
Forums
Gallery
Events
Everything posted by Modeler12
-
For ships with full sails and 'running' gear the coils may not be all that practical, as some of you pointed out. However, for our models, and as far as I am concerned, the looks of them may not always present the 'actual'. Is that bad practice??? There was a heated discussion about whether or not a line on a belaying pin should have a 'hitch' on top. Again, purists said and showed old sketches of lines that were thrown across the pins. Perhaps that is what was done in those days; but is that what I want to show on a ship model??? No, thank you. If a line ends up lying on deck looking like a lost hair, I rather tuck it in with a coil.
-
 I understand your confusion about all the details. Let me try to explain the following: 1. Actual dimensions are shown in inches. To convert to mm, of course, multiply by 25.4. 2. The table to the right gives 'constants' that you than use with the numbers shown for the various parts as 'dimensions'. The drawings show these 'dimensions', but they are actually only numbers that are relative . . . . . For example, if you see a 'dimension' or number 3 for one of the measurements, you multiply that by the 'constant' from the table. That then gives you the actual dimension in inches. You have to convert that to mm. The reason for the table is that Harold tried to give you the details for a lot of different cannon sizes. I doubt if they all actually were built that way, but that is my personal view on this. For a six pounder cannon the carriage becomes very small and I would not necessarily go with all those tiny dimensions. But this is what Harold Hahn suggested.
 -
Harold Hahn, famous model ship builder, published the chart and pictures shown below. It shows not only the typical British cannon designs but also the carriages shape and dimensions. Perhaps that helps. Let me know if you need larger images.
-
One way is to make rope coils separately and then tuck the loose end of the line underneath the coil. See the following thread for details by several people. http://modelshipworld.com/index.php?/topic/1310-making-rope-coils/?hl=%2Brope+%2Bcoils
-
Thanks Daniel. I will definitely do this on my next build. If I am not mistaken, you used 0.5mm brass wire for all of the deadeyes. Right?
-
Storing and using those tiny drills
Modeler12 replied to Modeler12's topic in Modeling tools and Workshop Equipment
AEW Here is a table of the diameters for those numbered drills. I probably should have added the values in mm also.
-
Storing and using those tiny drills
Modeler12 replied to Modeler12's topic in Modeling tools and Workshop Equipment
Right on Mark, but what I like is to have of those guys at my finger tip when I need them. That is why the set of pin vises. When broken, I can still replace them easily. All I need is a better supply. -
We all have used and lost or broken several of those number 80 through 60 drills. Some look like a piece of wire and end up on the floor. I decided to invest in a set of pin-vises that could be 'dedicated' to hold one drill bit each. I marked them with the size. In addition, I went a step further and made this drill holder . . . . No further explanation necessary . . .??? Well, yes, the drills in the second picture have a thicker shaft which comes in handy when using them in my drill press. The set of 'unmarked' drills in the first picture have various sizes for those times when the hole diameter does not matter too much and I just need a 'drill'. But there are also a number of collets that I can use in the pin vises or my drill press. Notice also that I have to replace a couple of the real tiny guys.


-
In the US the General Finishes stains are available at Woodcraft. I happen to live close to one of their stores and don't know of any other distributors, but I am sure if you search the web, you will find an outlet. In fact, I just did that. Google 'General Finishes' and you will find several links. For export to Europe, for example, go to http://www.generalfinishes.co.uk/index.cfm?page=delivery
-
Steve, you present several interesting ideas. Keep it up. However, the 'crumbled aluminum can' idea was not mine to start with. It was an old one proposed by . . . I don't remember. What I suggested was to use very thin cloth and go from there per: http://modelshipworld.com/index.php?/topic/89-making-cloth-flags/?hl=%2Bmaking+%2Bflags More importantly: I wish all of you people a Merry Christmas and a Happy New Year. If Christmas is not on your agenda, I hope that your God or believe will allow us to pursue more friendship and common enterprises through this great forum and other venues.
- 396 replies
-
- 7
-

-
- Idea
- Bright Idea
- (and 1 more)
-
Apparently there are several different versions of this machine, but all have similar features. Mine is a Ryobi, but what I like to point out is that the table has a big gap between the disk and work piece; a good place to loose those small pieces. I ended up using a thin section of birch plywood to solve that issue (as well as for my band and jig saws). To see what I am talking about go a few frames into the following video (ignore the picture that starts the vid):
-
Seizing or whipping a line. Here is how I have done it.
Modeler12 replied to Modeler12's topic in Masting, rigging and sails
I have not used it, but have ordered some thread from a fellow in the US who sells fly tying thread down to 8 denier. For nylon that translates to about .0031 inch (or .08 mm) in diameter. The 16 denier would be around .0044 inch. Search 'Badger Creek Fly Tying'. -
A video about attaching blocks to spars and masts
Modeler12 replied to Modeler12's topic in Masting, rigging and sails
Yes, you guys, it is so simple, and that is why I liked the idea. I bet that most of us have 'struggled' doing this business by stropping a block, add a seizing, and then somehow attaching it to a post (perhaps with another seizing). This does it in one easy step. The music, incidentally, should not be identifiable per You-Tube requirements, but it is some Latin guitar music I picked up a couple years ago. To make this video I have to combine the 'scenes', narrative and 'music'. All of that with some editing and critique from the admiral. But it is fun to do this as well. -
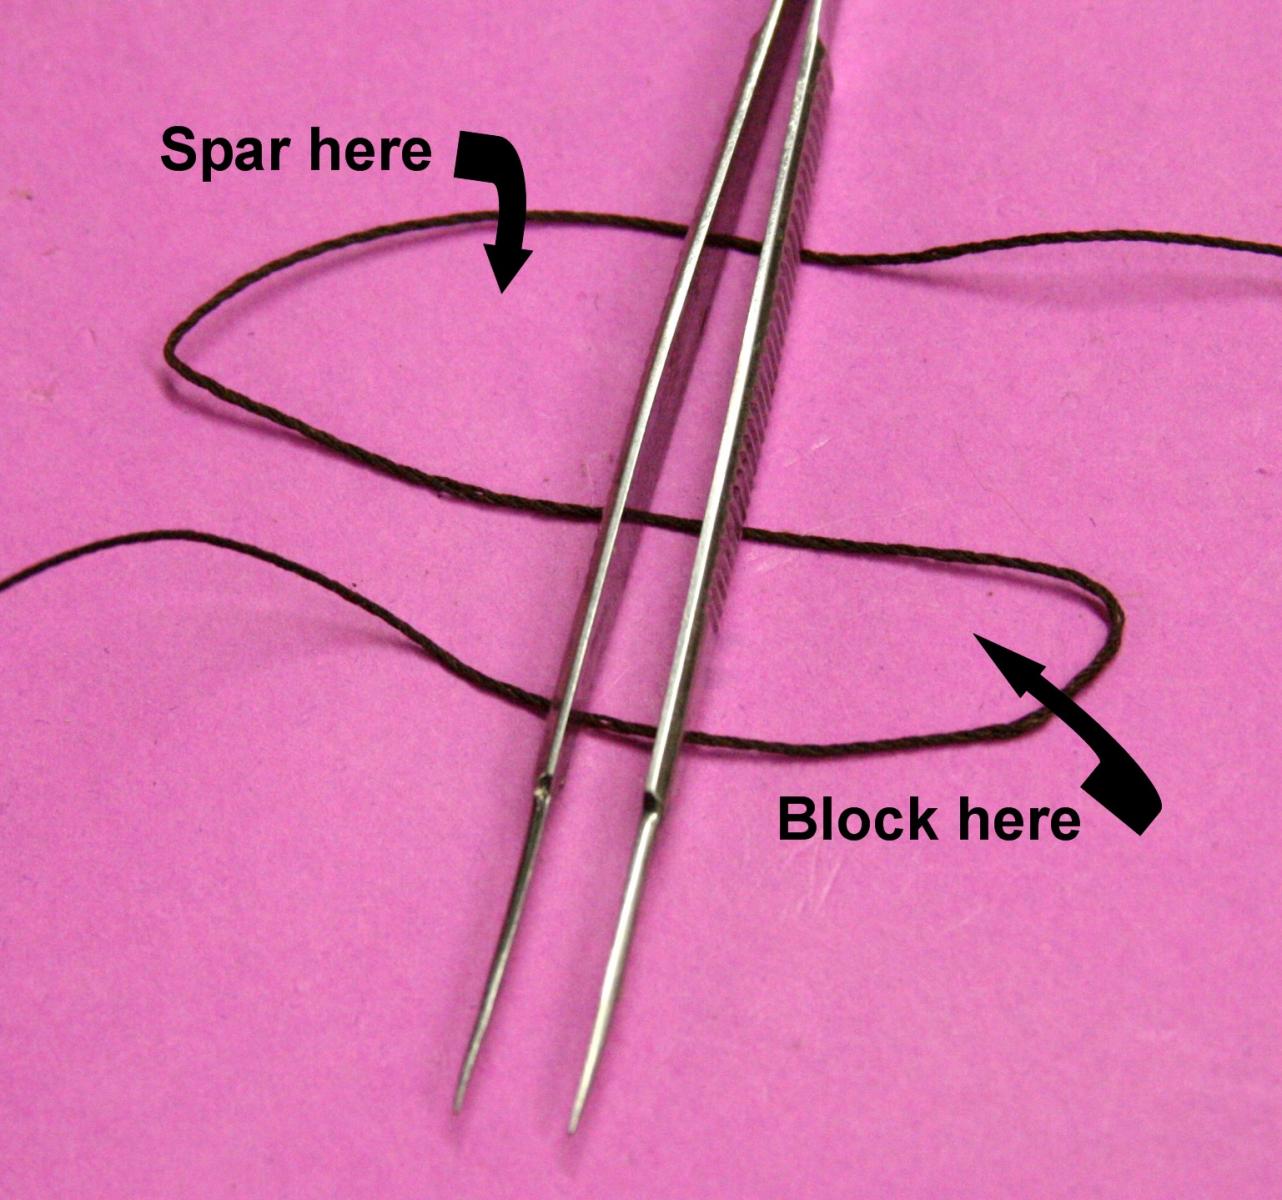
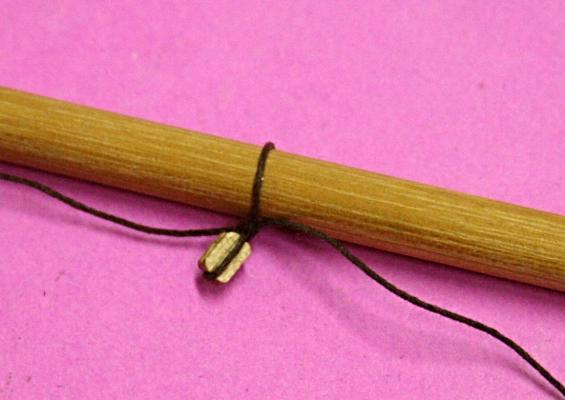
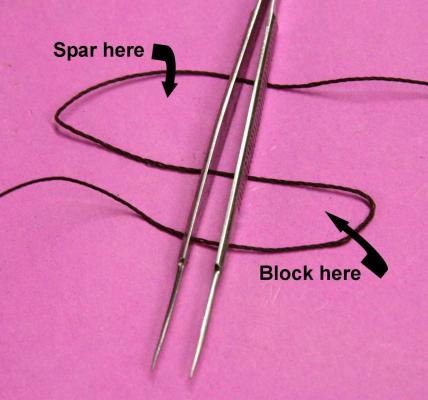
Thanks to Bender (and with his permission) I have put together as brief video about how to rig a block to a spar, mast or gaff. I hope this may be of some use to you.
- 14 replies
-
- 13
-
-
As I mentioned to you, Al, I will be posting a video about your idea shortly. Thanks for letting me use a couple of your pictures (as well as your idea) for this subject. I think that this is such a simple, but very effective idea, that it deserves some attention in this forum.
-
After many years of building furniture and various wooden toys, etc. I am a firm believer in using water based stains. I do have some 'Miniwax' leftovers and a few others that are based on spirits, but I really should throw them away. If I were to open one of those cans I know they would show a solid layer. Yet, if I were to do that with one of my water-based stains, it might require a simple stirring and perhaps an addition of a few drops of water. My favorite is made by General Finishes here in the US. It is easy to use with brush or paper towel. Cleans up easy, can be applied a couple times if necessary (to darken or remove) and takes subsequent coatings of finishes such as urethane. Again, regarding the latter, I use water-based products. The industry has come a long way to remove solvent based products and substitute water-based materials, especially for indoor use. Of course, you cannot mix the two.
-
Sorry, but I think proportional dividers are useless in most cases. What you are doing is take a measurement with this tool, slide and set a scale and transfer the measurement at the other end. Sounds simple? The problem is that you cannot measure plank widths very well with two points, and then you are adding errors by setting the scale (which usually is a rather small slider), and again using the points to indicate where you want to make the cut. Why not simply measure the plank width, for example, using vernier calipers, multiply that number by the scaling factor (using a calculator) and come up with the precise number you are looking for? For multiple planks and locations, I set up a quick table of the measurements and the converted numbers next to it. You can then sand or file the plank width to those numbers again using the vernier calipers to verify what you are doing.
-
Bender, that is a great way to tie a block to a yard, mast, etc. I had to try this and, if you don't mind, I like to show my first attempt below. The hardest part for me was to hold the block in the loop while pulling on the loose end to slide the loop closed. I ended up holding the block carefully on its edge with a hemostat. I might add that I used a 'common whipping' or seizing for the center thin thread. Again my hemostat came in handy for this. By way of starting this whole thing, I think of making a dollar sign with the tweezer being the thin seizing line. Thanks again for posting this neat trick.
-
Please, I am not suggesting another way, per sec, but what about gold foil? Your frame looks like it is (perhaps) an antique and might be better off with the same gold finish, rather than painting. Take a look at this http://www.thecreativityexchange.com/2013/02/transform-old-framesfurniture-with-spray-paint-and-gold-leaf-diy.html Good luck either way.
-
Great job Fillingham. The picture is worth . . . . Then when you consider that wire .0055 inch diameter translate to less than half an inch when you scale 1:76, that is very good. Likewise an eye diameter of .030 inch becomes 2.25 inch. My point is that scaling eye bolts is usually ignored when making them (except for you). The same applies to hooks!!! The eye bolts I have been practicing on are all too big!!! I have steel wire .010 inch and I will use it (despite the scaling factor).
-
I might add here that the price difference can be significant. The 'solder it' tube at Micro Mark is $9.95. Amazon wanted $7.81 for that tube. At Micro Tools it is $5.95 for the same item. A pair of forceps or hemostats (straight) is $10.95 at Micro Mark (item 21110). At Micro Tools $1.68 (item 650FS). I have not dealt with Micro Tools before, but I will see how it goes.
-
Thank you both Tom and Bob. I was curious and did a Google search. Found the Amazon link but decided to go a step further. In the past I found that Amazon has pretty good prices but they apparently make their money from the 'shipping and handling' charges. I placed an order with Micro Tool for the same item with a bit less charges. I'll compare and let you know when I try it.
-
I go along with 'cover it up' and some rope coils, buckets and so on go a long way. They don't have to be perfect, and a 'sleeping sailor' next to it might be ok. We all agree, cover up the damage and you might be surprised with the questions after the ship is finished.
-
What is this 'composite' you are referring to? There are so many, and I would think that in your part of the country you would not be concerned.
-
Bob, where did you get that paste? It sounds good, because handling those little pellets is not easy.