Modeler12
-
Posts
1,716 -
Joined
-
Last visited
Content Type
Profiles
Forums
Gallery
Events
Everything posted by Modeler12
-
 One more thing about hatches. Most of the time the grating of hatches is left uncovered on models. But in real life they are covered when the weather is bad. I decided that the Pelican will be at anchor loading and unloading cargo; hence the main hatch grating will be removed and set aside. So is the roll of canvas which will have a couple of lines to hold it and be placed near the grating. The second hatch shown below will also have the canvas partly rolled and fastened as shown on the third small hatch. This way I still show the grating as well as the canvas covers. I simply used a piece of cloth and painted it brown. It is held together with some PVA
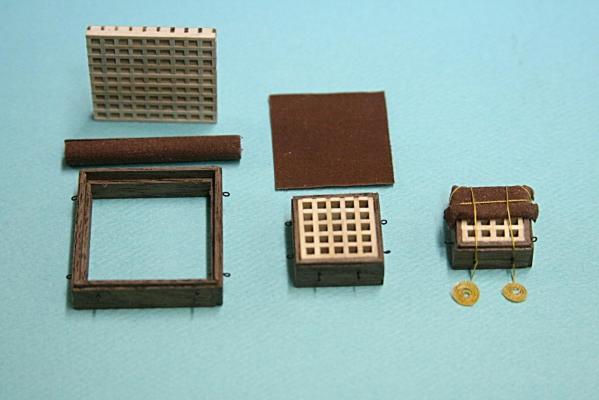
-
Question on Shipyard Fixtures circa 1774
Modeler12 replied to edbardet's topic in Nautical/Naval History
Interesting pictures. It leads me to the next question. After the planks were steamed, how and where were they formed to the shape they wanted. Certainly they would not carry hot planks across the yard to another building, or would they? -
Batavia by *Hans* - FINISHED
Modeler12 replied to *Hans*'s topic in - Build logs for subjects built 1501 - 1750
Beautiful work, Hans. I have never been to Lelystad (sp?) but know the story about the Batavia. Sad, but very interesting. In one of your pictures (http://modelshipworld.com/index.php?/topic/5920-batavia-by-hans/?p=170753) you showed the hatches being partly covered with the 'tarp'. I really like that view because we do not see this kind of arrangement in modeling too much. We all tend to leave off the important tarp and show the grating. In reality what you show is much better. Dank u well en nog veel geniet en geluk met uw verder gebouw van de Batavia. -
Good to see your posting and getting back to your ship, Geoff. Will be looking forward to seeing your progress and great work. You are right about 'lots of line' and that's no lie. I think I used twice as much line to do what I have so far. Not only the mistakes, but all that extra for 'just in case'. Even then I short changed myself a couple times.
-
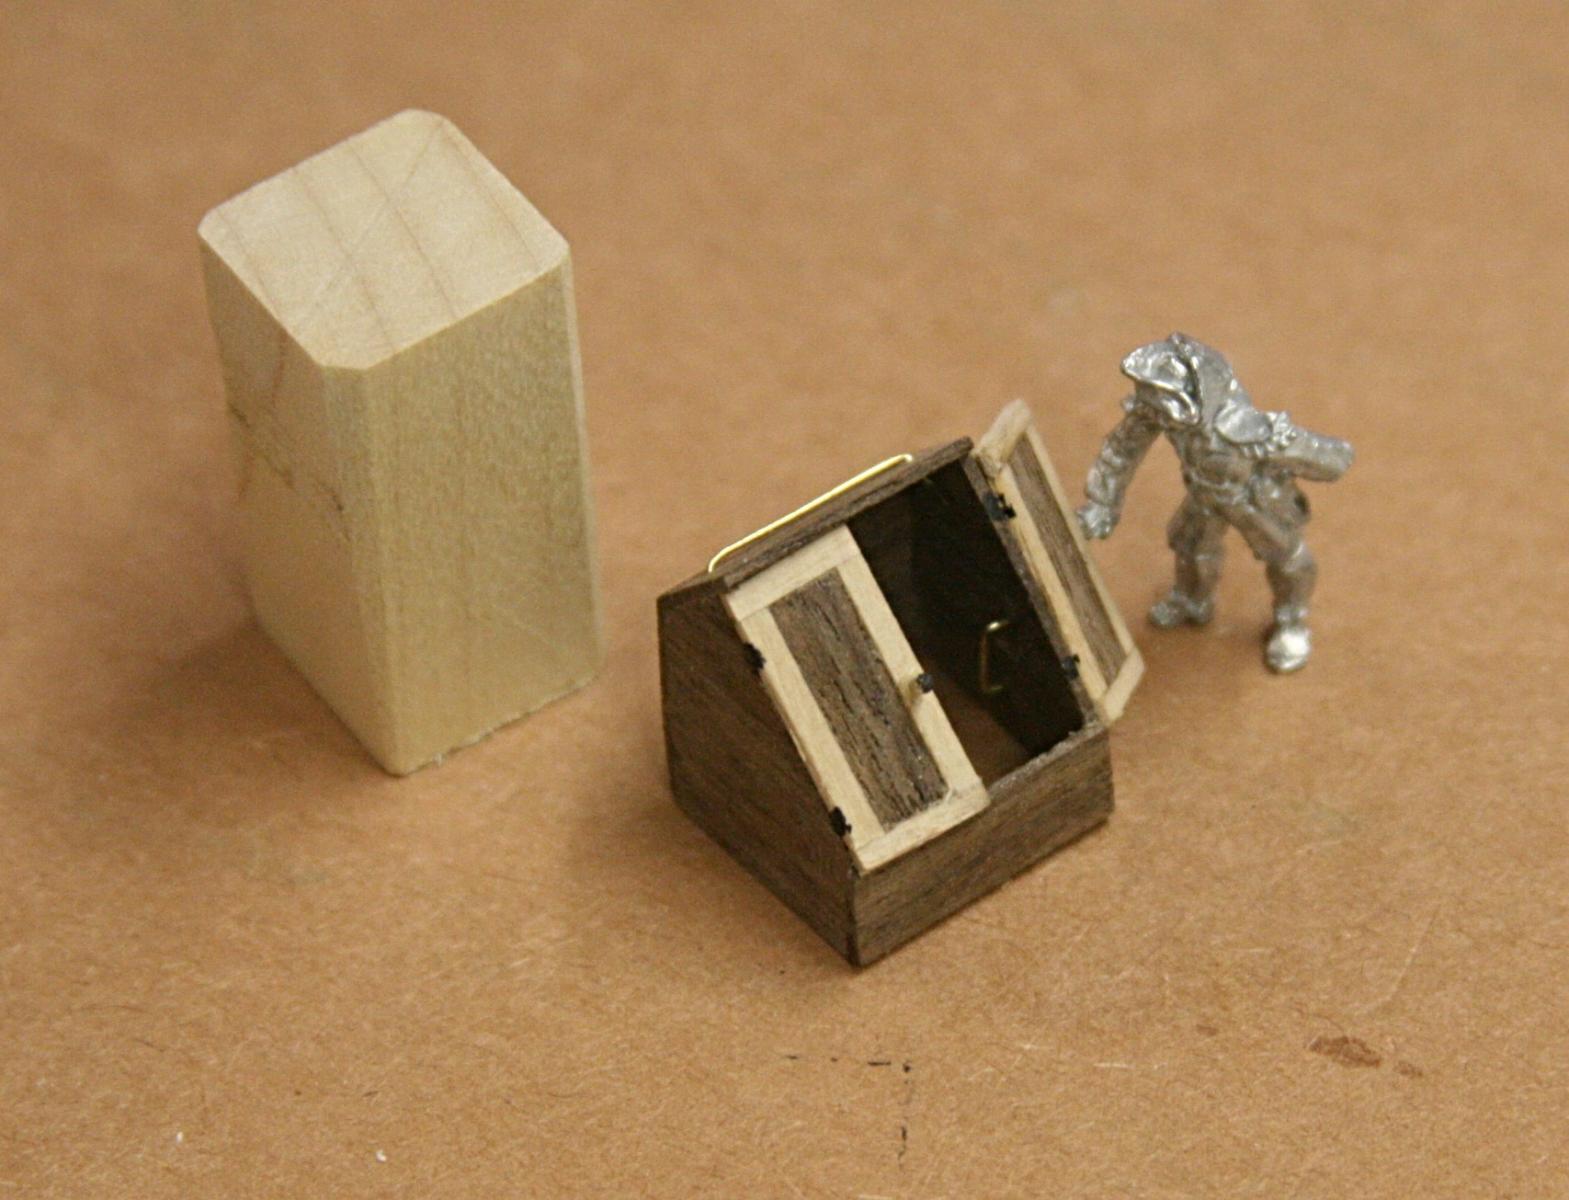
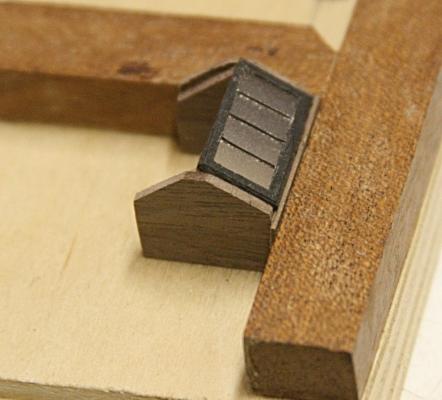
Thank you Geoff and Tom, I need to get back to my Connie, but I just had to make some more sawdust instead of loose ends of rope. When I am finished with the two skylights I will stop this Pelican for a while. Just to show how the first skylight turned out, let me continue where I stopped above. When the window panes were painted black, I matched them with the walnut pieces for the ends and sides. I had to notch the ends so the windows sat inside the frame. Again I used my mini mill to do that. Then it was a matter of gluing the parts together. Instead of a wooden strip on top I decided to use a piece of brass. It gives it a bit more 'character', I think. As I look at these pictures, I see more touch up work to be done, but I will hold off until later. Now I have to do the same thing with the smaller skylight.
-
I assume you are referring to the plastic, Michael. I have used this before making windows on the USS Constitution. At that time I was a bit sloppy and had too much CA on them. But the overall effect was ok. Now that I look at the pictures (they always show what I don't see at first), I may have to redo the black tape on the windows. Too much handling, sanding, etc. It was only 1/64 inch wide.
-
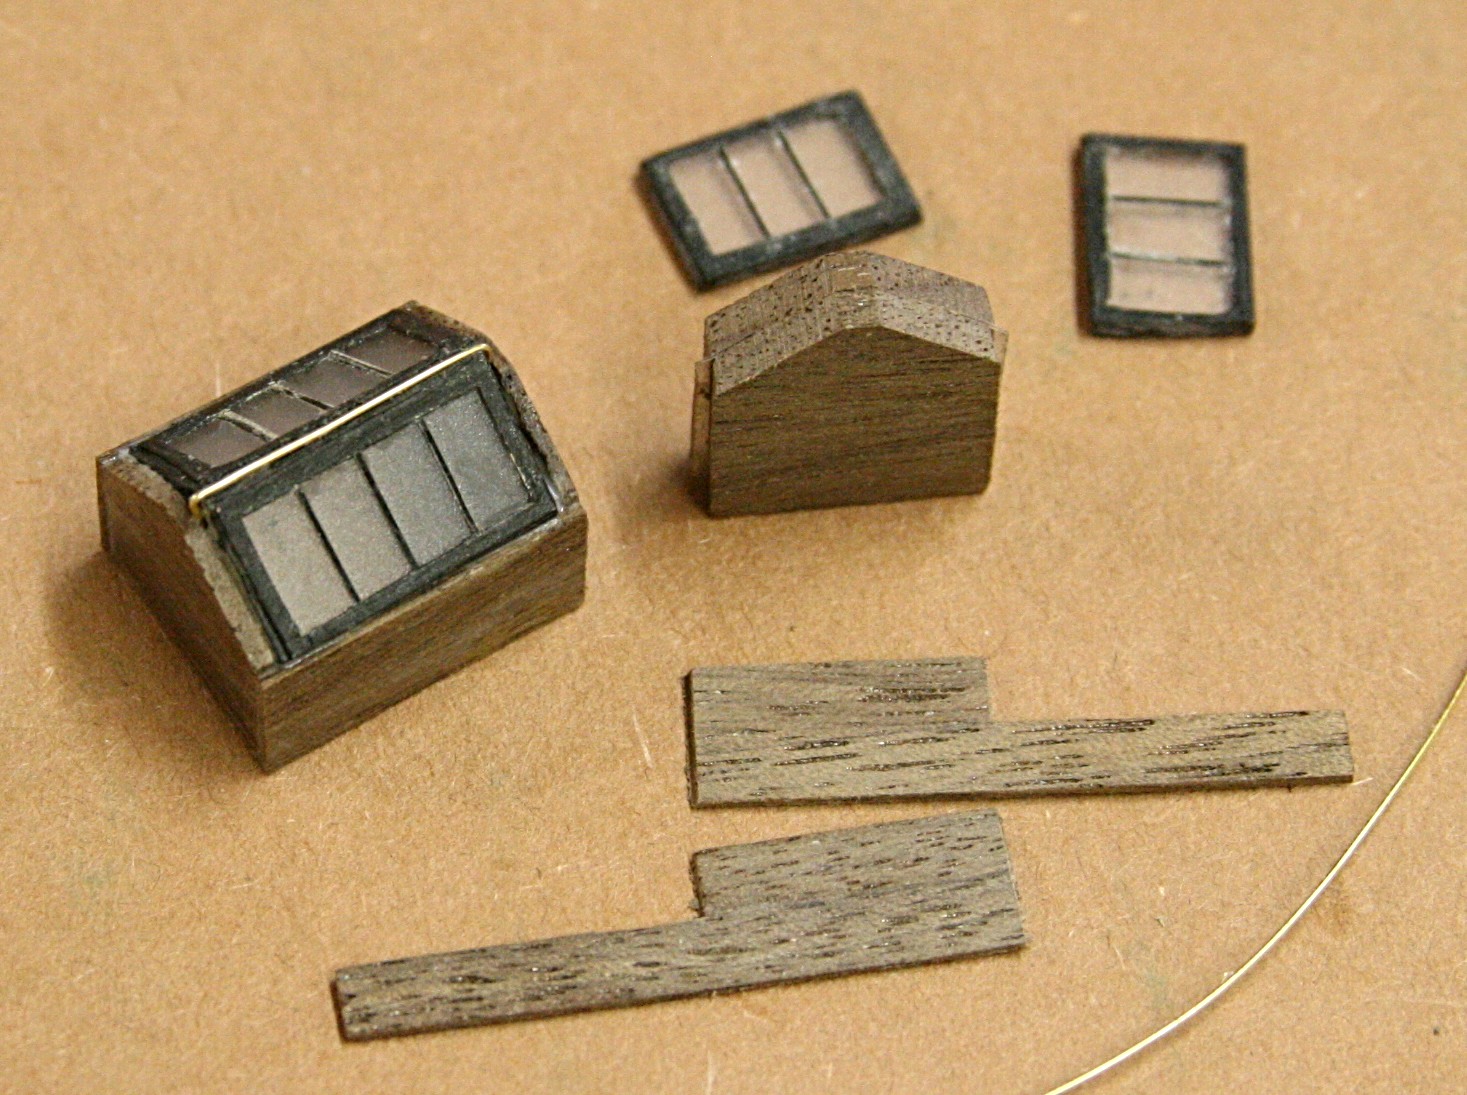
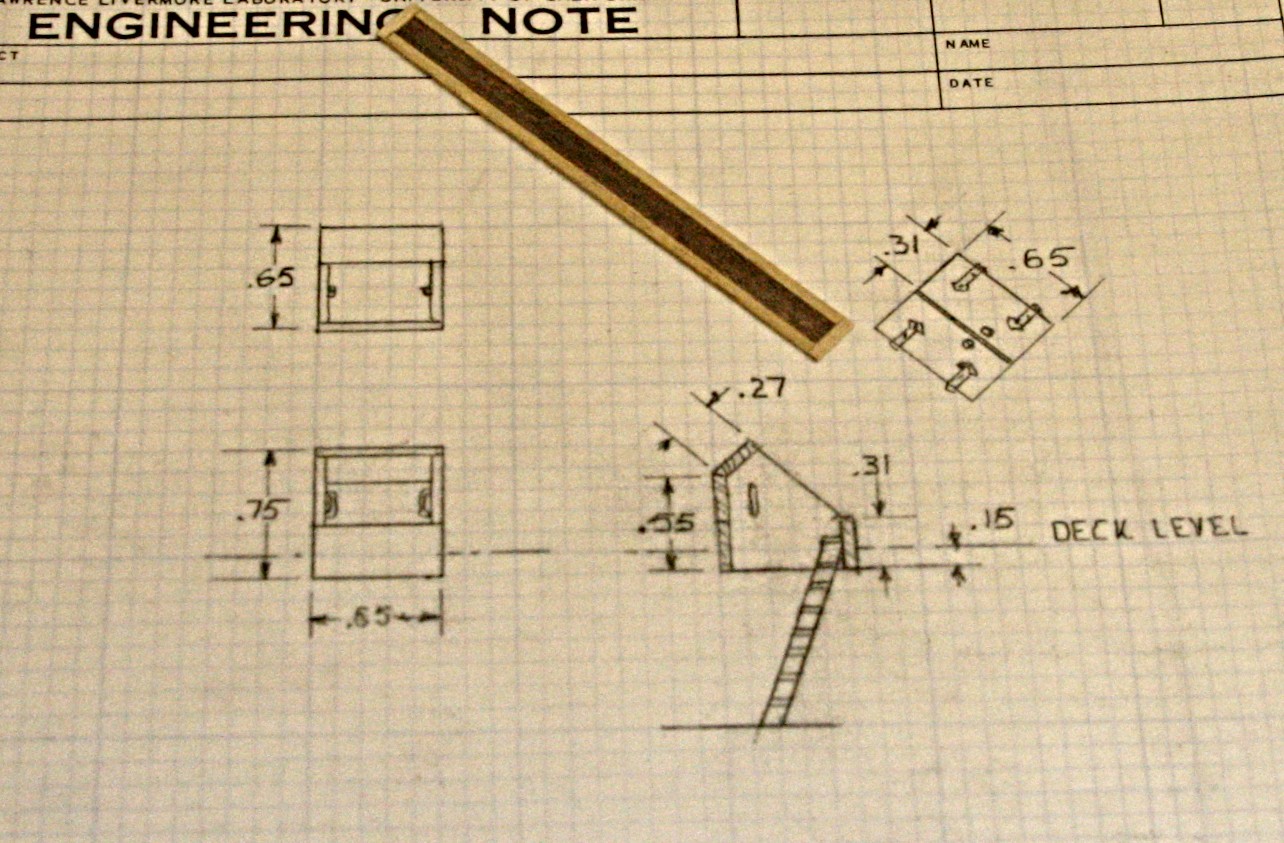
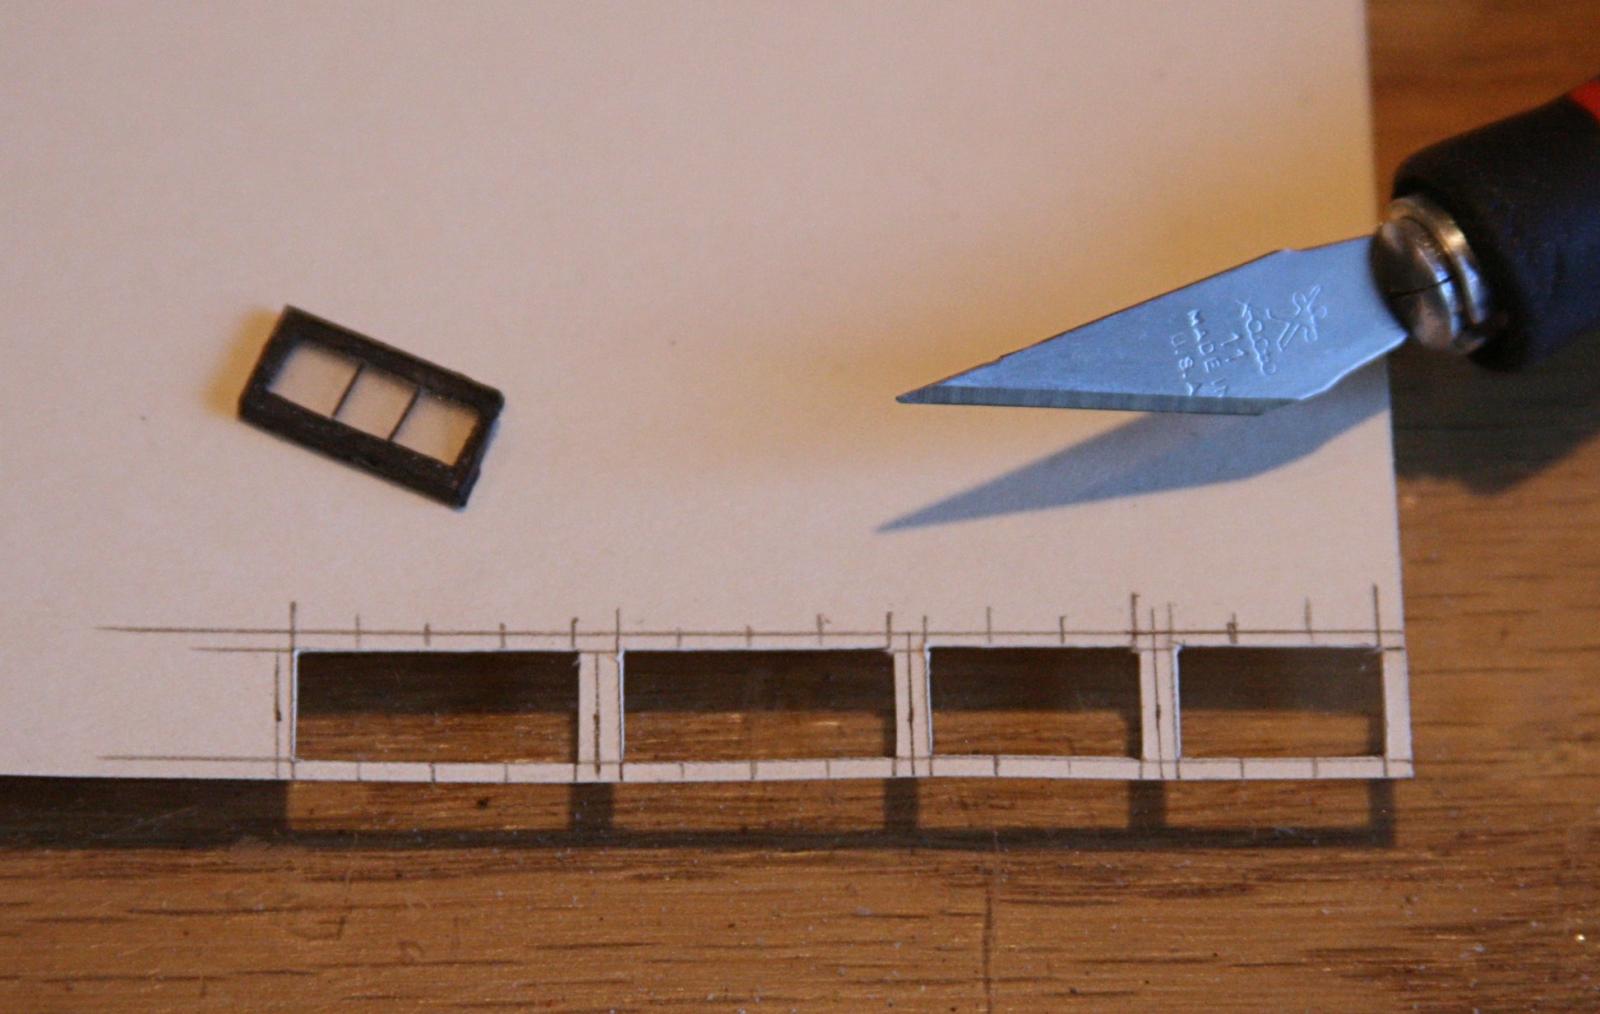
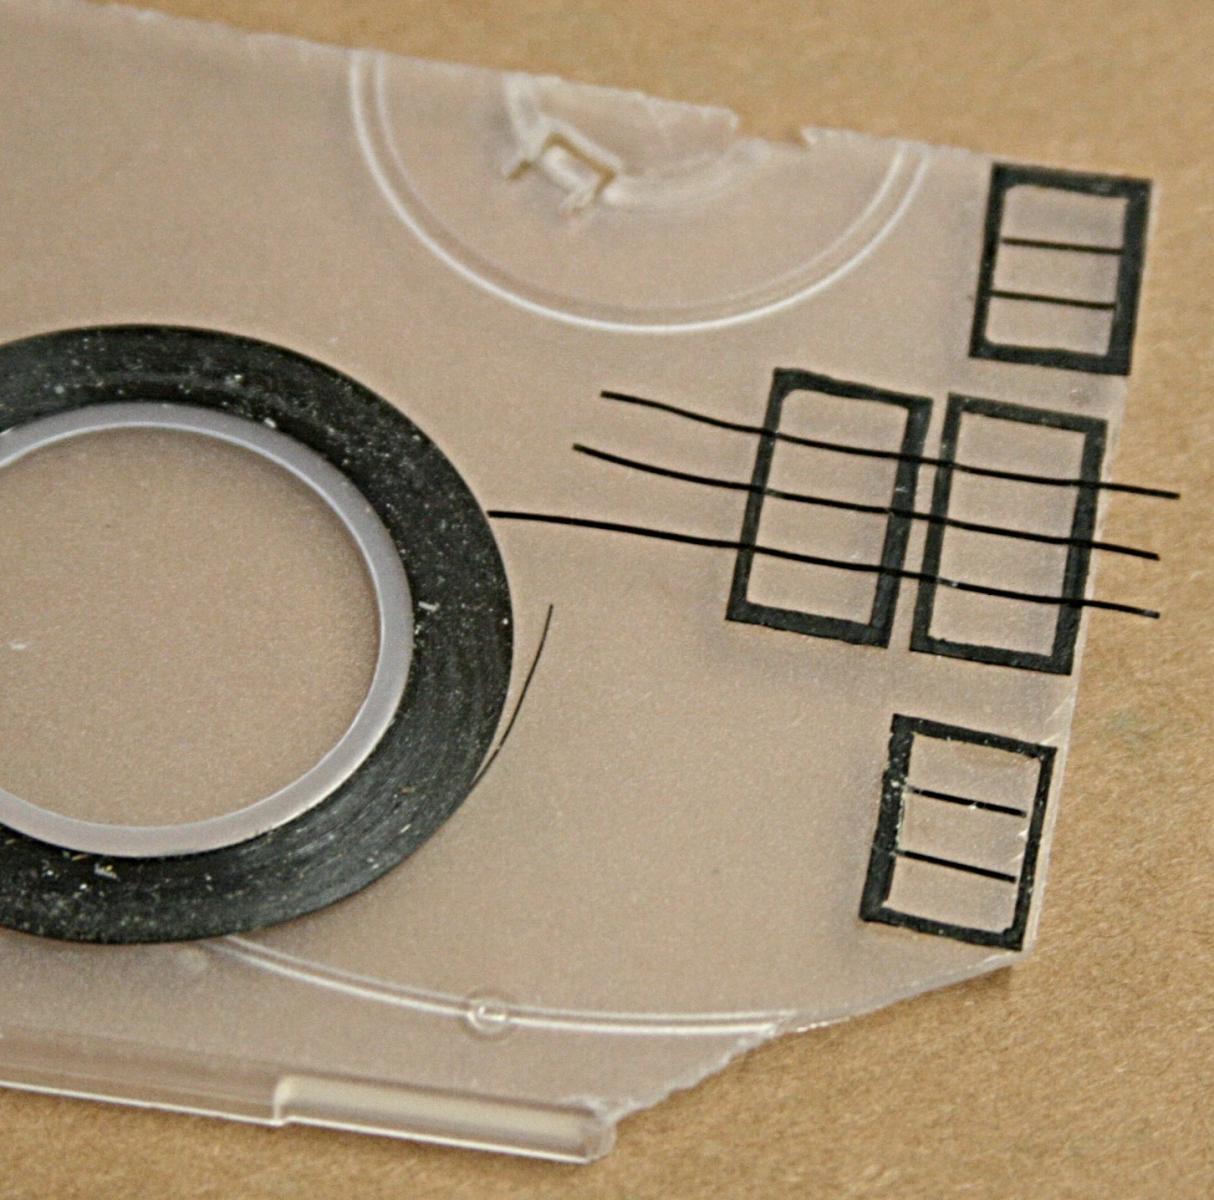
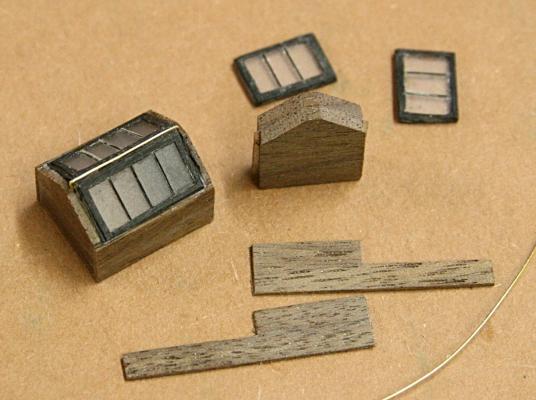
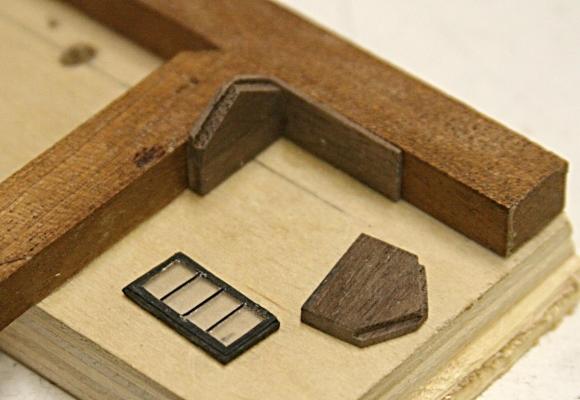
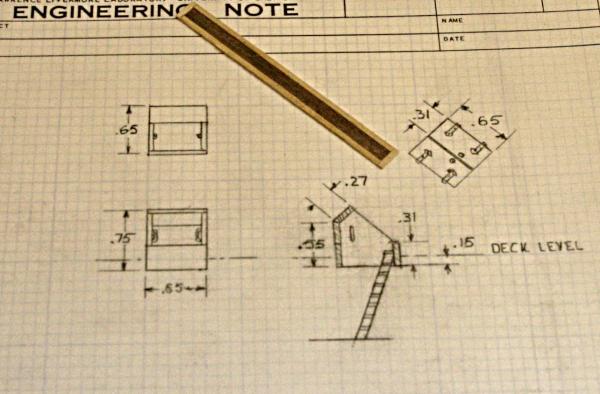
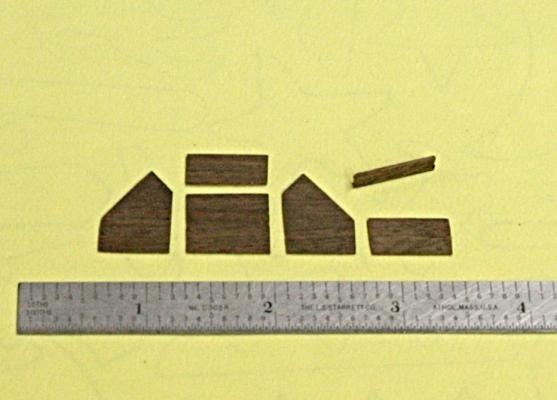
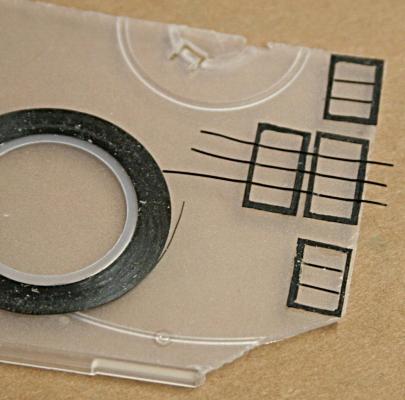
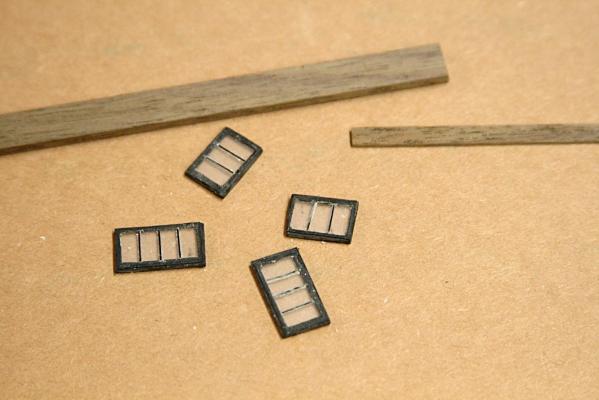
It has been a while since I did anything more with the Pelican model. But, while finishing my Connie, I couldn't help but check something about the deck furnishings. I intent to add lights to the inside of the hull and, besides the cut-away view, I want to have light shining up through the officers hatchway and sky lights. Here is how I made them thus far. I redesigned the hatch with doors that are made out of two different woods. The frame of the hatch is 1/32 inch thick walnut. After cutting the sides to size, I glued them with PVA using a 'squaring jig' and a block of wood (coated with wax) to hold the sides together. After some sanding, I added a brass railing to the inside, next to the stairs, and one on the back side. I was not happy with my first crack at making the sky lights. I took the approach of making the frame first and adding the plastic windows afterwards. It did not work well. So, now I am making the windows first and adding the frame to them. I started by cutting out stiff paper stiles, painted them black and glued them to a piece of plastic that is frosted on one side. It is one of those CD holders. After cutting those out, I painted the edges black also. Now it is matter of making the frames out of walnut. Notice there are two sky lights, one with three and one with four panes.


-
I must admit that the mill made it easier. But I also toyed with the idea that a fixture on a drill press might work also. All you really need is a sliding table because the grooves are all in one direction. With some care you can feed the stock underneath the routers slowly while pressing down on the part. You would need to be able to lock the spindle so it doesn't move up or down.
-
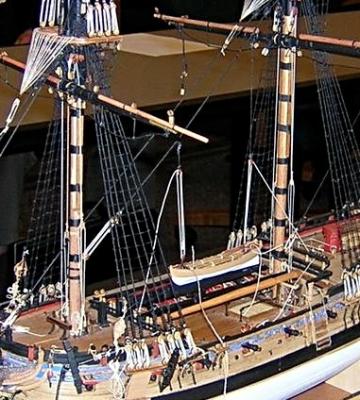
Thank you Keelhauled, This has been a work in the making for some time and I intend to finish it soon. But right now I am busy with a few other things. As you can see there are two more sails (and all those lines and blocks) to be added. After that I need to 'blow them to smitherines' to get them filled so they will look like a real ship sailing on a starboard tack, etc. All it means is to get rid of wrinkles, and that is tough . . . . .

- 732 replies
-
- 9
-

-
- constitution
- model shipways
- (and 1 more)
-
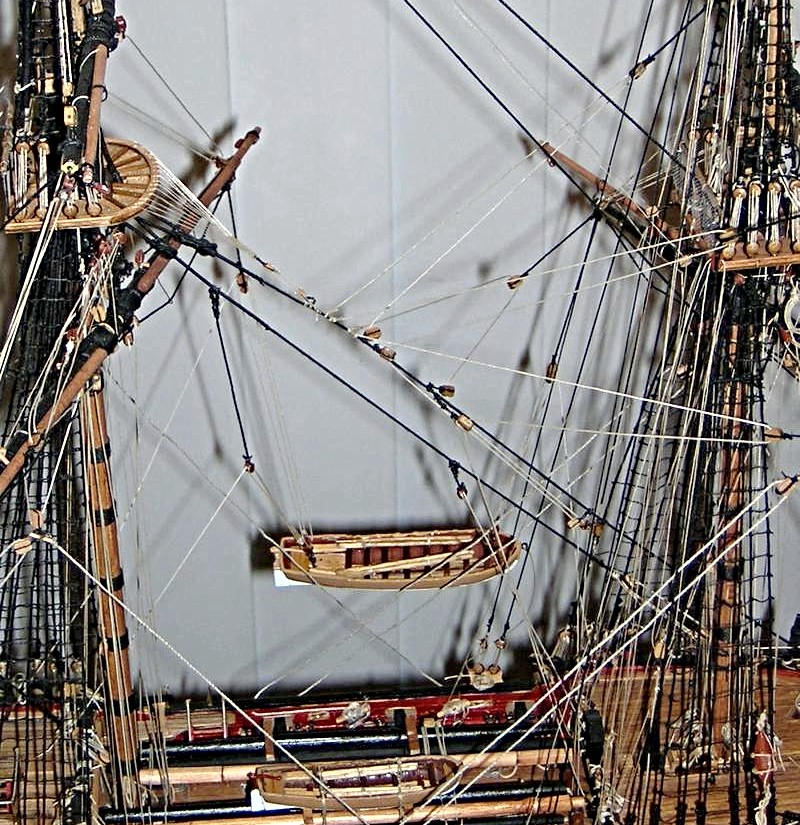
Here are a couple pictures of the model Fly by Oidtman. The first shows how he rigged the way he envisioned a boat to be lifted. Both a stay and a yard are being used. (I may be wrong about the stay because of the second picture). The second is more complicated, but it involves moving the boat to port using both main and fore yards and all the tackles that are part of the whole process. Not clearly shown is the fact that both yards would have to be lashed on starboard to counteract the force being carried on the post side.

-
Henry, if I am not mistaken, both the main and fore yards would be used to lift really heavy 'cargo' or to launch a boat. I recall seeing another drawing someone had published here that showed the whole process. PS Mike, I am sorry for starting a new thread on the same subject. I just did not realize that you asked the question first. Strange how we both thought about the same subject for the same reasons. PS Robin, that thought also occurred to me, but I am sure an experienced boats'n and captain would be prepared to do what ever. Even if it means 'man the pumps'. But here is another thought along those lines. In bad weather the grating (hatches) would be covered with a tarp (something we never see on ship models). That would also have to be removed.
-
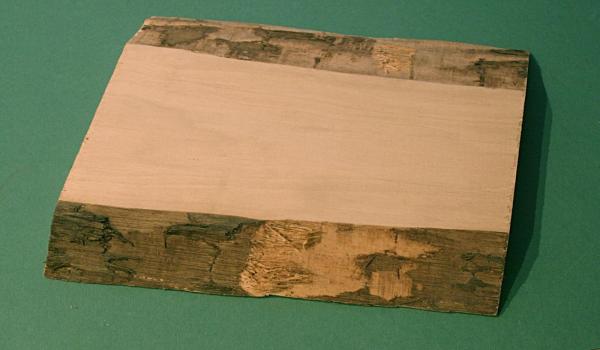
Sam, I got the wood as part of a sample kit from Hobby Mill (http://www.hobbymillusa.com/) At the time I did not even consider whether it was quarter sawn or not. I also had some other woods that (as yet) I have not used, but it included a couple pieces of boxwood. As far as tools are concerned: go for what you have to work with. I did that for several years, enjoyed the 'craft' aspect and learned from that. Slow and easy, with a steady hand. Now I am at an age where my hands are not that steady any more and 'better' tools are handy to have. One thing, though, about hand tools: get the best you can afford, keep them safe and sharp.
-
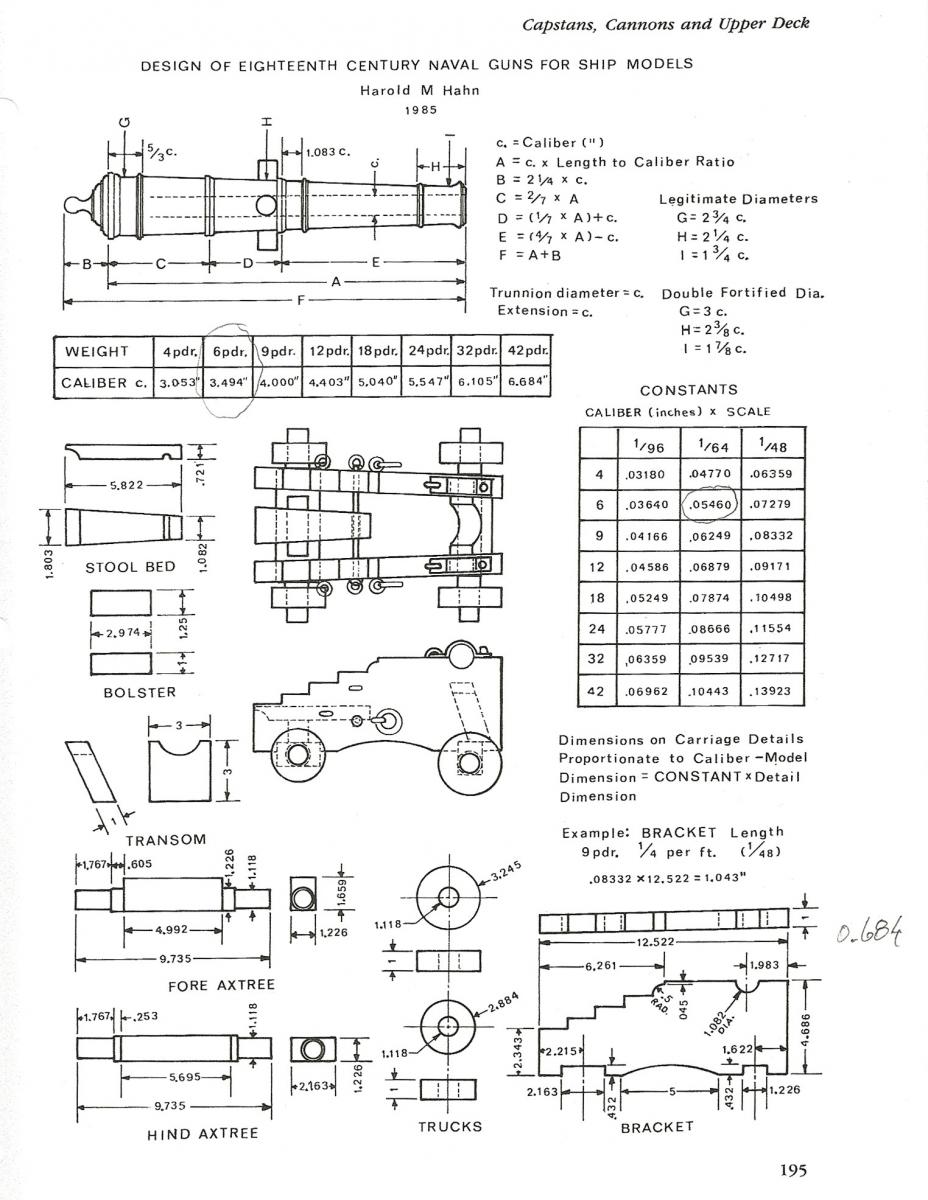
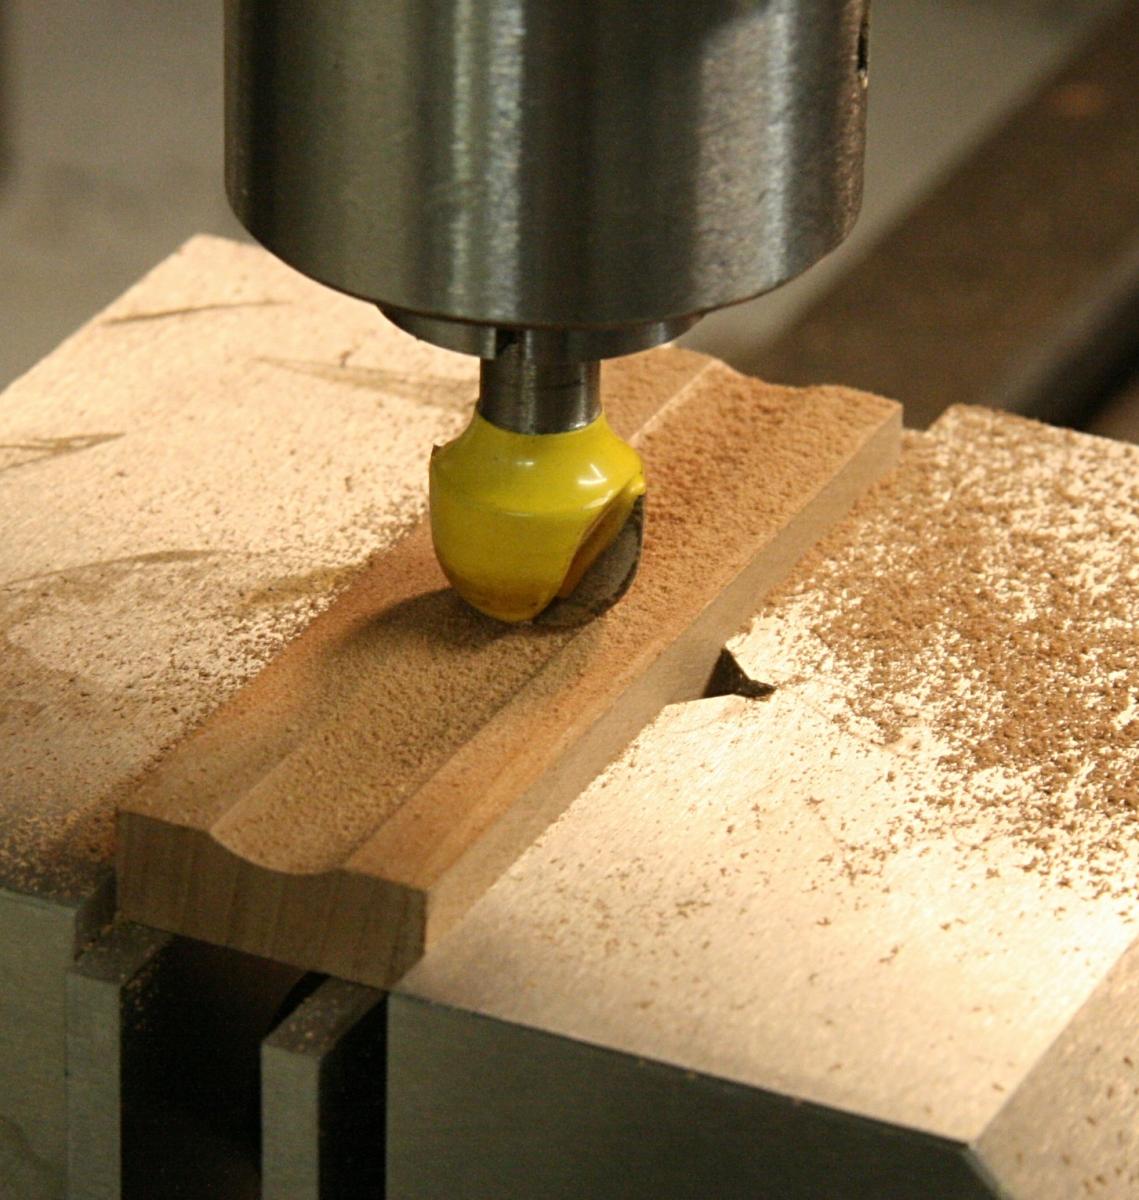
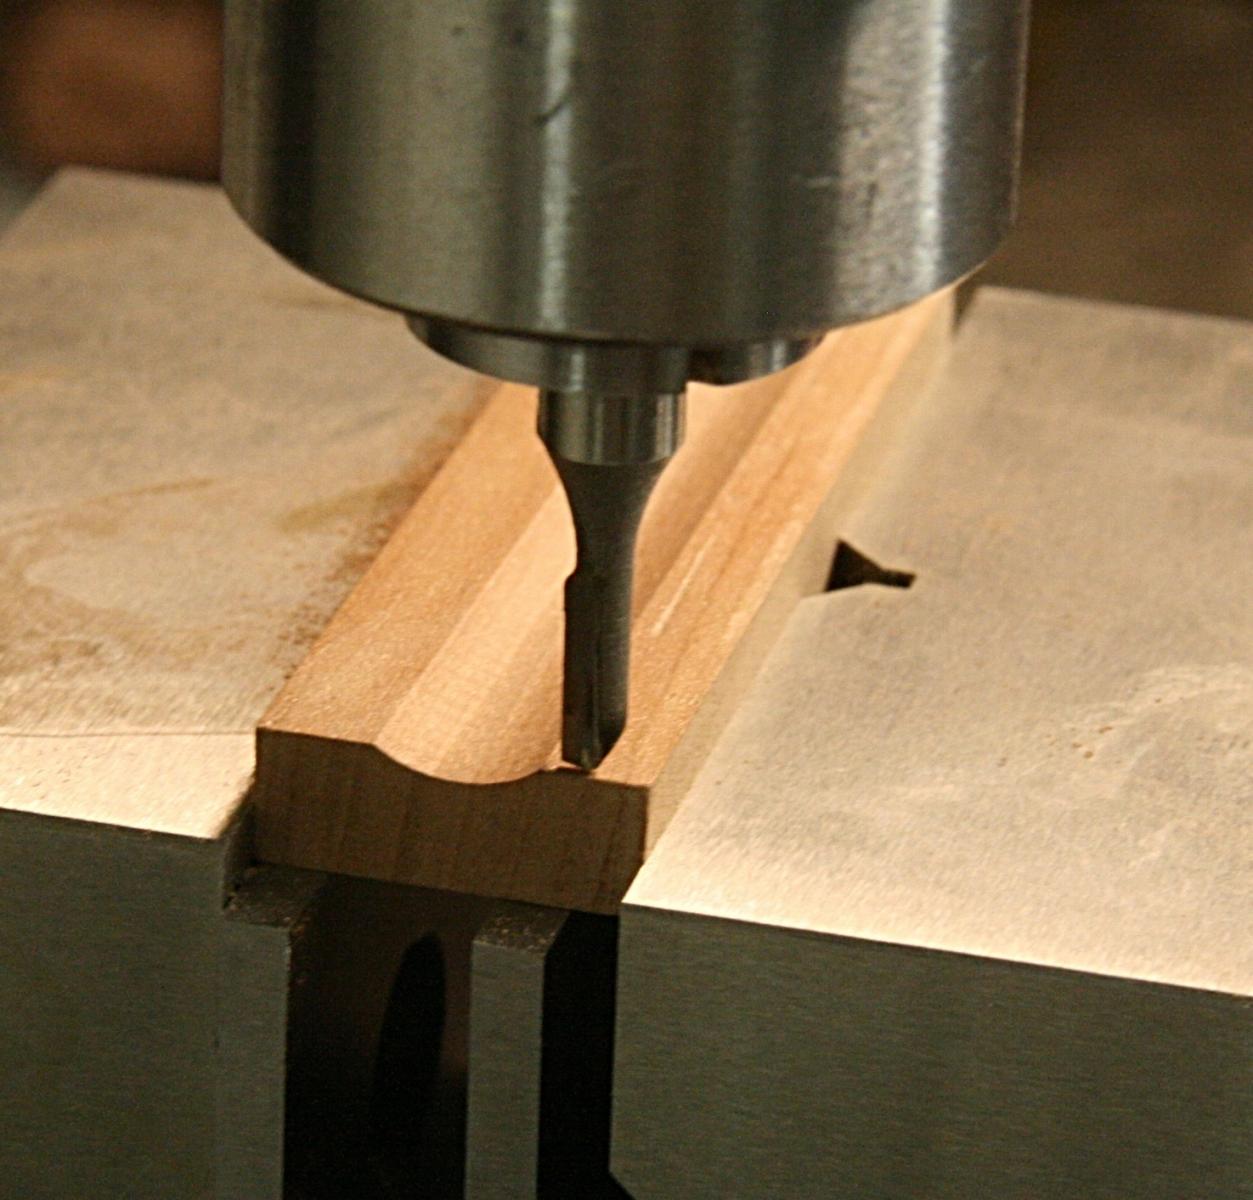
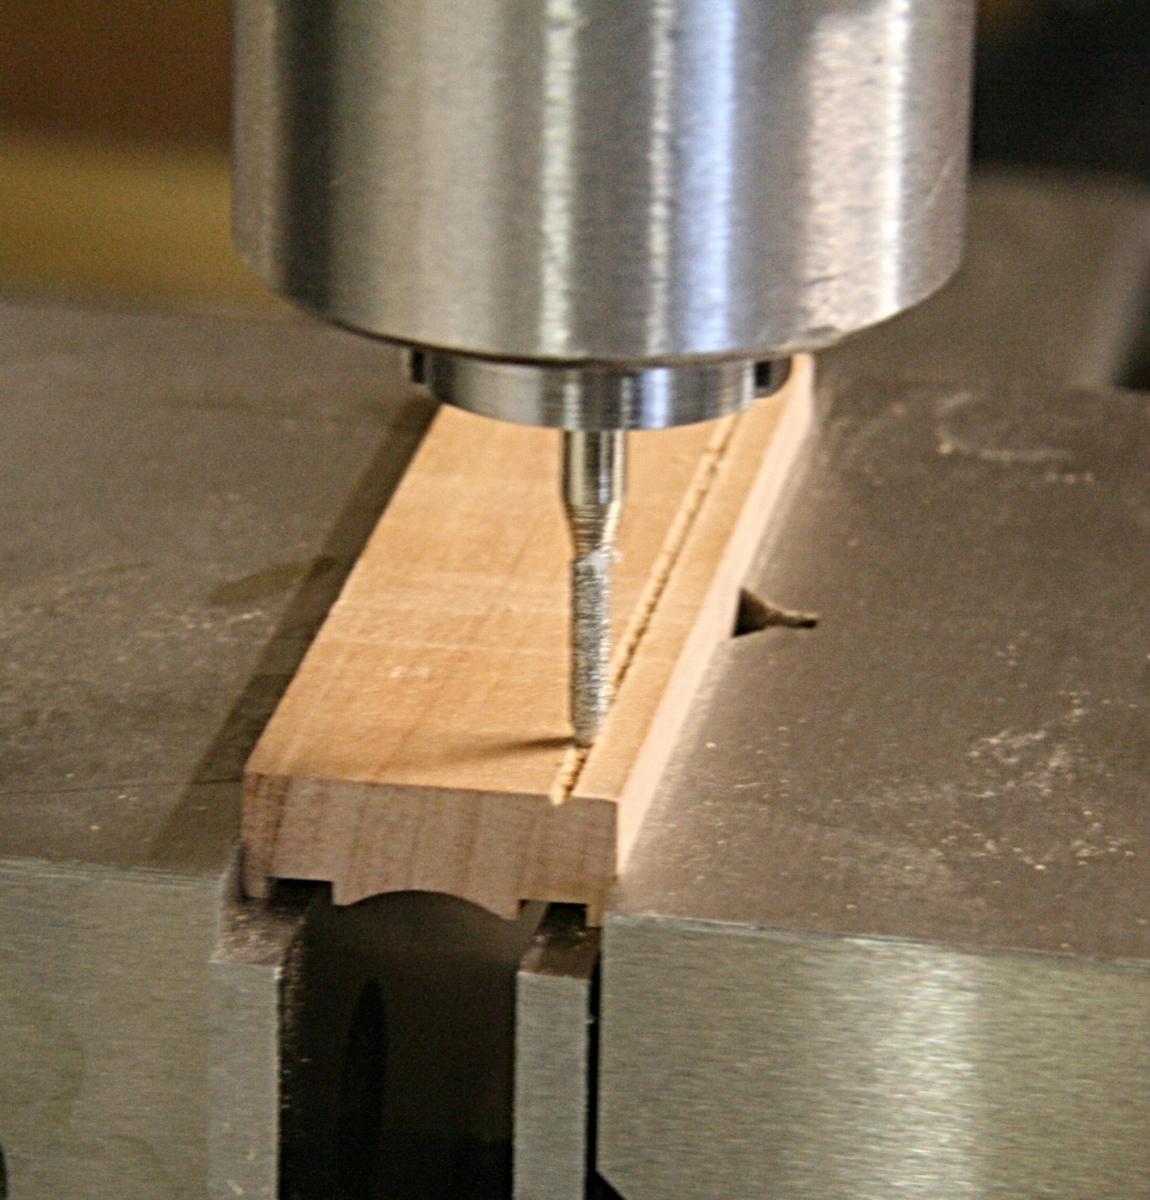
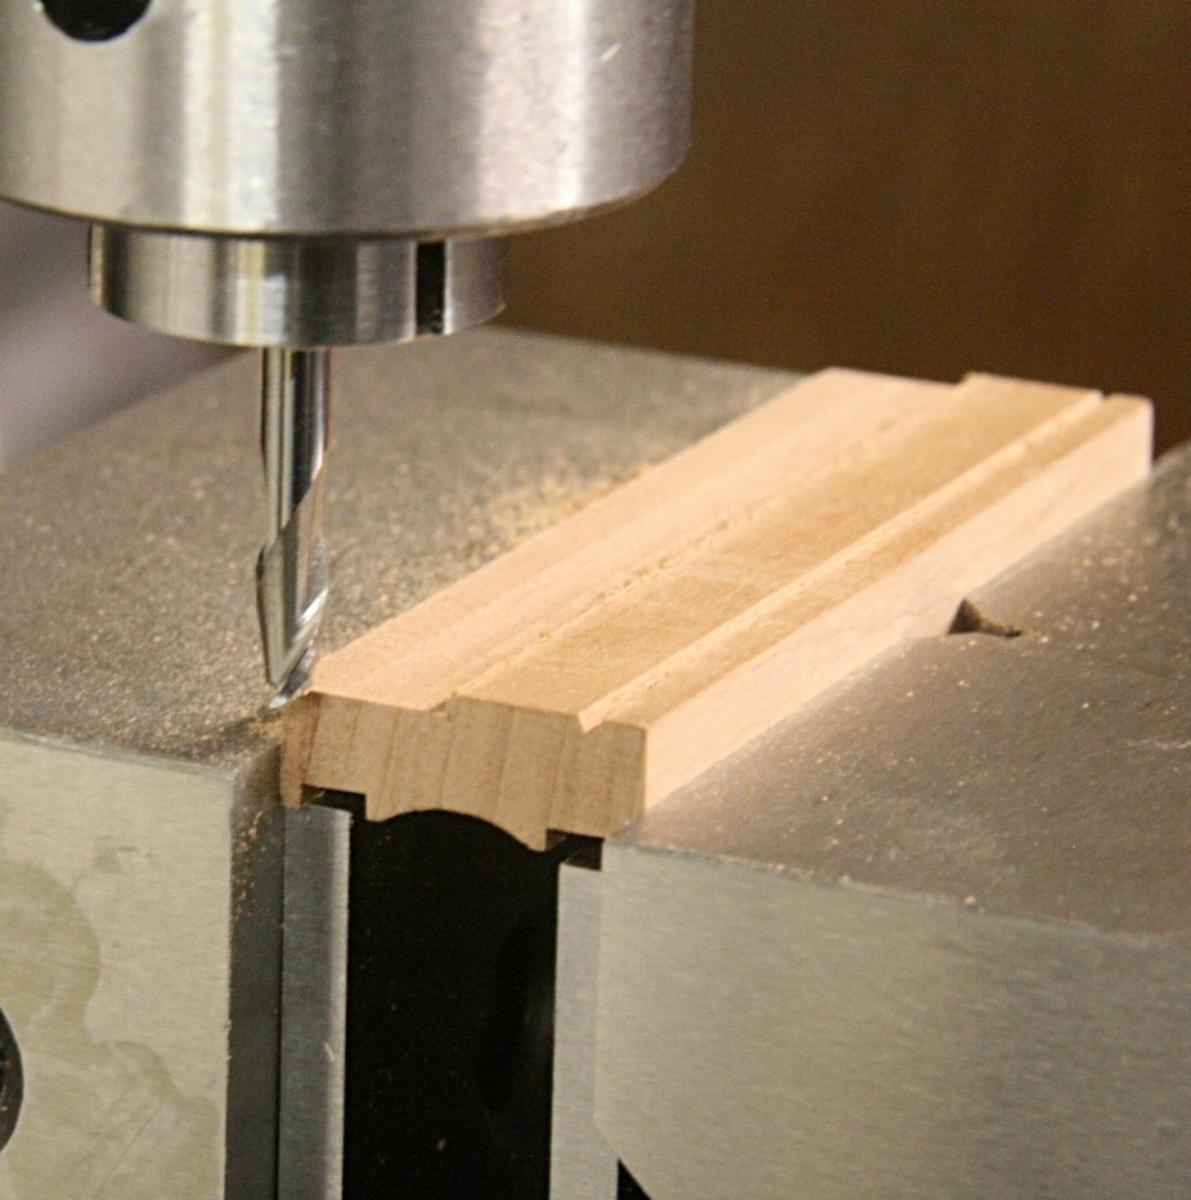
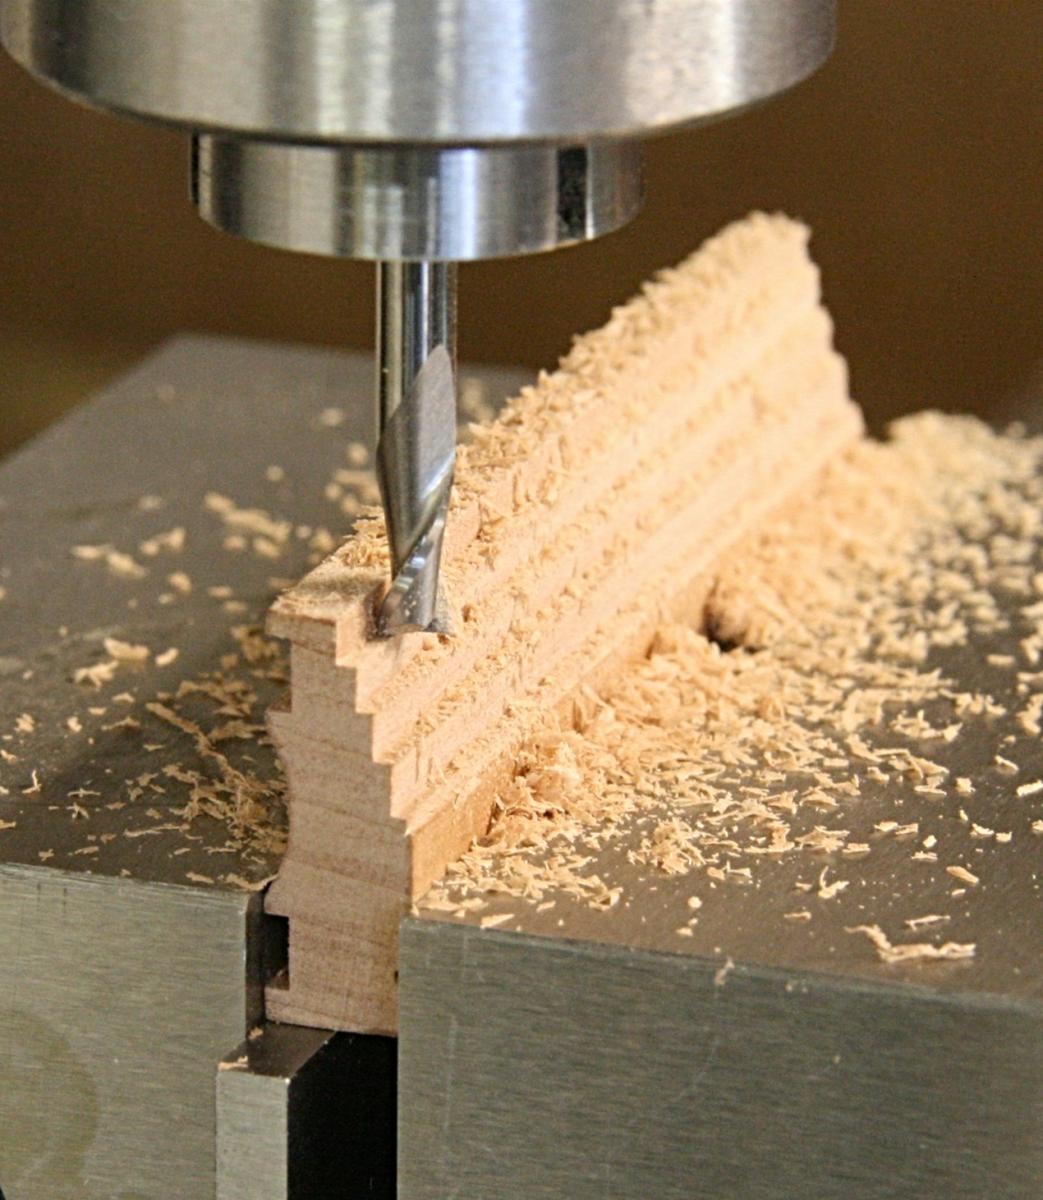
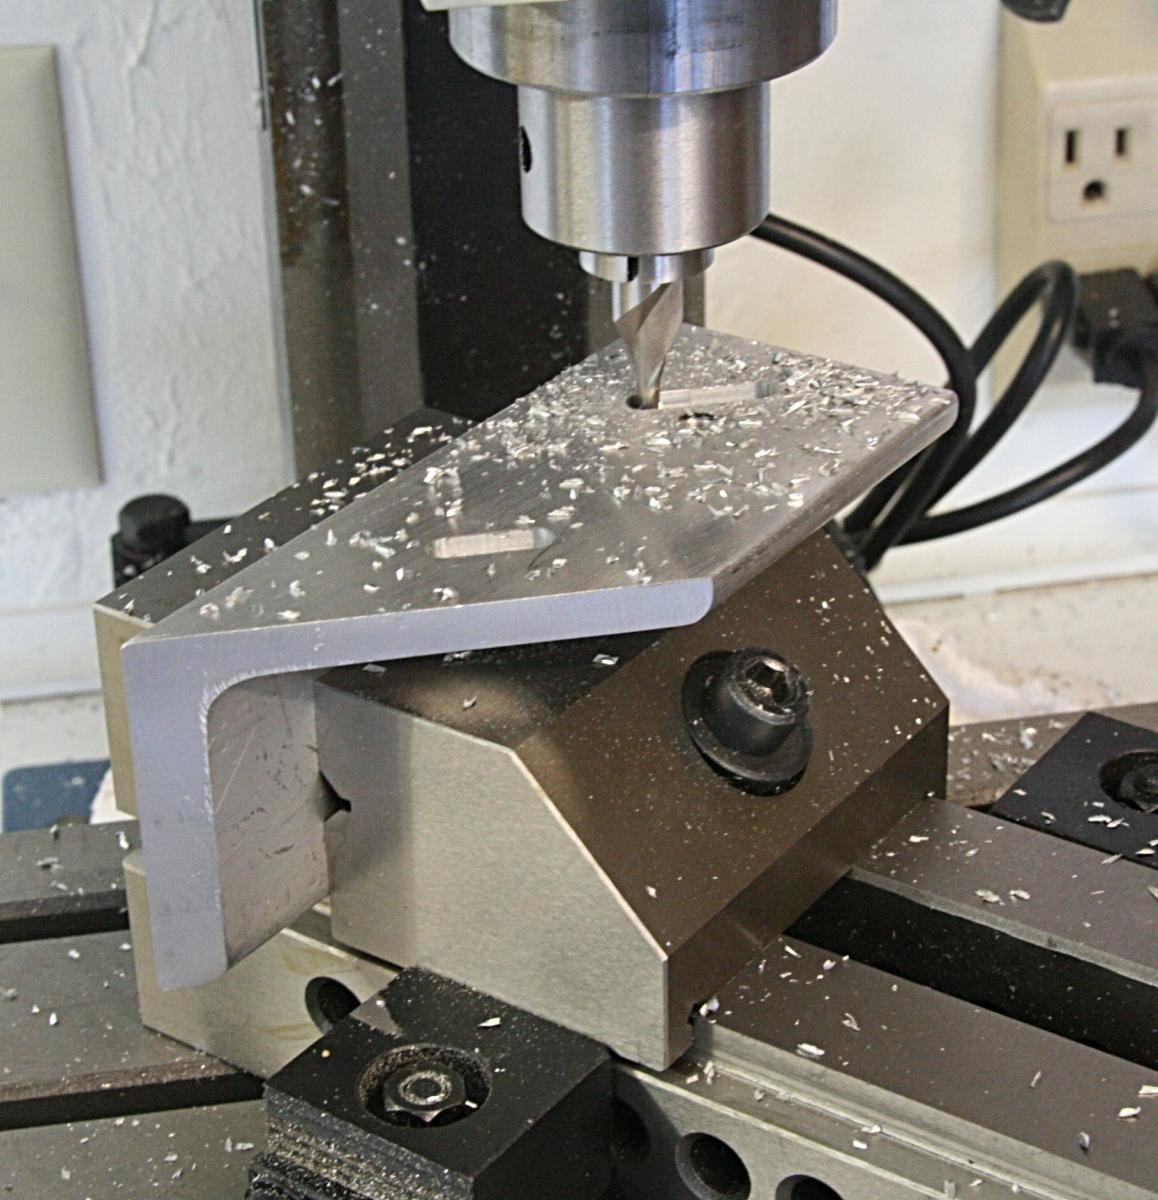
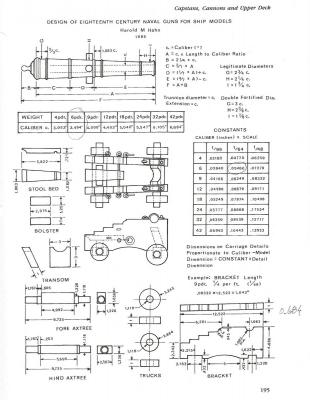
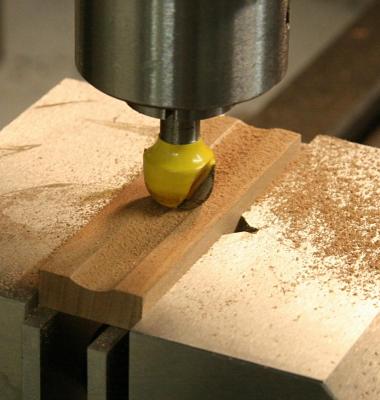
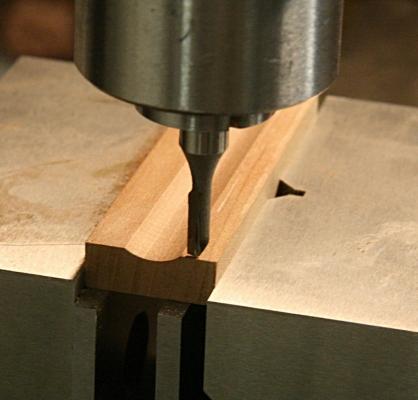
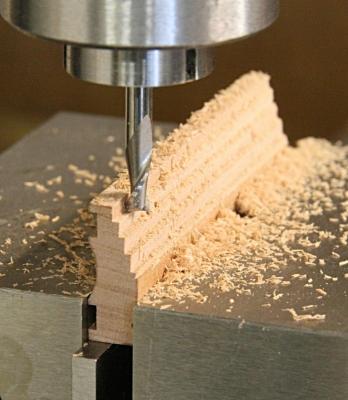
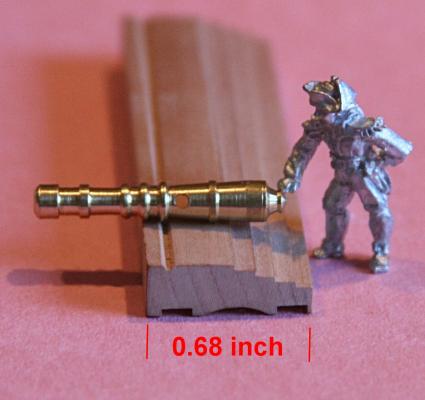
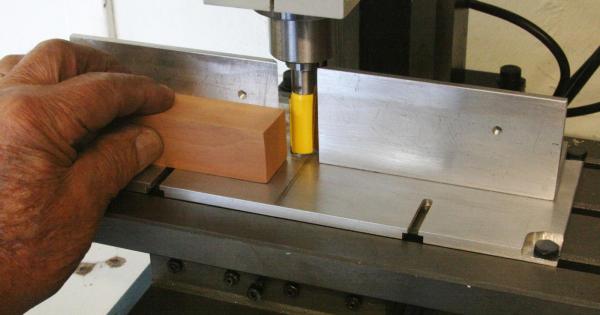
For my next project I need 16 guns (6 pounders). I am using the drawing published by the late Harold Hahn who came up with the formulas and dimensions for a variety of guns used by the British. The first drawing shows how he arrived at the various dimensions. It involves the scale you are working to and the caliber of the gun. The sides of the carriage are obviously the most complicated. Using my new mini mill and a piece of pear wood, I proceeded as shown in the pictures that follow. I used four different bits, including the diamond coated V. I do not have a rounded bit with this small a diameter and will have to file the round groove by hand after the 'log' is slices. I need at least 32 of those pieces at a thickness of 0.051 inches. To cut the last step I decided I was too close to the vise and turned the part around. All cuts were made at about 5000 rpm. I think I would not have been able to do this without the mini mill. For me this has been a good investment thus far.


-
Go to one of the fabric shops. Those ladies have used and know more about scissors than I can recommend. I did and love the one I have. Brand?? I don't know, but it works fine on everything I cut. Then there is the little (expensive) tool my mother-in-law gave me for Christmas. But that is another thread.
-
A slitting/routing fixture for the mini mill
Modeler12 replied to Modeler12's topic in Modeling tools and Workshop Equipment
Richard, a couple suggestions: I drew up the plans after making some rough sketches of the idea. The drawing is rather large (full scale) and hard for me to scan unless I do it in four sections. I will try to do that and post them here or via a PM. The base should be what you can handle on your mill. The exact size is not important but the way it is attached to the mill table is, of course. The slots on mine are 9 cm apart and I was able to barely use a four inch wide plate. The angle pieces are very large because I used some scrap pieces I happen to have. If I were to start from scratch I would use some 1.5 x 1/5 inch or even 1 x 1 at 1/8 inch thickness. (Home Depot). The way it is, the routers and other cutters barely clear the corners of the tall angle pieces. I may have to cut the corners near the center to be a bit safer. I incorporated the 3/4 inch wide 'guide bar', but don't really need it thus far. You can leave it off and always add it later if you need one. So, that leaves the door open for making the adjustments of the two angle pieces and, as I showed in the mill review, they have slots to align with the drilled/tapped holes you can see on the bottom of the base plate. See http://modelshipworld.com/index.php?/topic/5783-a-review-of-a-mini-mill-from-little-machine-shop/ I just used the planer feature on some pear wood blocks and it worked pretty well. I did have to lower the router bit into the base a tad in order to have enough cutting blade to do the whole face of the block (1 x 1 inch and about six inches long). I hope this helps. -
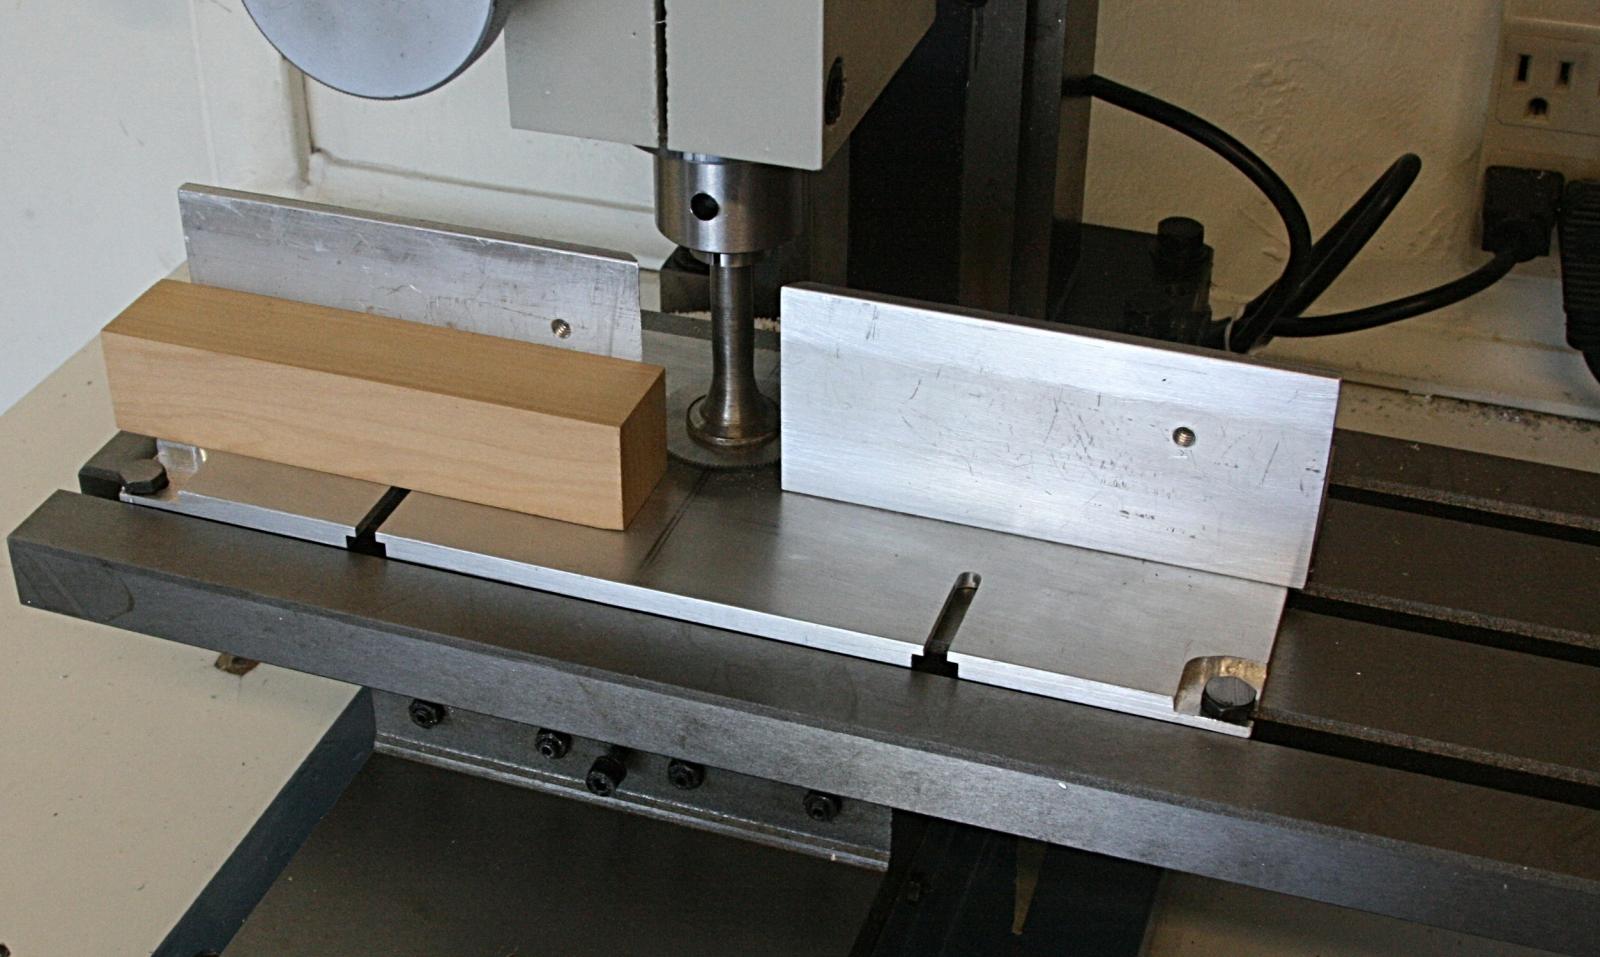
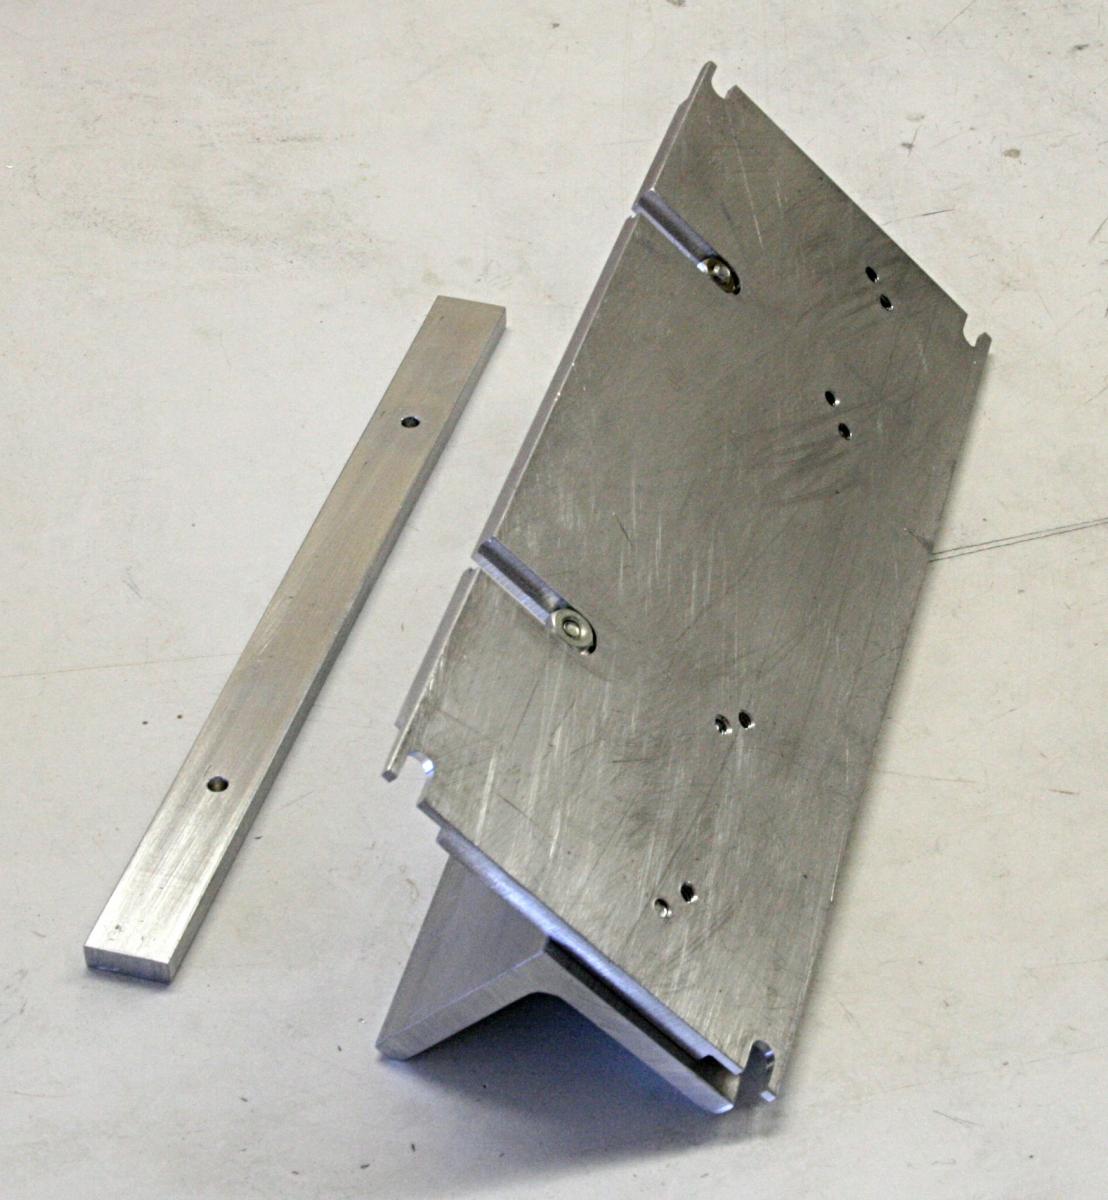
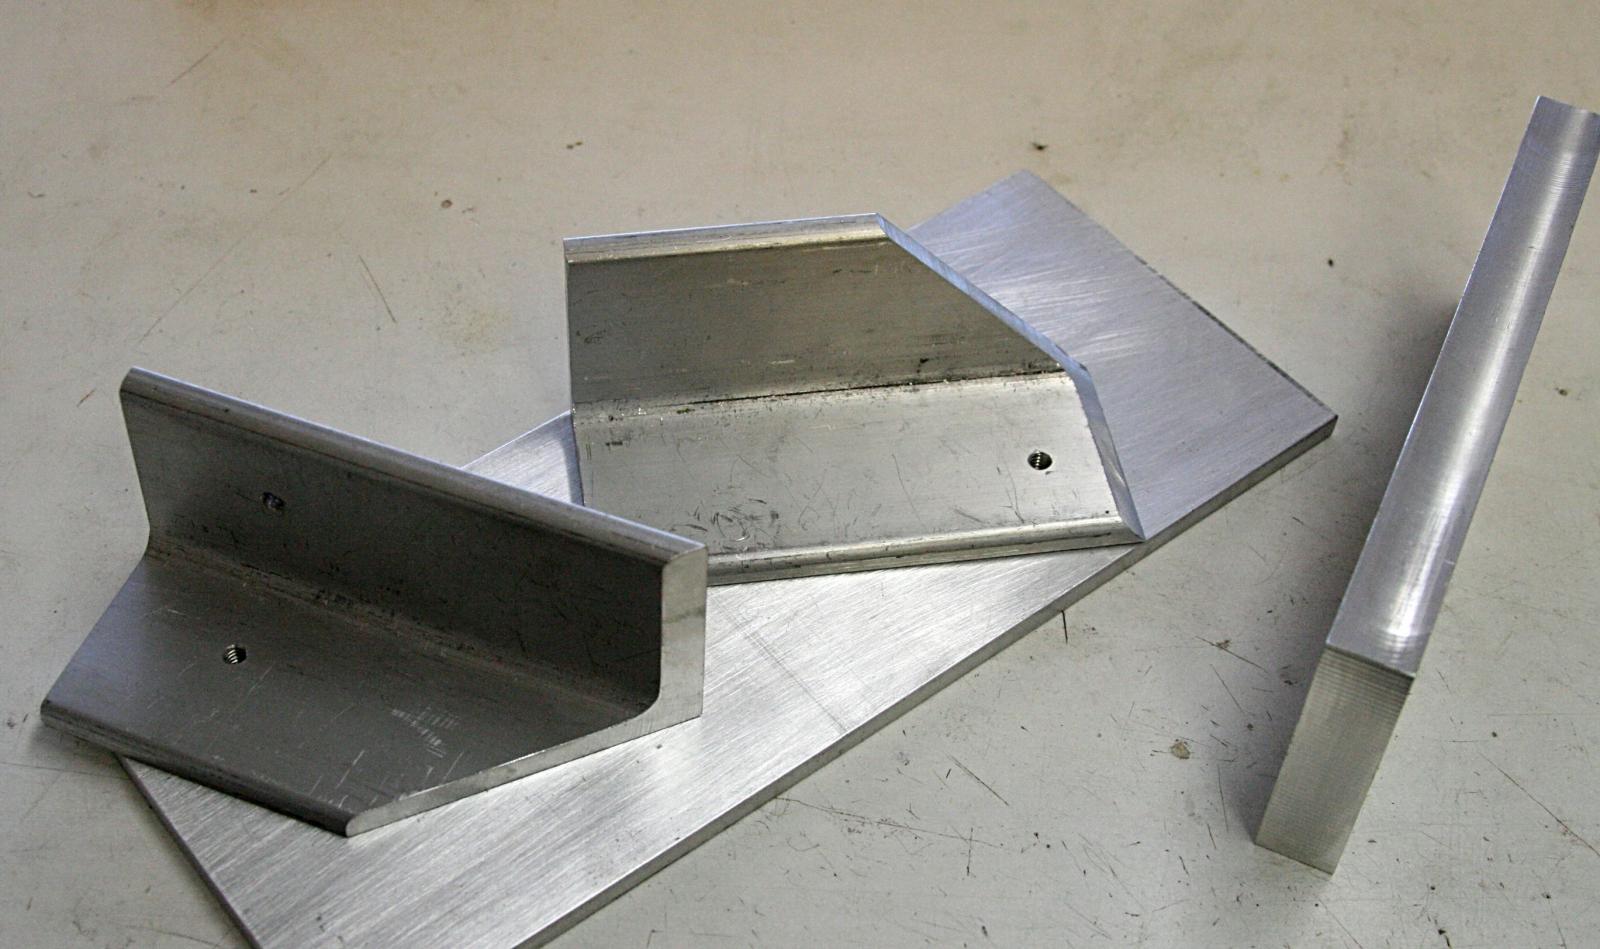
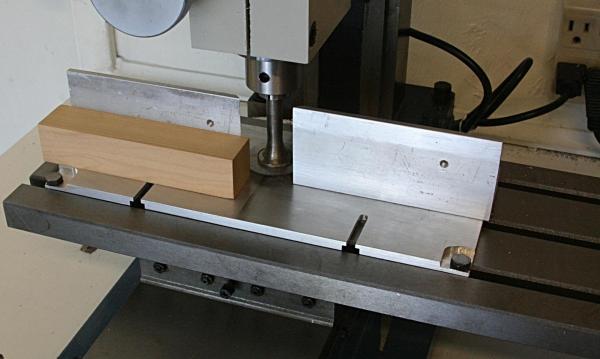
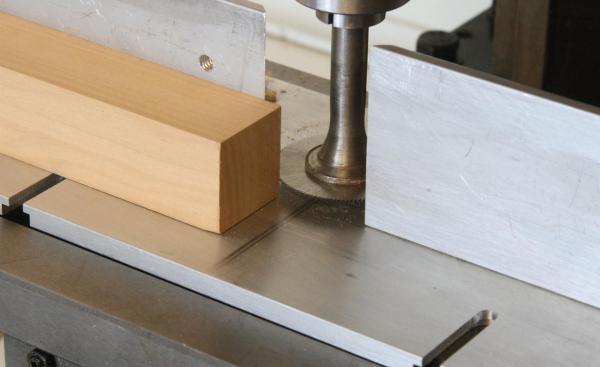
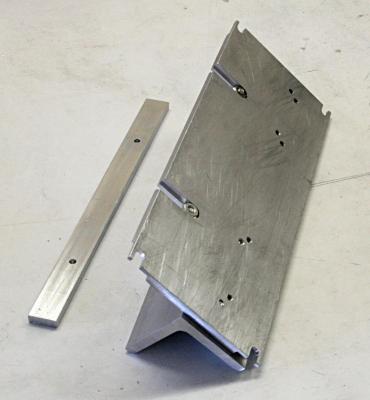
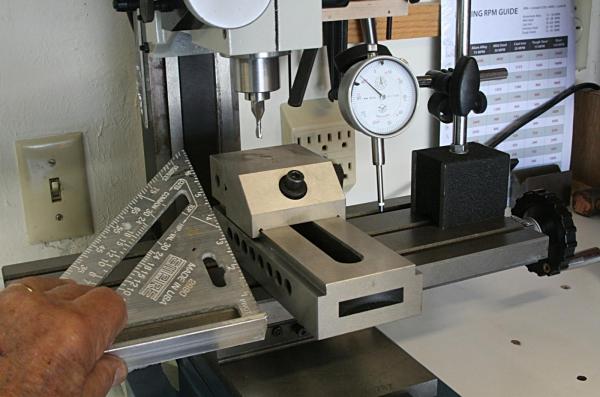
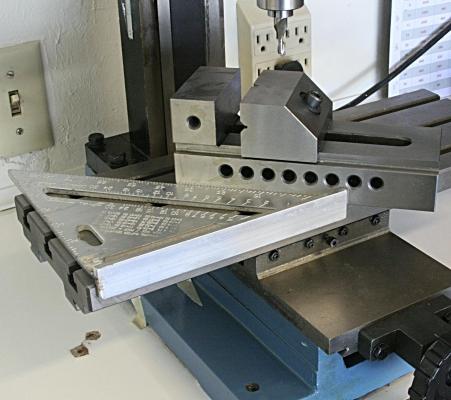
While practicing with my new mini mill, I decided I wanted to add a fixture that would allow me to cut wood to various shapes and forms. This involves a 10x4 inch base plate and adjustable angles as shown below. The base mounts to the mill table using four screws at the corners. Then it is a matter of setting the angles, guide bar (if used) and the X and Y feed to accommodate the cutter. Above I show a slotting blade similar to that used on mini table saws (except this one is 1.5 inches in diameter). I have used this on my old drill press and wanted to do better using the mill. A tall router can be used to make a planer and other cutters can make shapes. But I will have to experiment with those a bit later. One that I want to try is using the fly cutter (not shown) with special blades to make moldings The last picture is just to show the bottom of the base with its slots and threaded holes. I have more details about this in my review of the Little Machine Shop mini mill in another thread. The main thing is to keep this thing versatile for cutting wood (and never any metal this way).
-
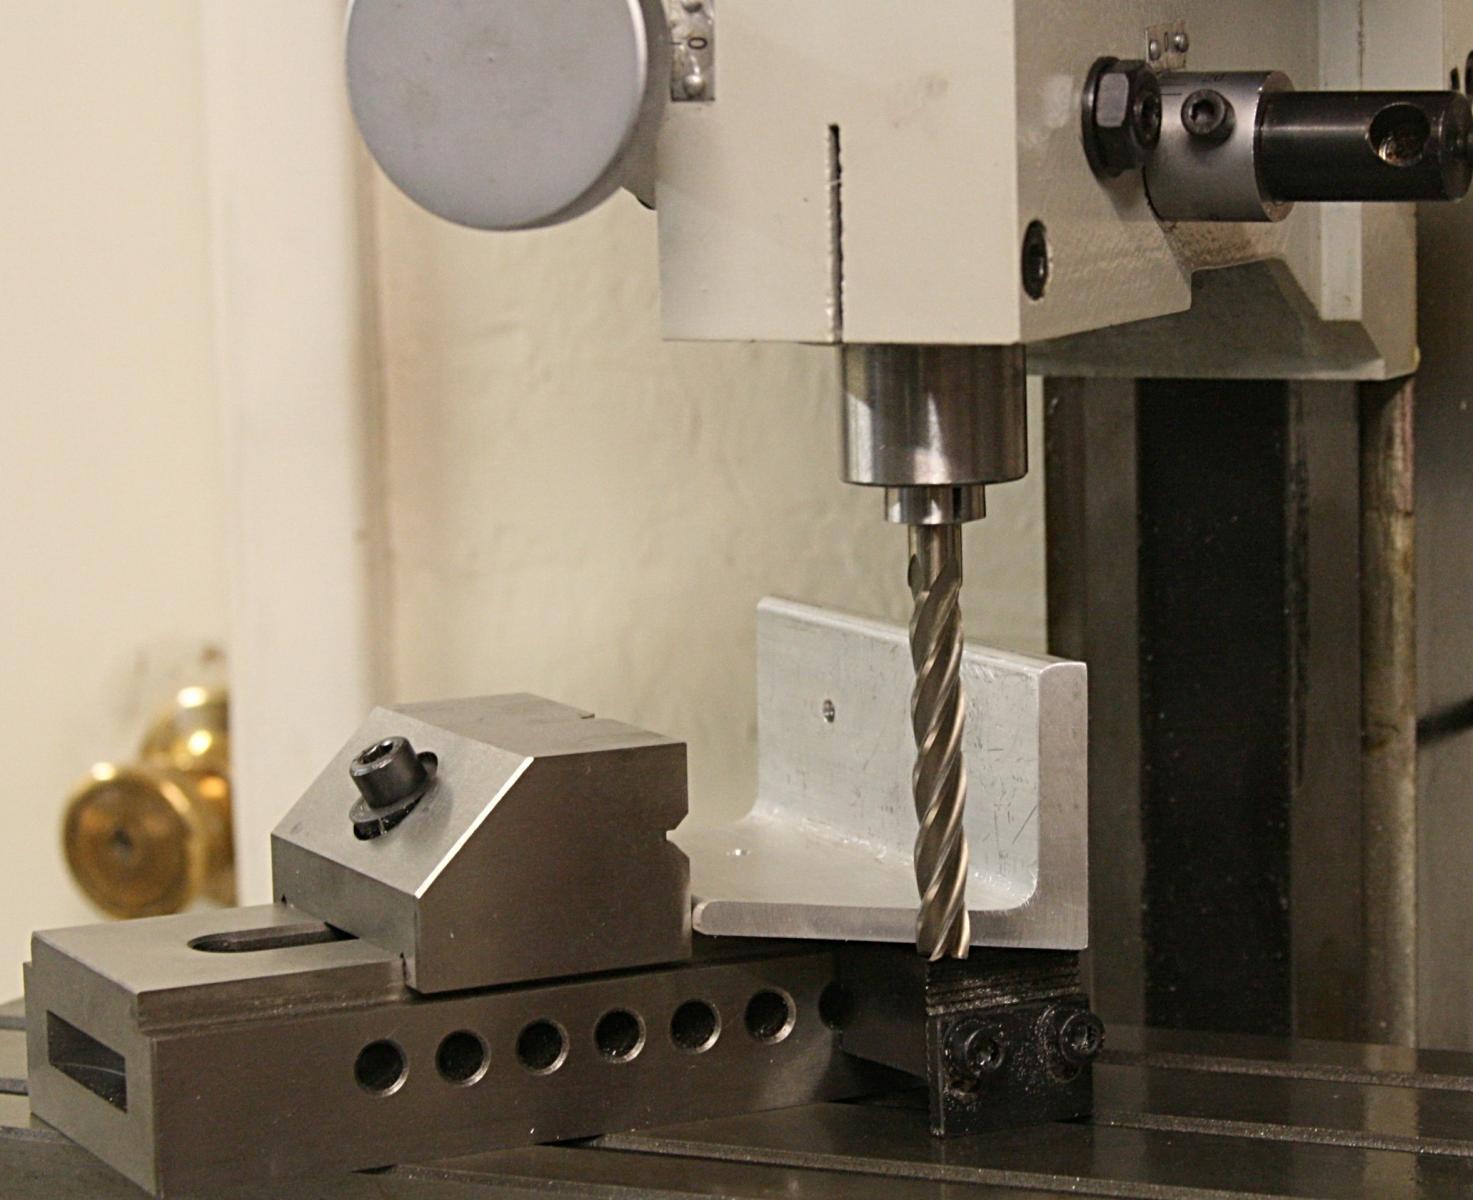
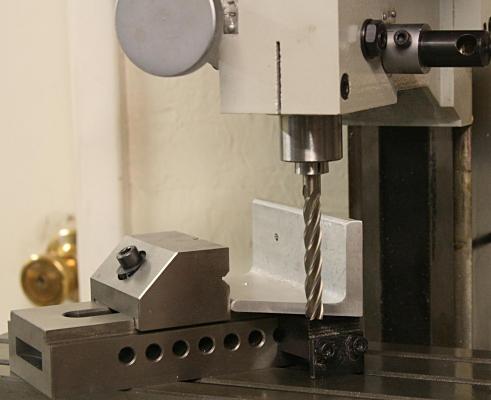
I have some practice using the mill now and I would like to add a few comments here. I used a block of 6061 aluminum to practice some basic cuts. The machine runs very quiet and the speed control and indicator gave me a good feel of how fast I was cutting. With practice I was able to generate some good size chips and the motor never hesitated or stalled. I know that was a concern by some of you, but even at the 5000 rpm all went well. I also took some other material that I then used to make a slitting/routing fixture (another thread above). Notice the tall end mill I used for cutting the ends of the 2x2 aluminum angle. While going from the 1/4 inch thickness to the full 2 inch, the cutter changed its tune but the machine never hesitated. Even with the large bed I had to change the set-up for the vise several times. I know purists will balk at this, but I found that using a small carpenter's square to align the vise with the bed worked very quickly and good enough for my purposes. I have the dial indicator and magnetic vise for other checks. Thus far I would say that this mill compared with others in its class certainly has features that are important to keep in mind if you are considering getting one. Besides that, the tooling that I bought from the Little Machine Shop are much less expensive than what I have seen published elsewhere.


-
Thanks for asking Tex. Indeed my Conny is in waiting, needs attention, but I have been busy, nevertheless. I had another big birthday and we decided to spend a few days in the sun of Hawaii. Did a lot of hiking, climbing, whale watching, snorkeling and drinking mai-tais around the pool. The admiral is still complaining about her sun-burnt feet (who ever puts suntan lotion on those things down there?) Then there was the mini-mill I just got from Little Machine Shop. After careful practicing with this new toy, I am getting the hang of things again. It has been many moons since I had a crack at running a milling machine. I will post more details about my current project with that toy shortly. At least the Conny gets some visual attention since I had to move it to our dining room table to make room for other stuff.
- 732 replies
-
- 3
-
-
- constitution
- model shipways
- (and 1 more)
-
The way I saw the watwerway was that they go all around the deck, including the stern and how. The bowsprit goe over the waterway
-
Wood lathe templates or jigs
Modeler12 replied to rtropp's topic in Modeling tools and Workshop Equipment
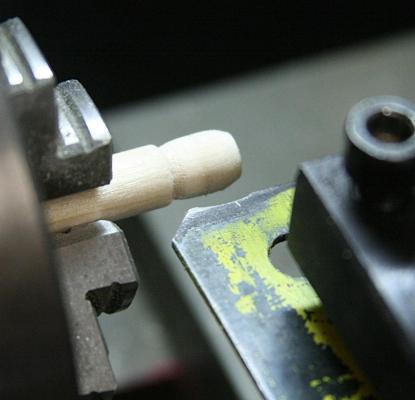
This is not for a wood lathe, but I have made barrels on my mini lathe using a piece of thick saw blade as shown below. I also made some by grinding two tiny grooves in the blade for the bands.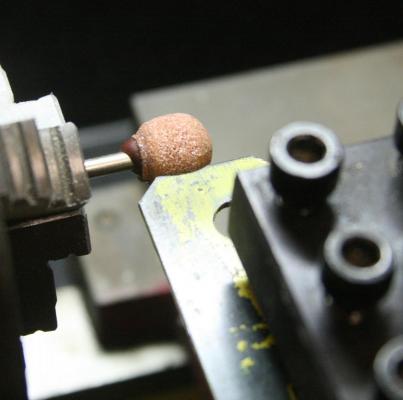
-
When I look at the machine you are interested in, it is a planer, not a 'jointer'. There are machines for the wood workers that combine the two functions, but this does not look like one. Here is the difference (according to one article I read): "A jointer is used to create smooth, flat surfaces along the four edges of a piece of wood. A planer cuts wood into the desired thickness, while creating perfectly parallel surfaces". I believe that jointers are used to create those 'edges' so they can be joined. While planers just create good, parallel surfaces. So, if you want to do both, look elsewhere for a machine that can do both. I have an old planer and it does not cut or smooth the side edges. I know, some one is going to say that after you band-saw off the edges, you can turn the piece on edge and 'plane' the other sides. Here is an interesting demo, but all of this is for big pieces of wood:
-
Gary, I am sure you are also a handyman around the house. To make your own release plate for your tripod is great. Most people would go and buy another one. I love your attitude, Sir. I agree, however, that to take good close-ups require a tripod. Nevertheless, your pictures have been very sharp and clear. You must have a steady hand. Q. When you talked about the capstan and the palls. Are you referring to the palls on the bottom? I am surprised there is even a history about that. In other words, the idea of using these kind of 'back stops' date from around 1770?
-
I asked Chris Wood at LMS about their charges. Here is his answer: Jay: We charge what USPS or UPS charges us. And in the case of UPS, it’s discounted from the standard rates because of our volume. We do not charge handling. That said, it’s still expensive to ship heavy items. And many people do not understand that shipping cost is based on weight and not the value of the product. As an extreme example, a 9x12” surface plate costs $32.95, but it’s $40.32 to ship it across the country. Regards, Chris Wood LittleMachineShop.com
-
Bad, to be sure. You live in Australia and the actual shipping costs would be higher but not that much. Here is another example. I live in California, A few weeks ago I decided to buy a couple more hemostats, or forceps. There is a small company about forty miles from where I live and they sell them for $1.68 but their 'S&H charge' is $9.25. Total cost to me $10.93. If I order more I get the message 'temporarily out of stock', When I order something from Amazon the same thing. However, with them you don't get to find out what the S&H charges will be until you have practically placed the order. Now they have your name, address and email so they send you their junk mail.