Modeler12
-
Posts
1,716 -
Joined
-
Last visited
Content Type
Profiles
Forums
Gallery
Events
Everything posted by Modeler12
-
I have a set of micro drill bits from Mc Feely's that have a 3/32 inch diameter shank. The selection of sizes is limited to eight ranging from 2.1 to 0.5 mm. 0.5 mm is about equivalent to a number 77 drill. http://www.mcfeelys.com/product/PX-88/Tungsten-Vanadium-Micro-Twist-Drill-Bits
-
 Right on Geoff. If you were to glue the masts together. you would need to install the lower and upper shrouds as well as some of the stays before you assemble the masts. That can lead to tangles. After I installed the lower masts, I continued to add things to it before putting on the next mast section and the mast tops.
 -
Geoff, I cannot emphasize enough to do as much as possible on the bench. You did that with the bowsprit and I notice you installed the deadeyes on the platforms. I might have gone a bit overboard on mine, but I found it not to be a serious hindrance to add the halyards, the various blocks that are strapped to the mast, and even the halyards for flags. Later on you will find the same to be the case for the spars. But I know you are well aware of this, so pardon my preaching to the preacher.
-
In a pinch I have used the collet of my dremmel-like tool (an old Monkey Wards left over). I insert the drill bit and clamp the collet into my drill press. To be sure, it does not run true, but I am usually able to get by with some care. The other way is to invest in a series of drill bits that have a thick shaft. There are some threads here somewhere on that subject.
-
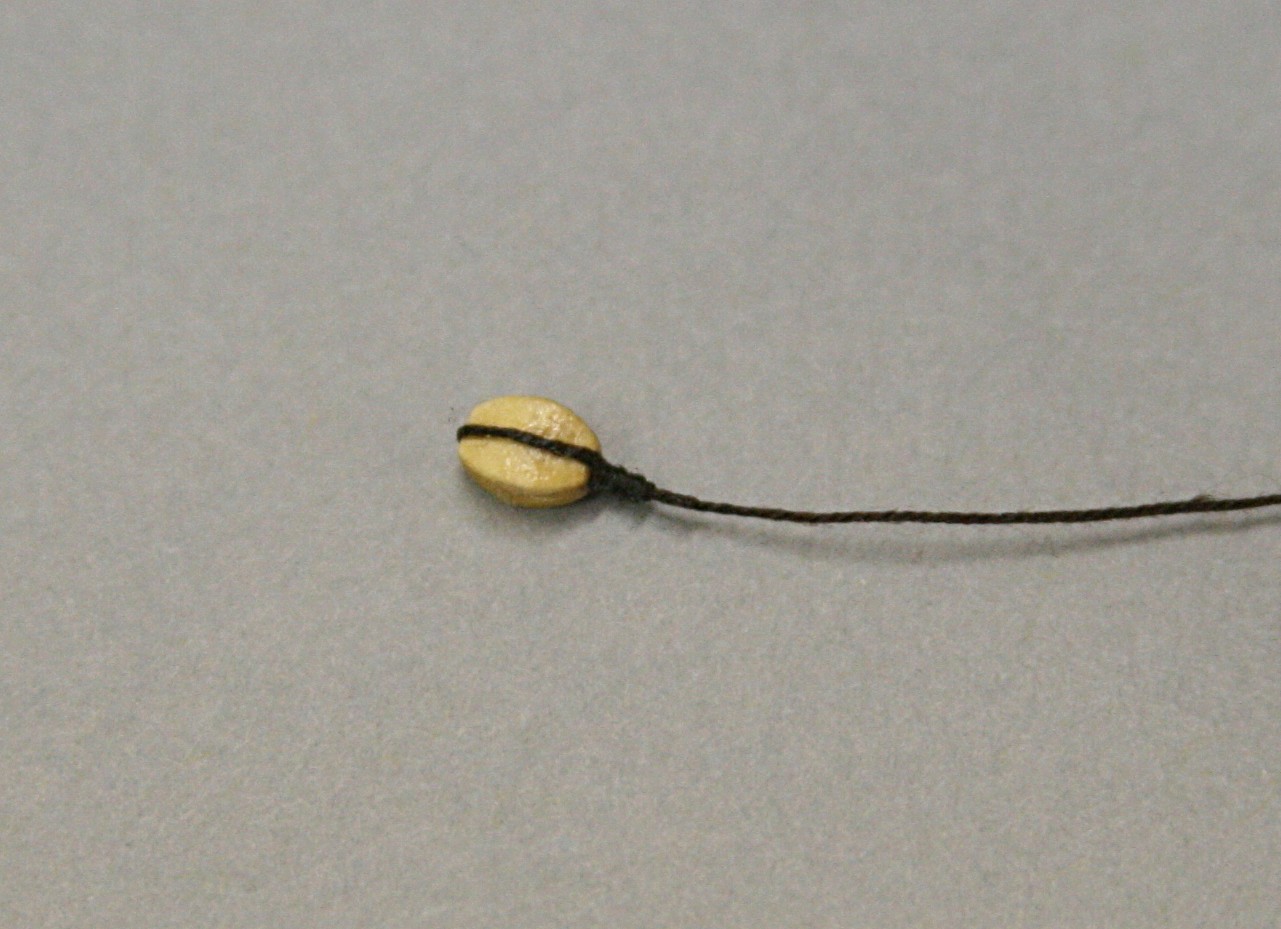
Seizing or whipping a line. Here is how I have done it.
Modeler12 replied to Modeler12's topic in Masting, rigging and sails
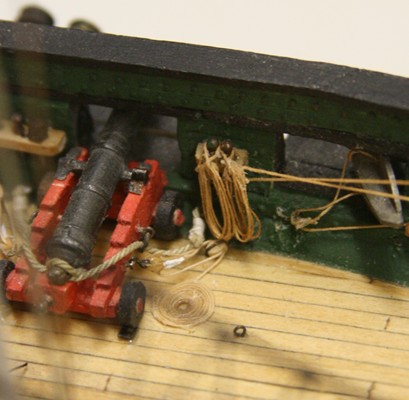
You know Harley, the biggest problem I have had with seizing is that the thread is always too thick. I wonder if anyone have suggestions about where and how thin a thread we can get. I am willing to dye it if necessary. But that, of course, adds thickness. I mentioned the cannon rigging, and now I remember that I did not seize the tackle lines for just that reason. I ended up painting the seizing on these tiny strops. The blocks were 2.5 mm. -
Bill Hime, I have a suggestion for you. Since you live in Madison, you should go to the Forest Products Lab there and ask one of the engineers if they could run a similar set of experiments. Perhaps they already can provide you with a better opinion than mine. FPL is well known for the work they have done in testing all kinds of wood structures. BTW Rather than tension, I think a cleavage or peel test would be more meaningful. Planks bonded to bulkheads will want to 'peel' loose. I don't foresee much 'tension' nor 'shear' in those joints.
-
The original question did not imply that bulkhead parts were to be bonded with 'burnt to burnt', but I just included that because I was curious. To do that, however, I flipped the two pieces so the edges mated and did not have any or much of a gap. Yes, the 'burnt to bare' did have a small gap and that is why it probably broke the way it did with the pliers. But even that one did not break at the glue joint when hit with a hammer. The PVA is known for a limited amount of 'gap filling', unfilled CA glue does not, and epozy is very good in that regards. When you plank a hull with bulkheads, I think it is more important to minimize the gaps than whether or not the edge had a dark residue from the laser cutting. In other words, bevel the edge as necessary towards the bow and stern and don't worry about some dark smudges towards the center. That is my opinion. If you want to spent the extra time to make it look bare, go at it. I am sure we all have to agree that planking will come loose more easily in the curves sections, but even where I spliced two planks on a bulkhead, I had very little problems bonding the two to make a joint.
-
I have made numerous seizings on the strop or line that goes around a block. The cannon riggings on my USS Constitution is one example. There are twenty-two guns with four blocks each. Lots of time to practice. I put a short video clip together for those interested in my approach. Of course, there are many other places where this seizing is used. The top of shrouds as they go around the mast is another one. There are also variations to the 'common whipping', but in all cases the idea is the same.

- 20 replies
-
- 17
-

-
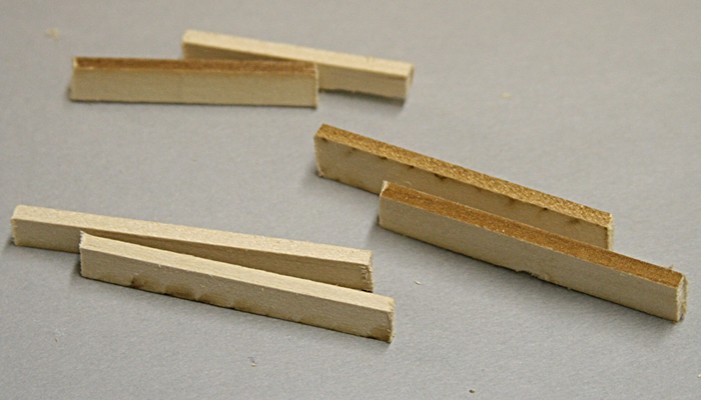
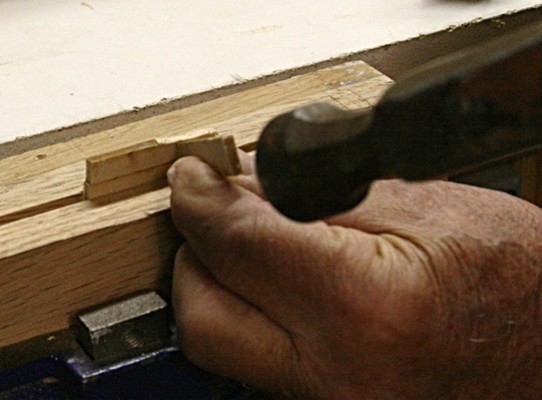
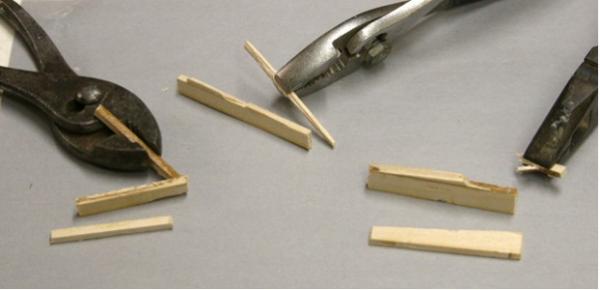
OK, here is what I did and the results. I clamped the glued up piece (started with the 'burnt to bare') in a wood vise. I used another piece of wood leaning against the top part and hit it with my calibrated hammer. I did the same thing with the other two, hitting it with about the same force. All three pieces sheared where I had clamped it and none broke at the glue joint. I then tried to break the remaining parts with pliers. Indeed the 'bare to bare' splintered some more but not at the glue line (top left). The 'burnt to burnt' (right) broke a sliver at the glue line, and the third one ('burnt to bare') did break through the burnt joint leaving burn marks on the bare side. It felt like it took about the same amount of force to break each one. My conclusion is that it makes very little difference if you sand the burnt edge or not. Al least with the glue I used. I suggest that others might try something like this with other adhesives.
-
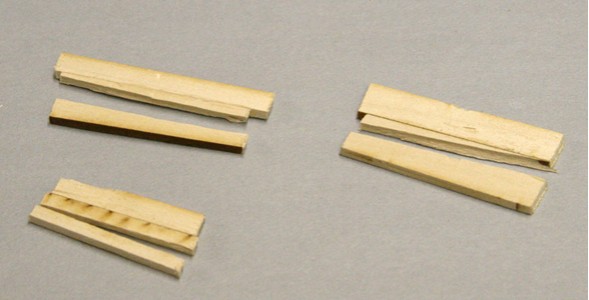
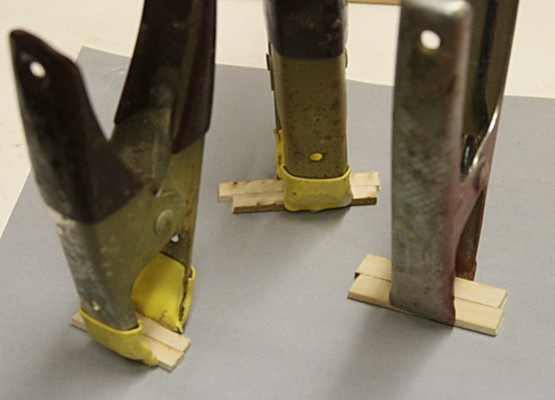
At first I agreed with Jeff. After all, wood that is 'burnt' should not have the fibers to grab and adhere to with glue. But I decided to run a little test. I took a few pieces (shown below) and used 'carpenters glue" (PVA) to bond three of them together. You can see burnt to burnt, blank to blank, and for good measure blank to burnt. The clamps apply about the same amount of pressure during this glue-up. I don't have a testing machine, but tomorrow morning I will put each one in a vise and hit with a hammer sideways. I will let you know how it goes tomorrow. You know, glue should be given some time to cure!!! BTW 'Burnt to burnt' is to the right and 'blank to blank' is in the background.

-
Goeff, I like what you are doing with the bowsprit. The more you can do on the bench, the better. Nice job on those foot ropes. I am still curious when you get to the running lines, how dyeing before or after might work for you. But you have lots of time for that. The standing rigging was fun and I know you will continue doing an excellent job.
-
I am sure you will get lots of suggestions to these questions. Here is one: If your knots are slipping you are probably using a synthetic thread such as nylon. Try cotton. As to what is the best . . . . Geoff, in his discussion, goes into a lot of detail, but have a look at: http://modelshipworld.com/index.php?/topic/945-constitution-by-geoff-176-scale-ms-2040/page-6 If you happen to be close to a Joann's Fabric shop, you will find lots of goodies.
-
Geoff a question about making ropes and dying them. Are you doing the coloring before making the threads or after they are made into rope? I did the latter and found that the finished rope was very stiff because the dye fills the spaces between the threads. This makes it hard to install the ratlines, for example. I am using a needle and thread for the ratlines instead of tying knots. I actually have to brush on some acetone to soften small parts of the shrouds in order to have the needle go through a bit easier. The same applies when making coils, etc.
-
I was not aware that would happen. Yours must the only one as far as I know. To prevent that from happening, I removed the music and here is the video again without the music: http://www.youtube.com/watch?v=fUSKKMEW7yY and the old version with the music: http://www.youtube.com/watch?v=KztQr5Z2BdI I hope that helps.
-
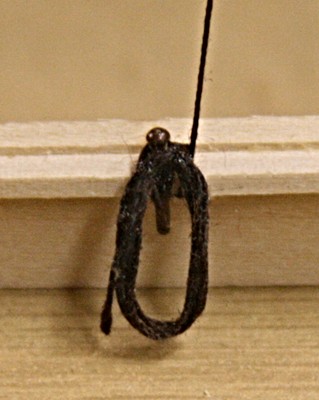
Perhaps I misunderstand your question, but the main difference between what Jackie did and my way is that I used two nails instead of hands to make the coil. I wound mine also in a counterclockwise direction and 'punched' through the loop to grab the standing line. Of course, another major difference is that I made this out of two parts and glued the coil to the pin after the standing line was wrapped around the belaying pin.
-
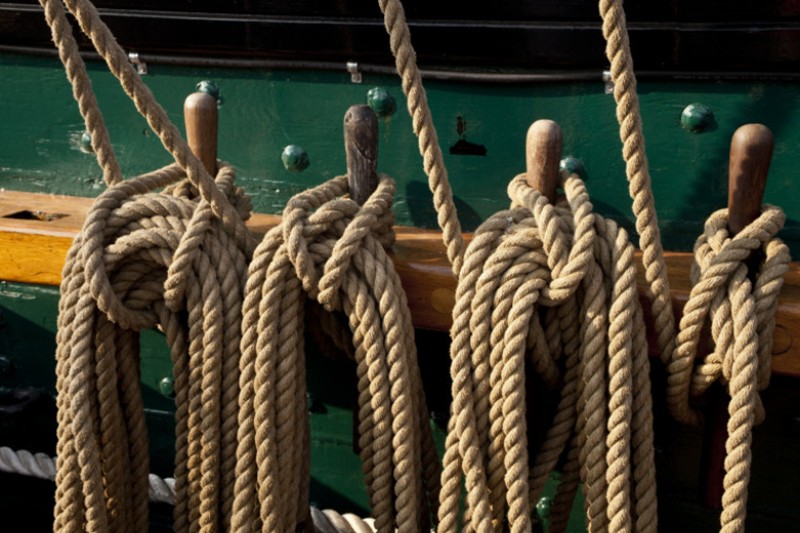
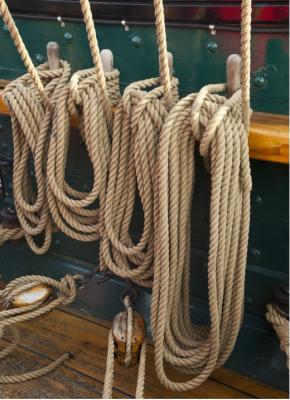
I am modeling the USS Constitution and the pictures below are of the ship as it is docked in Boston. I cannot imagine that a Navy ship would have the lines loosely thrown over the pin as shown in John's pictures. By having the small loop pulled through and draped over the pin, it would still be a simple matter to grab the large coil in the left hand, slip the small loop off the pin with the right hand and, voila, the whole coil is loose. Besides, I really don't think this should be called a hitch, but that is a matter of terminology.

-
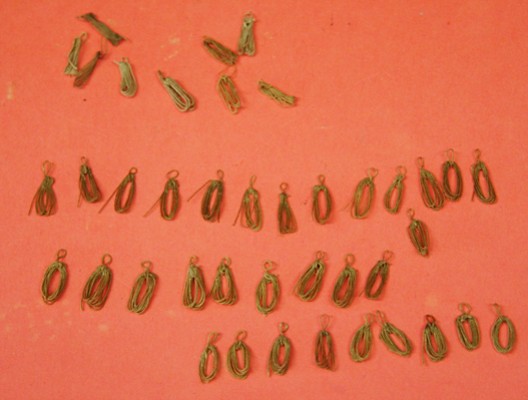
When I boarded a square rigged sailing ship, I asked one of the crew members to show me how to belay a line. The video below shows how this was done and how I adapted the procedure for my modeling. The technique is updated from an earlier video I showed, and now includes how I made the coils shown in the picture below. The nice thing with this method is that now I don't coat the whole line with glue, only the top of the loop. This allows me to adjust the lay of the coil when installing it on the model. Since each coil is made individually, it takes me about five minutes per coil. But notice the difference between the 'old' coils (top left in the picture below) and the current ones. Here is the video http://www.youtube.com/watch?v=KztQr5Z2BdI
-
Bill, model railroading is of course more popular that building model ships. But there are other adaptations of adding light to models. I happen to have built two model windmills and added some LEDs to the inside afterwards. Here is one of them. The tiny lights are available on line. Just search for 'nano LEDs' and you probably will end up with the company that supplies them. You can use two batteries to give you 3 volts, or use an adaptor that can be bought from the same company. Right now I am making a Christmas star for an outdoor tree and it will have several of those little guys. But that is just another idea. Adding them to the interior of model ships would be great. BTW the web site is http://www.modeltrainsoftware.com/nano-smd-leds.html and if you want to have the light blink on and off that can be included for a few more pennies.
-
How did some of the rigging terms get started? References??
Modeler12 replied to Modeler12's topic in Nautical/Naval History
Thank you gentlemen for the references. That gives me a good start. And Wefalck, indeed those little critters can climb into or along the most precarious places. I am familiar with the metal disks to prevent them from coming aboard. But, as I mentioned, I think they are more interested in going below deck rather than climbing the masts, unless someone left some of their lunch on the platforms (crows-nests, a term that I can understand). -
As I am going along making and learning, I am also curious how some of the common terms or names came about. For example, 'ratlines'. Now I am sure rats never used those lines to climb up to nowhere. They would go down where the goodies were. Perhaps some landlubber saw men climbing up those 'ladders' and thought they looked like rats. Besides, why is the ratline pronounces as 'rattlin' (or something like that)? We can all think of terms like that, but I wonder if there is a good source, book or other reference that can explain the source. I don't want the explanation of what it is, but how it came to be called that. More examples: halliard, probably related to 'haul that line'. Try to pronounce it the correct way. Topgallant ???? Leech and buntlines ??? ETC.
-
Yes, that last loop tucked under the previous loop was new to me also. That is why I asked Jackie if she was giving the last loop a 'half hitch'. She replied that the boatswain wanted it their way. Of course, it is important that all crew members do it the same way. In the dark or stormy conditions you don't want surprises.
-
Ira, you might be interested in watching the following video I took on a sailing ship. One of the crew members showed me how to secure a line to a belaying pin. I then tried to duplicate that for our ship modeling. http://www.youtube.com/watch?v=tKfrKOaT0xw I might post this as a new thread if it is of interest to others.
-
When to serve and when to seize?
Modeler12 replied to Geoff Matson's topic in Masting, rigging and sails
Hi Geoff, In addition to what Henry mentioned, here is a picture. I always think that a picture is worth a lot of words (or was that someone else who said that first?). This came from the book by George Biddlecombe, The Art of Rigging.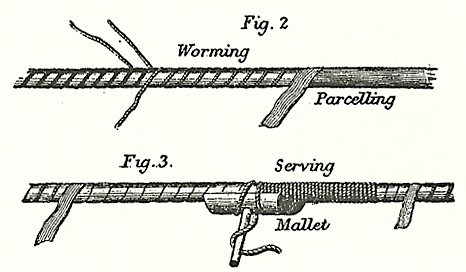
-
Then there were the days when ceramic painting artists would lick the tip of their brush to get a finer point. Delft's Blue is made with a cobalt based paint and others used lead as well. Although that is in the past, young people in the Asiatic countries are constantly exposed to these hazards without knowing about it. Again, with a little insight and common cautions that should not be a problem for most of us. I gave up reading MSDS reports when I retired.
-
This almost makes one give up this hobby. If every housewife read the MSDS for the household products she has on the shelf, our laundry would not get done and our food would be very bland, while the carpeting and tile floors would be filthy. I have always taken the standpoint that with diligent care and washing my hands after handling 'dangerous chemicals' I have a good chance to live to be a hundred (24 more years to go).