Modeler12
-
Posts
1,716 -
Joined
-
Last visited
Content Type
Profiles
Forums
Gallery
Events
Everything posted by Modeler12
-
 I used styrene foam near the bow and stern. It was easy to do, did add some work, and was not all that helpful. Yes, it gave the planking some extra support, but to add some extra thickness to the bulkheads would do the same thing. I would not bother again.
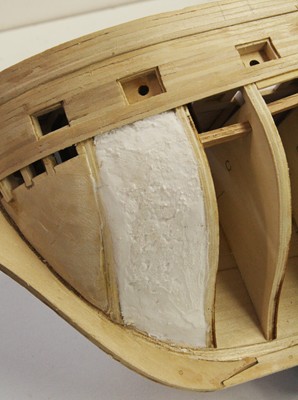
-
Make your own clamps
Modeler12 replied to Q A's Revenge's topic in Modeling tools and Workshop Equipment
Interesting. The problem with making your own Jorgensen screw clamps is that you need to be able to cut left handed thread for both the screw and the nut inside. I have a number of the threaded bars with both left and right handed threads, but never bothered to invest in a matching tap for the nuts. Besides, the ones I have are way too big for modeling. -
Kimberley, I did not mean to scare you, but let me add one more suggestion. You will find that if you can add what ever lines go from the sail to the mast(or spar) before the sail is attached to the mast, it will be a lot easier than if you try to tie lines after the sail is in place. I have found that if you think the process through before each step you will be miles ahead. A pin vise is really a small hand drill (not a vise). They are meant hold tiny drills (number 80 and thicker)and be twisted by hand to do the drilling. No speed involved, just a bit of care to keep the drill aligned while you gently push and turn. You can find them in any of the hobby supply houses.
-
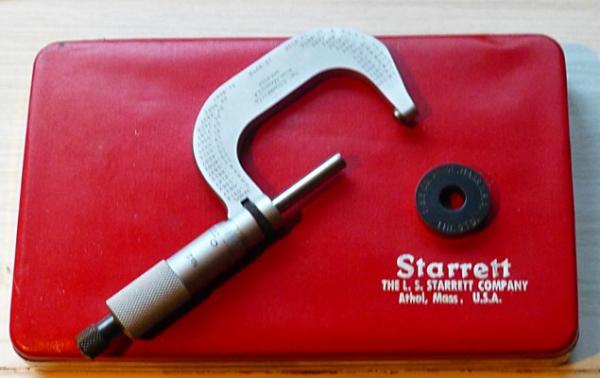
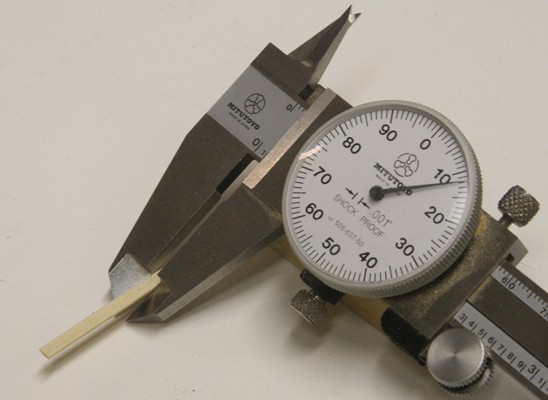
I took both calipers I showed above and a two inch micrometer that came with a 1.000 inch 'standard'. It is the black ring in the picture below. After 'zeroing' both calipers (which was not necessary since they were still set from before), I measured the 'standard'. My dial calipers were dead on 1.000 inch and the digital fluctuated between 1.0000 and .9995 inch. I don't have any gauge blocks larger than the 1.000 inch, but I am satisfied with what I have. I really think quality has a lot to do with this. As we all know you can buy 'calipers' that are real toys and those made by a reputable company. Then there are many in between. I might add that the dial calipers I show is a 505 series Mitutoyo (about $120) and the digital is an inexpensive Pittsburg (it was a gift but sells for $20). I can really tell the difference in just the way the two 'feel' and the finish. And, as I have said before, I like the dial much better because it gives me a 'indication' of where I am (plus and minus what ever).
-
I am sure it depends how complicated the rigging will be. If you add all the lines that were typically used on a frigate, for example, you could have as many as fourteen lines on a square sail. Multiply that by the number of sails and you have a nightmare. I am only adding three square sails to my Connie and I don't sleep well at night. Because of all these lines (and how they are tied to the pinrails)I decided to start from the top on down. Once the royal and topgallant are rigged I can forget about them. If you start at the bottom you end up fighting all those lines below as you go up.
-
Pat, perhaps I misunderstood your post, but both of my calipers (digital as well as the dial type) have a zero adjustment. In other words, when I close the jaws and there is a reading other than zero, I push the zero button on the digital or turn the dial on the other one. If you encounter deviations after that, then there is a problem with the instrument.
-
My model work area, equipment and some tools
Modeler12 replied to Modeler12's topic in Modeling tools and Workshop Equipment
Sorry Ulises. Some folks have a whole building for their shop and I have neighbors who have nothing but junk stored in their garage. We have found that keeping our cars inside makes them last a bit longer. That is why most of my 'tools' are built and used along the walls. In the past I have built furniture and lots of other wood projects. As a result my 'shop' evolved rather than having been planned. -
My model work area, equipment and some tools
Modeler12 replied to Modeler12's topic in Modeling tools and Workshop Equipment
Geoff, if I were to get rid of my Z, I might have to get a horse. Then you could come and shoe that stud for me. On second thought, I prefer driving my Z over a horse (not literarily, of course). I was also thinking of putting a short video together about my approach (different as it may be) of my rope walk. I assume you are turning out ropes left and right. -
My model work area, equipment and some tools
Modeler12 replied to Modeler12's topic in Modeling tools and Workshop Equipment
Thanks Pete. A plane ticket to Eastview might do it. Of course, when I took these clips, I had to clean up behind the drill-press a bit, and low and behold, I found a long lost cannon barrel. I had made another one on my little lathe since then, but now I have spare. Every time I 'clean up' I find something. As far as the layout is concerned, you can see that the equipment (like the cut-off saw behind my Z) are all along the walls. When I need to roll out my table saw the car(s) go first. The worst part is that the admiral always complains about the 'saw dust' on the kitchen floor, etc. Jeff, the 'lazysusan' has really worked well. Too bad I mounted it too close to the drill press, because the panels keep running into the quill handle. But to the right is an upright freezer as well as the electric switch panel. So space is still at a premium. -
I have made a short video to show you where and how I do some of my ship building. Perhaps this might be of some use to others, and it serves me as a document of the various pieces of equipment I have. I did not go into much detail about the various hand tools I have, but that might come later if it is of interest. While watching the video, you can always pause the frames to get a better idea of a particular step. Enjoy.
-
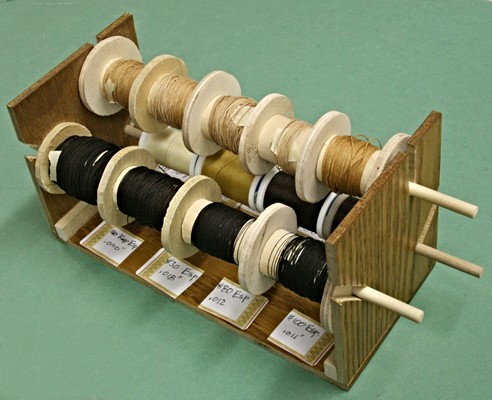
Tom, until my model is finished, there will always be 'more to come . . .' The starch method really requires several applications, so it is time consuming. The cloth came from a fabric shop where I picked out the lightest cloth I could find. It had to be a close weave, but other than that I don't know the brand, etc. I found that it stitched well on my wife's sewing machine and I was able to make very narrow seams (even incorporate wire in the bottom and rope along the leech edges for the jibs. I also used a thread of about the same color and found that the stitching showed up enough for the seams and reef-knots. I just did not like the dark contrast other have used. Some place in my build log I go into details. I used this same cloth to make flags.
-
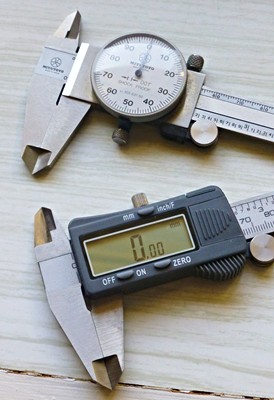
I know I am a bit old fashioned. I still prefer my watch with a dial. I also prefer to read my dimensions as shown below. I can easily see if the measurement is too high or too low and by how much. But the upshot is that I could not do without a pair of calipers. I also use them to transfer dimensions (as was noted above).
-
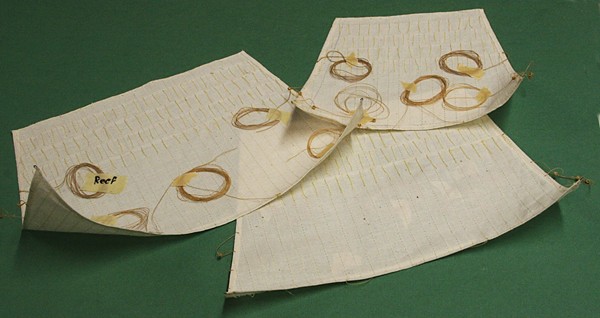
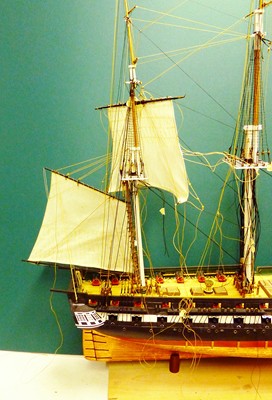
Just a couple days ago I made my first attempt at putting together a video clip and it just so happened that it was how I 'starched' the sails for my Connie. Have a look at http://www.youtube.com/watch?v=eLZRQf0eRco There are not many details, but I have found that starch does not give the cloth that 'coated' look. Just like starched shirts, the material looks about the same but it becomes stiff. Thus far I have given my jib sails three coats and the topsails only one. Even with one you can tell the difference right away. I also found that I get a more realistic shape when the 'wind' comes from the side and from below a bit. When I made the sails I enclosed a piece of wire in the foot (not the sheet). This helped shaping the sails to start with. The wire is completely hidden in the seam. I did use the ends of the wire to make a loop for attaching the sheets and clewlines. Here is another picture. I did the same with the jibs, but found it worked better for the square sails. I should mention that the picture was taken before I attached the sails to the spars and before starching.
-
Thank you Clare. I hope my email to you clarified where I am coming from. And Rich, thank you for your comments. I am very slowly getting back into working on my Connie. Rigging those sails with the numerous tiny blocks is hard on my nerves. I can only handle a few at a time. So progress will be slow. Meanwhile I am also working on a video to document where I do my work, what tools and equipment I have and then the start of my next modeling project.
-
Alistair my good, old friend from New Zealand. I am sorry you guys lost the prodigious American Cup Race here in the SF Bay. It was a total shock to most of us even here. It is amazing what they can do, speed wise, with those sailboats. What, to me especially, was interesting is the use of hydrofoils. Back around 1960, when I worked for Boeing, I became a bit of an expert on how hydrofoils worked on surface ships. But that is an old story for later. And like they say 'The older I get, the better I was'. BTW is that a New Zealand ferry in the picture I see about you and your new build???? Is that how you get to Awaroa Bay??? Maybe I'll pass on that one (unless we are invited). Geoff, the reason I started on this 'movie' bit, is that I have a beautiful wife who was a 'star' in her own right. She never earned an Oscar, but will always be remembered for her memorable role as Scarlett O (what's her name) in the movie 'Gone with the Wind'. For some reason, that still baffles me, she was replaced by Vivian Leigh. Any way I think you might see more of my comedy-show as we continue to build old Connie. (My wife is finally aware of who she is).
-
Great story, Jud. And you are right about mounting a horse nowadays, or at least at my age. My wife and I (in our mid 70s) rented some horses in northern California a couple weeks ago. We had to use a small step stool to climb aboard. I was so embarrassed!! But we had a great time riding in the surf along a long stretch of issolated beach. There were no spools involved, but almost some spoils.
-
The starch and hairdryer worked fine for setting the three topsails. They have a good shape but need to be retouched before final installation. I attached them to the mast with some tape to get an idea of their positions relative to the wind direction. I took some more video clips of this. For an updated version of the video go to http://www.youtube.com/watch?v=eLZRQf0eRco
-
As I mentioned above, I have discontinued our web site and the build log I had posted there. Instead I am trying to put together some videos and also include pictures as I go along. At this point I am ready to install the three topsails. The mizzen was the first one. Before I do that, however, I wanted to set the cloth in the 'wind-blown' profile. Again I used spray starch and a hair dryer. The first try is shown in the short video clip http://www.youtube.com/watch?v=vrJ4pdUOxLo
- 732 replies
-
- 2
-

-
- constitution
- model shipways
- (and 1 more)
-
Thanks texxn5. To see more about what I have been up to this summer have a look at this youtube clip: http://www.youtube.com/watch?v=ihU4QqPn1Rc I have closed my web site and will make the adjustment to my list below some time soon. My build log will continue shortly.
-
Great idea Geoff and well executed as always. I am about ready to tackle my version of the Connie. Like you, I have been busy with other 'thoughts' and projects this summer. Perhaps we can continue together as we rig this lady and see this great model come to a close. It would be nice to put her in a display case and think of her with lots of memories to go with it. Pardon me for this premature thought. PS I have closed my web site, but still have all the pictures and comments on my computer.
-
Ok Geoff and Tim. Now it is back to my Connie. Whow, it seems like ages since I touched her. But she keeps grinning at me in the garage, like, she needs some company and a friendly touch in the right places so once in a while. Meanwhile, I have been invited to a meeting of model ship builders here in the Bay Area. We are meeting on October 12 in Vallejo. It will be at the museum there and instead of bringing my Connie, as she stands right now, I thought to bring a couple of the square sails with all their rigging before they are installed. Of course, by then I may have them installed anyway and I will be forced to bring the whole lass.
-
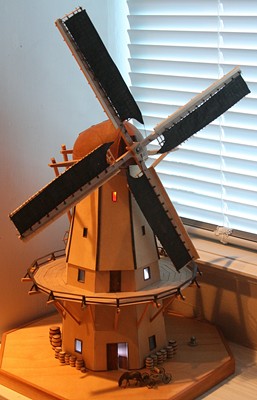
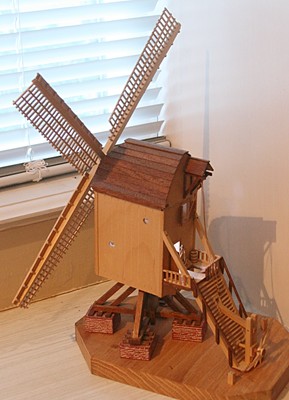
Thanks Steve. I know this is not the place for other models, but since you expressed interest let me explain a couple things about windmills (at least those that were built in the Netherlands). The model I showed earlier (and the 'finishes' version is shown again below) is commonly referred to as a 'tower mill'. They are mostly made of a brick tower but sometimes made out of wood like my model shows. These were rather large mills and raised above the surroundings in order to catch the wind. When the mill stood on a dike, for example, it was not necessary to build them high and those are typically you may see at Kinderdijk, the place where you can still see as many as 18 mills, some of which still operate. Note that all of these have the large beams and a capstan to rotate the top for alignment with the wind direction. A smaller version is the 'post mill'. In this case the whole building can be rotated around a large post in the center of the mill. As a side line I might add that someone in our family had one of those mills in Zeeland where they ground wheat to make flour. It was very similar to the one shown below. For more details on how I built them go to http://www.brentjes.com/windmill.html
- 732 replies
-
- 4
-
-
- constitution
- model shipways
- (and 1 more)
-
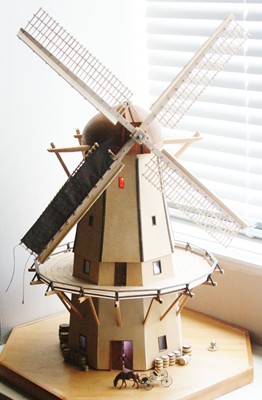
Thanks for those comments fellows. I am afraid I have been busy with other things and my Connie is slow in the progressive stages. Besides some vacation trips this summer, I have also been working on an old project I never finished a few years ago. It involves two Dutch windmills. The larger of the two never had its own 'wieken' or blades. I am still working on that and am also adding 'sails'. A windmill is often shown with its lattice work only. But to make the blades (or wieken in Dutch) turn, the miller has to raise the sails. I show one of them (not yet finished) in the picture below. The sails can also be reefed. In my model the blades are powered by a small electric motor I salvaged from an old microwave oven turn-table. I have also added a few LEDs to the inside. When this is finished I will get back to working on Connie.
- 732 replies
-
- 1
-
-
- constitution
- model shipways
- (and 1 more)
-
Metal, no (too heavy and not necessary). Tar, no (too sticky and not necessary) Wood varnished or painted, yes. Lashed to rings in the spanker sail.