Hubac's Historian
-
Posts
3,308 -
Joined
-
Last visited
Content Type
Profiles
Forums
Gallery
Events
Everything posted by Hubac's Historian
-
 These dolphins are much more proportional, and I think the placement works much better. You raise in interesting point about carving left/right masters. It is definitely important to do the work side by side, in order to see it properly. Definitely, you are going to want to glue the masters to a flat smooth surface, and after you do that you want to scrape away the glue “halo” (squeeze out), so that you get a sharp delineation between the carving and the ground. As for removing the carvings from the existing ground, acetone is the most effective release agent, but that will obviously melt your part. You could waste the wood away from behind with a Dremel sanding drum attachment. Or, you may have to chalk that up to experience and make new masters.
- 422 replies
-
- 1
-

-
- soleil royal
- Heller
- (and 1 more)
-
What I mean is that the dolphins make more visual sense as a framing for the port if their orientation is the opposite of what you are showing - whereby the tails contact the top corners of the port and the heads fan away from the port. Given the shape of your dolphins, you should still have clearance for the carriage tackle bolts.
-
Hi Eric - you might have an easier time of it, if you drill perforation holes all around your carvings, first. After extracting the carving blank, I find needle files indispensable for cleaning up the outline shapes of even small parts like this. Once you like the outline, you can mount the carving permanently to a wooden block and do the detail carving. Finally, you’ll be left with a master for making rubber moulds. It’s all very fiddly, but you’d be surprised what you can train your fingers to do. I like the dolphins. Will the tails abut the port openings?
-
As I say with all of this modification nitty gritty: Comme-ci, comme-ca. A little like this, a little like that. The important thing is to capture the essence of the thing in a fully coherent way, and you have more than achieved that. And, you have the distinction, now, of being the first to radically transform the kit head!
- 422 replies
-
- 1
-
-
- soleil royal
- Heller
- (and 1 more)
-
Coming along really nicely, Eric. As for the painting, my suggestion would be the following: if you still have scrap hulls, I would use them to sort through your color schemes and practice your technique. It will give you confidence, and it will help to demystify the process of getting a professional finish, free of brush-strokes.
- 422 replies
-
- 1
-
-
- soleil royal
- Heller
- (and 1 more)
-
That is very much appreciated, Mike!
-
Vellum is fantastic because you can erase on it over and over and it won’t disintegrate like regular paper. Once I have a design I like, I clean up as much loose graphite as I can, and I spray the drawing with hairspray as a fixative. I have a whole cache of these drawings that I have made for the model. Accurate scale drawings are indispensable for this kind of scratch work. Otherwise, you end up chasing your tail trying to approximate what’s needed in the available space.
- 422 replies
-
- 1
-
-
- soleil royal
- Heller
- (and 1 more)
-
I really think you have captured the essence of these early French headrails.
-
Henry - I’m sorry I missed your post, here. I actually think that I remember this discussion of the main brace on your build-log. Currently, and not very oftenly, I am still detailing the lin-stock tubs. I have decided that I would go through the Heller rigging instructions, line for line, and make notes and sketch modifications that are more representative of the time, referencing Anderson, Lees and Marquardt. Standing rigging first. Running rigging second. That will be my process. I wish that I had more time to really focus on the project, but I find myself pulled in many different directions; finding a college for my daughter, a HS for my son (they are almost exactly 4 years apart), coaching hoop, and protesting what is happening in our country; all of this, among the ordinary and every day stuff. So many of you have been there and beyond, yourselves, so I know you know. Despite the fact that I am not very visibly active on this site, I am still following all of your excellent work. As always, I appreciate all of you for looking-in, your likes, suggestions and comments. All the best, M
- 2,699 replies
-
- 7
-
-
- heller
- soleil royal
- (and 9 more)
-
Just incredible!
-
I’m so glad that you gave that technique a shot. The results are excellent! Sometimes, it’s just more practical to free-hand the engraving.
- 422 replies
-
- 1
-
-
- soleil royal
- Heller
- (and 1 more)
-
What I have found is that I can lightly trace over my lines with the tip of a very sharp EXACTO blade. Three or four passes of incrementally stronger pressure. The key is to go light on the first couple of passes so that the blade doesn’t wander off the line. After the fourth pass, you’ll have a deep enough groove to use the heel of the blade to scribe. Again - light pressure on the first few scribe passes.
- 422 replies
-
- 1
-
-
- soleil royal
- Heller
- (and 1 more)
-
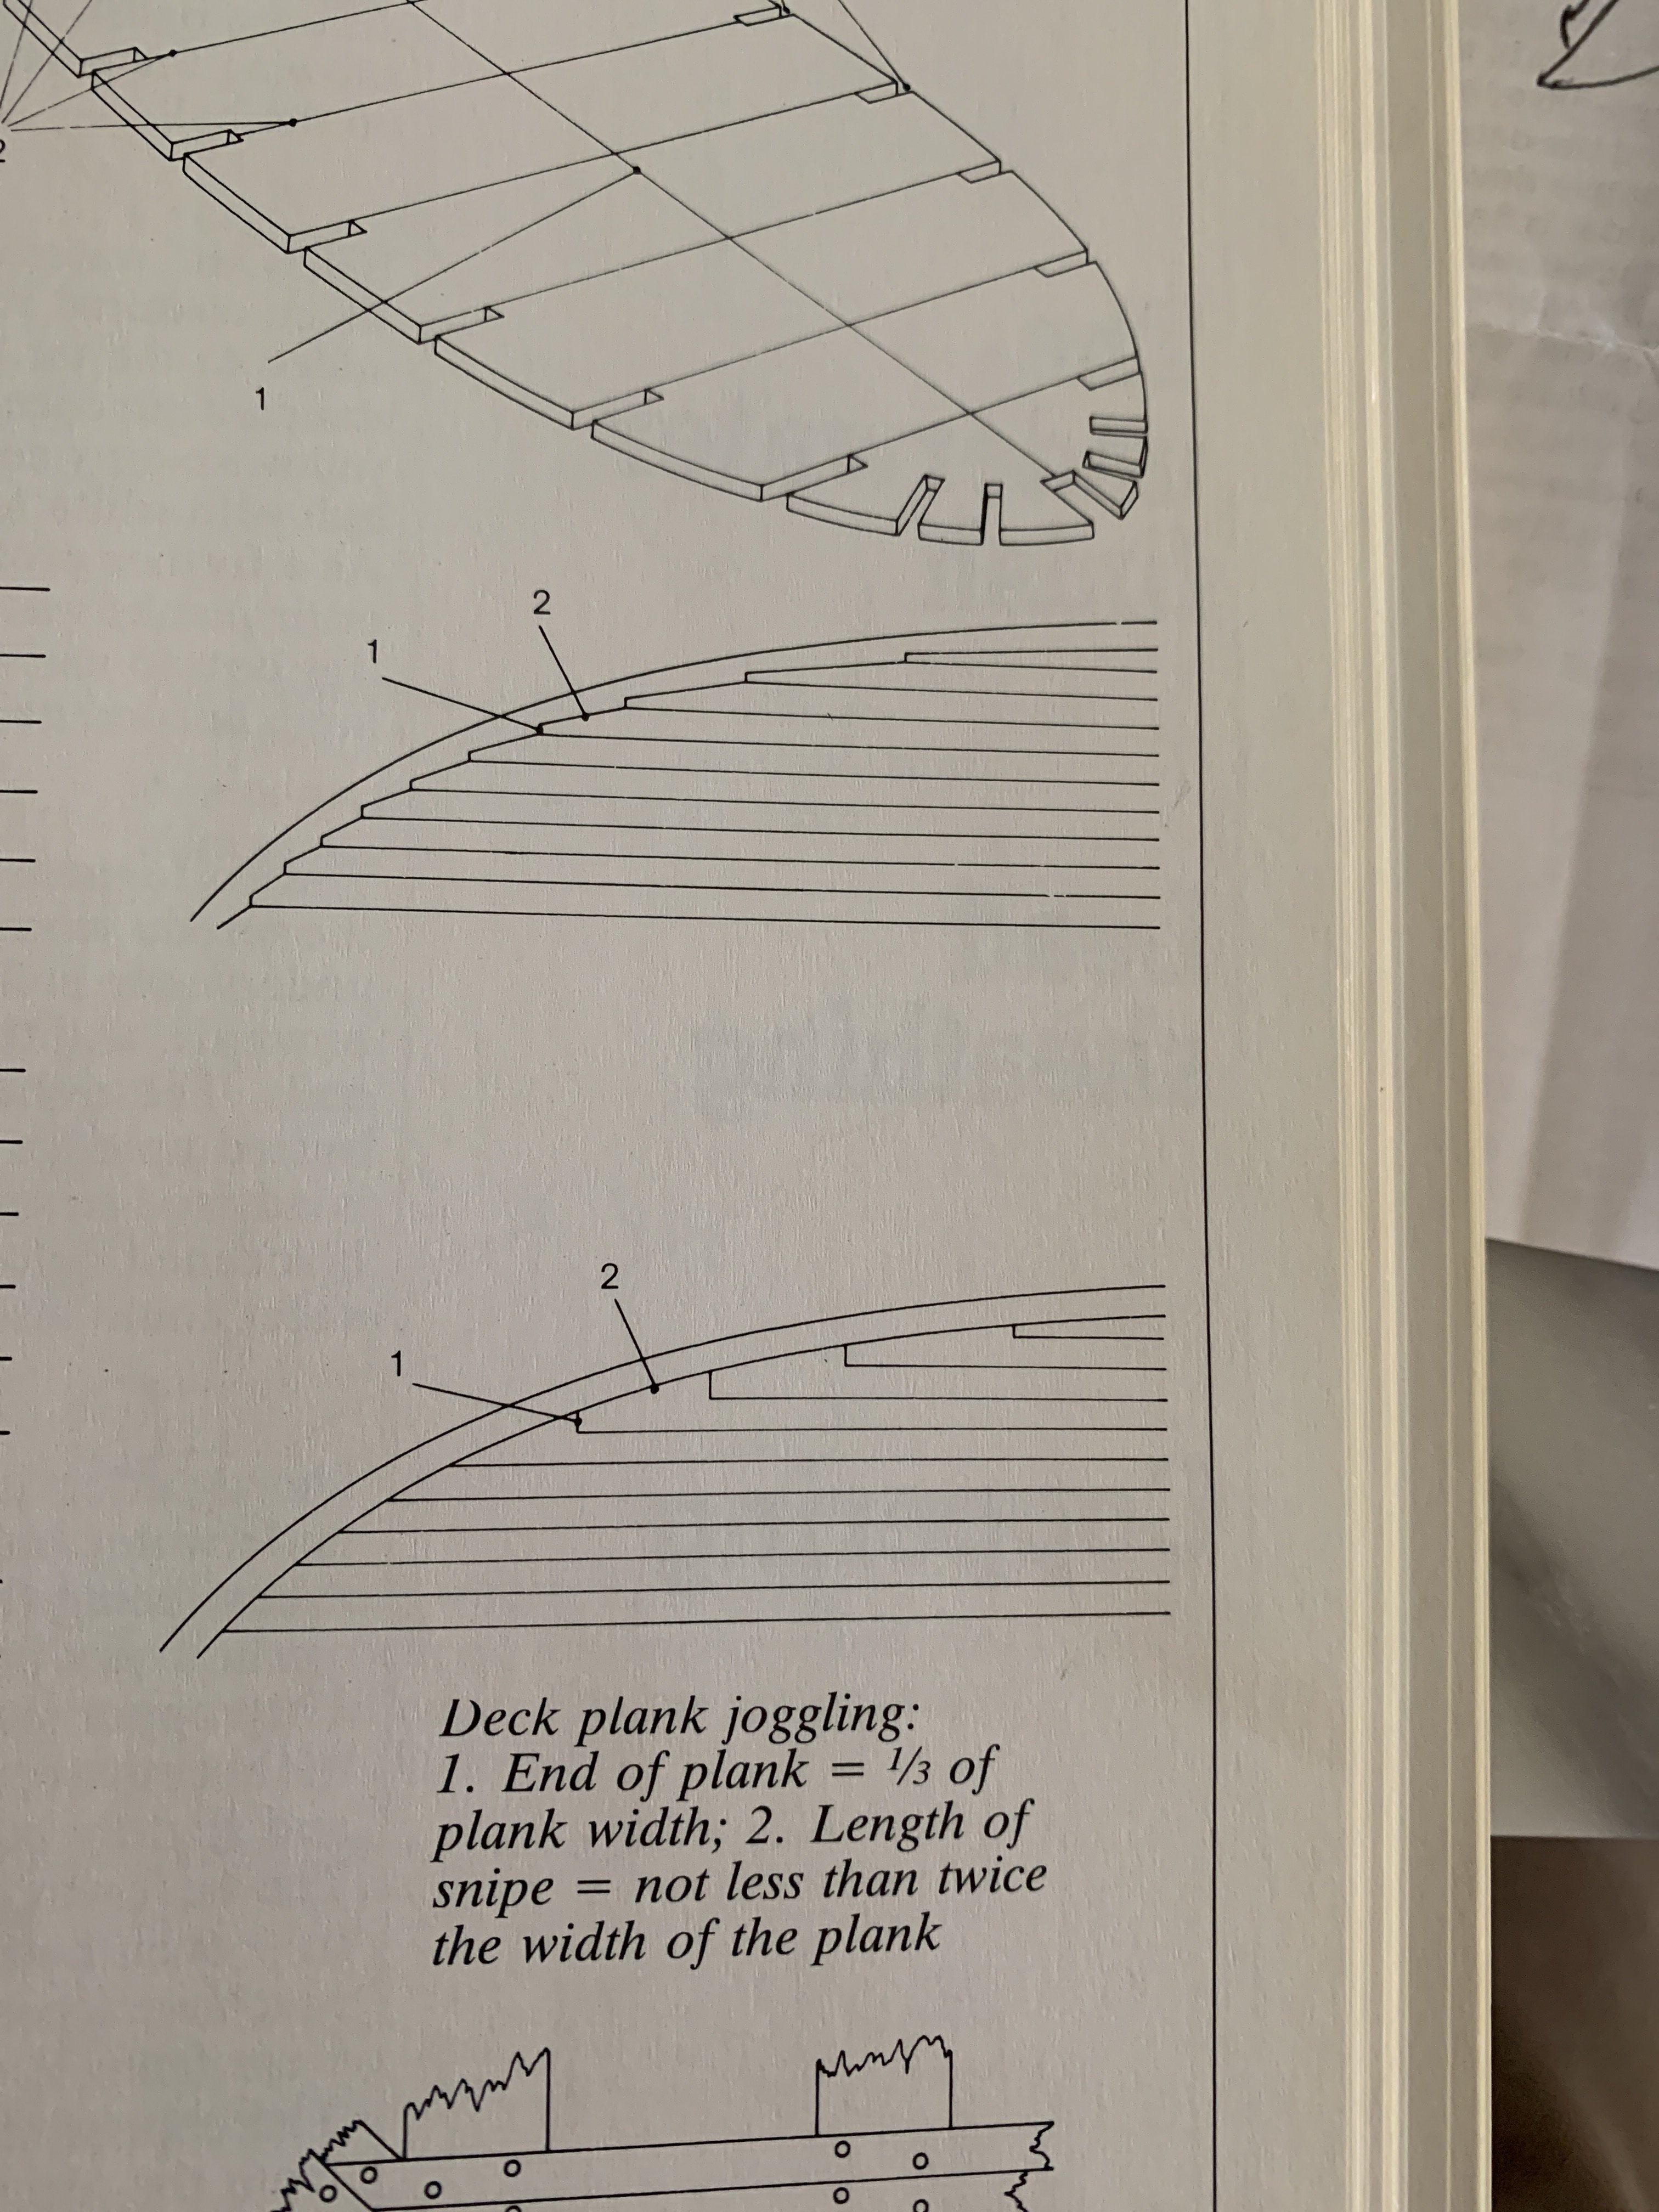
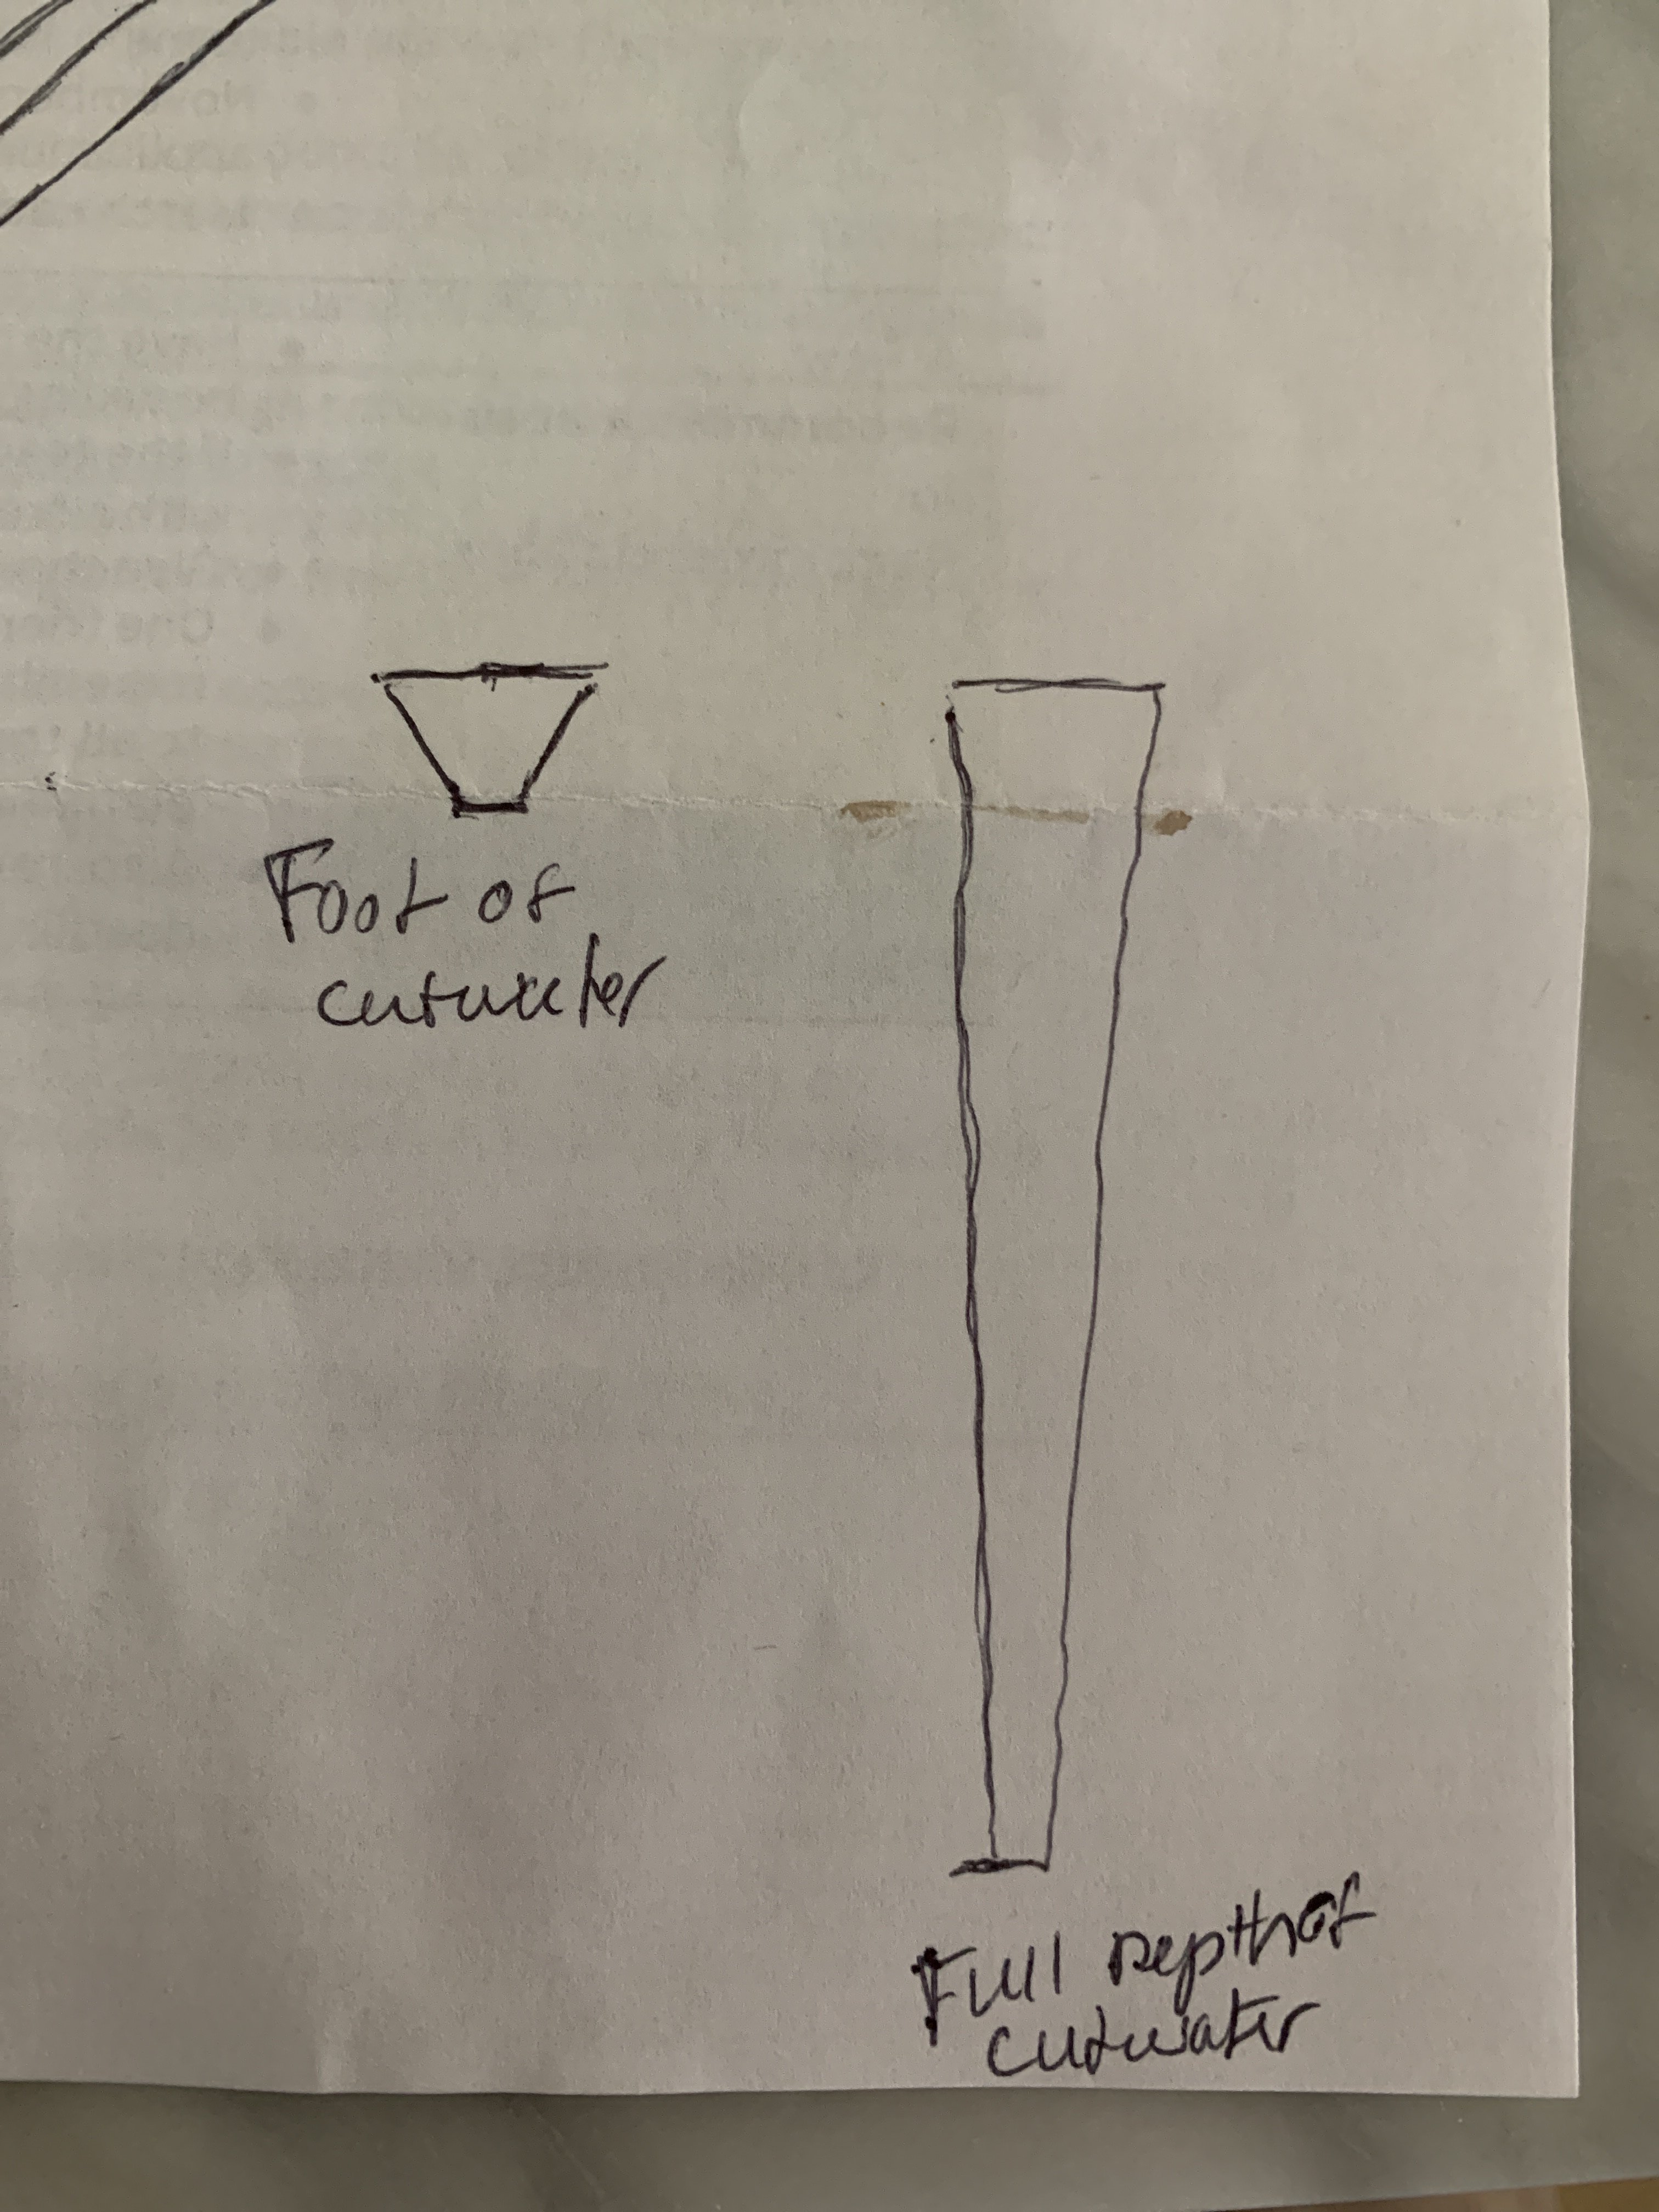
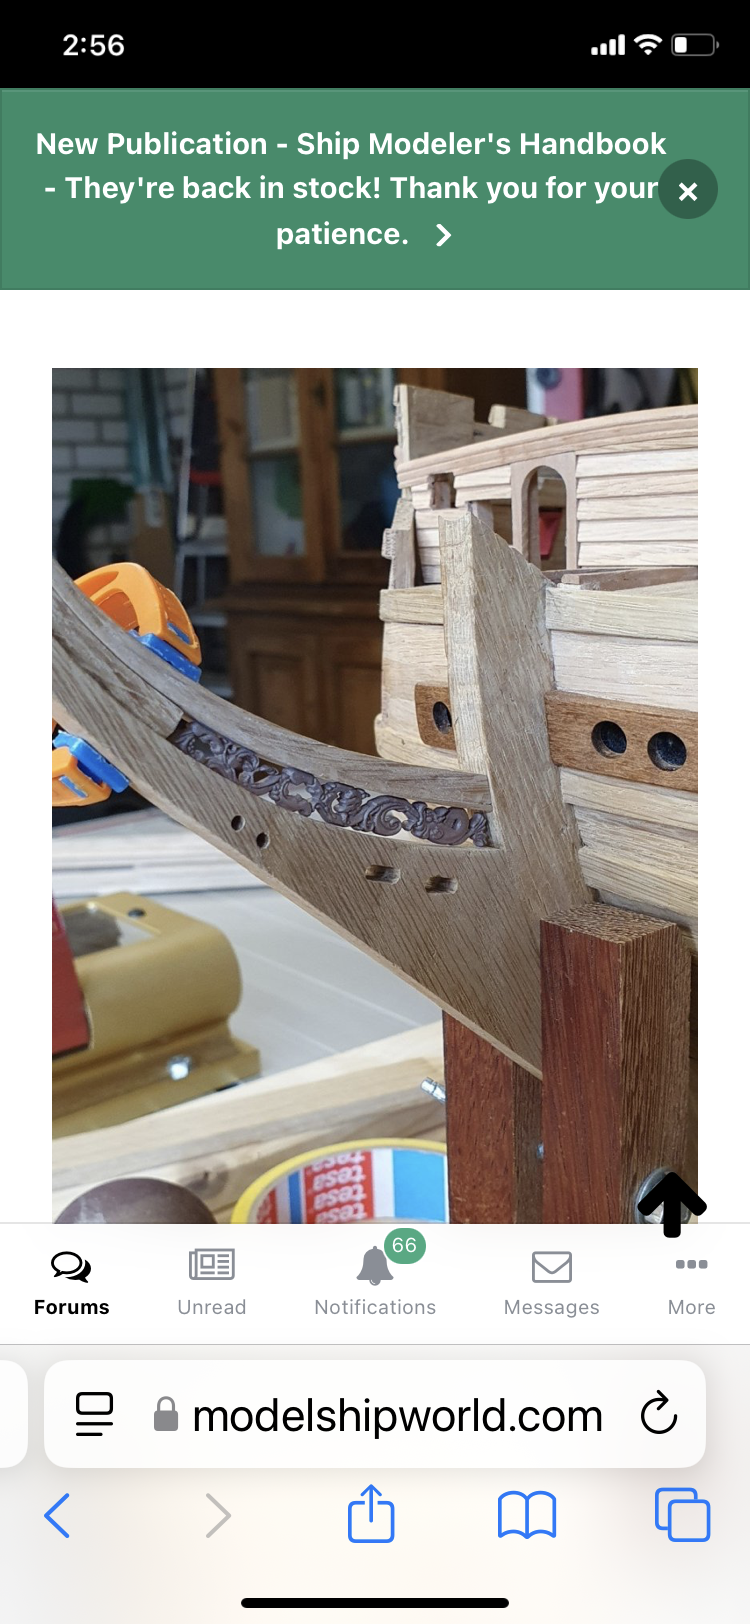
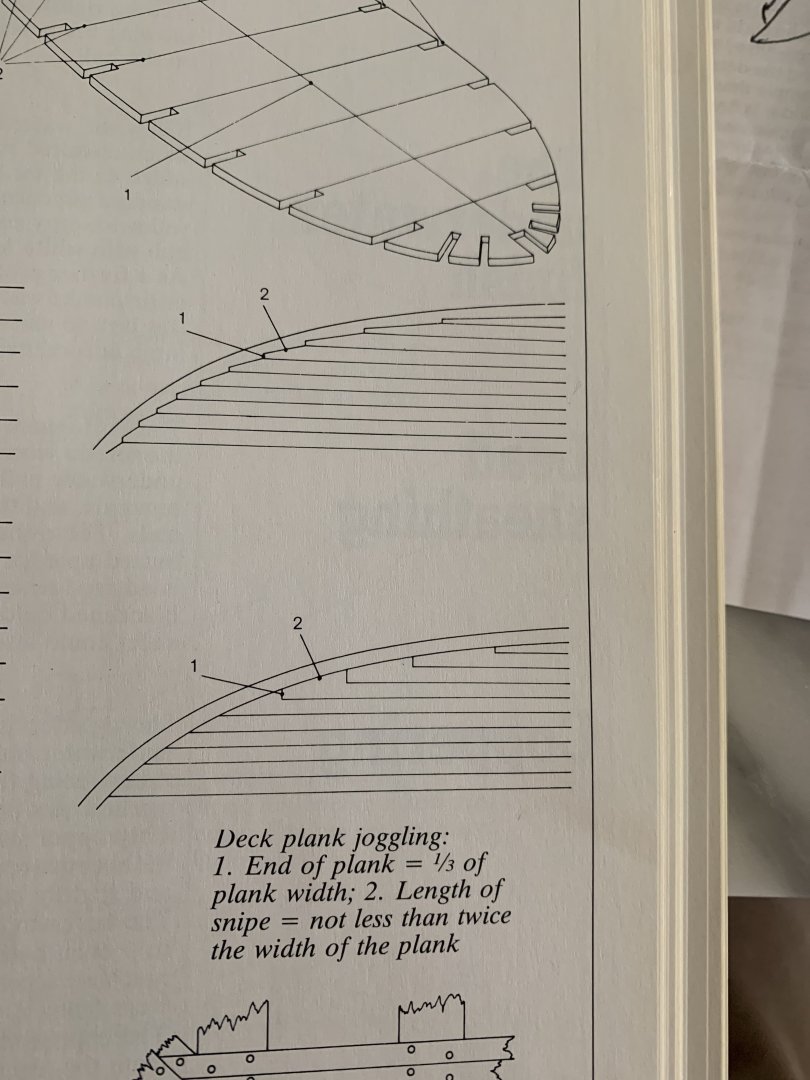
Generally, shipwrights avoid cutting timbers into long tapering points because those sharp timber ends become much more prone to rotting quickly. This is why deck planking is “joggled” into the margin plank, for example: As it relates to the stem, it is also quite beneficial for the structure of the thing to be inter-locking with the use of hooks and scarfs. I’ve taken the liberty to draw an approximate sketch of your cutwater: Ideally, you don’t want the gammoning holes to cross between timber joins. As for the tapering of the cutwater, Lemineur shows it as a long gradual taper across the full depth of the cutwater: However, he also shows the foot of the cutwater as being full width, while the head of the cutwater (behind the head of the Figurehead) is tapered to half-width: The way to understand this, I think, is that the foot of the cutwater is very shallow in depth, as opposed to the head of the cutwater, which extends some 30’ further, ahead of the stem. From a practical standpoint, you want that taper to be most pronounced at the foot of the cutwater, as it improves water-flow. This is what you have done. I do think, though, that the full depth of the cutwater should have a gradual tapering, back to full width where it meets the stem. What this means is that your cutwater foot will have a much more pronounced looking taper, because you are reducing by anywhere from a 1/3 to a 1/2 width, over a relatively short span: I hope that makes sense.


- 422 replies
-
- 2
-
-
- soleil royal
- Heller
- (and 1 more)
-
Given that you are showing the full length of the cutwater, I would taper to somewhat more than 2/3 of the width. This is complicated, somewhat, by the variable depth of the cutwater, which shortens, as it approaches the keel. The tapering of the cutwater is part of the reason that I chose to pad out the stem, as you are doing; the extra depth, there, gives you a little more flexibility to massage those transitions. I think you can find good pictorial examples on Drazen’s Provincien blog. If I remember, he has a number of good pictures of his bow and cutwater. The long and short of it is that there are no concrete step-backs for where to begin those tapering transitions. I would estimate conservatively, and work slowly, checking as you go. Trace a centerline down the middle of the leading edge of the cutwater, so that you can remove material uniformly. This is one of those things, where, if it looks right at scale, it is right.
- 422 replies
-
- 1
-
-
- soleil royal
- Heller
- (and 1 more)
-
This is what I did with my cutwater. the leading edge would continue to taper toward its foot, whereas it is full width at the top, just beneath the figurehead: The taper isn’t huge but it is perceptible.

- 422 replies
-
- 2
-
-
- soleil royal
- Heller
- (and 1 more)
-
Aaaah, okay - perfect! Thank you, Dan. Sand makes perfect sense to me, as it would provide extra ballast, keeping the cask firmly planted upright. So, with this in mind, I can cut away the linstock staffs, drill out the centers, scribe staves, add barrel bands and a lanyard. The other thing I’ve been debating is the feasibility of the profusion of single knight-heads. The French, at this time, do seem to like lashing blocks to an eye in the deck, as a fairlead to a cleat on the deck. I could do that. I could. However, the single knights are sheaved, combining both functions into one. I will probably use these knights, as I can’t find any argument against them. For the fore and main braces, though, I will employ the block/cleat configuration to each side of the gratings.
- 2,699 replies
-
- 3
-
-
- heller
- soleil royal
- (and 9 more)
-
Thank you, everyone, for your thoughts on this matter. So, Henry, should the linstock barrel be depicted with simply a hole in its narrower diameter top, for where the linstock would be placed during battle? I see some builders detail these tubs with coopered staves engraved, barrel bands applied, the linstock stick removed, and the centers bored out to look more like liquid carrying vessels. They even attach ears to the rim, to accept a rope lanyard. What you are suggesting, I think, is that this tapered cone barrel is wider at its base precisely to be a more stable support for the lit match. In that case, the hole at the top should only be big enough for the linstock to be inserted. I suppose that for the sake of expedient clearing of the decks, it still makes sense for the lanyard to be attached. The more conventional buckets (narrow at bottom and flaring at top) are really the swab buckets for swabbing the bore between shots. Heller only provides 10 of these and they instruct you to place them in non-sensical places along the decks, rather than as equipment specific to the battle stations. Do I have this right, Henry?
- 2,699 replies
-
- 4
-
-
- heller
- soleil royal
- (and 9 more)
-
Hi Guys - does anyone know what specifically these are? They are part of the battle-station equipment for each gun. I think it is a cask, and perhaps the barrel swab is the long handle?
- 2,699 replies
-
- 3
-
-
- heller
- soleil royal
- (and 9 more)
-
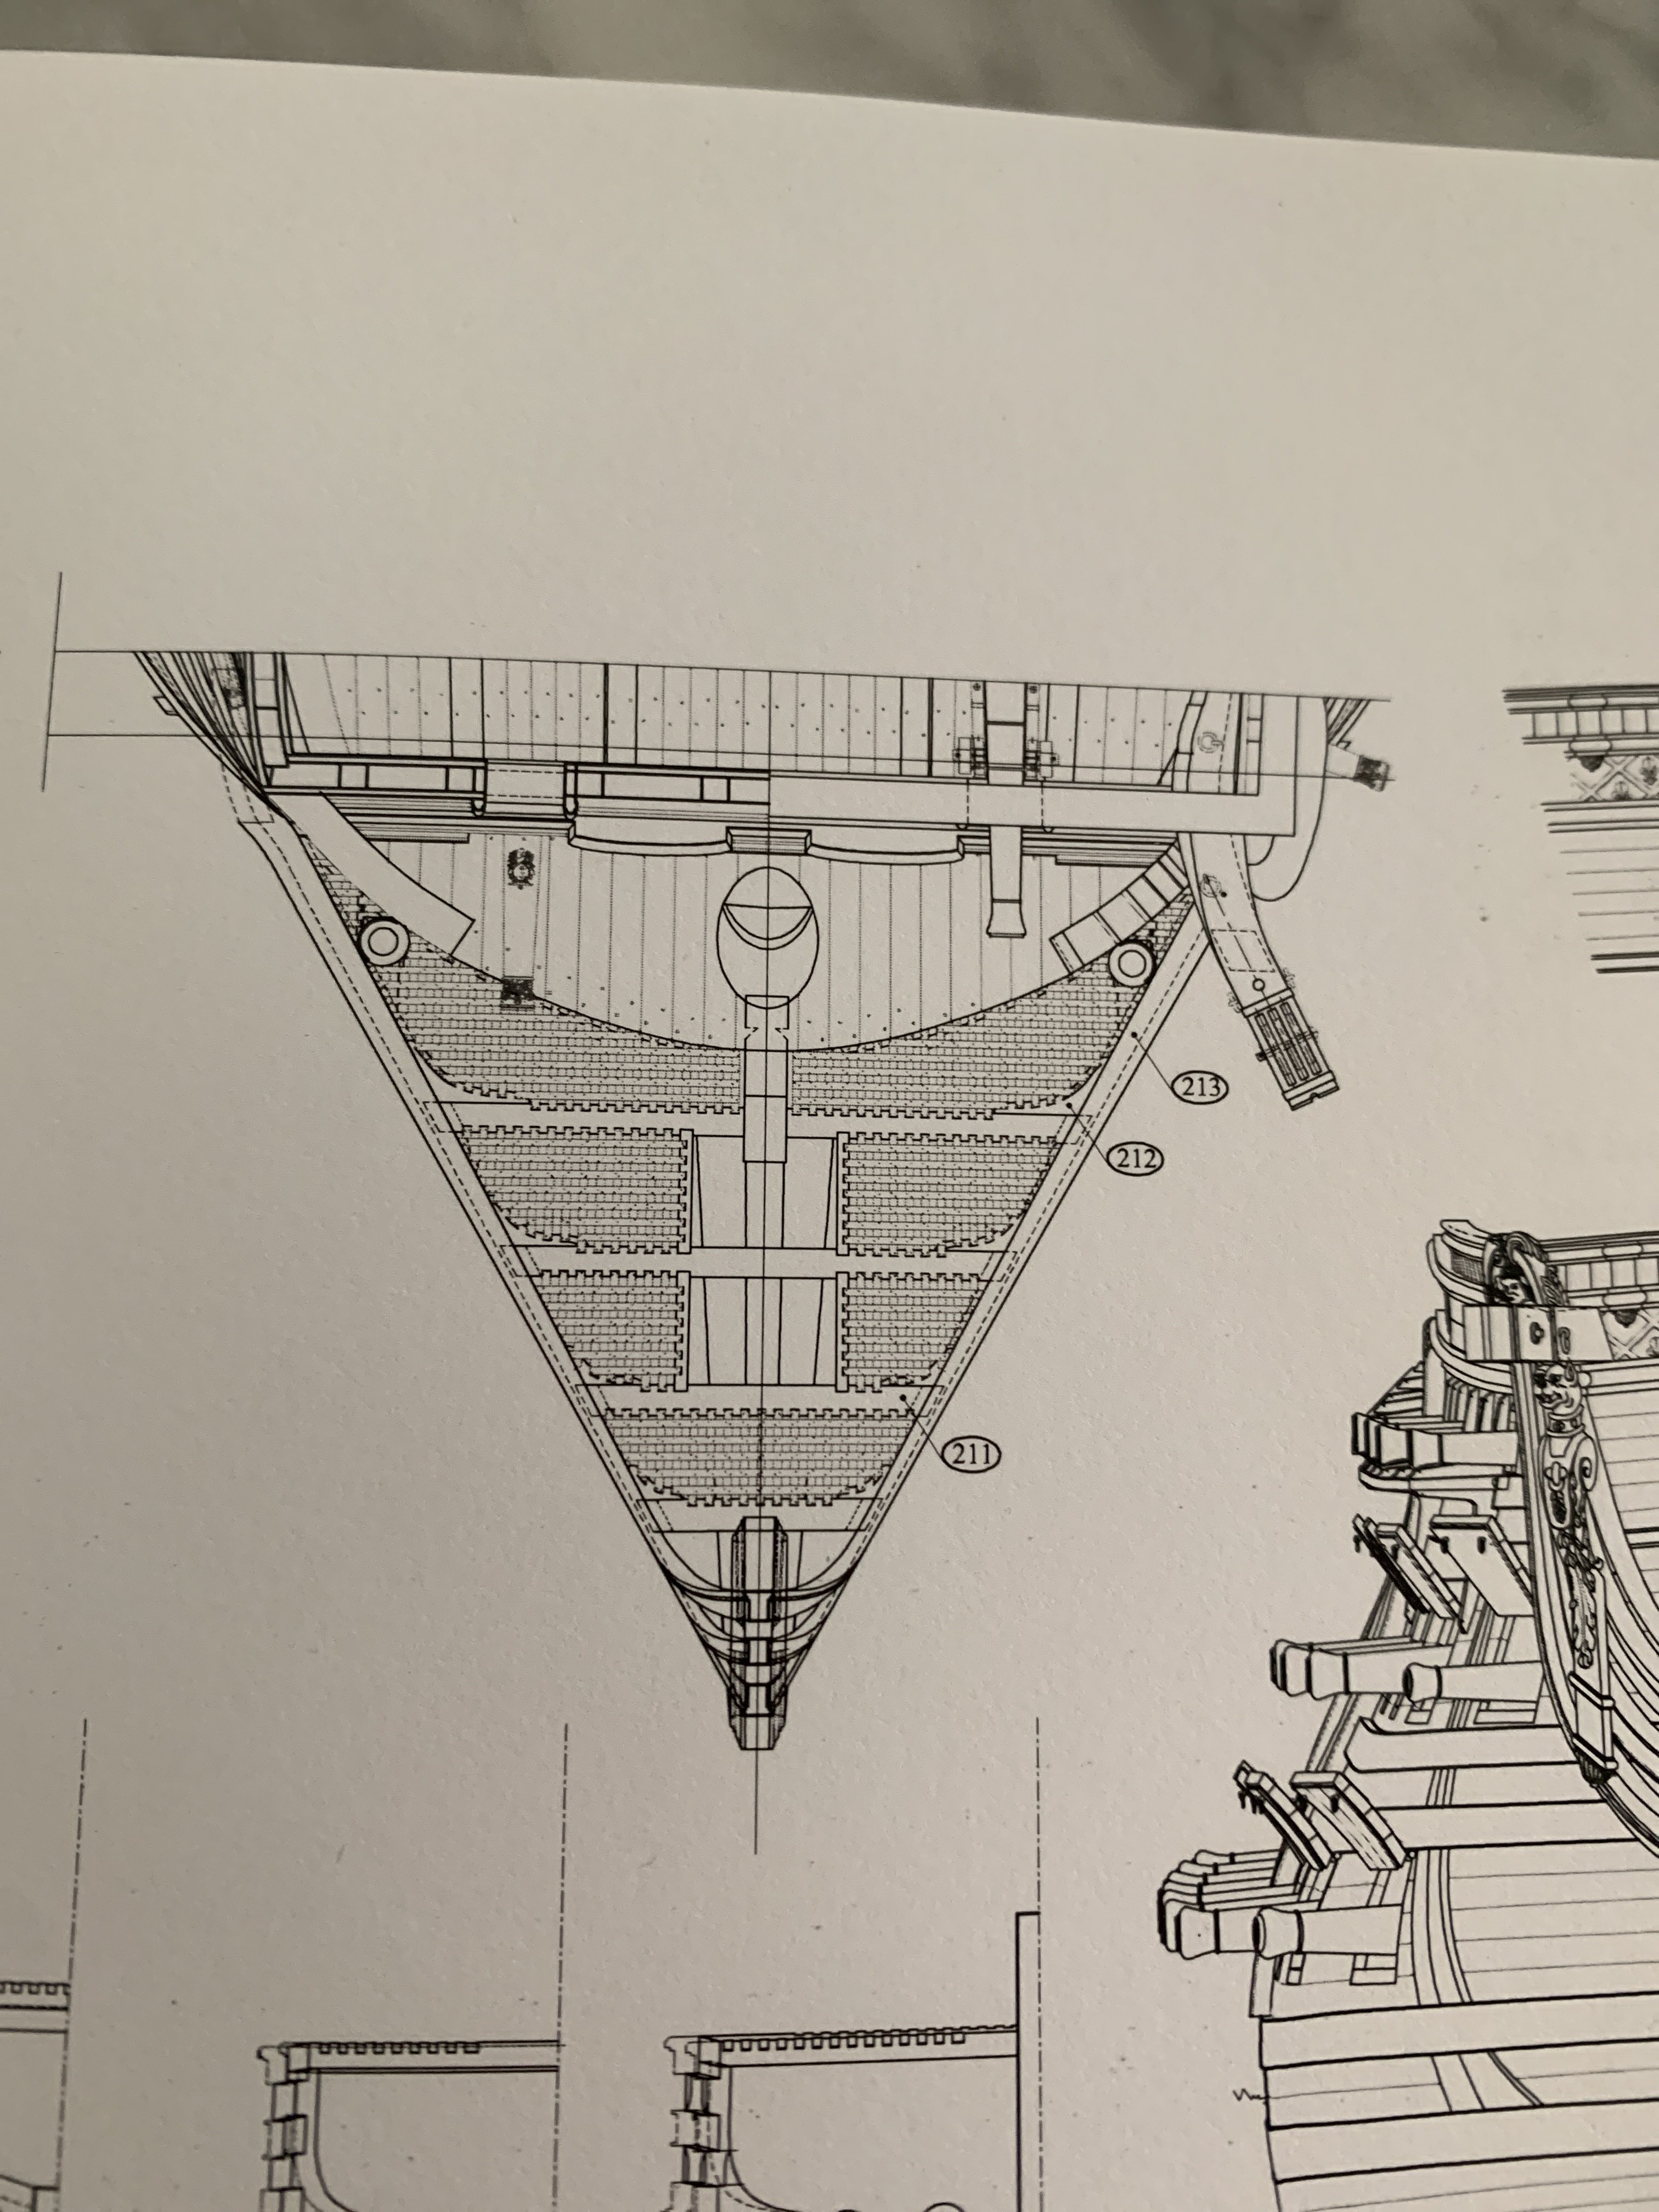
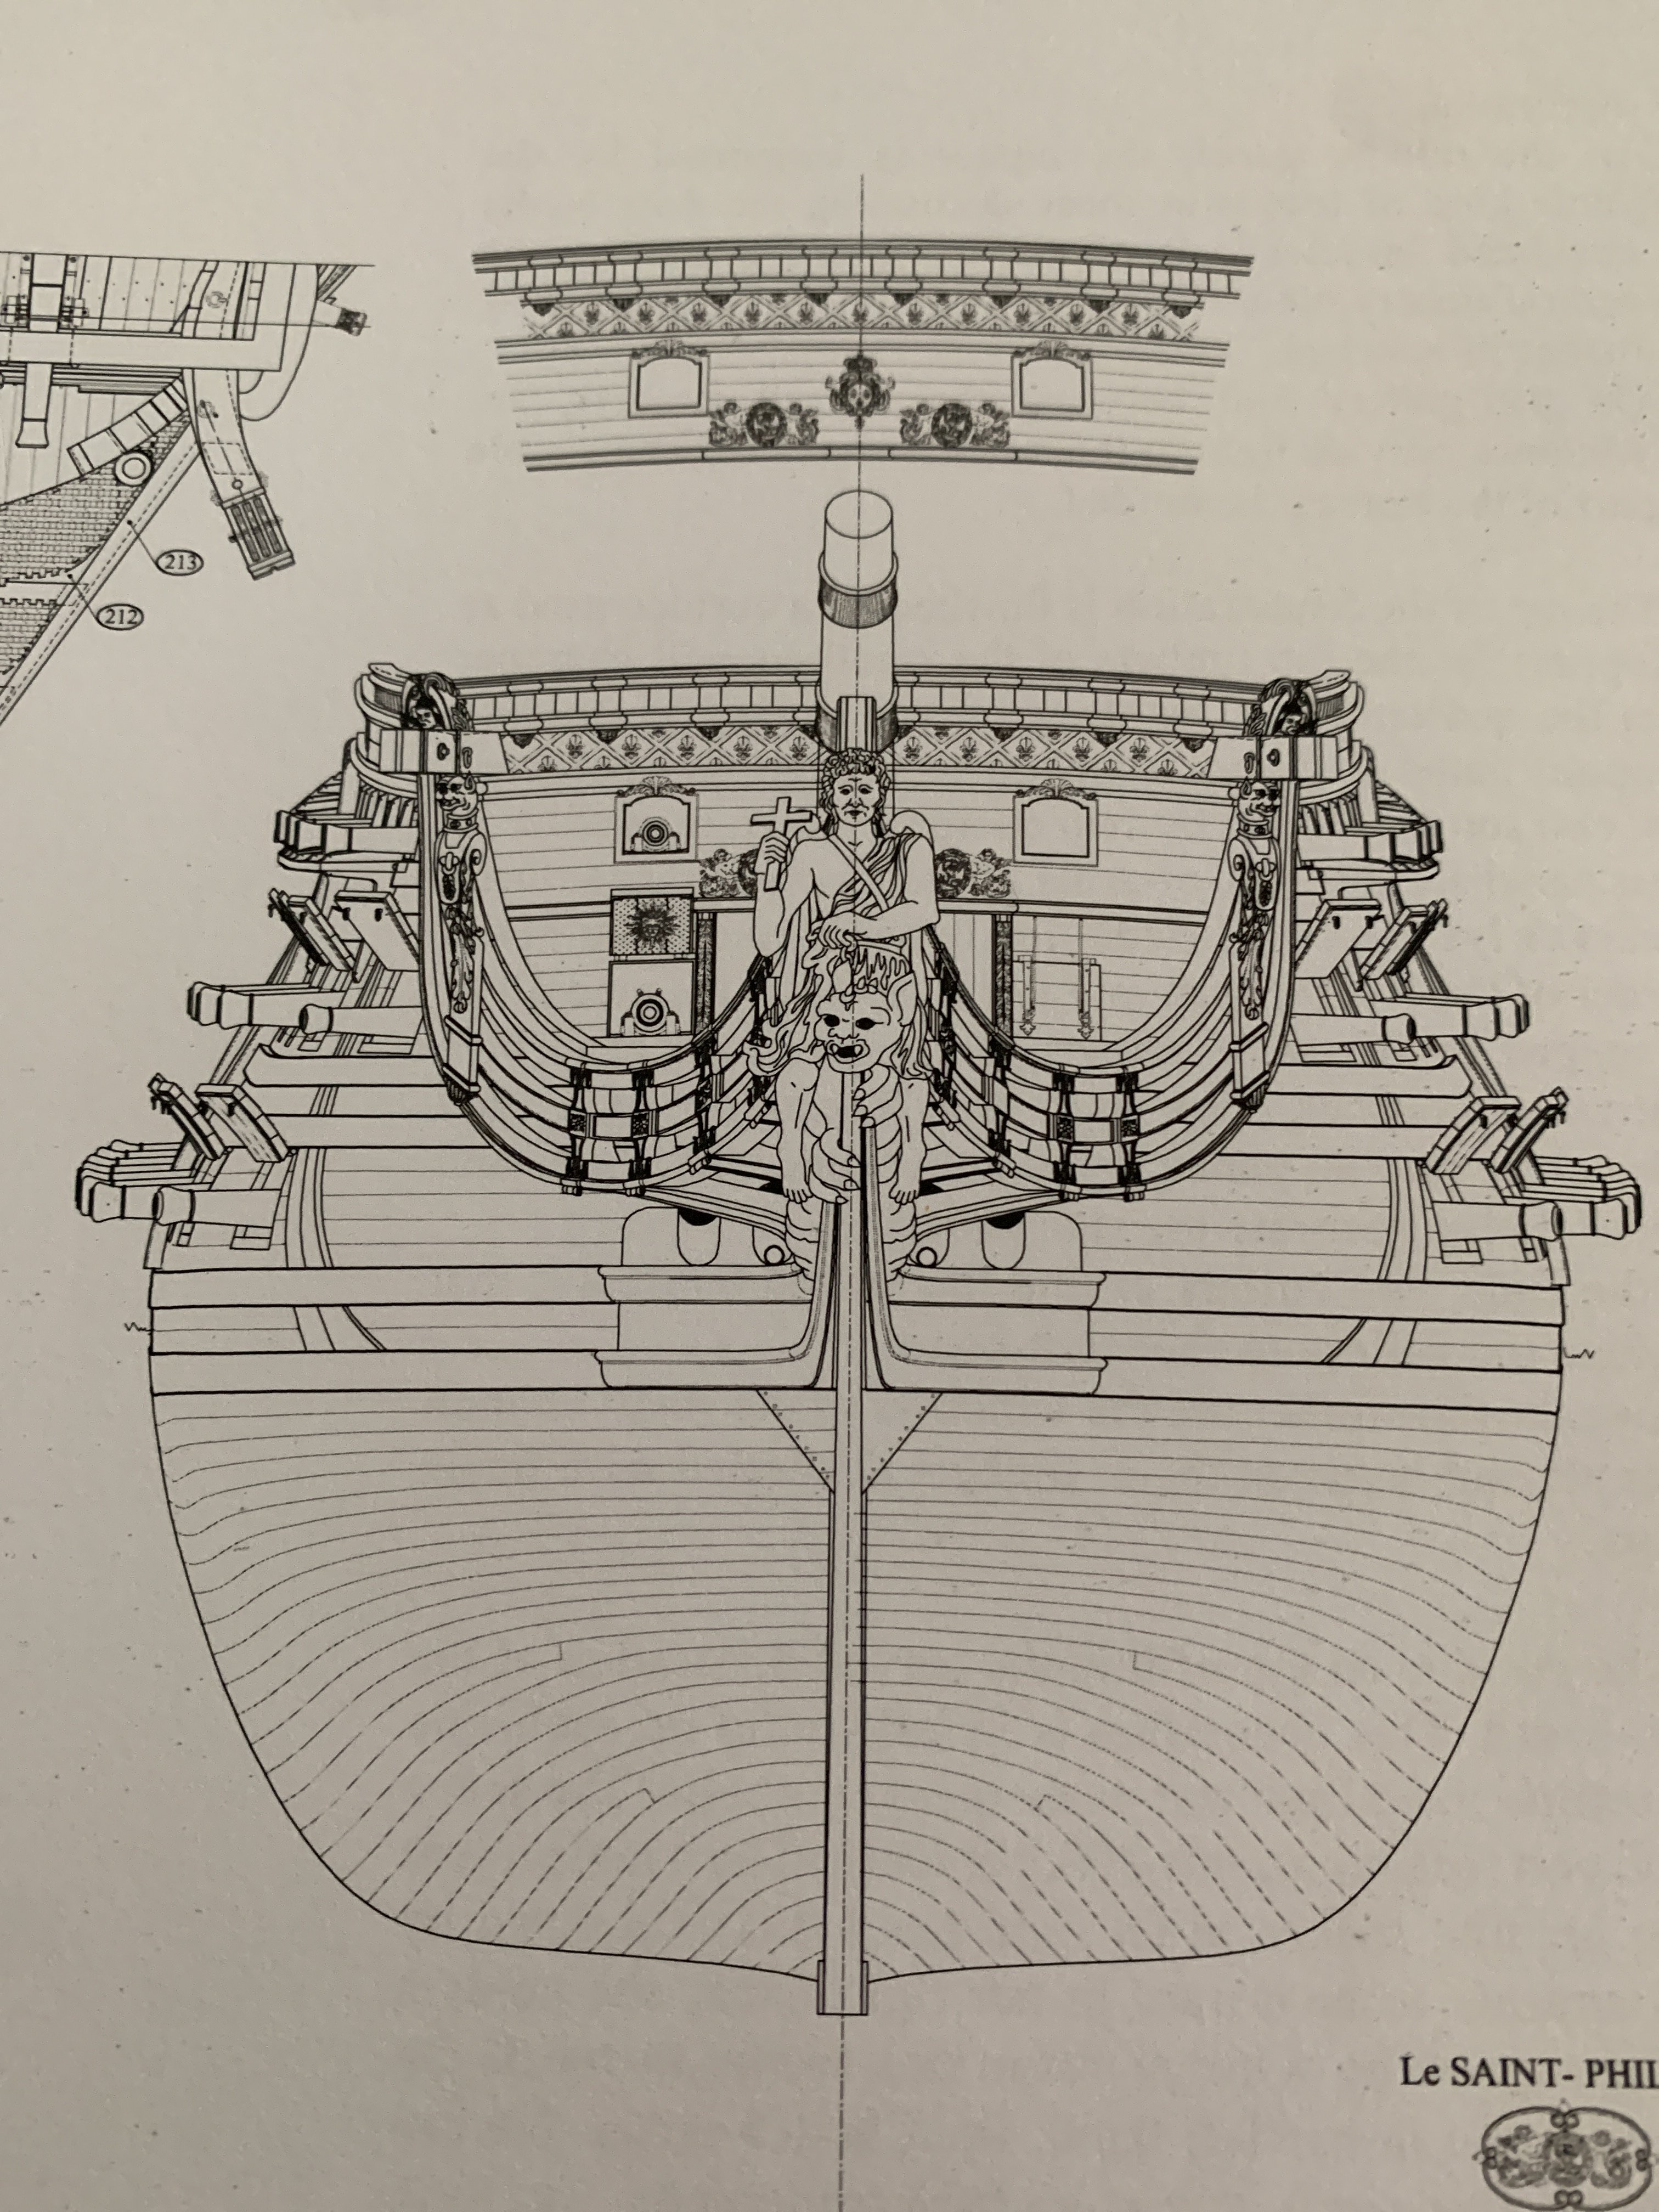
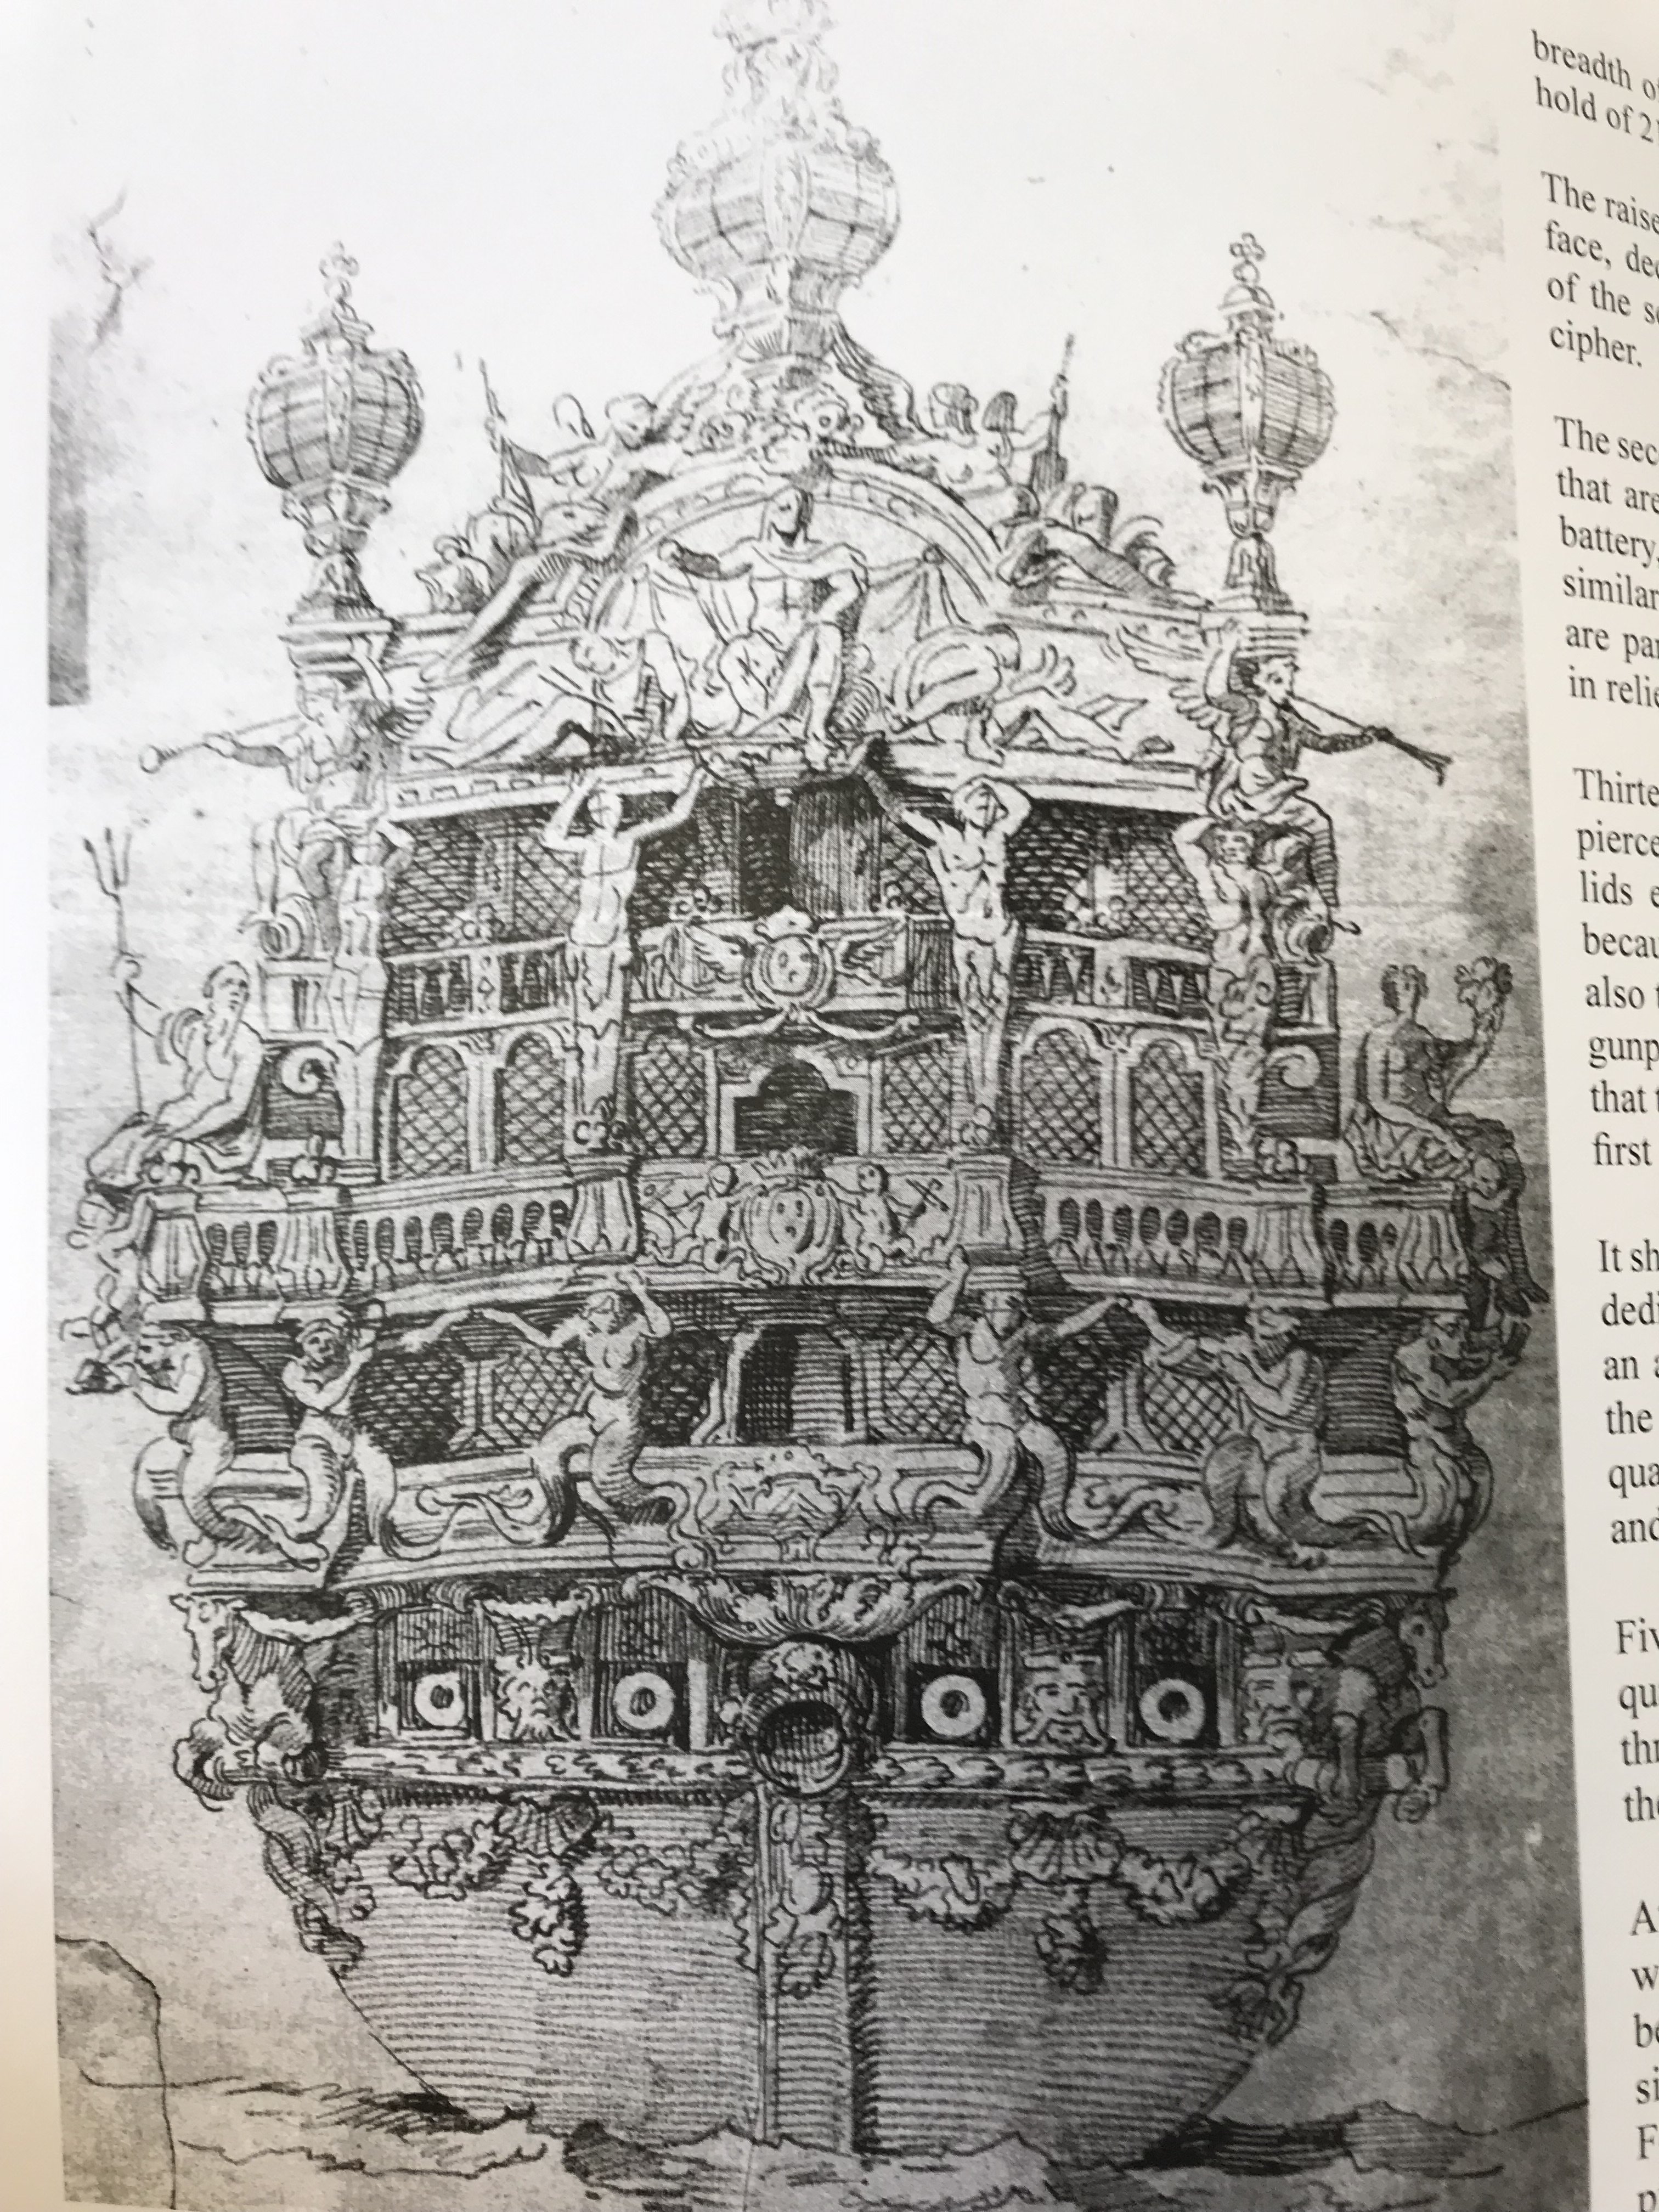
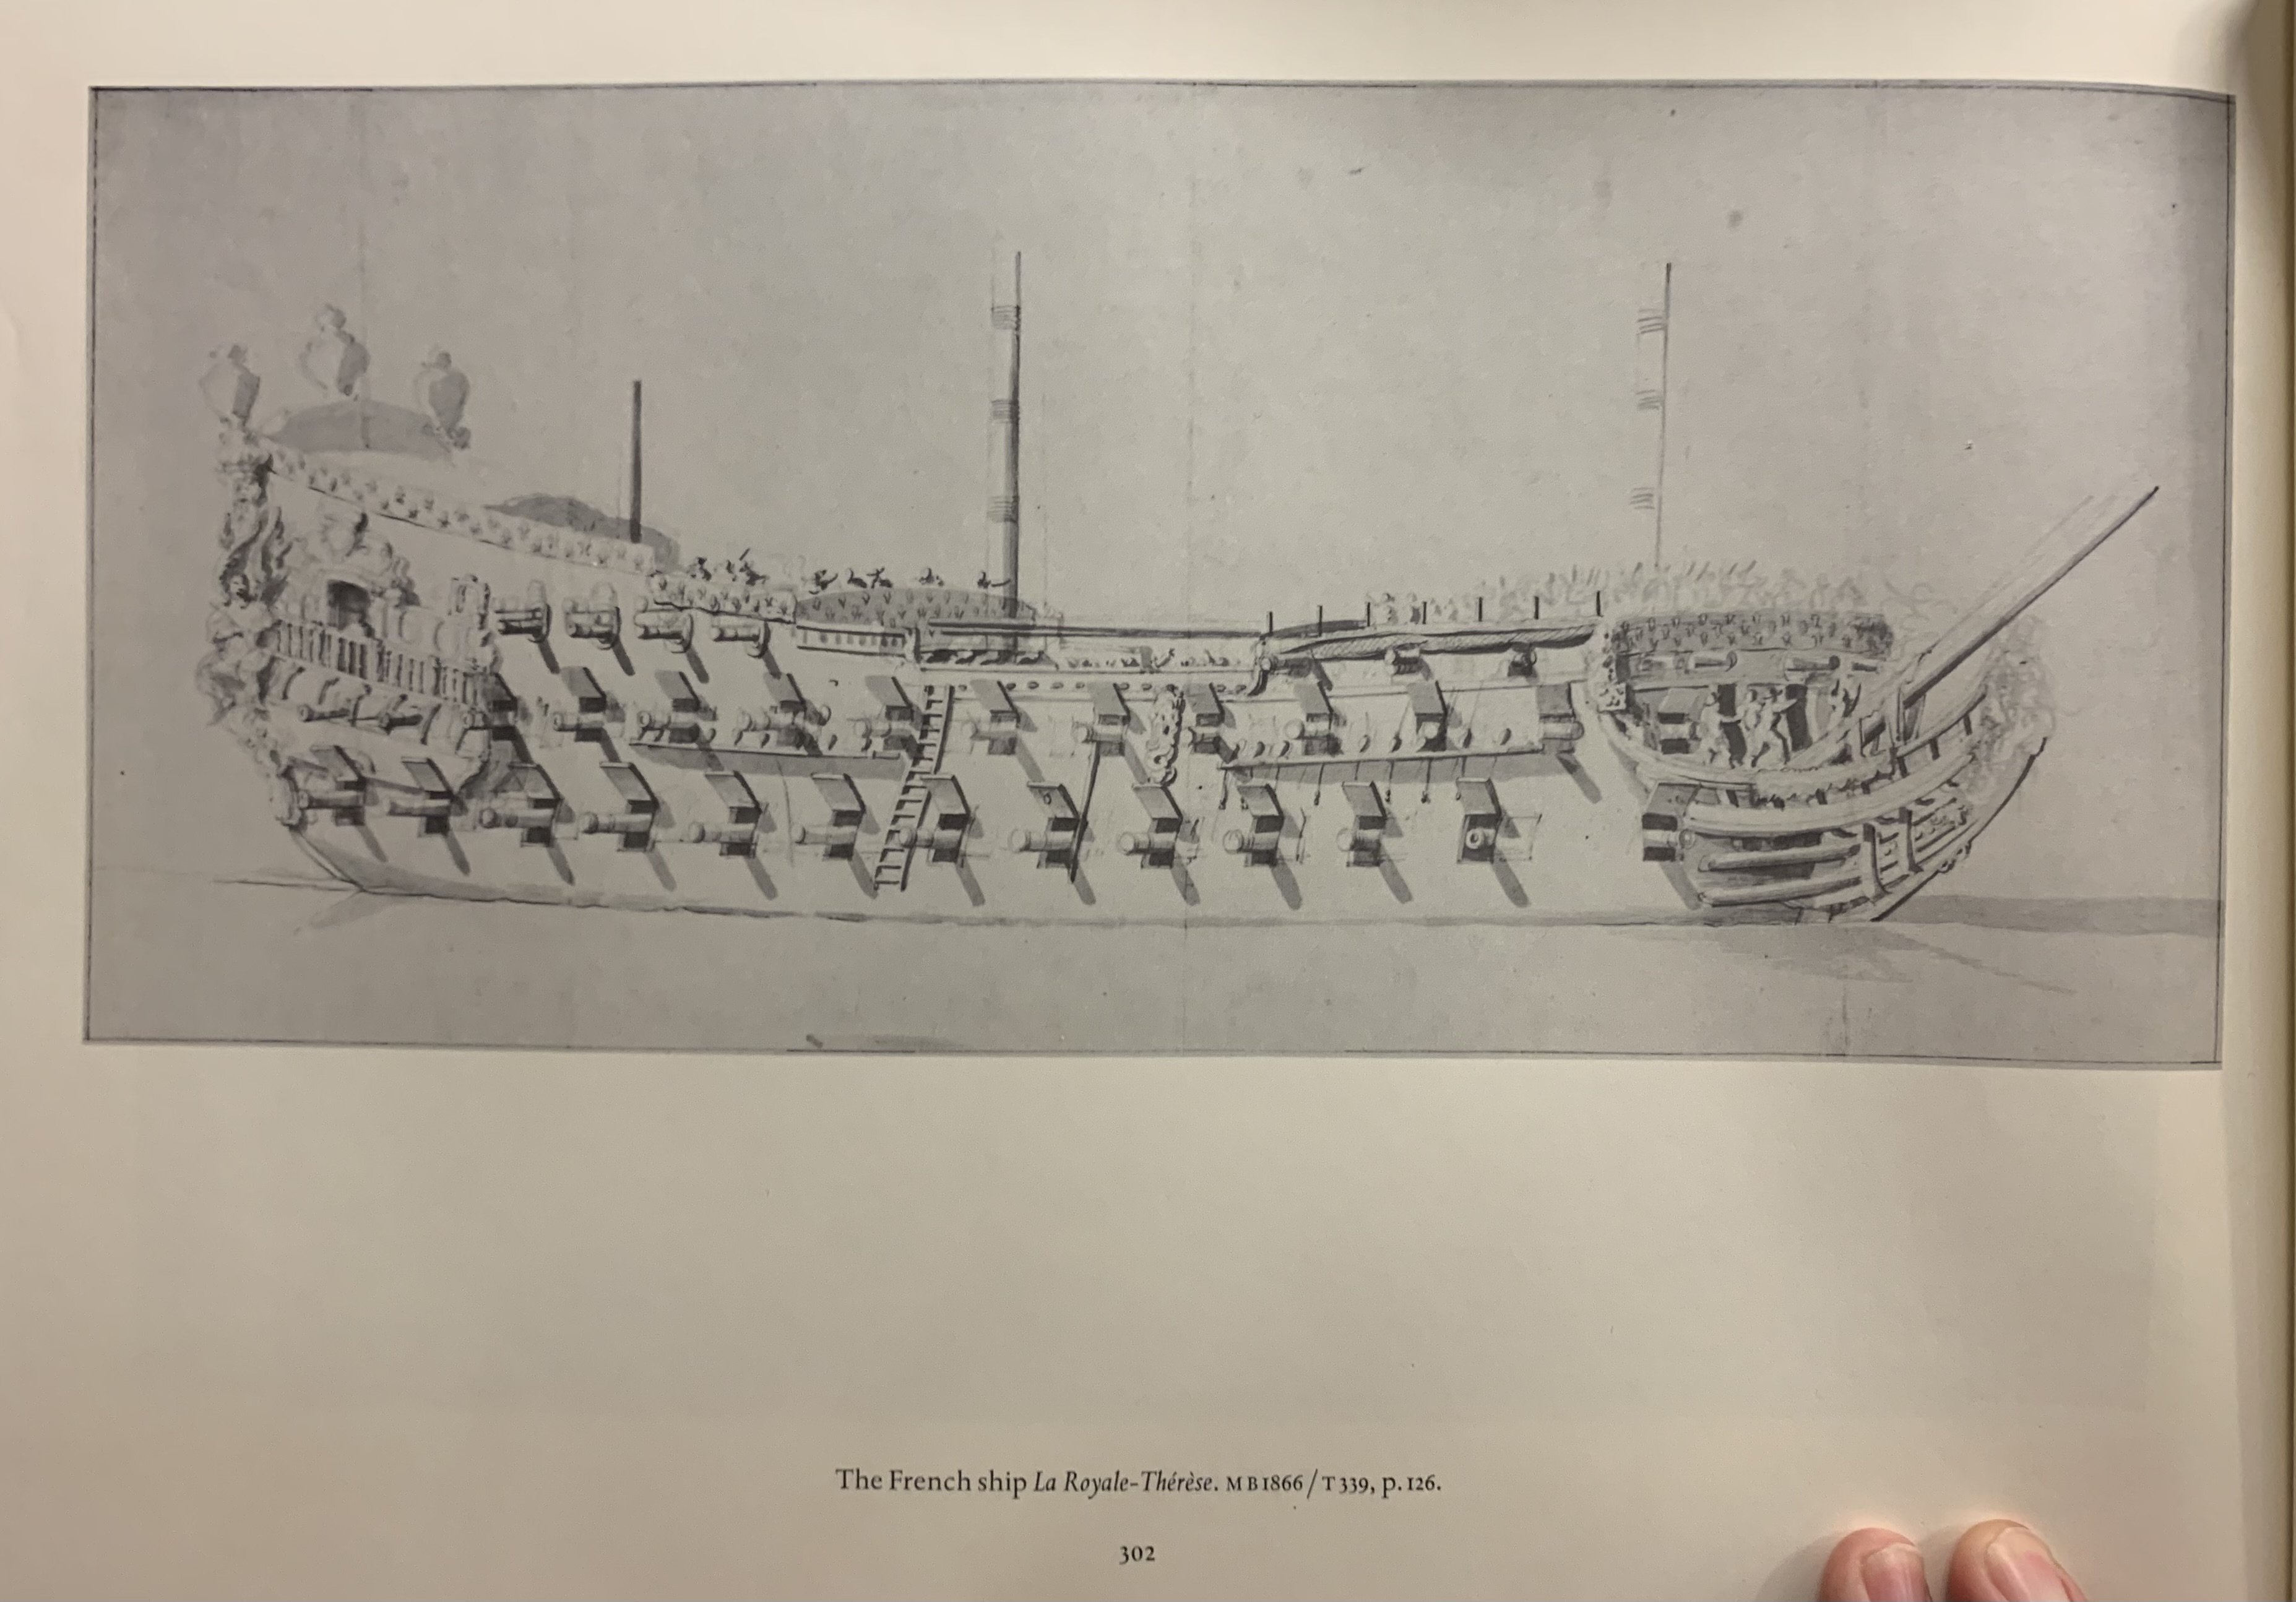
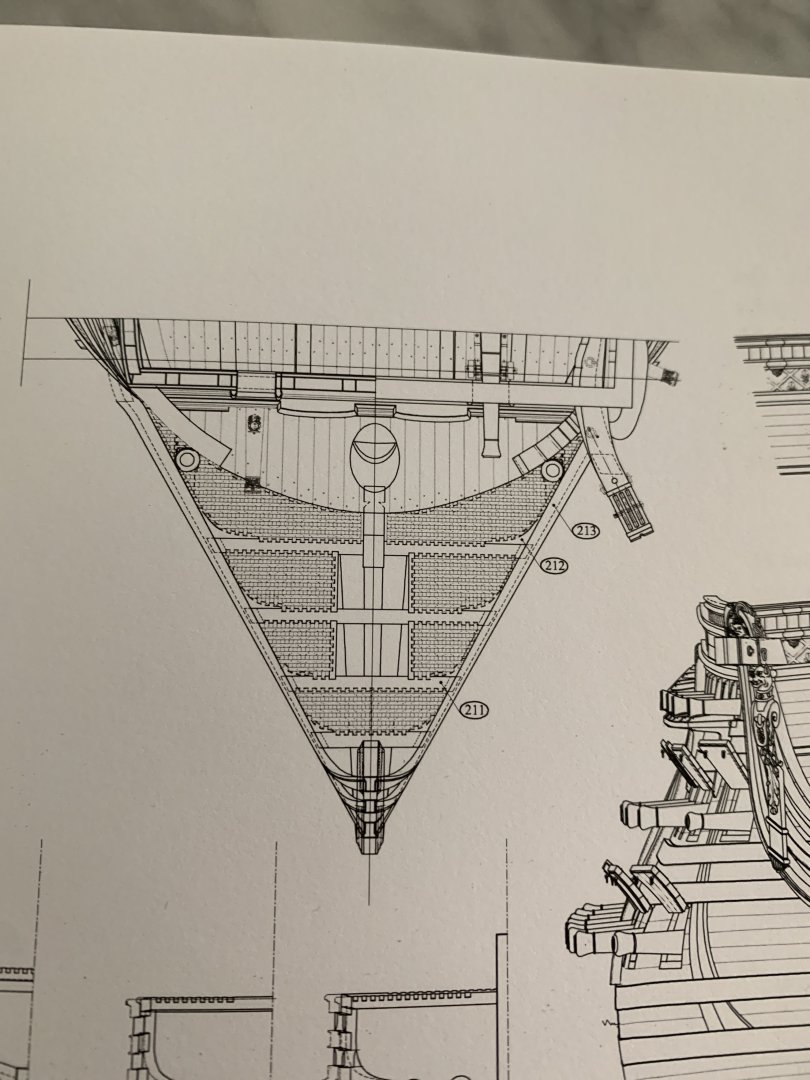
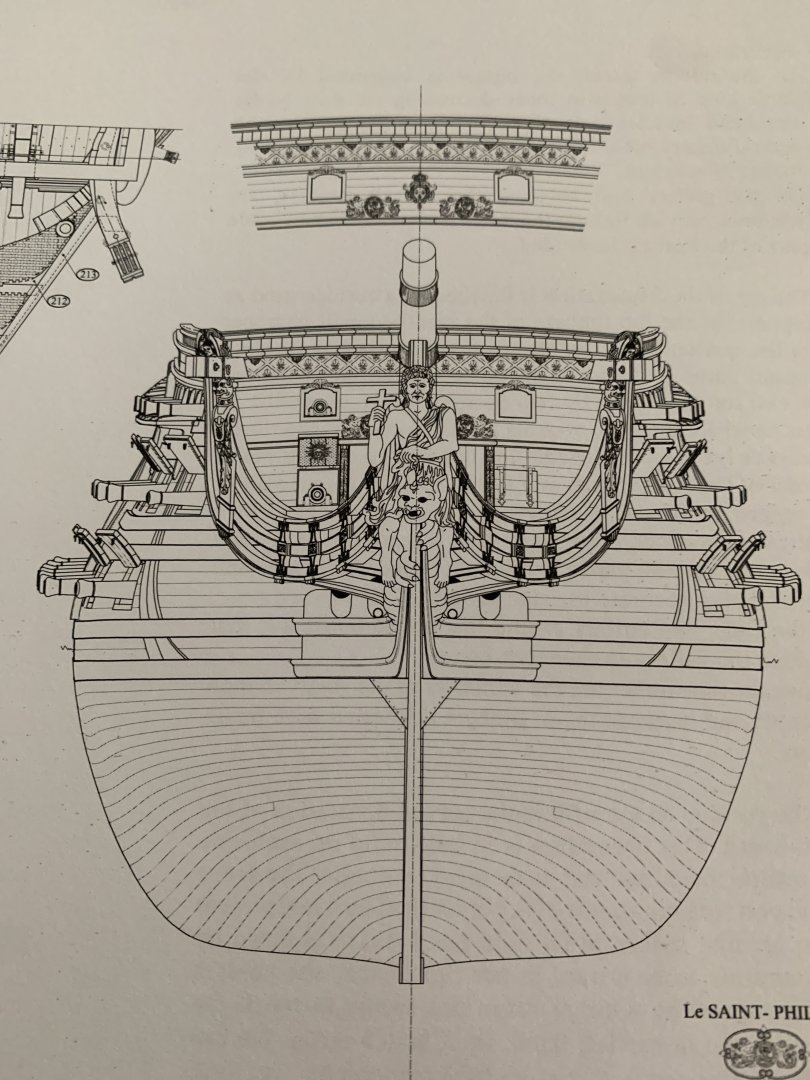
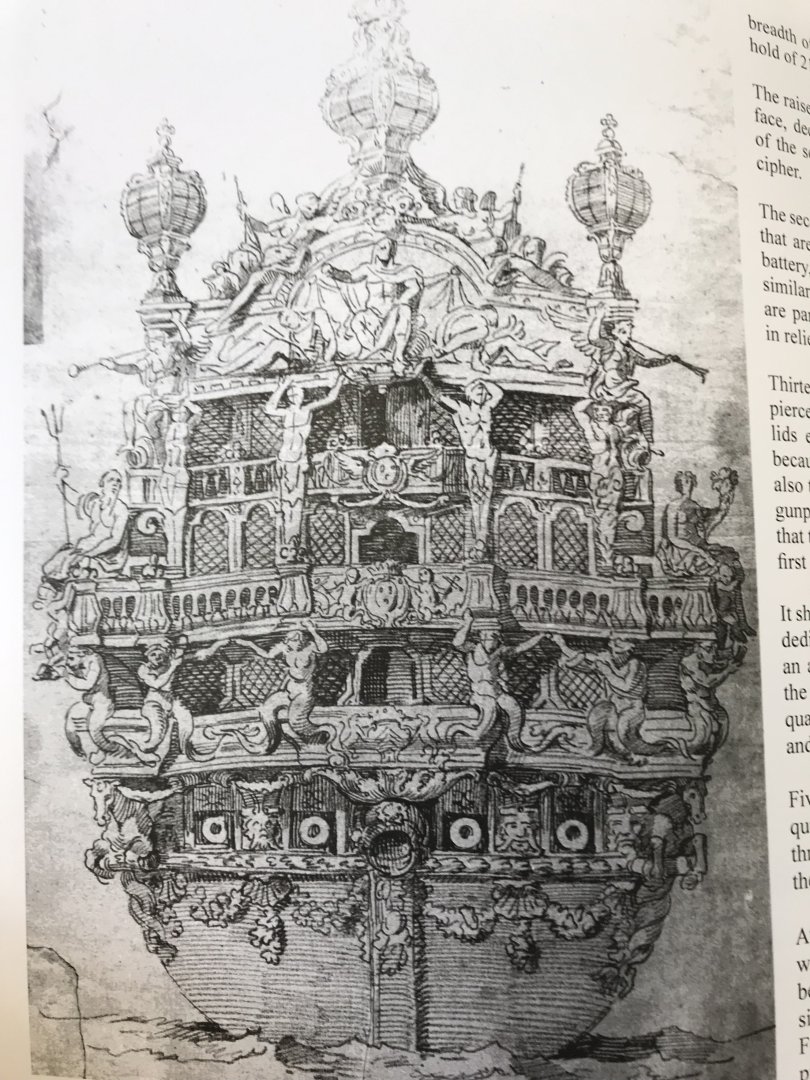
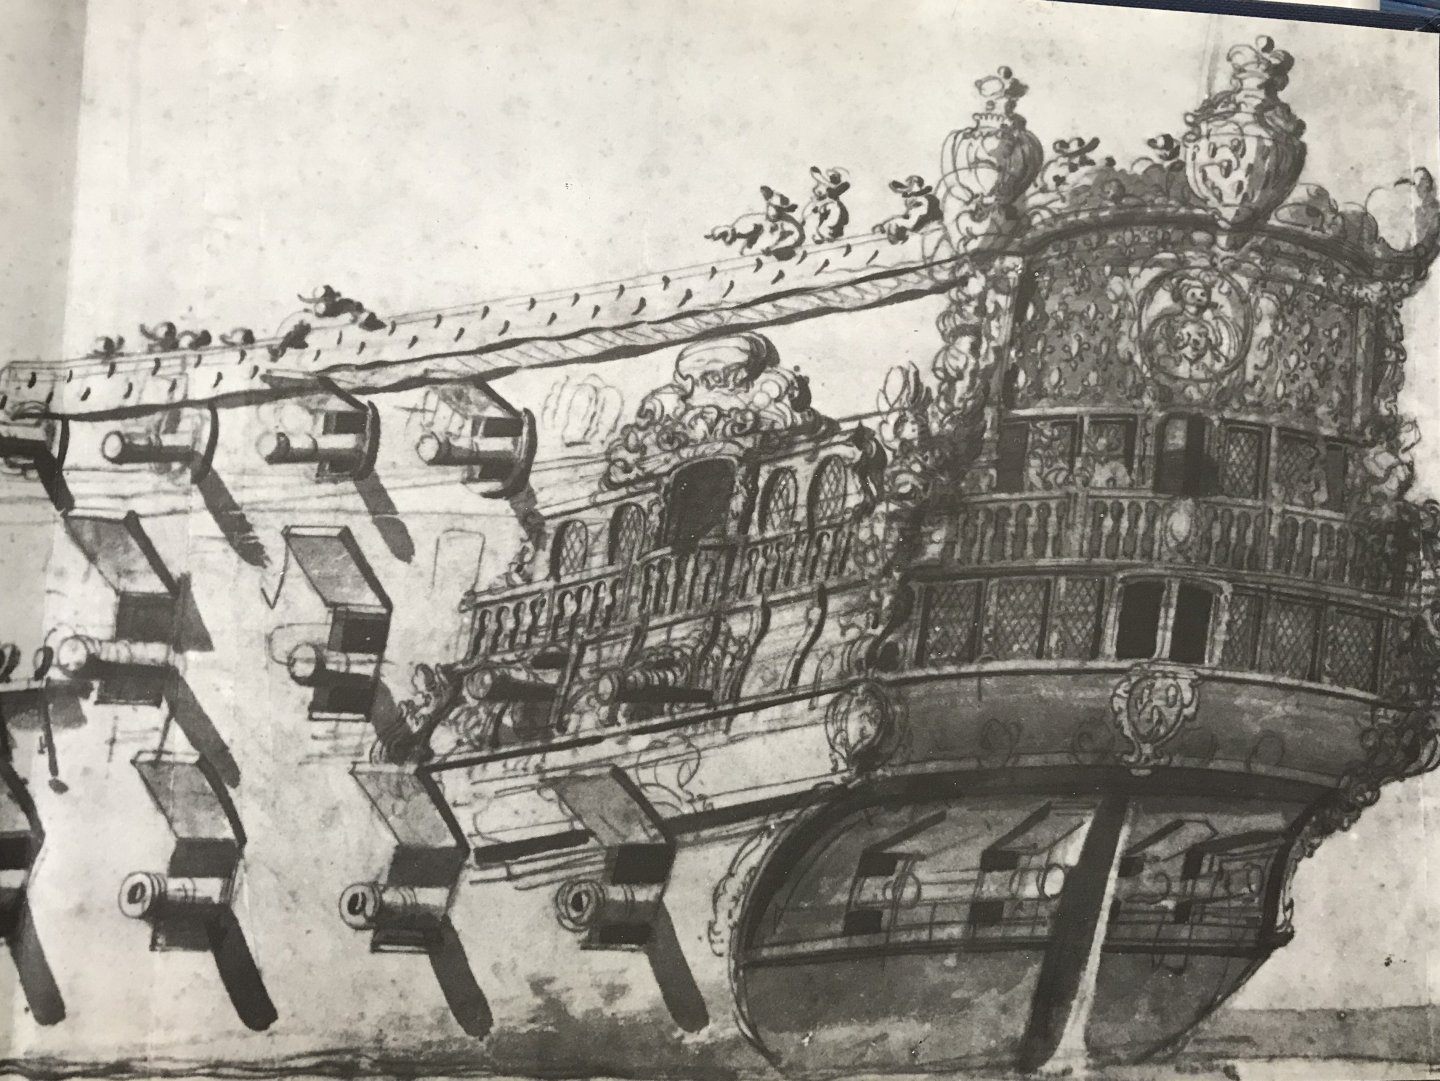
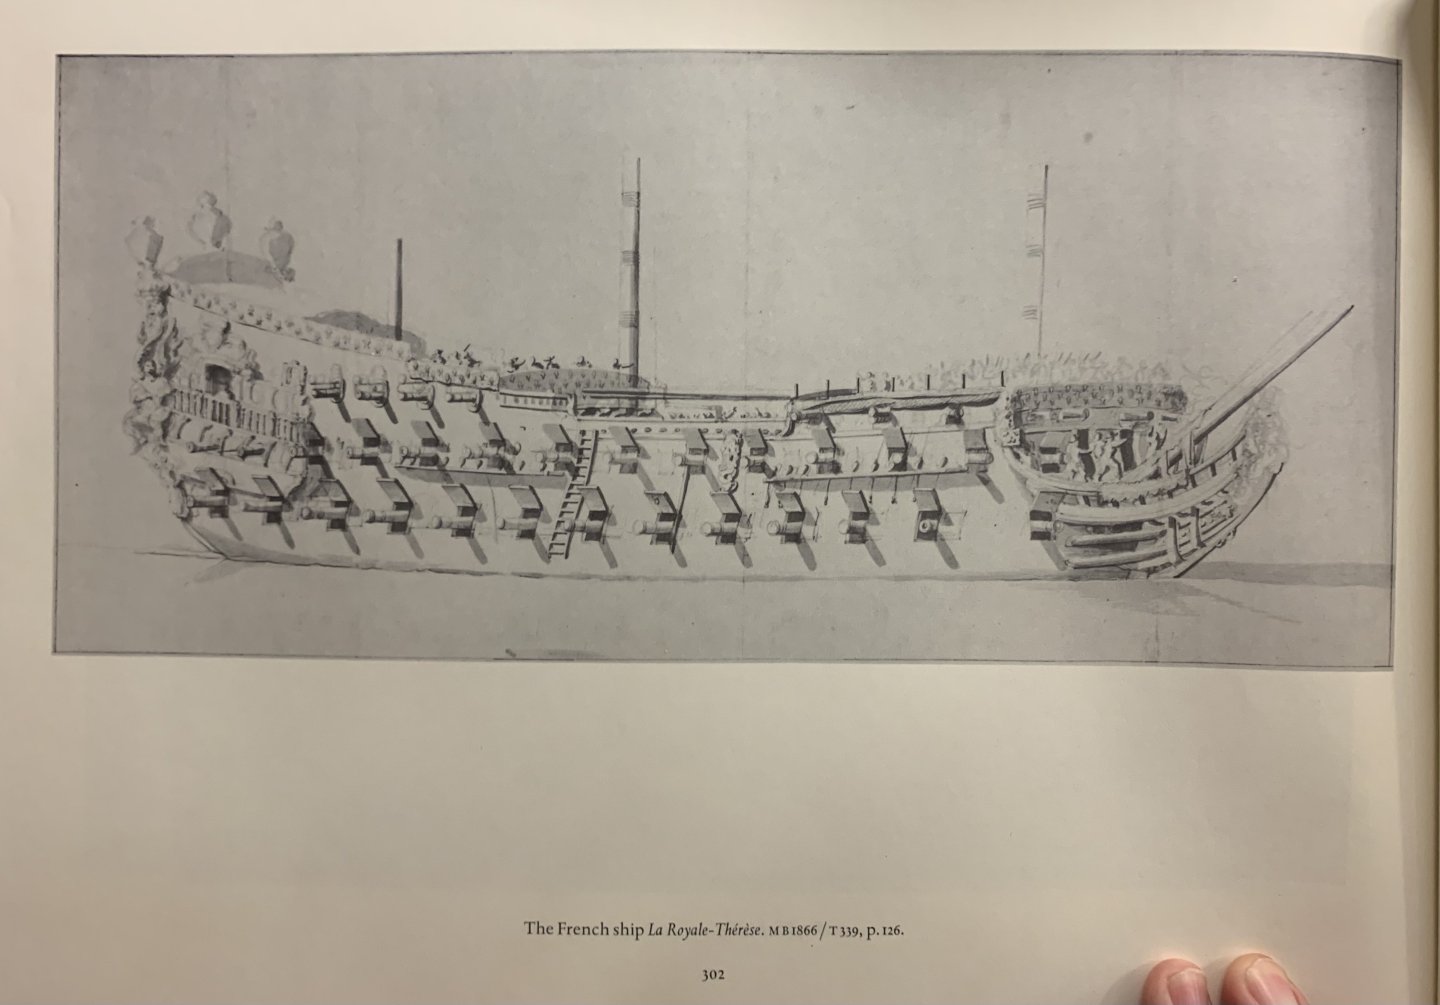
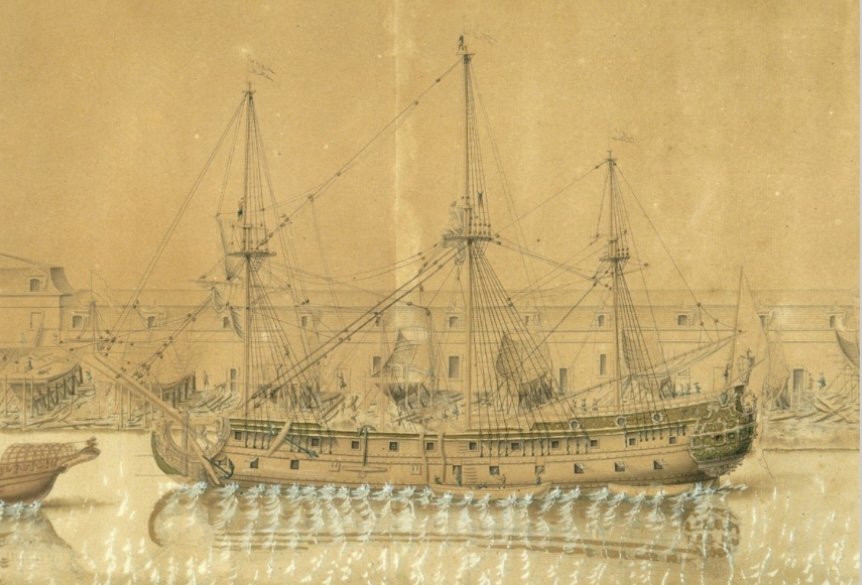
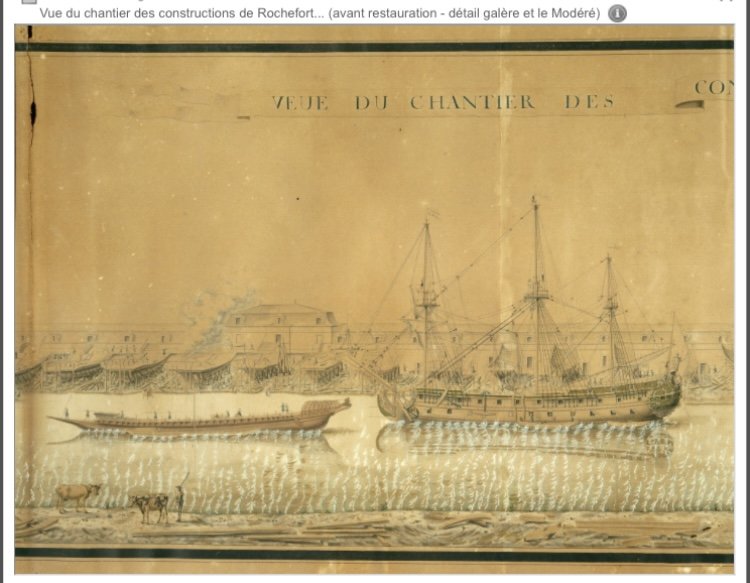
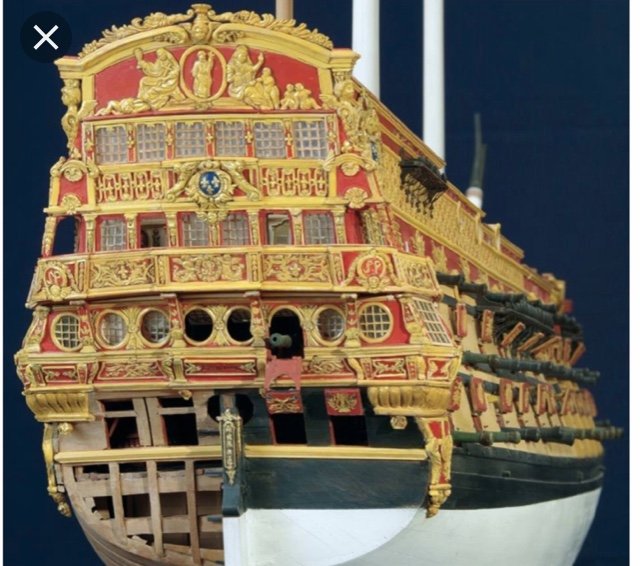
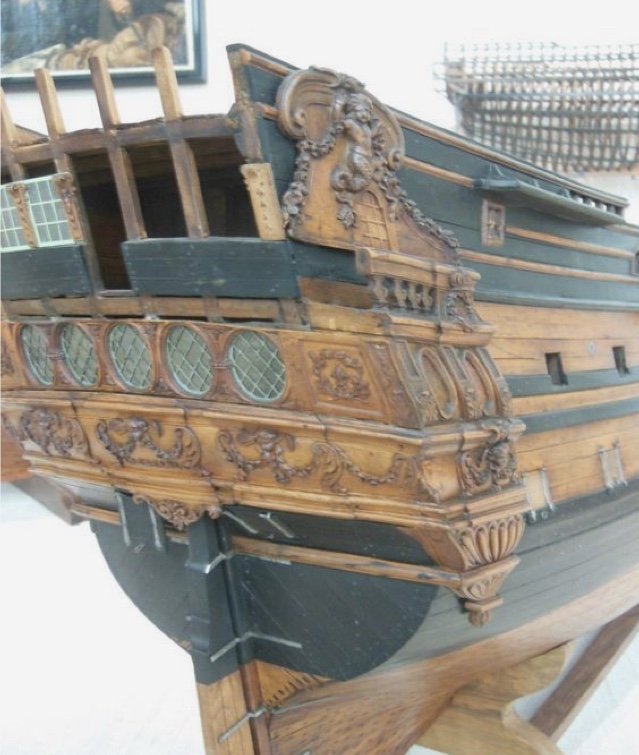
It seems quite reasonable to me that all QG windows would be false. You have given me good reason to black-out the single window on the Quarter Deck level of my model. Observe Tanneron’s model of L’Agreable of 1697. All QG windows are shown as false: As for placement of guns within the quarter galleries, one thing seems pretty certain to me. A gun would not have been rigged in the door opening to the QG. This, for all the reasons you mention, but most especially because it must remain a clear pass-through - even in battle. If one doubts that officers had the need to use the facilities during battle, they must consider that battle raged for hours and hours at a time, and they were certainly anxiety producing affairs. The Tanneron model of Soleil Royal is a confusing representation of the structure and function of the QGs. I will preface my following comments with the disclaimer that they are merely my observations, and not expert-verified facts. Tanneron, in my opinion, has created a composite of what Soleil Royal may have looked like, both at the beginning of her career in 1670 and after the replacement SR was built in 1693. Early features include the very tall stern, the completely open quarters and three stern balconies. The overall shape of the QGs, on the other hand, suggests the style of ships built during the second major building program of the 1690’s. The primary difference would be that the bottles, by this later date, would have been completely closed-in, in order to adhere to the reglements mandating this change in approach. Tanneron shows an extra port on the main deck level, at the forward edge of the QG, where it makes structural sense to place a port within the QG. Also, though, he shows a port in the middle of the QG at the middle deck battery. This should be where the entry door to the QG is placed. Instead Tanneron shows this door opening from the center of the lower stern balcony, which is represented as open and walkable. Perhaps, Tanneron pulled this idea from the conceptual LeBrun drawing for the Royal Louis of 1668, and the finished Girardon drawing of the same. Both show an open doorway in the center of the lower stern balcony, which suggests a walkable balcony: In my view, though, there are several issues with Tanneron’s construction, at this level. My primary issue is that it seems to ignore the practical function of the QG as a functioning toilet. If the lower stern balcony wraps to the quarters, where is the seat of ease supposed to be? The other issue has to do with the fact that even at this early time in the 1670’s, a lower stern balcony would be vulnerable to heavy following seas, and could be washed away. It is my belief, that the lower stern balcony was always a bit of theatrical representation; a shallow decoration of the lower stern counter, made to look like a walkable balcony, but whose functional purpose is really to serve as a shelf for the Four Seasons figures that support the middle balcony. As you mention, though, there are early contemporary drawings that support the idea that the QG’s were occasionally armed. See the Royal Therese, below: And, also, a contemporary drawing of the port of Rochefort: The vessel above shows a gun through a panel opening, forward of center. I think, perhaps, that your idea for a split panel has some traction. That is the solution Lemineur applied to the middle deck stern chase ports of the St. Philippe of 1693: As for your email problems, perhaps the issue might resolve itself, if you created a new email account for your client correspondences. ‘Might be a glitch in your current account. Computers and their inner workings remain a mystery to me. I am like the dog that has no conception of what happens to their owner, when he walks out the front door.


-
Ah, yes - I remember now. That will be a good one!