Hubac's Historian
-
Posts
3,306 -
Joined
-
Last visited
Content Type
Profiles
Forums
Gallery
Events
Everything posted by Hubac's Historian
-
 As a thought on plastic surgeries - one could remove an 1/8” band of “planking” all along the lower and middle batteries, in an effort to make the height of the Heller hull more reasonable. You could maybe even do this above the main deck guns. There are problems, though, with re-joining through the middle tier of guns where the tumblehome is a reverse curve. I am not at all suggesting that you should try this. There are multiple compounding issues, down the line, that make this very tricky and maybe impossible. It’s just a thought that popped into my head. One of the mitigating factors is that the Heller hull is a bit longer than it should be for the first ship, so that makes her height seem a little more proportional. In the end, what you are doing amounts to creating a combination of optical illusions that gives a sense of correctness.
 -
While I agree with piercing the beakhead deck, the thing about Cedric’s comment that I’ve wrestled with is the possibility that the foot of the sprit-mast anchors between fore bit extensions at the lower battery level, as opposed to entering through the beakhead bulkhead and anchoring through bit extensions, at the middle deck level. If I remember, that is precisely what Nigel has modeled on his AL Soleil Royal build. This would account for the higher 40 degree angle that you tend to see on the early First-Marine ships. As I’ve mentioned in our correspondence, though, I think it becomes a matter of prioritizing one thing over the other. What has to be born in mind is the fact that the interspace between decks amounts to a very generous 7’ headroom. This exaggeration, if applied literally to the geometry of the bowsprit angle would be correspondingly exaggerated. I think you pattern your cutwater and headrails so that they are proportionally pleasing to the rest of the bow, and adjust your bowsprit angle accordingly. It won’t be exactly correct, but a reasonable impression of what is more or less correct for the period.
-
It’s a veeery fine line between “is right” and “looks right at scale.”
- 419 replies
-
- 1
-

-
- soleil royal
- Heller
- (and 1 more)
-
So, the skids look really good - great scribe around the wales. As for scale on the ladder steps - at 1:96 scale, the stock kit steps are a generous 1/32”, or 3” at full scale. Personally, I would not go beyond 1/16”, or 6” at scale, and I would carry that uniformly across the wales.
- 419 replies
-
- 1
-
-
- soleil royal
- Heller
- (and 1 more)
-
All very clever solutions to vexing problems, Gary. Great work, as always!
-
Yeah, it all becomes a slippery slope in short order. But, I’m rooting for ya!
- 419 replies
-
- 1
-
-
- soleil royal
- Heller
- (and 1 more)
-
Here’s a thread on that very subject: Somewhere along the way, I also read that horse hair would be applied as a binder. So, yes, the white stuff would certainly obscure the planking strakes, if not completely obliterate them. You could fill most of what’s there and leave a few faint trace lines, here and there, to suggest the planking. Color, as these fine gentlemen note, would likely have been a dingy, yellowish white.
- 419 replies
-
- 1
-
-
- soleil royal
- Heller
- (and 1 more)
-
To be clear - I don’t think you would have to undo your wales, if you wanted to re-scribe plank lines. It’s just a lot if effort and it may not be worth it, frankly.
-
Fabulous is an understatement, here, Eric. I really love the graduation of the wales. It makes a big difference, and you have really nailed the sheer. Now, I’m going to preface what I’m about to say as a step or two too far for me, personally; it would be quite a lot of work for I’m not sure how much gain. However, in actual practice the planking strakes between the wales would follow the sheer of the wales. There, I’ve said the horrible thing. One COULD fill the kit plank lines at the point where they diverge from the sheer; mark out new plank lines with an ordinary drafting compass, following the wales; and then, very carefully engrave the new lines as they fair into the forward seams that you did not fill. This becomes exponentially more difficult for the complicated underwater portion of the hull. Personally, I don’t think I would do this. I think it depends, mostly, on what your paint plan is. However, if you are looking for some guidance as to how the under-hull of a ship like SR might be planked, I will direct you here: I talk about this model all the time because I love it so much. It is the best scratch-build of the ship that I am aware of. When I fantasize about doing another SR kitbash of this earliest representation of the ship - and your build has certainly dared me to dream - I imagine that I would do an all pale blue hull, with a thinned grey wash-coat. That wash-coat, though, would highlight all of the plank seams, and that dissonance with the wale sheer would be that much more apparent. As it builds out of the box, Heller failed to correctly represent the planking between the wales. At the bow, there are several thin sharply pointed plank lines that end into the wale sheer. It’s wrong, but the sheer is much flatter than what you are representing, here, so it doesn’t really jump out at you. Anyway, food for thought, or not, as you please. As for the listons d’or, I would gild these before applying them to the hull. It’s just easier. Personally, I think it is very difficult to get really good results with actual gold leaf. ‘72Nova’s La Reale build is a glittering example of the best possible results. I prefer paints and doing a layered gold with lowlights and highlights.
- 419 replies
-
- 1
-
-
- soleil royal
- Heller
- (and 1 more)
-
Hi Bill - I’m not speaking from a ton of experience here. I was 24 when I last rigged a model - rather poorly, by the way. My inclination would be to have all mast sections, tops and yards pre-made and rigged with all of their blocks. On my current build, I will have a combination of furled and un-furled sails. Those sails will all be attached to the yards, in advance. Because I don’t have any safely sheltered area to store the model, as it grows tall, my objective is to rig the model in a year or less. As for sequencing, I think the guiding principles are not making access too difficult for any one line with other lines previously installed, and also working in a way that allows the fore and back stays to always keep the masts straight and in-line with each other. Toward that end, I will probably install all of the lower masts first (shrouds, then fore-stays) working from the mizzen mast forward. This way, the main shrouds won’t make the setting up of the mizzen fore stay any more difficult than necessary. And so forth, working my way up the masts one section at a time. After all of the standing rigging is in place, I will attach the yards, and tackle all of the running rigging. Of course, the biggest un-resolved issue with that approach is how to rig the parrels, with the shrouds in the way. I’m definitely open to suggestions.
-
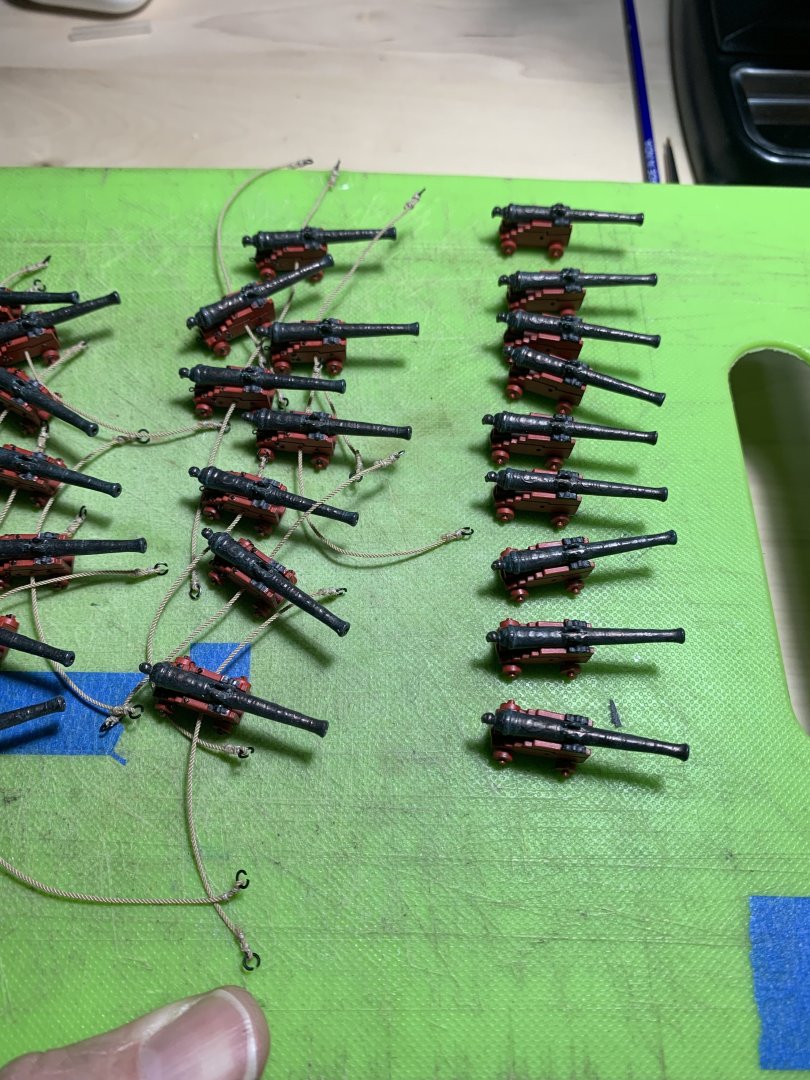
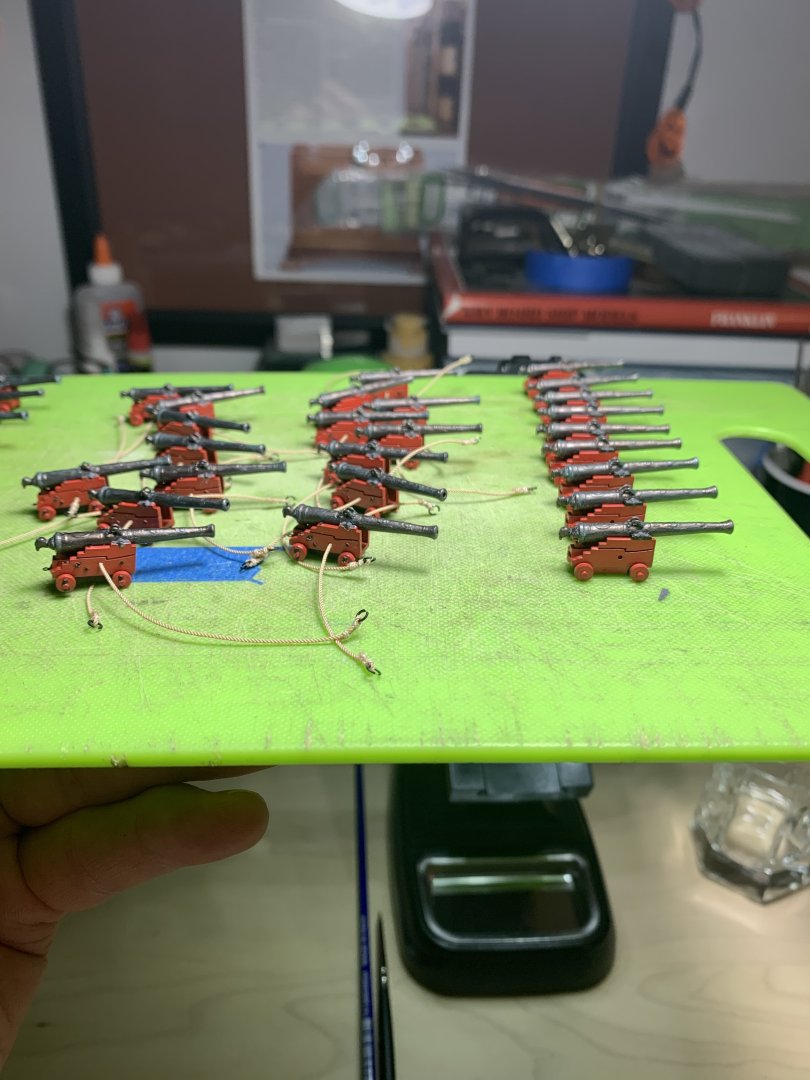
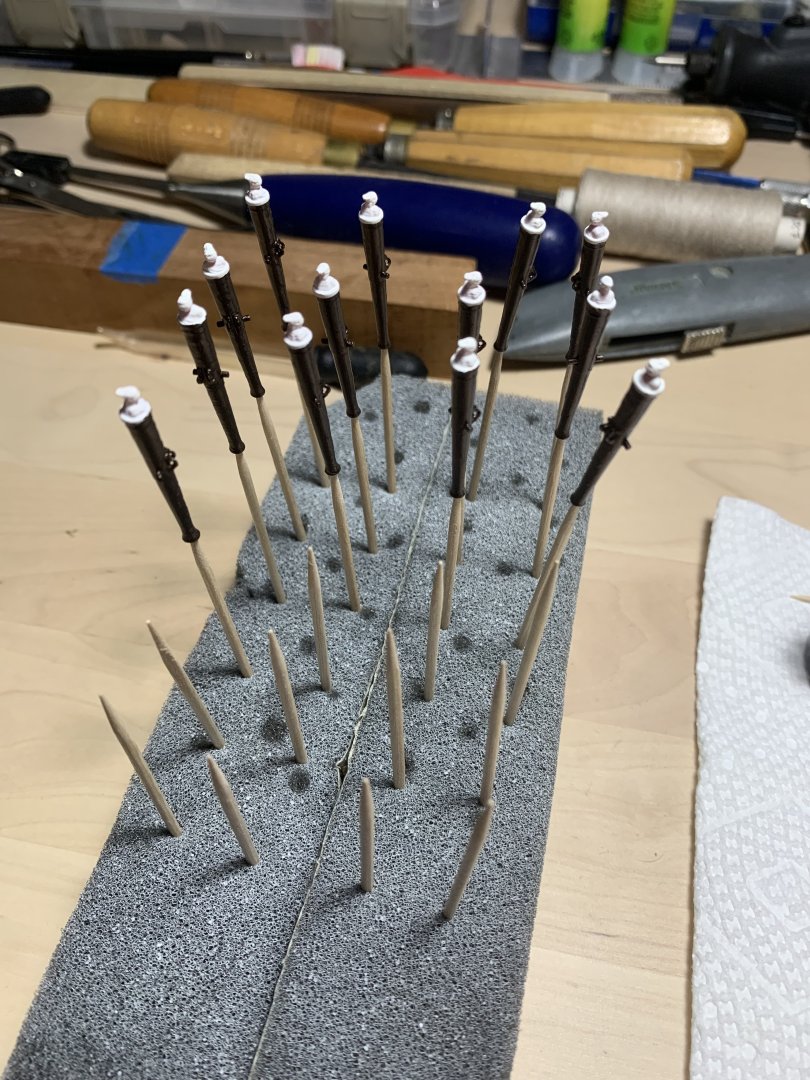
Ultimately, I decided to make cap-squares for all of the main deck guns. With black construction paper and CA applied with a sharpened tooth pick, the process was relatively straight-forward, if a little time-consuming. I used my new bent-nose tweezers to massage the paper into the glue, and to snug into the trunnions. The glue wicks into the paper and polymerizes it. Truly, paper is an underrated modeling material. The added benefit is that the black construction paper has some tooth to it that approximates the scale appearance of wrought iron. In other words - it’s not a very fine surfaced paper. I’d be lying if I said that it didn’t bother me at all that I did not really address the raised trunnion mounting blocks on the carriage cheeks. Naturally, with this much scraping of glue and general handling, there is going to be a round or two of paint touch-ups. At first, I was going to re-touch the red around these silly trunnion blocks. I had a eureka moment, though, and realized that I could paint those blocks black and they would blend into the cap-squares. I experimented on the less visible guns, and liked what I saw (guns, right): This may be a slight exaggeration of the scale of the cap-square irons, but at best - the carriages are mostly viewed from above. What you will see is a straight red line delineating the top of the carriage cheeks. I decided not to paint the paper cap-squares, themselves, because I did not want to lose that wonderful texture: All-in-all, I think this turned out to be a fairly elegant work-around to a lot of extra work that I wasn’t interested in doing. Next step: mount and rig the guns. As ever - thank you for your continued interest.
- 2,699 replies
-
- 15
-
-
- heller
- soleil royal
- (and 9 more)
-
All of the extra tabbing along the interior joint will serve you well. I like your idea to thin the ApoxieSculpt and massage it into the joints. Just thinking ahead, you may have the opportunity to raise your waterline up to maybe mid-way of the lowest wale. The waterline should be 4.5 - 5’ scale feet below the lowest gun port, which works out to 9/16” - 5/8” in 1:96. This will be an easy enough thing to pencil onto the hull after the hull-halves have been glued together.
- 419 replies
-
- 2
-
-
- soleil royal
- Heller
- (and 1 more)
-
Kevin - would not most of Victory’s guns have been iron?
- 2,699 replies
-
- 2
-
-
- heller
- soleil royal
- (and 9 more)
-
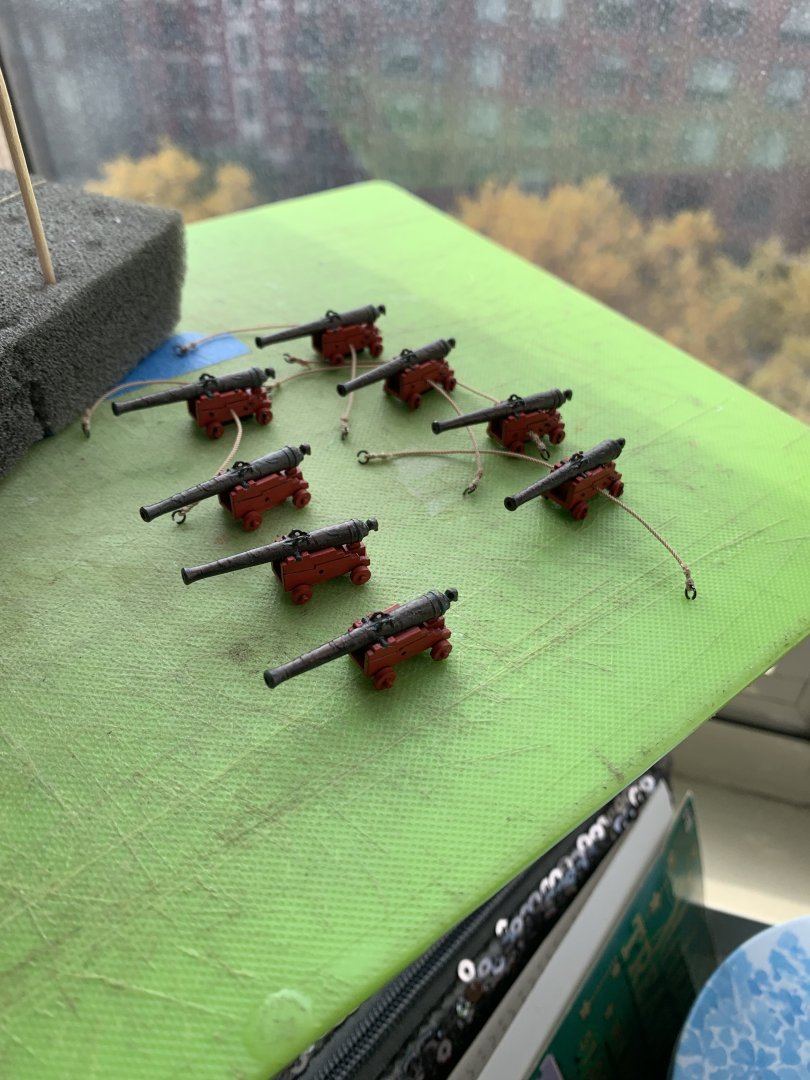
Today, my son is home, sick, and so I stayed home with him. This will afford me a few hours to assemble guns, while otherwise enjoying a lazy afternoon. Painting of the barrels came out well. The Citadel ver-de-gris wash is a little tricky to use. Unless you are depicting the centuries-old guns currently on display at the Palais des Invalides, then you are going to want to dilute the wash-coat. I like to use a medicine dropper to do this because it is easier to keep track of ratios that are repeatable. I think I ended up at a 50/50 mix, cut with common tap water. Despite thinning, the wash coat does dry almost immediately, and it is almost impossible to avoid lap lines with a brush. I do think a bristle brush is the best applicator - as opposed to an airbrush - because you can draw color into and out of crevasses, thus modulating the effect. After everything has dried, I use a Q-tip, covered with a t-shirt scrap to burnish each barrel, and minimize the lap-lines. Particularly stubborn laps can be further softened with a well-worn SOFT toothbrush. In the light of day, this degree of oxidation looks about right to my eye: As for assembling, I have a small, round needle file that I use to clear paint from the trunnion blocks. I scrape paint away from the undersurface of the trunnions, as well as the quoin and the cascabel rim, where these two surfaces meet. I will add cap-squares, at least to the fully visible carriages. If the process is not too tedious, I will do so for the rest of the main deck guns; it’s just a little extra bond-insurance to safeguard against guns breaking free of their carriages. So, little by little. Catch as catch can. We are getting there! Thank you for stopping by.
- 2,699 replies
-
- 15
-
-
- heller
- soleil royal
- (and 9 more)
-
In addition to the audaciousness of the build-concept, what I love about watching this all unfold is your personal journey of discovery into scratch-work. Any heavily scratched project, considered in its whole, seems absolutely daunting. In reality, though, it’s just a long series of mini-builds that aggregate into the finished thing. All it takes are patience, time, and commitment to an ideal of the finished project. You have all of those qualities in spades, Eric.
- 419 replies
-
- 1
-
-
- soleil royal
- Heller
- (and 1 more)
-
Huge help, Dan! The problem with rigging is precisely that there aren’t any substantive modeling technique books out there, so one finds themselves in a vast grey area of looking through better build logs along with their own experimentation. In his books, Philip Reed details some of his rigging technique, but owing to small scales, that is often accomplished with wire. As you said the other night - most of what a really good model requires isn’t complicated, but it is helpful to understand the best simplifications for the sake of whatever scale you are working in. You have my vote, Dan; by all means, please write that book!
- 2,699 replies
-
- 3
-
-
- heller
- soleil royal
- (and 9 more)
-
For this model, I will buy my rope. The prospect of making all the rope this project will require, in all the many sizes does not interest me.
- 2,699 replies
-
- 5
-
-
- heller
- soleil royal
- (and 9 more)
-
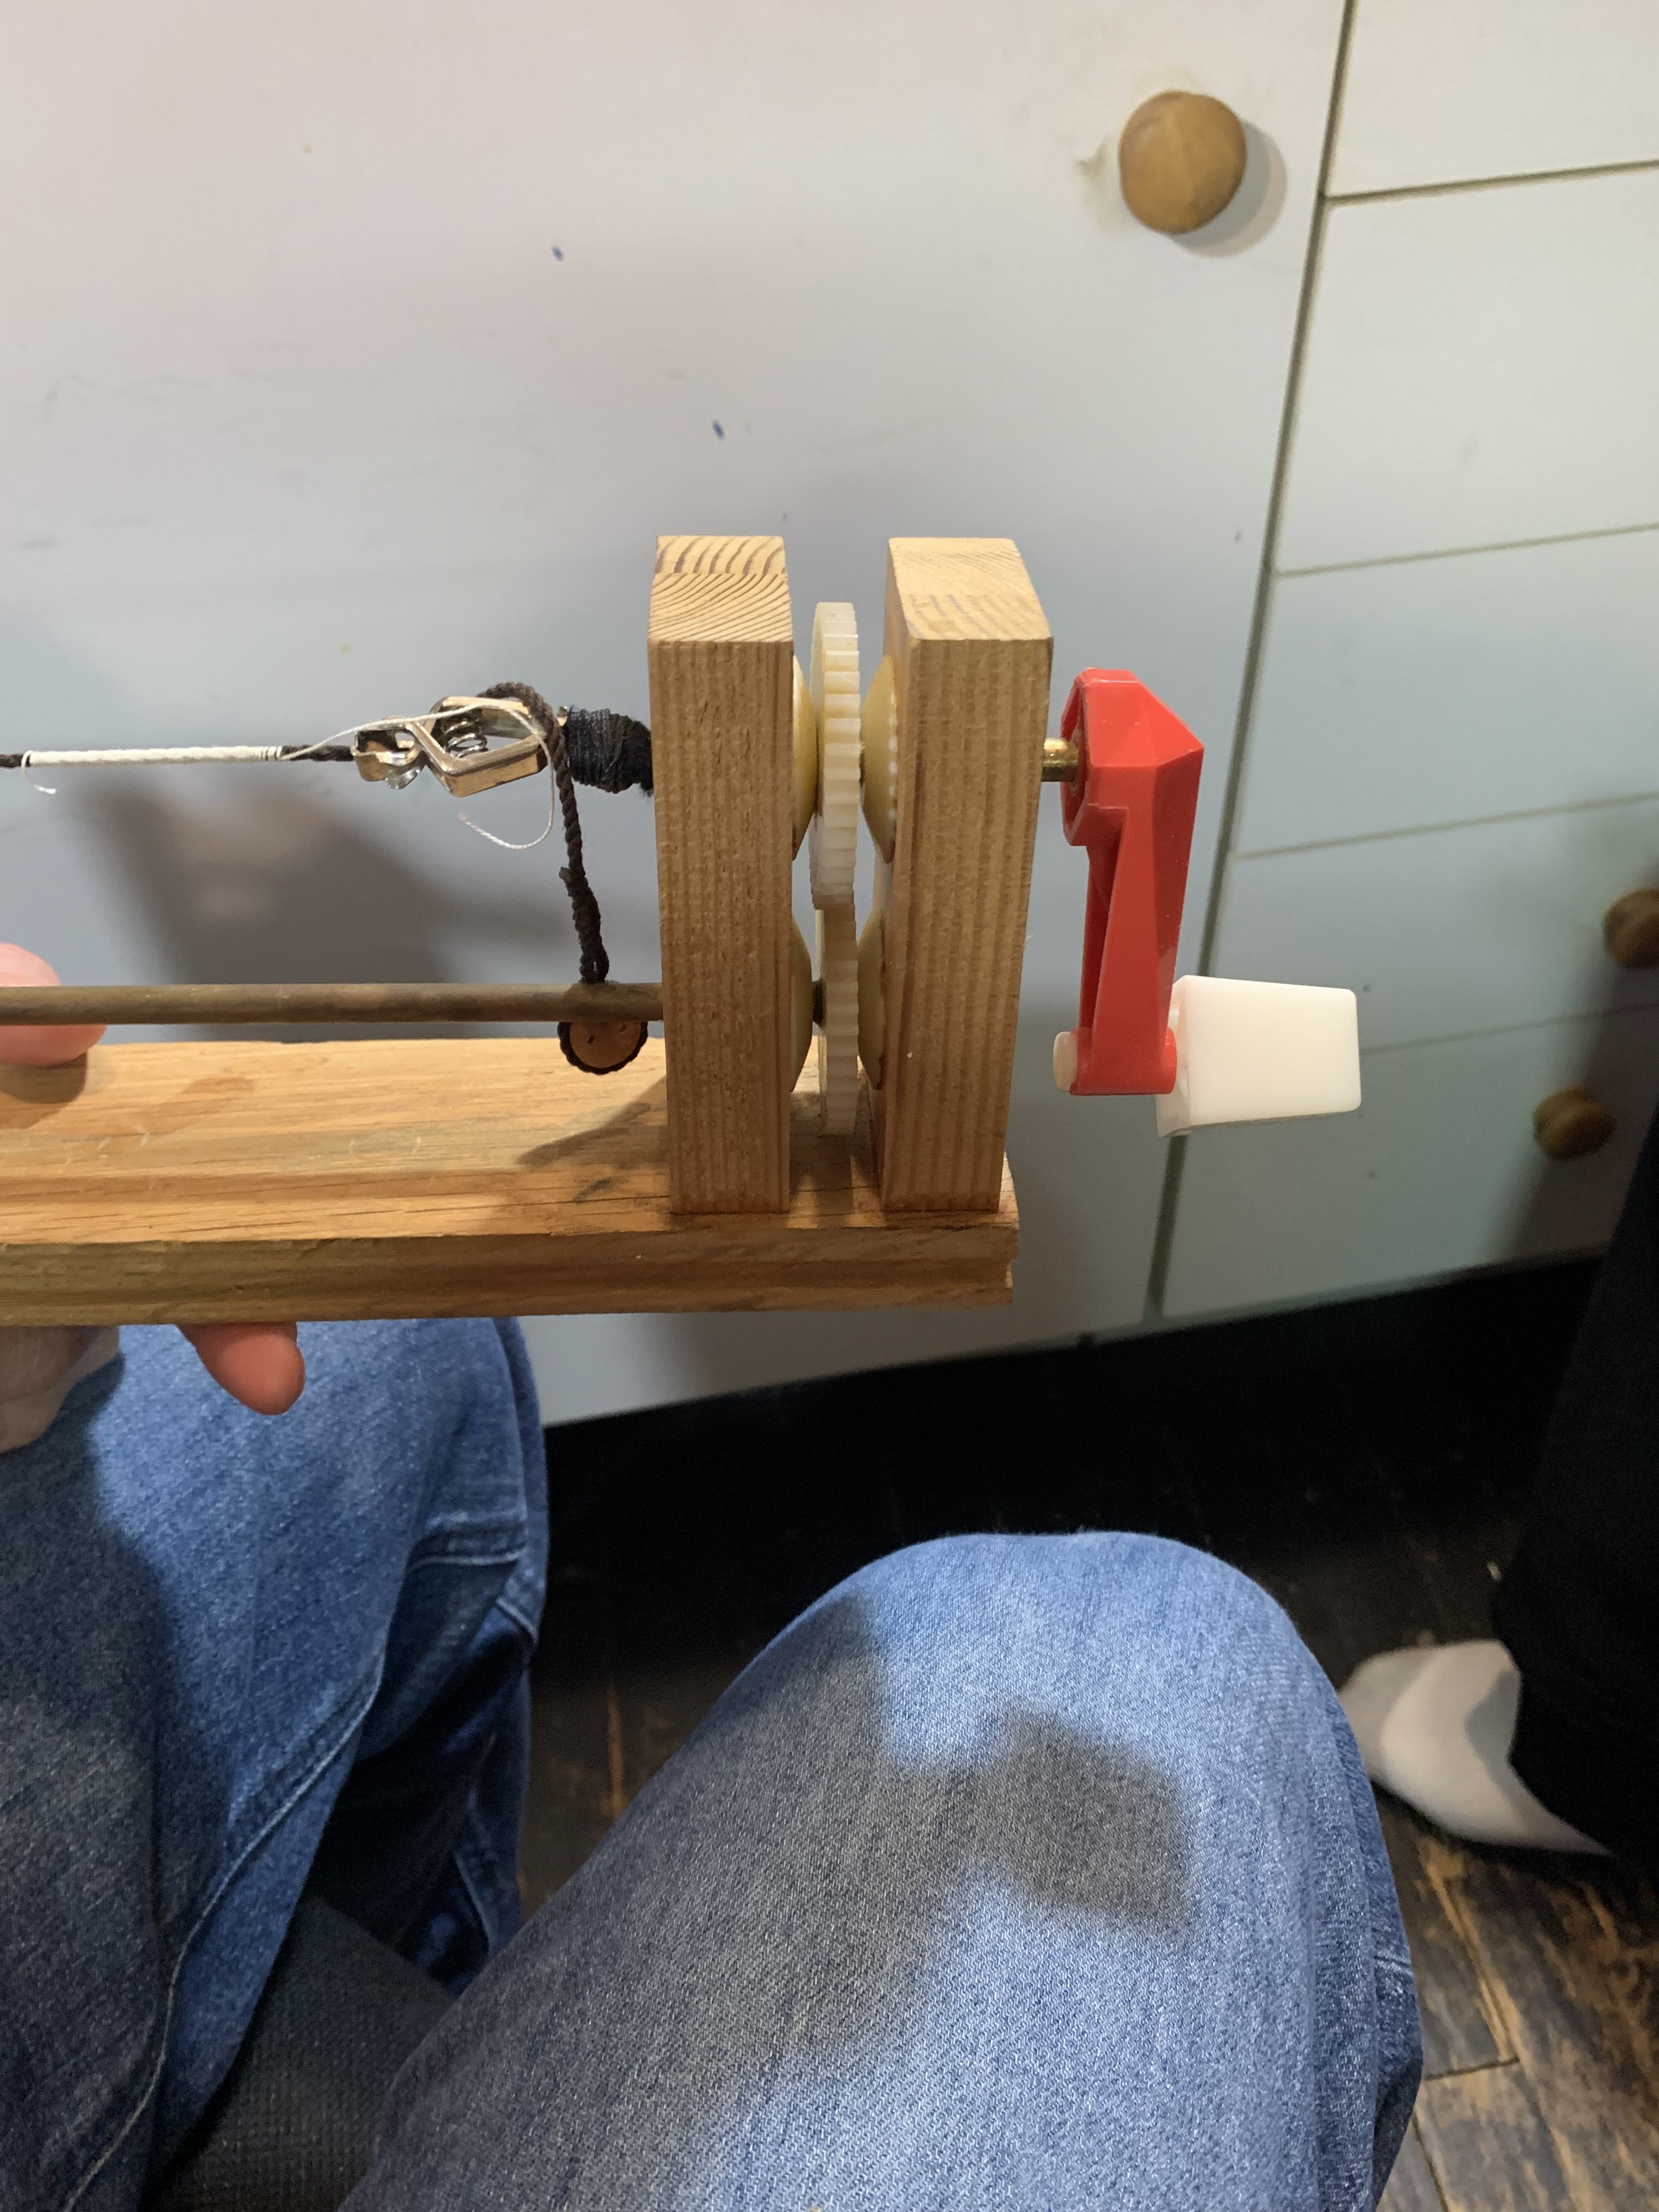
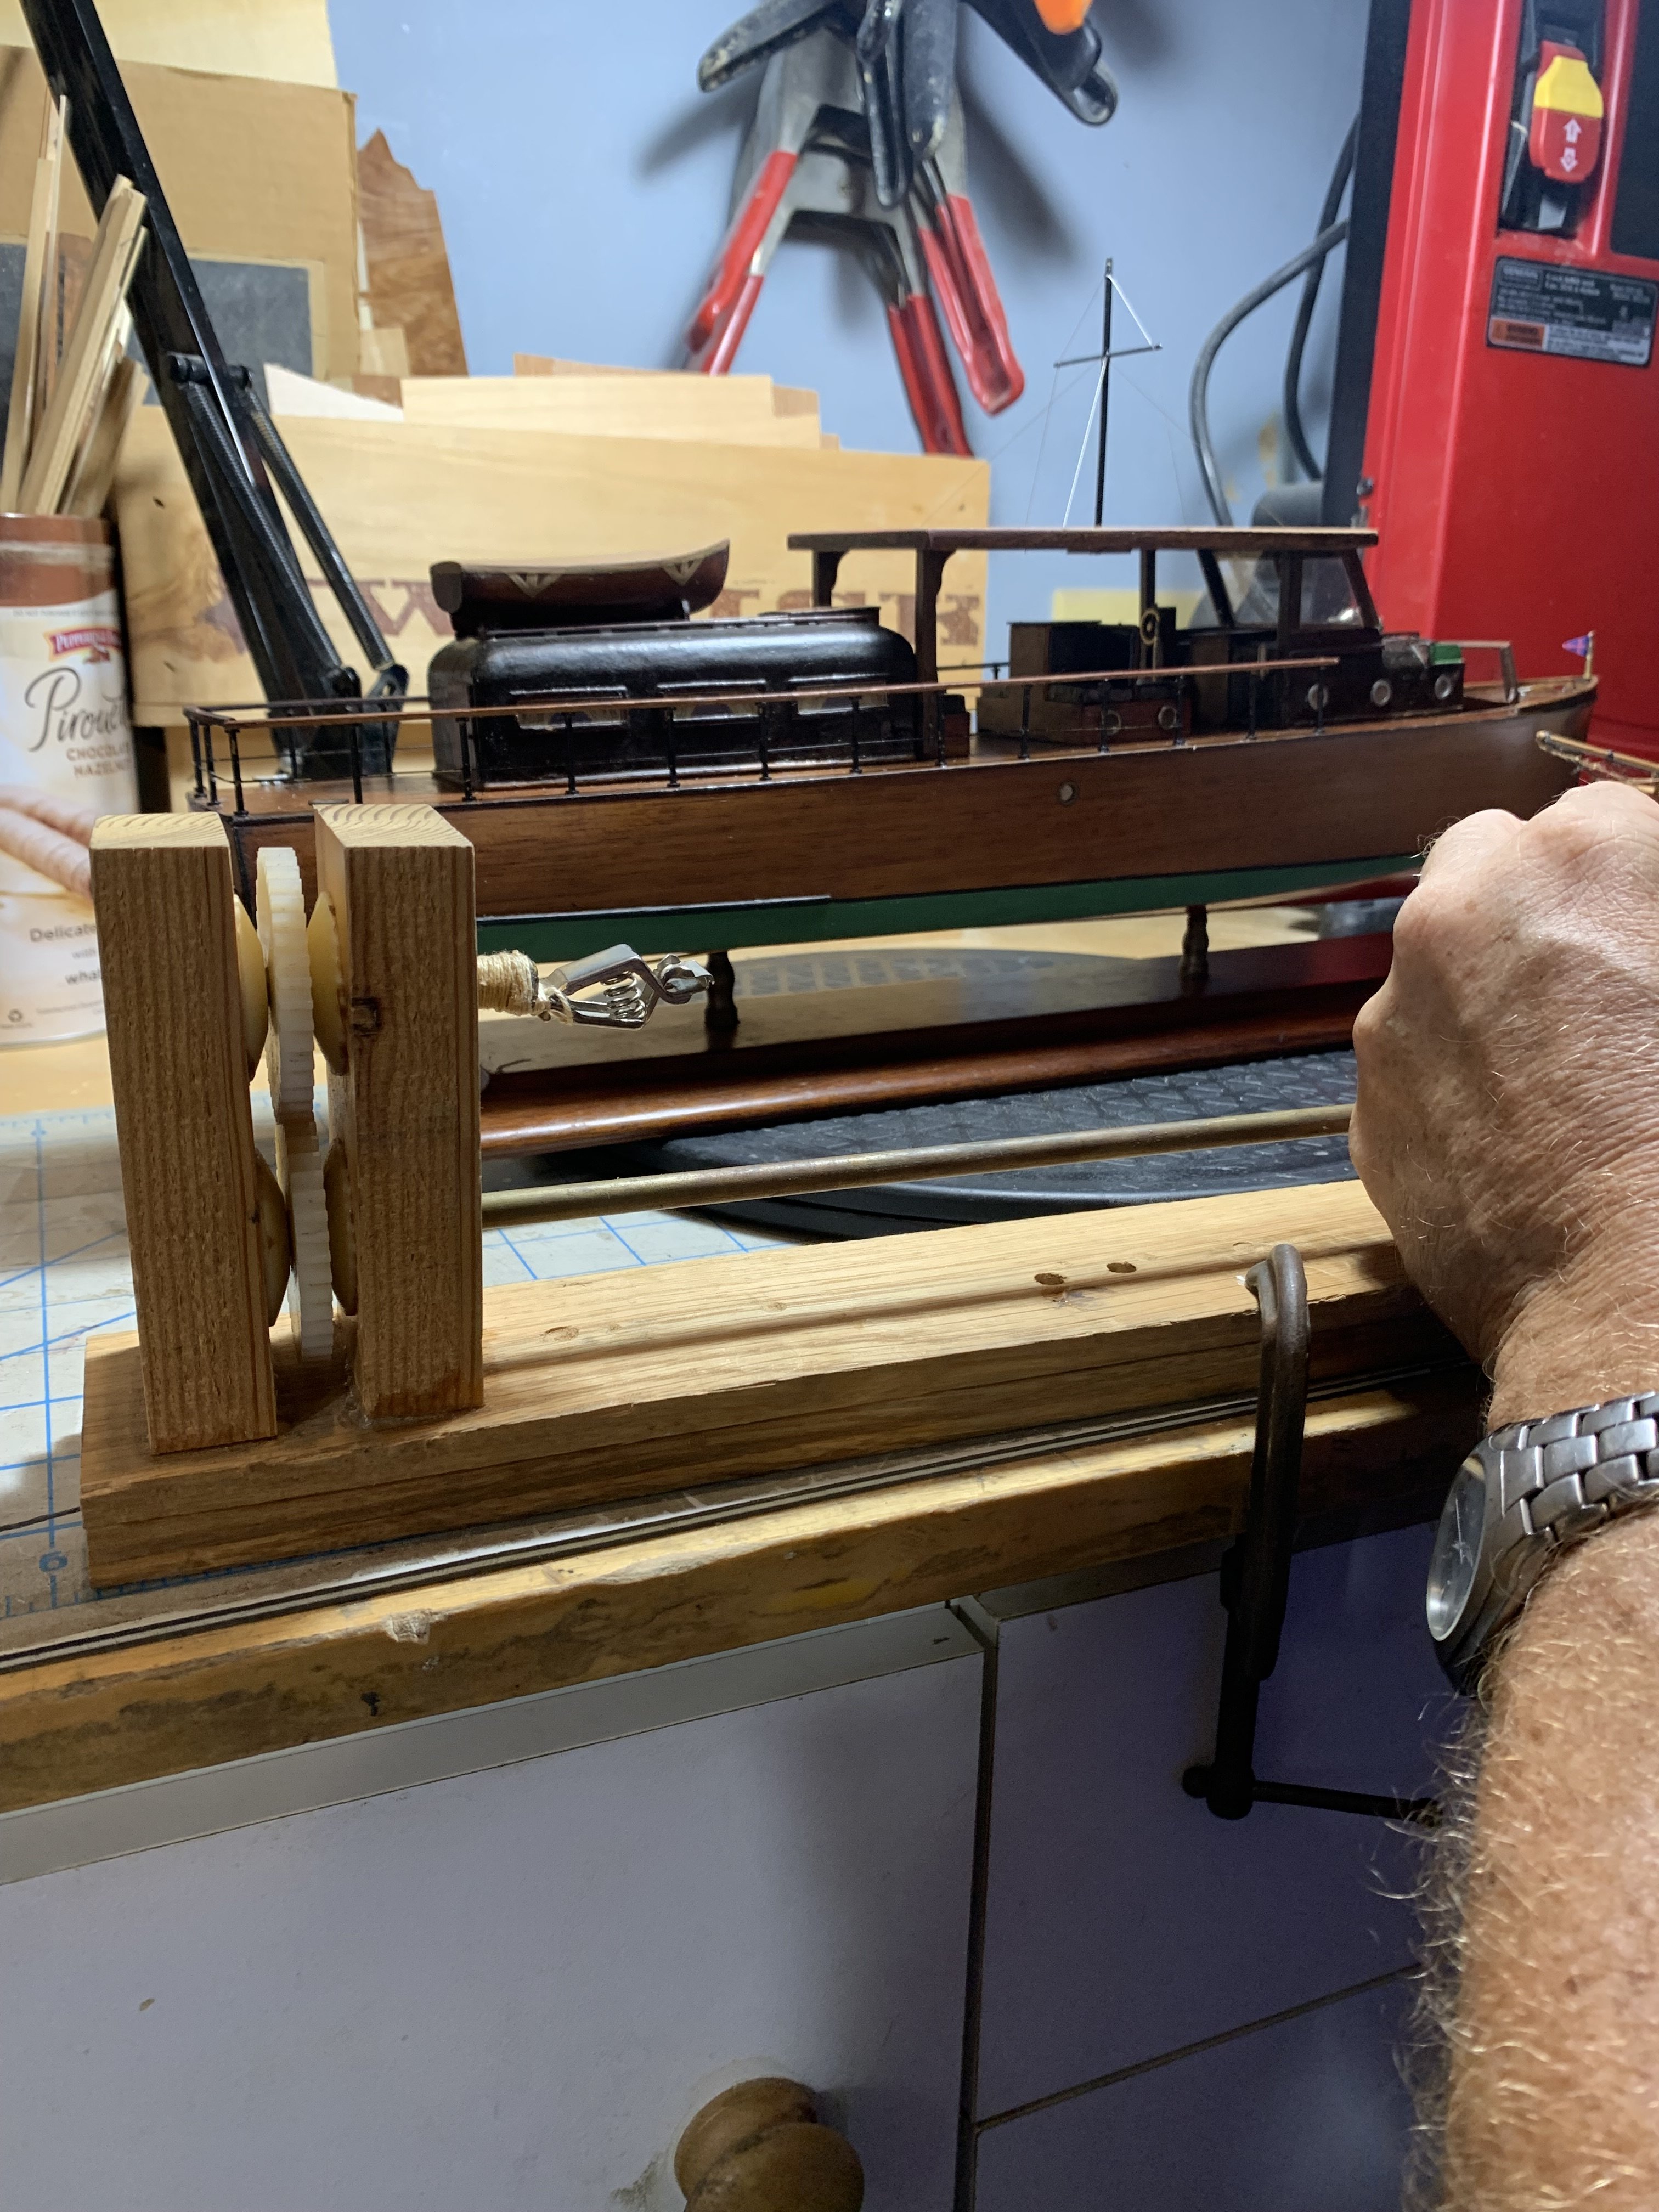
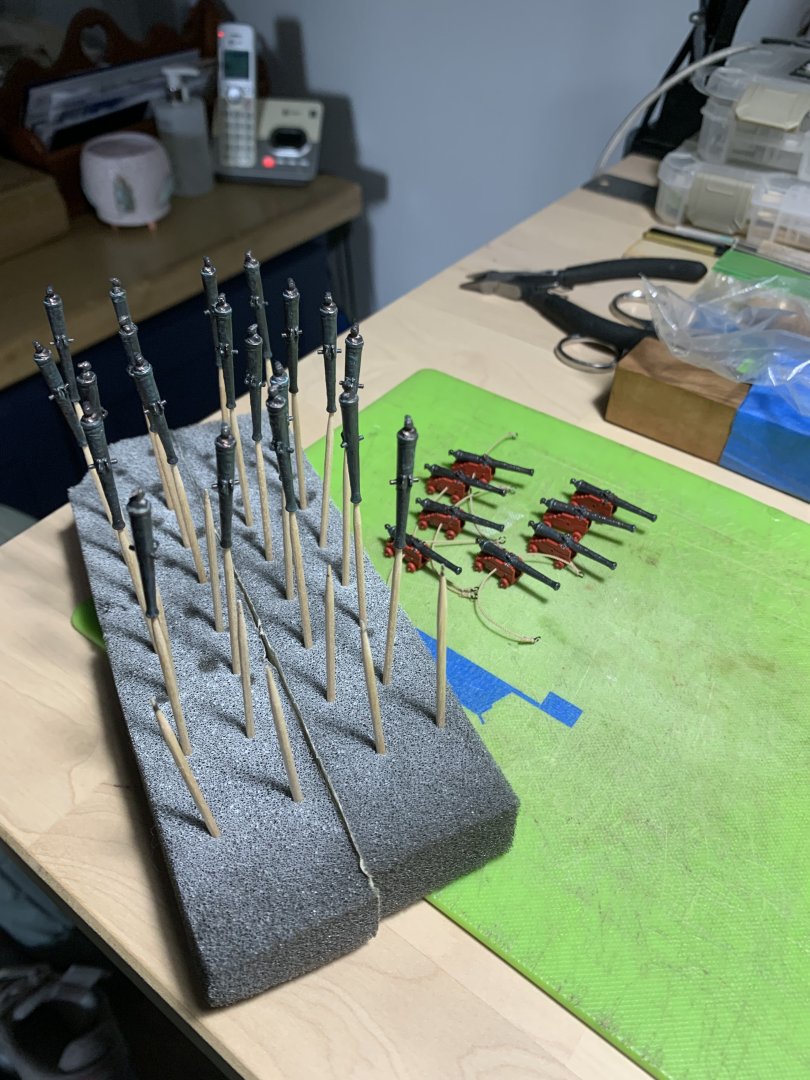
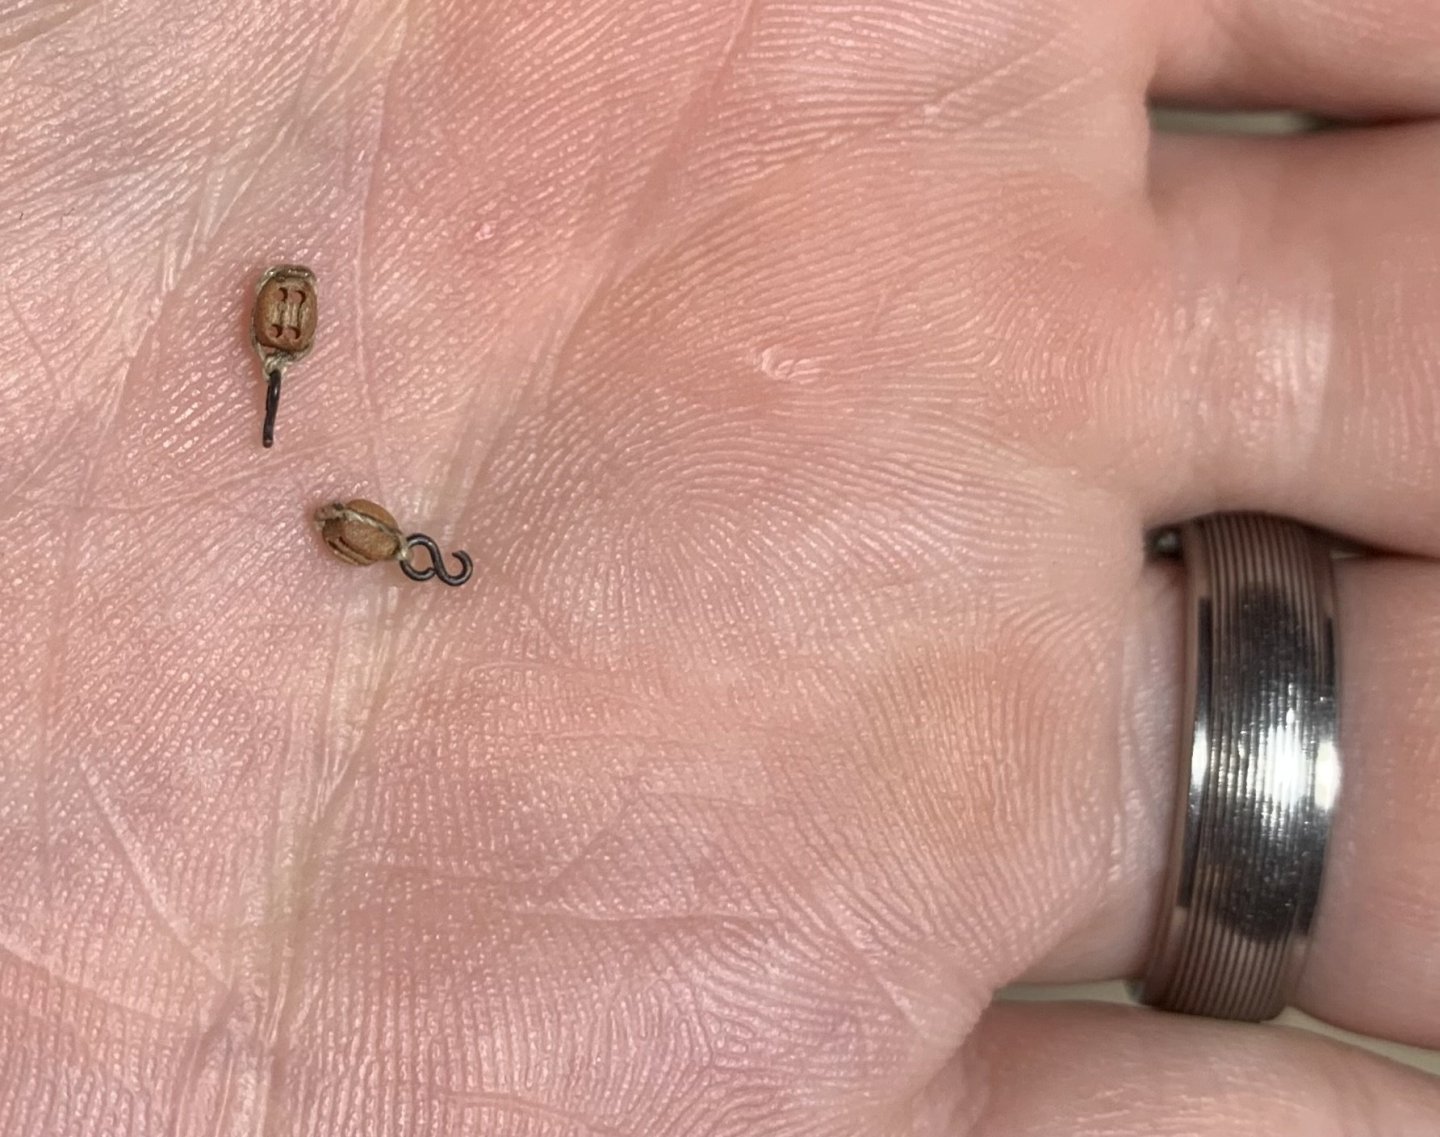
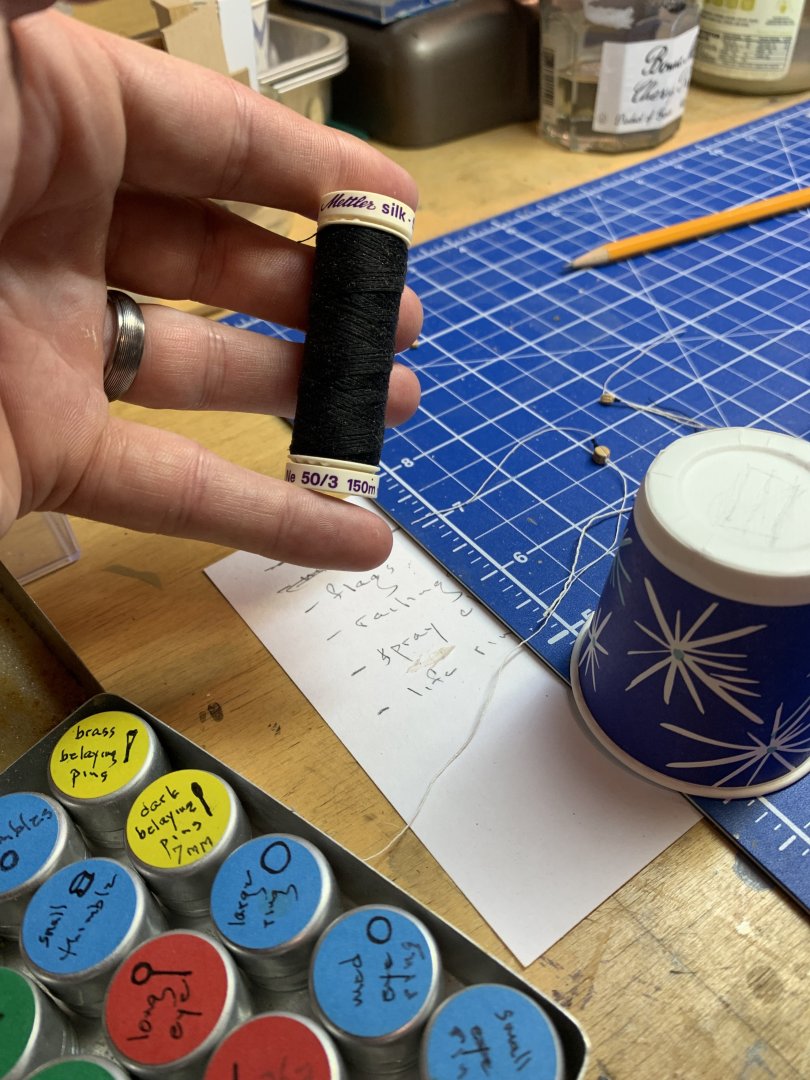
In response to reading through my travails of researching and learning basic rigging techniques, Dan Pariser offered to give me a first-hand tech session of the various tools, materials and techniques that he employs in his own professional work. As is always the case, this was time well-spent. Immediate takeaways: - The helping hands vise with a retro-fitted hardware store spring for tension is an absolute game changer. Intuitively, this is common-sense, but actually using the device makes it crystal-clear how medieval my previous efforts really were. Welcome to the enlightenment! - Speaking of which, a simple magnifying visor really helps to ease eye-strain - particularly for fools like me who are still stubbornly resisting the very real need for transition lenses. - Buying a box of small CA gel tubes is a wise investment. - Along those lines - small disposable paper cups, like the ones you would use to stock a water cooler, are the perfect elevated platform for you to place a dollop of your gel CA. I had been using small squares of tin foil, but it’s easy to lose sight of the glue spot and/or stick the foil to your hand when you aren’t paying strict attention. - One really should accustom themselves to using bent-nose tweezers for their rigging processes. Self-evident, I know, but I have a tendency to make due with whatever I have laying about. I am usually working way too hard. - Common, round tooth picks are the perfect CA applicators. So, Dan showed me a variety of approaches to stropping a block, either with or without hooks. What was especially fascinating was the interplay between polished line (free of whiskers) and either embroidery thread or fly-tying line for seizings. Embroidery thread, because it has a lay, will grab onto the polished line, while fly-tying line is more prone to slipping. This can make it difficult to advance the seizing. To counteract this, when using fly-tying line, one might begin the seizing with a Lark’s Head knot, and then reversing both leads in the counter-direction, in order to cinch the knot tight: https://howdidyoumakethis.com/larks-head-knot/ Another important take-away was to begin the seizing at the distance away from the block that you wish the seizing’s length to be. With each successive wrap, the seizing grows tighter as it nears the block. Lastly, a perfectly serviceable and long-lived serving machine can be made for a mere hardware store pittance: As soon as I got home, I now found it incredibly easy to make hook strops for my 2mm double blocks: Right now, I’m in the process of painting all of the main deck guns. Their bores have been blacked-out. I have learned from my earlier experience with the lower main deck guns to always keep the gun barrels separate from each other during the painting process. This is especially true for the next step, which is the Citadel ver-de-gris wash. I’ll have a bit of a tedious touch-up process for those lower deck guns, much later in the build. The cascabels are still white, here, because I am using that end to hold the barrel while I brush on the Citadel dark bronze. I haven’t tried to airbrush this paint, but I suspect that the metallic flake would make it a poor candidate for air-brushing. Once painted, I’ll join the barrels to their carriages. I’ll add cap-squares with CA and strips of black construction paper. Then, I’ll glue the guns down and attach the breaching ropes and tackles. Dan showed me quite a bit more about knotting techniques and other rigging tips, but I will discuss those things as the build necessitates them. Thank you so much, Dan! And thank you all for looking-in!


- 2,699 replies
-
- 12
-
-
- heller
- soleil royal
- (and 9 more)
-
I don’t think I have ever seen anything quite like this. It’s like a fine rasp, but with an adhered abrasive?
- 2,699 replies
-
- 1
-
-
- heller
- soleil royal
- (and 9 more)
-
I’m a little confused: carbide abrasive coated paper, or carbide abrasive coated metal? Forgive me if that is a foolish question.
- 2,699 replies
-
- 1
-
-
- heller
- soleil royal
- (and 9 more)
-
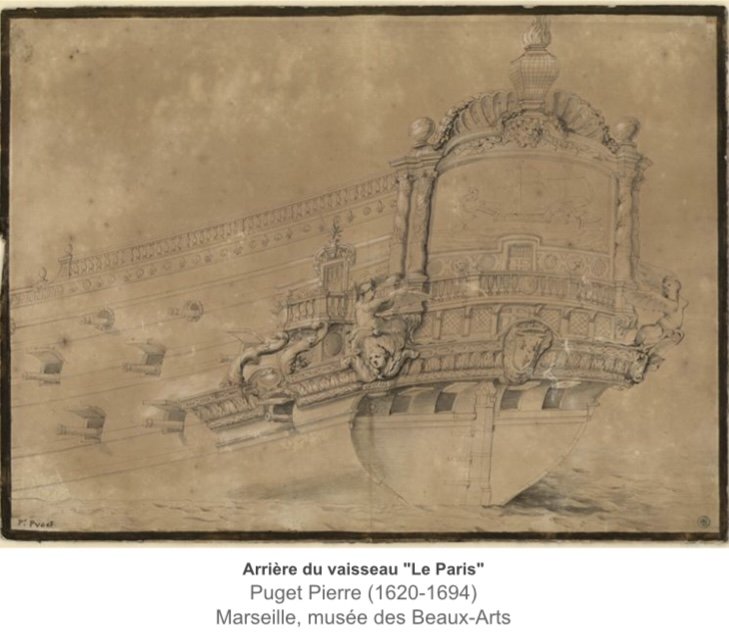
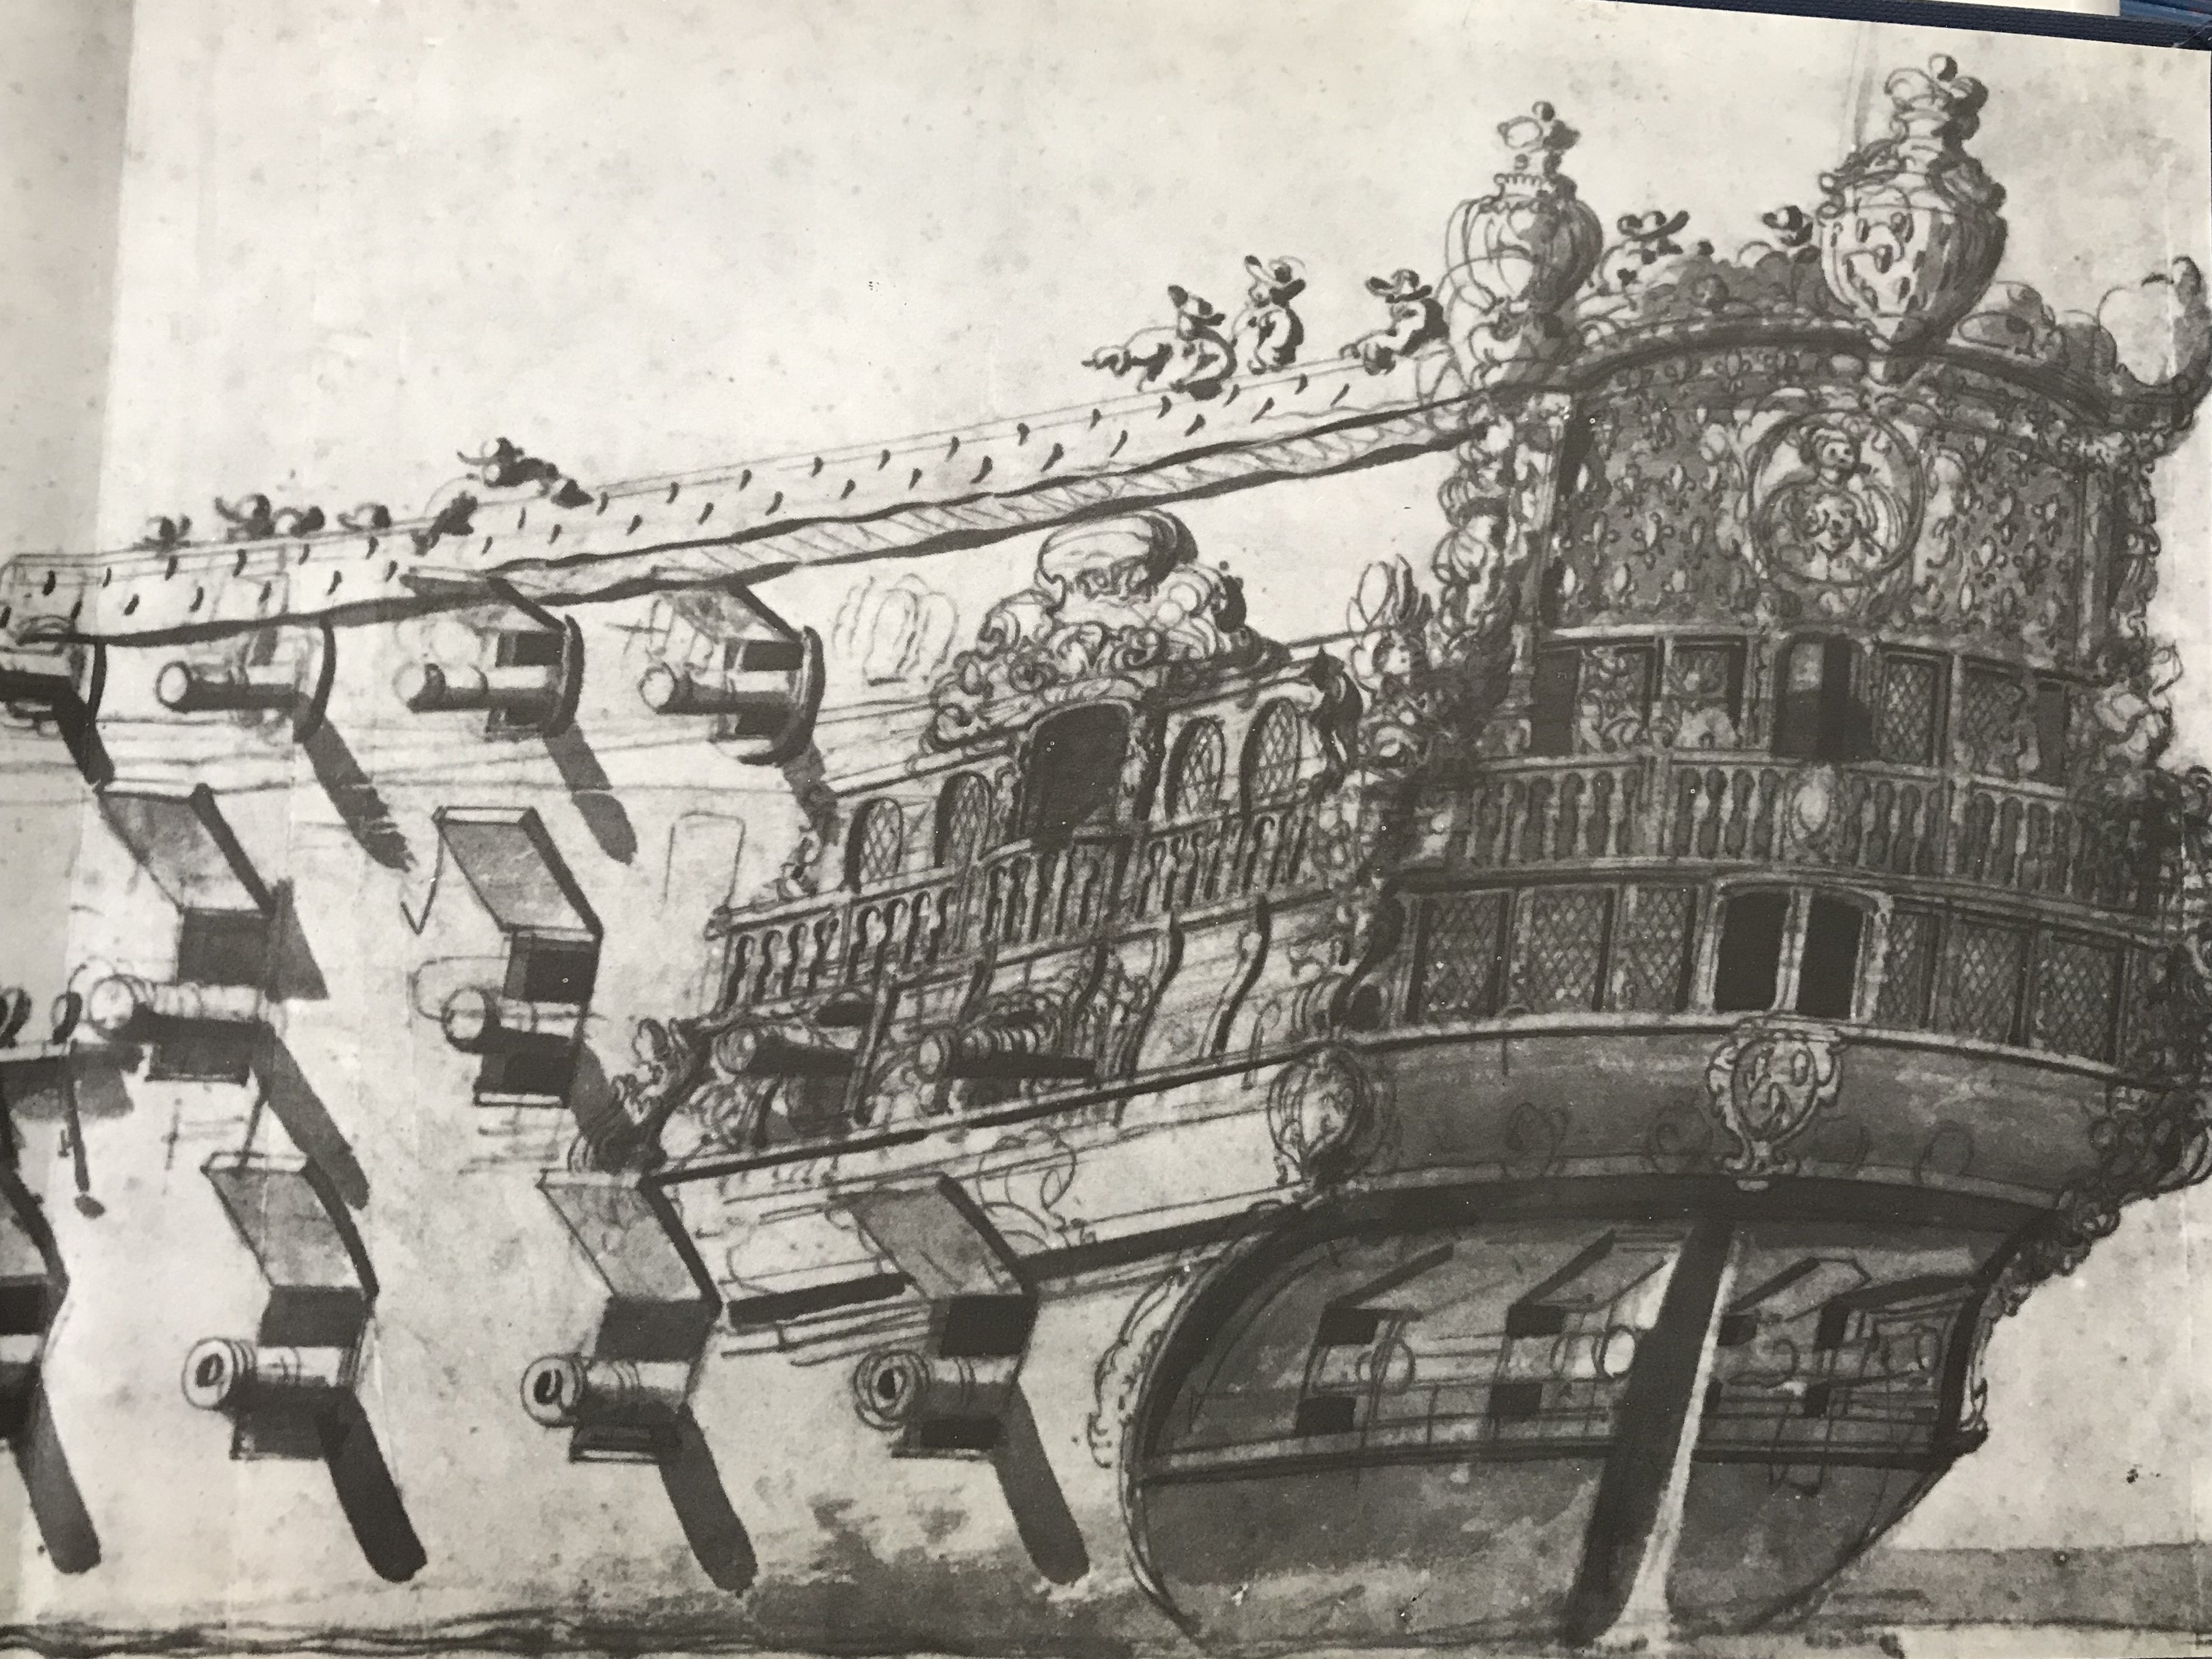
Yes, because this early period in the development of the French navy - before the widespread use of plans - interests me so much, I am constantly searching for contemporary portraits that give an overall sense of line, proportion and decor.
-
Alex, your log is wholly unique to the site and a pleasure to read, with marvelous works that both inspire and amaze. It is really fascinating to see the progression of your carving skills, through your earlier vessels like L’Ambiteaux, Le Francoise, etc. The detail has always been there, but there is now a lightness and animated quality to the work that is really extraordinary. It’s such a vague and indeterminant quality to describe or quantify, but you have certainly achieved it. Here would be a fun, never before modeled winged project; Puget’s exuberantly ornamented Le Paris of 1668 (later renamed and redecorated as La Royal Therese): And as the Royal Therese: