Hubac's Historian
-
Posts
3,308 -
Joined
-
Last visited
Content Type
Profiles
Forums
Gallery
Events
Everything posted by Hubac's Historian
-
 Another beautiful job, Bill! So, what’s next in your dockyard?
 -
Just brilliant beyond compare. The detailing is off the charts!
- 324 replies
-
- 3
-

-

-
- Sovereign of the Seas
- Airfix
- (and 1 more)
-
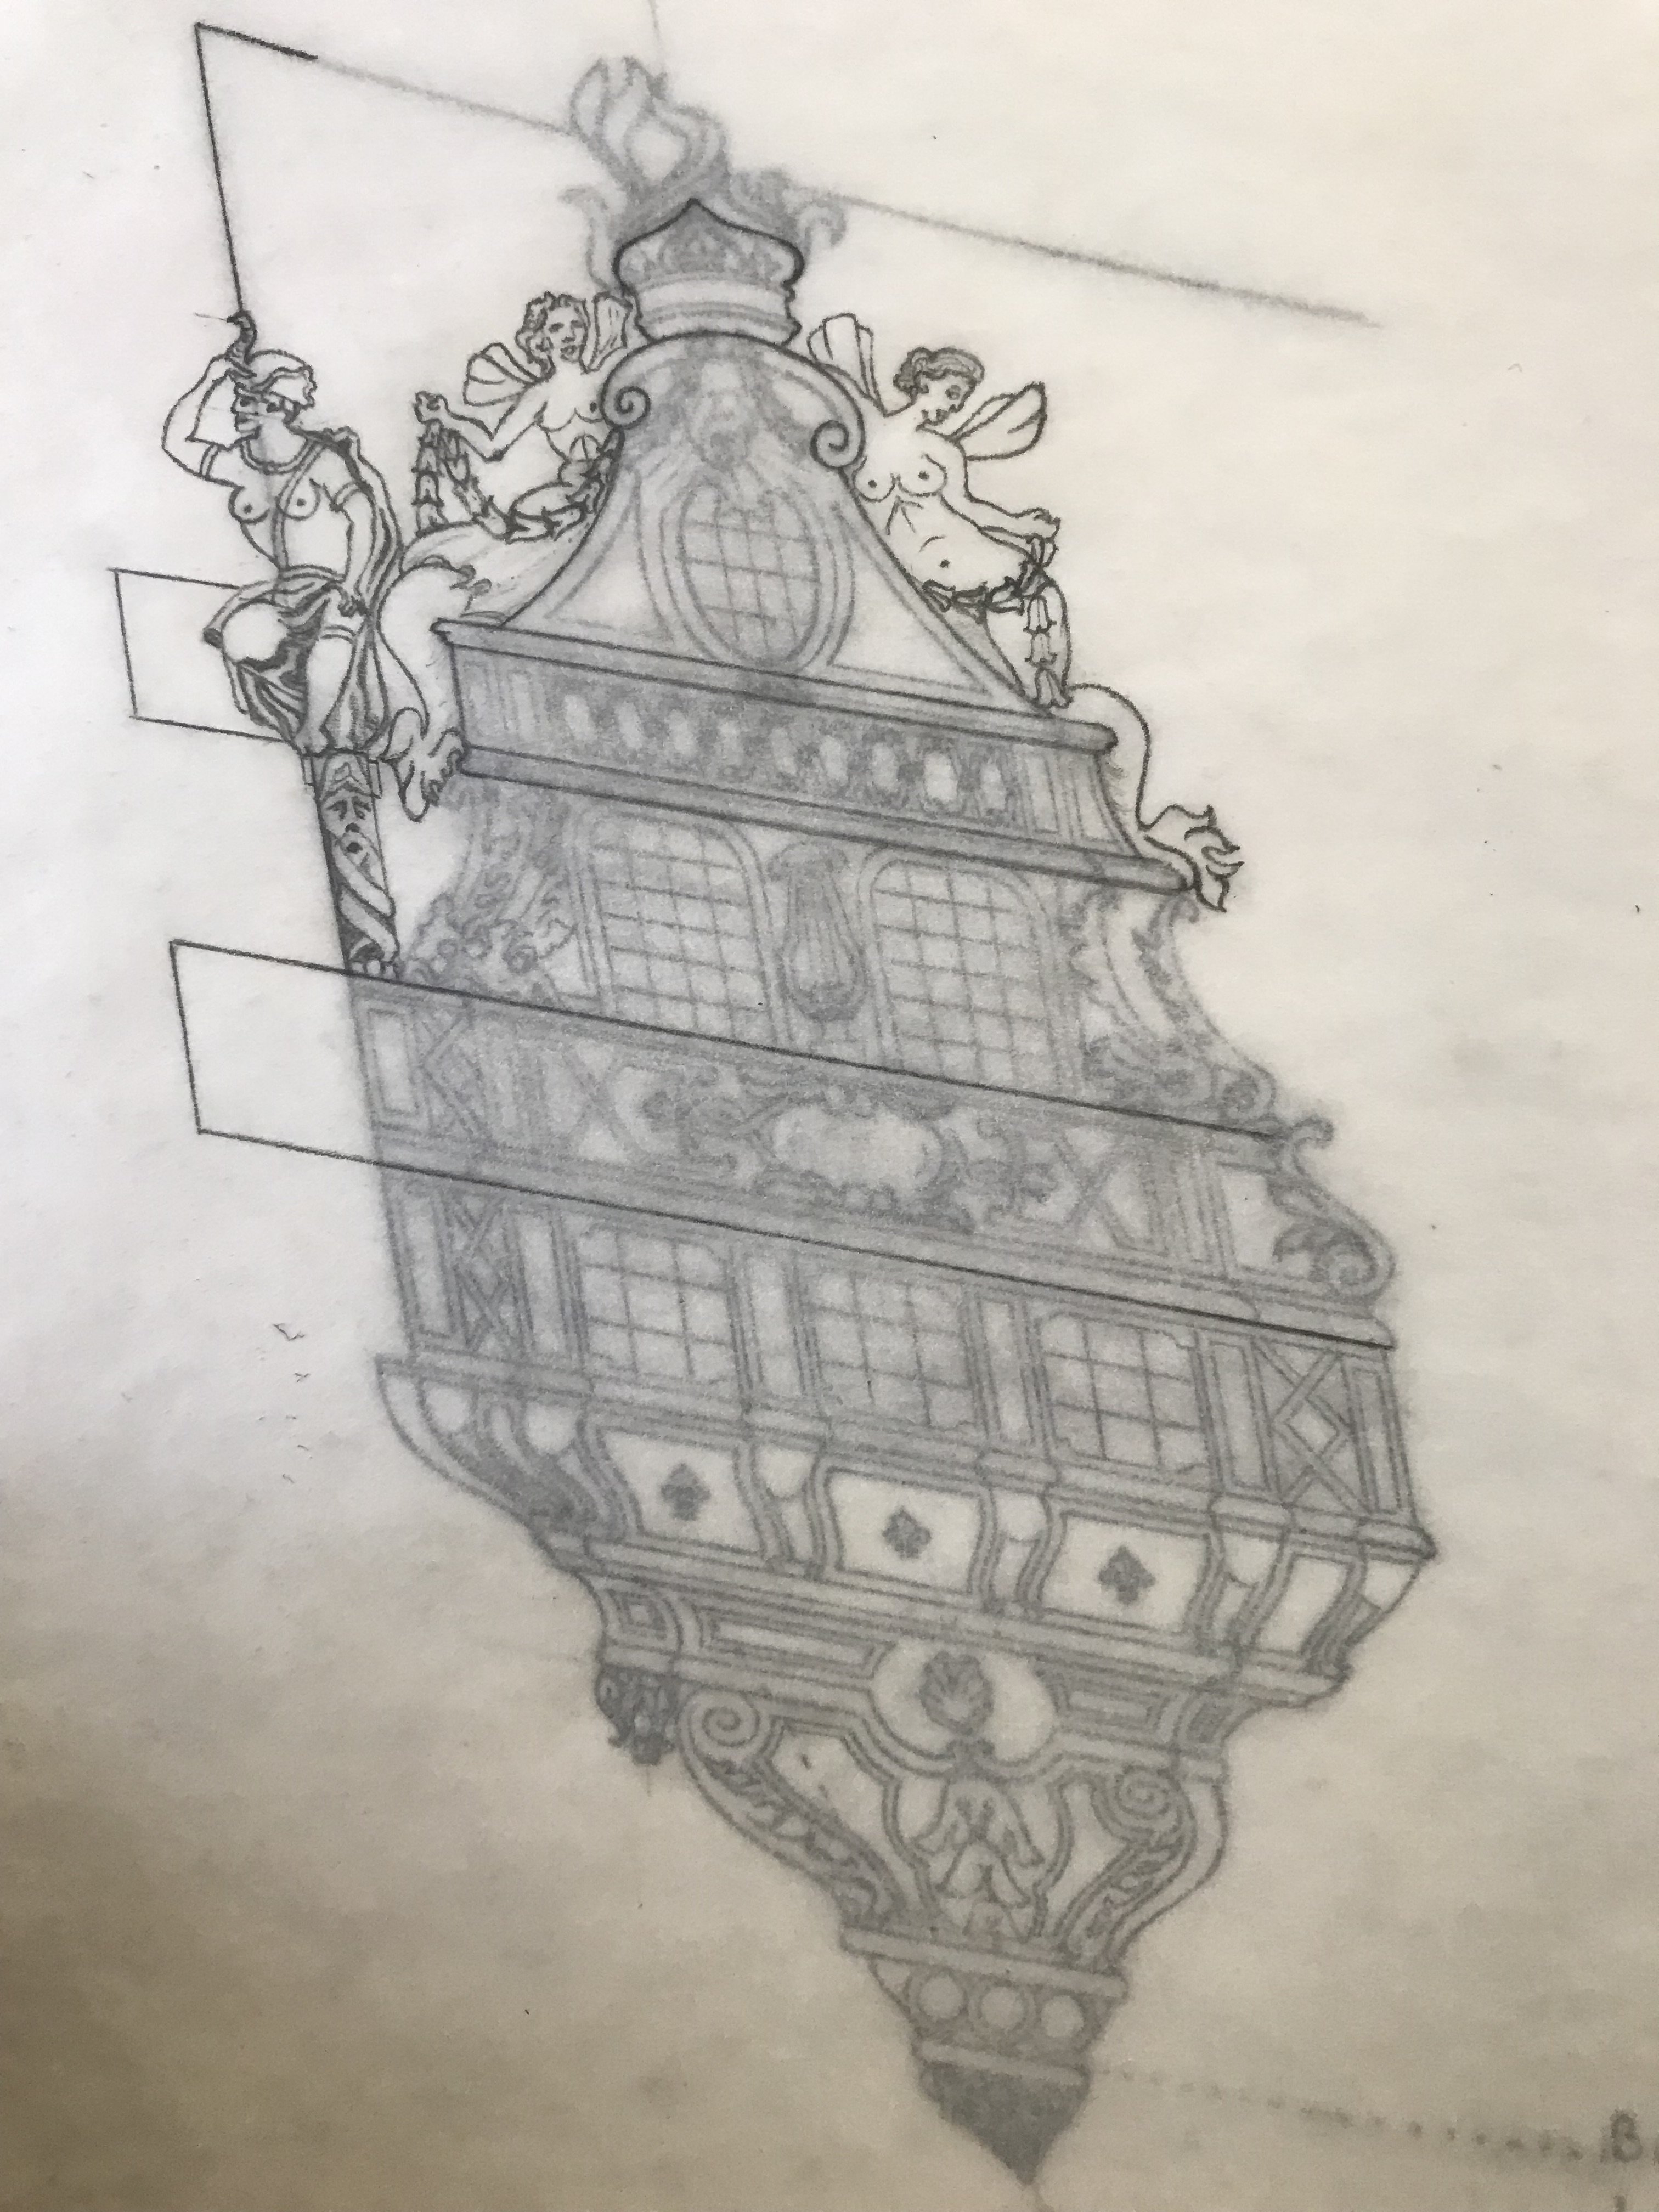
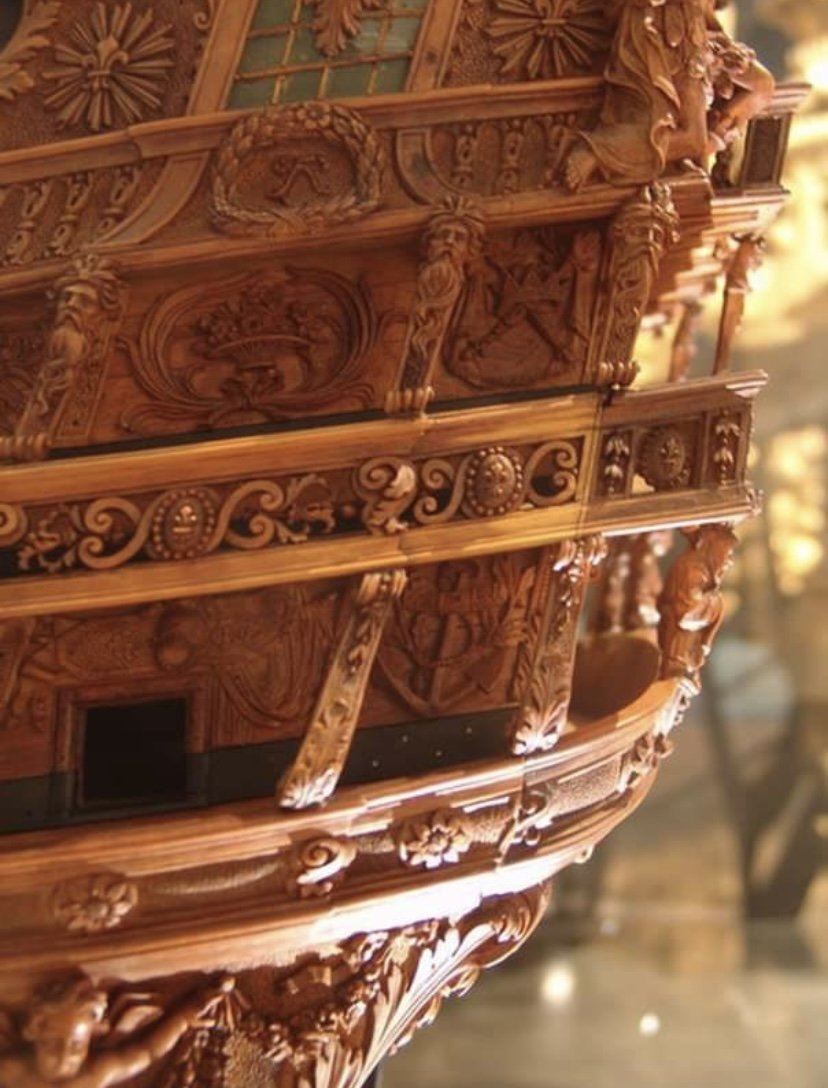
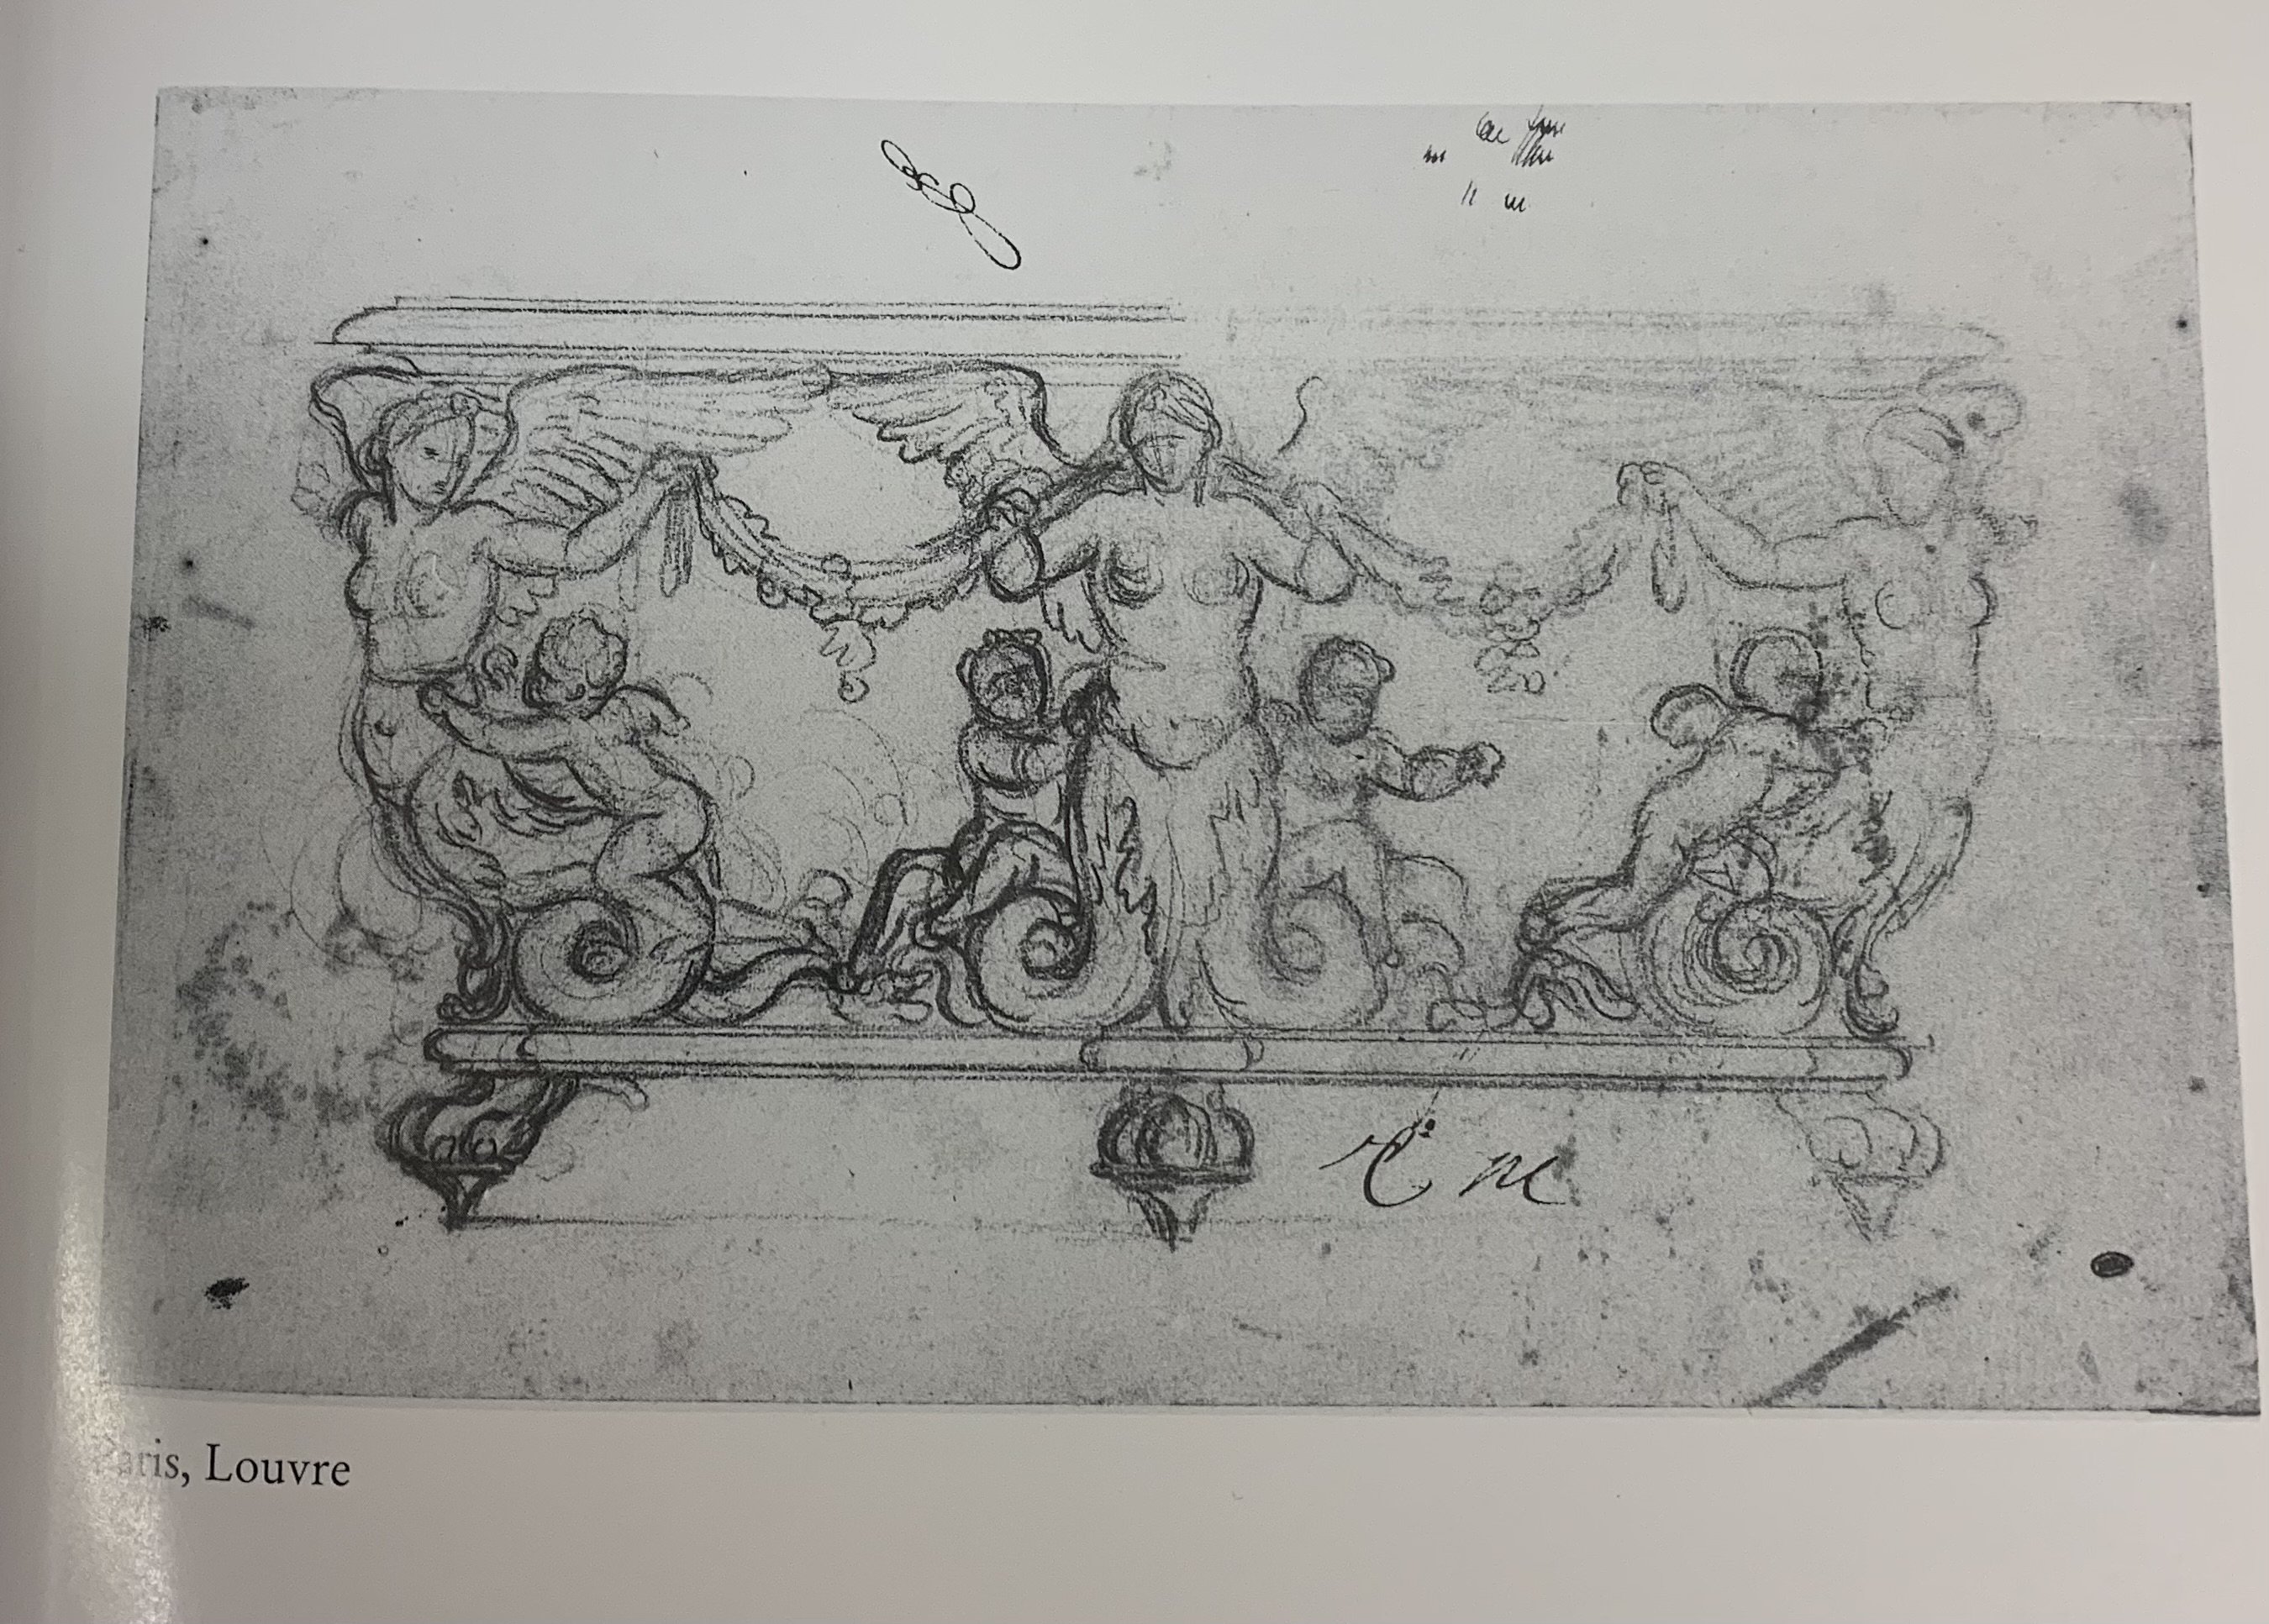
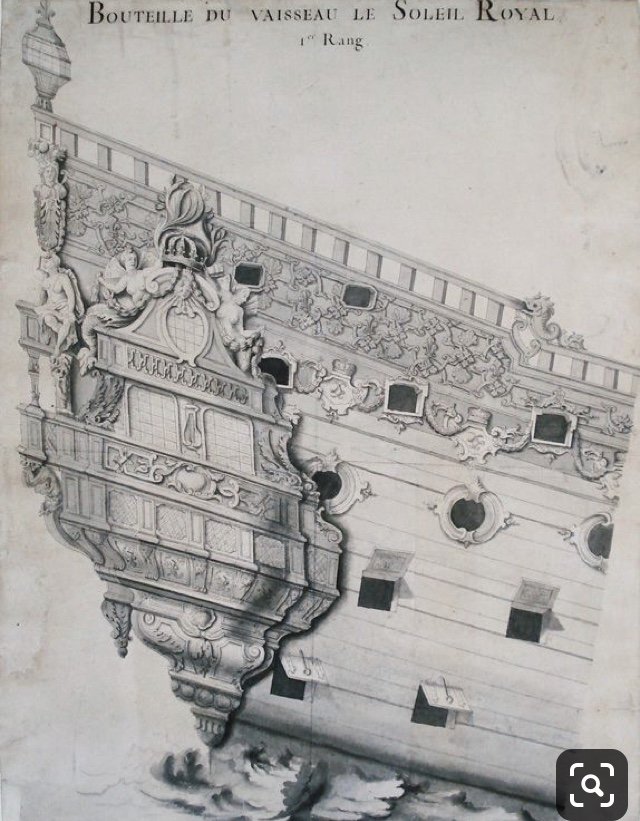
With regard to the two main issues you have raised, here, I submit the following for your consideration. When I was first considering this, presumed to be Jean Berain, design for the 1689 quarter galleries of Soleil Royal, there were aspects of the drawing that seemed like artifacts of an earlier time. If I were to interpret the drawing literally, it would result in a cramped and muddled looking structure: This profusion of five false windows in the lower gallery tier have more in common with the construction practices of the early 1670’s. The windows, themselves, are one thing, but where it really gets cramped is the area below with all of it’s pilasters and panels. The way this is drawn is unpleasingly asymmetrical to my eye. Alternatively, I reduced the number of windows on the lower tier to three and arranged them along a central axis that runs straight through the crowned upper finishing, and the grape-clustered lower finishing. The triangulation of the 3:2:1 window arrangement better supports the essentially diamond shaped quarter galleries in a more harmonious way. The pilaster and panel arrangement is also much more coherent: This light re-design has the added advantage of being much more consistent with the construction practice of these times of the latter 1680’s. With the exception of the quarter deck level (Admiral’s quarters) - the single window in the amortisement - all other quarter gallery windows would be false, with perhaps a small, hinged center window within the window, for ventilation while using the toilet. It is my belief that all of these lower tier false lights would have been removable panels, behind which there could be an additional cannon port. You see this at the main deck and middle deck levels of Tanneron’s model: photos, courtesy of Yoann Guillemenet.


-
I understand your impulse toward perfection, but the windows are really excellent. The mullions follow the horizontal camber of the stern, and the vertical tumblehome of the topsides. One point I am still curious about. How did you ultimately get the tagua nut carvings to re-adhere to their place settings?
-
Absolutely stunning work!
-
Are cavals the single sheave post belay points? Curious because the Heller SR is littered with them, and I have not yet determined whether they were a real thing. Do you know more about these?
-
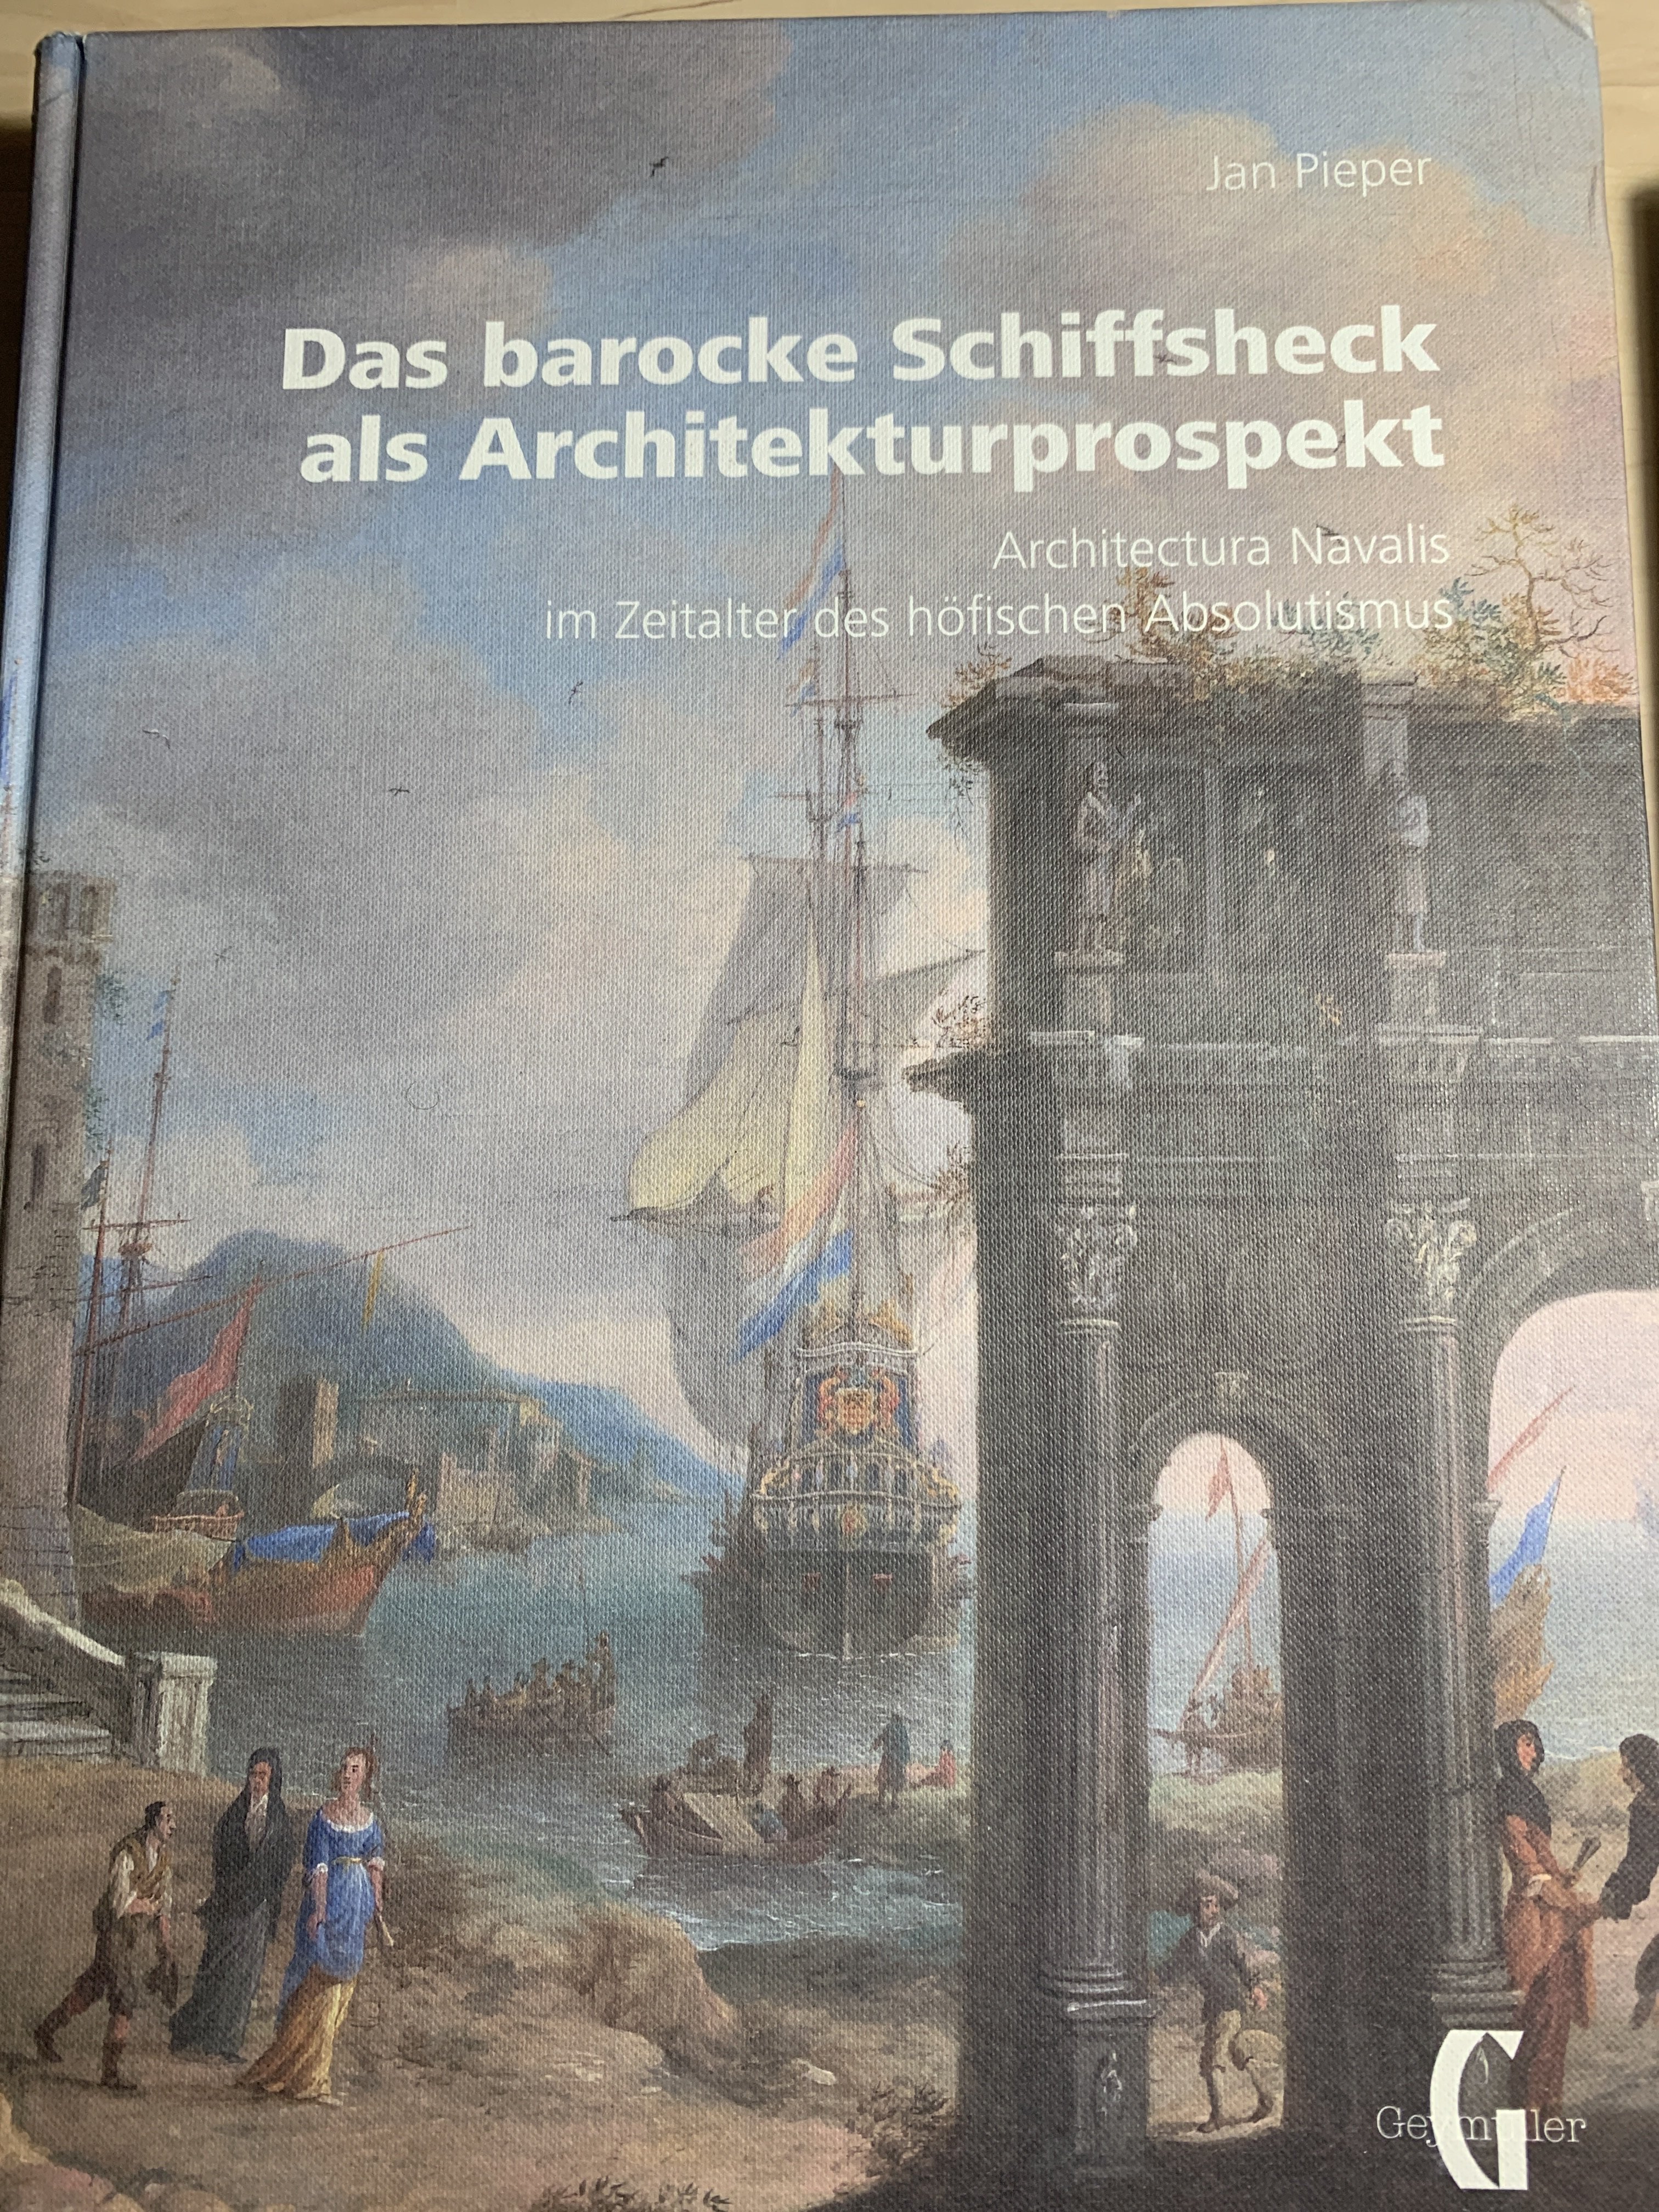
Fantastic work, Matthias! Your earlier book recommendation with the loosely translated title, The Baroque Ship as an Architectural Prospect, has become my favorite resource. Thank you for the recommendation!
-
Hi Guys - very late to this discussion, but my 1 1/2 CENTS: I was searching for pictures of the replica ship under sail, and could not find any that showed boomkins rigged. Perhaps the crew employs other practical work-arounds, although I have no clue what they might be.
-
I would add, also, that I’ve coiled and flaked rope as a volunteer on South Street Seaport’s historic schooner Pioneer. Coils have to run freely, so longer loops and fewer are better than smaller, stacked coils. Mostly though, at scale, I just don’t like the appearance of perfectly round coils that instantly bring to mind the knitting needle they were formed on. The varnish tip is a good one, but I would be reticent to apply acetone to an acrylic painted, plastic model. This approach, it seems to me, is perfect for wooden modeling. ‘Something I will definitely tuck away for the future. I can tell you from my several mis-adventures of blemishing my ventre-de-biche hull that color-matching that distressed appearance is a real biche 😜
- 2,699 replies
-
- 3
-
-
- heller
- soleil royal
- (and 9 more)
-
Hi Ian - Those are actually blocks that Kevin is printing with his own equipment. The smallest I found were also 2MM.
- 2,699 replies
-
- 3
-
-
- heller
- soleil royal
- (and 9 more)
-
Gentlemen, thank you all for the likes and kind words. It is all very much appreciated, coming from such an esteemed group as you all are. Kevin, I don’t think there’d be any significant difference in time period for single and double blocks. The larger, purpose-specific blocks of the yards are a different story. I’m a ways away from those. Wow! - you are absolutely right, what a scale difference it is to go down to 1.5mm. I suspect that I could rig them with the same 100wt silk thread that Michael is using on his Sovereign.
- 2,699 replies
-
- 4
-
-
- heller
- soleil royal
- (and 9 more)
-
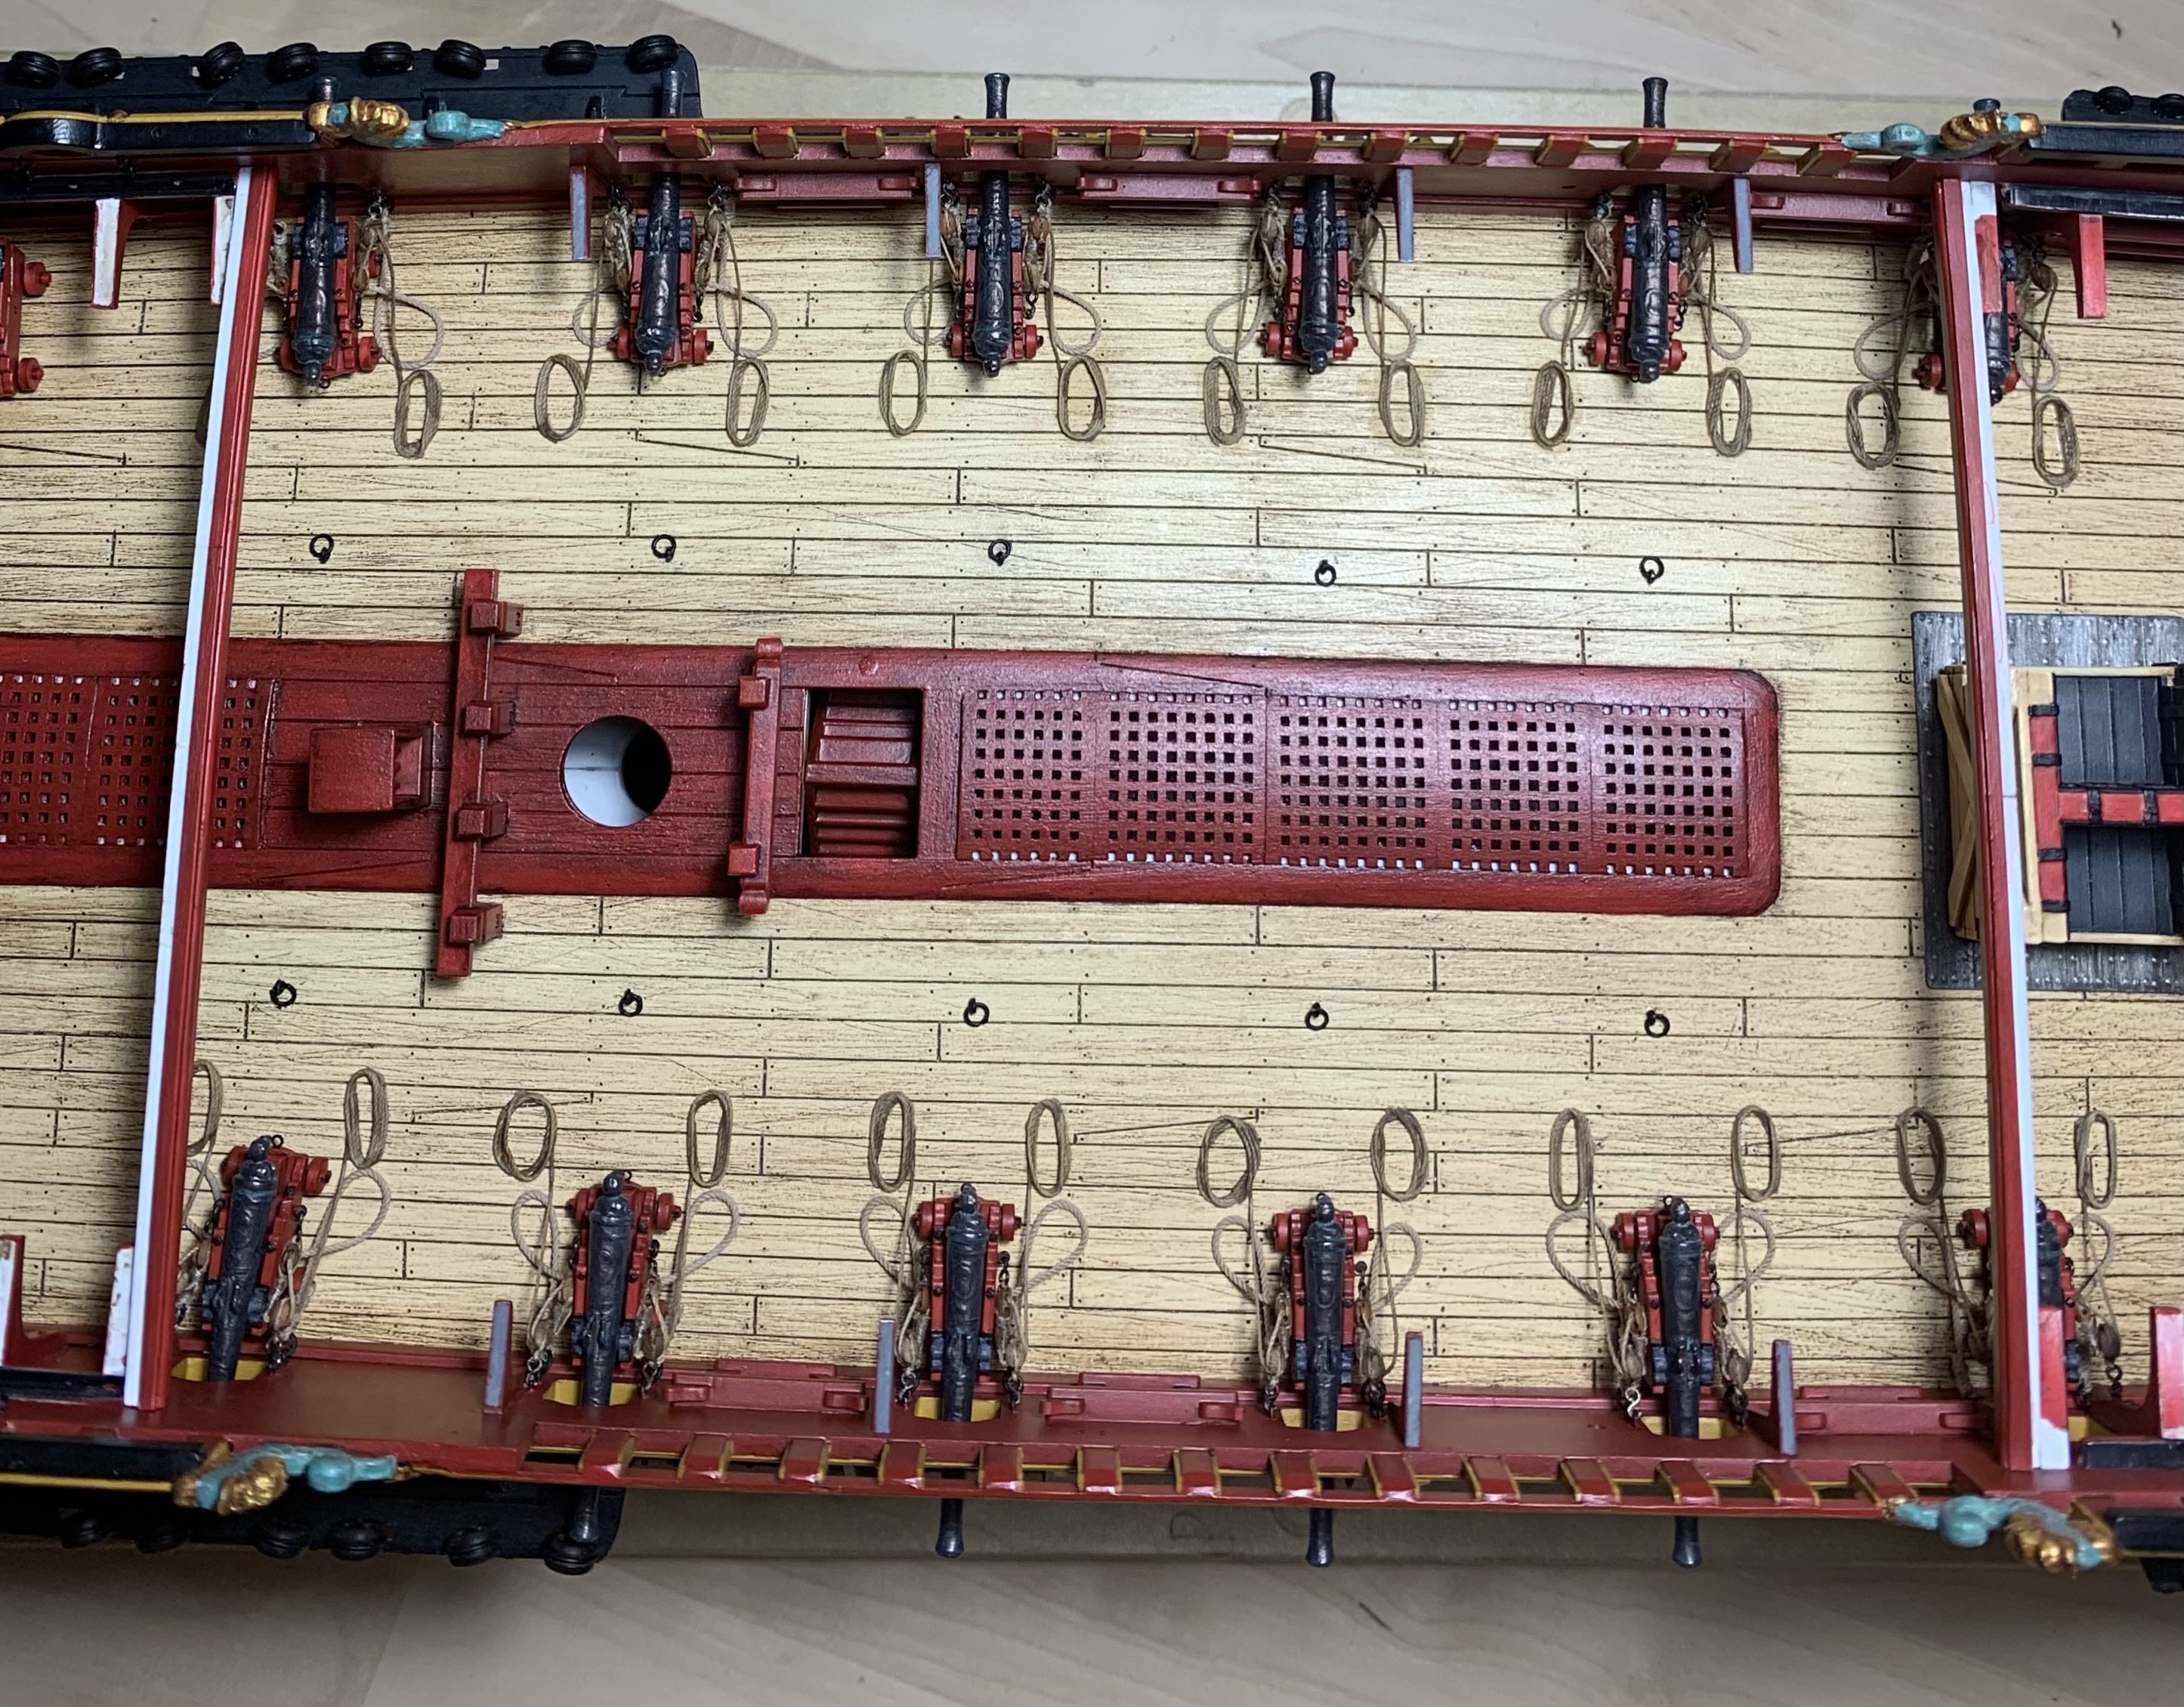
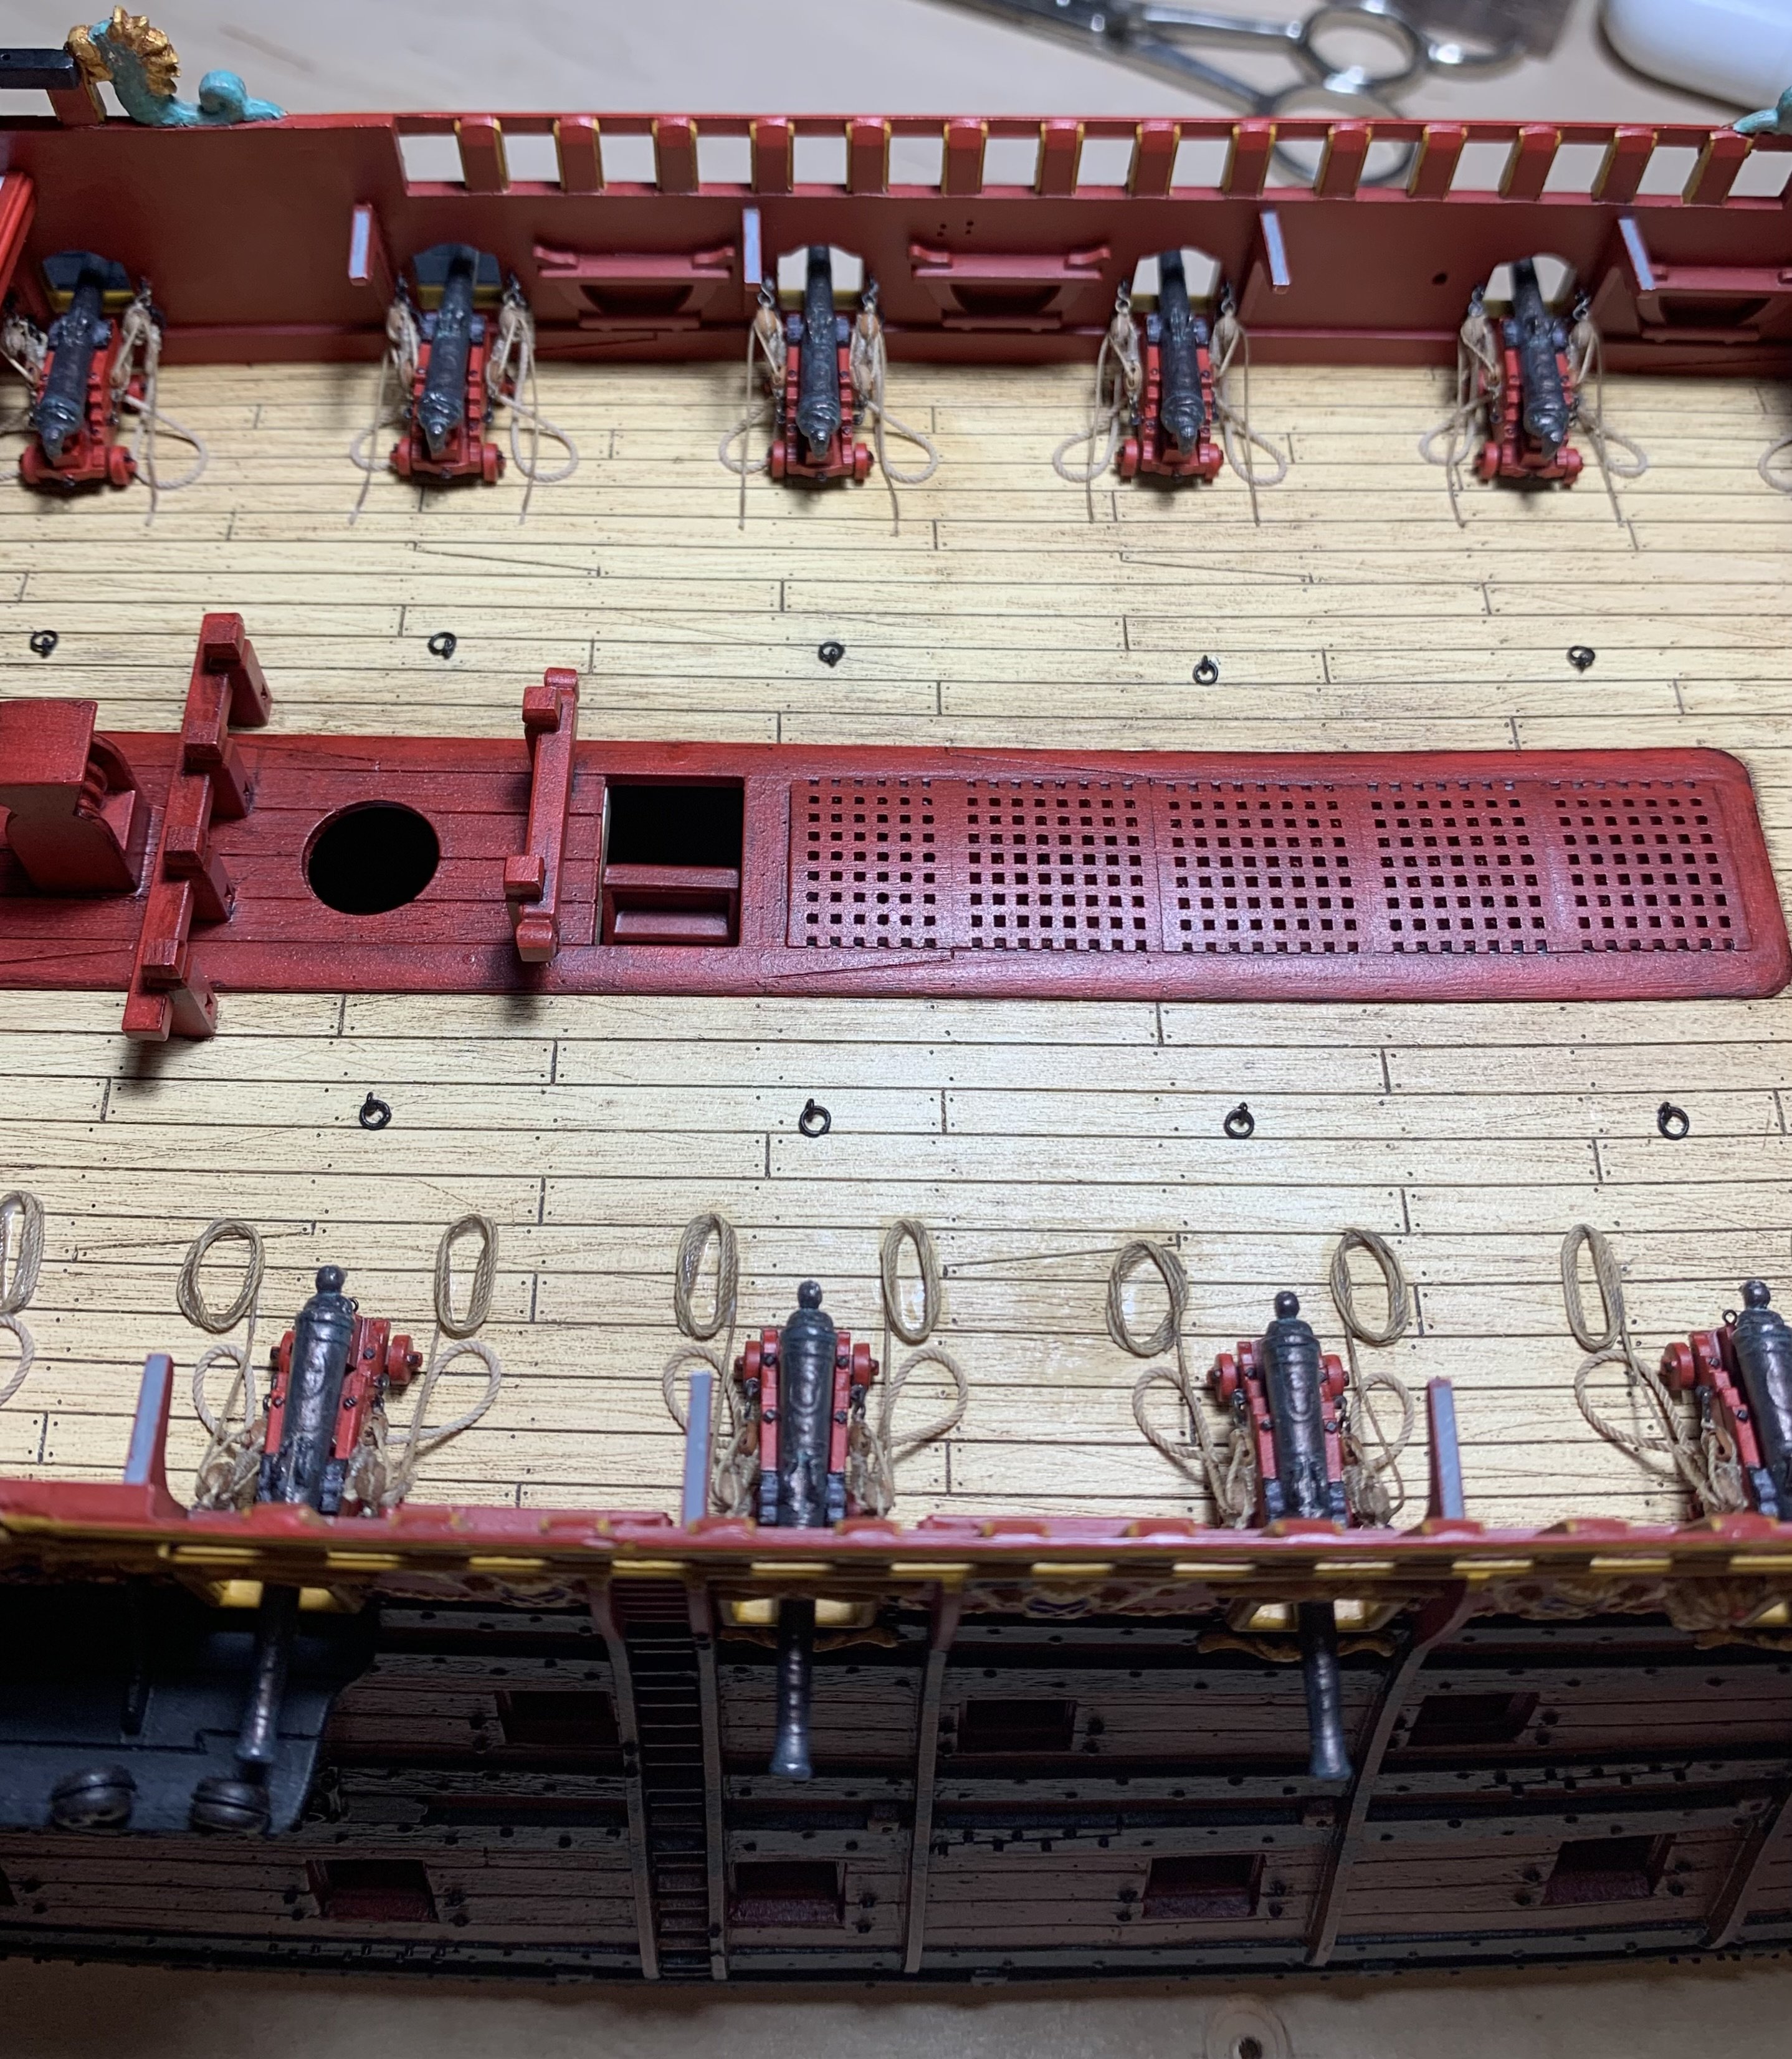
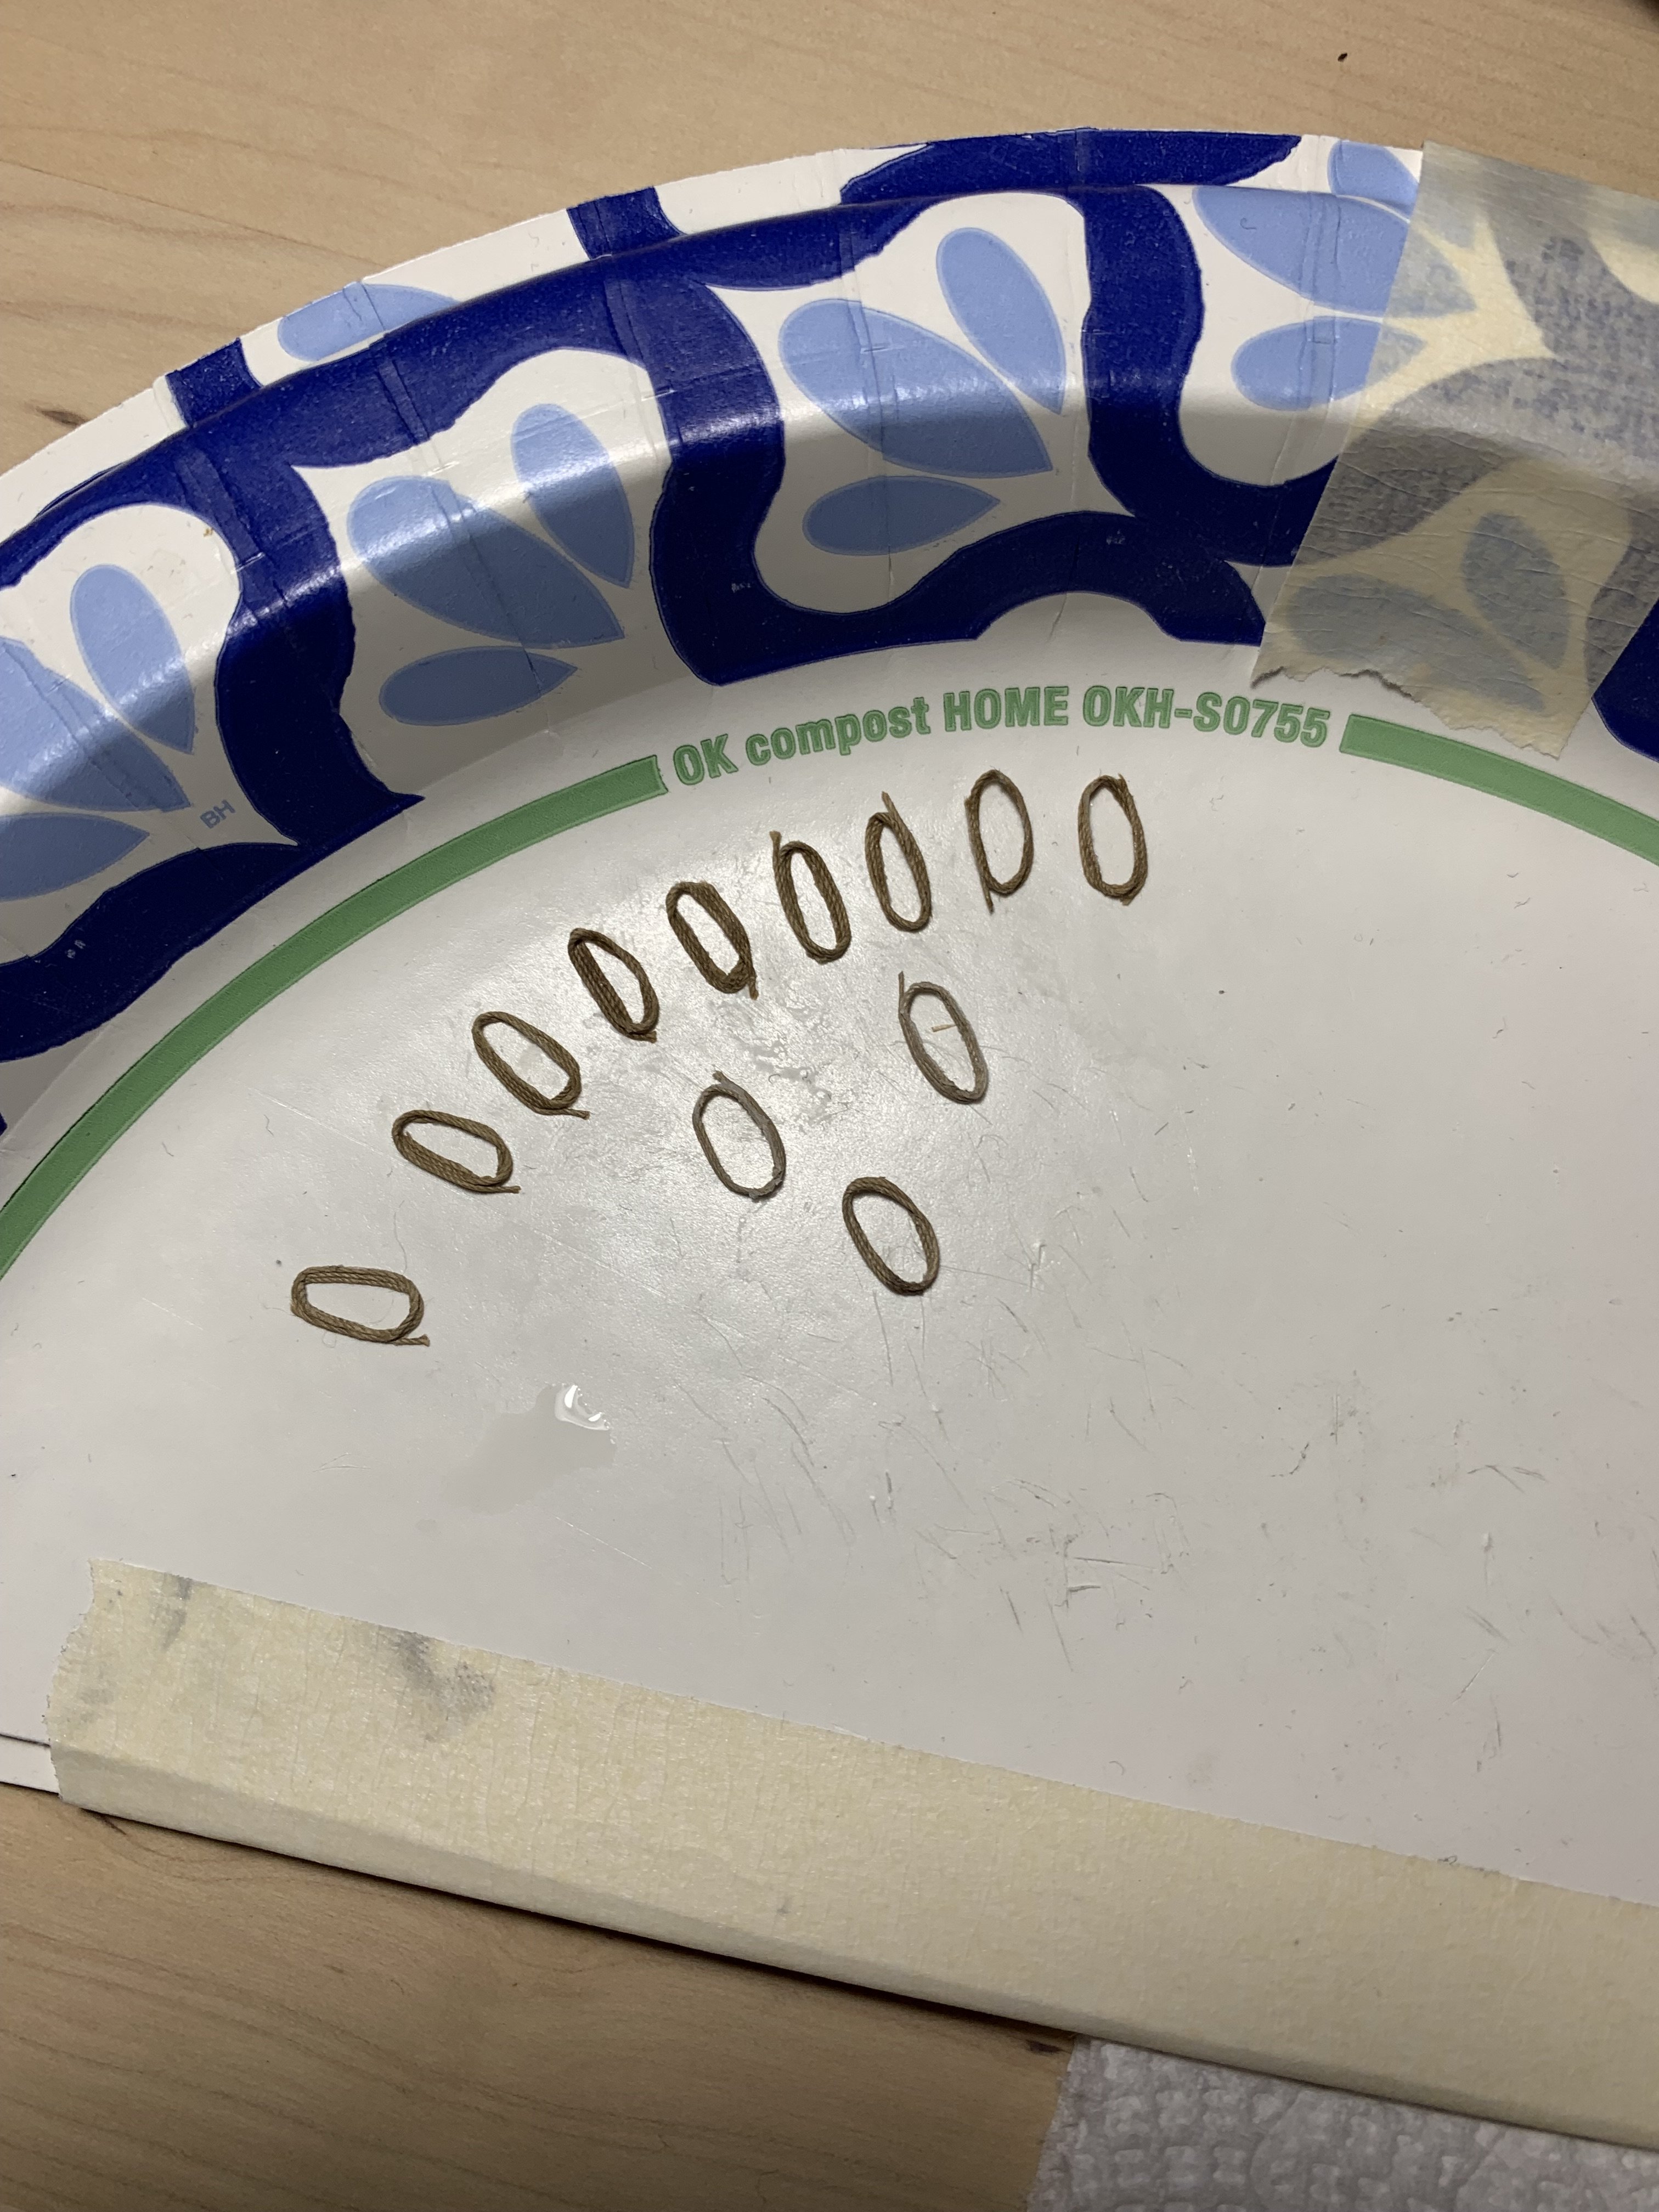
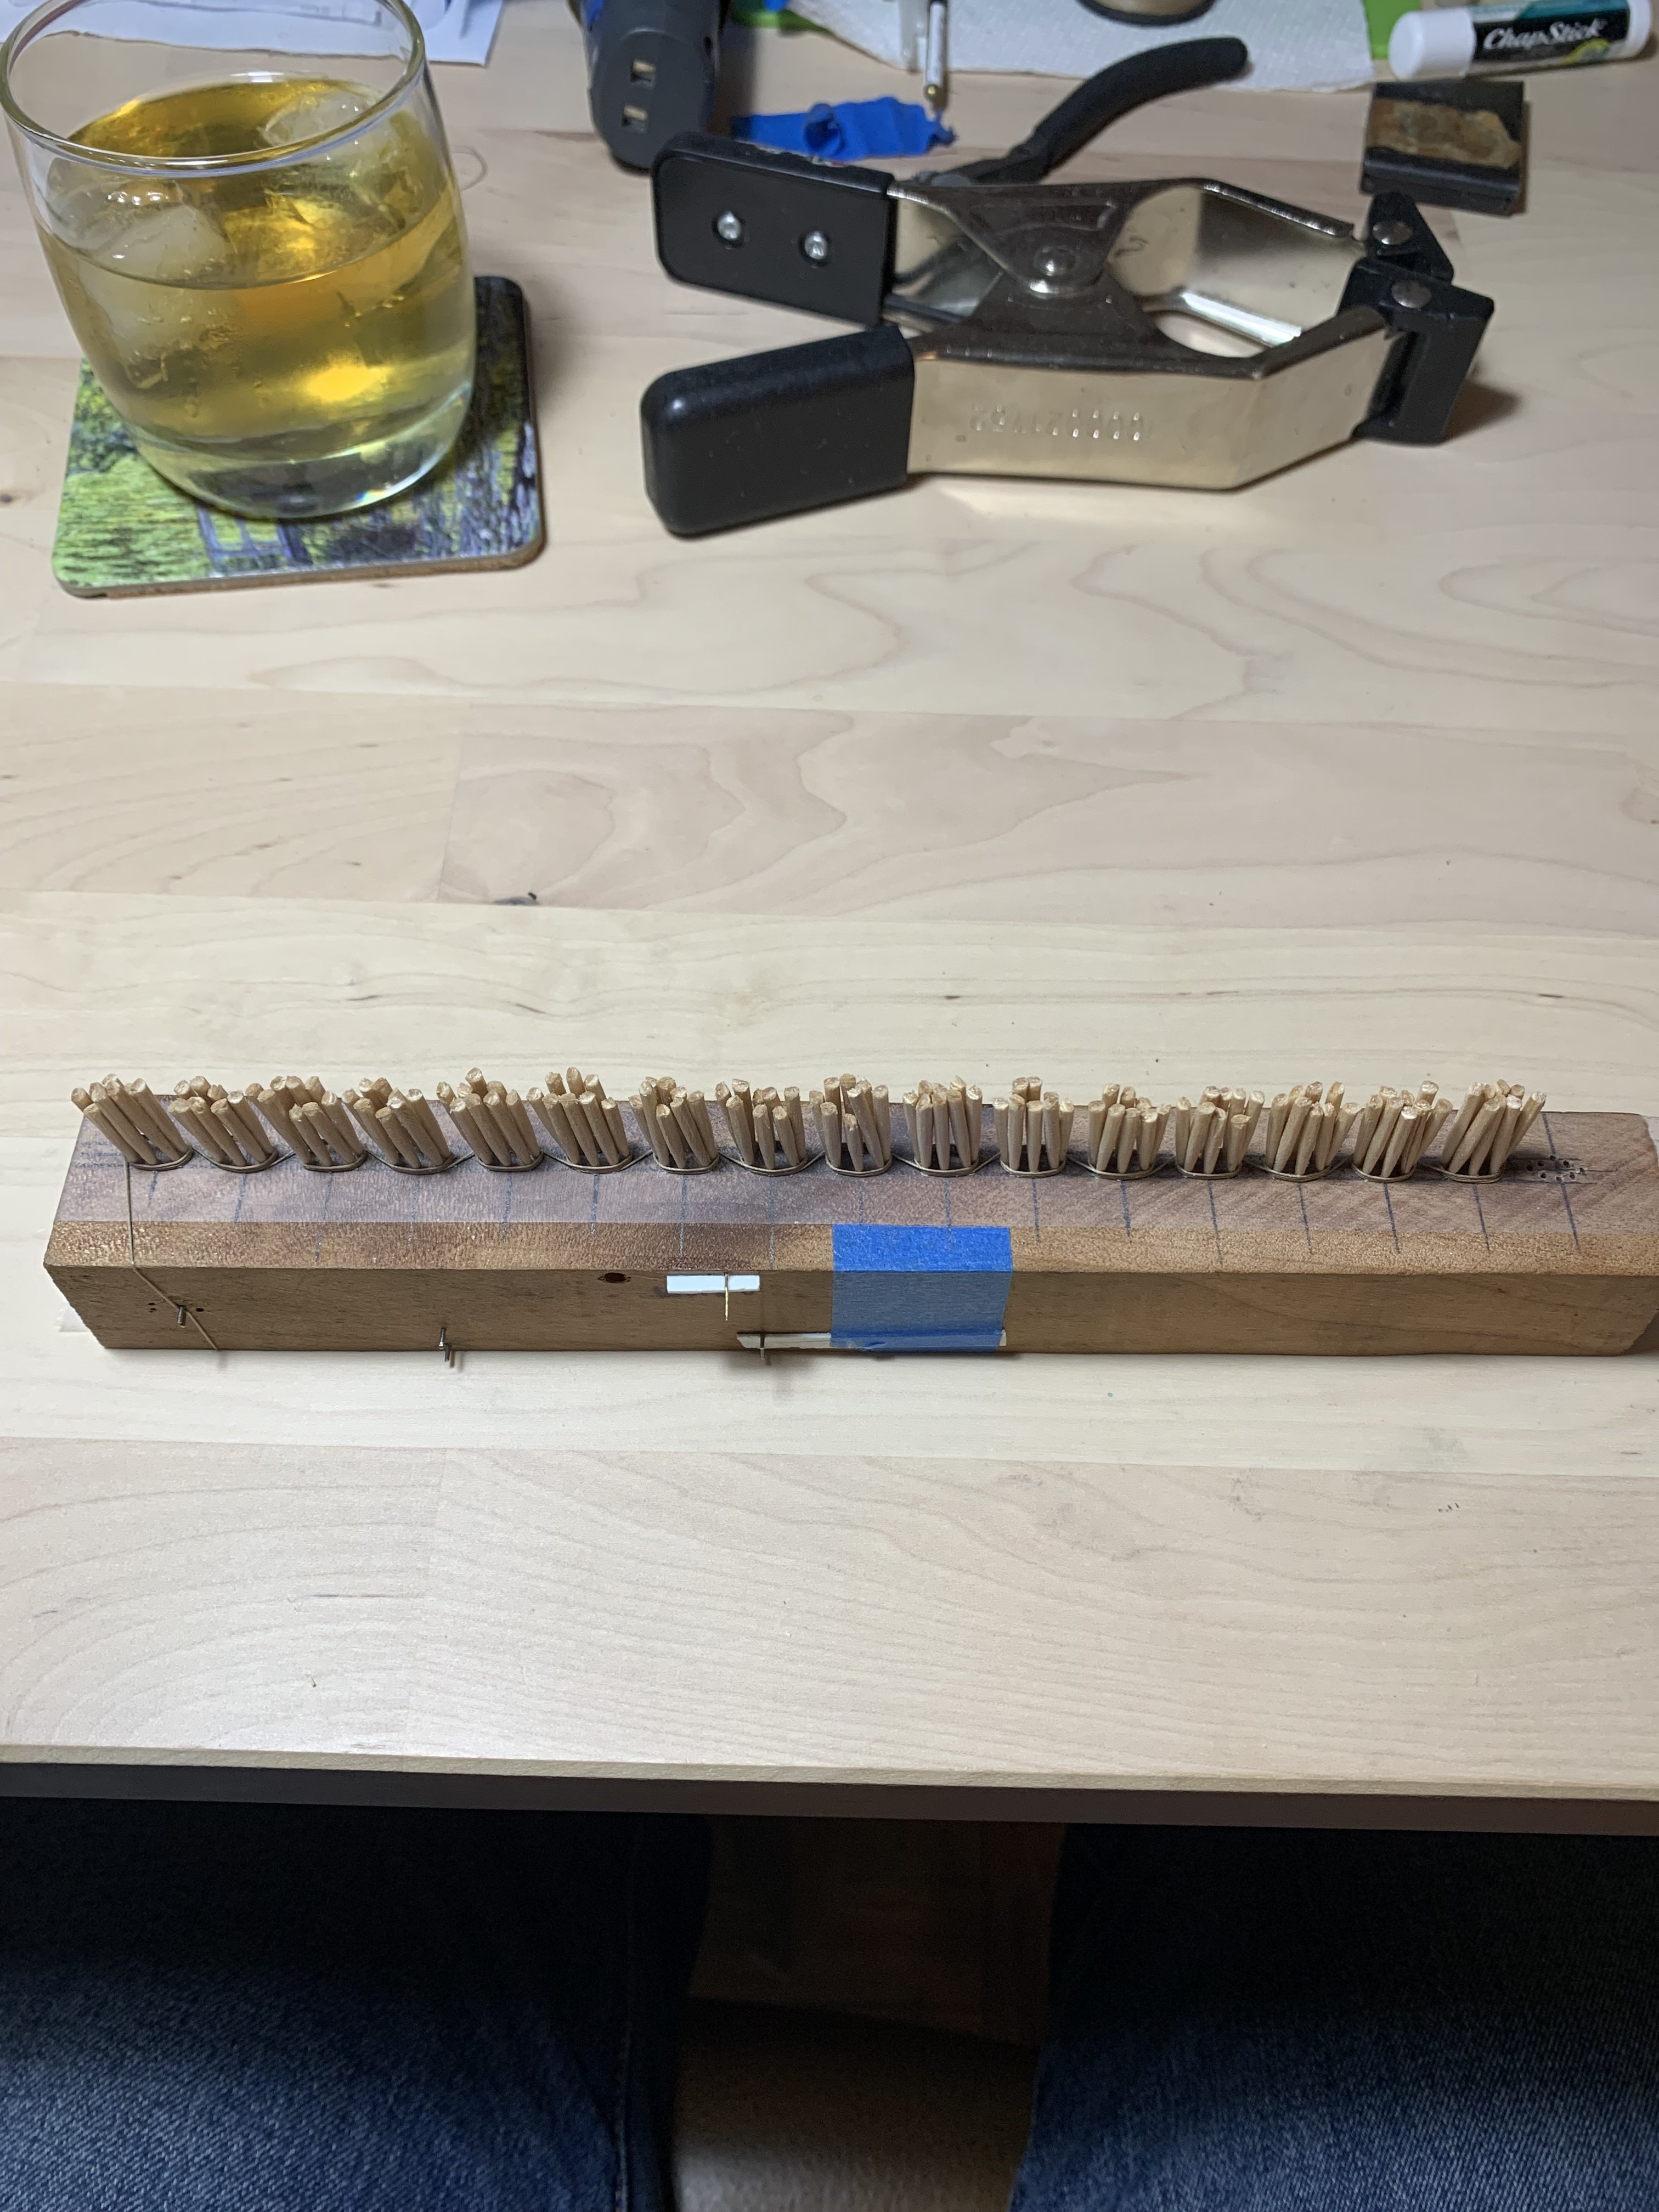
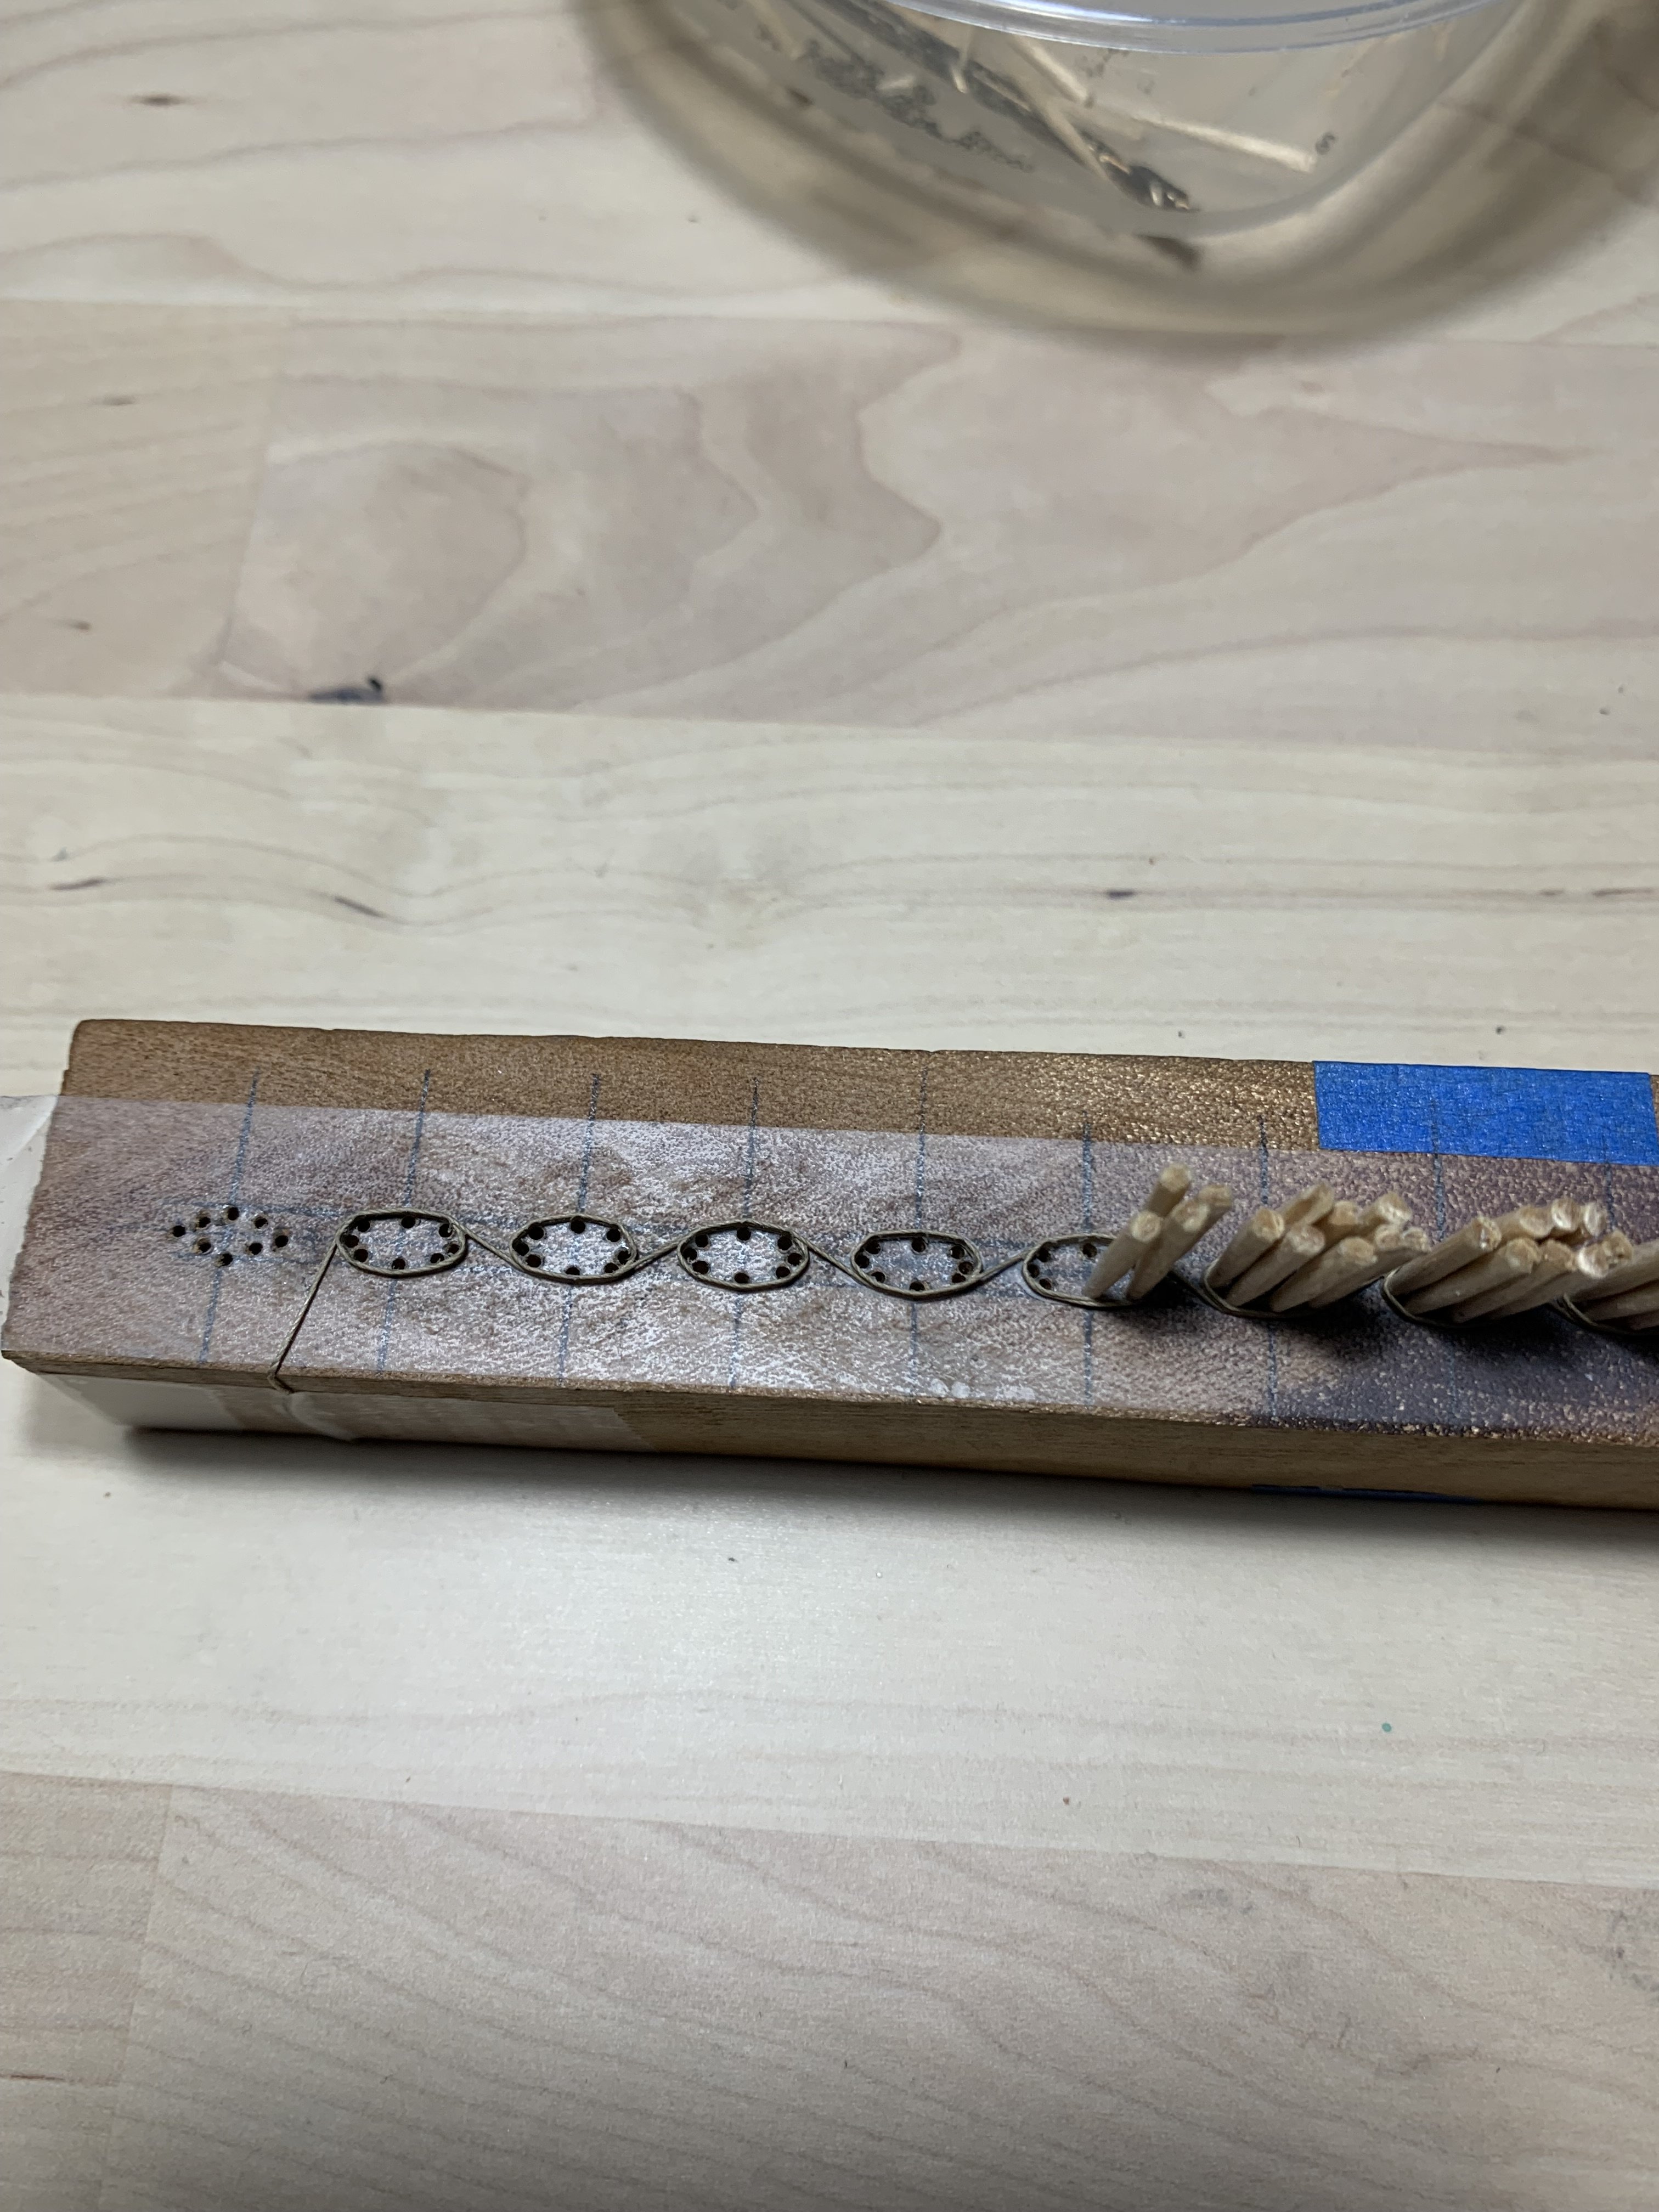
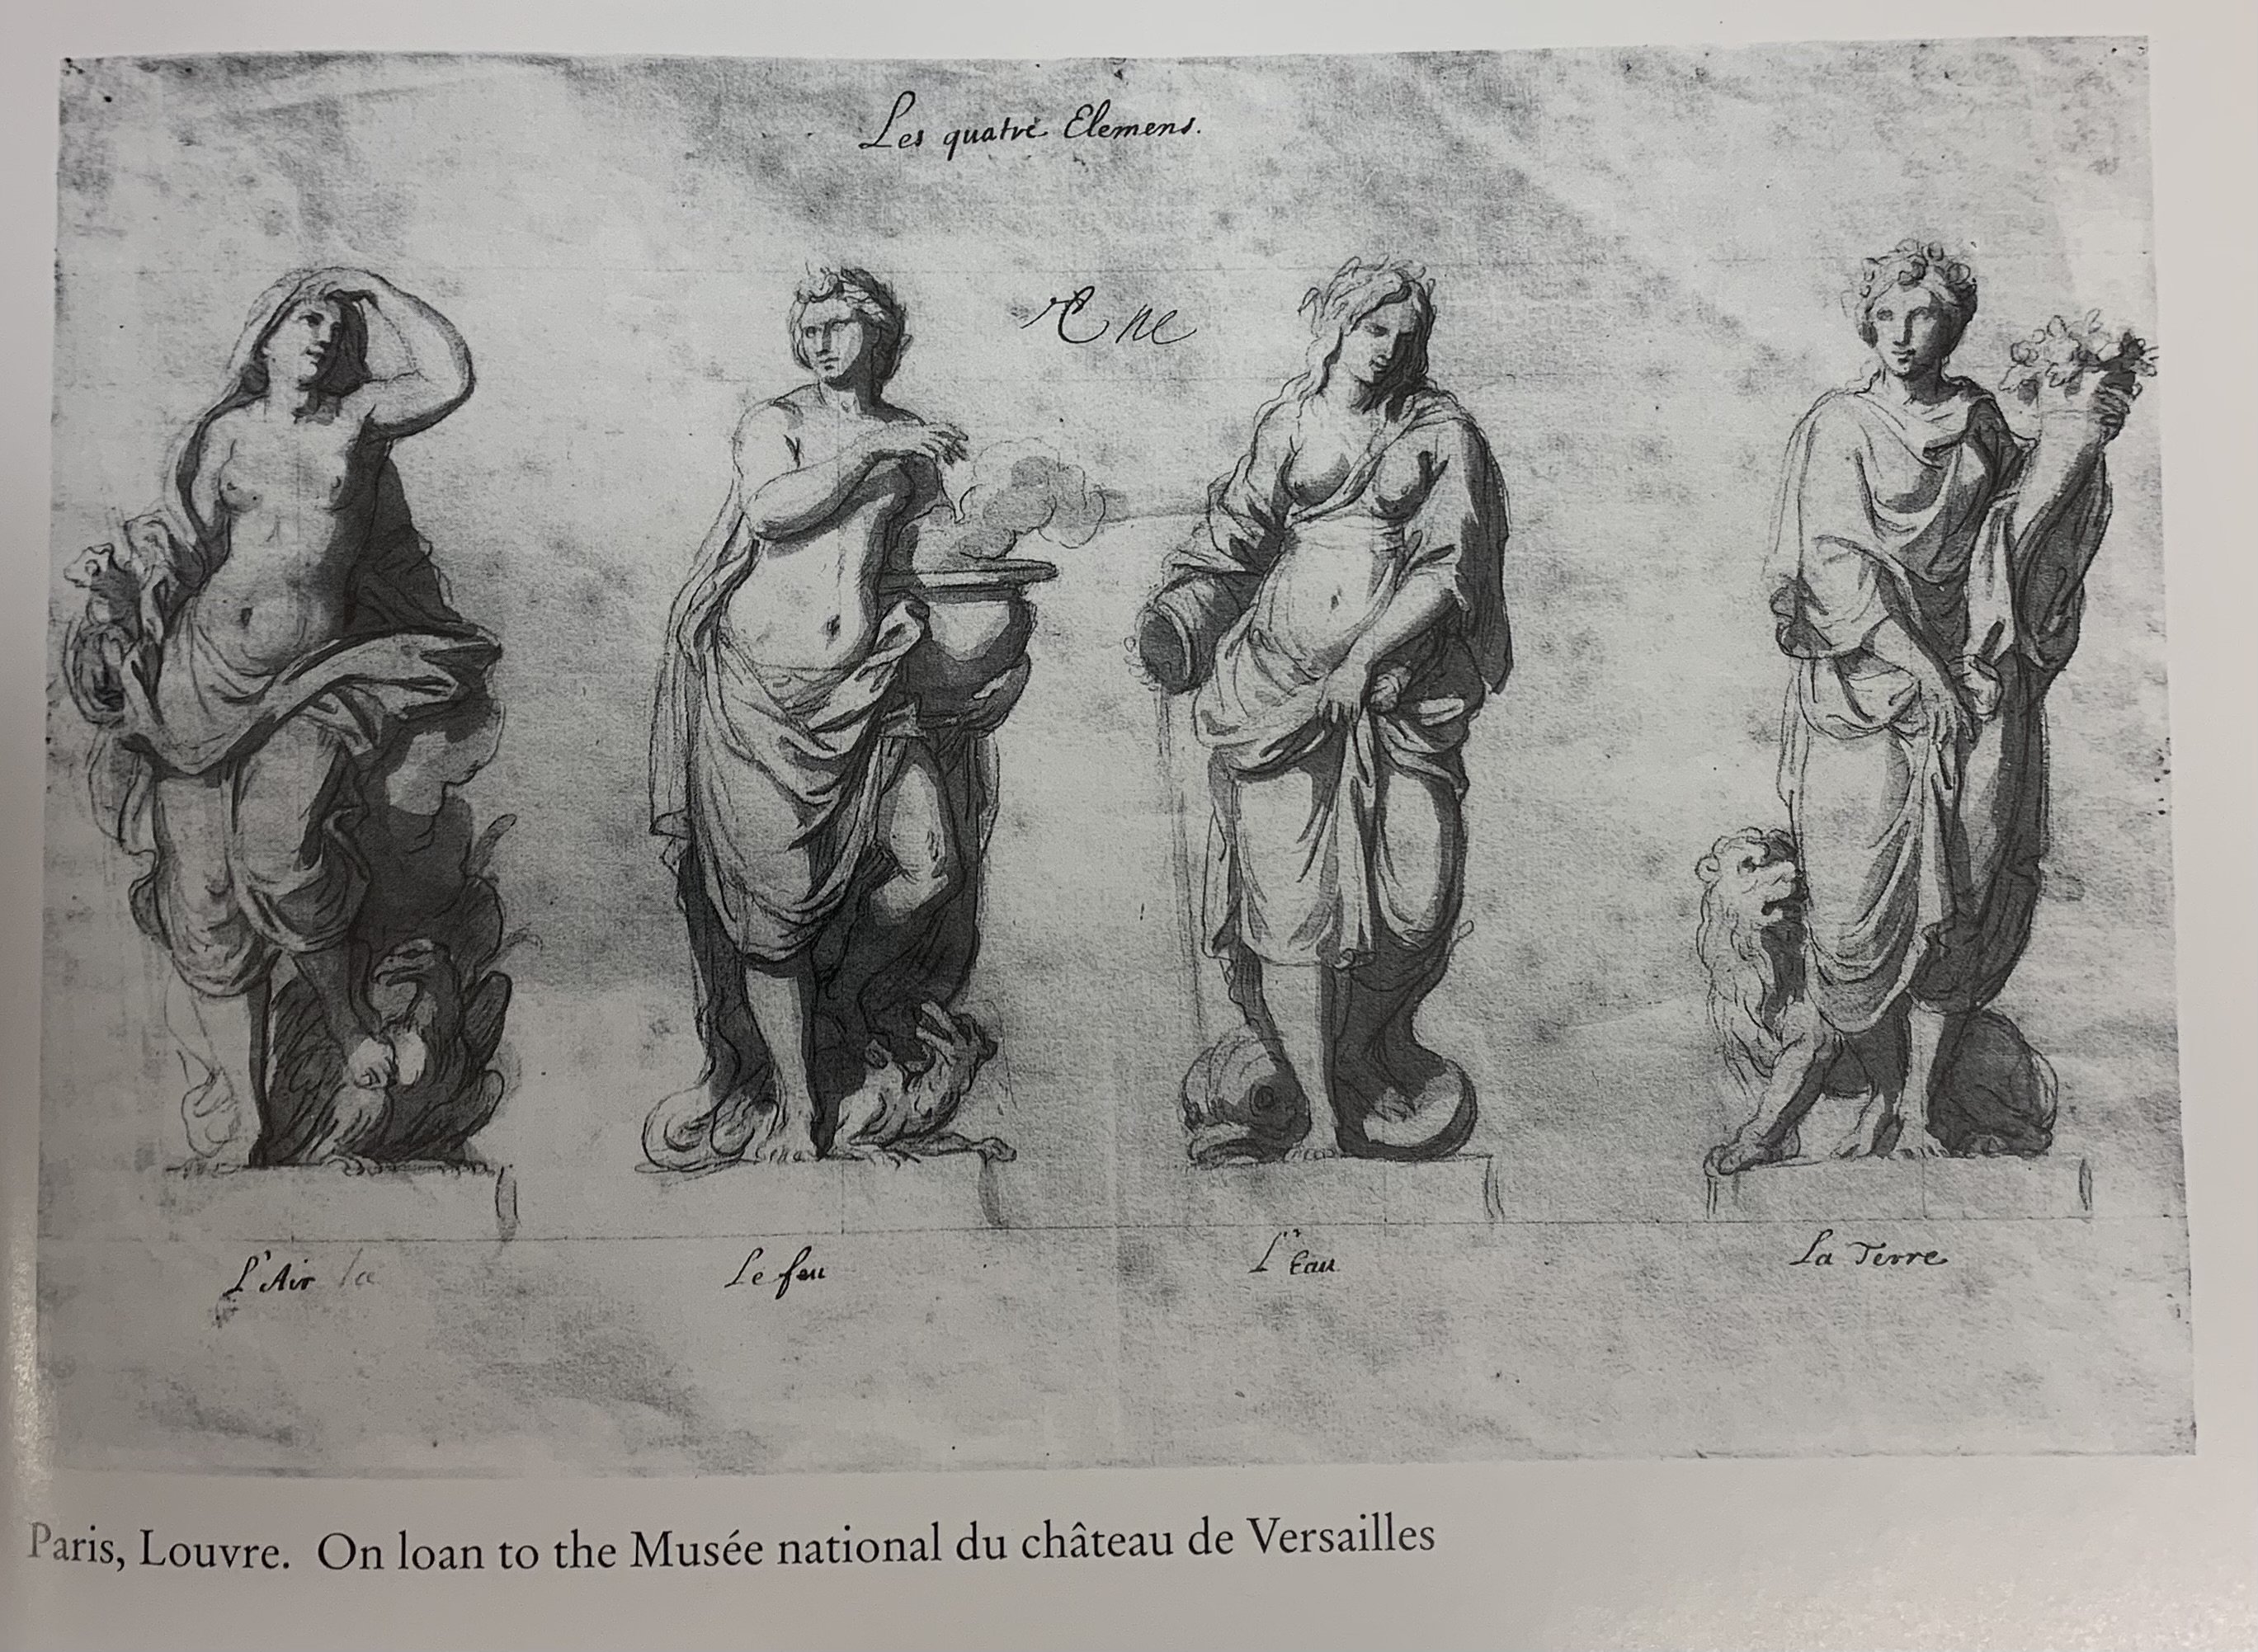
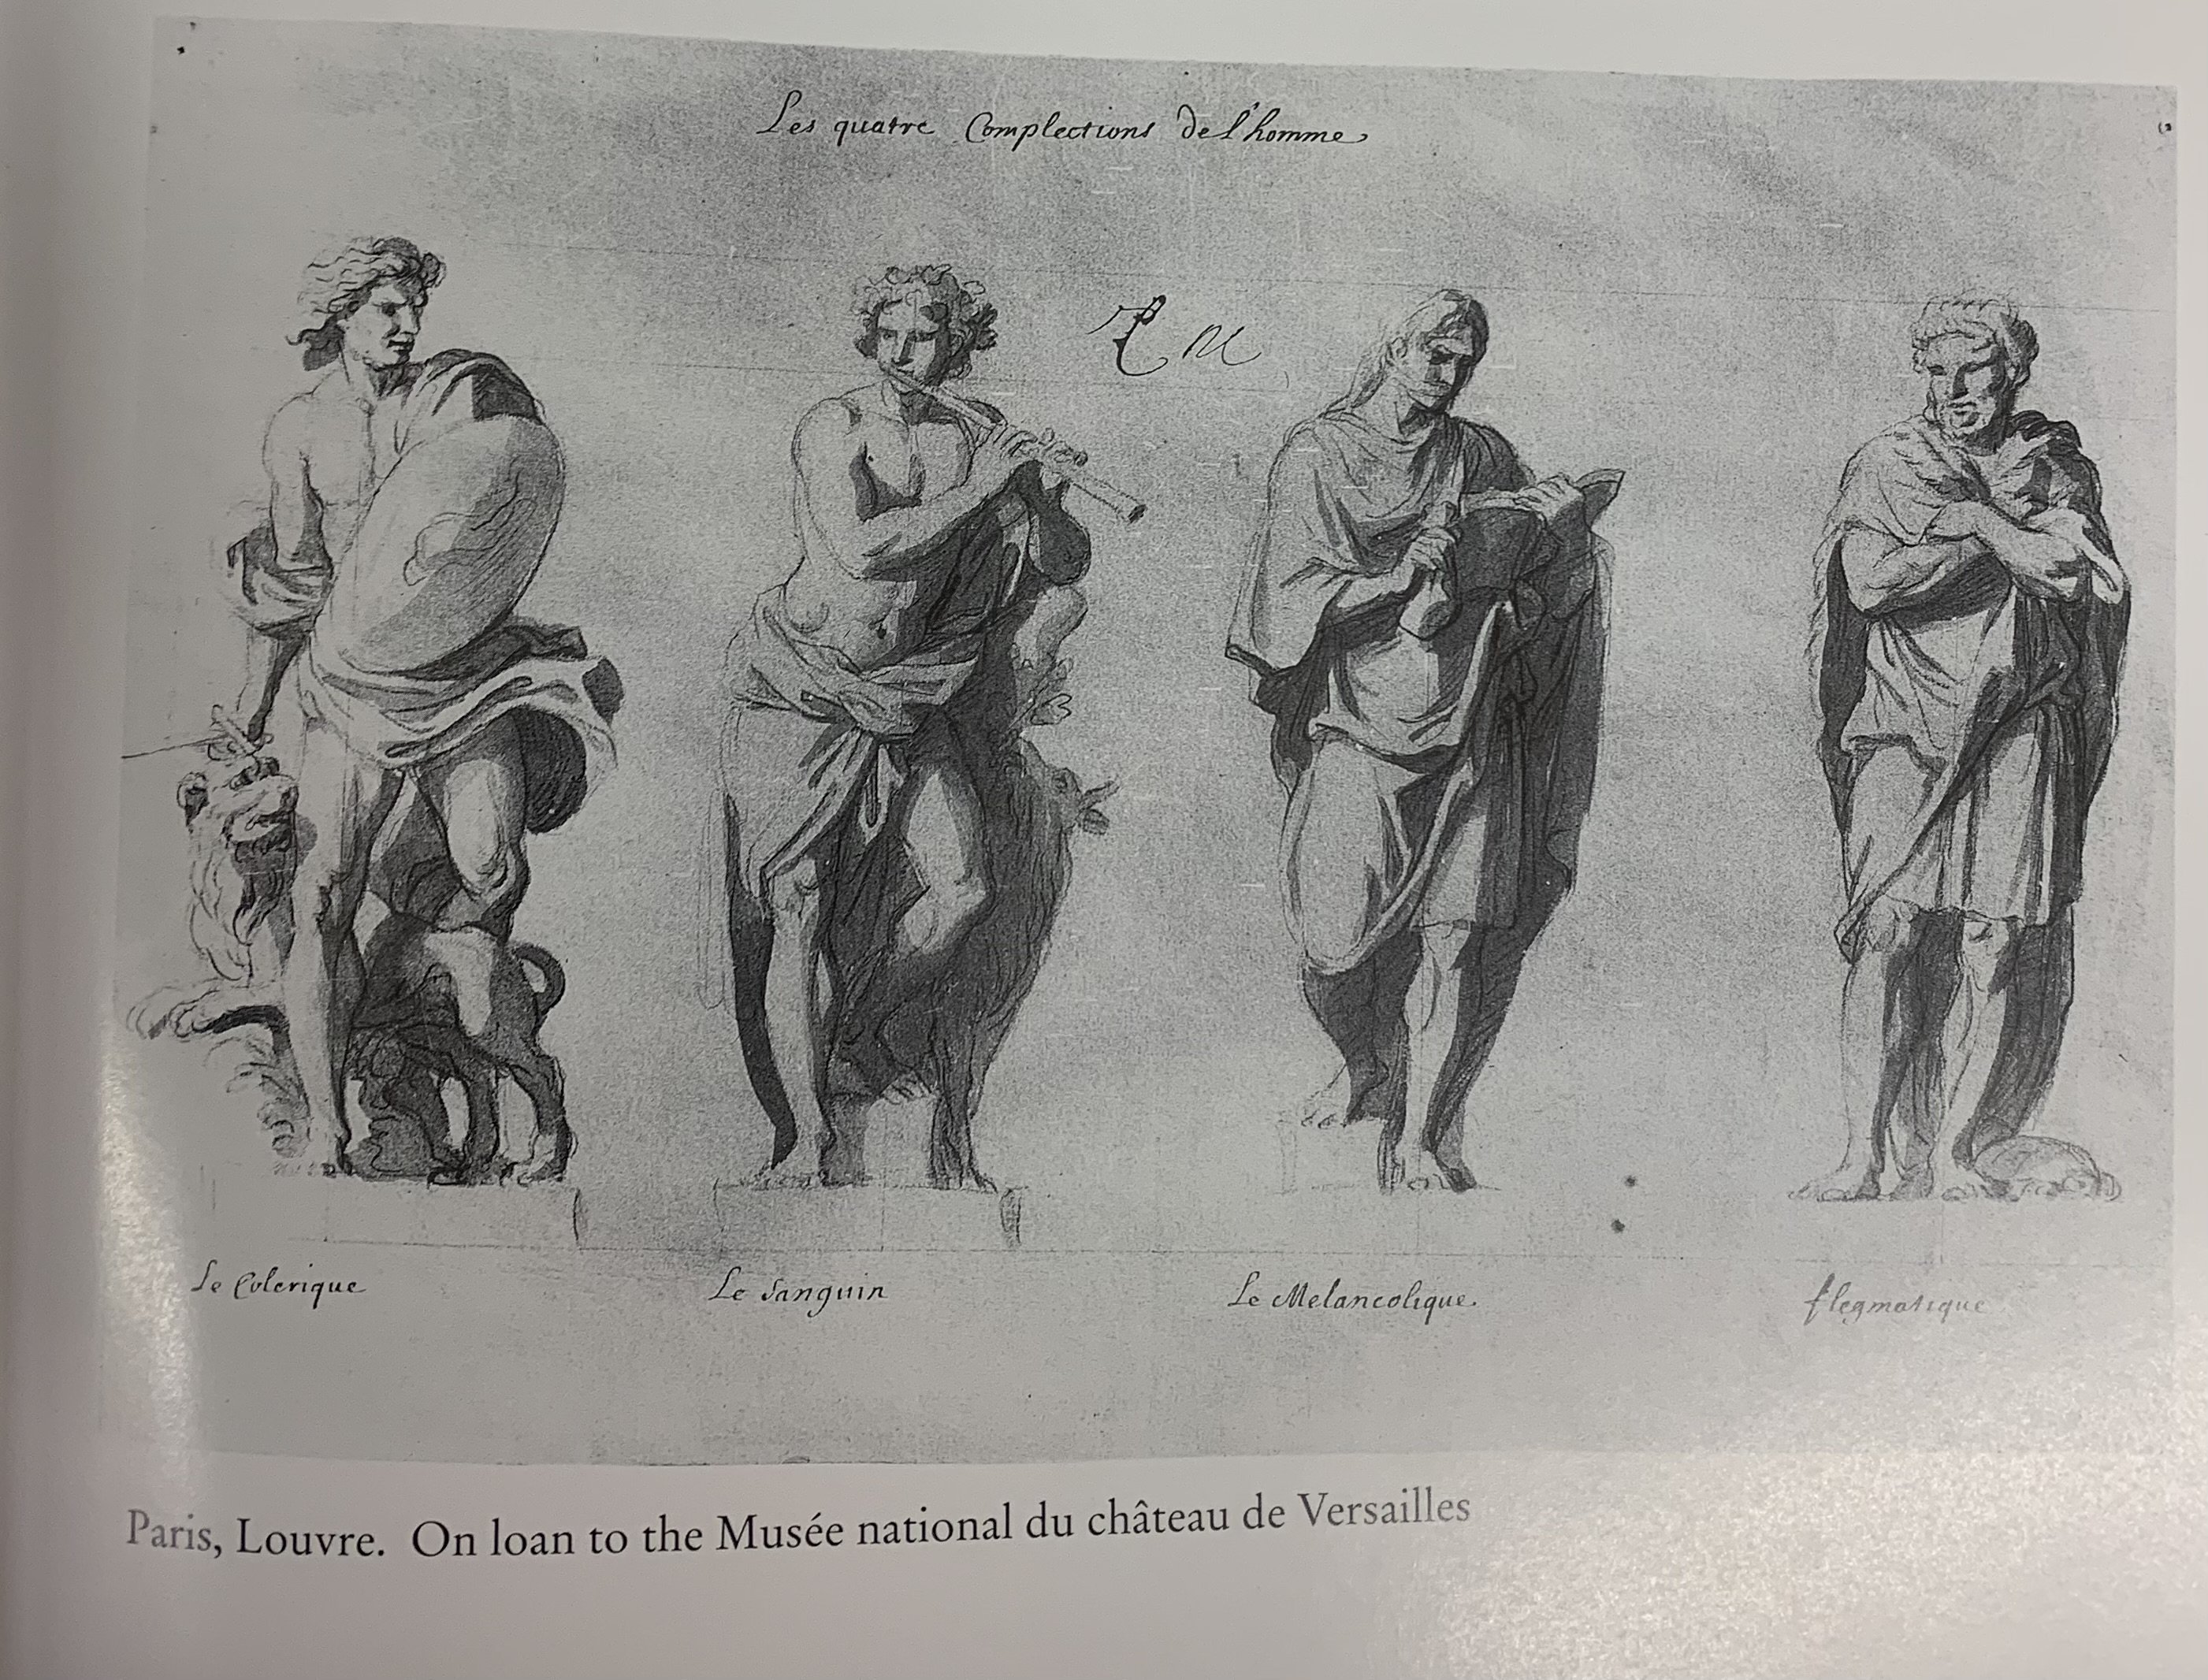
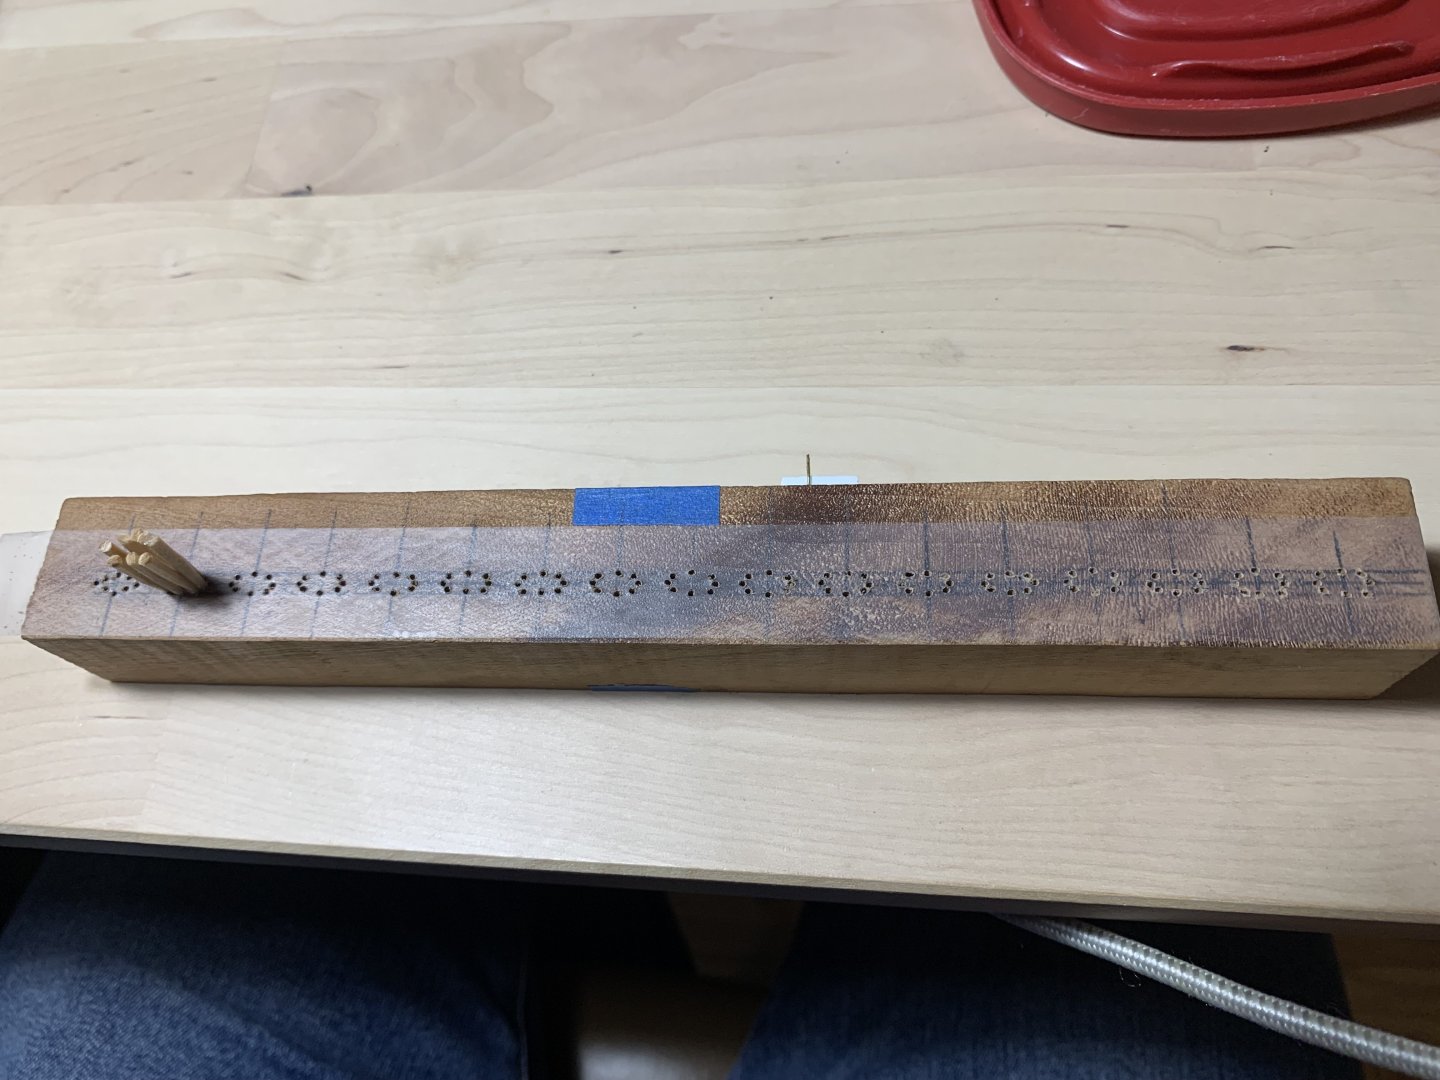
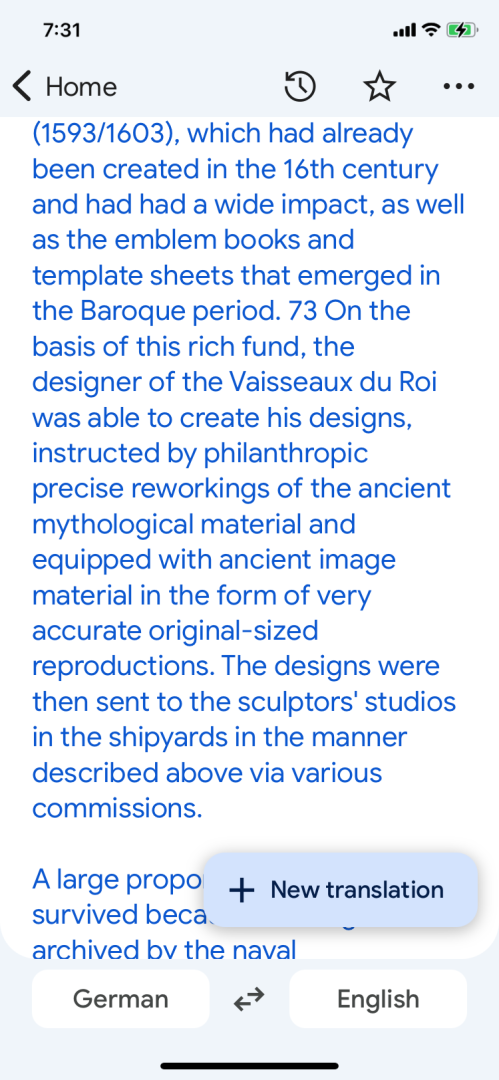
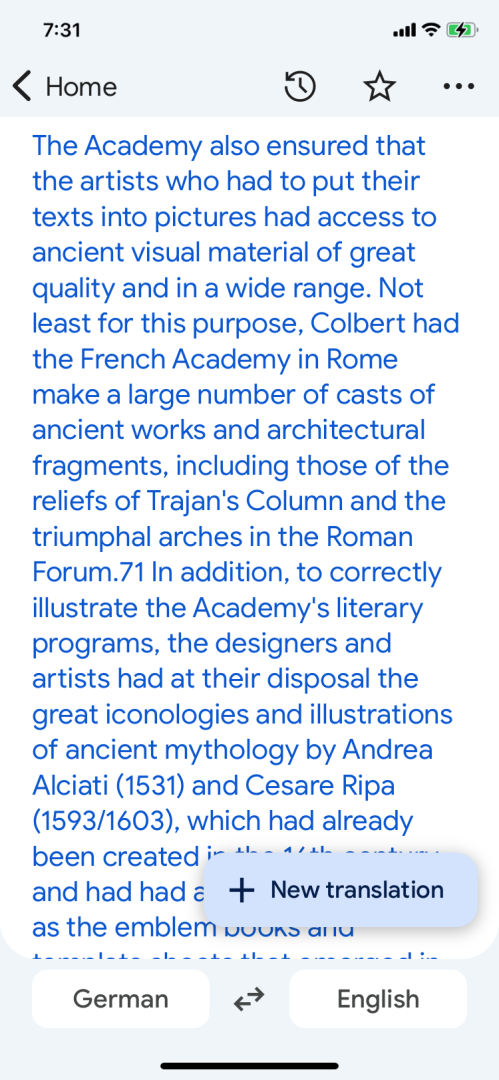
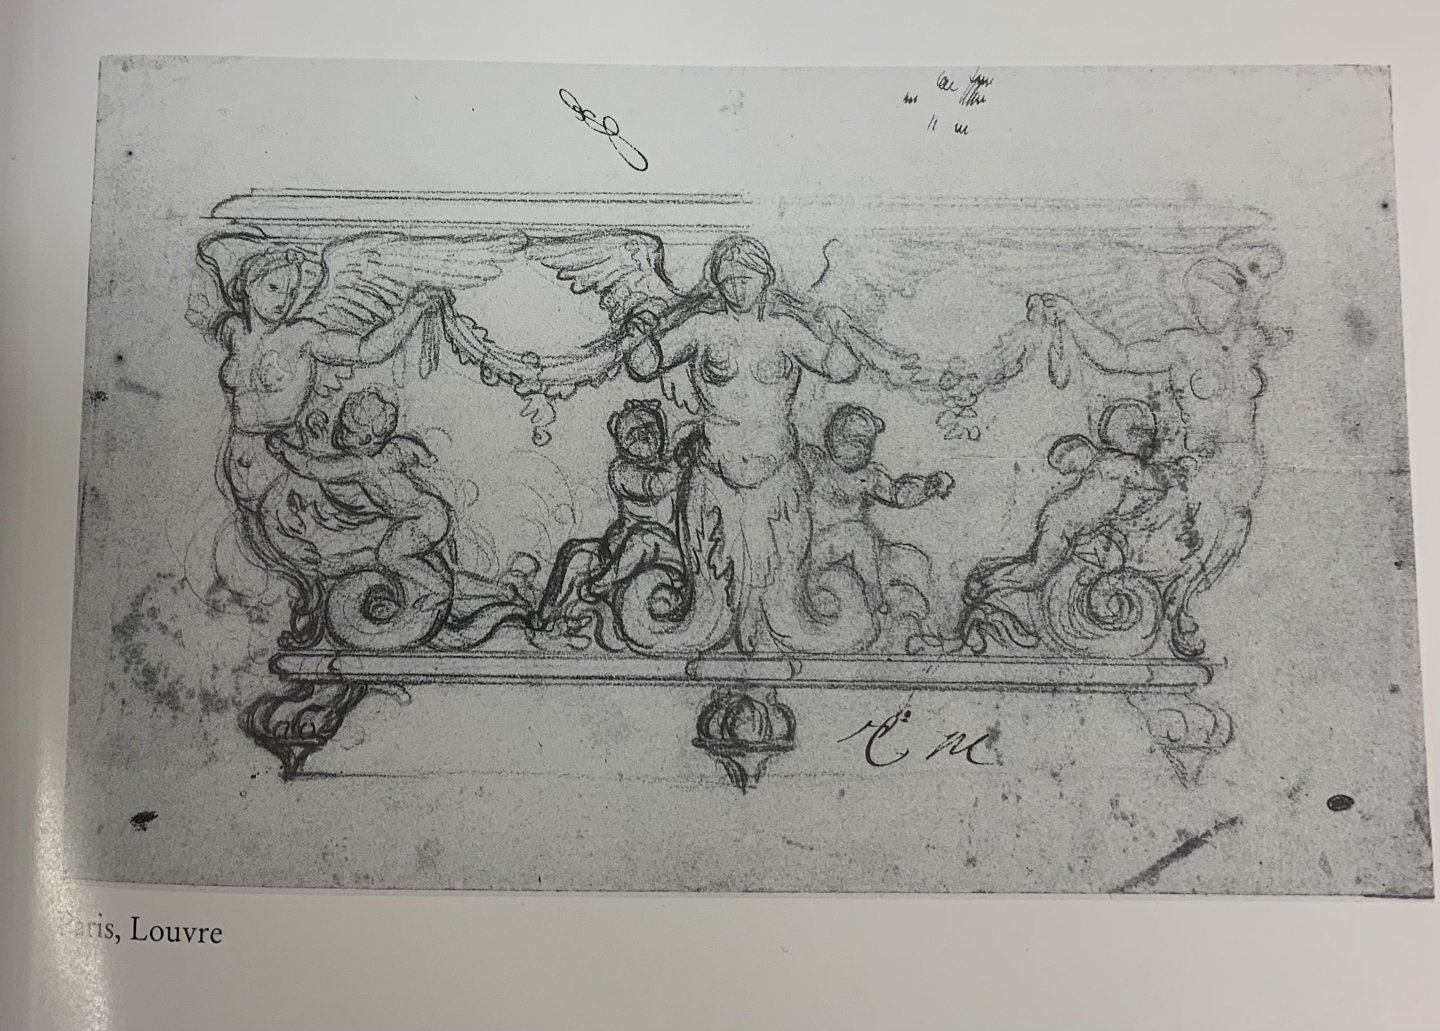
It seemed to take me a Dog’s Year, but I finally completed the rigging of the main deck guns. Like so many things that I am now tackling on the project, there was quite a steep learning curve. I will do a few things differently on the upper decks, where the guns are fully visible. The main deck guns, however, are largely obscured by the connecting gangway, overhead, so I did not feel any strong compulsion to re-do anything. What was important to me were the lay of the breaching ropes and the coiling of the haul-out tackles. Mine was a multi-step approach. The breaching ropes held their shape pretty well, once the white glue set. I tacked the loops down to the deck with a small amount of gel CA applied with a toothpick. Once that had all set, I brushed them all over a few more times with dilute white glue. The haul-out tackles were quite challenging to hook to both the bulwarks and carriages. Eventually, I learned that a drop of CA, applied to the eyelets enabled me to set one hook (bulwarks first), and then to the carriage. My first significant mistake was that my seizings to the hooked single block were twice as long as they should be. In a number of instances, when I drew the tackle taught through both blocks, the ends of the seizing wanted to kink up in the reeves of the double block. I did my best to mitigate this problem by slacking the tackle to whatever degree I could reasonably manage. In truth, these seizings should only be two wraps, maximum. The other mis-calculation of mine had to do with the scale of the blocks I used (2mm), and the hooks I made (also almost 2mm). My reasoning was that because I had shifted the stock middle battery up to the main deck, I’d be able to set the longer barrels further inboard so that there was a bigger gap space between the carriage eyelets and the bulwarks. That was all true. The scale upgrade of the cannon caliber looks convincingly better on the broadside view: Nevertheless, what I should have sourced were 1.5mm blocks and figured out a way to make even smaller hooks. I will resolve these issues by the time I do the QD and F’ocsle guns (up-shifted stock main deck guns and their carriages). Once the tackles had set, I tacked the running end down to the deck with a small spot of CA. I then came back and saturated the visible section of line with dilute white glue, in order to give it a more convincingly slack appearance. Once that was all set, I nipped away the excess line and did any carriage touchups that were necessary, as well as a dab of dullcoat, wherever CA glue was visible. For the coils, themselves, I adapted a Tom Lauria technique that I found on YouTube. Because these were not to be suspended from pinrails, it wasn’t necessary for me to make rope hanks the way that Lauria illustrates. Instead, I could make a running series of coils. I began by marking out uniform 1/2” spacing for coils that would measure just slightly bigger than 5/16”: Scotch tape prevents the glue from sticking. I found that the ends of toothpicks that I rubbed with beeswax made perfect peg formers. I made three wraps around each peg stack and wove in and out from one stack to the next. The pegs released easily enough, and I set them aside for the next batch: I had simply scotch-taped the beginning and end of the line until the glue had set. It was probably overboard, but I brushed over each coil four passes with the dilute solution. When I removed the coil cluster I found that there was glue flash along the bottom of each coil. I spent a little time cutting most of that away with a sharp Exacto. Right out of the former, the coils are pretty stiff and segmented looking. First, I tried soaking them in rubbing alcohol, but they did not really seem to soften or become pliable. I was not a Chemistry major. On the next batch of coils, after separating each coil, I merely had to dip them in water for a few seconds to soften them. Now, I could squash the coils flat on a paper plate with my fingertip. The result was what I think are slightly irregular and more natural looking coils: Once they had dried, I used a small dot of CA at each cut end, and then trimmed those ends close to the coil. I suppose I could have tacked the coils down to the deck with gel CA, but I chose, instead, to do multiple washes of thinned white glue. My rationale was that I knew I could easily clean away any stray white glue: On the port side, you can see the tackles before coils. Here you can see the fully cleaned-up effect: In my view, coils on a ship would be tidy, but not perfectly round and symmetrical. I am pleased with the effect. Next, I will have to map out all necessary cleats, blocks and belay points for the main deck, before I can shift up to the f’ocsle deck. I will probably put a small carving kit together to take to work with me, so that I can chip away at the Africa carving. I’ve had a long time for those shapes to gestate in my mind, so I think I can approach that with more confidence, now. I continue to work my way through this book: Unequivocally, this is the best treatment I have found of the architectural development and allegorical framework of French sterns. It is chock-full of fascinating insights such as the following: I also continue to immerse myself in the earlier works of Charles LeBrun and Puget, so that I can better understand how to construct an ornamental program in their style for SR 1670: I have had a number of significant realizations as that puzzle clicks together in my mind’s eye. While I’m not physically modeling as much as I would like to, at least I continue to improve my understanding of this earlier time. Thank you all for looking in! Best, Marc


- 2,699 replies
-
- 17
-

-
-
- heller
- soleil royal
- (and 9 more)
-
I suppose my phone/identity has been busier than I’ve been - that’s alarming on several fronts. Of course I am following the build, Bill, but not on that moment-to-moment degree. I have to figure out how to put that shadow-energy to work for me 🤔😀
-
Oh, that would be a treat! Like Kevin, you would work wonders with that kit.
-
Indeed - a very clever representation!
-
This is all extremely satisfying to see. Your attention to surface-prep for the paint work can’t be missed. It is all excellent - so happy to see you at it, again! Best, Marc
-
I echo all complimentary sentiments above, Gary. Great stuff!
-
I’m always impressed by this work at scale 1:144.
- 324 replies
-
- 1
-
-
- Sovereign of the Seas
- Airfix
- (and 1 more)
-
This all looks preliminarily very good, Eric. Depending upon how you choose to make the transverse supporting knees that connect with the inside of the headrails (I made mine as one piece that saddled over the upper knee of the head), you may want to reduce the taper along the upper knee of the head. There are hair bracket mouldings that frame the trailboard and continue to the buttressing knees below the hawsers. You could choose to make the transverse headrail knees as port and starboard pieces that connect to your presently tapered upper knee. What you’re trying to ensure, here is a reasonable run of the three headrails, converging at the forward scroll, whilr still maintaining enough space below the lowest headrail for the under-support of the headrail knees. That’s a jumble of ideas, I know, but hopefully that makes sense. It might be worth temporarily tacking your stem spacer and upper/lower knees in-place with Elmer’s glue (easily dissolvable in water), so that you can make a card pattern of the headrail trio - just to see how it will all resolve into the hull and at the forward end.
- 422 replies
-
- 1
-
-
- soleil royal
- Heller
- (and 1 more)
-
That is an interesting problem, Mark. I will think about it while I make dinner. My impulse thought is to vacu-form thin (enough) sheet plastic, and then fret it after it has assumed the required shape. Will think more on this.
-
Well, I am making progress in my reading. A couple of general revelations: The 24 drawing sets (stern, quarter and bow drawings) are fully reproduced copies of the same that are catalogued in a special volume of Jean Berain’s work from the mid-1680’s to the 1710’s. On that basis alone - the book is worth the price of admission. It is very nearly the same as seeing the original drawings themselves. The second revelation is that the particular allegory of any given ship is only drawn for the stern, the quarter galleries and bow. This means, in my interpretation, that all ornament in-between, is of a more general nature. We’ve discussed this before, but this really sunk-in, lately.
- 422 replies
-
- 2
-
-
- soleil royal
- Heller
- (and 1 more)
-
Has the book arrived?
-
She is a ship-in-motion! Looks great, Eric! I was wondering where you were 🤔
- 422 replies
-
- 1
-
-
- soleil royal
- Heller
- (and 1 more)
-
Also - I know you mentioned at the outset that the ship was basically hermetically sealed in its vault, and as a result, the wood was in excellent condition. I’m just curious as to whether the preservation team still had to treat the wood in various ways to stabilize it.