
HOLIDAY DONATION DRIVE - SUPPORT MSW - DO YOUR PART TO KEEP THIS GREAT FORUM GOING! (Only 24 donations so far out of 49,000 members - C'mon guys!)
×


Richvee
-
Posts
385 -
Joined
-
Last visited
Content Type
Profiles
Forums
Gallery
Events
Everything posted by Richvee
-
 If/when I ever plank my first hull, I hope my first effort can come somewhere close to yours. Well done!! I went solid hull for my first attempt.
 -
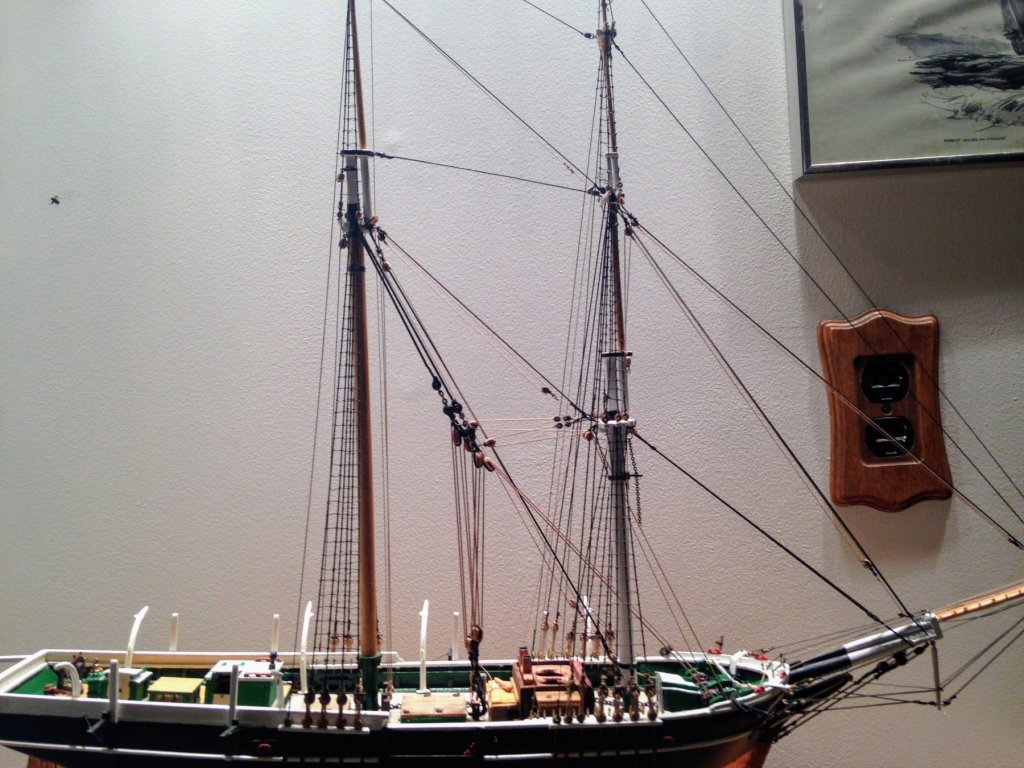
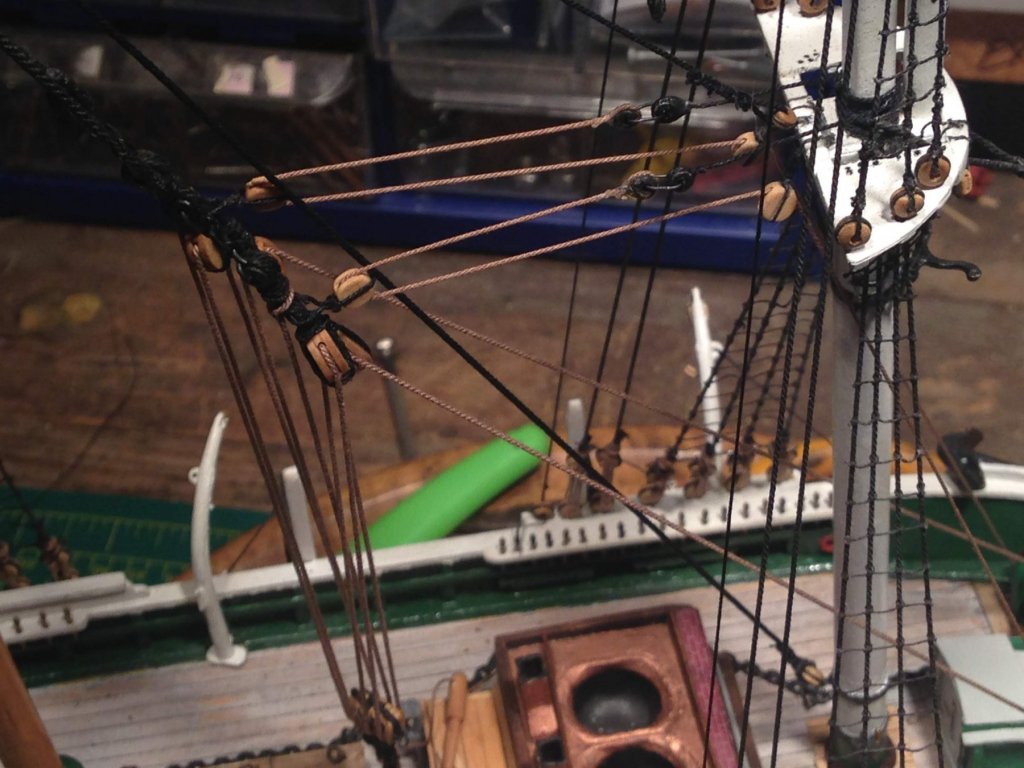
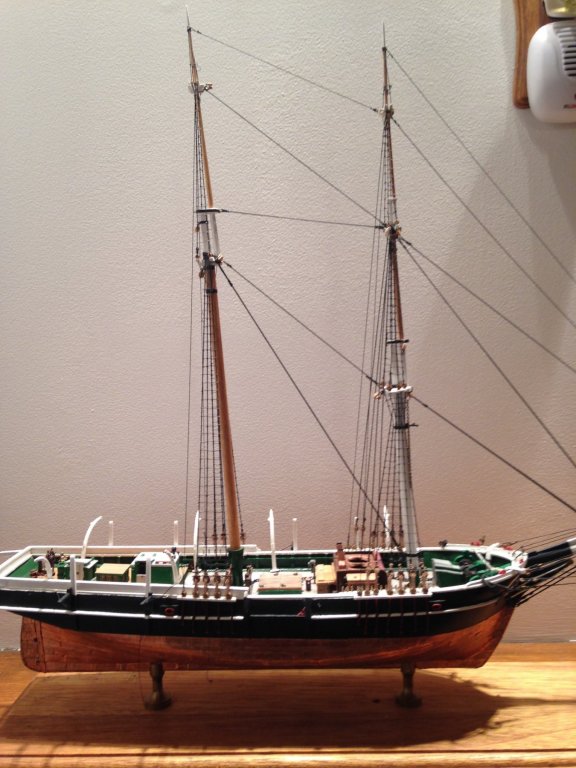
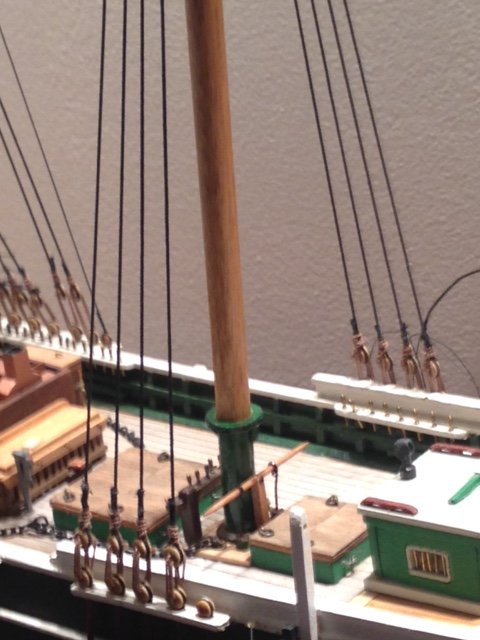
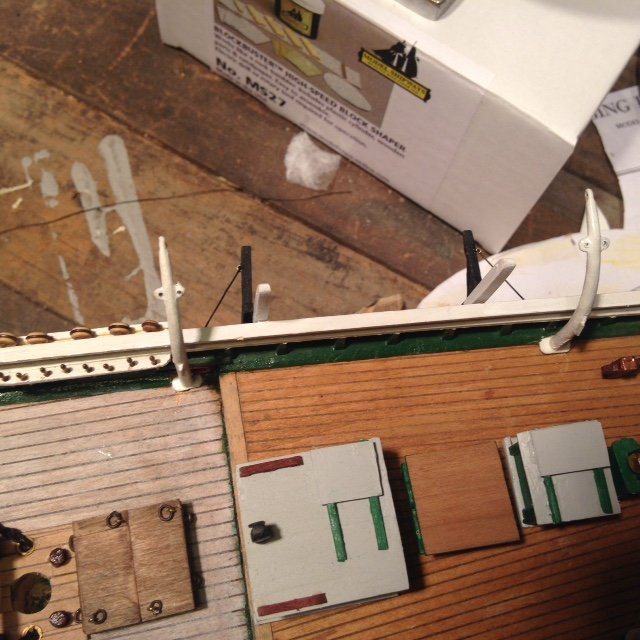
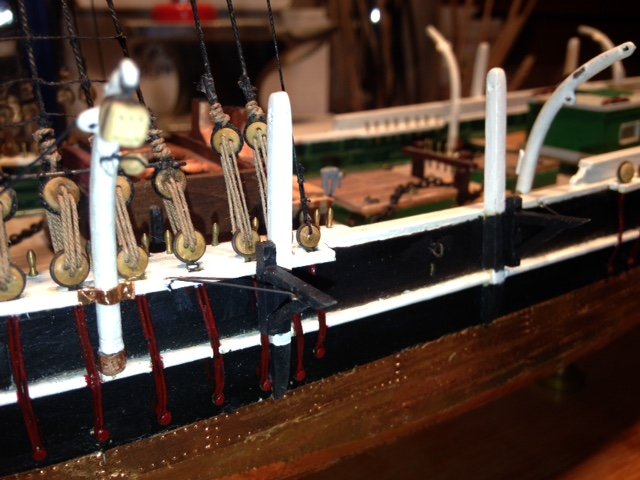
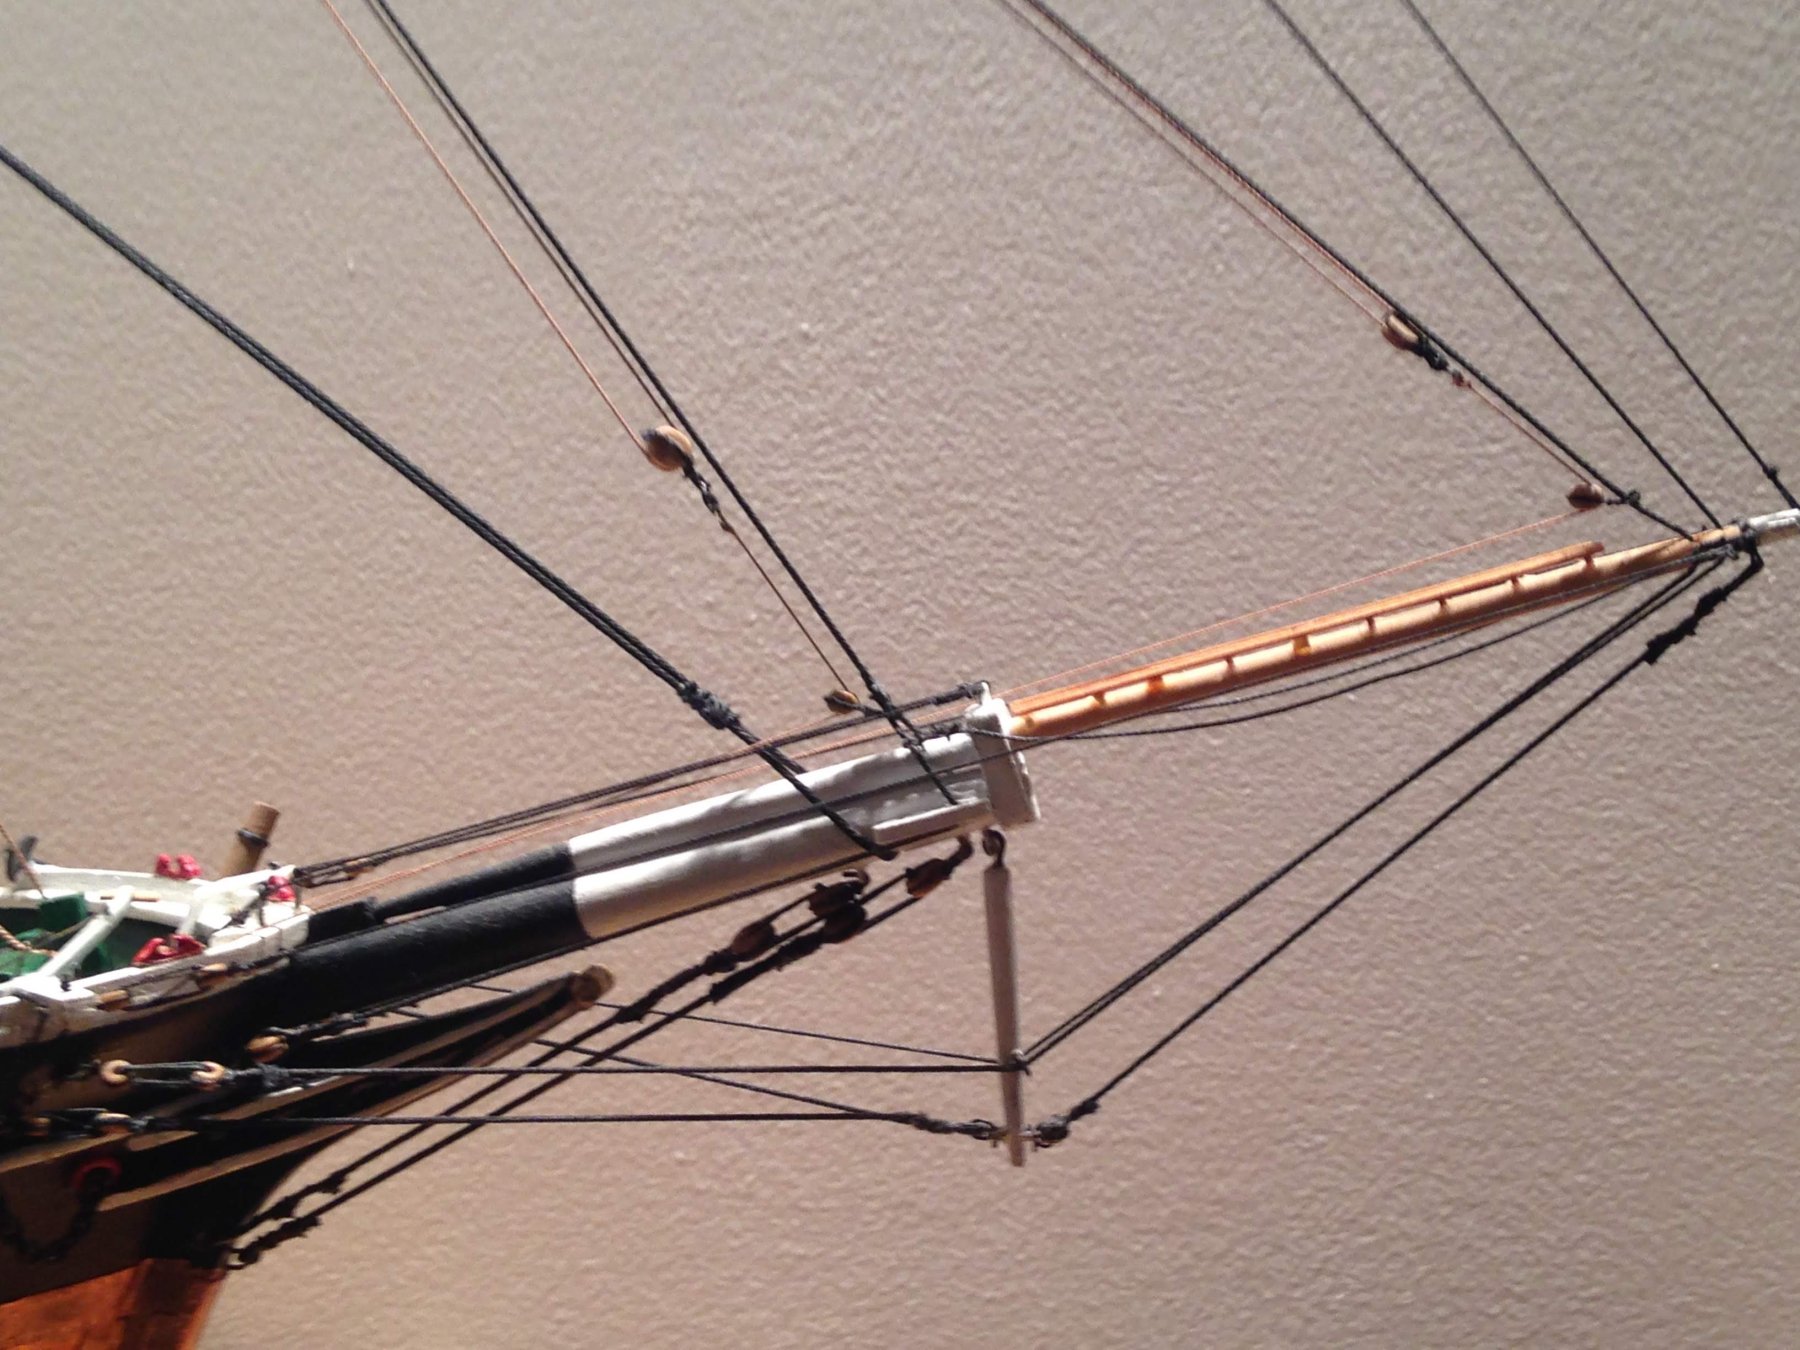
The plastic worked well for the 2 pin pin rails on either side of the fore mast. This time they're epoxied on there. Halyards and downhauls for the Jib, flying jib, outer, inner, and topmast staysails are in. I found it interesting the topmast halyard didn't have a block at the head cringe of the sail, it was just sister hooked to the head cringe. So I just hooked the downhaul to an eyesplice in the halyard as shown below in the top of the picture. Jib and flying jib halyards and downhauls That brings me to here... Next, I think it's time to get serious about these darn whaleboats. But not before a a little weekend trip to the New Bedford whaling museum. The wife and I are headed up there early tomorrow morning to spend a day there...Russ--I'll ask about the plans they used to sell on line..maybe we'll get lucky and they'll have a set laying around they would sell.


- 109 replies
-
- 7
-

-
- model shipways
- kate cory
- (and 1 more)
-
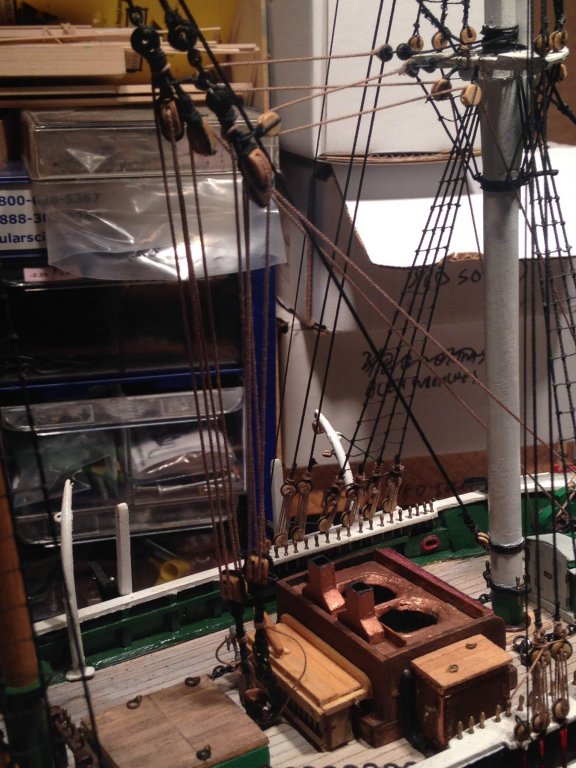
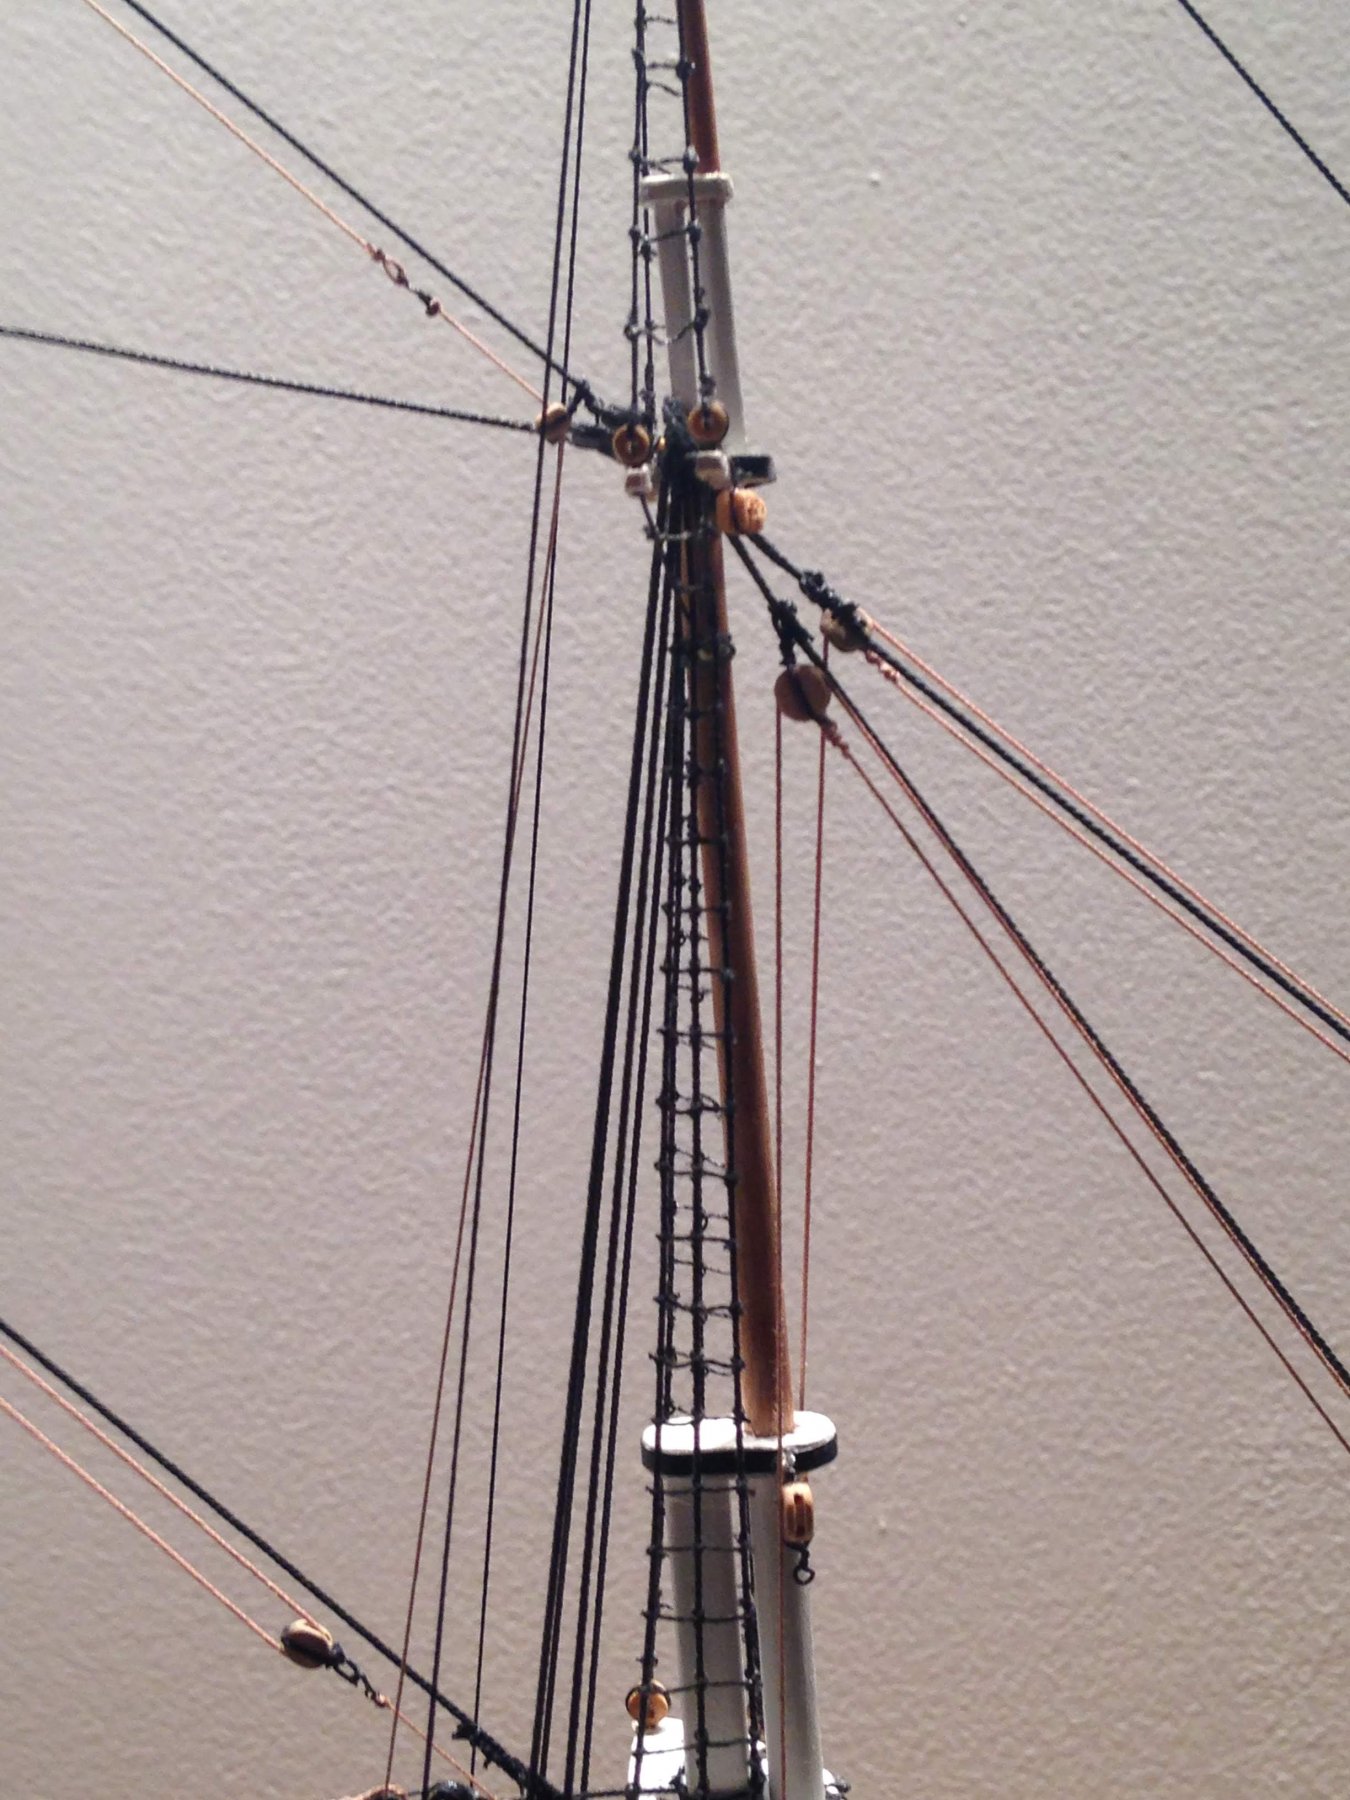
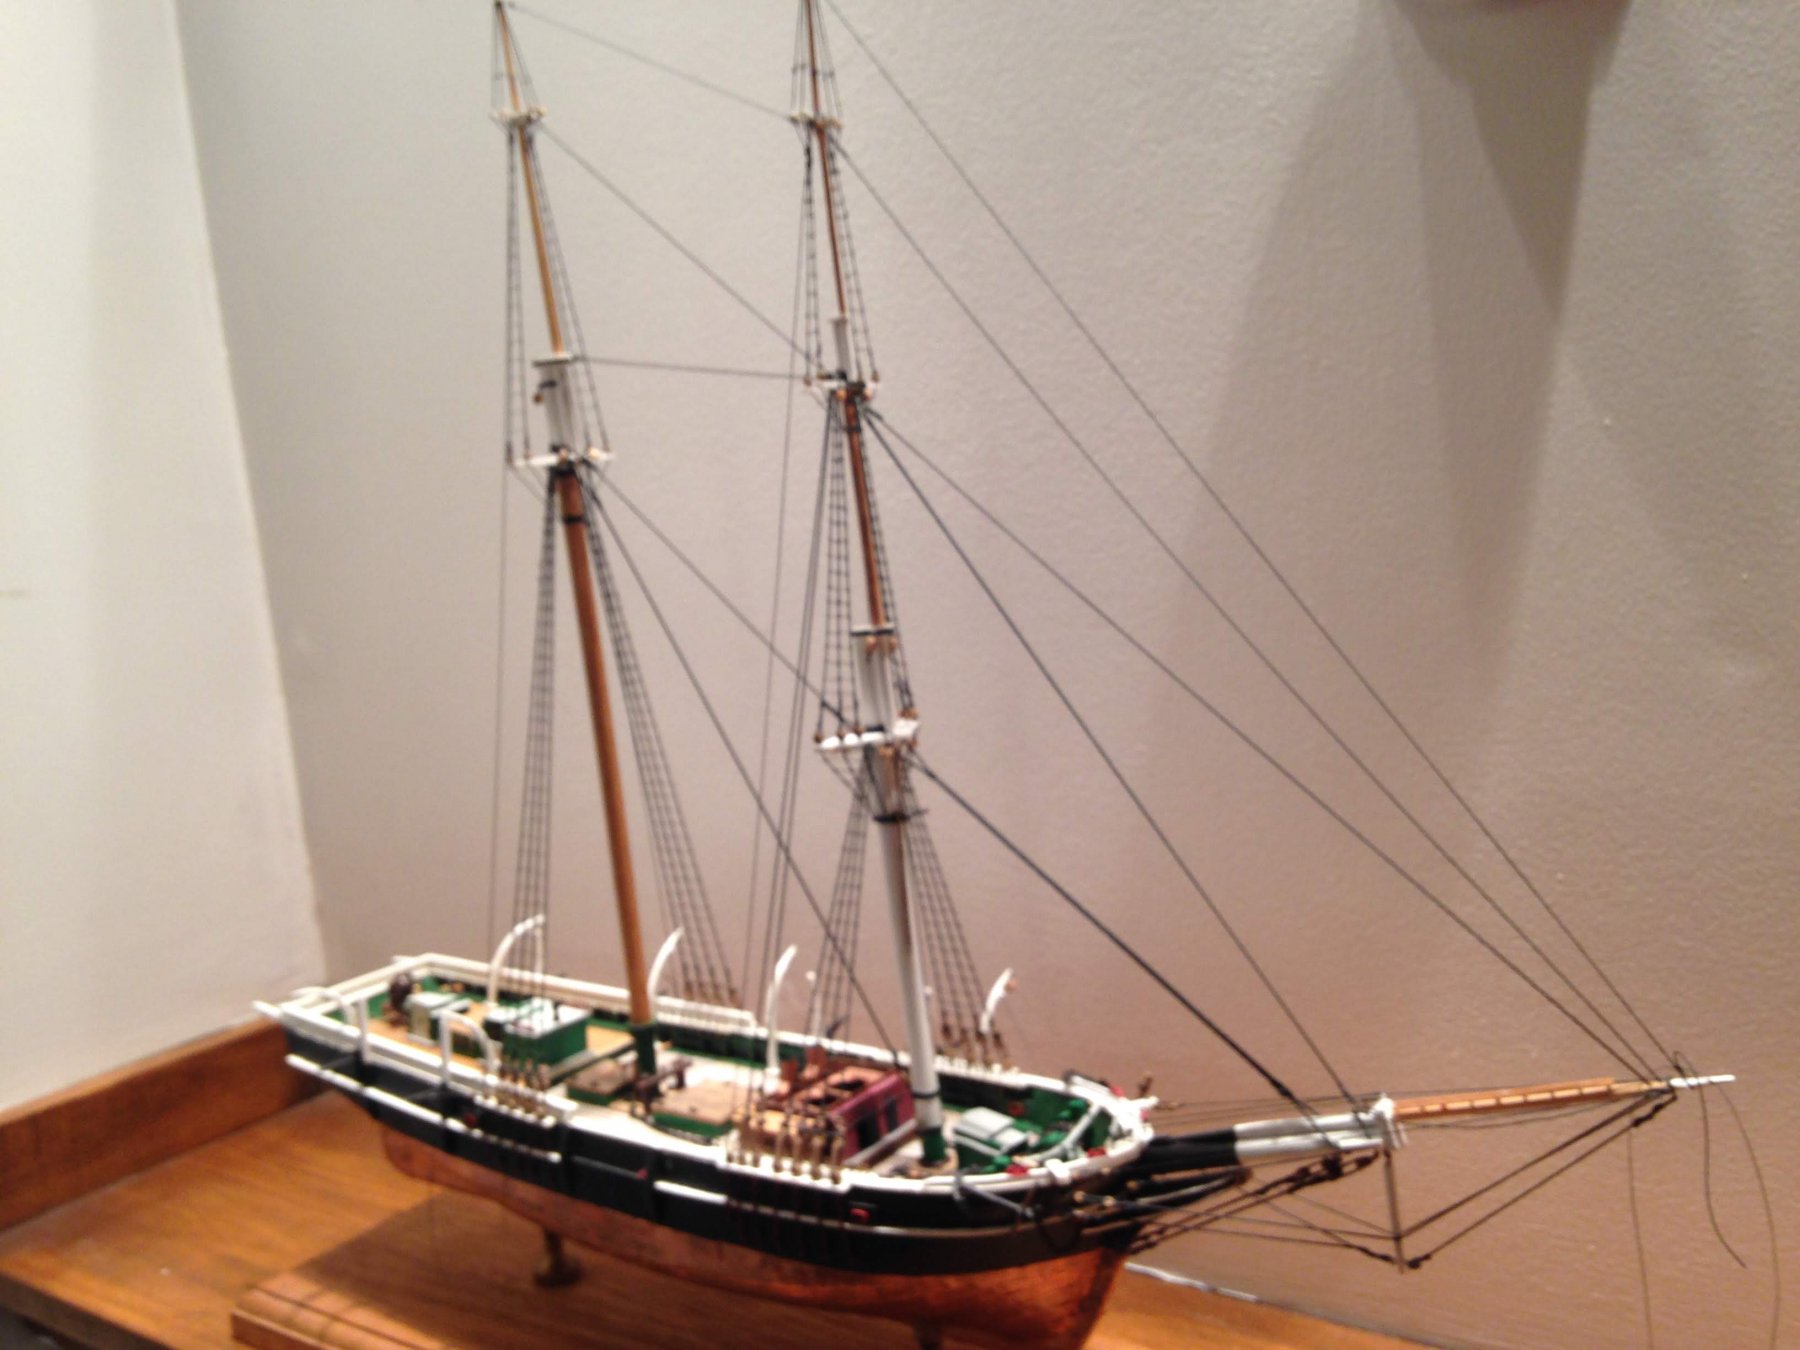
It's been a frustrating few weeks in the shipyard. I've re-rigged most of the upper stays, fore royal stay. Just too much slack after tightening the cutting-in tackle. I must have re rigged the 4 backstays half a dozen times. I think I have all the standing lines where they need to be now. Ran the jib halyard and downhaul, and belayed the downhaul to the bow rail. Then, more trouble. As I tried to belay the hauling end of the halyard to the pin in the small pinrail on the fore mast, I realized the little two pin rail on either side of the mast is not going hold up the strain, off they came. So now I need to construct some new pinrails. Got an idea at work today. I found these plastic dividers we use. The thickness looks to be just about perfect. Hopefully I can fashion 2 rails, with two belaying pins in each that will hold up when affixed to the spider band with lines belayed to it. Because as you can see, the wooden one shown below didn't stand a chance.


- 109 replies
-
- 4
-
-
- model shipways
- kate cory
- (and 1 more)
-
I have found with all info available between Mystic, New Bedford Whaling Museum and other sources, the question becomes how MUCH detail and extras do you want to add. Figuring how much is too much, how much am I capable of, has kept my interest in my build at a high level. Also can't help but think how much more detail one could add at 1/4" scale!
-
Pulling up a seat for this build. One of the great things I've found about modeling a whaler is the extensive education I'm receiving about the American whaling industry in general and the whaling vessels in particular. I'm sure you'll enjoy this build as I am with the Kate Cory.
- 145 replies
-
- 1
-
-
- model shipways
- charles w. morgan
- (and 1 more)
-
Thanks guys. That makes sense.
-
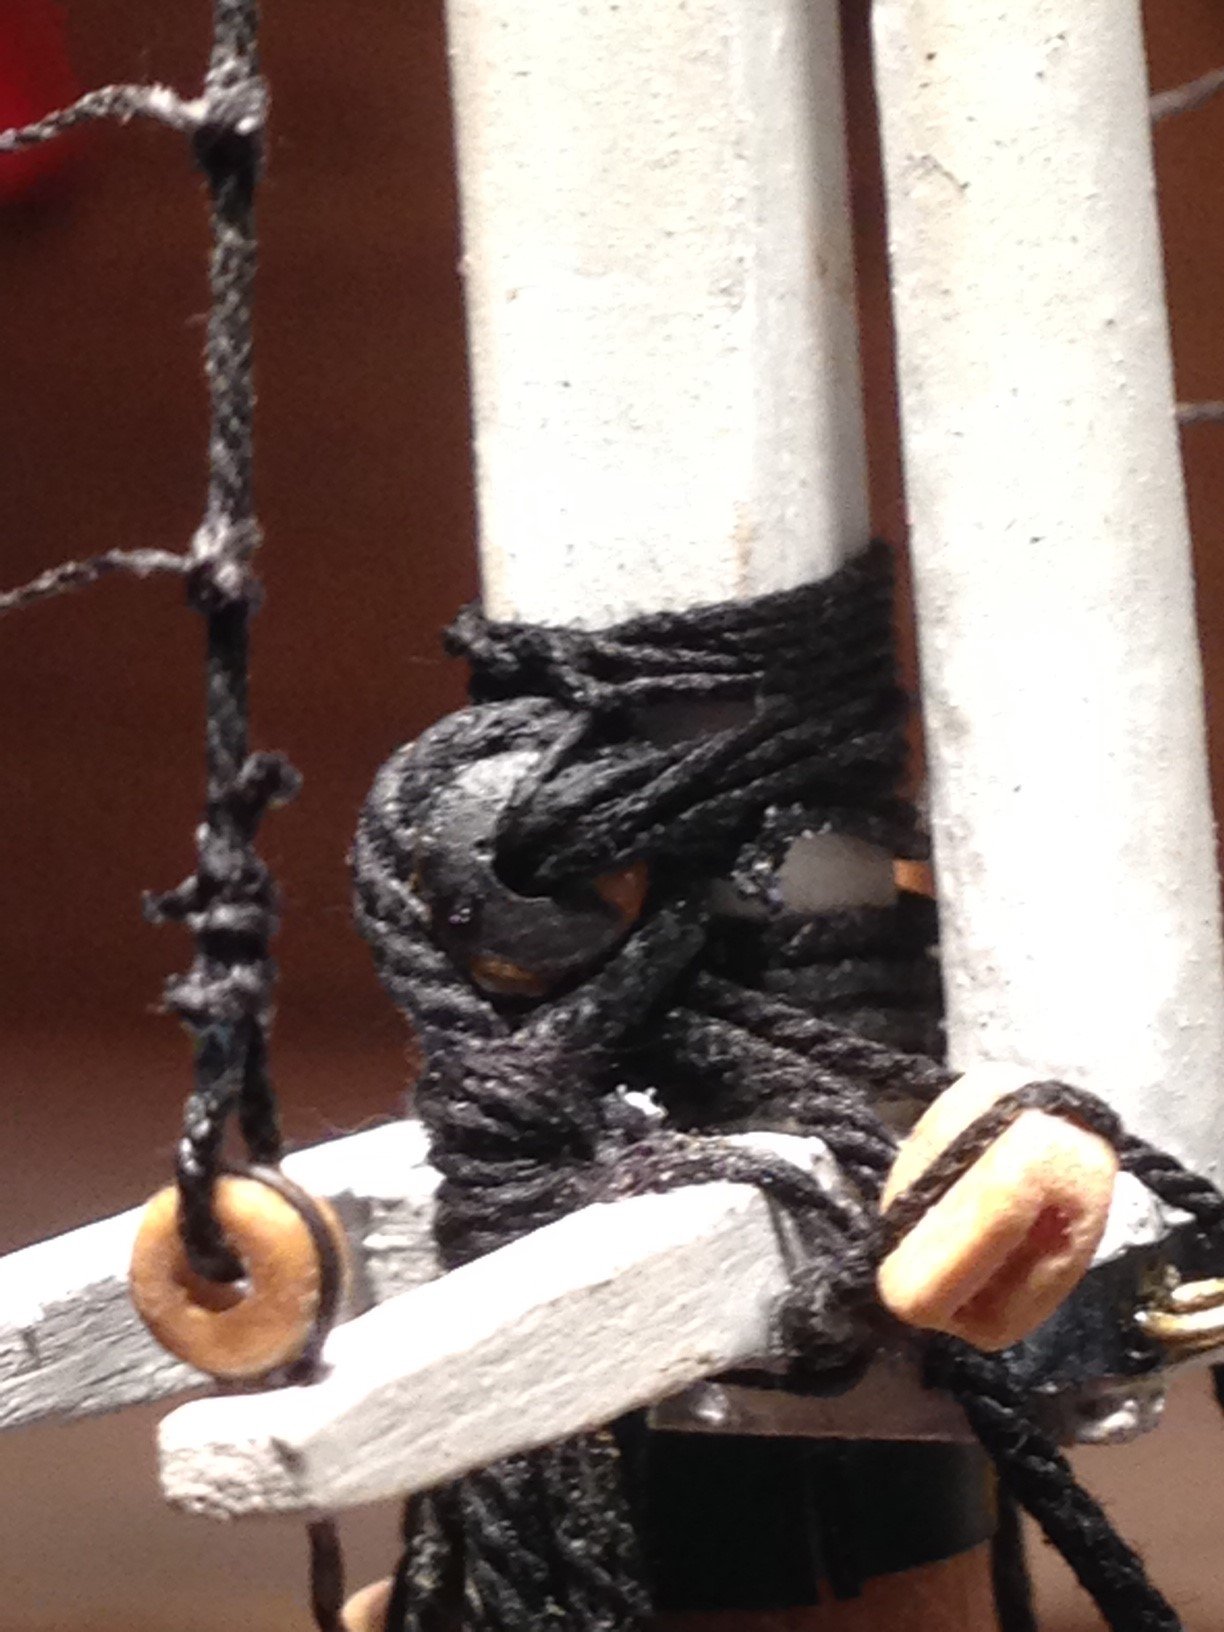
Looking for some advice. This week I finished off the cutting in tackle not without some setbacks. First, I had a pretty major catastrophe as I swung my arm around the model too quick and snapped the fore royal mast off right under the royal crosstree. . The fix took some time. The repair is not real pretty, but fairly well hidden under the crosstrees. The top most ratlines are going to have to be redone. with the repair done, I managed to finish the cutting in tackle, tension the lines and secure the lower blocks to the belly chain bit. All things considered, I'm happy with the cutting in tackle. Here's where the problem has arisen. Upon completing the Cutting in tackle, I noticed a LOT of my standing rigging had way to much slack in the lines because of the tension from the cutting in tackle. I cut away the fore topgallant and main topmast backstays, the outer mainstay, the main topmast stay and spring stay and main topmast spring stay. I reattached them, but haven't secured them all yet. Is there an order I should secure theses stays in that may avoid slack as I proceed, or is this just trial and error until I get all the lines to look good with no noticeable sag in them?
- 109 replies
-
- 3
-
-
- model shipways
- kate cory
- (and 1 more)
-
As I get closer to finishing off the standing rigging, I'm have difficulty keeping the lines tight enough as to not slack as I add higher stays. I have subsequently untied the fore topgallant and main topmast backstays, along with outer and main topmast stay, and springstay and main topmast stay. As I try to secure these again, it seems as I get near the end, one or more lines slack again. I've noticed a lot of people step the main masts, rig them before moving on to installing and rigging the topmasts, and topgallant masts. Unfortunately this isn't an option for me anymore as the masts were completed as a whole unit and then installed. Is there a preferred "order" for securing these stays that may cause them to slack less? Or do I just need to keep adjusting until I find that "sweet spot" where everything looks taught?
-
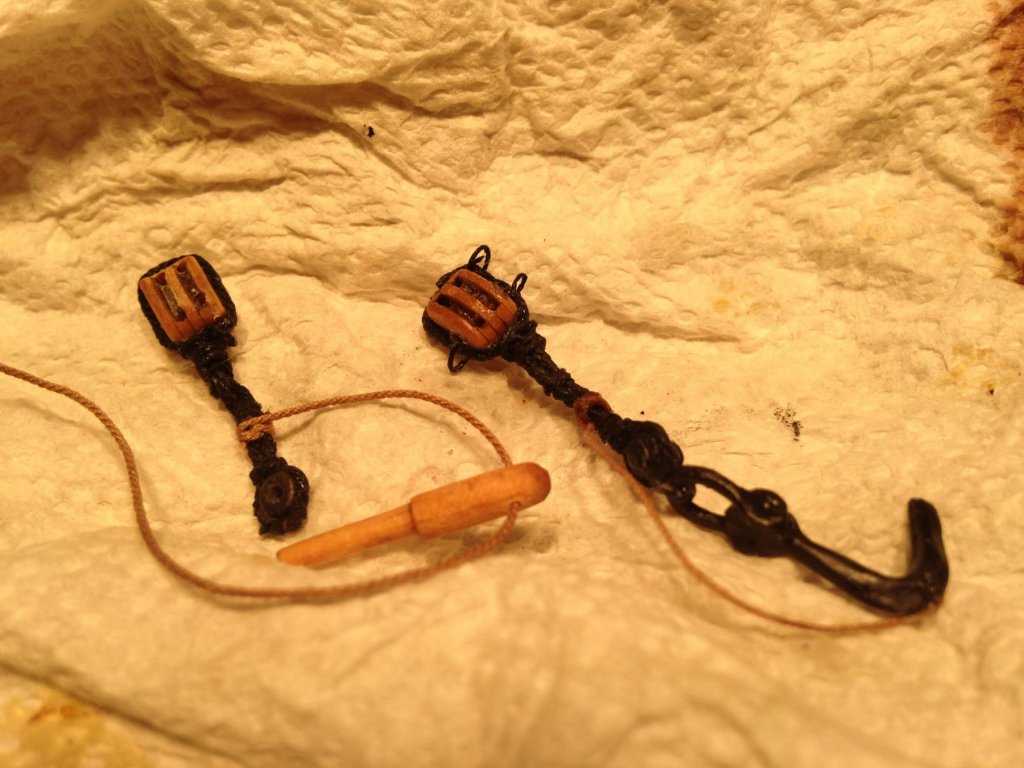
Thanks Kurt. I was pretty happy with the look. Wayne, I hope you get back at it soon. I've seen your log, you're off to a great start. Be sure to check out John B.'s KC log, as well as the many Morgan builds on this site. In particular, Bruce's Morgan, particularly his whaleboats, are stunning. Not only am I learning ship modeling, but I'm getting quite an education in the history of American whaling. Fascinating subject, IMO. I'm learning the hard way I shouldn't have tied off the standing rigging. I've already untied the backstays, and will probably need to undo the inner main, outer main and spring stays to re-tension them. It was a productive Sunday in the shipyard. Not only finished the cutting in pieces, I managed to get the blubber hook rigged. Ends are just wrapped around the windlass until final adjusting. Still need to lash that hook to the bit as well.


- 109 replies
-
- 6
-
-
- model shipways
- kate cory
- (and 1 more)
-
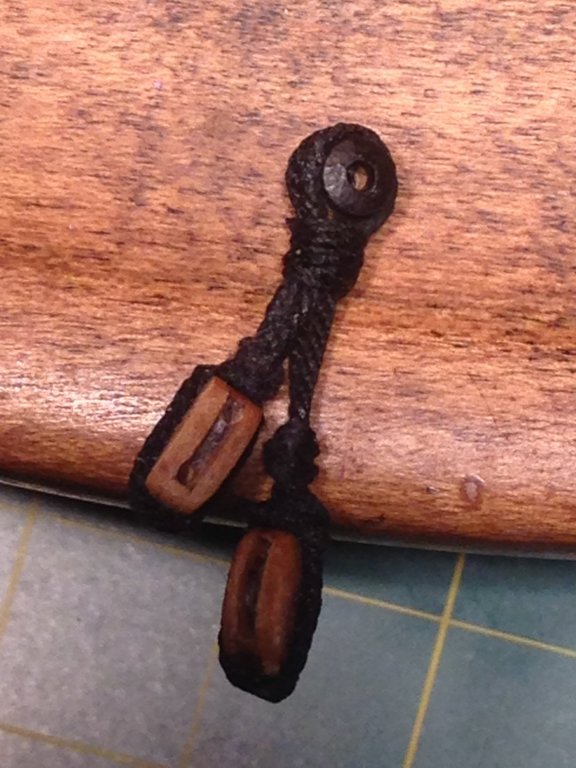
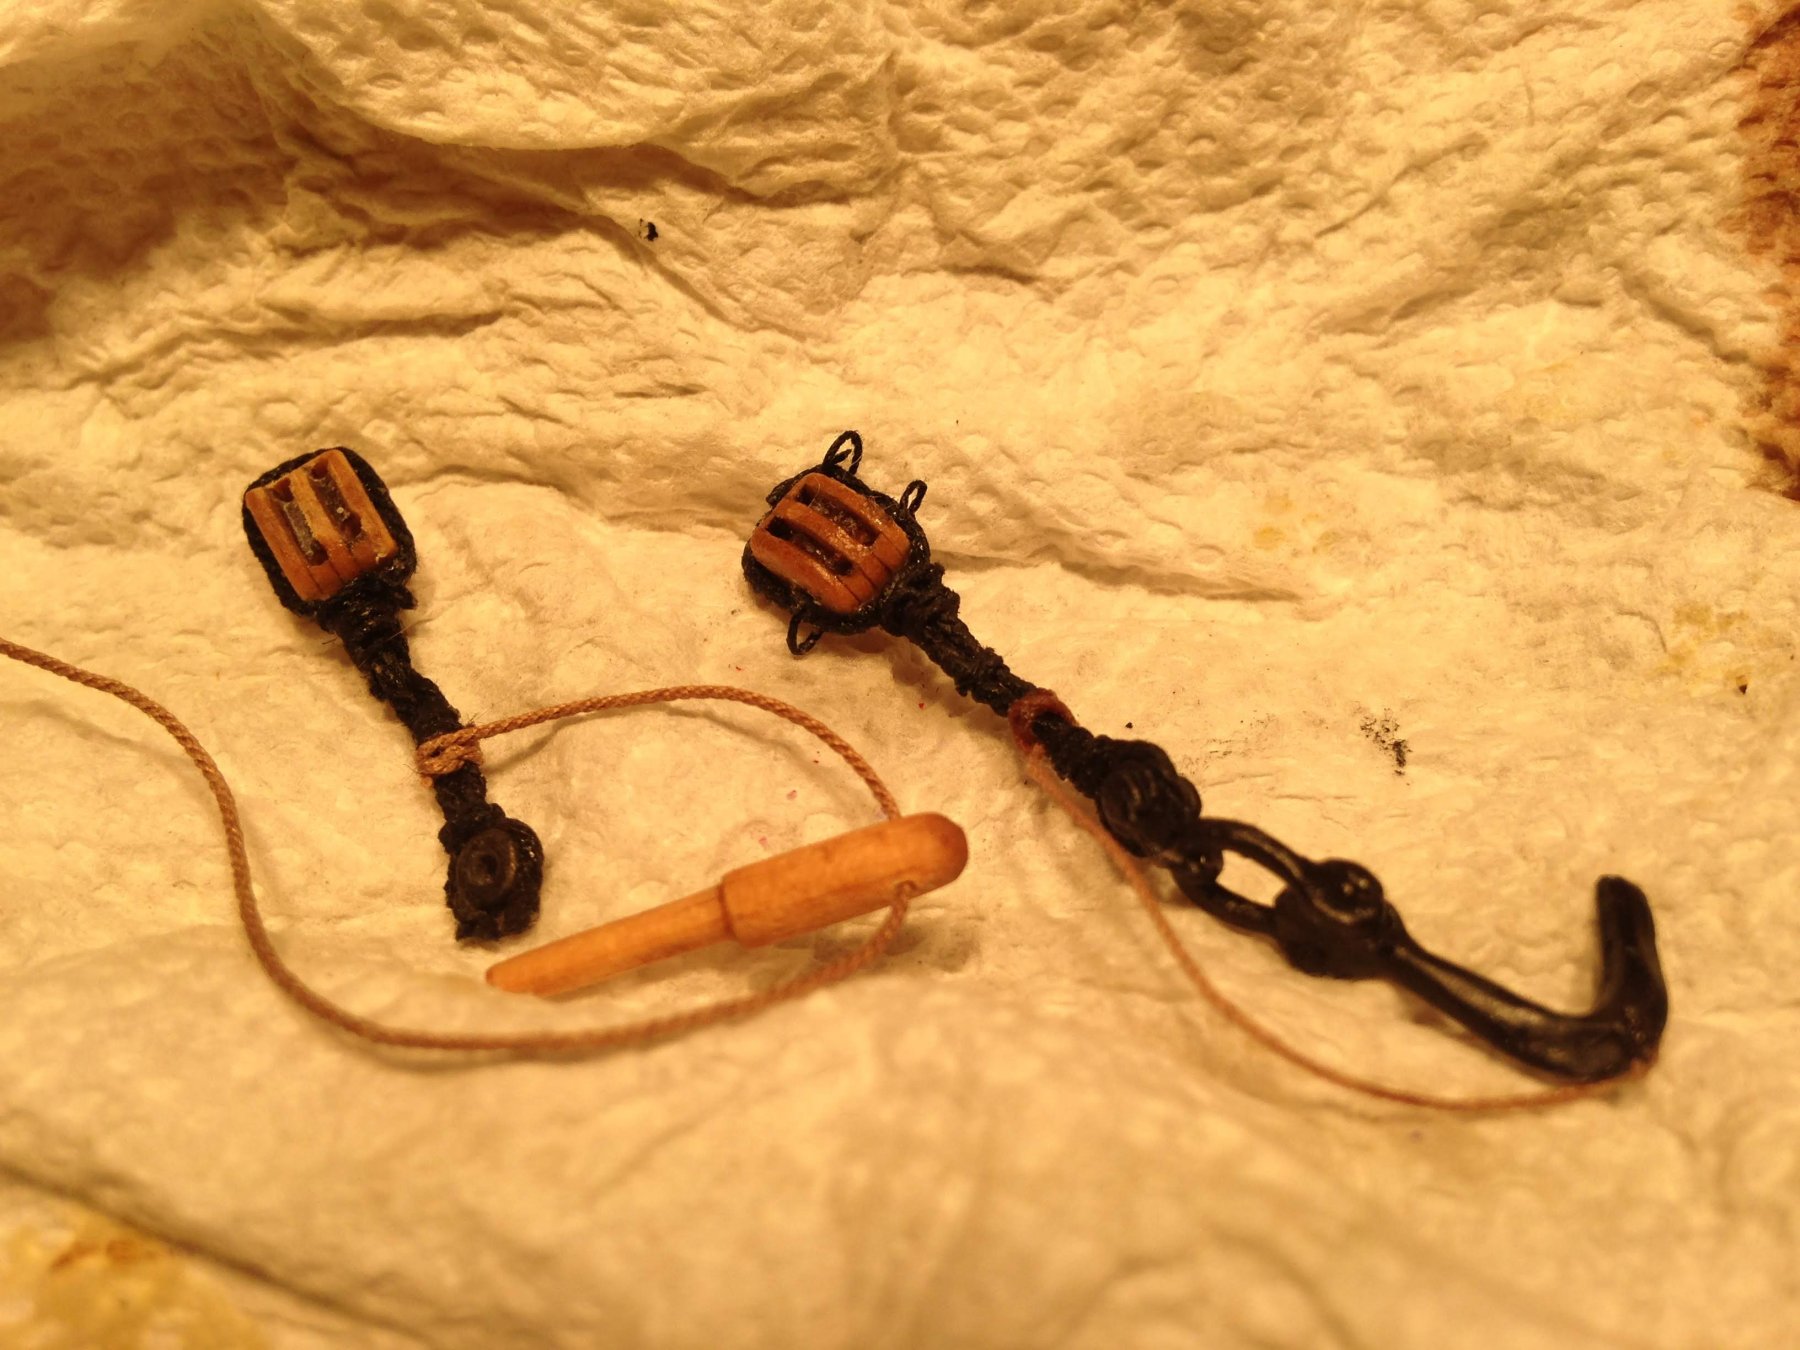
Upper blocks shackled into the pendents. Lower blocks fit with wooden toggle, and blubber hook. A little extra detail adding the small rope handles on the lower block with the blubber hook. Now all that's left to do is rig these things.
- 109 replies
-
- 3
-
-
- model shipways
- kate cory
- (and 1 more)
-
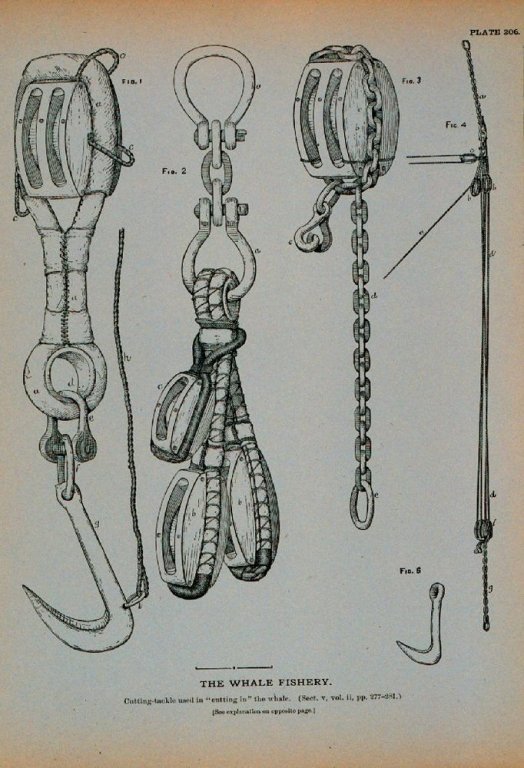
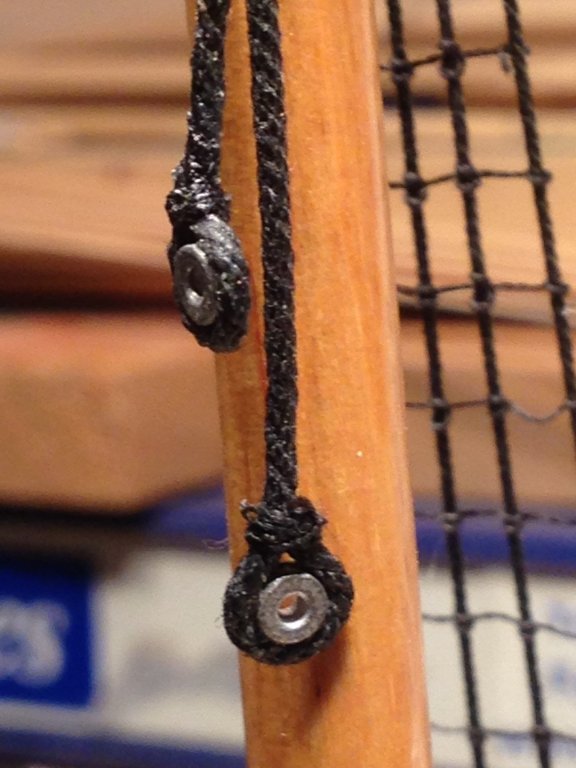
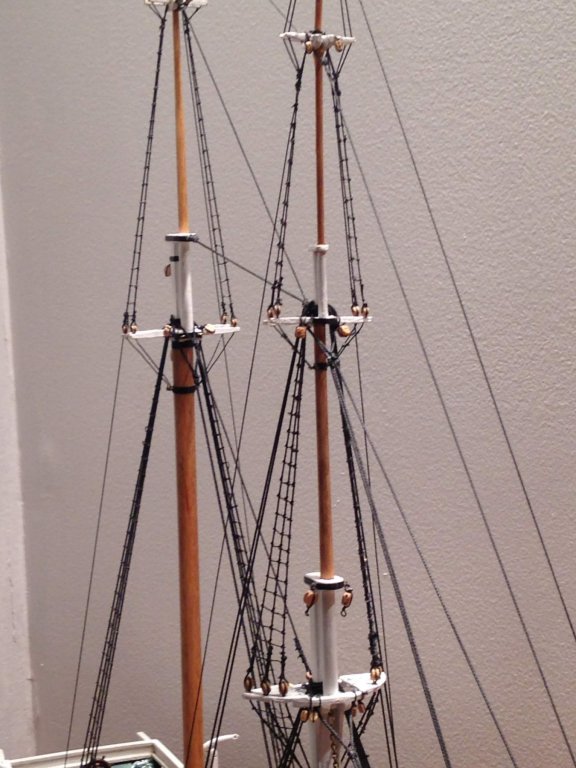
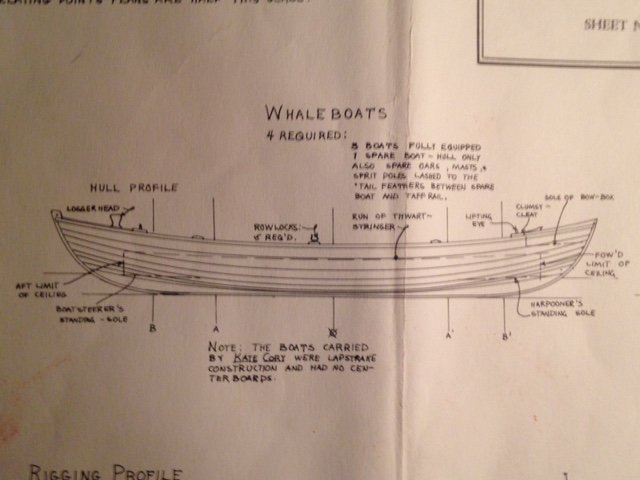
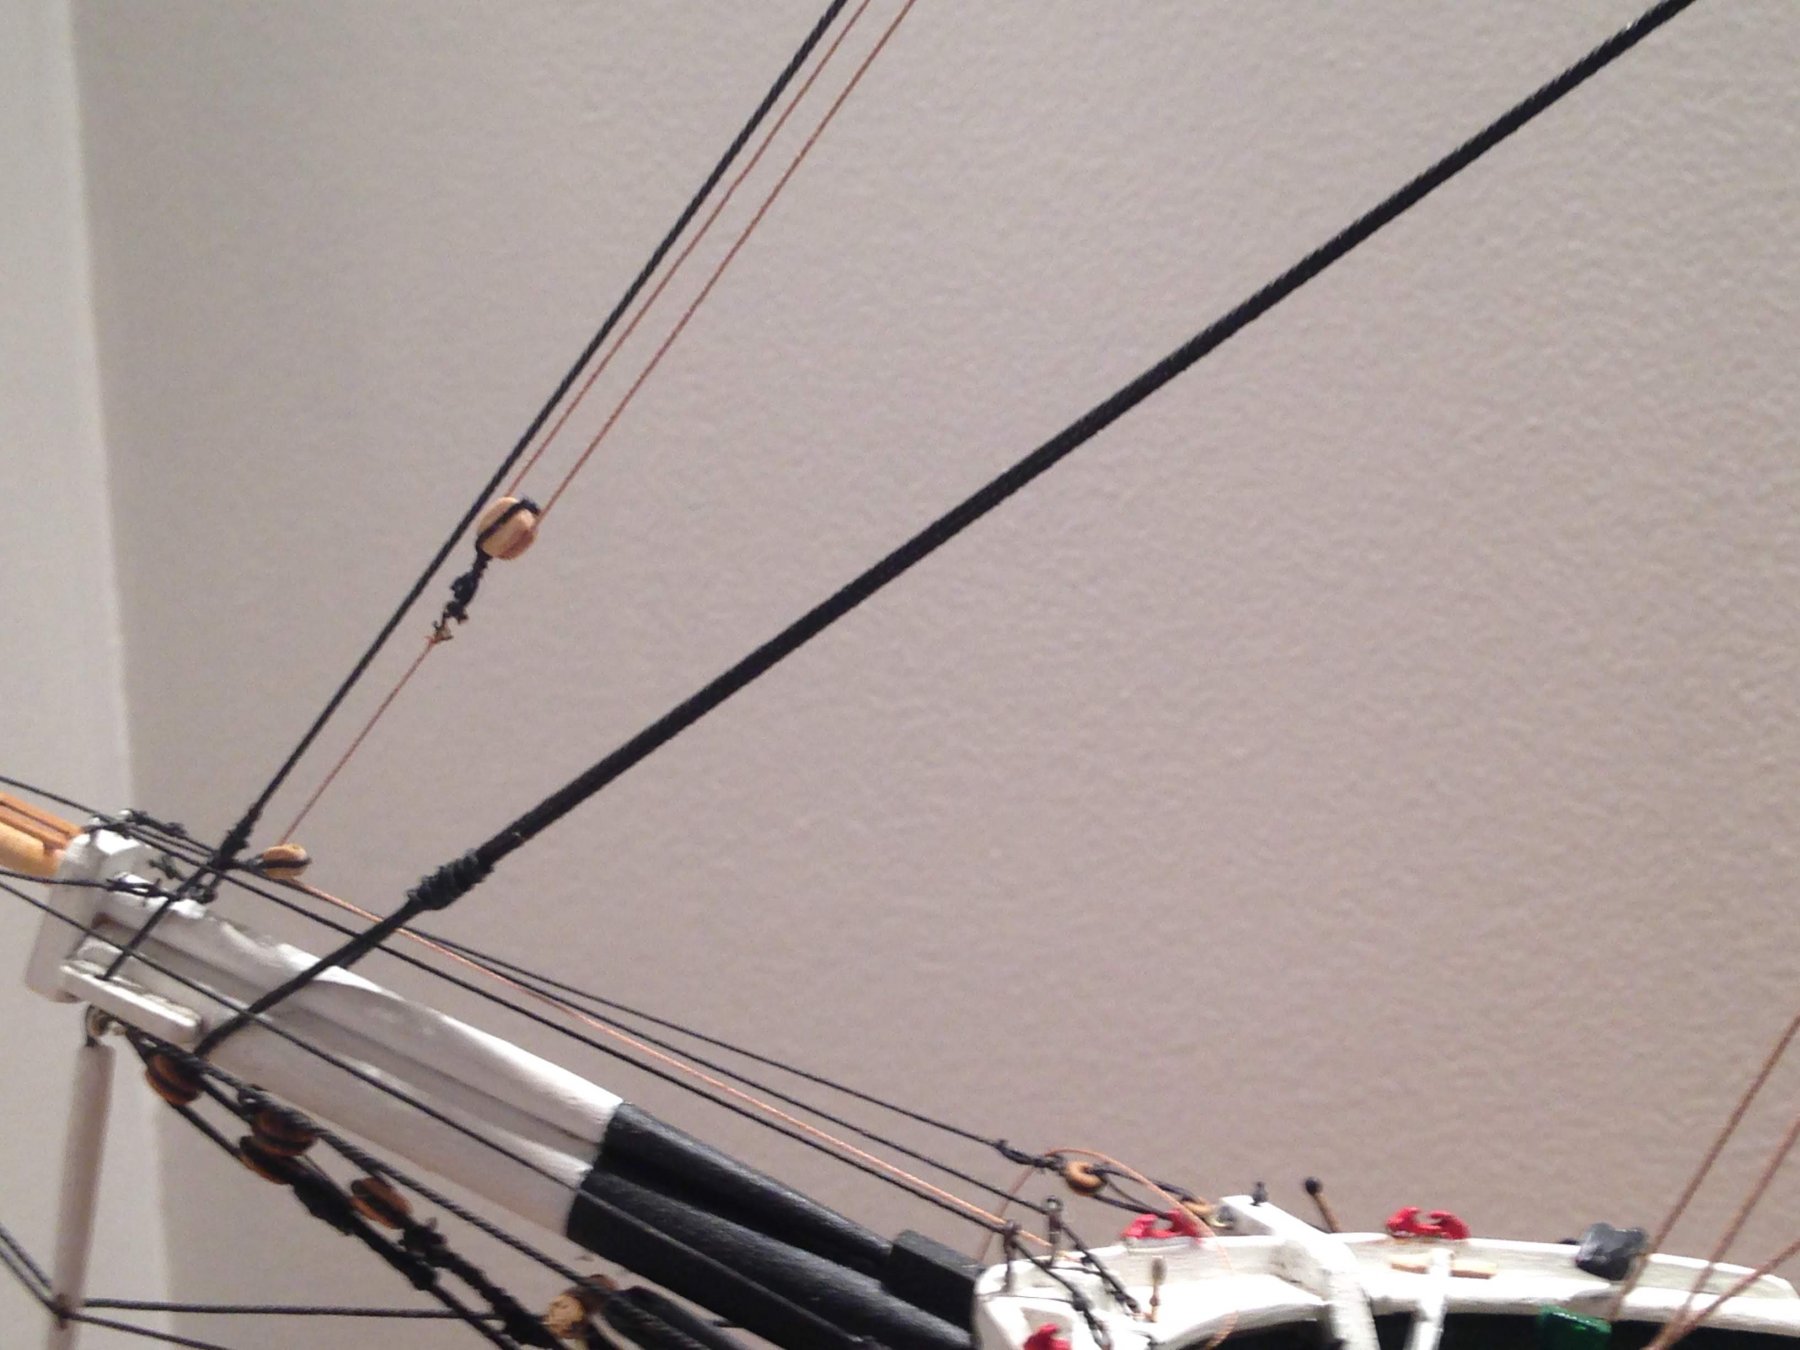
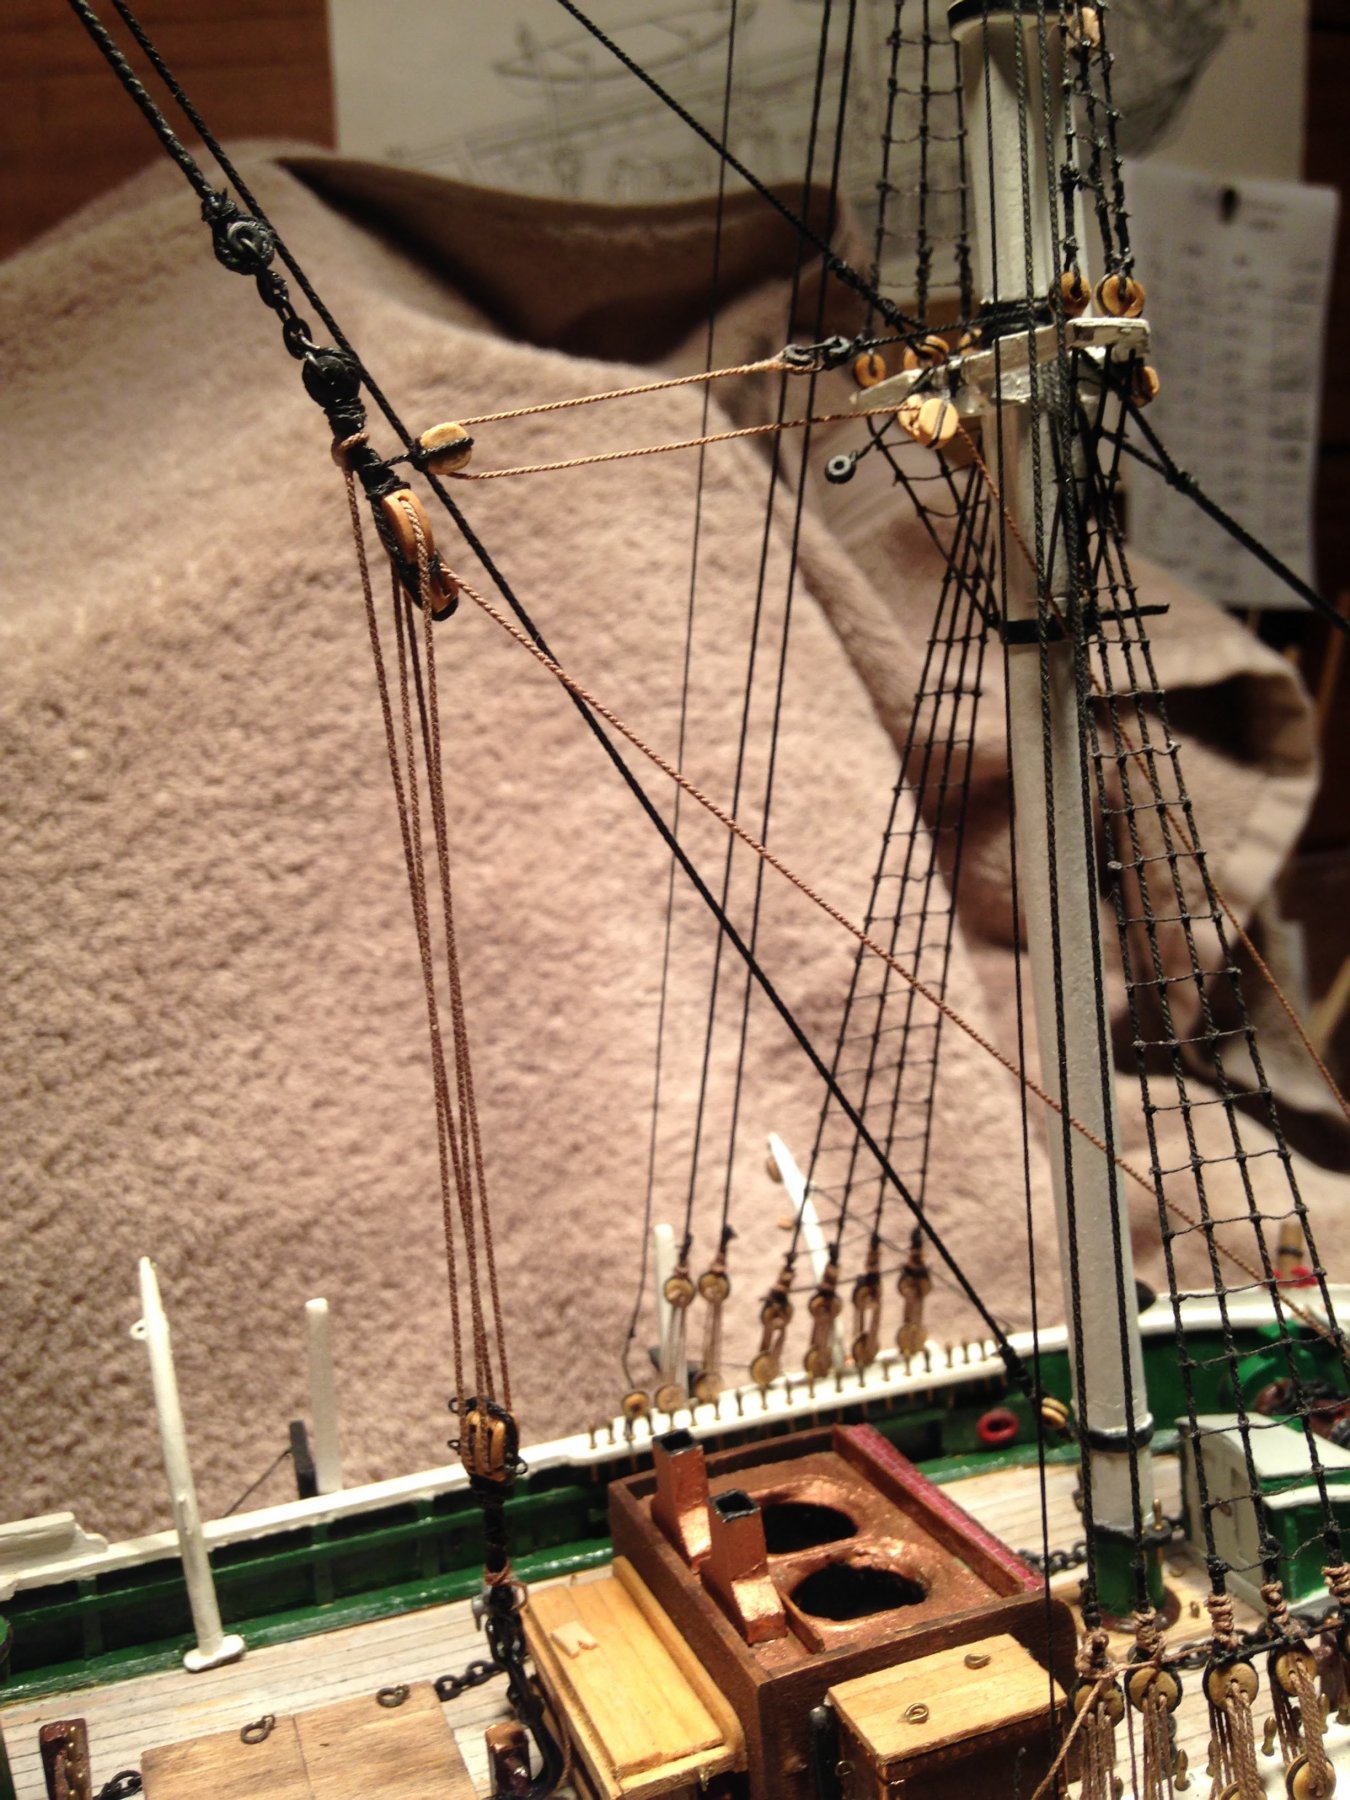
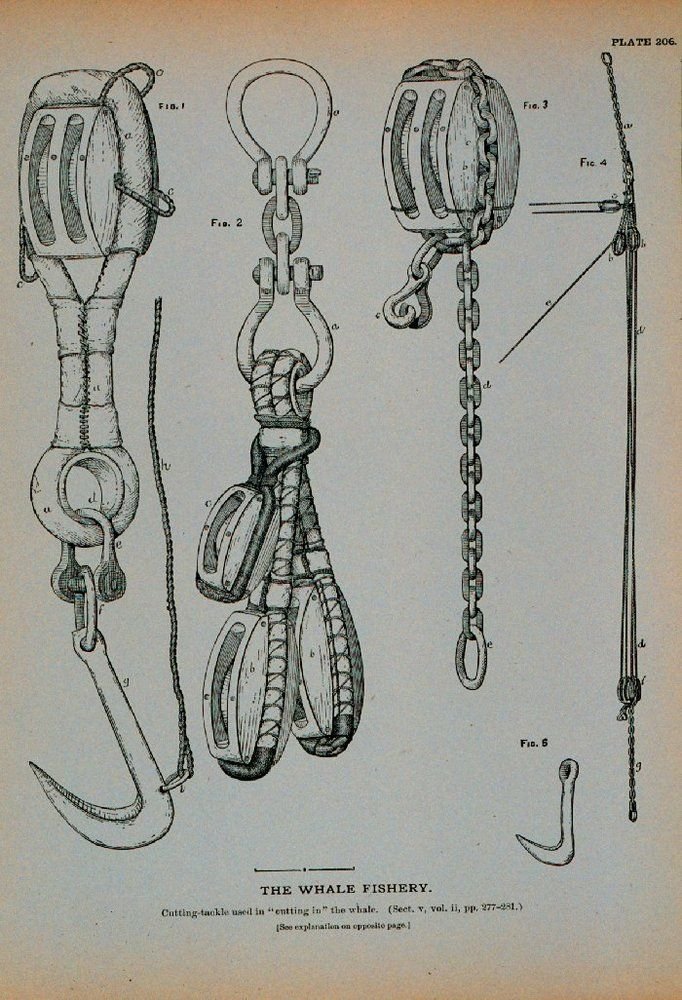
So I have started on the tackle and pendants. After studying the MS plans, the rigging specs booklet from New Bedford, it seems the Kate Cory's pendants were 8"c tarred hemp and not chain. So I used Syren .045 black rope, and 3.5mm bulls eyes for the thimbles and lashed it to the main mast. This illustration I found on line was extremely helpful for me in understanding cutting in tackle. To the left is the lower block setup with the blubber hook. The toggle strap is similar. The second is the upper block configuration, and the third is a chain option for the toggle rig. The far right shows the falls and guys. I added the bull's eyes for thimbles on the pendants and lashed it to the main mast as shown in the plans and described in the rigging Specs. I've made one set of upper blocks, without the guy block strapped in yet. Chuck's 9/32 block kits add a nice touch to add detail to these 17 1/2" blocks used on the KC. Next up the lower double block. and figuring out how I'm going to represent the linkage between the pendants and the upper block straps as my metal work is no way up to the task of making shackles.

- 109 replies
-
- 3
-
-
- model shipways
- kate cory
- (and 1 more)
-
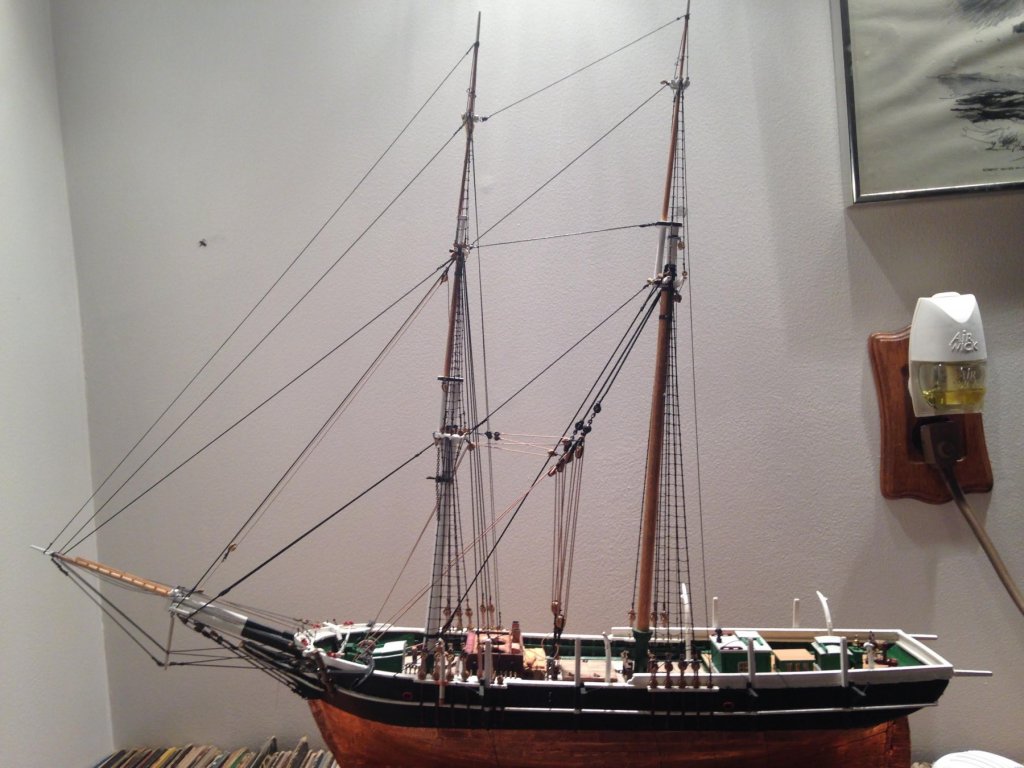
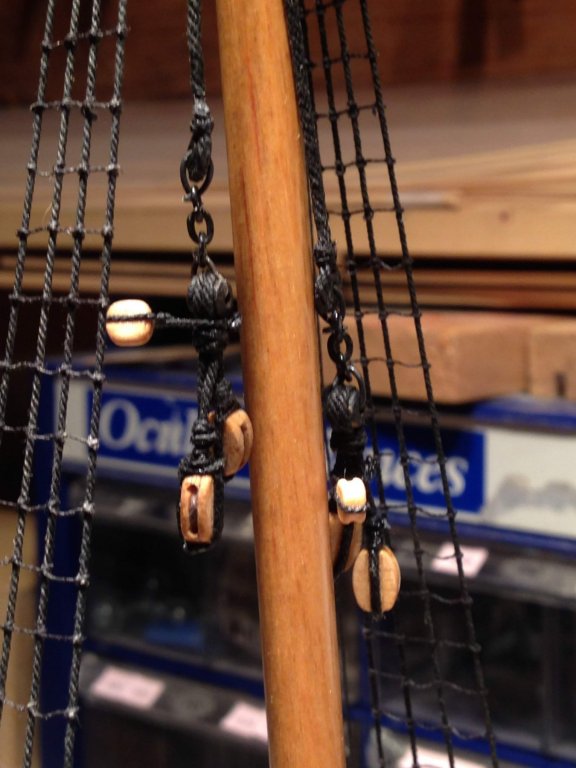
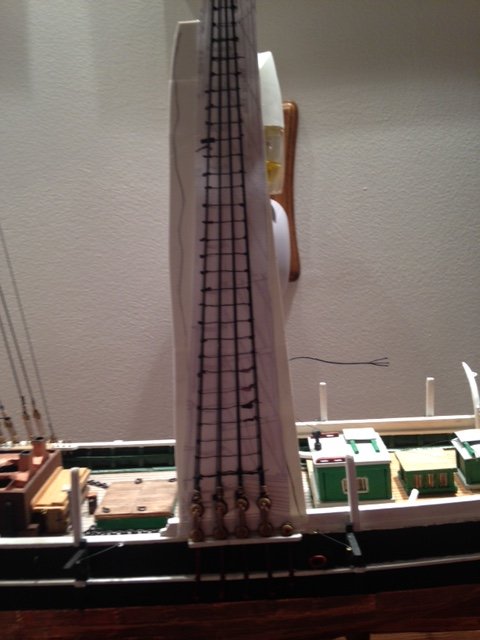
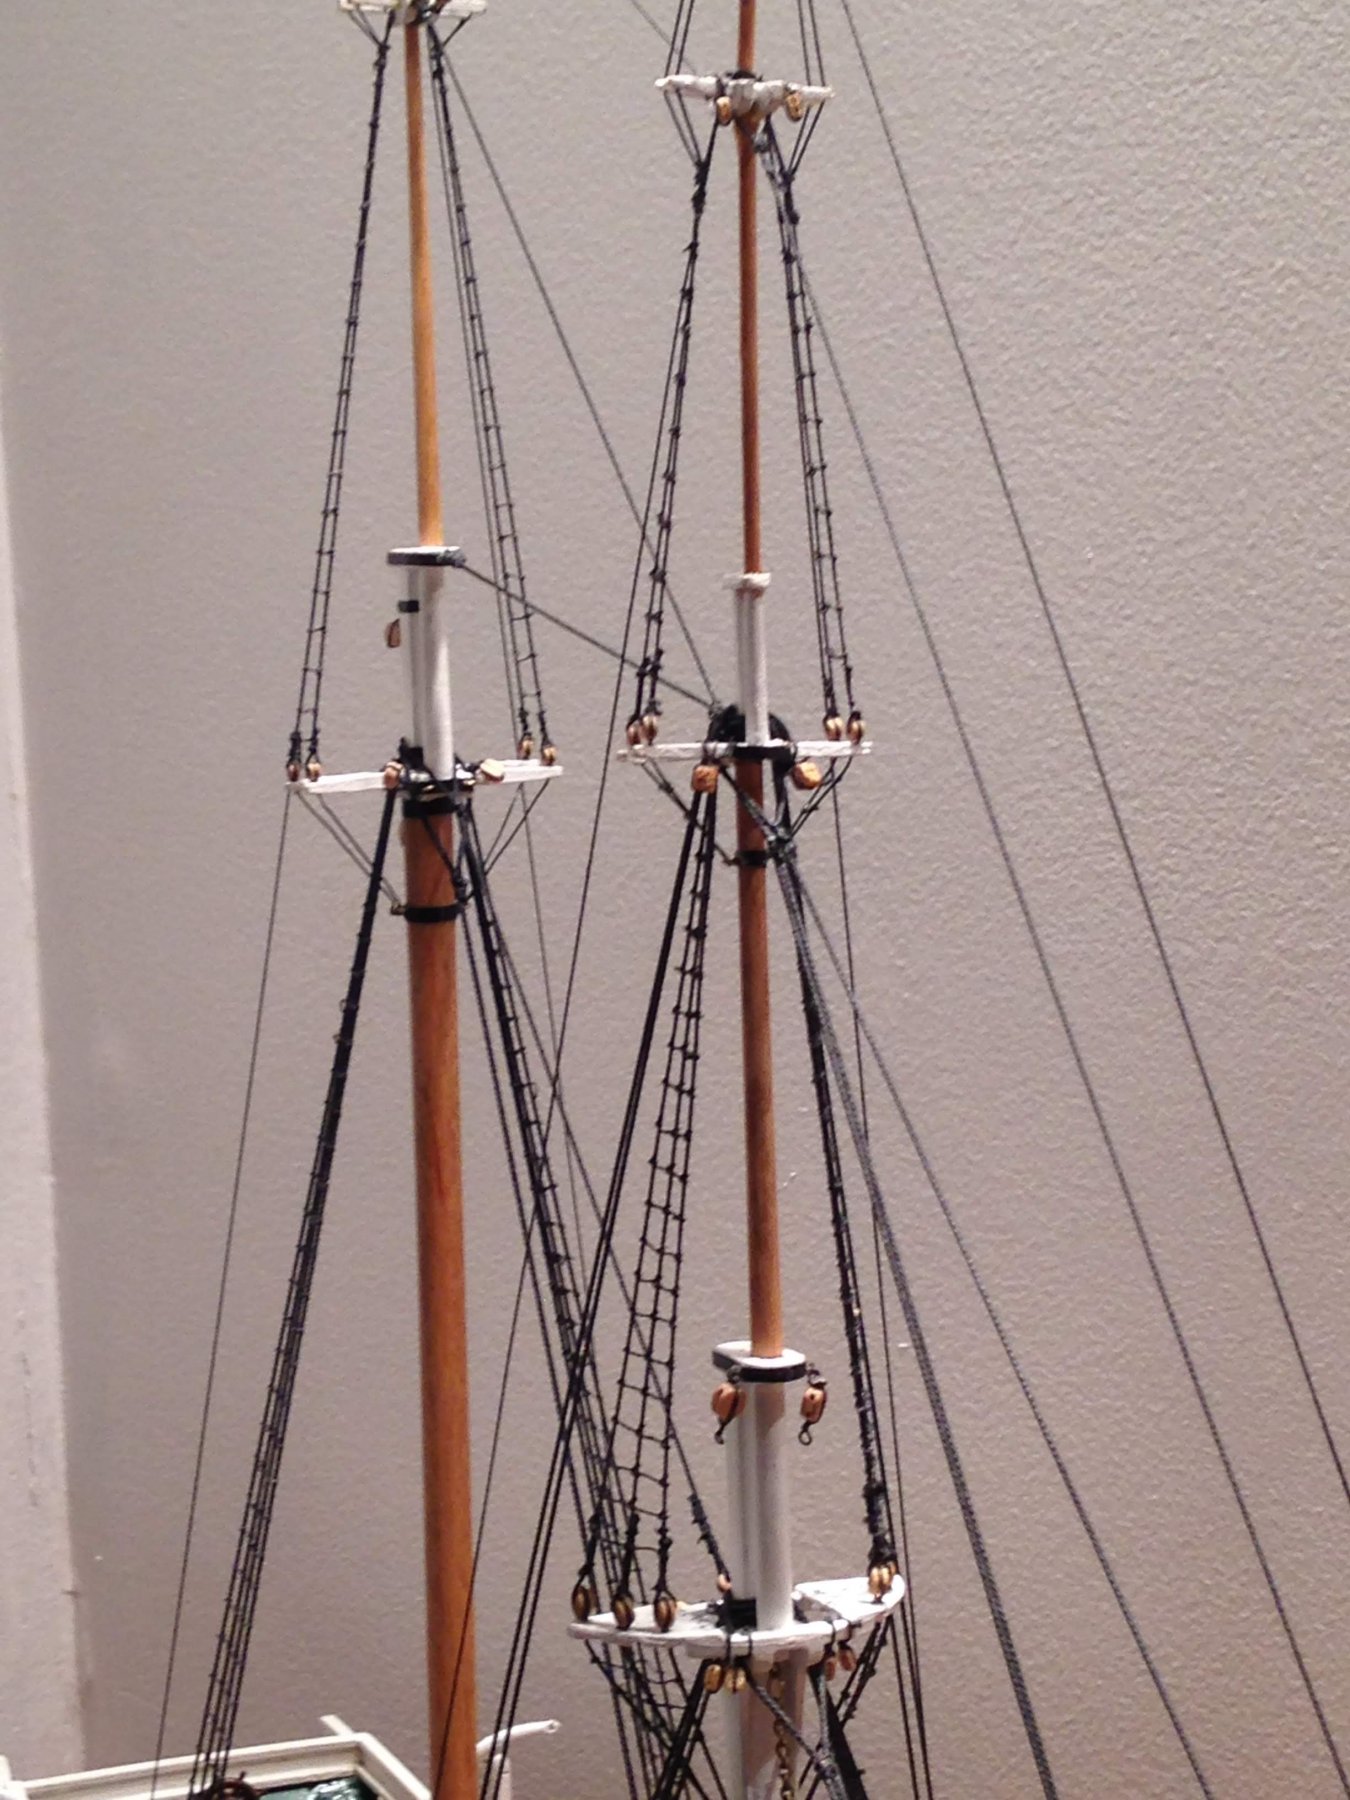
The standing rigging is just about complete. Backstays and royal Forestay still need to be tensioned and cut. I decided to use small bulls eyes for thimbles as my metal working "skills" need a LOT of work. Hope they don't look to oversized. It's amazing what the camera picks up. That drop of glue on the trestle tree looks horrendous, yet hardly visible looking at the model. i'm going to have try to clean that up a bit. Next up I guess is cutting in tackle. Or whaleboats. If I get frustrated trying to rig the tricky cutting in tackle I'll switch over to whaleboats for a spell.

.thumb.JPG.de1136aba95d1b2dbf04ebbe10933a6b.JPG)
- 109 replies
-
- 6
-
-
- model shipways
- kate cory
- (and 1 more)
-
Been a while since I've posted. Spring and summer keep me busy. Work is progressing VERY slowly. Ratlines done and some stays being rigged. Some pics to follow when time allows.
- 109 replies
-
- 2
-
-
- model shipways
- kate cory
- (and 1 more)
-
Looking good so far! Good to see another Kate Cory build! I'm going to pull up a seat. Hope you've just been busy and haven't abandoned the build. Life does get in the way. I haven't done much on my Kate Cory since April. I'm in between standing rigging, carving whaleboats, and thinking about starting the cutting in tackle. She's a nice looking ship. If you haven't already, look into the plans and rigging spec booklet that at one time was sold through the New Bedford Whaling museum. Not sure if it's still available, but worth the effort if you can locate a set.
-
Spring and summer is a slow shipbuilding season for me as my other interest, baseball umpire, take up a good portion of my free time. Bad weather has kept me off the baseball fields, and added some time in the shipyard. Main shrouds rigged. A few loose ends still to be cut off on the starboard side. Grid made from a copy of the plans, and taped to a thin plastic sheet for some stability. Now ready for ratlines. maybe I can get them done before the Northeast joint clubs show in 2 weeks.
- 109 replies
-
- 7
-
-
- model shipways
- kate cory
- (and 1 more)
-
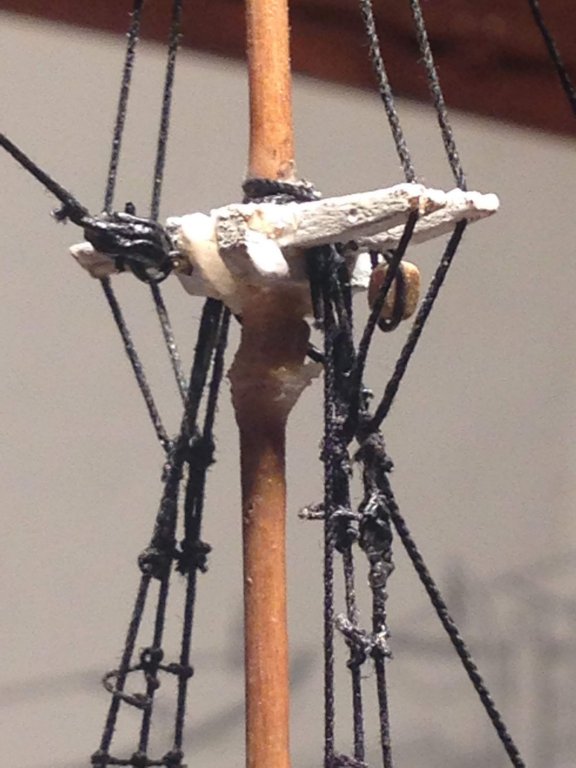
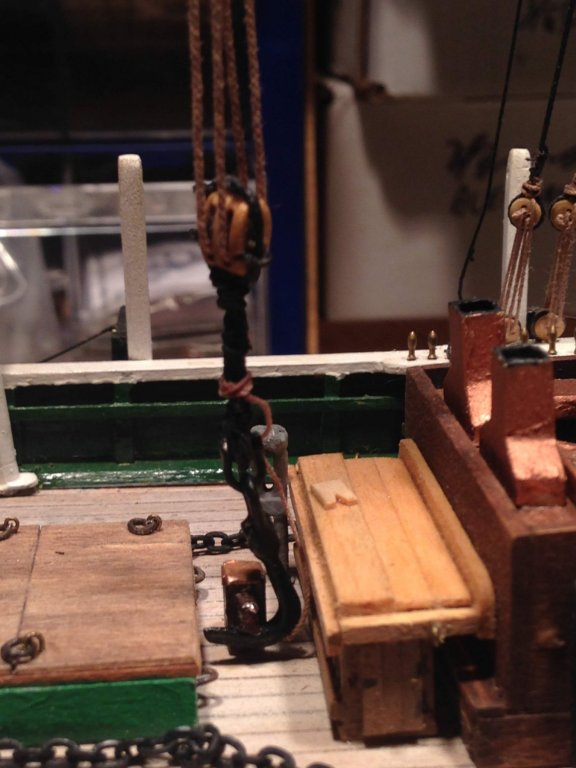
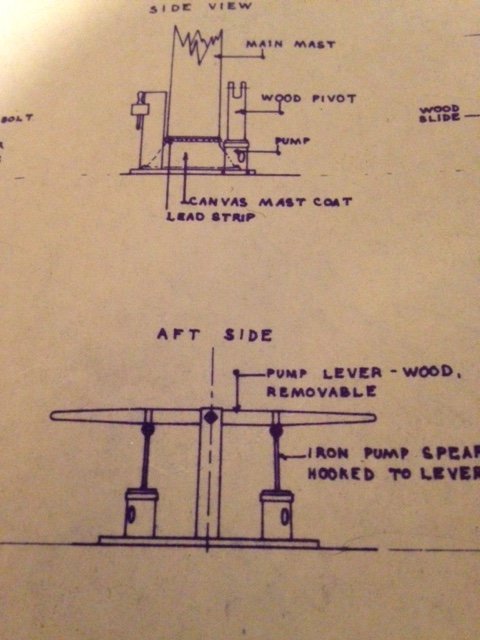
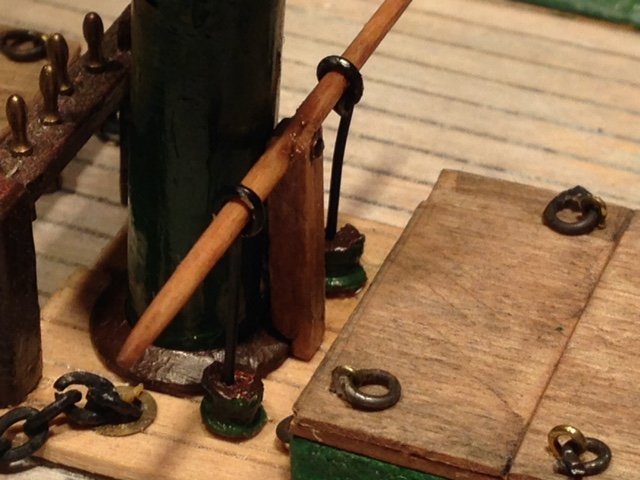
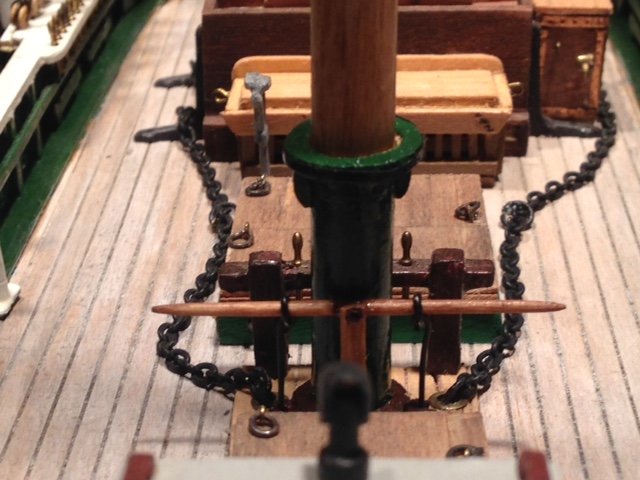
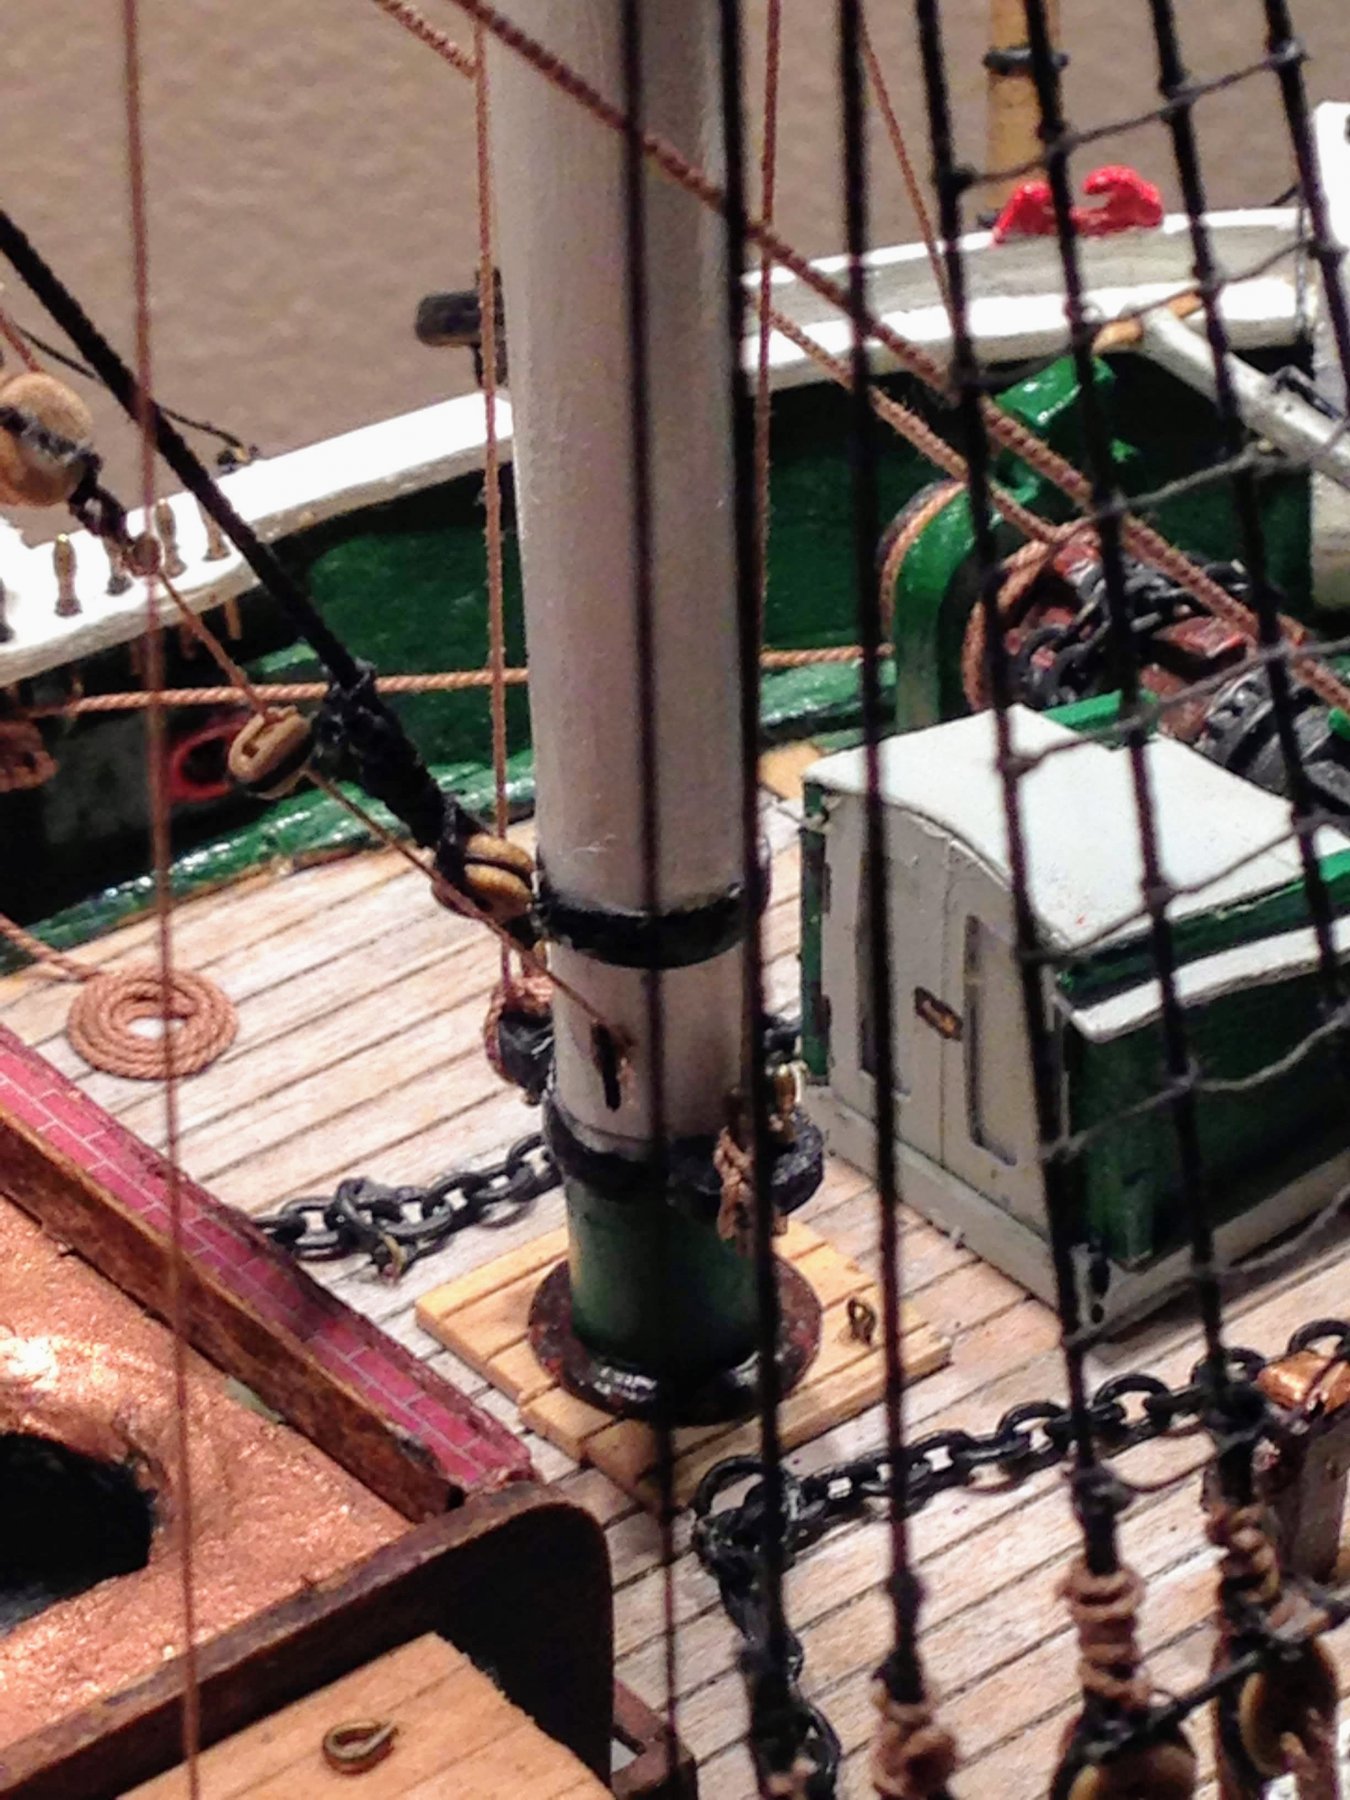
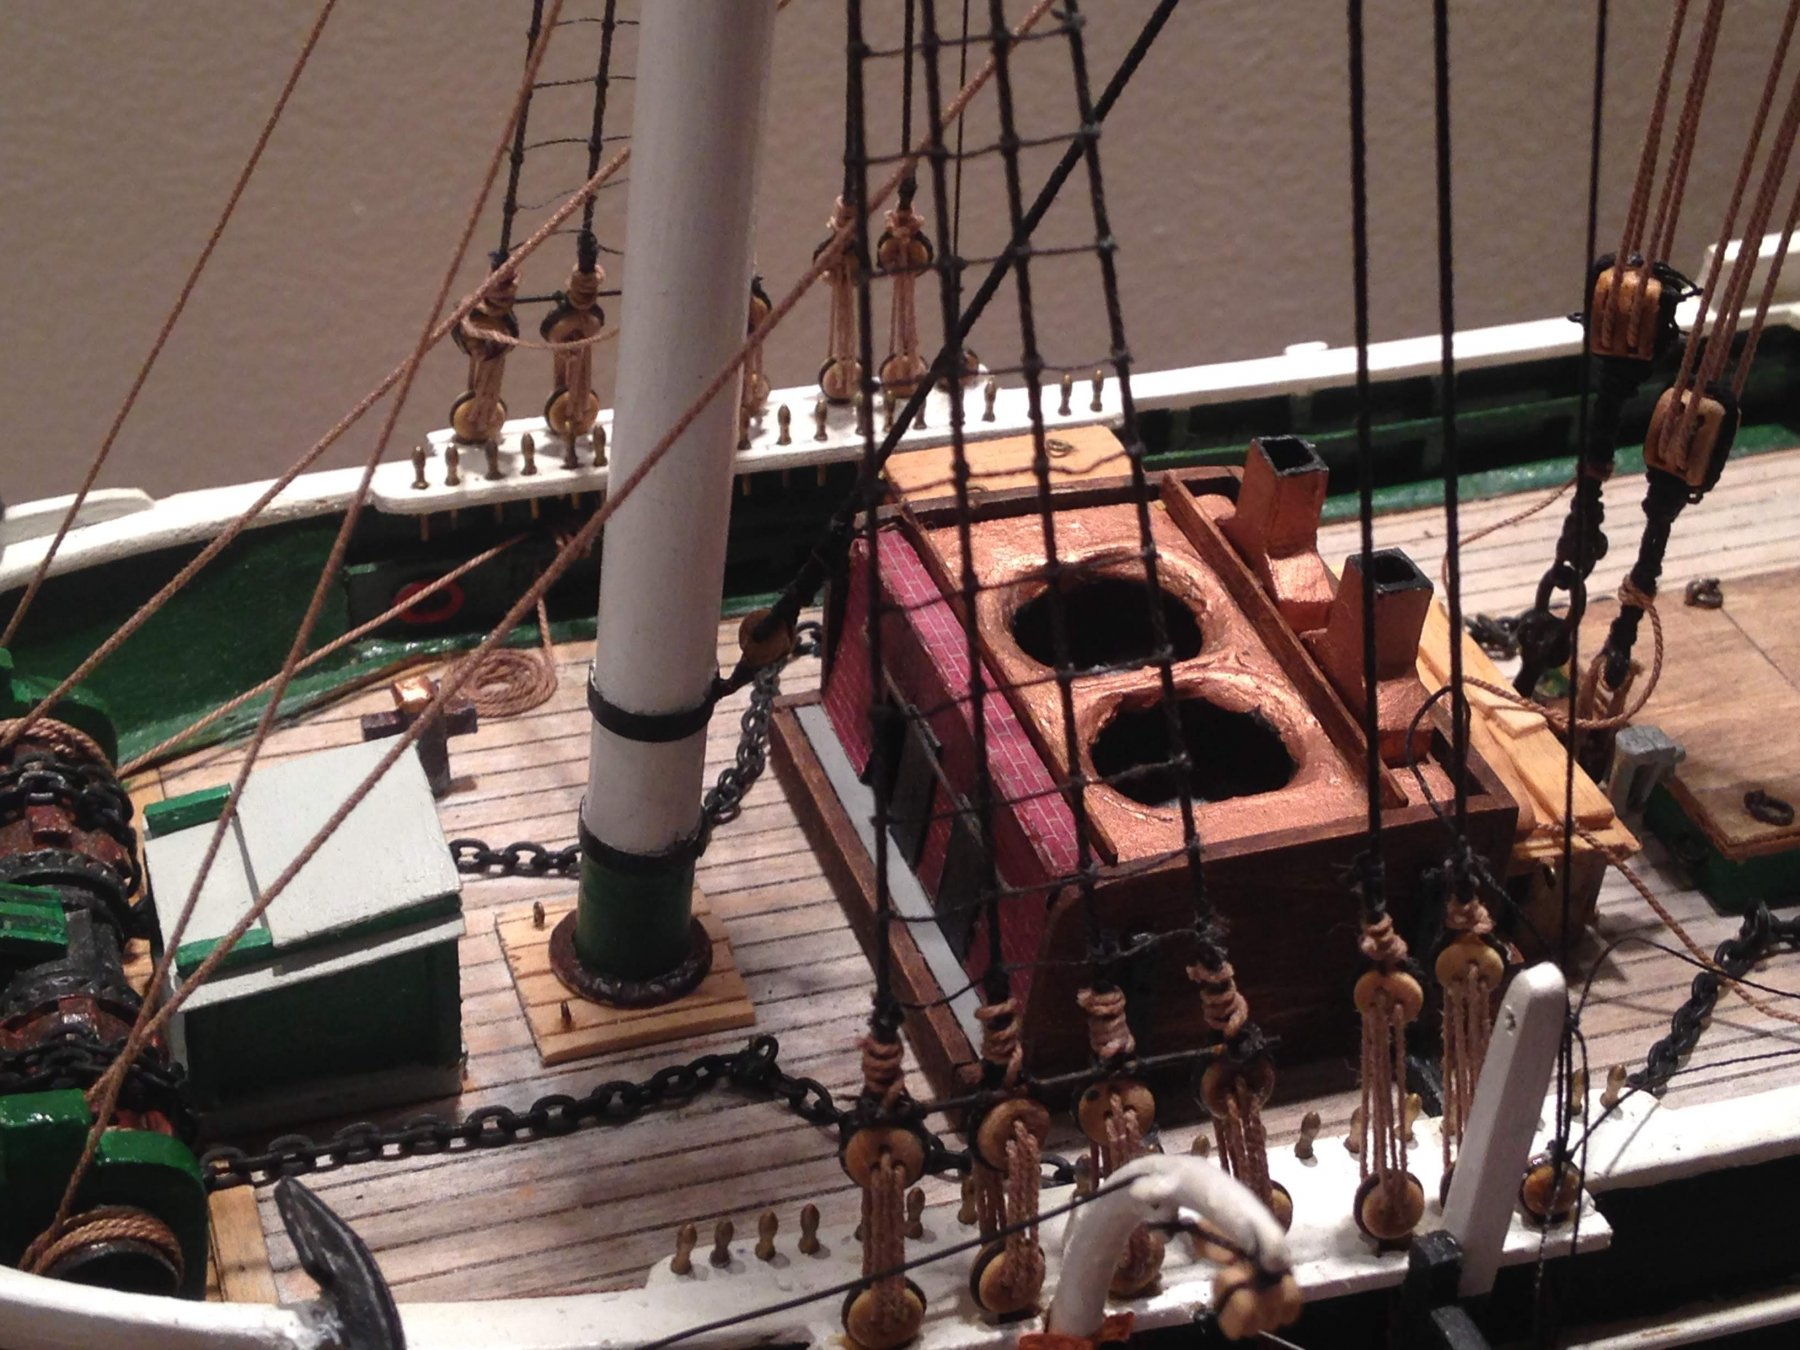
I had a small dilemma with the pump just aft of the main mast. The MS plans show a pump pivot secured to the main mast. (See boom rest photo above). The plans from New Bedford has a wooden pivot post in the center of the pump lever. I decided on the later. 3/32 square pivot post, notched to accept a 1/16 square lever sanded round and tapered. I used some split rings I had for the lever straps. I cut them down until they fit fairly snug over the lever with a piece of 24 gauge annealed steel wire hooked to the ring for the pump spear. Wow, those pumps are tiny!
- 109 replies
-
- 5
-
-
- model shipways
- kate cory
- (and 1 more)
-
Found both on Amazon. They're on their way! Thanks.
- 109 replies
-
- 1
-
-
- model shipways
- kate cory
- (and 1 more)
-
Thanks for the likes everyone. torpedochief- Thanks. I'll try to find them. The set of plans and the rigging booklet that the New Bedford Whaling Museum sells has been invaluable. Detailed rigging specs, great detailed plans of the deck furnishings, Masts, spars, etc. I'm not only enjoying the build, I'm enjoying the history lesson in 19th century whaling that comes along with this build.
- 109 replies
-
- 2
-
-
- model shipways
- kate cory
- (and 1 more)
-
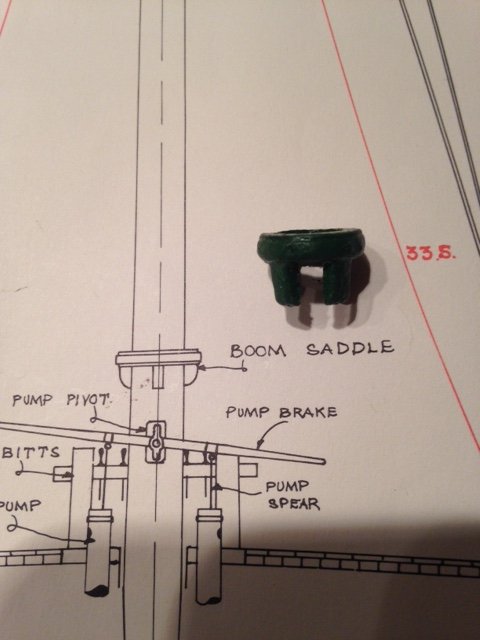
Looking at the boom rest, the fitting that comes with the kit seems way oversize. Figured I'd take the snow day and try may hand at making my own. I think it's a bit better than the metal fitting. I'll take it off and paint it up, and ad the iron band. Then the mast will be ready for mounting.

- 109 replies
-
- 6
-
-
- model shipways
- kate cory
- (and 1 more)
-
I received an email today from the New Bedford whaling museum. They have put together a data base of American whaling voyages. It is an amazing collection of data. Voyages, logs, crew members, etc. Searchable in many different ways. The data base seems to be huge. I just stared poking around and the info is great to anyone interested in whaling history. Here's a link to the PDF about the data base Whaling History pdf ..And here's the site. The data takes some time to load. Give it a minute. I have just started to scratch the surface of what is avialable here. It's a little tough to navigate, but worth the effort.
-
Thanks Russ. The deck was almost by accident. Like I said, I did the deck and hull years ago. When I pulled it out again, the deck was badly stained. I sanded it all.I was able to get the quarter deck pretty clean.I wasn't that worried about the fore deck, because I knew it would be mostly covered with the windlass.(It's really too tight up there because back in the day,I didn't shave those front bulwarks enough). I varnished the quarter deck and used a diluted white/grey on the main deck. Adding white and grey washes until I was happy with the color. Then I added a very thin wash of black over everything. Some old model railroading weathering techniques came in handy.
- 109 replies
-
- 2
-
-
- model shipways
- kate cory
- (and 1 more)
-
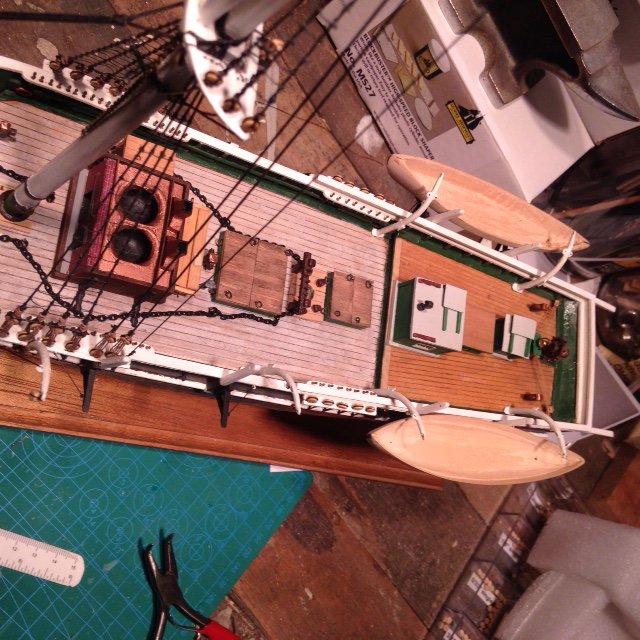
Added the cranes, and dry fitted the davits. I don't think I'l permanently install the davits until rigging is just about done. In between working on the whaleboats, I think I'll get the main mast stepped. Ratlines and little whaleboats - Slow progress at this point.

- 109 replies
-
- 7
-
-
- model shipways
- kate cory
- (and 1 more)
-
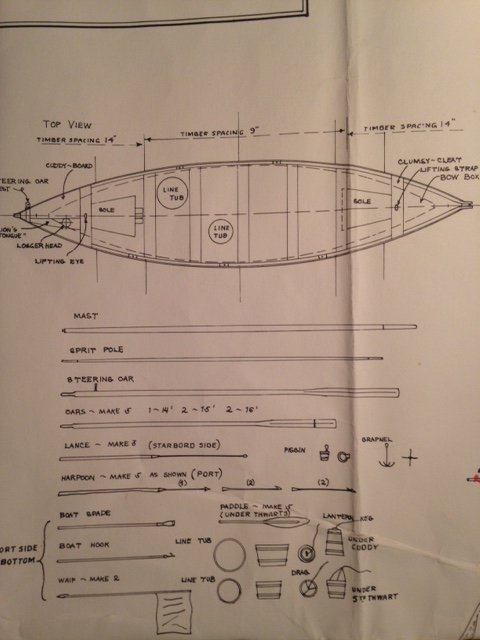
Thanks for checking in Bruce. Just got home from work and a did a quick scroll through your Morgan build....All I can say is...OUTSTANDING!!! How I haven't come across it before I don't know. the workmanship, detail, and neatness is inspiring. I'll be using your log often as I attempt to get a result somewhere close to your whaleboats. Of all the whaling models I've seen at this scale, those boats are up there with the best I've seen. The whole model is just jaw dropping! Odd thing about the KC whaleboats..they didn't have a centerboard. I like the idea of masts and oars only. However, I feel I need to have some harpoons/lances (pointy things) somewhere on the model. Although it may not be authentic, I think I may want to put the line tubs in the boats. The thought also crossed my mind of outfitting one completely and showing it being lowered into the water, but I'm afraid that may offset the "symmetry" of the whole ship. I'm pretty sure from the plans, KC's boats didn't have a rudder. Just a stearing oar. Is that possible? No mention of the rudder in the plans. I'm also wondering where the mast was stepped, as the plans do not show where it would go.
- 109 replies
-
- 1
-
-
- model shipways
- kate cory
- (and 1 more)
-
Thanks Kurt. I agree abut the scale. There's so much that can be added but in this scale you have to decide how much is enough, and what becomes clutter. Tools for the Cooper's bench, tools for the tryworks, barrels, Cutting in stages, there's just so much....And that doesn't even include how much one can pack into these little whaleboats. Besides mast, spar, harpoons,spades, etc,there's line tubs, knives, lantern box, compass...how much is too much at this scale? I'm still debating if I should be accurate with number of harpoons, lances,etc. in each whaleboat or just a few to give a good representation of all the different things that go in the boat.


.JPG.e601f7c108eab40850d3b15174420429.JPG)