HOLIDAY DONATION DRIVE - SUPPORT MSW - DO YOUR PART TO KEEP THIS GREAT FORUM GOING! (89 donations so far out of 49,000 members - C'mon guys!)
×


Richvee
-
Posts
388 -
Joined
-
Last visited
Content Type
Profiles
Forums
Gallery
Events
Everything posted by Richvee
-
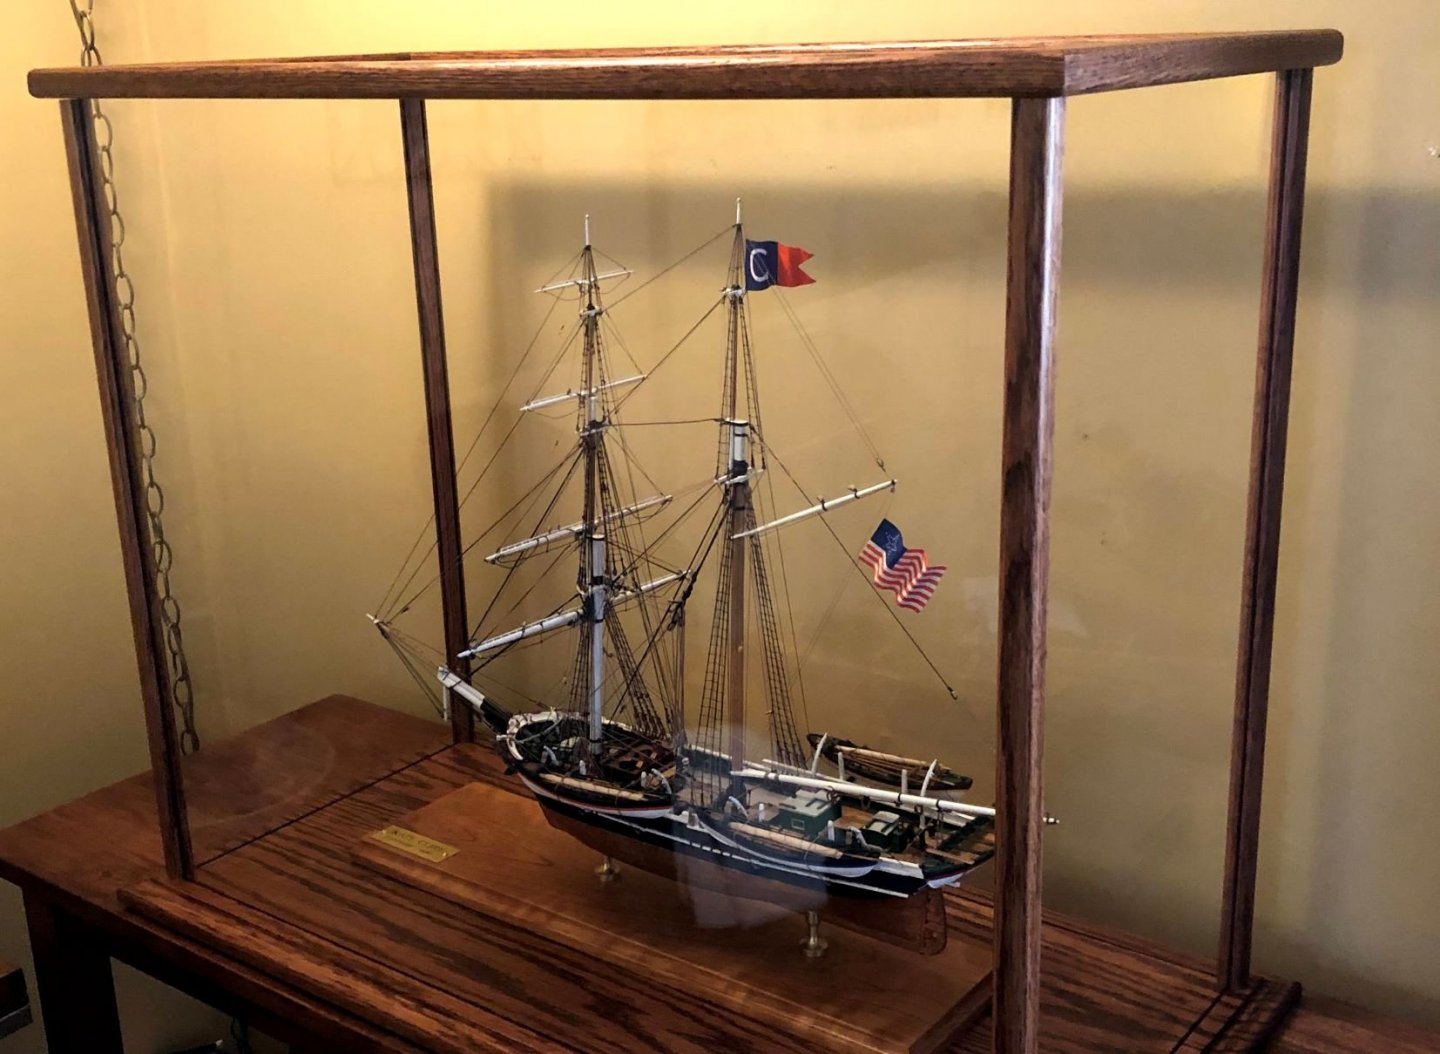
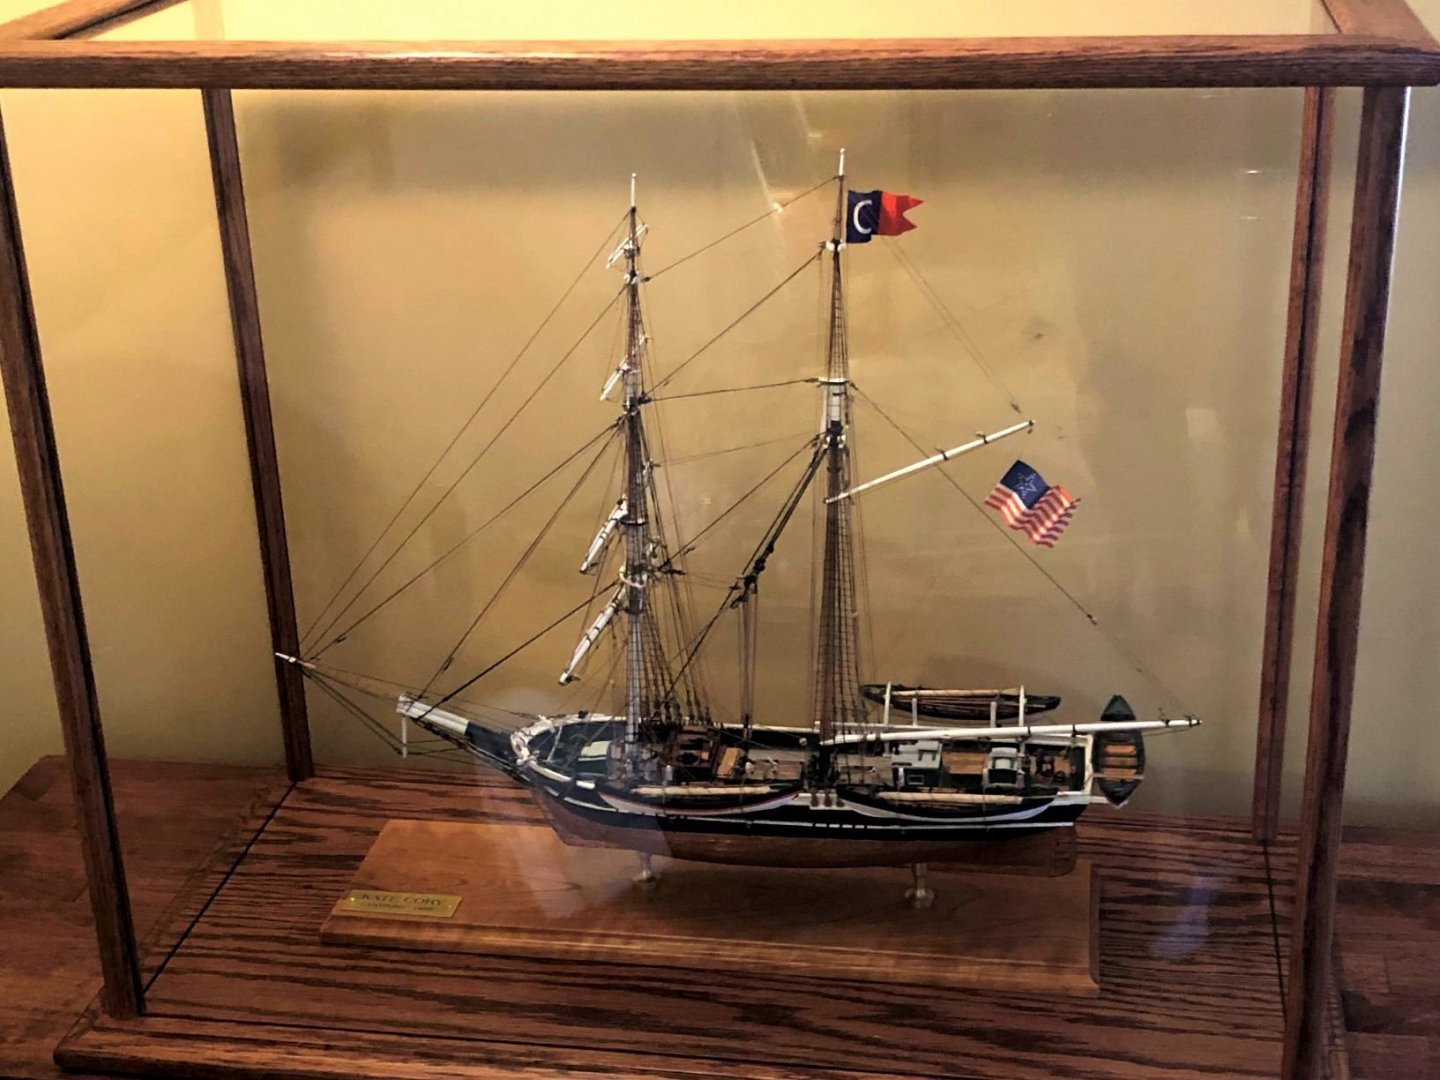
 Thanks for the likes.. I put the KC in it's case today. Amazing how the case gives it that extra something.. I think it looks pretty good!
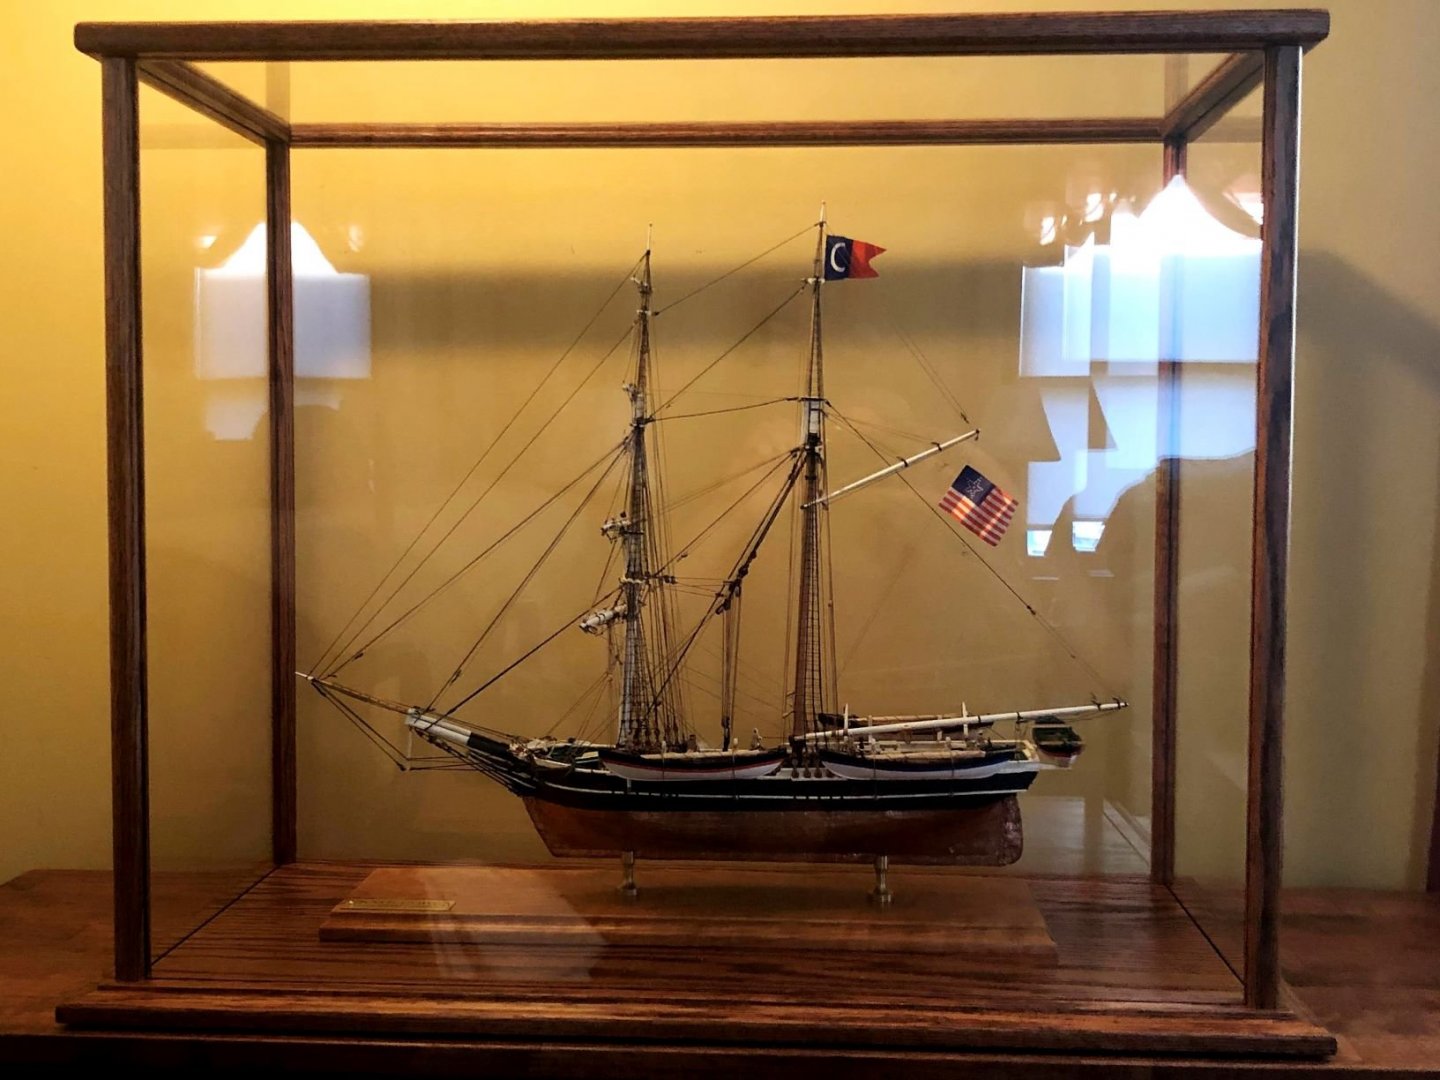
- 109 replies
-
- 8
-

-
- model shipways
- kate cory
- (and 1 more)
-
I have the Model Shipways Pride of Baltimore due to arrive in the mail any day. I’ve also ordered the rigging package for the Medway Longboat from Syren. I’ll probably start the POB, and somewhere in the middle take a break and rig the longboat. That should take me through the next 4-5 years. 😃 I also have a vintage ( early1980’s) version of the 1/8” scale Essex. That is one daunting model and will require a ton of scratch building. That will stay the shelf for now. Thanks for looking in.
- 109 replies
-
- 1
-
-
- model shipways
- kate cory
- (and 1 more)
-
Rigging in 1855 - Need a Sanity Check Please
Richvee replied to BANYAN's topic in Masting, rigging and sails
If I’m following correctly, your peak halyard has a take up end and a hauling end, both belayed at the deck. My 1856 whaler , Kate Cory has a similar setup with 2 single blocks on the gaff and one triple on the mast. I was confused on how this functioned. Michaelmys gave me a very good explanation on how this works. In this thread -
Ernestina Morrissey by Jond - FINISHED - 1:48
Richvee replied to Jond's topic in - Build logs for subjects built 1851 - 1900
Instead of flooding your inbox with likes, I’ll just say I’m really enjoying following this build. Amazing work. -
Glad you followed, @jablackwell. It was your build log that lead me to this site, and it was a great source of information and inspiration for me.
-
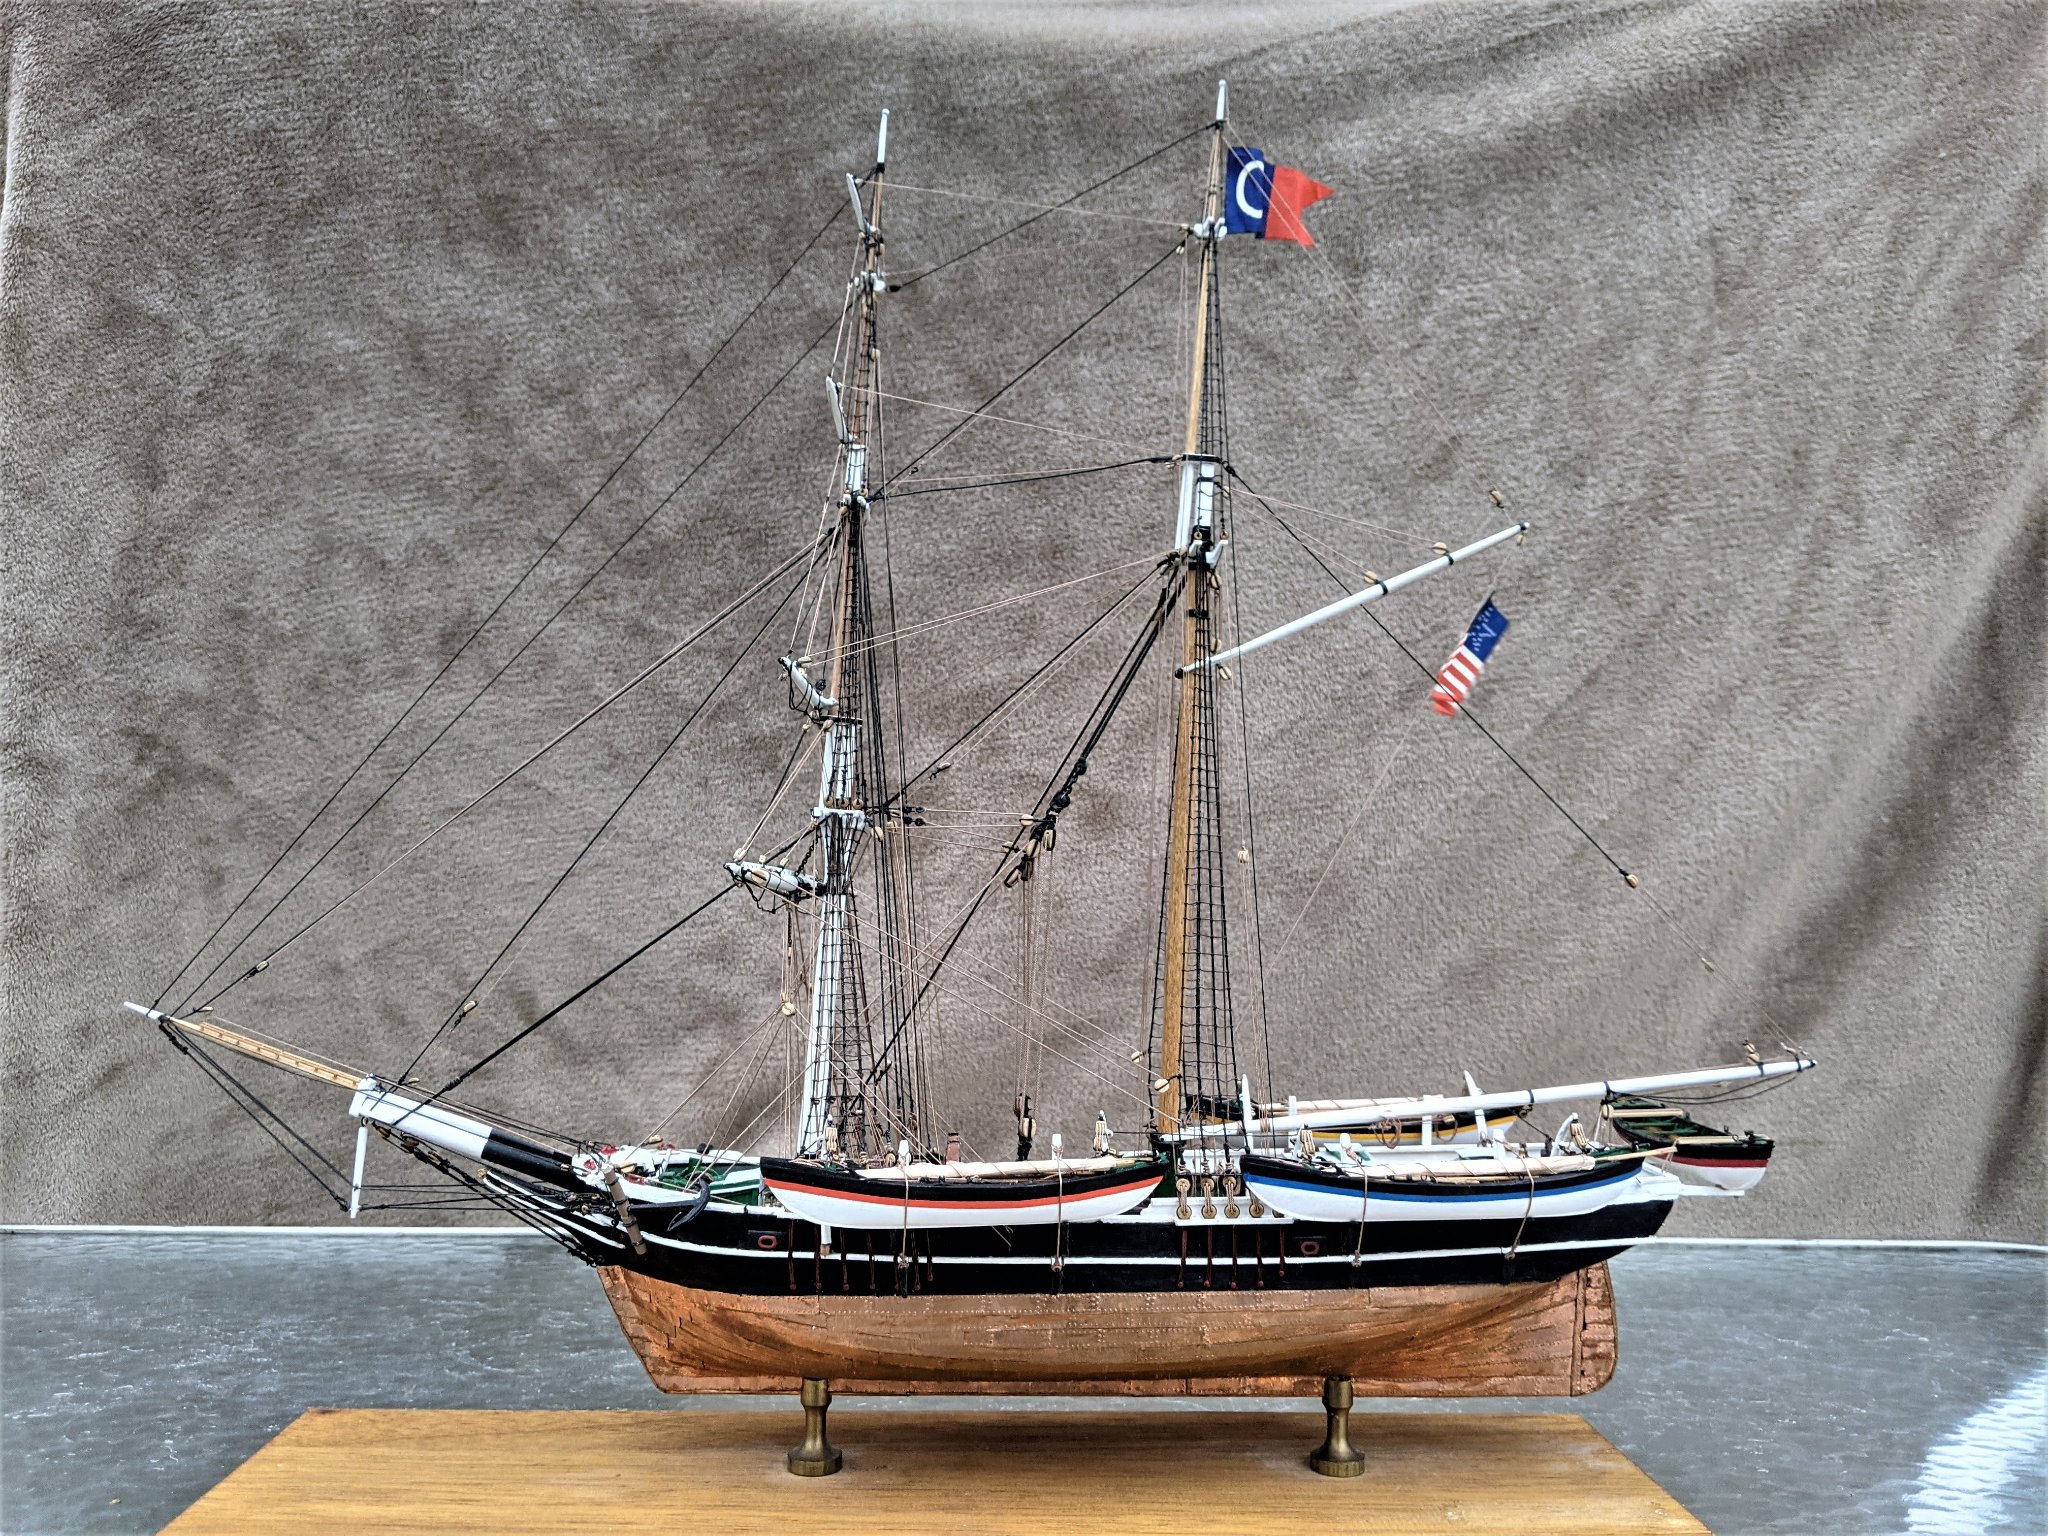
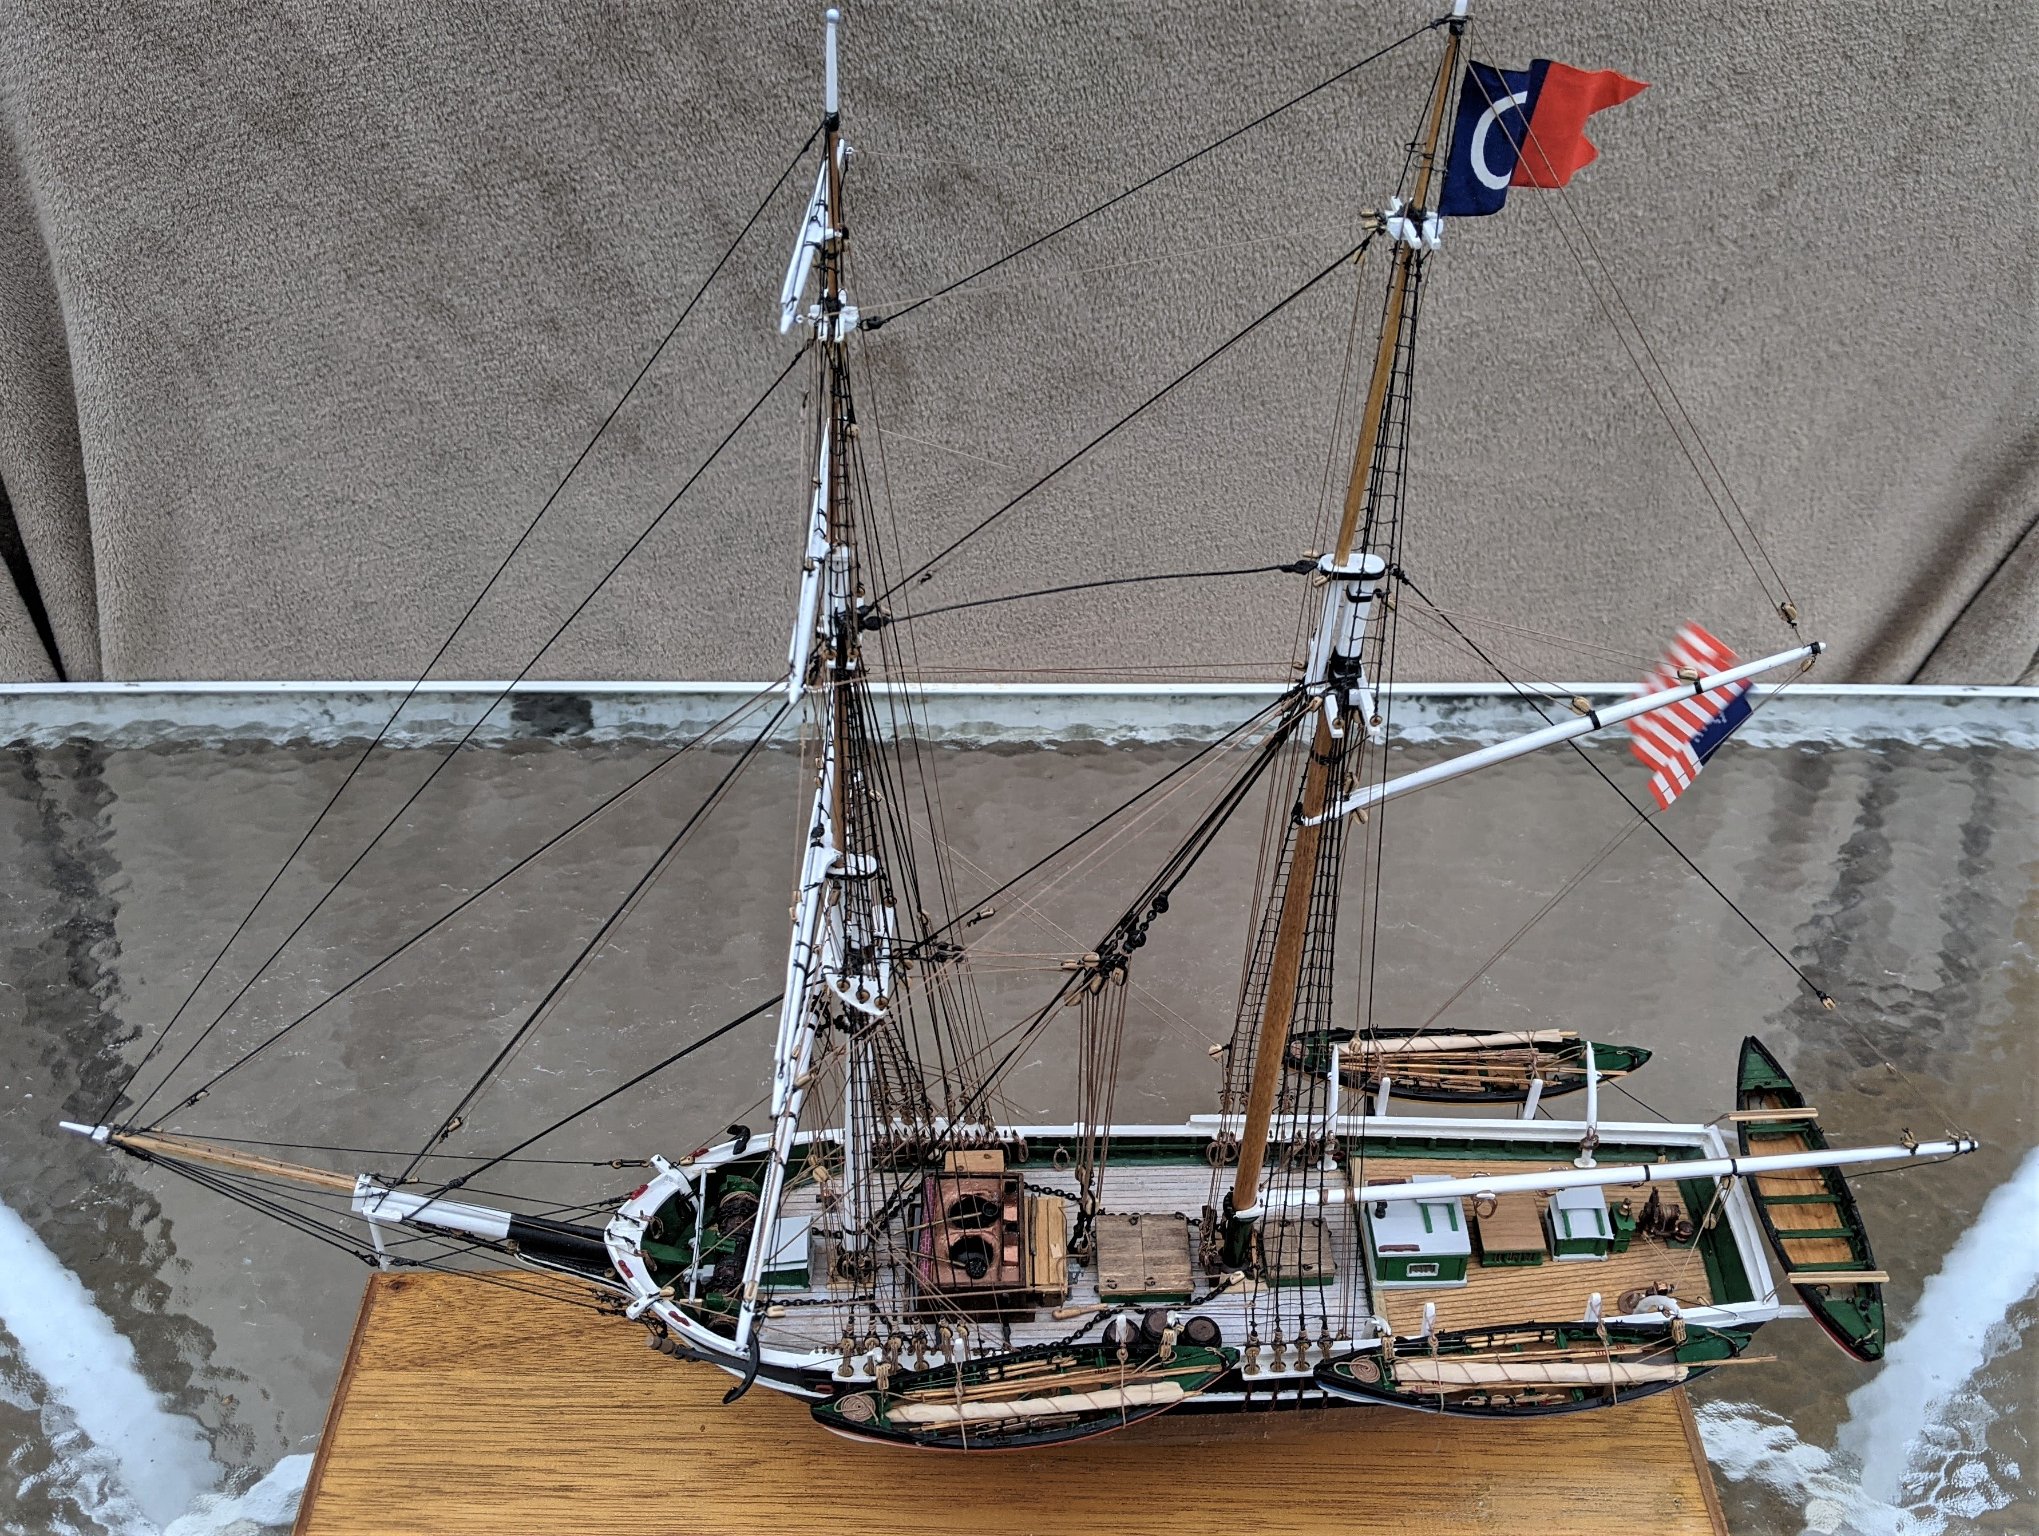
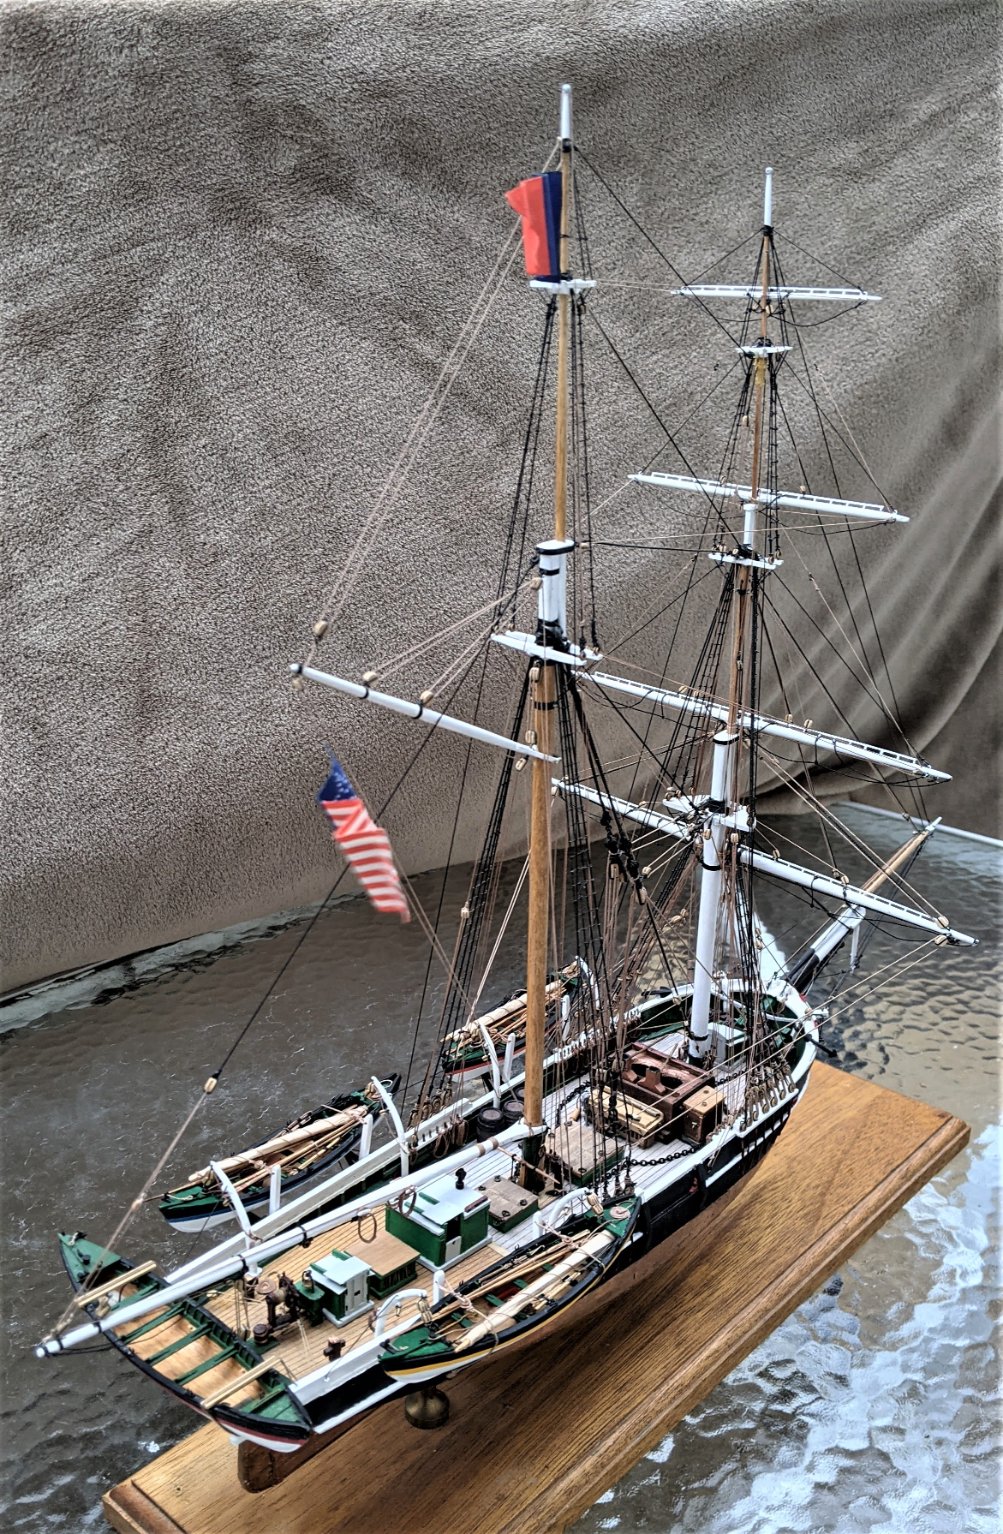
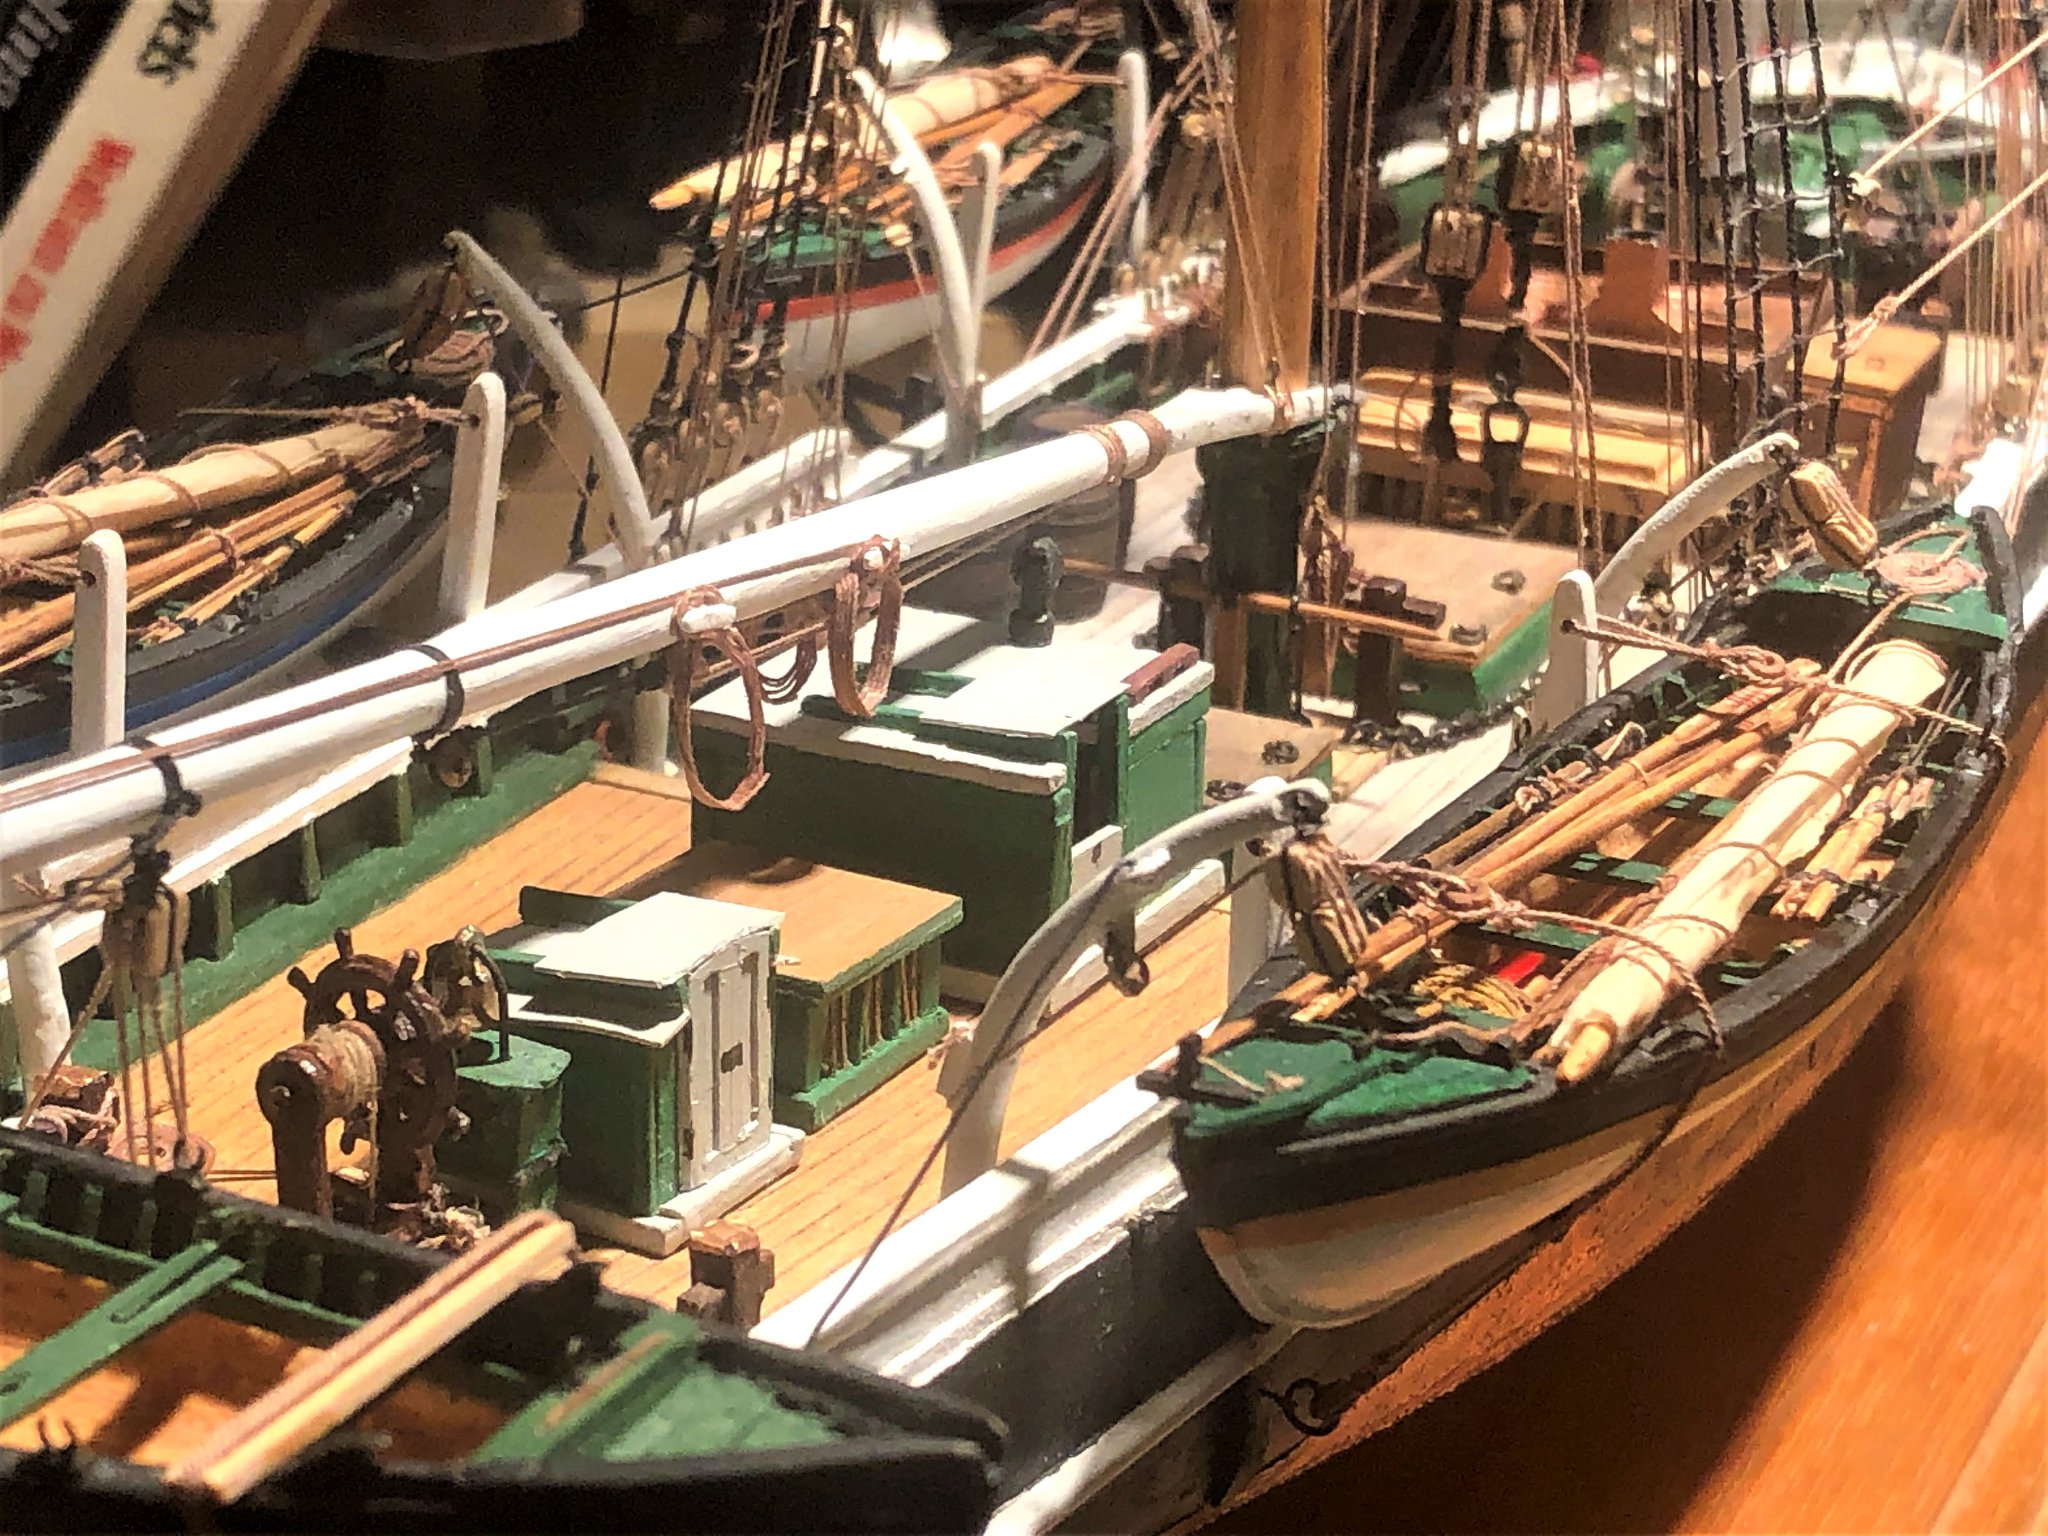
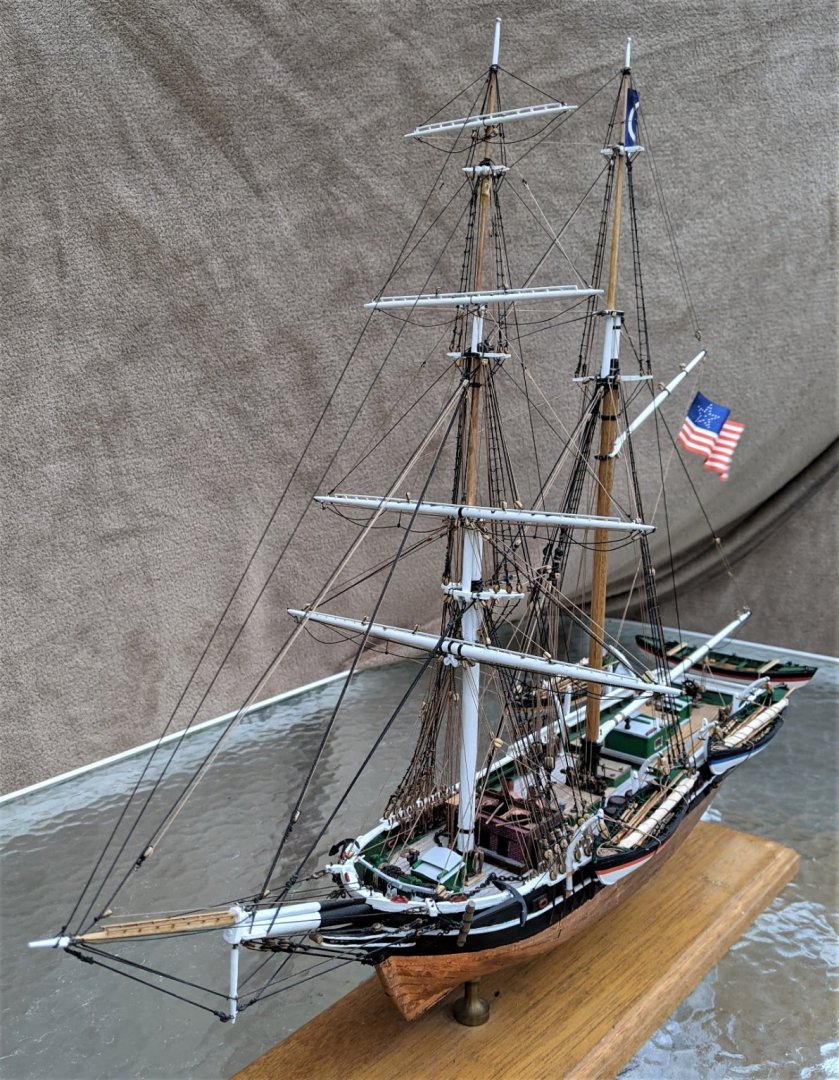
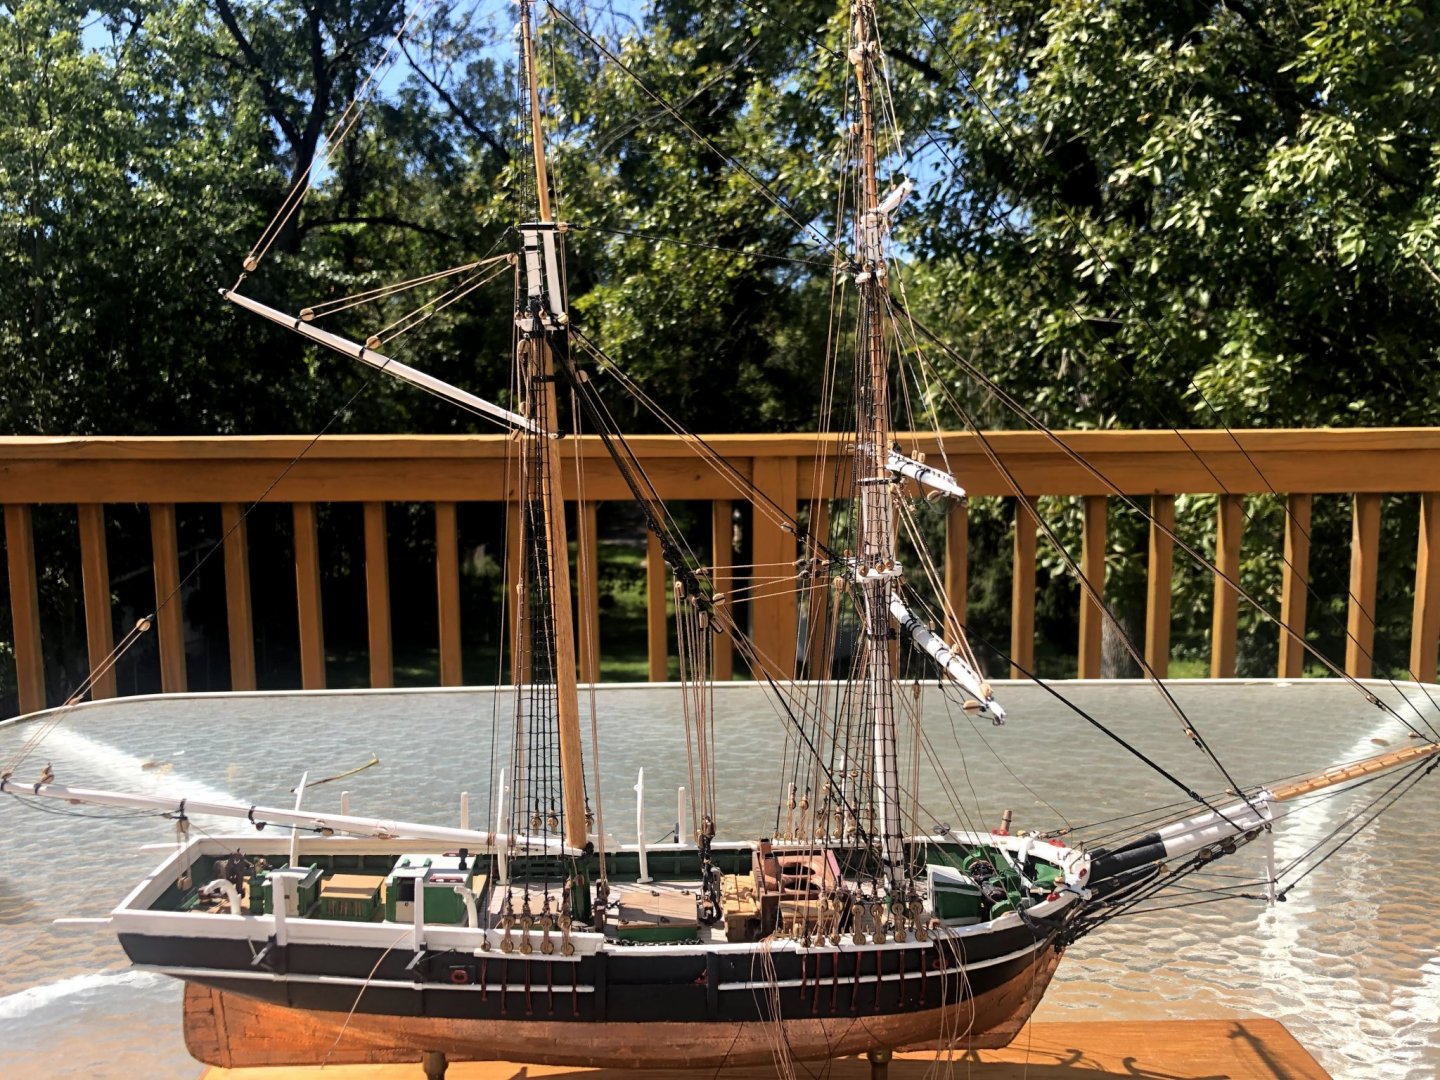
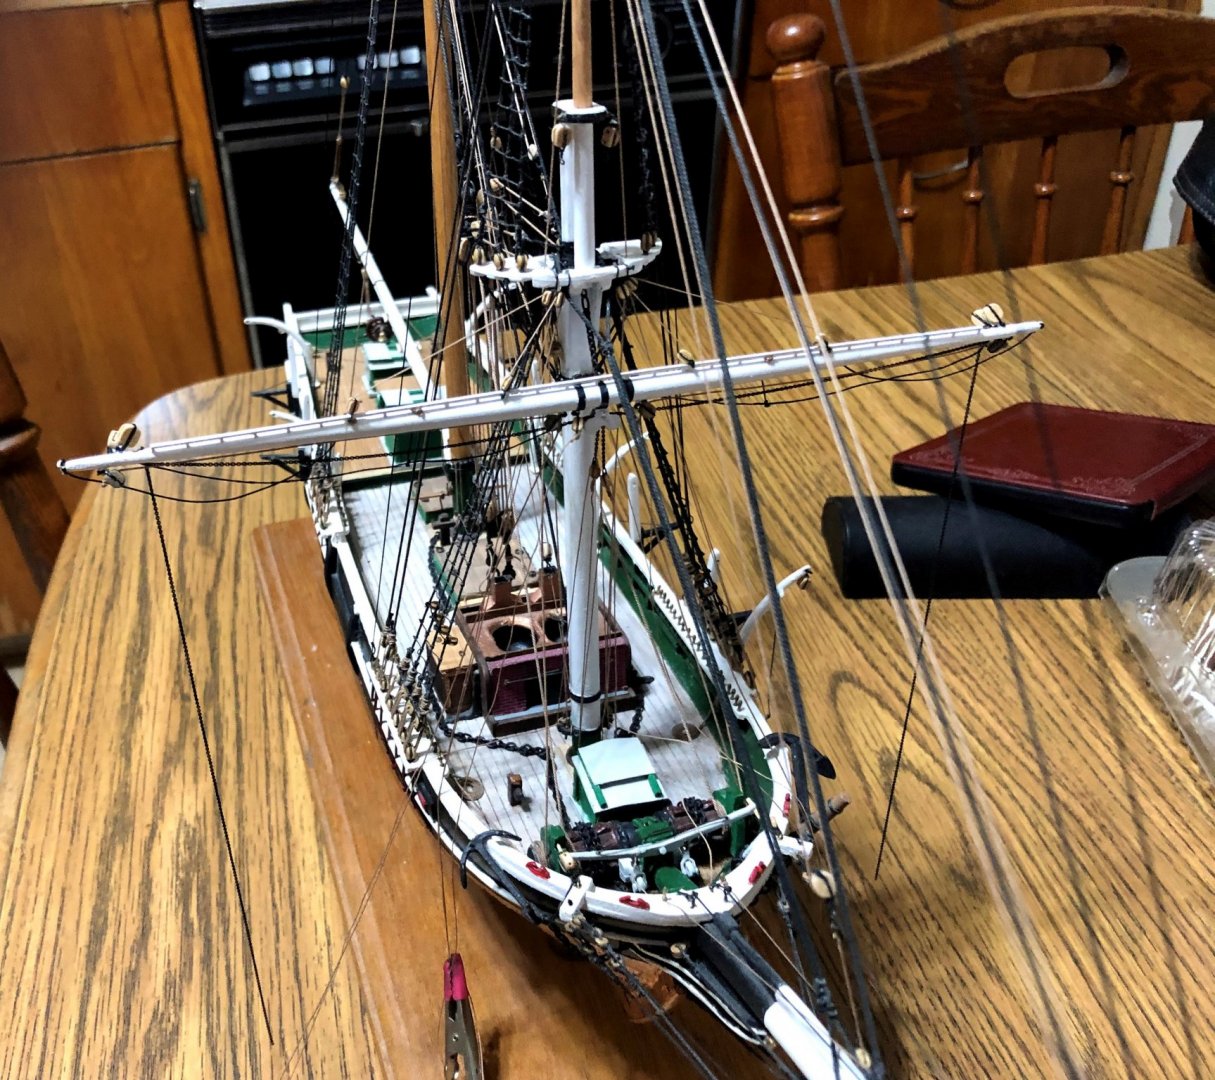
Well, that about wraps it up. The following pictures were taken by my daughter with a better camera than I have, so I'll use them even though there's a few odds and ends that need to be finished when these shots were taken. Namely the barrels need to be lashed and rope coils needed on a few davits. I purchased a case, for what I though was a reasonable price, from a gentleman who runs a site called Grandpa's cabinets. You can customize size, wood choice, and finish, and it comes complete with high quality plexiglass. Assembly is simple. I also purchased a nice, unfinished table that will serve as the display table. I'll post some final pictures when the table and case are set up. Right now I need to finish the new base, and I'm waiting on a nameplate that I ordered. Anyway, I really enjoyed this build. I think it's a sharp looking vessel, and I'm a little surprised how few KC's are on this site. So it's my first completed ship build. (I'm not going to count the Taurus, and Benjamin W Latham I built almost 50 years ago as an early teen. I think the Taurus is still sitting around my mom's house, but the Latham is nowhere to be found. I learned a ton about model building, and whaling. It's been a great journey. Not only did this build lead me to this site, it lead me to a great club, The ship Model Society of New Jersey. I've taken advantage of Model Shipways end of season sale and picked up the Pride of Baltimore 2 for a50% off, so that's on it's way and will be the next project. Thanks to everybody who checked in, and for all the likes along the way. Special thanks to this site, as I would have never been able to complete some things without the help and knowledge of the members here. This place is a wealth of information and the contributors are great. .


- 109 replies
-
- 12
-
-
- model shipways
- kate cory
- (and 1 more)
-
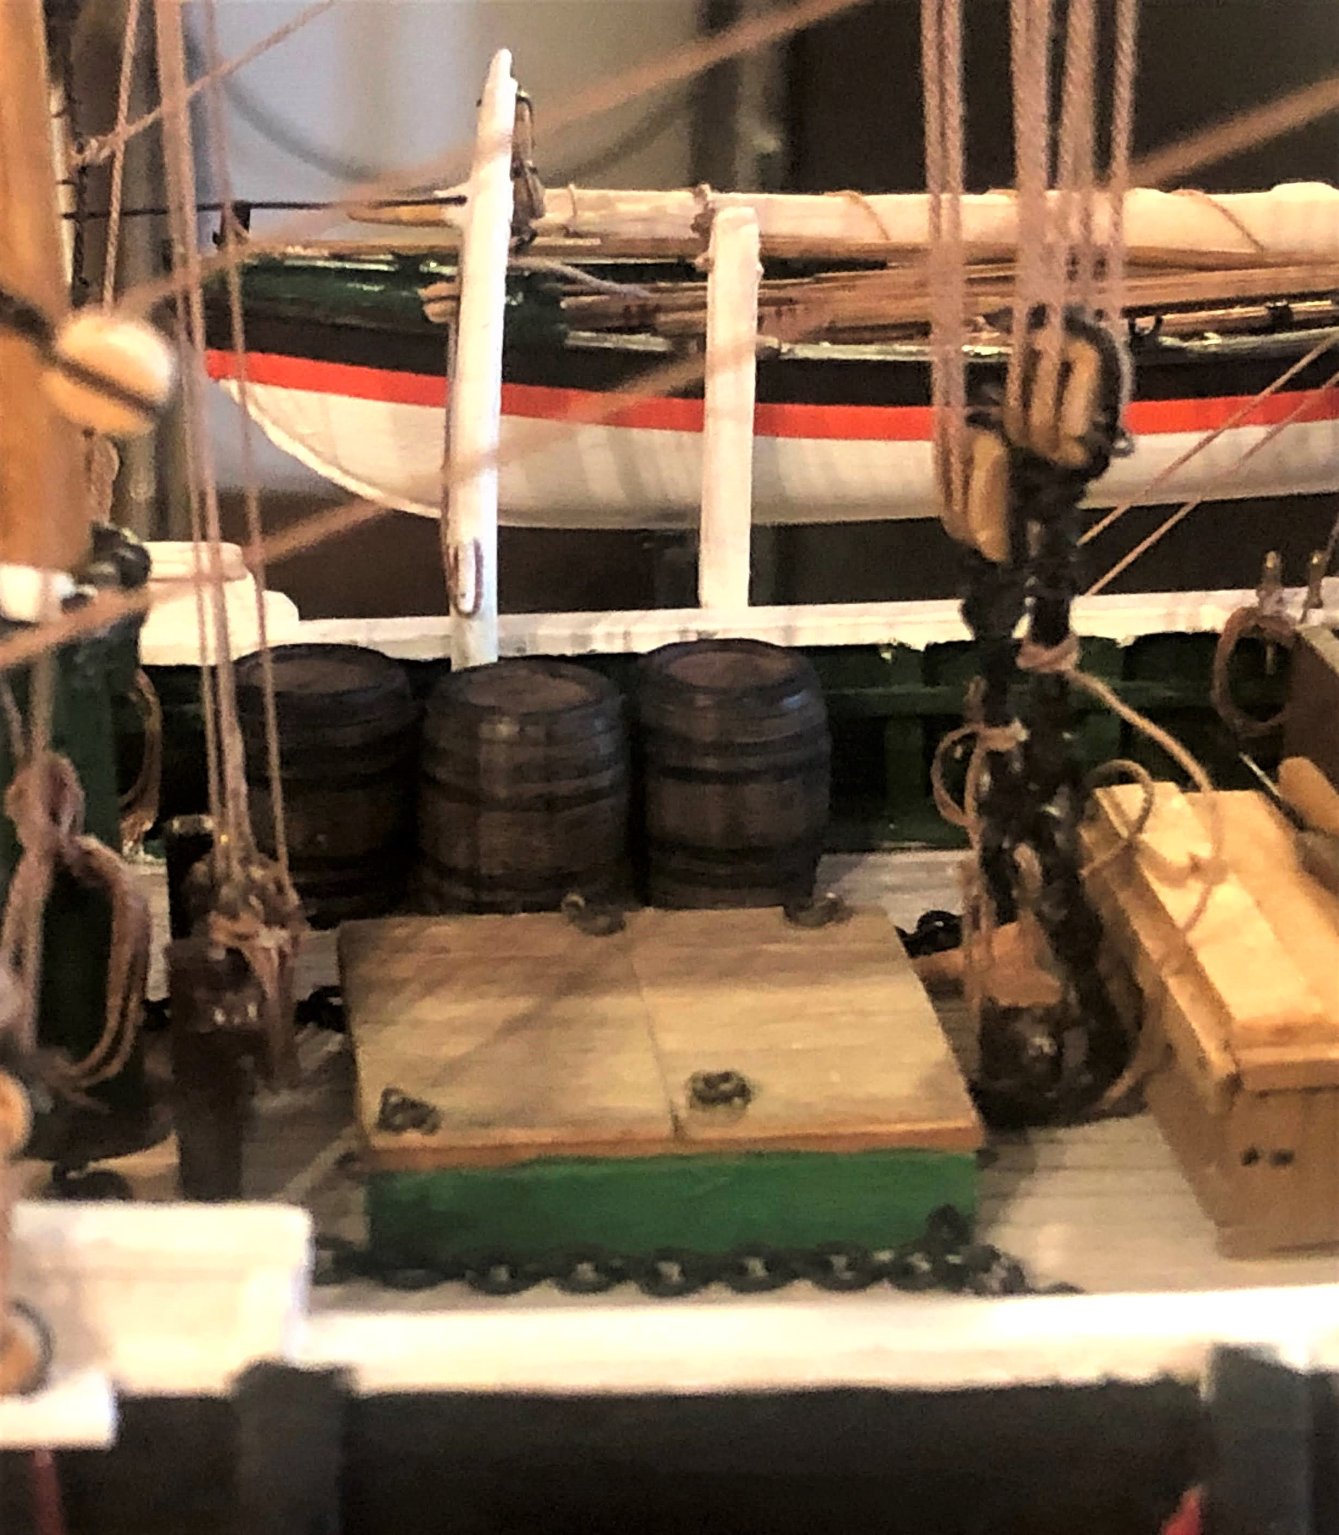
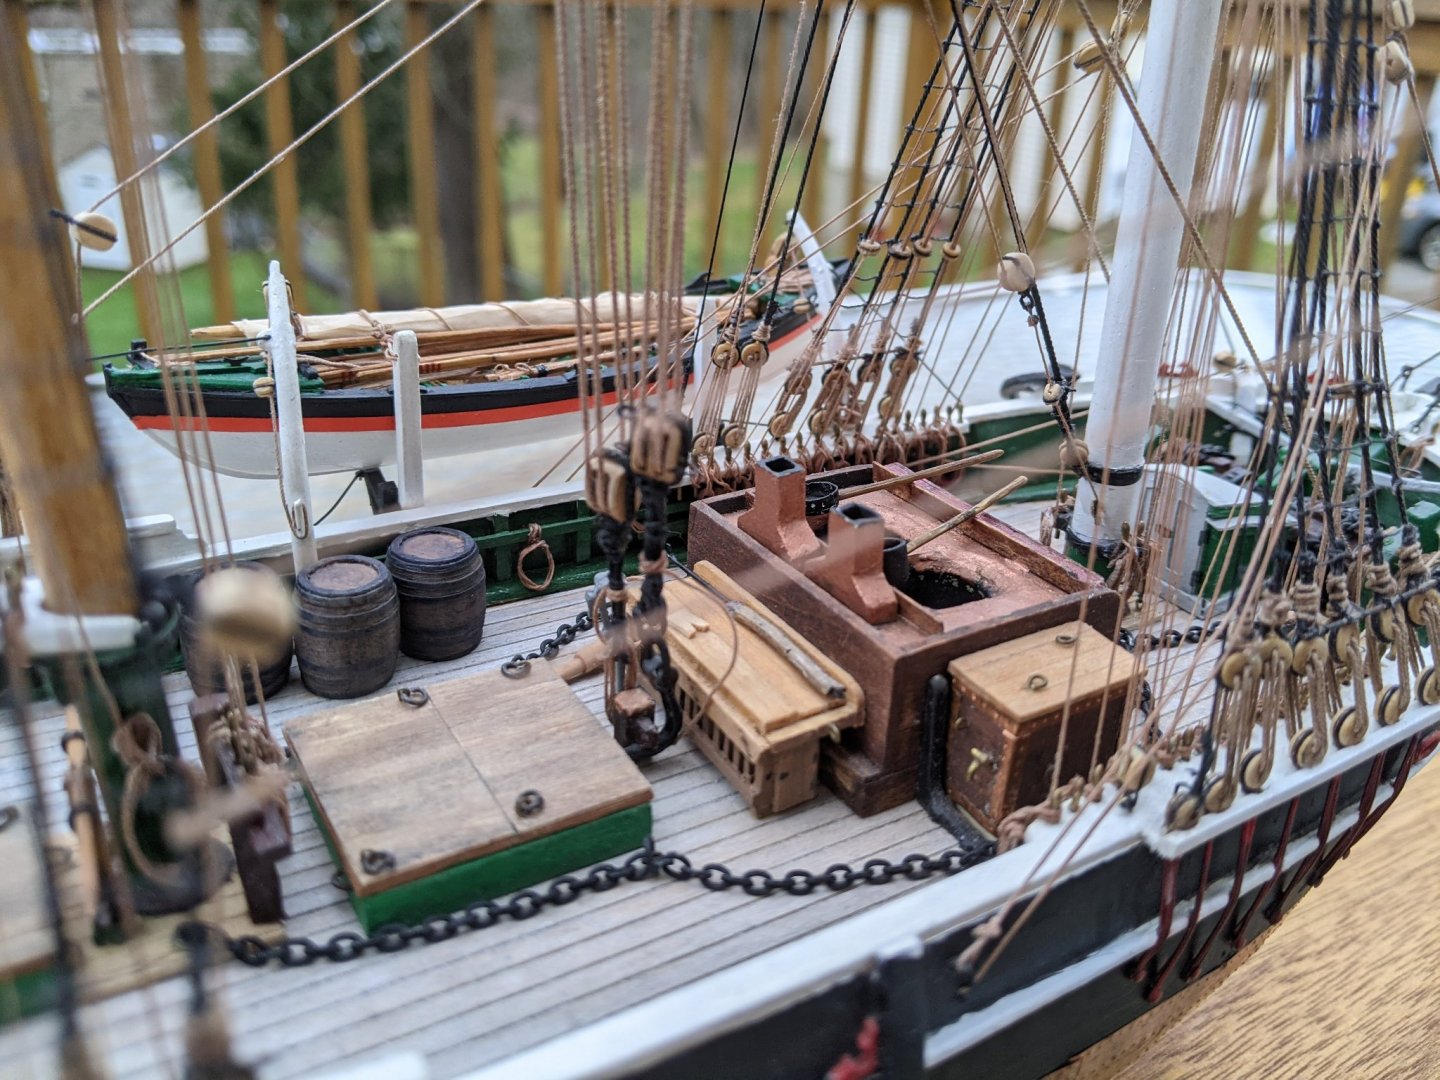
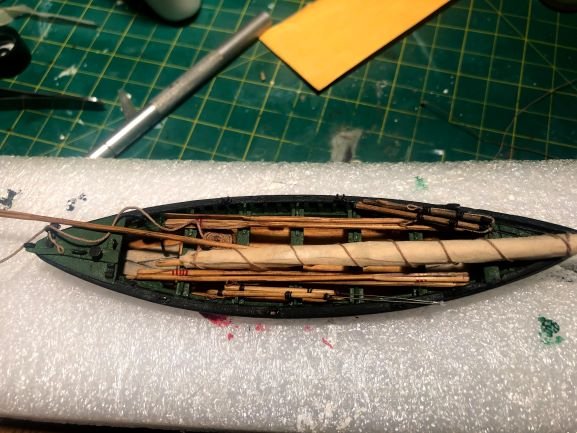
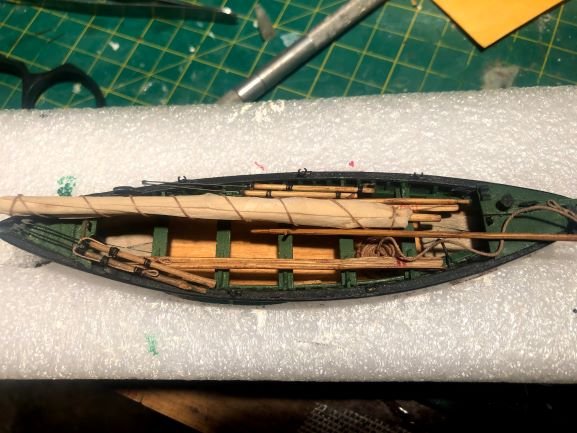
Thanks for the likes and looking in. Closing in on the finish line. The boats are loaded, and hung from the davits. The spare boat is also lashed to the tailfeathers. All that remains is the rope coils on the davits, and lashing those barrels to the rail.....If I decide to use those barrels. About those barrels...I picked them up from an "S" scale website years ago when I ordered the brick for the tryworks. I've painted them, re painted them, tried drybrushing some "age" onto them, added a coat of dullcoat.... I'm not sure I like them. My wife says I need to make them look "worn". I said how much more worn can they look? I don't know. Maybe I've been staring at them too long. Maybe they do look horrible. I need some honest opinions. My daughter will be visiting tomorrow. I hope she remembers her camera. I hope she can take some decent pictures for me. Happy holidays to everyone and thanks for checking in. The final product is real close now!!


- 109 replies
-
- 6
-
-
- model shipways
- kate cory
- (and 1 more)
-
Good to see you back in the shop. I've found throughout this year that getting in the shop brings a little sense of normalcy in these otherwise "not normal" times.
- 90 replies
-
- 1
-
-
- syren
- model shipways
- (and 1 more)
-
I actually have this kit. Machine carved hull. The plans and instruction booklet are real nice. I purchased it back in the mid '80's. My Kate Cory is nearing completion and I've dug out the kit and started poking around here for some Essex logs. I'm not sure I'm up to the challenge of this 1/8" scale kit. It's going to require a lot of scratch building, as there's no way I'd use many these old metal fittings for grates, bitts, barricades, etc. There sure is no lack of info here about these ships, and @rafine's Essex log is an inspiration, and it also reminds me just how much I have to master to get decent results on such a model.
-
USF Essex by mtbediz - FINISHED - 1:50
Richvee replied to mtbediz's topic in - Build logs for subjects built 1801 - 1850
I'm a little late, but I'll be following along. My Kate Cory is getting close to complete and I'm looking for my next build. I have an old Model Shipways 1/8" scale Essex kit from the mid '80's in the closet...The machine carved hull and the plans and instructions are probably all that's left that's useful. The rest would be scratch. I'm not sure I'm ready for such a build, but I'll be following here looking for tips and inspiration. -
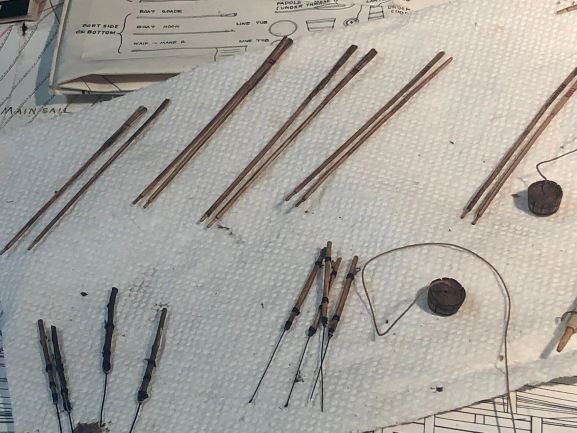
More whalecraft.... Here's some loaded in a boat. I still need the second line tub for each boat, and it looks like I have enough room under the forward 3 thwarts for a waif, and maybe a boat hook, and boat spade.
- 109 replies
-
- 6
-
-
- model shipways
- kate cory
- (and 1 more)
-
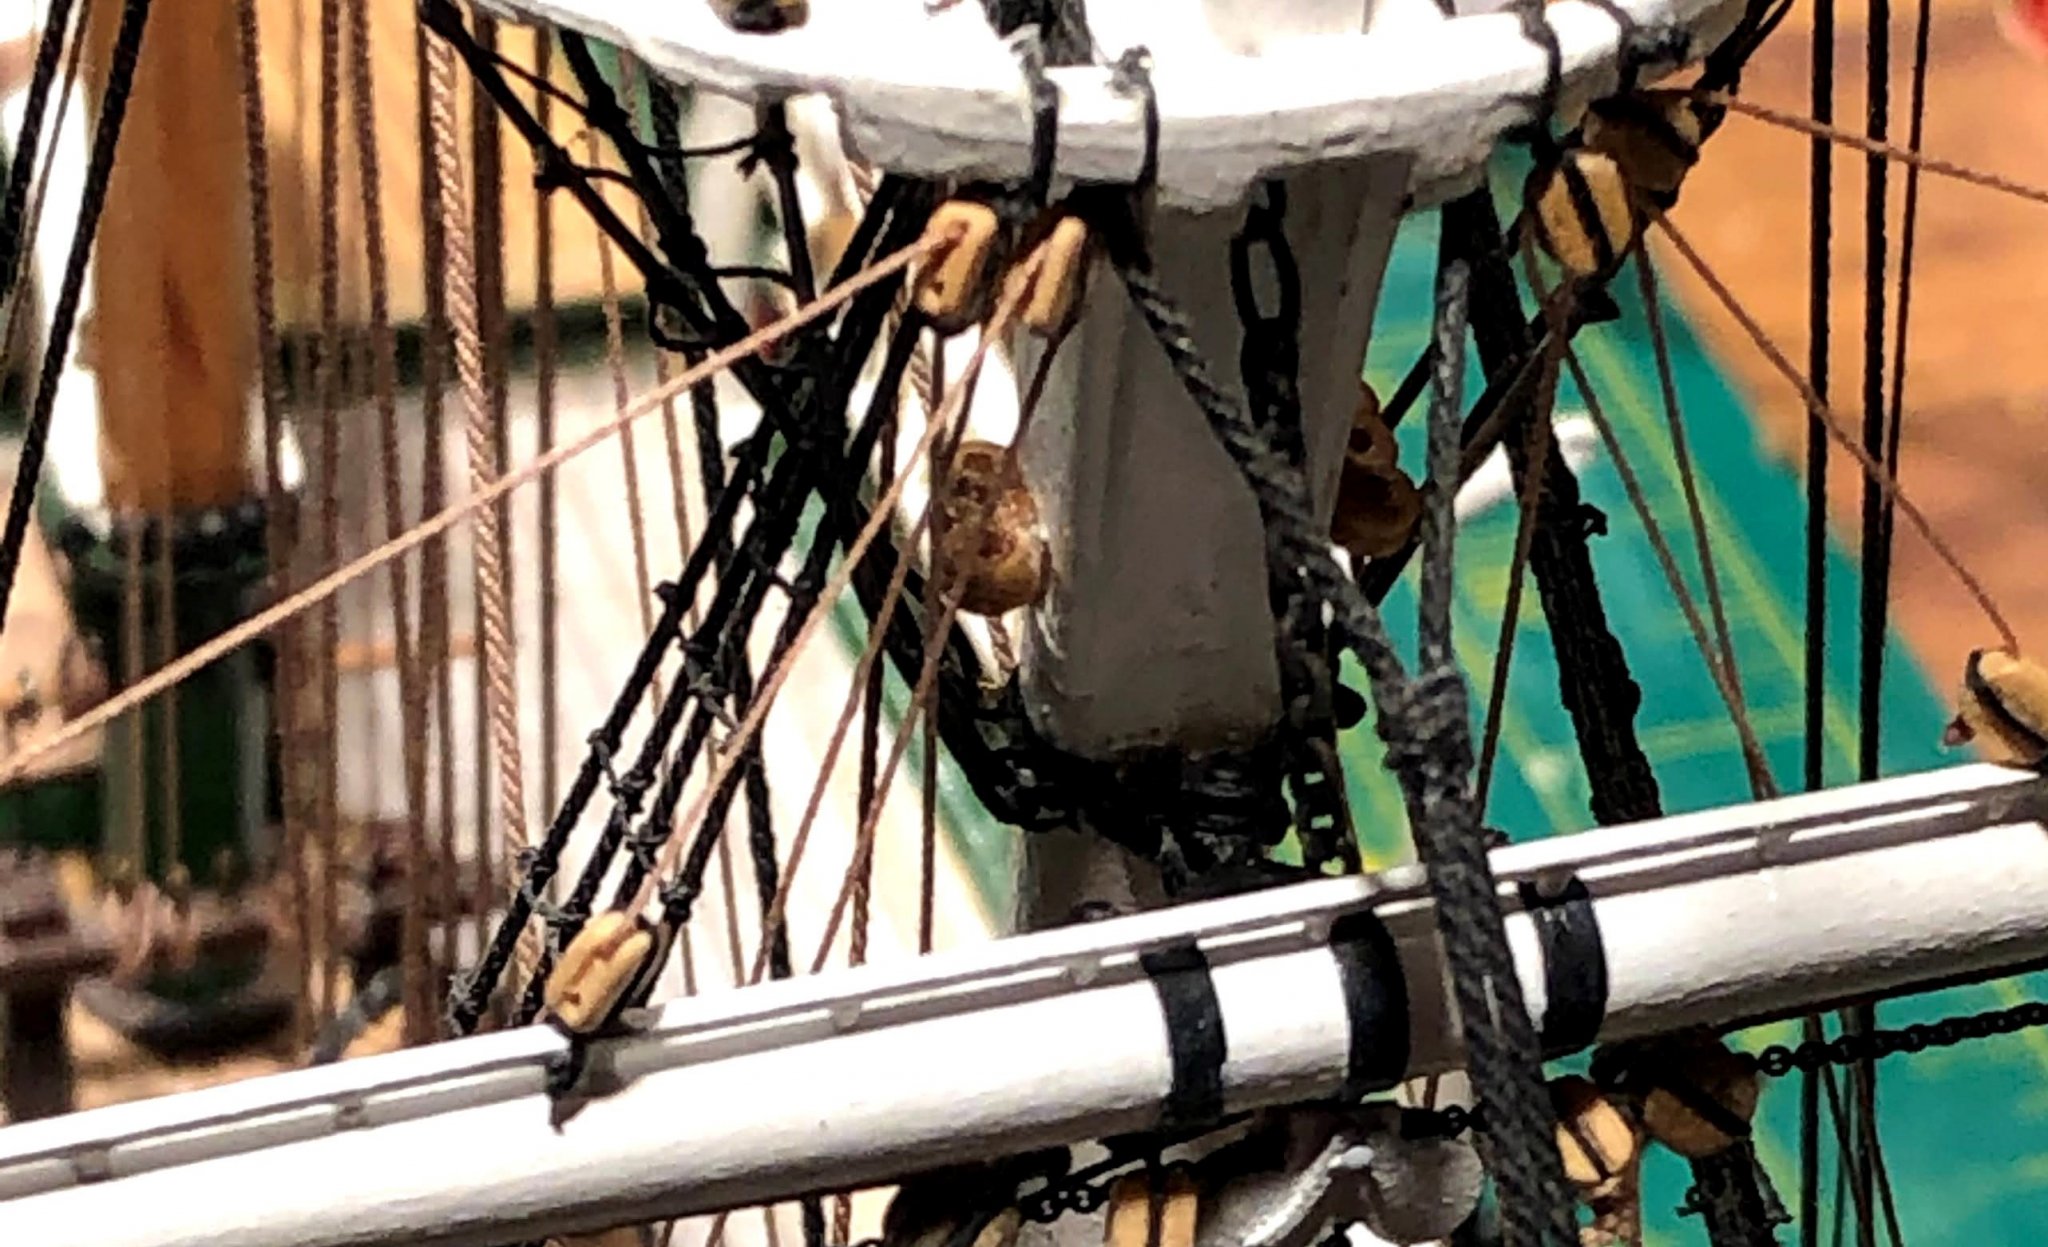
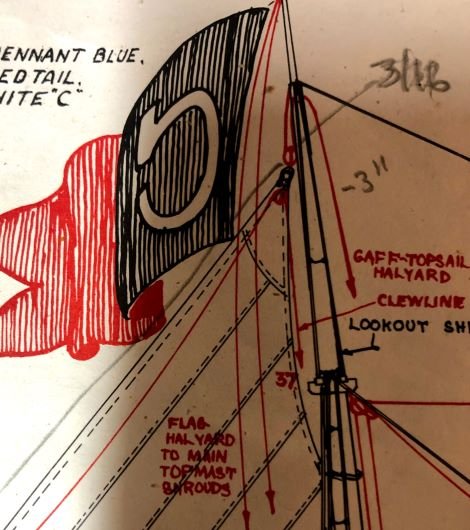
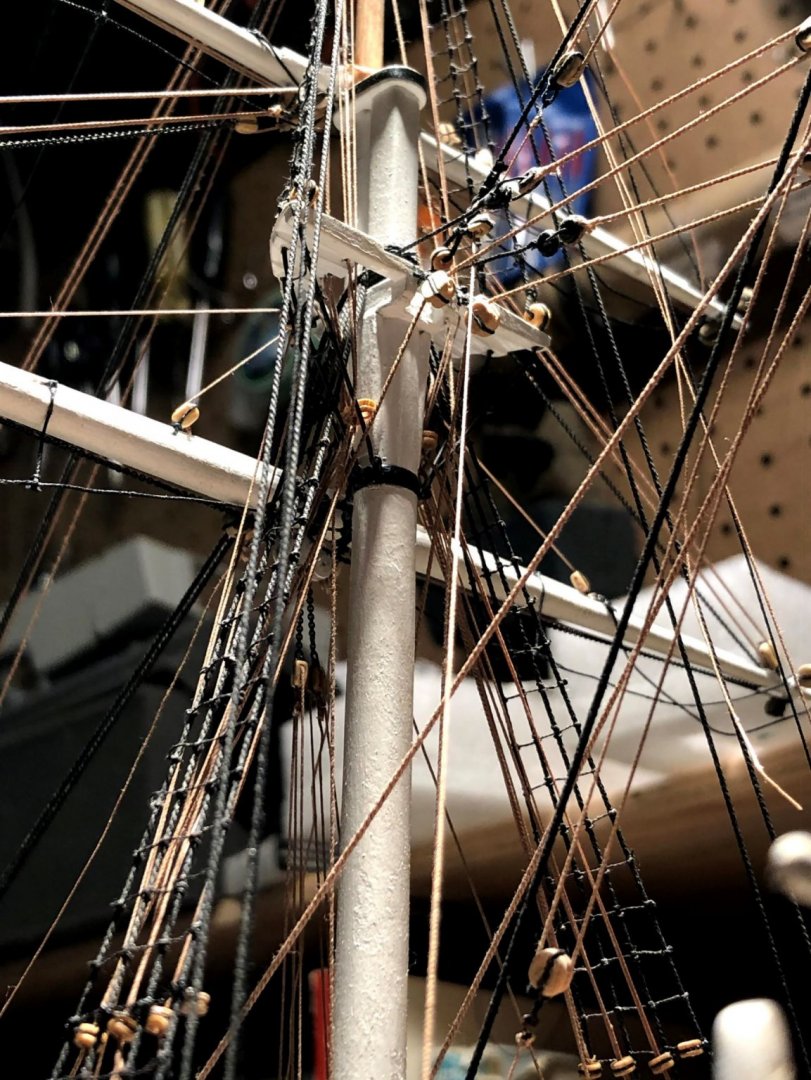
Looking at the plans on the Kate Cory. Off the main mast hangs the pennant. It says "halyard to main topmast shrouds". Can someone explain to me how this was "belayed"? Was it simply tied off around a shroud? Where/how was the excess rope coiled?
-
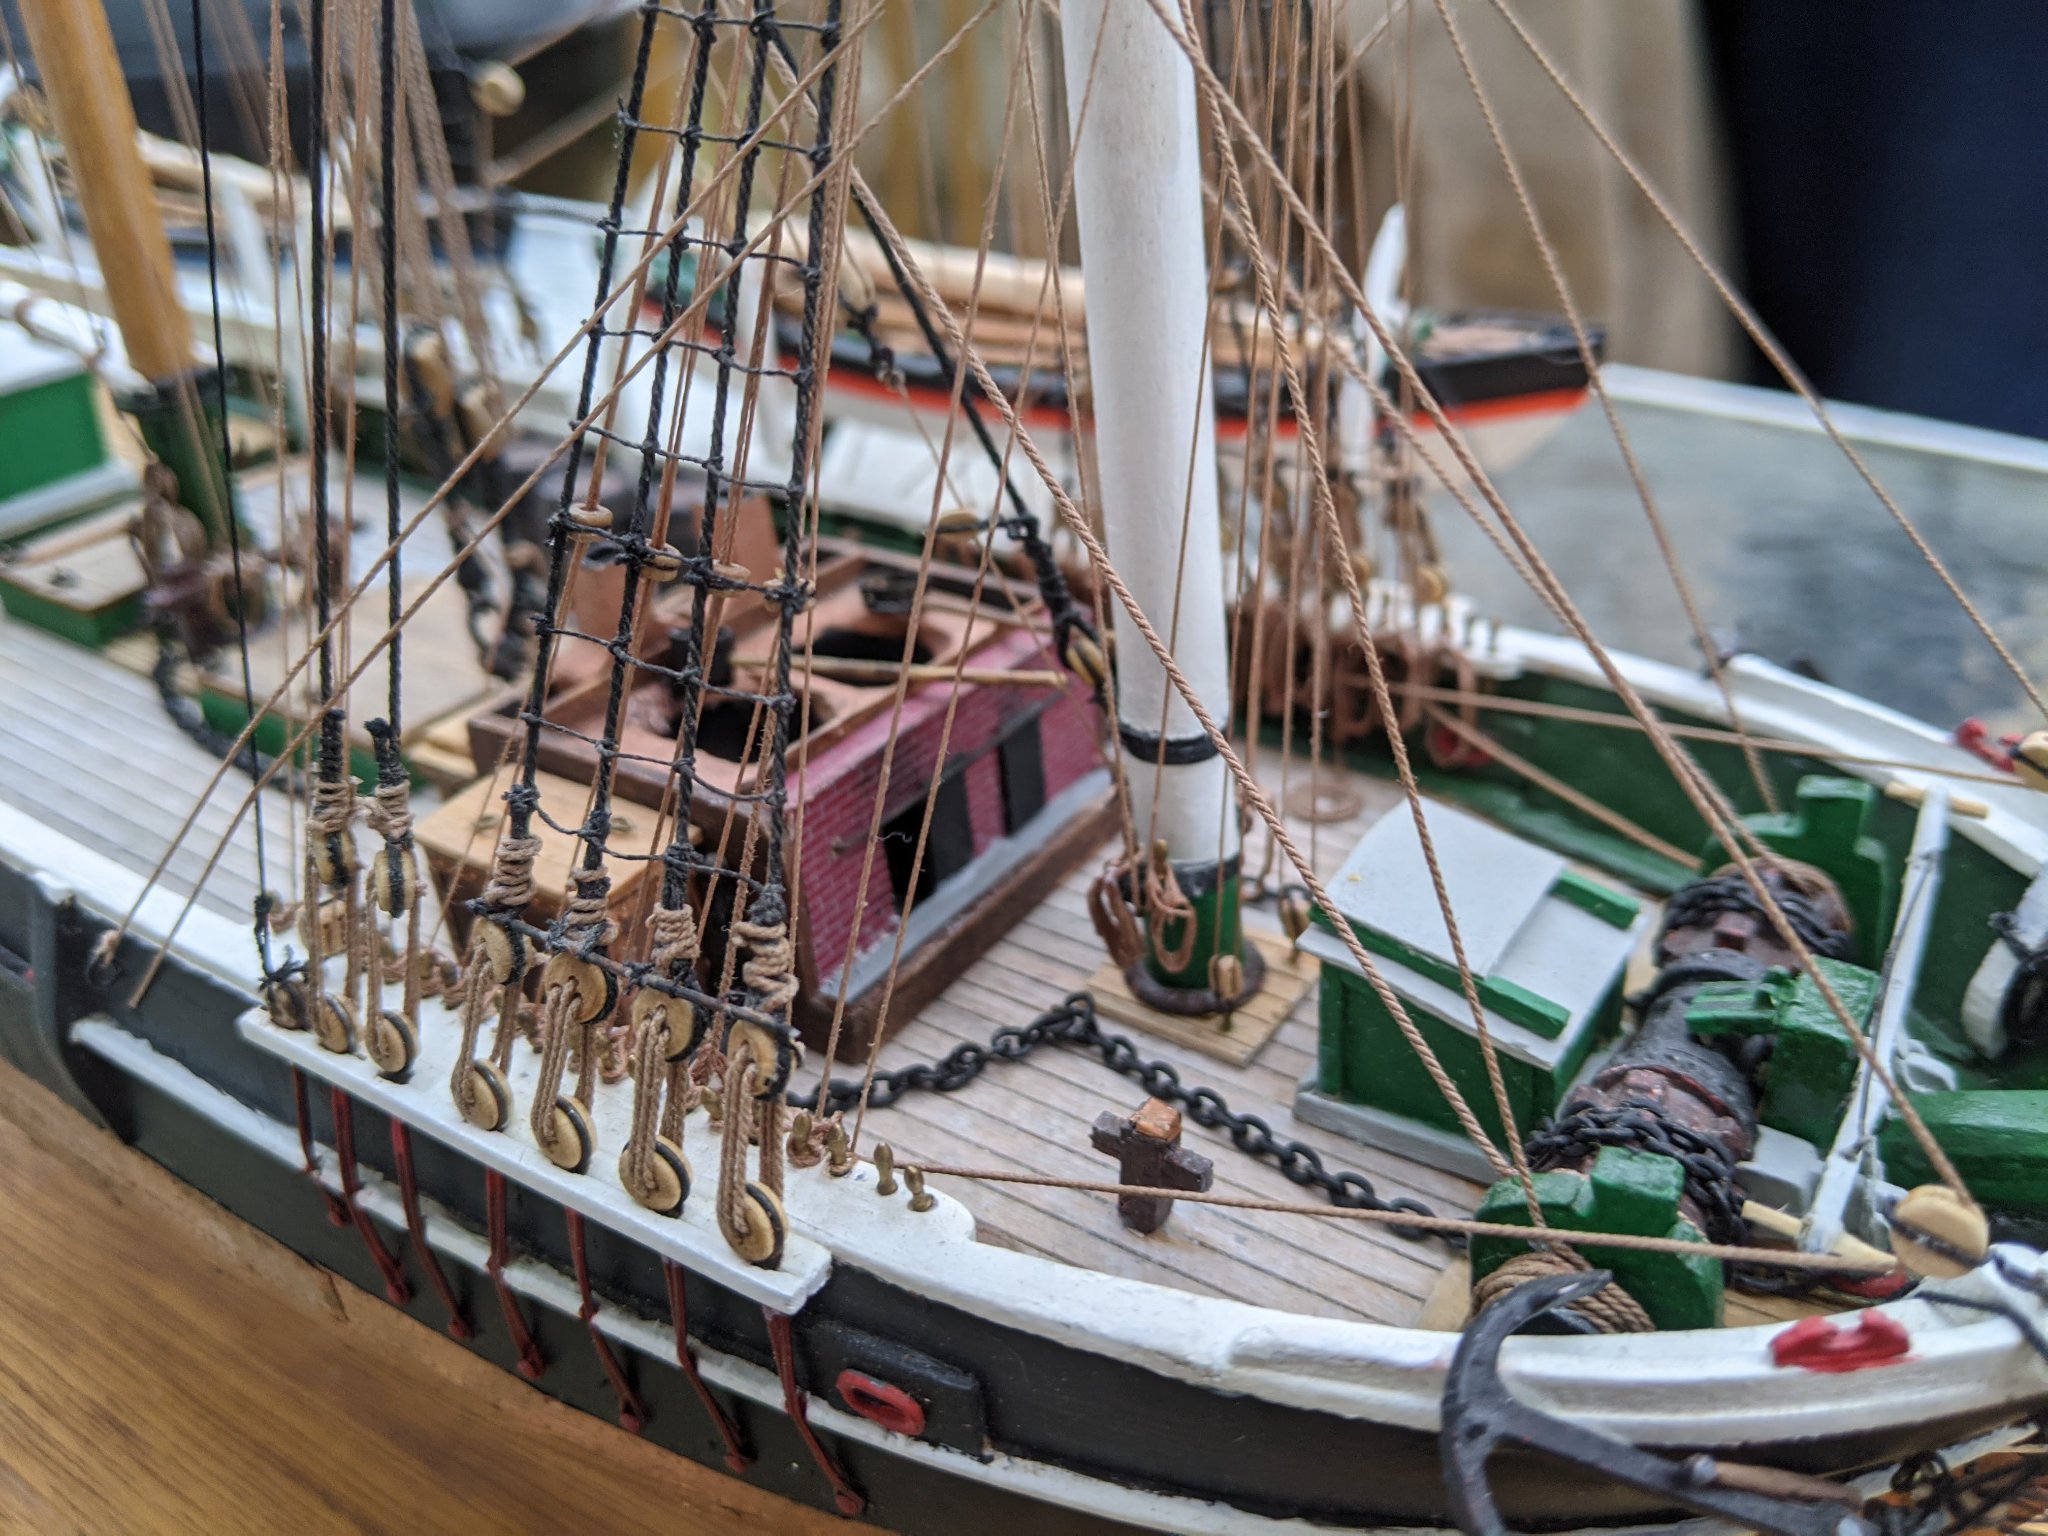
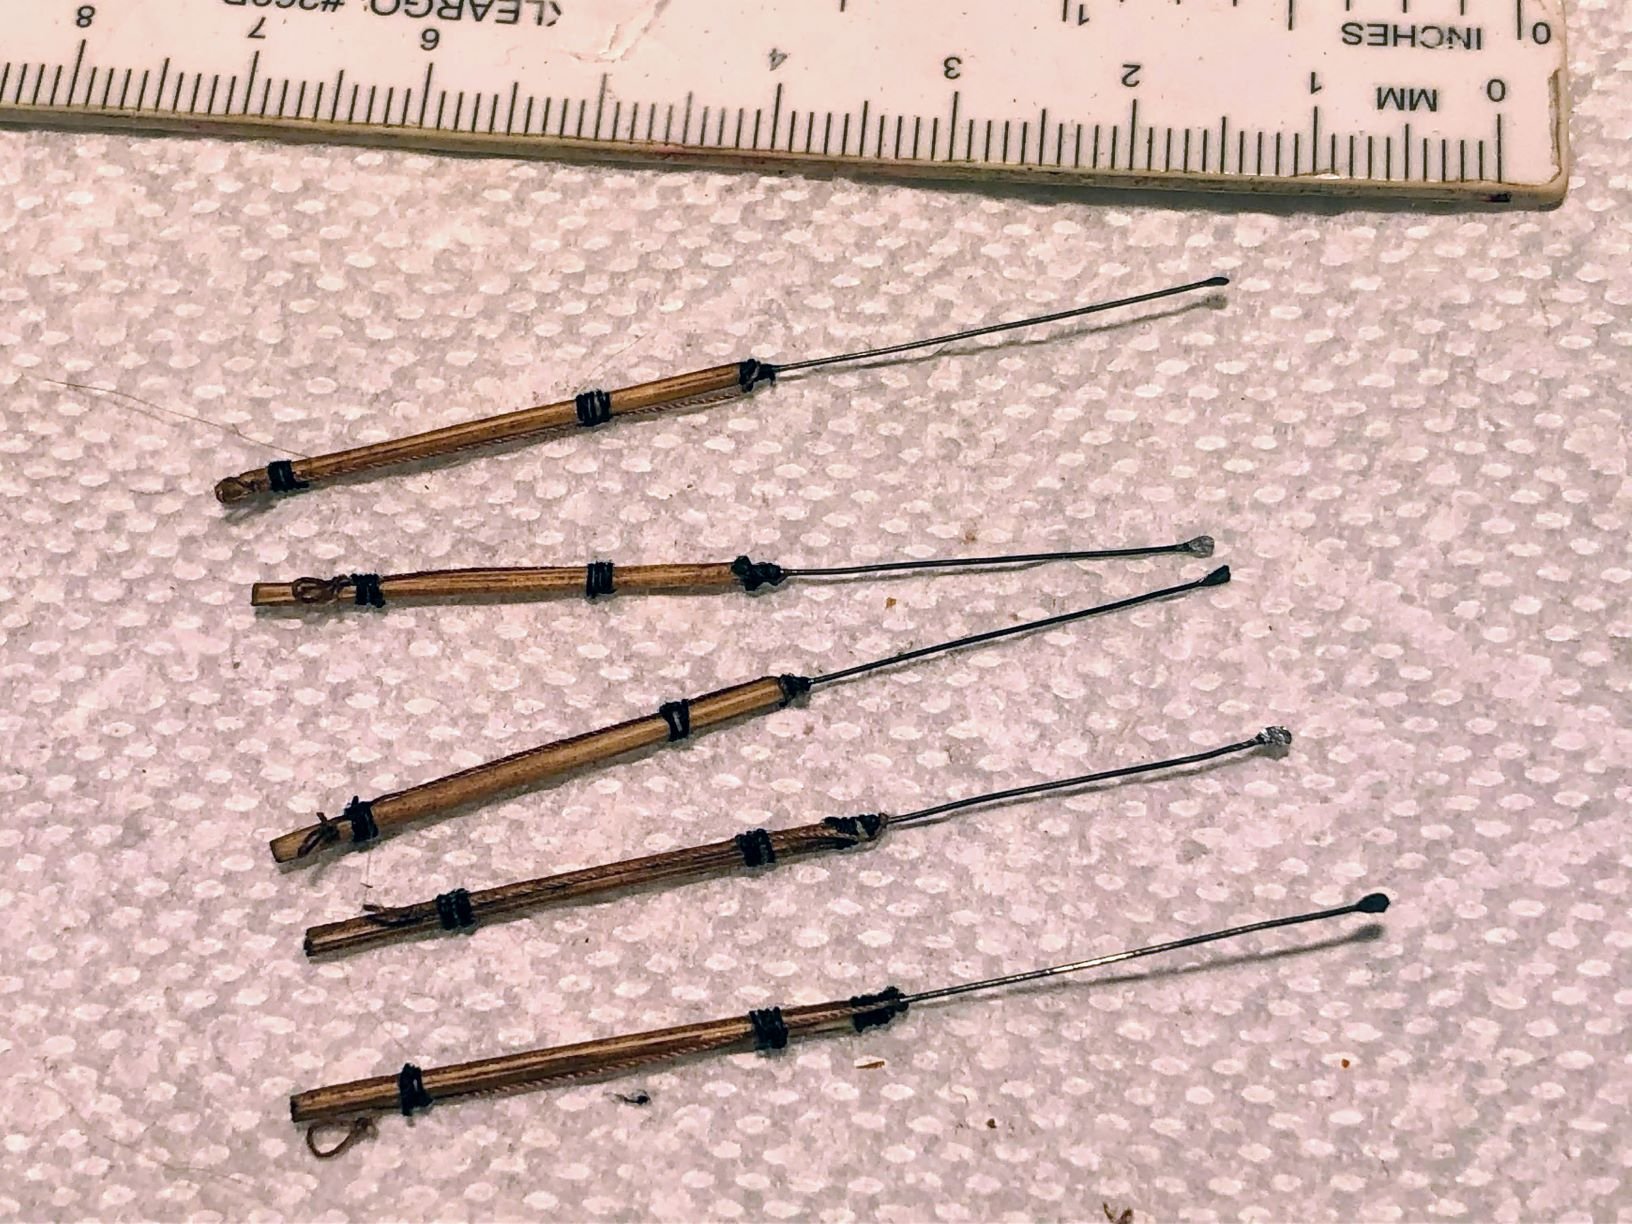
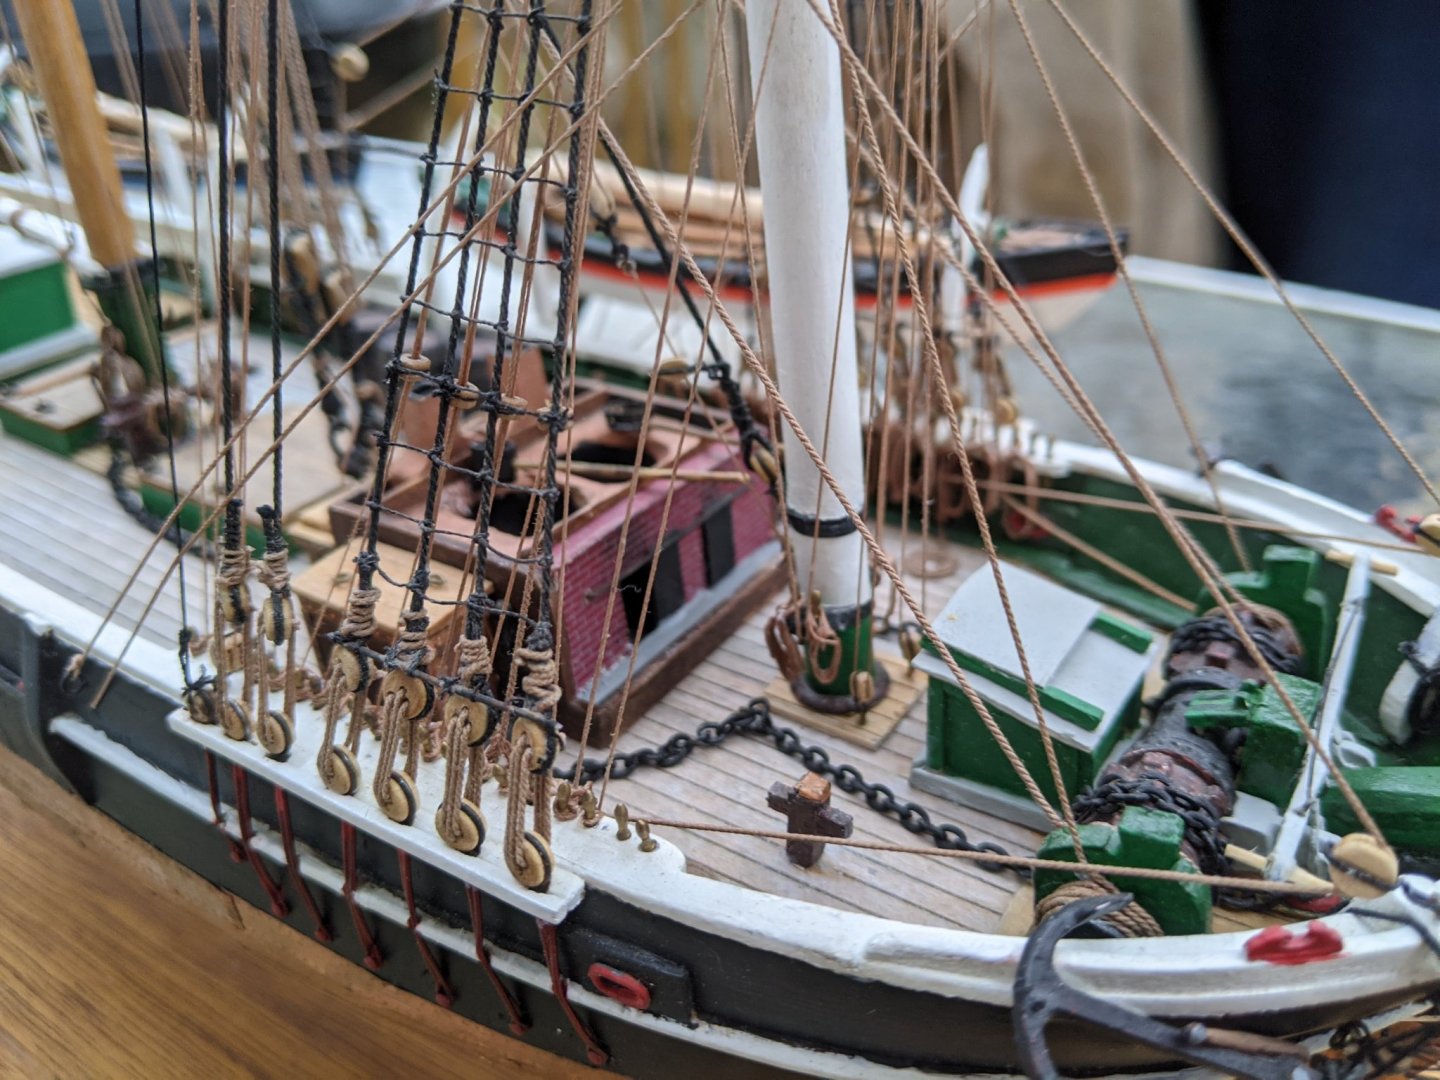
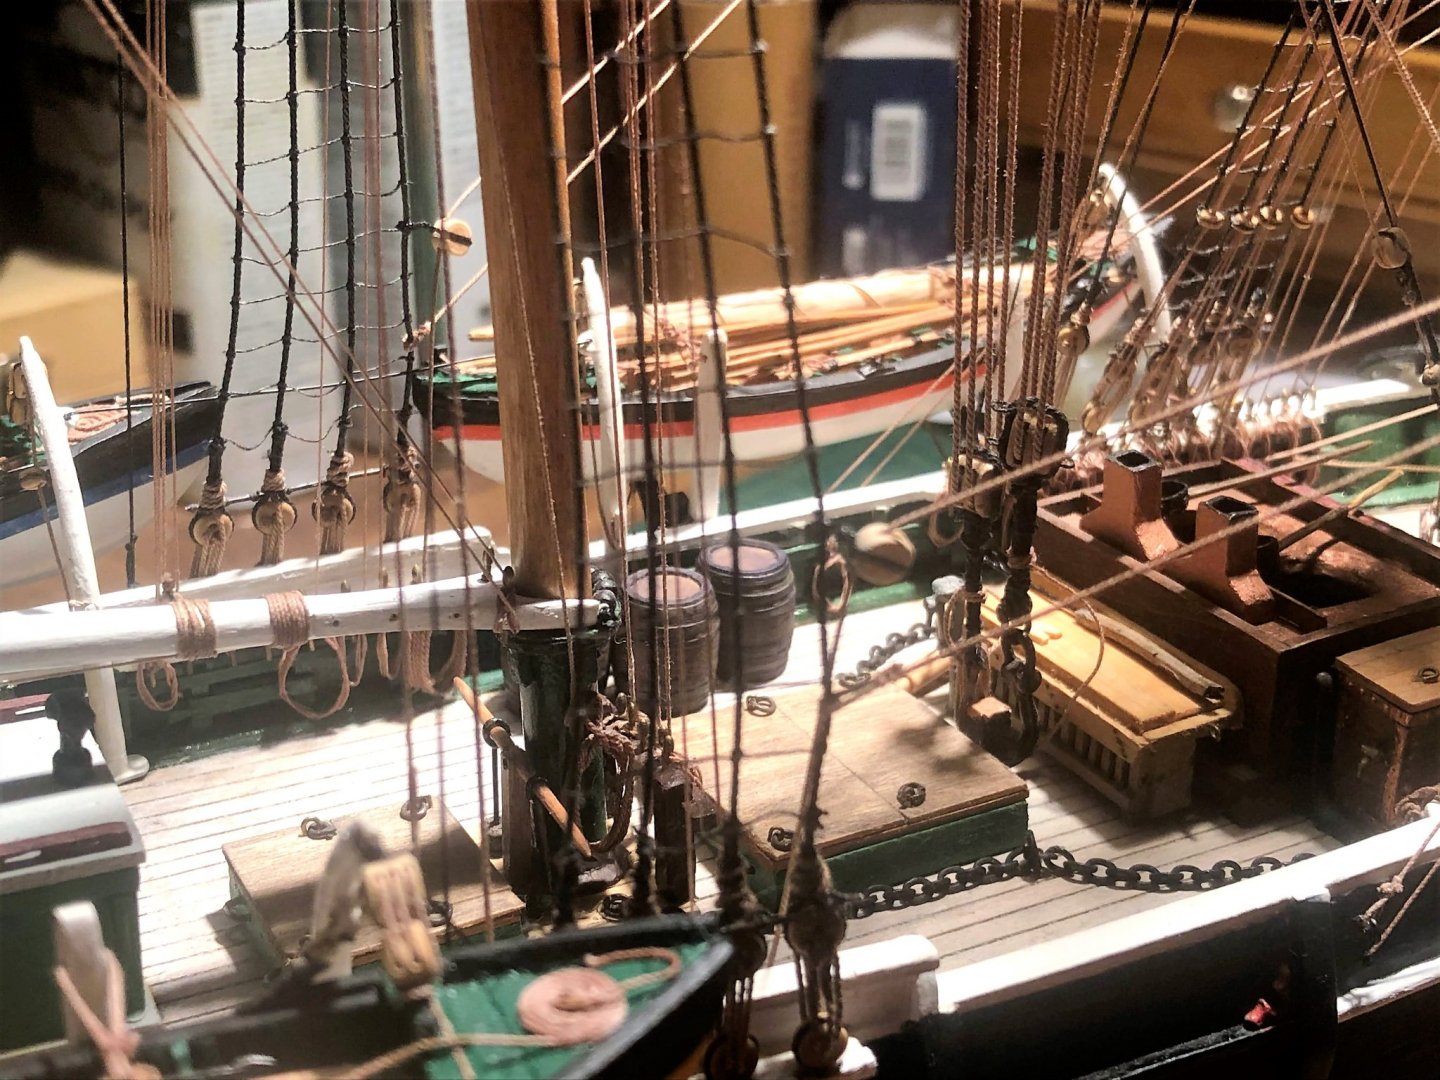
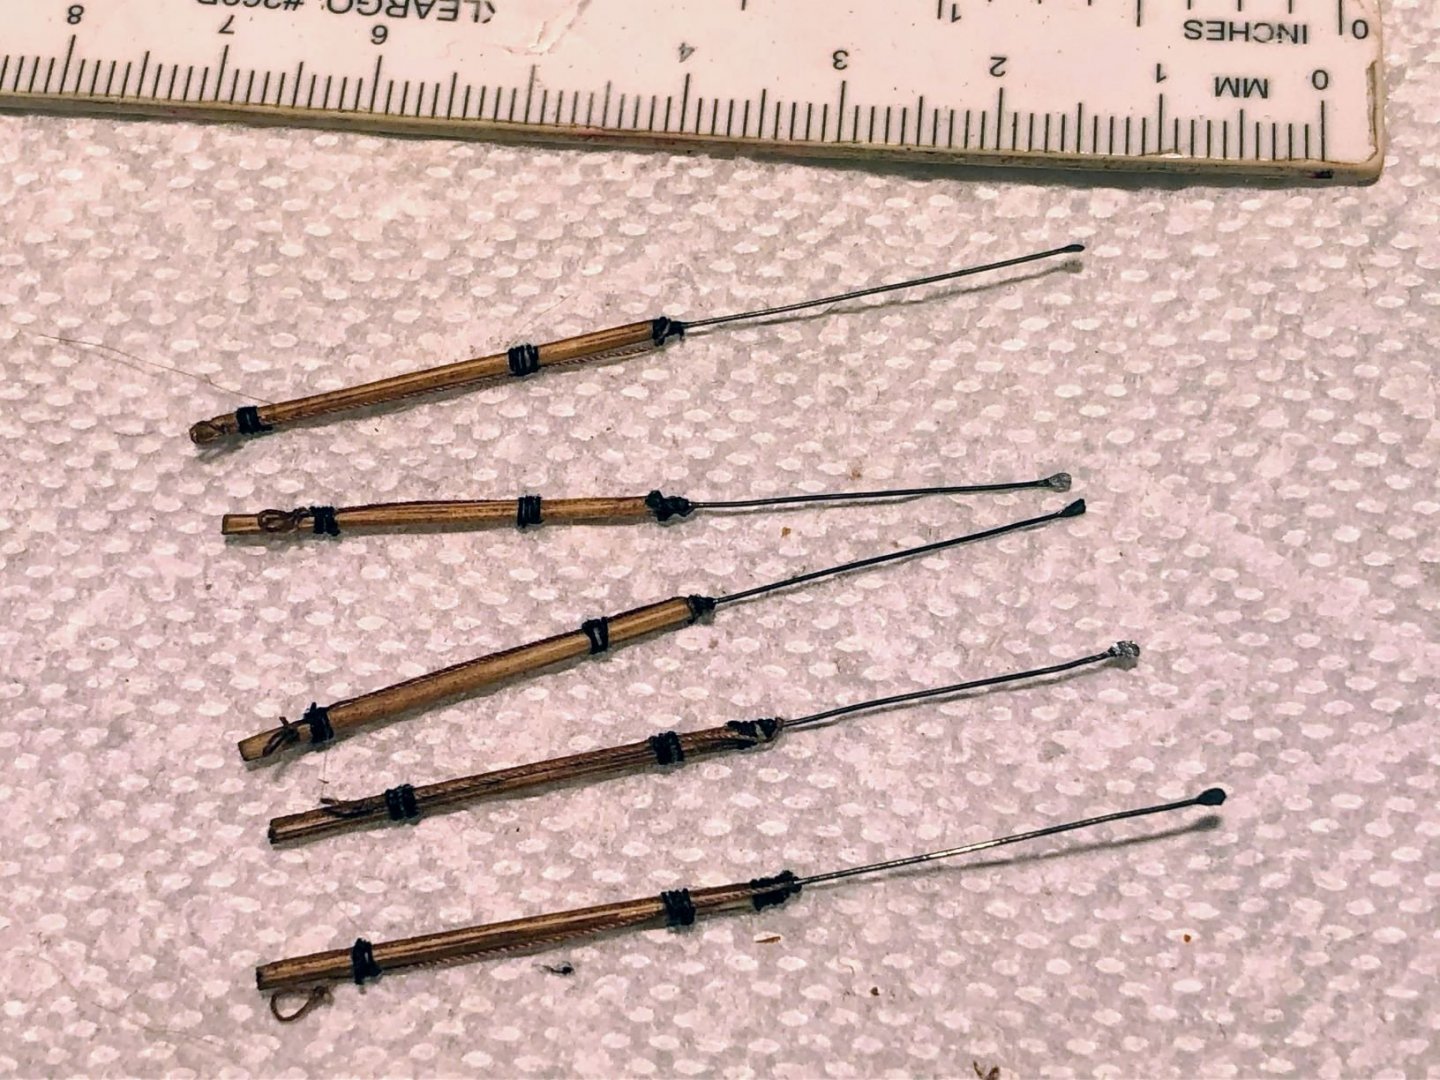
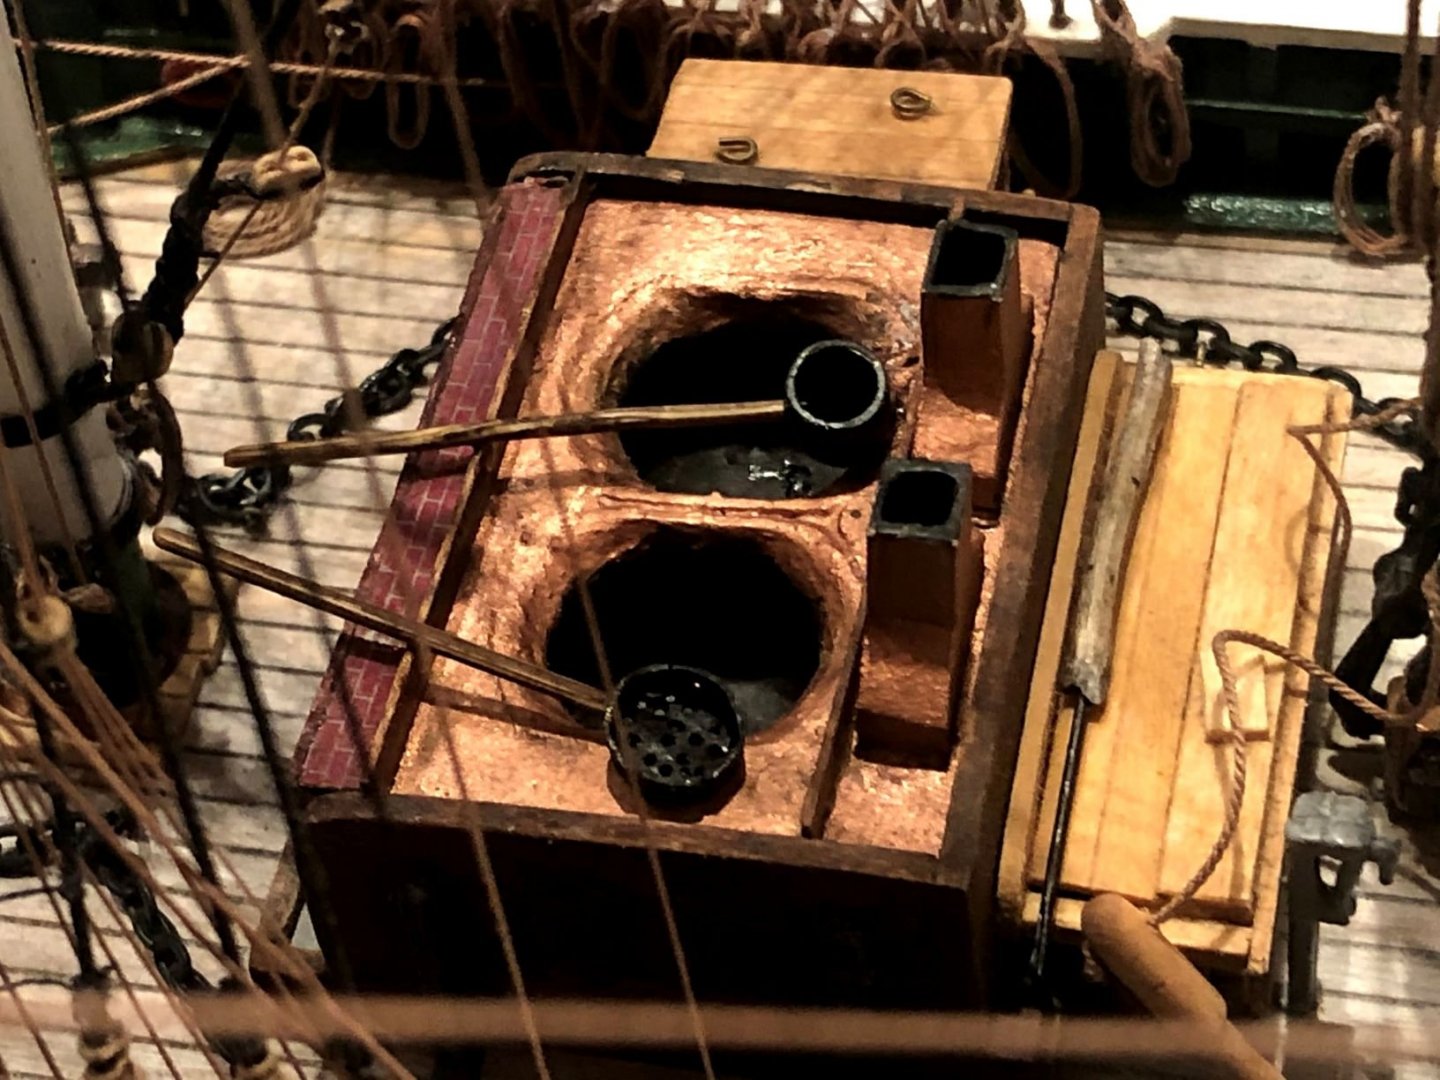
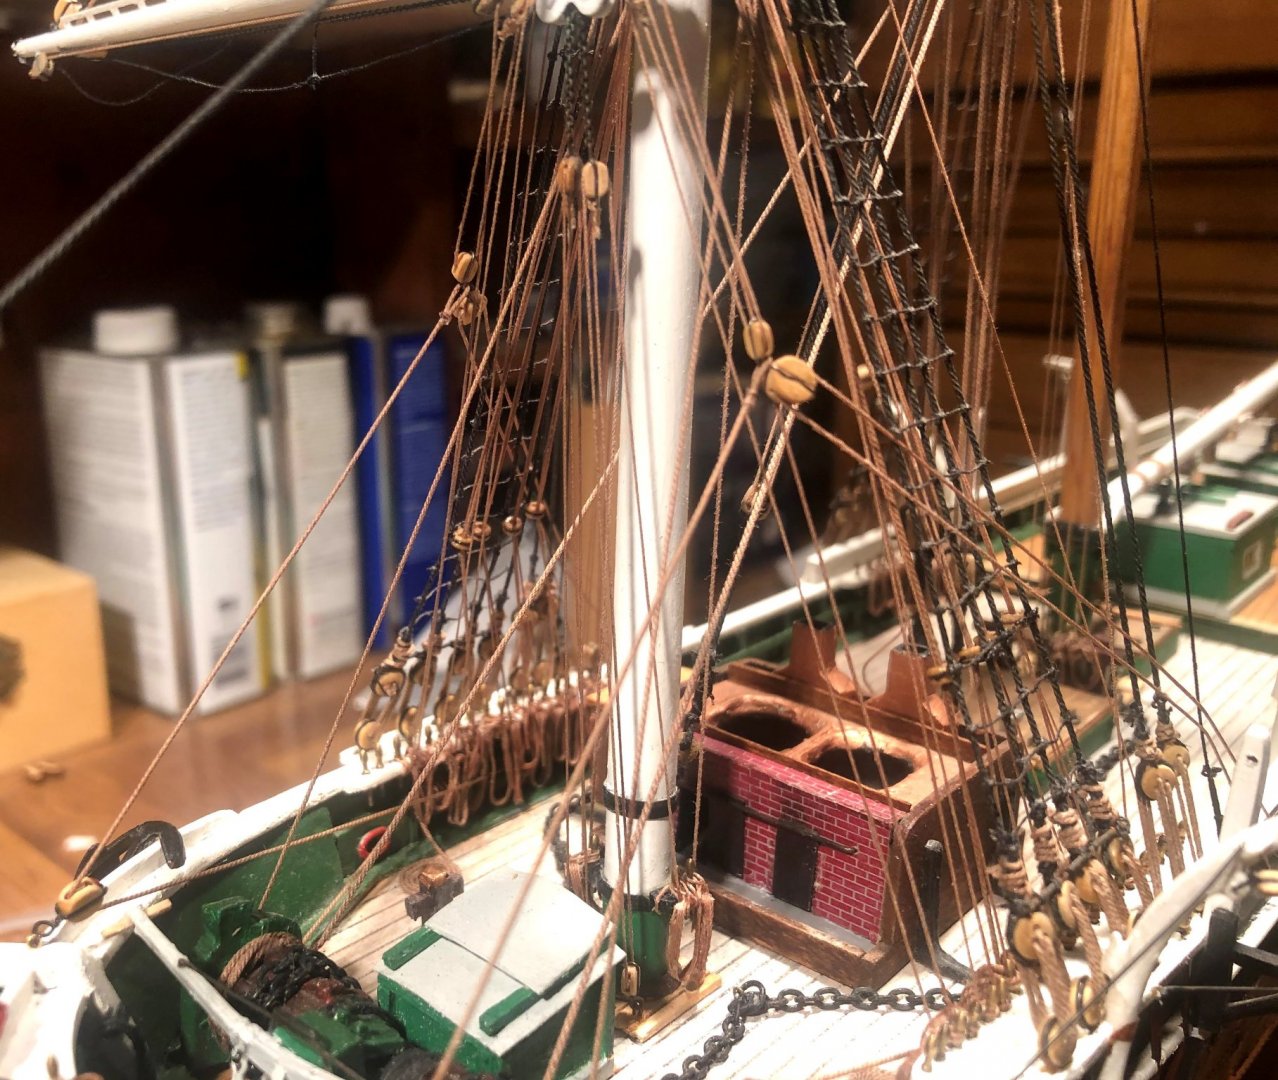
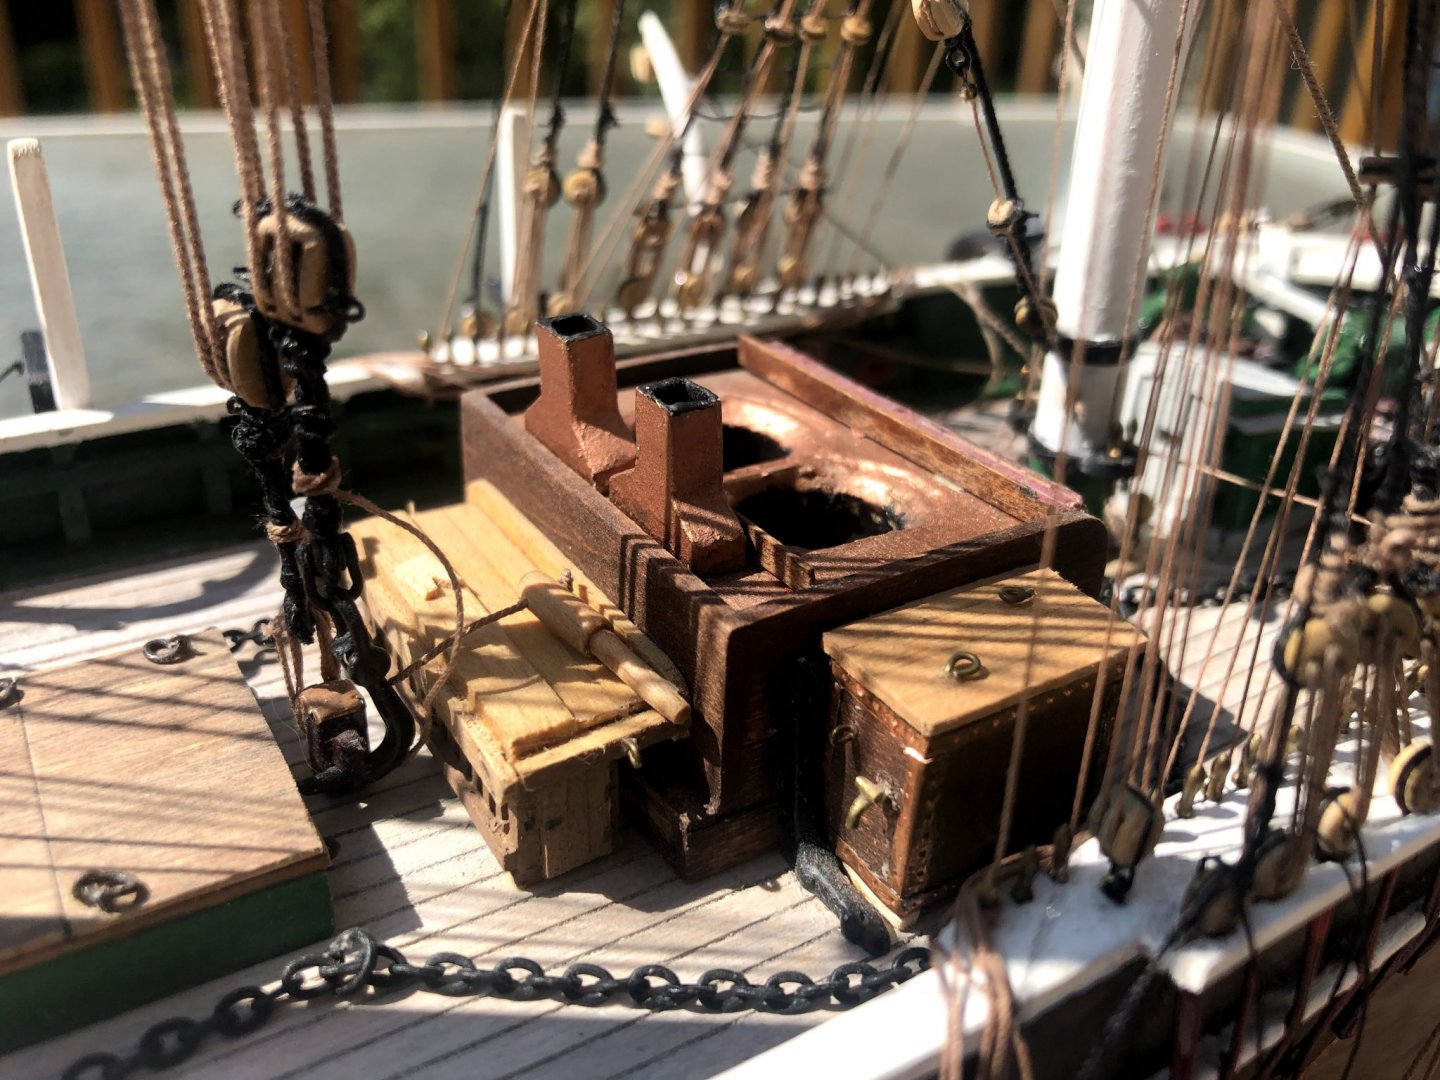
Tryworks tools and lances. I made the handles using a drawplate and running bamboo through it to about .03" or about 3" diameter. The strainer is made out of a thin brass ring and the base is a piece of styrene filed to fit. The holes are #78 drill bit. The lances are 32 gauge steel wire. The tips are just punched flat om an anvil and shaped a little with files. The bucket is also a piece of brass tube, and the "poker" laying across the cooper's bench was made out of a thin needle, with the eye cut opened and turned a bit to look like the tool in one of the above posts from New Bedford.

- 109 replies
-
- 6
-
-
- model shipways
- kate cory
- (and 1 more)
-
Thanks Bill, Ryland. Appreciate the kind words. Ryland-I think my knack for realism stems from my modeling background with model railroading. it's always the goal in model railroading to make things look as real as possible. Next model I want to try to give up a little realism for a cleaner, more polished, "like new" look.
-
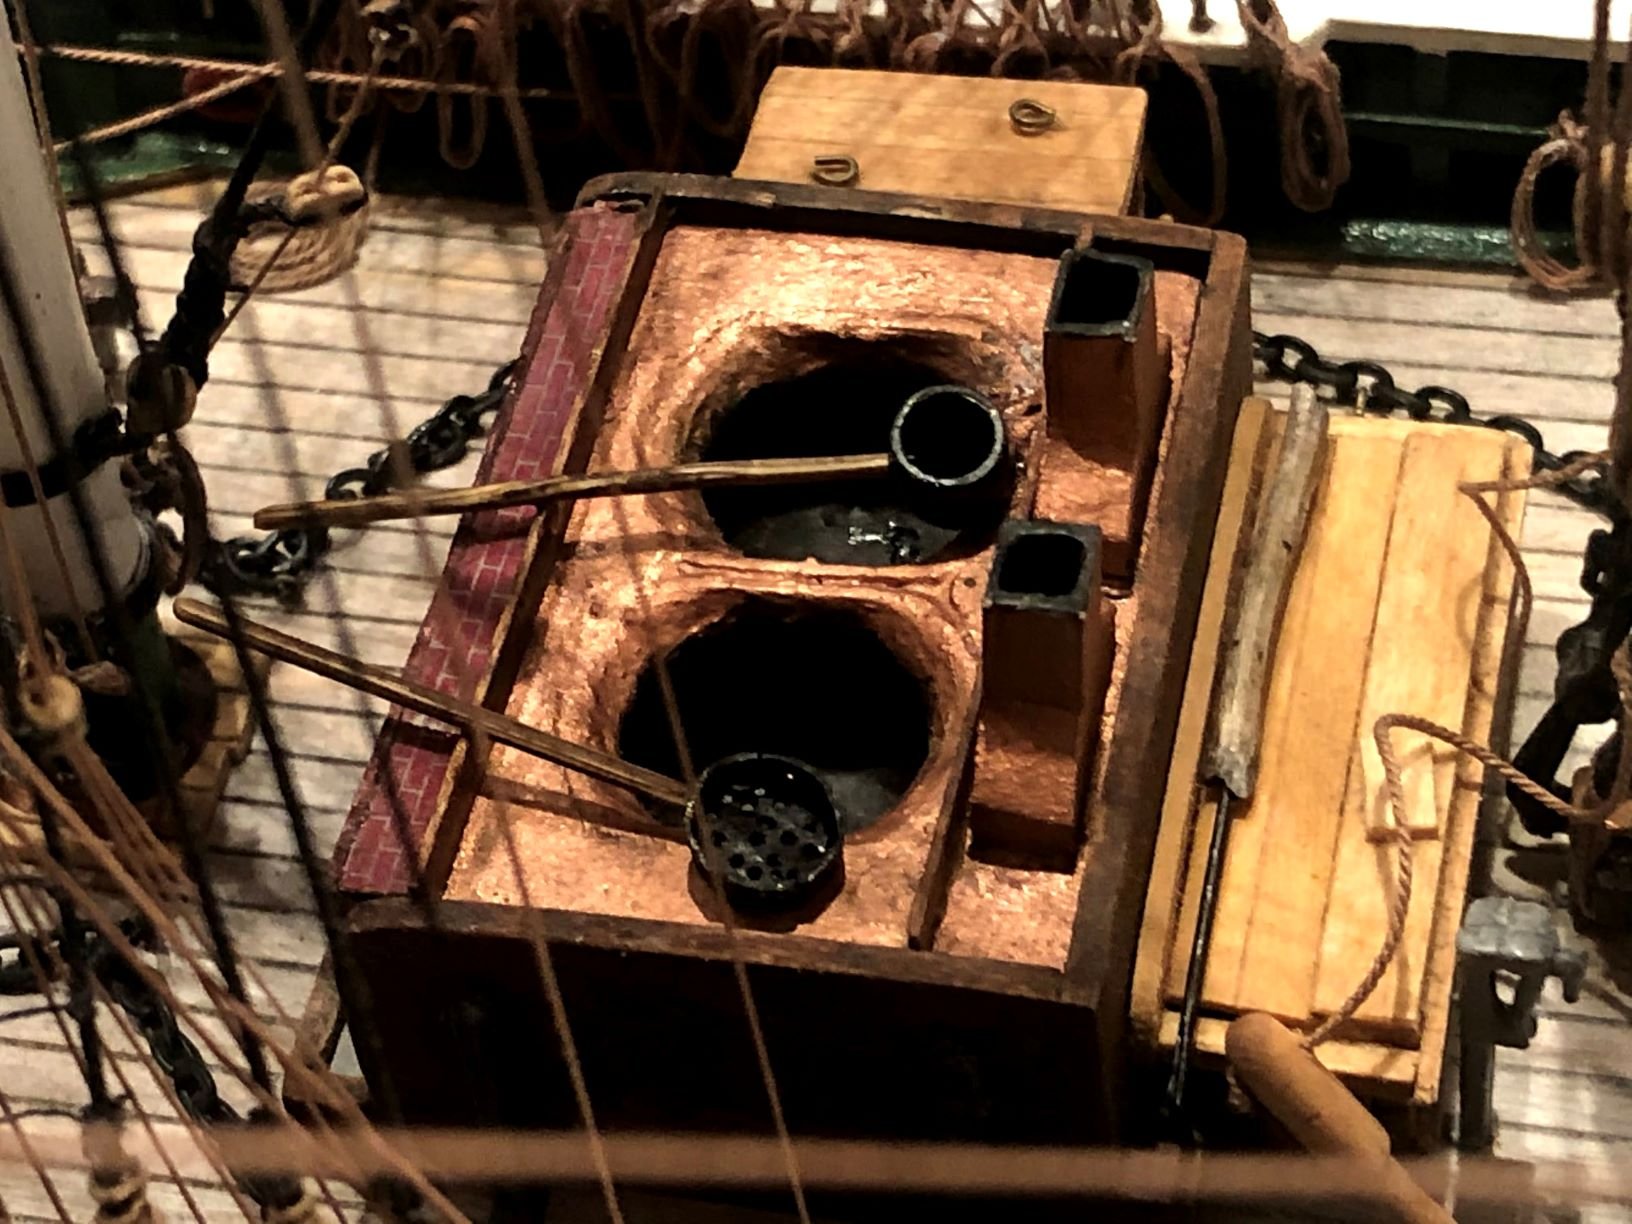
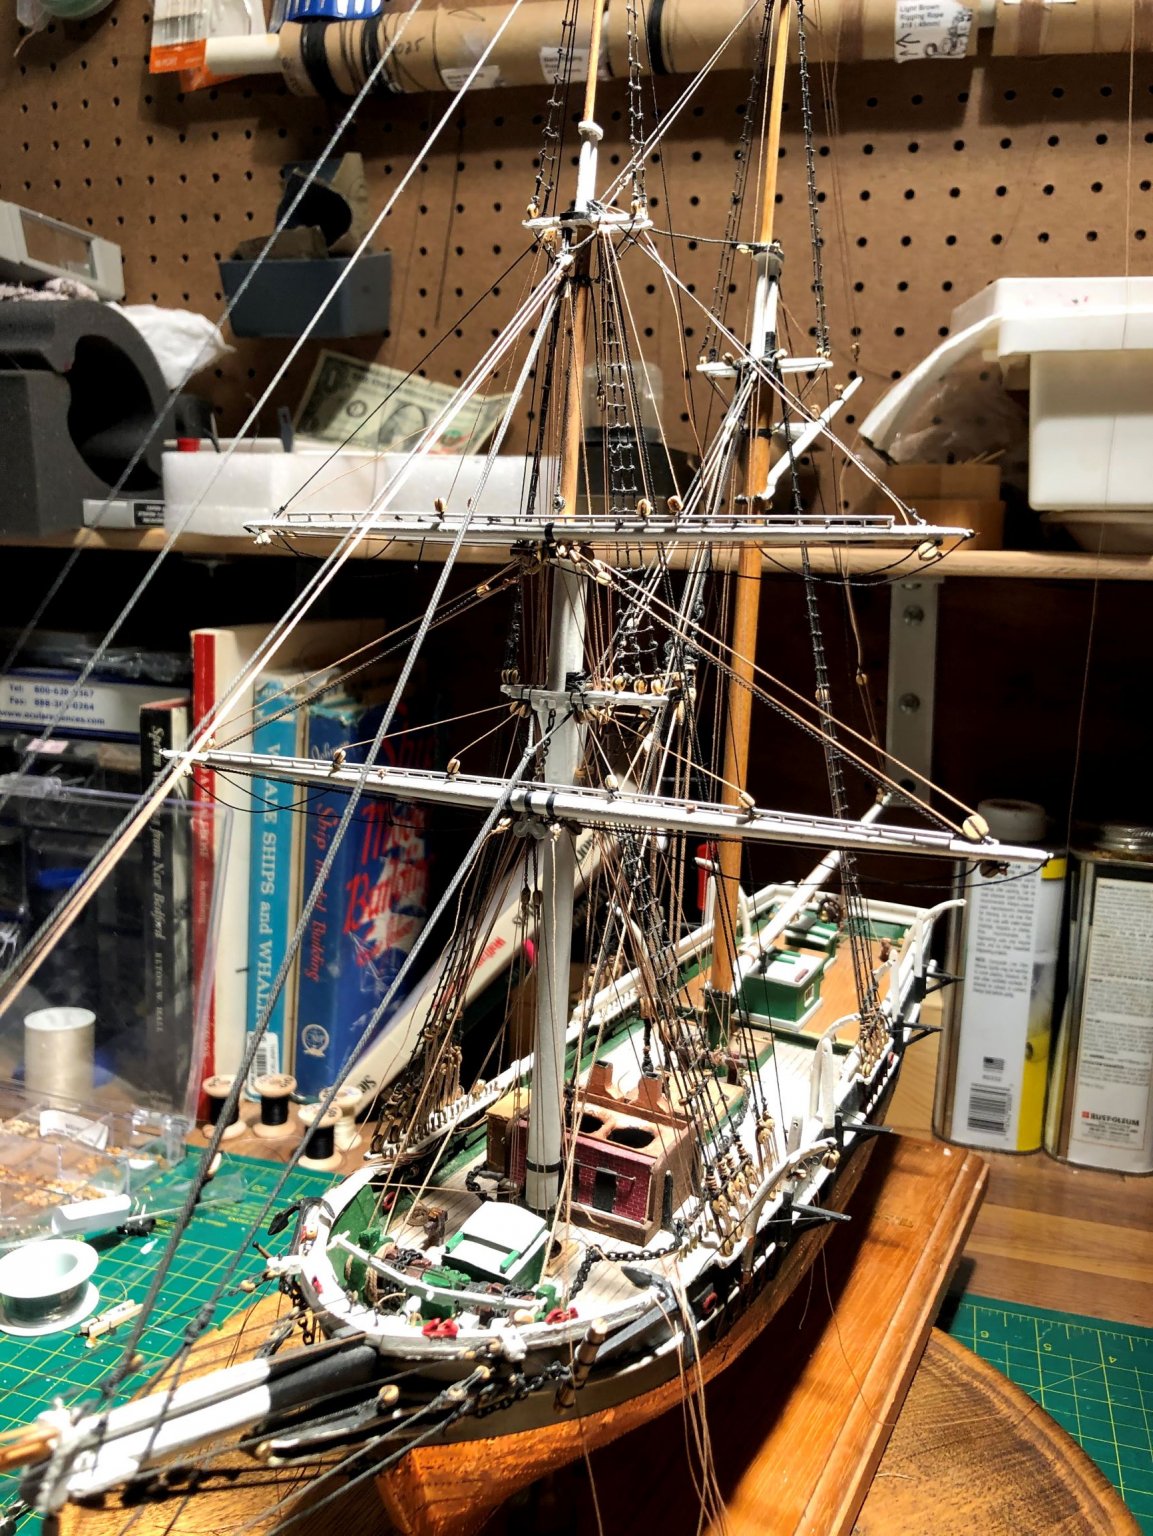
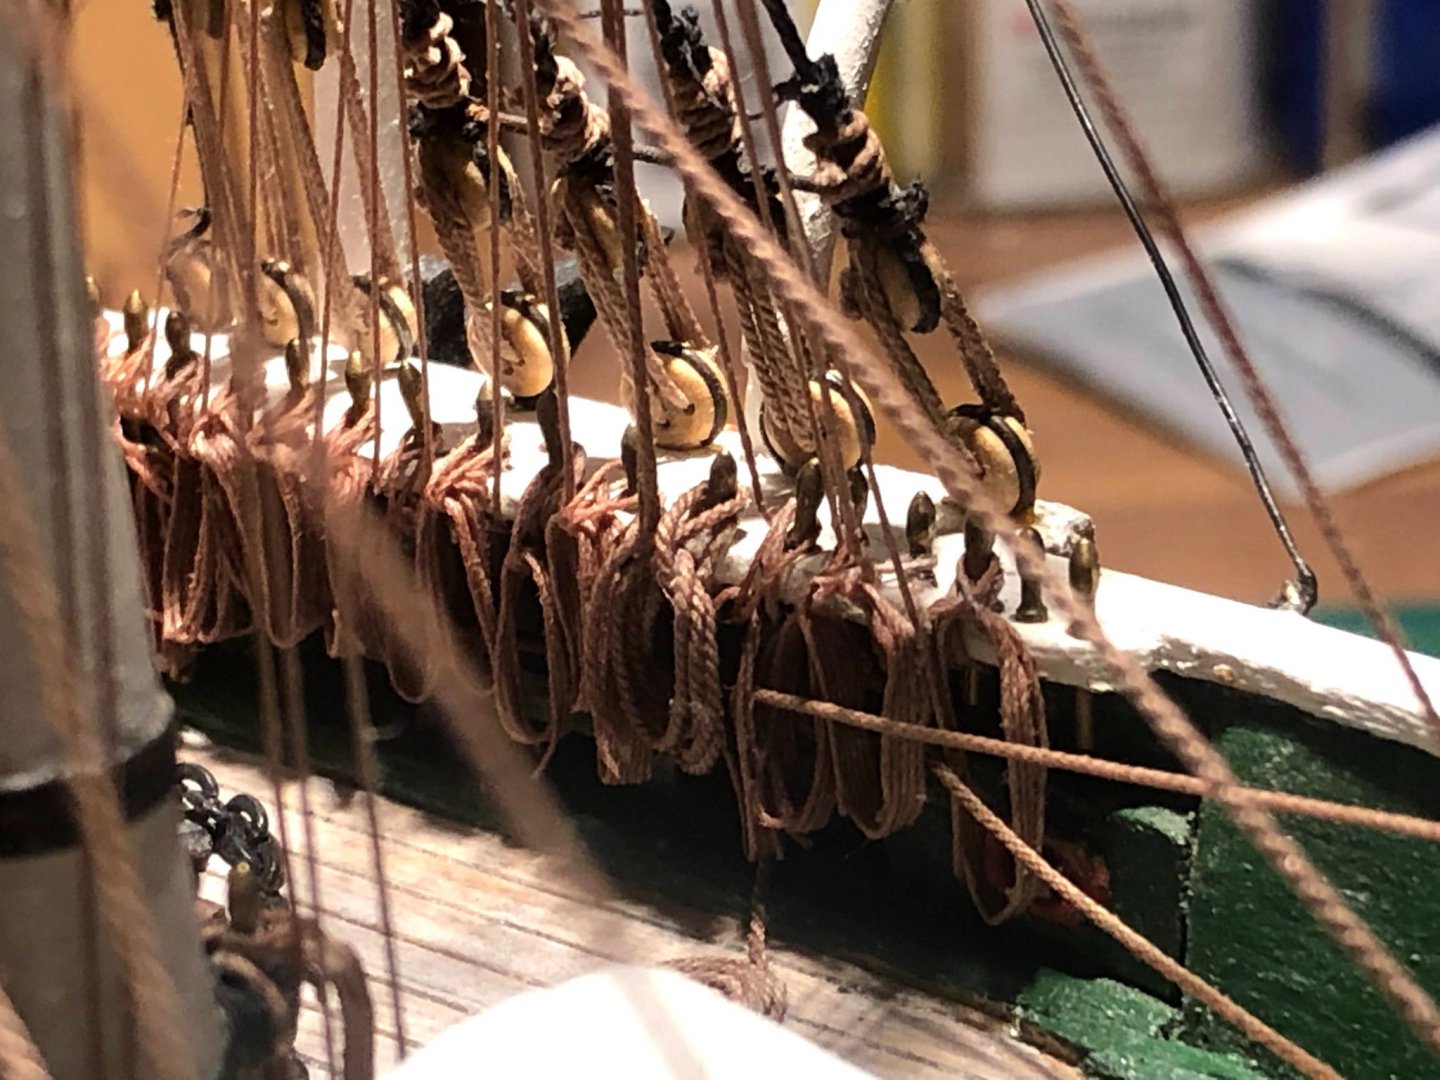
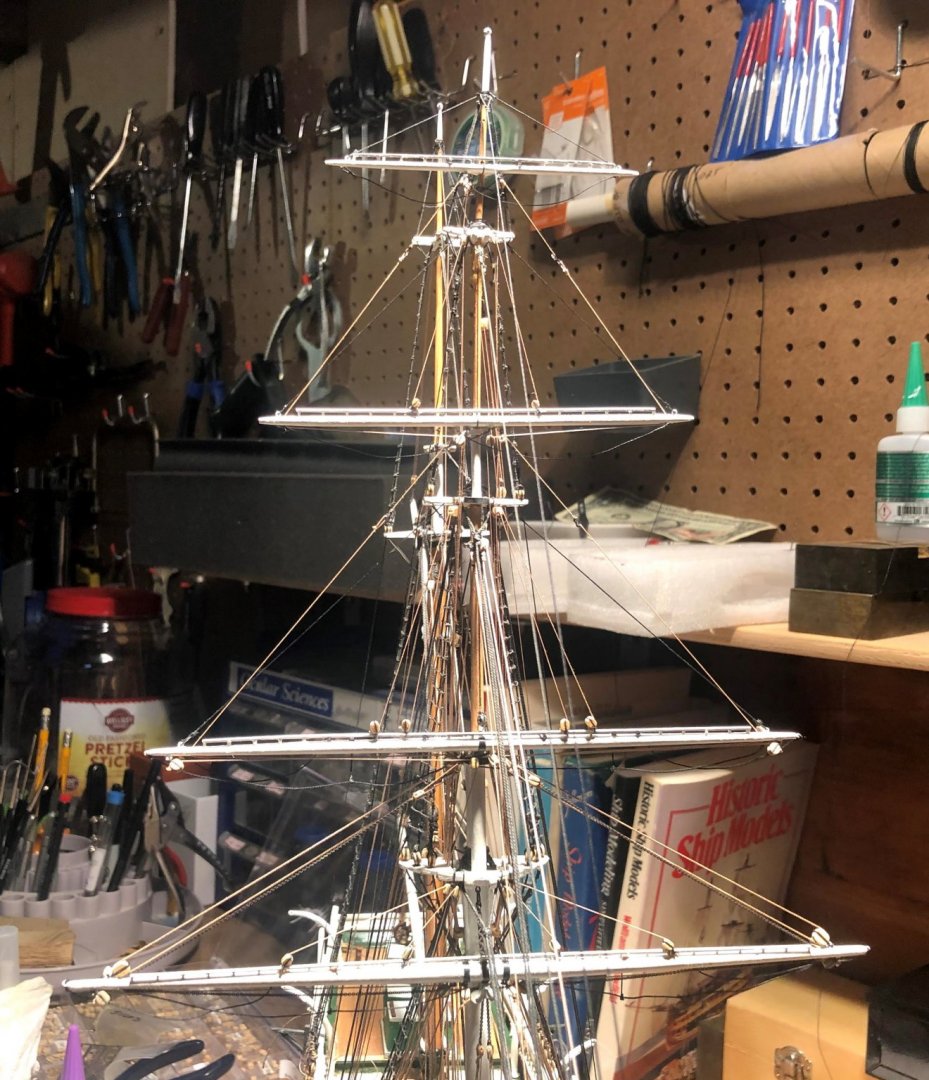
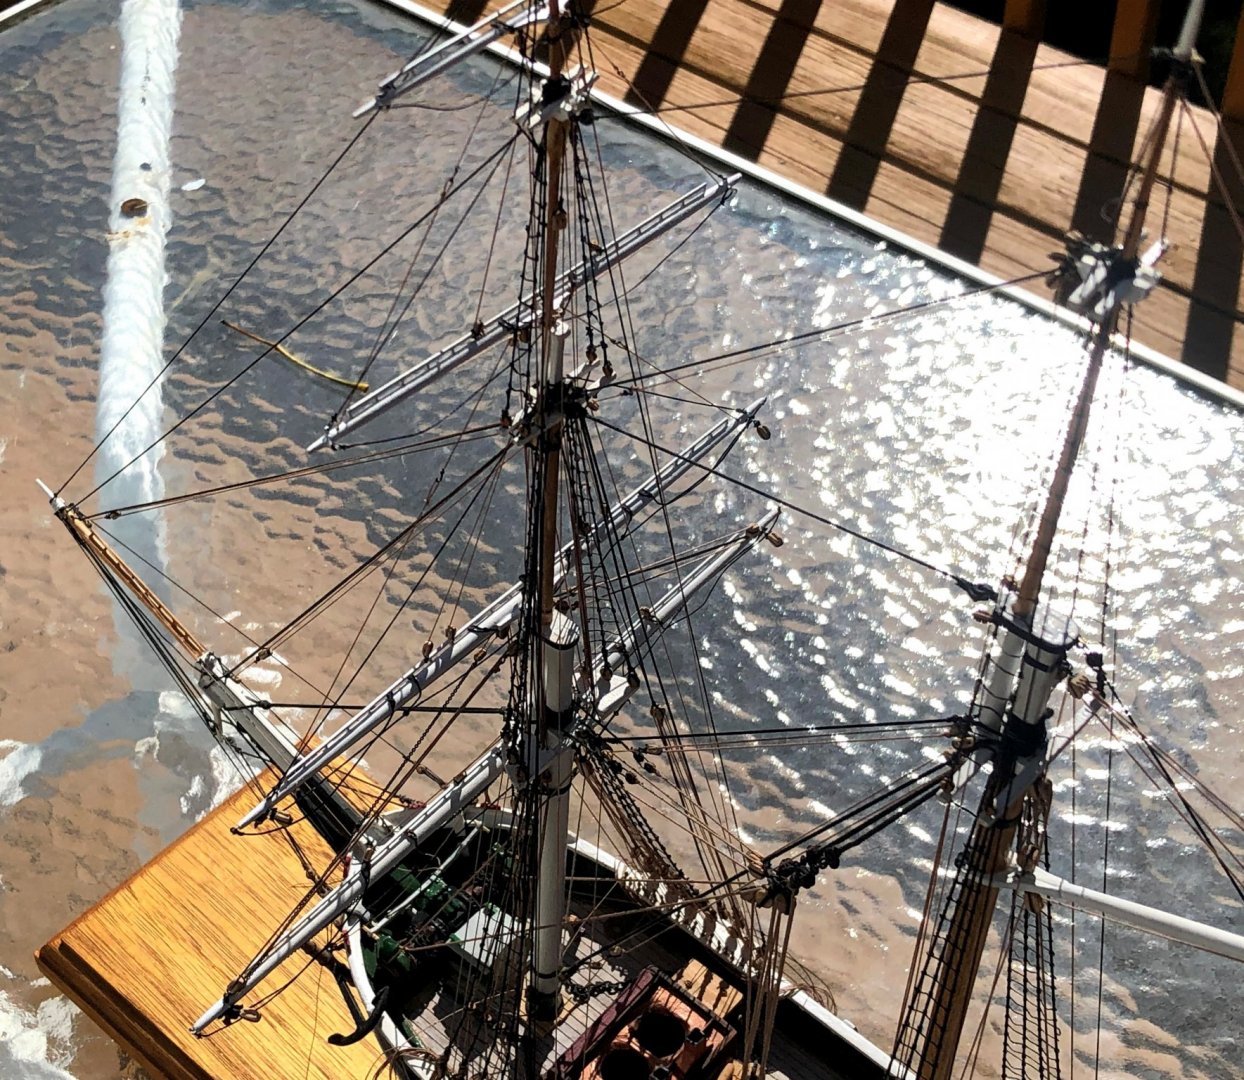
I have spent the past month experimenting with different methods of rope hanks. The two I ended up using are Tom Lauria's method which makes a wider loop of rope. I used these on the main rail, and sparingly on the fore rail where things are real tight. On the fore rail, the hanks are almost all made using this method I ran across on youtube. One thing I changes from the way these are made in the video is, I needed to coat the whole hank in diluted white glue. Not just the top and bottom as shown. It gave the hank stability as I worked on getting the upper loop back through the hank. It was easy enough to make the hank flexible when installing them by wetting them with some more diluted white glue. Here's a shot of the main rail, with Tom's method. For the fore rails, with many more lines, I used the second method for more of the hanks for thinner, compacts coils. Rigging is almost complete. I have added the braces for the top 3 yards, and the clew, tack and fore sheets. The only thing left is the brace for the lower yard. That runs from the main shroud, the the end of the yard, and back through a block on the main shroud. Thys will severely limit access to the deck, so I need to fabricate a few tryworks tools and install them before adding these last braces. Hopefully I can make a few that look something like these on display at the New Bedford Whaling Museum. I can't seem to flip these right side up. Whatever I do, they load upside down? I hope you get the idea of the tools. After the tryworks tools, it will be on to fabricating oars, masts, line tubs, harpoons, and maybe a few other items for the whaleboats. I want to try to furl some sail cloth around the whaleboat masts. We'll see how that works. The end is near, but still a lot of work to go.


- 109 replies
-
- 4
-
-
- model shipways
- kate cory
- (and 1 more)
-
Lol. Yes. Just the modeler, and other modelers. Those details are lost on the casual viewer. But we don’t model for the casual viewer. We model for our own self satisfaction. ( well, at least I do).
-
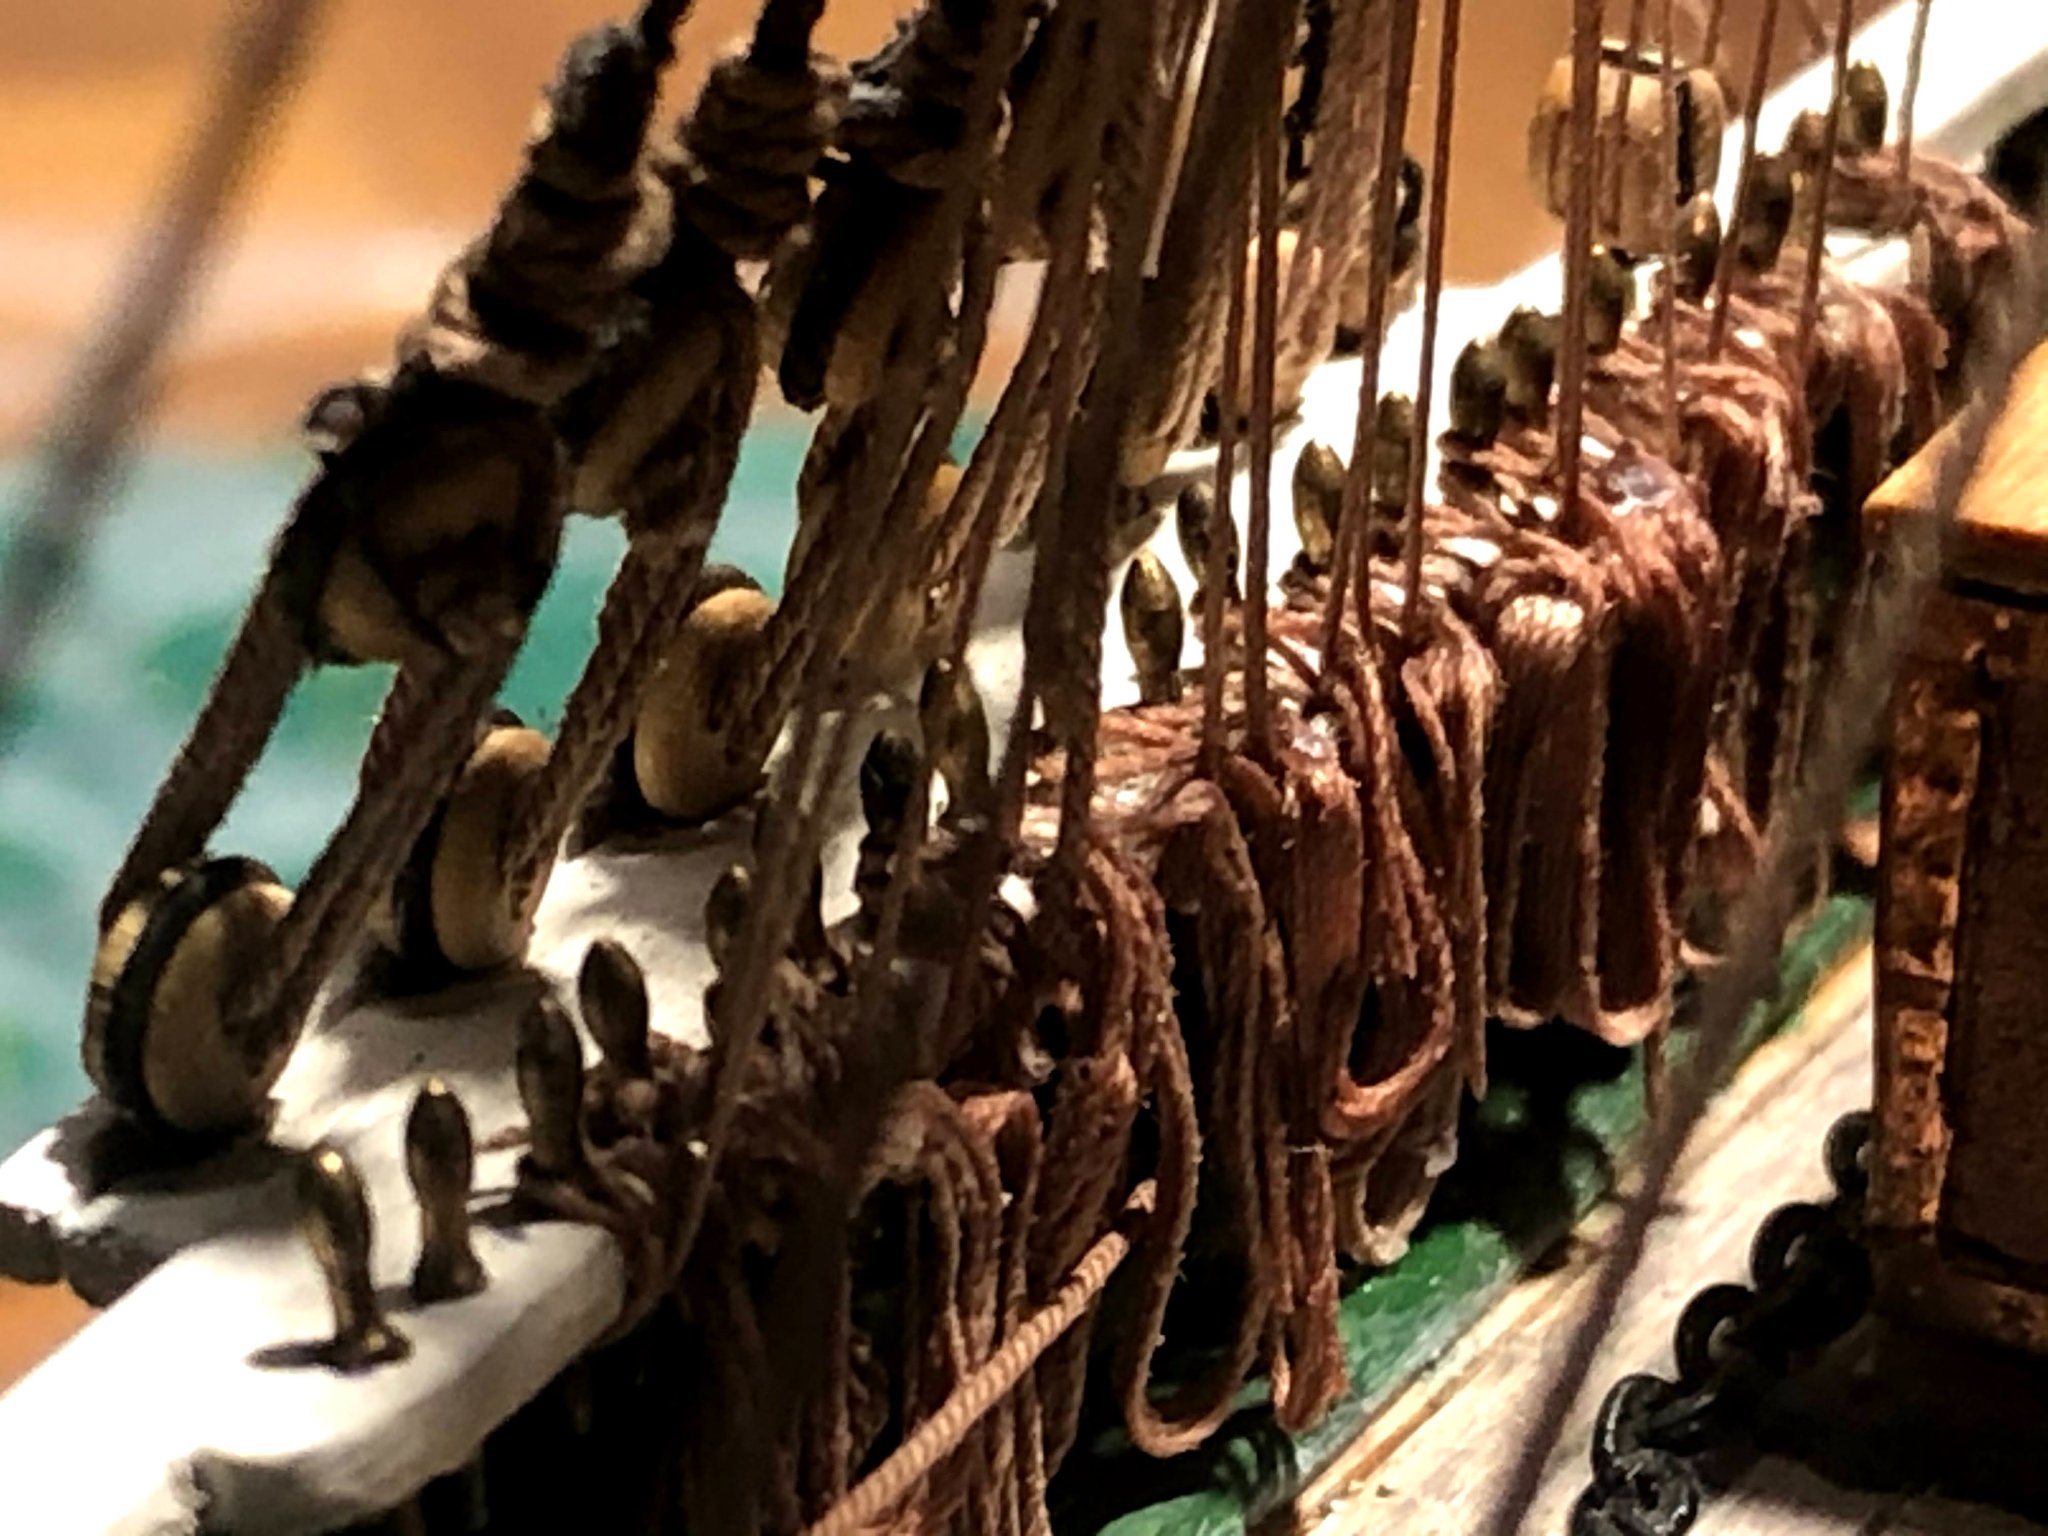
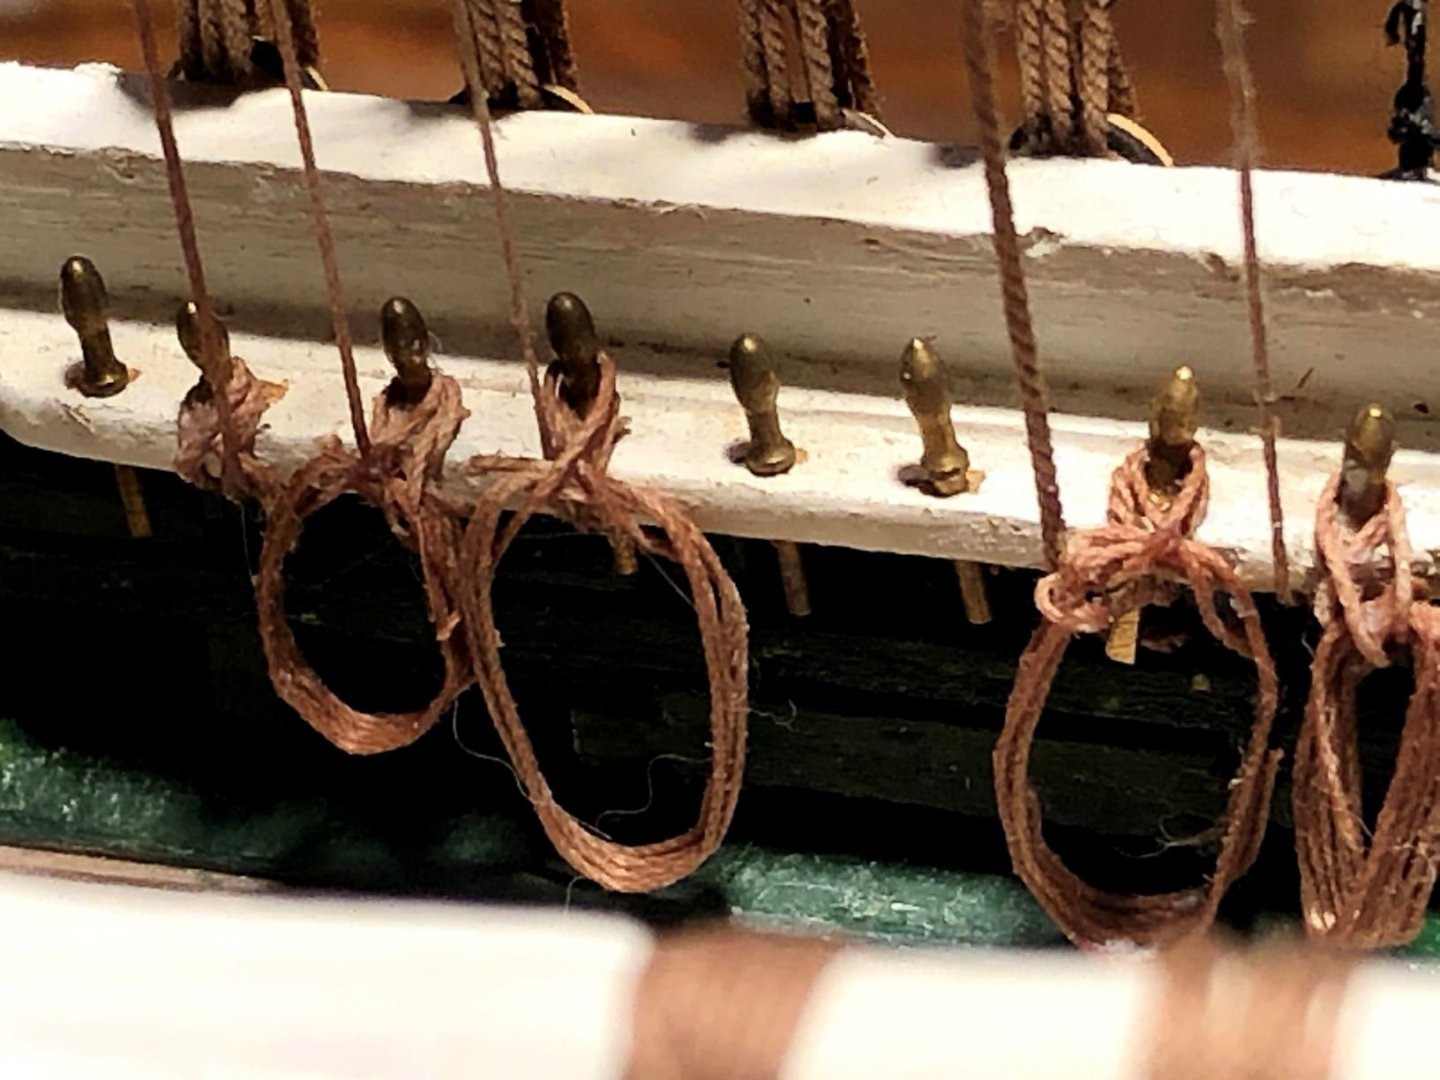
I used a combination of methods. On some I was able to get good angles and wrapping twice under and over in a figure eight pattern was easy. These lines held nice by themselves, and I was able to dab some diluted white glue on them, let it dry then cut the excess. Others, either because of access angles, or whatever other reasons, didn't behave so well and gave me a hard time. On those, I put a spot of white glue on the underside of the pin, worked the line around the bottom of the pin, through the glue, and let it dry thoroughly before attempting to wrap it over the top. On the stubborn ones, there's only one wrap, and the wrap around the top is sometimes held in place with a small spot of CA glue. In the event I need to re tension any lines, water does a good job releasing the white glue, and a drop of Model Expo's CA remover works to loosen the ones with CA holding them down. Overall I think it was worth the effort. The lines look much better coming down in front or to the side of the coils. I'm hoping the few on the fore rail I just couldn't get to are not obvious and hidden beneath all the coils when they are in place. Here's a closeup look at the main rail with a few more coils in place.
-
I’m at this exact point on my KC build. I too had the lines fed through the holes and then the pin put in holding the line in place. After making a few rope coils I was real unhappy with the look of the coil with the line seemingly going through the coil. I chose to rework the lines and hitch them under and over and dab them with a spot of diluted white glue. You can see the 5th line from the left that’s still through the hole. I’m causing more damage trying to extend and wrap that line than it’s worth. That one is staying through the hole and hopefully after all the coils are in place it will be less noticeable. Now I think the line and lay of the coils looks better.
-
Thanks Chuck. Rope coils, yard braces, and a few lines off the lower yard, a few flags, and that should wrap up the rigging. Some whaleboat and tryworks hardware, and hanging the boats and that should do it! The end is close, but a lot of detail still to go. I’ll try to get in our zoom meeting tomorrow night if I can get out of work early enough. Hopefully soon after the holidays we can get back to some kind of normal and have in person meetings again.
-
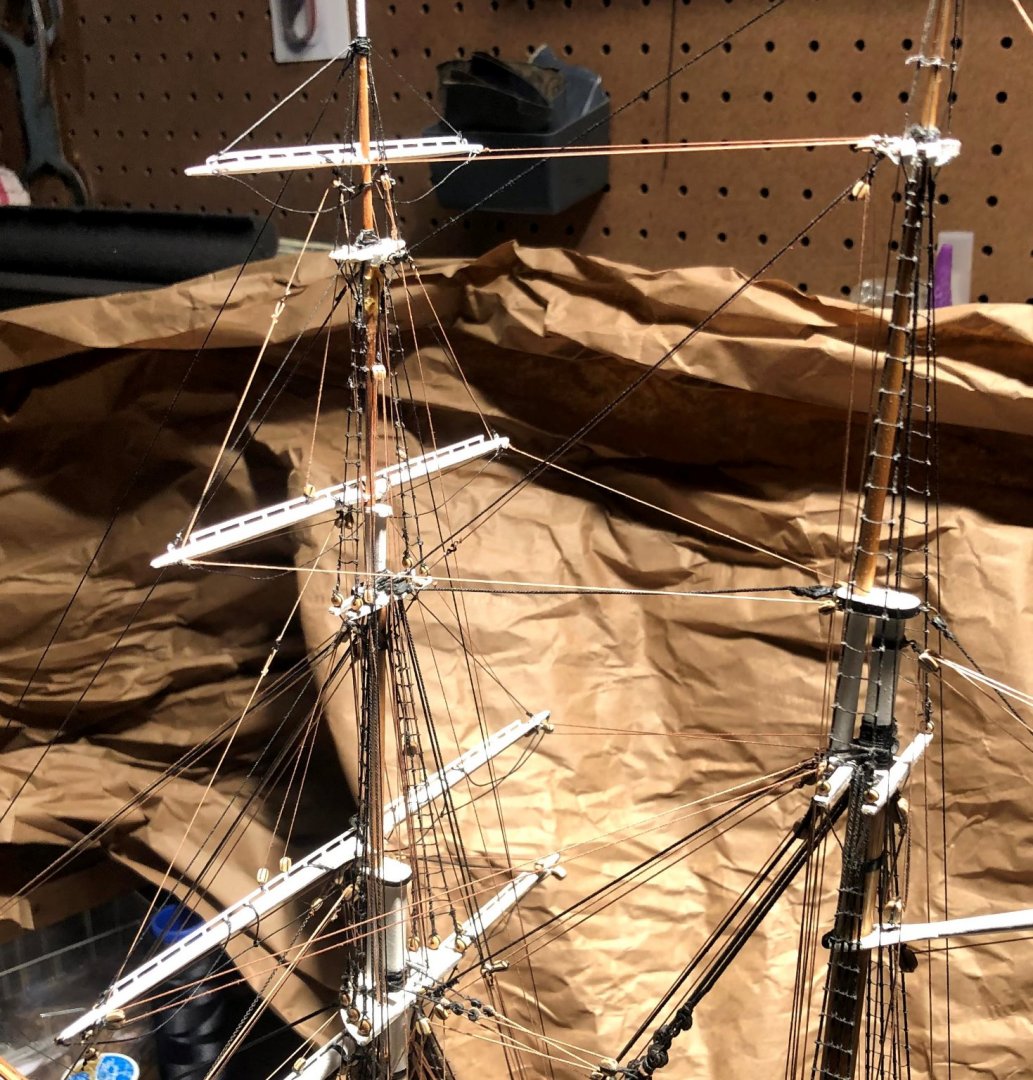
Work is moving along. All yards have been completed and hung! Each is complete with all reef, bunt, leach, lifts, and sheets. The braces have not been added yet. They will wait until I make the rope coils for the pin rails. The braces, along with the fore tack/clew garnet/and fore sheet rig would inhibit access to the deck. I'm happy to report there were only a few minor setbacks in the process. I knocked the boom's main topping lift, and had to re-rig that whole thing. I also managed to burn part of the topgallant halyard tackle trying to "de- fuzz" the royal clew line. I used a different thread for the royal clew...a .005 white line from Bluejacket dyed to match Chuck's light brown line. Brown Rit dye did the trick, but the line was way "fuzzier" than Chuck's superb line. So I tried to pass a lighter over the .005 line, and the topgallant halyard caught fire. I spliced it by using a little CA on the ends, slicing both end on a diagonal, then a dab a CA, and rolled the two lines together in my thumb and forefinger. Came out OK. I can't even tell exactly where the slice is in the maze of rigging under the fore top. Next up is making all the rope coils. I'll be experimenting with different methods, but as of right now I'm leaning towards following Tom Lauria's method on You tube. So that brings me to here.... A look at the tryworks and some running rigging at the pinrails. Some hanging threads on the backstay that have to be trimmed off. I had to re-tension the backstay after knocking the bowsprit and the forestays numerous times during rigging. Luckily tightening up the backstays took care of the forestay's sag.
- 109 replies
-
- 7
-
-
- model shipways
- kate cory
- (and 1 more)
-
Looks like a fun kit. I've got my eyes on a clipper somewhere down the road. I'll be following along. For anyone modeling a clipper, I highly suggest a read through the amazing bulidlog of EdT's Young America.
- 74 replies
-
- 3
-
-
- mantua
- thermopylae
- (and 1 more)
-
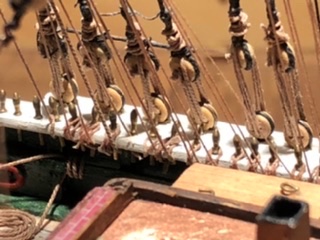
Topsail yard in place. It sure is getting crowded under the top with all those lines running through the fairlead holes. I used a row of 2.5mm wooden bulls eyes to serve as the fairleads under the top, and on the shrouds. The fore tac, and clew line, and the braces are left off to allow a little better access to the rails on the deck to belay all these lines. For now, they are run through the belaying pin holes with extra length, and the pin in each hole to hold the lines there.

- 109 replies
-
- 6
-
-
- model shipways
- kate cory
- (and 1 more)
-
Great stuff! Love the realism of your work. I'll be using these photos when I get around to the whaleboat hardware on my Kate Cory. Even for my 1/64 ship, I agree the line tubs are a must in each of my boats. Other than oars, mast, and a harpoon or two, I'm not sure how many more details I can stuff into my little boats.
- 52 replies
-
- 1
-
-
- model shipways
- new bedford whaleboat
- (and 1 more)
-
Nice work. I agree learning the history of the whaling industry is half the fun. You work looks far beyond beginner level.
- 52 replies
-
- 2
-
-
- model shipways
- new bedford whaleboat
- (and 1 more)
-
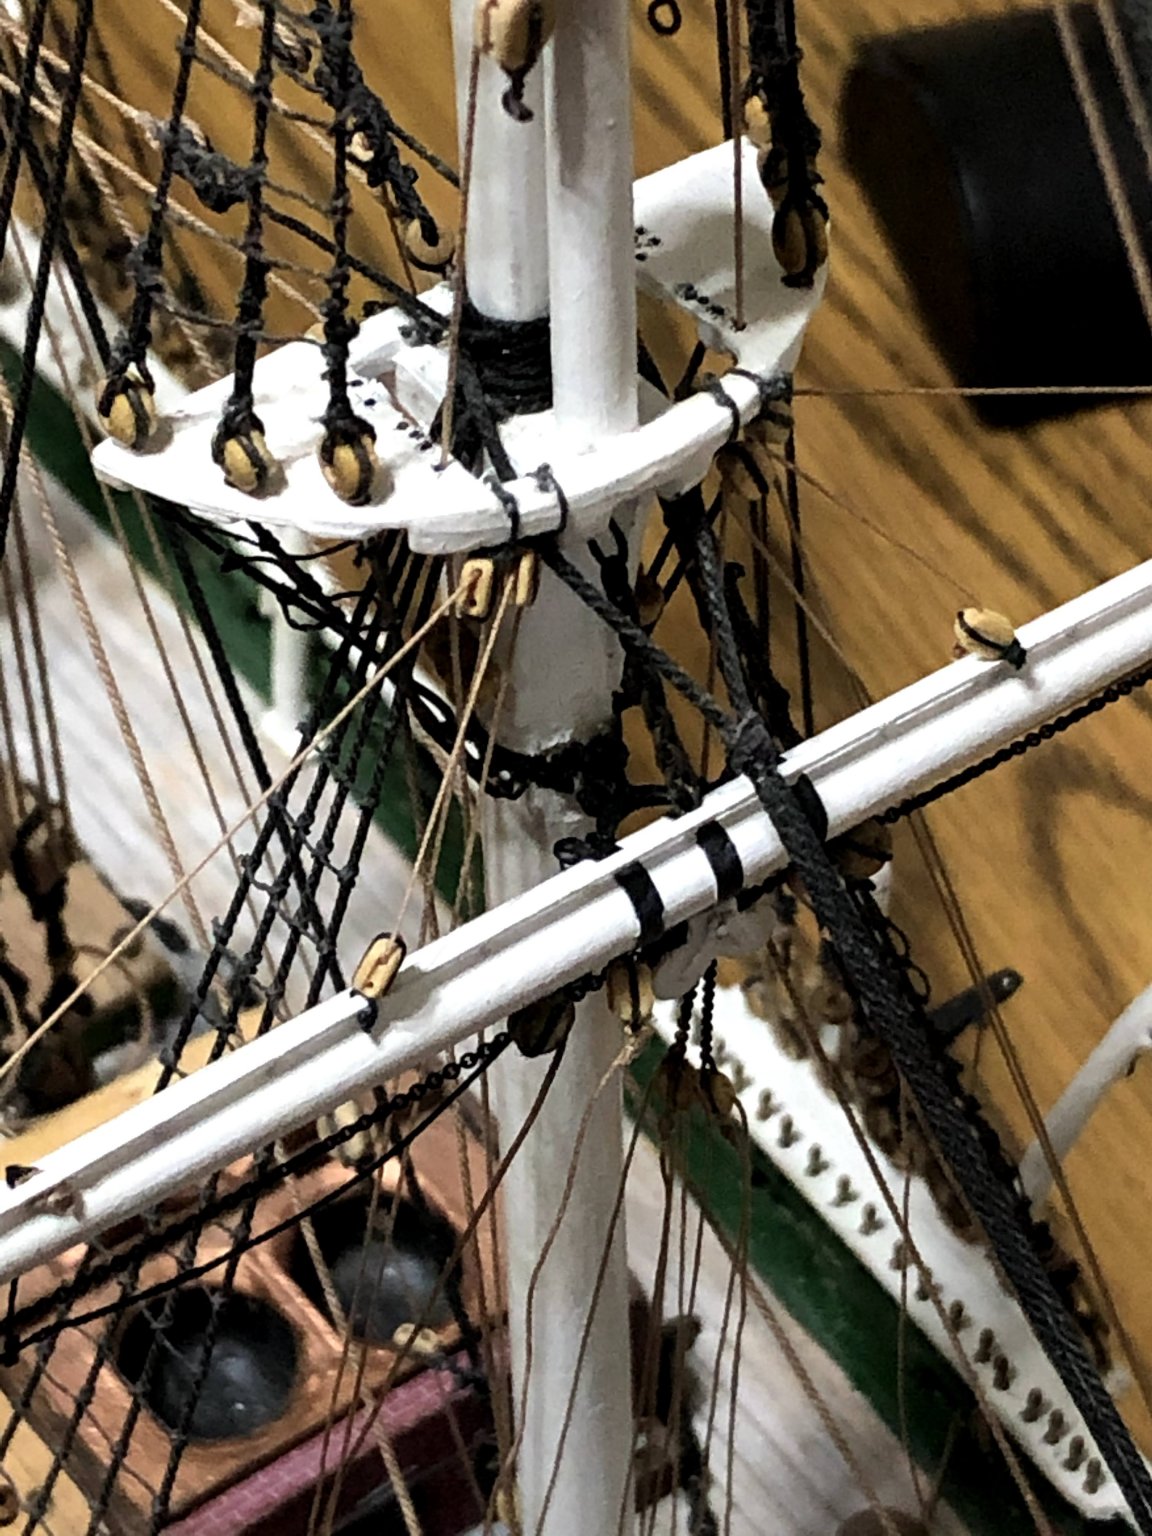
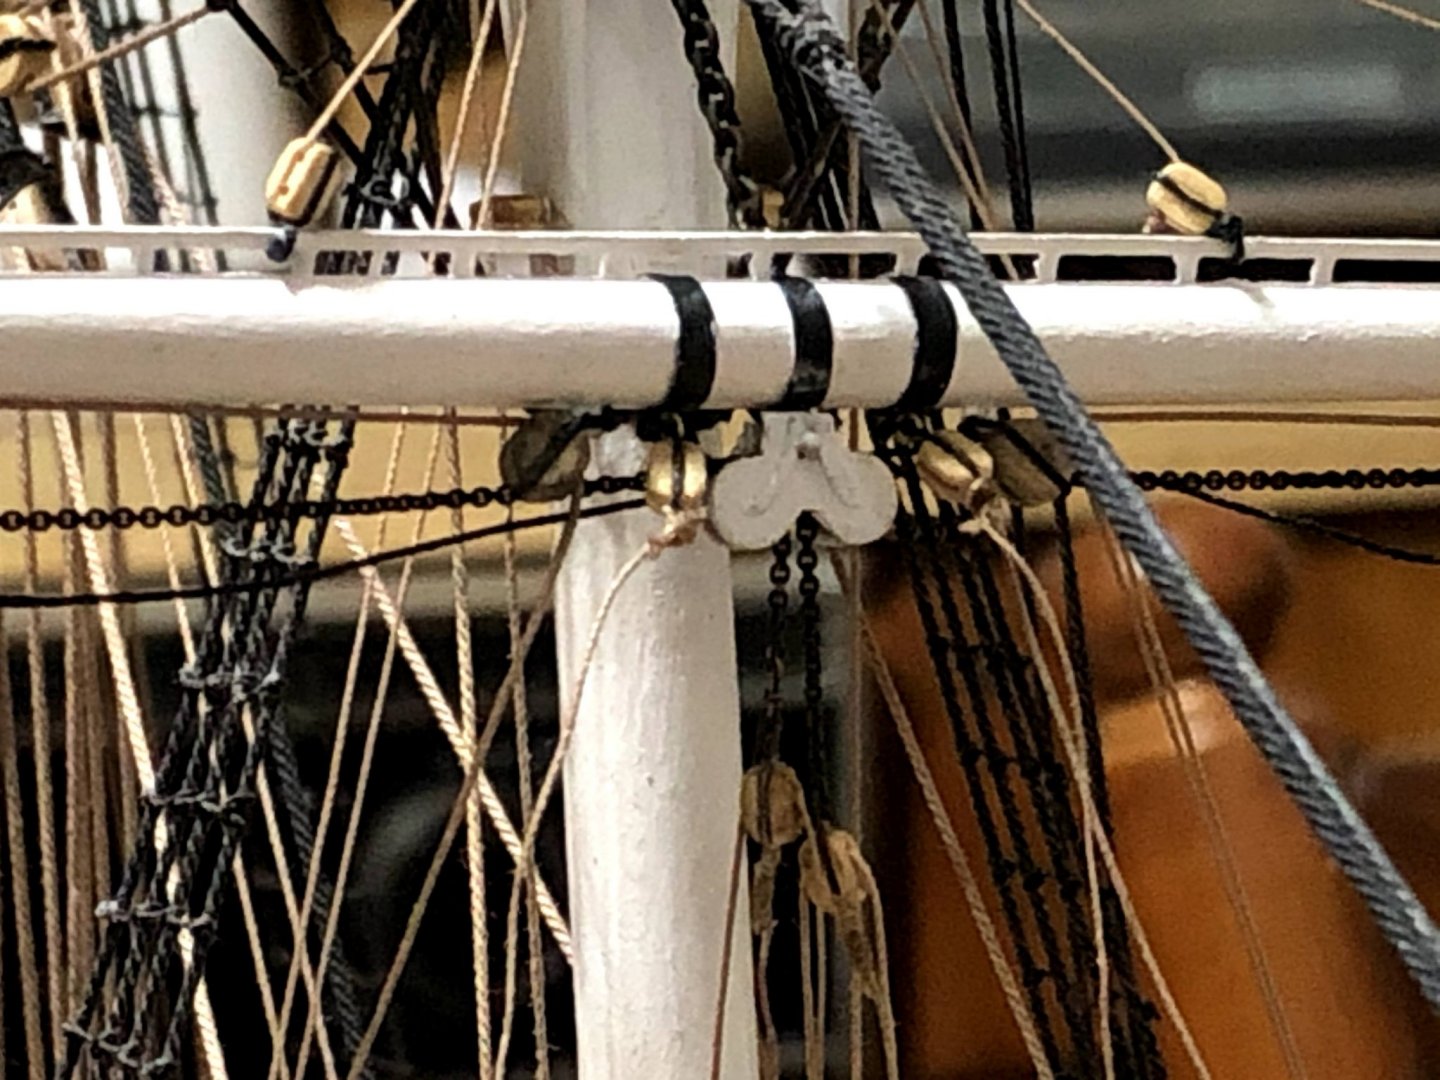
Did as much detail on the lower yard off the model as I could. Lift and brace blocks, reef tackle blocks and line, bunt and leech line, chain sheets, footropes and flemish horses. Everything went pretty smooth. I fastened the blocks to the sheet chain, and added the tackle line, then I rove the tackle through the lower blocks that I had strapped, but left a long piece of wire still on the blocks, so I could thread the wire through the deck eyes next to the mast and secure the block after the tackle was rove through the blocks. . I figured it would be easier to fasten the lower blocks to the deck eyes with the tackle already rigged through the block. That worked out real well. I was able to fit the pin through the truss to secure the yard to the mast with minimal trouble. Had a little trouble with the sling chain. I was a little off when I cut it to length when I test fitted the yard. I had to undo the ring bolt under the mast, remove the chain, clip two links off it and re attach it under the top. While the sling chain was off the model, and after resizing, I soaked it in acetone for a few minutes, dried it and blackened it. The original plan was to just paint it once it was in, but since I had it off the model, I went with the blackening. It took a very nice black color, as did the sheet chain. None of the lines a permanently belayed yet. Some are wrapped around their pins just to keep some order. Tensioning all these lines is going to be interesting, given that fact that the yard swivels on the truss. I'm not sure if I should level the yard, and add a drop of CA on the truss, or let swing and let the lines actually hold it in place. Here you can see the sling chain tight, and in place AHHHHH!!😱 The bunt and leech lines are through the wrong hole in the blocks! Looks like they'll be getting re done. Chain sheet and block


- 109 replies
-
- 4
-
-
- model shipways
- kate cory
- (and 1 more)