HOLIDAY DONATION DRIVE - SUPPORT MSW - DO YOUR PART TO KEEP THIS GREAT FORUM GOING! (Only 24 donations so far out of 49,000 members - C'mon guys!)
×


Richvee
-
Posts
385 -
Joined
-
Last visited
Content Type
Profiles
Forums
Gallery
Events
Everything posted by Richvee
-
 You're not the only one who lies in bed thinking about what should be done next and how we're going to do it. ..Sad but true.
- 145 replies
-
- 1
-

-
- model shipways
- charles w. morgan
- (and 1 more)
-
Beautiful work. Great thing about whale ships.— There’s plenty of diversions. Another diversion you may want to think about is at least one whale boat carved to its final shape and size. You can get to the details whenever, but It’s a big help having one the right size when figuring where to mount the davits, the height of the cranes outboard for the whale boats to rest on, etc. Don’t be in a rush to mount them. All they do is get in the way when rigging. You’ll want to drill any holes, etc, to make sure things line up nice, but delay the final mounting. I got standing rigging done on my Kate Cory before I made the cranes and installed them and still haven’t installed the davits permanently yet.
-
Thanks for all the "likes" guys... After additional fairng, and re-lining the hull, I have started the task of planking a hull for the first time. Special thanks to Chuck for a tutorial on plank bending this past Saturday at his place for our club workshop day. It sure helped seeing it done, but it didn't stop me from cracking plank #6--- Good thing there's extra space on each sheet for cutting new planks. I cut a new plank, and after some sanding and shaping and bending, it looked good. I was so excited it came out nice, I went and glued it on without shading the edge with a pencil!! 😱. So that plank came off, and of course, not in one piece. So back to the sheet to cut another. Third time's a charm. So I'm at 3 strakes on one side and two on the other. Holidays are going to be busy so I'm not sure when more will get done. But I'm happy with the progress so far.
.jpg.268e5a517155b997bca06d81ee9991dd.jpg)
-
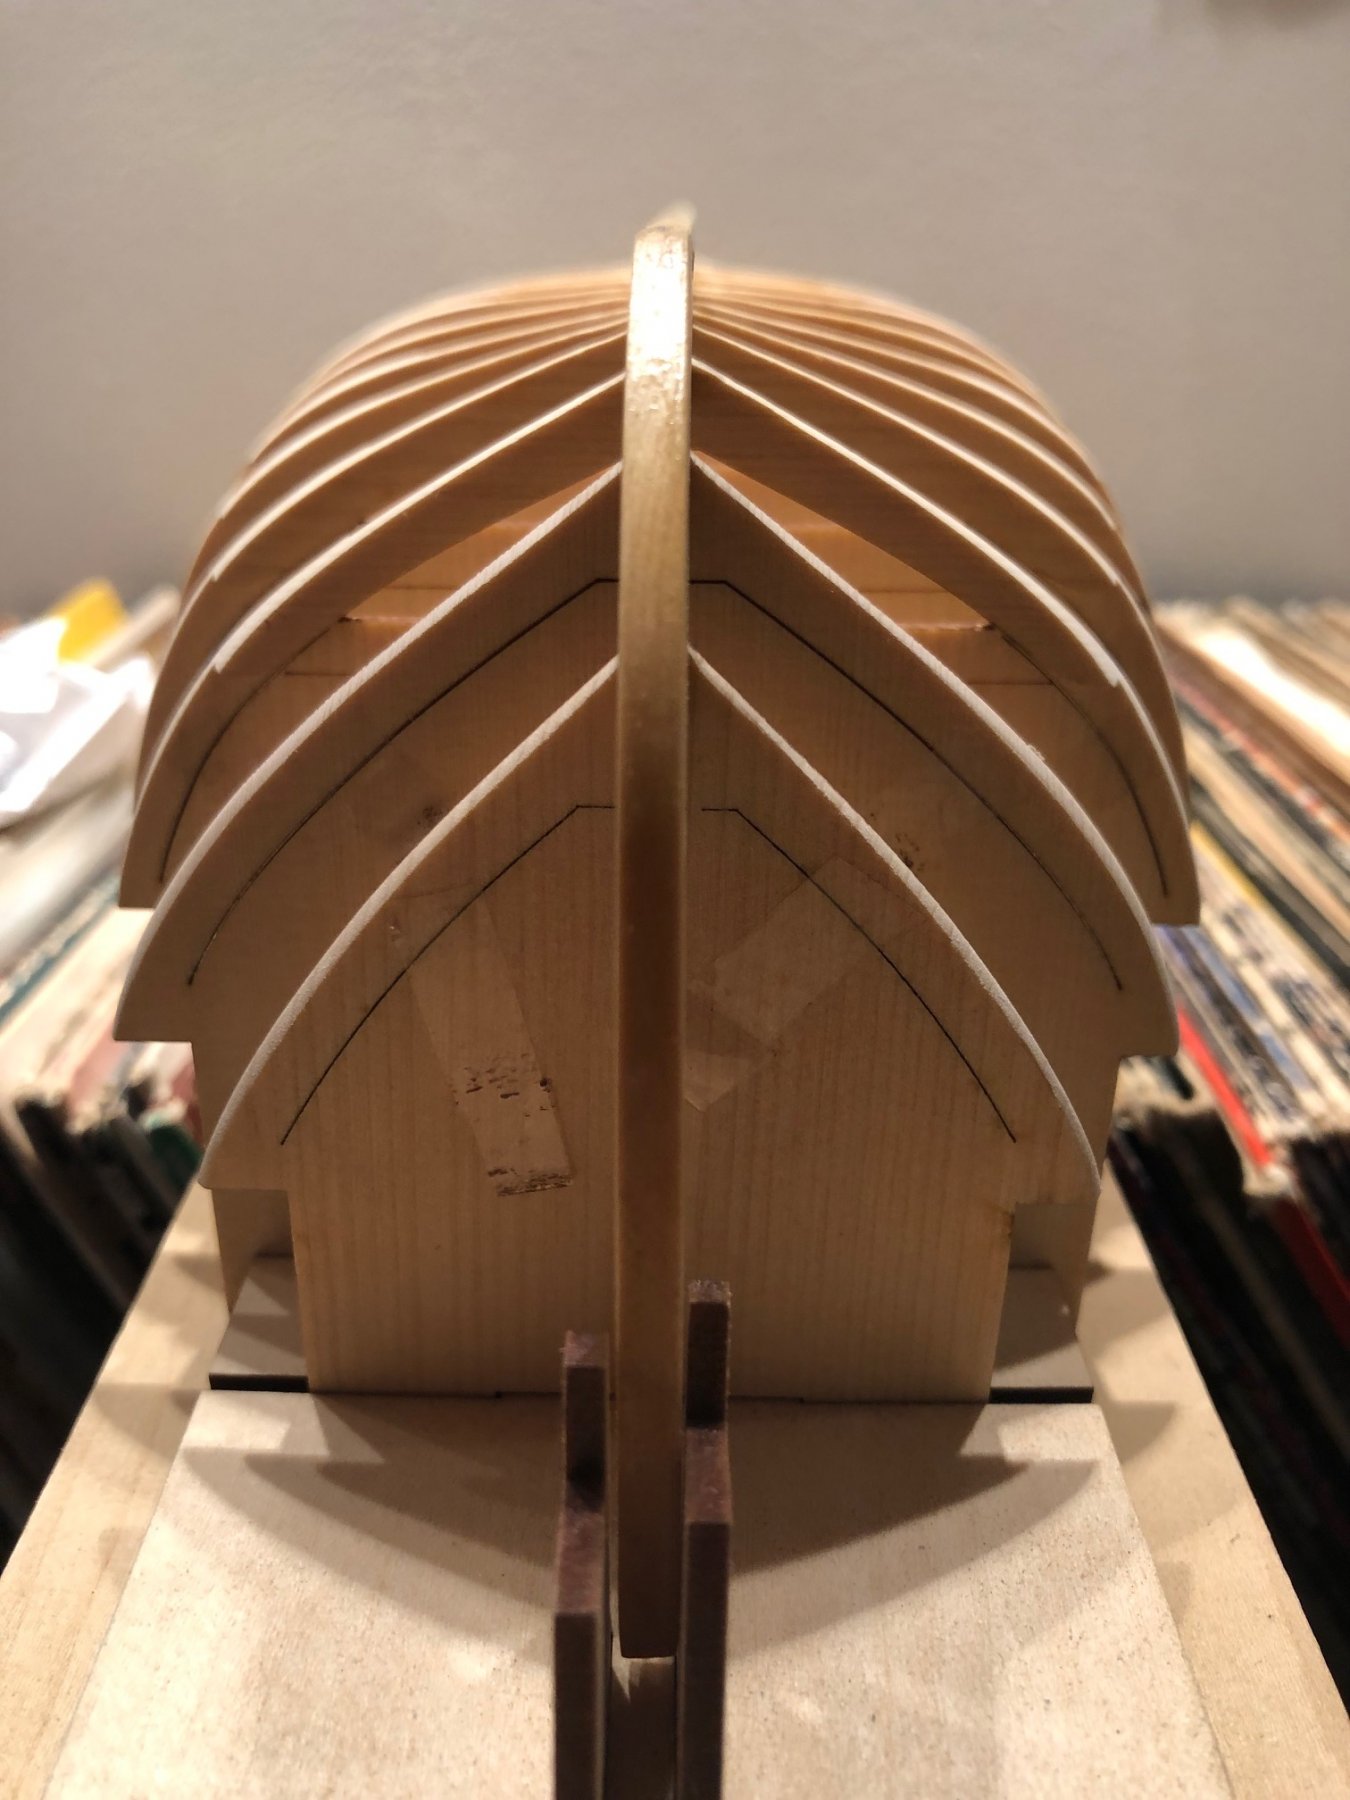
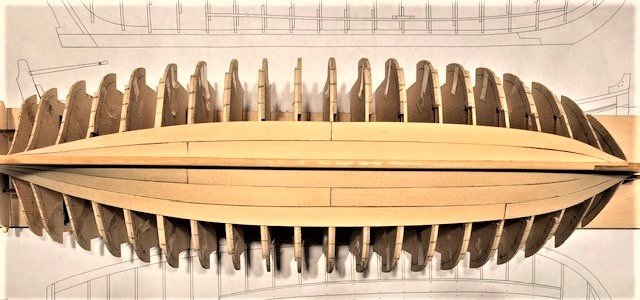
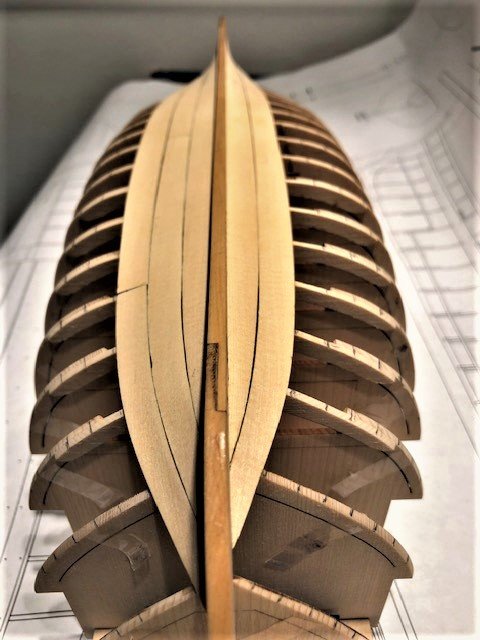
Just read KenW's log and I see I'm not done fairing. There should be no char left on any part of the frames edges. looks like I'll be taking off the tape I stated lining the hull with and fair some more, then re-do the tick marks and lining.

-
uh-oh....methinks I have some more fairing to do. 😨 Thanks for the post!!
-
Looks real nice!!!
-
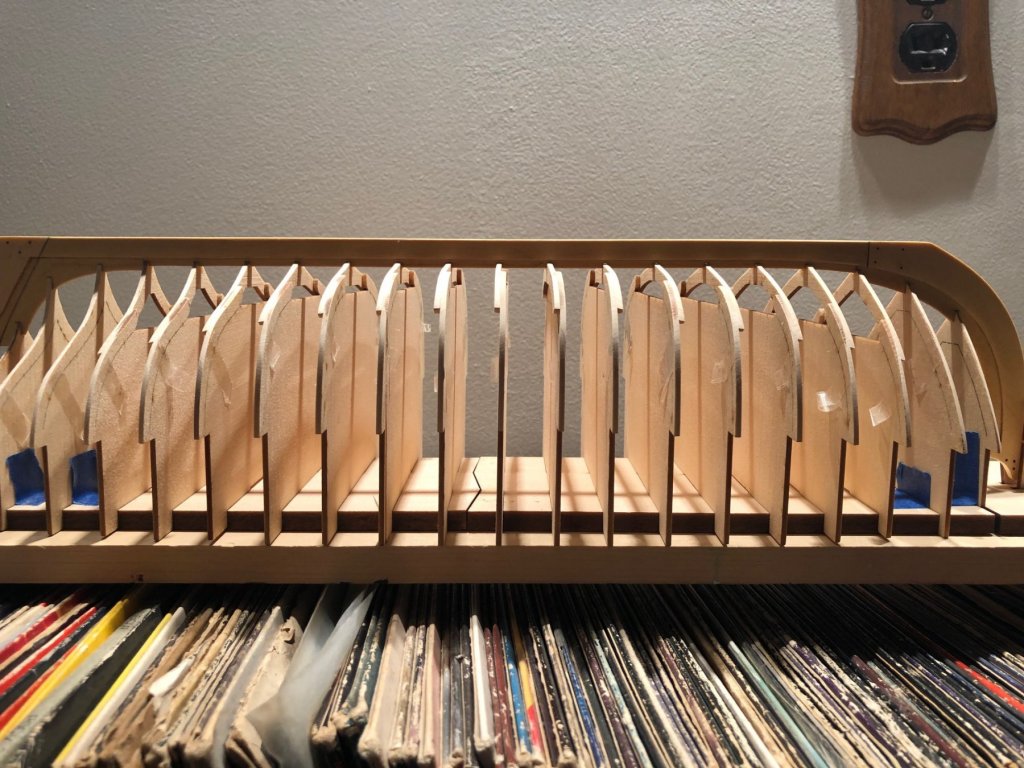
When I glued the keel to the frames, I used a divider to measure the distance on each frame from the rabbet to where the floor and top timbers meet (where the frame doubles in thickness). I tried to get that distance equal on each side for each frame.( of course that distance varies for each frame). Most frames were right on with no adjustments. Only a few I tweaked 1-2 mm either way to center the frame.
-
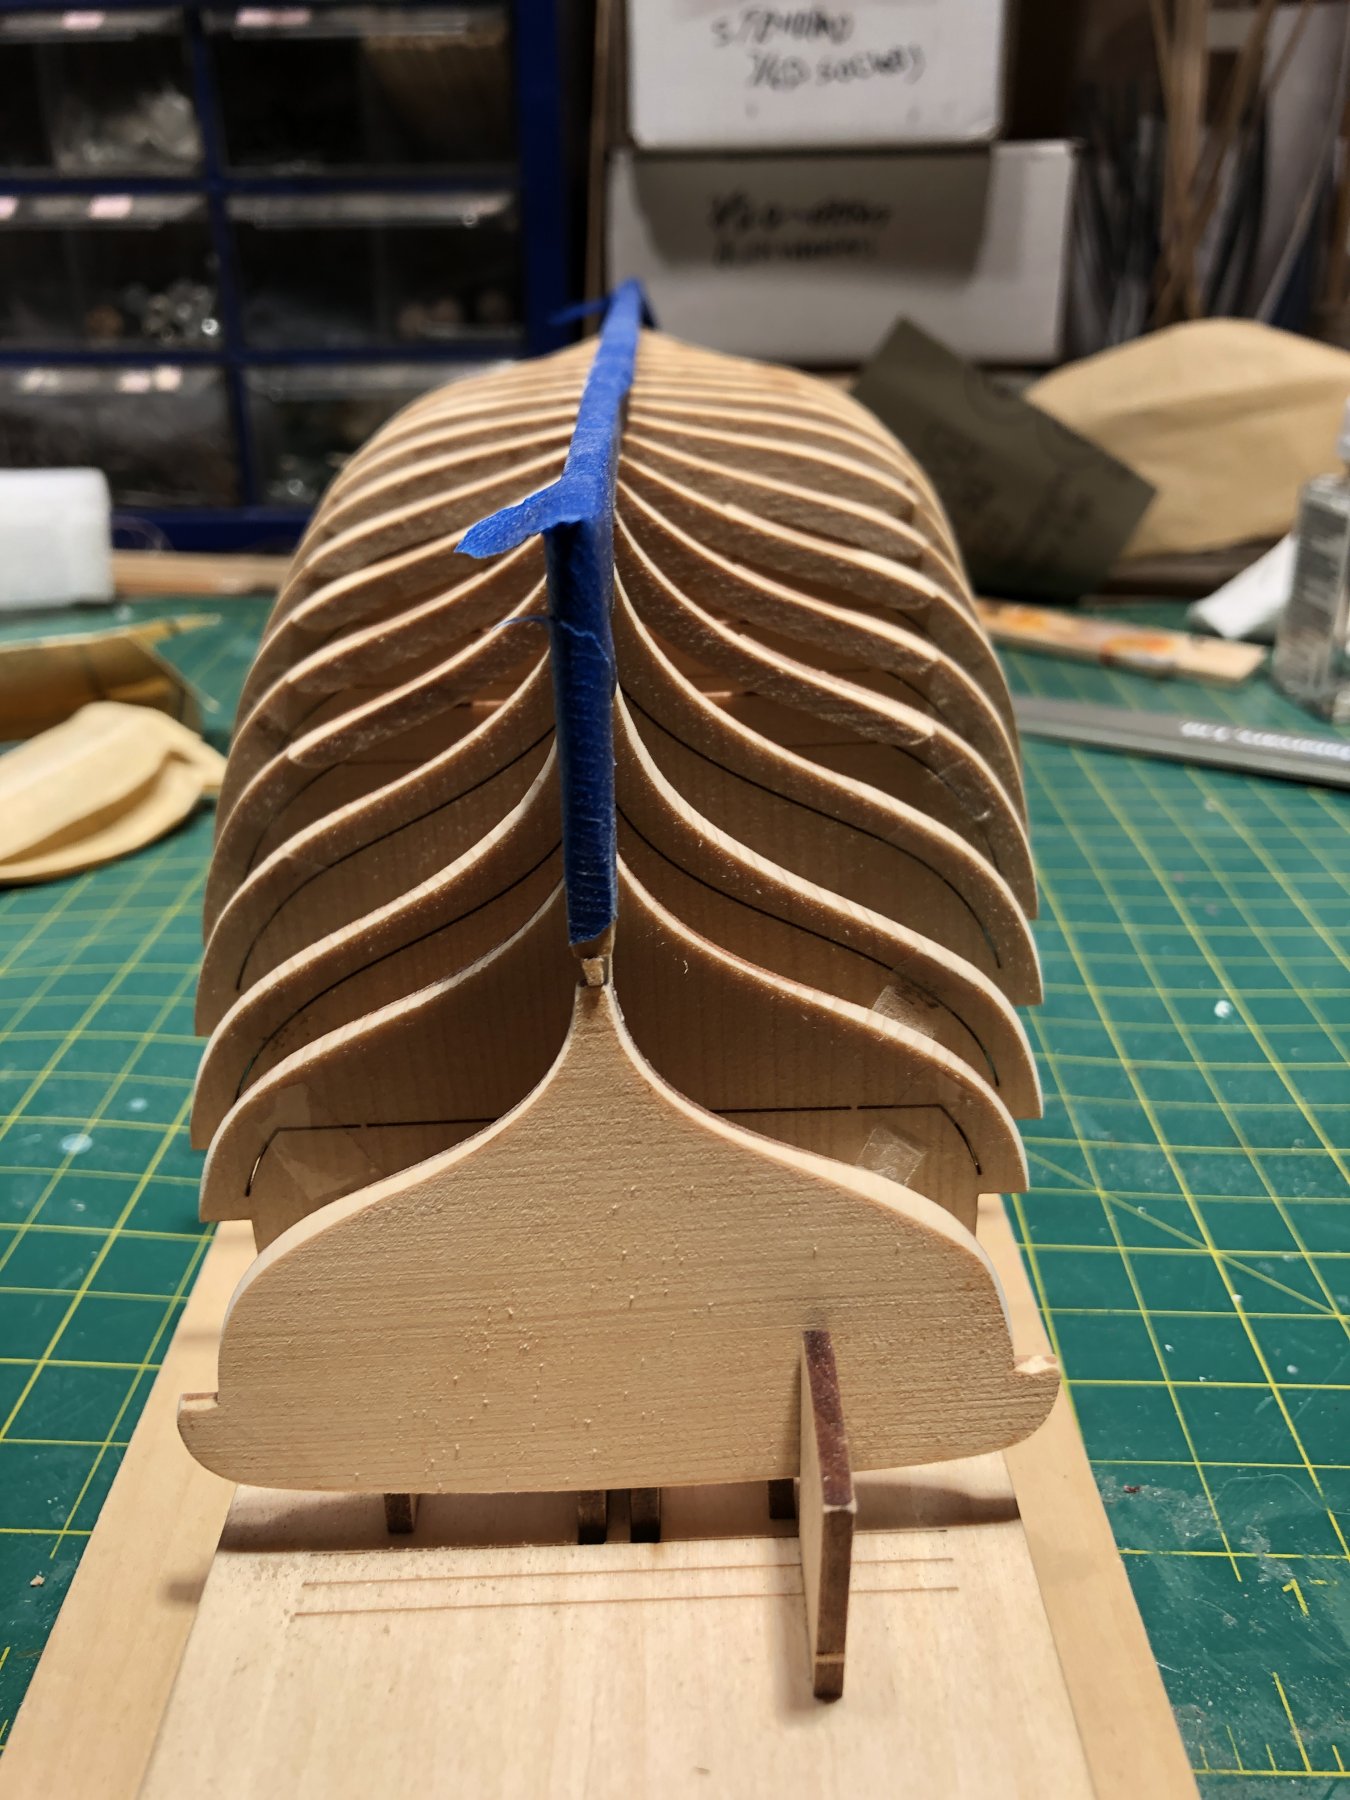
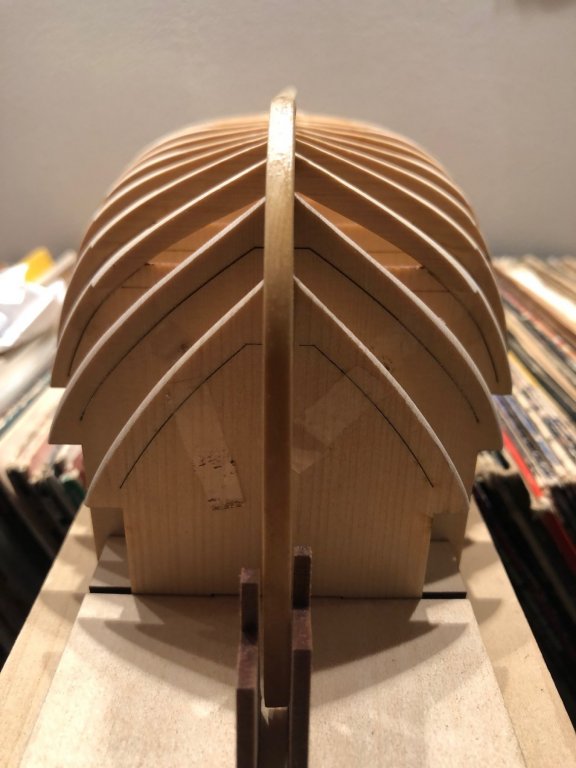
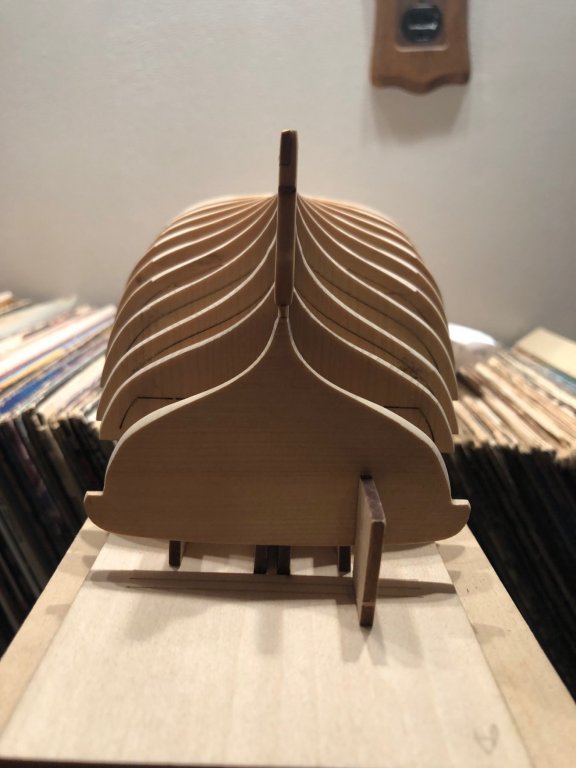
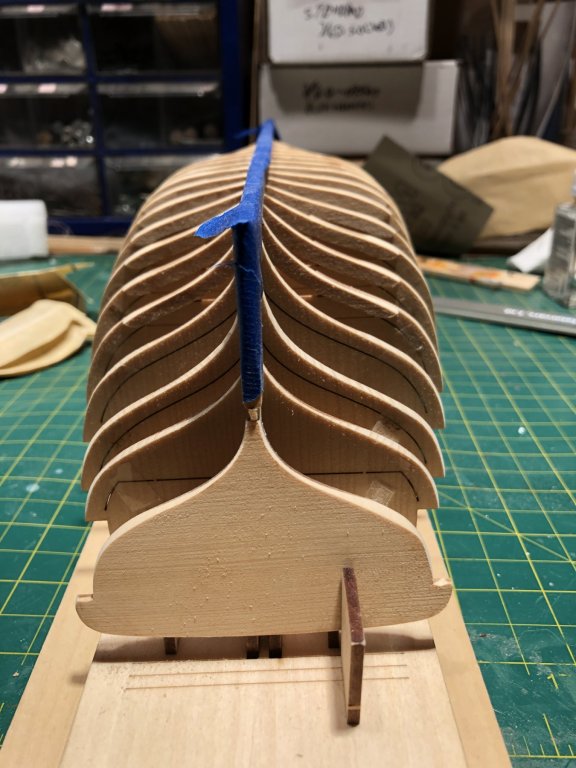
Frames seem to be pretty well well faired. A new endeavor for me. Running a thin strip across the frames looks nice and smooth to my eye. I'll proceed to marking and lining the hull, then take another look for dips or bumps.
-
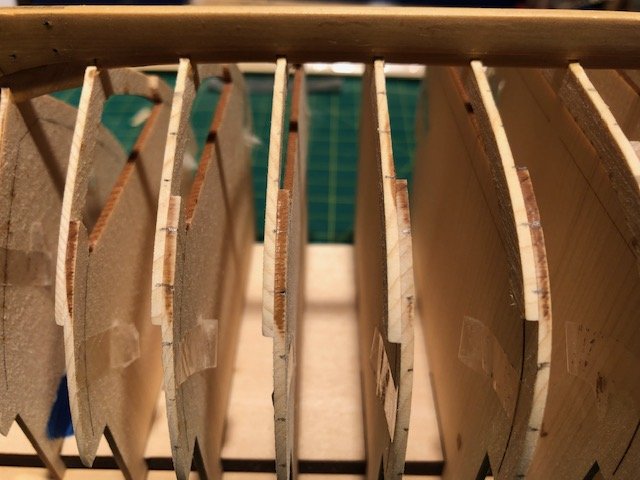
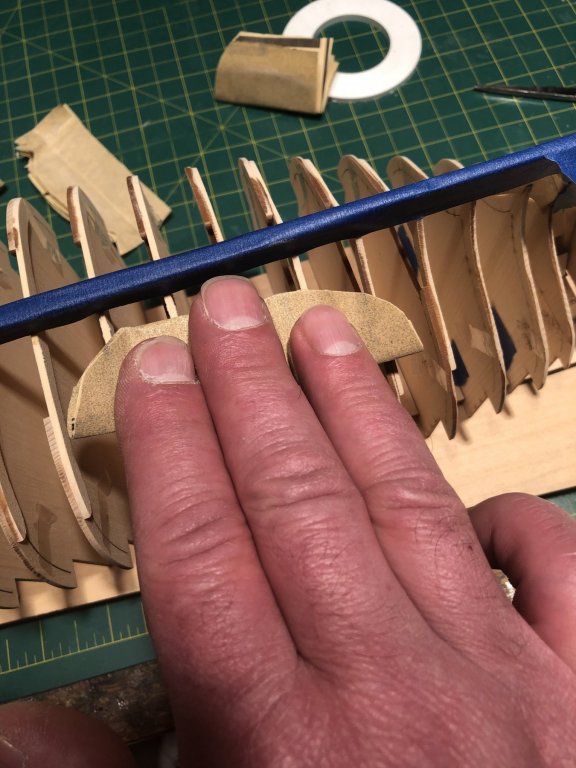
Started the fairing process using 220 grit paper, triple folded, edges cut round and turned up so they do not slam adjoining frames while sliding across the frames Masking tape on the keel to keep it clean. So far so good. Everything is still in one piece.
-
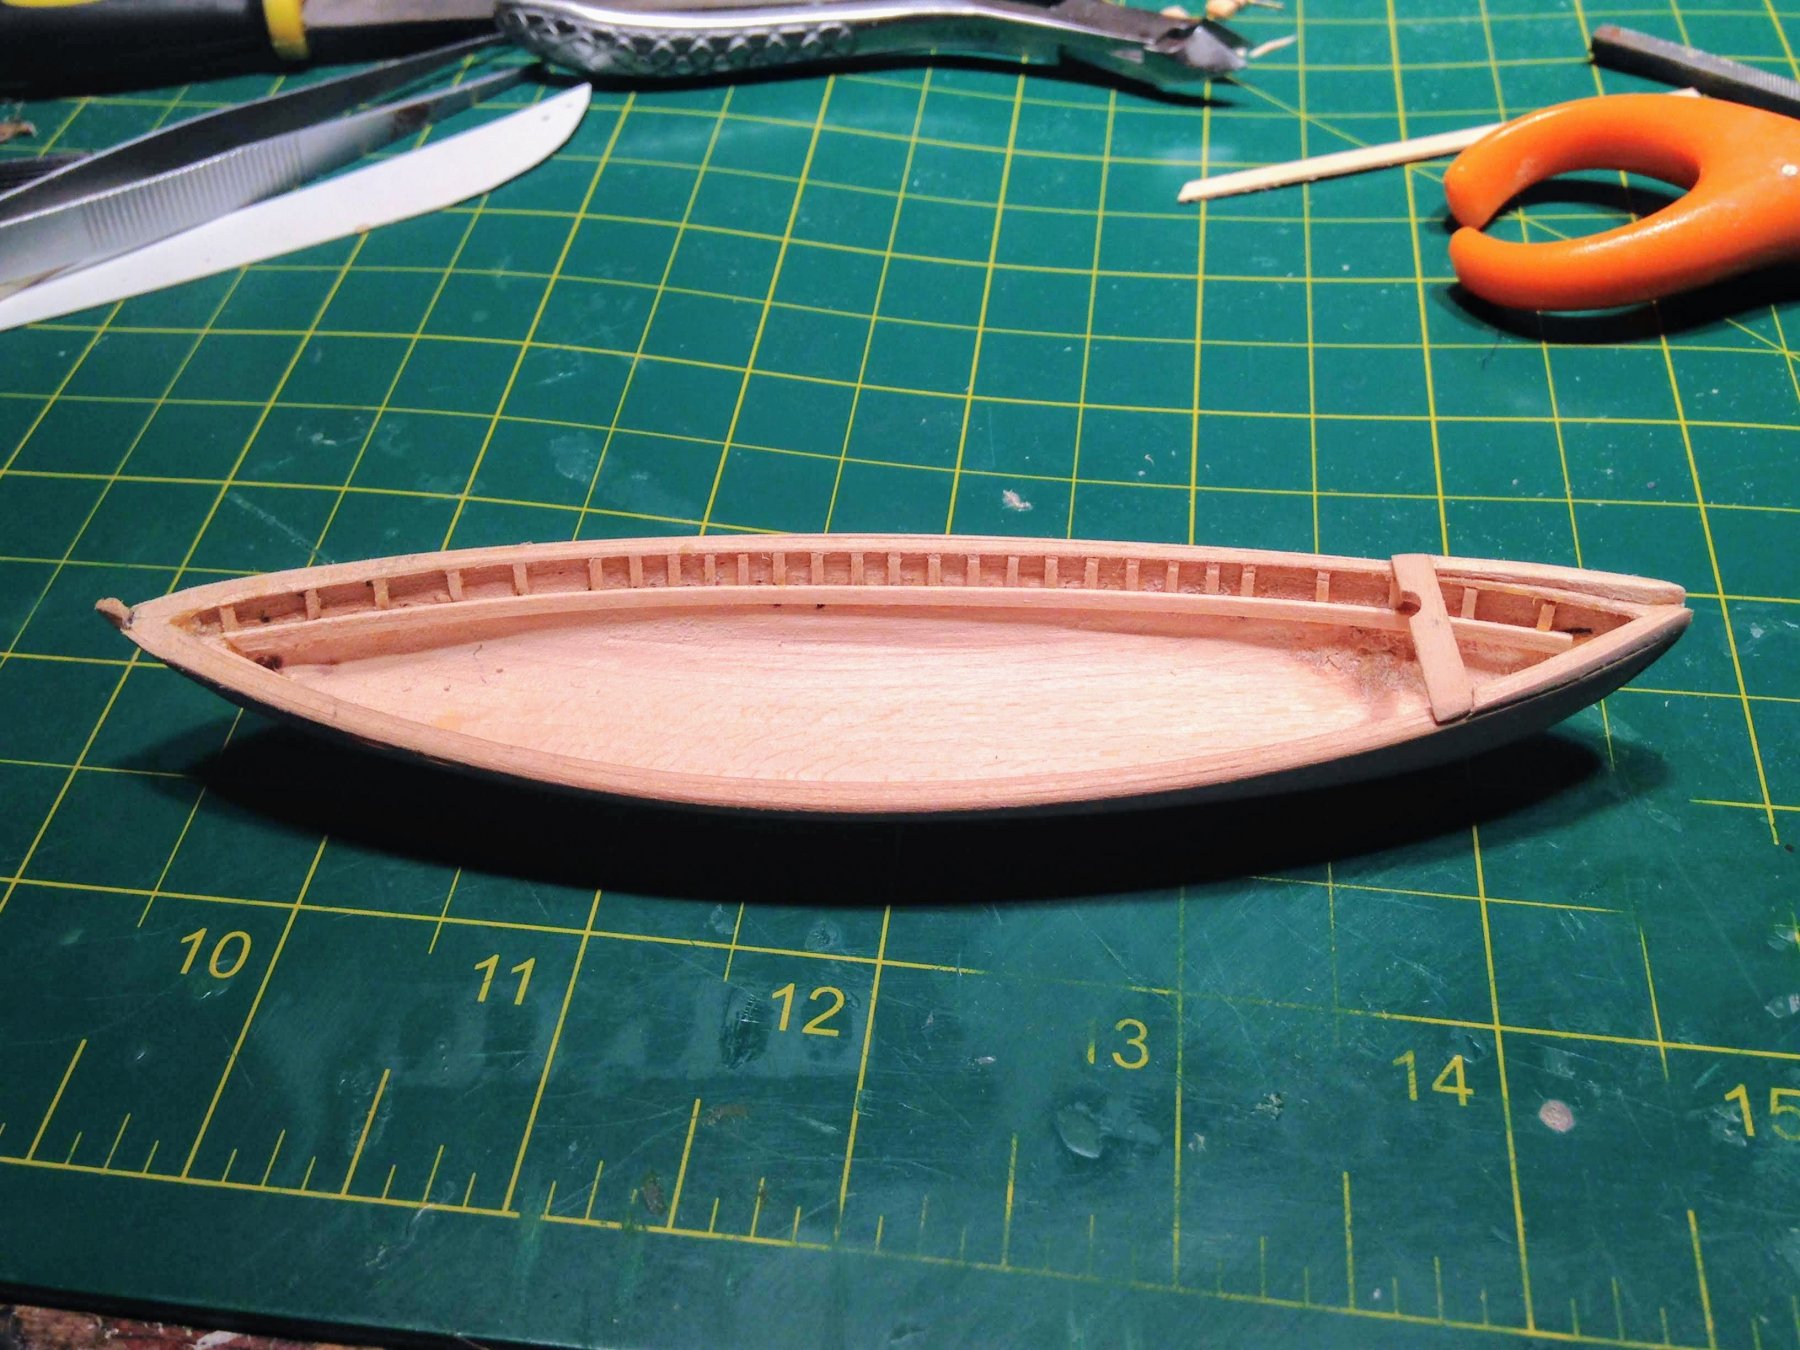
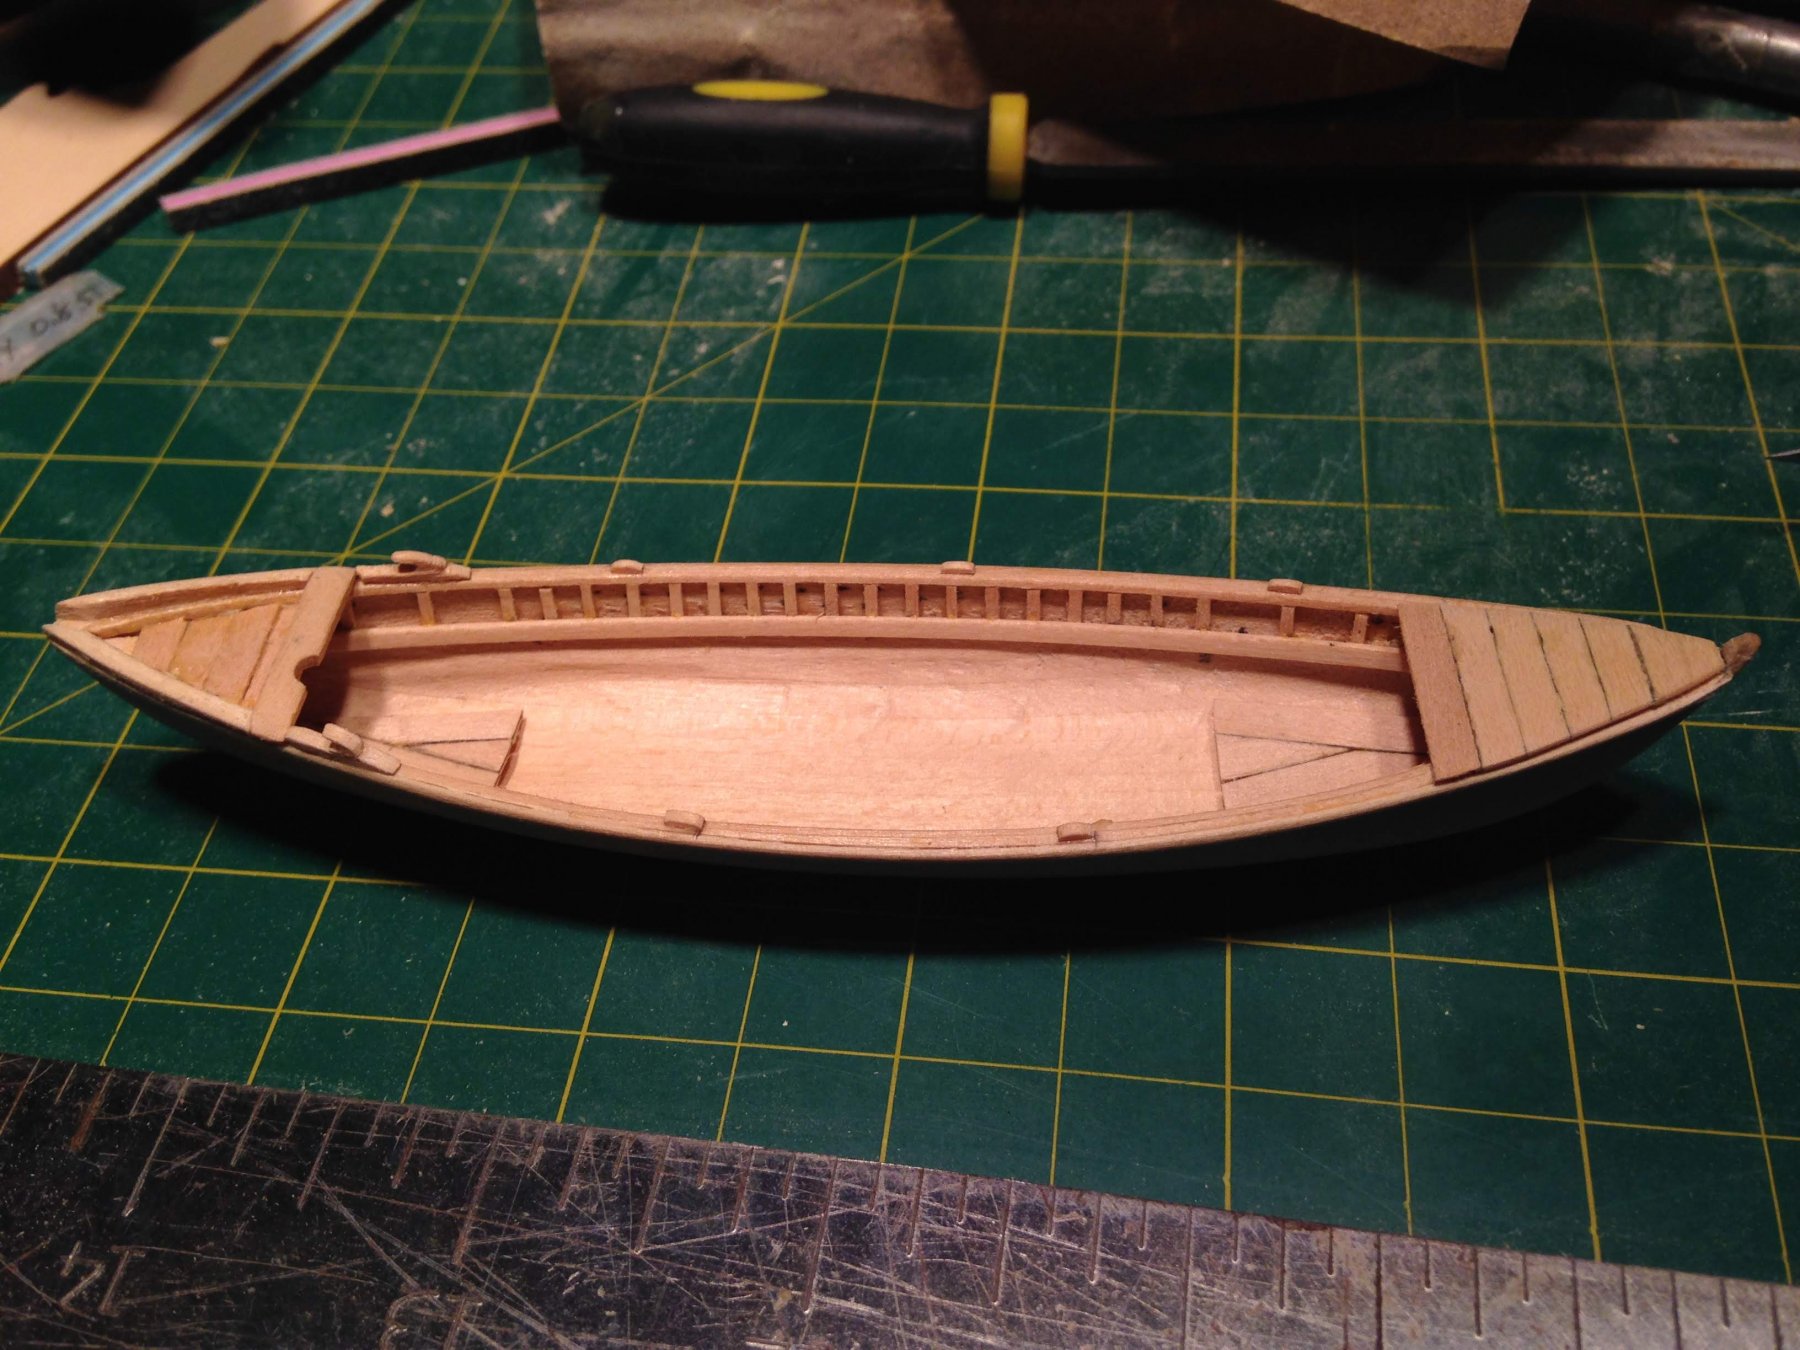
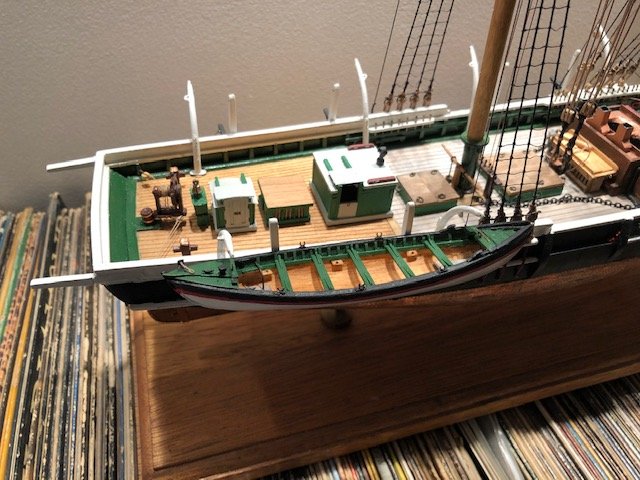
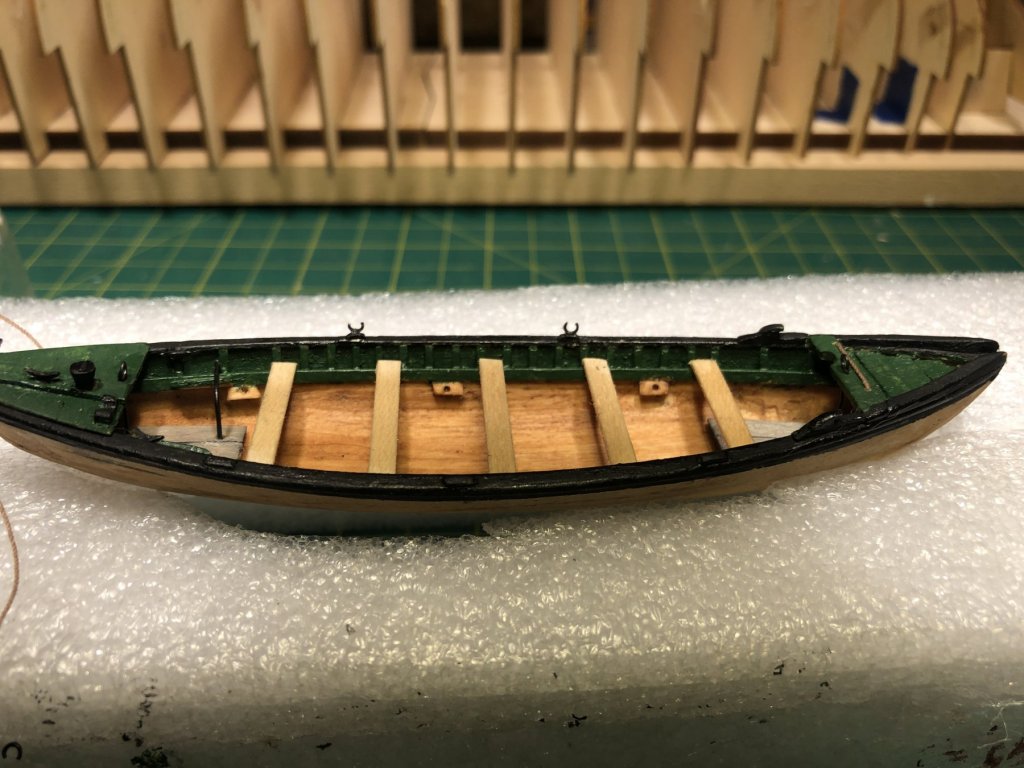
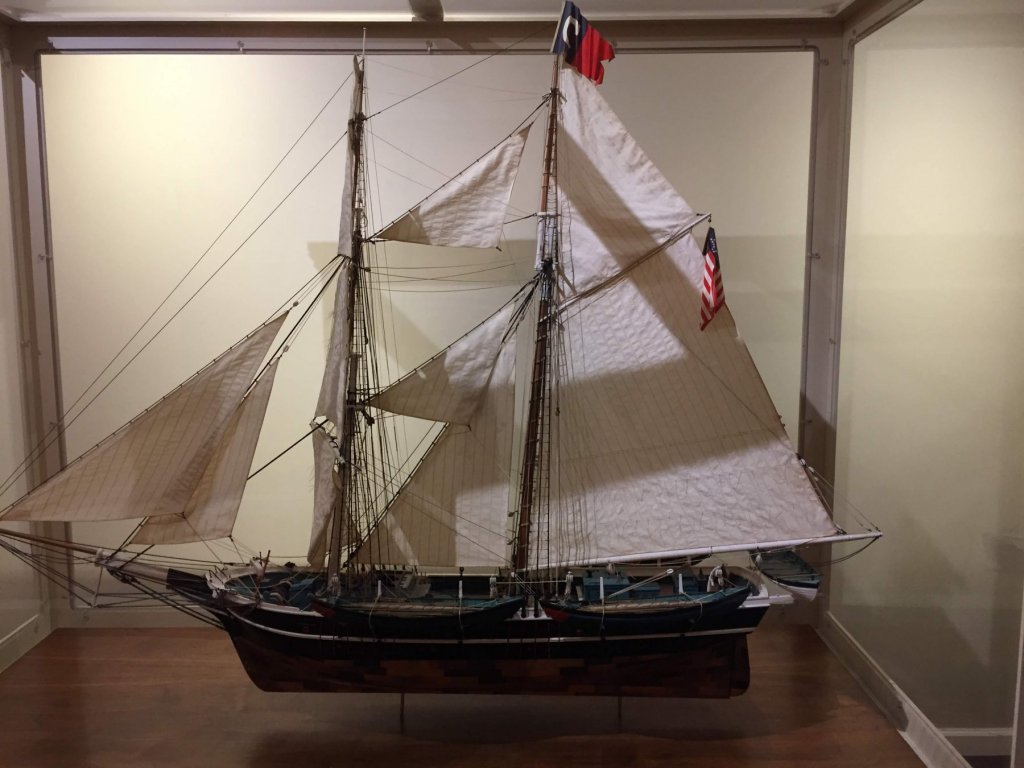
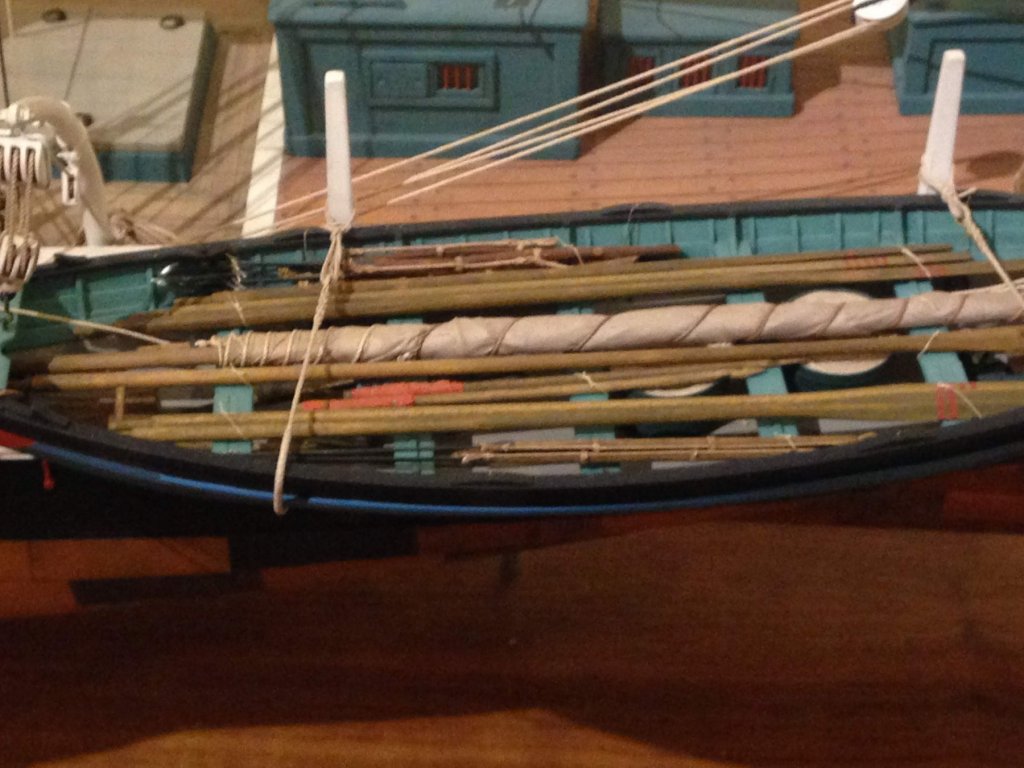
One complete whaleboat. At least now I know how high I need to put the boom to clear a whaleboat on the tail feathers. Not sure if I want to make one at a time, and see if I get any better as I go, or make the remaining 3 simultaneously. Couldn't resist to see how one looks on the ship.

- 109 replies
-
- 12
-
-
- model shipways
- kate cory
- (and 1 more)
-
Yes Kurt. Bit by bit is right. Some of these parts are so small I can only work on them for small periods of time and then take breaks. Slow going. I have the thwart braces to make,finish painting and that should be it. I think I’m going to finish this first one, then go back to the ship and make and rig the boom and gaff. That will leave yardarms, 3 boats and a lot of little oars, harpoons, line tubs and other hardware to make. Still a lot ahead of me. Hope all is well and a happy thanksgiving to you and yours as well!
-
Continuing with whaleboat number one’ s details. Cuddy details,(loggerhead, lion’s tongue, cleat, starring oar brace, then some paint before moving on to oar locks, thwarts and thwart braces.
- 109 replies
-
- 5
-
-
- model shipways
- kate cory
- (and 1 more)
-
It’s not the actual fairing, but the process of looking at the frames, and figuring out/deciding where and how much to sand/file is what I need a primer on. I basically need a clearer picture in my mind of what the final results need to look like.
-
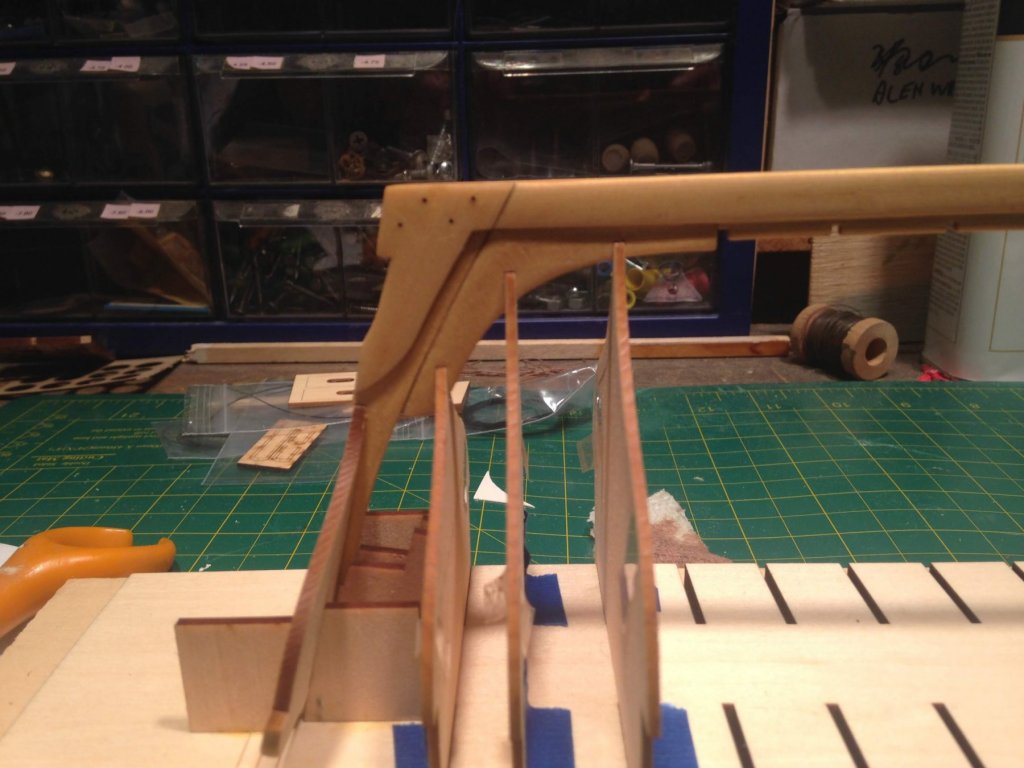
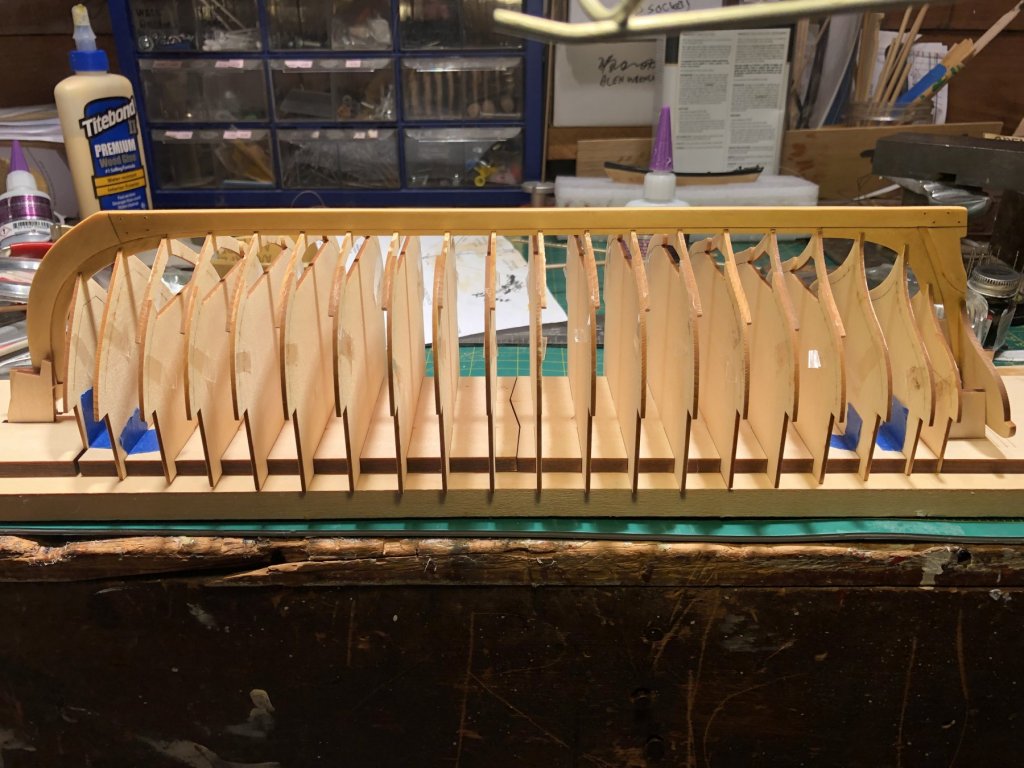
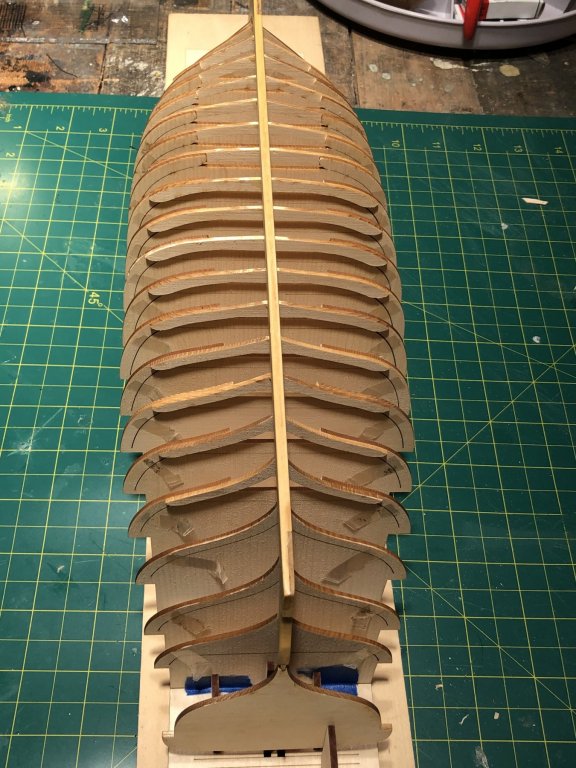
I wasn’t going to start a log being a “rookie” at planking and probably having very little to offer, but I’ve decided to join the crowd anyway. I got a bit of a jump on some being able to pick up a kit from Chuck at our club, but Im sure you will catch me as I slow down now that I’m ready to start fairing the hill, something I’ve never done before. here are a few shots I took. The first two show the completed keel and the 5 one piece frames test fitted. These next two show all the frames finished and glued up. Everything went together real nice with minimal amount of sanding. I do however think I rushed the gluing process and have I a few frames that could have been more snug in the keel notches ..I think I may have to add a shim or two on some frames. I plan on bringing the model to our next meeting to get some input on fairing and the like.
-
Getting Back Into The Hobby After 45+ Years
Richvee replied to Tom in NC's topic in New member Introductions
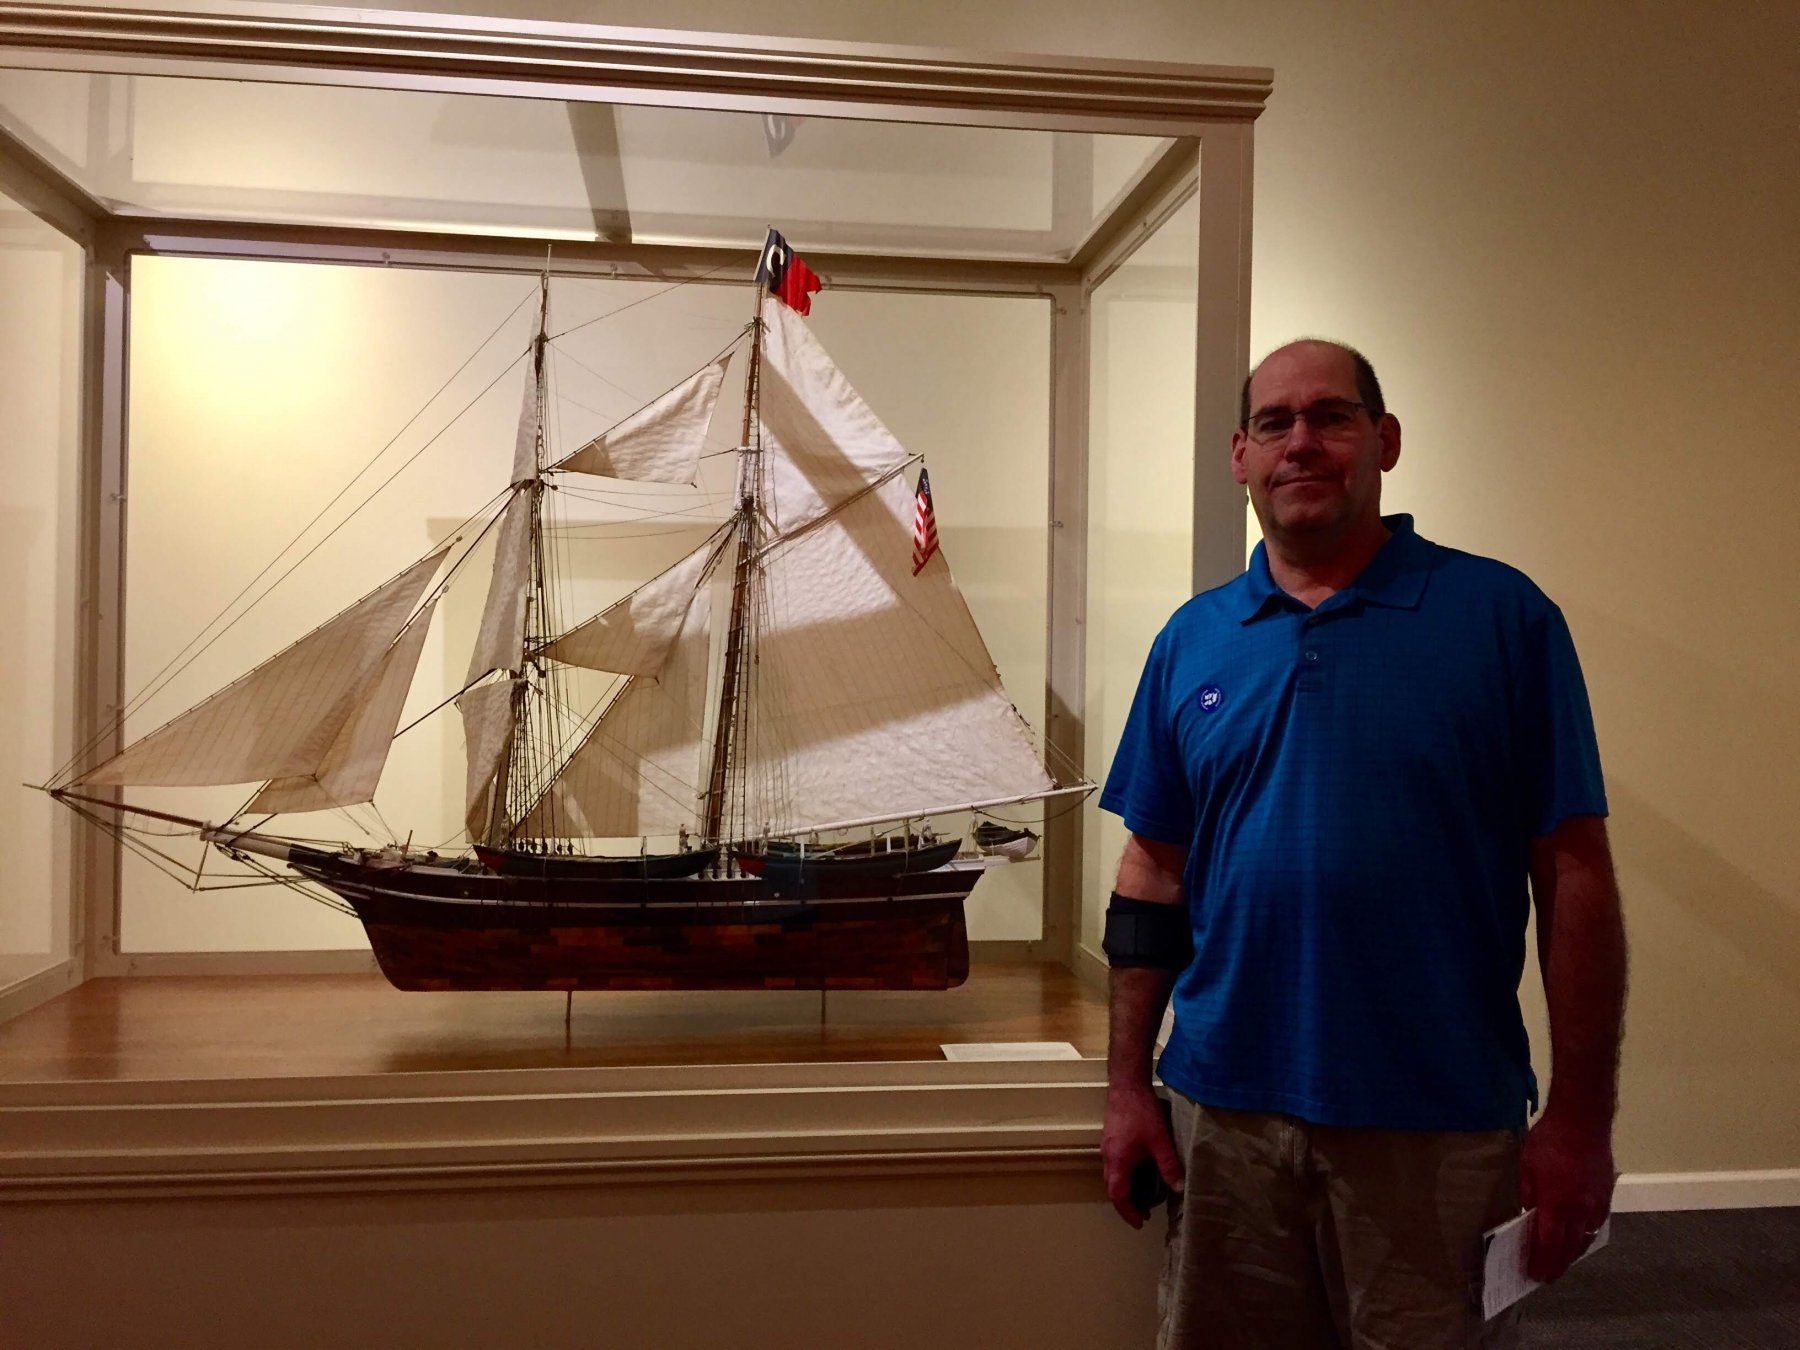
Welcome Tom. My story is similar though I’ve managed to find time to get back in the hobby before retirement. Started to find some time after the kids were grown. Took almost 30 years off from the hobby. Once my son moved out, I started cleaning the workbench area that he had taken over for making snow and skateboards and found the whaling brig Kate Cory that I had started some 25 years ago. Dusted it off and got restarted in the hobby and here we are 2 years later! Looking forward to seeing your Cuddy Sark take shape. -
Beautiful clean work. Love the deck furnishings. That work bench/ chicken coop is outstanding. Can’t wait to see you tryworks. I can 100% relate to the deck coloring. I went through the same process trying to weather the deck on my Kate Cory after it had sat idle for many years.
- 145 replies
-
- 1
-
-
- model shipways
- charles w. morgan
- (and 1 more)
-
Hi Jon, Just got around to finding this log. The whaleboats are looking great. As for the copper tape, I agree with you. It needs to be a very smooth surface. I also varnished the hull. Then I applied the tape by coating the hull with 2 coats of contact cement, let it dry, then glued the plates with more contact cement on the back of the plates. So far they're holding on well. Your timing for putting this project on hold is eerily similar to when my KC hit the shelf. While I hadn't started any whaleboats or coppering of the hull at this stage, you are at almost the exact same point with the hull, decking, rails, etc. as mine was when it went into extended hibernation for almost 30 years! Looking forward to seeing you get back to this build. I'll continue prodding along on mine. Judging by the amount you accomplished in just under one month, my guess is whenever you pick back up on this, I'll still be working on mine and you'll end up passing me.. 😊 Rich
-
Good advice about detail, Jon! Thanks for noticing the cleats. I don't want to tell you how many split in process, or how many came out a tad big and were ruined trying to make the smaller, or how many just didn't end up with the right curve, etc.
-
Yes Kurt. Thanks so much. really interesting stuff on how a kit plans come together. The black and white photos are great. I think I've seen one of those pictures in an old MS catalog, but the clarity of these prints are amazing. I can get a lot of info from his details there. Thanks again!
-
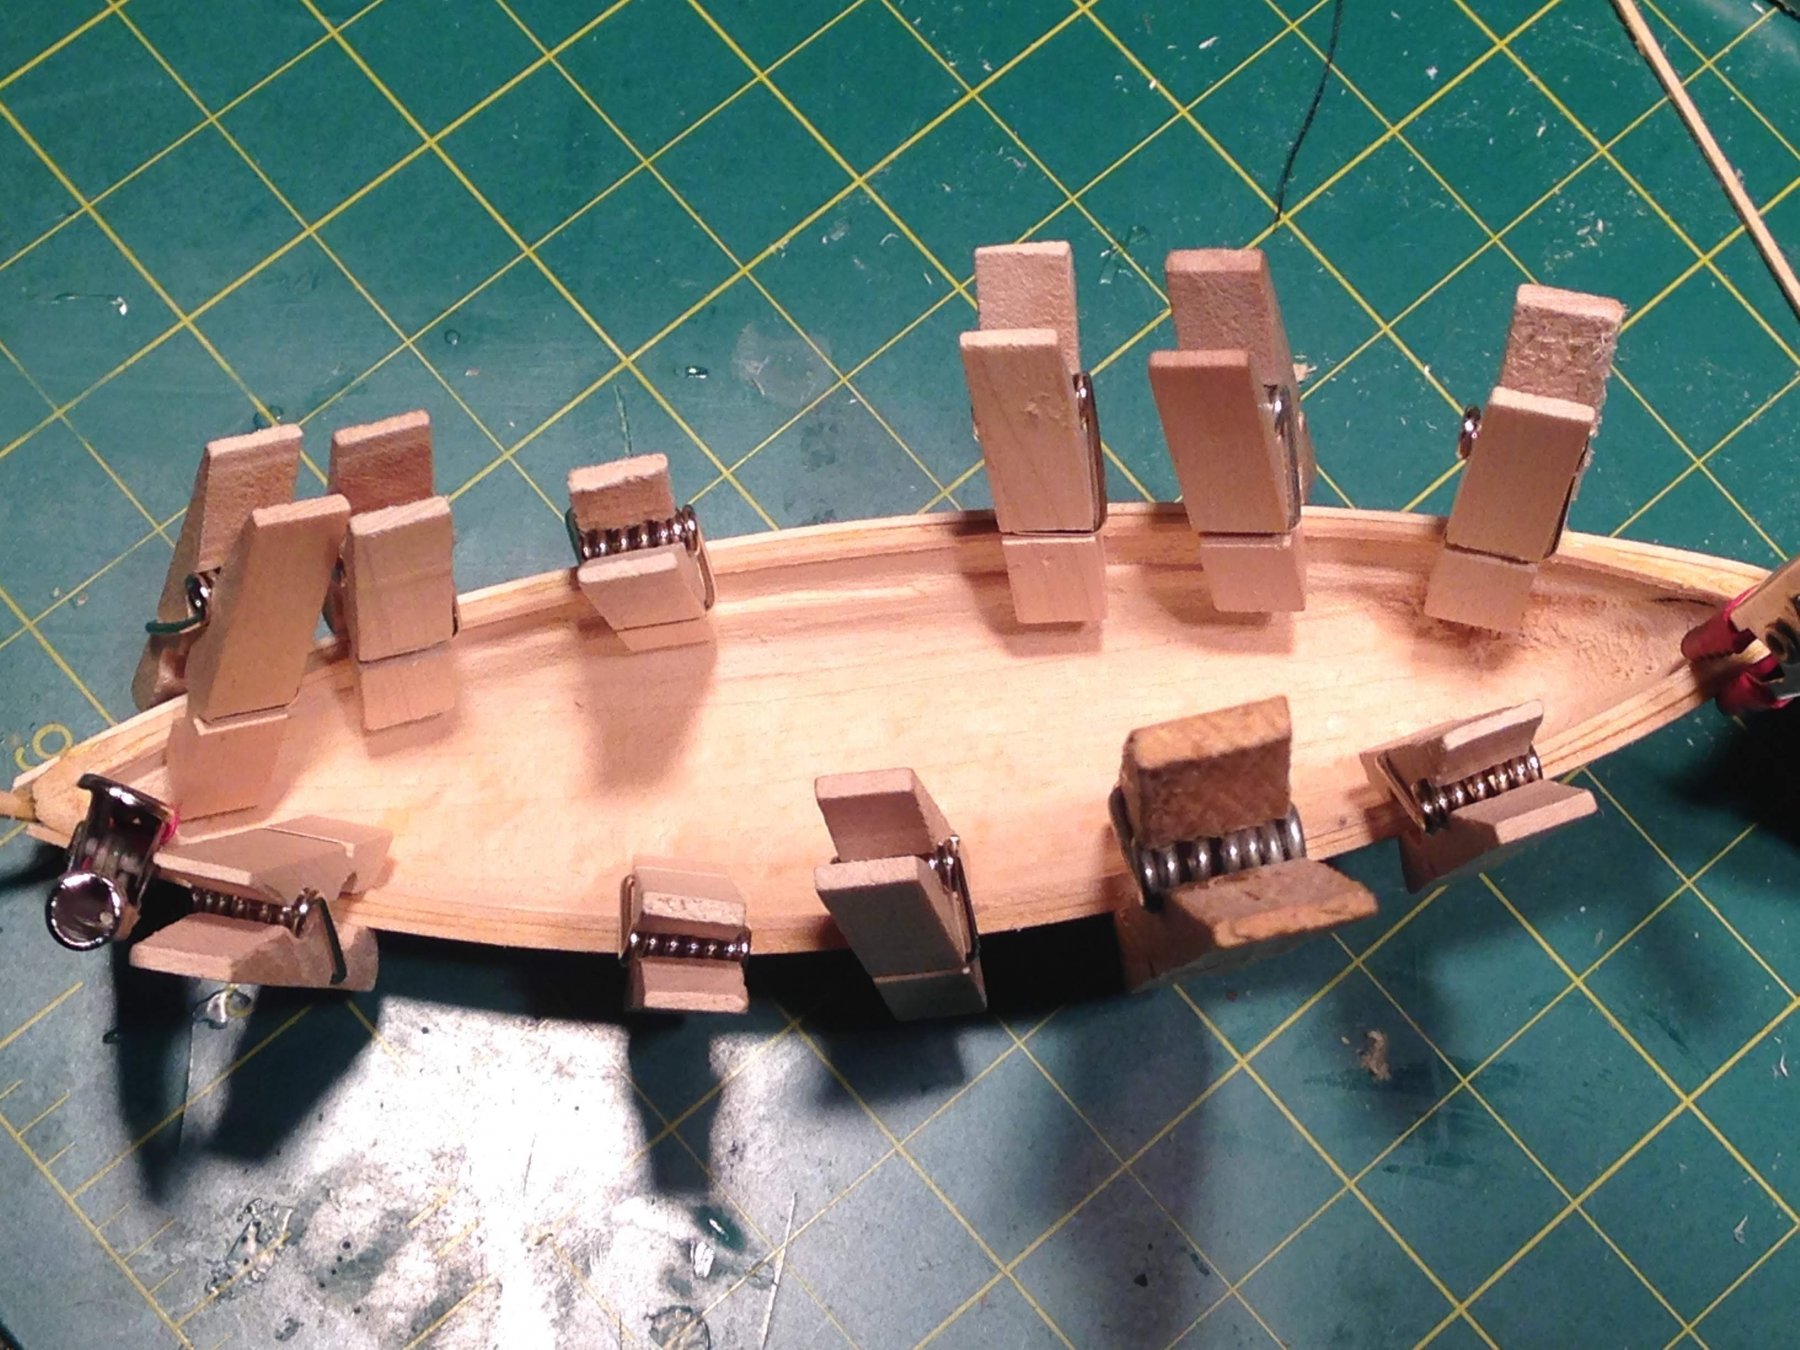
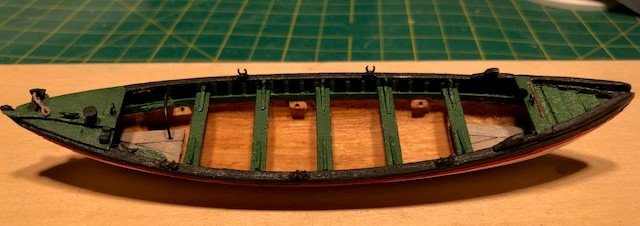
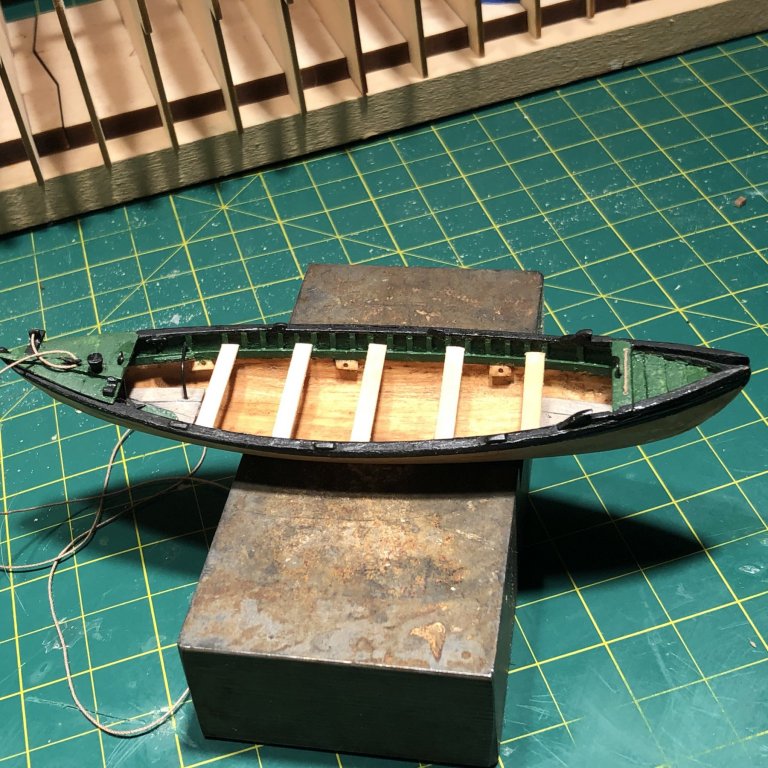
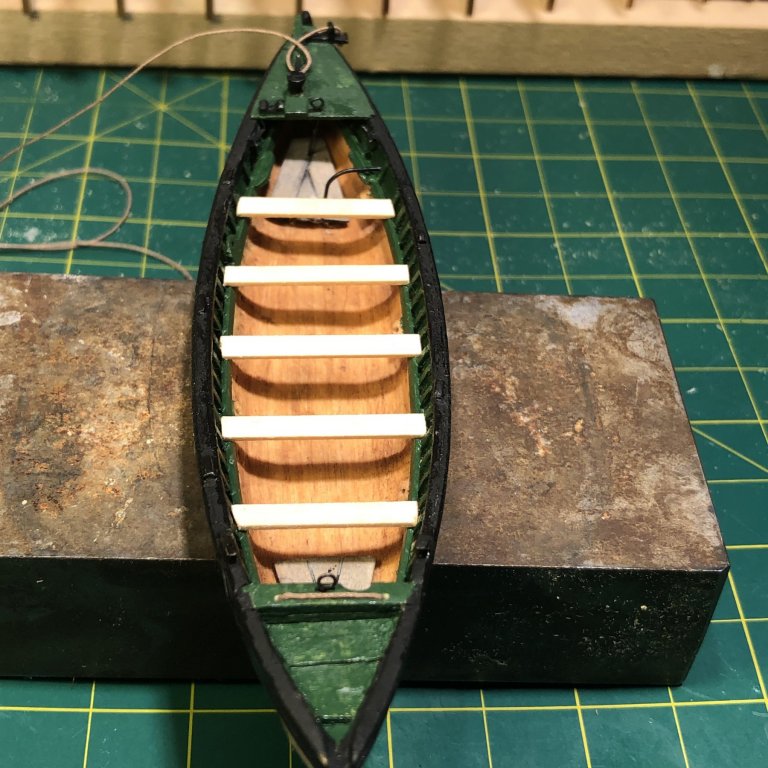
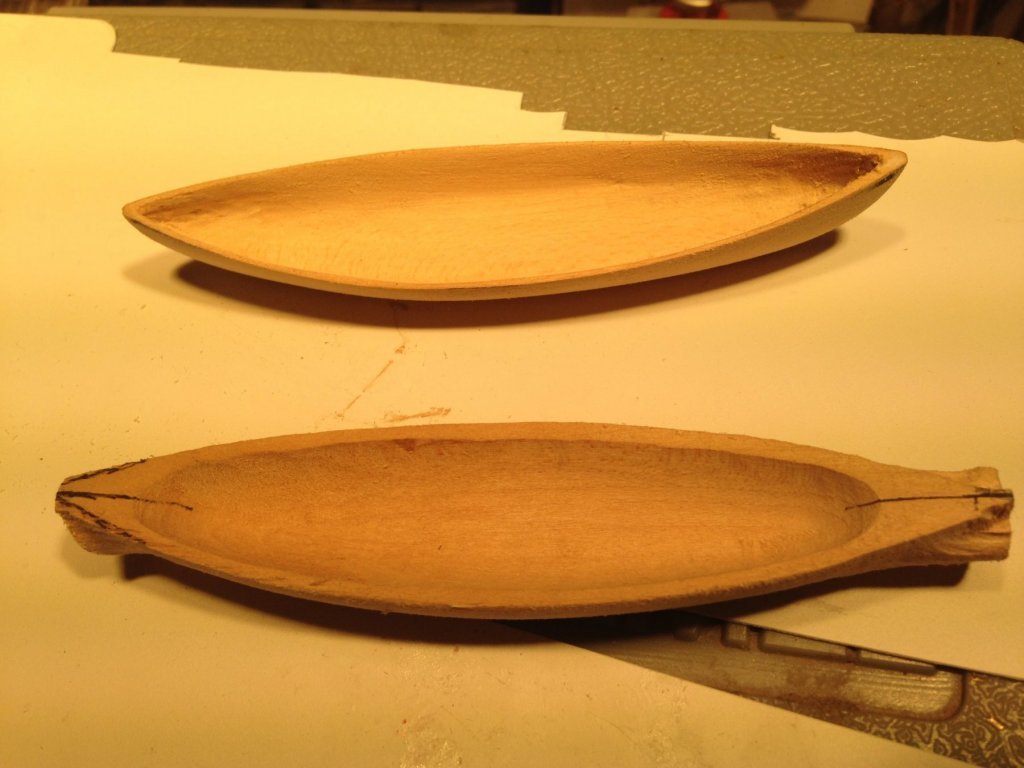
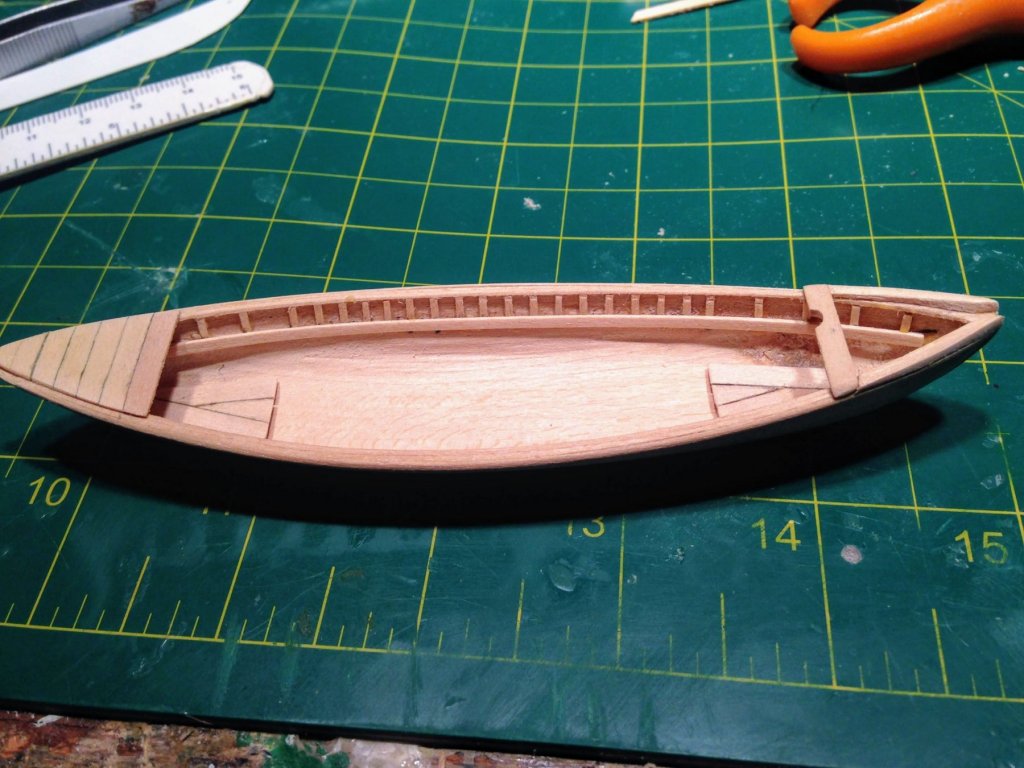
Before moving on to the boom, gaff and yardarms, I thought it is about time to at least make one whaleboat. I've decided I will make one to completion, try to take notes and see how one comes out, then tackle the other 3. I've given a lot of thought to the color scheme. Looking at countless pictures and visiting New Bedford and Mystic, the colors vary greatly. I've decided to stay close to Ronnberg's colors on his 1/2" scale model in New Bedford, except I'm going with white boats where he went with the blue/green bulwarks color on his. ..As I've mentioned earlier, I started this model some 30 years ago. back then the hull was sanded, rails and deck added, topsides and bulwarks painted. At that time, I used a floquil "rail green" on the bulwarks. Recently I came across the bottle in my storage, and low and behold, it's still as good as new! So the whaleboats will have the same green inboard as the main ship's bulwarks from the thwart stringers up. Green thwarts, cuddy board and bow box. Grey ceiling, black rails, black gunwhale strake. The sheer strake will be assorted colors for each boat. I'm thinking blue, yellow, and red. The 4th, spare boat that sits astern on the tailfeathers was a spare, so there would be no identifying stripe on that one. I may make an exception and outfit this boat fully as well, even though it was a spare. Ronnberg did this as well, and I'm leaning this way as it gives a nice appearance to the finished model with all four whaleboats finished and equipped. I started with carving/sanding the machine carved hull to shape. Approximately 1/16" think and 1/32" at the top where the ribs will be placed. Below is the beging of the carving. The top of the rails have not yet been shaved down to 1/32" Once this was done, I added the flat keel, (1/32 X 3/32 thinned to 1/16" wide at the stem and stern.) Then the rail. 1/32" strip on the inside and outside Once dry the rail was sanded and the outside rounded a bit. Next came the exposed tops of the frames, (1/32" srtip) the thwart stringers (1/32 X 1/16), the clumsy cleat, and the bow rails with it's open slot. I've decided against planking the ceiling. I'm planning on fully equipping all the boats, so by the time I've added thwarts, line tubs, harpoons, masts, oars, etc, very little of the ceiling will be visible. Next up was the cuddy board and standing soles. Both were made with 1/8" X 1/32 strip. For the cuddy, the strips were glued edge to edge, then trimmed to fit with about 1/32" of the rail showing on each side. I think that will give a nice touch with the black rail showing a little around the green cuddy board. The standing soles were not painted, as the crew needed sure footing these were eft unfinished. I plan on trying to get a weathered wood look for these. (Thanks for the tip, Bruce!) Next, I planked the bow box with 1/8" X 1/32" strip. My research shows many boats had a vertical board at the very front that ran under the bow box planks. If you look close at the very front, maybe you can see I tried to replicate that. Added the oarlock pads, and the horn cleats on the rails. That's where I'm at now. Again, the question arises, how much is too much detail on these little boats? I think I'll add the pads under the thwart stringers that held the oars upright when under sail, or running with a whale, the foot brace up near the cuddy board, and of course the cuddy board details---Loggerhead, lion's tongue, cleat, steering oar brace, and lifting eyes. I think that will be a sufficient amount of detail.


- 109 replies
-
- 3
-
-
- model shipways
- kate cory
- (and 1 more)
-
I'm wondering if the bars were different colors through the renovations...?? Here they look black... Here, ochre... and here it's tough to tell I'd say the choice is yours. I wouldn't think either would be "wrong" Personal opinion. I like the black for a little contrast. On a model I think it would make that detail "pop".
- 145 replies
-
- 2
-
-
- model shipways
- charles w. morgan
- (and 1 more)
-
Love the idea of thread for those bars! it looks perfect.
- 145 replies
-
- 1
-
-
- model shipways
- charles w. morgan
- (and 1 more)
-
Jon- I have to ask...By the looks of your builds, you don't mess around with anything small!! What scale are you planning for the Kate Cory? And...Is it going to sail??
-
Thanks for the likes everyone. Jon - Looking forward to your buildlog. If I can be of any help in your research let me know. There's so much detail you can add to whalers. The question for me has been what to include and what to leave off.
-
Had a nice weekend up in New Bedford at the museum. I could have easily spent half the day looking at Eric Ronnberg's 1/2" scale Kate Cory. So much interesting stuff there. Some inspiration to get my whaleboats going

- 109 replies
-
- 10
-
-
- model shipways
- kate cory
- (and 1 more)