HOLIDAY DONATION DRIVE - SUPPORT MSW - DO YOUR PART TO KEEP THIS GREAT FORUM GOING! (Only 24 donations so far out of 49,000 members - C'mon guys!)
×


Richvee
-
Posts
385 -
Joined
-
Last visited
Content Type
Profiles
Forums
Gallery
Events
Everything posted by Richvee
-

Ernestina Morrissey by Jond - FINISHED - 1:48
Richvee replied to Jond's topic in - Build logs for subjects built 1851 - 1900
Beautiful. What’s next? -
Then I'd say buy two! My guess is if one is used for it's intended purpose, it will soon be useless for our rigging needs. 😉
- 263 replies
-
- 4
-

-
- Medway Longboat
- Syren Ship Model Company
- (and 1 more)
-
What an absolutely beautiful model. Impressive size, and the details are amazing. Enjoyable read. Thanks for sharing.
- 86 replies
-
- 1
-
-
- whaling
- clinker built
- (and 2 more)
-
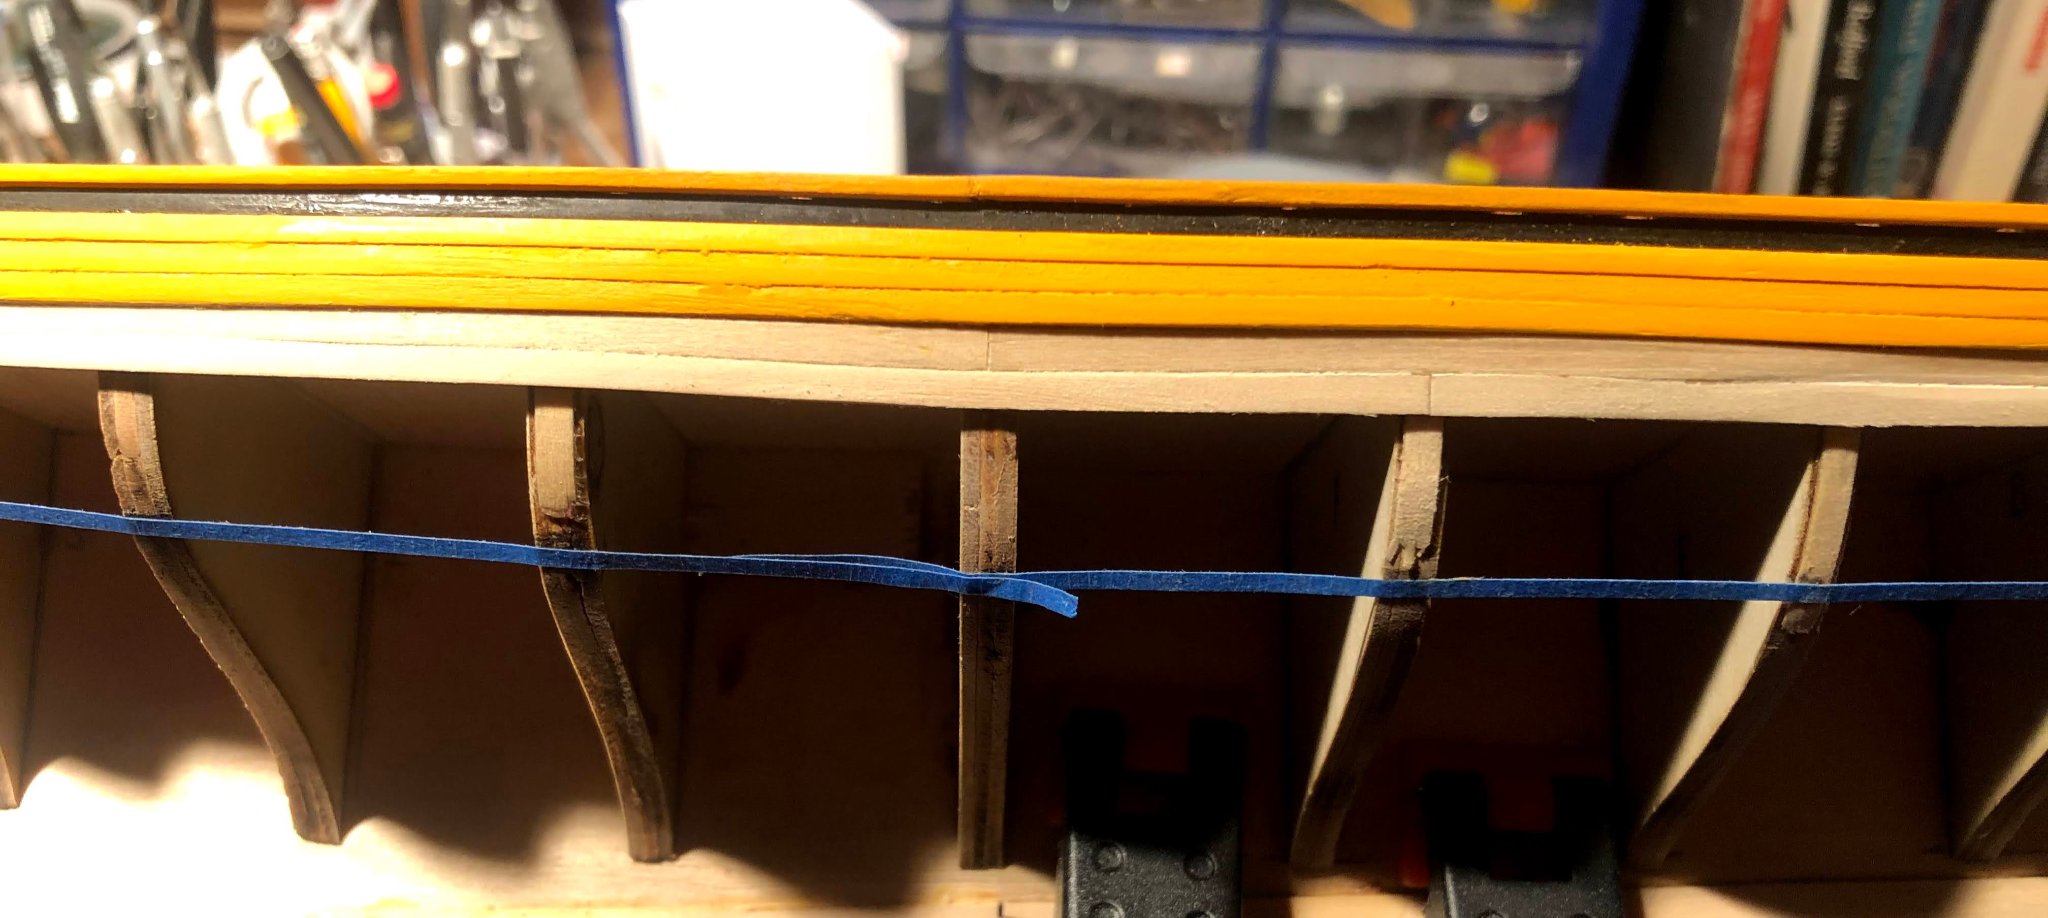
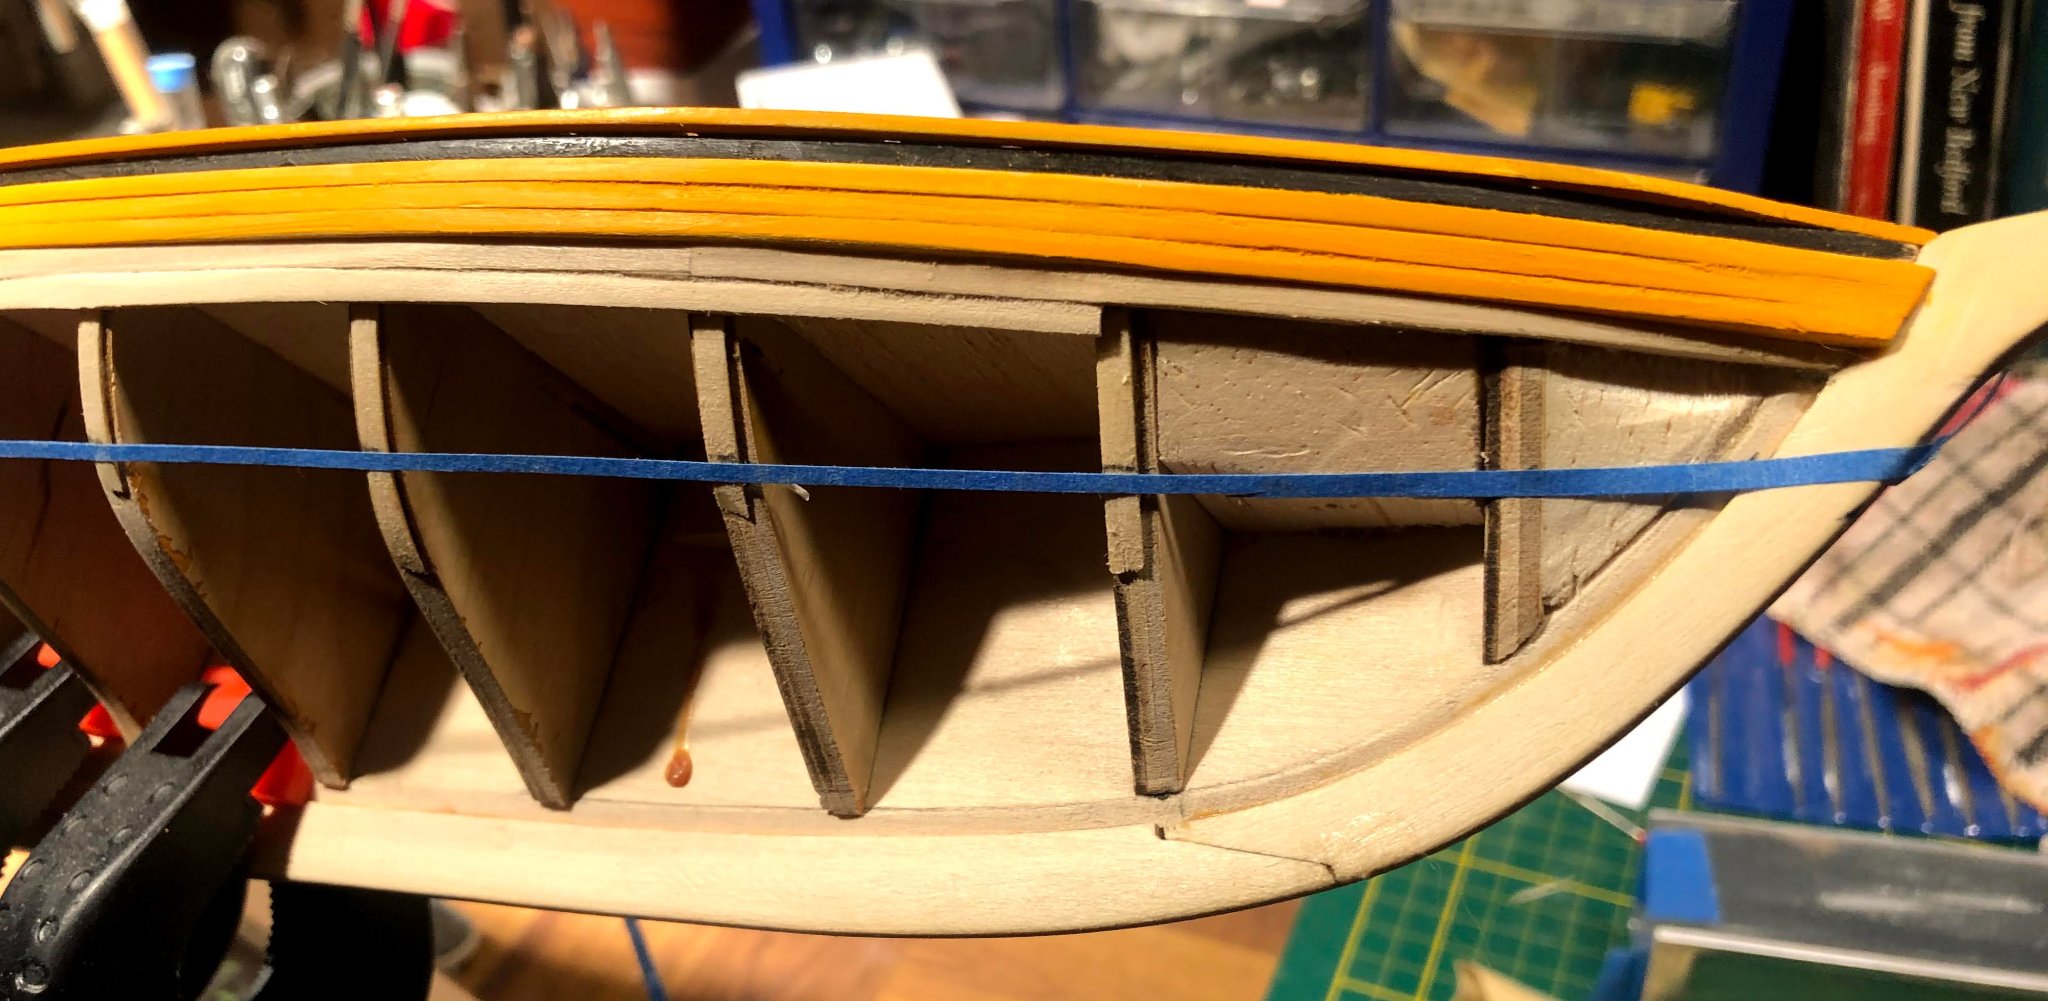
Slow going as work gets in the way. It also looks like we'll have a pretty full high school baseball season so I've been spending more free time in the rule book and getting in a little better shape. I installed the planksheer. I painted the outboard side, again, because I can't see another way to get a crisp line later. It was short at the bow, as many have mentioned. Pretty straight forward fix to add some length. I've added the whales, and I've started the first few strakes after lining off the upper belt. I found myself a nice pair of proportional dividers on E-Bay for under $40. I was amazed at the prices of this little instrument from retail vendors. The whales are painted, but I'll need to sand them more. The paint was more to get color on the top of the first whale strake, again, the only way to get a clean line for me.


- 51 replies
-
- 4
-
-
- Model Shipways
- Baltimore Clipper
- (and 1 more)
-
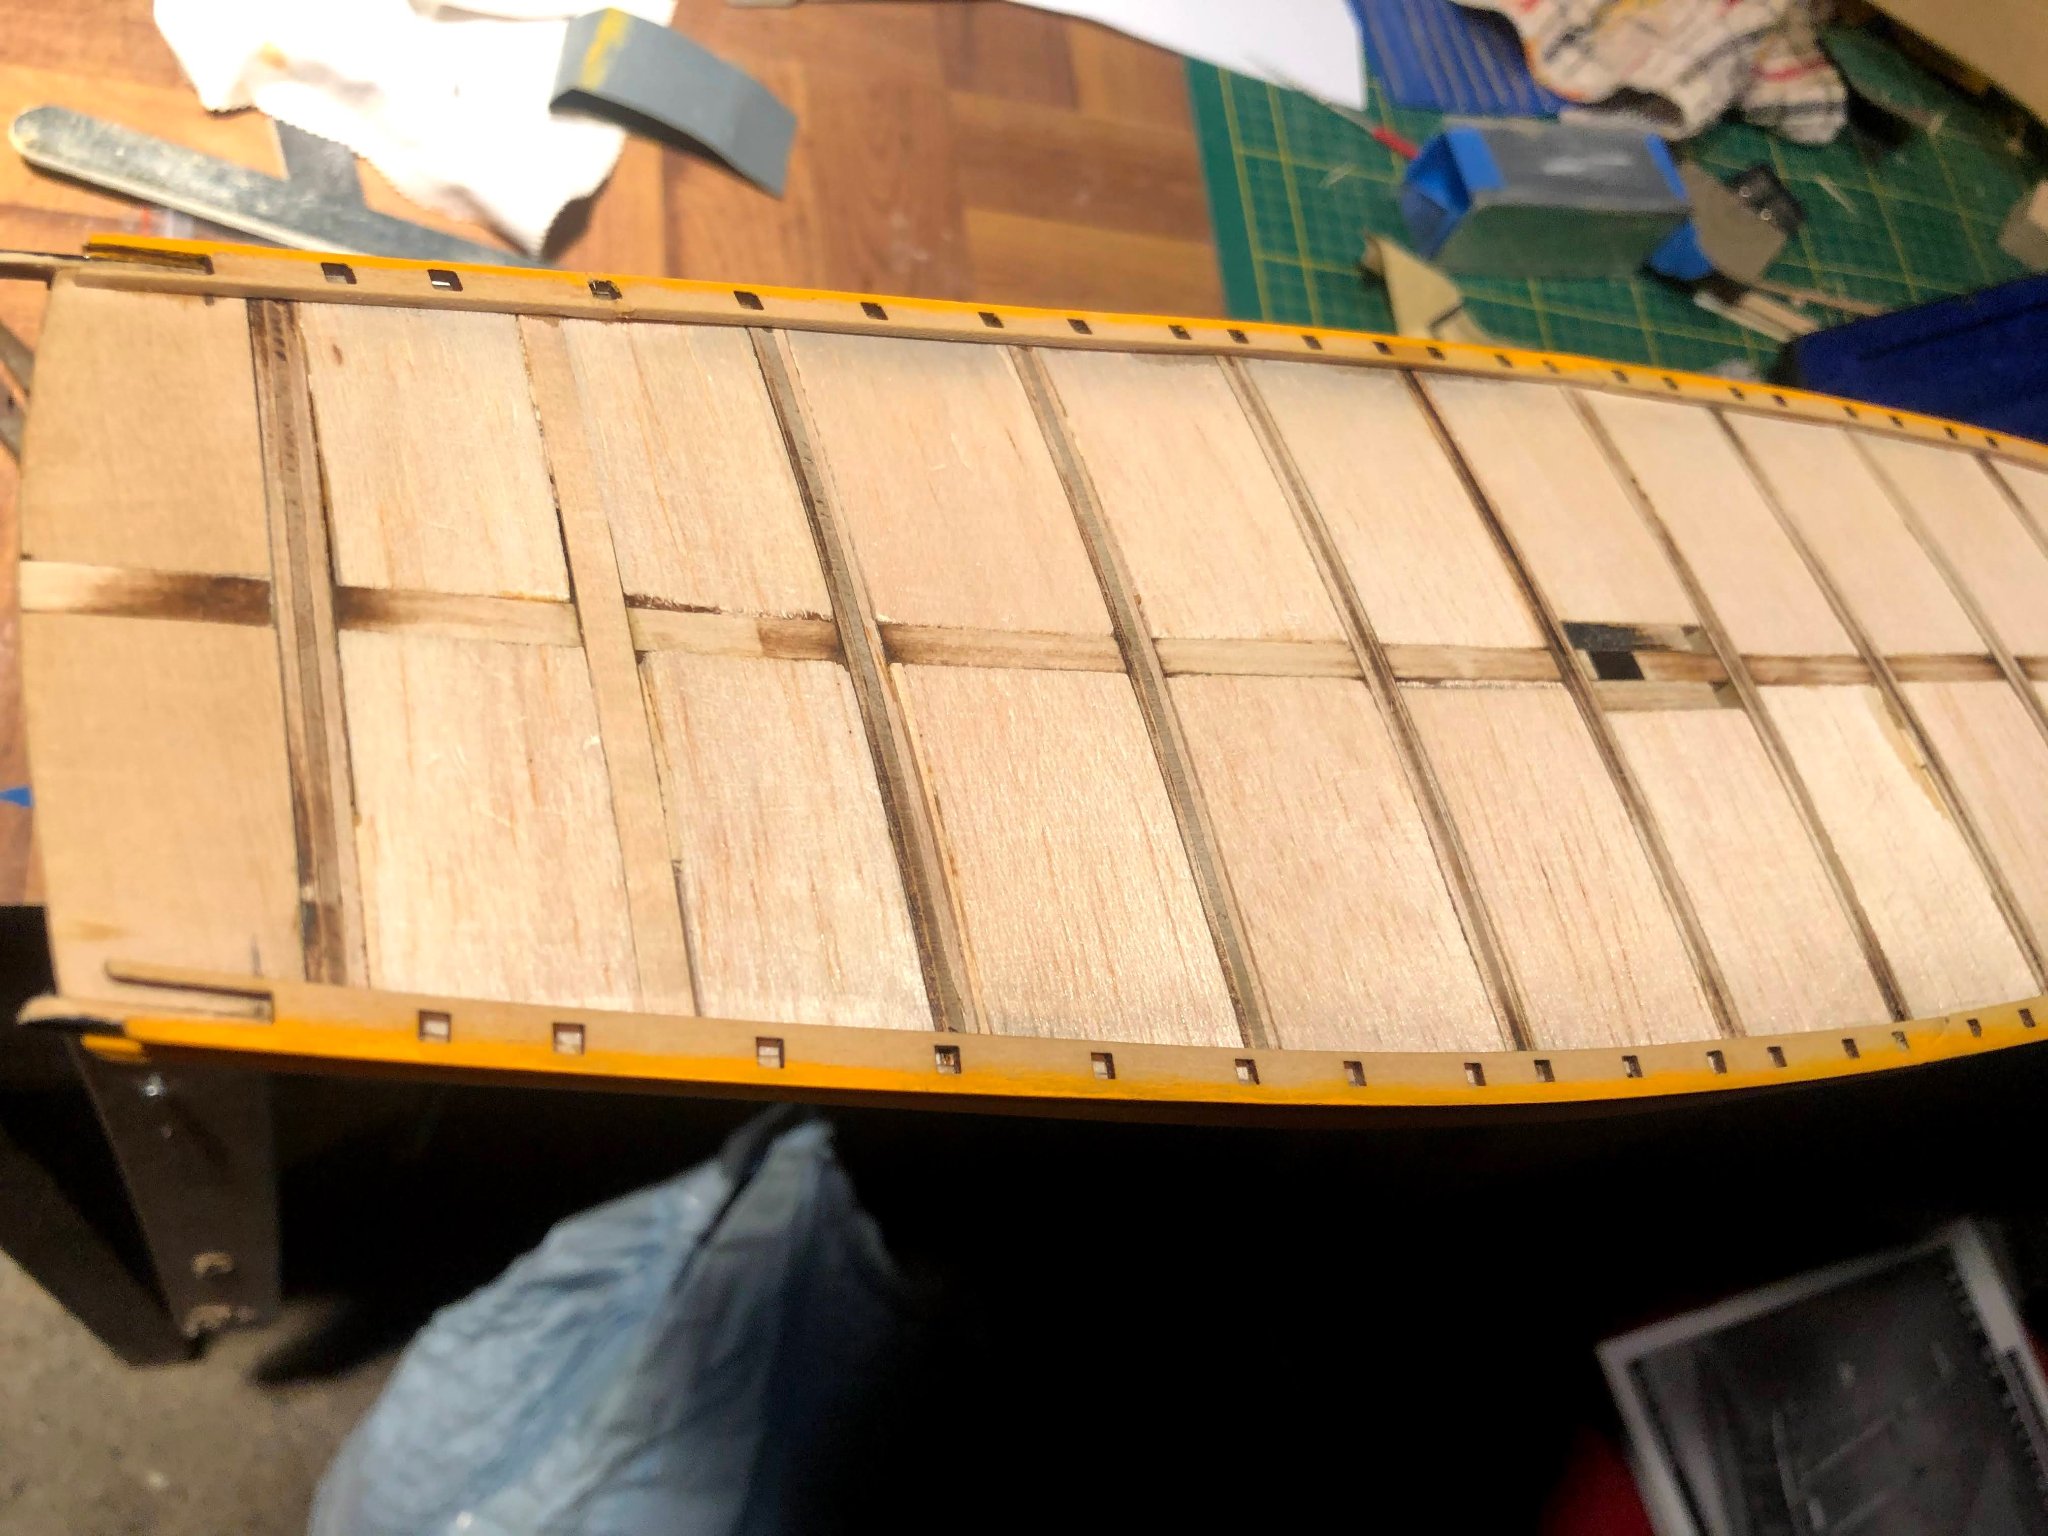
Some progress in between snow shoveling and work. I've faired the hull, along with sanding those low bulkheads to match the bearding line. Laying a plank across those spots seems to look OK. We'll know for sure when we start planking, I guess. I decided to go ahead and fill between all the bulkheads with balsa, taking the advice of @jwvolz . This being my first attempt at planking a deck, I thought this looked like a good way to go. I would also like to add the hatch and cabin moldings prior to planking the deck, so I though a solid base will give me the best shot at laying down level moldings. I have gone ahead and applied the first plank flush with the deck. this is a single plank, painted black. Above will be the planksheer painted yellow outboard, and below will be the wale also painted yellow. As I've seen in other logs, the only way I'm ever going to get a decent line here is to paint this plank prior to adding the planksheer and wale. Here we have the first plank installed, and the outboard of the planksheer pieces painted yellow.

- 51 replies
-
- 4
-
-
- Model Shipways
- Baltimore Clipper
- (and 1 more)
-
Thanks Joe. The deck planking are indeed 1/16 thick. I think I'm going to take your advice. I've seen others do things to get a sub deck on this mode. This seems like the best method to me, as to not run into any added thickness to the deck which would undoubtedly cause issues with the planksheer and bulwarks. Your Latham looks tremendous. Years ago, in my early teens, I lived close to Model Shipways in Bogota, NJ. I built the Taurus (pretty sloppily I may add, as most teens would). I then went for the 1/8" scale Latham. Back then they were all solid hull. I don't think I ever finished the rigging, but it was my introduction to the hobby, so the Latham holds a special place for me. Maybe I'll try it again some day in 1/4" scale. It's a beautiful ship, and you are doing it justice. (Unlike I did way back when LOL).
- 51 replies
-
- 1
-
-
- Model Shipways
- Baltimore Clipper
- (and 1 more)
-
Hope you can join us tonight, Michael. The zoom meetings have been going very well. I also have a little modeling background in HO trains. I'm currently in ongoing negotiations with the Mrs to obtain use of the spare bedroom for trains. Negotiations are not progressing well. 🥺
-
Thanks for looking in Pat. Do you have a build log for your POBII? I'd love to see your progress. I wouldn't count on me passing you. I'm a slow worker, and just learning as well. There will be periods when nothing gets done for weeks on end, especially in the spring and summer. Besides yard work, I umpire baseball, so there's times in the boatyard is severely diminished. Which is OK with me. I need the distractions from time to time. .. I just noticed it's post #1 from you. Welcome. Take a little time and write a little something in the New members forum. Nice to have you with us. There's a wealth of info here!
- 51 replies
-
- 1
-
-
- Model Shipways
- Baltimore Clipper
- (and 1 more)
-
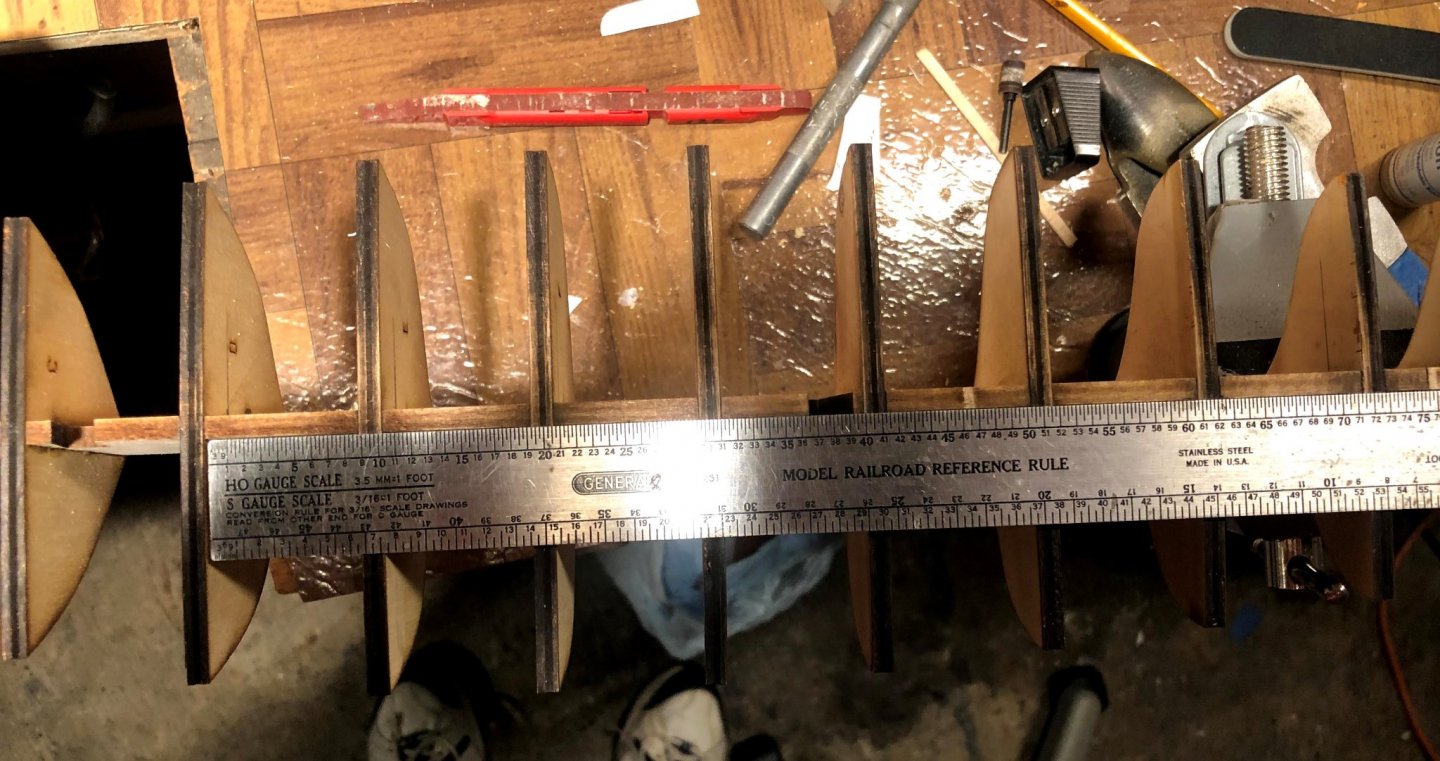
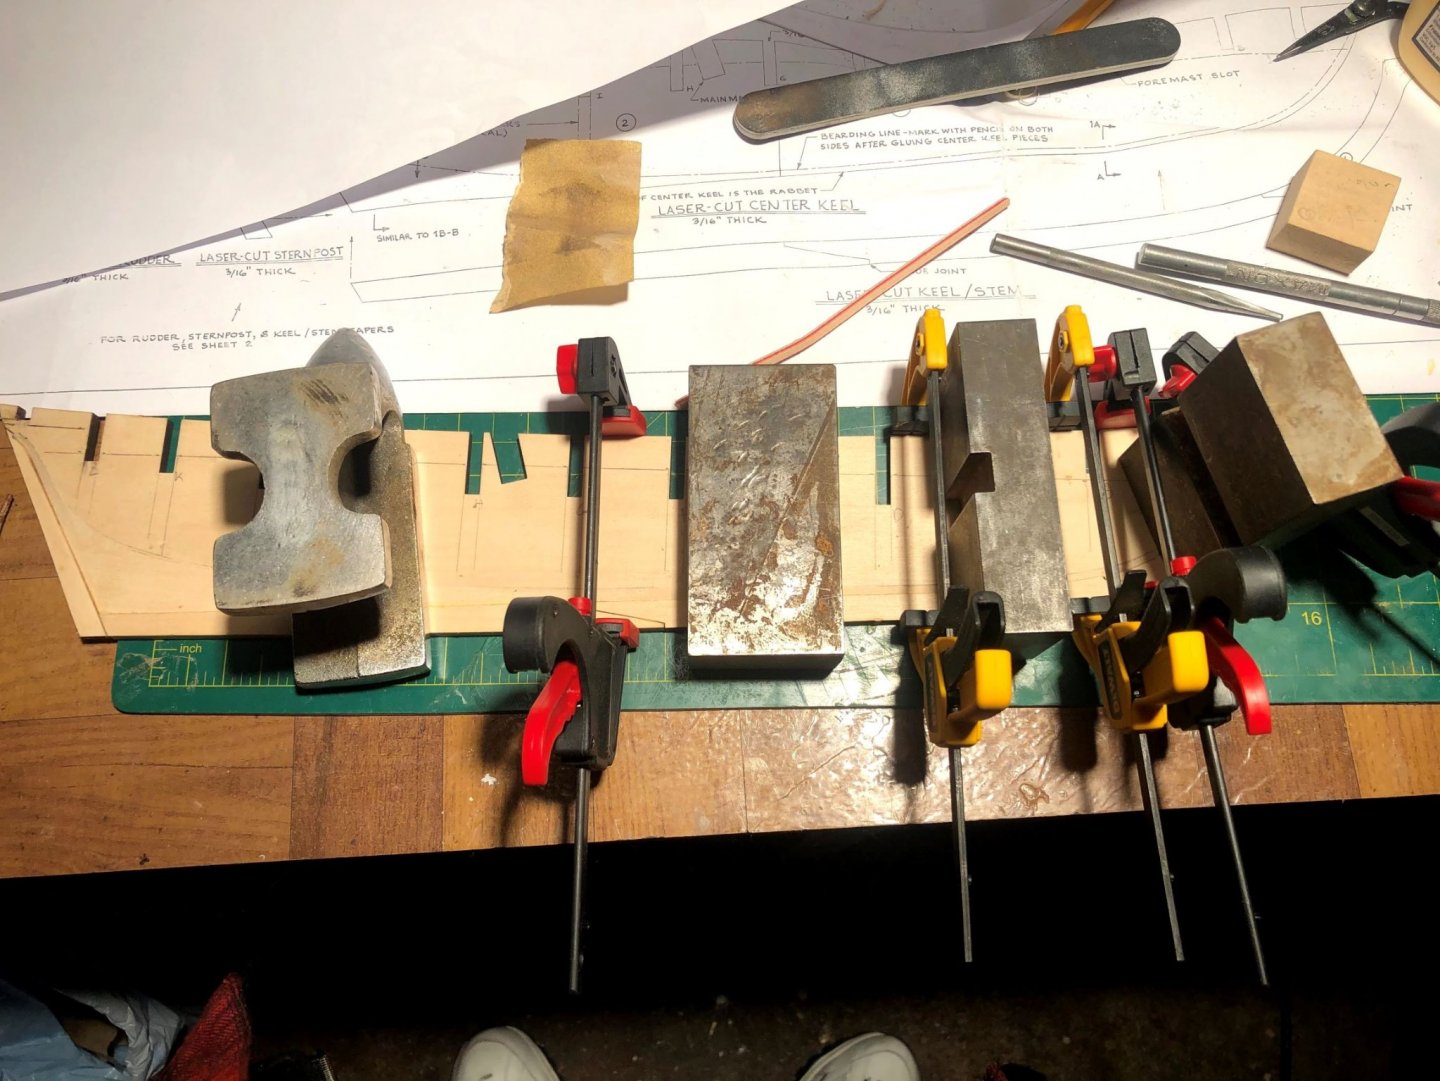
A little update. I will proceed with the plan of sanding the bottoms of the offending bulkheads to match the bearding line and run smoothly into the rabbet. The bulkheads have been installed, taking care to square each one up with the keel. I did one at a time, clamped it up, let dry before moving to the next. Added the stern filler blocks. Hopefully I've come close enough on the shape of this thing to make it work. In this photo the port side of the filler block hasn't been faired at all, the starboard has been. Obviously more fairing is needed, but I think it'll be OK. . I couldn't flip this next pic no matter what I tried. If you turn your head sideways you can see the bulkheads look to line up pretty evenly. ↩️ I'm happy that I was able to run a steel rule down the center keel and it looks nice and straight. I picked up a 2 foot length of 1" x1" balsa today. I think I'm going to add filler blocks between the bow and BH "A", and near the stern, between K and L. Hopefully it will help me not only visualize the curves a little better while fairing, it will give me a little more surface for securing the planks in the most difficult sections of the hull. Lots of sanding ahead. Until next time......

.thumb.jpg.515da655eb0aad9315c87c69e5524806.jpg)
- 51 replies
-
- 4
-
-
- Model Shipways
- Baltimore Clipper
- (and 1 more)
-
Thanks. I just checked . They match up with the plans very well. All which leads me to believe my bearding line may be a tad high through this section. As mentioned above by Brian, I have tested a plank between the keel and the bulkhead, and I believe after fairing the bulkheads, that lowest plank will sit rather nicely between the bottom of the bulkhead and the top of the keel with a little edge beveling. I think I may be OK. I'm going to move ahead and start gluing the bulkheads in place. With the tops flush with the deck. Thanks everyone for the help.
-
Unless I hear differently, that's the action I'm going to take. I posted the same question in the Framing and Planking forum and got the same answer there...Sand away at the bottom.
-
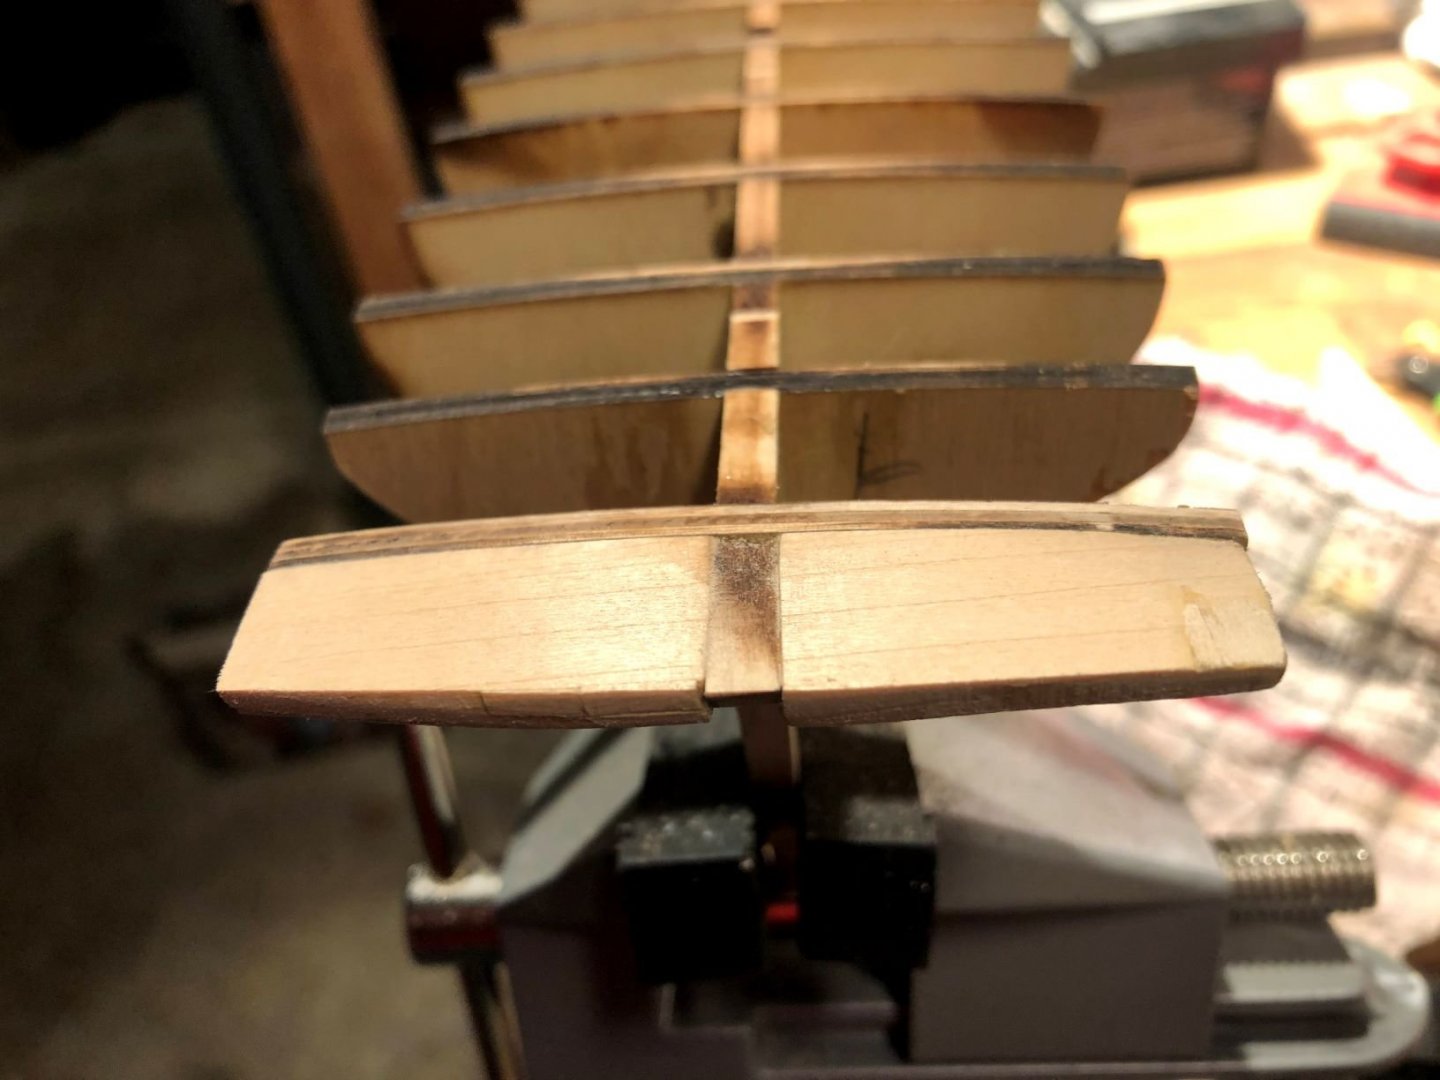
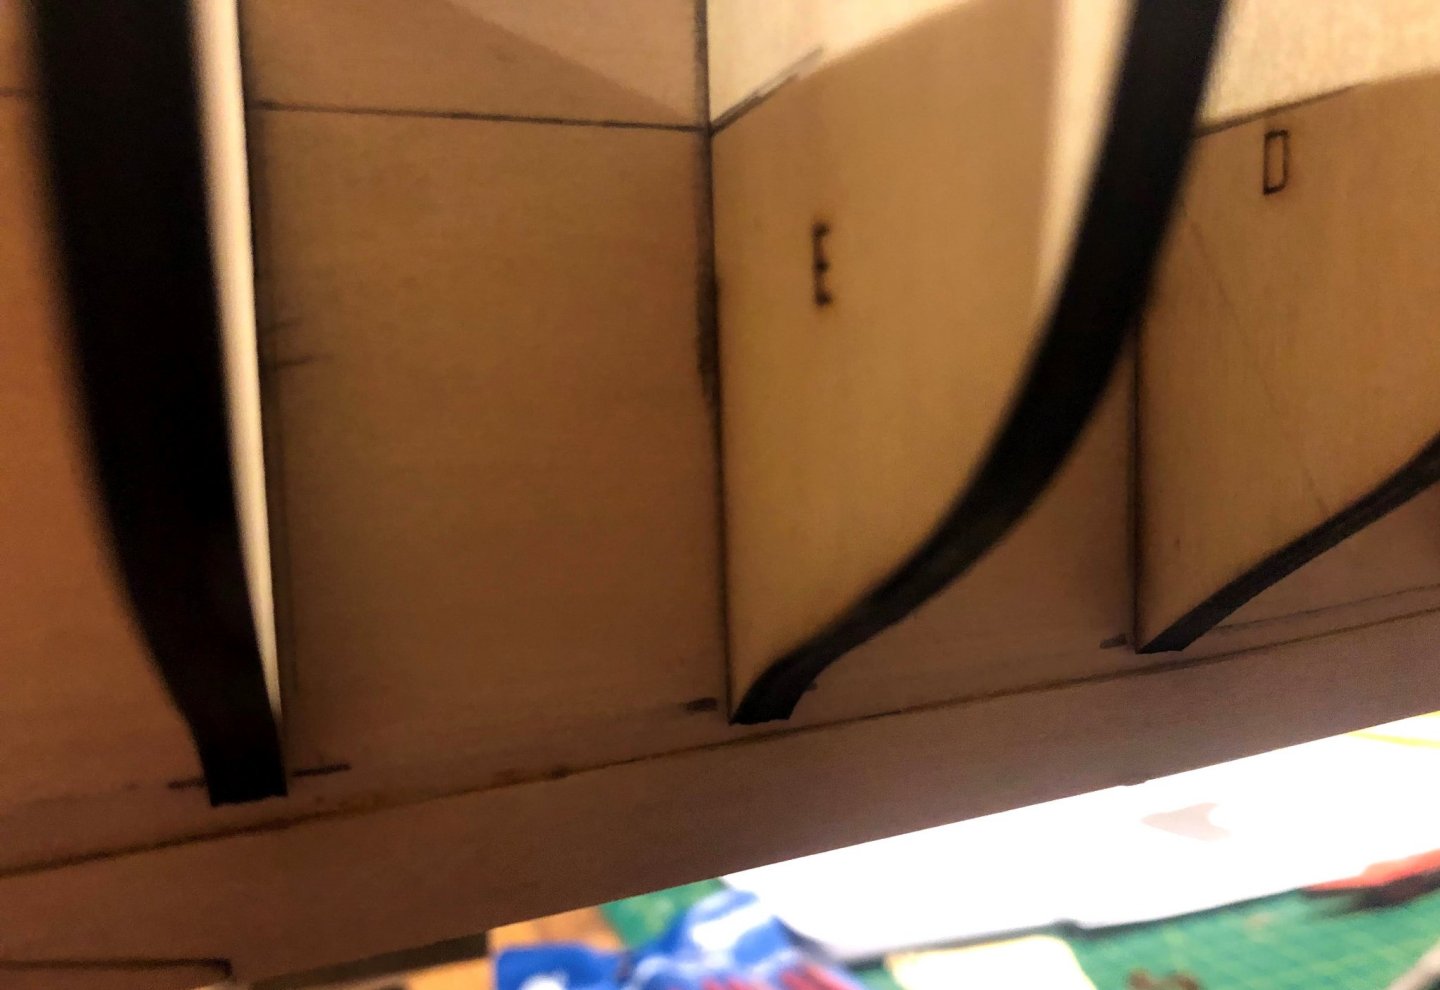
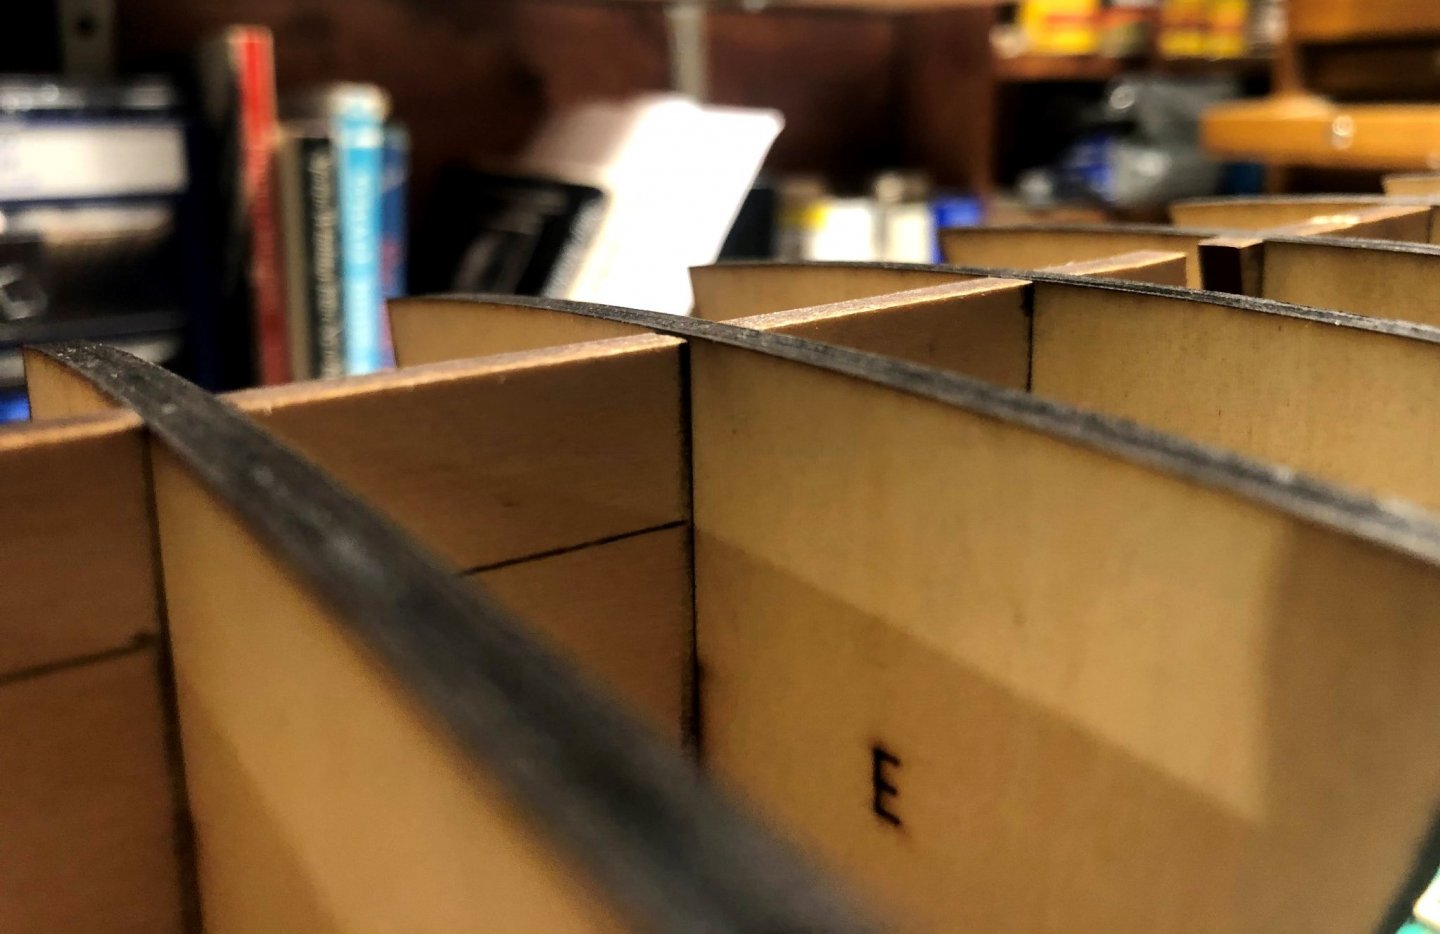
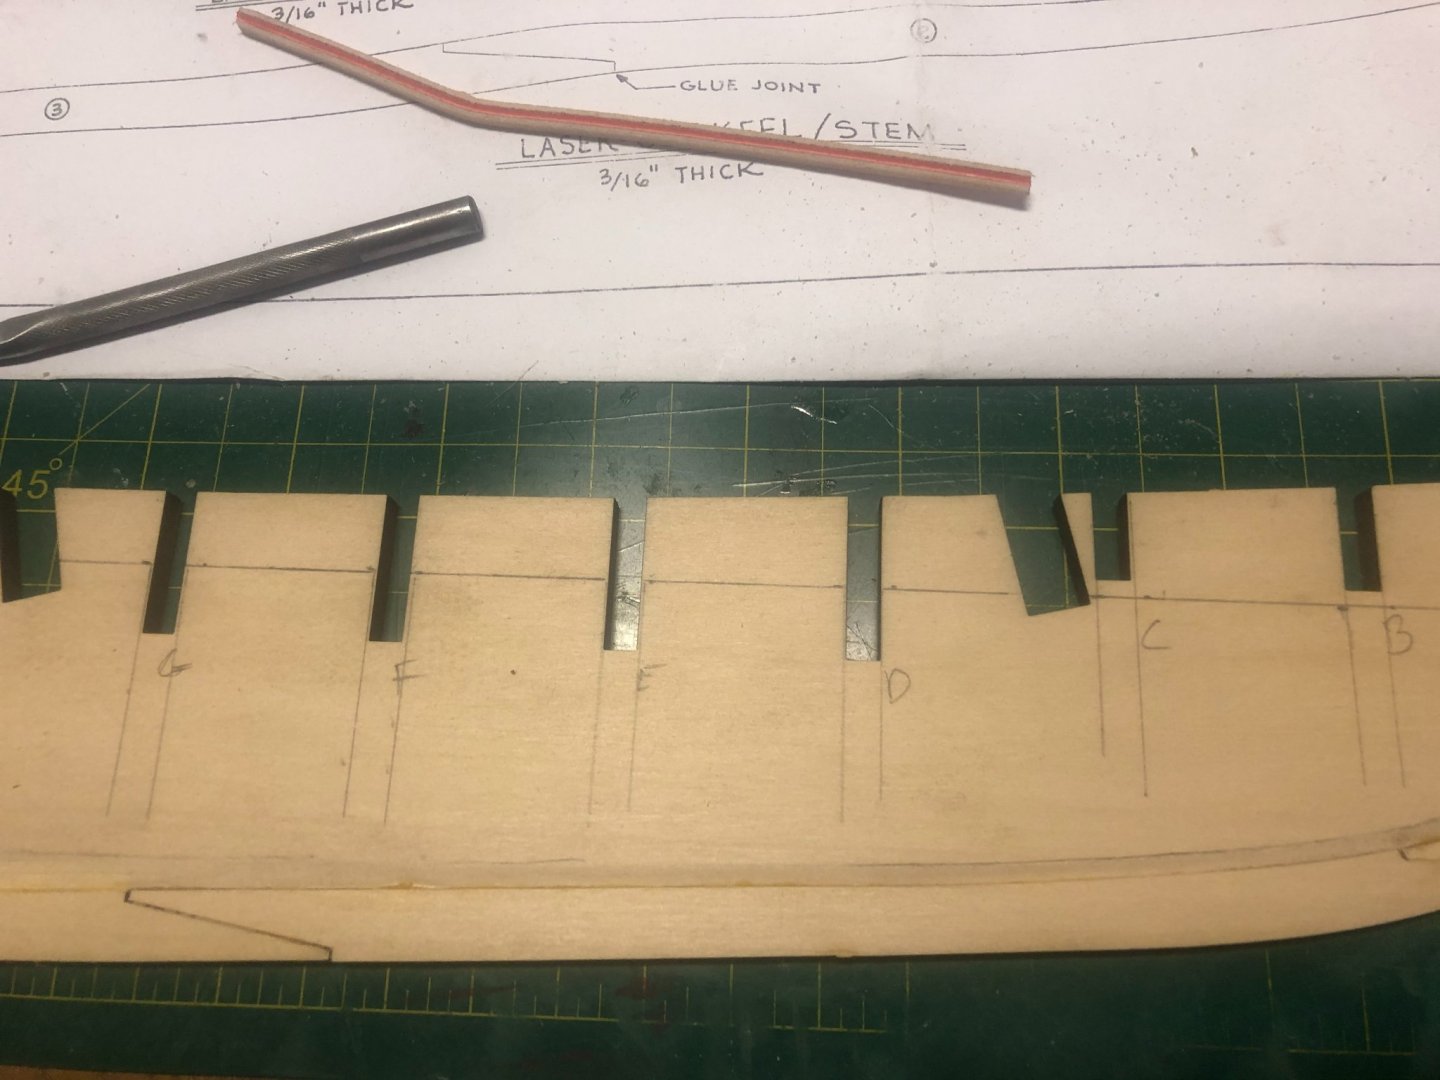
I have cut and dry fitted the bulkheads for my pride of Baltimore 2 MS kit. They all fit nice and snug with minimal sanding. They will all sit flush to the top of the center keel once the char is removed, and all the reference lines line up nice. That said, I have 3 bulkheads, D, E and F that end well below the bearding line. Is sanding and fairing the bottom of these three bulkheads more than the rest of them what should be done? Or should I shim the center keel slot, raising the bottom of the bulkhead to align more with the bearding line, and then trim the top of the bulkhead level with the keel center?

-
That’s a nice looking boat. I could live with that if I could make my kit supplied boat look similar. If shortening is needed, I guess one would shim the center keel slot, and sand the top at deck level?
-
Thanks for looking in everyone. I'll be sure to check out some other options when the time comes for the ship's boat. Appreciate the pics and link. Right now, I have a novice question I could use some help with. I've cut out and dry fitted the bulkheads. They all slid into their slots nice and snug with very little sanding. All are seated completely in their notches, and all line up nice and level at the deck and all my reference lines. However, bulkheads D,E and F fall below the bearding line. (Same port and starboard) As you can see, my reference lines line up, as do the tops of the bulkheads at the deck Is this just a matter of fairing the bottom of these 3 bulkheads to fall in line with the bearding line, or do I have some deeper issues.. Like I cut the rabbet too wide? And if that's the case, is there a remedy?


- 51 replies
-
- 2
-
-
- Model Shipways
- Baltimore Clipper
- (and 1 more)
-
Thanks David. I'll try my best. It's only my 3rd ship. We'll see how it goes.
-
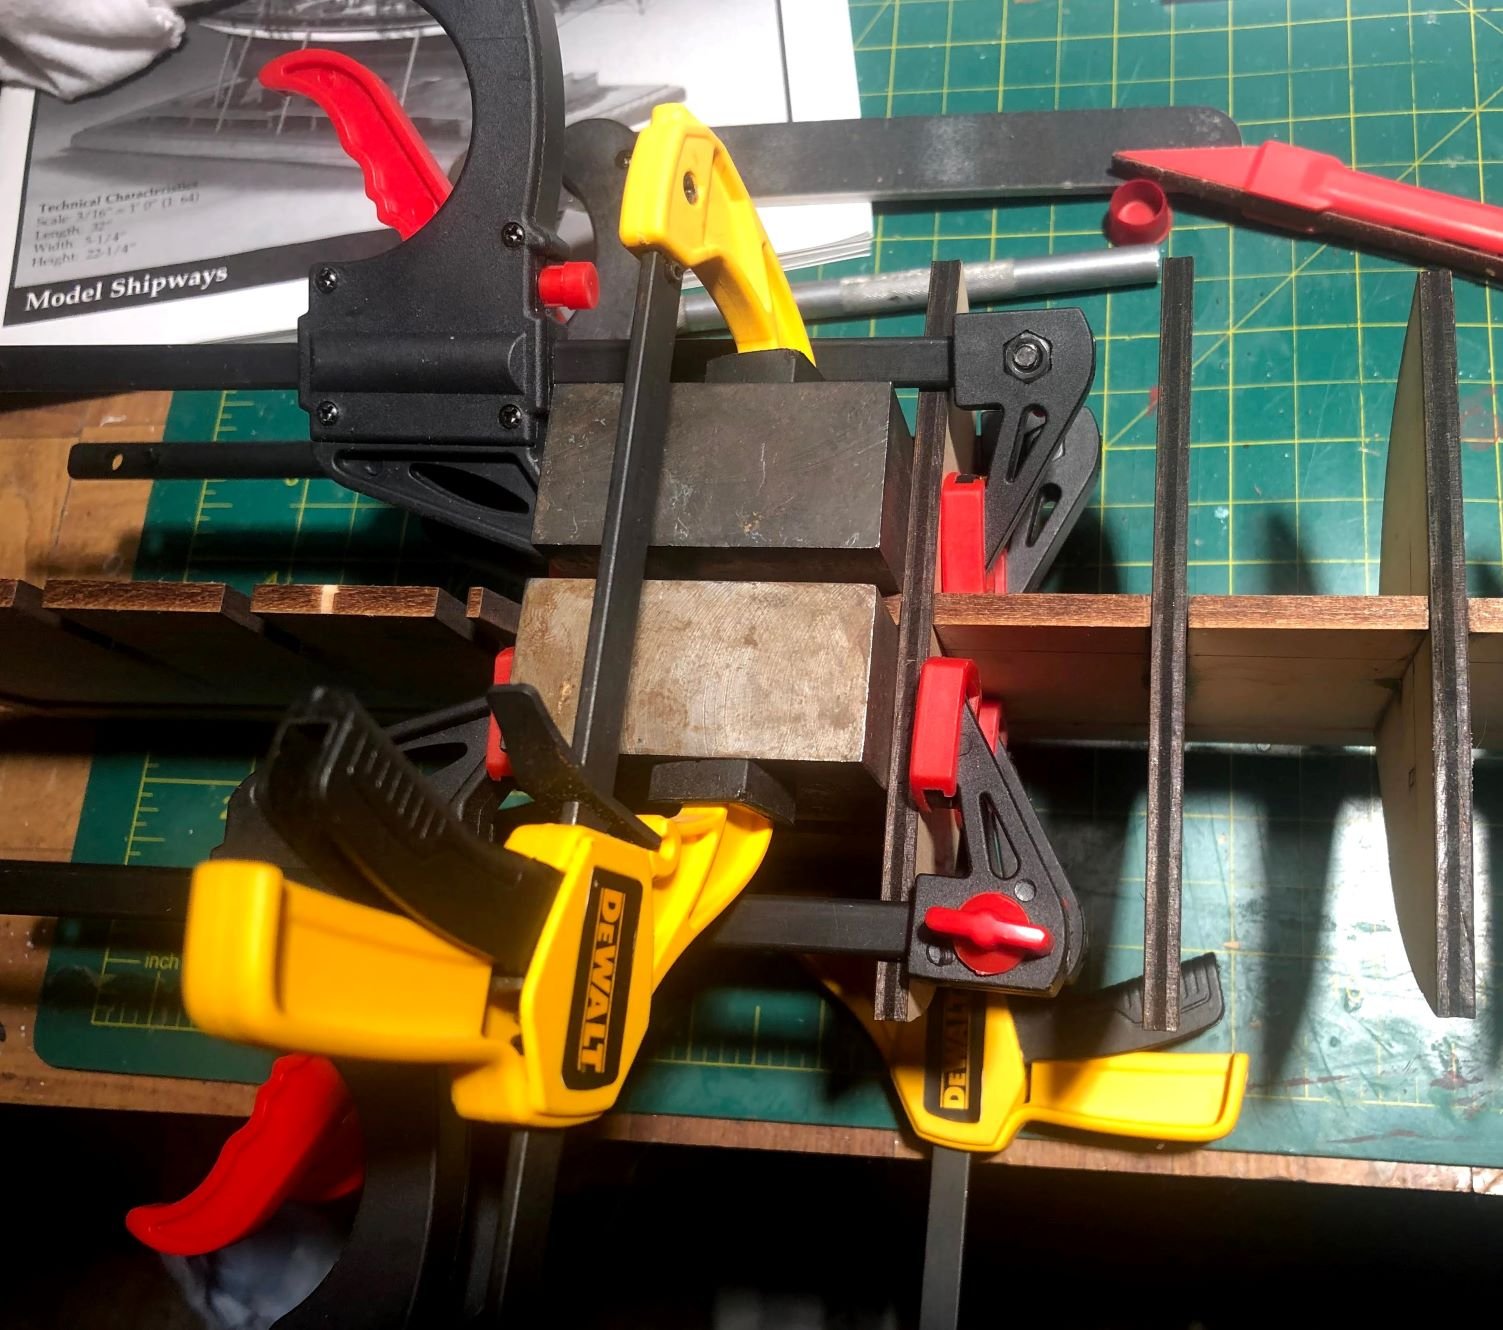
I've decided on the POB2 as my next build. I'll save the rigging of the Medway Longboat for that inevitable time when I get a little tired of this ship. I've chose this model for a few reasons. Lots of interesting deck work Lots of available resources Love the lines of this ship, and really like the way it looks under sail. That's the plan going in...To make this my first attempt at sails. ..And last but not least, while I was contemplating what to make next, the POB2 showed up in a MS email for 50% off. 🤑 I've been looking at the first chapter of Robert Hunt's practicum that is available on line, and I'm torn about ordering the package. It's a bit pricey, IMO, and there's a wealth of free info here in the MSW forums. That said, I really like the idea of step by step instruction, since I'm still quite the novice. Reading through the instruction manual that comes with the kit, I can pretty much say they're almost useless. The plans, on the other hand, look good and very detailed. I've got plenty to do before I would need chapter two of the practicum, since I tend to move at a snail's pace with this hobby. And I'm sure this build won't go any faster. The kit arrived and the parts all seem to be in order. The dowels for the masts resemble the letter "U" and will certainly not be used. Maybe I'll try rounding off square stock, or at least get some kind of hardwood dowels that are better than the horrible pine dowels supplied. Rigging and blocks will have to upgraded as well, as I've already been spoiled after using Siren line and blocks on the Kate Cory. I'll decide as I go how many of the cast metal fittings will be used. Either because they are out of scale, or because I'm going to leave some of the modern touches off this model, such as propellers, or just because they're just plain horrible. Anyway, the project has begun. Bearding line drawn in using a template that I cut from cardstock, followed by cutting a rabbet. Stern, keel, and bow glued into position and drying. reference lines have been drawn on the center keel, Next up will be cutting out, marking up, and fitting the bulkheads.

- 51 replies
-
- 5
-
-
- Model Shipways
- Baltimore Clipper
- (and 1 more)
-
A little irony. I started mine in 1989. Worked only it for about year. It was just about at the same point as yours when you took a break. I had the deck, bulwarks, and rails done, topsides painted, and just about ready to start competing when I got married, bought a house, and raised 2 kids. It sat for about 27 years until 2016. Glad you didn’t take 27 years to get back😁
-
Thanks for the kind words. The copper looks great. Glad you’re back in the boatyard!
-
LOL I actually have the last post on you build log... 2 1/2 years ago...No worries. Mine sat on the workbench for 27 years while I raised a family. Ironically I was at almost the same spot as you when it went into hibernation, except I had finished the rails and bulwarks. When I got back at it coppering was the first task.
- 109 replies
-
- 1
-
-
- model shipways
- kate cory
- (and 1 more)
-
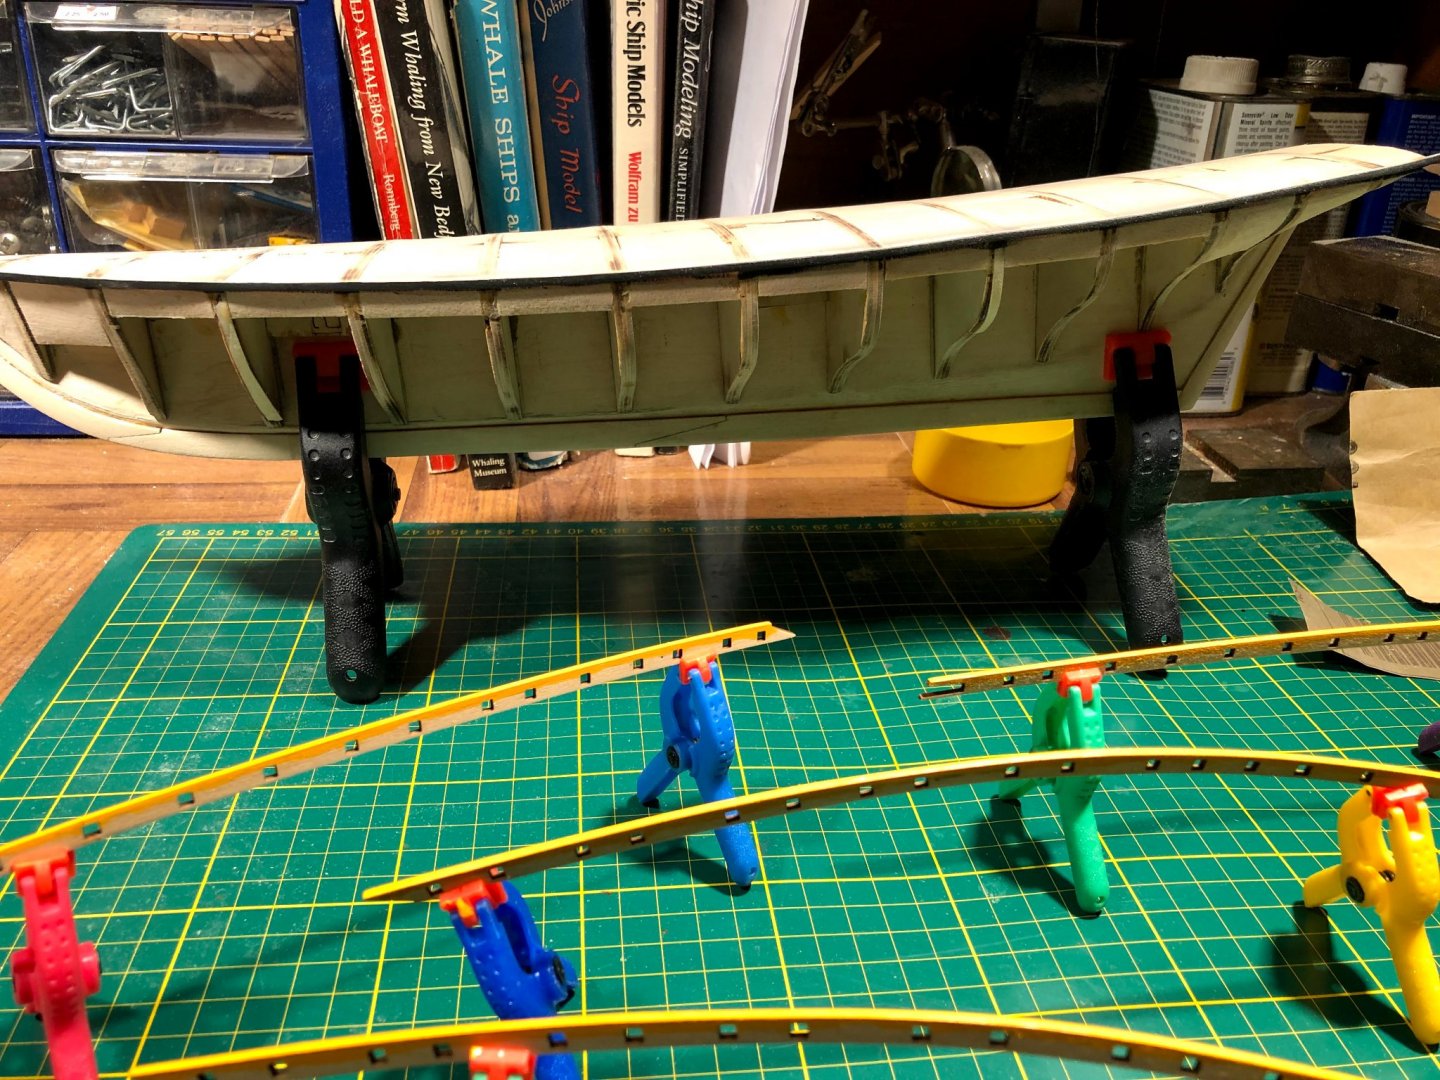
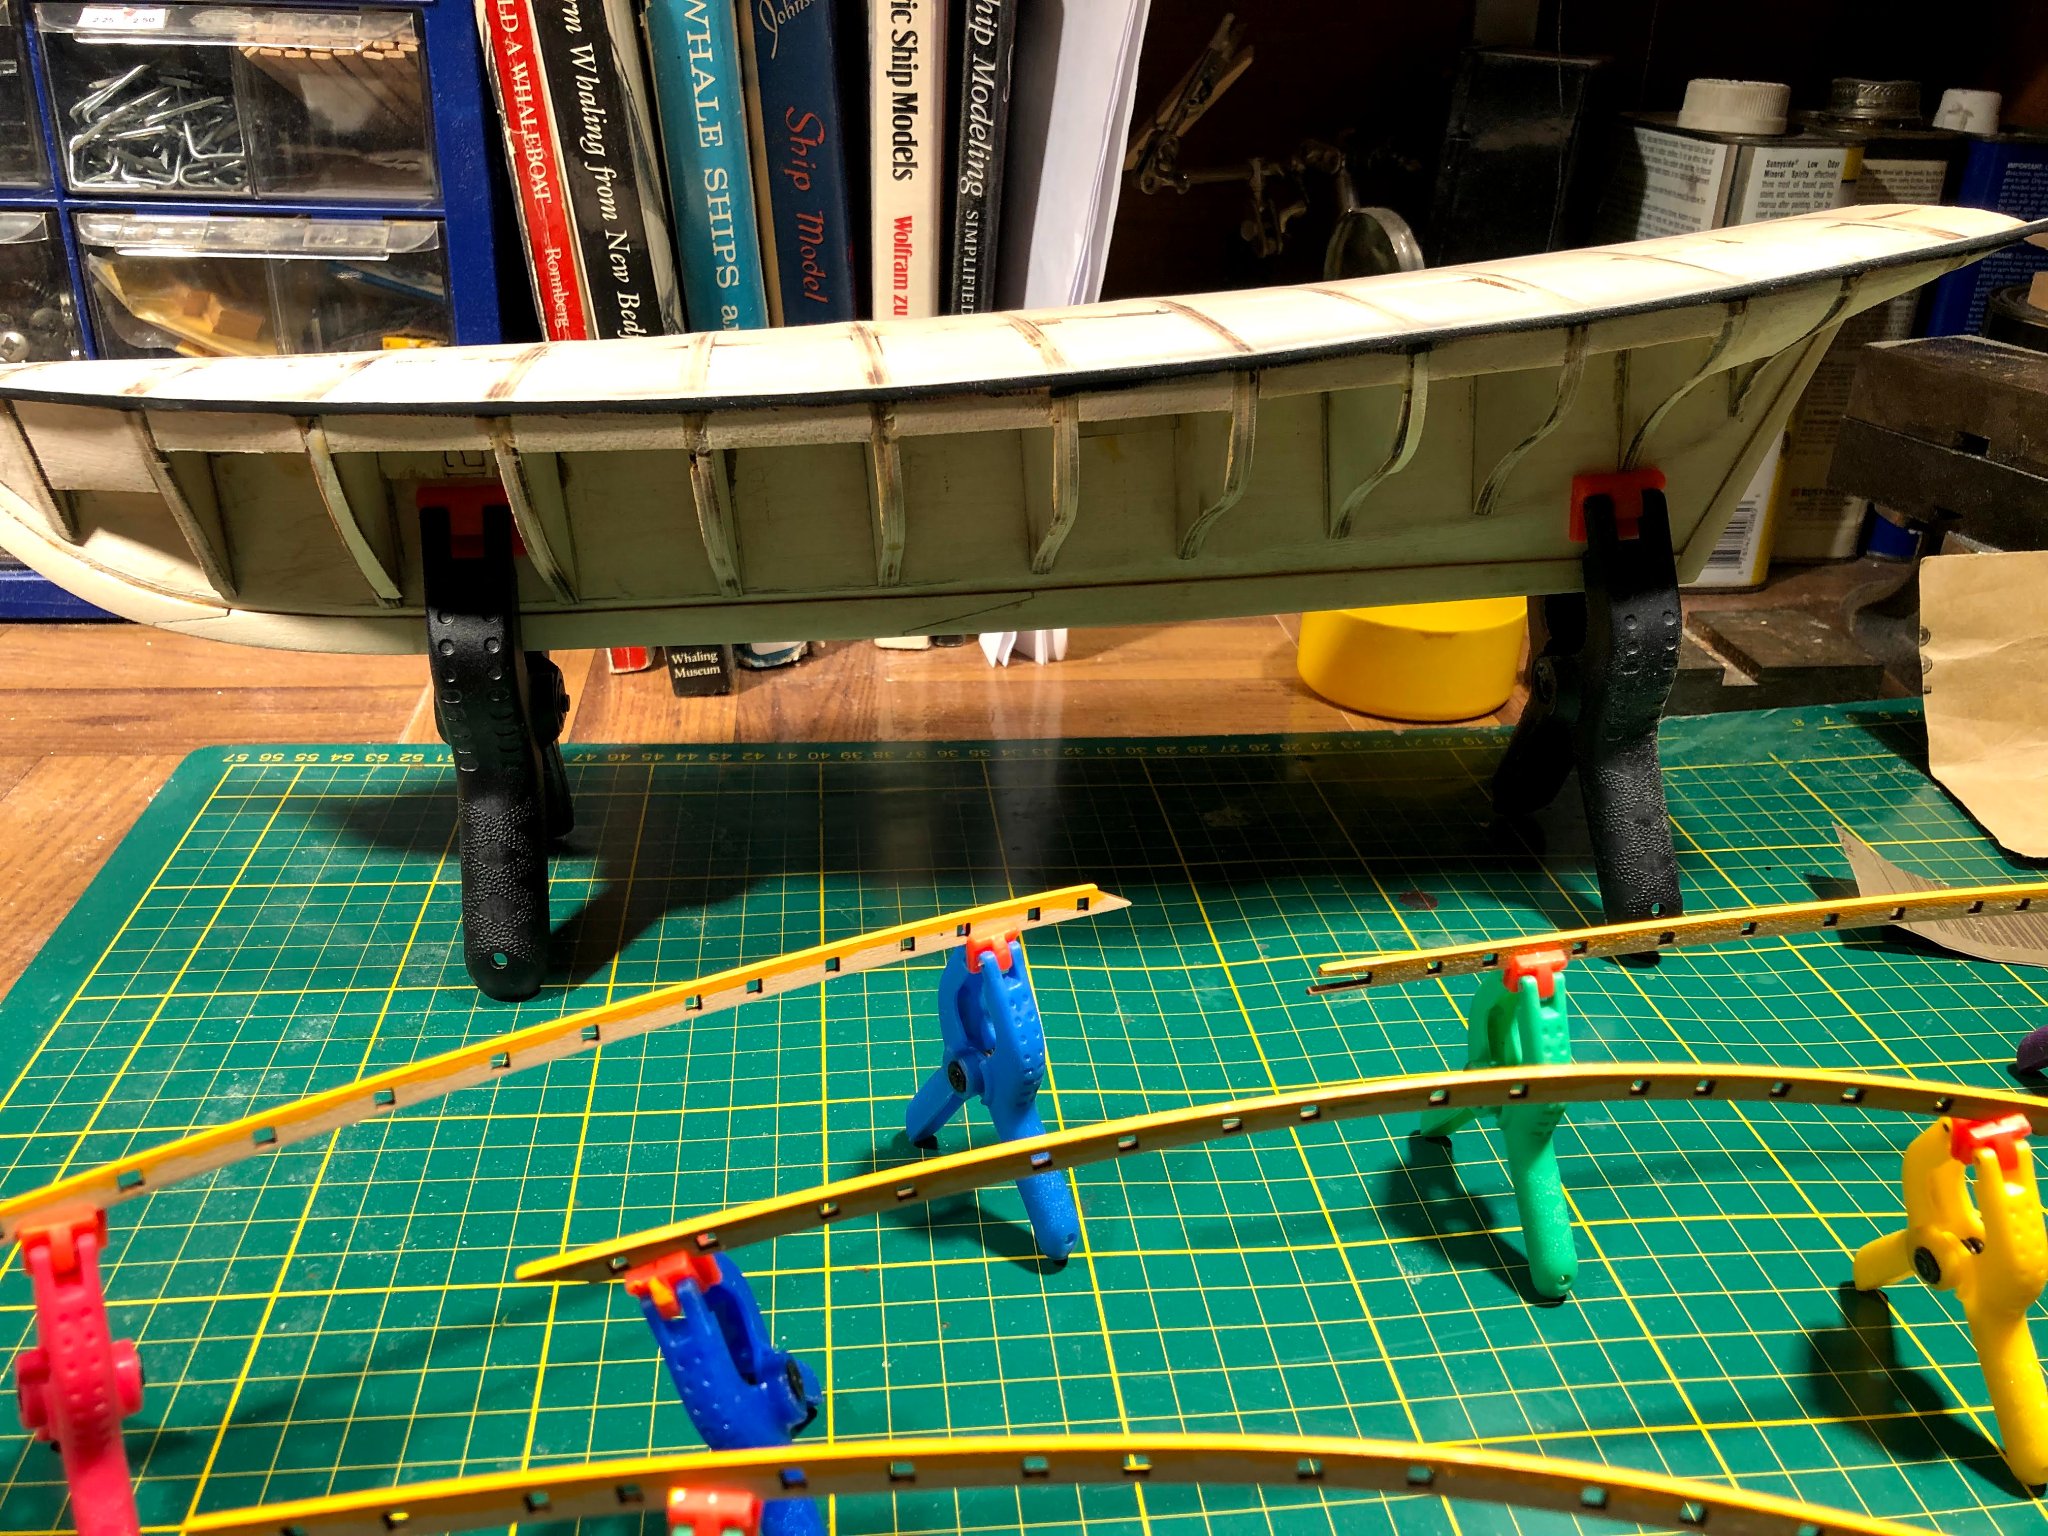
Mike, You're so right about all the things one can add. I had trouble figuring where to stop on adding to the whaleboats. Mine are missing so many things, but I think there's enough in there to catch your eye, then give it another look and notice a few more items. Like I've said, not only was this a real enjoyable build, I learned a ton about how a ship works, and more than a ton about whaling and the whaling industry of the 1800's.
- 109 replies
-
- 1
-
-
- model shipways
- kate cory
- (and 1 more)
-
Thanks for the kind words. I agree about the lines, and color scheme of the KC. Do you have a build log for your KC? I'd love to follow along.
-
Thanks Mike. I'm not sure why it's not a more popular model. I guess it's the solid hull and the lure of the Morgan if you're going to build a whaler.
- 109 replies
-
- 1
-
-
- model shipways
- kate cory
- (and 1 more)
-
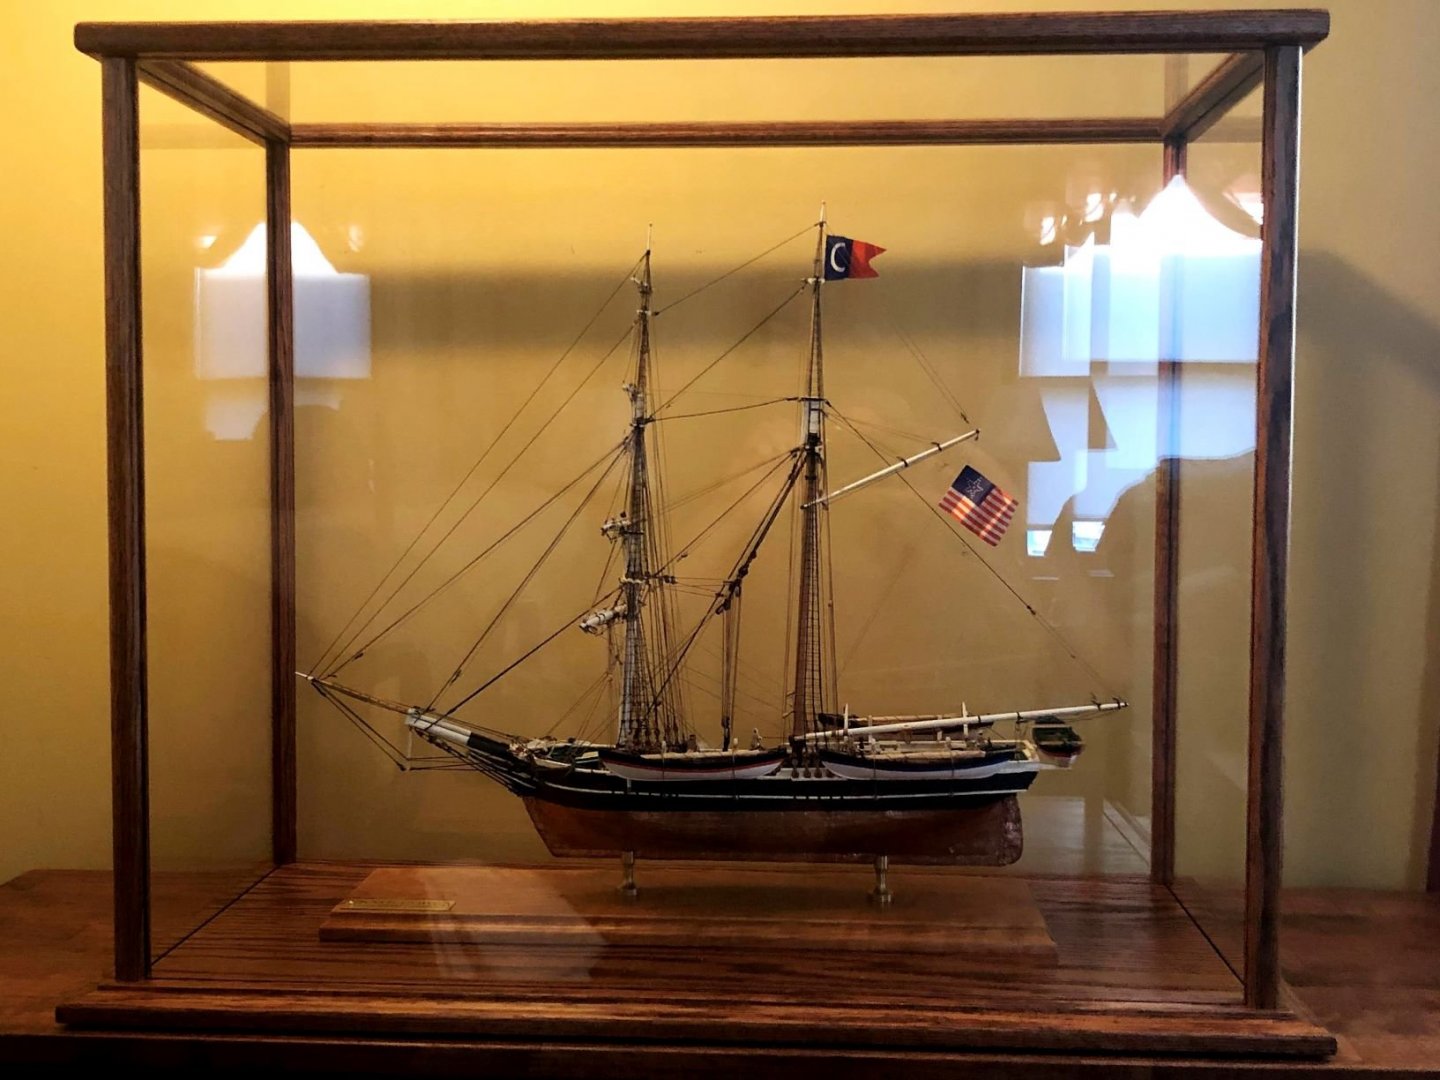
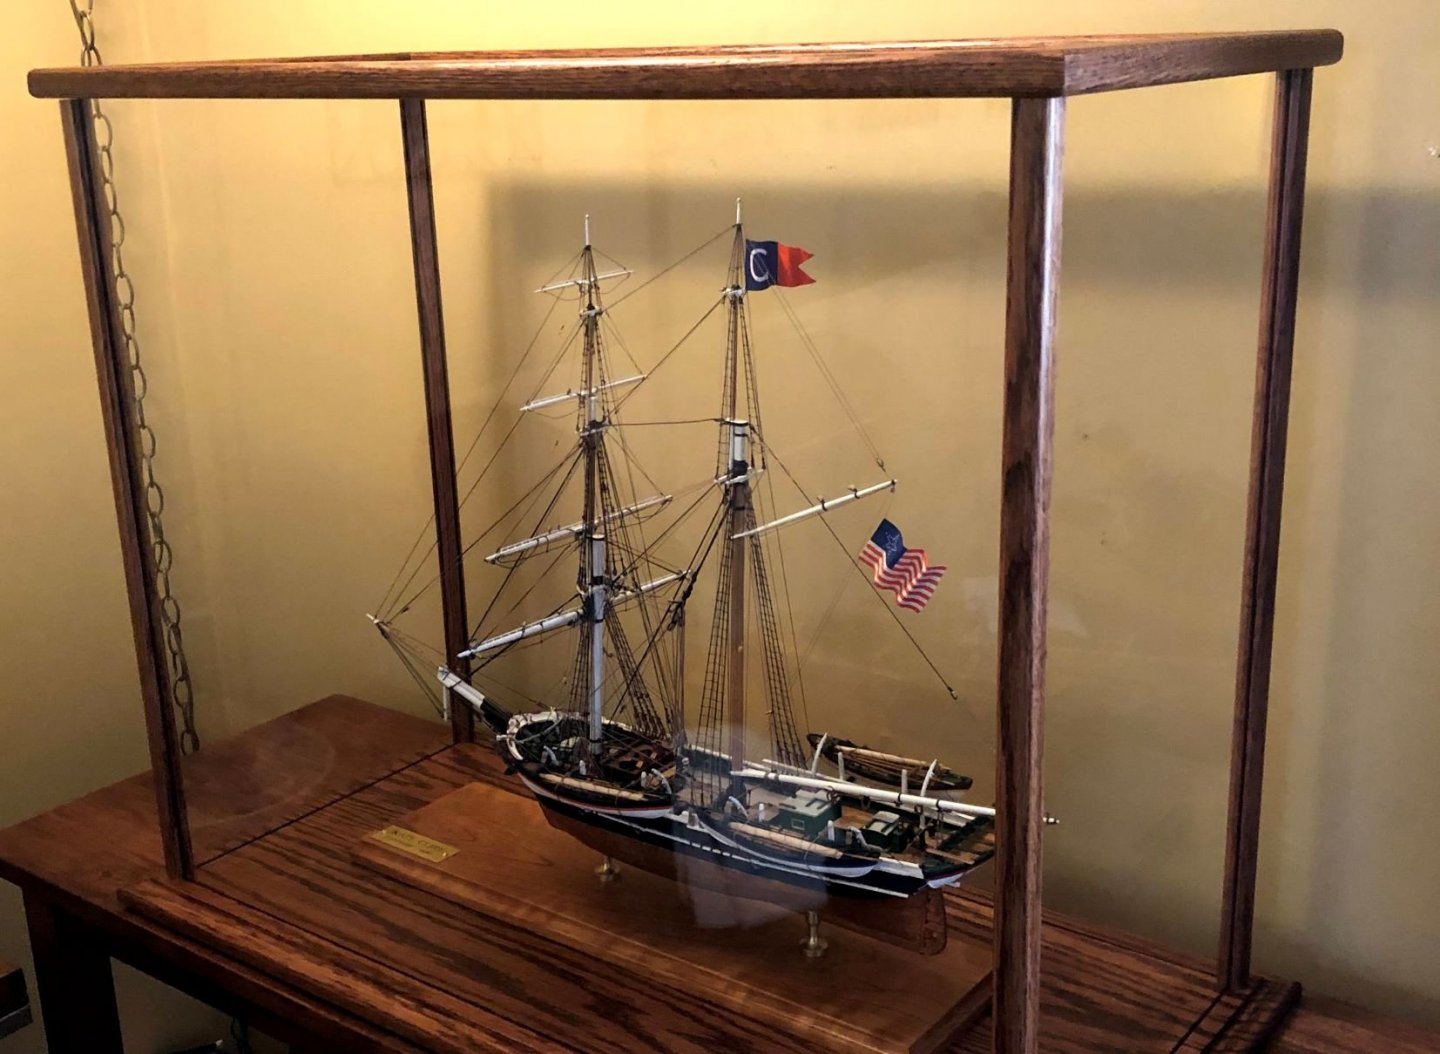
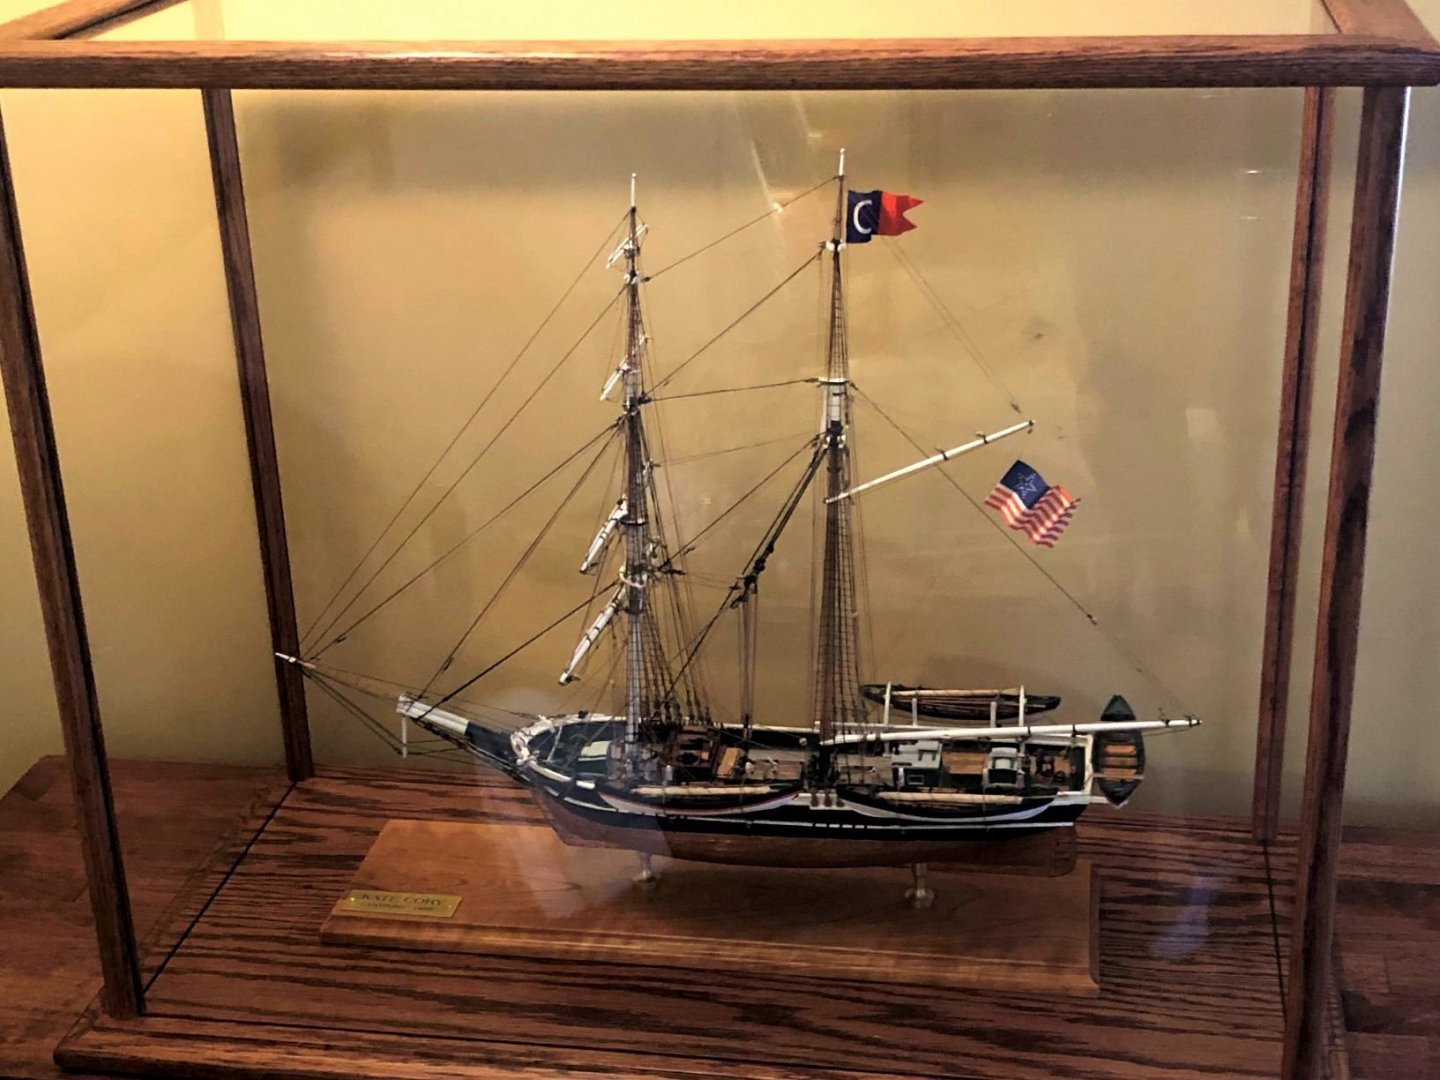
Thanks for the likes.. I put the KC in it's case today. Amazing how the case gives it that extra something.. I think it looks pretty good!
- 109 replies
-
- 8
-
-
- model shipways
- kate cory
- (and 1 more)
-
I have the Model Shipways Pride of Baltimore due to arrive in the mail any day. I’ve also ordered the rigging package for the Medway Longboat from Syren. I’ll probably start the POB, and somewhere in the middle take a break and rig the longboat. That should take me through the next 4-5 years. 😃 I also have a vintage ( early1980’s) version of the 1/8” scale Essex. That is one daunting model and will require a ton of scratch building. That will stay the shelf for now. Thanks for looking in.
- 109 replies
-
- 1
-
-
- model shipways
- kate cory
- (and 1 more)
-
Rigging in 1855 - Need a Sanity Check Please
Richvee replied to BANYAN's topic in Masting, rigging and sails
If I’m following correctly, your peak halyard has a take up end and a hauling end, both belayed at the deck. My 1856 whaler , Kate Cory has a similar setup with 2 single blocks on the gaff and one triple on the mast. I was confused on how this functioned. Michaelmys gave me a very good explanation on how this works. In this thread


.jpg.d83f7d3b61e5d758ddca30209ede6bec.jpg)