MORE HANDBOOKS ARE ON THEIR WAY! We will let you know when they get here.
×

Mike_In_RI
-
Posts
276 -
Joined
-
Last visited
Content Type
Profiles
Forums
Gallery
Events
Everything posted by Mike_In_RI
-

Protective topcoat over blackened brass?
Mike_In_RI replied to Mike_In_RI's topic in Metal Work, Soldering and Metal Fittings
Great... back to the project and thank you again. -
Protective topcoat over blackened brass?
Mike_In_RI replied to Mike_In_RI's topic in Metal Work, Soldering and Metal Fittings
Thank you both barkeater and wefalck for your help. The tubs & buckets are also ready for final coating. It sound easiest to just mount the bands and shellac/varnish everything in one go once I settle on the grade of finish. weflack: Would shellac also be a reasonable solution for adhering the bands to the tapered tubs so they don't drop off? I had been gearing up to drill and pin them. I just happen to have leftover shellac flakes from a French Polish project years ago. Thanks again, Mike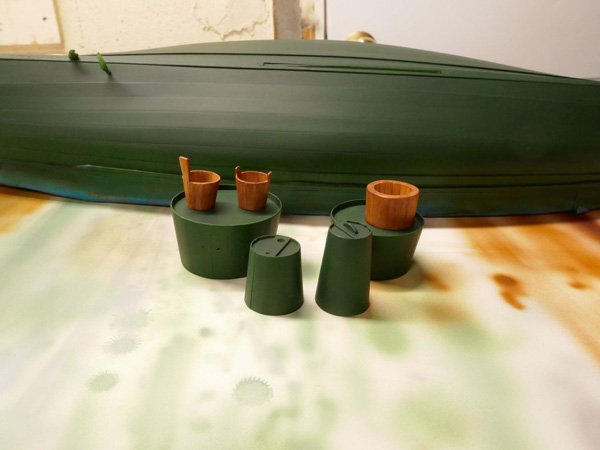
-
I have blackened brass hoops for assorted whaleboat line tubs and buckets. They look fairly uniform and have been washed, rinsed and polished. I'm about to mount the hoops but need advice before that about if/what fixative layer and assembly sequence I should use. i.e .. mount the hoops then varnish the hoops along with the tubs? ... wax the hoops and mount them after the tubs are varnished? etc. I also have several harpoons and lances that would need the same treatment. Any help would be much appreciated. Mike

-
OK, thanks for the clarification and (ahem) the correction. Looking forward to watching your project. Mike
-
Hi Dave, I've been checking in on your build for part time for some weeks now. If you don't mind, I'd like to follow your project full time. The Hannah is a possibility for my next build which could start in a couple of months. I have one question. In an earlier post you stated, roughly, the the plans show a flat keel where the model tells you that there should be a slight rise forward in the keel. By that do you mean if you maintain the forward frames fair at deck level, there would would be a growing "non-fair" area in the lower part of the forward frames? That is, how the issue present itself? Mike
-
Thank you again for the encouragement. I'm running into little roadblocks... finding suitable twigs for the harpoon wood and learning how to tie small knots in tight spaces. I also spent almost a day figuring out how to resize the photos in my log as they were unnecessarily too big. Good Luck on your new kit.
-
One popular supplier is K & S Precision Metals. ksmetals.com > retailers/distributors. Good Luck, Mike
-
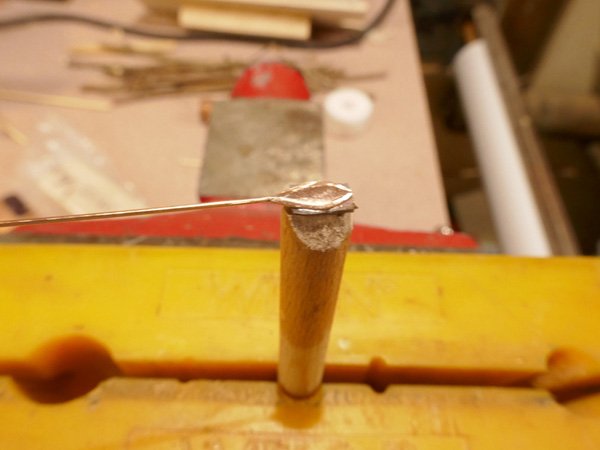
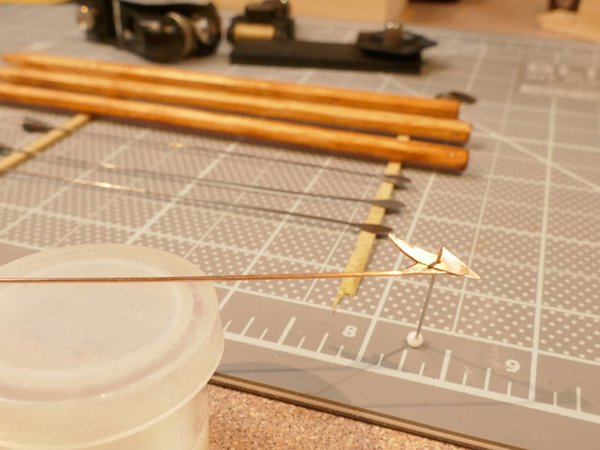
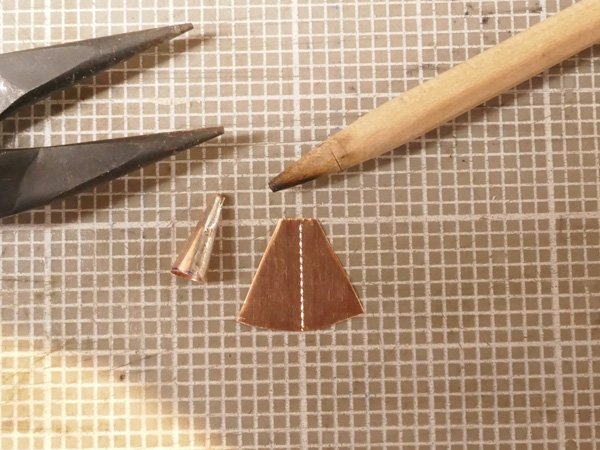
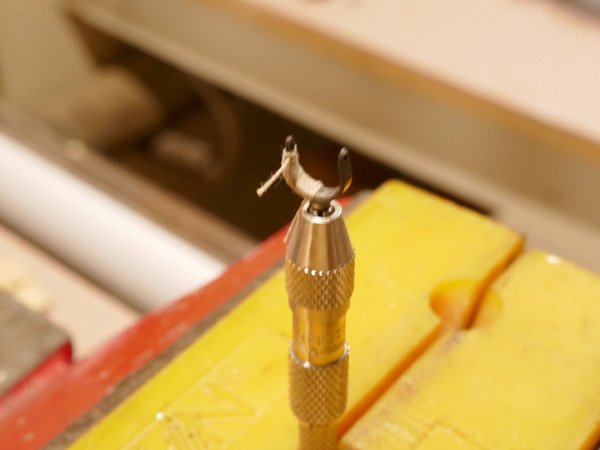
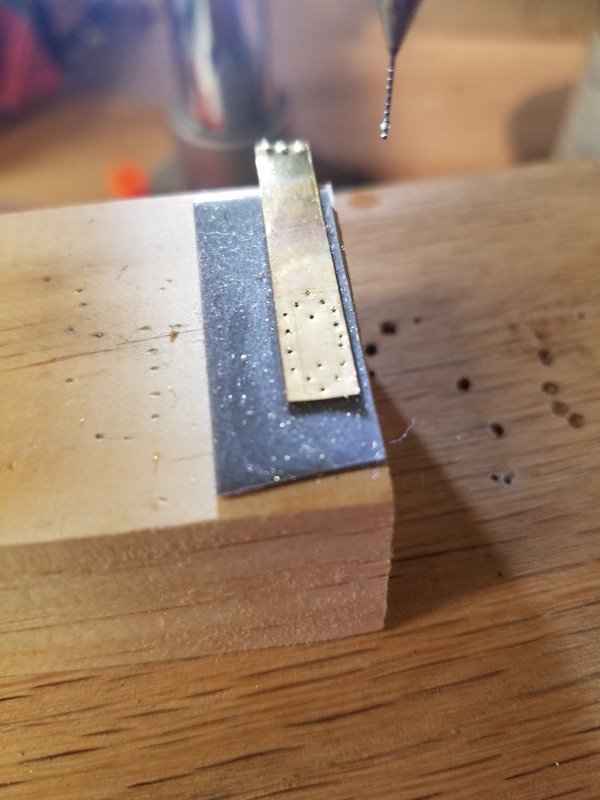
For the lances, it took a while to sort out how to hold the lance blade and file or grind it. I dropped using the thicker/folded etched lance technique in favor of using .025" copper sheet stock which is just about the same thickness as the lance shank. It seems there were a lot of methods to make lances over the years. Here is a shot of a full scale Beetle whaleboat lance where the blade is actually thinner than the shank. The shot is from the New Bedford Whaling Museum. This is the fixture used to hold the lance blade for finale grinding/filing. The blade is stuck onto the end of a shaped dowel held on with 3M heavy duty double-sided tape. The 3M regular two sided tape was too weak. The blade is drilled at it's base just a little larger the the copper shank and filed down to expose a small half circle for silver soldering the shank. The lance sockets are made of .005 copper rolled over with a tiny overlap. The final size, after lots of trials, is easier to get to by making it slightly oversized, forming it around the wire pliers and sliding it up and trimming to fit. These cones do not show once they are served and tarred but I enjoy working through different building techniques for some similar case that will surely show itself. There are four versions of harpoon irons suggested in the plans along with etched blade variants. The easiest for me was the "improved toggle iron" using the corresponding etched piece but not the suggested method for attachment to the shank. The suggested method is to hammer the end of .024" copper wire and drill it out for the blade. For me, there was no where near final copper area to drill and support the blade. It was much simpler to silver solder a small rectangle of .025" copper sheet to the end of the shank, drill it then shape to fit. Hopefully, I don't ruin it when putting a little pivot pin in there.

- 128 replies
-
- 4
-

-
- model shipways
- new bedford whaleboat
- (and 1 more)
-
Well, I'd have to say that your project is absolutely stunning. The build quality, the weathering art (which I truly envy) the presentation and the photography all bring ones attention right into the scene. Well done! Can't wait for the first make that the second photo of the Fifie. You're gonna need more space.
- 52 replies
-
- 1
-
-
- model shipways
- new bedford whaleboat
- (and 1 more)
-
OK, we have a few nearby Michael's so I'll see if I can make up a small assortment. Thank you for the help. The flags are really sharp. Is that a textile? Is the Adeline the same ship as the Adeline Gibbs? The later has it's logs digitized at the Martha's Vineyard Museum.
-
PJG, quick question if you don't mind. What is the type/brand of card stock that you use to paint with acrylics? The faux leather I've been using isn't thin enough for the knife sheaths. Thank you for any help. Mike
-
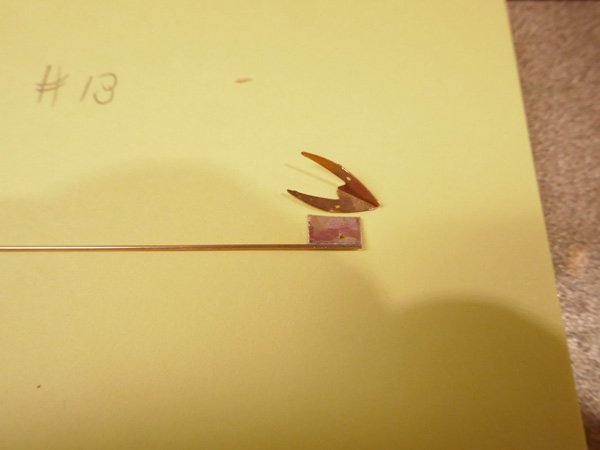
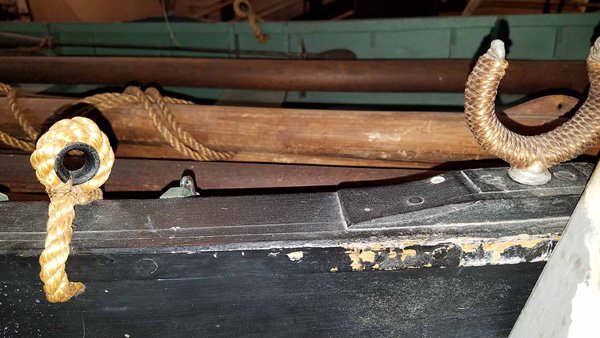
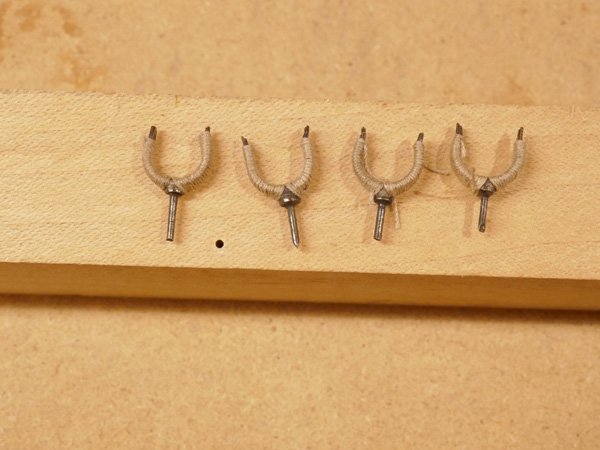
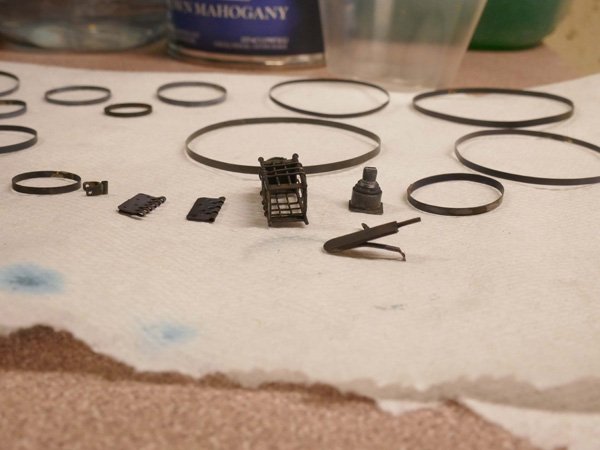
Thank you PJG. I appreciate your input. It was actually fun except for the grain reversal issue. After I posted the picture of the oars I read in the Ronnberg book that the last 1/2" or so of the blade should be more rounded. So, I fixed that and of coarse had to then re-paint that area. The lesson? Don't read the book after you think you have something finished. I've been working on the oar locks, hull painting and hoop blackening. Here is a picture of the rope work on an oar lock on one of the Delano half scale whaleboats at the New Bedford Whaling Museum. I have no idea how the ropes were started and finished so I just used clove hitches on both ends. Maybe someone can lend an idea. Luck finally struck when I was able to find a single color Vallejo Model Air color that was an almost a perfect match to the original 3 mixed colors (Golden Artist) that I had intended to use. So the hull now has 1 wet coat over 4 light coats of olive green. I should be able to get it done with 2 more wet coats. Originally, the brass blacking was a bit disappointing in that all hoops had some degree of blotchy bare spots. I've read just about everything online about cleaning procedures and tried several versions but could not quite get them right. As black as they were coming out of the Brass Black, when I started the polish procedure, I got flakes of reacted material coming off. It turns out that when I left a part in the solution for a while, the reacted material built up a to a thickness that became a "flake" ready to come off when polished. So the final fix in my case was to not even put the part into the brass black but to swab it evenly and constantly removing the discolored material. Literally, per the directions. In any case, all is well now, I just need to decide how dark to make them. I reworked all the hoops, the lantern, etc. The little piece in front that looks like a busted skate board is the steering oar brace. Back to working on the harpoon & spades. Mike

- 128 replies
-
- 5
-
-
- model shipways
- new bedford whaleboat
- (and 1 more)
-
Yes, gone are the days of perfect eyesight. When I restarted this project I treated myself to the glass lens version of the Optivisor. I had been using the plastic lens version on electronic projects for years and the glass lenses do make a difference.
- 52 replies
-
- 1
-
-
- model shipways
- new bedford whaleboat
- (and 1 more)
-
I just took a look at the James H review of the Fifie. Looks like you are going to have a lot of fun on that one! My only other wooden boat build, also of a whaleboat, has walnut exterior planking. Yours will look really great.
-
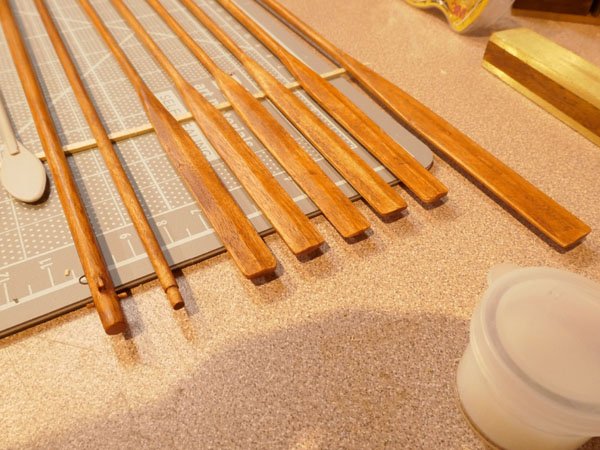
Short update. I wanted a natural look to the oars and proceeded to test all kinds of ways to get the color and and a good way to apply it. The oars are one piece birch wood. I will probably not use dowels again, at least not for oars. Half the oars had grain reversal along the blade which took all the fun out of chiseling them into that sharp section along the center of the blade. The coloring consists of three thin coats of sanding sealer each sanded back. Then several very thin wiped on coats of mahogany Vallejo Model Air acrylic using 50/50 paint/medium thinner. The first piece I worked with used no medium thinner and dried too fast and darker than I wanted. With some experimenting, the addition of the thinner medium made the application more controllable. Also, I should have waited to attach the iron staple, wood pin and shoulder cleats on the mast until after the wipe on process. It was awkward getting the color on smoothly in the little nooks and crannies. Lesson(s) learned!
- 128 replies
-
- 4
-
-
- model shipways
- new bedford whaleboat
- (and 1 more)
-
Wow, all the rope work really pops nicely. Well done.
-
Thank you for compliment on the compass. I had to put a little extra time into it... (it's my avatar). That shot is from the New Bedford Whaling Museum and they have a few of them on display. I have no experience with sail work but I'm leaning toward furled sails with silk span. Just last night I was looking at online tips for that. The presentation of this whale boat, as you mentioned earlier, generally tends toward being over crowded so I'm considering a version that has the eye catching stuff in the boat while the more repetitive stuff is on display in the case somewhere. Possibly, unless I'm to itchy to get to the next build, I'll include a davit look that does not include ships bulwarks. My next build.... great question. There are a few general ideas. A plank on frame build that is slightly above my current skill level with little/no above deck work. Or, a ship cross section build i.e the Constitution. Or, based on the great look of your weathered items, I might dip my toe into a scratch build of a partial whale boat in a boat builder workshop setting. The last one being a big leap for me as my artistic skills are ... none.
-
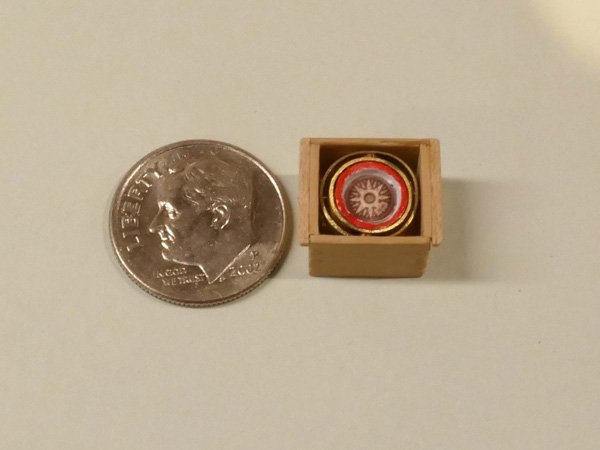
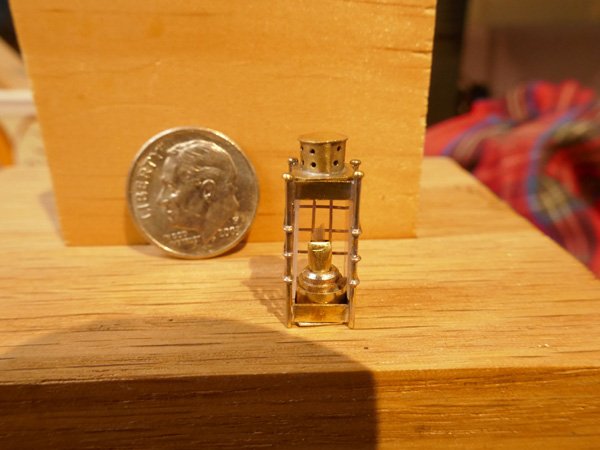
Thank you again for the encouragement. I'm +1 for getting in the practice and -3 for eyesight. Here is the final version of the lantern after using the "Brass Black". .. and the compass is now in the compass box. I hogged out the zinc compass that came with the kit in order to paint it and fit the rose. Now onto painting the oars...

- 128 replies
-
- 8
-
-
- model shipways
- new bedford whaleboat
- (and 1 more)
-
Your wooden harpoons & lances came out far better than my photo etched ones. I made them weeks ago and haven't bothered putting a finish on them. For me, I couldn't grip them firmly enough to shape them the way I wanted. I'm thinking about making a new set out of solid copper with a piano wire shaft. Again, the copper wire shaft is too soft, even after tempering, to hold firmly. I had not even considered wood. Whatever your wood is, I'm guessing box, seems to do the trick, well done. Great grapnel & bucket.
-
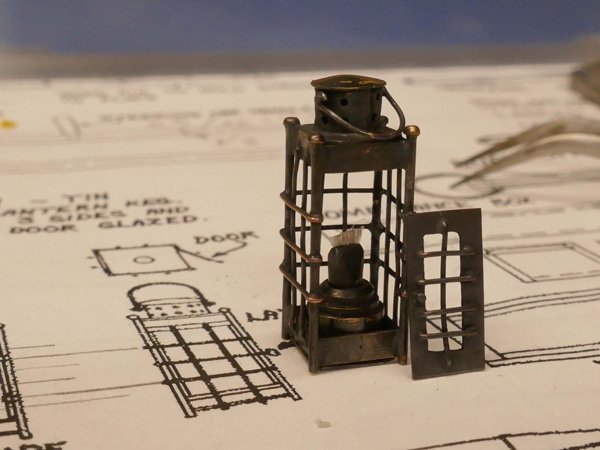
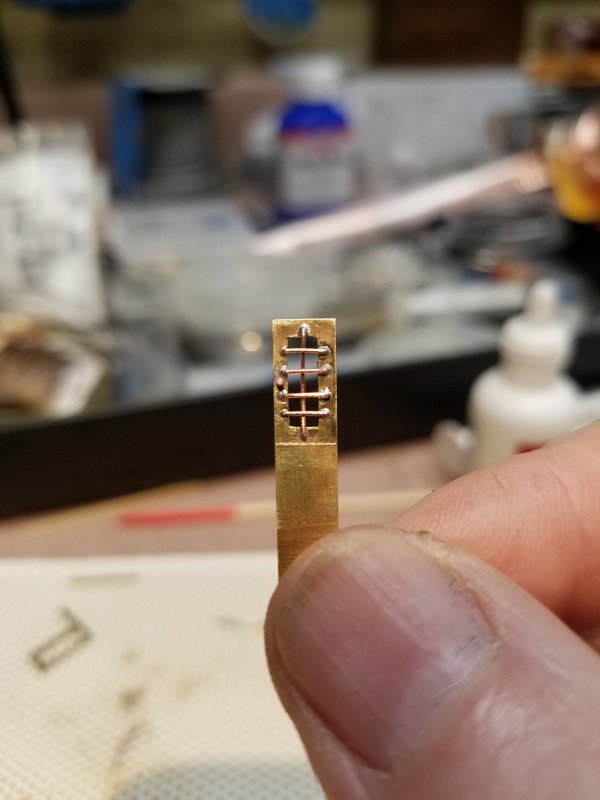
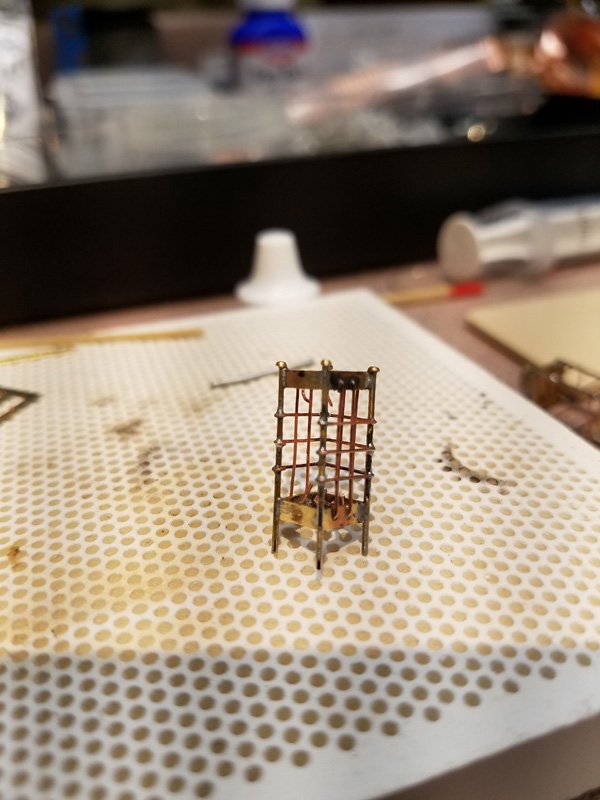
Thank you PJG. I can see that a lot of the aesthetic decisions that I have been putting off are catching up with me. i.e as you mention the presentation choices. Re: The boat lantern. This small part was a real learning experience for me. Although it will be almost, if not, invisible, I needed to learn more about fine work with sheet metal, soldering, etc. So after three version of the lantern... very crooked, crooked and almost straight... I did get a satisfactory boat lantern finished. It even has a wick just to up the parts count. The frame is made from 2 small pieces of 1/4" square brass tubing supported by 4 brass pins. The pin heads are ground down to emulate the sample in the plans. The cage wire is .014" copper soldered horizontally on 3 sides to the brass pins and vertically to holes in the brass stock. It took the longest time to make an acceptable door. Center punching at that scale was troublesome. The solder joints are on the back side of the door to minimize removing the excess solder. I choose to make it an oil lantern rather than the candle version in the plans. By now, I can't wait to get back to wood and sawdust. Mike
- 128 replies
-
- 9
-
-
- model shipways
- new bedford whaleboat
- (and 1 more)
-
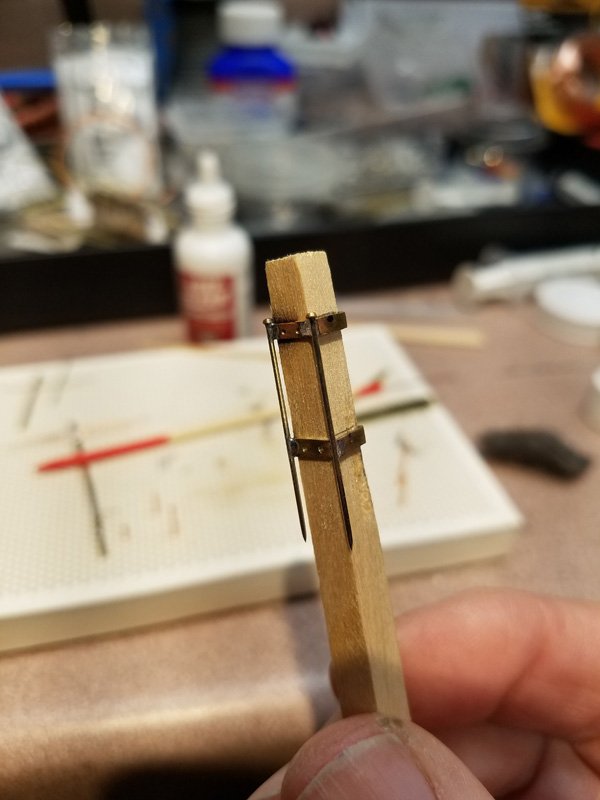
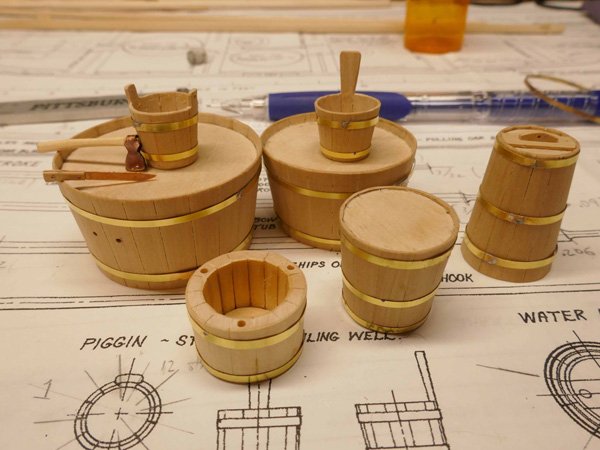
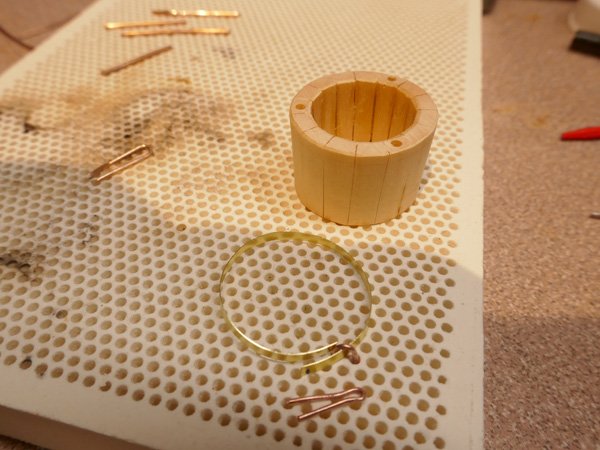
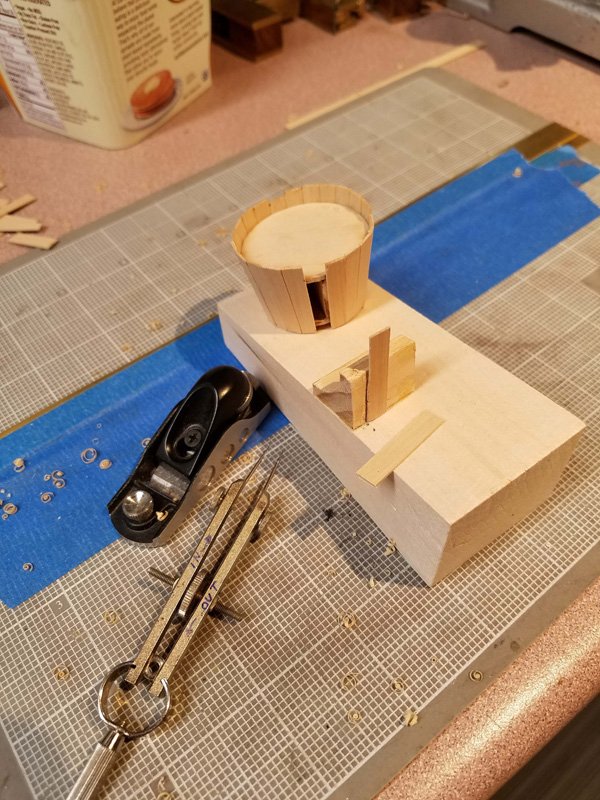
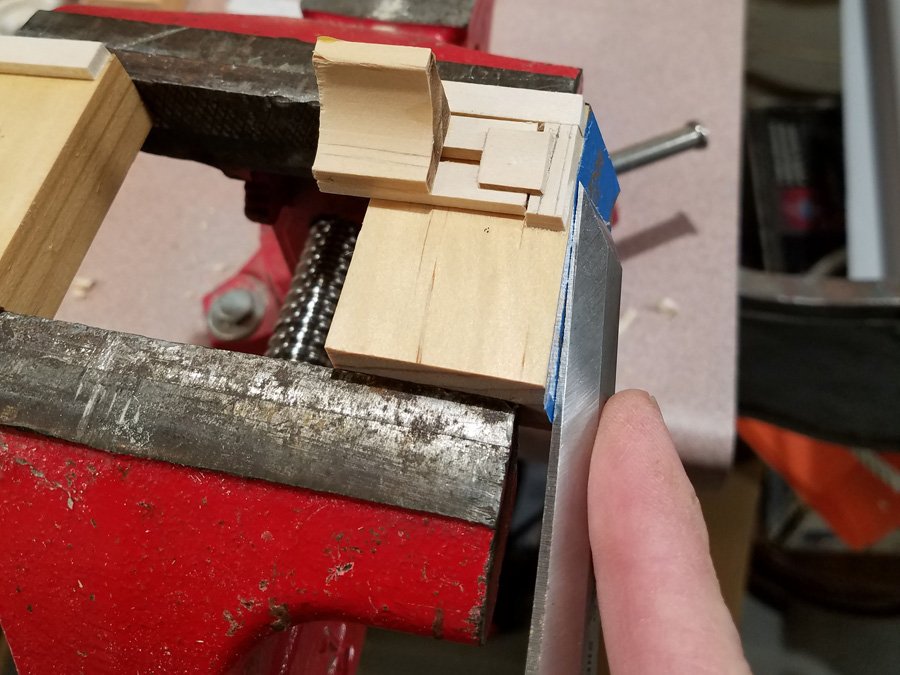
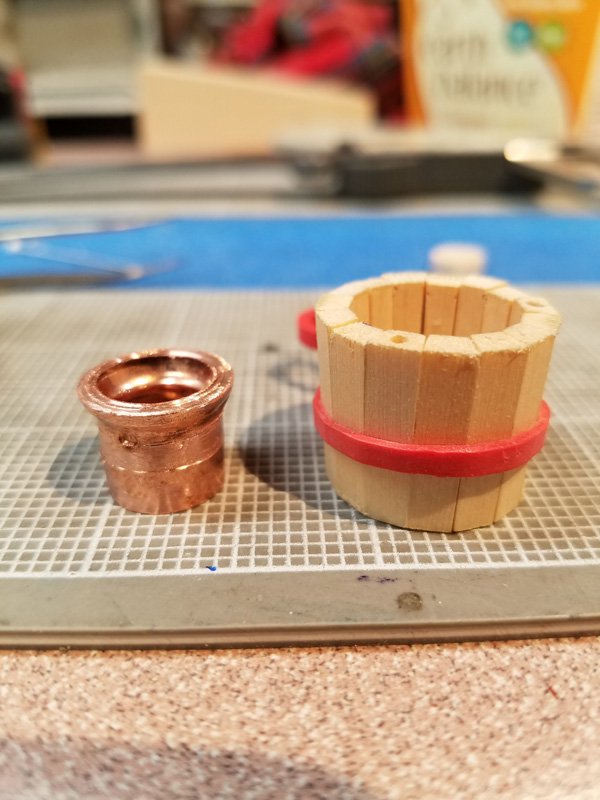
Well, that was a fast 3 year break from ship modeling! It's time to get back to the whaleboat project so all the sawdust creating tools are back on the bench. I began working on a lot of the smaller accessories of the whale boat. Most of that time was spent trying to develop some new skills i.e silver soldering for the cooperage and lances, etc. The lantern took three versions to get (almost) right just from learning how to drill those tiny holes. For me, the kit basswood is too thick for the buckets so I took a shot at building them with individual staves using 1/32" boxwood and a very sharp chisel. After the first one, the job became easier notwithstanding the drogue which took 3 different method to get right. The cut down copper fitting was used to maintain concentrically between the upper and lower inside diameters of the drogue. The cove molding piece is holding and controlling a drogue stave. The 3/4" chisel is sliding against an angled (12 degree) piece of pine to set the inside angle of the stave. The inside face of the stave has 2 pair of marks on it to set the taper along it's length. Below is the fixture used to plane down the stave edges with a small bevel at the joints. Hoops of .005" brass were sliced to 1/16" with a heavy old paper cutter. The joints were solder using silver solder and a temperature controlled soldering station mostly used for electronic projects. "Model Building with Brass" by Kenneth Foran is a great reference. The two line tubs and the drogue have staves that were not bent and were just sanded round. The remaining cooperage has staves that were steam bent with a floor steamer we got that has a little attachment for small areas. The boxwood bent easily and the joints were almost too flush as I like to see a small gap. Most of the completed small parts are not yet painted, stained or blackened.
- 128 replies
-
- 4
-
-
- model shipways
- new bedford whaleboat
- (and 1 more)
-
Great series of start up shots. The whale boat kit along with the build manual is a great choice. I am working on the same kit "anew" ... took three years off the build to work on two other hobbies. Shortly, I will begin to upload more log shots of work I've re-started over the last few weeks. In any case, I can appreciate how well you are doing especially using the weathering style. Are you airbrushing? Heads up. The laser cut cooperage wood is out of scale. Mike
- 52 replies
-
- 3
-
-
- model shipways
- new bedford whaleboat
- (and 1 more)
-
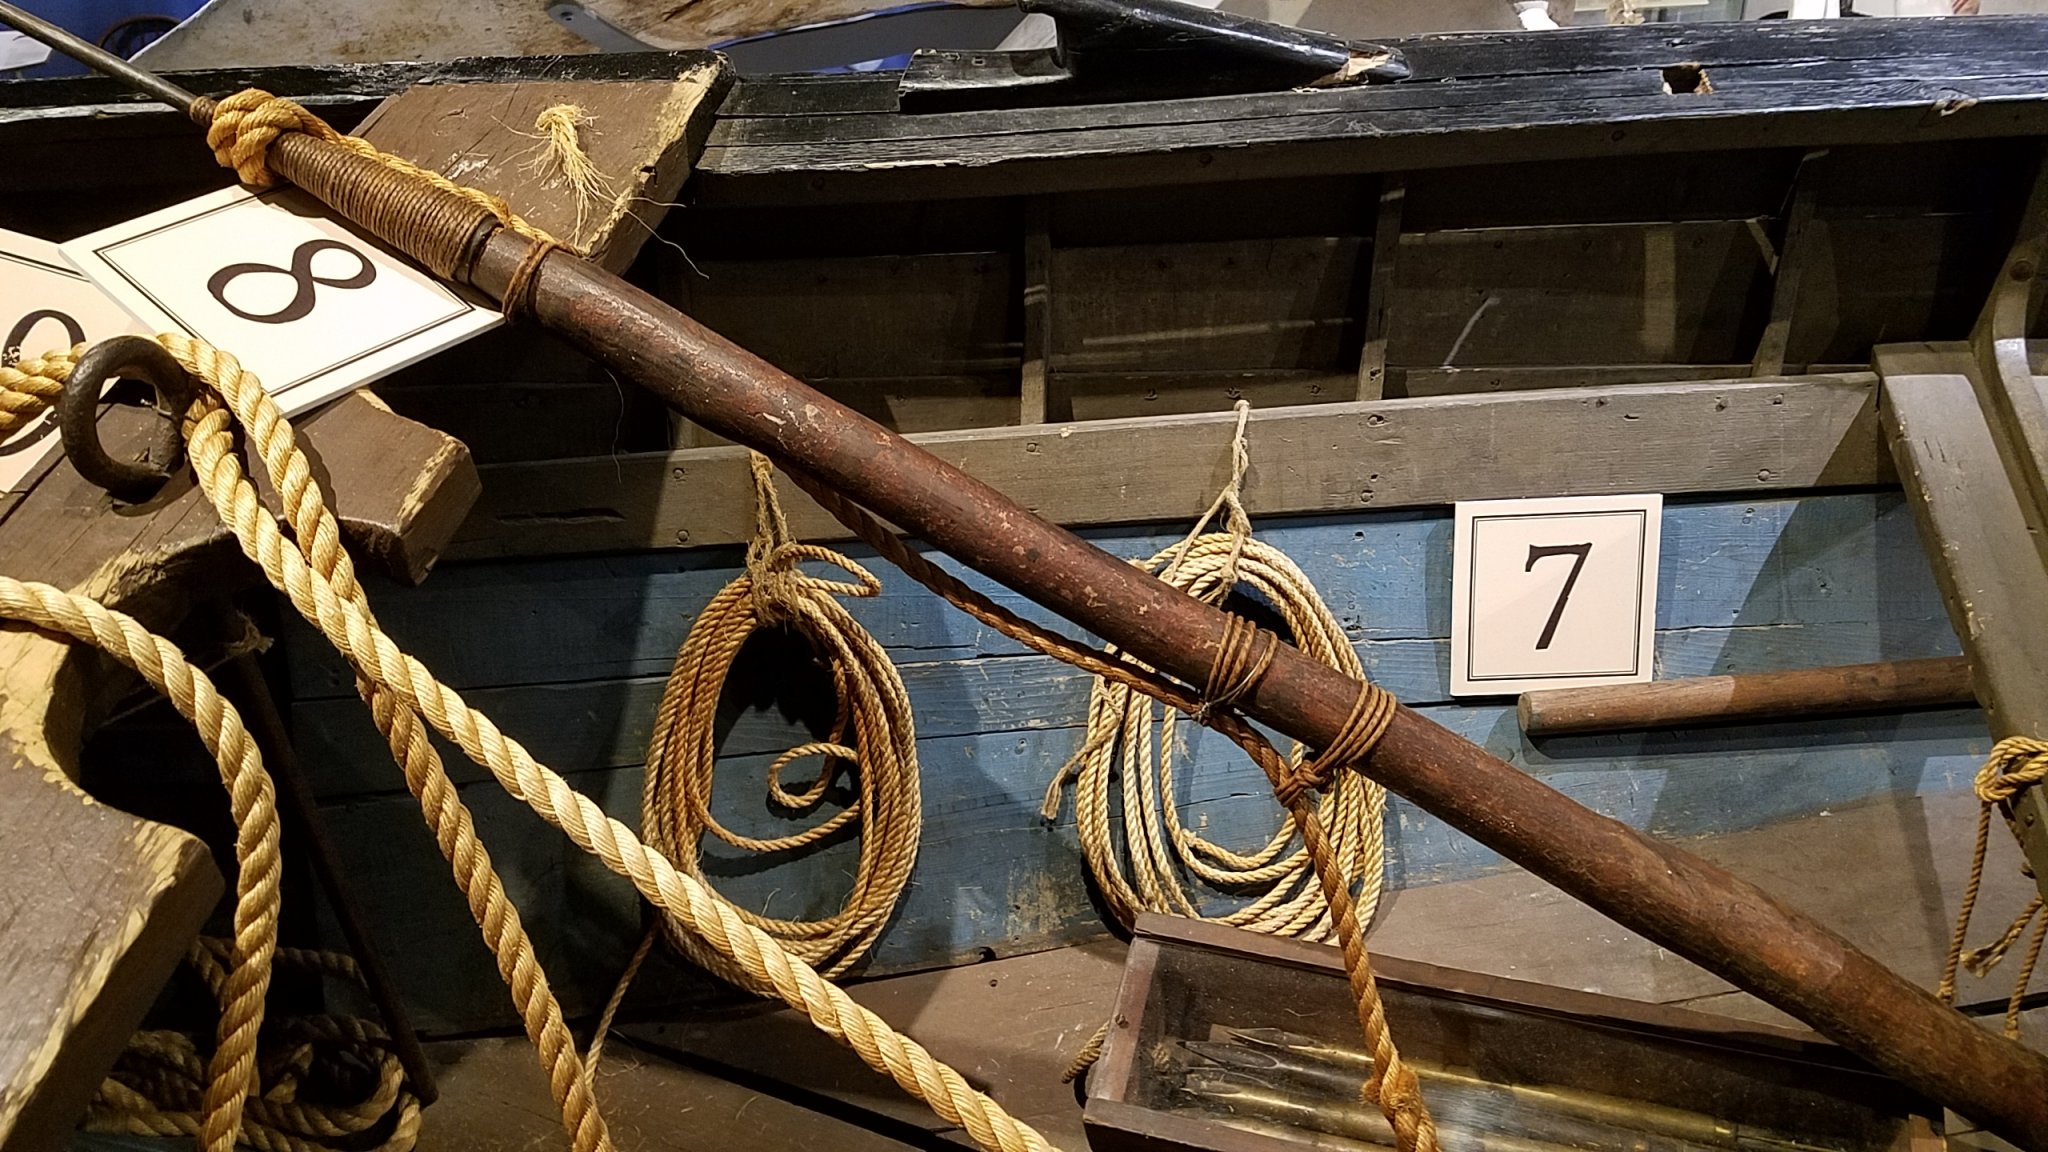
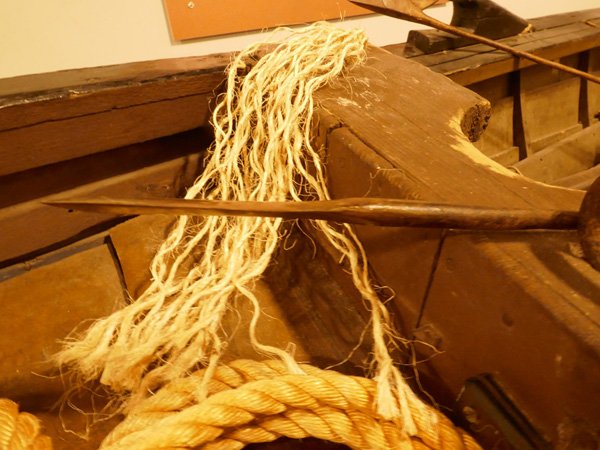
Great model, I will certainly check out you build. Very nice job. Just in case you need support documentation for the rat .... "A boy, a rat and a whaleship". This whaleboat is in the New Bedford Whaling Museum. You can make out the almost used up lance tales. Without knowing any better, it might be (or not) that the lance tip was tied to one of the thin tails in place and just yanked out when the lance was grabbed. I just noticed in Ronnberg's book, page 121, his model shows the tails with stopping knots. The photos in the build manual that came with my model are almost impossible to make out. They are copies of copies, etc...

-
Re" Lance Tails". Please ignore if this has already been answered. From page 33 of the Ronnberg book (and build manual). ".... a bundle of rope yarns ".... These were called "lance tails" by Walter Channing in his plan of a beetle whaleboat; their name hints that the business end of the lances were tied down to the thigh board until needed during the lancing process. "
-
Thanks guys for checking in. Yes, I will get going again on the whaleboat when the snow hit's. I'm up to my ears now in broken quad copter parts now so am looking forward to my winter hobby. Mike
- 128 replies
-
- 1
-
-
- model shipways
- new bedford whaleboat
- (and 1 more)