MORE HANDBOOKS ARE ON THEIR WAY! We will let you know when they get here.
×

Mike_In_RI
-
Posts
276 -
Joined
-
Last visited
Content Type
Profiles
Forums
Gallery
Events
Everything posted by Mike_In_RI
-
 Hi PJG, I just now came across your build log. Great progress.. as usual, and remarkably clever. When I read about horizontal hull sawing all the oxygen left the room 😰 but what a great job! The wood combinations really work well together. Mike
 -
Well done Jean-Paul. Great detail on the furniture, rope work, display, colors ... everything. Mike
- 164 replies
-
- 2
-

-
- first build
- model shipways
- (and 2 more)
-
Hi Fentone, nice shaping work on the bulkheads. So your first exterior hull planking job is at hand. This whaleboat is a great project to plank... not to big and fixable if things go south. Maybe you have already done this but already but, if not, please read the planking literature and tips in this site before going any further. At the top of the forum web page see >> More >> Planking Techniques. There are time proven systems to do this to get great results and avoid a lot of frustration. i.e, the better we get at pre-bending the planks, the less we need to clamp. Essentially, all the bulkheads are marked out before any planks are installed. In the case of the clinker (your model), the mating surface between the last plank installed and the next plank should be smoothed out for a better joint. Also, the fore and aft planing may need to be treated differently... check the drawings. Mike
- 66 replies
-
- 1
-

-
- Providence
- Artesania Latina
- (and 1 more)
-
Jean-Paul, I, just-in-time, went through your entire build log. Your model has a great traditional classy look to it. The detail is superb and the color combinations are great..... Is that the finish line you see out there? Mike
-
Hi Alan, actually, I saw the idea of rolling the splice in one of you posts earlier this year and have been doing that ever since! My compliments.. it also balances out lumps & bumps. Thanks for looking in ... I've been taking a look at your Bellerophon CAD project. That is quit an undertaking! The learning curve for those programs is quite steep... again my compliments. I use some CAD software now and then for electronic circuit hobby projects and tried FreeCAD for the project enclosure. Mike
- 128 replies
-
- 1
-
-
- model shipways
- new bedford whaleboat
- (and 1 more)
-
Thank you Steve for following. I was just pouring over your Mayflower work... especially the planking. After seeing that, I'll be sure to do a practice planking project before a the next serious build! Very nice. Mike
- 128 replies
-
- 2
-
-
- model shipways
- new bedford whaleboat
- (and 1 more)
-
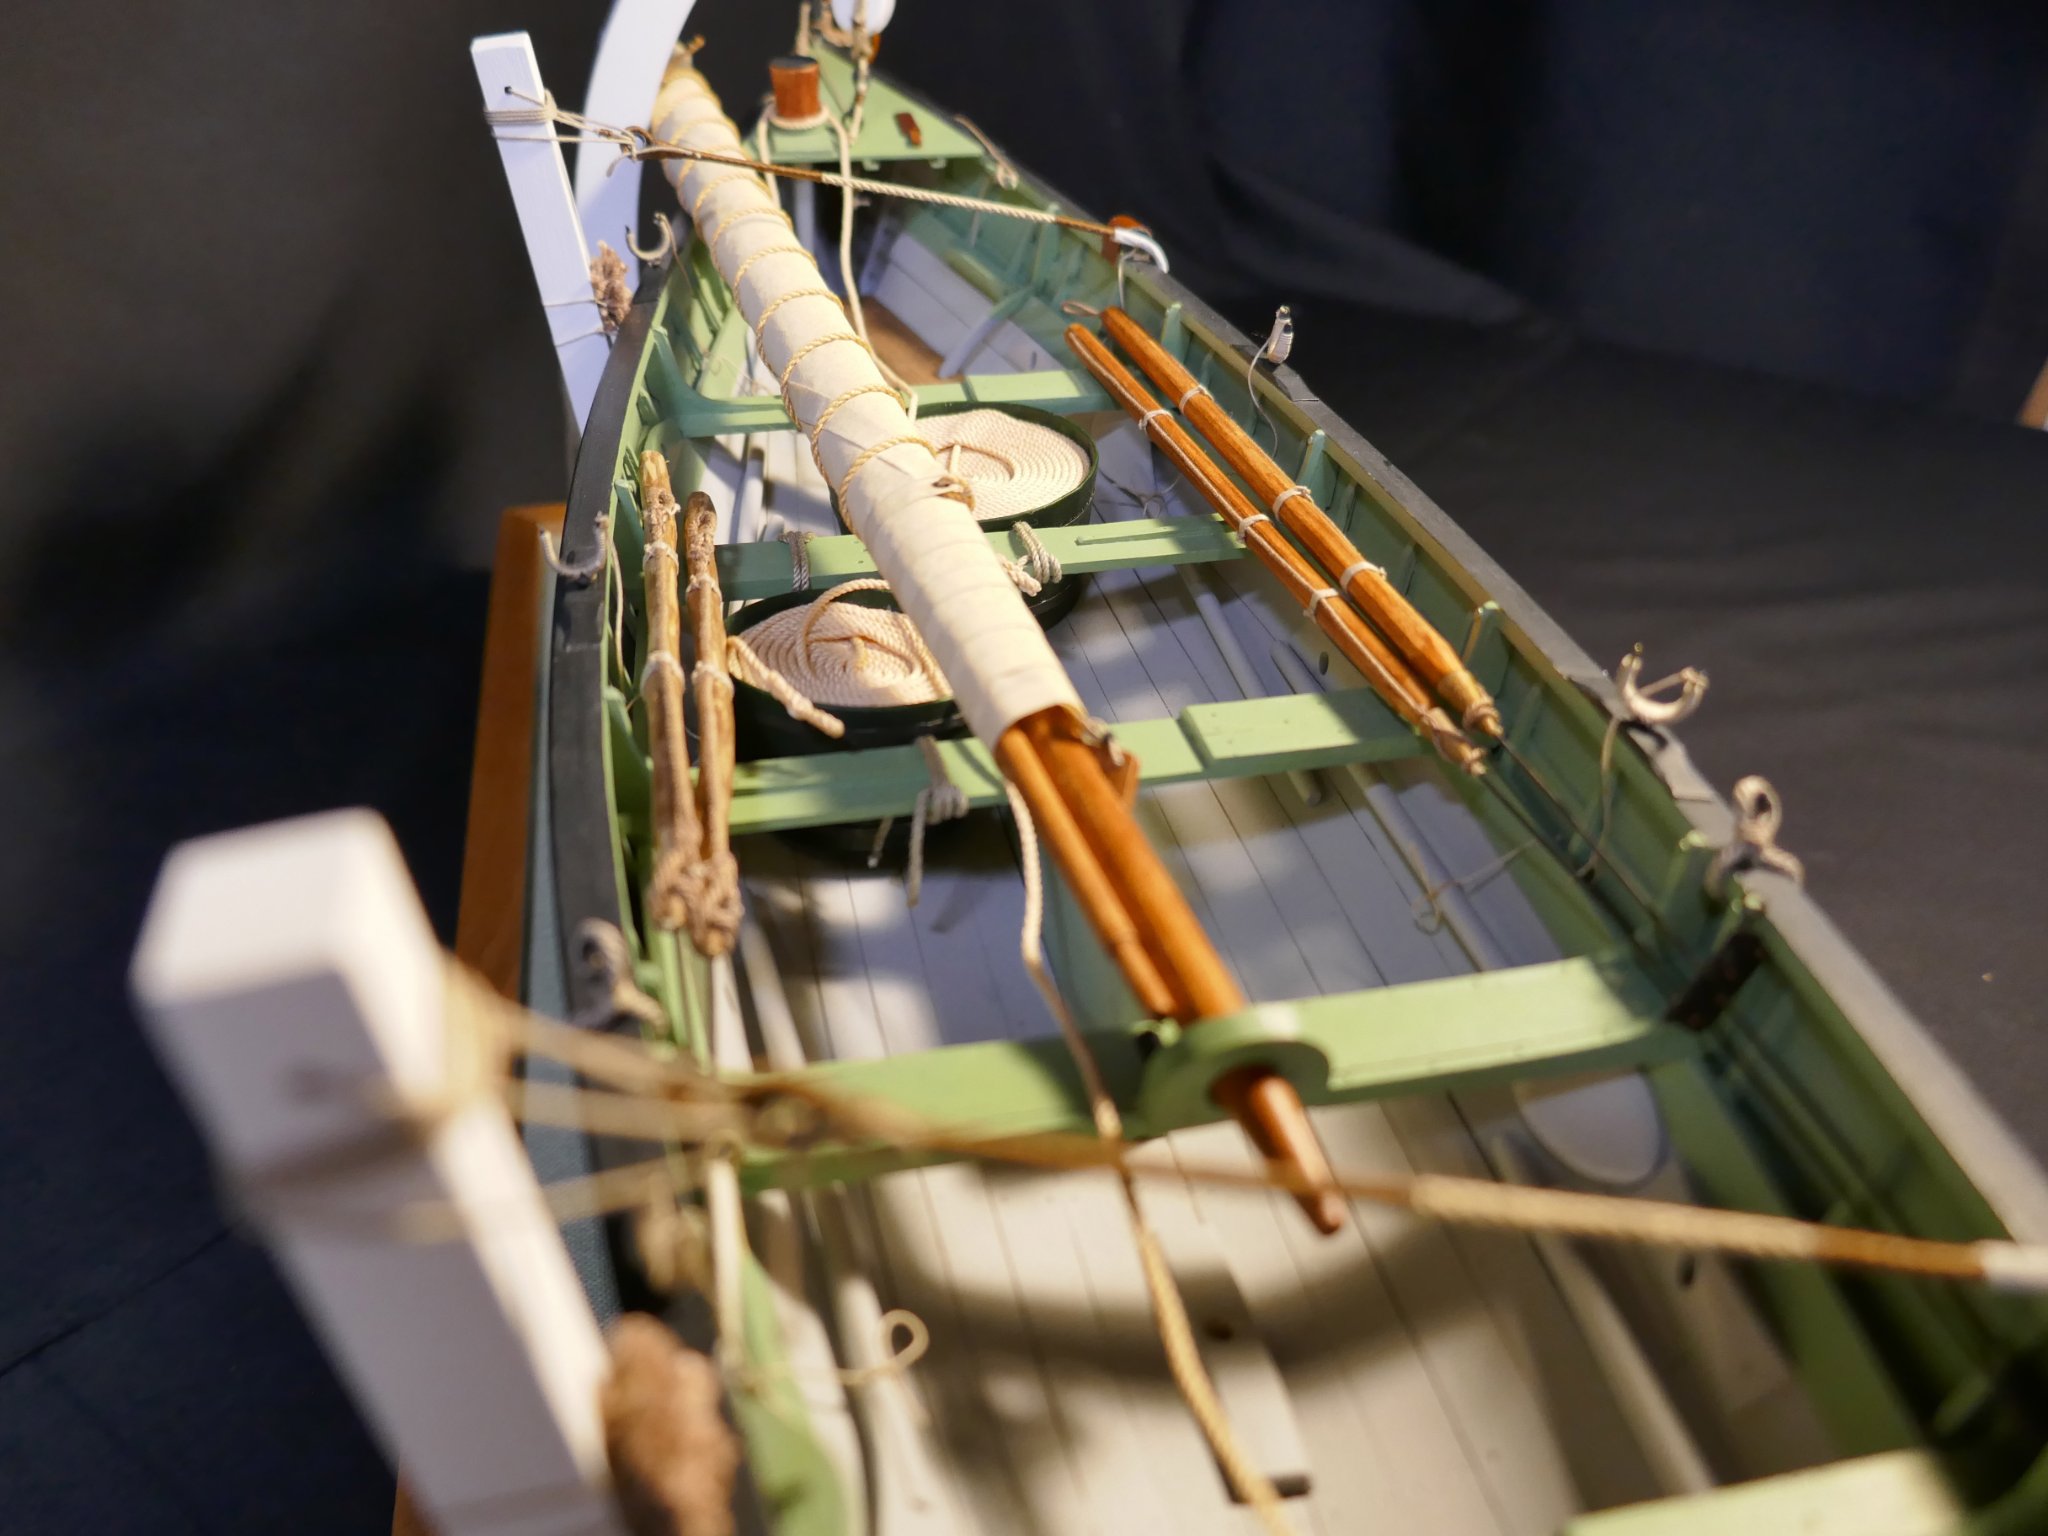
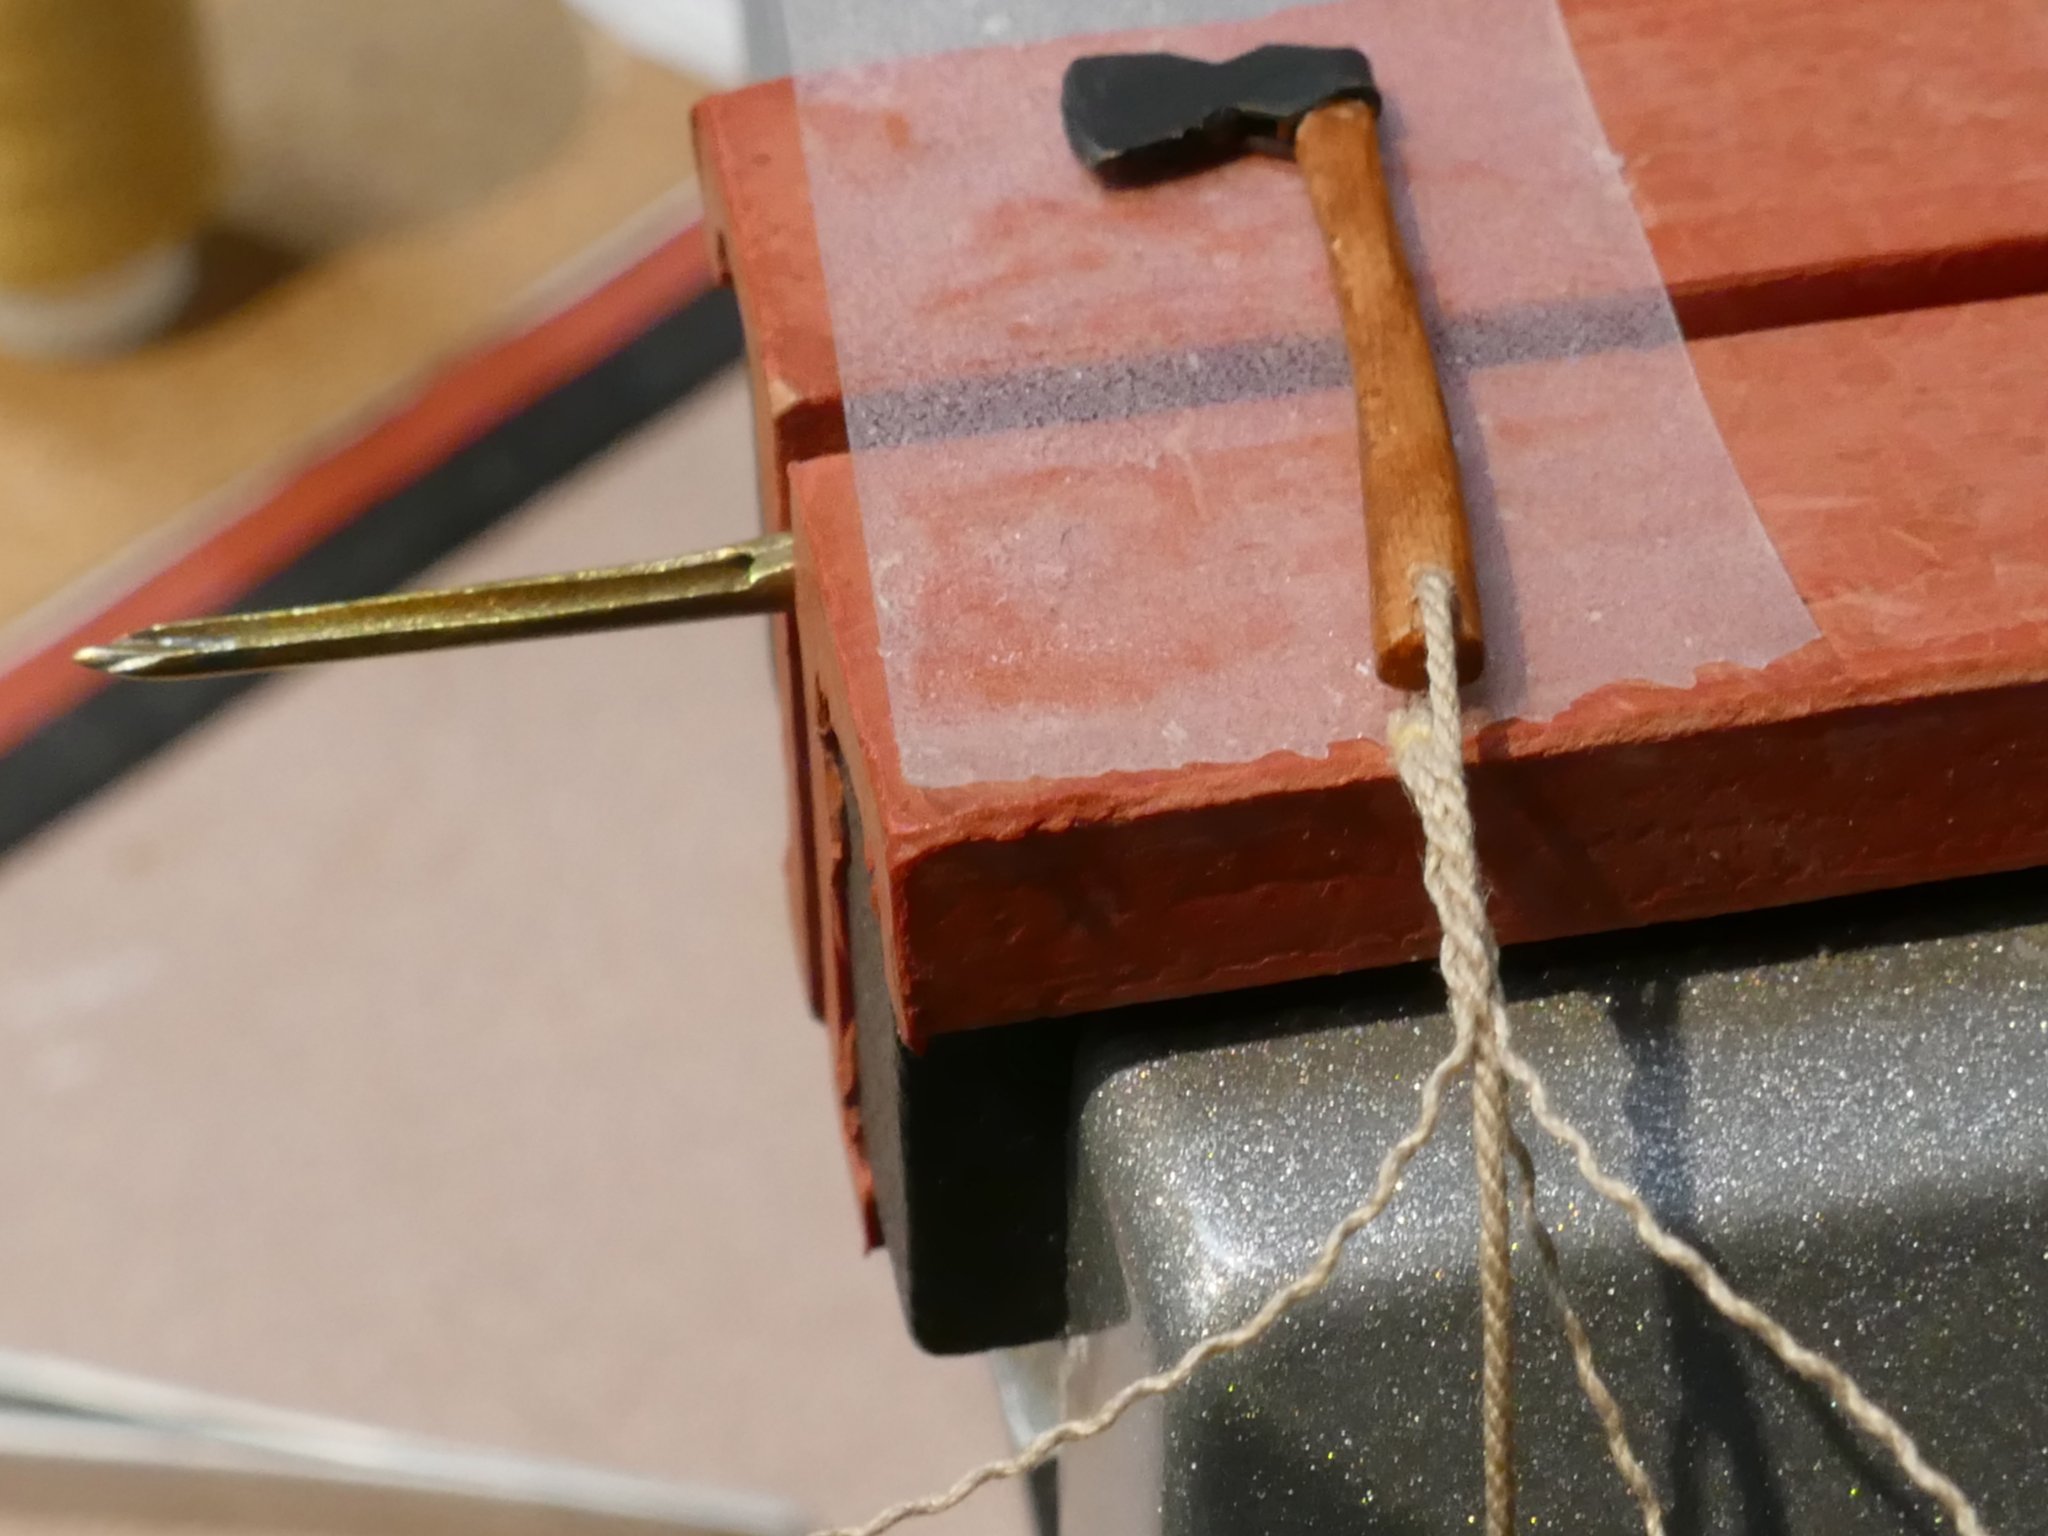
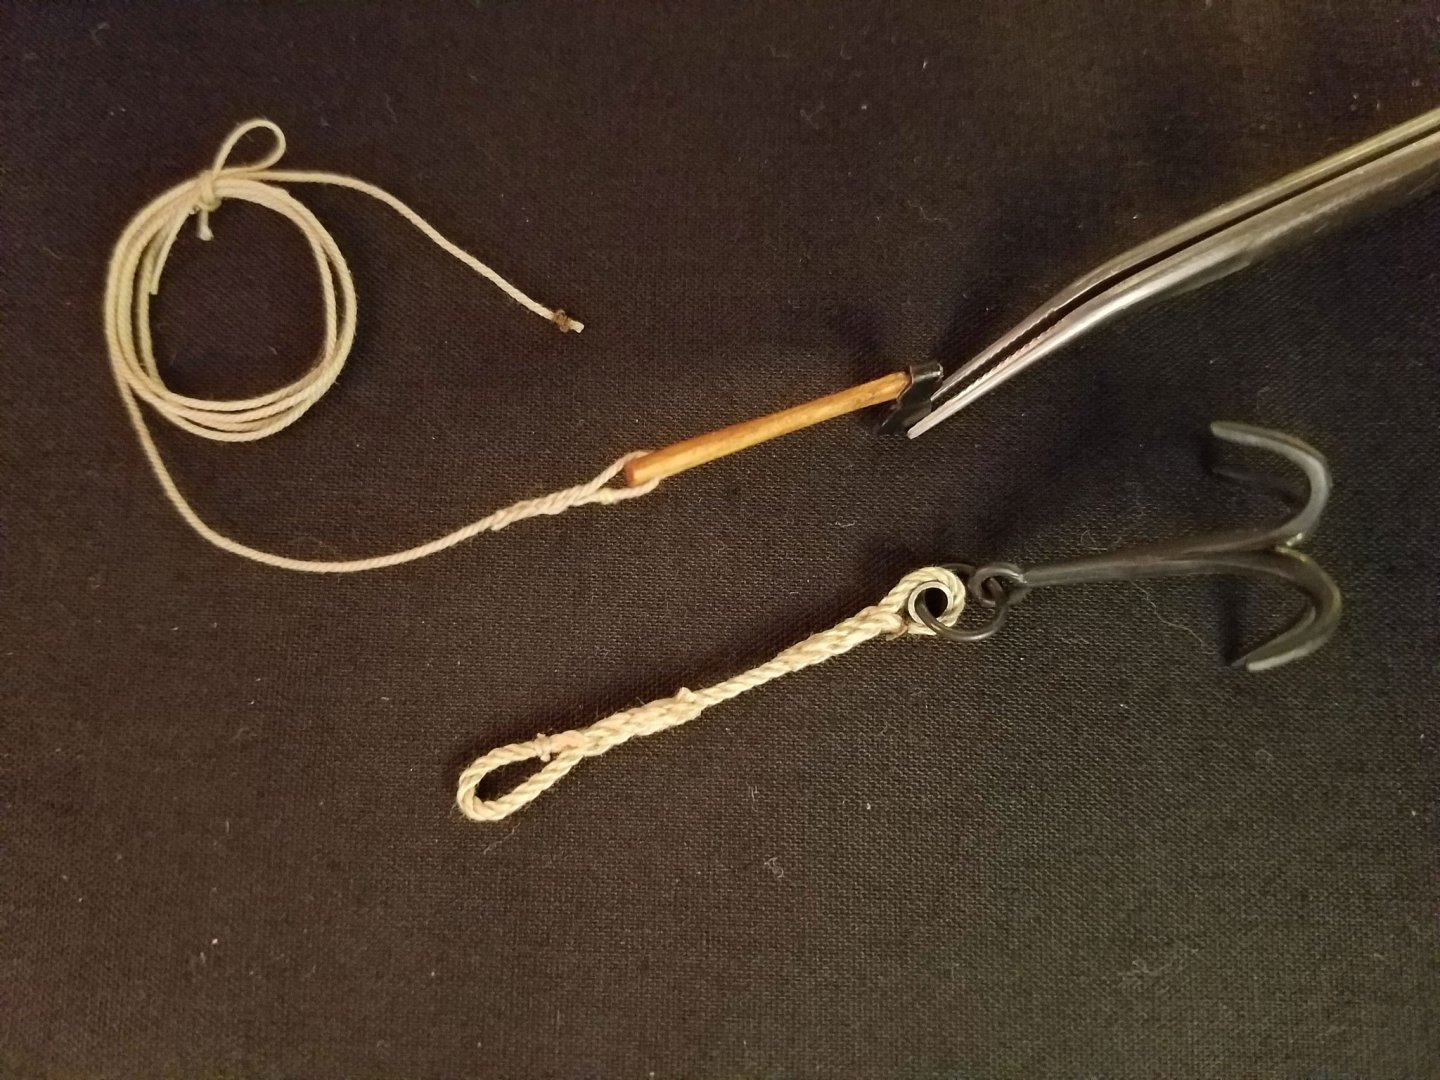
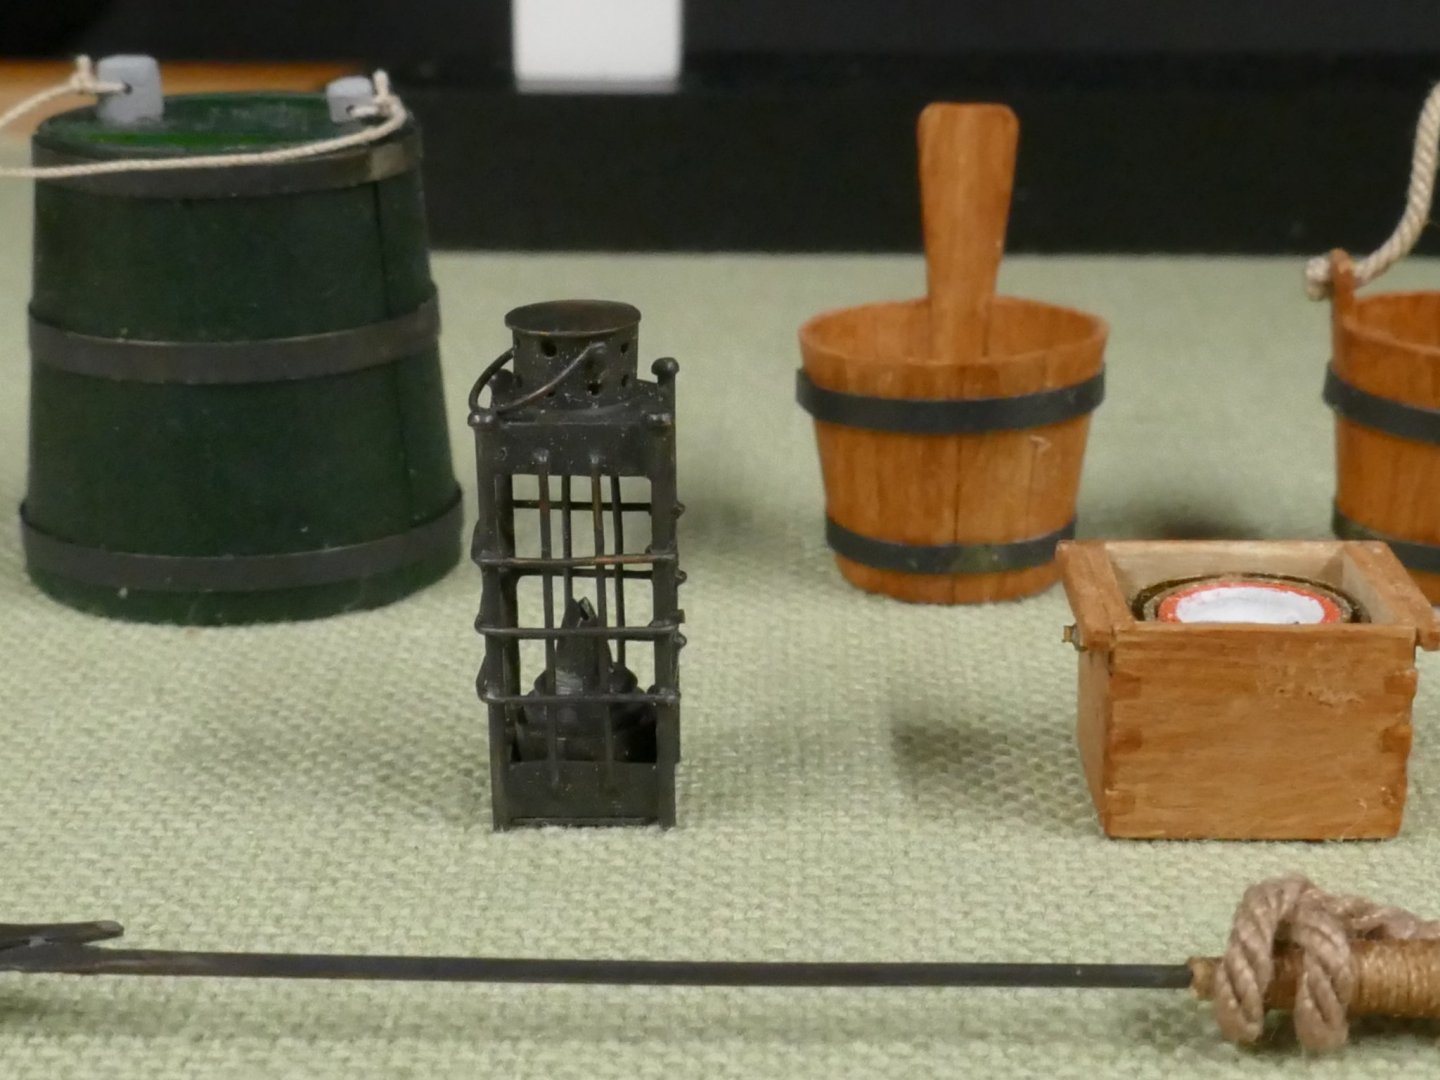
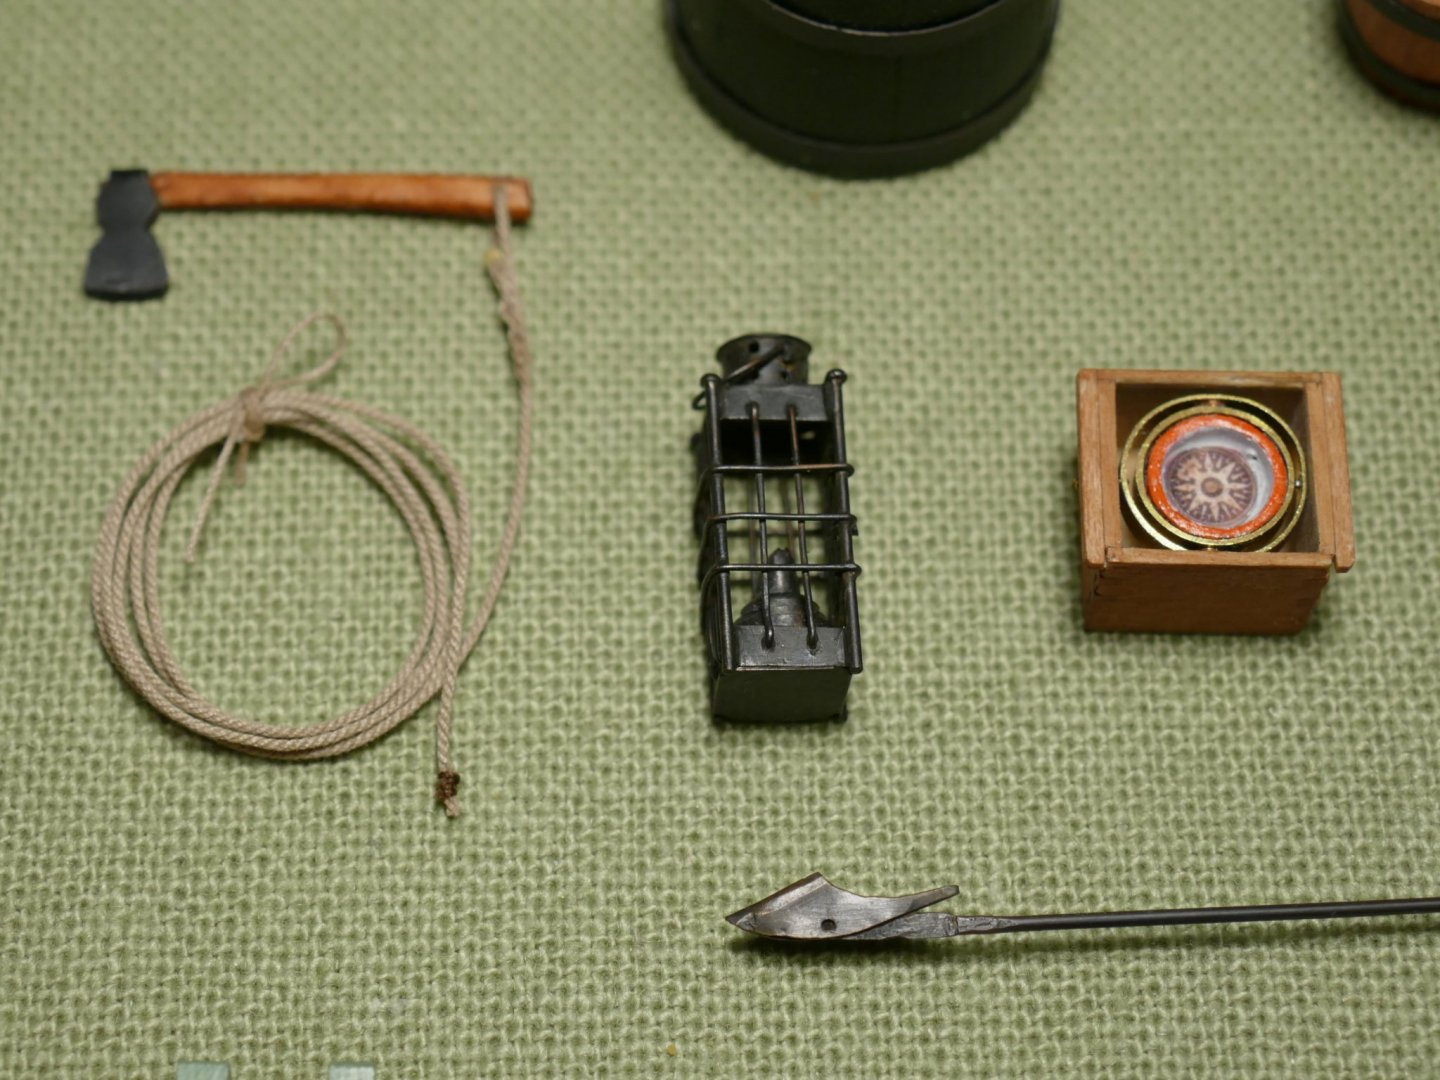
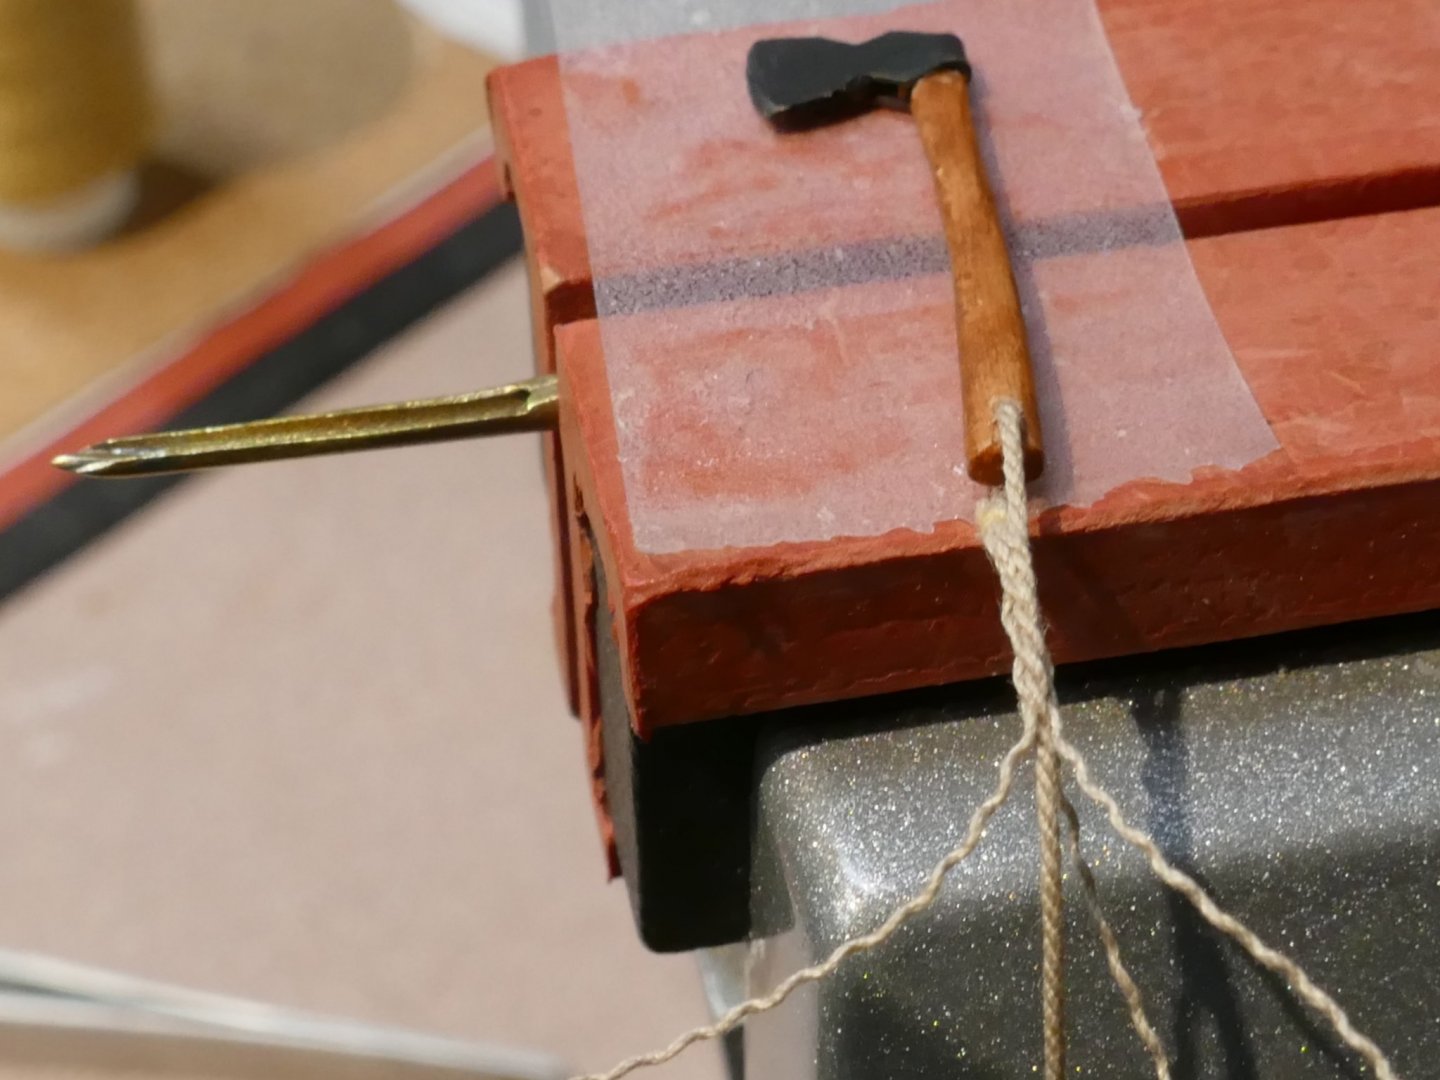
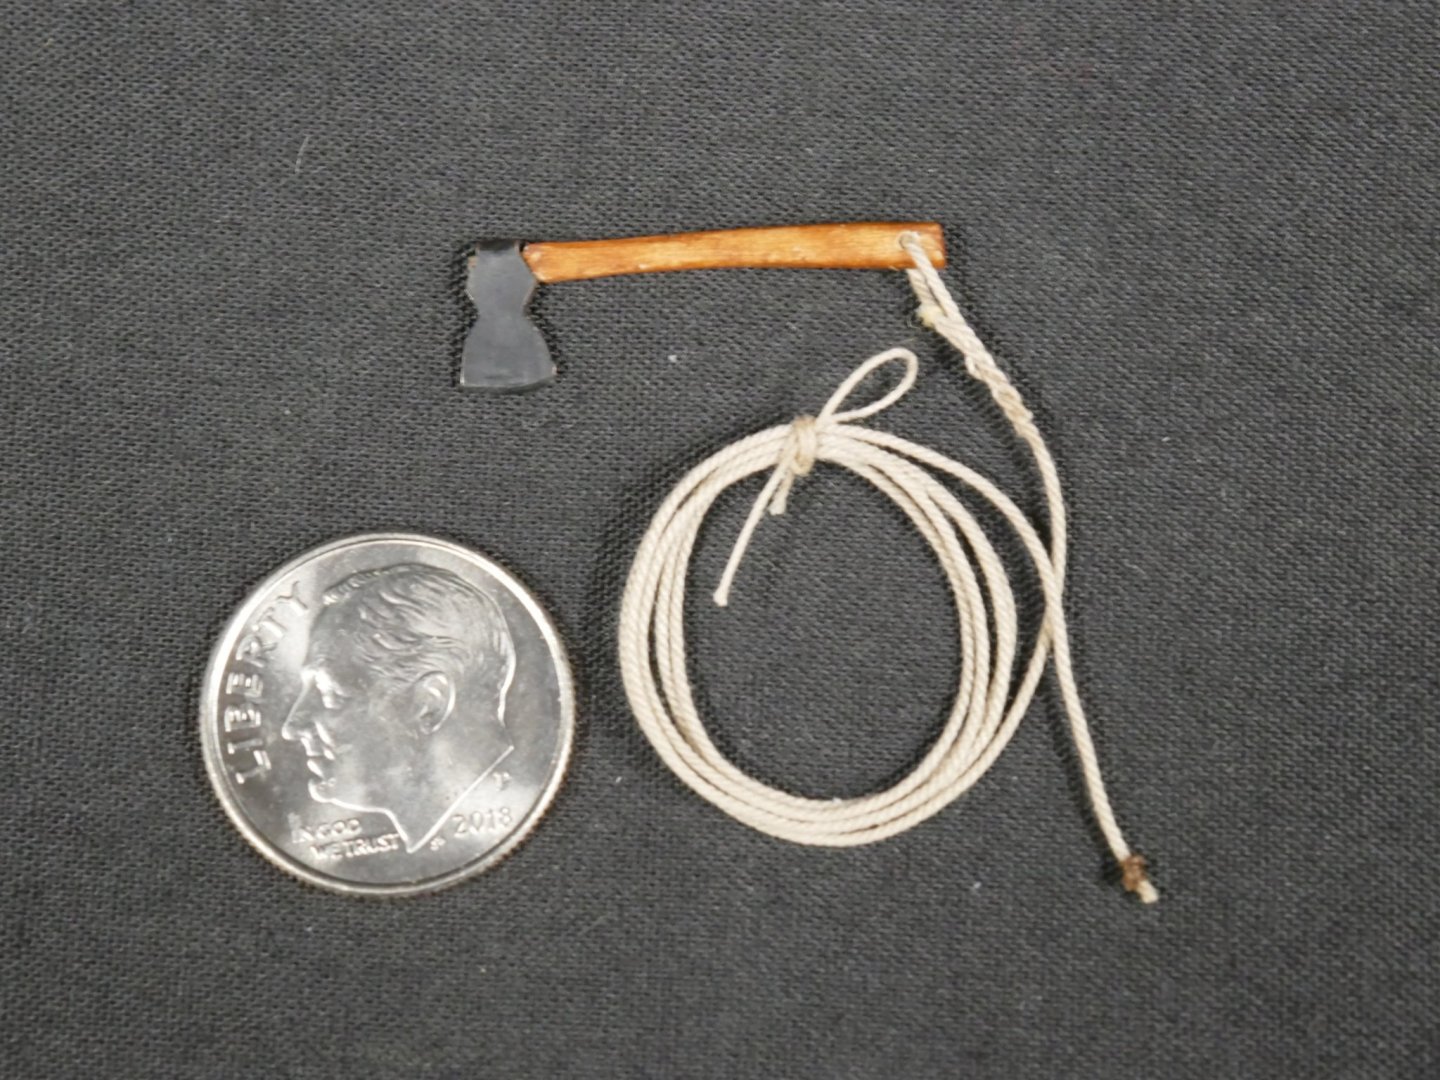
Hi Alan, thank you for mentioning the eye splice. I became a little anal about knots back in July or so. I really knew very little over the decades about knots, splices, hitches, etc so I ordered the Ashley Book of knots and boy did that slooooow things down. First, learning certain splices at full scale and then trying to replicate them at modeling scale took lots of time. You can actually pin down the time I bought the book. Prior to getting ABK, you can see faux eye splices on the lances and harpoons. After getting ABK, the whale line, drogue bucket, grapnel and the steering oar brace lines have eye splices. Here is a shot of the smallest one for the boat axe. It's made with .018" three strand Syren rope.. Thanks again for checking in. Mike
- 128 replies
-
- 4
-
-
- model shipways
- new bedford whaleboat
- (and 1 more)
-
Thank you G.L. , Vladimir, Bruce & Bob. The workbench looks empty this morning. 😳 Mike
- 128 replies
-
- 2
-
-
- model shipways
- new bedford whaleboat
- (and 1 more)
-
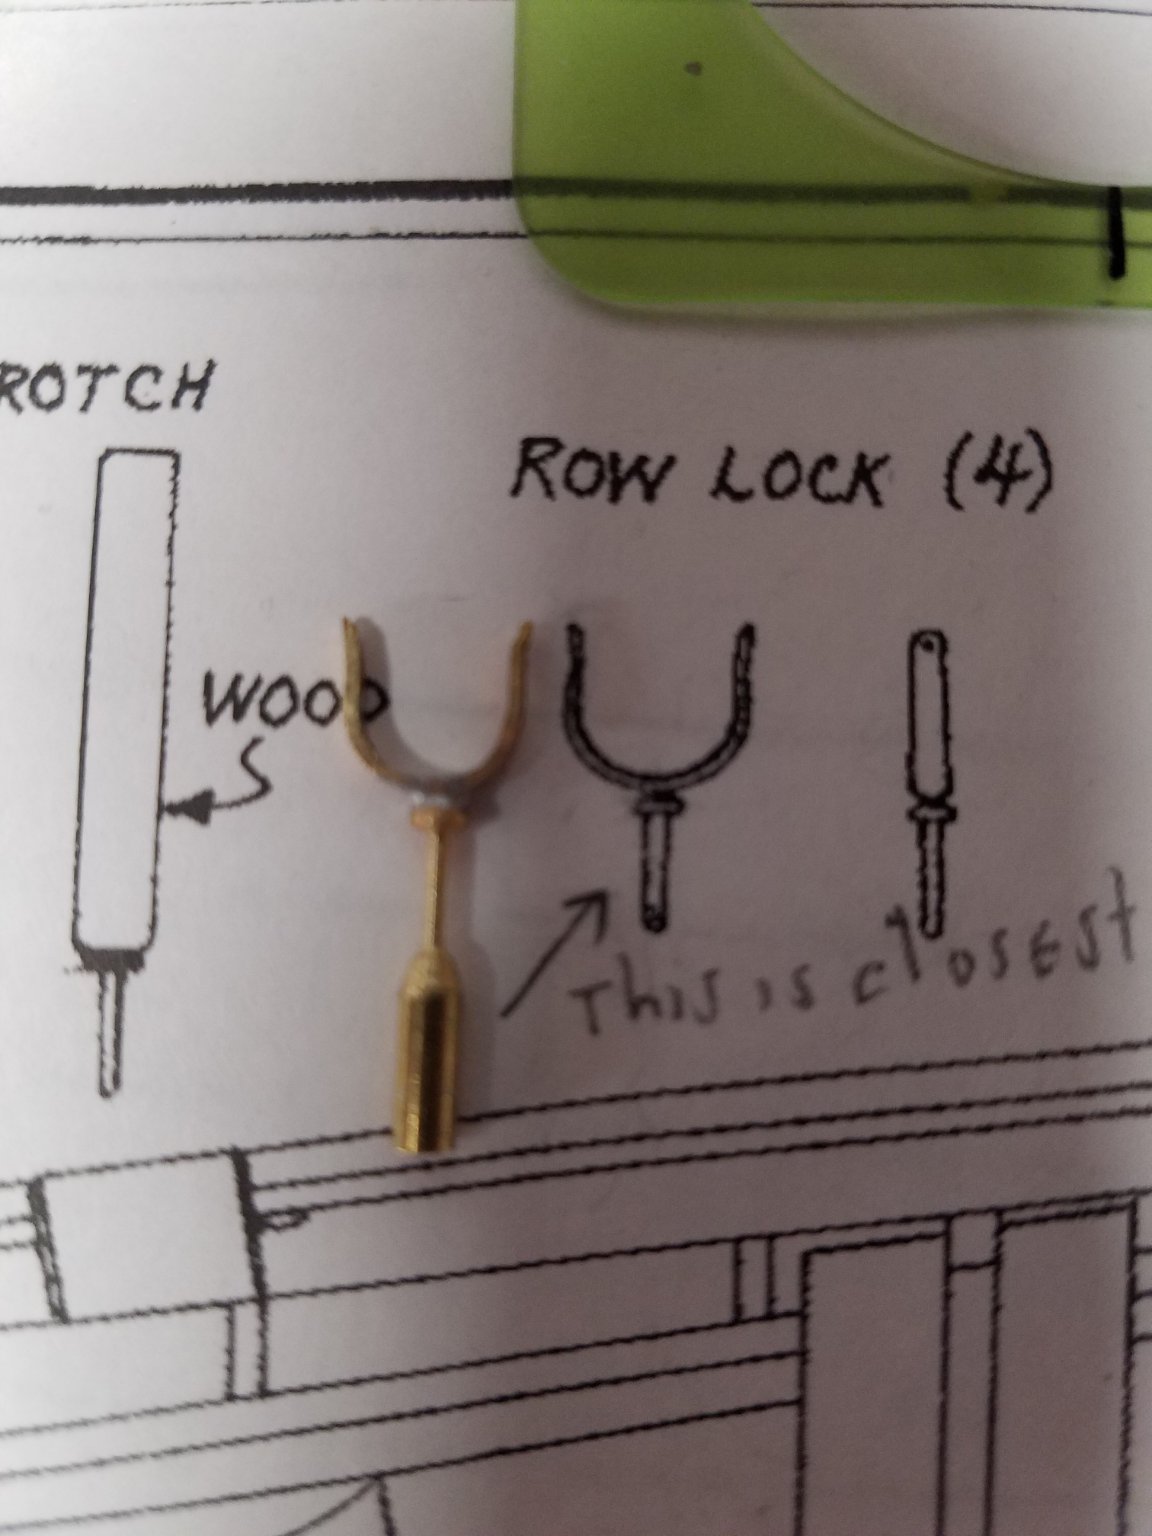
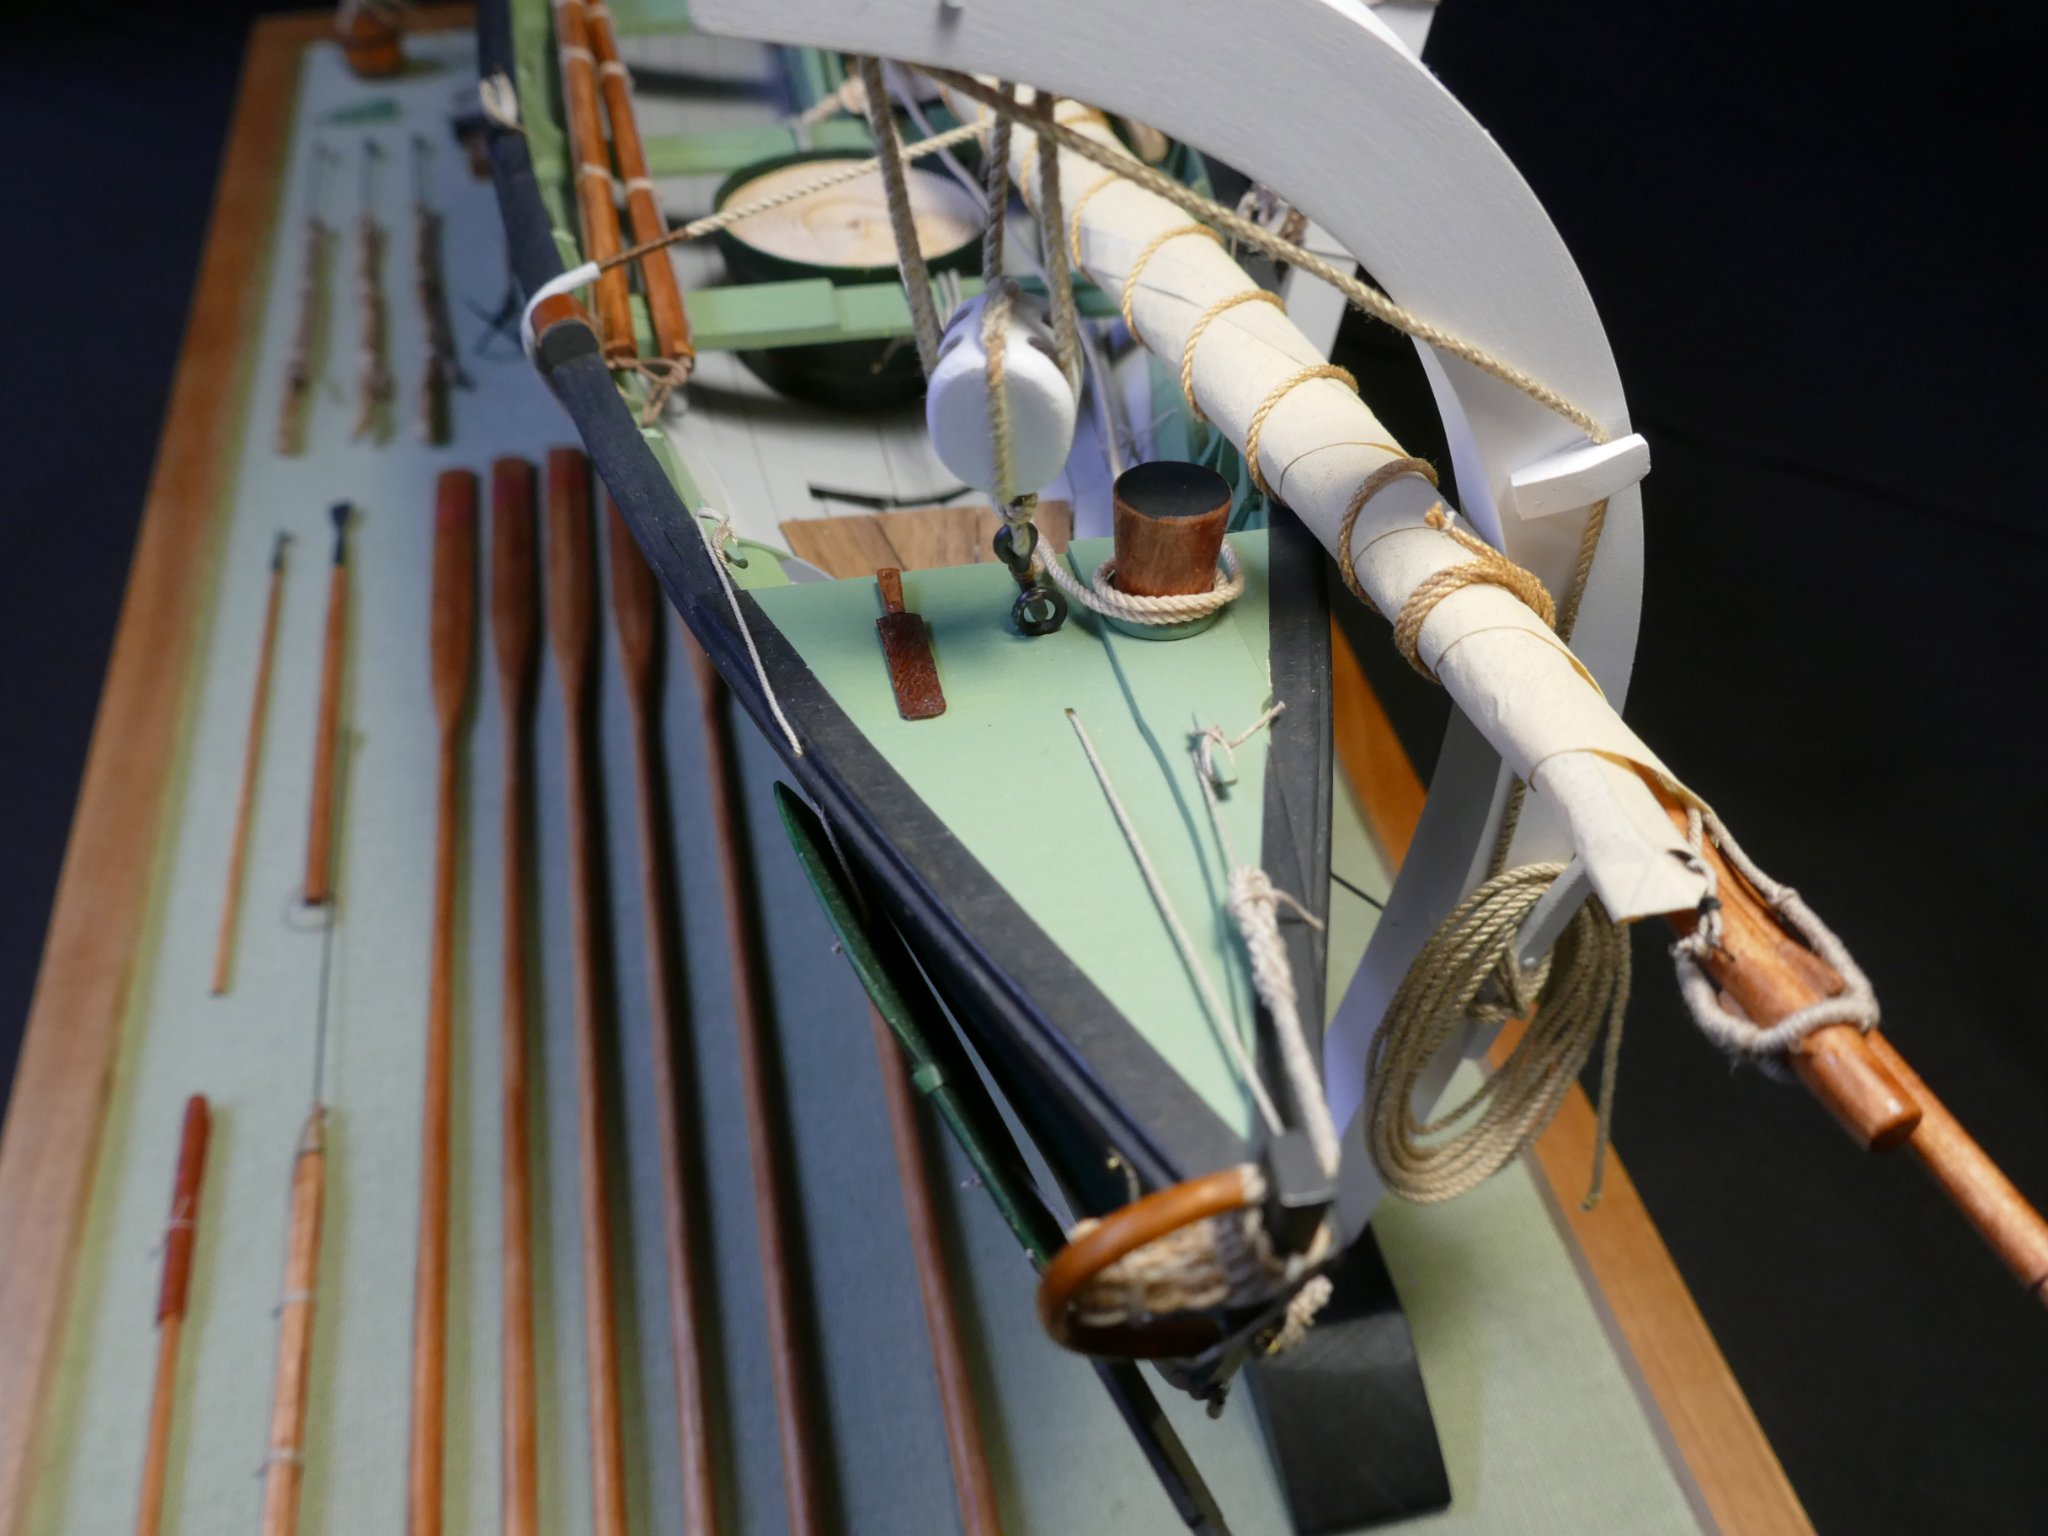
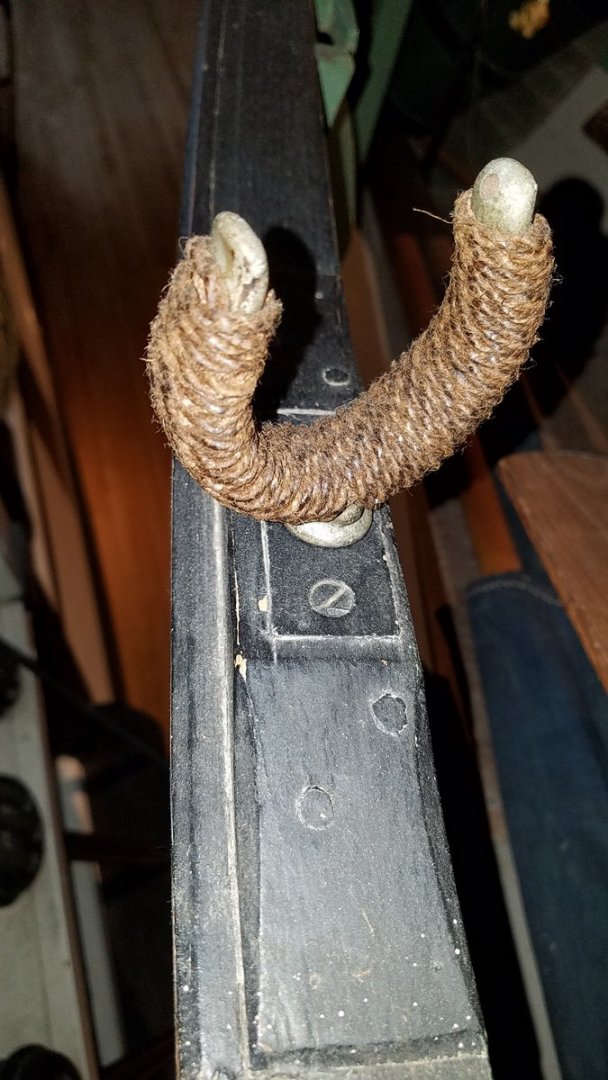
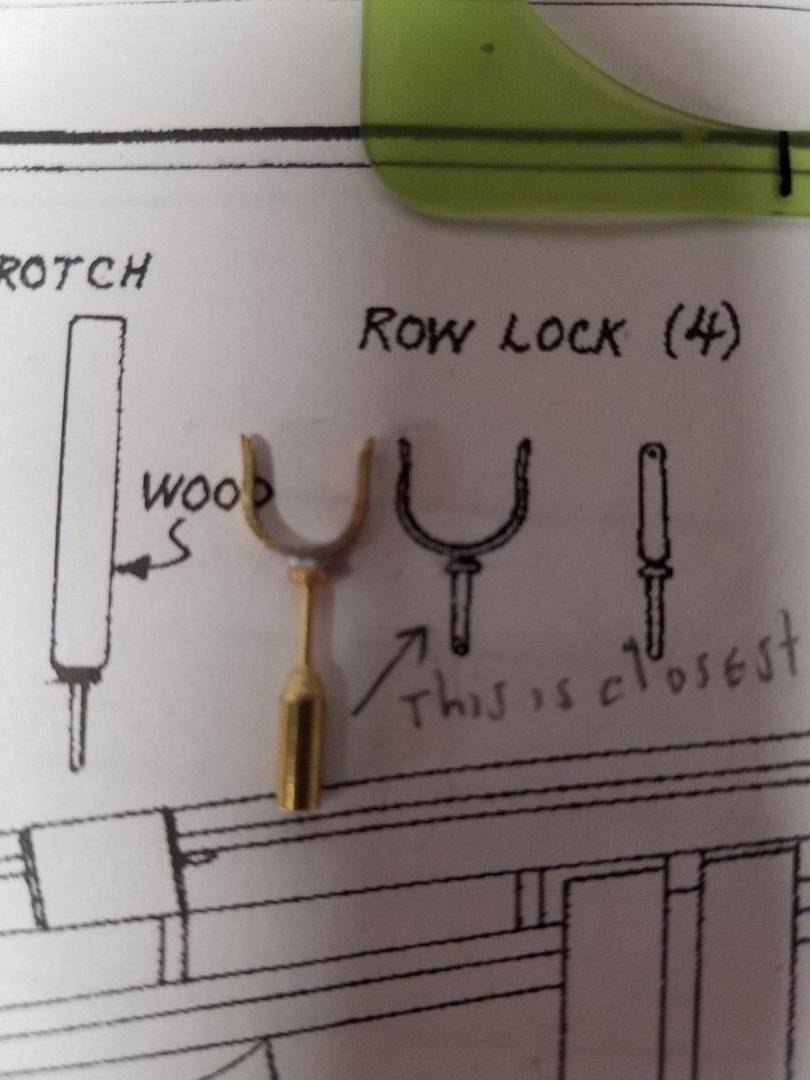
Hi Brad, this is the original shot from the Whaling Museum. The oarlock has a casted look to it including that bulge that rests on the oarlock plate. The top curved portion is from the etched parts include in the kit. The lower pin portion was made on the lathe. You can see it roughed out in this shot. Then soldered in. ... hope that helps. Mike


- 128 replies
-
- 3
-
-
- model shipways
- new bedford whaleboat
- (and 1 more)
-
Jean-Paul, thanks for those two links and the tips. I have a lots of saved URLs for modeling.. but not those two! Mike
-
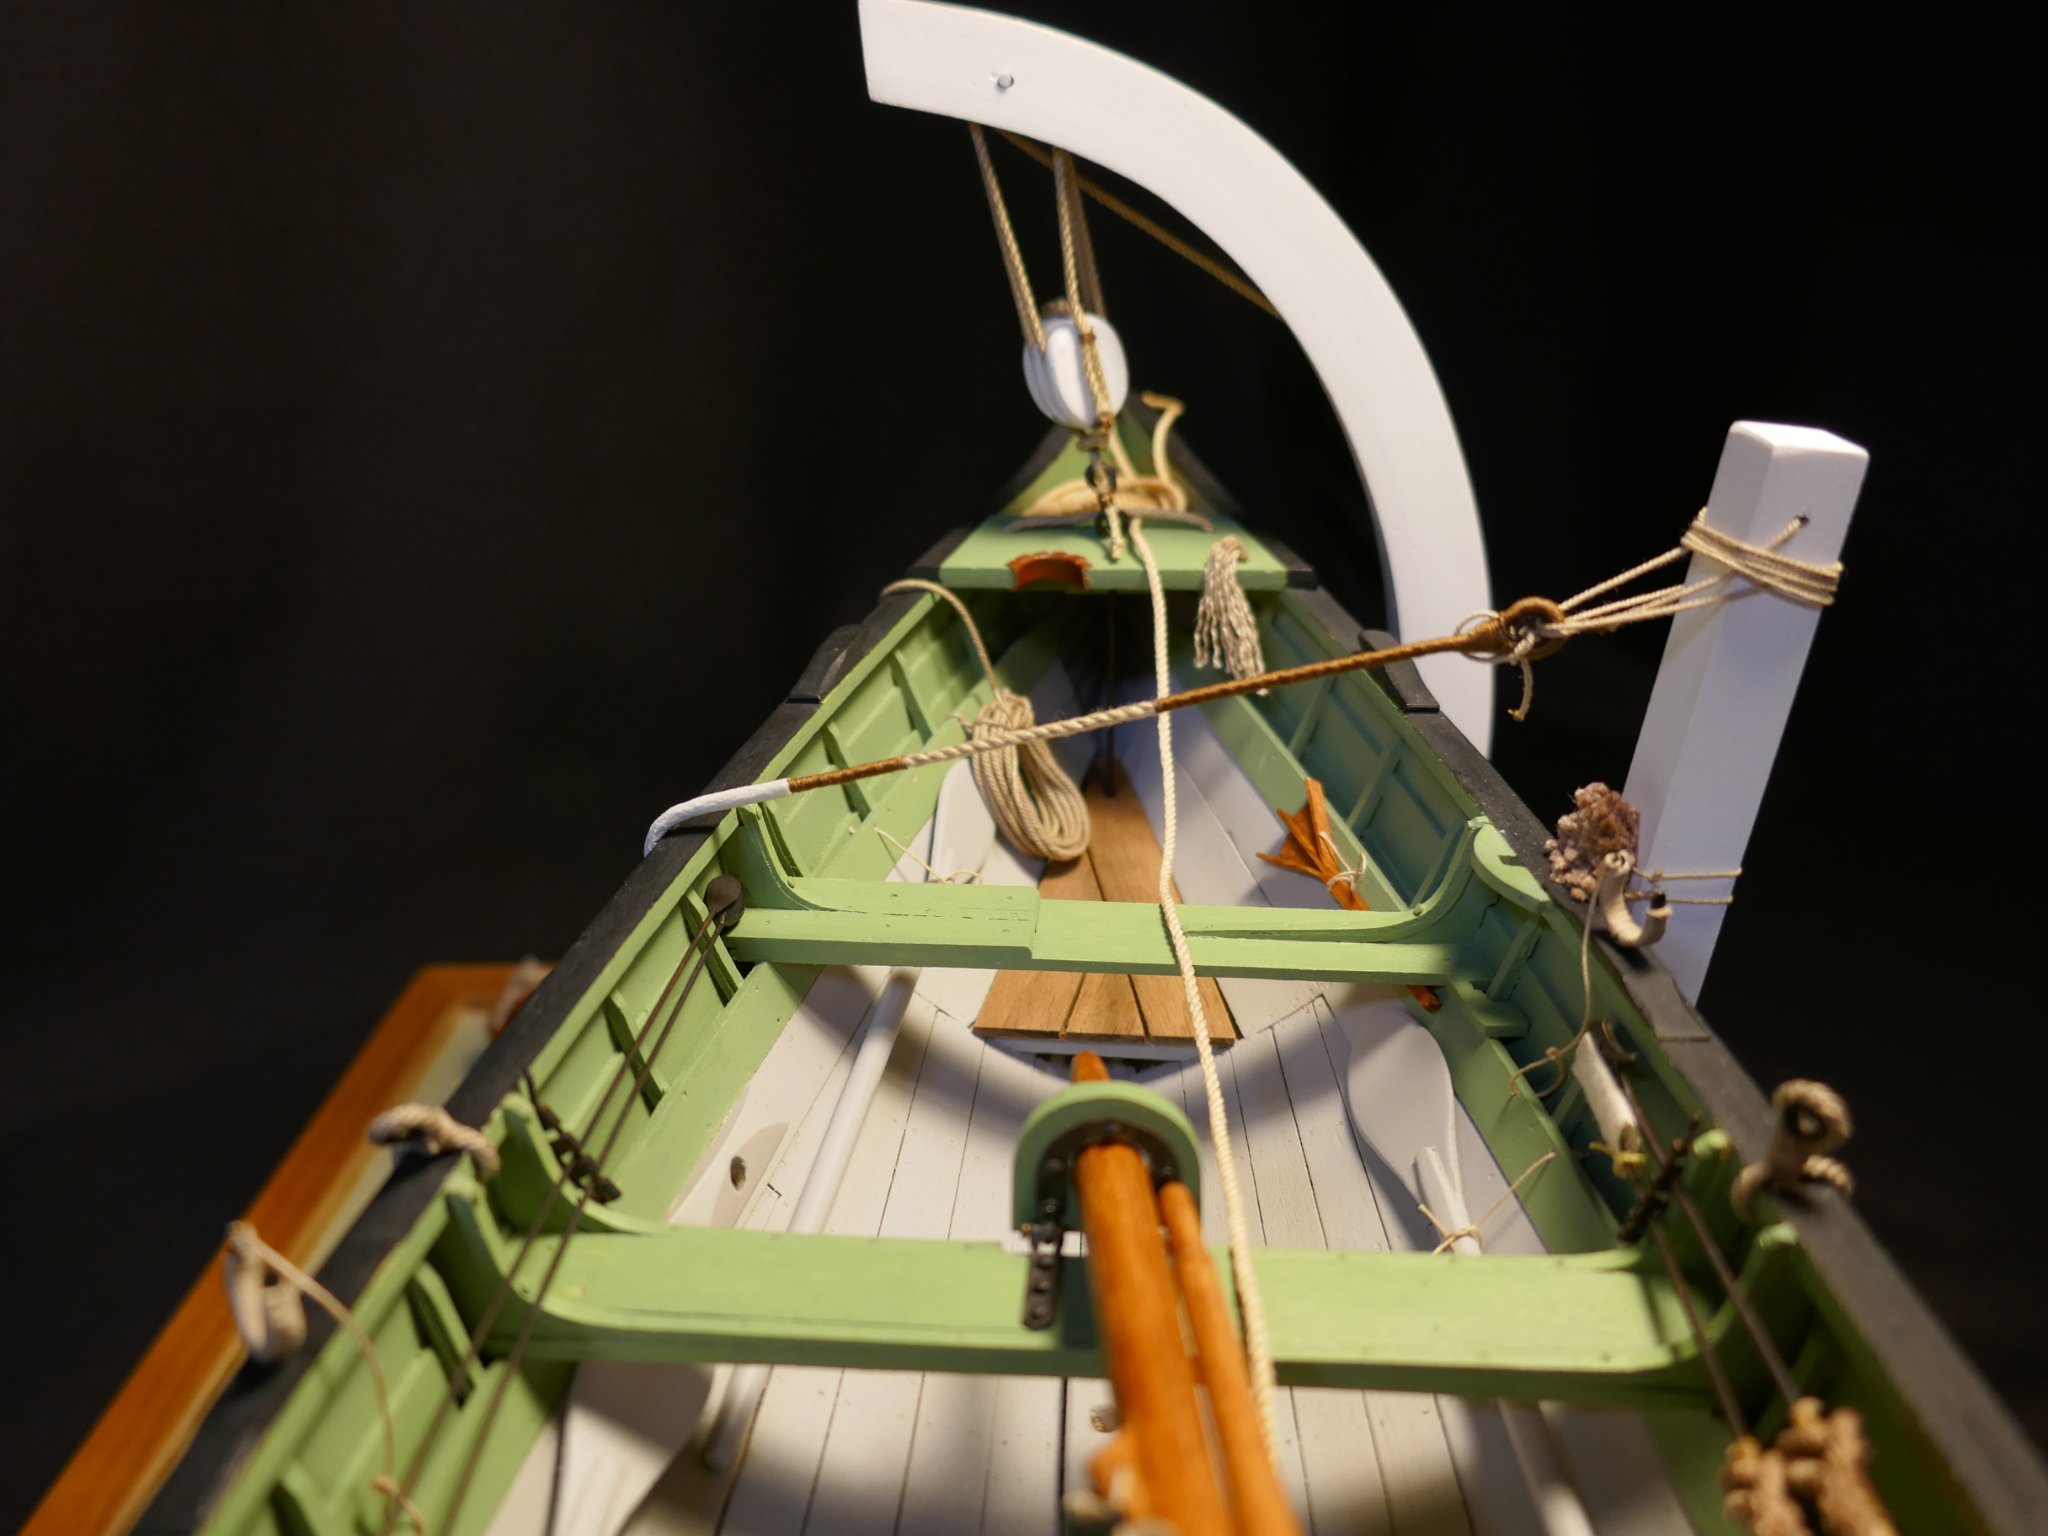
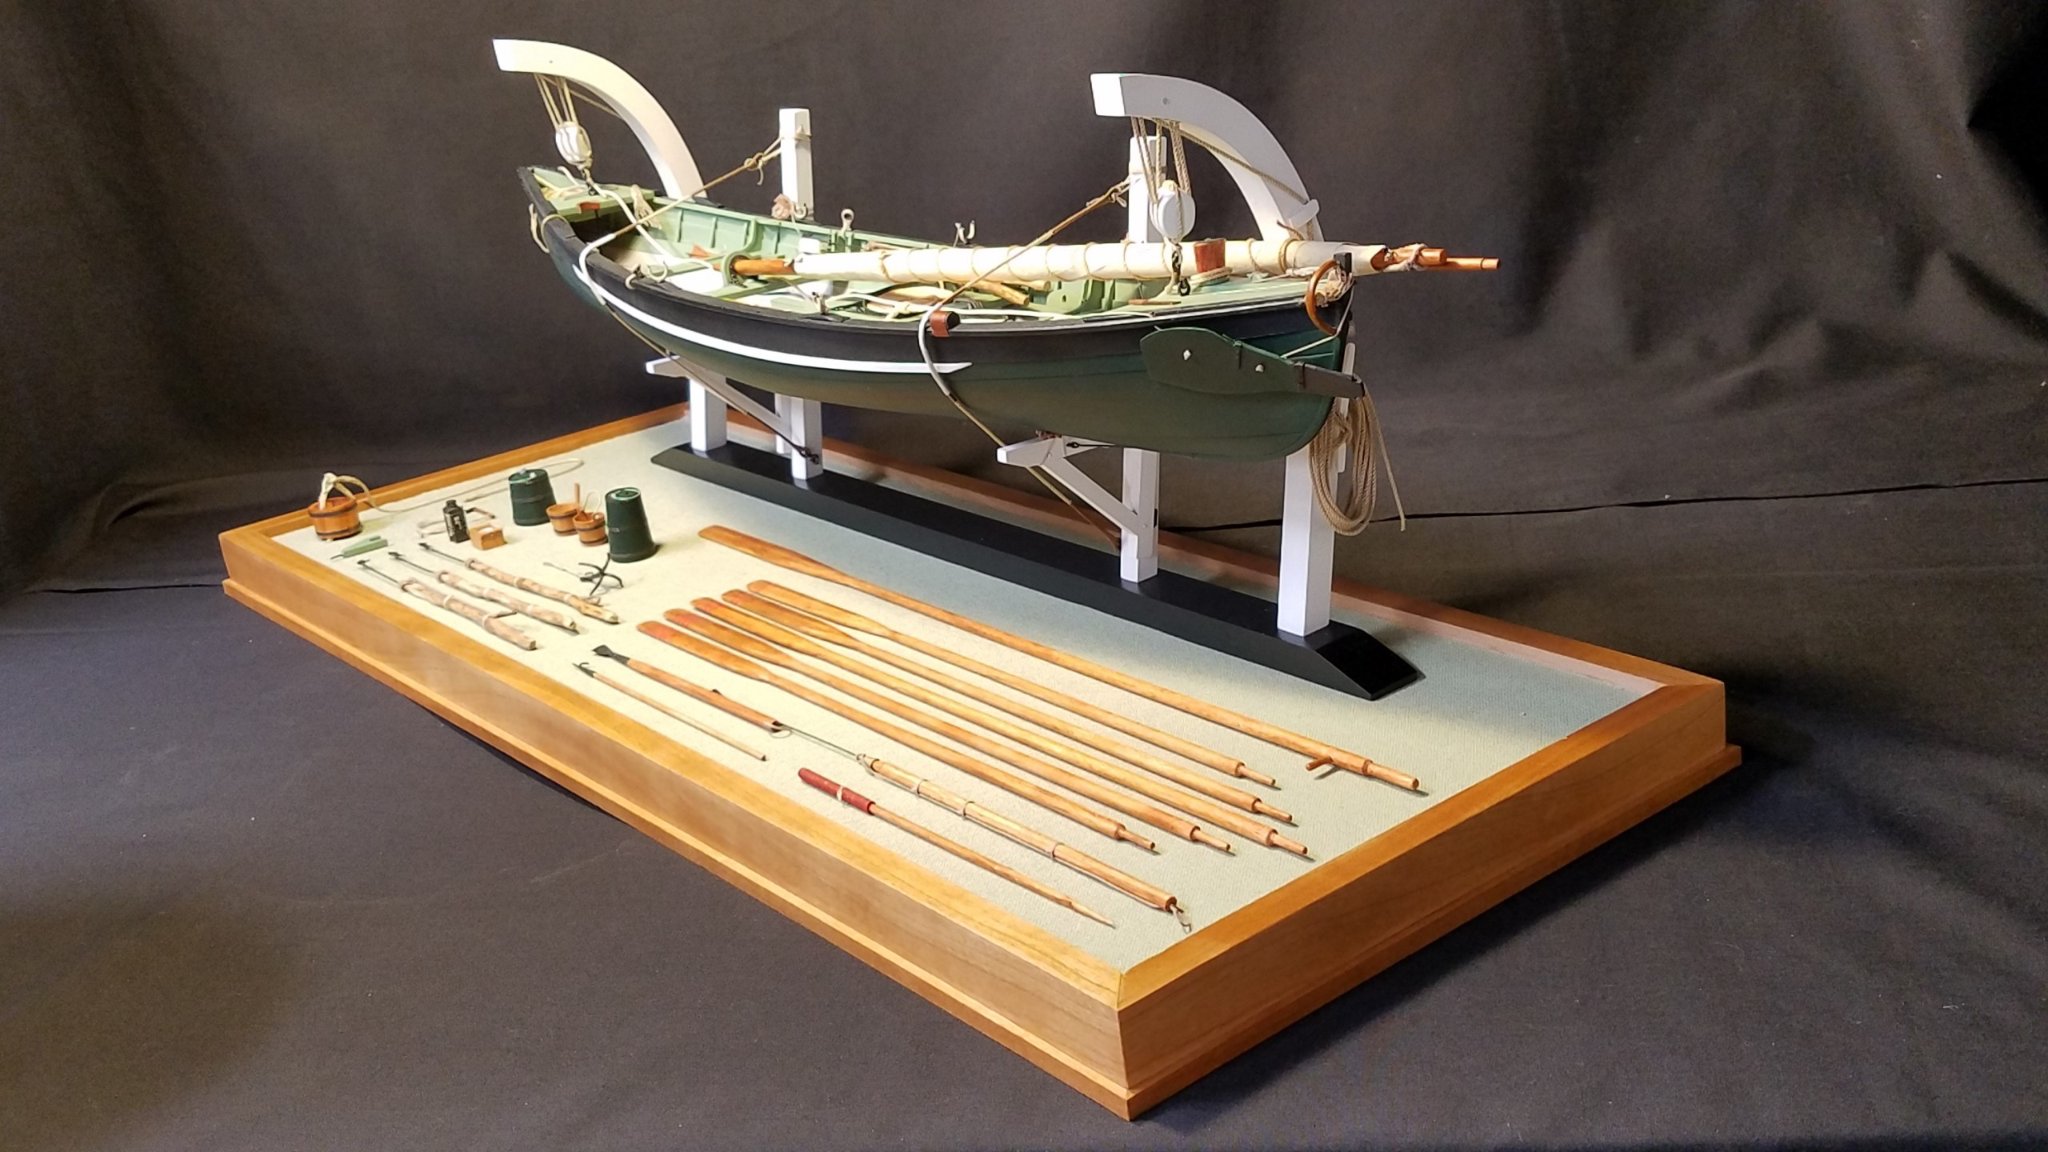
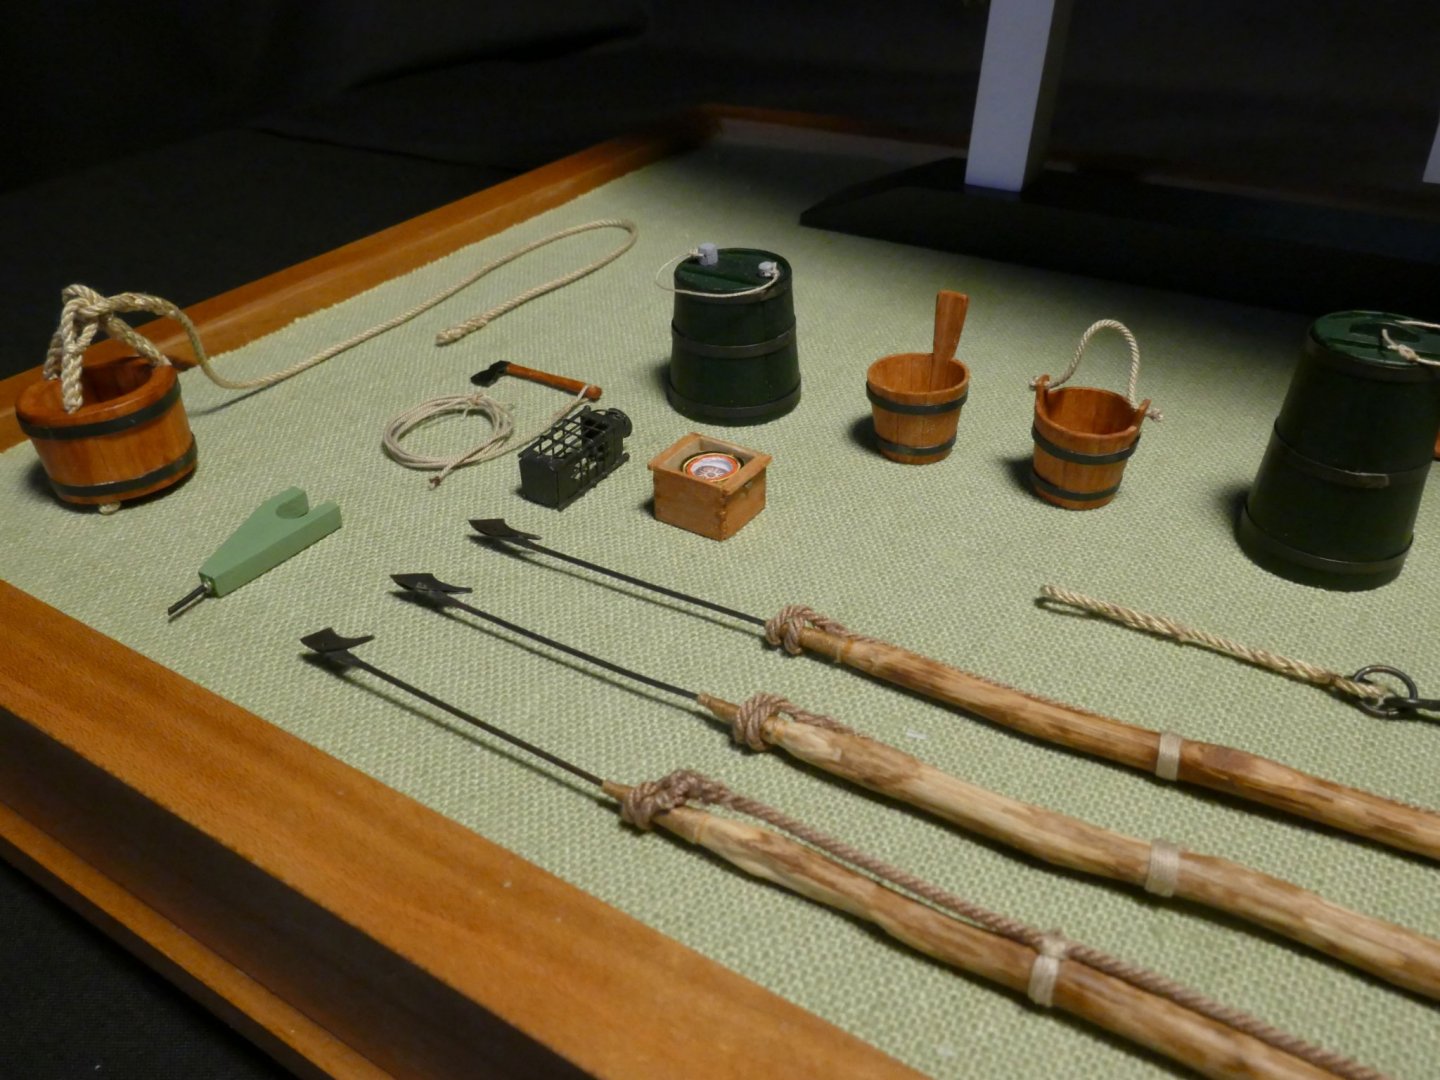
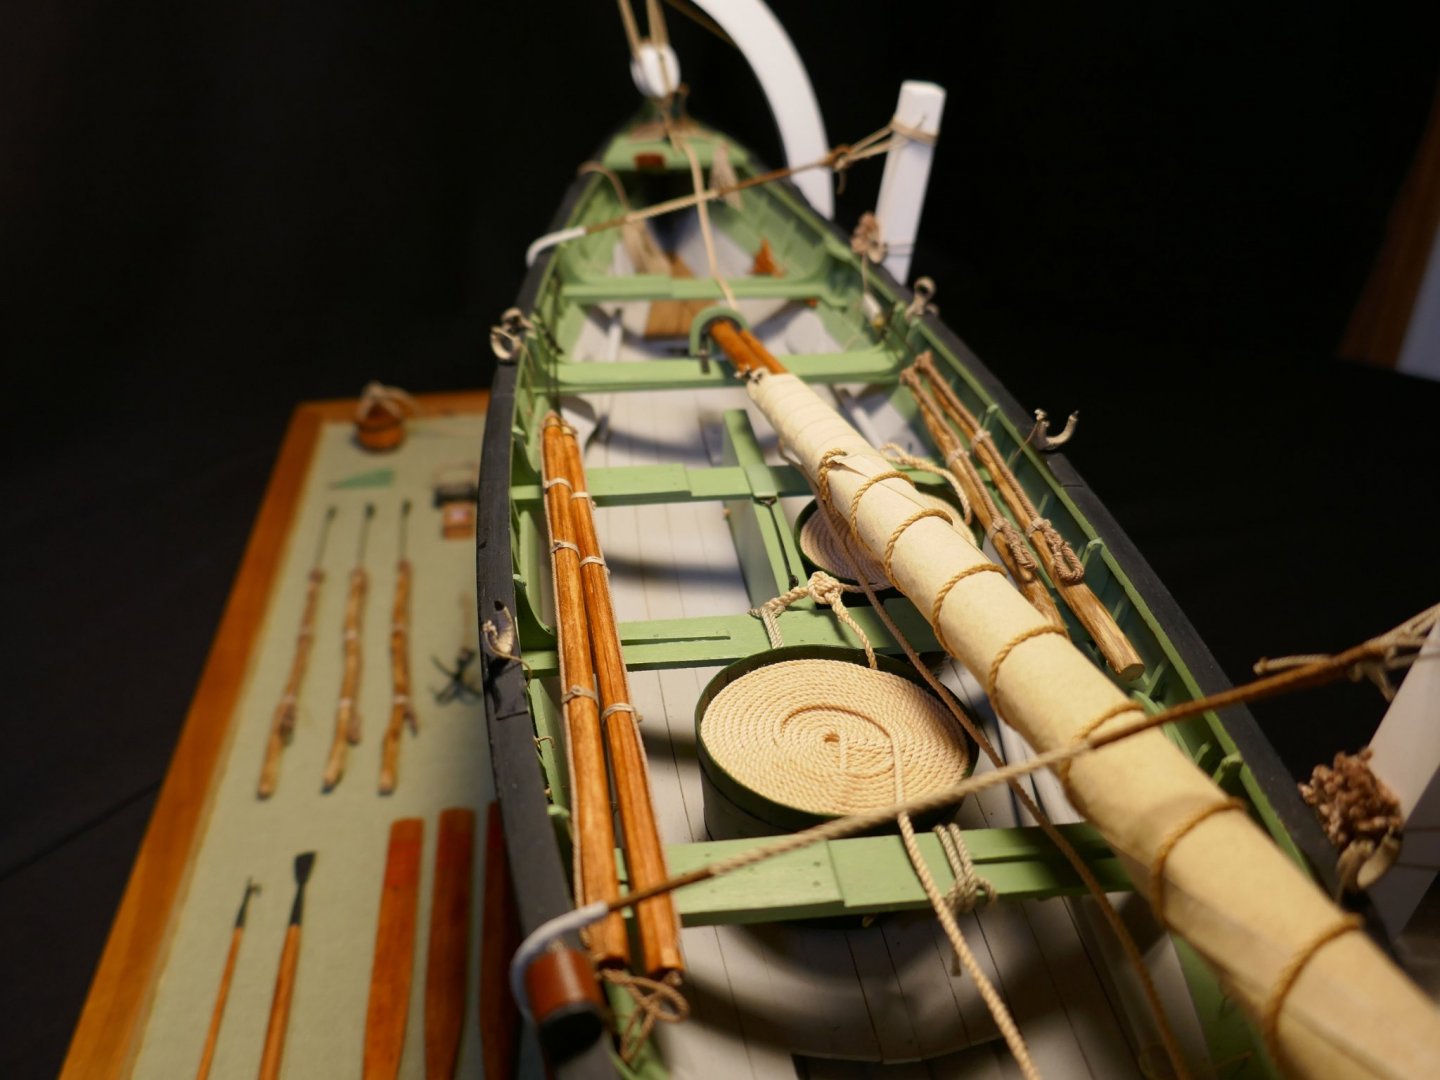
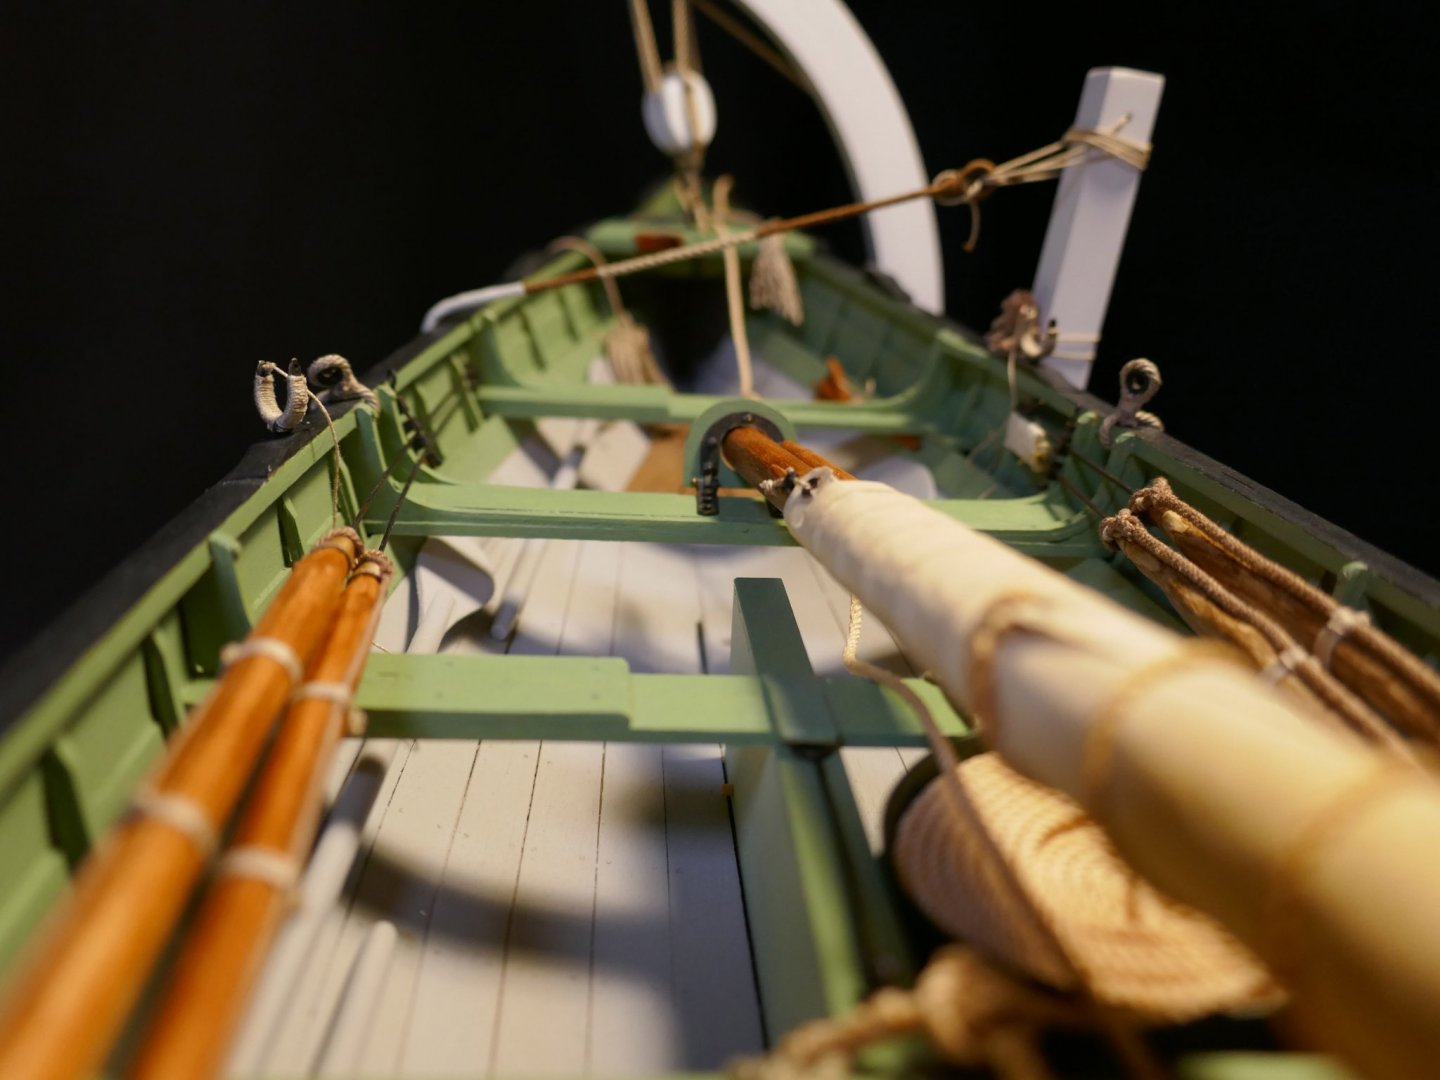
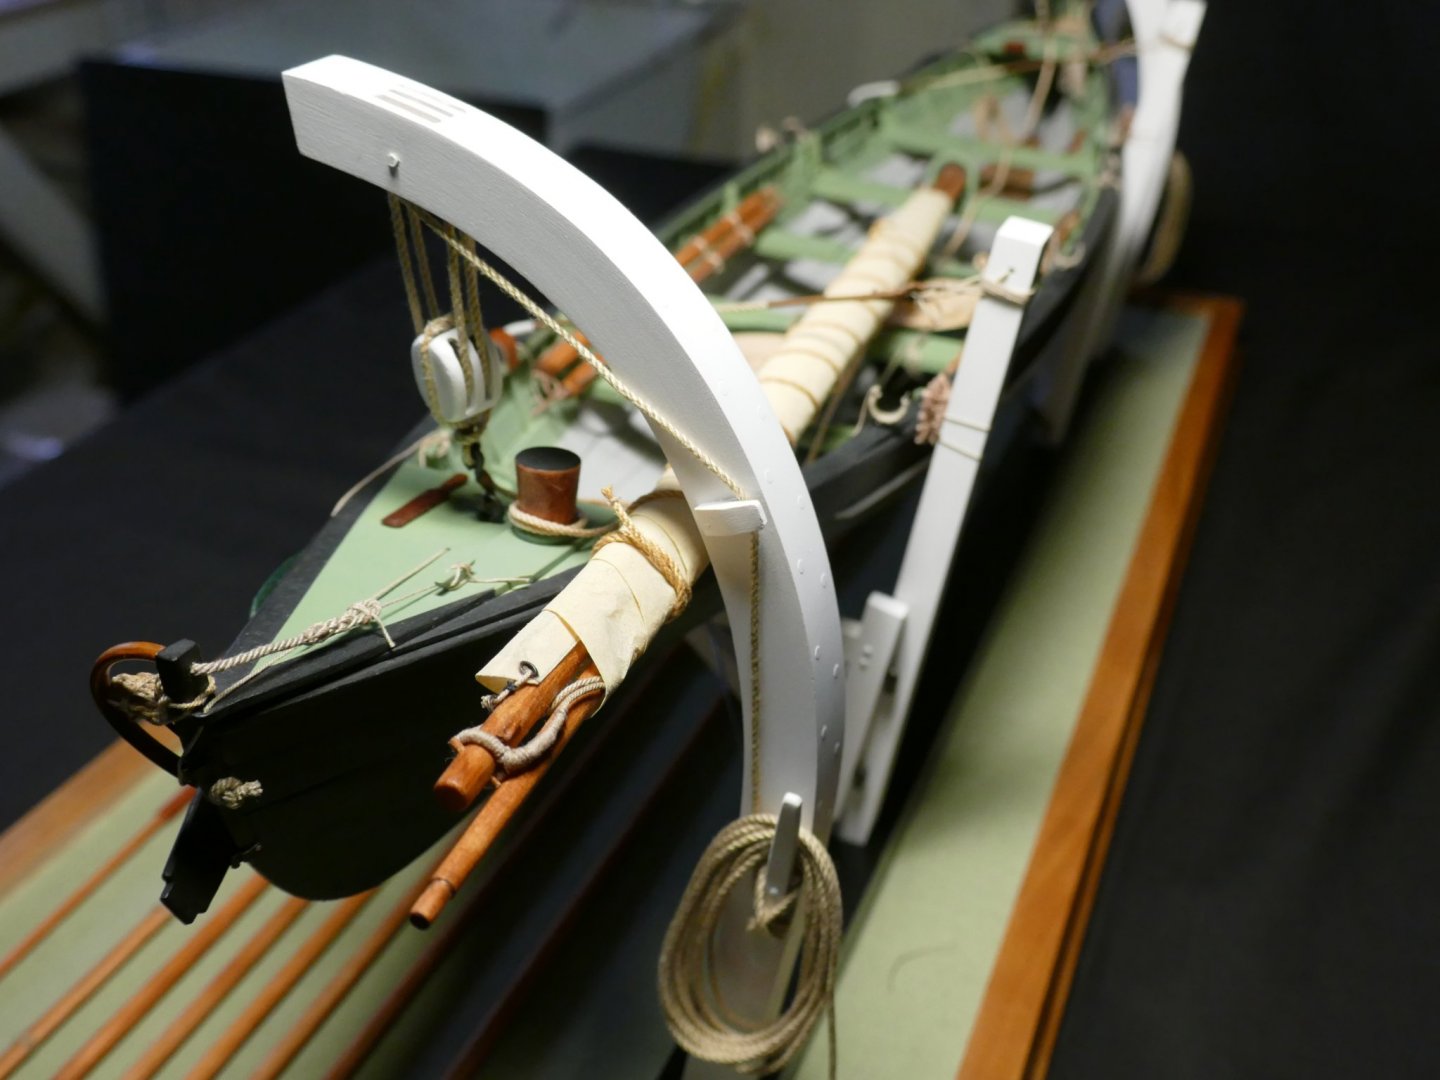
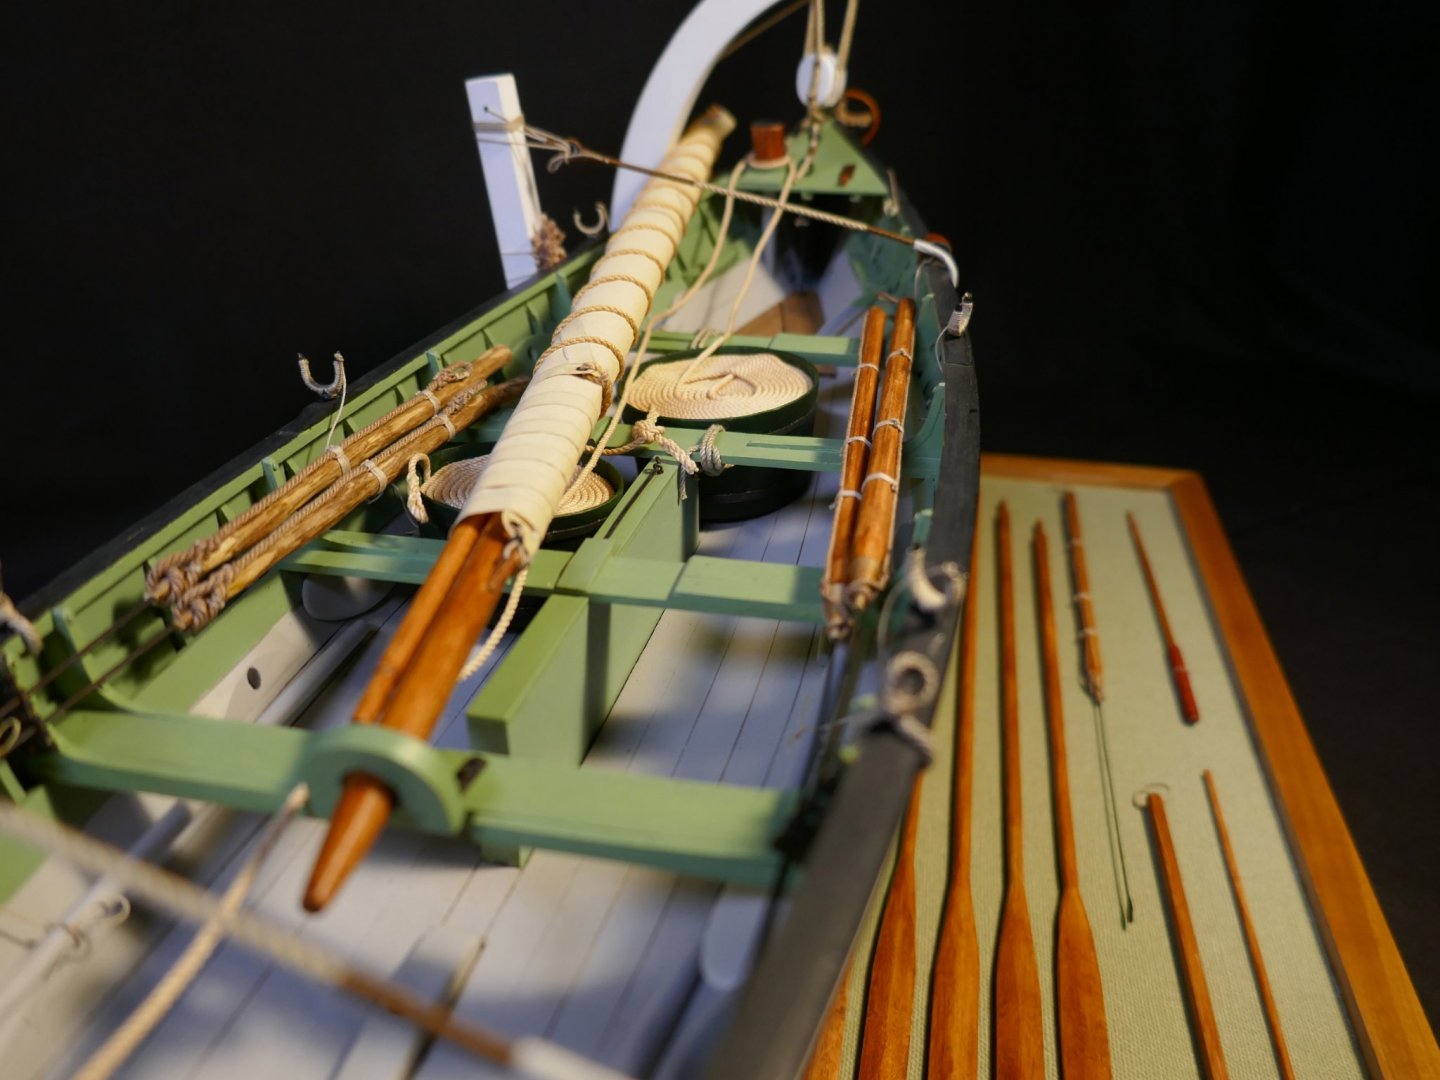
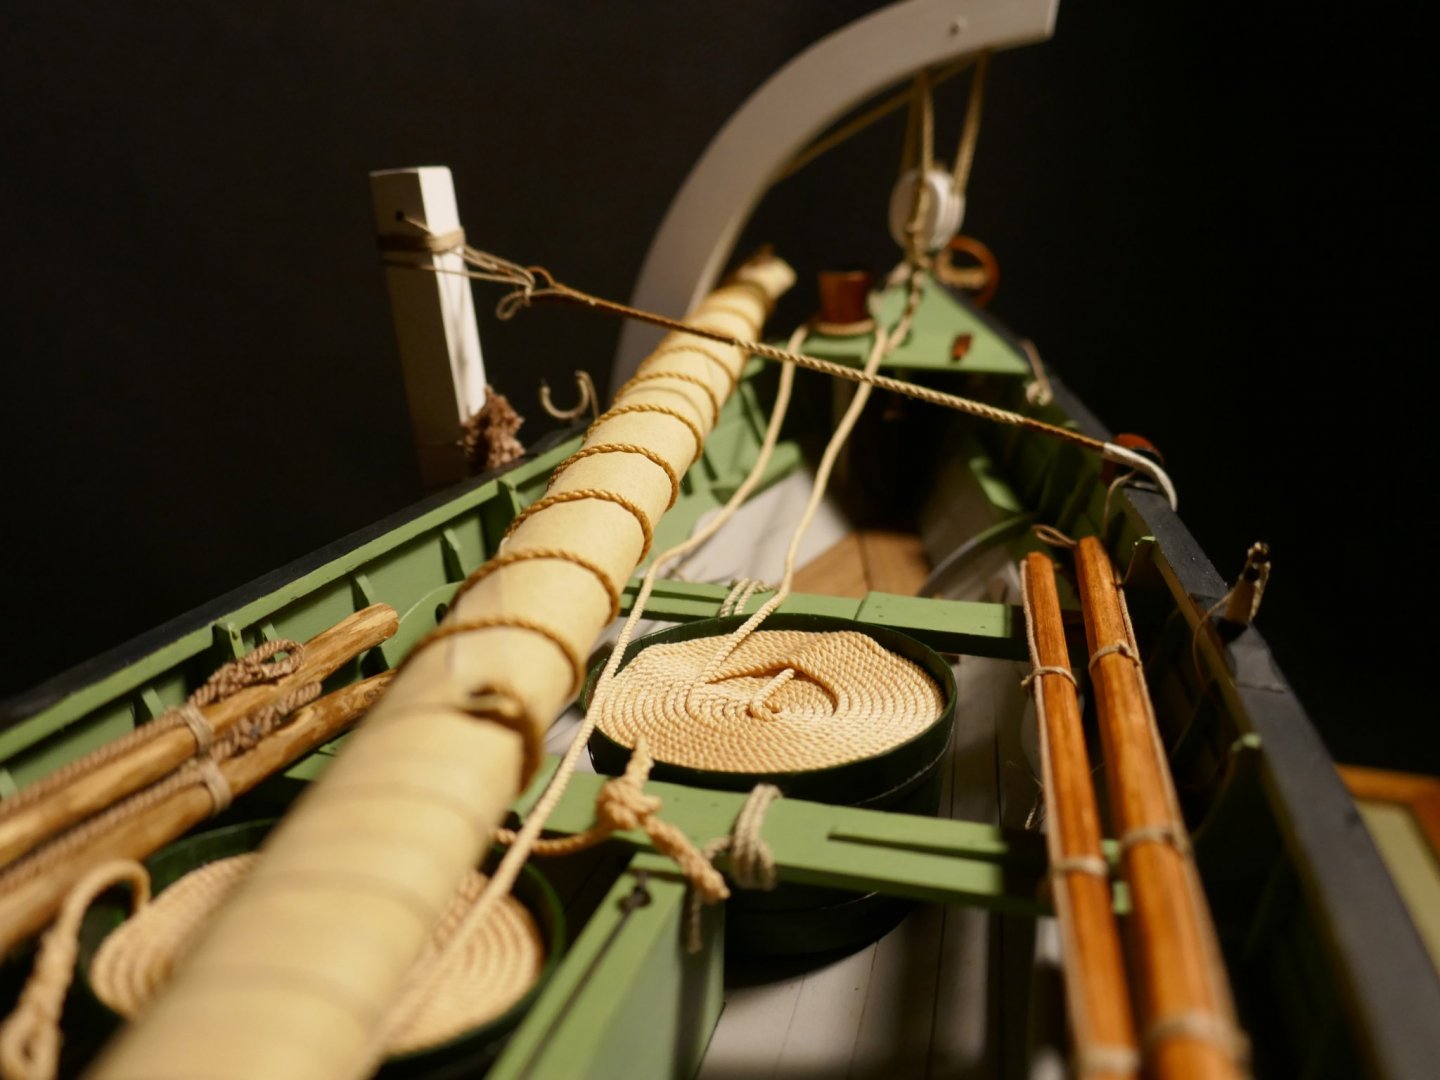
Wow, I woke up this morning with nothing on my workbench! Something's wrong. Jean-Paul, thank you for asking. I was going to post up on your AVS log, which is phenomenal by the way, to ask a few questions. Generally I like the scale I have been working at and except for the bulkheads and two or three etched parts, the whaleboat is scratch built. After looking at your Armed Virginia Sloop, I like the idea of a scratch AVS. Are the kit plans and build manual sufficient for a scratch AVS in your opinion? Also, I live fairly close to the Mystic Seaport Museum so there are some nice choices there with a lot of documentation... maybe a kit/scratch Morgan (my wife's preference) or Emma C Berry. Others I'm curious about would be the NRG half hull and USN Picket Boat. Thanks Bruce. The whaleboat display is always a trade-off between realism of all the equipment in the boat but then blocking all the small detail. I was also considering a wharf setting and repair setting but I liked the Jim Shoesmith idea. Thanks again guys for hanging in there with my project. Mike
- 128 replies
-
- 2
-
-
- model shipways
- new bedford whaleboat
- (and 1 more)
-
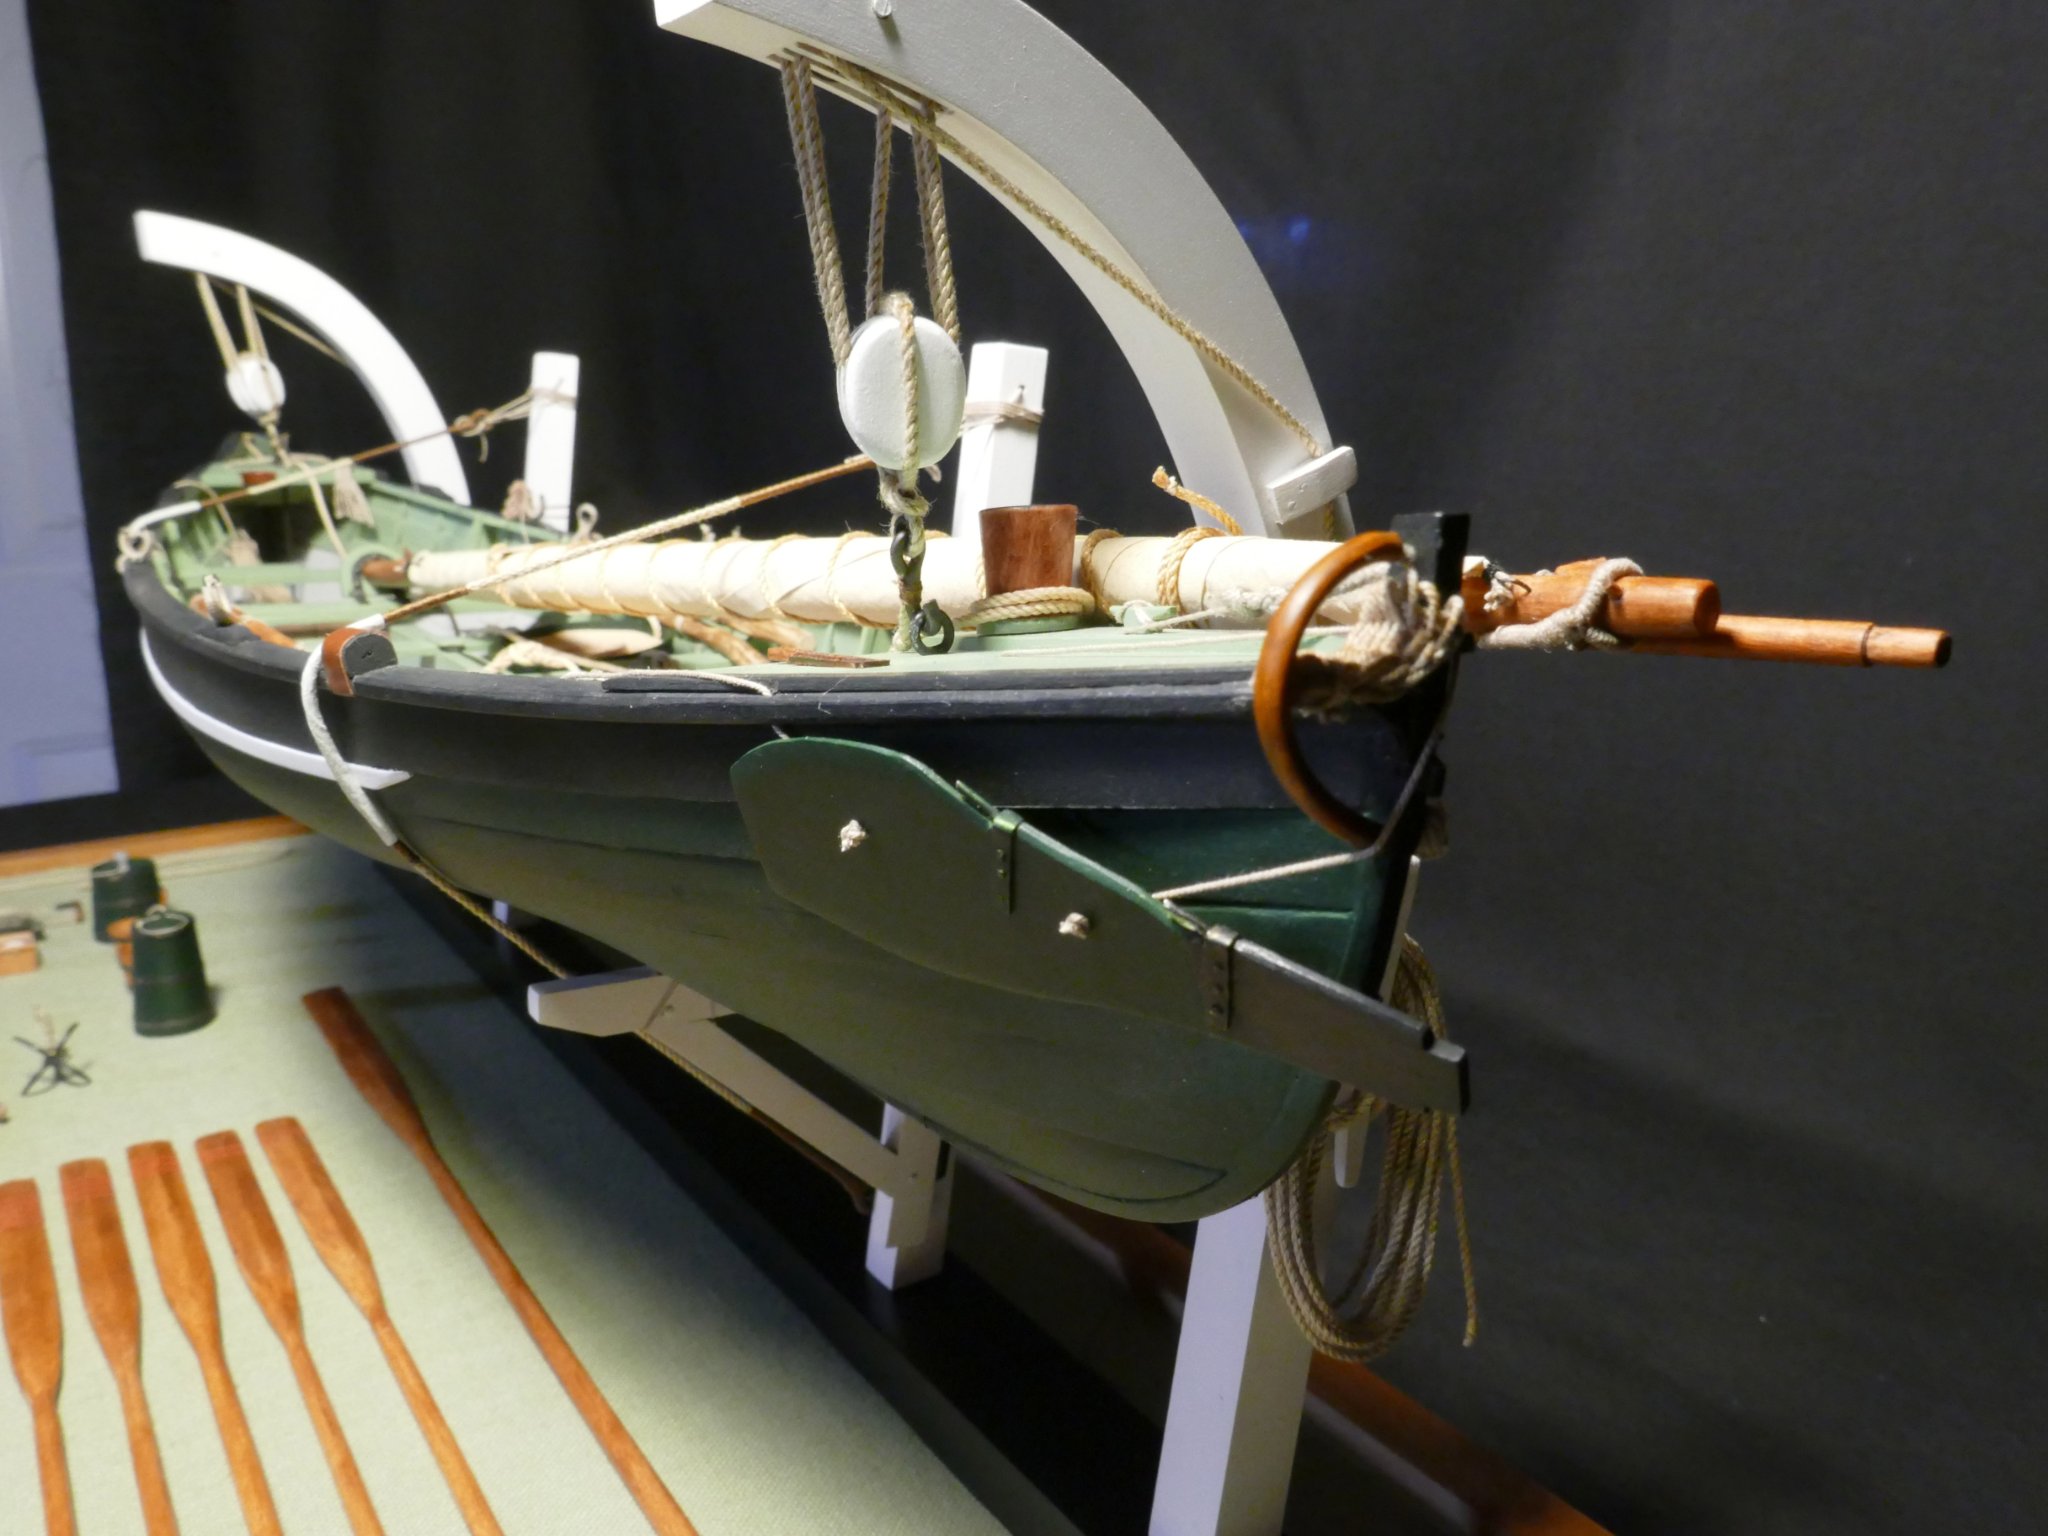
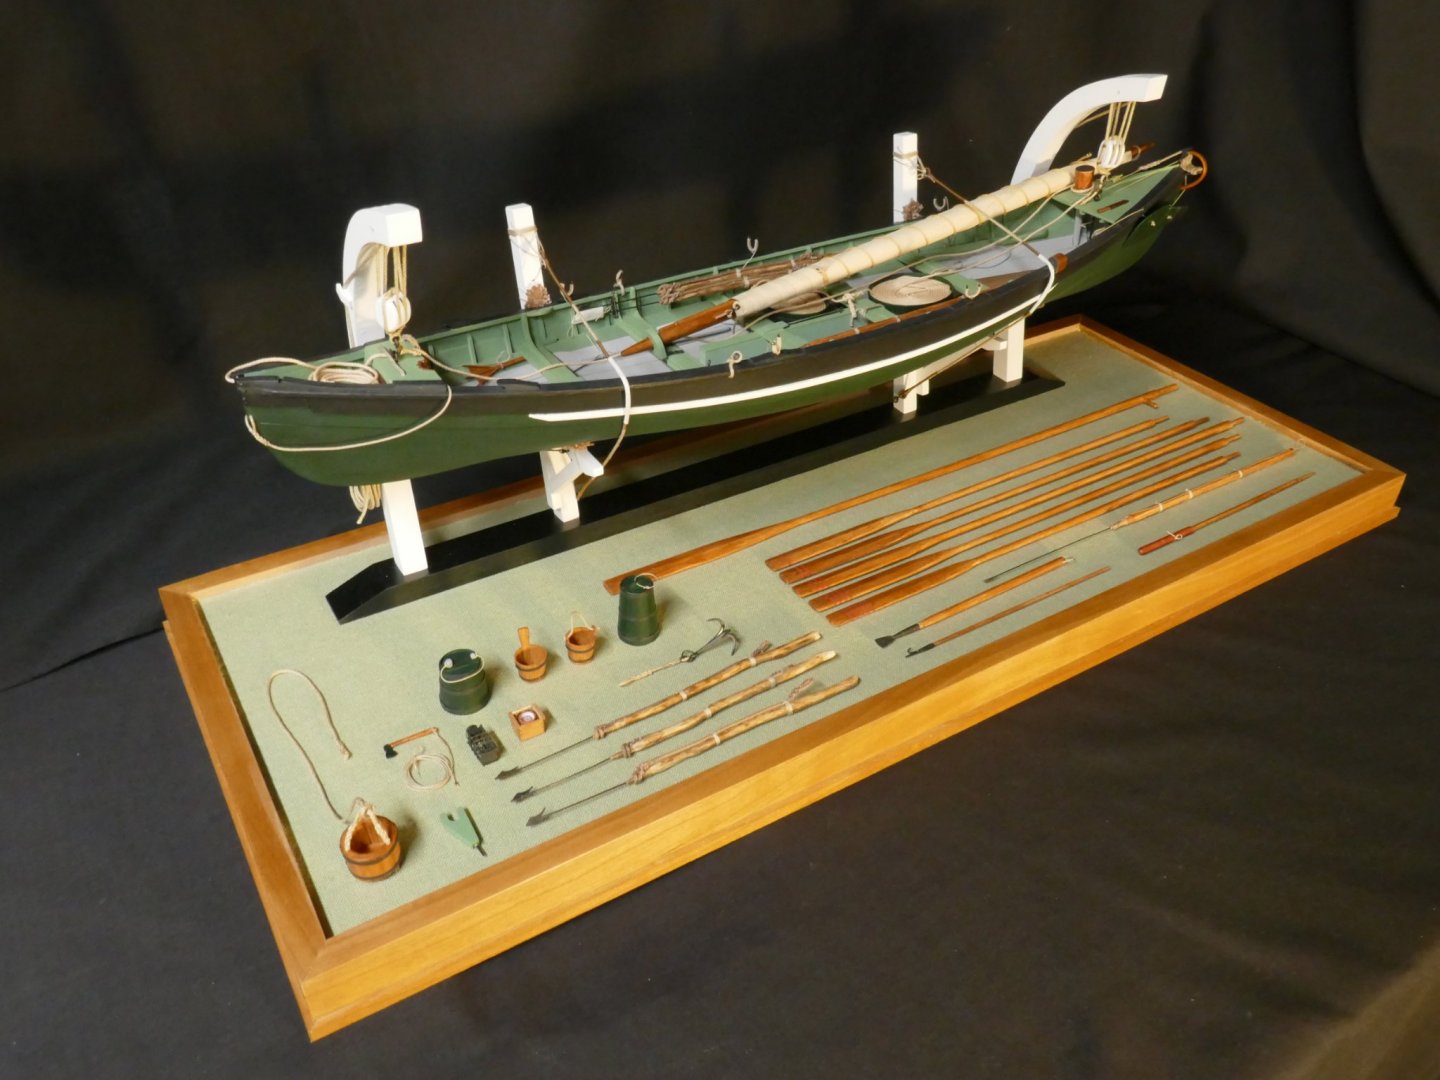
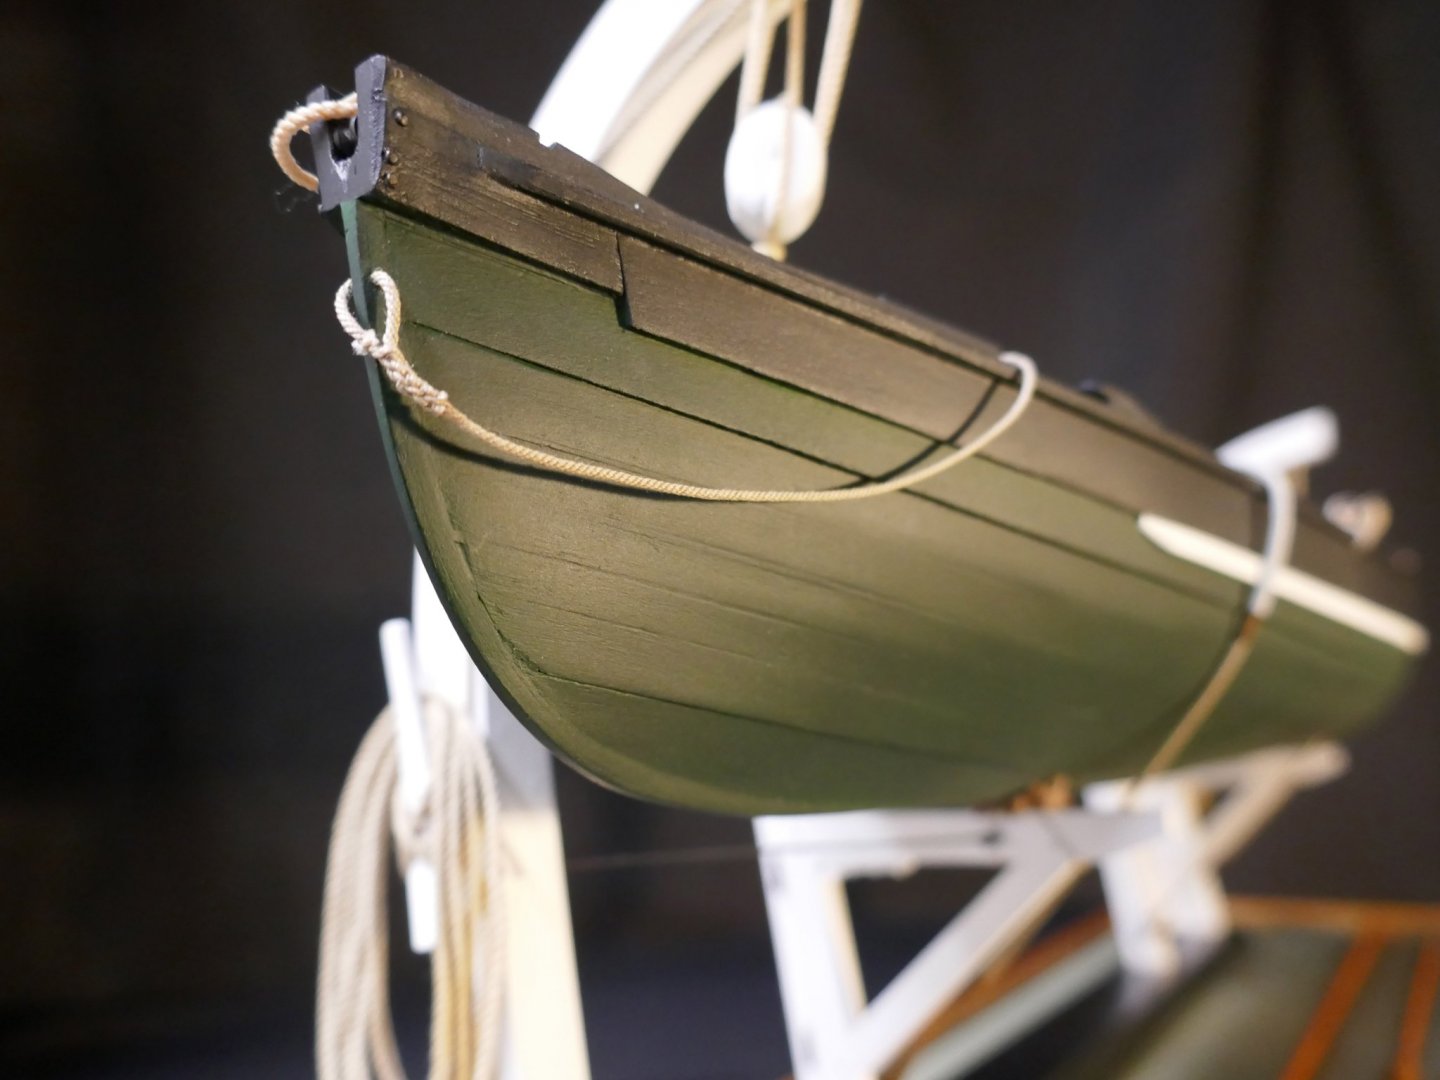
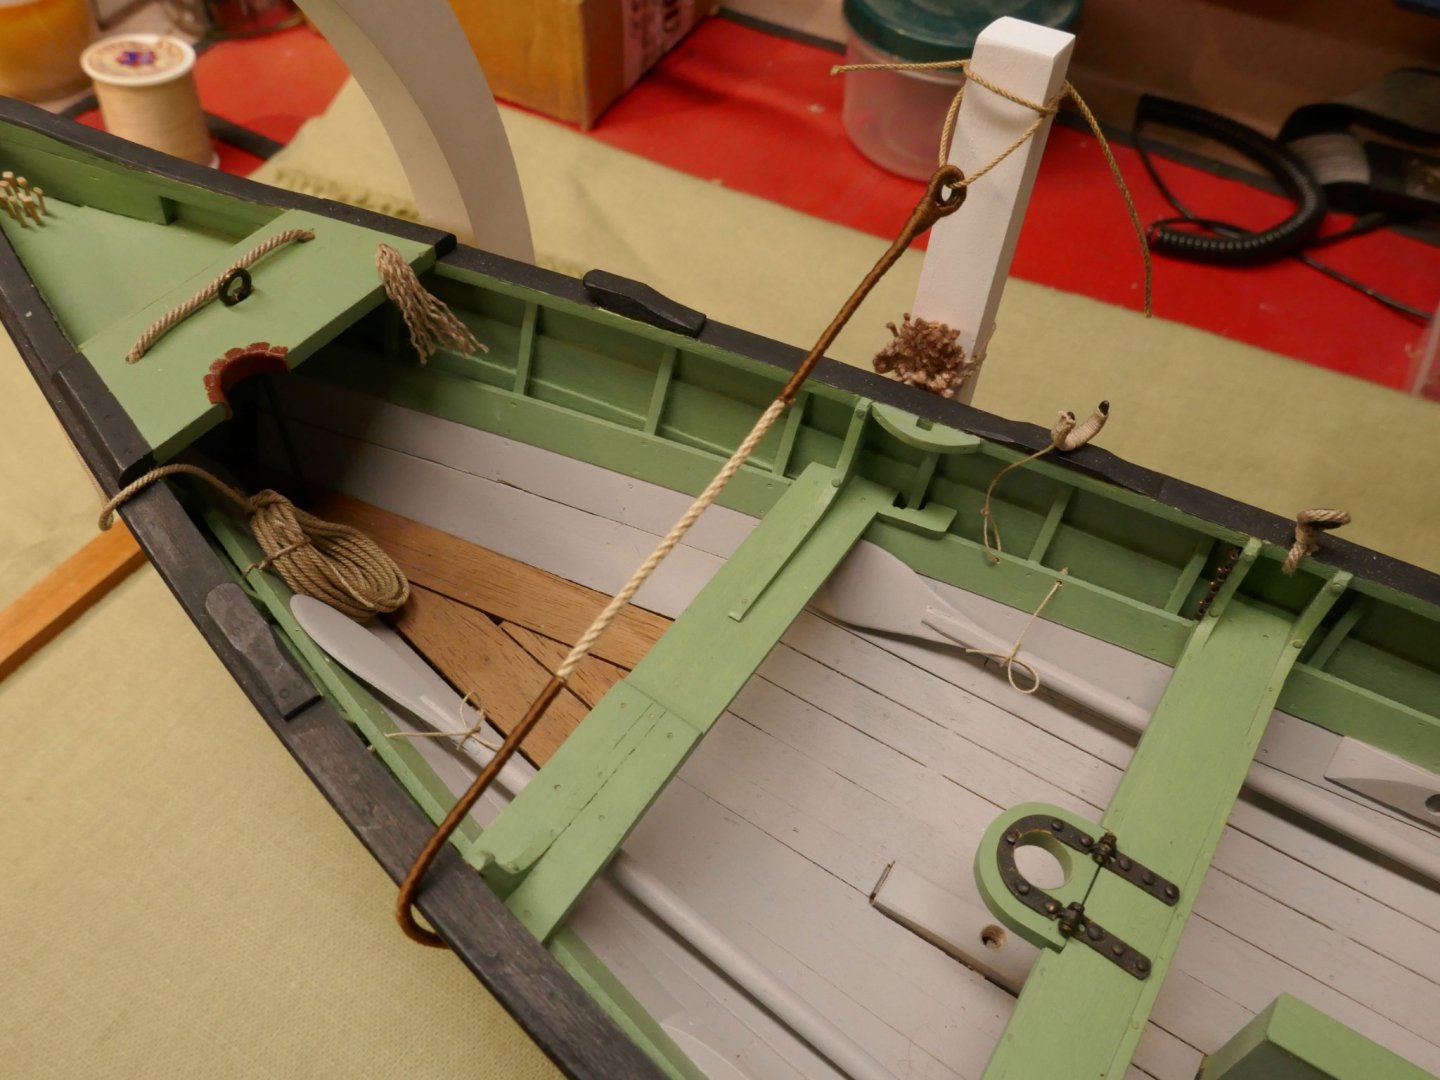
Hi Bruce. Thank you for your comments. I’m lucky to live close to the New Bedford Whaling Museum. Many photos were take while I was there and it went a long way helping me visualize what might go into the model that I wouldn’t have seen by just looking at the plans. In any case I’m happy to say… …It’s a wrap! One year(net) working on this project and we finally have a whaleboat. Whew! This kit is ideal for either a starter project or one that you can really put everything into. It was the first model ship that I really spent a lot of time learning some skills before jumping off to another project. As many others have said, this forum has been a great resource for me for learning… materials, methods, paint, soldering, oxidizing, rope, knots, adhesives, etc. My photography skills still need improving but here are the final shots. The simplified davit display is based on a model by Jim Shoesmith. I took a photo of his whaleboat during a visit to the New Bedford Whaling Museum a few years ago. ... my wife took this shot. I hope she is as supportive on my next project. Thank you one more time for all the help and encouragement. Mike


- 128 replies
-
- 16
-
-
- model shipways
- new bedford whaleboat
- (and 1 more)
-
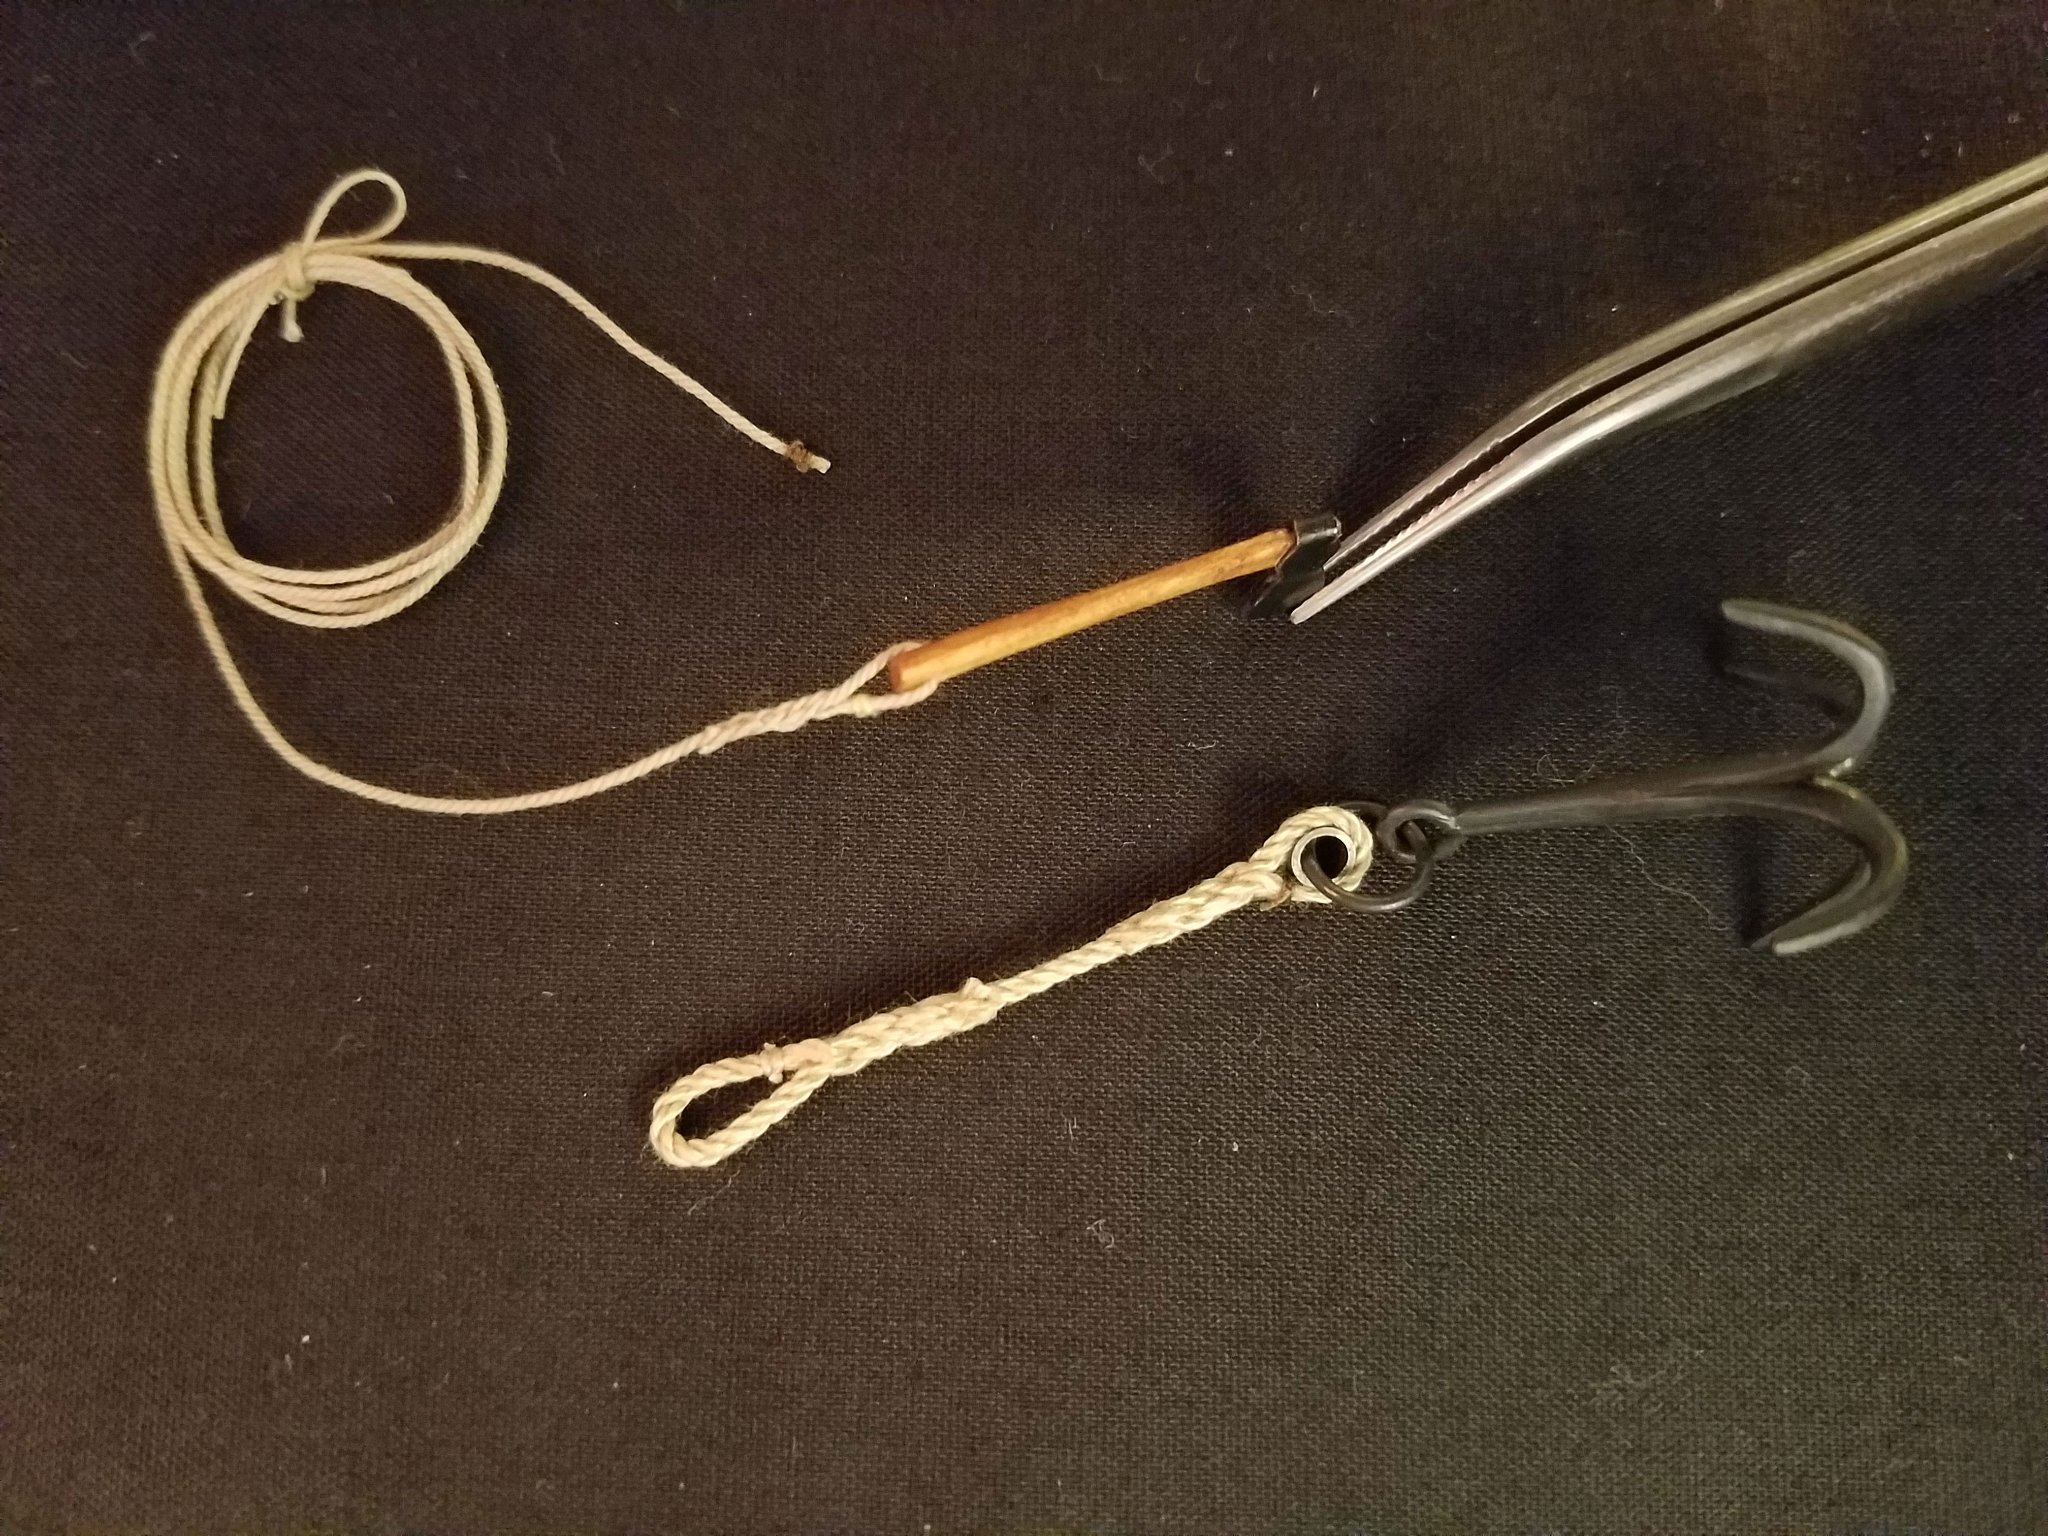
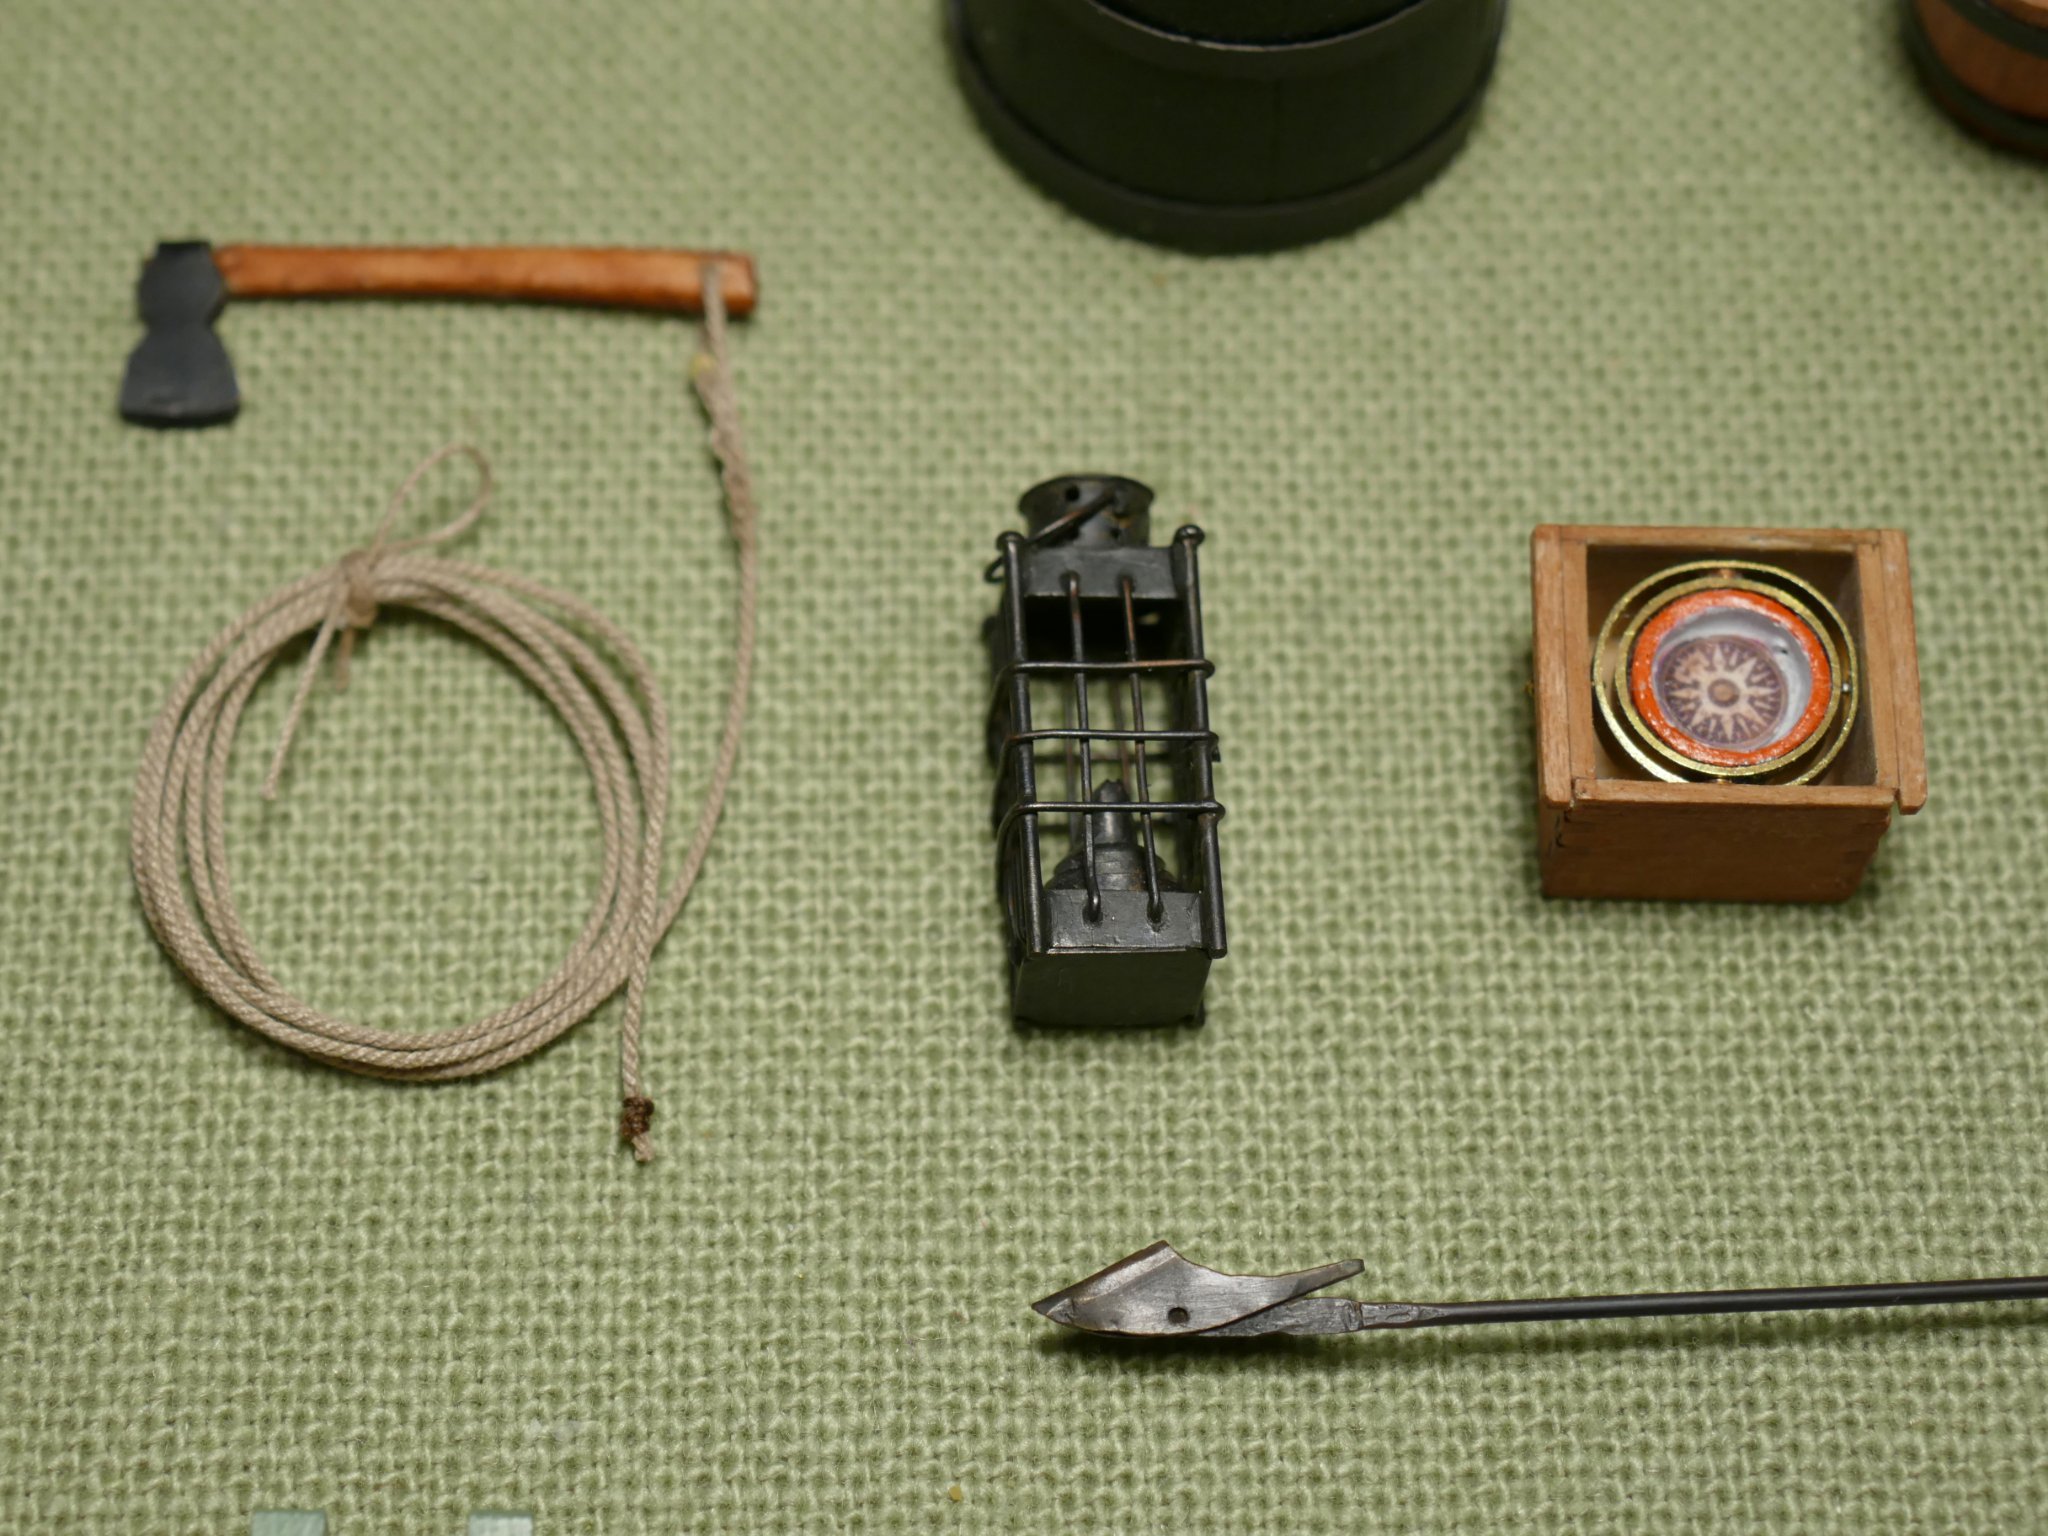
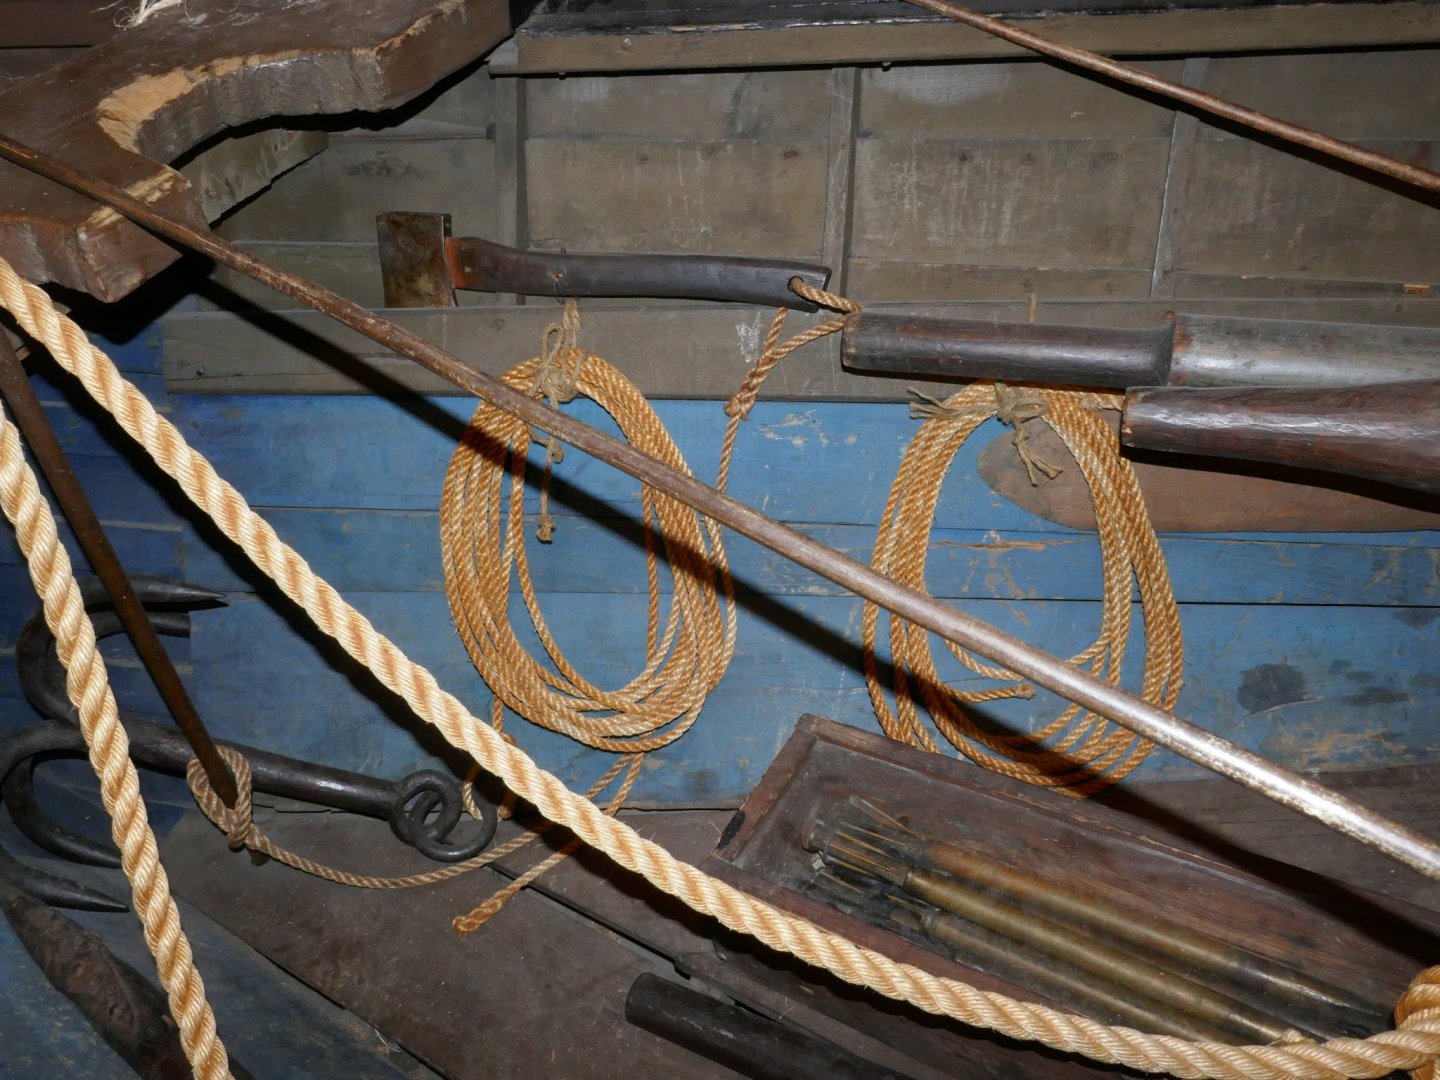
Thanks guys. Again, I really appreciate you looking in. I'm just wrapping things up these last few days. There is so much temptation to go back and re-do things that I might be able to improve. But, I think I've dragged this out long enough. So, the boat axe with line is the last piece I'll make for this project. I came across this photo taken 4 years ago at the New Bedford Whaling Museum. The axe is on a full scale Alaskan whale boat showing a length of line seemingly long enough to extend all the way aft. ... and my attempt at the smallest eye splice to date (for me). It's made with .018" 3 strand, Syren rope. My home made cotton rope wasn't sturdy enough to work without fraying while the Syren material held up nicely. I soldered a pin point to the tip of my DIY Swedish FID to be able to stick the strands. On to the display.... Thank you again, Mike
- 128 replies
-
- 7
-
-
- model shipways
- new bedford whaleboat
- (and 1 more)
-
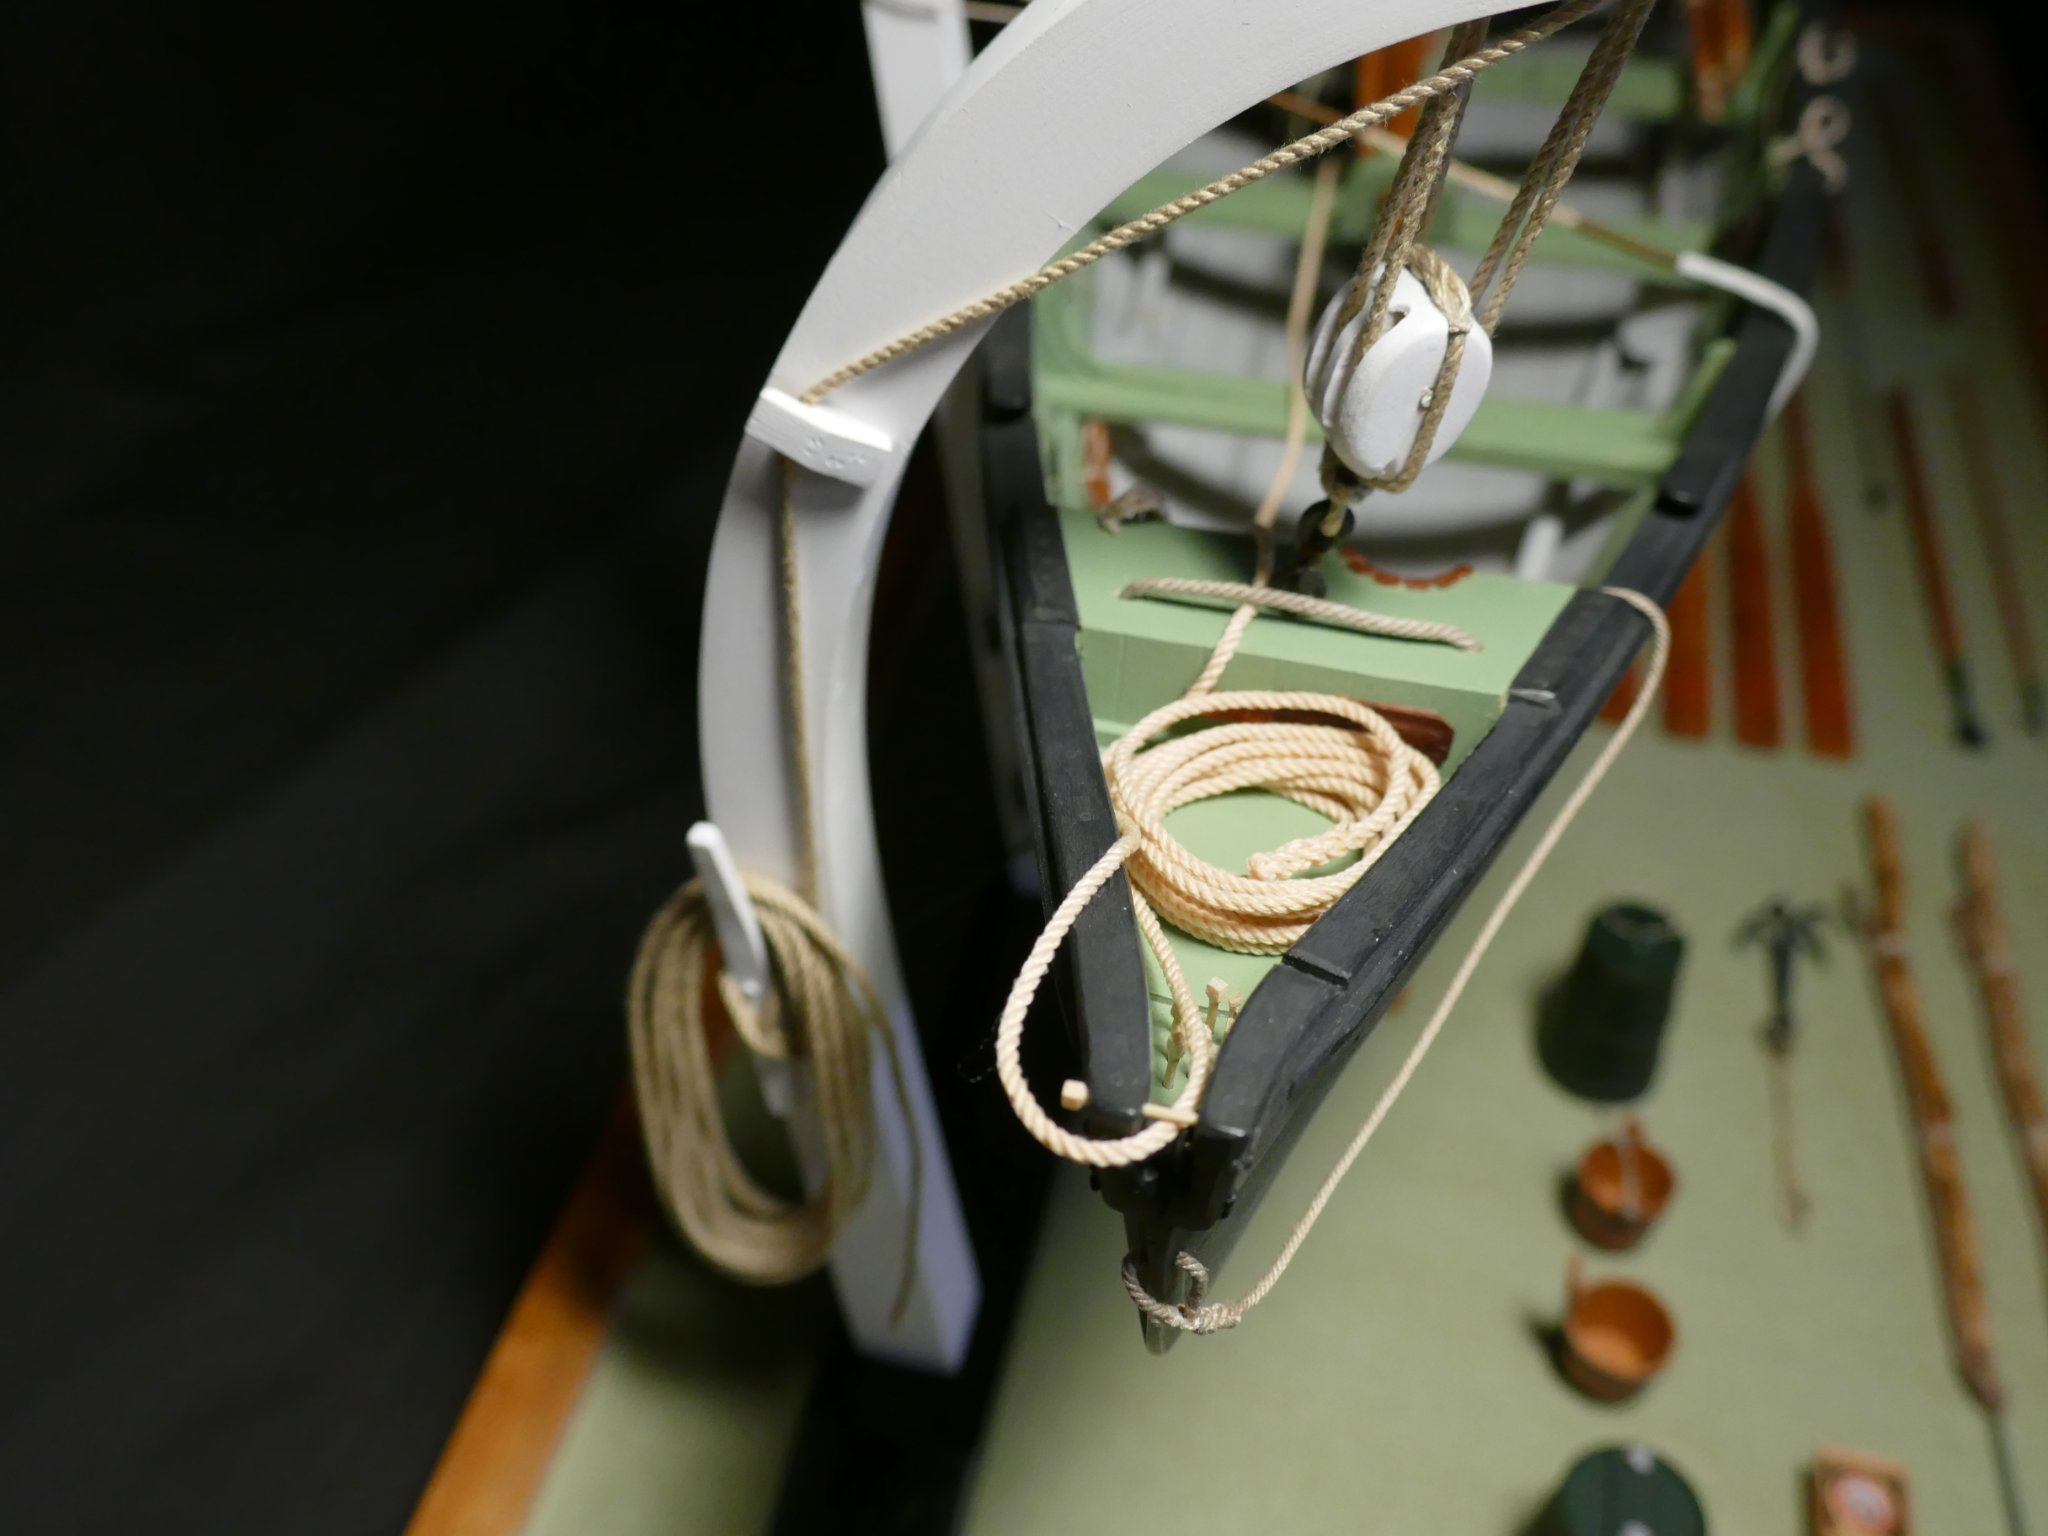
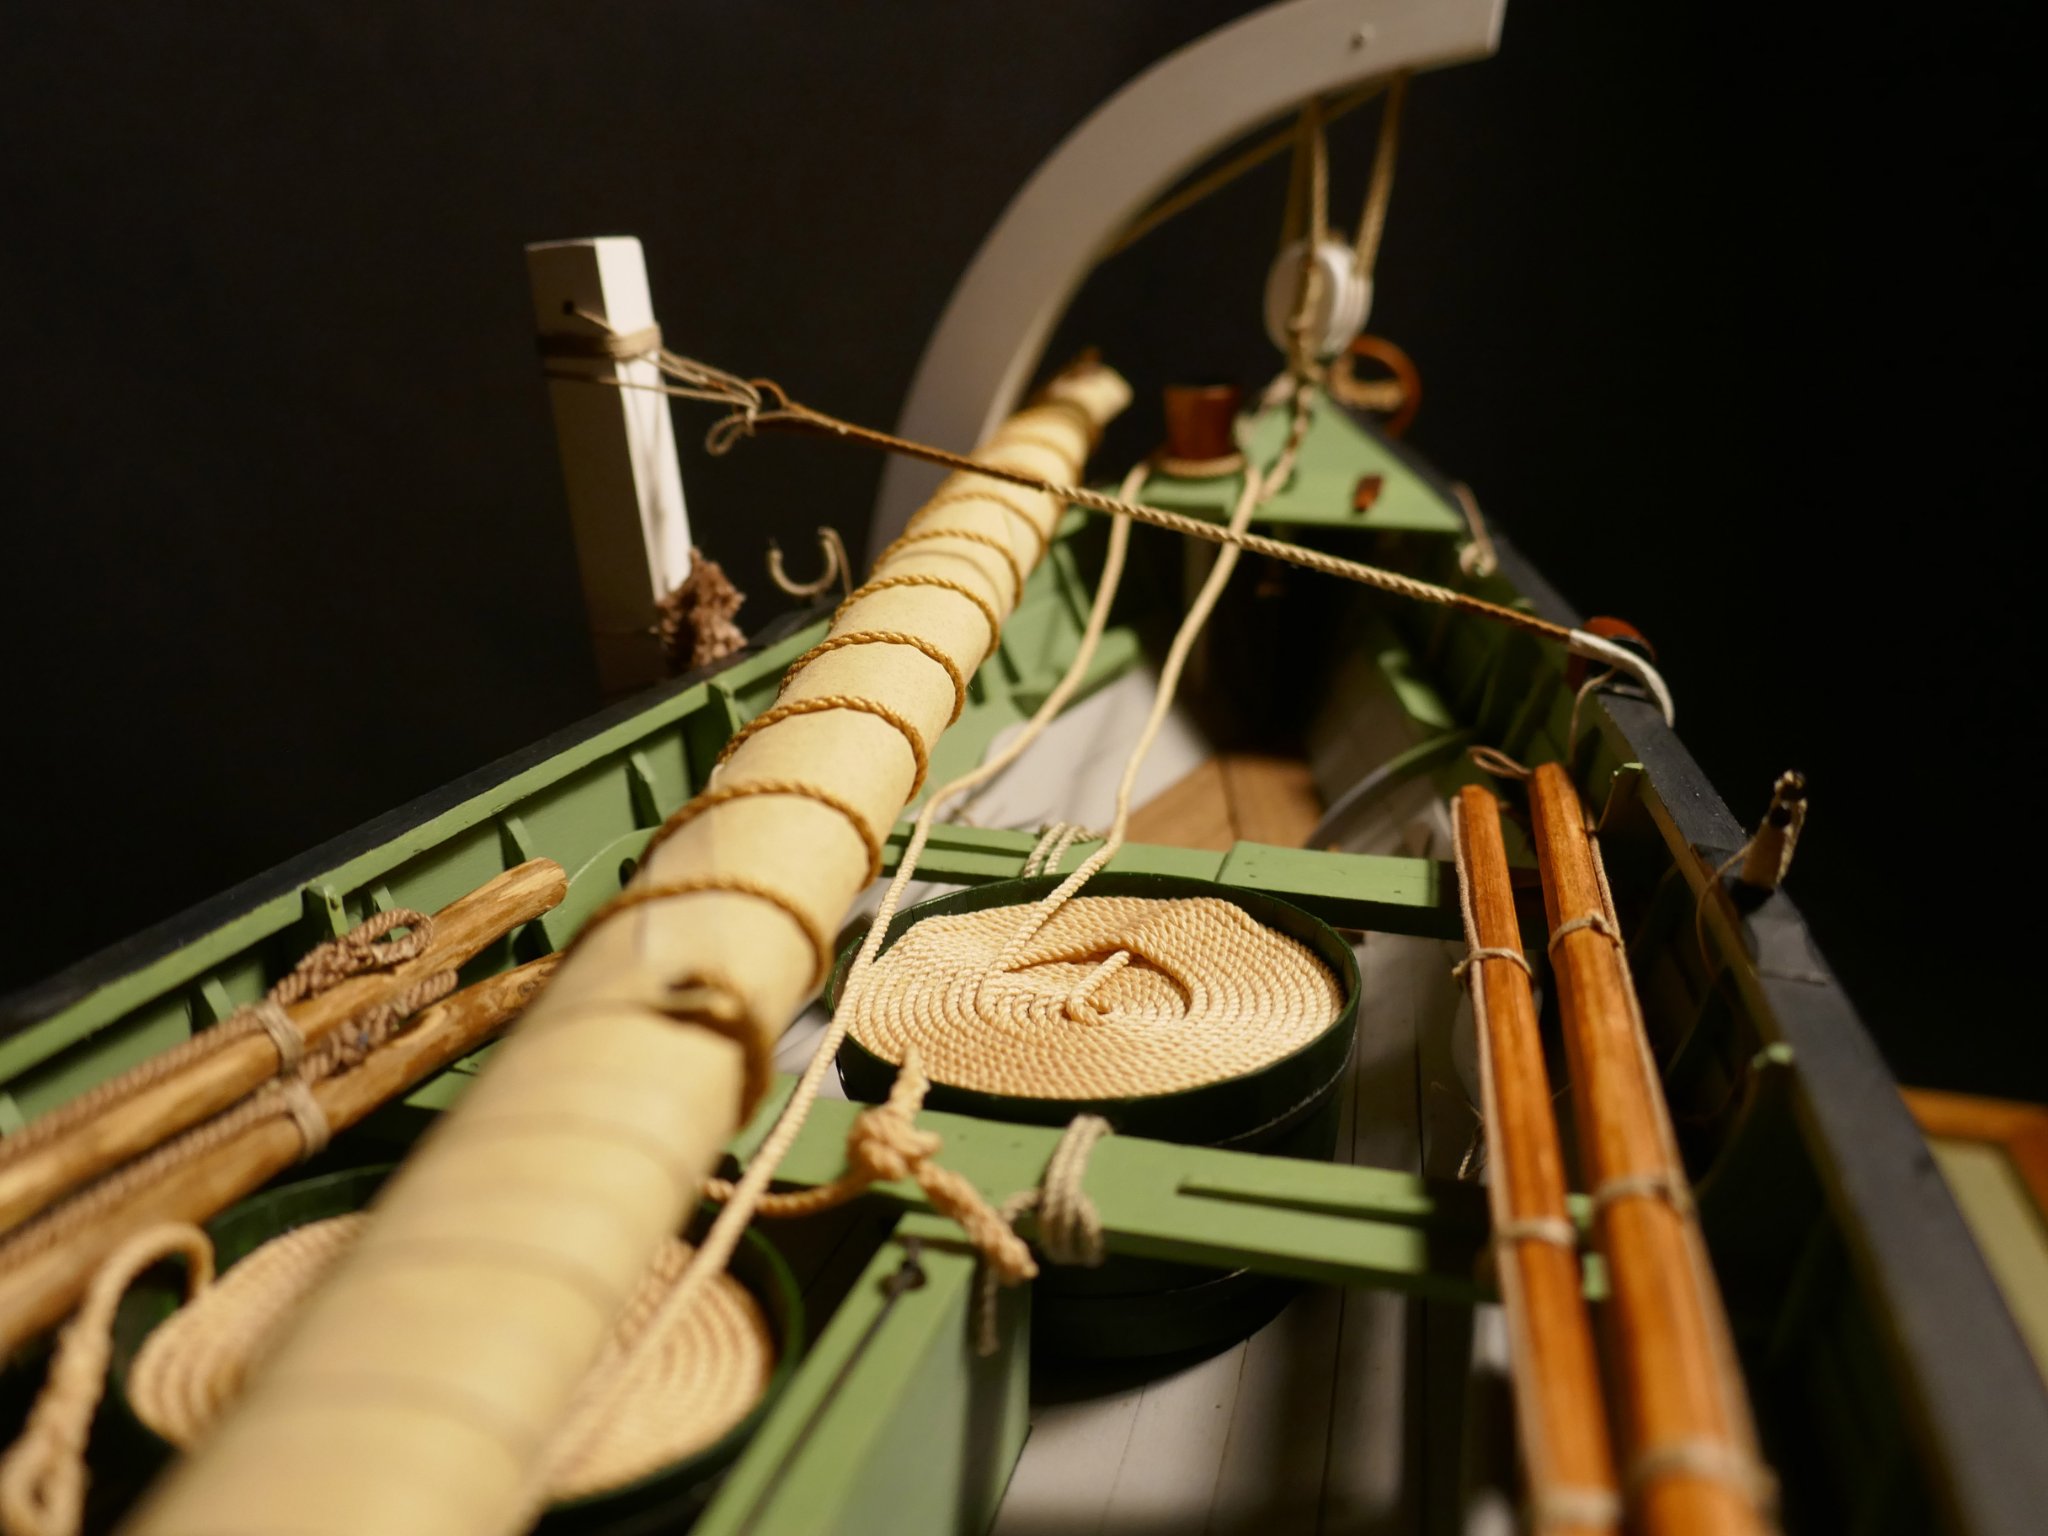
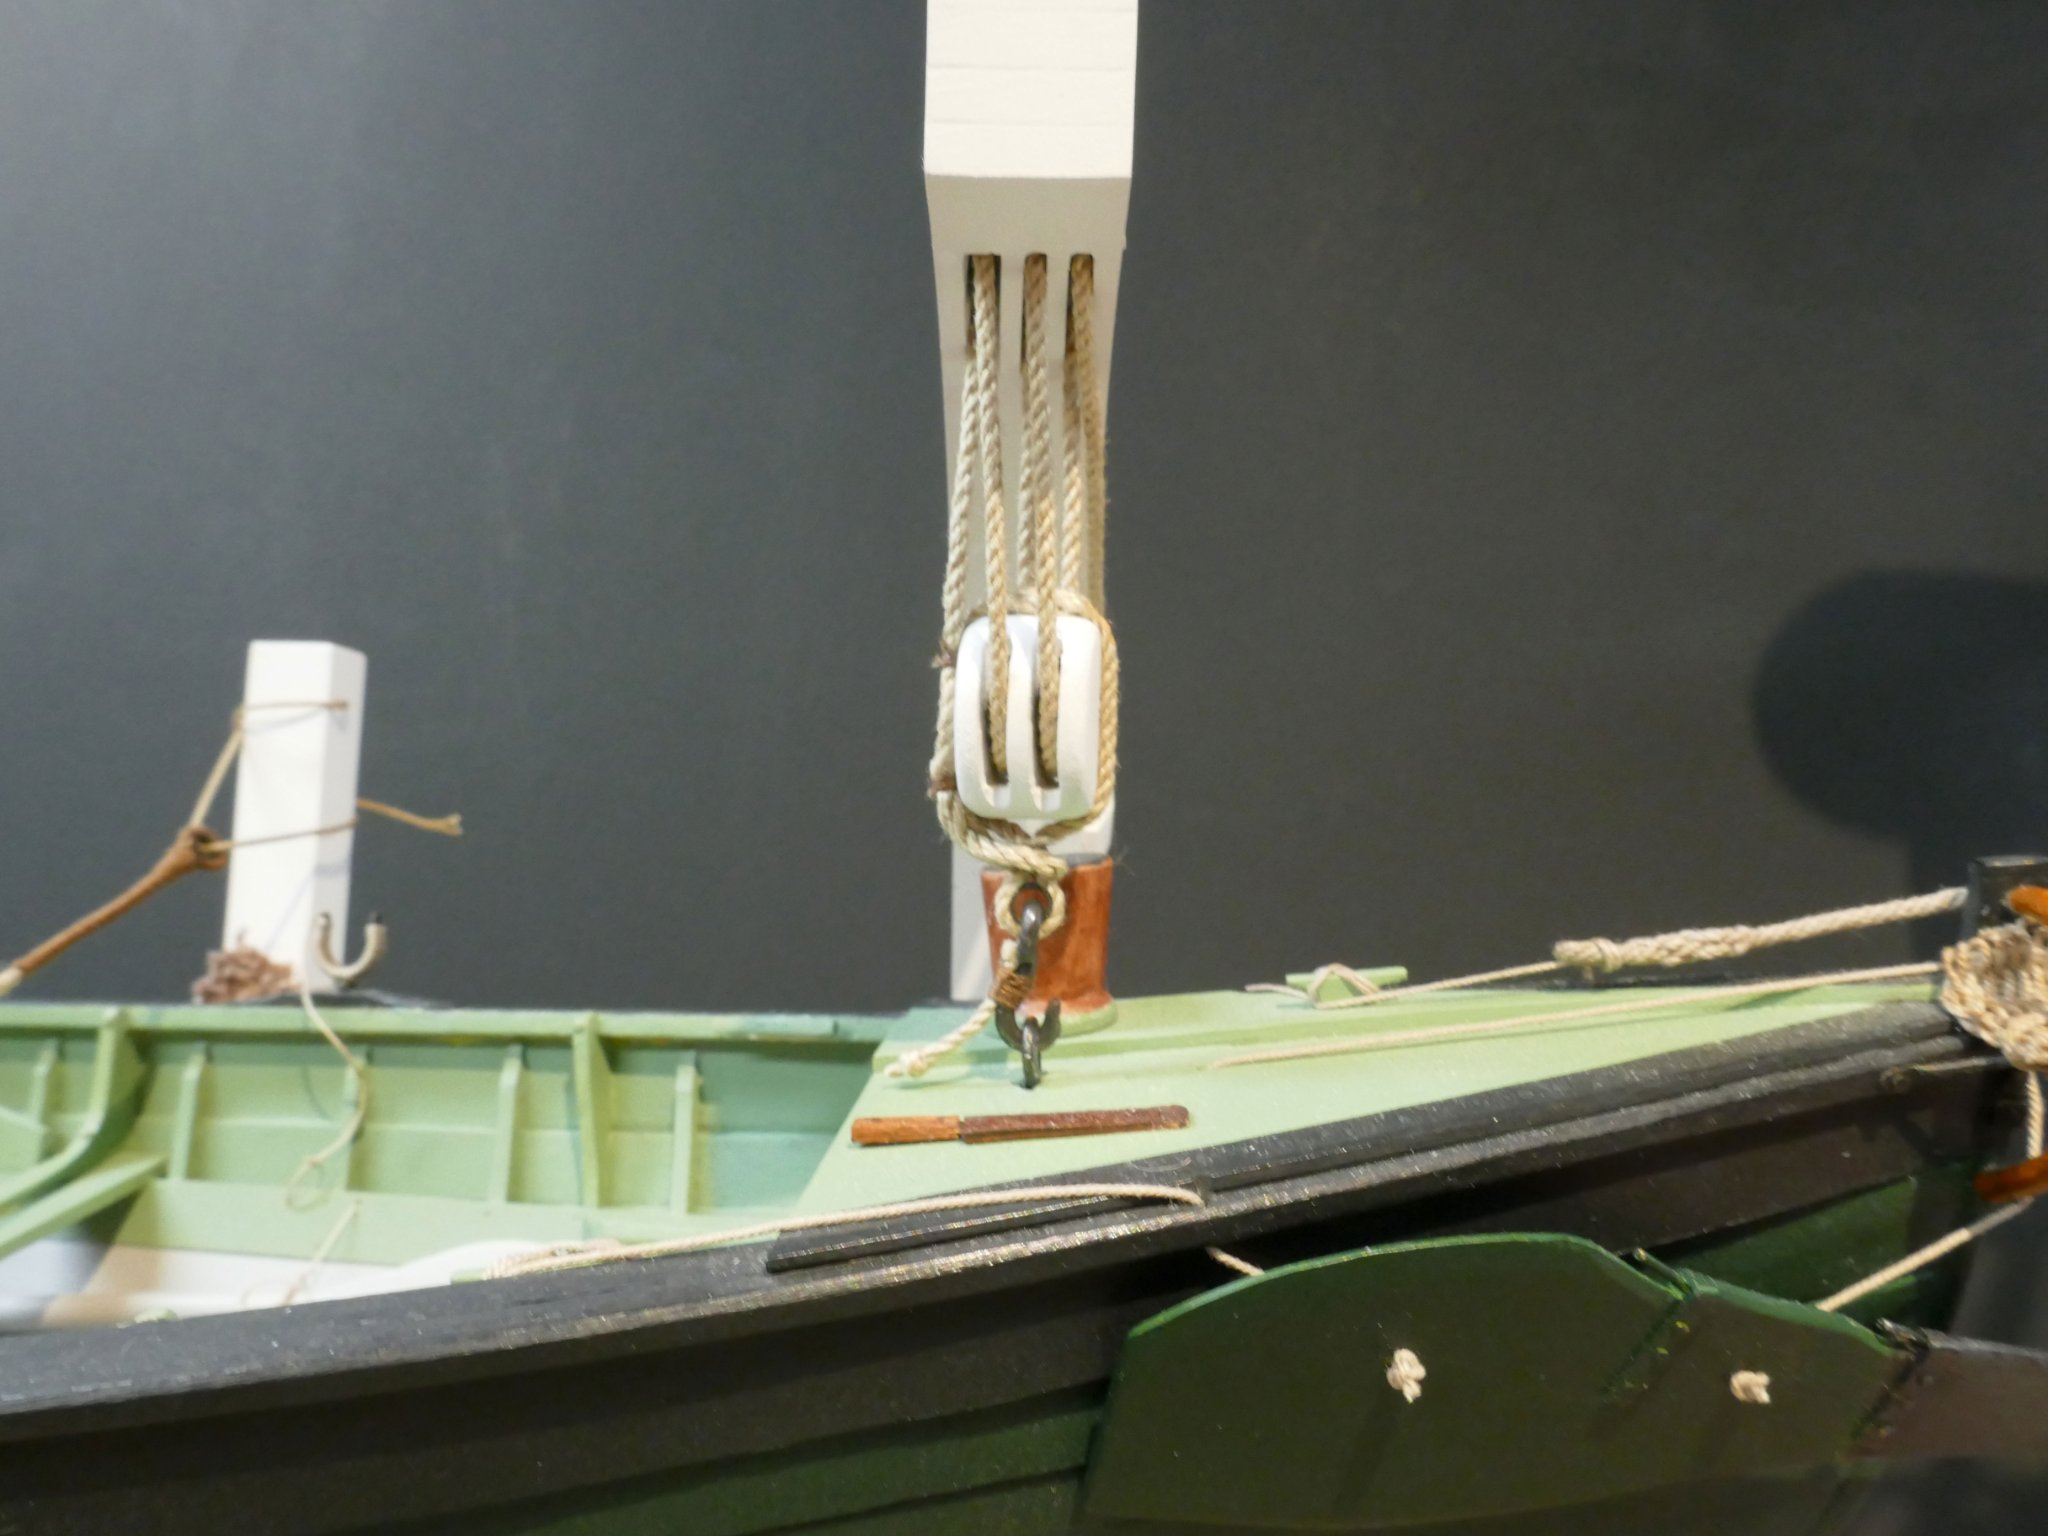
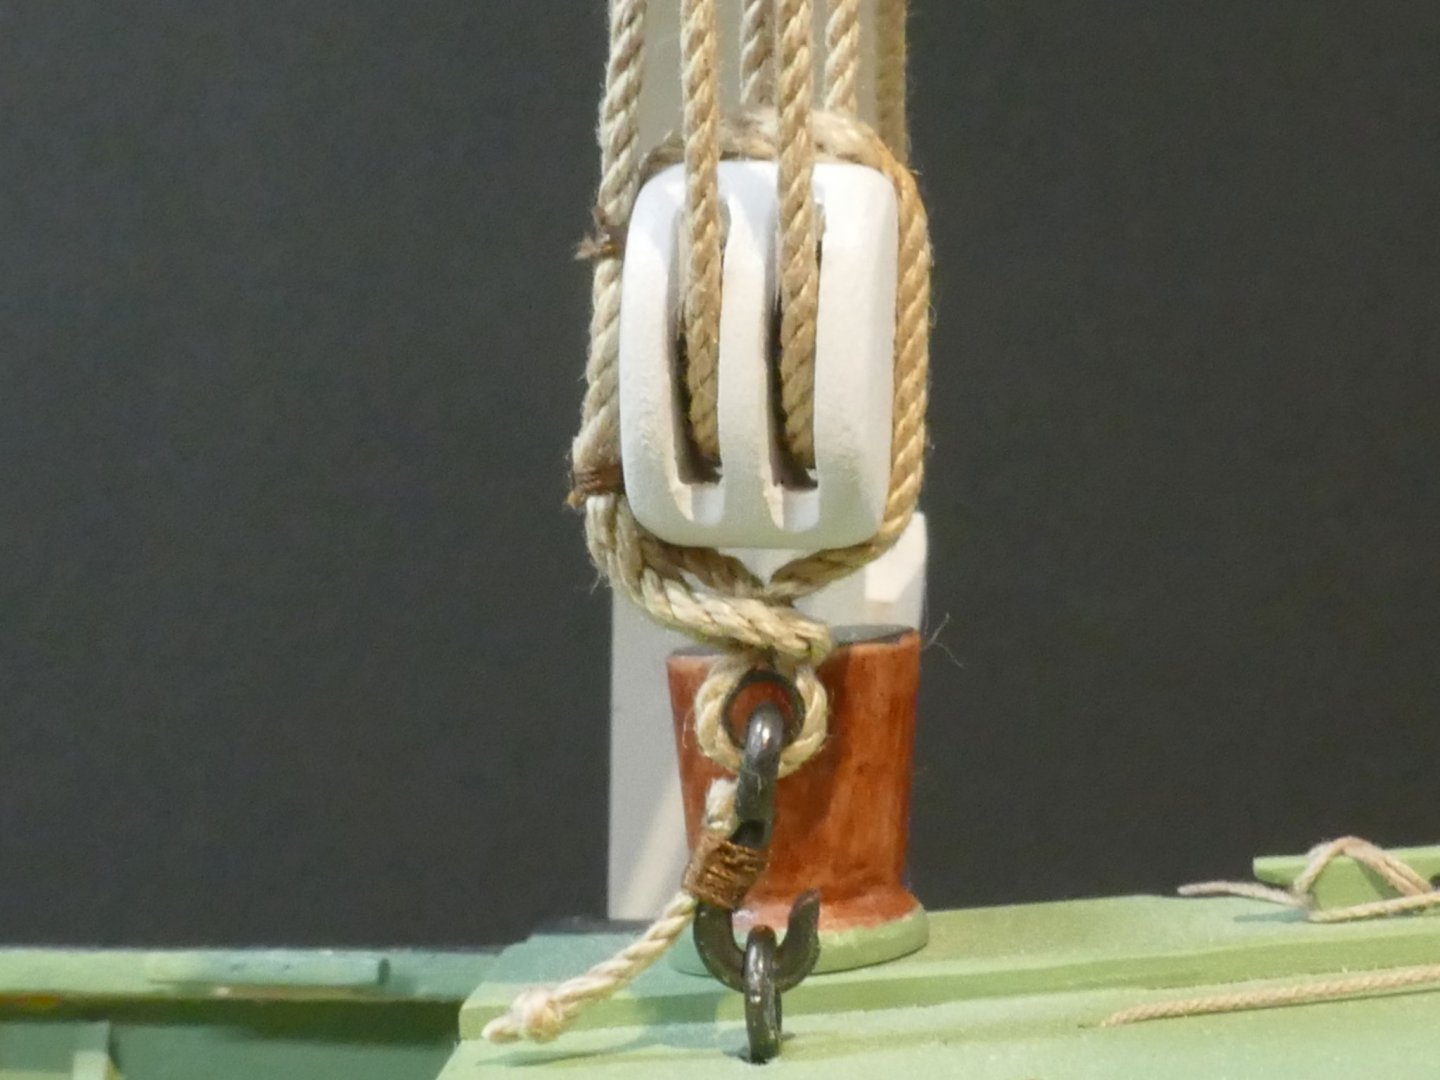
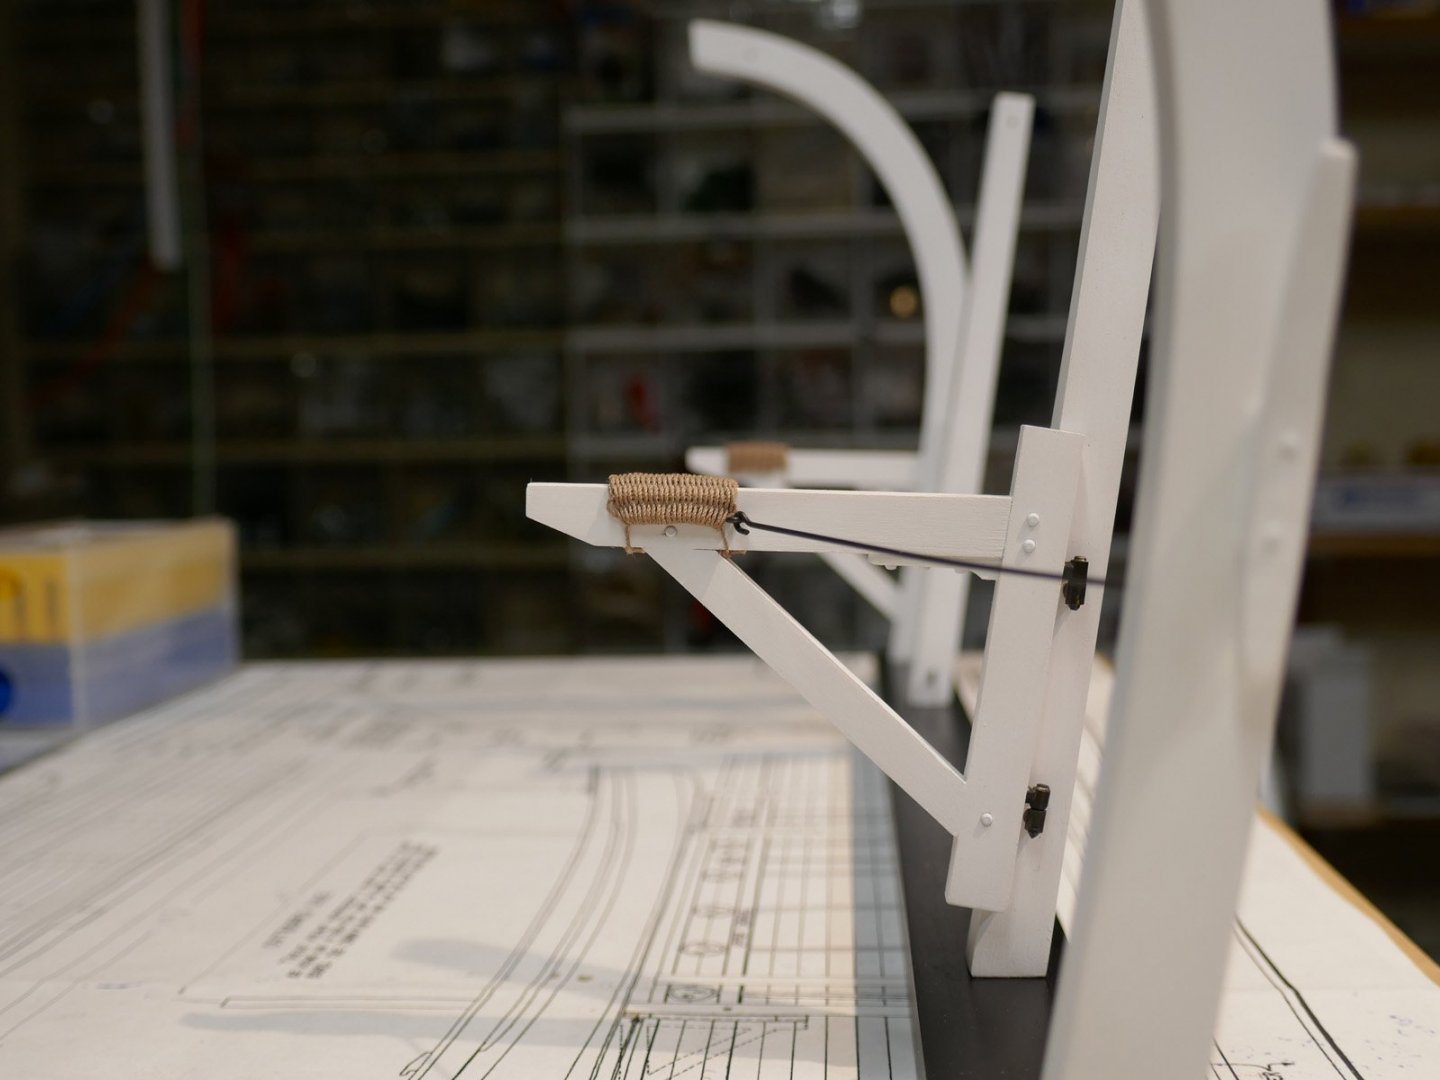
Thank you guys for the thumbs up. I do appreciate them. Here are a couple of shots of the davit fall, block, hook & pigtail. The pigtail is used to quickly yank out the hook once it is loose. Although a fairly small assembly it includes a block with pulleys and shank, a hook, thimble, modified short splice, eye splice, stopper knot and home made rope. A visit to the optometrist is already scheduled! Thanks again for your support. Mike

- 128 replies
-
- 10
-
-
-
- model shipways
- new bedford whaleboat
- (and 1 more)
-
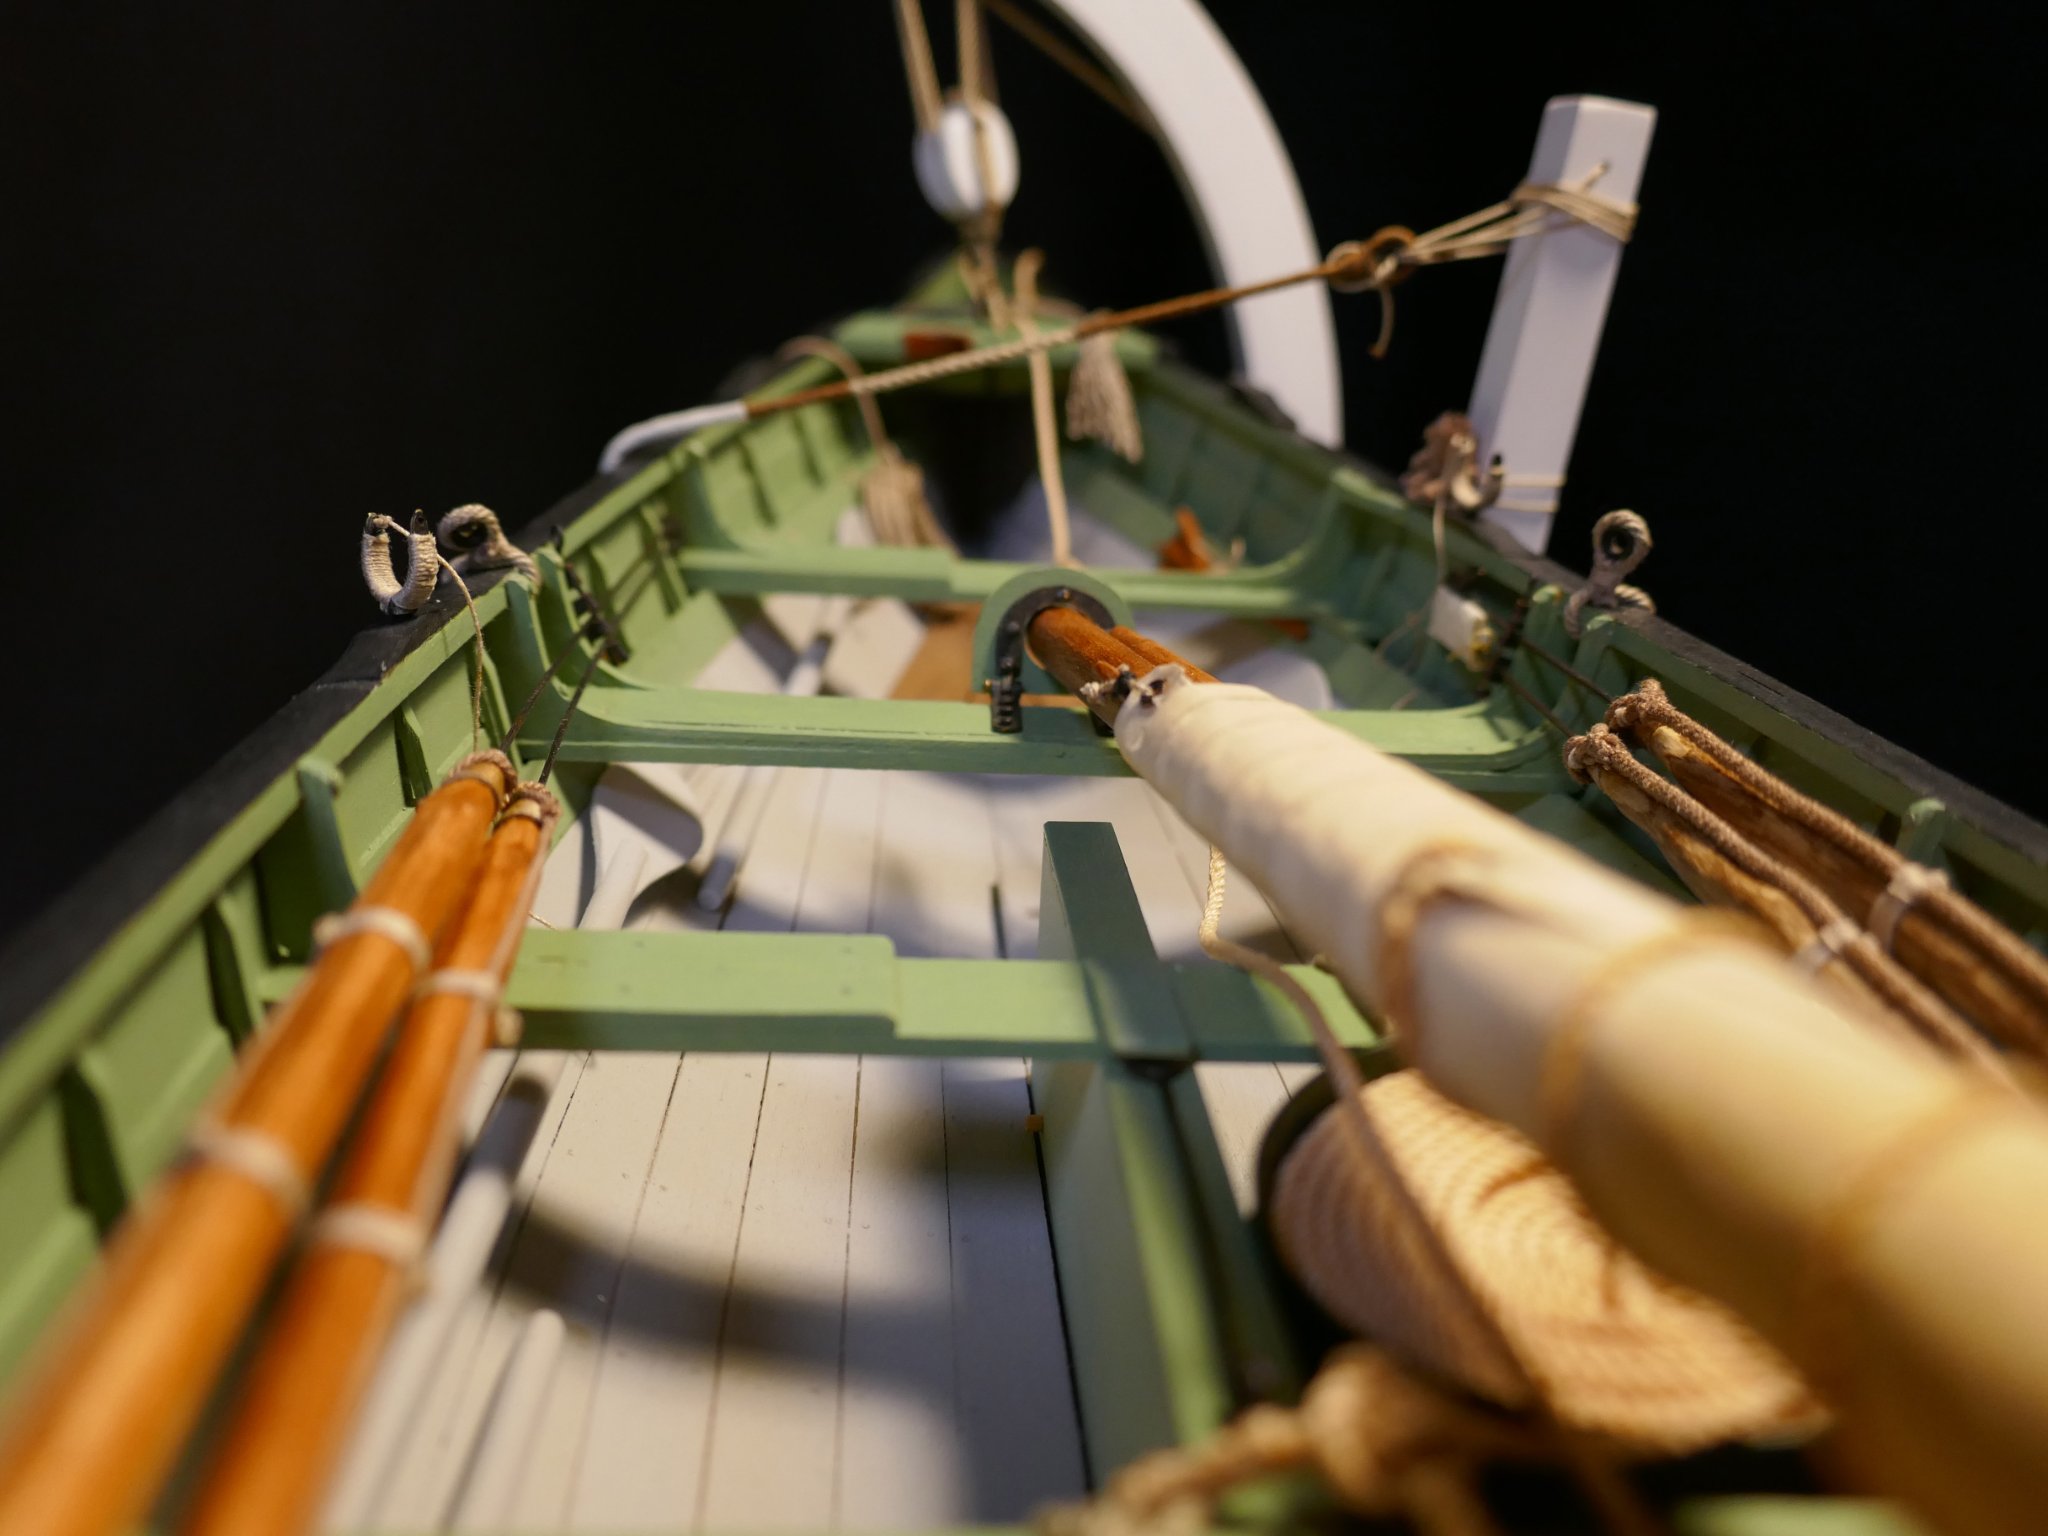
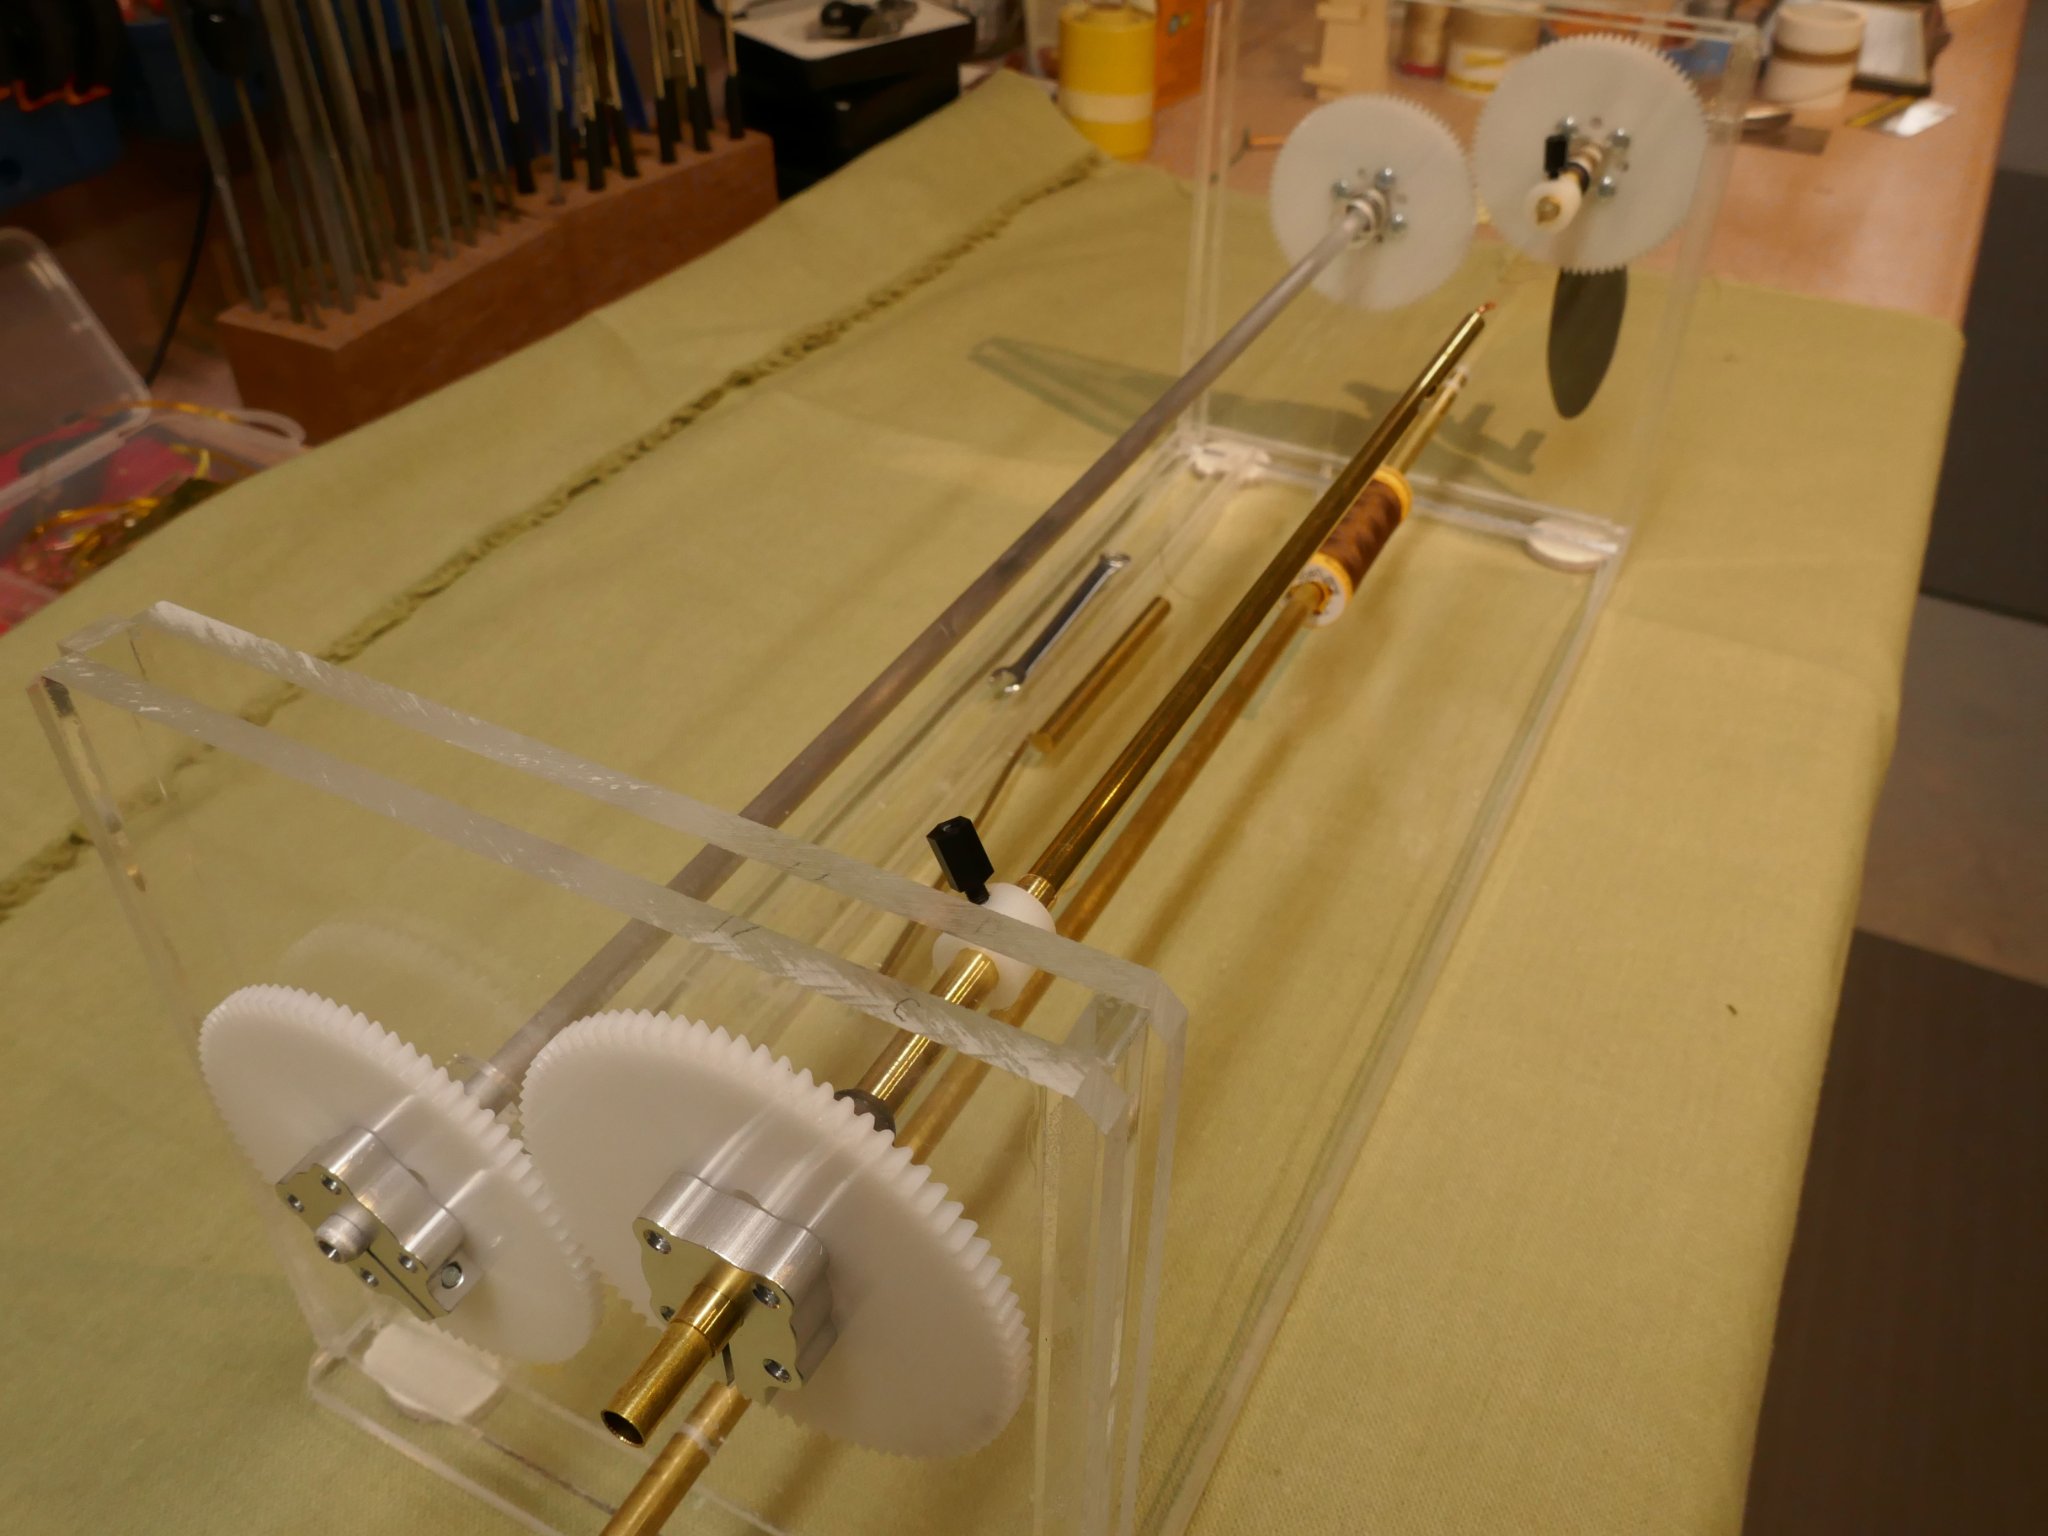
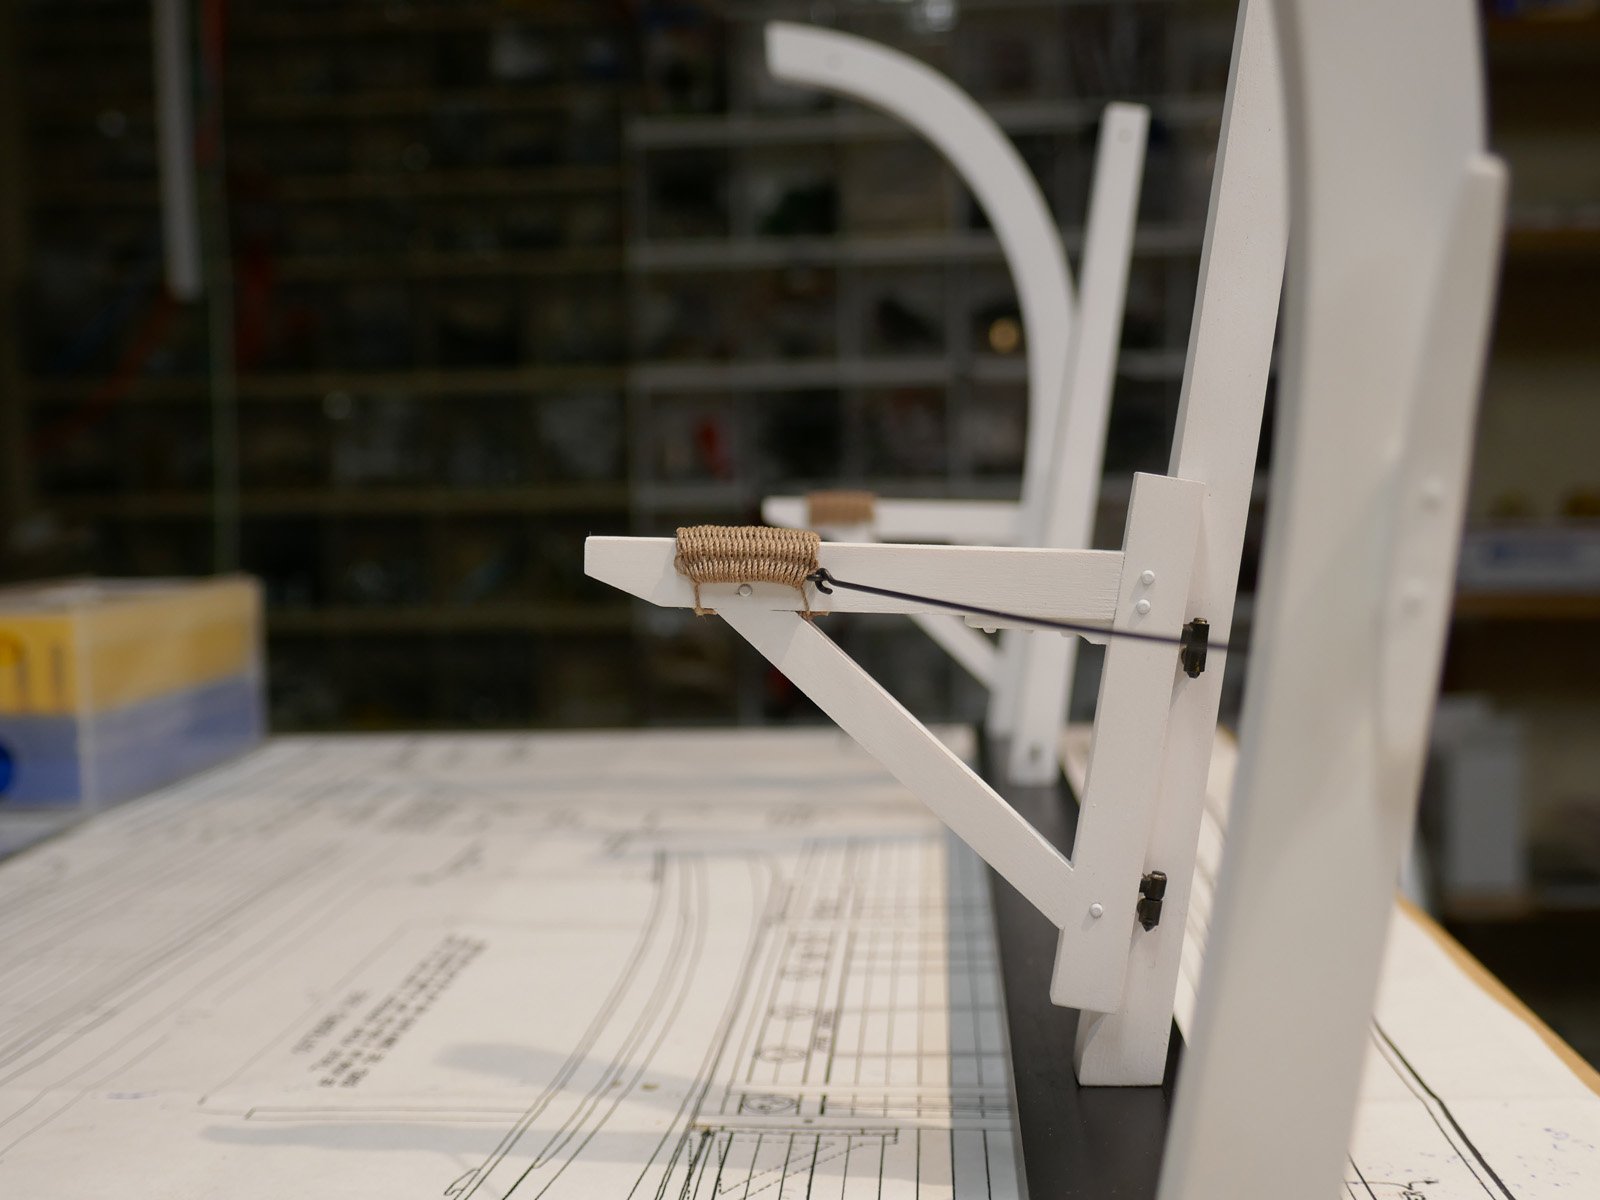
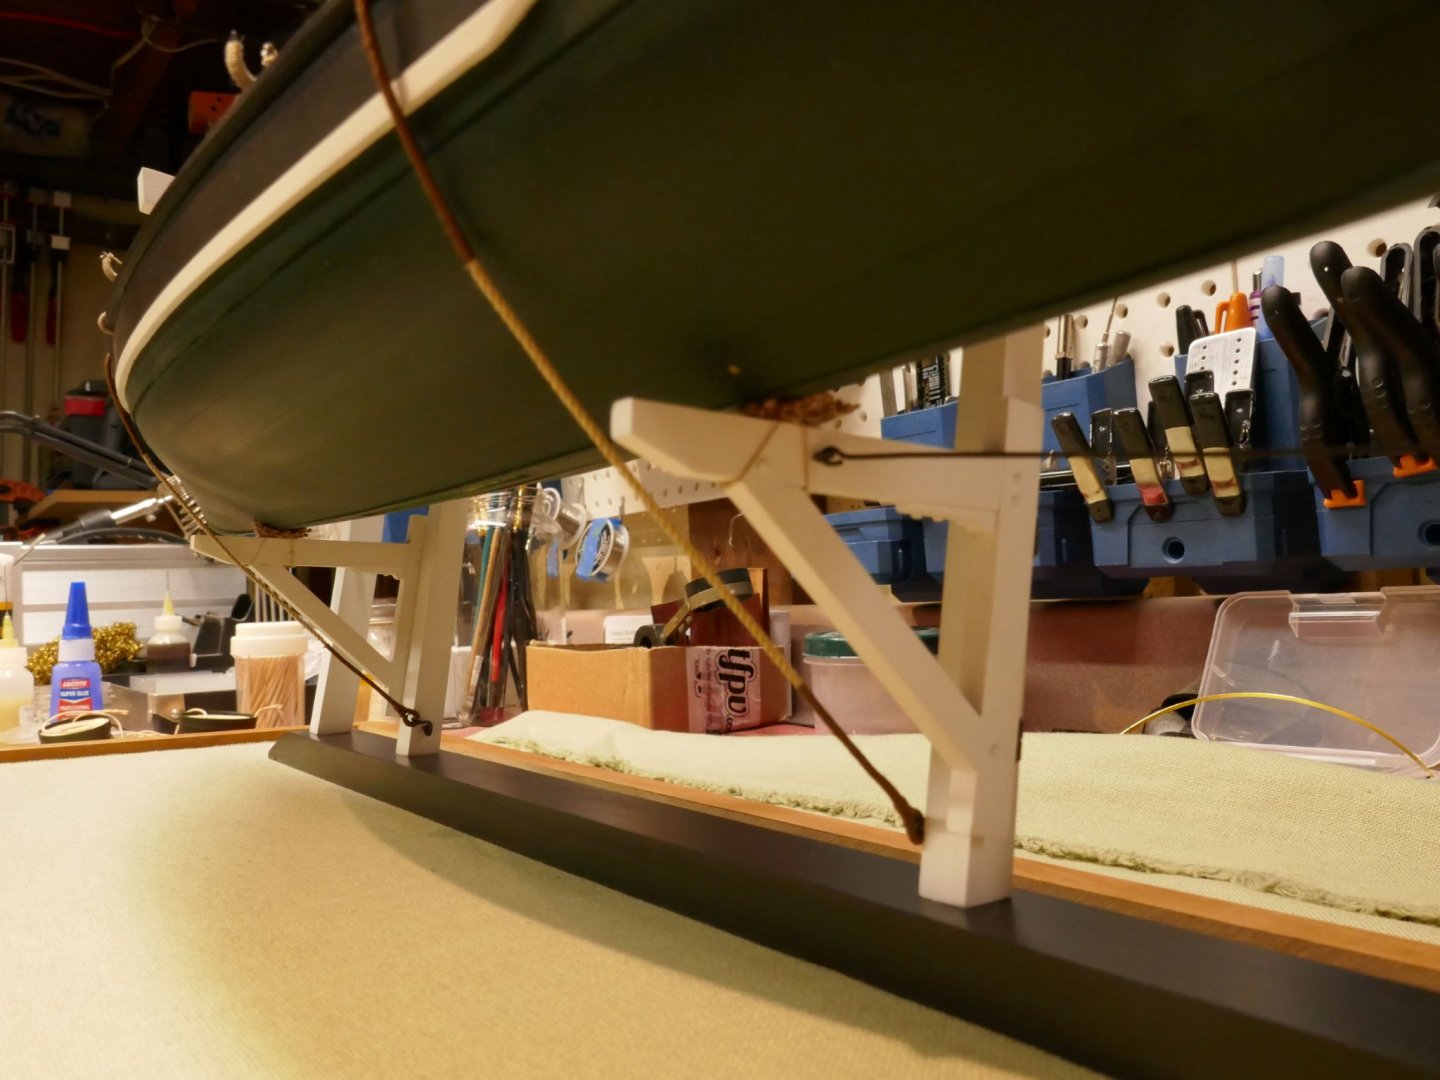
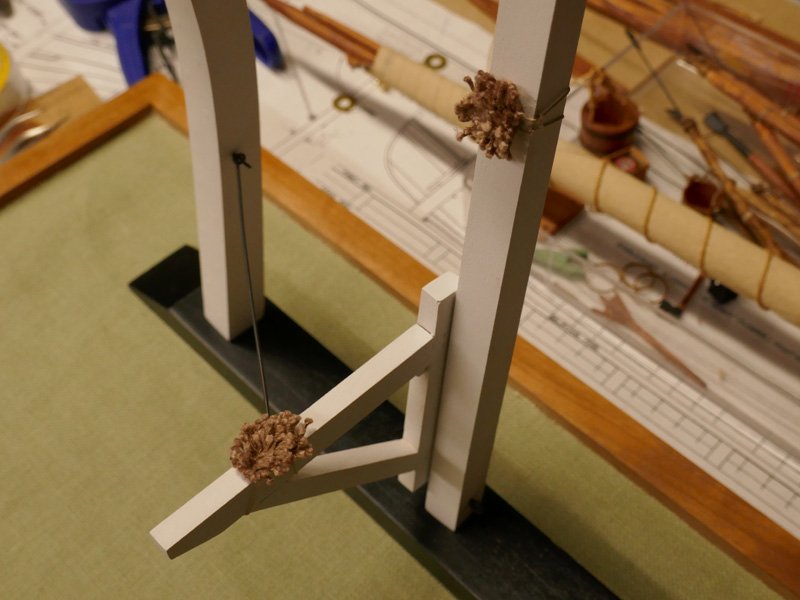
Thanks guys for the likes. I appreciate them. The boat gripe lines need a lot of serving so I decided to make a rope serving machine for this project and any future projects. Searching this forum, I really liked the "archjofo" design so I put this one together (no motor) with some left over acrylic and about $50 in gears and hubs. The left drive has a long telescoping brass tube while both sides have interchangeable tips to grab the rope. The gripes are temporarily tied to the crane supports for now. The baggy wrinkle can just about be seen in this shot. I only mention that because it took forever to make it!! The pulley system is next and with that and a little housekeeping, the project is winding (slowly) down. Mike

- 128 replies
-
- 8
-
-
- model shipways
- new bedford whaleboat
- (and 1 more)
-
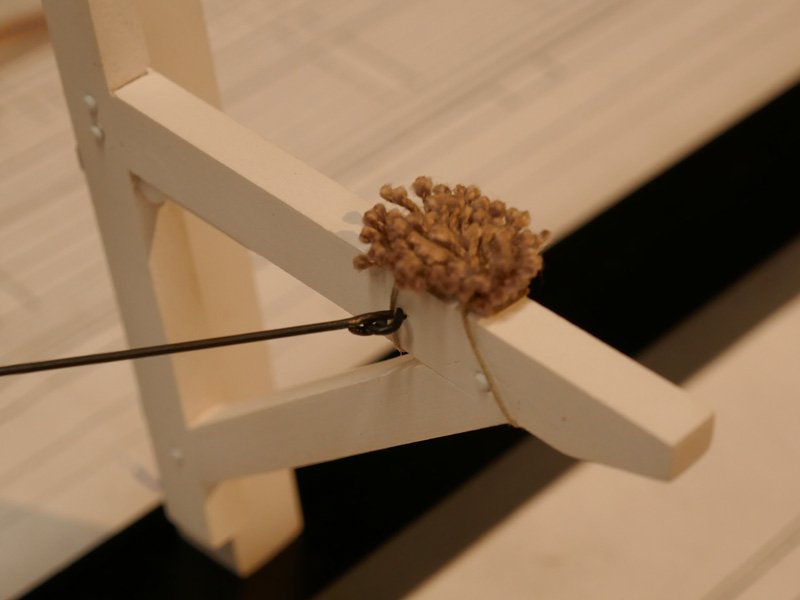
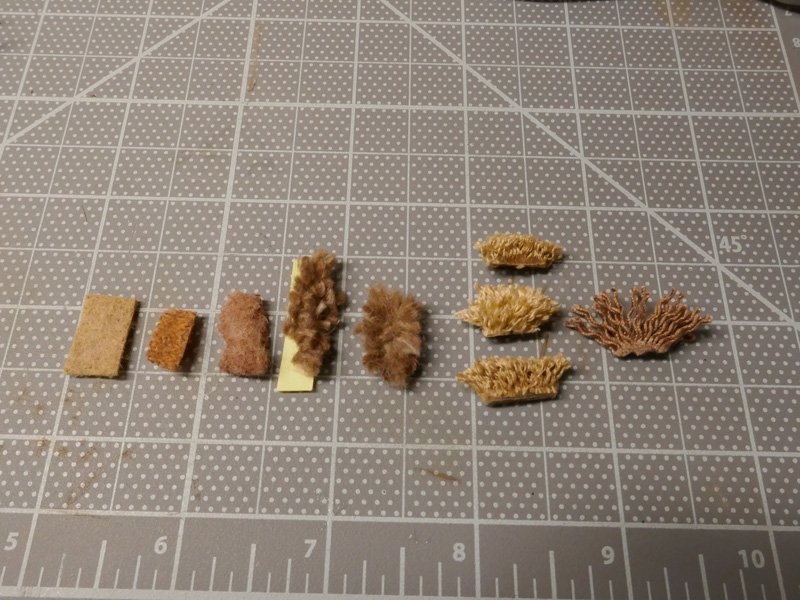
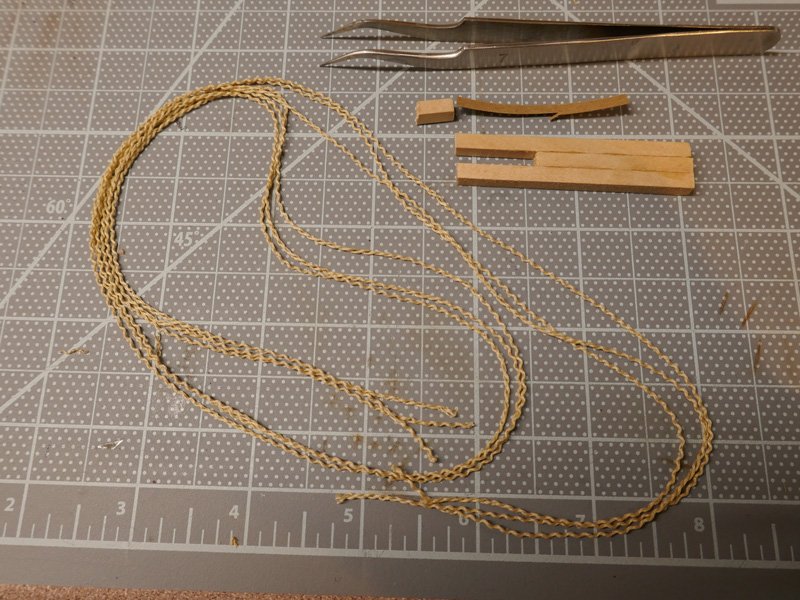
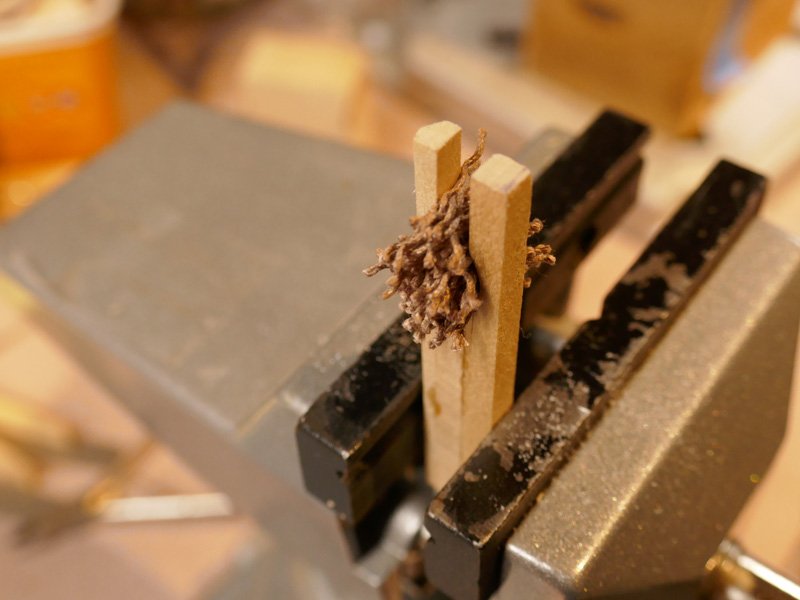
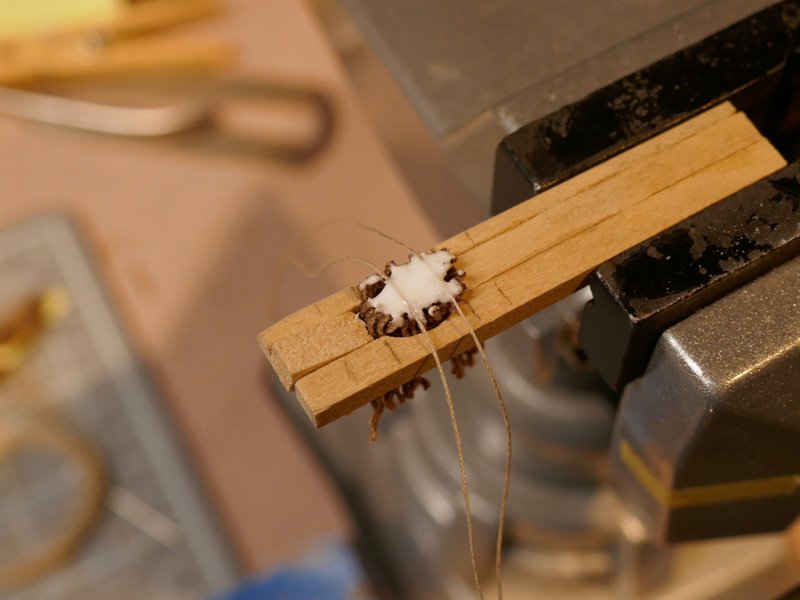
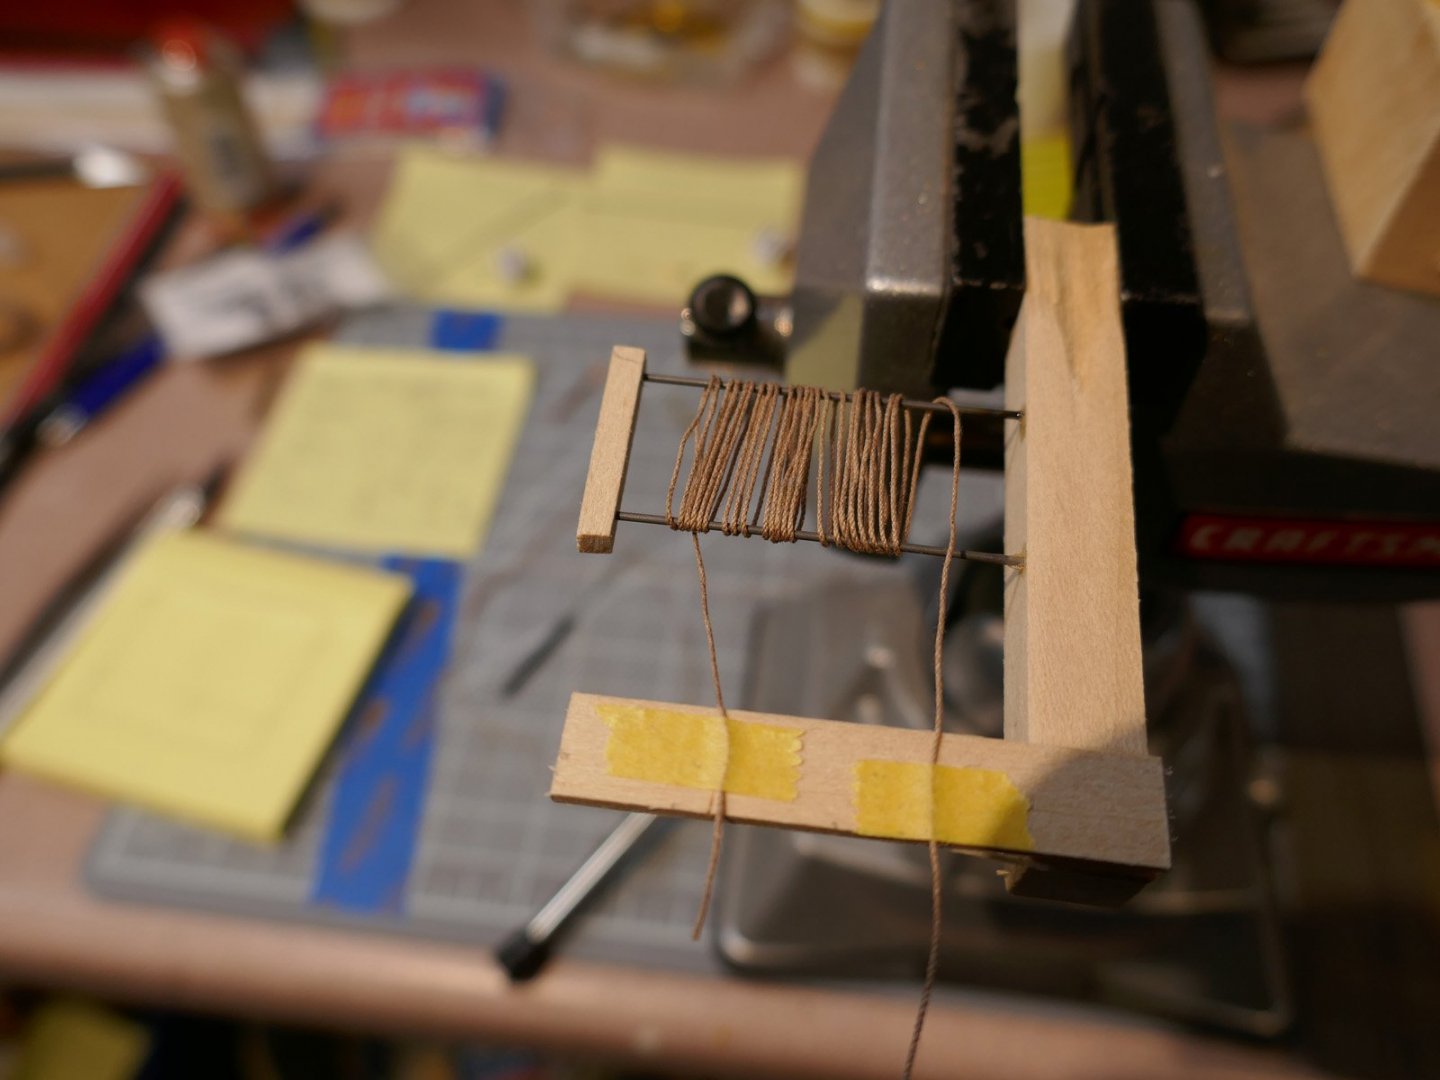
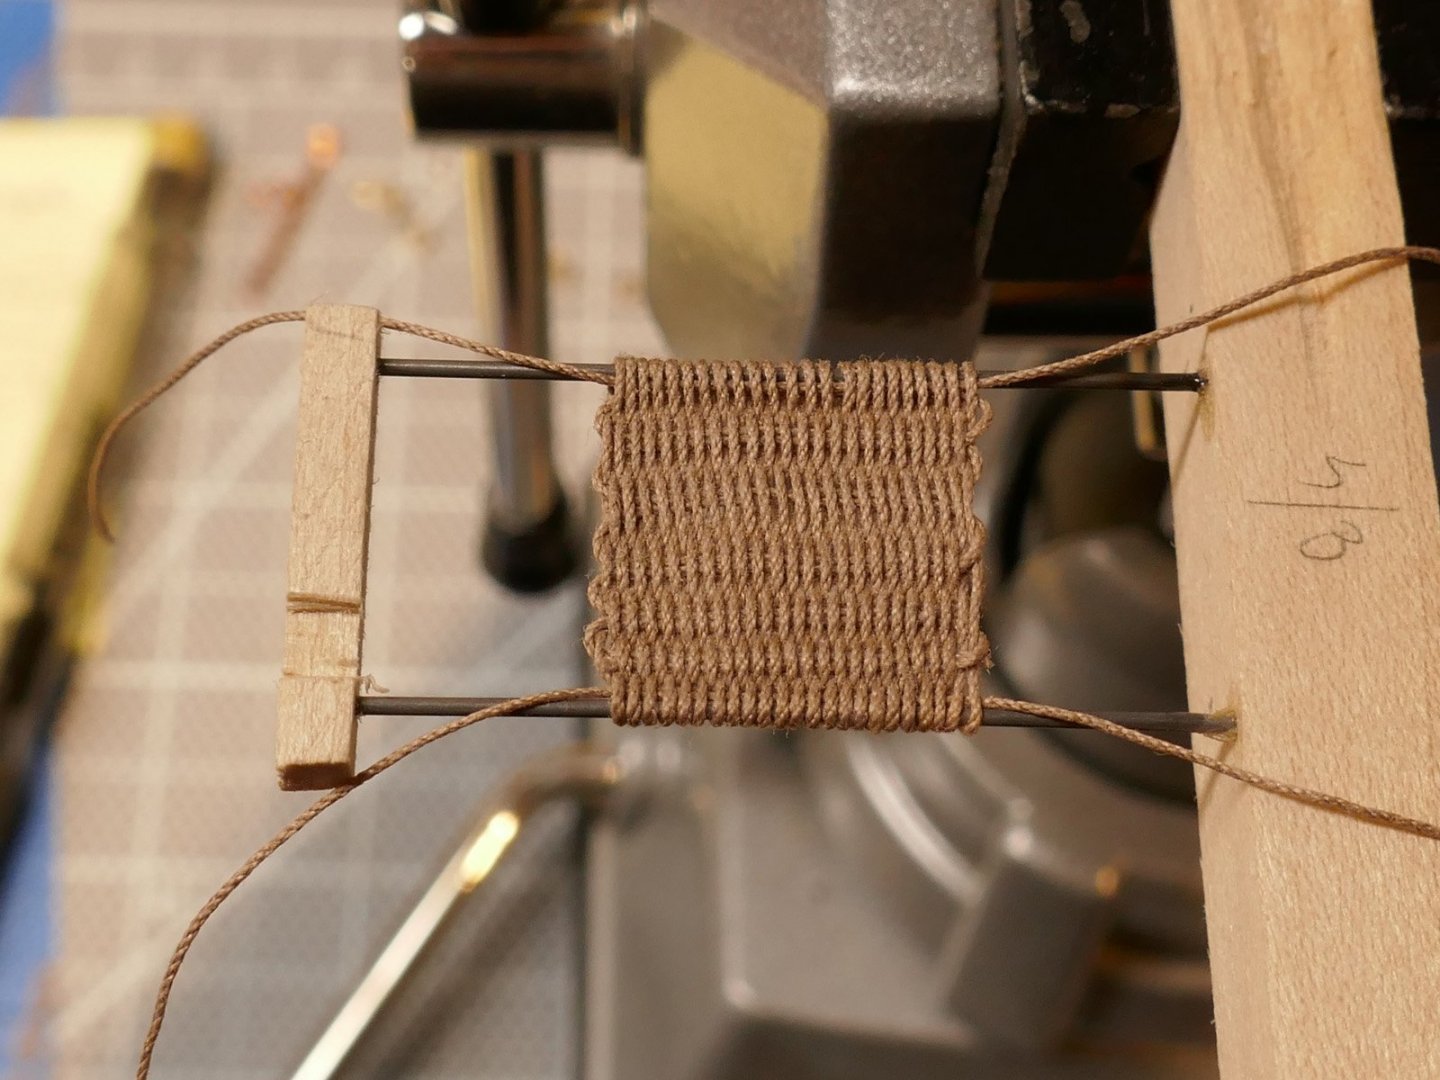
Although I like the look of the sword mat, I decided to give "baggy wrinkle" a try instead. Baggy wrinkle is a more authentic anti-chaffing material for the whaleboat contact points with the cranes and the crane support. ... two weeks and a dozen material trials later I finally settled on un-layed rope, which just so happens to be the material that baggy wrinkle is classically made with anyway. This sequence shows the method used. Make a small wooden jig to hold the ~1/2" cut pieces of un-layed rope including a small wooden piece to close off the end of the slot in the jig. Note: the rope strands could be wound on one arm of the jig and then cut all at once to save time but would use up a lot more rope. The strands are stuffed in the jig slot sticking out on both sides. Tweezers can be used to pack it down until the slot is full. One side of the material should be trimmed as flat as possible leaving the ends a standing up a bit from the jig. Apply enough glue to touch all the strand ends. A hypo needle glue applicator works well in this case. It's finish up with some lines for attachment to the the cranes and a small piece of craft paper is place on the end to hold it altogether. Finally, the displayed side should be flattened out a bit and trimmed to scale thickness. Thank you for looking in. Mike
- 128 replies
-
- 6
-
-
- model shipways
- new bedford whaleboat
- (and 1 more)
-
I should have mentioned in the previous post that, by eye in indirect sunlight, the actual color to me is a grey-beige. So it's OK for me. I think cameras, monitors and overhead lighting whether at home or in a store can really influence color perception. By now, I'm walking the rope color trials up to the room where I will display the model. Mike
-
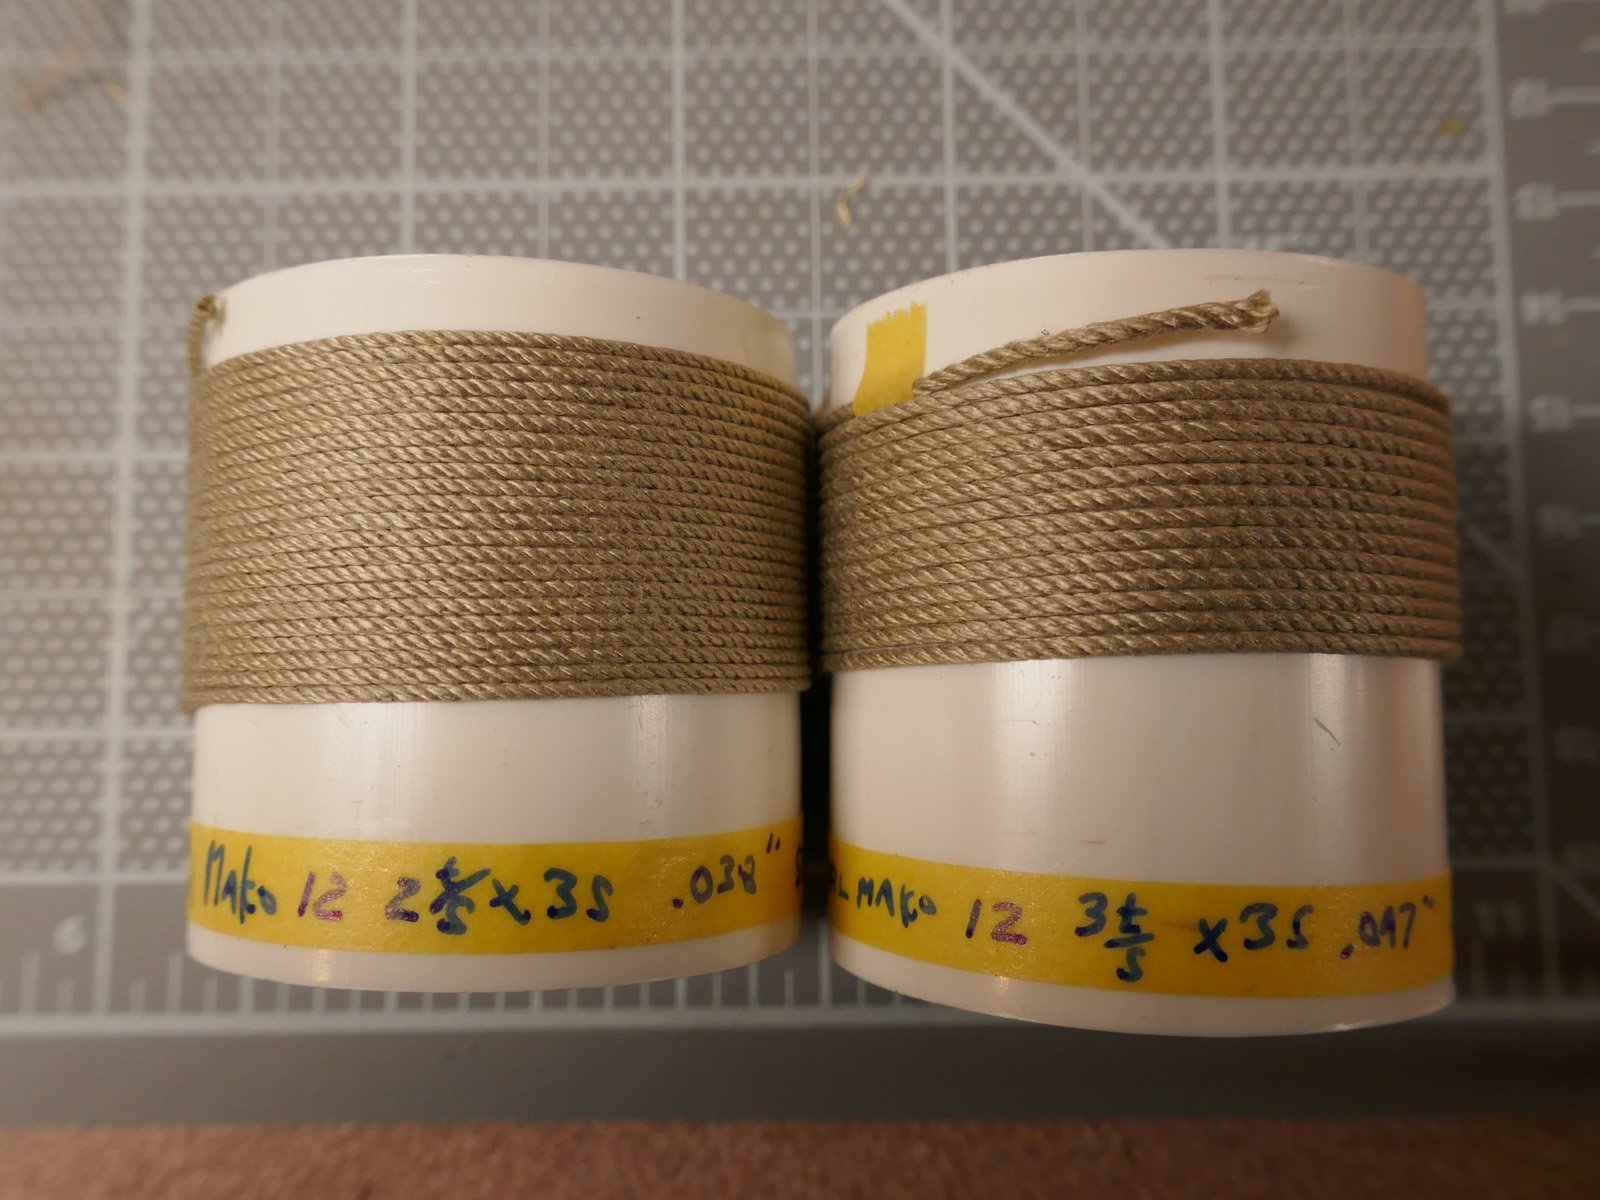
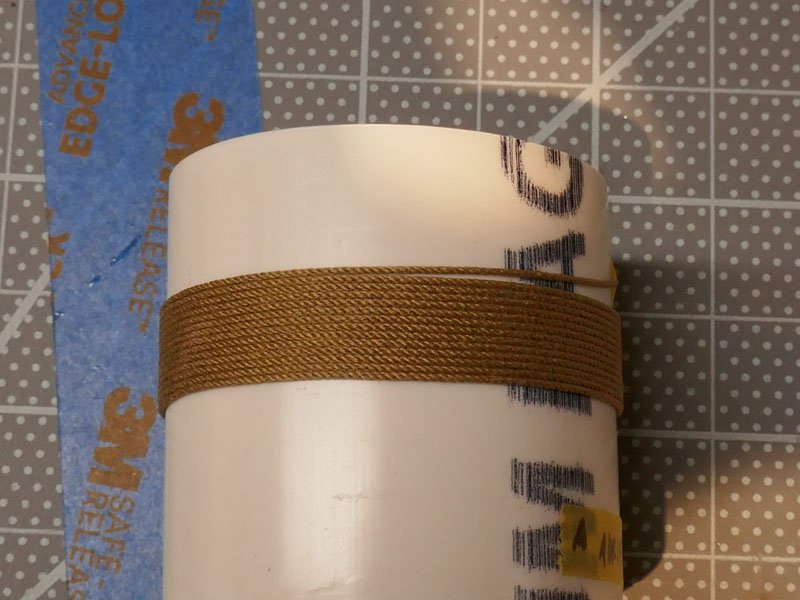
Thank you Chuck. It took hardly any time getting used to the Rope Rocket.. pretty much stuck to your video tips. Well done. I'm running a spreadsheet with about 20 trials so far with a split of about 50/50 cotton/polyester. I finally found some weight 12 Aurifil and twisted it up today: Mako 12 2 t/s x 3s .038" (10 strands/10 method) Mako 12 3 t/s x 3s .047" This color is 5011 Rope Beige. Under the shop lights (LED 5000K) it is grey while under LED 2700K lights it is tan. 🤨 Notwithstanding the price, I currently favor the cotton just to avoid the heat treating step for the poly. Mike

-
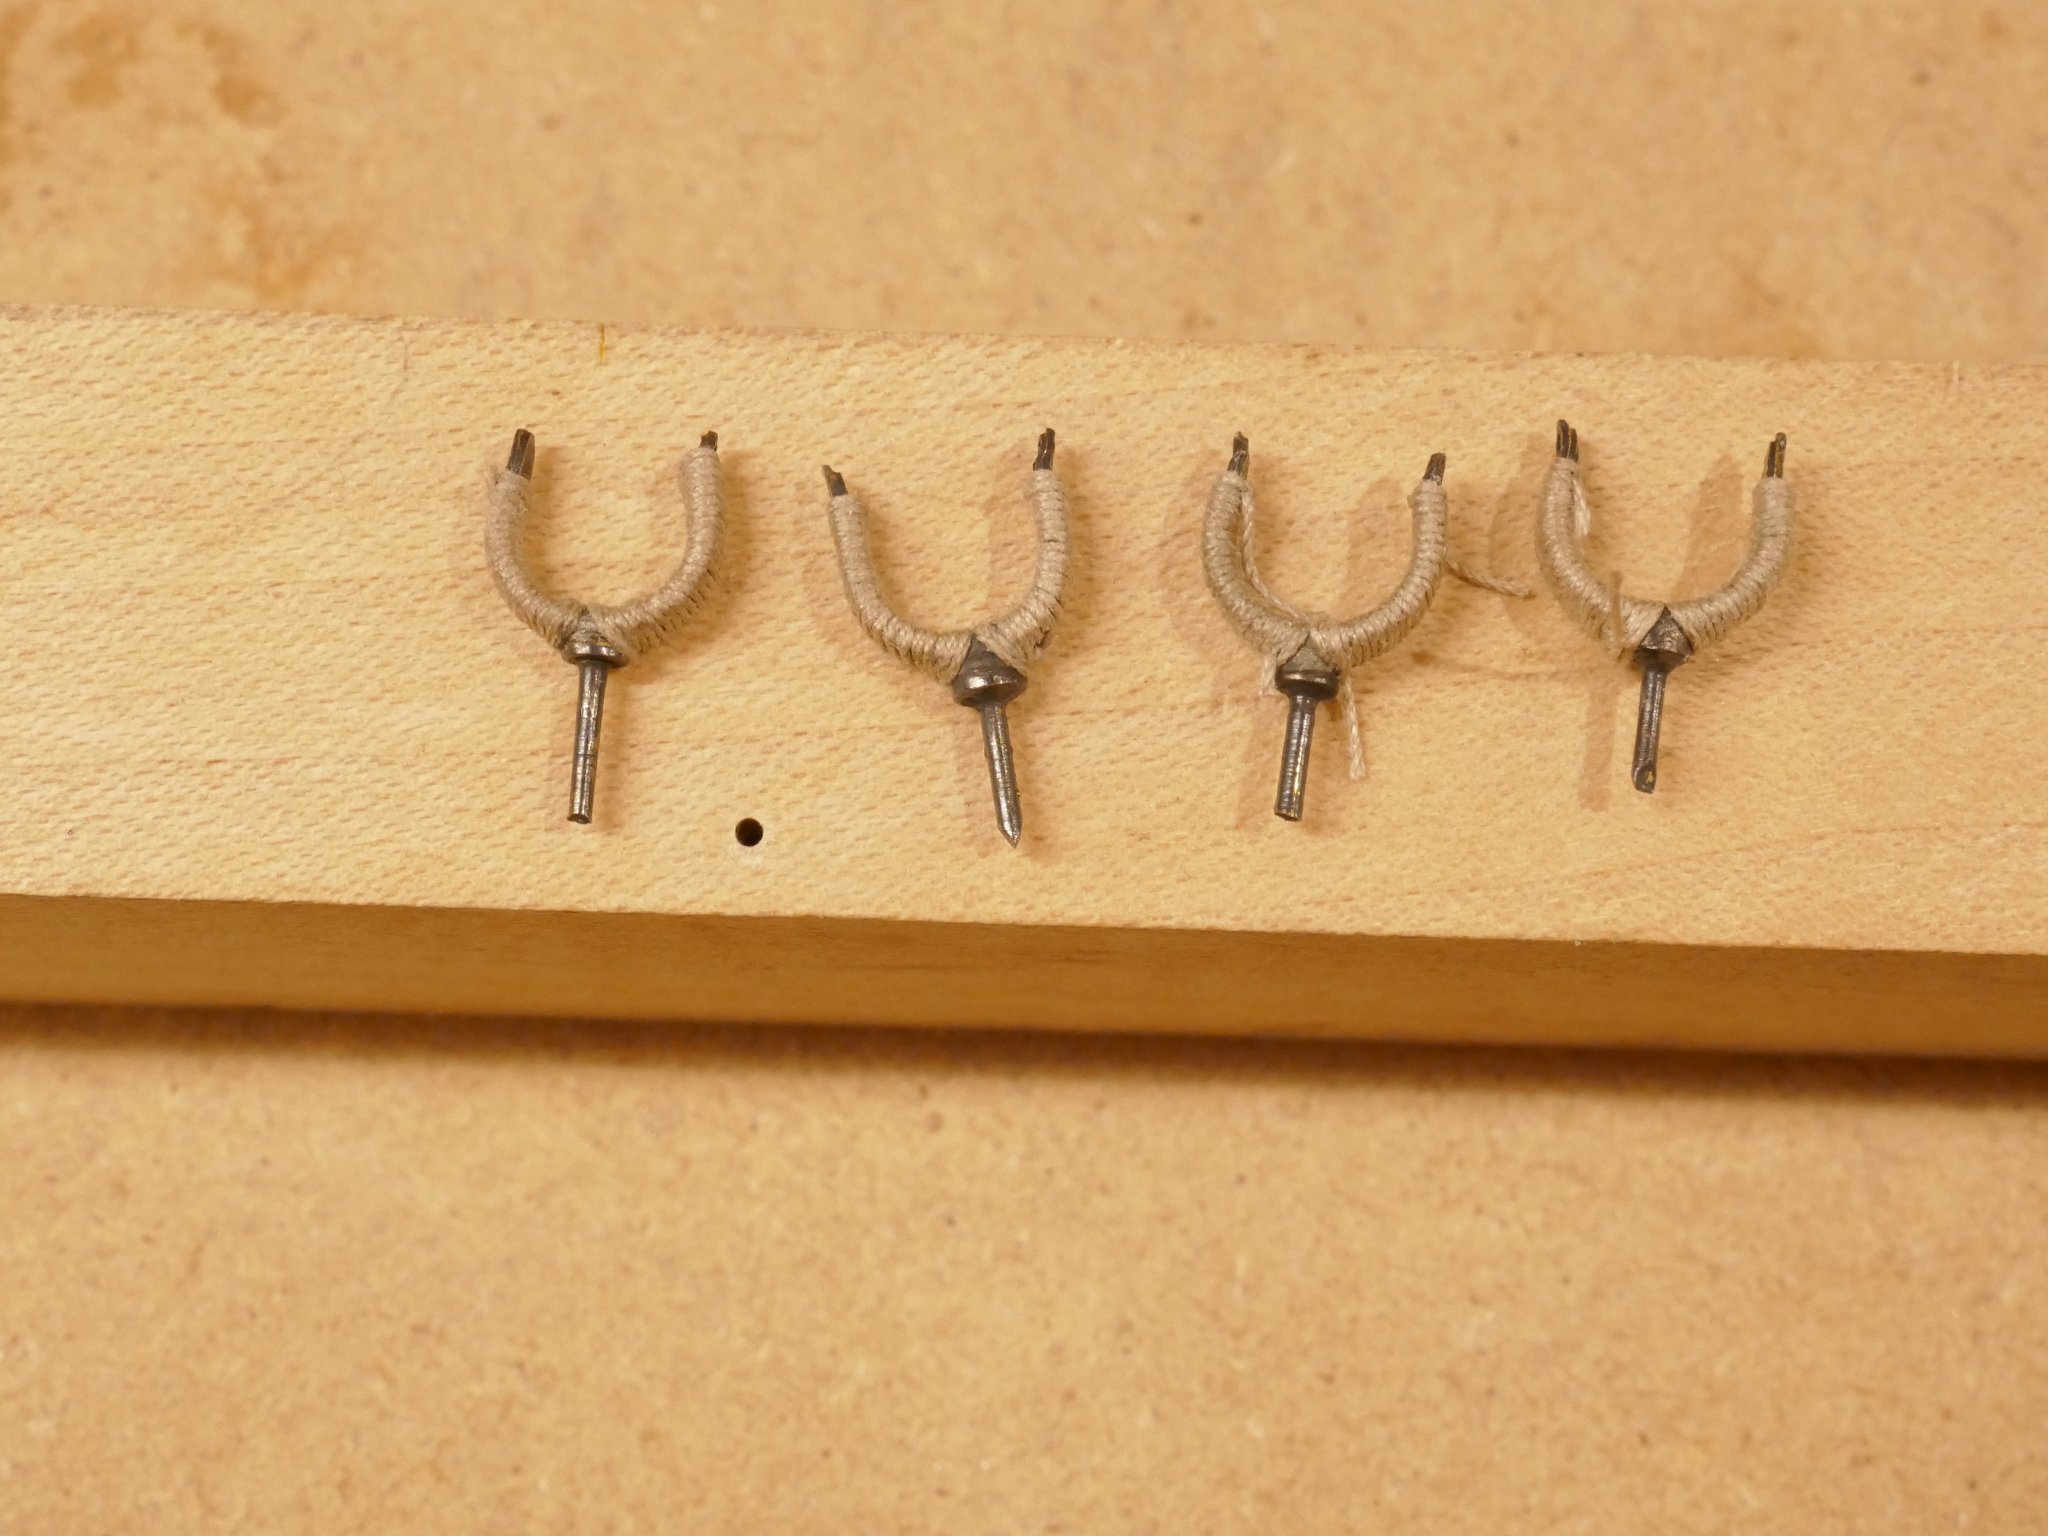
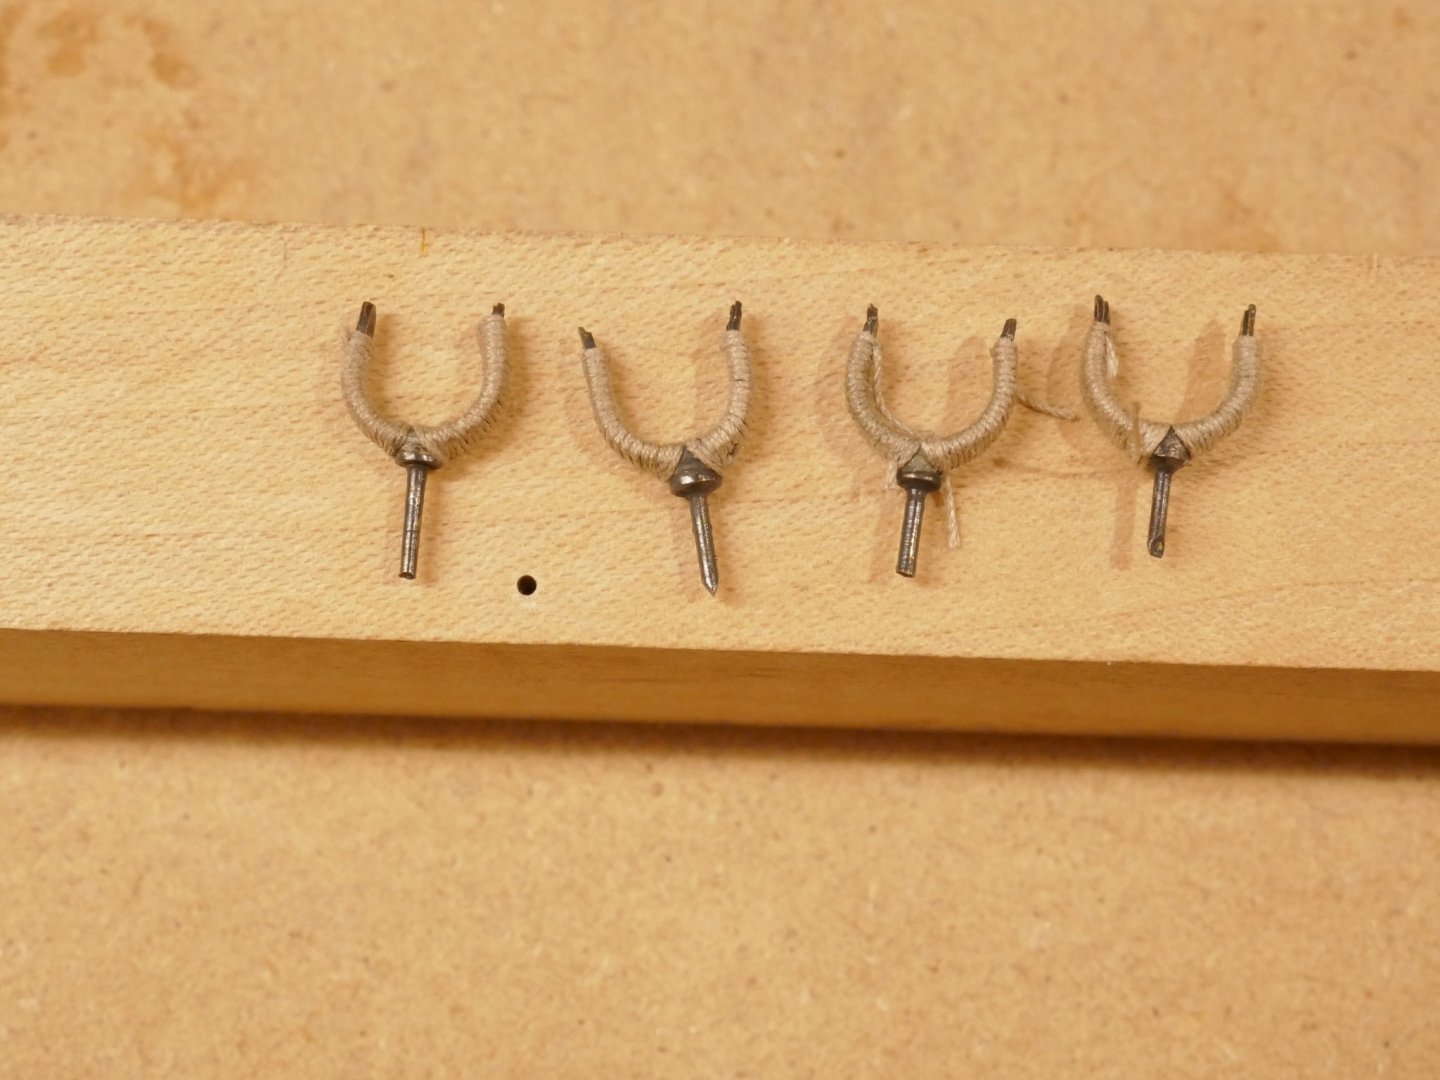
Hi Brad, I made the pin with the larger stem on the lathe (attached) and used the supplied etched oar lock. Sorry the shot is out of focus. The drawing in the plan set match the whaleboats in the New Bedford Whaling museum. So I turned the brass to roughly match. Thank you for looking in, Mike
- 128 replies
-
- 3
-
-
- model shipways
- new bedford whaleboat
- (and 1 more)
-
Thank you Mario, Fentone & Brad for the compliments. Is it me, or is this project taking forever? (Don't answer that.) I saw a whaleboat model a while back ... can't remember where, that used chafing mats on the crane supports. So, here is an attempt at weaving sword mats from .012" light brown Syren rope. I followed a youtube video by 'Mark The Braider' with the main difference being that I wanted closed loops at both top & bottom so it could be tied to the crane support mode neatly. The sides of the jig should be out of the way so the rope can go in and out from those directions. The final size is ~ 1/2" x 5/8". Loose ends and any mistakes are tucked in the back. The boat gripes ... ropes that fasten the boat to the crane support, need lengthy serving. It's hard to tell from the plans if they should be served entirely or only partially. In any case, I'm waiting on some gears, bearings, etc. to arrive for a DIY rope serving machine build. In the meantime, I'm sure there are some overlooked items to work on. Thanks again to for your support. Mike

- 128 replies
-
- 4
-
-
- model shipways
- new bedford whaleboat
- (and 1 more)
-
I've read that you have tried different glues. What glue are you using for general use? Some wood glues set up pretty quickly by just applying finger pressure for a minute or so as long as the bends are mild. One can use the time to think about the next piece.
-
Sorry for the delay in responding. Still have trouble getting any notifications. I have had one trial with Aurifil Mako 28, color "Toast", 2 threads/strand x 3 strands, thickness .027" (10 strands/10 method). It twisted nice and tight. I stopped at this trial because the color was too dark for my current build. I've since got another color and will try that soon. Mike
-
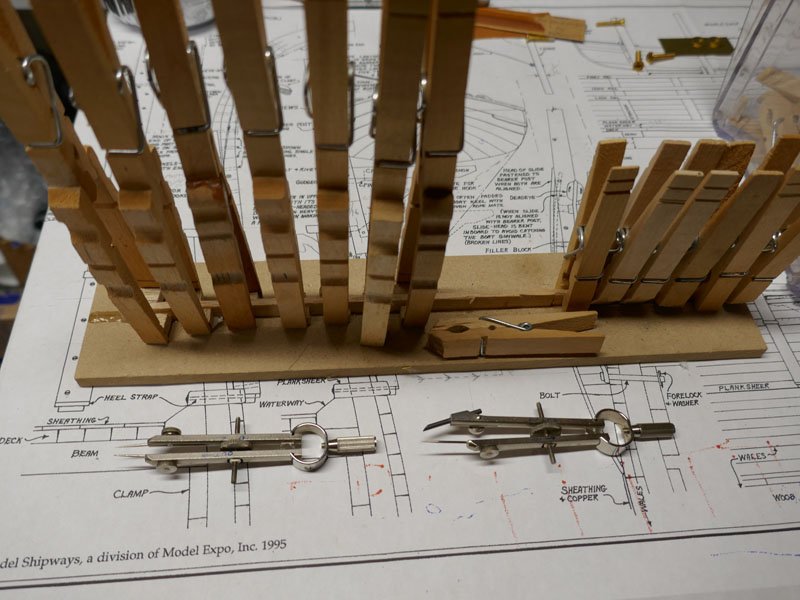
Hi Fentone, congrats on starting your ship model. I used to make those Guillows kits as well... "back in the day." You're really moving along well already and it's a smart move to be posting up on MSW. There is a "Tips & Techniques" section in the forum that is worth checking out just before starting something new, i.e. painting, planking, etc. For tools, I would recommend a pair of dividers and some cheap custom clothespin clamps: You can work out your own design but by extending the arms on the clothespins with other clothespins, there is a lot less pressure on the basswood. The balsa tips will also help avoid marring the wood and let them reach around the hull when clamping the exterior planks. The dividers are almost a must to keep a handle on the spacing and symmetry of everything. For instance it looks like the thwarts on your whaleboat are going to sit directly on top of the uppermost inner planks and two or three of the thwarts are going to sit on top of the centerboard case. The dividers can help show any areas that need adjusting before gluing. Keep up the good work. Mike
- 66 replies
-
- 3
-
-
-
- Providence
- Artesania Latina
- (and 1 more)
-
Thank you very much. I'm not sure about museum quality but I'll take the compliment anyway. 😏 I'm getting closer to the finish line. Some acrylic sheets should arrive today for making up the top of the case. The davit structure and painting is complete notwithstanding the rope work that goes along with it. So, as you mentioned at the end of your project... lots of little things to decide about whether to include or not. 'Just now making up the last (I hope) thimbles as part of the lashings for the boat to the crane supports. Any progress on the Fifie? Mike
- 128 replies
-
- 1
-
-
- model shipways
- new bedford whaleboat
- (and 1 more)
-
Jean-Paul & Bob, thank you for your kind words. 'Just working on air brushing and brass blackening today. Best, Mike
- 128 replies
-
- 1
-
-
- model shipways
- new bedford whaleboat
- (and 1 more)