
MORE HANDBOOKS ARE ON THEIR WAY! We will let you know when they get here.
×

Mike_In_RI
-
Posts
276 -
Joined
-
Last visited
Content Type
Profiles
Forums
Gallery
Events
Everything posted by Mike_In_RI
-
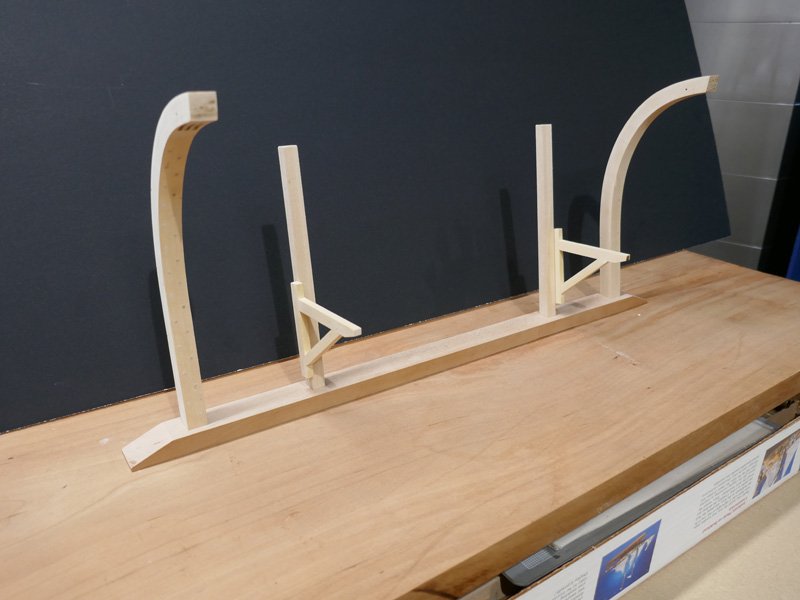
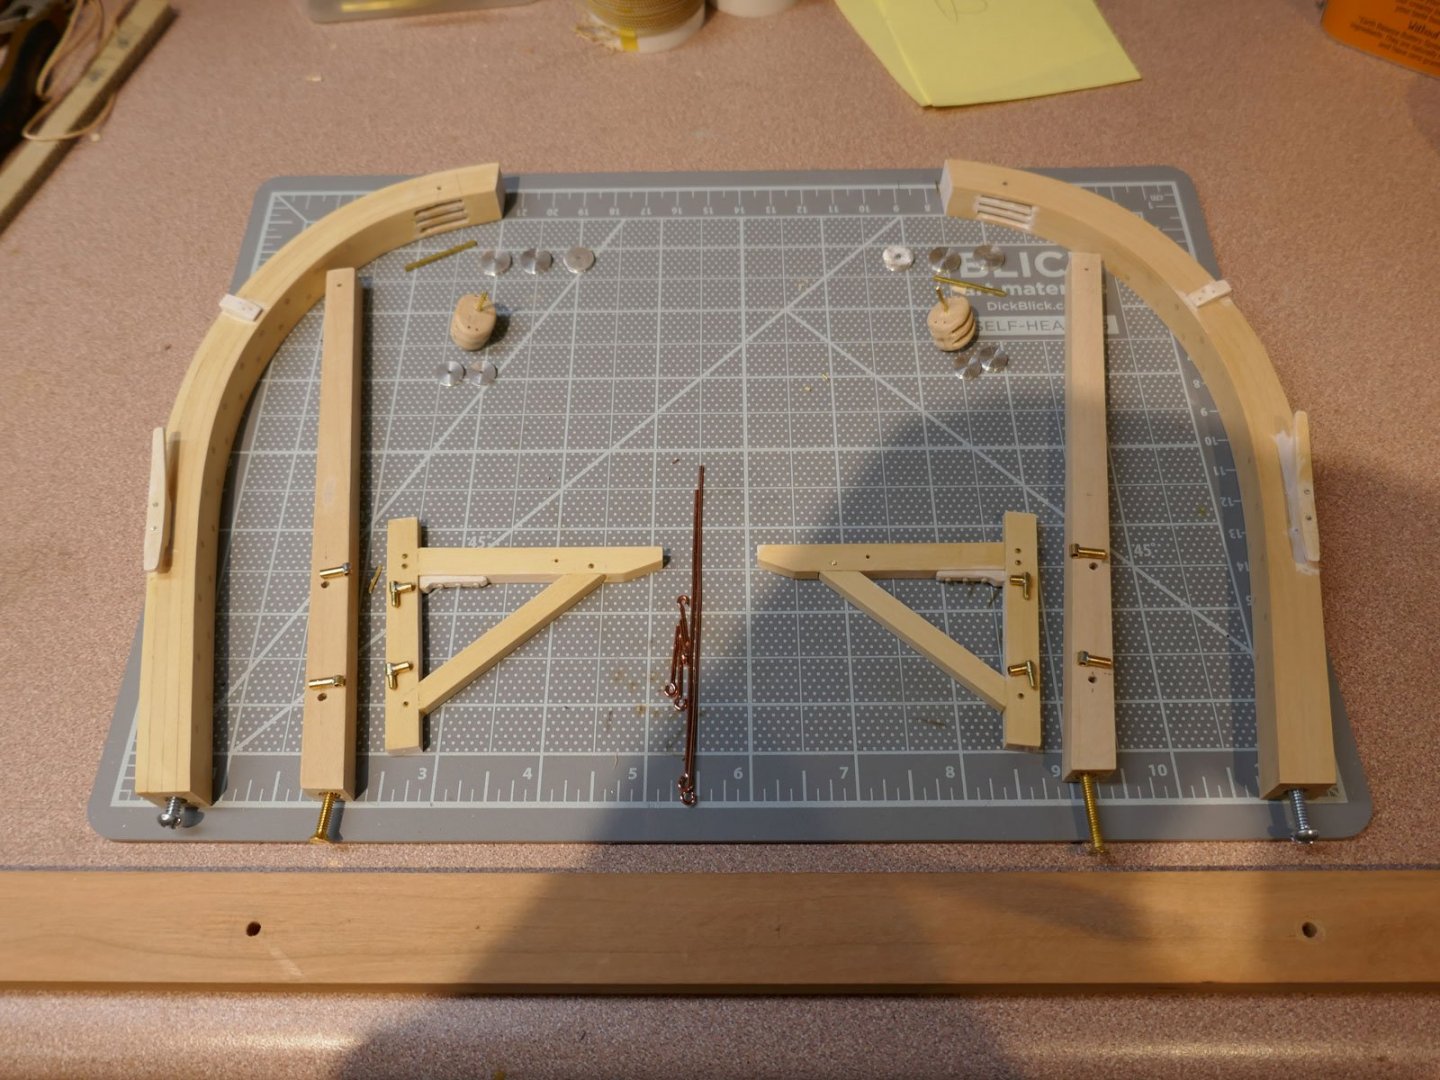
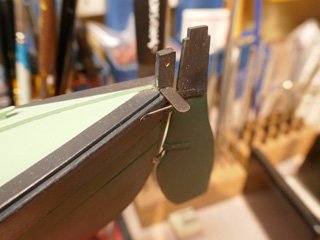
 Thank you guys for the likes. I appreciate you looking in. Here is an update of the abbreviated (no bulwarks) davit presentation. The cranes use mortise and tenons as suggested in the build manual. Yellow cedar was used and it chiseled out very nicely although it was slow going getting the joints to look tight. The davits and cranes will show from about the davit straps up. This is essentially the "cruise" position of the cranes. The hard part is to ensure the two cranes are parallel to each other and horizontal in that this is affected by the final hinge positions as well as the initial 7 degree back angle of the davits and crane supports. This is the full kit of davits, cranes, crane supports, faux pintles, hinges, blocks, sheaves, crane hooks, horn cleats and thumb cleats. Setting the cranes in the lower position would cause the project to be 1 1/2" inches taller and need more hardware so I'm trying to simplify here a little. Thanks again for looking in. Mike
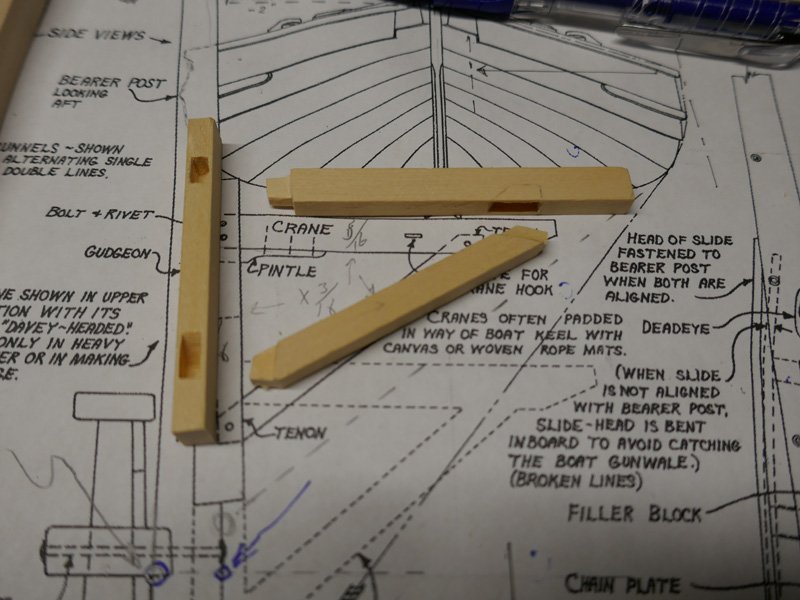

- 128 replies
-
- 7
-

-
- model shipways
- new bedford whaleboat
- (and 1 more)
-
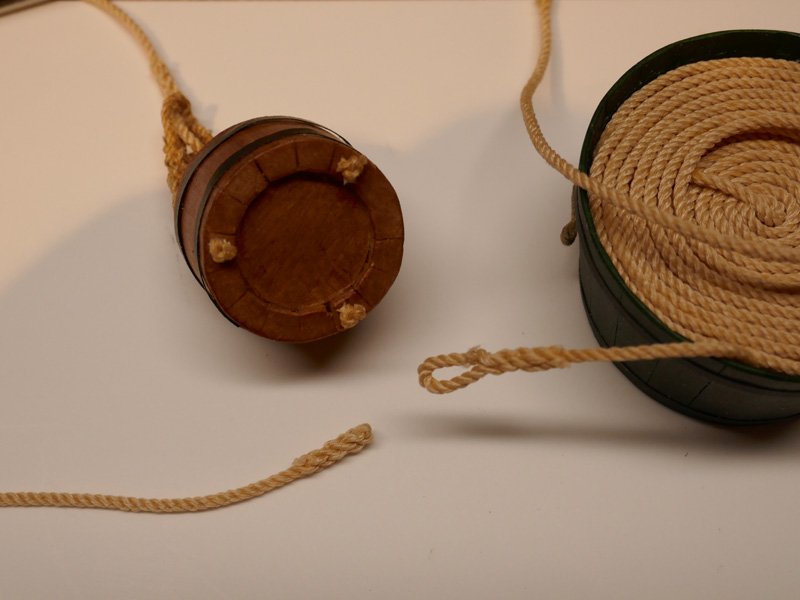
Yup, that's a really good grapnel. The taper makes a big difference and I like the crimped tips. Well done. Mike
-
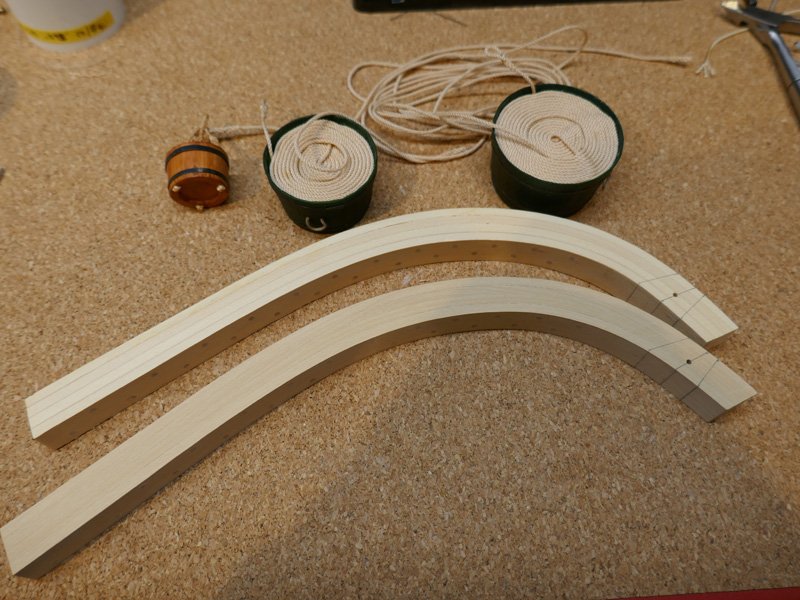
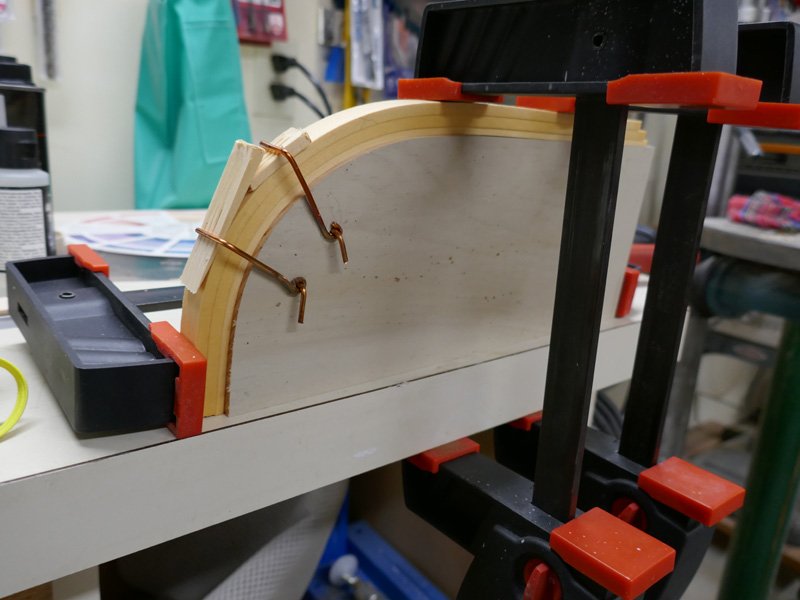
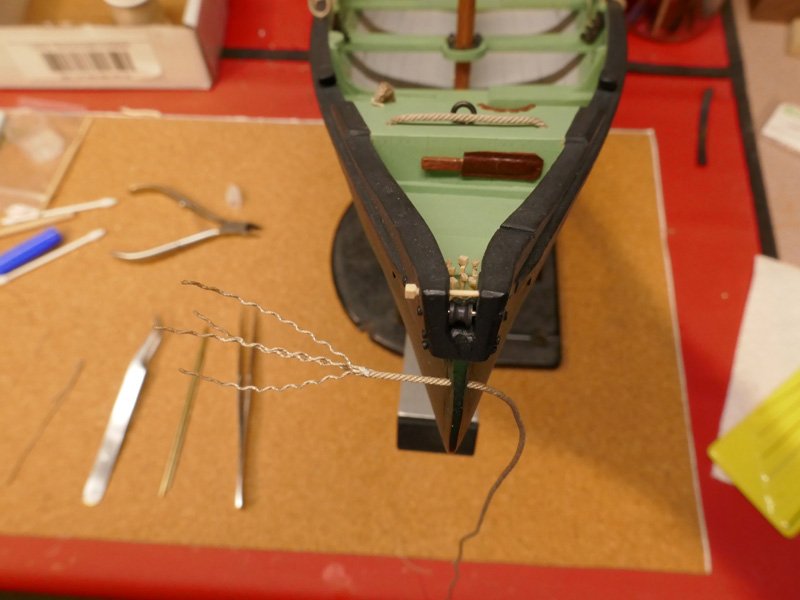
Quick update... Finally, after a few weeks of thread sampling and home made rope trials with the Rope Rocket, the color, size and twist of 3 strand whale line is just about what I have in mind for whale line. Eye splices, back splices and crown stopper knots were more manageable. Note: the line in this shot looks darker than the actual line. The davits were much easier to bend using 4 pieces each of 1/8" boxwood vs the thicker yellow cedar I previously tried. The wood was soaked for two hours in water then pre-bent on the form for a day. Once removed, they spring back about 30 degrees and left to dry a little longer. They were then laminated using Titebond III and set on the form for another day. The shape stayed on the original curve with no spring back. The davits were drilled out for trennels using 5/64" toothpicks. Today, I hope to get the upper section of each davit hogged out to receive 3 sheaves. Thanks again for the comments and likes, Mike
- 128 replies
-
- 4
-
-
- model shipways
- new bedford whaleboat
- (and 1 more)
-
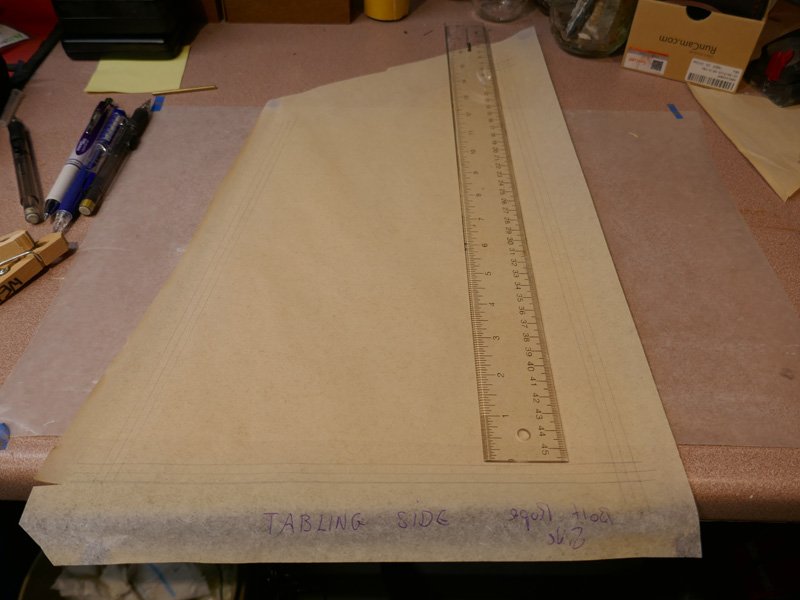
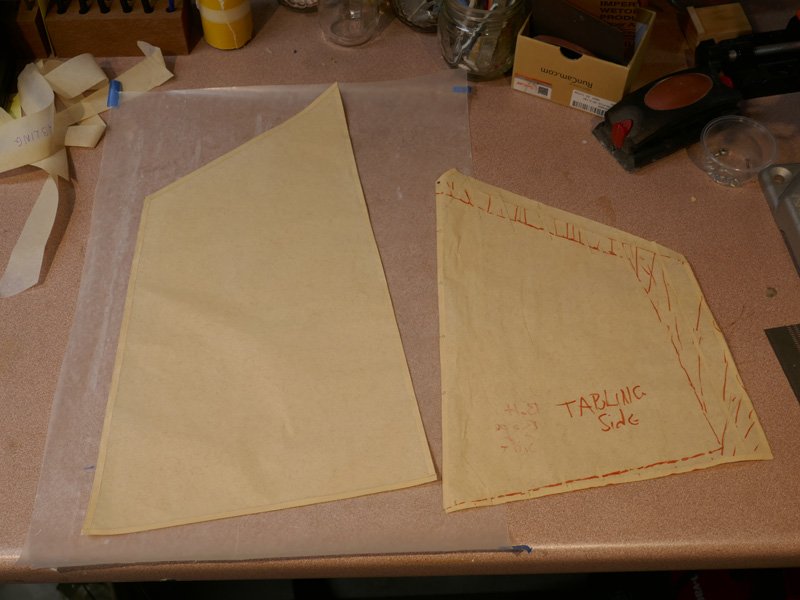
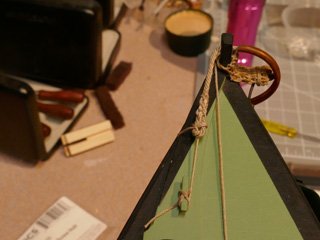
Thank you Mario. I appreciate that. I never thought I would be making rope on this, or any other project. But I must say it's a lot fun except for waiting for the sample types, sizes and colors to come in the mail. I'm hoping the last order of some cotton colors will do the trick. I want to end up with ~.045", right twist rope that's on the lighter side for the whale line. In the meantime.... The sail was finished today. It it is made of 00 Silkspan and air brushed with a light tan coat of acrylic paint. Because the sail will be furled, I made a template outlined in orange noting the parts of the sail that will be visible so I paid more attention to those parts. The folded down peak of the sail was cut out and the remainder of the Silkspan was hemmed by folding over the edges twice and using thinned glue to keep them tight. Thimbles were placed at the throat, tack and clew then attached to the mast. Save for the whale line, the boat itself is just about complete. Considering the method of presentation, I'd decided to mount the whaleboat on davits without the bulwarks. Here's a shot of a (failed) attempt to bend 3 pieces of yellow cedar into the required curve. Upon removing the clamps, the wood sprung back too far to be workable. The build manual recommended using basswood but I used some yellow cedar which turned out to be too thick and/or too stiff. In any case I am now trying 4 x 1/8" pieces of boxwood and, fingers crossed, the process goes more smoothly. Thanks again for the likes and I appreciate you looking in. Mike

- 128 replies
-
- 3
-
-
- model shipways
- new bedford whaleboat
- (and 1 more)
-
Thank you Ryland. The Rope Rocket pretty much does the work... set it up and follow the videos. I've been making short (7 foot) lengths with Mara polyester thread and am getting consistent results. Also, I found a color that is suitable for my project which was the reason I am trying to make my own rope. Some cotton thread (Aurifil) is on order for comparison so by next week I'm hoping to have the material settled and start making longer whale line. Sorry I did not respond sooner. It looks like my notifications are not coming. I'll have to check that. Best, Mike
-
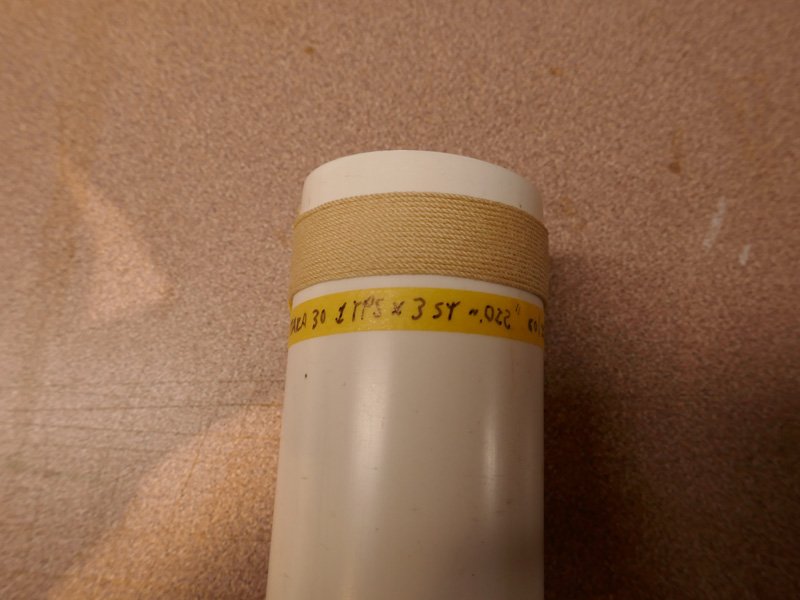
Looks like I don't need an an extra hardening step after an untwist/re-twist unless I intend to store the the thread.. which I don't intend at this point. In any case, I have some nice .045" right twist Mara rope with almost no unwinding tendency. Both these samples were heat treated. Up to now I only have 7 foot lengths made so I'll scale that up. Thanks for looking in, Mike

-
Thank you Chris. I really appreciate you comment. The finish line is almost in site although I've taken a fork in the road in an attempt to make my own rope🙄. The first two tries with short lengths look OK for color and twist but I still need to pin down the right size and sort out a small unwinding issue. I'm using the Syren Rope rocket and it really is a lot of fun! Thanks again, Mike

- 128 replies
-
- 1
-
-
- model shipways
- new bedford whaleboat
- (and 1 more)
-
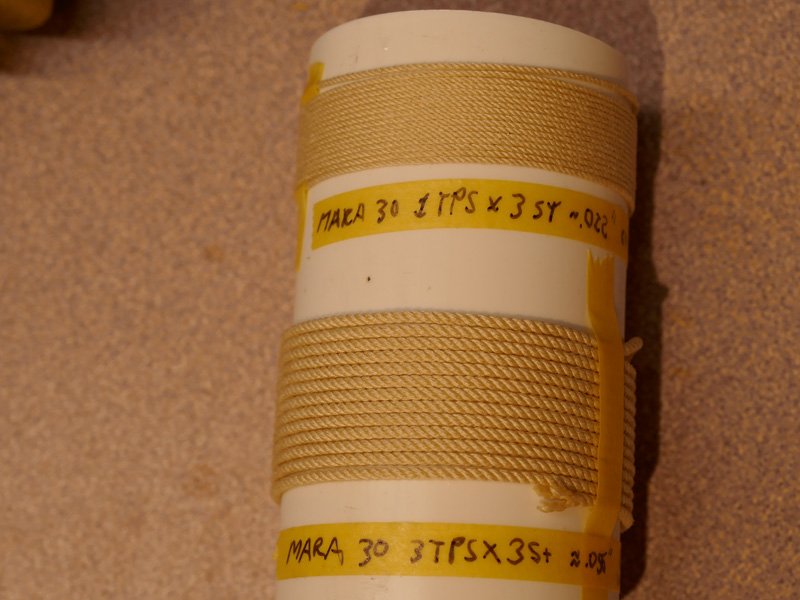
This try looks good as well but has a small tendency to unwind. It is made up of 3 strands of Mara 30 and right twisted. The thickness is ~ .056". My previous posts question is still in play... should I need to dampen/wax the left twisted 3 strand rope prior to the final right twist? Thank you in advance for any input, Mike
-
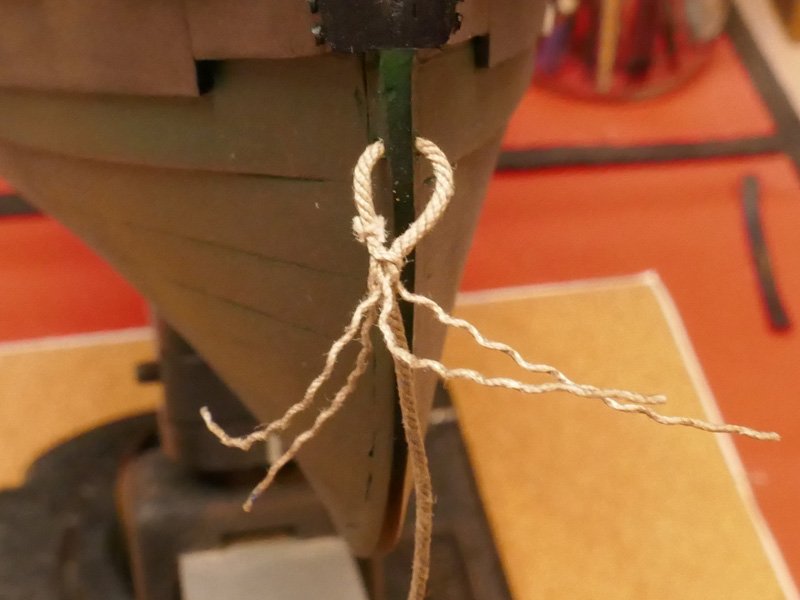
SOLVED The photo below shows my first and only try at rope making. It's 7 feet long and .022" thick and was produced on the Syren Rope Rocket. I'm quite pleased with the way it looks as it's the right color for my project and has no tendency to unravel. However, I want to make sure I am not leaving out a step. My goal is to get ~ .040 to .045", "bright straw" color, right laid whale line. These are the steps I took: - Three threads of Mara 30 (right twist) unwound and rewound quite tightly with a left twist - I did NOT stretch, apply water or apply beeswax after this rewind >>> Should have I done that here?? - Then right twist the above tightly - Stretched the rope, applied water & beeswax .. done. To get to the thicker rope I need to untwist/retwist several threads ahead of time. Should I do that lock-in step as part of the rewind. I'm thinking .. yes. Thank you for any tips on the matter. Mike
-
Hi Jerry, welcome to the MSW site. I can't answer your question but just wanted to take a moment to thank you so much for your service. Best, Mike
-
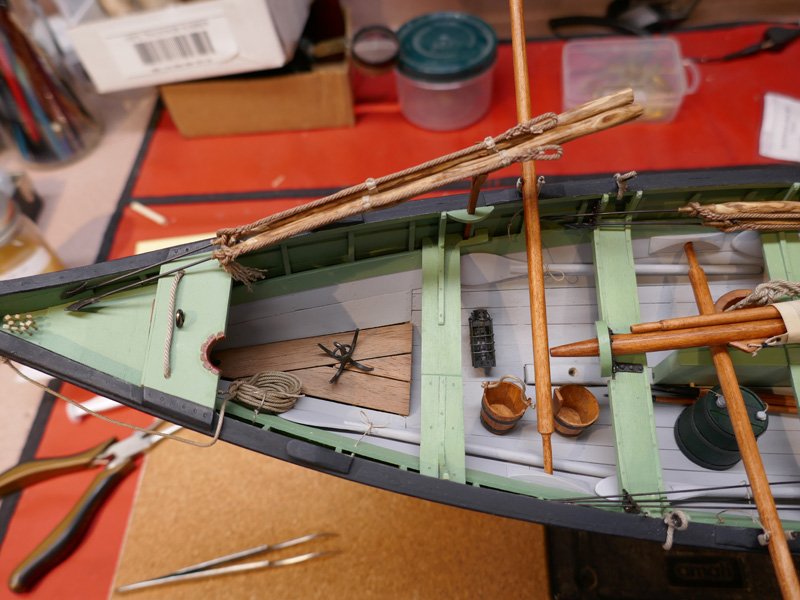
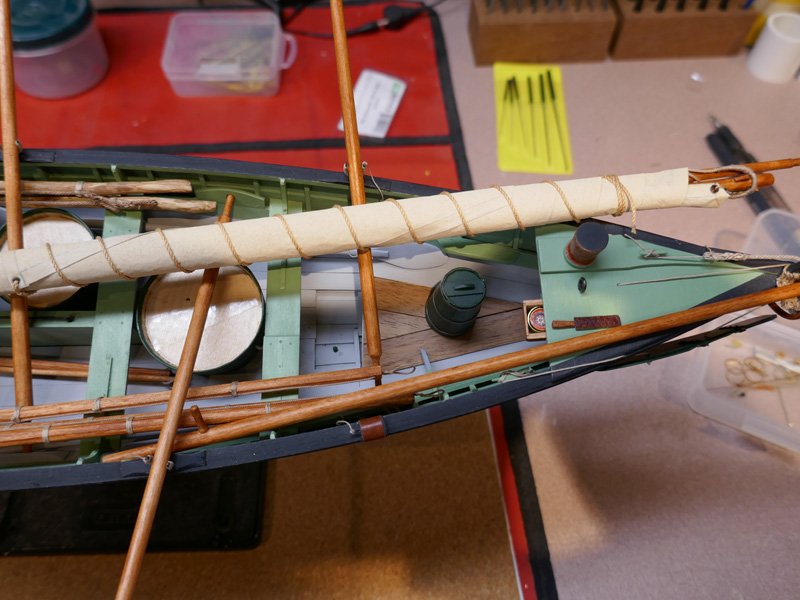
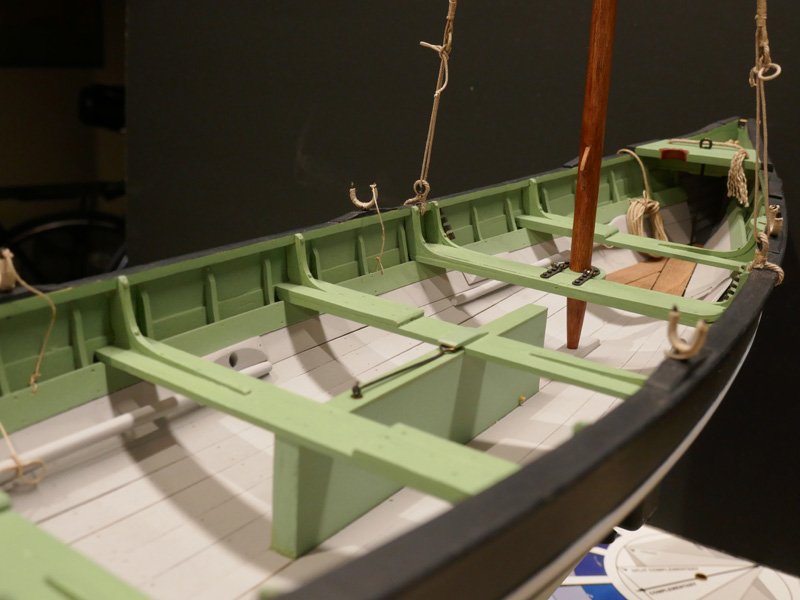
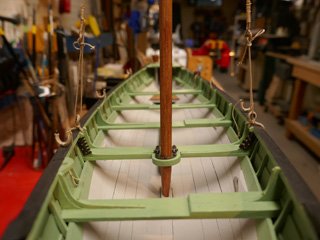
Thanks guys for the likes. I do really appreciate your input. Just a quick update before I begin rope making practice. The boat warp was pre-wound on a tongue depressor then lashed in place. It has the 45 inches of line as called for in the build manual but it looks just a little too hefty. I may trim it back a little. Also, the five paddles have been lashed to the thwart risers. They are painted grey to blend in with the ceiling planks. Time to try my hand a making whale line. Mike
- 128 replies
-
- 6
-
-
- model shipways
- new bedford whaleboat
- (and 1 more)
-
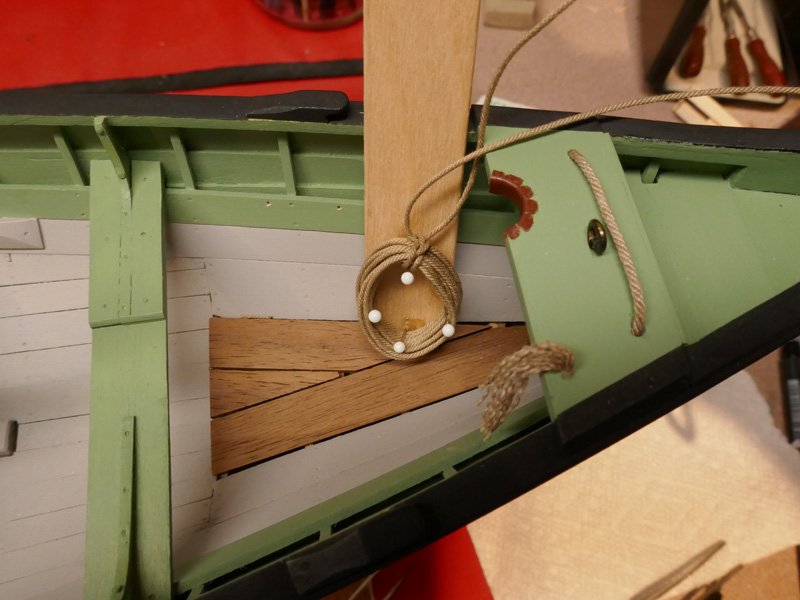
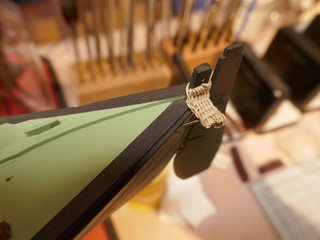
Hi Vladimir, thank you for visiting the page. I do appreciate your input and comments. I think this kit is a great one for putting in as much scale detail as one feels like. I've decided not to rush this one so I could pick up all the tips on this web site as I can before moving on... and there are plenty of tips to check out. So, this is a proud day for me. I finally pulled off a satisfactory "in place" eye splice using 4 strand .035" rope. Of course, tomorrow I will need an appointment with the eye doctor for a realignment of my eye balls! The eye splice is for the boat warp and has a line length of 45 inches per the build manual. I made a couple of sweedish fids from brass tube for the sticking and tucking. I only used 2 tucks. It seems to me that the rope twist gets tighter using more tucks which makes it more difficult to lift a strand with the fid. I could be imagining that (??). This shot also shows 10 or so chock pins. They were whittled into shape and meant to snap when the whale line got snagged. Time to glean some more tips from this site on how to coil up the line to look authentic. Thanks again, Mike

- 128 replies
-
- 5
-
-
- model shipways
- new bedford whaleboat
- (and 1 more)
-
Hi Mario, albeit late, I'm just checking out your launch build. Super detail and lots of time put into the small stuff. Very well done. I'm slowly accumulating a list of potential next builds and this one makes the list. 'Love the diorama. Mike
- 53 replies
-
- 1
-
-
- bounty launch
- model shipways
- (and 1 more)
-
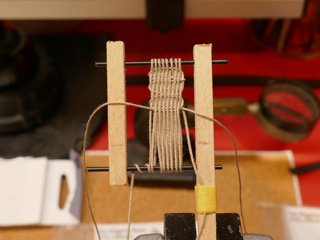
Hi Mario, thank you very much for the encouragement. Just today I was looking at your very sharp and clean whaleboat. I really like your use of different woods as well. I have slowed down some in the last few weeks when I didn't get the look that I wanted from the .045" whale line. It just seems too pudgy to me as they sit on the harpoons. In any case I ordered a Rope Rocket from Syren and today ordered assorted threads for experimentation. I'm trying to get as much scale into the project as I can so I'll attempt to get the line a little thinner and a more "bright straw" color. I hope the learning curve isn't too long! In the meantime I put some time into the steering oar brace chaff mat: (somehow all my shots are smaller ..??..) ... trying out the look of a "sword mat". Ashley #2964 The oar lock lanyards and the shroud lines are in as well as the trip line and steering oar strop. The strop covering is a piece of shrink tube painted with a little burnt umber. Comments, corrections and suggestions are always welcome. Mike
- 128 replies
-
- 3
-
-
- model shipways
- new bedford whaleboat
- (and 1 more)
-
Thank you for helping out. Yes, I will do some testing on small pieces of the .045" rope I have. Possibly with some lighting up with acrylics. I infer from the Ronnberg build manual To Build a Whaleboat that he was starting with a white or light linen provided by MSW back in the 80's then colored it to his liking. Mike
-
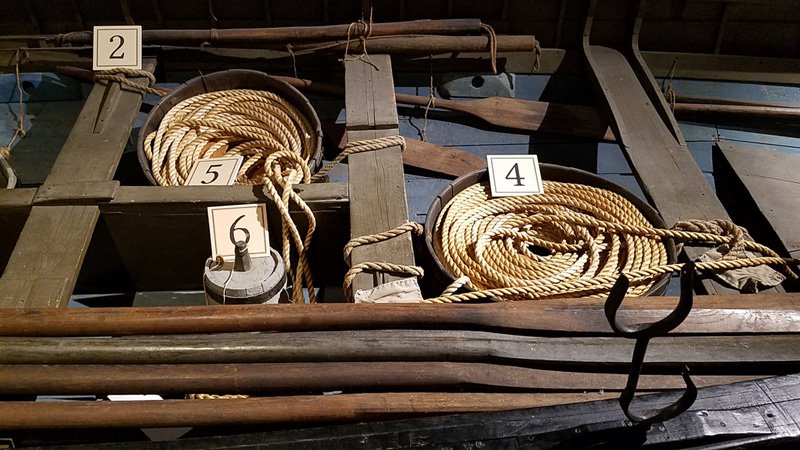
For my whale boat project I would like to get a closer representation of the whale line. Currently, I am using .045" light brown Syren rope for the harpoon mounting which is fine for "lightly tarred". However, per the Ronnberg build manual, the whale line itself should be a "long fiber manila, not tarred... and .. a bright straw color". I also note that the build manual photos show a right lay of the whale line. Other than the Syren .045" rope, I see no other commercial sources of that size. Can line that is already light brown be died up to a brighter color? Bleached then dyed? Attached photo from the New Bedford Whaling Museum. In the long haul, I don't mind "spooling" up to make my own rope but I would appreciate any tips that may help me be as in scale as possible in the short term. Thanks, Mike
-
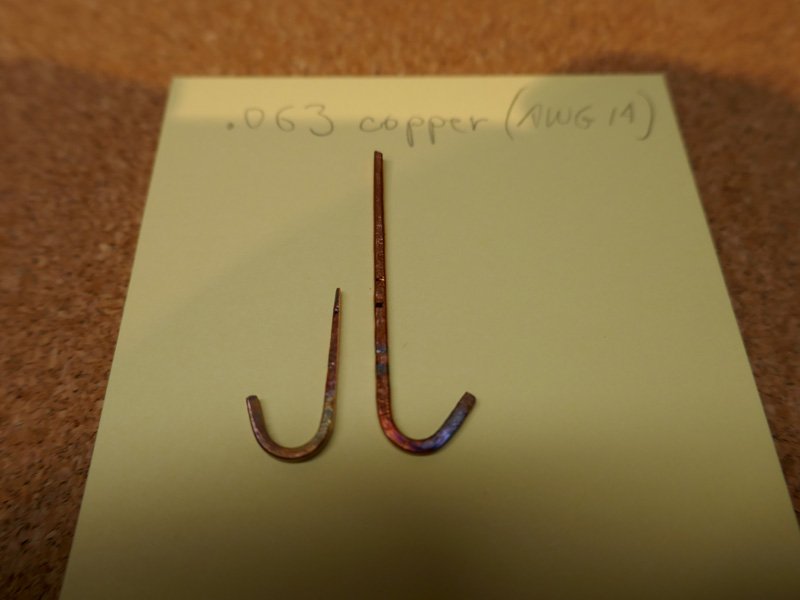
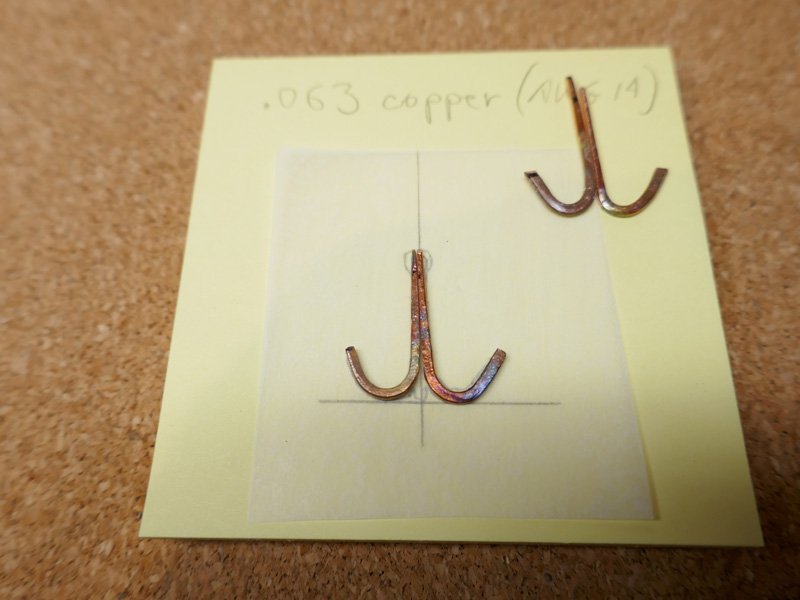
The grapnel was made from four pieces of AWG 14 copper, annealed and hammered to a roughly square cross section. They are hammered to provide flat mating surfaces for soldering. In retrospect, I could have left the lower hook sections round which would have made filing a little easier. The shank on all four pieces were filed at an an angle so the shank narrows toward the top. There are two longer pieces for the central core and two short pieces that are added to the sides of the core. Fluxed and torch soldered using tiny pieces of cut off Stay Brite solder. The shorter side pieces were bound with steel wire and soldered using no lead solder which will melt at a lower temperature than the silver bearing solder. Two copper rings are soldered on top. A little more filing then on to blackening.... Mike
- 128 replies
-
- 6
-
-
- model shipways
- new bedford whaleboat
- (and 1 more)
-
Thank you Vladimir, I appreciate your comments. Best, Mike
-
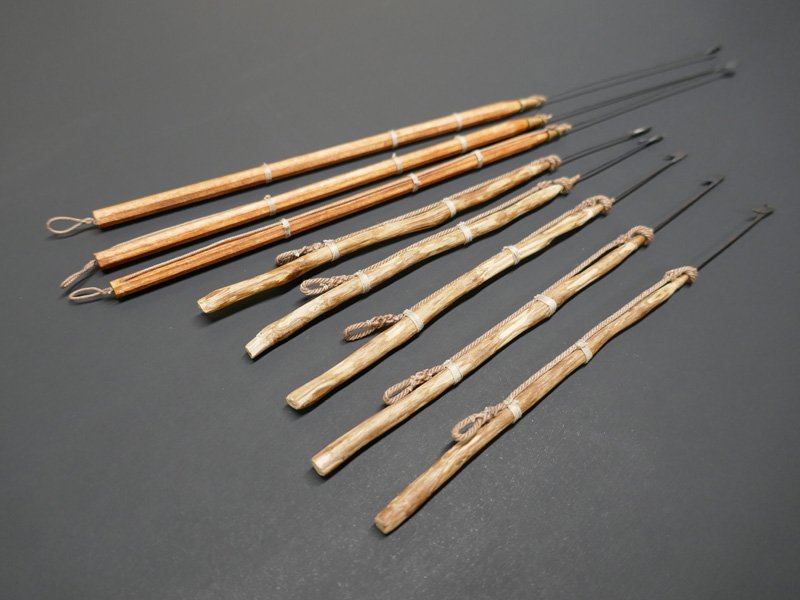
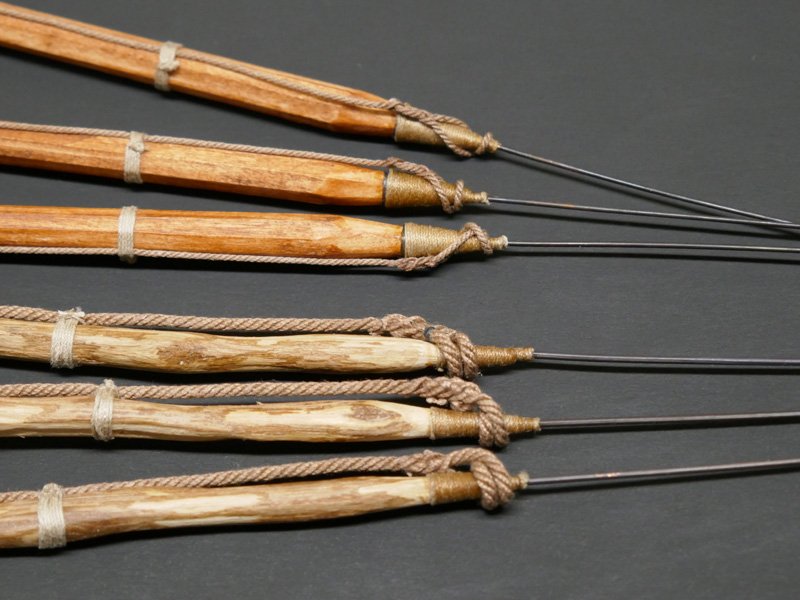
Although it has been a month since I've had a log update, I have been working steadily on my knot and splice tying shortcomings. So, I am now an owner of The Ashley Book of Knots and The Arts of the Sailor as well as a practice kit of three strand, right laid, synthetic rope. All in the effort to set up the harpoon and lance splices in the scale required in the plans. I have learned some sailor vernacular and really got into the weeds of tying essentially all the assorted variations of the eye splice... sticks, tucks, against the lay, with the lay, marlin splice, half tuck, Z, S,... whew! On to the rope mountings of the harpoons and lances. The harpoons use a lightly tarred version of the whale line which is right laid, three strand and ~.045 inch in scale. The only .045" miniature rope I have is the Syren left laid, 4 strand rope and can't seem to find any other source of the right laid three strand version. So, just to keep the project moving, albeit slowly, I went with what I have in stock. Harpoons: Syren .045" left laid, 4 strand, light brown rope "bent to the shanks with a round turn and eye splice". The splice is stuck against the lay and terminated with just one tuck. Two tucks made the splice look too long to me. As is, I think the eye splice looks a little chubby. Lances: Syren .025" left laid, 3 strand, light brown rope with a Marline splice stuck into the lay, skip two crowns and tucked one more time against the lay. I could not repeat a .025" regular 3 strand eye splice with any good consistency.... more practice is in order as usual! The last big storm that hit Rhode Island was about 3 weeks ago so I finally got a reasonable amount of dead oak branches to make the harpoon shafts. The grapnel and boat spade is next along with a few remaining small items. Thank you for the likes. I really appreciate them and any comments and suggestions. Mike
- 128 replies
-
- 4
-
-
- model shipways
- new bedford whaleboat
- (and 1 more)
-
Hi Bruce, I like the tapering jig used with the sanding drum. 'Looking forward to your progress. Mike
- 43 replies
-
- 2
-
-
- mediator
- first build
- (and 1 more)
-
I just jotted and email with that question to Model Expo with my fingers crossed. With the thread that came with my kit there are no MSW part numbers on the paper spools. The Roonberg build manual is from 1985 so I'm hoping it's (an available) older standard as you suggest. 'Just checked out your build log. Congrats on getting going on the Mediator. I'll watch along if you don't mind. Thanks again for the help. Mike
-
Hi Bruce ... as it turns out the numbers must be referring to a Model Shipways number system. I went pouring back over the Ronnberg book and in the sail section it refers (only once) to "Model Shipways #871 linen". Thank you for the effort you put into the search and I apologize for the false start. I also found a reference to a color swatch 870 from Getermann after my first post so yours find made sense as to color. In any case I'll call MSW on Monday to find out the actual specification. Thank you again, Mike
-
There is a reference in the Ronnberg book "To Build a Whaleboat" to using #874 and #870 linen for the harpoon and lance rope mountings. I've searched the web and this site for what I assume is a thread size but can't find any cross reference to those numbers. The Syren .025" is close enough for me but I'd like to be able to reference a chart or source for the future. I'd appreciate any help. Mike
-
Protective topcoat over blackened brass?
Mike_In_RI replied to Mike_In_RI's topic in Metal Work, Soldering and Metal Fittings
Yes. That sounds similar to the barrel hoop application. i.e adhesion in the shear directions. I'll mix up a 4 pound cut today as a feeder batch to be thinned for this and other uses i.e. knots, surface prep, etc. The flakes are quite old so may not desolve. Thank you again, Mike -
Protective topcoat over blackened brass?
Mike_In_RI replied to Mike_In_RI's topic in Metal Work, Soldering and Metal Fittings
Hi Bob. Thank you for the input. With my whaleboat project, I'm trying to take the time to get the correct practices worked out before moving on to the next model. So, I really appreciate the help I get including historical content. That cooper tool museum link was great. Speaking of the hoops, here is one you may like... The sixth generation cooper works on a hoop at 16:05. It's a long but fascinating video. https://sydneylivingmuseums.com.au/2018/06/14/centuries-old-coopers-craft-proves-evergreen Mike
