rwiederrich
-
Posts
5,520 -
Joined
-
Last visited
Content Type
Profiles
Forums
Gallery
Events
Everything posted by rwiederrich
-
Well you don't want the nails to protrude like rivet heads. You're doing so well....don't make that mistake. Rob
- 44 replies
-
- 1
-

-
- Cutty Sark
- Sergal
- (and 1 more)
-
Wow Luis...you've been busy. So, I'm assuming your search for another AMERICAN clipper has landed you on the Staghound? I hope you feel comfortable in joining us as we finalize her hull and deck furniture. Again....good to see again. Rob
-
I see you used a 36" door...why not a 28" door...that would save you 8" extending the clearance between the portico roof and the mizzen.....? Rob
-
Well McLean says the portico is aft of the mizzen. Champelle's rendering puts the portico in just about the same place that you placed it...without the roof access and stanchioned rail. I'm opting to keep this configuration since it found resolution with others. Also his poop height and portico roof align with the main rail and monkey rail prospectively. As far as the spider band is concerned.....since the mizzen has a fife rail...no spider band is needed...just the spanker boom foot rest. The spanker gaff lift can be purchased and belayed at the fife rail.....unless the forward portico roof rail can also act as a fife rail...which would make sense. Rob
-
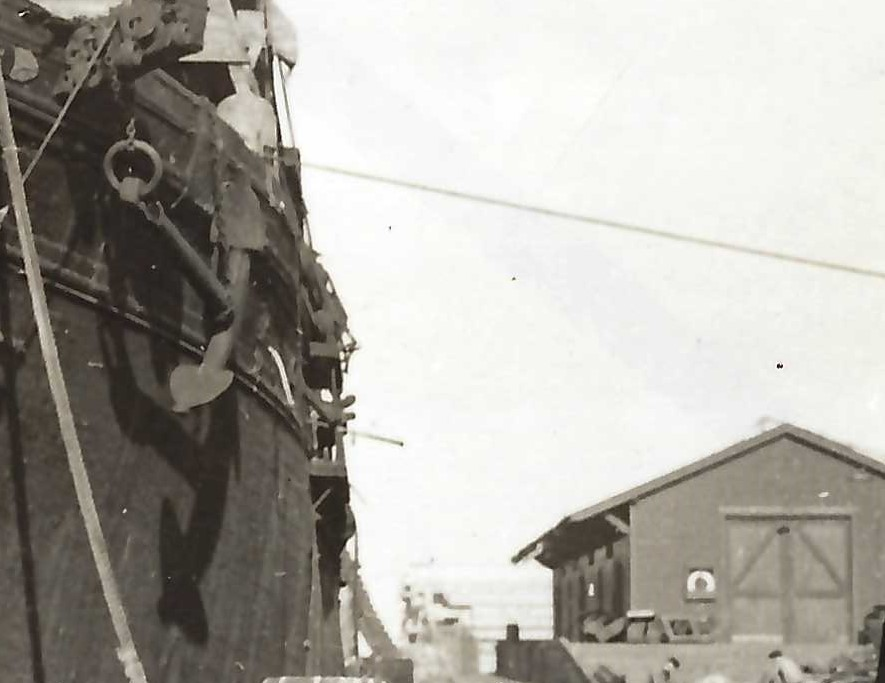
Yes...I noticed that a while ago, while researching her. I think that brace is an effort to stabilize her warping and sagging due to age and hogging. Same goes for the iron rods supporting her Hood. And remember when I asked about the anchor billboards....Glory didn't have any.......Well not till she was near her later years.....cuz she Shure had some installed some time in her latter life....cuz she has them in this image before she was scrapped...
-
I like your representation. It accounts for many unknowns...but still meet the Duncan account. Doesn't leave much room for mast flexure(Hopefully there wasn't much of that). Rob
-
It’s funny that there can be several other drawings that slightly differ. , when in fact NcKay’s half model contains all the raw data. The trouble lays with interpretation. We need to reconcile them , forcing them to agree with the half model. Even though, as a builders reference, it lacks the keel and monkey rail. Hence the rub of reconciliation. Behind the scenes……much deliberation and study have been employed thus far. To keep these initial pages as limited as possible. Folks like to see model building being done on a model building log. Much will follow when the paperwork is settled on, so wood can be cut. Full speed ahead….and on till morning. Rob
-
Those stories are harrowing. Frozen hands, and feet...not to mention hungry and tired. The life has been romanticized till all the reality of such labors has been forgotten. Rob
-
I believe so. I plan on rigging her in this manner...without the Howes double topsails. I want to keep that ginormous topsail to show how much sail had to be brought in when that monster had to be furled. Sailors could loose and furl that sail several times in the course of a watch....and in the freezing rain, in the dead of night...it was a stinker. It wasn't till the dawn of the Downeaster that the double topgallant came into practice. So much easier on the crew if you have to drop and furl half the canvas. Plus in many cases you didn't even have to furl the upper topsail but drop it so it hid in front of the lower topsail...eliminating its effectiveness. Rob
-
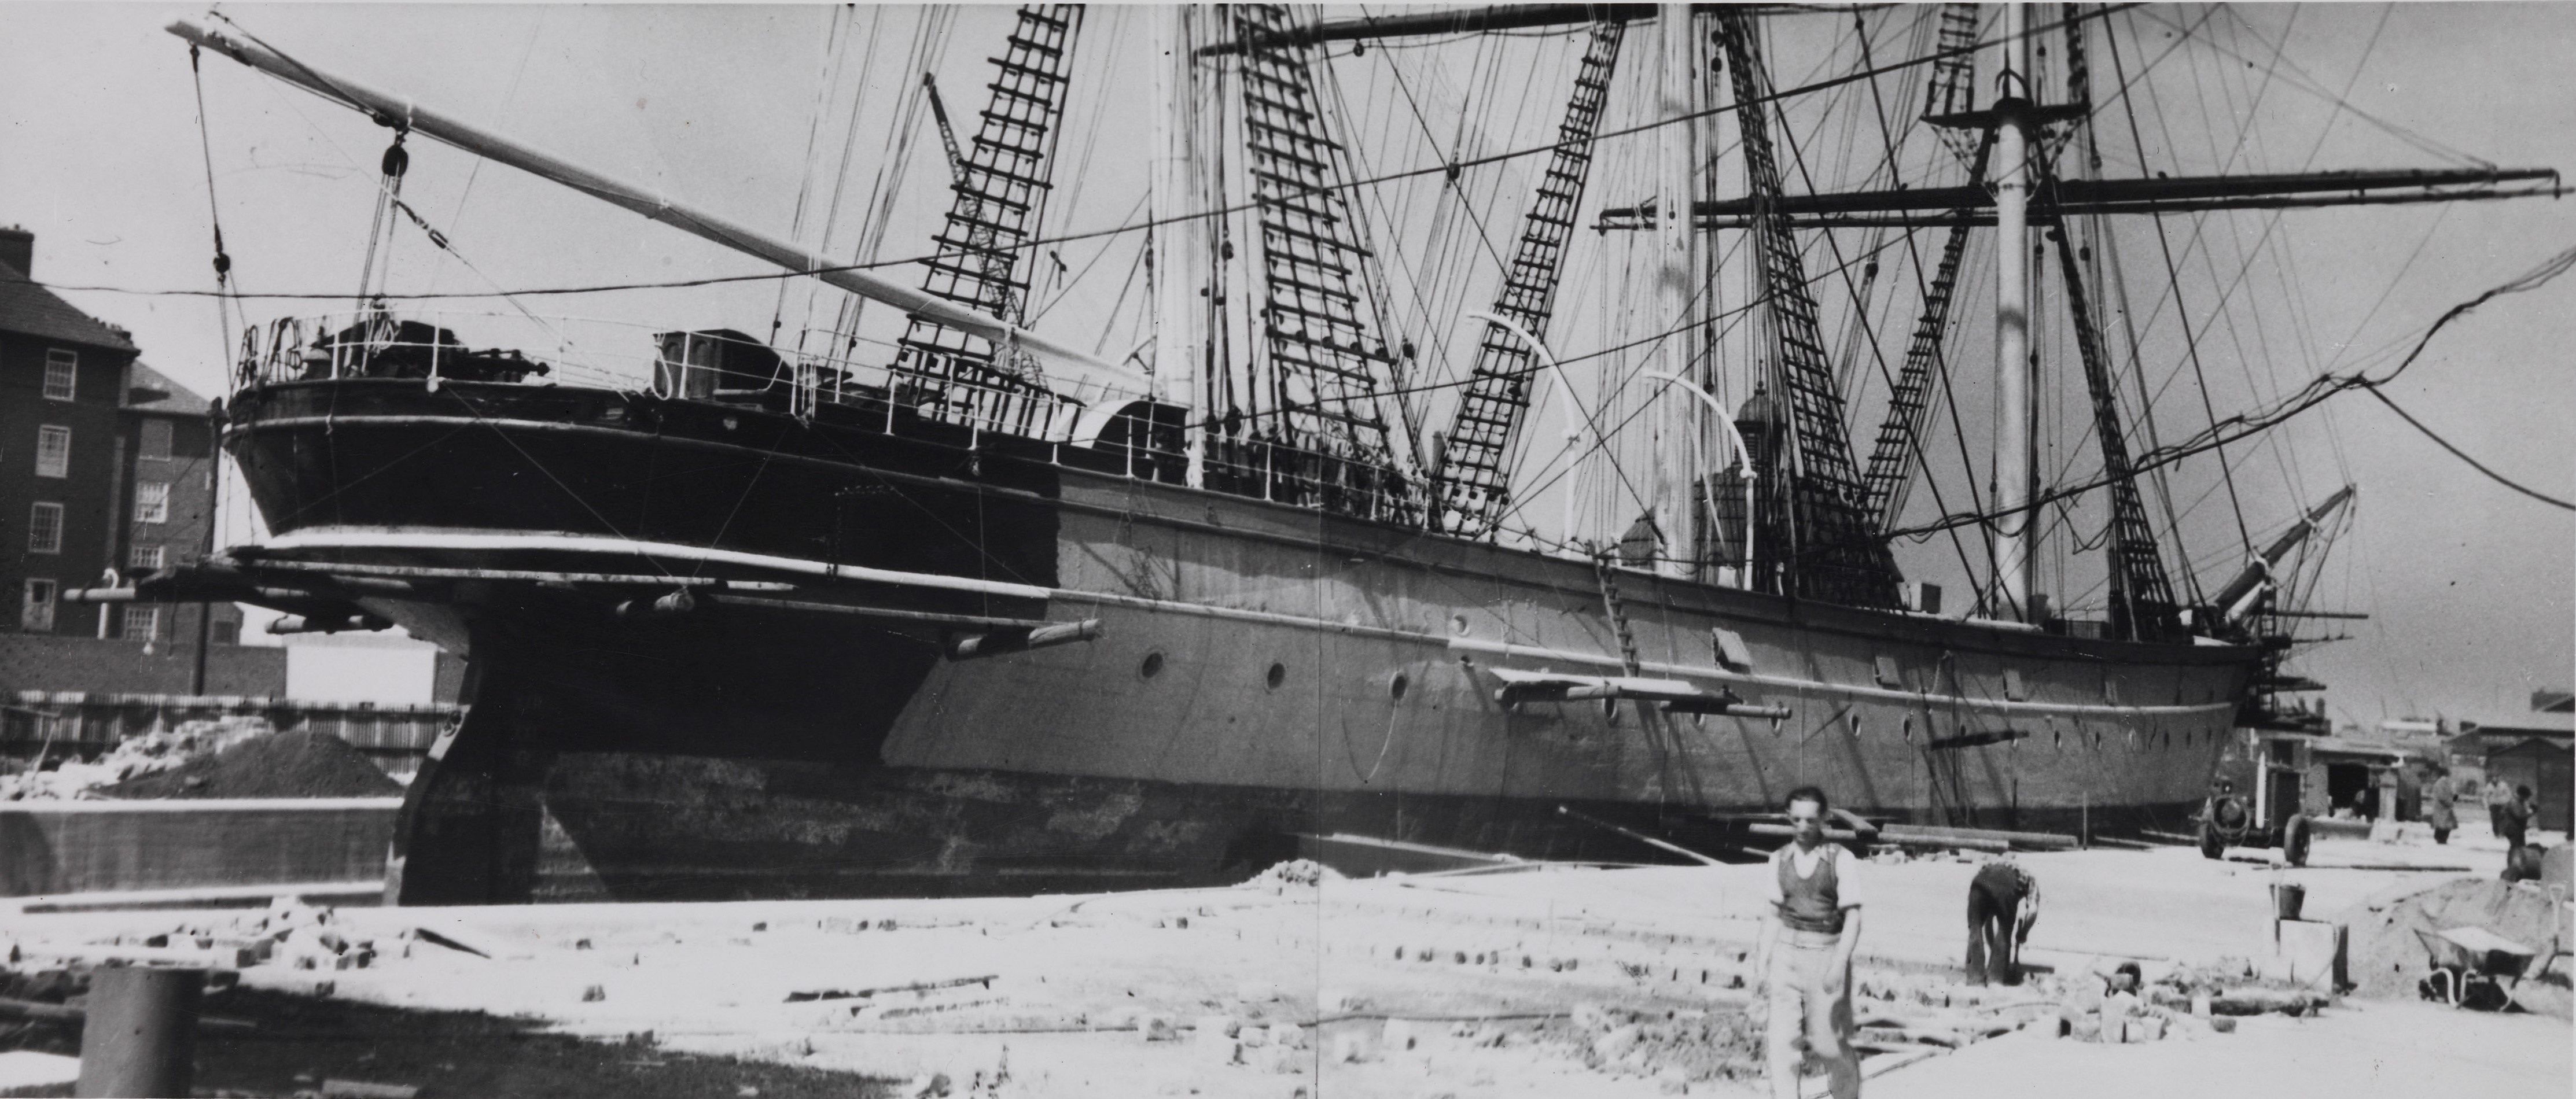
Wonderful work....indeed. Found another image of Cutty Sark during her refurbishment.

-
Your right, not until late 1853~ mid 1854 did Many begin to accept and change to the Howes rigged double topsail. McKay's Great Republic(1853), initially was rigged with the Forbes double topsail design...which Howes modified and improved. Every McKay clipper after was rigged with Howes designed double topsails. Rob
-
Well...I knew that...but Flying Cloud has been modeled to death.....I meant Staghound...which has of yet found good representation. I meant she is the one you continually advertised as a favorite. Any number of good clipper designs could have made Flying Clouds record times...given the right season...weather...tides...tenacious hard driving captain...etc..etc.. She just happens to be the right design, put into the right conditions to pull it all off. Rob
-
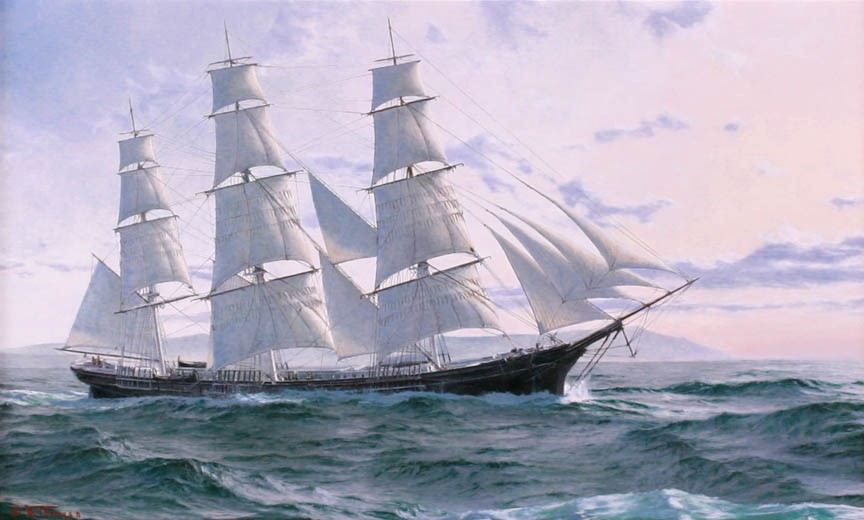
Preparing myself for the upcoming construction...I wanted to post another painting of Staghound.
-
Without McKay’s model, we would be months at this, if not longer. Glory’s saving Grace was Michael Mjelde himself. It makes me giggle to think we are working so hard on your favorite McKay clipper……. I know why you’re so Passionate. Rob
-
I can't agree with your more Rich McKay's model is the bible for her actual dimensions. Not withstanding the addition of planking and a keel. Hammering out the details and we will be set to get bulkheads made.... Rob
-
We have been working diligently to conclude the drawing of Staghound. One correction needs to be remedied. Staghound had 12" waterways molted to the deck frames and to complete the decking, 3.5" deck strakes were bolted to the deck frames as well. This means the actual deck line is 8.5" below the sheer line or planksheer. Vlad has done a magnificent job drawing out the lines, and as Rich has stated.....the true deck level must be attained before mast position can be finalized. We are close to that point and a final drawing will be forth coming....just a few keel issues to resolve first. Thanks for following along. Rob
-
Thanks Bill. It's always nice to hear good things from other model builders. Hey you built a pre 1805 version of Victory...was that when she was painted blue. I recall, years ago a fellow built one in that fashion...quite beautiful actually. Rob
-
Thanks Gary. The research has to be decided because all else that follows will be a waste of time, if I am to be as accurate as possible to the actual ship. Again, thanks for coming along... Rob
-
I agree with you fully. I had concluded just the same. Because Chappelle's drawing shows space between the portico and the mizzen mast. With a fife rail crammed between them. His fife rail is three sided with a front with a horizontal bit. This design is all well and good for the fore and main...to affix the lower stays too...but not on the mizzen. Your depiction affixes the fife rail to the head of the portico...leaving the front and sides of the rail exposed for pins. Side doors make more sense ergonomically. Freeing up the front for the mizzen fife. The roof of the portico, could be just a roof....but, as you say, why not use it as a fore perch...surrounded by stanchions and a rail(Giving easy access to the gaff foot). There needs to be a simple 2 rung step up from the house roof/poop deck to access it. I like where we are going with this. It makes sense and still is in line with Duncan McLean's description. Rob
-
I agree with this fully....and it too is my own conclusion. It didn't fail me to notice Duncans brief description of the *Hood*. And from all the research we have done...it is conclusive by the lack of such features on any drawing, that McKay did indeed keeps its identity and fabrication a close secret. What other secret could he be referencing? The age of the wood....or the pigment in his paint?😉 Apart from the main difference that Staghound was an extreme clipper and Glory was a medium clipper...doesn't change the concluded fact, that McKay developed an engineered construction practice, that made his vessels superior in form and robustness. These practices did not and at the time of Glory's construction...McKay was desperately trying to use what worked in the past to propel him, once again into the future. But painfully knowing the end of the clipper had already passed....being overrun by the improved reliable steamship. We are magnificently blessed to have such a rich collection of images of Glory, whose structures can easily be translated to any of his other clippers.....Why, because the Naval hood was(to McKay), as important as the keel of the vessel. Or any other reinforcing structure. Rob
-
I have that in my collection. Perfect example. Rob
-
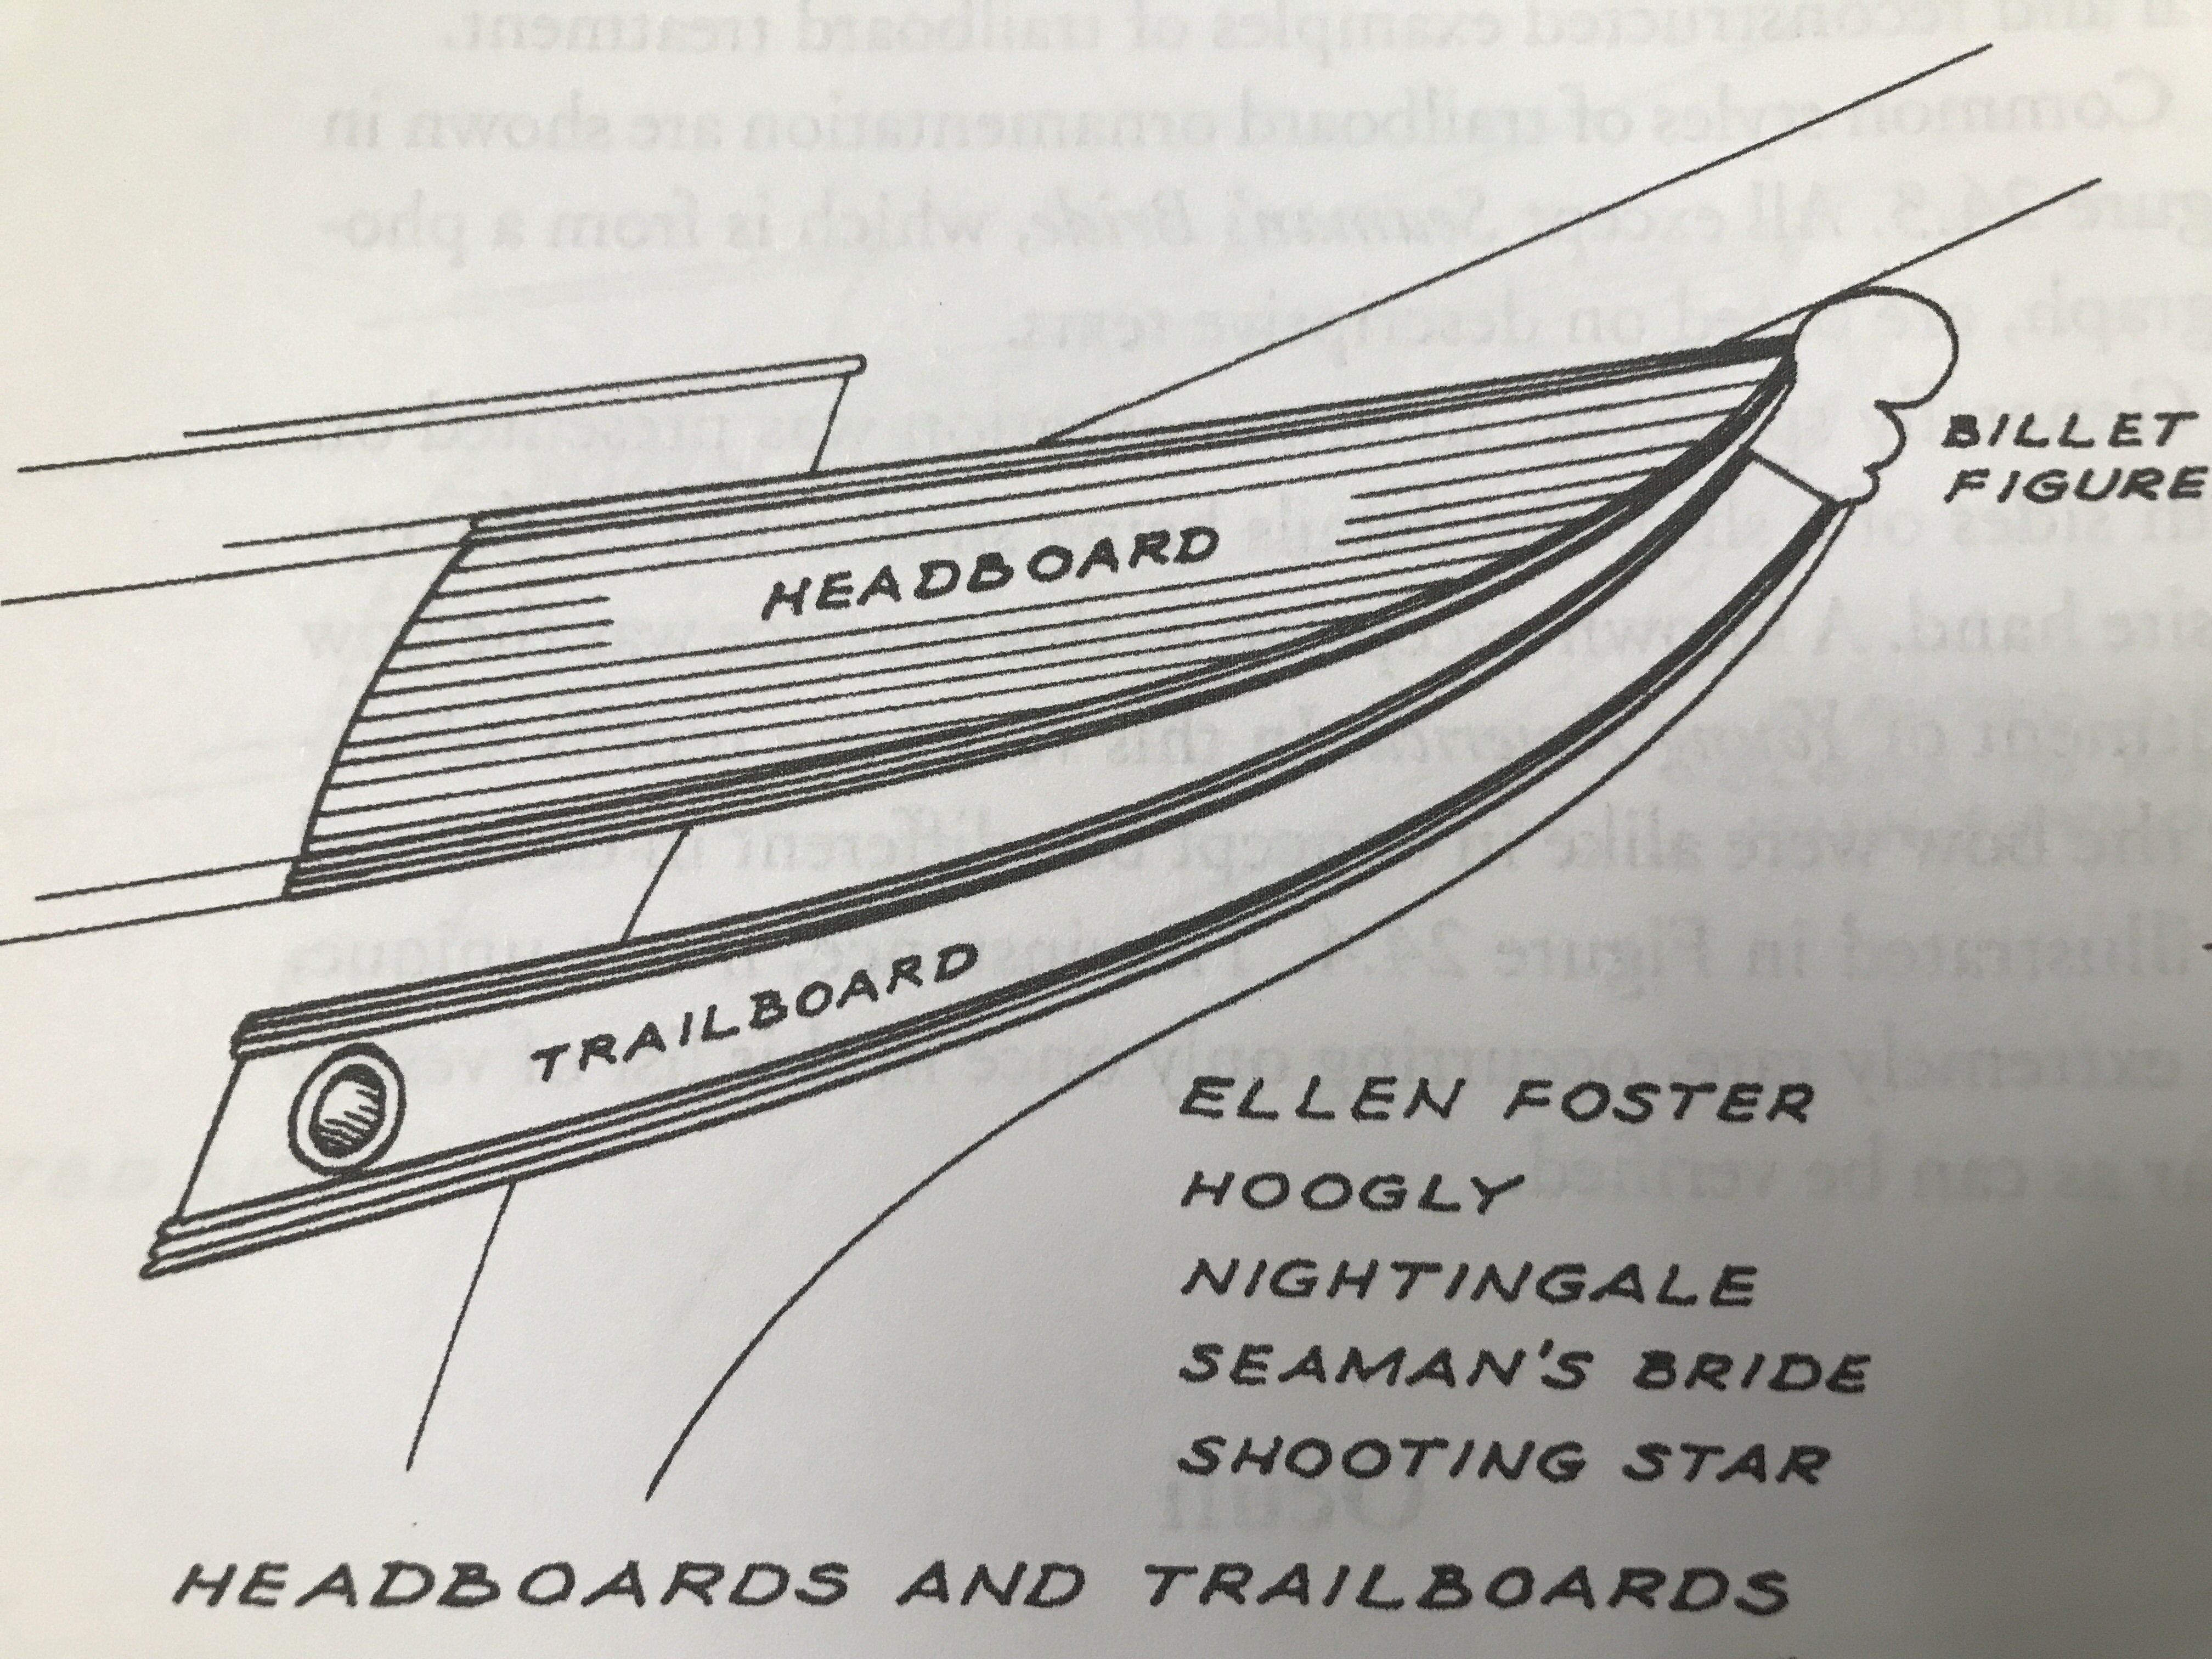
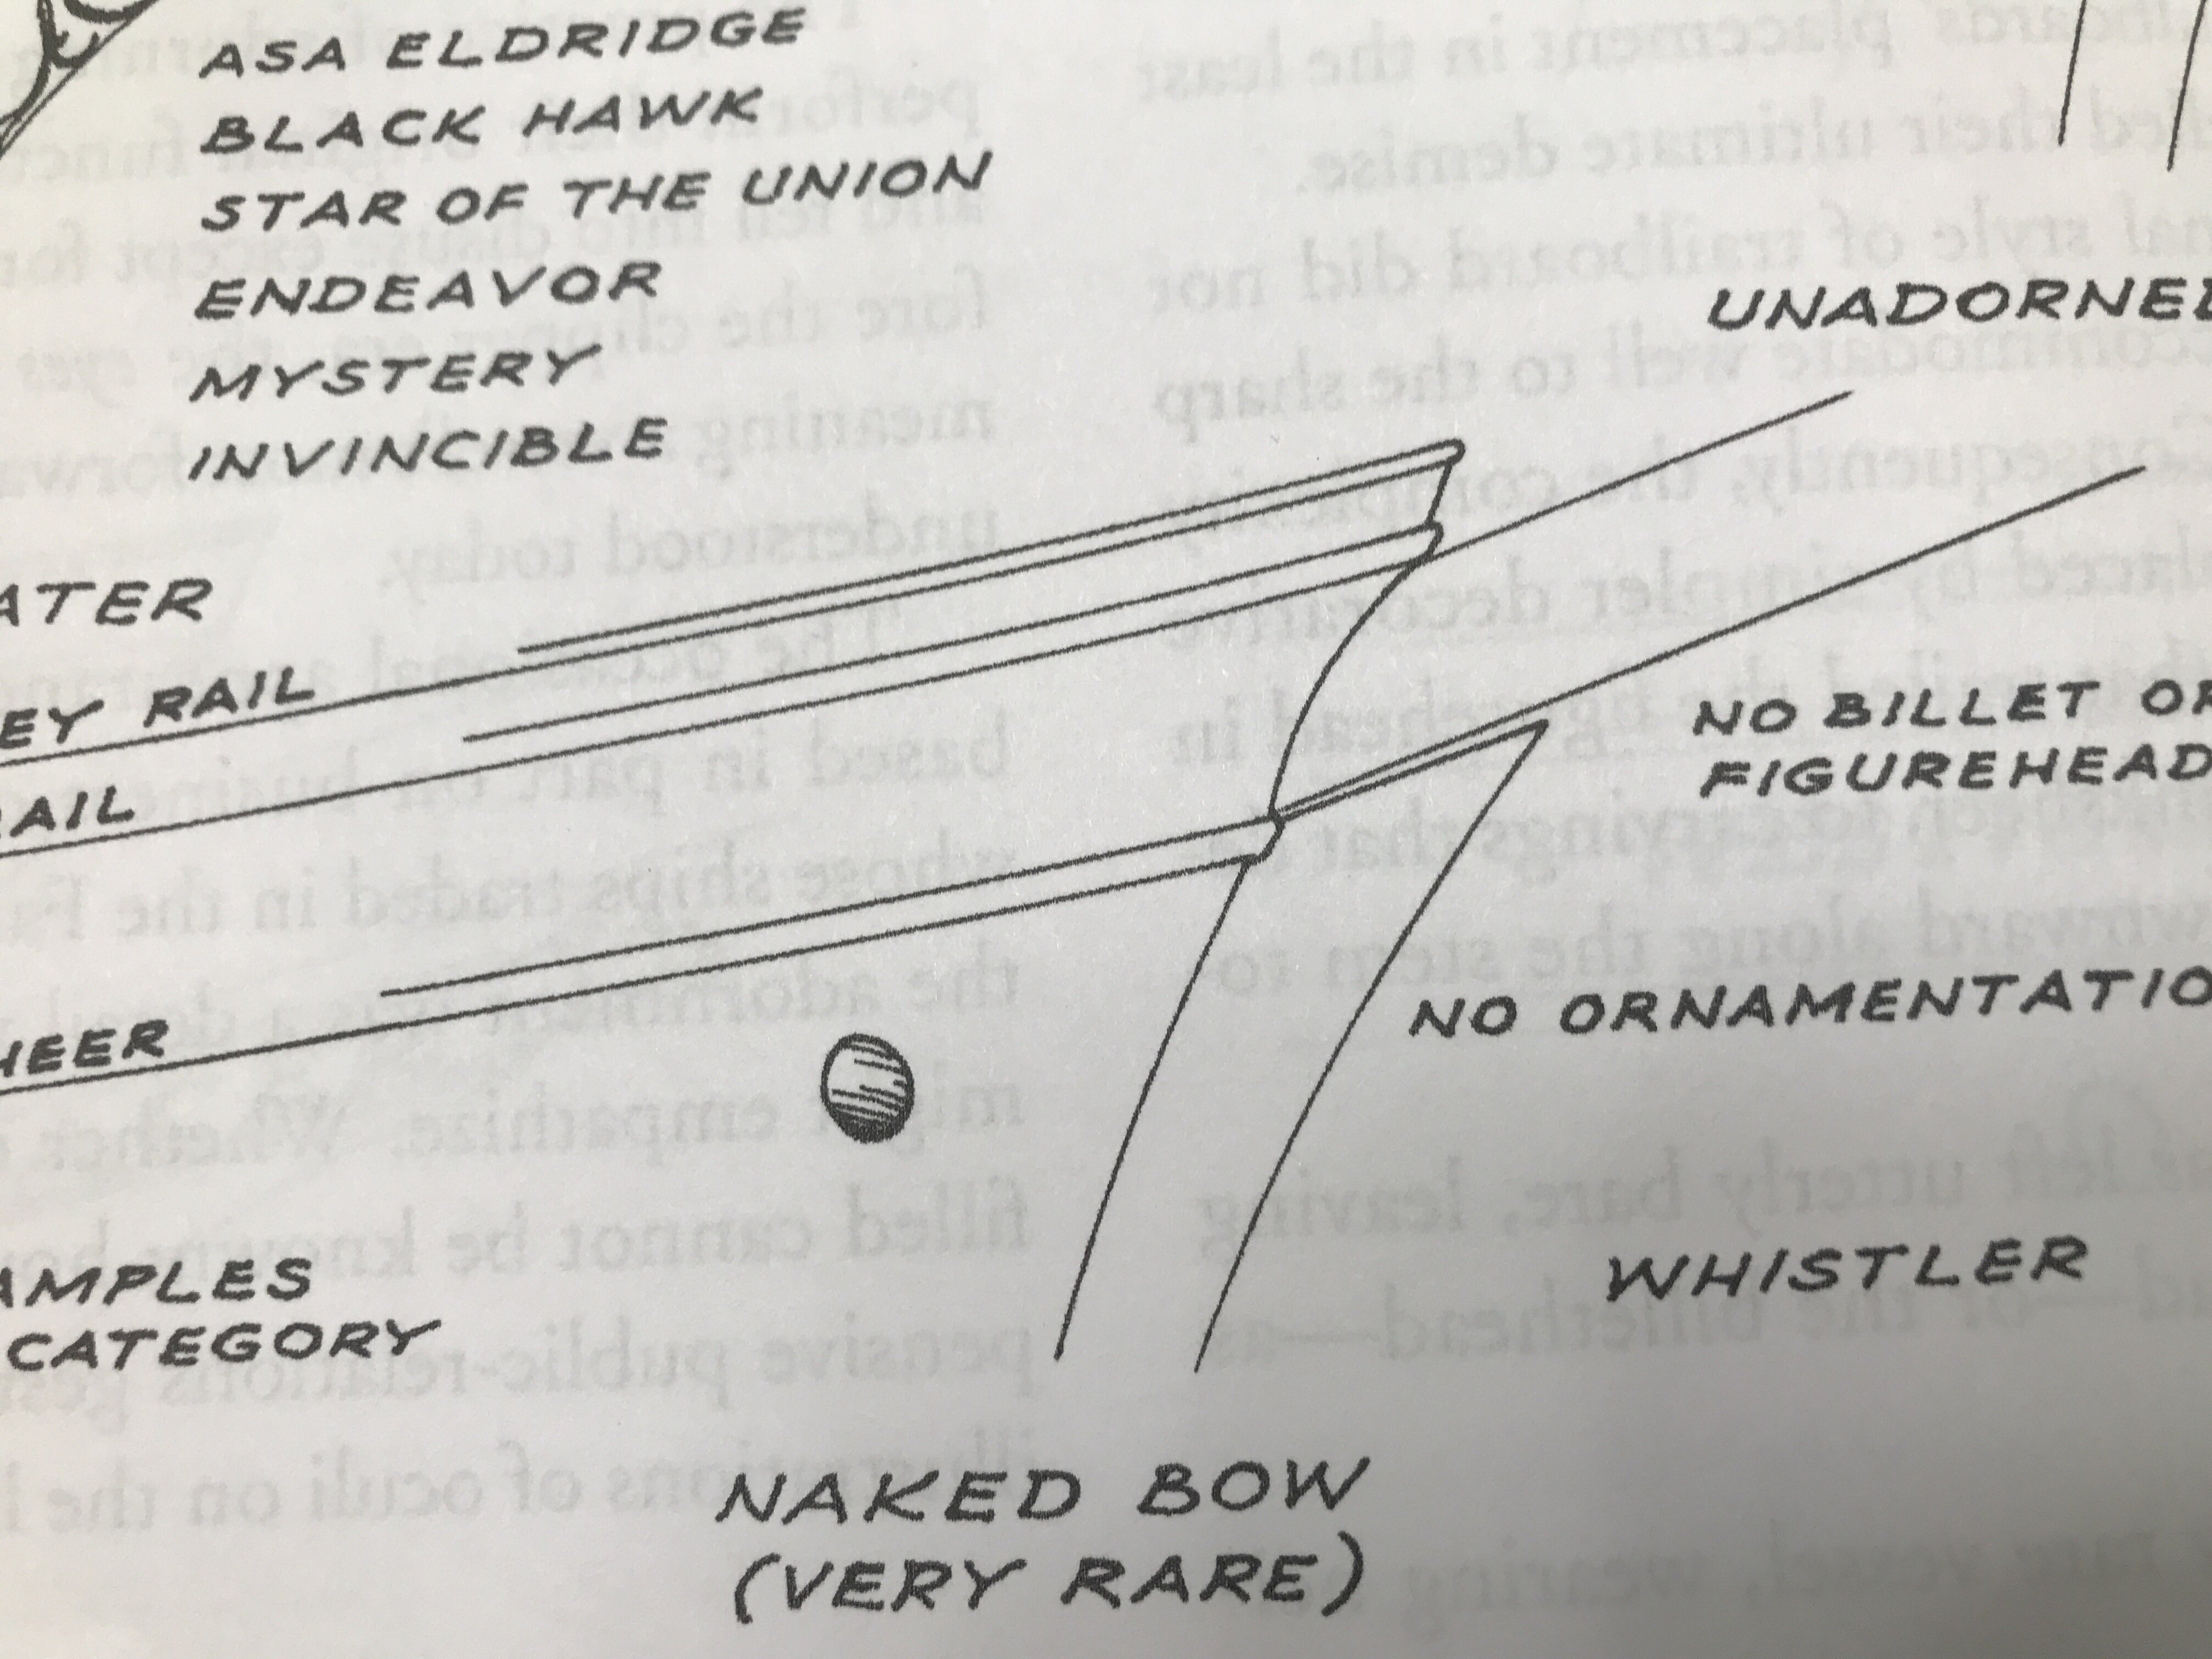
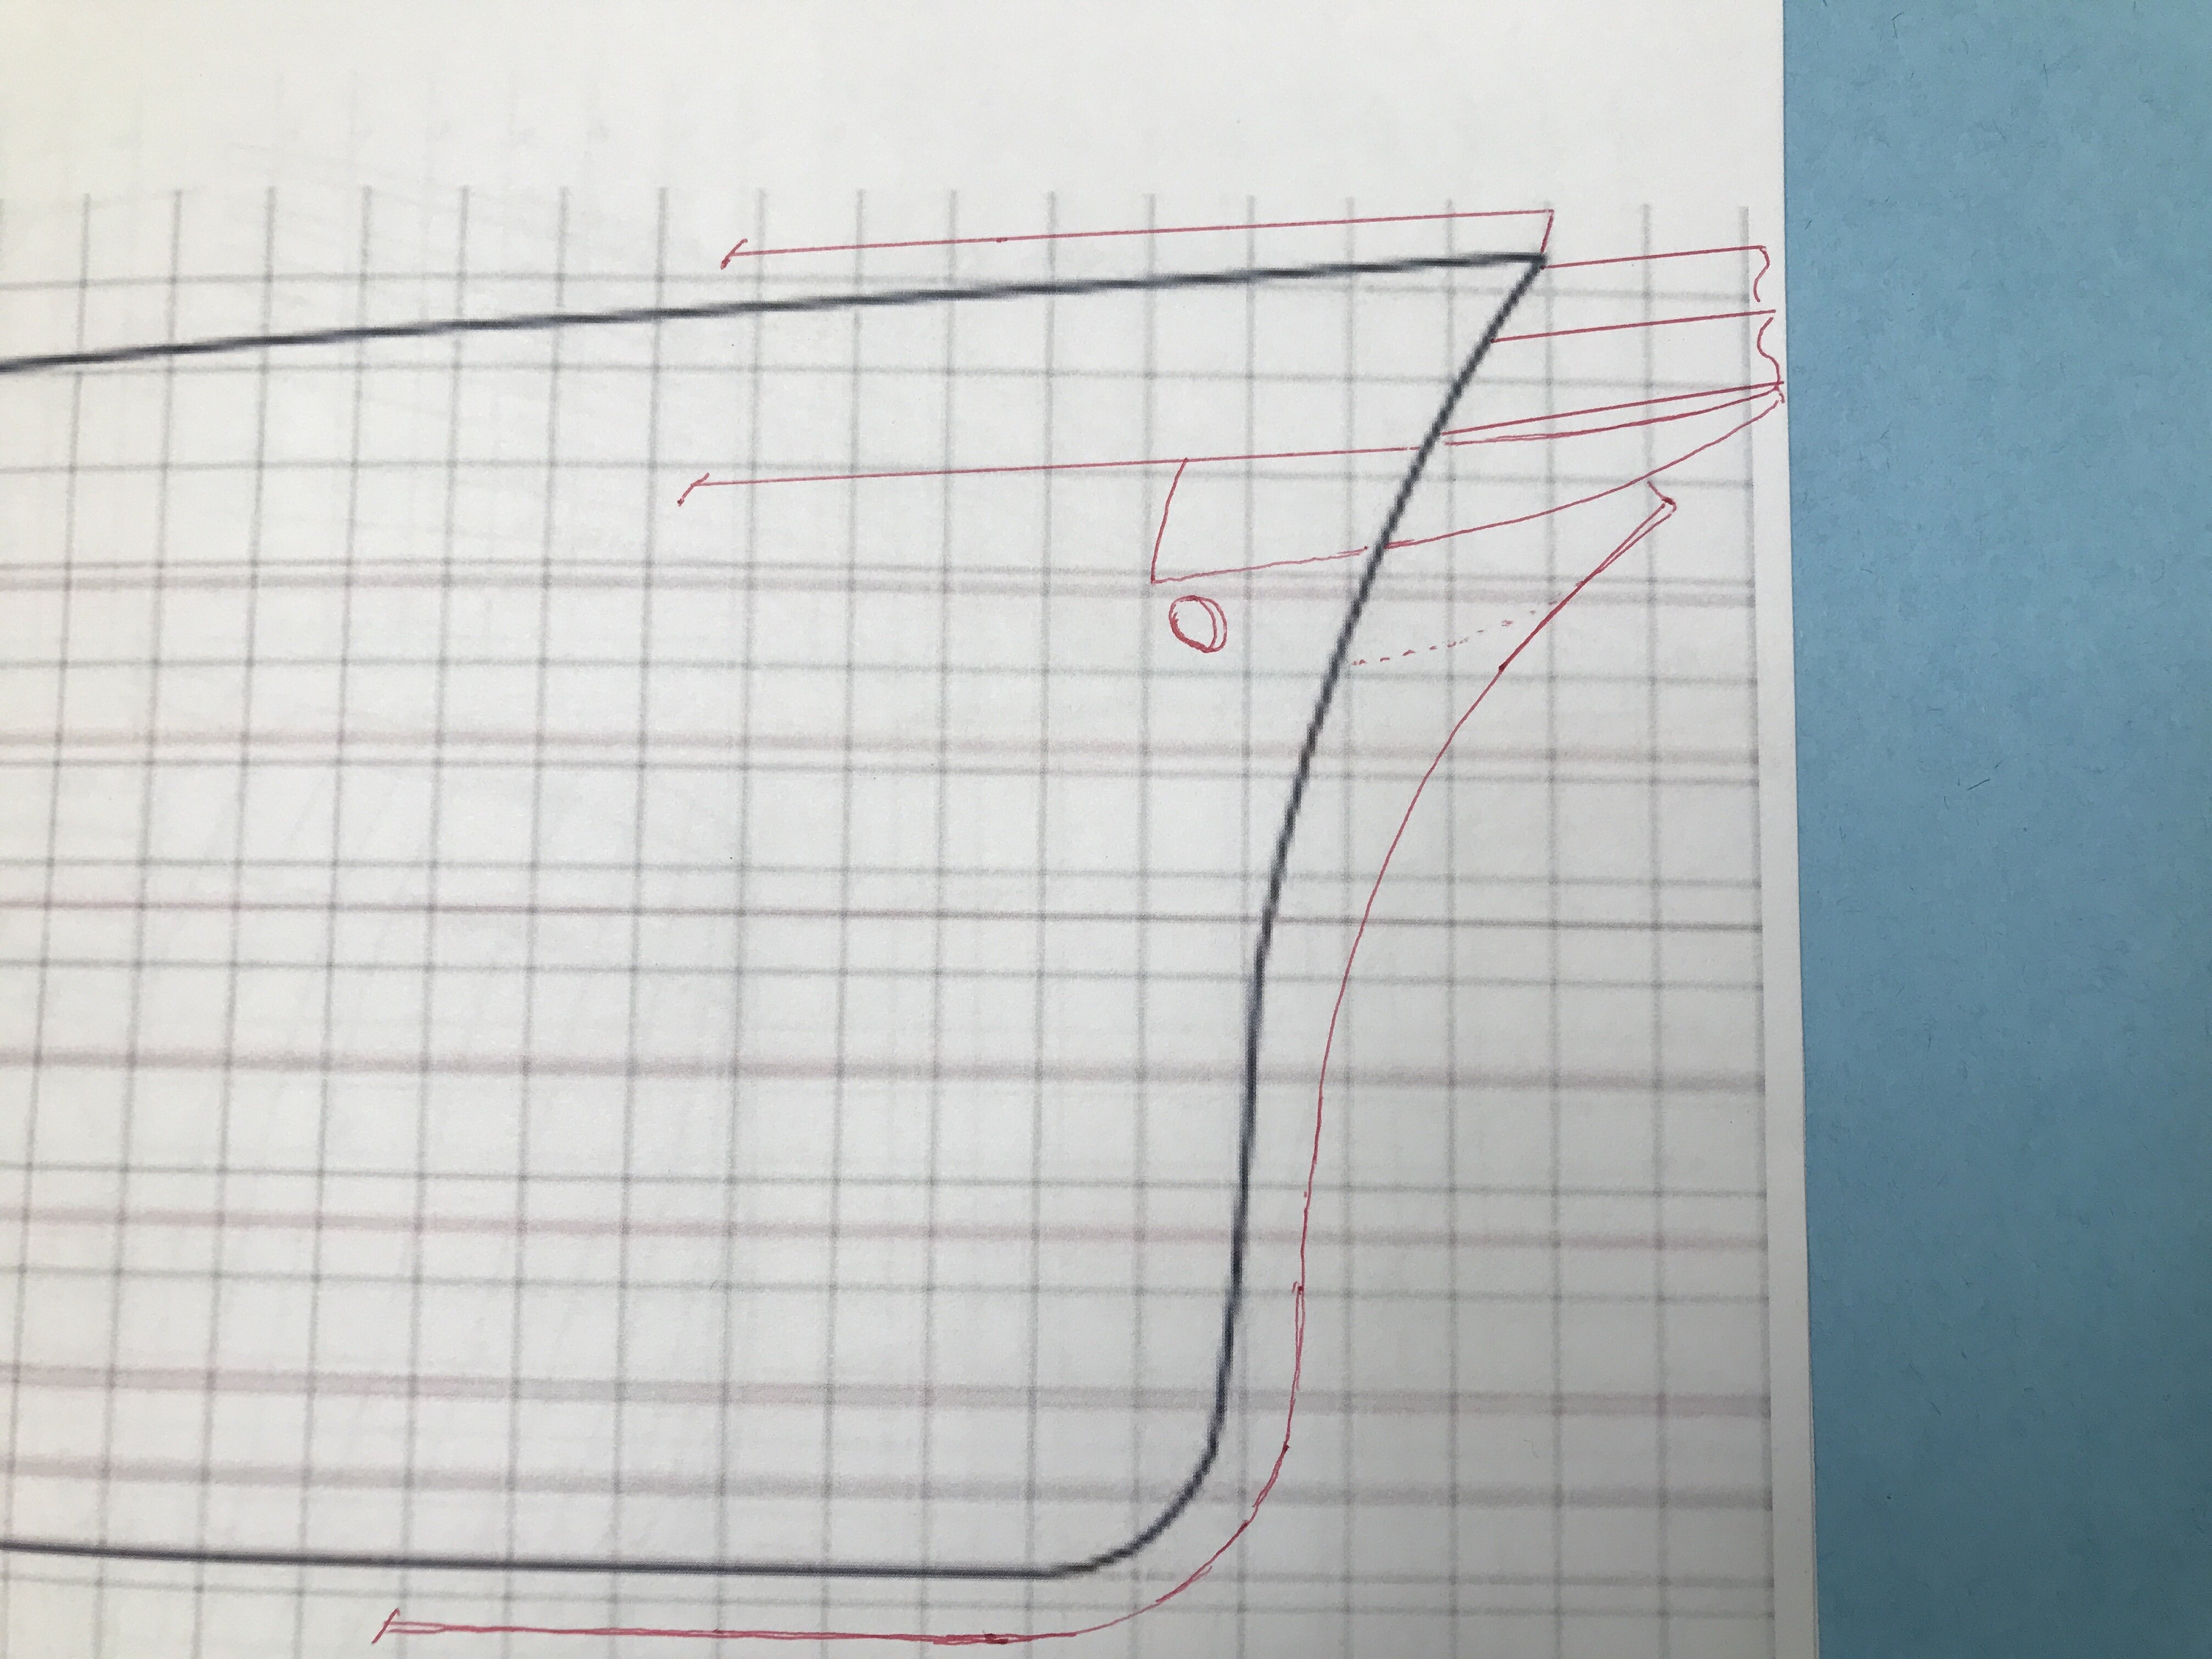
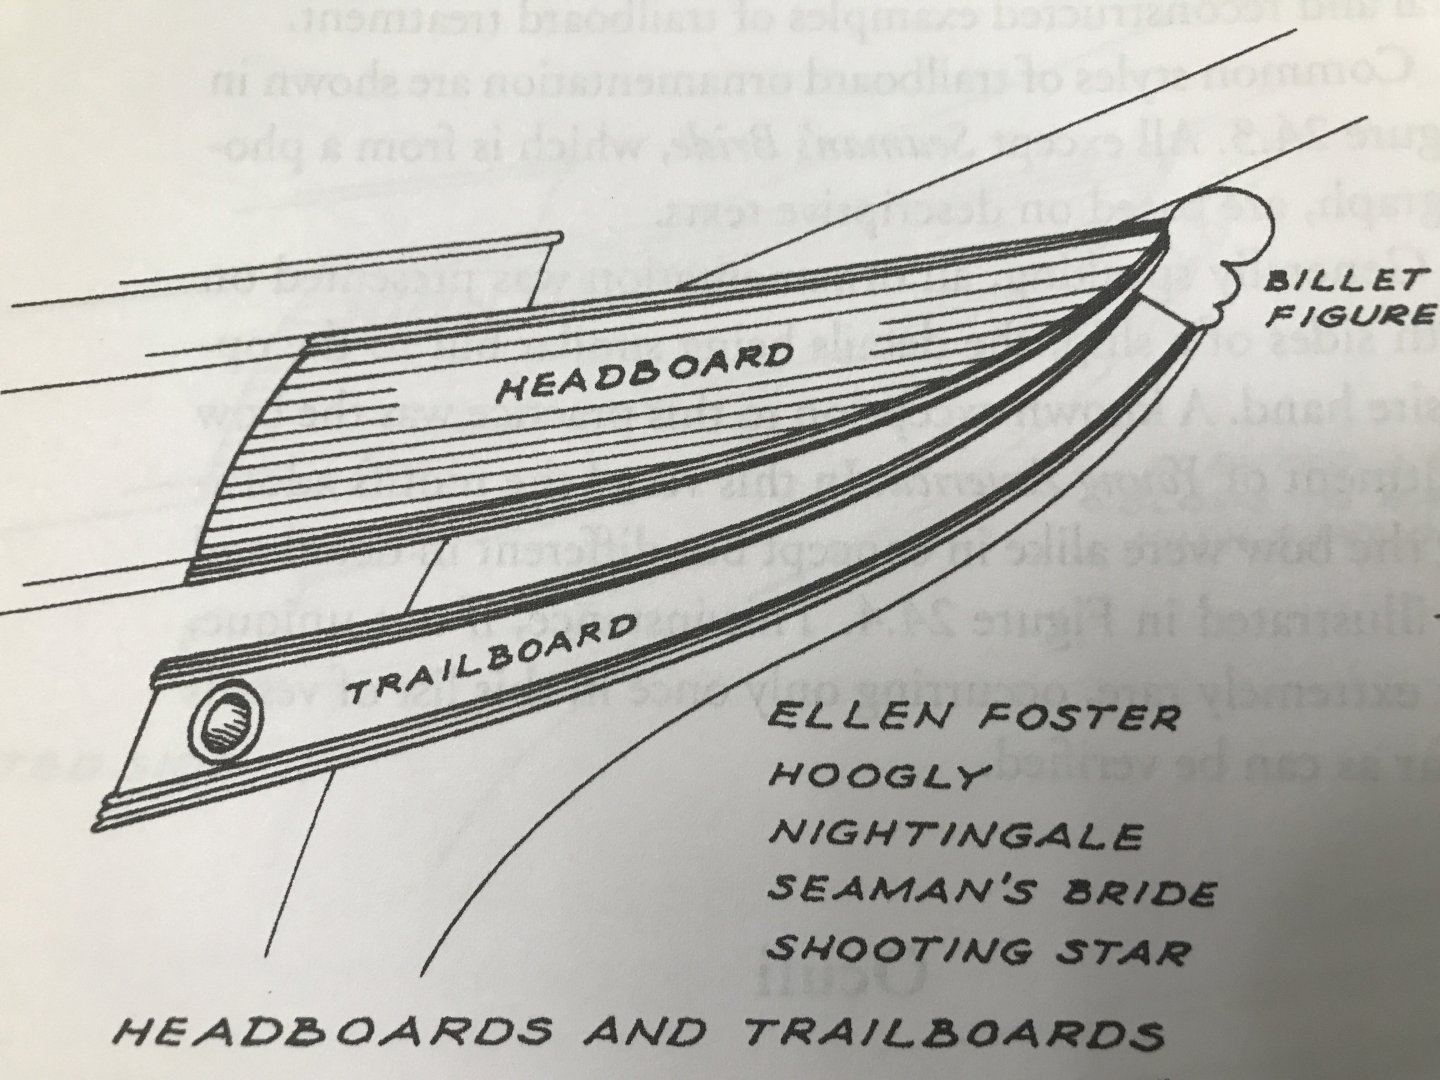
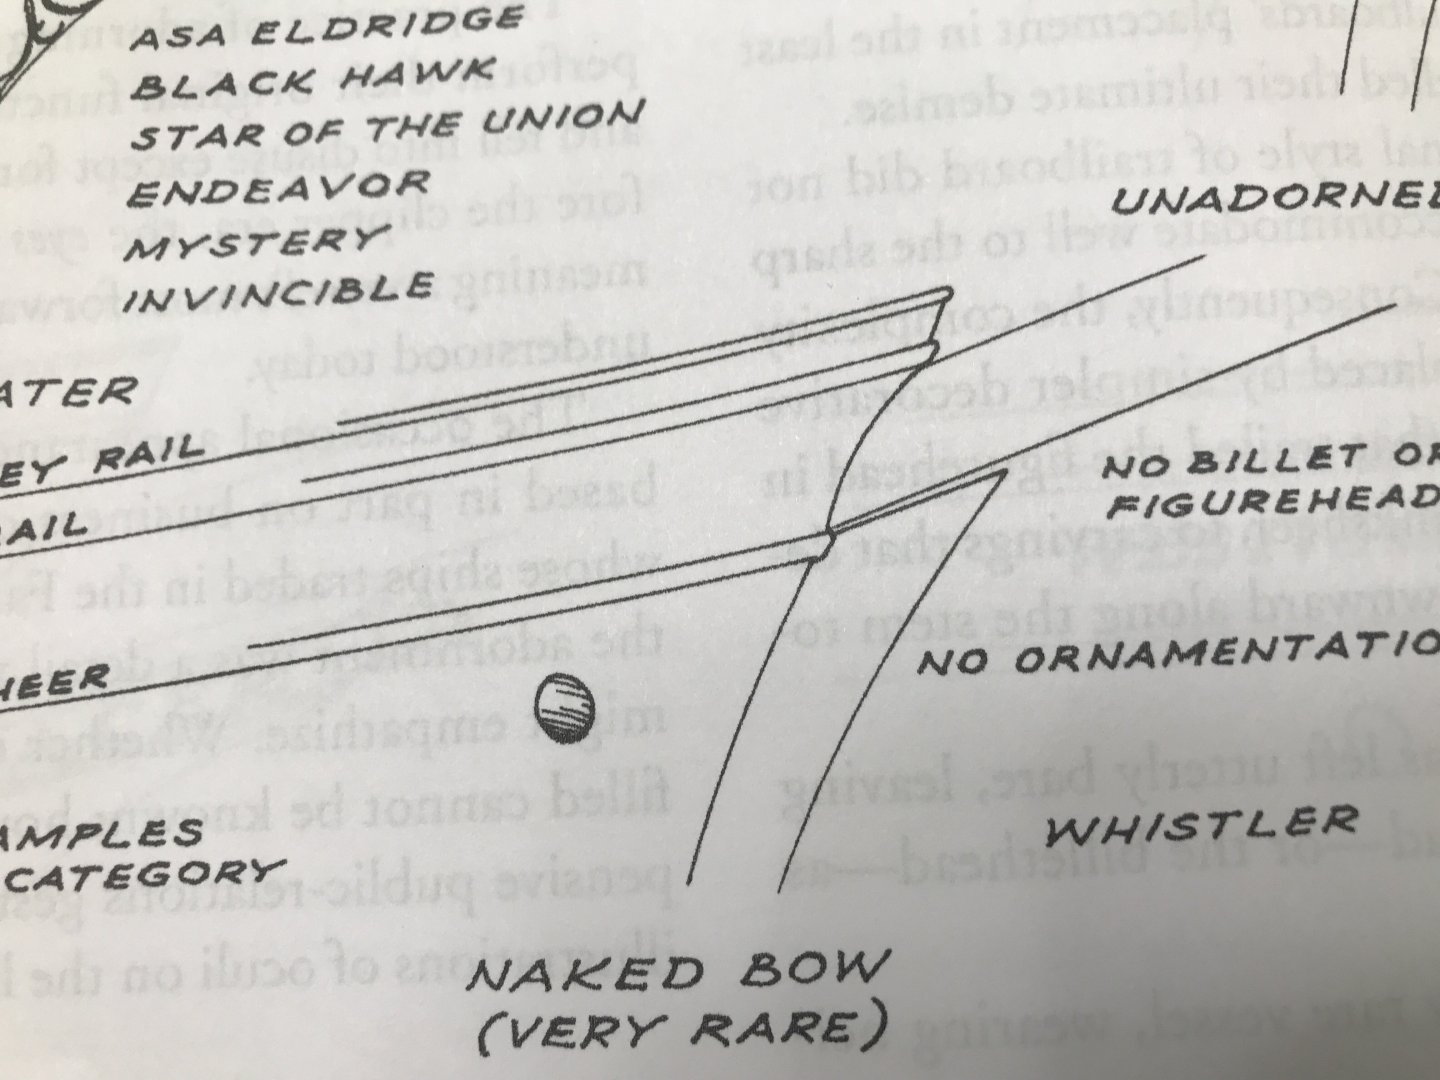
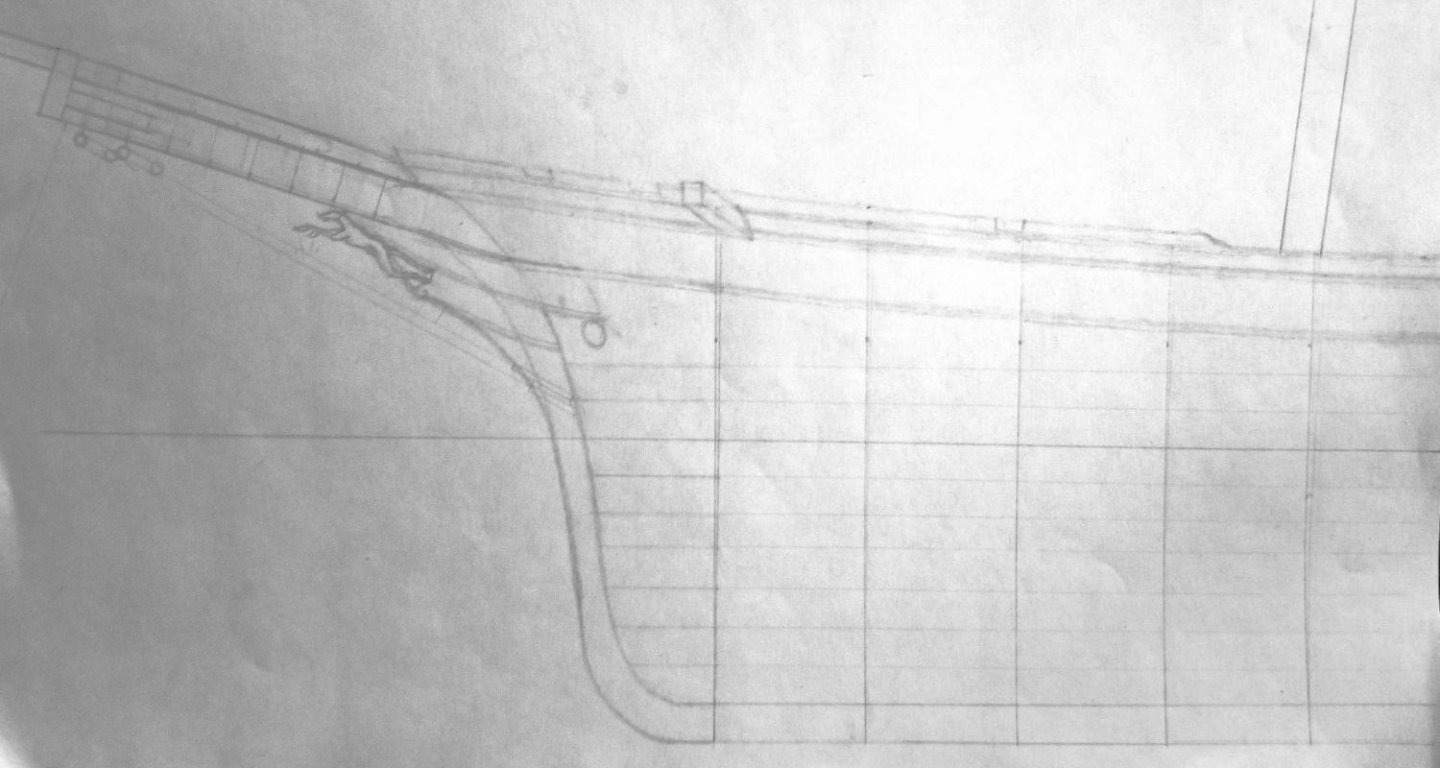
Ok , here are my scribbles. I used both Vlads drawing and that of Crothers. I’m assuming Vlad’s is a replica of McKay’s. I did this on the fly…..but it shows us the difference. Also, I reviewed Duncan’s observation that Staghound has no headboards or trailboards. That means she was nearly *naked*. I’m including several pics showing this and my renderings . First, could have Donald Not included his famous hoods? Or could it have been added, just not as pronounced as the typical headboard of the day, so Duncan didn’t recognize or mention it? Lastly, the trail board typically flowed along the head of the stem, inserting into the howes hole. McKay never followed that typical pattern of others. Now about the hood renderings on both prowes. I think the Vlad rendering is the closest of these two…….with even yours being closest. Your thoughts? Rob

-
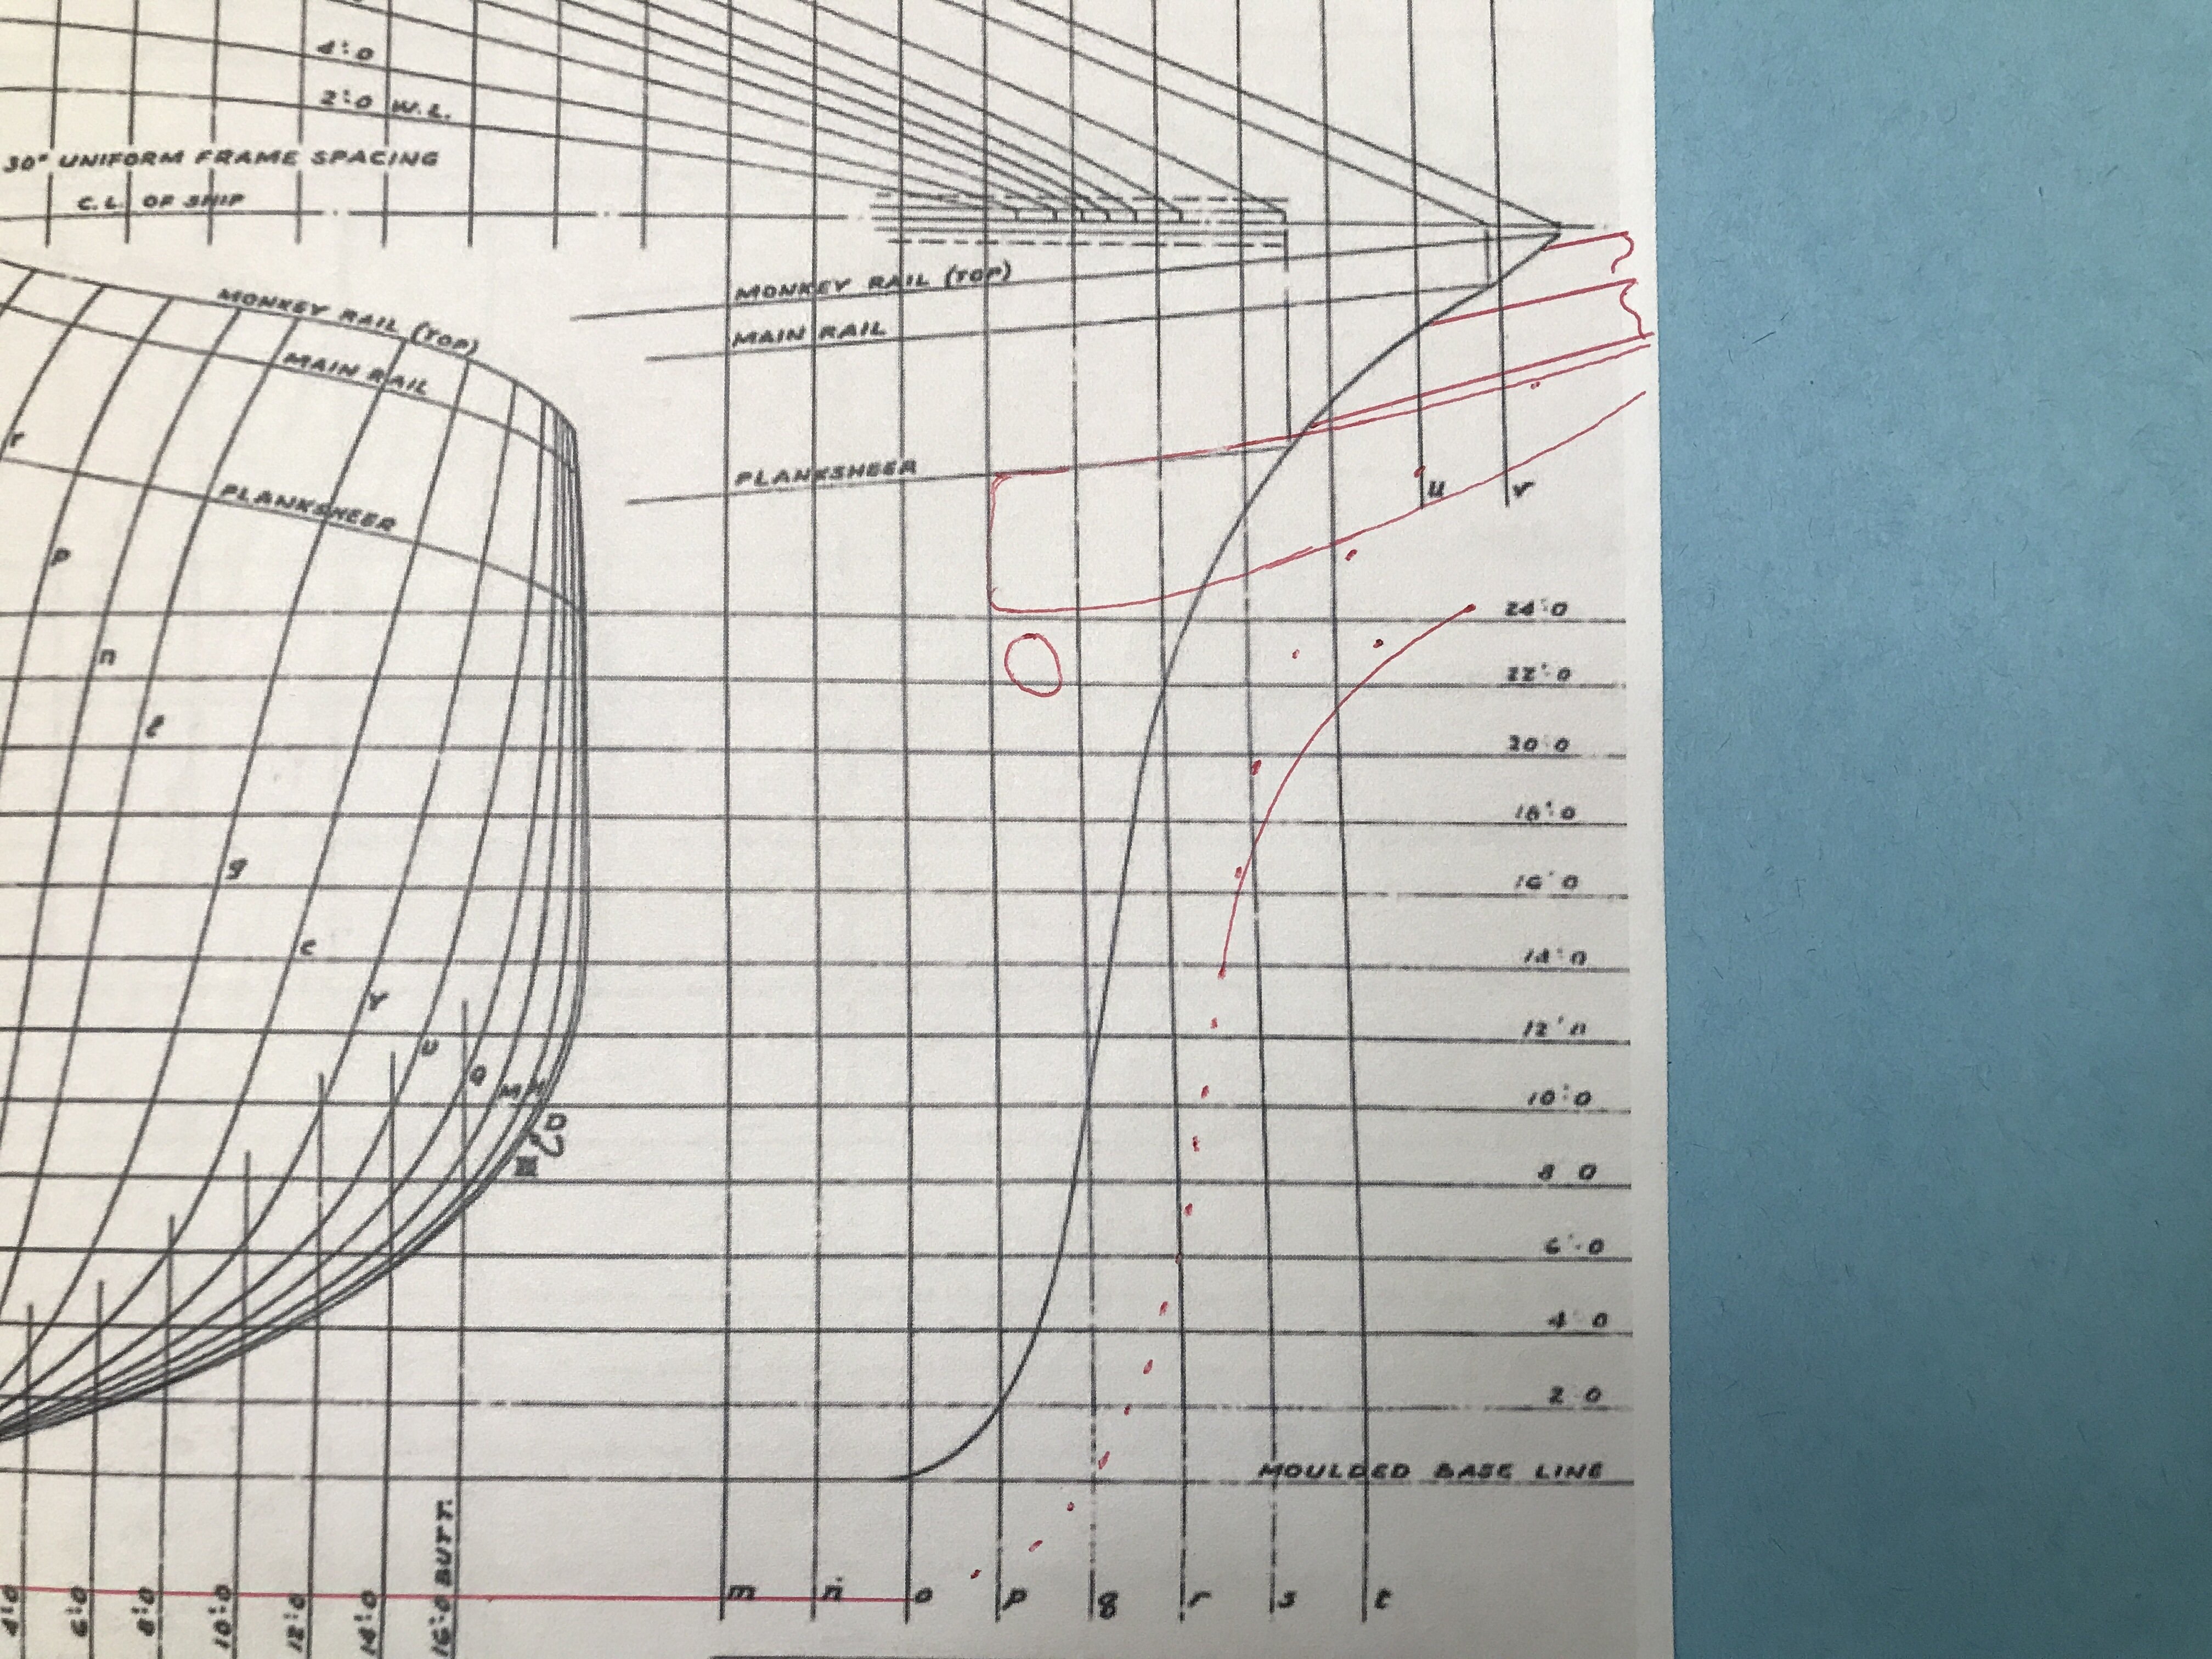
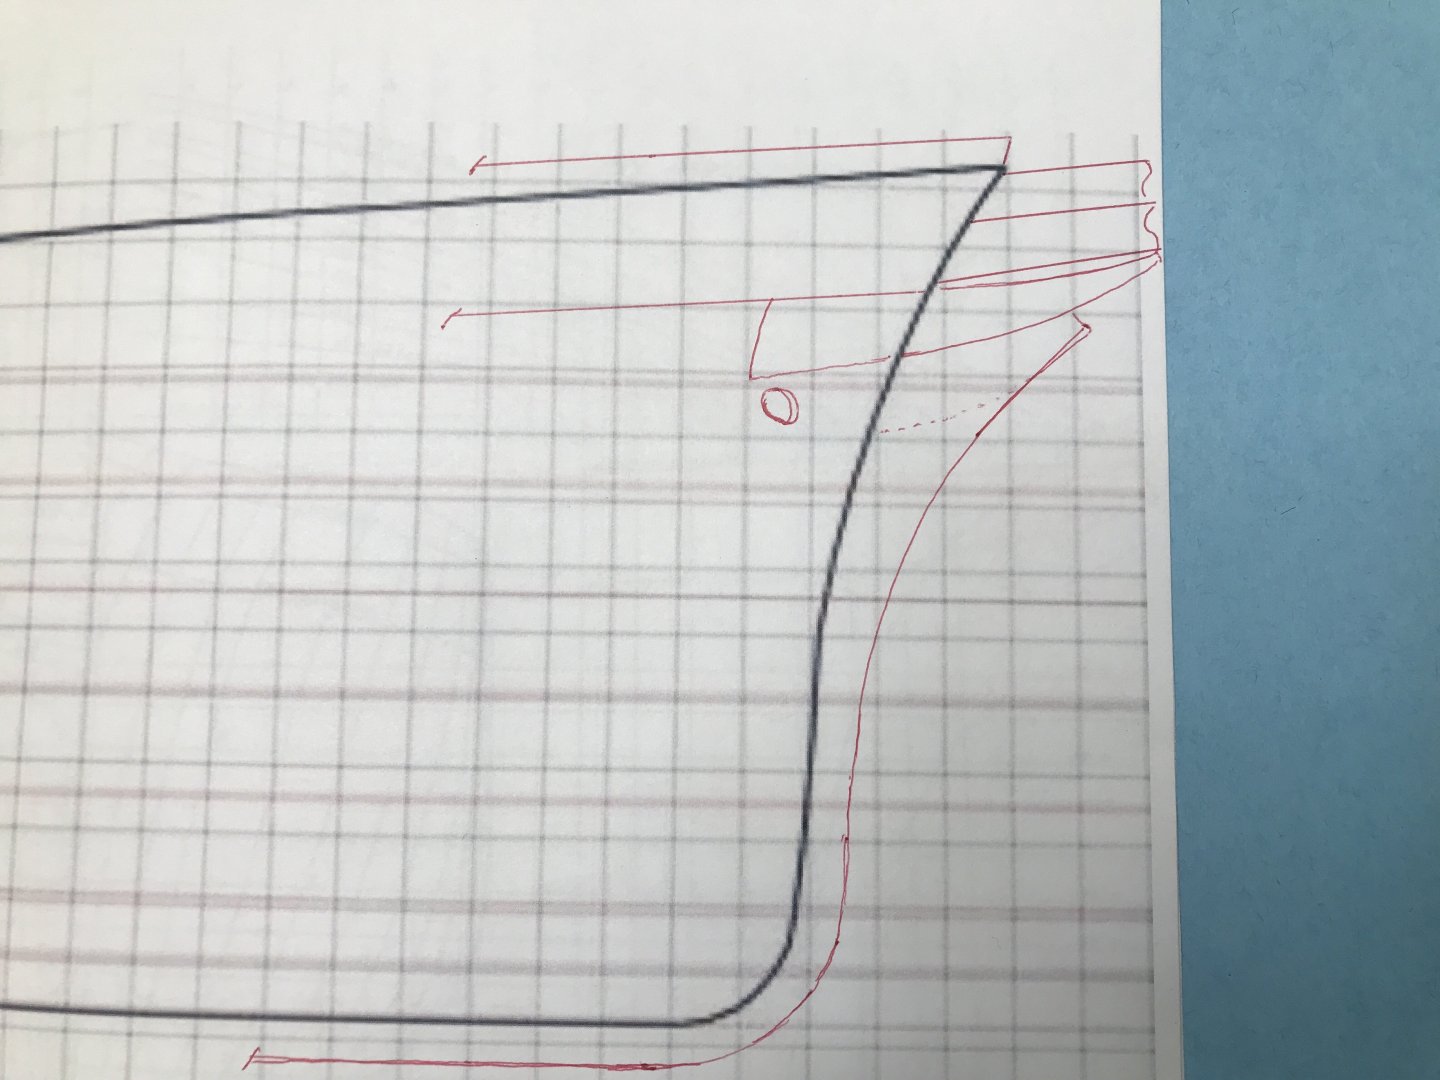
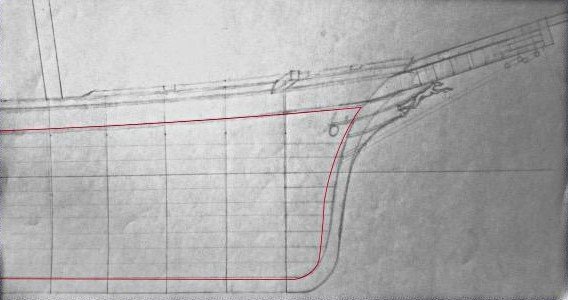
Rich...From looking at Crother's moulded lines figure 1.5.. Where exactly IS the load line? Didn't Duncan say it was 10.5 forward and 12 something aft? And I'm assuming that is at ballast. So where is the copper line? I would assume it would be in the neighborhood of 16~18ft. I also drew a line from the stern post foot..across the drawing to the keel foot(or false keel) and to the stem. You then have to follow around the drawing, 3 scale ft to form the cutwater. I drew on the Crothers graph, these lines and then I added the hood, which follows(Or is part of) the planksheer. Looking at where the monkey rail terminates(On the graph),you can quickly gather the details of the hoods own termination and where the bowsprit and jibboom originate. Once I drew these fixtures in, I then could finalize the cutwaters projection to flow under the hood and form the seat for the stag figurehead. which rests neatly beneath the fore section of the hood. The addition of all these features...drastically changes the image of the McKay half model and all the line drawings we have. From all this...we need to determine the location of the copper line. Like I said, somewhere in the neighborhood of elevation lines 16~18ft. Give it a look over and let me know what you think. I'll post pics of my own drawing(scribble) when I get home. Comparing my drawings to yours...it looks like you were onto the right track. Our two drawings agree. II did the same with Vlad's composition and the stem lines are a bit more vertical. Rob
-
I’m in agreement. I figured 5’ but now we’re adding that 2deg offset …. Making it 7’ Rob
-
McKay’s model doesn’t include the monkey rail, nor the 3’ keel. I’m not sure Vlads drawing includes neither. His drawing should only include the monkey rail. I hope he pipes in. Rob