HOLIDAY DONATION DRIVE - SUPPORT MSW - DO YOUR PART TO KEEP THIS GREAT FORUM GOING! (Only 20 donations so far - C'mon guys!)
×


jfhealey
-
Posts
361 -
Joined
-
Last visited
Content Type
Profiles
Forums
Gallery
Events
Everything posted by jfhealey
-
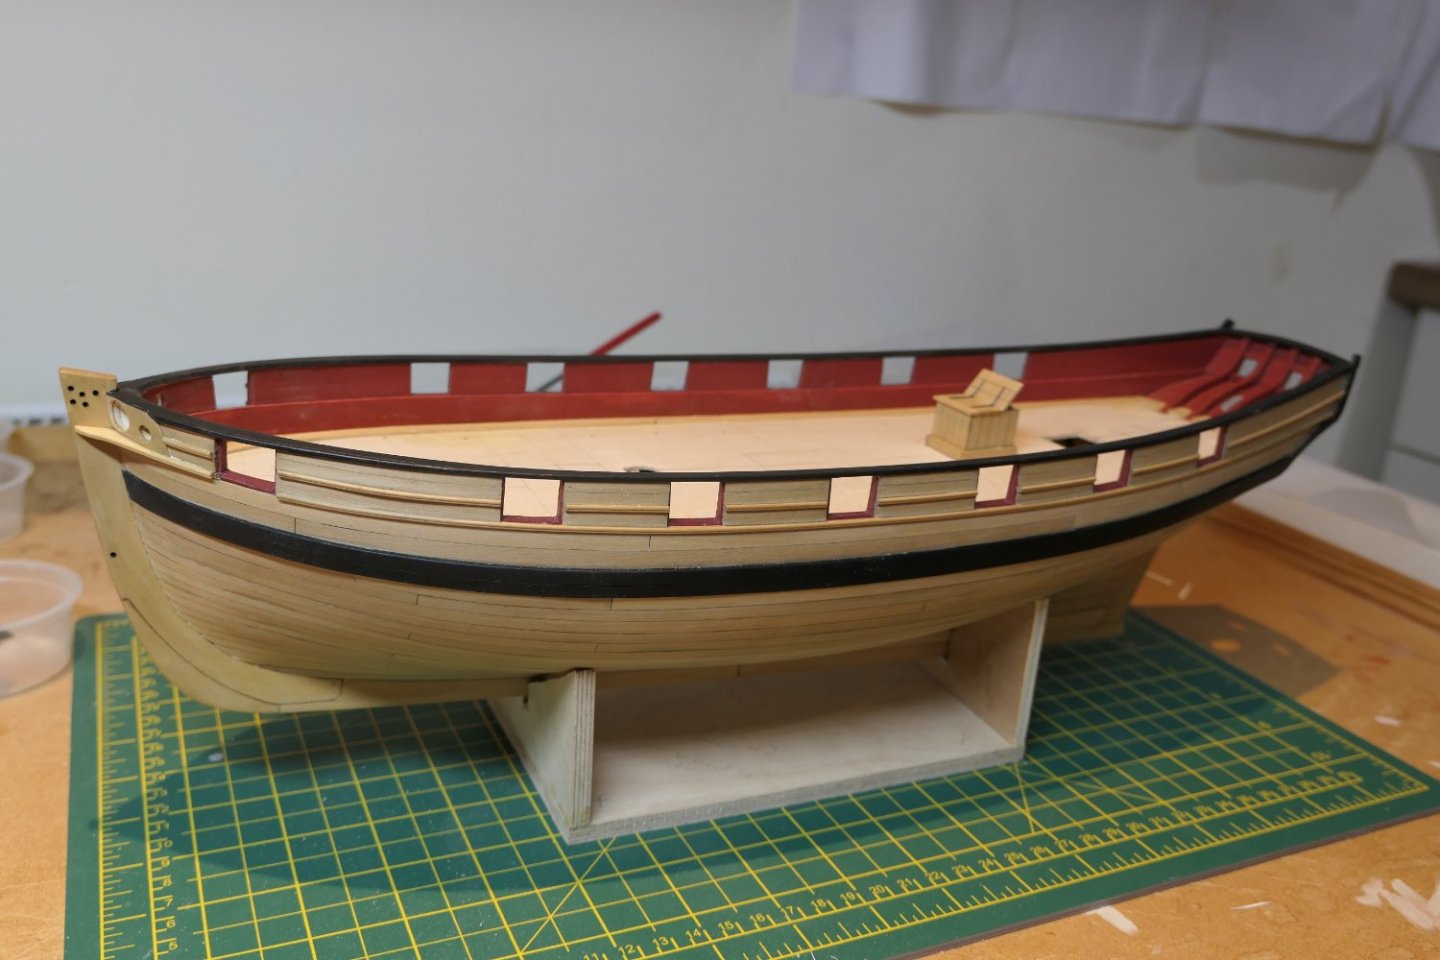
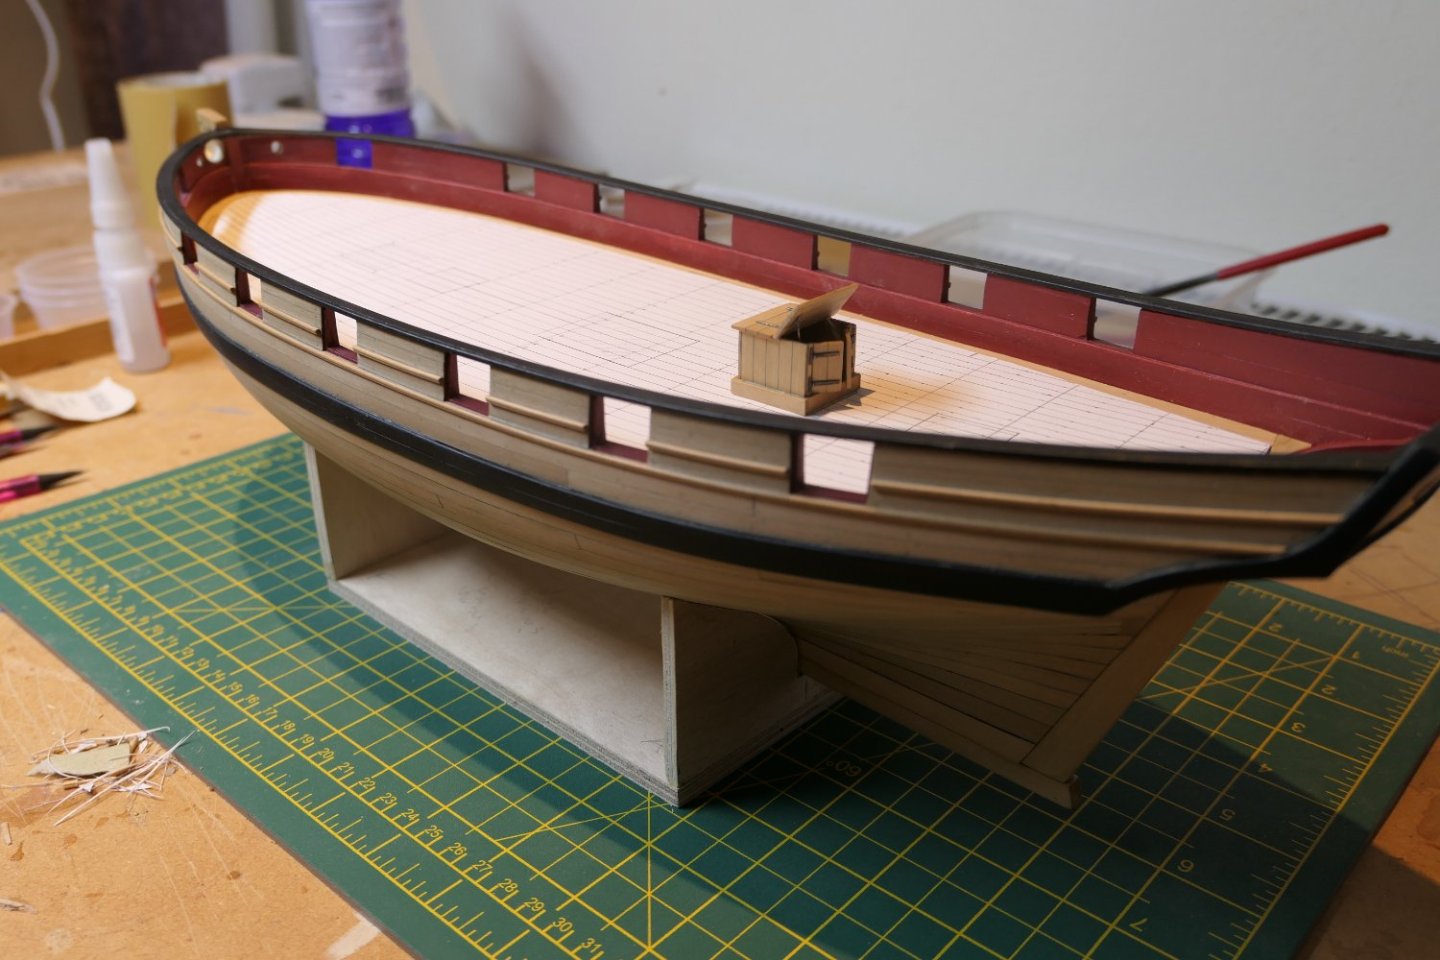
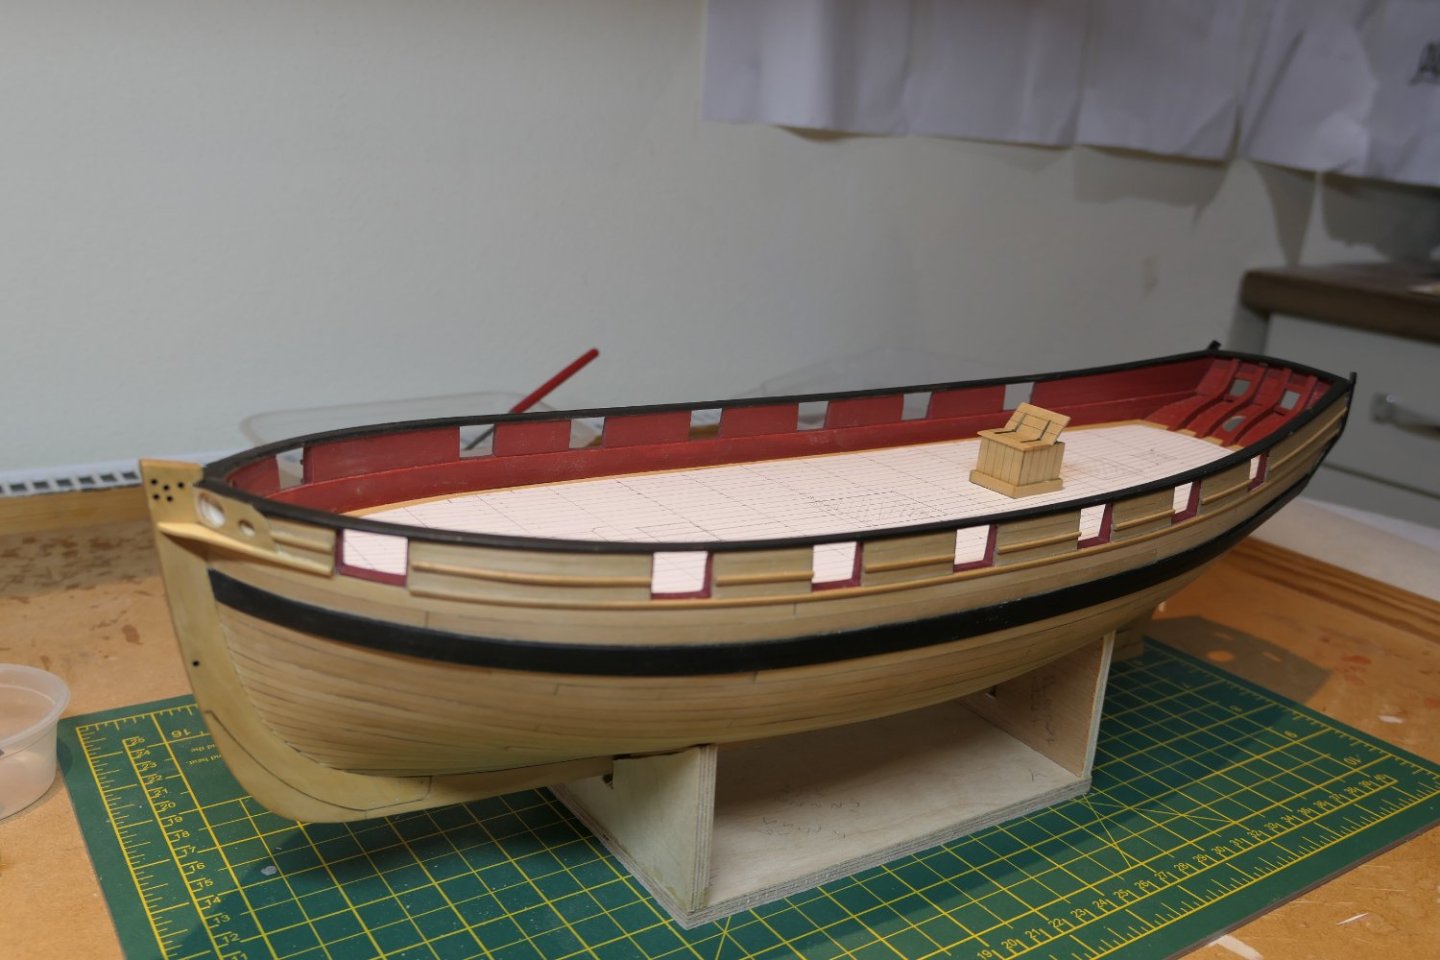
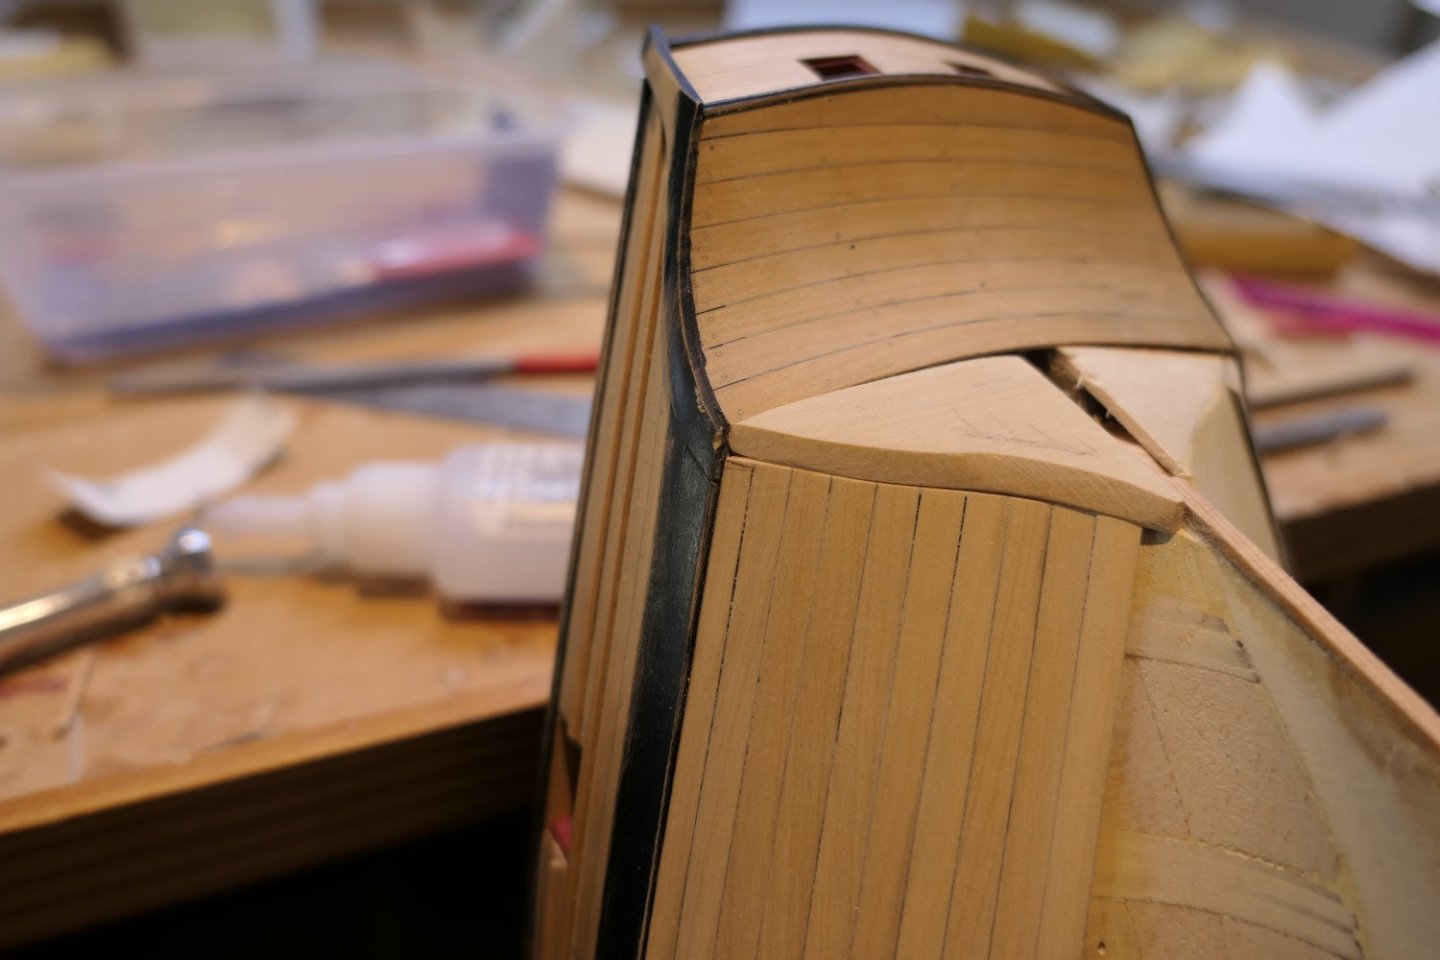
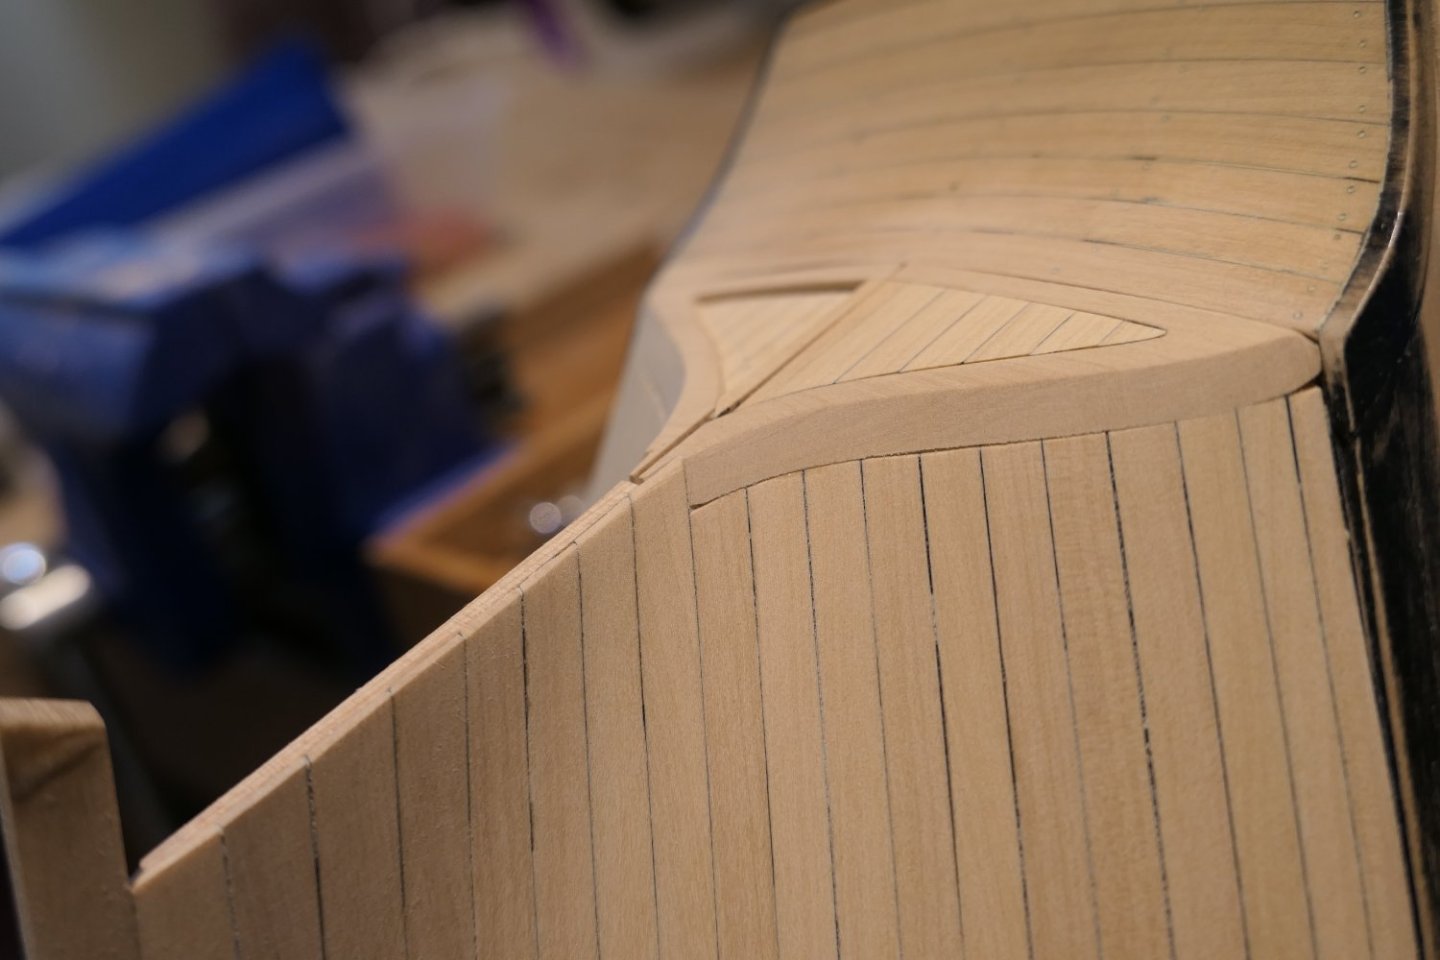
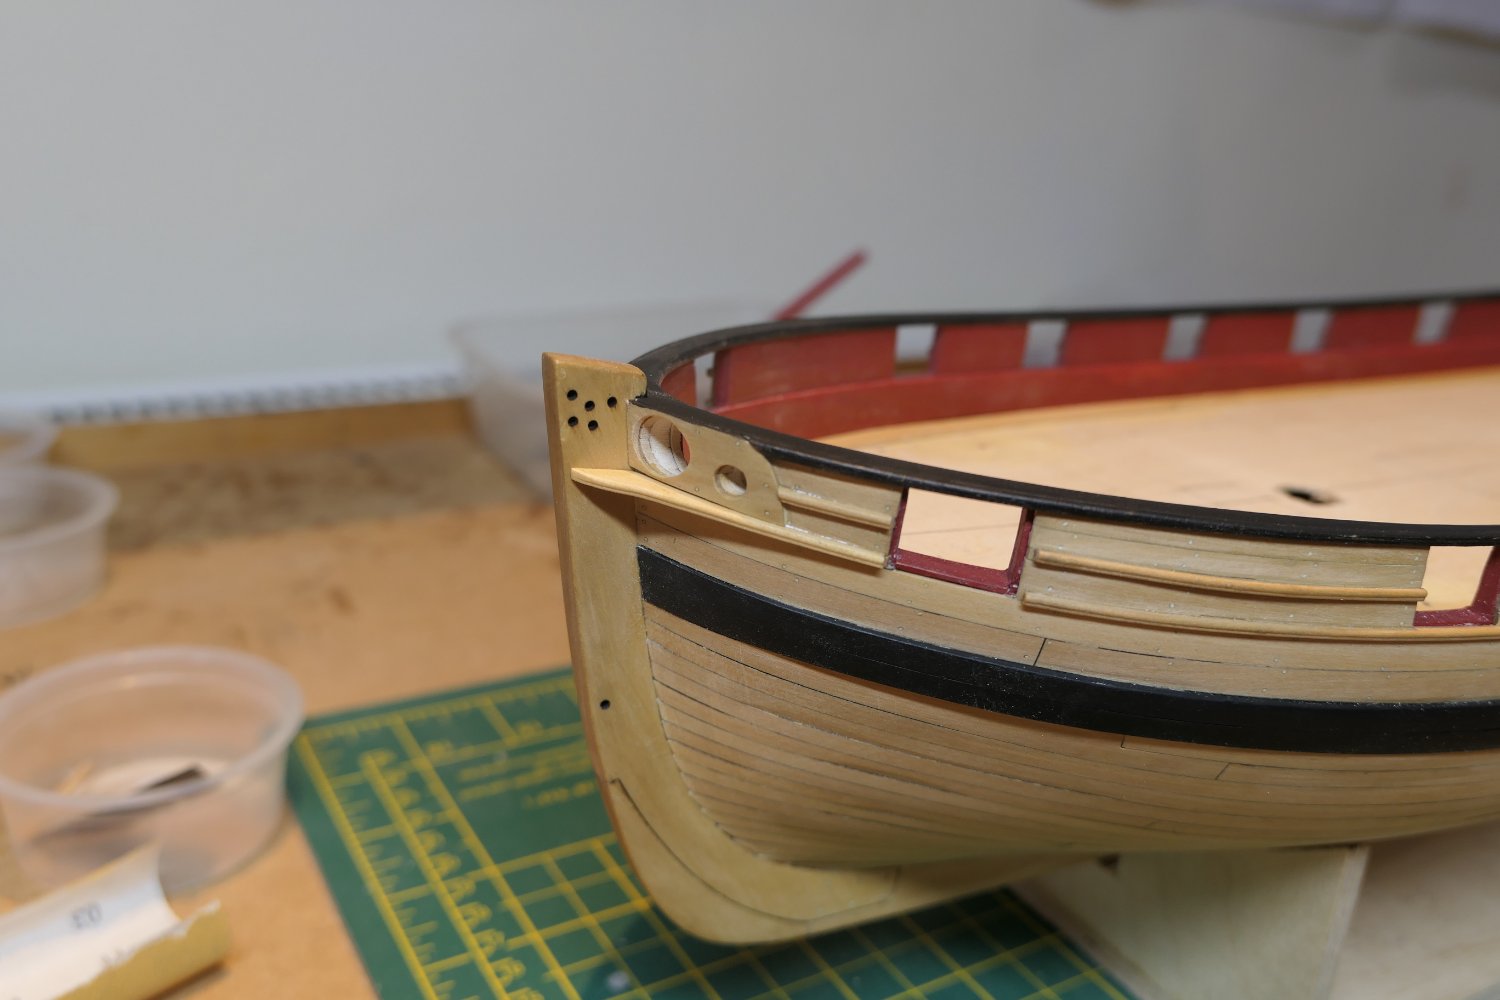
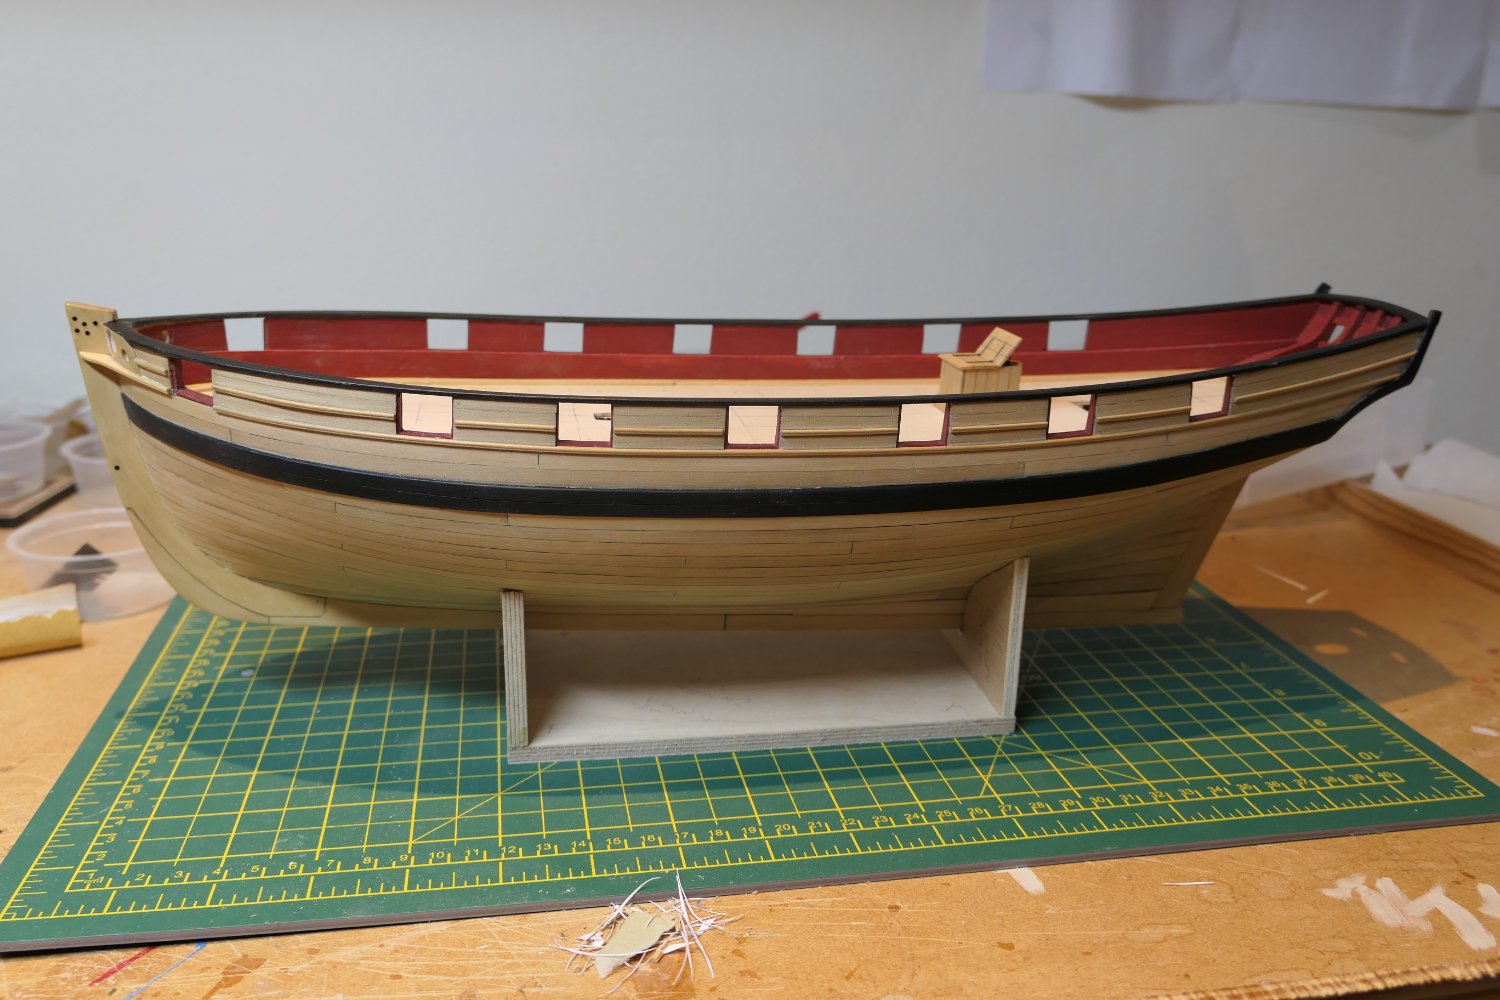
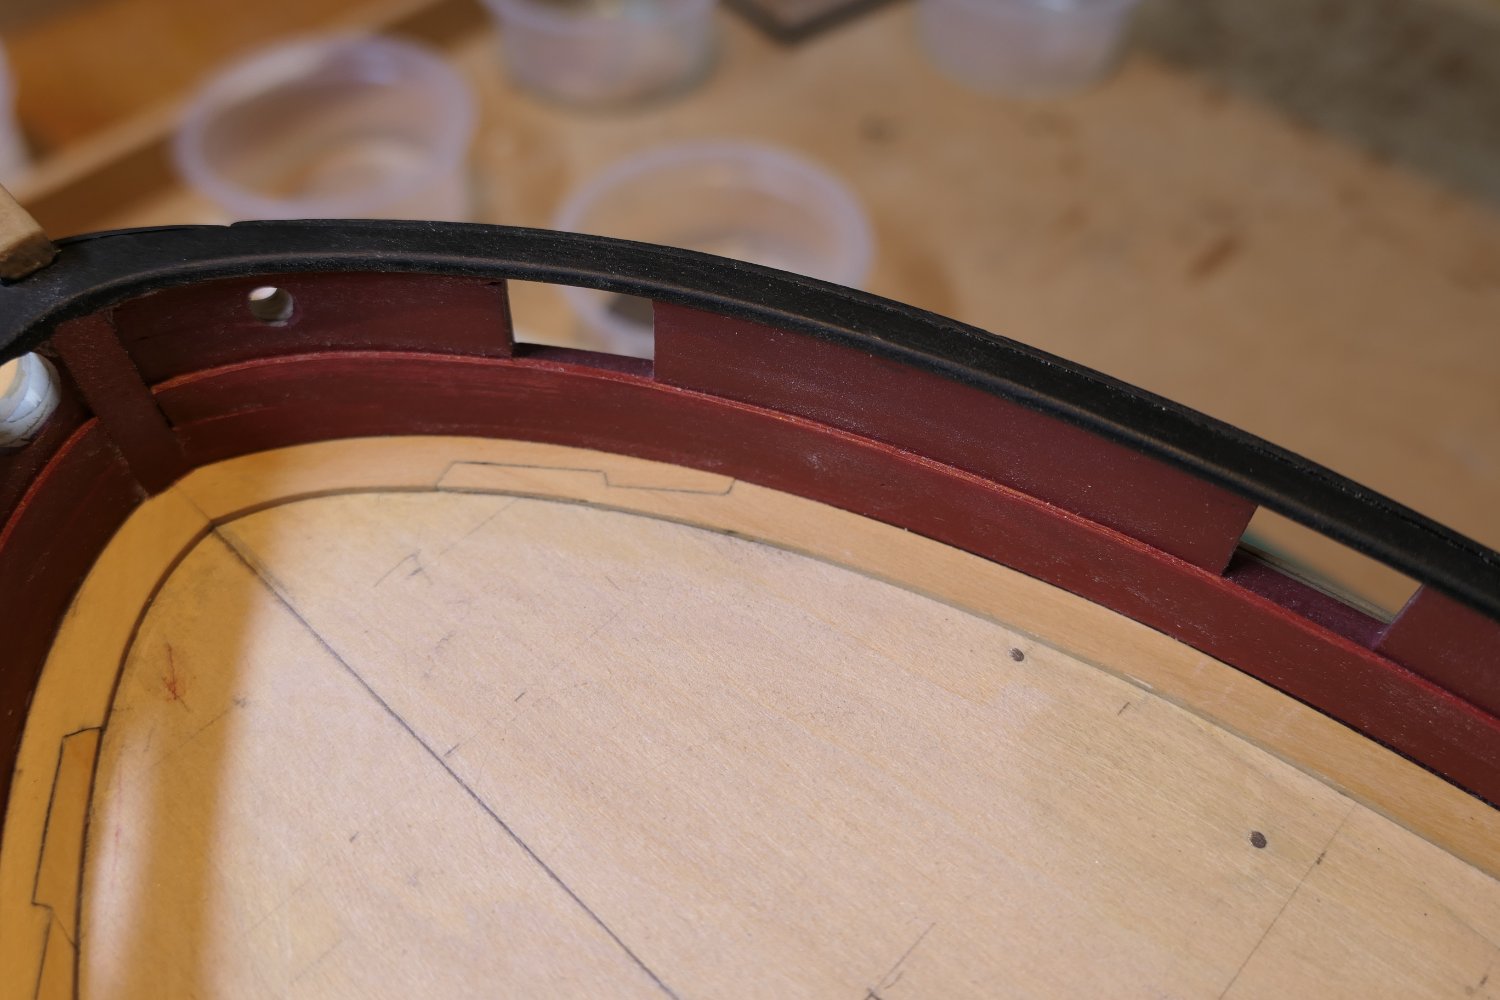
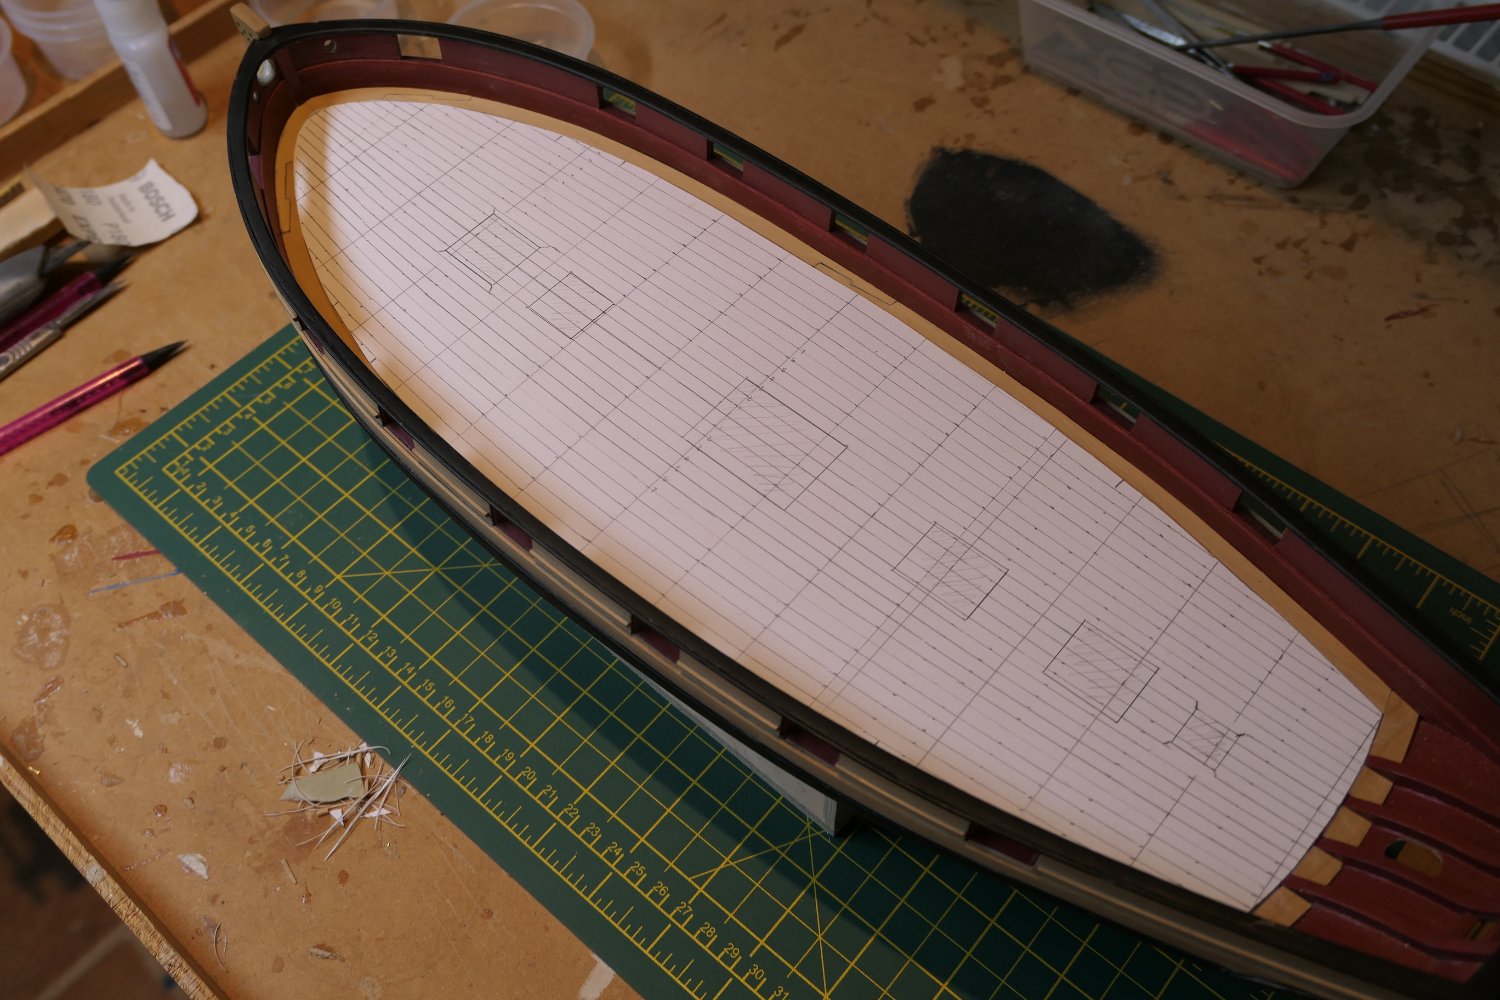
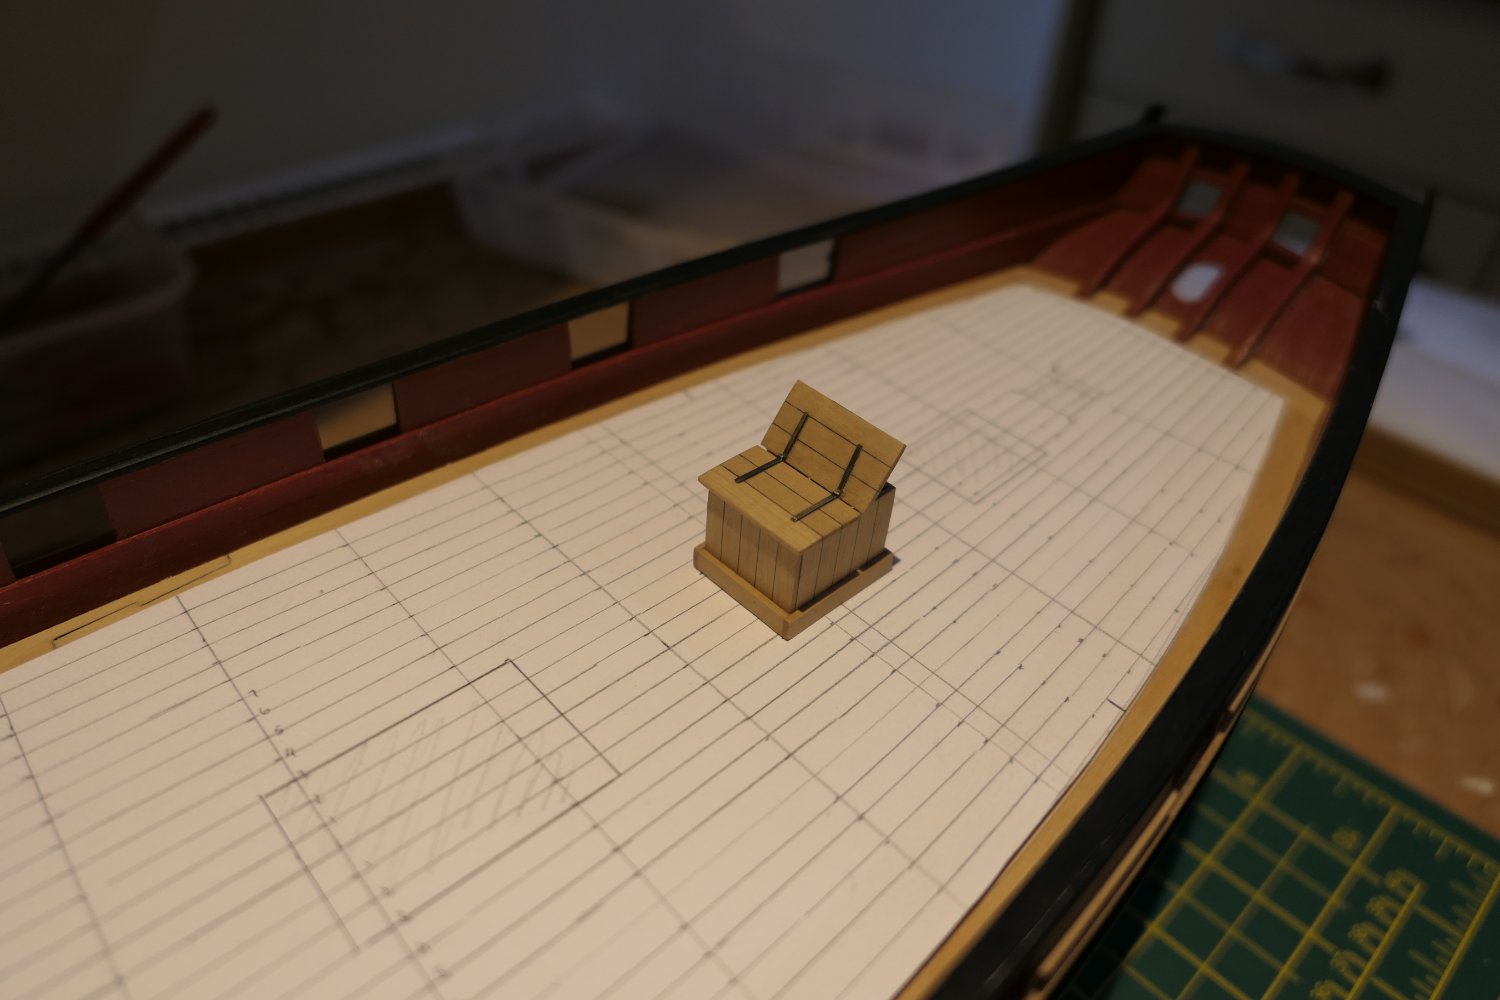
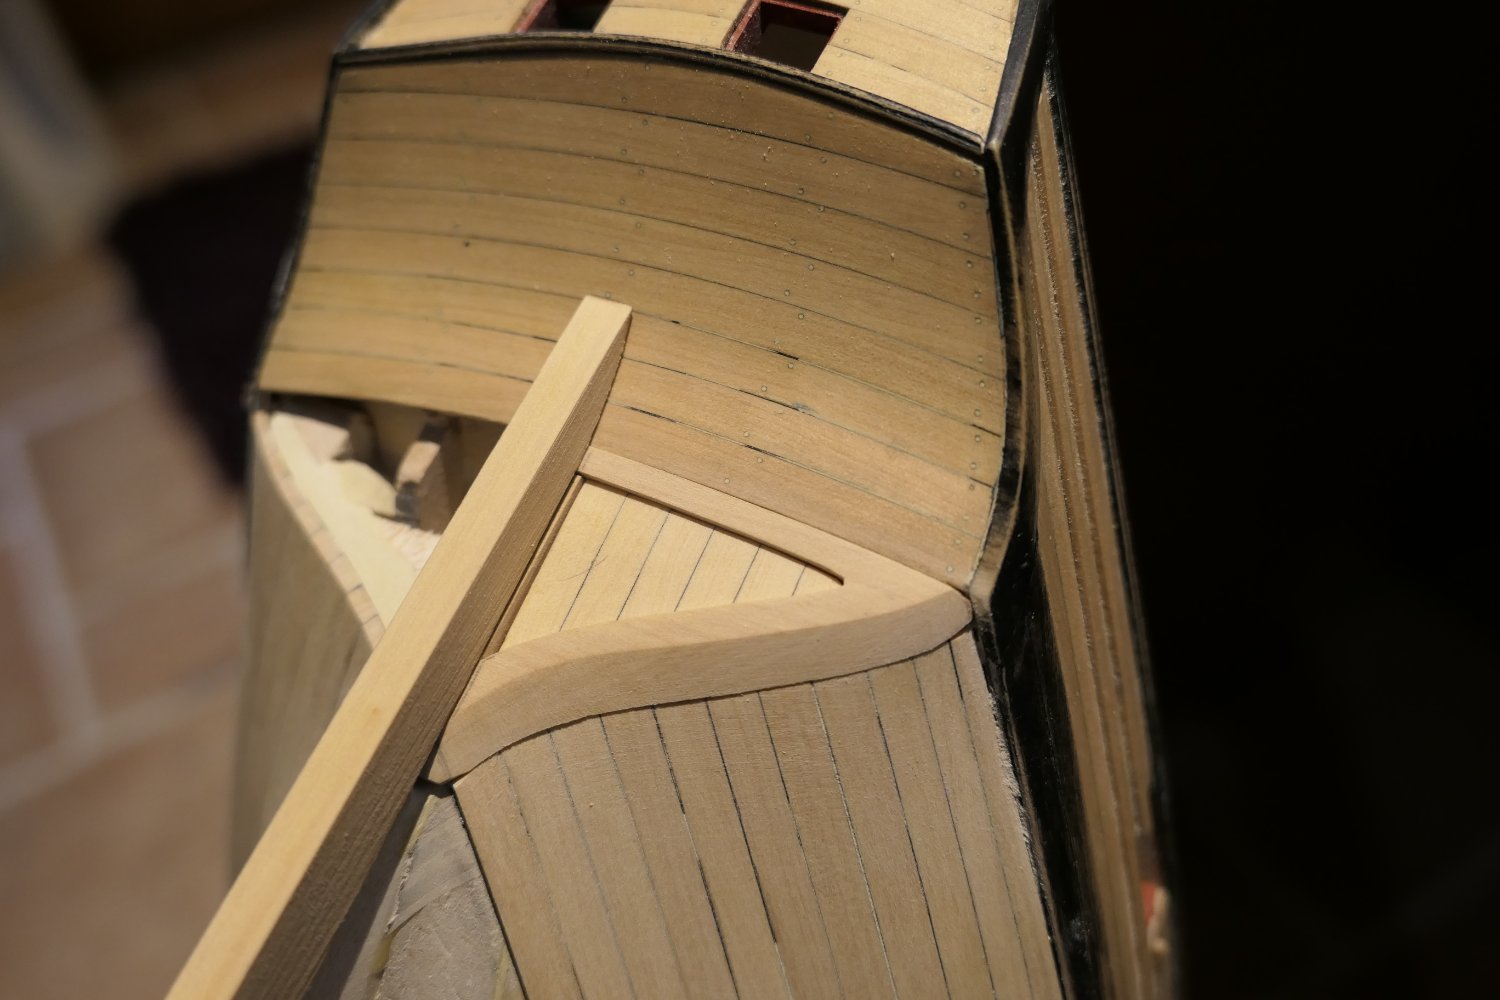
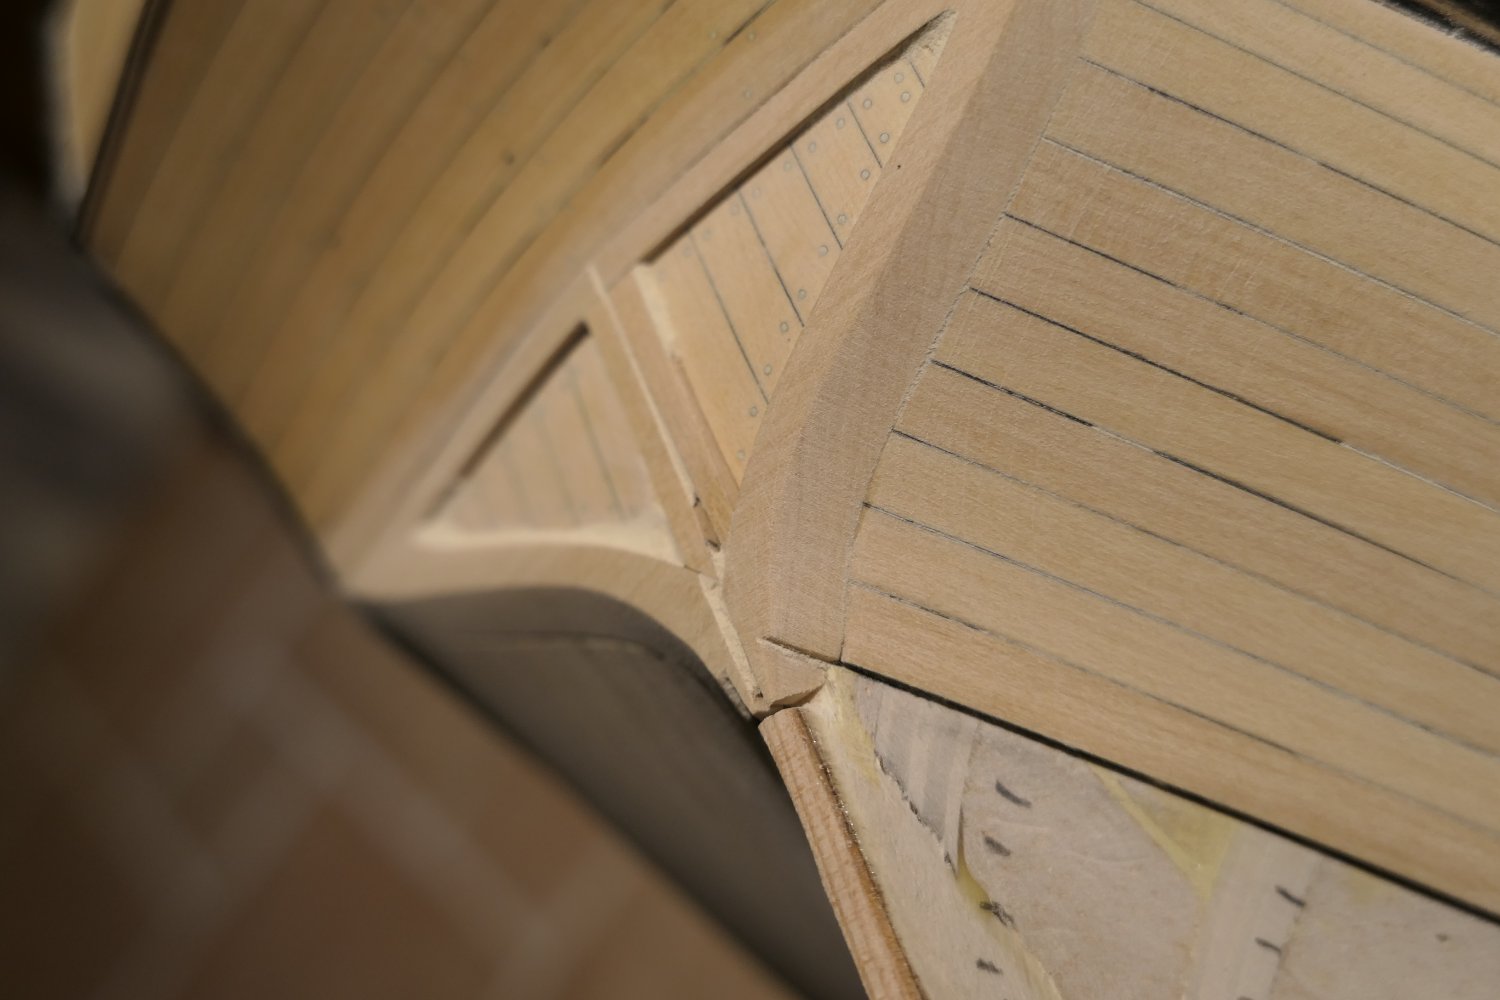
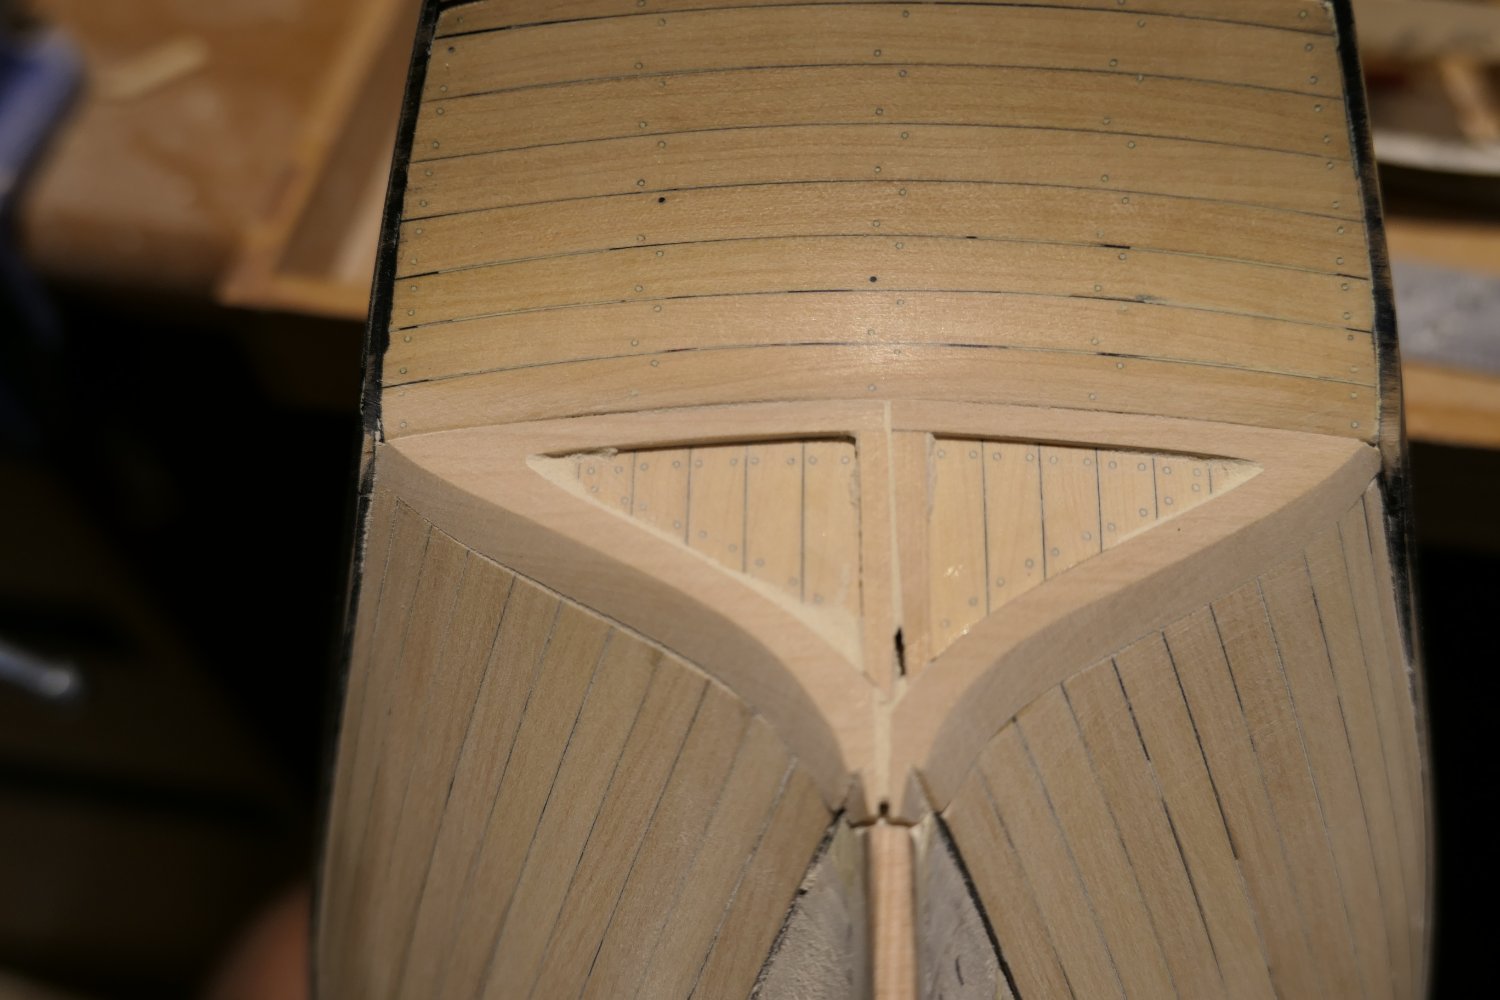
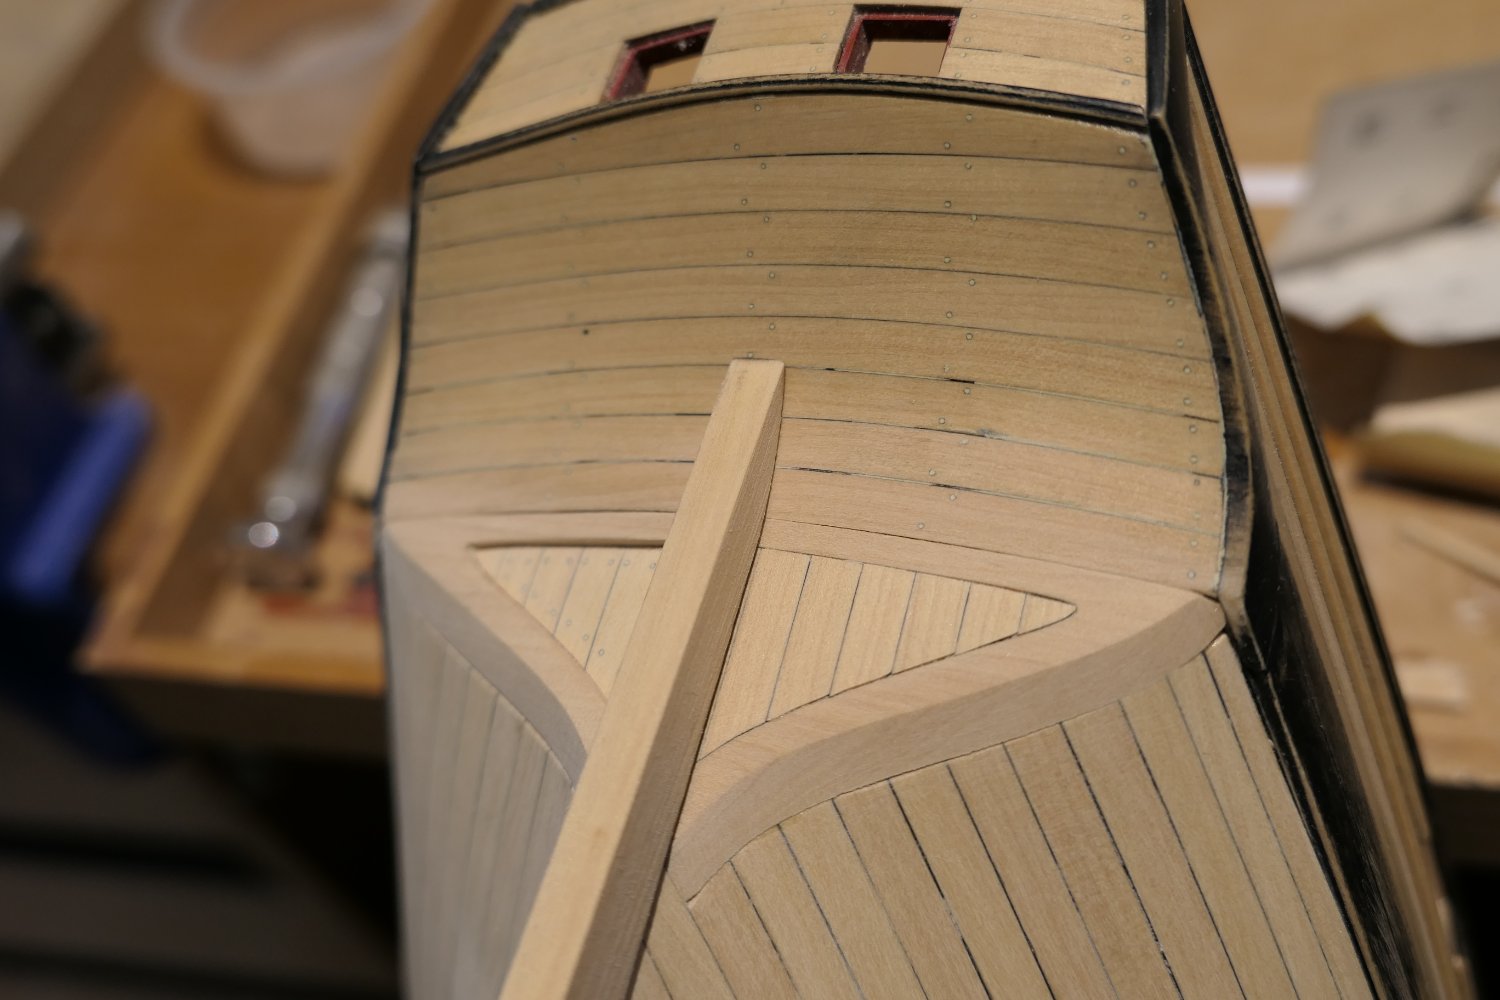
Thank you Chuck, Glenn and JJ and for the likes. Progress here is slow not least because I've had cataract surgery on both eyes. Its a miracle operation: I can see long distances with sparkling clarity and detail and without specs for the first time in 50 plus years. But reading and model work is all to pot. Over the counter reading specs are OK for reading but not adequate for model work. I have to wait a few weeks for everything to settle down before getting some prescription readers - and then with any luck I shall be up and running again. In the meantime I've done those little shaped pieces at the bow, The margin planks (too wide, I think, but I'm hoping the waterway, cannons and deck clutter will disguise that) with scarf joints ( practice required!), the companionway housing ( a bit dollshouse-ish possibly. I'm still thinking about it) and some preparation for the deck planking. I was very unhappy with my deck planking of the Winnie - all down I can see now to a lack of preparation. There is no substitute in this hobby for experience and I don't have much. But I'm learning! There is a gentle bend in the deck planking though it does not really show in the pictures. The planking was cut in Imperial sizes by Hobbymill EU. In metric the planks I will use are a smidge over 5mm and I will sand them down to 3.5mm at bow and stern remaining 5mm at the centre. I wonder about the central planks remining un-sanded -5mm straight through as Chuck shows them and as, no doubt, is authentic. I think I prefer all of them gently curved. My deck furniture bits and pieces are winging their way across the pond from Syren as I write so I'll put those together and have a play around before deciding. At the moment the only finish on the planking is sanding sealer. At some point I will have a jolly good clean up and apply a permanent finish Matt varnish I guess. All the best everyone Fred


- 113 replies
-
- 19
-

-
- Cheerful
- Syren Ship Model Company
- (and 1 more)
-
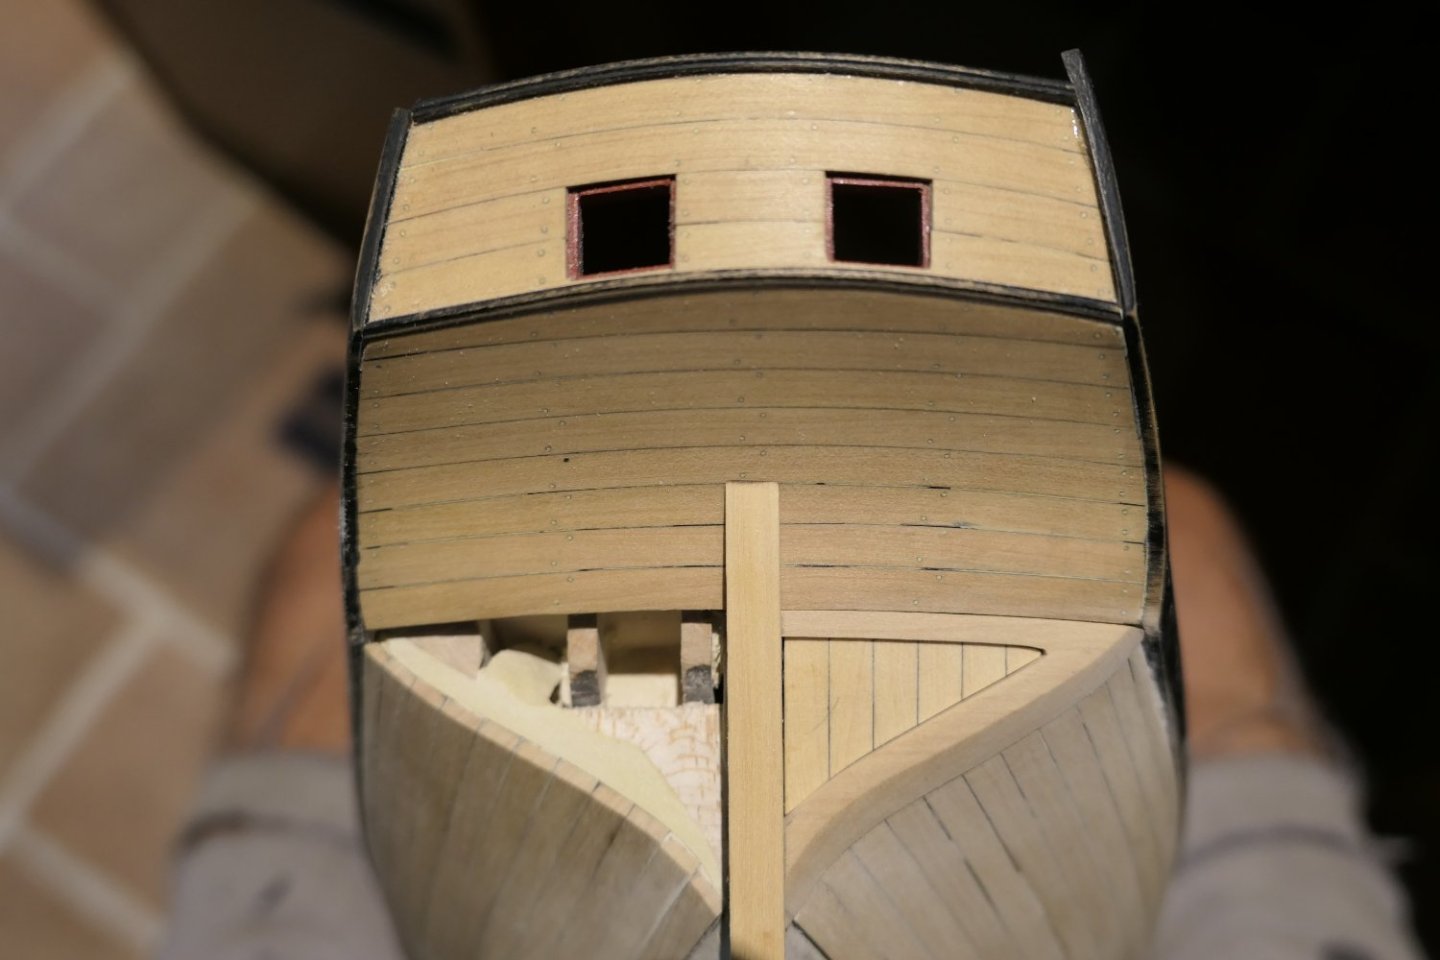
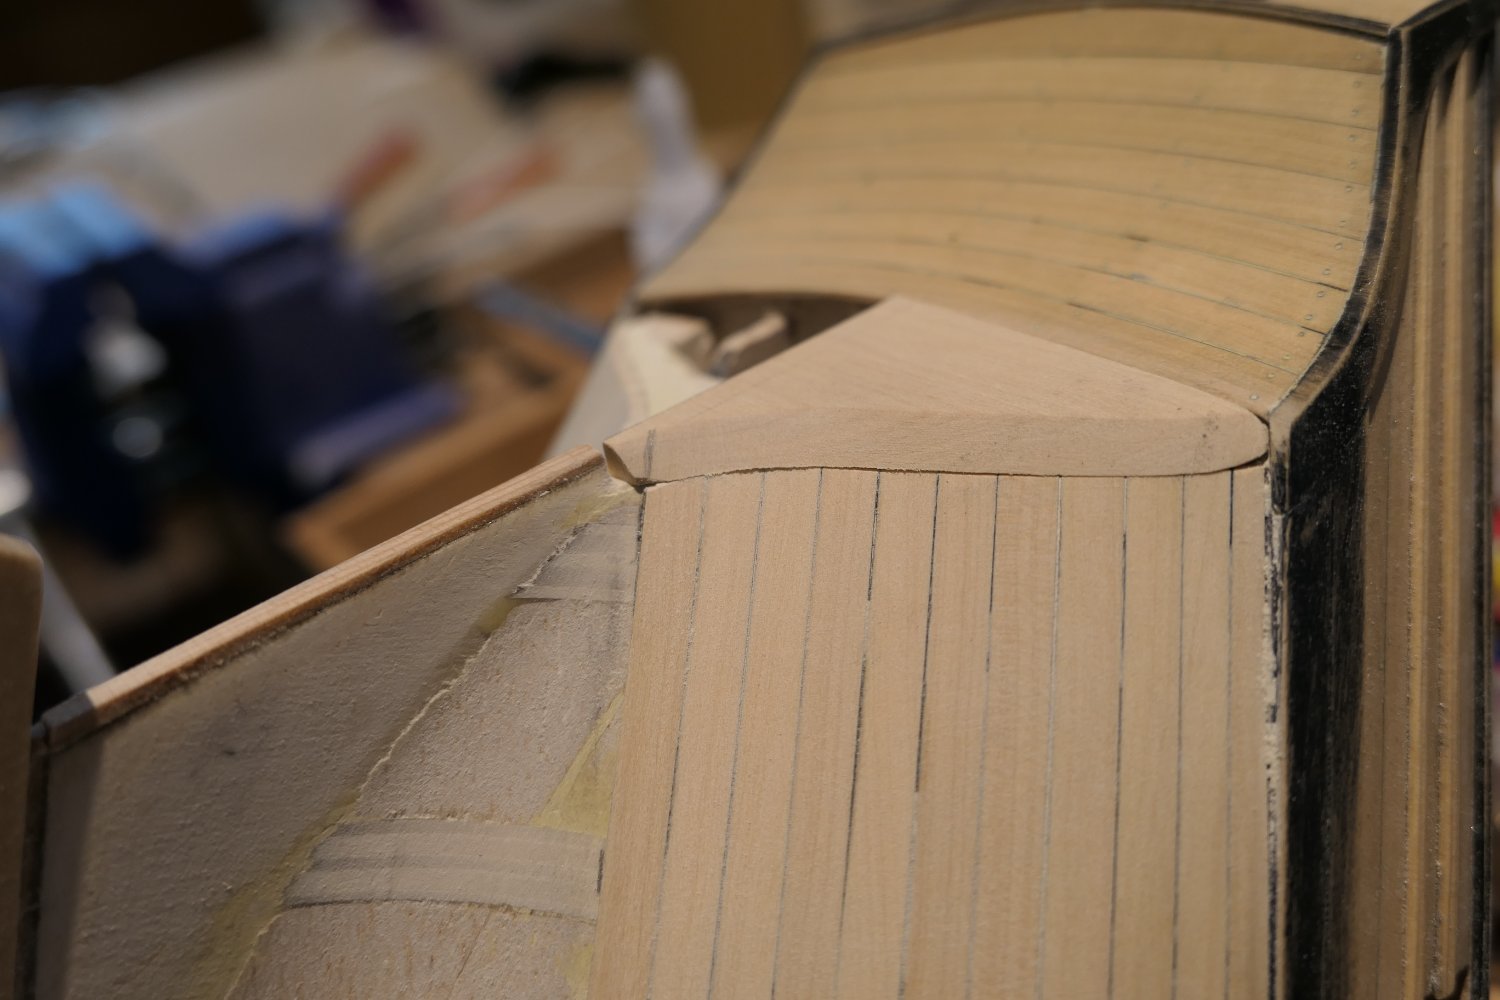
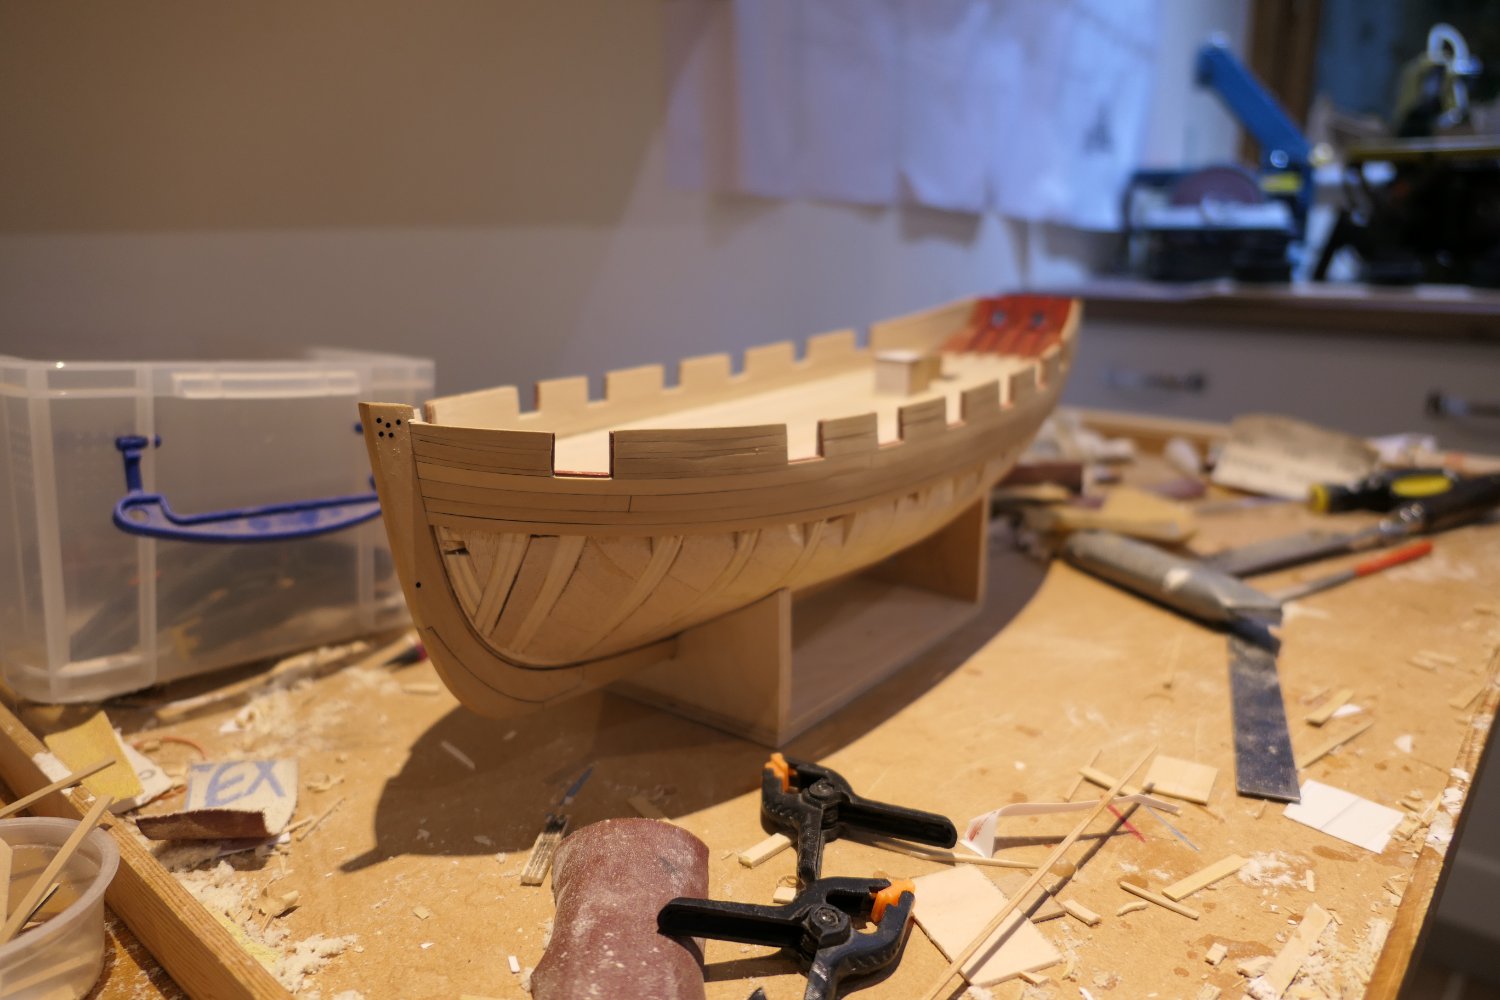
Thank you CiscoH, JJ and Glenn and for the likes. I started the square tuck with a problem. I had no underhang below the counter. I'm unsure how I achieved that. It meant some cutting away. I decided to make the square tuck frame in one piece. That seemed easier with not much backing wood to glue to. These are trial pieces. Here is another trial piece with the infill area cut away and the one piece frame split to form the joint in the top corner. I later abandoned splitting the frame - forsaking the joint, which I doubted I could form very well, for a tidy outcome. These are the pieces I will use. Here I've formed the cut out and I'm trial fitting the infills. At this stage I was going to leave the infill a little lower than the surrounding frame. I later abandoned that idea and went for flush. An important "line" is the first plank below the square tuck. The incoming plank must flow smoothly through. Here I'm making ready. Both sides done. The stern post resting in position. Flush fitting the infills. And here is where I am now. Ready for a bit of a repaint and the treenailing the hull - which fills me with dread! All the best everyone Fred
.thumb.JPG.edca43a4197c24f6094920576be5d0cb.JPG)
.thumb.JPG.afc9ea40913de970cca7680f17b9fc13.JPG)
.thumb.JPG.3f56a4a8990131c9d2aa19bfcf5e3a54.JPG)


.thumb.JPG.b51a253da1bef4f978691814ea74e604.JPG)
.thumb.JPG.ee35650c083cb96cd3adc5427d143b3c.JPG)
.thumb.JPG.64bae3e50affb18ab6ea09d81c487b64.JPG)
.thumb.JPG.9f0aee7e61e355f23295ca65bde27a64.JPG)

- 113 replies
-
- 18
-
-

-
- Cheerful
- Syren Ship Model Company
- (and 1 more)
-
Thanks Glen. Your post came in as I was typing. Your log is bookmarked and regularly consulted - that's the advantage of coming fairly late to Cheerful. Fred
- 113 replies
-
- 3
-
-
- Cheerful
- Syren Ship Model Company
- (and 1 more)
-
Thank you Paul and Chuck. I forgot the caulking between the deck planks on my Winnie and shall forever regret it. I won't forget this time around! And, though I'm sure you've heard it a thousand times and more, thank you Chuck for sharing your wonderful creations and making access to the craft of model ship making so much more enjoyable than I think it would be if we had only the mass market kits to make. Is your next project - plank on frame! - yet anything more than a twinkle in your eye? Fred
- 113 replies
-
- 4
-
-
- Cheerful
- Syren Ship Model Company
- (and 1 more)
-
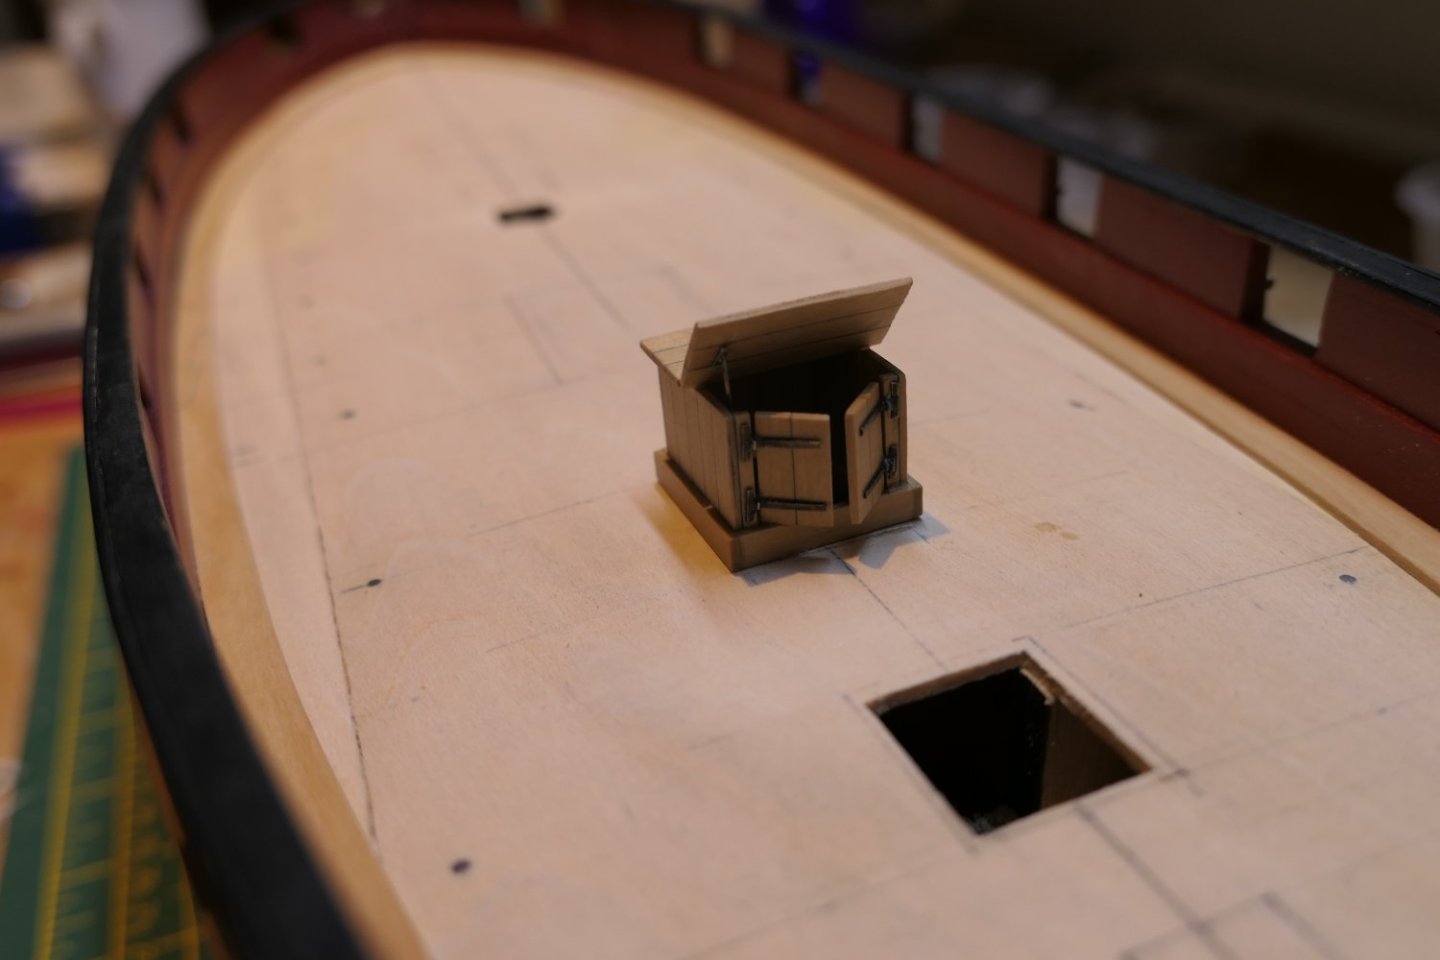
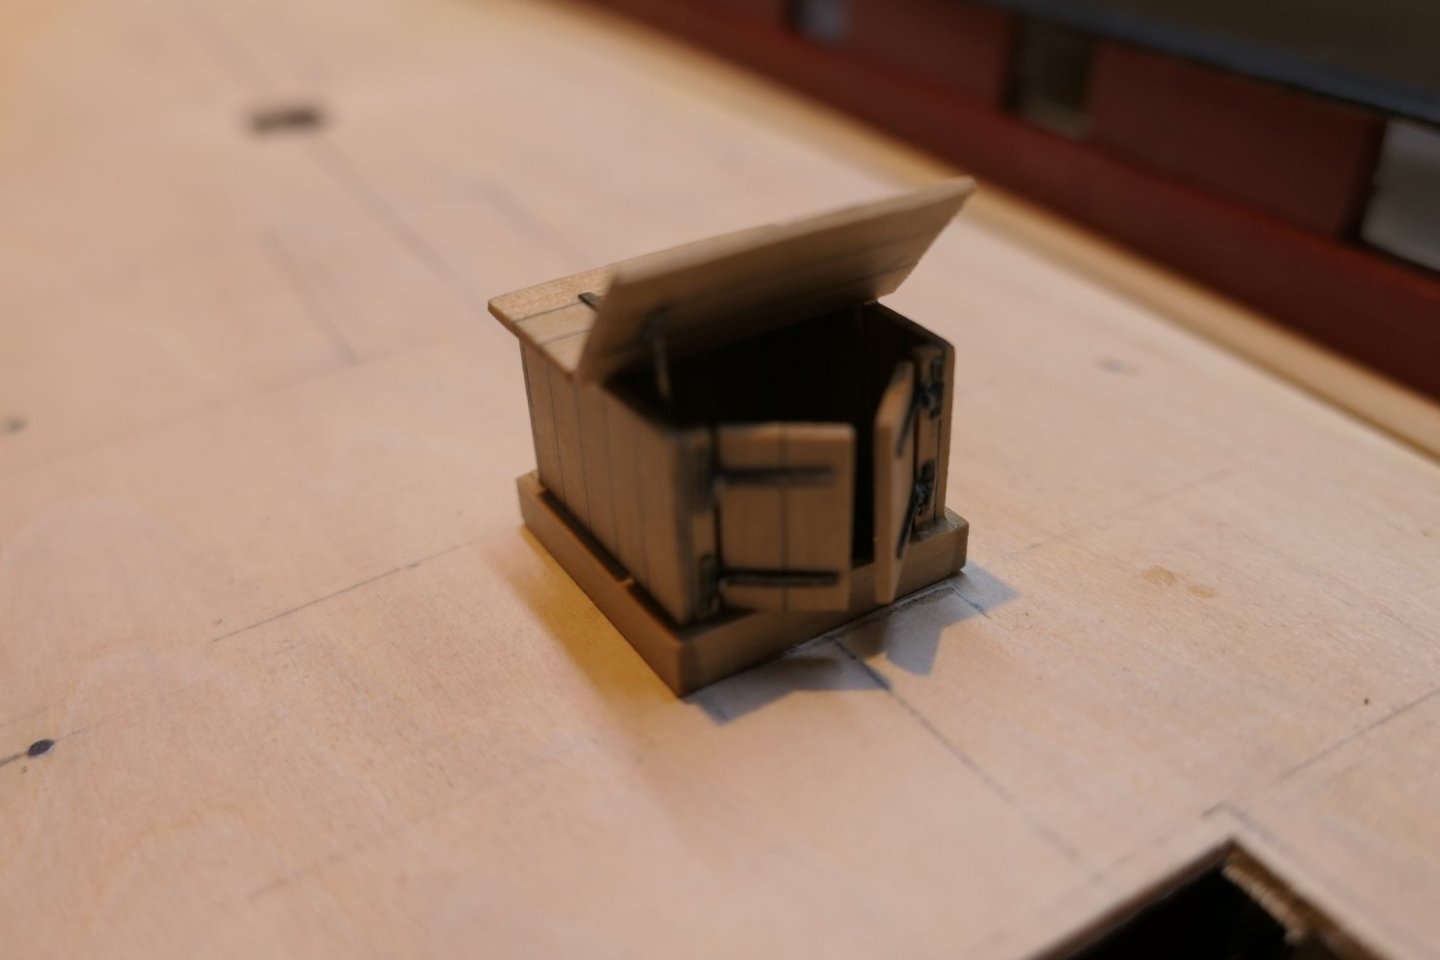
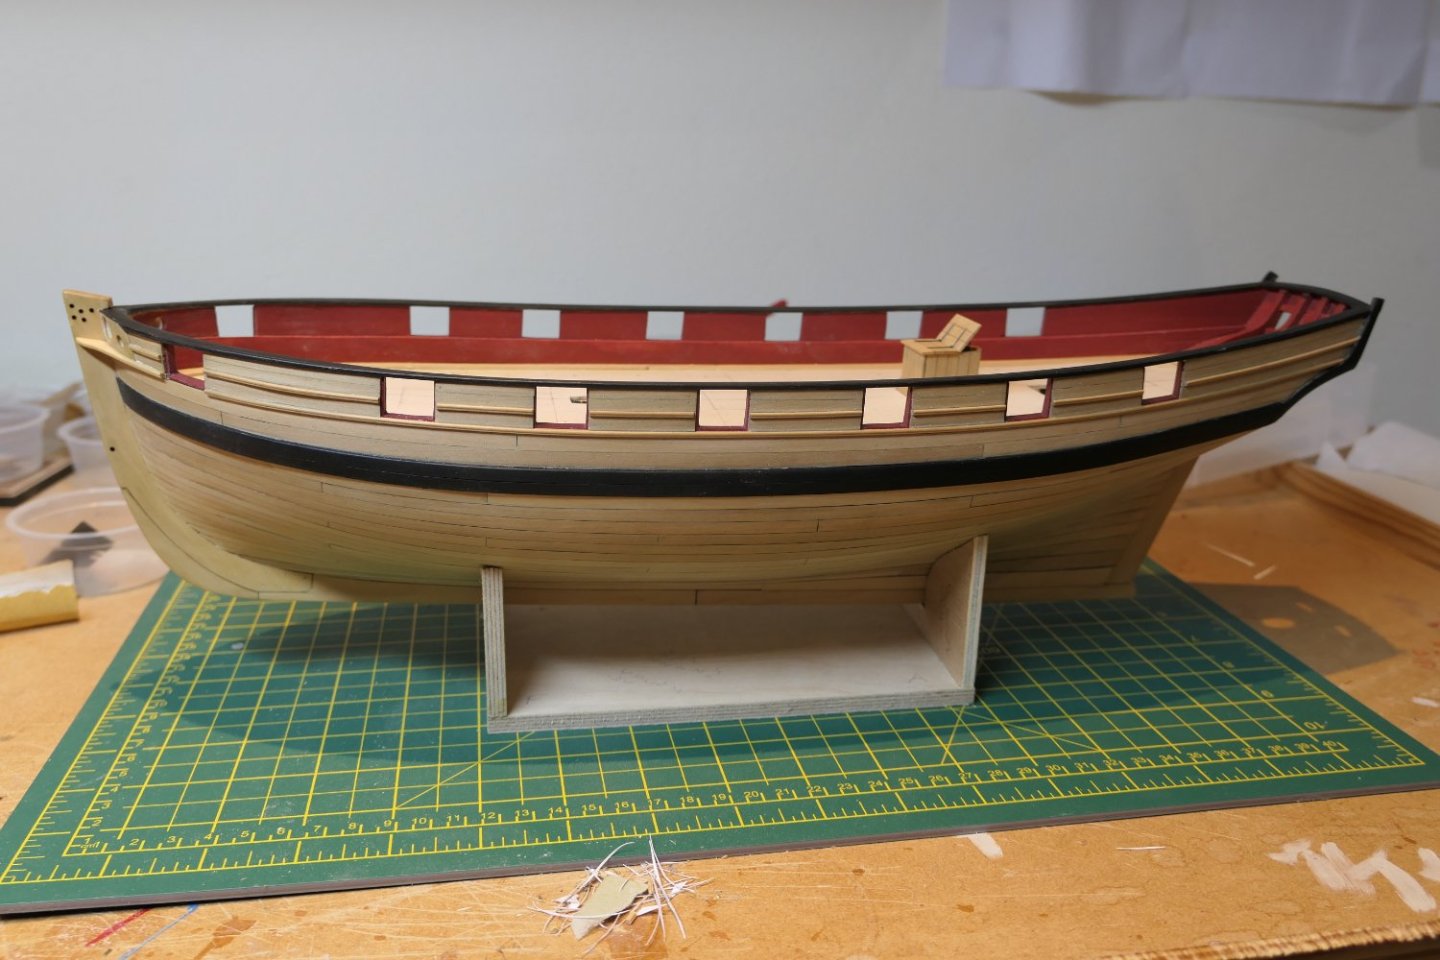
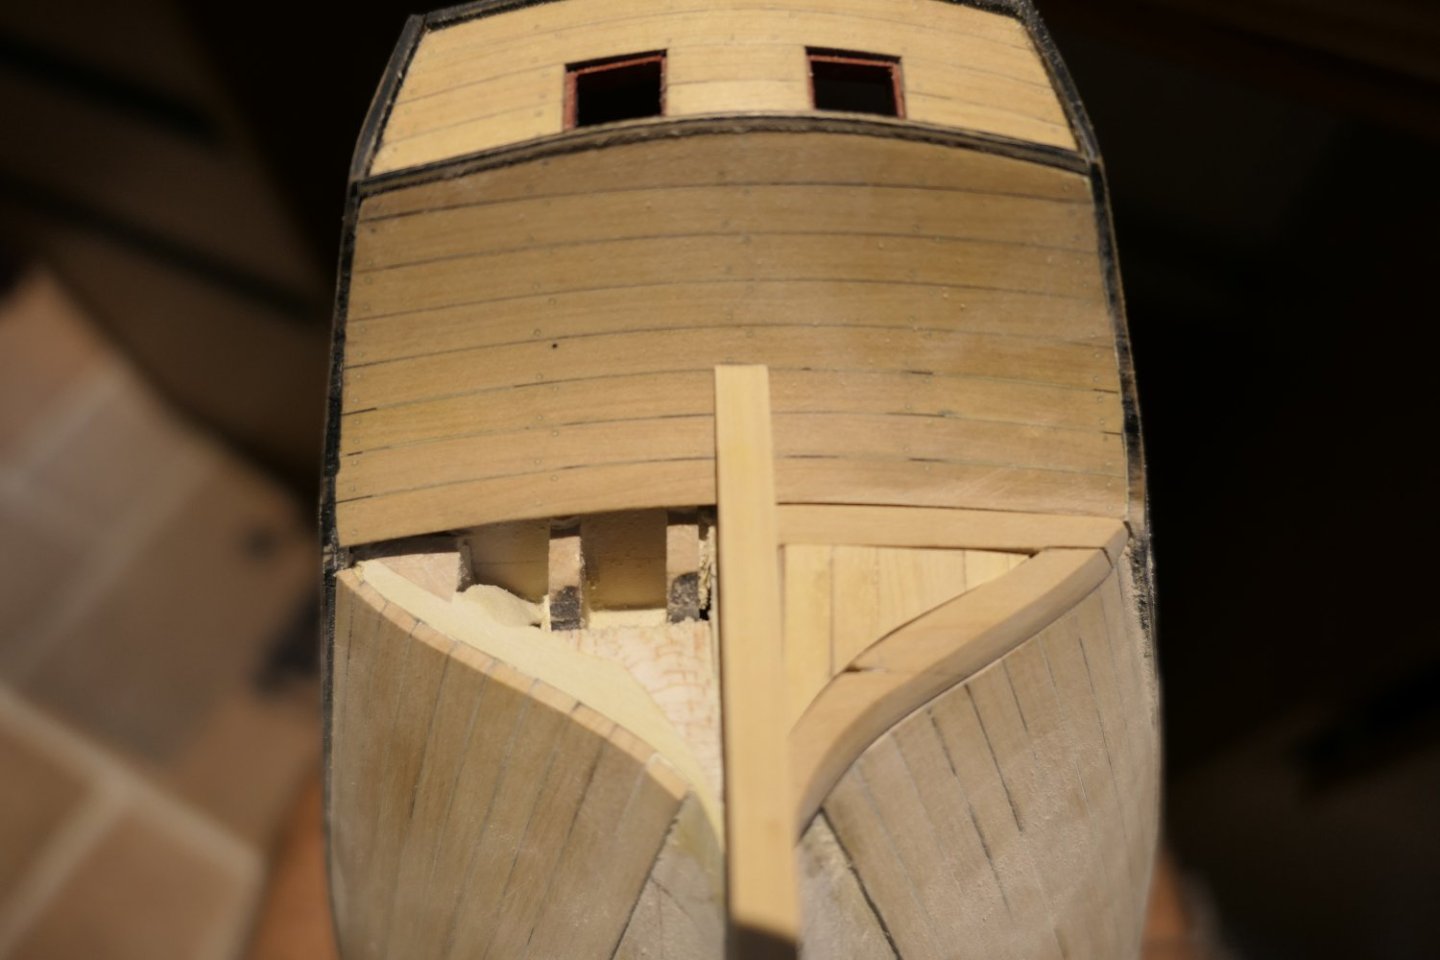
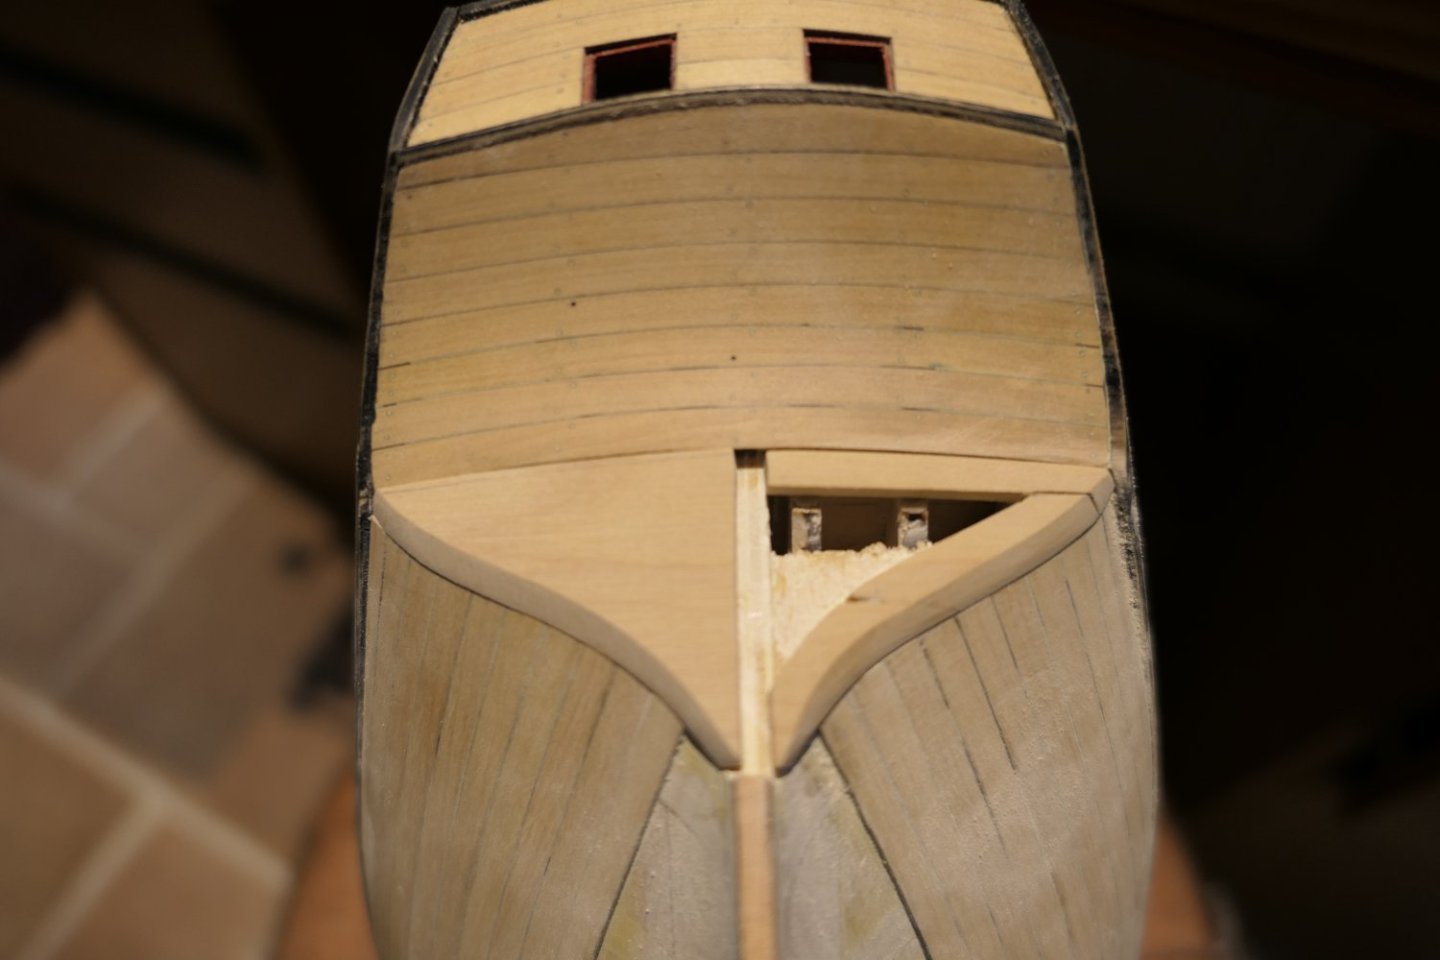
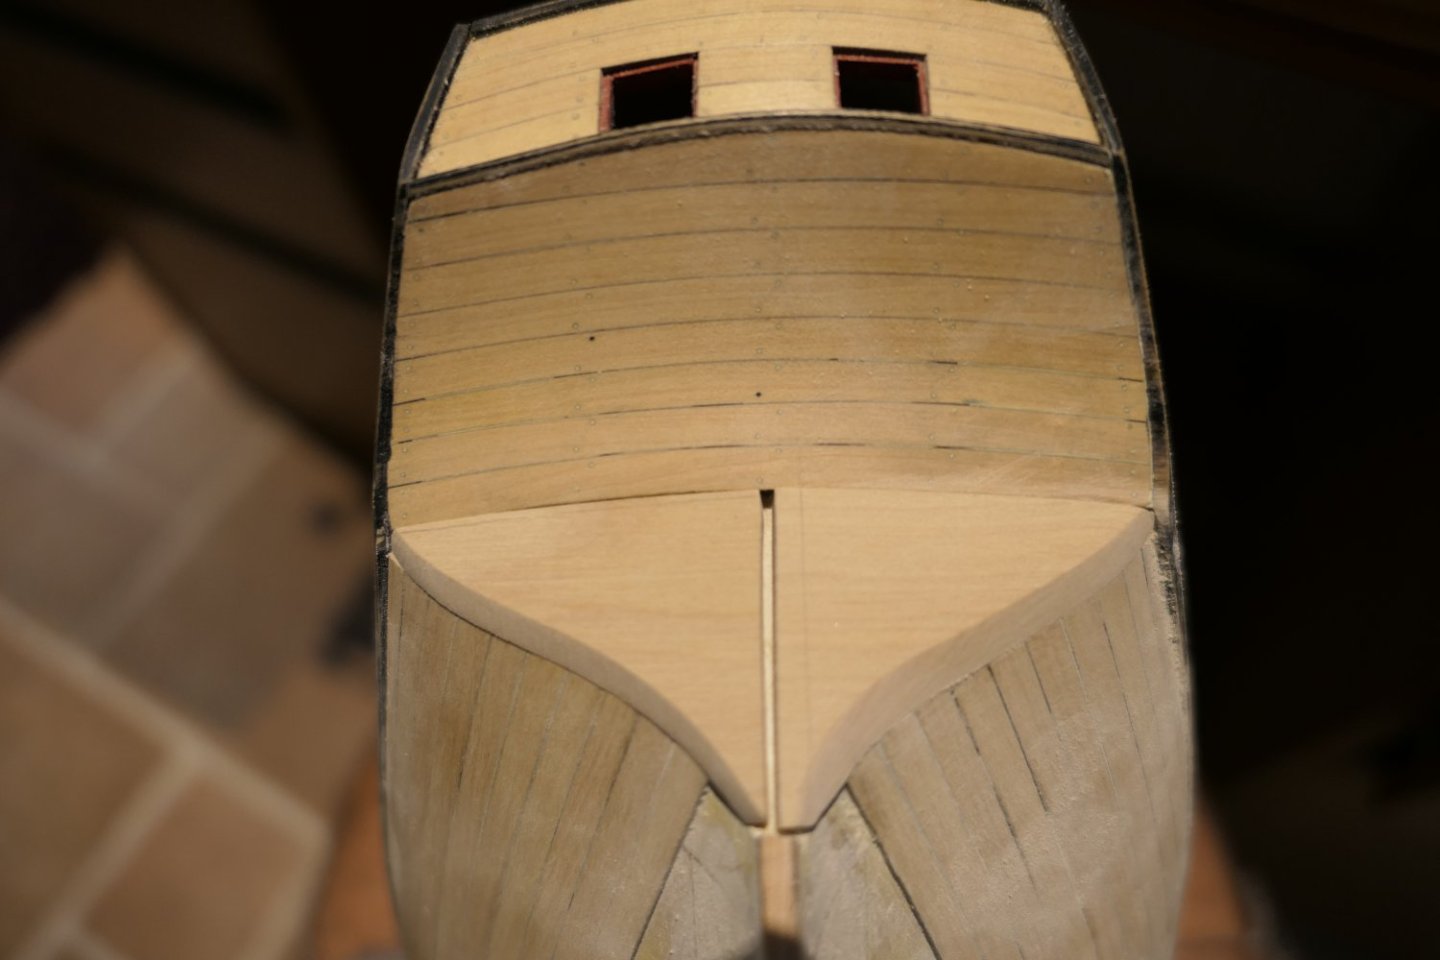
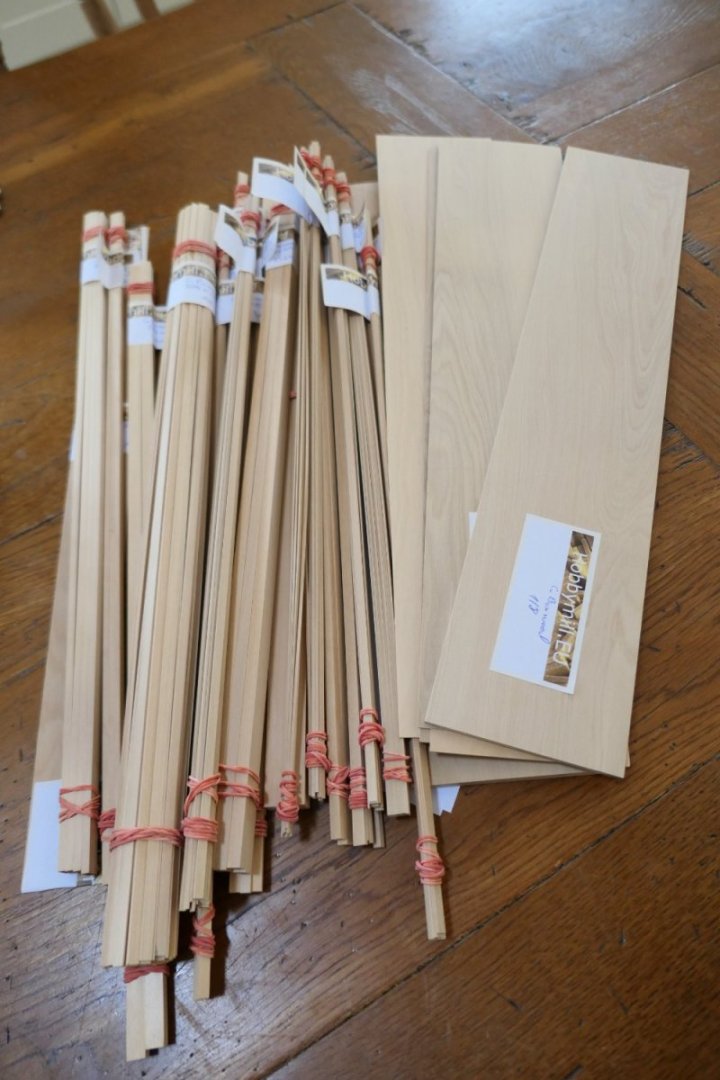
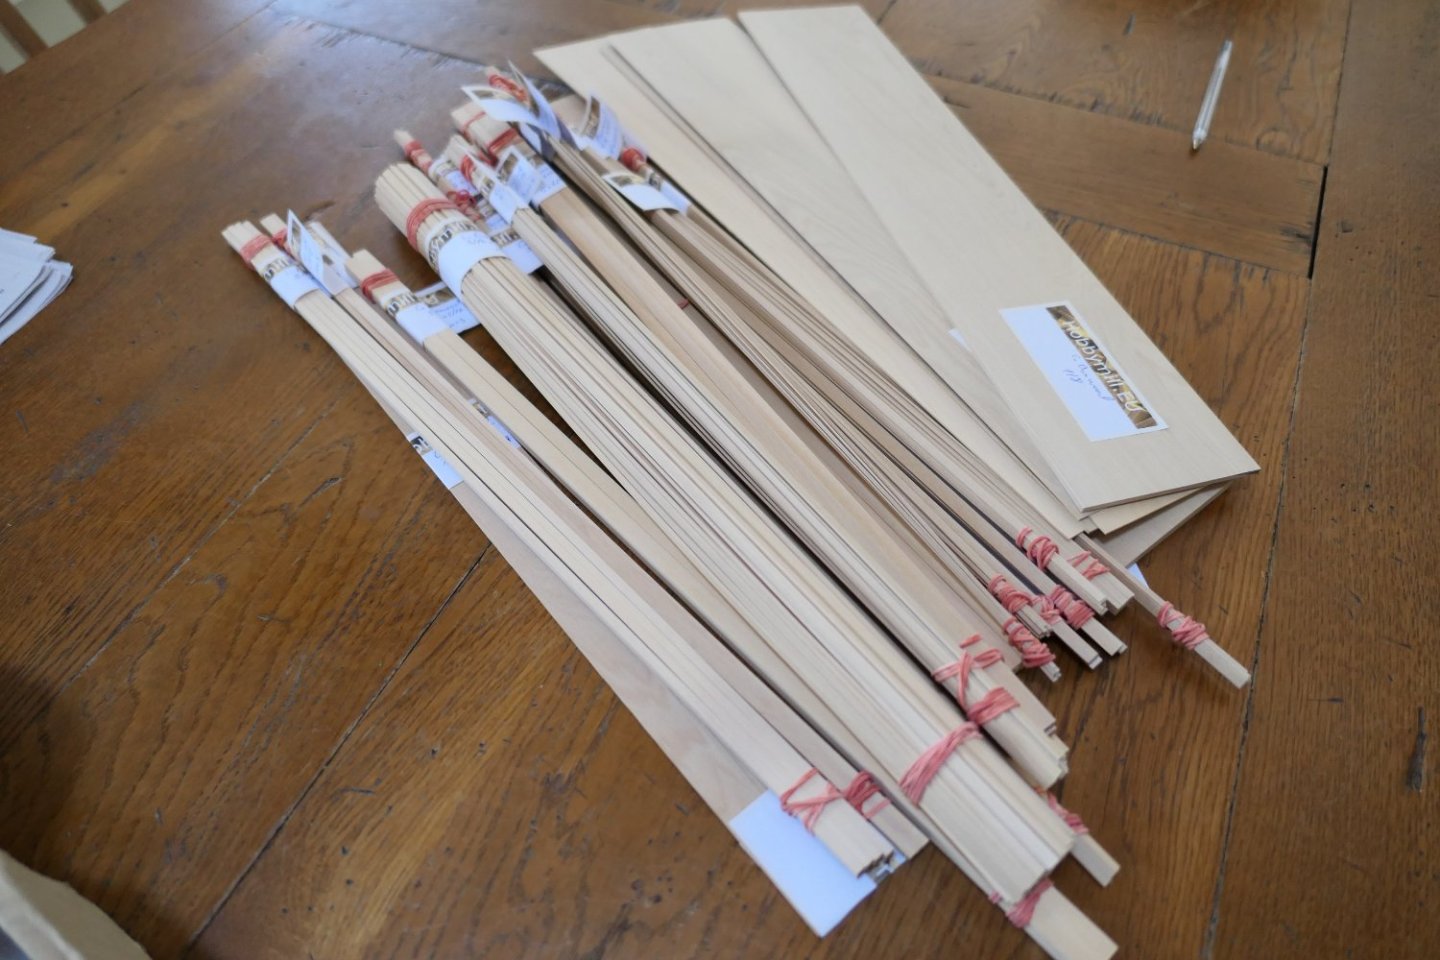
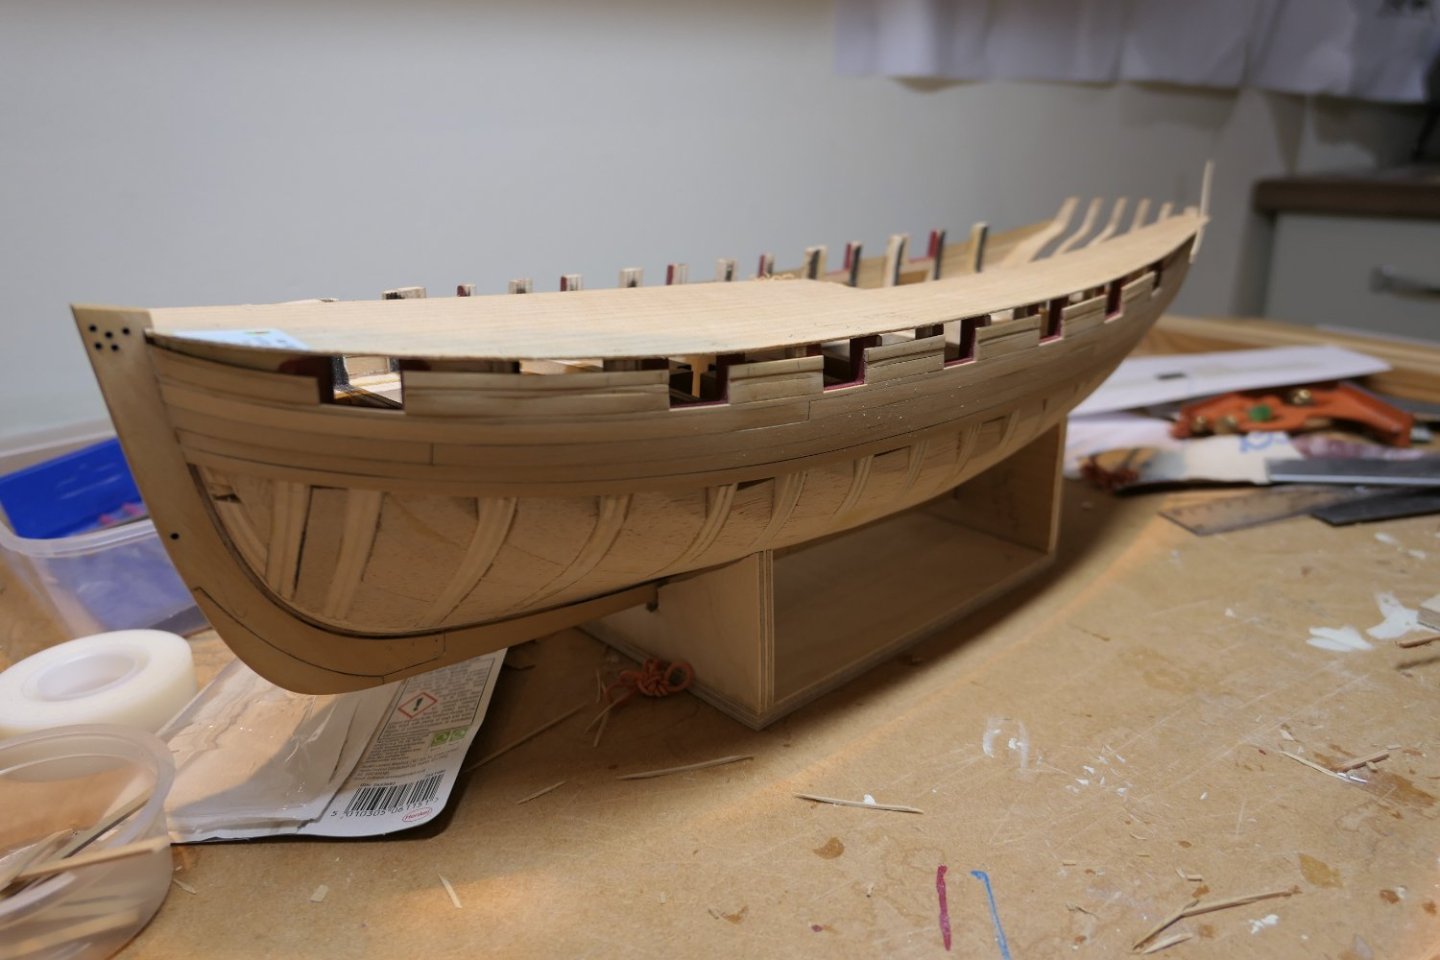
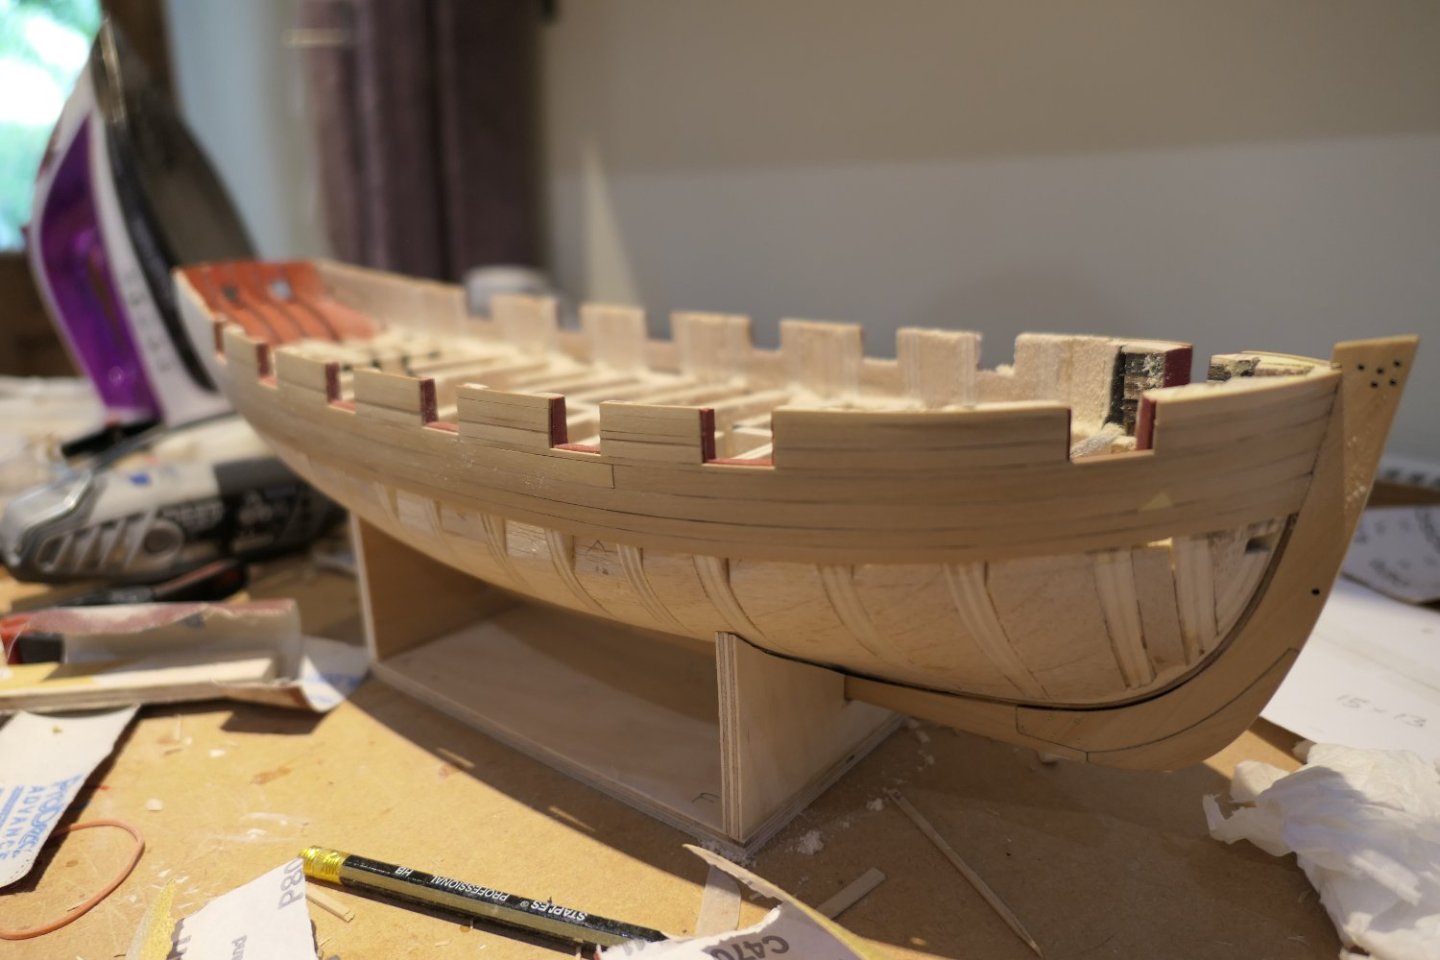
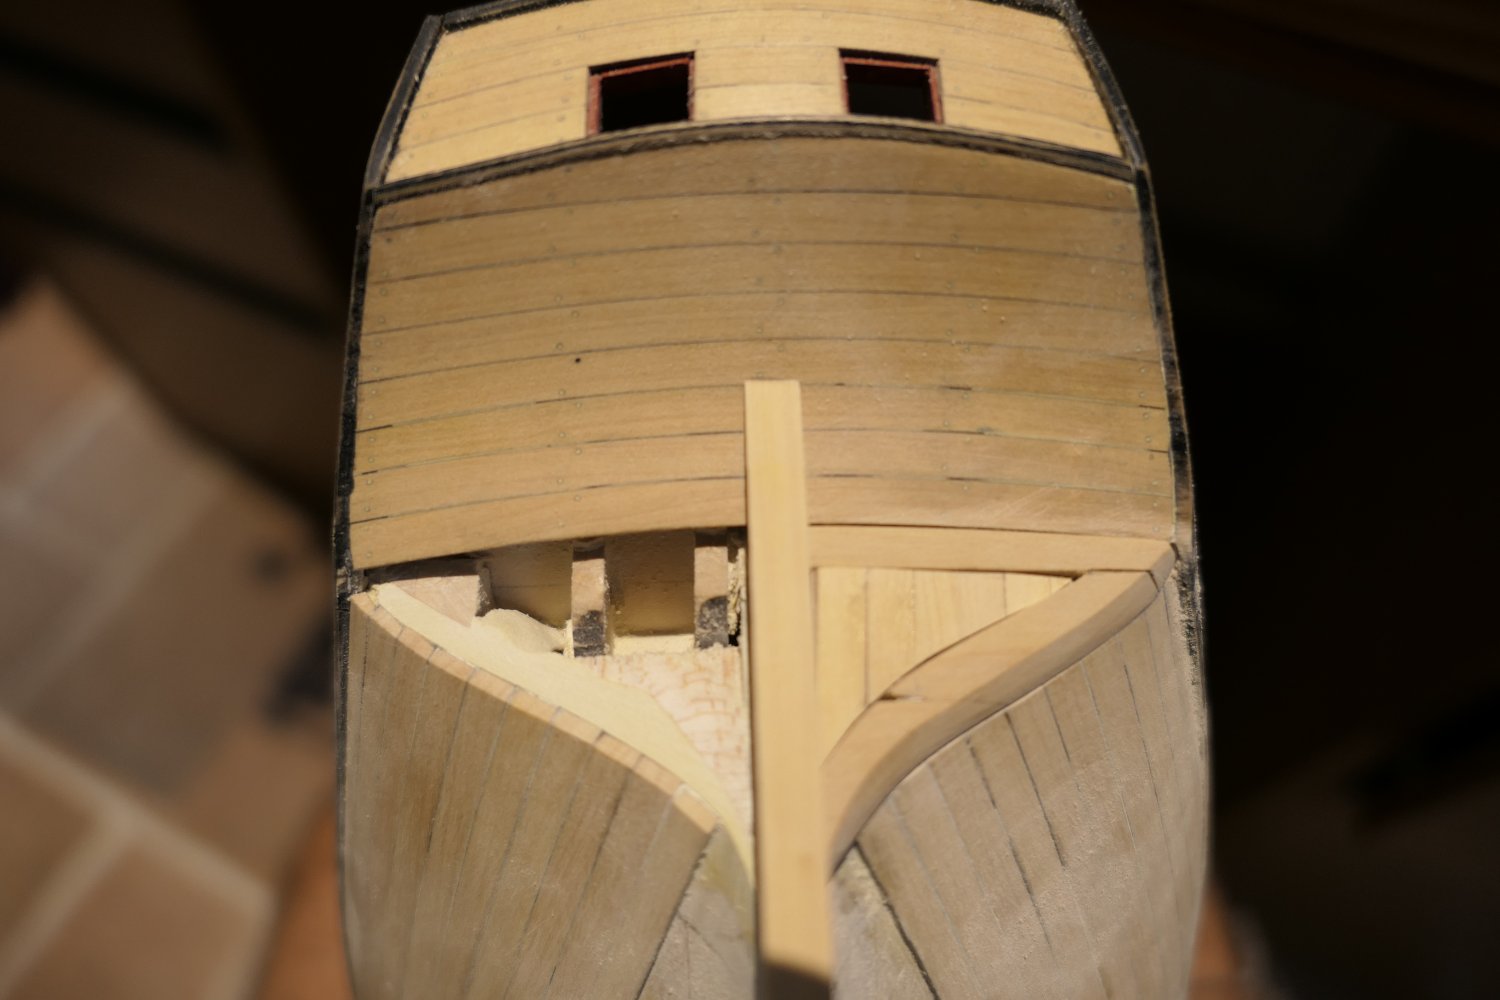
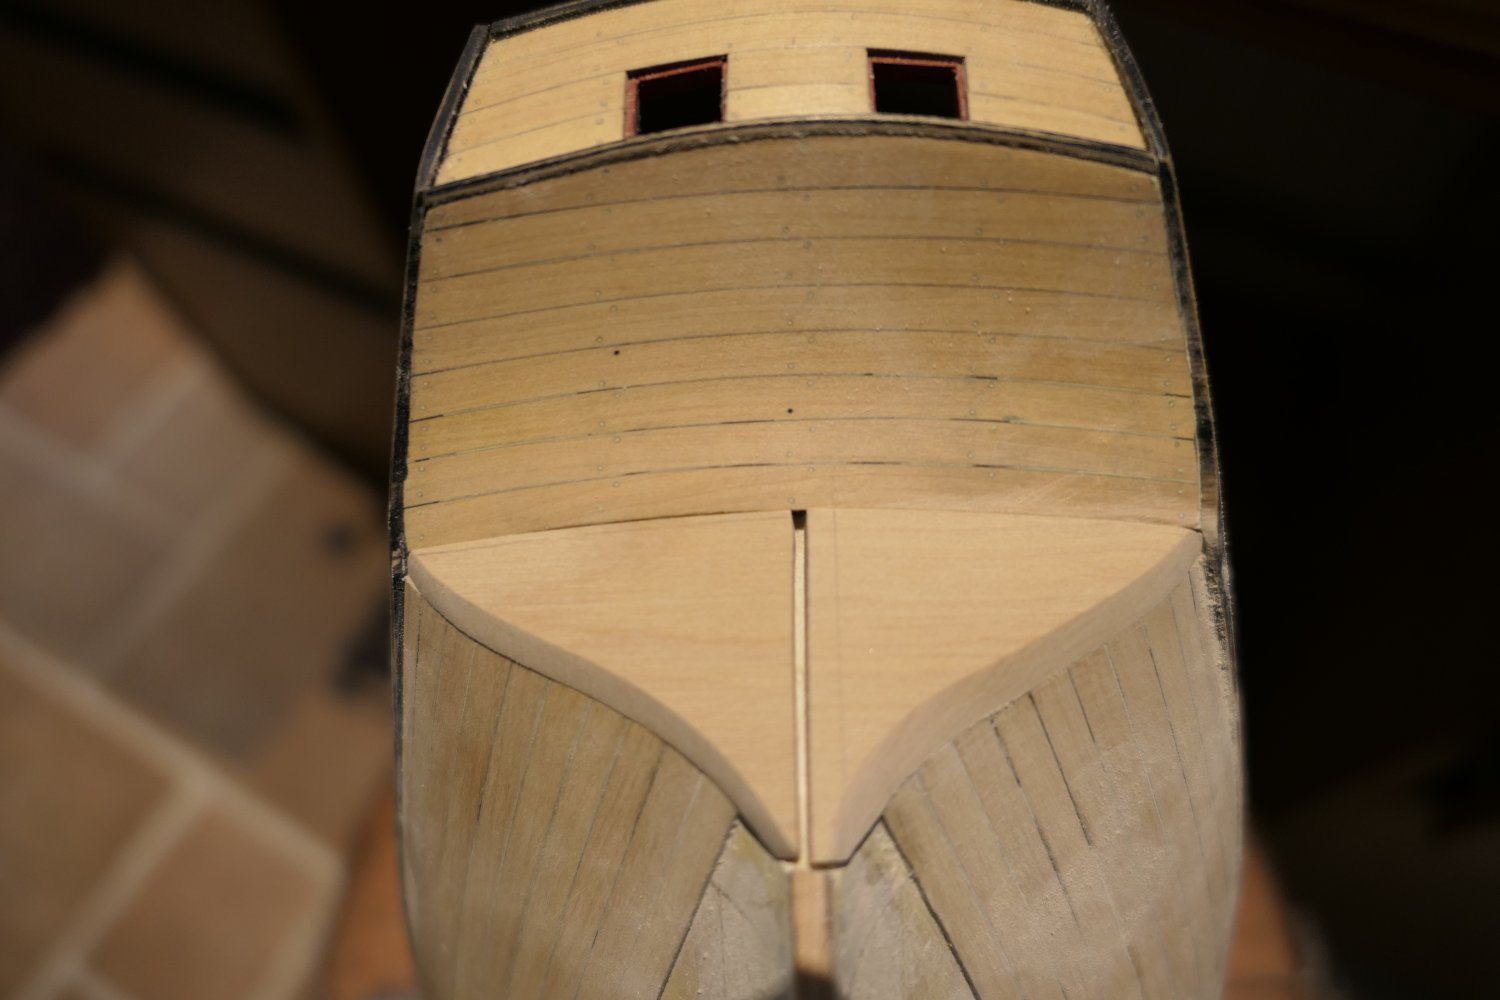
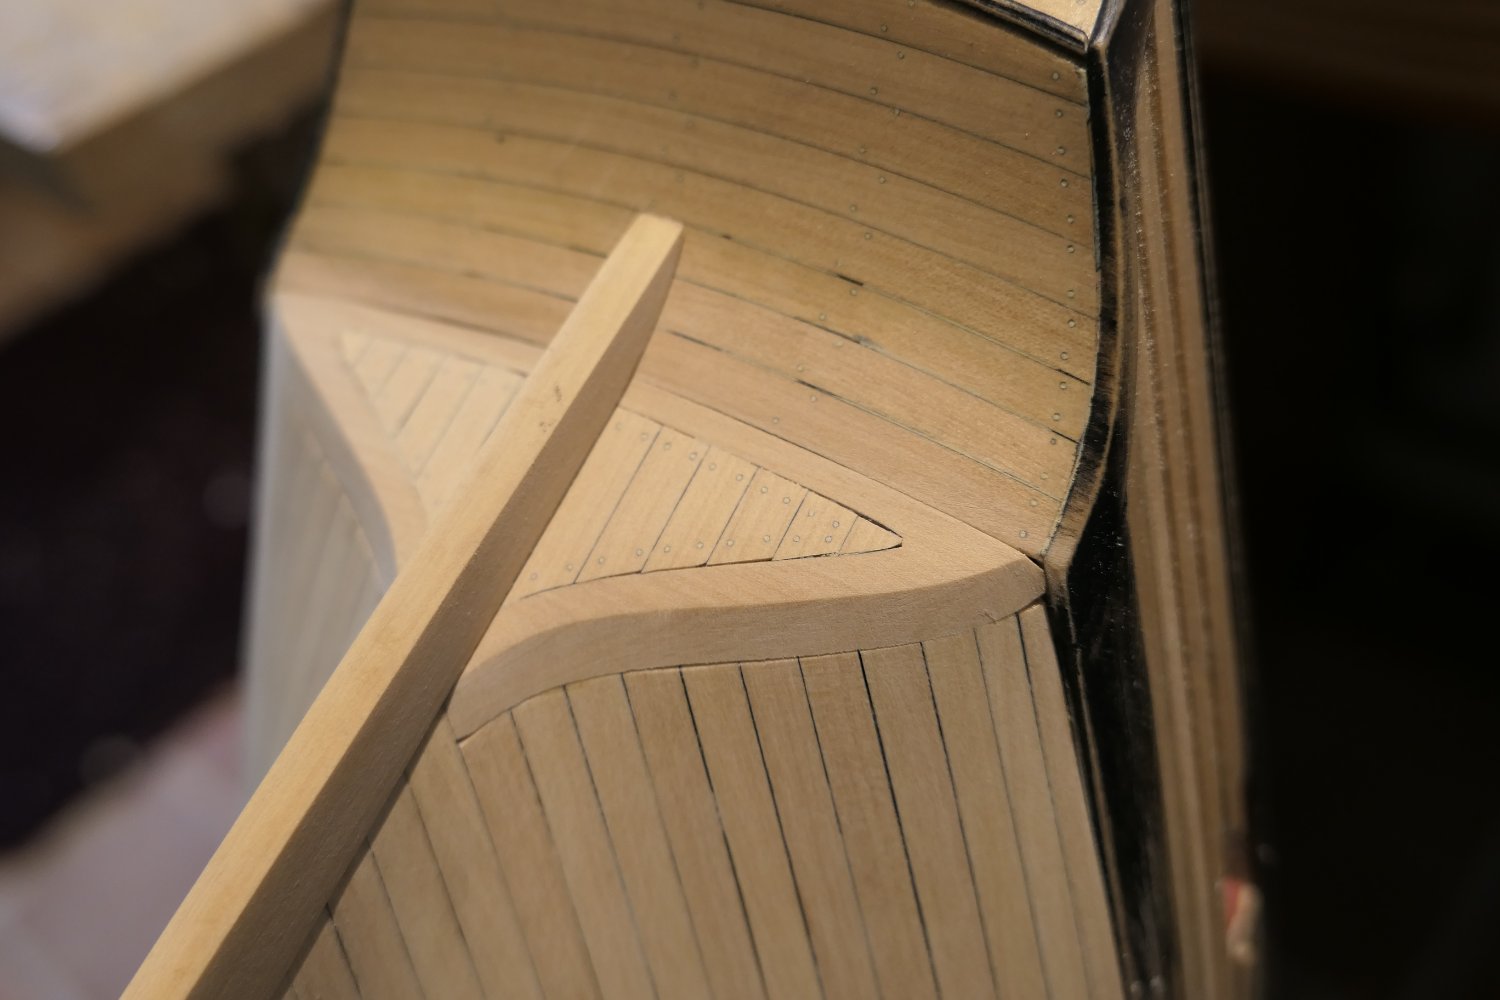
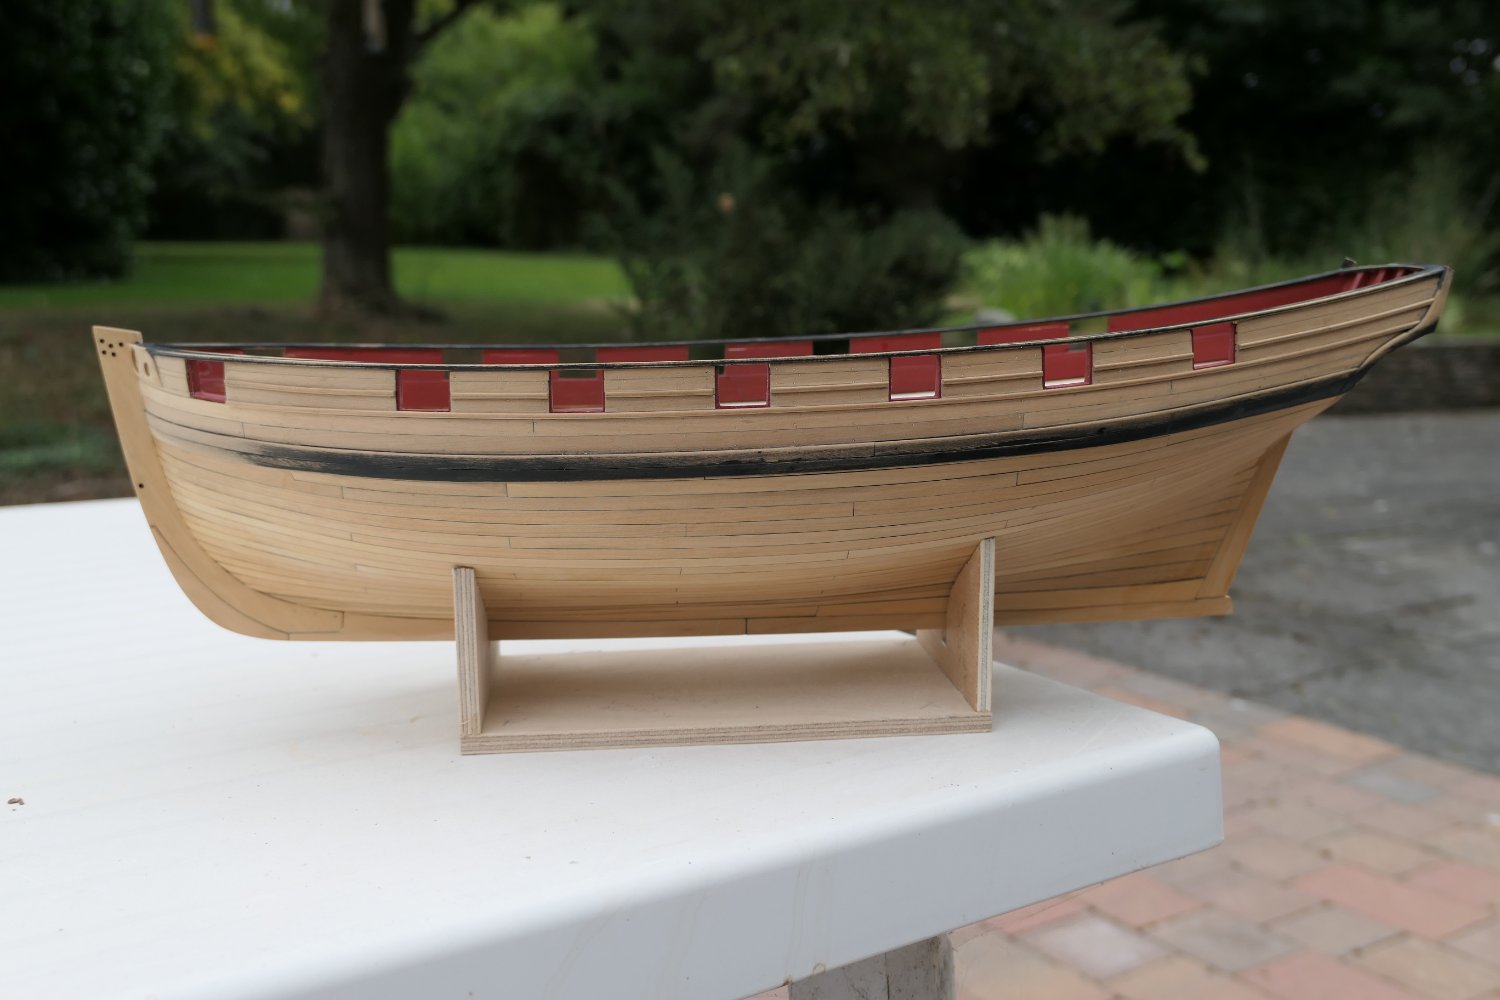
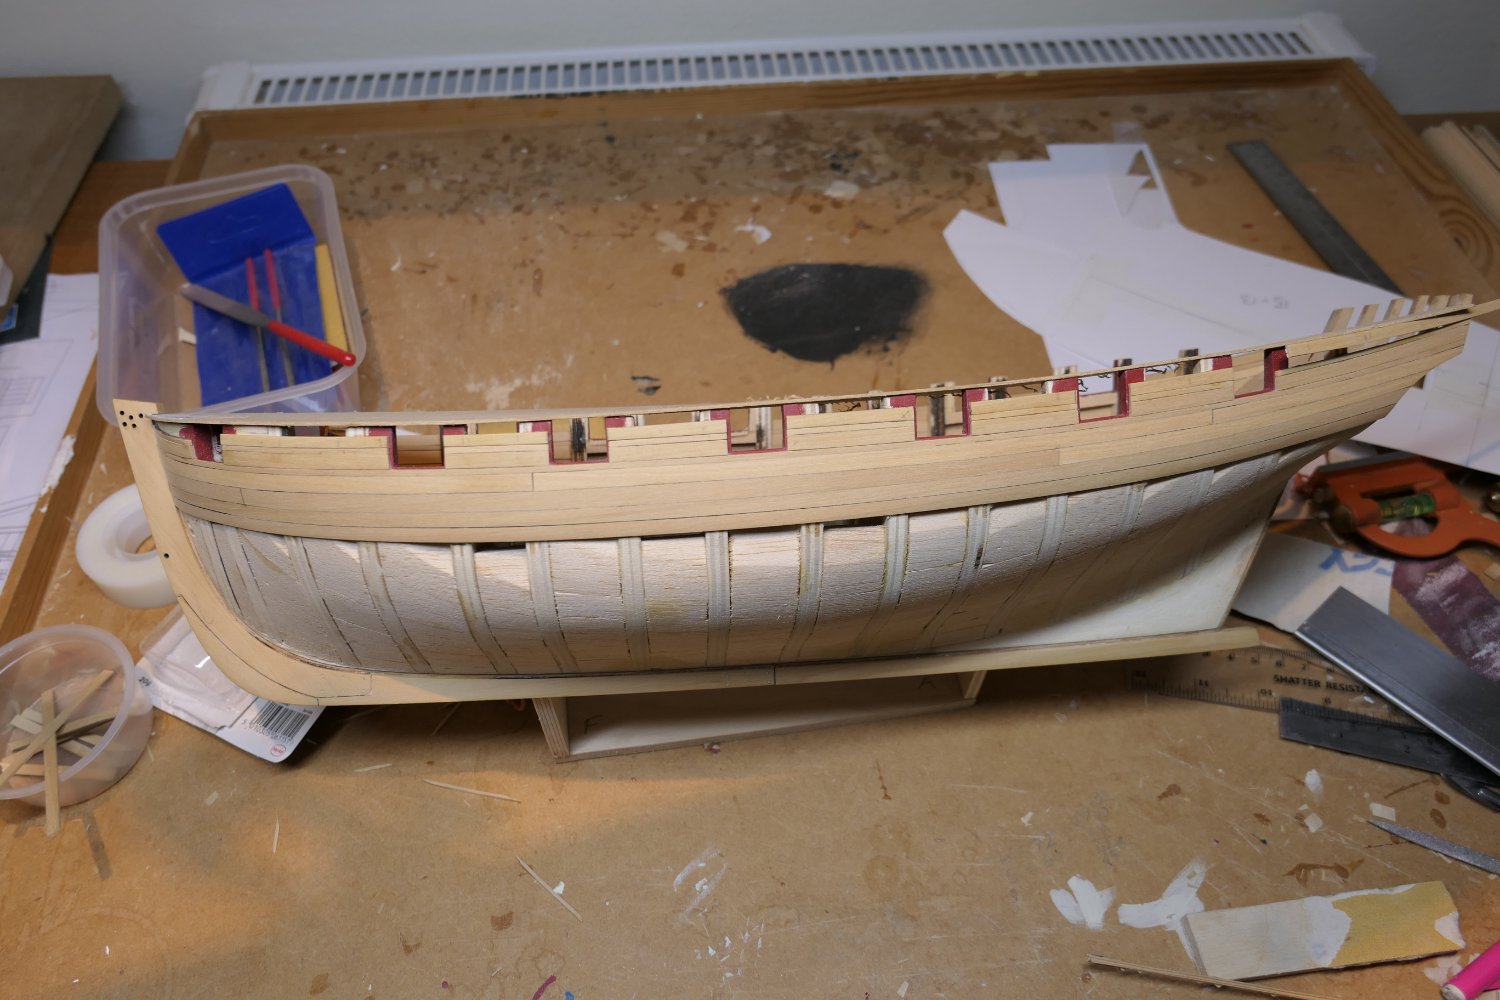
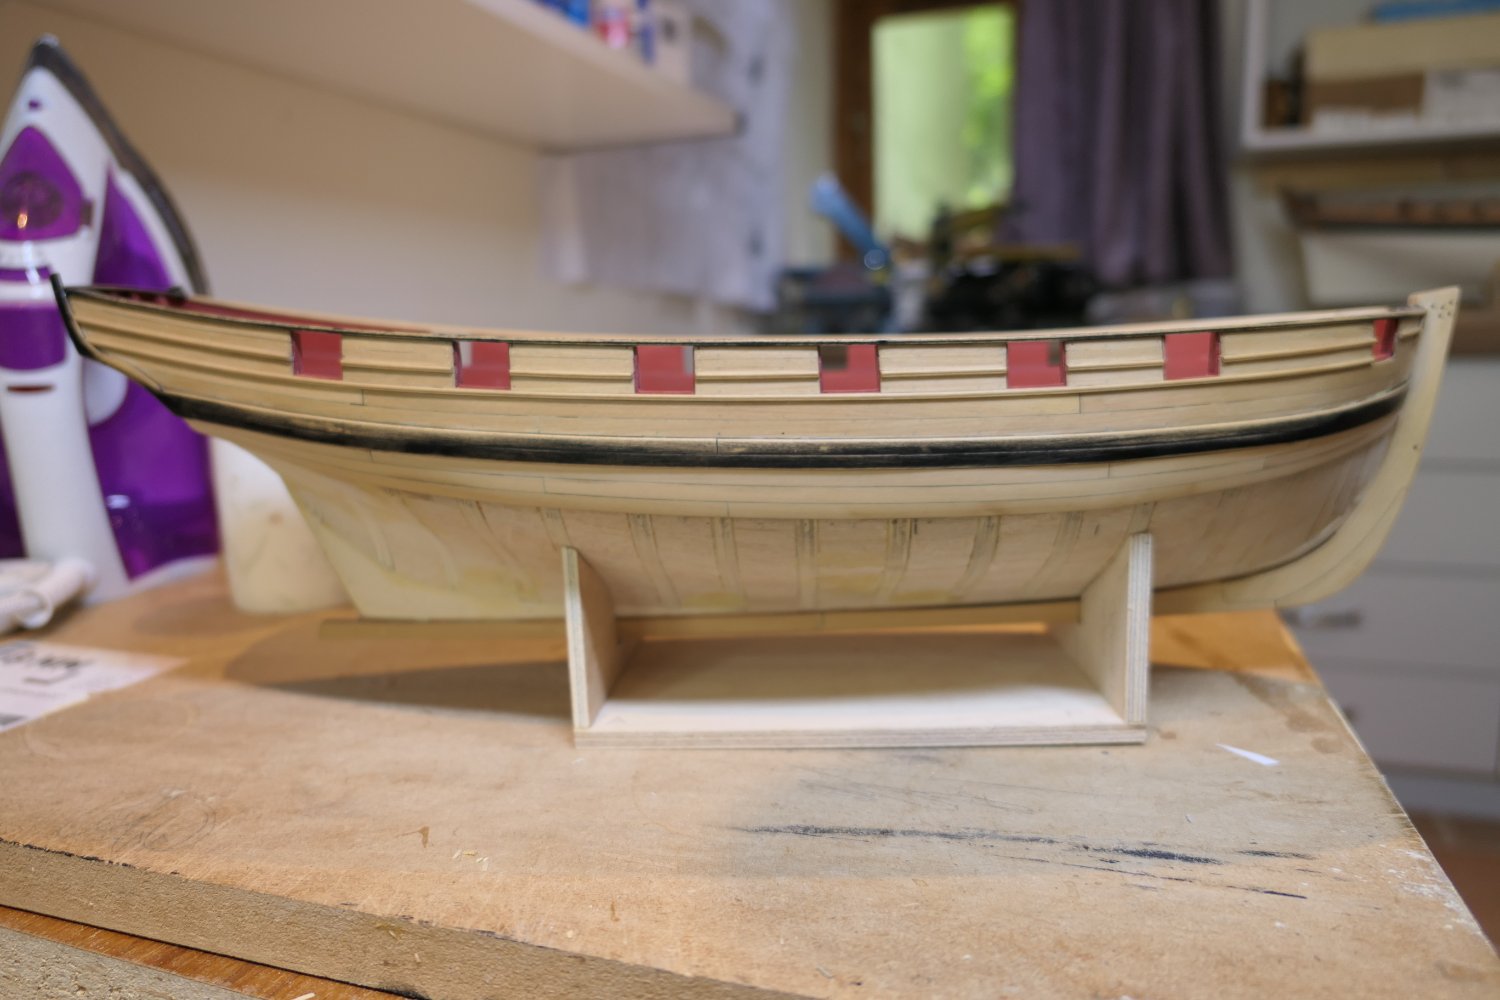
Thank you Chuck and for the likes. I bought Syren's pre cut bulkheads. They go together as simply as Lego bricks. I don't have sufficient confidence in my planking skills to single plank - so I opted for balsa fillets between the bulkheads. I made a schoolboy error along the way: I should have taken my measurements against the bulkhead former and filled up between the bulkheads one piece of balsa per side. I didn't: I took the measurements from the outer edge of the bulkhead and filled up a complete section on one side before turning to the other. As a result I got a bit of a wiggle on - but I spotted it in time and before the wiggle got bigger than faring the bulkheads could cope with. A lesson learned. I intend to build Cheerful with the hatchway doors open. This is a test to see what can be seen through open doors. Answer: not much. But worth creating at least a small false deck. I purchased the Cheerful boxwood set from Hobbymill EU. Its beautiful stuff - wonderfully accurately cut with no saw marks in sight. Highly recommended. I oversanded the last couple of bulkheads and didn't realise until I tried fitting the piece that form the back of the square tuck. I had to re-form with wood filler. The first planks go on. I took a lot of care with the port openings. On my Winnie these were scruffy because of expelled glue. I can see I should have blown away the dust before taking the picture. Planking progress and the inner bulkheads sanded back. I used 1mm thick "planks" glued to the inside of the strakes as a sanding guide. The flat sheet on top was intended to guide installing the top row of strakes for an even and flowing sheer. The false deck came next. I'm building a bit out of order but I like to see those ugly interior bulkheads gone. Planking above the wales finished. The cap rails are on. There is a bit of a bump above the first port opening. I later removed the cap rails and sanded that out. And now the fancy mouldings and wales Which is about where I am now! All the best everyone Fred
.thumb.JPG.cdc542f602495e74855e49f3b6f58c23.JPG)
.thumb.JPG.3fac00f0276221fa1192cdb2a244ba08.JPG)
.thumb.JPG.2fef08d2038d40f1cbe569c2da43a4e9.JPG)
.thumb.JPG.7edbf11c5df59c0f4c3f482b87d9c8b5.JPG)
.thumb.JPG.10109051a7a0f1a8655120f9411147cb.JPG)

.thumb.JPG.8ce534edc54fb3ef1fc464985bef038e.JPG)
.thumb.JPG.069eb2d22fe084169383075e43fd4495.JPG)
.thumb.JPG.750f2e876f10e1923336ffeb67f046da.JPG)
.thumb.JPG.1b197c5c66069aeb3f328f424491acd5.JPG)
.thumb.JPG.9795bafd76046fcdafbc319ebbb3a103.JPG)
.thumb.JPG.23d74cb4713c10c91f87ebbb03031934.JPG)
.thumb.JPG.e3c24e08e183c4f77da6806b7f25dbe2.JPG)

.thumb.JPG.85a30e822fc7557bb364add294a2e17f.JPG)
.thumb.JPG.31458633388c35eb73600af0ac301ff3.JPG)
.thumb.JPG.7253d9596796eef3534605ad0bea2043.JPG)
.thumb.JPG.17d952161319969f0530097800550153.JPG)

.thumb.JPG.e08c46b7c32df3e4d76b5d32787680e8.JPG)
.thumb.JPG.2308e98c12b751e1197aa54ca4b5cfb2.JPG)
- 113 replies
-
- 13
-
-
- Cheerful
- Syren Ship Model Company
- (and 1 more)
-
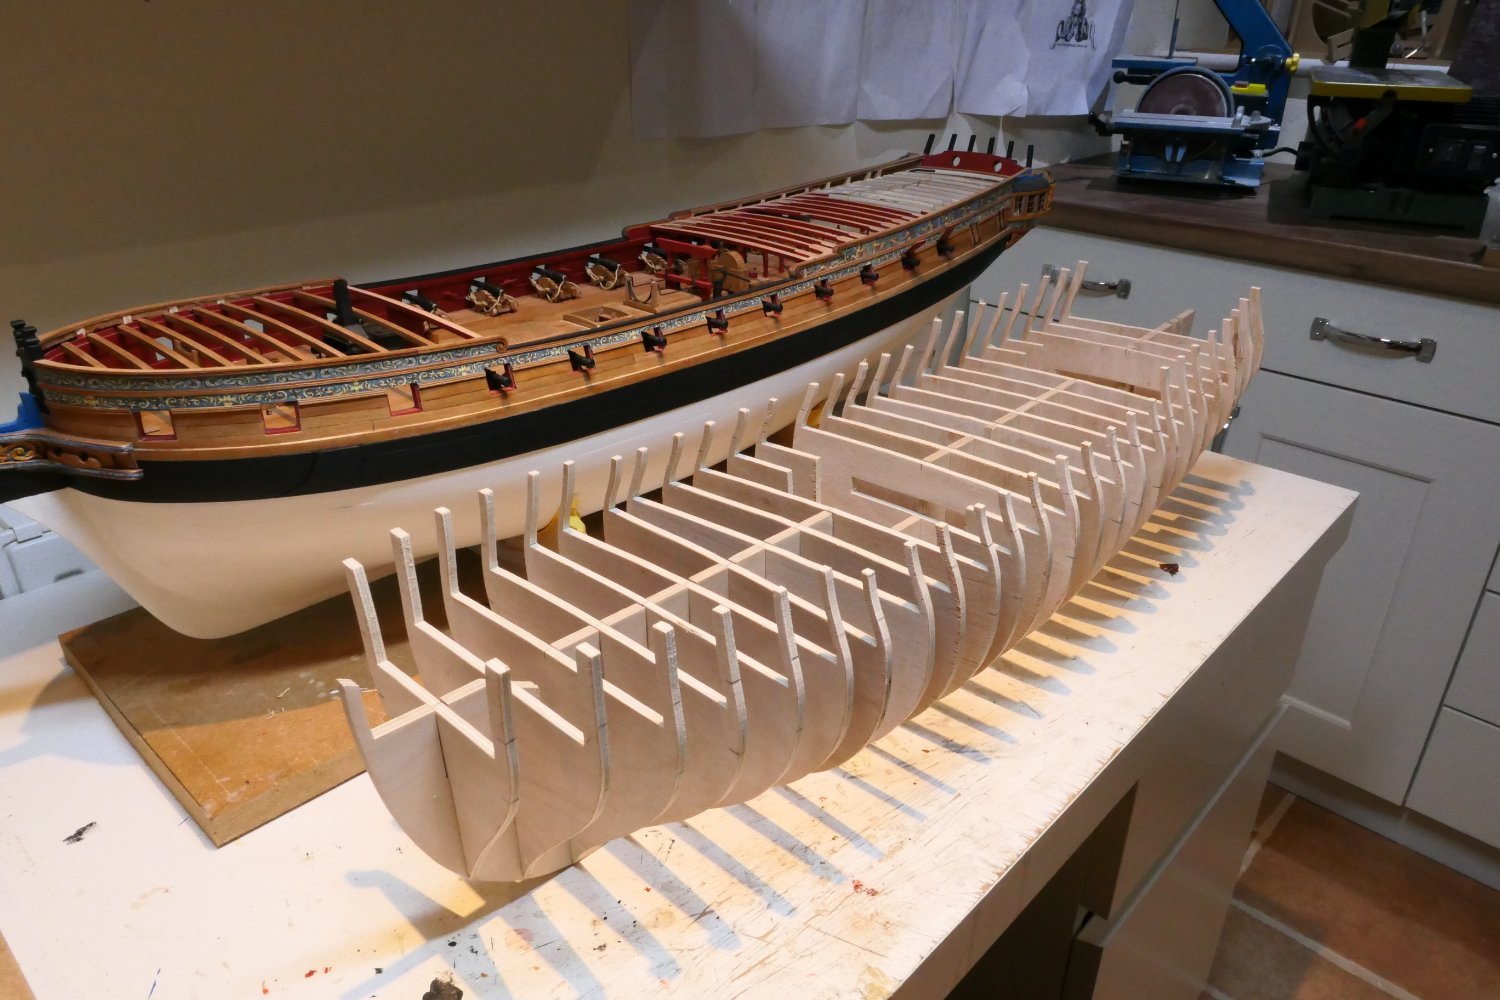
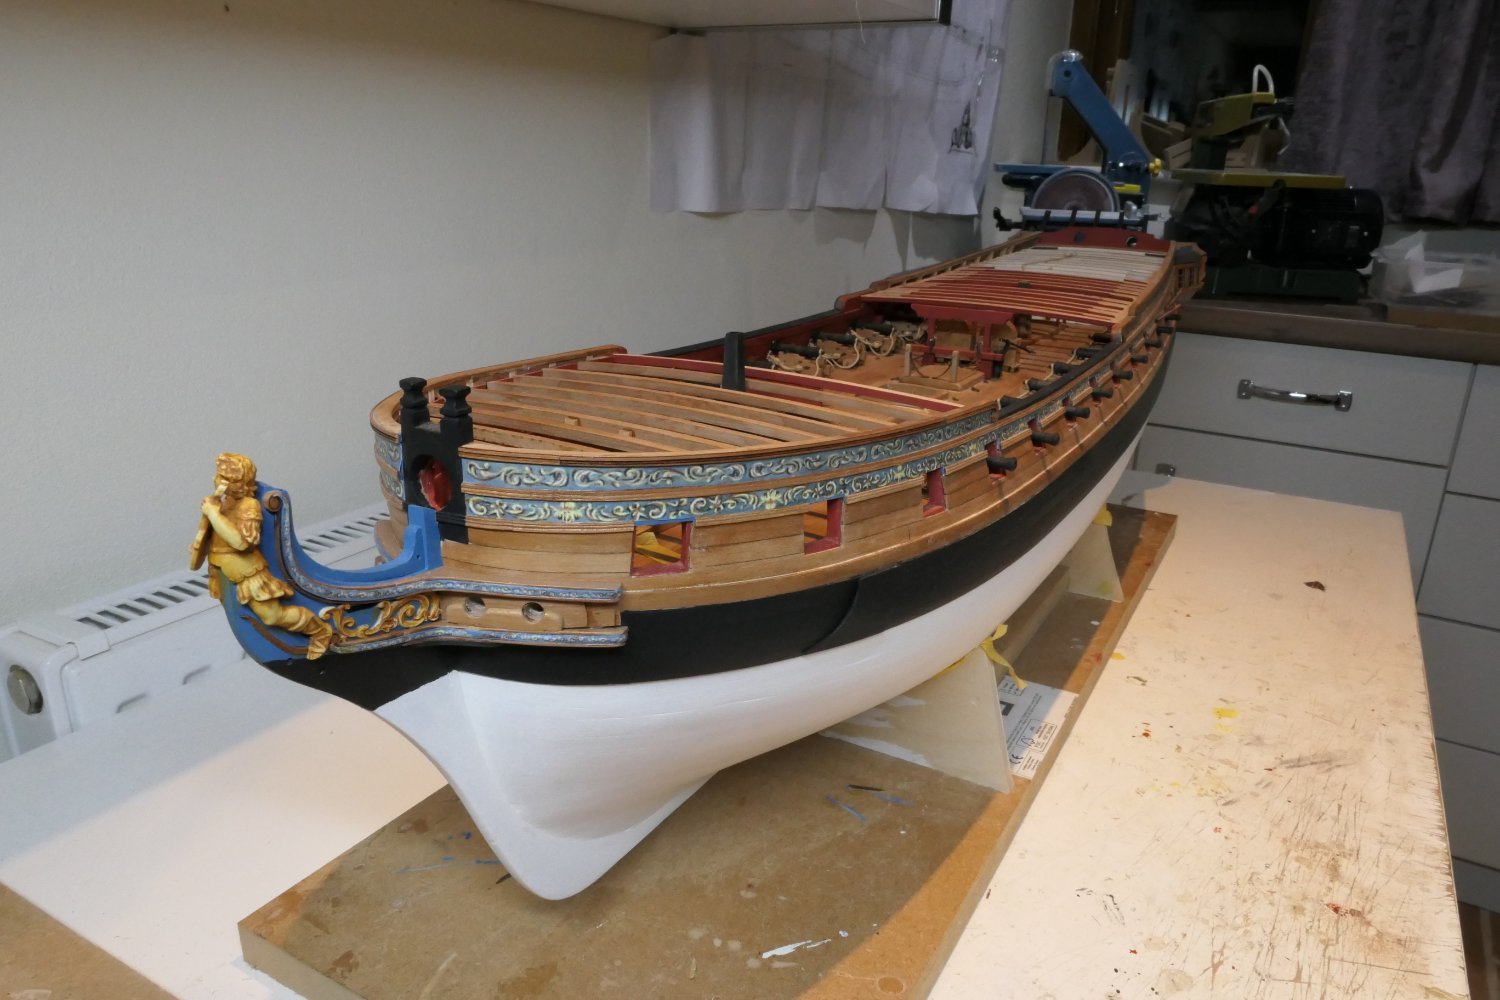
I'm taking a break from HMS Winchelsea. For those yet to start the Winnie it's a monster requiring real dedication and stamina. And, of course, for the relatively inexperienced model maker you look back at things you've done and think: "If I did that again I think it I'd do it so much better" ( do you, I wonder ever shake off that feeling?). Aan I so want to make the Winnie really well - so a break and a re-set are in order. I've decided to have a go at Chuck's ever so pretty little cutter Cheerful. I have the advantage coming late to the Cheerful of so many superb build logs to follow. This is where I am at the moment. All the best everyone Fred
.thumb.JPG.0b938845c46caa6ebcbe748475641b6e.JPG)
.thumb.JPG.595029c48b2697ec615fbf9f5e95c4a5.JPG)
.thumb.JPG.b3b79138be5a520fb691c9b3074fd028.JPG)
.thumb.JPG.07fbf744fd2d2522f5a8bdb027e4ab31.JPG)
.thumb.JPG.4812e99750d4be057ae7411694d991e7.JPG)
- 113 replies
-
- 17
-
-
- Cheerful
- Syren Ship Model Company
- (and 1 more)
-
Matt - how is your Winnie coming along? Fred
-
Steve - I've only now caught up with your message. Thank you very much for taking the time to set that out. It's really helpful. I recently purchased the Cheerful plans and bulkheads from Chuck and the Cheerful boxwood package from Hobbymill EU who were very helpful and good to deal with. The boxwood, incidentally, from them is flawlessly brilliant. The Byrnes will have to wait a while but I'm persuaded the Proxxon is probably not the way to go. Glenn - many thanks for your thoughts. I'm underway and will start a Cheerful log soon. One of the joys of MSW is the "been there and done it" knowledge of the other builders. I have read and re-read your log and many others beside. I hope I shall make a much better fist of Cheerful than I might otherwise have been able to do as a result. All the best Fred
-
Matt - I know exactly how you feel. I started the Winchelsea a long time ago (the posts are somewhere near the bottom of the pile now) and quickly realised that for a third ever build I was way in over my head in terms of the difference between the outcome I had in my mind's eye on the one hand and the achievable outcome my skill level suggested was achievable. So I started again - the posts are nearer the top as "Fred's W2". W2 is much better than my first effort but my expectations of my limited ability and experience continue to outstrip what I can achieve. So, like you, I'm thinking of taking time out from Winchelsea and having a go at Cheerful. I ordered the parts (including the laser cut frames - like you I scroll sawed the frames for both Winnies) from Chuck a couple of weeks ago and they arrived yesterday. I'm resolutely going to remember the basics - take it slow and steady and treat every part as a mini kit. My preference would be to double plank Cheerful because I don't have enough confidence in my ability to achieve the sort of outcome I want to achieve from single planking - but the frames are not designed for double planking. I'm wondering whether the answer is to cut the middle frames again on the scroll saw following the inside of the printed line (thus reducing the size by the required 1mm or so) and to let the fairing take care of the fore and aft frames. Or perhaps just fill the inter frame spaces with balsa and then fare the whole thing with a bit of wood filler as required. Any way, whatever you decide Matt, best of luck and I shall follow your posts with interest. May I ask: what table saw did you use? The Jim Byrnes seems the absolute stand out but does anyone in the UK know what it costs if Customs pick it out for imposition of duty? Or does the Proxxon do a decent job I wonder, I'm thinking of purchasing the Cheerful wood pack from Hobbymill Eu but I wonder how prices compare - milled v milling your own. Best wishes Fred
-
Absolutely wonderful. Your great grandchildren will treasure your Tiger in 100 years time. All the best Fred Healey
-
Glenn I've only now found this build log. I'm going to set aside some time to read it from start to finish. First impressions, looking only at the last page pictures, are that this is essential reading for anyone thinking of building the Cheerful. Which I am: I think I need, if not a break from the Winchelsea, then at least something else I can turn to when I feel I'm losing my way a bit (like now!). This really is a lovely build. I'm looking forward to my reading . All the best Fred Healey.
- 778 replies
-
- 5
-
-
- cheerful
- Syren Ship Model Company
- (and 1 more)
-
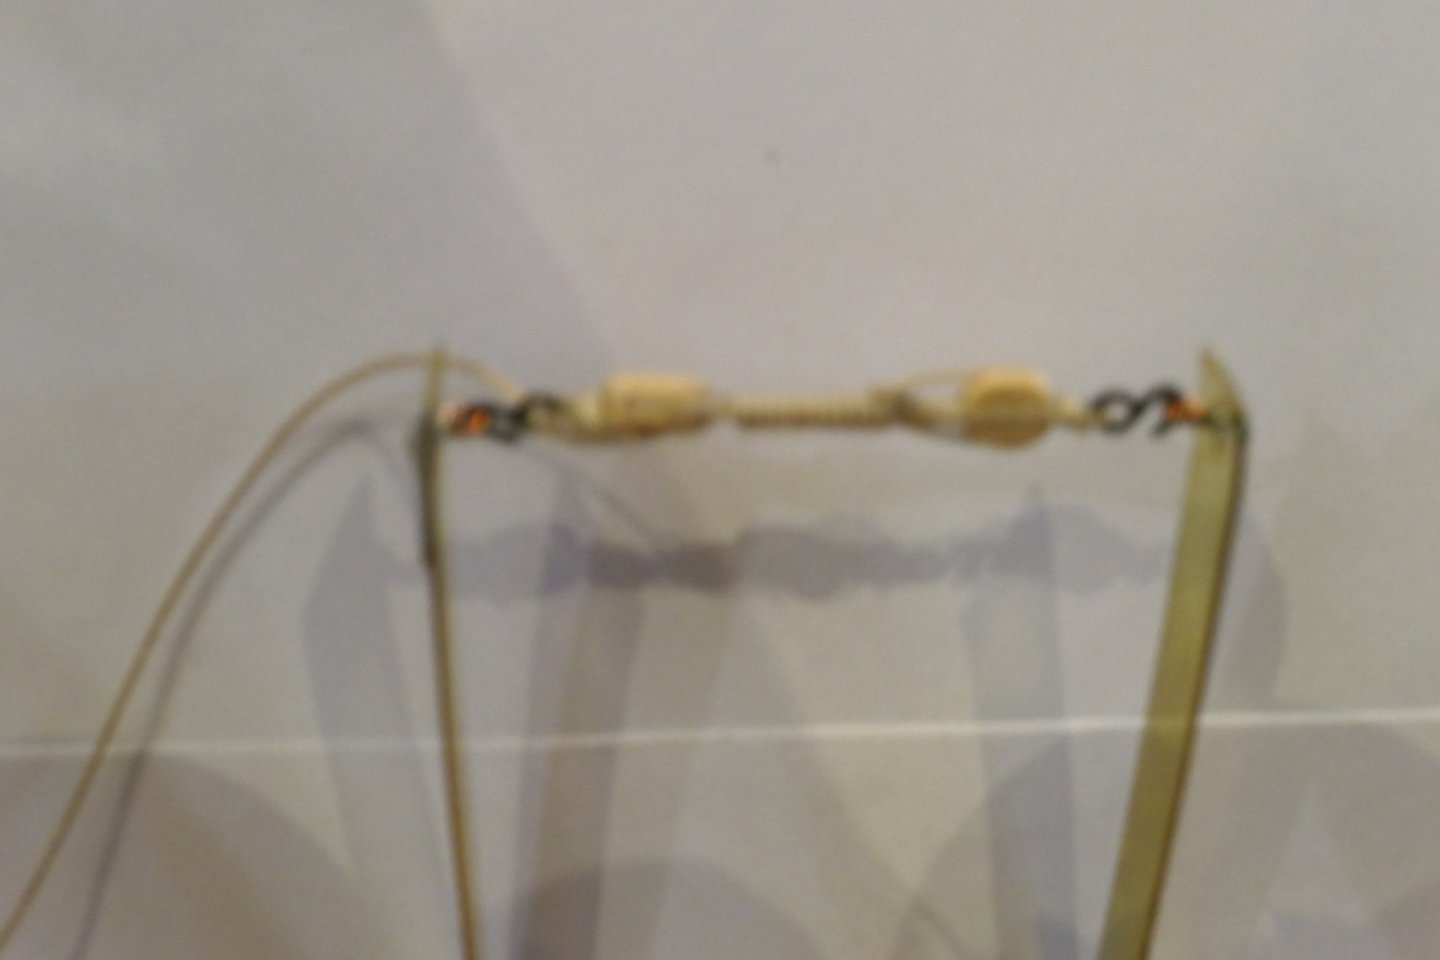
As to the breech lines: JJ managed to get 5 or 6 windings beneath the knobbly bit at the back of the barrel (I'm sure I know the name but I'm having a senior moment about it at the moment). I'm seriously impressed with that. I got 1 - and that with a needle and thread. There is much less room there than appears to be the case from JJ's pictures. I shall try harder next time! My only tip, if you are going to rig your guns, is to rig the bolts to the gun rather than the bulkhead. Fixing the rigged bolt into a pre drilled hole in the bulkhead is the work of a moment. Rigging the breeching rope (or the tackle) to an already fixed in bolt is a nightmare. I know this from experience. As to the tackle: I'm sure coiled down tackle is authentic. But was it, I wonder, Sunday best for the Captain's inspection? I can't believe (not that I know a thing about it) that ropes were coiled down like that everyday. On a model I guess it's a matter of what you (unless you are a stickler for historical accuracy) like the look of. "Frapping", by a short head, just looks tidier to me. But lots of you have left your guns un-rigged as of course did Chuck - and you can't really argue with that can you? Other than that I know I have a lot of work to do on my knots and splicing. But for a first go at rigging guns I'm pretty satisfied. All the best everyone. Fred
-
I don't think those guns could possibly have turned out any better. Really top work! Keep it up for the next twenty five or so.......! They test your patience. All the best JJ Fred
-
This is superb. But what, can I ask, are you planning to do with the tops of the bollard timbers? You seem to have followed the plan meticulously in every respect except for those - where you did your own thing from the outset. I suspect you have a plan and I'm intrigued to know what it is. In passing - I do envy you Americans your "February meet". Lucky fellows to be able to get together. All the best Fred Healey
- 607 replies
-
- 2
-
-
- winchelsea
- Syren Ship Model Company
- (and 1 more)
-
Thank you bdgiantman.
-
I don't quite know how those last 4 or 5 pictures came to be posted. I'm not on top of the technology here. And thank you Gregory for the speediest of responses!
-
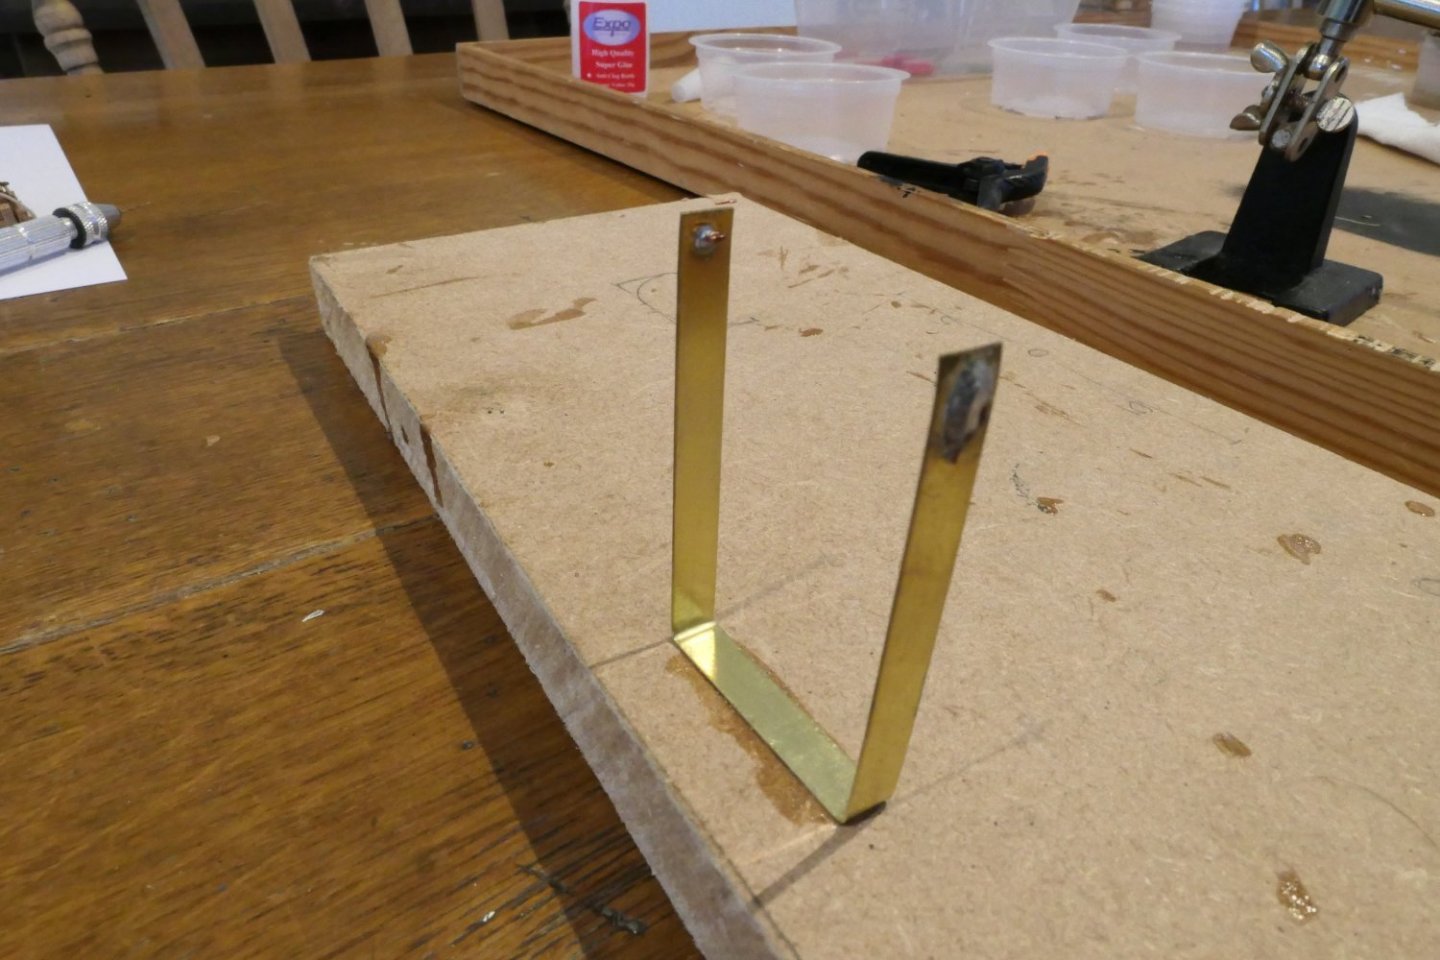
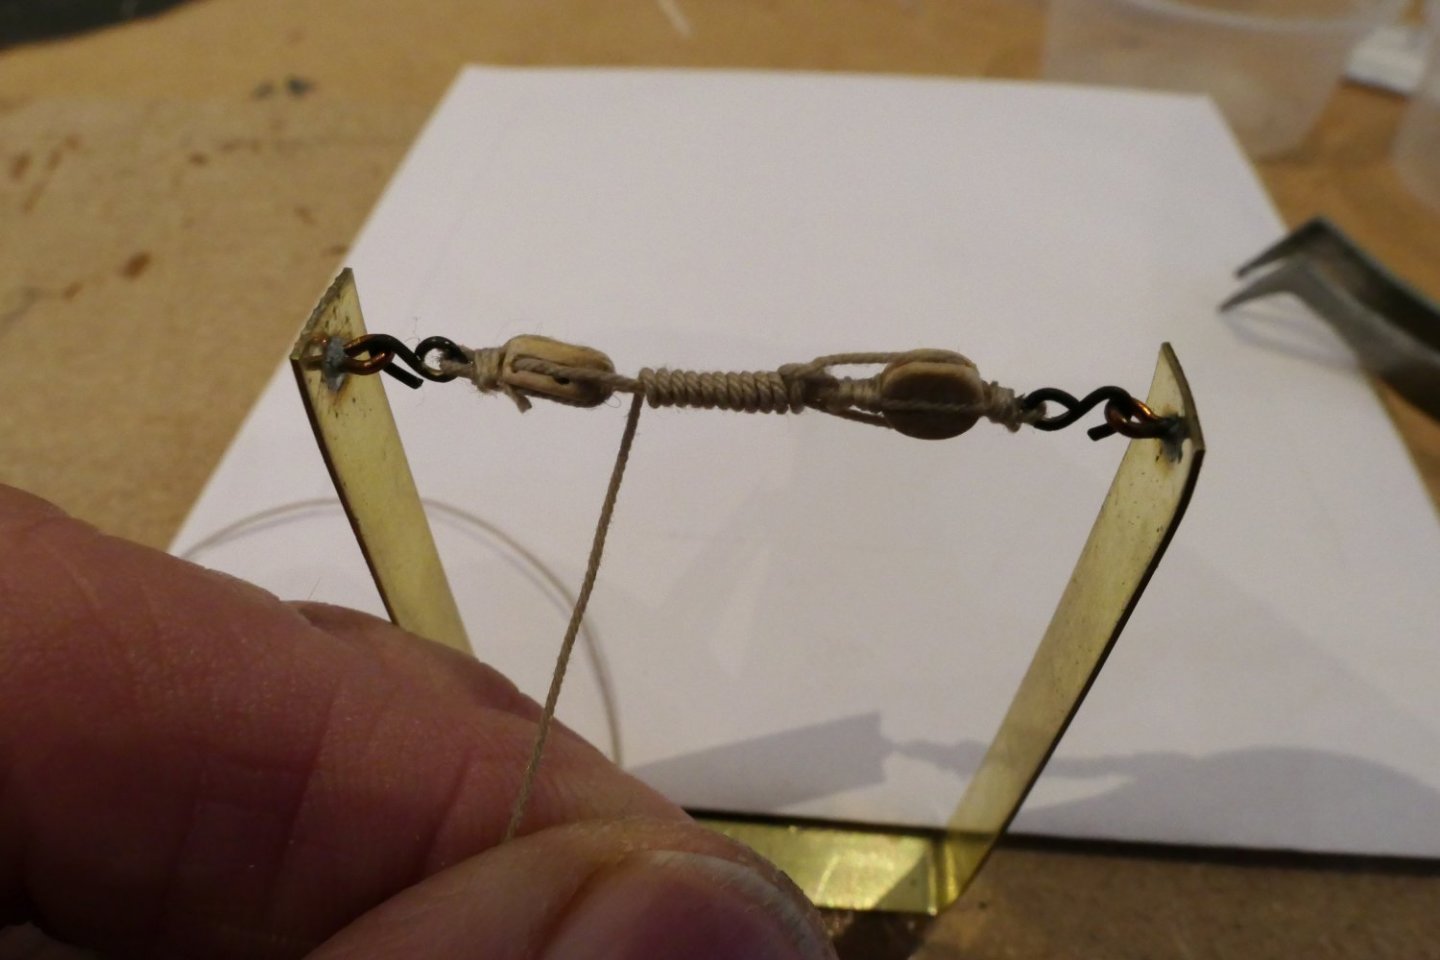
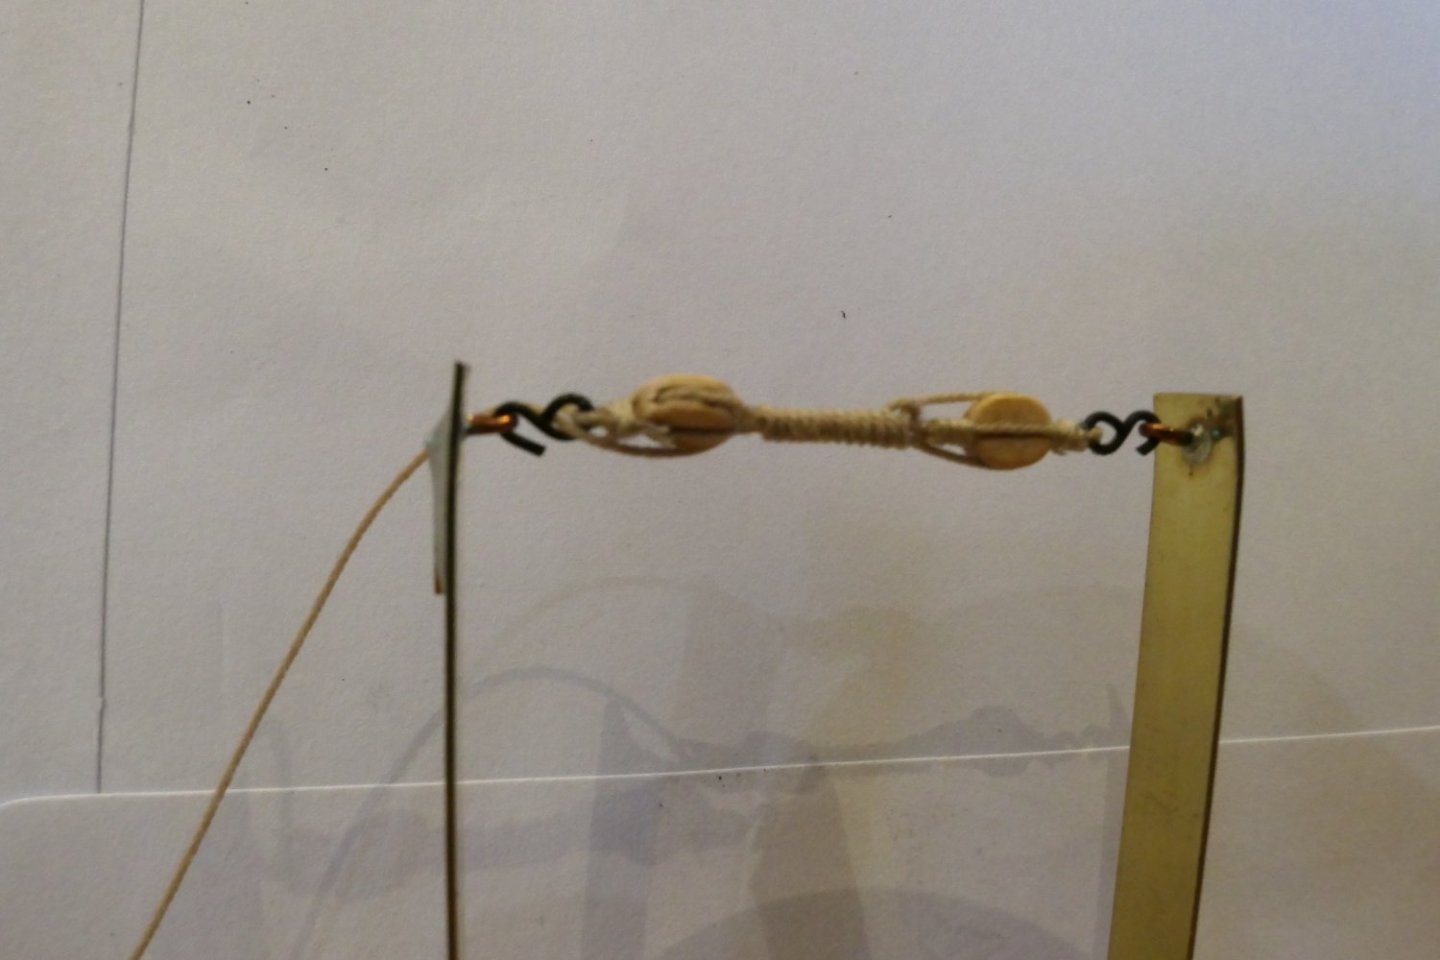
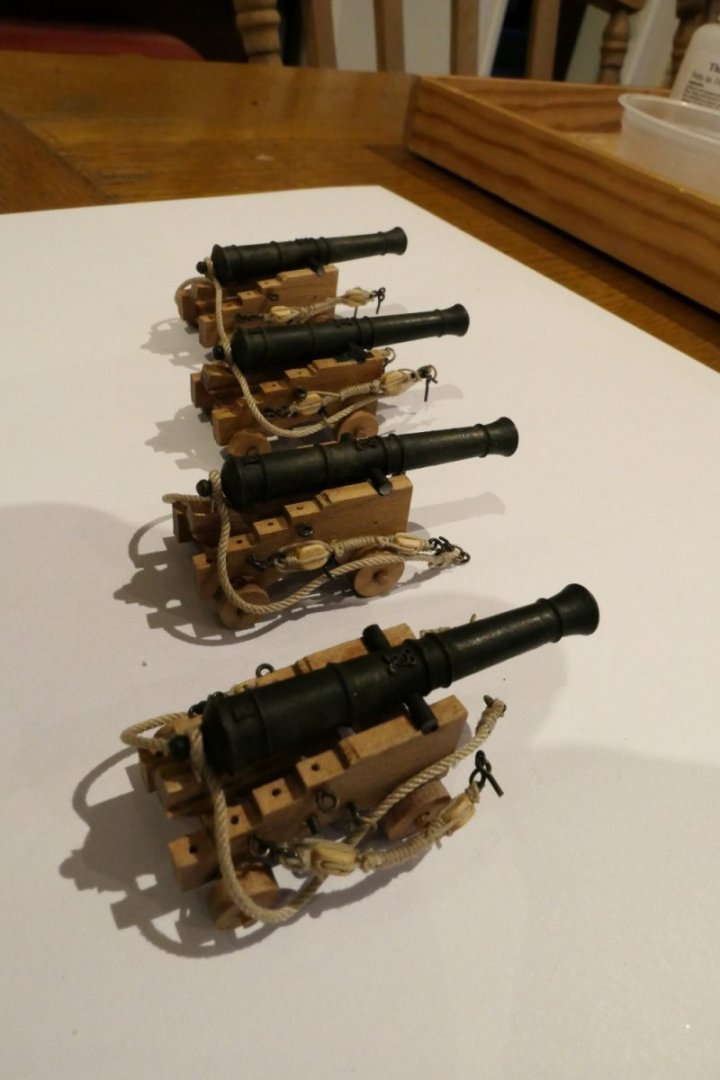
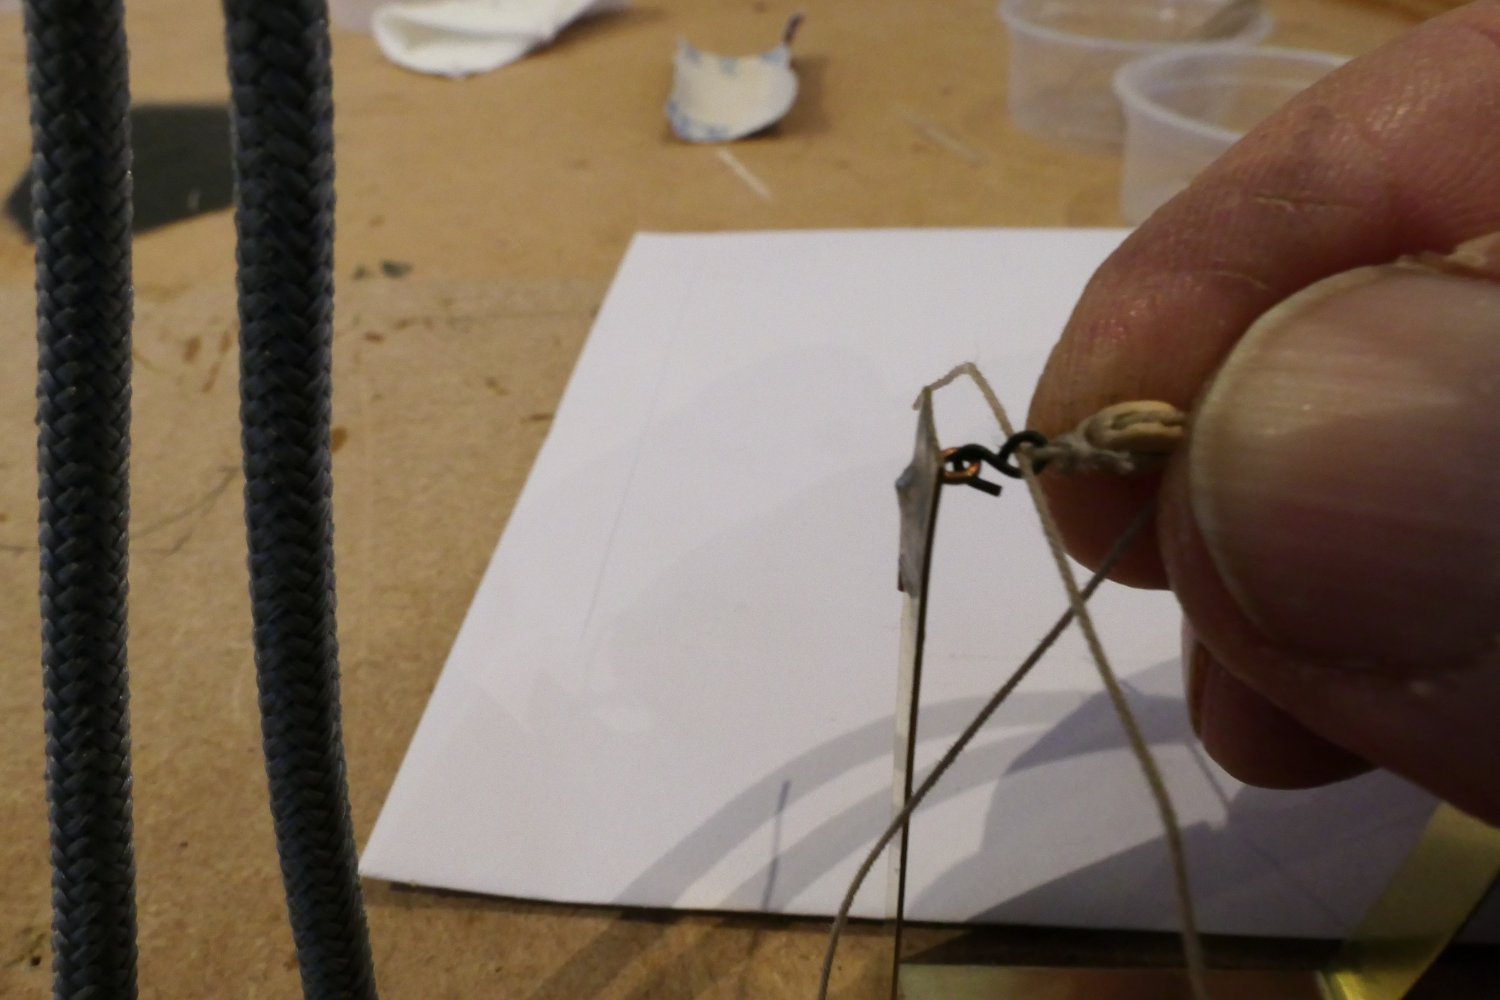
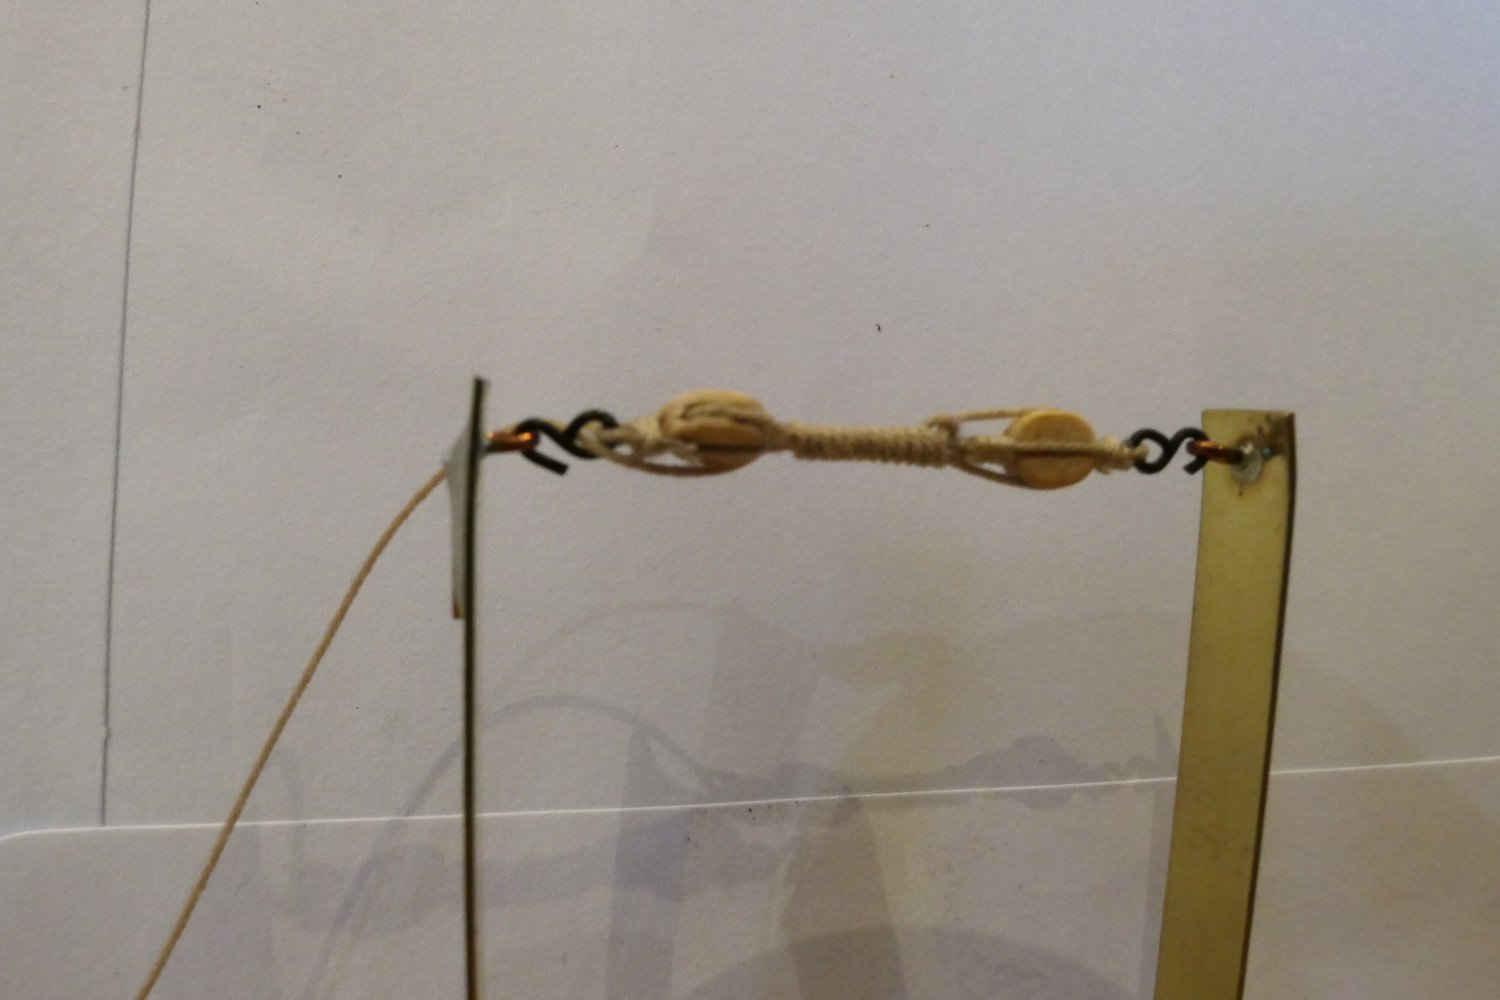
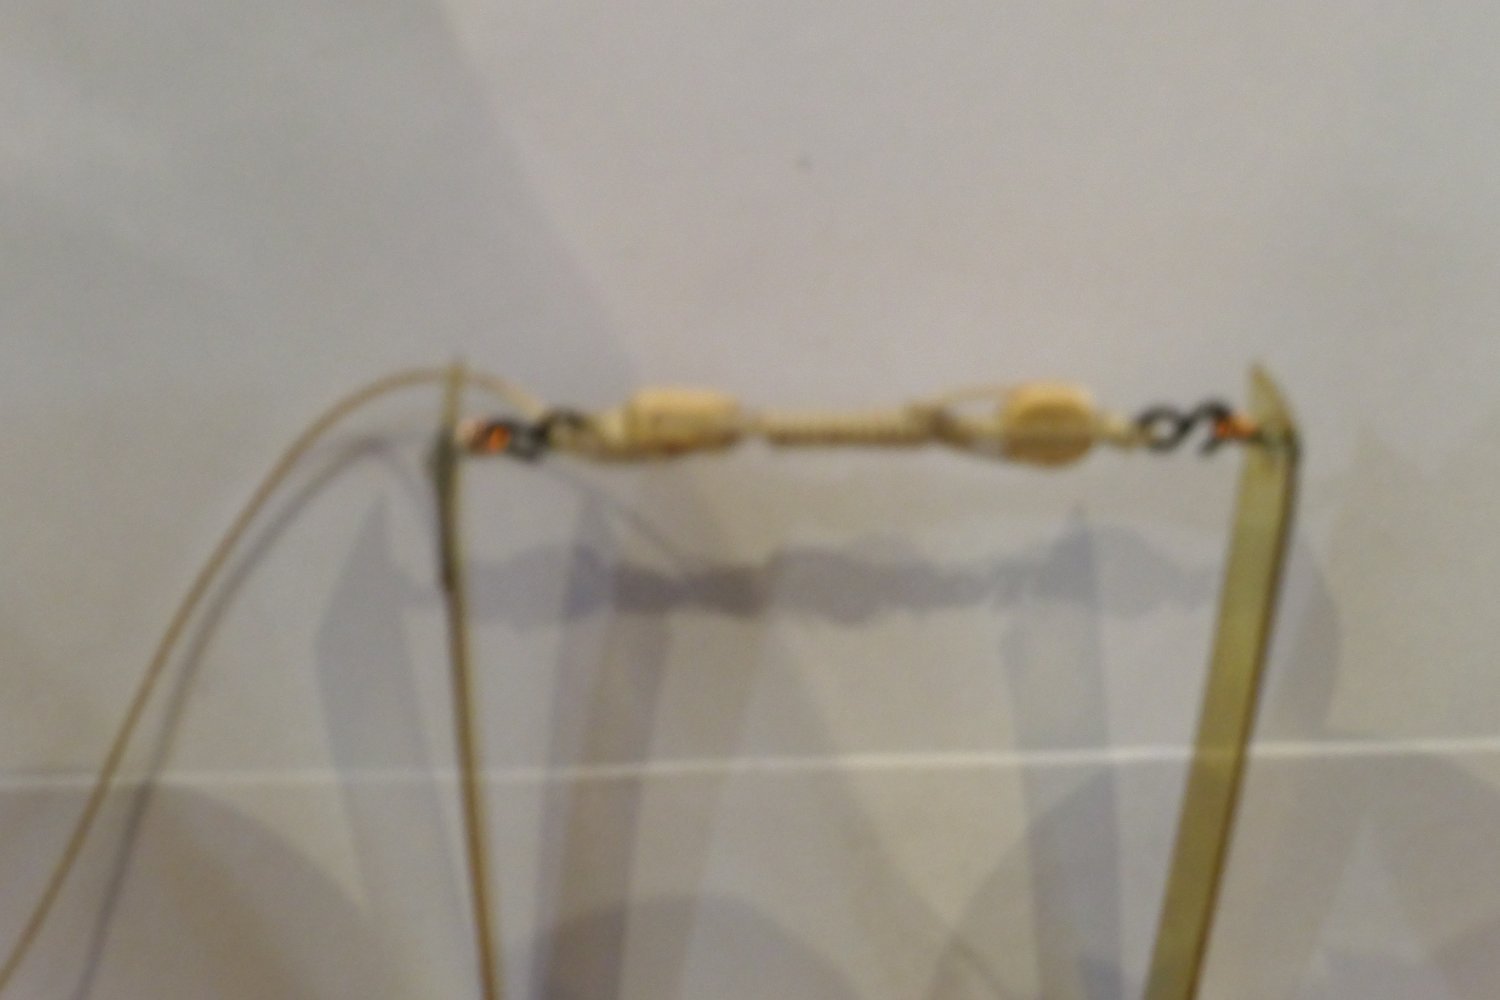
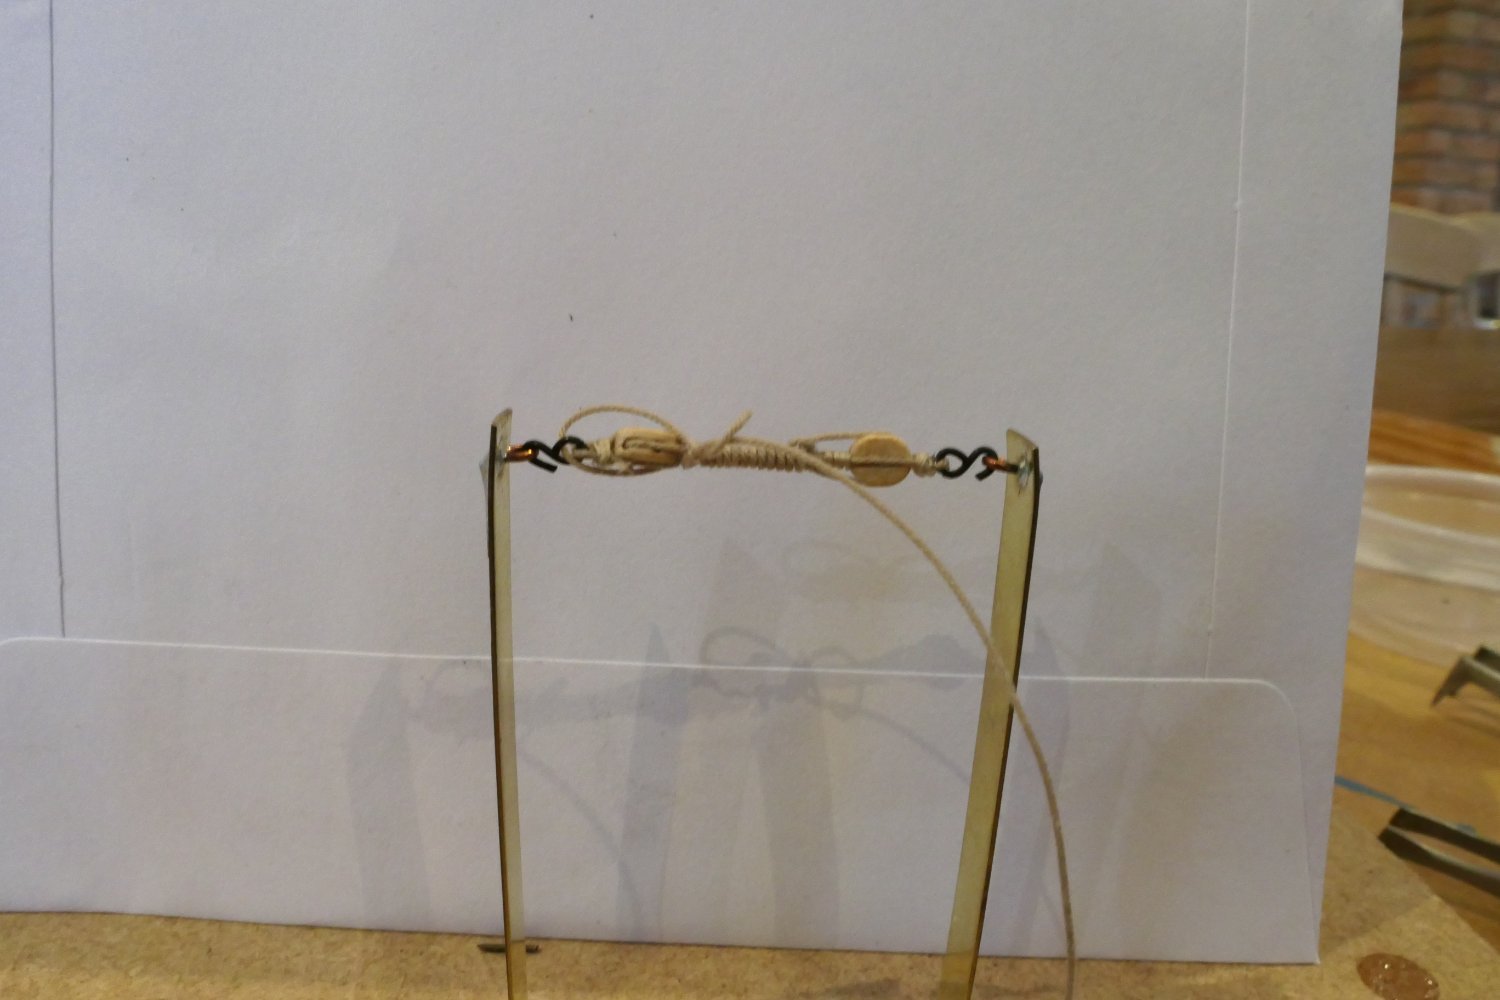
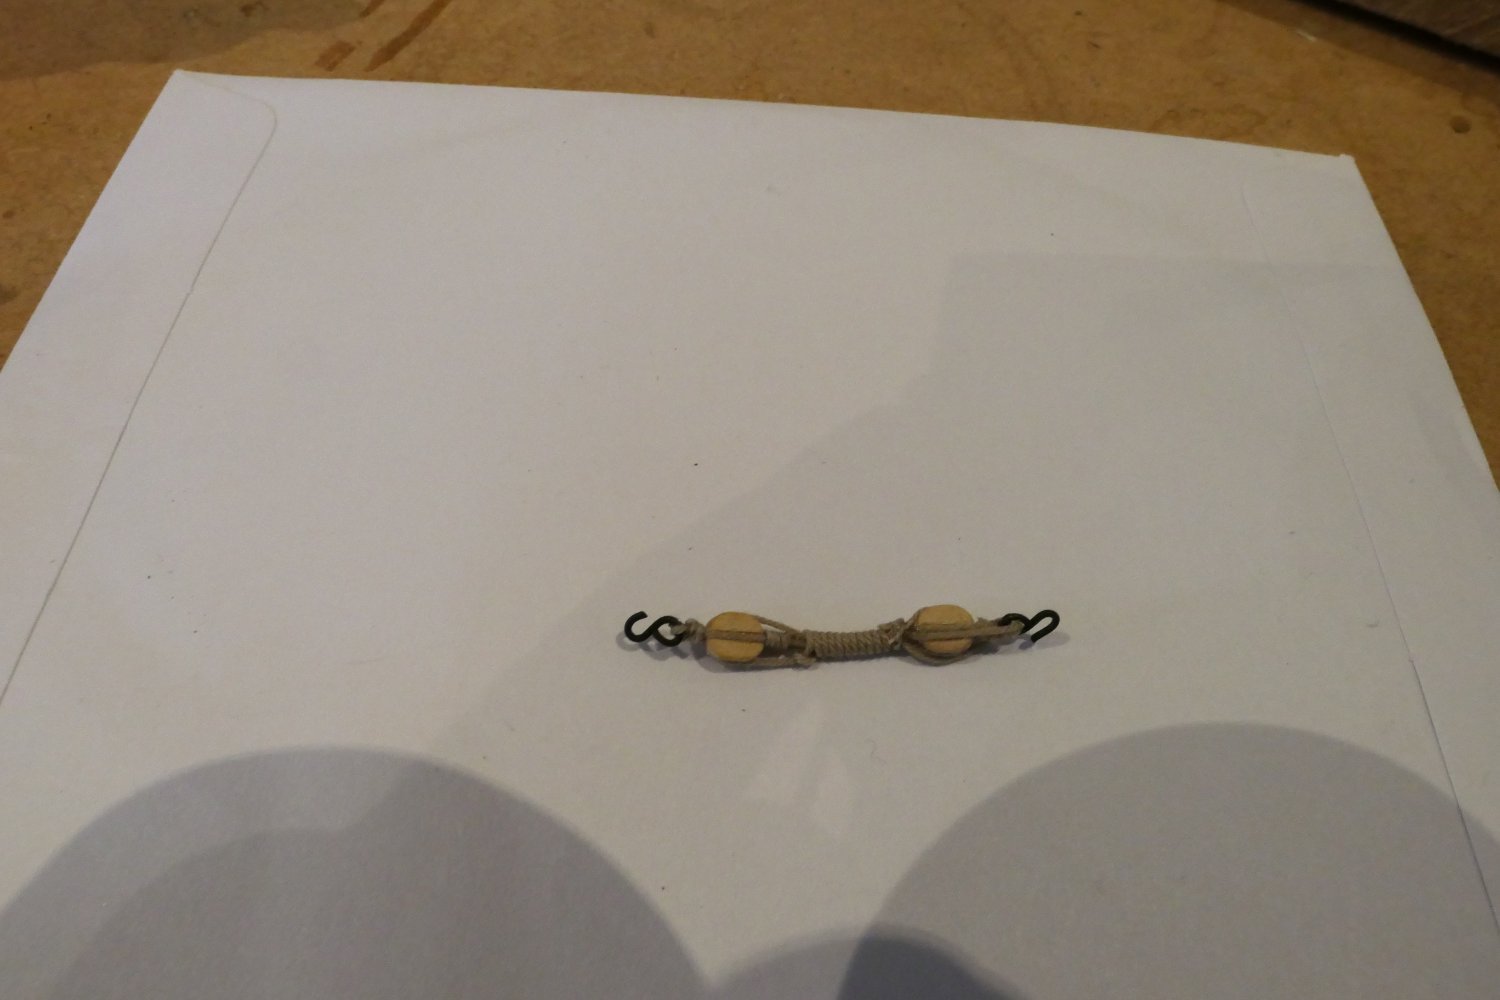
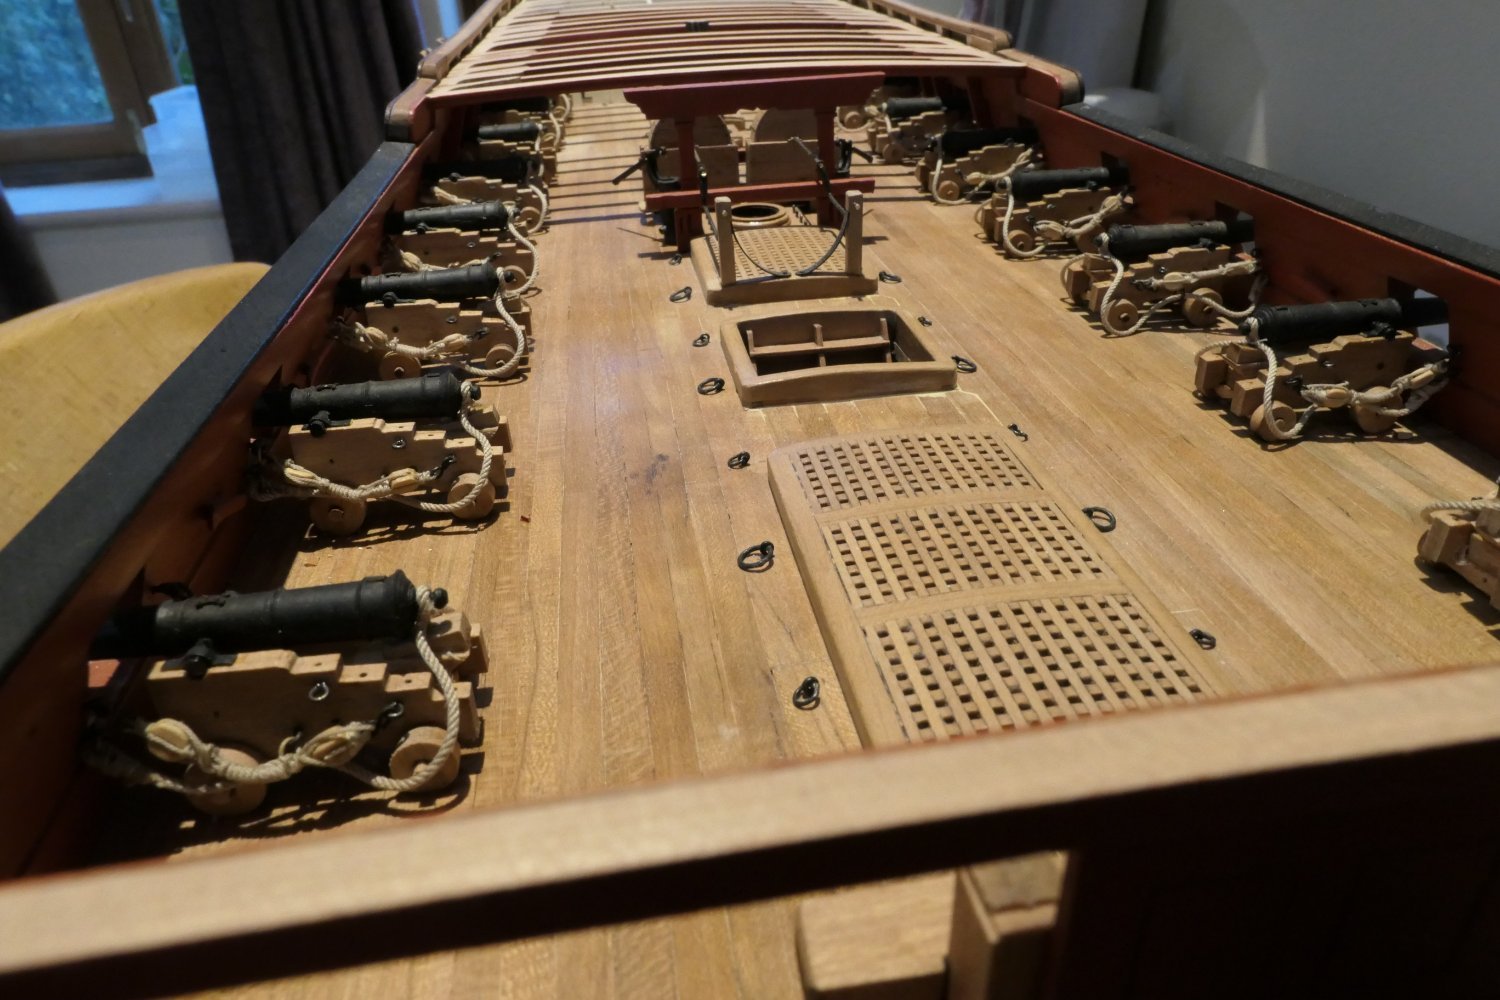
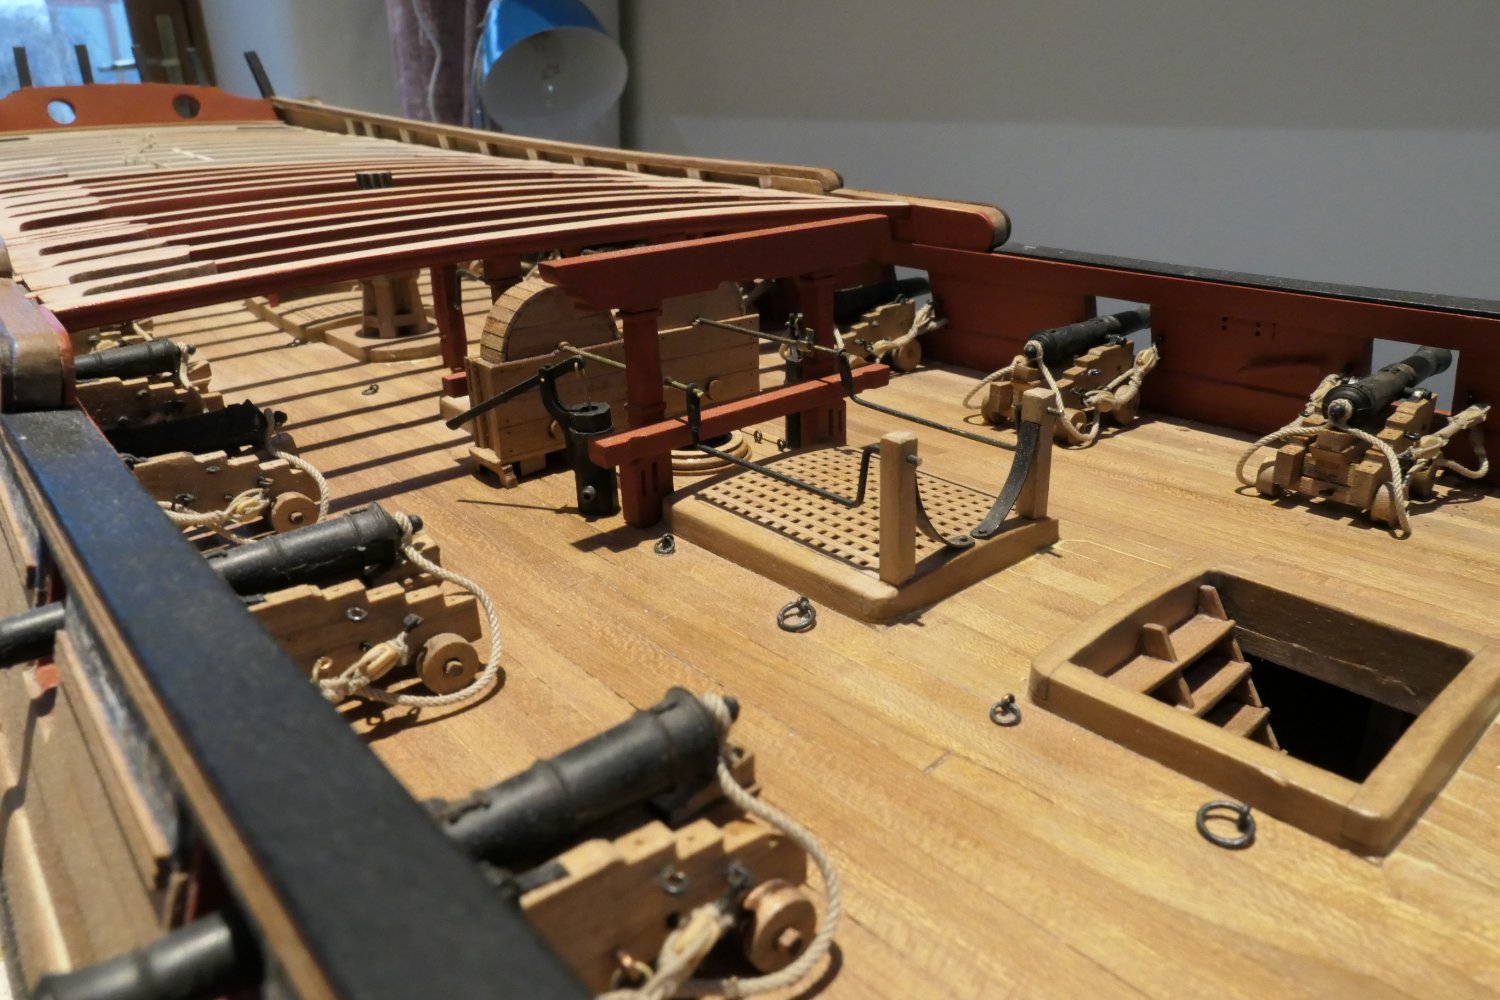
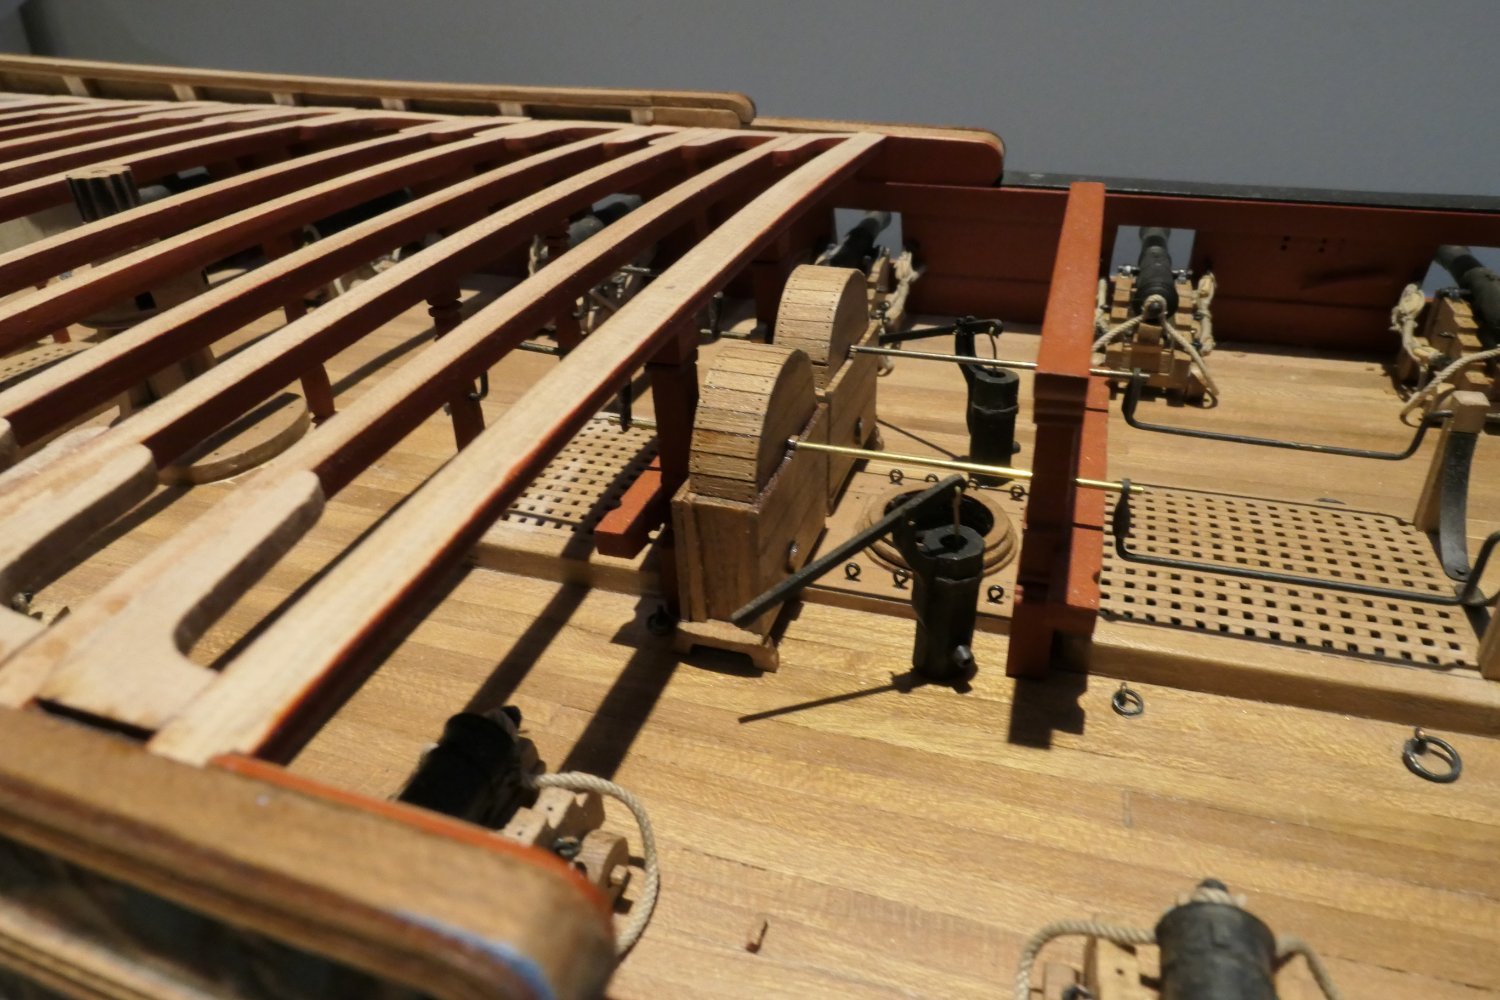
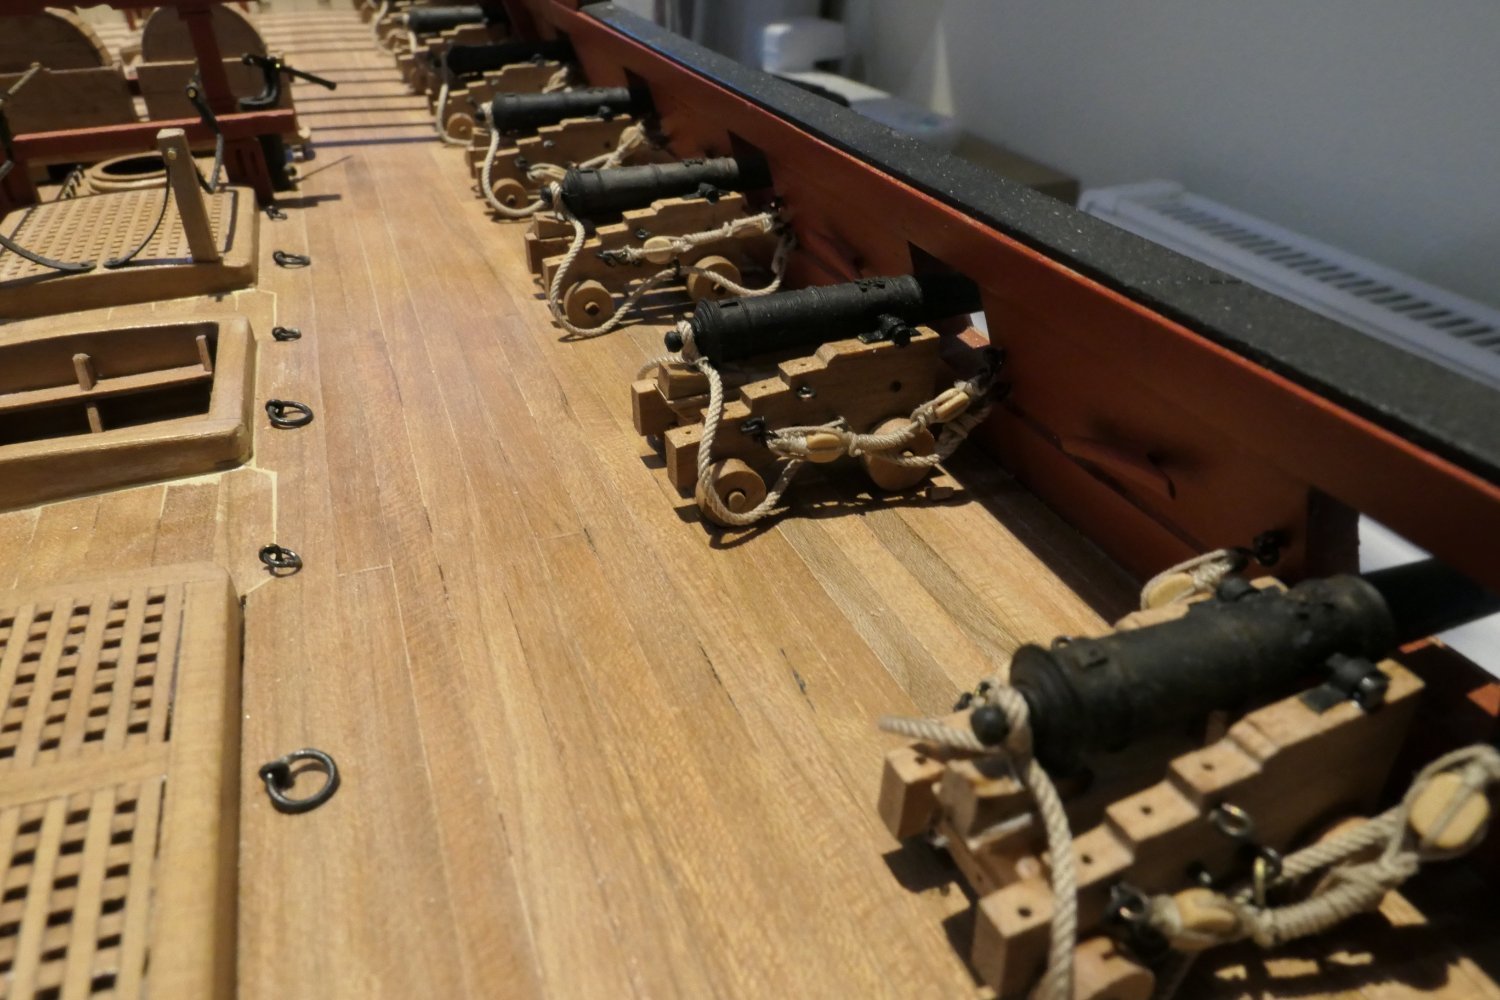
Evening all I have - finally - finished rigging the guns. I'm pretty happy for a first go. I used Syren 5/32 single blocks, 0.050 Ultra tan rope for the breeching and 0.018 for the tackle. I formed a little "hands free" from brass strip with eyelets soldered near the top. The gap between the eyelets is 3.7mm which produced a "frapped" outhaul tackle which looks about right to my eye. Here is one end of the tackle. And this is the other. And here they are in the hands free. I put in a simple overhand (?) knot/twist. And start "frapping". The brass strips have sufficient spring to provide a little tension and keep everything in place. Then push the free end through the eye of the hook. And tie it off. Here are the rigged guns waiting to go on board. It's a lot easier to fix the ring bolts to the rigging rope rather than the bulwarks. I did not take a picture of the breeching rope but its just tied off underneath the gun barrel. All the best everyone Fred
.thumb.JPG.a8b032c0fa5ca7de807517607437c18a.JPG)
.thumb.JPG.cd3127583b55850112bcdc373b7388ae.JPG)
.thumb.JPG.8cc89e0ee704fec22106ce8a4a65a717.JPG)
.thumb.JPG.3bc026679e1e2c9fa699aa96b54f74c0.JPG)
.thumb.JPG.ac3184f35de7046733dd9ed3be7976af.JPG)


.thumb.JPG.825ff66d0c102cbad6d4eec679e1954a.JPG)
.thumb.JPG.7a6e82fe23dd218f2fe3cda5a4e508df.JPG)
-
Thank you Gregory , Matt and Chuck for your very kind comments and the likes. Matt - I wondered whether the launch and gangways might cover much of the visible deck - I hope so. Chuck - like everyone else I can't wait to have a crack at Speedwell. As you say: take everything youv'e learned and move on. But I still hanker to make the best job I can of your lovely Winchelsea. I'm wondering whether - were I to do it again - I could paint the friezes (I love Siggi's HMS Leopard - really inspirational) and carve the fancy mouldings and have a go at carving the figurehead - and certainly include masts and rigging. Given that I've never done any of those thing before I suspect I'm dreaming of an outcome beyond my ability but I shall have a go. I think I'll make a mast and then review.
-
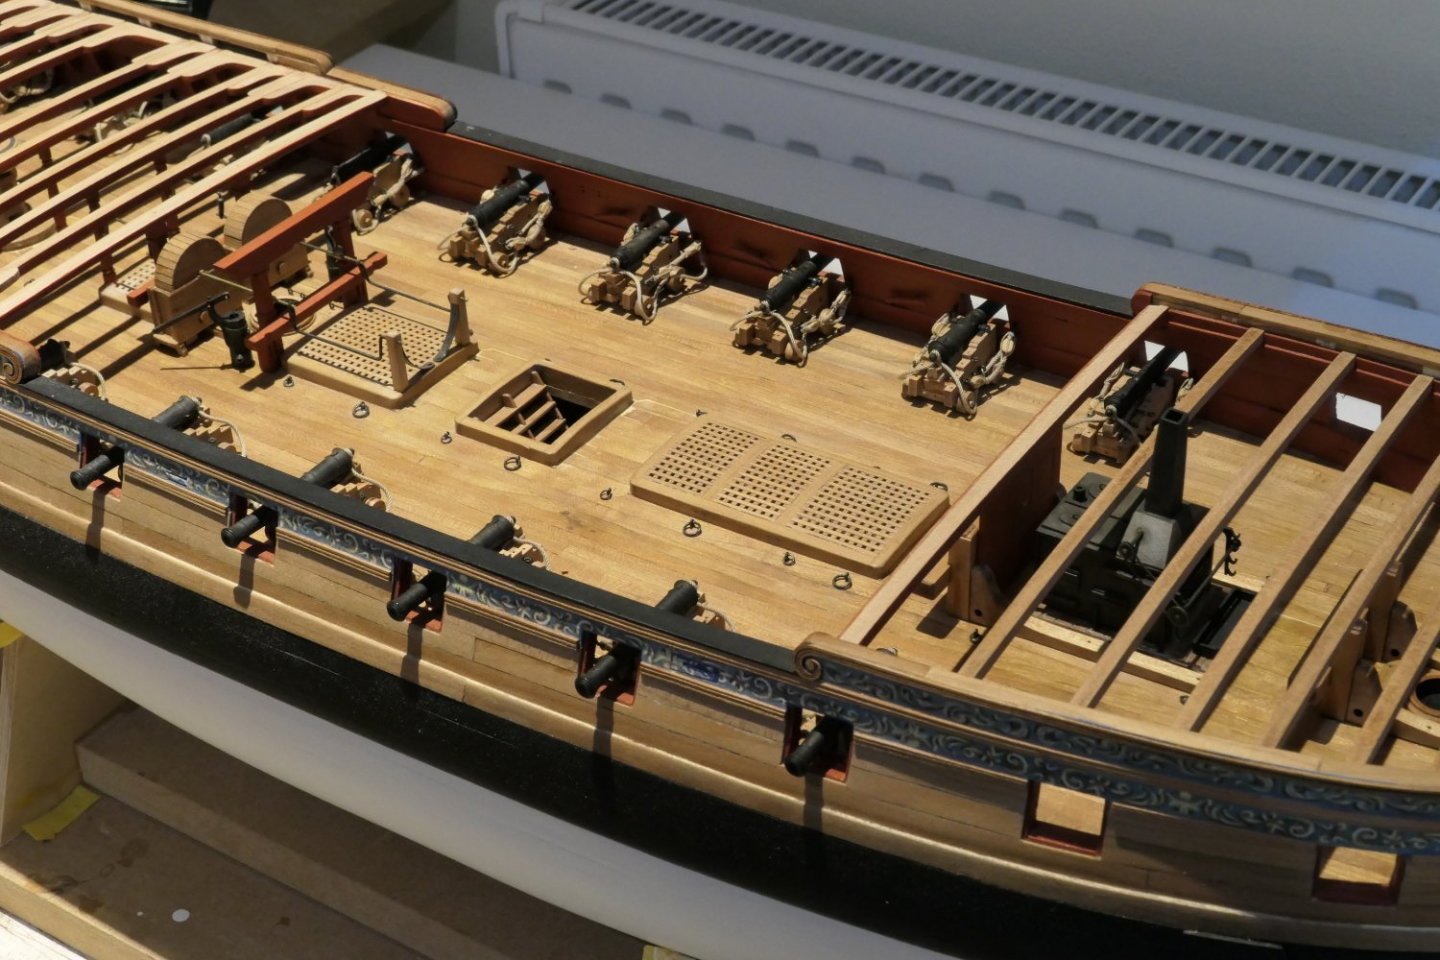
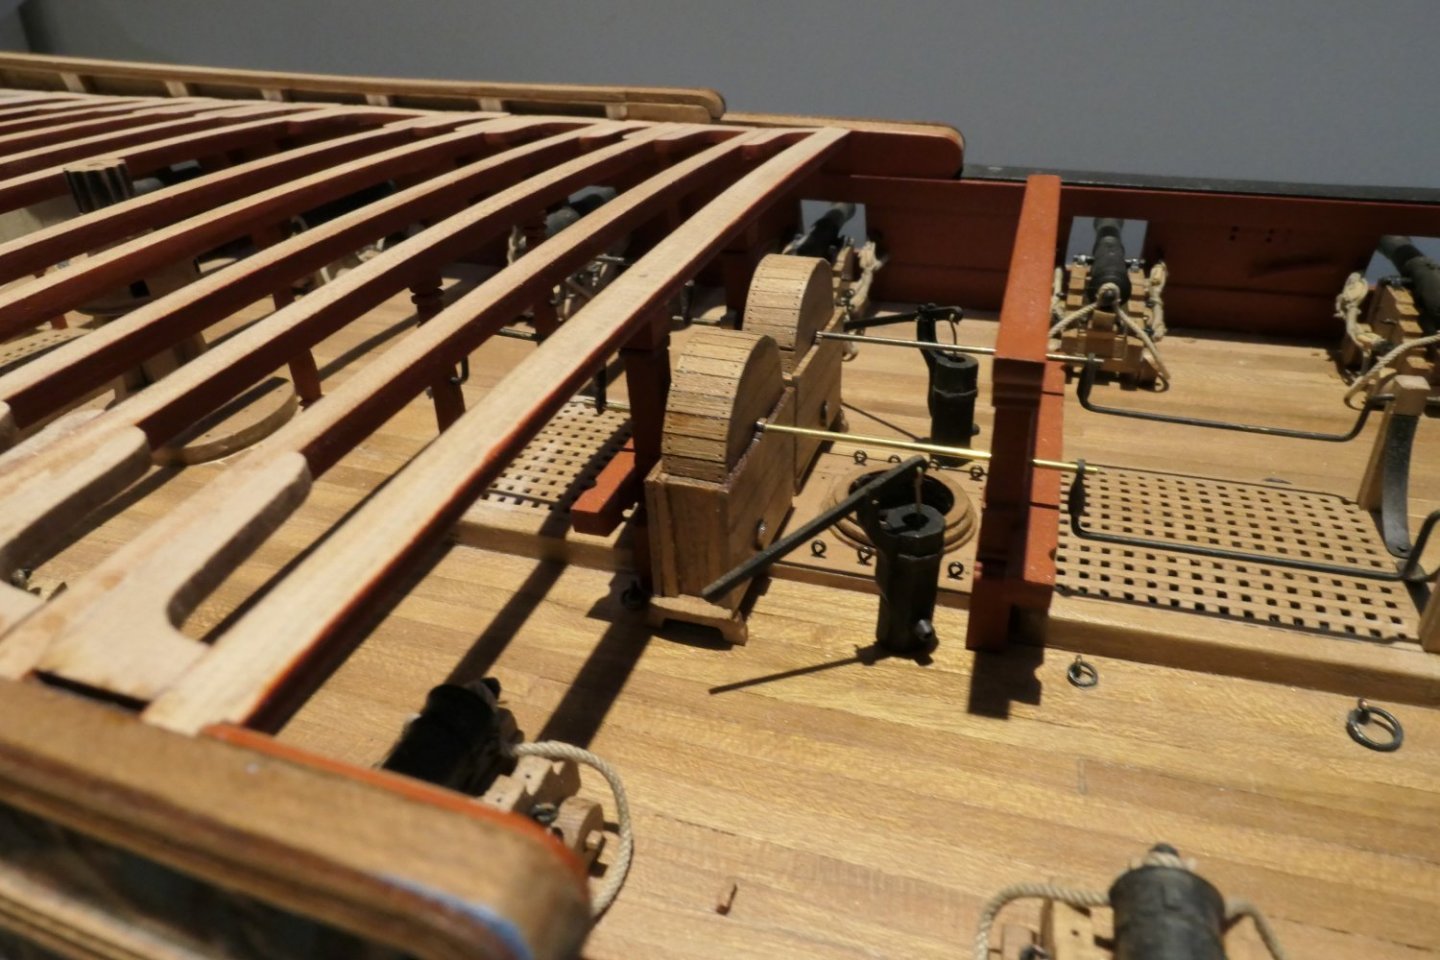
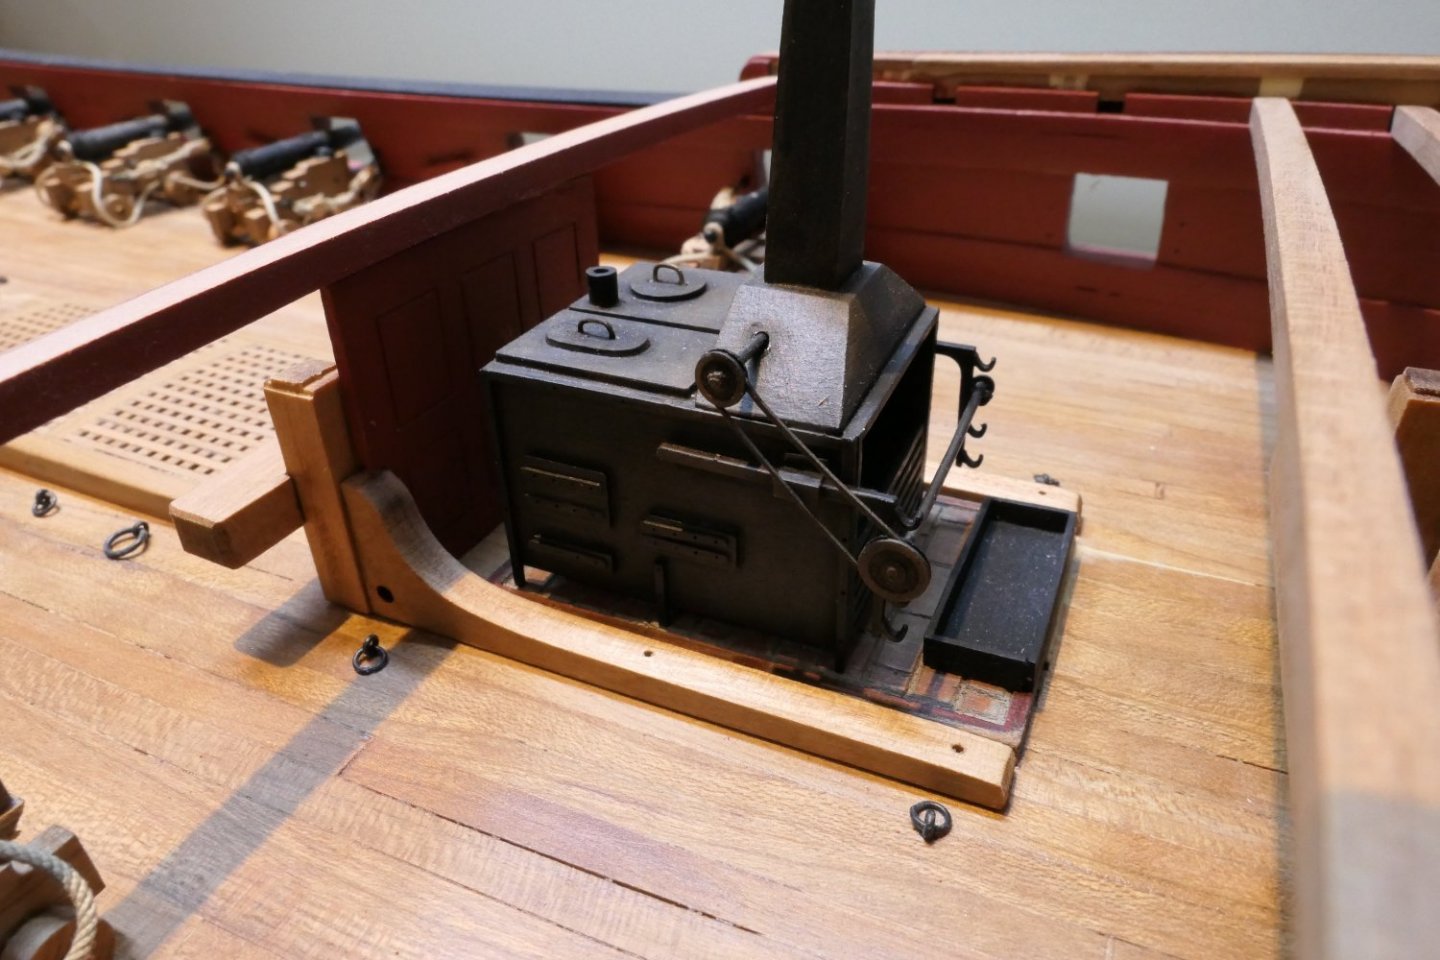
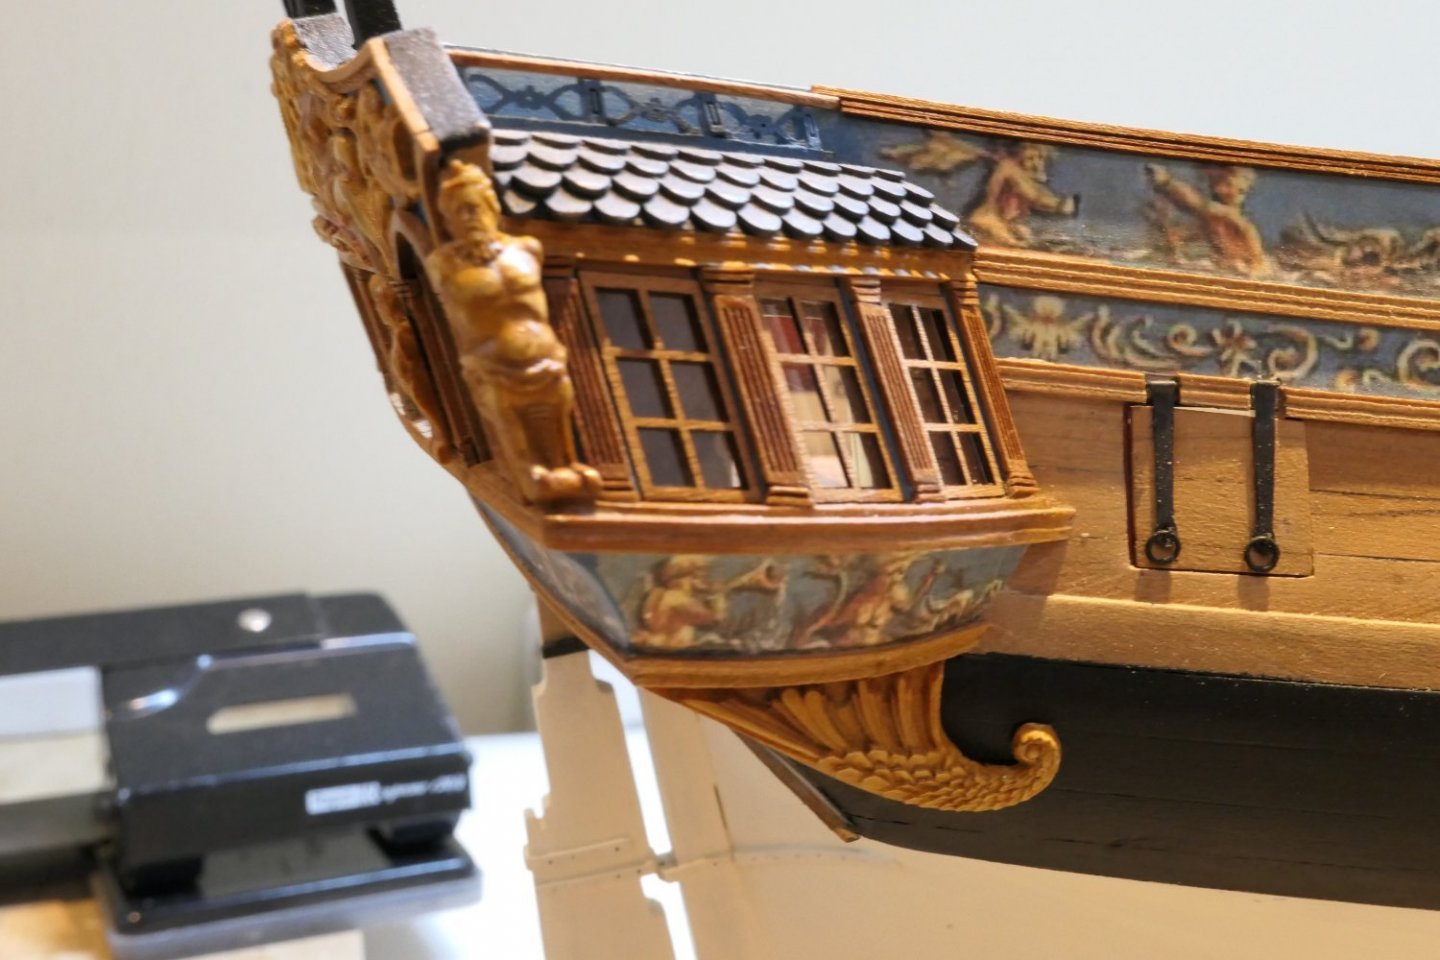
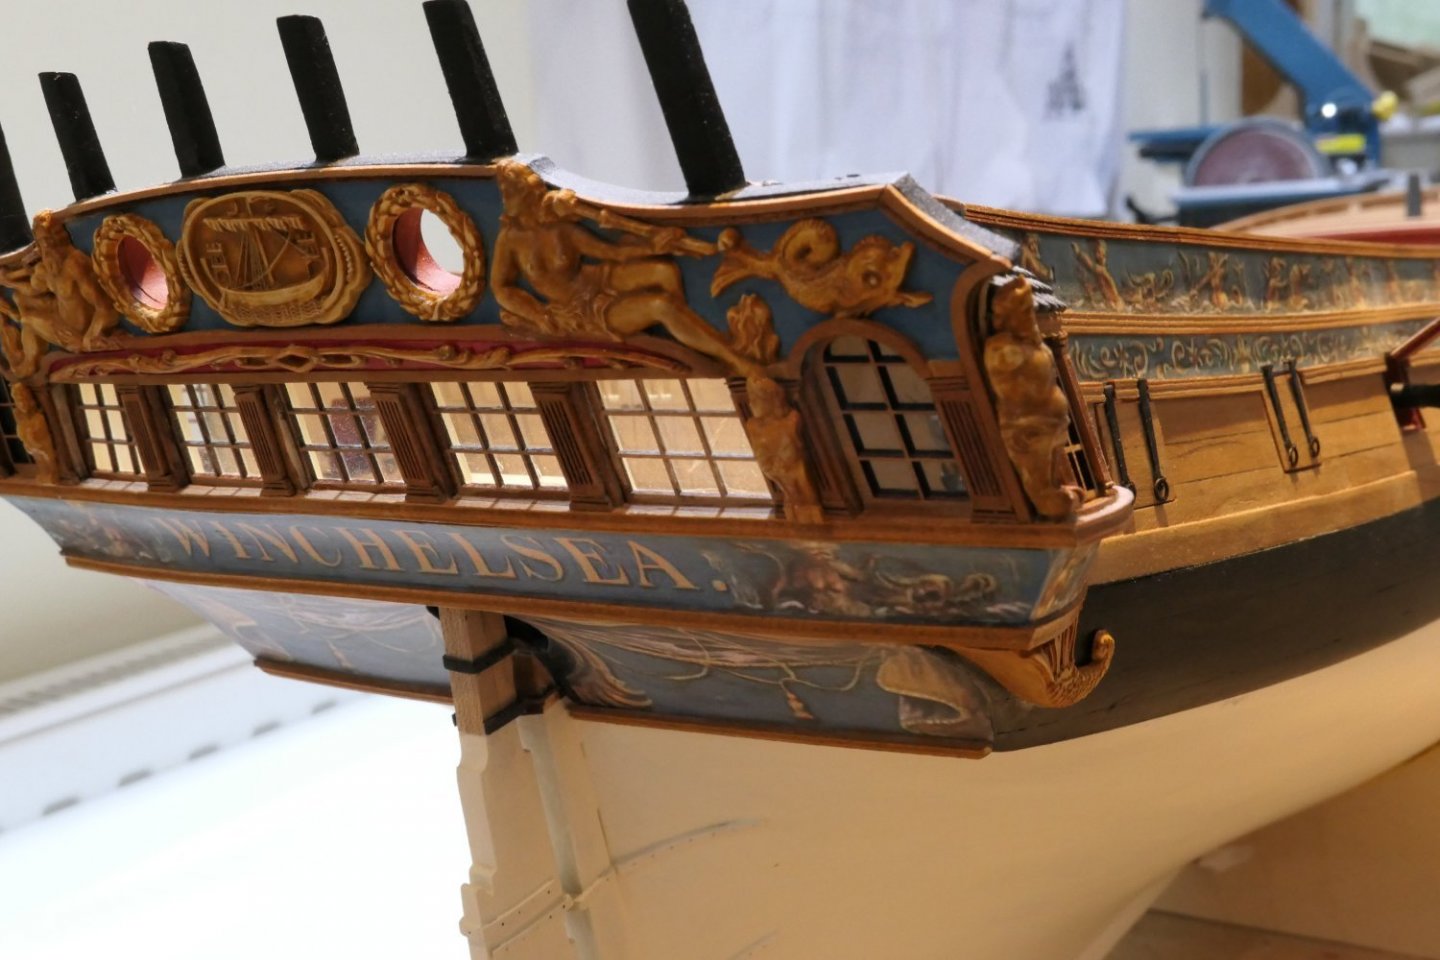
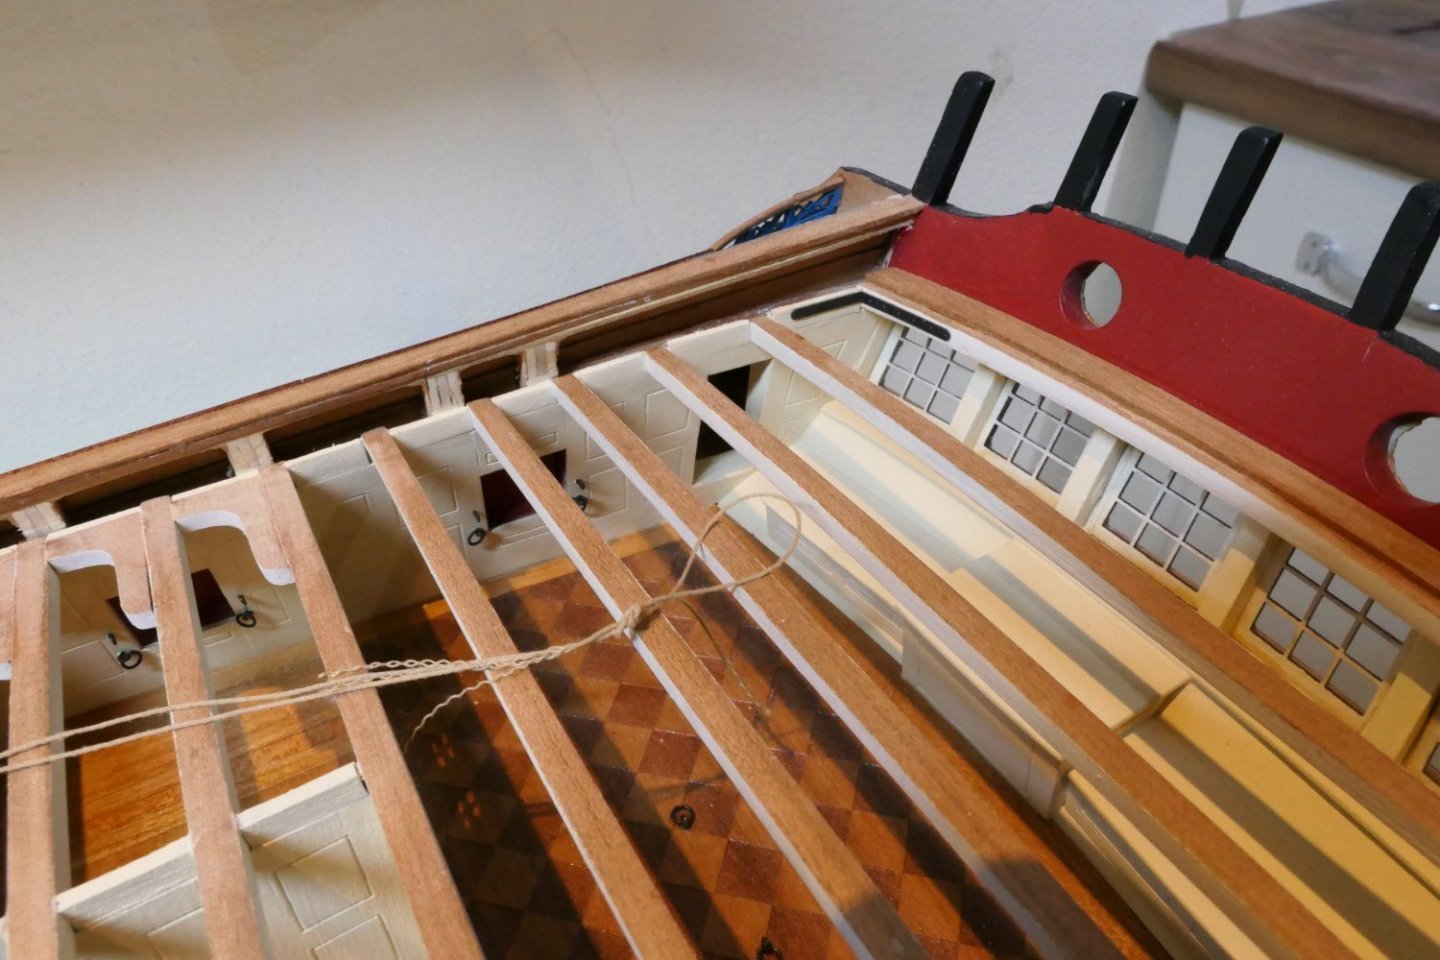
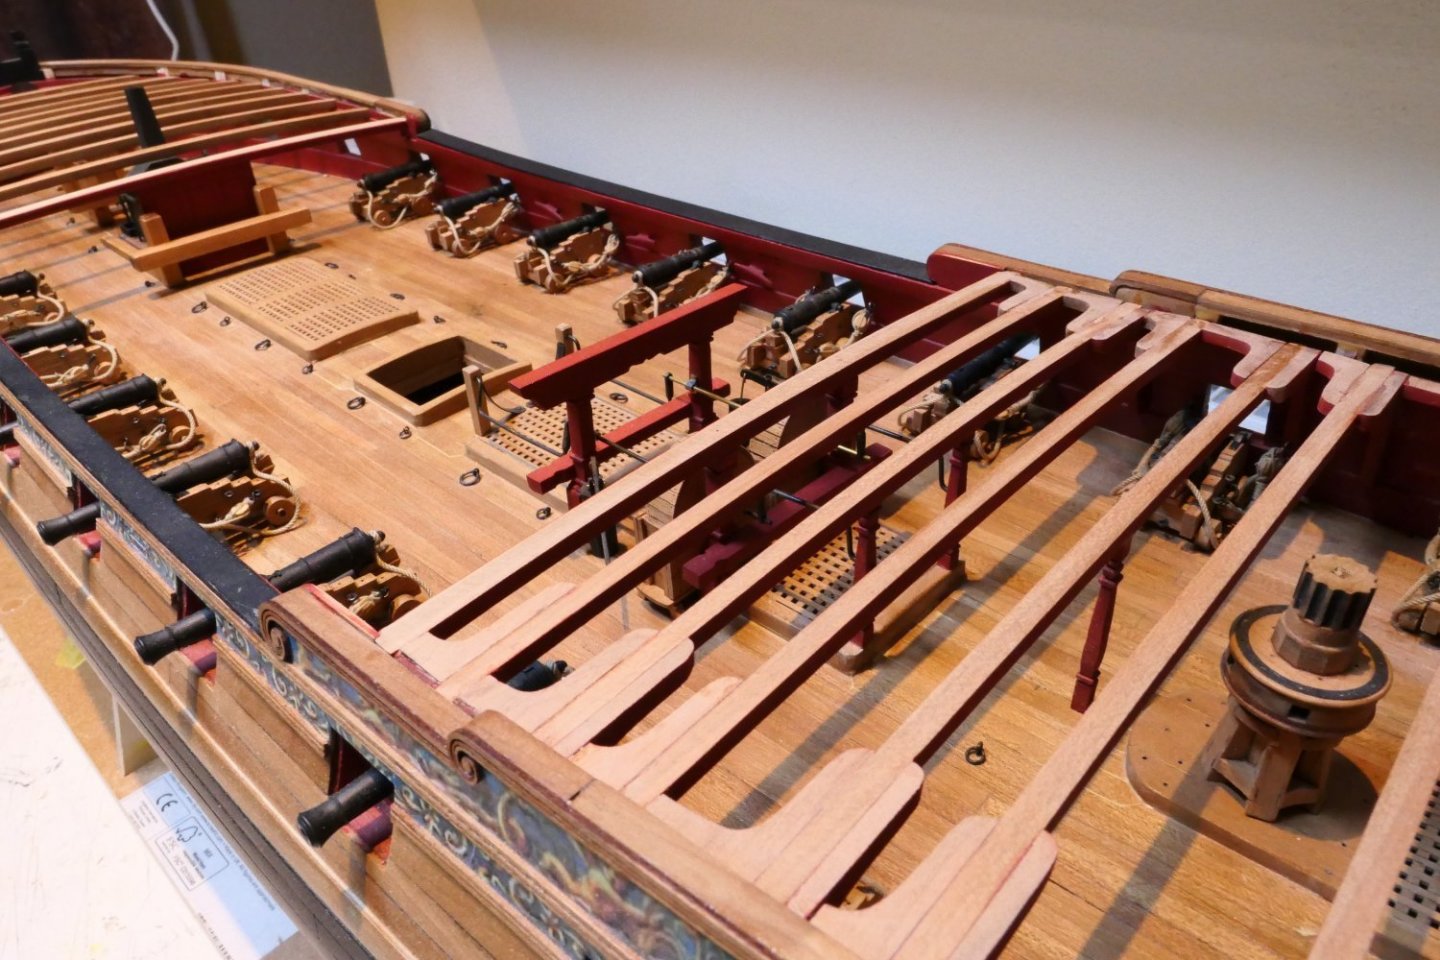
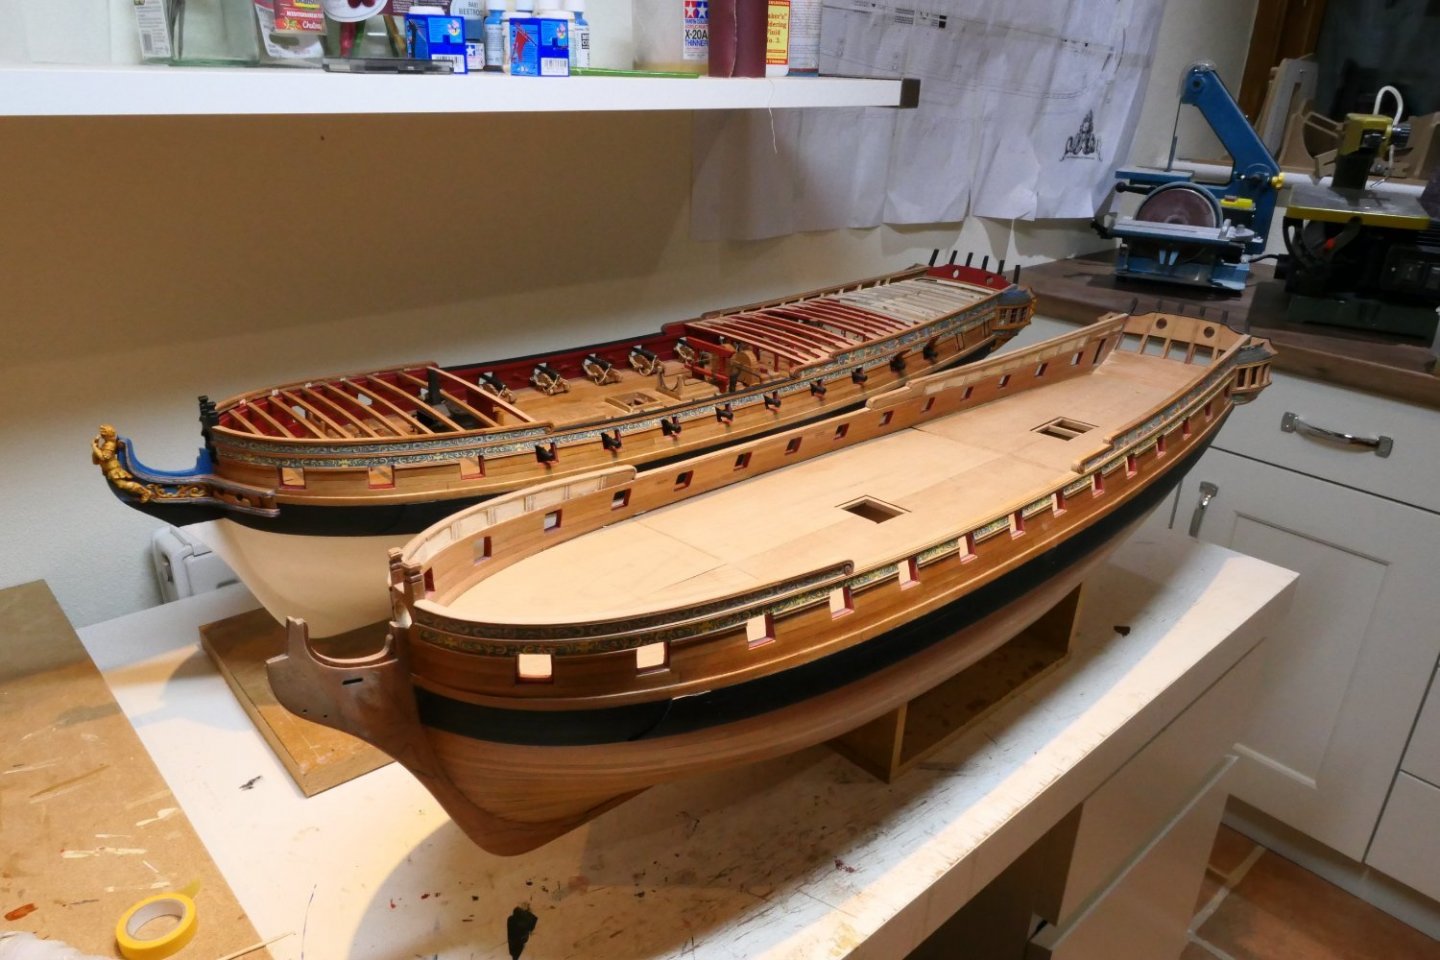
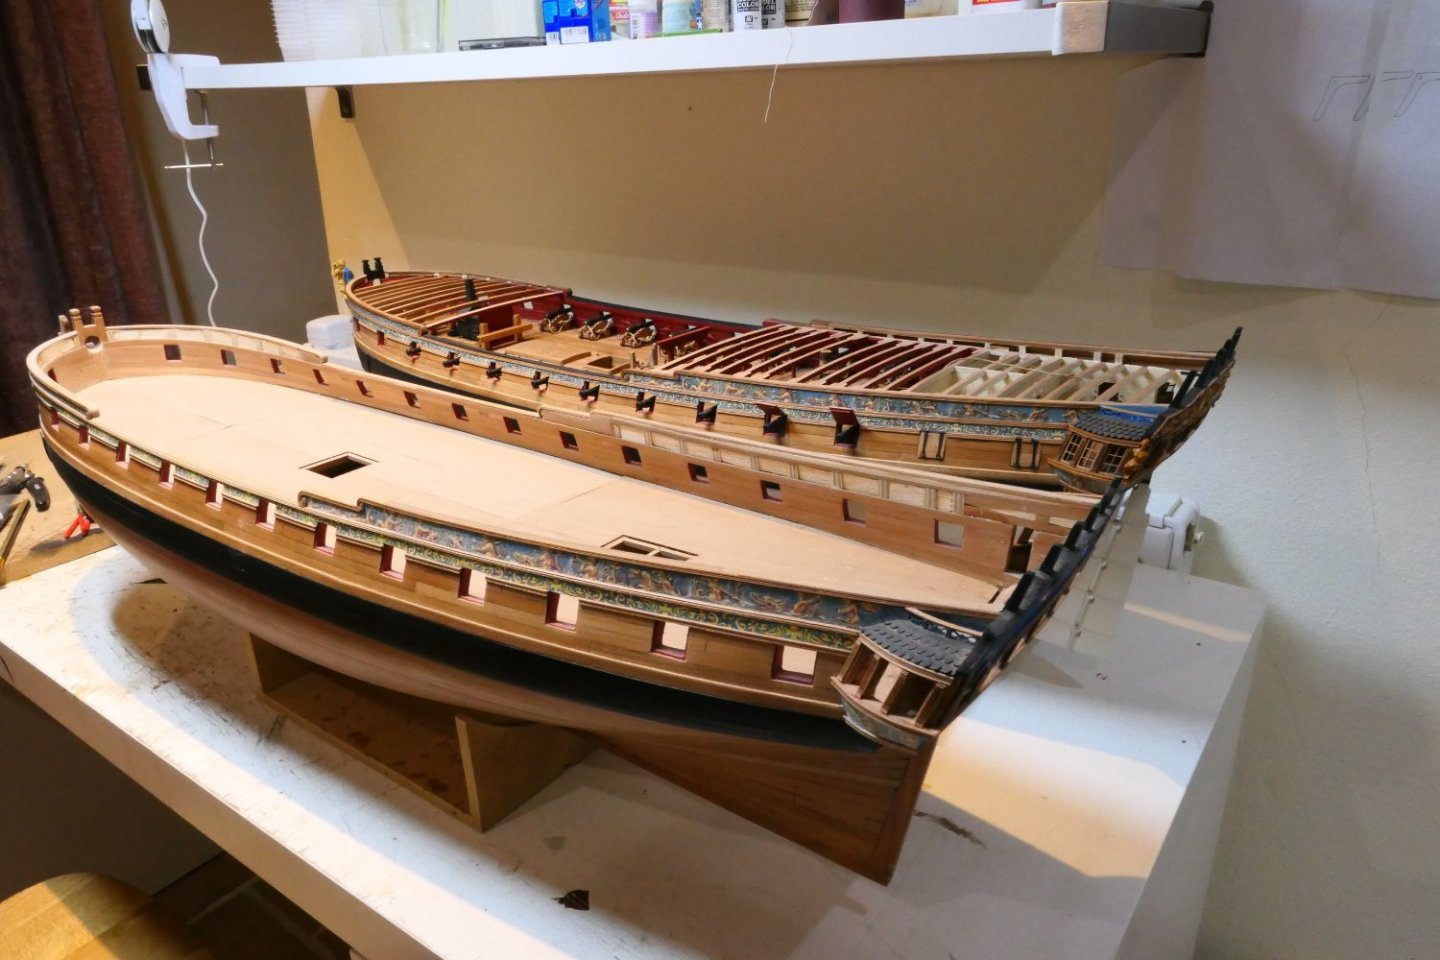
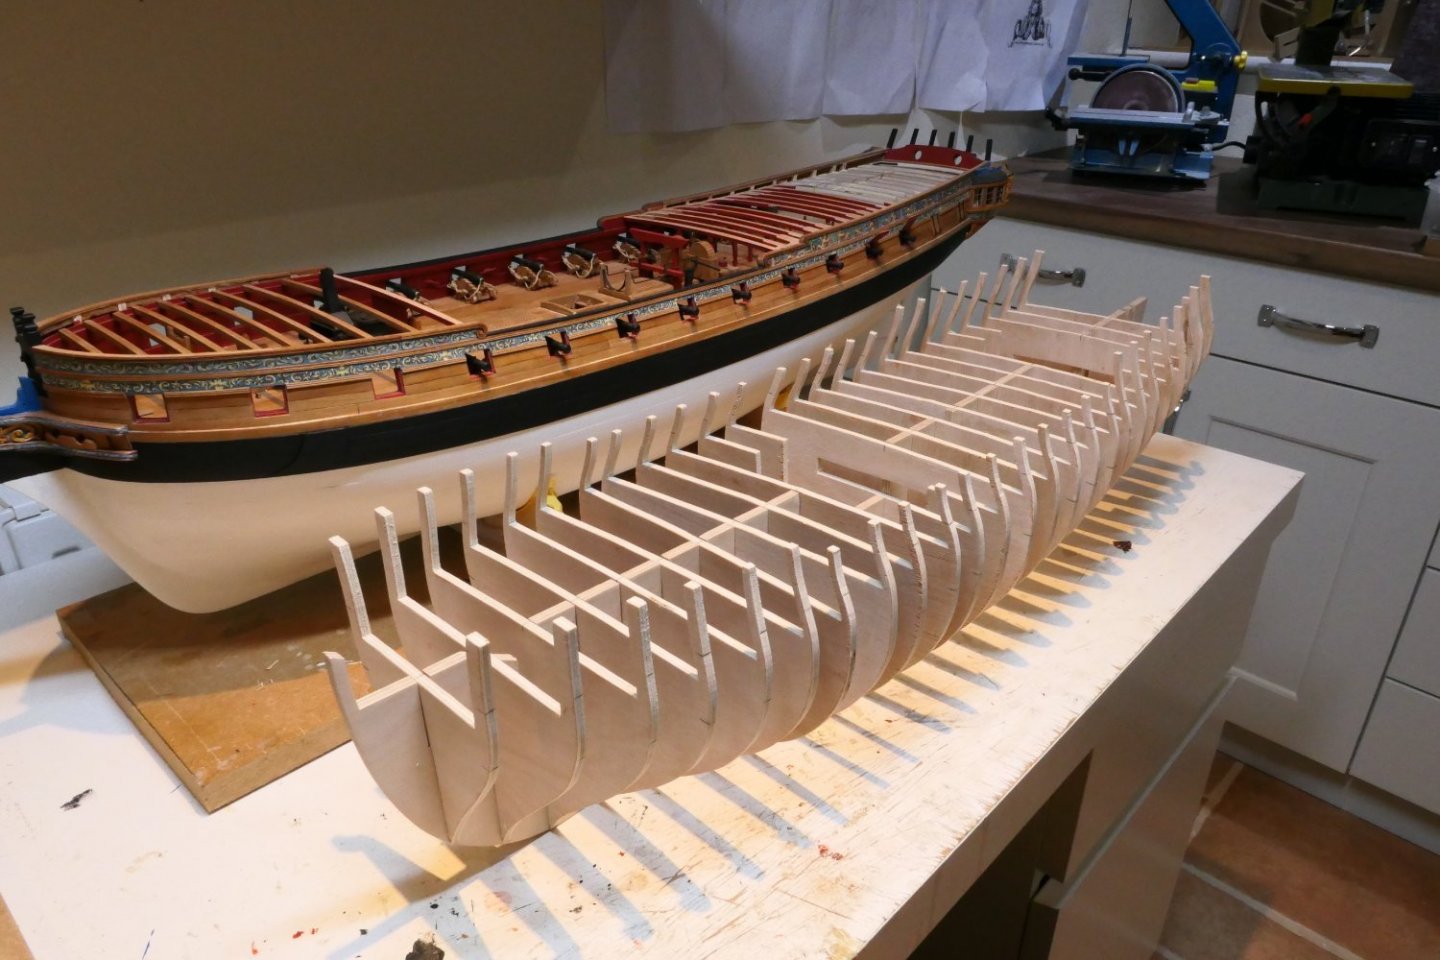
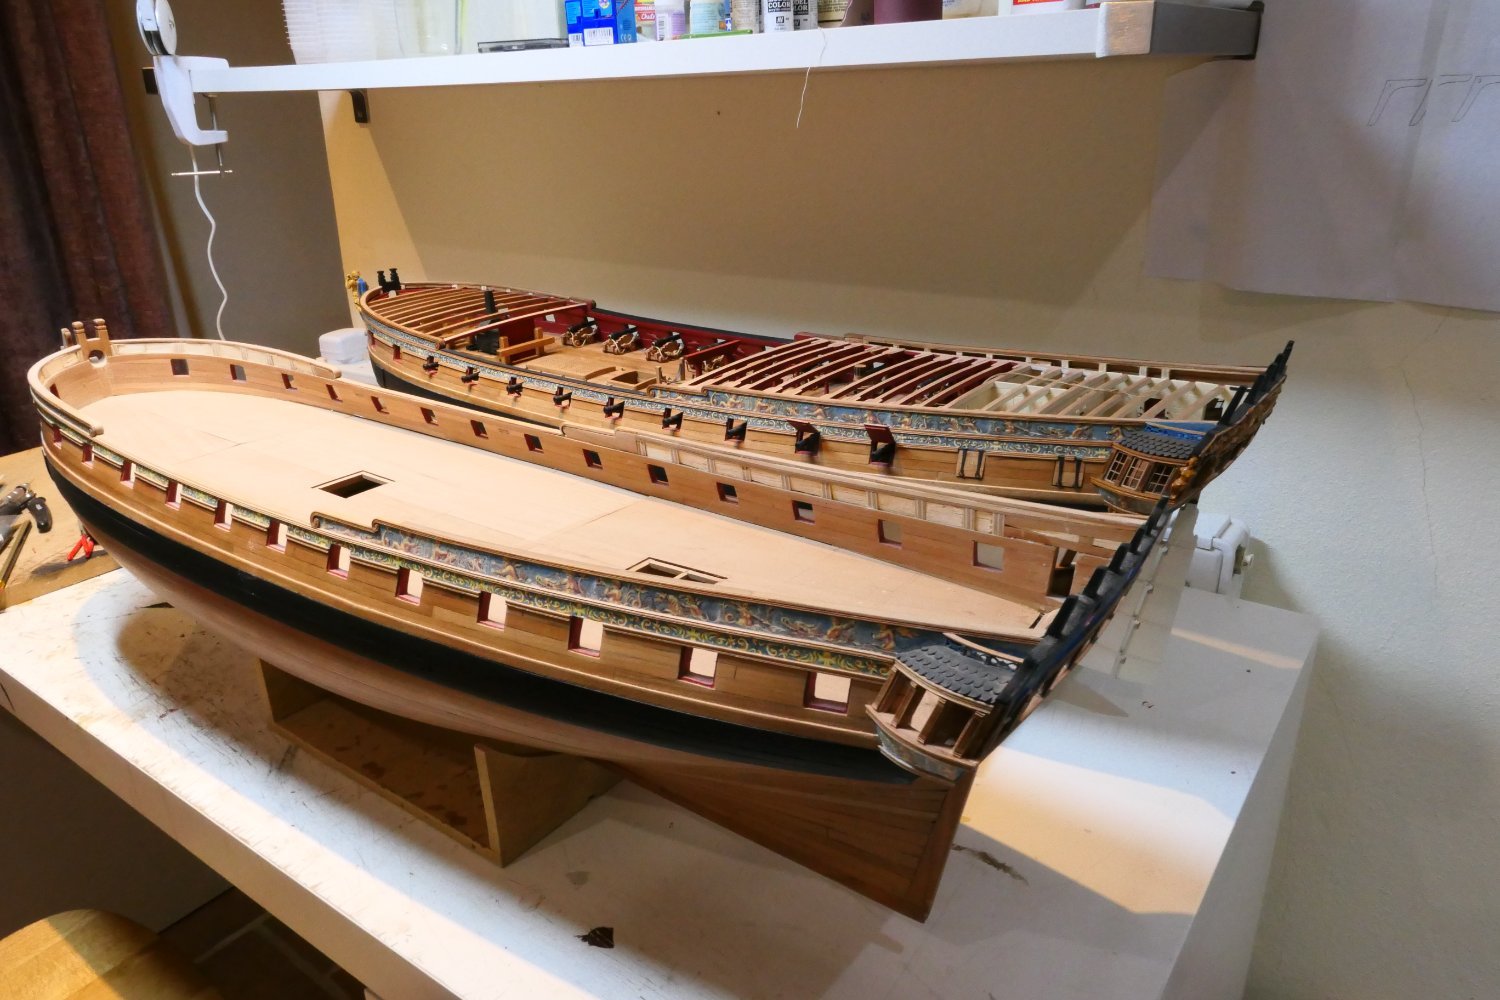
Good afternoon everyone. Thank you for the likes. I'm plodding along slowly. Chapter 7 is nearly done and Chapter 8 is well under way. Rigging the guns with Syren Ultra rope took an age but I'm pleased with the outcome. Here are some pictures. The stove is done. I've glazed the windows with the supplied acetate (?). I had my doubts how effective it would be but it actually looks jolly good. Here are a couple of pictures of the whole. Now seems a good time to take stock. I love everything about it ...... except some of the bits I've done where I have fallen short. That is in part because I'm a relative newcomer - Winchelsea is my third build and its been a sharp learning curve - but in no small measure to the knowledge I've gained reading all the other logs. Model Ship World is a treasure trove of useful learning. Here is W2 with my long abandoned first attempt. They are, incidentally, the same size. That W2 in the foreground looks bigger is an illusion. I am becoming increasingly dis-satisfied in particular with the deck. I wonder if a lighter coloured wood - maple? - might have looked better. Omitting the pencilled caulking was a serious mistake. That would have provided some definition to the individual planks. But mostly I just bodged up some gaps that shoudn't have been there in the first place with some mismatched filler. Ugh!! Look around the hatchway. The question is what to do about it. If I had the skills I would scratch build something – but I don't. And there is not really another model on the market that I would prefer to build than this one. I really want to produce a result I can be really proud of without reservations and this one, I fear, will come up short. Here is one possible solution: I've got the plywood left over from the big sheet I bought for W1 and a scroll saw. And I really think I can make a better go of it. Just a thought! Best wishes everyone Fred


.thumb.JPG.e5f3e0e7d8e54a8a1ba614e2c1ef1a48.JPG)


.thumb.JPG.8434ae06a8fd02c5bd1e45725aa56809.JPG)
-
Happy Christmas everyone and best wishes for a peaceful and healthy New Year. And Chuck - if you can see your way to that fully framed 1/48 Speedwell I have it on my Christmas present list for next year. Fred
- 1,784 replies
-
- 3
-
-
- winchelsea
- Syren Ship Model Company
- (and 1 more)
-
I did exactly what Ben and JJ did ; sanded to the blue line not the green. It is easily fixed with a bit of filler which is hidden by the frieze. Here is a picture of mine. You can see the filler.
.thumb.JPG.3871ad389a50b66216074f9c8ae4478e.jpg.99ea7fd3fbd661abbfd7e5546412f829.jpg)
-
Good morning Reg Were you able to get your next chapter parts from the US or does the Covid import embargo still apply? I will shortly be ordering chapter 8 parts and I am very happy to include your order if it helps. I am assuming, of course, that there is no import embargo into NZ from the UK. I intend to place my order in the next week or so. Chuck usually dispatches the same day and packet takes about a week to get here. The possible downside is that, from time to time, packets from the US are picked out by customs and then subject to import duty and VAT and sometimes a handling charge. That can add about 20 - 25% to the cost. There will also be the onward postal charge to NZ. I guess about 20% of packets are stopped by customs and subject to charges but there does not seem to be any rhyme or reason to the process. And I suppose I should quarantine the packet here for 7-10 days before sending it on to satisfy our respective consciences. Let me know if this helps. All the best Fred
- 137 replies
-
- 1
-
-
- winchelsea
- Syren Ship Model Company
- (and 1 more)
-
That is looking fantastic. Keep going at that level and you will have a superb Winchelsea. Fred
-
The level of detail you pack in to 1/4 scale is quite something but just think what you could do with 3/8/or a 1/2. That said, I guess a lot of Speedwell - if that's what it's going to be - builders will want to sit it alongside their Winchelseas at the same scale.
- 1,784 replies
-
- 1
-
-
- winchelsea
- Syren Ship Model Company
- (and 1 more)
-
Thank you Chuck - I've got them now: I never knew all that stuff was there! I've been working from the Syren website. As to Speedwell: I'll do my best not to think about it....but!
- 1,784 replies
-
- 1
-
-
- winchelsea
- Syren Ship Model Company
- (and 1 more)


.JPG.56ba55aadc2f8ef422803c448cc69a55.JPG)
.JPG.02629b7bc3d0e70ce000fc4c6341f768.JPG)
.JPG.d6f6a93b72f9034c3a3f9a80f7749511.JPG)


.JPG.759e63519dff67883271b1299c4cef2c.JPG)
.JPG.35abf2c116d0c0406d6d3a6857549d63.JPG)
.JPG.d2af900fe8ed67de52b70d0e9f96c0b3.JPG)
.JPG.4dfe8d3665396dc0a4eadaeffdabb84c.JPG)
.JPG.9f3767ecd3ad46a1b4aa6b7021b05ba3.JPG)
.JPG.2cbbf6b1911cb606dc3351aa9ba64cc5.JPG)
.JPG.2fff214558b306e7fbb3bf36149eda69.JPG)


.JPG.f573b217c81897e11381bc192ffa4b2a.JPG)
.JPG.7d3a95067edf670f88b88fd4711f627e.JPG)
.JPG.ac32b39da399cea9684aa499a2eea5c6.JPG)
.JPG.3d1dafcbc89d3f38cf050c03c6f071d7.JPG)
.JPG.eb81e1a58a3911a42d5e184d55888249.JPG)
.JPG.4252899a33a4caa1fccd2fbde4946f75.JPG)


.JPG.70825c1b1cd7fa54272ab17d8f28c3fa.JPG)
.JPG.cb6434e0f076ee6a78dbcd54313cd93f.JPG)
.JPG.5f0644f206ca838507bfdc7fd3f891aa.JPG)
.JPG.1fc4b1f16d365cc48f706c743bfa4da0.JPG)
.JPG.32f2d1bf479ff56e79060825908018cd.JPG)
.JPG.d0b3da3c6898bcca3beb5a3cb6abc5f7.JPG)
.JPG.54473ee9bf33adf83acf8aef260e4d7f.JPG)
.JPG.ca58c0f242e8dbeb5e9b712f30b51e8b.JPG)
.JPG.f10da76db9c1472a52f94e11ff9317a4.JPG)
.JPG.cb12e687d44929dcc66df88881c34833.JPG)
.JPG.4938e2a98a8c6d6388a1ac27368e215e.JPG)
.JPG.1dace2813d05f55a51f432fe31583906.JPG)
.JPG.a882ba682feb2b7df635f2ca5fdf4ab2.JPG)
.JPG.072ca9637ad4d6b2cd784f5f9cec5797.JPG)

.JPG.83f3a4409627d040f38e542f6998b013.JPG)
.JPG.24512adde2d665bef16f4fb37beef9c9.JPG)
.JPG.5827fb656f776d70fb0fc06e8c659744.JPG)
.JPG.857950ef5cf354c5530203fc686fb92a.JPG)
.JPG.bce648362d4939e0a28920a1d6318c45.JPG)


.JPG.4d23434174e9e480bc11894cc079afc4.JPG)
.JPG.01fc31259ed321dd85fc3fbfbc93bfe6.JPG)


.JPG.91ea5075e14576ea58a0d48a2876add0.JPG)

.JPG.73390b9d32b04f347e73d296b6202a7e.JPG)