HOLIDAY DONATION DRIVE - SUPPORT MSW - DO YOUR PART TO KEEP THIS GREAT FORUM GOING! (Only 13 donations so far - C'mon guys!)
×


mog
-
Posts
196 -
Joined
-
Last visited
Content Type
Profiles
Forums
Gallery
Events
Everything posted by mog
-
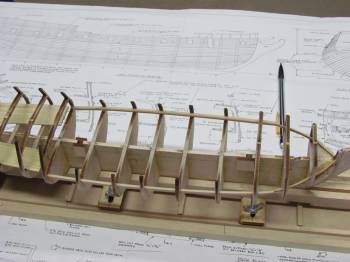
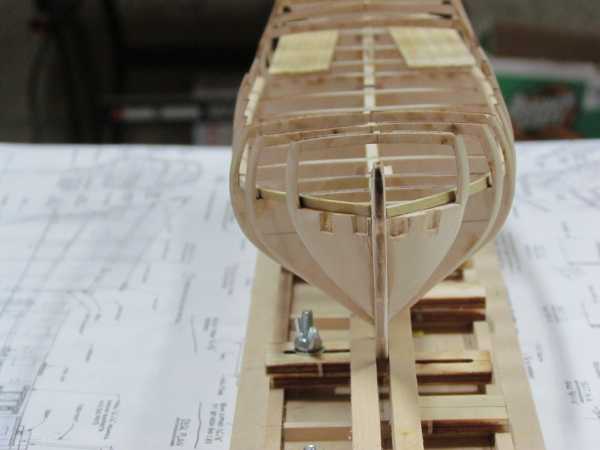
Everyone sees there builds a little differently and with their own opinions , so just my thoughts here Precut parts are never perfect; most bulkheads will need some sanding and shimming along the way. Maybe allot of both And still might not fit perfect but that’s the beauty of wood you can always shape it to get darn close. I soaked my test battens to get a good bend, just to see where I was, I use allot of Rack of eye to get a visual of the lines, however I always got some gaps or dips at or between the bulkheads, that’s just the way building is, again it’s never a perfect science, I agree with the other posts your doing great, your lines are looking good, take your time, enjoy the challenge. I don’t know what your planking plans are? But it all starts with your battens and finding a good line. again take your time, it pays off later. I double plank my hulls, It does several things for me, first of all not being the best plank guy around it gives me some margin for errors, the kit supplied hull planks are thicker so you can sand , shape and fill where needed to cover a few errors, and get really good hull lines, which makes the second planking much easier as you learn from the first planking , second planking strips are generally .05 mm gives a very nice look to a well shaped hull, a little ahead of myself with all the planking talk, but you’re at the stage that sets tone for the rest of your build. Again enjoy it,
-
Mike, Always good to have a new rattlesnake build on the site, the more ideas the better, especially with the model shipways kit, I found the instruction book lacking depth, so I relied on the plans for most of my work, plus allot of ideas from the members. I tossed all the cast metal bits and scratch built everything. During the bulkhead stage I also had the warping problems, and found the bulkheads very fragile, not to worry it all worked out, time trial and error that’s the key, every rattlesnake build is a bit different. take a look at my log “ Rattlesnake by mog” I have taken a slightly different path working for a more natural look and feel. Please feel free to ask any questions or pass along any ideas, as I like to say it’s your build, build to please the builder.
-
mike v Stains in small quantities really starts to limit your choice, Admiralty stains from Cornwall model boats Ltd, in the UK do offer some stains .but again limited . I buy 250 mil cans , any DIY store has a large selection, and selection and easy to get is the key . My main go to stains are teak, light/medium/ oak, Antique pine, teak oil, Canadian cedar, walnut and mahogany. I only use satin stain, avoiding anything gloss. Danish oil is a good brand, but really any store brand will due plus store brand is cheaper. Ship staining is all about Trial and error , I mix different stains to get certain effects, or I might stain one color then overstrain it with another, each coat slightly changes the look. it’s all about what effect you want, and how it works on different types of wood. It is also a good idea to keep good notes on all your experiments. I even keep and label Allot of my test wood strips . You will always go back to your notebook. When I find the right mix or wood combination I want to use on the build , I always number it in a stain log just for the build I’m working on for example # 1 cedar all deck areas, or #2 light oak with teak over rub hull below the whale. This way as you progress thru the build you will know what you used in each area. I finish all staining with a light coat of matt varnish .first question on conditioner when staining is have you ever tried it ? The standard school of thought for painting wood is always prep or condition , which I guess has prompted the you should condition when staining debate. Everyone has a different mindset when it comes to picking a path you want your build to take. As for me its all stain and natural wood tones, very little paint, please see my POB build log “rattlesnake by MOG, “ it will give you some idea where I’m coming from , Like I said staining is all about trial and error , getting the right tones and depth of color , and what works on different types of wood is the whole deal. , conditioner is a sealer, holding in the grain, as so the stain will lay on top and not absorb into the wood, it also effects the stains color example a light pine or cedar stain will turn dark when applied over conditioner. Again it’s your build , so your call , I would experiment with and without conditioner to find the effect you want. For me it’s all about what statement you want your build to make. I believe staining brings a ship to life, Anyway these are just my thoughts , long winded but if it helps in anyway great,
-
Thanks JPett and Craigie65, Your right like the old style solid look of a ship, for me is all about the feel, or presence the ship makes. Plus I do spend allot of time in Scotland, guess some it has rubbed off
- 57 replies
-
- 1
-

-
- rattlesnake
- model shipways
- (and 1 more)
-
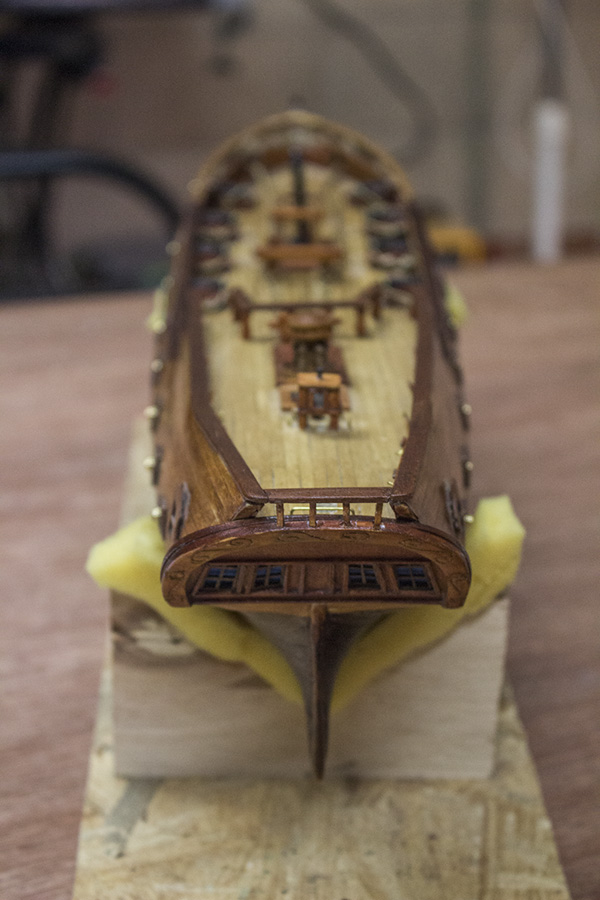
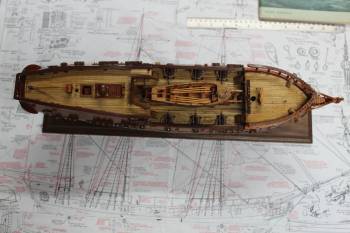
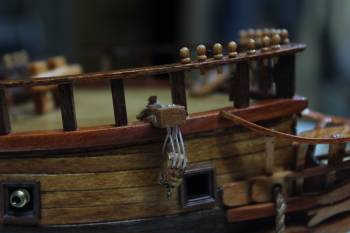
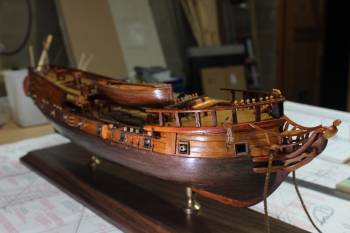
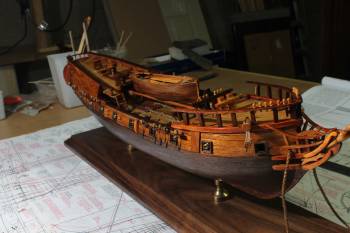
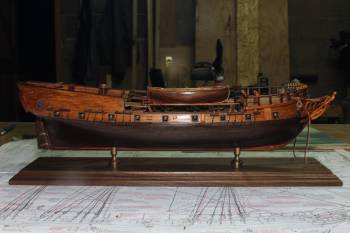
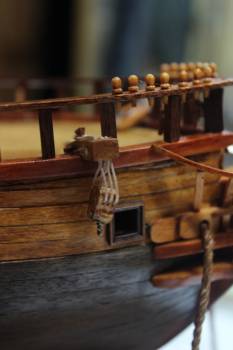
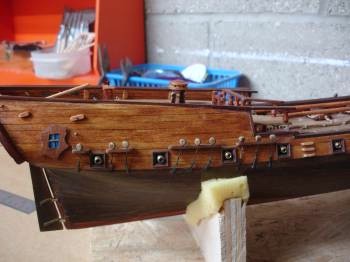
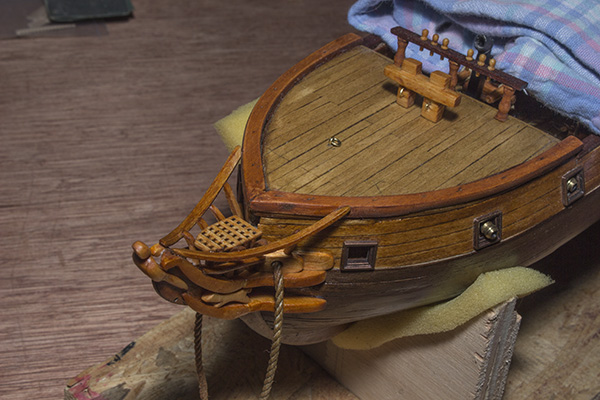
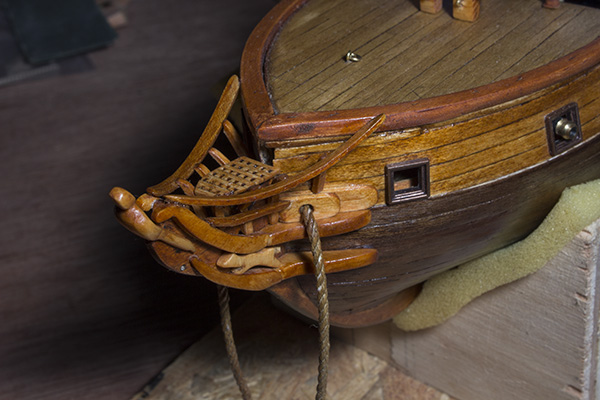
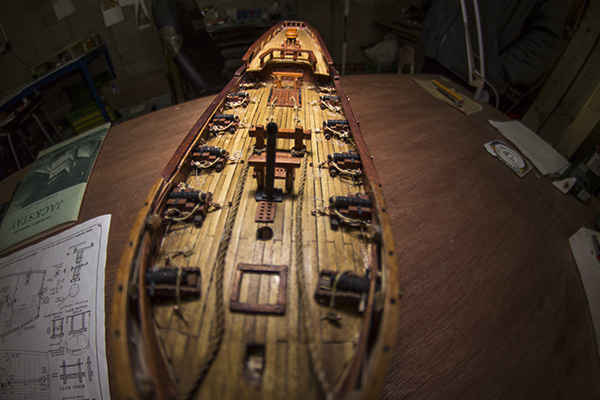
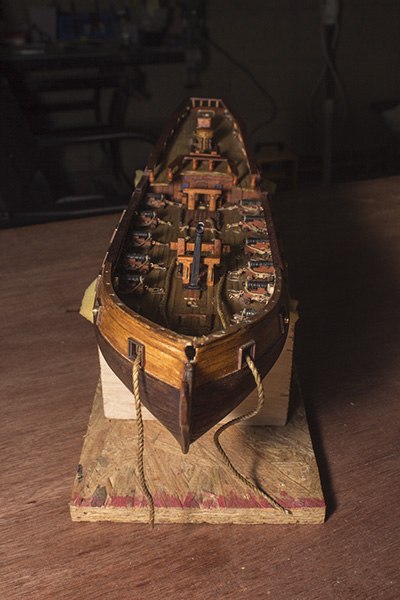
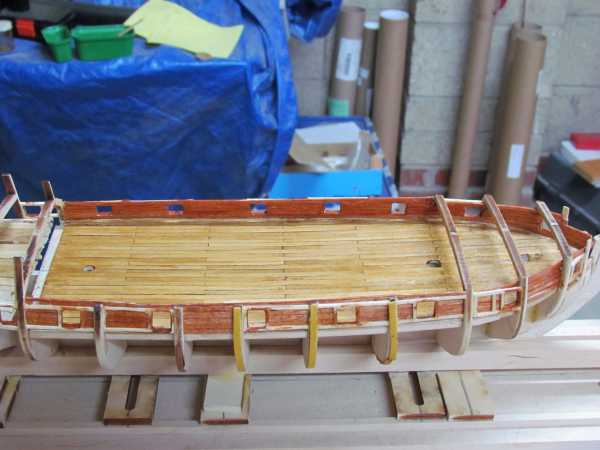
Progress to date Completed cutting and installing forecastle rail with pins .cats head with anchor block, and mounted hull to the stand , However have not rigged the longboat yet, will do so at a later date. I think I’m now ready to set the hull aside and start mast building, anyway Unless I have missed something.?
- 57 replies
-
- 4
-
-
- rattlesnake
- model shipways
- (and 1 more)
-
Like many have said it’s your build, do it your way. I build for the builder, in my current build log rattlesnake by mog you can see I hardly ever use paint, stains blended with different types of wood gives the build its own expression. yes it goes against the historical look of the ship, but again for me this is a hobby, not a profession I’m not a master craftsman , simply put I let the build take its own course , some will hate it ,some will like it, at the end of the day the eye of the builder is what matters most. just my thoughts.
-
Ken, Your Rattlesnake is looking good, Nice look the blue in the windows. I feel your pain on the deck beams, I lost mine the first week, finally got tired off fixing them and removed them until I was ready to cut my own. have a look at my Rattlesnake by Mog, we might be able to compare notes, any and all advise is always welcome, the members have helped me thru several tough spots. I have taken a slightly different path to the original look of the ship , besides my rule of very little paint, I tossed all precast bits into the bin and attempted to build my own . Again I like what you’re doing with the build.
-
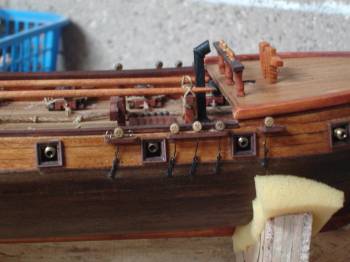
Took several months off, to work on other projects Completed deadeyes. Channels, and simple wire chain plates with strops.
-
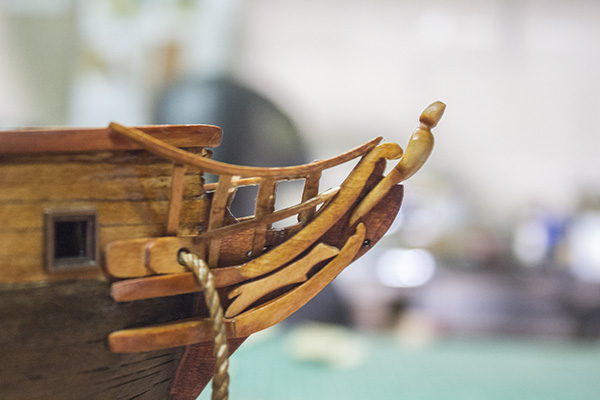
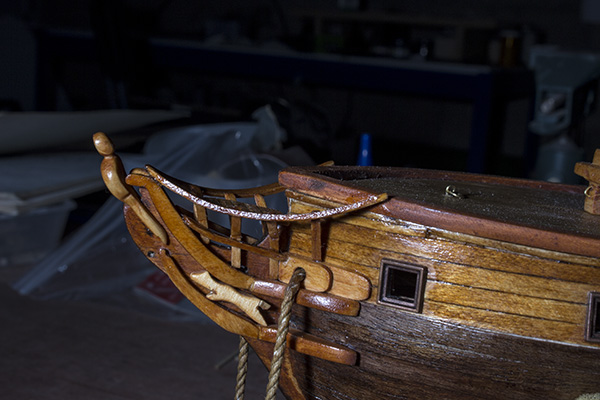
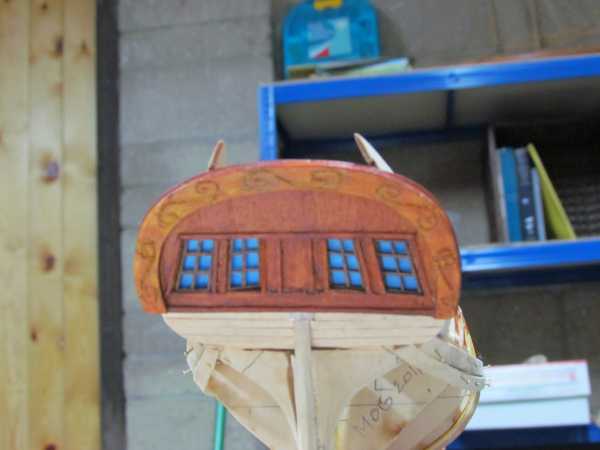
First my thanks to Martin and Chuck for all the research information. As this was my first attempt at building head rails , it was a slow trial and error process. I’m learning that scratch building is allot of stop , start, head scratching and much time staring at piles of wood trying to find that right piece . With 1:64 scale there is not allot of room in the bow area, so bending and fitting was different to put it mildly. I tried to keep the look consistent with the overall build, while sticking to a very simple, plain building method. I have not learned to carve the fancy stuff yet. However overall I’m pretty pleased with the outcome. The only thing I might redo is the figure head I shaped it using sandpaper from a solid block, will have to take another look at how it fits in.
- 57 replies
-
- 1
-
-
- rattlesnake
- model shipways
- (and 1 more)
-
JP, sounds good about the long boat , I really enjoyed doing it, it was like a mini break away from the main ship. look forward to seeing it. also good luck with the basswood plan, I found it worked better when I really gave it a good soaking before bending, the good thing is if you don’t like the look you can double plank. Cheers MOG
-
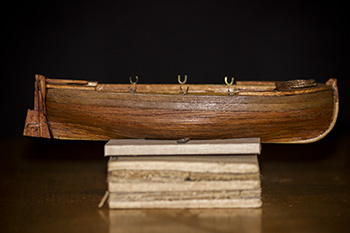
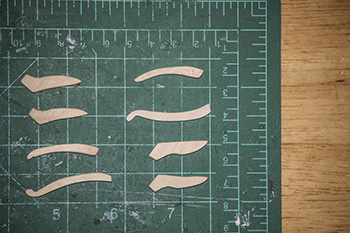
JP, Thanks for the words, really to kind, as I have said several times on the site, when your a very simple builder of average skill it’s easy to like your own work, I’ve see the other RS build Logs, very good work don’t think I will be at level for a long time. With that said on to the planking , again following the Mastini style I double plank every thing the hull, the deck,. I just like the way it adds to the look. On the MS kit I was not happy with the wood supplied for planking not if you were only going to single plank, it was ok for the first layer, know this is just me , others might say its just fine, but the hull main ship or long boat is the whole show , gives that it’s my boat look if you know what I mean. Sorry to much ramble the long boat I used the laser cut frames provided as a template to get the basic shape then allot of sanding getting it down very thin to form the right lines,. Then planked around the frame again keeping the shape more sanding until the first planks are thinned. after that I planked normally using very thin walnut strips, using the glue, heat pressing method. The key was getting the right lines on the fist shape Allot of work but I used it as a learning tool to help me better understand proper shaping of the bow and stern turns, something I need work on when dong main hulls. A little long winded but it happens when talking builds. MOG
-
Zev Your build is looking good, There are several of us building Rattlesnakes , each has a different style, so there’s allot of good RS build info on the site. Mine is also from Model Shipways, also had some of the problems with cuts out of center on most bulkheads, plus the beams were so weak I had to cut them away as it was simpler, than gluing them every time they broke, also tossed all the precast parts preferring to build everything from wood. I’m a big follower of Frank Mastini’s work , following his style of using stain, rather than cover the wood with paint, it’s not for all but it works for me. Also I have found allot of good information in the Neophte Shipmodellers Jackstay by George F. Campbell. Look forward to seeing more from your build.. If you find the time have a look at my build log Rattlesnake by Mog it's not the best build you will ever see, but it's where the path has taken me. MOG
-
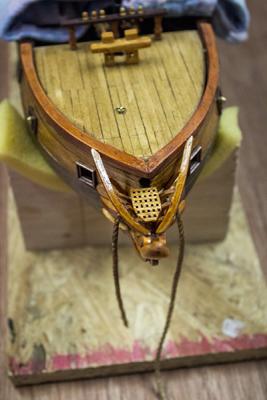
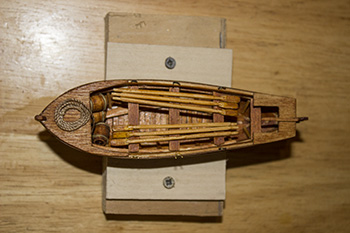
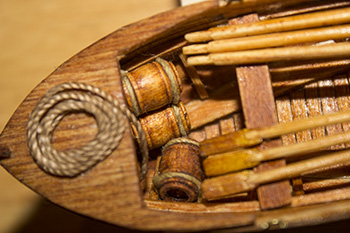
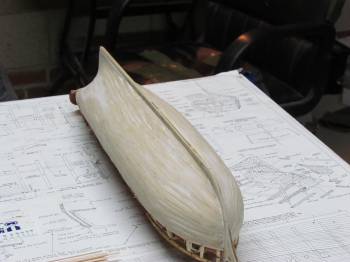
Longboat, doubled hull planking, using walnut and maple added coverings to the bow and stern and reshaped the rudder. tried to keep the hull consistent with overall style of the ship First attempt a carving the cheeks and lower rails, getting there with many thanks from Chuck and Martin W. on this version of the Rattlesnake there is no precast headrail parts to follow and the instruction book is lacking so area will be all trial and error built.
- 57 replies
-
- 1
-
-
- rattlesnake
- model shipways
- (and 1 more)
-
Looking for information on building headrais, really need some old hands advise here, the plans give me the general idea,howver I need some of that been there done that info.
-
What finish are you using.
mog replied to Snowmans's topic in Painting, finishing and weathering products and techniques
After a section is finished painted or stained I always coat with matt lacquer, it seals and protects the surface from the effect of sunlight and dust for years to come. A Post said they were going to use linseed oil as finish. I really like the effect it brings to some wood , however if using boiled linseed it will change the color of some wood and could tint some painted areas. Trial and error here is the only way. But if using a finial protective coat I think it has allot merit. -
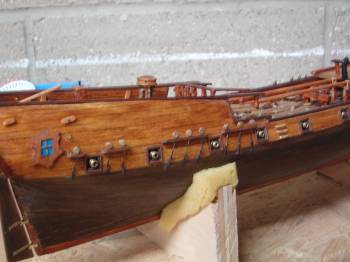
Below the whale Very thin walnut strips stained with cedar, a coat of sanding seal then rubbed stained several more times,, I found the second satining over the seal not only fills some flaws, but gives them style the top planking is maple with a thinned oak, teak stain mix, allot of trial and error but I like the result.
-
Last few pics . just finishing up the long boat. Will post soon. As you can see I like to follow my own path when building. Preferring to just see where it leads me. I tossed all the precast parts and attempted to scratch build. Not great but had a good time working my way thru it. After looking at allot of the great work in the build logs , my Rattlesnake must look pretty rough around the edges..But a hobby is a hobby not a profession.

- 57 replies
-
- 3
-
-
- rattlesnake
- model shipways
- (and 1 more)
-
Not sure what the protocol is here for reposting a pre crash build log started in Apr 11. post a few to keep things simple I will go with a quick time line getting up to my current stage

- 57 replies
-
- 1
-
-
- rattlesnake
- model shipways
- (and 1 more)