HOLIDAY DONATION DRIVE - SUPPORT MSW - DO YOUR PART TO KEEP THIS GREAT FORUM GOING! (Only 51 donations so far out of 49,000 members - C'mon guys!)
×

Heinz6672
-
Posts
205 -
Joined
-
Last visited
Content Type
Profiles
Forums
Gallery
Events
Everything posted by Heinz6672
-
 Thank you for your compliment! I made a photo of the wood filler. It is from the company "Clou". I do not know if you can buy it outside of Germany. But here you can buy it in any hardware store. So I don´t think that it is something very special. I use the wood stripes from the kit. I think it´s a beautiful wood and good to handle. Although many stripes are very crooked. I tried to use the best parts of it. About the spaces...hmmm, I don´t know how to explain it... the only thing I do, is to put the wooden stripes not close to each other, but leave a small gap. I did this by eye. So there is no secret or special ability. I hope this will help you :-))) Best wishes -Heinz-
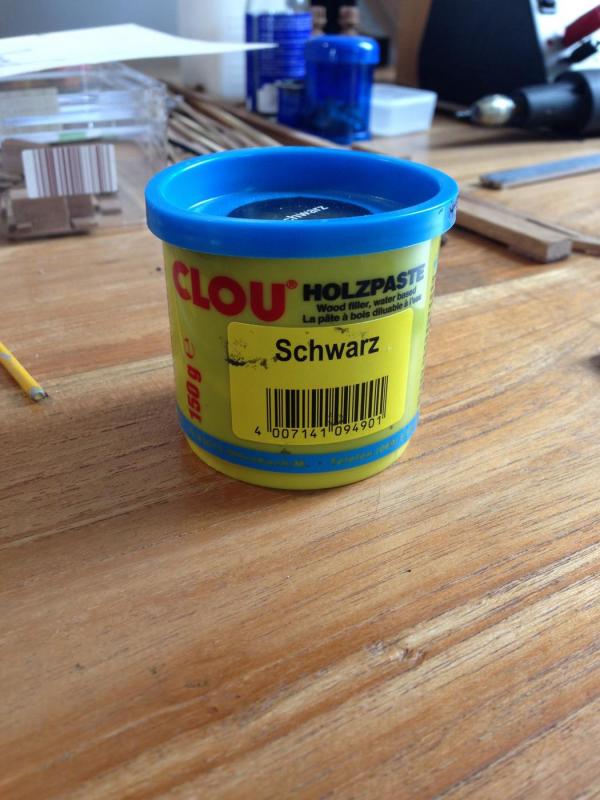
-
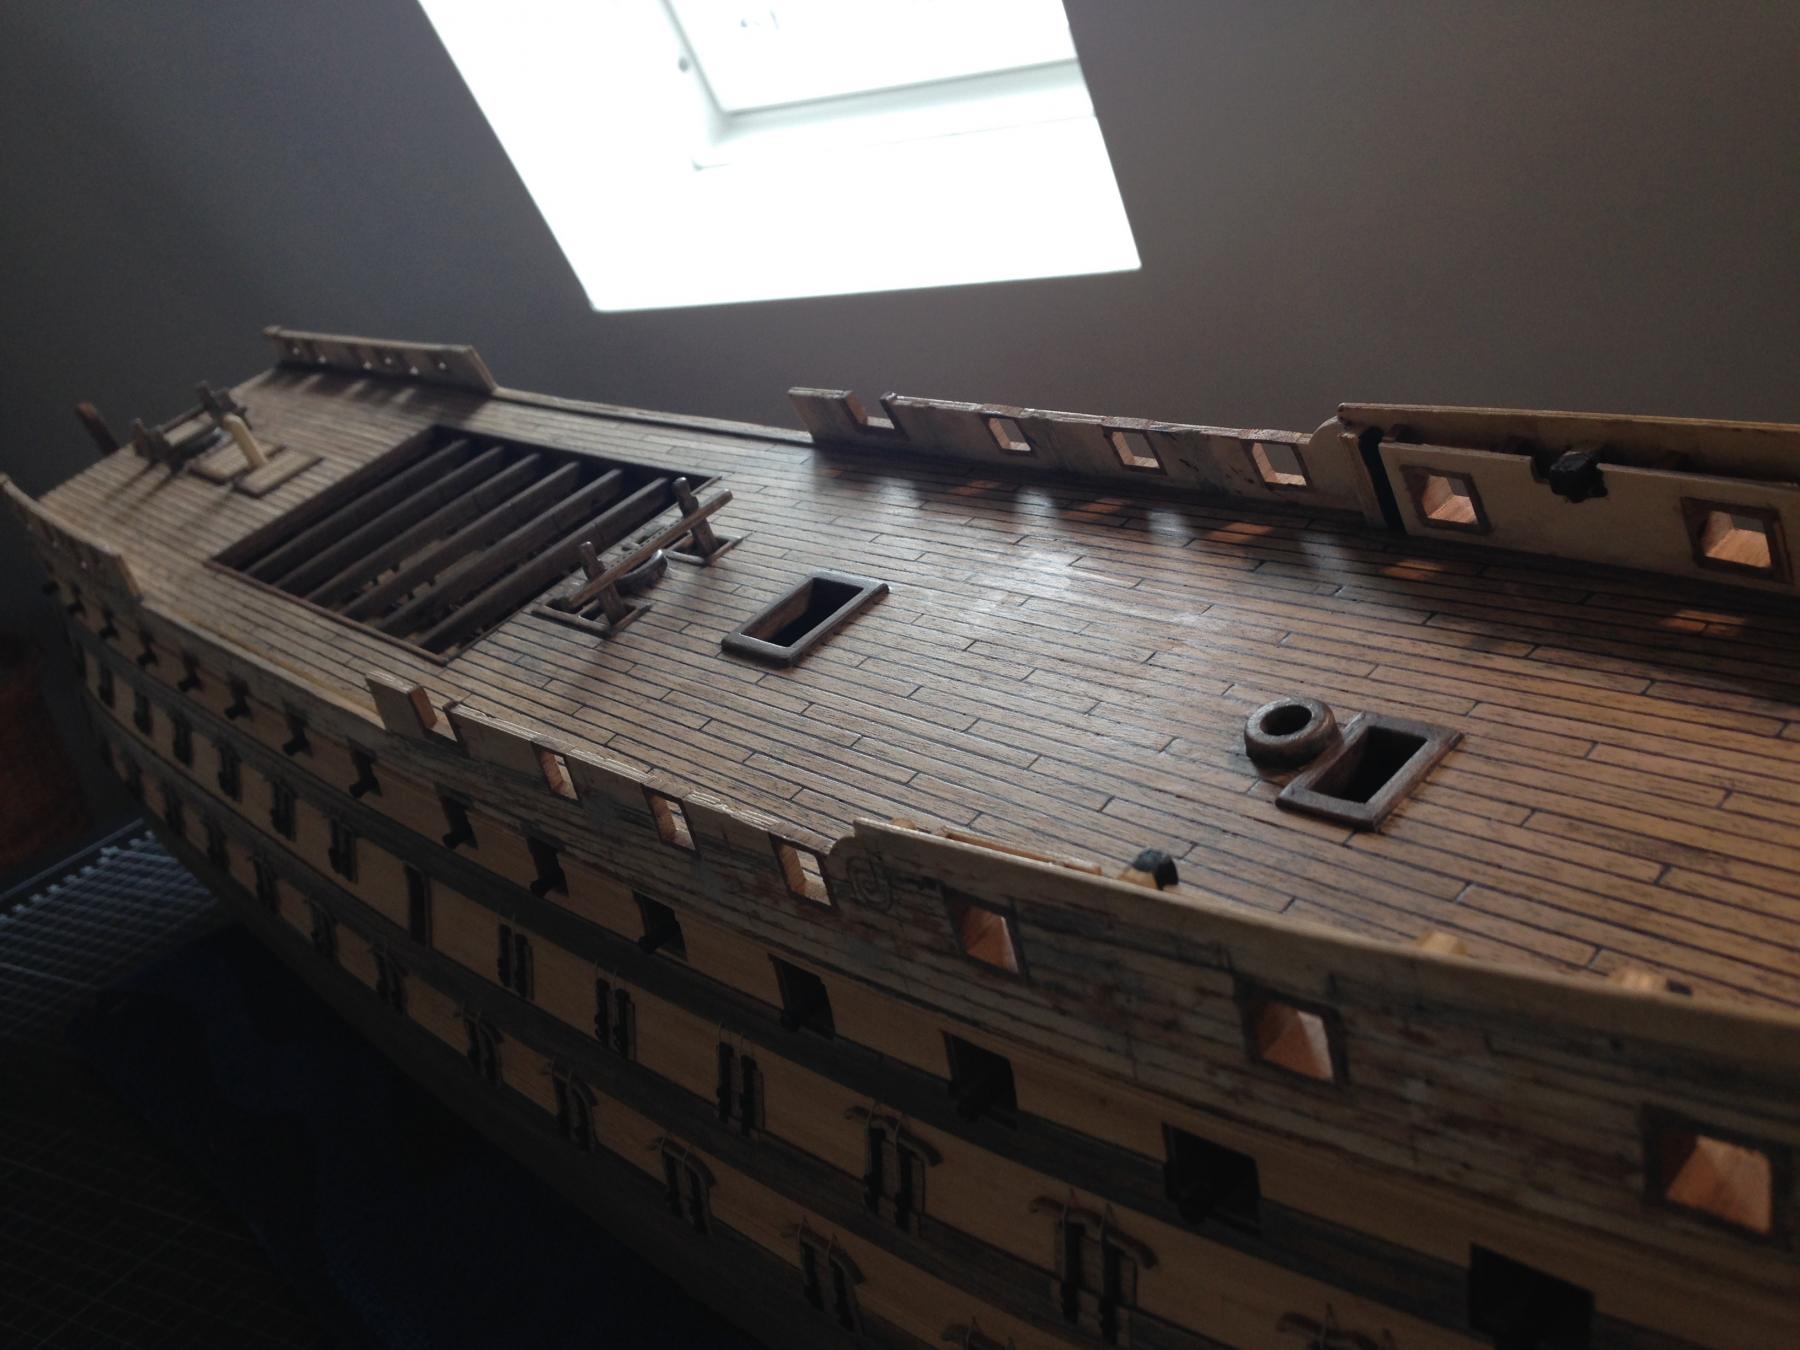
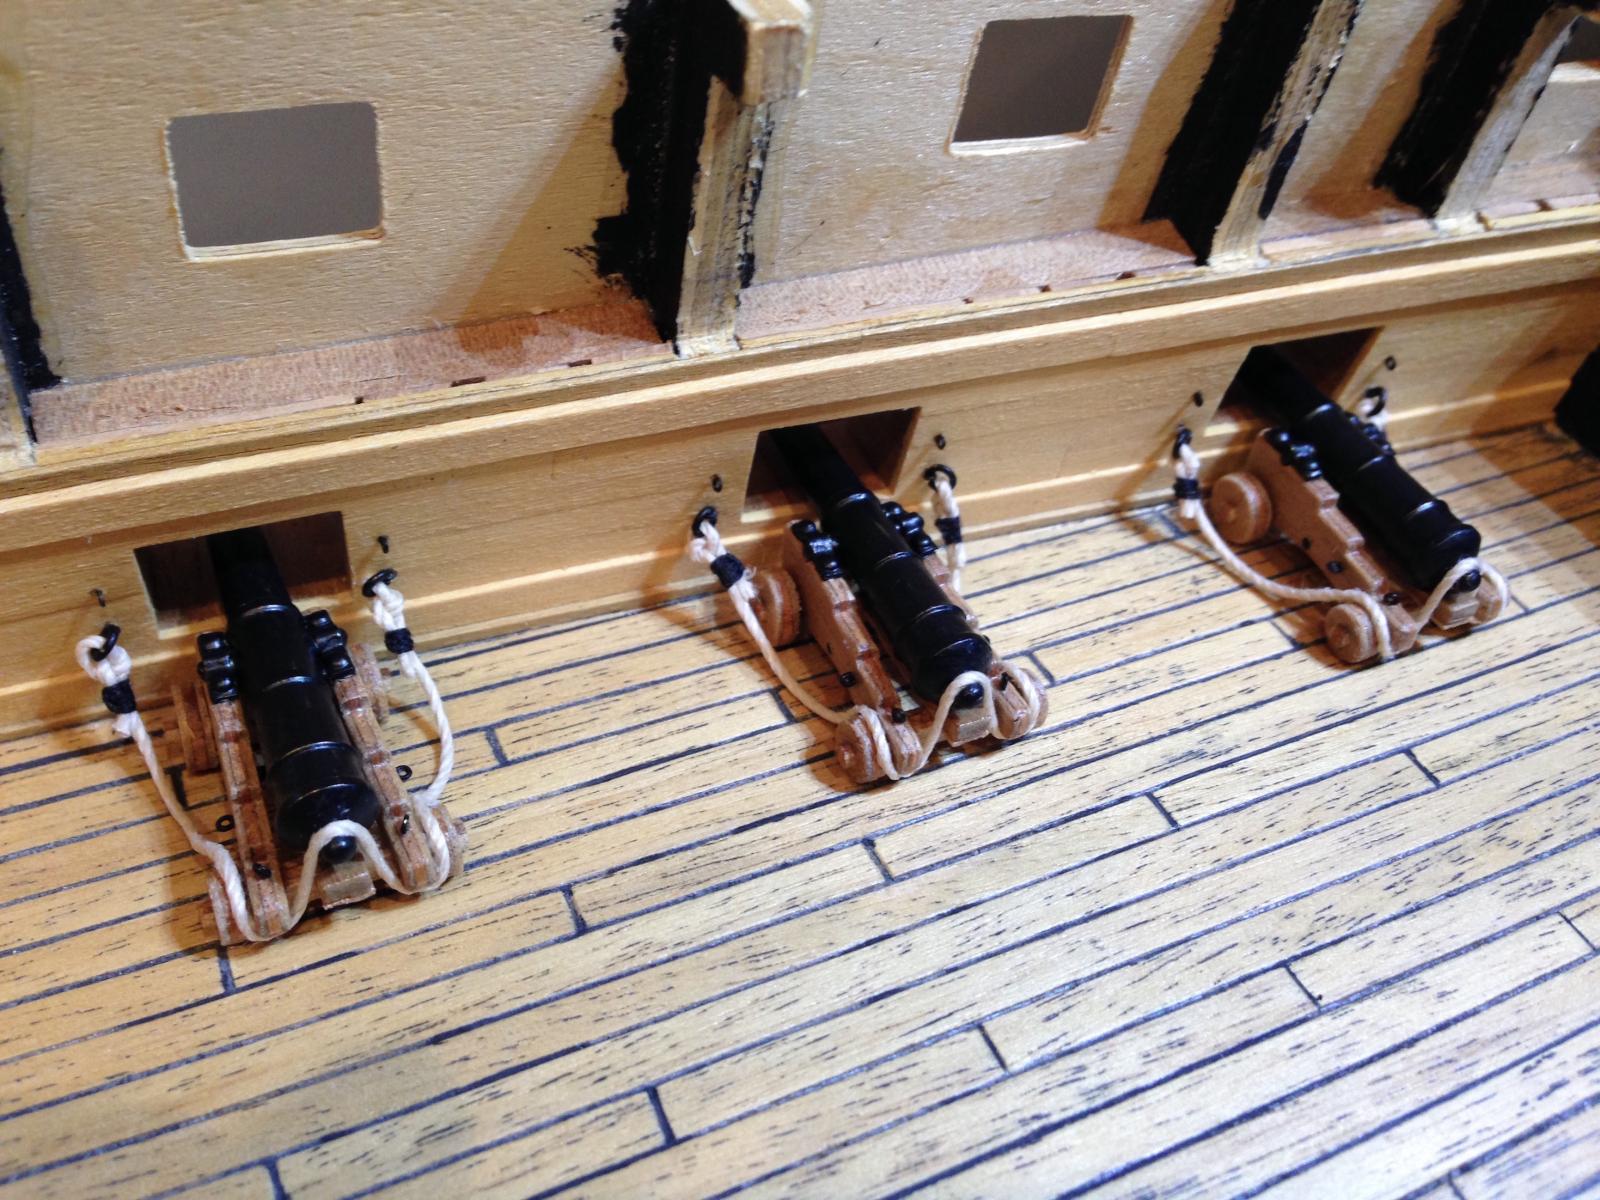
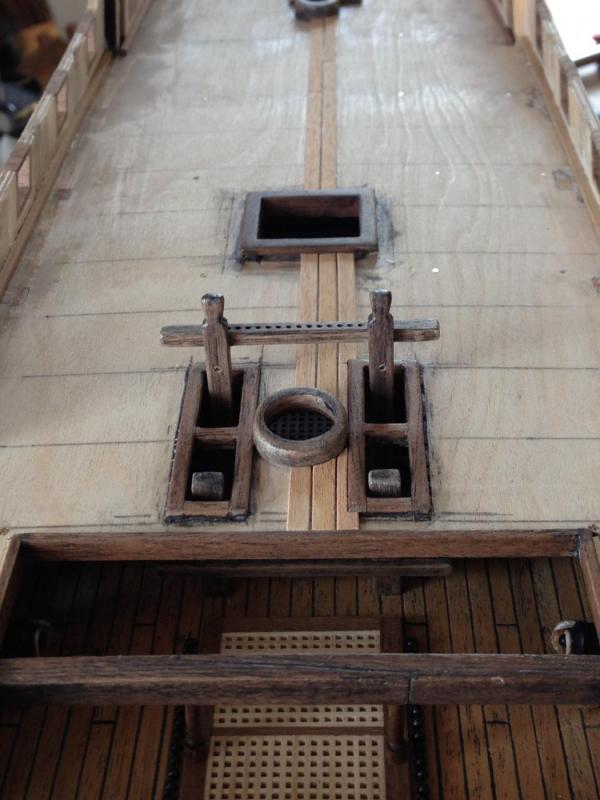
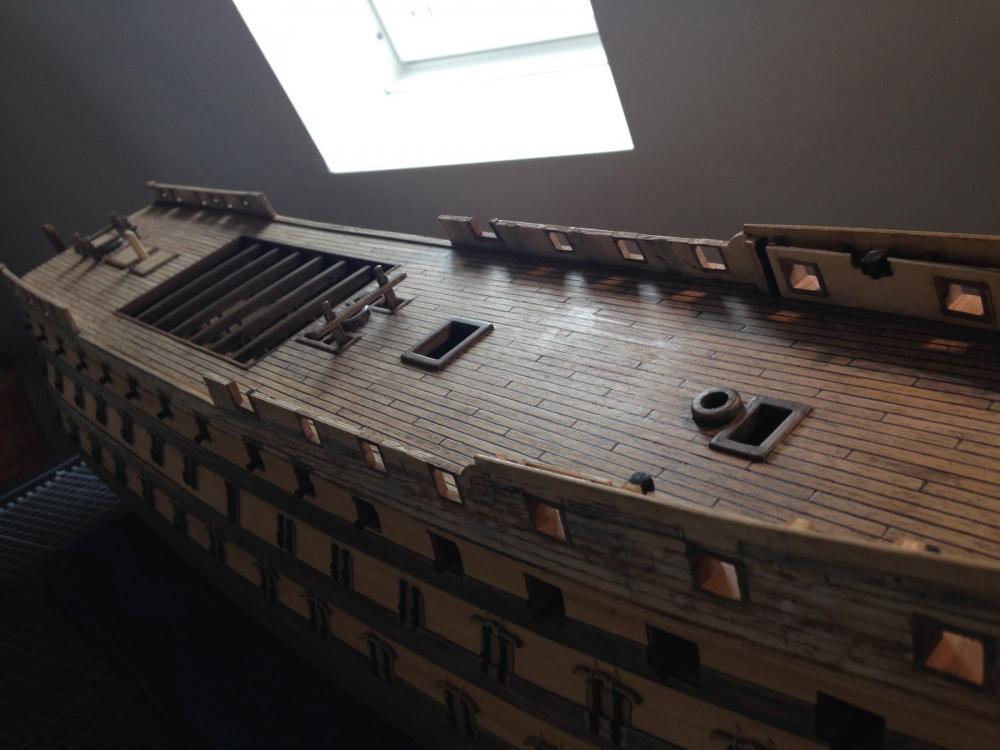
Ian and Kevin, many thanks for the nice words! They are really welcome :-) @Kevin: the way I planked the deck has 2 big advantages: the first advantage is the old (dirty) look caused by the black wood filler all over the planks. The second is, that you can hide some mistakes, like planks that don´t fit perfectly together. But you need very good nerves when you see your deck completely coated with the wood filler...
-
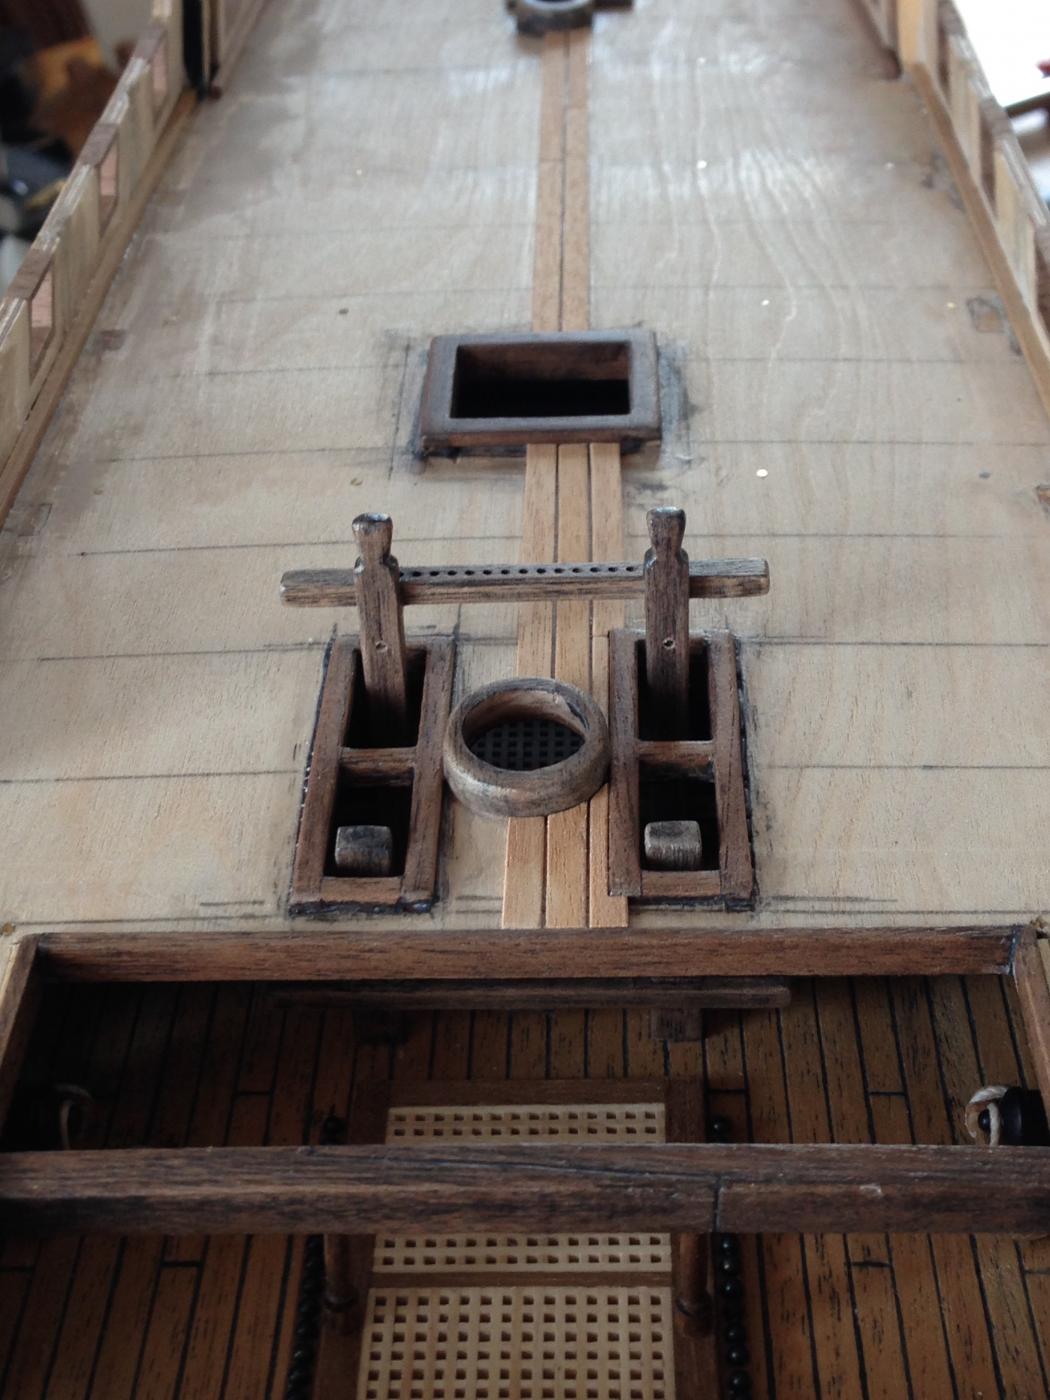
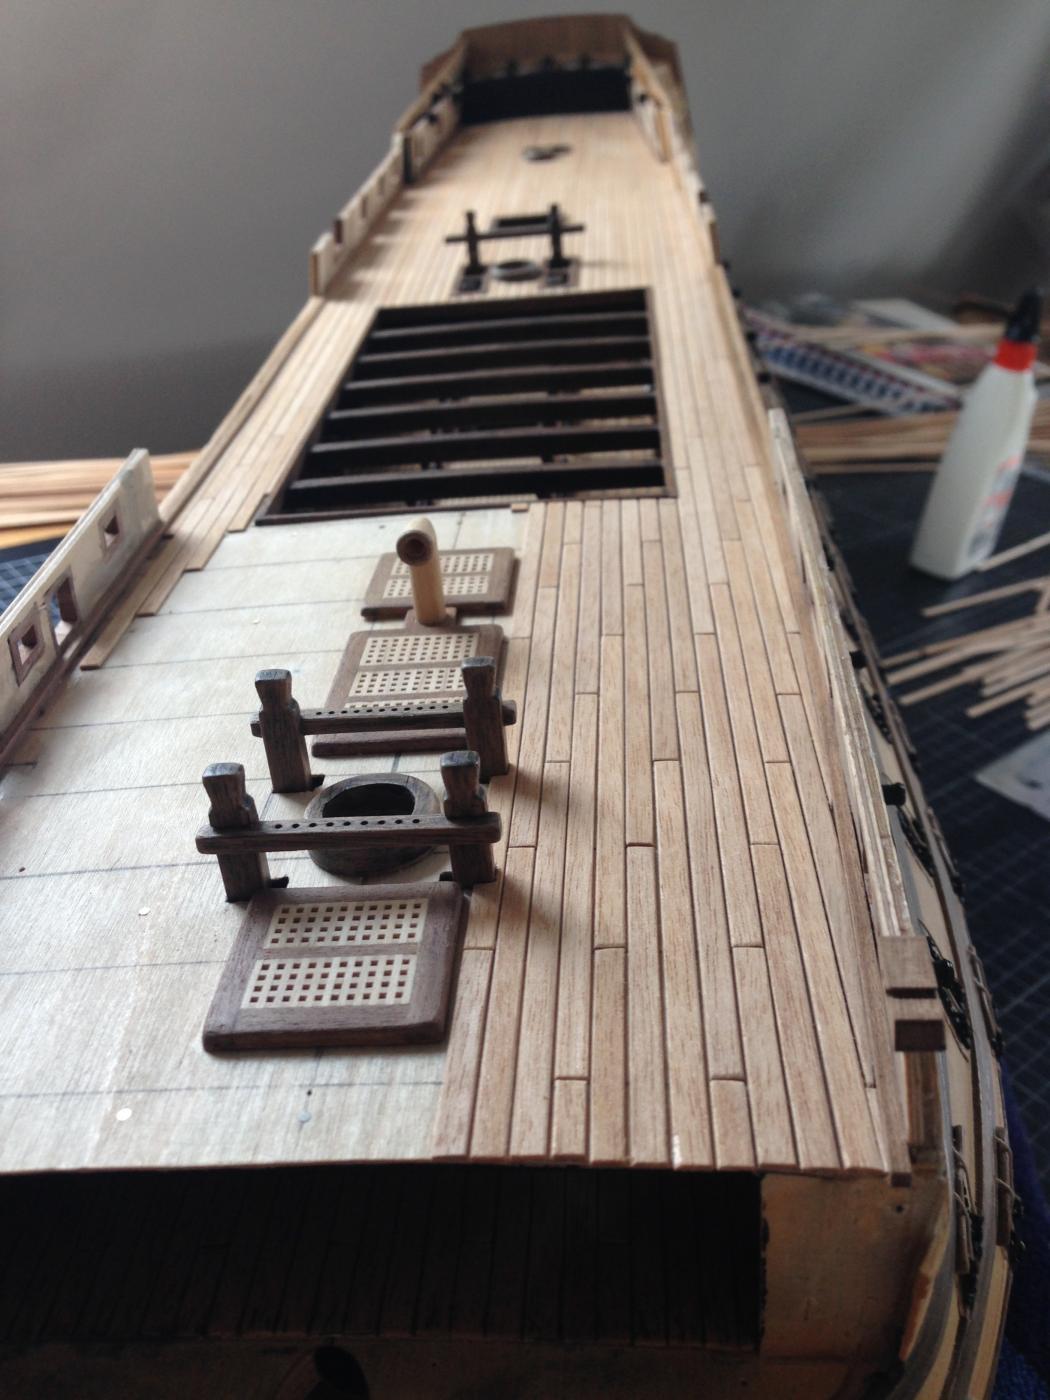
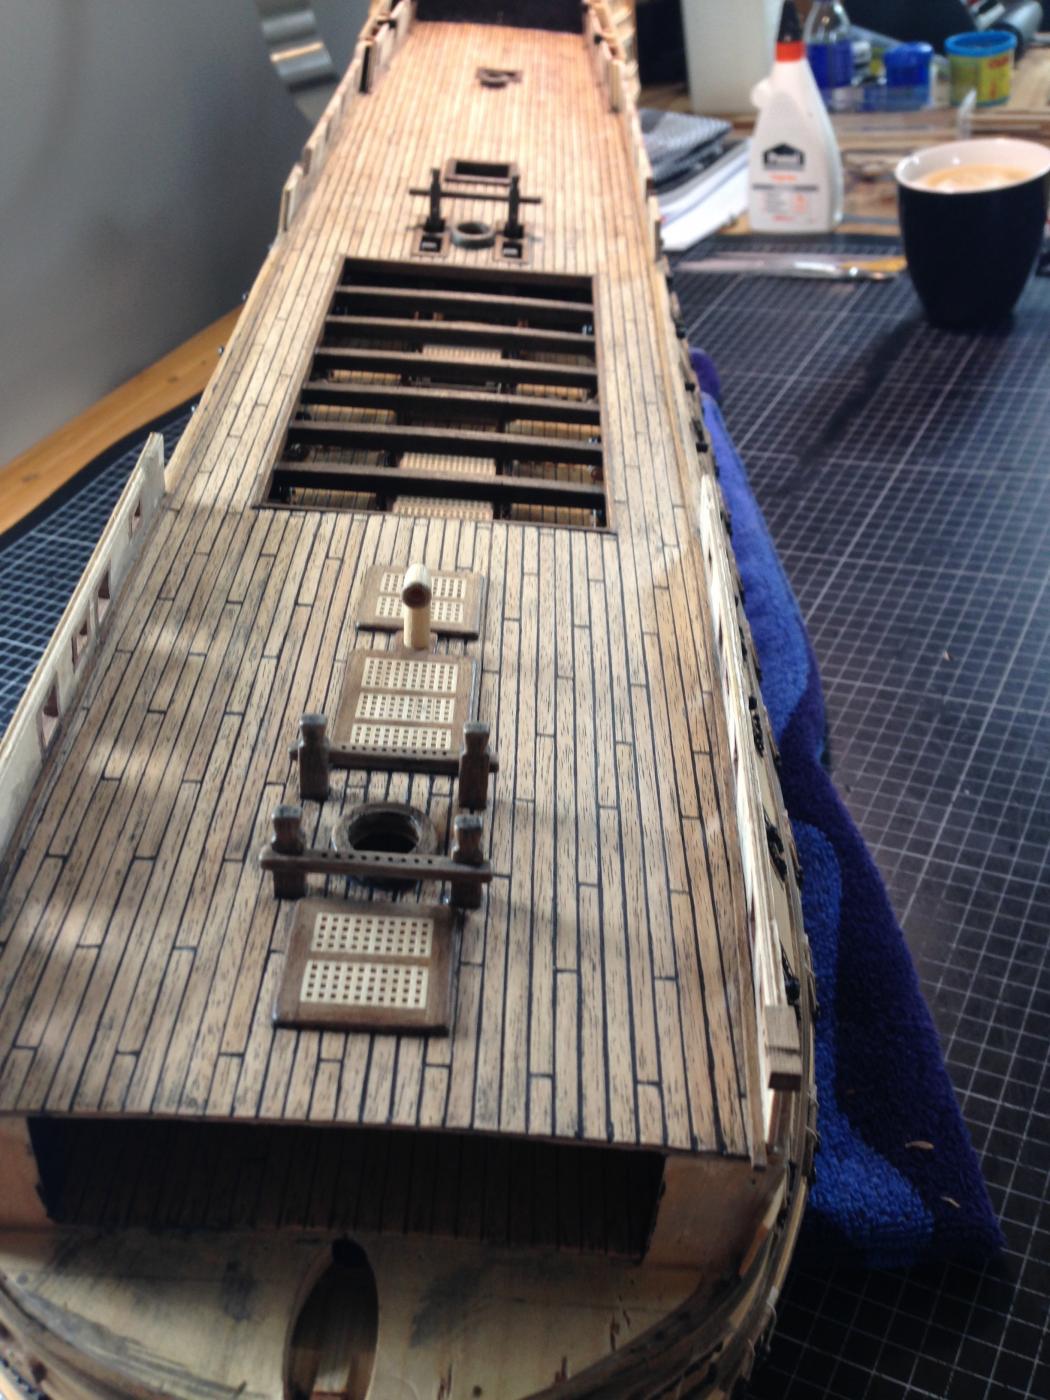
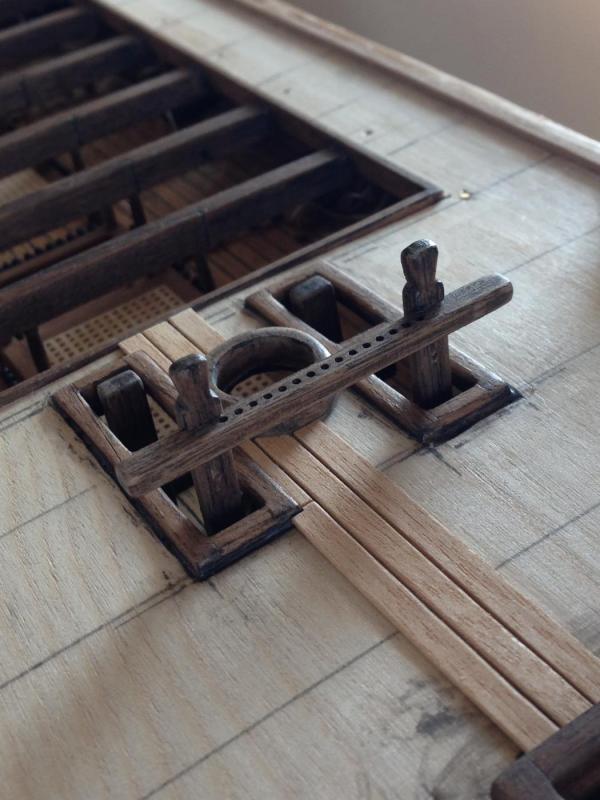
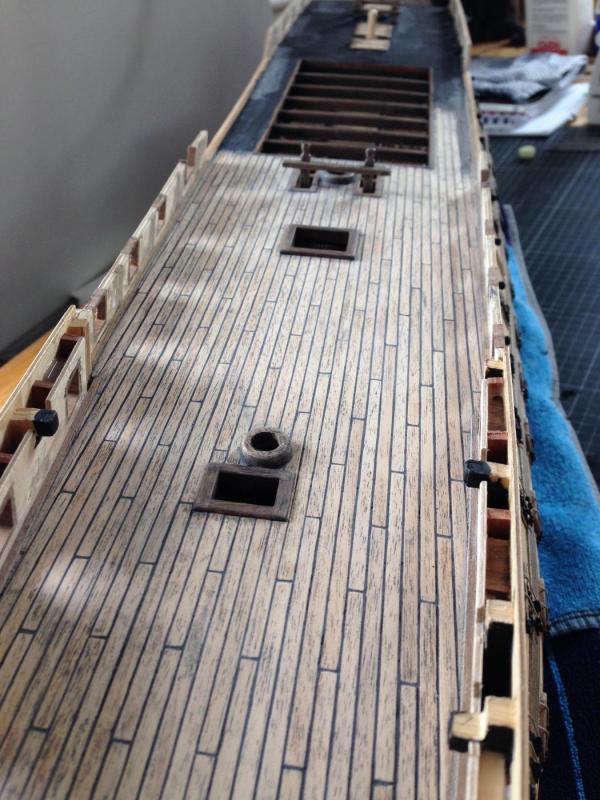
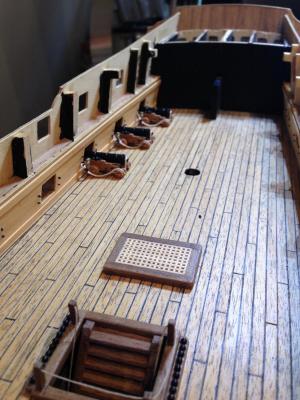
Hello captgino, thank you for your nice compliment. My old technic? I mean the way I make the planks and the caulking. I tried to explain it with these words: That means I first lay the wood stripes with a little slit between them. Then I fill the stripes with my black wood filler. After scraping and sanding the planks I seal them with varnish. Best -Heinz-
-
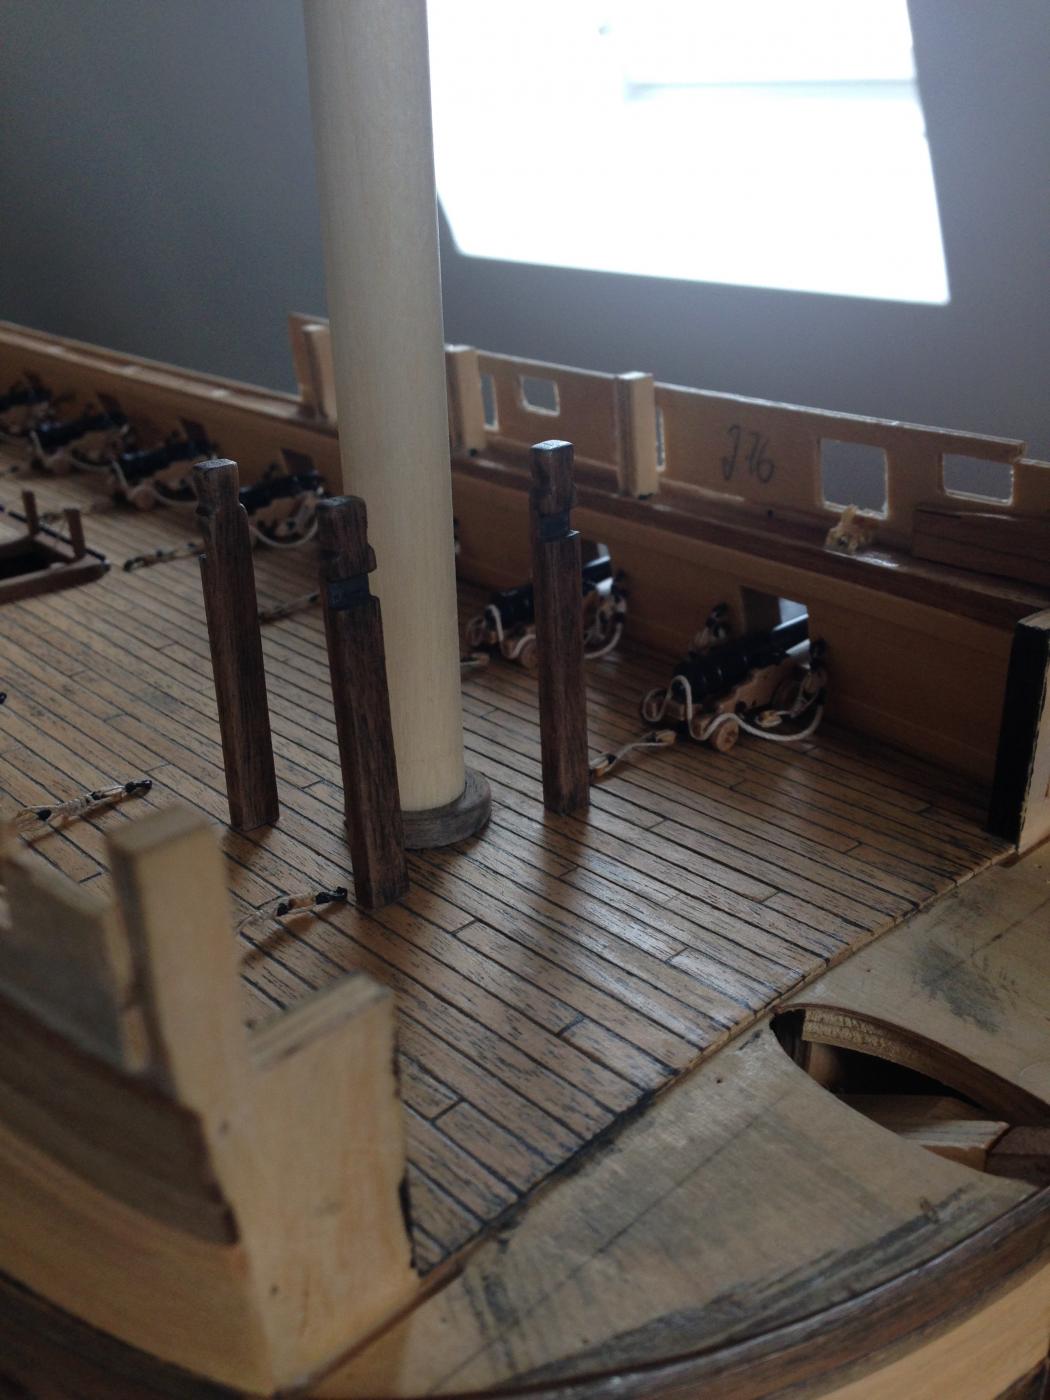
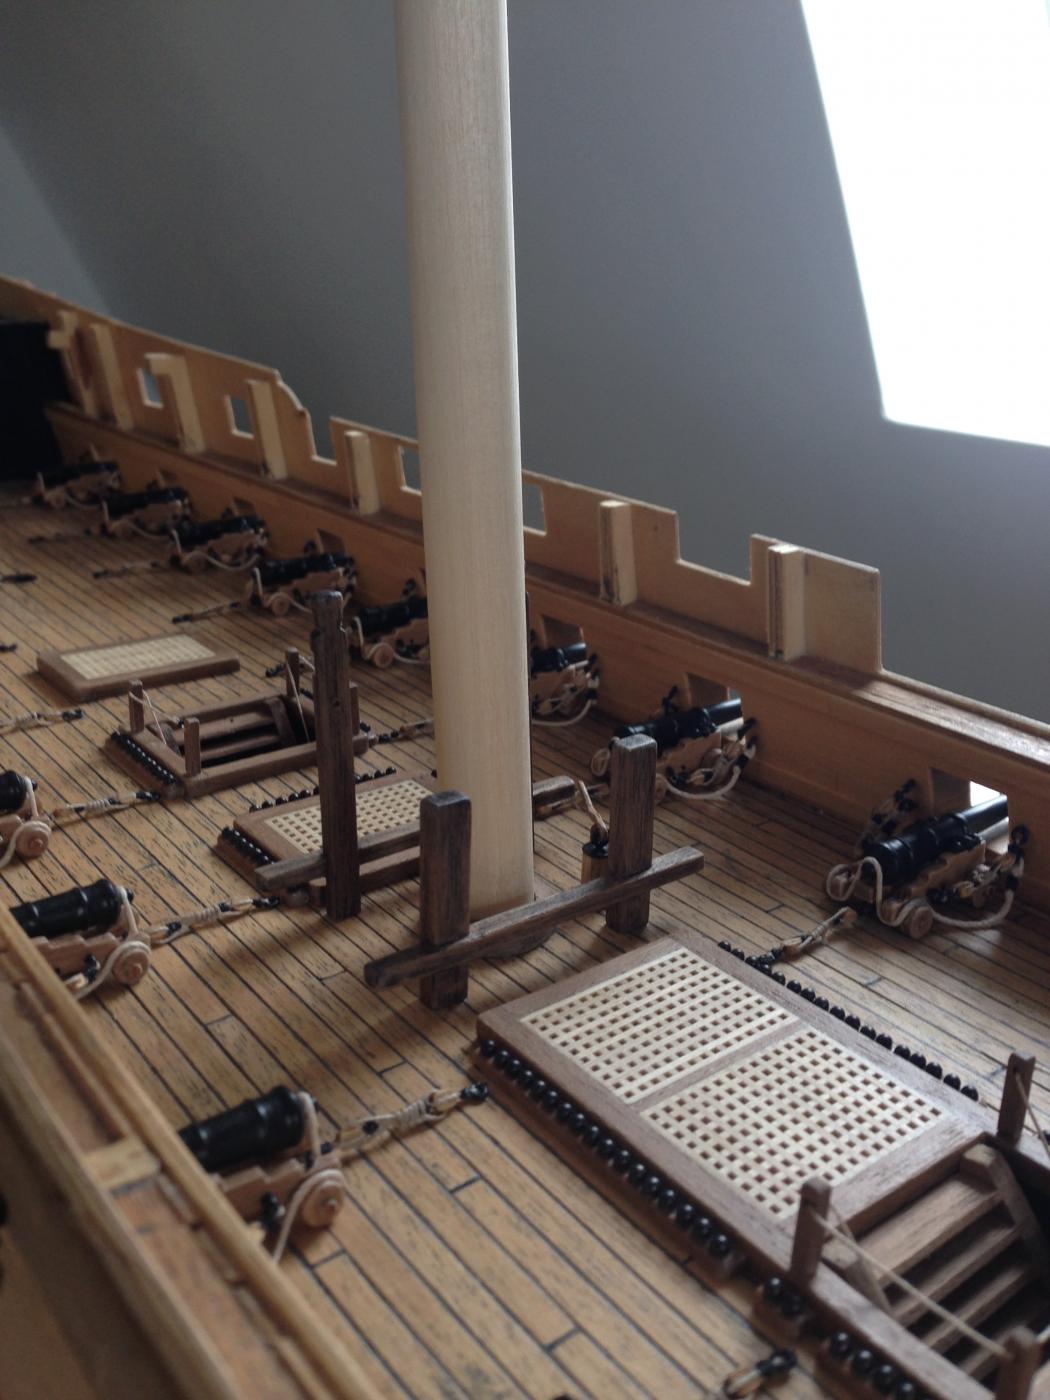
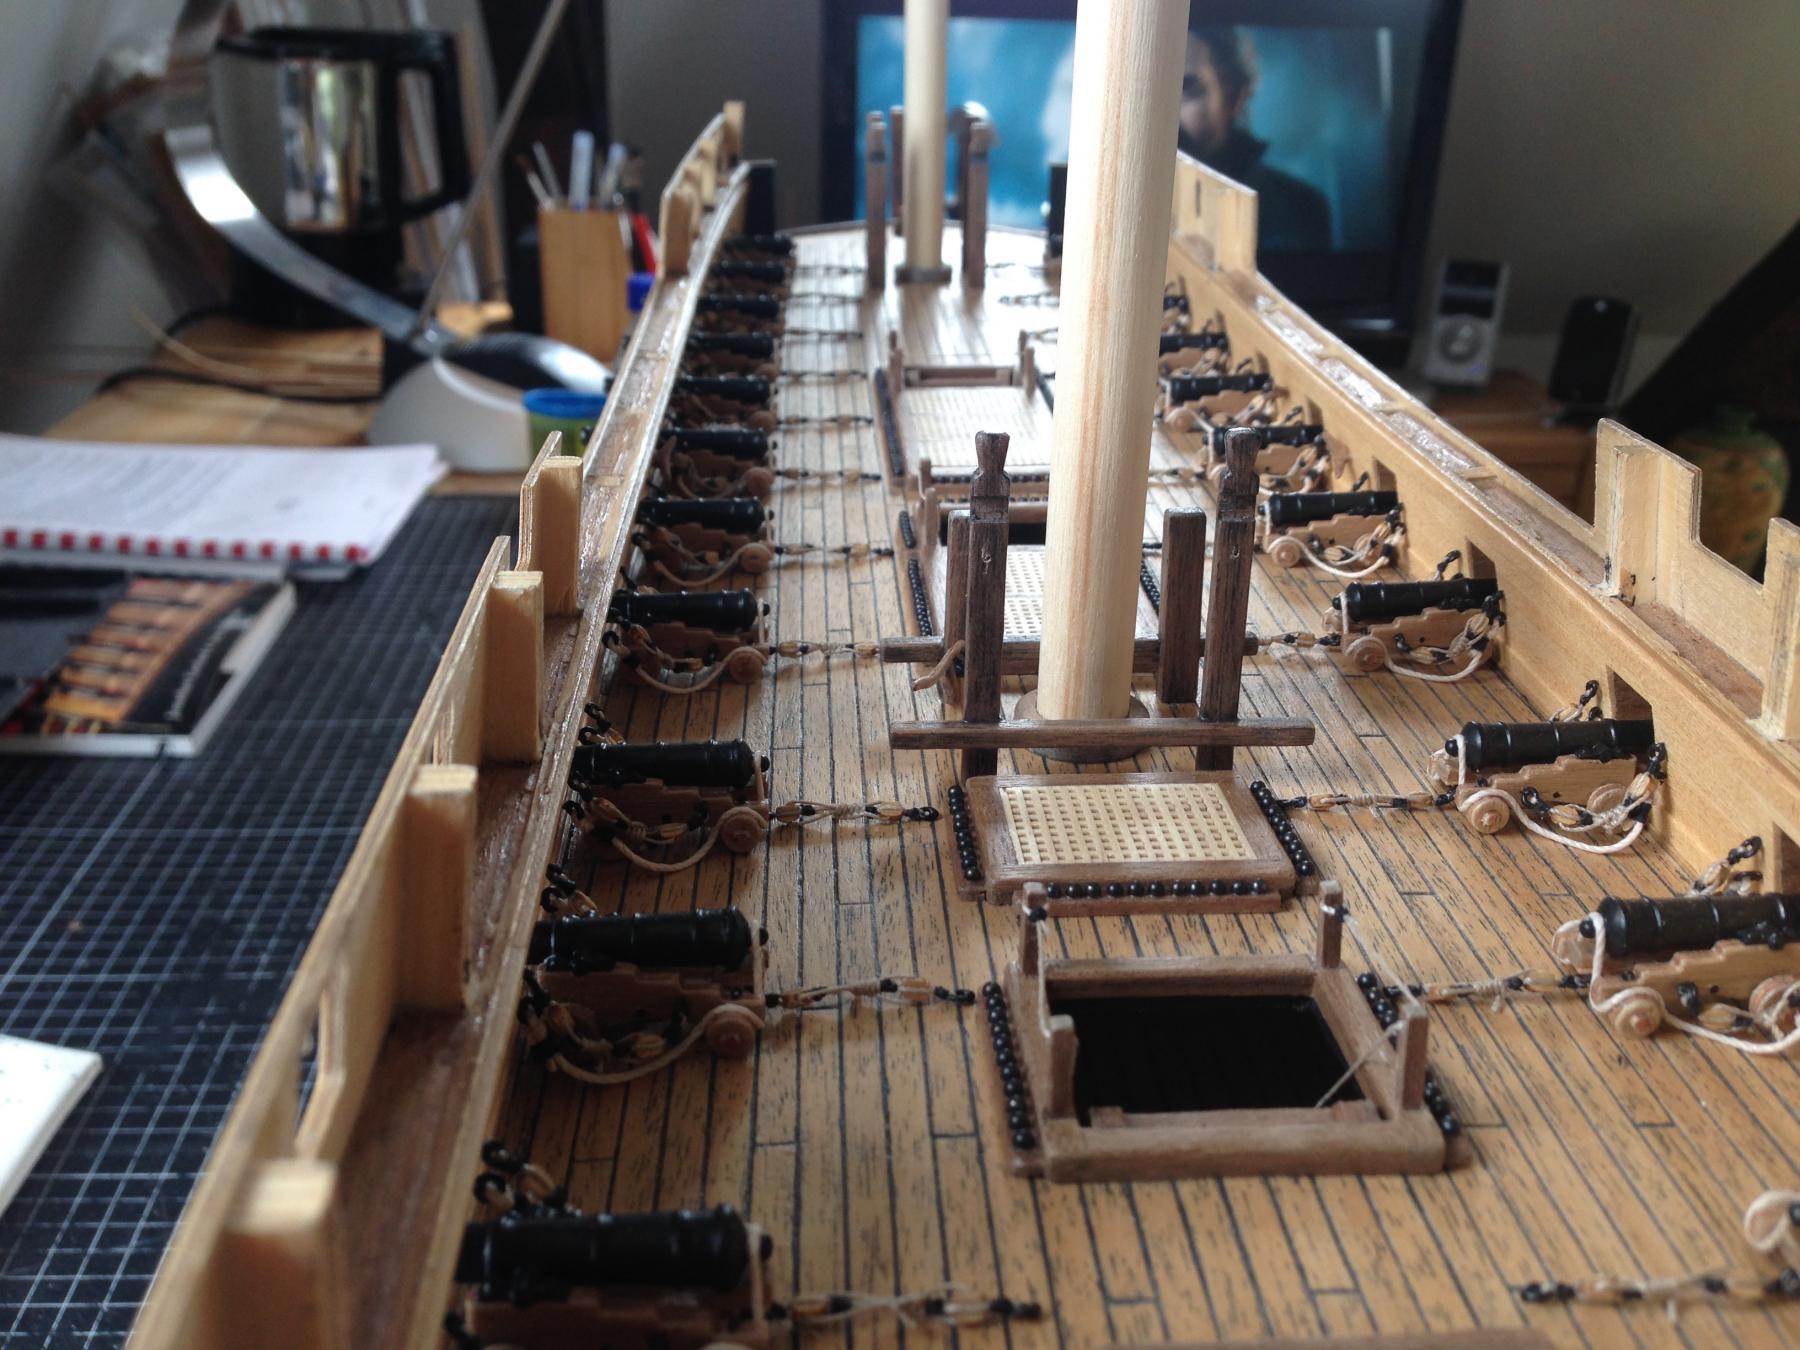
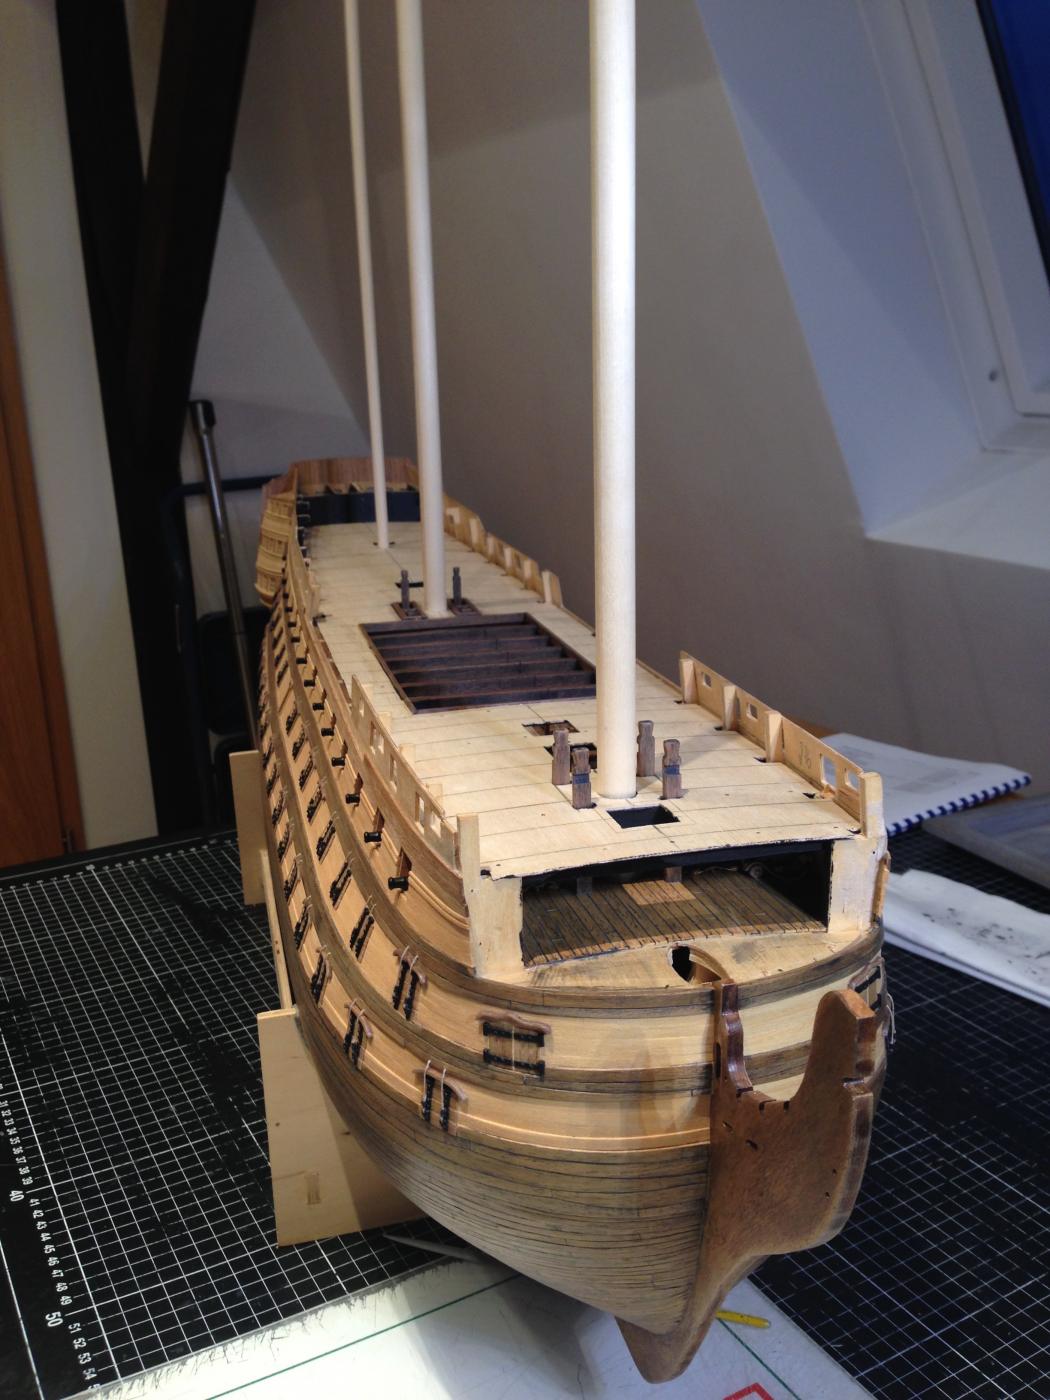
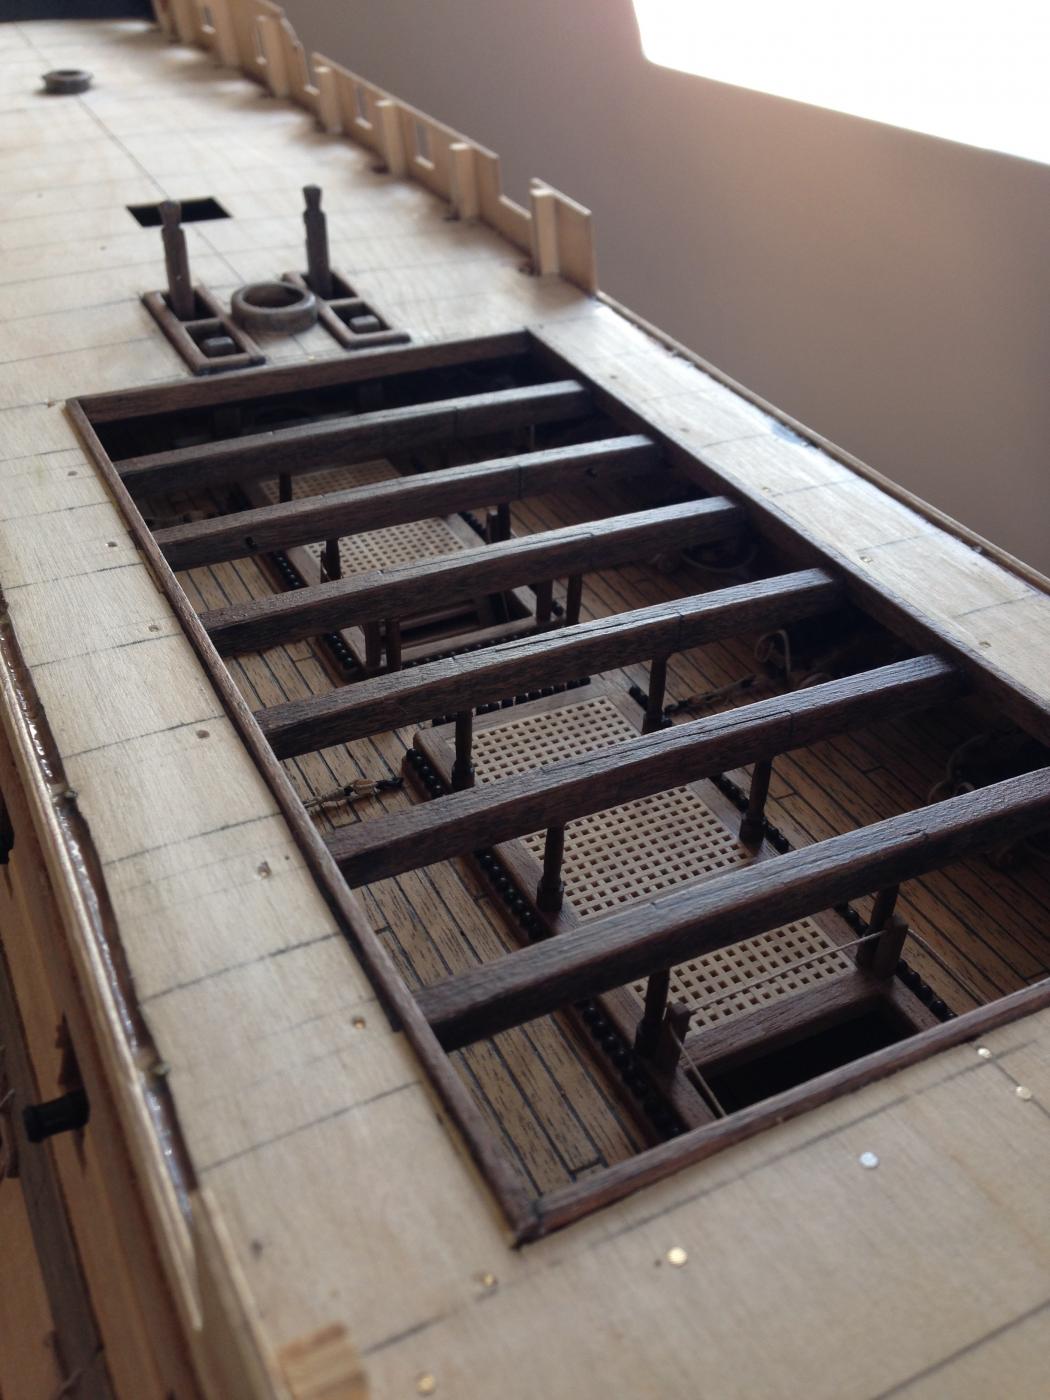
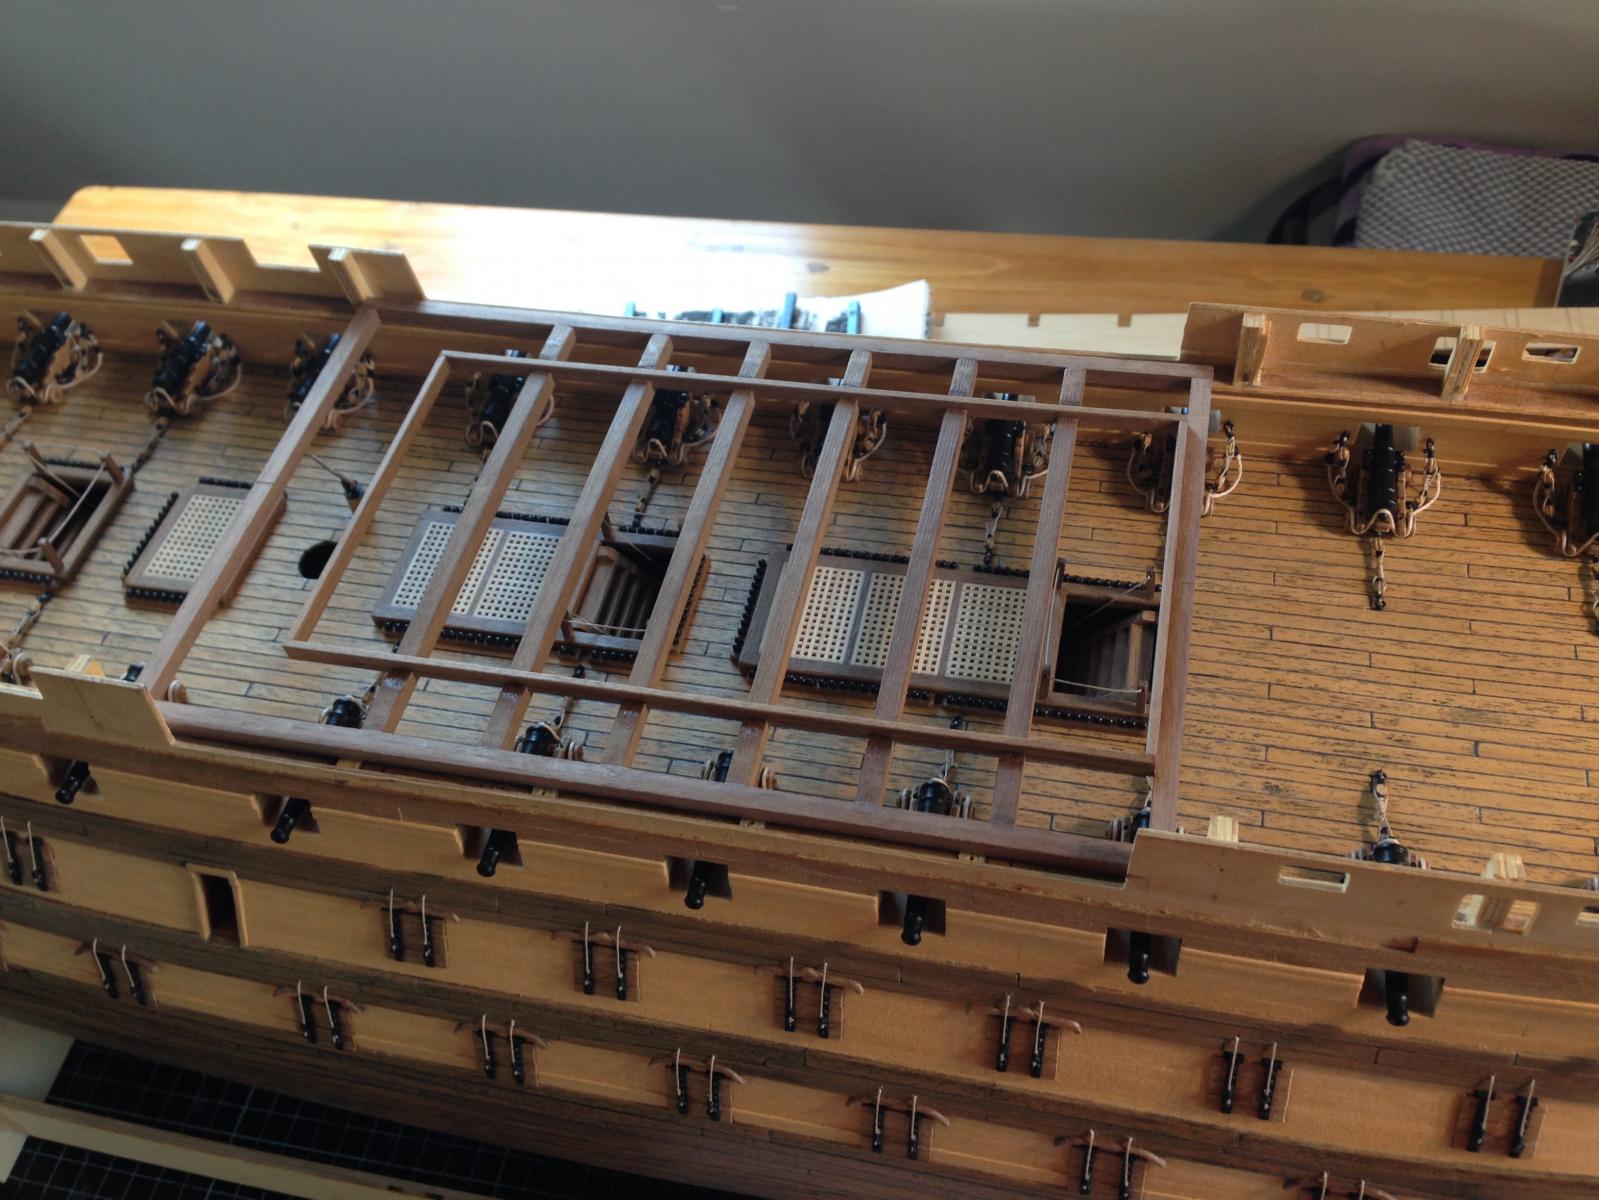
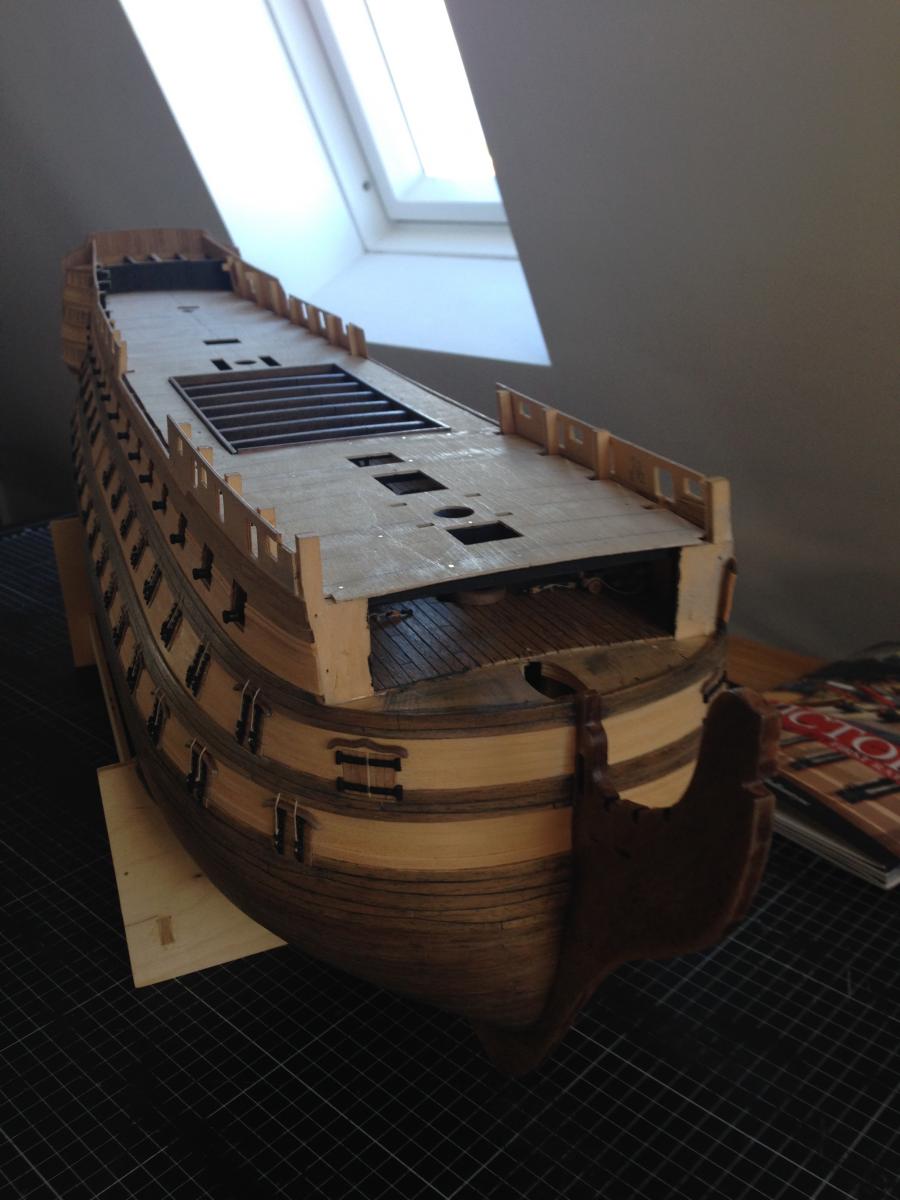
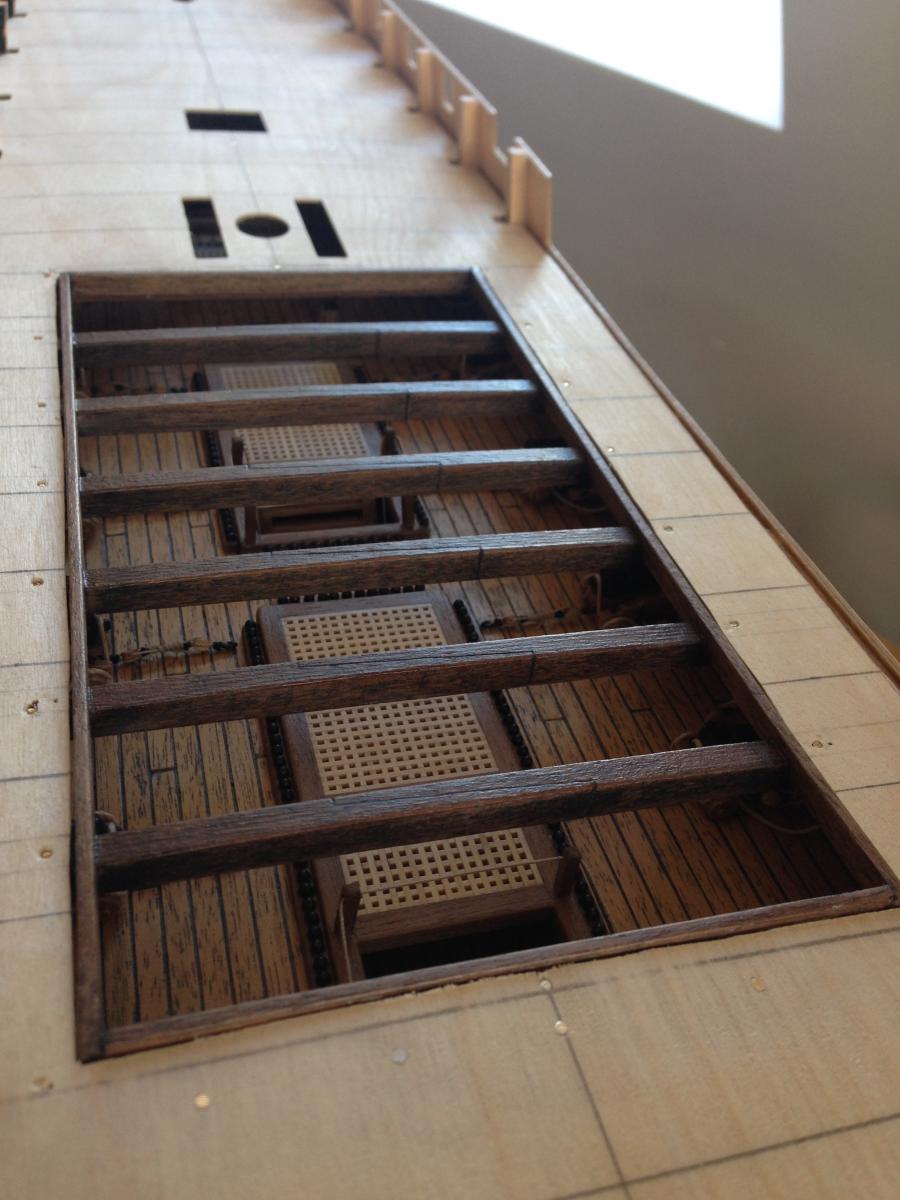
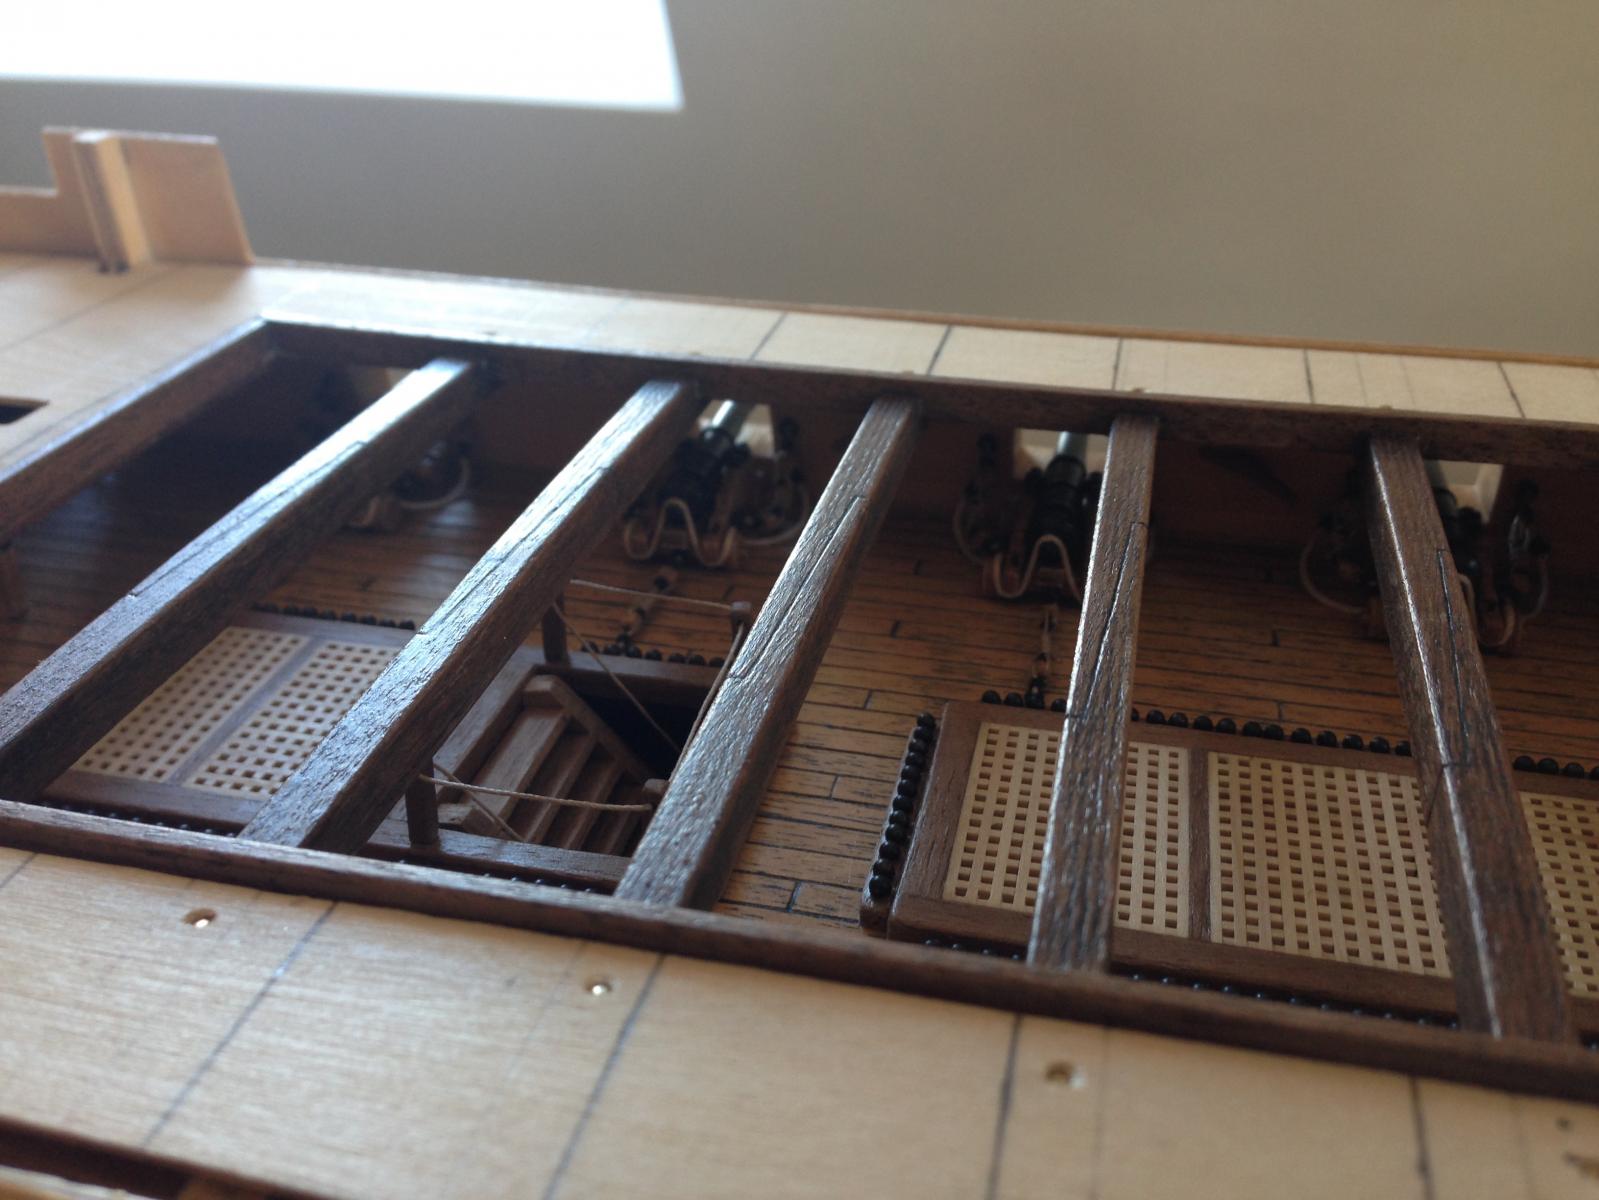
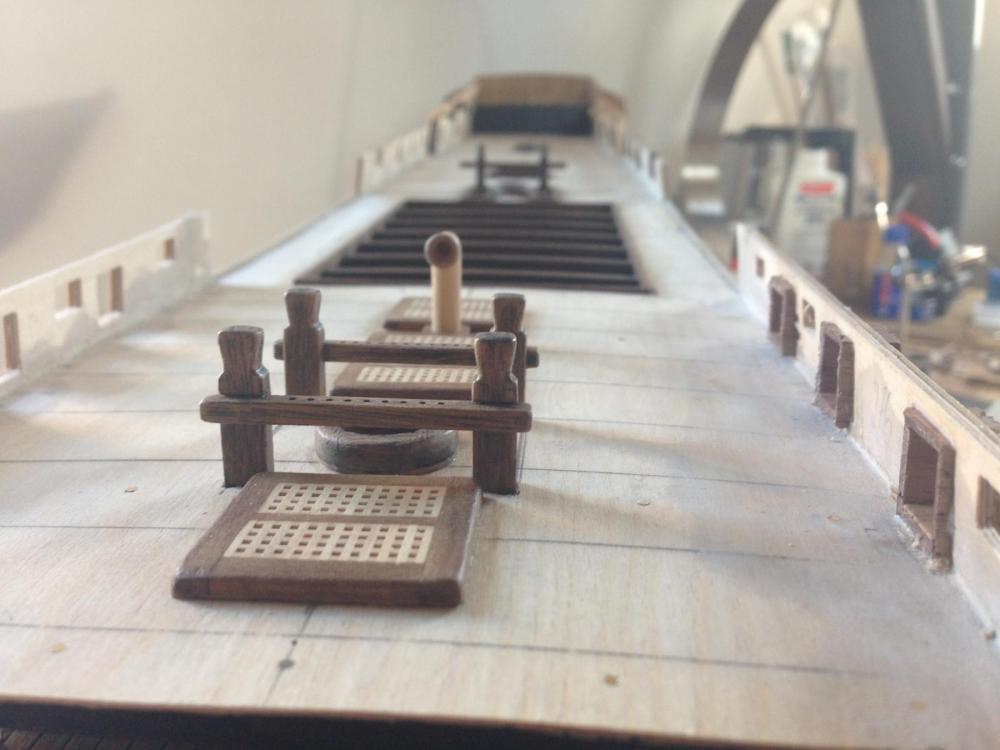
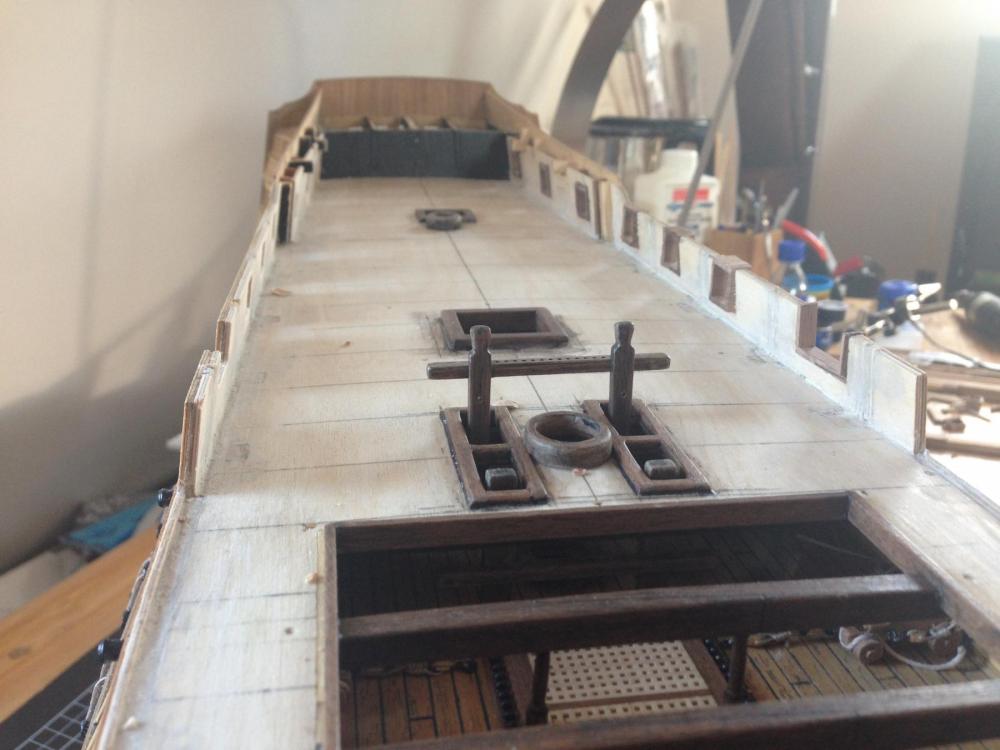
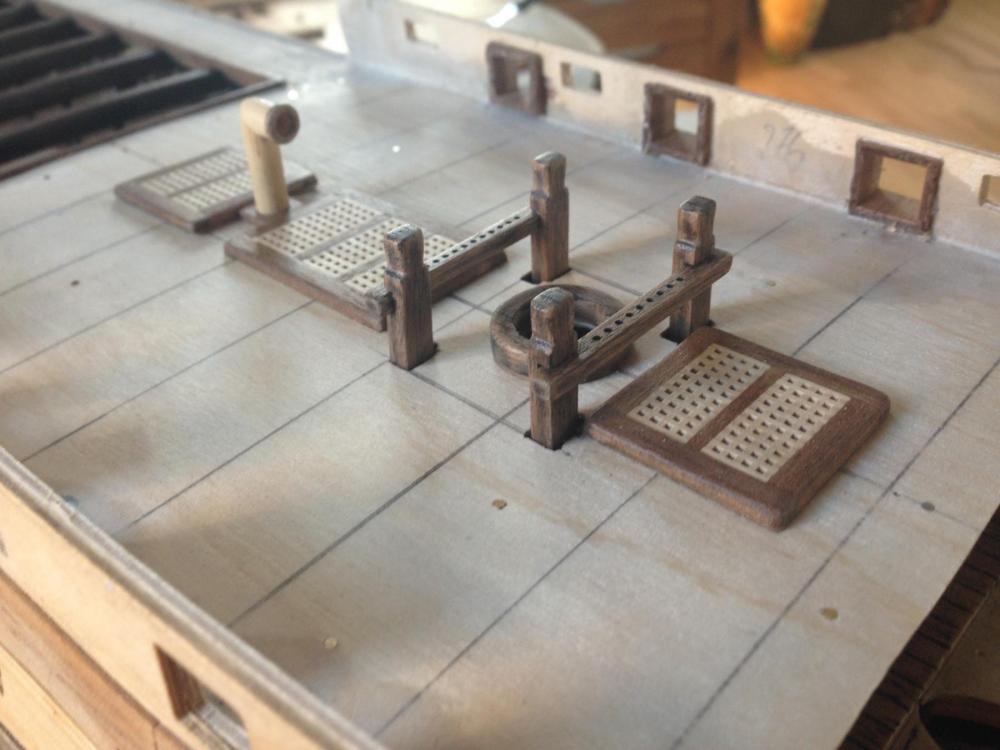
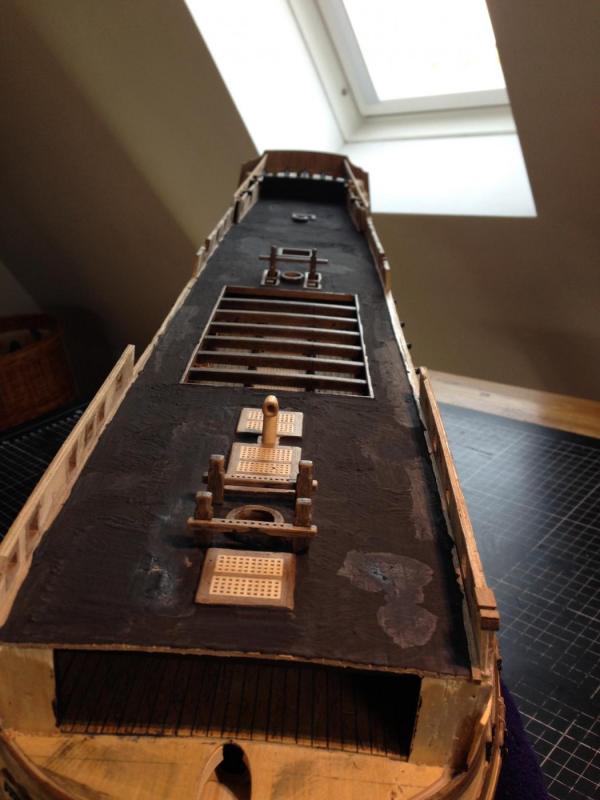
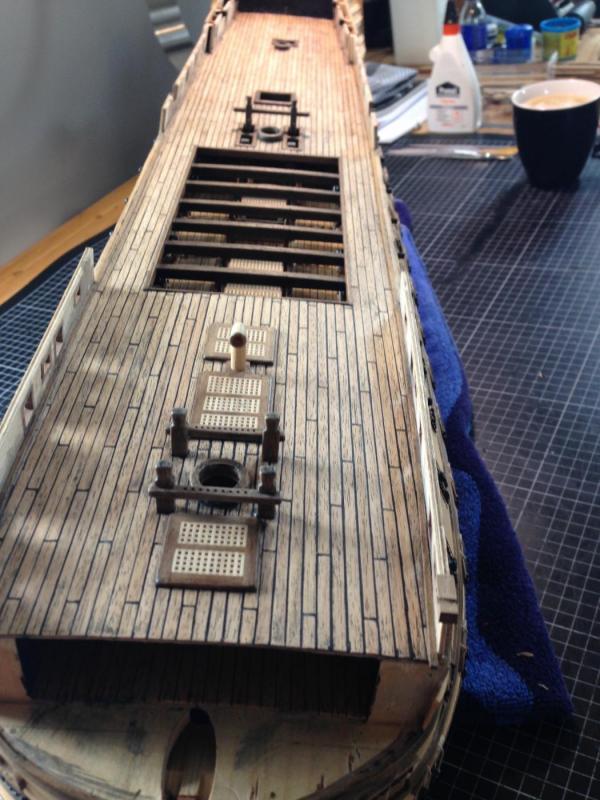
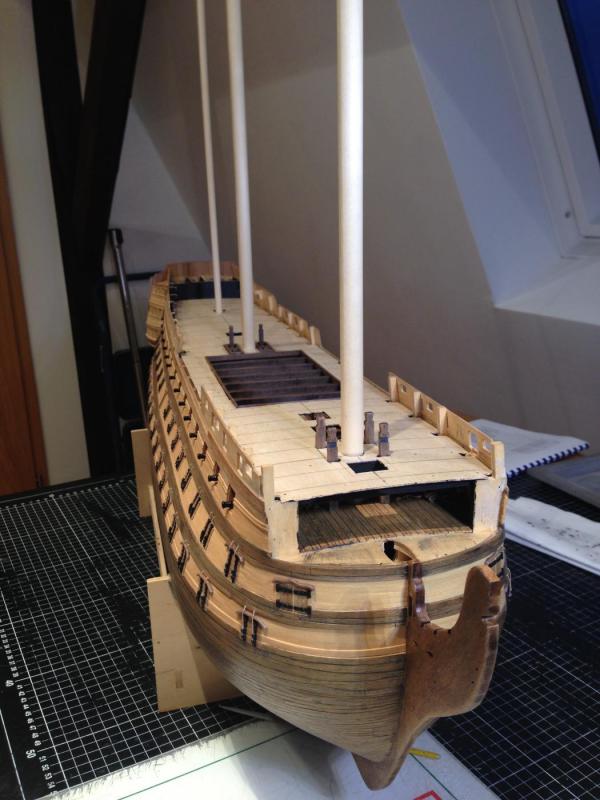
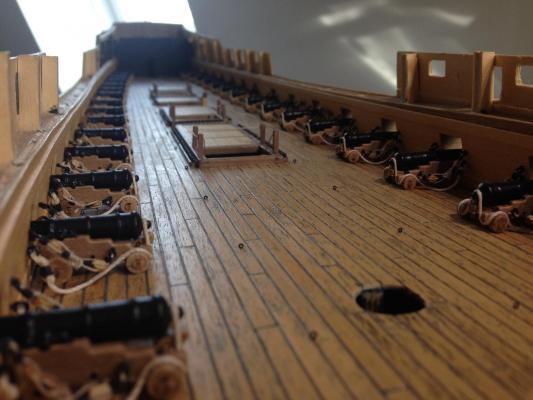
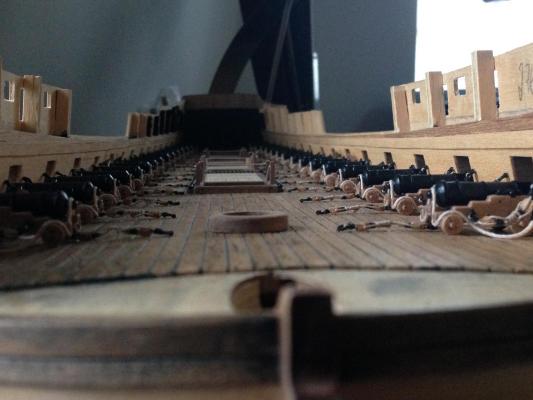
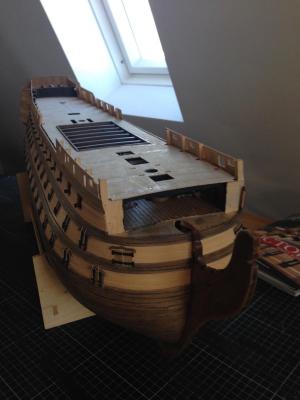
Hello my friends! It´s time for a new update! Last time, I asked myself, whether I should start to plank the deck or finish to plank the hull. I decided to first plank the hull. Unfortunately I had some problems to get new wood stripes. This is why I changed my mind and start to plank the deck. I knew that it would not be easy to do, because this time I first built the gratings on the deck. In fact, it took my much longer to plank the deck. But I think I managed it quite well and I am glad to say, that I am happy with the result. As you can see in my pictures, I used my "old" technic. That means I first lay the wood stripes with a little slit between them. Then I fill the stripes with my black wood filler. After scraping and sanding the planks I seal them with varnish. Now I start to finish the hull planking! Greetings and best wishes to all of you! - Heinz -


-
Very well done, Robert, I am glad to see an update from your clean and beautiful work! Keep it on!!! Best - Heinz -
- 527 replies
-
- 3
-

-
- caldercraft
- victory
- (and 1 more)
-
Alexandru, as always: an extraordinary and fantastic work I am happy that you did that third attempt :-). Best wishes to you and your Vic !!! - Heinz -
-
this means that there is still hope for me? :-) Thank you very much !!!! - Heinz -
-
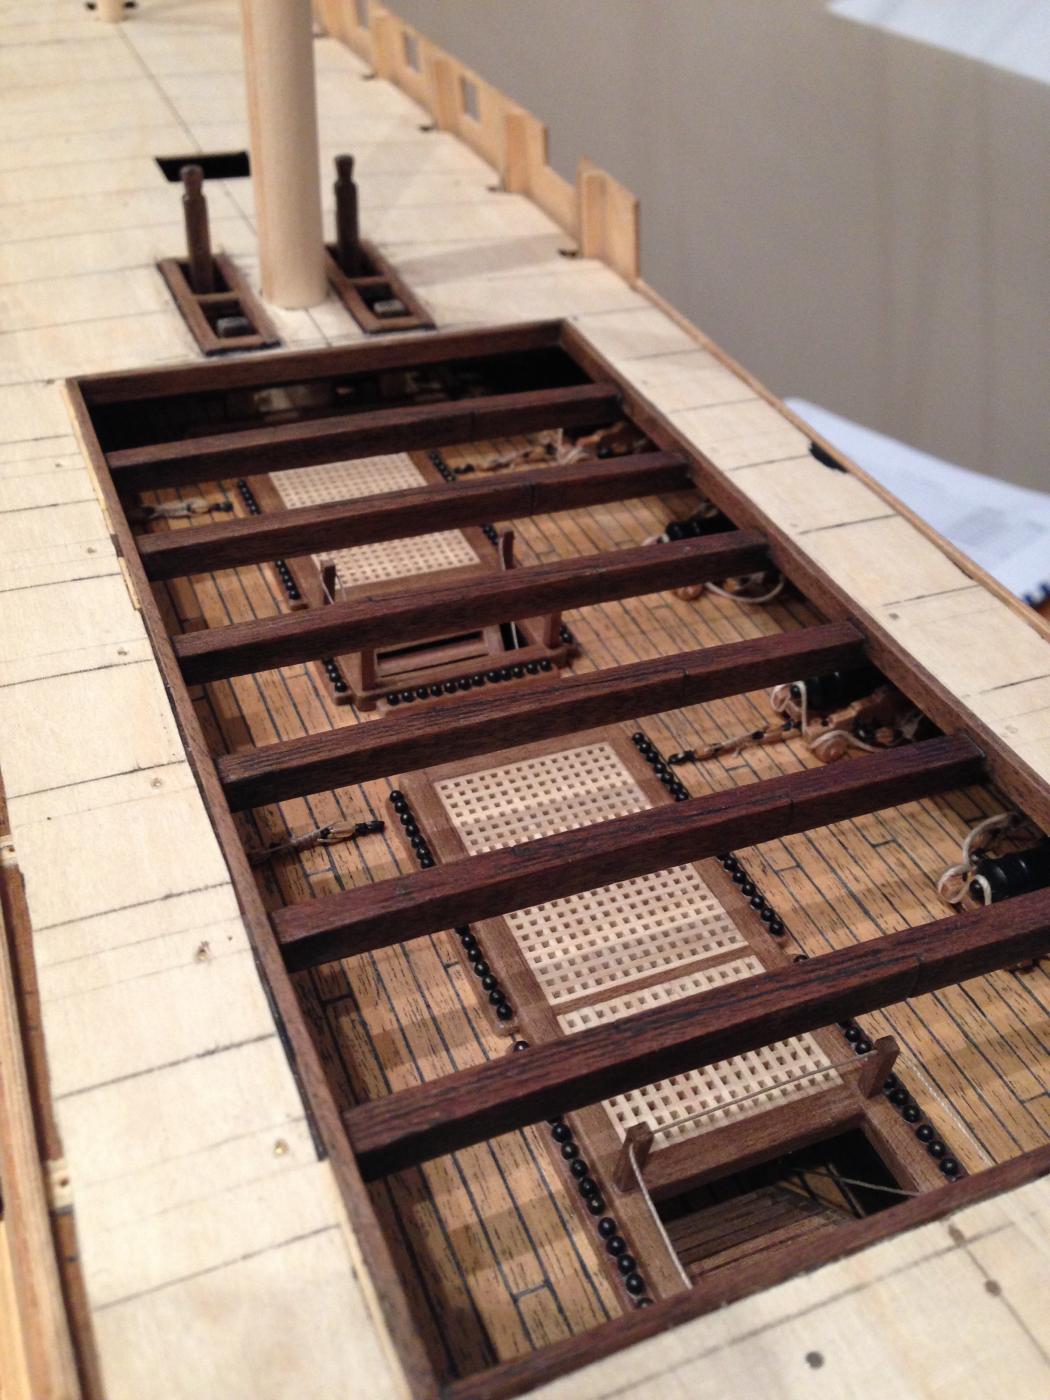
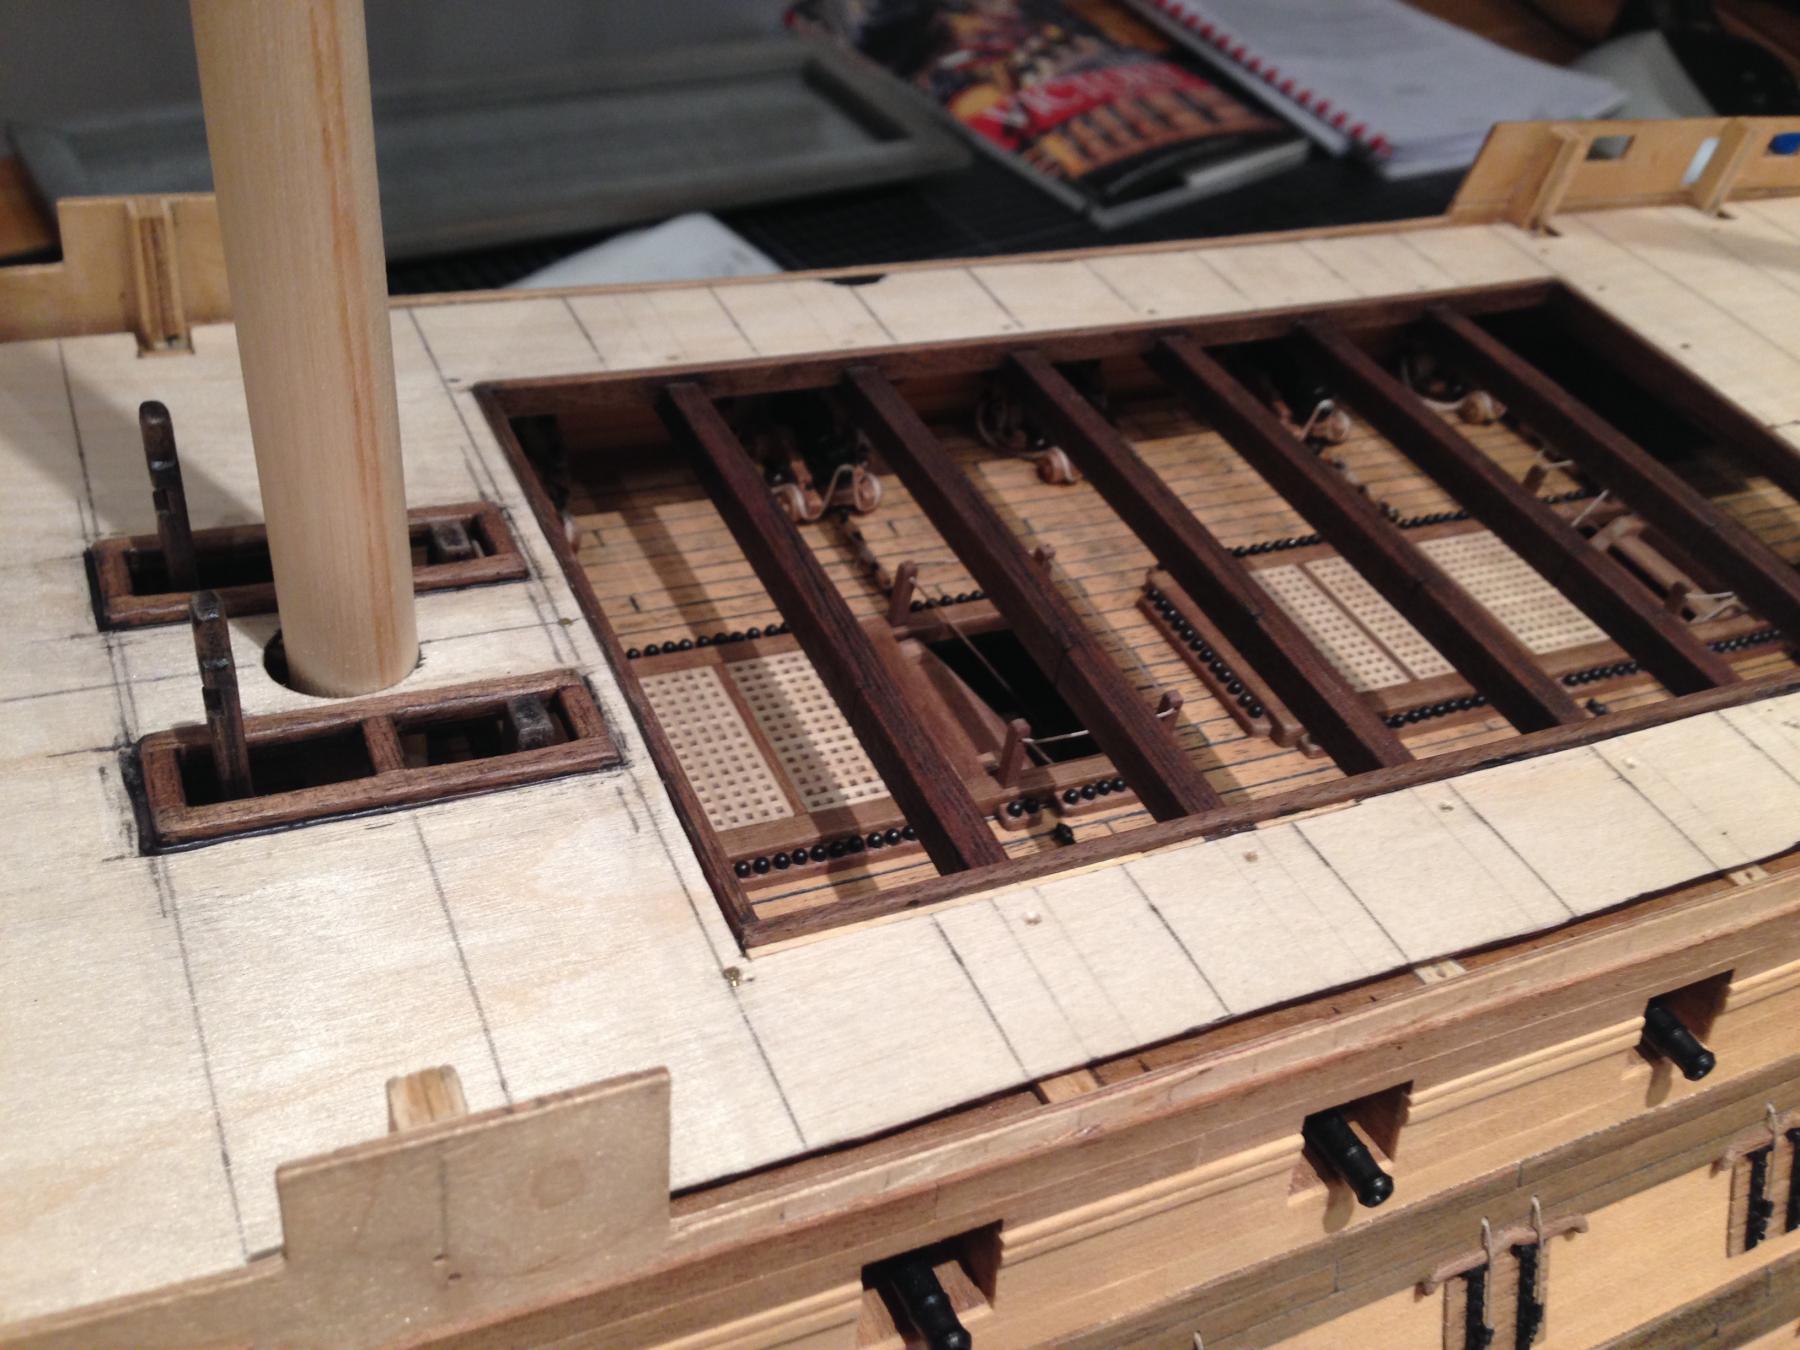
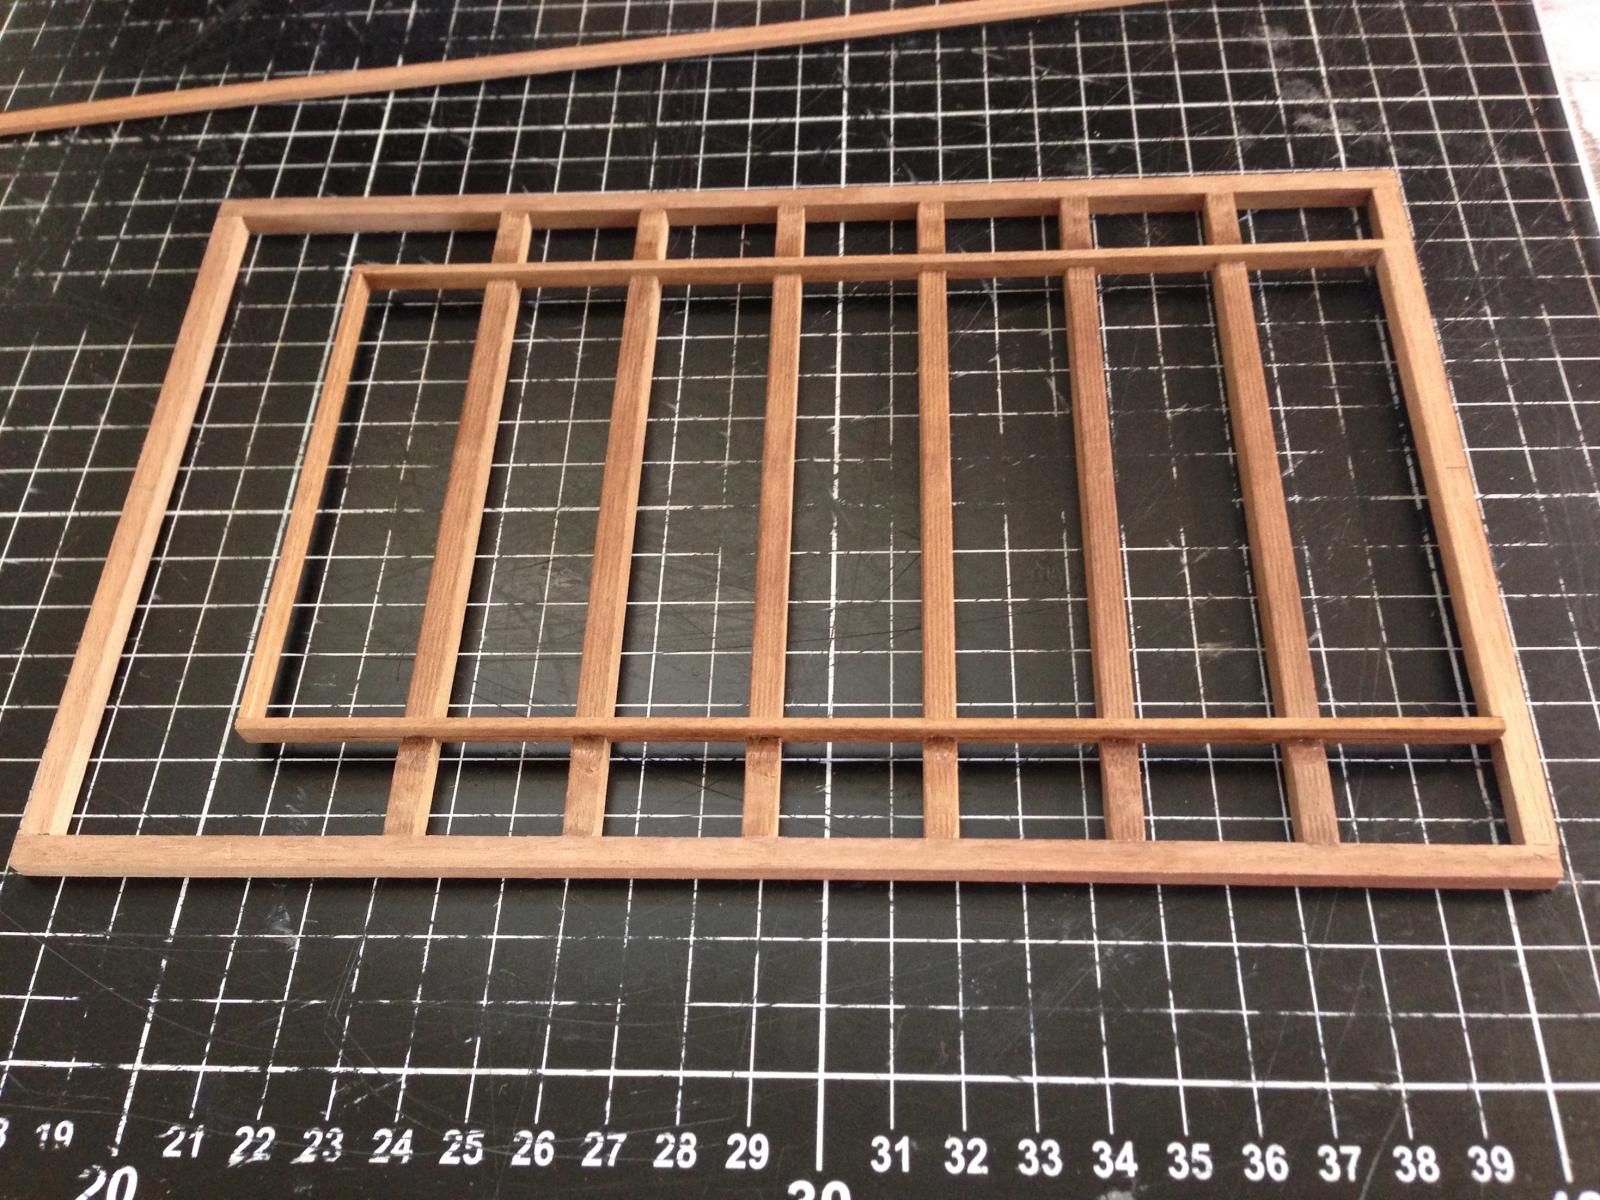
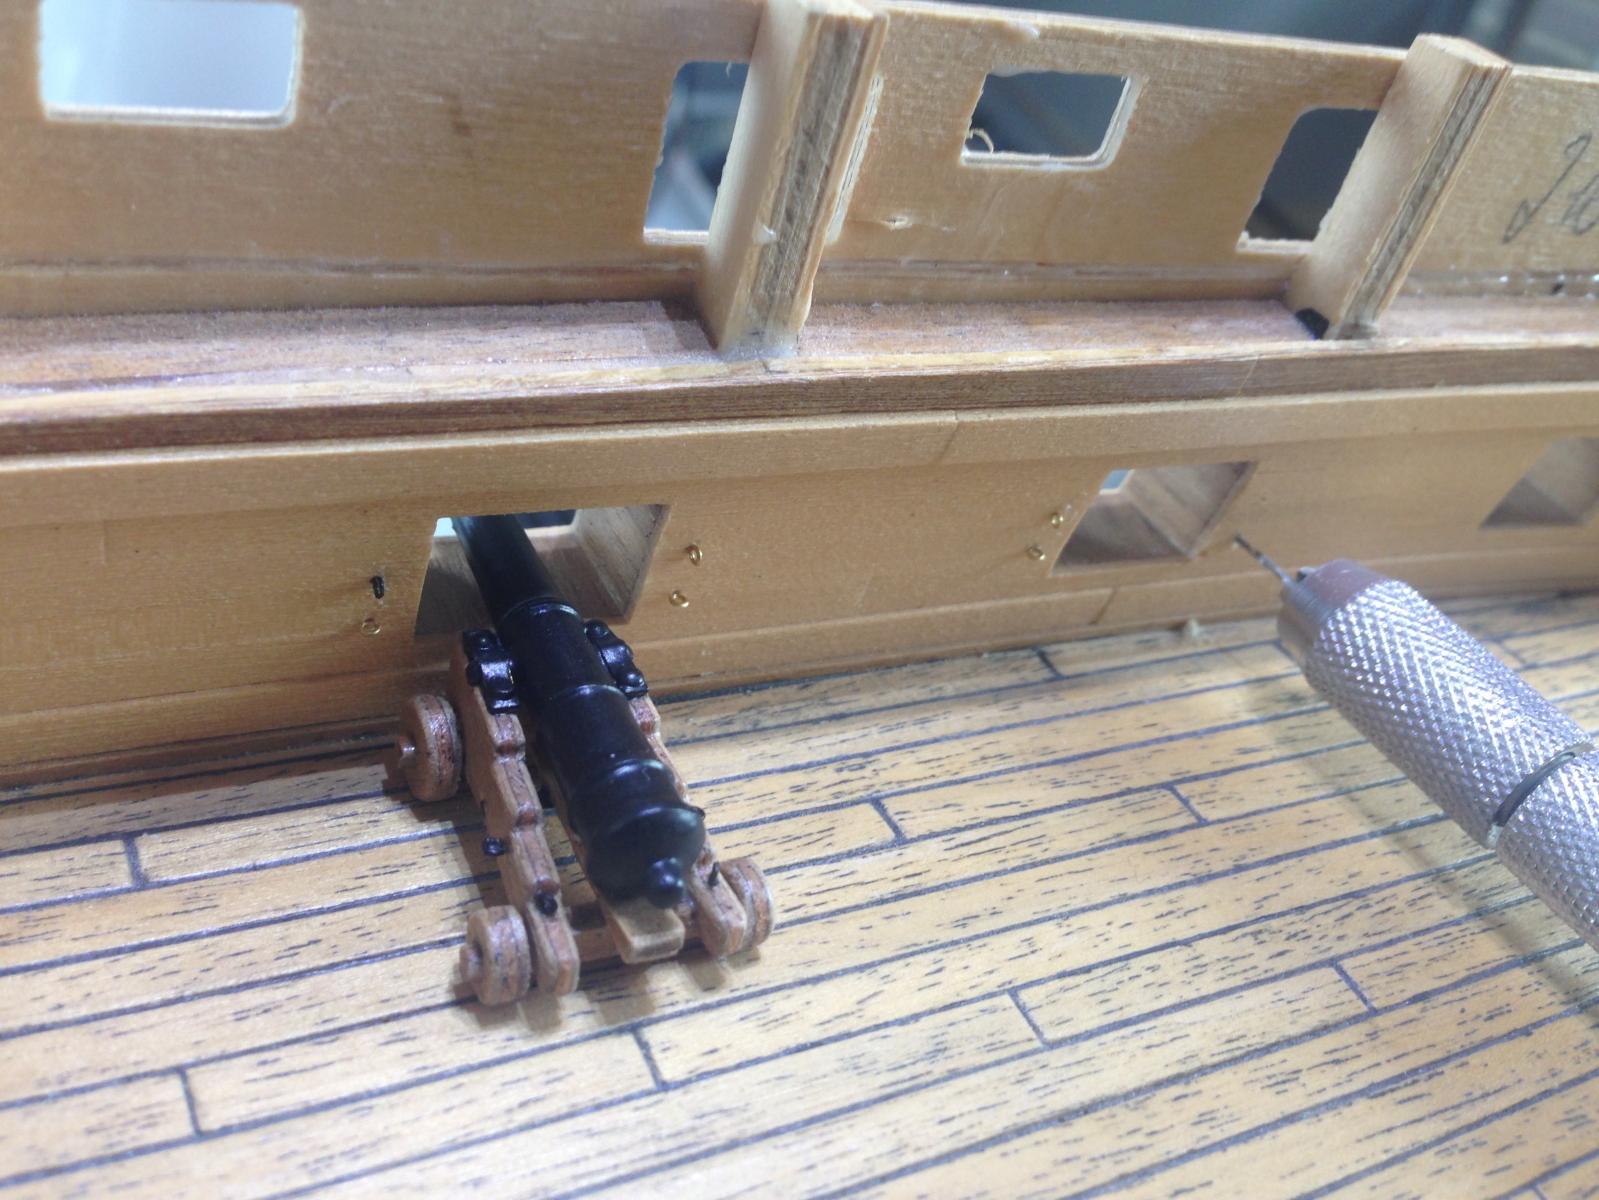
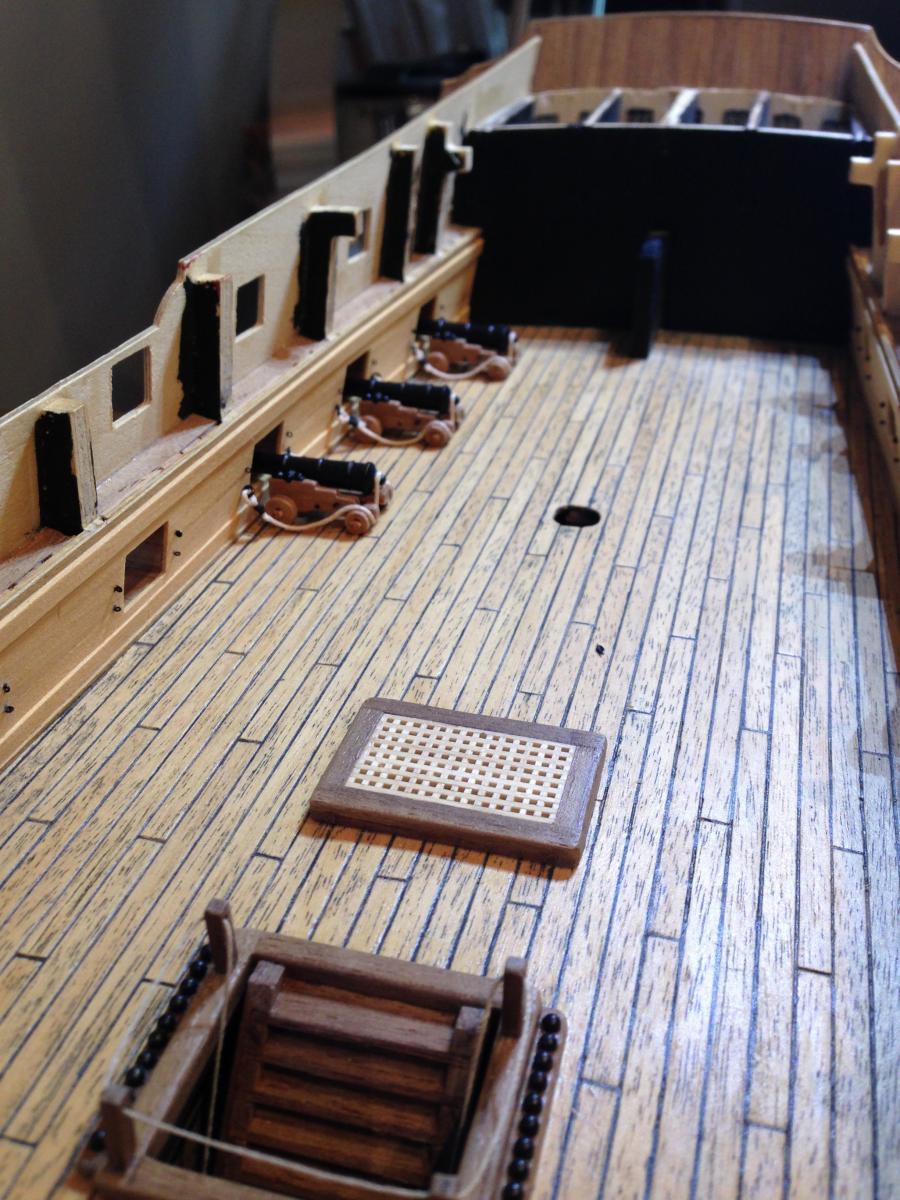
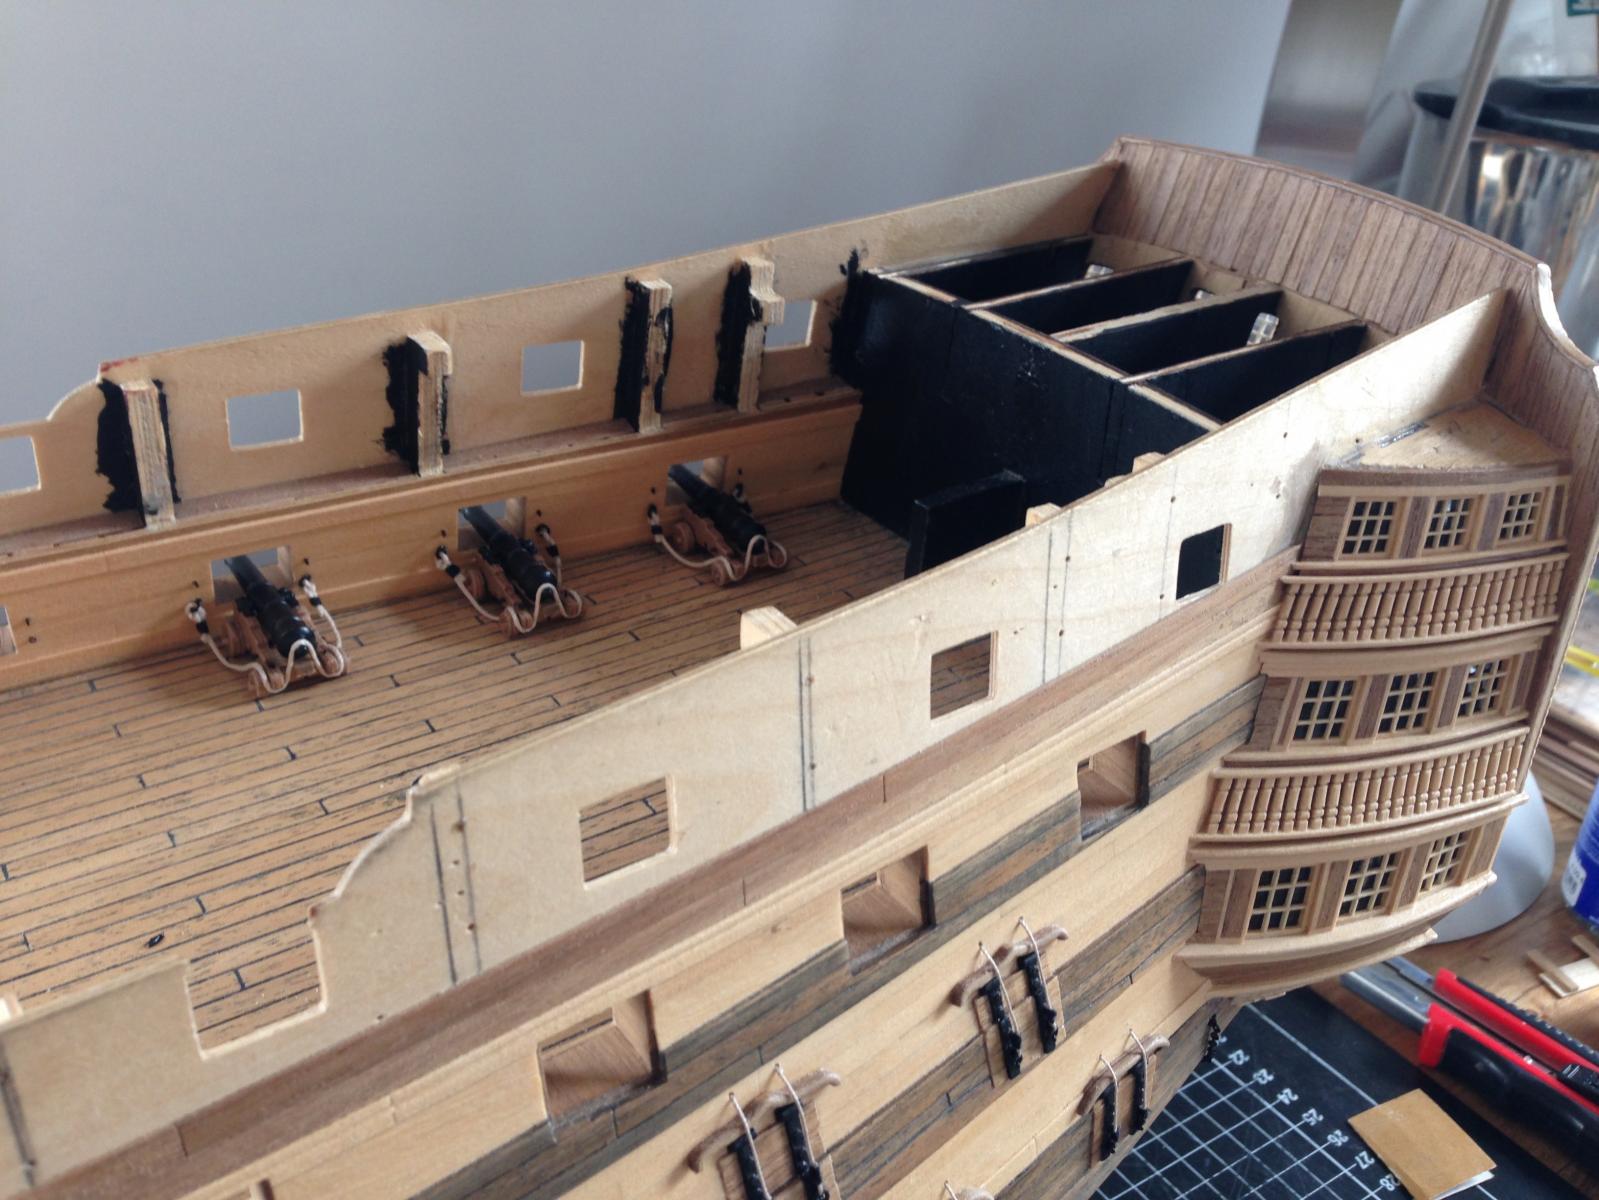
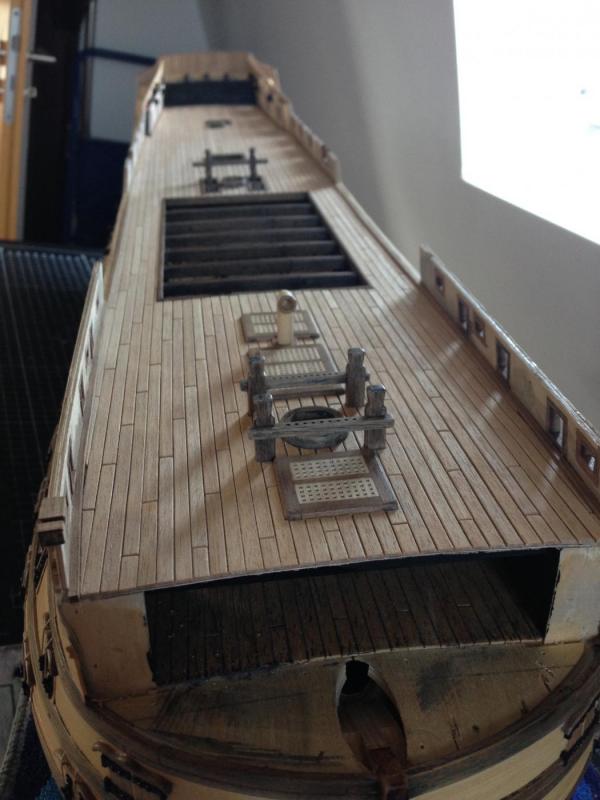
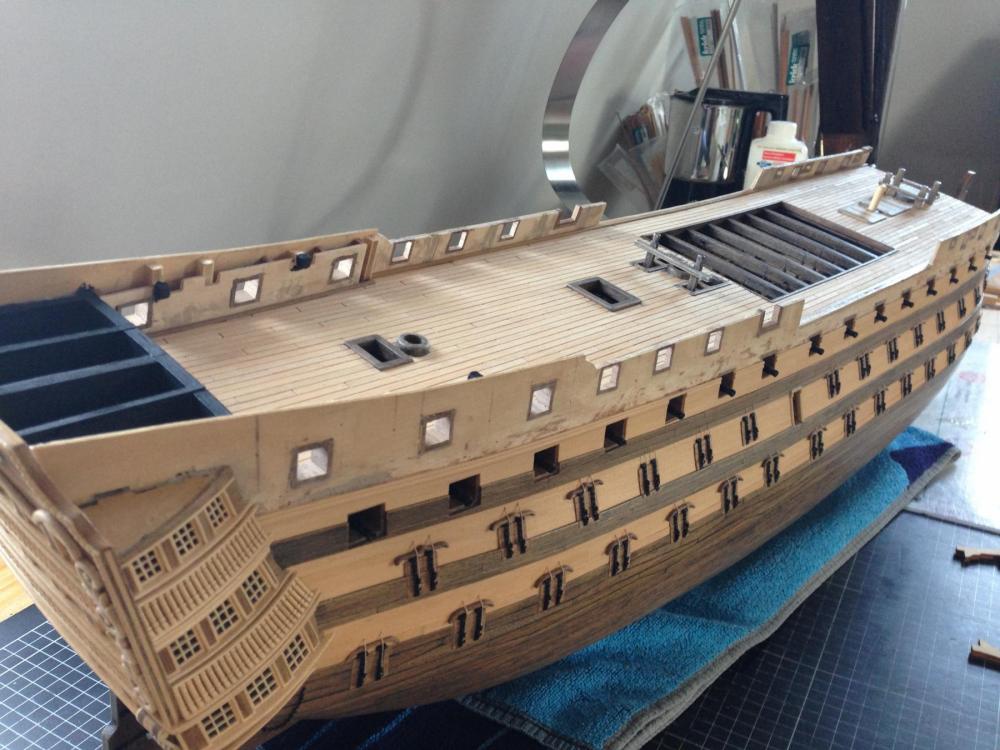
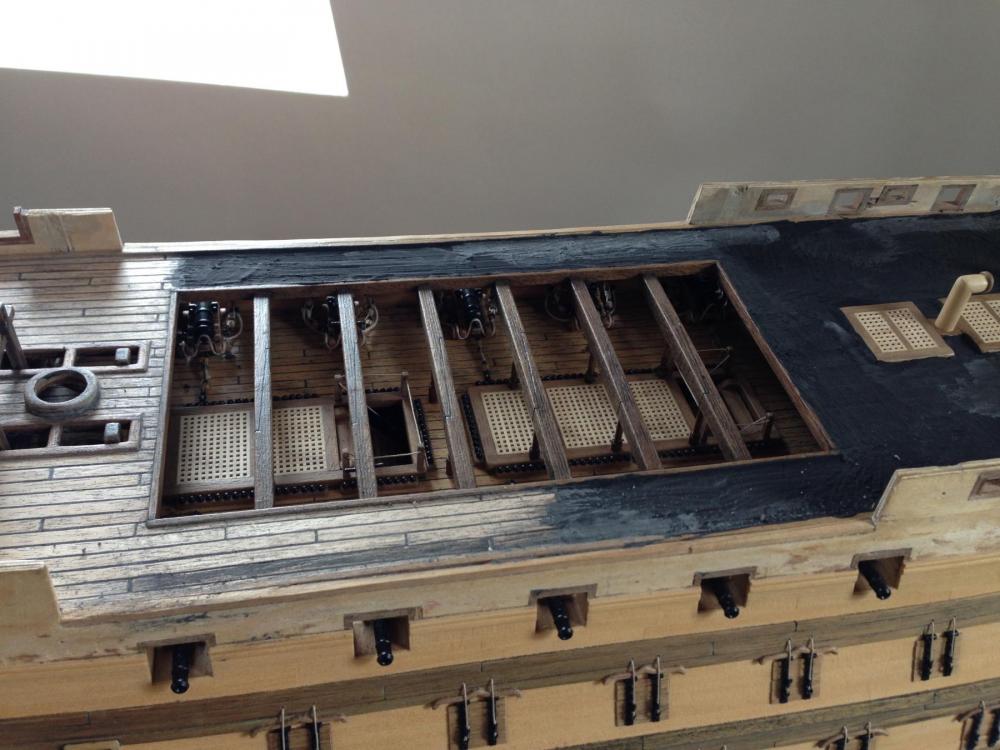
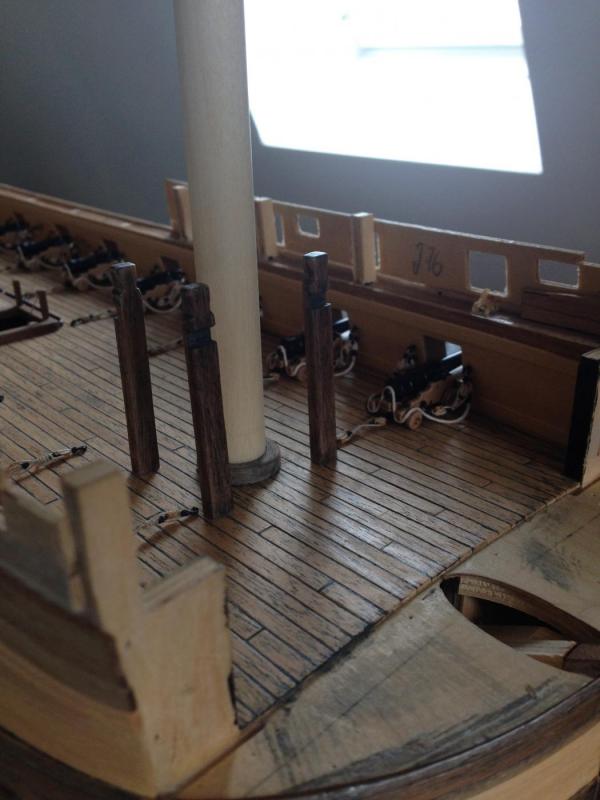
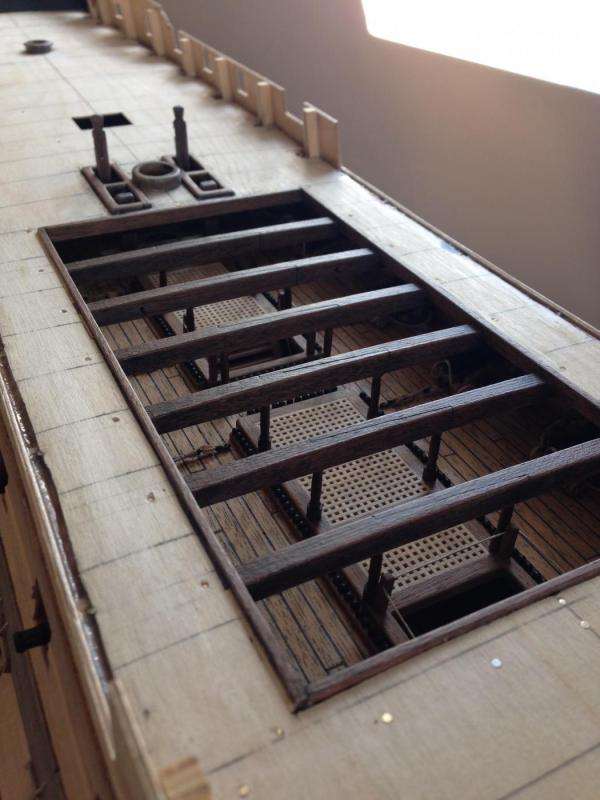
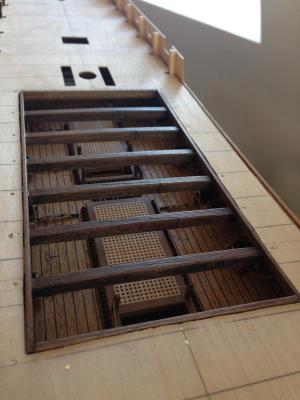
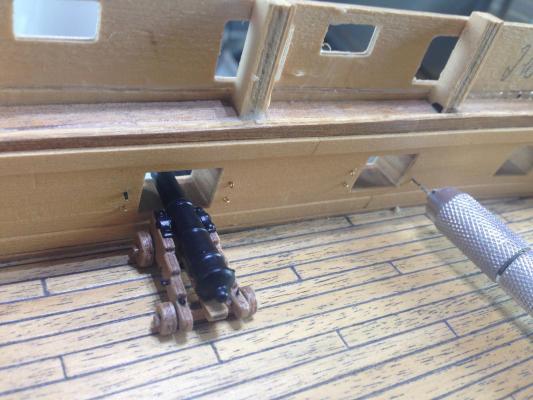
Hello friends, another little update. I took the next step and fixed the deck. Of the 30 guns that I made, suddenly only 10 are visible :-((( I have put in the masts temporarily, because I was afraid that they would not fit later. And I decided to change something in the way I build the deck, compared to the deck below. As I build the deck below, I first do the planking and then put the gratings with frames on top. I had some problems because the deck is slightly curved. You could not see the slits where it does not fit perfectly, because of the cannonballs beside them. Now I want to first build the gratings and then do the planking around. Or should I start with the ship´s side. That would give me the chance to finish the second planking of the hull. Maybe someone can give me advice at this point... Best wishes to all of you ! - Heinz -


-
Hello Isalbert, Is that worth?... I think: Yes, it is. When you work on that level and 99,99% is perfect (you are absolutely right, Dave :-) ), 3 hours overtime should´t be an argument. Although it is natural human. And I know very well how it feels when you made something not perfect. You know that you can do it better. And you think about the time (hours, days, weeks?) you spend for nothing, when you trash your work. But I also made the experience, that you will always look and think on that one thing you did not made as good as you can. Even if nobody else see it - you see it for yourself. And every time I renew a piece and made it better than before I came to the realization, that it was worth the time, work, material, etc. I can not compare myself with Alexandru. But if you look at the construction of my Victory, you can see what I mean. Of course, looking at my Victory there are many mistakes of a beginner. But I told myself: no matter how long it took me; no matter how often I have to renew something, no matter if I have to buy new material... I will make it the best I can with my limited tools and skills. I am glad if someone like what I do; but I only do it for me. So please, Alexandru, I know you find a way to remove that broken piece. Please renew it for yourself, your wife and me :-)))). By the way... ... I took a look at your profile and found some photos of your Vic. I don´t know the words to say how impressed I am. I am not able to imagine how it´s possible to work on such a level. Even if the model has a larger scale, it´s amazing. It feels like I am working on a paper boat...
-
Hello Alexandru, please let me tell you first, that I am a big fan of your work and your skills. Not only that you give me a lot of inspiration - if I am unsure about a detail, I always look in your forum. I do not dare to say that we have the same hobby. I think your work is exceptional! But now I was surprised the first time and a little bit shocked. It is clear to see that the ornament is broken. And I think it´s happening at the beginning of production. Why did you continue with it and use this broken piece? This ornament should be an eye-catcher and must look the best as possible! I had the same problem on my victory. I did not wanted to use the pieces of my kit and tried to make them myself. It took me several attempts and a lot of time to do. But I think it was worth it. Alexandru, please think about it, to make this ornament new. I could not believe that I am the only one to see it. Every time I look on your photo, my eyes seem to jump on this fracture. Especially at this point of the ship, an error would be a real shame. I hope you don´t mind me, that a beginner like me, start to criticize something you have made. But I find it important to say my honest opinion. Best wishes to you, Alexandru! And thank you much for sharing your skills with us !!! - Heinz -
-
Hello Tris, thanks for the compliment! You are welcome to follow my build-log :-) - Heinz -
-
Thank you so much, Nigel. Your compliment is very welcome !!! Ian, please don´t let us wait too long for your surprise. I could not wait to see what you are talking about... Thanks for all your "likes"!!! Best -Heinz-
-
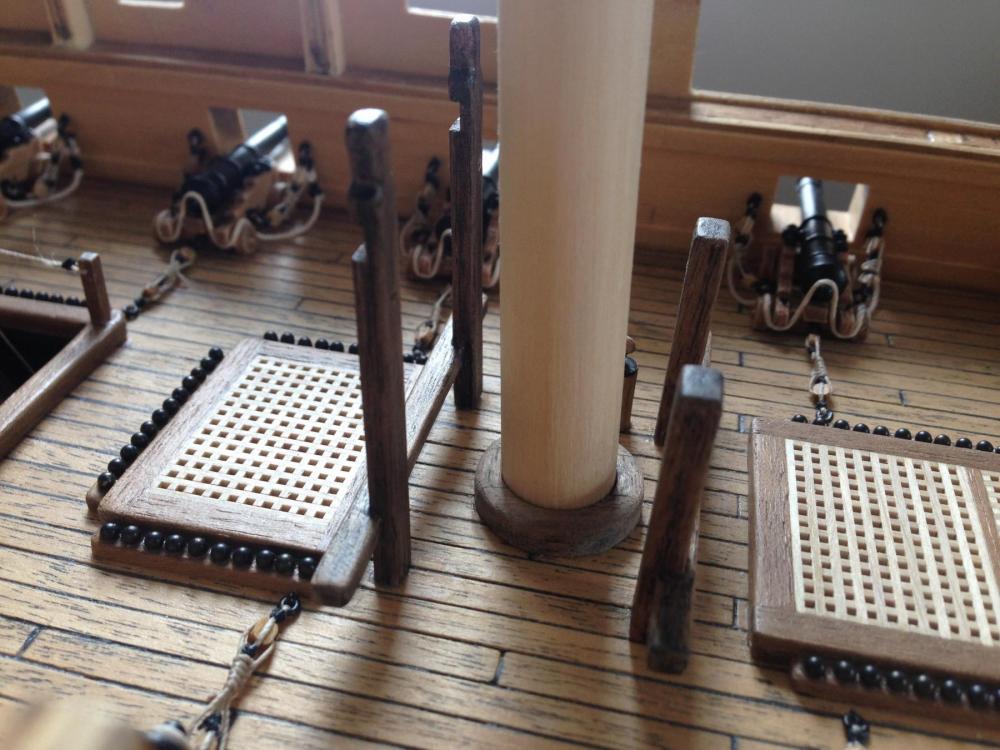
Hello Ian, my friend! Now I have to disappoint you :-)... No, I did not made them out of two pieces. I took them from the kit and worked with my "old" technic. I make a slit and fill it with my black wood filler to make the slit visible. I put the wood filler over the whole camber beams to give them that dark and dirty look. I love the effect! Thank you for all your nice words!!! - Heinz -
-
Thank you very much, Don. This means a lot to me :-) - Heinz -
-
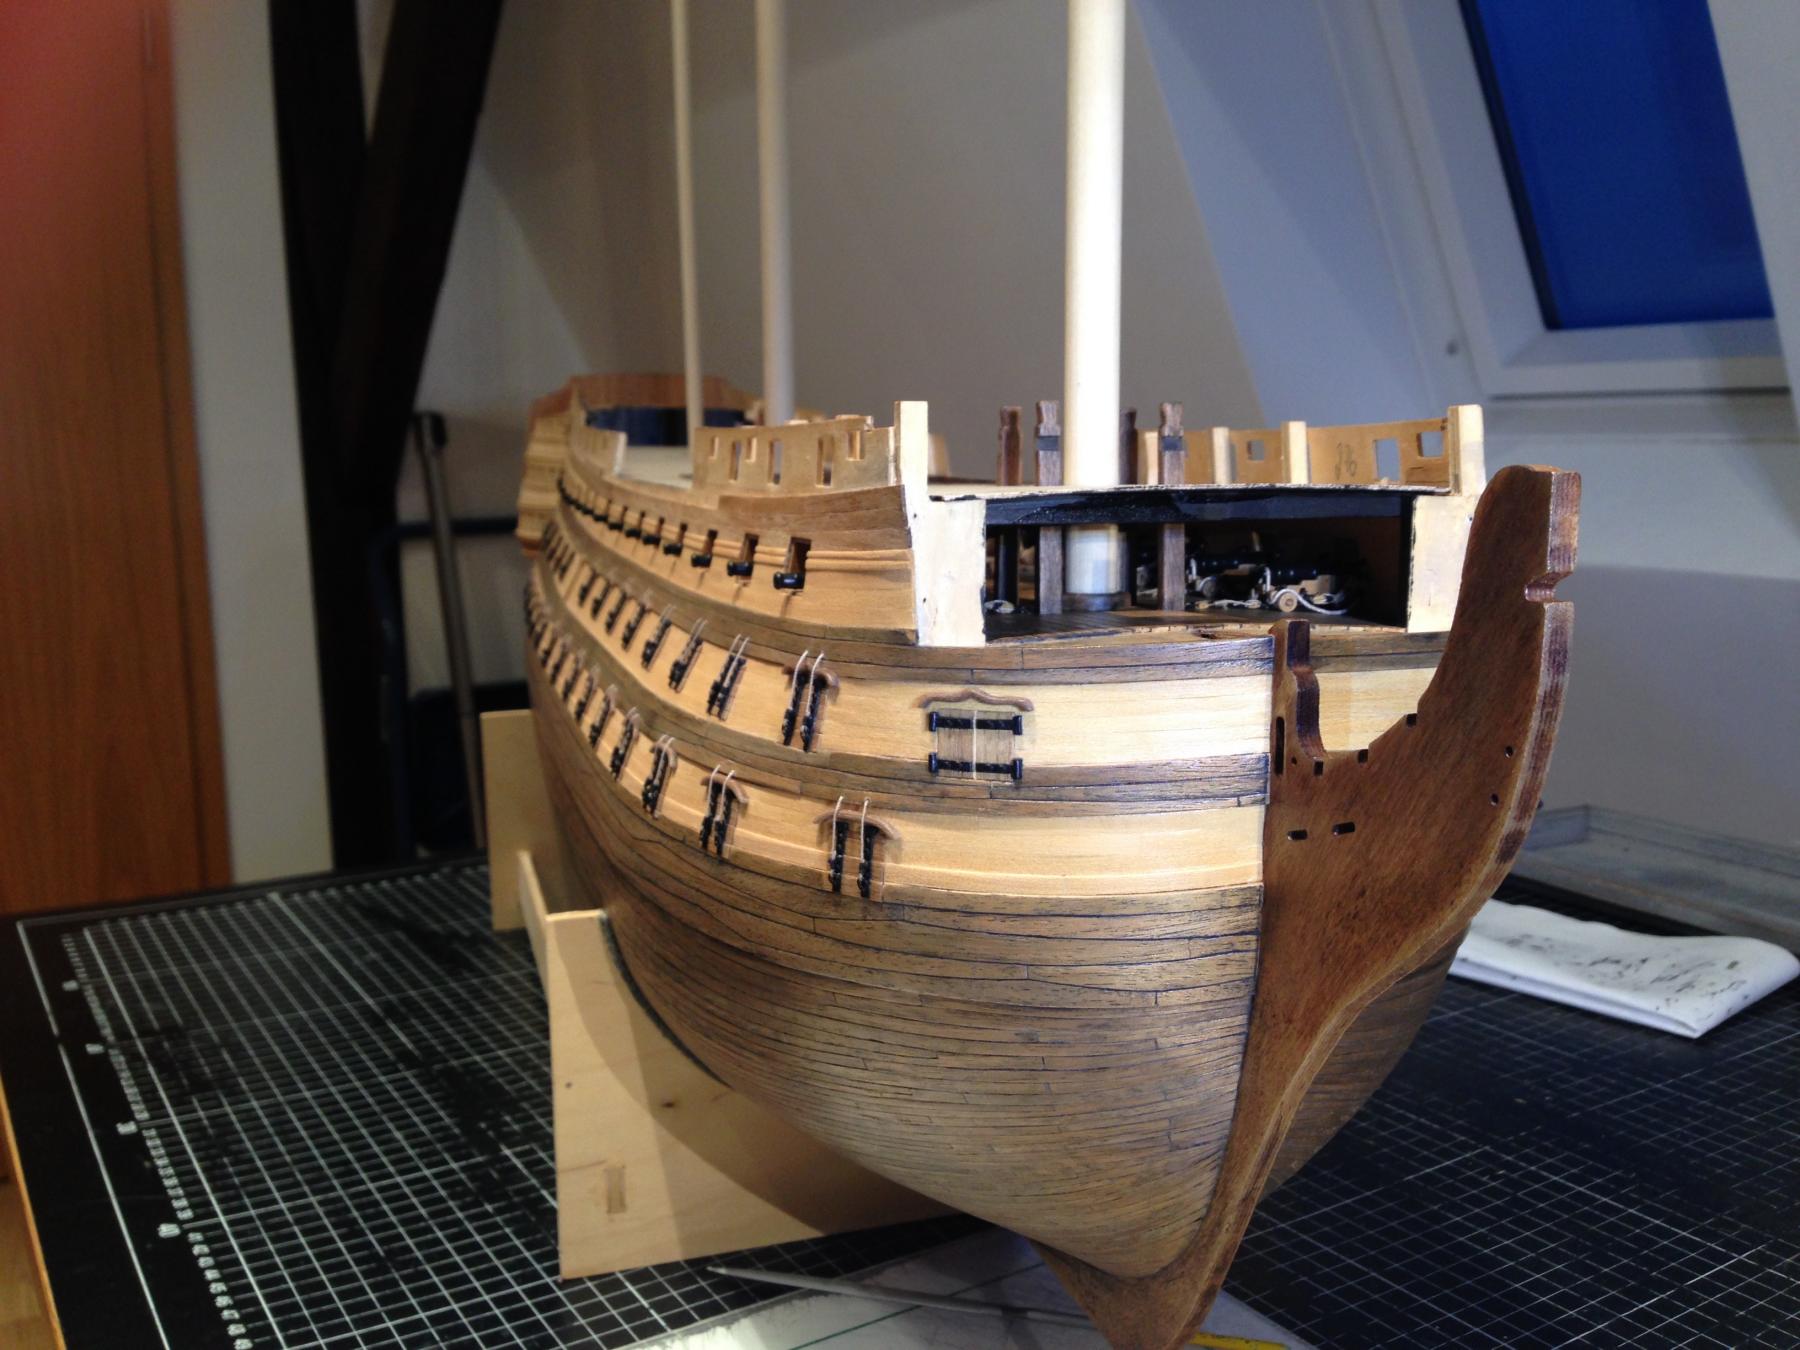
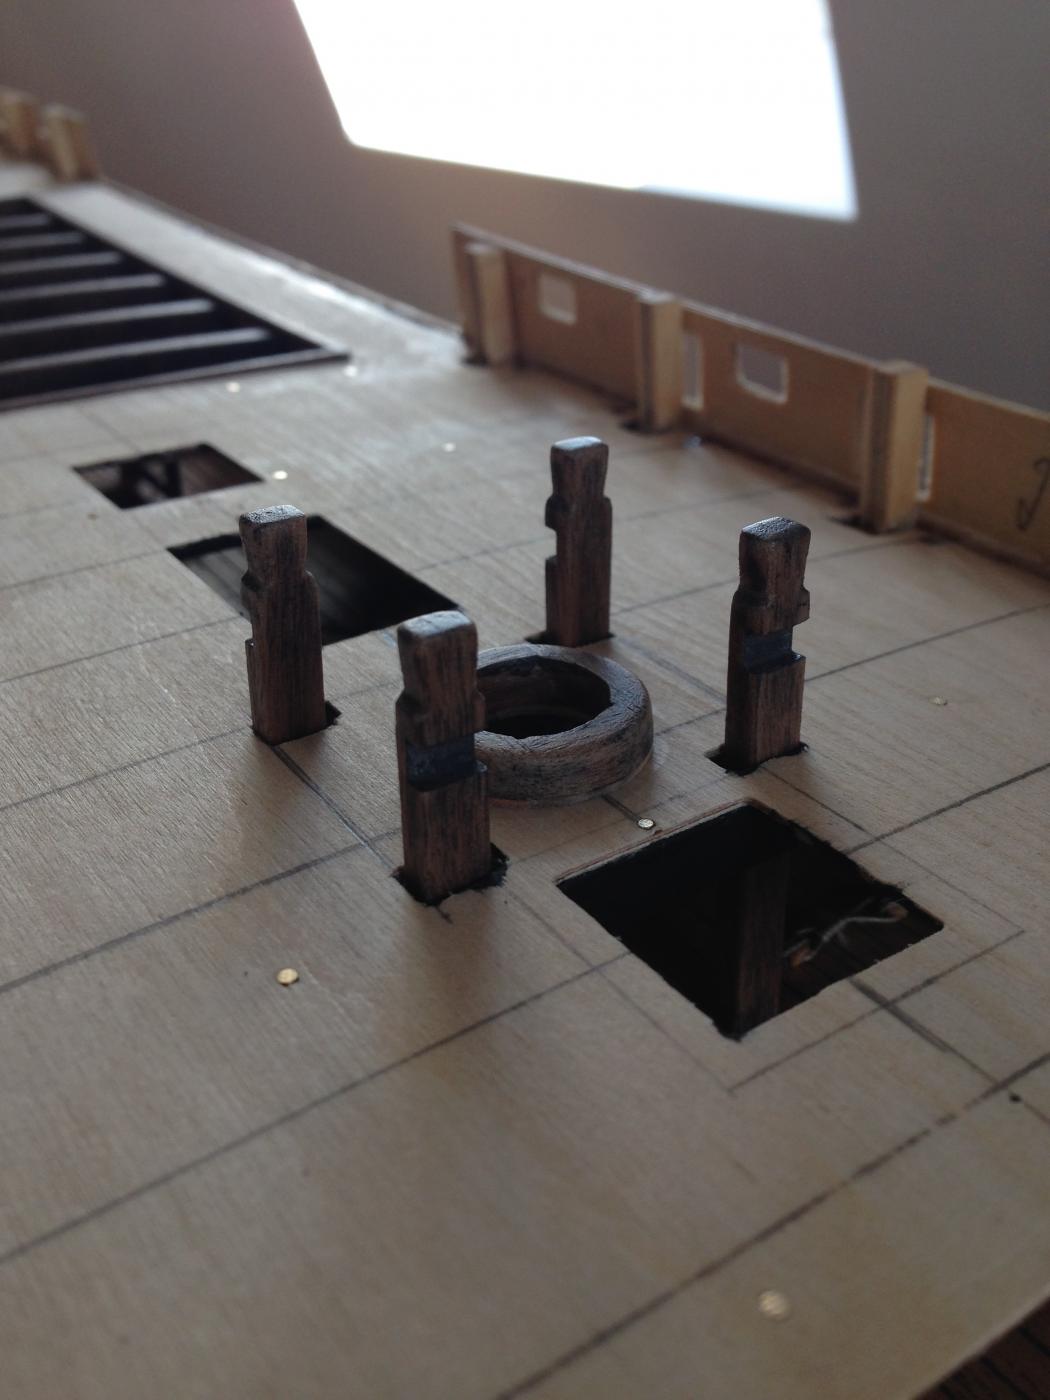
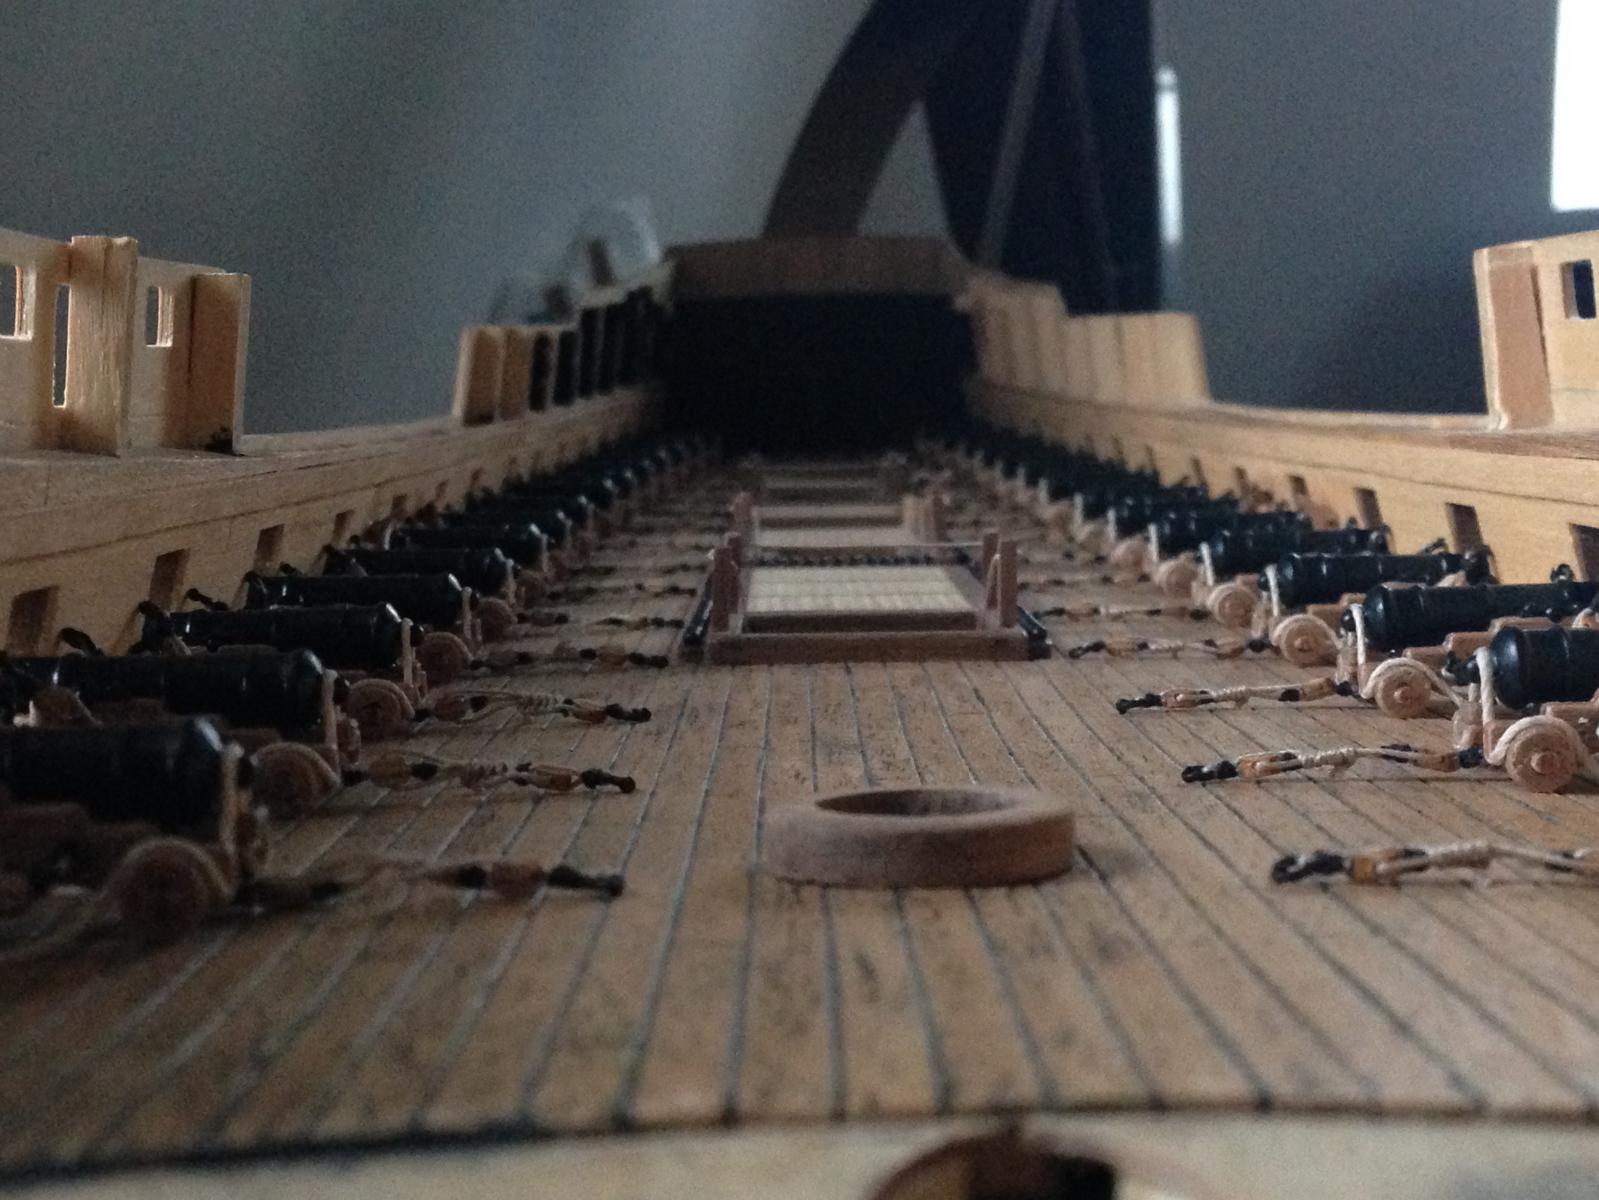
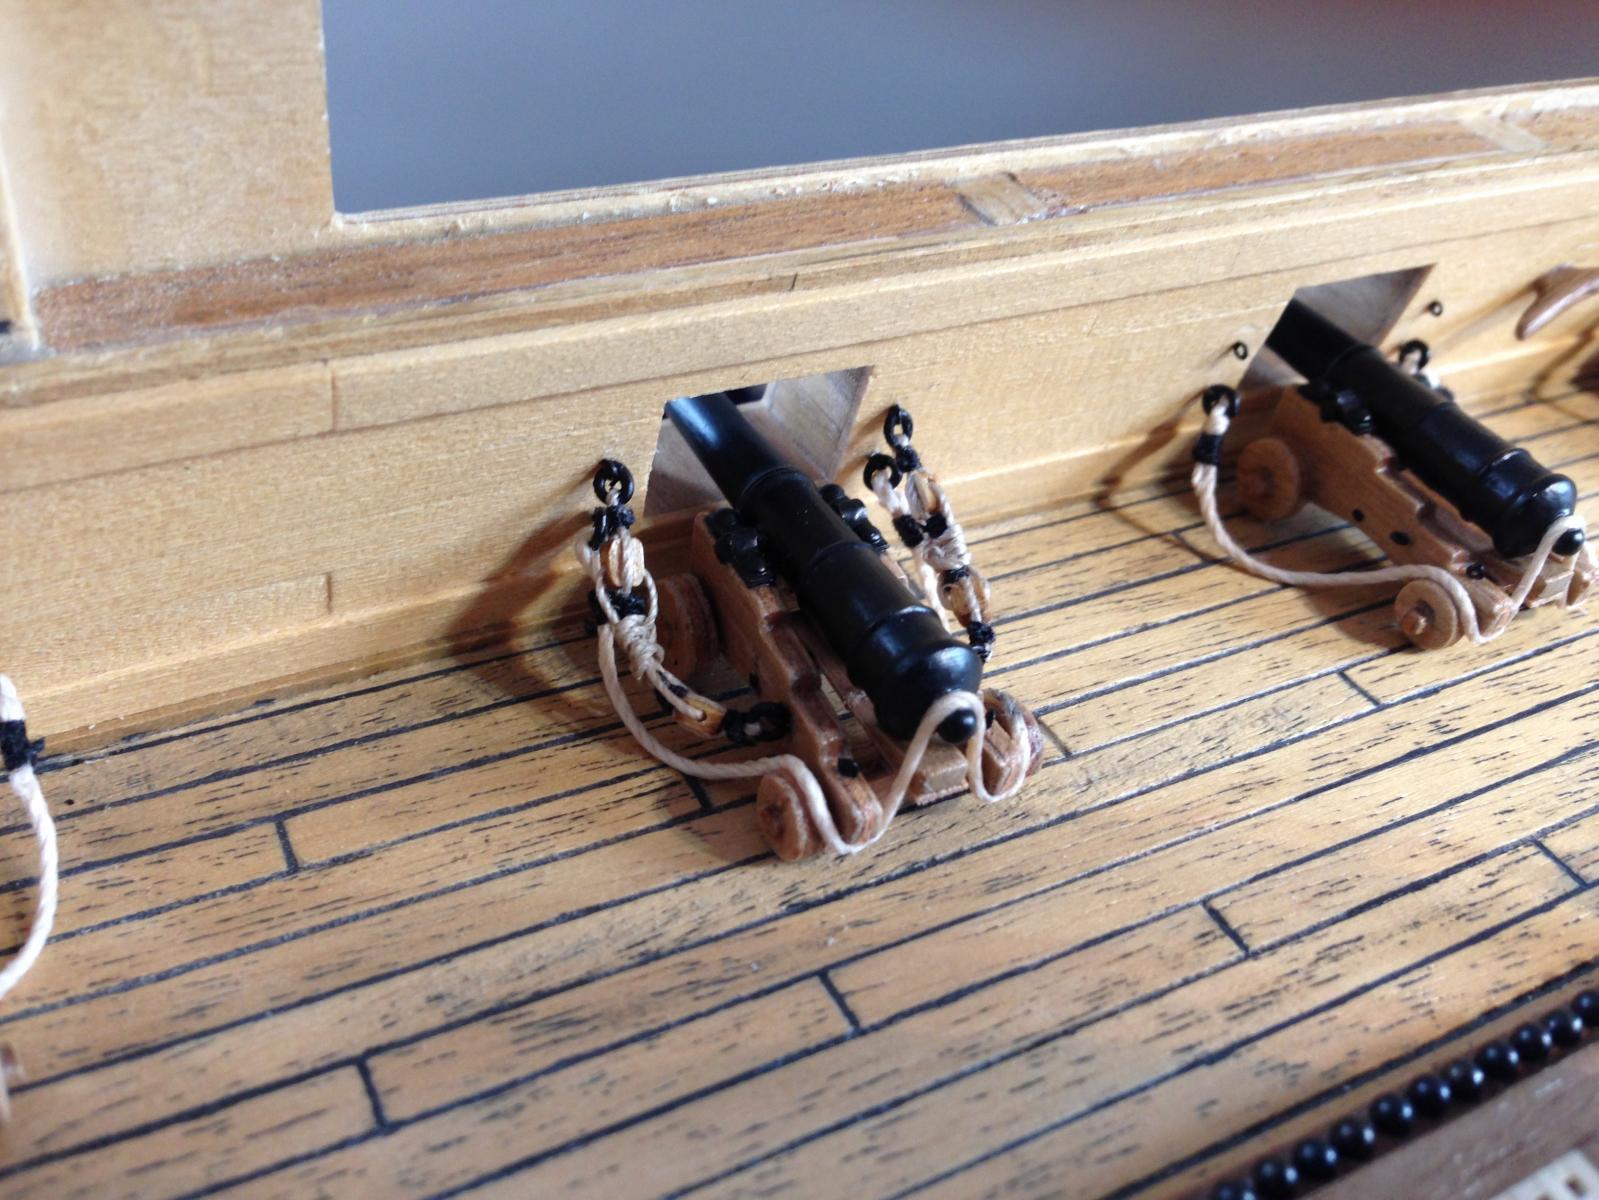
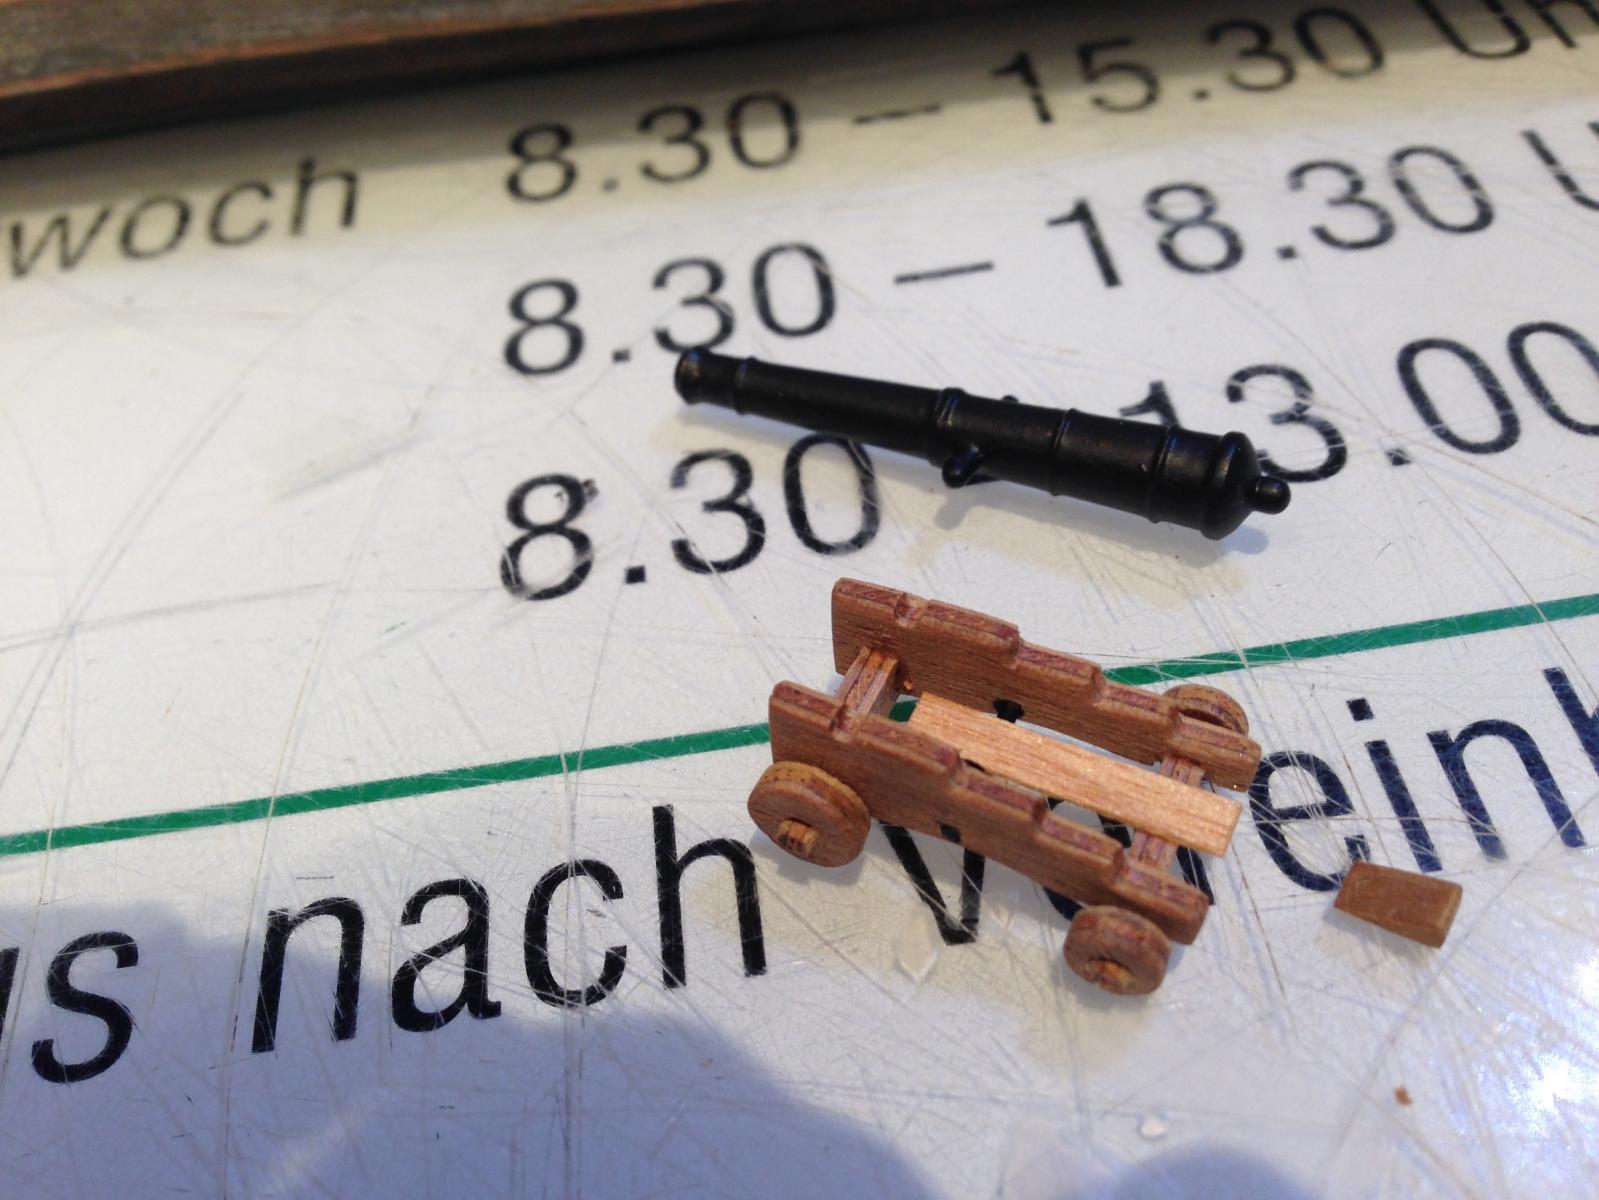
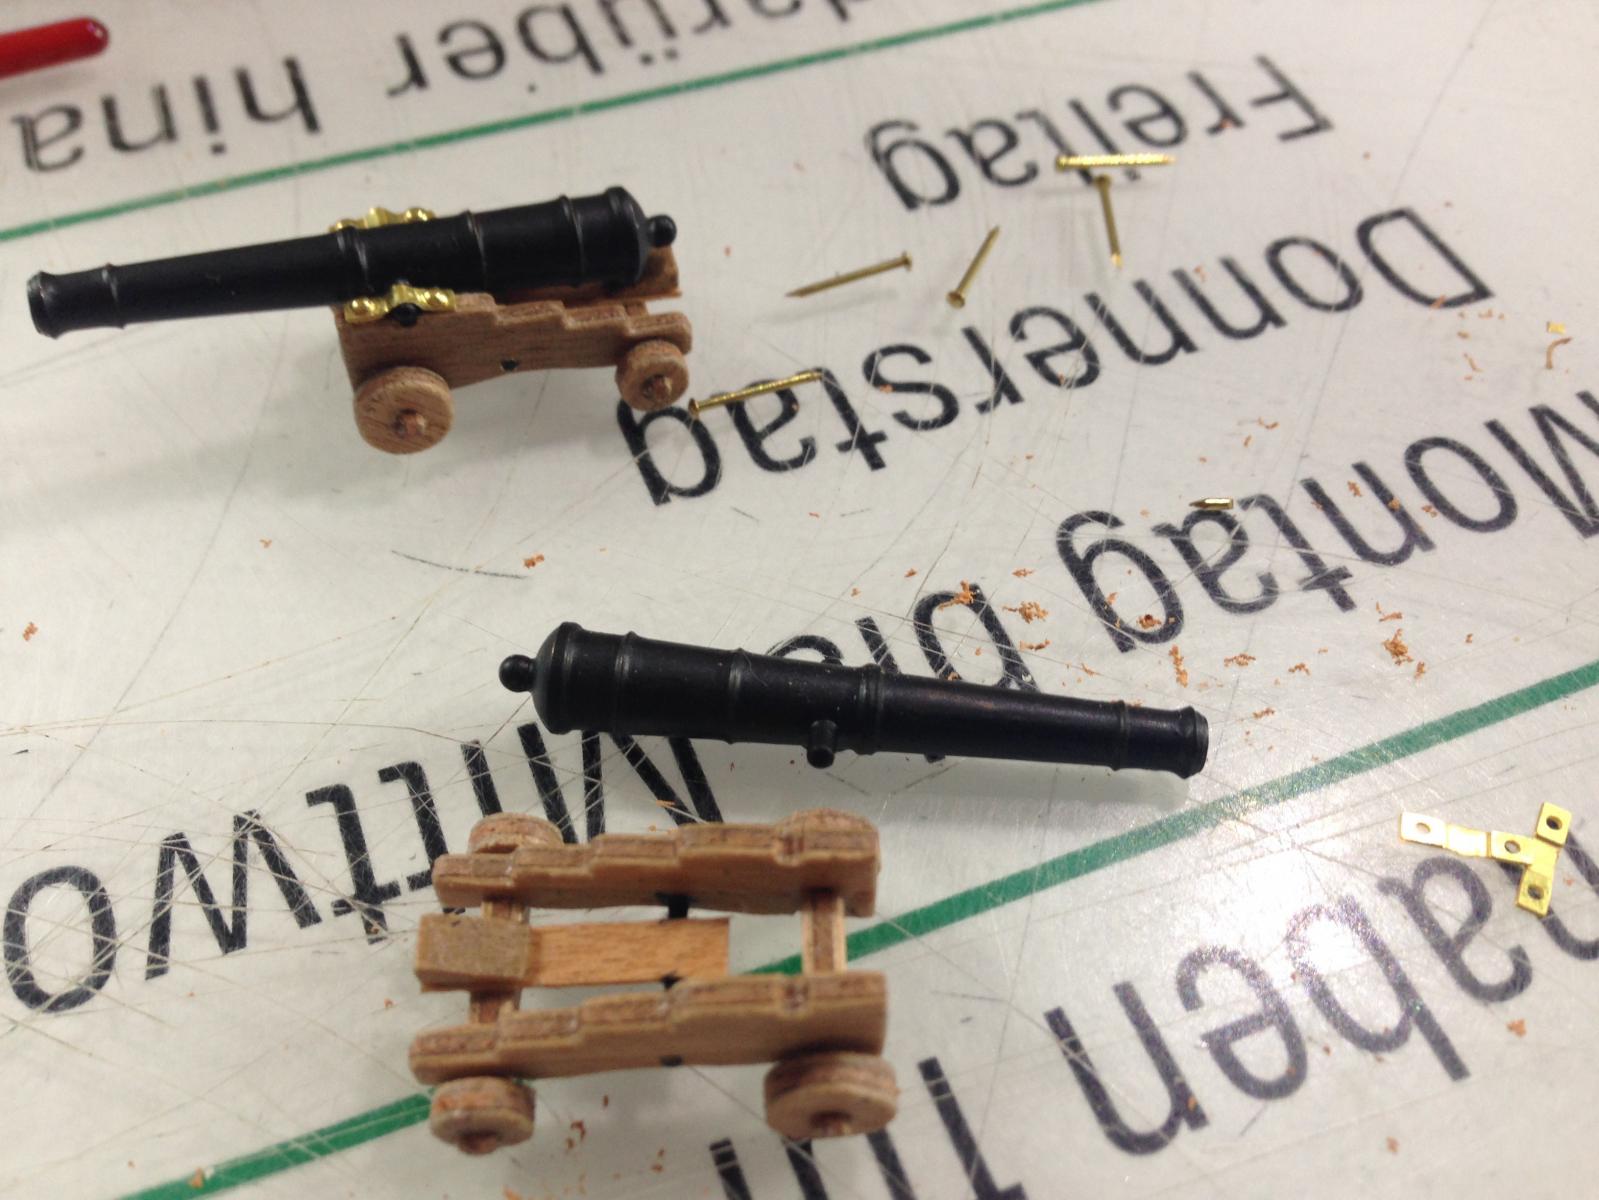
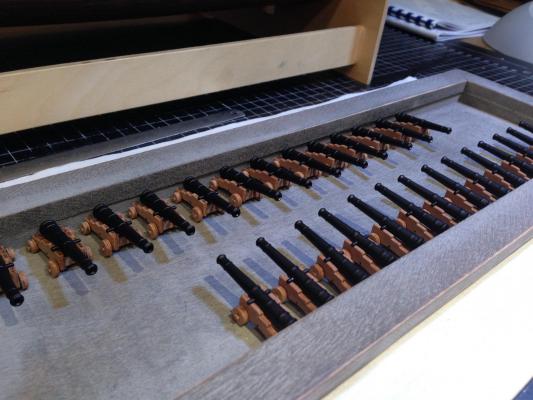
Hello my friends, I finished the cannons on the upper deck. Time for an update :-) Although there are still a few things to do on the upper deck, I decided to start with the next deck. I knew before, that this will mean some new problems for me, because I removed the wooden edges on the frames, as I rebuild the side walls (please look at post no. 5 and 6 on my bulldog).. How should I fix the bows on which the deck will lay? I decided to fix all these bows on the bottom of the deck and lay the whole thing on the top of the side wall. I am very pleased about this solution. Contrary to my fears, everything seemed very stable. Luckily, you can not see from the outside that the bows hanging in the air, rather than to support the deck :-). Now I have time to take care of the missing things on the upper deck. But first I have to read plans and look very much in other forums ... Greetings to all of you! - Heinz - p.s.: I do not know why all pictures are messed up today. Sorry for that!


-
Thank you Robert! I know that you are right. Other people have to search to find that mistake. But - as you said - it is in my mind. For me it´s like a turn signal shining into my eyes... :-) By the way: I continue to build the next 14 pulleys. "Only" 74 to be done right now. Oh my God... I am thinking about changing my hobby :-) - Heinz -
-
Hi Jerry! Thank you very much for your nice words! I followed the work of "your Admiral" very attentive. I like the bounty very much. In fact I have bought a book about the bounty and the real story of her. I am very pleased about what Charlene has made of my copperplates! And I think it was a good decision to give them to you :-) All the best for both of you ! -Heinz-
-
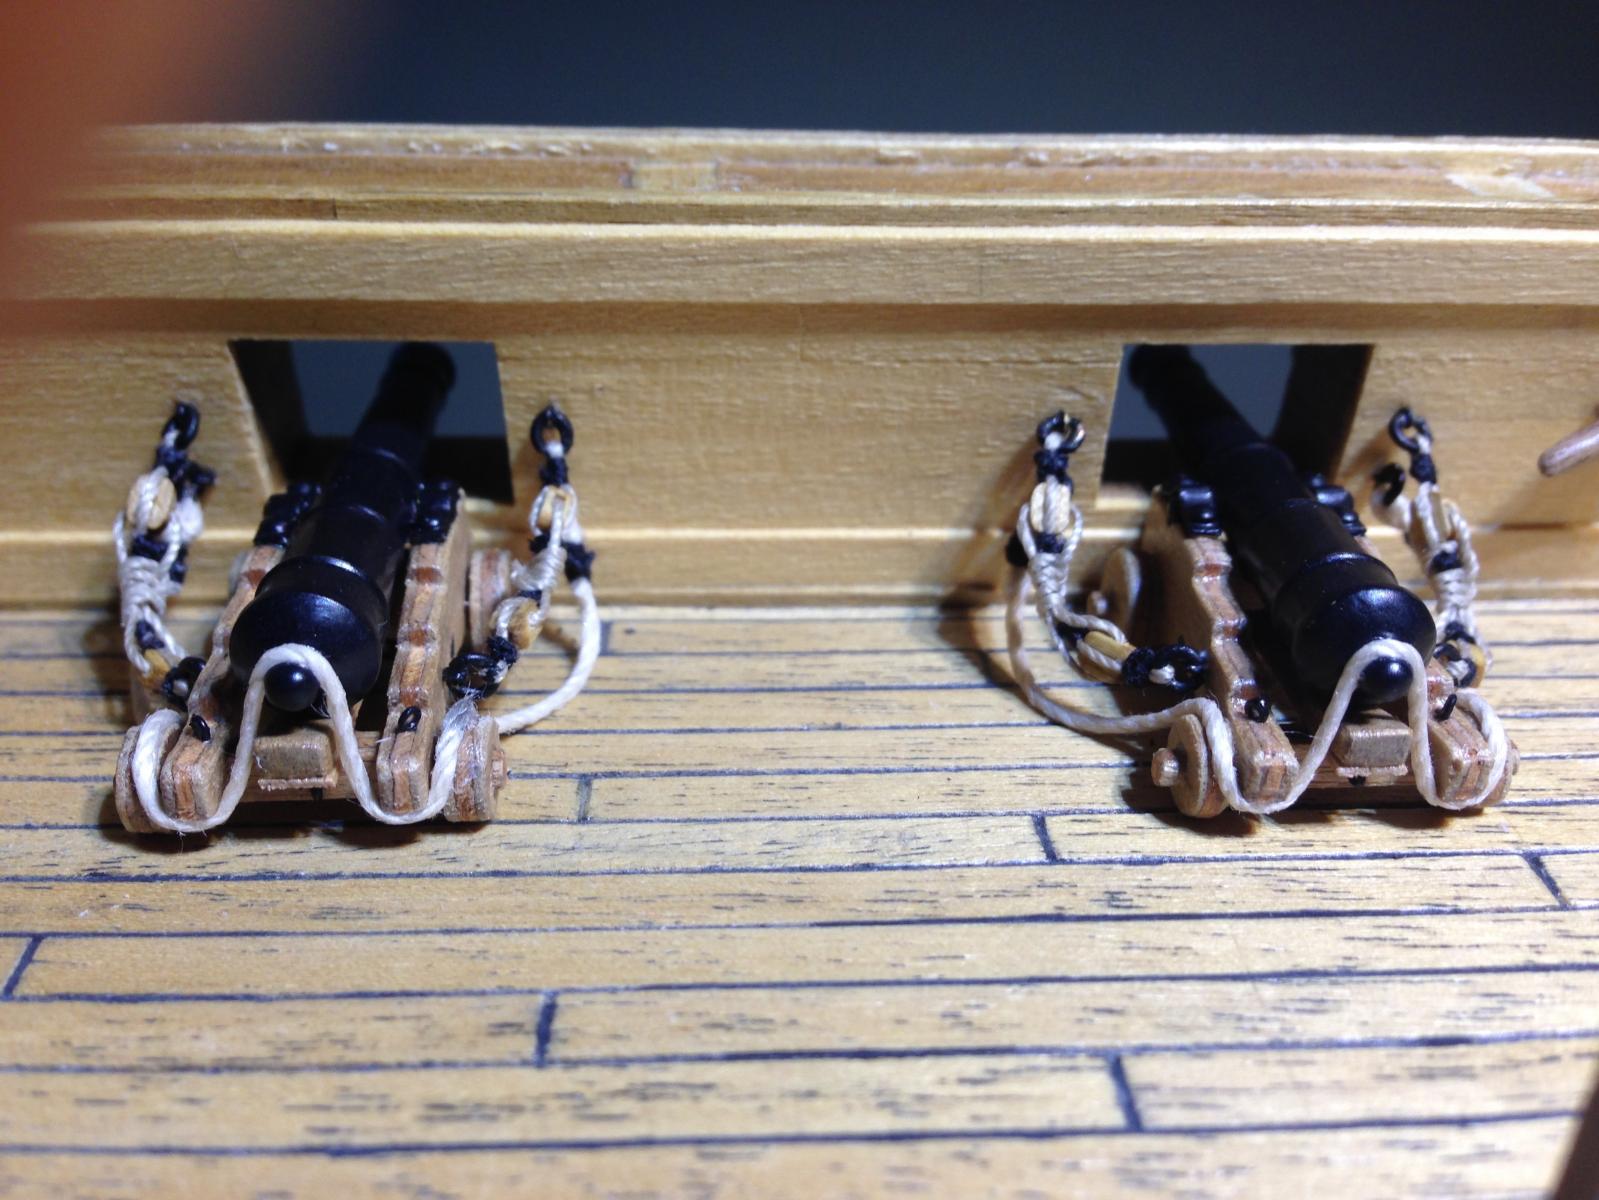
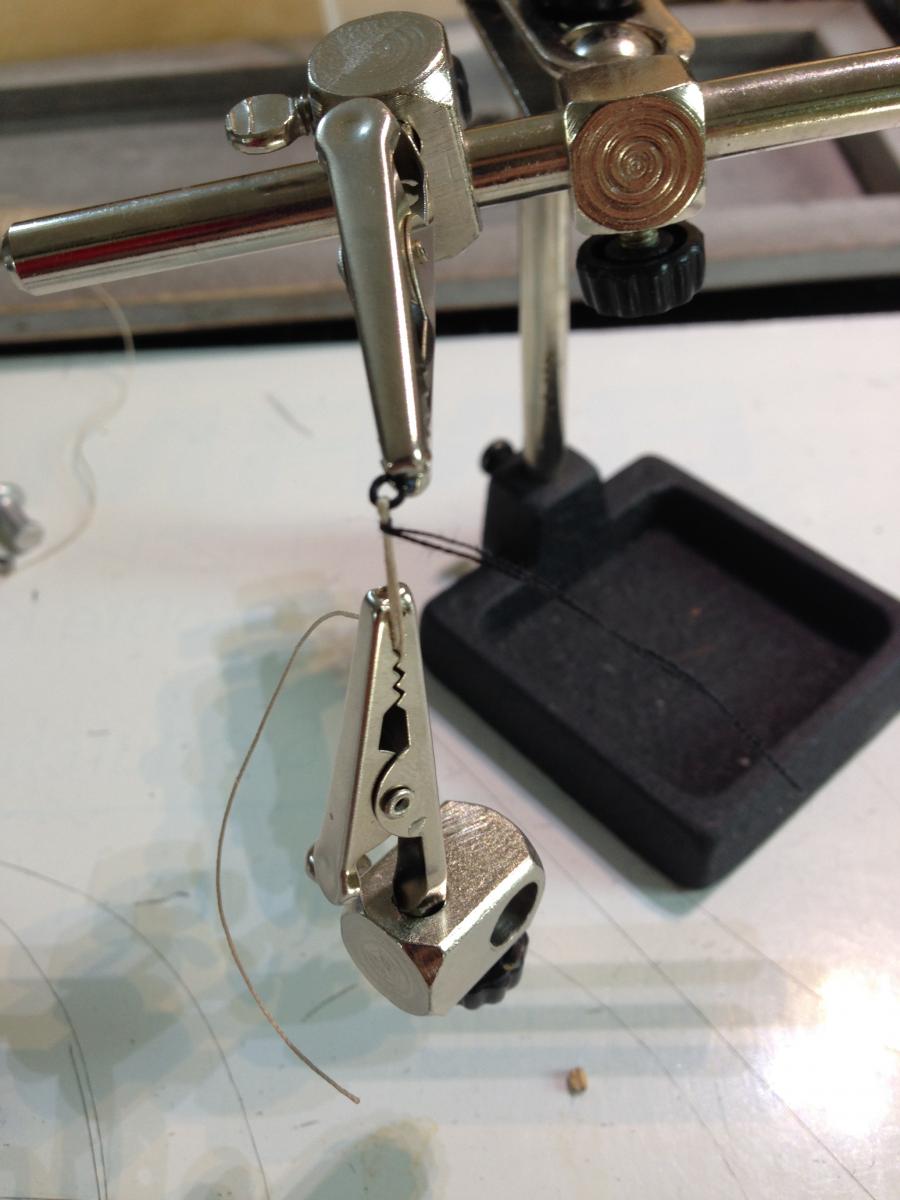
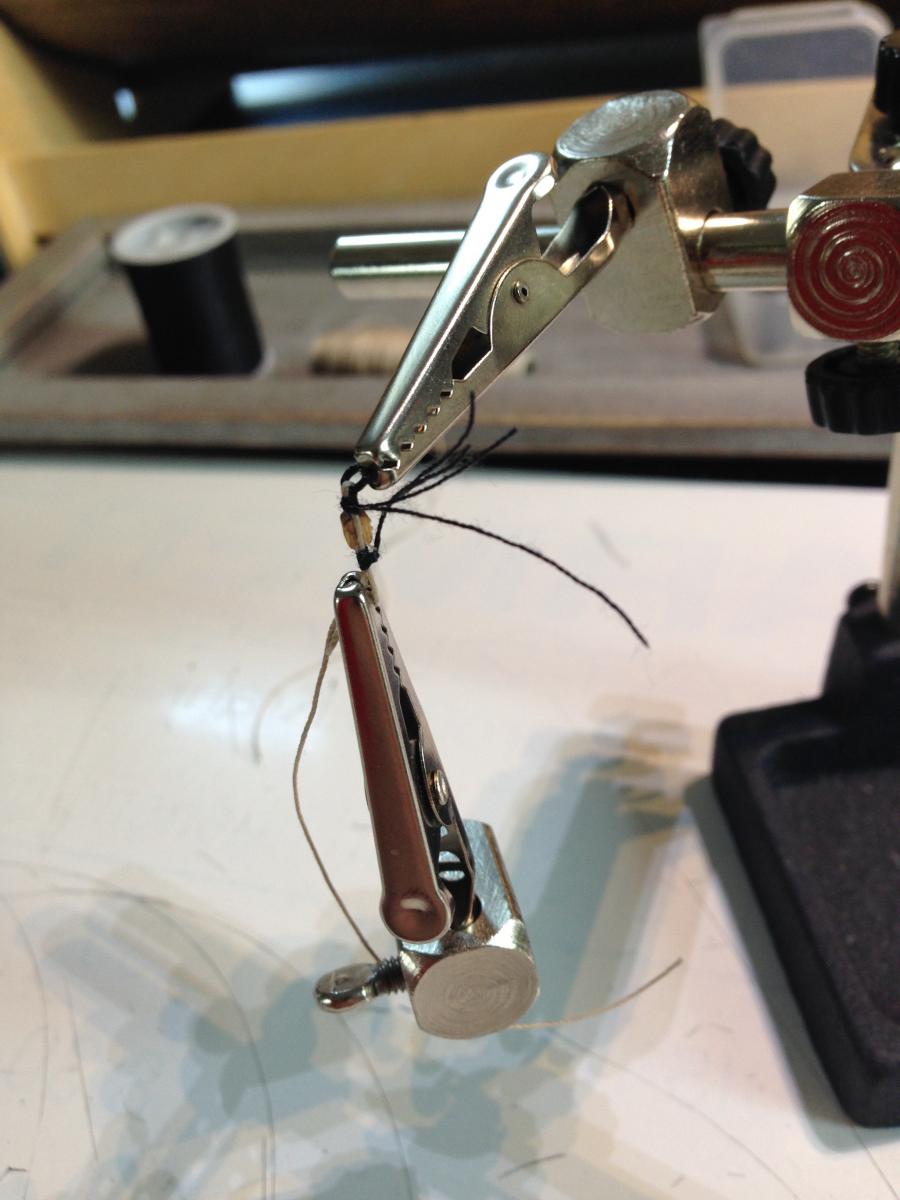
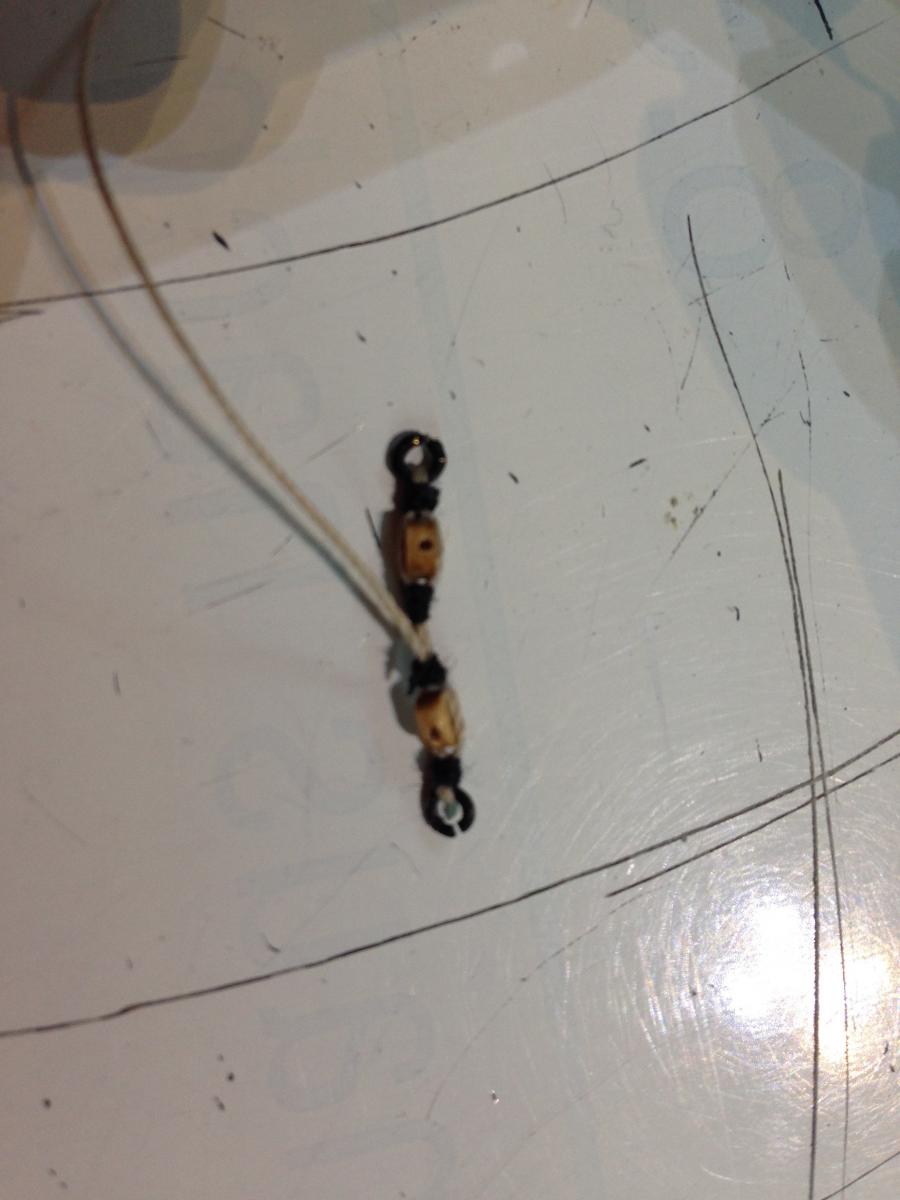
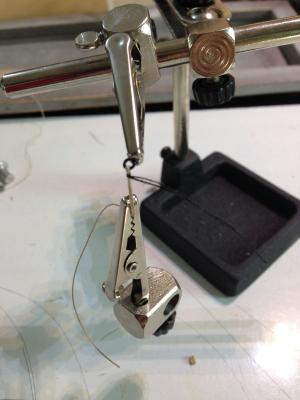
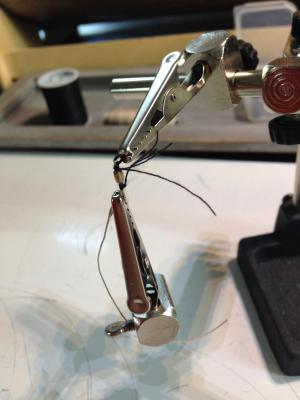
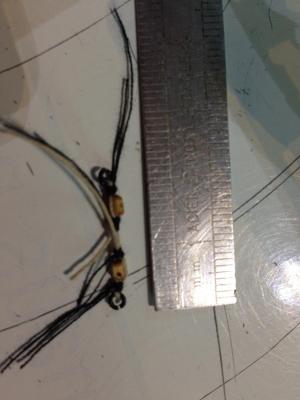
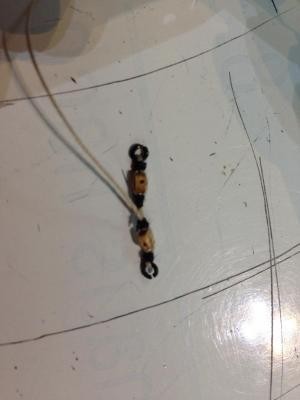
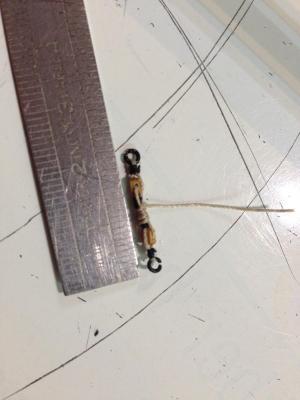
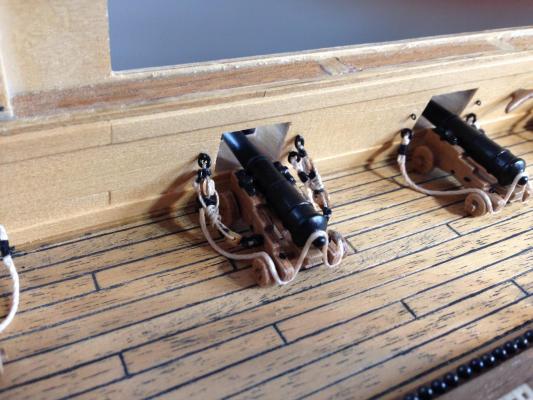
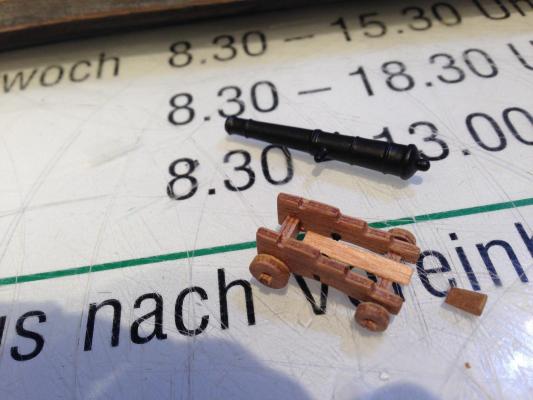
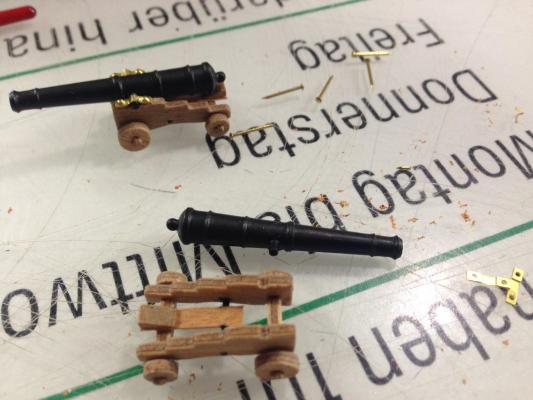
Hello friends, I continue to rig the cannons on the upper deck. First I have made the big rope going around the cannon. Now I started to make the pulleys on the left and right sight. Every parts are so small that I decided to make a few pictures to show how I manage to build them. I use the chain links of an old chain and paint them black. Sometimes I have to rework it with black color when everything is fixed. Unfortunately I had a little accident and touched the rope with the black color on the right wheel. Damn! I could not clean it without destroying it. You can see the mistake on the last picture. I hope you like the result (instead of the black fleck of color, of course) Greetings and wishes for a nice weekend :-) Heinz
-
Ian, thank you very much! You have made my day :-) But let me tell you, that we are playing in the same league. I don´t think that my skills are better than yours. Maybe I am more patient than other modelers. And I am not afraid to try ways that are more difficult and took much more time to do. I would´t be able to do this without these many modelers here on this forum. They give me so much inspiration and show me what is possible. But I have to admit that I am very proud of your appreciation. Thank you so much for it :-) - Heinz -
- 191 replies
-
- 5
-
-
- victory
- caldercraft
- (and 1 more)
-
Hello my friends :-) just a small update. Not much words, just watch my pictures :-)))) All the best and a nice weekend - Heinz -


-
Paul, I think I will write you when I found the words to say how much I love your work! Amazing!!! Please keep it on! Heinz
-
Hello Gary, I just found your blog. Big compliment to your Victory! Another jewel on this side :-) Best wishes to you Heinz
-
Hello Robert, yes, that is exactly what I have done. I rounded the edges with sandpaper to make them stand out. Otherwise you could not really see that they are builded in a special way. Especially when the color of each plank is very similar and you work very clean it may have the look of a laminate. In fact, I went even further. I took an old and small screwdriver, using it like a little chisel, and made a slot between the planks. I filled the slot with black wood filler to simulate the caulking. This has made the individual plank even more visible. This procedure has another big advantage: you don´t have to work 110 percent correct. It´s no problem if the plank does´t fit exactly, because you NEED these little spaces between the planks for the wood filler :-) Maybe your read my comment on Ian´s blog (Seventynet). He worked so clean and correct, that you have problems to find the single plank. And this is really a shame, because he used this special but and top-technic for his wales. But Ian told me that he will surprise us with a secret solution. I am very curious to see :-) Best wishes and keep on the good work! Heinz P.S.: if you take a closer look to my first planking, you will see that I have had much problems with it. Starting with the gun ports I have to renew and ending with 1 kg wood spatula. My victory could not compare with yours at this point :-)
- 527 replies
-
- 2
-
-
- caldercraft
- victory
- (and 1 more)
-
Good morning Ian, it´ s not only fun to watch your build log; it´s getting really exciting :-) The last time I asked myself how you solve the problem with the wales, you make me curious how you would do it. And now you are talking about a surprise in the future.... I can´t wait to hear about it and see it on your model. You really do the best to entertain your audience :-) As you can imagine, I follow your build log with a particular interest, because we both seem to have the same philosophy. I am already a little bit further, so I could watch and judge your work with the experience of doing it for myself. I am impressed about how fast and clean you work. It took me much longer to get a similar result. And this is the next point I really like: we are doing the same thing, but we do not copy each other! Ian, the wales are very, very good. I also like the color change of the individual planks. If you can manage to work out the edges of the planks, they would be perfect (in my opinion). What I mean is: you use the technic with anchor stock and top and butt for the wales, but it´s hard to see it. In fact you work so accurate, that they are no splits or spaces that make the single plank visible. It seems to me I am looking on a laminate. Without the change of color I would believe that the wales are made from one piece. A little space between the planks (maybe filled with black wood filler, like I do); rounded edges, or something like that would assert your work! As always... this is only my personal opinion. An interchange of ideas. You do a very good work and I am sure your surprise will surprise me :-)))) Best wishes to you! - Heinz -
- 191 replies
-
- 4
-
-
- victory
- caldercraft
- (and 1 more)
-
Hello Robert, you have made a fantastic job! I am close to say, that you don´t need a second planking :-). I am very impressed of your work! Best Heinz
- 527 replies
-
- 2
-
-
- caldercraft
- victory
- (and 1 more)