modelshipwright
-
Posts
299 -
Joined
-
Last visited
Content Type
Profiles
Forums
Gallery
Events
Everything posted by modelshipwright
-
 Lovely work Greg, Bill
 -
Thanks Mioriticul. Yes, it was a challenge taking on the carvings with little experience but I was determined. I use a 2.5X magnifier to see an enlarged version of what I am doing so that helps. The boxwood came from several sources. A good friend and fellow modeler gave me his entire stock of 30 year old boxwood as he was alergic to the dust. Additionally, I purchased some from Exotic Woods in Burlington Ontario. Regards, Bill
-
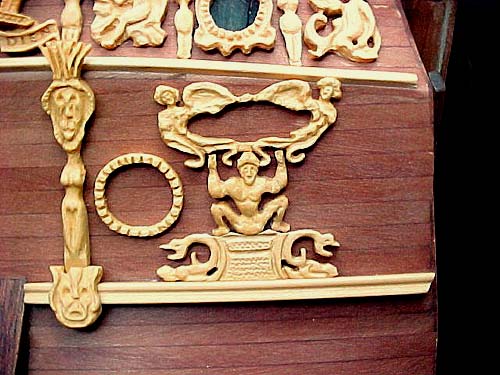
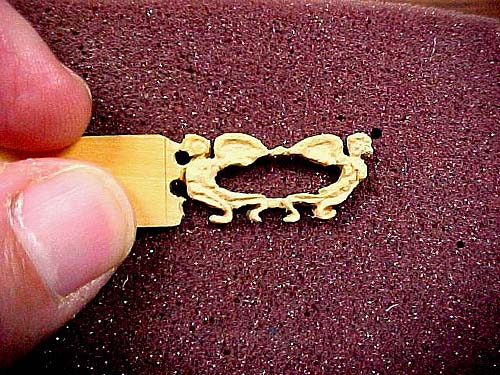
Next in line was a carving of a little fellow squatting and holding a wreath of angels above his head. This was mounted on the previously carved pedestal. A round gun port surround was added as well. Wreath of angels in progress. The same carvings were completed and added to the port side along with three more gun port surrounds. Next was the addition of curved side trims on both the upper and lower counter as shown in this picture. These were most difficult to carve and fit to the curved surface. Curved end trim for counter in progress. More to follow........................... Bill
- 382 replies
-
- 1
-

-
- sovereign of the seas
- carving
- (and 1 more)
-
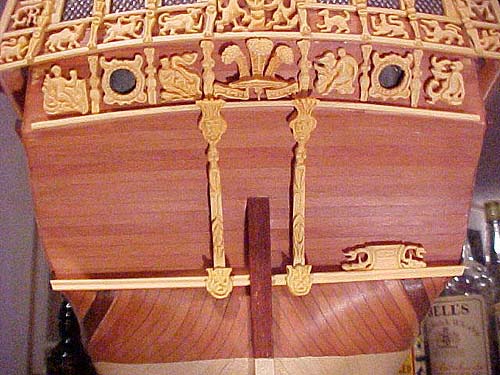
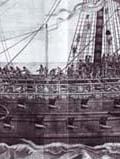
Now the upper counter is completed with a few other carvings of mythical creatures and I am beginning the work on the lower counter. On the right can be seen a pedestal ready to accept a wreath of angels, the next carving to follow. The following photo shows one of the pedestals in the process of being carved. The port side pedestal is finished and mounted on the lower counter. More to follow.................. Bill
- 382 replies
-
- 2
-
-
- sovereign of the seas
- carving
- (and 1 more)
-
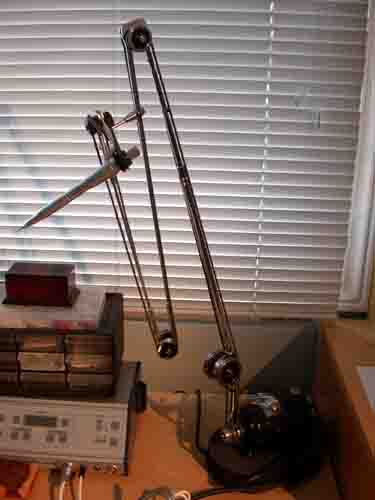
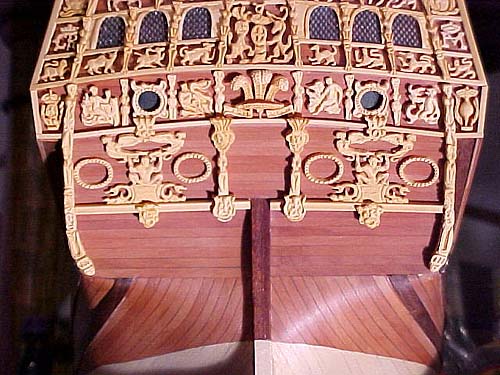
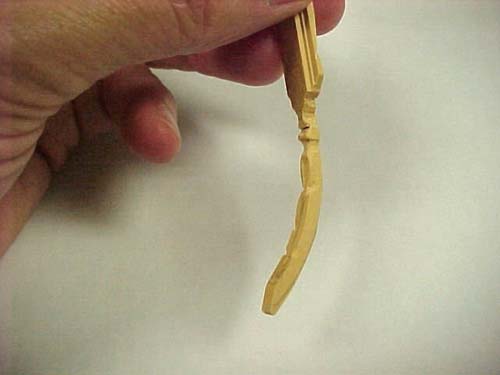
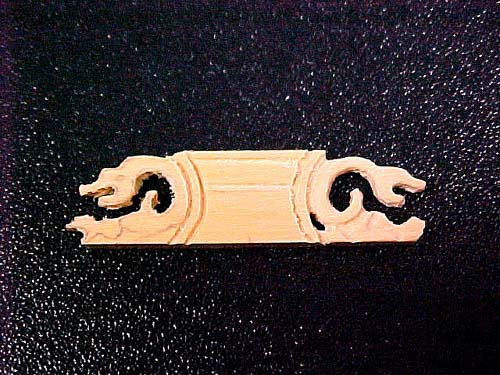
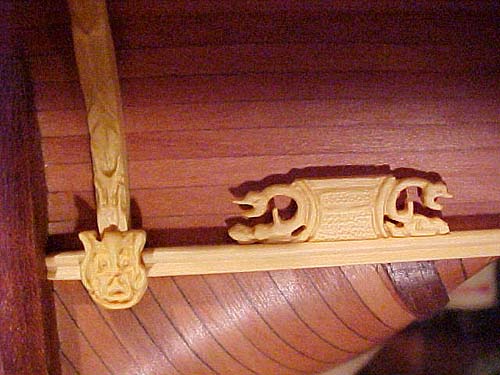
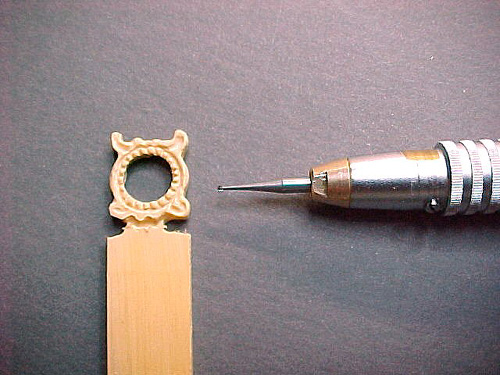
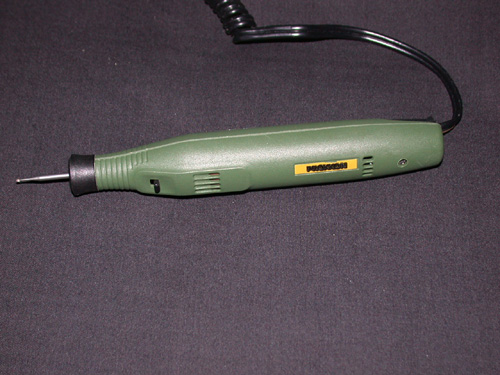
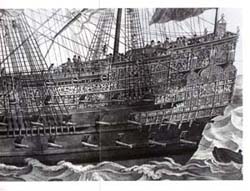
On either side of the Feathers are gun ports. I carved the gun port surrounds as shown in the next photo. The surrounds mounted on the stern counter. By now, I had abandoned the Proxon engraver tool in favour of a belt driven Emesco Dental Drill to do my carving. The beauty of this drill is that there is no torque on your hand as you find in other rotary tools. The belt is smooth and assures that your hand will not ache from fighting the side torque. The Emesco Dental Drill More to follow.................. Bill

- 382 replies
-
- 2
-
-
- sovereign of the seas
- carving
- (and 1 more)
-
Lovely work on your SOS. It really is coming together at this point. Regards, Bill
- 555 replies
-
- 1
-
-
- sovereign of the seas
- mantua
- (and 1 more)
-
Nice work on your Sovereign Vince. It is always fun to add to the kit the way you did with the rigging. Regards Bill
-
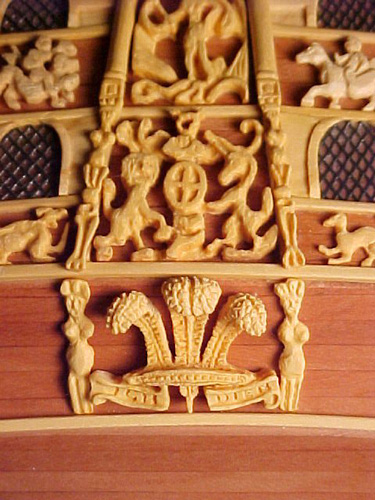
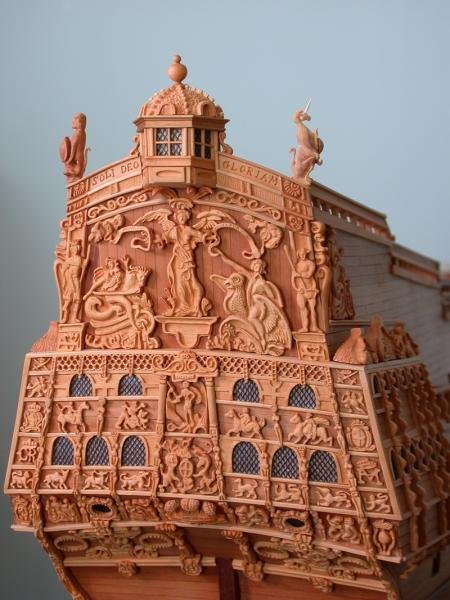
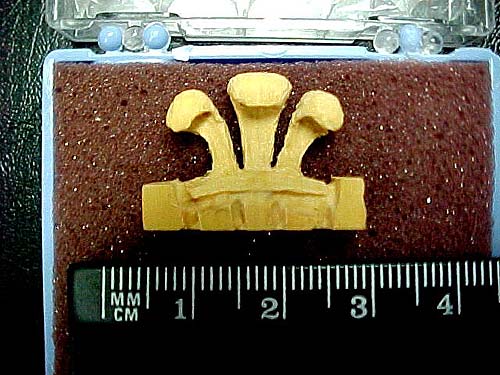
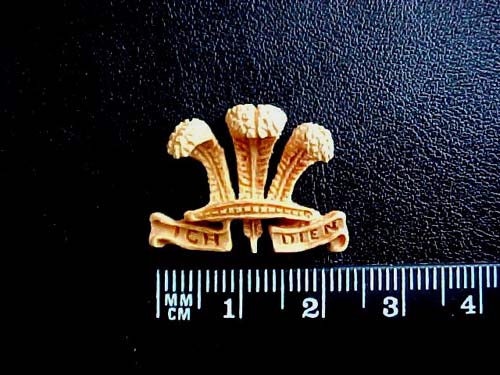
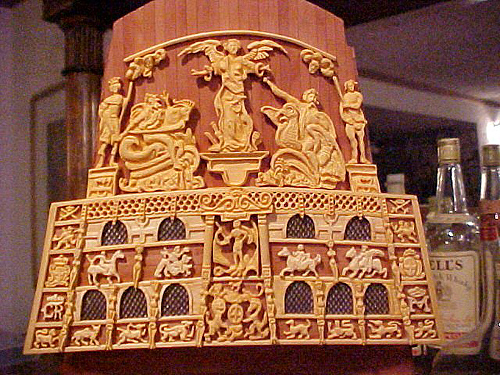
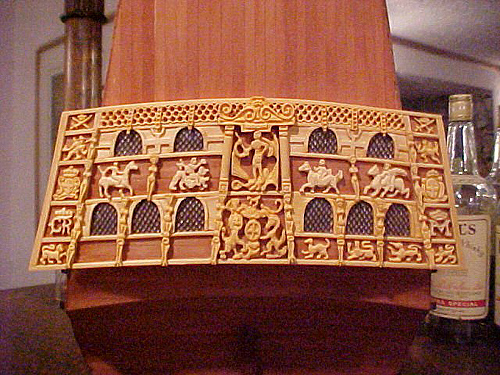
Next comes the Prince of Wales Feathers. As stated on the web site: http://www.princeofwales.gov.uk/the-prince-of-wales/titles-and-heraldry/prince-of-waless-feathers "The badge of The Prince of Wales comprises three silver (or white) feathers rising through a gold coronet of alternate crosses and fleur-de-lys. The motto "Ich Dien" (I serve) is on a dark blue ribbon beneath the coronet. Its use in royal heraldry goes back to the time of Edward Prince of Wales (the Black Prince) in the 14th Century." This was my first in the round carving and posed some difficulties as the feathers curl at the top and some more engraving is needed. The feathers as depicted in an encyclopedia. The carving in progress. The finished carving. The carving mounted on the stern with a couple of caryatids at each side.


- 382 replies
-
- 1
-
-
- sovereign of the seas
- carving
- (and 1 more)
-
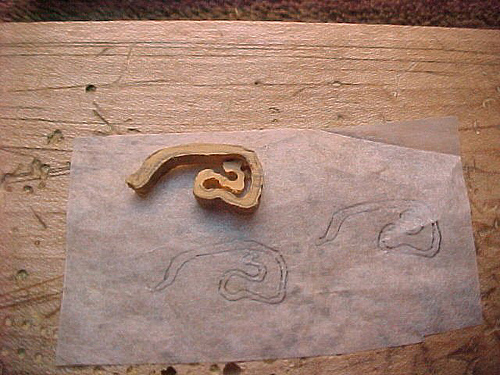
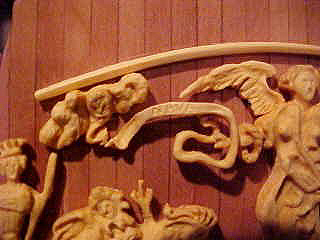
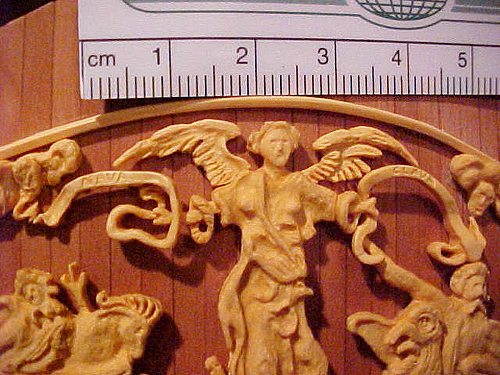
The next issue was to carve the ribbons. These ribbons connect the faces in the clouds above Victory's head to her arms. The faces are blowing air which turns into ribbons and they wind down to encircle her arms. Sounds easy, right? After some due consideration, I decided that they had to be carved from the solid. I started with a piece of boxwood about 1.4" thick and cut out the shape of the ribbon on a jig saw. Then I had to create the different levels of the ribbon from front to back. The ribbon in the rough. The finished ribbon on the left side of the stern. Notice the engraving of the word "NAVA" about which Thomas Heywood said "may Victory point to Jason, being figured with his Oare in his hand as being the prime Argonaut, and say Nava, or more plainly, Operam nava;". The corresponding ribbon on the starboard side is engraved "CLAVA" about which Haywood says "Shee pointeth to Hercules on the sinister side, with his club in hand, with his Motto, Clava; as if she should say. O Hercules, be thou as valiant with thy club upon the land, as Jason is industrious with his Oare upon the water." The next photo shows both ribbons in place. More to follow.................... Bill
- 382 replies
-
- 1
-
-
- sovereign of the seas
- carving
- (and 1 more)
-
Thanks Druxey, my pleasure. Regards, Bill
-
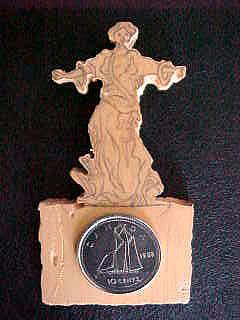
In the next series of photos I am showing the development of Aeolus, God of the Winds. This carving was in a way more complicated than Victory as it involved a bird as well. Ths first shot shows the rough carving compared to a dime. In the next show it shows Aeolus in its finished state. And now in position on the hull. Note that Neptune is also added on the left side of Victory. Additionally, I have added wings to Victory. Note that Victory has rings around each arm. These rings are part of the Victory carving, not added later. By now you have noticed the Bells Scotch bottle in the background. A source of inspiration in my carving. More to folllow............ Bill

- 382 replies
-
- 2
-
-
- sovereign of the seas
- carving
- (and 1 more)
-
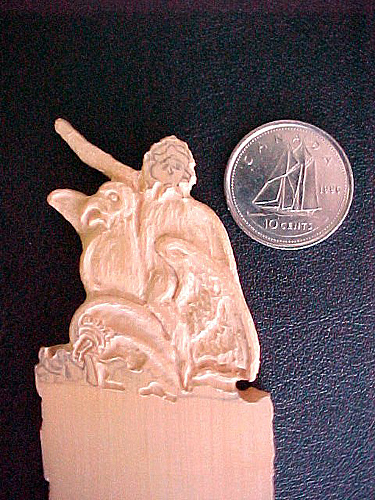
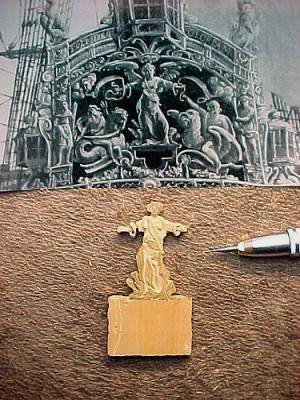
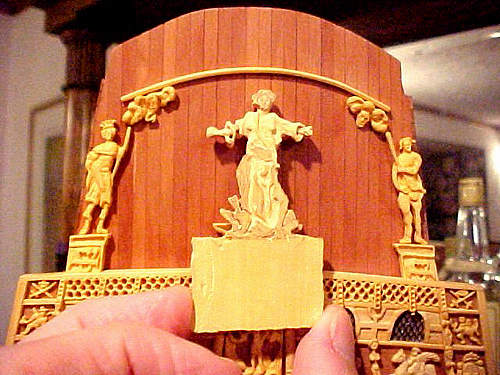
As Victory was a major turning point in my carving, I will post a couple of in progress shots of her. The first shot shows her size in relationship to a Canadian dime. The next photo shows the carving compared to a section of the Lely Portrait which was my guide in creating her. And finally, Victory mounted on her pedestal on the stern. More to follow.................... Bill
- 382 replies
-
- 1
-
-
- sovereign of the seas
- carving
- (and 1 more)
-
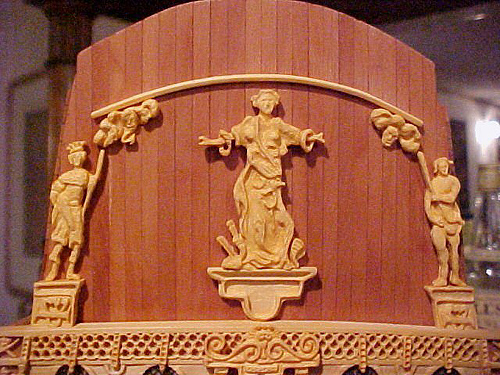
The next two carvings to be added to the stern were Jason holding the golden fleece and Hercules holding a club. Both carvings are standing on pedestals with a decorative motif. As the carving proceeded, I began the central carving of Victory. It was by far the most complicated carving to date and took many hours to get it to where I thought it deserved to be on the stern. This photo shows Victory in progress held against the stern. Note the arch over her head with sculptures of clouds with faces in them. More to follow................. Bill
- 382 replies
-
- 2
-
-
- sovereign of the seas
- carving
- (and 1 more)
-
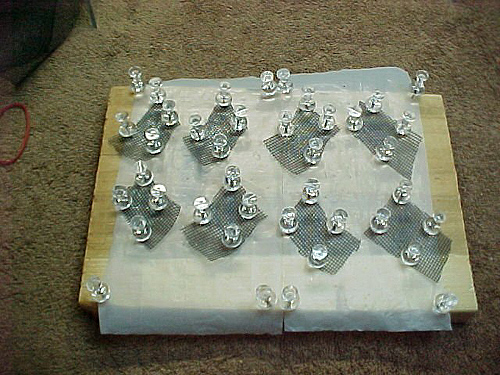
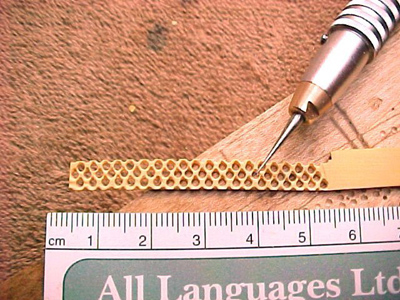
You may have noticed the presentation of the leaded glass windows on the stern. I had experimented with black thread soaked in a mild solution of white glue and water and trying to create a grid but this method failed. Finally I fell upon using plastic window screen. I stretched the screen to make the openings in the screen diamond shaped and pinned them to a teflon sheet on a board. I then painted the area with white glue and let them dry overnight. In the morning the pins were removed and the shapes maintained themselves. I cut the appropriate shape and placed it on the hull and laid the boxwood window frame over the grid. It turned out to be an effective method or reoplicating the glass. More to follow........................... Bill
- 382 replies
-
- 1
-
-
- sovereign of the seas
- carving
- (and 1 more)
-
Thanks everyone. It brings back many memories of my first attempts at carving when I repost this build log. As my skill improves I am often tempted to go back and replace some of the earlier sculptures, but alas, there is not enough time for that. Regards, Bill
-
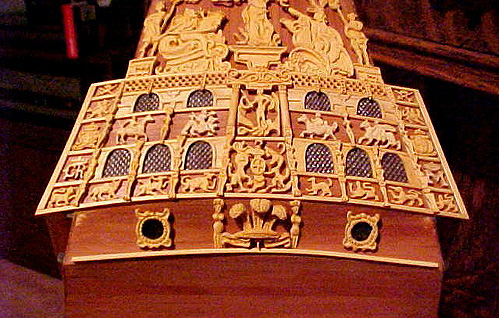
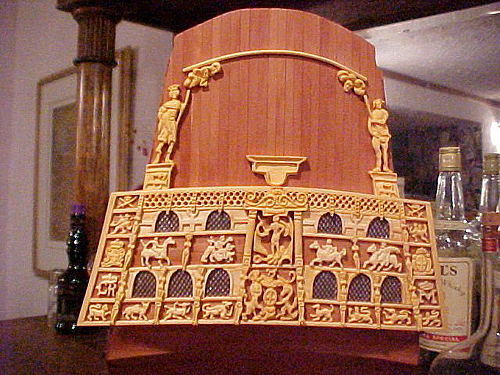
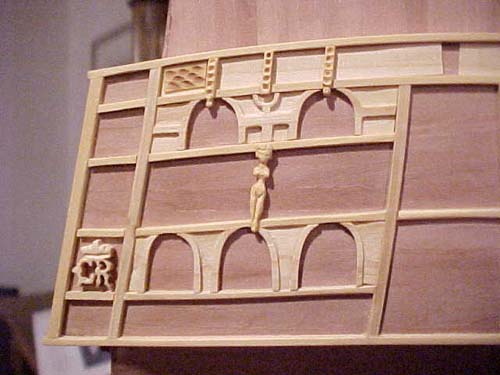
You will notice that the area above the top two arched windows has dimples carved in the left most panel. I was struggling with the effect I wanted to create and did not keep that presentation. The next photo shows a curved piece of boxwood that has a series of tear drop shaped openings that alternate like theatre seating as the rows expand. This is how these areas were filled in, using one strip and later adding partitions to create panels. In this shot, you can see the two strips in position with partitions placed over them to create the panels. More carvings are added and the windows treatments were added. More to follow........................ Bill
- 382 replies
-
- 2
-
-
- sovereign of the seas
- carving
- (and 1 more)
-
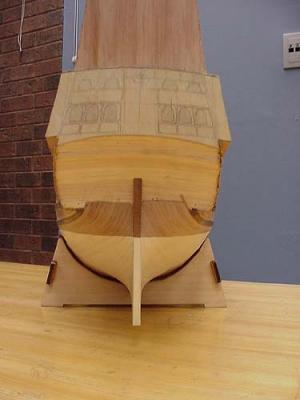
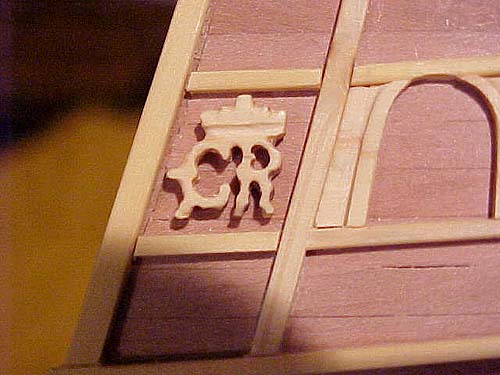
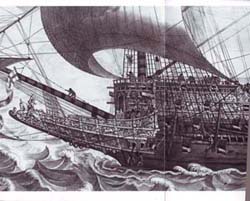
Having made the decision to modify the hull, I proceeded to make the changes to achieve a profile close to the Lely Portrait of the stern. The following picture shows the beginnings of the stern construction. As you can see in the photo that follows I decided to "paint with wood" in my depiction of the Sovereign. It meant that I would only use different colour woods to represent colour on my model and thus the decision to plank below the water line in American Holly and above it in Swiss Pear. Not an easy feat as I found out. With no experience in carving, I consulted the Seaways List for information as to how to go about carving ornamentation. There was a limited amount of information available in print. The preferred method was to trace the outlines of the sculpture on a piece of wood and start carving. I soon found that when the lines disappeared, it was like driving in fog. This left me to do some soul searching and find a way to get around this. I discovered that drawing the item to be carved on paper, and then on the wood, was the answer. This allowed me to commit the image to memory, so when the lines began to disappear as I carved, I still knew what the object looked like and could continue to carve without fear. The following photo shows my very first carving for the stern of the Sovereign. It was carved using a Proxon engraver that holds 3/32" burs. The Proxon Carver The next photo shows some additions to the stern which include some of the arched window frames, carved from Boxwood with rotary tools.
- 382 replies
-
- 2
-
-
- sovereign of the seas
- carving
- (and 1 more)
-
Thanks for your comments Anja. Regards, Bill
-
Thanks Hopefull, aka David. Although I did save the research part of my MSW1 build log, the rest of the text is gone. I really don't think I can remember all the posts but will try and re-post the log in a way that reflects the progress of the build. Regards, Bill
-
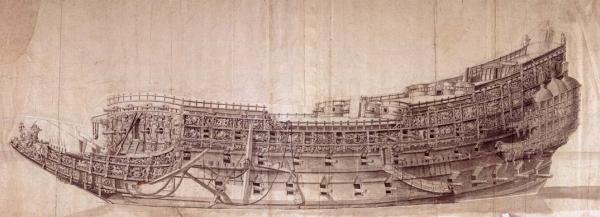
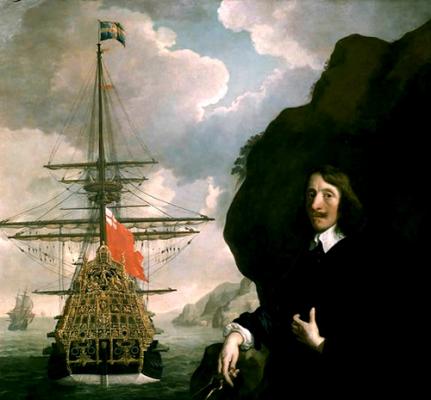
Back to the future. If you are this point, you have read all the steps I took in my research and have seen the thought processes which lead to my decision to trash the Mantua kit and scratch build it from that point on including the ornamentation. It was a leap of faith and I took it with great fear. Now that I look back, it was all worth it and I am enjoying the process or creating what I believe is a true contemporary representation of the ship. Here are the contemporary works that lead me to that decision. The Van de Velde sketch. The Payne Engraving The Lely Portrait
-
Part 14. While in the process of final planking the hull above the main wales, I began to contemplate the bow and particularly the beakhead and the positioning of the bowsprit. Mantua shows the bowsprit as being mounted aligned with the centreline of the ship. The plans I purchased from the Dromedary which were drawn by Clive Milward show the bowsprit as offset to starboard and clearly indicate that the stem head was to port of this mast. Some of the list members have helped in this analysis and I thank Lars, Sven, Terrence and others who reinforced the decision I have come to as far as my depiction of The Sovereign goes. I have decided after consulting my reproductions of Payne’s engraving, the Van de Velde sketch and Millward’s plans, that they clearly indicate that the bowsprit was offset to starboard. The foremast is indeed stepped quite far forward and as Lars indicated, could not have been stepped to the keel but rather to the stem. This would cause the bowsprit to impact it if aligned centrally. I intend to offset the bowsprit on my model. While studying the Payne drawing and Millward’s plans I noticed that the bowsprit is rigged with five shrouds on each side which terminate on the beak immediately behind the figurehead of King Edgar. They include deadeyes and lanyards. This is most interesting! I can only assume this rigging was added to stabilize the bowsprit as perhaps the gammoning was not sufficient to do so. Any comments on this would be appreciated. Clive Millward’s plans show this as well and I can only surmise that they existed. Mantua has rigged this area very differently. Additionally, the construction of the beakhead presents another opportunity to strive for originality. I intend to look at the plans of Wasa, which had a similar beak and see if my construction of the beak can be improved upon over Mantua. More to folllow..................... Bill
-
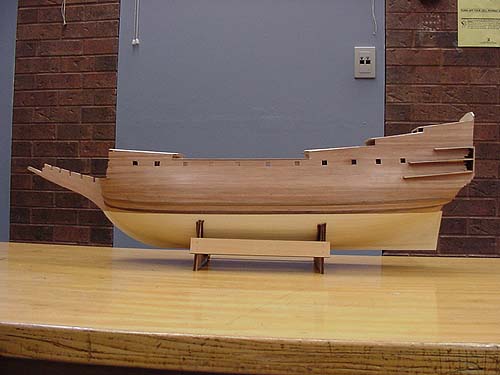
Part 13. I received photographs of Edward Marples model of the Sovereign of The Seas which resides in the Ventura County Maritime Museum in Oxnard California. Robert Scott, who works at the museum kindly sent them to me after reading a query of mine on the Maritime History List. Mr. Marples, who is now deceased, was a renowned ship modeler in Southern California and his model shows this very well. He researched The Sovereign for a long time prior to modeling her and eventually used the plans drawn by Clive Millward and available from the Dromedary in El Paso Texas, mentioned in my previous article. The model is 51” long and 48” high by about 24” wide measured across the yards. He used Holly for the planking below the waterline to simulate an off-white colour, Swiss Pear above the waterline, and in the areas requiring black as a background for the ornamentation, he planked the model with Ebony. All the ornamentation is hand carved, quite an accomplishment, gilded in gold leaf and placed on the Ebony background. The decks are of Swiss Pear and the hull and deck planking was treenailed. The stern ornamentation follows Thomas Heywood’s description and resembles the Portrait of Peter Pett and The Sovereign mentioned in previous articles. As the ornamentation in the plans from the Dromedary is almost indecipherable, he used a sketch in Bjorn Landstrom’s book ‘The Ship’ as a guide for the carvings. It seems he was unaware of the portrait or did not have access to it during the construction of the model as the stern ornamentation is more like Mr. Landstrom’s sketch than the portrait. This is a scratch built model and is a considerable accomplishment. I hope some day to travel to Oxnard to see it up close. Construction continues on my Sovereign and the sub-planking is now complete and the hull is now fully enclosed. After many hours of scraping the hull with furniture scrapers, I am satisfied with the shape and have begun assembly of the lower main wales. It should be mentioned that Mantua’s plan #5 and #6 differ greatly. One is meant to be a rigging plan and the other a general plan with a side view of the ship. Positioning of the wales and their distance from the bottom of the keel varies from plan #5 to plan #6. You are left to fathom this out on your own. I personally think plan #5 is closer to the truth, but it is anyone’s guess. As a general overview of my progress to date, it has suddenly come to me that all the work I have done to correct imperfections in the bulkheads and other structural parts of the hull may have added up to more effort than if I had scratch built it from a plan. All the shimming, cutting, scraping etc might be avoided. It has certainly laid the groundwork for me to consider scratch building my next model. More to follow....................... Bill
-
Part 12. Recently, a friend of mine offered his power tools and a very nice piece of Swiss Pear and during a Sunday afternoon, we cut (240) new strakes for The Sovereign's outer layer of planking. The Walnut supplied with the kit was out of scale, being 6mm in width, and had a distinct green cast to it which when finished was not attractive. The Swiss Pear has a nice blend of colour spread randomly throughout the strakes and when finished on a test panel made a very warm and rich finish. I cut the strakes 3.9 mm wide which represents 12" at 1:78 scale and intend to use a length of 100 mm representing 25 ft. as a plank length. The thickness ended up at 0.7 mm as I felt that this would be easy to work around the rather severe curves at the stern and bow while leaving enough thickness to allow for scraping. I also plan to replace the deck planking with Holly and will return to cutting planks in the near future. While working my way along on the Sovereign, I reflected on the decision I had made to modify the ship to match the Portrait of Peter Pett and The Sovereign of The Seas by Lely in the National Maritime Museum in Greenwich England. The decision was taken after extensive research and many hours of thought. Recently there have been more than seven people, both on the list and off, who indicated to me they are going to build the Sovereign from the kit. They also asked me for the eleven e-mail postings on SOS that I sent to the list. As this kit is very expensive, I feel that I must share that thought process which led to the decision. Once the modifications to the superstructure are done, you almost assuredly cannot go back. If it got to the point where completing the kit became difficult or impossible it would result in many wasted dollars. Firstly, I am a new ship modeler having completed only one wooden model kit, a Spanish Galleon. Although a more experienced modeler may be comfortable modifying the Sovereign kit, the decision to do it was daunting to me. The major modifications were as follows: 1. Change the planking on the underbelly of the hull where it meets the wing transom on the stern. I added balsa filler to allow the planks to curve to a completely vertical plane where they meet the transom. This is clearly shown in the Portrait. 2. Modify the framing of the stern and support structures of the stern galleries to produce an 'hourglass' like shape for the stern when viewed from aft. This included reducing the overall width across the stern galleries and making their silhouette when viewed from aft, slightly concave. 3. Planning for and drawing out the new aft stern gallery windows which were reduced from (20) on the kit to (10) on my modified version. In the decision process, one must consider the ornamentation that Mantua offers for the stern. Firstly, virtually all of would have to be discarded if my modified version was to follow Thomas Heywood's description of the carvings which matches the Portrait. As I have no carving experience, this was a major consideration. I would have to create all new ornamentation. If at some point I decided to return to using the Mantua bronze ornamentation again, they will not fit properly on my modified stern. It took me weeks to finally take the plunge and actually cut wood with all this in mind. My decision was helped by a visit to Florida in December. My good friend John Weliver discussed this process with me at length. His knowledge and experience were invaluable. He also took me to visit Father Romero in La Belle FL and there I received a lesson in carving as well as other advice on scratch building. I came home to Toronto armed with the courage to take the steps necessary to do the modifications. I subsequently purchased Father Romero's Royal Yacht Fubbs Practicum from Pier Books which extensively covers the process of carving ornamentation. It will serve me well when I start carving. I hope this helps anyone who might consider modifying The Sovereign and will serve as a caution that once the modifications are started, it may not be possible to go back and complete the kit to Mantuas vision. I would be happy to share the details of this with anyone off the list. More to follow.................. Bill