


sjanicki
-
Posts
227 -
Joined
-
Last visited
Content Type
Profiles
Forums
Gallery
Events
Posts posted by sjanicki
-
-
This, in addition to the navy museum in Barcelona, is one of the greatest in Spain in my view and on the top of the list in Europe. Glad you were able to visit!
- mtaylor and HardeeHarHar
-
 2
2
-
-
On 7/29/2023 at 5:12 PM, EricWilliamMarshall said:
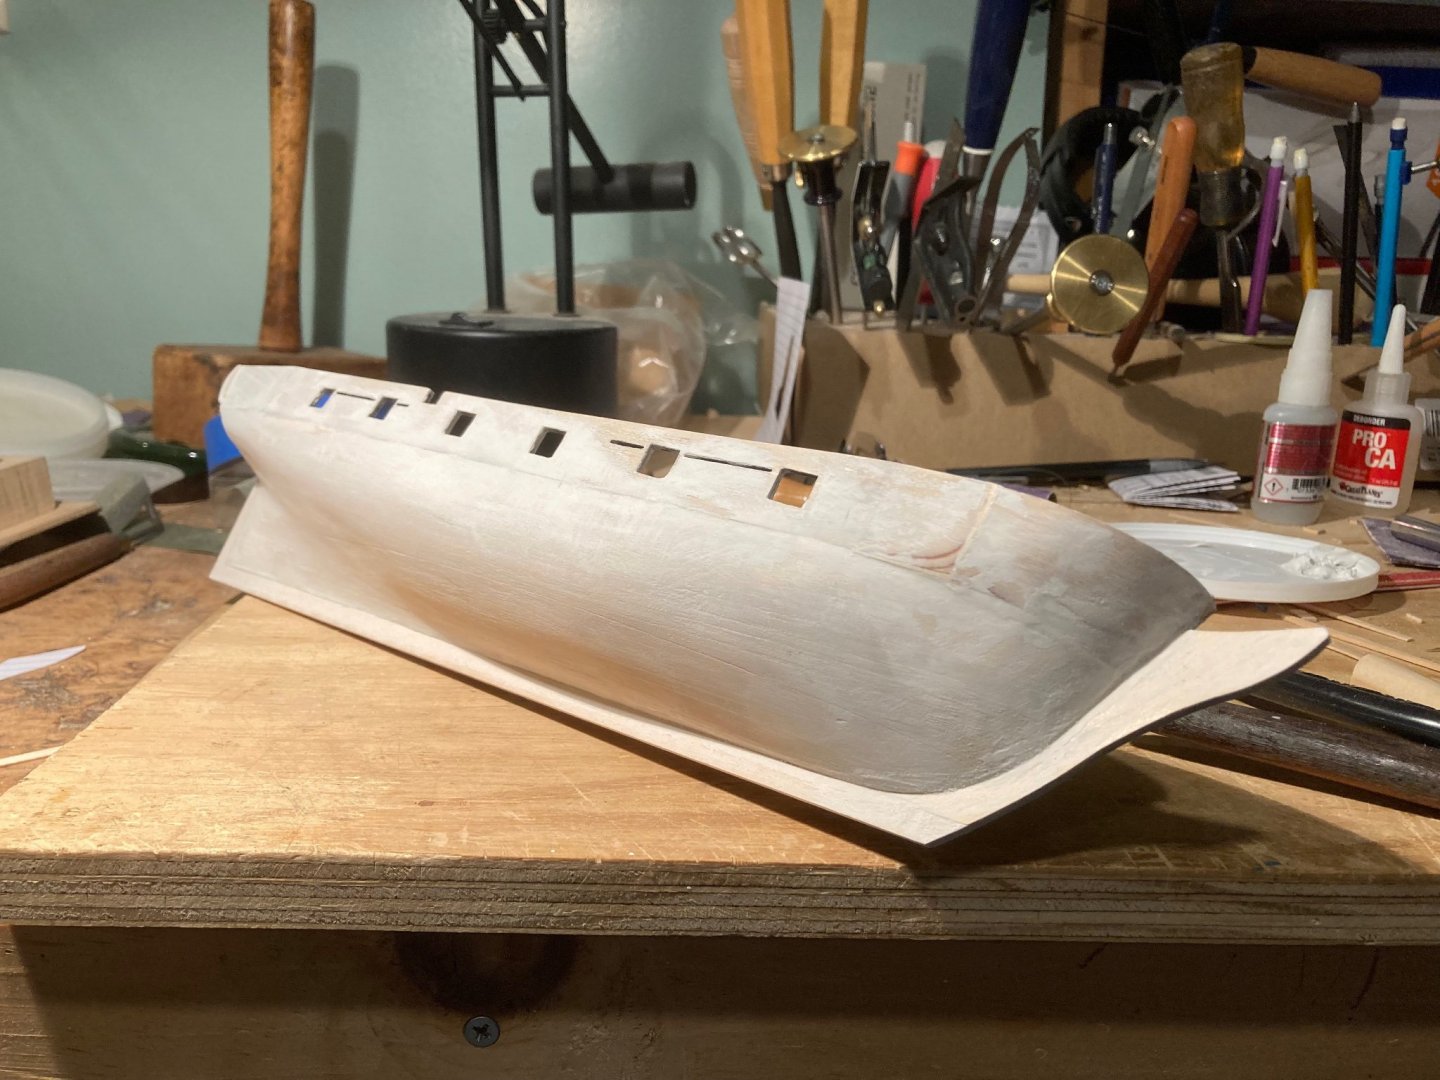
For those working on this kit, the catheads should be fitted in earlier then the instructions state. I suggest doing that work after attaching the bulwarks but before adding the rails. Otherwise, if you’re like me you will find it difficult to cleanly cut the correct angles without damaging the delicate curved bulwarks and breaking the rails. Note: the instructions state to paint the catheads black but everyone (including the writer of the instructions) has painted them white.
If it makes you feel any better, I made the exact same mistake when building the kit! Thanks for flagging it - hopefully they adjust the instructions.
-
-
-
Wow! Love how you did the cabins! Great work
-
I love watching your progress! Keep it up
-
You have done such a good job on this! Honestly keeping the lines tight isn't a big deal as long as you wait to cut them and tie them until they are all in place - that way you can make sure they are all properly tightened. I used clothespins as weights to keep them taught while I tied the rest
-
-
-
-
-
On 12/31/2021 at 2:32 PM, BrianK said:
sjanicki,
thanks for sharing this great build. I am hoping to start this BJ cutter soon and have found 3 or 4 finished MSW builds on the topic, including yours, that are very inspirational and rich in information for a novice builder like me. I am a follower. 😃 Thanks again!
BrianK
Of course! It is a wonderful kit. Please just tag me in your build if you have a question and I'll try to comment! Have you started a build log yet?
-
-
13 hours ago, EricWilliamMarshall said:
Next up a bit of research about coppering the hull!
There are a ton of different ways that people apply these copper plates. Personally, after applying the bluejacket plates to both the Revenue Cutter and USS Perry I found the following process to work the best:
- Apply all the plates butting against another vs. layered. My skill wasn't great enough to layer them without it looking horrible.
- Form each plate to the shape of the hull before trying to glue
- Cut the plates that need to be cut to shape before applying
- Apply the plates to the keel starting with the base.
- Apply to the side of the keel a single row.
- Apply a single row of plates along the waterline all the way around.
- Start in the center of the ship starting at the keel and tiling your way out with an overlap.
- The bow section and stern are the most difficult and require cutting each tile exactly to shape.
This post shows how I went about it fairly well. Please let me know if you have any questions on my process!
I will note that many, many, on this forum are far more skilled at copper plating than I am and have done a better job but I found this method to make a reasonably high quality result for my skill level.
-
18 hours ago, EricWilliamMarshall said:
There are scars but hopefully they are less noticeable than the original malady! All the supplementary wood were birch coffee stirrers. I feel I got lucky and merely lost some time.
Mark, Marc, Bob, Keith, Nic, Stan, and Al - thank you all you insights and timely support! Now to employ the rest of the suggestions! I added some more parts and a coat of gesso with quick sanding.
You have done a wonderful job on this! Your re-work has really paid off -
@EricWilliamMarshall I think you will see that that if you mount the cap rails very carefully you will hide that it may not be perfect underneath (that was a similar trick I used on my build)
-
You are doing a great job on this model - very impressed!
- Jeff preisler, BobG and mtaylor
-
3
-
10 hours ago, EricWilliamMarshall said:
I received copper plates and the photo CD-Rom ordered from the fine folks at BlueJacket Shipcrafters. For the curious, the photo CD contains 84 images of in-process building and 32 of the finished model as jpegs and each image is named. For example: Main mast lower deadeyes or Masking main and quarter decks. All in the matching 'style' of the photos in the instructions and of higher resolution (better then the images in this blog). For example the image of the Main top components is about 2.1MB in space and 3648 x 2736 pixel dimensions. The files also include some embedded metadata like focal length and exposure if you are curious. The whole lot is about 242MB.
I've attached a teaser of some of the thumbnails. The images are taking with an eye for rigging details or various assemblies and function almost as build log. I believe these will prove useful where I'm not understanding the printed English and later, when I get to the rigging.
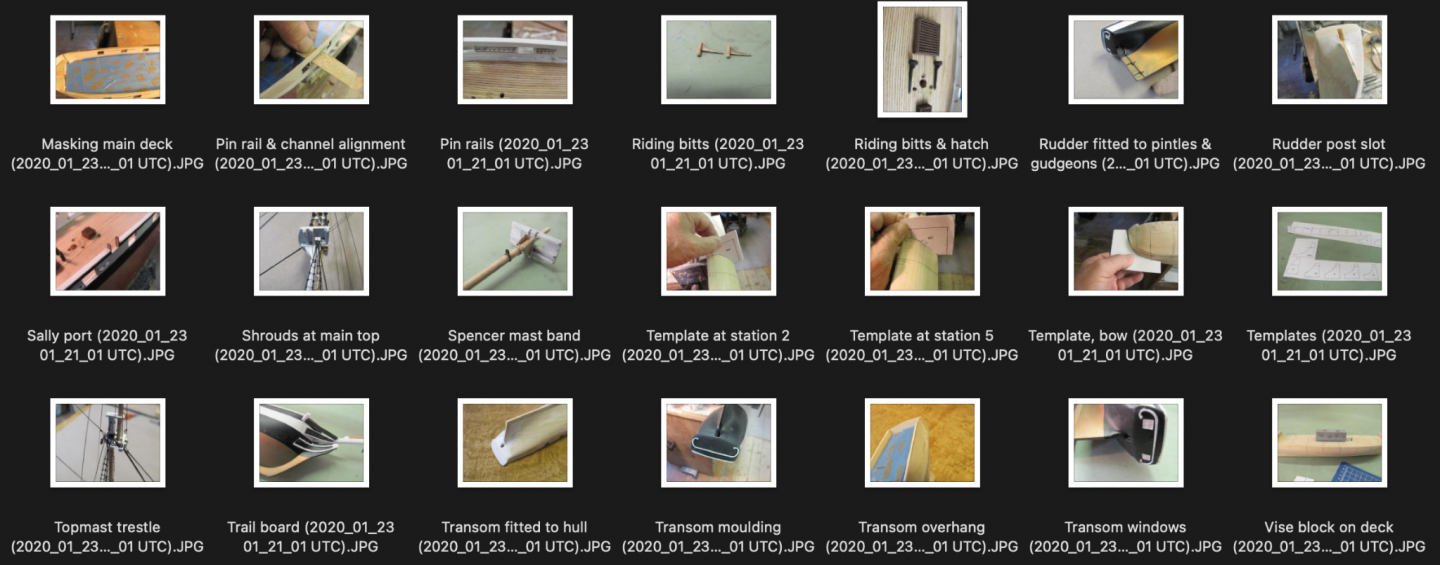
I can attest that these were incredibly helpful to the build - especially to someone with my level of knowledge (read not much knowledge).
Looking forward to your progress!
- mtaylor, ESF, EricWilliamMarshall and 3 others
-
6
-
Just getting to this build log of yours @EricWilliamMarshall! I really enjoyed your historical references above - I may need to make a small plaque of these stories to go in my office with the Perry.
I am glad you were able to learn from my log of how not to built the USS Putty (great pun introduced by a fellow member on my build). The rotary shaft tool is amazing but perhaps I should have gotten one that was slightly less powerful...
I really enjoyed the build and I am sure you will as well. Please tag me if you ever want to hear how I approached anything on it. Also, I am excited to see that you will be applying the copper plates as well - I think it makes for a gorgeous look when finished.
Looking really good so far!
- Hubac's Historian, ESF, Ryland Craze and 1 other
-
4
-
On 8/5/2021 at 8:40 AM, schooner said:
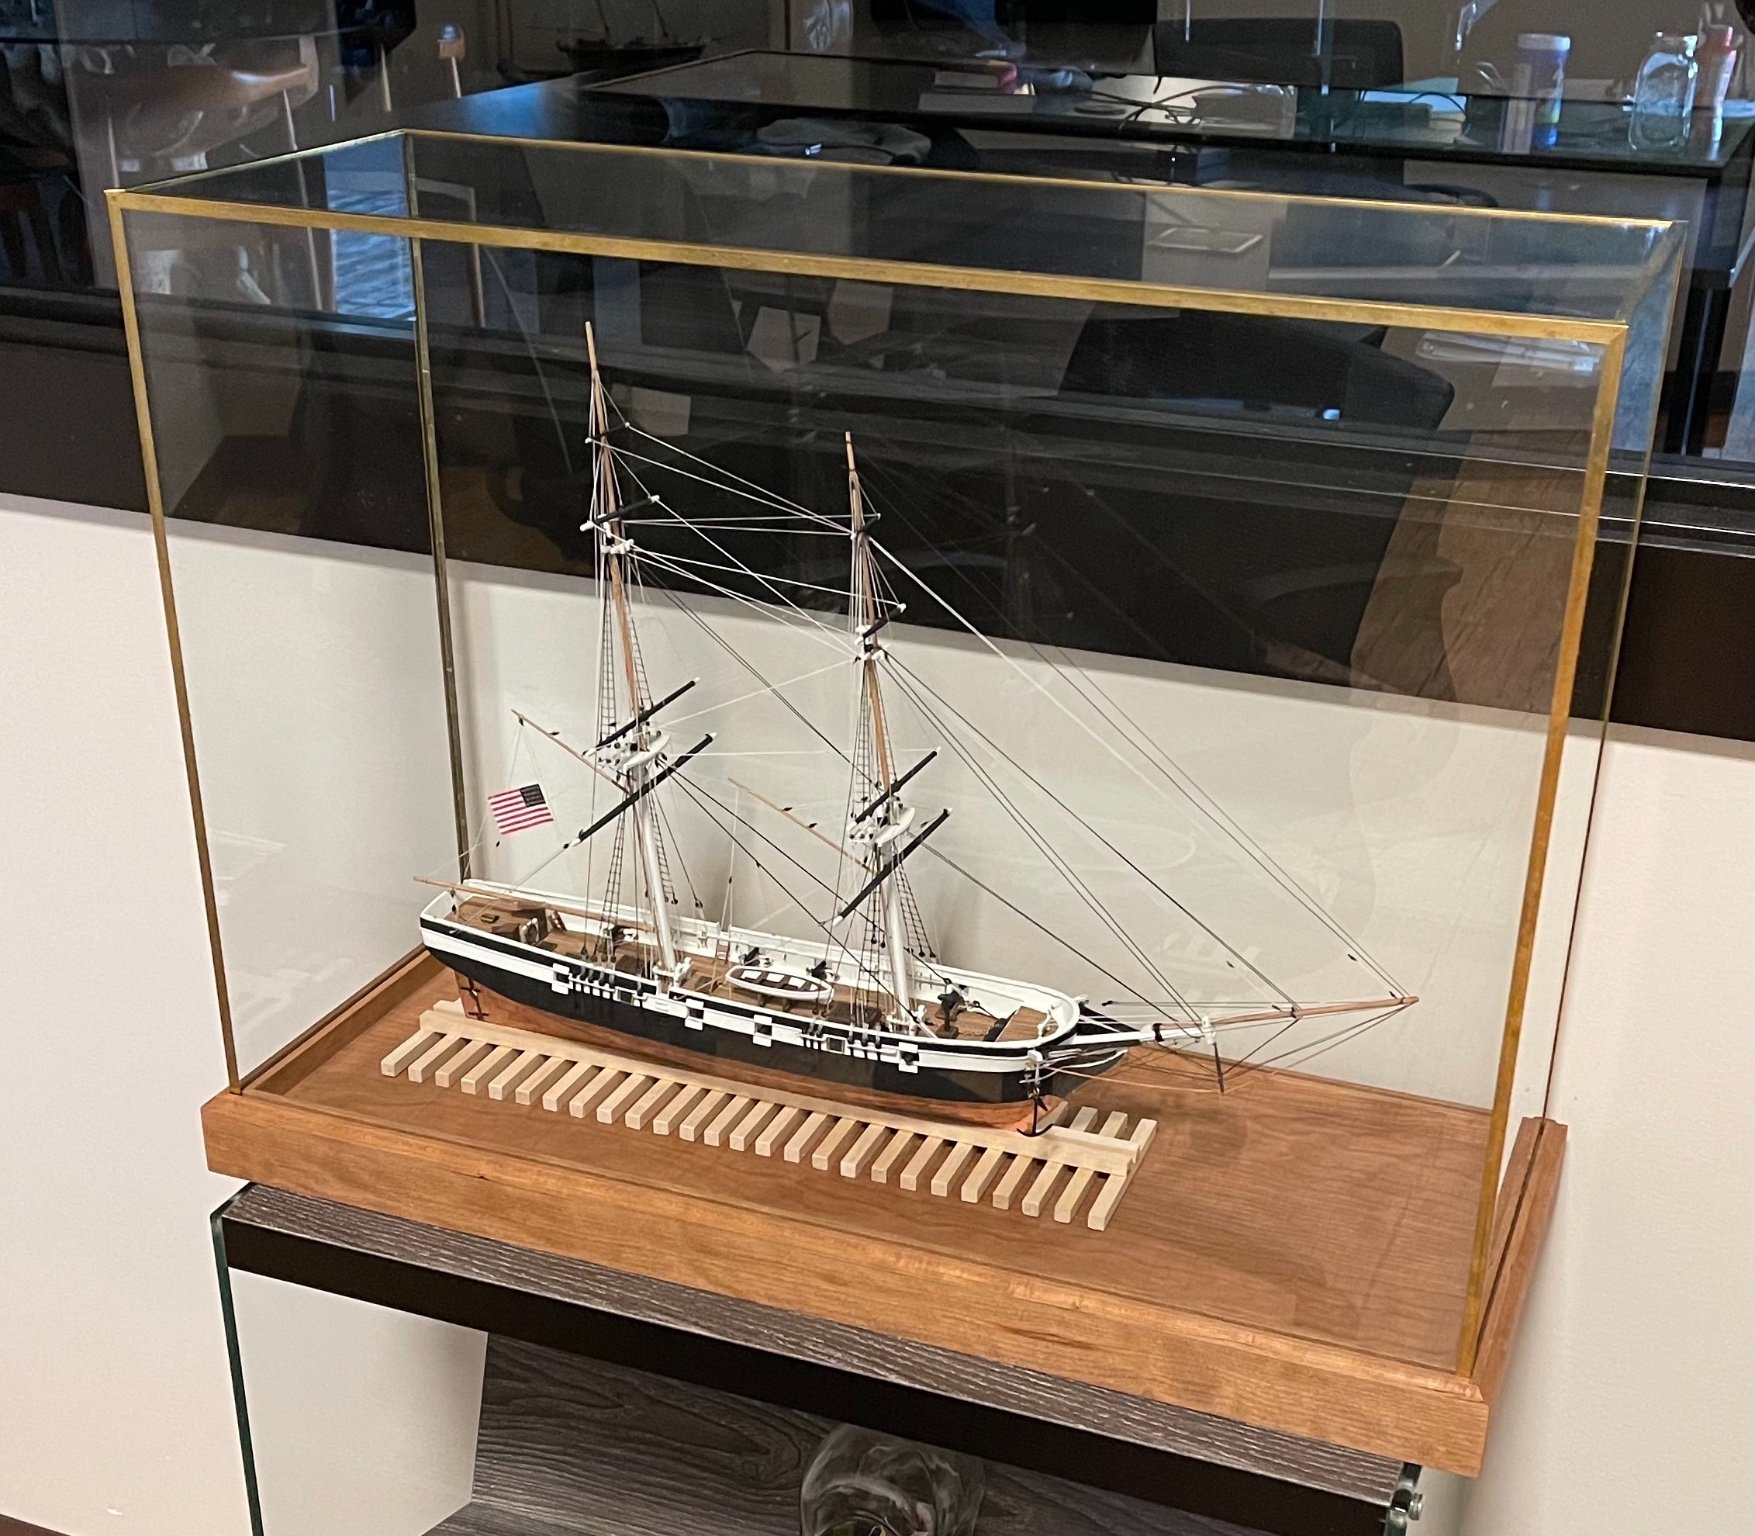
Great looking model! Love the ways.
Nice display case, is it from Bluejacket? If so, did you have any issues finding someone to cut and fit the glass?
Yes - the case-kit was from BlueJacket. I didn't have any issues with finding a place to purchase /cut the glass but prices really went up since I built the Revenue Cutter...
-
-
On 7/14/2021 at 11:27 AM, wtimlen said:
What's next on the list?
I don't know yet! I need to think - recommendations are very much appreciated!
On 7/22/2021 at 11:53 AM, GrandpaPhil said:Congratulations! Well done!
Thank you!
The USS Perry is now in my office across the room from the Revenue Cutter!

-
On 7/12/2021 at 12:31 PM, wtimlen said:
Hello Stan,
That is some accomplishment, it looks beautiful. Congrats!
Bill T.
Thank you! Very happy with the results! It will look great in the office with the Revenue Cutter to match


New BlueJacket Shipcrafters kit in development: West Coast lumber schooner
in Traders, Dealers, Buying or Selling anything? - Discuss New Products and Ship Model Goodies here as well!!
Posted · Edited by sjanicki
Following along on this very cool build. As a fellow PNW native hoping that it ends up as the Wawona as others have echoed...