HOLIDAY DONATION DRIVE - SUPPORT MSW - DO YOUR PART TO KEEP THIS GREAT FORUM GOING! (Only 68 donations so far out of 49,000 members - Can we at least get 100? C'mon guys!)
×


hollowneck
-
Posts
1,586 -
Joined
-
Last visited
Content Type
Profiles
Forums
Gallery
Events
Everything posted by hollowneck
-
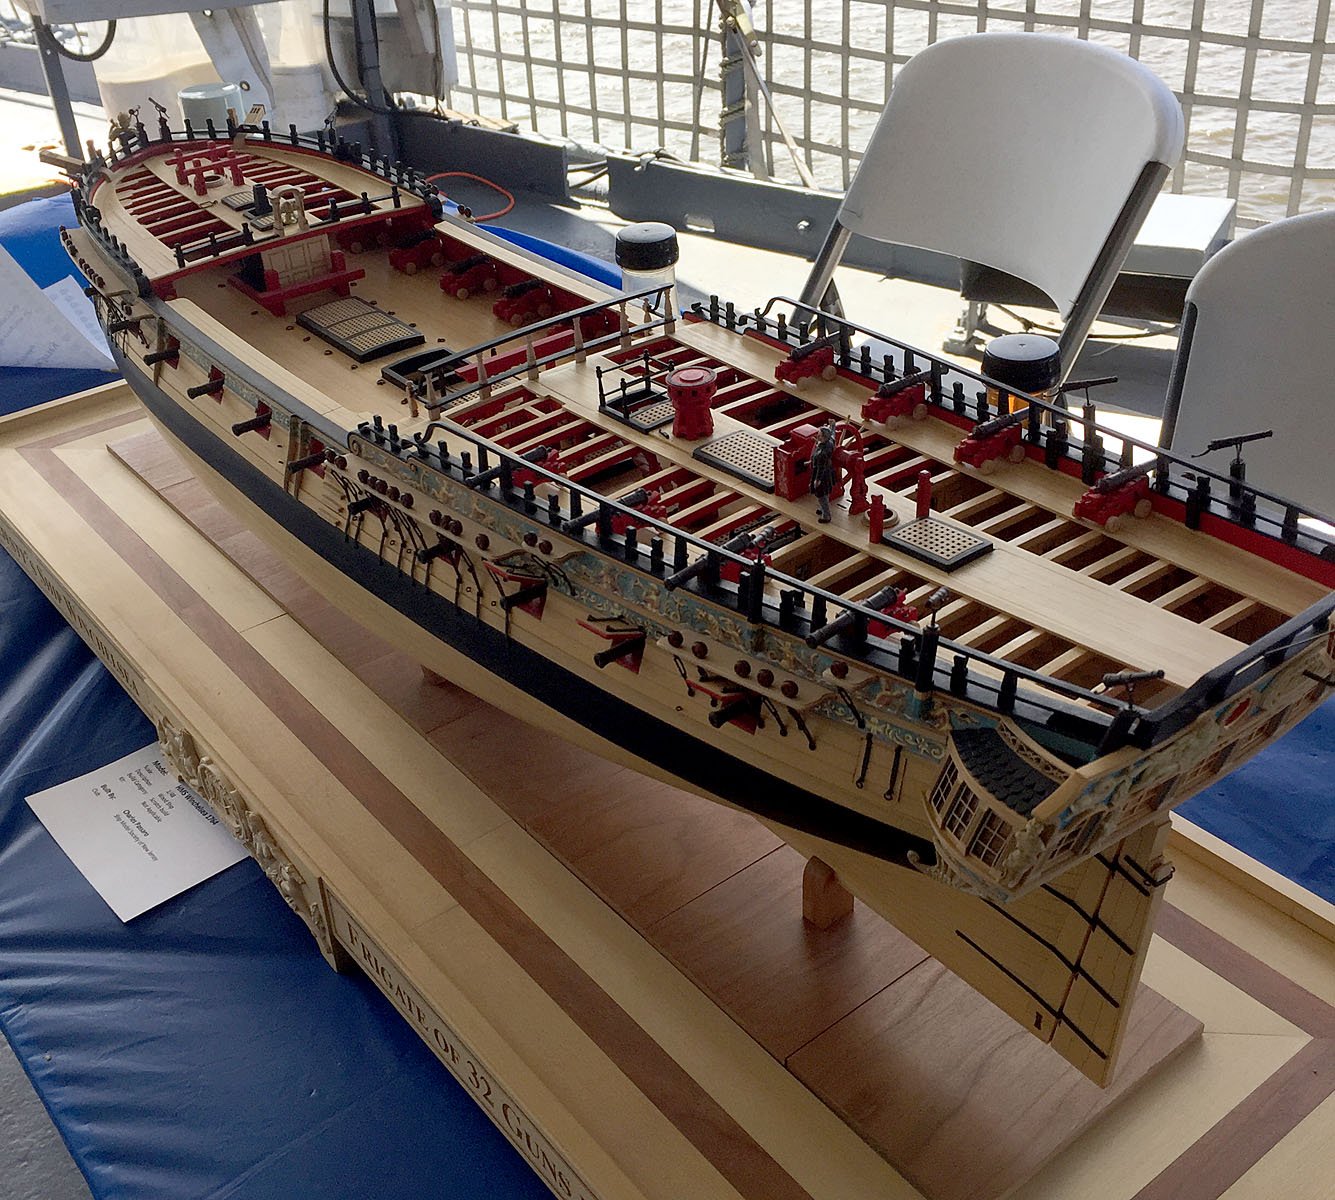
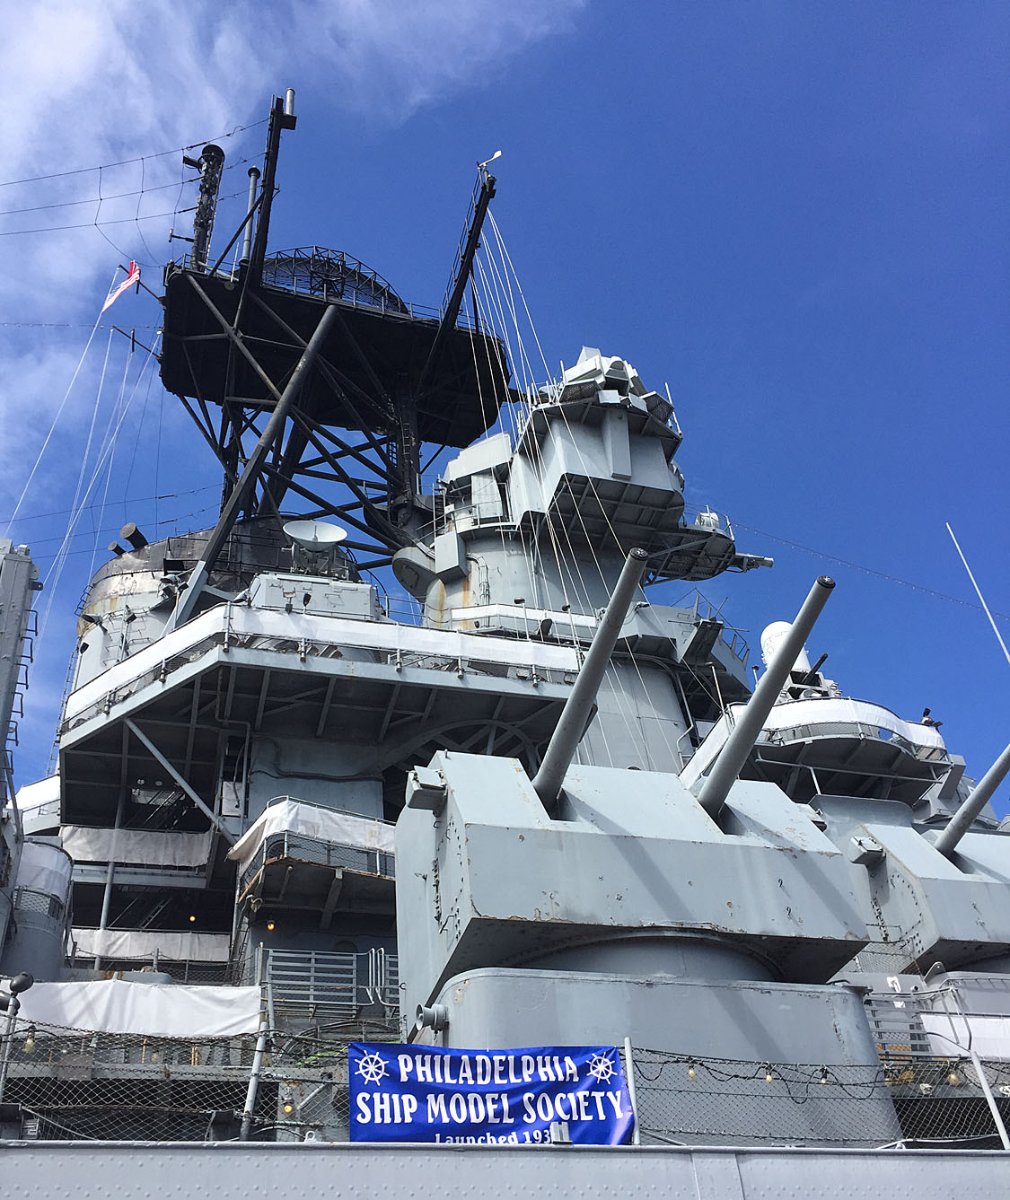
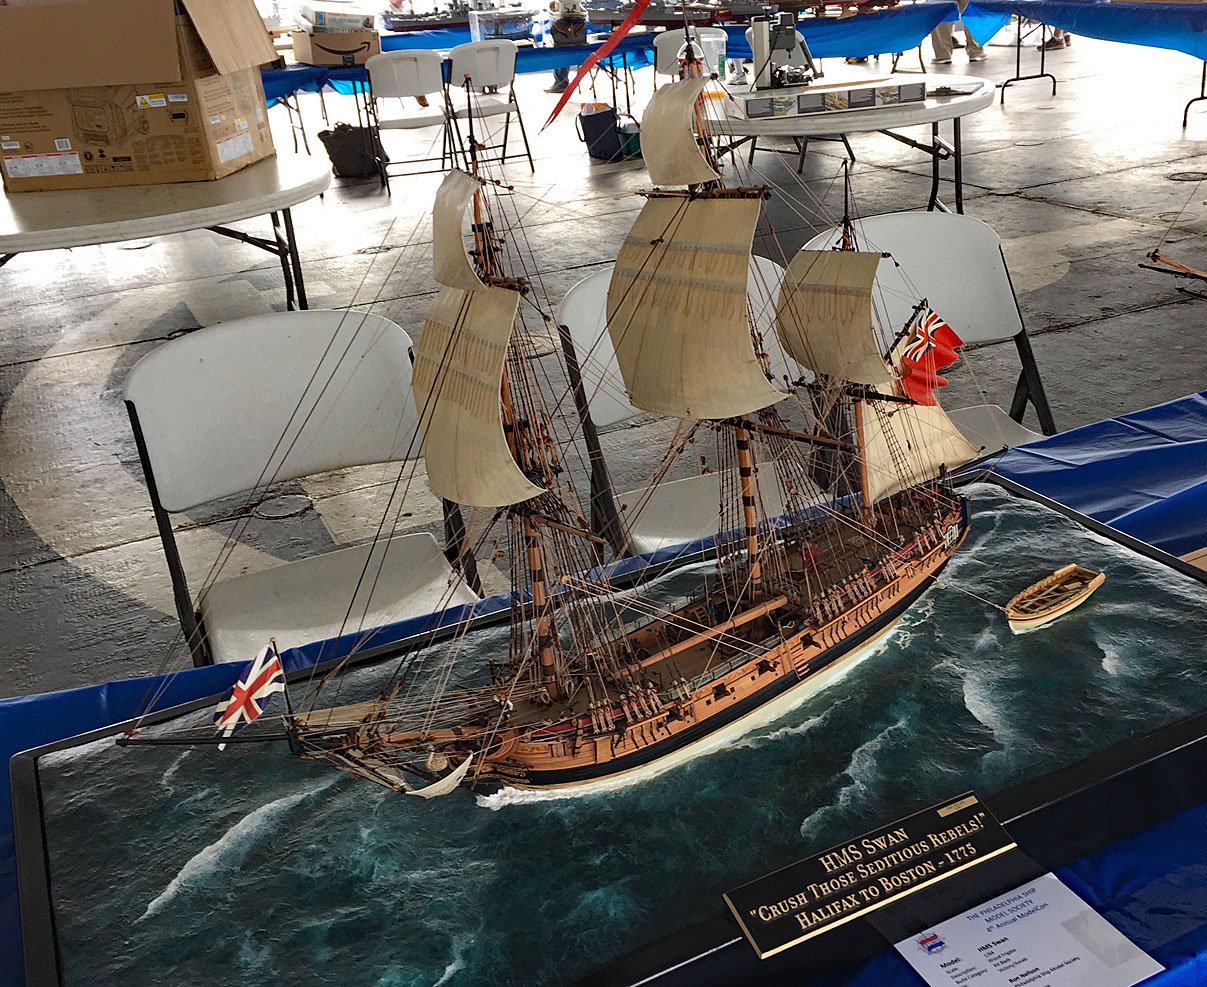
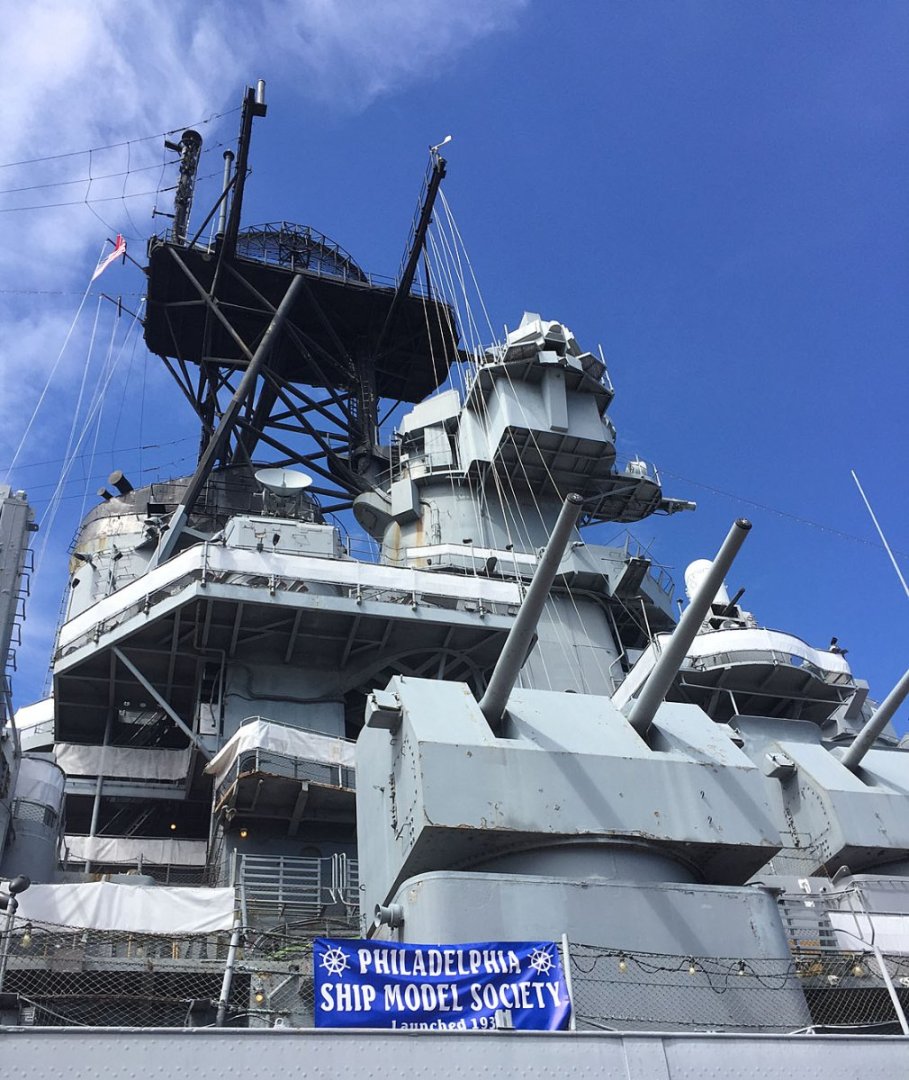
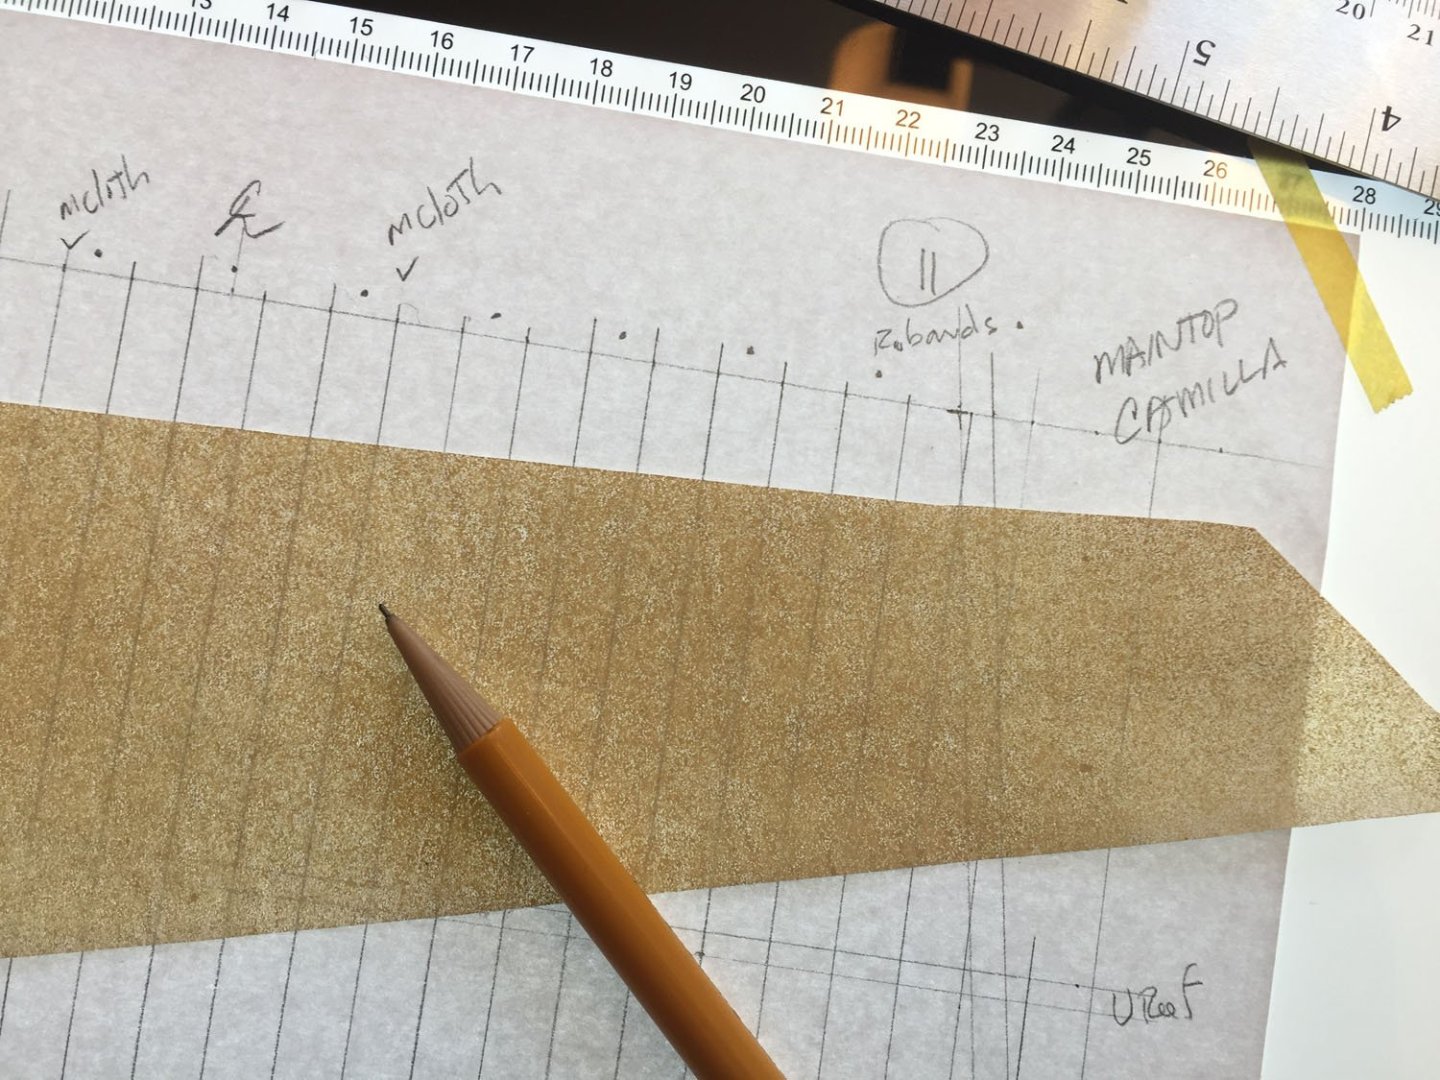
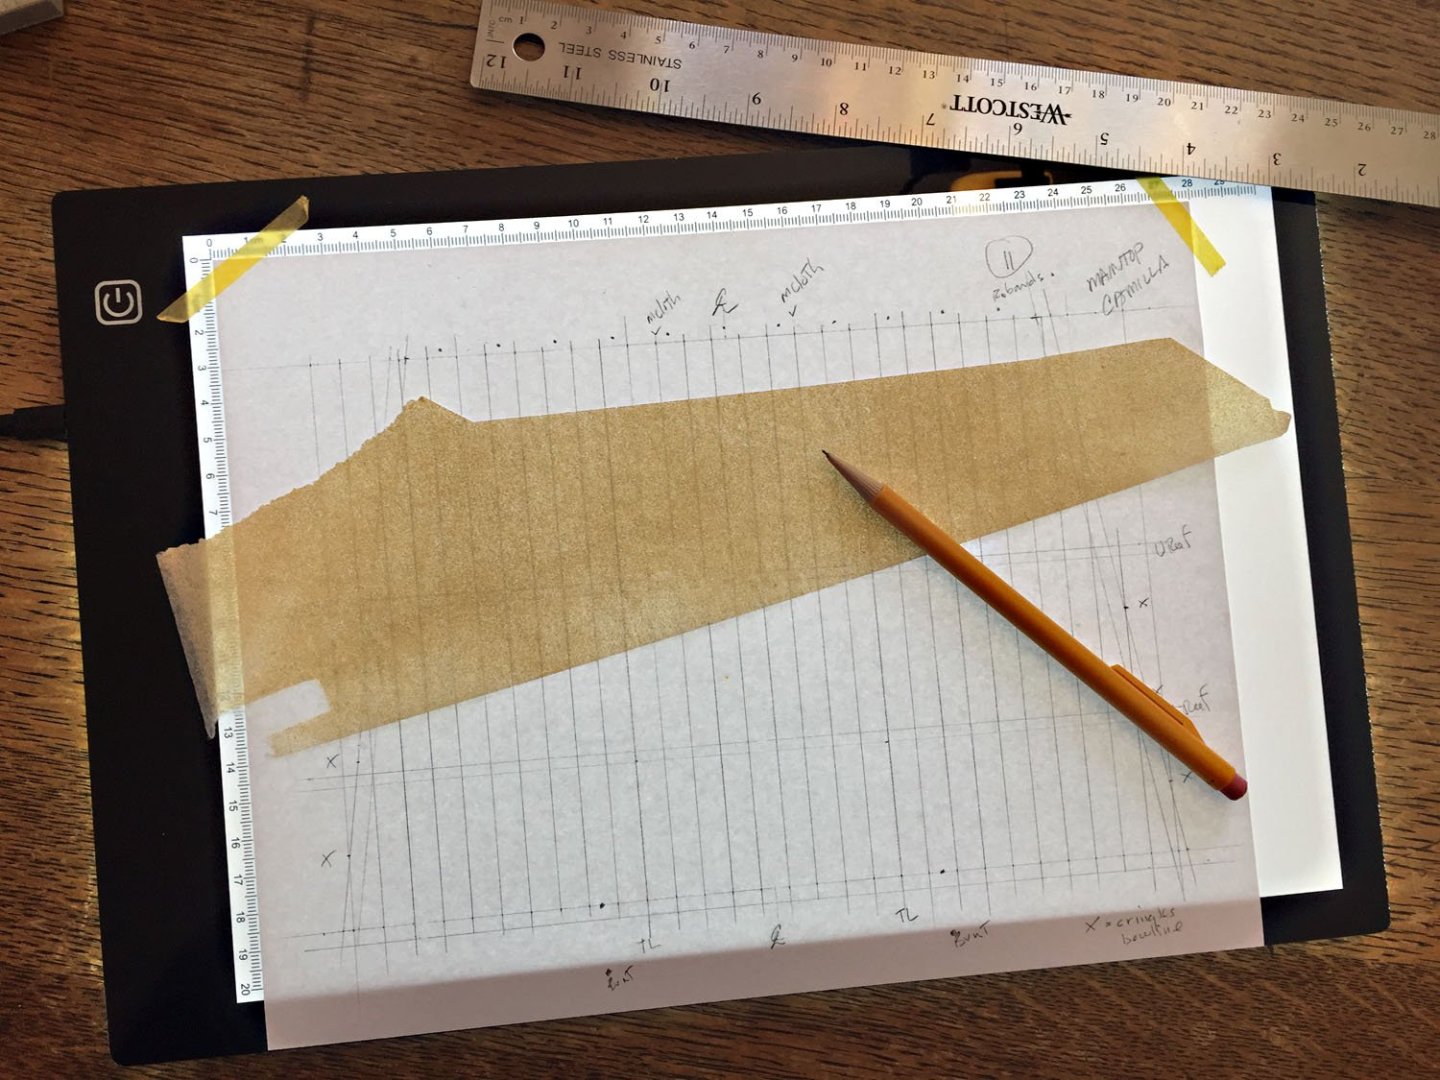
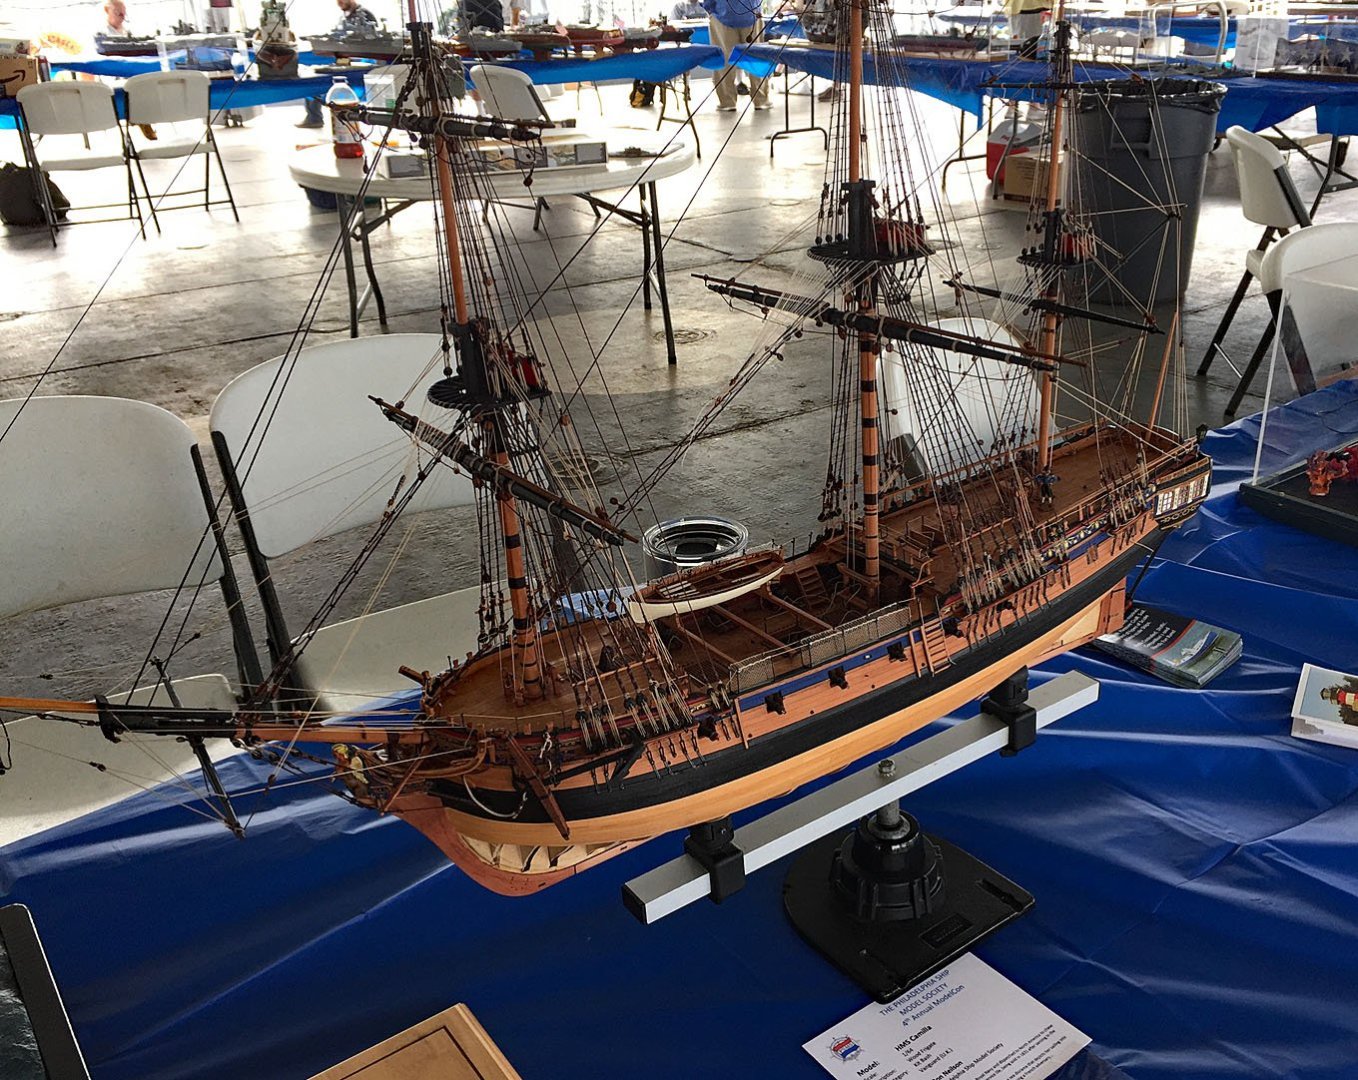
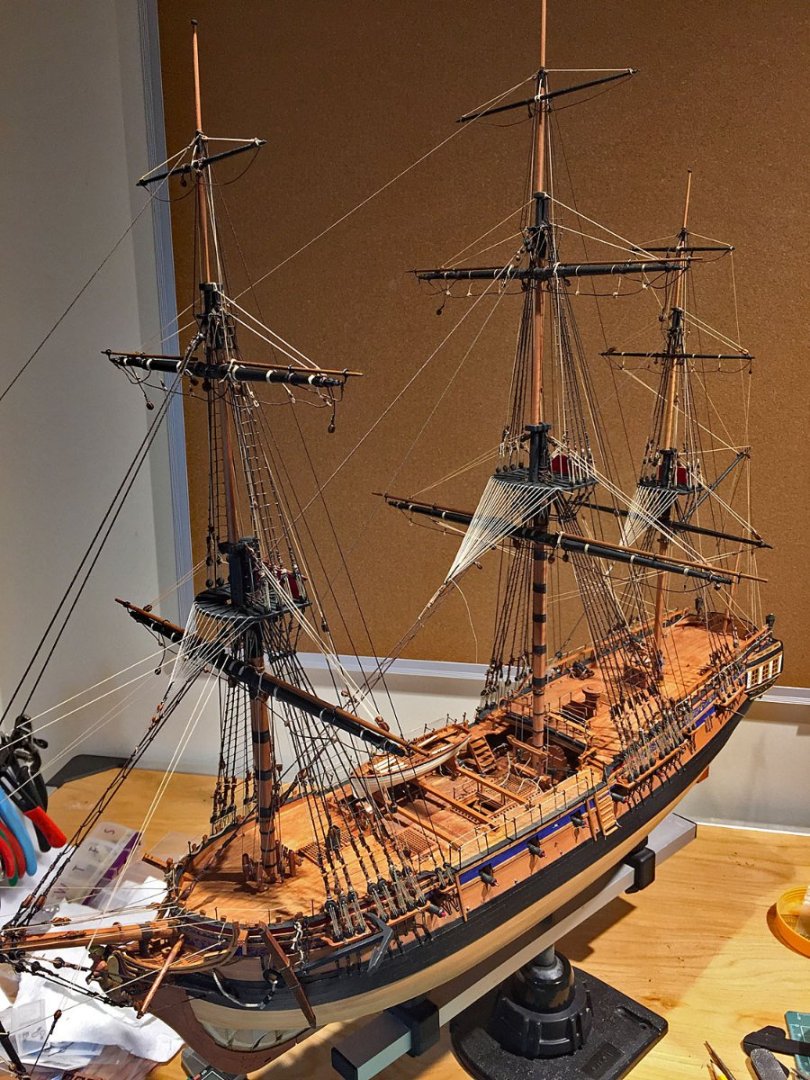
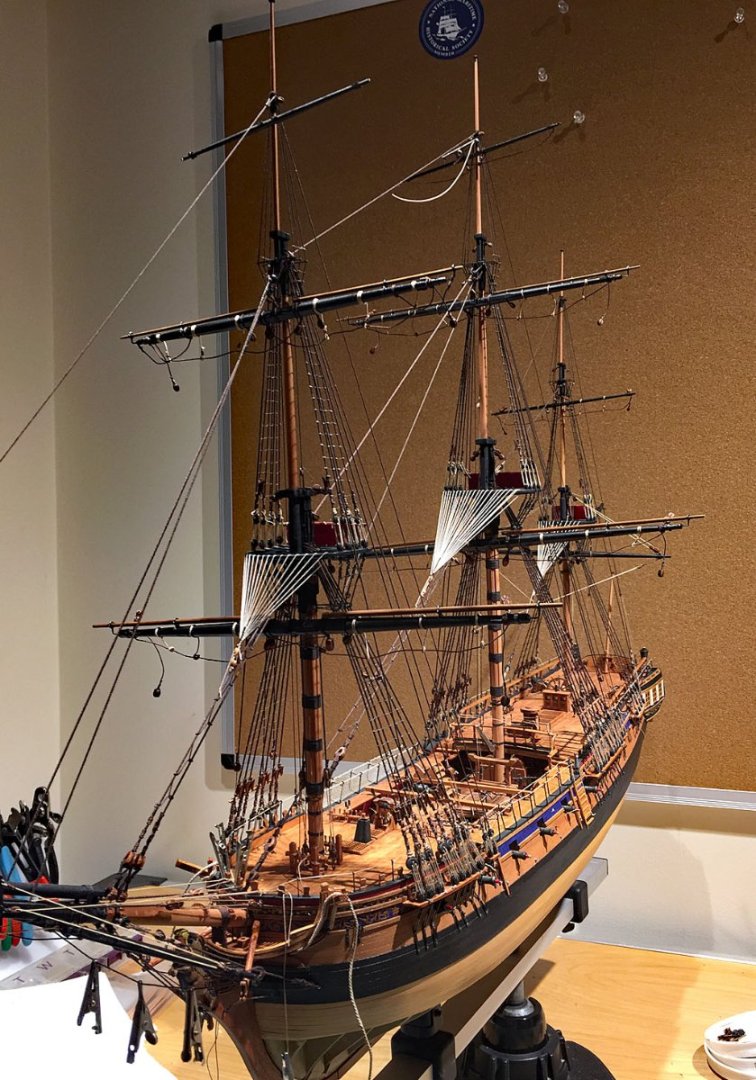
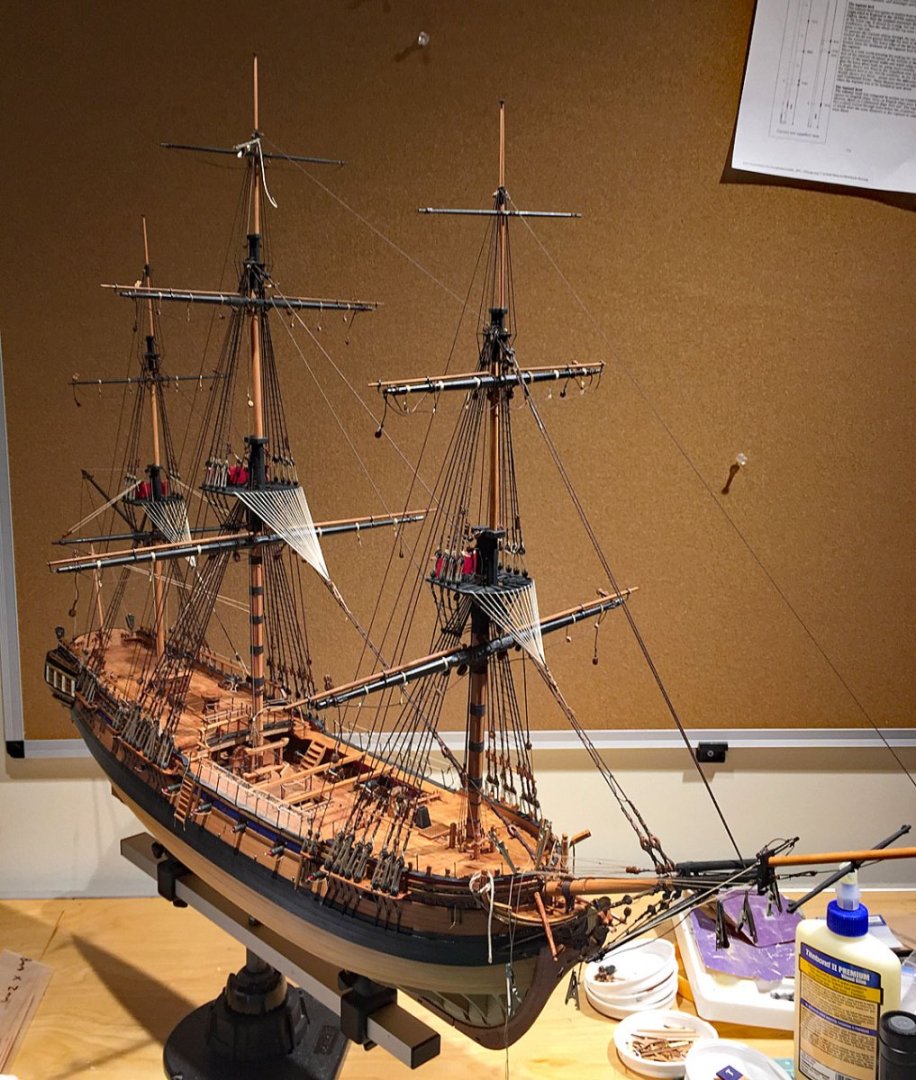
 Sailmaking for HMS Camilla begins. The balance of her rigging (clues, tacks,braces) is purposefully in abeyance until her sails are ready to be mounted. Camilla will carry nine (9) "set" sails. By "set" I mean they will be shown as working sails, shaped to show the effect of the ship's movement across the water. My sailmaking process begins with pencil layouts for each sail drawn on #20 lb. white photocopy paper - bog standard - at .003 thick. To the bond paper layout shown here I'll affix two (2) "skins" (layers) of .0015 silkspan later in the process. Using this technique, the combined thickness of the sail layers is approximately .005-006. This resulting thickness permits a good approximation of a sail's scale thickness (at 1:64) and makes for a manageable component that can be readily affixed to the ship's spars. Other detail elements are marked on this layout for tabling/linings, bolt ropes, cringles, etc. The sail will be shaped on both leeches and at the foot later in the process after bolt ropes, reef points and cringles have been created/attached. I've layed out the full outline of the Main Topsail (in it's familiar trapezoidal shape); an additional 4mm outer reference line has been added to the outline at both leeches and at the foot (more on this later too). Sundry reference pencil marks for the addition of linings, reef point reinforcements, cringles and bunt positions, etc. have also been added. The layout paper is lying on a thin LED light tablet that is large enough to accommodate the layout for the majority of my model's sails. The light on the table is dimmable which is a nice feature. The diagonal, parchment-toned piece is a leftover scrap of colored silkspan from a previous model to check its transparency against the pencil lines that make up the sail (fabric "cloths"); these lines need to be consistent and visible on both sides of the sail. The cloths indicated here are roughly 8mm and this equates to about 24" wide (at full size). NOTE: the cloth lines are drawn on BOTH SIDES of the bond paper since the bond paper will be "sandwiched" between two layers of colored silkspan. I continue with using metric measurements in this stage of my build. I use an HB lead pencil (mechanical as shown) and attempt to draw the cloth lines as evenly and consistently as possible. In this close-up, the cloth lines are visible through a layer of colored silkspan and reasonably consistent. It's easy to get these lines either too dark - or too faint. The placement of the mast cloth liner is indicated at the top of the layout as is the upper reef point tabling (on the side). This sail will have eleven (11) robands. These are the lines that will "bend" (mount) the sail to the yard when it's completed; the spar mounting points are shown with dots along the top of the sail layout. When the sail is completed, the last thing I do to prep it for mounting is to use a pointed (and very sharp) awl to poke tiny holes through the finished sail edge and then thread precut ropes into the roband holes. In practice there would be roughly twice the number but I feel my reduced count works fine. After all the sails have been drafted on this white bond paper, I proceed with prepping and coloring large sheets of silkspan that will be subsequently cut to adequate sizes for lamination to the bond paper layouts. Drafting all the sails will take a couple days of work and is quite exacting, and thus- some eye fatigue results. My mostly-rigged, in-progress HMS Camilla on display this past weekend at an event hosted by my model ship club, the Philadelphia Ship Model Society. The one day model ship display event (ModelCon 2022) was held on the fantail of the Battleship New Jersey (BB 62), a historic heritage venue on the Delaware River at Camden, New Jersey. To demonstrate how I'll present HMS Camilla when she's completed, I brought an earlier model of HMS Swan, a model I built in 2018. Syren Ship Model's Chuck Passaro's superb Admiralty-styled Navy Board model of HMS Winchelsea -1764 was also on board the Battleship for the event. The Ship Model Society of New Jersey also participated in the one day show for the public as did the Hampton Roads, VA and Washington, D.C. clubs. Many MSW members are building this excellent scratch project and build logs abound! The view from dockside at the Battleship New Jersey. It's HUGE. The club sign is 8' long. There were over 100 models of all types on display, everything from many excellent steel navy models, a handful of period sailing vessels as well as a bunch of R/C models - including an R/C submarine. One of my favorite models at the August 6 Saturday Show, the party boat "AQUAHOLIC." In addition to the fisherman at the stern (and the bathing beauties), Miami Vice's two 80's stars can be seen hanging out on the upper deck. These two dudes are keeping a sharp eye out for the Bad Guys who want to party on this boat too.

- 542 replies
-
- 16
-

-

-
- Sphinx
- Vanguard Models
- (and 3 more)
-
Thanks,Glenn, you’re too kind! Yep, those shiny, plastics thinggies from the turn of the last century…I LOVE them. When in my shop I load five of ‘em into my 5-disc player from a huge library and I’m set for 5 + hours with my rapidly accessed, hand-selected “playlist.” The bigger reason for CD’s is that Most streaming sources are mediocre quality, including Spotify. I avoid all streaming if possible since the audio quality from CD’s is considerably better ( I am a musician and retired from a pro audio career and am fortunate to have a recording studio playback system in my shop). That’s my CD story and I’m sticking to it -🎸🎶 💿 = 🥰
- 542 replies
-
- 7
-
-
- Sphinx
- Vanguard Models
- (and 3 more)
-
Thanks B.E. Pennypincher does look a lot like Jack Aubrey. My CD of the Master & Commander soundtrack was in the background when I was painting this tiny gentleman. Subliminal? Probably not.🥴 Thanks, Ben. Capt. P. IS impressed. He especially likes the first-rate rigging rope...
- 542 replies
-
- 5
-
-
- Sphinx
- Vanguard Models
- (and 3 more)
-
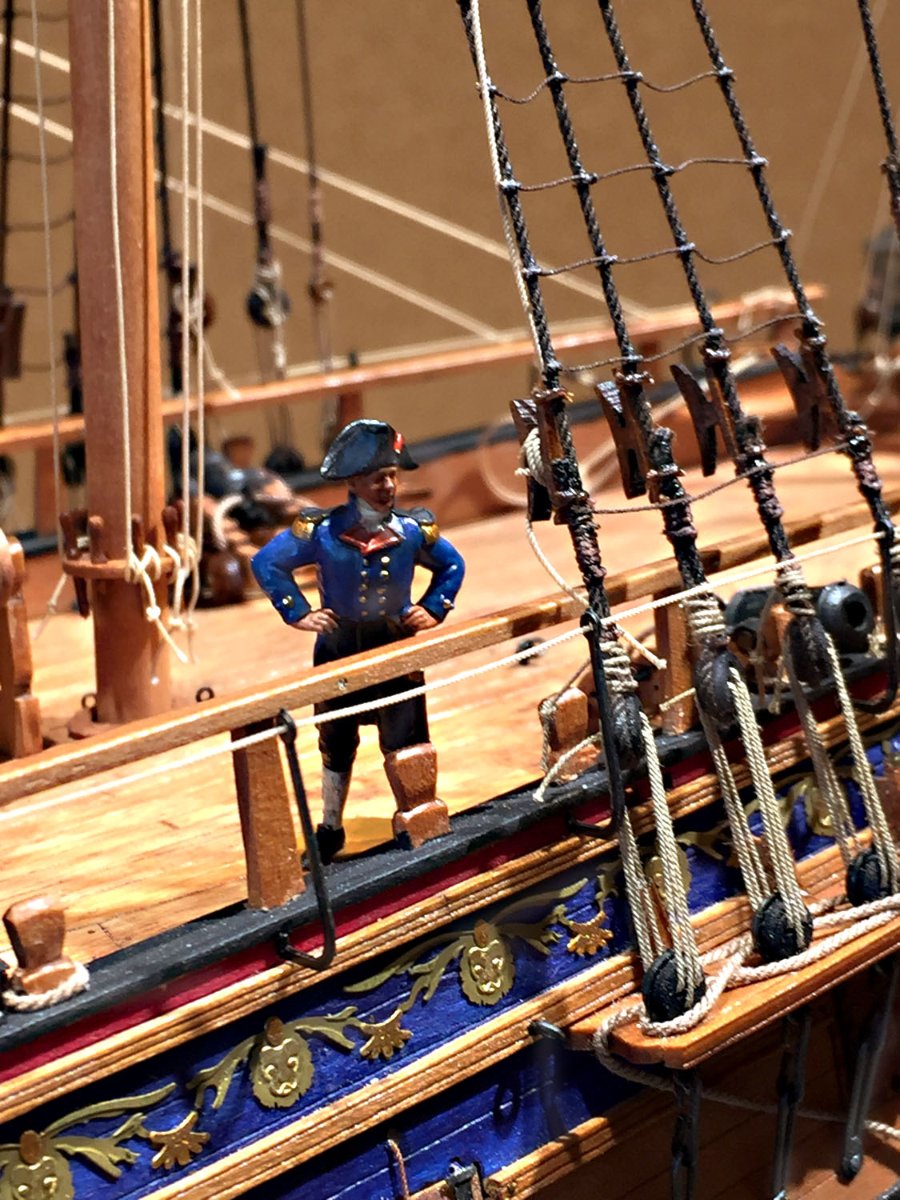
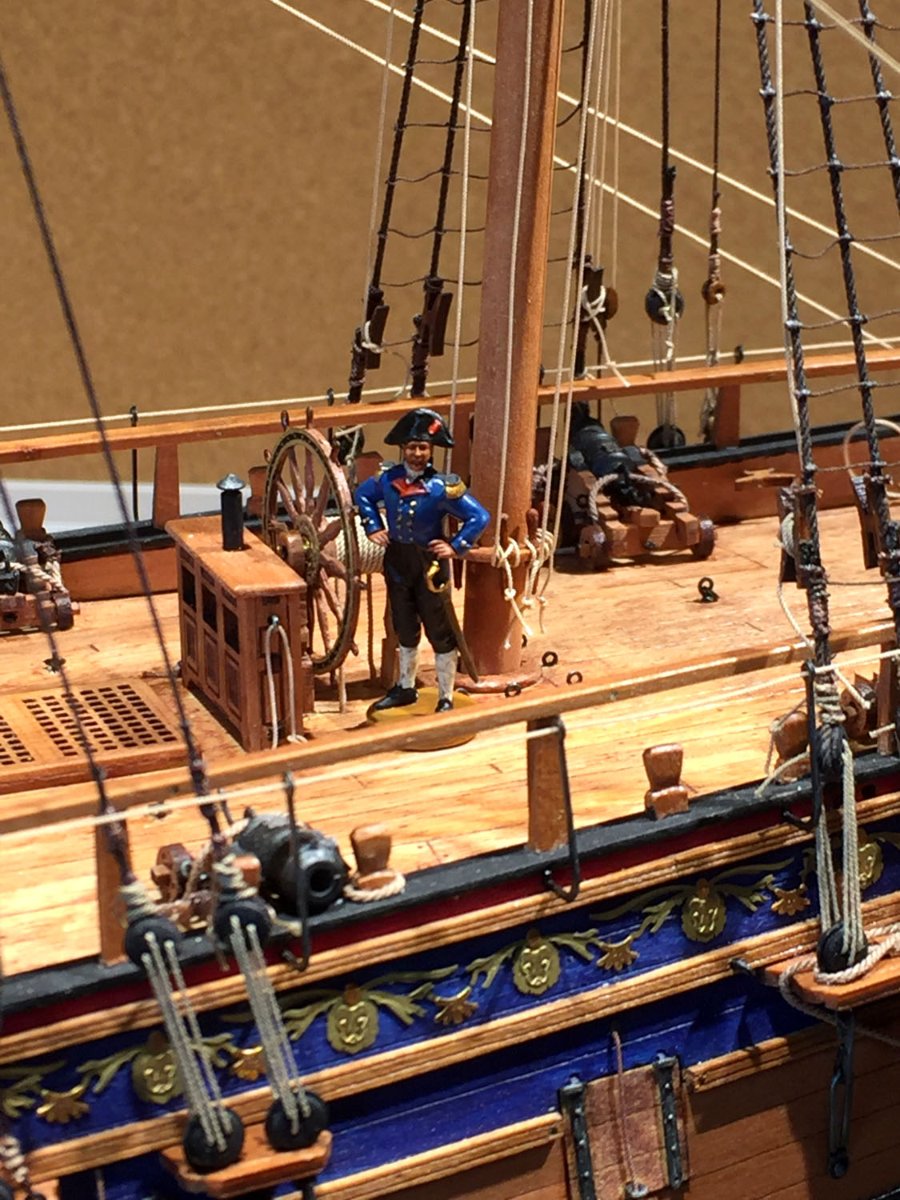
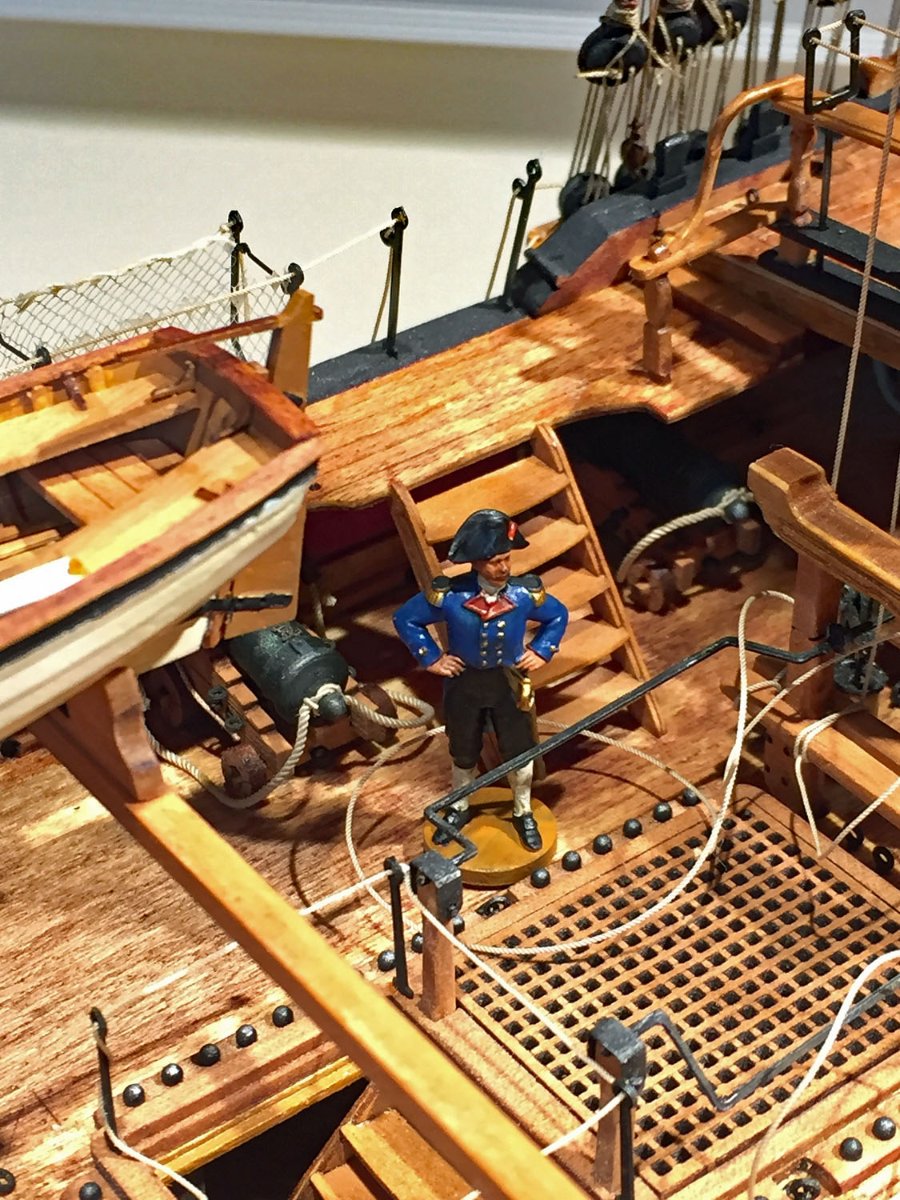
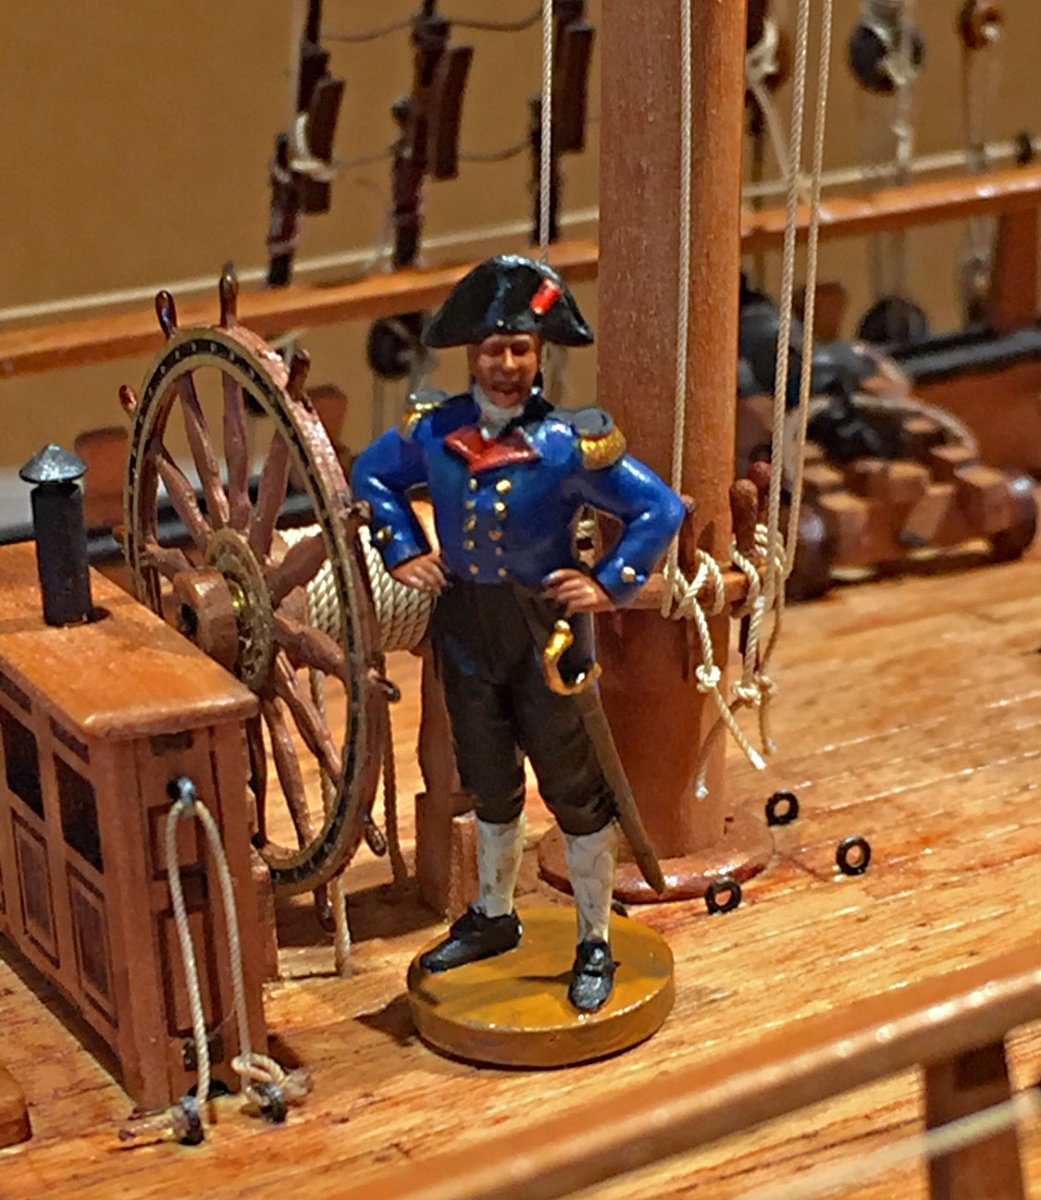
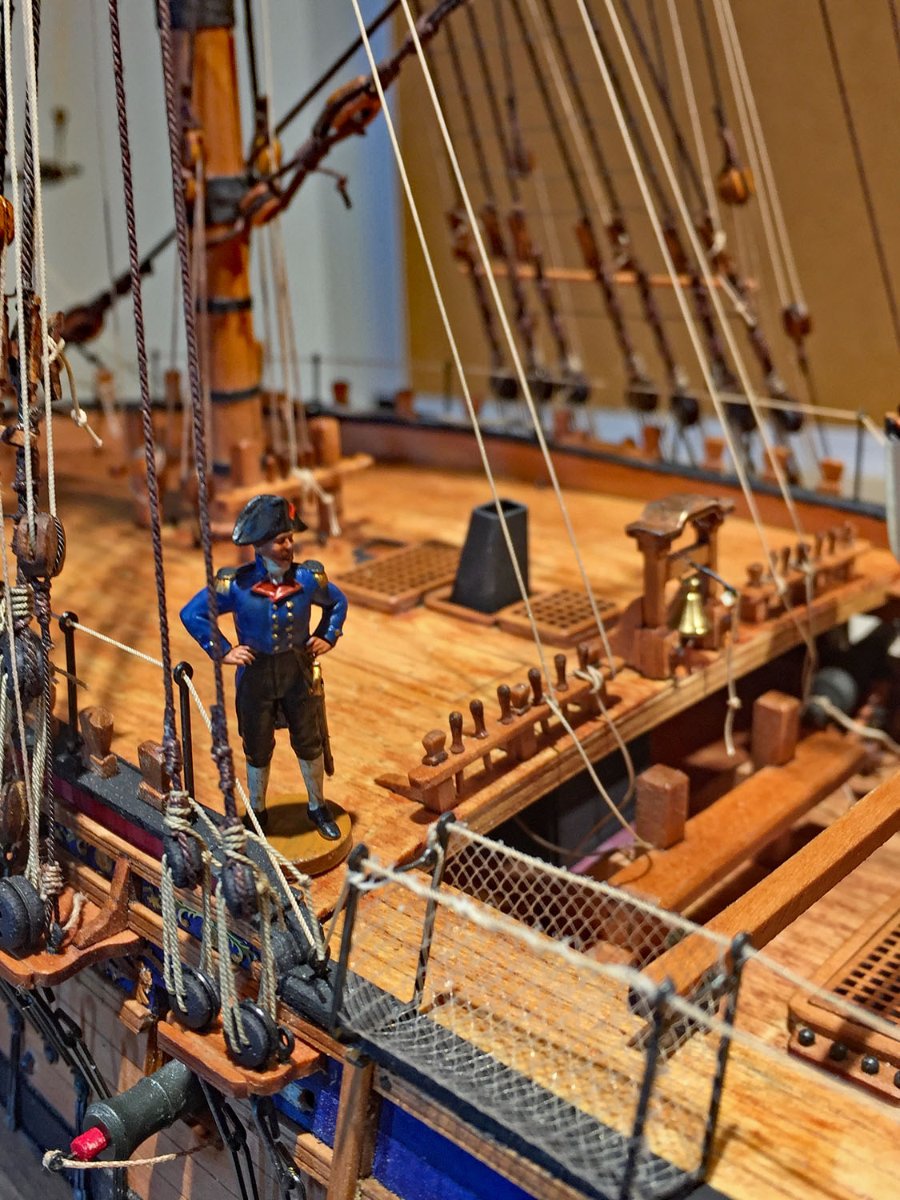
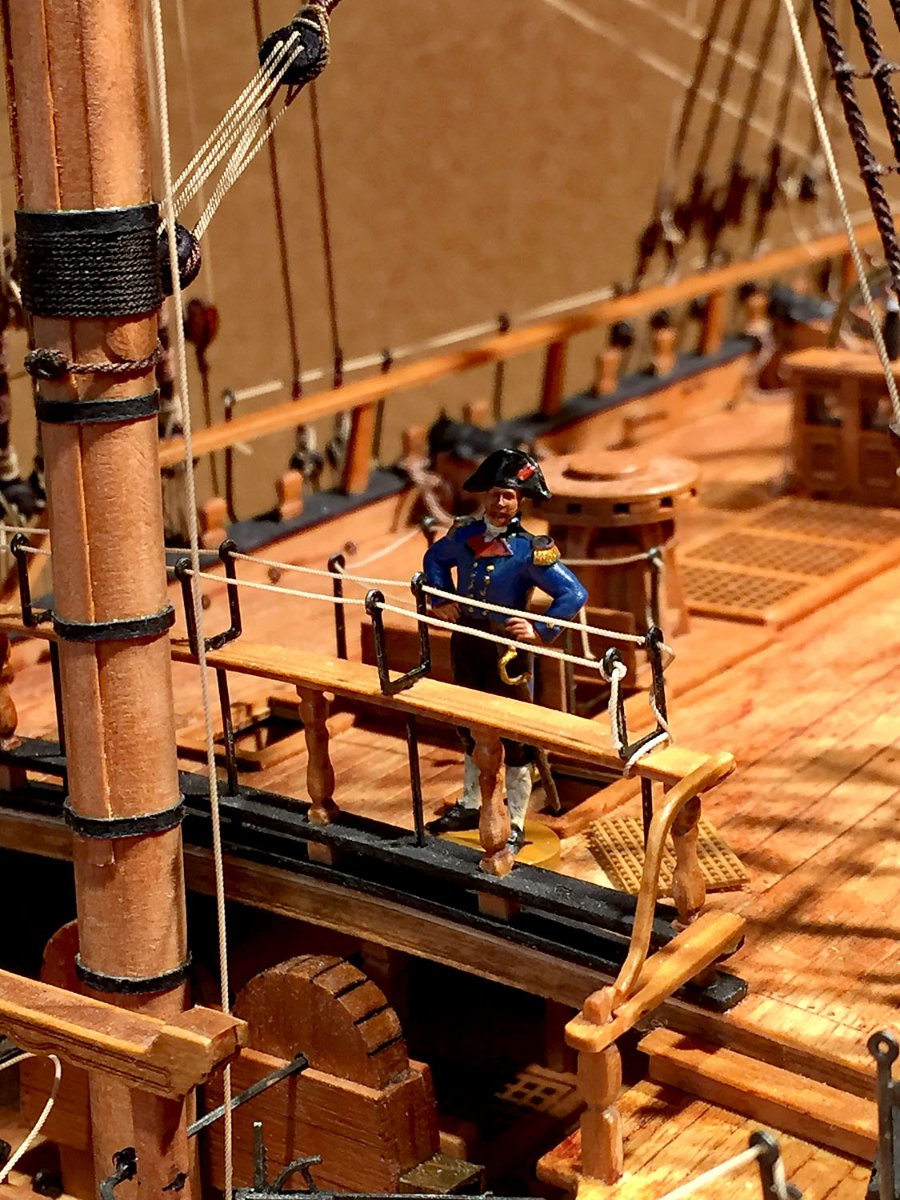
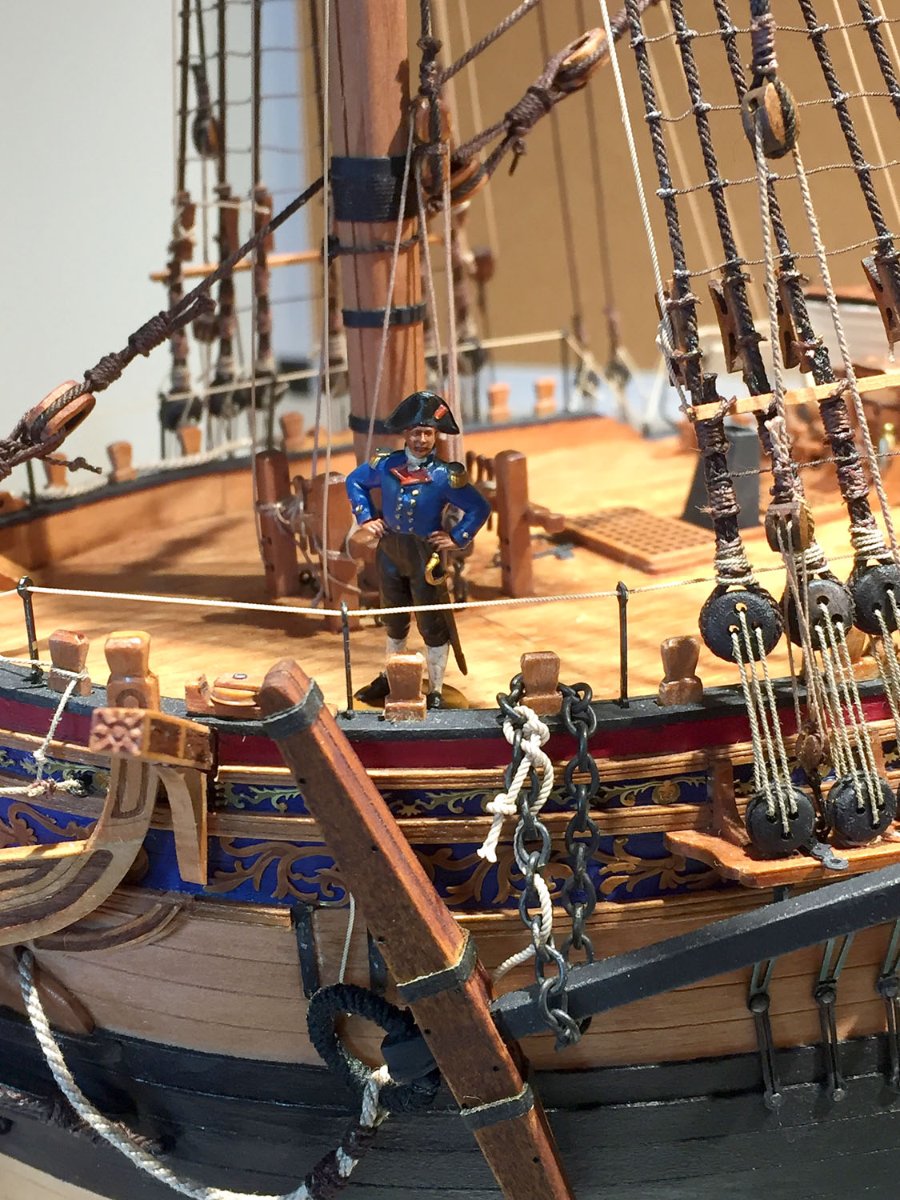
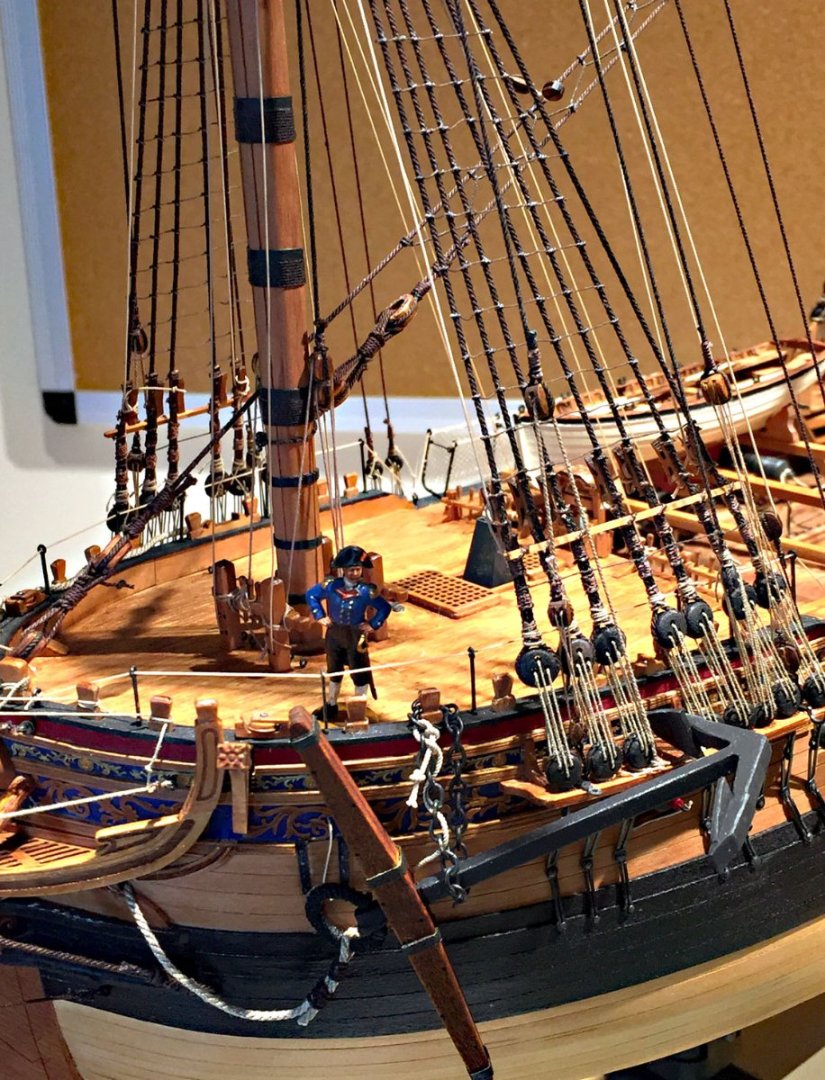
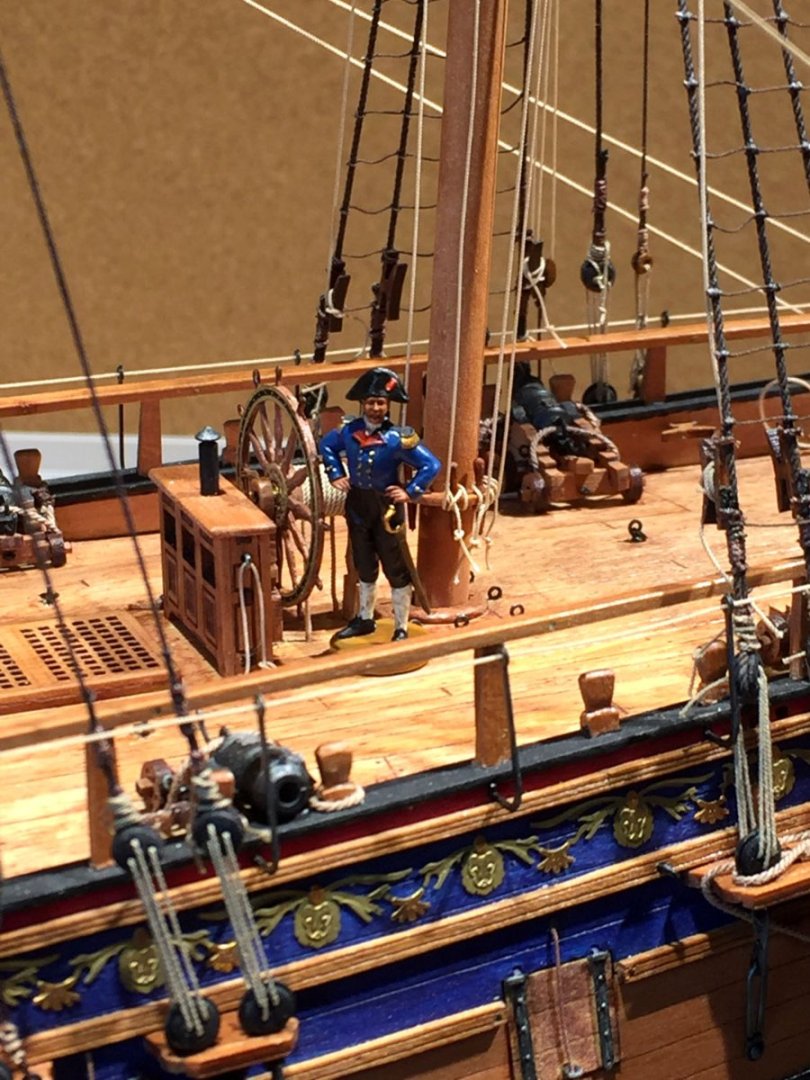
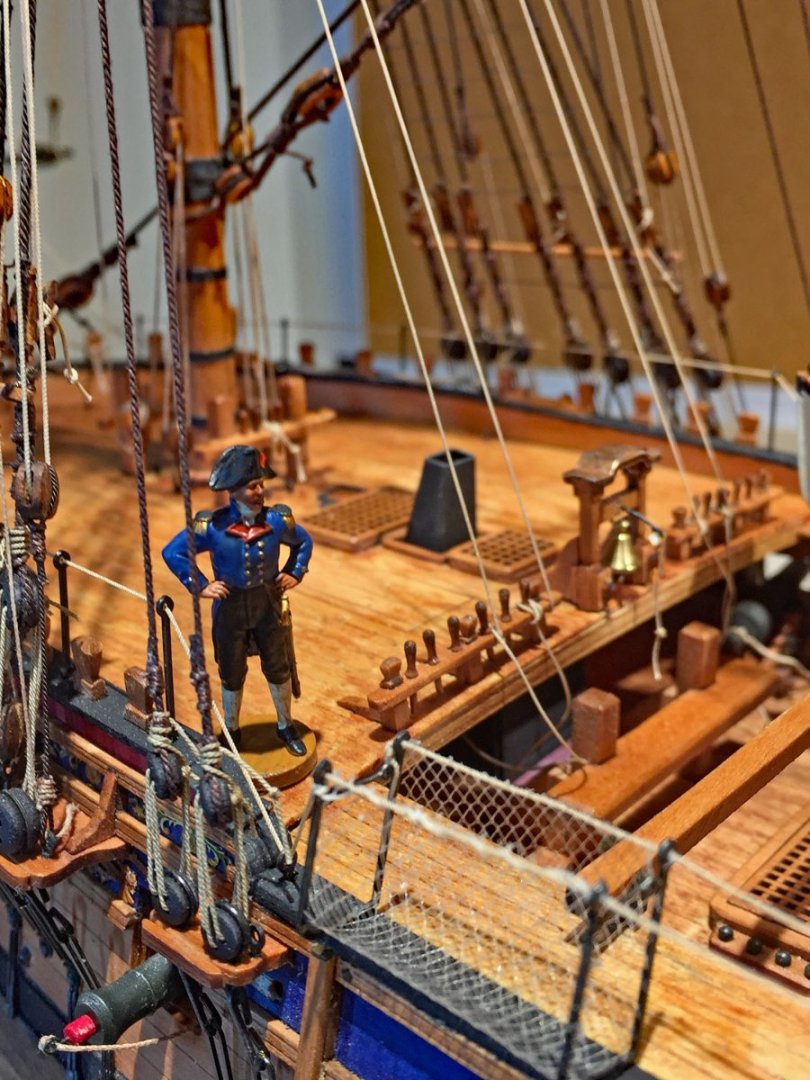
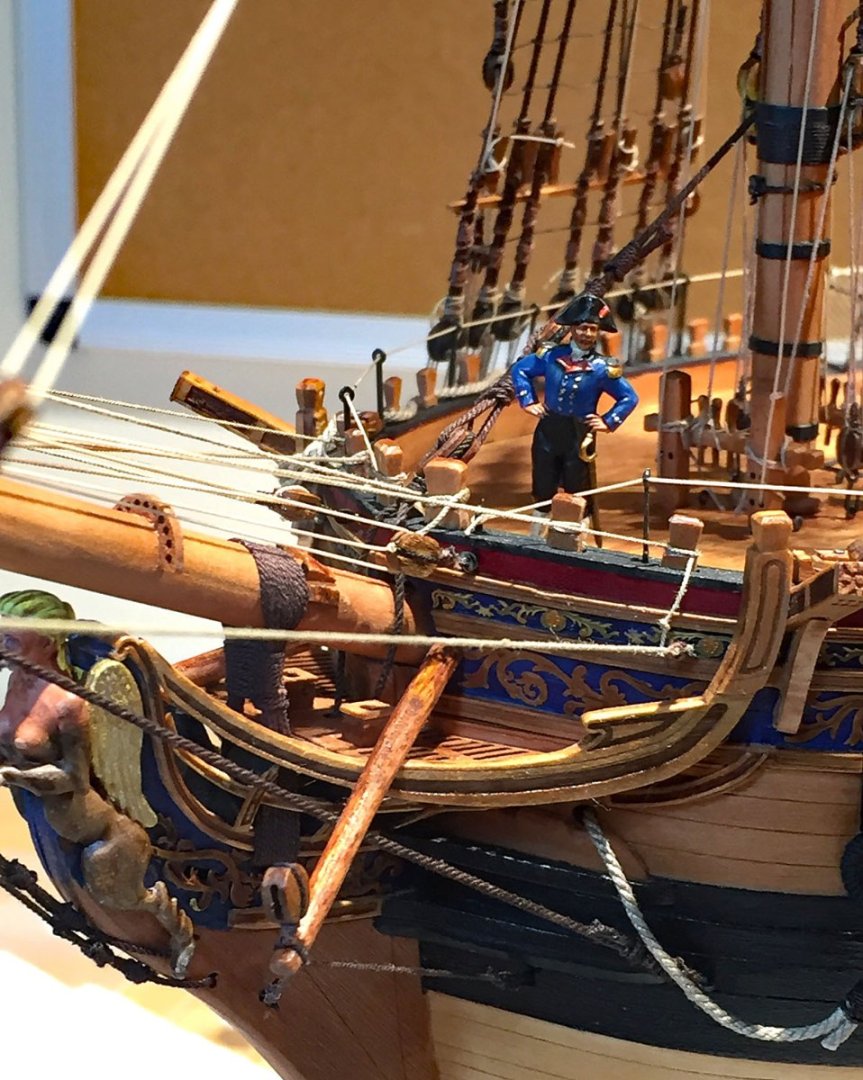
HMS Camilla's Captain Pennypincher finally showed up at quayside to see if everything is shipshape. He's getting anxious to go prize hunting... A few photos of rigging progress. The clews & tacks (and a couple braces) will be rigged after sails have been mounted to her yards. Otherwise, all standing and most of her running rigging has been completed. I like to place figures on many of my models: Camilla will have only one, seen here. Captain Pennypincher is anxious to get into the Channel to see some action: "I can't wait to see what her new-fangled 12-pounder carronades will do." Pennypincher will walk his fancy shoes on the deck after I remove the superb little figure's 3D printed base. I'm hoping to add silver paint to his shoe buckles after the base is removed. However, I'm a little nervous that my 0000 brush isn't small enough to do this job. Soiled stockings...clean cravat, impeccable waistcoat. This 3D printed resin figure from Chris is approximately 28mm tall and very accurately scaled for 1:64. Pennypincher is from a hyphenated surname, aristocratic family and stands quite tall at about 6'1"... "Where'd my crew go?" "Did they mutiny?!" "That's not fair play!...however, I alone will now get to keep all the prize money for myself!" "My disloyal crew? I say, 'bugger-off you sodden tars, you should have trusted your Captain.'" Sails await. A good 2-3 weeks lie ahead to accomplish this final part of my ship build. My rigging still allows reasonable access for bending her sails. Running the sail management lines is always a challenge since these are literally the last ropes and there just isn't any other way to run these lines earlier in the build. Many of the sail lines will be belayed to spots that will require a special set of long rigging tools that can reach into the tight spots.


- 542 replies
-
- 16
-
-
-
- Sphinx
- Vanguard Models
- (and 3 more)
-
Here, here. A shout out for James. Bravo! B.E.
-
Yep. I, for one, would not like higher latency; "tech talk" for the "go slows." No, Thanks. One of the reasons (IMHO) that MSW is so popular is that it is extremely fast - partly owing to a minimum of ads (and rollover nonsense). The small banner ads from our sponsors take only a miniscule amount of data. The ability of members to post large graphics files (build logs, gallery, etc.) is key; the email server on the forum is nice icing on our tasty cake. Going without our FREE forum for such a short period of time is a good reminder of its value.
-
A Warm Welcome from a MSW modeler in Pennsylvania. You've found the best place on the internet for support and expertise on ship model making.
-
I suggest keeping the cranes but adding the safety ropes will be necessary, otherwise they may look peculiar and draw attention away from other impressive aspects of your model. You may want to consider mounting only one boat (Pinnace) should you retain the cranes. My entirely unsolicited recommendation. Whatever the final decision, I'm certain you'll decide on a complementary outcome. I'll be interested to see how you choose to present your beautiful model.
- 857 replies
-
- 2
-
-
- Sphinx
- Vanguard Models
- (and 1 more)
-
The NRG (our forum’s parent) notified their members when MSW went down.
-
Congratulations, B.E. Your model is a reference for everyone who decides to follow and build Vanguard's excellent kit: superbly executed details and creative solutions await future modelers, in abundance. I'll hit my one year Sphinx (HMS Camilla) build anniversary this September. Time does seem to fly when you're having fun...
- 857 replies
-
- 2
-
-
- Sphinx
- Vanguard Models
- (and 1 more)
-
My copy arrived today, July 26. … a Day of Re-Connection: first, our forum was restored then an agent of the U.S. Government delivered my missing Journal. Life is good.
-
Phew! This is the stuff of nightmares, for everyone on the forum. I can’t imagine what a few terabytes of lost data would mean to our community. ‘Bravo” to the crew who sorted this out over the past 24. “You don’t know what you’ve got, till it’s gone.” - Joni Mitchell/Big Yellow Taxi, Ladies of the Canyon, 1974
- 39 replies
-
- 10
-
-

-
Thank you. You may be living at the “bottom of the world” but your beautifully executed Winchelsea is at the top of the planet! Superb work. Thanks, druxey. My Quadhands has made several previous appearances. It is worth the investment. I can’t think of a more useful shop item for rigging with the exception of my needle pointed tweezers and embroidery scissors. I’ve used detail powders on scale figures in my last diorama as an experiment ( to enhance facial details in the painted metal sculpts). As I studied Camilla’s flat-looking MDF anchors, I recalled the technique applied to the kit’s cannon by the kit’s prototype builder. I did need to purchase a dedicated ‘set’ of powders for this job. Doing so turned out to be quite fortuitous since this material also enhanced other “metal” details as I experimented. I sincerely hope some of my approaches for materials (and tools) can help others in MSW world.
- 542 replies
-
- 7
-
-
- Sphinx
- Vanguard Models
- (and 3 more)
-
Just came across your Diana build. You've achieved some very tasty upgrading and impressive work. The coppering is especially nice. Diana was my second model and her beautiful lines elicit strong, positive responses from onlookers. Can't wait to see how you rig her!
-
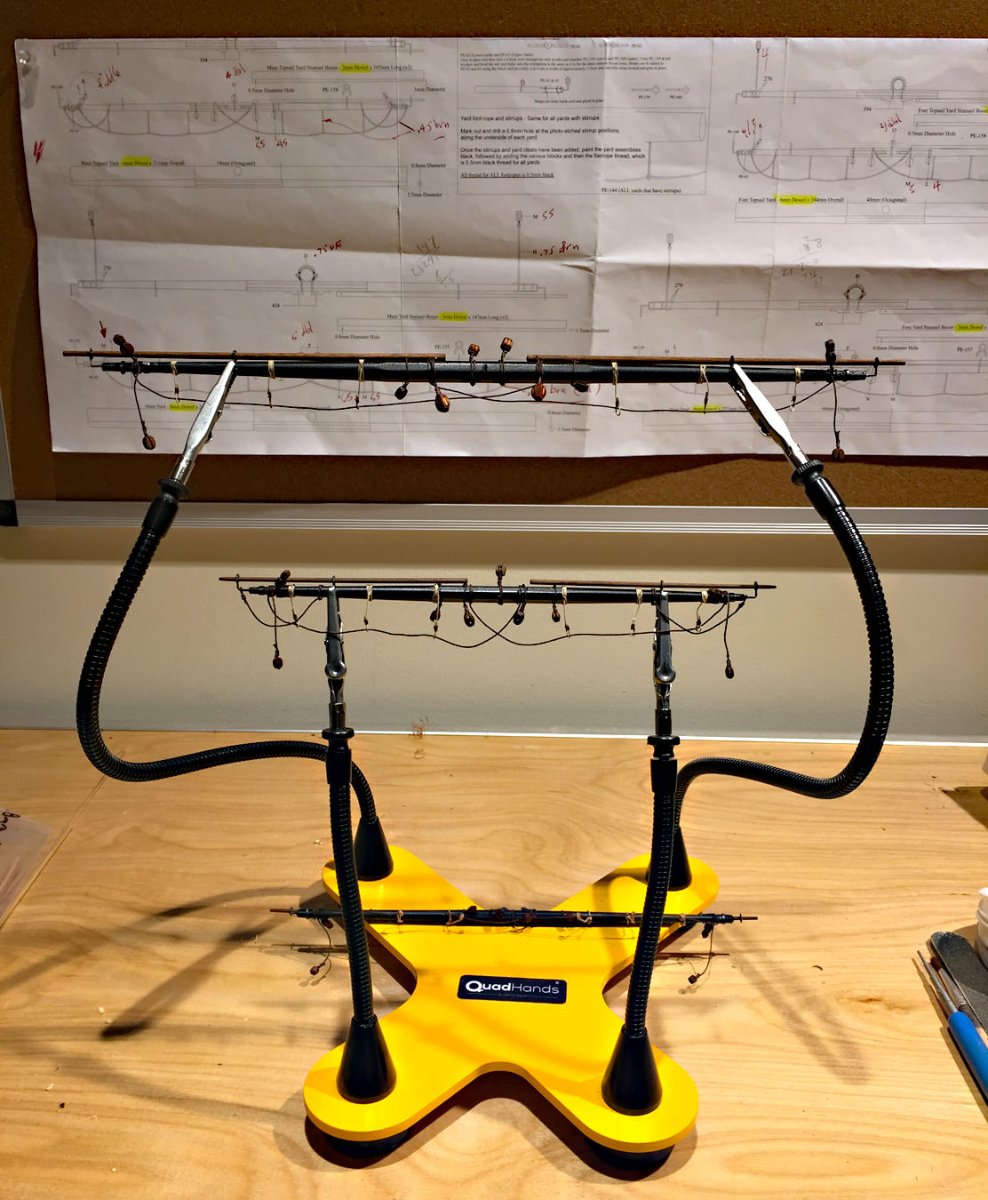
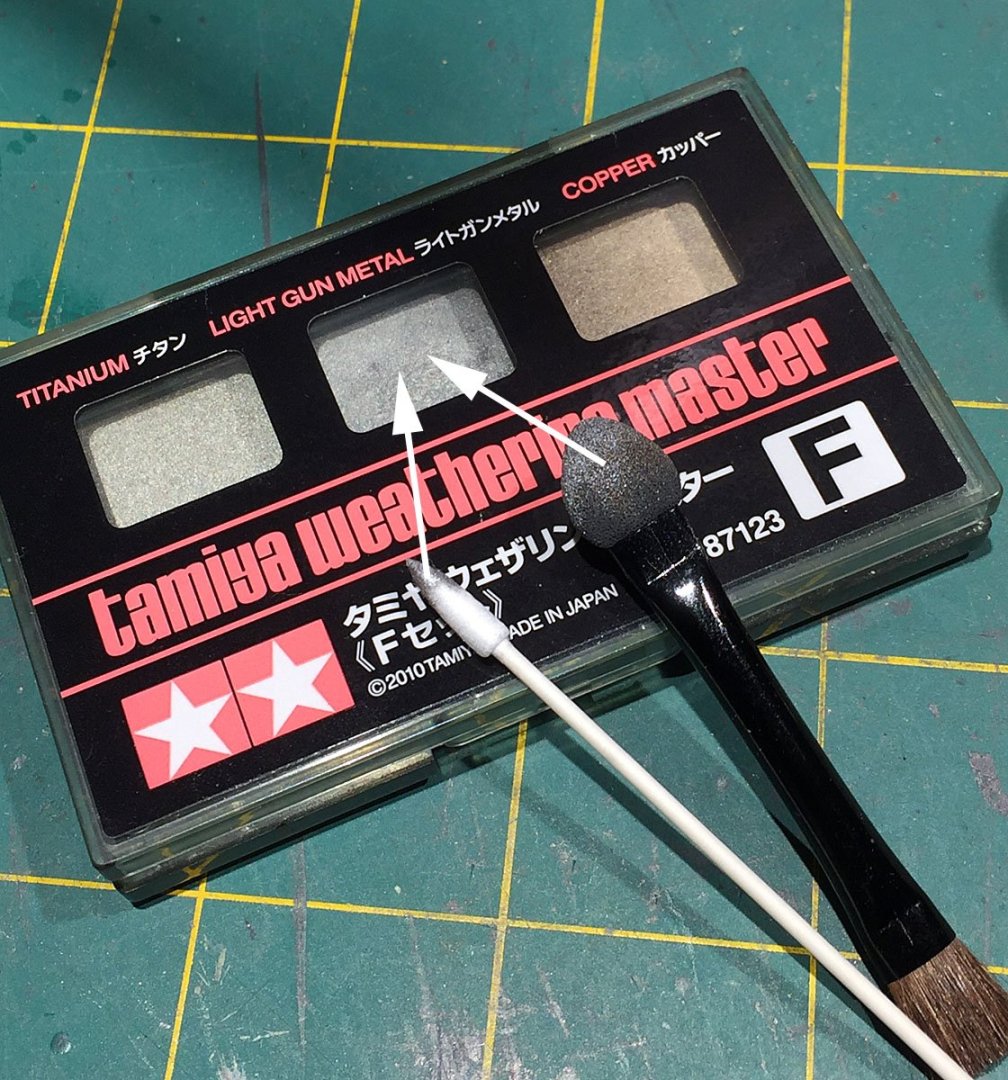
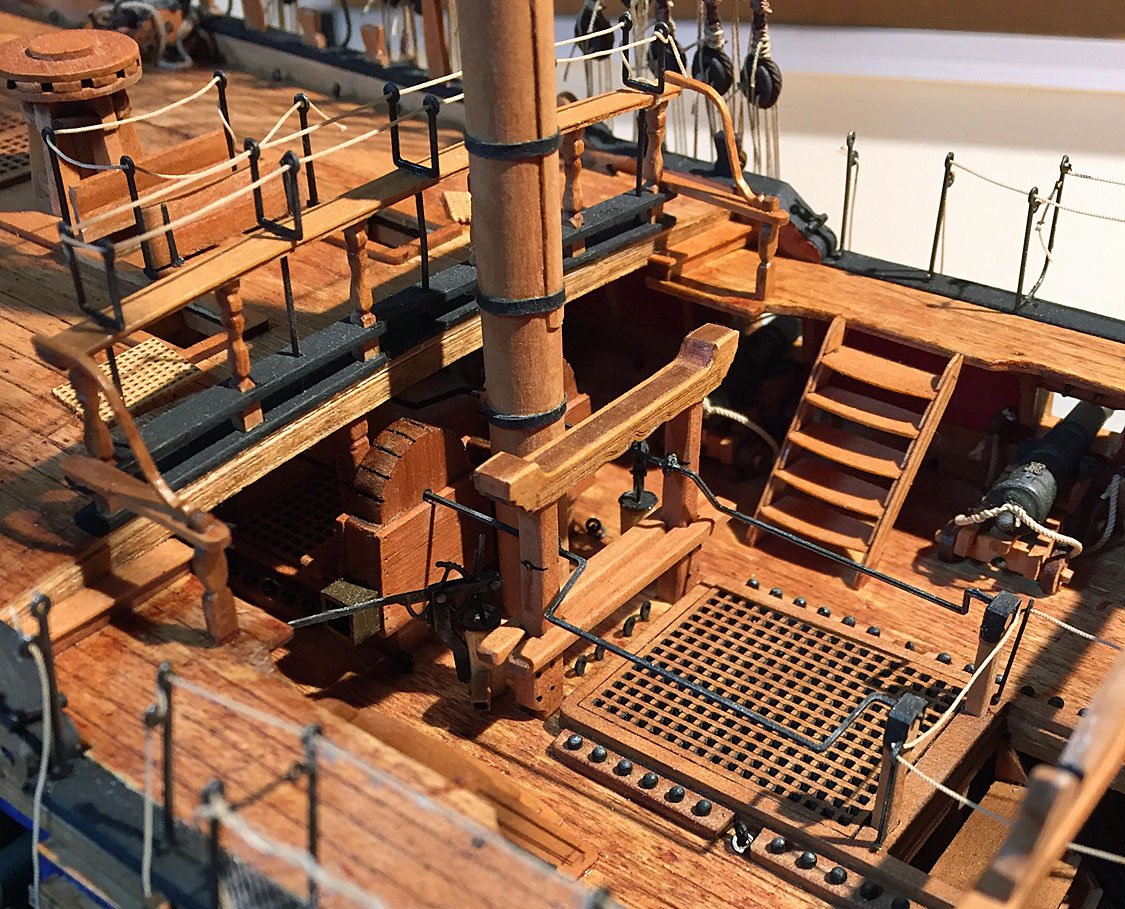
A milestone approaches...yard rigging is nearly completed. Populating the yards is painstaking and sometimes very tedious. The QuadHands station makes this task so much easier. The flexible arms hold the workpieces securely and as you tie-on the various components (lots of them) you can easily bend the arms to effectively rotate the work toward or away from you: very handy. Having two sets of arms is quite a luxury too (the QuadHands come in various arm/base configurations). The multiple tentacles allowed me to maintain spacing consistency by visualizing a completed yard while working on its sibling. This is the completed main topgallant yard. With the exception of the fiddle blocks for the lifts, all the remaining blocks are 3.0 mm. The loops for the strirrups are about 0.5mm and were made off this jig on my smaller, simple ThirdHand jig before lashing to the yard. I've added the small black rubber "boots" to the alligator clips so they don't mar the paint job on the yard (the clip "booties" come with the QuadHand). On the previous photo the alligators were grasping the iron rings mounted the yard's wood so no need for the rubber alligator boots. My trusty 0.79 mm thumbdrill just won't go away (not that I want it to). Here, a 3.0 mm stropped block gets its hole properly opened up so rope can more easily pass through when subsequently running the lines. It pays to do this with every block, regardless of size. It's very frustrating to be running a line and have a block be - well, blocked. It's not easy to open tiny holes on some blocks that are in very difficult to reach spots. Behind the block and drill is its topgallant yard. Some builders can work with 2.0 mm blocks. I find them nearly impossible to prep well. In this kit (scale= 1/64), the smallest blocks are 3.0 mm and they are extensive in the rigging set-ups. After staring at my two anchors made from MDF and pear, I decided to try and enhance the look of the anchor. I noted this technique in the Sphinx manual by Jim Hatch wherein he uses a metallic weathering powder for adding realism to the model's cannon. Here you see a small brush with some metallic weathering powder that's been applied to the edges (mainly) of the anchor. I believe this is an improvement to the previous flat black color; previously, to my eyes, it just wasn't a very convincing anchor. After taking this photo I also added the weathering powder to the anchor's four stock bands as these are also made from iron. And here's what I've used to add this realistic treatment to the anchor (and other items- see next photos): Tamiya Weathering Master. Of the metallic colors indicated in this particular set (there are other color sets), I've chosen the light gun metal. The "Titanium" was too bright for a proper light reflectance from iron. These weathering materials are used extensively by our brethren in the plastic model (and train layout) world. Two tips are better than one. The tapered cotton tip (also from Tamiya) worked a little better in some tight spots...like... ...Here. I also used this same weathering powder on the cannon muzzles, the chain linkages as well as bolt heads, even on the tips of all the stanchions and hammock cranes. The result is very subtle in most cases and as it should be. It is very easy to over do this kind of embellishment. The powder itself is somewhat viscous, almost "wet" feeling when applying and adheres nicely. The compound has an extraordinarily fine texture: one is hard-pressed to see any granules of shiny, metallic bits. A view with all of Camilla's yards nearly completed. A starboard progress view; a rigging milestone has been reached. Next up: some finessing of the footropes, finishing-off the crane netting to port and then onward to yard jeers, tyes and halliards. A view showing the effects of the light gun metal weathering compound on various "metal" parts of the ship: cannon cascabel, rear breeches, chain pump iron bars, deck bolts/rings, even the cannon balls. The dale pumps were also touched-up; unfortunately, in this shot you can't see the effect, but it makes the delicate P/E mechanisms look considerably more realistic. I've applied a tiny touch to all the tips of the stanchions and hammock crane irons. The King's monogram on the eight midship cannon have also been lightly "dusted" which adds a little more visibility to this fun detail (cannon monograms by Syren, not included in the kit).


- 542 replies
-
- 20
-
-
-
- Sphinx
- Vanguard Models
- (and 3 more)
-
Presentation of a scale model ship
hollowneck replied to Gaetan Bordeleau's topic in Photographing your work. How to do this.
Have you seen this "probe" lens, Gaetan? A new pro photo tool for macro shots (24mm) and it's configuration could produce some very interesting photos of models - interiors as well as exterior. f14, built-in LED lights at front lens. About a 3/4" dia to the tube. Manual focus. Pretty decent glass. It's $1,600 USD, but It can also be rented. Venus Optics Laowa 24mm f/14 2X Macro Probe Lens with Canon EF Mount
-
Thank you, druxey. Your encouragement is much appreciated!
- 542 replies
-
- 2
-
-
- Sphinx
- Vanguard Models
- (and 3 more)
-
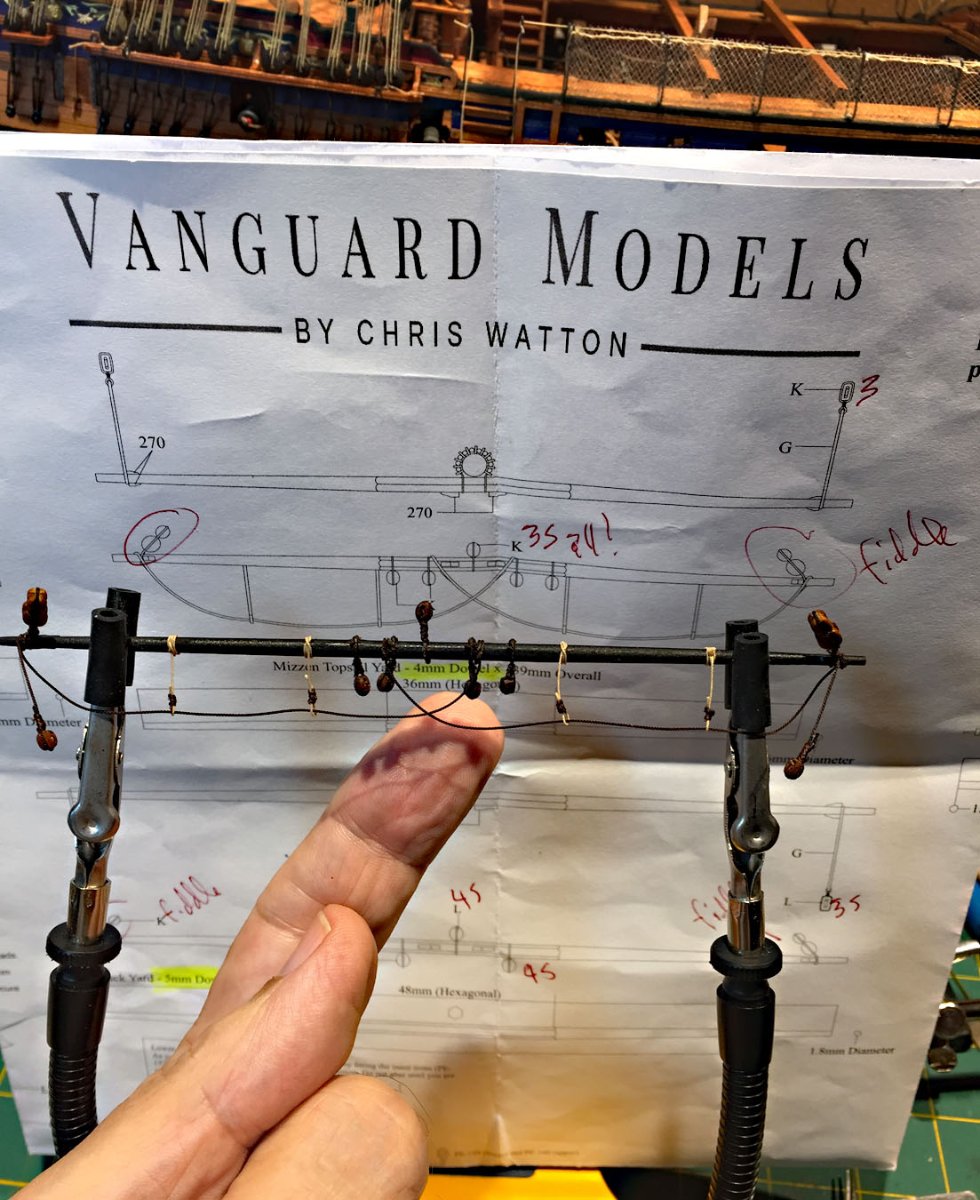
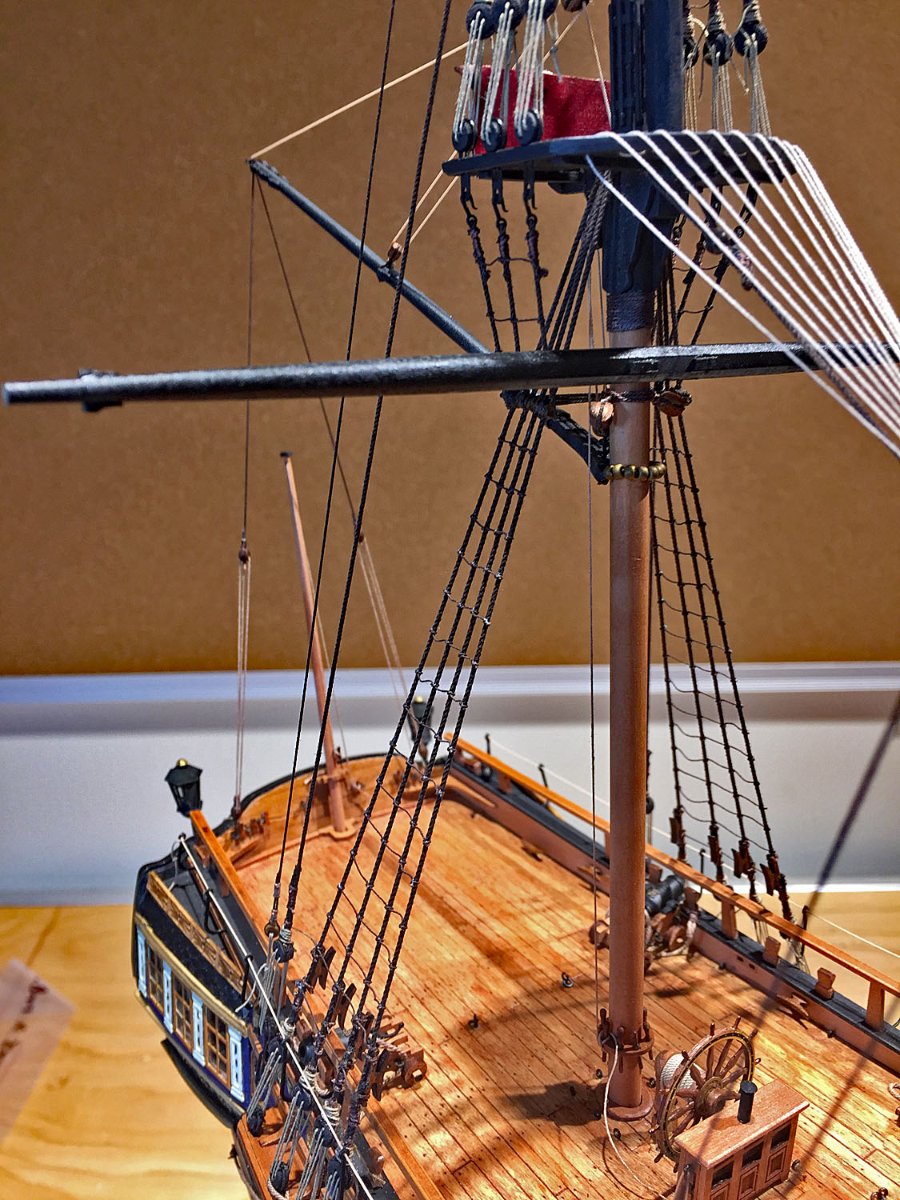
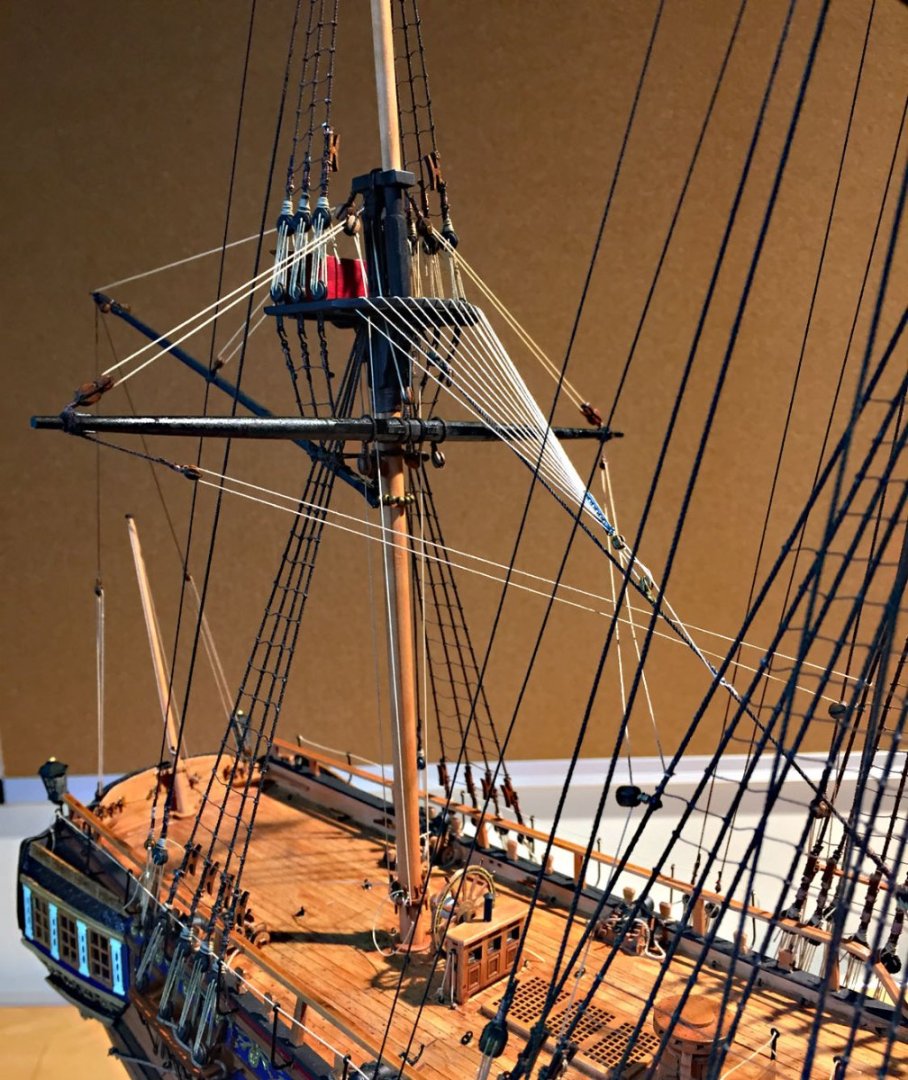
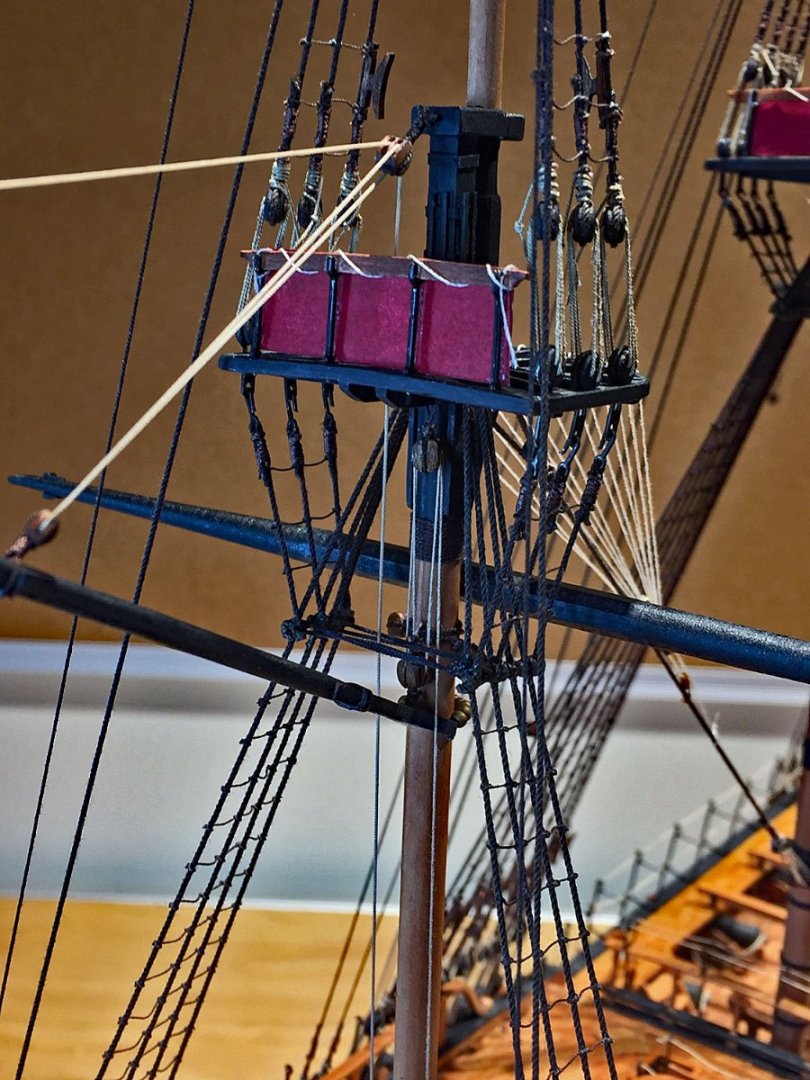
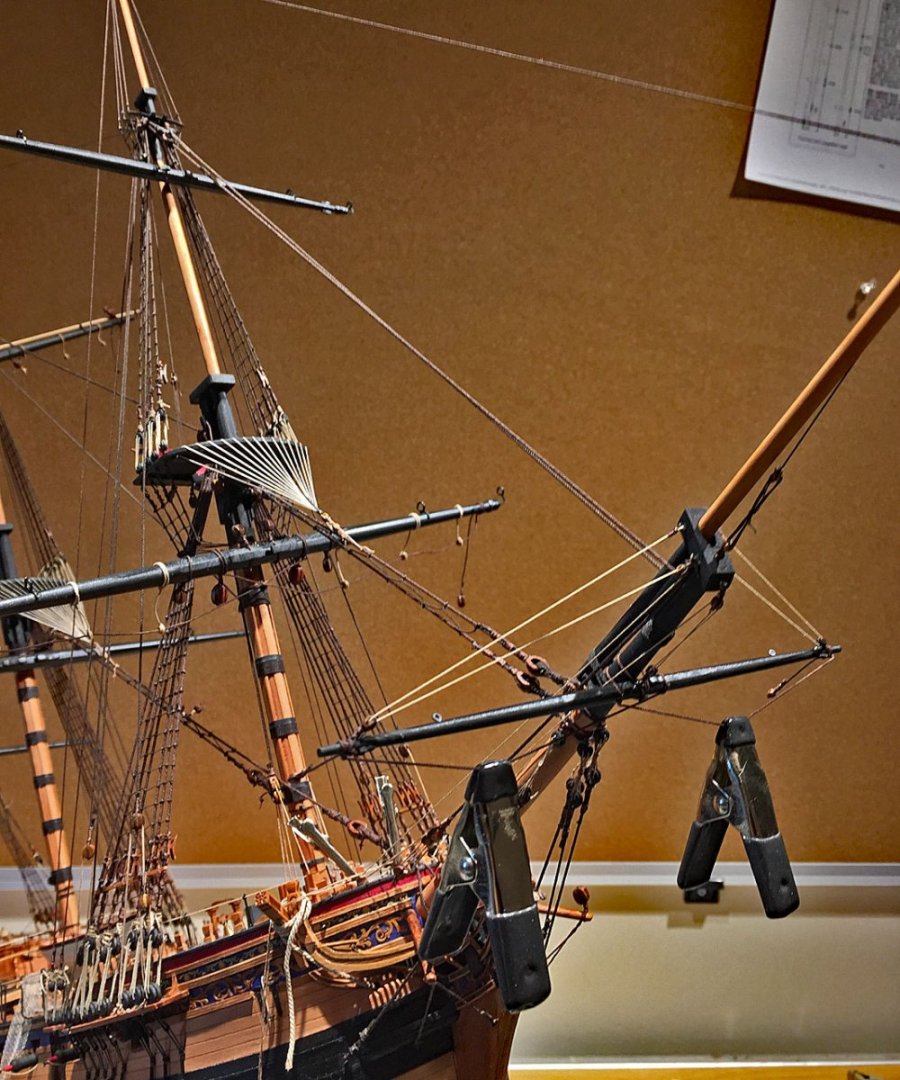
Crossjack/Mizzen mast rigging completed The mizzen mast's crossjack yard carries no sail. The crossbracing is shown here. A closeup of the crossjack yard details. The shaped octagonal center of this yard will clearly be visible since this yard is near fully-rigged. .

- 542 replies
-
- 13
-
-
- Sphinx
- Vanguard Models
- (and 3 more)
-
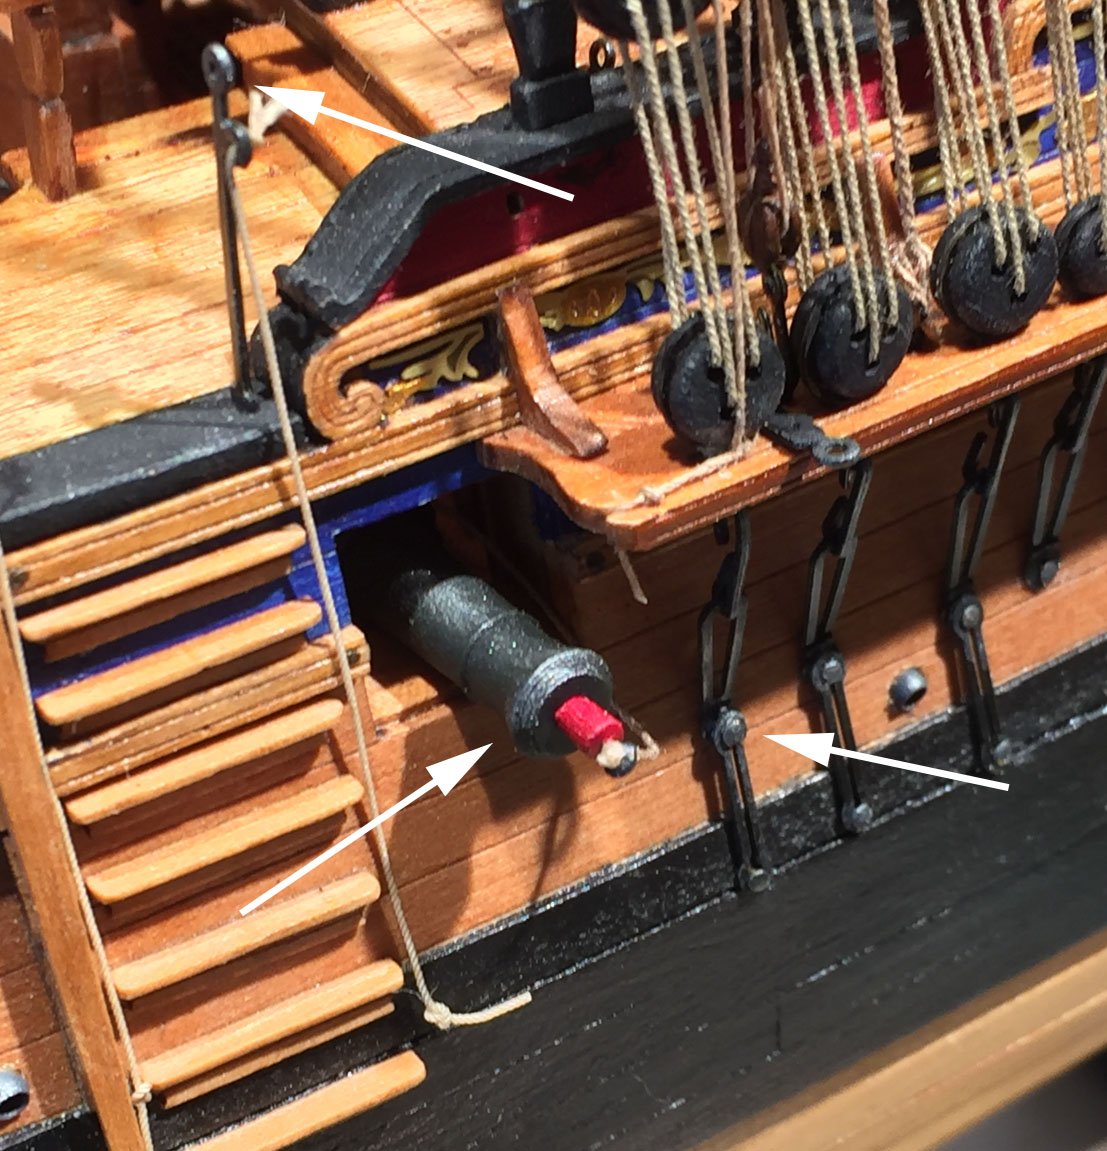
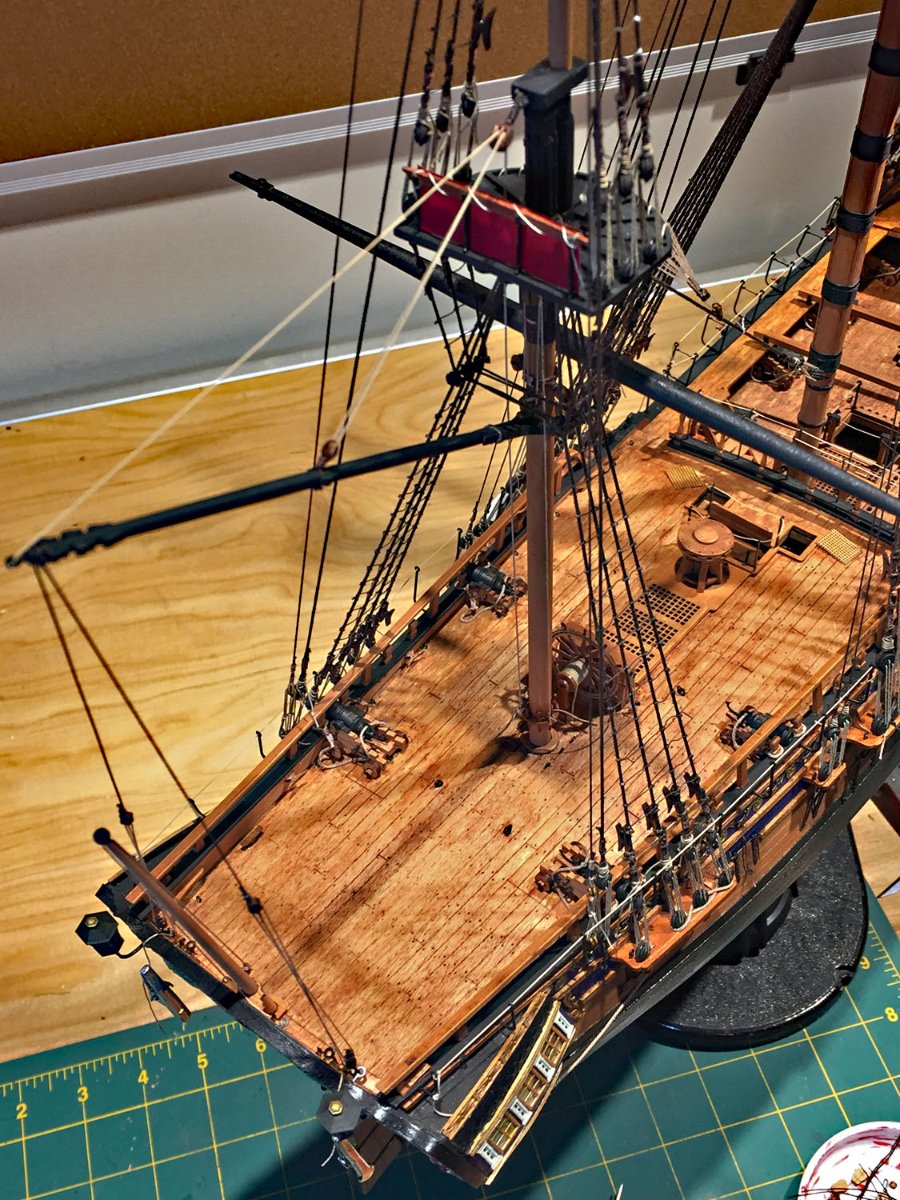
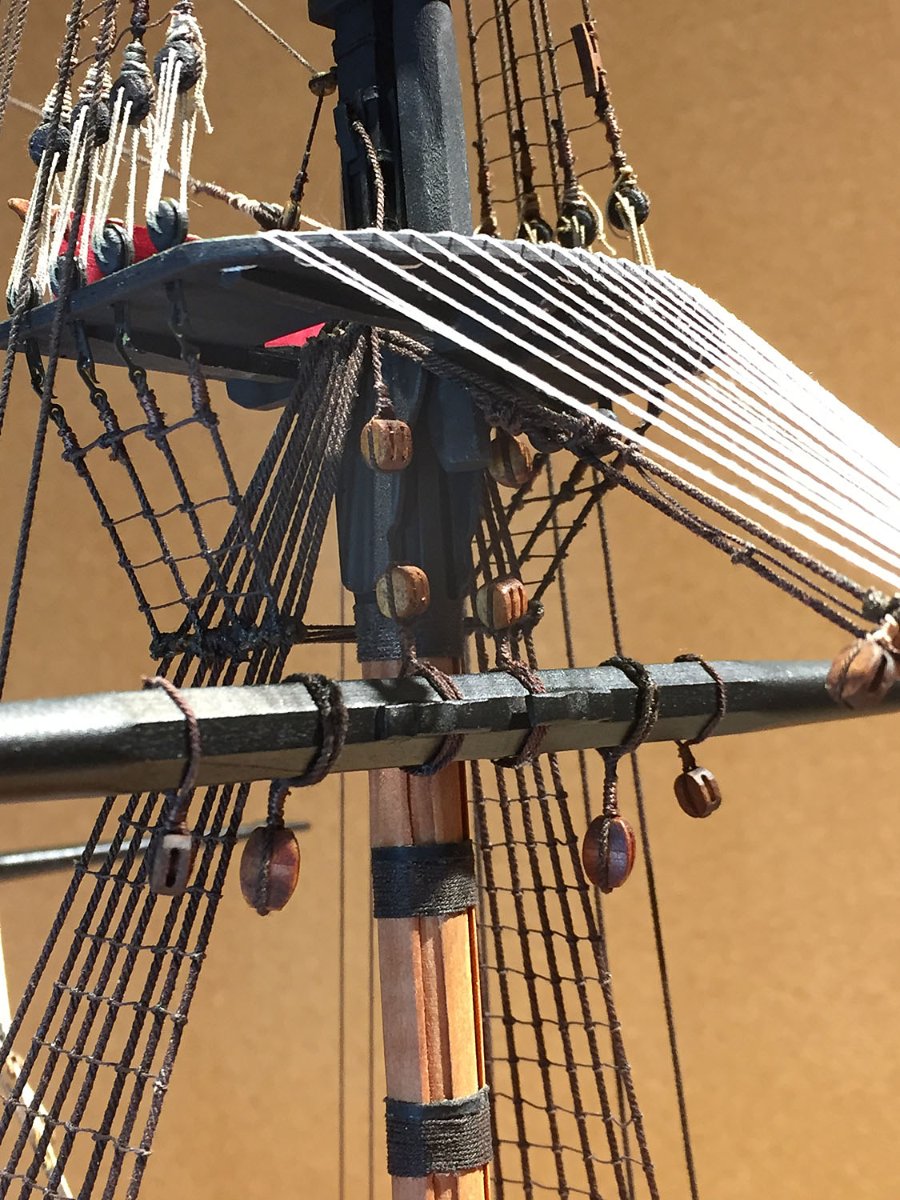
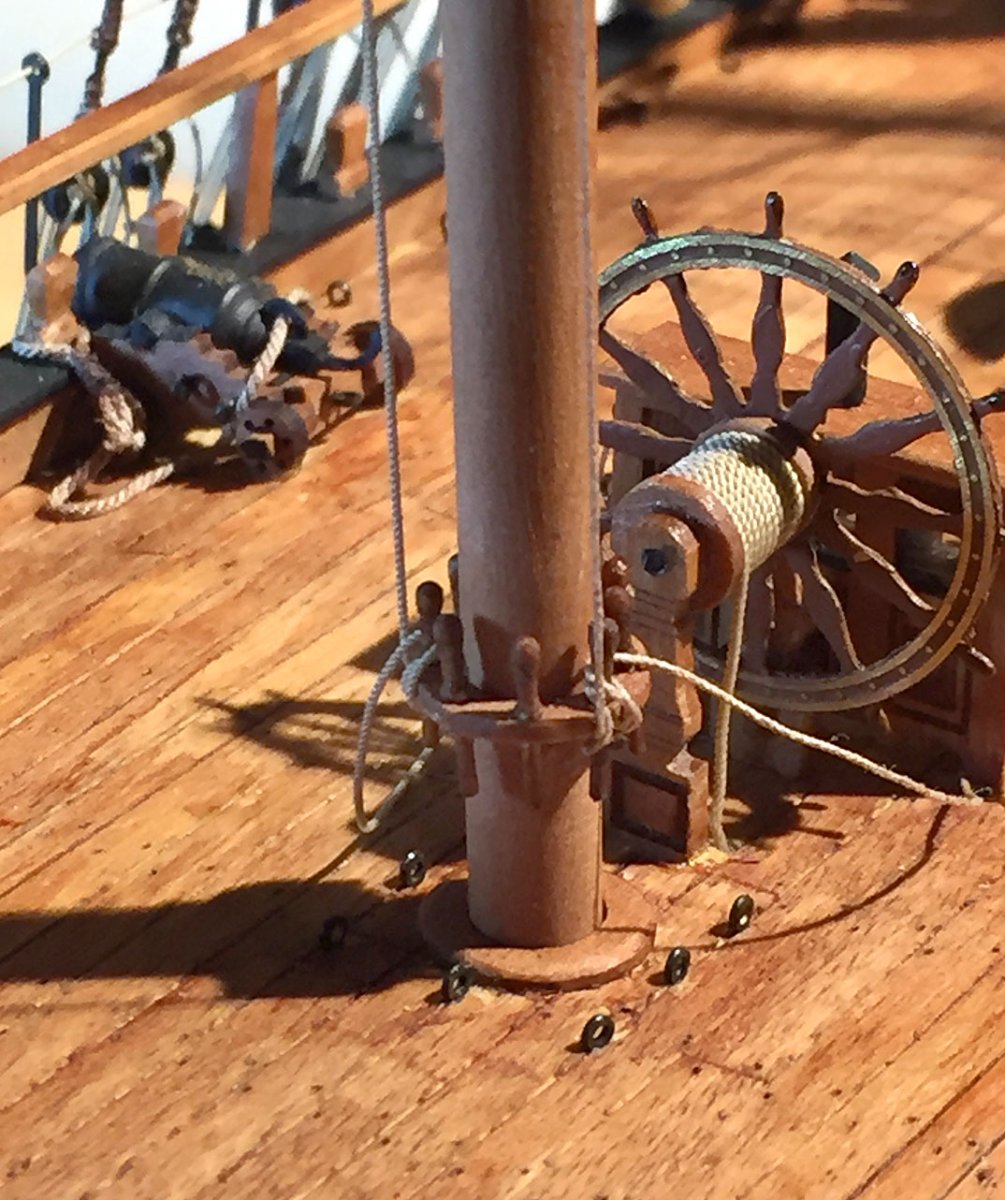
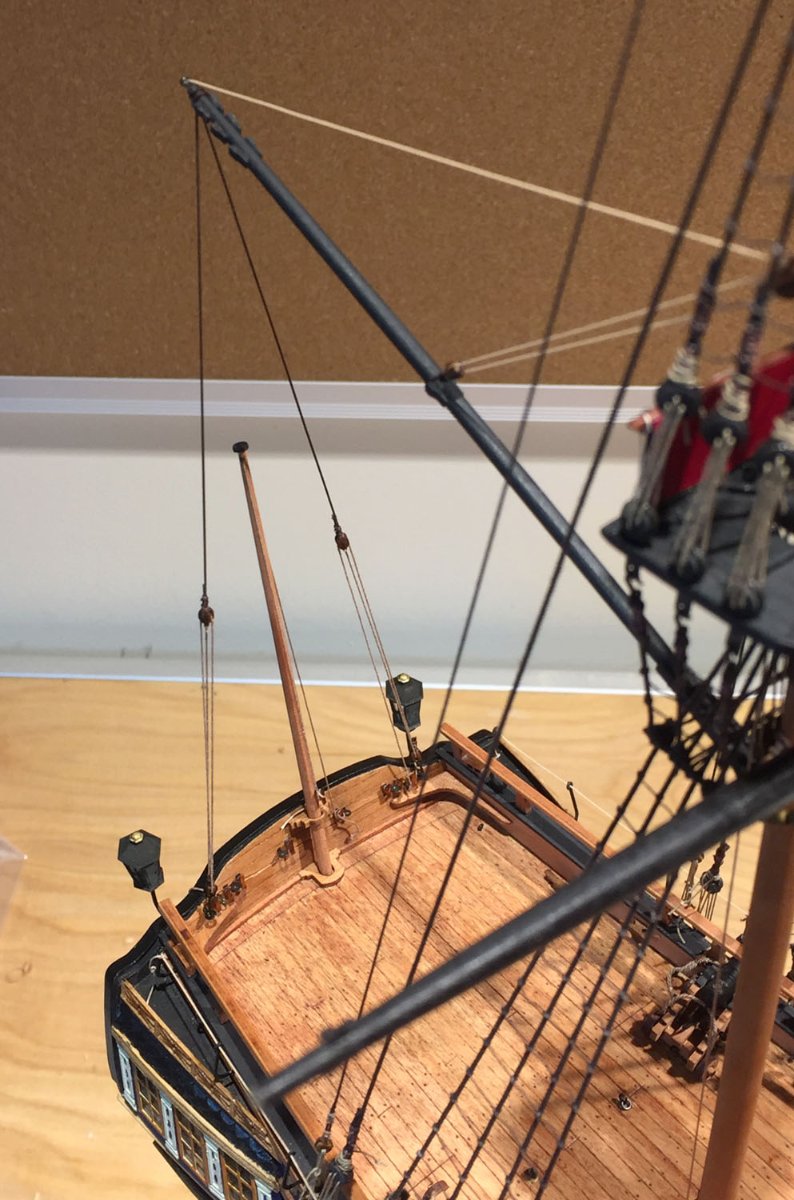
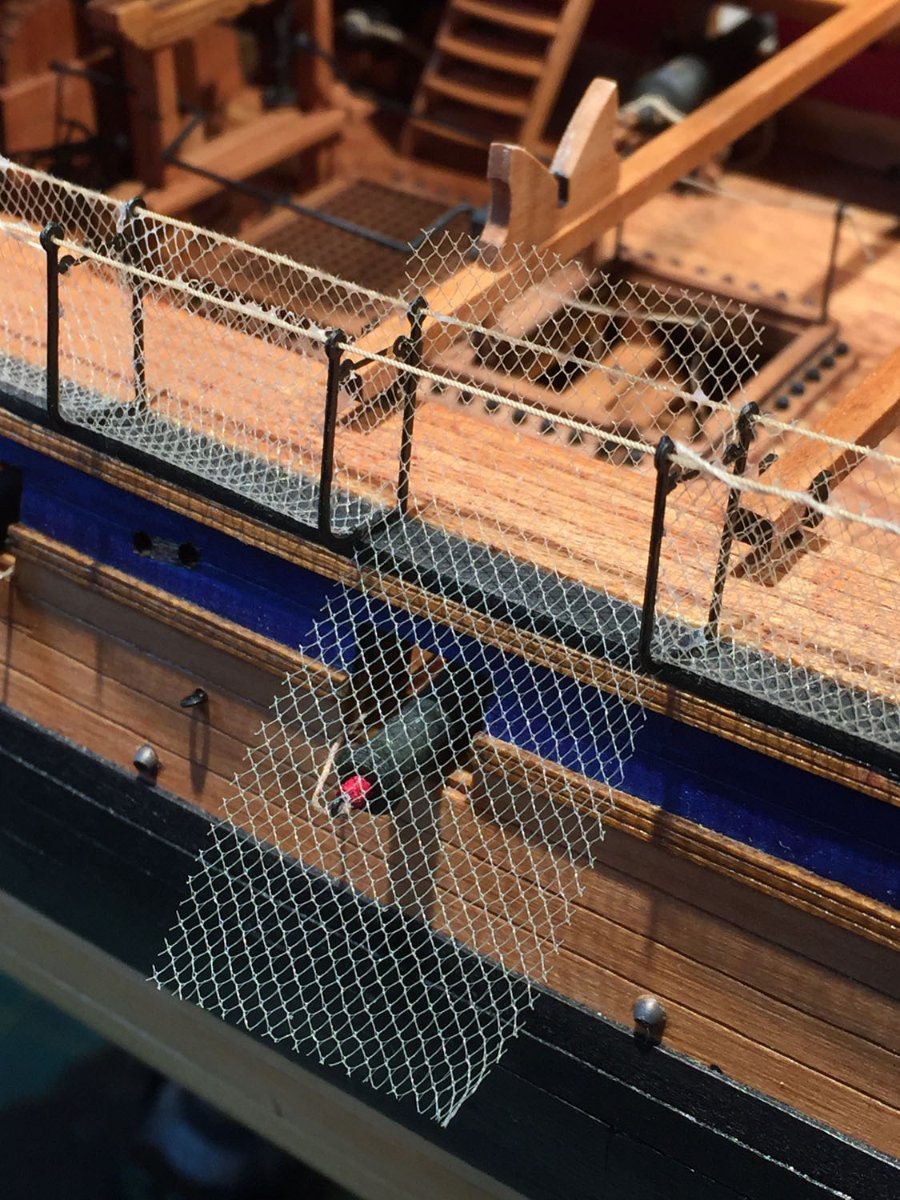
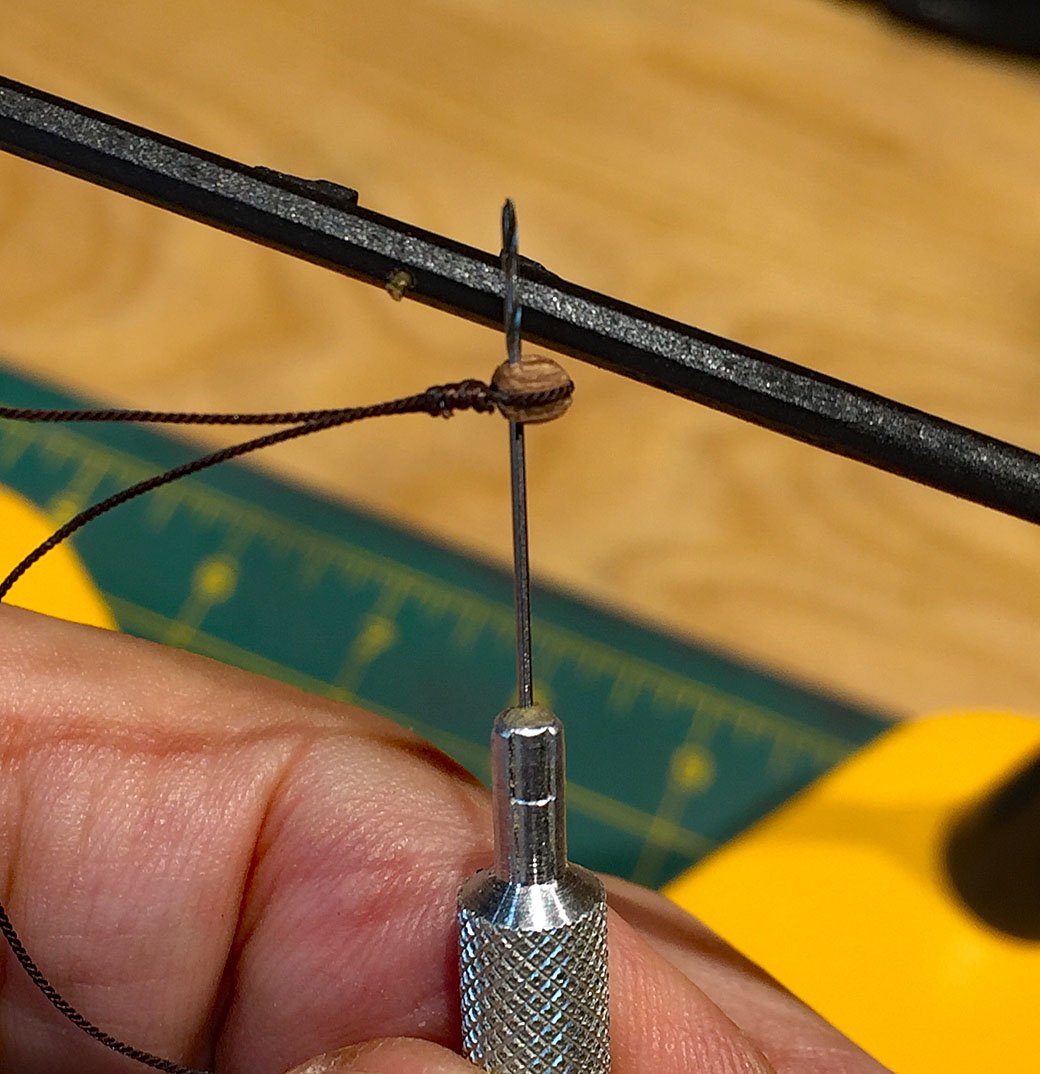
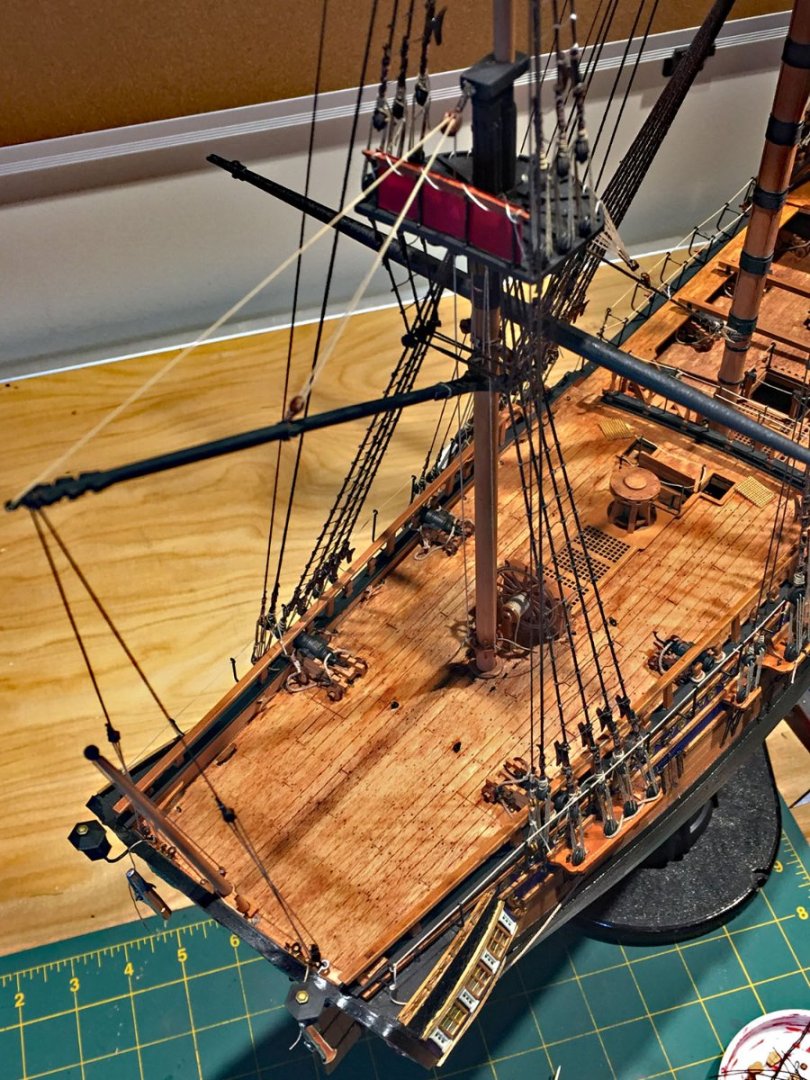
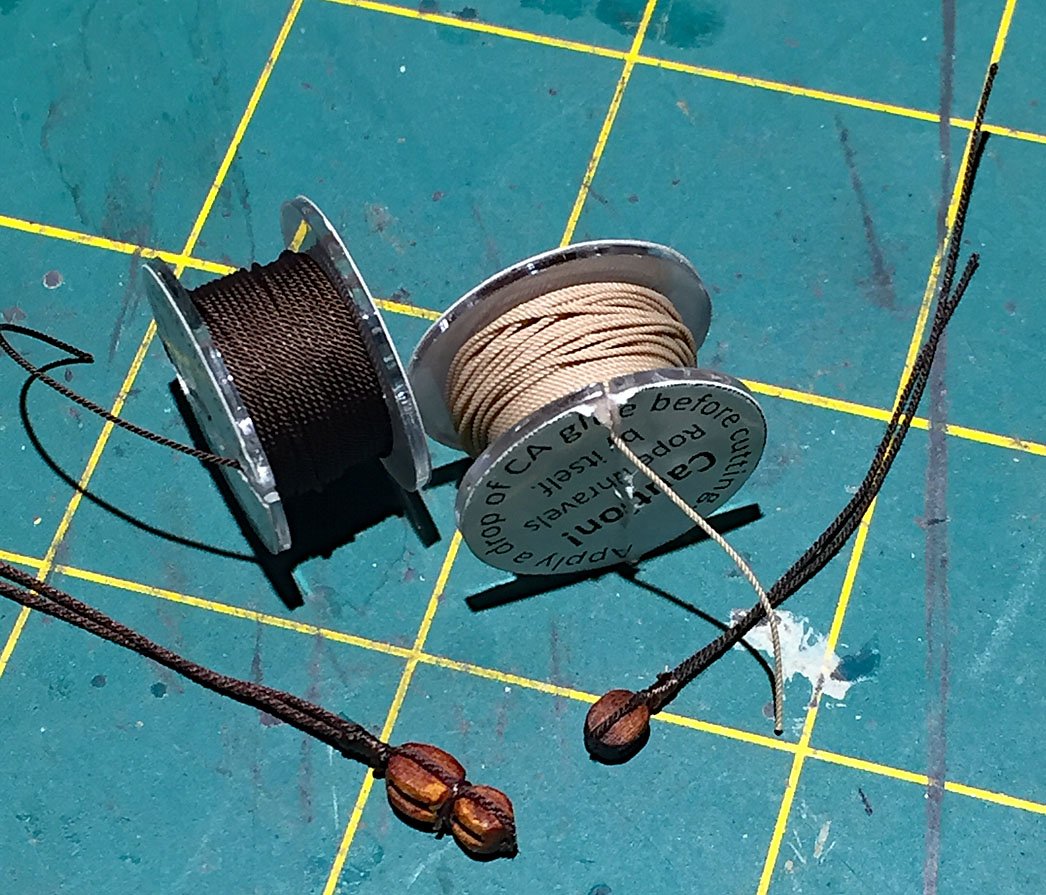
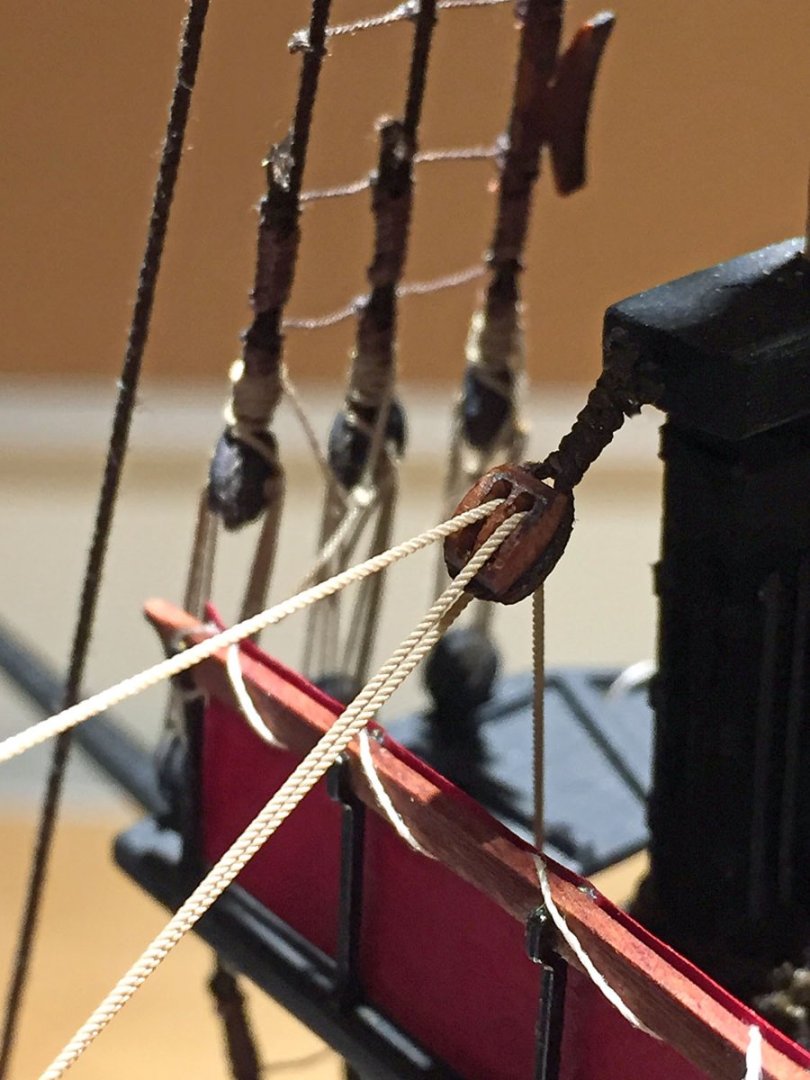
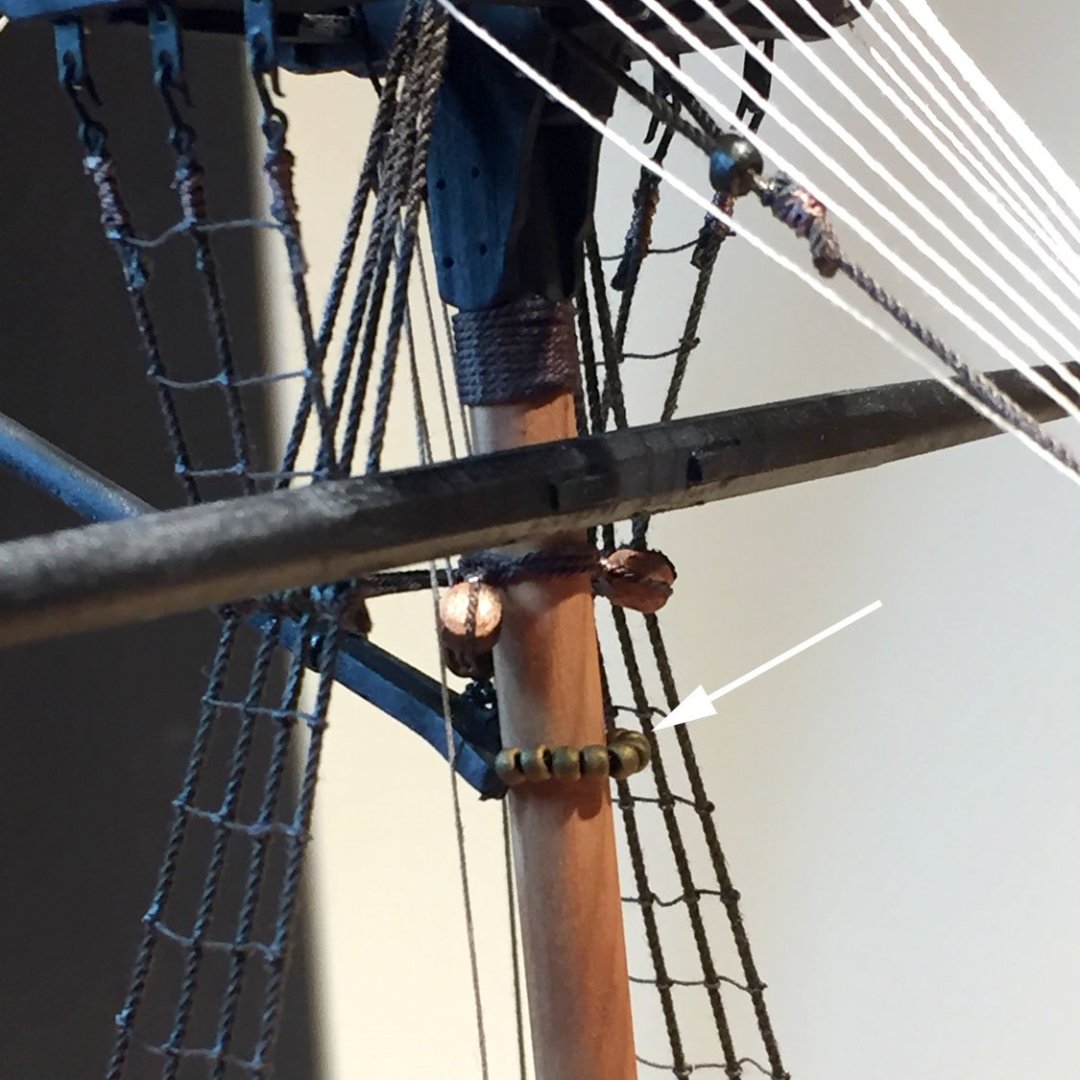
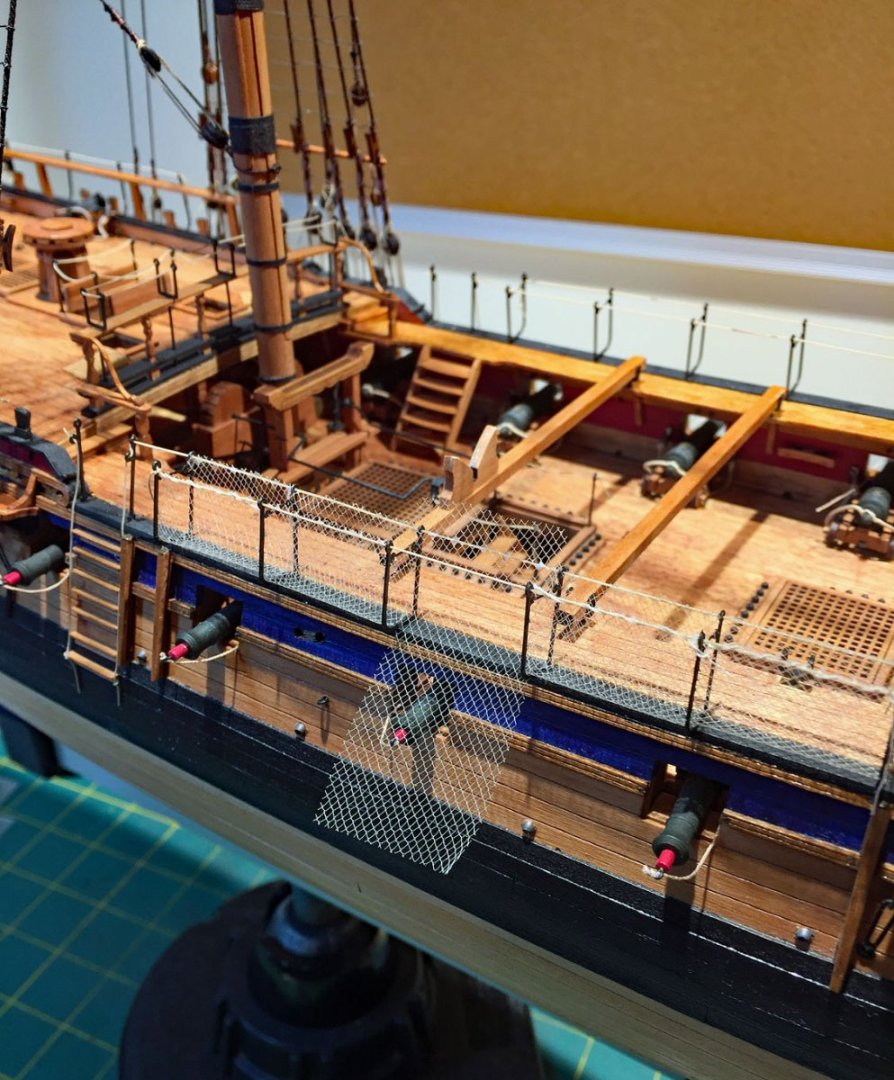
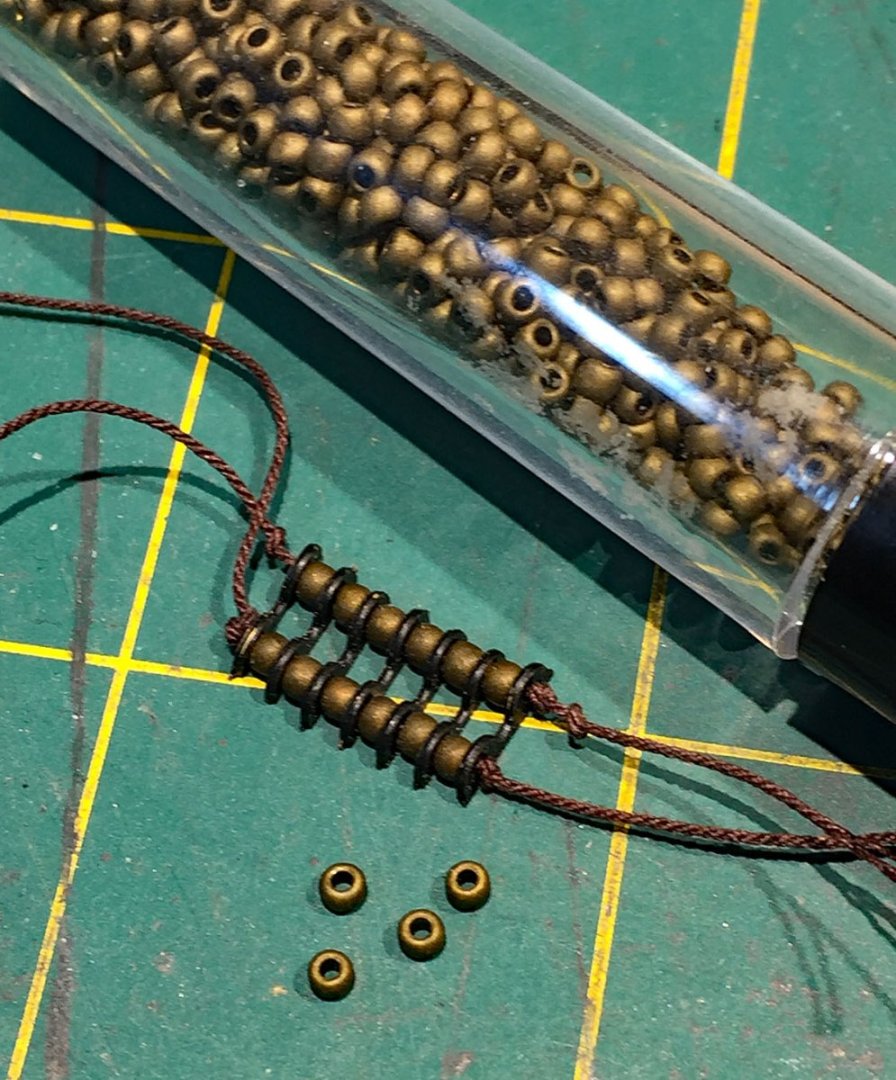
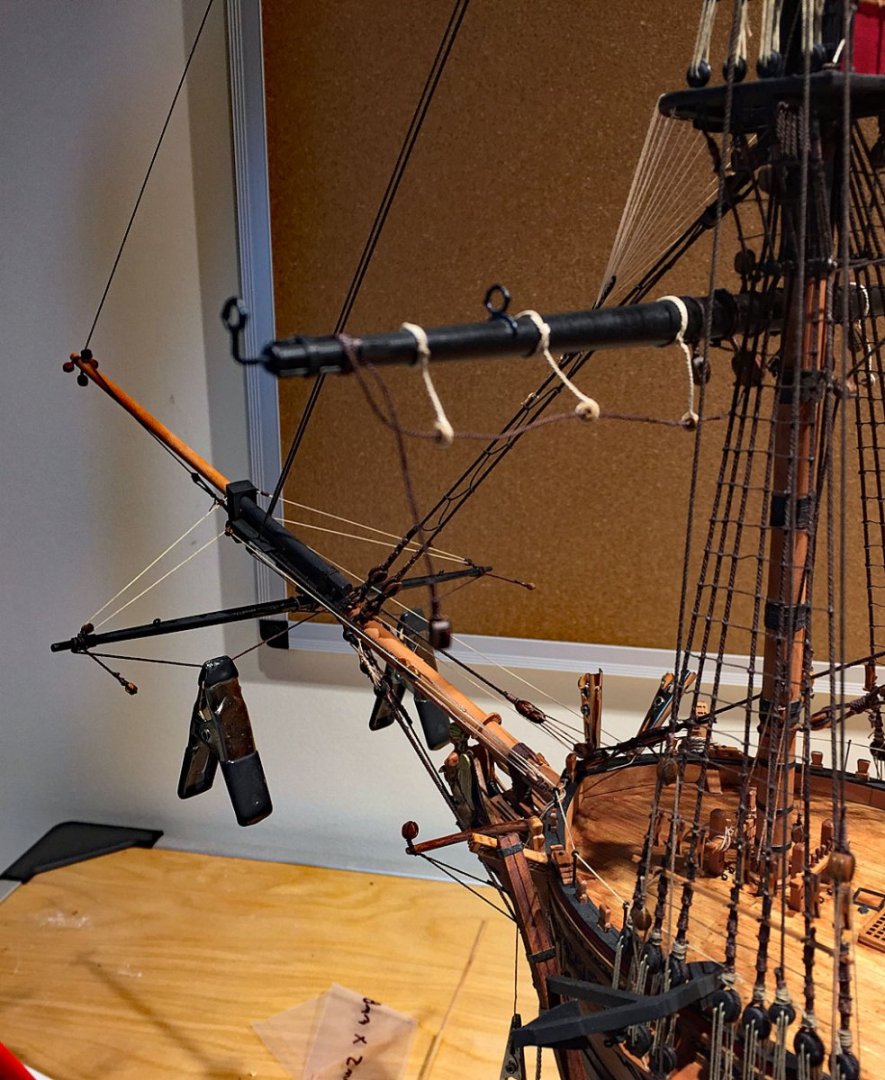
Moving right along...now advancing the rigging at the stern, the gaff & halliards; crane netting details... There are a number of moving parts to the gaff rig on the mizzenmast. After scratching the yard itself I rig it with it's parrels and most of its blocks and set it in position around the mizzen as I measure and tie-off its various halliard lines. It's easy to misjudge the length of these lines. Better to have too much left over rope than not enough. How do I know this?.... I have two strong overhead lights over my bench. These lights cast shadows in some of my build photos and also make the model's deck appear "mottled" in part owing to the color temperature of the ceiling lights. For me, good-quality, indirect lighting is especially important throughout a build, but especially when it comes to the intricacies of rigging. There are different methods for throwing additional light on your subject including head worn ones. This rigging would have been nearly impossible to execute without having pre-mounted blocks to the masts in the earlier mast building stage. The multiple, large fold-out plans provided in the kit are excellent but they don't explain the complex SEQUENCE of steps and procedures to this challenging task. The stern lateen yard has been mostly set-up, however there are additional rigging lines to be mounted as well as a set fore/aft "spanker" sail; the sail will be loose footed. In a few years time, the shipyards would add another boom yard at the foot for better control of this sail - as it grew larger. When it was set, and when the wind conditions allowed it to assist the rudder, this important sail helped the helmsman to achieve a correct compass heading. Bending the model's sail is doable after temporary rigging here because the gaff itself and mizzen mast are both still reasonably accessible - which is not the case with nearly all the other yards. The spritsail at the bowsprit is also reasonably accessible for sail mounting. Now that the gaff has been rigged, the crossjack (lowest yard on the mizzen which carries no sail) is ready for its various blocks and brace lines. Detail photo of the substituted gaff parrels (no alternating ribs) placed around the mizzen mast. In shipyard practice these round "roller balls" were typically made from wood; I wished the kit had furnished small wooden beads. I don't like the shiny black plastic ones provided, so I substituted these "tarnished brass" ones. There are other colors of jewelry beads but they are all shiny, plastic-looking. I admit one COULD paint them, but not this sailor. I have a small collection of jewelry findings including these particular beads. I like the metallic tone and imagine them to be machined brass: fancy, upmarket rigging for this Captain! The parrels and ribs assembled here are prepped for a topmast, not the gaff which only required 9 parrel beads. As I've mentioned previously in this log, I'm a big proponent for using high-quality rope on any sailing model. As can be seen here, this rope raises the detail interest level several notches higher in my estimation. This three-stranded halliard rope measures less than half a millimeter in diameter (.45mm). I use dark brown rope for standing rigging and most lashings which is a good approximation of "Stockholm Tar". The lighter beige color rope resembles hemp and is used for all my running rigging; it will also be utilized on sail management lines (clews, bunts, reefing, etc.). On the left, a Syren fiddle block (DIY, shaped boxwood) and on the right, a 4 mm single sheave Falkonet pear one. Both blocks have been colored with a raw sienna coloring pen. The less dense grain of pear absorbs the alcohol-based colorant a little better. A view of the main yard with mating jeer blocks stropped and prepped for their hauling ropes. I'll add this yard's other details (mast lines, stirrups, footropes) before these go to their next stage. As I rig I place many components in temporary positions as a reference: it's easy to misjudge the lengths of some lines by estimating and eyeballing it, especially for yard tyes and jeer lines. The starboard side gangway hammock crane netting is nearly completed. Here I've positioned a length of precut tulle fabric and fastened it to the inside rope with some Liquitex matte adhesive. When dry, I'll pull the loose netting's end up through the opening and carefully position it to be glued to the outer rope. This is, without question, a very fiddly task as the fabric seems to have a mind of its own. I'm pleased with the results despite the amount of time to accomplish it. Once both edges of the netting have set, I'll use my pointy embroidery scissors to trim off the excess bits at the tops of the ropes. A lashing line tied along the outermost rope hides some of the random fabric "fuzzies." A closer view of how I position the tulle netting for attachment (note that the tulle appears lighter colored here due to my overhead lighting). This tulle is a very good color match to the hemp colored rope I use throughout the rigging. If one gets very, very close to the model they'll see tiny bits of residue from the matte adhesive. I haven't conceived of a better way to attach the netting without this compromise. PVA, even diluted, still leaves a minute visible residue. So does "Tacky" fabric glue. Perhaps someone here has a better idea. The front rope gets lashed with a .1mm rope and this hides some of the idiosyncrasies of the netting's attachment. Two of the gaff's rigging lines have been temporarily belayed to a belaying rack on the mizzen. I have yet to make a kit- regardless of the source - with it's supplied rigging "strings." I understand why this is the case with manufacturers, a compromise. This also the case with most kit blocks too. Including higher quality rope and blocks (even with expensive kits) would add a substantial prime cost (especially a large model like this one) resulting in unsold boxes sitting on shelves. I estimate that Camilla will have an additional $125-150 of additional investment with my aftermarket upgrading, just between substituted rope and blocks; this doesn't take into account the additional pear and boxwood I've used to scratch the masts and yards. My approach is not for everyone - and I get that. In this photo, the belaying pins (8 mm) are pear and aftermarket from maker, Falkonet. The Vanguard kit provides P/E brass belaying pins, a big upgrade to the horrifically out-of-scale, clunky ones found in most other sailing era kits. I've used nicely machined, accurately-sized brass ones (Model Shipways) but painting them is inadequate as the paint inevitably scrapes off in their racks and onto rigging lines, not to mention how necessary it is to paint them an acceptable wood color in the first place. I was beyond happy to source these genuine looking, and beautifully turned pear ones. There are a couple dozen total in the build. Next update I.m hoping to have Captain Pennypincher make a Cameo appearance, on Camilla's deck. It's time for a shipyard inspection!


- 542 replies
-
- 13
-
-
-
- Sphinx
- Vanguard Models
- (and 3 more)
-
Presentation of a scale model ship
hollowneck replied to Gaetan Bordeleau's topic in Photographing your work. How to do this.
I just came across this thread. Interesting information. Thanks for posting this to our community, very helpful. I recently purchased the Neewer LED lighting panels you've mentioned. These are a "game changer" from my previous strobe (& hot light) set-ups, whether studio or location. Mr Bordeleau has a very nice, professionally-equipped photo studio: there's lots o' pro photo gear shown (as well as pro studio monitor speakers). My point? It would be difficult to take a bad photo with a Canon DSLR with all this equipment! I was a photog for many years (film & digital) and I do use a full frame DSLR for critical studio photos; this said, the new iPhone 13 (Pro Max) offers a dramatic challenge to the DSLR model (for our macro modeling shots). New tech/gear is changing many assumptions about what is required for "good photography." -
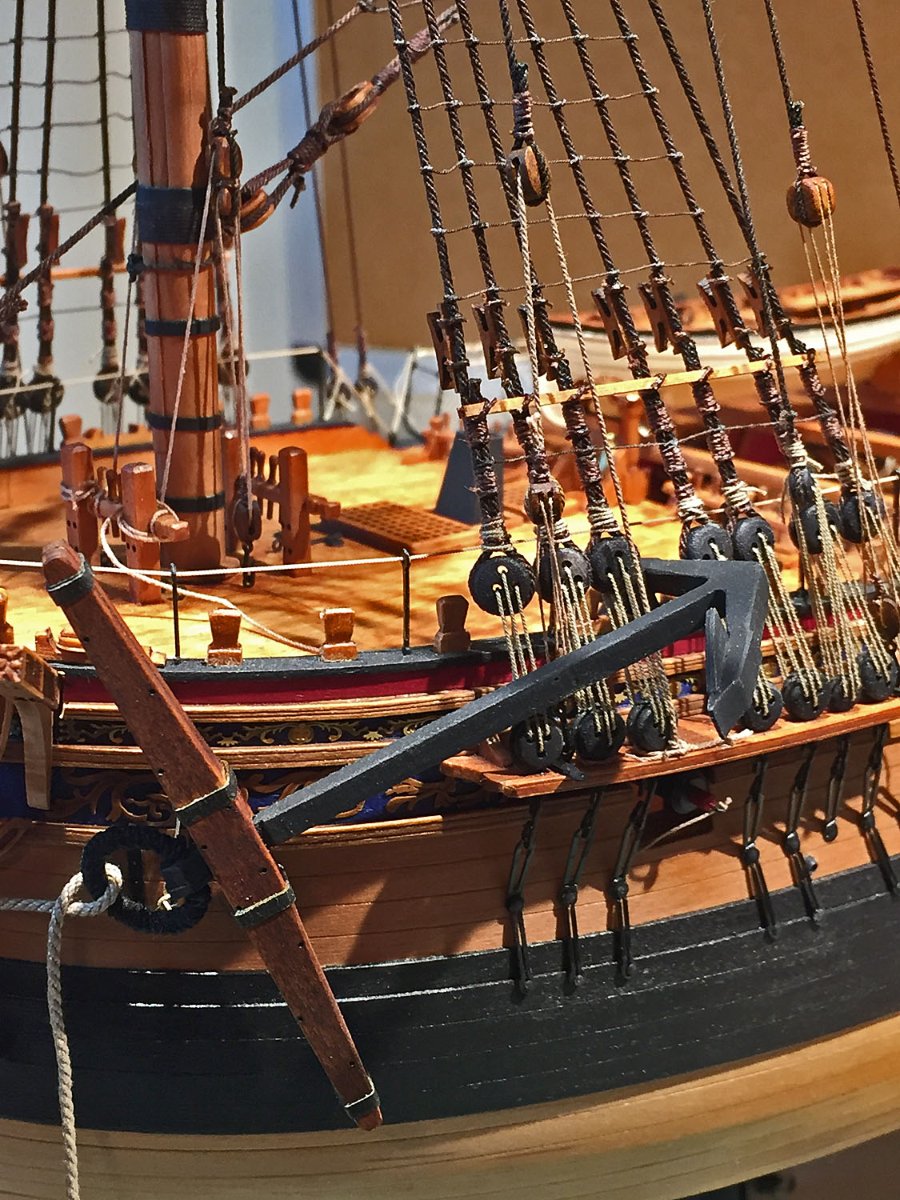
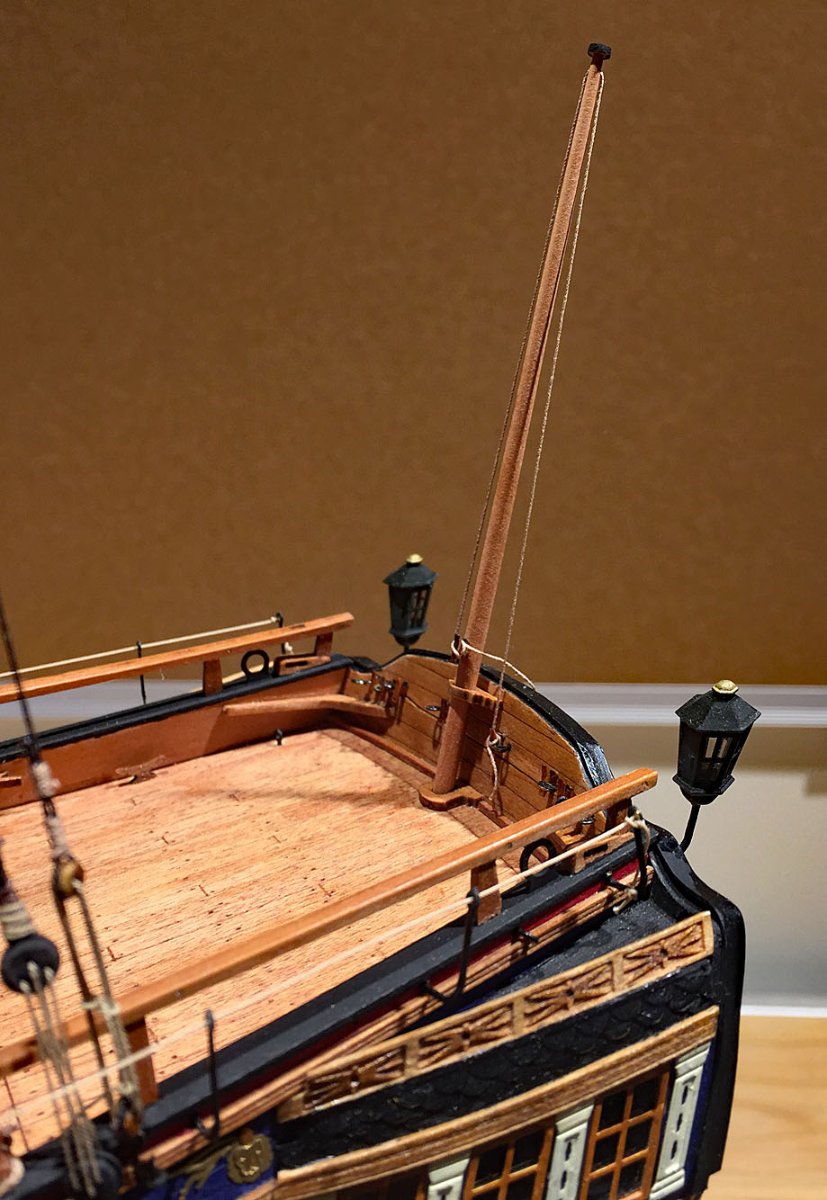
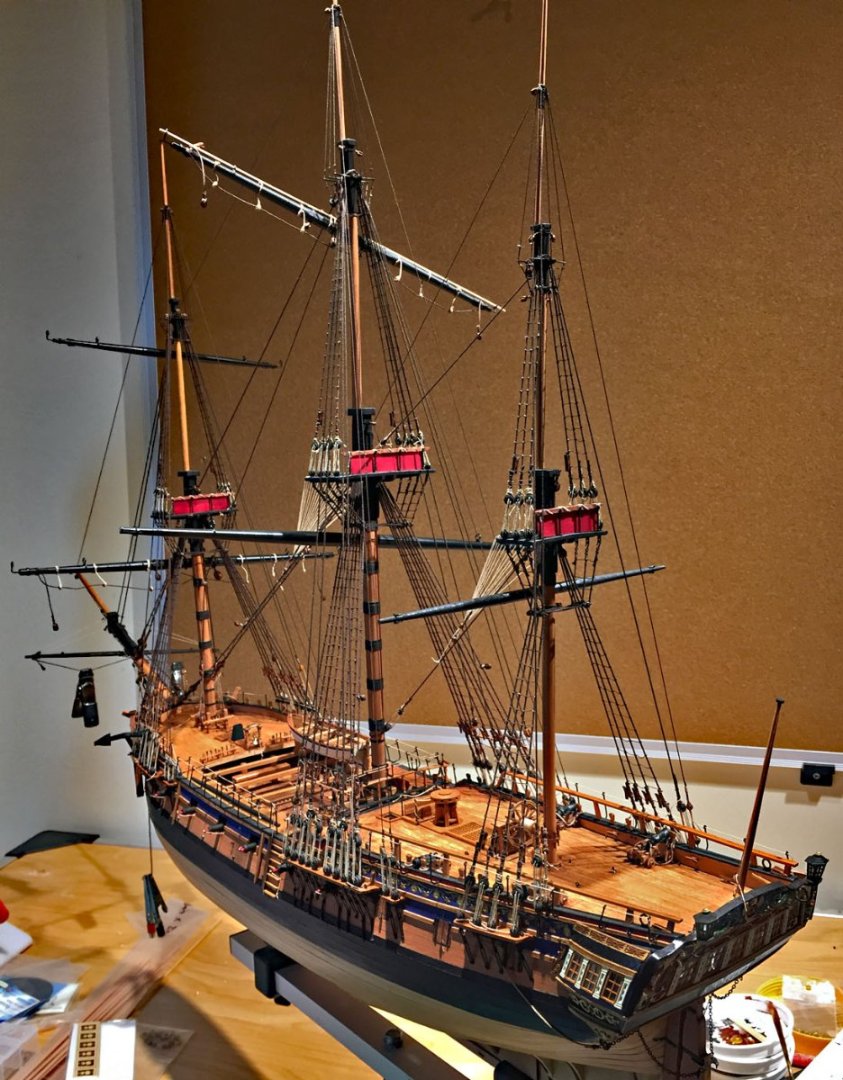
As anticipated, rigging work is getting denser, more difficult as the tasks involved require doing even smaller, more precise work. As anyone knows who has fully rigged an 18th-C ship at this scale (1:64), access gets progressively difficult and specialized tools and diligence are required: it's very easy to break something with a slight slip of a sharp tool, miss with an errant paintbrush touch-up, a head-slapping mis-read placement of a rigging line. It's also getting more difficult to take explanatory photos that aren't confusing; there is so much now to look at in each and every one. I'll do my best to focus on the important points in my upcoming photos. But I'll try... Voila! A completed anchor temporarily placed on the port bow. The anchor rope hasn't been secured yet, nor the anchor chain, buoy and associated lines. These anchor details will be added in the final phases when all else is completed. At the stern q'deck, I've turned a pear ensign staff in my lathe and mounted it with a halliard line for hoisting The King's Colors...at yet, another final stage. Oops. In a previous post I'd advised mounting the boom cranes (large yards) AFTER all else has been attached to them. This is why! The P/E boom ring snapped-off with a clumsy bench move. The kit's P/E includes a couple spare parts, but only two large and two medium-sized pieces. The repair was straightforward and I simply removed the broken stem and re-inserted a replacement ring. There are some thoughtful spares throughout the kit (both lasered wood and additional P/E). This is a good thing. I wasn't looking forward to scratching a brass replacement for this problem. An interesting experiment during this repair: I bent the P/E in the opposite direction (the non-intuitive one) and this seems to have resulted in a more secure method as the brass recess allows it to be bent forward on itself, a closed right angle creating a more solid piece. I also applied a small drop of CA to this bend-created "joint" and this may indeed be the best way to affix these delicate parts - even if one does them last in the yard fabrications. In any event, this repaired one with a REVERSE P/E bend feels much stronger to the touch now. Too bad I didn't try this earlier. Build and learn...build and... The lower spritsail rigging on the bowsprit is nearly completed. This yard is easier to fashion than the others, but its rigging is quite tricky to set-up properly. The small, hanging clamps are helping to set the foot ropes in gentle "rope-like" curvatures (overnight). I'll brush diluted white glue on the ropes and switch to another method/device to exert gravity on them when the balance of the spritsail rigging is completed. The kit shows an additional sprit topsail mounted to the jib boom, but I'm not certain I'll add this as the additional sail management lines would result in a quite complex mounting task. I'll ponder this on my ponder list, which is gradually shrinking. Another (slightly tilted) view of the spritsail rigging partially set-up. The forecourse yard has been populated and awaits its sundry ropes. The foot rope stirrups fall BEHIND the yard, as they should (Thanks, B.E.). I'm awaiting some correctly scaled fiddle blocks for the course's lifts from Syren. I'll then add the stunsail booms to them. Because I'm mounting sails to all her yards, the bits n' pieces along the yards need to be in-place prior to this work. I intend the bottom ones (main & fore courses) to feature furled sails but all the yard components will be quite visible from the rear of the sails. The furled sails are intended to give "visual space" to the model; large sails would look impressive but obscure viewing of all the beautiful detail this kit offers on her decks. Most of Camilla's yards have now been scratched and painted. The mizzen boom and its top yards await, as do the topgallants for the main and fore. This month is roughly the 10th month of my build thus far; I anticipate I have another few weeks ahead of me to finish rigging and adding her sails. I'll take a break and then in the Fall, make her water display diorama.


- 542 replies
-
- 15
-
-
- Sphinx
- Vanguard Models
- (and 3 more)
-
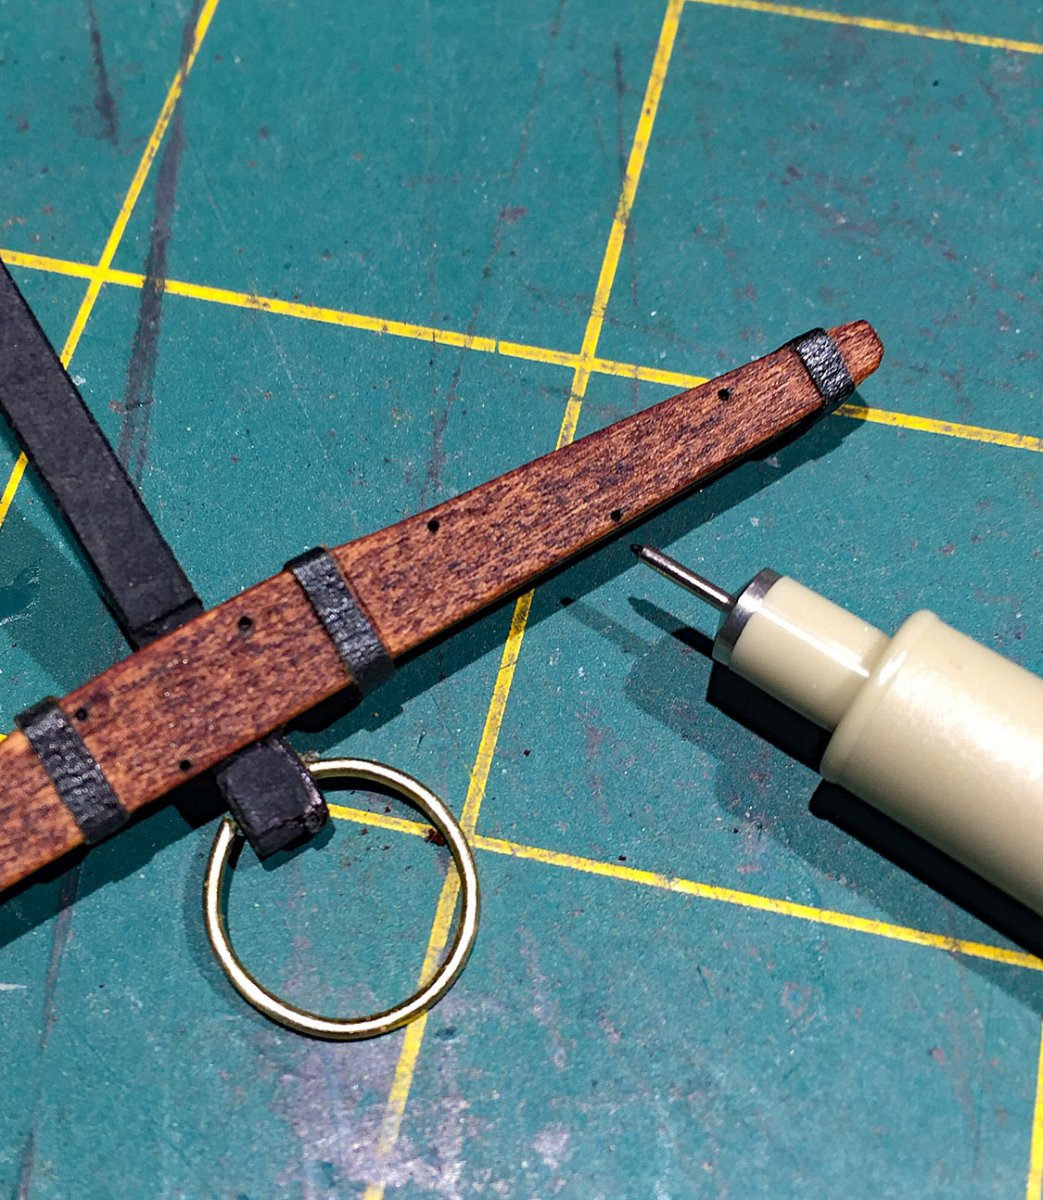
Thanks, druxey. The stocks are mounted correctly. What took the most time making these anchors (only two for Camilla) was sanding off the laser char from the various pieces before assembling them. Wrapping the puddening ropes to the hawse rings was also time-intensive, wrap after wrap!
- 542 replies
-
- 2
-
-
- Sphinx
- Vanguard Models
- (and 3 more)
-
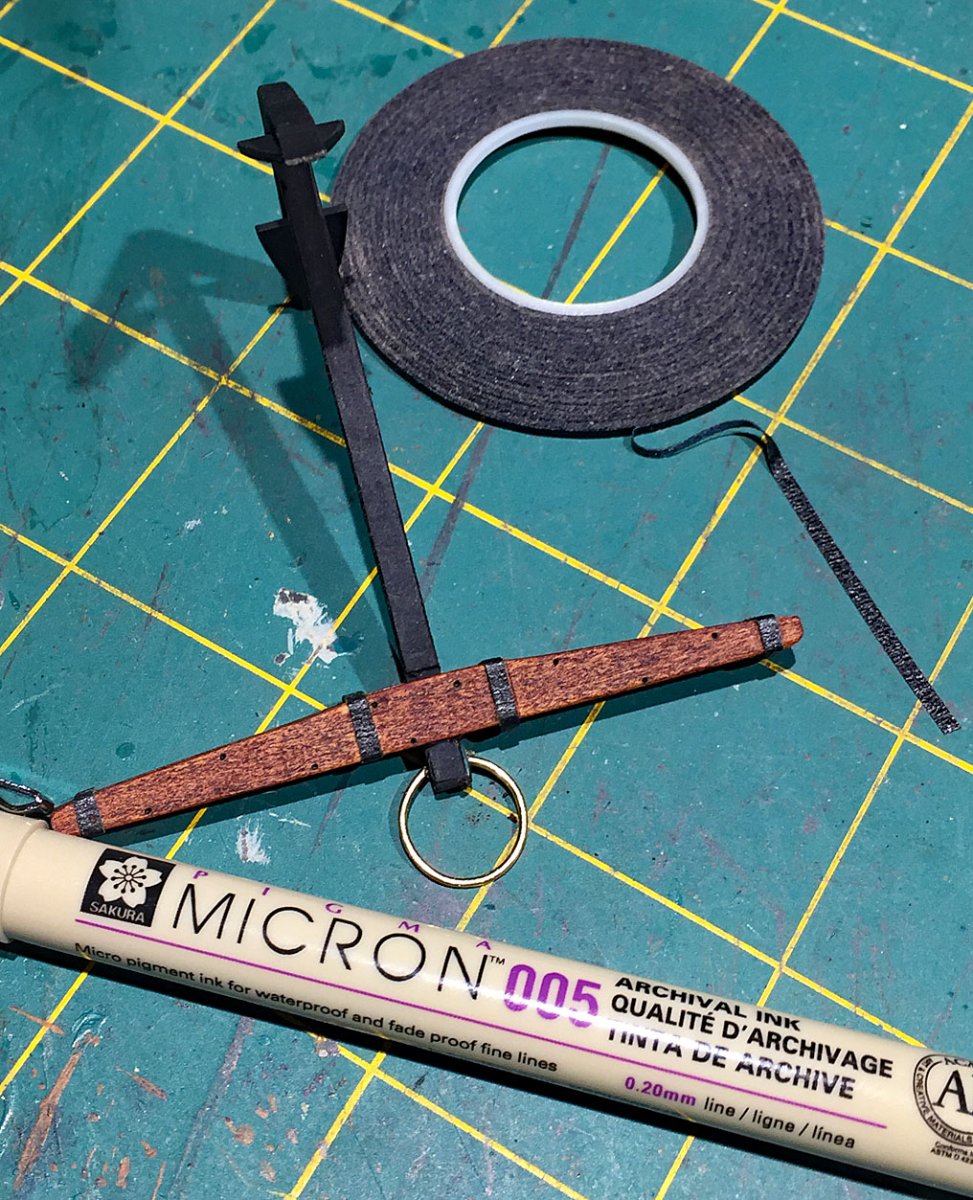
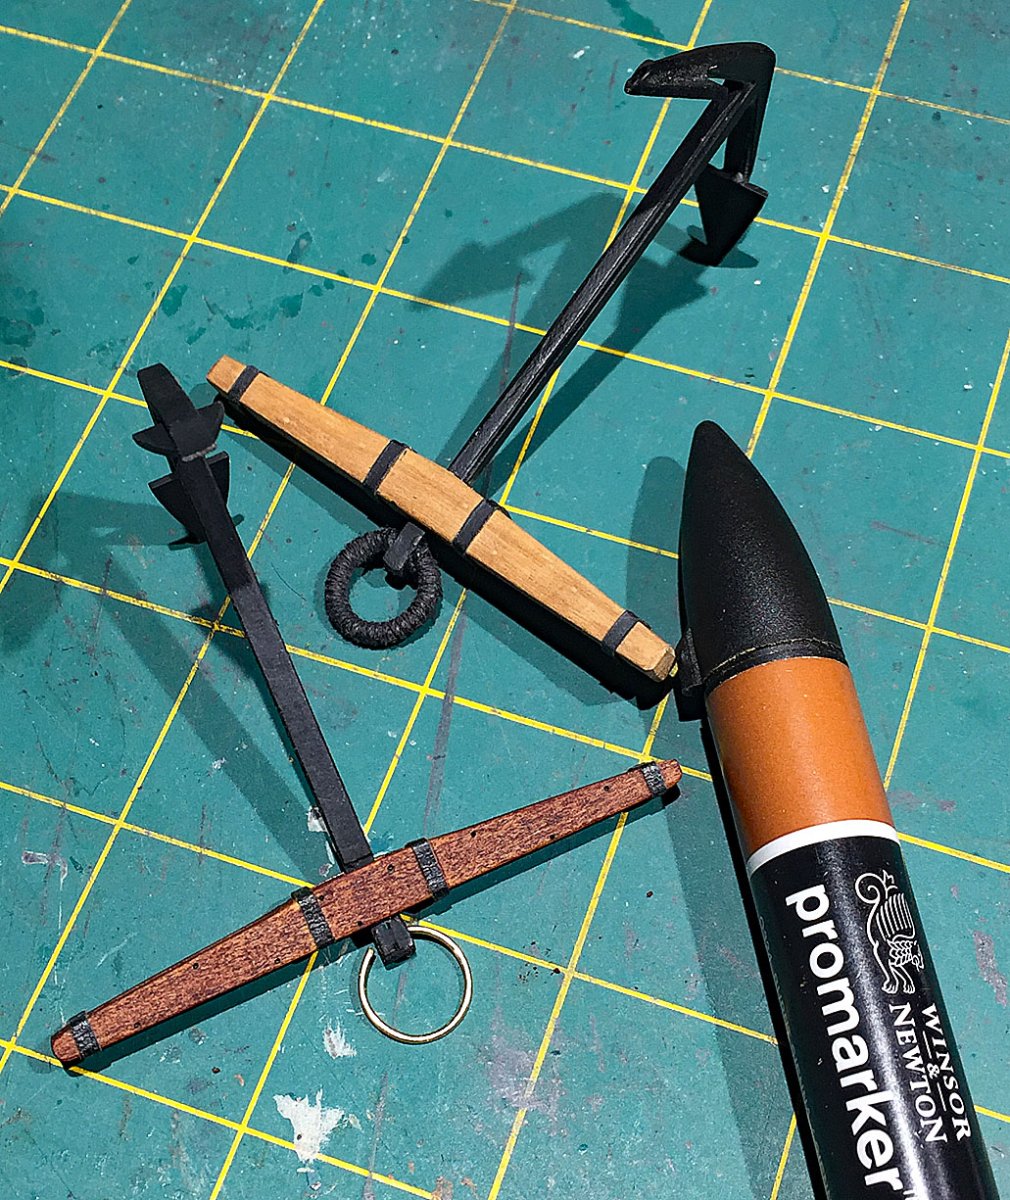
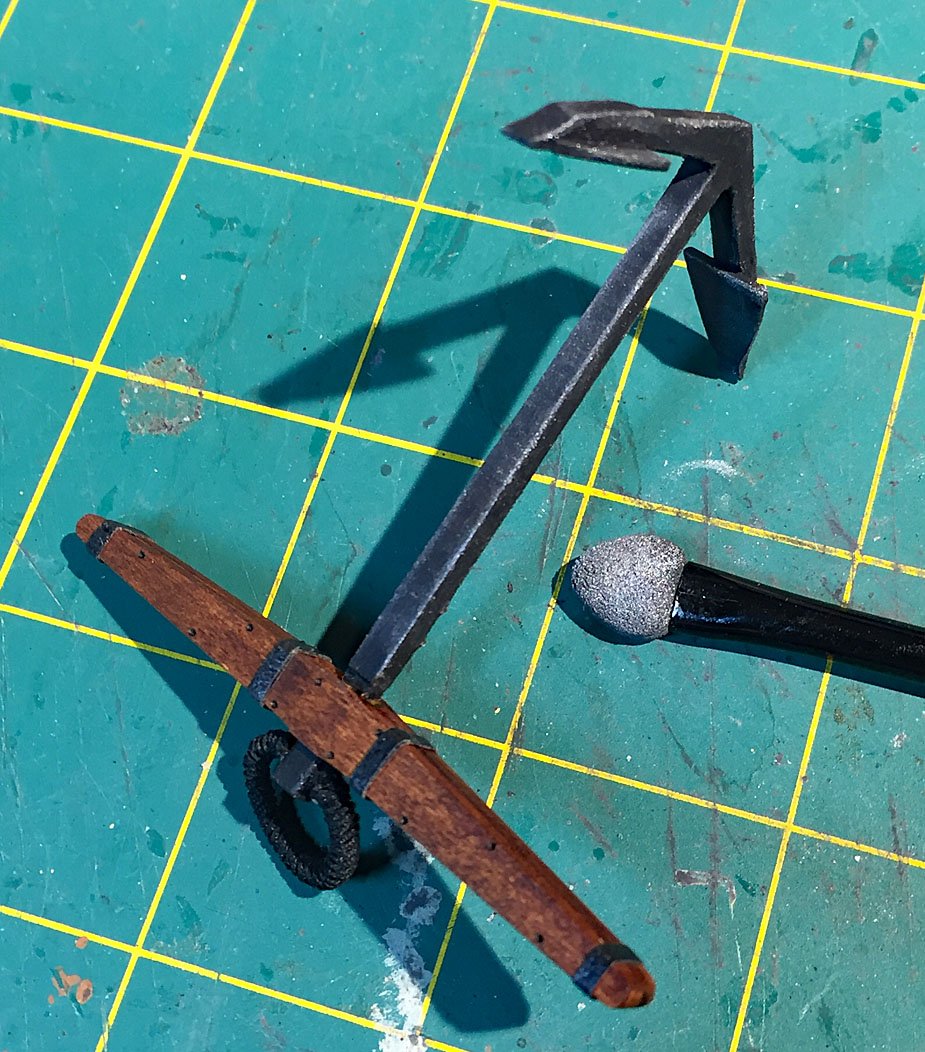
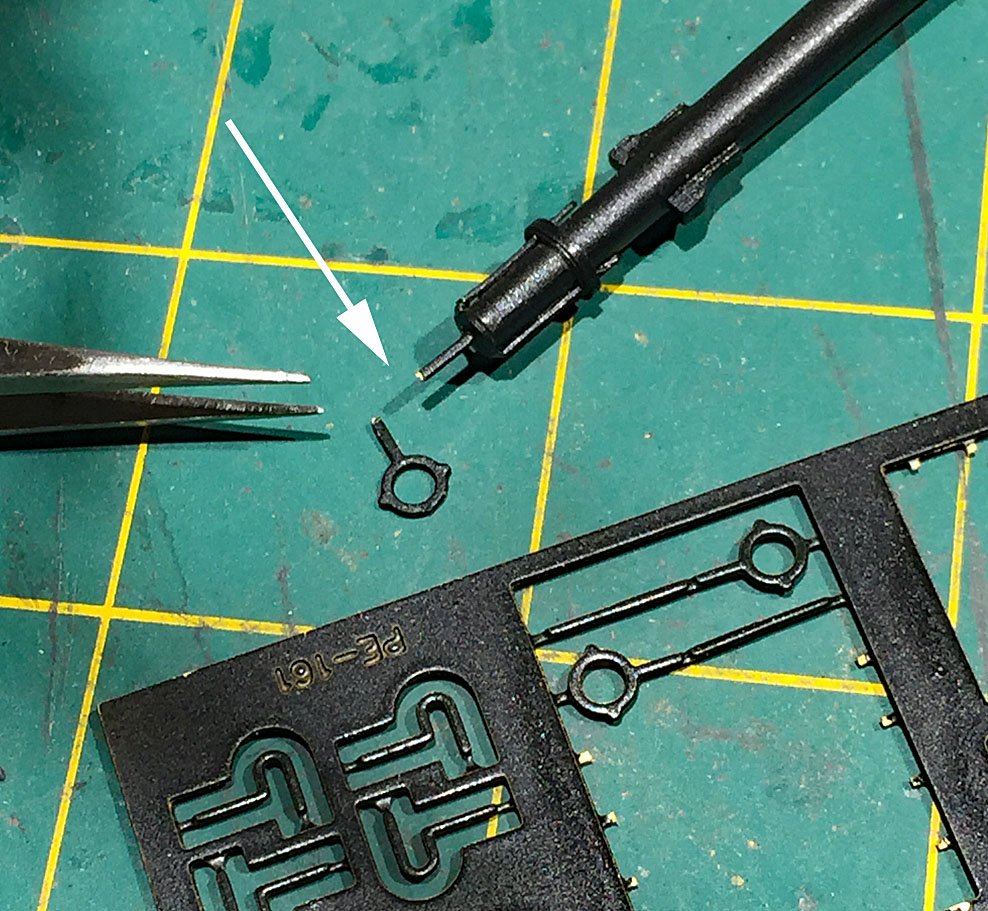
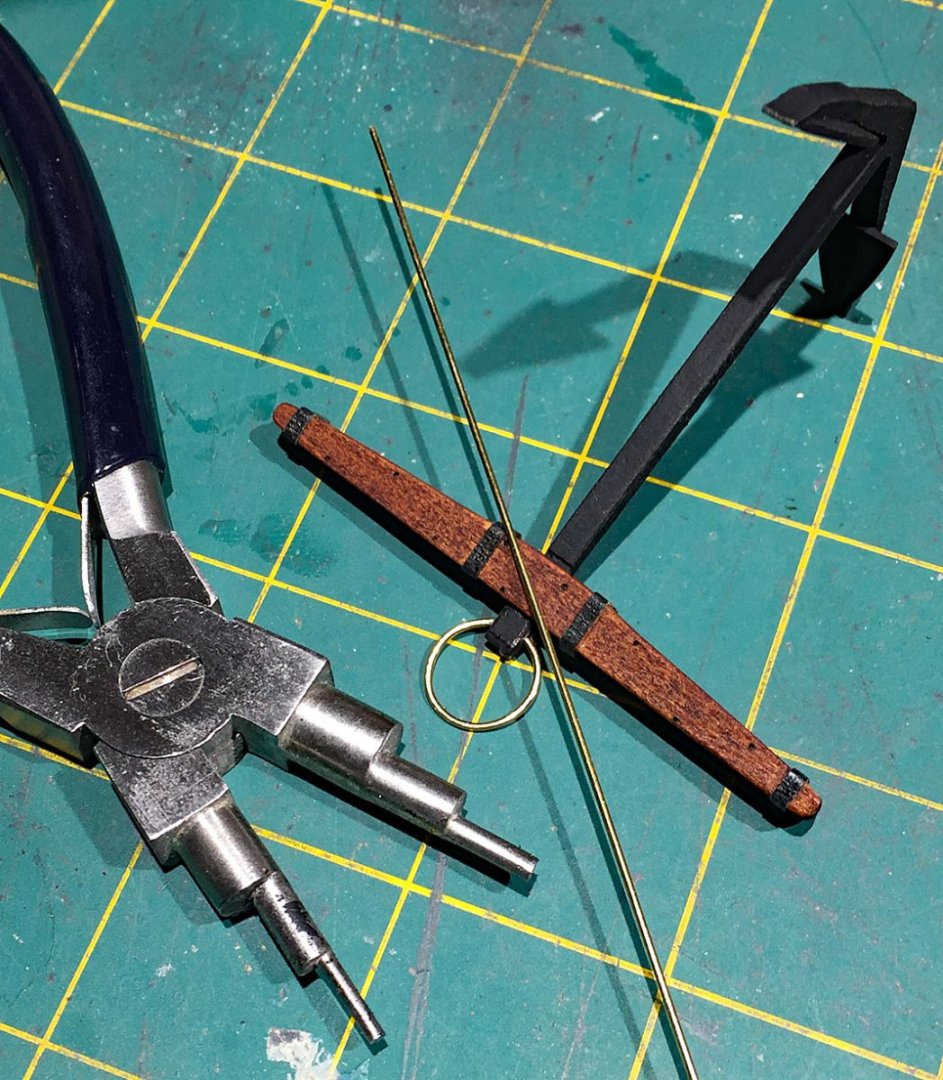
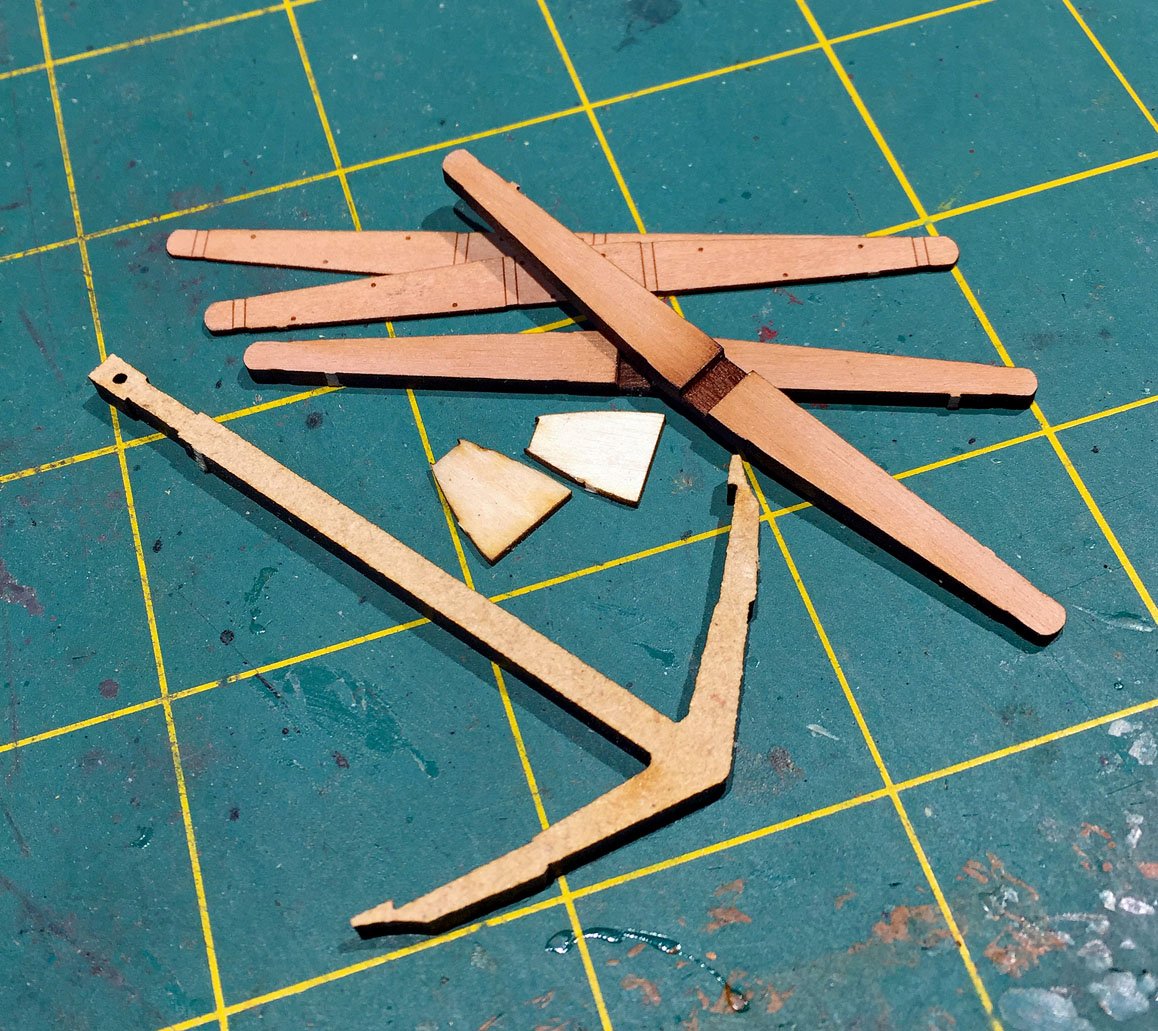
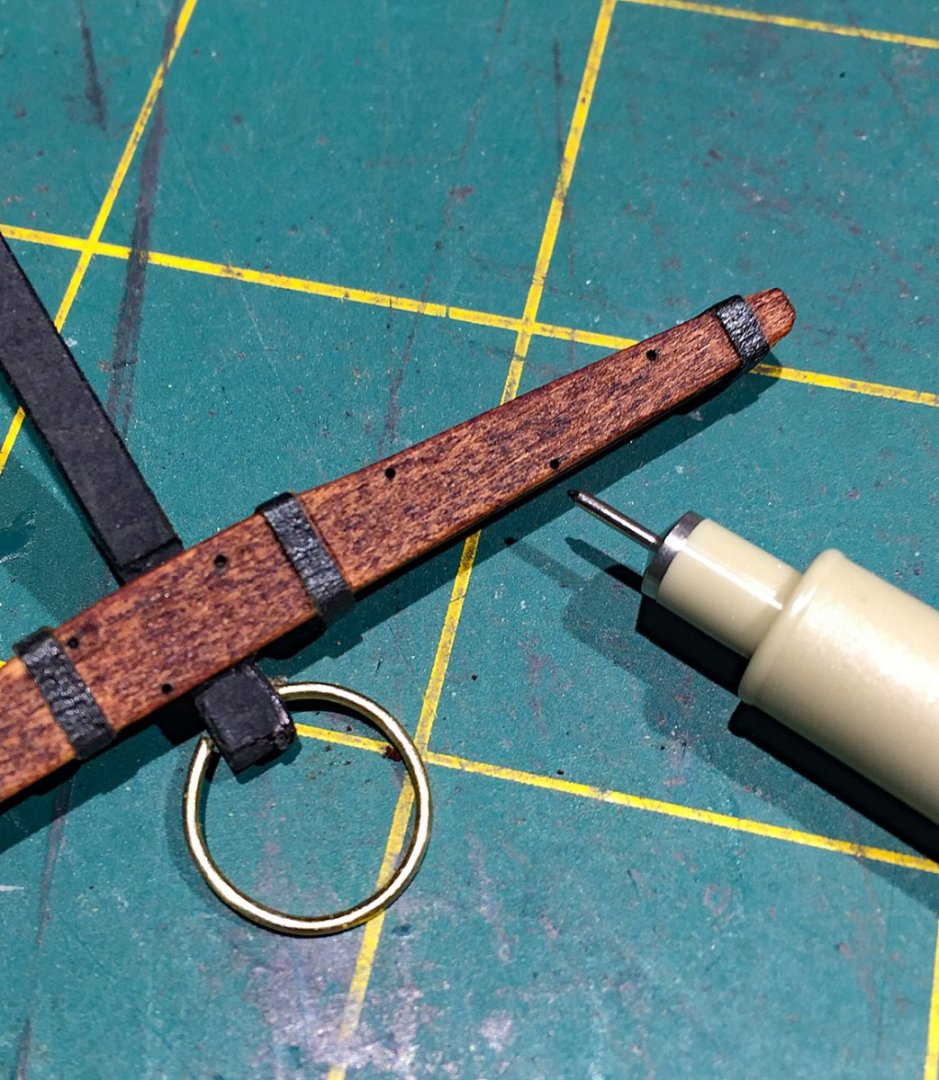
Making the Sphinx kit's anchors. The provided pieces are pictured here as well as the tools and materials I use to upgrade their assembly. The MDF (anchor), thin plywood (the anchor flukes) and pear wood (stock pieces) are the components provided to fashion anchors. There are four sets like the above provided. I plan to add only two anchors to my build. To my knowledge this is a first and a unique approach to making these vital parts of a ship's sailing inventory; most of the kit models I've built have supplied cast metal anchors. One new anchor assembled (foreground) and nearly complete. The slightly larger anchor above it is from another 1:64 older model I've built (HMS Ardent/Caldercraft). I wanted to compare these two since the kit provided a new approach to make these components. As already noted, these new anchors are, I dare say, a radical departure from the "normal" kit pieces in that the anchor itself is made from a laser-cut MDF pattern and not cast metal. I colored the pear stock with my Promarker alcohol-based pen and to my eye it resulted in a quite acceptable simulation - along with a flat black acrylic paint applied to the anchor itself. As shown on the cast metal anchor, thick rope "puddening," will be added to the brass ring on the new anchor assembly. There are small but visible metalwork details to the cast metal anchor (the shaft lines and flukes) and both approaches are meant to represent black iron. The kit's all-wood anchor offers somewhat of a detail trade-off, but after detailing them, I'm O.K. with adding them to Camilla. With materials for four anchors provided in the kit (normal for a ship of this size) using MDF instead of cast metal surely lightened-up the kit box contents and shipping cost! There is also thin "black card" provided to make the iron straps ( also used for boom iron strapping on the yards), but I much prefer to use graphic arts tape. After assembly of the seven pieces that comprise this new anchor, one adds iron straps and a hawse ring. The Micron pen (.20 mm tip, from maker Sakura) is used to add the tiny black bolt details on the anchor stock (both sides). The bolt positions are etched in the pear laminate finishing pieces, as are lines to guide the application of the simulated iron strapping. The bolt heads in the pear laminate are too subtle without darkening them and need emphasis, as shown here. To make the anchor stock's four straps, I use a graphic arts 1.5 mm wide black tape (which is self-adhesive). After trimming I apply a tiny drop of CA to the end to insure that the tape stays affixed. The tip of the Micron pen used to "fill" the black bolt markings on the pear laminate stocks. The brass ring awaits rope "puddening." I'll wrap this hawse ring tightly with either black or dark brown thick rope, as was the shipyard rigging practice. The puddening cushioned the terminated hawse cables rubbing against the iron ring from excessive wear and tear; the worn puddening rope was frequently replaced in practice. To fashion the anchor's brass hawse ring, I use these stepped mandrel pliers - a great tool for making reasonably small metal rings. I used finger pressure only to wrap the brass rod (.89 mm) around the largest cylinder. After obtaining a round shaped ring section of the brass, it was cut off with my Xuron cutter and then the open end was closed-up with a small pair of regular needle-nosed pliers after inserting it into the anchor's opening.


- 542 replies
-
- 18
-
-
- Sphinx
- Vanguard Models
- (and 3 more)
-
B.E. You gave me an idea. Thank you. Since I haven't begun the yard's rigging (jeers, lifts, etc.), the only thing I'll need to re-do by "flipping" the topsail yard is fashion a new pair of slings and attach them on the opposite side of the spar after switching the mounting pin. A little paint scraping and touch-up. All other yard attachments will present correctly so it won't be necessary to start over with removing and redoing these. This change is only a tiny diversion from today's workshop plan...and your comment reminded me that I need to scratch an extra main top mast for her midship skids.
- 542 replies
-
- 2
-
-
- Sphinx
- Vanguard Models
- (and 3 more)