hollowneck
-
Posts
1,589 -
Joined
-
Last visited
Content Type
Profiles
Forums
Gallery
Events
Everything posted by hollowneck
-
Welcome Steve. Model makers and artists welcome here. Looking forward to seeing your progress on that impressive model!
-
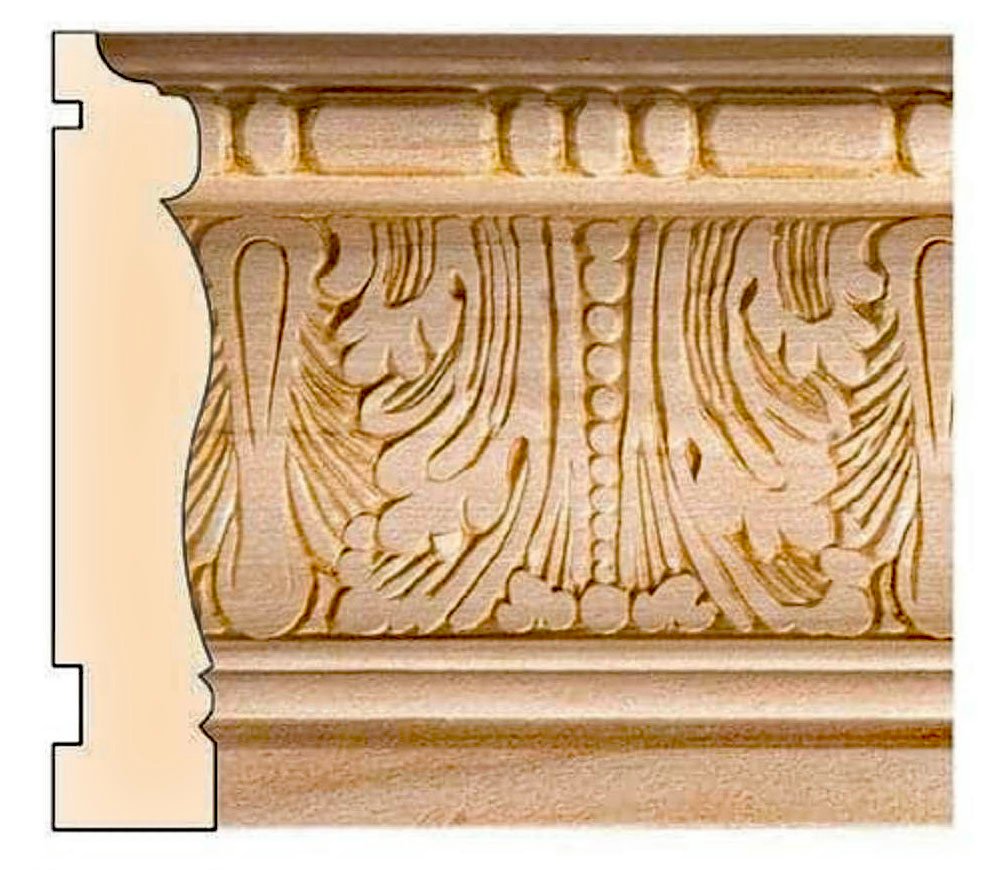
 Continuing Inspiration for sailmaking...a book of wonderful paintings... as well as my choice for building the casework for Camilla's diorama. Within the last few weeks, I was fortunate to acquire a beautifully printed volume of 18th-century, aquatinted engraving reproductions in Naval Achievements of Great Britain by James Jenkins, a limited edition publication and 1817 homage to the British Royal Navy. This particular volume is also a limited edition reprinted one from 1998 by London publisher, Sim Comfort & Assoc.; the original edition as well as this latter one features fifty-one color plates along with extensive explanatory text that covers the subject of each color engraving. The beautifully-bound, large volume ("Octavo"size, about 14" h X 12" w) features the detailed artwork of one artist (Thomas Whitcombe) who was commissioned by publisher Jenkins to memorialize famous sea actions of the Royal Navy between 1793 and 1815. Uniquely, Whitcombe had been an officer in the British navy and his knowledge of warships was first-hand and intimate. Every page reveals important and interesting details of the sailing warships in this era in both artwork as well as textual references and data. When I study these photos, I immediately think that these paintings are the "Instagram Photos" of the early 19th-century. Black & white photography wasn't invented for a good 30-40 years after the original volume was published. The 1998 second edition book explains that the color pages of many of the original publication from 1817 were literally torn out and framed as wall paintings by those who couldn't afford to purchase original artworks by esteemed painters of the era. Although arguably the re-printed engravings in this volume may be perhaps even nicer than the original printing of 1817, I have no plans to rip-out any of these to hang in my shop. I have been perusing the depictions throughout (all 51) as I lean into the final stretches of my build of HMS Camilla and her impending diorama. Admittedly, I'm still taking breaks from the tedious sail rigging. HMS Camilla's diorama requires a "pan" of sorts to not only feature the completed model but contain the "water" setting as well. I have sourced a very specific architectural wooden millwork made from poplar. This millwork is normally used by interior finish carpenter artisans for door casings who go to similar vendors I'm purchasing this stock from. Per my previous diorama depictions, I plan to make a simple, mitred-corner "box" with this millwork. The "height" of this casing is 4" with a thickness of approximately 3/4". The 4" depth will be wholly adequate to support the model's keel as well as allow for a varying water diorama depth; the casing's height also won't overwhelm the overall presentation. A straightforwardly-constructed 1/2" plywood base will hold the millwork decorative sides in place. I haven't decided on the final colors for the casework but I am leaning toward a natural wood finish and then adding highlighting to the relief details with either a darker hue of stain or even possibly something more dramatic like a blue color stain (over the natural wood stain color - as yet undetermined). An accented coloration to the wood will flow into the details of the casework "carving." The carved details are, in fact, pressed into the soft poplar at the mill to form a continuous pattern. I plan to order a length of 94" for my case (the longest available length) and because this is a custom order I've got to order soon as it will take a few weeks to receive it. I anticipate that after I've gathered the "pan" materials it will take about a week to build and another few days to finish before starting on the diorama's water construction. Back to the bench...
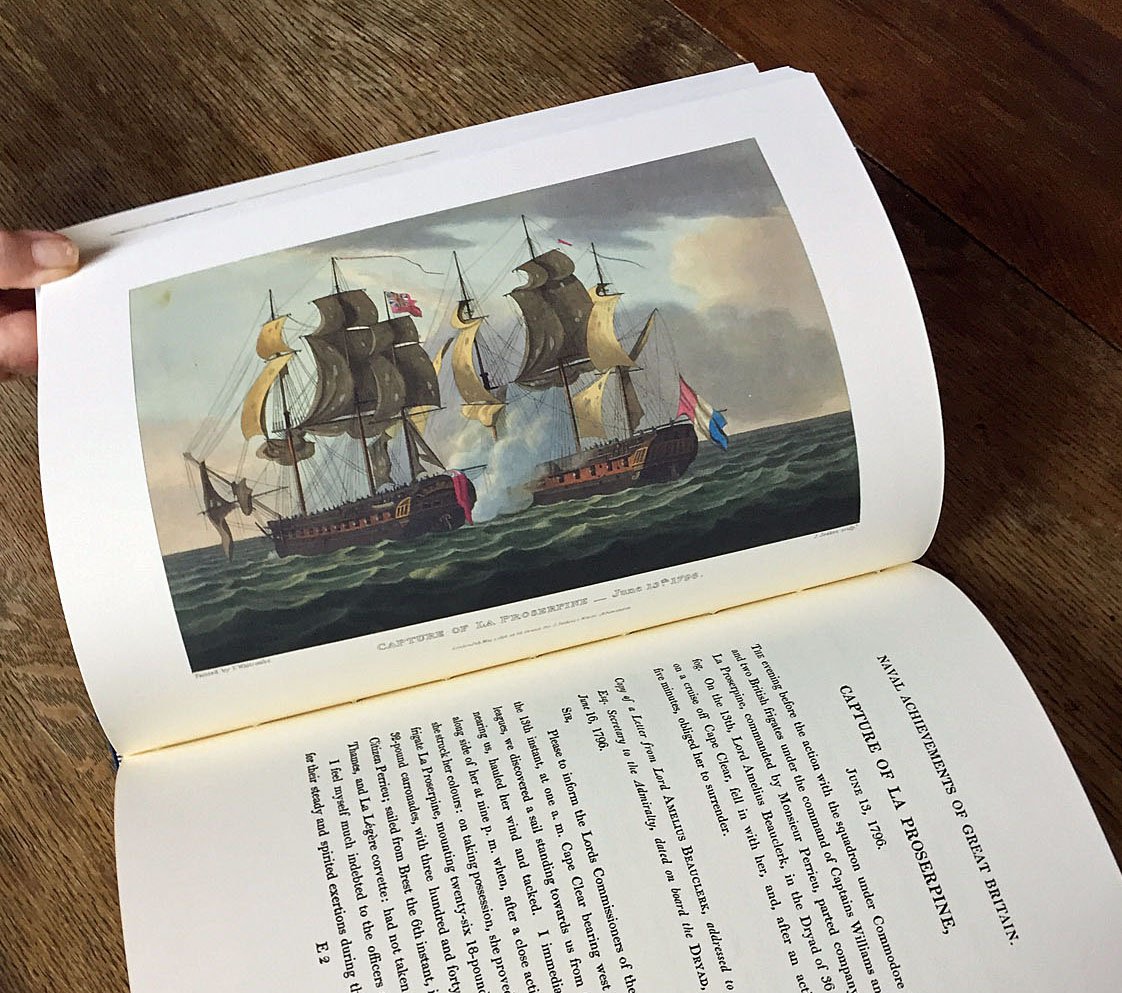
- 542 replies
-
- 10
-

-
- Sphinx
- Vanguard Models
- (and 3 more)
-
Very nice casework. Love the wood choices and additional detailing. Your case presents your model beautifully. On posting photos, Mark's suggestion should work as he suggested: by first bringing the photos into an image editing program, saving them in the correct orientation and then uploading these image edited photos directly from your computer to the forum. Using a "smartphone" for photos is fine (assuming you're doing this). Just send them from your phone to your computer first, after editing them into your image editing software, upload to the forum. I use my old and creaky iPhone 6 for all my shop WIP photos and I haven't had any problems uploading them to my build log here.
-
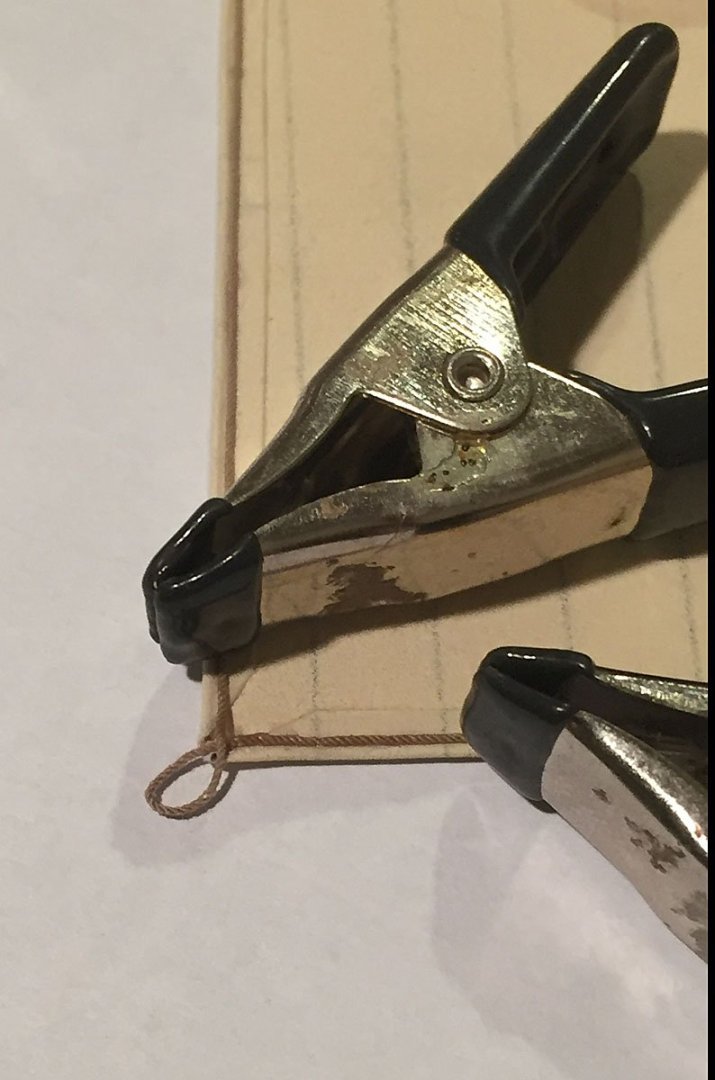
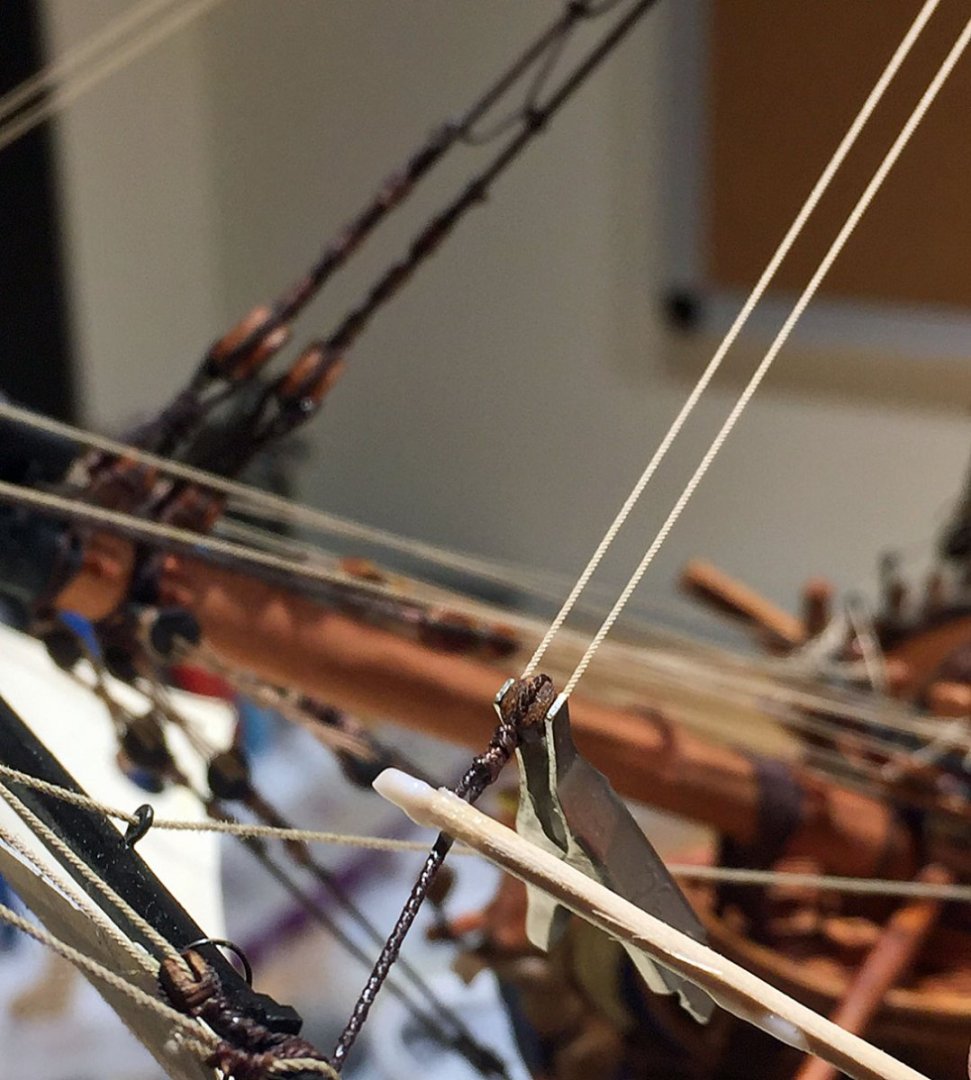
Thank You, druxey. Here is a slightly better photo showing the waterholes in the corners of the spritsail (lower). I'm going to add a thin painted "rim" around the holes to indicate they're grommeted (stitched) around the openings.
- 542 replies
-
- 8
-
-
- Sphinx
- Vanguard Models
- (and 3 more)
-
You're quite welcome Mike. I hope my details for making sails (and their required rigging) helps those who would like to add working sails to their models. I realize that for most, "working sails" on a stationary model - and not cruising in a diorama - is something that most will choose not to do.
- 542 replies
-
- 2
-
-
- Sphinx
- Vanguard Models
- (and 3 more)
-
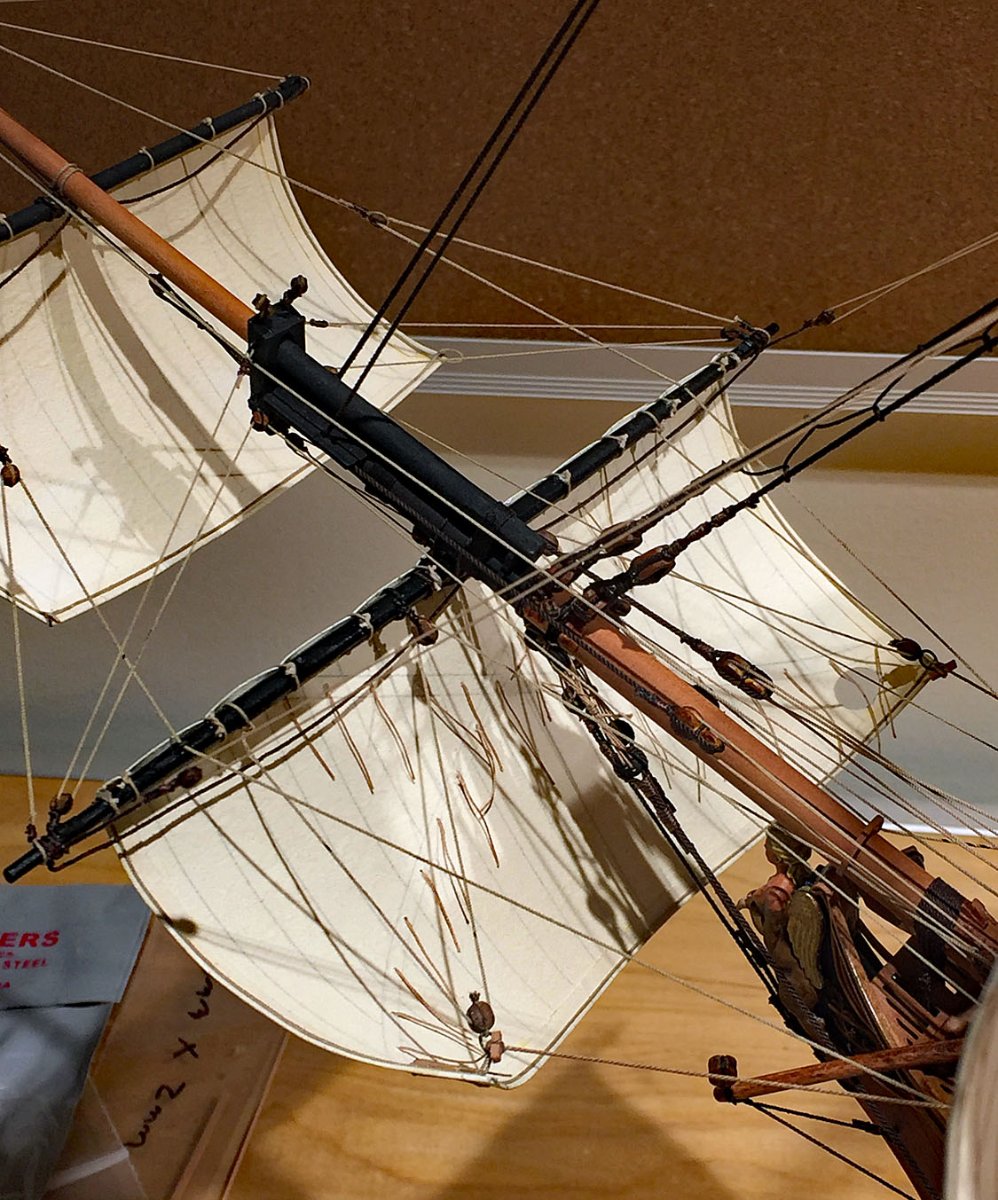
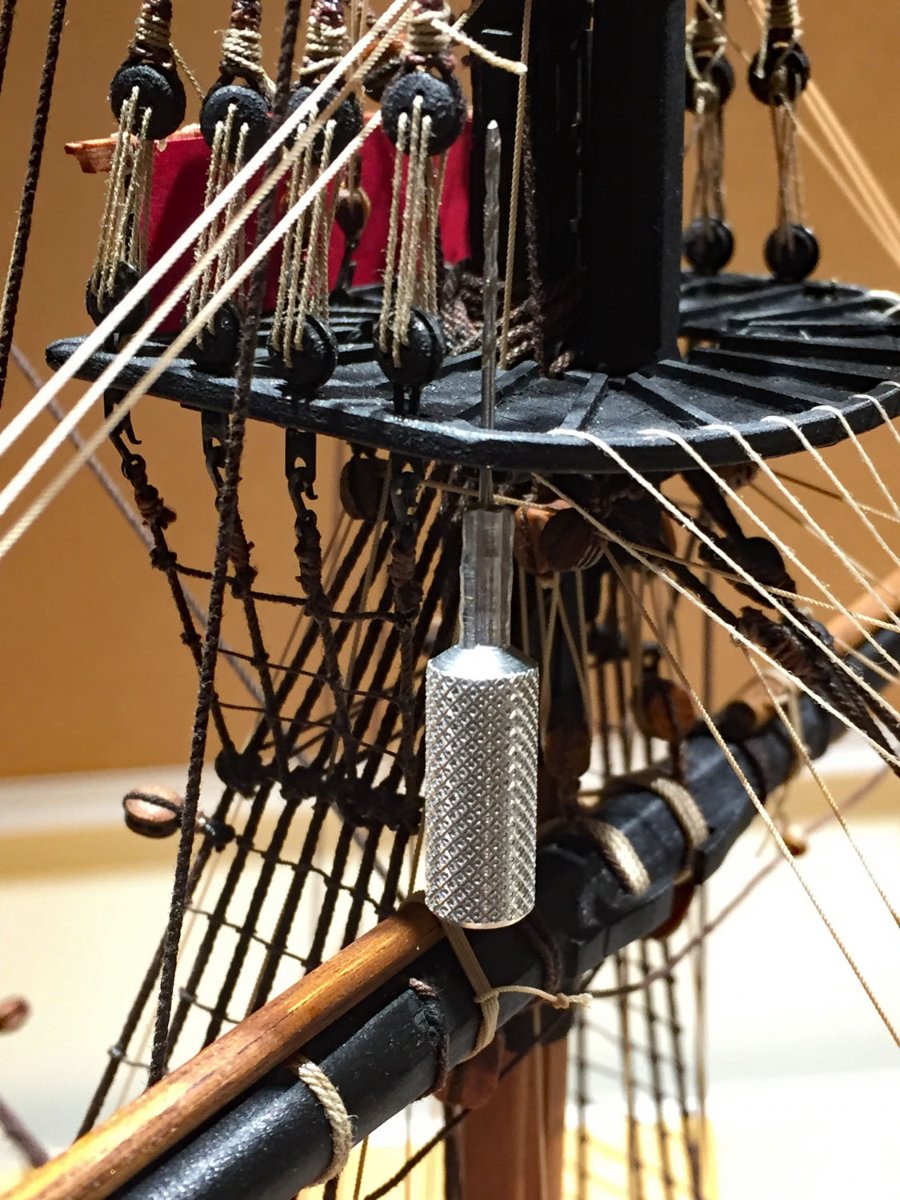
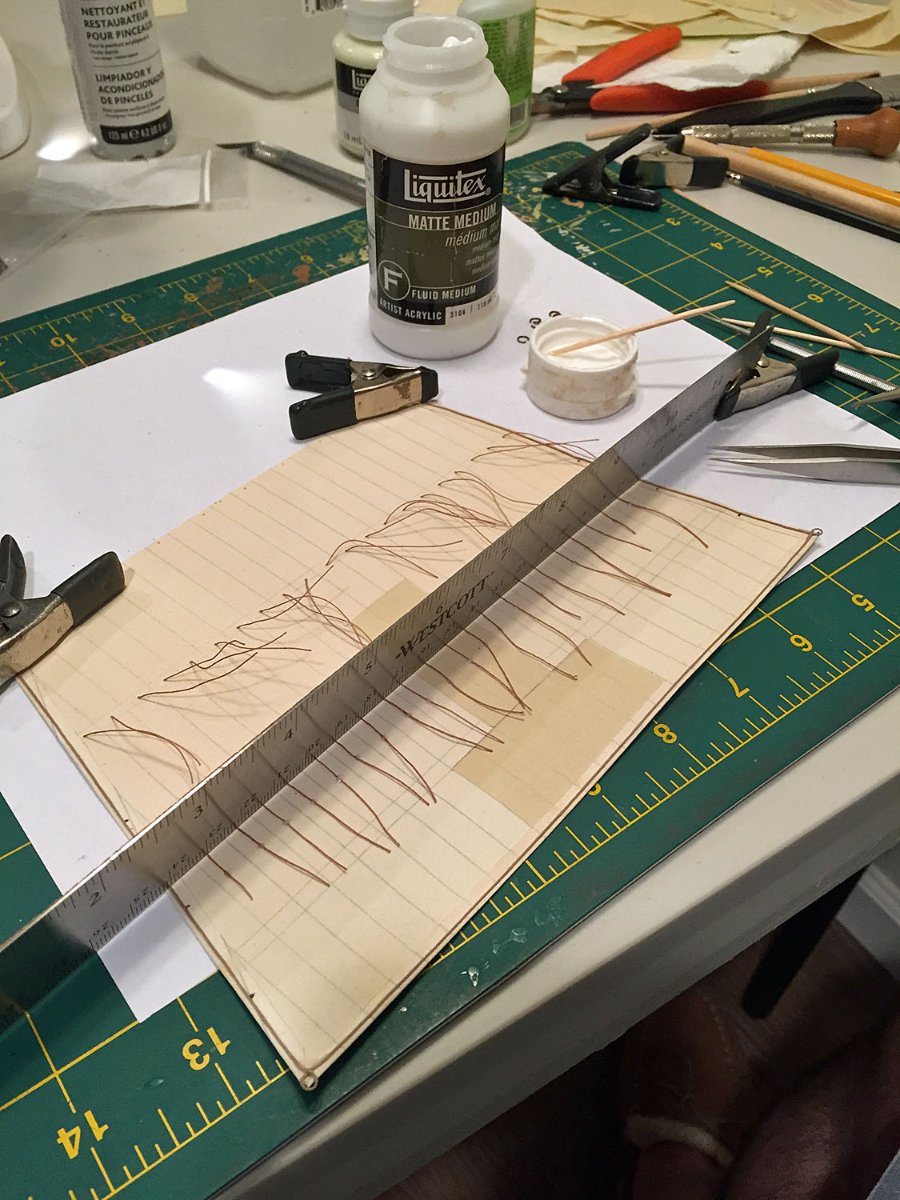
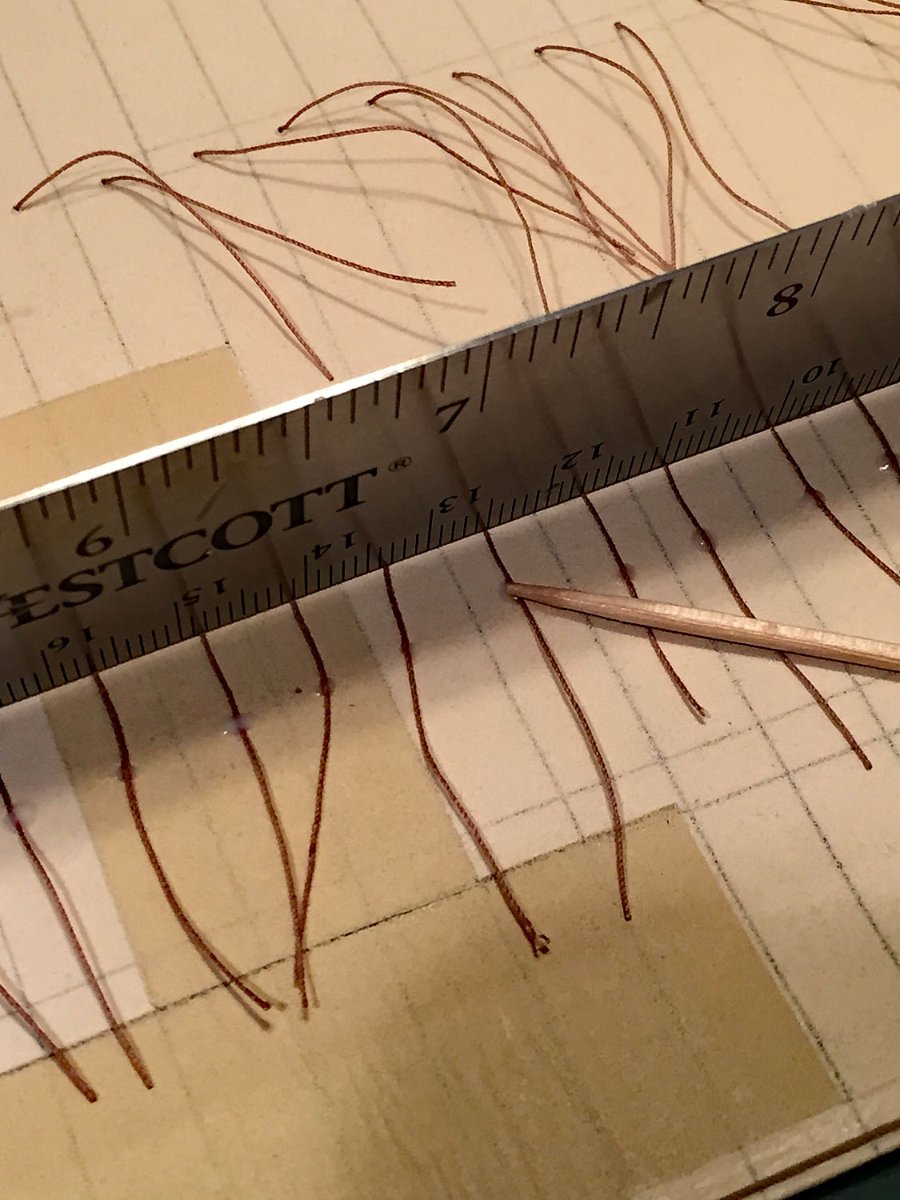
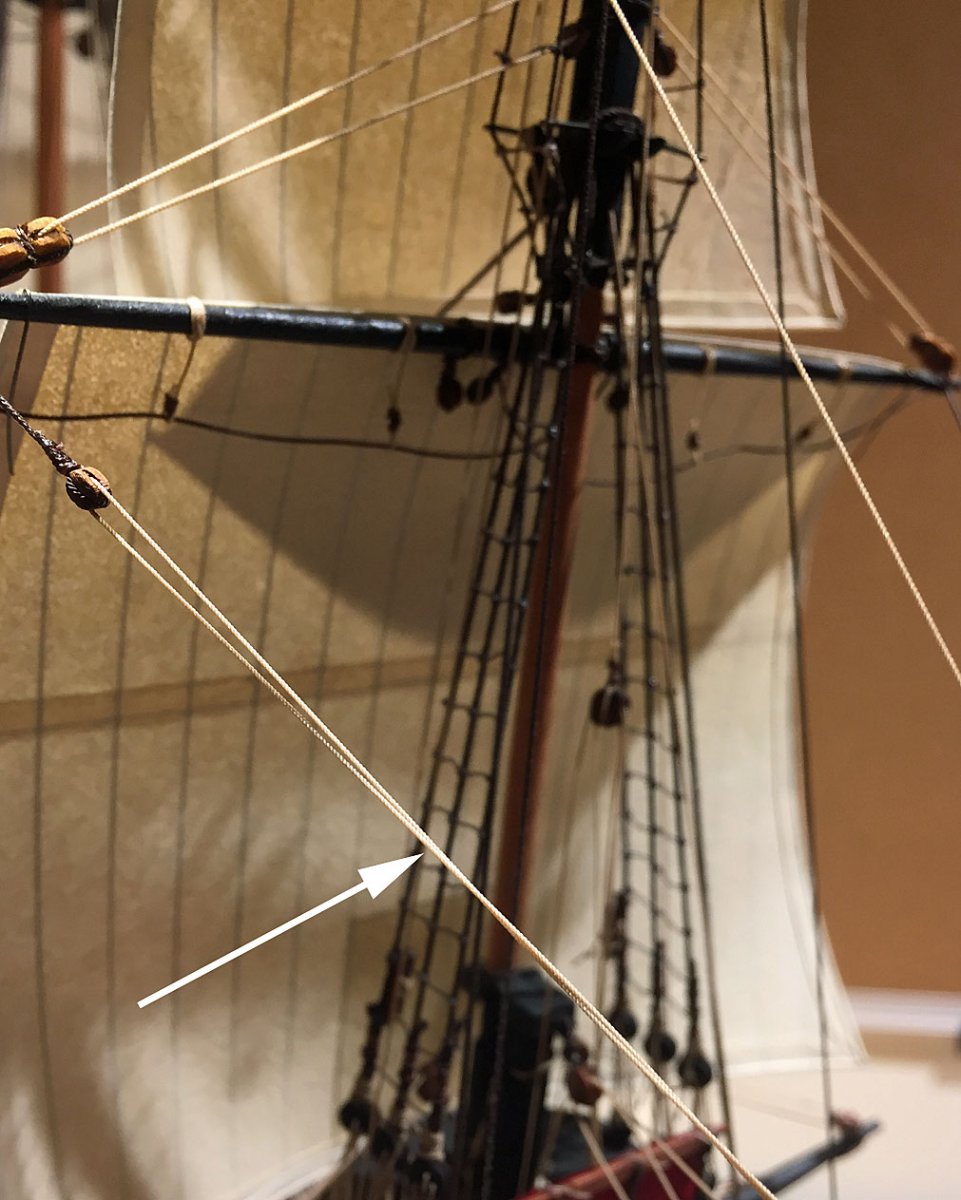
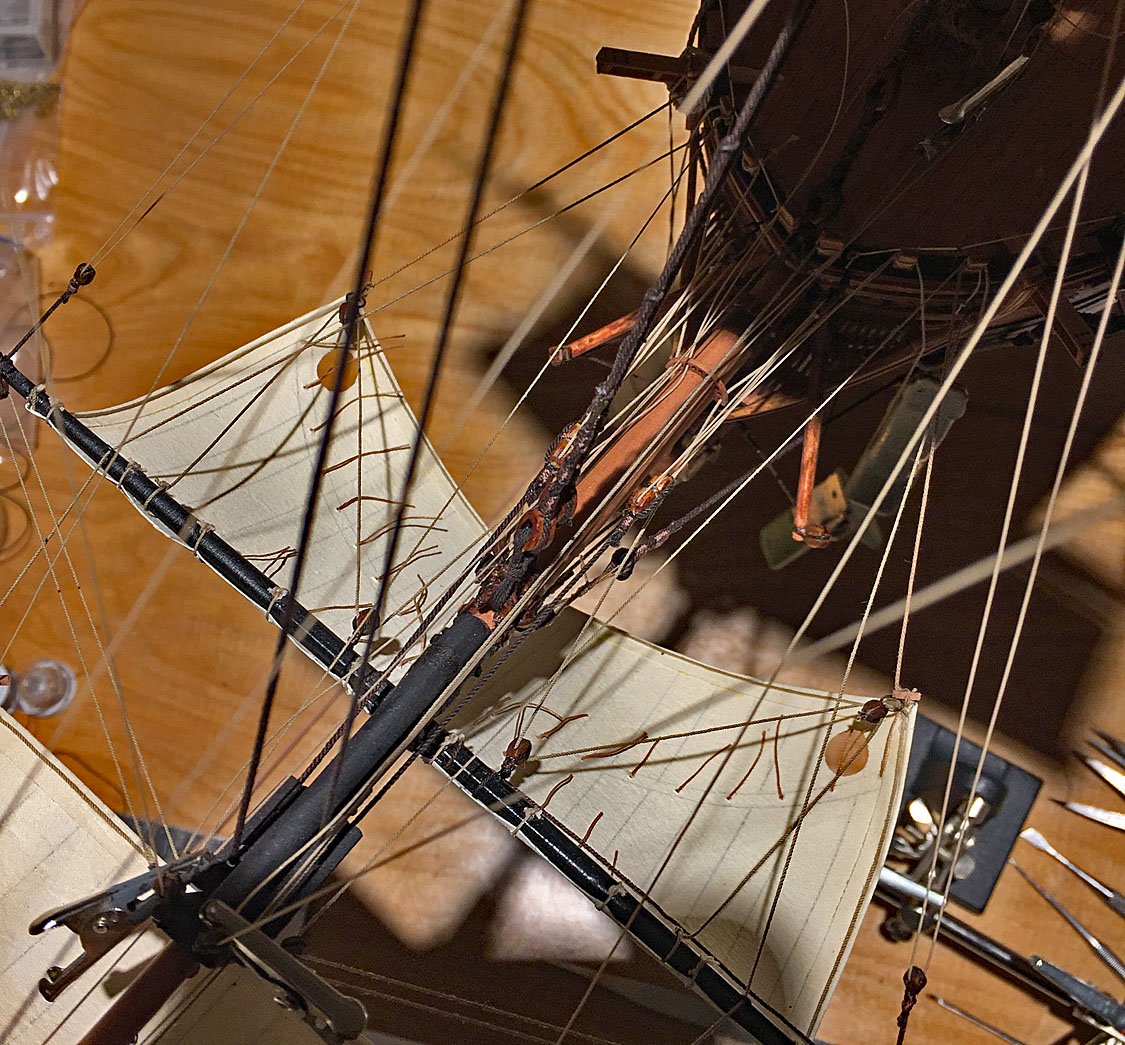
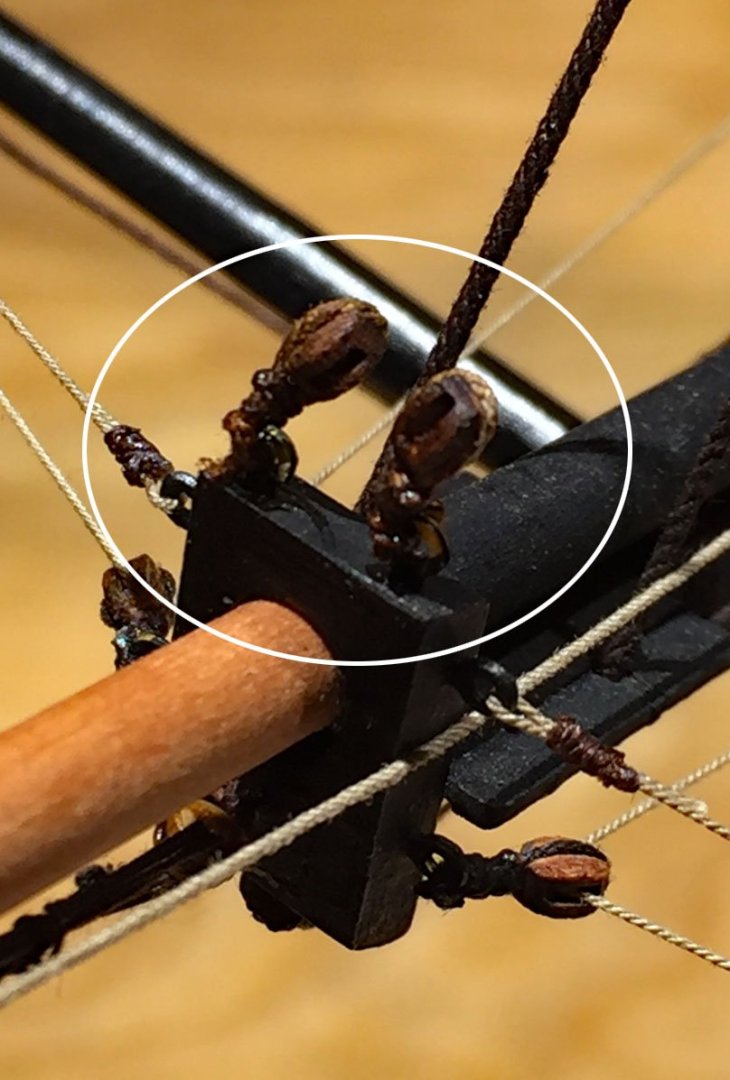
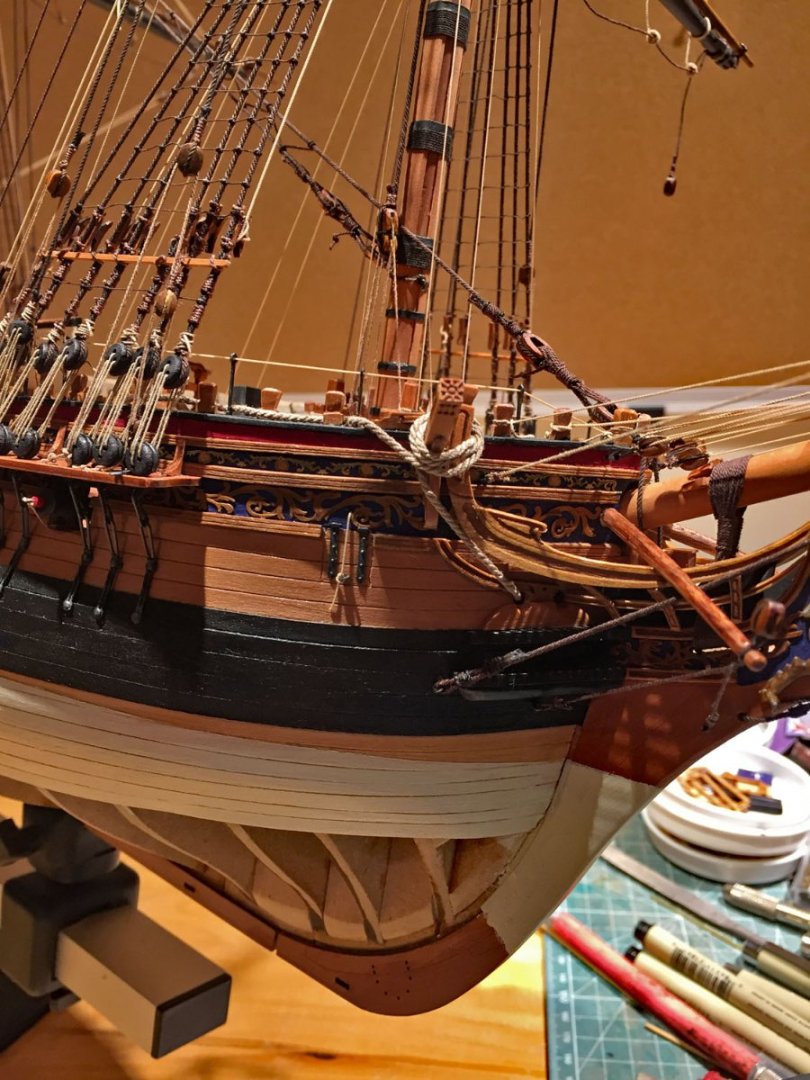
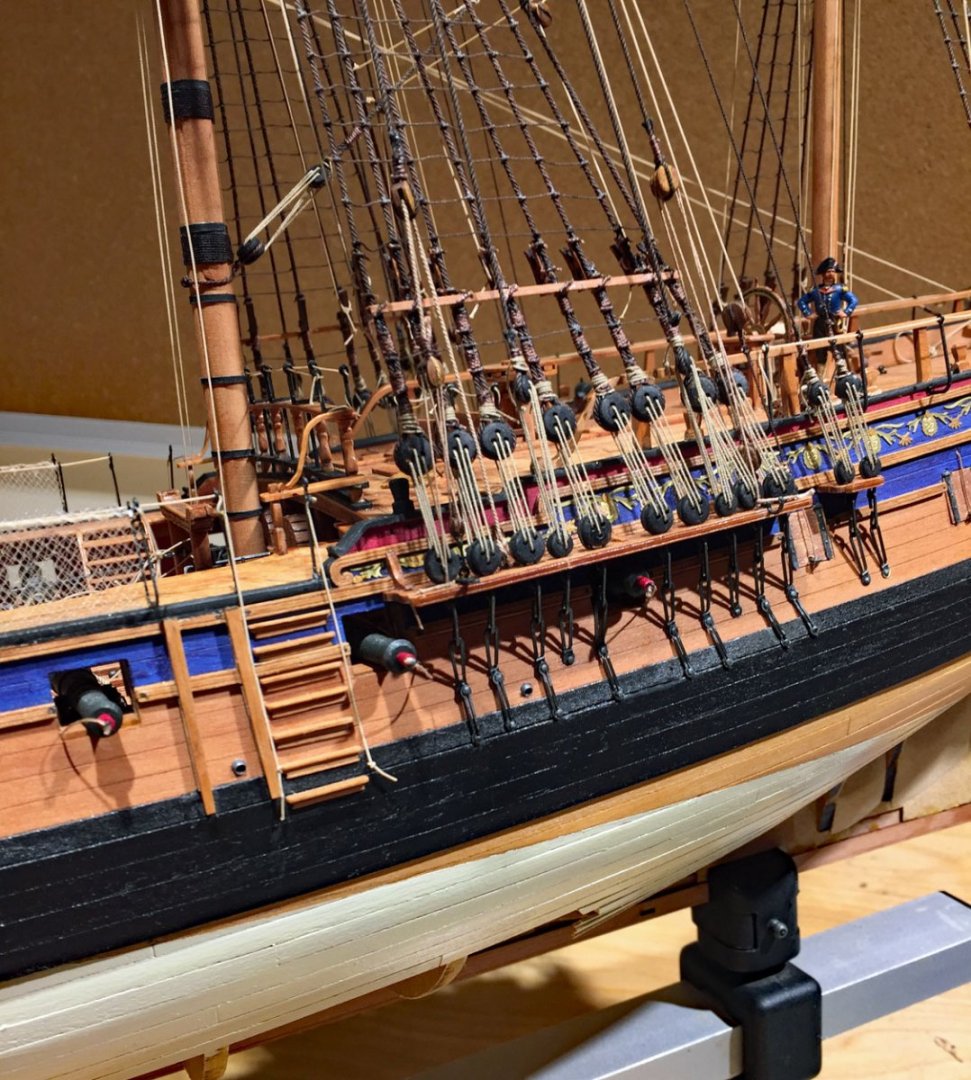
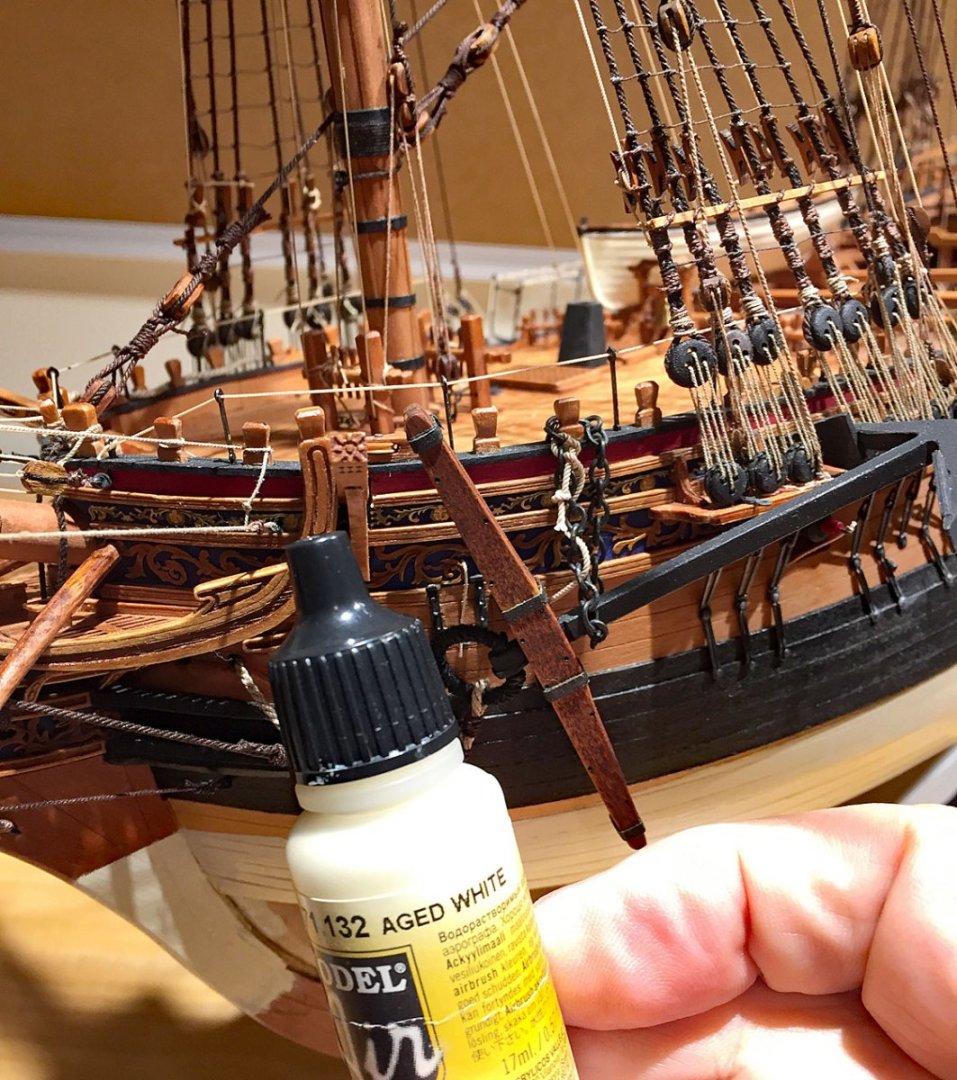
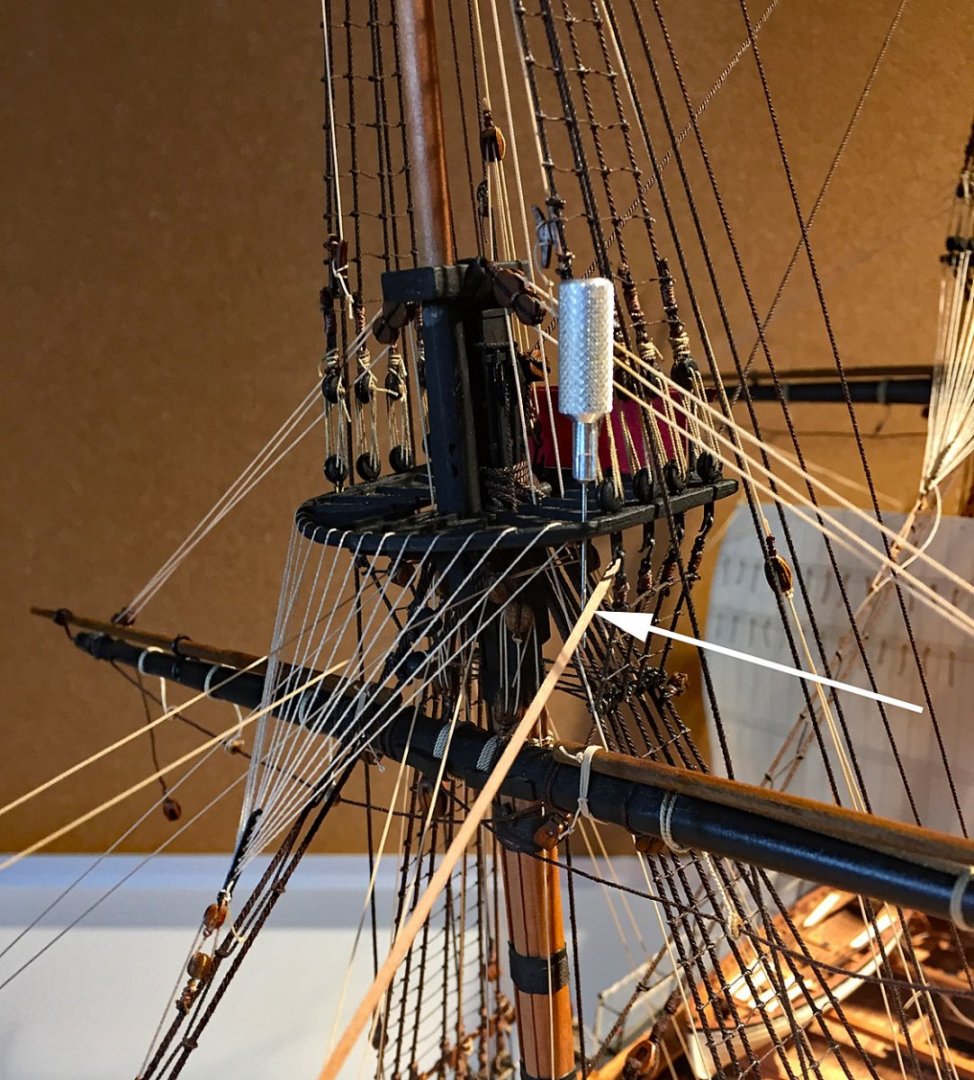
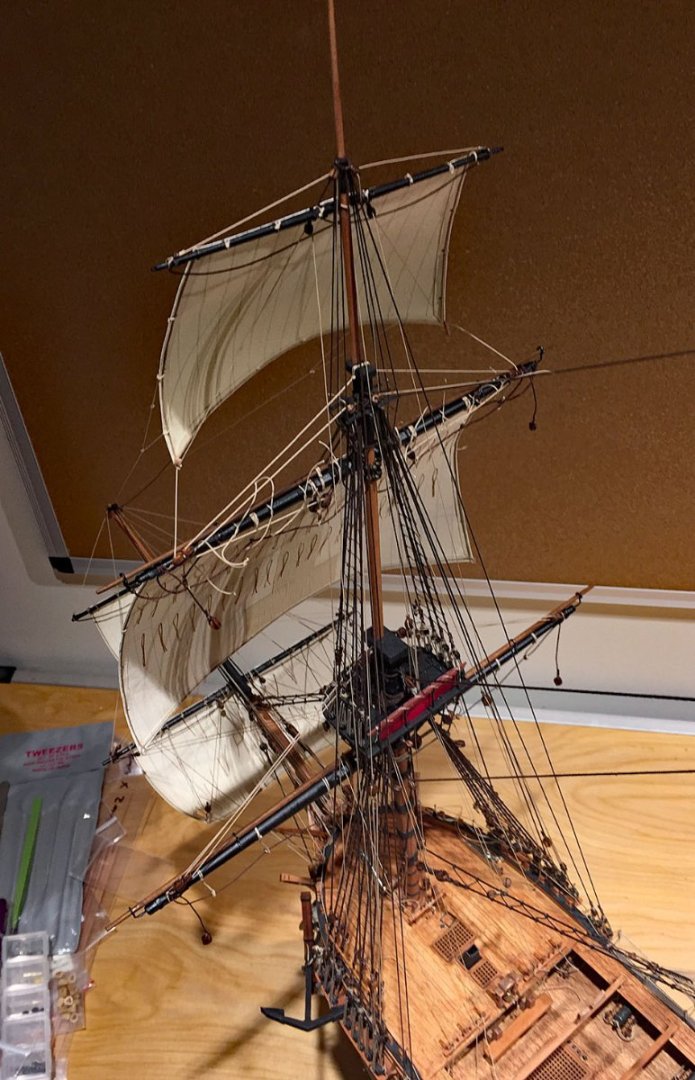
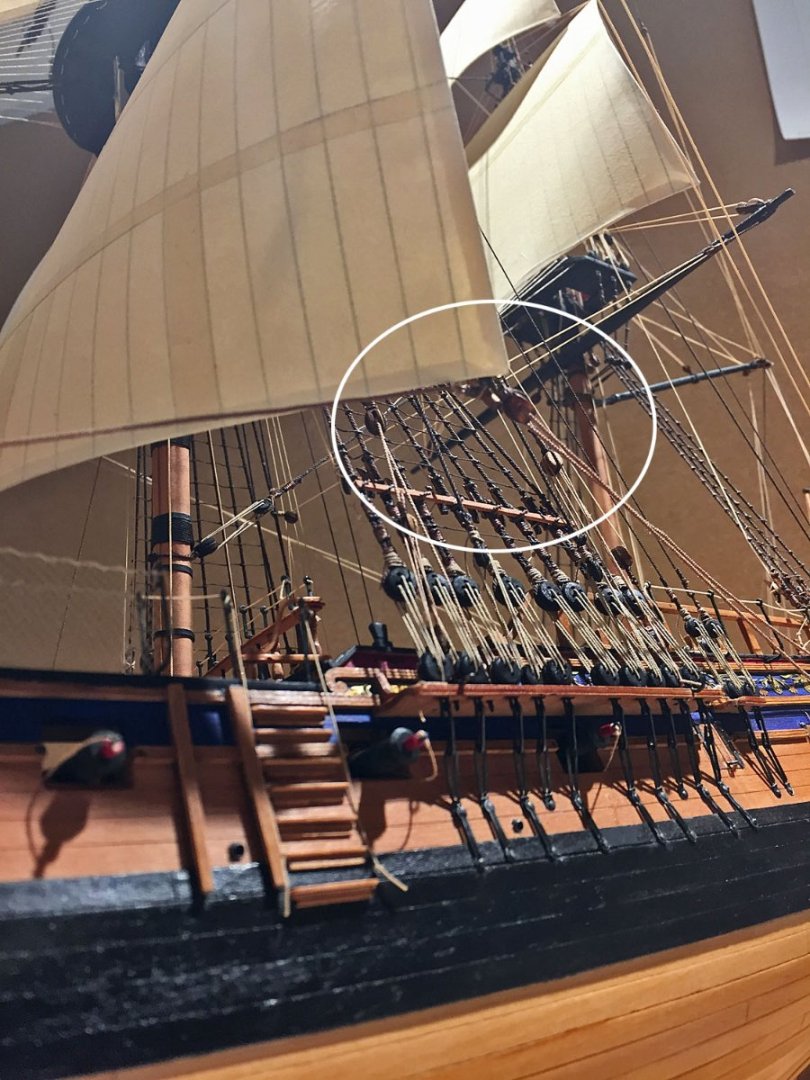
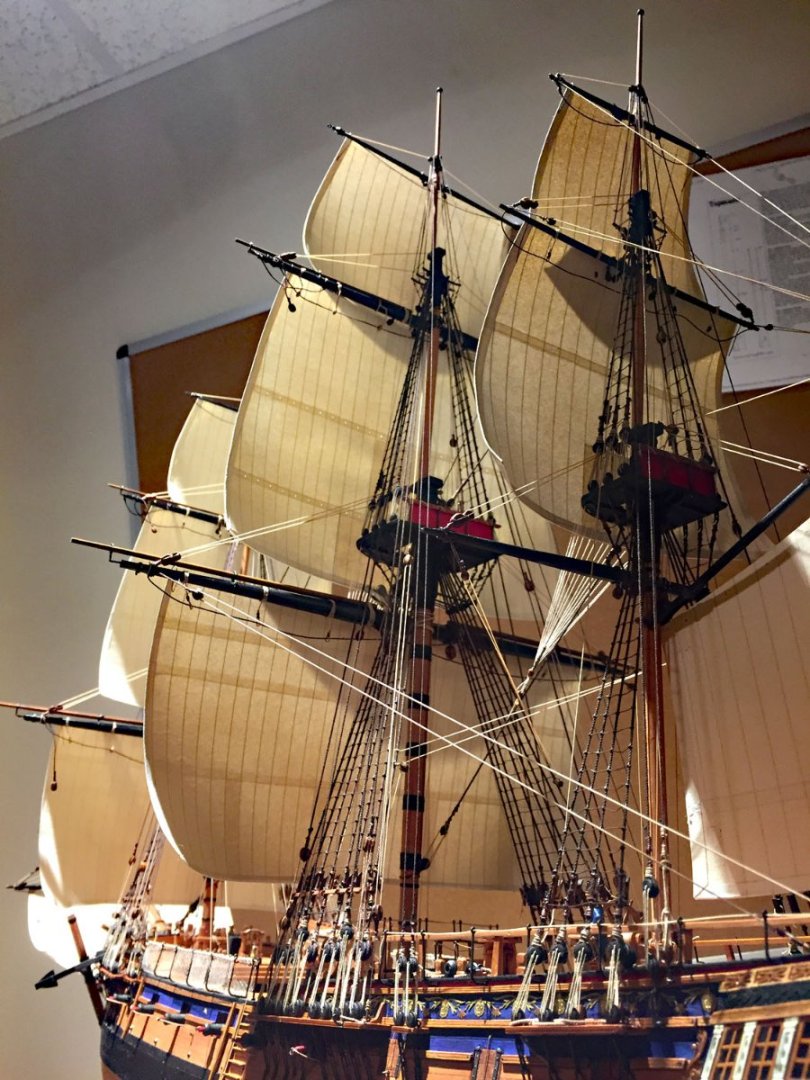
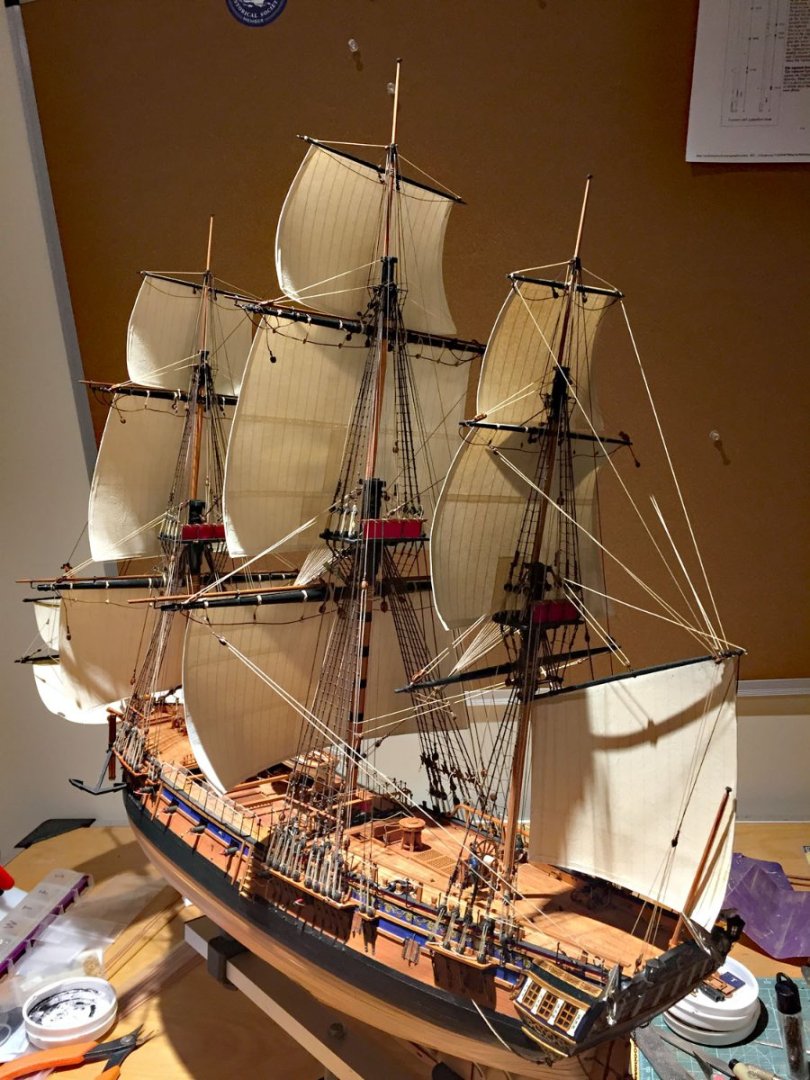
I've been busy with sailmaking rigging details and here are some photos of this work over the past couple weeks. This work is very tedious as the spaces for the additional sail rigging lines get's very constrained. Additionally, to add sail rigging requires a number of block additions and belaying decisions. When adding sails (with attendant management lines), my "rule" is to work "top-down"- starting from the gallants, progressing to the topsails, then finally down to the main courses. The bowsprit/jibboom sails (two on this model) are outside this metthod as is - of course - the lateen spanker sail at the stern. Here are some more sail prep details. At times, progress seems sooooo....sllllooooowwww during these final rigging stages. But, I'm not in a hurry. Are You? However - to break the repetitive monotony of the sail fabrication final details and their complicated rigging, I finished some unfinished business on the hull. This acrylic color is my choice - AGED WHITE. The lighting makes the paint in the bottle appear considerably whiter than it is: the actual hue does have a yellow cast to it. It's from Vallejo and this particular bottle is for airbrush work (less viscous consistency) which I also like by applying by brush (three coats). An airbrush isn't necessary for this. I masked-off the waterline with Tamiya tape, per normal, and then brushed on three thin coats. A brighter white color would be much too stark; this paint during the era would be a hue resembling "tallow." A view of the waterline painted at midships. As anyone who follows this thread knows, my model will be displayed in a waterline diorama. Hence, painting the lower hull was minimal and even this small area will be largely covered in diorama "water." I haven't decided on the angles of heeling and the exact tack of the ship but I'm pretty confident I won't be lifting the hull much above the wave action. This part of my project gets very interesting in the final stages because I'll soon need to decide on the sail bracing(s) and yard positions. I've decided to set a total of 11 working sails including both large fore and main courses - as well as both spritsails. All the sails will need to be positioned in a sensible manner depending on how rough the depicted seas are and naturally, the wind direction. Another waterline view at the bow. This area of the model is always dramatic in a diorama: the cutwater/stem will likely be splashing large amounts of water up and around the front of the hull. When I paint the water I add some translucency to the colors so that below waterline ares of the hull can be partially seen (in some places). I accomplish this translucency (like real water) by layering colors and mixing a medium into them for the sea and waves. There are dozens of reef "points" to add to several of Camilla's large sails (these are the thin ropes that secure partially furled sails when the conditions call for "shortening sail"). Making and affixing lots of these reef points is more tedious than doing ratlines - in my estimation. There are about as many of these to do as there are ratlines required to tie to the shrouds. Ugh. Once the reef point ropes are cut and inserted into the completed sail, they must be affixed in-place, at the proper lengths, fore-to-aft: I use Liquitex Matte Medium acrylic for this. The "points" on the aft side of the sail are much longer than the ropes on the non-windward (fore) side of each sail that carries these lines. In the photo here, I've inserted individual ropes through holes in the reef lining bands (can't be seen in this view), added a tiny drop of adhesive to hold them so they don't slide out of position and wait until the matte medium dries, which is fairly quickly. The next step is tricky because the ropes want to point in every direction but the way you'd like them to hang downward - loosely; as a simple solution to hold these ropes I created a simple jig which is a ruler's edge (supported by a simple clamp on both ends of the ruler - one seen here). The edge of the ruler holds the loose ropes in rough alignment for adding yet another tiny drop of matte medium adhesive to secure the ropes a few millimeters below their pass-through holes. The ends of the ropes will be trimmed evenly after this step is completed. As can be seen in the photo, the top band of reef points is higgledy-piggledy (that's a shipwright's technical term). The sail's linings are clearly seen here as are the bolt rope on the leeches and foot and clue cringles. Holes for the bowline and bunt line cringles will be made after the reef points are completed. This sail is the mizzen course. The holes for the sails robands have been drilled through at the head of the sail. The robands "bend" (mount) the sail to the yard. A toothpick suffices for daubing the tiniest amount of matte adhesive to the aft reef points. This secures them firmly. I chose a gluing spot a few millimeters down from their through-holes. On working sails, these lines will be moving with the wind and at any given sailing moment will not be uniform across the sail, and shouldn't be. The lengths of the ropes will be trimmed, but they'll be loosely arrayed as they would appear in real sailing conditions. On the fore sides of sails with reef points, the matte adhesive is used to affix much shorter lengths of the reef ropes. These points are more uniformly arrayed across the fore side of their sails with considerably less randomness. It's getting very busy in Sail City. Here, Camilla's two spritsails have a majority of their sail running rigging affixed. Keen eyes will see that the Spritsail topsail - at the tip of the jibboom - still needs it clues to be rigged...which leads to the next photo. As mentioned earlier, adding sails requires a host of additional blocks and decisions about where to belay the falls that result. In the case of the Spritsail topsail, blocks need to be added to the foretop. I should have remembered to do this at a much earlier stage of my build, but - I didn't. Thank goodness for my trusty #72 thumbdrill. After two holes are carefully drilled into both sides of the top, an eyelet (bolt) will be glued in (facing downward). There are sufficient number of P/E brass eyelets left over in the kit's rigging provisions; the "eyebolts" are painted black. The eyelet will hold a single-sheave, stropped block UNDER the foretop and receive the clueline from the Spritsail topsail. The arrow points to a guide that I used to determine an unimpeded run from the topsail's clue (sail corner) up to the foretop. The guide helped me to determine the exact position of the hanging block for the sail's line. It's a perfectly straight, 1.0 mm square piece of spare pear stock and I've inserted it to an approximate location of where a block will be later positioned. Both undersides of the foretop need a single-sheave block for the spritsail topsail's clue lines. Here is the block for the spritsail topsail clue stropped to a hook that hangs from the eyebolt that I added to the foretop. Speaking of additional sail rigging blocks: there are now five (5) rigged blocks at the very tip of the jibboom. I've added the double-sheave block- the darkest one - for the top gallant bowline; the line will lead back through the fairlead on the lower bowsprit and tie-off deckside. The bowlines for the fore topsail require single-sheave blocks mounted atop the beeblock at the end of the bowsprit. These sail lines will also feed through the fairlead. Last, but not least, the forecourse bowlines require two single blocks. These are mounted to the stay rigging lines near the open heart blocks that secure the foremast. These blocks are 3.0 mm, single-sheave. Blink, and they'll disappear! The arrow points to the port side one squeezed into the existing rigging. The bowlines will run unimpeded back through the bowsprit fairlead and terminate on deck like the other bowlines. I should have added these blocks earlier too. Oh well... build and learn. A gulls eye view showing how I'm working "top down" with the sail rigging. Fore topgallant nearly rigged. Fore topsail is bent to its yard, but no clue rigging yet. The robands will be trimmed-off ala' the topgallant above it. Another progress view of the foremast rigging with two of her three sails in various stages of additional rigging. That's All For Now , Folks. Back to more sail rigging prep. Sheesh.


- 542 replies
-
- 16
-
-

-
- Sphinx
- Vanguard Models
- (and 3 more)
-
Mr Hoving, I respectfully believe you should offer your unique creative efforts as a limited edition booklet. Small runs of high-quality printing can be produced by a number of vendors who specialize in these publications. Publishing your work as a hardcover, tangible physical asset would likely not be the most profitable venture, but something tells me this wouldn't be the primary motivation by yourself or your son. I'm also reasonably confident there is also a small market outside of this unique forum that would be interested in acquiring a physical copy of your creative works were it available. Please give my suggestion some further thought.
-
Thank you for sharing this; your "father & son" team creates stunning, superb art. Emiel's painting is extraordinary, a Master of marine depictions. I'm certain that many MSW members will appreciate viewing your "book"!
-
Thank You, B.E. Without a set of course sails these rigging details are slightly puzzling - or have been to me in my early models. When one “bends” sails to these large yards it becomes quite clear what these running rigging lines and tackle are all about! My hope is that showing the details from a couple different perspectives this important rigging detail will be - uh….demystified. Thanks, druxey. I’m gradually learning ‘the ropes’….The complex confluence of this variegated trinity has been…uh, demystified. I’m also pleased that it’s you who couldn’t resist the opportunity to pun! Cheers
- 542 replies
-
- 1
-
-
- Sphinx
- Vanguard Models
- (and 3 more)
-
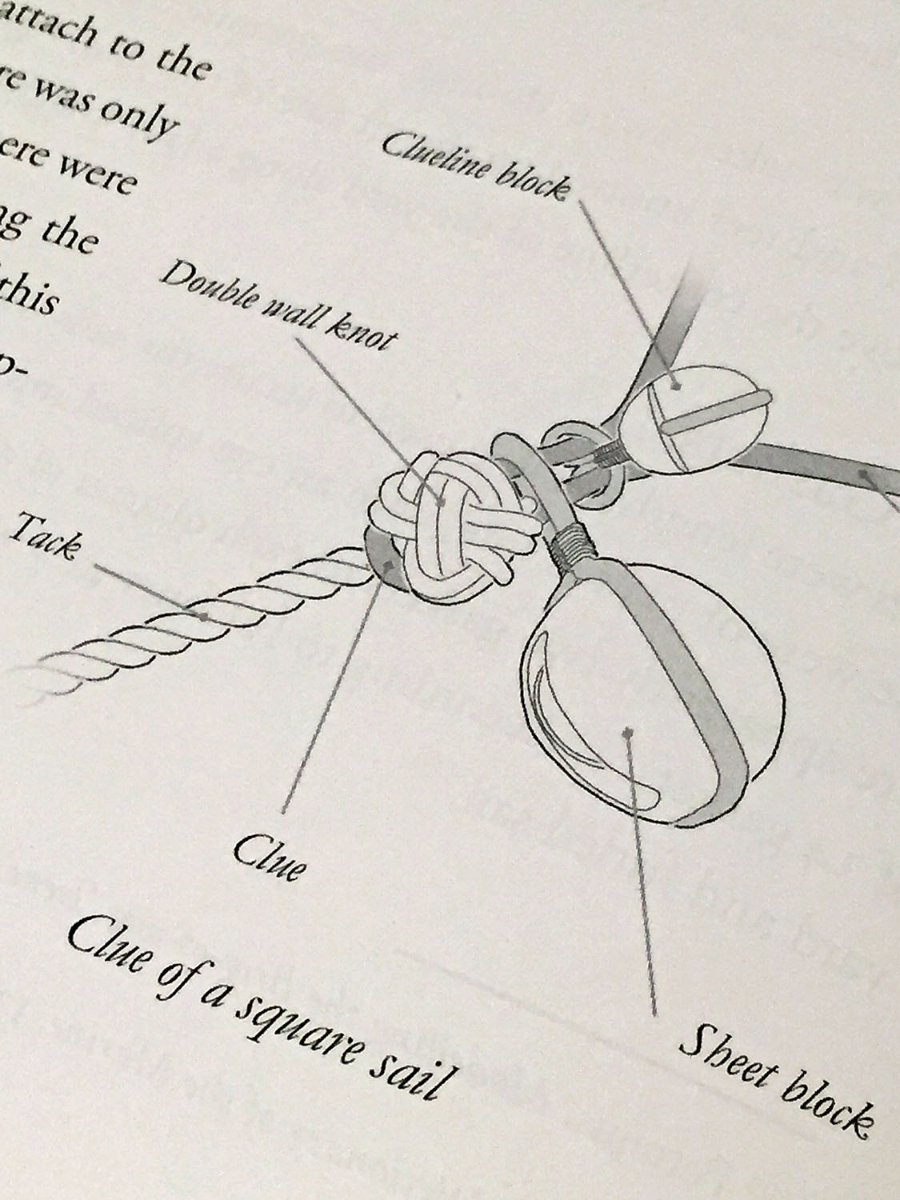
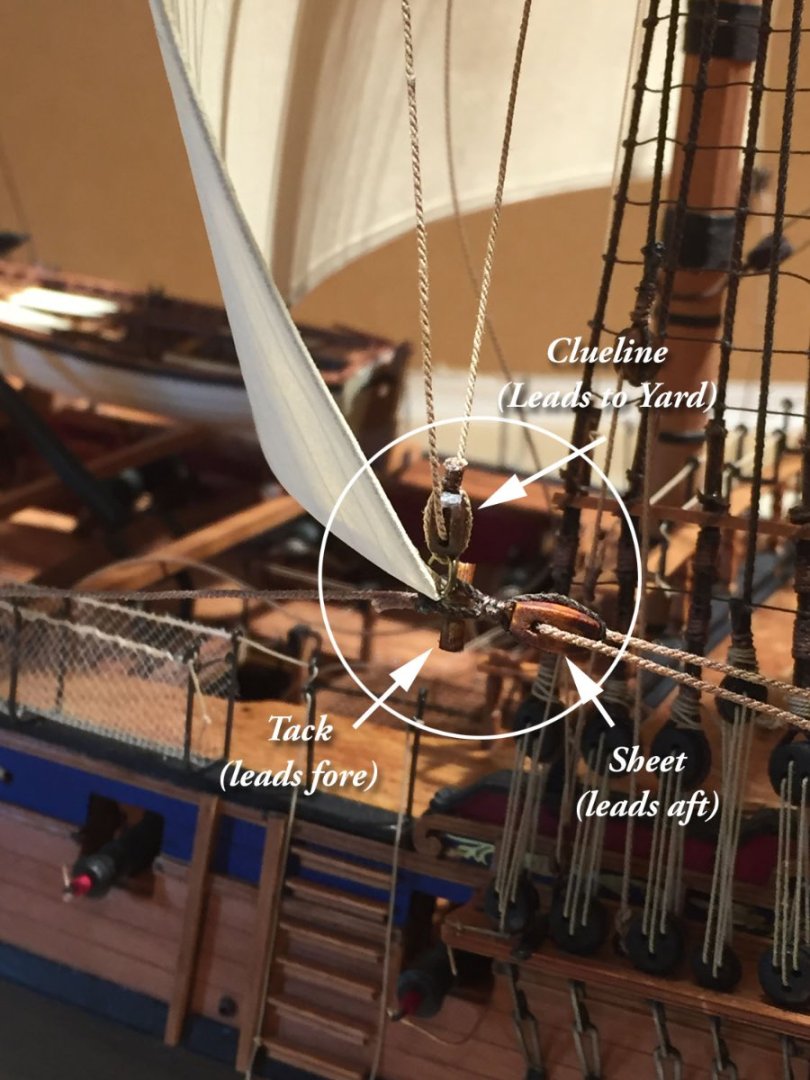
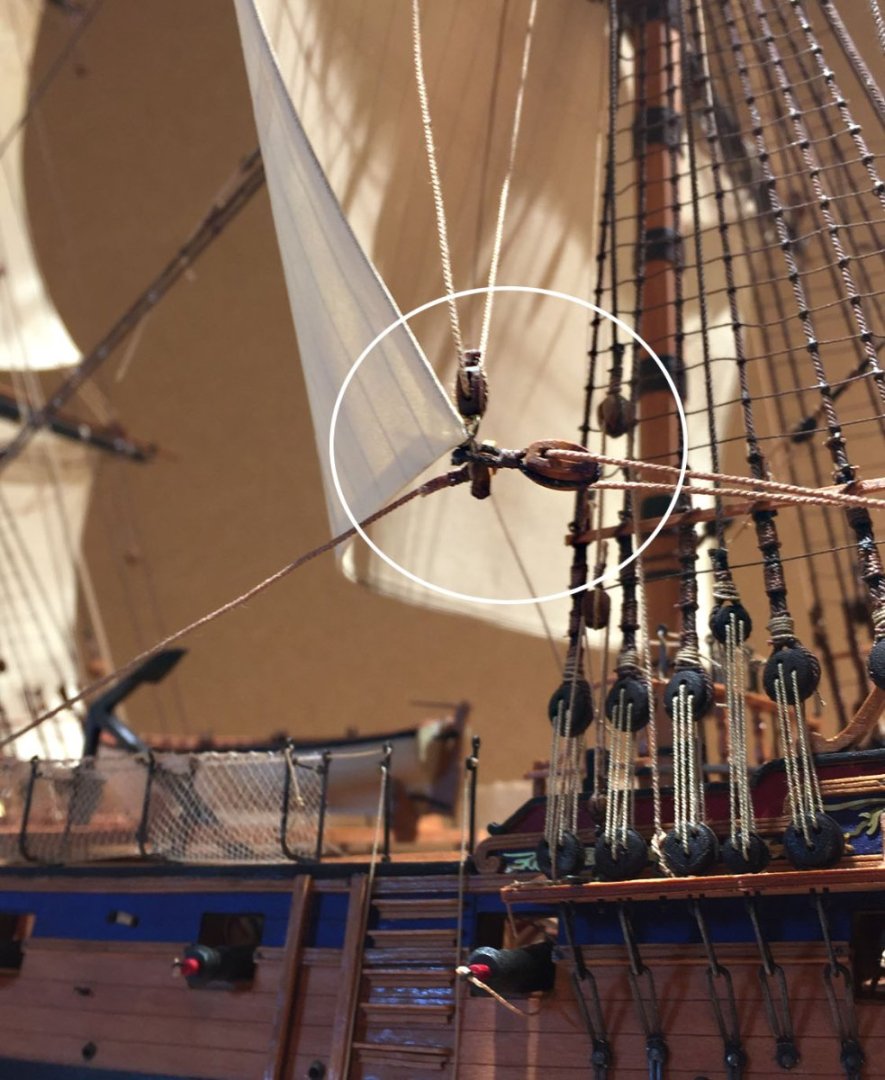
This post continues with further details explained in the previous one on the mainsail's rigging. Paying attention to their additional rigging is an important part of making a sail look like a realistic working one. A critical area with both the Main and Fore courses is the Clue rigging at the lower corners of these large sails. These two sails are also mounted to the ship's largest yards and uniquely, have long lines that extend fore and aft to manipulate them. Getting these sails to appear convincing starts with setting-up and running the critical rigging to their rope cringles; these were formed by the boltropes mounted to these sails in the previous post.. The Mainsail's clue components, up close. Three separate lines will exert forces at the corner(s) of the Mainsail. The Clueline block and the Sheet block have been stropped and fed through the sail's Clue cringle as shown. After these two blocks have been inserted, the Tack line is fed through and a "stop" is lashed into its end. In practice, a large and complex knot was the "stop" that held the other blocks in position within the Clue cringle. The metal ring shown here is a 3.5mm dia. "jump ring" of oxidized brass which is stropped to the Clueline block and simulates the special configuration of this block. The clueline block had to remain flexible against the fore/aft counter-forces to this sail exerted by taut Sheet and Tack lines. The Clueline is also the principal sail hoisting block, whereas the others work in tandem to pivot the sail during Wearing and Tacking maneuvers (turning the sail to optimize the capture of the wind). After stropping the Clueline block, the Sheet block and prepping the end loop in the Tack line, assembling them to the cringles is straightforward as shown in the first photo. In the photo here I've measured the length of the tack ropes and temporarily rigged them into the assembly with their "stopper" toggles. The toggles are made from a colored toothpick inserted into a lashed loop at the end of the tack line. The hand tools are holding the sail's leeches and foot flat so that the clue corner assemblies will be easier to make. I've suspended the Mainsail from its yard temporarily to depict the three lines that rig to this sail's corner Clue cringle. Another view of the completed rigging assembly on the Mainsail. There are three tension forces on this sail: the upward one from the Clueline block, the aft force of the sheet block and the fore force from the tack line (which has the mounting stop - also called a "toggle"- to hold it captive to the sail). When a ship was underway these blocks all worked in concert. A clear view of the Clueline block's rope that is lashed to the main yard, leads downward to the clue line block and then runs up through another single sheave yard block that, in turn, feeds the end of this line down to the Midships bitts. A low perspective view of the Mainsail's Clue assembly. Because of the translucency of the sail, in this backlit view all the linings are quite evident across the sail and along the foot and leeches. The reef points and robands have yet to be mounted. The Mainsail will look similar to this view when it's fully mounted and rigged. Some lines have been temporarily rigged to illustrate the importance of this particular rigging. The identical processes will be used to rig the Clue assemblies of the Foresail.


- 542 replies
-
- 13
-
-
- Sphinx
- Vanguard Models
- (and 3 more)
-
Thank you kindly! Admittedly my process is quite complex, but if you want realistic-looking working sails on your model(s), the investment of energy is well worth it IMHO. I work almost exclusively in 1:64 scale (3/16" = 1 foot). I believe my sailmaking technique is good down to 1:72 and up to 1:48. Building in scales outside of this range may not be as convincing.
- 542 replies
-
- 2
-
-
- Sphinx
- Vanguard Models
- (and 3 more)
-
Thank You, druxey. Your commentaries are always appreciated by this shop hermit. Yes, rubbing alcohol is a good solvent for acrylic and many other things - and is about 1/10 the cost of the Restorer! I used rubbing alcohol to clean the surface of my new light table while fabricating my sails. The spray adhesive I use to attach the silkspan leaves residue on the bond paper that transfers to the light table: the surface gets quite sticky. Between sails I wipe it down with an alcohol dampened soft cloth.
- 542 replies
-
- 2
-
-
- Sphinx
- Vanguard Models
- (and 3 more)
-
Hello and thanks for allowing my membership
hollowneck replied to Chestcutter's topic in New member Introductions
Welcome, Michael. You're at the right spot for all things - great & small - in our challenging but immensely satisfying hobby. Your warm welcome will be followed-up with supportive, friendly members on our unique (and safe!) social media forum. -
Savor the former "happy" part, Rusty! You've done a beautiful job with this model - similar to all your others. I've always thought that, like me, you enjoy the challenges of rigging.
- 201 replies
-
- 2
-
-
- Duchess of Kingston
- Vanguard Models
- (and 1 more)
-
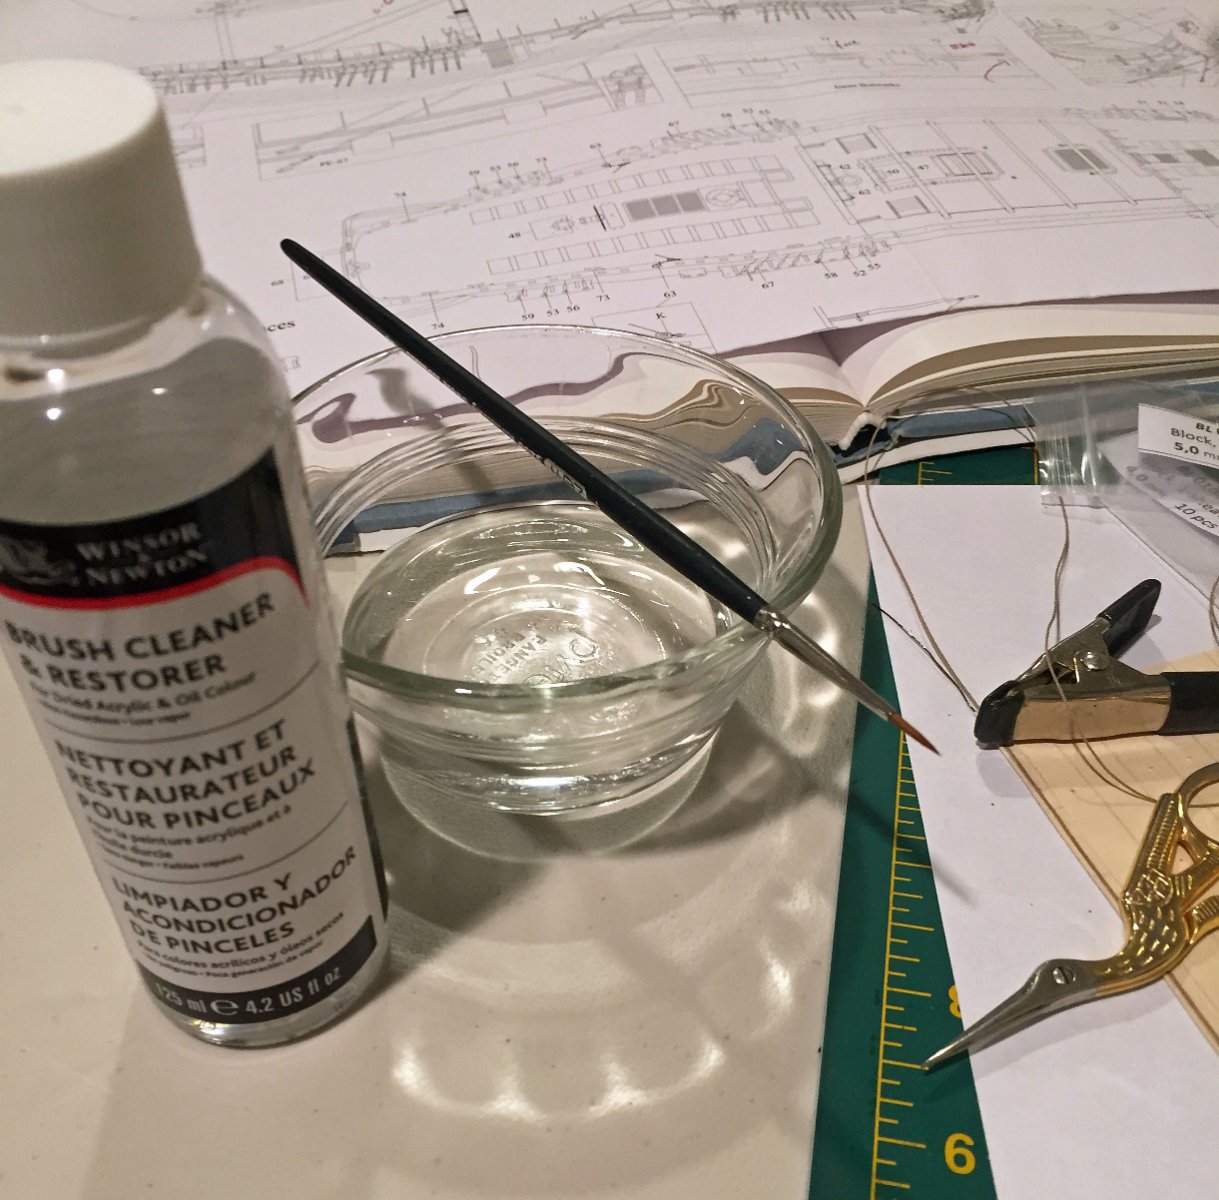
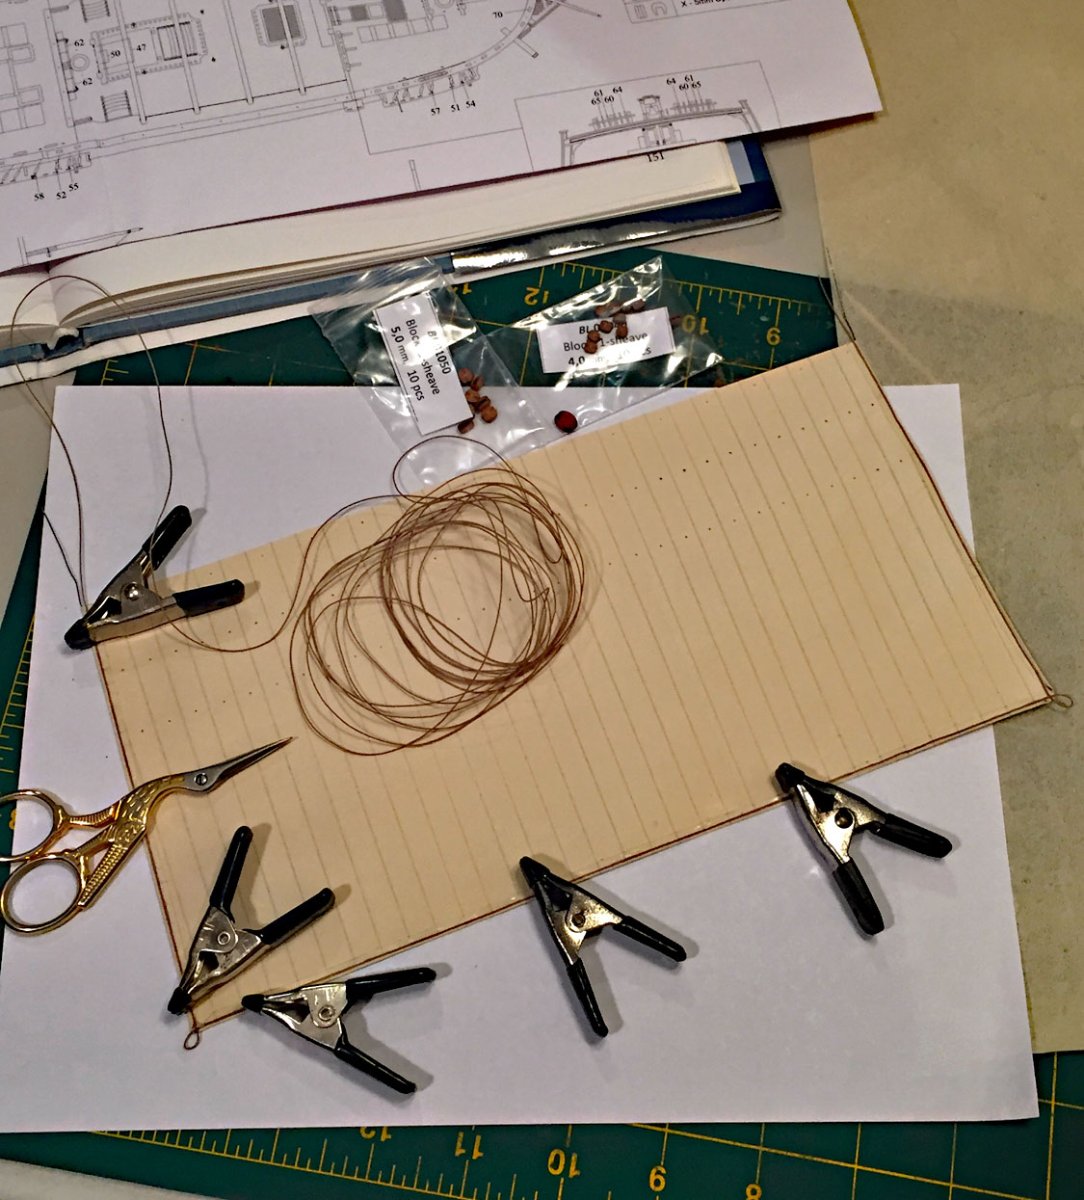
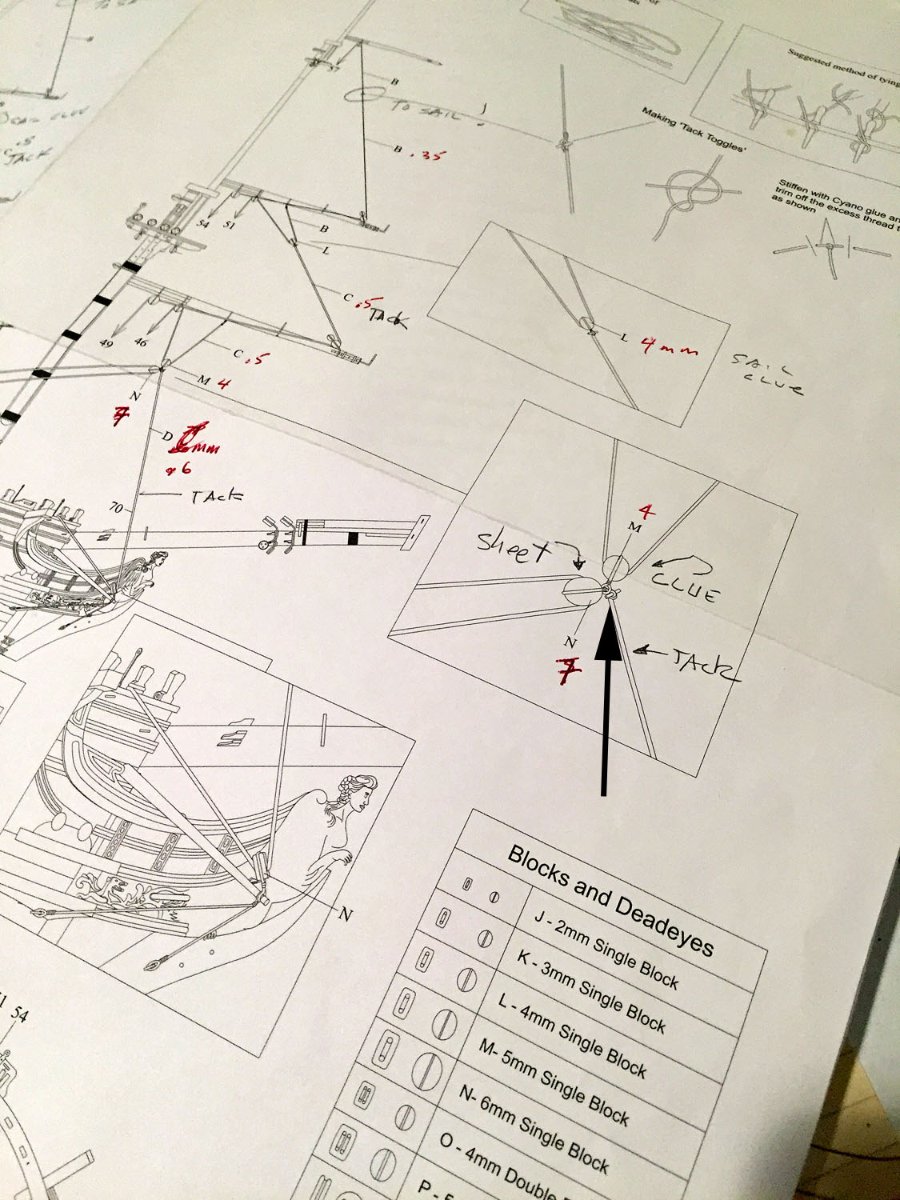
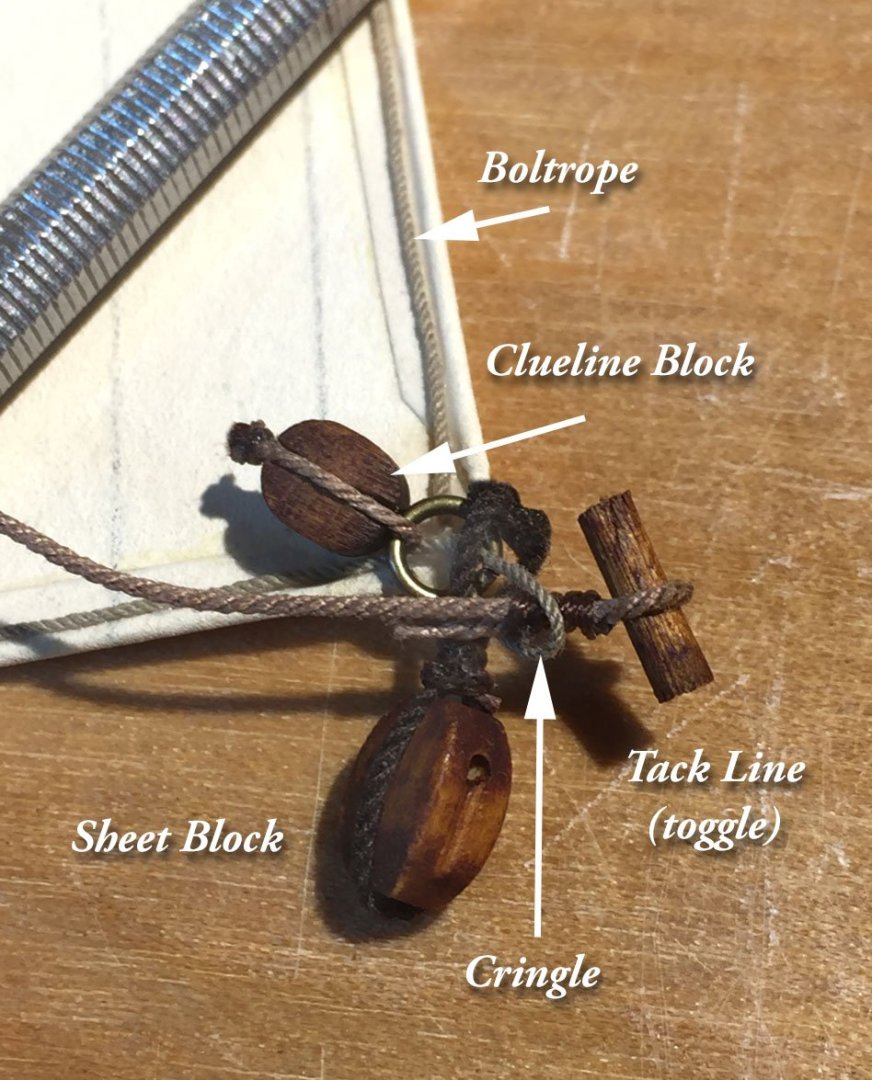
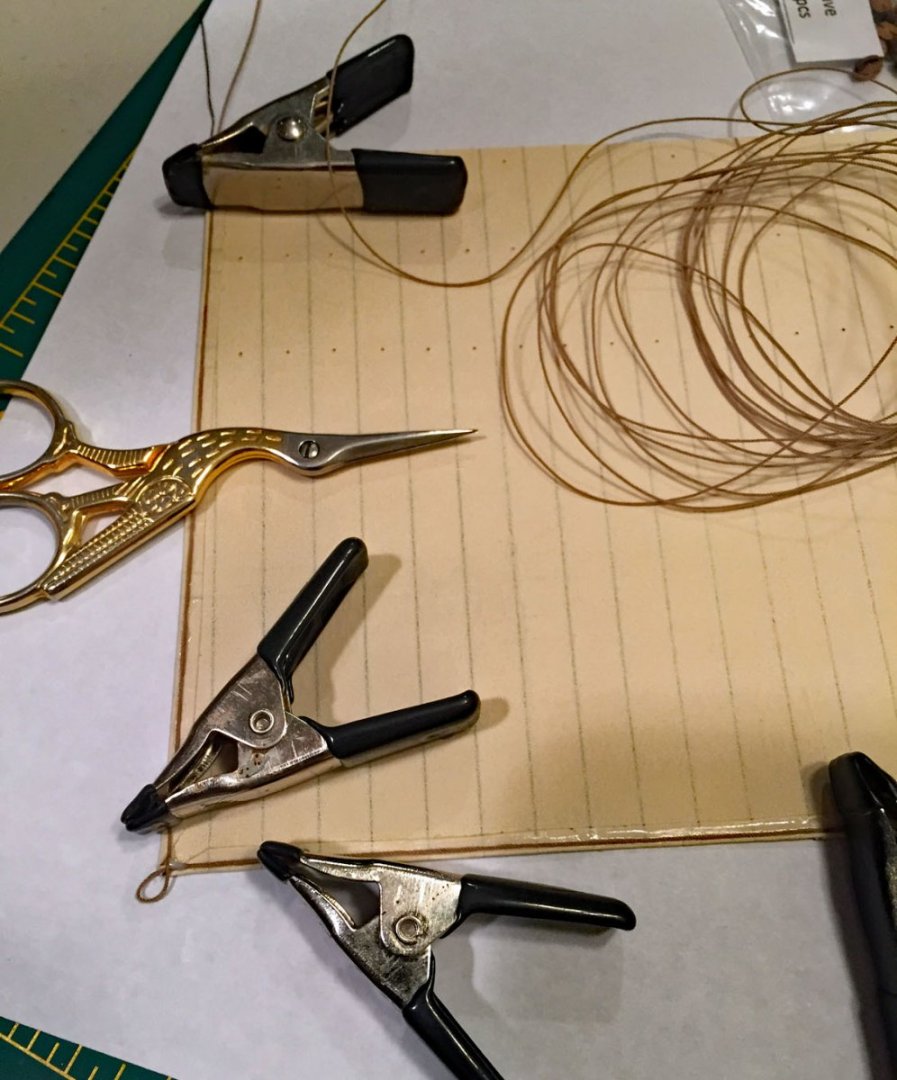
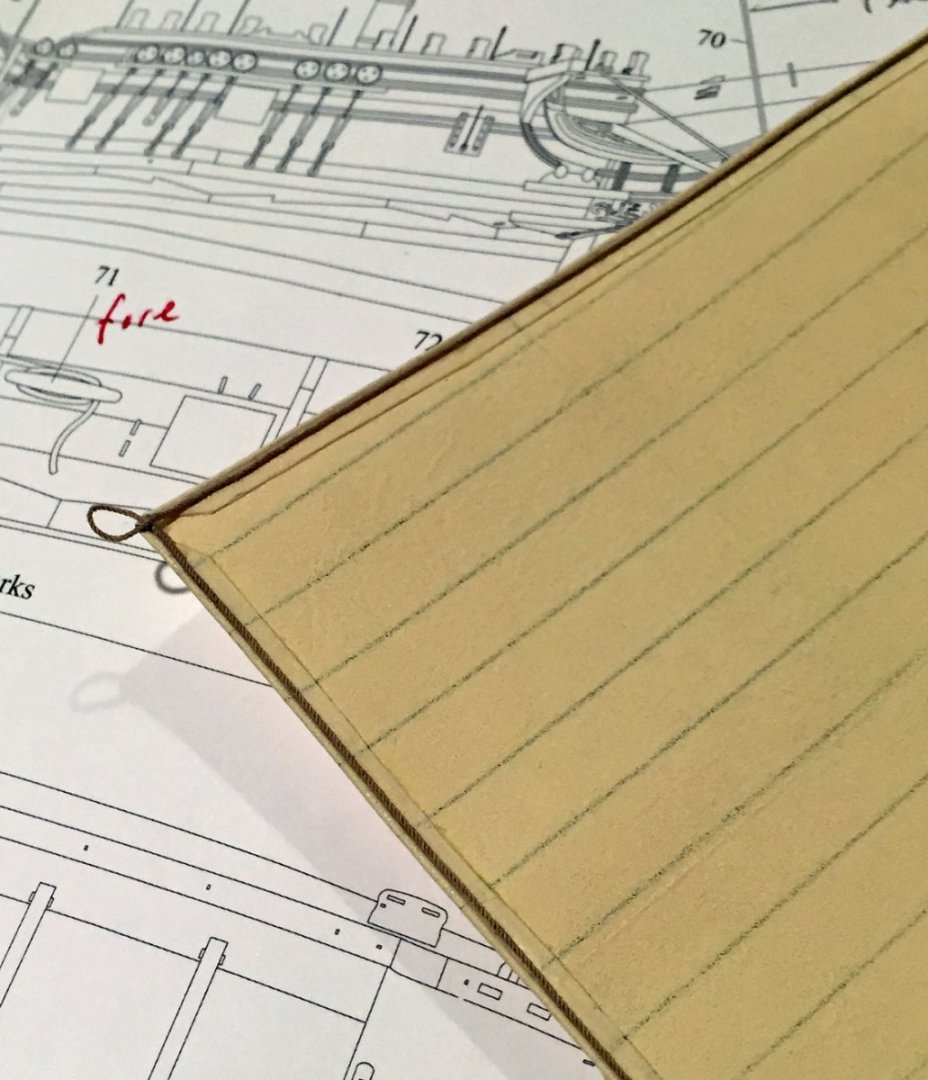
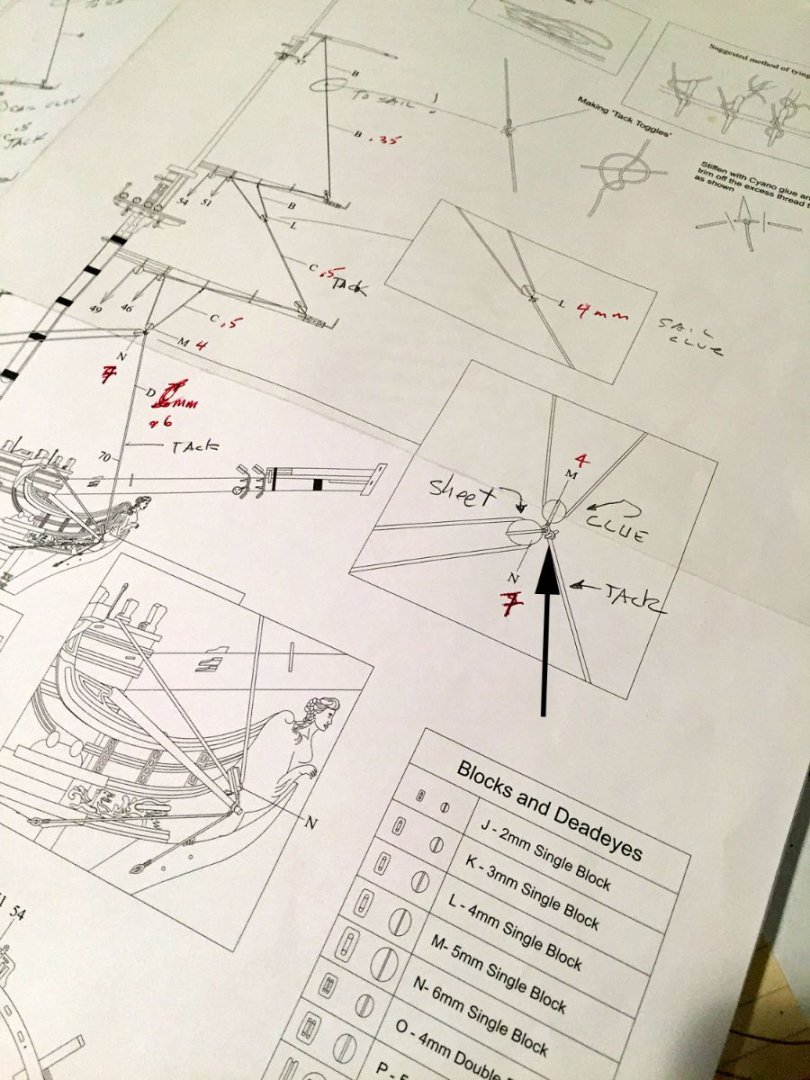
Some important fabrication details for continuing with the prepping of the sails. I've started the process of applying the boltropes to the sails. Here, the Mainsail's bolt rope has been glued to the tab linings on both leeches and the foot. The clamps and scissors are holding the rope in-place after aligning the rope along the three sides right up to the edges. This is looking at the aft side of the sail. The boltrope for all the sails is .40mm, tan (running rigging color). The edges of the sail have had Matte Medium acrylic adhesive sparingly applied. Small holes have been made along the two reef point linings; holes for the robands (to mount to the yard) have also been drilled thru at the sail's head (hard to see in this photo). Once the boltrope work is completed, the two lines of reef points will be threaded thru the holes made through the reef linings. The bolt rope is "looped" at both corners of the Mainsail to form the clue cringles. The clamps hold the rope in place as the glue sets because the bolt rope loop (the very important clue cringles-both sides) will want to "unloop" itself and raise up from the corners if not held in-place. Note that the shinyness of the Matte Medium adhesive seen here will disappear once its dried. This step requires patience to get the loops consistent on both corners and the right size, like the one shown here. The bowline and bunt cringles will be created with another technique once this basic edge work has been completed and the adhesive has set. A closeup of a properly formed clue cringle with its bolt rope loop. You'll note the simulated bolt rope linings (beneath the rope in two places). These were fashioned previously with the folded-over "tabs" that also now have the invisible sail forming wires. Another closeup of the corner formed by the leech and the foot bolt rope after it has dried completely. The rope is continuous around three sides of the sail. The two blocks are for the Clue line (smaller one) and the larger one, the Sheet line. Both blocks will be stropped and then mounted to these "looped" corner cringles. An identical process will be used on the Fore Course sail. The Tack lines also get fed through this Clue cringle per the next photo diagram. The heavy Tack line ends in this exotic knot in full size practice which I'm not about to attempt - and at 1:64 scale, and would be beyond silly. I've rarely seen them even on rigged 1:48 models. I will secure the end of the Tack to the sail's foot with a short "stopper" made from a small piece of dowel that will be inserted into a simple loop formed at the end of the Tack rope and fed thru the end of the Clue cringle. The illustration is from SeaWatch publications Swan Series, Vol IV book by David Antscherl. I'll show this full arrangement once I've mounted the stropped Clue and Sheet blocks to the cringle (first things first, per the diagram). This particular sail will be mounted (as will the Fore Course) with the clue blocks dangling in-place, ready to accept the Tack line mounting. Note: the "Clueline block shown in the diagram is an odd and specialized block in full size practice; I've substituted a 5mm single sheave block which will get the job done without any issues. The Matte Medium is used as an adhesive to glue the bolt rope securely to the sail's linings. The other bottle is necessary if you use my recommended technique for applying the adhesive with a fine, pointed brush (to minimize glue spread and speed the process along). The Brush Cleaner & Restorer is powerful stuff and does clean anything acrylic; it's made specifically for artist's paintbrushes and is pricey but it works really well - especially if your brush starts to set-up or you've forgotten to clean it right away. I also use this restorer/cleaner on brushes used with other acrylic paints throughout the build. I have a small dish of tap water to slightly dilute the Matte Medium (it is quite viscous right out of its bottle). Lying across the water dish is a fine point sable "spotter" brush. Using this particular type and size of artist's brush (#2) allows you to work quickly with the fast-setting acrylic Matte Medium; don't worry though - it's not as quick-setting as CA!! I rinse my brush in the water after each use and then give it a good clean with the Brush Restorer. Acrylic is sneaky stuff and penetrates into the fine hairs and will seize the brush up badly if you don't pay attention to cleaning, even over the course of just a few minutes. My recommendation: use the brush to apply the adhesive, give it a quick dip in the water and set it aside as you work the sail's bolt rope application ... after you've secured the bolt rope, immediately clean the brush with the Restorer. Repeat this process for each sail as you fab them or you'll be tossing-out quite a few good brushes. A completed Clue cringle on one corner of the Mainsail after the Matte Medium has set. Note there is no shiny residue on either the rope or the the sail linings from the acrylic adhesive. Here is a section of the Sheets, Tacks and Braces rigging plan for Sphinx, which happens to be the final plan sheet provided in the kit. I've made notes (in pencil and red ink) to guide my selection of rigging blocks and rope for these critical (and complex) lines that help to bring all the sail's to life. The toggle for the Tack line is shown in the box for the Clue rigging at the end of the arrow. This is the spot for the small section of dowel that I'll make and insert to secure the Tack to the sail's Clue. This process will be repeated with the Fore Course. The top sails and top gallants have a slightly simpler rigging, but the bolt rope mounting technique still applies to all the sails.


- 542 replies
-
- 9
-
-

-
- Sphinx
- Vanguard Models
- (and 3 more)
-
Thank you, BenD. Yes, that acrylic color is "spot on" in my estimation. I'm wondering if you purchased the Liquitex rattle cans? The paint jars and tubes will work for this color too, it's just a more involved and tricky business to paint the porous silkspan sheets. Been there, done that. Good eye, Ben. 👁️...The twisted lines are indeed rope from Crafty Sailor. As you well know, I've primarily sourced Ropes Of Scale for this build, but I have also used some "Crafty" rope as well as some older Syren stock. I liked your comment about my fixing of the "tornado rope;" I quickly learned that I had to apply a tiny drop of CA to a spot where I'd cut a length from the tiny spools or else it would instantly "explode" and essentially end up ruining an inch or two. As you correctly point out, Ropes Of Scale rope does not unravel - and your heat treating...well, works a treat! I thank you for being a reliable and fairly-priced vendor that has focused on high-quality. In any business endeavor, it's extremely difficult to achieve all three of these essentials (as determined by customers!): Quality. Delivery. Price. Congratulations.
- 542 replies
-
- 5
-
-
-
- Sphinx
- Vanguard Models
- (and 3 more)
-
Thank You. My techniques are multi-stepped, but not hard to accomplish. Your nicely executed build of Alert will be a great one to try my approach.
- 542 replies
-
- 4
-
-
- Sphinx
- Vanguard Models
- (and 3 more)
-
Thank you, druxey. I particularly like my dockside rat's view looking upward and into her majestic presence! ....not that she'd have sails unfurled in that spot...😳
- 542 replies
-
- 4
-
-
- Sphinx
- Vanguard Models
- (and 3 more)
-
I'll trust the locals on this! Thanks, Nipper. Yes, the Channel seas can certainly be like the Hunt & Platje paintings with their complex hues of muted blues. I'm leaning toward Camilla's sea looking as close as I can replicate it as depicted by Platje - not only the colors but the waves and swells. I've been drawn somewhat to the greens hue; on reflection, the Hunt & Platje colors will be a better choice.
- 542 replies
-
- 3
-
-
- Sphinx
- Vanguard Models
- (and 3 more)
-
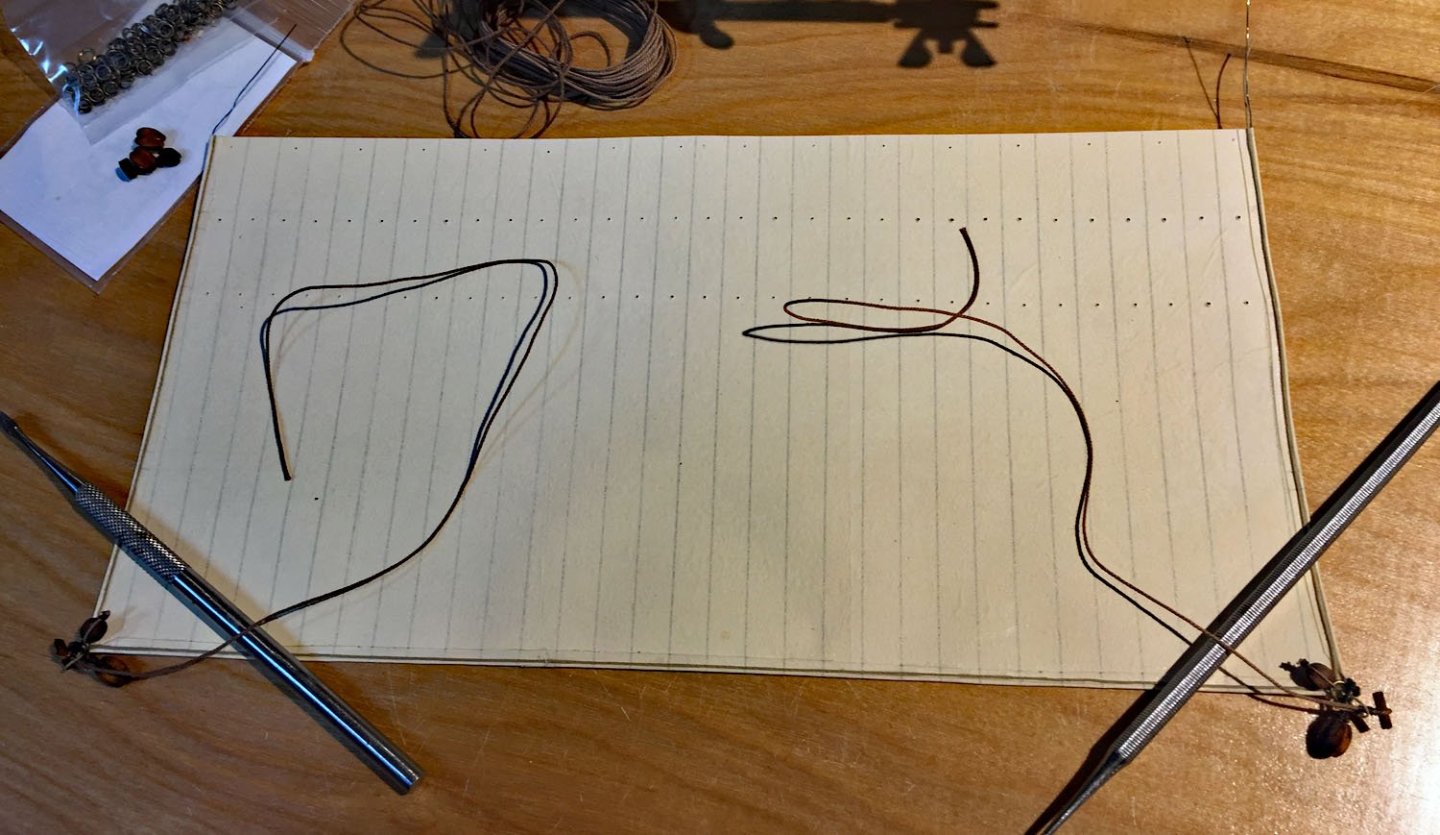
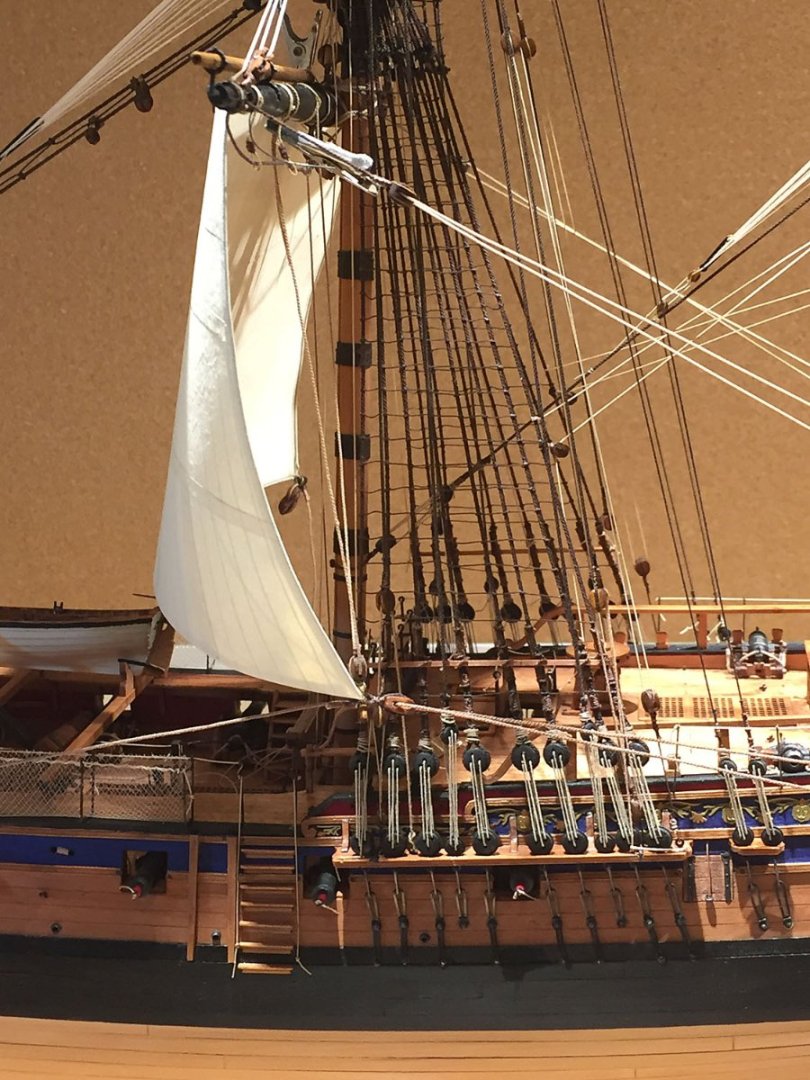
Finished the fabrication of Camilla's last two sails today, the large main and fore courses. These were easily the most difficult to make which is why I guess I left them to last...😬 Like her other sails in these photos, all eleven of her working sails are temporarily mounted to determine if all is ready for the next stages of prepping their rigging. However, before I mounted Camilla's last two sails I noticed that several of my rigging blocks (on the spritsail and mizzen topgallant braces - to name two) like to spring into a twist, which is a no-no. This is always an issue with single blocks and neither a unique nor new problem. I believe the tension of the rope strands that lash the block exerts sufficient enough rotation to twist a rigging line - like this: There must be some easy solution to address this annoying fact. I had an idea. Here's what appears to be a very simple fix to this issue, as follows: I coated the standing tarred line to the single blocks with Liquitex Matte Medium as an adhesive with only a tiny amount applied along the rope from its anchor point to its stropped block. The tarred line appears shiny here because the medium has been recently applied (toothpick as applicator). The small alligator is sufficient to hold the lines (and block) straight, untwisted while coating the rope; the clip holding the block is necessary before applying the matte medium. The adhesive will be nearly invisible when dry and will hold the block and lines in-place. The adhesive on the line nullifies the torsional rotation. Twisting issue solved. I think. I'll see if my fix holds true in the coming days. In the meantime... I shot this photo to check that my sizing for the main course was adequate. Another overall photo with all sails now temporarily mounted. After I assess whether or not any last-minute sail fabrication adjustments or changes will be necessary, I'll proceed with each sail's additional rigging details. In this photo one can clearly see the "twist" to the lines for the mizzen topsail's braces. In fact, this pic caused me to figure something out to address this pesky problem. This said, note that this isn't a problem with the main course's bracing lines to the stern sheaves. I speculate that the thinner the rope and the more taut one rigs their lines, the more likely you'll run into the "twisties." Cpt. Pennypincher has ordered that the stern ensign staff be removed since it will foul the mizzen course as it currently stands. Camilla's getting in good order, quite ship-shape, and with some good weather and a little Irish Luck, she'll be ready to leave her mooring within a fortnight...(or two)

- 542 replies
-
- 14
-
-
-
- Sphinx
- Vanguard Models
- (and 3 more)
-
Thank you, druxey for the information and the link. Elliot was somewhat unique in that he was also a Royal Navy Lieutenant in addition to being an artist/painter/engraver. Viewing a couple of his other paintings revealed to me that he had a very stylized approach to rendering his seas; "choppy" green-tinged water in several of his works. His paintings are heavily varnished (evident in auction photos) and one doesn't need specialized optics to assess this. Several layers of varnish has indeed shifted the color hues beneath the layers, particularly after a century or two of aging! Old varnish (and often shellac) is very yellow-hued, sort of like one's vision before cataract surgery, wherein everything is tinted with an organic yellow filter. I'm visualizing grey/blu water with a touch of green. Thankfully, my vision is post-cataract correction!
- 542 replies
-
- 2
-
-
- Sphinx
- Vanguard Models
- (and 3 more)
-
Yes, this is how I've normally handled this and I was planning to do similarly with this model. This is the first model I've built with the stern ensign staff, so I was a little confused what to do: leave it or take it down? I'll likely remove it, not needed. Your explanation makes perfect sense: it's quite likely it wasn't mounted when underway. Thanks!
- 542 replies
-
- 1
-
-
- Sphinx
- Vanguard Models
- (and 3 more)