HOLIDAY DONATION DRIVE - SUPPORT MSW - DO YOUR PART TO KEEP THIS GREAT FORUM GOING! (89 donations so far out of 49,000 members - C'mon guys!)
×


hollowneck
-
Posts
1,588 -
Joined
-
Last visited
Content Type
Profiles
Forums
Gallery
Events
Everything posted by hollowneck
-
 I like how both models complement one another in your sophisticated, elegant presentation; the table has worked quite nicely in the sitting room also. I believe I’ve spotted a Geoff Hunt print on the right, but I can’t quite make out the one to the left. The Syren capstan is a nice touch. I’d be quite comfortable in this room were I your guest; you’d find me sprawled on the carpet straining to get closer looks🤩 Like many of our colleagues here, I’ll be keeping a sharp weather eye out for the next Blue Ensign masterwork.
- 857 replies
-
- 4
-

-
- Sphinx
- Vanguard Models
- (and 1 more)
-
Thanks for your encouragement, druxey. When I have nothing else to do, I just might attempt to put a 17:00 shadow on one of these dudes.
- 542 replies
-
- 3
-
-
- Sphinx
- Vanguard Models
- (and 3 more)
-
Thanks for the insights on the ensigns, B.E. You share with us an encyclopedic knowledge of the British Navy and her fighting sail. Not mounting a Union Jack is how I've been leaning. The Main T'gallant pennant is a must and will be accompanied by a large ensign at her stern. I did Google for Royal Navy sailors, early-18th-C and the uniforms that appealed to me matched the Captain's. HMS Camilla's dress code is shipshape and - Fashion Forward. As far as the cannon team, I've seen that a couple of the impressed men from Cinderford go shirtless, so their dress will be considerably less formal. 😂 Appreciate your info on the books, especially the Osprey one; I believe what popped-up in my image search was from a page in Nelson's Sailors.
- 542 replies
-
- 3
-
-
- Sphinx
- Vanguard Models
- (and 3 more)
-
Thanks for the good words, Mike - and the fast look-in on this Build thread. I'm getting excited to see the special order carpenter's casing wood arrive so I can begin to address the "box" she'll sit in. There's still a bunch of details (like making/mounting rope hanks), weathering of all the sails and the paper flags so Ive got some things to do before Big Shop Tools start making sawdust!
- 542 replies
-
- 5
-
-
- Sphinx
- Vanguard Models
- (and 3 more)
-
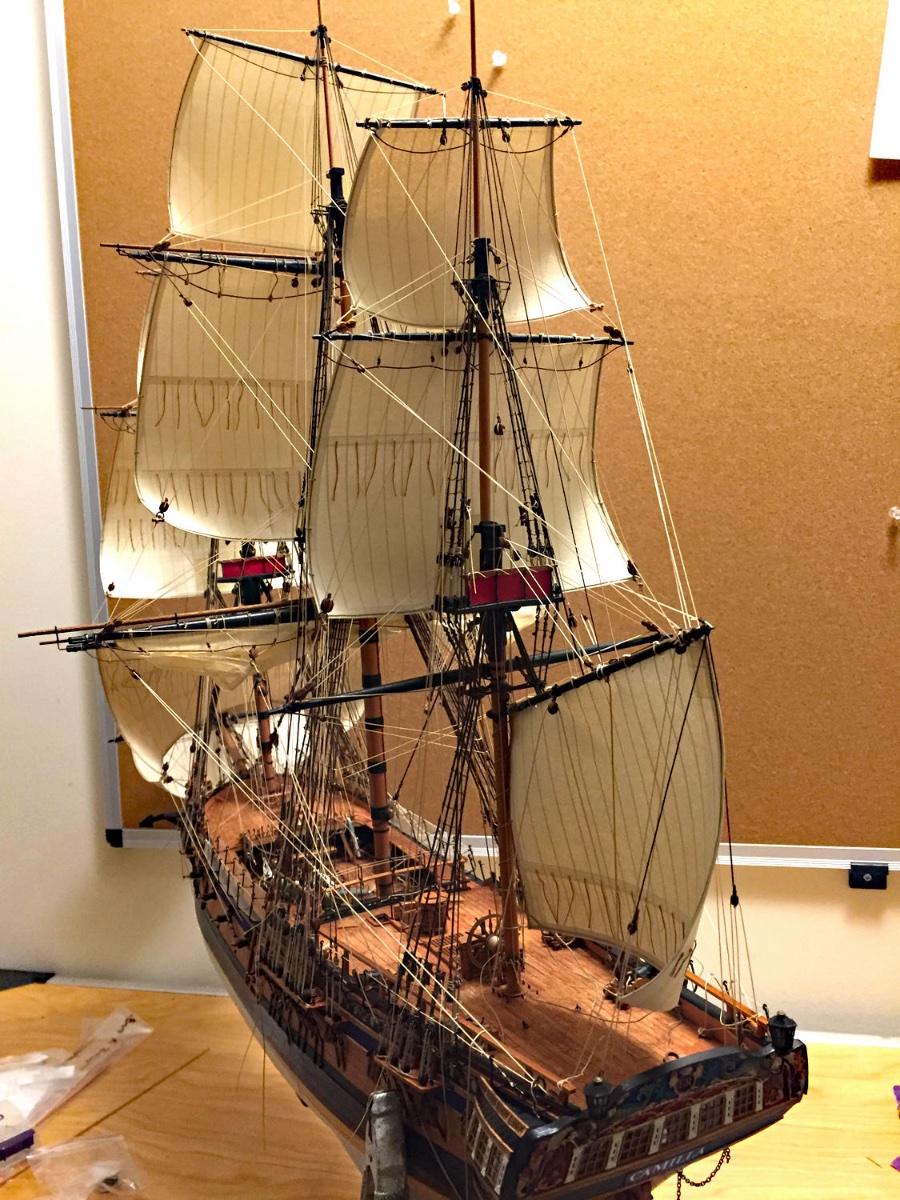
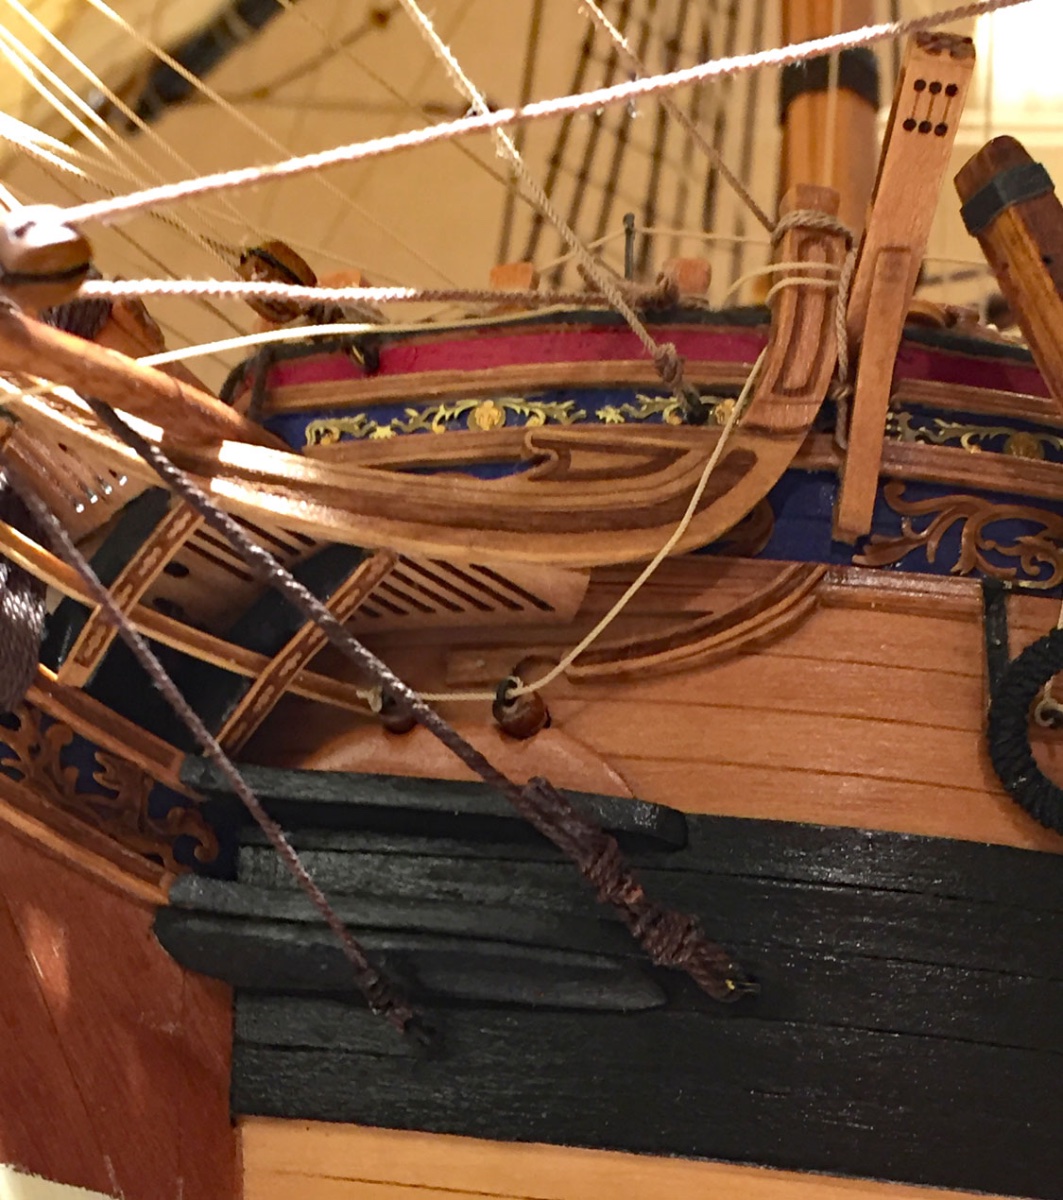
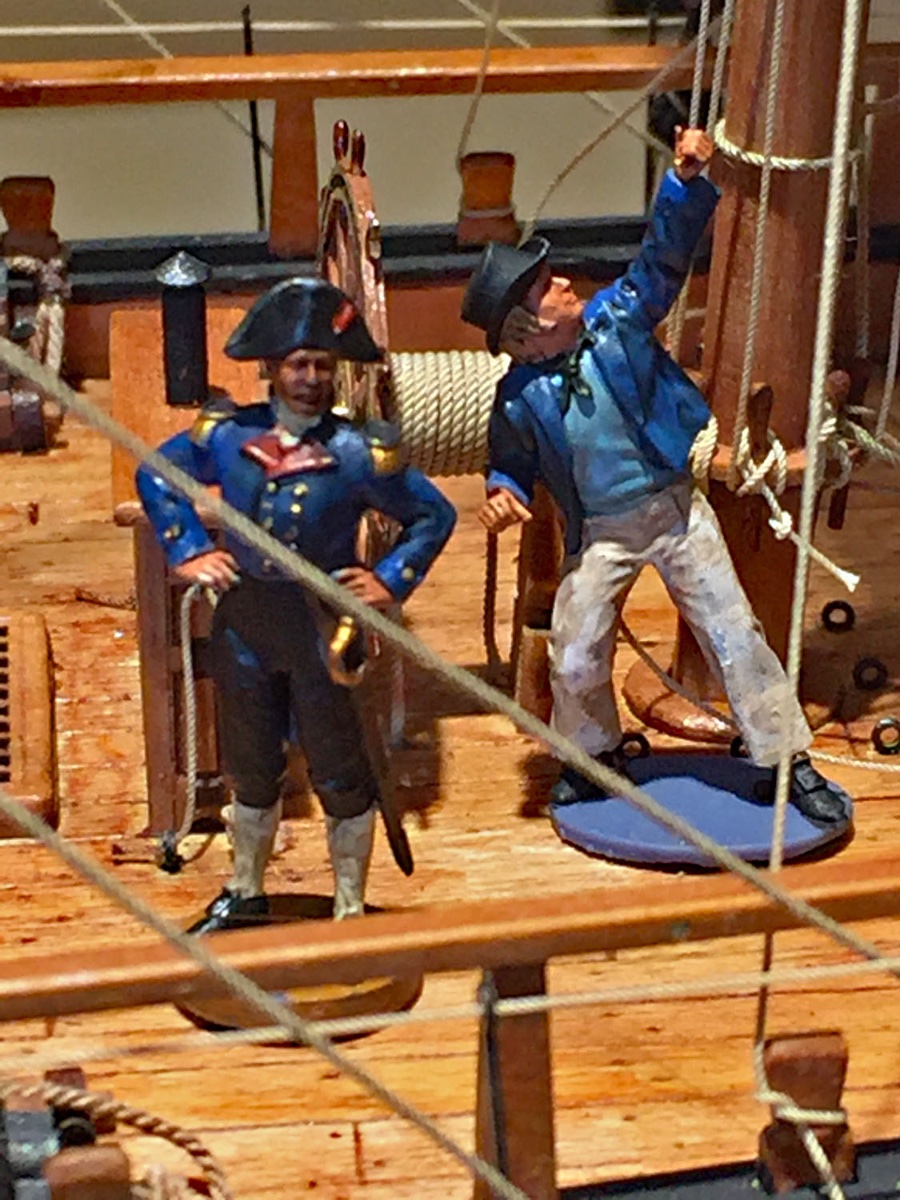
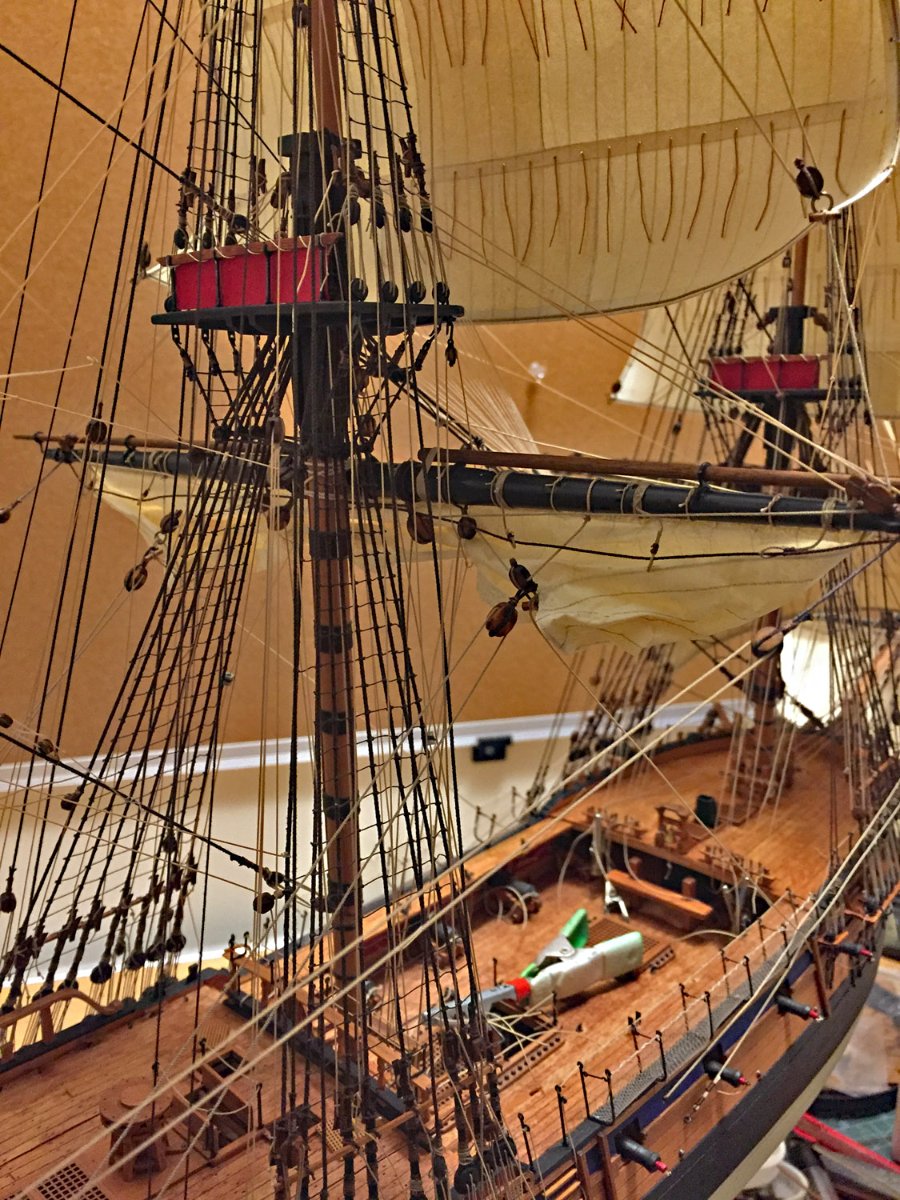
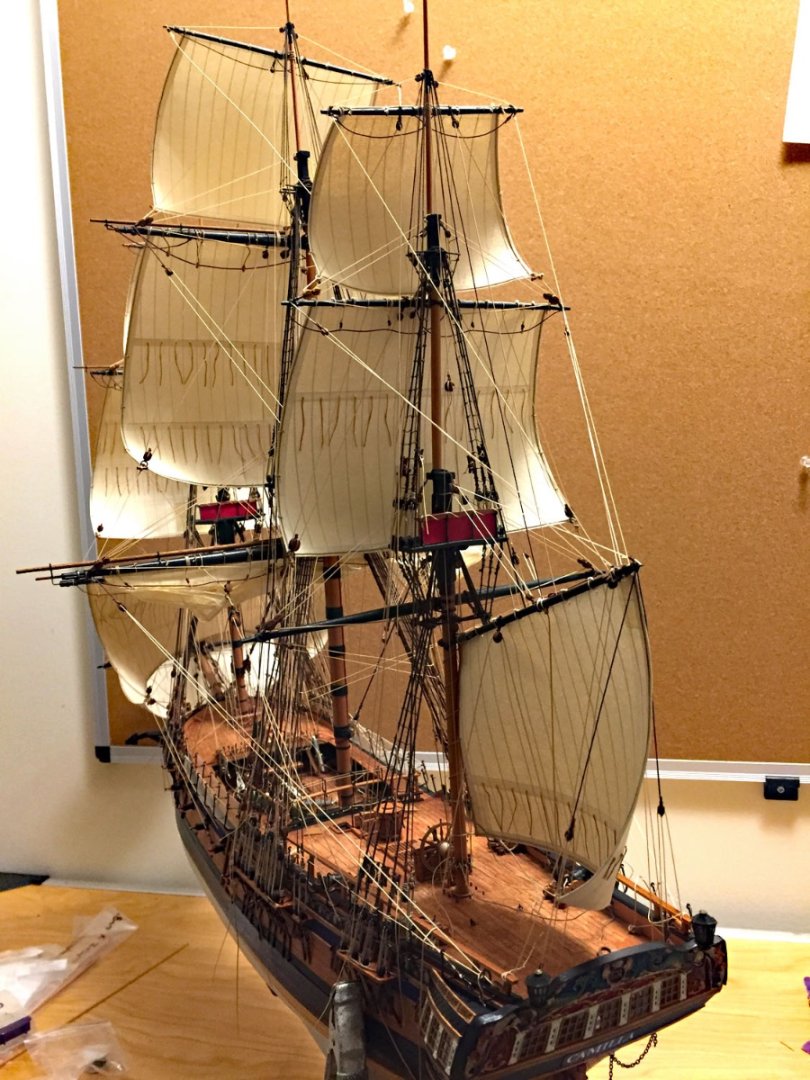
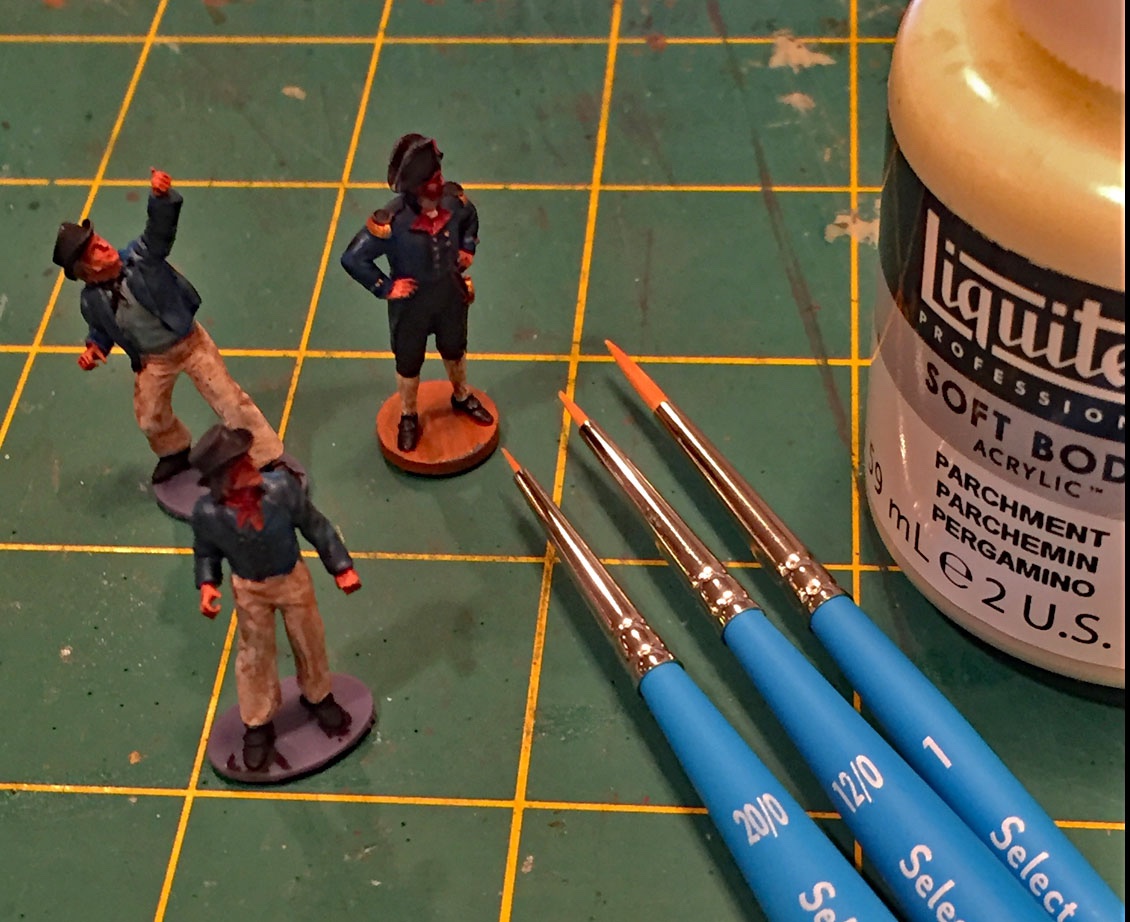
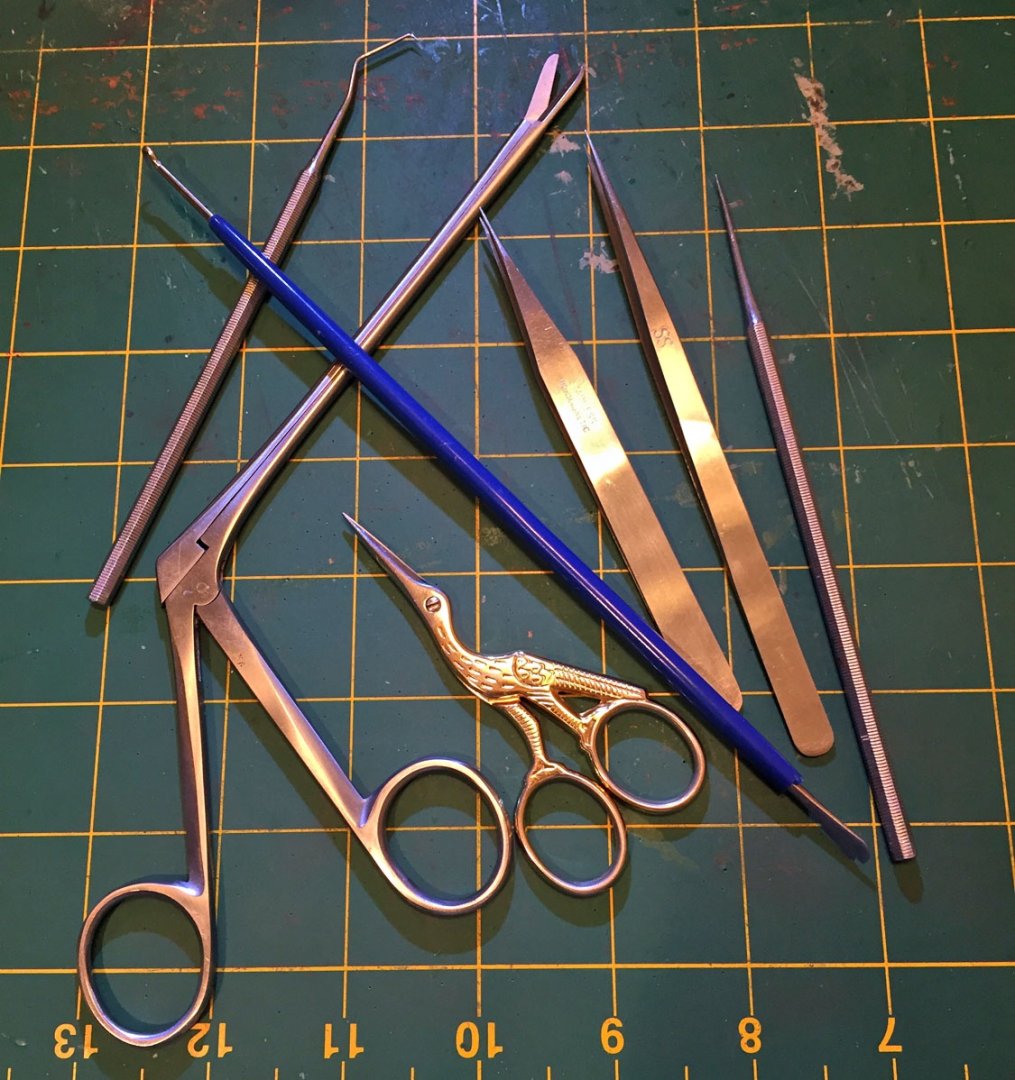
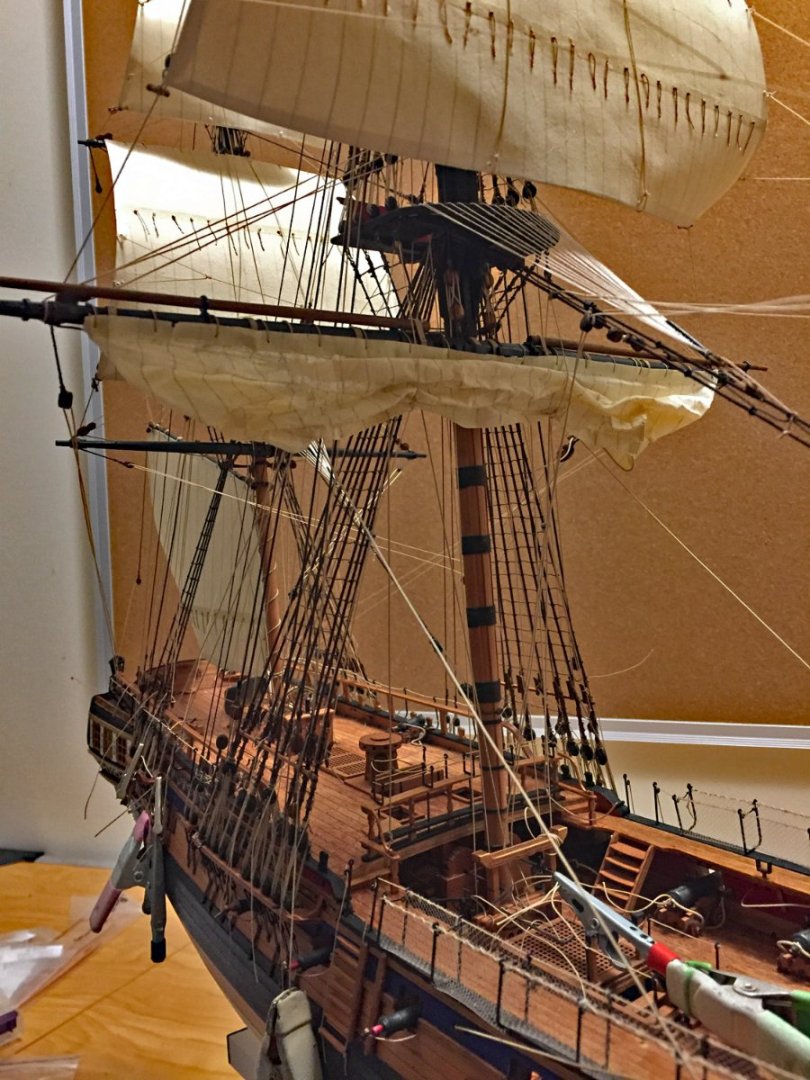
An update on the completion of some details that get me closer to having HMS Camilla ready for her diorama to be made. Some final rigging has been accomplished on the gaff sail at the stern (spanker). I have yet to make the large ensign that will be hoisted on haliards rigged to the gaff yard. The large flag will require a block and tackle to haul it. The ensign staff provided in the kit has been removed; this created the space for the flag as well as the rigging required for handling the fore-to-aft sail. With the rigging of the gaff I've nearly completed all the critical sail rigging; the large array of temporarily positioned ropes - sail as well as running - can now be tightened, battened down and then fixed in place. In addition to a large Royal Navy ensign, HMS Camilla will fly a lengthy top gallant pennant. I haven't decided yet whether or not to fly a Union "Jack" at her bow. The flags will be made from paper and shaped to show the effect of the following wind. After rigging the gaff, the final running rigging ropes were run from the Main top gallant yard to the deck. The bracing lines (adjusting the top gallant's yard for tacking & wearing) require the longest run of ropes on the model. From the foc'sle's forward pin rails to the midship jeers and cleats on the main shrouds, the area is still relatively wide open for finishing all the belaying points. Once rope hanks are made and mounted, the skids and the ship's boat will be returned along with a spare topmast. I thought it might be helpful to show the array of tools I use for rigging. Of course, there are others who will use other tools. For my work, all these long manipulation tools are essential for getting into a myriad of tight spots. There are a few areas where the long surgeon's scissors can more effectively trim a line where the small embroidery ones and fingers just won't fit. Even the dental pick is handy, especially for mounting rope hanks to cleats and belaying pins. ....a follow-up look at how I approached making and mounting the hawse buckler's (large stoppers for the anchor ropes that have been removed). I led a small rope from each buckler pair up to the caprail, both starboard and port. ... just when I needed a break from never-ending rigging*, two sailors showed-up to crew Camilla! I did a little research on the uniforms of the era and I believe I got it reasonably correct. The two "tars" (Royal Navy sailors) flanking Cpt. Pennypincher came all the way from the 3D printing machine in Chris Watton's shipyards in the U.K. The bases on the figures will be removed (likely with a disc sander); retaining them while detail painting is a help. Since my pared-down crew (eight plus Pennypicher in total) is an active one in a diorama, I have taken my builder's liberty to "weather" their clothing. Clean,white trousers and stockings? No way. With figures of this quality, the subtle details of the sculpts can be easily emphasized with finishing "washes" after the principal colors have been painted. After I've let the painting thoroughly dry I'll spritz them with some Testor's DullCote ( a lacquer acrylic) to tone down the "shine" of the paint. A closer look at the Boss and one of his employees. These figures are superbly-sculpted and cast in very fine, high-quality resin. The details are quite extraordinary, right down to facial expressions and details of the hands. But, I do have to admit I couldn't see fingernails or whiskers. There's always room for improvement, right?... I'm happy to say "Good Bye" to the sad Amati crew from the 70's....and, there are rumors that a Vanguard six man gun crew is about to board ship. And the brushes needed to paint these 28mm (1:64 scale) figures: a 20/0, a 12/0 and a #1 round pointer brushes. Small acrylic bottle for scale. * never-ending rigging. Yes, it seems at times that I'll never see the end of the rope(s)! The Truth is that I do like this stage of building. But it is quite draining, especially on the eyes and the steadiness of my hands and fingers. Only a few hours at a time is how it works for me. Taking a break to work on something else keeps my sanity - and fun - a thing of delayed gratification. I believe anyone on this forum who rigs sailing ships of any era or variety won't have a problem with this sentiment..


- 542 replies
-
- 20
-
-

-
- Sphinx
- Vanguard Models
- (and 3 more)
-
Tis’ a thing of beauty, Sir. Congratulations and kudos. Your build has truly been an inspiration for many of us.
- 857 replies
-
- 4
-
-

-
- Sphinx
- Vanguard Models
- (and 1 more)
-
Welcome to our community,Jack. You’ve made a great start with getting your materials lined-up for your build. I have no problem with you posting photos from my Build Log on yours, especially the materials and various tools and techniques I use. The photos of some components to your Polaris model look well done. You’ re off to a very solid start. Everything you’ll need in the way of information for your ship modeling journey is right here - including a very supportive membership that will be eager and responsive to lend plenty of advice when and if you ask for it.
-
Your model is looking good. Nice job on your hull plating, a very difficult and fiddly task. I've been dealing with my model's sail belaying for the past month. There is not a lot of information on the specifics of where and how sail management lines get rigged on a 17th-C, three-masted frigate. Detailed sail and belaying plans for frigates are also in short supply!
-
A brilliant "foot (& peg leg) - ectomy" surgery to your cook. He'll still hit his head on deck beams but I'm certain there were other more lethal hazards working in the ship's galley! BTW: Horatio Nelson was 5'6", so was Churchill and Hitler. Napolean was rumored to be 5'2". 250 years ago people were, on average, much shorter. You know, like Vladimir Putin, who is 5.3" and shrinking daily... I'm very tempted to start painting my crew for HMS Camilla. There will be no cook on HMS Camilla: she has a solar-powered microwave in the First Officer's cabin...
- 857 replies
-
- 6
-

-
-
- Sphinx
- Vanguard Models
- (and 1 more)
-
Bravo, B.E. Looks good- and you needn’t change her badge to HMS Porcupine. Also, there will be no excuses now for losing a drunken sailor over her side! 😉 …every time I sit down and look at my model, I see things that need touch-up… Dust: I keep a can of compressed air handy and it works a treat. Prior to final photography, I’ll give my Camilla a Force 5 blast.
- 857 replies
-
- 3
-
-
- Sphinx
- Vanguard Models
- (and 1 more)
-
Congratulations,Chuck. Your unwavering focus on quality (and fidelity) is an inspiration to many, many members of this forum. You have truly given so much of yourself, to so many. I know I am not alone when I personally say ”Thank You” for all that you have done to elevate our hobby.
- 1,784 replies
-
- 8
-
-
- winchelsea
- Syren Ship Model Company
- (and 1 more)
-
I think your model will look great with ropes on all the cranes/stanchions, even on the breast rail. Context and all that, a "finishing touch." Without ropes, I think they'd look odd: black prickly bits randomly popping-out of her hull. That would guarantee you'd get puzzled queries from onlookers... Thank you kindly B.E. for your commentary on my build photos as I complete my sails and rigging. I agree they do show the complexity - and frankly, the "beauty" of fighting sail. Macro shots are now required for most of my rigging photos since there is so much in each photo to see. I've tried to make viewing easier in some by adding pointers and circles to illustrate my descriptions. I agree: my Foretack is going to remain as-is. However, my hauled Mainsail has "hit the bullseye" (courtesy definition from @druxey for what I've called "rigging trucks"). Thanks for allowing me to "invade" your Build Log by responding to your post on mine.👍
- 857 replies
-
- 3
-
-
- Sphinx
- Vanguard Models
- (and 1 more)
-
Thank you, druxey. Can I claim I've "hit the bullseye(s)?"
- 542 replies
-
- 3
-
-
- Sphinx
- Vanguard Models
- (and 3 more)
-
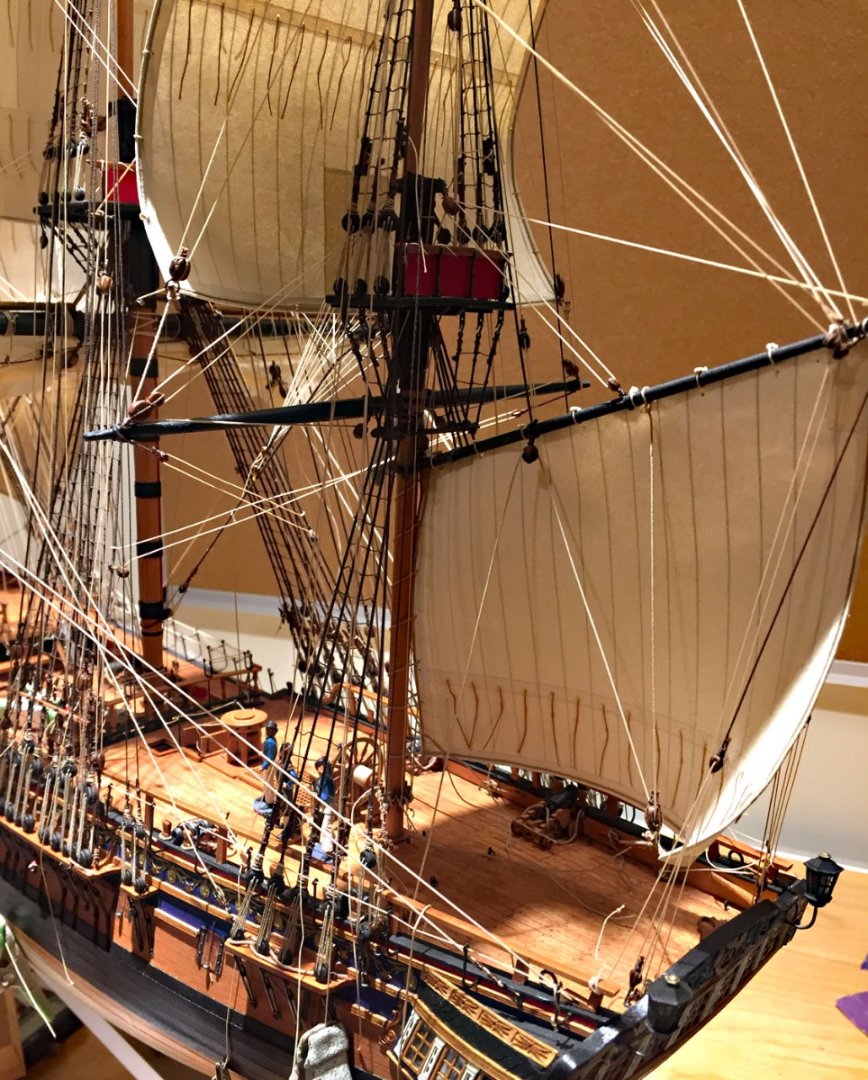
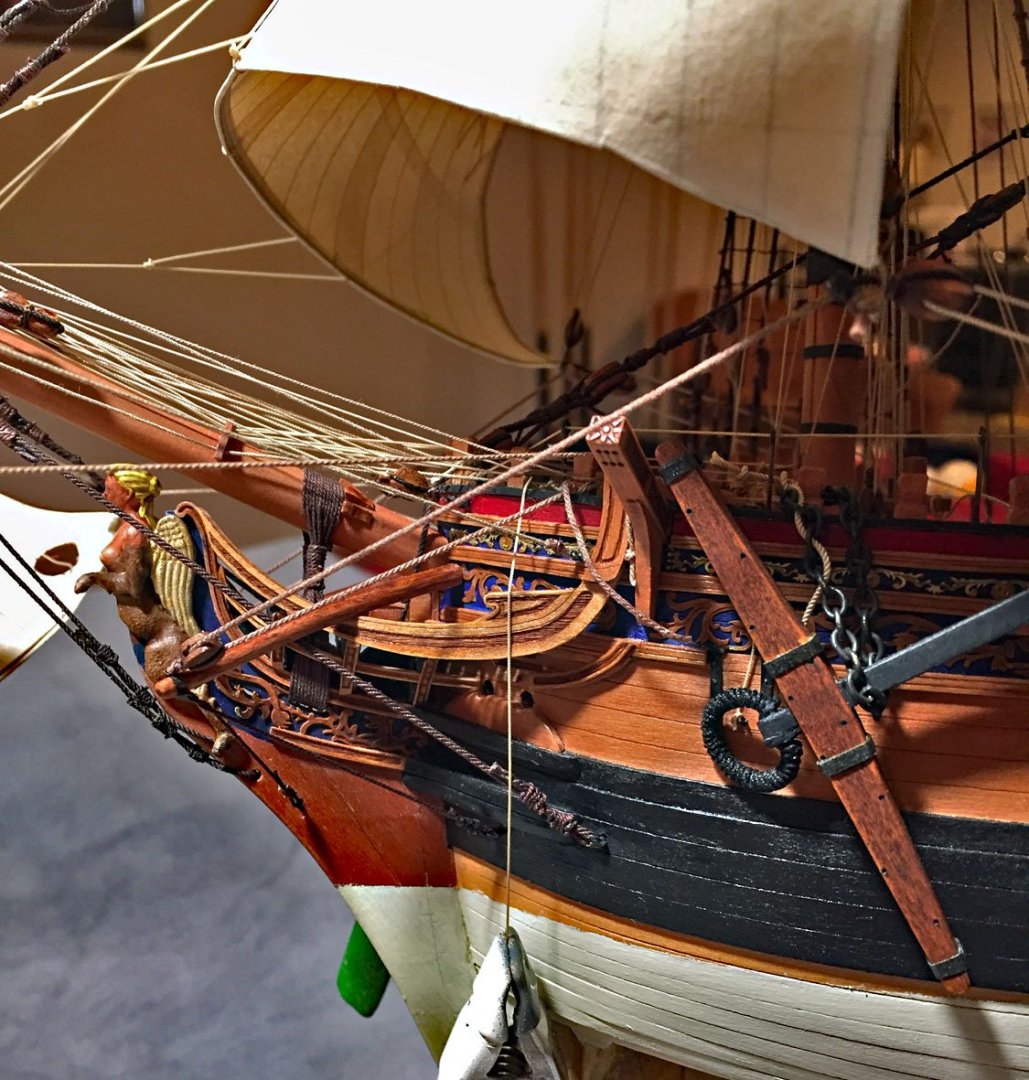
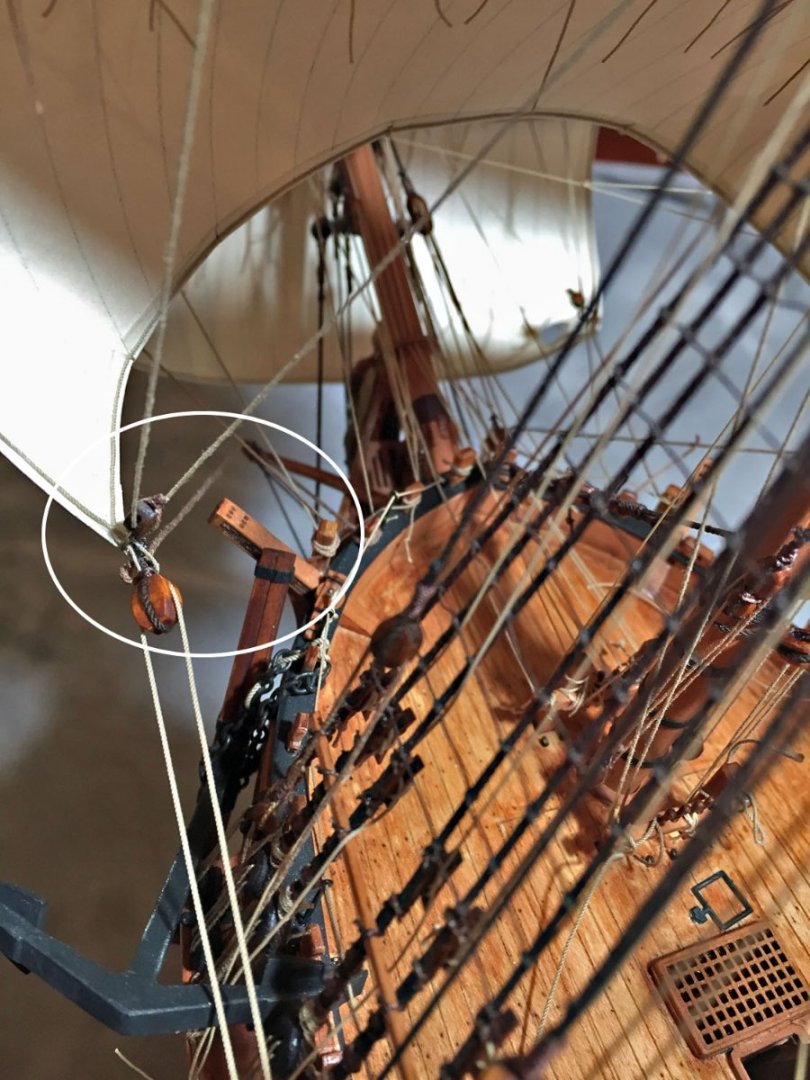
Nearing the finish line on sails and their rigging. Some small changes, diversions (improvements?)... I've removed the hawse cables and mounted a bower anchor. The hawse bucklers (plugs for the thick anchor rope openings) are yet to be scratched and inserted. The Fore course tack rope is very close to the cathead, yet it does lead fair to the boomkin block. This is because the foresail is hauled up against the wind which draws the clue and tack inward. The boomkins should extend further and thus be a little longer. Oh well...next model. The sail rigging necessary to present a hauled Main course is completed. The two bunt lines (center of sail) are rigged to blocks added to the top (like the additional foretop rigging for the Fore course) )and then led down to the deck through shroud "rigging trucks." I'll carefully paint these in a brown acrylic as I think these were made of wood, not iron. These were not supplied with the kit, but filched from my vast stash of rigging gubbins....I know, another 17th-century technical term... The sail's tack rope hasn't been rigged yet in this photo. When rigged, the tack line, (leading fore), will help gather the dangling clue corner of the sail more upward and closer to the yard. The Main Course is hauled and both tacks lead to the mid-deck bulwark cleats. Now that sail rigging is complete, I'll adjust and secure all the lines at the midship's jeer blocks and various shroud cleats. The fore topsail's yard bracing will be done last in this area of the model owing to the limited access after the sail rigging is cinched-up and done. In the log, I've somehow overlooked mentioning that my Maincourse shown here was made from silkspan in roughly half the actual length of the sail to allow a better and more natural depiction. I did mention however, that unlike all my other sails, this Maincourse was created from a single layer of colored silkspan with reinforcement linings and partial bolt ropes at the clues. As a result, the single layer is more translucent, but to my eye this isn't a deal-breaker by being highly noticeable or incongruous. A view of the hauled Main course from the starboard stern. Clue, sheet and tacks have brailed the gathered sail close to the yard, but the sail won't be "gasketed" (tied tightly to the yard with additional ropes) since Camilla is in "fighting sail" configuration. The outline of the added bunt line tackle block that permits the bunt ropes to gather the large sail at the center can be seen at the very corner of the top. Like the Fore top buntline blocks, these two blocks are 3.0 mm stropped, single-sheave ones.


- 542 replies
-
- 18
-
-
-
- Sphinx
- Vanguard Models
- (and 3 more)
-
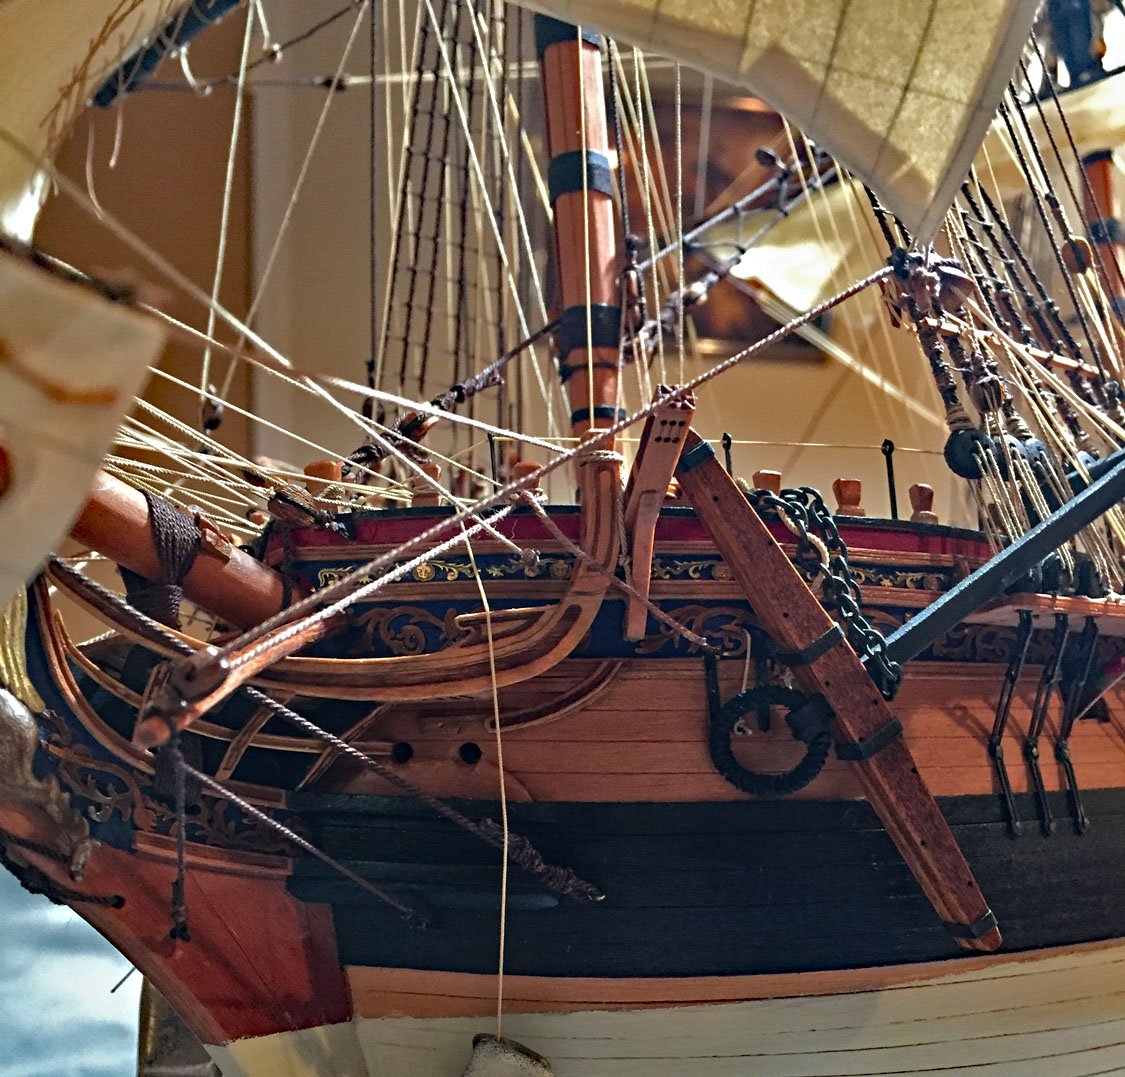
The berthing rails and deletion of the boomkins are very nice "additions," B.E. Will the brass rod alignments of her cranes be replaced with rope? A few posts ago you asked about my sail rigging on the main fore of my Camilla; your query makes perfectly clear sense to me now! Here's a couple photos of how CLOSE Camilla's foretack comes to getting tangled-up with the cathead. Admittedly, this is the worst-case as the sail is tightly-hauled. Foretack-to-boomkin; close, but no cigar. The tack line clears, but not by much. I agree with your making the boomkins a longer extension, however I'm NOT re-doing mine since the rig runs fair. Next model...
- 857 replies
-
- 10
-
-
-
- Sphinx
- Vanguard Models
- (and 1 more)
-
Here, here. I second that (e)motion! Really good improvements to the model engineering of this challenging part of any period ship build. Investment in Indy...we're getting very close to pounds for dollars. Us lucky Yanks!
- 488 replies
-
- 5
-
-
- Indefatigable
- Vanguard Models
- (and 1 more)
-
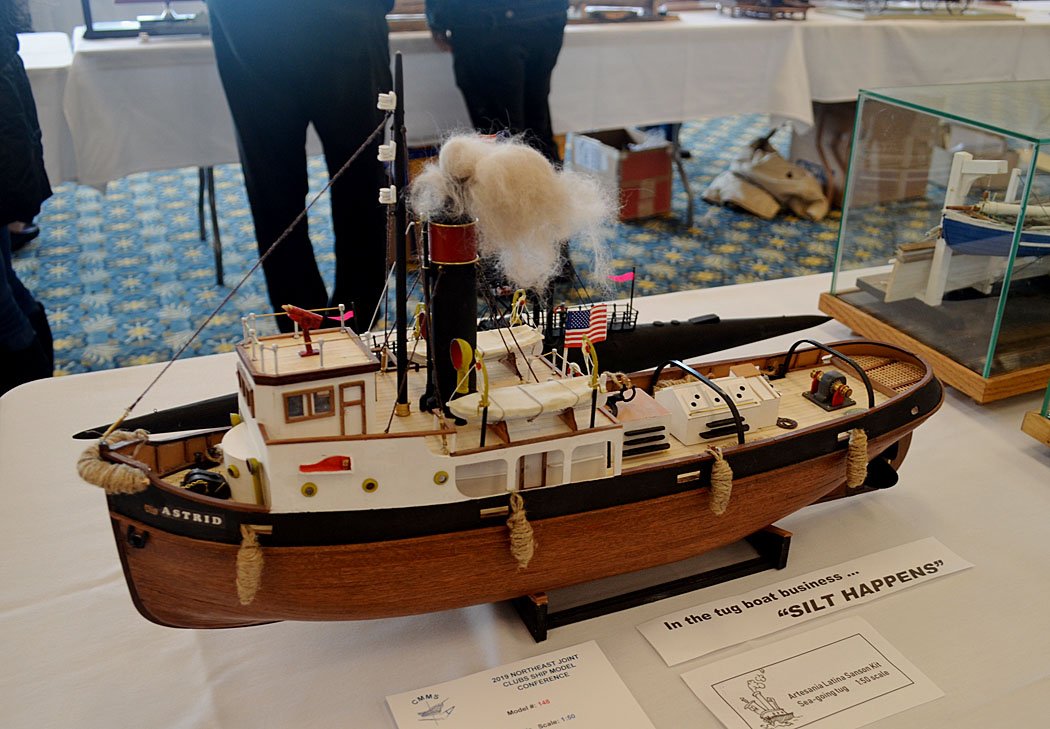
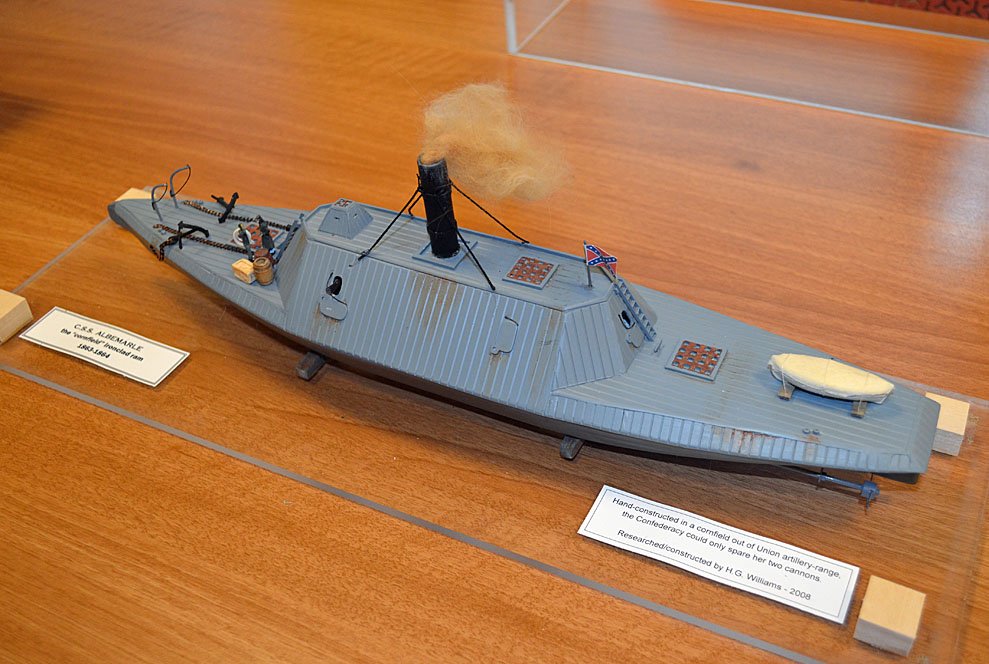
"Wakey, wakey, pussycat"... Model ship builders in the house! Model by Howard Williams, CMMS (Connecticut Marine Model Society), 2019. Tug smoke courtesy of his "mature"feline. Another model by Howard Williams, CMMS 2008. Ironclad smoke courtesy of Howard's younger kitty. Photos: courtesy of me. Apologies Mike. Is this hijacking your thread?...
-
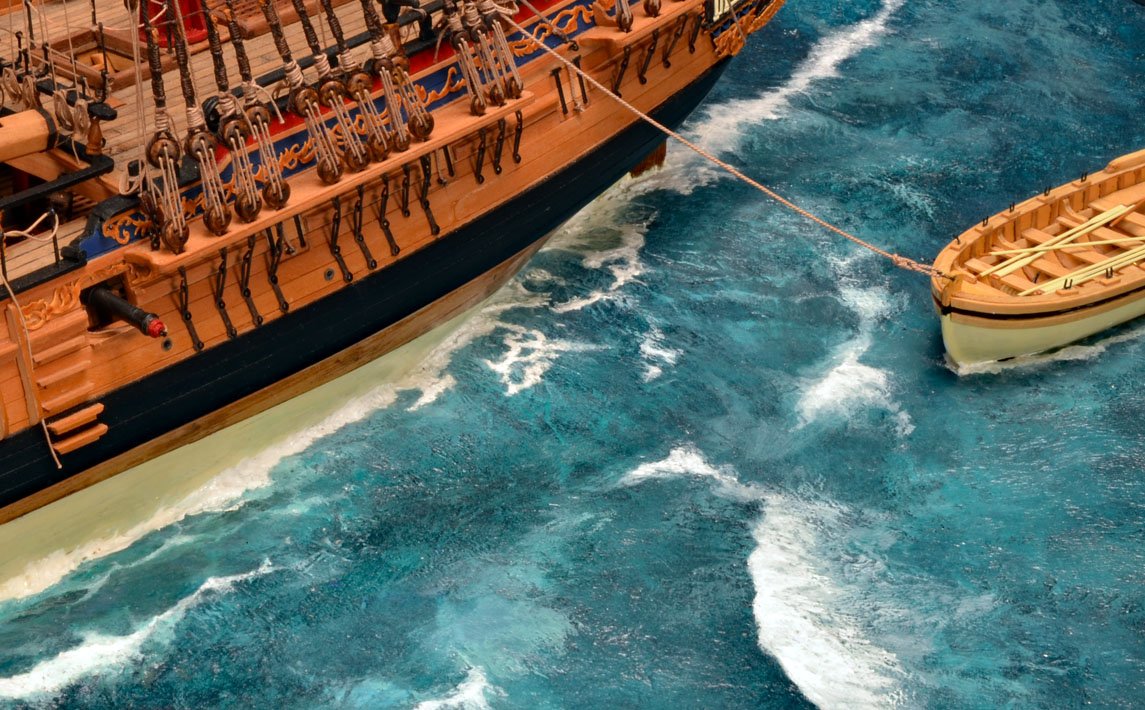
Indeed...Holy Smokes!...you got your boiler tenders doing their jobs! Aha. Interesting. I haven't tried any medium with TP, just diluted white glue & water. I used toilet paper (single-ply, important!) on my HMS Swan diorama to get the effect of wind moving across a water's surface. Attached is a close-up where you can easily see the effect of the minute "crinkles" produced by the toilet paper after it had thoroughly dried but before any color/painting. If you'd like, the pic has enough resolution so you can zoom in closer for details. The water surface effect is especially visible near the towed boat. You've gotten plenty of well-deserved "High Fives" on your model. Congrats (again). Great job.
-
Congratulations, Glenn. As we all know, it's BOTH the journey AND the destination! You've persevered and arrived with an admirable model.
- 476 replies
-
- 3
-
-
-
- sphinx
- vanguard models
- (and 1 more)
-
Mike, I've discovered that regular, bog-standard cotton balls are hard to work with in fashioning smoke, and in my particular experience, making "sea spray." The solution, ironically, is to use synthetic cotton balls, specifically created and sold as "medicinal cotton balls." Sheep have never come near them. A synthetic, possibly nylon, rayon - or even Biktarvy or Ozempic. The medicinal cotton is easier to work with, can be painted easily and various glues (and hair spray) work well once you've "teased" it into a convincing-looking shape. Hope this helps with the next one. I've got a diorama coming-up soon and I'll likely use this exact same material for some sea spray at strategic spots where my ship's bow is smashing into some big rollers! BTW: I had to buy a large bag of 1,000 to get two medicinal balls for my last diorama. If there's a supply chain problem at your end, just give me a shout-out; I can spare one or two for an MSW buddy.
-
Thank you for looking-in, your compliment about my sails, Shipman. Much appreciated. I'd like to note that my Chris Watton designed, early 21st- century Caldercraft kit model of HMS Agamemnon came complete with copper-plated golf balls fastening her copper plating. I didn't even pay extra for this detail. You may be unaware that this HMS Camilla build will be presented in an English Channel action diorama. I also agree that it strikes me as incongruous seeing a ship with sails set yet sitting on a plinth. This information dense forum is a formidable one, indeed: chock full of important details that can be easily overlooked, or just missed.
- 542 replies
-
- 6
-
-
- Sphinx
- Vanguard Models
- (and 3 more)
-
B.E., ...and here I thought you'd never ask. 🤣 I love it when you talk to me like this...simple answer: "No." It's a close call though. I'll take a pic and post it. The more difficult rope positioning is going to be the tack on the hauled Main course once I get the sail's bunt folds properly fiddled.
- 542 replies
-
- 2
-
-
- Sphinx
- Vanguard Models
- (and 3 more)
-
Thanks, Mark. The first battle is happening in my workshop! To the Victor Go the Spoils! - or, is it the other way round?
- 542 replies
-
- 1
-
-
- Sphinx
- Vanguard Models
- (and 3 more)
-
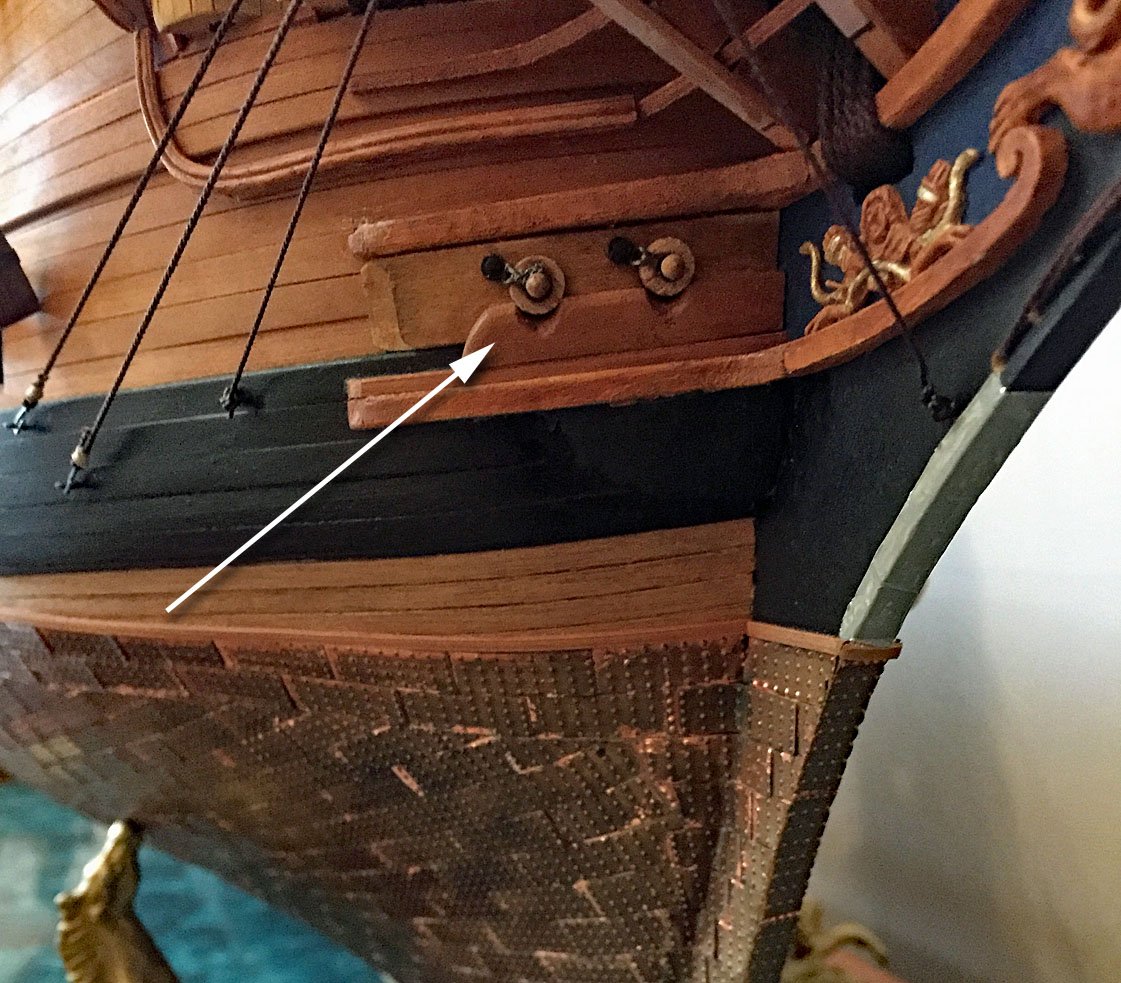
Small update: yet another diversion from my sail mounting... I've removed the anchor lines (hawse ropes) from Camilla due to her inclusion in a diorama on an "action chase." I'll fit her with a variation of what I did several years ago for my model of HMS Ardent (64) shown below. The "stoppers" in her bow's hawse rope openings were called "Hawse Bucklers." I haven't yet discovered a detailed explanation of how these were constructed but I imagine they had to have a suitable mechanism that allowed them to be released from inside the ship and that they had to be quite water-tight to be effective: sort of like a big cork that could be easily pushed out to clear the way for a big, fat rope. My photo also shows a lead sheath that protected the stem's cutwater. Ships that were anticipated to be in action had to protect this area as there was often lots of floating bits encountered that could damage the hull if not protected. Aside: Ardent's coppering has taken on a nice brown patina after 8 years of oxidation. I could touch-up some of the shiny bits with a weathering chemical to even out the look but I've got a few other items on my modeling punch list at the moment...
- 542 replies
-
- 5
-
-
- Sphinx
- Vanguard Models
- (and 3 more)