hollowneck
-
Posts
1,591 -
Joined
-
Last visited
Content Type
Profiles
Forums
Gallery
Events
Everything posted by hollowneck
-
 Good point. I'll certainly have all the anchor bits n' buoys mounted, including the possibility of adding an anchor lining. I thought about this possible addition as I was rigging the deadeyes...I did add a centre-deck spanshackle, so the crutches make more sense. How do you plan to handle the masts? Stubs with broken wood? Angled tops? A fellow artist/builder would like to know! Cheers!
- 857 replies
-
- 5
-

-
- Sphinx
- Vanguard Models
- (and 1 more)
-
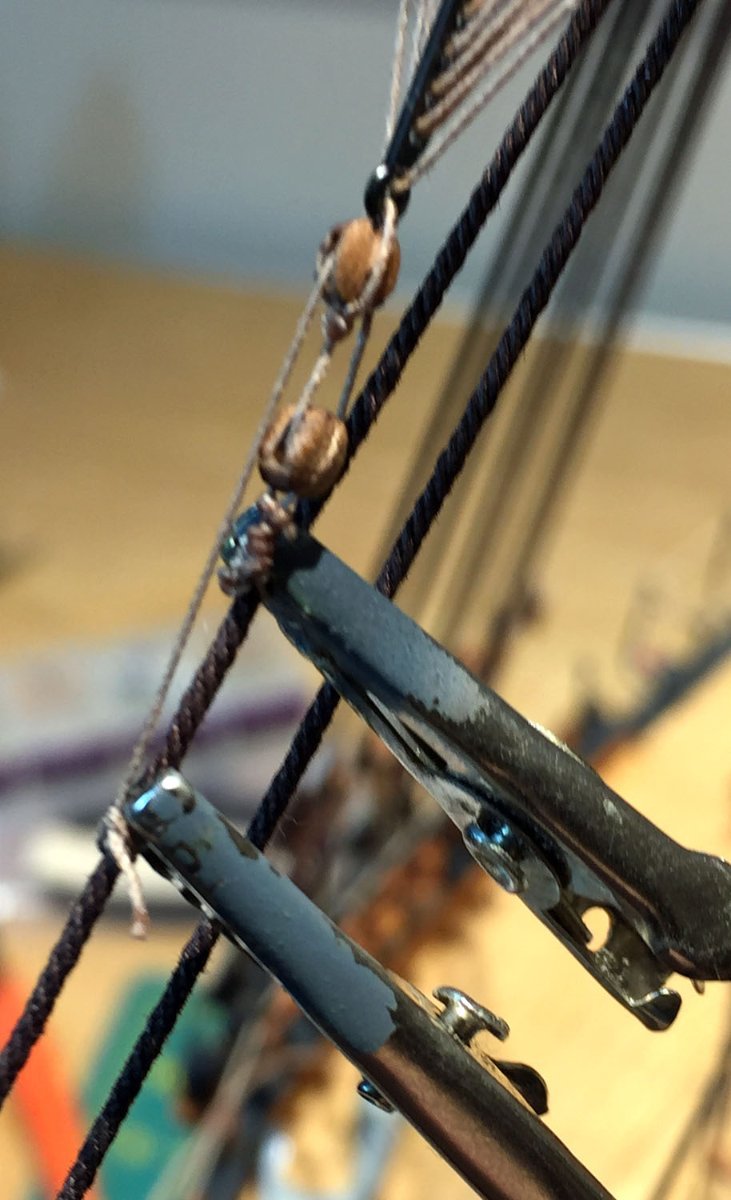
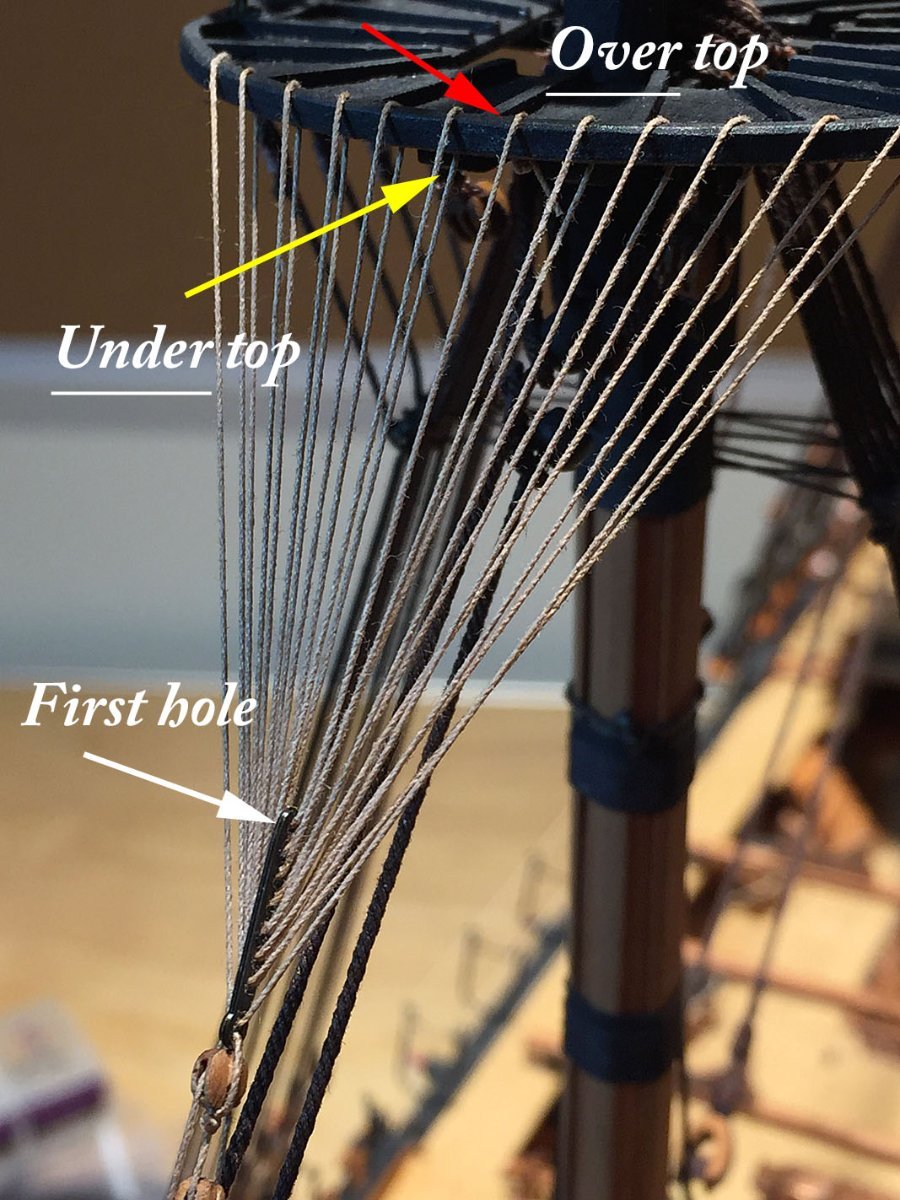
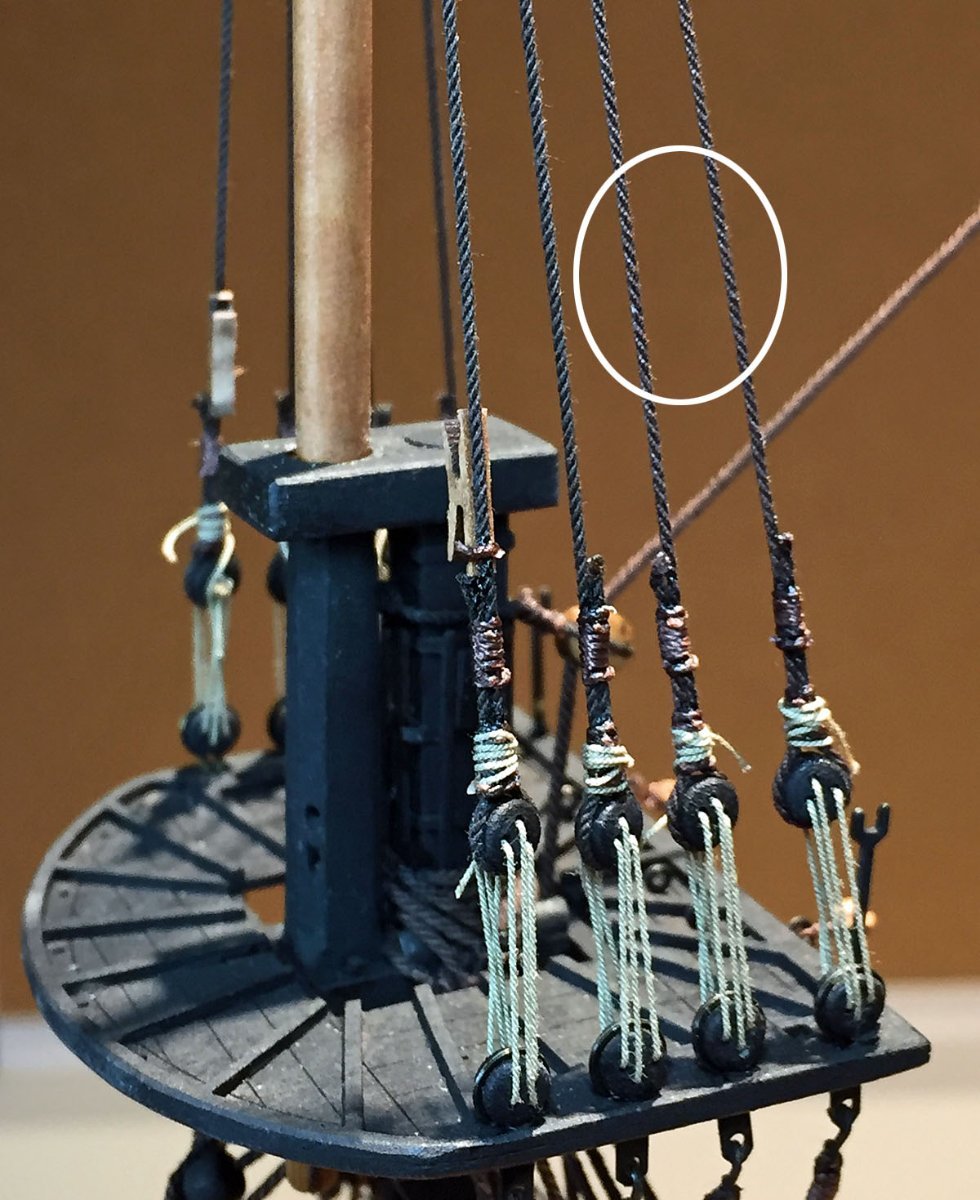
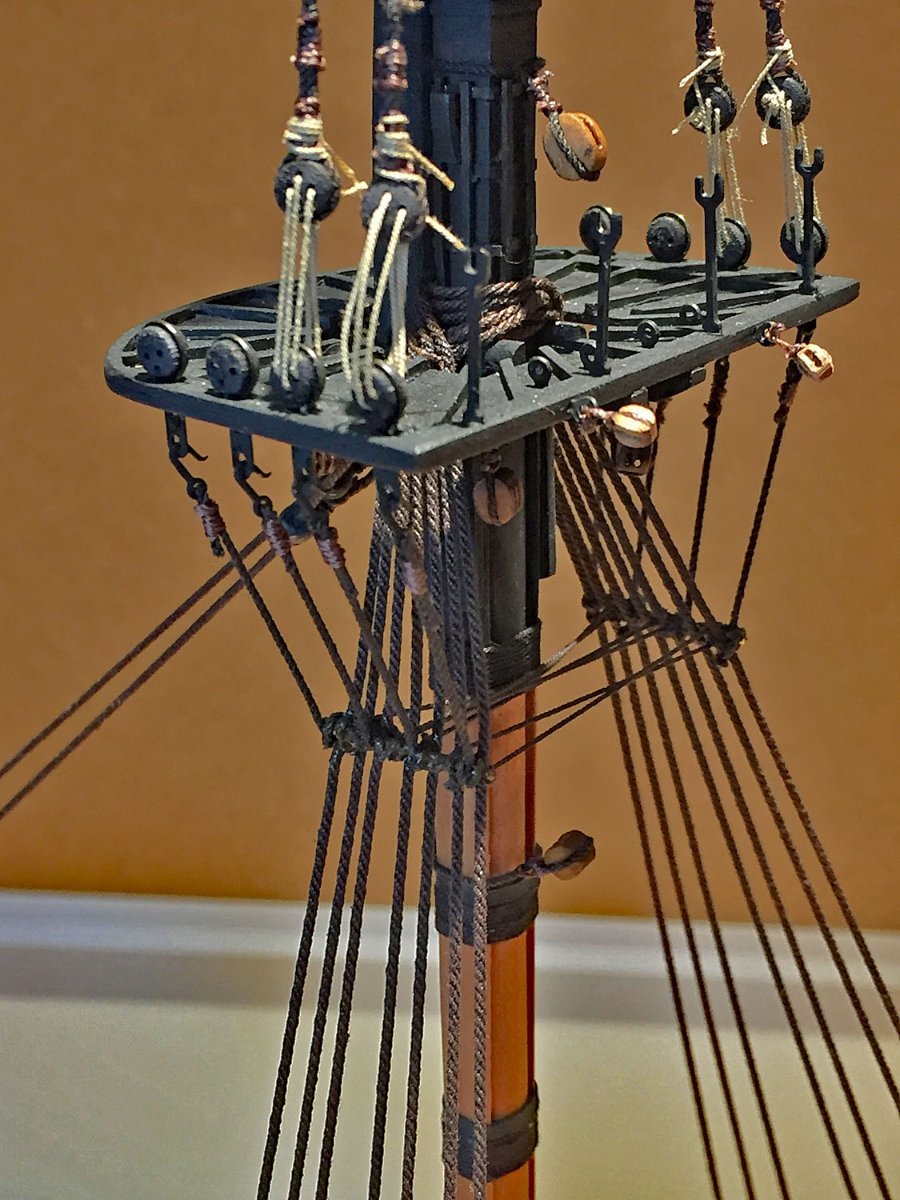
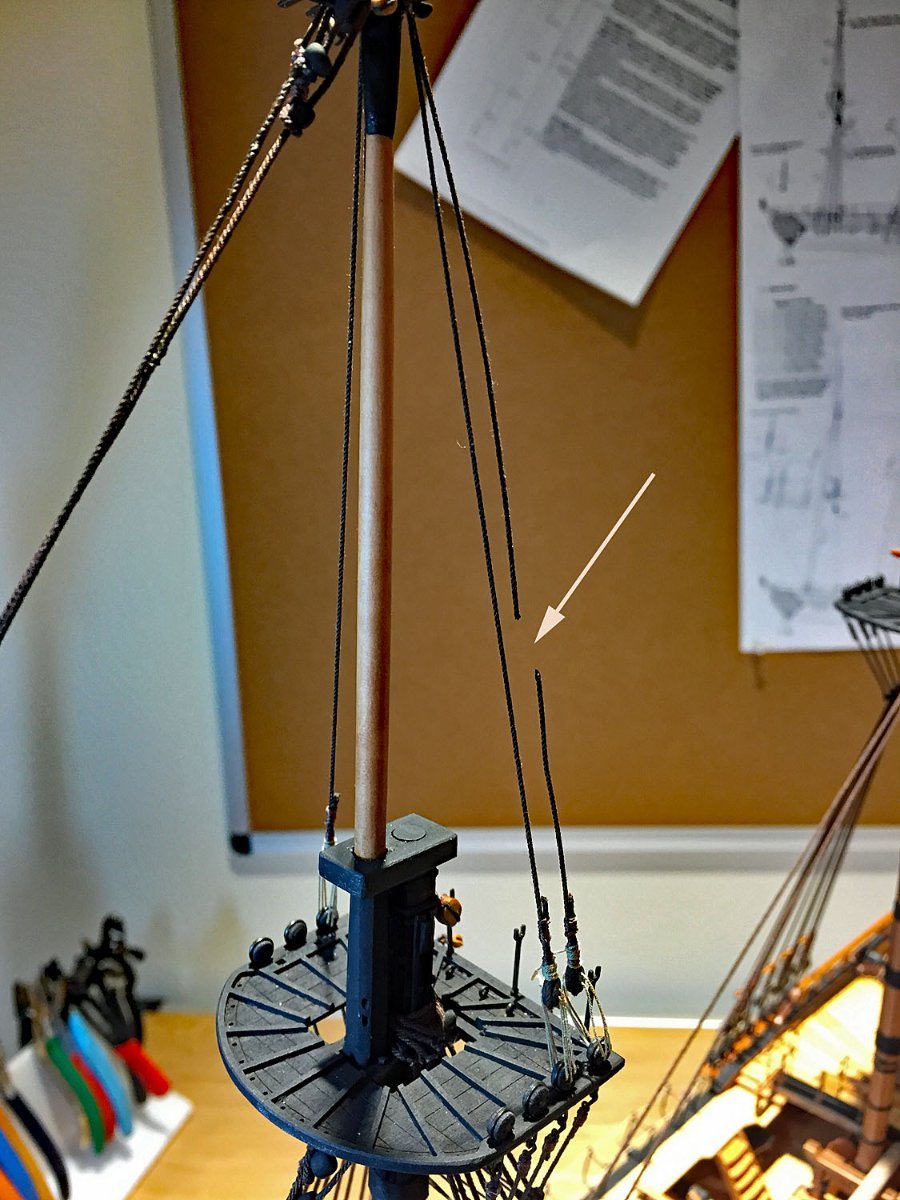
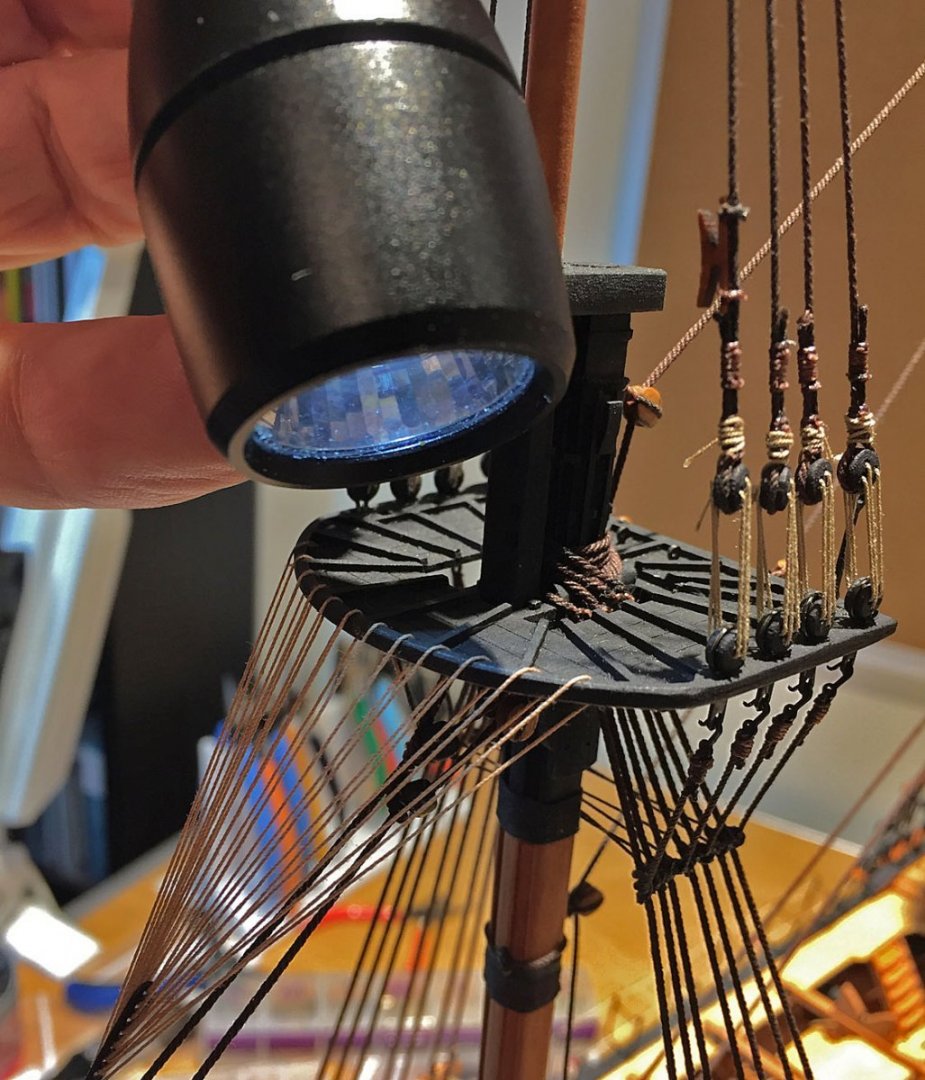
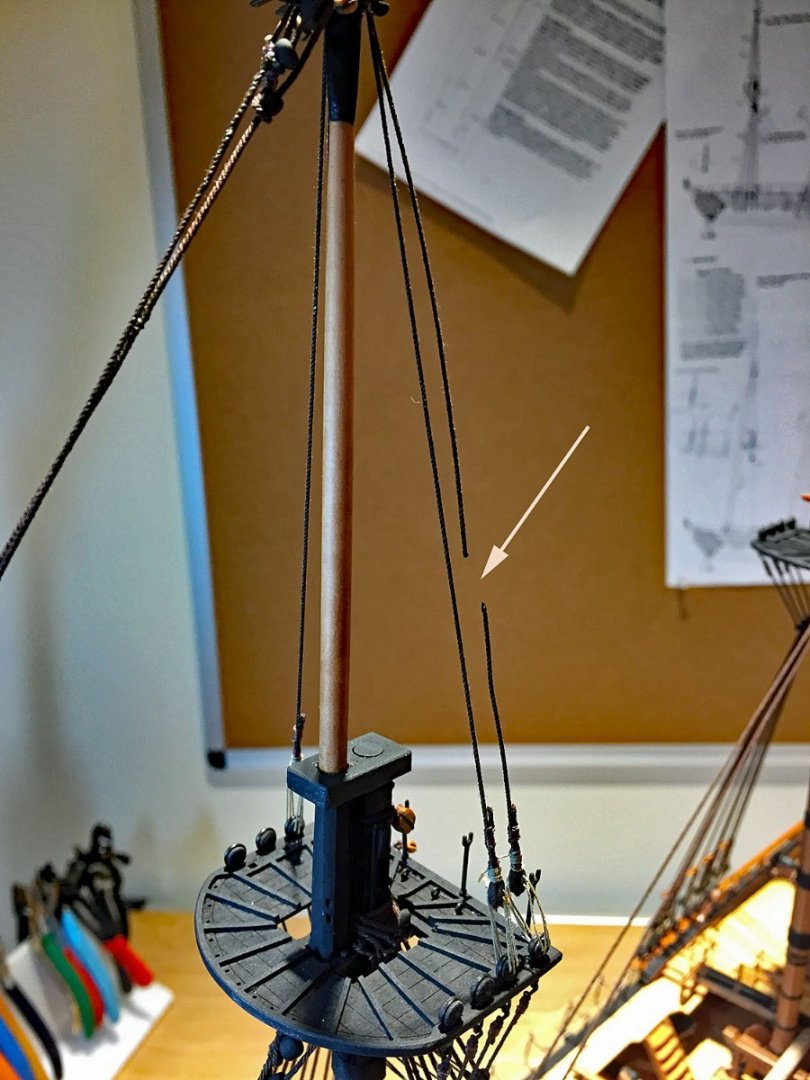
Rigged the crowsfeet to the foremast. PLEASE IGNORE THIS PARTICULAR PHOTO'S INACCURATE ADVICE! (jump to the next thread in this log). BUT THE OTHER TWO PHOTOS BELOW ARE HELPFUL. Rigging the crowsfeet can be tricky. Before running the continuous, laced line into the top and down to the euphroe block, I start with securing the euphroe tackle to the stay (see closeup and description of this below). After lashing the two blocks with their lines to the euphroe, I position both on the stay and temporarily clip them into place do they don't slide around when subsequently tensioning the lines from the euphroe to the top. To determine how much line to allow for the crowsfeet, measure down to the eurphroe block from the edge of the top and multiply this length by the number of holes you'll feed the rope to the top. I add another 2 or 3 inches. In this example, I had a total rope length of approximately 42." There were twelve runs to the top. The distance from the euphroe lashing is about 8-10 feet from the stay to the edge of the top. This will be a long run of rope that can easily get fouled in other parts of your model. Proceed appropriately. My crowsfeet line is "beige" (natural hemp color) line that is nominally .20mm dia. This is roughly equivalent to 1/2" diameter rope at full scale. For reference, the main propose for the crowsfeet was to protect the foot of the topsail from becoming worn and fouled on the tops. In the above photo, I've indicated the beginning sequence to this rigging, starting with the line entering the hole on the top at exactly the midpoint (in this case, the first hole to port, close to center), the Red arrow. Tie a stopper knot in the line after it is pulled through the top's hole so it stays secure for the balance of the rigging. You can trim this down after the full run is completed. Next, run this line to and through the FIRST hole at the closest end of the euphroe block (white arrow). Now, run the line back up to the top to the first hole on the starboard side, UNDER and through it (the yellow arrow). The balance of this "lacing" is straightforward, running in sequence, alternating port-to-starboard and along the top, filling all the holes in the euphroe. Once the line is fully rigged, you'll likely need to even-up the tension across this array of lines; I use my needle point tweezers to finesse this step. You want these lines to be taut but not so much that the mast stay is pulled upward from too much tension exerted by the euphroe tackle lines. Here, I'm showing how I use a small flashlight to illuminate the tiny holes in the top from my hand position above it. The crowsfeet rigging progresses upward, under the top - trying to poke a .20mm diameter rope into the holes is an exercise in extreme patience, particularly when the top is painted black! The light shining downward helps immensely to see where the rope needs to enter upward through the tiny holes. I use my needlepoint tweezers for this task. TIP: Don't try to rig crowsfeet without making the end of the rigging rope stiff with glue first - just a tiny amount ( I use CA) so you create a "needle" point on the end. You'll trim this glue-hardened end off later. BEFORE you start threading the lines between the top and the euphroe block, secure the euphroe tackle at two points as shown in this photo. I use my smallest alligators to hold the lines in place. This keeps the assembly from slipping upward from tension on the rigged euphroe block, and, if not secured - TEMPORARILY - you'll wrestle with attempts to get the proper results that the rigging process requires. Once you've tied-off the full crowsfeet run to the top, you can remove these clips and affix the best position of the two tackle lines on the stay and apply a drop of glue so the tie points don't move or slacken: you may need to "slide" these tie points up or down a couple millimeters to accomplish the best tautness to the lines. For reference, these two tackle blocks are 3 mm single sheave, pear. The line is the same .20mm line used for the crowsfeet.


- 542 replies
-
- 14
-
-

-
- Sphinx
- Vanguard Models
- (and 3 more)
-
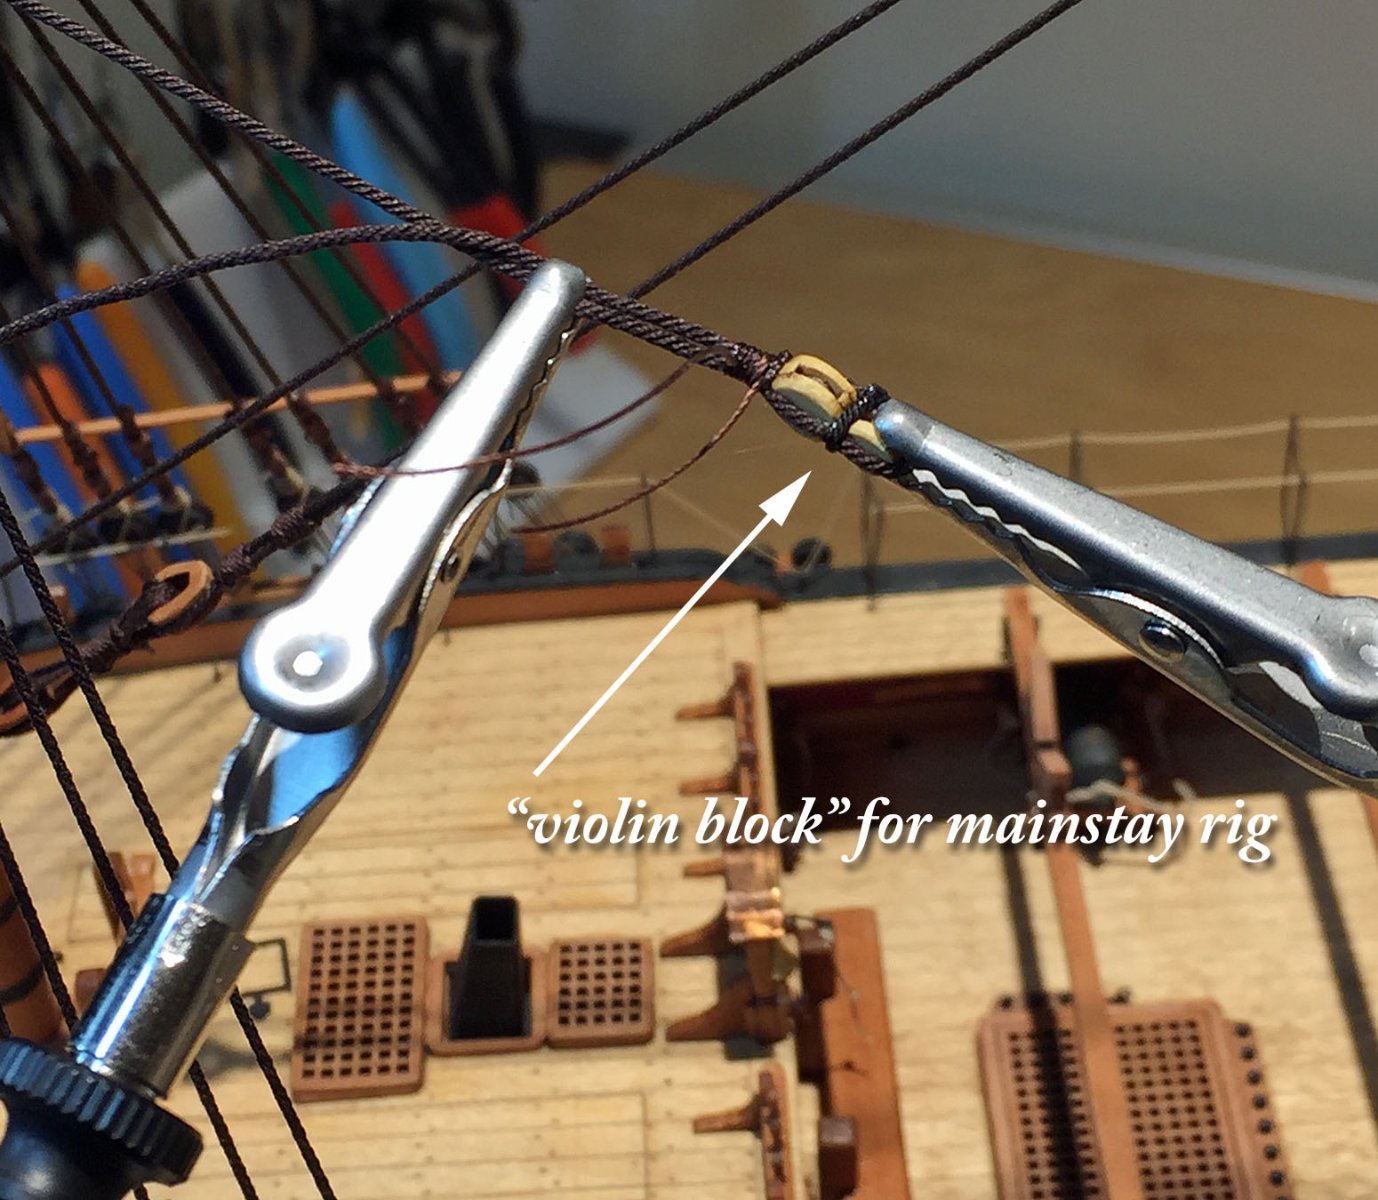
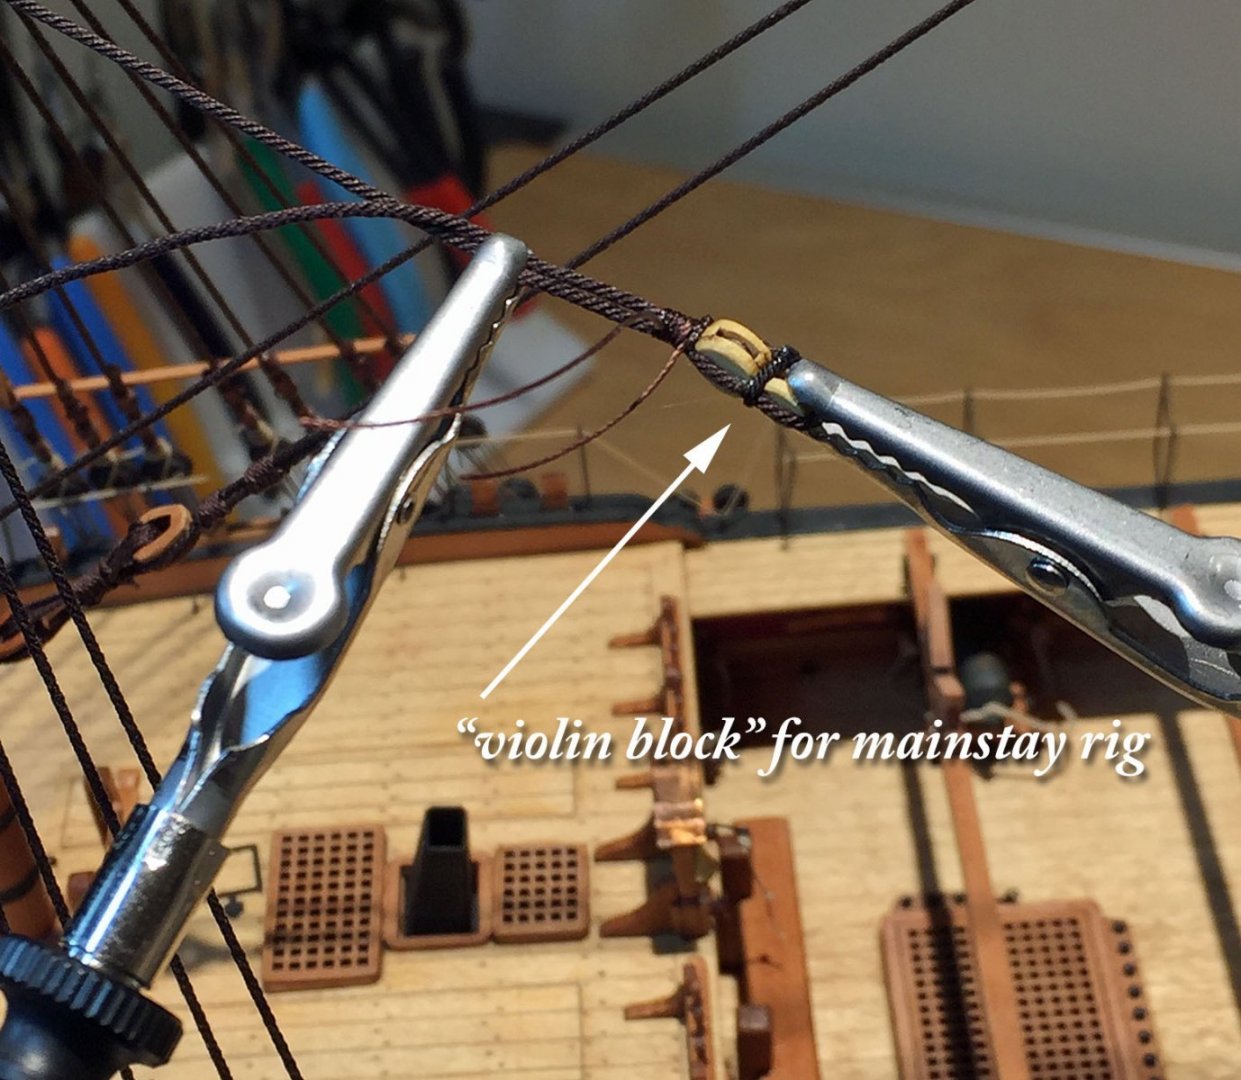
The quick answer is that I'm referring to Chris' plans as well as relying on past experience of rigging similar 18th-century Royal Navy warships. You'll see in my last post that I re-rigged the main mast stay, because following the instructions and plans in the kit - was in error. This involved both an incorrect block as well as rope size. Generally, the sequence of rigging is my own although the provided plans are always helpful. As I proceed to rig, I use a marker to highlight a rope line once it's completed. This helps to visualize what has been accomplished and what remains. I've also substituted nearly all the kit's blocks with upgraded versions, typically falling in the range of 3- 5mm. My posts that explain why I use violin blocks is pretty self-explanatory: these blocks are NOT furnished in the kit. I also rarely use any of the rigging "thread" provided. When substituting real rope I generally downsize by one incremental step; e.g. a plan calls for 1 mm dia. rope, I use the next available thickness, which is .8mm typically. This also depends on my choice of rope vendor now. I do this "downsizing" throughout the rigging process and you've likely spotted these minor changes that deviate from Chris' plans. Many of the upgraded blocks will not easily accommodate the plan-specified thicker rope sizes either.
- 542 replies
-
- 3
-
-
- Sphinx
- Vanguard Models
- (and 3 more)
-
I especially like your continuity of color choices throughout your build. Great job on the ekeing rails, including the coloring. I punted on mine...
- 857 replies
-
- 2
-
-
- Sphinx
- Vanguard Models
- (and 1 more)
-
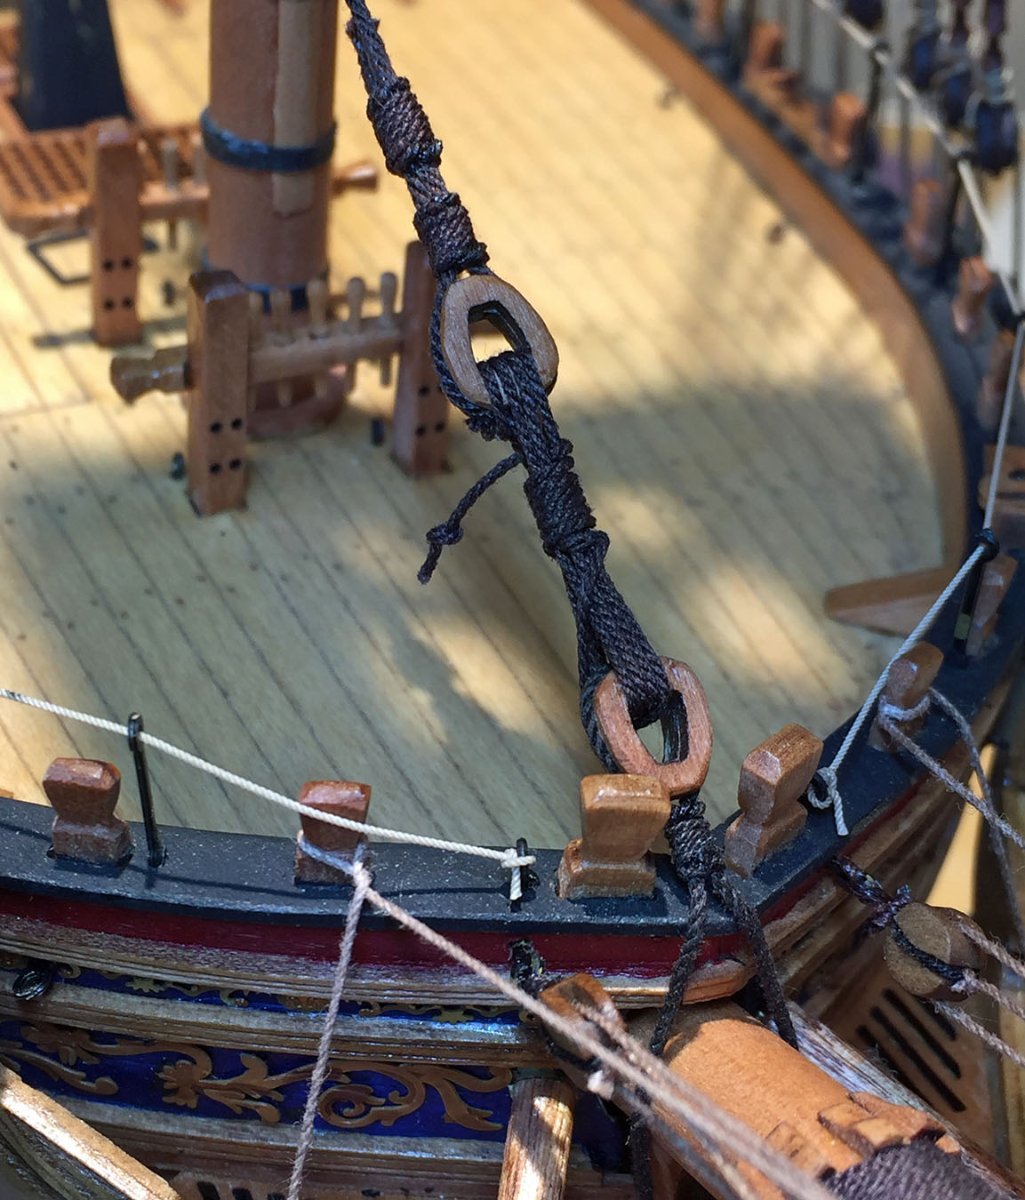
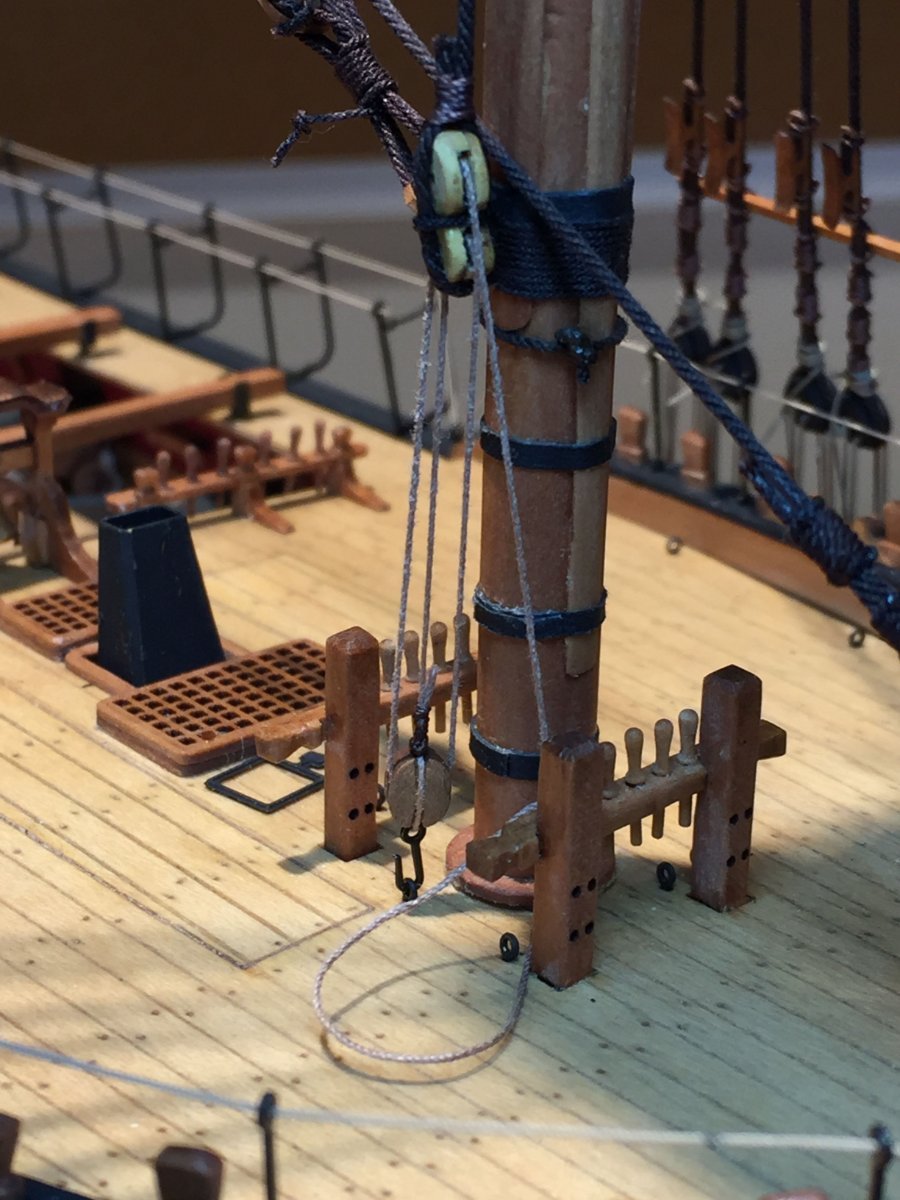
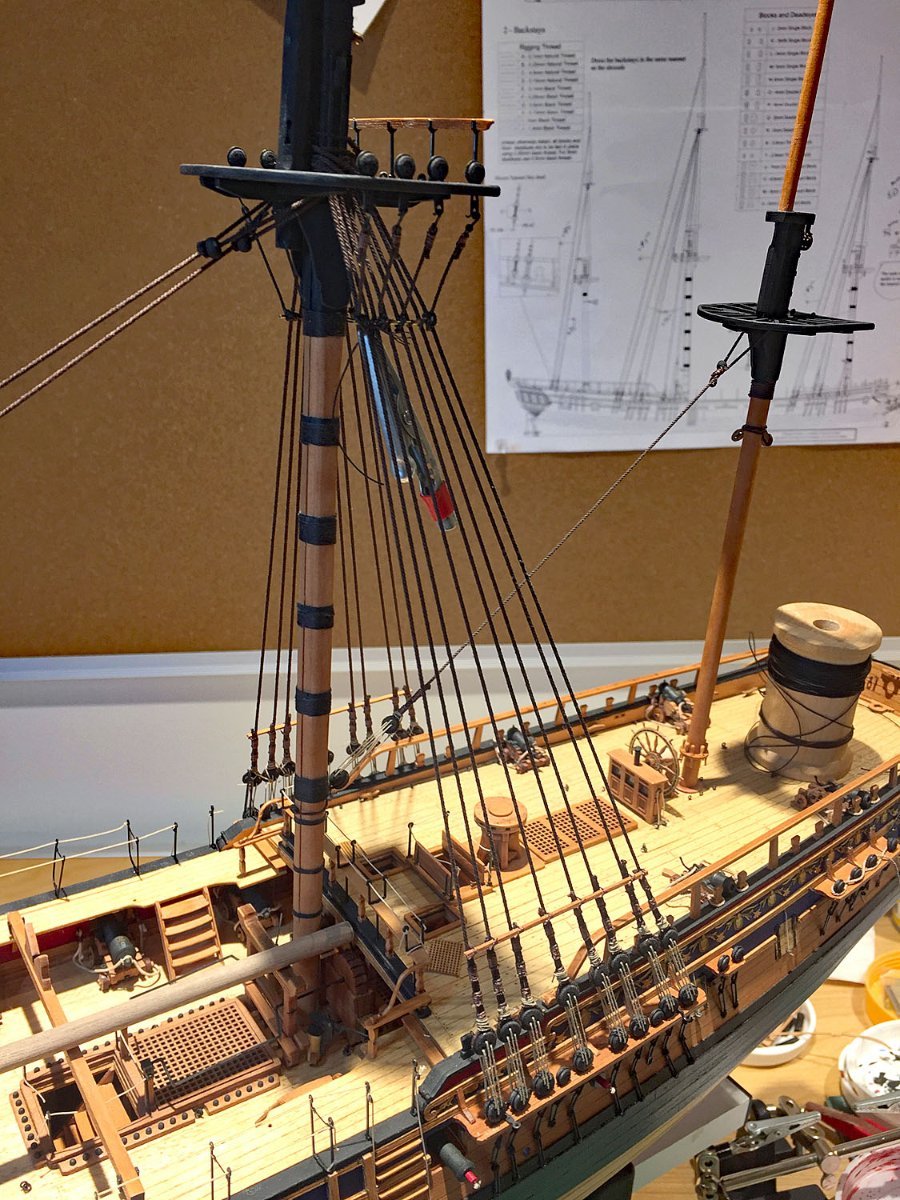
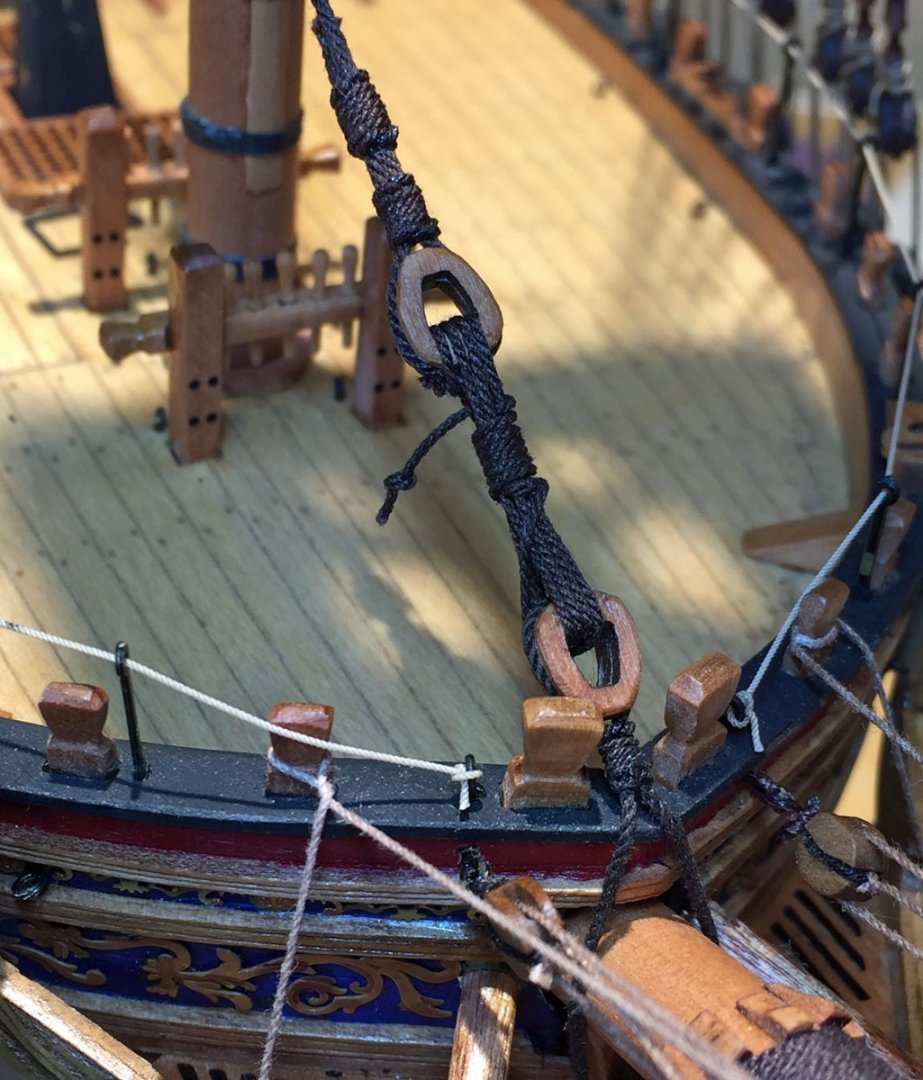
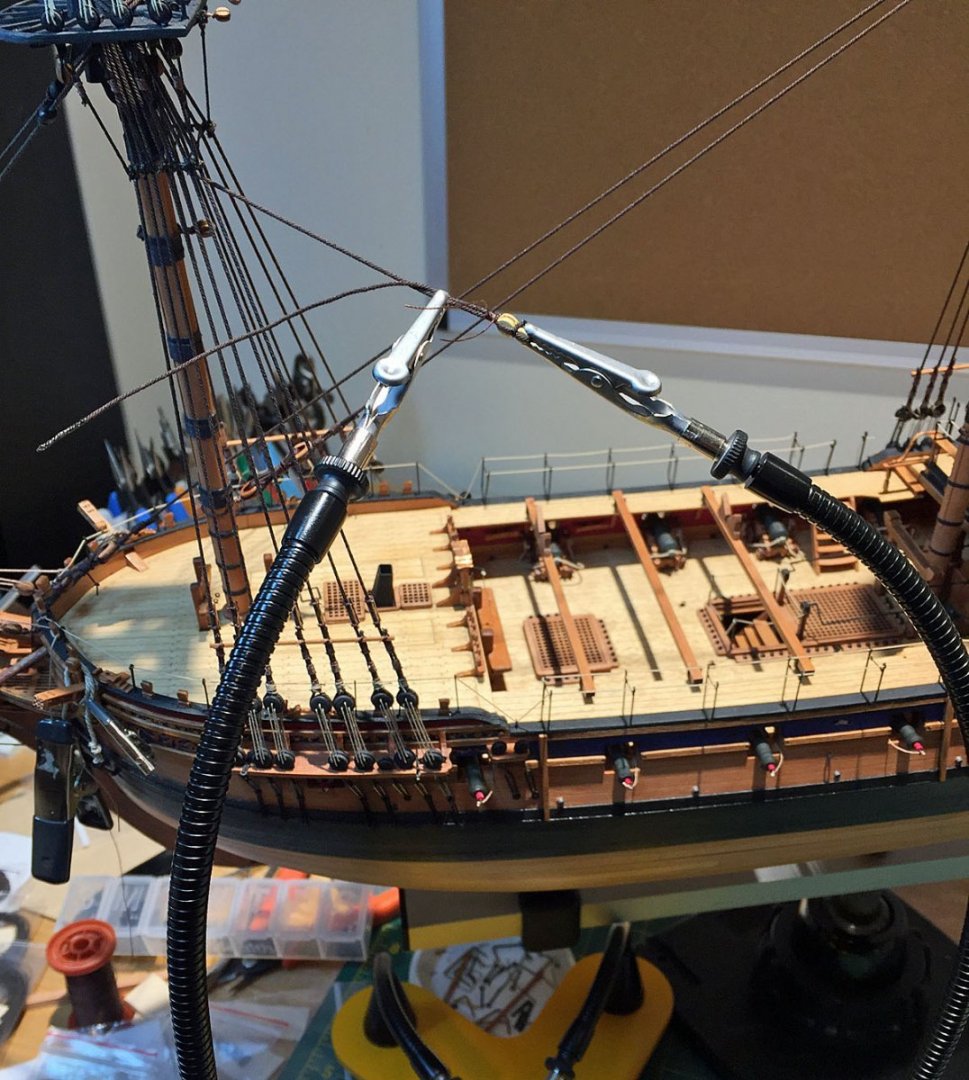
Onward...incremental progress, but progress nonetheless! A do-over for the mainstay tackle at the bow. I'd used an open heart block previously at the bowsprit end and have changed this to a closed heart. At the same time I substantially increased the diameter of the rope that holds this block and then descends around the base of the bowsprit into the stem. This is a much better solution for this critical mast support. In addition, I made the beefed-up rope run between the foremost timberheads (bollards). Previously, my rope from the heart block was on the outside of these timbers - and this was clearly wrong. Thanks to druxey for pointing these details out to me, a man who certainly knows his ropes.🤗 The tackle rigging for the mainmast's topmast stay. The topmast Preventer stay will be rigged to the opposite side of the foremast in a similar arrangement. When my alcohol-based W & N promarker color pens arrive (soon, I hope) I'll carefully attempt to color these boxwood blocks. Better to do this BEFORE rigging I realize, however...there are plenty more that await coloring. I'll see how this coloring of boxwood works out (burnt sienna); my experience is that the density of boxwood requires more than one application. Another view of the tackle rigging fall line dressed to a belaying pin at the base of the starboard foremast. Once all the rigging is dressed to their proper locations (chocks, blocks, bitts, belaying pins, etc.), I'll add various sizes of coiled rope hanks that will be prepped off the model. In this close-up I noticed the mast coat has popped-up from the deck. This likely happened due to movement by the mast during its rigging. I'll squeeze a tiny drop of glue under the edge, push it down. Had I not taken these specific close-up photos I may not have noticed this! For reference, most of my rigging closeups are approximately 600 to 800% enlargements of the actual model size.

- 542 replies
-
- 11
-
-
- Sphinx
- Vanguard Models
- (and 3 more)
-
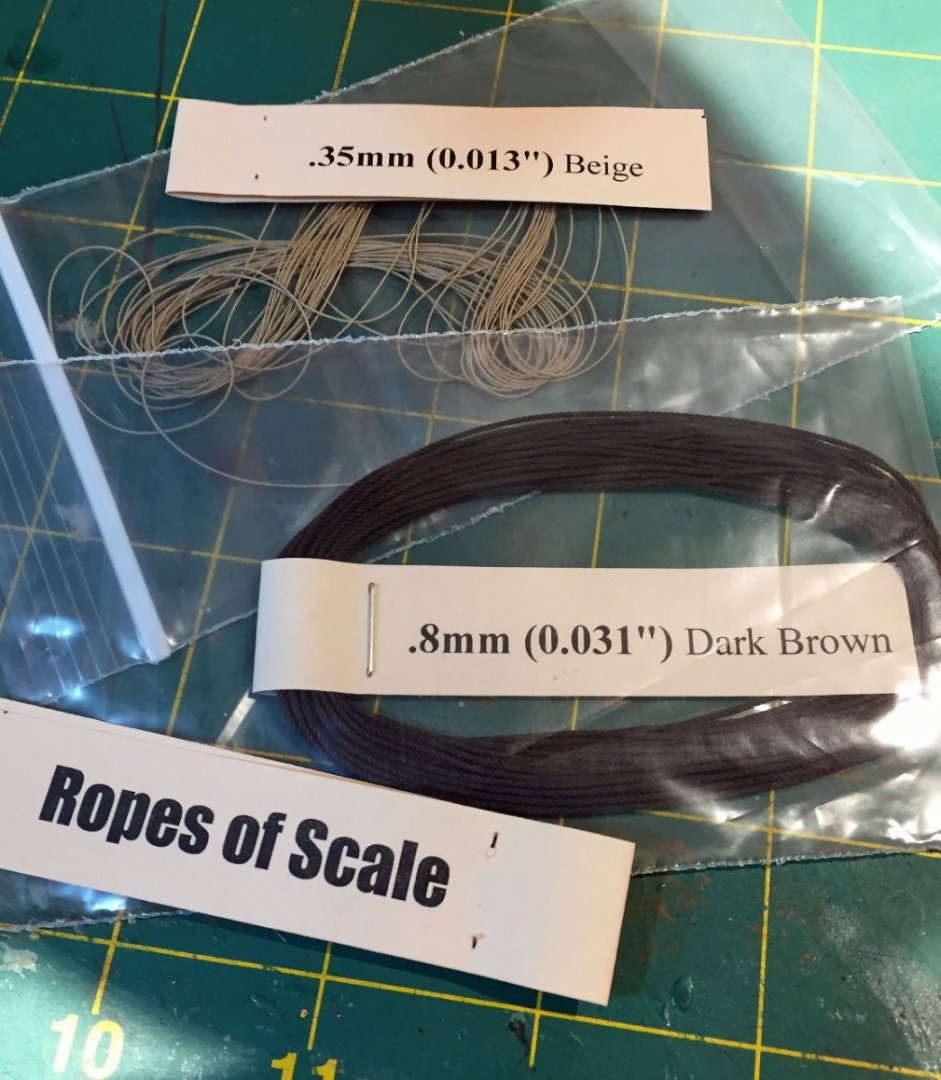
The upholstery thread I'm using is .20mm or .008 thick. I previously said it is polyester. This is wrong, it's nylon. I'm using a "Beige" color rope for my running rigging; I'll use five different thicknesses when I get to this stage. The beige color resembles natural hemp. You can see this rope and its color in my deadeye rigging ropes as well as the ropes for the hammock cranes.
- 542 replies
-
- 2
-
-

-
- Sphinx
- Vanguard Models
- (and 3 more)
-
Nice looking model, Keith. Congrats. On the old photos from the 19th-century (and even early 20th): most people look so "stiff" (even joyless,mostly super- serious), is because the photographer would coach his subjects by asking them to take a deep breath and hold it since the exposures on glass plates (tech of the era) were quite long, even in bright sunlight. Also, try to hold your breath and smile at the same time...can be done, but it's not natural.
-
Yep, druxey. A bonehead move. I usually have a bottle of alcohol handy too. Will an 18 yo single malt Dalwhinnie work?
- 542 replies
-
- 3
-
-
- Sphinx
- Vanguard Models
- (and 3 more)
-
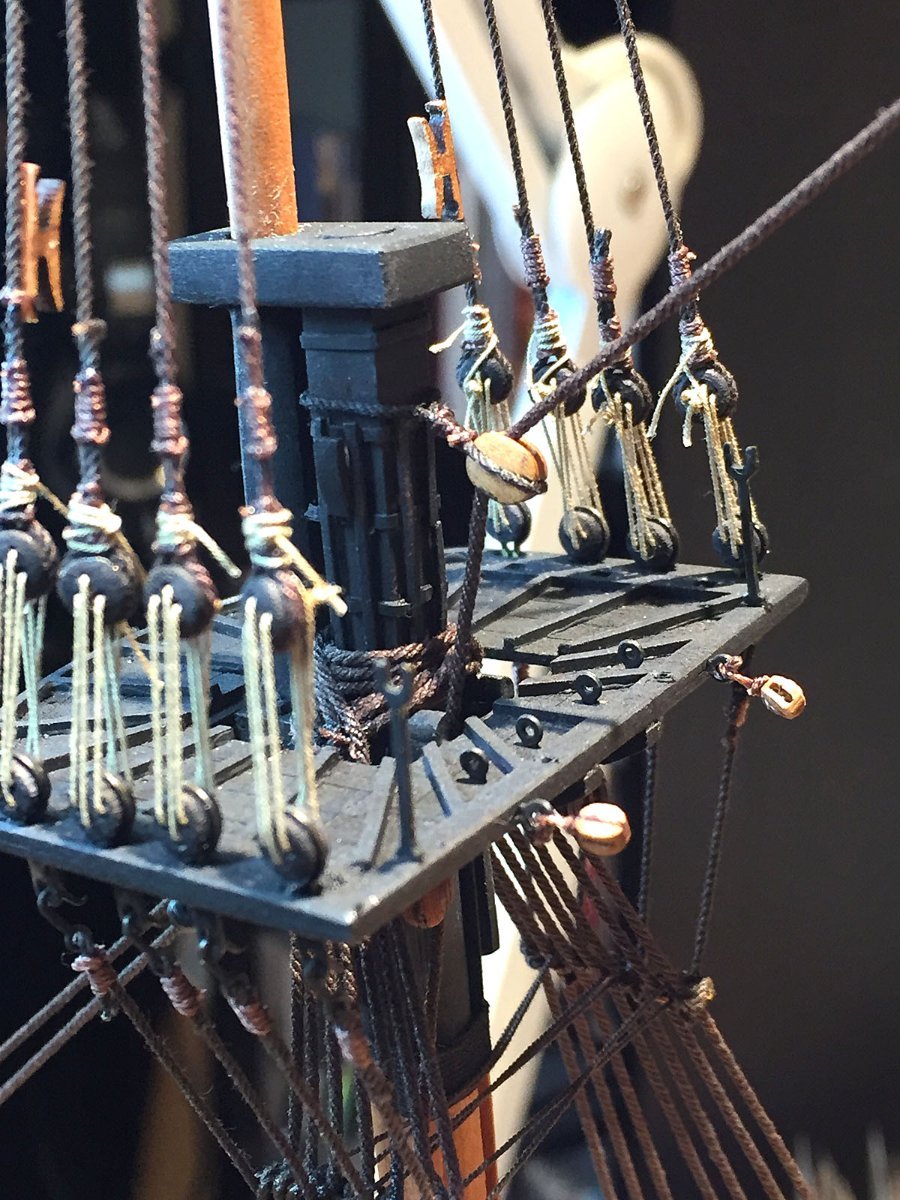
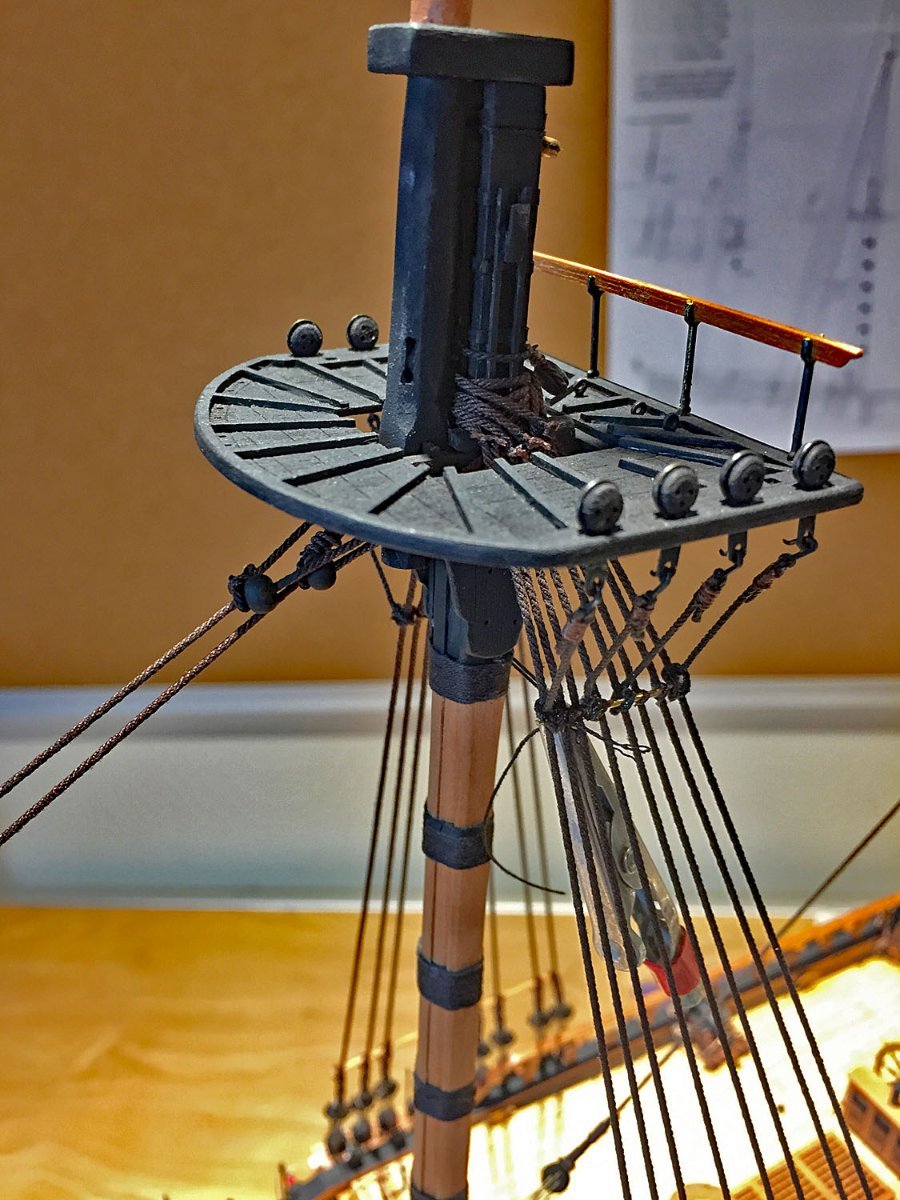
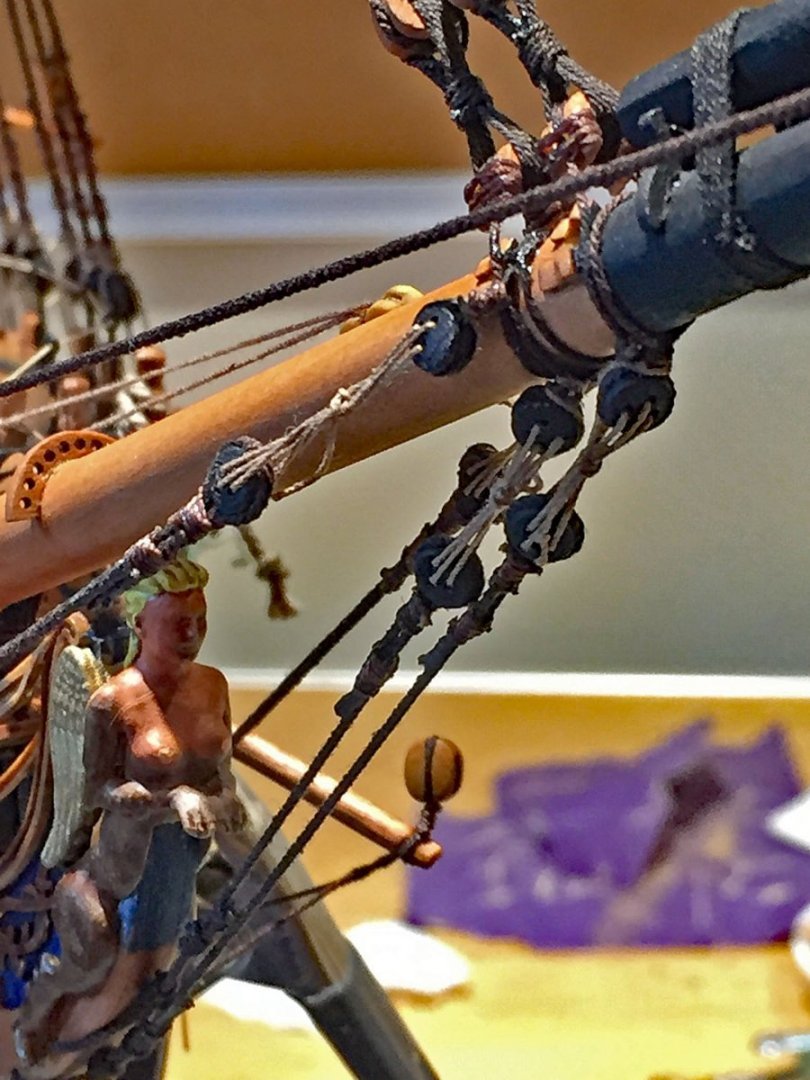
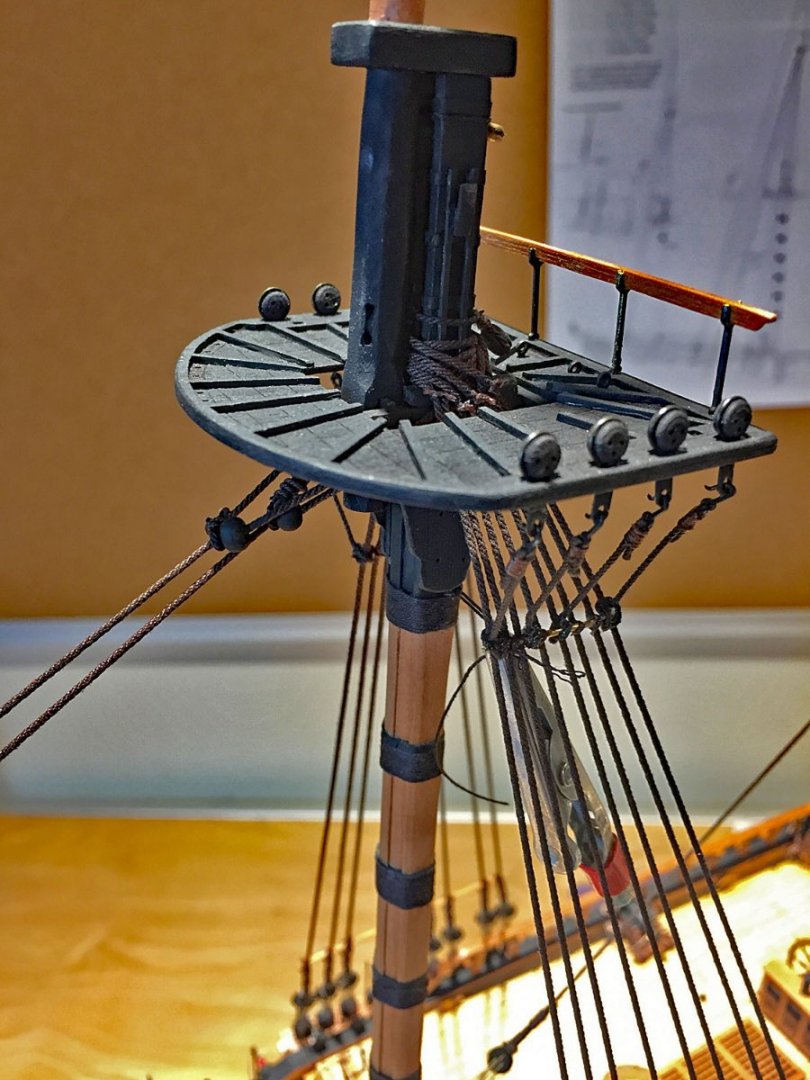
A few more photos of HMS Camilla's rigging progress. Rigging fixed. In my previous post I showed how I tried to cleverly remove some random glue from a rope with a handheld lighter; it torched the line, burnt it. Sacré Bleu! Non-reparable. So, I stripped-off the line that consists of two leads wrapped around the upper post head at the crosstrees and started over. I'll never do that again. A lot to see in this photo of the foremast rigging. At the bottom of the photo, the catharpins are laced and tied to the intersection with the futtock shrouds. The resulting tension created with this rigging step is quite critical to get right. All shroud lines on the foremast are now completed, upper and lower. The large single block holds the main topmast stay that descends to the base of the foremast. Setting each of these stay lines is a tricky business to achieve the right balance for line tension. With standing rigging, one needs to constantly double-check the alignment in three planes as well as insure that all the lines are taut - without skewing the angles of the mast components unnecessarily. Another detail in this photo: I will mount the guardrail and remaining stanchions AFTER all the stays are run (including backstays). There are several lines that terminate to the small eyebolts at the aft area of this top. Mounting the guardrail (and its rope netting) too early makes attaching the subsequent rigging to the top's eyebolts very difficult. Tying-off the main stay topmast violin block. These one-piece blocks are much easier to rig than attempting to tie two separate blocks together - particularly at this smaller scale. This detail is shown to illustrate the usefulness of the "QuadHands" tool for rigging. Here, two of the four flexible extension arms firmly hold the block and the rope in-place. The extensions reach almost 15 inches high from their base. This is very handy in many rigging spots. Here, this double block provides leverage to the lines secured at the base of the foremast; the rig is designed to tighten the stay line that runs upward through a large block at the tophead and then across to the main mast. The same rigging set-up will also apply to the adjacent Mainmast Preventer stay to the opposite side of the foremast. There are many different approaches to rigging processes by age-of-sail modelers and all of them are correct - as long as the result is neat and accurate - with all lines appropriately taut (or not). This consideration is very important when one adds sails to their model. Assuming a model's sails are mounted as "working sails," some running lines will be very taut, others, not. Another photo showing the utility of the QuadHands jig. Pretty self-explanatory. In the bottom left corner, a spool of my Coats & Clark dark brown upholstery thread. I use this thread extensively for tying-off blocks and lashing lines. It is a polyester thread and not likely to come undone once secured. I've used this thread for all my models and so far (knock...knock...), so good: no loosened or unwound rigging lines- yet.


- 542 replies
-
- 17
-
-
- Sphinx
- Vanguard Models
- (and 3 more)
-
Indeed. The detail on both the rudder trunk and the Officer's poop screen look excellent. I must admit this level of built-in detail is tempting me to think about building this model in the "dockyard" style. Hmmmm. decisions, decisions! I already have a 64-gun fully-rigged, so perhaps the razéed one ala' Navy Board will be a nice change-up. It would be considerably smaller to display!
-
Collections of Ship Models: Help!
hollowneck replied to Sam Willis's topic in Nautical/Naval History
Sam, You've arrived at the internet's best forum for all things ship modeling! As druxey commented here, your work is quite familiar to many members of this forum. In addition to this open thread, our forum has a private messaging feature you might want to periodically check-out. Welcome! -
Following-on this developing thread, I'll add that some of Chris' earlier kits sold by Caldercraft and Amati sometimes had "iffy" strip wood (decks & hulls), acceptable in one kit, crap in the next. It was this "fact-of-life" that led me down a path of learning about and sourcing better materials, and replacing lots of the kit woods. Like me, you've built a couple of Chris' legacy designs (Vanguard, Pegasus, Granado). It is entirely feasible you may have gotten better quality strips than me in all your kits. I agree. Indeed, Chris' recent track record - with his own company now and the outstanding effort to control the material quality - speaks for itself.
-
Ah-Ha! Thanks for the detailed explanations, Chris. I didn't realize I was looking at a "sub-deck;" you were clear about these being "planked over." My error. I better understand the economics factor with the large size of this model and the issue with the "scrap" resulting from blemishes, coloration, etc. I don't mind planking decks - and I'll simply plank over the tabbed cutouts - but I have to admit I've gotten used to the efficiency, high-quality and detail afforded by the lasered decks of your most recent models - as well as some from your past (specifically the Russian brig Mercury, and if I recall correctly, the Revenge). The laser-etching on the sub decks will be immensely helpful as decent templates for more accurate margin planking, nibbling and straightforward butt planking. I'll assume the deck strips will be supplied from a good quality, tightly grained stock. You're making fast progress on your design. Thanks again for sharing it.
-
Thanks for showing us your progress, Chris; looking good. I, for one, would like the OPTION of ordering fully lasered decks WITHOUT the "tabbed slots." In building my Sphinx I opted to not build her as a "Navy Board reveal model" and at present I'm in her mid-rigging stages. As you likely know, I detailed this decision in my current Build Log, and with regard to using the "slotted" decking, I've detailed the decisions and solutions I had to make to include the preferred, fully-lasered etched decks. My decision turned out to be acceptable to me, but not ideal as the "slot lines" for the cutouts still vaguely appear on close look. I understand there will be many modelers who will want to build this model without the considerable overhead of masting/rigging - this could possibly be the majority I acknowledge. The accurate and detailed "etched" decks of Vanguard Models are a superb feature and I would always prefer to mount these as FULL DECKS (no planking required, in other words). I plan to continue building your models as fully-represented ships with masts and all the appropriate rigging; I would hope there are modeler's here who share this preference. Perhaps you could possibly "poll" here in your thread, see if offering a full-lasered decks option would be of interest to others. This would be Indy-specific, but could also apply to future Sphinx builds.
-
Wow. That long piece of boxwood laminate looks quite tasty. A nice idea as well as execution on the foc'sle margin plank, in keeping with your other many excellent embellishments! A humble suggestion: perhaps the remaining length of the box sheet would work as a laminate for the model's baseboard. It appears to be wide enough. From what I can observe, the existing base looks fine, but the lighter boxwood would also look very nice beneath the finished model; essentially, more "contrast." Were it I, I'd temporarily slip a length of the box below the model and "test" the overall look, to see if I liked it. The contrast could prove very attractive. Such aesthetic choices - and there are many in what we do - I acknowledge are highly subjective and personal. Cheers!
- 857 replies
-
- 1
-
-
- Sphinx
- Vanguard Models
- (and 1 more)
-
Thanks! Appreciate it! It does make me feel good that looking at my photos (and perhaps reading some of my long-winded text), can inspire. Inspire & perspire. They do go hand-in-hand. For Age of Sail modelers, one either looks forward to the masting & rigging stages, or one hates it. Clearly, this stage involves an entirely different skill set, good close vision acuity as well as fine motor skills - plus - specialized tools and progress measured by one line of rope at a time which makes "progress" – at times, feel never ending. I'm frequently asked about the rigging when someone looks at my models. The question that is invariably asked: "How long did that take you." Lately, I've taken to responding with: "A lifetime," implying that the skills needed don't come immediately, nor easily. After our hobby's "in-joke," I will seriously estimate my invested time for a particular model, measured in months, usually. There are no manic deadlines in our hobby (typically), so timeframes aren't very important for most hobbyists (pro model makers is another matter). This said, after years of doing this hobby, I like to keep my time investment in any given model (including my dioramas) to not more than 9 months to one year. As the C&W song chorus belts out: "That's my story and I'm stick'in to it..."
- 542 replies
-
- 6
-
-
- Sphinx
- Vanguard Models
- (and 3 more)
-
Welcome, Slugger. You found the Sweet Spot.
-
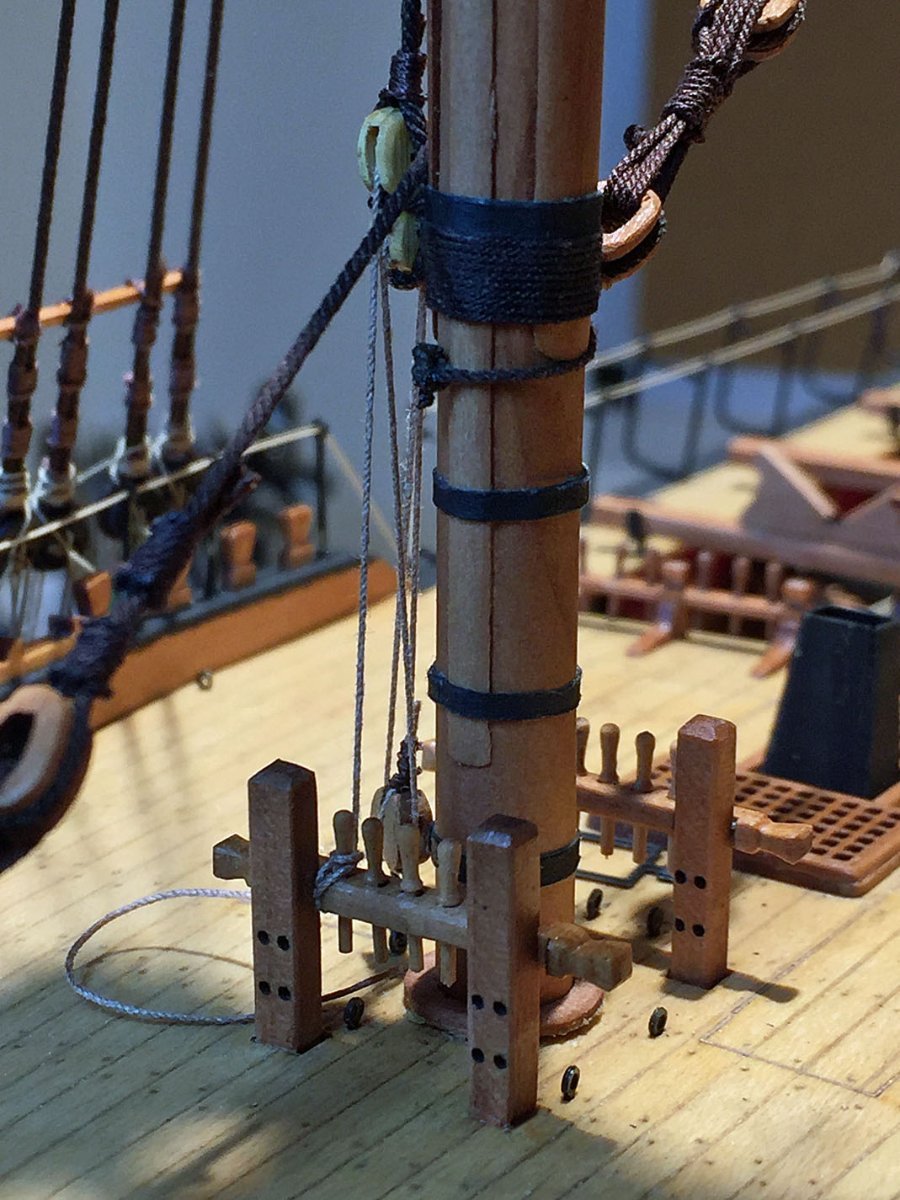
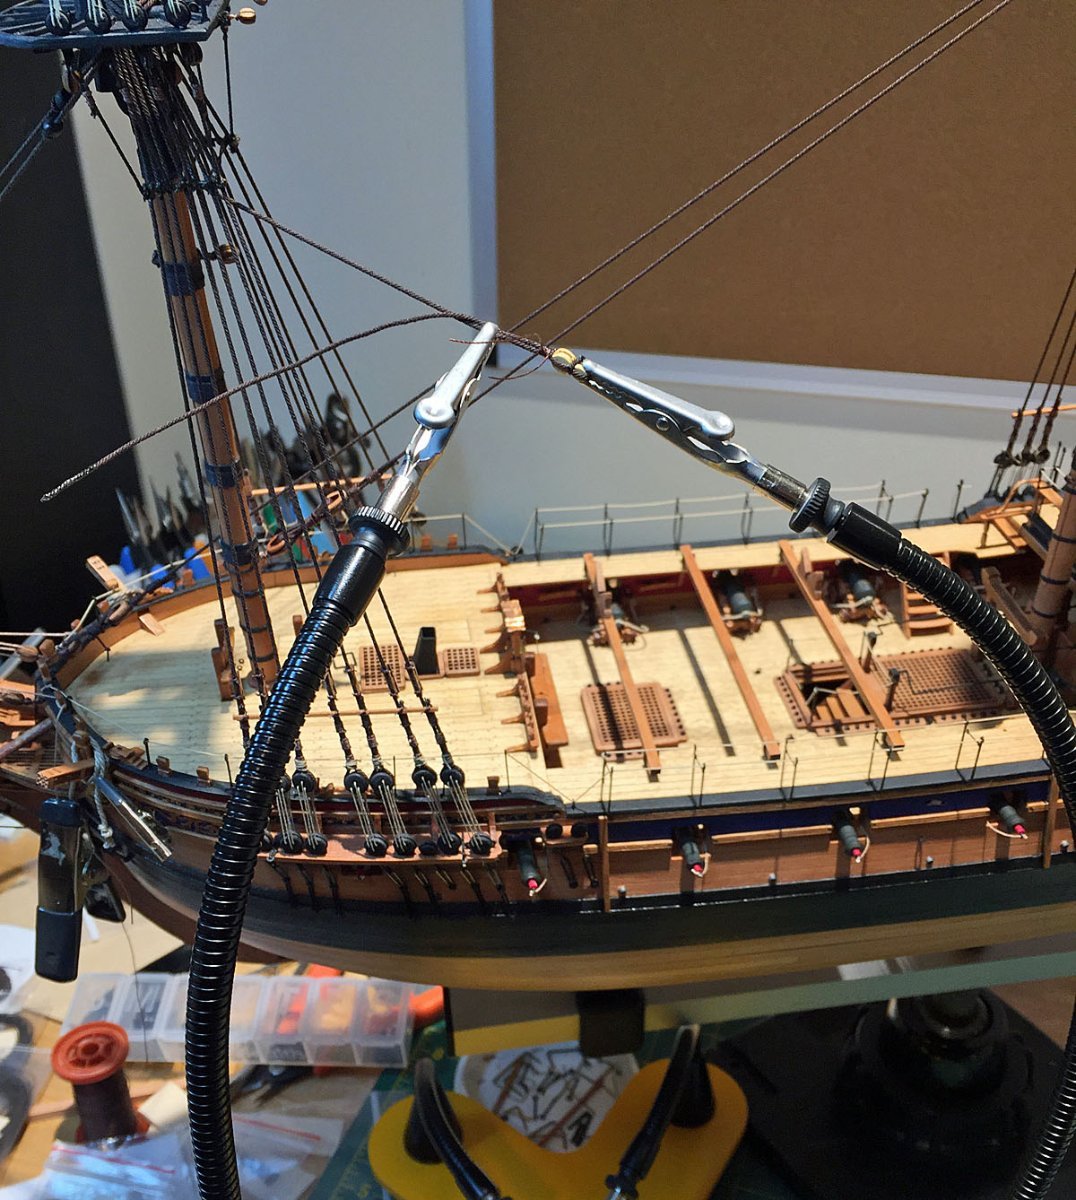
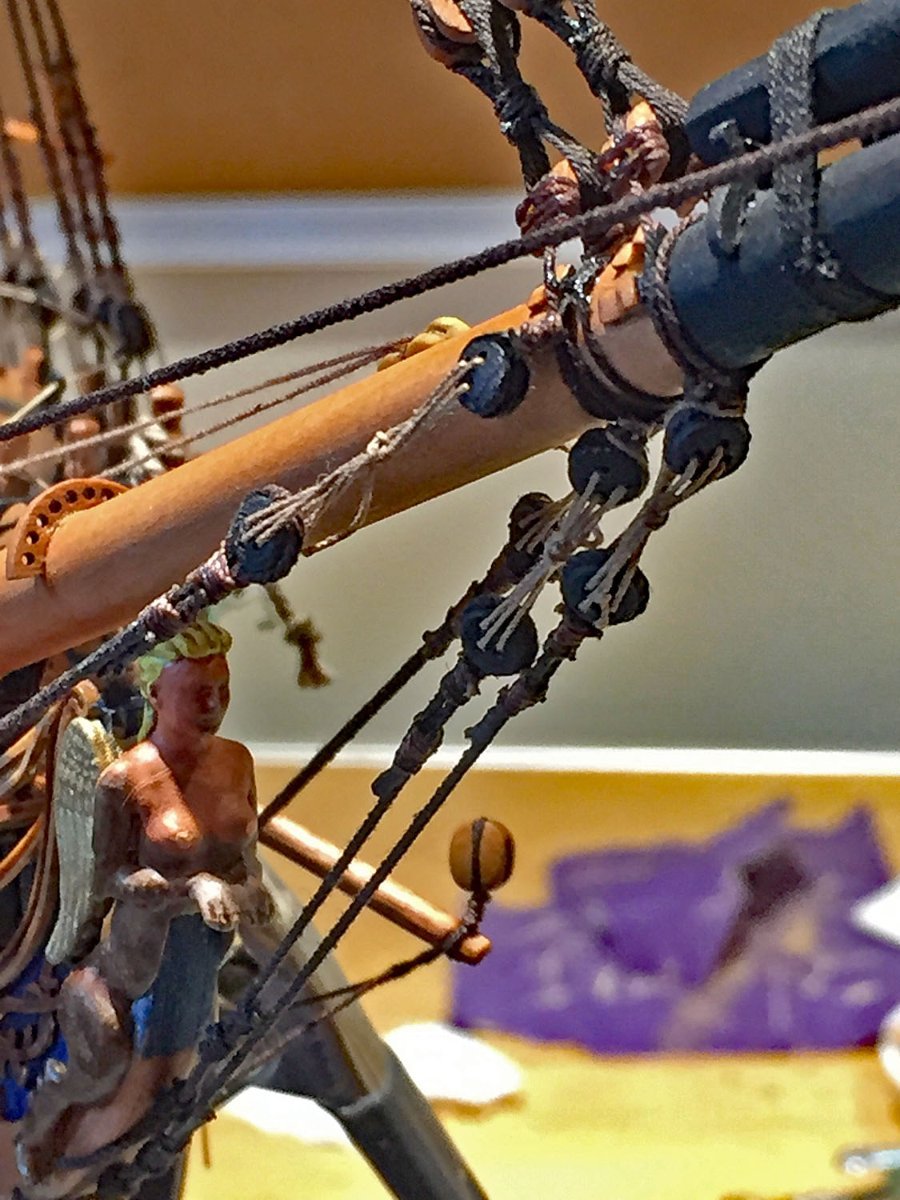
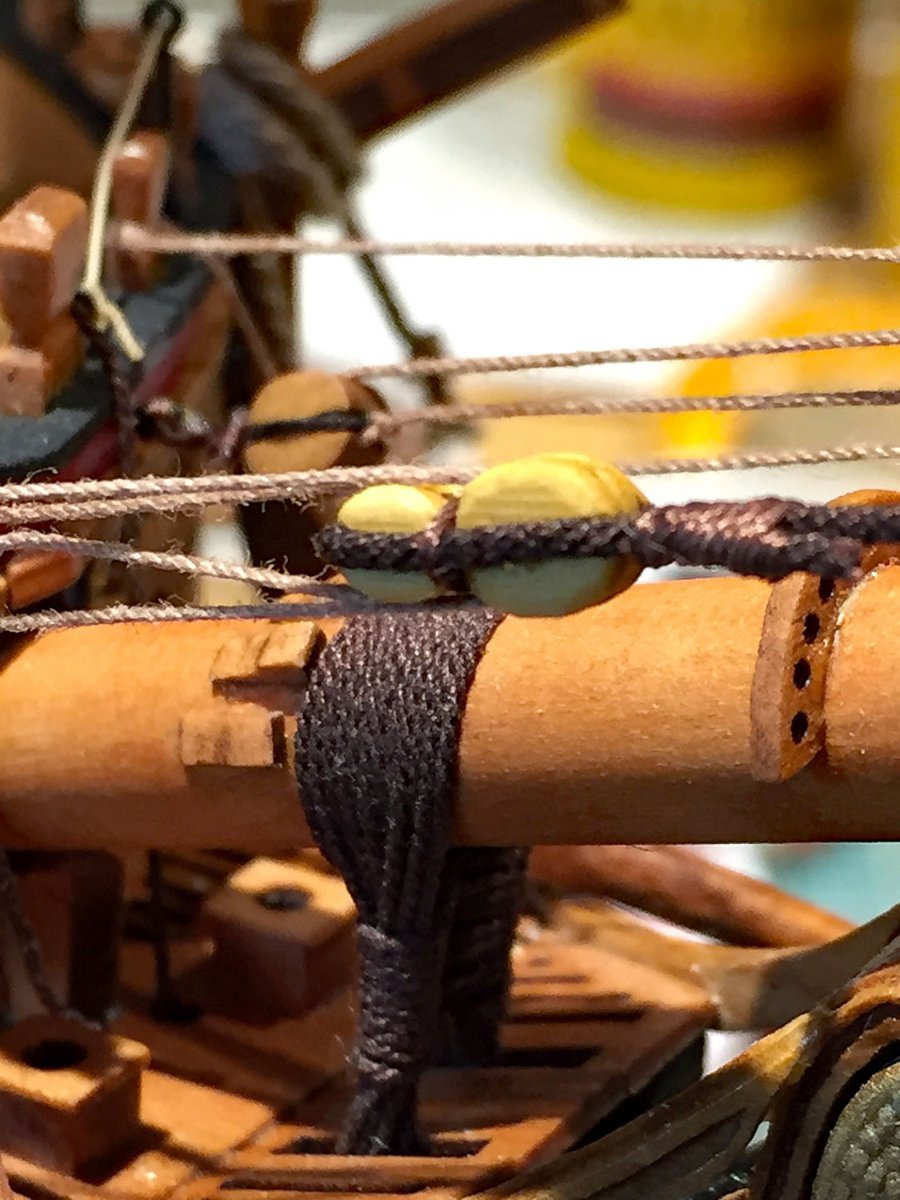
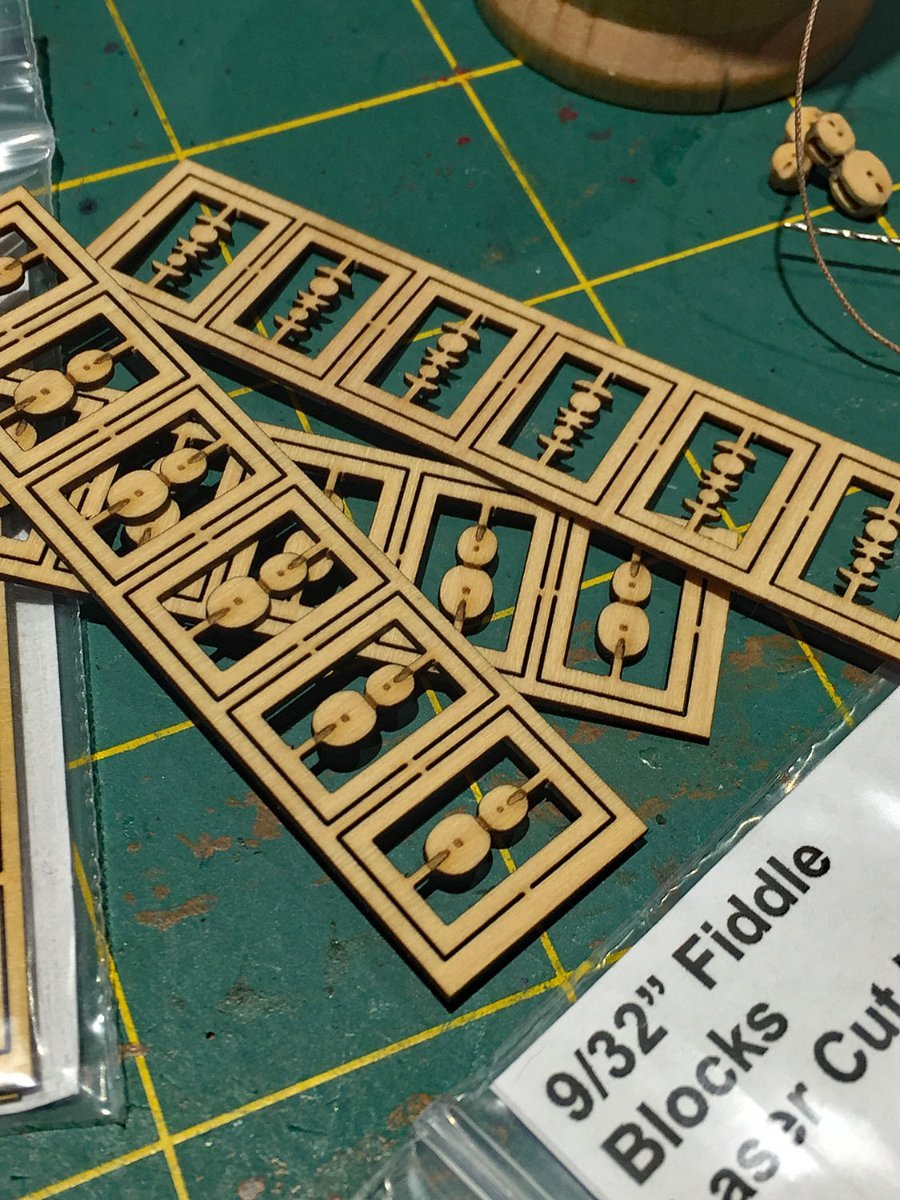
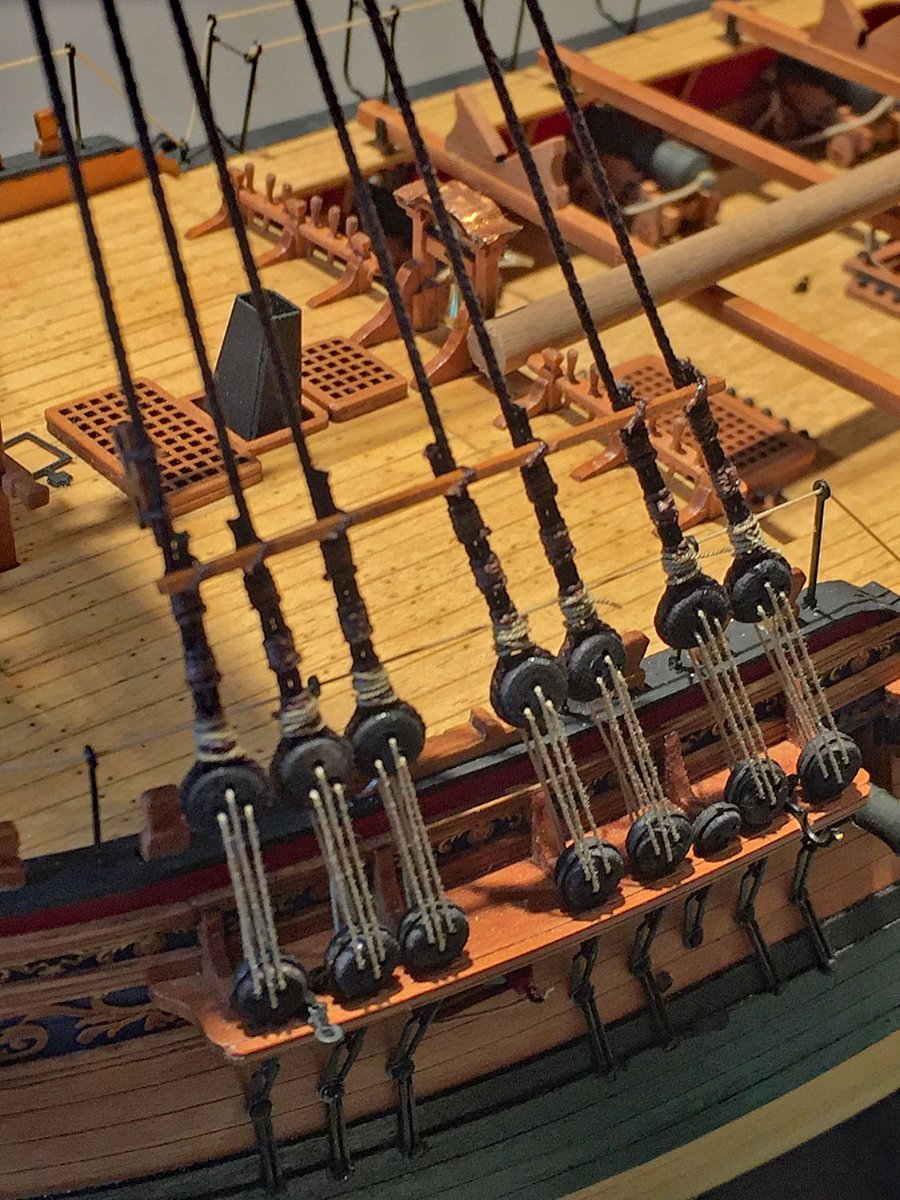
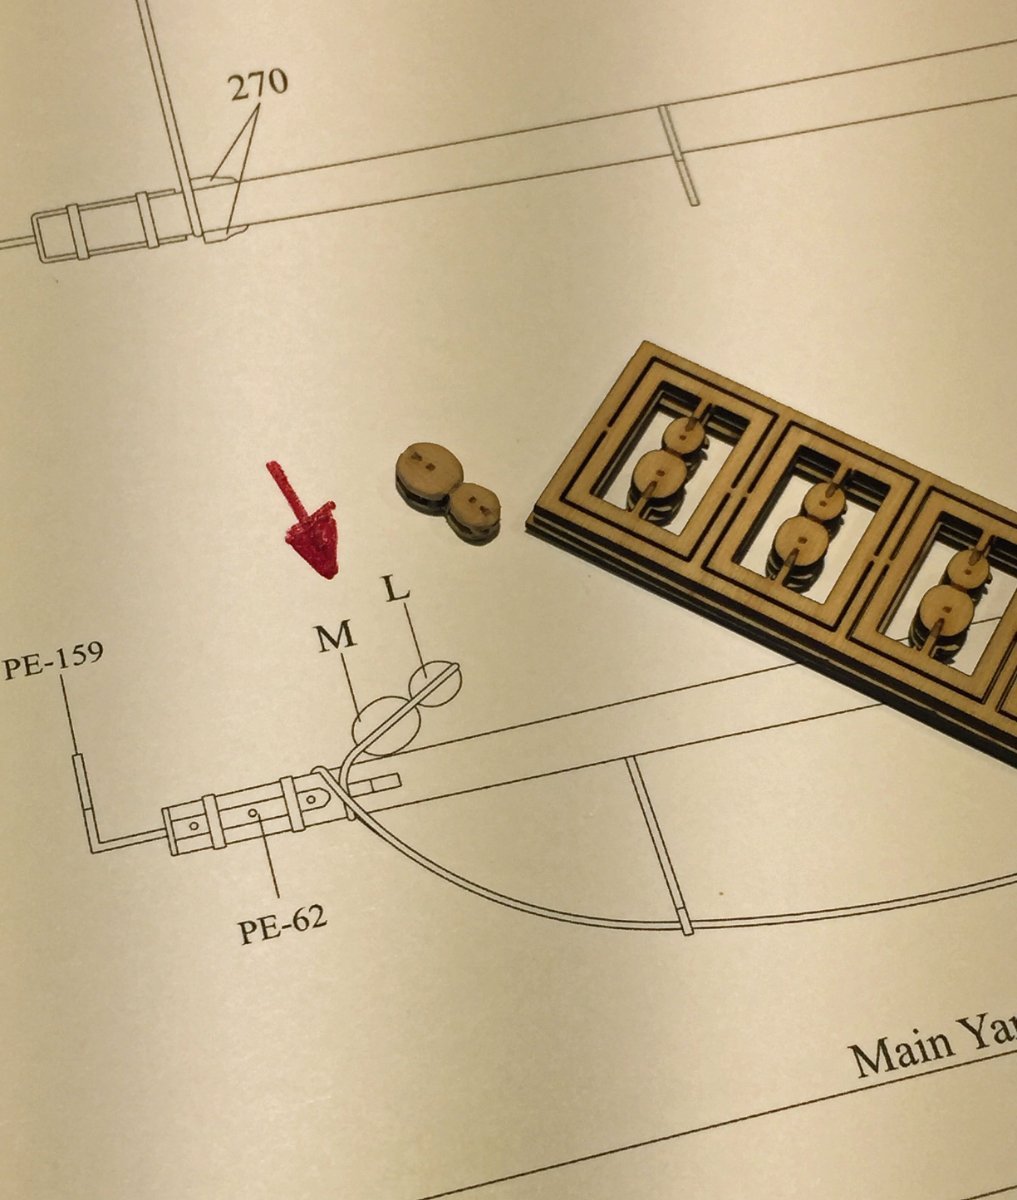
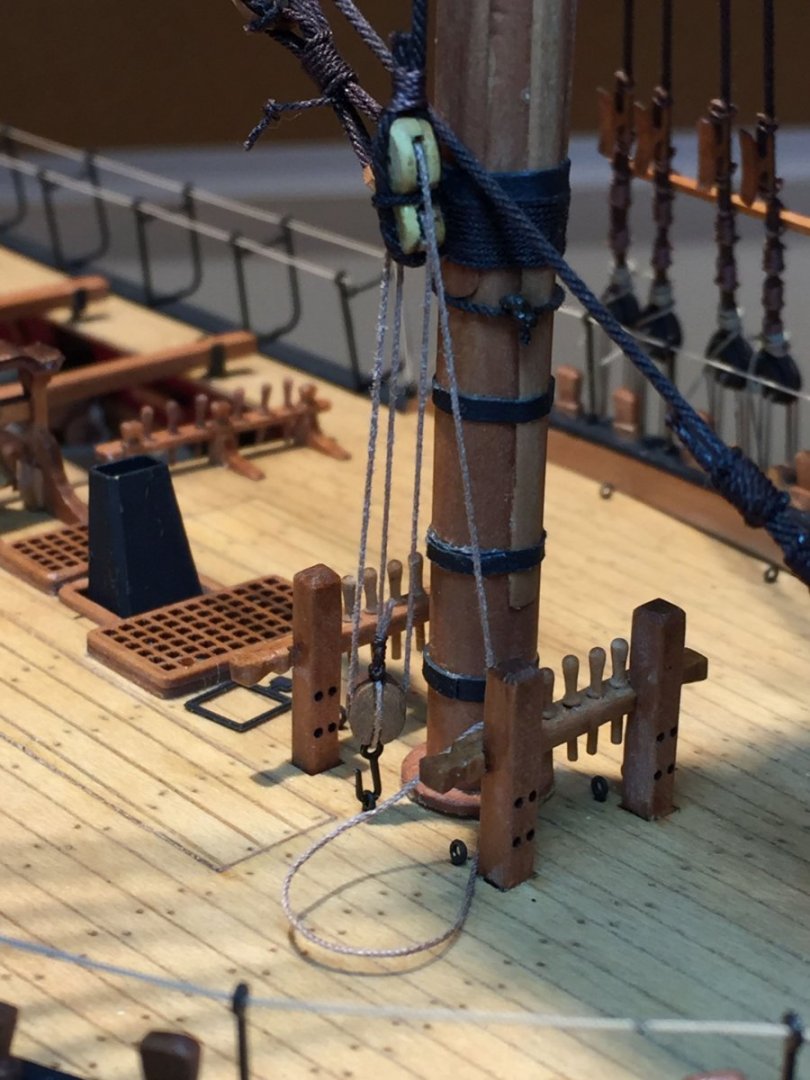
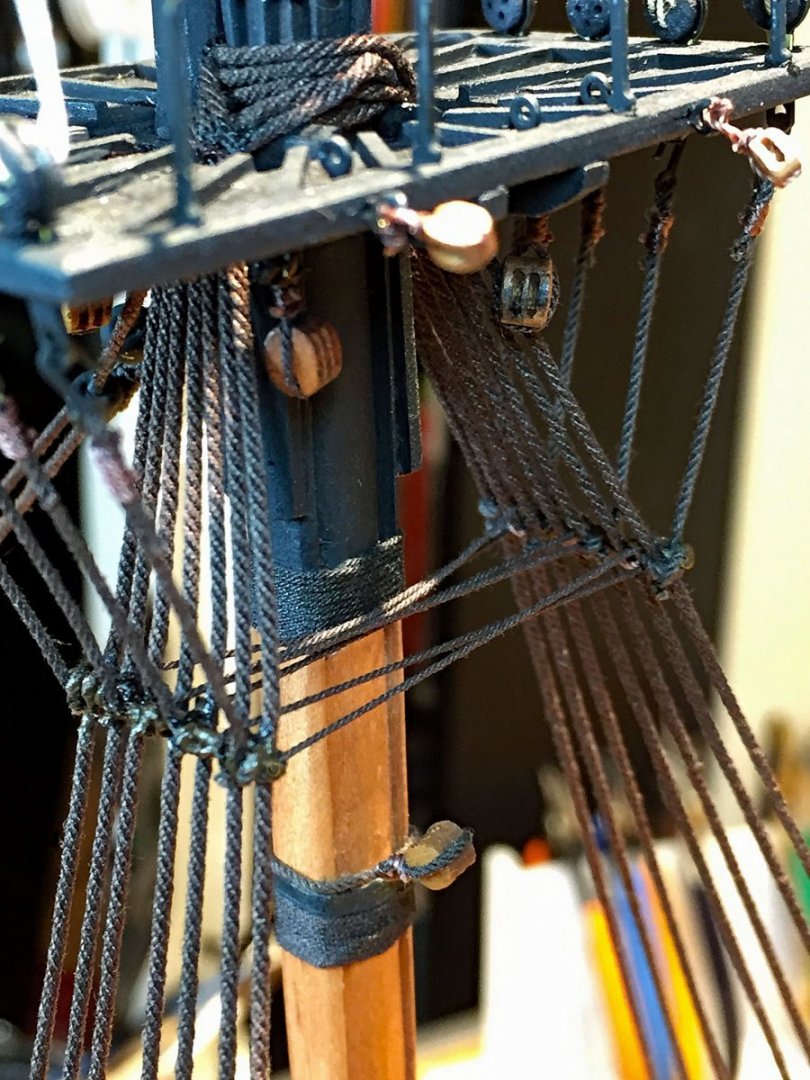
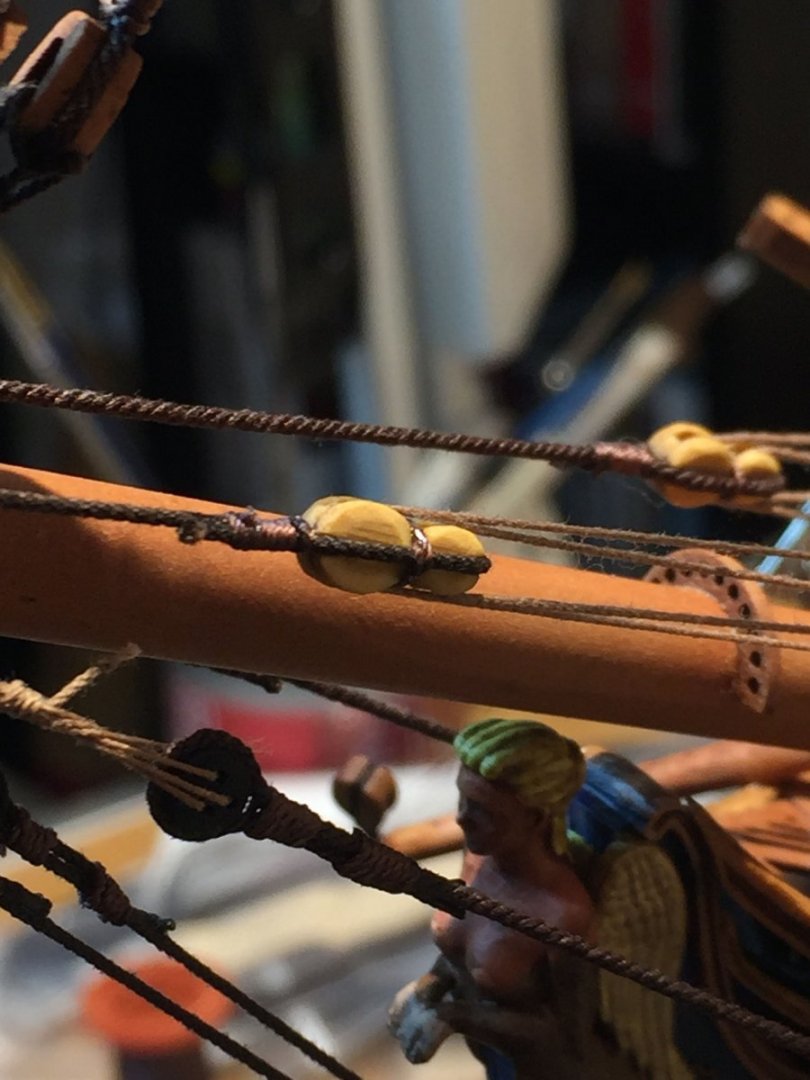
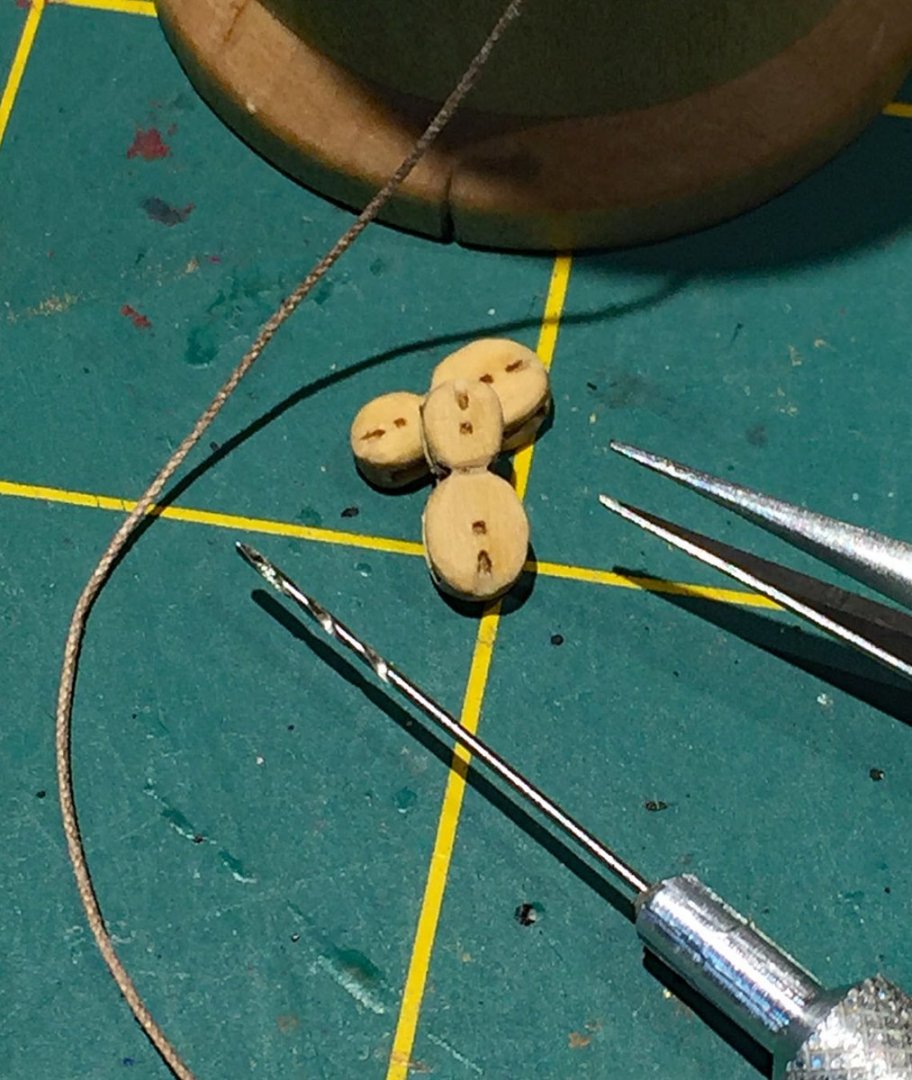
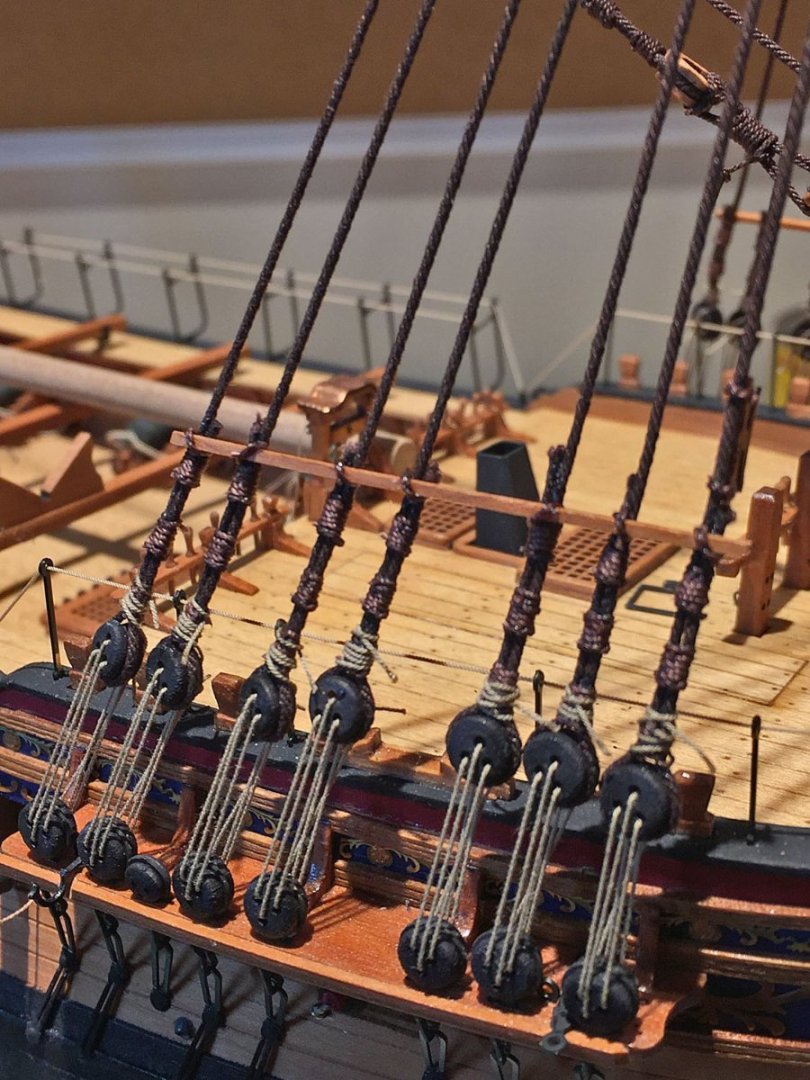
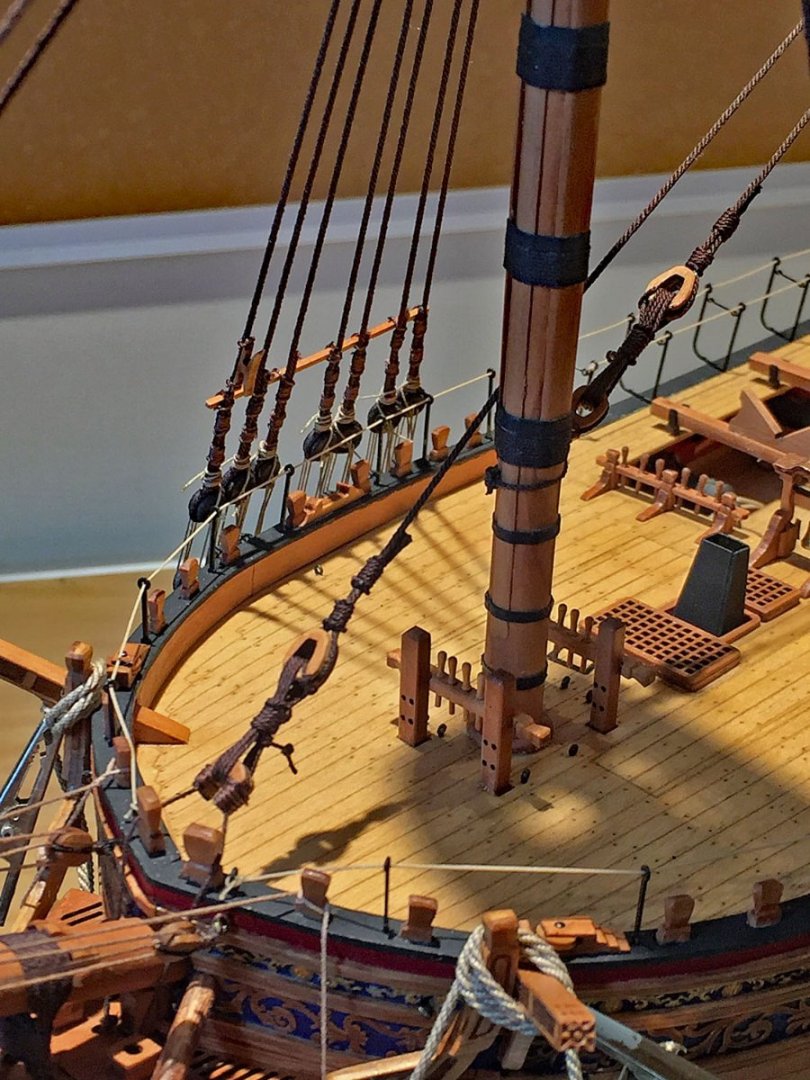
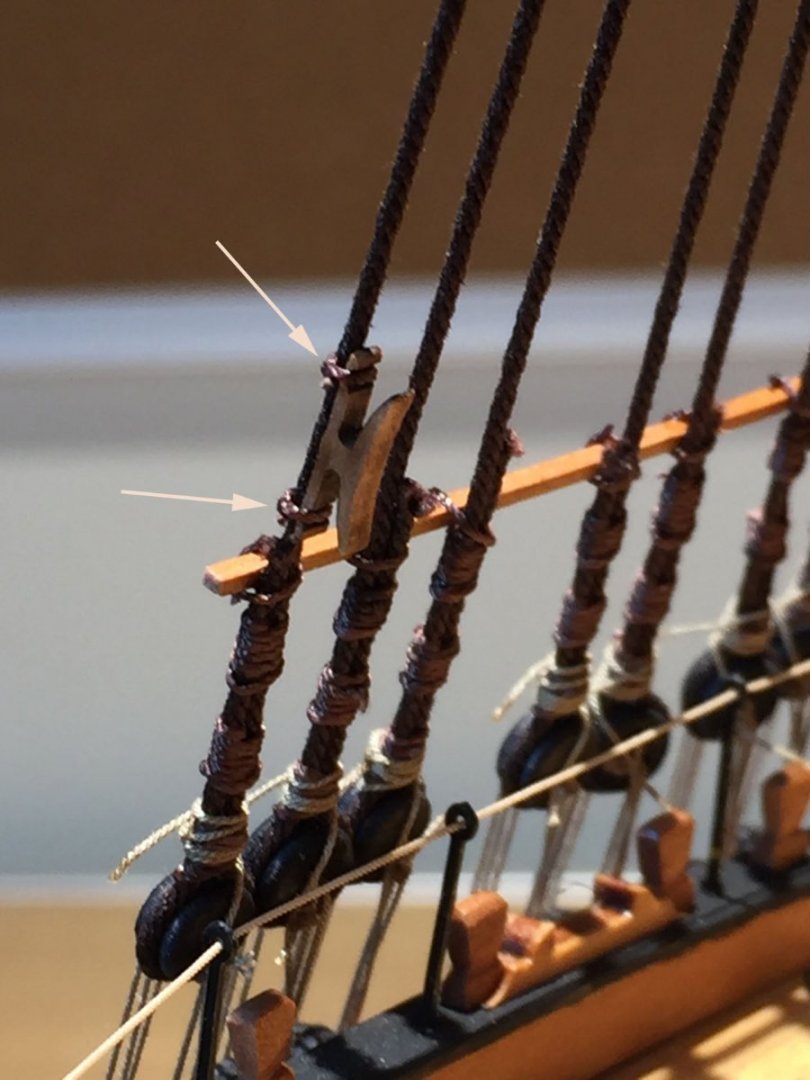
An update...fell out of the saddle for a few days gentlemen, jumped back up. Here's some progress on Camilla's standing rigging, some details on the rope I've chosen to use on this build and a variety of blocks I'm using (some kit, some other sources). Bobstays. These stays counterbalanced the immense upward pull on the bowsprit exerted by the fore & main mast stays. Four heavy lines run from the bowsprit to the stem and hull. This shroud rigging has blocks that permit tightening of the lines as they loosen over time. The foremast shrouds, futtocks and catharpin lines. The mast wooldings can also be seen in this photo. The catharpins are tied-off to a span of .7mm brass wire tied to the upper shrouds where the futtock shroud lines continue up to the top. No ratlines yet. The fiddle blocks for the fore topmast stays are boxwood; I considered dyeing them to match the other pear blocks I'm using throughout but I did't mind using these here for contrast with the many lines in the bowsprit area which will triple in number by the time all are run-in - including the sail management lines. I will also be using these boxwood fiddle blocks for all the yard lifts. I wish these were available in pear, but I'm really not complaining. A close-up of a lashed and mounted fiddle block at the stem. These tackle blocks have two sheaves of different diameters adjacent to one another contained in a solid wooden shell and not side-by-side as in a double block. Here are the "fiddlestacks" - the three piece layered boxwood patterns to make-up the fiddle blocks. This clever approach to fabricating these essential blocks works really well but does require a lot of handwork to assemble and prep before they can be employed. After being (carefully) glued, all the sheave holes need to be drilled through for the rigging rope. The multiple rope line "channels" need to be delicately filed to accommodate the various sizes of rigging. These mini-kits are from SyrenShipModels and I recall two available sizes. The 9/32" size comes close to the 5 & 3 mm sizes specified in the kit's rigging plans for making the yard lift double blocks as well as the stay lines. The kit provides simulated fiddle blocks as "singles" (lash a 3 & 5mm together) but assembling them is a real pain in the... Little fiddlers with nice detail. One needs to drill them out after hand sanding all the edges and rope channels. I would also call this very "fiddly" work...but worth it. The built-up block's mid-section also needs to be sanded so a lashing rope can tie it to the main running line. Deadeye rigging on the seven (7) foremast shrouds. The shroud spreader (1.5mm X 1 mm pear strip) is lashed to the shrouds after the deadeyes are tied-off. Tricky to achieve, one needs to shoot for an even spacing across all these blocks. I have a simple bent brass wire jig that holds the deadeyes in place temporarily while the shroud is being tied in place. Catharpins. Fun word to say! These lines below the tops pull all the shrouds taut, port and starboard, and align them along the plane of the keel when properly aligned. The shrouds are quite taut when this is done properly which makes tying the myriad of ratlines much easier. No, I haven't forgotten the Burton pendants! I run all these after the stays and shrouds are completed. A clear view of the foremast shrouds with a spreader lashed to them. I use a lighter brown, .01mm polyester upholstery thread for nearly all lashings of lines. The blocks shown here for the mainmast stay lines (Main & Preventer) - open and closed hearts - are provided in the kit and similar to my fiddle block assemblies ( the lighter colored boxwood block in the foreground) in that you fabricate them with a three layered pattern, identical to the previous explanation for the fiddle blocks. They also require some careful sanding to break the edges and deepen the rope grooves for the heavier stays. The main mast shroud and stay rigging started. The stays are held in place by a "mouse," the round items just under the tops; in actual use these were complex, tapered rope assemblies that acted as stoppers for the looped end of the stay line. The ones in the kit are shiny plastic jewelry beads. They work o.k., but you'll need to paint them with a flat black paint to avoid the plasticky look. For previous models I've made these with a small length of thin dowel that I drilled through and then sanded with a conical taper. After the crow's feet and other running rigging lines are mounted, these stoppers are barely visible. Upper shrouds come next. The Big(ger) Picture: coming together and starting to look like a sailing ship! Main Stay rigging. The Main Preventer lashes to the foremast and is seen in the upper right corner of the photo. Oops. I hate it when this happens... I accidentally smeared some glue on an upper shroud line and to remove it I tried using a handheld flame (barbeque lighter) and ZAP!! - it removed the glue for sure, but it also burned through the line. This will be repaired of course, but not without a lot of slaps to my forehead...DOH! I'll never do that again. This was a glue removal "trick" I witnessed by another modeler who made it work without torching his rope. I'm rigging with a new rope source: very nicely made, triple strand cotton rope. Minimal unraveling. These are just two of the main sizes for my shroud rigging. I have several other sizes for other rigging areas, in both the 'tarred" (Dark Brown) lines and the running hemp (Beige) lines. Although polyester rope looks less "fuzzy," I still prefer real cotton rope for principal rigging. Polyester rope from other sources is somewhat "shiny" and is also harder to work with since it's also "slippery." However, this said, I've used a very nice looking beige polyester rope on this build's safety lines on stanchions and hammock cranes. These lines are easy to afix so working with the polyester isn't an issue. Also, the slightly hairy look on some rope lines is a non-issue - unless, of course, the cotton rope is so worn it becomes an apparent distraction - something that isn't typical with our sailing ship models. If you've ever been on a real sailing ship with real hemp rope lines (not synthetic), you'll see that the rope is actually a little "fuzzy." A mounted shroud cleat, one of seven for the fore mast shrouds. Note the top and bottom lashing points. I glue the cleat first with a miniscule drop of CA to hold it in place (with a tweezers), then tie-off with brown upholstery thread. The red arrow points to the required blocks for all the yard lifts (sixteen required). The plans show making these from two separate blocks. A single fiddle block solution is better, more accurate.


- 542 replies
-
- 20
-
-
-
- Sphinx
- Vanguard Models
- (and 3 more)
-
Some. As we all know, life can intervene with our best modeling plans. I have been making steady progress on rigging and I'm going to post some photo updates this weekend (Mar 26/27 - my plan in any event). I hope some of these will be helpful for those who are heading into this later stage of their Sphinx rigged-builds. Thanks for the check-in, Glenn. I'm doing O.K., but I've been attending to other important parts of personal life these past few weeks, not to mention dealing with the intense distraction of the first major crisis of the 21st Century, and I'm not talking about Covid, or climate change. I can compartmentalize pretty well, but what's going on in the world right now is difficult to process. Here on this International forum, I'm certain I'm not alone in this regard. Because there is a tightly-moderated platform for MSW concerning "political speech," I'll refrain from writing anything more. Thanks to those who've followed my Log and commented or mentioned that it's been helpful to them. Stay tuned, fellow MSWer's who've been watching. HMS Camilla is slowly getting her "wings!"
- 542 replies
-
- 9
-
-
- Sphinx
- Vanguard Models
- (and 3 more)
-
Thanks Andre. Your Swift is coming along nicely, good job. Reading my HMS Camilla build log (only a partial one and far less thorough than others of the same kit re: HMS Sphinx) - or any of the many other logs for warships of this era - will give you a solid look into what you'll encounter with your Constitution kit, especially since you'll want to fully rig it. As I have frequently commented here, when one's completed a full hull with all its various bits n' pieces, you're only halfway to completion of a fully-rigged, three-masted, square-sailing, 18th-century warship model. Keep this in-mind and know that a project of this scale will demand a substantial amount of your time. My saying this is not meant to discourage you, but there's nothing like an icy-cold bath to kool off one's ardor! In addition to "patience", a period ship modeler also needs a good reservoir of perseverance. Your Constitution kit will result in a large, impressive model, but be prepared for the many months necessary to accomplish this with any degree of building fidelity. The English have a wonderful, simple expression for the reality I'm describing: "Keep Calm and Carry On." Cheers!
- 542 replies
-
- 3
-
-
- Sphinx
- Vanguard Models
- (and 3 more)
-
Great enhancements, Glenn. Impressive - and, I agree, a "reference build" for this excellent kit. I like all of your detail "hacks." I concur with you that Chris has raised the bar; some of us are attempting to vault over the top of his achievements!
- 857 replies
-
- 2
-
-
-
- Sphinx
- Vanguard Models
- (and 1 more)
-
Whoa! Ski for free @ 80yo? Now, that's a Senior Discount. Glad to read you're coming back to the forum! Ron
-
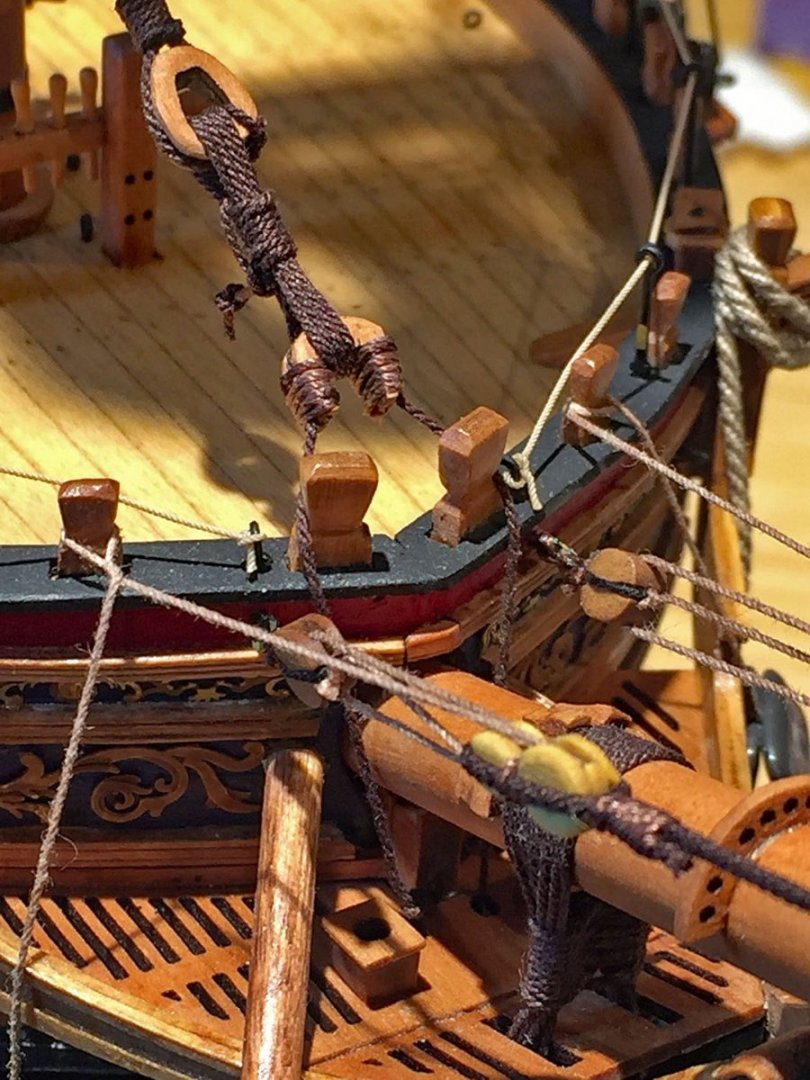
For emergency usage a rope was attached to the rudder chains on both starboard and port; this rope is temporarily tied-off in the mizzen channels. This rope was jury-rigged to the below deck steering ropes if they became disconnected.
- 310 replies
-
- 1
-
-
- Diana
- Caldercraft
- (and 1 more)