hollowneck
-
Posts
1,589 -
Joined
-
Last visited
Content Type
Profiles
Forums
Gallery
Events
Everything posted by hollowneck
-
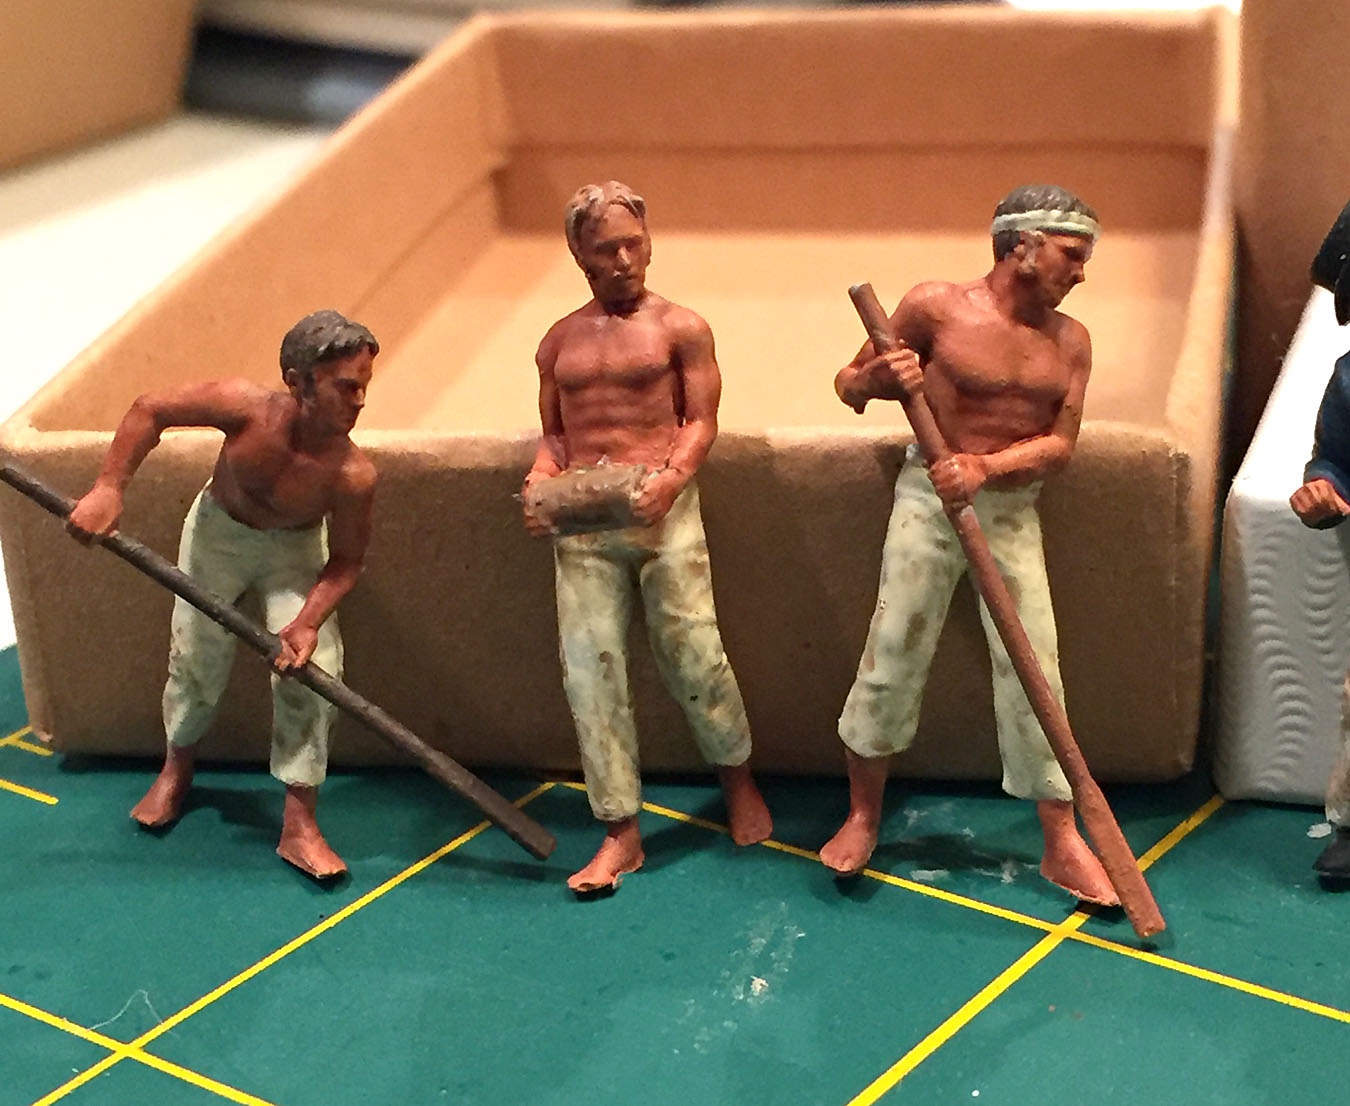
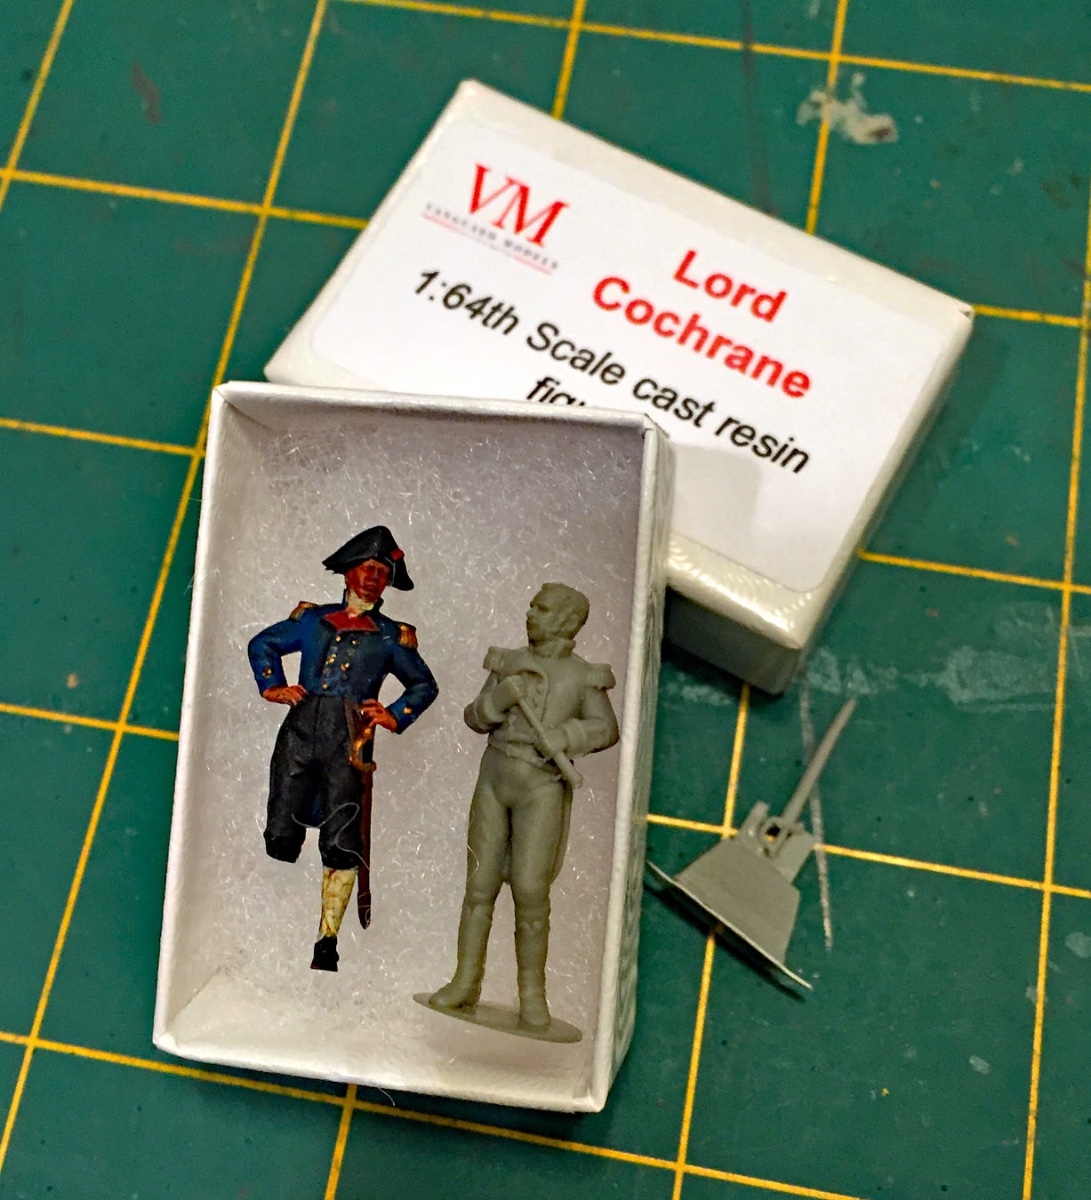
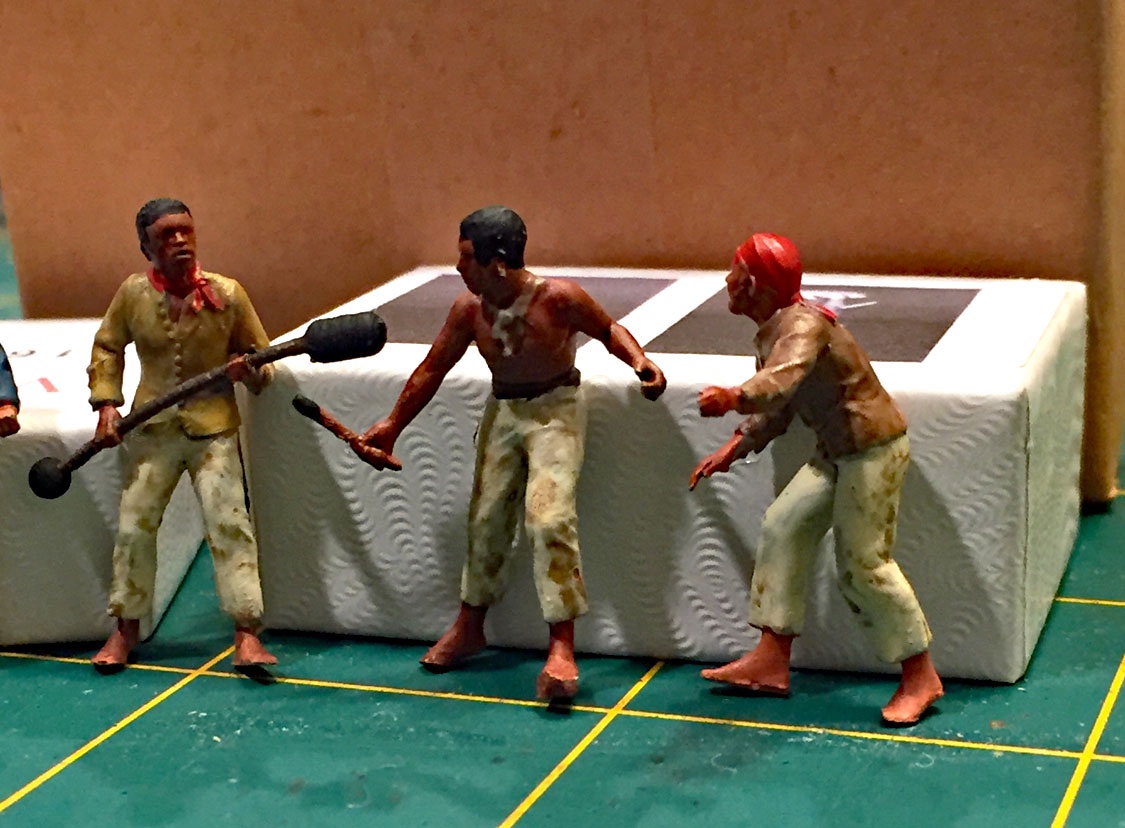
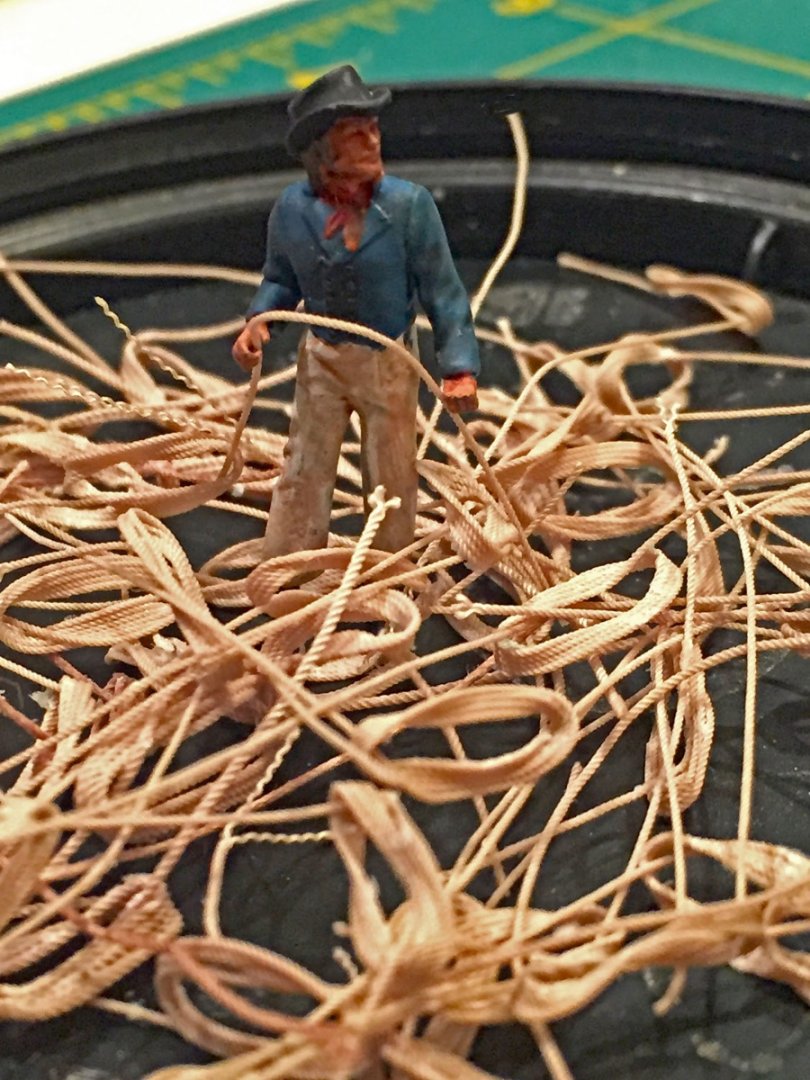
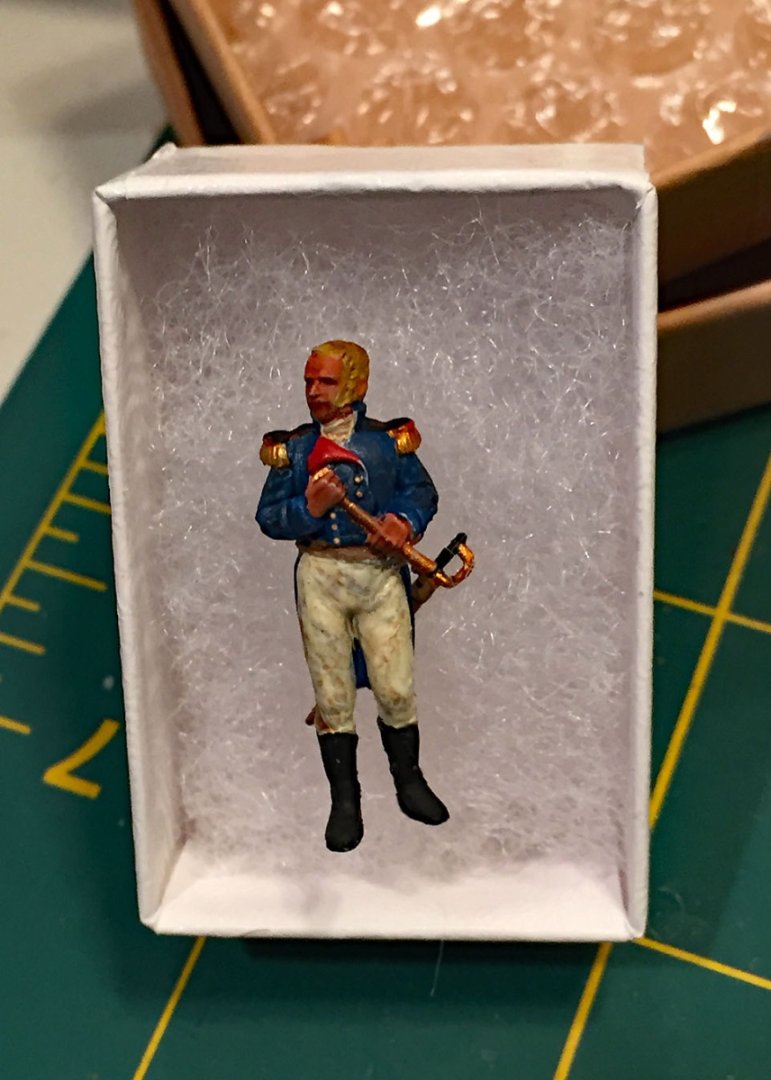
 Camilla's Crew. My People. "Ready when you are, Capt'!" The 3D printed bases successfully removed with minimal orthopaedic foot damage. A limited palette of mostly subdued colors. Most can stand upright without the assistance of glue, but all will get CA'd to the deck in good time. Vanguard (Chris Watton) has indeed gone "above and beyond " with these superbly-sculpted, 3/D printed resin figures. The quality of the material is excellent and after a simple primer coat they take tiny paint strokes nicely. The hands and face detail is very convincing once a light accenting wash is used. A reminder: you're looking at 1/64-scale figures that are nominally 28mm tall across the range. These identical figures are available from Vanguard in smaller as well as larger scales. The legacy and standby Amati not-very-accurate-28mm (& 33mm)-scaled figures should now be retired to old fishing trawlers... However, we now also have Vanguard's scale-accurate and excellent fishermen figures at-hand. Cpt. C.W.Wigglesworth is ready to take command of His Majesty's Frigate, HMS Camilla. He's perched within the Vanguard official shipping container and its special cushioning. That sword is on it's own sprue and gets affixed behind his coat after painting. At Vanguard, this figure is known by "Lord Cochrane”..to avoid confusion at the website should others desire his presence on their model. "Could some bloke help me out with all this bloody rope?!" 80 rope coils completed. Three of Camilla's six-packed & sun-tanned cannon crew... Their linen trousers need a good wash, eh? - "After the day's gunnery practice," says Wigglesworth. ...and three more cannoneer brethren. " ...an extra pint all-round for you blighters!" says a pleased Wigglesworth after a particularly good gunnery session.
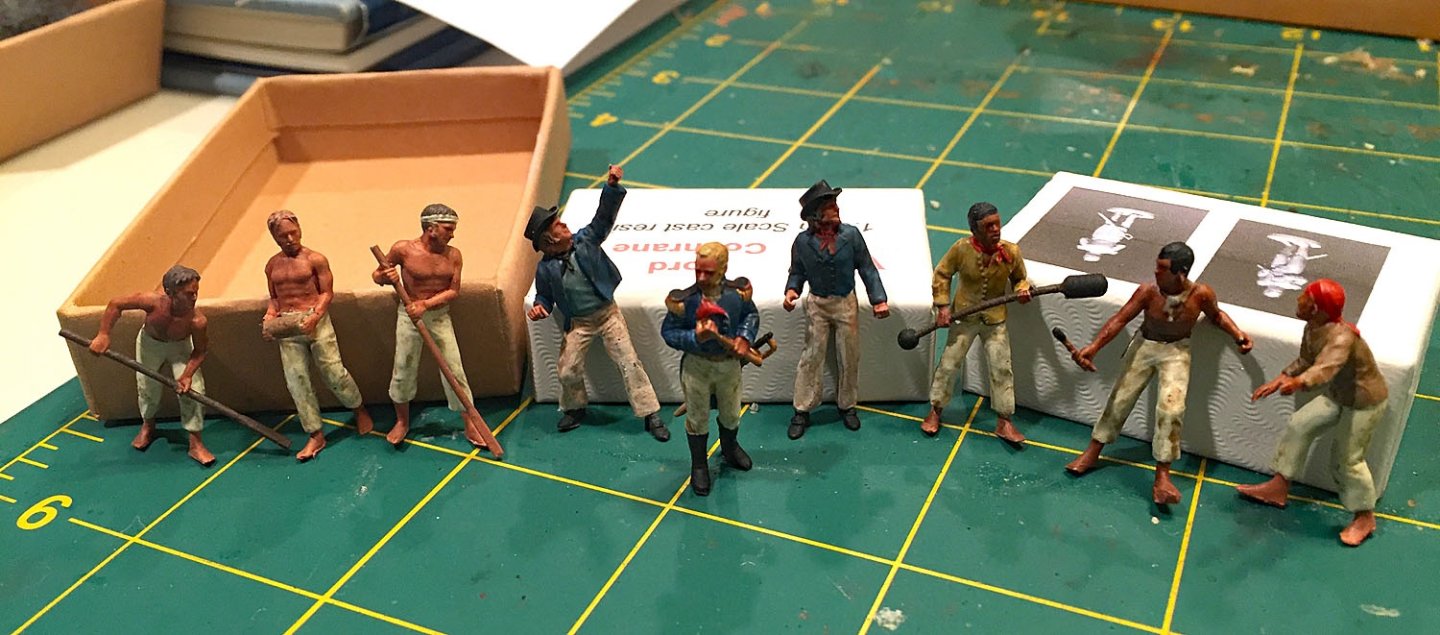

- 542 replies
-
- 13
-

-

-
- Sphinx
- Vanguard Models
- (and 3 more)
-
Ha-ha. I'm sorry to give fellow MSWer's nightmares - the wholly unintended consequences of my Build Log! Sorry, peeps. I no longer have house pets, but in an earlier life I had 5 cats (2 house, 3 barn), and two dogs*. The cats had a pet door, the dogs - cozy doghouses. But this was before my wife and I were empty nesters after raising a combined 7 children. Most of our children now have pets - for their children, who do get VERY CLOSE TO Gampy's ships on occasion! I'd NEVER seriously consider having pets with all my "open air" models. Well, maybe an iguana in a terrarium, or a fish tank, but no birds either! I'll now have nightmares dreaming about a pet parrot perched on a model's bowsprit! * not counting 4 horses and usually 15-20 head of heifers, but they never set hooves inside our farmhouse...😂
- 542 replies
-
- 6
-

-
-
- Sphinx
- Vanguard Models
- (and 3 more)
-
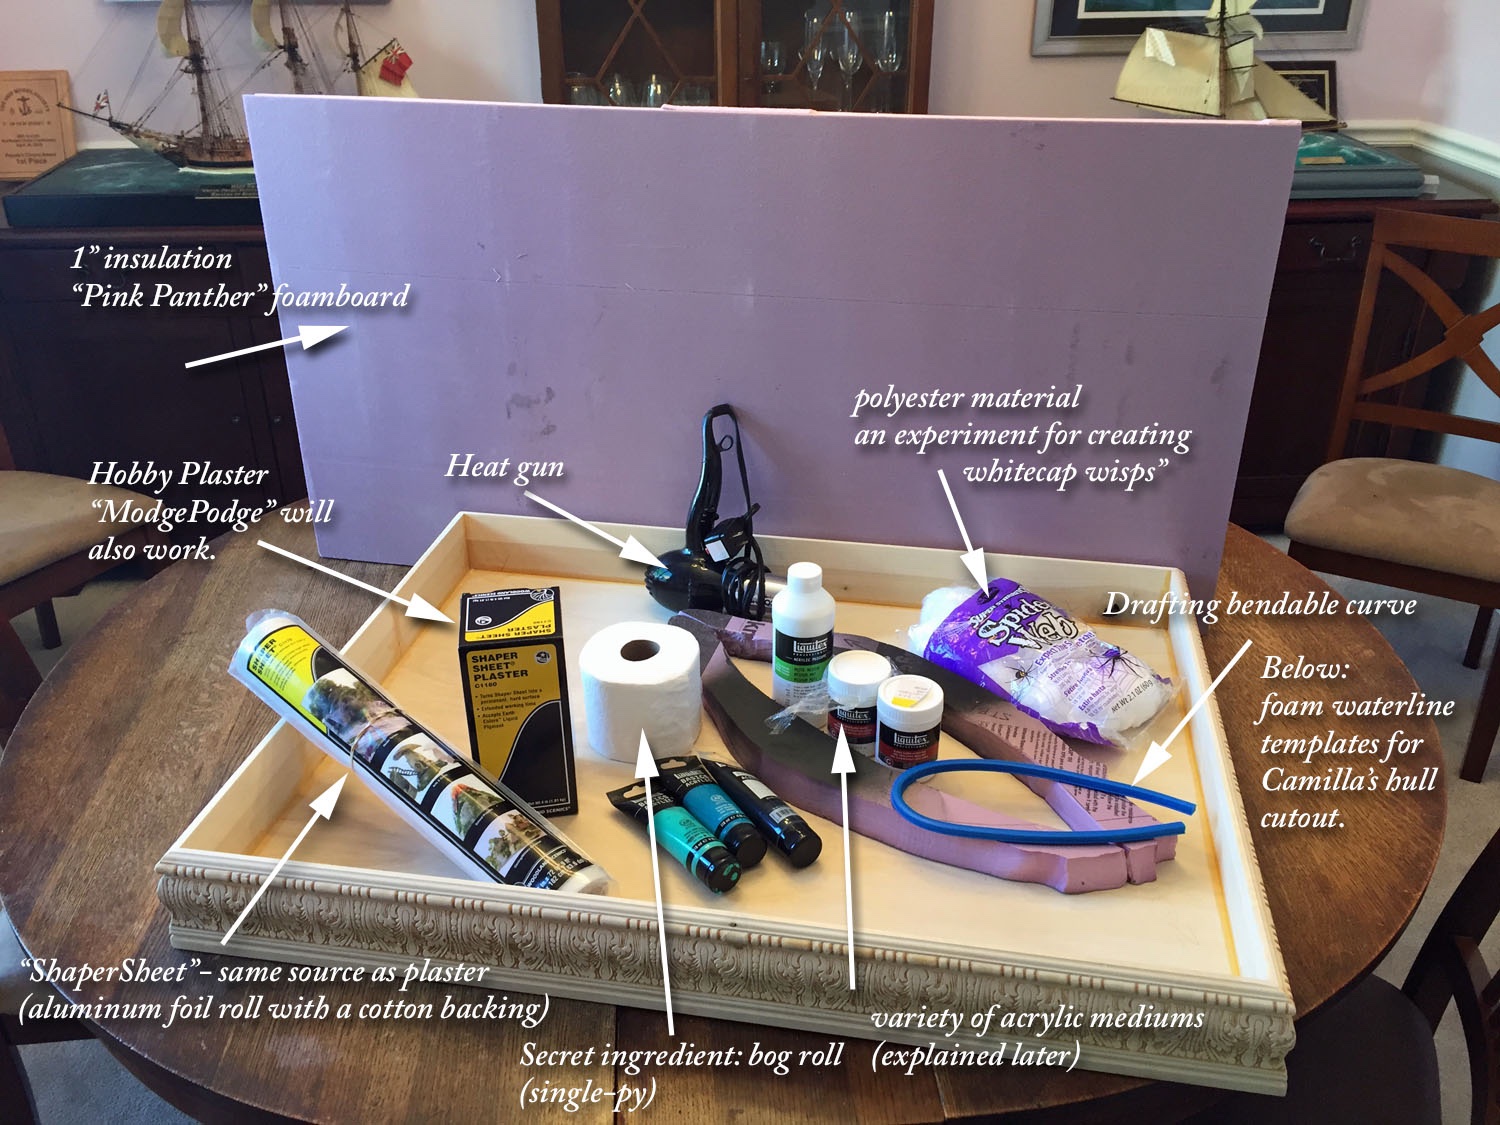
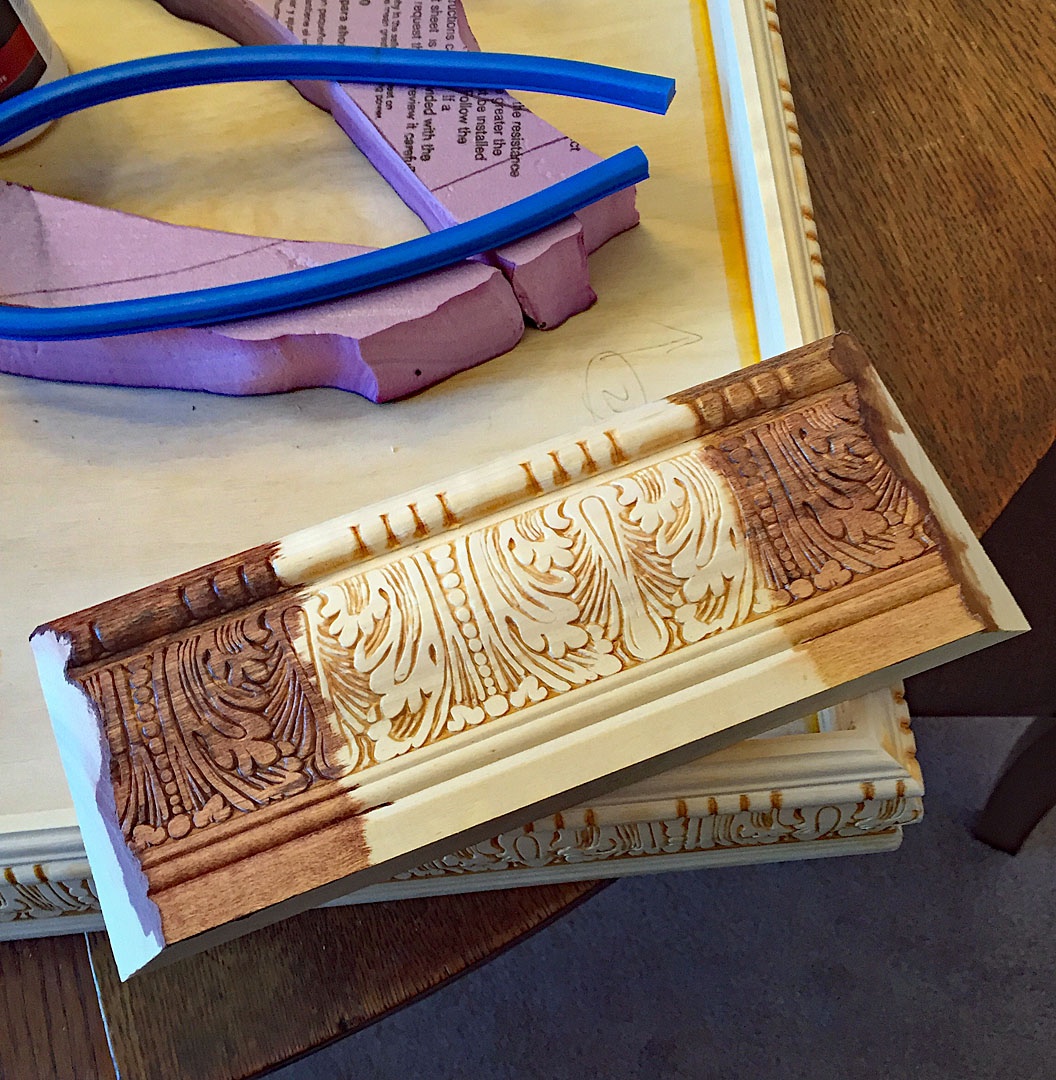
The gathering storm... Pretty self-explanatory. Most (but not all) materials gathered. A couple prelim tools. Of course there will be sundry hand tools like various paintbrushes and cutting implements like a hotwire foam cutter, breadknife (for cutting the insulation foam), etc. The insulation foam board is from HomeDepot and comes in 4 X 8 sheets like plywood. It had pre-scored cut lines so you can break it into sections so you can fit it in your vehicle if you don't drive a Ford F-250. I'll use multiple levels of this inexpensive material to build up the wave profiles. I also haven't shown various glue(s). The bendable curve was held against Camilla's hull (port and starboard and a tentative waterline profile for both was transferred to spare pieces of 2" thick insulation); these will be used to trace the outline of the cutout in the base foam board for Camilla's hull. This cutout will need to be careful "finessed" with additional hand tools to create as tight a fit as possible to the model's hull to secure it in the foam board's cutout. Various acrylic materials molded along her full waterline will act as adhesion components to create her hull's wake - and, naturally "disguise" the small openings ("cracks") that will appear around her hull after placement. Thinking about the case color in a natural wood finish. I'm leaning toward the right end of this cutoff piece of the case's millwork: oak stain with a chestnut stain (over-wipe) to fill the patterning. On the opposite end(left), the stain is chestnut only; at this point in time I feel it may be too dark. The ultimate decision will be made after the diorama is completed. To finish (and protect the wood) I'll use a Wipe-On Poly, and likely a semi-gloss. The bottom of the case will have felt bumpers.

- 542 replies
-
- 8
-
-
- Sphinx
- Vanguard Models
- (and 3 more)
-
Derek, one word (well, two actually): lovely display. Your Speedy looks impressive, with good lighting and the gilded mirror is a nice touch. I don't know about you but I do a "walkabout" every few weeks (no set schedule) with a can of compressed air and a small handful of long medical swabs - to reach some areas where the air blasts aren't enough to keep the dust bunnies from accumulating - especially on the rigging as #druxey has correctly noted. Frankly, this takes a couple hours to hit all my models but I get to be up close (again) with each one, noting where I could have done things better.🤔 And a by-product, the models stay mostly clean and still they tempt guests to closely inspect them. I purchase several cans of compressed air at a go: saves $. And I don't have to feel stingy when giving them air baths!🤣
- 542 replies
-
- 5
-
-
- Sphinx
- Vanguard Models
- (and 3 more)
-
Hey, Mike - big thanks, again. The quick answer is that the model's keel will rest on the plywood bottom and in this instance (depending on the depth of the wave action in her diorama), I may add a small "shim" of insulation foam board under the keel to raise Camilla up slightly. On previous dioramas I've rested the bare keel on the base. No adhesives required. The surrounding foam and resultant water texturing materials hold her hull firmly in the open cutout of the foam board. I'm posting a quick couple photos of preliminary diorama materials next as I'm jumping into this soon...
- 542 replies
-
- 4
-
-

-
- Sphinx
- Vanguard Models
- (and 3 more)
-
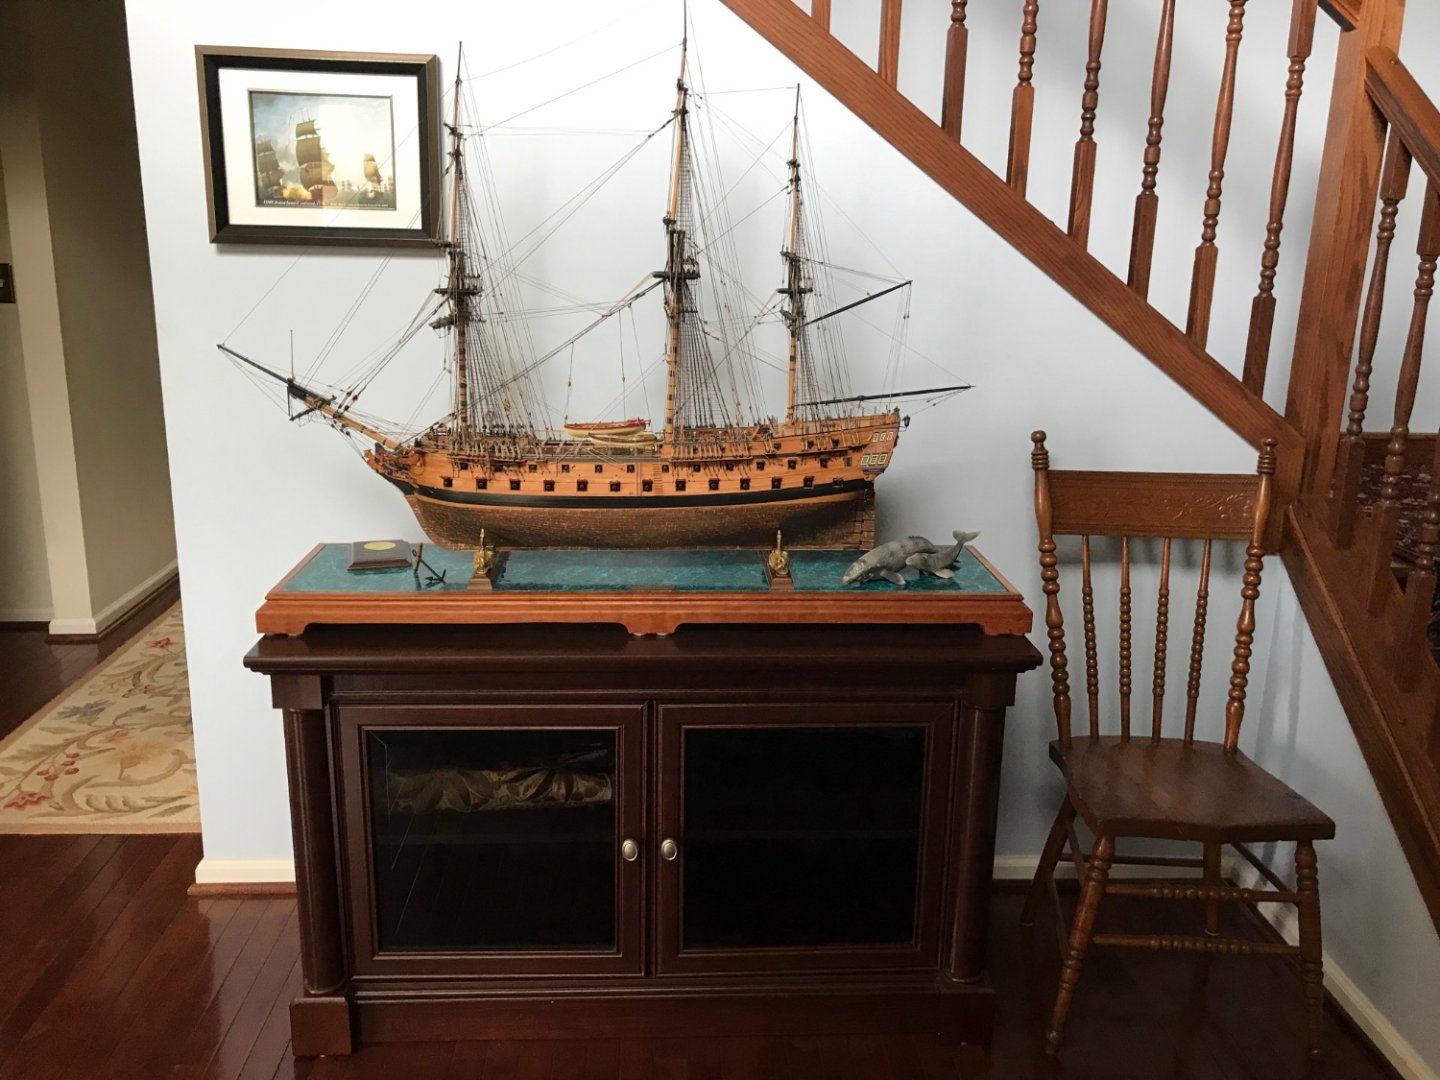
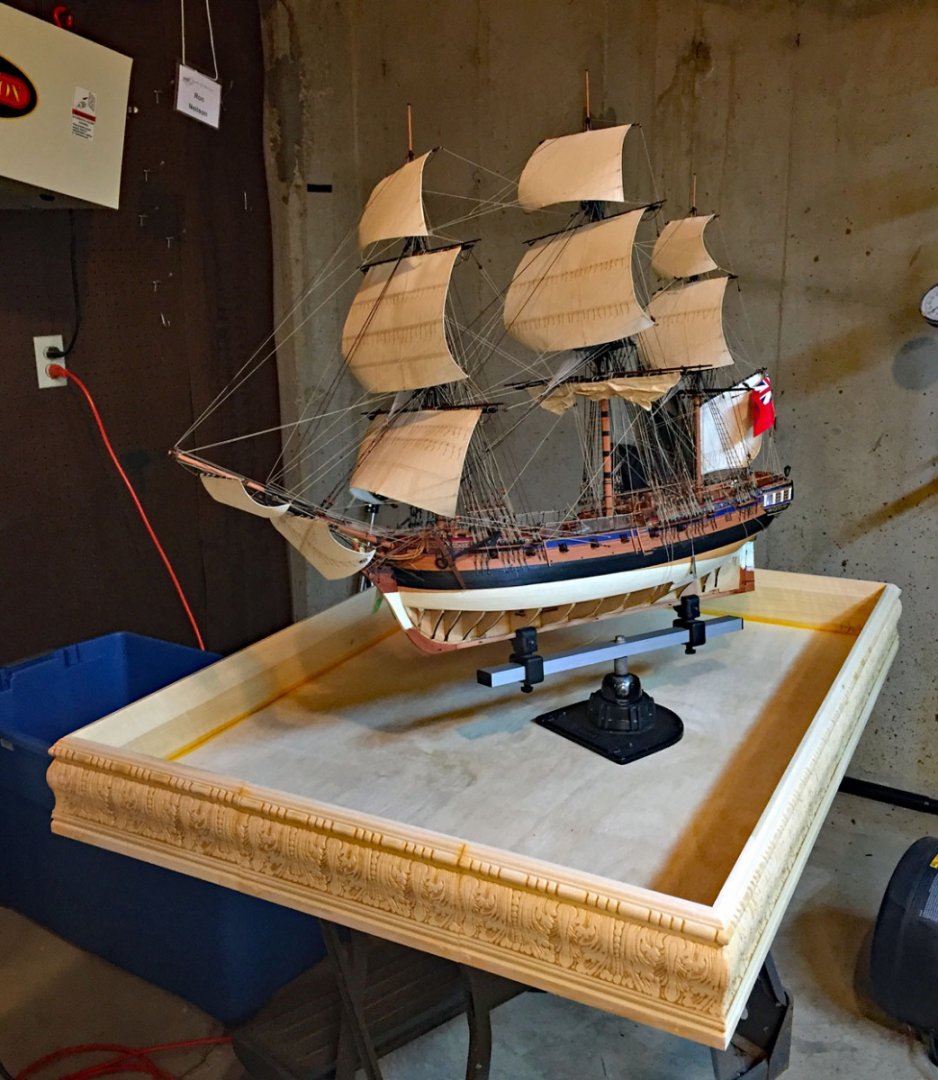
Thank you kindly, Derek. The larger "fighting sail" models many of us are fond of are space hogs when they're masted and rigged. My original plan for HMS Camilla was to also show her with stunsails! That is, until I measured what this would yield across her breadth. My extremely empathetic and supportive wife wasn't thrilled. I wanted to do it simply for the challenge of never having added these sails previously. I dreamed of replicating the look so many era painters have depicted of these beautiful ships under full sail. As it stands I'm very fortunate to have a large home that already has an even dozen of my models scattered about. My wife calls our home "The Neilson Ship Museum." There is room for Camilla (I'm thinking about purchasing what's termed here as a "hi-top bar table" to set her completed diorama on) since it is large and nearly square-based. There is even space for Vanguard's new Indy, somewhere...🤔 Lucky me, I can rig my models until the whales come home, so-to-speak. Go ahead, tell your wife a Yank made you do it. I'll take all the blame and bashing from afar. Just don't show her this photo of what greets our guests when they open our front hallway door! Cheers - Your Speedy model is a beauty, superbly rigged. Go Large as they say here: build Sphinx with a full rig. You know you want to do it.
- 542 replies
-
- 14
-
-
-
- Sphinx
- Vanguard Models
- (and 3 more)
-
Thank you kindly, Tom. I get very EXCITED having arrived at this next (and last) step. I certainly have ideas about what I want to create, but so much of this final phase is freeform, open-ended - seeing how the "Flow" goes. I've learned when "creating water," to remain open to the possibility of many happy surprises. This said, I do my homework by collecting a thick folder of water photos, and in this case (pun), the English Channel, which I've seen many times, firsthand. My challenge this time around may be to create "wispy" whitecaps on a troubled sea. We'll Sea.
- 542 replies
-
- 6
-
-
- Sphinx
- Vanguard Models
- (and 3 more)
-
You're correct, I WILL notice. I LOVE Dilbert. I'm certain he also builds model ships. Thanks for the levity. Us model makers tend to take ourselves way too seriously at times (methinks). Cheers Druxey!
- 542 replies
-
- 3
-
-
- Sphinx
- Vanguard Models
- (and 3 more)
-
Thanks Glenn, your comments are always appreciated. As is evident, I like all the elements you personally find uninteresting. I have built a number of models presented in the conventional manner on pedestals on baseboards. However, the ones that get the most excited reactions - and often, deep discussions - are my diorama models of the last few years. They also turn me on the most too!
- 542 replies
-
- 5
-
-
- Sphinx
- Vanguard Models
- (and 3 more)
-
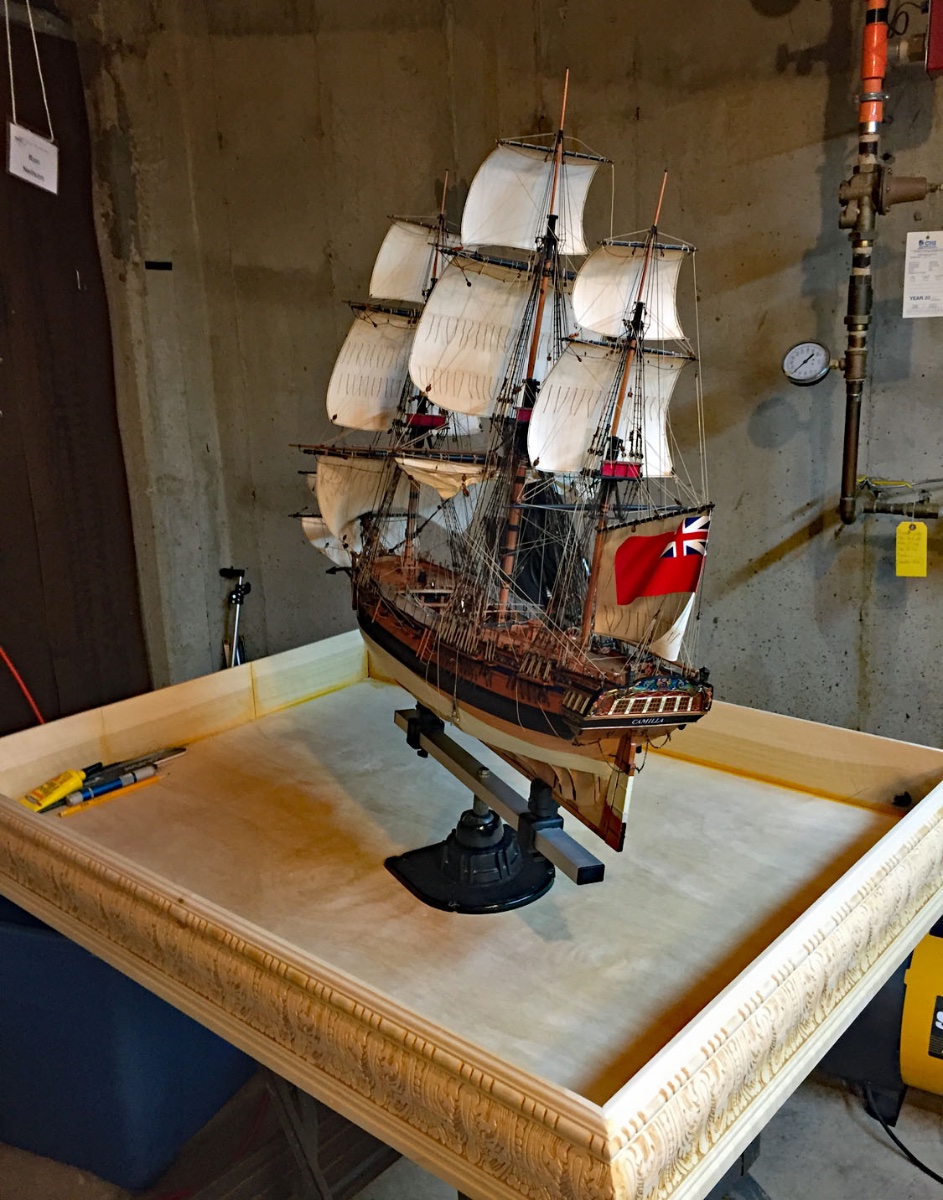
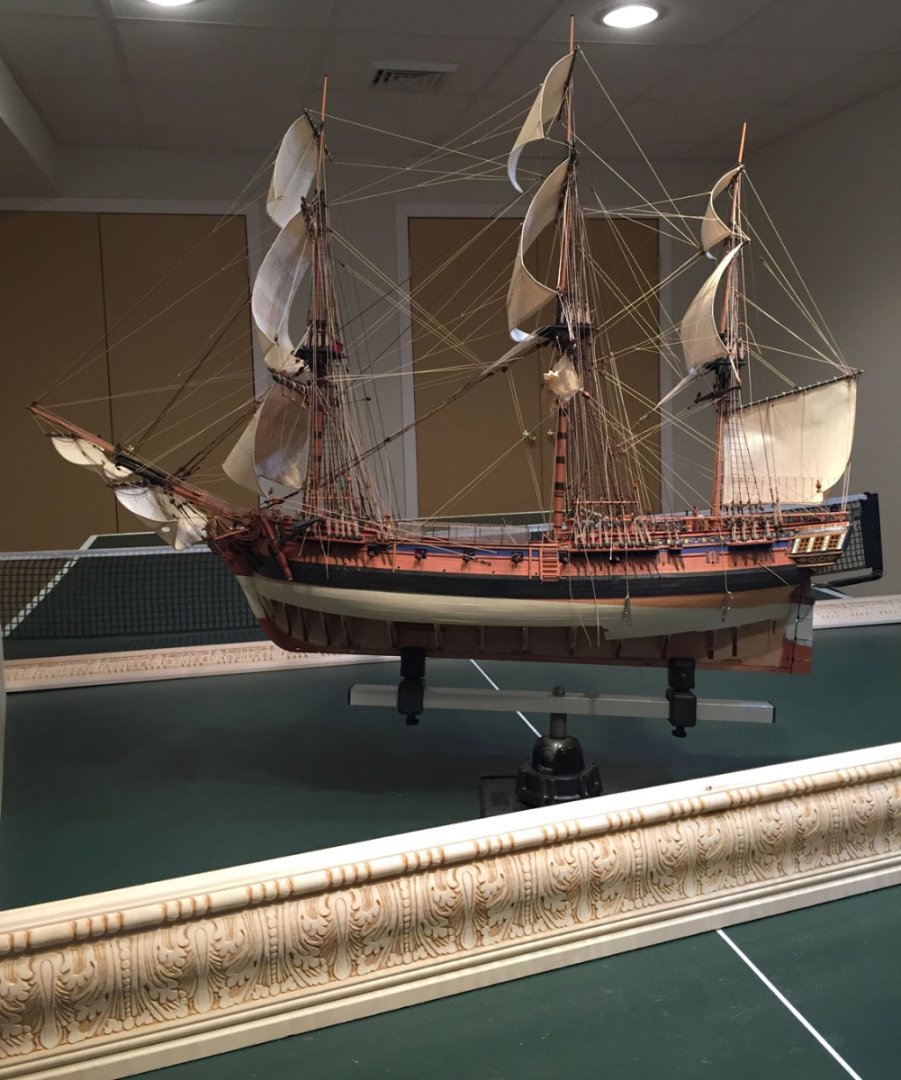
Big Stuff this past week or so. Sawing, hammering, gluing, sanding, detailing...you get the picture. In my basement shop where I can make sawdust ( I have two air systems: a plain ShopVac for vacuuming, and a ceiling mounted 'ShopFox' for all the tiny airborne particles. HMS Camilla's diorama case completed. Tricky business to get the 4" high mitered corners precisely joined. Specialized 45/90 degree mitre clamps required. The model is positioned approximately in the case with an approximate list to starboard. The outside case measures 38" W X 28" deep. Height = 4" to case sides. The water may possibly be slightly higher depending how I create the wave action of stormy weather. Camilla will present herself considerably lower in the case once removed from the build clamper and resting her keel close to the plywood interior base - like all my other dioramas. The yellow tube in the corner is Stainable Wood Filler (MinWax); I used it on the case and also on the model. The name says it all. It dries out rapidly and getting it out of its tube is a pain, but it does take stain well because it's a (somewhat) malleable paste with actual ground up wood; the solvent carrier evaporates rapidy so you need to work it as soon as it pokes out of its nozzle. Fingers work best I've found. Another view. I am a model maker, and at best, an amateur cabinet maker. You know the saying: "Measure Twice, Cut Once?" I measured Thrice and still got it wrong! I had to salvage enough from cutoff pieces of the casing millwork to recover from this boob on the LAST side (of course). The yellow glue joints to a three-piece completed side rail are somewhat evident here. This will be less of an issue once I detail sand and then give the case it's final staining (I'll wait until all the water is complete and the model is in place before deciding the final colors for the millwork). The slight mis-match on the lovely Acanthus pattern of the case bothers my eye a little, but I'll be able to live with my imperfection(s). 3 sides out of 4 isn't too bad, right?🤫 Now, my next posts will be diving into the deep end: Camilla's water awaits!

- 542 replies
-
- 15
-
-
-
- Sphinx
- Vanguard Models
- (and 3 more)
-
Ah-Ha! Then the Legionnaire's armor will match her bottom...
- 488 replies
-
- 5
-
-
- Indefatigable
- Vanguard Models
- (and 1 more)
-
Good idea. The reddish hue of bronze will better complement the warm wood colors.
- 488 replies
-
- 4
-
-
- Indefatigable
- Vanguard Models
- (and 1 more)
-
Thanks! No other nearby vessels will miss this ship's service and allegiance!🤫 Yes, also called "bond" photocopy paper, typically indicated also as #20 lb multipurpose printer paper. As Brits might say: "Bog standard" but not literally meaning "The Bog." (which is the seat of ease to ship modelers...)
- 542 replies
-
- 2
-
-
- Sphinx
- Vanguard Models
- (and 3 more)
-
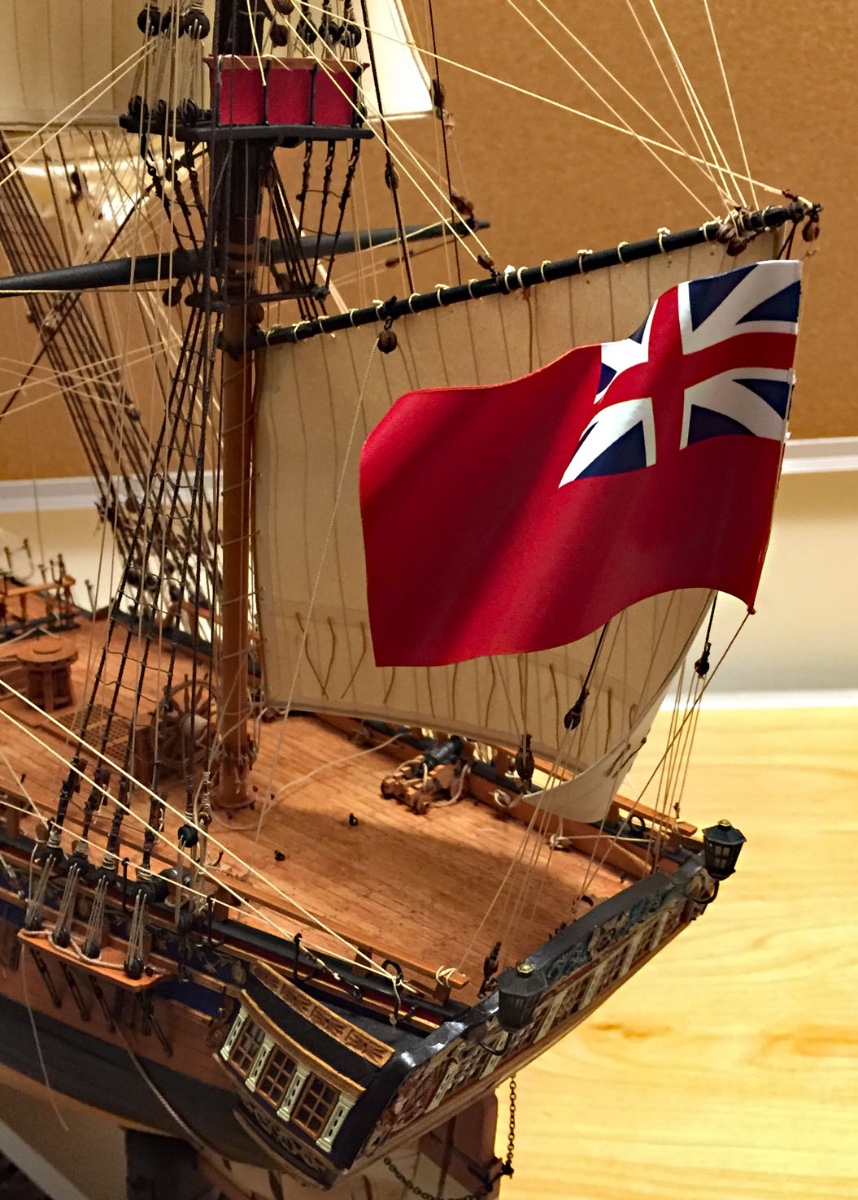
Thank You, B.E. Your commentary is always much appreciated. When I completed the flag and held it in place initially I was somewhat disappointed with the slight "sheen" of the paper. After touching-up the fold line with paints - but before tying it off to its halyard - I gave the flag a shot of dulling lacquer. Not knowing if it would react negatively with the inkjet colors, I had printed an extra sheet and tested the spray on it first to see if the lacquer would have an adverse affect. As they say in the French Navy: "Tre´bien!, No problemo!"
- 542 replies
-
- 1
-
-
- Sphinx
- Vanguard Models
- (and 3 more)
-
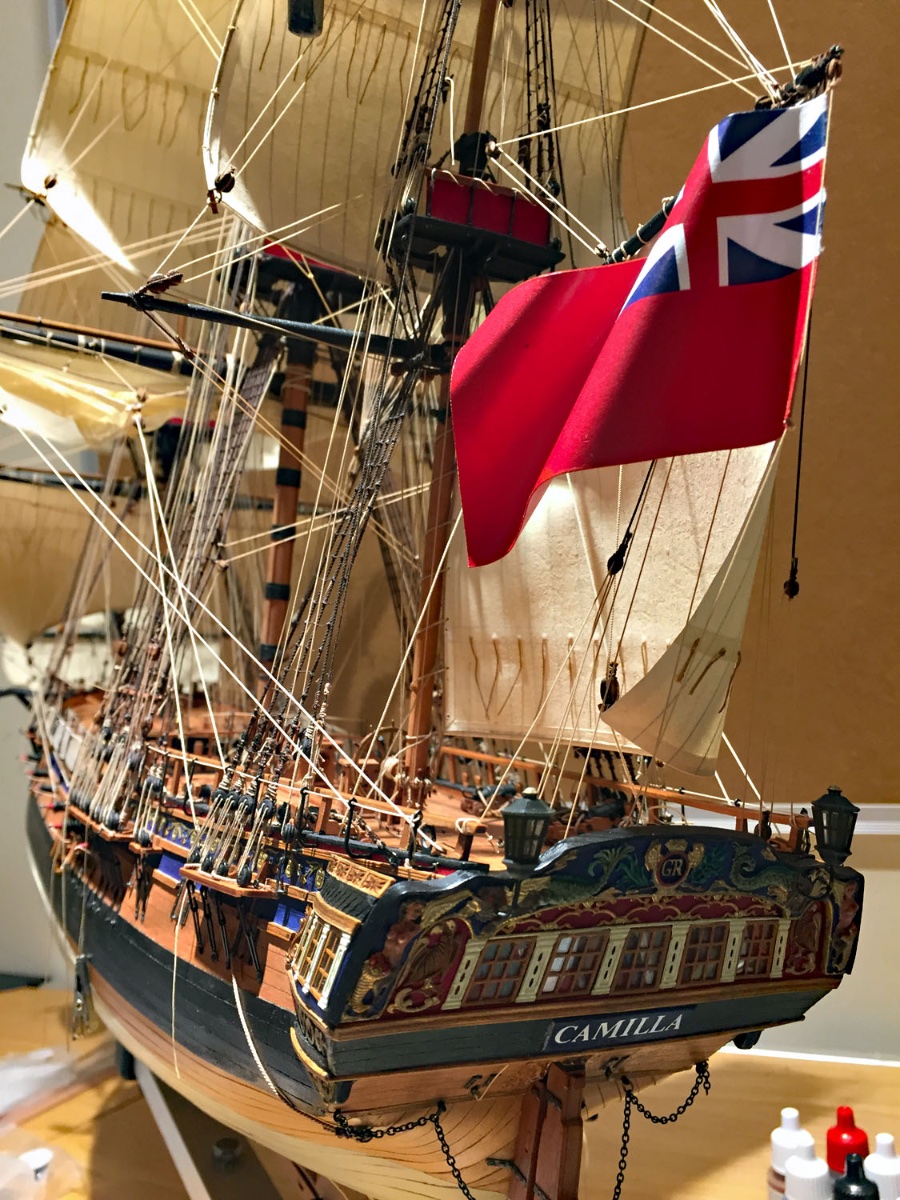
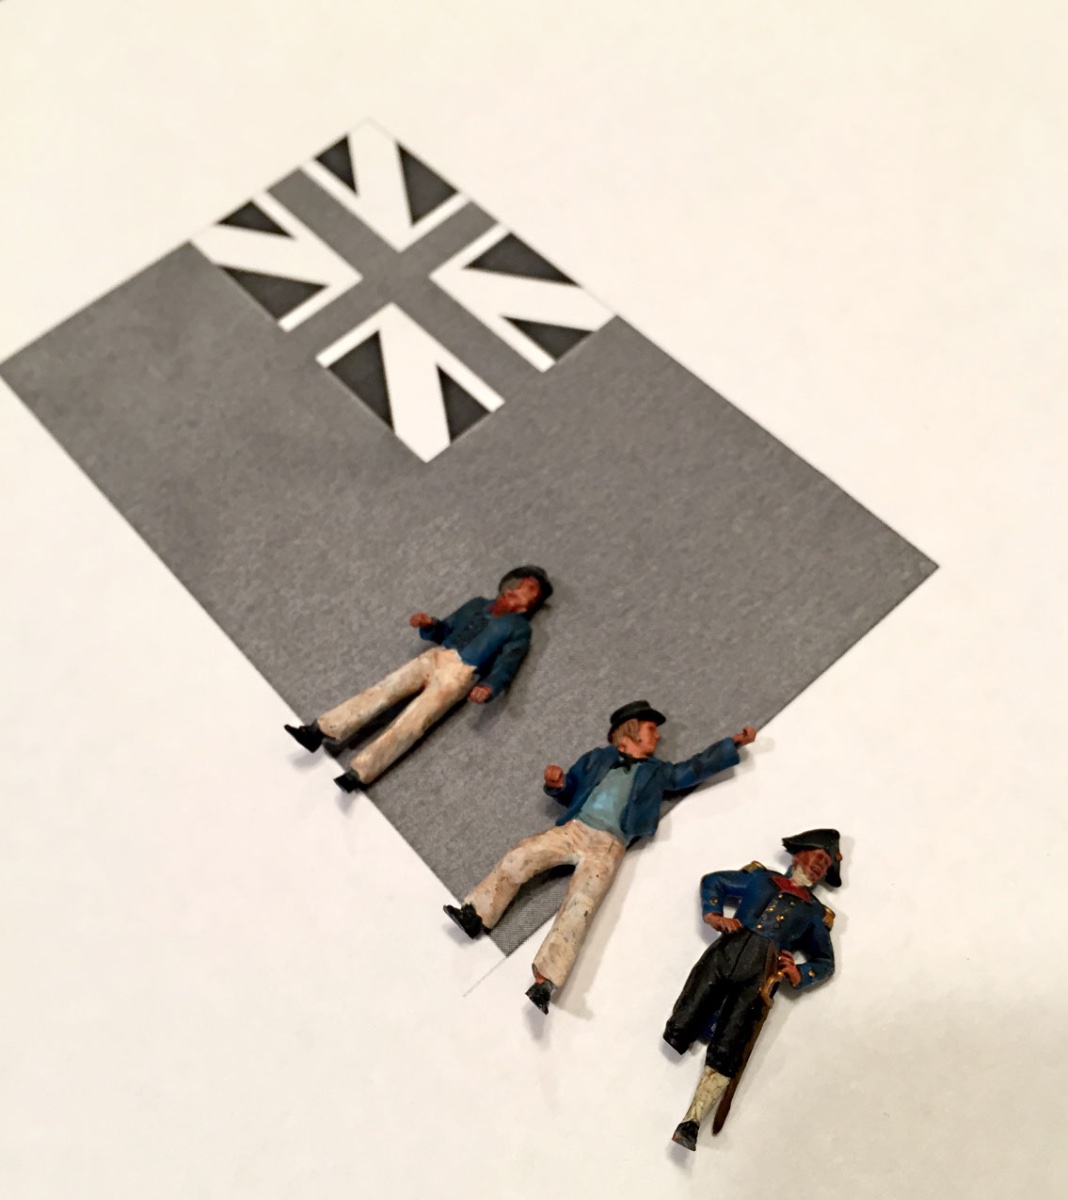
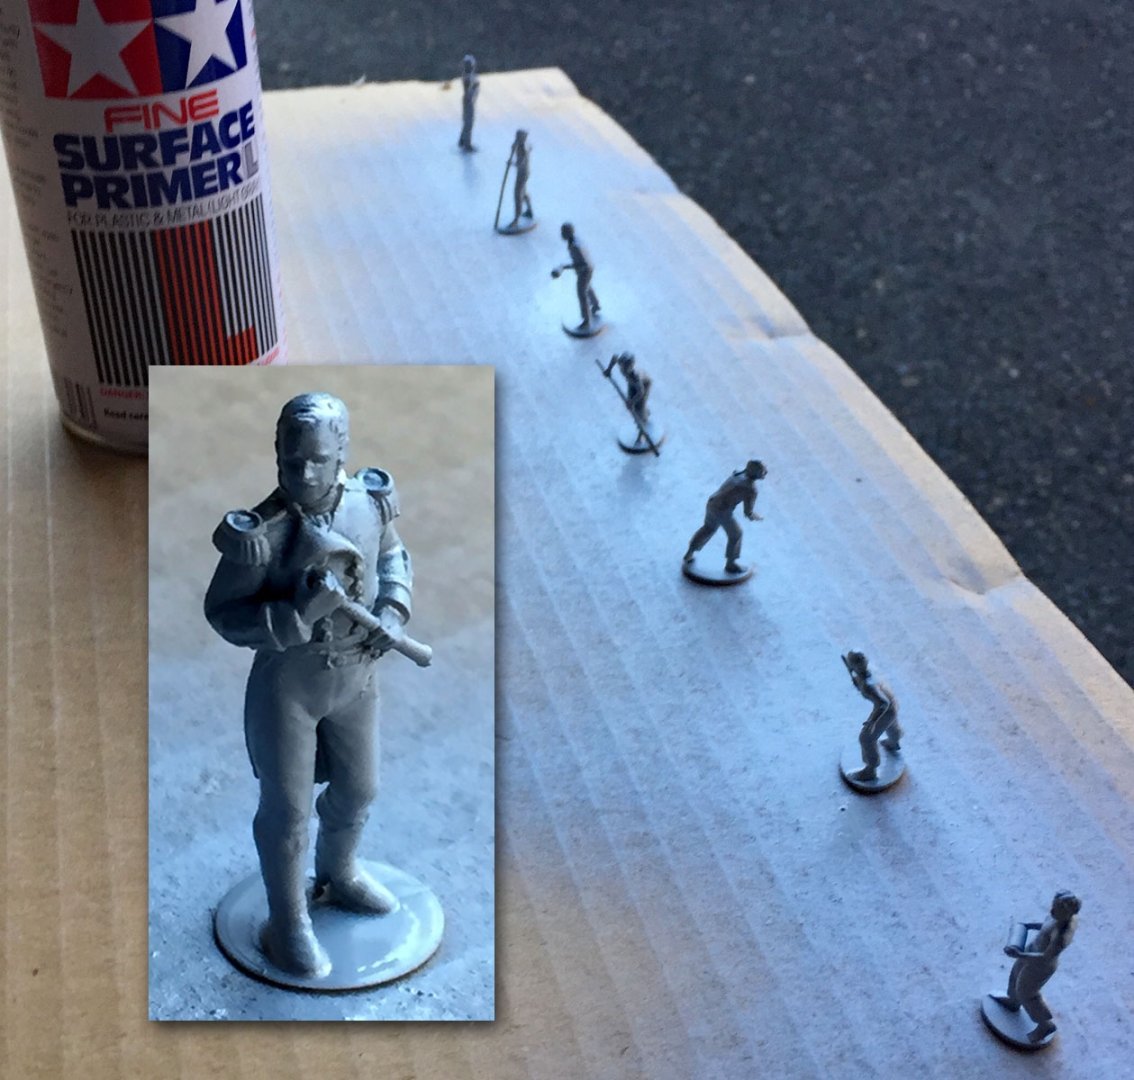
While waiting for the glue to dry on the model's case joinery, I made HMS Camilla's ensign, primed the new Captain and his cannoneers for their detailing and started affixing her 80+ rope hanks. The British flag is made from copier paper (folded over), inkjet printed. I carefully shaped the flag with my fingers utilizing three different sized dowels. The doubled thickness of the copier paper (and possibly some spray mount adhesive to hold the two sides together) holds its shape. A quick spritz of dull cote spray magically turns the semi-gloss printed paper into a convincing fabric. A single tackle block for the flag's halyard line was mounted to the gaff to haul the flag. HMS Camilla's diorama will show her with a strong following wind, hence the largely unfurled ensign at her stern. I have yet to make her Mainmast pennant which will also be made from paper. Because of the pennant's length, I'll mount a thin wire between the paper layers to retain its long waving shape (same wire used for the sail bolt rope shaping) The new 3D-printed Captain and his gun crew get primed prior to detail painting. The figure's thin base will be removed with a scalpel, not a disc sander this go-round! I believe the detail painting of the figures will be a little easier with them temporarily glued in-place on the cardboard sheet. Holding these with fingers - even clamping tweezers - gets tedious. There are jigs made expressly for holding small figures but I don't have them. A view of the rope hanks mounted to Camilla's mainmast shroud cleats (starboard). A little trimming and dressing remains. Essentially, this last stretch of the rigging is complete at this position.


- 542 replies
-
- 16
-
-
-
- Sphinx
- Vanguard Models
- (and 3 more)
-
This involves the water and math calculations of Archimedean physics: soak the tongues for another 24 hours and you'll possibly be close to their original configuration. If not successful, toss the whole lot and start over!😂
-
Thank You, much appreciated. For me, crafting the presentation is yet another extension of the challenges and pleasure I get making these beautiful models. I transition from intricate rigging with surgeon's and dentist tools to chopping up large sections of plywood with power saws, sanders, jig saws and large cabinetry clamps. Once Camilla's base is completed (but not yet stained and sealed), then it'll be time to make water... all in the endeavor to present the pinnacle of late 18th century technology: a fast-sailing frigate of His Majesty's Service. Post base-making with my power tools, the ship's new Captain and the balance of my 3D-printed crew will get their colors.
- 542 replies
-
- 4
-
-
- Sphinx
- Vanguard Models
- (and 3 more)
-
I only use poly sealers on my models (and base/cases). Fun fact: Shellac is made from the carcasses of beetles(“🎶…Yeah,yeah, yeah”).
-
Thanks Bob, much appreciated. I'm hoping my "wind up" is helpful since it really does set a proper stage for the creation of the water. I contemplated going "plain" on the base, but this ship needed a little something more for its dramatic presentation. There are layers of Home Depot house insulation (foam board) to glue together and shape which will get the process underway. Unusual tools for the first steps are coming up: bread knives, hot wire foam cutter, saw blades, etc.
- 542 replies
-
- 3
-
-
- Sphinx
- Vanguard Models
- (and 3 more)
-
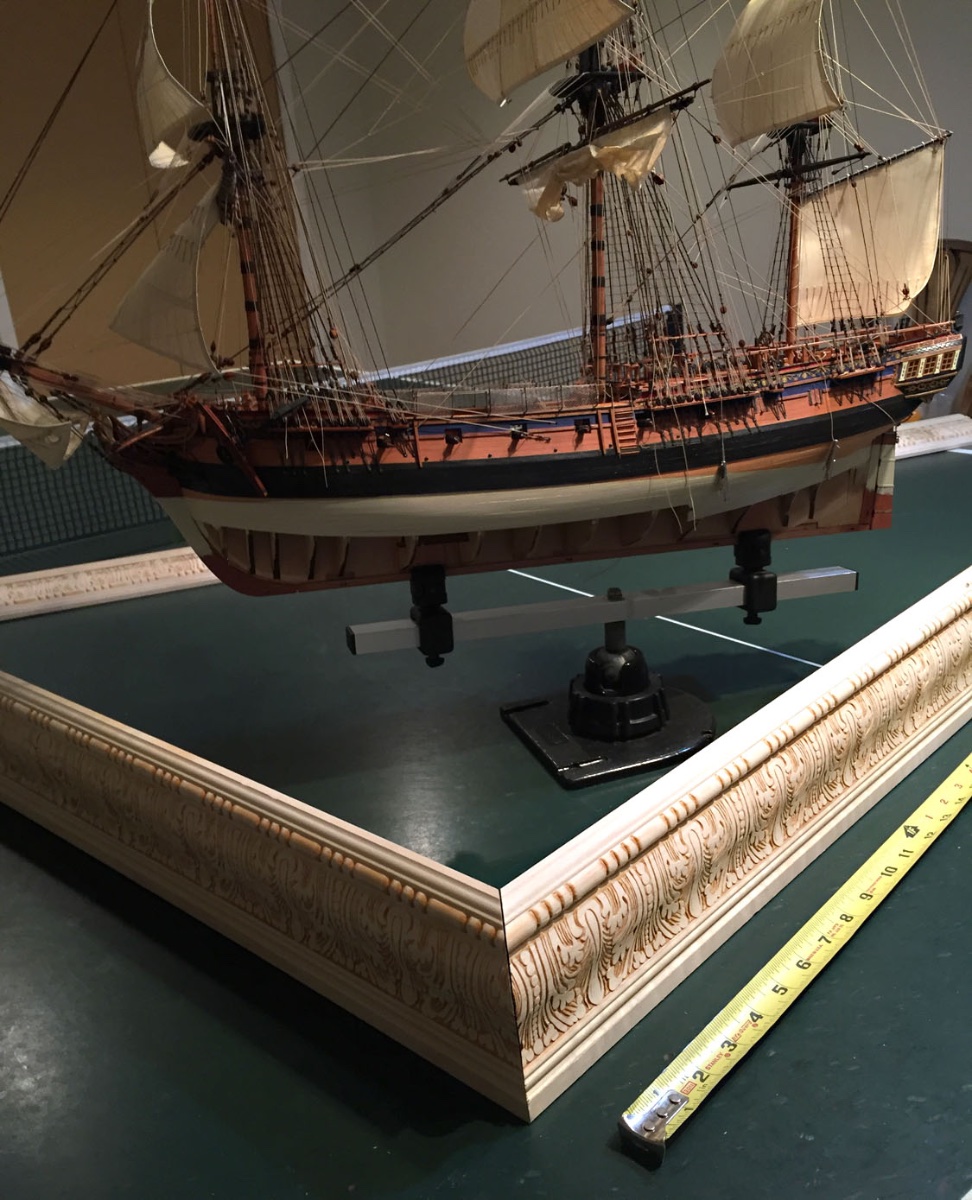
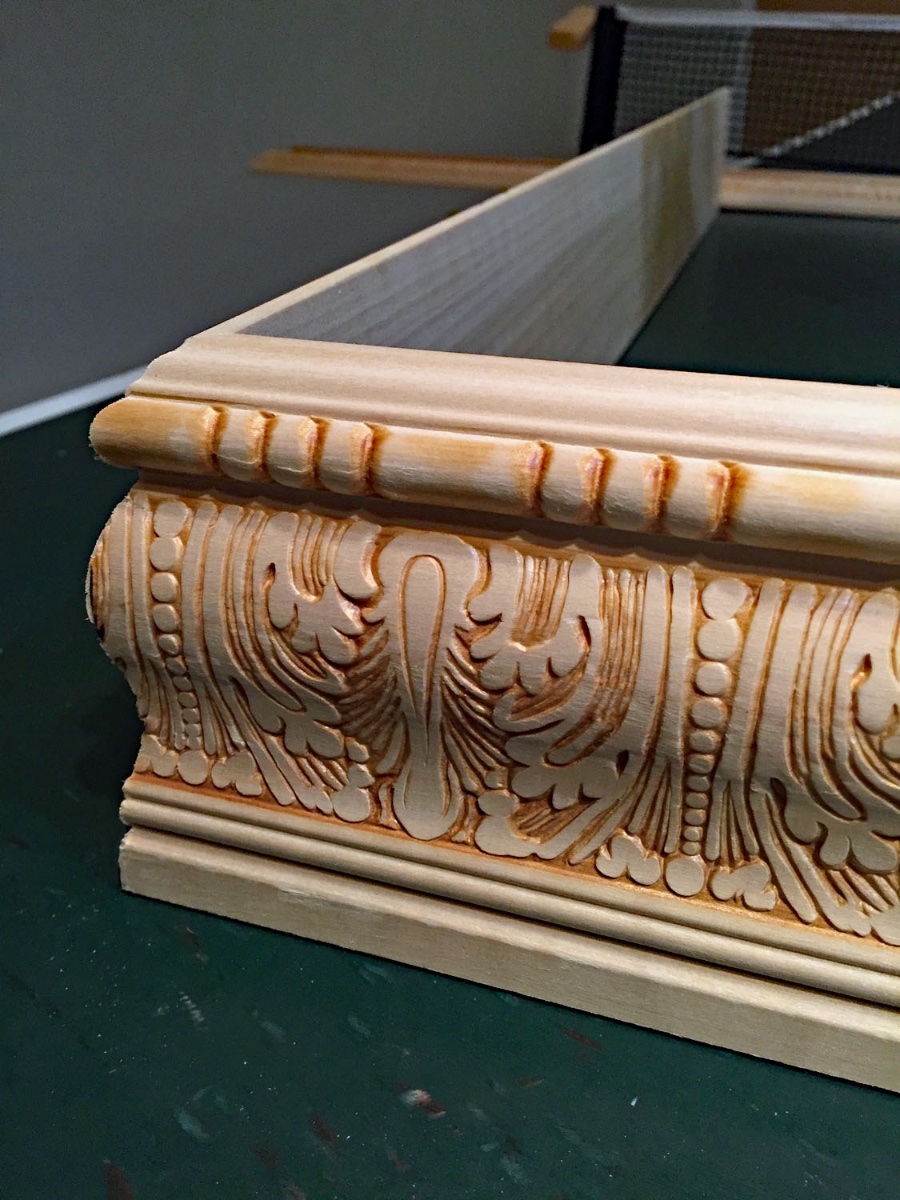
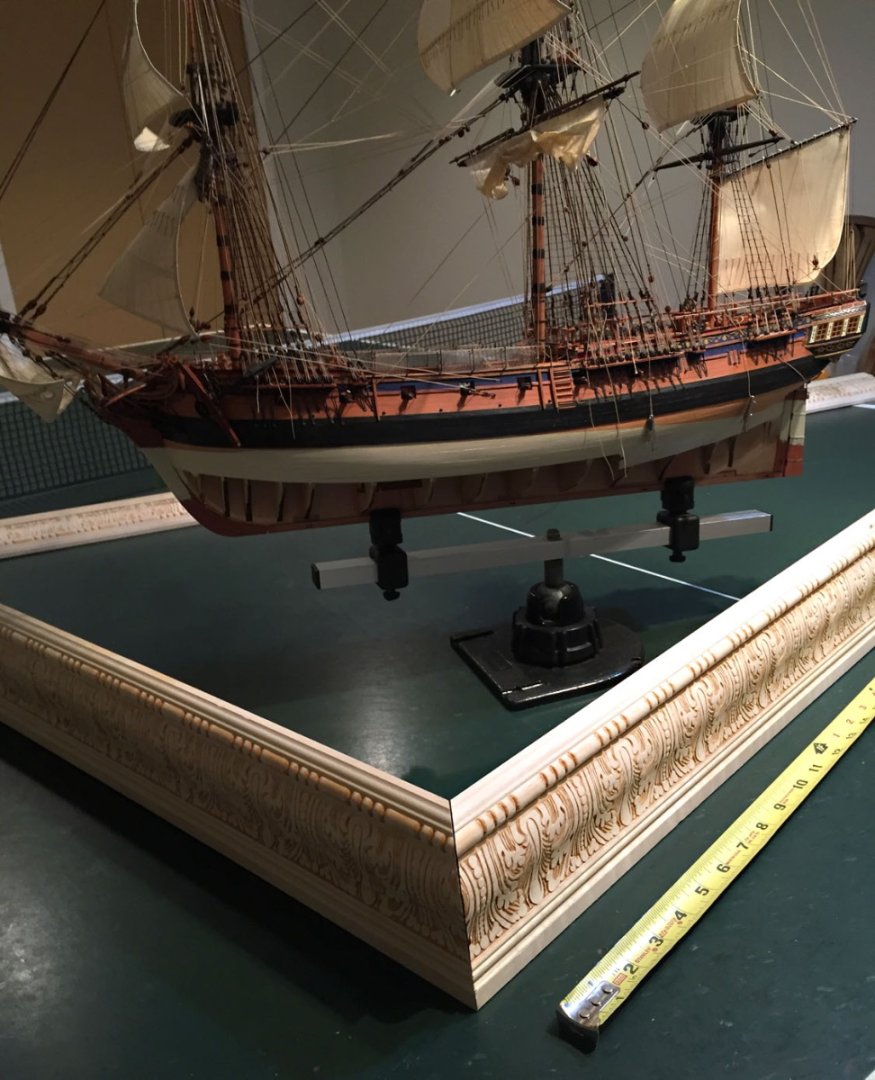
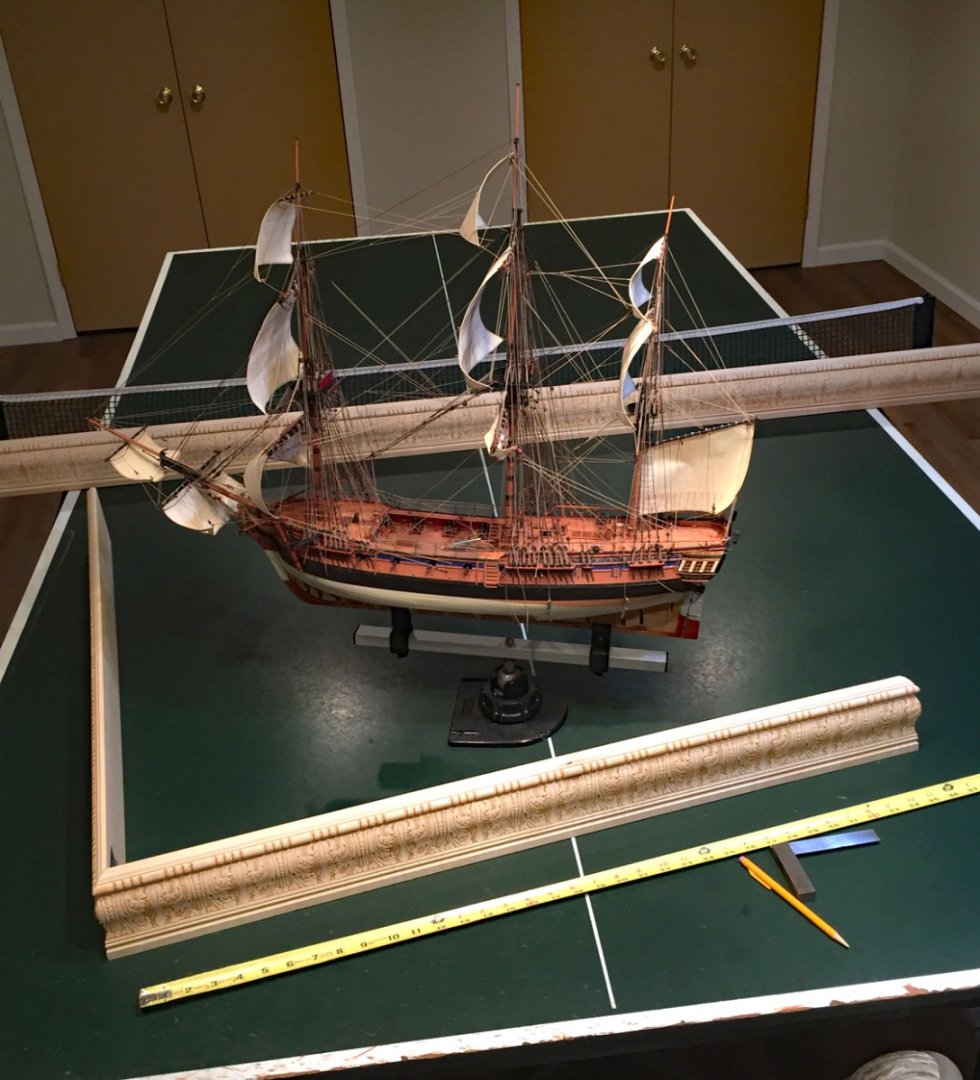
Making rope hanks continues, tidying-up rigging continues too. Two days ago, the custom millwork I'd shown a few posts ago arrived for Camilla's base/diorama! About 30 coils made. 50 more to go. grrrrrrrrrr.... This is tedious, repetitive busy work, but necessary. I'll be very glad when I can start mounting these guys where they belong. Ta-da! the millwork for Camilla's base/diorama arrived. I temporarily set-up "shop"on my pong table to eyeball the proportions of the base in context with the model. I've decided to make the width an even 36" and the depth (port-to-starboard- more or less), 26". In this photo I've cut two lengths with their 45 degree mitres and temporarily stuck them together to get a sense of the completed base size. The architectural door casing wood came in two 7 foot lengths which will give me little room for error; there will be short length cut-offs I can use for experimenting with the color of the stain and the infill accent on the repeating acanthus pattern. The wood is poplar, medium soft, nearly knot-free and from experience I know it should take the base and accent stains evenly. A lower view of what the model will look like (sort of - since HMS Camilla will be quite a bit lower once she's placed into position in the "base" after the sides are affixed to a plywood base). The height of this casing millwork is 4". The nominal thickness is 13/16". "Nominal" because the shaped profile isn't uniform, patterned front to back: there is a 1/16" thickness variance across the section. This small difference required me to shim the stock when cutting the mitres so the 45 degree angled cuts wouldn't be skewed owing to this small disparity. Here is a mitered corner of the casing, before gluing, sanding and filling (if necessary). Because of the convoluted section profile, the mitre saw I own (power) required the stock to be securely clamped and shimmed while on the saw's platen before making the angled cuts. There is less than a 1/16" fudge factor to all the cuts; once glued and clamped any small discrepancies in the corner tolerances should come together without thin corner cracks showing. This process is similar to what custom picture framing shops do: precision measurements requiring very precise cutting. I use a 10.5" dia. narrow kerf blade in my mitre saw. Dramatic lighting, huh? 🙄...Hopefully, after I've glued the four sides to the ply base (the next process), all four corners should look like this. 🤞The play of lighting on the diorama's base will be very interesting once colored and finish sealed. Art history buffs will notice I'm shooting for an English "Georgian" period look to the overall base design. I'm about to dive into the English Channel's freezing water within just a few days. Most materials I need are in the shop - including some Earl Grey's tea, scones, clotted cream and raspberry jam. Mmmmmmmm Cheers Mates!

- 542 replies
-
- 14
-
-
- Sphinx
- Vanguard Models
- (and 3 more)
-
Doug, I agree with Glenn, your boat looks fine with your Speedy. I suggested the resin ones from Vanguard as a "bookmark" possibility for future model projects. I should point out that Chris' 3D-printed clinker hull "cheaters" have molded in ribs, thwart rails and a tapered keel to the transom - so no fiddling with making and mounting these details. I also like that the clinker overlaps are partially visible in the boat's interior. BTW: Thanks for the kind words, much appreciated.
- 102 replies
-
- 3
-
-
- Flirt
- Vanguard Models
- (and 1 more)
-
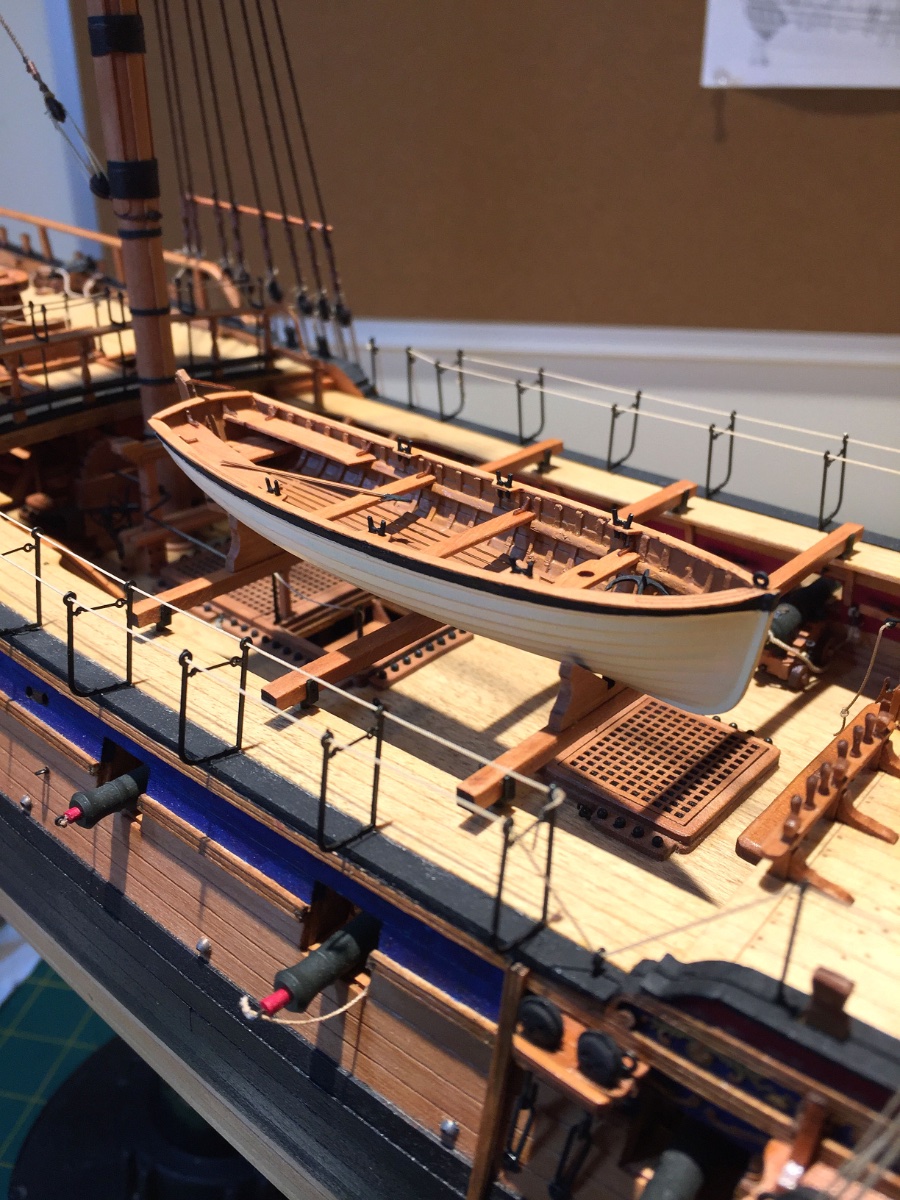
Same for me on difficulties with these small boats in the kits. Vanguard has provided an excellent solution for those who would like to include a small boat (or more) with their ship - without the demanding and critical skills needed to fashion a decent-looking small boat; these small craft (in small scales) are very challenging to construct. Here is a link for the Vanguard 3D-printed, resin boats offered in hulls only or complete "mini kits". I will also add that the prices are quite reasonable, especially for those who are in the U.K. as the Royal Mail cost is a pip. https://vanguardmodels.co.uk/product/clinker-hull-boats-3d-printed/ Here is a photo of the launch I made with a Vanguard 3D printed resin hull. I scratched wood pieces to simulate the boat's interior elements and used some of the laser cut pear parts in the larger kit (HMS Sphinx). This pic from my WIP Build Log and not a final arrangement.

- 102 replies
-
- 6
-
-
- Flirt
- Vanguard Models
- (and 1 more)
-
😁...Indeed, he could be dancing a jig... however, I've updated my Log with an important announcement that he'll be given another post. I confess I have no whale bone in my shop since it's now illegal.
- 542 replies
-
- 4
-
-
- Sphinx
- Vanguard Models
- (and 3 more)
-
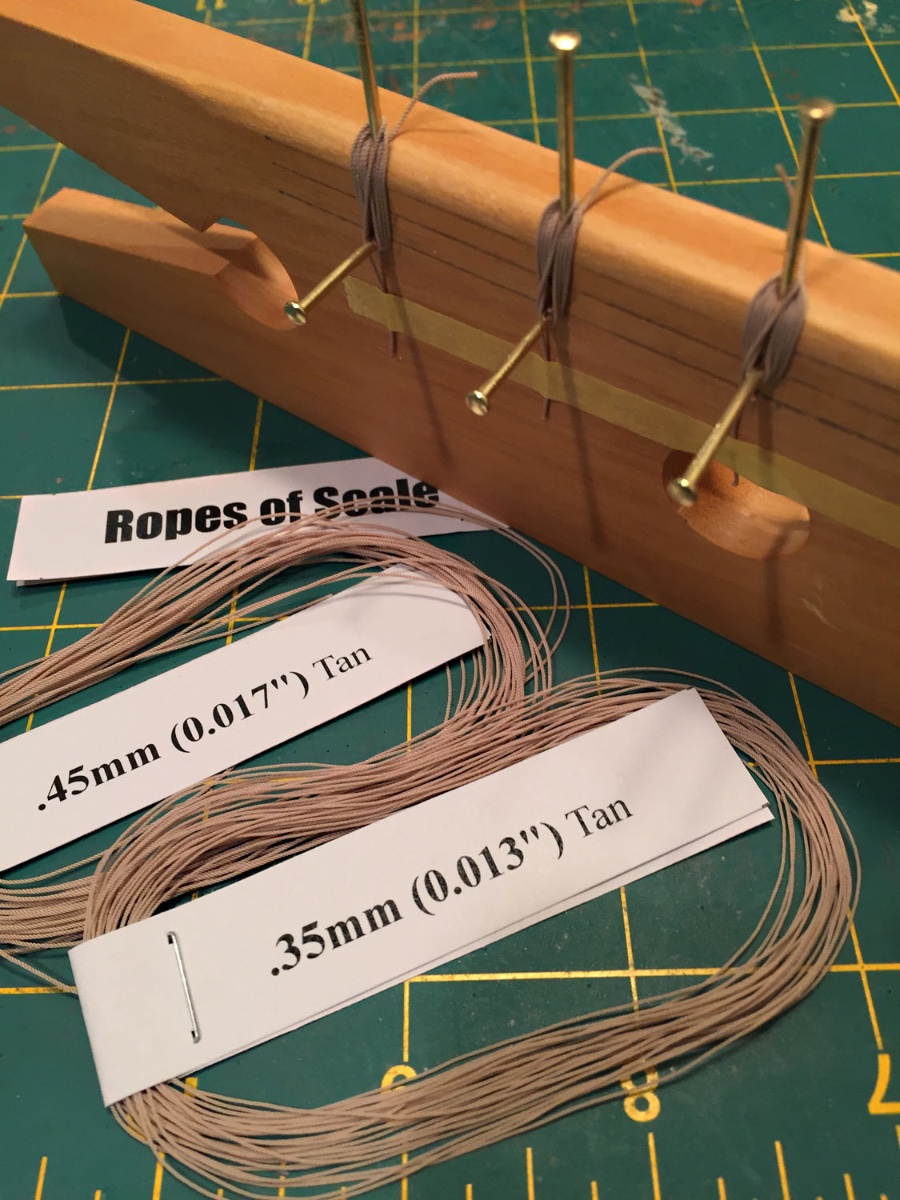
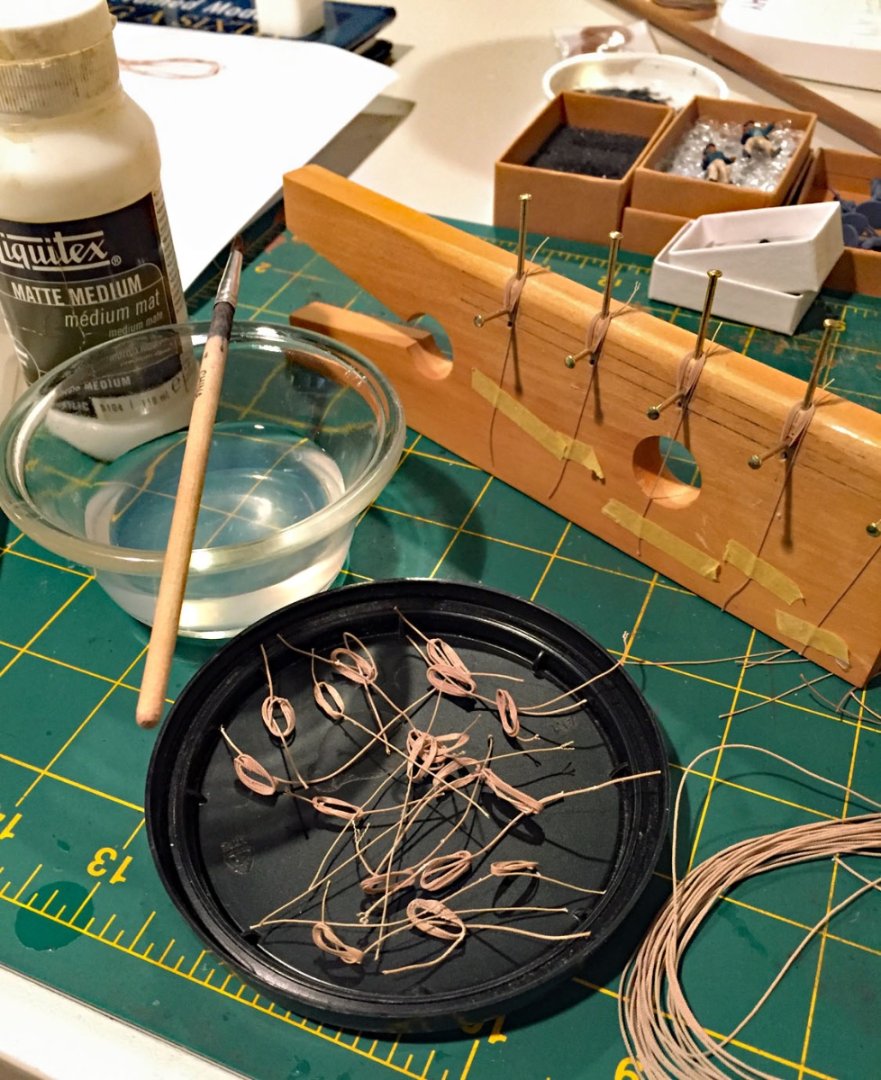
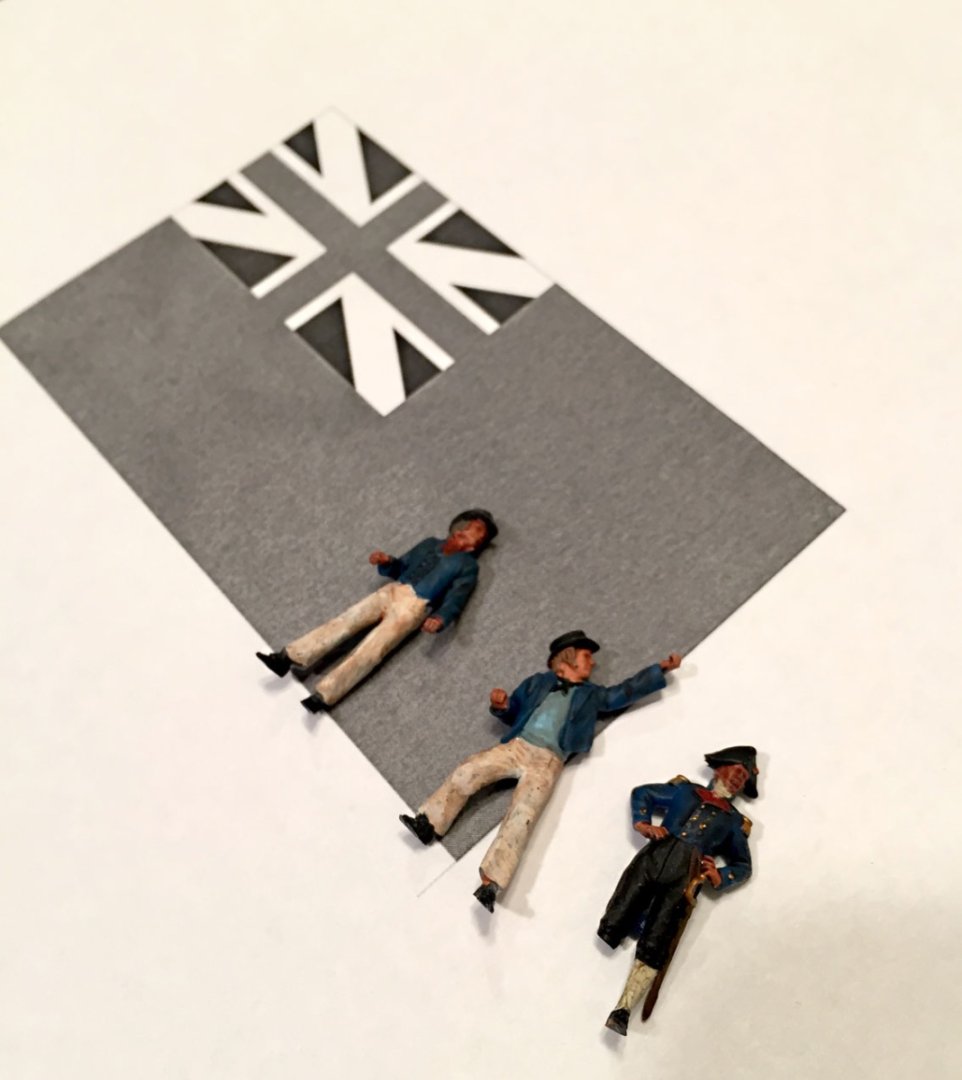
Completed rope hank jig, a test for the Ensign, and reassigning Cpt. Pennypincher... My completed hank jig has five stations. The Matte Medium adhesive for securing the coils as well as the beeswax that acts as a release agent on the wood armature (I rub this along the top and facing surfaces about every two or three runs of hanks). On the righthand side, three short coils; on the left, two longer ones. The openings in the wood came with the spare piece. The ends of the hanks have been taped down with a strip of Tamiya tape until the coils dry. I've estimated that I'll need a total of approximately 90 total rope hanks, a mix of the two sizes shown below. These are the two sizes for nearly all of the running rigging on the model: .35 mm & .45 mm tan rope. I found a good image for the Royal Navy ensign online and I downloaded it so I could edit it in P'Shop. I then resized it in good resolution (200 ppi). I wanted to double-check the overall size before committing to a color print file. However, I no longer have a color printer so I've printed out the flag in its correct size with a home office black & white printer: 3.62"W X 2.12" H. I'll take the image file (including a reverse image "flipped file" for the opposite side of the flag) to an imaging vendor (probably Staples) and print out a couple copies in color (Red Ensign). Notice how large the ensign is next to the sailor figures. When I was removing the resin bases for three of my 3D printed sailors with my disc sander, Captain Pennypincher's leg disappeared into the void somewhere on my shop floor, never to be found again. I've considered fashioning him a "peg leg" with a toothpick but now owing to his disability, I decided to transfer him to another post ship and bring aboard a new Captain... ... meet HMS Camilla's new man-in-charge, Captain C.W. Wigglesworth. He may be a tad shorter than Pennypincher, but he is much-admired among his sailors. The ultra-thin 3D print base will allow me to remove it with a sharp craft knife and thus, I can save his leg post-painting. What's one more figure to paint? Wigglesworth will get in line with his six cannoneer crew next week for wardrobing. The grey sprue on the right is Wiggleworth's sword & scabbard.


- 542 replies
-
- 9
-
-
- Sphinx
- Vanguard Models
- (and 3 more)
-
Link works for me fine: iOS on an iPad in Safari. Also o.k. on my Mac, also using Safari.