hollowneck
-
Posts
1,589 -
Joined
-
Last visited
Content Type
Profiles
Forums
Gallery
Events
Everything posted by hollowneck
-
 Thanks, BobG. When I decided to do a Build Log (my first), I knew I'd need to do many photos and detailed procedural descriptions. I'm pleased that you have found my work interesting. At this moment I AM thinking a choppy sea, some swells, Camilla heeling with filled sails. Stay tuned!
- 542 replies
-
- 3
-

-
- Sphinx
- Vanguard Models
- (and 3 more)
-
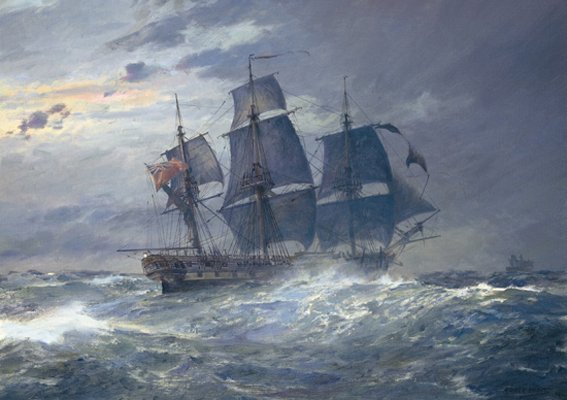
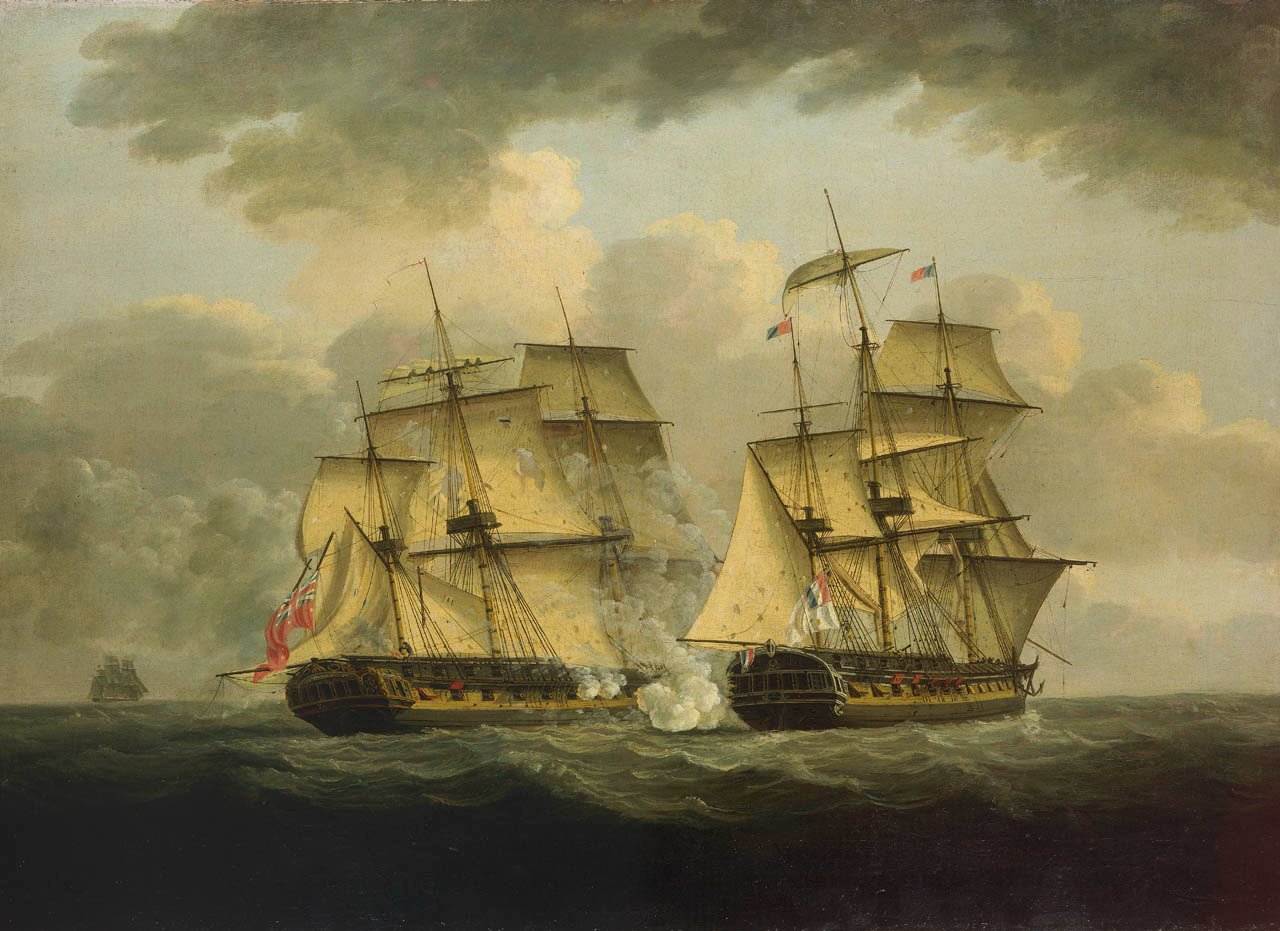
As I hunker down on the remainder of my sailmaking and rigging (more details to come and be explained), I've been researching water right along for HMS Camilla's diorama. Of dozens I've stashed on my computer, here's four very specific paintings I've been looking at for inspiration. My diorama setting is the English Channel. On very few occasions have I ever seen "blue water" in the Channel. Of course, there are sunny days with gloriously bluegreen aqua, however, I've rarely see them - especially when the sky is foreboding and squalls are rolling across the choppy water...enjoy. All of these are beautiful, stunning depictions. Making water and designing the presentation platform/case lies right around the bend - (ing - as in mounting all her sails)... Probably one of the best candidates for my model's sea coloration. English Artist: Elliot (unsure of the date/era) Perhaps the next best reference choice for water coloration. Although quite exaggerated, I like the choppiness of the wave action. But Love the French officer jumping from the stern, English lobsters in pursuit. French Artist (19th-C): Crepin Then, for wave action (and sky!), I'm really relishing a possible attempt to depict this sort of stormy, squally sea. This is the HMS Indefatigable by contemporary English painter, Geoff Hunt. As many here know, this is the subject ship for Chris Watton's (Vanguard) next kit. Or, the greyish/green rollers in the Channel. By Dutch contemporary painter: Platje I have a dedicated "Skies/Weather" folder for photo/painting reference too. I'll share these when I start making water in earnest; my plan is to also show "sky" in Camilla's presentation. More on this later if I can figure-out some mechanics that aren' too awkward. Cheerio. Now back to those (pressing) sails...
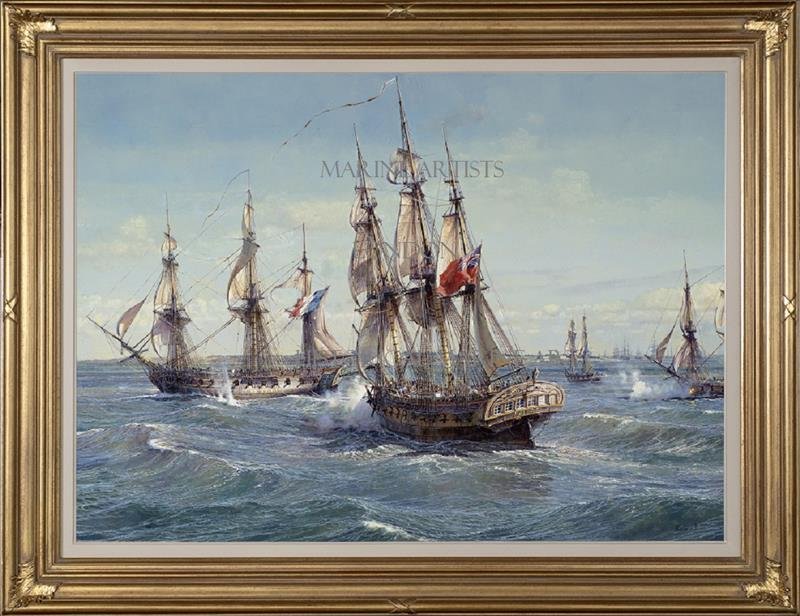
HMSCUmberlandfightingagainsttheLeLysandLaGloire1827.thumb.jpg.ffca383b502fdc72360f3ffb01e52d2d.jpg.ff4354c4ed1b04e05abaddf58df8d27f.jpg)
- 542 replies
-
- 10
-
-
- Sphinx
- Vanguard Models
- (and 3 more)
-
Very nice,B.E. Clever to use a couple of Chris’ scale figures to get the correct height at the stern. I love that your work surface resembles mine. I sneezed at my bench today and several tiny rigging hooks instantly disappeared into the morass of bits n’ pieces, tools, etc…it’s good that there are plenty more on the P/E frets!
- 857 replies
-
- 3
-
-
- Sphinx
- Vanguard Models
- (and 1 more)
-
I agree with Rusty. Very pristine, precise work. When completed, your Winchelsea scratch is going to be a stunning model.
- 840 replies
-
- 4
-
-
- winchelsea
- Syren Ship Model Company
- (and 1 more)
-
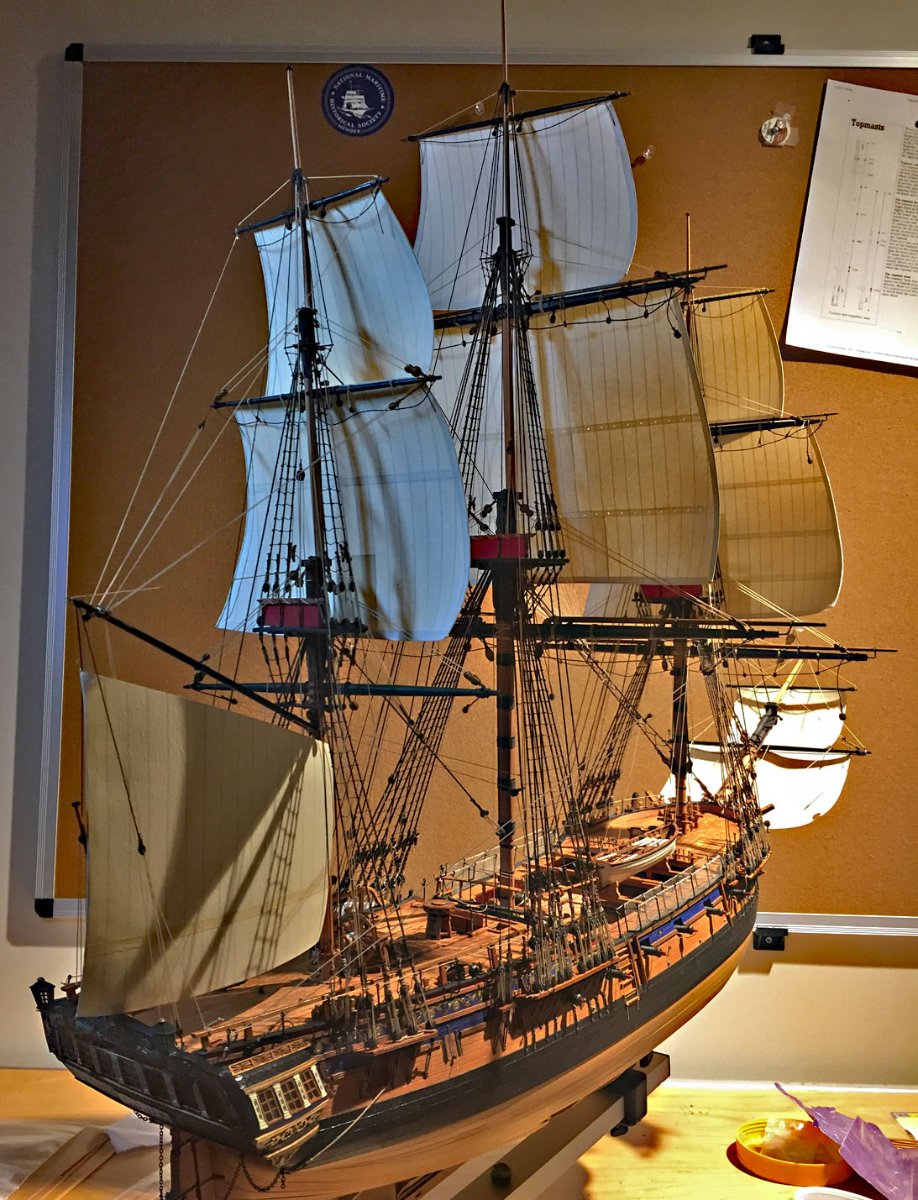
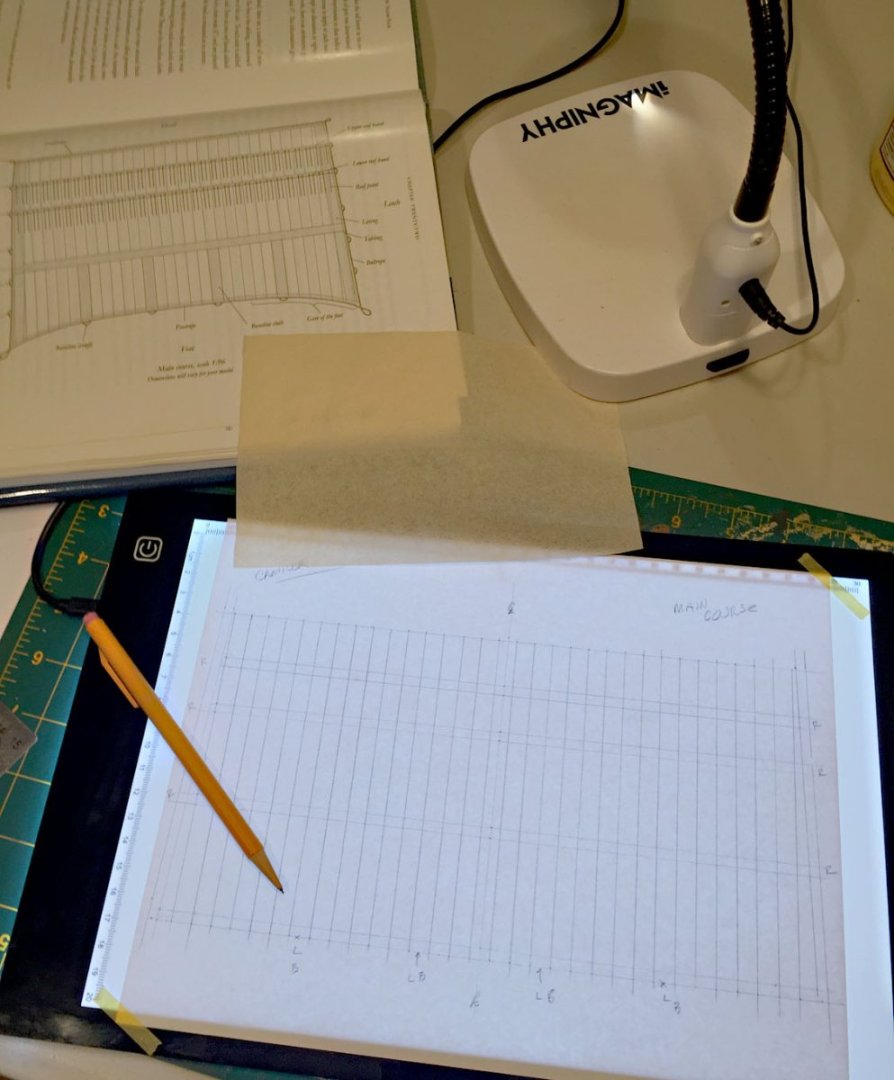
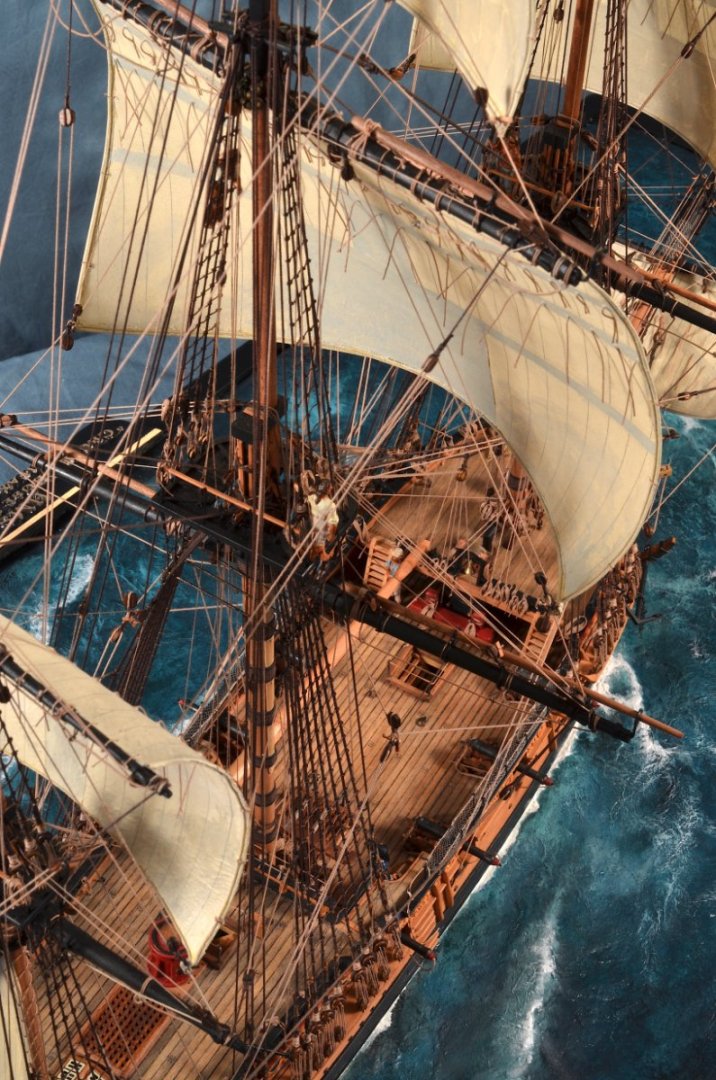
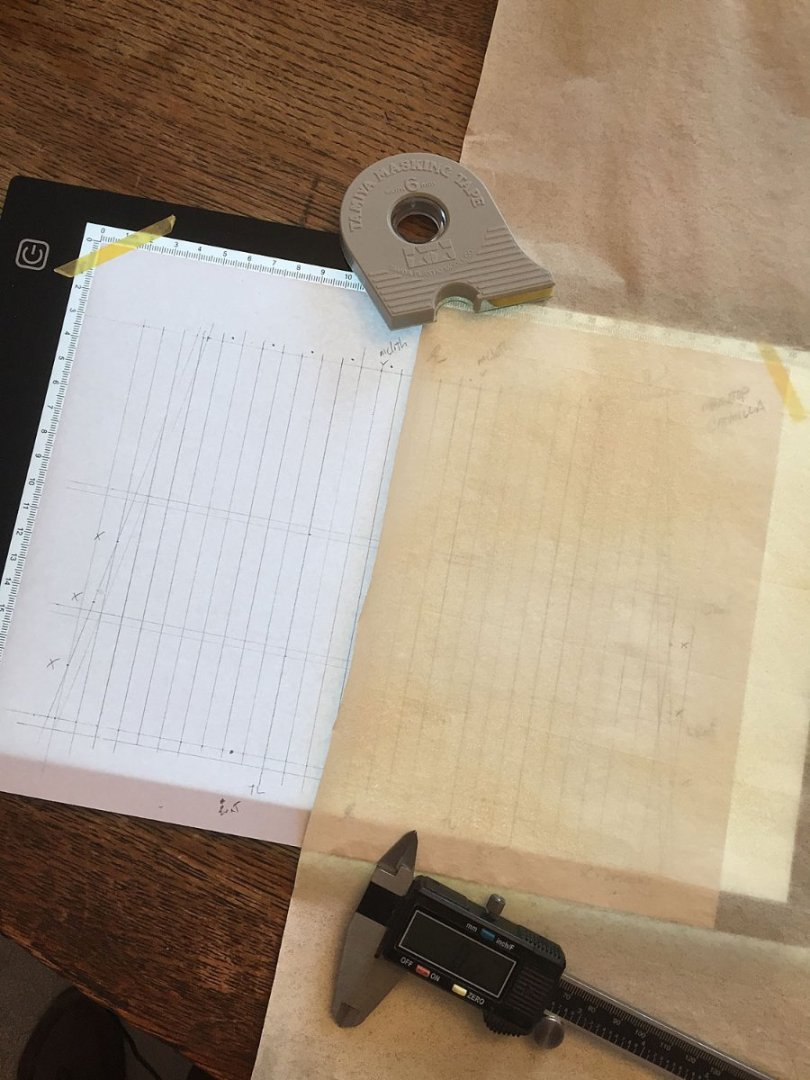
Steady as she goes... Nine of Camilla's eleven sails are temporarily hung from their yards. After fabricating her final two courses (Main & Fore, the largest and last of her sails), I'll mount boltropes, reef points as well as rig and prep all the clews. After clews, the braces will be adjusted and/or added. As can be seen here, the mizzen's gaff needs to be lowered a tad; luckily I've left enough rigging rope to do this without shorting the falls! The mizzen course is lashed to the mizzen mast and tied to the gaff spar and is loose-footed. This is a very tricky area to model since there is a large flag of the King's colors that gets rigged to the ensign staff just behind the large fore-aft sail. I may need to rig the flag higher-up to the gaff's end with an appropriate halliard line. Bending the sails at this stage requires some delicate work, but this is how I've mounted sails previously and it works for me. This also my first model to mount and rig a spritsail topsail. More bowlines and bunts to figure out where to belay them! Meanwhile... ...Cpt. Pennypincher is hiding behind the mizzen course, keeping a sharp weather eye out for mischief by the riggers... The beginning layout for Camilla's main course (on my sail's bond paper); these last two sails take up nearly the entire width of my new light table to draft. At the top of the photo, my reference for detailing this sail and the fore course will be taken from David Antscherl's Swan Series Vol IV on rigging. Camilla is not a sixth-rate, however her rigging and sail complement is very similar. The width (call it breadth) of this main course measures approximately 14 1/2" to the very ends of the stunsail booms. In earlier months I seriously considered mounting stunsails when getting to these final stages of my build. Now , it's Plan B... No stunsails - as much as I'd like to make these and show Camilla with even more sail in her diorama. Adding stunsails - even on only one spar - would increase her total breadth by more than a foot! This would make her nearly 28-30" across her beam, nearly as wide as she is long. If I hold to this initial plan I've only recently realized this would require her diorama to be quite large since a large ship model must have a decent amount of "water" surrounding the portrayal. Why bother with a diorama presentation approach otherwise? "Adios, stunsails." Perhaps some other scale, or model - or life.

- 542 replies
-
- 10
-
-

-
- Sphinx
- Vanguard Models
- (and 3 more)
-
Thank you Rokket for looking in and the compliment! It's one of the steps I love about building model ships in this era. Sails breathe "life" (nearly literally) into a static model. The other step, of course, is creating the sea upon which her sails will carry her: the motion and then the motive! Thomas - many Thanks. I realize that sometimes my explanations get long-winded, but describing my complex process calls for more words, not fewer! I'm glad you as well as others appreciate the granular detail involved. I need to mention that every time I get to this stage for my models (this will be the 5th one with sails) I learn something new, sometimes it's subtle improvements to technique, sometimes dramatic. Even a new tool, like my new thin line LED light table, which is a great help in the early sail drafting stages. There is such a deep well of limitless knowledge here. And I thank all of you for inspiration, critique and positive acknowledgement alike.
- 542 replies
-
- 4
-
-
- Sphinx
- Vanguard Models
- (and 3 more)
-
The illustration showing the truss pendants (from Ian_Grant) is from a very handy book on rigging by Lennarth Peterrson : Rigging Period Ship Models. It covers an earlier era than that of your model but remains a good reference for much of the sail rigging that extended into the early 19th-century. Highly recommended. I use it as a key reference for my 18th-C models. Available and in print, not too expensive. As you can see, he's a detailed draftsman and has done a good job illustrating - with very clear diagrams - the essential square sail rigging details throughout his book.
- 146 replies
-
- 2
-
-
- Harriet Lane
- Model Shipways
- (and 1 more)
-
Thank You, B.E. Clearly, we both enjoy sharing our work. It seems to me that we both like teaching and appreciate being eager students as well: one can only teach by learning.
- 542 replies
-
- 2
-
-
- Sphinx
- Vanguard Models
- (and 3 more)
-
You are welcome, Bob, much appreciated. I'm pleased that you are finding some of the details helpful. Should you choose to tackle making your own sails with my process, I believe the results will be quite rewarding.
- 542 replies
-
- 4
-
-

-
- Sphinx
- Vanguard Models
- (and 3 more)
-
Thanks, Mark. I agree that part of creating realistic-looking sails is to have some translucency to them. By looking at paintings from the era one can see that actual canvas sails were thin enough to allow light transmission, despite the heaviness of the material.
- 542 replies
-
- 2
-
-
- Sphinx
- Vanguard Models
- (and 3 more)
-
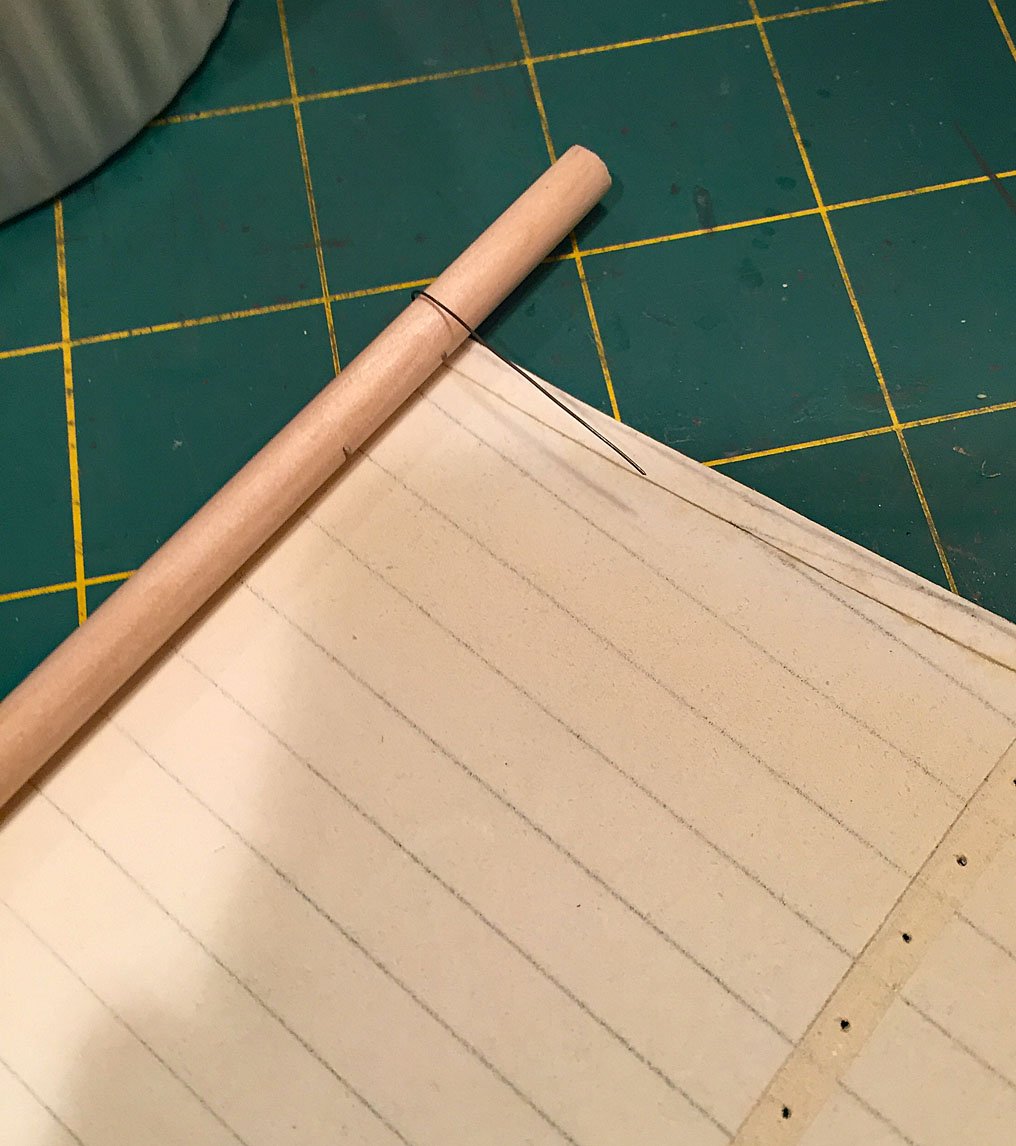
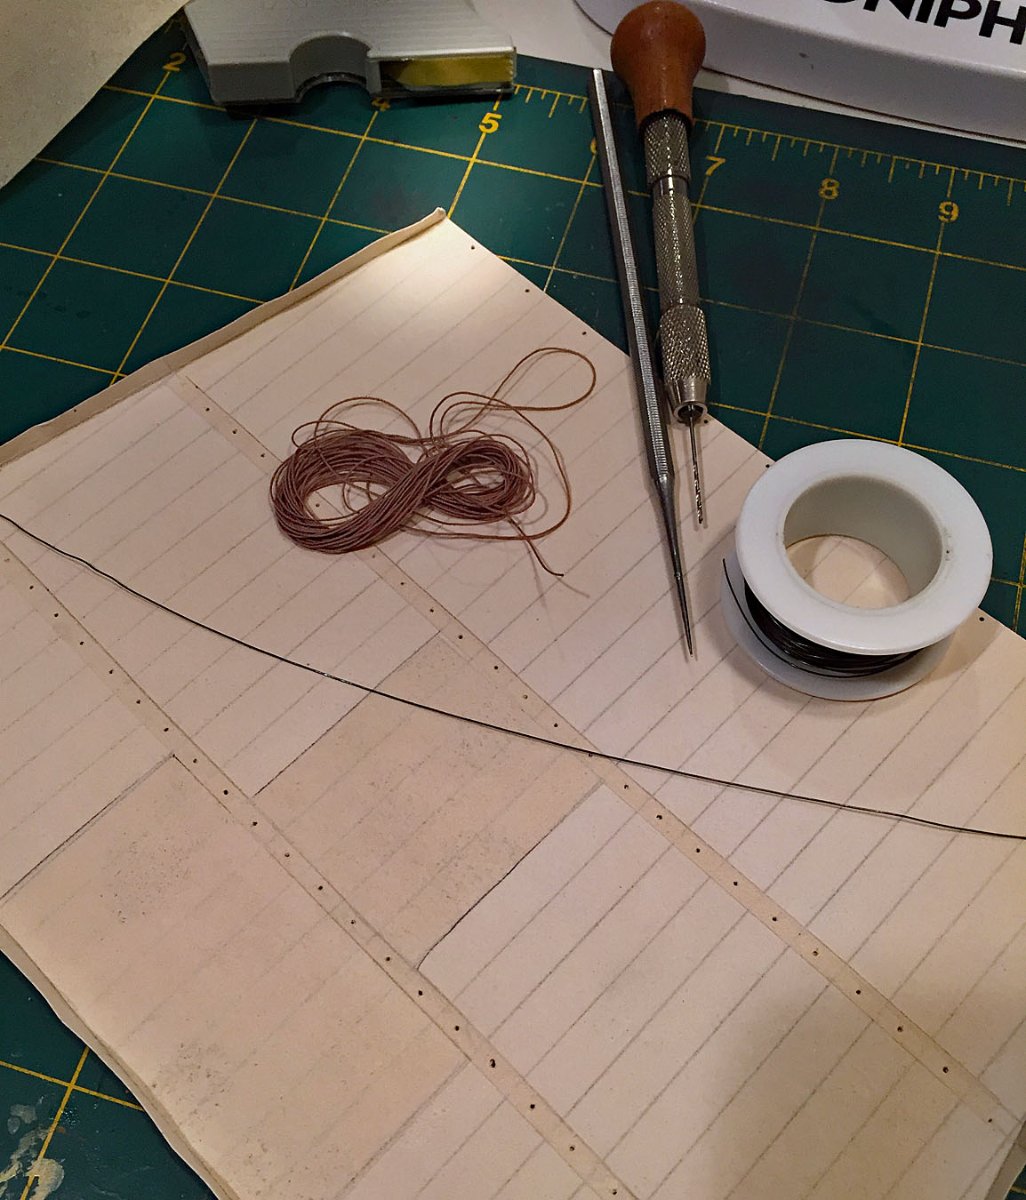
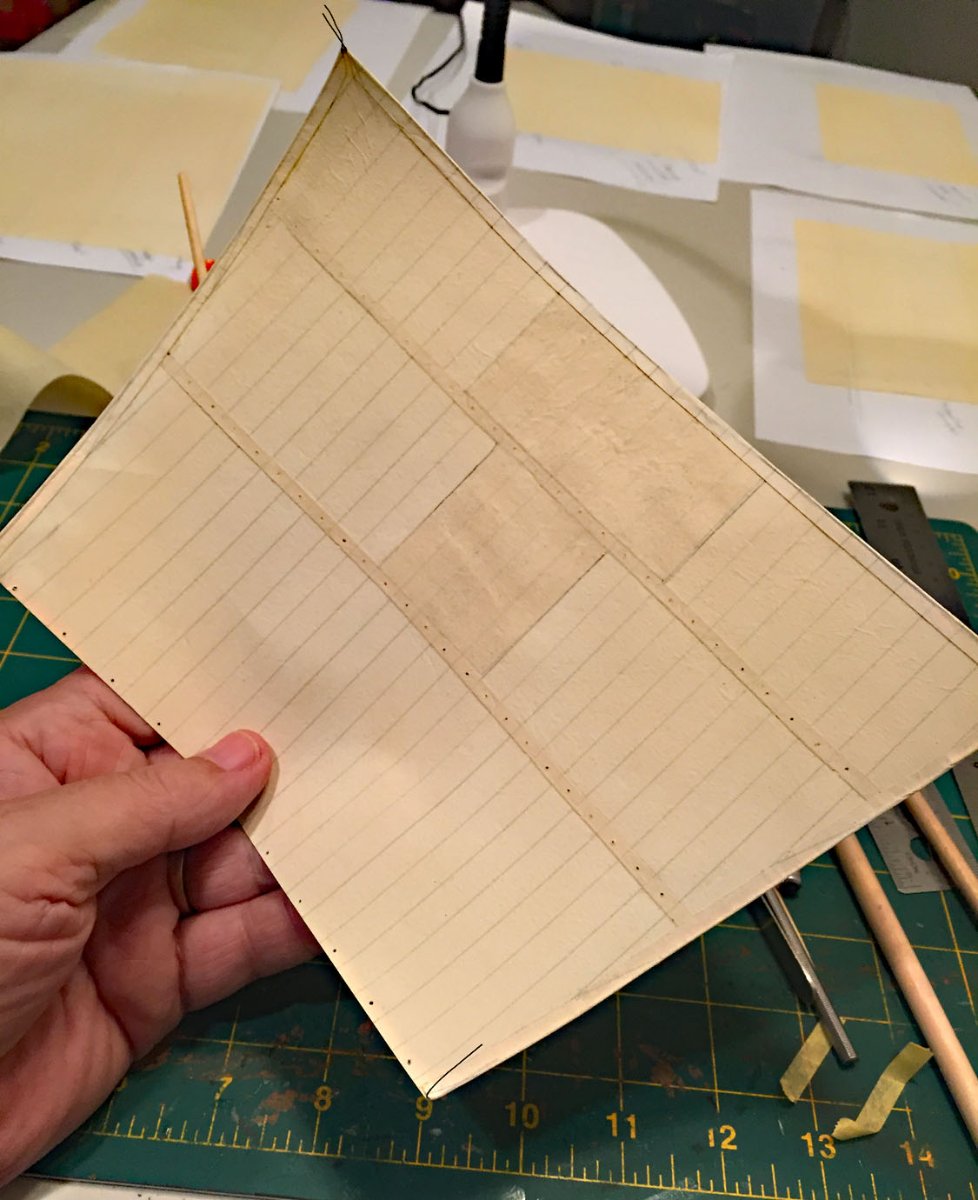
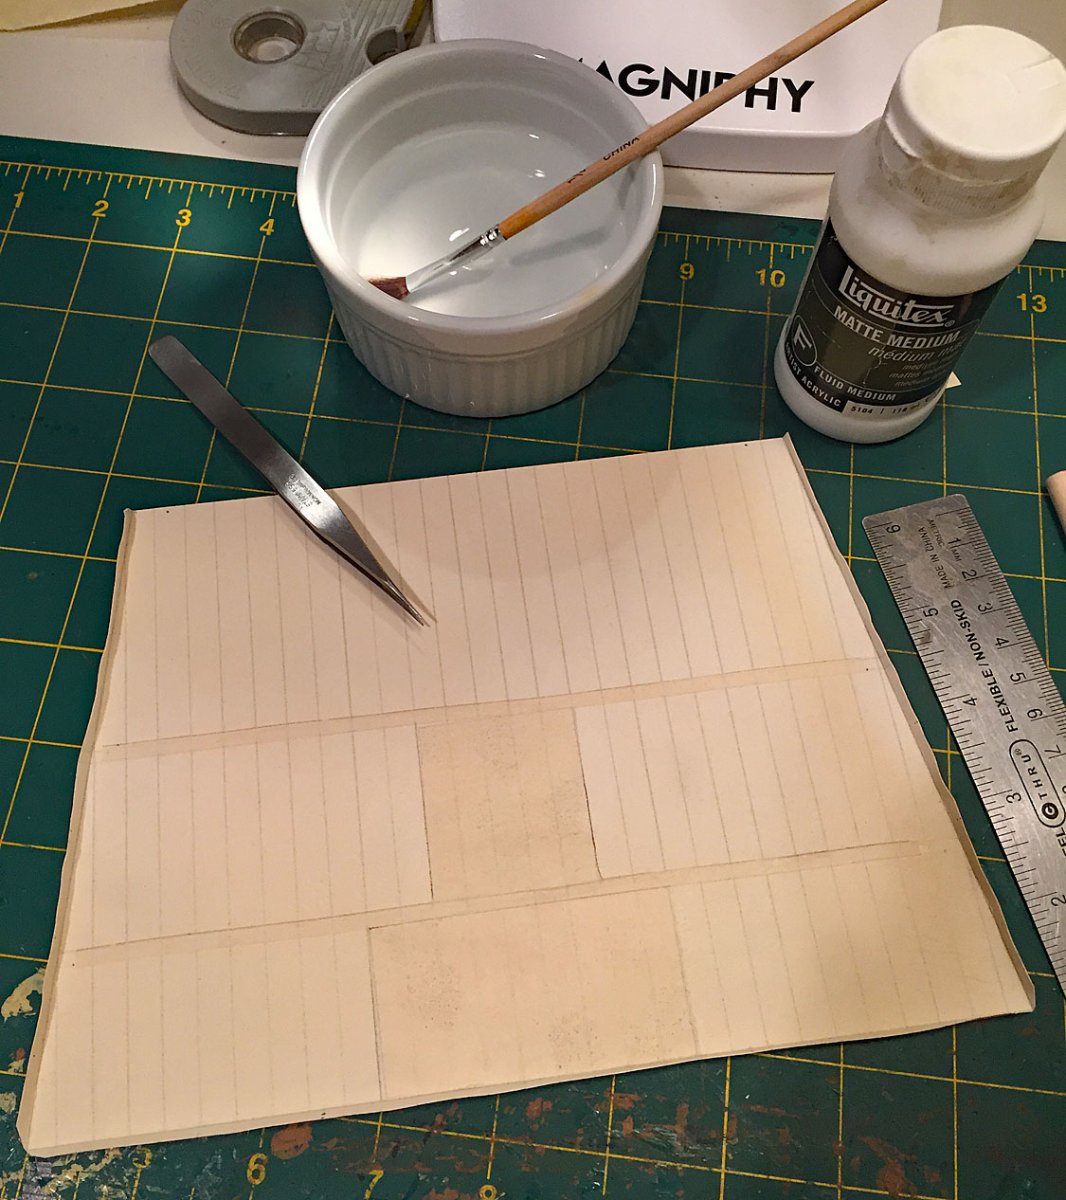
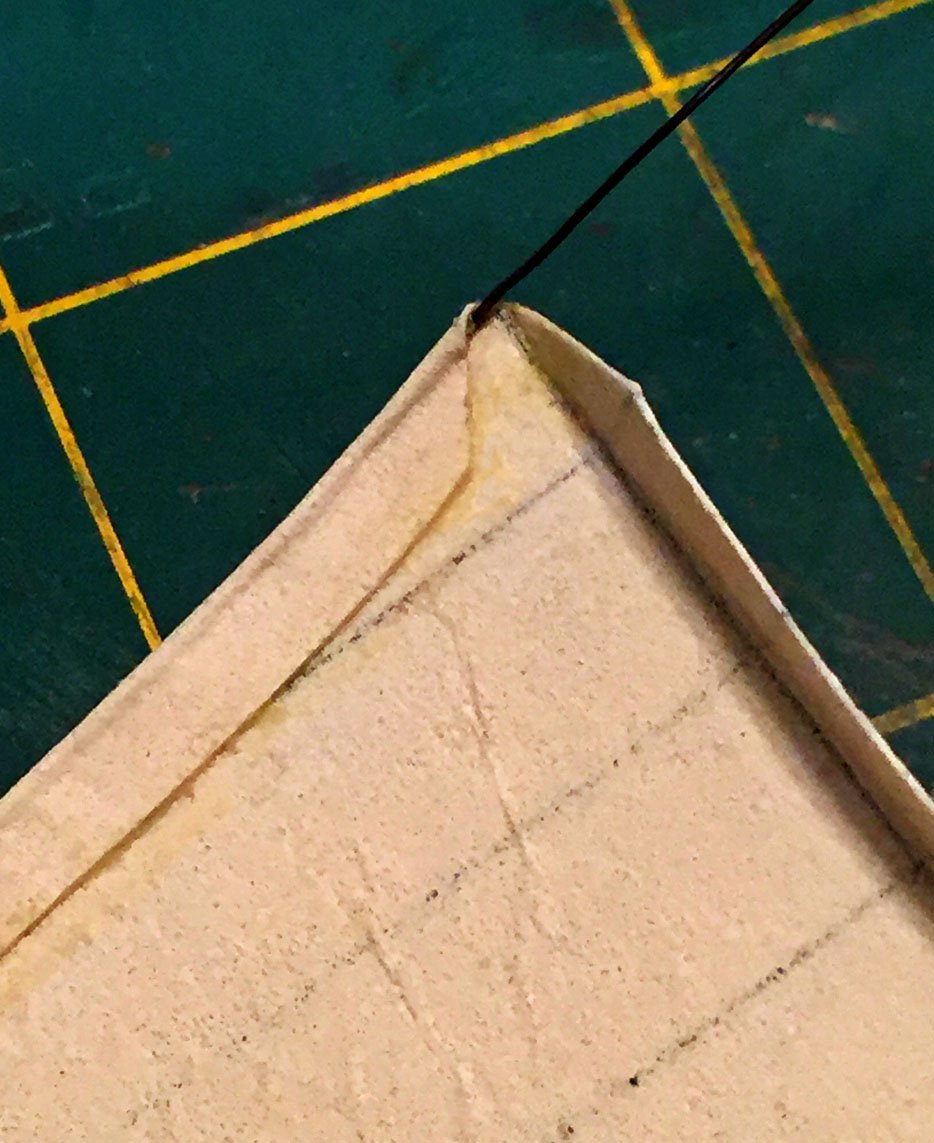
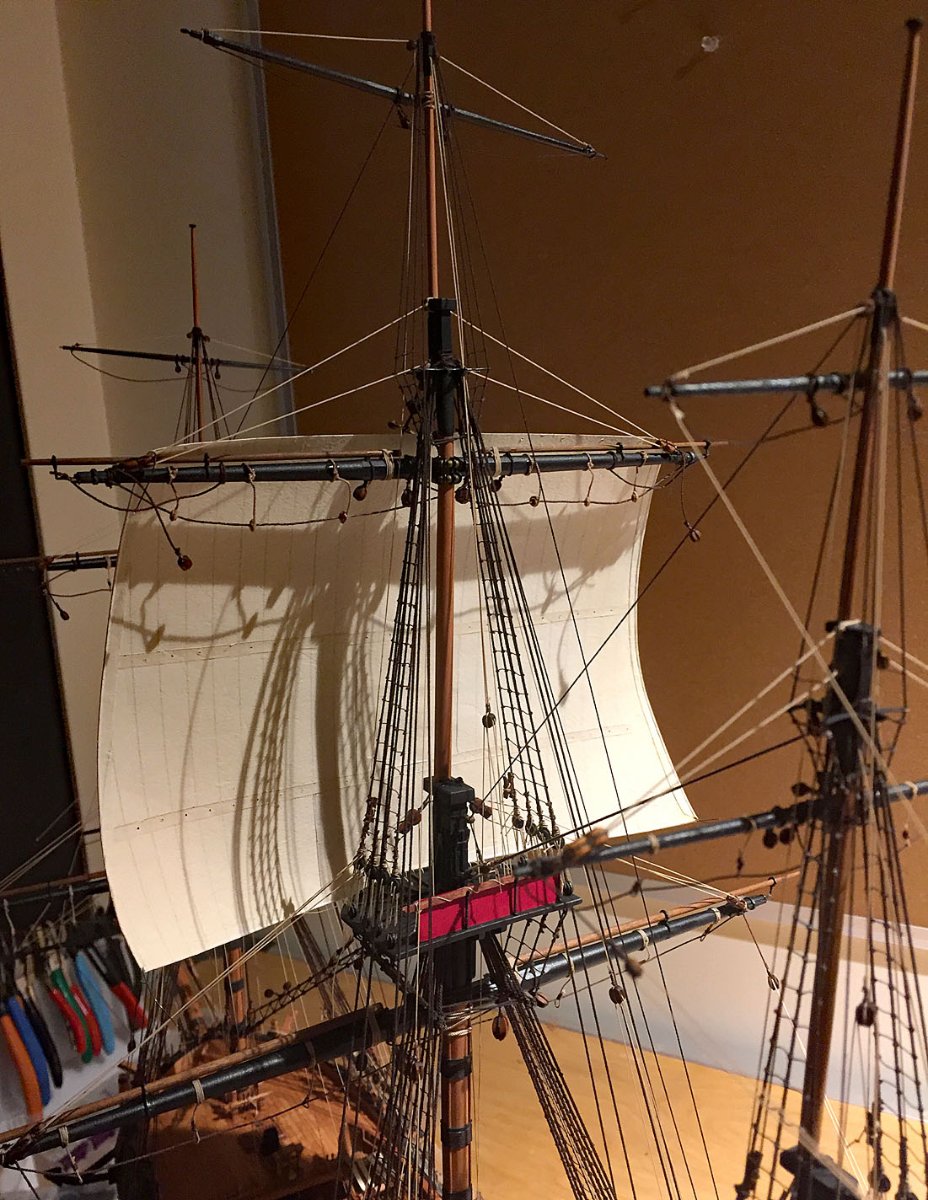
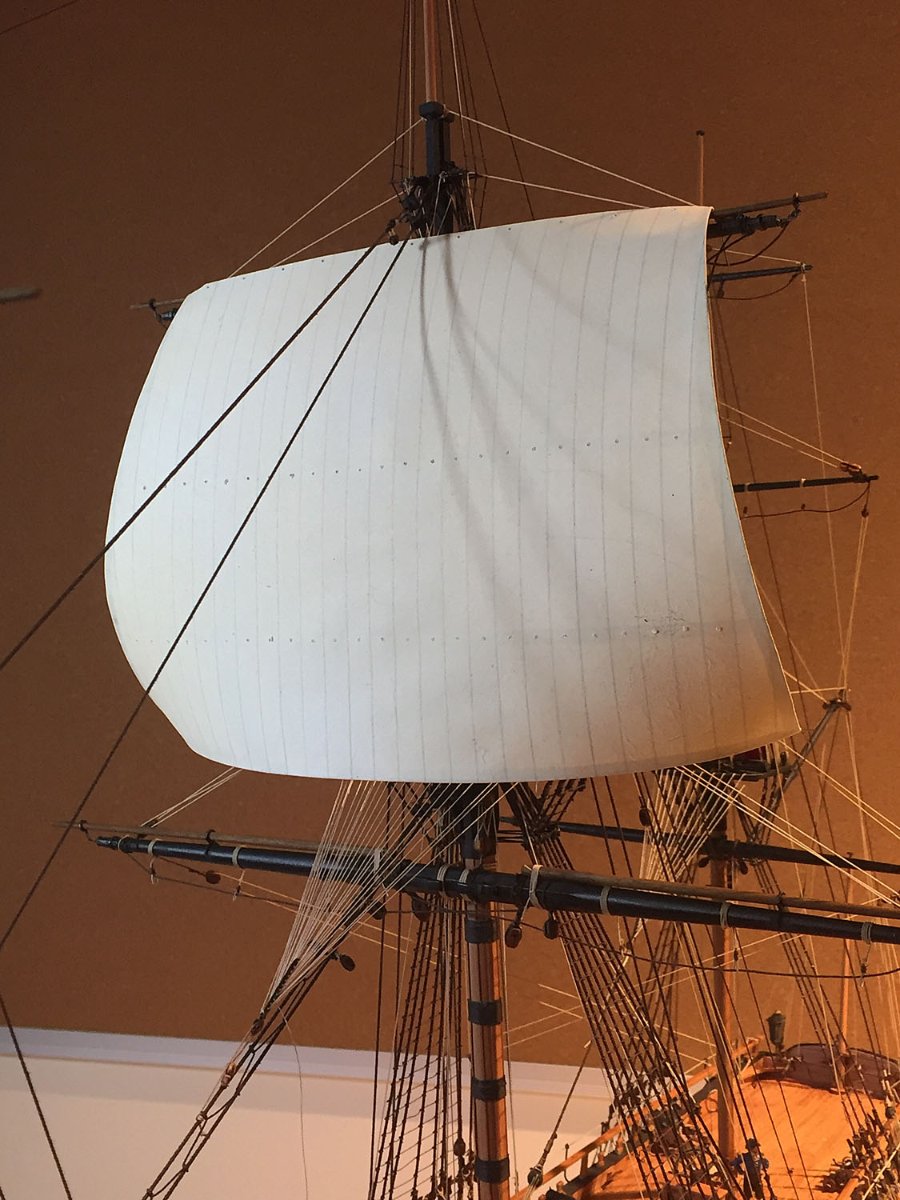
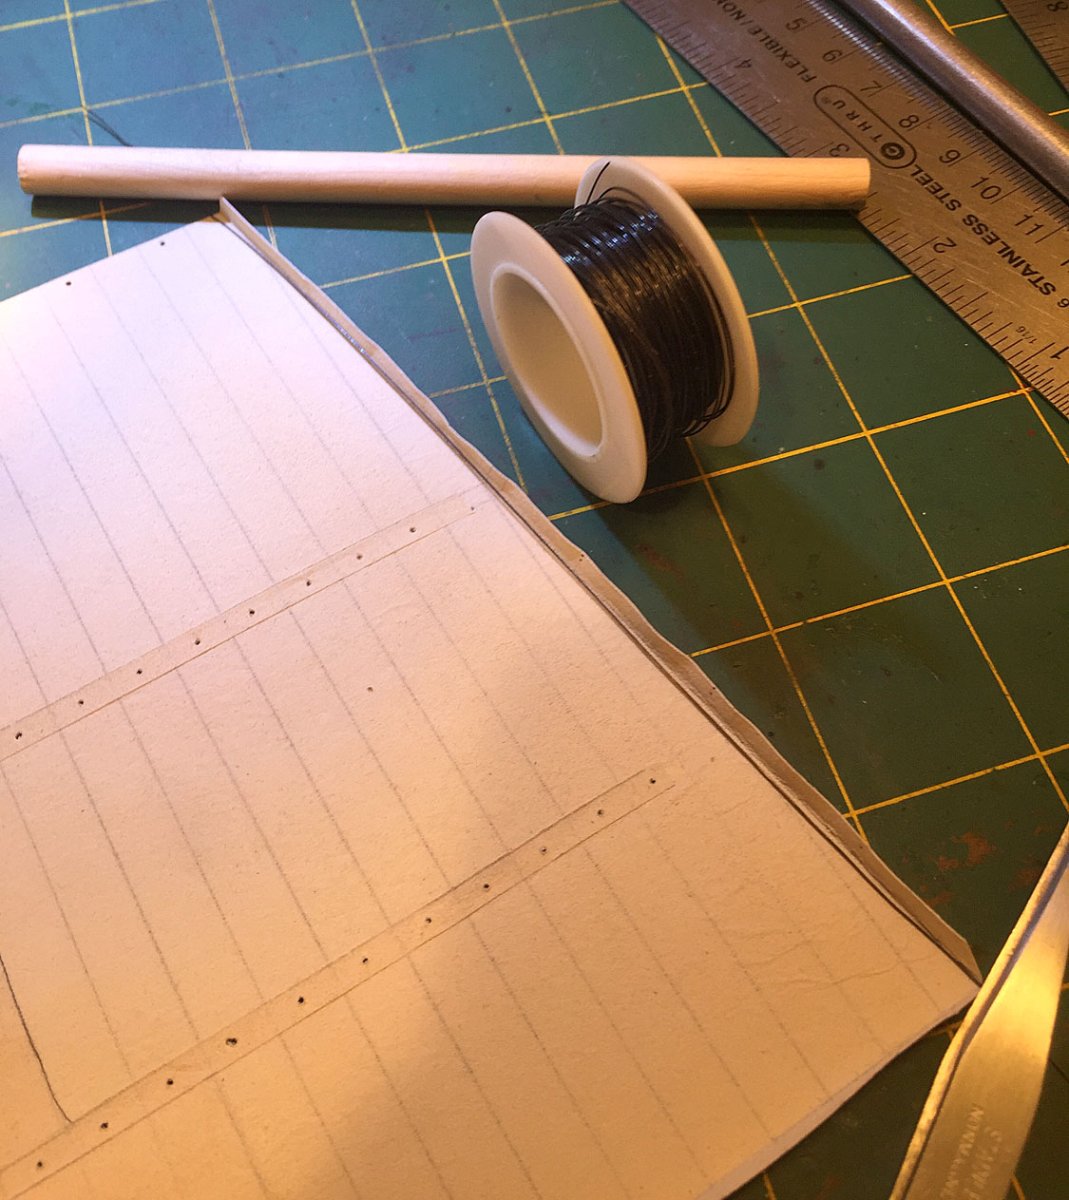
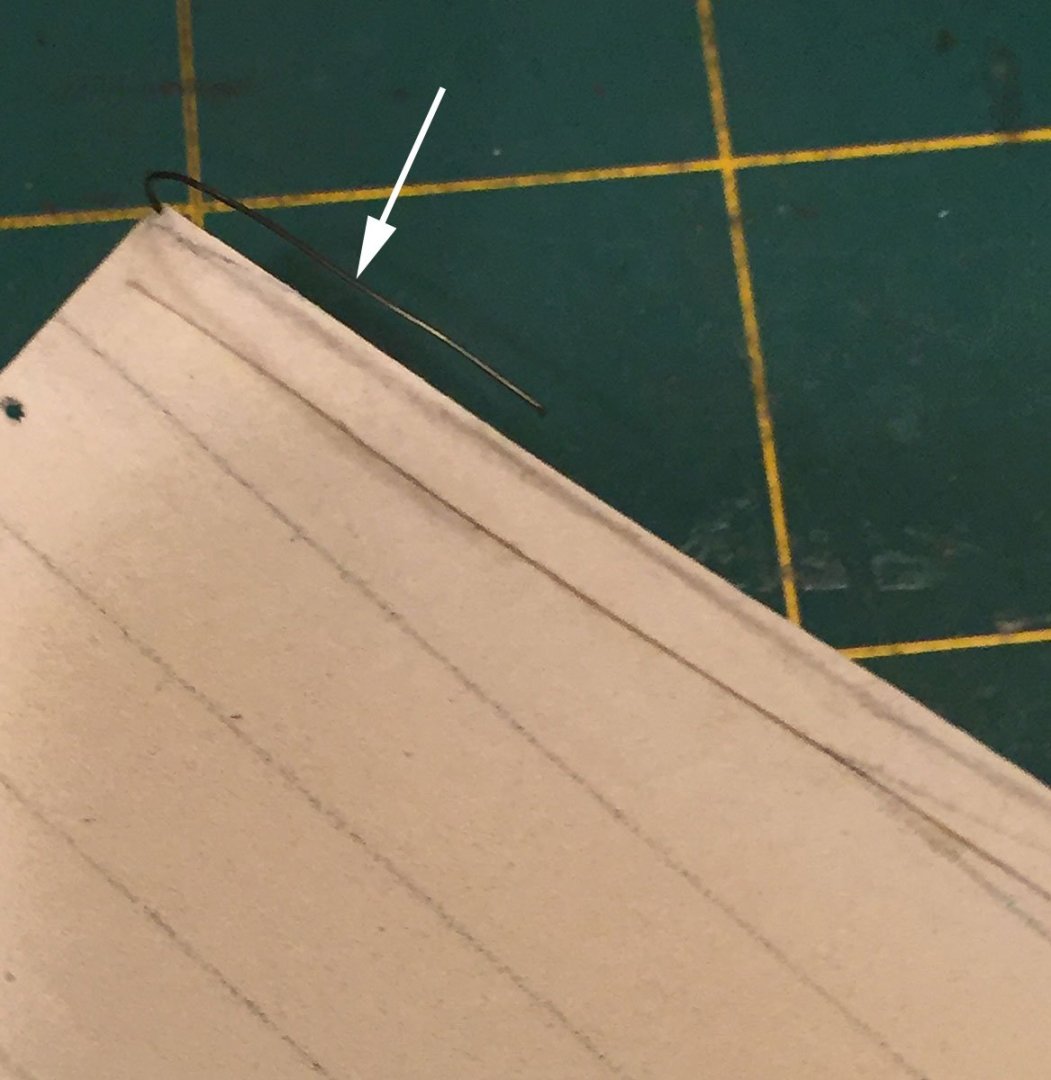
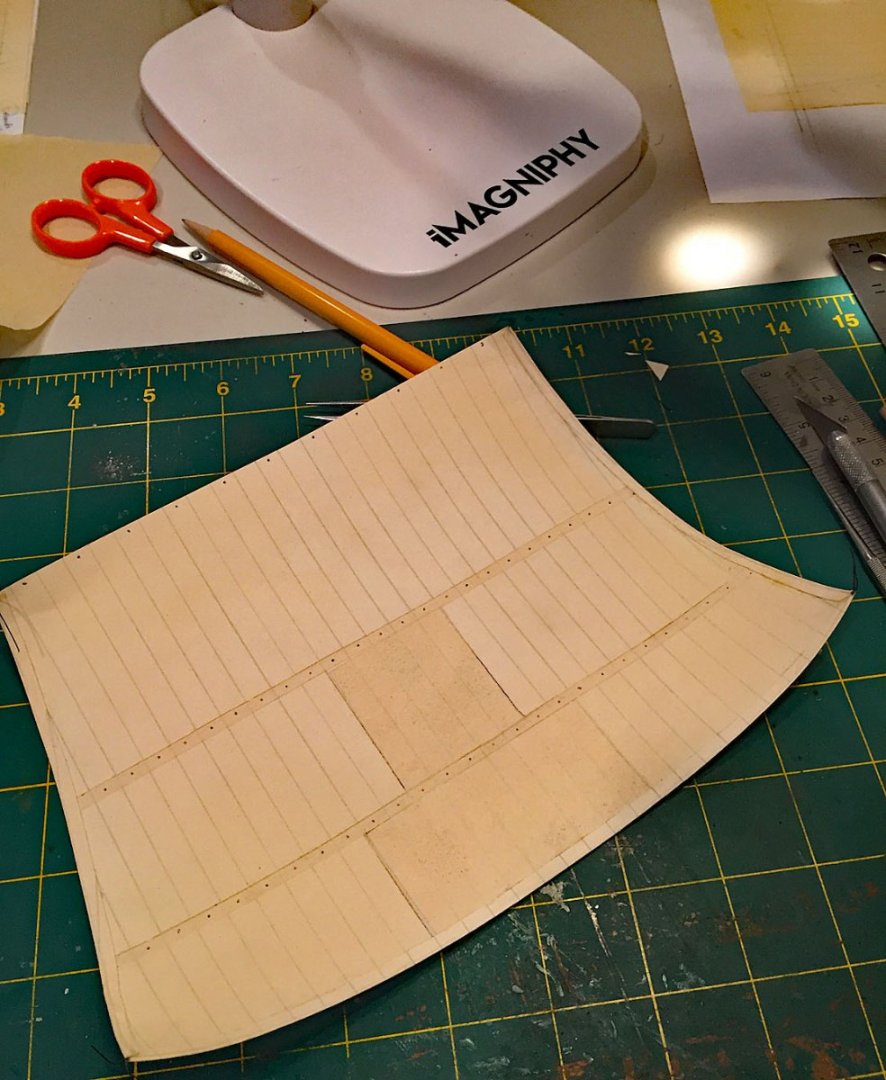
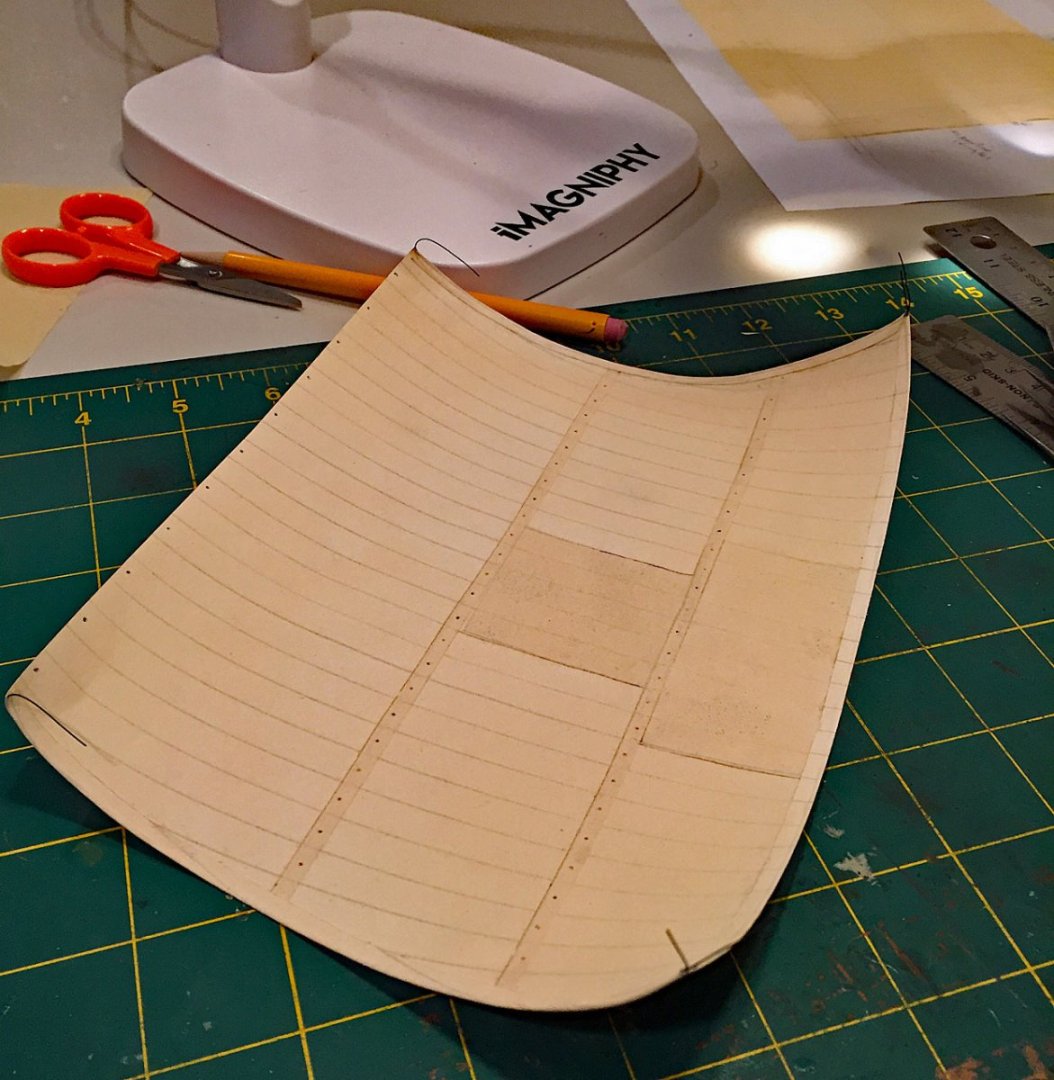
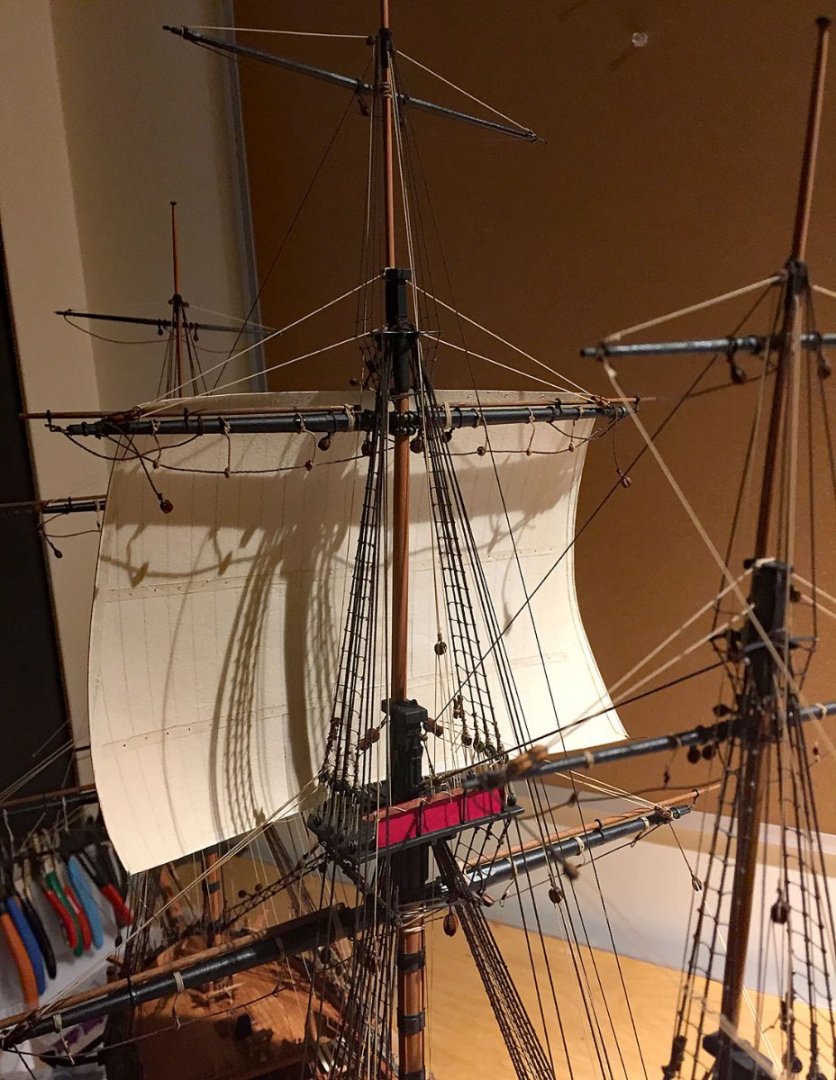
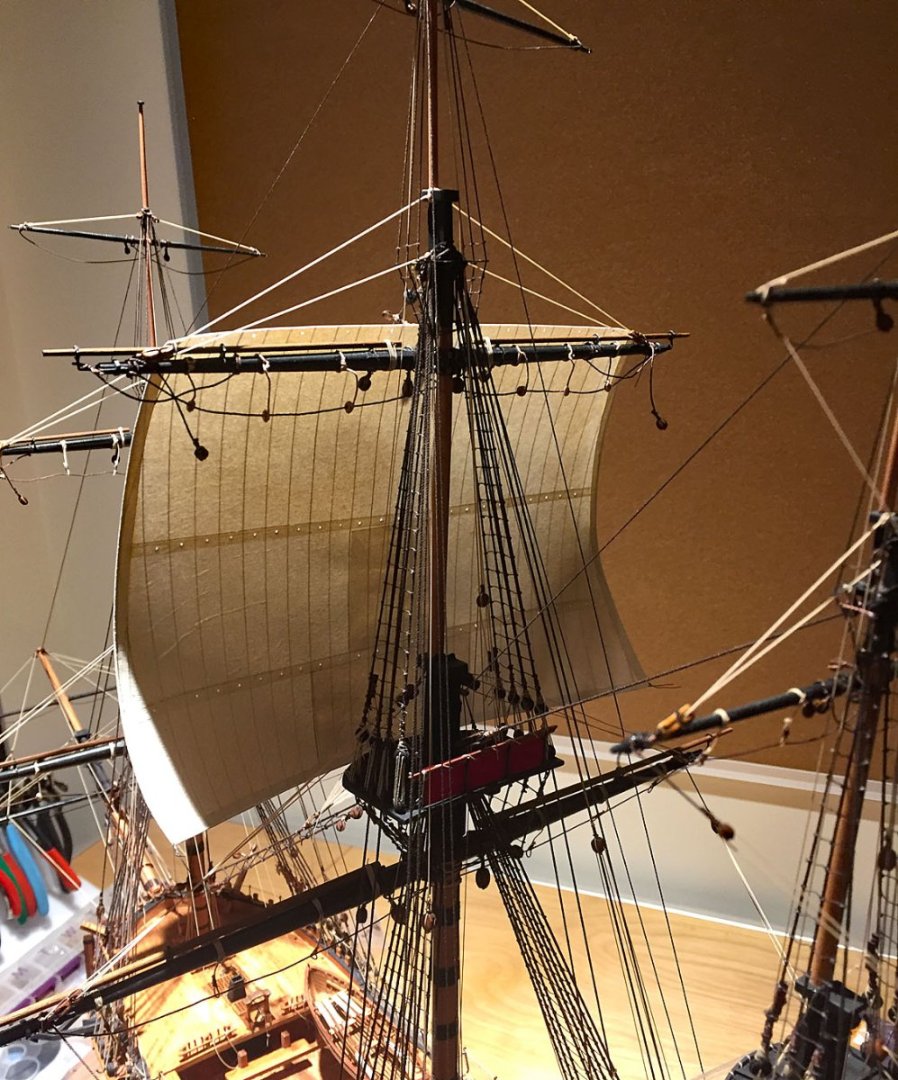
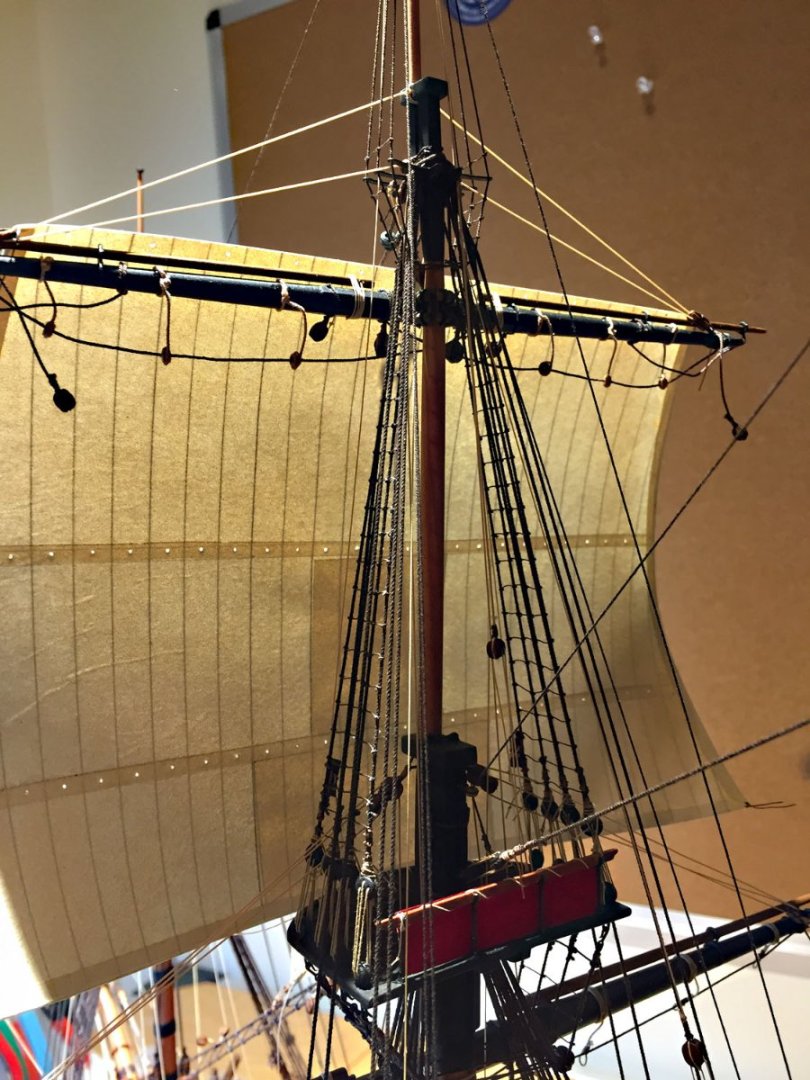
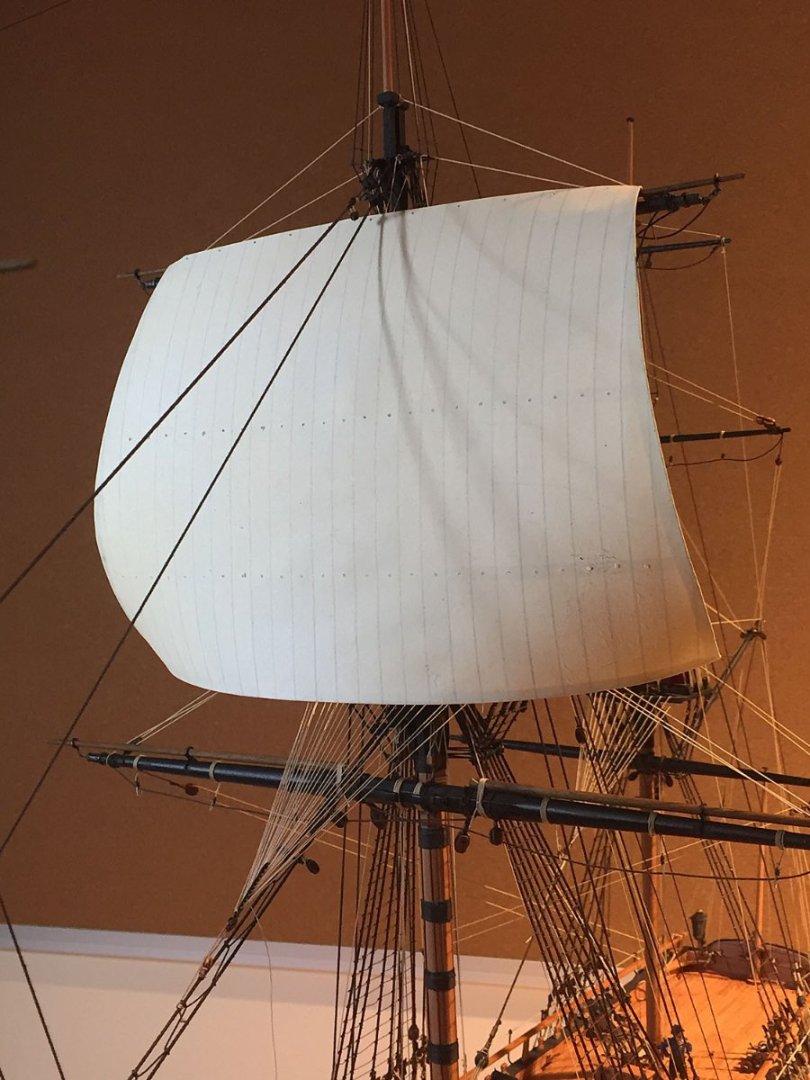
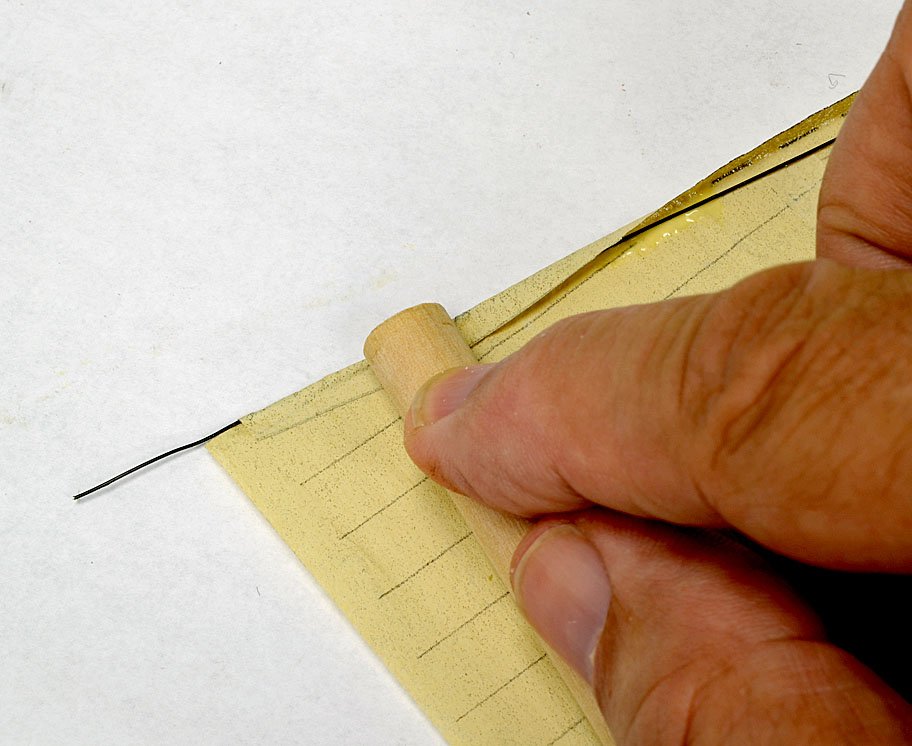
Sail fabrication continues. The details described and shown in this update are essentially the same for all the sails. The most difficult and time-consuming to make are the topsails (Fore, Main & Mizzen). These sails are large, have various linings (added canvas reinforcement pieces), and reef points. The remainder are smaller and with the exception of the lower spritsail and mizzen course (a fore/aft lateen) have no linings or reef points. After applying silkspan pieces to the reverse side of the sail layouts, they get trimmed to their final sizes with a craft knife. The next step is applying the mast cloth, linings and tablings (leech and foot) shown here. Shown here is the Main Topsail, the largest sail that Camilla will show deployed. The tabbed edges for both leeches and the foot are bent upward to form a "trough" on three sides. These protrusions that were described in the sail layout stage become the tab linings for the simulated boltropes. Because the sail has now become considerably thicker with the silkspan layers, bending the three narrow (4mm) tabs requires a straightedge and a thin lifting tool to create properly. It is important to fold these tabs as accurately and consistently as possible along the sail's three sides. There is no tab at the sail's head as it attaches to the yard directly with roband ropes. I use the reverse edge of an X-acto knife to carefully lift the tabs against a tightly held straightedge to accomplish the upward bending. Careful finger pressure brings the tabs to an upright position so it's easy to apply glue along the fold with a toothpick. I use Liquitex matte medium adhesive to affix all the sail linings as shown: mast cloth, lower lining and reef bands. A small paintbrush, some toothpicks and a dish of water are necessary for this step. The additional sail pieces are cut from scrap silkspan leftovers and are the same color. Once the sail has had its linings applied, I use an awl and a small drill to make the reef points and roband holes that will get ropes mounted through them at a later stage. The rope I'll use for both is .03 mm in the normal hemp running rigging color. In the photo is the spool of wire that gets mounted to the sail's leeches and foot. The wire is 32 ga. annealed and coated wire (florist wire); it's pliable and because it's soft steel, the coating keeps it from rusting. This is important as water-based Titebond glue is used to seal the edges as will be demonstrated. This photo shows the placement of the leech forming wire. The wire will be enclosed within the boltrope "tab.” This forming wire technique will be applied to three sides of the sail. The thin wire is held captive within the sail's three edges (both leeches and the foot) by the foldover tabs previously shown; these "tabs" also simulate the edge linings of the sail which will later get boltropes affixed. The wire is cut over-length to the sail's edges and later trimmed-off. However, the extra wire at the head of the sail is kept long purposefully; this small length of protruding wire becomes a temporary suspension point that holds the sail onto the yard as it is mounted with its ropes (robands). A small diameter dowel is a close approximation of the sail's yard thickness and helps to form the protruding suspension wire at both head leeches. The length of the wire isn't critical; just enough so that it can hang on its yard and be mounted with ropes. It can be left in-place or snipped-off after serving its purpose: I snip it off after bending the sail to its yard. An extreme close-up of one corner intersection of a leech and the sail's foot. Note that the wire-retaining "tabs" are trimmed at sufficient angles to create a tight corner seam- without an awkward overlap. The corners have been carefully "notched" with a knife in the earlier sail cutting out step. A sail that has all its boltrope tabs formed (leeches and foot). The sail's head suspension wire at the bottom can be seen. The three folded-over tabs have their encapsulated wires glued in-place. To seal the wire along the edges of the sail a simple dowel can be used once glue has been added along the full length of the tab. It's important to "push" the wire with the dowel's tip so that it sits at the very edge of the trough created by the folded over tab. Some glue will squeeze out when this is properly done (but don't use too much glue!). Since white glue is slow drying this isn't a problem; you'll need to scrape or wipe off any excess that appears. The sail's boltropes will be attached to these three lining tabs later. For gluing the tabs I use undiluted white aliphatic glue (TiteBond), applied with a toothpick along the full length of the sail. This photo is taken from an article I authored a couple years ago for the NRG Journal on my sailmaking. The colors of the sail material shown don't match the previous due to lighting differences. The yellow-hued glue can be seen in the trough containing the forming wire. A view of the main topsail formed by carefully bending and shaping the three edges containing the encapsulated wire. Boltropes, reef points (lines) and cringles will be added. I've formed the sail here to show the effect of the involved process of "wiring" the three edges; I'll not finalize the shape of the sails until much later when they're ready to be mounted to their respective yards. Another view of a "formed" sail. Both photos were taken specifically to show how the wire helps to create a "billowing" effect of the sail. The suspension loops at the sail's head are clearly seen. The protruding wires at the intersection of the leeches and foot will be trimmed off. The temporary placement of the semi-completed Main Topsail on HMS Camilla. Another slightly closer view of the sail. It's temporarily suspended by the two small wires at the head on either leech. Note the translucency of the sail materials. The three layers that comprise the sail still permit subtle light transmission. The random, tiny wrinkles in the sail (middle, left) doesn't bother my eye. A photo of the topsail without the effect of backlighting. The dramatic shadows are a fun visual side-effect! And a view of the main topsail from Camilla's port bow. Still, a little naked-looking. The foot hangs below the mainmast top and is restrained by its crowsfeet. When fully-mounted, the foot will drop down another 10-15mm from its current position; a good sign that I've gotten a good handle on my overall sail measurements. There is no sail plan (per se) in the Sphinx kit. However, there are very helpful belaying plans for the basic rigging included. I have used measurements taken directly from Camilla's yards as well as calculated sail dimensions based roughly on information in Lee's as well as David Antscherl's Swan series, Vol #IV and L. Petterson's books on rigging details. Once clewlines, bowlines and bunt lines are added, the sail will present even more convincing visual movement. Depending on the final placement in her diorama (the effects of wind and water), Camilla's yards may be braced to show correct positions on a tack; I don't yet know exactly what the angle of the yards will be. Once all the sails are fully fabricated and formed, the robands, reef point ropes, all boltropes and cringles for sail management lines will be added. These final steps will be detailed once all Camilla's sails have been brought to this stage as explained in this update. There's lots more critical details to come.


- 542 replies
-
- 20
-
-
-
- Sphinx
- Vanguard Models
- (and 3 more)
-
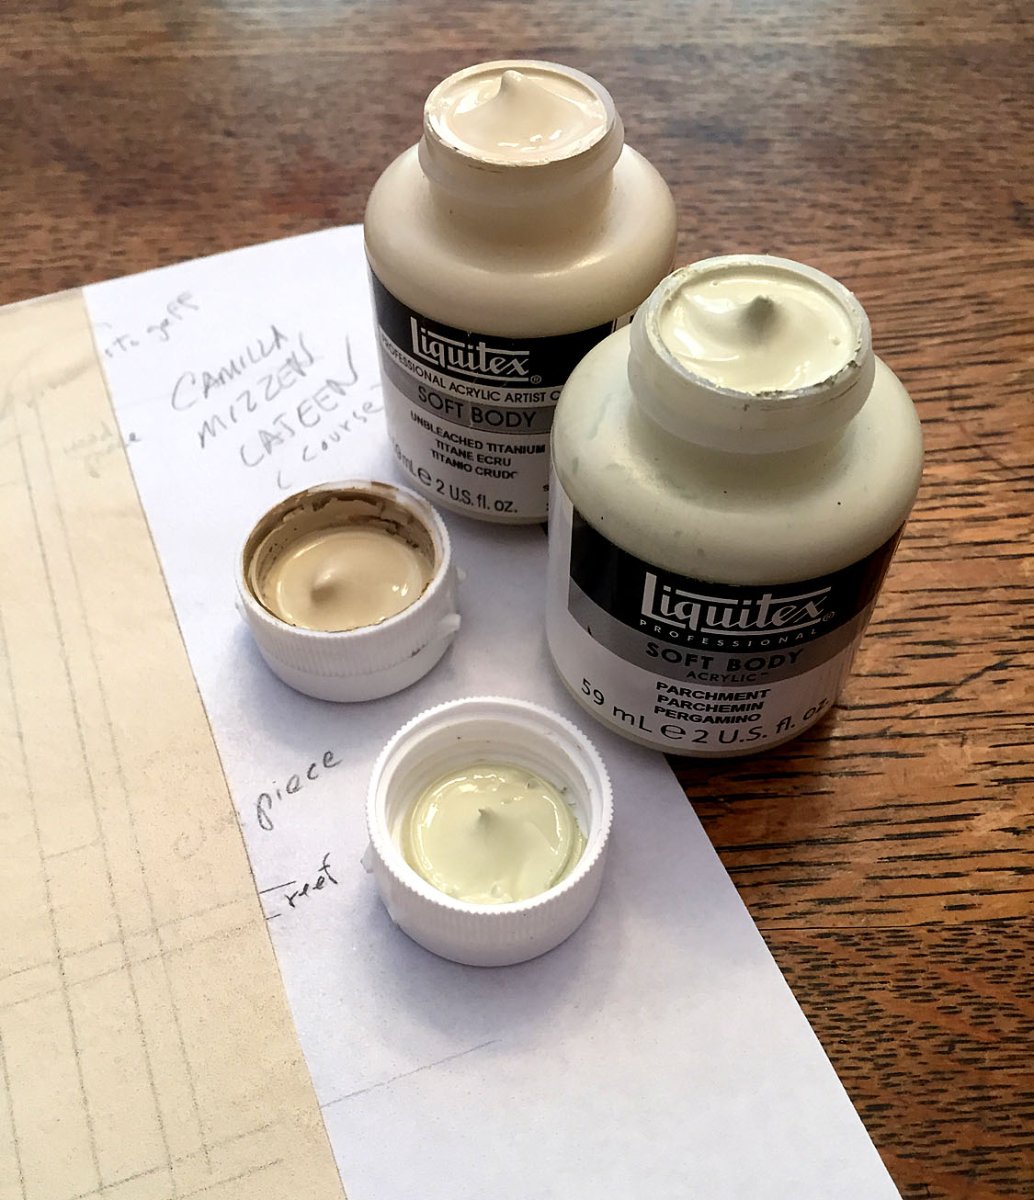
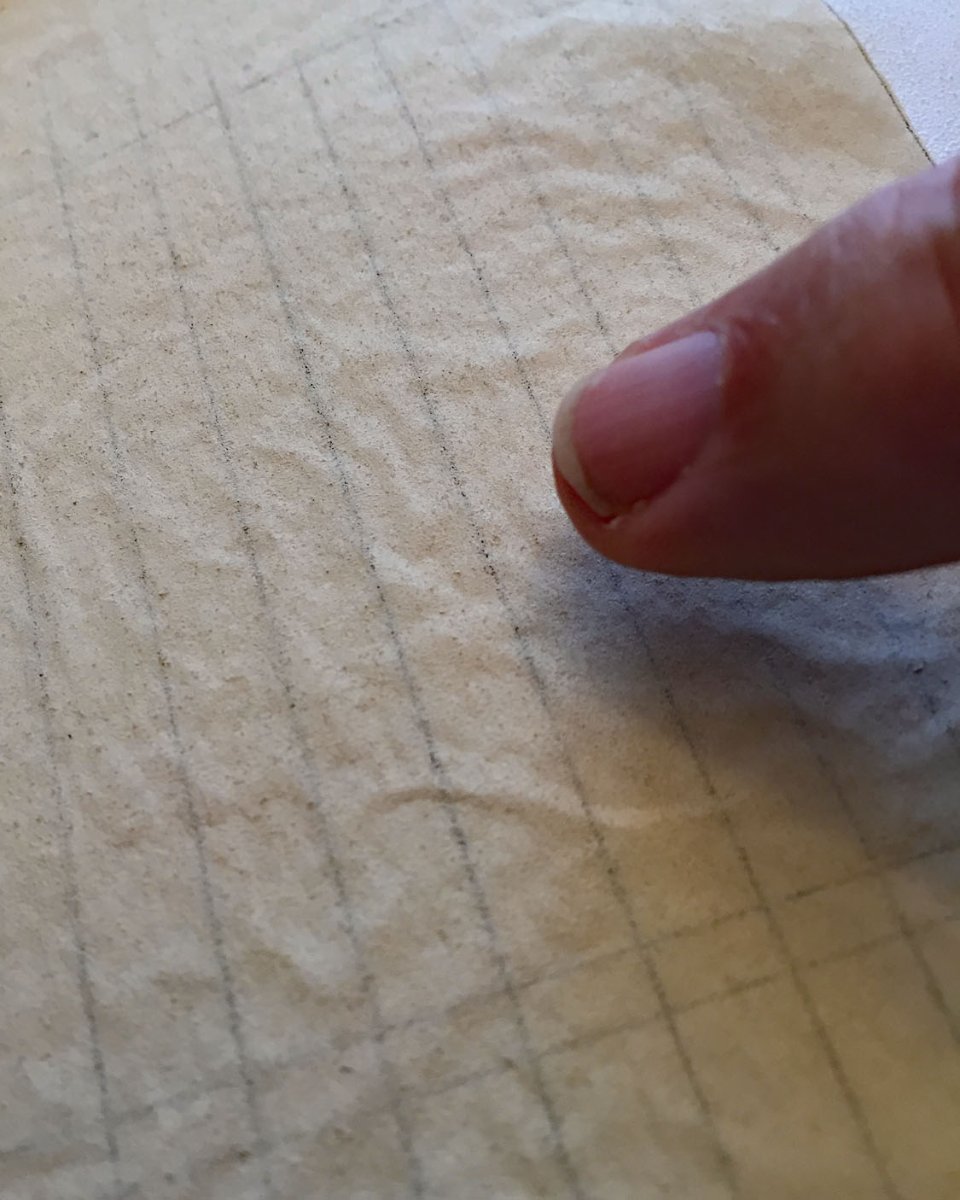
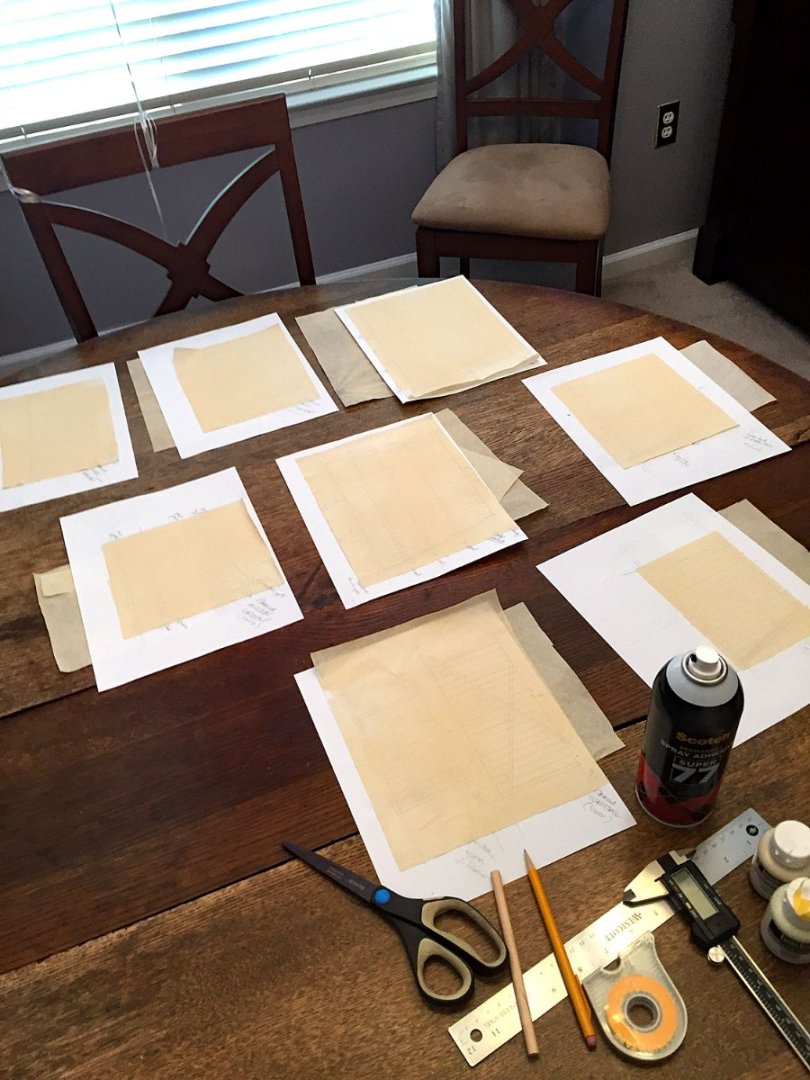
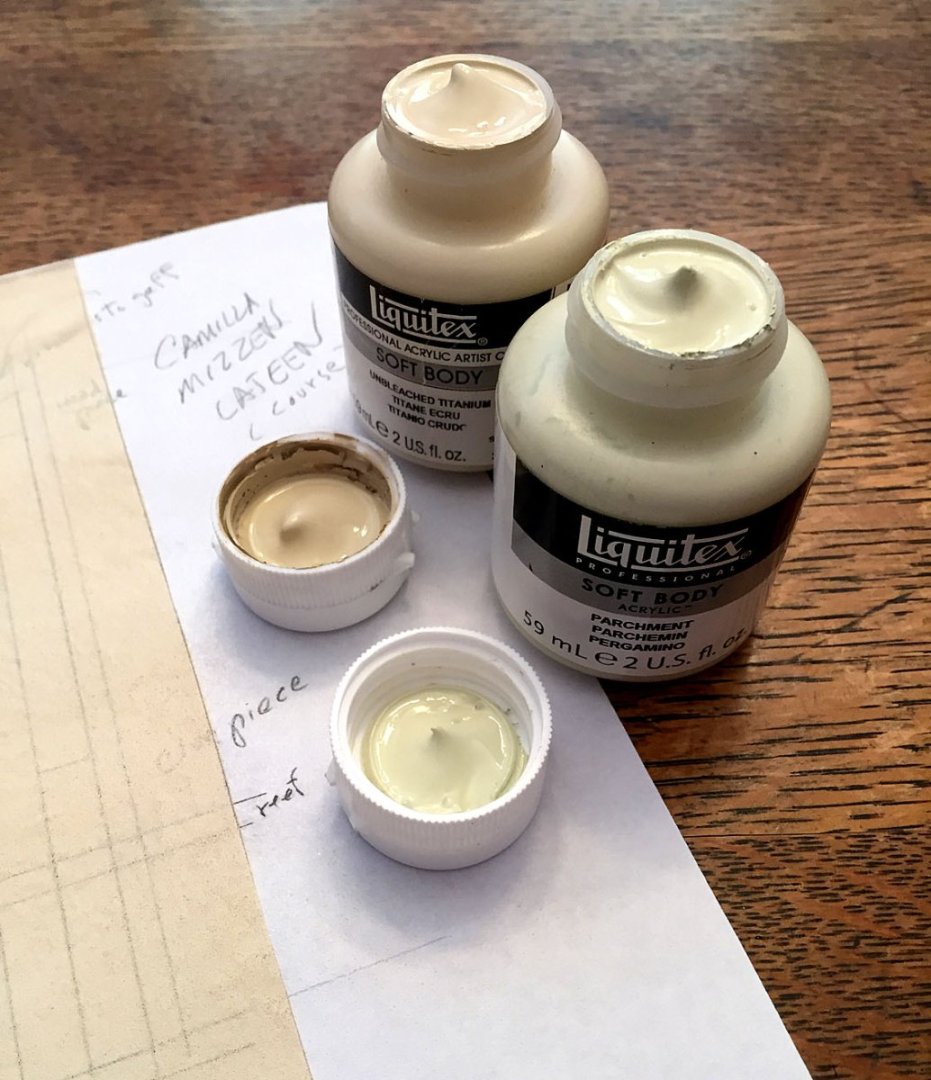
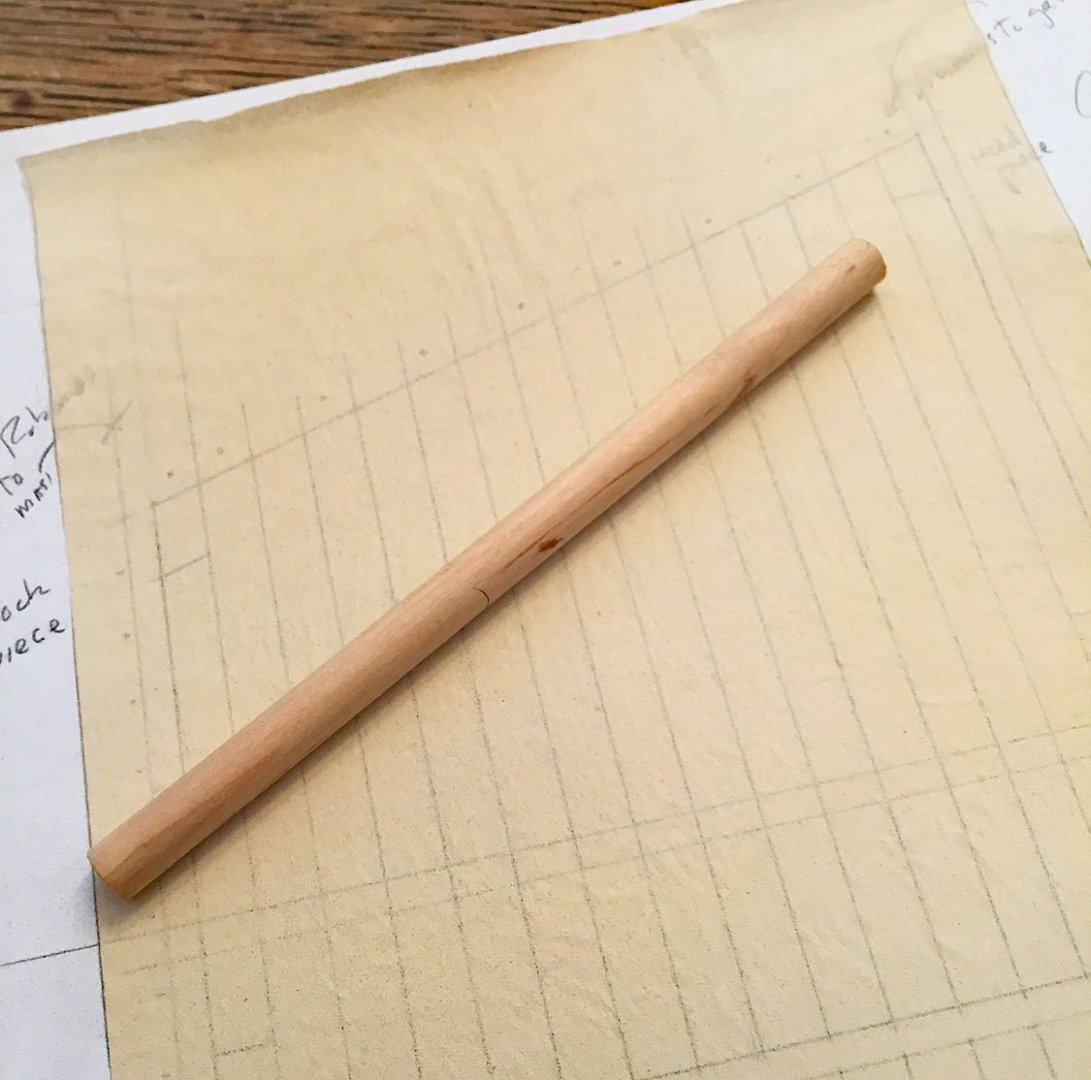
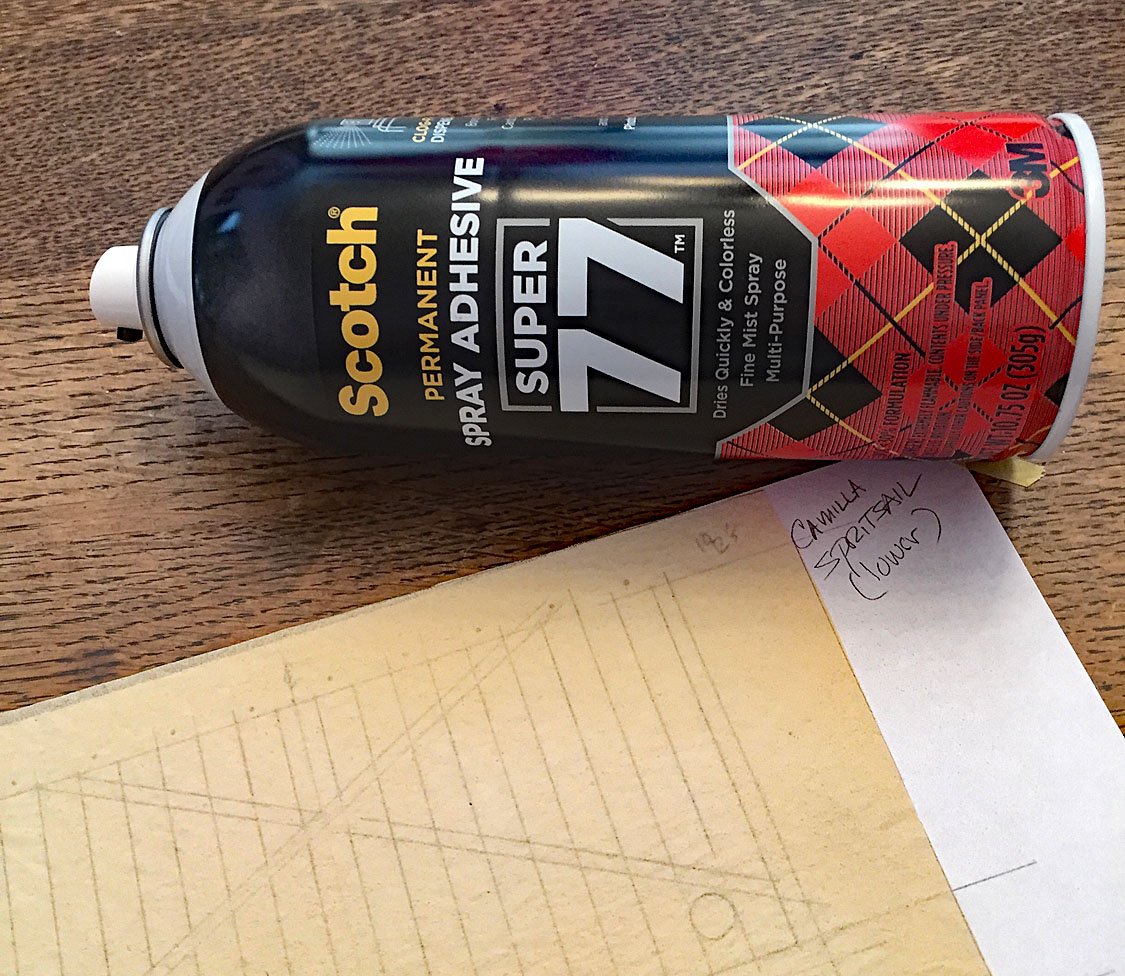
HMS Camilla is slowly getting her wings. Now that I've created all the paper layouts ( 9 sails) and painted the silkspan, it's time to start some lamination, as follows: After spraying a fine mist of 3M adhesive to the paper layout, a cut piece of the painted silkspan is applied gingerly to only one side. You want to make sure you handle the paper layout carefully, and minimally. One reason is that the pencil line graphite will easily smear and rub-off. At this stage I try to only handle the sail layout by its corners, especially after spraying the adhesive for the silkspan "skin." I've purposefully shown the wrinkles here (a tight close-up, it's not as bad as it appears). The air pockets between the silkspan and the paper need to be carefully worked out so they disappear. The best tool to get out the wrinklies. Because silkspan is somewhat porous, you'll feel some stickiness as you smooth out the small wrinkles and air bubbles; have a paper towel and some water handy to clean your fingertip. It's not good to have sticky sails. The spray adhesive eventually settles in and dries out. Silkspan is also very elastic (malleable?)- whether dry or wetted - and can be smoothed out nicely with some adroit, and light finger work... ...and then there's this simple tool too. After rubbing-out some larger wrinkle spots by finger, I use a piece of dowel to roller across the entire sail. You'll see this tool pop-up later when I finish the sail's edge tablings. Here's the adhesive I use to attach the silkspan. It is sticky stuff, from the Masters Of The Sticky Universe: 3M. There are different sprays available. This one, #77, or another, #45 General Purpose, work well. This spray has an extremely fine mist. Unlike the Liquitex spray can colors, how 3M accomplishes this without clogging the nozzle is very ZEN. I've tried other adhesives. Trust me, this is the best and most efficient way to get this done. I show this photo now since the little acrylic bottles were at-hand. You can easily see the difference between the pure white of the bond paper, the colored silkspan (in Unbleached Titanium) and a Devon Clotted Creme-looking Parchment color acrylic (foreground) ..Mmmmmm....that I'll use later on some of the sail linings as well as other areas of the finished sail. Voilá! Eight (8) silkspan laminated sail layout sheets with nine (9) sails (both upper and lower spritsails are on a single sheet-foreground). One side's lamination is done. These will dry o'night. Prepared pieces of silkspan for the opposite sides are beneath and will be added next (tomorrow?). I've got a number of scrap pieces of painted silkspan for each of the sail's linings and tablings; these need to be precisely cut into their final sizes and glued onto the sails. I'll use a different adhesive for this task since the giant can of immensely sticky 3M spray isn't the right tool for that job. Yes, Not my workshop. I'm spraying sticky, icky glue in my garage - not in my basement workshop. Like the smelly toxic paint process, glue spraying is best done outside. My large dining room table is closest to my garage and has a large, smooth, flat surface and - oh yeah! - the Admiral is one of the most understanding ones in our hobby, certainly in this household's admin. I am a lucky sailor. She keeps telling me that. Must be true. This is the evidence...


- 542 replies
-
- 11
-
-
- Sphinx
- Vanguard Models
- (and 3 more)
-
Absolutely, Allan. I have David's excellent SeaWatch Swan Series Supplement and he goes into great detail for working with silkspan; his is also a good, basic technique, including tips on furling silkspan. I've watched Tom Lauria's YouTube(s) and he approaches the task with similar processes.
- 542 replies
-
- 3
-
-
- Sphinx
- Vanguard Models
- (and 3 more)
-
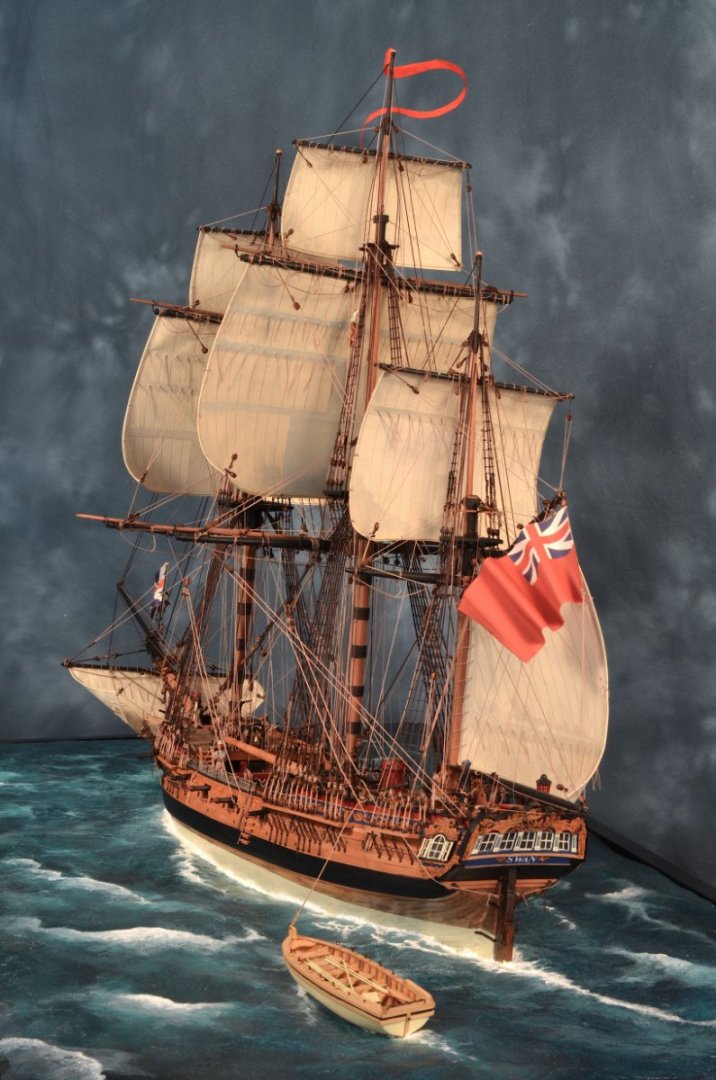
A couple quick pics from my Gallery Album for my HMS Swan. I'm posting these here to show those who are following this thread; I'm aiming for similar results with my current HMS Camilla build. I confess, my multi-stepped sailmaking process is quite complicated.
- 542 replies
-
- 6
-
-
-
- Sphinx
- Vanguard Models
- (and 3 more)
-
Bruce, thanks for the shout-out. Yes, ModelSpan is essentially the same as Silkspan. I've used both with prior models. In the U.S. I purchase it directly from a manufacturer, SIG, in different weights (3). As B.E. has suggested there are sources for ModelSpan in the U.K. I have also purchased ModelSpan here in the U.S. from reseller, Bluejacket Shipcrafters. Blue Ensign, thanks for your additional information. Indeed, at 1:64 more substance to the sail material is required, hence my solution to use my sail "sandwich" combo of bond paper and silkspan. When I add a couple more finishing "tricks" to their fabrication, the sails can be easily shaped and, most importantly, are more substantial and realistic-looking once they're mounted.
- 542 replies
-
- 5
-
-
- Sphinx
- Vanguard Models
- (and 3 more)
-
Thanks, Allan. I agree that cloth sails - cleverly fashioned and made from a myriad of different materials - have never made me swoon at a model that has them, especially at smaller scales, like my favorite 1:64. There are excellent examples by other ship builders of paper sails, an approach that yields more realistic portrayals. Thanks for sharing your solution to drawing on silkspan with a shaved nib of a Liquitex marker; clever! I find that the carefully drawn pencil lines on the bond paper suffice, particularly after they've been slightly muted with the application of the layered silkspan "sandwich." As I'll explain soon, I like that my sail sandwich has some "heft" when complete and ready to mount. The heft is a direct result of the layering (still not thicker than .005/6) and a couple additional tricks I employ to have them appear to billow away from their yards and masts. Using only silkspan - even multi-layered - presents nicely, but these sails typically hang rather limply from their yards; fine for a static model but not so convincing for one presented in a diorama. I'm really happy my build thread has produced some lively interaction with my colleagues on this subject (and others!). So many beautiful ships to build, so little time!
- 542 replies
-
- 6
-
-
- Sphinx
- Vanguard Models
- (and 3 more)
-
Thank You, druxey! Trivia makes the world go round...thanks for the background on titanium oxide ( TiO2 ). I'm pleased the manufacturer punted on the batch, otherwise the closest color to it would be "parchment"- which as I'll show in the next steps I also use on my sails for color contrast and...wait for it...a "weathering" touch. The parchment acrylic I use (available also in spray cans), is from a paint pot. I drybrush it on the sails...more on this later.
- 542 replies
-
- 4
-
-
- Sphinx
- Vanguard Models
- (and 3 more)
-
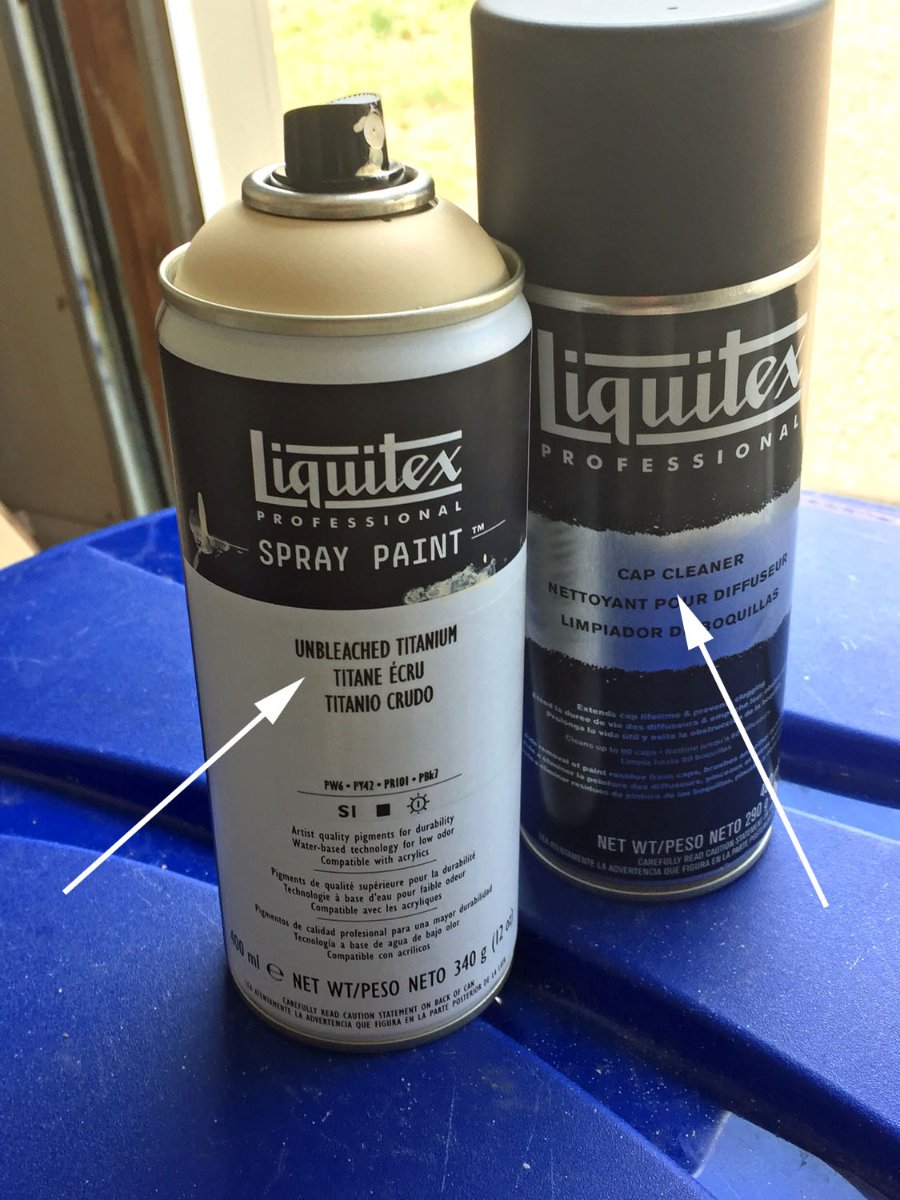
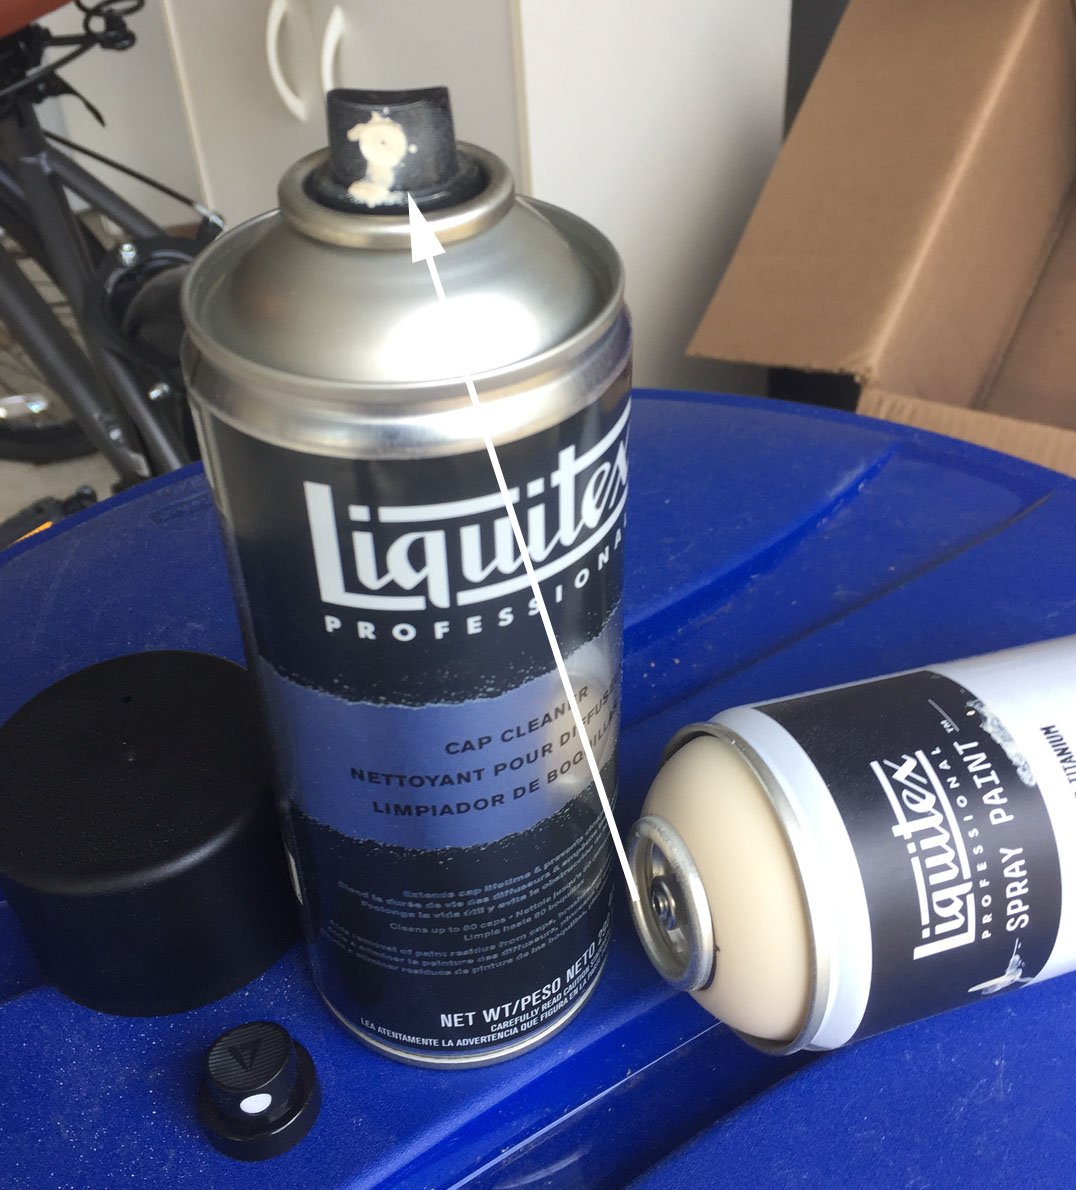
You're welcome, Tom. The cap cleaner is a life (and pocketbook) saver. I forgot to mention that one can also purchase a package of various Liquitex nozzles that produce different spray patterns. I have a set but thus far I haven't had a need to replace any and the basic nozzle on the colored paint - if kept clean - does a fine job. I've tried to handle this painting task with an airbrush but it produced way too many headaches; it just wasn't very efficient time-wise and when the paint consistency was right for creating a consistent application on the silkspan, the airbrush nozzle would clog. Airbrushes are great for certain modeling tasks, coloring silkspan isn't one of them. On color uniformity - indeed, I suspect that most sails were pretty "raggedy" as well as dingy-looking, this estimation by judging from paintings of the era. Typical sails also had a patch work of random fixes. A typical Royal Navy warship provisioned many rolls of sailcloth for repairs. If a sailing ship lost it's means of propulsion, the crew were in deep doo-doo. It should be pretty evident to most forum reader's of my log that I'm creating a diorama that will attempt to portray realism. I've purposefully created my Camilla model with this in-mind. It's a fine line as I've mentioned previously. For example, one can easily overdo the "weathering" of various elements. I try to put the "realism" mostly into sails as well as the portrayal of the sea; a little lower in artistic priority in this regard, is the model itself.
- 542 replies
-
- 5
-
-
- Sphinx
- Vanguard Models
- (and 3 more)
-
That's some crazy small stuff, Eric. Good job getting those stairs to look even. The companionways look good too.
-
🤣🤣🤣 ...James' purgatory will be documented in The Poor James' Almanac.
- 857 replies
-
- 4
-

-
-
- Sphinx
- Vanguard Models
- (and 1 more)
-
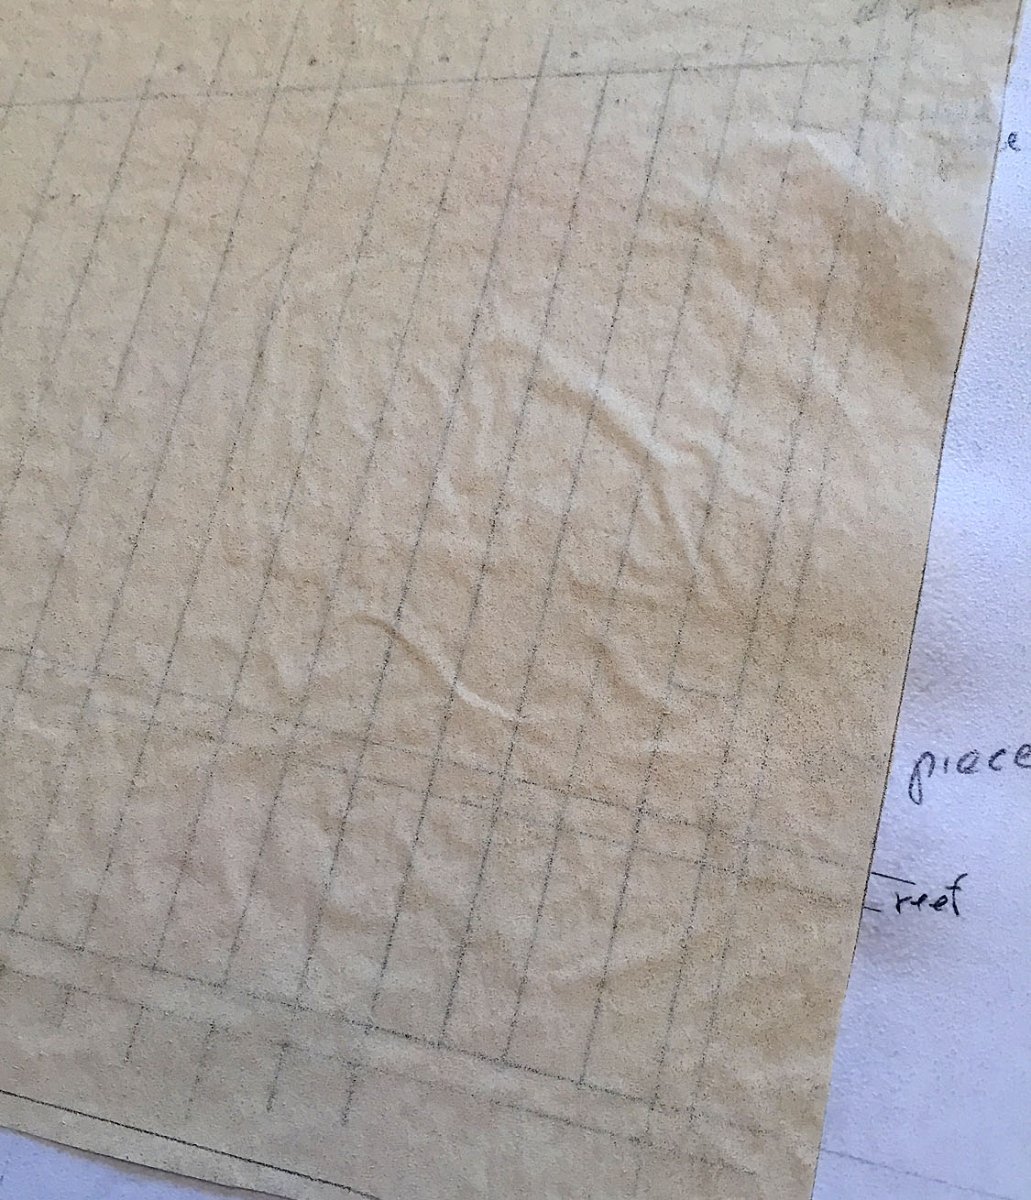
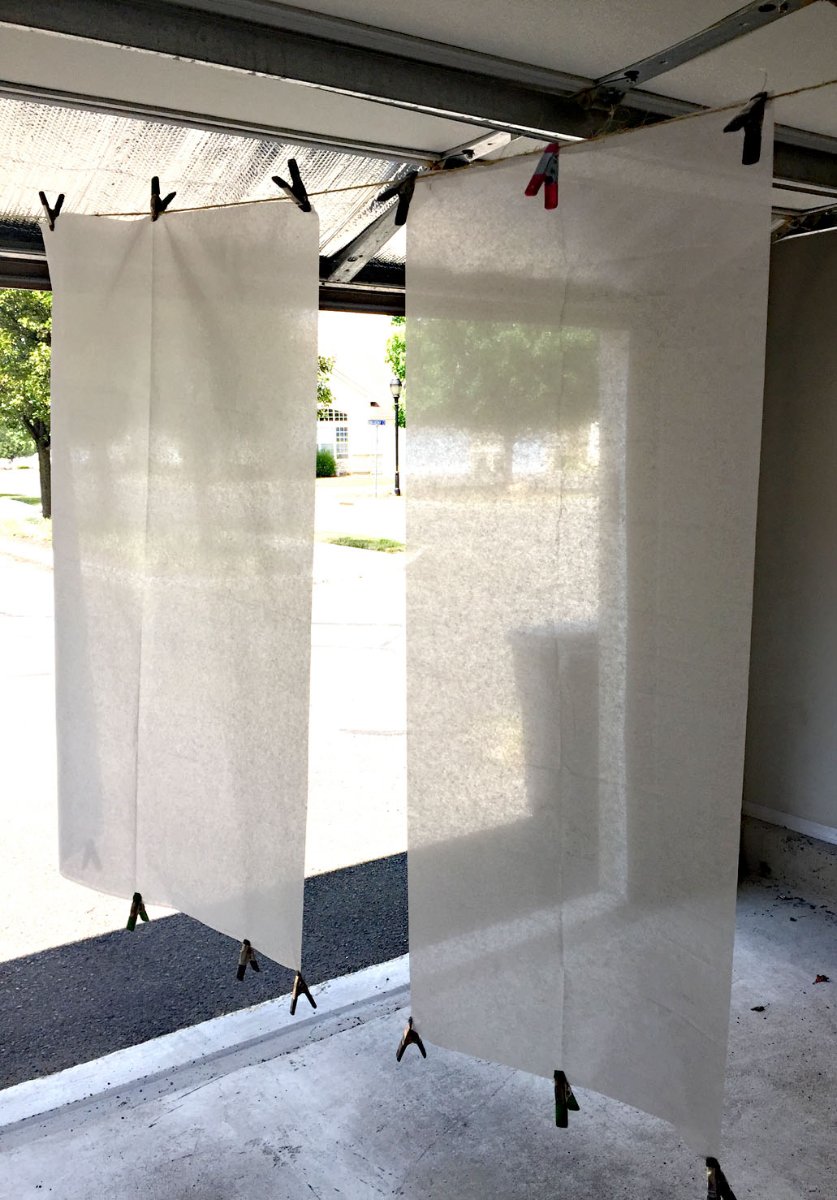
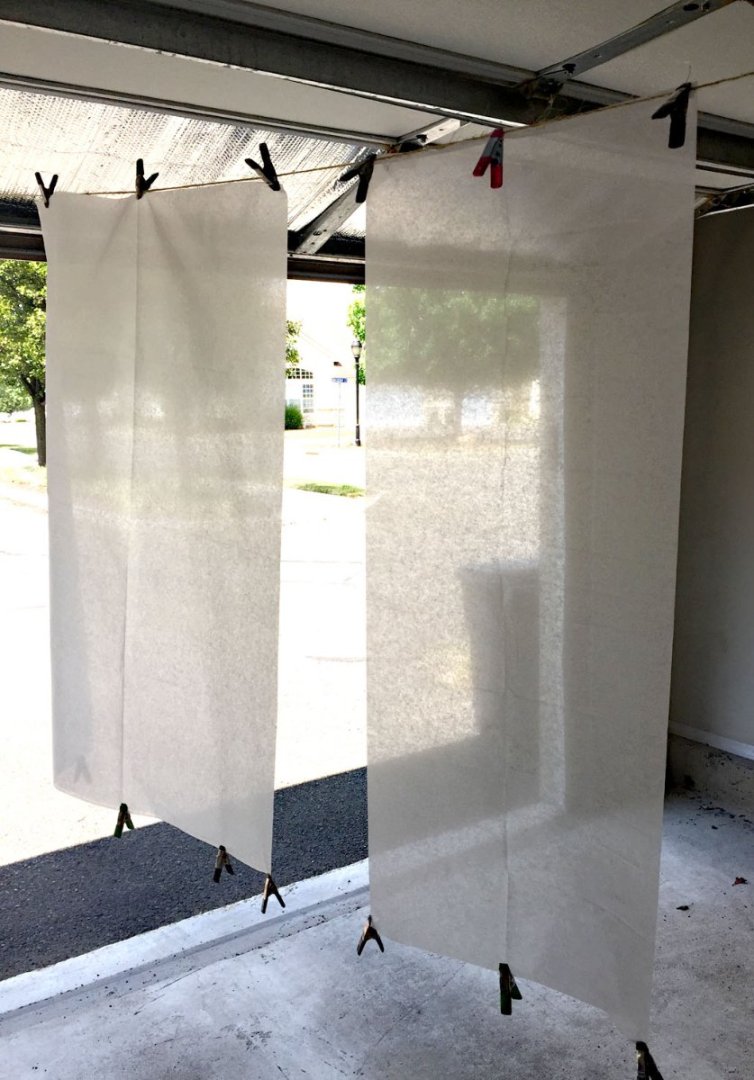
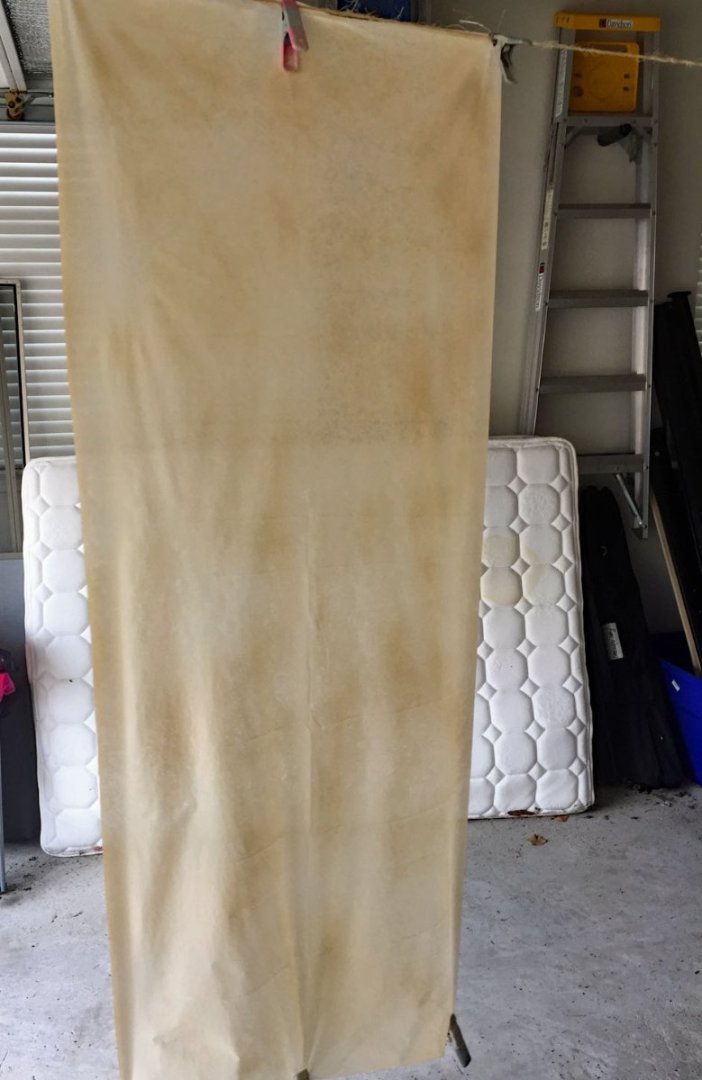
Onward on sailmaking, and more granularity. Today's task: coloring the silkspan. Sheets of "naked" silkspan. Clipped to a temporary clothesline in my garage. This material is highly translucent but it is also somewhat POROUS. I learned the hard way that coloring silkspan by placing it on a flat surface is NOT a good idea - and contrary to my earlier descriptions of this coloring step. Even using the lightest finger touch to the spray nozzle, sticky paint would randomly pool and cause the painted silkspan to stick to any underlayment if you didn't immediately lift the painted silkspan up and away from the surface: not good. In fact, this often results in a real hassle and there had to be a better way to color the material. Yes, one COULD hand color (paint brush or airbrush) the acrylic color but the result would likely be the same with the paint causing the silkspan to randomly stick to whatever surface was beneath it. Also, it shouldn't take more than a hot minute to fully paint the two large sheets (on one side only) as I've shown here... The paint for coloring the silkspan is Liquitex Unbleached Titanium; this acrylic paint is available in bottles and tubes but for prepping the large sheets of silkspan as previously described, the spray can is the way to go. I like the color: the only sails that appear snowy white are 21st century, contemporary synthetic ones you can purchase for your sailboat at Marine Outfitters. Another lesson learned in my experimentation: after tossing away a nearly full can of the expensive paint ($11.00/can at Michael's and other artist supply vendors), I learned about the Liquitex spray can Cap Cleaner. The thick paint will clog the plastic nozzle unless you clear it immediately after using it. The solution: simply remove the spray can's nozzle and swap it over to the separate Cap Cleaner can, turn upside down and squirt a couple squirts. Bingo! the paint nozzle is now clear and ready to spritz again, another day. One sheet of painted silkspan (enough for nearly all my Camilla's sails (fore and aft sides). In 92 degree heat, and after spray painting, the material was dry after about 3 milliseconds ( I exaggerate: it actually took about 30 seconds.) The small clamps at the bottom of the sheets are important: the silkspan will move around wildly with the slightest air movement. Unfortunately, this paint is also very odiferous (nasty smelling chemicals) and you don't want to spray it anywhere inside your shop unless you have an industrial grade paint booth. And No, this isn't my bedroom's temporarily moved mattress - however, the whiteness of the mattress does show a decent contrast to the unbleached Titanium color of the silkspan - kind of looks like "dirty laundry," and a near perfect color (IMHO) for depicting slightly weathered 18th-century canvas sails. I try to coat the silkspan with an even amount of spray, however there will inevitably be spots where the spray painting will overlap to create a lightly mottled look; to my eye this doesn’t matter. The effect of this can be seen in this photo. The slight tonal variations are acceptable to me and whenI hold a portion of the painted silkspan over my sail template and it doesn’t look as consistent as I’d like, I’ll just select a different portion of the material to mount to the paper. The long sheet of painted silkspan hanging in my garage has been brought into my shop and placed on top of a sail template on my drafting light table. The painted silkspan is fully dried after a couple minutes. I’ve placed it on only half of the sail layout to show how dramatic the color change is with a very subtle “crème” hued coloration. The colored material will now be cut into appropriately-sized smaller sheets and mounted to both sides of each sail's layout paper. I'll indicate what adhesives in my next step in the next update where the sails get trimmed to size and various sail reinforcements are also affixed. The calipers?...I was double-checking some rope diameters that I'll use for the sail's bolt ropes and cringles. Evidence that it really was 91 degrees (in the shade) in my garage when I did this sailmaking silkspan painting. Luckily, I had a glass of icy cold lemonade at the ready. And, my neighbors are likely wondering what this is all about...


- 542 replies
-
- 9
-
-
- Sphinx
- Vanguard Models
- (and 3 more)
-
Yep, that's me demonstrating my sailmaking technique at a Northeast Ship Modeler's Conference workshop in 2019 ( I displayed my HMS Swan diorama at the same event). Thanks to AZZOUN, a colleague of mine from the PSMS Club for posting this video that's on my club's PSMS site; I'd forgotten about it! Here's the direct link to the video made by Azzoun: https://www.philadelphiashipmodelsociety.com/presentations/ Unfortunately, more recent archived NRG Journal articles aren't available on the NRG's site at this time; the issue archives stop at Volume #60 (2015). Earlier issues are available to purchase on both CD's and USB flashdrives. Also, on the NRG site, under the "Resources" Menu Tab, the sub-menu "Articles & How-To's" has various helpful references for ship modelers but nothing specific on sailmaking. My NRG Journal articles for both sailmaking (as well as making diorama water) could be posted in this section, but at the moment they are in suspended animation. Perhaps this NRG section will be updated in the future.
- 542 replies
-
- 3
-
-
- Sphinx
- Vanguard Models
- (and 3 more)
-
You are welcome. I intend to cover all the same steps I outlined in my NRJ article here. In fact, I’ll have some other additional details to share since the entire process is quite involved and I couldn’t cover everything in an article that’s limited to “X” words (and “N” pics). As I explain the steps I’ll show the materials so others that want realistic sails on their model can make them too. Nothing too exotic involved, nothing costly. Thanks for looking-in.
- 542 replies
-
- 3
-
-
- Sphinx
- Vanguard Models
- (and 3 more)
-
B.E., your Herculean (and sometimes Sisyphean) efforts with these... little boats ...are to be applauded. 👏 As you may recall, I checked-out on attempting to make any of these small boats and went for scratching a "custom," Chris' 3D-printed, clinker boat. You, my MSW friend, are also a master of understatement.
- 857 replies
-
- 6
-
-
- Sphinx
- Vanguard Models
- (and 1 more)