

robert952
-
Posts
922 -
Joined
-
Last visited
Content Type
Profiles
Forums
Gallery
Events
Everything posted by robert952
-
 Using sails to get and from the 'ole fishing hole' or for other purposes (i.e. lighthouse tender) seems a fairly common evolution for these work boats. Hence, my plans for my Peapod build is to add a sail (if I ever get the planking done). I am using Chapman's American Small Sailing as my source for that purpose. For dories Chapman states the sail was "usually a mast hole in the forward thwart that carried a loose footed spritsail. Sometimes a jib was set." Further he points out that "since the dory had neither keel nor centerboard, the sails were only effective running free and the use of a jib seems to have been an affection."(pg 89) But, he then discusses (on the next page) 'shore dories' with a centerboard. He includes two plans, one showing the sprit-mainsail and jib rig and another two-masted sailing rig both with centerboards and rudders. I can scan the plans and post if you would like. The drawings are dated 1939 for the sprit sail and 1831 using what looks more along the lines of a 'leg of mutton' (?) set up - I think.
- 62 replies
-
- 2
-

-

-
- First Build
- Grand Banks Dory
- (and 2 more)
-
Adding these details takes a kit to the next level. Good job.
- 62 replies
-
- 1
-
-
- First Build
- Grand Banks Dory
- (and 2 more)
-
Super build. I enjoyed following along. Thanks for the details of your experiences.
- 62 replies
-
- 1
-
-
- First Build
- Grand Banks Dory
- (and 2 more)
-
Greetings and welcome aboard. If it's the first model you have built, you may want to review this thread: https://modelshipworld.com/topic/13703-for-beginners-a-cautionary-tale/page/8/#comment-977787 The recommendation from above (short version) start small to build your skills. (Be honest with yourself to avoid frustration down the road.) As for tools it depends on the model and scale you plan to build. The list you have is a good start for basic tool kits. You could also review some starter tool kits like this one to see what you might want to consider. (Those kits may or may not have things you really need.) You may need smaller clips and maybe larger. Tape (painter's tape) proves useful to me for test fitting and holding things in place temporarily (as with test fitting, holding things as glue cures, and of course, to help with masking off areas during the painting process. I'd suggest some type of 90 degree square (machinist square). I'd suggest at least two to square up two faces and allow you to work on more than one frame/bulkhead. When building plank-on-bulkhead or plank-on-frames, getting the frames set properly is critical. Some models give you a building rig of some type. However, I have found it a good idea to be sure you check they are square. Look at Micromark and Model Expo for these while shopping. You can find different price points. Find what your budget can stand. Tweezers! Be sure to have a couple of different sizes with self-locking in the mix. There's some 'kits' that have a selection of tweezers that might be a good start until you figure out which type works best for you. As to glue/adhesives, again, a lot depends on your model, how things fit, how fast parts need to set, etc. Also, if you plan on using photoetched parts, plastic, and different materials ,may require different types of glue. I'll leave room for others to join in with their list. As you will likely find with this thread, you will get a lot of opinions and ideas. Good luck. Keep us posted with a build log when you start.
-
I was discussing modeling tools with a couple of NRG members the other day. We agreed that sometimes the tool we need doesn't exist and we improvise and create our own. I love the repurposed Exacto knife sheath and piece of scrap wood in use here. A good example of necessity being the Mother of Invention.
- 49 replies
-
- 2
-
-
- muscongus bay lobster smack
- Model Shipways
- (and 2 more)
-
It's in my stash. I think it good to follow along to see what I have in store for my (eventual) build.
-
Interesting (and different) aspect of nautical history. Thanks for sharing the research. Great read.
-
Thanks for the detail in the log. I appreciate the time you take to write about how you have experimented with techniques.bThis info can prove to be a help to others building this model. Also, your experiences can be applied to similar work. I think every model can be a learning experience for the model builder and those of us following along.
- 62 replies
-
- 2
-
-
- First Build
- Grand Banks Dory
- (and 2 more)
-
@Mike Collier Thanks for stopping in. Ran into an issue that I have to correct. When I fix that I will get back on track. @Knocklouder Thanks for joining the ride.
- 44 replies
-
- 2
-
-
- maine peapod
- peapod
- (and 4 more)
-
I had read on the forum (somewhere, sometime) about using hair clamps as they aren't 'aggressive' to borrow the term. Bobby pins with scrap wood like you do seems a good solution too. Thanks for the images.
- 62 replies
-
- 2
-
-
- First Build
- Grand Banks Dory
- (and 2 more)
-
Fantastic model! Nicely displayed.
-
I am giving one of these boat models to my Dad for Father's Day. I pointed out this site so he can seek answers to questions as he progresses. IMO I find details like in this log goes a long way to answering questions for people just starting into the hobby or (like me) just looking for verification of what we are doing. Keep up the nice work. I'm adding this log to my 'watch list.' I'm looking forward to watching the progress.
- 62 replies
-
- 3
-
-
- First Build
- Grand Banks Dory
- (and 2 more)
-
This thread is a good example of why I like the forum. State a problem, ask for help, get multiple solutions to review. Pick what works best for your project. Though not a current problem I have, I'll file the info under - 'just in case.'
-
Helping hands troubles
robert952 replied to VitusBering's topic in Modeling tools and Workshop Equipment
After posting, I reread the other entries. I can see an issue as pointed out that a bit of pressure could shift the 'target'. I find the 'ball and joint' like this item difficult t o use. For some reason I can't get the ball joint tight enough to stay in place and have similar problems to what's described. Hence I use the 'quad hand' approach.
-
Helping hands troubles
robert952 replied to VitusBering's topic in Modeling tools and Workshop Equipment
Ah... I see now. Here's my video and 'solution'. As you can see, if it put a sharp bend to the arm it springs back. But a more gentle curve stays in place. Again, I am not sure it answers your question. But I could at least duplicate your video. I guess I never really did a sharp bend. I do note (now that you piqued my curiosity) if I bend the long arms back against a curve - like an S - the spring back is more pronounced. Again, I guess I never used these much that way. Hope this helps. BTW - a word of thanks. I have never loaded a vid to YouTube. I knew from what people said it was not hard. However, I had just never done it before. I guess now I can add 'Youtuber' to my CV. 😎 -
Helping hands troubles
robert952 replied to VitusBering's topic in Modeling tools and Workshop Equipment
Not that it helps you, however, the I have two. Neither one has any spring back on the arms. One is from Quad Hands (with magnets). The other I have has the arms bolted from the underside in the corners of the plate. I got the second one as a gift and do not know which brand it is. There's no identifier on the second one. It's likely from KOTTO as I had it on my Amazon wish list. All the arms on both appear identical, move smoothly and have no spring back (or a very tiny amount). They hold in position once set. As I said, I don't have the problem you have. I would be one who gives this a 5 star rating. As I say, I know this doesn't help your situation. -
I will light some incense and see if it will attract the attention of your muse. 🕯️ (OK. scented candle.)
-
Don't be shy about posting pictures. You might want to post a second log for the GH2. I am enjoying watching the build of GH1 and would follow GH2. The ship has a spot in my heart. I actually made the newbie mistake of starting on a Golden Hinde kit (Mamoli kit) as my first adventure into this hobby. It was way to advanced for me at that time. That attempt is stashed away in a very unfinished state. I'm not not sure if or when I might get back to that and see if it's salvageable. (I may just salvage the material from it.)
-
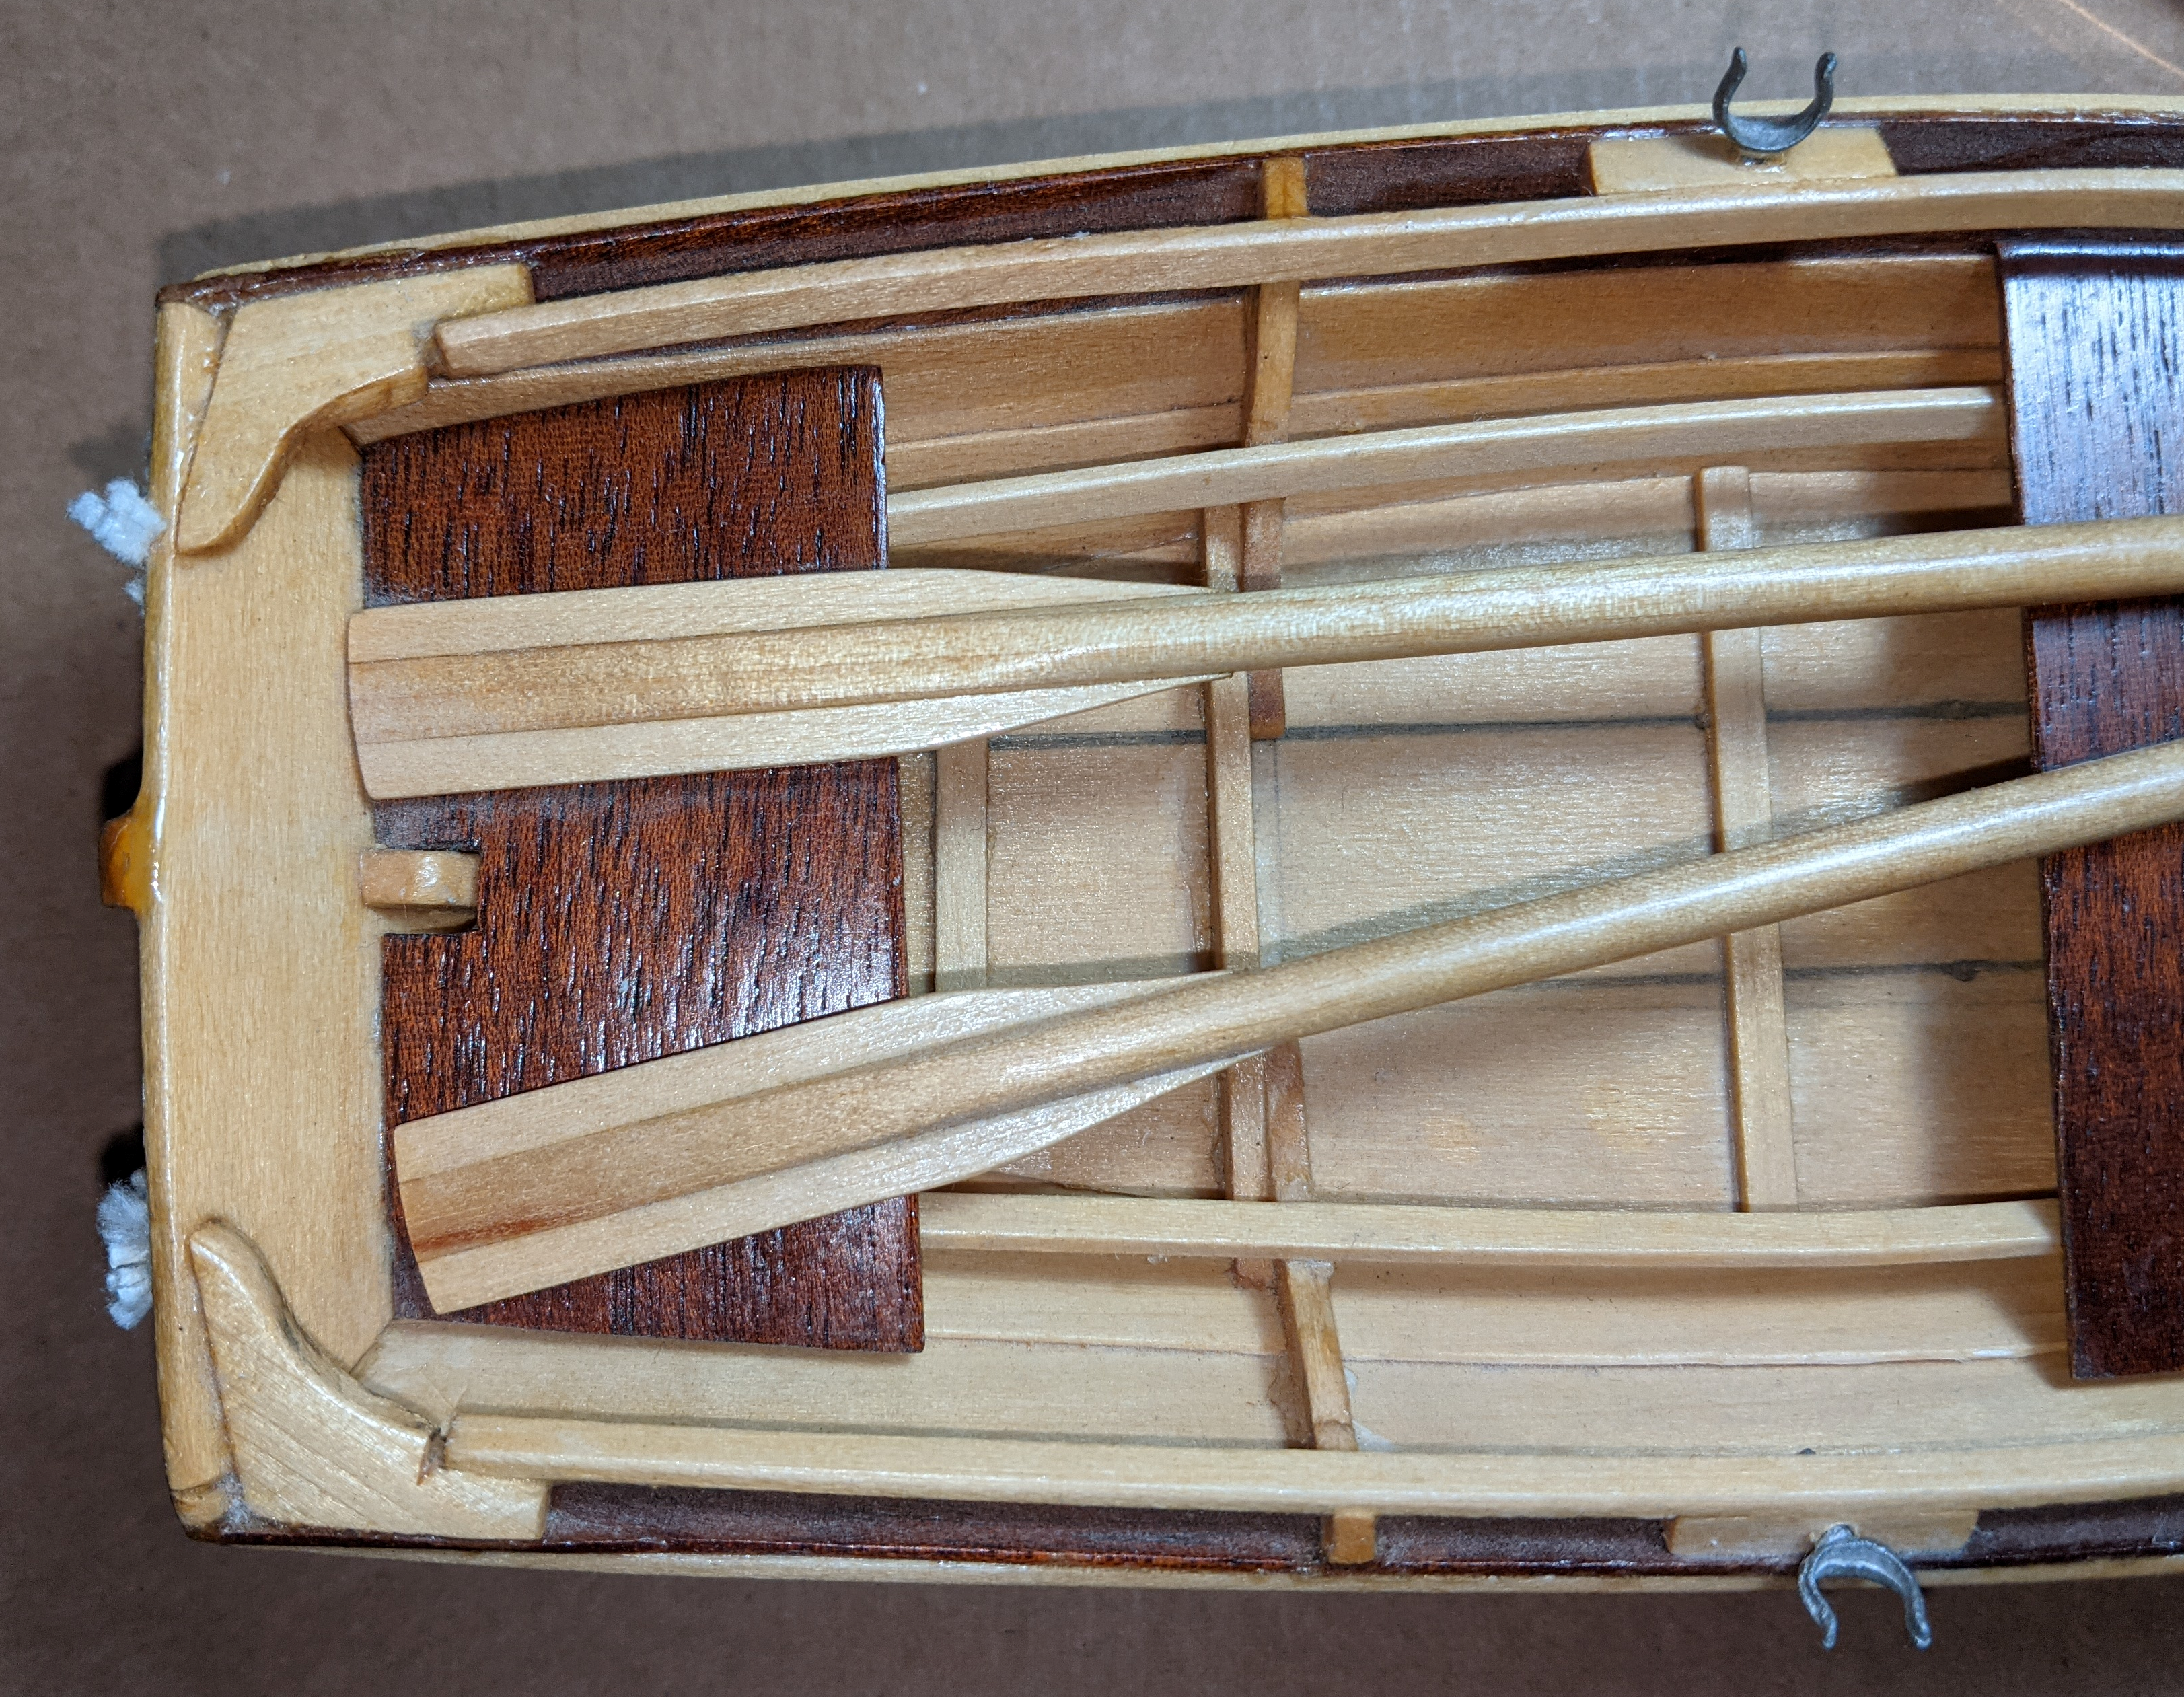
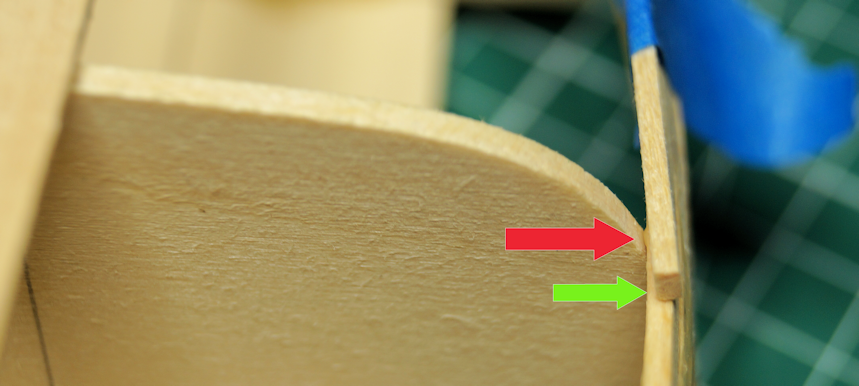
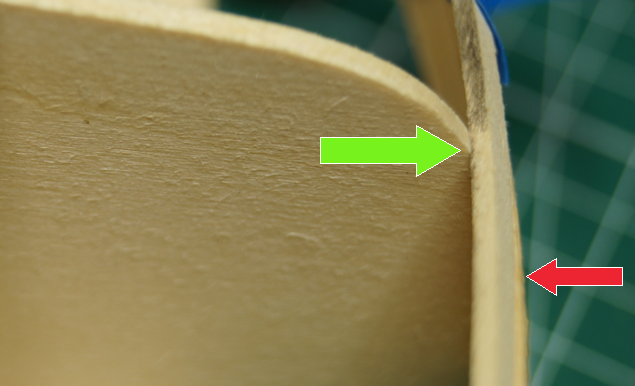
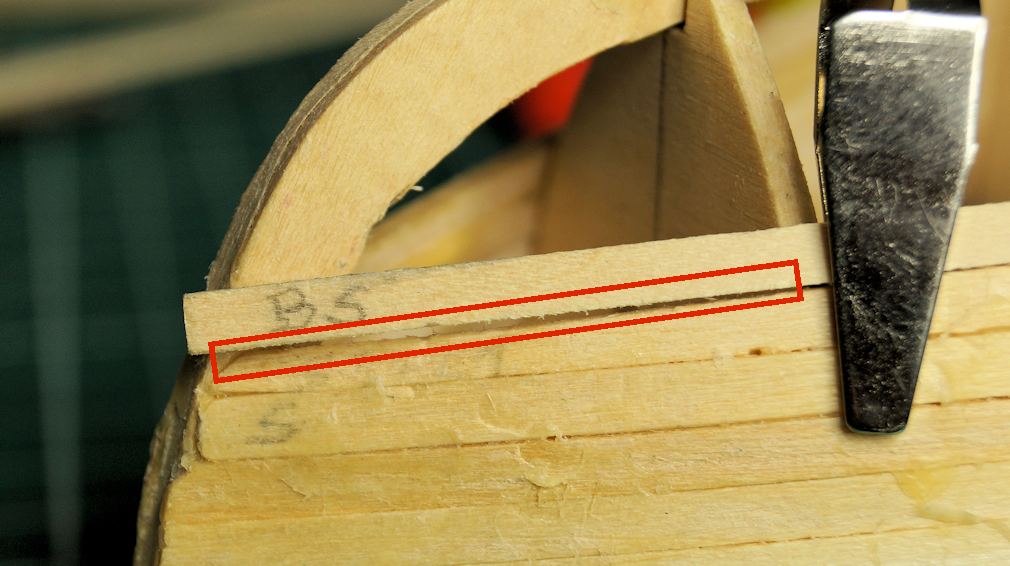
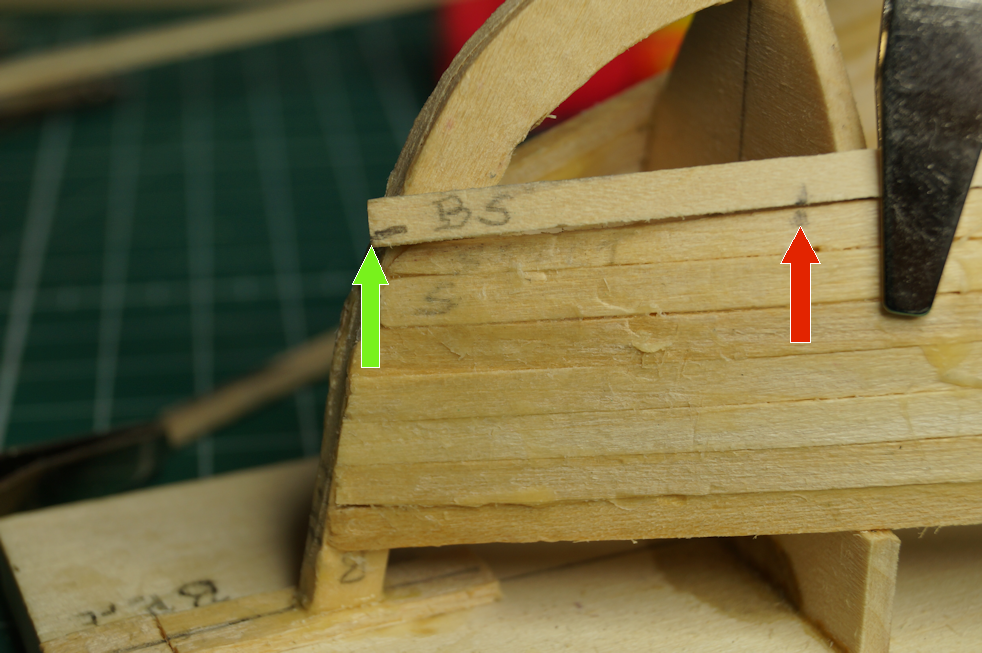
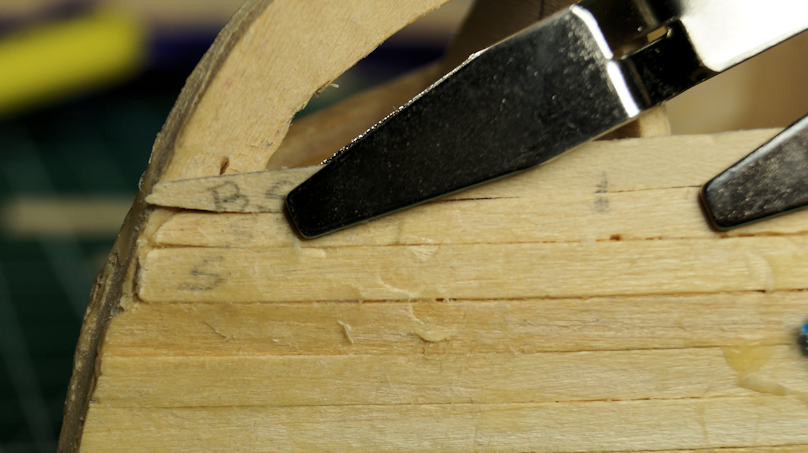
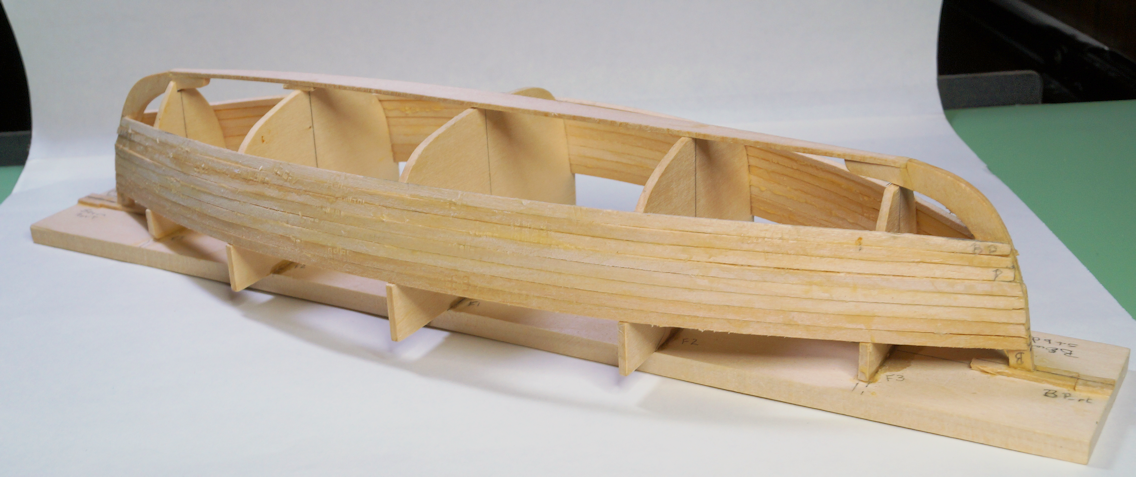
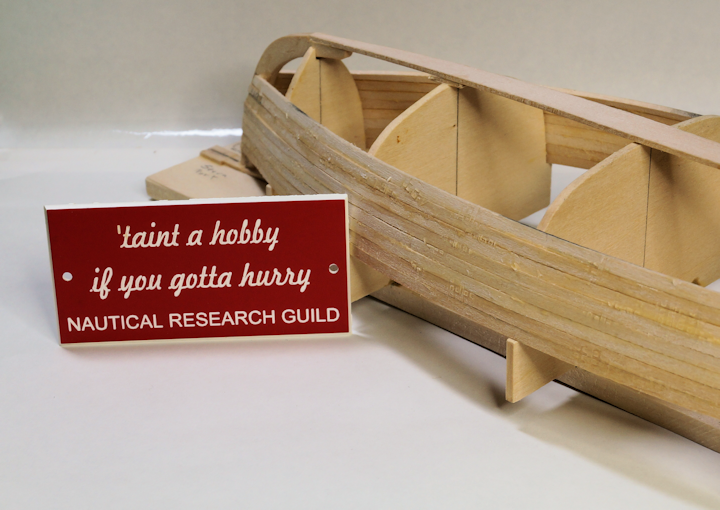
For a few planks more. Sounds like a 'spaghetti western.' Maybe because I had spaghetti for dinner tonight or the fact I recently watched an old Clint Eastwood movie. I hope that this build log will provide input and insight to those who may be researching this model and model building in general. Towards that end, I will add a bit of detail on my method that might be useful. So, settle in as I become verbose (again). Step 19 of the 'construction manual' says to repeat steps 15 - 18 (adding planks to the boat). Step 20 says: "Use care to align the planks so that there is not a step between adjacent planks. Small imperfections will be sanded out later." Though I am not quite there yet, step 21 says to trim planks to fit as you work towards the 'bottom of the boat'. (Seems like the use of a nautical term would be appropriate. I'll call it the keel.) The instructions do not provide detail on how to accomplish this. Here's how I accomplish this goal...at least to some degree. Someone reading this log may not know the why and how to get the boards to lay properly. The reason for the why can be seen half-way down my first post in this log at the drawings showing lapstrake vs carvel planking. In the drawing, you can see how the 'artist' used rectangles to show the planks for the carvel method. To match the lines of the hull, you will need to angle planks to insure a proper fit. Hopefully, this image shows another view to the situation. Note that the green arrow points to a plank sitting on the flat surface of the previously assembled plank and the red arrow shows the angle the plank needs to lay properly against the bulkhead. (I just taped the plank in place for the photograph.) The solution is to bevel the plank. In this photo, as it is oriented, the bottom edge of the plank gets beveled. Per books covering planking of models, the method indicates you bevel only one edge of the plank. Beveling only one edge means you have a flat surface to assemble the next (beveled) plank to maximize surface faces for your glue to hold. (As a note: this model is planked while upside down. The instructions point out their reference to top and bottom refer to the boat as it floats upright. In the photos, I wanted to refer to the orientation in the images. I just feel it's a bit awkward to point at a 'lower edge' and call it the 'upper edge.' However, when the model is complete, the top edges of the planks are the beveled edges.) Prior to shaping, I scraped and sanded the edge of the plank. I am finding the process to be more art than science. You want the bevel to fit against the edge of the plank with the side against the bulkhead (or frame - depending on the actual method of the build). I take it slow to match the bevel at each station. I eventually end up with a fit that I am happy with and seems to do the job. I 'dry bend' the board into it's approximate shape during this process. I learned you have a hard time scraping and sanding a curved piece of wood. After I have the bevel, I wet the board; bend set in in place as seen below; secure it on the bulkheads; and wait for the plank to dry. The plank is not glued into place at this point. The green arrow shows the fit after the bevel is done. The red arrow shows a bit of the lower plank. Part of that 'step' gets corrected in my next steps and when I glue the plank in place. (A small bit of force fit is required sometimes to make the curve relatively smooth. As a plank curves along the bulkheads, the ends start overlapping. You can see this situation in the photo below (I hope). By the way, the BS is my marking for Bow Starboard. I work on two planks at a time (port and starboard) and this helps me keep straight which board I have in my hand and which end goes where. The bevel and taper becomes customized for each plank. Reference material illustrates the bevel with a sketch such as below. This sketch is from Planking Techniques for Model Ship Builders by Donald Dressel (Pg. 51) I find the method isn't difficult. You mark the points where one plank starts overlapping (red arrow below) and the point that allows the plank to fit properly (green arrow). You remove the wood between the two marks. I extend the starting mark onto the plank below to be sure I align the plank properly when I glue it. One key point here: USE A SHARP BLADE. You cut a mere sliver of wood. I thought I had one more cut left on the blade I was using. As you can see below, I really didn't. Oh, well. We all make mistakes. And it's nothing that a little (or maybe a lot) of wood filler can't fix. At this point I apply glue. I am using carpenter's wood glue. All of this leads me to the efforts of my work on the model. I added six more planks to each side of the boat since my last post. I leave with a bit of levity. I tutor a student; a scary thought that I am forming the mind of a teen. (It's algebra, so I doubt I will warp their mind too much.) Since my model table sits across from my main desk, the student sees my work in progress. I suspect I am like many: I work on a model when time and mood allows. The student made a comment about how slow the progress seems to be. So, I dug around and found the small laminated item I got when I joined the NRG to show to my student. I took this photo since I had the model set up for photography. I've always liked the sentiment. I may get a large print of it to hang over my work station. Since this process will continue for the rest of the planks, I may not post the next entry until I've completed the planking. I hope you found this entry interesting, educational, and at least a bit enjoyable.

- 44 replies
-
- 5
-
-
- maine peapod
- peapod
- (and 4 more)
-
Re: Name of knot. That's called a wonhelova. 😁 Not sure the language that's translated from. It's the knot I use most often. Nice looking models. I only hope my 'first time sail' works and looks this good. You've got a good start on a nice little fleet. Looking forward to following your next build.
- 23 replies
-
- 2
-
-
-
- Norwegian Sailing Pram
- Model Shipways
- (and 1 more)
-
bulkhead bevels
robert952 replied to Woodshipguy's topic in Building, Framing, Planking and plating a ships hull and deck
It may be of use to know which model and instruction manual. Maybe someone has assembled the model kit and can give an experienced answer. Typically, you bevel each bulkhead to allow planking to sit flush on the bevels and give the proper shape of the ship. Depending on the model kit the bevel is somehow marked per bulkhead indicating a base line for how much to remove on each bulkhead. Even after that, you may need to fine tune the shape. There's several methods that others may be able to help with that process. Hope this helps some. Again, details on which model kit you are building can be helpful to giving more specific details for your build. -
Very nice looking model. Congrats on a job well done.
- 72 replies
-
- 2
-
-
-
- Norwegian Sailing Pram
- Model Shipways
- (and 1 more)
