

abelson
-
Posts
424 -
Joined
-
Last visited
Content Type
Profiles
Forums
Gallery
Events
Posts posted by abelson
-
-
-
Excellent, detailed roof! You have a lot of patience - a ship builders virtue.
-
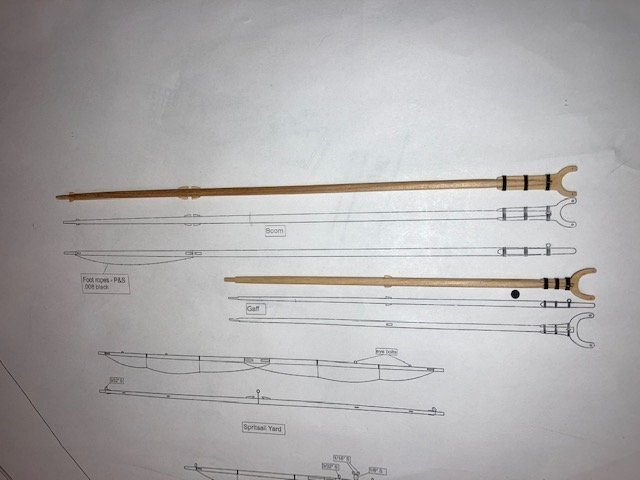
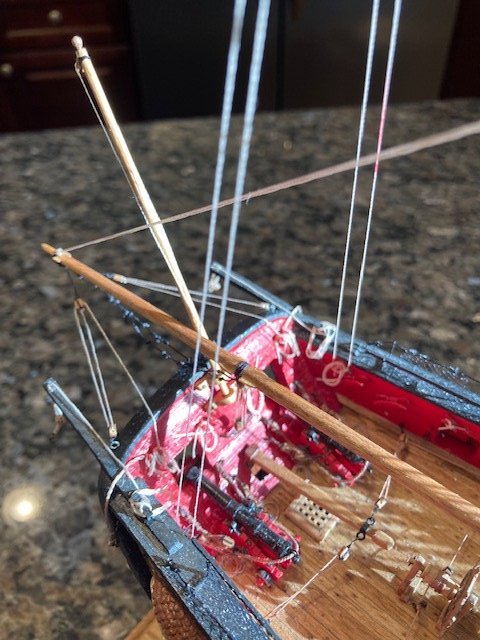
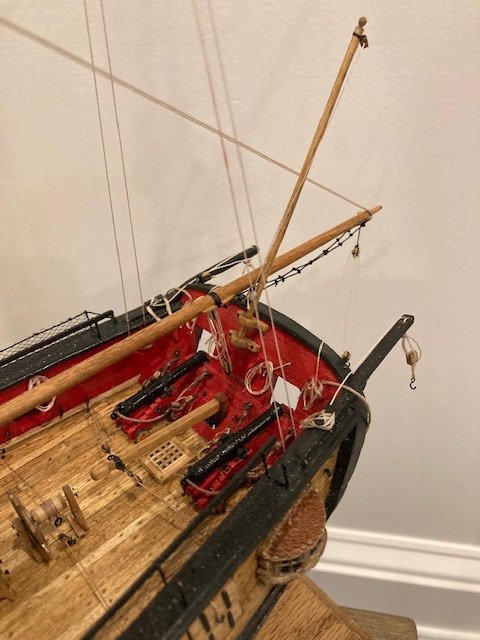
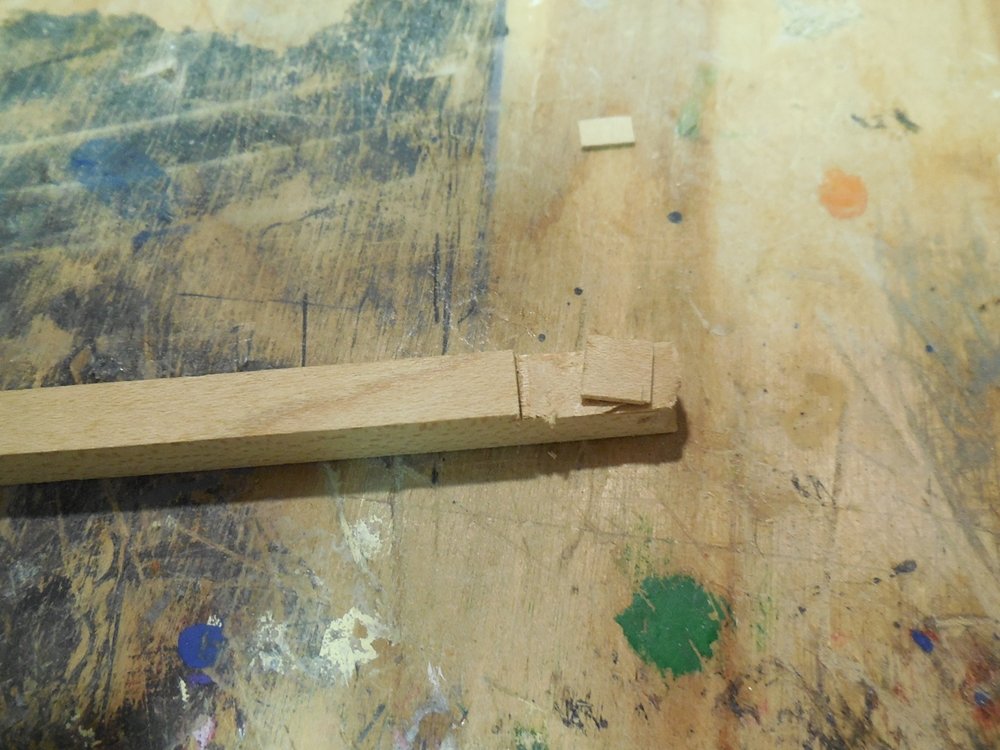
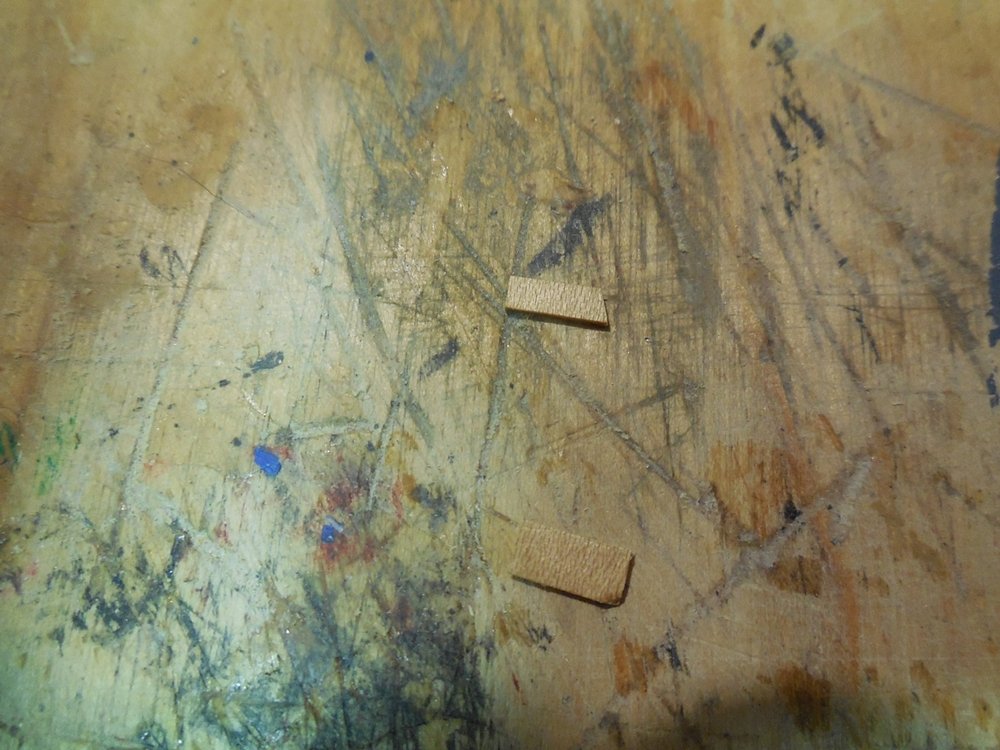
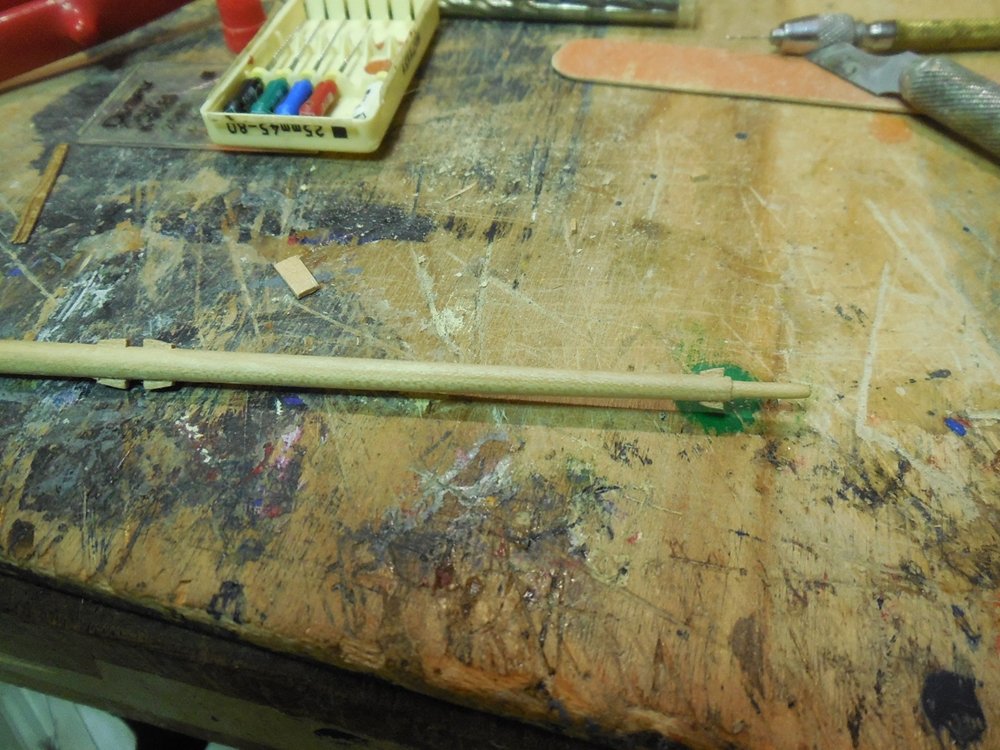
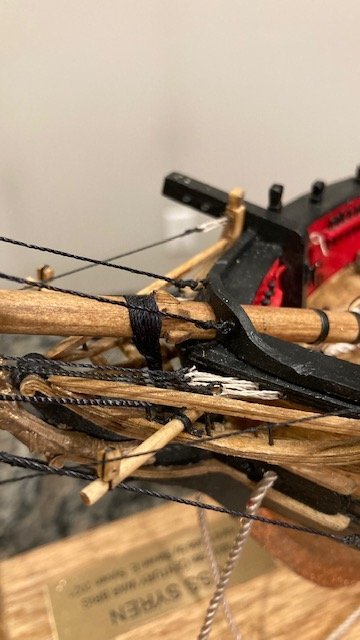
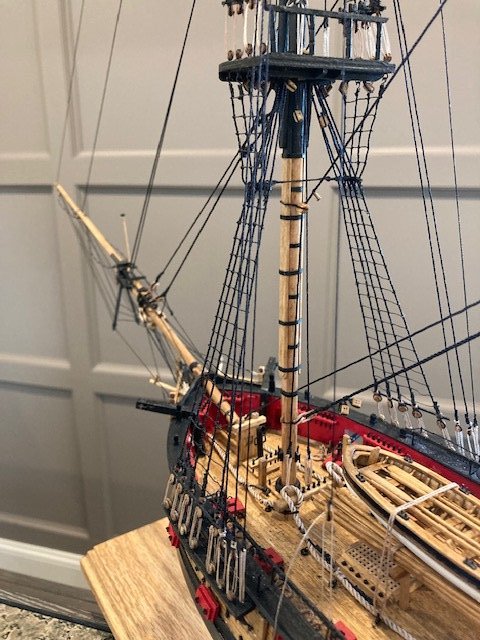
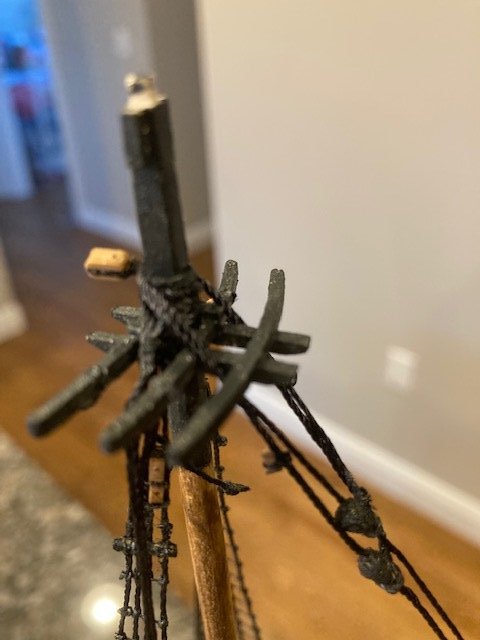
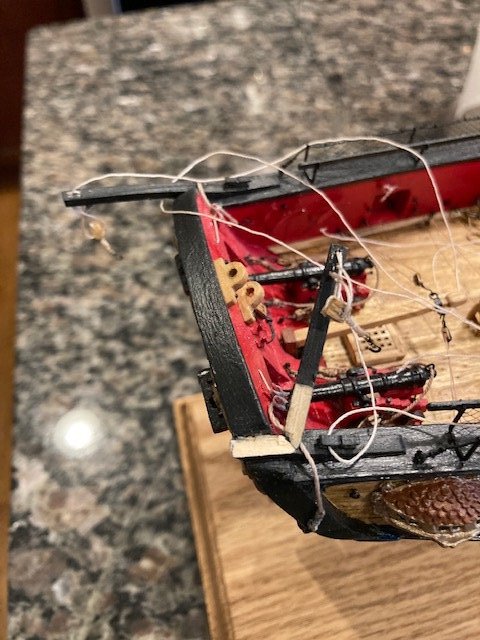
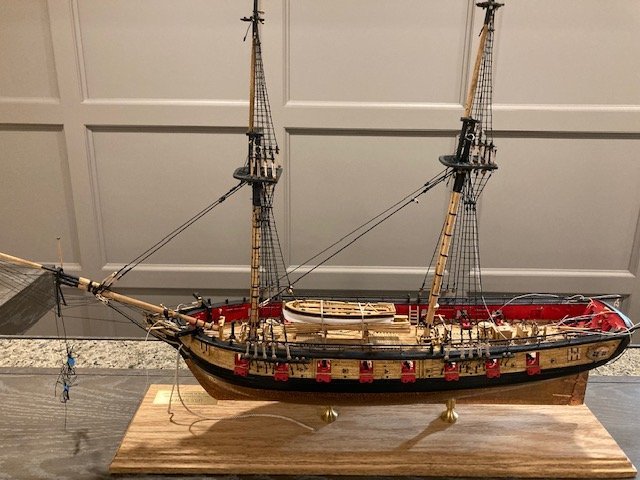
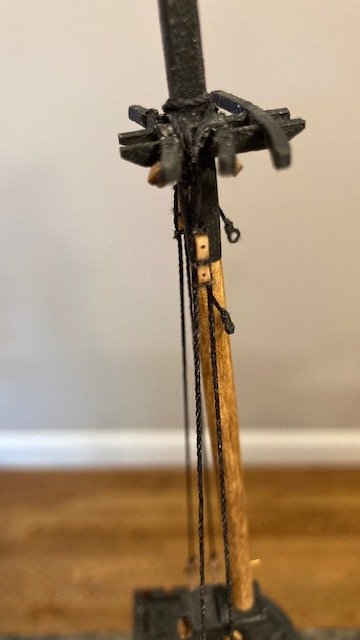
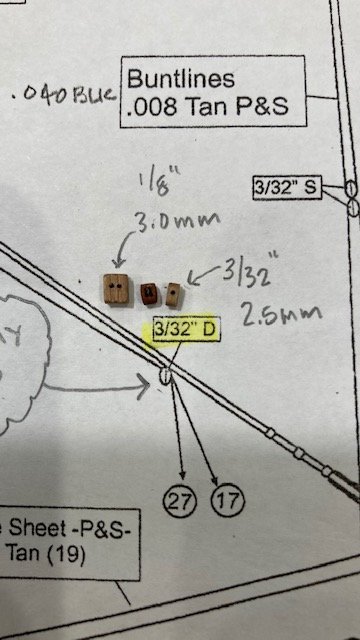
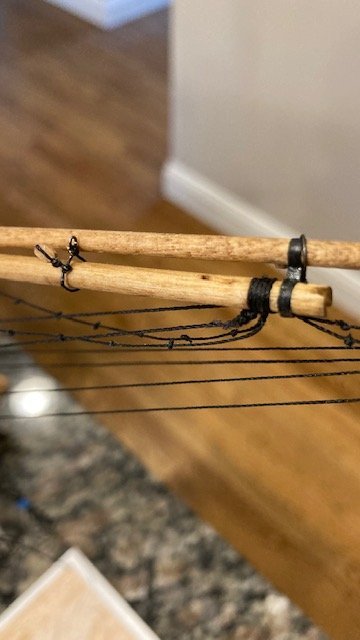
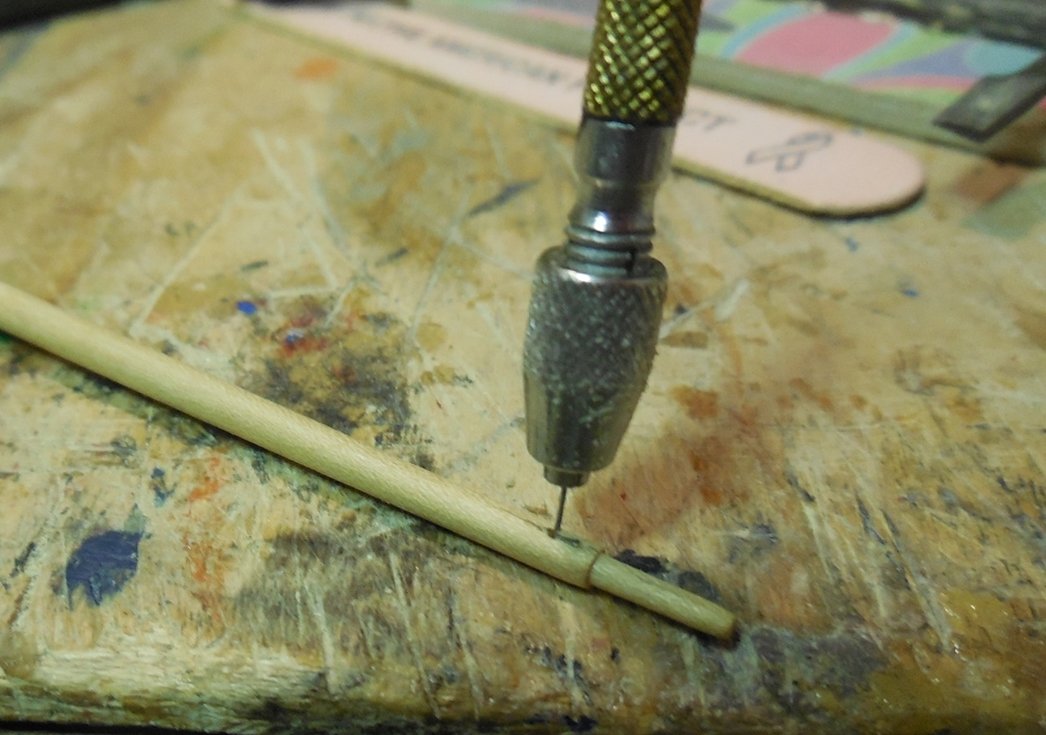
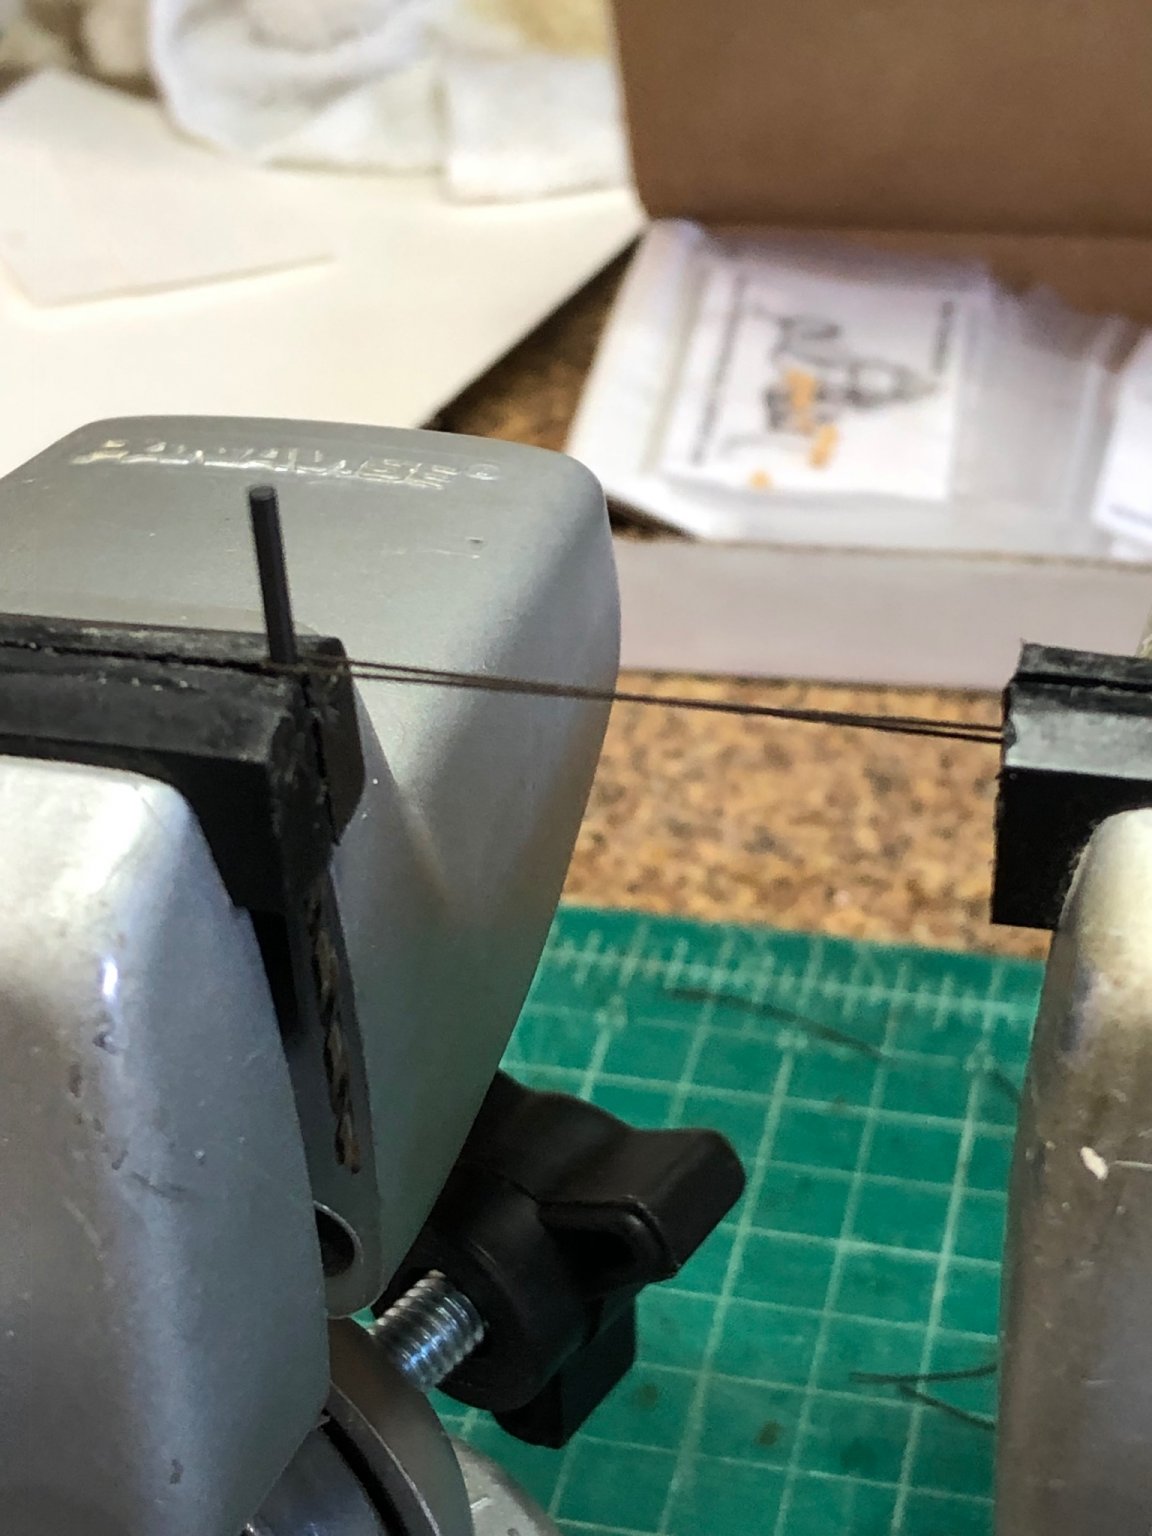
Completed the boom and gaff. Following the instructions, this was a fairly easy, enjoyable task. Tapering is the most time consuming part. For this, I used a battery powered drill. I cut the dowels long enough to allow for inserting them into the drill chuck. I decided to leave the boom and gaff finish natural. I applied one coat of Minwax Golden Oak. I painted over the pinstriped simulated iron bands with black paint. FYI, there’s a discrepancy on Sheet 6 - the gaff cleats should be on the side of the gaff and not on the top and underside as depicted in the plan view. The elevation view shows the cleat correctly as does the picture on Page 108 of the instructions. I fell victim to the discrepancy. It was one of those oh s__t moments. I have noticed that others have fallen victim to this discrepancy too. Also, there is another discrepancy on Sheet 6 - the elevation view shows the gaff vangs seized to the pendent block. This is not correct. The vangs are seized to the eyebolt on the bulwarks.
.jpg.3bf6ad22f01a8486d914d1628b387c1e.jpg)
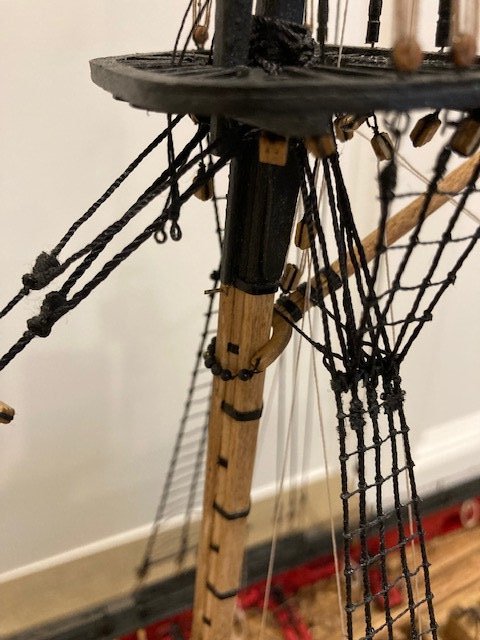
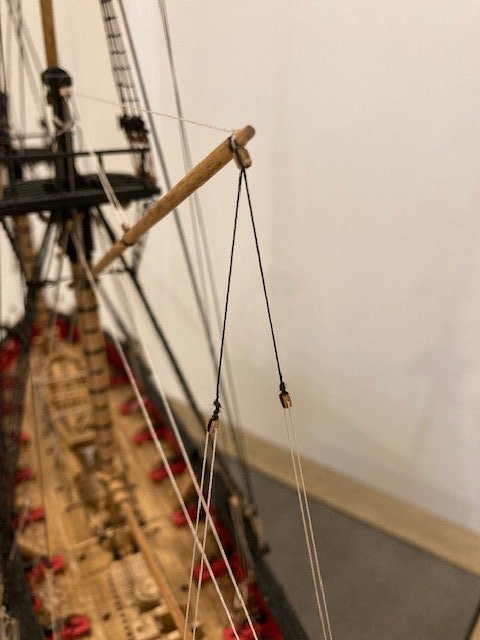
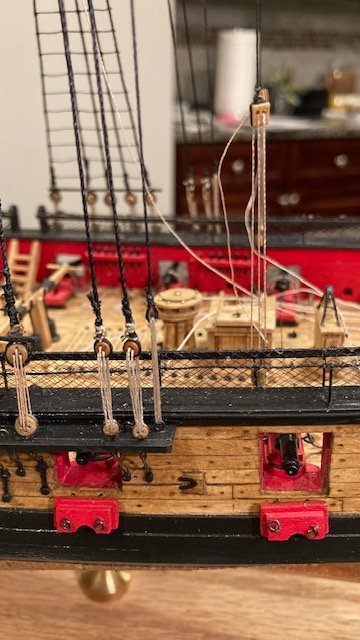
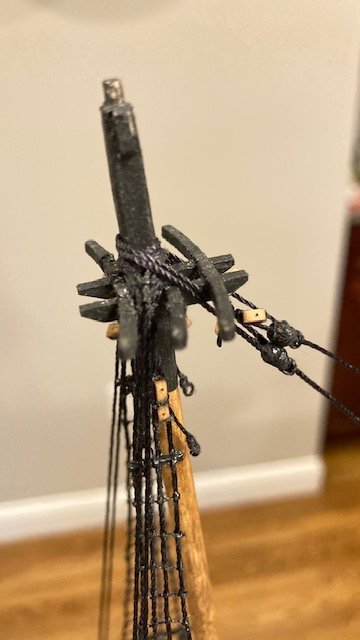
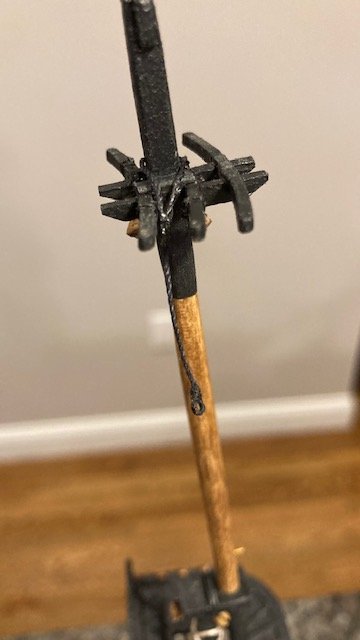
Added the 3/32” single blocks on the gaff as shown on Sheet 6. Rigged the vang pendants (.012 blk) ahead of time. Seized a I/8” double block to the eye on the gaff jaws. Blackened the beads and strung them (6 beads per parrel) on the parrel lines and seized the lines to the boom and gaff jaws.Insert
.jpg.f242818d4b3e00e2bee9fab96e23142a.jpg)
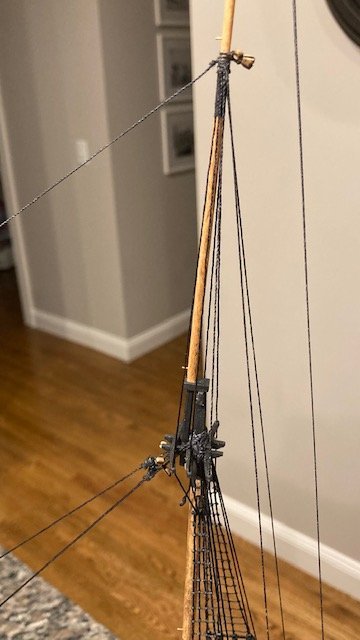
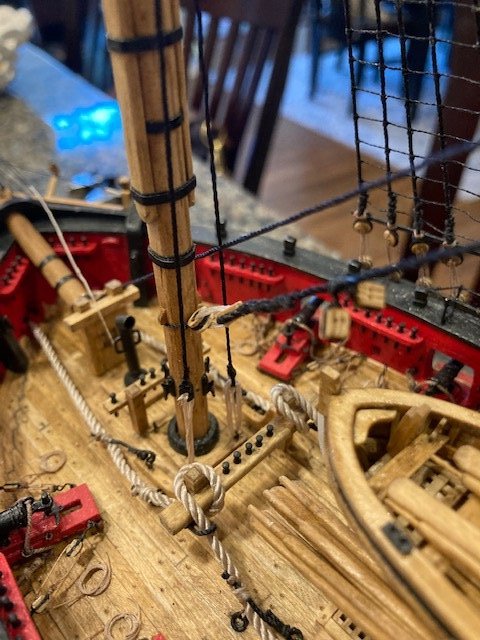
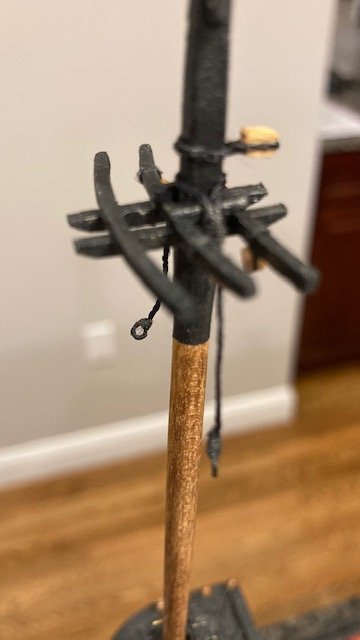
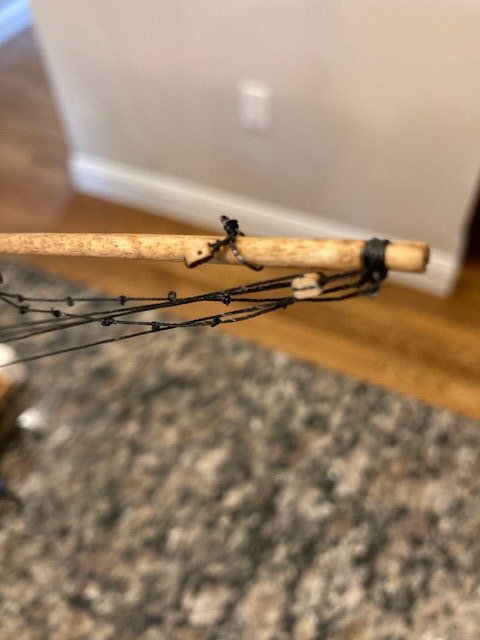
Attached the gaff to the mast below the catharpins. In doing so, I realized that another bead was necessary, so I added it. The loose end of the parrel line was reeved through the jaws, tied off and secured with CA. I set up the gaff throat halliard with a generous length of .008 tan line that I had previously seized to the 1/8” block under the main top. The loose end of the halliard is belayed to the port side pin rail. The peak halliard was next. It was rigged as per the instructions and belayed to the fife rail. With that done, I added the vangs (.008 tan).
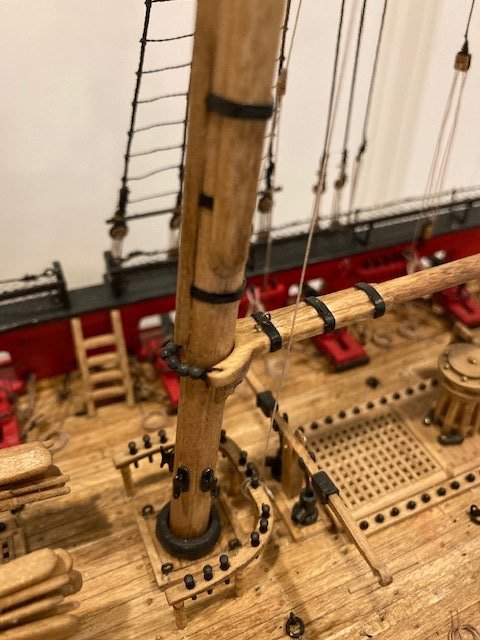
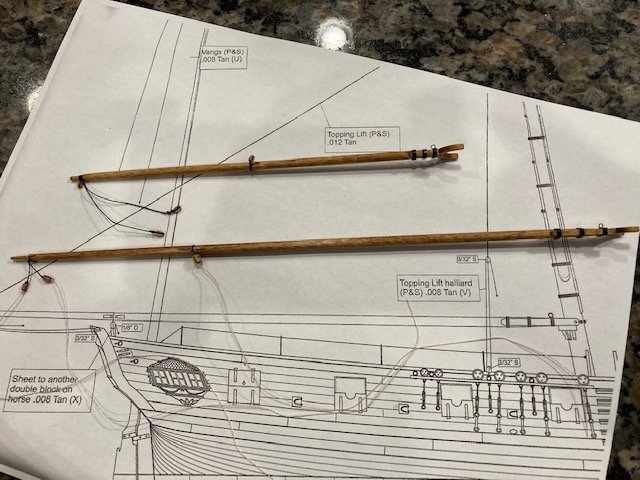
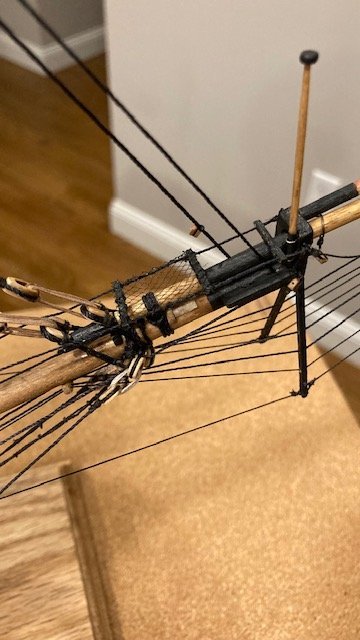
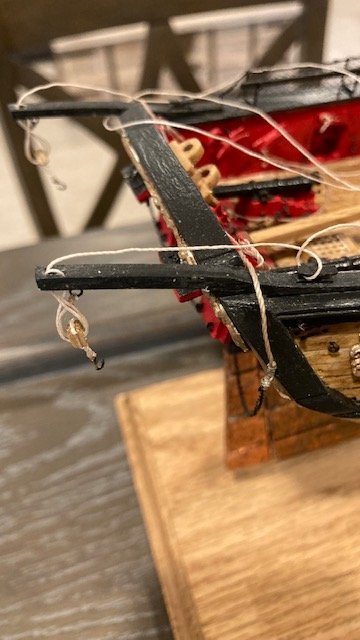
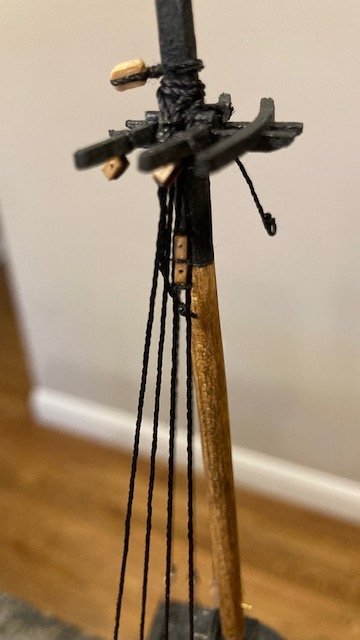
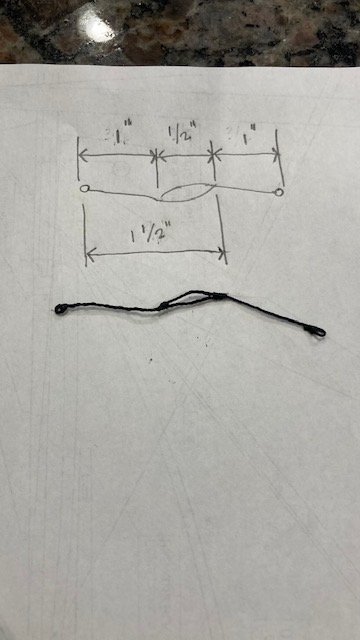
I decided to attach the boom to the main mast before completing the gaff rigging. After seizing the parrel to the jaw, I realized that I forgot to add the foot ropes – I wanted to do them with the boom off ship. BTW, I discovered another discrepancy between the plans and the instructions: The instructions say to use .012 black line for the foot ropes but plan Sheet 6 calls out .008 black line. I decided to use .012 line to match the jib boom. I cut two, 6” lengths of .012 line --and added the foot rope knots (11 per rope) on each length. I left loose ends on the knots so that they could be adjusted and trimmed. I Seized one foot rope to the boom, adjusted each knot so that they are ¼” apart, applied CA to each knot, and cut off the loose ends. For the second rope, I tied the knots and spaced and trimmed them before seizing the rope to the boom. Completed the boom topping lifts, boom sheet, and boom sheets, and finished them off with rope coils.

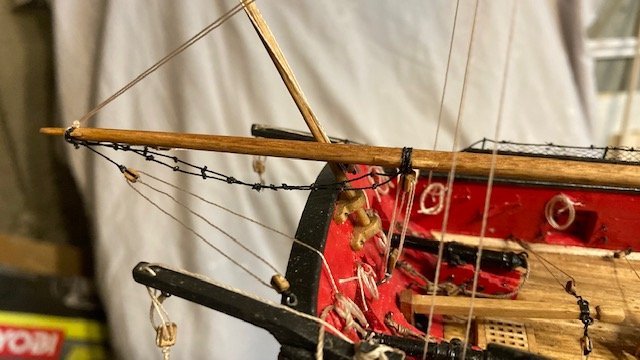
In the instructions, at the end of the boom topping lift paragraph, it says, “Note the “leg” of .008 rigging that runs from the topping lift to the boom. It is shown on the rigging plans. This should be rigged as well.” It is not shown on the plans. SalD’s build log picked up on this too. He notes that the line is shown on page 122 in Chapter 20 – it’s in the photo on Page 125 in my instructions. Thank you, Sal. I tried adding the “leg” but had difficulty. So, I decided to leave well enough alone and to not add the leg. I notice some other build logs have done likewise or otherwise overlooked this.
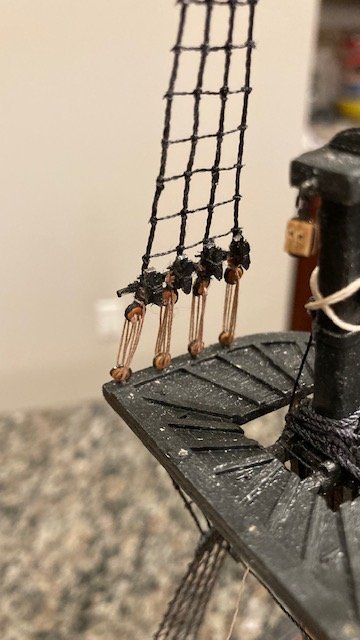
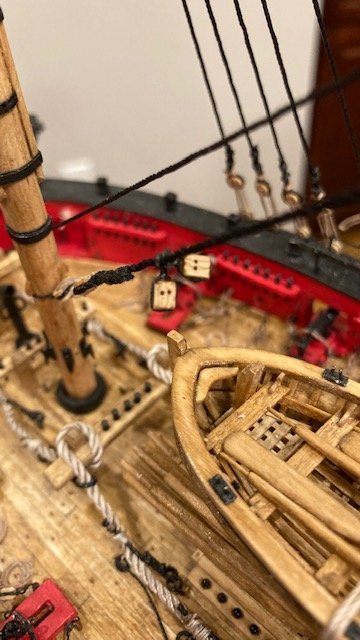
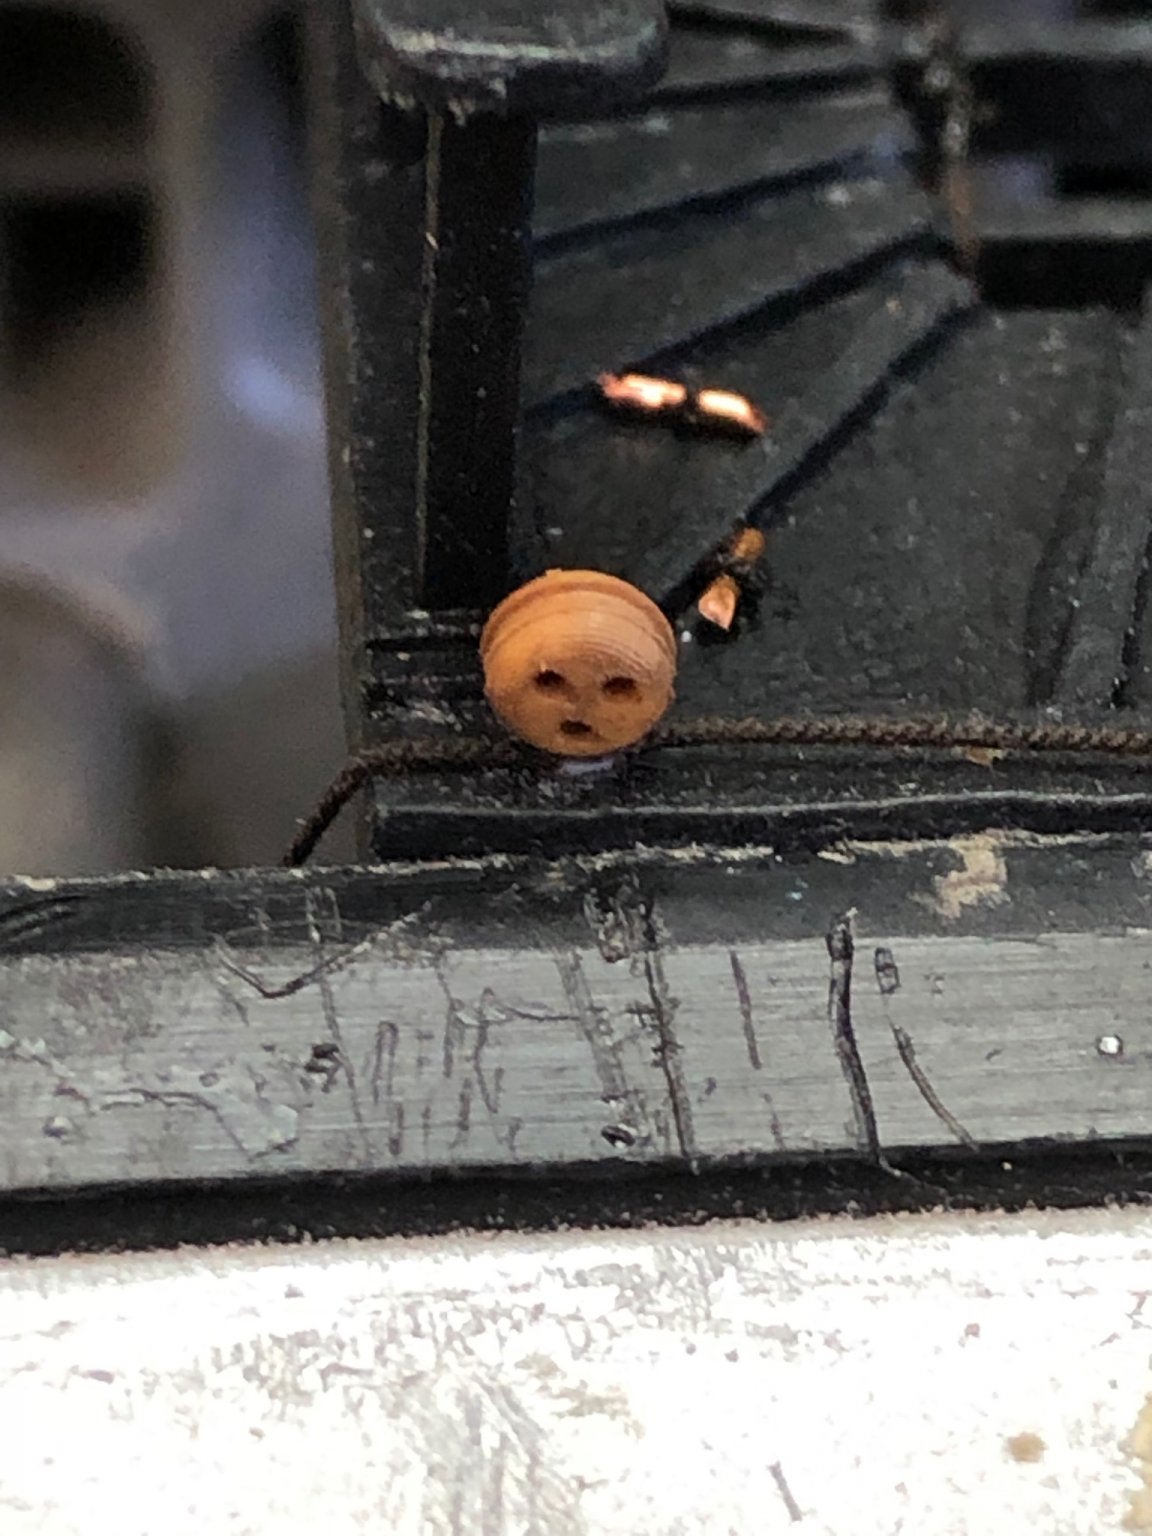
I had previously made flag staff chocks, so I decided to add a flag staff which was made from 1/8” dowel. I also added the flag staff halyard (0.008 tan). The flag staff halyard runs through a 3/32 single block at the end of the staff. The free ends are tied off to a cleat on the side of the flag staff. The end of flag staff has a ball made from the head of a craft pin and painted gold. I added some rope coils at the transom.
One of the things that I find difficult with rigging is belaying the lines to the rails. What helps is CA glue. After the initial wrap around the belaying pin, I apply a little CA to the line. This keeps the line taut and allows for wrapping the line around the pin at the top of the rail. I apply a little CA with each pass, if necessary.
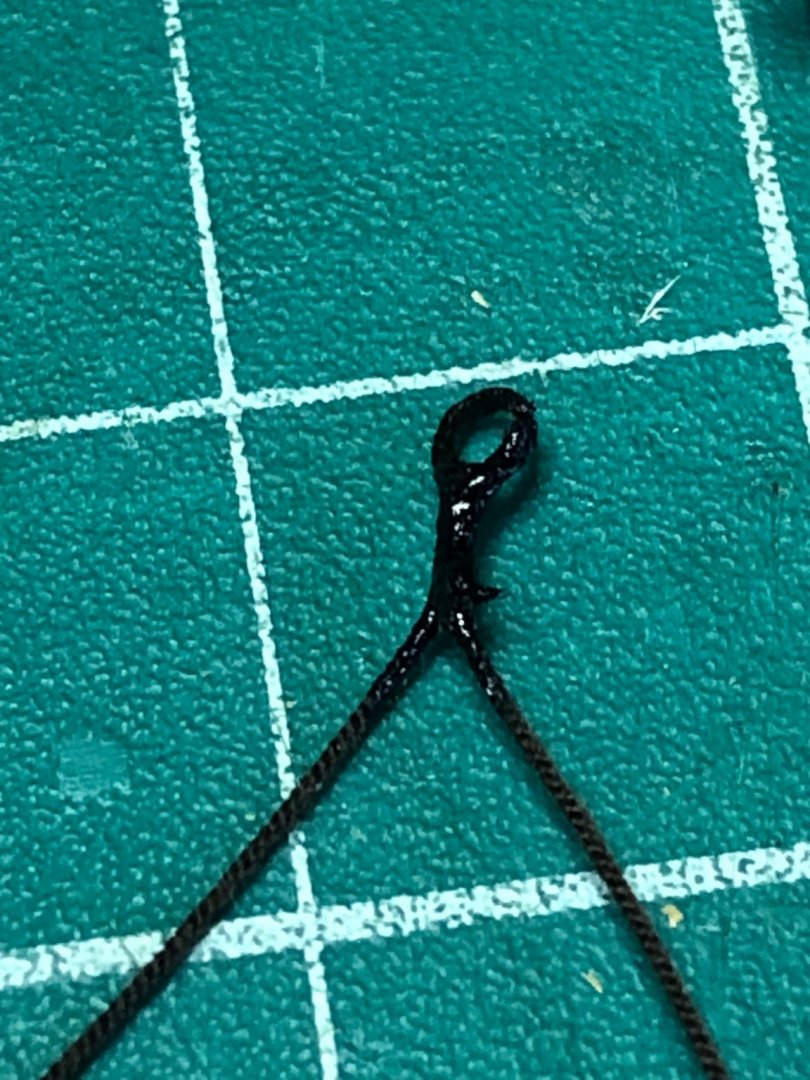
For the rope coils, I made a jig using Tom Lauria’s Rigging Tips: Making Scale Hanks on YouTube. I laid out an ellipse measuring ½” x 3/16”. I drilled 12 holes along the perimeter of the ellipse and inserted a common pin in each hole. I then nipped off the pins at a height of about ¼”. I used a 1/16 drill bit for the loop. The first coil didn’t come out too well. The second was a keeper. Each subsequent coil was a challenge – some were keepers, some were throwaways. I’ll need to make many more.

Moved on to finishing Chapter 18 by adding the Flying jib stay (.018 blk), Jib Stay (.018 blk), Inhaul for the jib stay traveler (.008 tan), and Inhaul for the flying jib stay traveler (.008 tan). These were done as per the instructions. The only problem I had was belaying the lines. I found it very difficult to belay the lines in the traditional under/over manner in such tight guarters. By luck, I was able to snag one pin and belay the line in the traditional manner. For the others, I simply wrapped the line around the head of the pin and glued it. I'm hoping the rope coils will hide this. Next, it's back to Chapter 19 and the staysail rigging. Stay tuned.

- GrandpaPhil, CiscoH, Ryland Craze and 1 other
-
 4
4
-
-
-
On 9/3/2018 at 7:05 PM, JesseLee said:
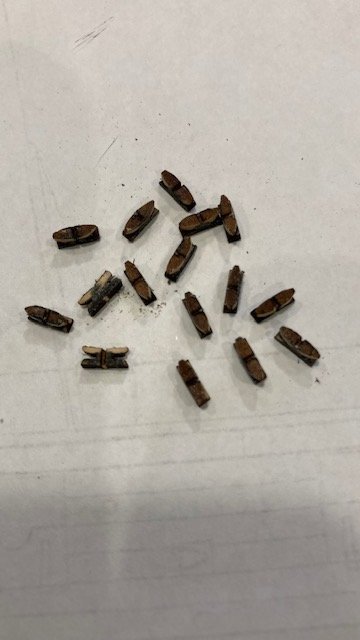
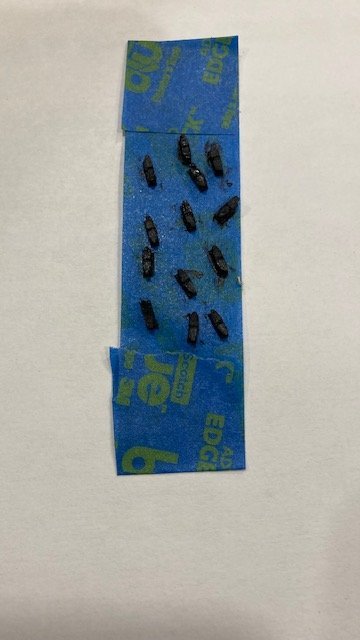
Did something a little different for the cleats. I have had glued on cleats come off in the past so I wanted them more secure. I measured and marked where they are and drilled small starter holes for them with a small twist drill. I then used these small drill/reamer tools I got many years ago. They twist i and open the hole. Then you can use them like a mini file or rasp to remove wood. I slowly did this form one hole to another to open up a slot through the boom and gaff. I pre-shaped the cleats out of scrap I have. When all is shaped and ready I put glue in the open slot and push the cleat all the way through so it is sticking out of both sides then shape them up down to proper size.
Don't know when I will get back to the shipyard. One of my Aunts died and I will be going out of town for a few days, leaving there and going straight to a Dr. appointment. I will most likely be very sick from the travelling and my body will crash on me for a few days when I get back.
Jesse


Good idea on boom cleats.
-
Good idea on leaving the lanyards loose until the stay and preventer are tight. Looking good. BTY, I think you need to add another eyebolt abaft of the fore mast.
-
Well, I thought I would add that I'm a year and eight (8) months into my build - tedious work and attention to detail requires time and a lot of patients. Made progress on the standing rigging. Secured the fore and main topgallant mast/pole and rigged the shrouds (.018 black) as per the instructions. I cut a 13” length of .018 line for the fore pair of shrouds and a 26” length of line for the aft pair of shrouds. The aft-most shroud (main topgallant backstay) was set up with an eye and a lanyard (.008 tan) attached to the eye bolt on the main channel. The main royal backstays (.012 black) and tackles were next, followed by the main royal stay (.012 black) and the main topgallant stay (.012 black). The fore royal backstay running tackles were difficult to belay to the pin rail because of the long boat. In hindsight, I think it would have been better to lash down the long boat later.

I finished the fore topgallant stay and the fore royal stay. I had previously reeved these lines through the fairlead and dolphin striker and set up the lanyard back in Chapter 16 (see March 18th post, Page 3), so all I had to do was seize the lines around the fore gallant mast and the fore royal pole, respectively, and tighten up the lanyards. This turned out to be a good idea.
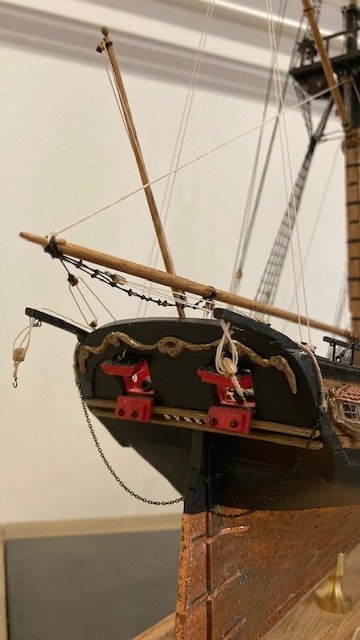
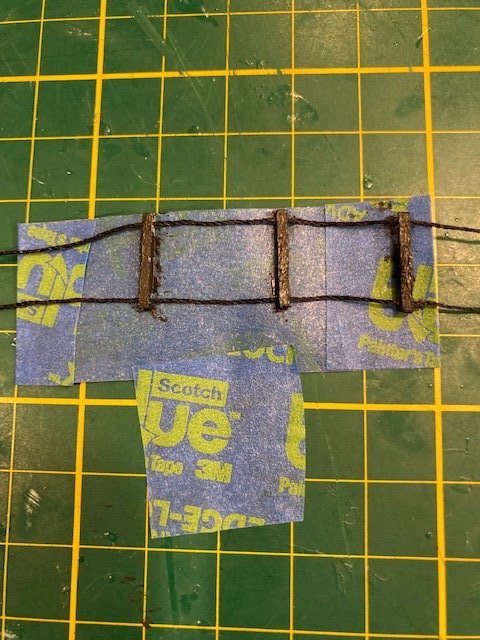
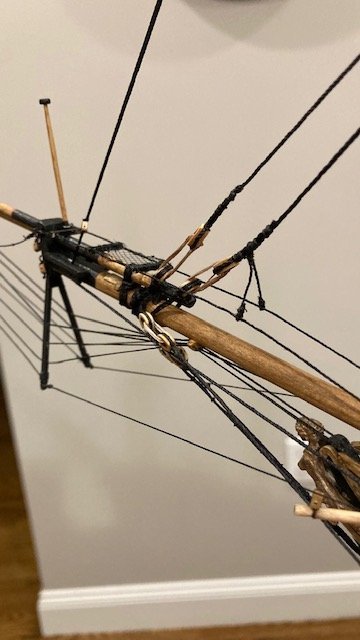
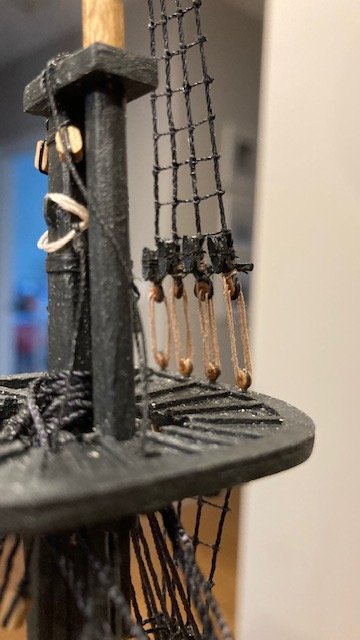
I made the bowsprit horses next. I hadn’t seen much discussion in other build logs on how to make these. However, I did take a page out of JesseLee’s build log and decided to pre-rig the horses off ship. I improvised here, as follows:
1. Rather than use 1/32” x 1/32” strips/battens, I used 1/16” x 1/16” strips, cut about ½” long.
2. Instead of lashing the strips, I drilled a hole at each end of a test strip to reeve the .018 line. The ends of the test strip split when drilled. To avoid this, using the test strip as a template, I marked the location of the holes for three battens on a longer strip, drilled the holes, and then cut the individual strips.
3. Sanded the strips to reduce them somewhat in size.
4. Set up the three (3) battens and horses, spaced apart as per the Sheet 5, on a piece masking tape to hold them in-place.
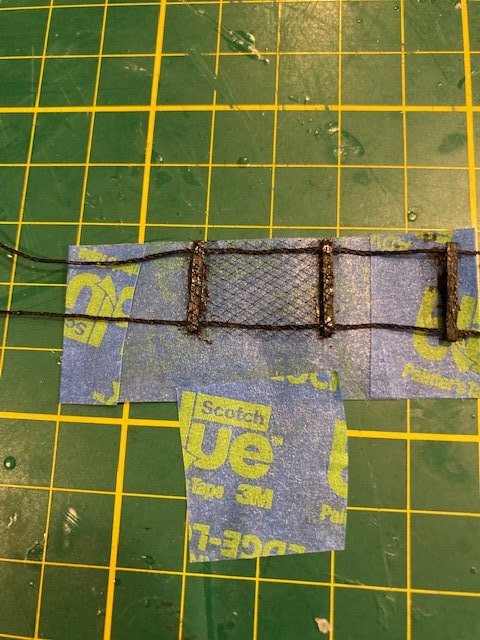
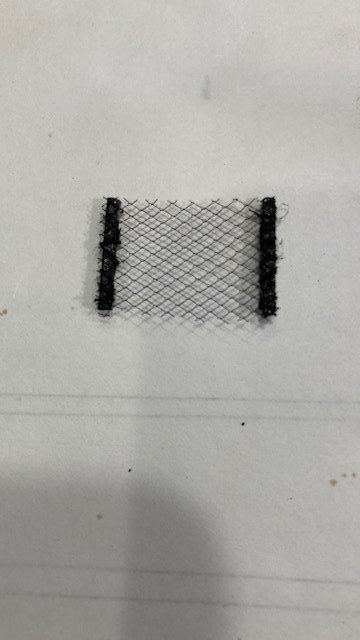
5. Cut a square piece of netting to fit between the aft battens, placed it on the battens, and applied CA to secure it.
6. Removed the .018 line and lashed the netting to the battens with black thread.
7. Made an eye on the bow end of each horse. Removed the eyebolts from the bowsprit cap, attached them to the eye, and re-inserted the eyebolts into the bowsprit cap.
8. Reeved the loose end of the horses through the battens and the eyebolts on the splash guard and attached a clip to each loose end to hold the lines taut.
9. Slid the battens into their proper positions and applied CA to secure them.
10. Lashed the netting to the horses with black sewing thread.
11. Made an eye at the loose end of each horse. Note: Cut the line long enough to allow for the horses to be pulled upward when tied to the fore stay with the “leg.”
12. Removed the eyebolts from the splash guard, attached them to the horse eyes and reinserted them into the splash guard.
13. Cut a short length of .018 line and seize it to the fore stay just above the closed heart.
14. Looped each loose end of the leg around the horse, applied tension to the horse by lifting the leg, and applied CA to hold it. Seized each leg to the horse with black sewing thread.
This procedure worked well for me. The most difficult part is tensioning the horses and seizing the “leg.” The leg pulled down the fore top mast stay slightly. Overall, the horses aren’t perfect, but I’ll accept some imperfection. I wanted to move on to the jib stay and flying jib stay, but I ran out of .018 black line, so I'll have to order more from Model Expo. In the meantime, I think I’ll start on constructing the boom and gaff. Stay tuned for progress.
- WalrusGuy and Ryland Craze
-
2
-
6 hours ago, WalrusGuy said:
The rigging is coming out very nice! 🙂
Yes, so far so good. Thanks for the compliment.
-
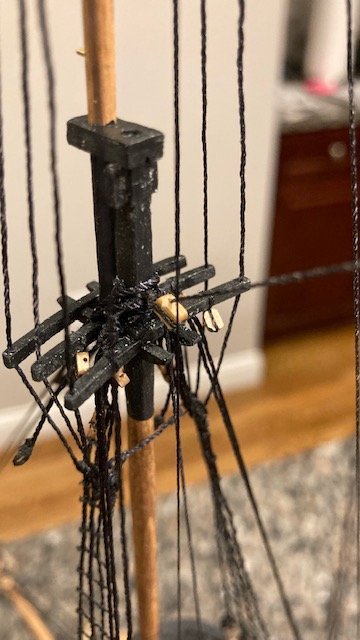
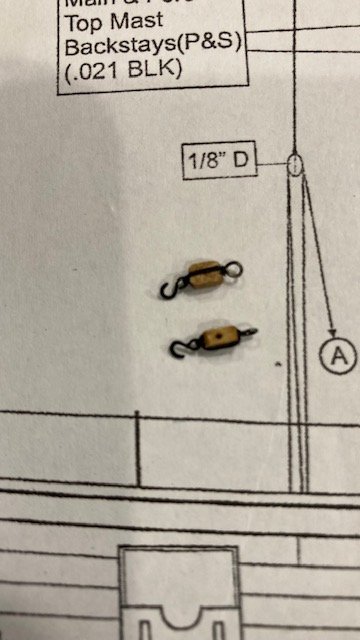
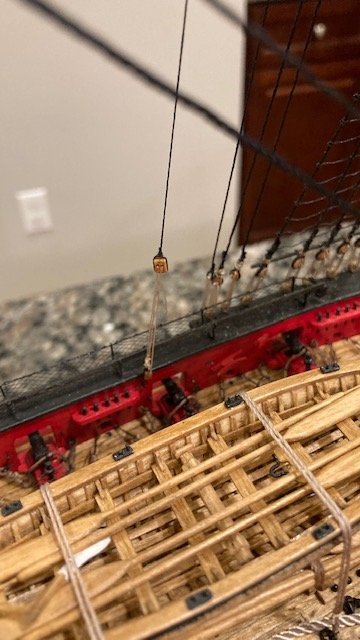
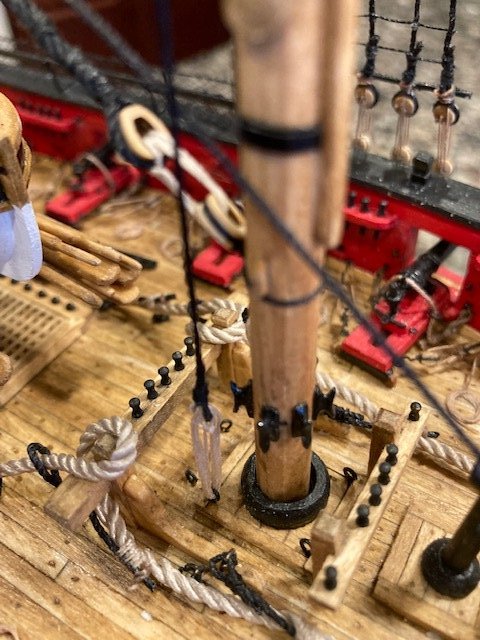
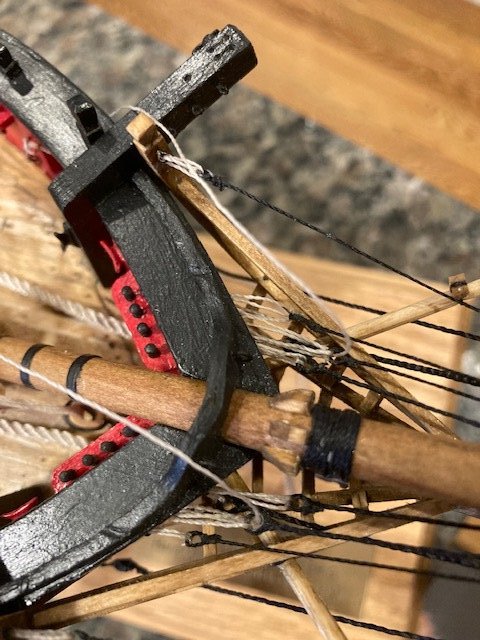
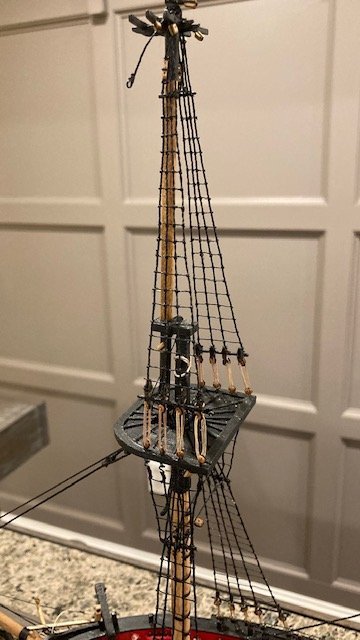
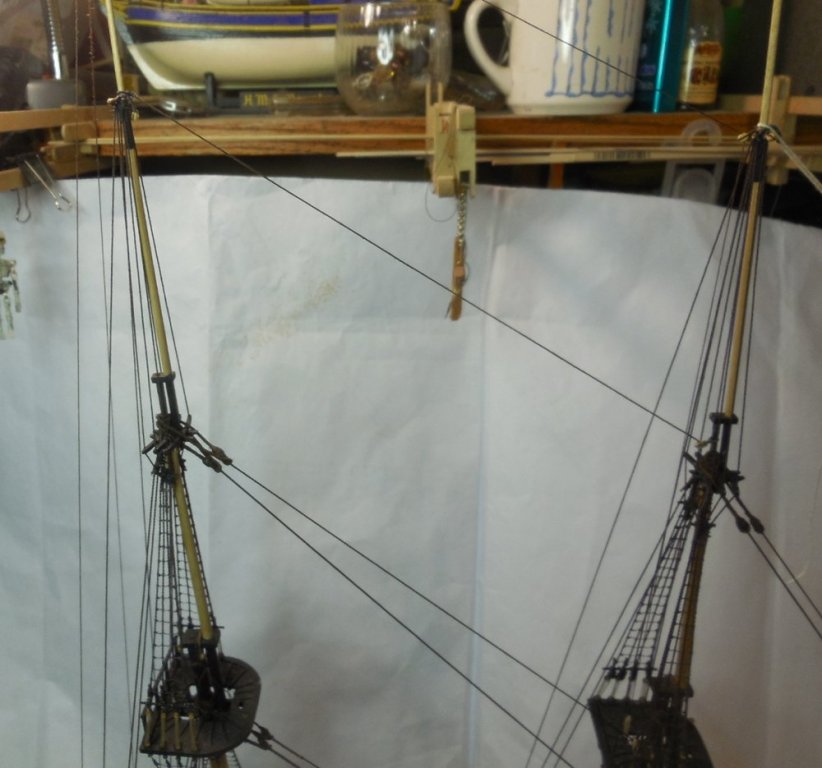
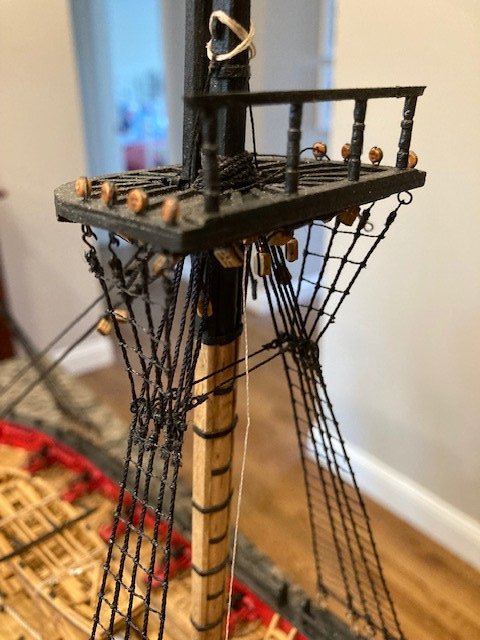
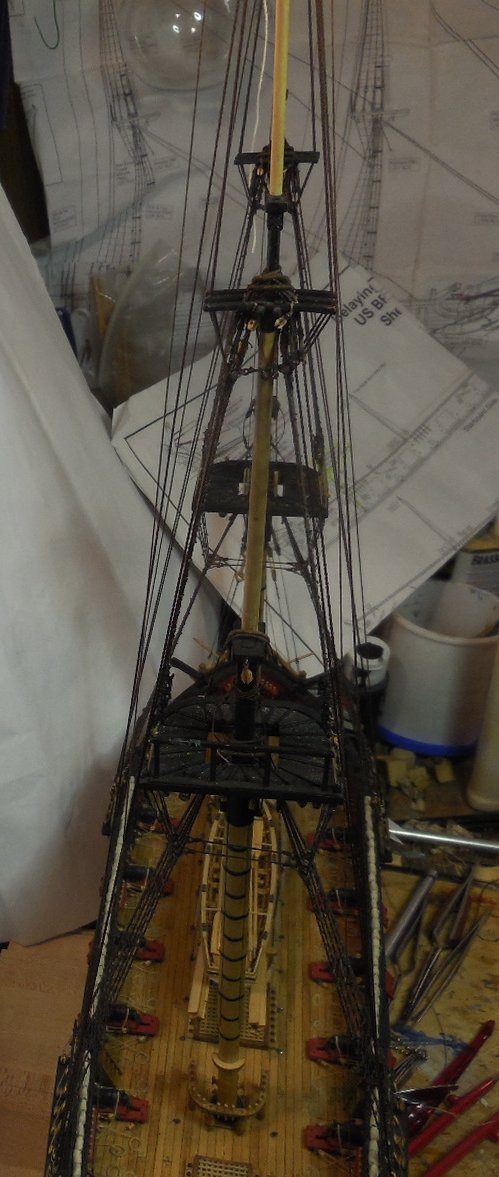
Set up the claws temporarily to determine the length .021 black line for the main topmast backstays. I looped the loose ends of the line around the top mast head and then around the claw and allowed enough length for turning the deadeye and seizing the line. I seized the line around the topmast head – starboard side first followed by port side. I’ll complete backstays when I receive my order of 2.5mm deadeyes. In the meantime, I made the mouse for the .028 black main topmast stay and the .021 main topmast preventer stay a la the main stay (see July 12 post on Page 4). I had to ream the 5/32” block rigged to the fore mast below the catharpins in order to reeve the .028 line through the block. Unfortunately, in reaming the block, it split in half. So, I had to lash a new block to the mast. A word to the wise: make sure the .028 line will pass through the 5/32” block before lashing it to the mast. I decided to add the 3/32” single block for the main topmast staysail down haul (refer to Sheet 7) to the main top mast stay before setting it up with a lanyard. I also added the 3/32 single block for the main topmast staysail hallard on the port side of the main topmast stay above the mouse. I made an eye at the end of the block to tie the hallard to later.
The main topmast preventer stay was next. I had to ream the block rigged to the fore top in order to pass the .021 line. Fortunately, this was done without incident. I added the two 3/32” single blocks for the main topsail braces and the two 3/32” single blocks for the topgallant braces above the mouse.
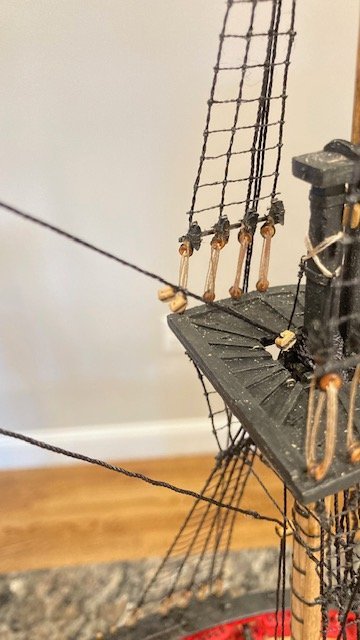
While waiting for my 2.5mm deadeyes to arrive, I decided to set up the main topmast stay and preventer stay before rigging the topmast back stays. I created an eye on the end of each stay per the instructions. I used .012 tan line for the lanyards. I tied one loose end to the stay eye and then reeved the other end though the eyebolt in the deck “abaft of the fore mast.” I made three (3) passes with the line, tied it off at the eye on the stay, secured it with CA, and trimmed the end. The lanyards aren’t quite equal in length.
Set it up the fore topmast preventer stay (.021 blk) with a mouse around the fore topmast head. Reeved the loose end through the bees on the starboard side, set it up with an eye and lanyard, and lashed it to the eyebolt on the starboard side of the bow – a bit tricky. Added the 3/32” single block just above the jibboom for the fore topmast staysail downhaul. Seized a 3/32” single block on the starboard side of the topmast stay above the mouse. This block is for the fore topmast staysail hallard. Fore topmast stay (.028 blk) was set up like the fore topmast preventer stay. The loose end is reeved through the bees on the port side and set up with an eye and a lanyard.
I received my order of 2.5mm deadeyes, so its on to rigging the topmast backstays. I set these up same as the topmast shrouds. With that done, it’s time to secure the fore and main topgallant mast/pole and add the top gallant shrouds. Stay tuned.
-
-
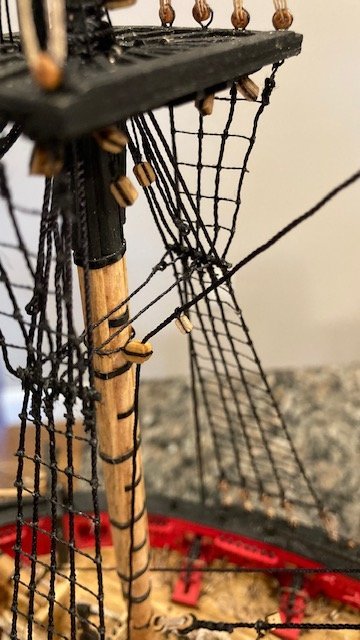
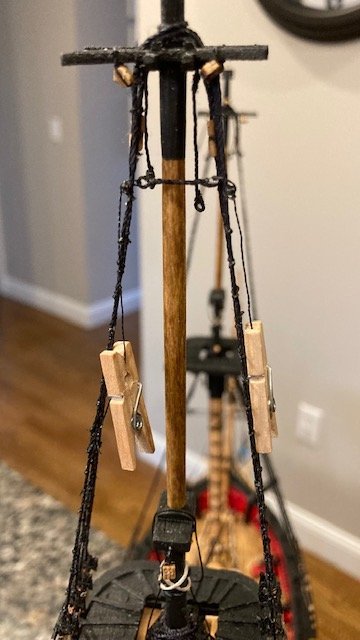
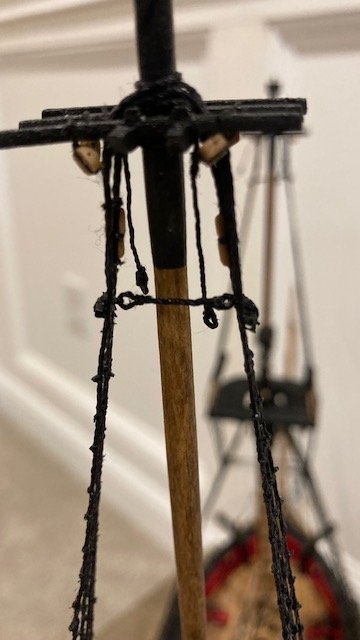
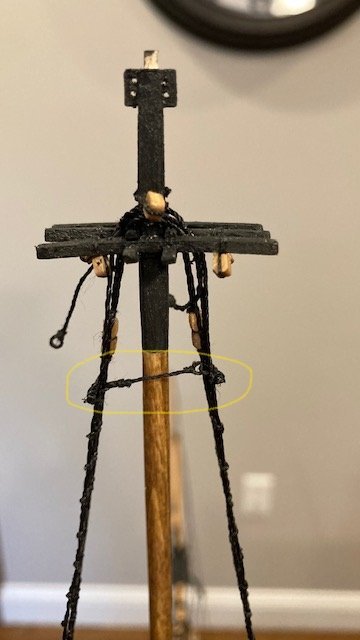
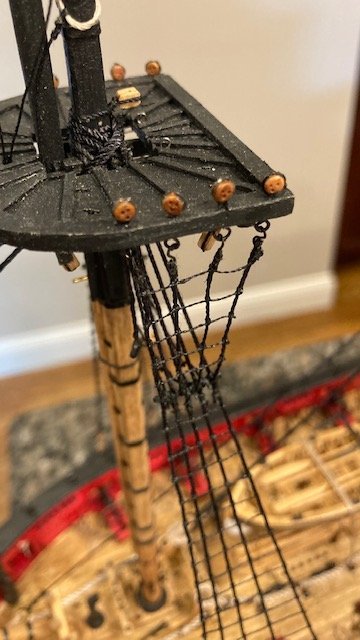
Completed the main topmast shroud rat lines, cleats, the single upper catharpins. I got a little overzealous and broke the starboard side davit. It was an easy fix though -just a little white glue.
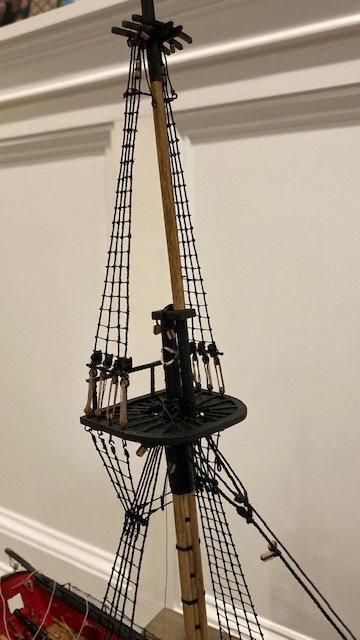

I made up the cartharpins (.021 black) basically the same as the lower cartharpins (See April 9 post on Page 4) except that I used small clothes pins instead of metal clips to hold the tie lines. This is where you see if the futtock staves are set at the same elevation. My fore top mast staves were a little off. Looking head on, the catharpin was not level (see photo). So, I decided to redo the starboard side stave (see photo) - still not perfect, but much better. Here are photos of the completed main topmast shrouds. Now it’s on to main topmast backstays. But first I need to order more 2.5mm deadeyes.

-
On 8/18/2018 at 5:53 PM, JesseLee said:
Been plugging along slowly. Haven't posted until now because there would be too little to show until I got a little more done. By the time I rig a line or two I am in so much pain I have to leave it and come back later so it takes a while.
Since my last posting I have rigged the main & fore topmast backstays, main & fore topmast stays, main & fore topmast preventer stay, fore & main topgallant shrouds, main & fore topgallant backstays and the main royal backstays. It doesn't look like that much in the pictures. When trying to rig the block and rope coil for the main royal backstay I snagged the door to the companionway and snapped it off. It went right down the hole below so I have to make another. I have accidentally cut a line or two and have had to re-rig them. I found it very difficult to rig the lanyards for the fore topmast and fore topmast preventer stays. There is very little room to work with. I am still not satisfied with my mouse making but they are ok.


Ah. Murphy's Law.
-
On 9/19/2021 at 2:48 PM, Redshadowrider said:
One Down.....
I don't even want to count how many to go. This is one frustrating phase on this build. I will say, that my absence from here is due mainly to not working on the ship for a couple of weeks. We have had some activities at our flying field that have occupied my time. Labor Day, yearly invitational with out of state flyers spending 5 days flying and B.S.ing. And it just won't turn to fall temperatures here. Now, I am back at it, but I still have miles to go.
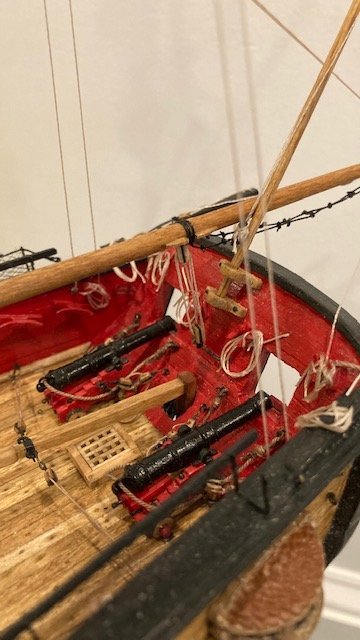
Here is my first rigged carronade. I think it came out ok considering how much detail is in such a small space. One thing I am going to look into is how to make the coiled rope touch the deck completely.
Keep up the good work. I found rigging the carronades a particularly arduous task. I lessened the task by eliminating the upper tackles - after I had completed one carronade I didn't like the look of the upper tackles because the blocks were too close together. I had already made up the blocks and didn't want to re-do them, so I decided to eliminate them all together. It's not authentic, but I'm satisfied with my decision.
-
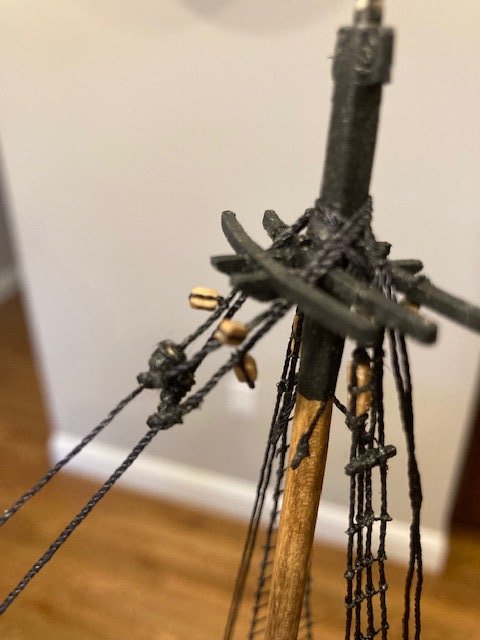
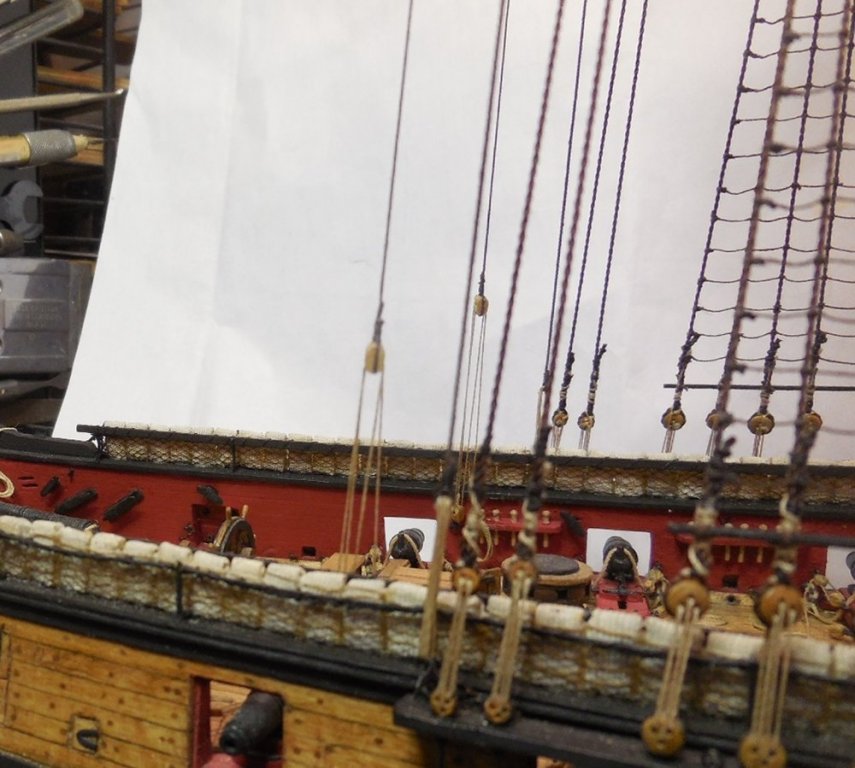
FYI, It looks like your main topgallant mast is missing a single block for the topgallant bunt line. The plan of the fore and main topgallant mast/pole on Sheet 5 doesn’t show all of the blocks. I discovered there are three (3) 3/32” single bocks on the main topgallant mast (2 for the lifts and 1 for the topgallant bunt line).
-
On 9/6/2021 at 11:27 AM, niwotwill said:
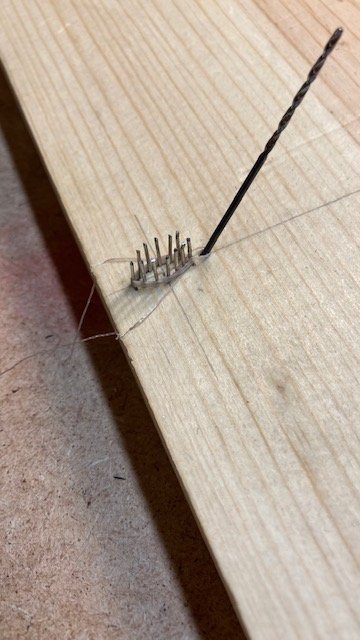
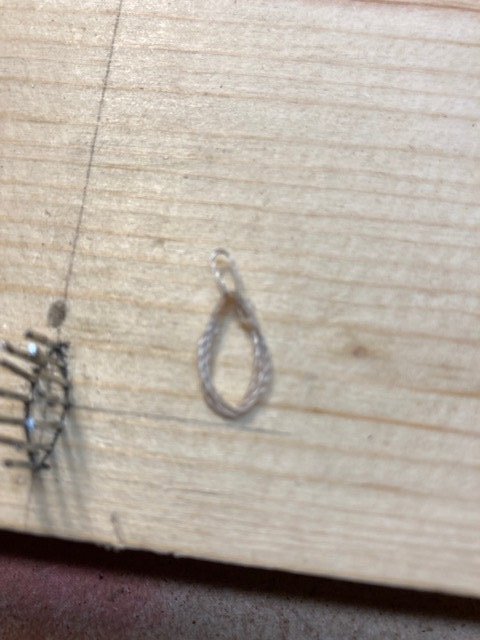
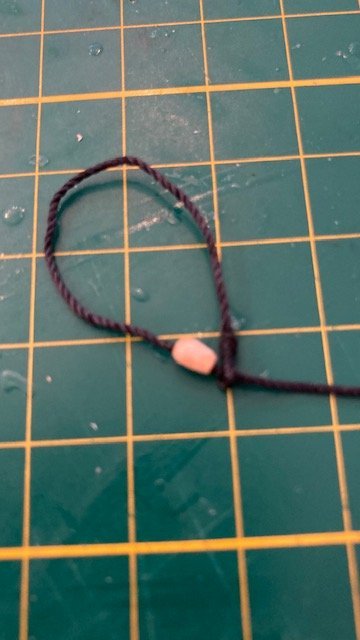
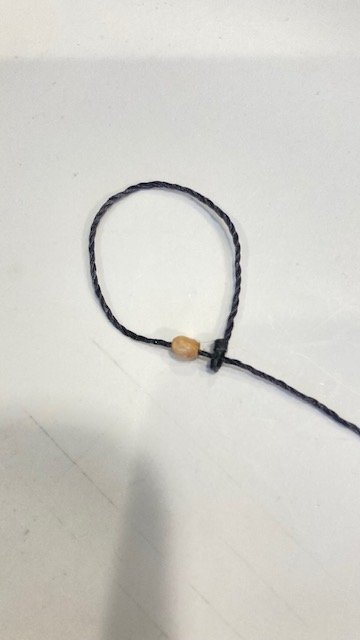
In my last post I forgot to detail how the deadeyes were mounted on the topmasts. First I cut a 5" length of line doubling it to form a loop around a #57 drill bit. Lashed the end close to the loop and added a drop of CA. When hardened removed the loop, now a deadeye plate, from the bit and added another drop of CA.
ready for lashing

Finished deadeye plate
You can paint it black as the practicum recommends or spray with flat clear Krylon. Next feed the open ends through the hole from the bottom and after splitting the leads add a drop of glue. I use LePage white glue which dries a translucent white color.
Then place the deadeye letting it set before tying.
When set simply tie a half-hitch around the deadeye and add a drop of CA. Use the thin CA so it soaks into the line and around the deadeye.
When complete just snip of the loose ends and wait for the glue to dry clear.
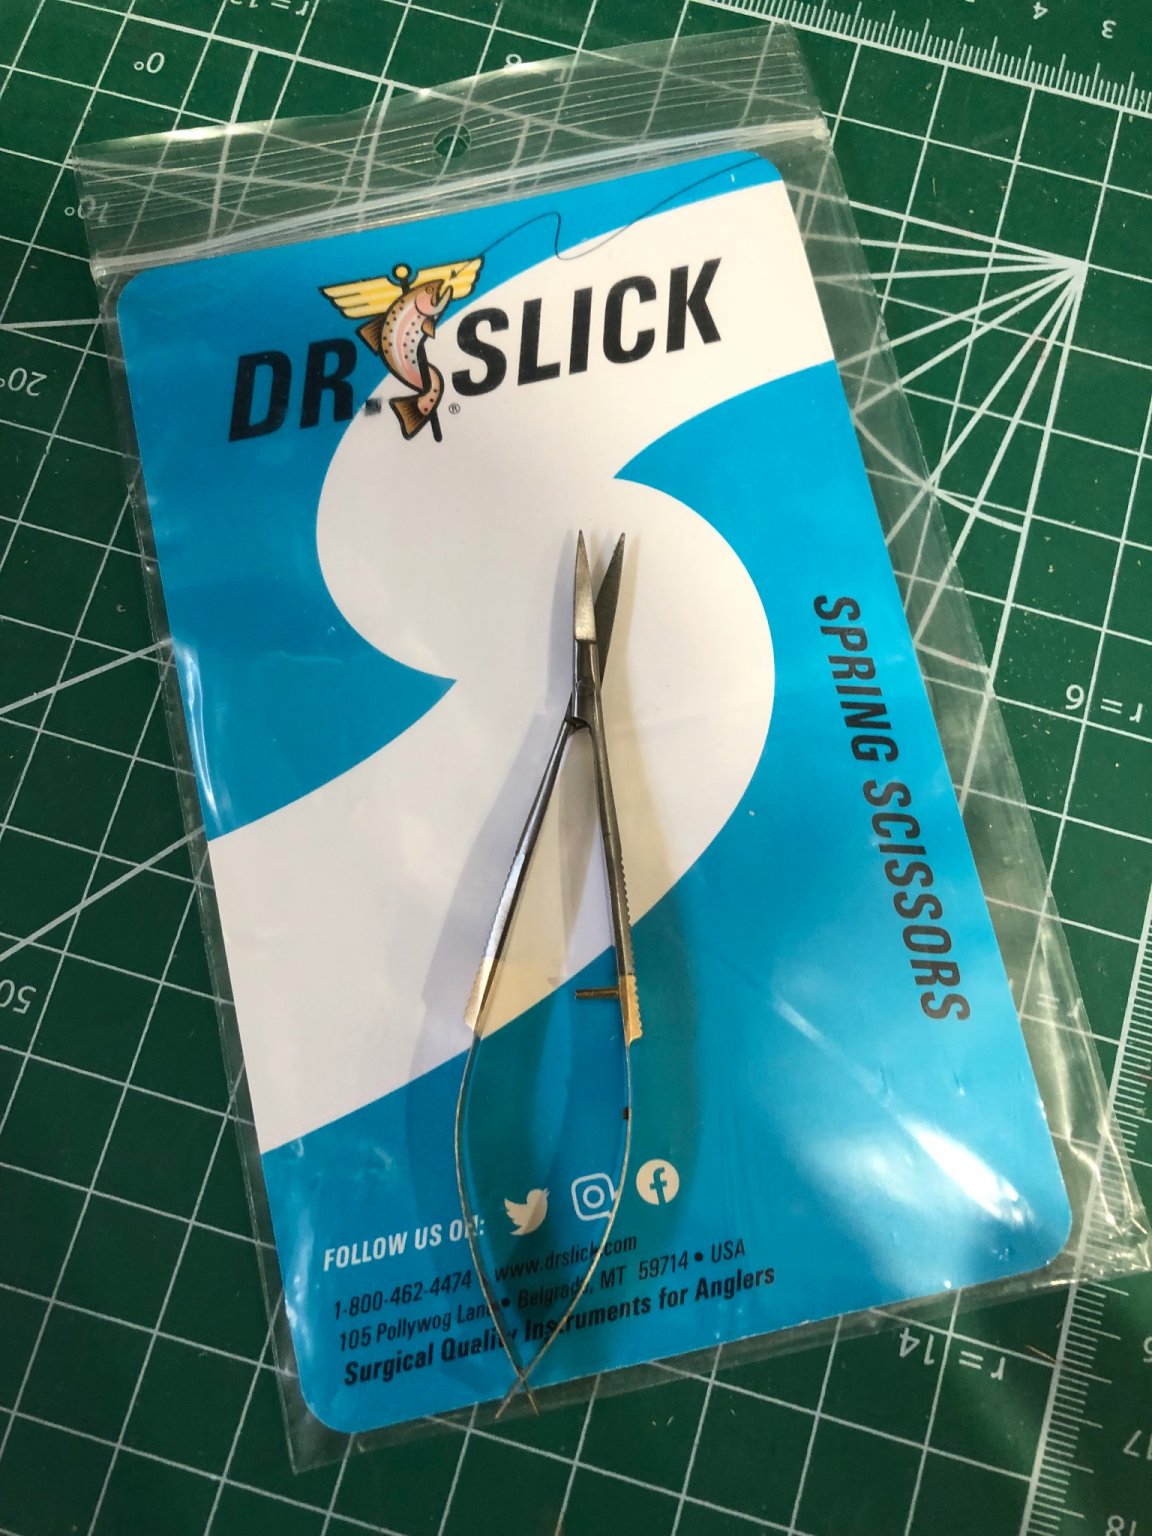
You can see the glue dried nearly invisible. On another post, I forget which, the user recommended these spring scissors which I now use and love. These are used by the fly tying hobbyists. They come in straight or curved tips.

Yeah, I use them also - they give a niece close cut. A good alternative to nail clippers. Ship is looking good!
-
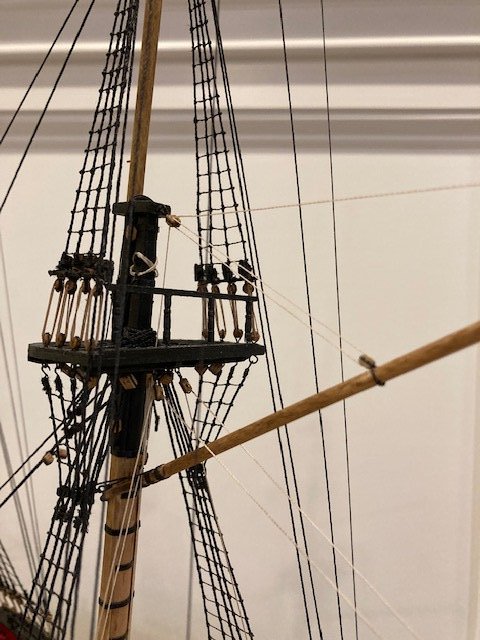
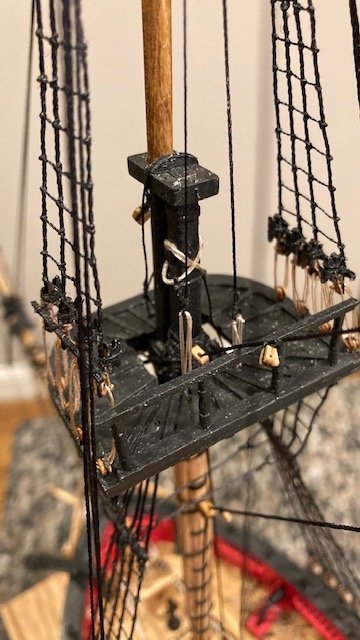
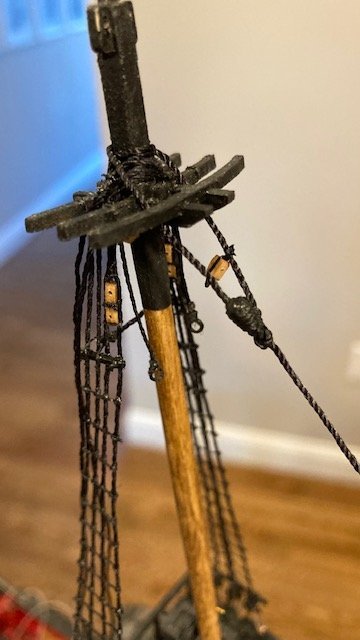
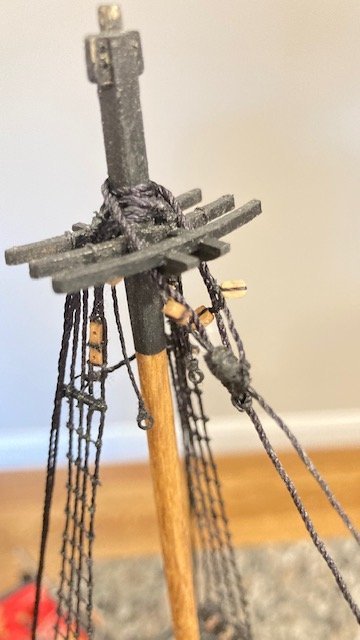
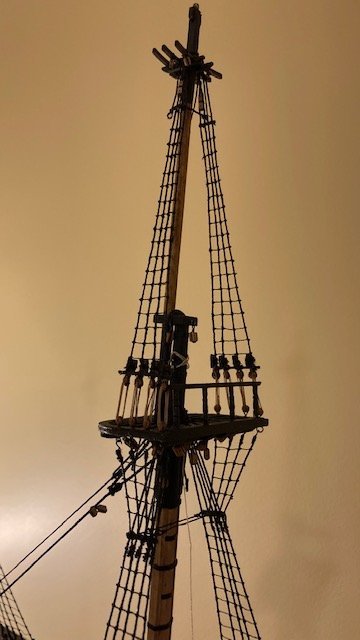
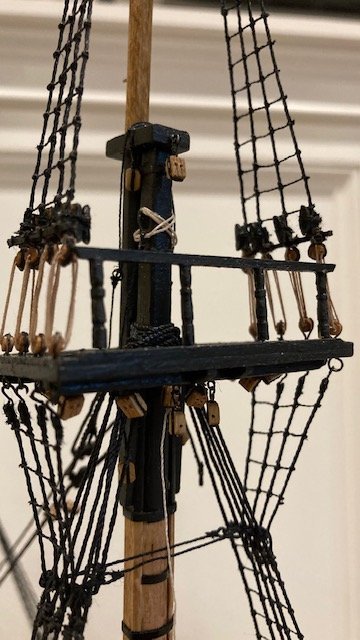
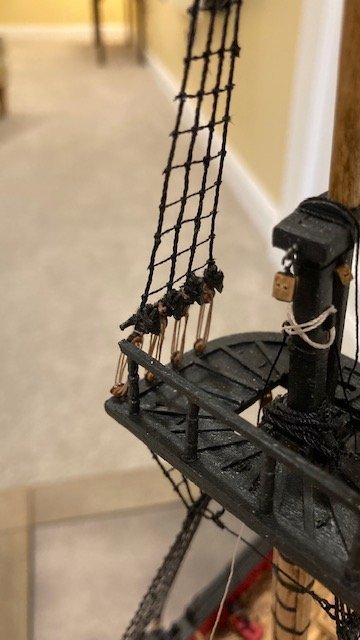
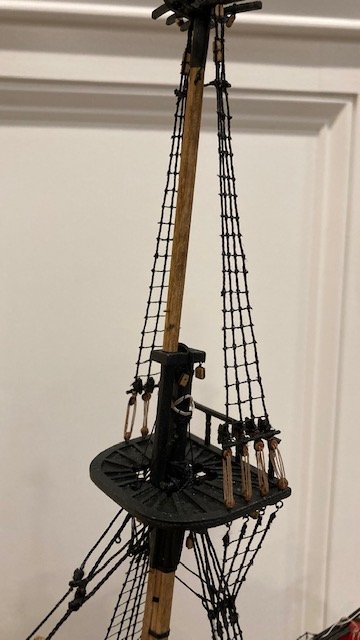
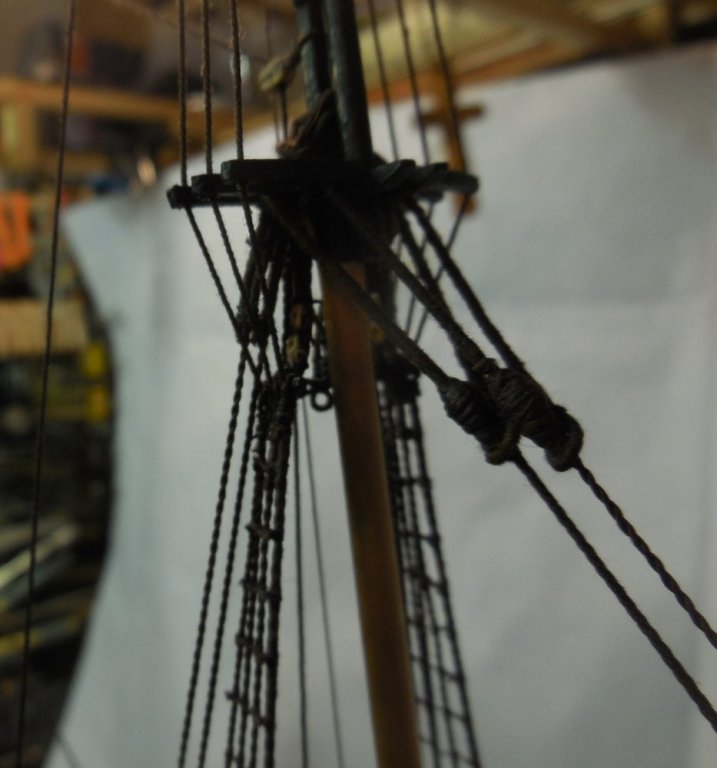
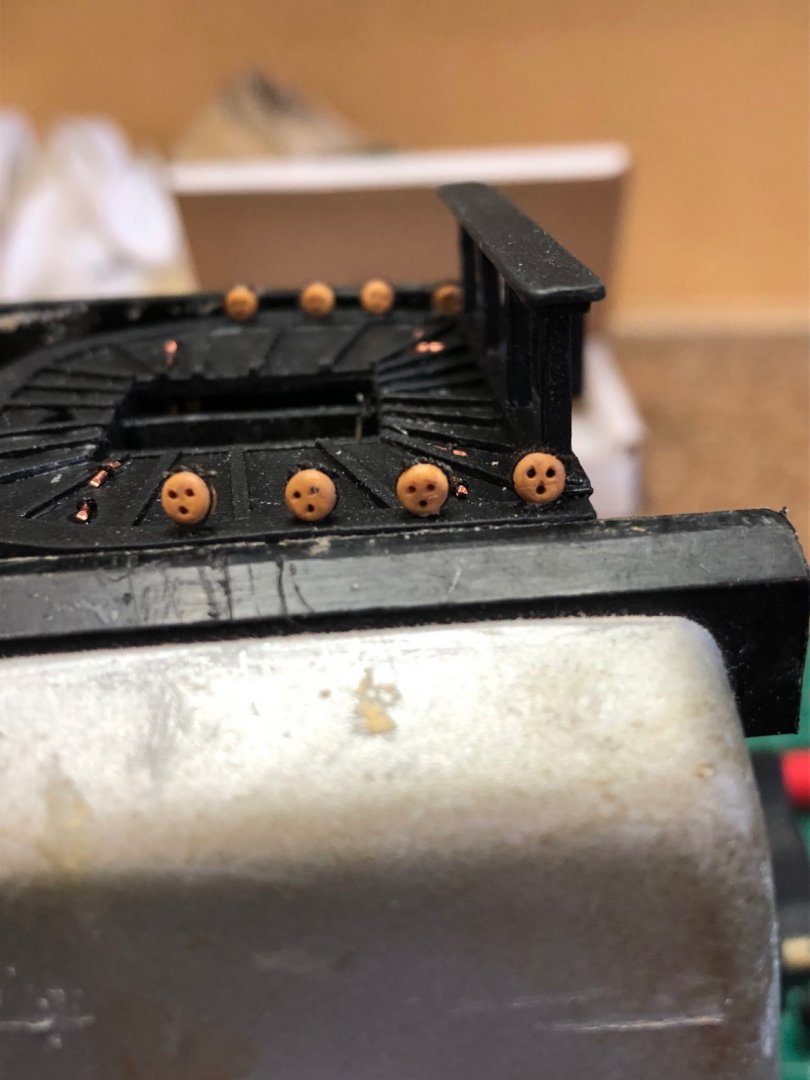
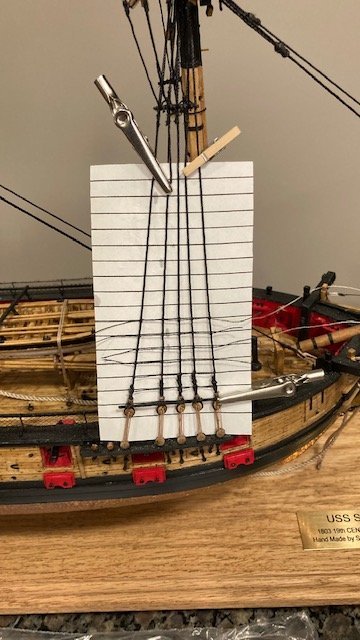
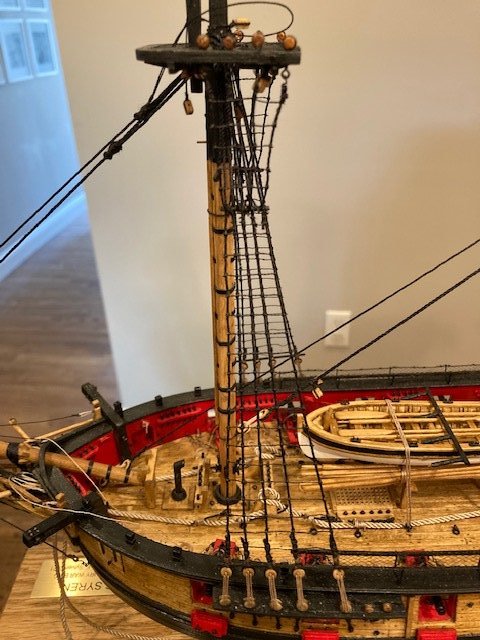
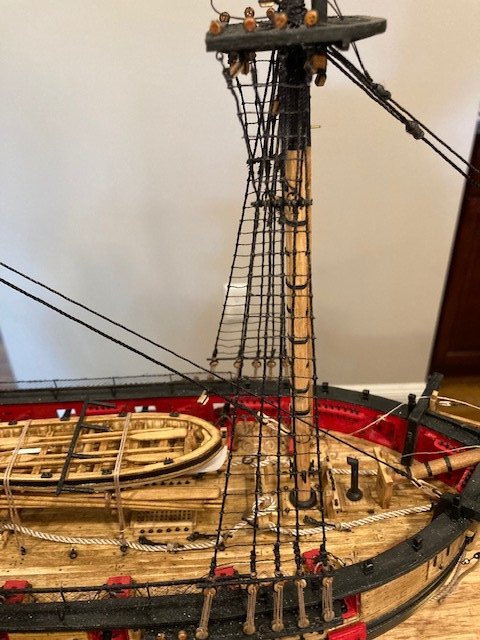
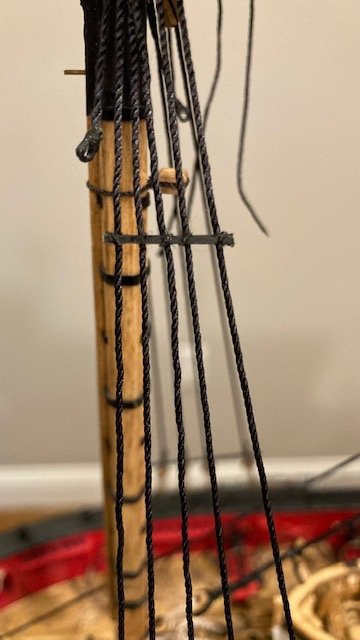
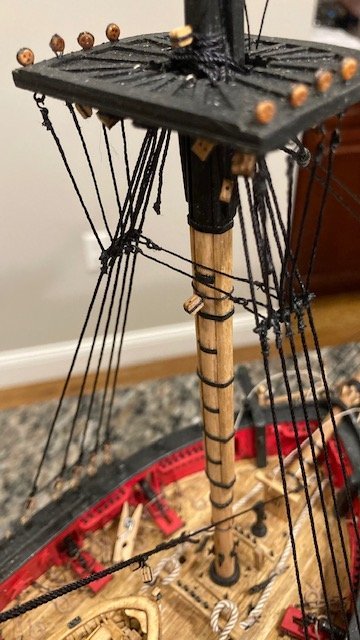
Completed the main topmast shrouds (.021 blk). I found them particularly difficult. To get the pair of 2.5mm deadeyes at the ends of the shrouds reasonably equal requires the use of a “deadeye claw.” I found it difficult to hold the deadseyes on the claw. I used alligator clips for this. Starting on the starboard side, I rigged the shrouds in alternating pairs as per the instructions. I cut a 13” length of .021 line for each pair. I looped each line and seized it with .012 black line about 5/8” below the loop. This allowed for the line to be placed over the cheek blocks on the top of the mast. The spacing between the deadeyes on the topmast shrouds is the same is the lower shrouds, so I used the same deadeye claw. These are tricky because they’re so small. I looped the line around the deadeye, held it in-place with a small clothes pin, and applied a little CA with a toothpick to hold the deadeye in-place, making sure the holes are in the proper orientation. This allowed for the line be seized without the deadeye falling off. I removed the shroud and seized the deadeye off-ship. The second deadeye was setup in the same manner. I setup the port side shrouds in the same way. The lanyards were rigged with Syren .008 light brown rigging line (a 6” length is about right for reeving through the deadeyes and the hitches around the shroud). I made three (3) clove hitches - the clove hitches look nice but they’ll be covered up by the sheer pole. I removed the fore top rail to facilitate the shrouds. Before completing the shrouds and adding the futtocks stave, I added the Sister Blocks (two 3/32” single blocks glued together, end-to-end) between the first pair of shrouds. I located the top of the blocks 1/4” below the cross trees as scaled on Sheet 5, which places them higher than they appear in the photo on Page 102 of the instructions. The instructions say they are placed just above the futtock stave. The futtocks stave would be about ½” below the top of the sister blocks.
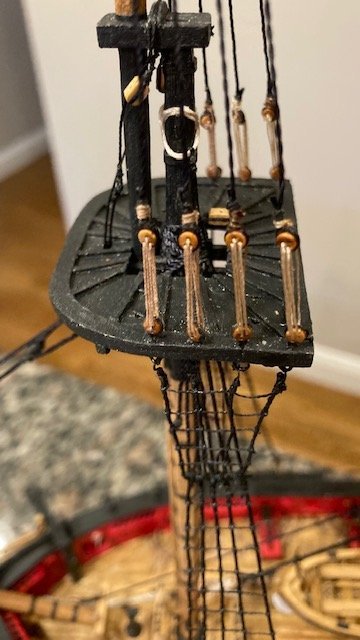
Completed the main topmast shrouds – phew. I ran out of Syren .008 tan rope for the lanyards. Syren ran out of tan rope, so I had to use the kit supplied .008 manila hemp. The difference in color is noticeable now but overtime, as the model ages., may not be noticeable. Added the top mast sheer pole and futtock stave (1/32” x 1/32” strip). I painted them first, glued them to the shrouds, lashed them with sewing thread, and touched up the paint.

The topmast rat lines (.008 blk) were done next and similar to the lower mast. I made a copy of the fore top mast shrouds from plan Sheet 5 and placed it behind the shrouds to see how it lined up. I was surprised how closely the alignment of the shrouds matched the plan (see photo). Decided to buy some 5mm cleats from the Syren Model Co. rather than of using the kit supplied metal cleats. I shaped them to resemble the kit supplied cleats, painted them black, glued them to the shrouds above the sheer poles, and lashed them with sewing thread. I used white glue to adhere the cleats to the shrouds. The Syren cleats have a groove in the center of them that makes it easy to lash them to the shrouds. I wrapped the sewing thread around the cleat, tied it, wrapped it around again, tied it, glued it, and trimmed it. I’ve completed the port side aft shrouds.

-
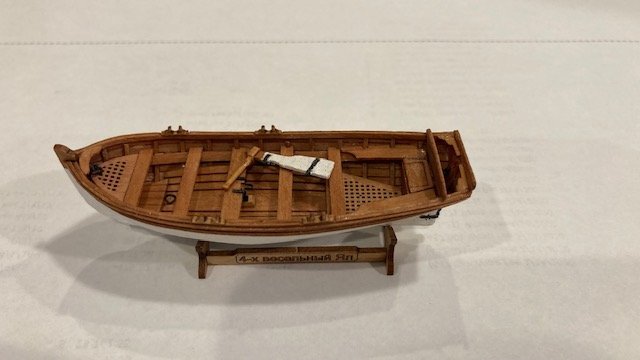
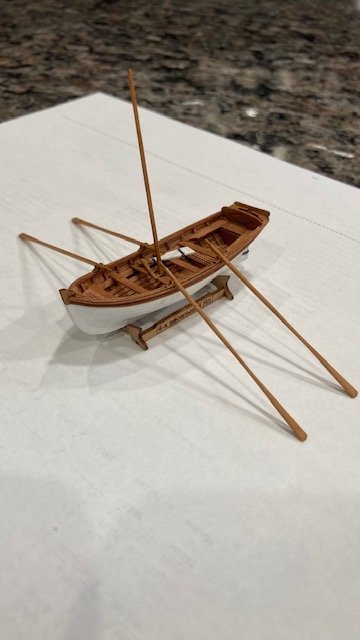
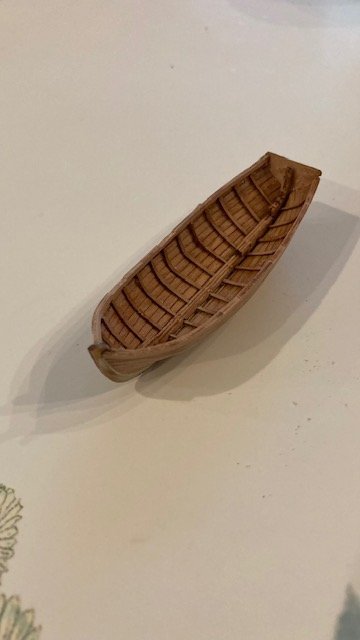
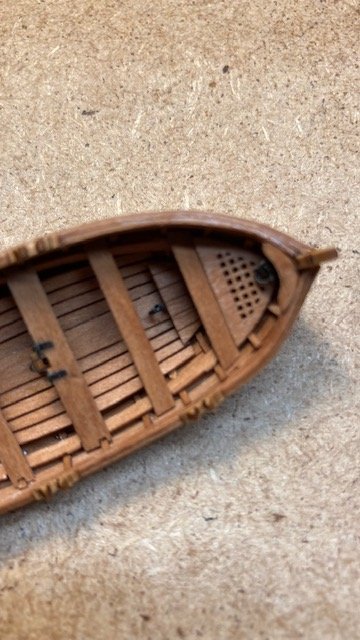
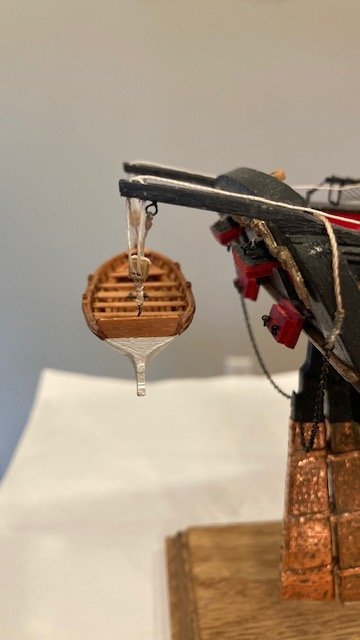
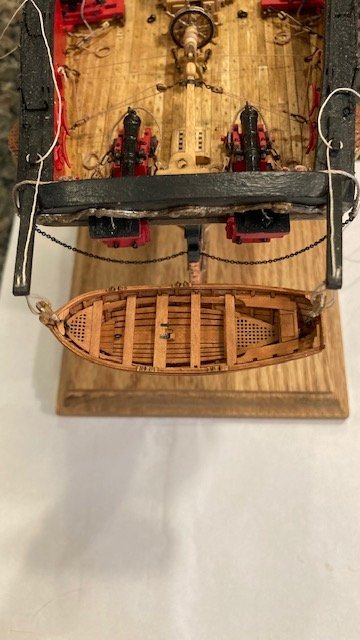
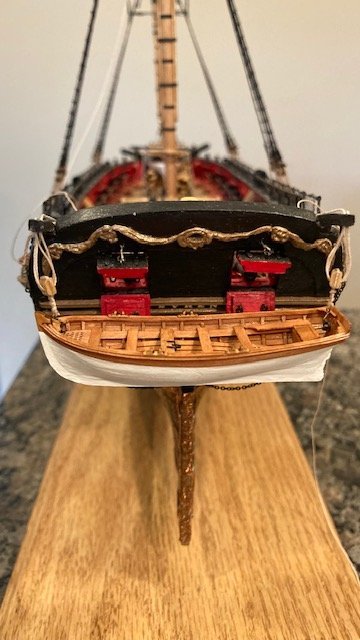
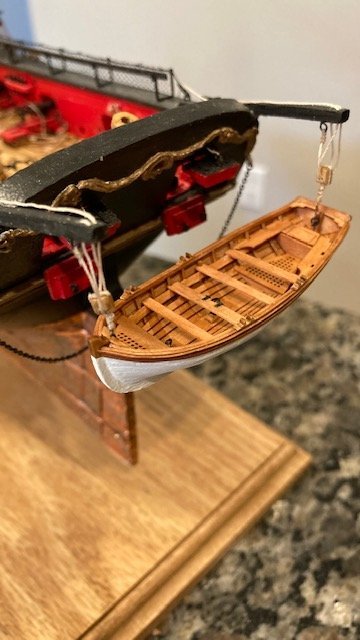
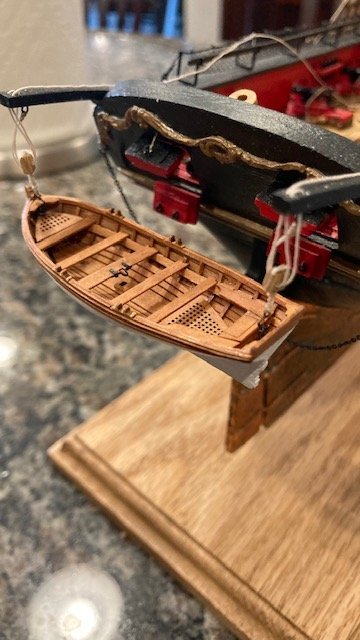
Finished the jolly boat. Added the backboard, rudder, tiller, gudgeons and pintles, mast and oars. The gudgeons and pintles were difficult because they are so small. The oars are delicate and require a lot of sanding. I plan to leave it off ship for now. With that done, I’m moving on to main top mast shrouds. Stay tuned for progress.
.jpg.00b59c4a1b59ce7d943d779327c2b85f.jpg)
.jpg.b227d8ee520d34dd289218432f2f9691.jpg)
- Ryland Craze, CiscoH, Gahm and 1 other
-
4
-
1 hour ago, Overworked724 said:
Outstanding!!! Really nice detail! You set the bar!!!
Thank you, Patrick.
-
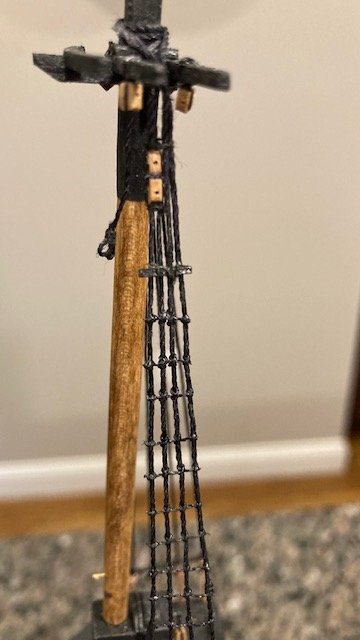
Completed the lower shroud rat lines. All and all, I’m happy with the way they turned out.
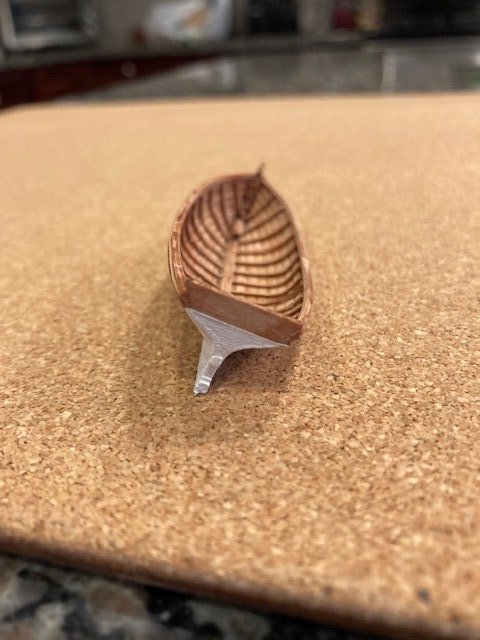
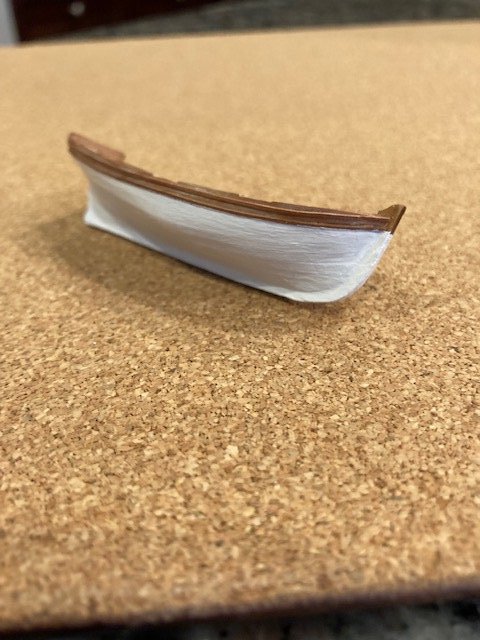
I decided to build a jolly boat that I purchased from Crafty Sailor. The scale of the kit is 1:72 (1/16” scale). The kit jolly boat is 2 3/4” long (14 ½’ at 1/16th scale). At the Syren scale of 1:64, the jolly boat would be 3 3/32” (16 1/2’ at 3/16” scale). To the novice eye, the difference won’t be noticeable. So, a little shorter boat is okay with me – I’m not looking for authenticity here. If you buy this kit, you’ll need to read the instructions very carefully as they’re a little confusing. The kit comes with 3 laser cut sheets (1 pear and 2 plywood). It’s very important to soak the ribs at least overnight in order to bend them. After installing each rib, I wiped a little water on it with my finger and then dried it with a hair dryer. I’m satisfied with the way they turned out. The transom piece was beveled to the engraved line and then glued to the keel frame.
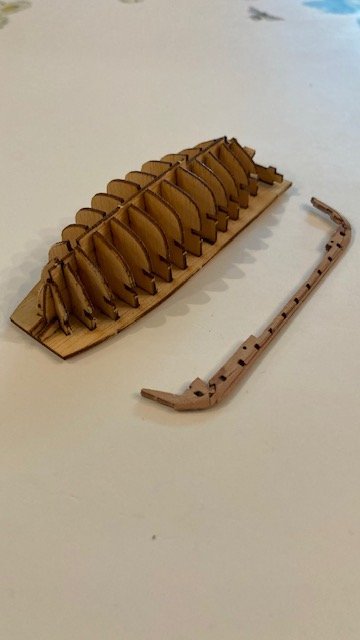
The planking boards were next. They’re numbered successively on the laser cut plan sheet from a7 to a13 and marked R (starboard side) and L (port side). The ends of each plank (except for the last plank a13) are beveled and the burrs are sanded smooth before soaking them. Note: the laser cut (taper) should be installed face down to reduce the width of the joints. The planks are alternated port and starboard or starboard and port depending on your preference. Installing the planks is tricky. I started at the keel and worked back to the transom, applying CA to each rip one at a time. Once completed, the planks were sanded, wood filler was applied to fill in the joints, and finish sanded. Next, I removed the jig with no problem. With that done, I assembled the keel pieces and glued the complete keel to the boat. This was a little tricky – a lot the sanding to get the proper profile to fit the keel. The boat looks surprisingly good, but small.

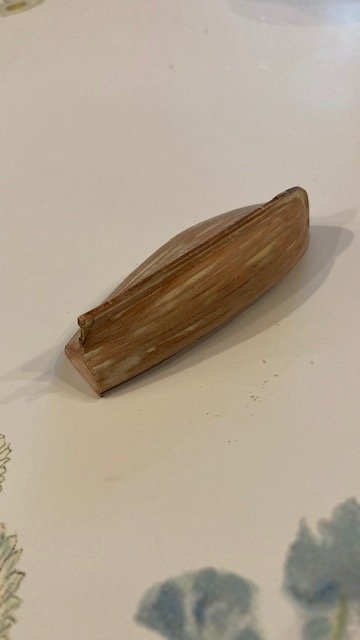
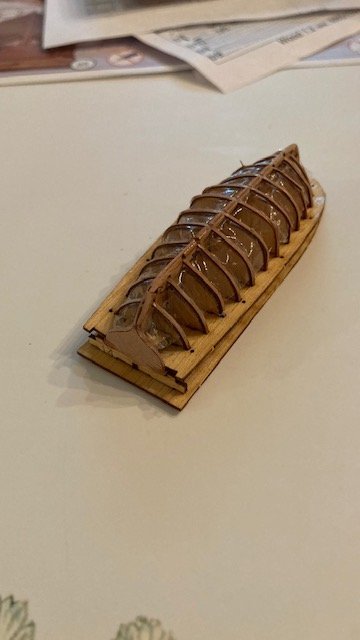
Added the “shoulders” to the hull as per the instructions. They are very thin. I soaked them, fit them on the hull, and held them in-place with small clothespins while I glued them. I applied a little CA on the underside of the shoulders with a toothpick. Before installing the boat interior trim, I primed the hull below the shoulder and later brushed on two (2) coats of finish white paint (ModelExpo MS4831). I wasn’t sure how to finish the interior of the boat. I have read where other modelers have used tung oil, so I decided to try it. I like the finish, but the contrast in color between the pear wood and boxwood wood is quite obvious.
.jpg.e27ad07814f69a66c826ca925fac2866.jpg)
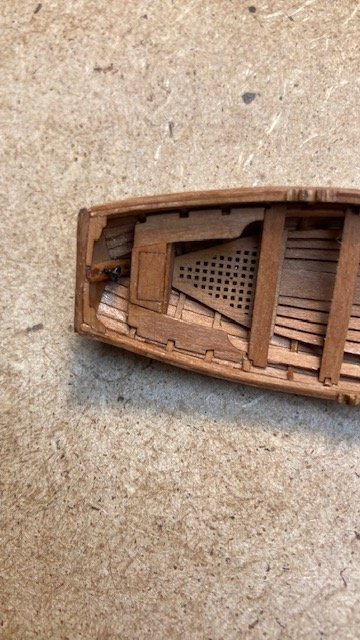
Completed the rest of the interior trim (see photos for progression) and applied tung oil. Note: I pre-fit the stern benches, glued them together, and then installed them as a complete unit. The breast hook broke while I was beveling it, so I had to fabricate a new breast hook. It’s not identical but it fills the void, so to speak. Added ringbolts fore and aft to hang the jolly boat. I Made up the double block tackles for the davits. I used 3.0mm blocks and .012 tan line. I drilled a hole on the underside of each davit for an eyebolt. I seized a generous length .012 line to each eyebolt and then glued each one in the predrilled hole. I then reeved the line through the blocks and the davit sheaves. I’m thinking, given the high seas, that the jolly boat would have been more secured than just hanging it from a hook – just my thoughts. Remaining bits are the backboard, rudder, tiller, gudgeons, pintles, mast, and oars. It was a good exercise in a miniature side build.
.jpg.b401922932a55d924042af2aaecb778c.jpg)

- Overworked724, Gahm, WalrusGuy and 1 other
-
4
-
-
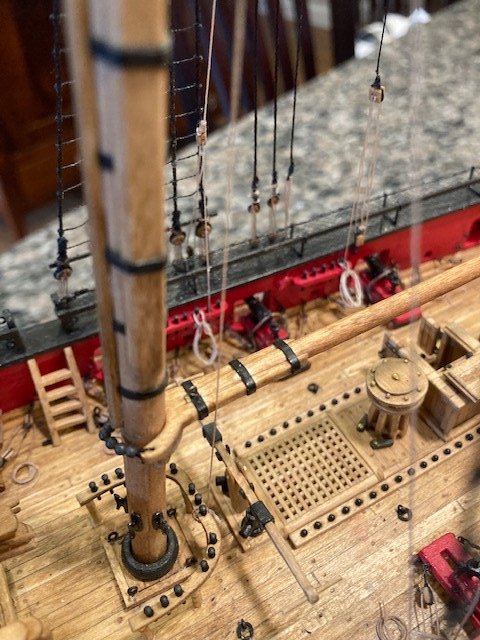
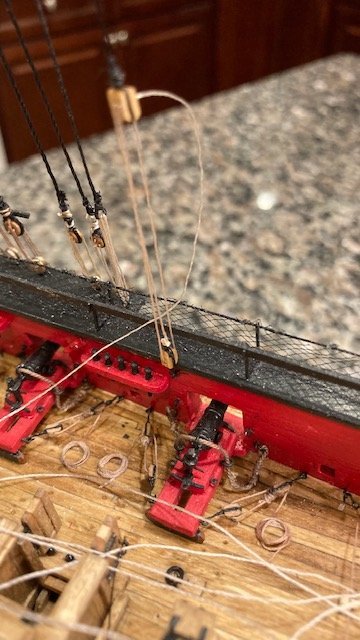
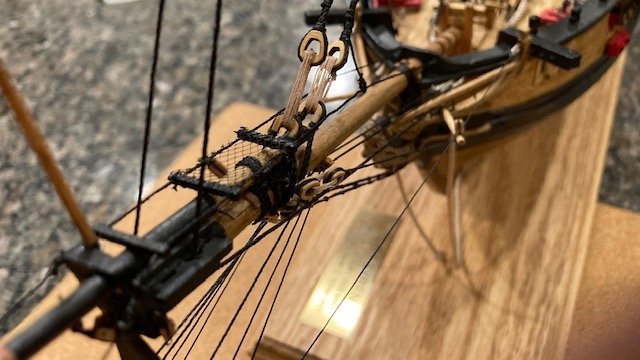
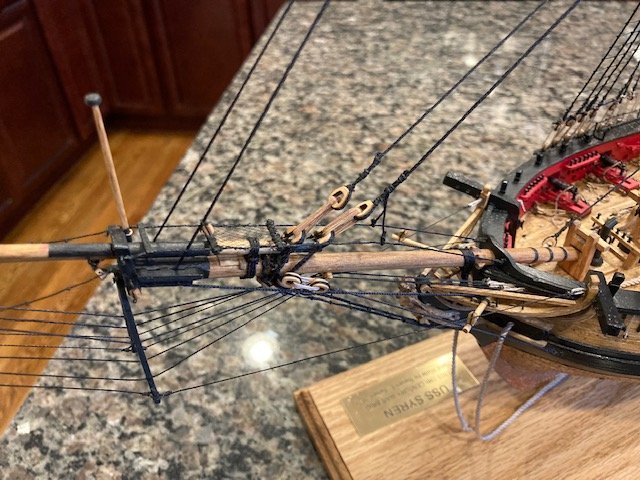
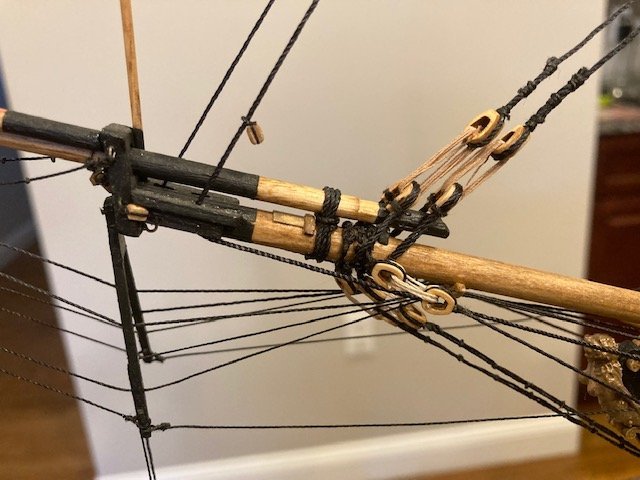
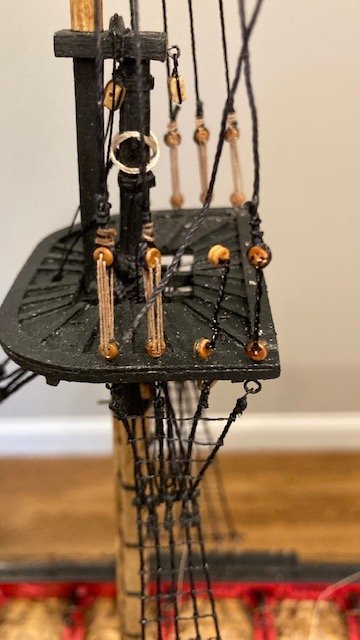
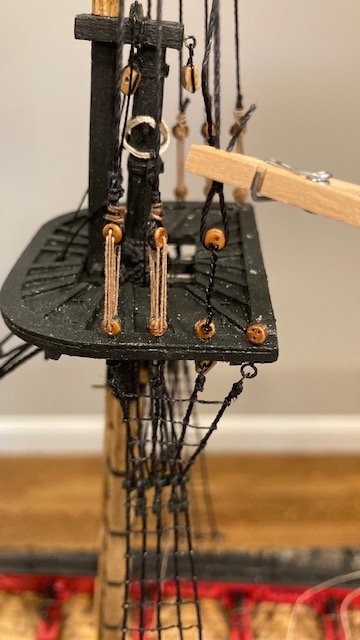
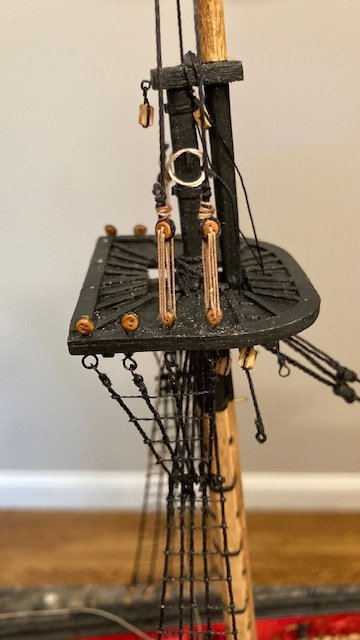
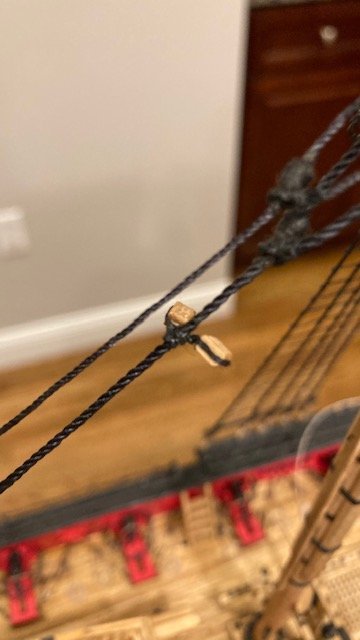
While still waiting for my Model Expo order, I decided to make the main topmast pendants. These were made from .018 black line. Starting with the fore top mast, I made an eye at the end of the line by wrapping the line around a rounded needle nose plier, applying a little CA, and then seizing the line with black thread. To get an approximation of the length of line, I scaled the length of the pendent below the top (3/4") and added 3/4" to fit over the cheeks on top of the mast. I then cut the line at an angle 1 ½” long. The cut ends of the two pendants were then glued and seized to the respective lines at a distance of 1” from the eye. The eyes were painted black. After installing the pendants, I attached a clip to the end of each pendant to stretch them out. Note: With the method I used to make the pendants, I had to remove the 1/8” single block for the main top gallant stay in order to install the pendants. No problem though, as I was able to re-rig the 1/8” block with the top mast off ship.

One dilemma though. I finally received my Model Expo order. The order included four (4) 1/8” (3.0mm) double blocks instead of 3/32” (2.5mm) double blocks. I decided to order Falkonet 2.5mm blocks from Model Expo. These blocks match the scale of the 3/32” D block shown on Plan Sheet 7. They are very small and need to be drilled out in order to reeve the .012 line for the top braces through them. I reviewed some other build logs to see what size blocks were used. I found photos but no discussion on this. But, based on the photos are saw it appears that other build logs have used blocks larger than 3/32”. FYI, there is a discrepancy in the pictorial size of the main stay blocks on Sheet 7. The upper D blocks are depicted larger than the lower D blocks – they’re both noted as 3/32”. The upper D block near the mouse appears to be 1/8”. For comparison purposes, I superimposed a 1/8” D block, a Falkonet 3/32” D block, and a 3/32” S block on Sheet 7 (see photos). The 3/32” Falkonet block appears to be slightly smaller than the 3/32” S block. So, the dilemma is, what size block to use. I might be over analyzing this, but I think the 3/32” blocks are too small for the .012 rigging line, so I will use the 1/8” D blocks.
.jpg.09be699cdca5d6f37b19a758d87eefce.jpg)
.jpg.71c0fcf19827a1897a5b152dcb0f17e6.jpg)
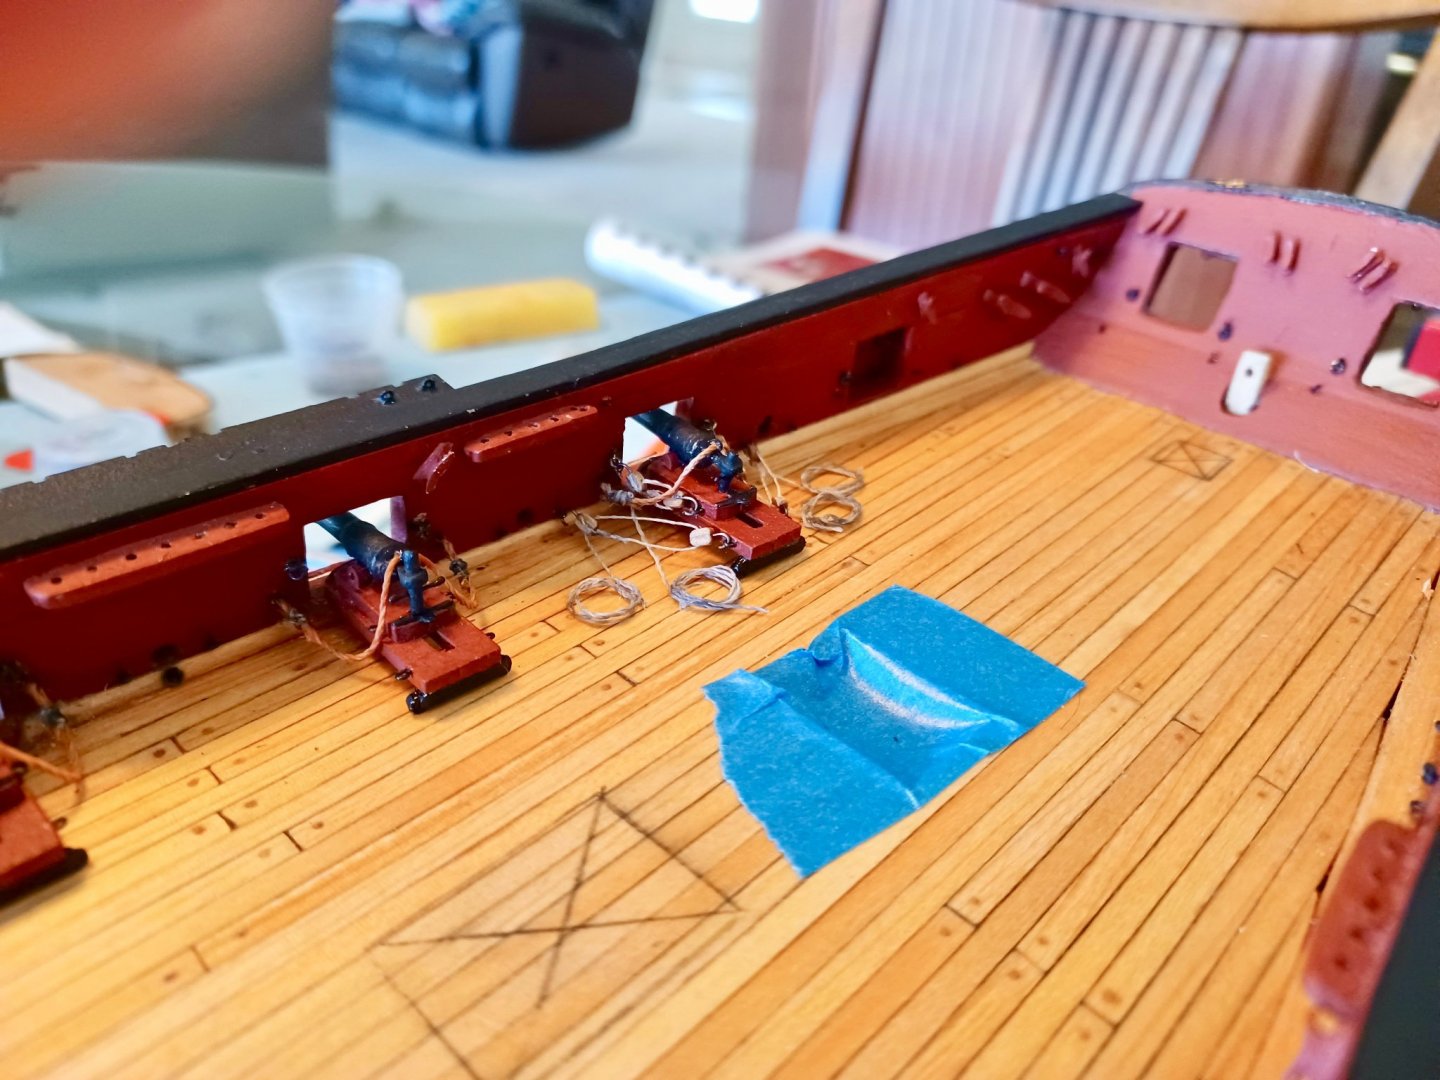
Accomplished my goal of installing the 1/8” double blocks for the Fore Top Sail Braces and the Fore Braces. To the novice eye, I don’t think the larger blocks will be noticeable. The process was simple – seized some .012 black line to each block, tied the loose ends to the main stay with an overhand knot, applied CA to the knot, trimmed the ends, and painted the knots black.
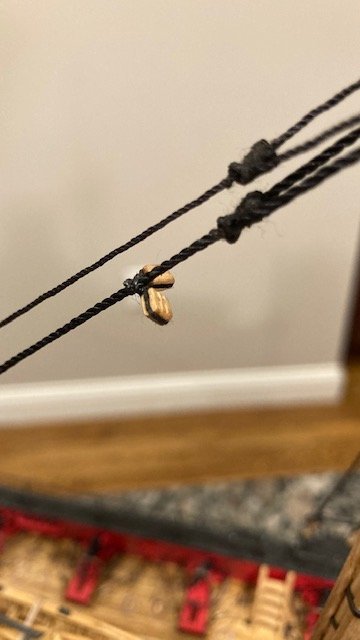
Thought this would be a good time to add 3/32” S blocks to the traveler rings on the jib boom. These were set up in the same manner as the 1/8” D blocks above.
Lashed the sheer poles and the futtocks staves to the fore lower yards. I used sewing thread to lash the futtocks staves. Next, the futtock shrouds were wrapped around the futtocks stave a la the main shrouds. The fore lower catharpins were rigged same as the main lower catharpins. Note without incident though. Murphy’s Law reared its head again – I got a little overzealous in tensioning the catharpin and the futtocks stave snapped. I was able reset it with some CA glue – catastrophe averted. Whew. Next up, the fore lower shroud rat lines. Stay tuned.

.jpg.a22b63b92cfb3d690b9226ae8d4bb70a.jpg)
- GrandpaPhil, WalrusGuy, Ryland Craze and 1 other
-
4
-
-
The lights definitely show off the model? Nice job.


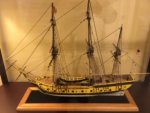
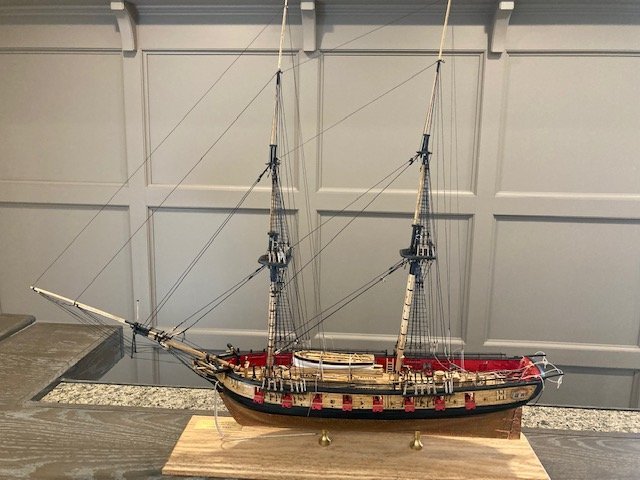
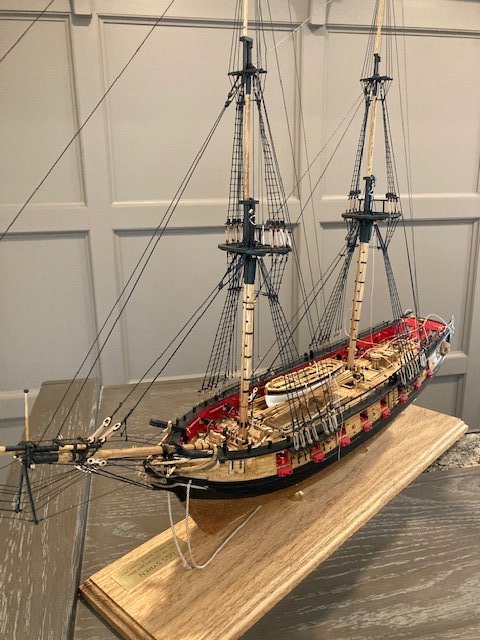
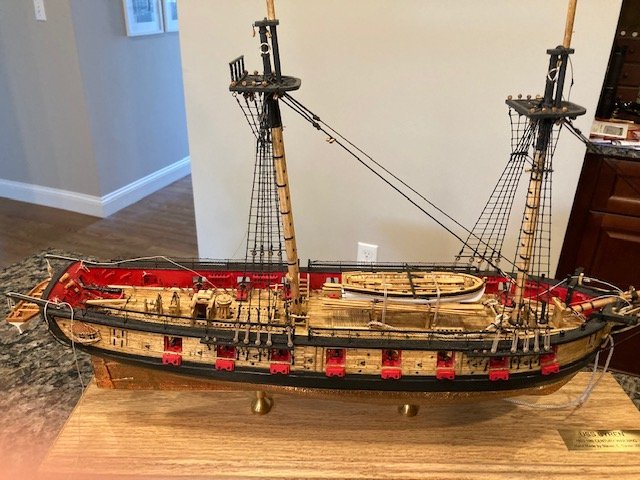
US Brig Syren by abelson - FINISHED - Model Shipways - Scale 3/16"
in - Kit build logs for subjects built from 1801 - 1850
Posted
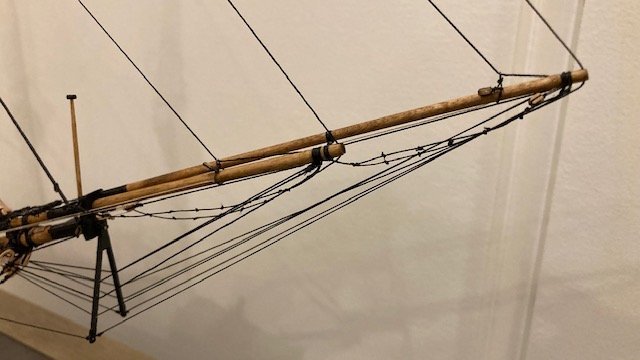
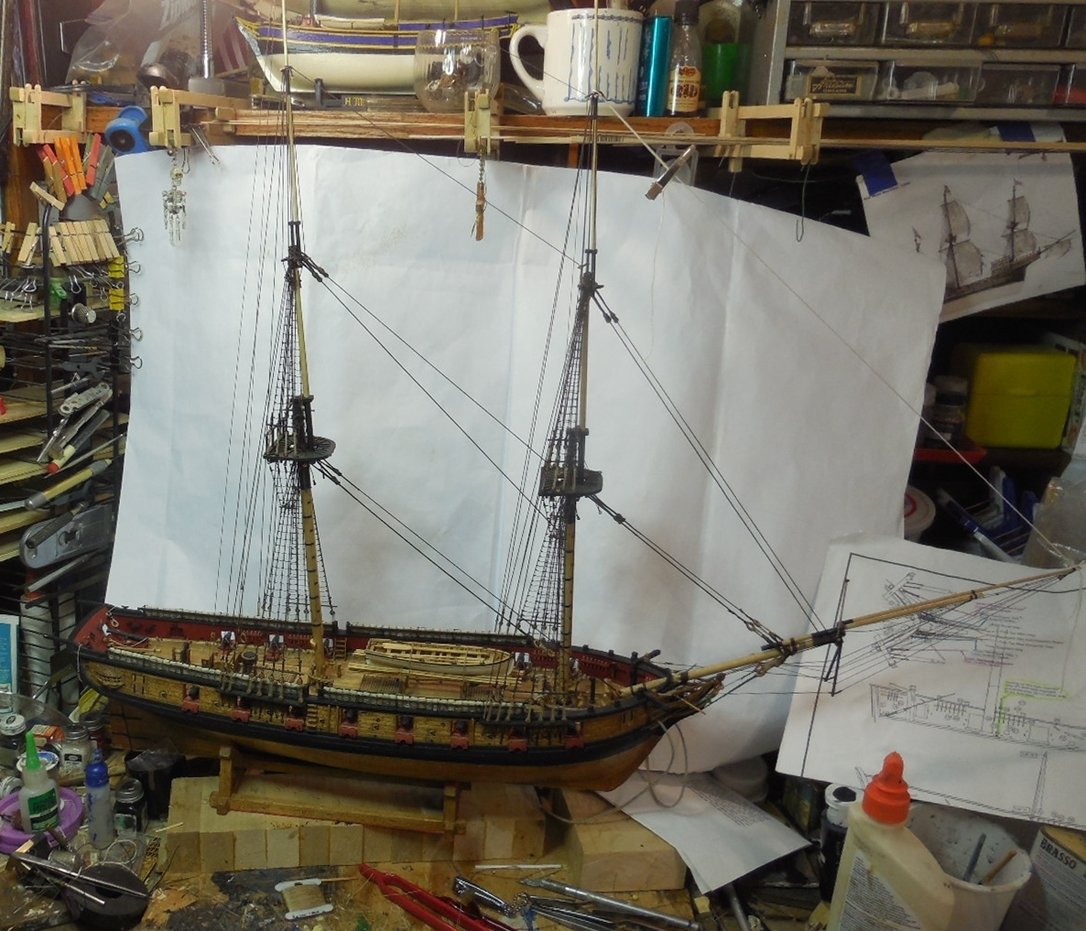
Started on the main topmast staysail downhaul. I had previously seized the 3/32” single block to the main topmast stay. I created an eye on the end of the .012 tan downhaul line. So far so good, but, I could not run the line through the block. This is where it all fell apart, literally. In trying to run the line through the block, I snagged one the lines, and pulled down the fore top mast (the Fid broke). Another oh s__t moment. I was ready to put the ship in dry dock. Upon assessment, I was able to push the fore top mast up and secure it with CA. A disaster averted. But, Murphy’s Law crept up. Somehow, the fore topgallant mast/pole snapped above the cap. It snapped at the point where I had inserted a pin to hold the royal yard. I’m not sure if this was a ramification of the of fore top mast mishap. In hindsight, it was a bad idea to insert the pin – it weakened the mast. Luckily, I was able to set the mast back into position and secure it with CA. It lists a little but, considering the consequences, I can live with that. I decided to take a little reprieve to regroup.
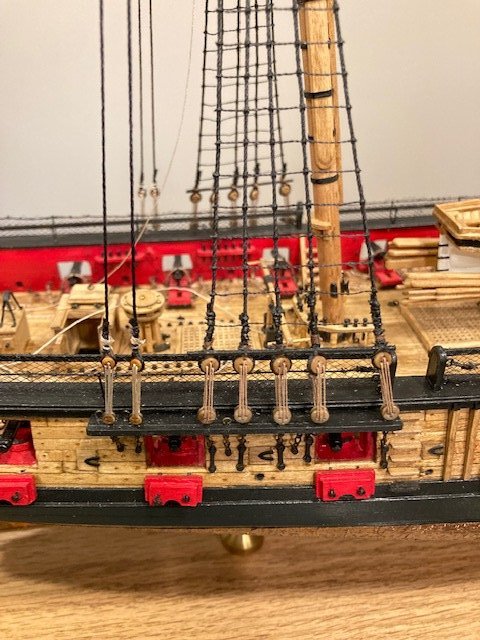
Well, after a short reprieve, I was able to rig the main topmast staysail downhaul (.012 tan) and main topmast staysail halliard (.008 tan). The downhaul was run through the Lubber’s hole and down to the port side rail abaft the main mast and belayed to pin “N.” I was able to snag the pins and belay the lines in the traditional under/over manner. Moving on, I seized 3/32” single blocks, two on the main top gallant stay and two on the main royal stay per the plan on Sheet 6 and set up the main topgallant staysail downhaul (.008 tan) and the main topgallant staysail halliard (.008 tan). These lines are belayed to shroud cleats above the main and fore tops. The cleats are not depicted on the plans, but their locations are noted on the Belaying Plan. It’s a little confusing, so study the Belaying Plan well before proceeding. The main topgallant staysail downhaul (.008 tan) is belayed to the aft-most shroud cleat (O) on the fore top port side. The main topgallant staysail hilliard (.008 tan) is belayed to the 2nd shroud cleat (P) on the main top port side. I assumed the 2nd shroud is the 2nd fore-most shroud. I found it very difficult to belay the lines, so I simply wrapped the lines around the cleats, applied CA, and snipped the lines. They’ll be covered later with rope coils.
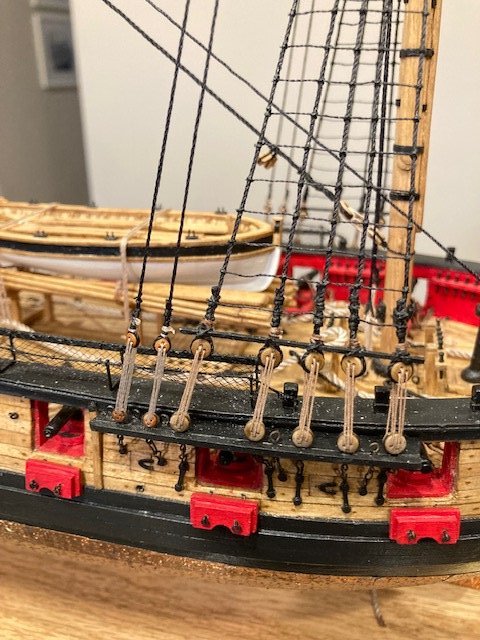
Completed the remaining staysail rigging (.008 tan) per the instructions. The Belaying Plan clarifies where the various lines are belayed. I did have one minor do-over, I had earlier seized the 3/32” single block for the flying jib sail downhaul on the starboard side of the traveler ring rather the port side as explained in the instructions. The lesson here is, don’t get too far ahead of yourself. Again, I had a very difficult time belaying the downhaul lines to the pin rails at the bow. I was unable to do it in the conventional way. It looks really amateurish. Hopefully, the rope coils will hide this. If anyone has a good way to do this, I’m all ears. Oh, I did have another do-over. The fore royal stay became slack while rigging the flying jib halliard, so I had to re-do the lanyard at the bow. The staysail rigging was clearly not my shining moment, but I’m satisfied with how it turned out. Now, on to constructing the yards. This will be the last post this year, so happy holidays to all! Photos follow.