


dunnock
-
Posts
530 -
Joined
-
Last visited
Content Type
Profiles
Forums
Gallery
Events
Everything posted by dunnock
-
Thanks Andrew and Thukydides. Your complements are much appreciated. David
- 310 replies
-
- 1
-

-
- Diana
- Caldercraft
- (and 1 more)
-
Hi Thukyidides, I have been following your Alert log and it is looking very nice. You have added a lot of detail and upgraded many of them. Thanks for pasting the drawing from Goodwin that clearly shows the fid passing through the bitts and bowsprit. I may try to add this detail to Trial hoping that it won't cause the sort of problems you had to contend with. It was a very good recovery by the way. I also notice the banding around the winch supports that don't feature on Trial. David
- 152 replies
-
- 4
-
-
- Vanguard Models
- Cutter
- (and 2 more)
-
Thanks for your thoughts Thukydides. The inboard end of the bowsprit is octagonal on the model although I see that most of the other pictures of cutters that I have seen show it as square. I have looked for a copy of AotS Alert but I can only find copies in the US at around £120 plus postage - too much for me I'm afraid. David
- 152 replies
-
- 5
-
-
- Vanguard Models
- Cutter
- (and 2 more)
-
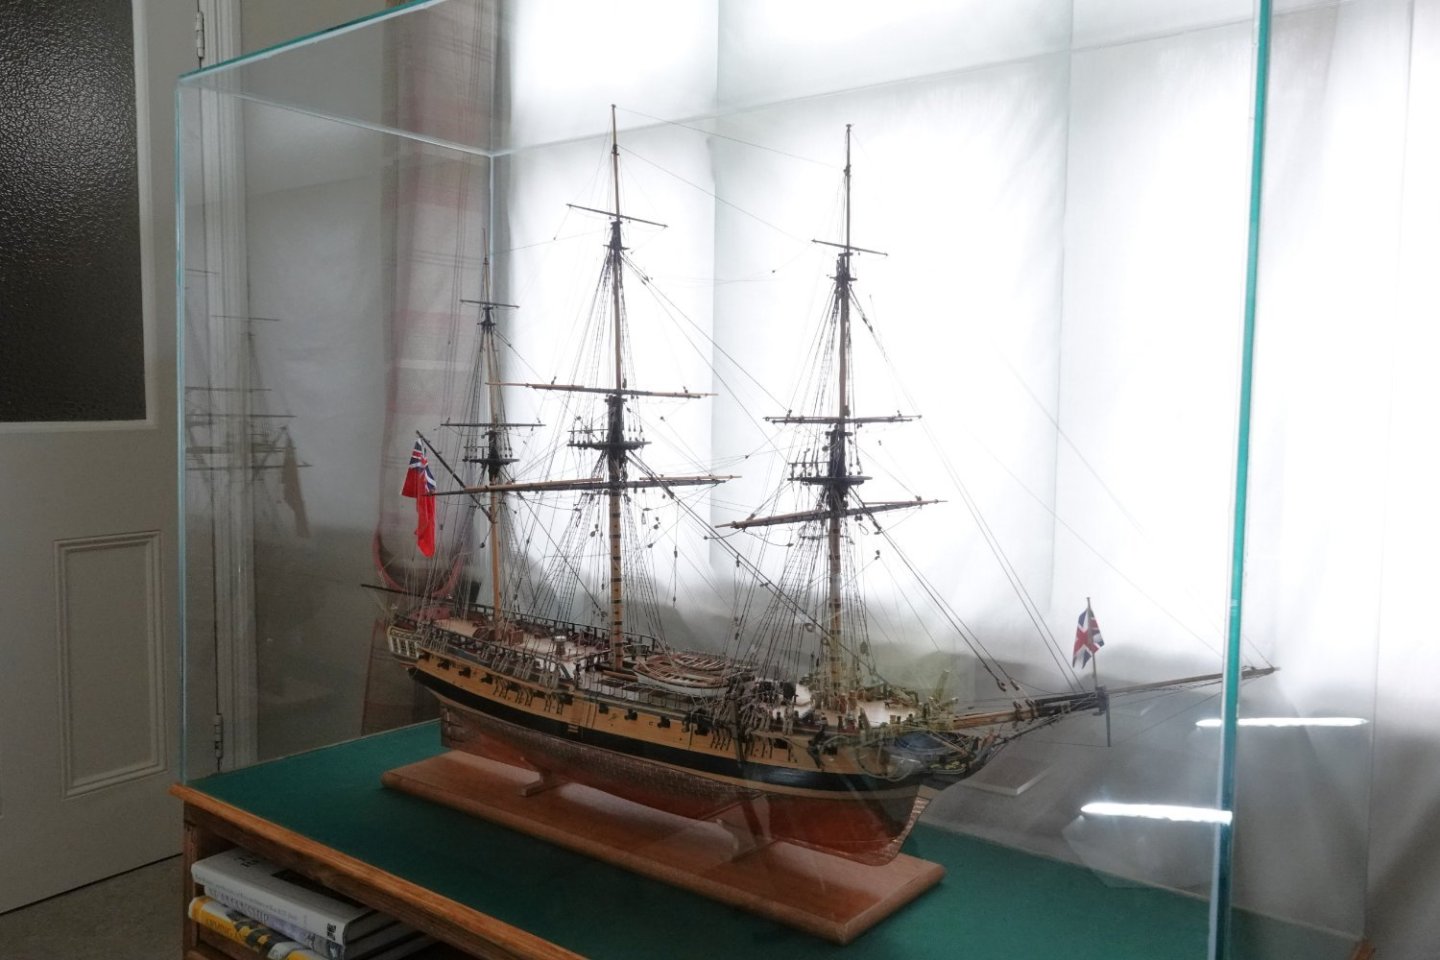
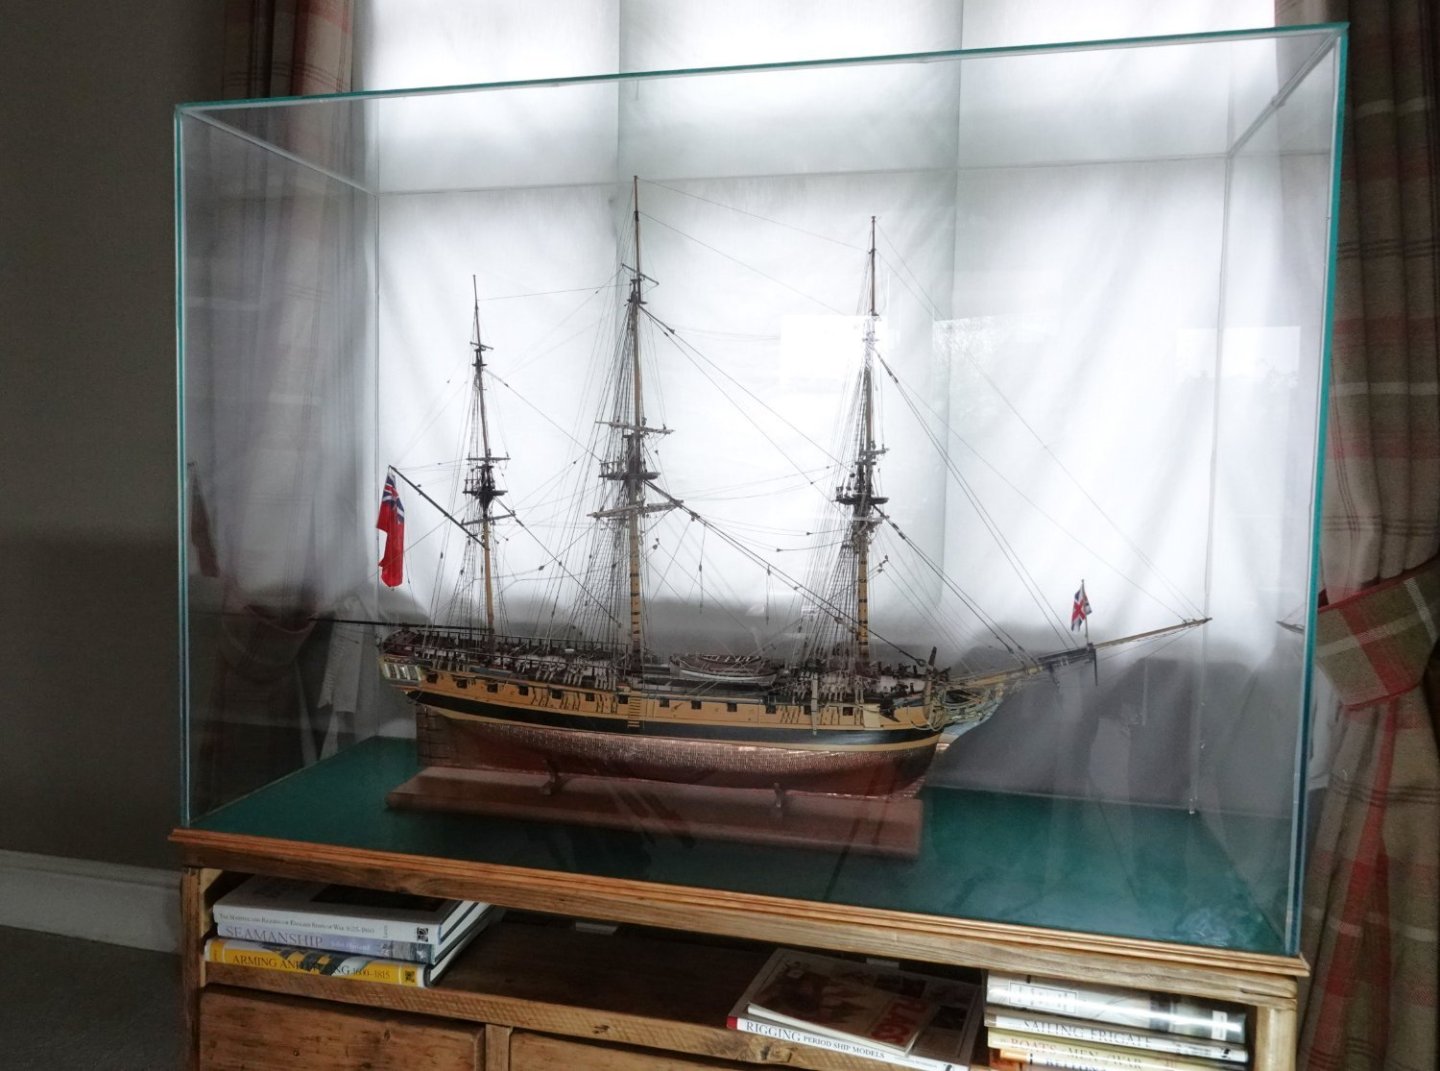
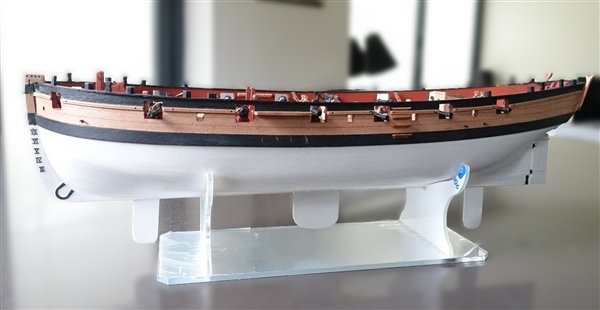
Thank you Dave. I was seriously considering making my own from acrylic sheet but since this company could make one in glass for a similar price to buying the acrylic and much cheaper than any other case supplier I had found, I decide to go with it. When it arrived, the case looked enormous but the overall look is diminished on the model and although it takes up a fair bit of wall space and we moved a sofa upstairs to accommodate it, it sits quite nicely in the room. Even my better half is now happy but I'm now closely questioned about where future ships might go. 😊 Thanks Brian. I have to walk past it every day to enter 'the shipyard' ..... and thanks Chris and David to for your kind comments and to all others for the likes you have posted. David
- 310 replies
-
- 2
-
-
- Diana
- Caldercraft
- (and 1 more)
-
I've been thinking a bit more about your question of run-in and run-out Andrew. It would be possible in theory to run the bowsprit in as far as the main mast bitts but now I'm also wondering how the bowsprit was fixed to prevent it being run-in by the tension in the rigging. As far as I can see from the kit plans and photos of various models of cutter, there is only friction against the hull and bowsprit bitts preventing it from shooting aftward. There is no fid as in a topmast providing a physical stop so was friction sufficient? Perhaps others have more information. David
- 152 replies
-
- 3
-
-
- Vanguard Models
- Cutter
- (and 2 more)
-
Thank you Tony. Until I looked closely at your photos, I hadn't realised that the catheads were missing on the RMG model. There are also one or two other differences that I've picked up, like the covered companionway that doesn't appear on the body plan and the smaller stern platform. I'm tending to base decisions on what looks right and what my skills will allow me to do. David
- 152 replies
-
- 3
-
-
- Vanguard Models
- Cutter
- (and 2 more)
-
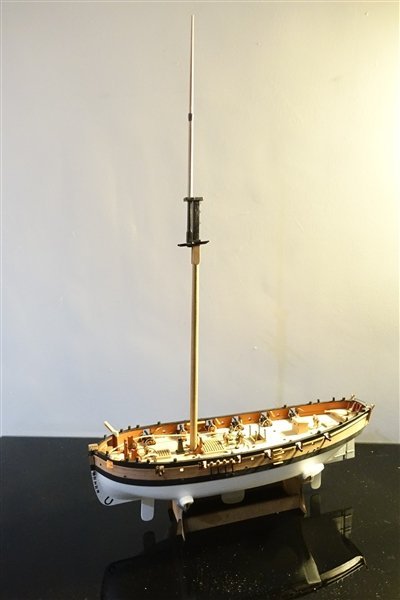
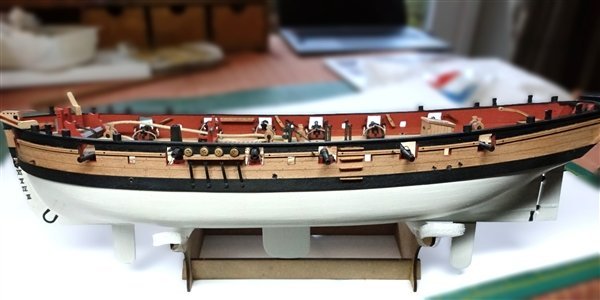
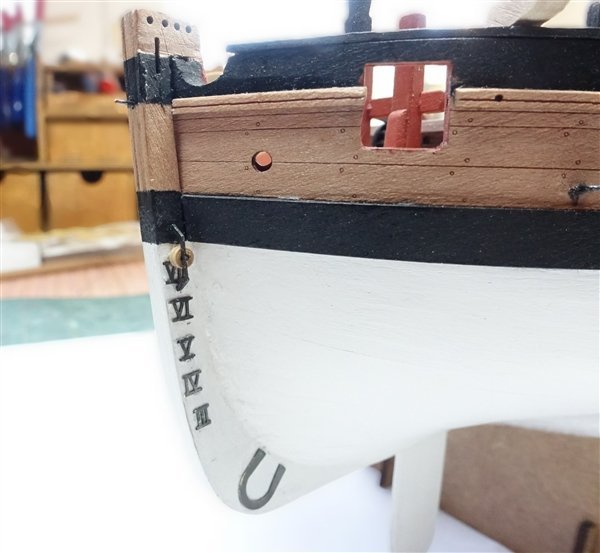
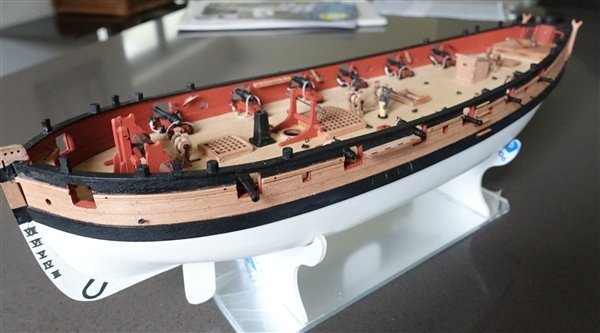
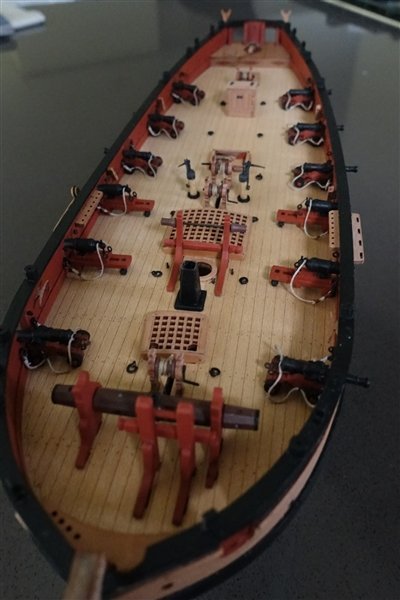
I have finally got Diana settled in her new home. I was planning to make a case out of acrylic sheet but I found a local supplier of aquariums who was prepared to make a case. The cost was about the same as I could have bought the acrylic sheet so there was nothing to think about really Jungle Pets of Buxton, Derbyshire (junglepets.co.uk) made the case in 6mm glass and delivered it a while ago but I have been waiting for a piece of furniture on which to place it. This was delivered earlier in the week. With me in the role of supervisor, my daughter and partner – much younger, fitter and stronger than me, manoeuvred the case into position over the ship and onto the baseboard without mishap. We breathed a sigh of relief. I guess this is really the end of the Story of Diana for me. Thanks again to all those who have followed, commented and given advice David
- 310 replies
-
- 18
-
-

-
- Diana
- Caldercraft
- (and 1 more)
-
Thanks Andrew although I'm not exactly sure what you mean by 'run in' but In Trial, I can't see any sheaves or attachments that would enable this to be done. What was the purpose of running the bowsprit in and out? David
- 152 replies
-
- 2
-
-
- Vanguard Models
- Cutter
- (and 2 more)
-
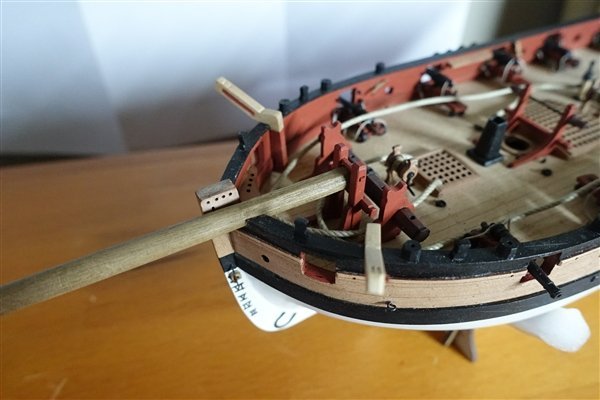
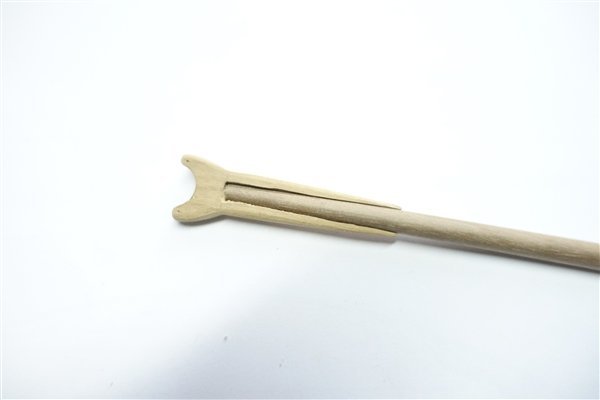
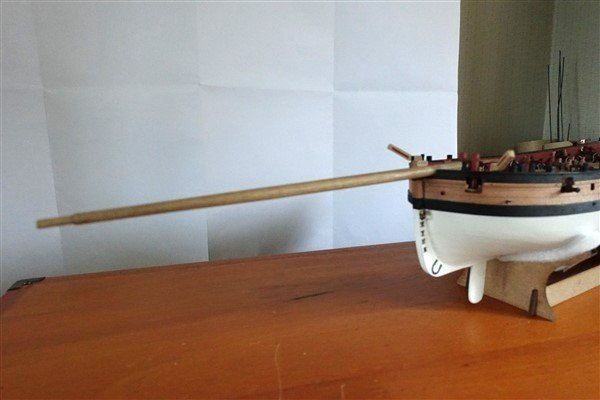
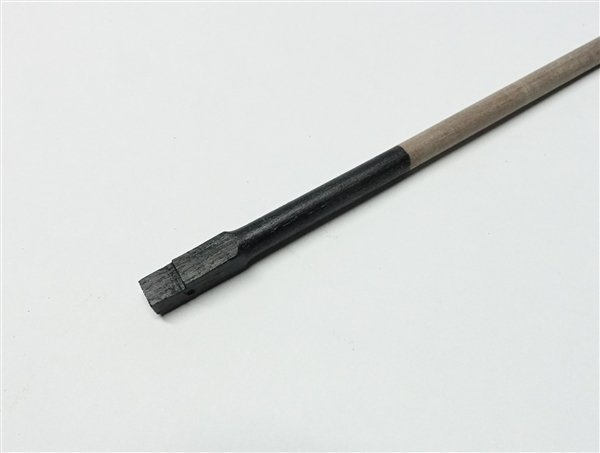
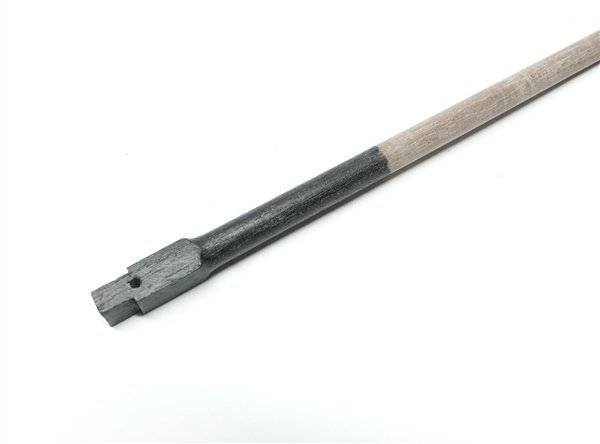
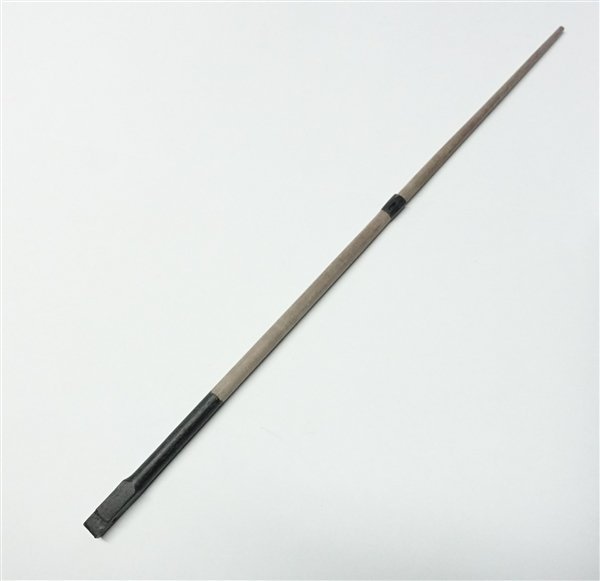
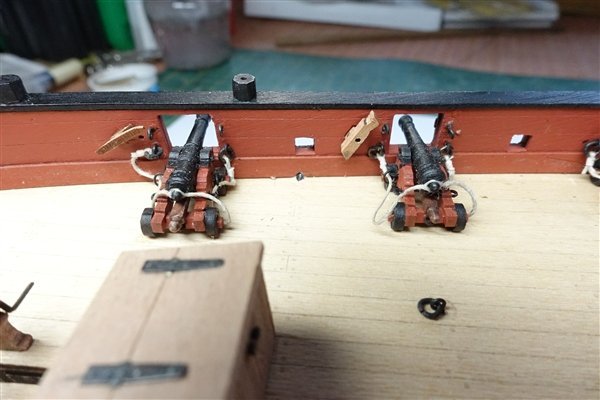
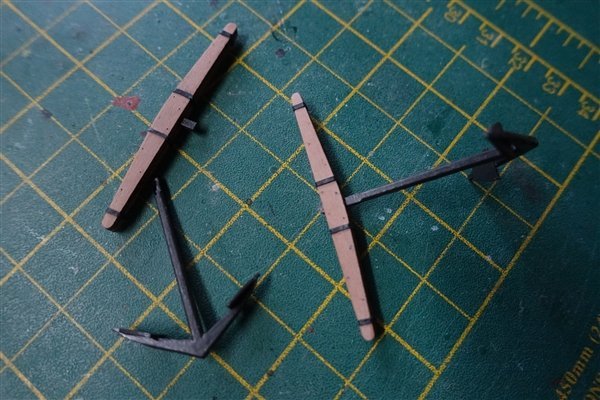
Bowsprit and Booms Steel’s formula for the bowsprit of a cutter would give a scale 304mm long and 8mm diameter. Looking at the photos of the model in RMG, the bowsprit is considerably shorter than the main boom so I have gone with the kit dimensions of 210mm and 6mm maximum diameter. The fit is checked and required some further filing of the hull. The kit has an assembly of two PE brass rings ( not sure what they are called) mounted onto the forward end of the bowsprit for attachment of stays, shrouds, etc but looking at the model there appears to be a different arrangement that I will try to adopt. I am indebted to Tony tkay11 (apologies but I'm not sure how you do that @name insert) for posting his close-up photos of Trial. They will be of enormous help when it comes to rigging. 18th and early 19th Century cutter models - Nautical/Naval History - Model Ship World™ I took a similar approach to the main boom and driver boom, using the tapering given by Steel and the overall dimensions given in the kit.. The greatest diameter of the main boom is 1/3 of the way in from the outer end and tapers to 3.75mm and 3.3mm at the inner end. The kit supplied jaws on the 1mm pear sheet now look too thin on my boom and also in comparison to the RMG model. I made a replacement by laminating three thickness of 1mm walnut strip. It looks a little rough in this shot but I have cleaned it up and used some acrylic filler which will be covered when I paint it black. I added cleats as shown in the kit plan but there are none shown on the RMG model. I will make a final decision on whether to keep them when I come to the rigging. The driver boom was made up in the same manner as the main boom and new jaws made from the three layer walnut strip sanded back to match the 2.6mm diameter of the inner end. The iron bands are not present on the jaws of the booms but three trenails can clearly be seen in the RMG shots of the model. Thanks for looking in and all the likes David
- 152 replies
-
- 11
-
-
- Vanguard Models
- Cutter
- (and 2 more)
-
18th and early 19th Century cutter models
dunnock replied to tkay11's topic in Nautical/Naval History
Thanks for posting this great set of photos. I have been puzzling about the rigging on my model of Trial and although I have got the RMG pictures, your close ups of the actual model are going to be so useful. Many thanks once again David- 42 replies
-
- 6
-
-
- Cutter
- 18th Century
- (and 4 more)
-
Lovely detailing on the guns Andrew. Knowing how small and delicate some of these pieces are, that is exceptional work David
-
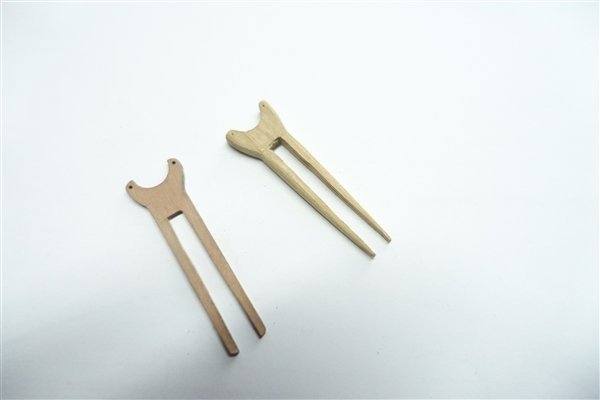
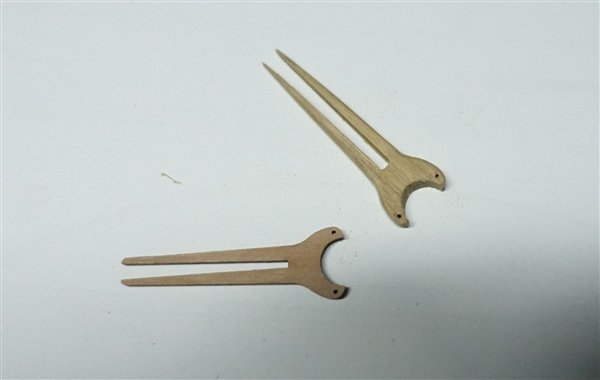
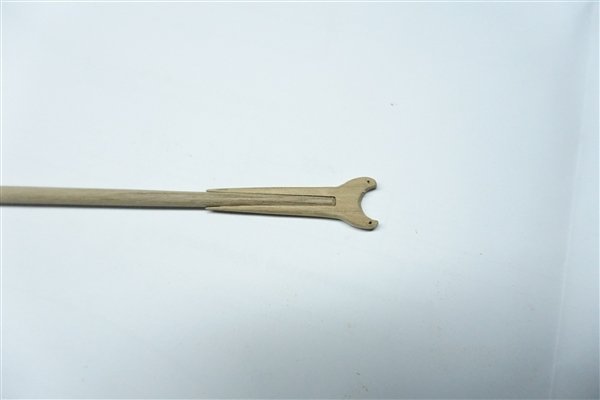
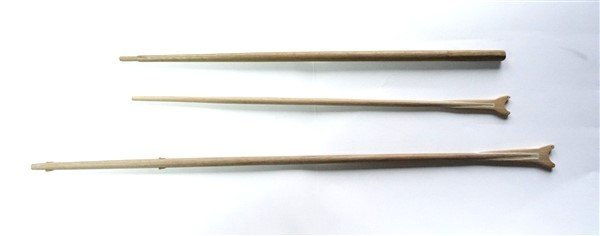
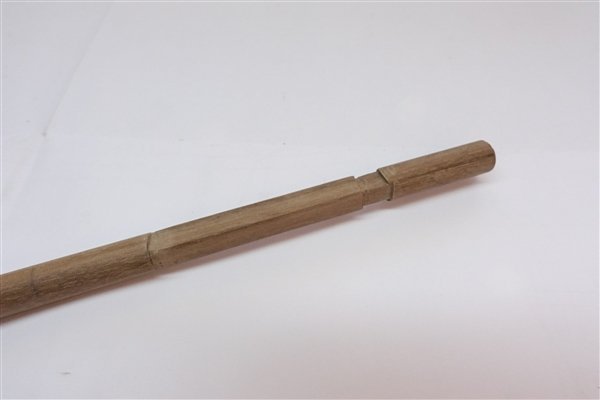
Thank you to all for the likes and encouraging comments, they're much appreciated. Topmast I looked at the kit plan, Lees and Steel and decided that my topmast would be based on a mizen topmast with square block and heeling. Whether it’s historically accurate or not I don’t know but I like the way it looks. The use of stop cleats at the head may be a simplification for the kit and looked a little too fragile to me, so I will make octagonal hounds. Because I am making a square heeling, the provided 6mm dowel is too small. I used 8mm and cut a square block and heel using chisel and file, initially to 6mm and then reduced the heel to 5mm and the fore and aft sides of the block to 4mm to fit the hole in the crosstrees. The heeling is 12mm: twice the length of the block. The hounds are 5mm long and were first filed 5mm square then finished octagonal after tapering the mast in the lathe. A sheathe is cut fore and aft in the hounds and the fid-hole drilled out and made square. The round hole in the cap needs to be sanded out to allow the cap to sit at the correct angle on the mast. The cap and topmast are not glued and will be disassembled for rigging Trial as she sits now.


- 152 replies
-
- 10
-
-
- Vanguard Models
- Cutter
- (and 2 more)
-
I have the half-hull on order so I'm following with interest. Looks like your making good progress and resolving the problems that crop up. David
-
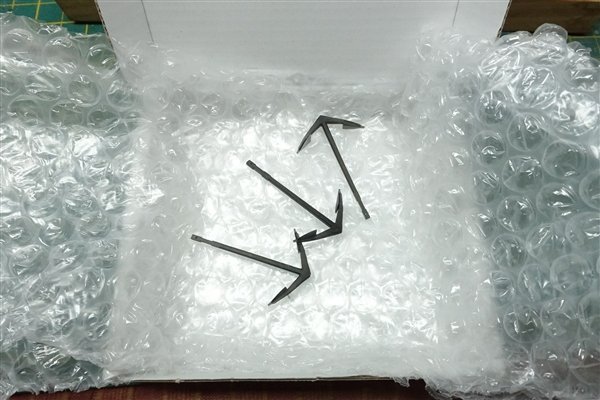
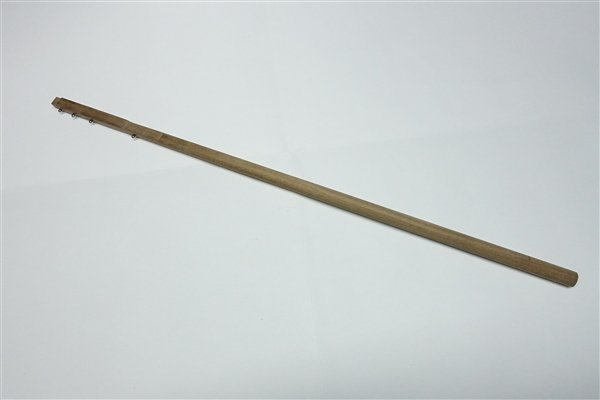
Thanks to all for the likes and comments. The replacement anchors have arrived – thanks Chris- snugly packaged in bubble wrap in a box. Knowing how fragile they are and how clumsy I am, I will leave them in the box and not make them up until it’s time to put them on the ship. Lower Mast I’ve been studying the plans, Lees, and Steel trying to make sense of it all. Lees hasn’t much, if anything to say about the masting of cutters. Steel seems to suggest that cutters and other small vessels have lower masts and topmasts in one but was that always the case? The rigging plan in the kit and the RMG’s photos show that Trial’s lower mast is rigged conventionally with shrouds coming from the head. Steel says that masts made of a single tree (as I presume cutters' masts were) are tapered as per made masts, between the partner and the head. He also says ‘Masts made of single trees and cheeked...tapered at the upper part as made masts, with the same number of hoops on the head. The cheeks below the hounds are either woolded or hooped…’. From this I take it that not all single-tree masts had cheeks fitted and being made from a single tree, would not require hoops or wooldings. Later on in a section on cutters, Steel says that bolsters are only fastened to the mast if the lower and topmast are made in one piece. There also appear to be no battens or hoops on the head of Trial's lower mast. Trial as a cutter seems not to fit with any of these definitions but since it was an experimental ship, perhaps that is to be expected and maybe I'm over-thinking it anyway. Comparing the kit plans and Steel based on his formula for cutters of deck length + beam + depth in hold multiplied by 3/4 Kit Steel Length 275mm 295mm Diam 8mm 9mm I will use the kit dimensions, they being close enough and the lower height will make it easier for display. The kit plan shows no taper on the lower mast, it being 8mm all the way up to the lower head but I will taper according to Steel: Q1 Q2 Q3 Head 7.9mm 7.5 6.8 6.0 The square section of the head is marked up made and filed to size. The cap tenon should be square rather than round as shown in the plan. It is an easy matter to square off the round hole in the cap. The mast is next put in the lathe to develop the taper. Very little sanding is required to reduce the 8mm dowel to size. I jumped the gun in adding the eyebolts aft of the head thinking that it would be easier now than later, forgetting that they wouldn’t allow the crosstrees to pass so had to be removed. The area below the head is flattened at the sides to take the bibs which are sanded thinner on the inside face towards the lower end and rounded on the edges. The trestle trees fit together nicely and are more robust than in previous kits that I have made. Despite Steel’s description, I think that bolsters would protect both ropes and trestle trees from wear and I will be adding adding them. Trestle trees and cap sit at an angle fore and aft to allow for the rake of the mast Now there will probably be a similar process of naval navel-gazing for the topmast! David
- 152 replies
-
- 10
-
-
- Vanguard Models
- Cutter
- (and 2 more)
-
Looking forward to seeing you mods to the kit. Your skills have shown that you will be more than up to it. A(nother) thing that puzzles me is that there is no binnacle shown. Were they not present on cutters? David
- 152 replies
-
- 2
-
-
- Vanguard Models
- Cutter
- (and 2 more)
-
Many thanks Andrew. I'm looking forward to seeing how you progress and your interpretation of the deck and fittings. Too late for me to steal your ideas unfortunately! David
- 152 replies
-
- 1
-

-
- Vanguard Models
- Cutter
- (and 2 more)
-
Thanks Thukydides. If you take it slowly you can feel the drill as it begins to come through to the inside bulwark. If it's not in the right position retract and drill from the inside out. David
- 152 replies
-
- 5
-
-
- Vanguard Models
- Cutter
- (and 2 more)
-
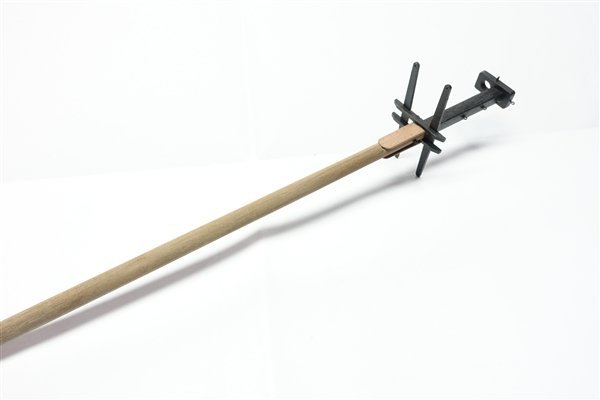
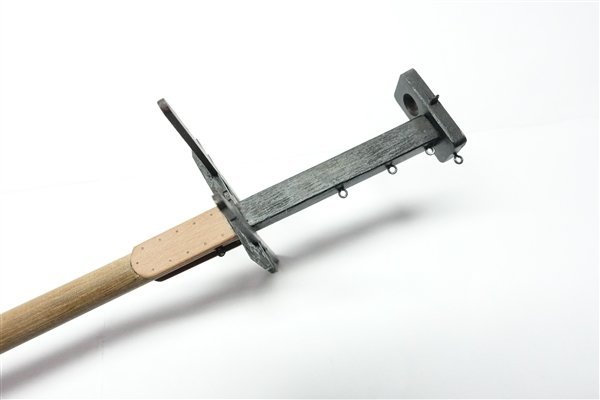
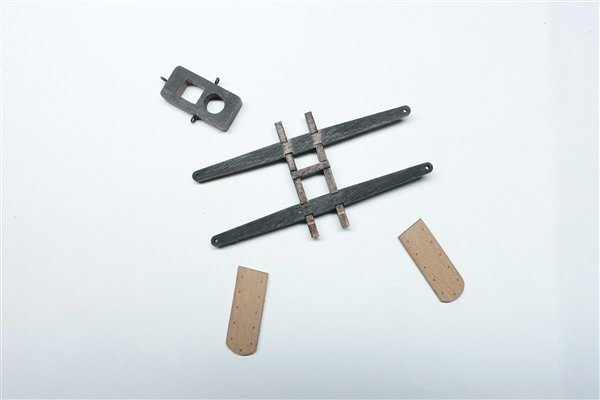
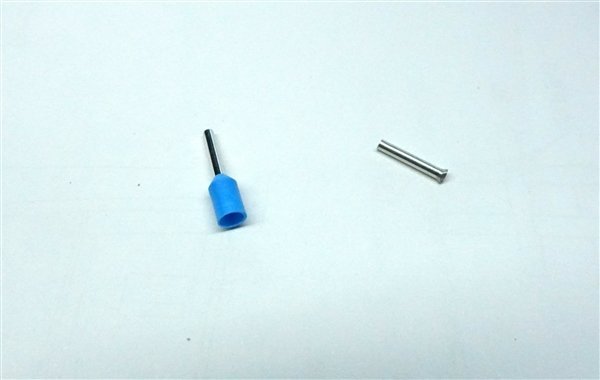
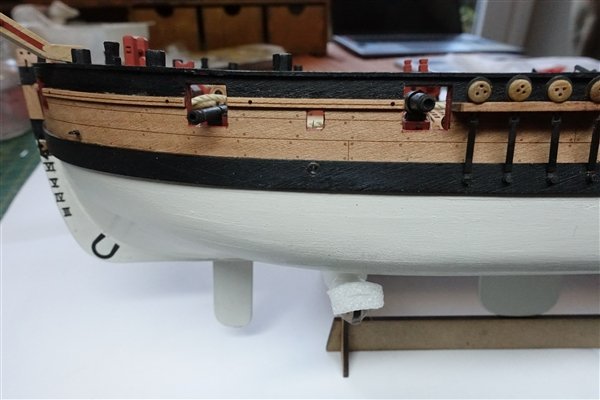
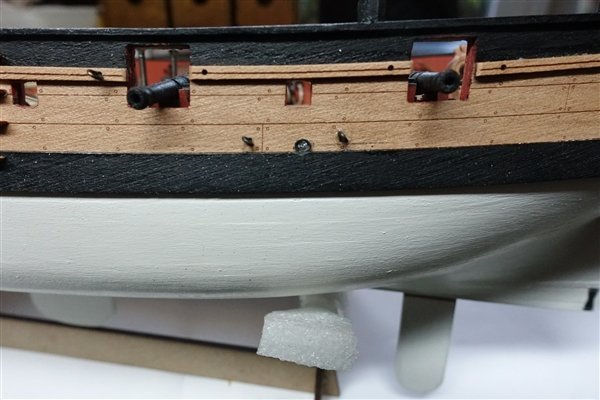
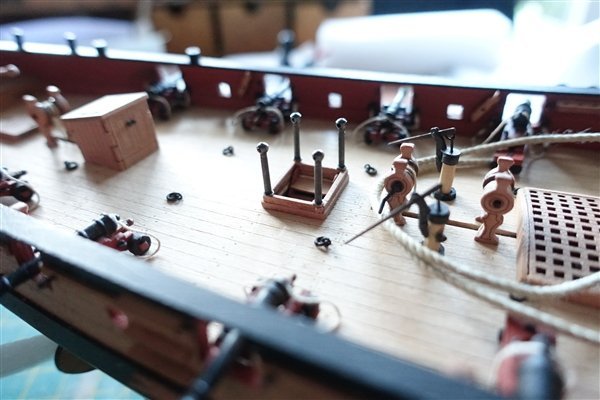
Thanks all for the likes. I’ve been wondering about drainage. I can’t imagine that water would be allowed to slosh around on the open deck, the only escape being through sweep or gun ports. There is no provision for scuppers in the kit and they don’t show on the RMG plan ZAZ6418 but there are three visible on the contemporary RMG model SLR0150. I have decided to fit scuppers according to the model. I use the same cut down 2mm electrical connectors that I have used before on Diana and Fly. The flanges are bent back further to lie flush with the sides of the hull and then cut to length. I carefully drill holes in the sides of the hull at an angle to intersect the deck at the bulwarks and slide in the ‘scupper’. The scupper nearest the bow exits on the top edge of the wale which requires extra care. With the sheave added at the bow and the main sheet bar to the fife rail, this completes work on the hull
- 152 replies
-
- 8
-
-
- Vanguard Models
- Cutter
- (and 2 more)
-
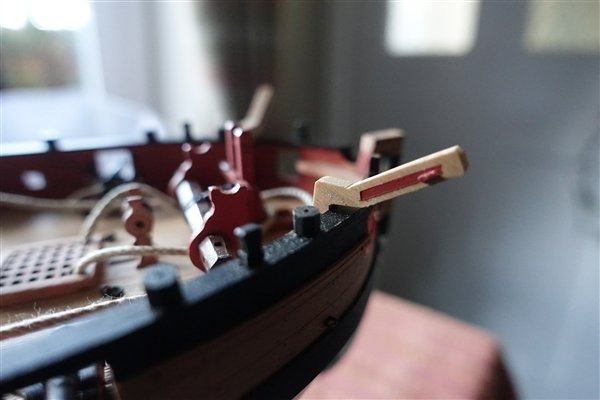
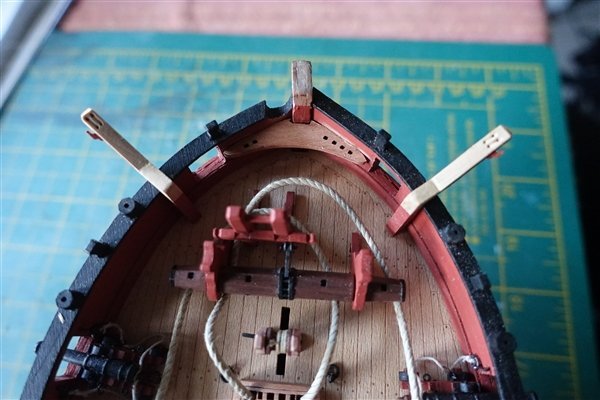
I have painted and installed the catheads. The placement was lined up using a copy of the deck plan laid across the deck and the position marked on the plansheer. The cleats were made from 1mm section boxwood shaved and shaped using a scalpel. The flat brass PE stanchions for the rail around the companionway didn’t look the part to me so I’ve replaced them with some I had from CMB – I think they are AL parts. Wide angle distortion has made them look out of alignment in this shot. I moved onto the anchors. The anchors are 3D printed and come with the pearwood stocks in two halves. The slots need some filing out for the shaft to fit comfortably into the stocks and I also spent some time tapering the face of the stocks to give an overall width at the ends of 3mm. Tree nail and bolt positions were marked on the stocks and touched in with soft pencil and given a coat of matt varnish to seal. It was putting on the hoops, cut from black card that led to disaster. I held the anchor stock gently in a vice but caught it as I was preparing another hoop and snapped the shaft. A small piece flew off and there was nothing left to glue back to. I also damaged the second anchor trying to insert the ring into the eye despite having carefully drilled the hole to take the 0.8mm wire ring I made to replace the PE ones. As I have found out these 3D printed anchors are extremely brittle. Chris is kindly sending me some replacements but I shall have to be very careful with these and possibly rethink the sequence in which they are assembled. Thanks again for looking in and for the likes and encouraging comments David
- 152 replies
-
- 10
-
-
- Vanguard Models
- Cutter
- (and 2 more)
-
Thanks very much Andrew. I really liked your idea of shading some of the planking before final painting off-white. It looks really effective. David
- 152 replies
-
- 4
-
-
- Vanguard Models
- Cutter
- (and 2 more)
-
Thanks Kevin. I'm happy with the final boxwood scratch catheads which are now painted and installed - pictures to follow in next log entry.
- 152 replies
-
- 3
-
-
- Vanguard Models
- Cutter
- (and 2 more)
-
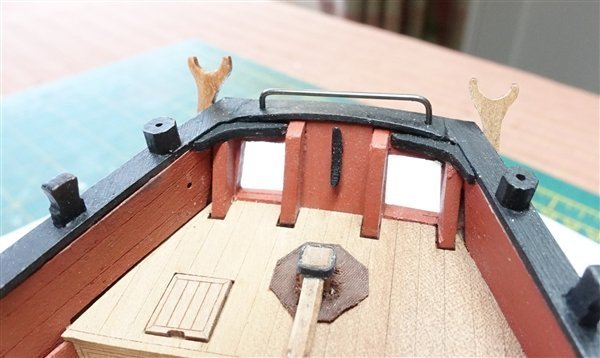
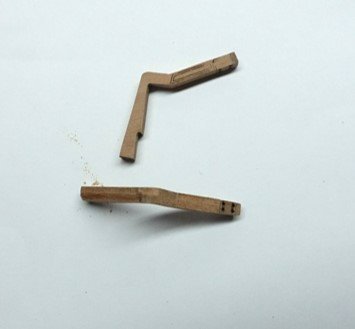
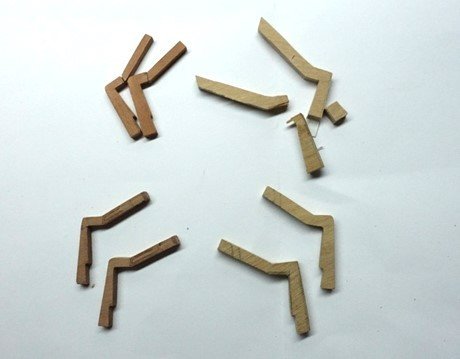
I have been finishing off and fitting all the deck fittings, including the mast partner and the rings at the base of the elmtree pumps that I had missed. All pretty straightforward. I have been looking at the catheads and was never happy with the way they had turned out. It is a simplified construction made from two pieces of 1.5mm laser-cut pear. The sheaves are added in two parts, upper and lower and finally an engraved cap is glued to the end. I wasn’t as careful as I should have been in removing the char from the sheaves which left them with a taper and the pre-cut sheave holes were made perpendicular to the cathead arm rather than at an angle to allow the anchor cables to fall vertically. I had several attempts at remaking them from pearwood strip and boxwood sheet. The pearwood strip versions didn’t work out. My first try with boxwood ended in pieces because I had cut them with the grain but orienting the cuts cross grain gave a piece less prone to breaking. After cleaning them up with a flat file, I was happier with the result. Pearwood and first boxwood attempt on the top row. The original version and final boxwood version are left and right on the bottom row. I need to finish them off with final sanding and paint them in some suitable colours. I am assuming the catheads on cutters have similar cleats and eyebolts fitted to other larger ships of the period but I need to check before fitting them. Thanks again for the likes and comments and for looking in David
- 152 replies
-
- 9
-
-
- Vanguard Models
- Cutter
- (and 2 more)
-
Sizzolo I think that you do yourself a disservice. That 'lived-in' look takes a lot of skill to get right and your launch looks perfect.
-
Thanks Dave B and No Idea for your kind comments and encouragement David
- 152 replies
-
- 3
-
-
- Vanguard Models
- Cutter
- (and 2 more)


