


dunnock
-
Posts
529 -
Joined
-
Last visited
Content Type
Profiles
Forums
Gallery
Events
Everything posted by dunnock
-
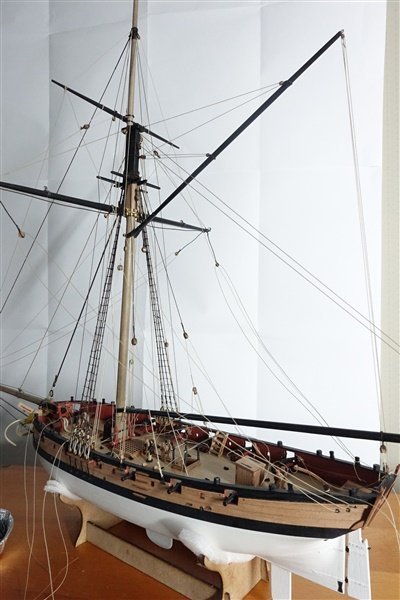
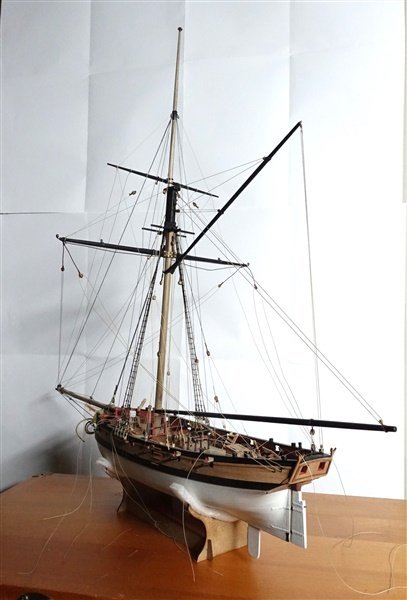
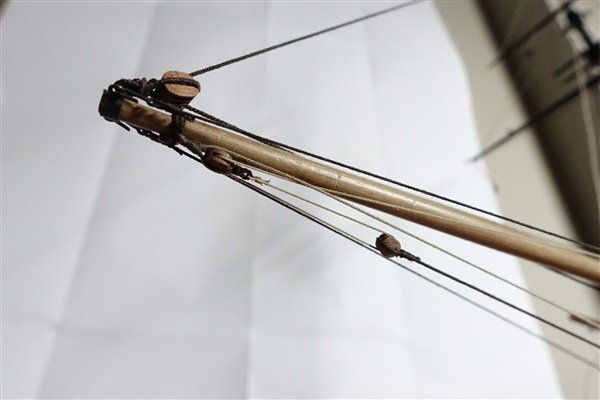
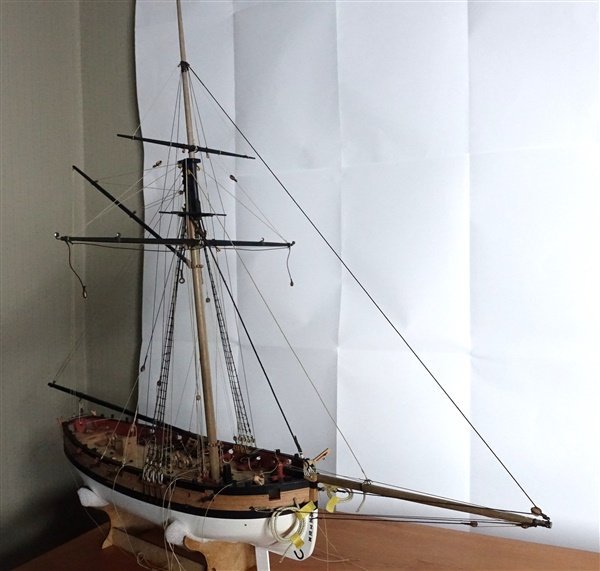
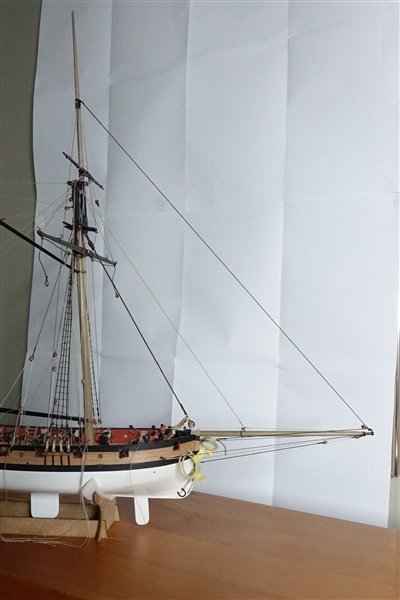
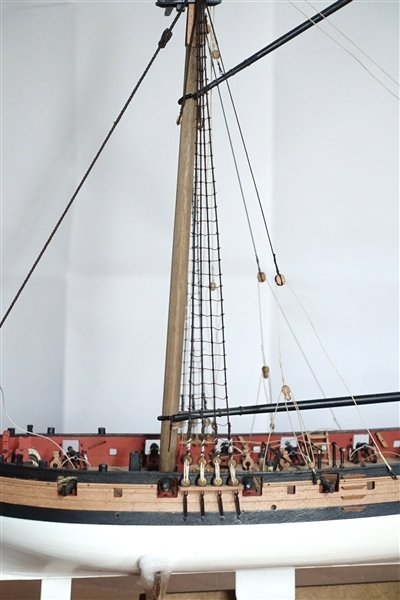
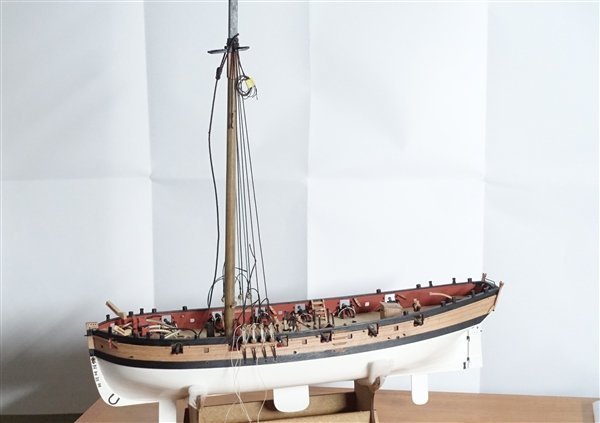
Thanks for the likes and encouraging comments. Forward Braces Looking at the main yard braces, the plans show they are tied off to the bowsprit bitts but I’d tied off the inhauler to one of them. I reviewed all my bowsprit rigging against the photos of the model in the RMG and other references. In the photo its not clear that an inhauler is present and Marquardt refers to Lever saying that on small ships, an inhauler was not rigged. For this reason (and for expediency), I have decided to remove the inhauler. The main yard braces are 0.66 times the appropriate stay. I used 0.6mm rope. They are spliced around the end of the bowsprit, lead through the brace pendants and back through the outer sheaves of the triple block and tied off at the forward bitts. The topsail yard braces, using, 45mm rope, are spliced around the yard arm, run through 3mm blocks hooked into the eyebolts at the cranse and run back to the crossbeam of the forward bitts. I left both sets of braces slack but some more work is needed to make them hang satisfactorily. I use dilute pva and weight the rope along its length with paper clips. Aft Braces Prompted by Andrew, I considered the aft braces. There are none shown on the museum model of Trial but all the of the cutters photographed by @tkay11 show them fitted and Marquardt also lists them. I decided to fit them. Looking at the photos of the 1763 cutter, the aft braces are shown threaded through a sheathed hole in the stern and I’ve tried to copy this effect. An eyebolt is glued in far aft and two holes drilled in the side forward of the eyebolt. The eyes of ringbolts are Ca’d over the holes to add to the effect. The braces are rigged in a similar manner to the fore braces with pendants on the main yard and spliced to the arm of the topsail yard. The main yard brace is tied to the eyebolt, passes through the brace block, leads through the forward hole in the stern and is belayed at the aft cleats. The topsail brace goes through the aft hole and is belayed to the nearest timberhead. Like the fore braces, I have left them slack. Bowlines Bowlines are not present on the Greenwich model and maybe it’s not appropriate to add them when there are no sails on the model. Marquardt says that the main yard bowlines are threaded through a double block on the end of the bowsprit. Although I tried, I could see no way of adding a block easily with all the other rigging in the way so I decided to added only topsail bowlines. These lead through thimbles stropped to the end of the ‘sprit. The thimbles are difficult to see with all that's going on. The bowlines are hitched to the yard in-board of the yardarm cleats with a timberhitch and lead through the thimbles. I was running out of suitable belay points up front so they are tied off to the winch standards. I used 0.35mm rope. I’ve gone beyond my original rigging plan and the model now looks very busy around the bowsprit. and I’m calling a halt. It’s time to tidy up all the trailing ropes and make some hanks and coils, not one of my favourite bits of the build. I’ve tried various methods of making hanks but I struggle to make them look very convincing. Ah well onwards.. David


- 152 replies
-
- 10
-

-
- Vanguard Models
- Cutter
- (and 2 more)
-
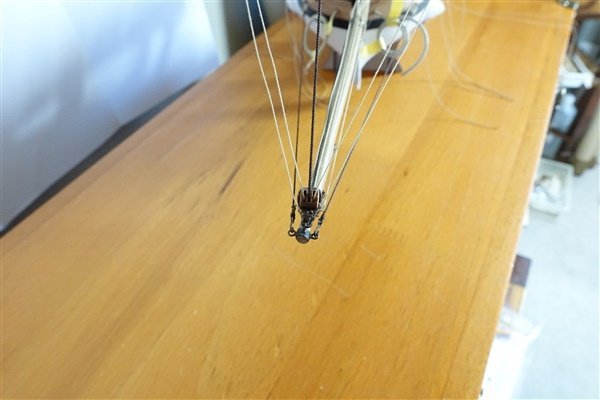
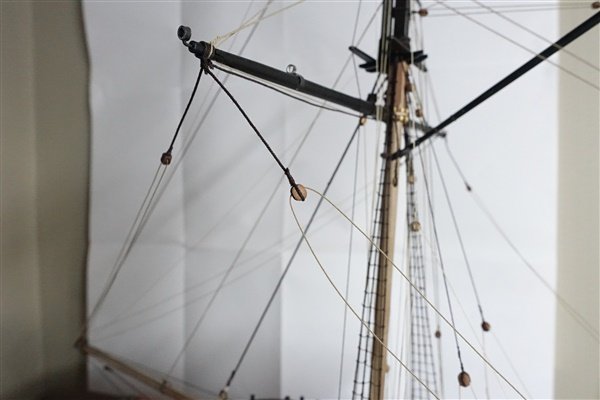
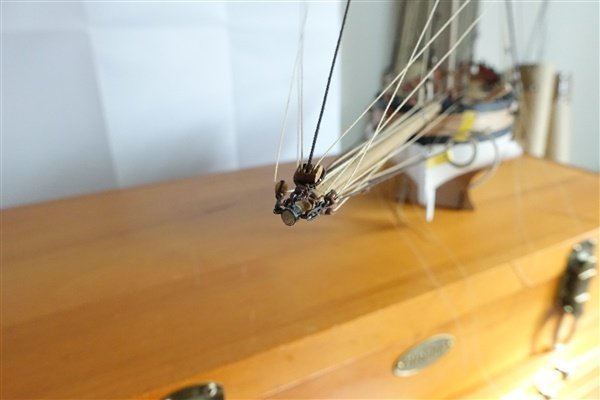
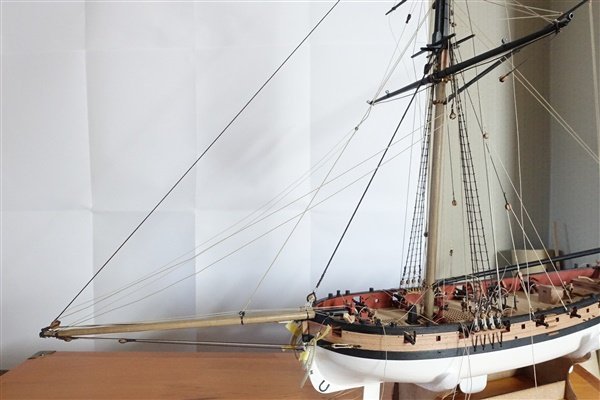
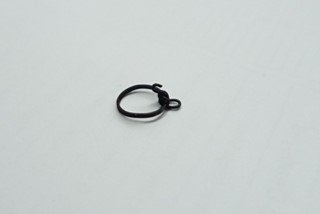
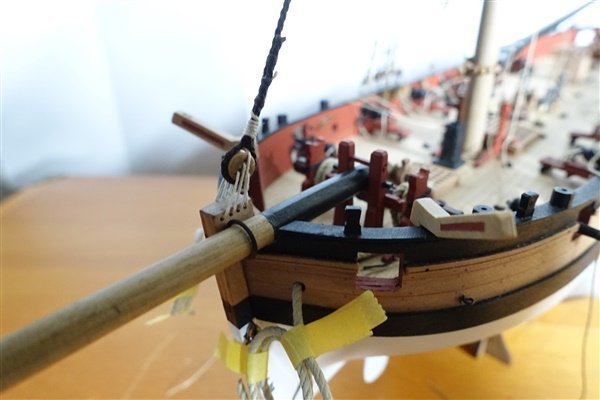
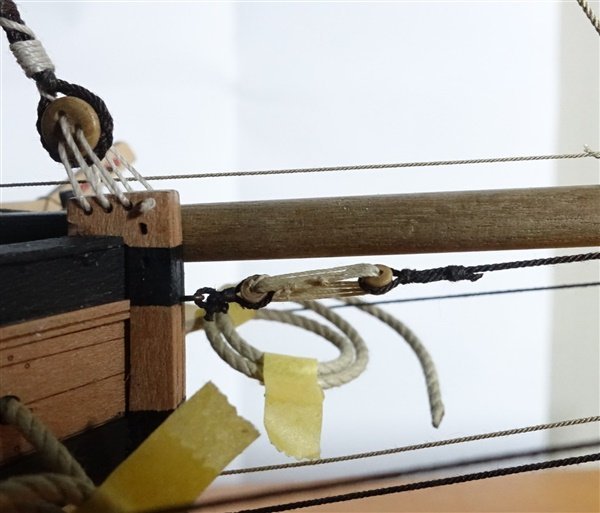
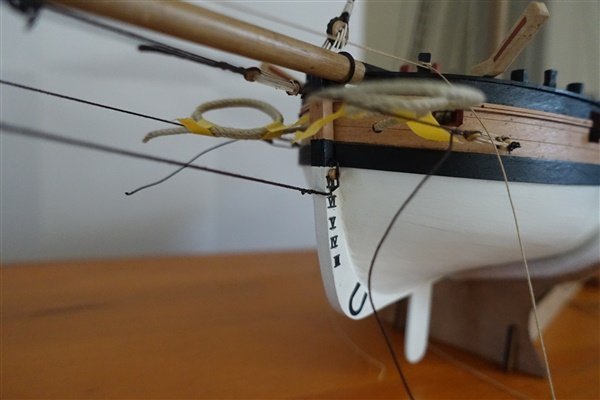
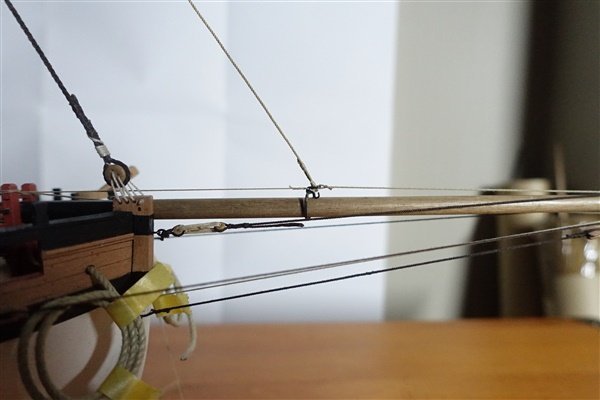
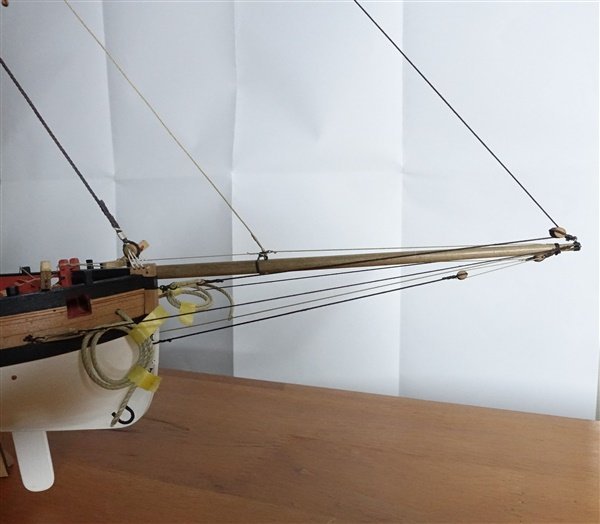
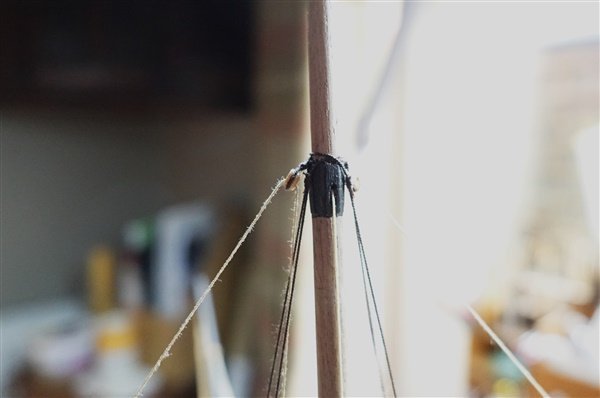
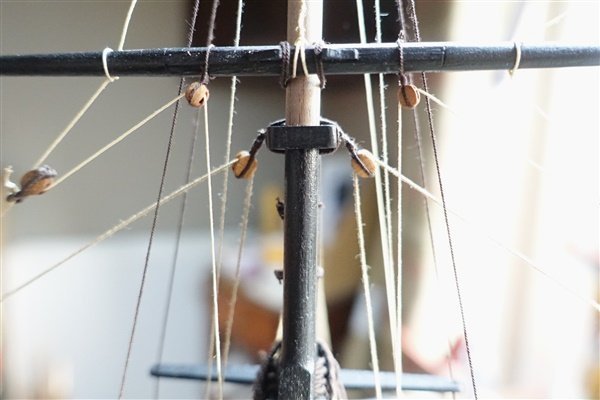
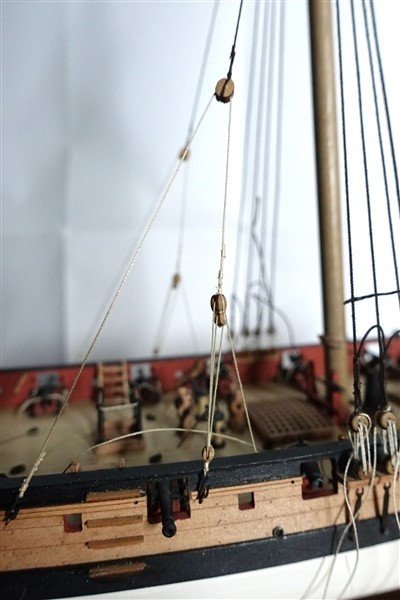
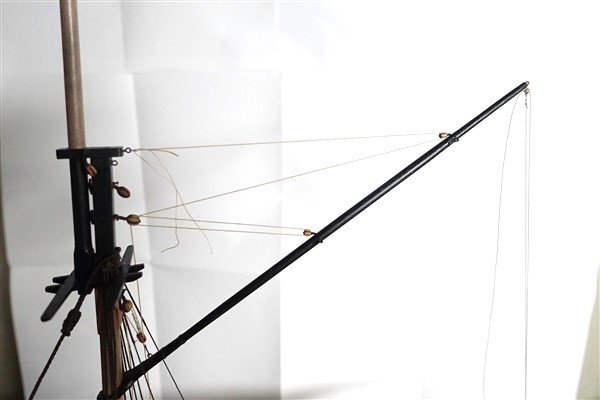
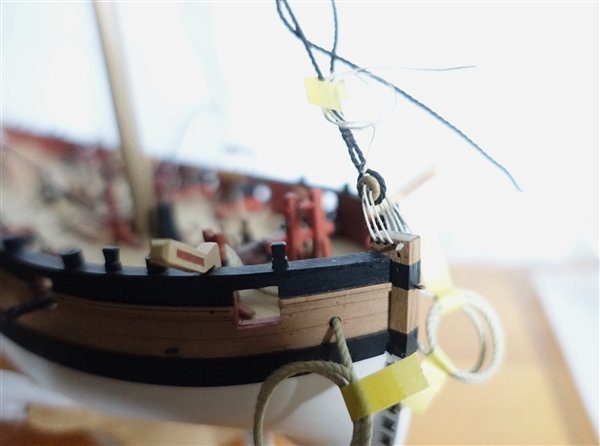
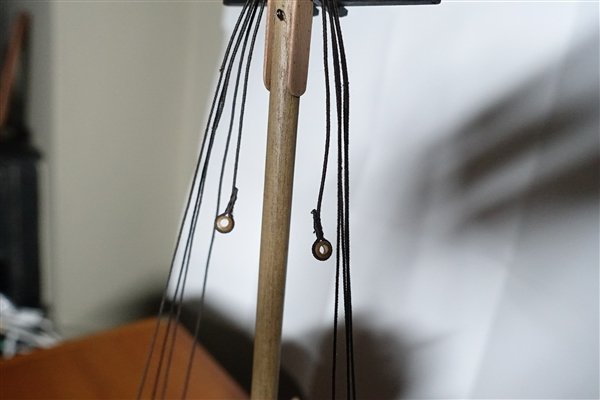
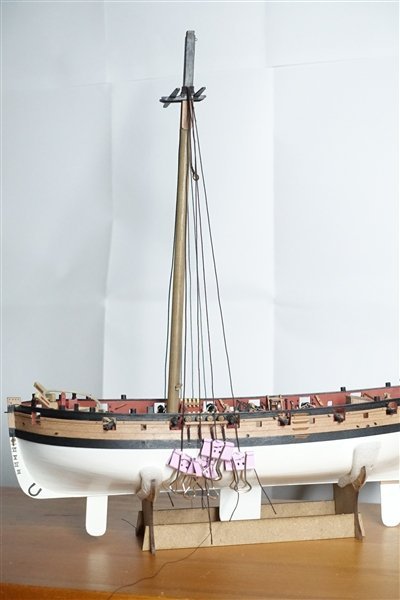
Thanks for the likes, encouragement and helpful comments The Ropes at the front End I made the traveller some time ago and kept it safe with a note on the plans not to forget it.. Not a part of the kit, so I made it from a piece of brass strip, formed around a dowel a quarter larger than the thickest part of the bowsprit. I threaded a hook on to the traveller before soldering the ends together . The ring was made from wire bent to shape and hooked on to the ring. In hindsight, The whole assembly was treated with brass black. I don’t think the hook is required but having nothing else to go on, I modelled it on the one I made for Diana. I haven’t used the PE pieces supplied in the kit to tie off a lot of the rigging at the forward end of the sprit but followed @Blue Ensign's description of the cranse in his Alert log.. Heat shrink tubing and three 2mm eyebolts were used. A 5mm triple block was tied to the top eyebolt for the topmast stay and main braces. The topmast stay is made from 0.45mm rope served for 40mm below the mast. The stay passes through the centre sheave of the bowsprit block and ends in a thimble. A 0.25mm lanyard connects the stay to a thimble seized to the eyebolt at the stem. The braces are made from 0.45mm rope with a hook seized in the forward end and a thimble in the after part. They are hooked into the eyebolts at the bowsprit and lashed with a lanyard to the thimbles tied to eyebolts in the bow just beyond the catheads. Before final fitting, I checked that the anchors don’t foul the braces when raised or lowered. There is no bobstay in the kit plans but one is clearly shown on the RMG model and I have tried to copy its form. I spliced a 4mm block to the bowsprit. The bobstay is 6mm rope and has a 4mm block seized in the forward end and passes through a hole in the stem and is spliced to itself. The tackle is 0.35mm rope and I have tied it off at a timberhead in the bow. The jib halyard, outhauler and inhauler took a bit of working out and then I realised that I had forgotten to form a sheave in the bowsprit. For the halyard, I am again grateful to BE and his Alert log for his excellent analysis and explanations taken from Steel and Marquardt. I seized a 4mm block in a served strop which is spliced around the starboard side of the mast cap. The halyard is psliced to the ring of the traveller passes through the block at the mast cap and ends in a 4mm double block. The fall is made from a 3.5mm single block hooked to an eyebolt into an eyebolt on the deck beside the mast. The outhauler is spliced to the traveller ring and passes through the sheave in the sprit and leads back to the bowsprit bitts The inhauler is tied off to the starboard side of the bitts. The halyard falls Sorry I forgot to take a lot photos of the intermediate stages. I will try to do better On the home straight now with just braces and the anchor to add and then a lot of tidying up before making hanks. David

- 152 replies
-
- 7
-
-
- Vanguard Models
- Cutter
- (and 2 more)
-
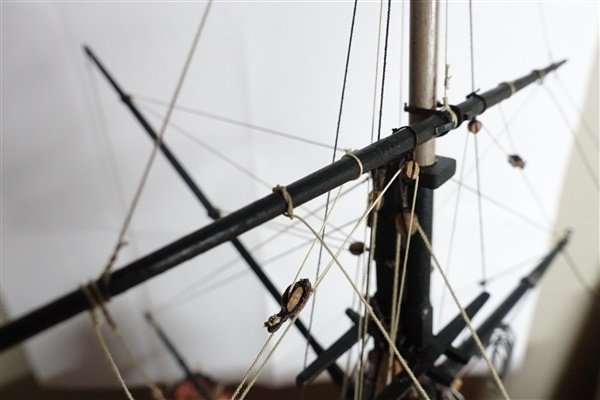
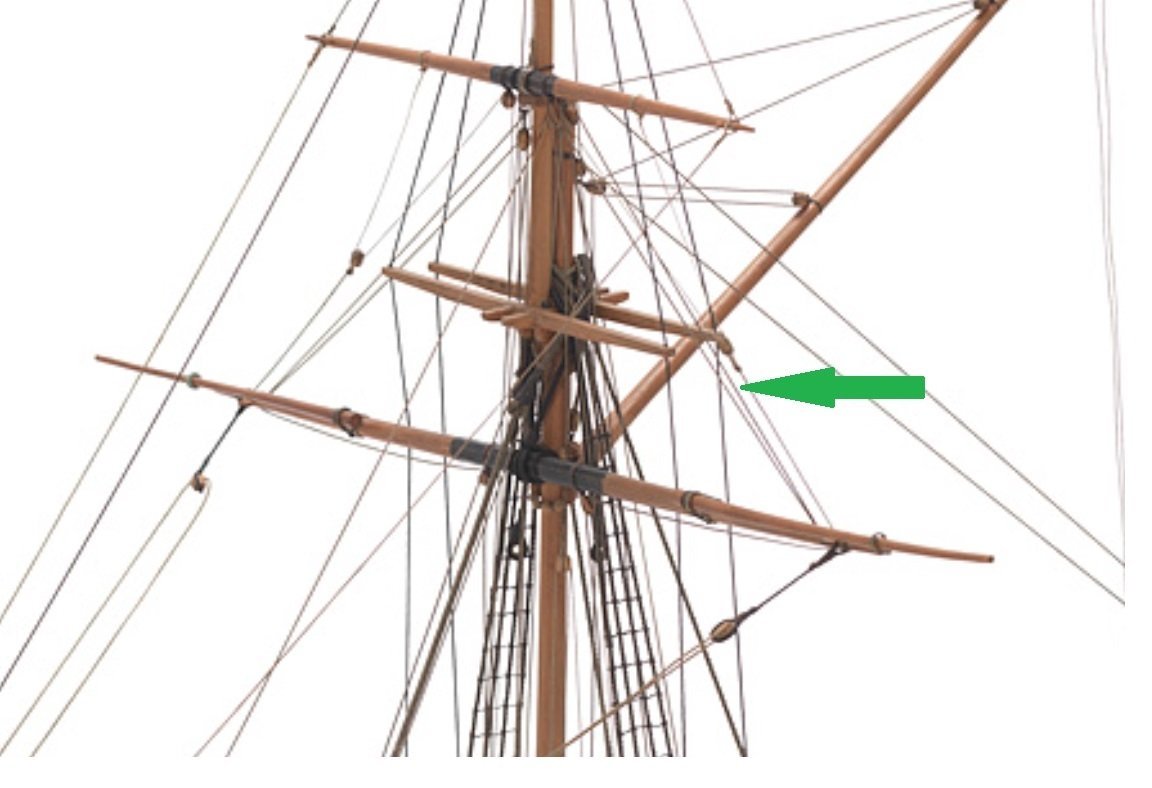
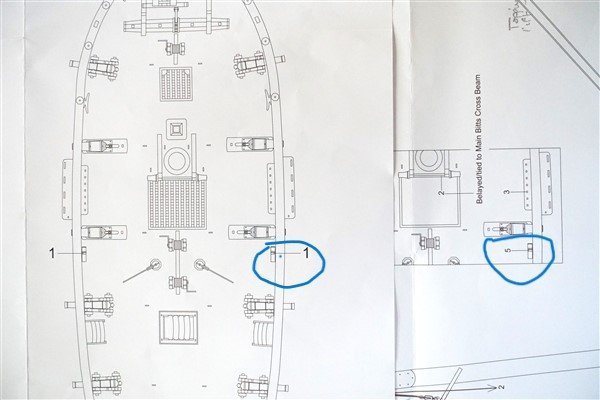
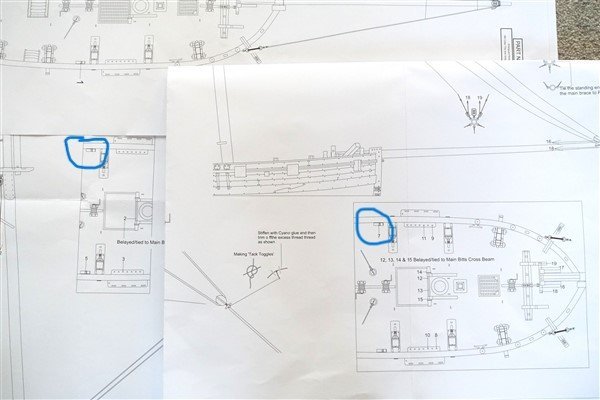
Thanks Thukydides and Andrew for your inputs. Thuky this is bit of rigging I mean- sorry for not being clear. The arrow indicates the ropes in question which I think run up to a block on a long strop at the cap and then probably down to the main bitts as you say. Perhaps the fixed end is tied to a bolt on the cap runs through the sheave on the yard, up to the block at the cap and then down to the bitts. But what is it for? Andrew, I was wondering about the the braces running to the stern and was undecided about fitting them. I think that if I can make a convincing job, I will add them presuming the fixed end is tied to an eyebolt at the stern. I'm not sure what you mean about the stern fillets. I have brought the flag halliard down to the bar on the stern transom. David
- 152 replies
-
- 1
-
-
- Vanguard Models
- Cutter
- (and 2 more)
-
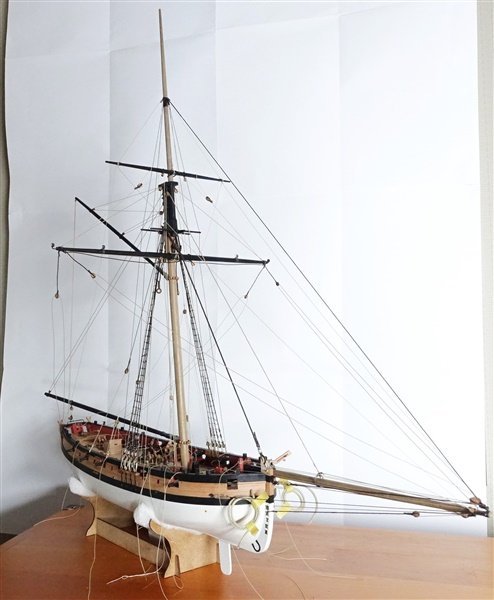
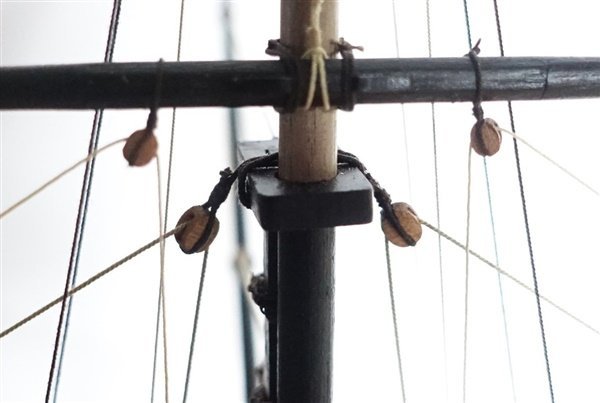
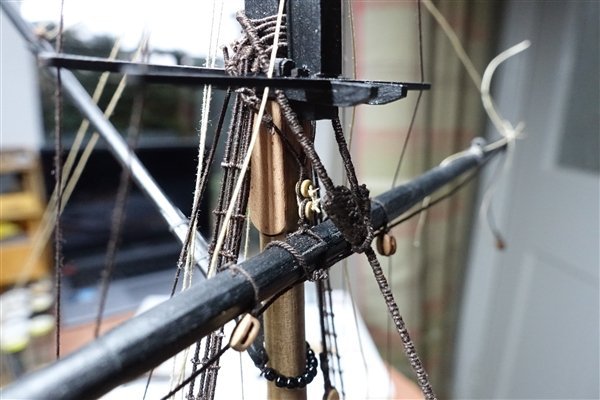
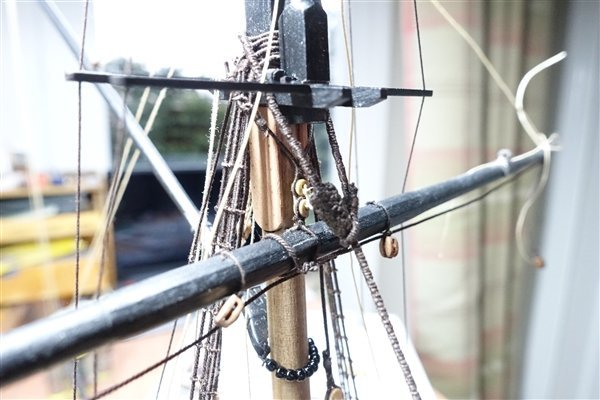
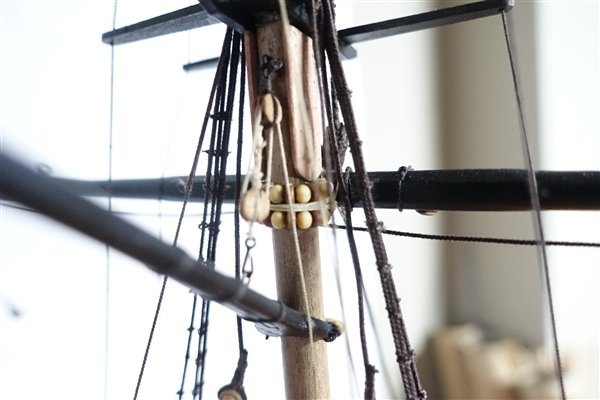
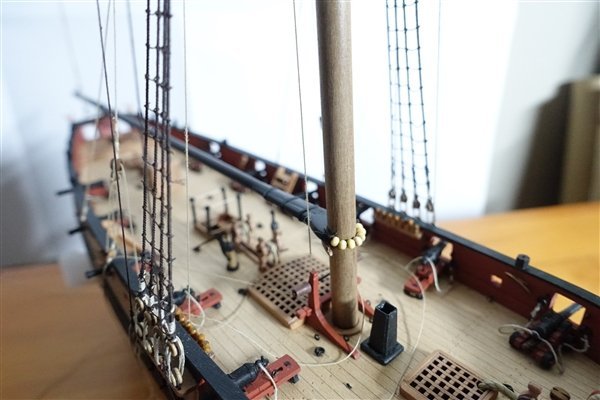
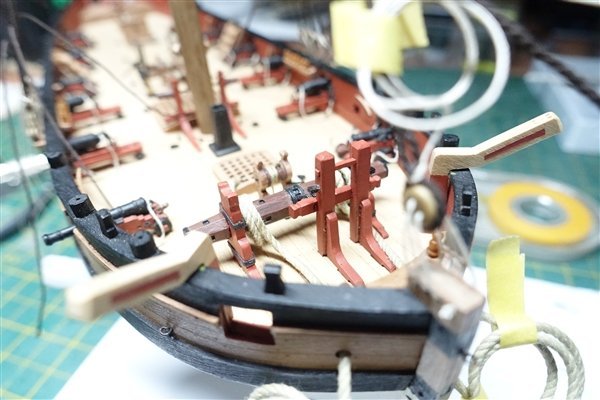
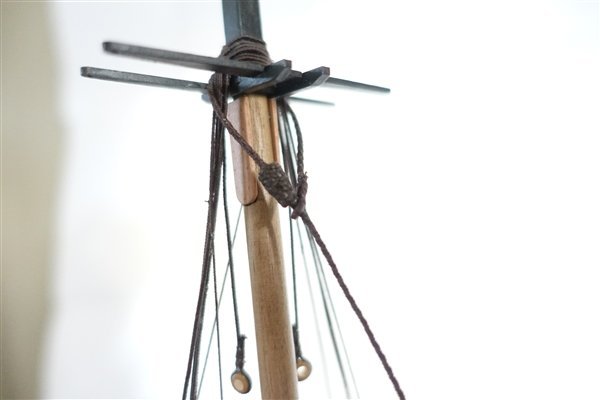
I have redone the parrels for a third time, staining them with walnut wood dye to darken them and take the shine off. I’m back from a very windy trip to Scotland and the ropes have arrived from Canada so rigging can continue. First though, I’m still puzzling about the main yard and its parrel. I found a copy of Marquardt’s 18th Century Rigs and Rigging in the UK so splashed out for it. In the section on cutters, his drawing on page 132 shows the yard running on a horse with a halyard running down to the deck. The kit plans show that the main yard floats free of the mast on its sling but the RMG model shows both a sling and parrels. I don’t understand the reason for fitting both since if the yard is on a sling, it can’t easily be raised or lowered so why fit parrels? I planned to follow the rigging on the model of Trial as closely as I can, so I will leave the main yard with parrel and sling but I’m not sure that it makes much sense The main yard lifts are fitted using 0.6mm rope. They feed through the 4mm blocks stropped to the mast cap. Tricky tying them to the small belay pins that I’ve used but with a bit of dilute pva and patience, I got there in the end. I forgot to take photos at the time so the next two shots also include topsail rigging. The Topsail Yard Like the main yard, I pinned it in place to make it easier to rig. The topsail yard tye is looped around the yard and passes through a sheave in the mast head. There is a 4mm double block spliced in the end. The fall leads to a block hooked into the eyebolt on the port channel and is tied off to the aft cavel cleat. Topsail Lifts are tied to the yard ends run through the thimbles at the mast head and down to the pin racks. The topsail sheet is set up with an eye and leads through the sheaves in the yardarm to the crossbeam of the main bitts. The clueline is timber-hitched to the yard and runs through a 4mm block toggled to the sheet and then up through the block on the yard and down to the outside of the main bitts. There is another conundrum relating to the RMG model of Trial. The photos taken by @tkay11 show a second set of sheaves in the main yard. It’s difficult to see, but it looks as if two ropes run through each sheave from a block stopped to the mast cap. I presume that the rope runs to the deck but I can find no reference to this piece of rigging in either Lees, Steel or Marquardt. I added this second set of sheaves when I made the main yard but I can't rig them until I can be sure how it runs. I have left fitting the bowsprit until last because once fitted, turning the model becomes more difficult but it can’t be delayed any longer. Thanks for looking in and for the likes. David


- 152 replies
-
- 5
-
-
- Vanguard Models
- Cutter
- (and 2 more)
-
Thanks Glenn and to others for their likes. I've been working on the half hull for the last week or so but fresh supplies of rope have now arrived so I'll be coming back to Trial (guilty as charged 😉) after my trip to Scotland for a bit of birding and hill-walking next week. David
- 152 replies
-
- 4
-
-
- Vanguard Models
- Cutter
- (and 2 more)
-
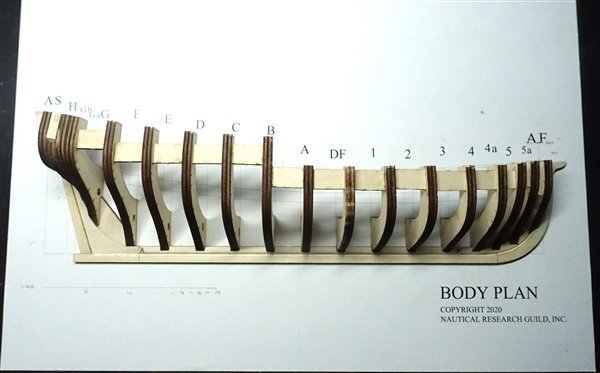
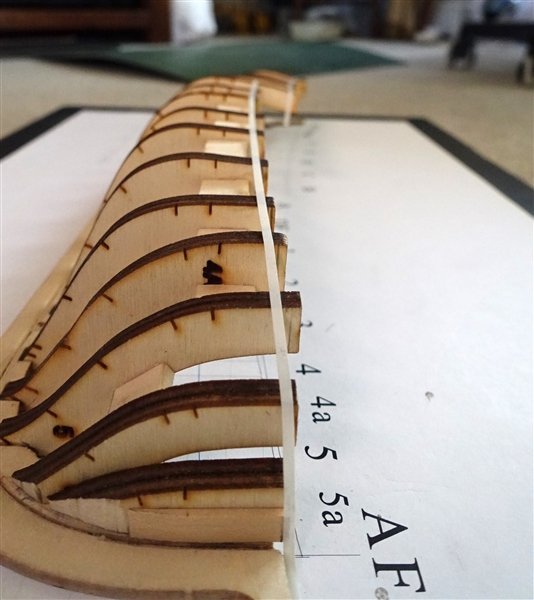
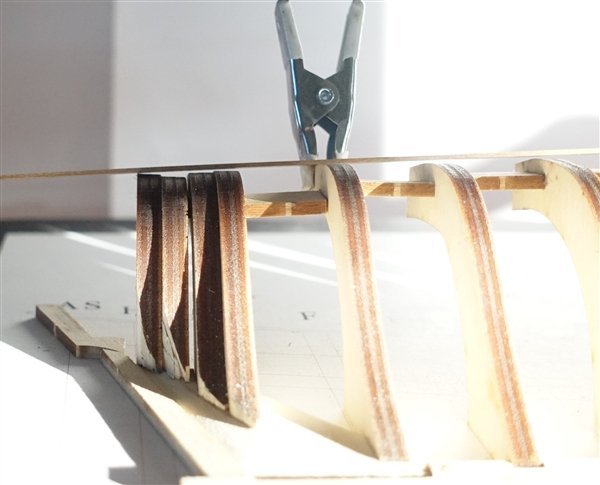
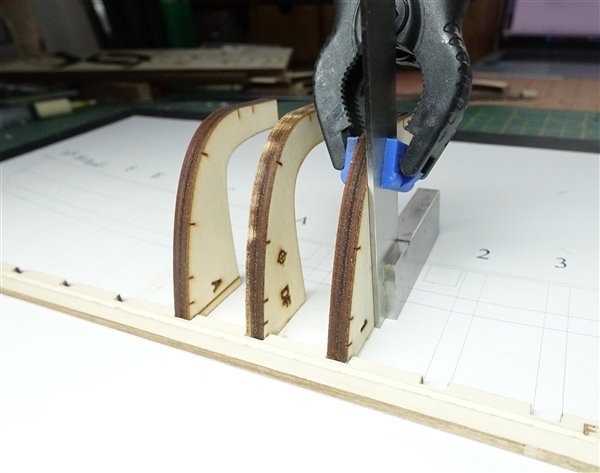
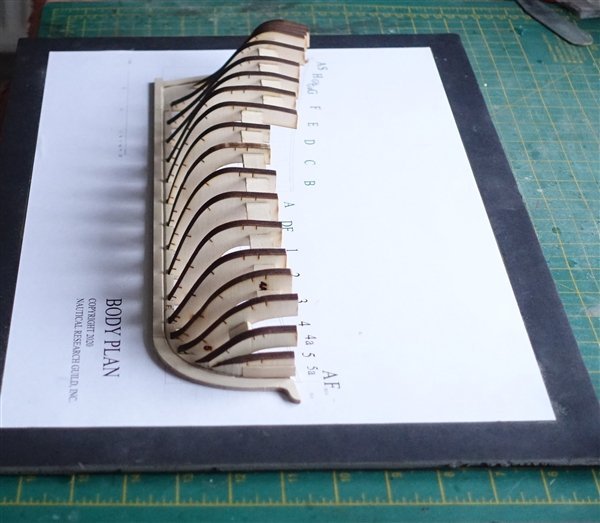
I used white charting tape to establish the line of the top rail and was surprised at how much had to be trimmed from the tops of most of the frames. Compared to the instructions and Toni’s log I had quite sizeable chunks to remove. I checked and measured several times and then realised that Toni's frames sit higher in the keel than on my version because as Toni says, he forgot to cut deeper notches. I carefully sawed through the frames, even so several spacers came loose and had to be reglued. The top edges were sanded to finish. Checking the run of the frames before starting the fairing process there are 4 that are low: 1, D, E and Gb. The top of frame 5a was also finished below the level of the toprail so this was built up too. These are built up with pieces of 1mm limewood strip. Now it’s time to create a lot of sawdust but I will take a break until the weather improves because it needs to be done outside. In the meantime I will return to finish HM Cutter Trial because fresh supplies of rope arrived from Canada the other day. Thanks for the likes and for looking in David
- 16 replies
-
- 9
-
-
- half hull
- Half Hull Planking Project
- (and 2 more)
-
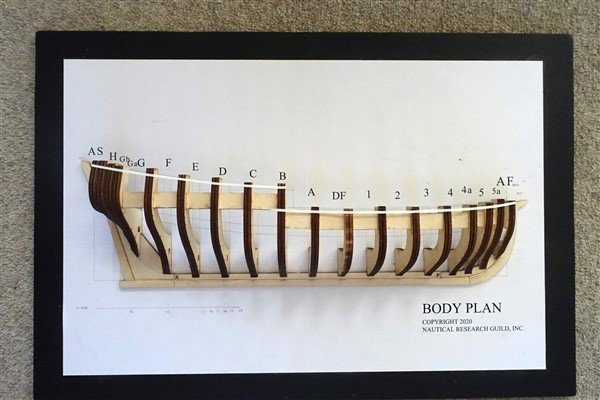
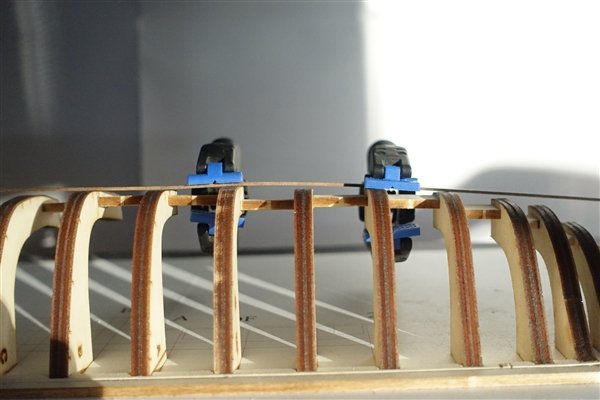
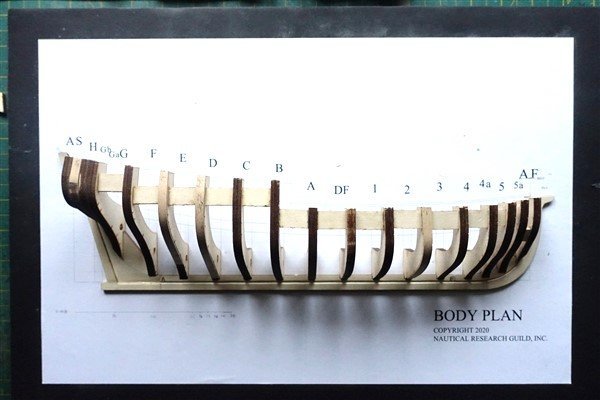
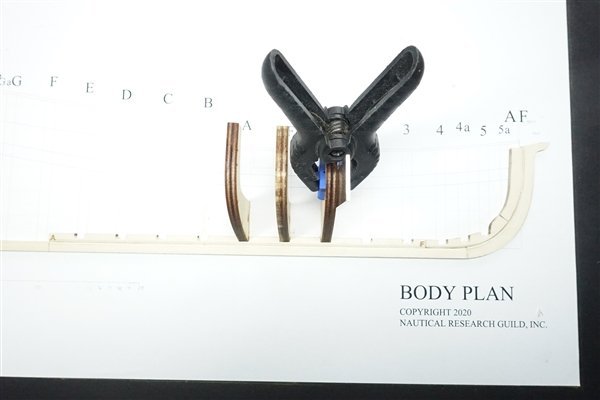
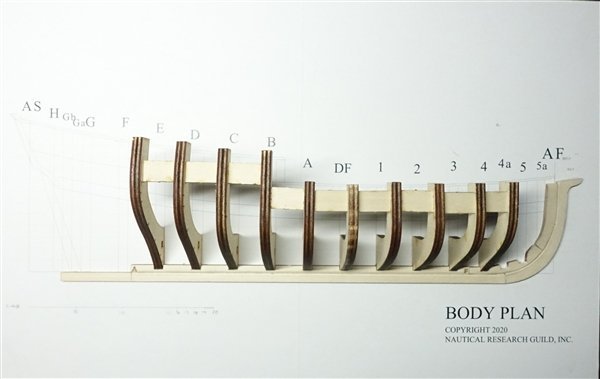
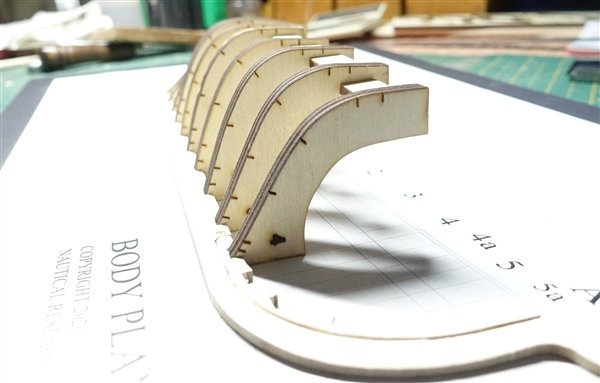
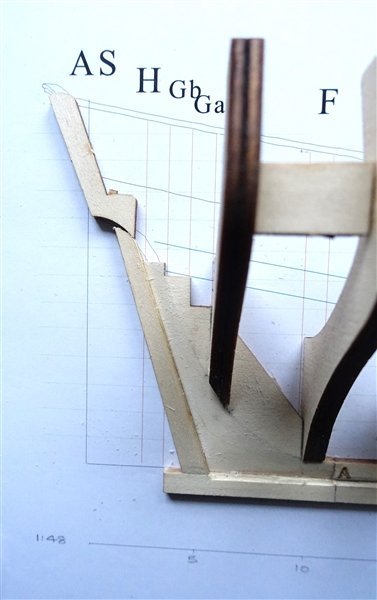
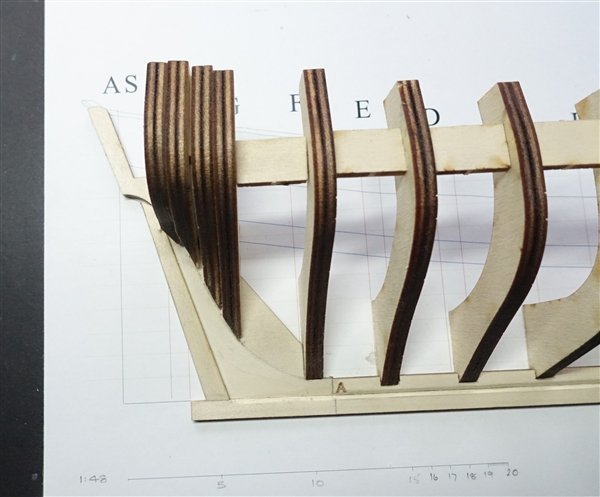
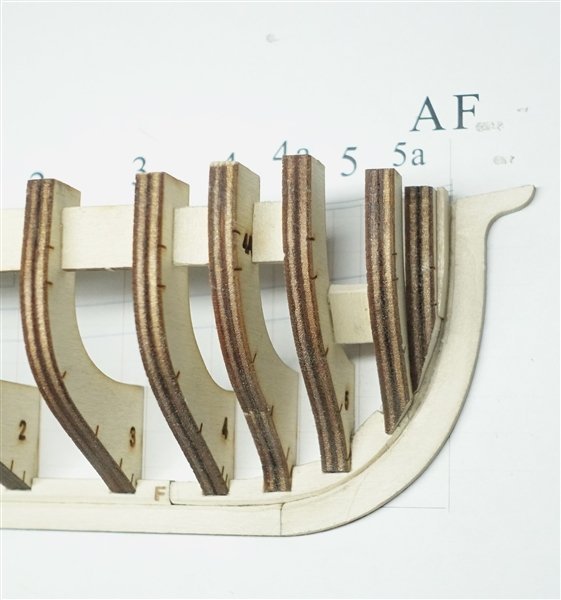
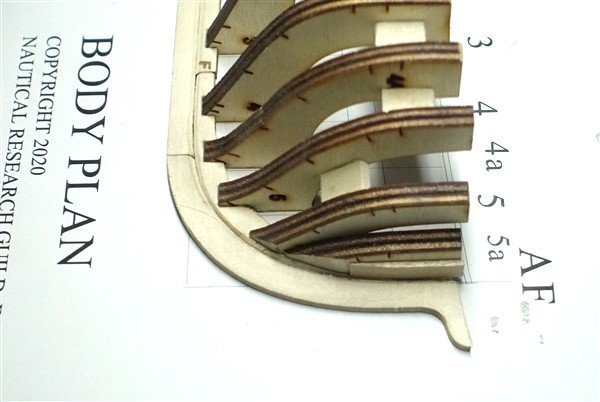
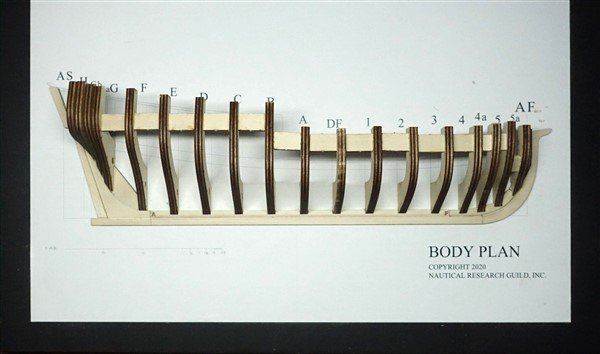
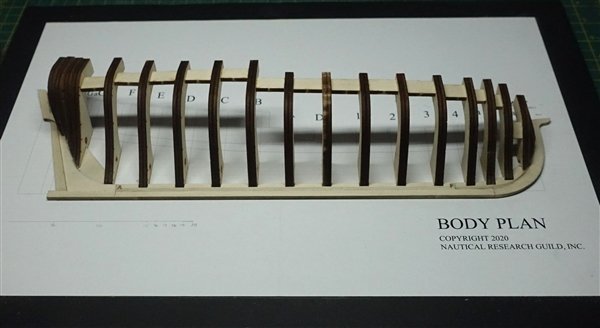
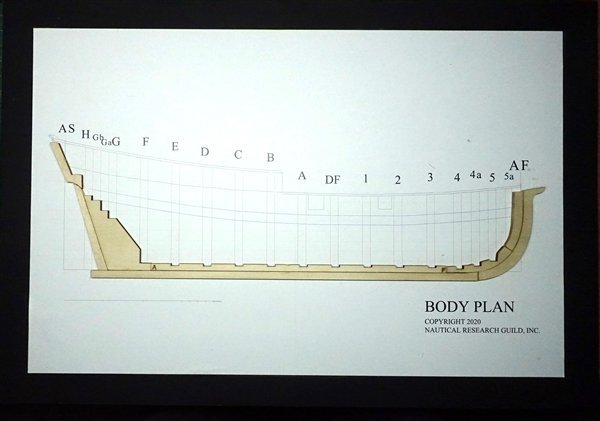
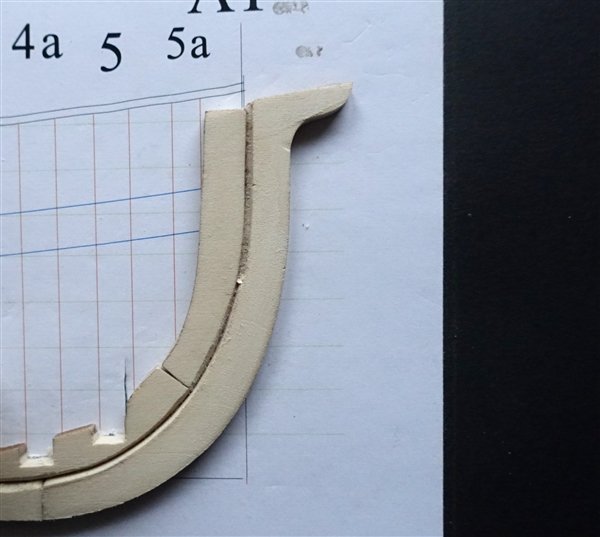
Before beginning to fit the bulkheads the notches in the keelson need to be cut closer to the rabbet. This is simple enough with a sharp scalpel. The central bulkheads are added first with spacers to provide extra bracing. Bulkheads 1 to 4 and A to E are straightforward and progress is quick. The spacers require a little work to fit snugly. The stern bulkheads are tackled next but before that can be done, the deadwood has to be sanded back. Bulkheads G and H are used to mark the bearding line and the wood aft of this is sanded out to meet the depth of the rabbet at the keel. Immediately below the deadwood the keel a 90ºnotch is cut. The deadwood, sternpost and transom piece can now be glued to the baseboard. I forgot to take a separate shot of this stage but below shows bearding line, deadwood sanded back and frames F and G installed. The frames F to H can then be fitted together with their spacers, including the filler pieces Ga and Gb. Frames G, H and the filler pieces are trimmed at the lower end to match the bearding line. The basswood ply splinters quite easily when they are trimmed. I will need to cut back frame H a little further but that can be done during fairing. The stem requires a bit more work. The slots for 4a and 5 needed deepening a little. A notch has to be cut in the stemson for bulkhead 5a and the lower end of the frame trimmed to run close to the rabbet. 5 and 5a are then fixed in place with a spacer. A further filler piece, 5b is provided which is glued onto the stemson and the fore of frame 5. A final filler piece is required that I made from a piece of 1.5mm limewood strip to fill the space up to the bow rabbet. The instructions recommend leaving the transom off for the moment because it is vulnerable to damage. With the framing complete, this marks the first milestone of the half hull project. The lines of the hull are quite pleasing in this shot but the flat bow gives me some concern for the planking. Thanks for looking in David


- 16 replies
-
- 11
-
-
- half hull
- Half Hull Planking Project
- (and 2 more)
-
While working on my latest model, HM Cutter Trial from Vanguard Models, I realised that it would be a good idea to have some further practice in hull preparation and planking before embarking on another full ship project. I’m hoping that this project will teach me some new techniques and help me make a better job of planking than I have previously. I am using the suggested ¼” foam-board as a base on which to build and used spraymount to glue the body plan to it. Laying out the keel, keelson stem and stern, it is clear that some trimming and fitting of the bow keelson is needed The whole kit is made in basswood making it pretty easy to cut and sand. The risk is taking off too much so slow and easy is the rule. Once the stemson is cut to length and sanded to fit the keelson lines up pretty well with the drawing. I didn’t need to fettle any of the slots for the bulkhead on the main keelson but the bow keelson required a bit of a tickle with a sanding stick. The rabbet is marked up with a pair of compasses. I measured the thickness of the sheets provided for planking which varied between 0.85 and 0.99mm. I took 0.9 as a rough mean and marked the rabbet. I used a chisel to remove the rough, then a file and finally scraped it clean with a razor blade. The keel and keelson were straightforward as a simplified 45º angle was used for the whole length. The stem is a little more difficult to do with a changing angle as the rabbet rises up the the stem pieces. However the manual provided and Toni’s log Half Hull Planking Project - Planking Downloads and Tutorials and Videos - Model Ship World™ provide plenty of useful detail and photos to help work it out Once the rabbet is cut, the keel and stem pieces can be glued up. I have used minimal glue to fix the pieces to the board to make it easier to remove the model when completed. At this stage the deadwood and stern pieces are not glued . David

- 16 replies
-
- 7
-
-
- half hull
- Half Hull Planking Project
- (and 2 more)
-
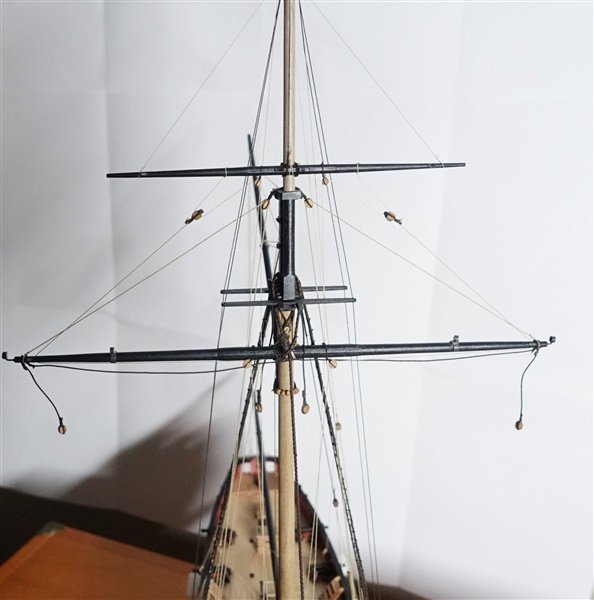
Main Yard The main yard is pinned and glued to the mast. The sling is made from 0.45mm served rope. An eye is seized in one end and a thimble seized off centre such that the eye sits on the starboard side of the mast. The difficulty is getting the correct length so that there is enough distance to tie the lanyard between the two thimbles on yard and sling. I think that the sling could have been a little shorter in hindsight but I will leave it as it is. The main yard shows a double parrel on the NMG model but Lees says that parrels were superseded by rope truss pendants about 1760. I decided to go with parrels. Tricky to fit making sure that the parrel ropes are not tide up with horses or other lines running down aft of the mast. Now that they are fitted they look slightly over size and too bright. I have stripped back some of the running rigging. I thought that using the line supplied in the kit would be OK but there is quite a contrast between that and the RoS line that I had used for e.g. the flag halliard. It was causing quite a clash to my eyes so I have decided to order more rope and strip out the kit lines. I have also swapped out the parrel beads on the main and driver booms. The beads in the kit were black and shiny and didn’t look right so I have replaced them with some wooden beads from CMB. Like the main yard, now that they are fitted, they look too bright and oversized. I may have to redo the booms or at least darken the trucks so that they are less obtrusive. In the meantime, while waiting for ropes and mulling over parrels, I have begun another project – the NRG Half Hull which I will post later today. Thanks for looking in. David
- 152 replies
-
- 15
-

-
-
- Vanguard Models
- Cutter
- (and 2 more)
-
I hope that I'm not stepping out of line here but Rob Durant @robdurant produced a programme called Picture Resizer and added a link to download on his log for HMS Diana built as Ethalion. I've used it for all my log pictures. It's simple to use and with a setting of 600 for the width, it works every time. David
-
Hi Theodosius, Sorry I missed your earlier post. I have had one of these machines for a few years and find that it works very well. The end pieces look to have been upgraded to something more substantial since my version. The only problem that I have found is that eventually the handles snap if you are tying off and tensioning the rope to them. I have repaired mine by gluing some spare brass sheet to them with epoxy. David
-
Andrew, Nice extra detailing with the added forward hatch and work on the gratings. I like your framing around the slots for the keels too. I missed that detail from the photos but I will try to add it retrospectively. David
-
Hi Jason, I think it is I that have mostly learnt and benefitted from your superb build of HMS Jason and now that you are back, I'm looking forward to your further progress. David
-
Many thanks to Jason, BE and Vladimir for you very kind compliments. David
-
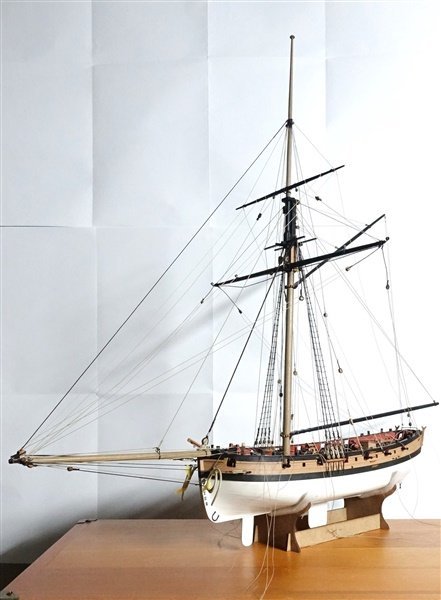
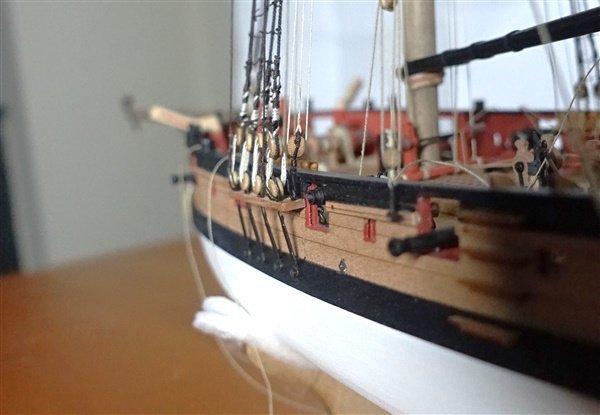
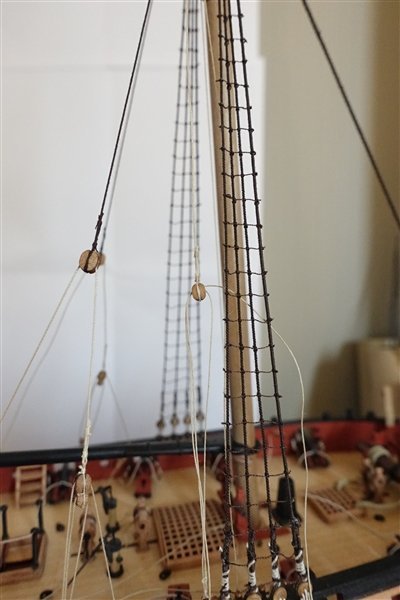
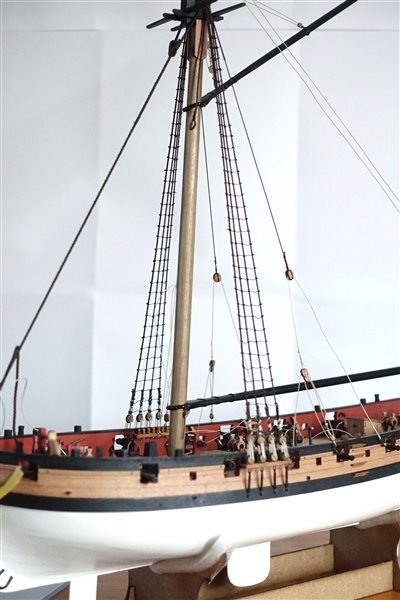
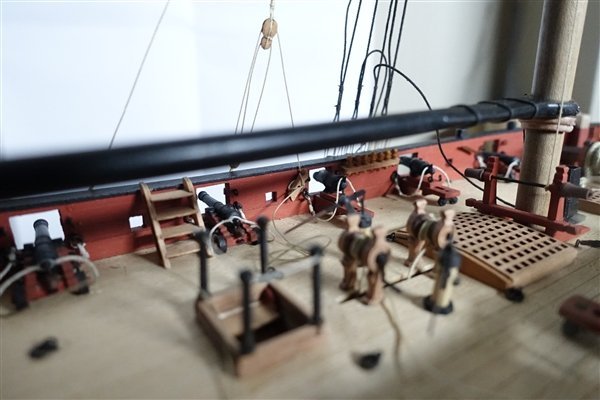
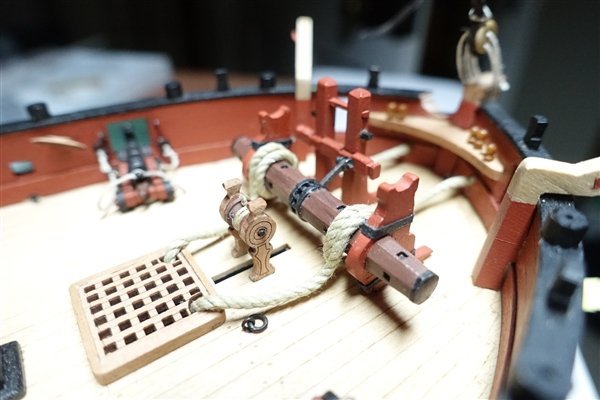
Main Boom Topping Lift Before going to the topping lift, I have repositioned the main yard lift blocks. They are now clove-hitched around the mast cap using 0.45mm served rope - more in-keeping with the way they are shown on the RMG model. The topping lift is first tied to the eyebolt at the mast head, leads through the block on the end of the boom and back up to the single block on the mast. It ends in a single block about 70mm above the rail. The block of the falls is hooked to an eyebolt on the starboard channel. The rope feeds through the block in the topping lift and is belayed at a cavel cleat. Herein lies my dilemma. According to the plan the falls are tied off to the cavel cleat (5) abaft the third starboard gun port. However this is also labelled #1 to which the starboard backstay is tied off. I have never come across two ropes being tied off to the same belay point. Is this correct or am I misinterpreting the plans? Looking further ahead the topsail yard tie is belayed to cavel cleat #7 on the port side. However this is also designated as #1 where the port back stay is already tied off. One solution would be to tie the topping lift falls and topsail yard tie to the nearest belay point on the pin rail. To tie each off to the cavel cleats further aft definitely looks wrong. On photos of the RMG model they seem to be tied off at the rail but I can't see any way of doing this. Any other suggestions, solutions or clarifications would be very welcome. While thinking about this, I have completed tying all the ratlines using Gutterman dark brown thread. First tie every fifth ratline Then fill in the gaps and repeat on other side. Thanks for looking in and as always, for all the likes and encouragement. David
- 152 replies
-
- 6
-
-
- Vanguard Models
- Cutter
- (and 2 more)
-
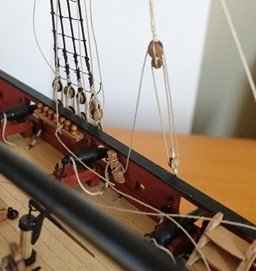
Time flies, I see that it has been nearly a month since I last wrote anything in this log. My wife bought me the set of pearwood blocks from Vanguard for Christmas so work can now continue. Backstays First off is to make the long block. The ends of a 3 and 4mm block are filed square and glued together with pva. A 0.45mm rope is seized on and threaded through the pendant block down to a 2.5mm hook that fixes to an eyebolt in front of the 5th gun port. The block of the falls are hooked into an eyebolt forward of the 4th gun port and the falls lead twice through the long block and are belayed to the cavel cleat. I can now tighten up the main stay lanyard but I will leave finally tying it off for the moment. Driver Boom Parrel beads from the kit are used on both driver and main booms. I was hoping to leave it later in the build but I had to fit the topmast because the mast cap has to be in place to run the rigging for the gaff and I couldn’t fit this without the topmast. The blocks at the mast head were originally tied to eybolts but I removed them and tied them on with strops made from 0.45mm served line. I also added cleats to the forward side of the mast head to prevent the strops from slipping. I will have to remove the main yard lift blocks from the eyebolts and tie them to a strop clove-hitched around the mast cap which I think is as they should be. I have made this awkward now. It should have been done before fitting the driver boom. The lower block of the peak halliard is hooked into the eyebolt on the boom and is fed through the block on the mast and run down to the bar of the main bitts The gaff halliard is seized to the eyebolt on the cap through the blocks on the boom and the double block on the mast head and belayed at the rack on the starboard side. The flag halliard is then set up and the tied off to the bar on the tafferel. The gaff and flag halliards are finally set up together to achieve a balanced tension in the two ropes. This where I got a little puzzled. The plans show the lower block of the flag halliard to be on the starboard side of the bar and then tied off at the port side. The photos in the manual show that the block and the belay point are both on the starboard side of the bar. When it comes to fitting the main boom the latter arrangement makes more sense so this is what I have gone with. Thanks for looking in David


- 152 replies
-
- 11
-
-
- Vanguard Models
- Cutter
- (and 2 more)
-
Hi David, The spirketing runs under the lower sills of the gun ports. I used 1 piece of 4x2mm. David
-
Second DaveBaxt comment. I've never used weathering finishes but have always been impressed by the effects achieved. I will be giving it a go on the next model I make. David
-
Looks very good Dave and a big improvement on the kit parts David
-
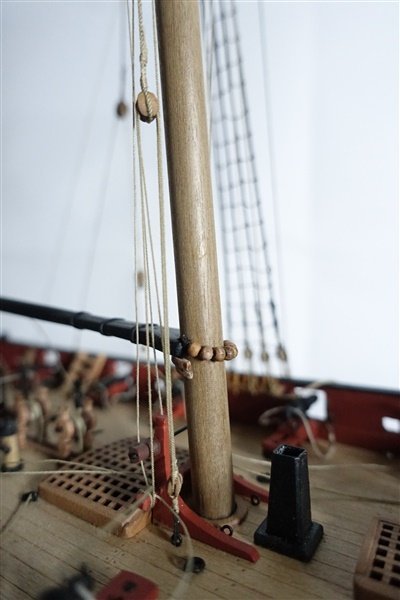
Thank you for all the likes and continuing encouragement. The Shrouds No matter how methodically I try to approach fitting the shrouds, I always find it difficult to get the lengths even. The usual method of making wire jigs to achieve the correct spacing between deadeyes has never seemed to work for me. You think that you have got it exactly right and then you put on the seizings and find that the shroud is too short or too long. It’s a further complication putting on a cross seizing as the first one. This time I have abandoned the idea of jigs and resorted to straight measurements and marking the position of the bottom the deadeye with a thread. I did have to redo one pair of shrouds but for the most part this has worked pretty well. Being a small ship, I found that I could work the seizings well enough with the shrouds attached to the model using my quad hands set up so didn’t bother with my previous idea of stripping the mast and working off model. I have used 0.25mm thread for the lanyards. I thought the suggested 0.1mm too thin. I will not finally fix the tension in the shrouds until later in the process of standing rigging The Mainstay I have tied in the deadeye for the stay in the same way as the shrouds with a cross seizing and two standard seizings. This differs from the RMG model which shows the stay wrapped around itself and seized together down the side of the deadeye. According to Lees this method of fixing the mainstay was used after 1840 but was it adopted earlier on cutters and smaller ships? I used 0.5mm rope for the lanyard and threaded it according to the plan, i.e. starting in the foremost hole of the stem with the knot on the starboard side and working the rope through the deadeye. The RMG model again differs and shows the knot on the port side. The lanyard will not be tied off until later. I have spent a bit of time tidying up the bow fixtures. Following Thukydidies suggestion, I have added a false bowsprit fid using pieces cut off scrap pearwood. I have also added some ‘iron’ strapping to the winch brackets and threaded the anchor cables. The cables are wrapped once around the winch drum before passing them through the hawse holes. Natural drape was induced by brushing with dilute matt varnish. David
- 152 replies
-
- 12
-
-
- Vanguard Models
- Cutter
- (and 2 more)
-
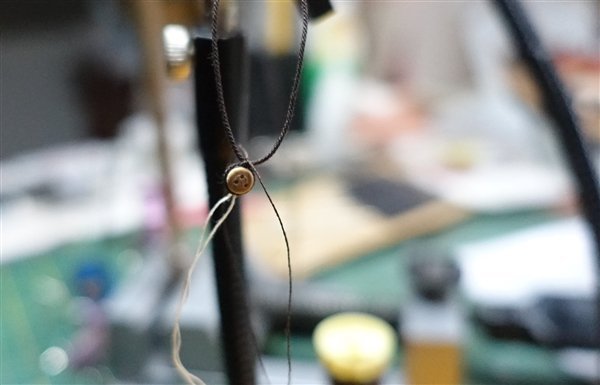
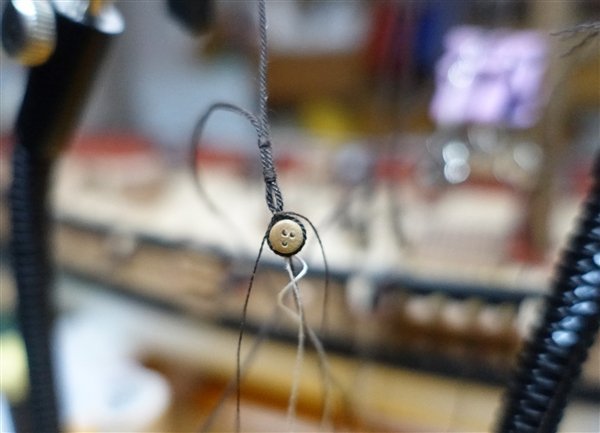
My apologies. In the above post I forgot to acknowledge that the inspiration for using the pieces of styrene tube for the mouse former came after looking at the Alert build by @Blue Ensign In previous builds I have used a piece of shaped dowel as a former and on Diana I used the serving machine to build up layers of a heavier thread. I found the styrene tubing much the easiest method. David
- 152 replies
-
- 3
-
-
- Vanguard Models
- Cutter
- (and 2 more)
-
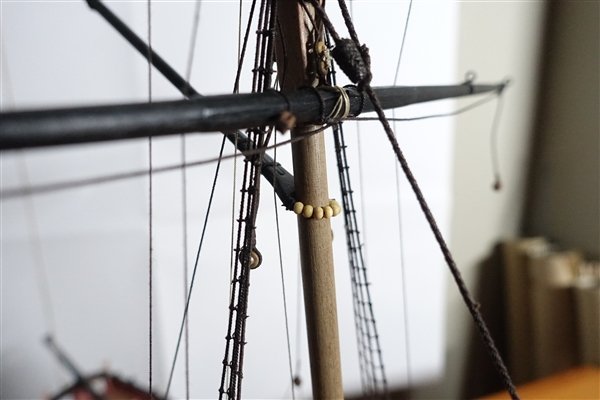
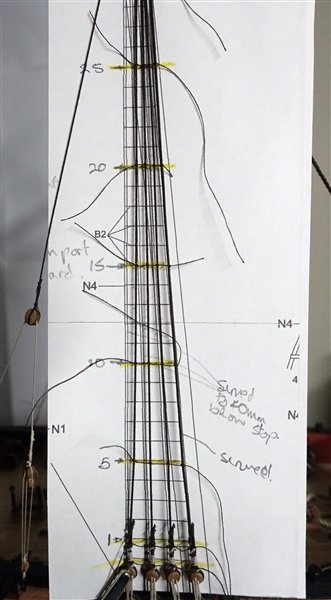
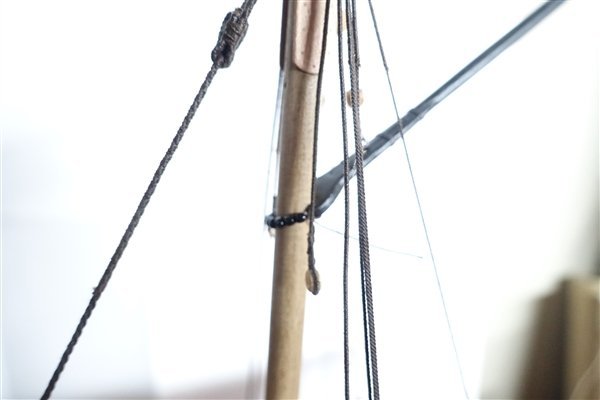
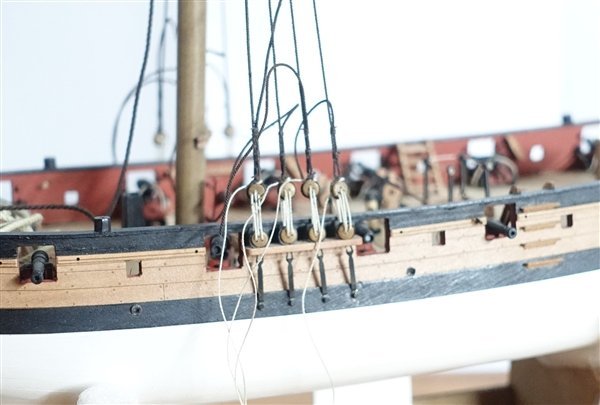
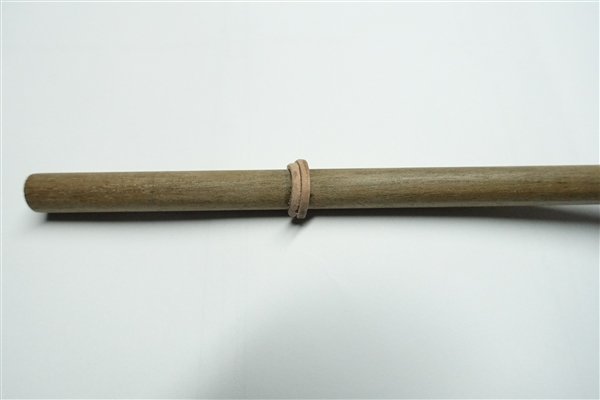
Lower Mast Rigging With only one mast to worry about, there is only a small amount of serving of ropes needed so I decided to prepare all the ropes before rigging them. I have used dark brown cotton ropes from Ropes of Scale for all this standing rigging. First off and not included on the kit plans are the pendant tackles. I used 0.6mm rope and they are fully served with Gutermann dark brown sewing thread . They come to about 1/3 of the way down the mast. I drilled out some 5mm deadeyes for the thimbles but when the pendants were put up on the mast they looked oversized and I replace them with drilled out 3.5mm deadeyes that look more in scale. The 5mm thimbles compared with a 3.5mm deadeye The finished pendants of tackles using drilled out 3.5mm deadeyes Next are the shrouds which I also made from 0.6mm rope. The foremost pair of shrouds are served along their whole length (in reality they were wormed and parcelled before serving) The other three pairs are served to about 8’ (scale 38mm) below the stop of the hounds. The pendants for the running backstays are then fitted. I used 0.45mm rope and made them to be 140 mm long. I also served these pendants for 38mm below the stop. Finally the forestay. This is 1.2mm rope served to 40mm below the mouse. An eye is made in the end of the rope The mouse is not shown on the rigging plan but I can’t see how the eye can be held in place on the rope without one. I made it from two pieces of styrene tube the smaller glued inside the larger. The former made from 1mm and 2mm styrene tube This former is wrapped in stretch fabric sport strapping which has a nice texture to simulate the cross threading. Initially I coloured the mouse in walnut wood stain which dissolved all the glue on the covering. So after I recovered it with fresh strapping, I painted it in dilute acrylic paint. The stay in position with the pendants, shrouds and backstays The mast is not fixed in place yet as, once I've got the correct length, I think it might be easier to fit the deadeyes off-model. Thanks for the likes and continuing to look in David


- 152 replies
-
- 12
-
-
- Vanguard Models
- Cutter
- (and 2 more)
-
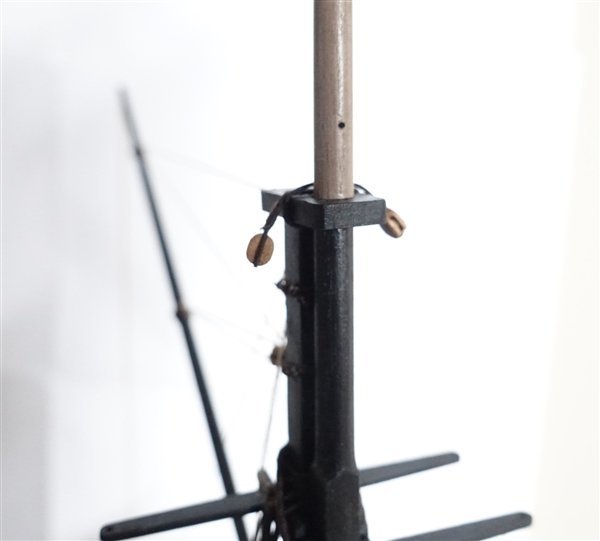
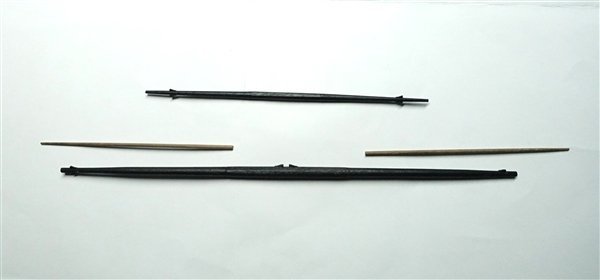
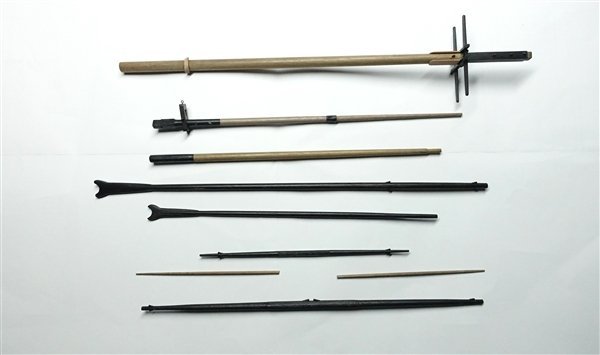
The Yards I have used the plan dimensions for the main and topmast yards but I made the central quarter at the slings octagonal which I think is more correct than leaving it round as per the plans. I wasn’t sure whether sling or stop cleats would be fitted at the slings but in the end decided to go with the pearwood stop cleats provided for both slings and yard arms. I’ve yet to add the stunsail boom irons and I will probably scratch these from styrene tube rather than use the PE brass parts which look a little thin to my eye. Lees also shows that the inner boom irons are only fitted around ¾ of the circumference of the yard rather than being a complete band. The plans show the stunsail booms are 1mm diam. at the ends but 1.2mm was as far as I was prepared to go. I decide to beef up the boom saddle on the lower mast by adding a second piece of pearwood This is the completed set of masts and yards Onward to the lower mast rigging David
- 152 replies
-
- 10
-
-
- Vanguard Models
- Cutter
- (and 2 more)
-
That's a good idea Thukydides. I'll give it a go David
- 152 replies
-
- 4
-
-
- Vanguard Models
- Cutter
- (and 2 more)
-
Thanks Andrew and Thukydides. Your complements are much appreciated. David
- 310 replies
-
- 1
-
-
- Diana
- Caldercraft
- (and 1 more)
