dunnock
-
Posts
531 -
Joined
-
Last visited
Content Type
Profiles
Forums
Gallery
Events
Everything posted by dunnock
-
Thanks Allan for your kind compliments. Lees 'Masting and Rigging of English Ships of War' is a great source of information although sometimes difficult to interpret, at least for me. As to your question, cartridge paper is just a high quality heavy paper about 250g/m2. I think. A lot of card stock seems to delaminate easily when you cut it or fold it, whereas cartridge paper is just one layer. It's so named because traditionally it was used to make paper cartridges. David
- 310 replies
-
- 3
-

-
- Diana
- Caldercraft
- (and 1 more)
-
Thanks Andrew for your kind comments. I'm hoping for accuracy where possible but primarily for a pleasing look to my eye. If the two go together then I'm happy.
- 310 replies
-
- 1
-
-
- Diana
- Caldercraft
- (and 1 more)
-
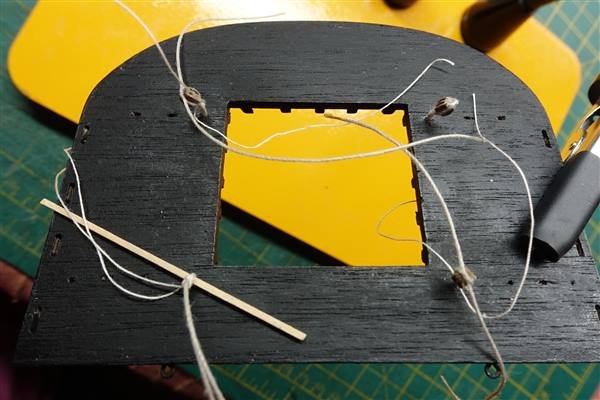
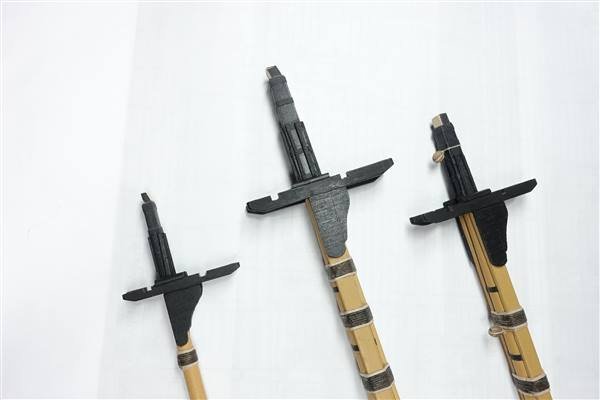
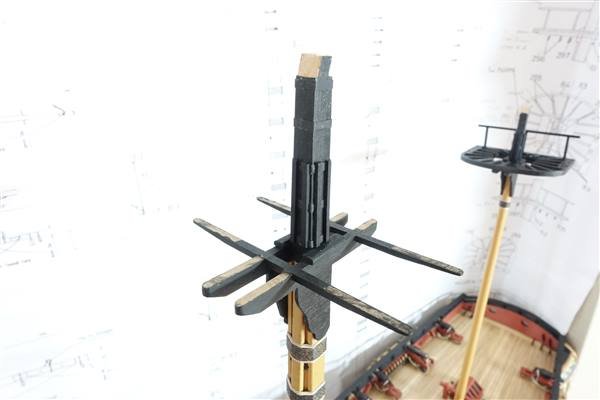
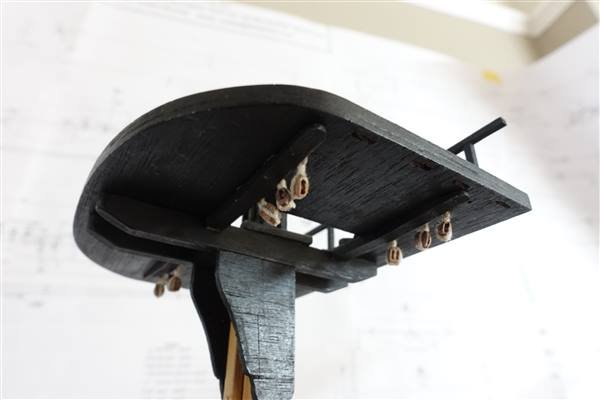
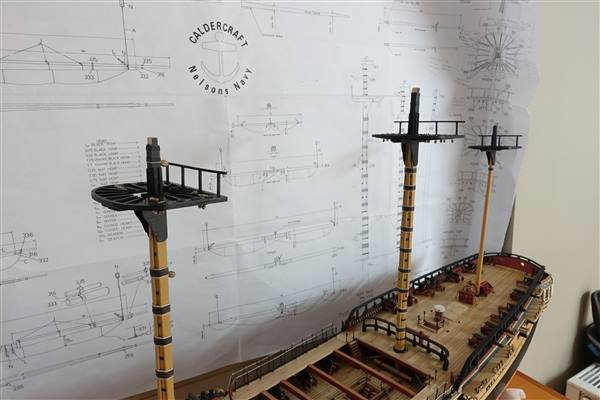
Thanks again for all the likes and encouragement. Over the last few weeks in between completing the hull and deck fittings, I have been working on the tops. There is quite a bit of work in them and they have taken some time. But first I needed to finish the mast heads. They were completed with ‘iron’ bands made from black cartridge paper and then mast battens added made from 3x1 walnut on the main and 1mm square on the fore and mizzen masts. The battens have recesses cut in to allow for the bands. The tops started with the kit bases and gunwales but I thought that they would benefit from some extra work. I used the drawing on page 81 of the AotS Diana as my pattern and enlarged it to 1:64 scale. For the planking, I used the thinnest strip that I had, some 5mm boxwood and the gunwale was laid over the top. The batten pieces for the main top were laid according to the pattern in the AotS which is slightly different from that in the instructions. The forward pieces radiate from a point on the forward edge of the lower mast and the aftmost from a point on the after edge. The fore and mizzen tops have a similar arrangement but the mizzen has fewer battens. PHOTO This arrangement of timbers leaves little space to place the eyebolts in between. The swivel socket pieces were added and the whole assembly painted matt black The Rail and stanchions were made according to the kit instructions using 1.5mm walnut. I cut a shallow rebate in the rail for each stanchion and when all glued together seems quite sturdy. The kit instructions say to fix the buntline and leechline blocks to the crosstrees with an eyebolt but in reality they were suspended from the floor of the top just aft of the crosstrees with toggles . I thought that it would be easier to add them now rather than when the tops were fixed in place. The strop was first seized around the toggle - a 1mm square strip and then threaded through the hole in the top. Using my quad hands, another seizing was formed around the strop and set at a distance to allow the block to hang beneath the crosstree. I used a piece of scrap 1mm square strip as a spacer. Finally the block was fixed in the strop with a dab of GS hypo and the strop tied off in a simple overhand knot. The trestletrees and crosstrees were rounded at each end and the lower edges outside the area of the hole of the top were given a slight chamfer as described by Lees in the section on Tops, Caps and Trucks. The trestletrees should have a slight rebate for the mast head but as it would not be noticed once the standing rigging was in place, I decided not to bother. I used 3x4 section rather than 3x3 for the bolsters to give a slight overhang of the trestletree. Finally the crosstrees were glued in place making sure all was symmetrical. The completed lower masts
- 310 replies
-
- 10
-
-
- Diana
- Caldercraft
- (and 1 more)
-
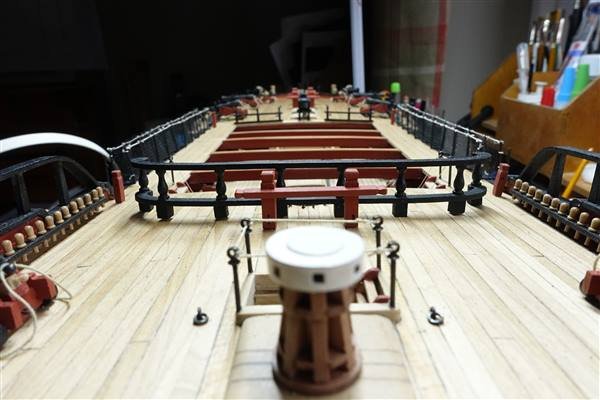
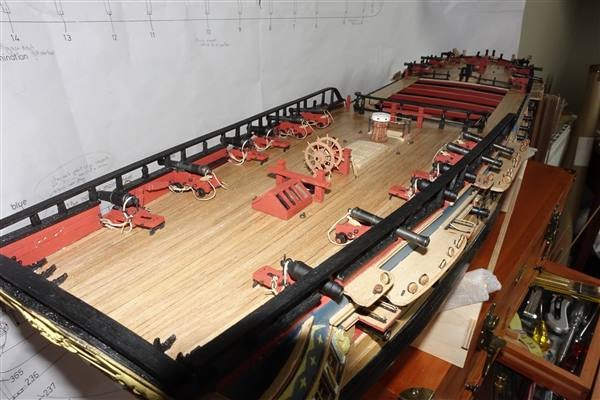
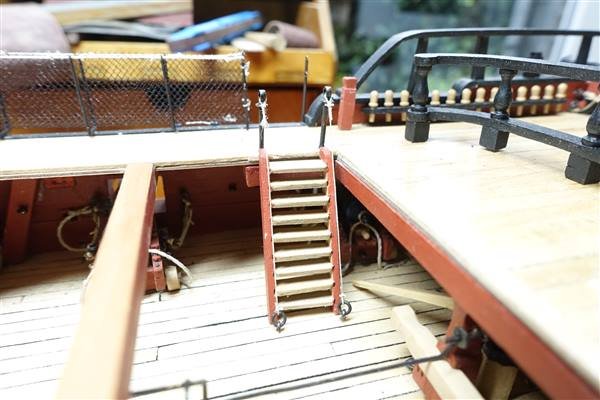
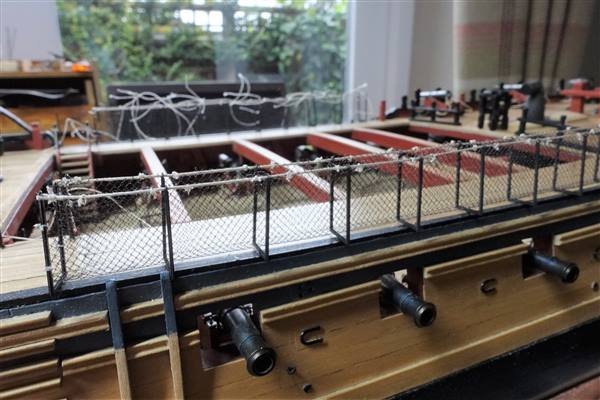
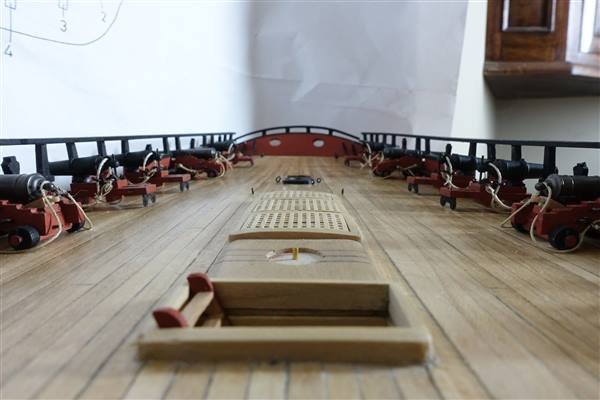
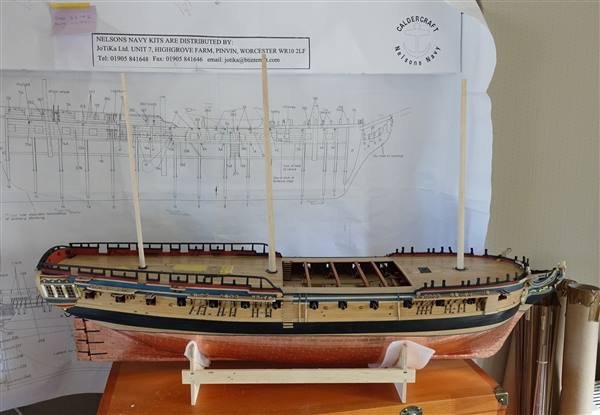
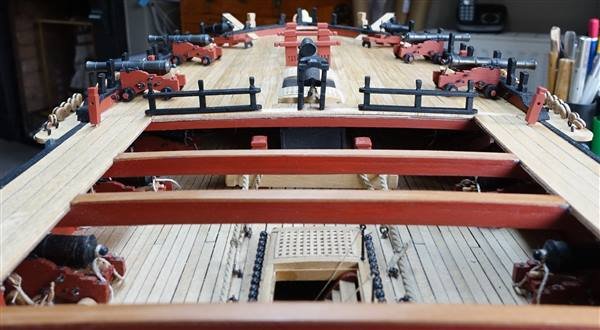
Thanks to all for the likes. I’ve added the deck fittings and checked through the plans for any missing eyebolts around the hull and added them where needed. The fittings have been made up already so this part is mostly a photo update. Tiller ropes were added to the wheel and cleats to the forward legs of the belfry for the fore top gallant braces For the stanchions at the ladders between gun deck and gangways and quarterdeck I used HiS Model brass eyebolts. The threads were filed down and then blackened in the usual way. The hammock cranes have been fixed to the midships. The position of each hammock crane was marked on masking tape placed along the gangway. I used black netting bought from CMB and left over from HMS Fly but I’m not happy with the results. The knots look too big and ugly to my eyes and I think I would prefer to use white or off-white netting. There is no comparison with the netting in my photos of the Victory, which have a less tidy appearance and somehow look more natural. I’m not sure how it is possible to achieve such a look using the monofil nettings that are available, so for the moment they will stay as they are. Maybe the eye will be drawn away from the netting when there is some rigging in place. It feels good to have reached this stage and have the hull completed after 20 months of work. There is some touching up of paintwork and general tidying up to do but no doubt Diana will suffer more knocks during the masting and rigging to follow so I will leave the finishing touches till towards the end. David

- 310 replies
-
- 11
-
-
- Diana
- Caldercraft
- (and 1 more)
-
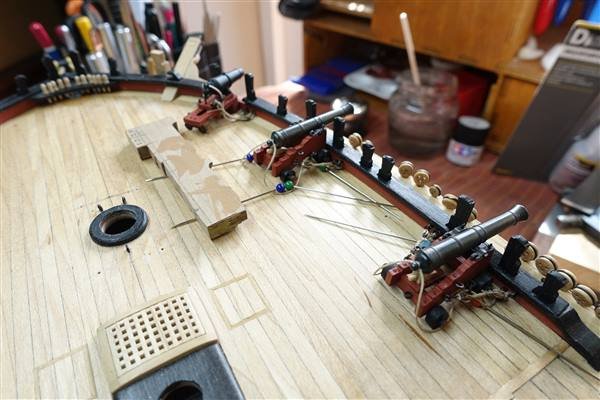
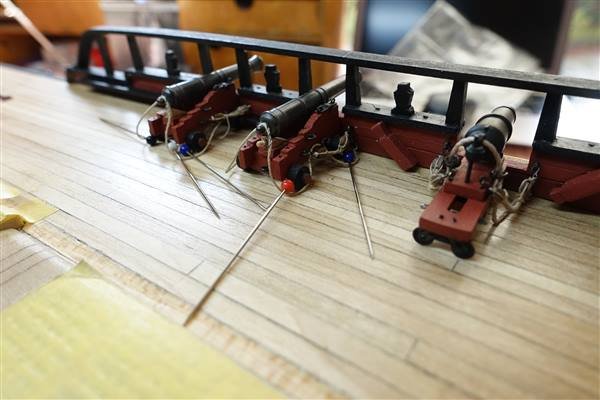
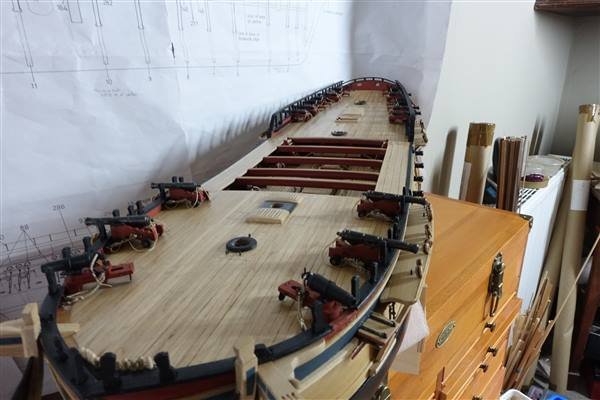
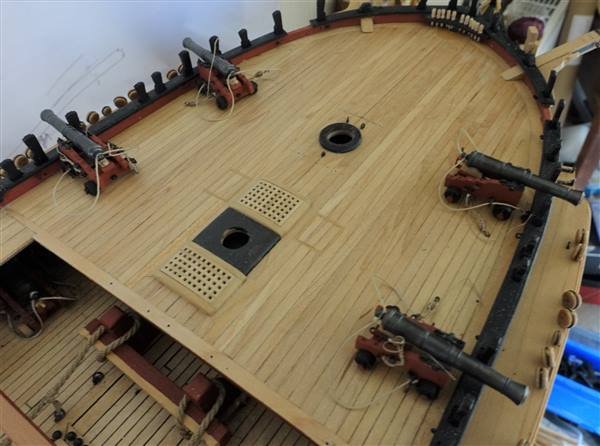
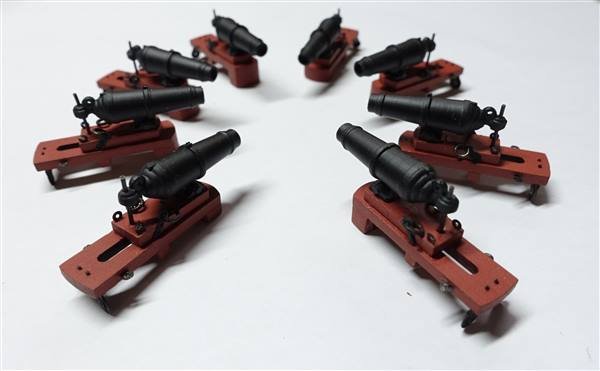
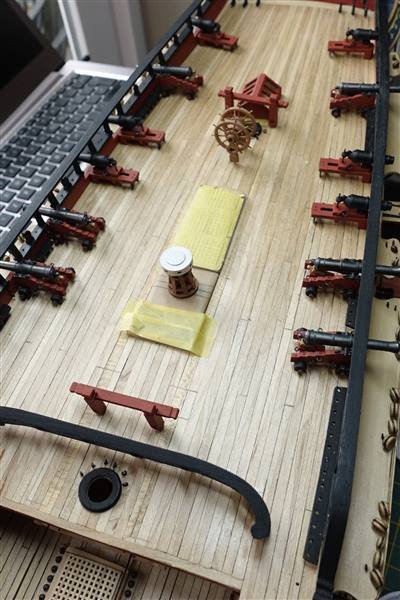
Thanks to everyone for the likes The 2.5mm blocks arrived from HiS Model so I have been able to continue working on rigging the carronades. It proved to be quite frustrating becuase I was getting a lot of failures of knots and thread. I used clove hitches instead of siezings which against 2.5mm block look fine and a simple half hitch to complete the strop. I think that the failures were partly that the 2mm PE hooks are quite sharp on the edge. If I had to do a lot of fiddling to get the hook into the eyelet the hook tended to wear through the strop of the block. Also I was either cutting the excess thread too close to the knots or the knots weren’t holding. I must have re-tied some tackles 3 or 4 times. In the end I found that the best glue to hold the knots was G-S Hypo Cement, an adhesive meant mainly for gluing jewellery and I left a little more tailing than I would have liked. The wheels of the 9 pounders were rubbed on sandpaper before glueing with PVA to give a slight flat and provide better contact with the deck. The port tackles and breeching ropes were hooked on to the bulwarks. I am undecided about adding training tackles particularly for the carronades but will leave them off for now. I tried to get as natural a fall to the ropes as I could by painting them with dilute PVA and using pins to weight them into a natural position. Sometimes this would take a couple of cycles to achieve something that I was happy with. And the competed guns Most of the fittings for the forecastle and quarterdecks are already made so hopefully it will be a simple job to add them and complete the hull. David


- 310 replies
-
- 8
-
-
- Diana
- Caldercraft
- (and 1 more)
-
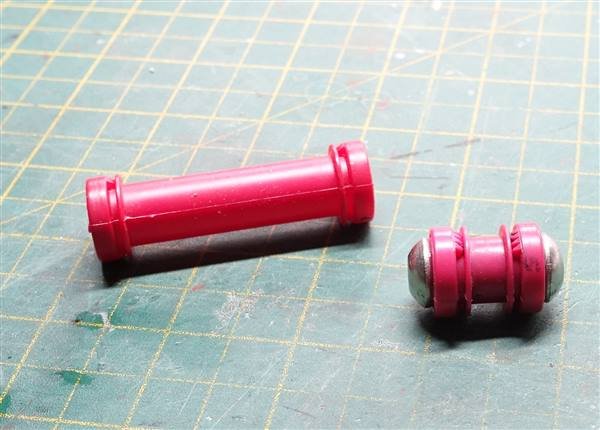
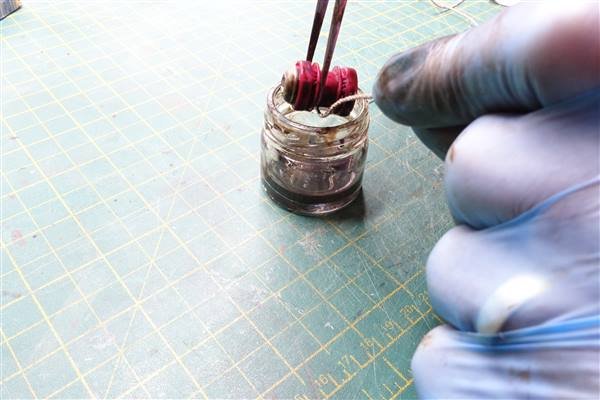
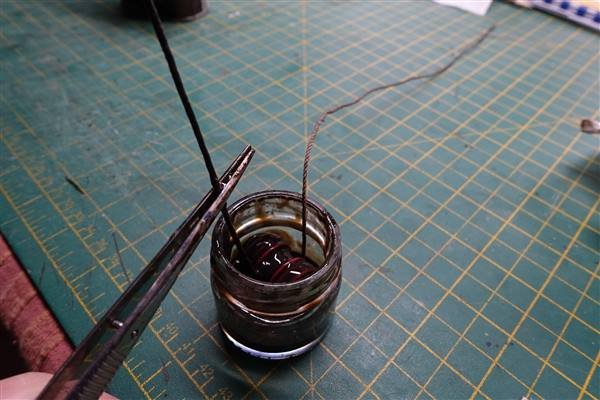
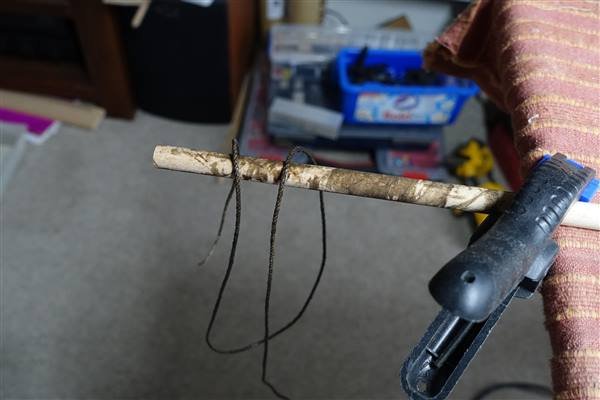
This is my method for staining ropes. As I've said, it's a bit crude but it will work for short lengths. I have so far managed to run 4 metres of rope through at one go without difficulty by laying it onto a rod to dry as I go. It's best to wear gloves and probably an apron because it can be a bit messy if the rope flicks out at any point. Hopefully the following sequence of photos will explain... The roller on the right is made from a cut-down rope bobbin on the left (Amati I think) and a bolt CA'd into it. A head from a second bolt is cut off and glued to the other end to balance the weight. The thread for staining is placed underneath the roller and dropped into the jar containing just enough stain to cover the thread Lightly grip the thread with the tweezers with one hand and pull the thread through with the other. This will remove most of the excess stain which will flow back into the jar. When all the thread has run through, I lightly pull it through some kitchen towel and then hang it from a rod to dry. I'm sure that this process could be made more sophisticated but it doesn't take long to run the thread through and dry it off and is probably good enough for what I will want to do. I have tried to simply drop the rope into a tray of stain but it is messy to handle, you need a bigger vessel and there is the danger of the thread tangling as it is removed especially with finer threads. Hope this helps David
- 310 replies
-
- 5
-
-
- Diana
- Caldercraft
- (and 1 more)
-
Hi Rob, No apologies necessary. Sorry I've not got back to you before: I've just returned from a few days away in Anglesey. In short, the answer is that the bobbin holds down the rope but I will take a few pictures and put them, together with a fuller description tomorrow. David
- 310 replies
-
- 2
-
-
- Diana
- Caldercraft
- (and 1 more)
-
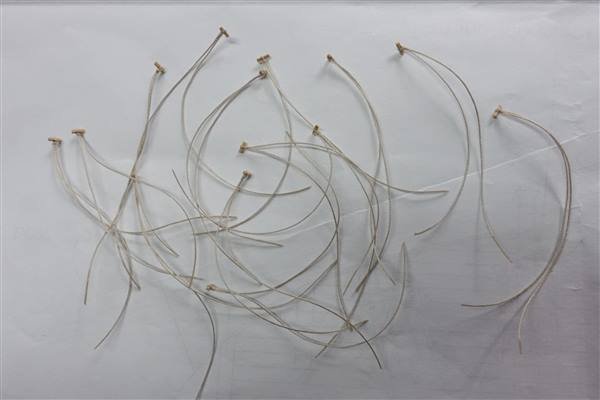
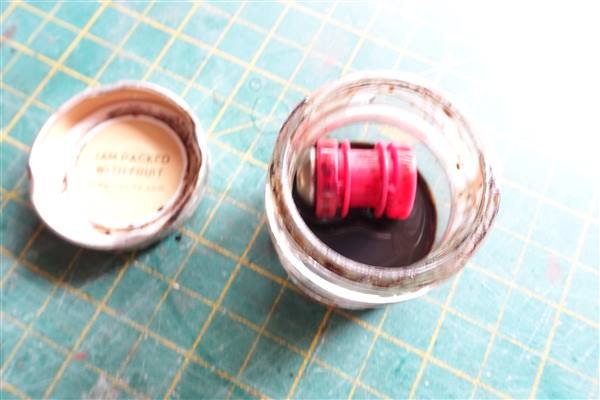
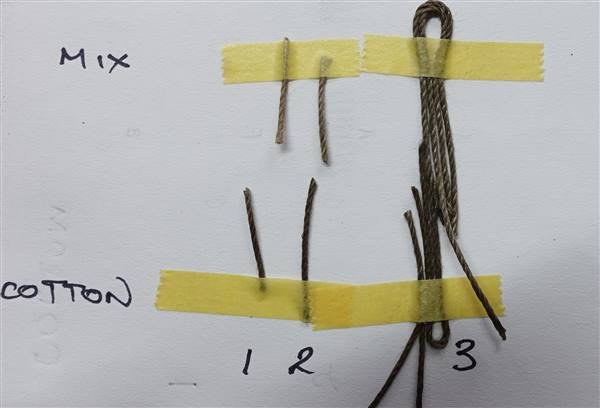
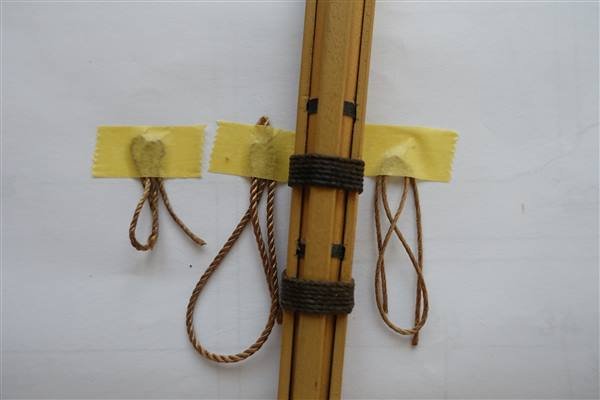
Thanks for the likes. The hemp ropes arrived from CMB so I set about testing them to see if they absorbed the stain better than the mixed synthetic ropes that I had tried before. The results were not very promising. I checked the ropes with the standard burning test and they were certainly cellulosic: probably cotton rather than hemp so they should have absorbed the stain better. It made me wonder whether it was the wood stain itself rather than the thread that was the problem. I had a walnut stain from a different manufacturer (Colron) and this produced a much deeper colour on both the cotton and synthetic ropes. I bought some Colron Jacobean Oak wood stain from my local DIY store and retested the ropes. Lo and behold, both types took up the colour. The Colron stains are water-based and notably thicker than the first stain I tried. These are the results: The mixed synthetic rope absorbs the stain to a lesser degree than the cellulosic but the Colron stain was so much better, requiring only a couple of dips to get the even colour that I was looking for. Serves me right for trying to get away with a cheap own-brand wood stain from a discount store. I have made a simple dipping trough out of one of those individual jam pots and a cut-down thread spool weighted with a bolt. It needs more refinement but works well enough for short lengths. I have finished the wooldings to the lower masts and bowsprit using stained 1.0mm cotton rope from Mamoli and which are 5mm wide. The bands are 0.6mm wide and still to be added. They will be cut from a manilla file folder. David
- 310 replies
-
- 4
-
-
- Diana
- Caldercraft
- (and 1 more)
-
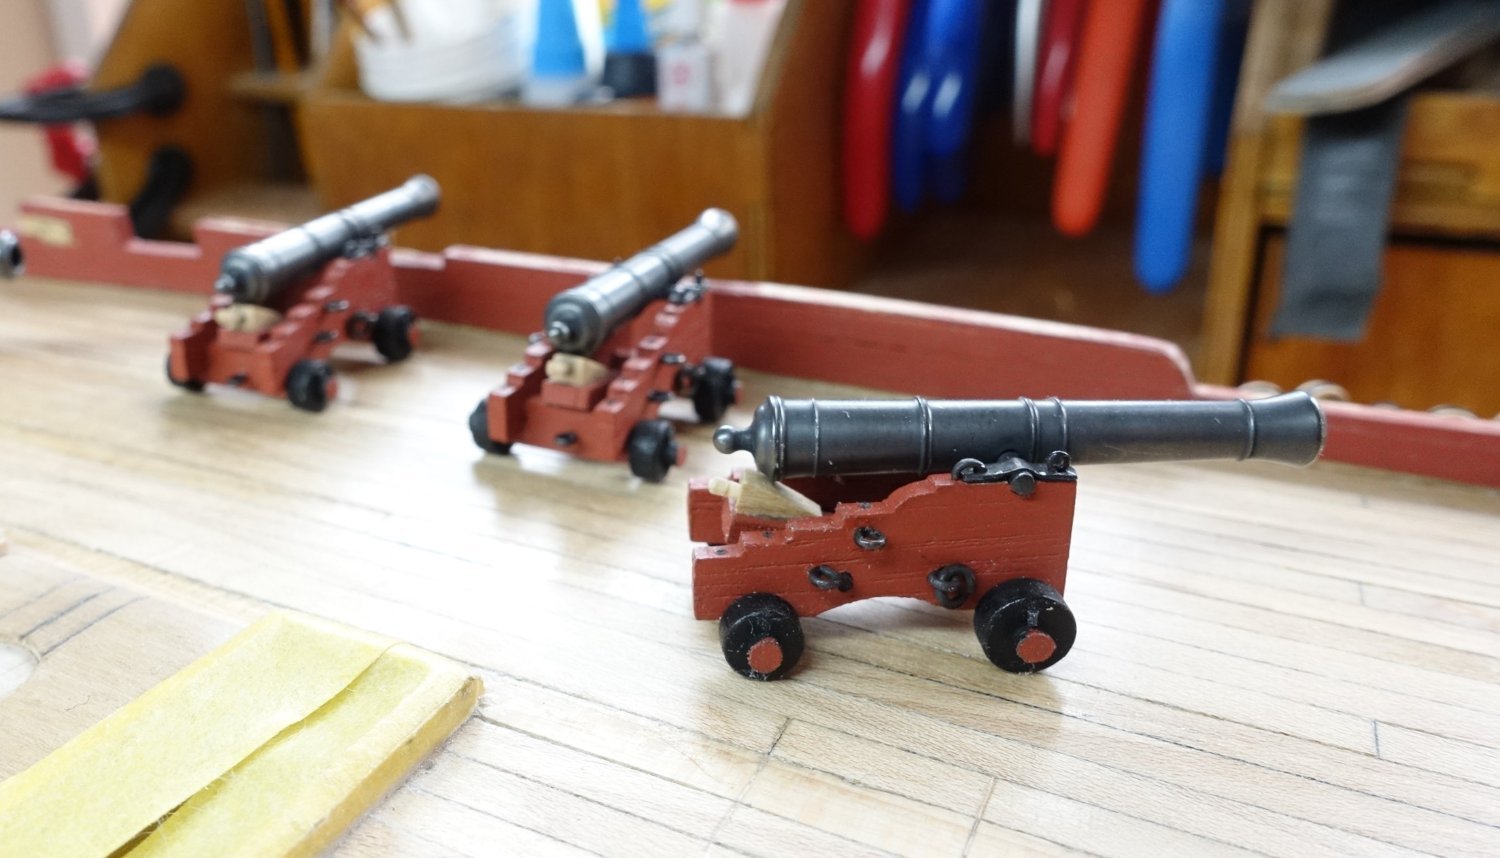
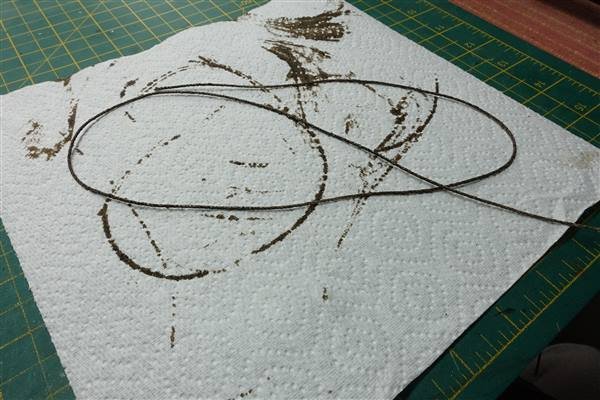
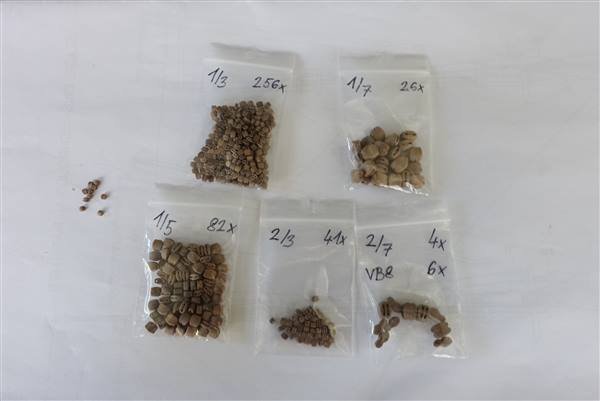
I’ve the last few days rigging the 9 pounder guns. The tackles are made from 0.25mm rope with 2.5mm single blocks and 3mm hooks the latter both from HiS models. They are very fiddly but once you get into a rhythm it’s easy enough. The siezings are simple clove hitches using Gutterman thread. At this scale it didn’t seem worth the trouble of winding proper siezings. The breach ropes are made from 0.5mm line. The strands are opened up and passed over the cascabel button to simulate the splice Now my arithmetic is usually pretty good but I must be getting too old because I realised about half-way through rigging the guns that I was going to be short of enough 2.5mm blocks to rig the carronades and have had to order a further supply from Radimir. In the meantime I turned back to the masts and the wooldings. I thought I’d have a go at staining the ropes to a more realistic dark brown rather than use the usual black thread provided but have run into difficulty. I had some 1.00mm thread left over from previous builds which I dipped in Jacobean Oak wood stain (with a couple of drops of detergent to aid wetting out) and after 3 dips with intermediate drying it came out to a satisfactory dark brown. The recommendation for Jacobean Oak came from B.E. in his build of Pegasus. However using a new batch of thread, I can’t get it to dye to more than a mid-tan. It might be ok for running rigging but is too light for the wooldings. The photo below shows cutting taken after the 2nd, 3rd and 4th dips compared with the wooldings already made and there is no comparison. In fact there seems to be very little further uptake of stain after the first dip. I have also tried to stain various other ropes with similar lack of success. I think that the content of synthetic yarn in these other threads is much higher than the original thread I used. And I’m not sure where it came from. Synthetic yarns are difficult to stain because of their inherent crystalline structure, particularly polyester which is normally dyed under pressure at temperatures above the boil. In the hope of achieving better results, I have ordered a selection of thread from CMB to try that are described as hemp, hoping that the synthetic component is low or zero. Looking through the various posts in the Masting and Rigging section of MSW, there is a suggestion that a mix of dilute PVA and acrylic paint will work. This sounds like a process akin to printing which probably doesn’t rely on the thread taking up the stain but just glues the colour in place and might be worth a try. If anyone has other suggestions, I would be very glad to hear them. David


- 310 replies
-
- 5
-
-
- Diana
- Caldercraft
- (and 1 more)
-
Thanks Dave that's very kind and much appreciated David
- 310 replies
-
- 2
-
-
- Diana
- Caldercraft
- (and 1 more)
-
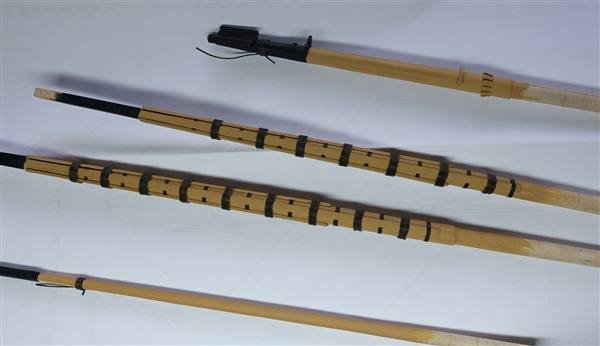
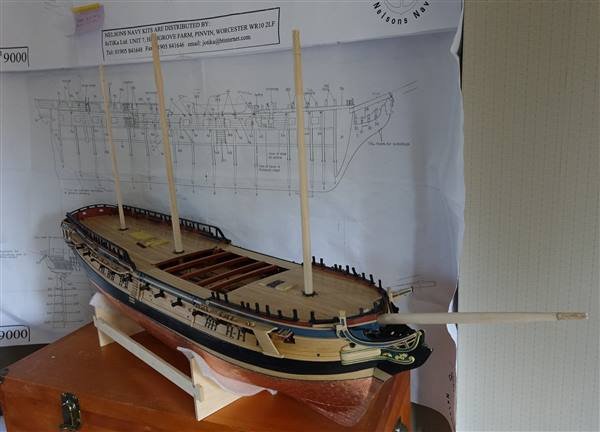
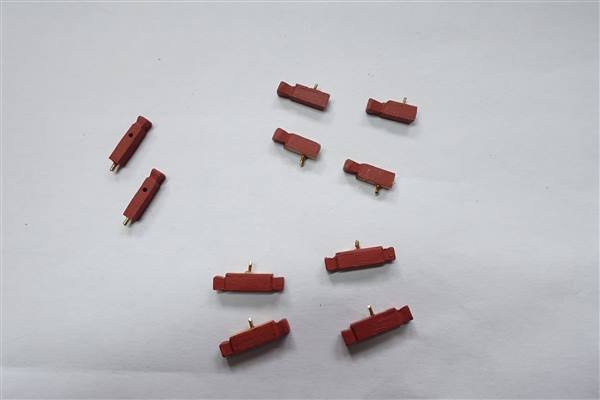
Thanks for all the likes and Andrew, I think that you will be much happier with Chris's version of the carronade. I have ordered a further supply of rigging blocks from HiS Model and persuaded my wife that as it was nearly my birthday, an ideal present would be sufficient blocks to replace all those supplied by Caldercraft to finish Diana. While waiting for the blocks to arrive, I began making the lower masts and bowsprit. Based on the sizes given in the AotS and Lees Masting and Rigging, the diameters of both the lower main mast and bowsprit were too small. I calculated that the lower mainmast should be 11.2mm at the upper deck partner and the bowsprit the same at the home (which I took to be the point at which it enters the hull). I redrew all the lower masts based on the quarters and proportions given by Lees and used this as the basis for making them. Most recommendations for mast making are to start with square stock but I couldn’t find any suitable material that was available in the UK so I will be using ramin dowel. I began each mast by planning and sanding the square section mast head then using my Proxxon lathe I shaped the tapers of each mast. The diameter of all except the mizzen mast are too large for the lathe chuck, so the sections below the partners wetre planed and then sanded down in my hand drill. These sections are now undersized compared to the plan but as they will be below decks, they will not be seen. I used the cheeks from the kit but made the front fish from 4x2 walnut strip rather than the 3x2 suggested in the instructions which looked undersized to me. The masts are painted in yellow ochre. Iron bands are made from strips of black cartridge paper but to a slightly different pattern from the Caldercraft plan and more in line with that shown in the AotS. This is as far as I got with the masts because the blocks have now arrived. Great service as they were delivered in just over a week after I ordered them from the Czech Republic. They look very good and so much nicer than the usual square blocks. I am now pressing on with rigging the guns and carronades. Those 2.5mm blocks on the left are really tiny. I hope I've ordered enough! David
- 310 replies
-
- 5
-
-
- Diana
- Caldercraft
- (and 1 more)
-
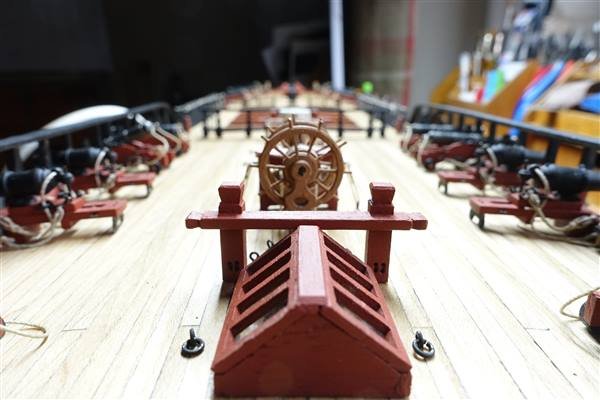
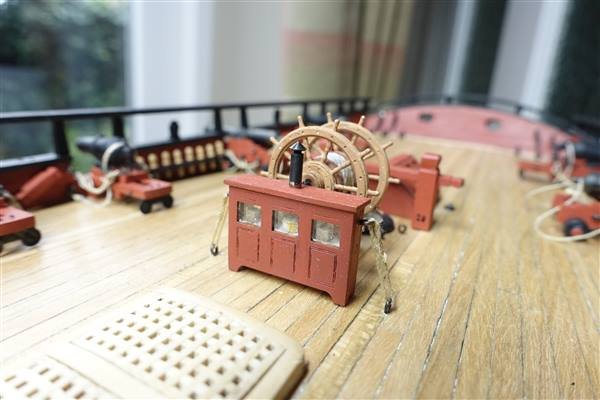
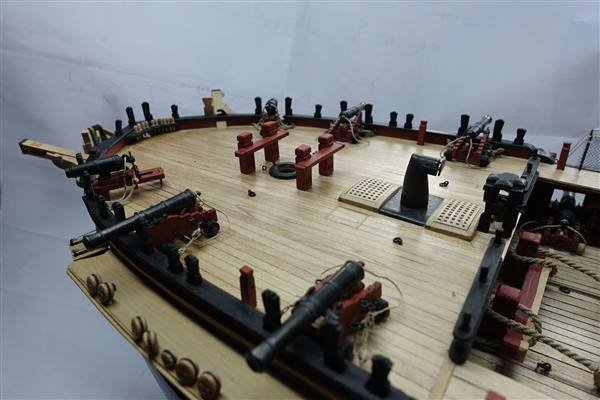
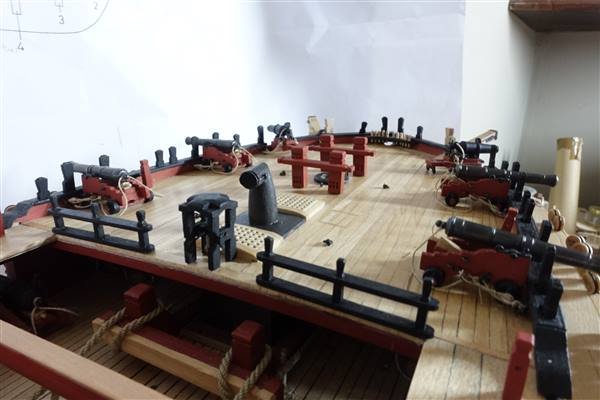
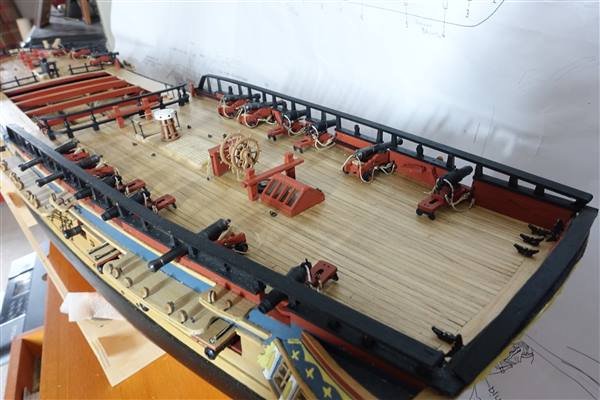
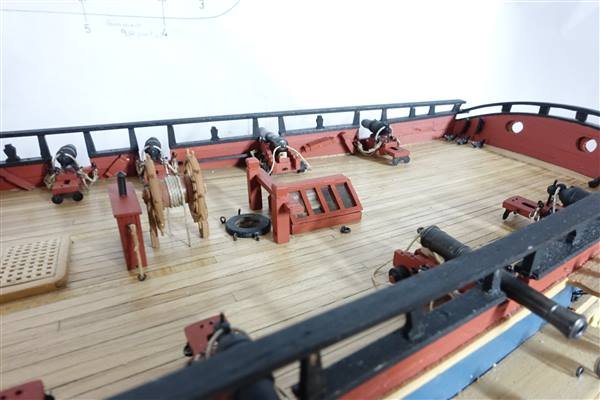
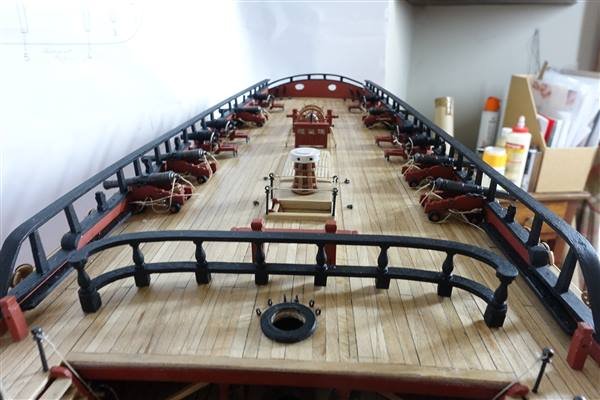
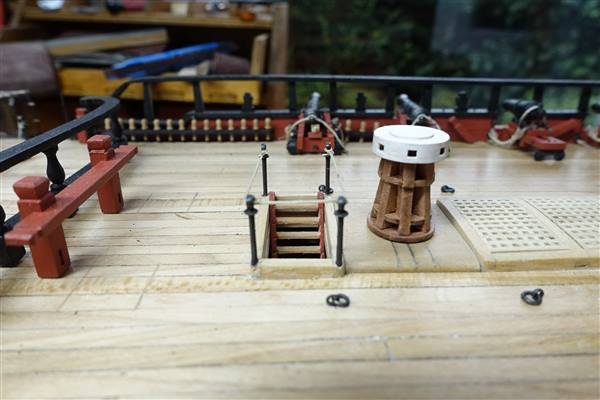
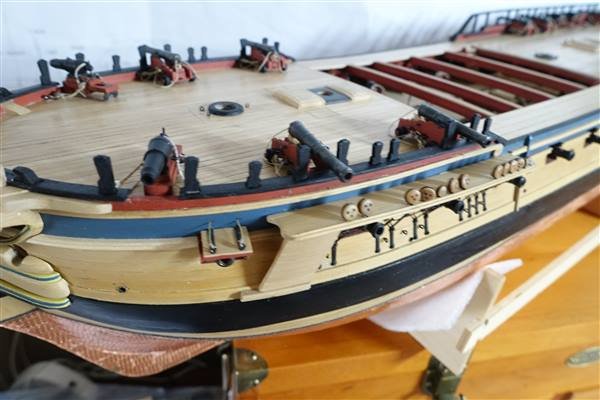
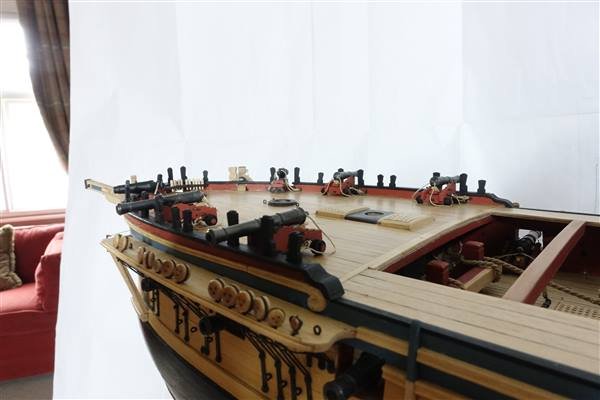
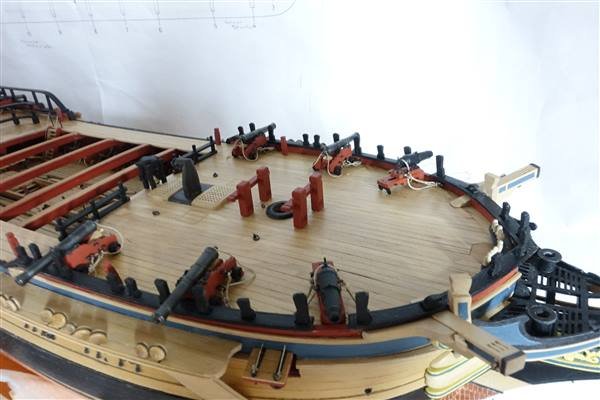
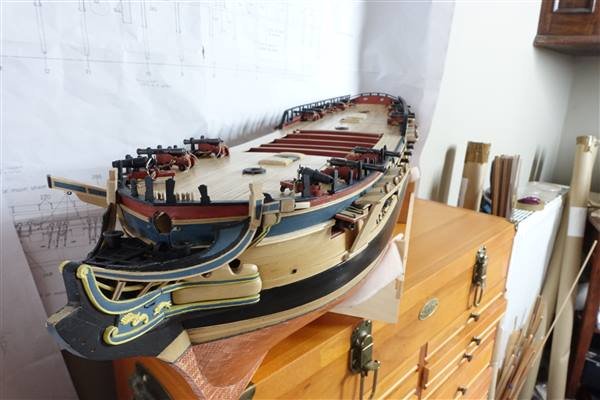
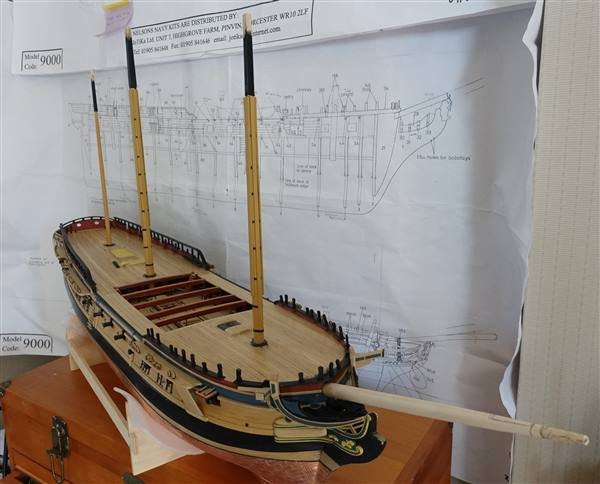
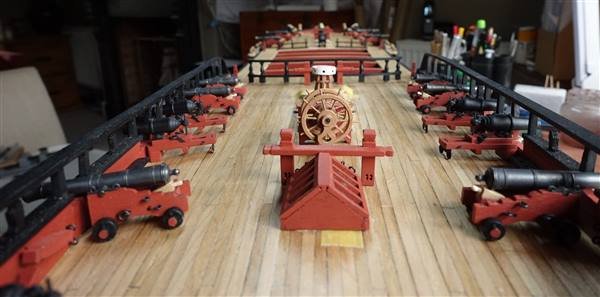
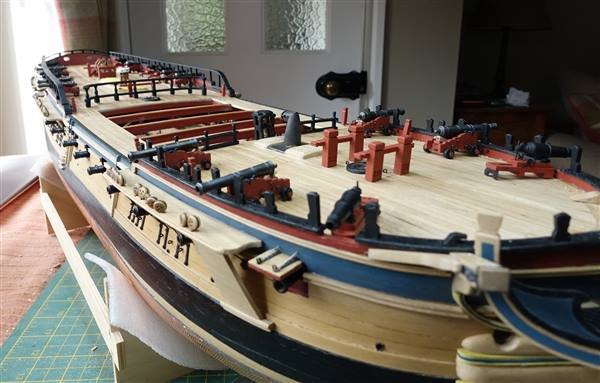
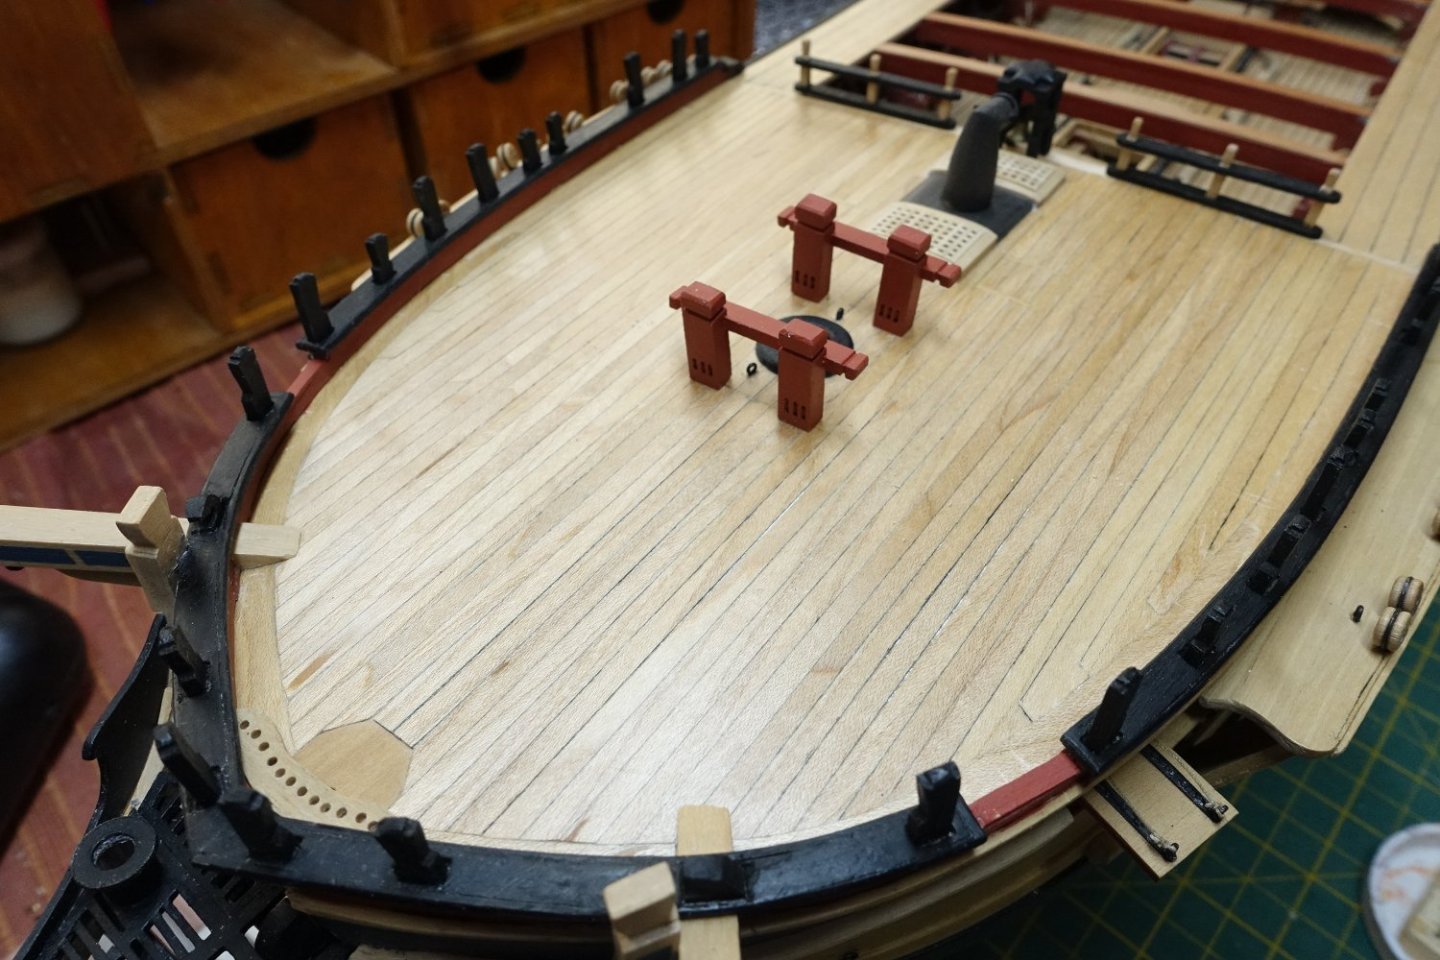
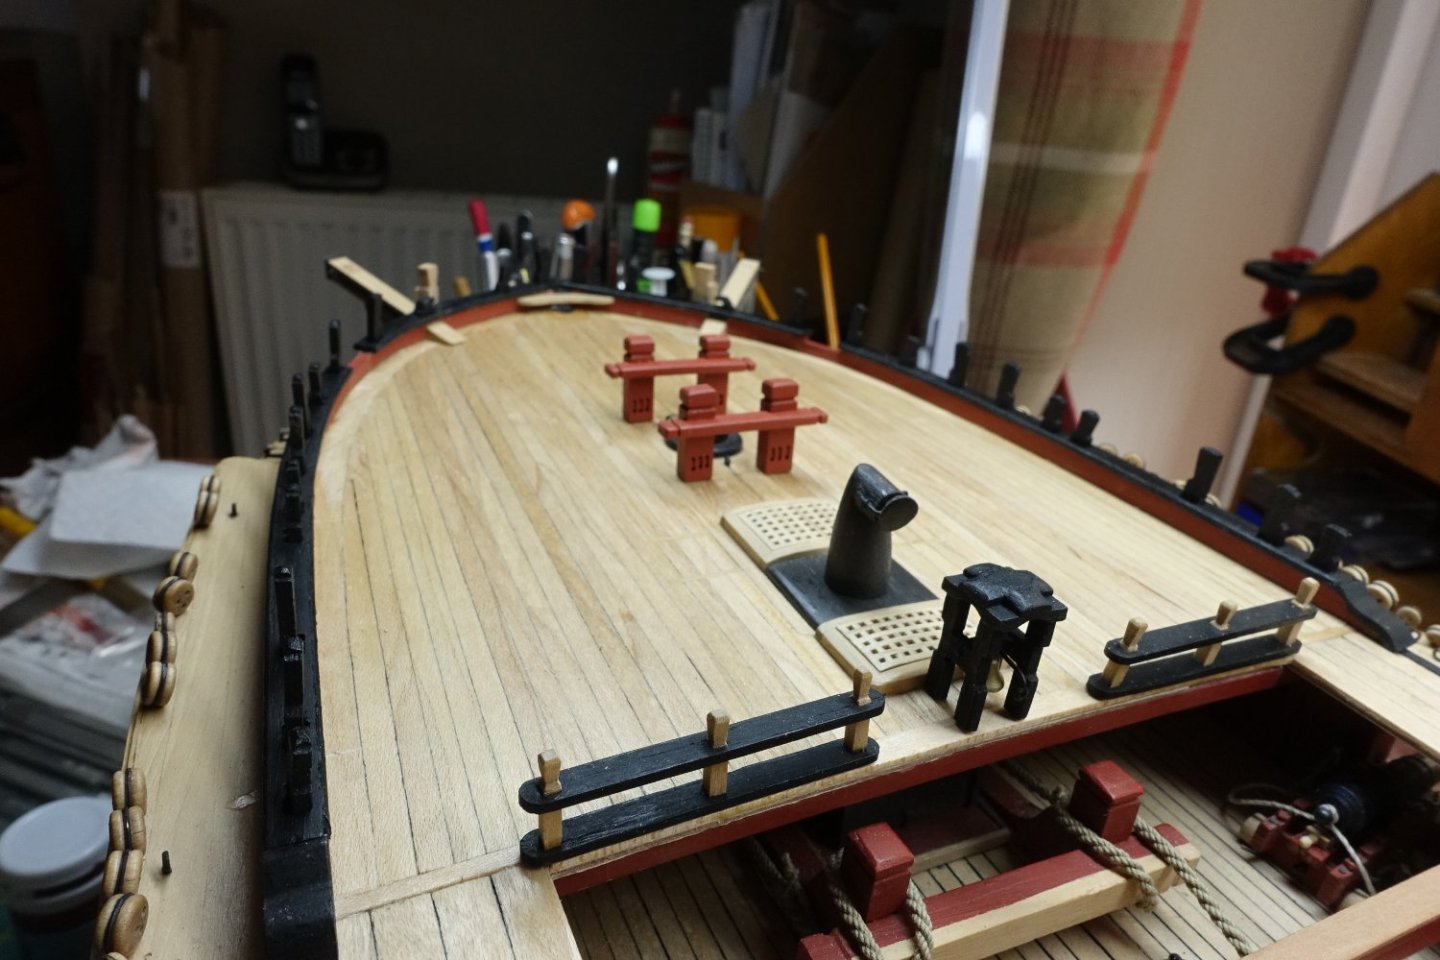
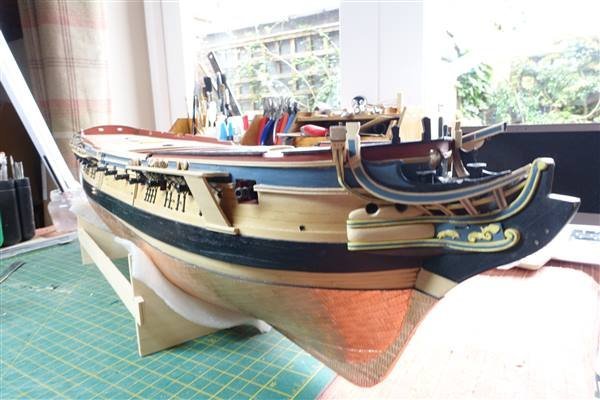
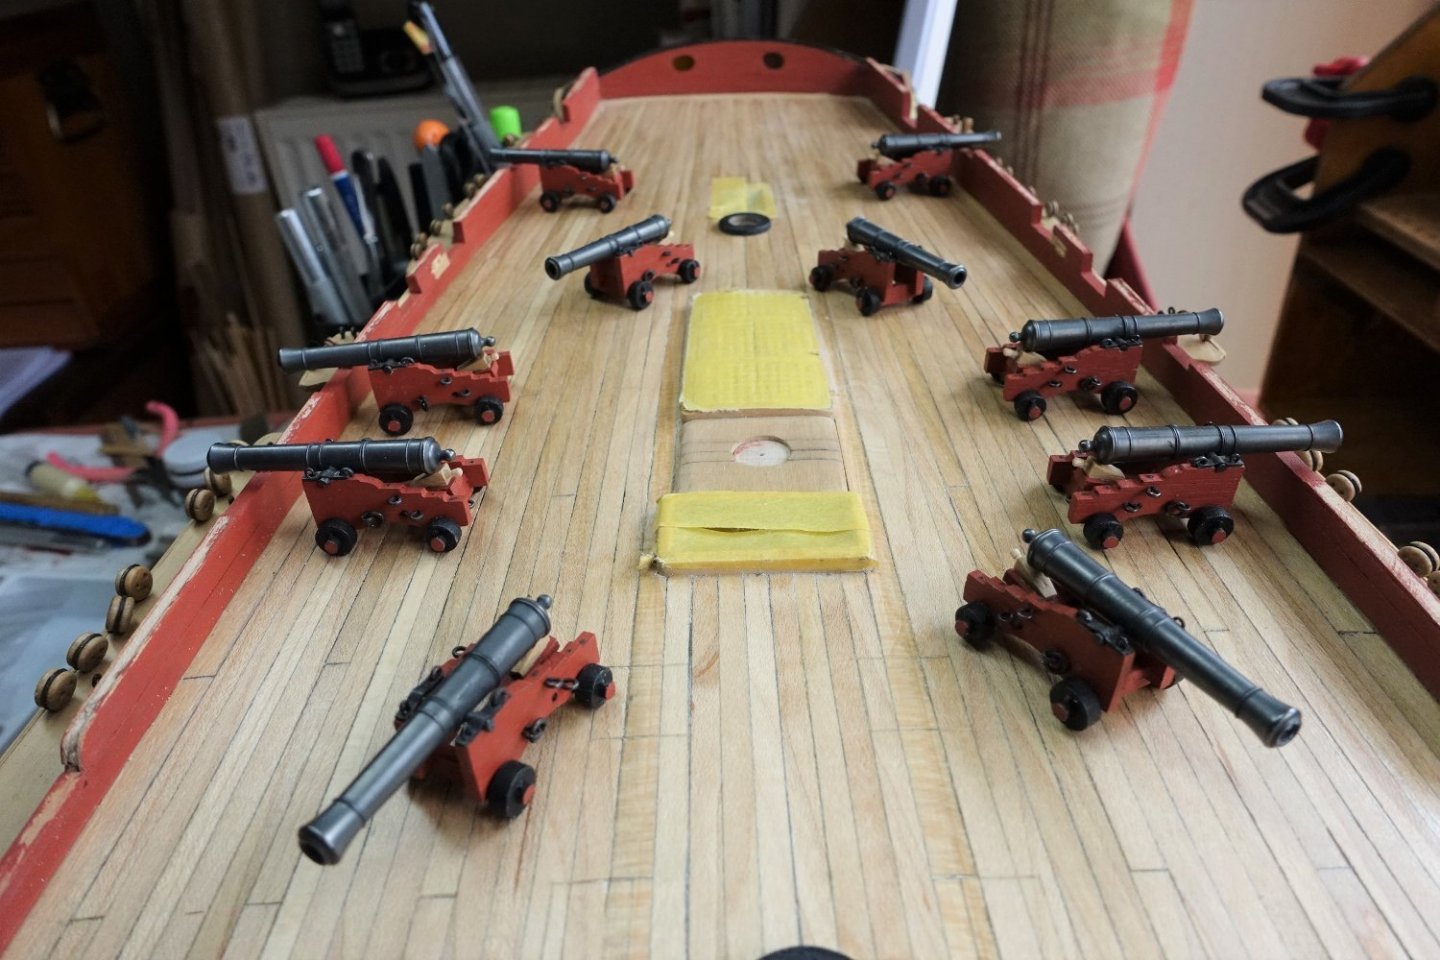
Since my last post, I studied Lees in more detail and concluded that the cleats will remain just cleats. I still don’t understand why the illustrations on page 170 shows cavel cleats with sheaves in 1710 but maybe this practice had gone out of favour by the time Diana was built. The cavel blocks part (115) have reduced in length by 2mm to fit the bulwarks of the open rails on the quarterdeck and I have followed Ray’s lead on his Diana build and added a sliver of 1mm to the back of each cleat to lift it clear of the inner wall. The quarterdeck balustrade was made up from kit parts. The instruction to cut 4mm lengths of 4x4 walnut for the lower section doesn’t take into account the camber of the deck and they need to be increased in length for all but the inner two pieces if the balustrade is to sit parallel. I reworked the replacement Caldercraft ship’s wheel by stripping off the dark brown colour and repainted it to a lighter shade which was more appealing to my eye. Prompted by B.E.’s comment in the log of his wonderful model of HMS Sphinx (https://modelshipworld.com/topic/29570-hms-sphinx-1775-by-blue-ensign-vanguard-models-164-scale ), I also include flanges at each end of the barrel. The replacement Carronades from Vanguard Models arrived promptly and have been completed. The small pieces of photo etch were a challenge and in fact I lost four of them during the chemical blacking process and are probably now lodged in the filters of some Severn-Trent water works. Replacements were made from the remaining pieces of brass sheet. I hope that these poor substitutes will not be too noticeable when they are rigged. The two carronades with only one front block are intended for the forecastle which has lower walls. This completes the work on the various elements of the forecastle and quarter deck, apart from rigging the guns and below are a few photos showing everything in place. Nothing is fixed yet as I will need as much space as possible for rigging the guns to mitigate my general clumsiness and tendency to snag any protruding parts. It feels good to have reached this landmark and to see Diana as a ship rather than a collection of parts but now they will all be removed and bagged up for safekeeping. It looks like the forecastle carronades are firing into the sea just off the bow so I will need to add the second block at the front to raise them to a more neutral position. After that I will not be able to put off gun rigging any longer. I have some 2.5mm blocks from Vanguard but stupidly I didn't buy enough to complete all the guns and as Chris is out of stock, unfortunately if I am to complete the guns, will have to look elsewhere. David


- 310 replies
-
- 11
-
-
- Diana
- Caldercraft
- (and 1 more)
-
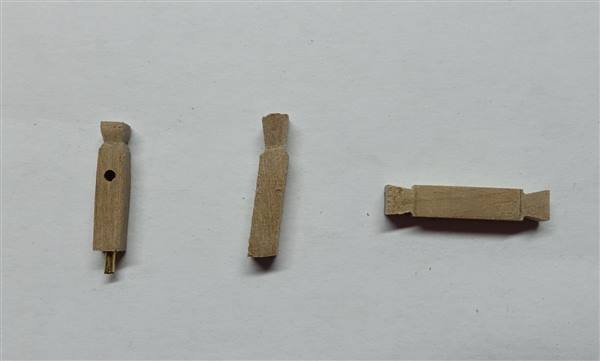
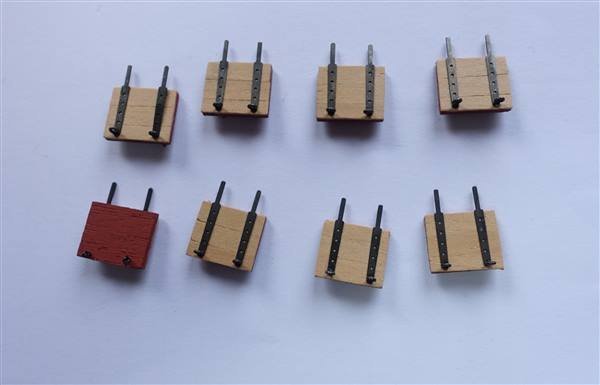
Thanks for the likes and kind comments. Another short update but mainly a call for help… I have been working on the various cleats for the forecastle and quarterdeck. The cleats at the stern are straightforward but I am confused as to how the other parts should look. In the photograph below, working from left to right, the kit part numbers are 113, 114 and 115. Part 113 is described as a rigging timber head by Caldercraft, and there are four at each corner of the galleries and two more on the forecastle. Are these actually knight heads? Lees book ’The Masting and Rigging...’ indicates that a knight head should have two sheaves and a belaying bar. Is that what is required here? Part 114 is a cavel cleat and again, according to Lees should have two sheaves and finally, part 115 is a cavel block which Lees also shows with a sheave at it’s base. Caldercraft gives no indication of whether sheaves should be added but if the cavels are glued to the inner bulwarks as shown, I don’t see how they could function. I hope that someone can help me unravel the mystery of the cavel! David
- 310 replies
-
- 3
-
-
- Diana
- Caldercraft
- (and 1 more)
-
Thanks Andrew - the band is just a trip of black card David
- 310 replies
-
- 3
-
-

-
- Diana
- Caldercraft
- (and 1 more)
-
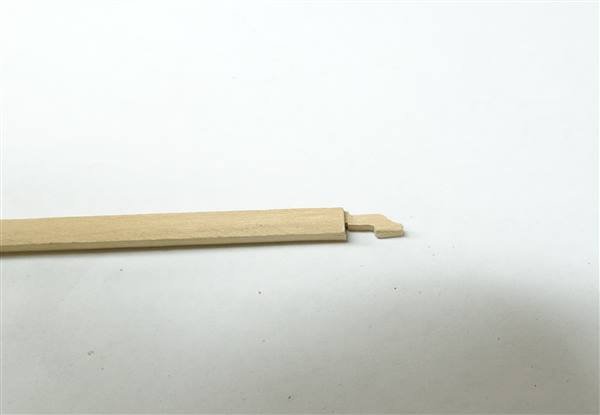
Thanks to everyone for the likes. This is just a short update because I realised that I had missed off the cathead knee and cleat when I was making the headworks so these are now added. The knee was cut from 3mm boxwood sheet using a tracing taken from the AotS as a pattern and reduced to the correct scale. The cleats were made from 3x3 boxwood strip. It is easier to cut and file them to shape before finally cutting off the parent strip The knees were fixed in place and then the cleats were pinned and glued to the cathead David
- 310 replies
-
- 10
-
-
- Diana
- Caldercraft
- (and 1 more)
-
Thanks Andrew, although I claim no credit or originality for the cardboard template which has been used by a number of other builders - I just copied their ideas. David
- 310 replies
-
- 1
-
-
- Diana
- Caldercraft
- (and 1 more)
-
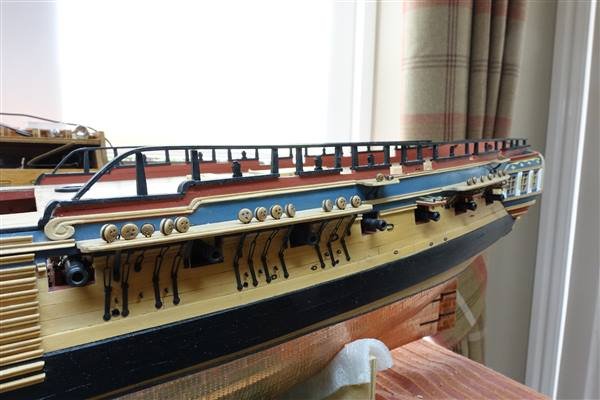
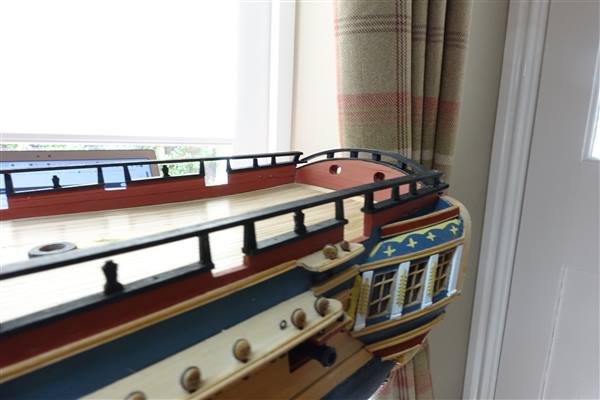
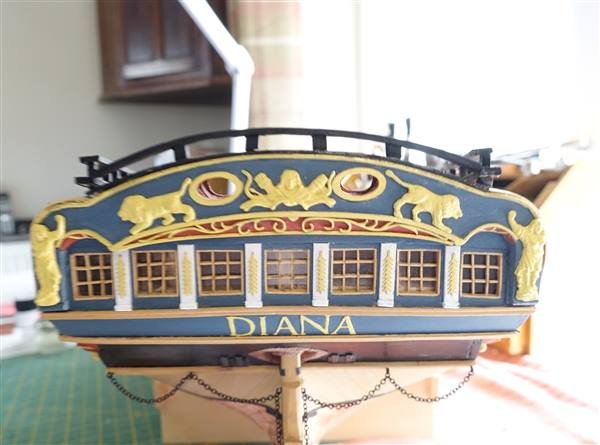
Thanks to everyone for the likes A while ago, I made up three sections of the open rails of the quarterdeck as a trial. It seemed to work well enough and so the same method has been used to complete all the other sections. A cardboard template was used to maintain the line. For the trial pieces, the timberheads were cut from walnut ply but I switched to pearwood strip which is easier to shape gives a much cleaner finish. The top rail (the fife rail?) is also made from lime which although a bit soft, is easier to bend from one piece and once painted it hardens up. The strip was first soaked and edge bent to the shape of the quarter deck and then the final downward curve at the forward end of the rail was made with the help of a sample bottle ('The Driver's Dram') of Kilchoman whisky acquired during a recent visit to the Isaly distillery. As an aside (and I have no connection to the distillery except to enjoy its produce), I think that this is the only Scottish distillery to grow and malt its own barley for some of its whiskys. Despite trying to be as careful as possible with measurements against the template, there were still some supports that were too short and needed replacement to make the rail to run smoothly over its entire length. Once I was happy that it all lined up, the rail was pinned and glued in place and left overnight. The taffarel fife rail was next to make up, again using lime strip. I wasn’t sure whether the supports were meant to be round or square. The kit says use 2mm dowel but I opted to make them from 2.5mm square section boxwood. The rail was cut oversized and first edge-bent and then curved to follow the lines of the stern. The four supports are in line with the stern-light frames and were pinned and glued in place and the whole assembly painted black. When test fitting this to the taffarel, I realised that the arrangement of the quarterdeck rail was not going to work. Looking again at the photographs of the ship models of Diana in Gardiner's The Sailing Frigate, the plansheer of the aftmost section of rail should continue to the finish at the level of the stern and meet the taffarel fife rail. The top quarterdeck rail finishes at the final support. The final section of the quarterdeck rails was carefully removed and replaced. I was able re-use the supports so only had to cut a new section of plansheer. When matched up, the fife rail was cut to length and glued and pinned in place. I’m pleased to have got this section completed, which apart from the headworks, has been the most difficult so far. I think though, that the effort has been worth it and although the rails may not bear the scrutiny of the close-up photo, from normal viewing distances, I am happy with the result. I'm continuing with the carronades and started to make up the kit version but comparing them with the plans in the AotS, have decided I can't live with them and have ordered a replacement set from Chris Watton as an early birthday present from my wife. David

- 310 replies
-
- 11
-
-
- Diana
- Caldercraft
- (and 1 more)
-
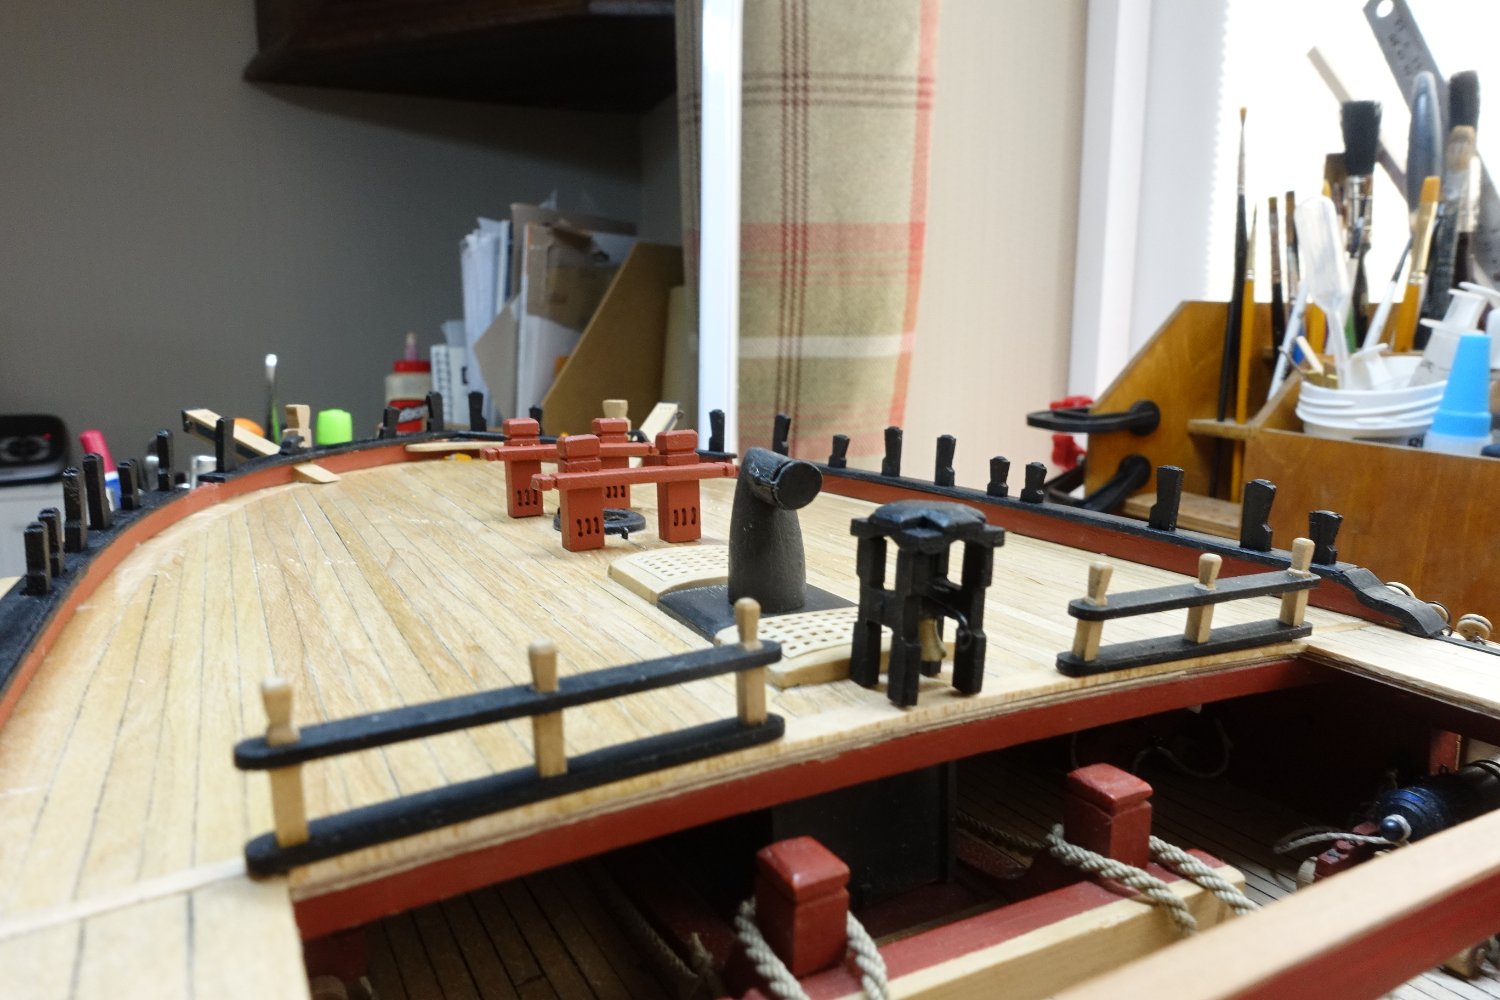
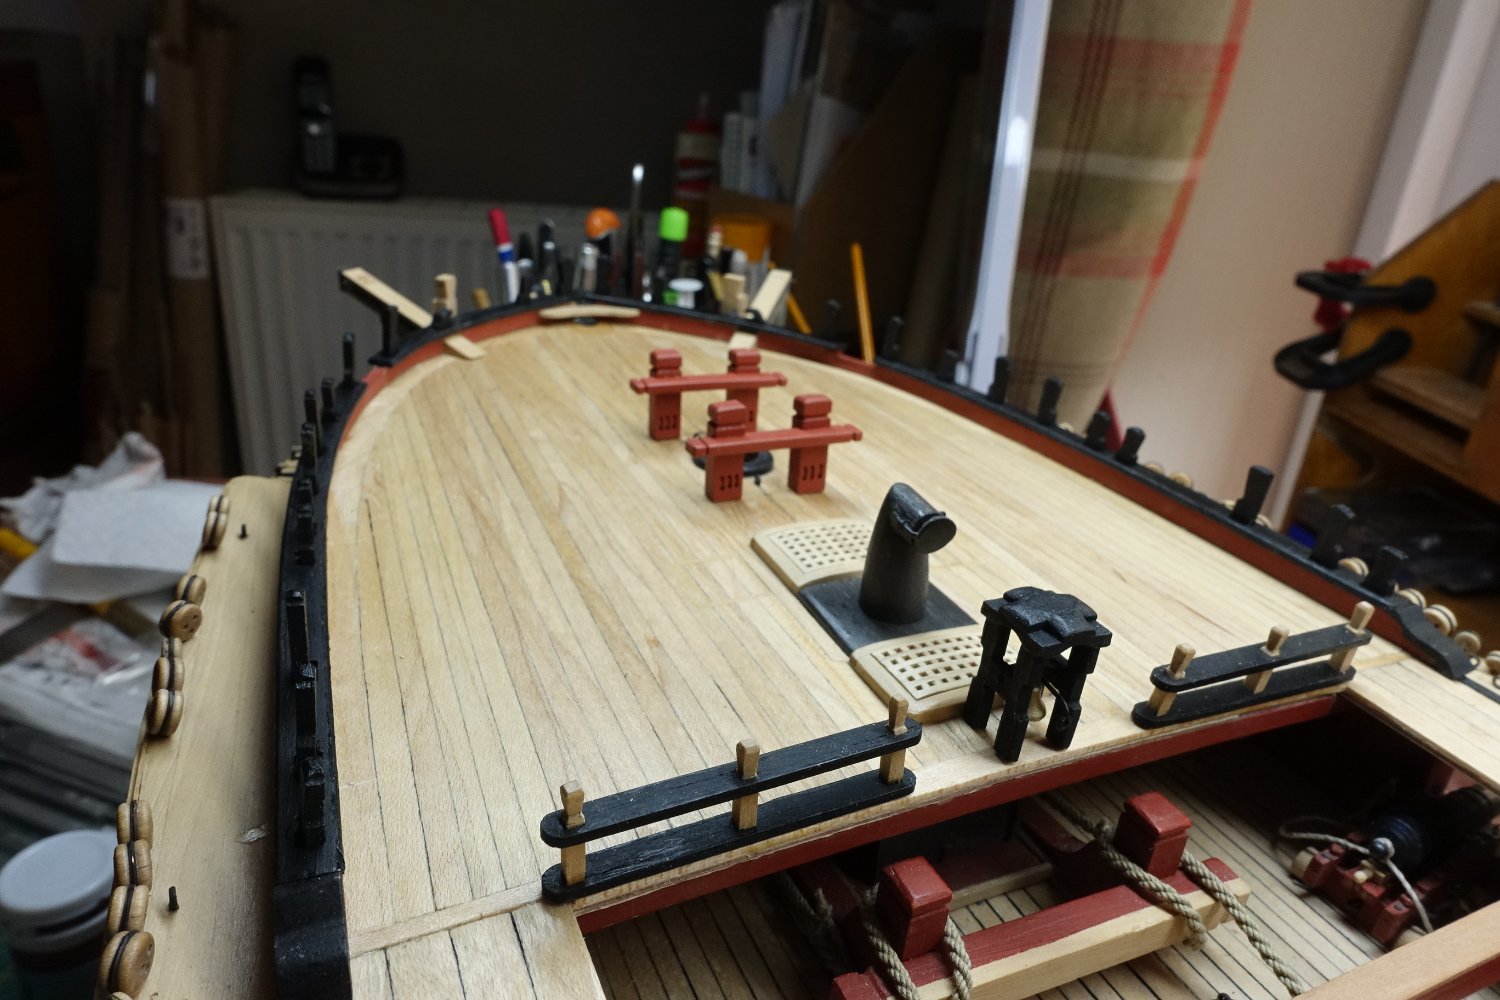
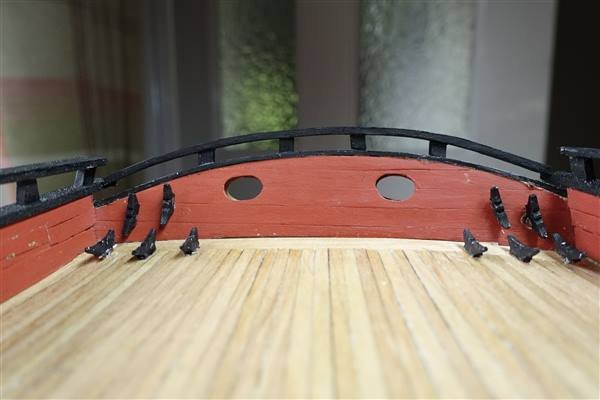
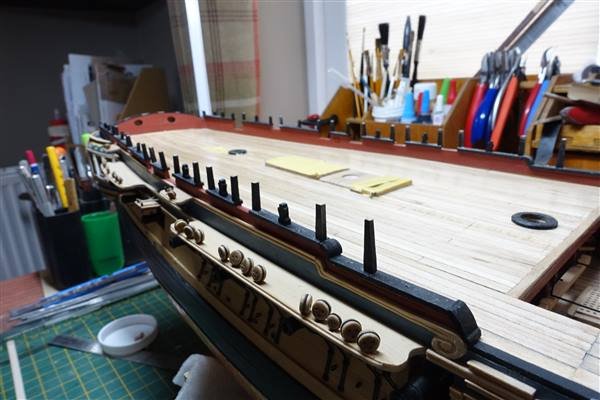
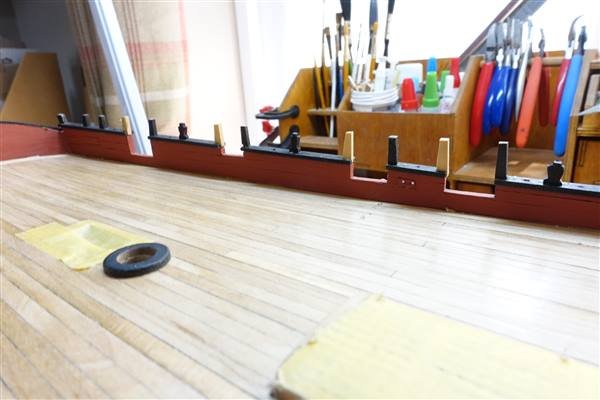
Thanks Andrew and I'm sure you're right that I will eventually succumb. Perhaps I'll find a few other thing to tempt me to make the shipping cost worthwhile. I’ve not done very much work on Diana for the last three weeks as I’ve been away touring the Inner Hebrides. The weather on the west coast of Scotland has been pretty poor but on the bright side has meant that I have had plenty of time to tour a few distilleries and to read Chris Watton’s Vanguard Ship Models’ log from beginning to end. What a fascinating story. I have already bought a few fittings for Diana from Chris but my next ship model is certainly coming from Vanguard. It's always difficult getting back after a long break, trying to remember what I was working on. However I have now completed the gun port lids and fitted them to the hull. A bit fiddly, especially the one tucked right under the mizzen channel. The kit knightheads were used for the forecastle and have been pinned and glued in place. They look quite vulnerable so I will have to be careful when it comes to rigging the guns. The belaying points around the foremast had me puzzled. The kit plans show 6 eyelets should be placed on the deck around the mast but the AotS show only 3 and this seems to be confirmed by Lennarth Petersson’s Rigging Period Ship Models. I have gone for three on the basis that should it be necessary, it shouldn’t be difficult to add the others. Before going away, I realised that the forward bits should have three sheaves in each leg, which I had not allowed for, so I remade them in 2x6mm pear. This has completed the deck fittings for the forecastle which are now pinned into position but nothing is glued yet.

- 310 replies
-
- 9
-
-
- Diana
- Caldercraft
- (and 1 more)
-
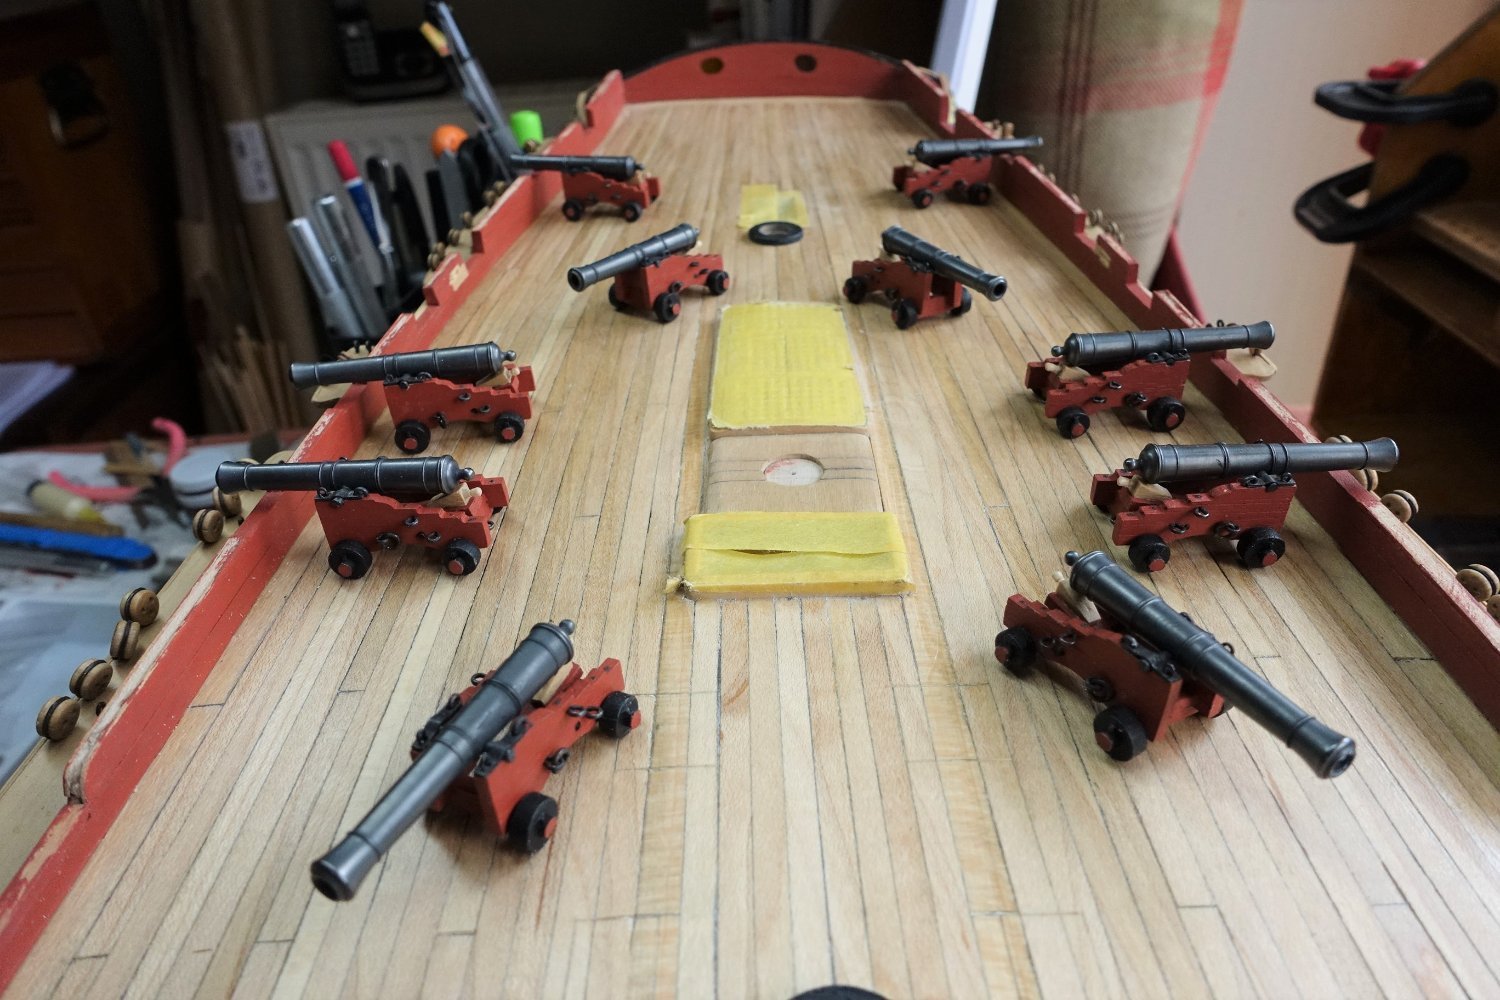
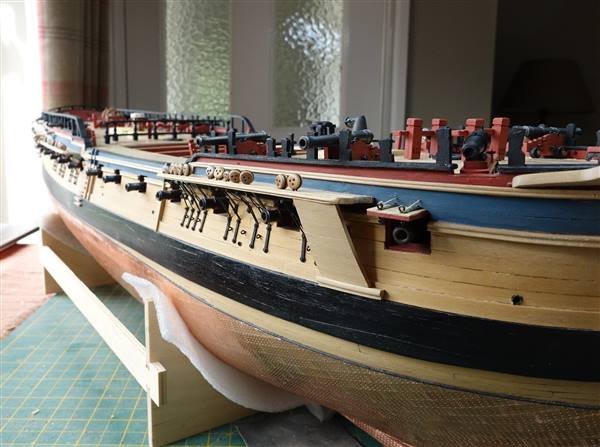
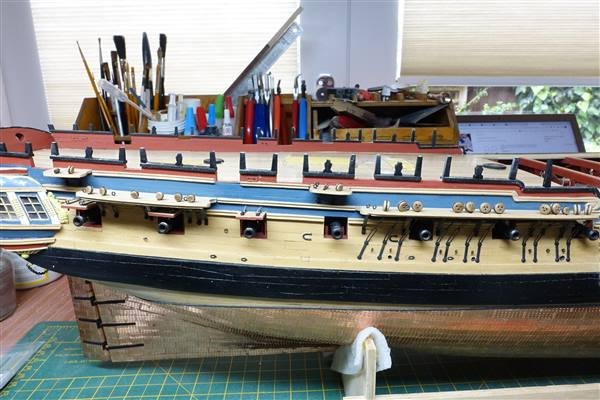
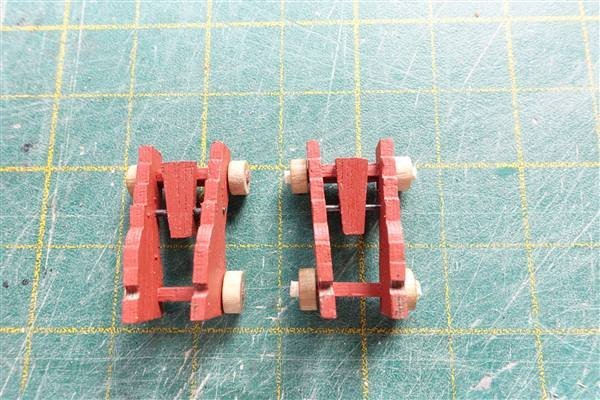
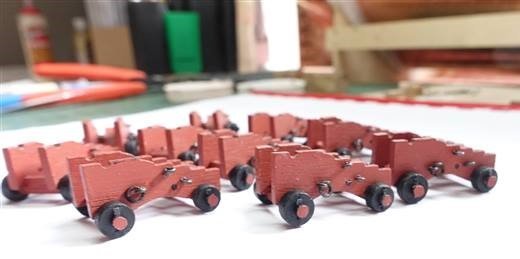
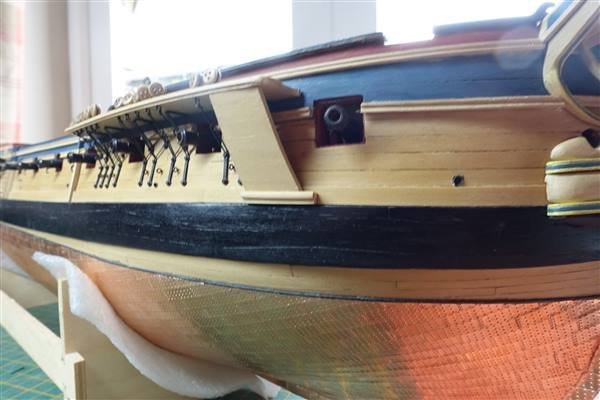
The 9-pounders were made up in much the same way as the 18 pounders covered earlier in this log. Once again, I used the kit pieces for the carriages but swapped the trucks for those that I bought from CMB: 5mm for the front and 4mm for the rear. These are thicker than the walnut ply versions which meant that the axle didn’t protrude from the truck. To add a bit more realism, I cut back the axles on the carriages by half to make room for stub axles made from 2mm dowel which were pushed into the truck cut to the length and glued onto the axle. The photo below shows carriages with and without the stub axle. I would have found it impossible to drill holes into the axle to add lynch pins so I cut small splinters and glued them each side of the axle. The gun barrels are from the kit but once again no GR monograms are supplied and the only source seems to be Syren. The actual monograms are reasonably priced but shipping to the UK makes them nearly three times the price. However, as the guns are on open view, I may have to bite the bullet (cannonball?). Before getting on with the fiddly task of making up the tackles and breeching I decided to finish off the outer hull. The numerous eyelets have been added and the fixed blocks for the main sheet, which I had left off until I was more certain of there position. There are two more eyelets to add shown in the AotS either side of the anchor stock but I will add them when I know the anchor’s final position. The anchor lining supplied in the kit is in 1.5mm walnut ply which would not sit well with the boxwood. Replacements were cut from boxwood sheet using the kit piece as a pattern. 5mm strip was added to the face to match the hull planking. The AotS shows that the anchor linings sit on bolsters which are not supplied. I made them from 3mm square boxwood strip, cut and sanded to shape.They need to fit comfortably around the bow immediately above the main wale so they were soaked and bent around a large radius pan borrowed from the kitchen. The gun port lids are a work in progress. I have used the supplied kit parts and added boxwood strip to the face. The PE straps were blackened and fixed with CA. the kit provided copper eyelets were used on the outside but they looked too big for those on the inside of the lid so I made some up from 0.4mm (26gg) black coated wire using a 0.65mm drill bit to form the eye. The nails need to be added to the straps before fitting to the hull and I'm wondering about making the hinge look a bit more realistic. David

- 310 replies
-
- 13
-
-
- Diana
- Caldercraft
- (and 1 more)
-
Thanks to all for the likes and to Dave B. for the very kind comment David
- 310 replies
-
- 2
-
-
- Diana
- Caldercraft
- (and 1 more)
-
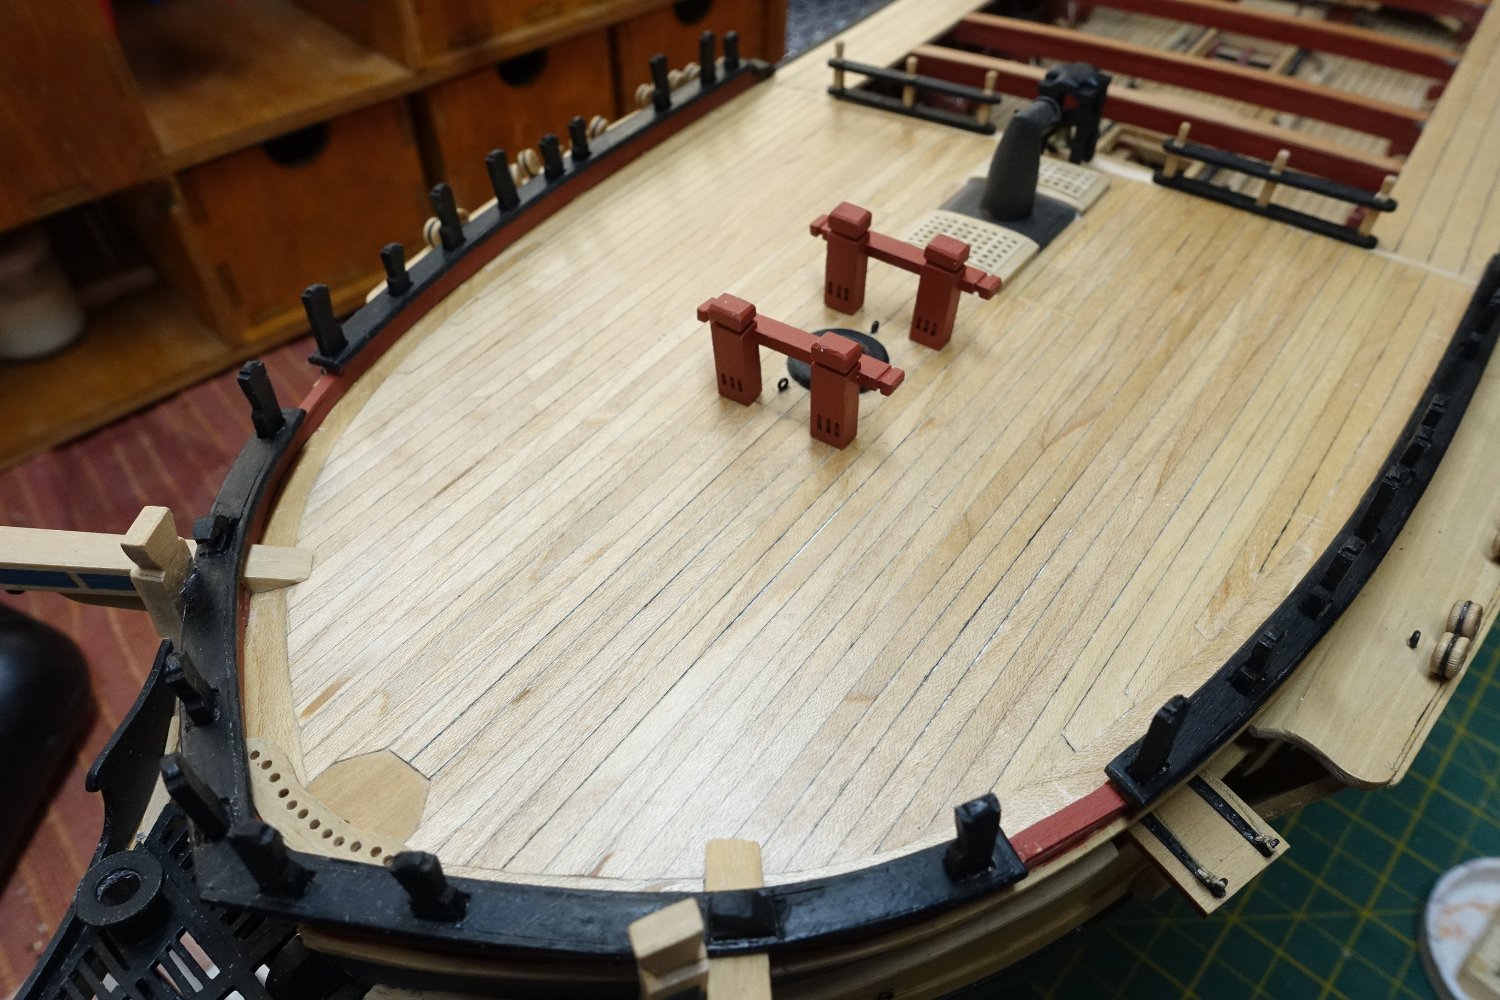
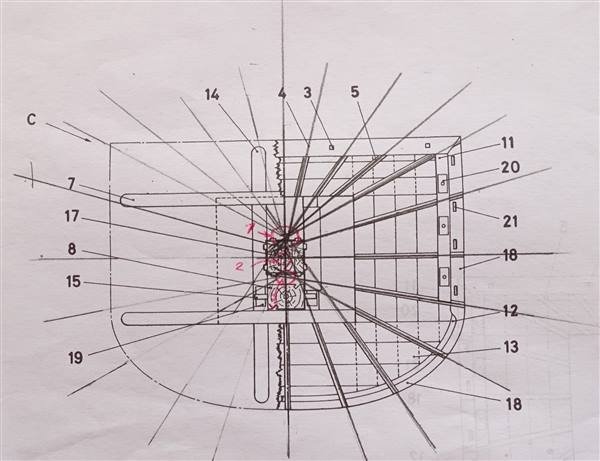
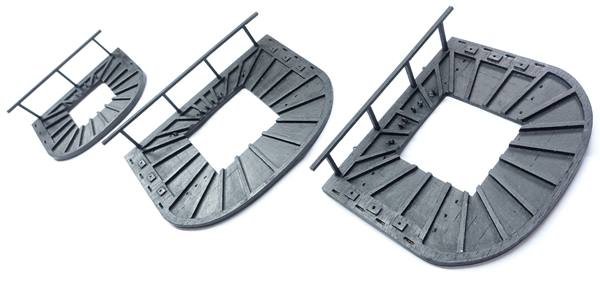
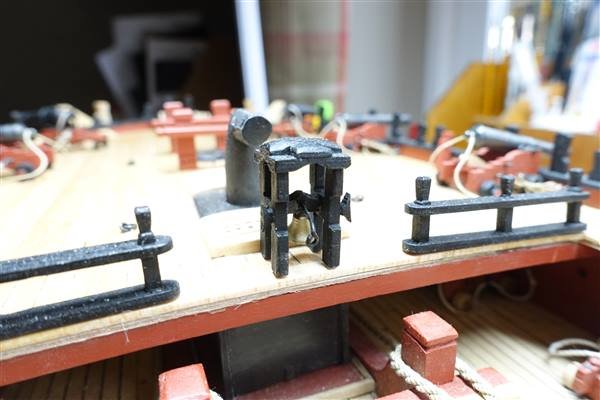
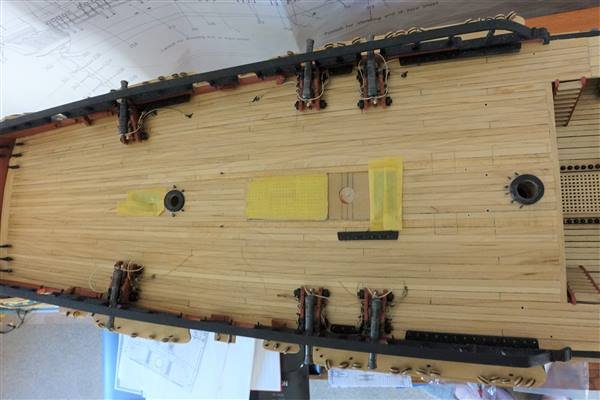
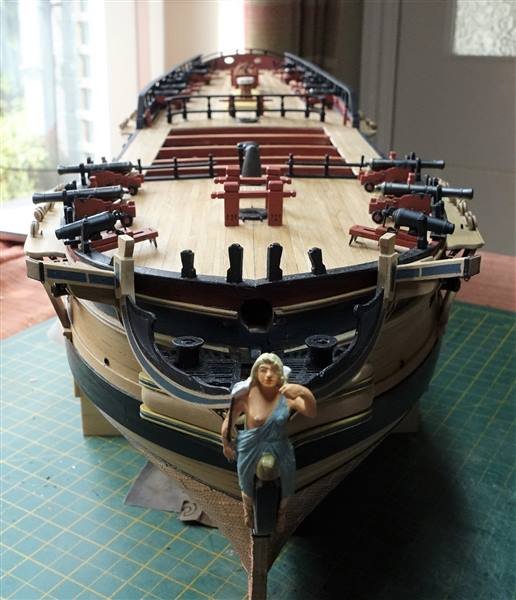
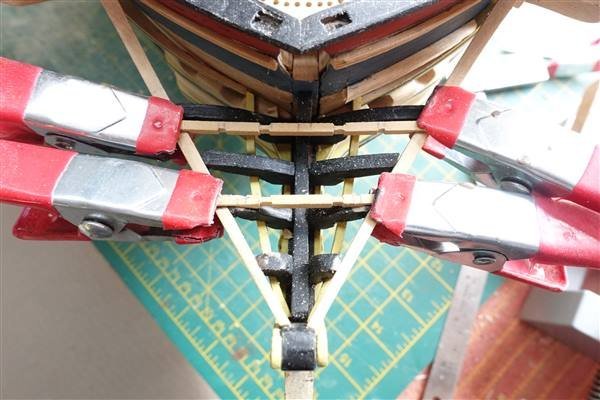
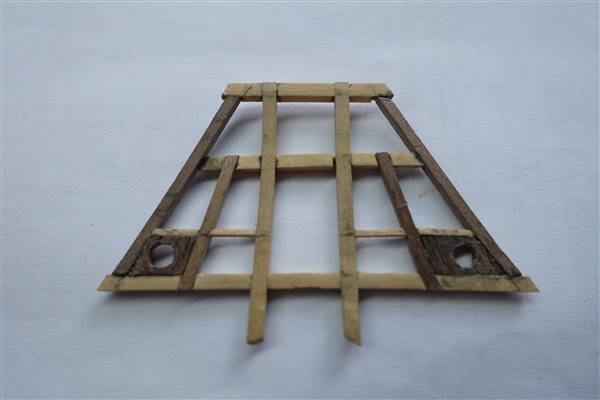
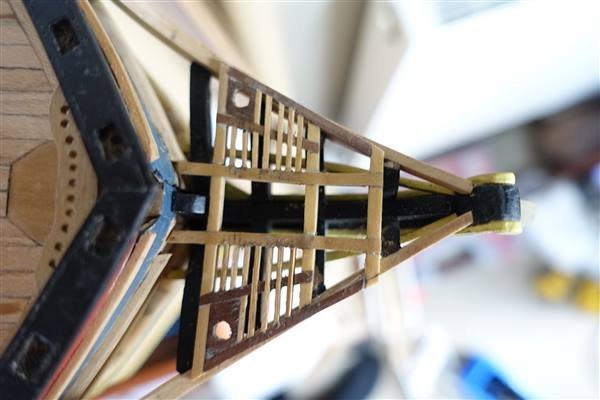
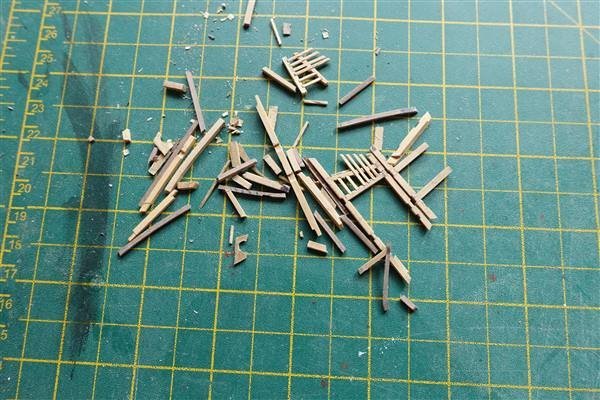
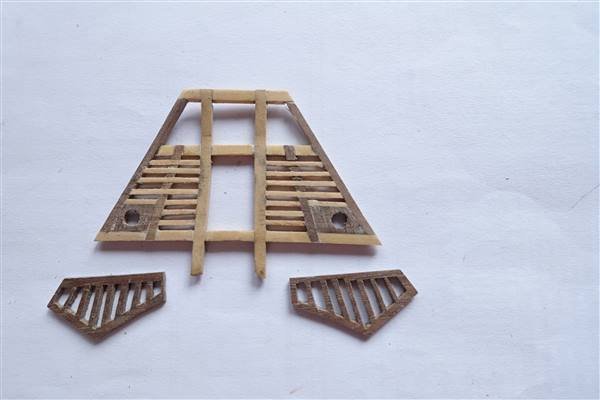
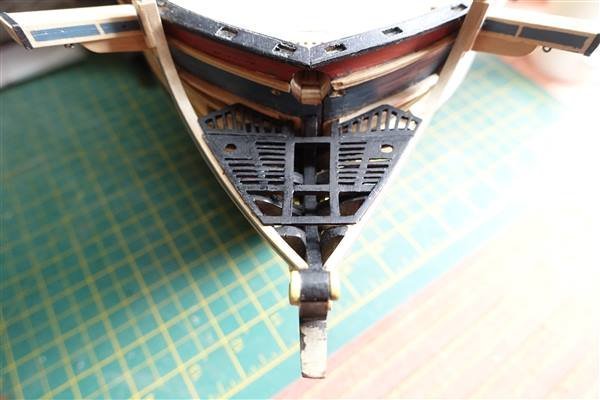
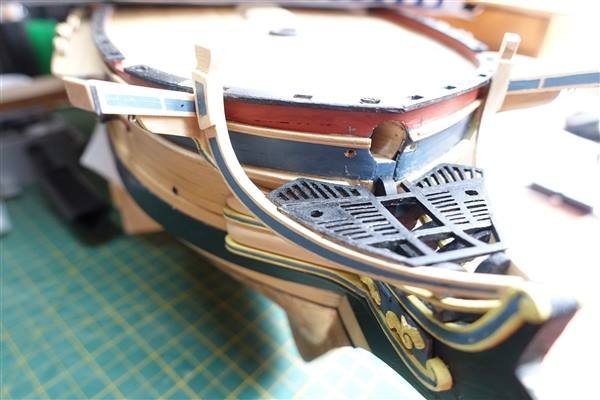
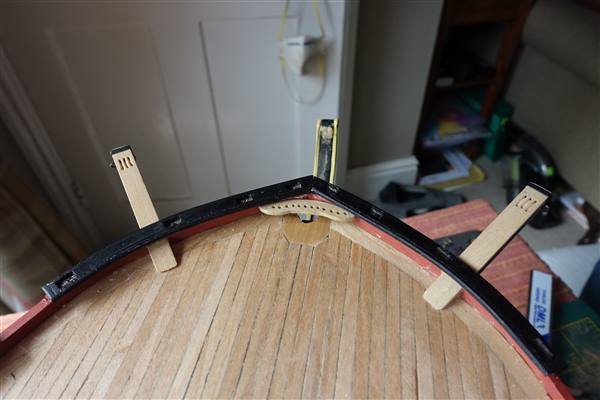
…And the gratings proved to be every bit as challenging as I expected. It has taken three weeks of work on and off (a week bird watching in Iceland intervened) and a lot of bad words but I think I have now got there. The main framework was made from 2.5mm square boxwood planed down to 2mm. The carlings were pre-curved which made cutting the joints a bit more difficult but I was afraid of the whole thing falling apart if I tried to bend the completed structure afterwards. I originally tried to follow the jointing pattern in AotS but it was too delicate, the space between carlings was to wide and after two attempts the idea was abandoned. In any case as the whole thing was to be painted black, the joints wouldn't be seen. So finally I made the carlings in one piece and cut housing joints for the cross pieces. Having completed the basic frame and checked the fit, leaving 1mm on the main rail for the false rail, the ledges were added using 1mm square boxwood. These were just cut to size and glued between carlings without attempting any fancy joints. and some of the pile of matchwood left behind The final stage was to fit the ledges between the after cross piece and the hull. The kit provides two pieces cut from walnut ply but as others have commented, there is too much wood and too little space. However I thought that with some work, they could be made to look something like so I carved away the slots to leave 1mm ledges and thinned down the frame a little. The false rails were cut from 1mm styrene sheet from a tracing taken from the AotS and glued using G-S Hypo, however before finally gluing them in, I thought it best to drill holes ready to take the boomkins while there was easy access. The seats of ease are not fixed, waiting for me to fashion the actual seat and looking a the final photo, I need to sand the base a little more to make them sit level. While waiting for glue to set, paint to dry and generally not getting on with it, I have started making up the 9 pounders but that’s for another post. Once again thanks for all the likes and comments. David


- 310 replies
-
- 10
-
-
- Diana
- Caldercraft
- (and 1 more)
-
Hi Allan, Thanks for looking in and for your thoughts. I haven't any further evidence other than following the drawings shown in the AotS. The ship models I have always assumed to be incomplete in their detail, only being built to show the main design features of the vessel. The models purportedly of Diana do not show many of the smaller details like oar ports, even the binnacle is omitted and nor do they include the quarterdeck pin rails. All the best David
- 310 replies
-
- 3
-
-
- Diana
- Caldercraft
- (and 1 more)
-
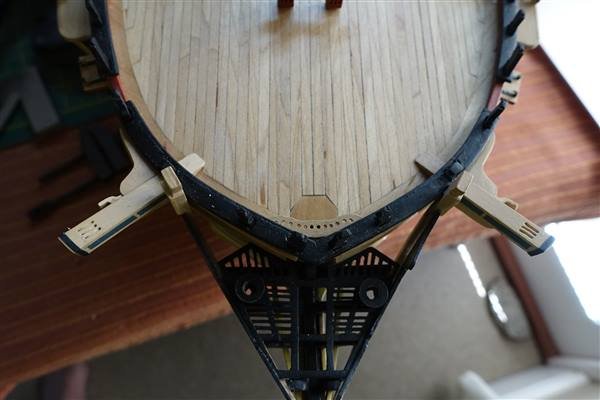
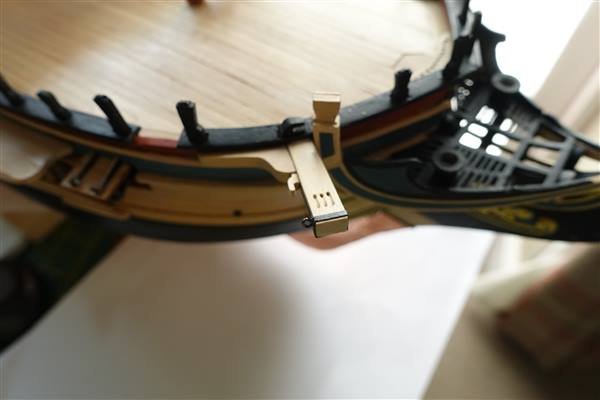
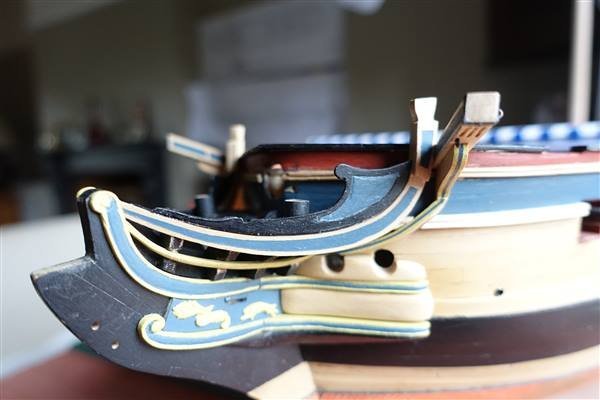
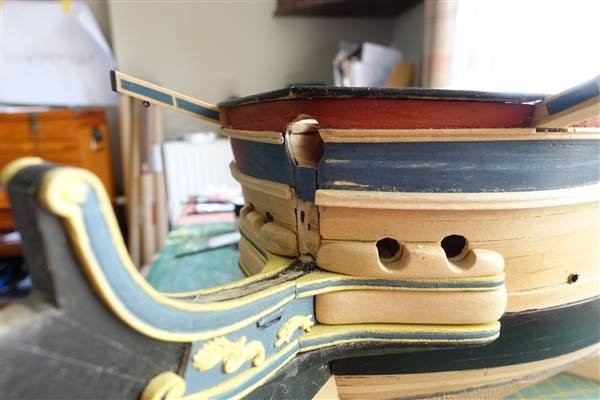
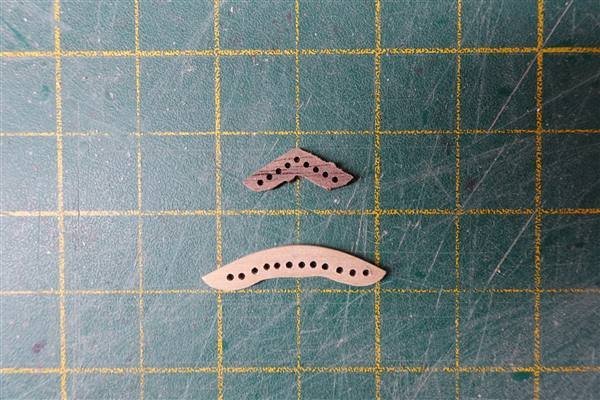
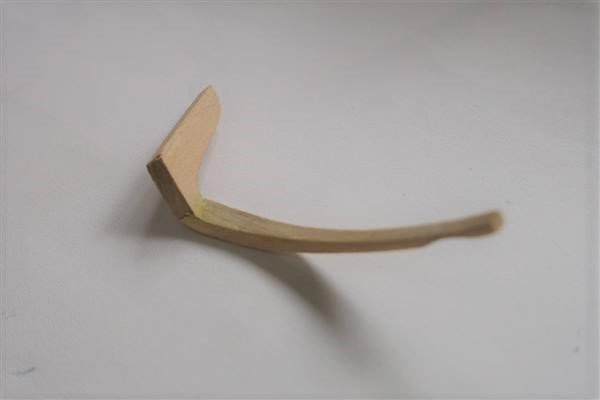
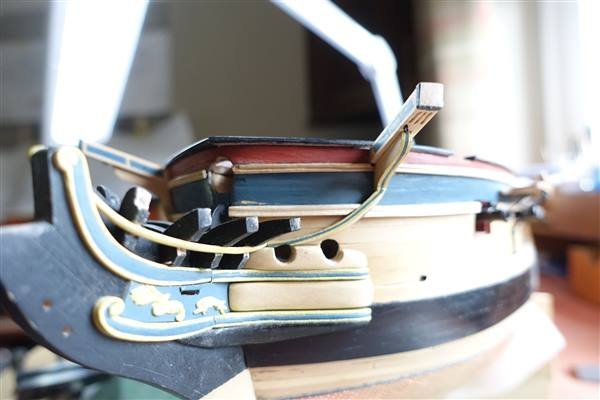
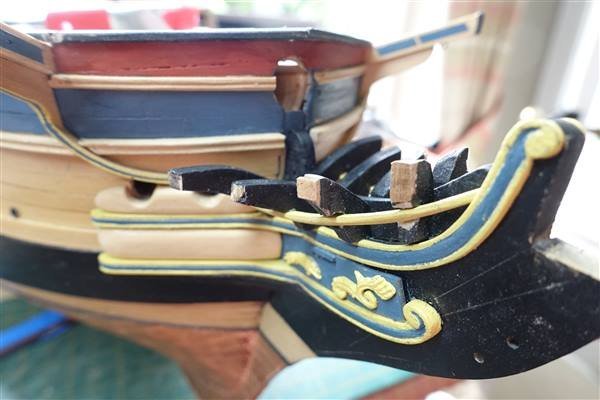
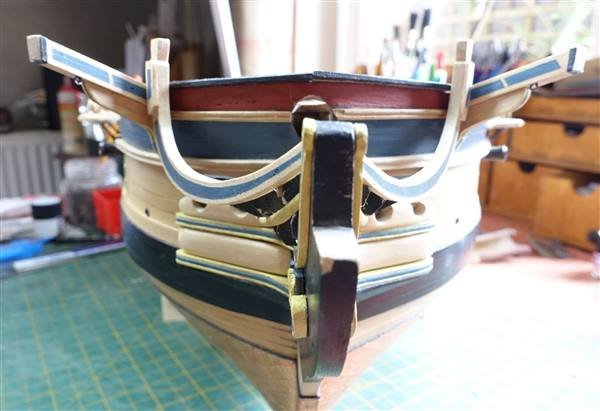
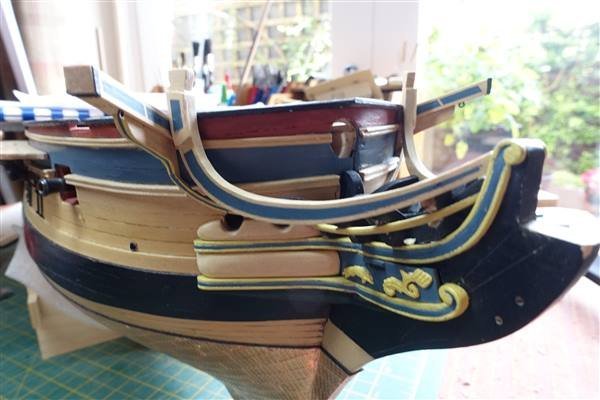
Well that took some time and a lot of reworking but I have finally made some headway on the head… The gammoning knee was remade to a better fit. The base of the head timbers from the kit were chamfered to match the curve of the prow. I didn’t like any of the kit parts for rails and head grating so they will all been made from various sections of boxwood. The bottom rail first looked to be the simplest so I made it first however I found it very difficult to get everything aligned. I was constantly assembling and disassembling. I didn’t glue the head timbers and knee together as I was worried that they would break during all the cutting and filing that was going to be needed. With hindsight it might have been better if I had. Before further work could continue, other things needed considering. Both the main and eking rails need to meet the catheads so these were made first, laminated from 3.5 square section and two pieces of 1mm strip. The rear sheave holes are drilled at angle towards the back to allow the tackle to hang vertically. The kit plan shows the cathead is set at an angle of about 11° but the AotS plans give a steeper angle 30° This looked too much to me and would also have created difficulties fitting them in the focs’l walls and capping rail. 20° looked better and the sheave was drilled to this. They were positioned relative to the hawse holes and bolster, slightly forward of the kit plan and pinned and glued into place. The capping rail (plansheer?) was next but the position of the forward pinrail needed to be considered. Again the kit piece is inadequate so a replacement was made from boxwood strip more in line with the shape given in the AotS. I have bought smaller, 6mm belay pins for this rail to give more space between them. The capping rail in the kit is too narrow even when measured against Caldercraft’s plans. Strips were glued to each side to give a width of 6mm. Having completed catheads and capping rail I could move on to the main rail. I have cut it from one piece of 3mm boxwood sheet. Cutting the head timbers again required a lot of (not so) fine tuning. I could now glue the gammoning knee and head timbers in place. When downloading photos taken over the last few weeks, I realise that I have not taken shots of many of the intermediate stages. Some photos therefore combine different steps and not necessarily following the order in which they were made so sorry if this confuses things. I left off the main rail at this stage to give easier access for positioning the eking rails. These posed the biggest problem of all. The cathead support is scale 26.5mm long and curves and merges into the eking rail. I spent a lot of time wondering how to tackle these two parts. Thankfully Blue Ensign was at a similar stage in his build of HMS Sphinx and I thank him for helping me to think through the problem. I had a few attempts at trying to make it from one piece using laminated strips or cutting it from 3mm sheet and bending the rail. In the end, I opted to make the bracket and rail separately and then chamfered them to fit together as best I could. To allow for the curve and sweep of the rail, it was made from 6x2 boxwood. After many attempts to get the right curve without breaking the wood, I finally achieved a reasonable shape and with a bit of filling at the join they don’t look too bad at normal viewing distances When it came to fixing the main rails, gaps appeared between some head timbers and rail. Maybe I should have fixed them in place before finishing the rails – anyway a bit more work on the head timbers using spacers and a bit of filler and trimming the rails was required to get a proper fit. Looking at these final pictures, I've noticed that the painting of the inner face of the port cathead doesn't match the starboard and I think that I might have created some difficulties for myself when it comes to the face pieces. The next challenge will be the gratings and getting all the carlings and cross pieces to follow the curve of the head. Thanks for looking in David


- 310 replies
-
- 7
-
-
- Diana
- Caldercraft
- (and 1 more)
-
You are correct that the Diana support is beefier in that it is a scale 26mm long and 3mm thick. I measure the angle to be 30deg in AotS. The kit supplied support is set at 11deg and is about half the size of the AotS drawing. I have lengthened the sheaves on the underside according with the drawings. Attempts at getting a sufficient bend in the eking rail are ongoing and I am working on the capping rail while I ponder further. David
- 857 replies
-
- 3
-
-
- Sphinx
- Vanguard Models
- (and 1 more)