


dunnock
-
Posts
531 -
Joined
-
Last visited
Content Type
Profiles
Forums
Gallery
Events
Everything posted by dunnock
-
Thanks for your kind words Dave but looking at your Endeavour, I'm sure that you would make a fine job of Diana. I am using AotS Diana as if it's pretty much spot on. I believe that it is certainly better than the Caldercraft plans and parts, who after all want to sell their kits to a wide range of modellers at an acceptable price. As I understand it, the kit is one of their earliest offerings and although some parts have been changed (the 18 pounder barrels for instance) much of the kit is as it was. I think the only way to check the AotS for accuracy would be to buy whatever plans are available from NMM. Perhaps others better qualified would like to comment too. David
- 310 replies
-
- 2
-

-
- Diana
- Caldercraft
- (and 1 more)
-
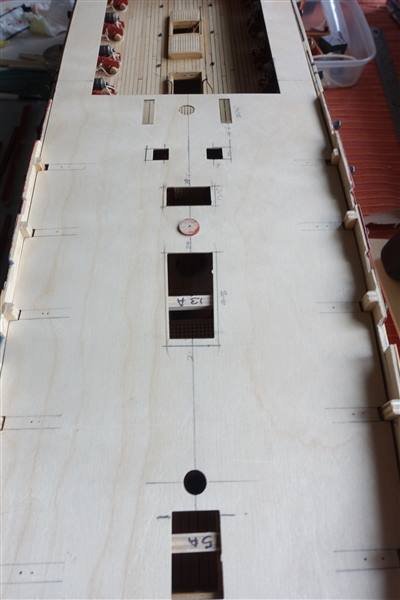
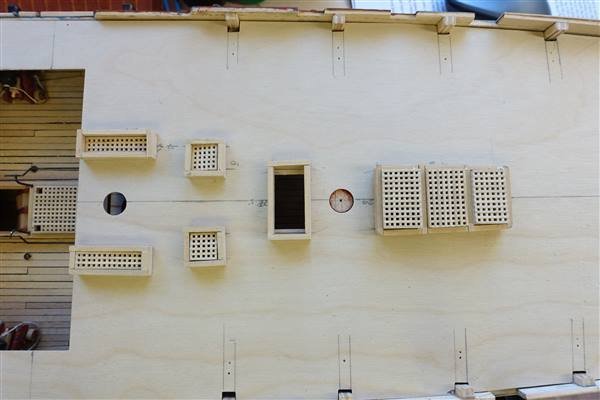
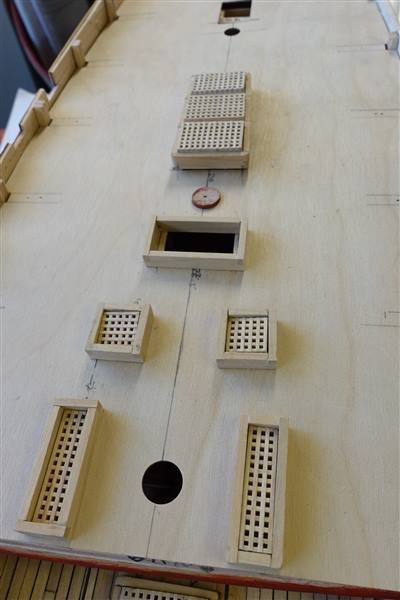
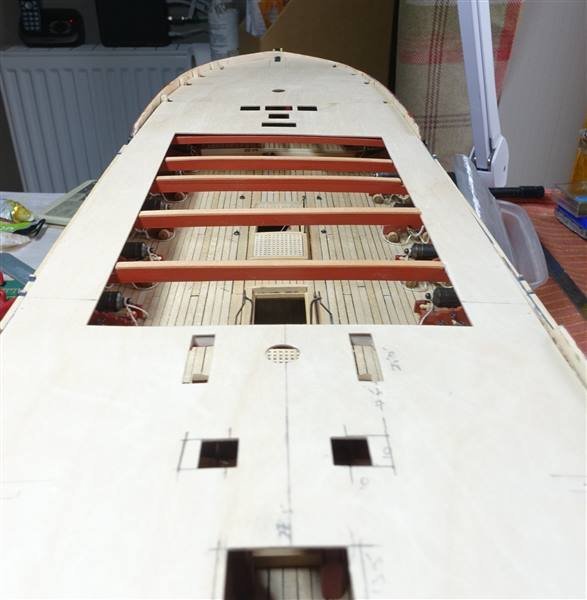
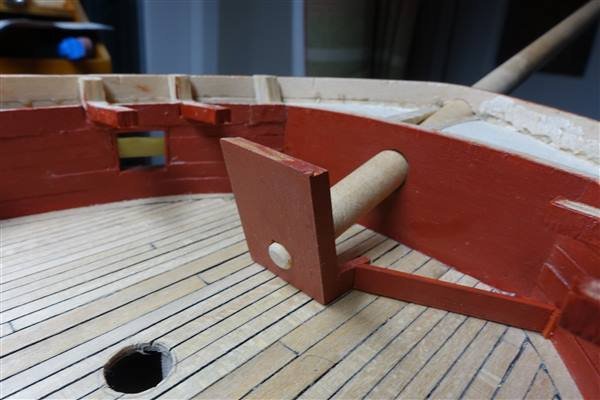
Quarter Deck Hatches The local post is very erratic so I’m still waiting for my delivery from Ropes of Scale even though they shipped my order within 24 hours. In the meantime I’ve started on the quarter deck coamings, which like the upper deck, are made from 6x2mm boxwood, and the gratings. According to AotS Diana the openings for the hatches and ladderway are larger and slightly differ in their positions compared with the ply deck supplied. I have marked up the new openings and made the coamings and gratings accordingly. The main quarter deck hatch, being tapered, took a few attempts to get even close but I am reasonably happy with the final result – I don’t think I could improve upon it anyway. I have rounded the corners and added strips for the gratings to sit on. The other hatch coamings and gratings are made up too but all require shaping. I didn’t have enough pieces to make gratings for the forecastle, probably because I made the aft hatch on the upper deck which isn’t part of the kit, so I am now also waiting for some grating kits from Jotika. If things don’t arrive soon, work on Diana will have to slow down and the shipyard will be going on short time. David UPDATE: The gratings have just arrived so work continues..
- 310 replies
-
- 8
-
-
- Diana
- Caldercraft
- (and 1 more)
-
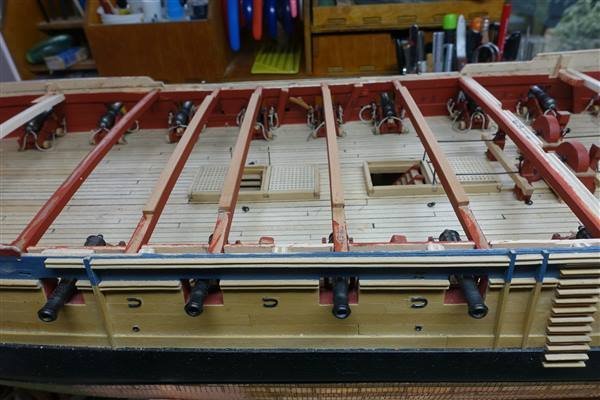
Thanks for the likes everyone Deck Beams and Skid Beams While waiting for cable from Ropes of Scale, I have spent some time test fitting the quarter deck and forecastle, checking it for any odd lumps and bumps. The plywood beams have been fixed from aft forwards as far as the capstan. The next will be fixed aft of the bulkhead extensions to keep it clear of the scuttles. I’m wondering in hindsight if I could cut away beam 13a where it crosses the hatch and brace it from beam 12a. I have replaced the walnut skid beams with pearwood. I only have 6x2mm strip so they have been made up with 2 lengths of 6x2 glued together and shaped using one of the walnut pieces as a template. According to the photos in Gardiner, the skid beams sit below the level of the gangways but I like the approach that Beef Wellington has taken to raise their level to be flush with the planked gangways. I have taken up this idea by adding another piece of 6x2 pearwood on top of the skid beam and sanding it back flush with the sides. David
- 310 replies
-
- 3
-
-
- Diana
- Caldercraft
- (and 1 more)
-
Jason, I've been trying to find the reference that I used but somewhere I read that the circumference of the cable is 0.6 x main mast diameter. and at 27.75" this equates to a scale 2.1mm diameter for the anchor cable. David
- 310 replies
-
- 3
-
-
- Diana
- Caldercraft
- (and 1 more)
-
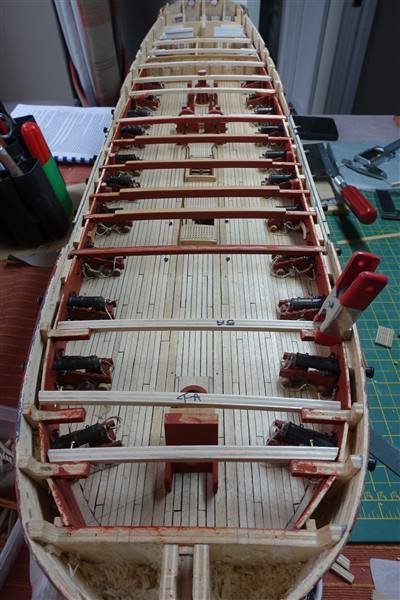
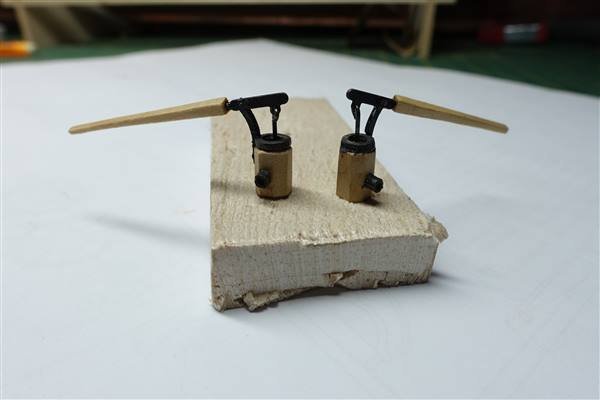
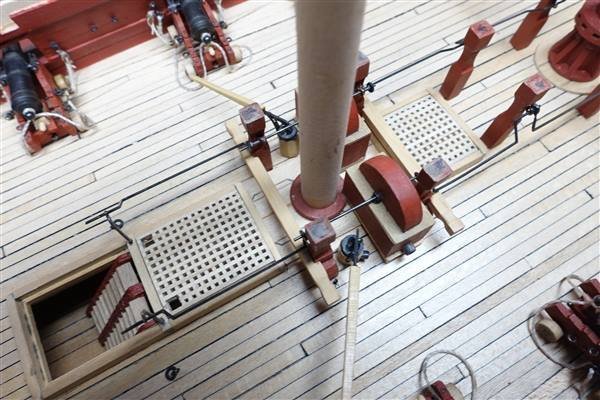
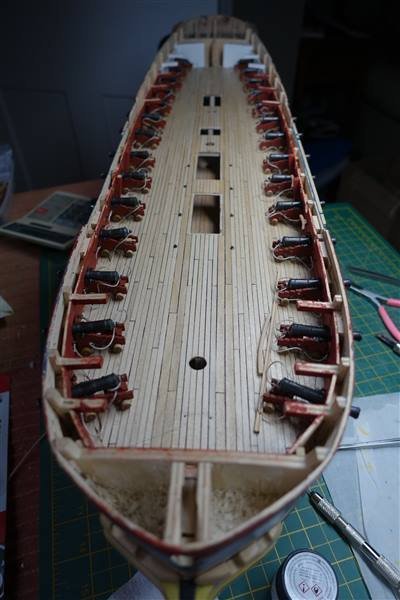
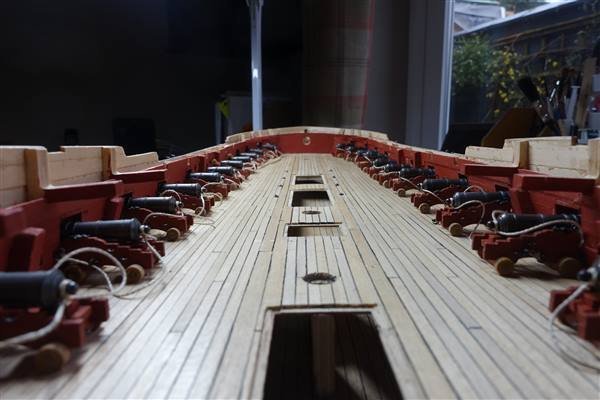
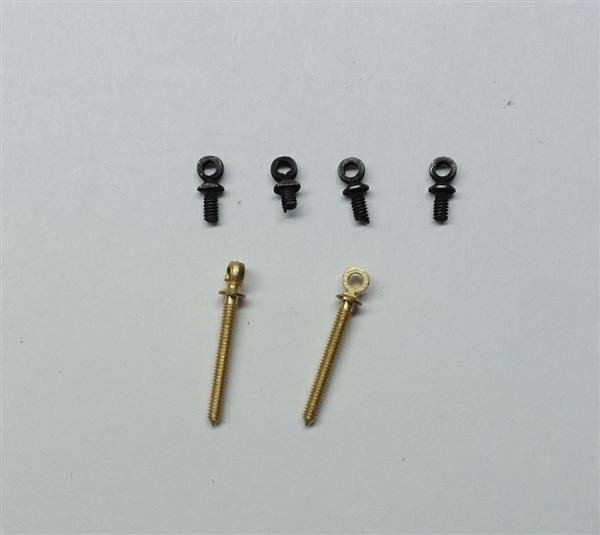
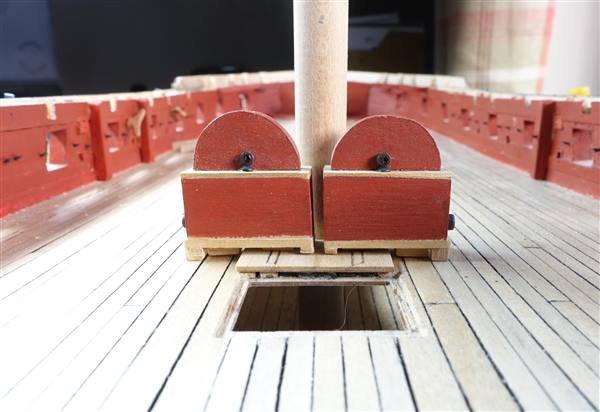
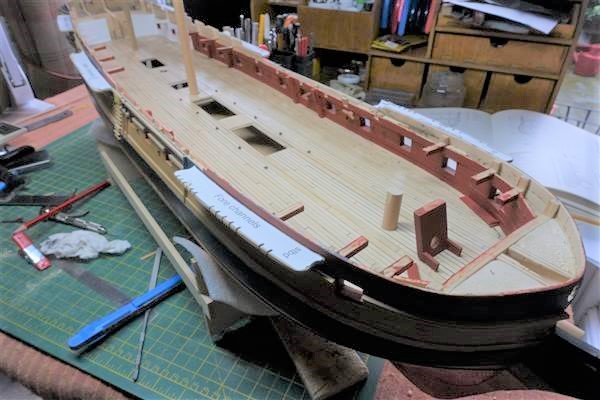
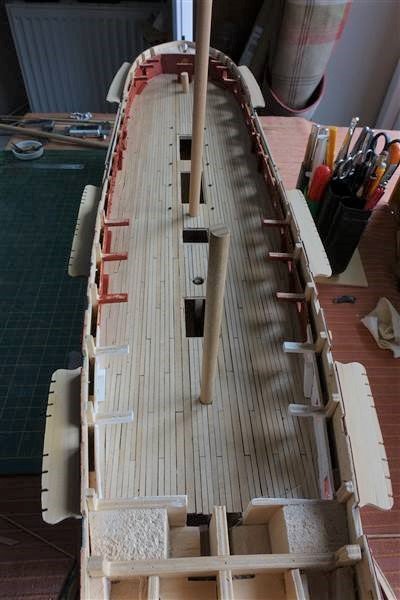
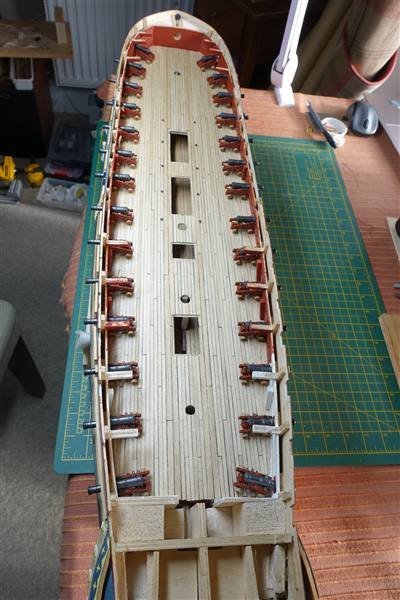
Many thanks for all the likes. All the guns on the upper deck have now been firmly fixed in position using epoxy to fix brass posts into the both the gun carriage and deck and aliphatic glue on the flattened trucks. I tried to set the breeching ropes in position by simply wetting them out and holding them in place until dry but the cord being mostly synthetic, didn’t respond well. The only way was to fix them using glue in discrete spots at appropriate points. The port tackles were prepared some time ago with the falls frapped around the tackle which made it a simple matter to hook them onto gun carriage and bulwark and fix with a dab of CA. Unfortunately I have forgotten to take a photo of the upper deck now all the centre, visible guns are rigged with port tackles but they can be seen in the shots around the main mast area. Having fitted the guns, I have moved on to the fittings along the central line. Starting from aft, the partitions for the captain’s quarters have been fixed in place The chain pump housings I have covered previously and these were now fitted using the kit supplied PE brass brakes, which although not great, I decided were acceptable. The provided walnut stanchions were given a bit more shape before being painted, pinned and glued in place. The deck beams are not glued in place yet I couldn’t live with the supplied parts for the elm tree pumps and ordered some from Jotika. Rather than used Jotika's dowel, I made the cylinder from 5mm square section boxwood filed and sanded into an octagon. The brass brake looked too short and flimsy so I added a boxwood extension. The area around the main mast is now complete and looks pretty crowded. The elm tree pumps aren’t glued and I will not fix them until the last moment as they look vulnerable to damage. I want to show the anchor cables feeding into the main hatchway but there is insufficient cable supplied in the kit to do this and anyway it looks a too bright and white. I was prompted by a member of this forum (and I’m sorry but I can’t remember who) to look at Ropes of Scale. The nearest cable they have is 2.1mm, slightly under-size but as close as the 2.5mm supplied is over so I have ordered some of there beige cable and a couple of other items to try with a view to replacing some of the kit rigging thread.. I don’t want to fit the forward bitts and other items until the cable and deck stoppers are in place. While waiting for the cable to arrive, I thought that I would fix the channels and brackets but as others have commented, only 22 brackets are supplied when 26 are shown on the plans. I have emailed Jotika asking for some extra parts and in the meantime have checked the security of the guns and worked on the deck beams and skid beams which will be for the next update. David


- 310 replies
-
- 8
-
-
- Diana
- Caldercraft
- (and 1 more)
-
Beautiful work Jason and good to see you back. I only hope that I can achieve a result half as good when I reach that stage
-
I wanted to use slow setting epoxy for fixing the guns to give me time to adjust them. While I was waiting for it to arrive, I decided to have a bash at the wash cants. They are formed from a number of complex curves and I wasn’t sure how to go about it. I decided to take it a step at a time by building them up from layers of 6x2mm pear strip. I built up the first a strip at a time measuring it against the curve of the hull and of the lower cheek. In the end they were three strips deep by two thick. The section along the stem was made up separately to a rough finish and then fixed to the hull section with epoxy to provide enough strength for filling and finishing. Having completed the first, I was able to go a little quicker with the other side and glued and roughly shaped the back three strips as one piece. The front three strips were also roughly shaped before glueing to the other half for final shaping. It took three afternoons of cutting filing, and sanding to complete both pieces. Not easy to photograph an all black subject but here the wash cants are fitted to the hull. While waiting for epoxy and filler to set at various stages, I was able to start fixing the guns. I had already mentioned that I had fixed 1mm brass posts into the carriages and drilled corresponding holes in the upper deck. I also slightly flattened the trucks to give better contact with the deck. The guns were then fitted by applying the slow setting epoxy to the holes in the deck and aliphatic glue to the trucks. The port side fixed and the starboard side in place ready to be glued down The The port side breeching is fixed but the ropes need tidying and setting in position. And that’s all I’ll have time for as my work room has to be dismantled – my table is needed for Christmas lunch. A Merry Christmas to all David
- 310 replies
-
- 10
-
-
- Diana
- Caldercraft
- (and 1 more)
-
Thanks for the likes and Rob for your kind comments. Originally I didn't intend to drill straight through but when I drilled the outer hull, I found that by applying slight pressure, I could feel from the inside where the drill was so I tentatively continued with the first scupper which worked out OK, and then pressed on with the others. David
- 310 replies
-
- 2
-
-
- Diana
- Caldercraft
- (and 1 more)
-
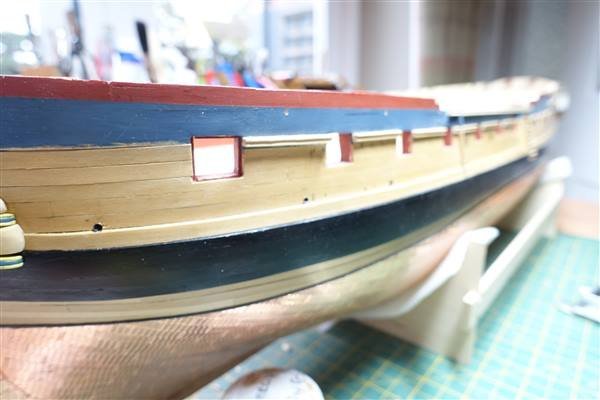
Thanks to AJohnson for the like Scuppers Continuing work on the outer hull, I have fitted the scuppers. These were made from electrical connectors, not sure of the proper name, bought from ebay for HMS Fly. Some scuppers are very close to the deadeye links so their positions were marked using a length of cord set at mast-top height and led through the appropriate slot in the channel. In the photo the black covered ones are 2mm and the blue 1.5: just right for 5 and 4” scuppers respectively. The plastic sheath is cut off and the inside painted with Tamiya Dark Iron. .The length is also just right for the width of the bulwarks to meet the waterway I think that it’s time to leave the hull and finish fitting out the upper deck.

- 310 replies
-
- 6
-
-
- Diana
- Caldercraft
- (and 1 more)
-
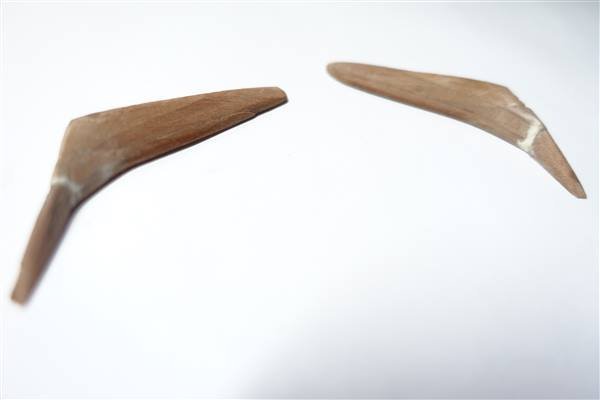
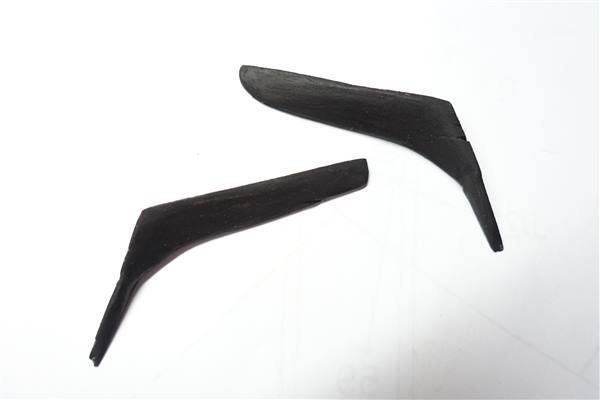
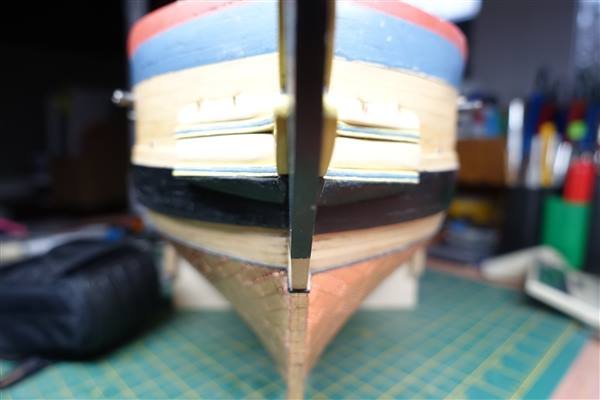
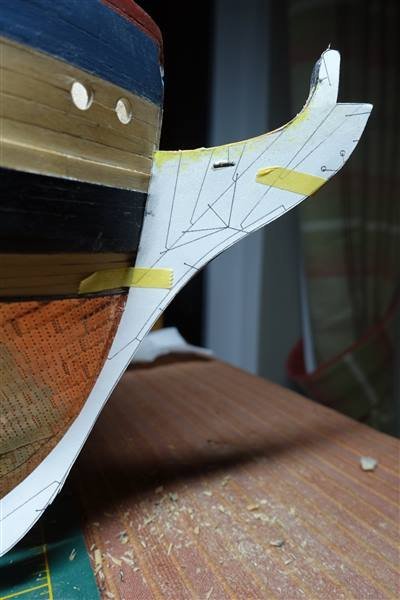
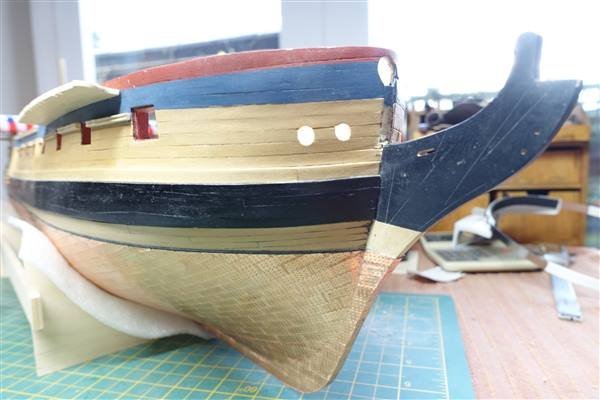
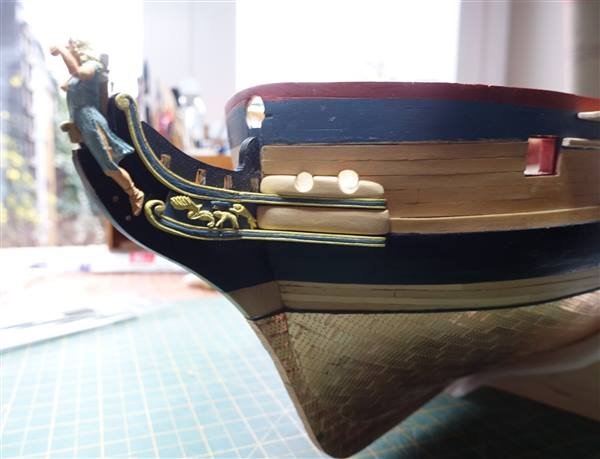
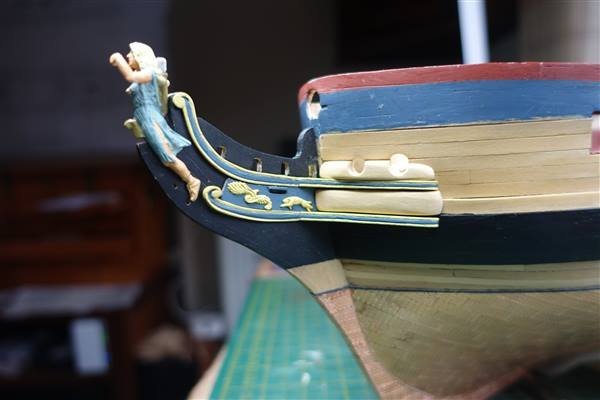
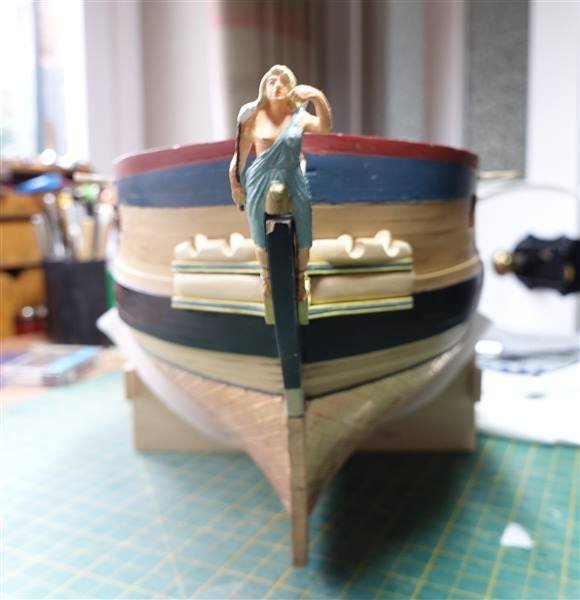
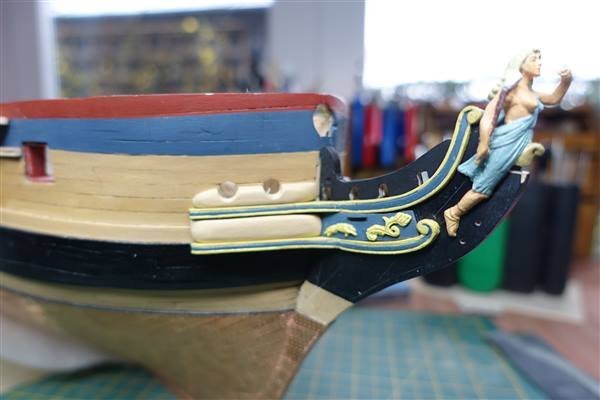
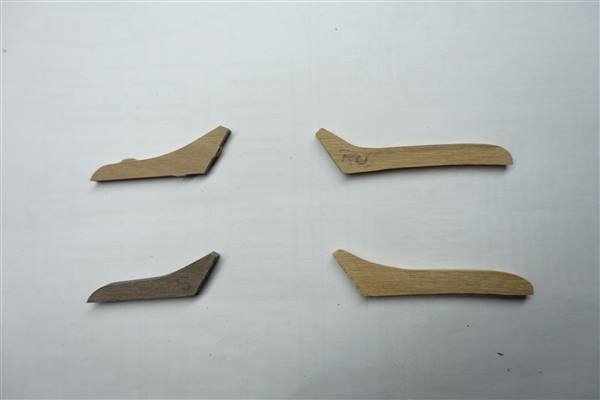
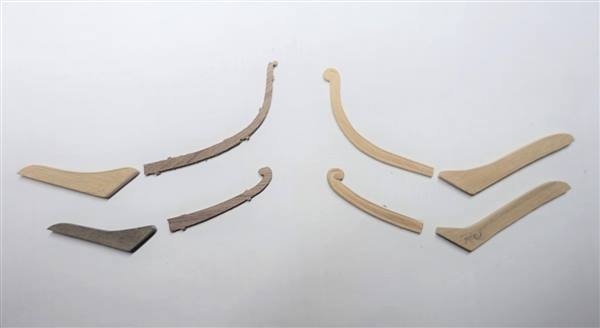
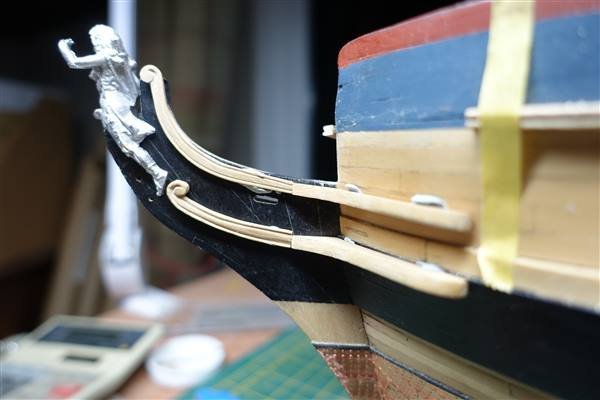
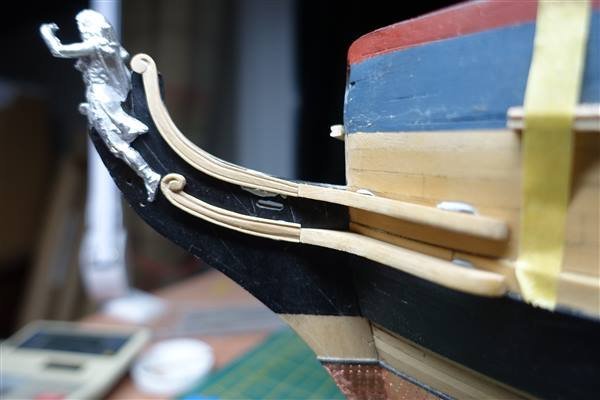
EUREKA!! Thanks for the likes but really there was little to like in my last post. I made all the parts from the lower cheek up to the level of the bolster. Before finally accepting that I had made such a fundamental error with the position of the wale, I wanted to make a final check on all the measurements related to its position. It was only then I found that the real problem was with the stem, which I had scratched from 7mm boxwood sheet. When I transferred the tracing from a scaled-up version of the drawing in the AotS Diana to the boxwood sheet, the tracing must have moved. This is the only explanation I have for the difference in profile along the top edge which was 2mm out at its junction with the stem. It was a great relief to find that the solution was a relatively simple matter of reducing the stem to match the correct profile. However it meant that I had to remake the trailboard and because I had (stupidly) already cut the hawse holes, quite a bit of work replacing bow planks, plugging the holes and cutting new holes in the correct position. Having made sure that all the components lined up, I have now fixed them in place. Initially I placed all the hunting dogs and scrollwork on the trailboard but because of the addition of the filling piece that isn’t part of the kit, it looked overcrowded and out of balance … so I removed both dogs and just went with the single ‘running’ dog which I think looks more balanced I’m glad to have got this stage sorted out. Looking at the photos in close-up, I will try to improve on the paintwork but overall, and at normal viewing distances, I am quite pleased with the results. The gammoning knee supplied is the wrong shape compared to the drawing in the AotS so I have made a new piece. Initially I cut it out from a piece of 7mm boxwood cut back to 5mm but it was too prone to splitting when it came to cutting out the slots for the head timbers. Since it is being painted, I decided to go with a new piece cut from the ply provided. When I drilled the hole for the mainstay collar, I realised that the first head timber (the stem timber?) would cover it so I guess that the head timbers will also have to be modified down the line. 0 The failures are on the left with the kit part and my final effort on the right I’m looking at the wash cant in the AotS and wondering about the best way to make this up. It seems to have quite a complex curve. Perhaps a series of reducing triangular pieces laminated together and then shaped to the curves might be the best approach.

- 310 replies
-
- 7
-
-
- Diana
- Caldercraft
- (and 1 more)
-
Hi RockinBudgie, I haven't built this kit and I'm definitely no expert but it would seem to me that, like all the other kits that I have built, the planking should sit firmly against each of the bulkheads. Perhaps the forward fascia should have the same arrangement as the aft. David
-
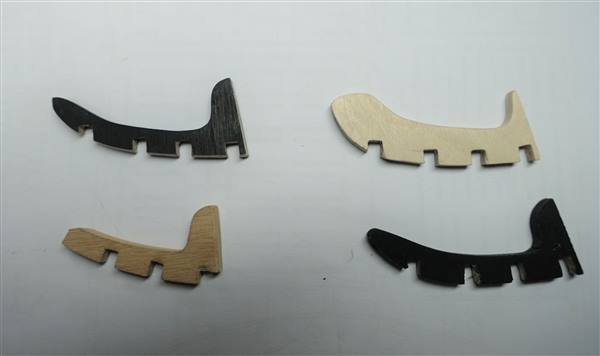
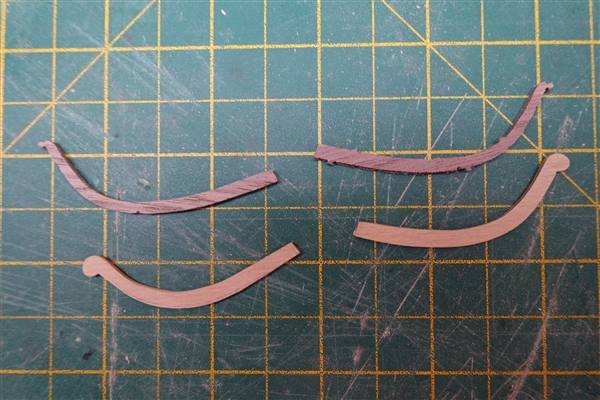
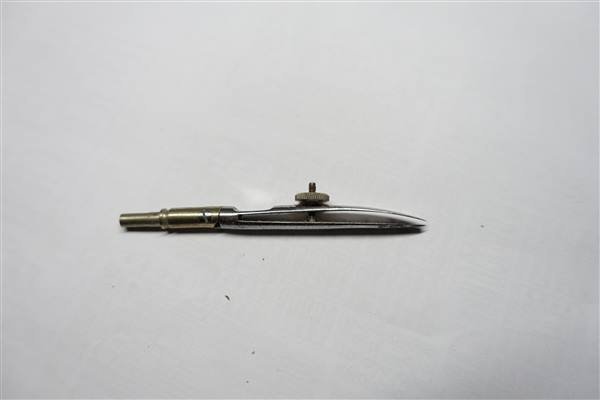
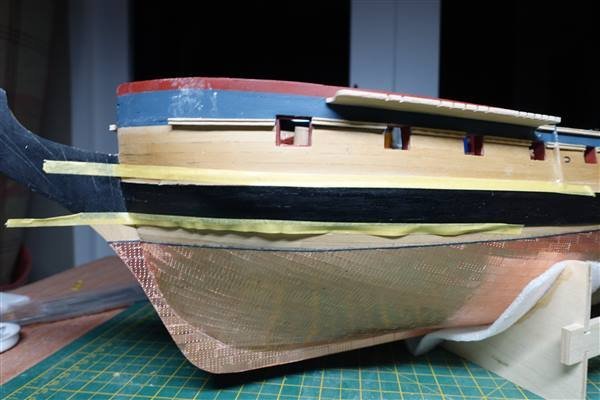
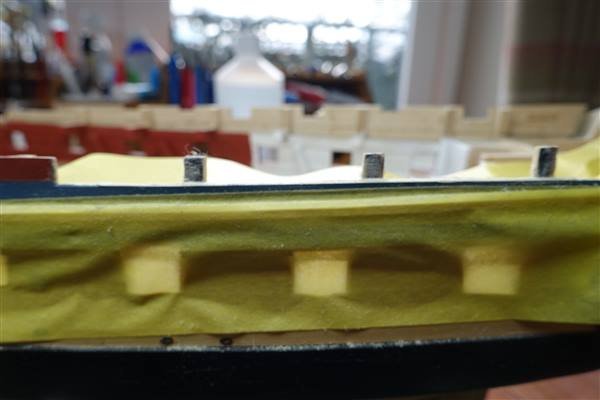
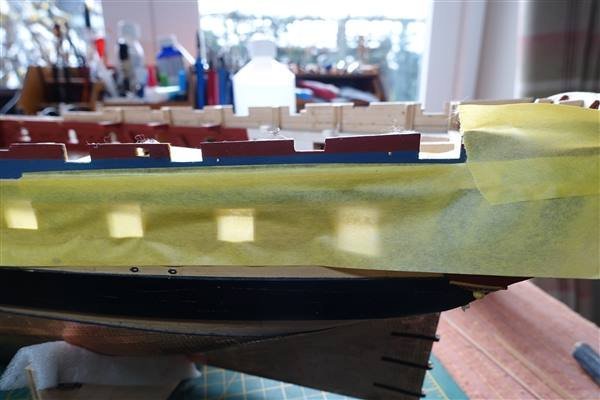
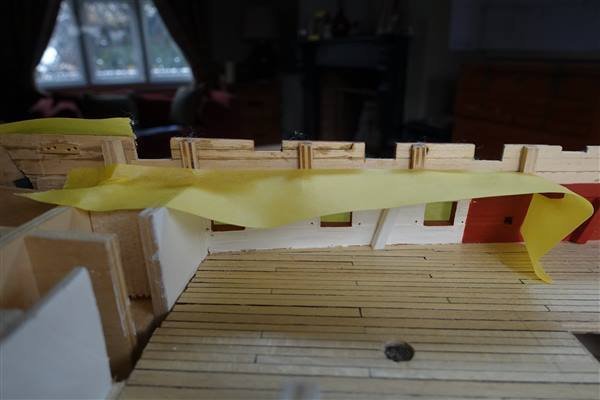
Thank you to everyone for the likes on, they are much appreciated previous posts Head Rails Looking at the drawings of the head rails in the AotS and the photos in Robert Gardiner’s The Sailing Frigate, both upper and lower cheeks in the kit look too short. I believe that the cheeks should extend almost to the line of the cathead and so I have scratched some from 3mm boxwood sheet. Comparison of Upper & Lower Cheeks The quality of the rails in the kit were thin and of very poor quality, so again I have made them from boxwood sheet. Comparison of Upper Rails I cut some shaping into the rails, firstly using a pen from my father’s old drawing set, which creates a nice clean line parallel to the edge, and then gradually opened them out with files and a sanding stick. Now for the confession. Starting on the filling piece, I suddenly realised that I was in deep trouble. The filling piece, which should be about 8mm deep, on my model is nearer 10mm. Checking all the relevant measurements, I realised that the wale is 2mm too low at the bow. Everywhere else along the side is fine but the sweep up to the bow is wrong. The space between the tapes shows where the wale should be. After a lot of swearing and telling myself how stupid I’ve been, I’ve resisted the urge to turn the whole thing to matchwood but am left with the dilemma of how to proceed. I don't think that replacing the wale is feasible at this stage of the build because the planking above and below follows the same line and that would mean taking apart the front half of the ship. As I see it, I have two options. I can carry on with the lower cheek sitting on top of the wale and making the filling piece deeper than it should be or I can sit the lower cheek above the wale and restore the distance between lower and upper cheeks to the correct spacing. Option 1 Option 2 Neither is ideal but my inclination is for option 2 as the least worst: to sit the lower cheek above the wale which although wrong, I think the relationship between the various elements would be more balanced than if I make the filling piece deeper. Having spent a lot of time upgrading and scratching various parts, having to make such a compromise is really annoying. David
- 310 replies
-
- 4
-
-
- Diana
- Caldercraft
- (and 1 more)
-
Hi Rob, Thanks for your kind comment and your link to Jason's log. I was going to add a strip across the front of the slots and somehow blend it in to the sides but letting a strip into the channel is a much neater solution which I will definitely be adopting. Like Jason, I feel that I have a confession to make as I have noticed an error that I don't think that I can correct easily so may just have to find a work-around....
- 310 replies
-
- 1
-
-
- Diana
- Caldercraft
- (and 1 more)
-
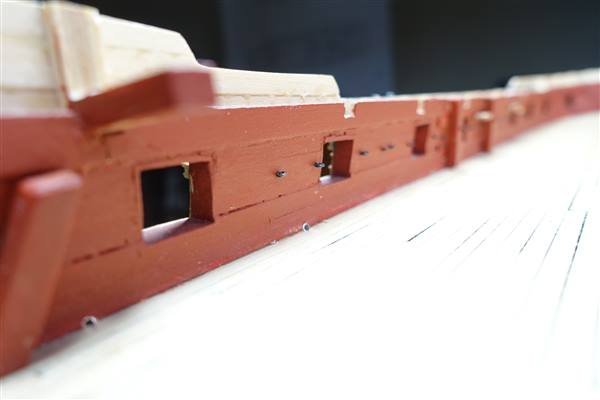
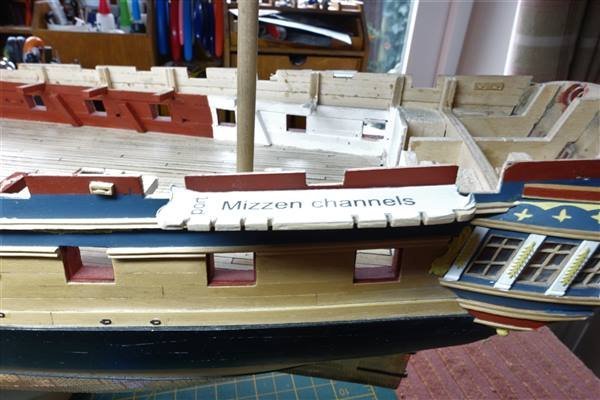
Thanks for all the likes and Dave I'm afraid I can't claim credit for the laminated 6x2, Robdurant was there long before me. The wood, like much of the visible wood on the ship, is boxwood. I have now replaced the quarterdeck bulwarks where the gunports were wrongly positioned. The surrounding hull and deck were protected with wide masking tape. I only needed to remove the planks from the last carronade port and the next two gun ports. The glue was attacked from the back with a small swab of cotton wool soaked with IPA. The joints came apart quite easily and were then cleaned up and sanded. It was then a simple matter to replace the planks. With the mizzen channel pinned in place, and a temporary mast to align the shrouds, The boxwood planking needs finishing but I have marked the positions of the two gunports and will cut them out at a later stage.

- 310 replies
-
- 5
-
-
- Diana
- Caldercraft
- (and 1 more)
-
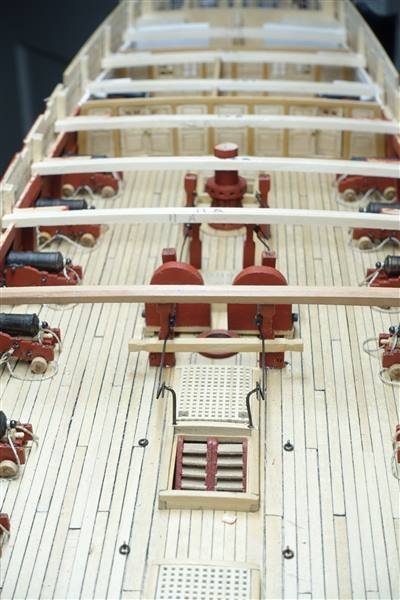
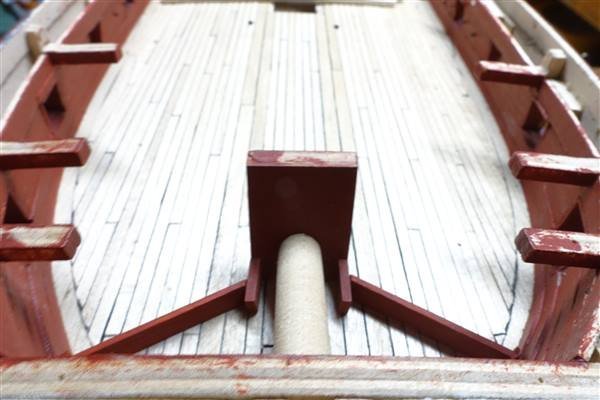
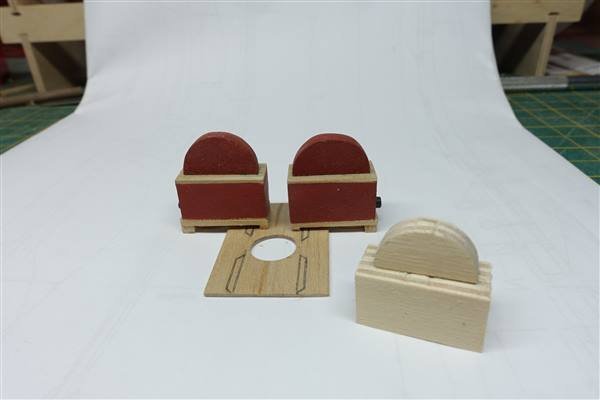
As a change from repetitive gun work, I made some further parts for the centre line of the upper gun deck. The bowsprit step and manger boards were quite straightforward and although not seen, I wanted to include them. The only slight difficulty was setting the step at the correct angle and getting the hole for the bowsprit in the correct position and at the correct angle. I cut the heel tenon in a piece of 10mm birch dowel that serves as a temporary bowsprit to check alignment. The step is temporarily fitted in place with 1mm brass pins. Chain Pumps I looked at the birch ply parts provided in the kit and thought that although they match the sizes given in the AotS Diana, I could probably improve upon them. Using the AotS as a guide, I made up the cistern from 6x2mm boxwood strip and the hood from some boxwood sheet laminated to make up 5mm thickness. The bearings are made from some brass eyelets that I bought along with the hooks from HiS Model. When blackened and cut down, I think that they look the part. I know that I am flitting about here but I next decided to tackle the channels. I couldn’t use the walnut ply channels provided in the kit as they wouldn’t have sat well against the rest of the hull. I am again indebted to Robdurant for providing the plans that he drew up and for suggesting the use of the laminated 6x2mm strip. The backstay stools are thinner and I cut these from 1.5mm sheet. Rob’s drawings were cut out and pasted onto the boxwood pieces using a glue stick. Sawing curves has never been my strong point (one of many) but I roughly cut them out and had to spend a lot of time sanding them back to the line of template. The channel positions were marked on the hull using the plans and the AotS drawings. A final check was made by putting temporary masts in place and using thread to make sure that the shrouds would not interfere with the gun ports. All was well until I came to the mizzen channels and realised that one of the shrouds would be right in the firing line of a carronade on the quarter deck. This will mean removing the bulwark planking and realigning the gun port. I’m not sure yet whether I will have to move just the one or whether this will make all the other gun ports look wrong. For the moment the channels are temporarily fixed in place using 1mm brass pins, 3 for the main and fore channels and 2 for the mizzen. I am wondering how to finish the edges with a moulding piece. I don’t think that for me scraping a shape will be the answer, although I will have a go. Alternatively I might cut them out of more 6x2 strip. A bit more thinking and trialing required.
- 310 replies
-
- 8
-
-
- Diana
- Caldercraft
- (and 1 more)
-
Dave, thanks for your kind comments. I bought the '3mm patinated in black' hooks. They are very nice and the black doesn't rub off when you are fiddling around. Although delivery costs are quite high, they came very quickly via post with no issues over importation from the EU. David
- 310 replies
-
- 1
-
-
- Diana
- Caldercraft
- (and 1 more)
-
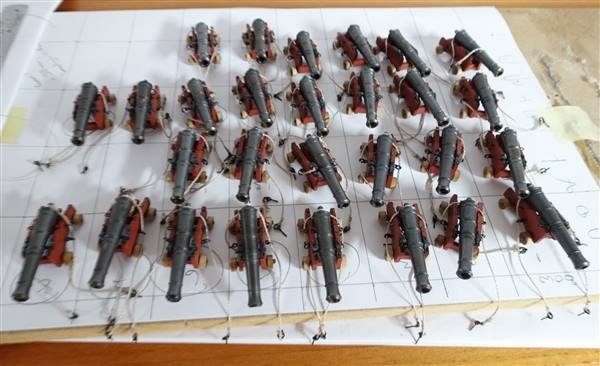
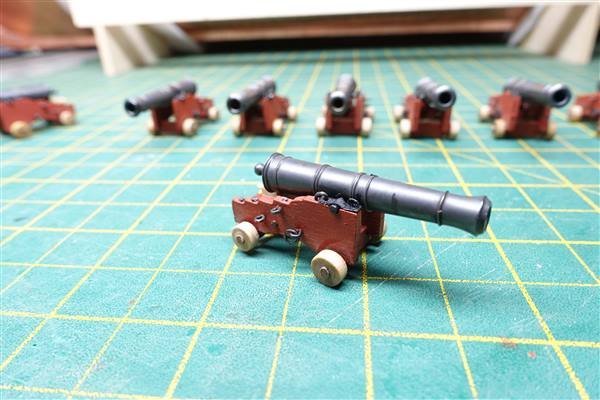
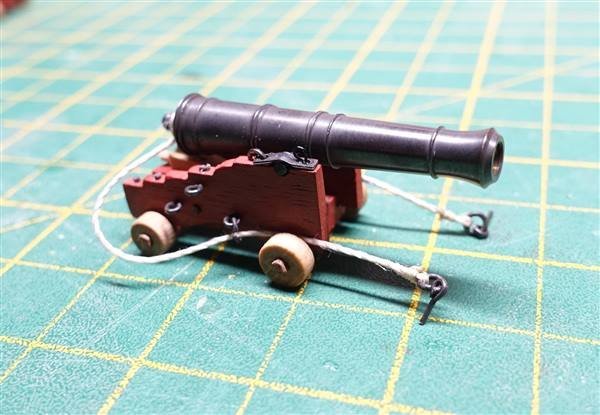
Breeching ropes and port tackles are completed. Port tackles are made up from 2.5 mm blocks from Vanguard models and 2mm hooks that I bought from HiS Models in Czech Republic. I stropped the blocks with some 0.3mm thread that was left over from and earlier build and the tackle rope is 0.25mm thread from the kit. I believe the tackle is a scale 260mm long. I have frapped the fall around the tackle and will cut off the excess length to make a loose coil on the deck. The quad hands that I bought a couple of months ago made rigging much easier than it might have been with such tiny blocks and hooks but even so, I found that I could only do a few at a time. I have only made port tackles for the 10 midships’ guns and I am debating whether to make the training tackles or leave them off. Maybe I will feel more inclined after a break from it. Between rigging the tackles, I have continued with more of the fittings down the centre line of the upper deck. But that is for another post. I am also thinking to put the guns to one side for the moment and carry on with more of the outer hull before finally fitting them. I have drilled the carriages to take a 1.5 mm brass pin and will fix with epoxy into corresponding holes drilled at each gun port but even so, I am concerned that the barrels will be vulnerable to my clumsiness when fitting rails, channels etc. Guns rigged with breeching ropes are kept in order to ensure that they line up with the holes in the deck for the posts and with the gun ports
- 310 replies
-
- 3
-
-
- Diana
- Caldercraft
- (and 1 more)
-
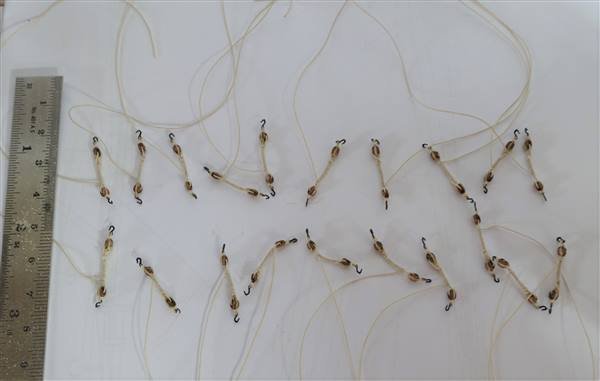
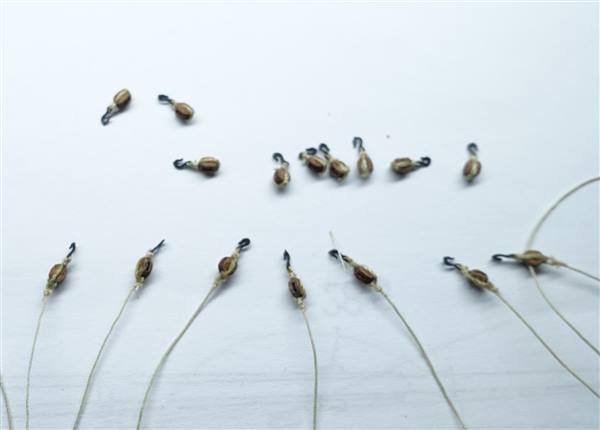
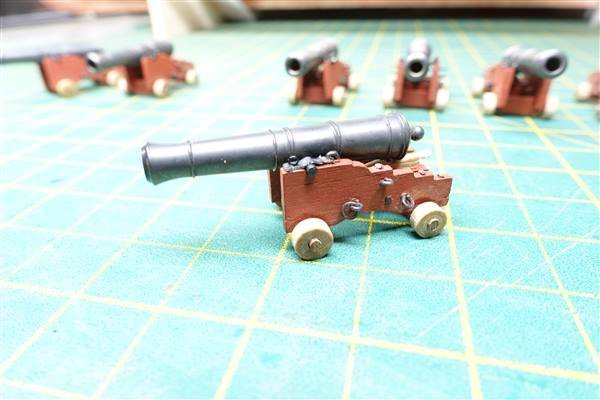
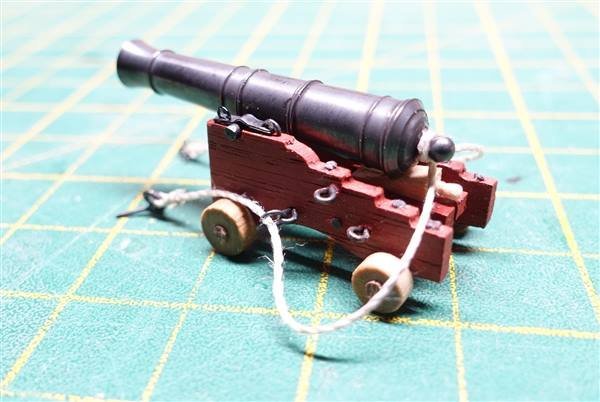
A short update as I continue with the upper deck guns. The barrels are completed and when placed on the carriages with the quoins, I am pleased with the way they look along the ship. I have used the cap squares provided in the cut, preforming them over a piece of 1.5m brass before they were blackened and then glued into position with CA. To finish off the carriage I added the eyebolt and hinge to those midship guns that are partially visible but only the eyebolt to the others. The copper eyebolts in the kit, I thought were a bit big for this purpose so I made my own from 28gg black ‘artistic wire’ twisted around a 0.8mm drill. The hinges are cut down kit eyebolts. This was a bit fiddly but once I’d got a method worked out, it went quite smoothly. The breeching ropes are 3 times the bore length of the barrel so 120mm for the 18 pounders. I made up the breeching ropes for all 28 guns using the 0.75mm thread provided in the kit, seizing one end to a ringbolt. It is then a bit of an awkward job to thread the rope through the eyebolts on the carriage and wrap it around the cascobel with a false splice before seizing the final eyebolt.

- 310 replies
-
- 5
-
-
- Diana
- Caldercraft
- (and 1 more)
-
Allan, Thanks for the info and link on 3D printed barrels. I can see that this will become the way to go in the future to replace many of the white metal, brass and PE components. I'm well into my 18 pounder gun carriages and just about to start rigging the tackles now but I will be looking around for options when it comes to the guns for the quarter deck and forecastle.
- 310 replies
-
- 1
-
-
- Diana
- Caldercraft
- (and 1 more)
-
Dave, Thanks for the link to Shipaholic's log. I did make some of my own hooks for my build of HMS Fly but nothing like as good as Shipaholic. I've just received some 3mm hooks from HiS models in the Czech Republic which look very nice. I've also bought some 2 and 2.5mm blocks from Vanguard Models but they are sooo small. I will be trying to make up the port tackles with these items over the next few days. David
- 310 replies
-
- 1
-
-
- Diana
- Caldercraft
- (and 1 more)
-
Thanks for the post on the Estonian wood suppler. I've been buying boxwod strip and square section from Original Marquetry but it's good to hear of a European source with a wider selection of wood types. David
- 857 replies
-
- 3
-
-
- Sphinx
- Vanguard Models
- (and 1 more)
-
Thanks Allanyed - I don't think that I would have a steady enough hand to paint freehand but I could try to stencil the lettering in future. Dave, thanks for your comments on the cannons. I thought about replacement but to buy 28 from Chuck would be quite expensive. For the carronades and 9 pounders that are more visible, I will look to Chuck or to Chris Watton for replacements. The problem I have now is finding suitably sized hooks for the tackles.
-
Thanks Allenyed, I don't mind at all. Always happy to learn something new. The kit provides PE brass letters which I thought were too heavy looking so I made my own but perhaps I needn't have worried but now that I have, I may leave well alone As you say, the drawing on the back cover of the AotS shows the name on the stern but it doesn't appear on the photo of the NMM model on page 16.
- 310 replies
-
- 2
-
-
- Diana
- Caldercraft
- (and 1 more)
-
Rob, Thanks for your kind comments on the gun carriages and your suggestion for the monograms. I'll take a look at Chuck's site. The postage and possible import duties have put me off before but I have noticed that quite a few UK based builders do buy from him. I'm afraid I can't claim any credit for the poppy seed idea, just picked up on someone else's ingenuity! Still working on the quoins but will certainly go with your recommendation on alignment of the guns. David