dunnock
-
Posts
531 -
Joined
-
Last visited
Content Type
Profiles
Forums
Gallery
Events
Everything posted by dunnock
-
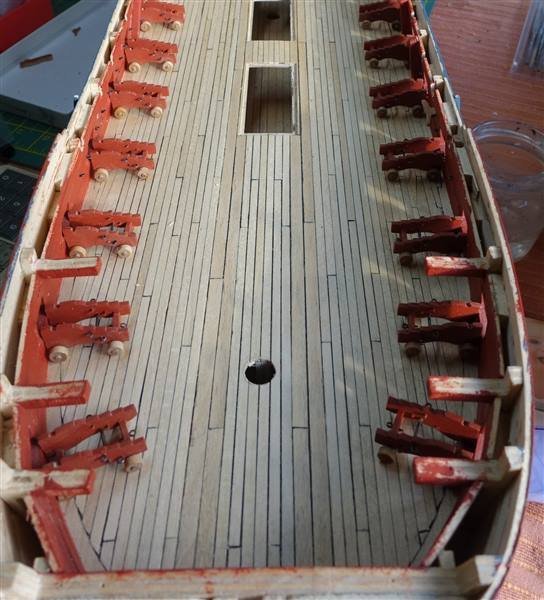
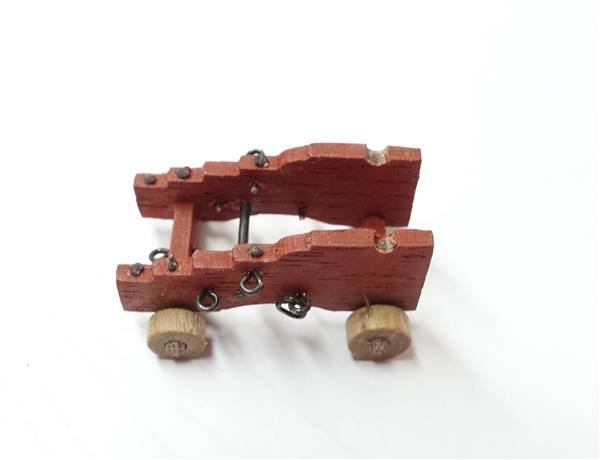
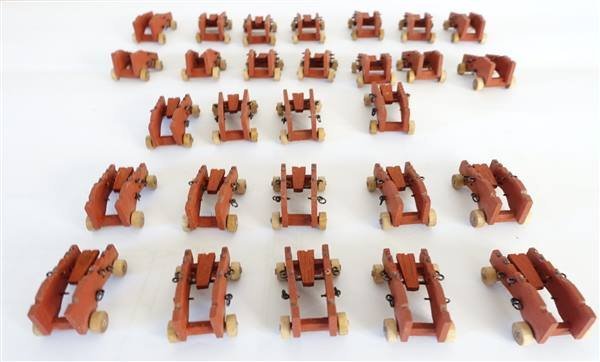
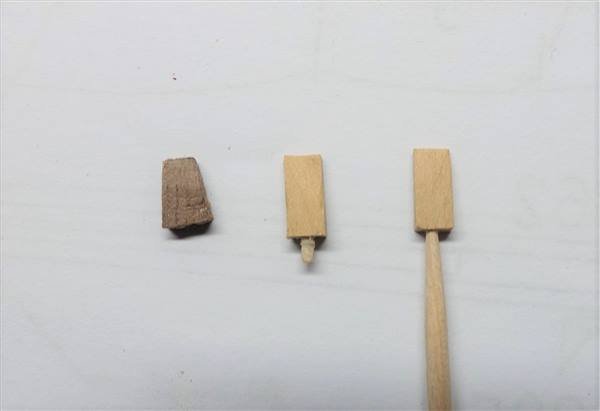
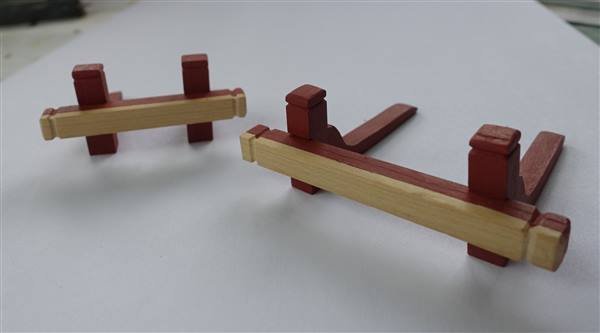
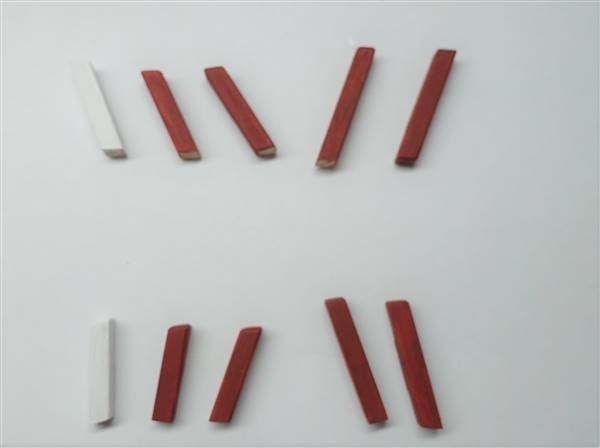
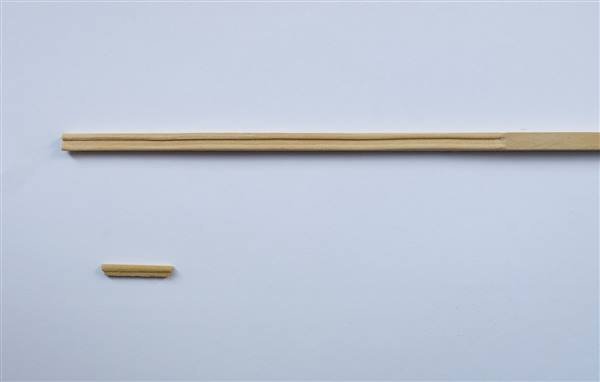
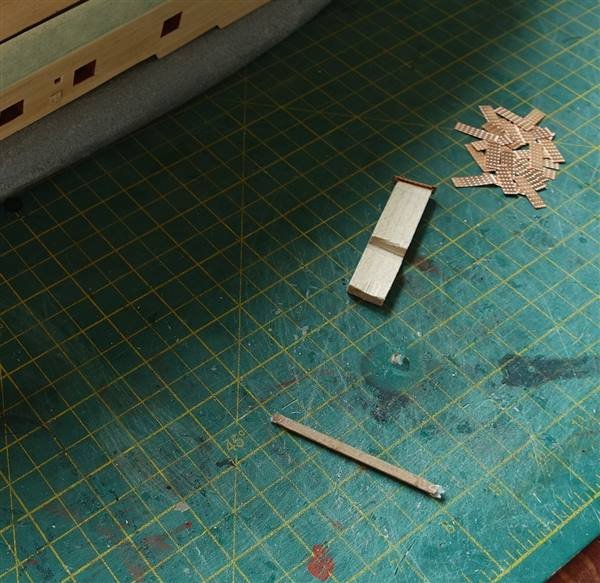
18 Pounder Guns The walnut gun carriages in the kit are not great but I am using them for the upper deck. The dimensions seem to be about right but they take some work to clean up. I may replace the carronades and 9 pounders in the kit for the f’csle and quarterdecks. I glued up the sides and axles using a simple jig to keep things in line. The bed bolt was made up from the 1mm brass wire blackened with Birchwood Casey Black and glued in place. I drilled the holes for the eyebolts using another jig made from plastic card. Cutting out the trucks and trying to clean them up was probably not going to be worth the effort so I bought some replacements from CMB. It required a bit more sanding of the axles to get a snug fit but they were worth the effort. The downside is that the new trucks are thicker and don’t leave enough room on the axle to fit the pins as I would have wanted to do. I wanted to represent the bracket bolts, at least on the ten carriages that were likely to be visible amidships. Elsewhere on this forum, I had read (and I’m sorry but I can’t remember who) that someone had used black poppy seeds. I made one carriage up as a test and thought that it looked quite good. It was also quite simple: just a small hole made with a needle then a dab of glue and a poppy seed carefully placed on top. These close-ups are unforgiving of the coarse walnut grain… The walnut pieces for the bed were very delicate. The groove cut for the bed bolt was very deep on all the pieces and I broke three as I was sanding and painting them. This is the stage I am at with all the carriages made up. I started to cut out the quoins but they are not great, too small according to the AotS and difficult to sand into a wedge. I have experimented with making quoins, at least for the more visible guns, using 3x3mm boxwood strip and a cocktail stick for the handle. I cut off 8mm from the strip then cut the piece in half diagonally to give two quoins and glued the cocktail stick into a pre-drilled 0.7mm hole. I’m quite pleased with the result but perhaps more work on the handle required. The photo below shows the comparison and second one in progress. The quoins are quite fiddly so I want to check the position of all the guns in the gun ports before committing to making 28 of these little quoins. Next up then will be cutting and blackening the trunnions and the barrels. Should the barrels have the 'GR' monogram? There are none provided in the kit.
- 310 replies
-
- 6
-

-
- Diana
- Caldercraft
- (and 1 more)
-
Good to hear that you're getting better and could be back to light duties in the shipyard soon. Enjoy your holiday
-
Thanks very much B.E.. Your Pegasus build was a big influence on the way that I went about building HMS Fly, so your comments are much appreciated. I was wondering how long it would take for the patina to develop on the copper because there is very little sign of it at the moment. David
-
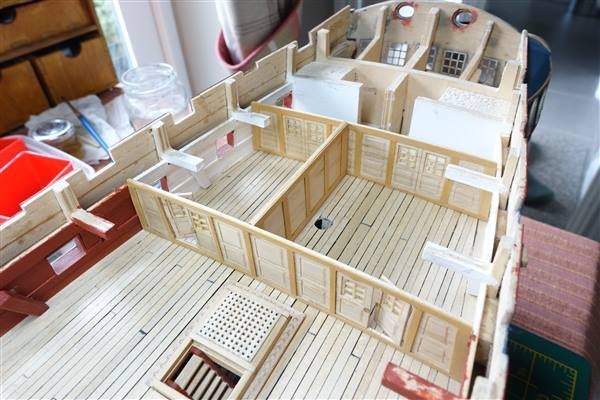
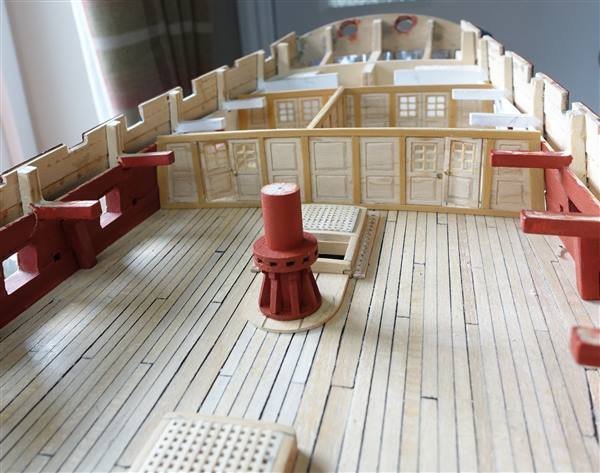
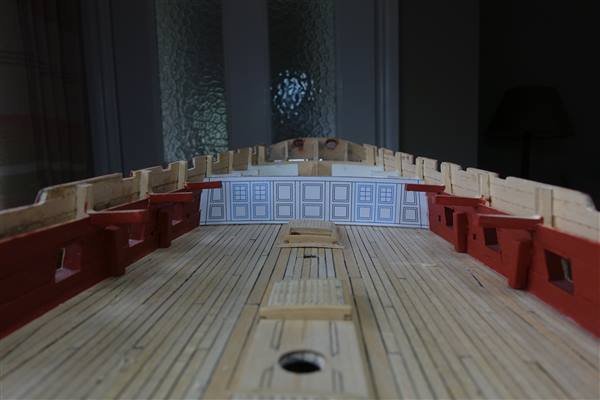
Thanks for all the likes and for continuing to follow my progress. I have finished all the partitions for the captain’s cabin. I had to remake one of the doors on the front bulkhead because too many breaks around the door light made it excessively weak. For the remake, I cut out the opening for the light and fitted the boxwood frames before cutting out the door. It would have been nice to have been able to cut back some of the bulkheads to open up the great cabin but I think it would have been a step too far and created difficulties with the stern structure. The capstan supplied in the kit is a bit of a horror show. The walnut ply is very poor quality and the proportions very different from that shown in the AotS. It might seem inconsistent to go to the trouble of making cabin bulkheads, mast partners etc and not try to improve on the capstan, nevertheless, I decided that for the lower capstan, I would use the kit version and attempt to make the upper one from scratch. This is it in position on its step. Nothing is glued yet and for the moment I have completed the parts that run down the centre line of the upper deck that I wanted to make. The rest: pumps, columns and also a bowsprit partner and manger boards, I will leave until the guns are in place. On to the guns...
- 310 replies
-
- 6
-
-
- Diana
- Caldercraft
- (and 1 more)
-
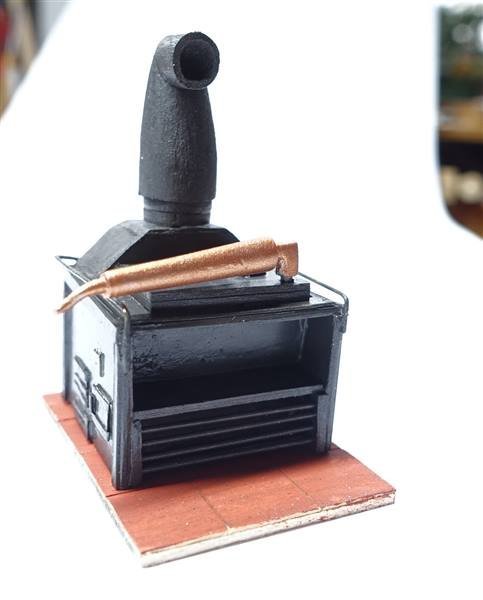
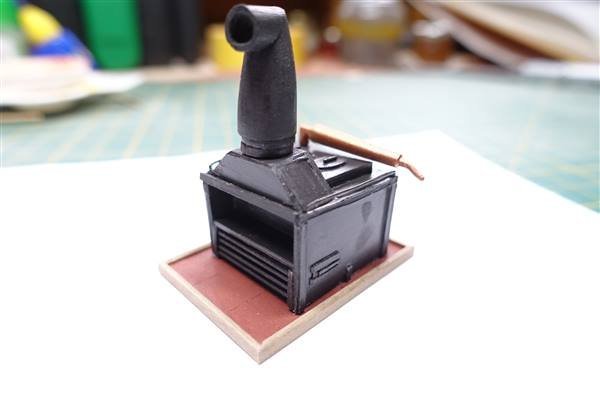
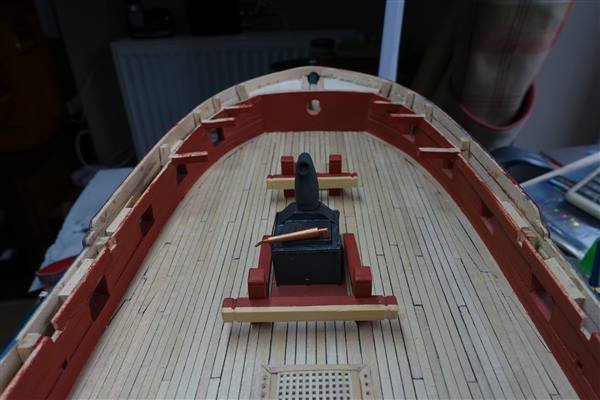
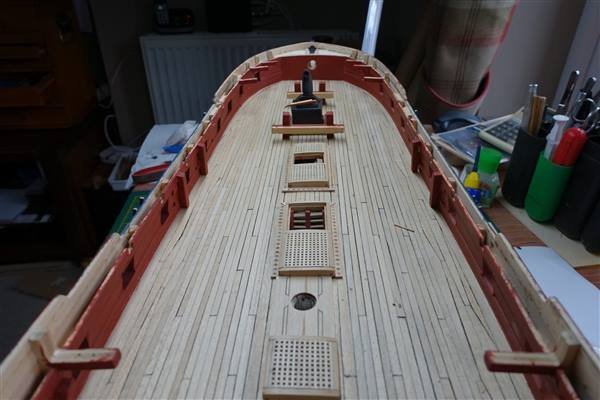
A few weeks since I posted but I will update progress on making some of the gun deck fittings. I’ve also been in Iceland for a week on a holiday that was postponed three times due to Covid restrictions. What an amazing country. We plan to go back in the spring when there should be good numbers of breeding waders and other birds around. I started with the ship’s stove which I made from 1mm and 0.5mm styrene card using patterns from AotS Diana. I used the condenser provided in the kit because when painted with Tamiya copper, I thought it looked the part but I made the chimney using 8 and 6mm dowel shaped and drilled out. The body of the stove is painted in Tamiya iron. I was quite pleased with the result… … until I realised that the chimney was over the boiler instead of the fire! Luckily I was able to remove the chimney and top plate and glue it back the correct way around The hearth is made from 1mm maple sheet and the tiles from boxwood strip and all edged in some 2mm walnut strip. The forward riding bits in the kit didn’t look right so I made these from pieces of 6x2mm boxwood stringing in the manner of RobDurant. There are no riding bits at the foremast provided in the kit but I wanted to make them for the sake of completeness. Again they were made from 6x2 boxwood and sized according to AotS. Neither are glued, just pinned together. I wasn’t very keen on the parts provided for the ladders and there is no provision for the double ladderway or at the rear hatch. Since these ladders will not easily be seen, I decided to use the kit parts but I will work out something that will hopefully look better for the q’deck and f’csle. I have started making the partitions that form the captain’s quarters. Once again I am indebted to RobDurant for providing a downloadable pattern making the task much simpler. I glued the paper pattern onto 1mm maple sheet and cut out the doors. With hindsight I should have left them until I had completed framing of the lights because they were prone to breaking up but I have managed to make them presentable. The panels are carved out using a #6 blade then finished of with a file and 600 wet & dry. And the edging strips are in boxwood strip. I also wanted to make the partition for the Great Cabin. Again I used Rob’s pattern. Cutting out the centre section made it the correct width. I again used 1mm maple sheet and will carve out the panels. This time though, I will leave the doors in place until the lights are completed. Since it will be difficult to see, I may not cut the doors out but just score the outline. I will also make the partition dividing the coach and the bed place but plan to leave it fairly plain. I’m surprised that there is no door between the two shown in the plans. I also wonder whether to paint the internal walls of the partitions white. Finally two shots of the deck. Nothing glued in place yet The mast partners are cut from 1mm maple sheet and simply scored to imitate the planking.
- 310 replies
-
- 6
-
-
- Diana
- Caldercraft
- (and 1 more)
-
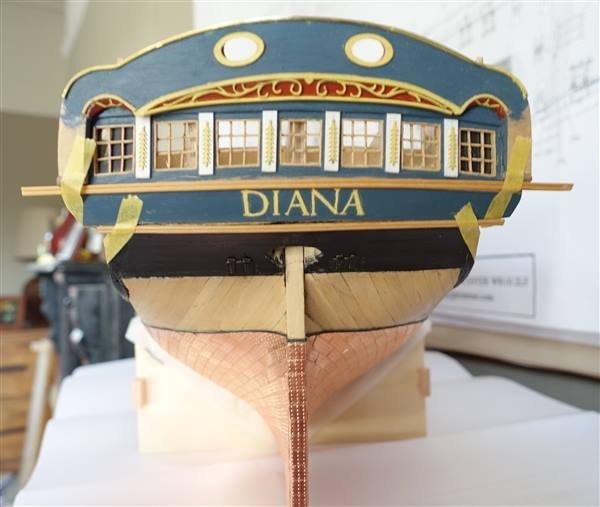
Thanks Beef Wellington and DaveBaxt for your kind comments on the stern. Dave, I thought the kit letters in PE brass were too chunky so I made my own letters in Perpetua Titling, painted them, cut them out and stuck them onto the counter.
- 310 replies
-
- 1
-
-
- Diana
- Caldercraft
- (and 1 more)
-
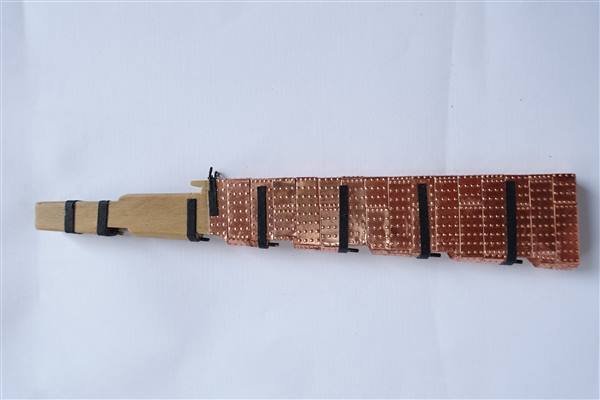
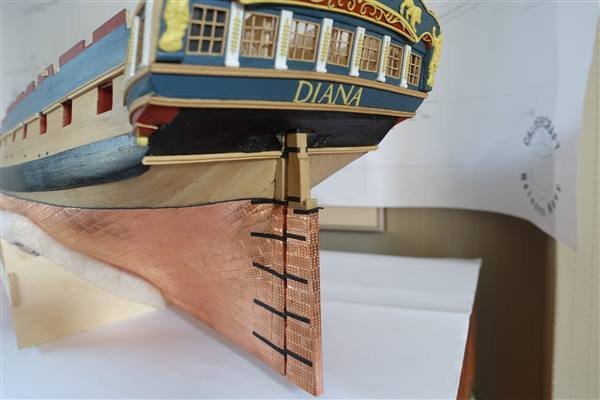
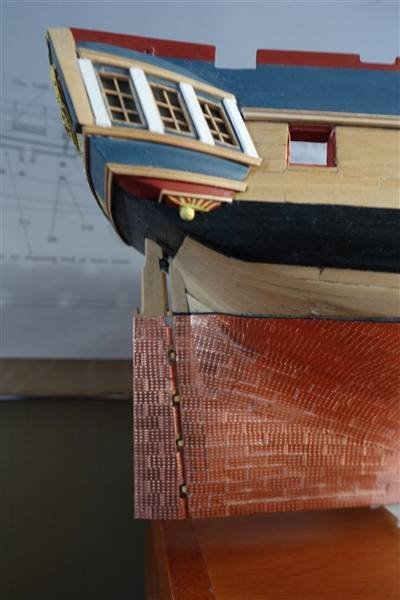
Copper plating the rudder was challenging because of the changing angles and cut-outs but any small gaps I have covered with Tamiya copper paint. The pintles and gudgeons are made from 3x3 boxwood planed down to 2x2. The pintles proved relatively straight forward with holes for the pins drilled before cutting the strip down to size. I made the spectacle plate from leftover stanchions from HMS Fly cut down and twisted into the right shape. The position and sizing of the gudgeons needed more care, each being placed separately and alignment with the rudder checked. The top three gudgeons I pinned in place but the lower four are just ca’d. The first two gudgeons fitted Completed and rudder mounted The photo-etched straps were too thick to allow free movement of the rudder and anyway were not sized correctly for my boxwood version so I used black card cut into 2mm strips following the pattern given in AotS. I will add the cloak (not sure of the proper term) that seals off the rudder from the sea and the chains at a later date. I think the next stage will be to work on the lower/gun deck. The stern was complicated enough and judging from other logs, the head looks more so, therefore I’m putting off work on this area to another time in the hope of tackling something simpler. David

- 310 replies
-
- 9
-
-
- Diana
- Caldercraft
- (and 1 more)
-
Just caught up with your build again Rob. Very nice job on the coppering and particularly around the waterline where it took some working out
-
Many thanks Dave for your comments, they are much appreciated. I'm sure that if you do decide to build Diana, you will find it a glorious combination of frustration, challenge and satisfaction. There are many Diana builders with logs on this site that will provide support and inspiration if you decide to go ahead. David
-
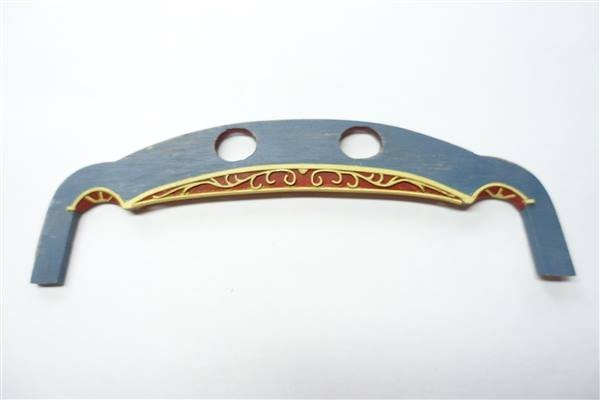
The majority of the stern is finally finished with only a little more of the decoration to be added. I thought that I had finished it a couple of weeks ago but as it was going together for final gluing, I realised that it wasn’t fitting quite as well as I'd hoped. I reworked the lower finishing pieces twice more before I was reasonably happy that they fitted as closely as possible to the wale and lower counter. I also removed and reworked part of the lower counter to get the rail to fit better. It now sits a little high against the lettering but I think it looks acceptable. Jotika should be sending me replacements for the console brackets, and also for the swag on the upper finishing pieces which I broke trying to file it down. However I've decided not to use the swags provided in the kit and will try to paint on my own decoration that is more in keeping with that shown in the Admiralty models shown in the ‘The Sailing Frigate’ I'm continuing to work on the rudder. The pintles and gudgeons provided are too small for my thicker boxwood version so I am working out my own solutions to the puzzle.
- 310 replies
-
- 3
-
-
- Diana
- Caldercraft
- (and 1 more)
-
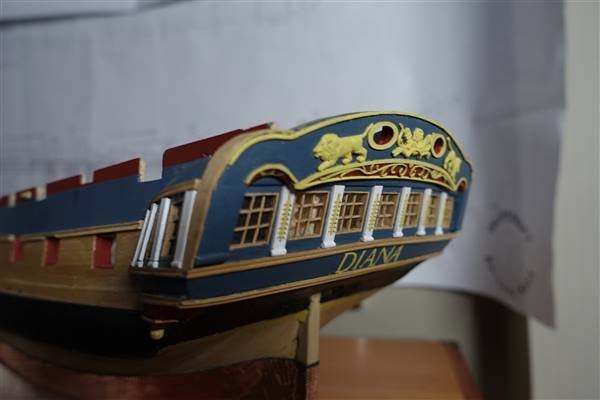
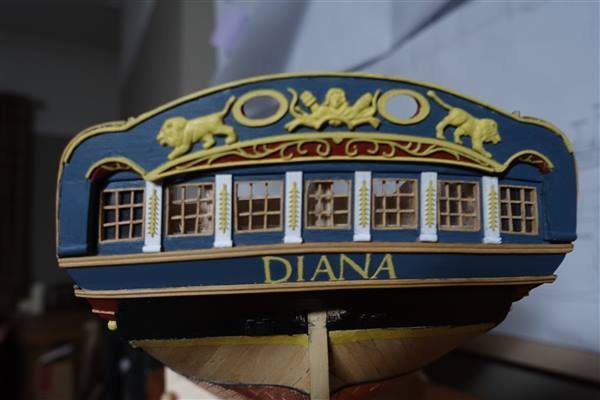
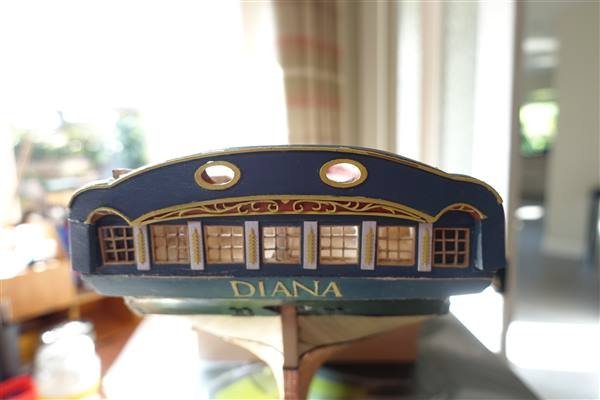
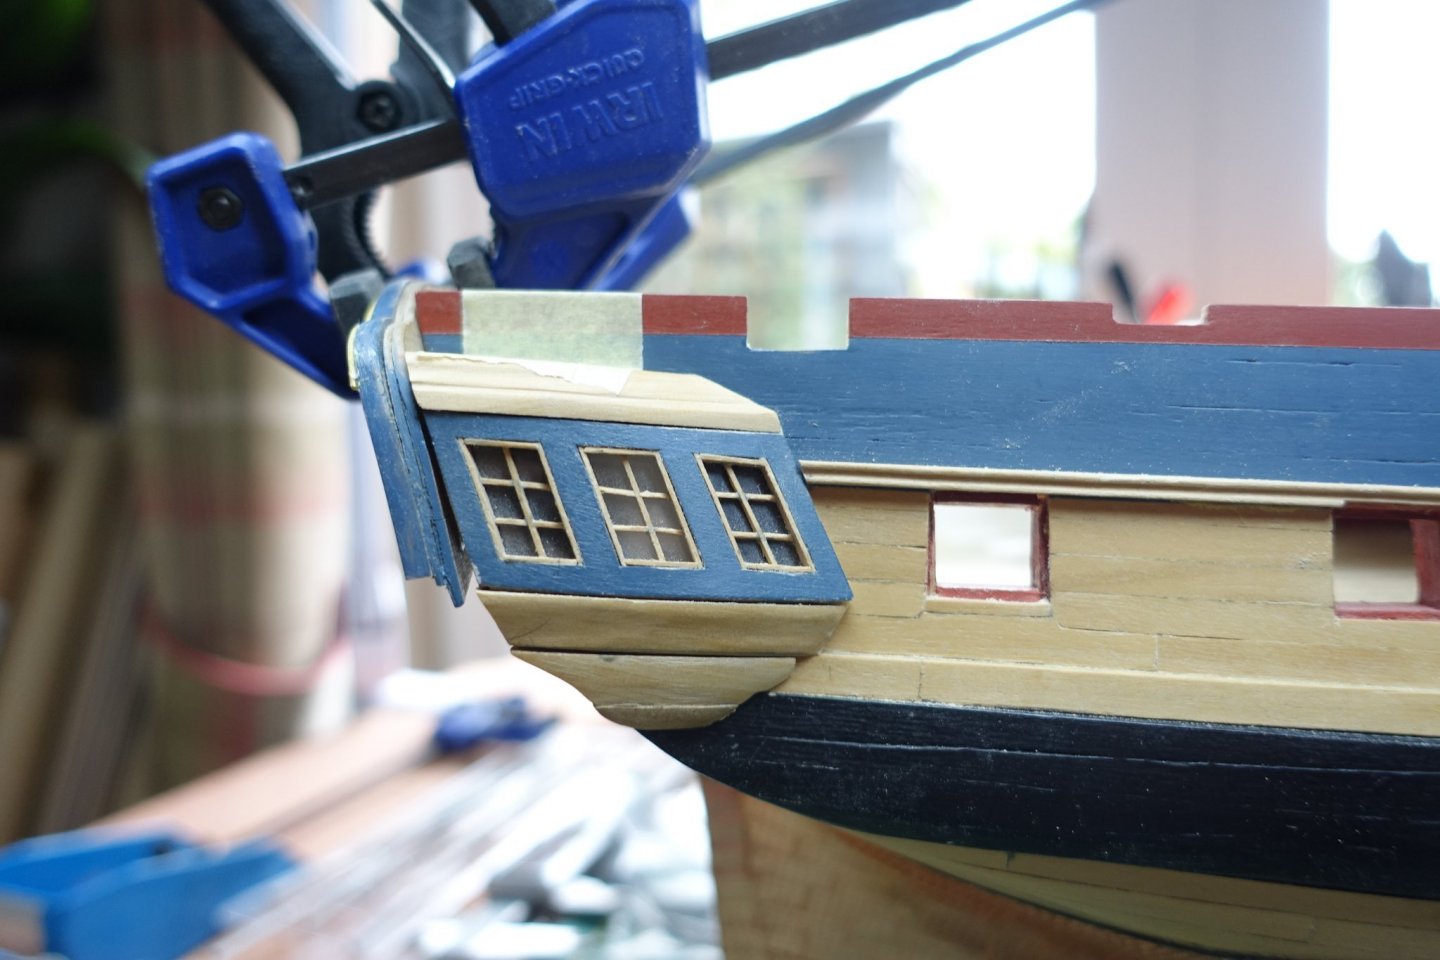
Thanks for all the likes, it really does help to keep me going. I have been wondering how to add the name Diana to the upper counter. I wasn’t keen on using the pe brass letters supplied as they looked a bit too chunky, so I pondered on how to either paint or apply my own lettering in some way. Having searched through all the typefaces on Windows, I decided that like others before me, Perpetua Titling looked the most appropriate. I would probably make a mess if I attempted to paint it freehand. I tried printing on baking sheet and transferring onto the model as suggested by Rob in his Jason log but the result was too faint for me to see. In the end I cut the letters out and stuck them on. The result looks effective from normal viewing distance but one leg of the N still looks a bit shaky even after tidying up. I think that if I try to improve on it, I will probably make it worse so I’m going to leave well alone. Now it was time to bite the bullet and get the stern galleries fixed. I glazed the stern lights using the kit PET film. The two false lights were glazed separately and the central section in one piece. The false lights are backed with black card in the same way as the false quarter lights. All lined up ready to glue: And fixed in place with the taffarel and upper counter With the stern gallery in place I was able to carry out a final adjustments to the quarter galleries. I was disappointed to find that some of the components required more than a little fettling, but I’m now happy with the way they look and I have glued them in place. A lot of painting and repair work to do before the final decoration and mouldings are added but I’m confident that it will look fine when complete. I now have a couple of problems with the final decoration. One of the console brackets ( I think that they are supposed to be stylised dolphins) is badly formed so I have written to Caldercraft asking for a replacement. The other is that I have broken one of the swags that go on the top piece of the quarter gallery. The mouldings as supplied are very chunky, so I filed them back to the bare swag. Unfortunately I was not careful enough and broke one of them. I hope that I can align it when I fix it in place. Once work on the stern is finished, I will move on to fitting the rudder which I have already started coppering.


- 310 replies
-
- 5
-
-
- Diana
- Caldercraft
- (and 1 more)
-
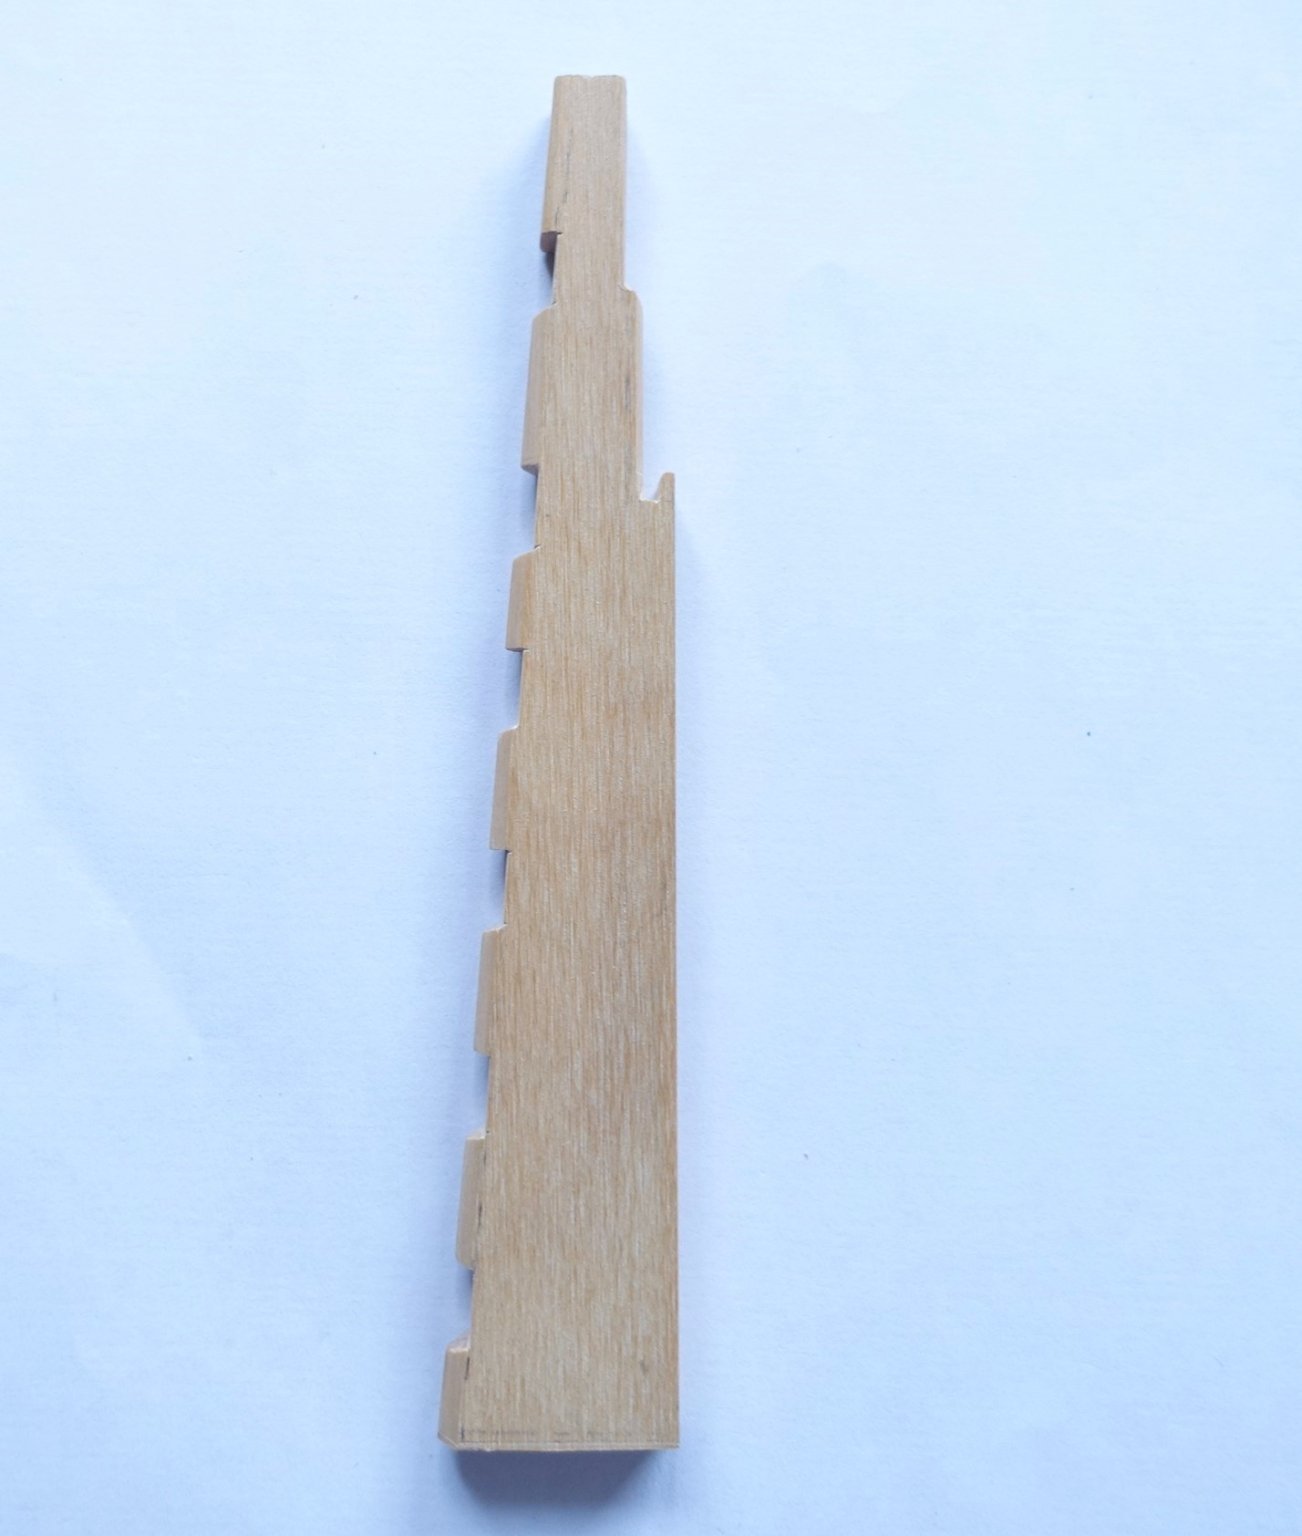
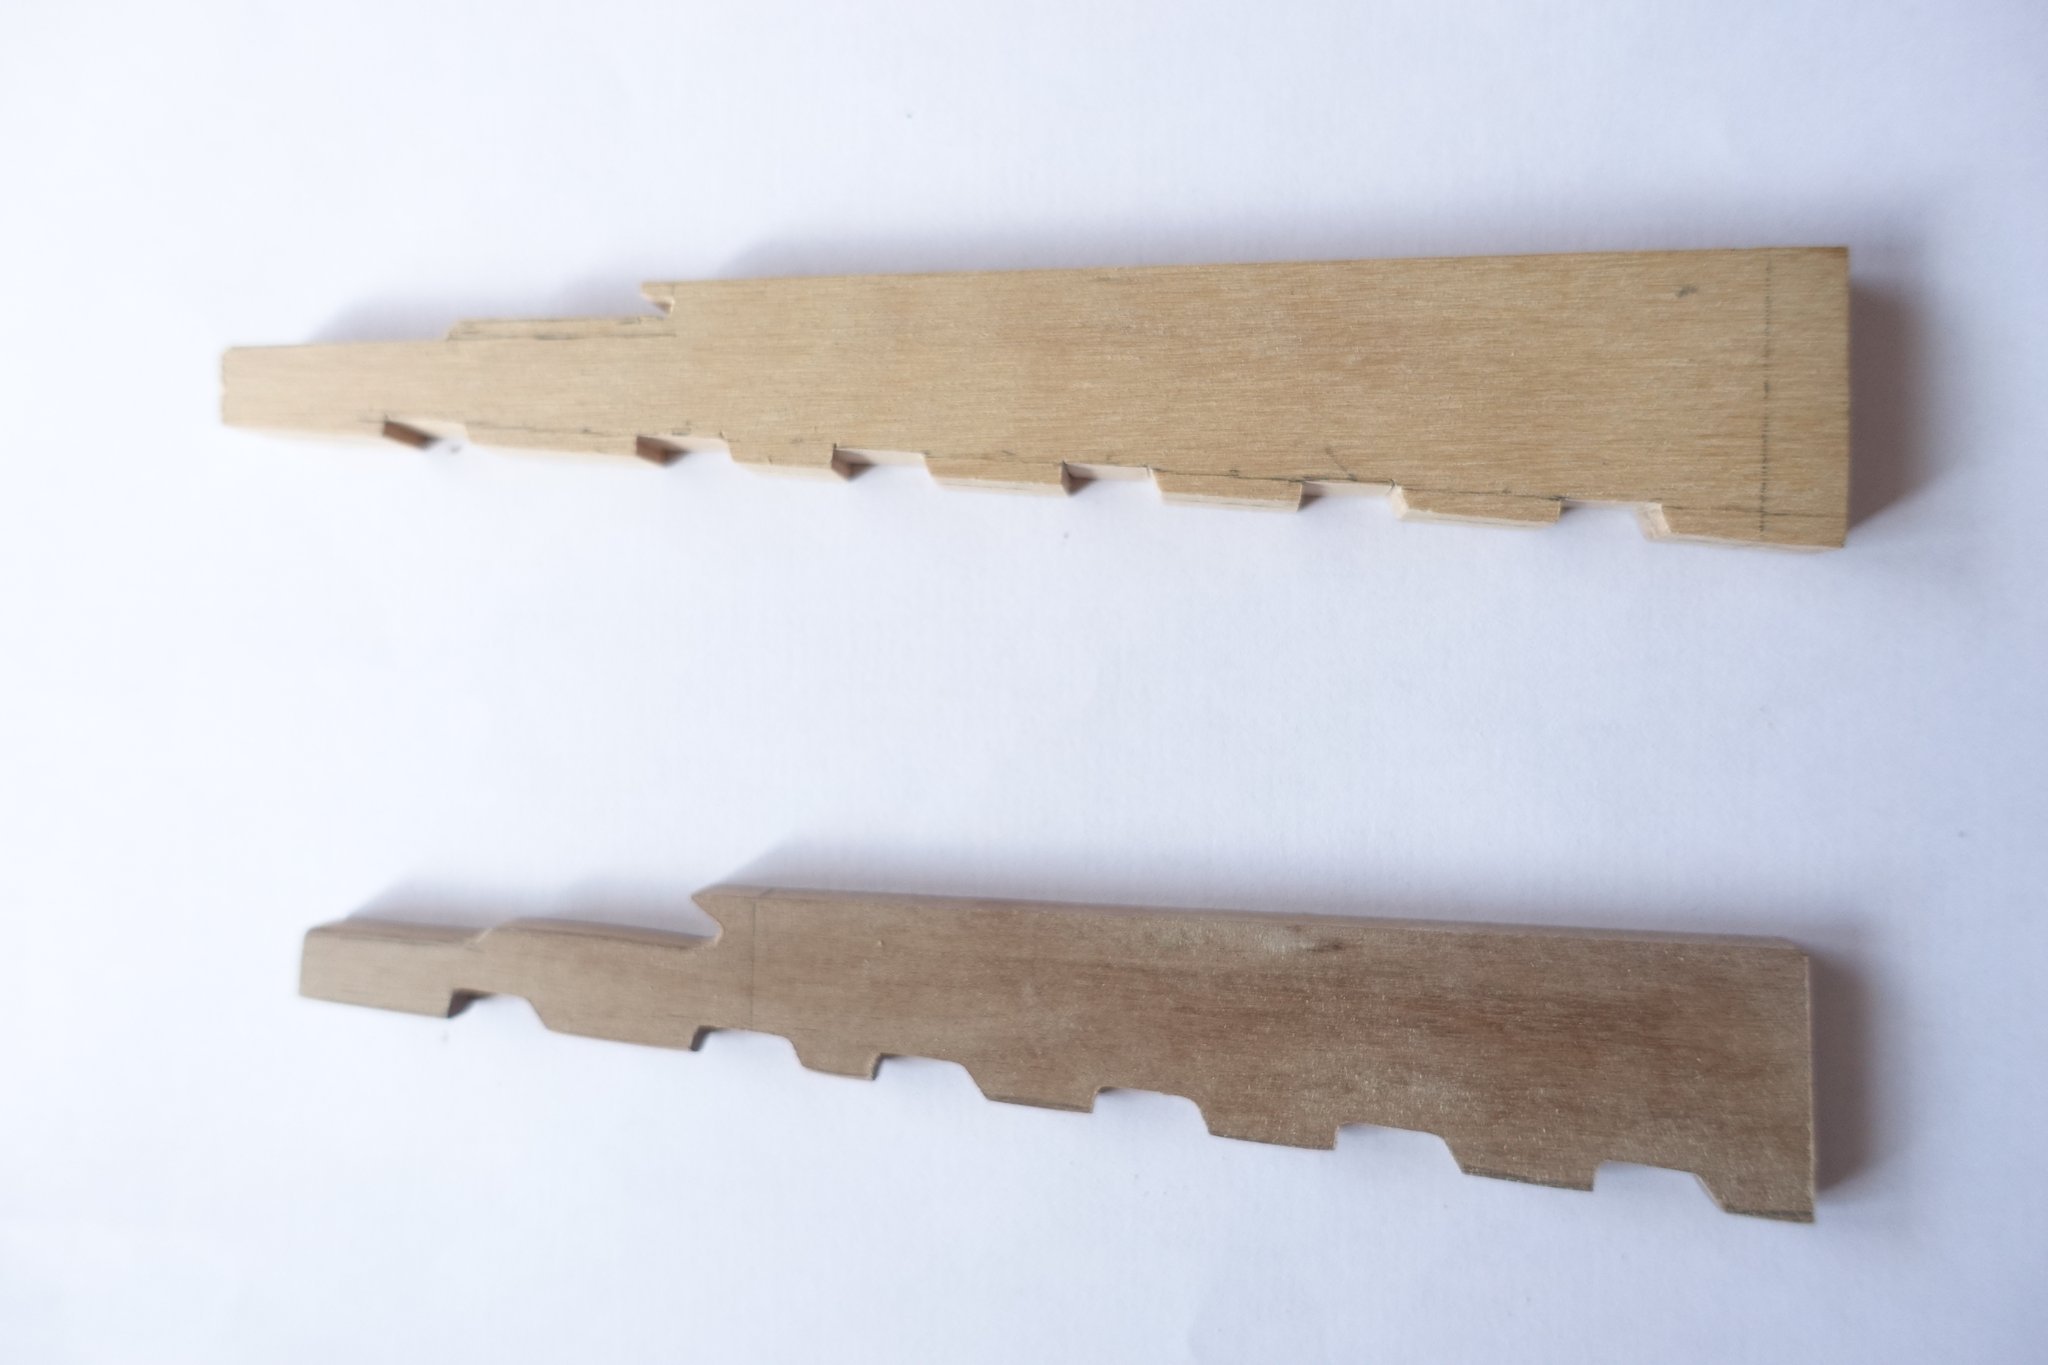
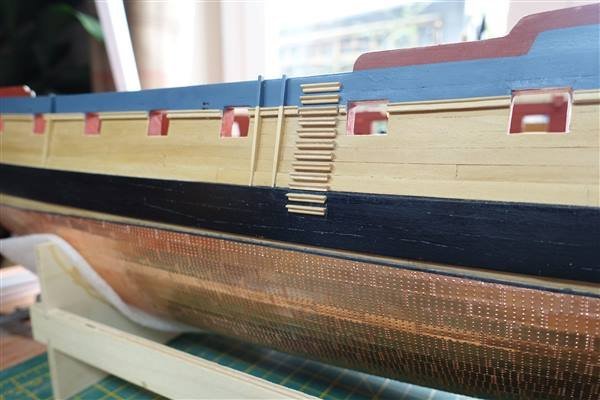
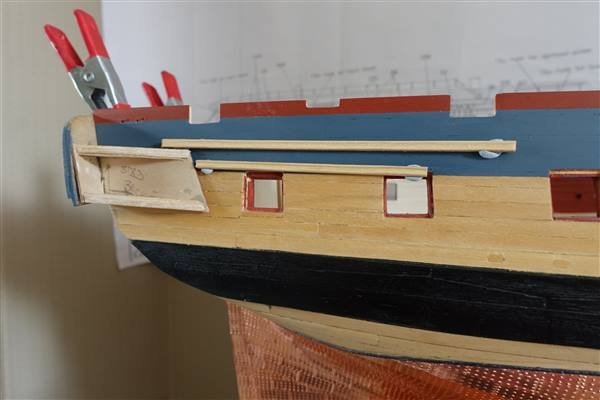
A few days away again, this time in Kent for a bit of bird watching but mainly to visit Chatham Dockyard. The talk and tour of the ropery was fascinating. In the early days, before the process was mechanised, how they twisted the initial yarn by hand from a coil of fibre wrapped around the waist is remarkable. It seems that it was fairly late on in the 19th century that rope making caught up with the the textile industry where mechanisation of similar spinning processes had begun to be used nearly 100 years earlier. A few other pieces completed between continuing with the stern galleries. I had some trouble with the steps getting the spacing to appear correct. On the first attempt I didn’t like the arrangement so removed them and tried again. I’m much happier with the new alignment and also made some attempt to allow for the tumblehome and shape of the wales. I have also made the riders. Although only the two amidships will be visible, I have also made the three that go along the aft section but which will be hidden by the quarter deck. They are shaped and painted ready to be fitted. The kit-supplied rudder no longer fits because of the new stern post replacement. I cut another from boxwood sheet using a template taken from AotS Diana. A bit more tapering is required but generally I’m happy with the overall look. Back to the quarter galleries. I glazed the lights using the polyester film supplied and then backed the false lights with black card before glueing the frame to the top and bottom patterns. This gave me the base from which to shape the lower finishing pieces. These are made from 7mm boxwood sheet and a piece of 2mm walnut taken from the kit. I have tried to follow the general shape illustrated in the AotS. The starboard gallery is finished for the moment, with just the drop to make, but I expect that a small amount of further work will be needed when they come to be fitted permanently The port quarter gallery will follow the same pattern and will probably take the rest of the weekend...


- 310 replies
-
- 5
-
-
- Diana
- Caldercraft
- (and 1 more)
-
I'm going to be following too and can only echo what West Port said about your Pegasus build
- 857 replies
-
- 3
-
-
- Sphinx
- Vanguard Models
- (and 1 more)
-
A very nice start on the coppering. Those tiles are in a different league compared to the ones supplied in my Diana kit. Is the relative difference in size due to the different eras in which the ships were built? David
-
Thanks for all the all the likes and to Rob for the encouragement. This might be obvious to most but despite cleaning up any excess immediately, I was having difficulty obtaining clean joints with the wood glue that I was using. After reading around, I realised that what I thought was PVA was in fact a PU adhesive. I have now bought a bottle of aliphatic glue which I’m finding is much better. It quickly forms a strong bond and any excess can be cleaned up without leaving any stain. I wasn't happy with my attempt at hand-painting the taffarel and maintain a fine line, so I have taken some 1x1mm strip scraped and sanded it down to about 0.5mm and formed it around the bottom of the curve. A bit more touching up of the paintwork and further decoration to be added before it’s complete but I'm happier with the look now. In the meantime I’ve been working on the main rail. After many failures at cutting a suitable scraper freehand, I finally got to a working method by fixing my Dremel in it's stand, turning it through 90deg and set it running with the thinnest grinding disc. The blade to be cut was fixed in my drill vice and then the scraper blade was moved towards the grinding disc. The rails are 2.7mm square boxwood planed down to 2 x2.7mm. A final check on the run of the rails and the quarter gallery I used Tamiya tape as a guide for fixing the rails The chesstrees and fenders are also cut from 2.7x2.7mm boxwood. I'm working on the steps now. After a few attempts, I have cut a profile for the scraper that I was happy with and then cut and shaped the steps. 13 done and 13 to go...


- 310 replies
-
- 5
-
-
- Diana
- Caldercraft
- (and 1 more)
-
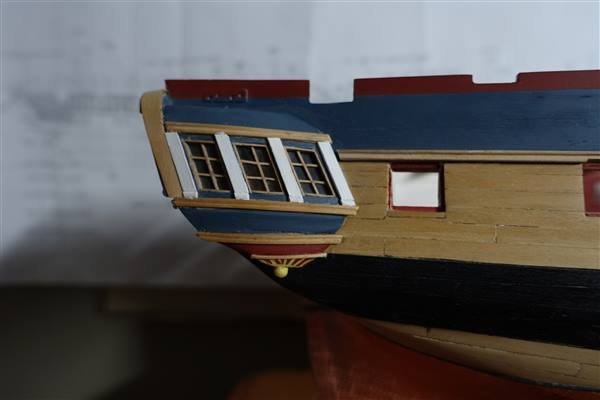
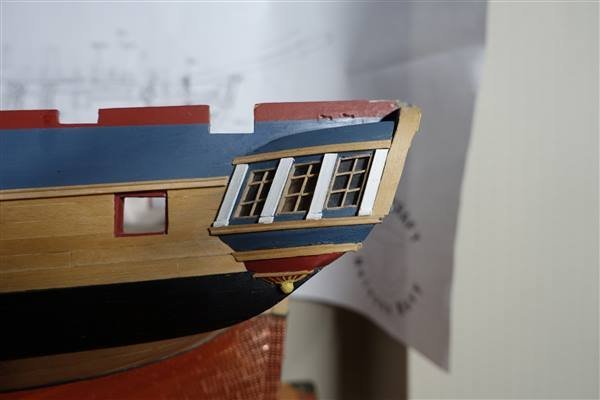
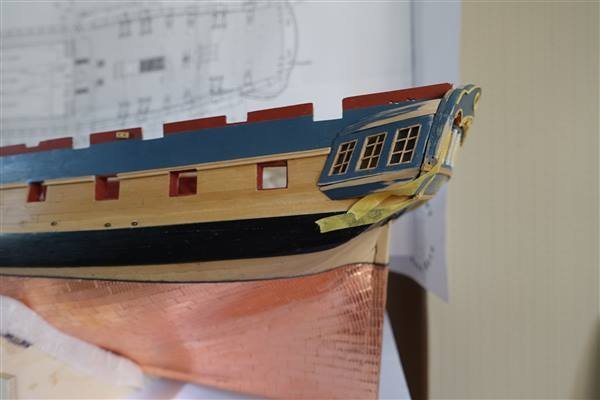
It’s been a while since I updated my log but I’ve been away on ‘staycation’ for a few days. I’m not sure when this portmanteau word was brought into the language: it always used to be called a holiday... The hatch gratings and frames for the lower deck are complete but I need to add the shot lockers and to order some 2mm cannonballs. The kit supplied parts are slightly oversized. I have continued to work on the stern and quarter galleries. I decided to follow Rob’s lead on Jason in the end and make my own lights rather then use the PE versions in the kit. I cut the mullions first and then finished off with the transoms. Then I cut them all out and started again because all the joints looked dirty and some were misaligned. The finished version. Still not great but I have lost the will to do it yet again! I have added some embellishments to the taffarel but the brass framing provided looked too bulky and in any case was too wide for my revised version. I cut the lines from 1x1mm boxwood strip and thinned it down to look more balanced. The scroll-work was also too large. First, I tried to paint it in but my hand is not steady enough, so I carefully filed the brass etch thinner and bent it into a better shape to fit my version. I did successfully paint the two smaller arches by cutting a stencil from Tamiya tape after the freehand version was a failure. Some touching up still required. You might also be able to see the repair to the port leg which broke off. For the quarter galleries, I made up mock versions using balsa block to check alignment with the stern. The general fit looks OK and they line up with the stern quite well. I think I can work with that so continued making them for real. I used 1.5mm boxwood for the frame and modified the kit ply for the top and bottom patterns and end and back panels. All these were cut and sanded to Rob Durant’s template. For the quarter gallery lights to line up, I have to make the lights from scratch using the same method as for the stern and like the stern lights, they provided endless hours of ‘fun’ and frustration. Here are the stern gallery and quarter galleries in place on the model If on my next ship, I say that I’m going to make the gallery lights from scratch, tell me not to be so daft! I’m not sure that I have the perseverance or the patience to repeat the exercise. . I’ve been dithering a bit for the last few days about how to continue. I think that I need to fit some of the rails to make finally sure that the galleries line up. I’ve been playing with cutting scrapers to make boxwood rails rather than use the walnut kit versions. This is a work in progress and I also need to order some more square section boxwood. Part of the same exercise is making the entry steps and again I’ve being doing trials on bits of scrap to get a satisfactory profile. Not quite there yet As a further distraction, I’m also working on the oar port doors. The hinges have been blackened and the doors made from strip to match the hull. These are tinny and easy to lose in the various de-greasing and blackening treatments. I use Birchwood Casey brass black diluted with about 3 parts water which I find works well after a couple of treatments. I'll finish off the oar ports and then continue with trying rail and step profiles.. David

- 310 replies
-
- 9
-
-
- Diana
- Caldercraft
- (and 1 more)
-
Beautiful work and a lovely model. I found your excellent log rather late in the day but there are so many useful tips and 'how-tos' that I will shamelessly be adapting for my build of Diana. David
- 725 replies
-
- 1
-
-
- vanguard models
- speedy
- (and 1 more)
-
Excellent tutorial Derek. I have bookmarked your method to refer to when I get to this stage on my Diana build David
- 725 replies
-
- 1
-
-
- vanguard models
- speedy
- (and 1 more)
-
Thanks Rob. If you don't mind, I will be taking a lead from your method of window framing Oh and thanks for the tip on the q & fore deck coamings. I've made a note on the plans for future reference
- 310 replies
-
- 1
-
-
- Diana
- Caldercraft
- (and 1 more)
-
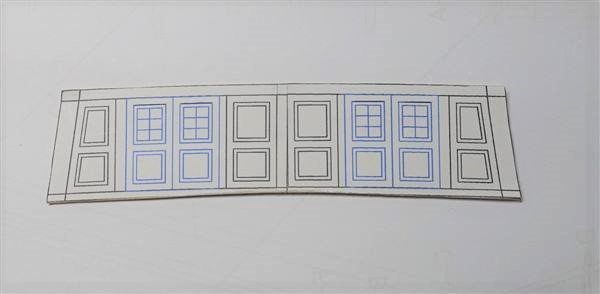
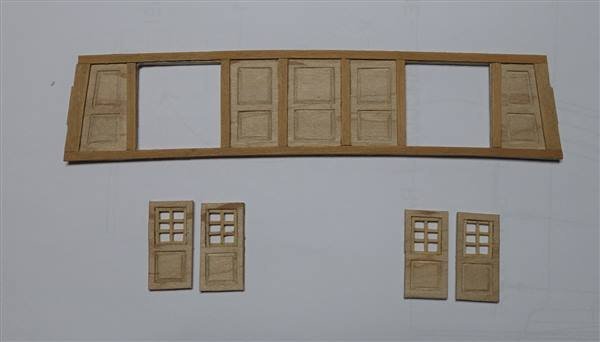
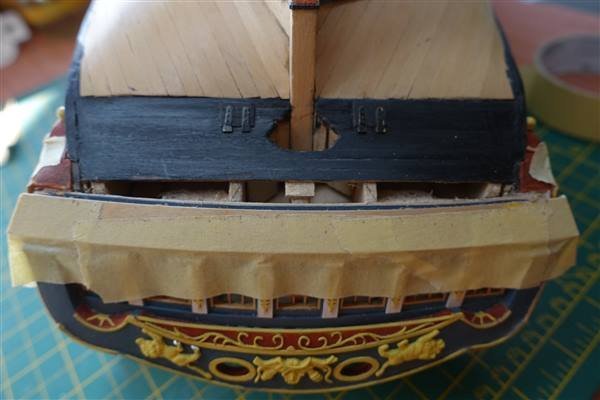
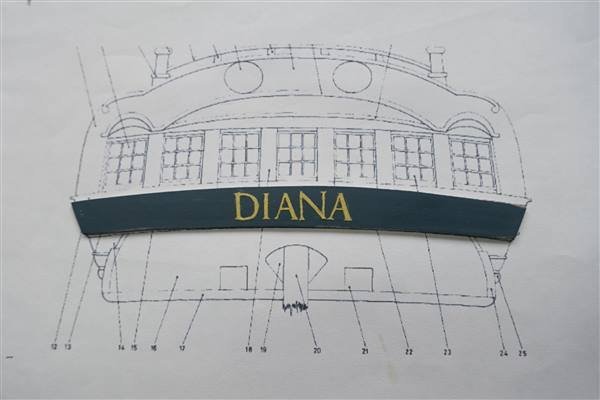
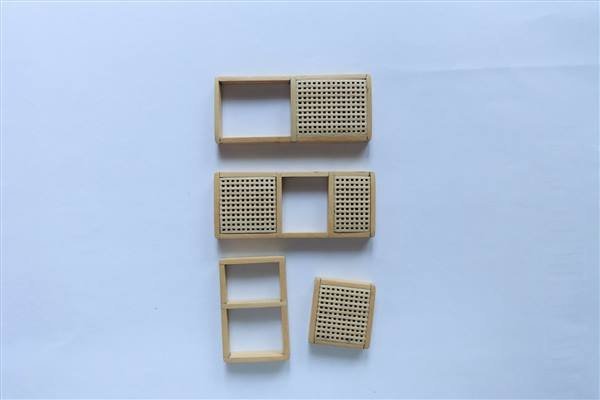
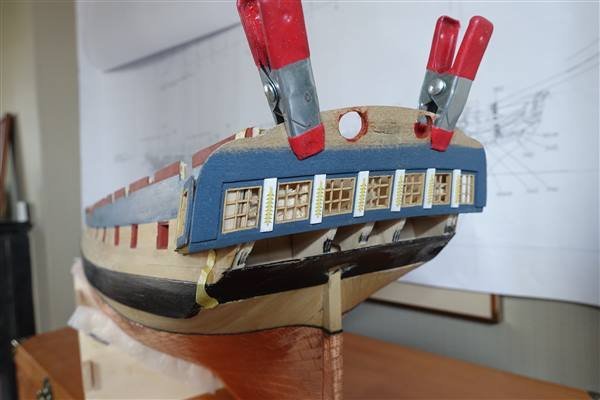
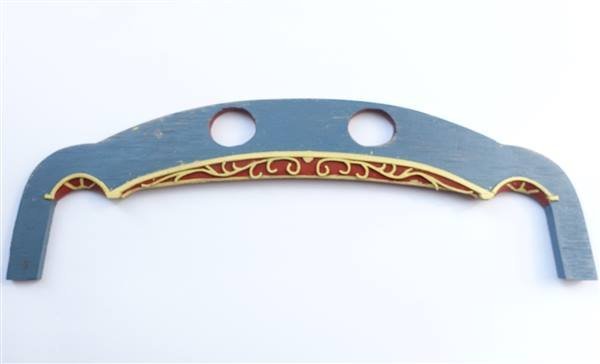
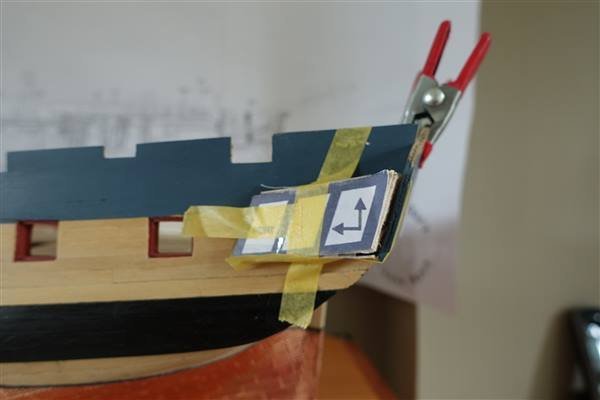
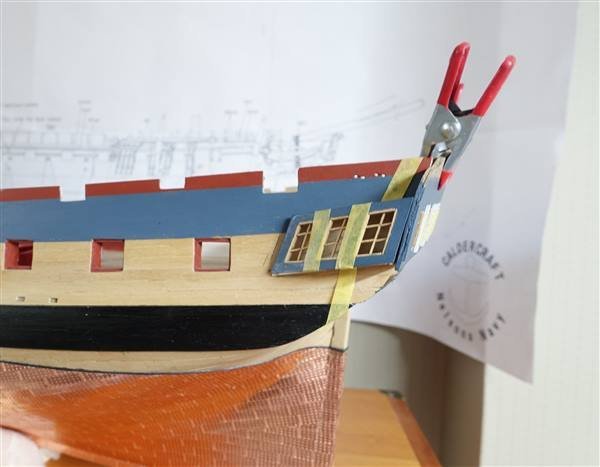
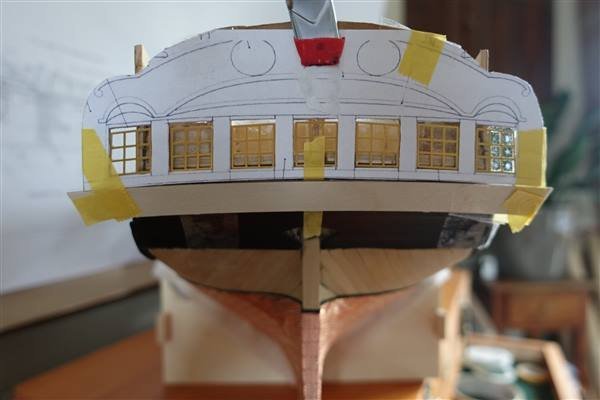
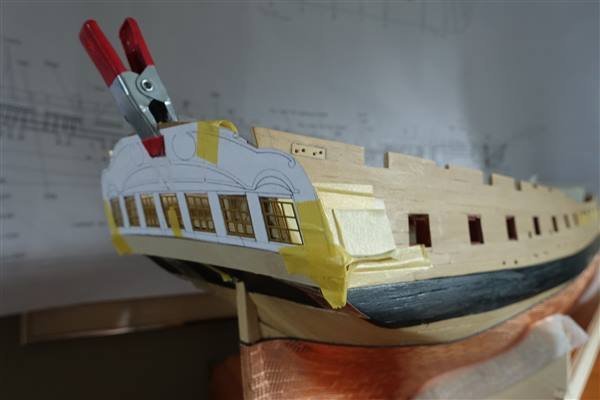
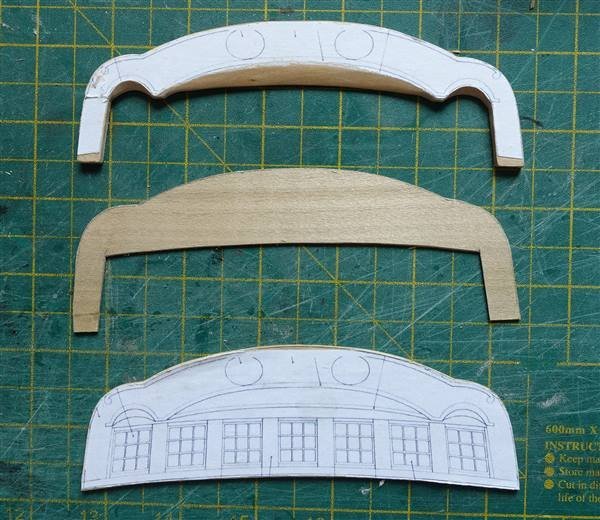
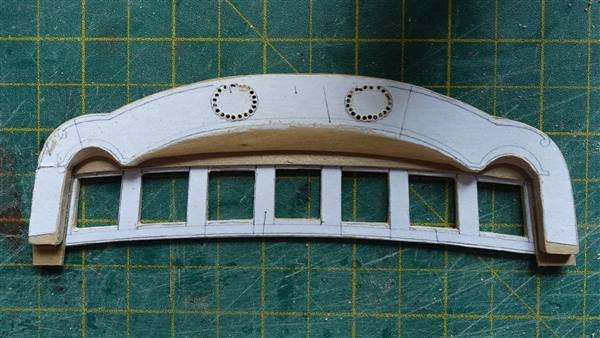
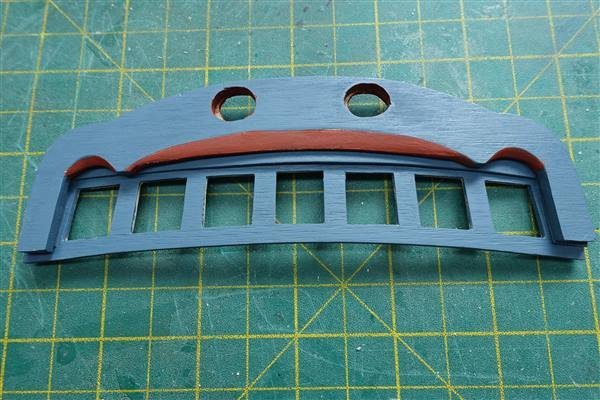
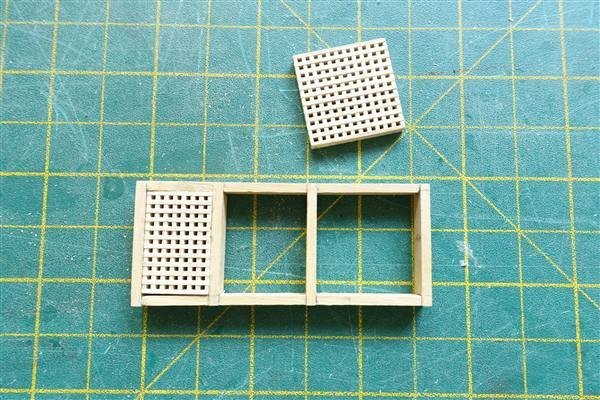
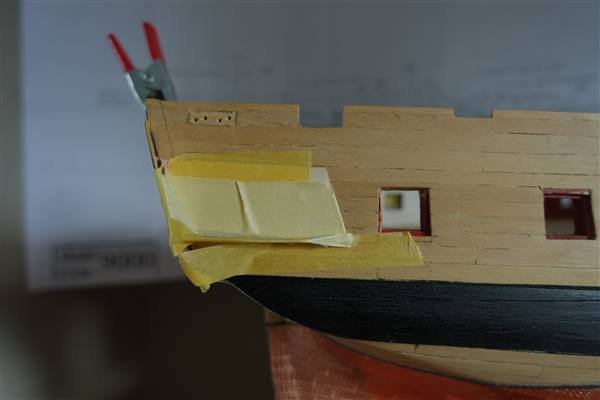
Stern and Quarter Galleries A cardboard template was made from the modified AotS stern gallery drawing and the alignment looks OK to me so I next added the PE window lights to check the overall look. I don't think that they look too bad but I would have to redraw the openings to make them fit properly so in the end I have decided to try to make my own from scratch. Trying to align the quarter gallery on the port side showed up another error in that somehow I had cut the sternmost starboard gun port 2mm too low. In the shot below you can see where I have added a strip to the bottom of the gunport. I made the stern gallery in three parts. The overall frame from 1.5mm boxwood sheet There is a step just above the line of lights and below the taffarel which I have added using 1mm walnut sheet and finally the taffarel is cut from 3mm boxwood sheet. I series drilled and cut out the lights and did the same for the two piercings in the taffarel. Partially painted in Tamiya Blue and my own mix of red. In between times I have been making the hatch gratings and coamings for the gundeck. The coamings are made from the 6x2mm boxwood guitar banding that I bought from Timberline some time ago and the gratings are from the kit. I've just noticed that the small grating and frame looked skewed but it must be the angle from which I have taken the shot and the fact the grating is not fully placed inside the frame!
- 310 replies
-
- 4
-
-
- Diana
- Caldercraft
- (and 1 more)
-
Thanks to Beef Wellington, BenD and Rob for the likes and also to Rob for your very kind comments. I have read about the treatments available (both chemical and biological!) for toning down the copper but have decided to let nature take its course. Rob, your points on setting up the stern and making sure that stern and quarter gallery lights are aligned are well noted. Having read both your's and Jason's accounts, I am trying to construct something more representative of the plans in AotS. To that end, I have got my daughter to copy the stern gallery from the book and modify it to account for the angle (she's much better with image manipulation programmes) which I will use to make a template and with drawings of the quarter galleries to check alignments. I have also taken the liberty of downloading your drawings for the quarter galleries which I will make up in cardboard to see how it all fits together. David
- 310 replies
-
- 3
-
-
- Diana
- Caldercraft
- (and 1 more)
-
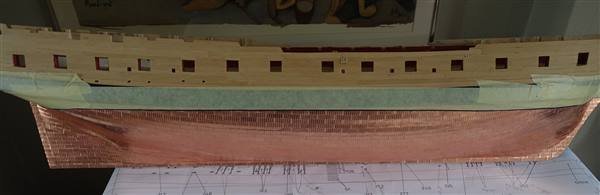
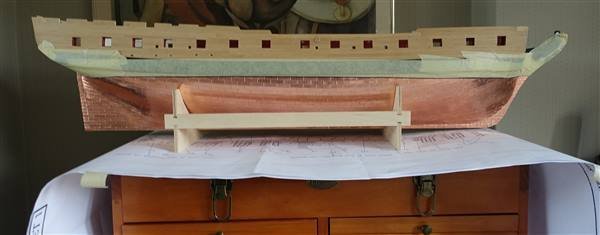
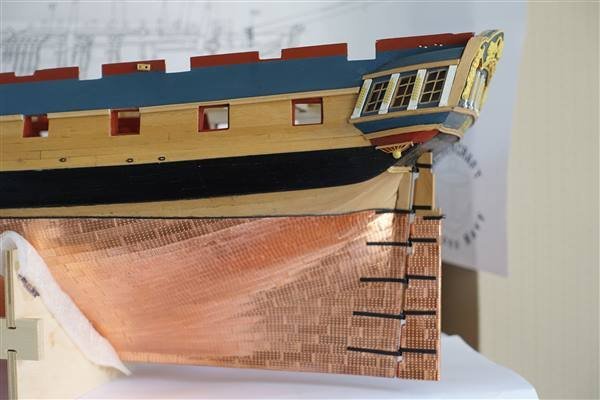
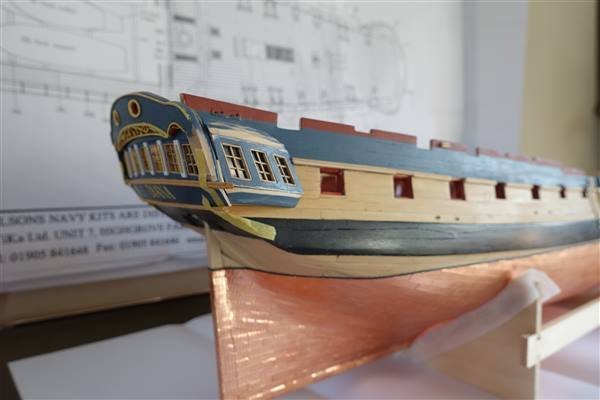
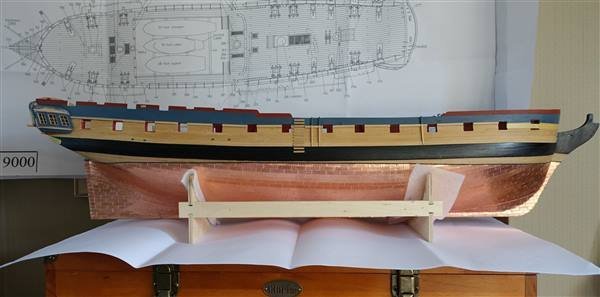
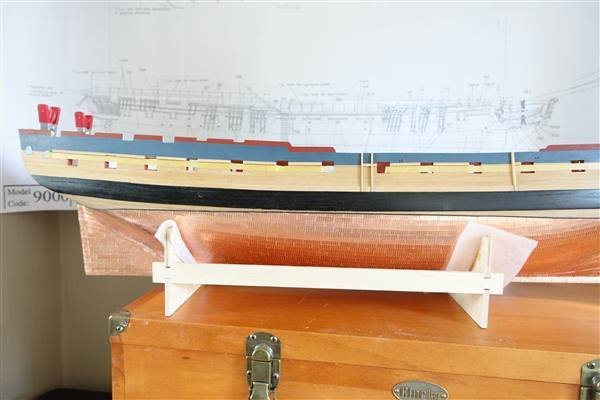
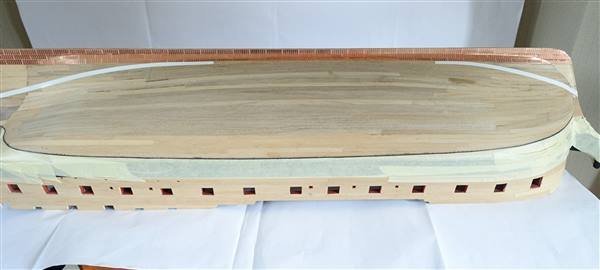
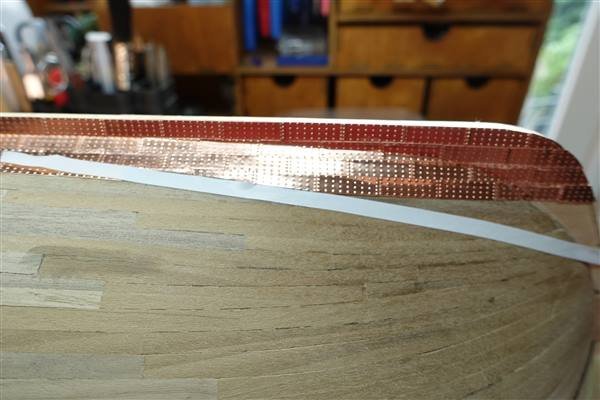
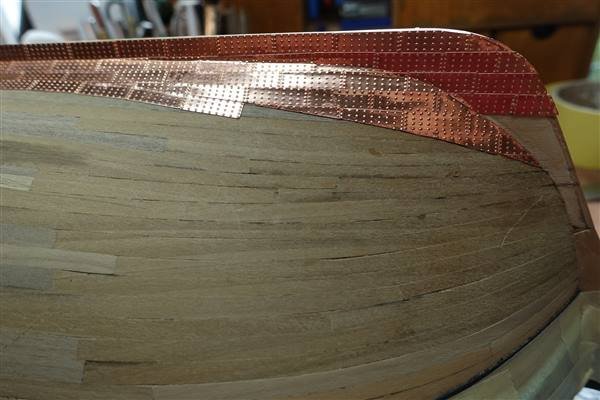
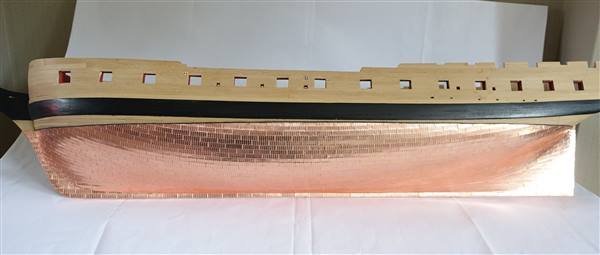
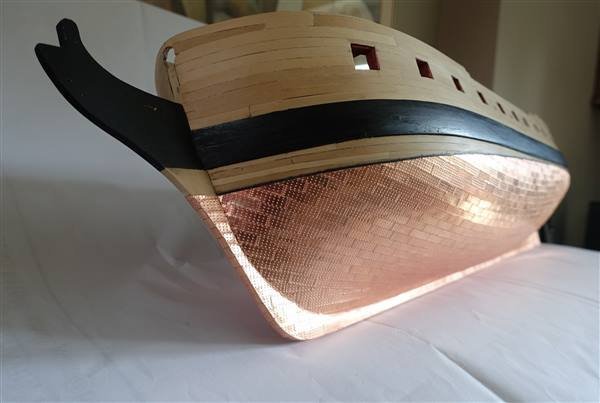
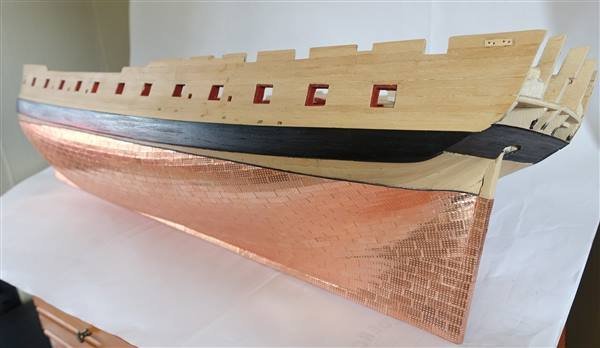
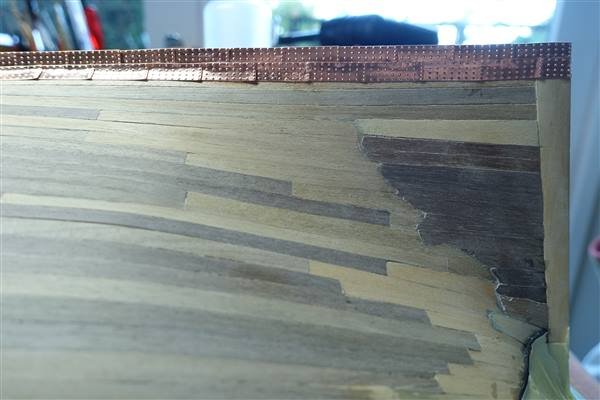
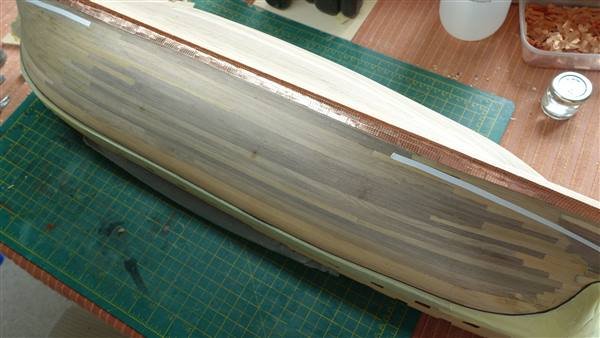
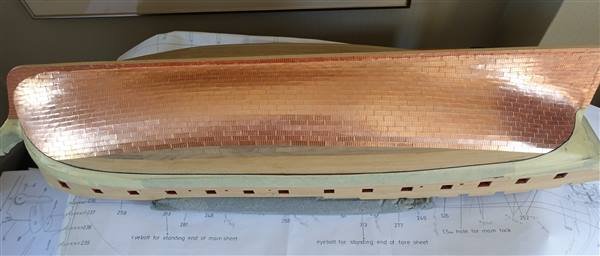
Port side coppering is completed. Although this task is pretty repetitive, I found that once I got going, I wanted to see it completed. Learning from the starboard side, I decided to plate the gore line progressively as it occurred in the run of tiling. Again I ran three straight runs of tile and then marked the position of the gore line with white tape. Instead of then placing all the tiles along the line, I continued to add plates normally from the stern row by row and cutting tiles to the line of the tape as it needed. This resulted in a much smoother transition than I achieved on the starboard side After that, it all went quite smoothly but I am glad to have completed this part of the build. I am going to leave plating the rudder for a while because I the kit supplied part will need replacement so I’ve started to think about the stern and quarter galleries. David
- 310 replies
-
- 7
-
-

-
- Diana
- Caldercraft
- (and 1 more)
-
Hi Schubbe, thanks for the compliment but there are definitely better examples on MSW. I started using a pattern cut from plasticard and then tried to make a crude jig for the top and butt planks on the deck but found both to be more trouble than they were worth so I just cut each on individually. I followed this route for the wale too. I think that perhaps if I spent more time and made a more refined jig that I would have got tighter joints. Maybe next time.
-
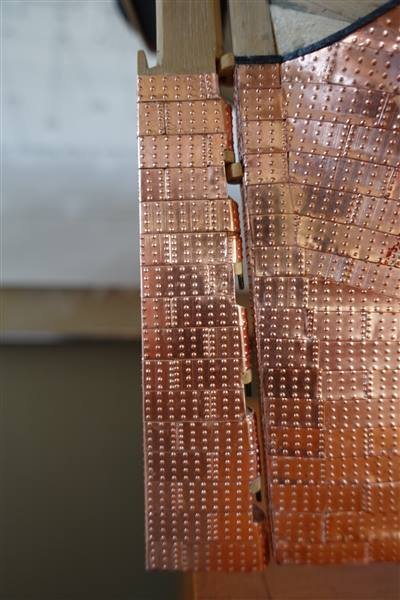
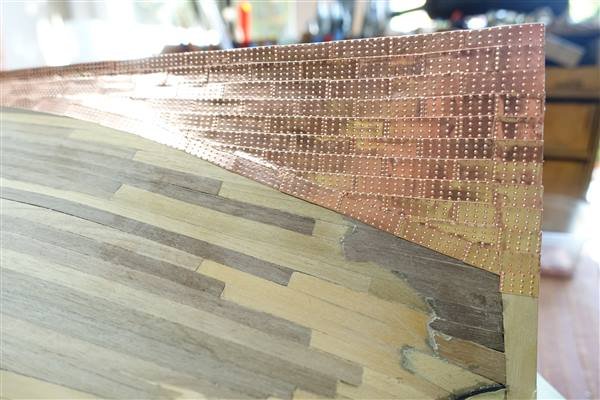
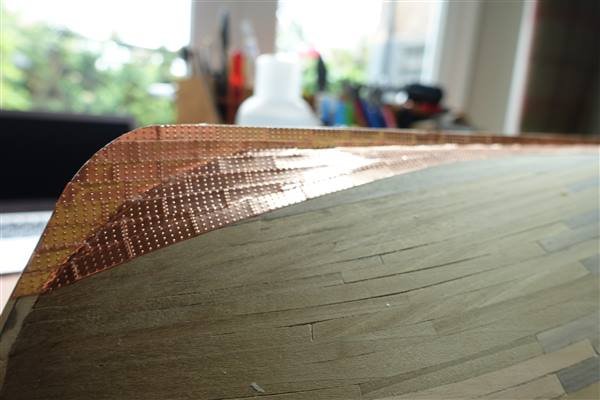
On with the copper plates. Starting with the starboard side, I laid the first two rows of plates beginning at the keel and sternpost. Thinking that the overlap would be easiest if I used the dimples as a guide, I glued the first two rows. I realised at that this was creating too much of an overlap between plates making the joints look much too thick and as you can see from this photo, a lot needed re-gluing. On subsequent rows I reduced the overlap to the minimum which looks much better. I tried various methods of holding and placing the tiles, including using tweezers, and a piece of dowel with Blu-Tak on the end. Finally I settled on using a piece of scrap basswood just smaller in cross-section than a tile and cut at an angle. A piece of double-sided tape on the end provides just enough tack to hold the tile while a dab of CA gel spread is spread across with a piece of scrap walnut strip. The biggest puzzle so far has been deciding where to put the gore line. There doesn’t seem to be any formula for this, so based on looking at other builds on this forum, I just went with what seemed right. I ran three straight rows and then used tape as a guide to mark the line. So far it seems to be working out… Onwards and upwards …
- 310 replies
-
- 7
-
-
- Diana
- Caldercraft
- (and 1 more)