


dunnock
-
Posts
530 -
Joined
-
Last visited
Content Type
Profiles
Forums
Gallery
Events
Everything posted by dunnock
-
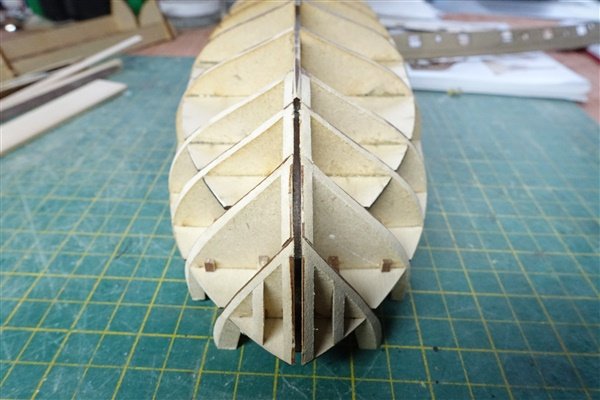
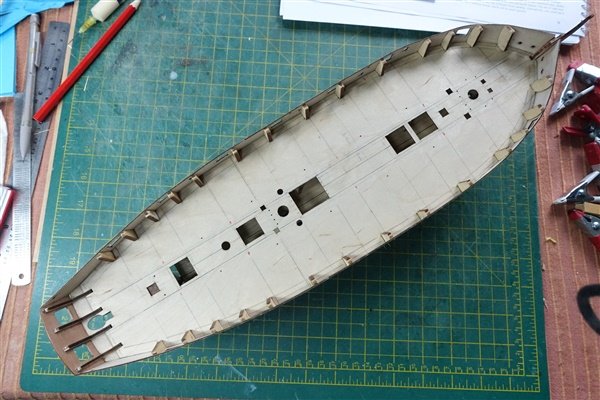
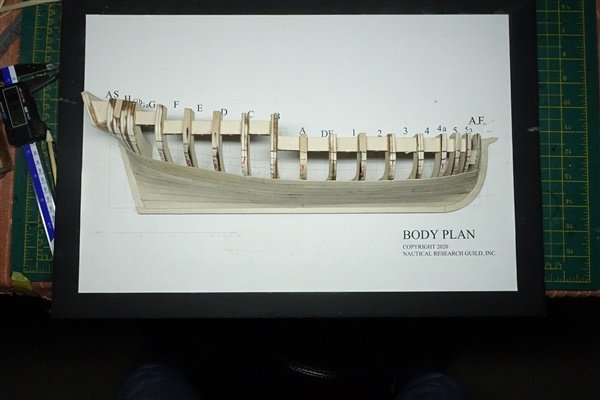
The stern frames are now birch ply and more robust than the previous MDF that I believe was used in previous versions of Speedy. Even so, getting the counter and transom pieces on is a relief and makes the stern section quite robust. The counter pattern was soaked and curved around a jar before fitting and then the transom pattern glued to the stern frames. Hull fairing of the 3mm MDF was relatively quick. I worked it a bit at a time by hand over a couple of days for fear of overdoing it. For some reason BH 14 was low on one side and I had to add a 1mm strip to bulk it out. I think this is my best attempt at fairing a hull so far but the planking will soon let me know if that it true. The gunport patterns were soaked in warm water fitted to the bulwarks and left to dry. The two problems I had at this stage were getting the forward tab of the pattern to fit in the slot on the stem and getting the pins to hold the lower edge of the pattern against the bulkheads. I used a travel iron to improve the contact between bulkhead and pattern. I glued the port pattern without difficulty a few bulkheads at a time again pinning and using heat to improve contact at the lower edge and left it to partially set for half an hour before glueing up the starboard side. When it had all set I noticed the starboard quarter was about 0.5mm too low at the stern so it was partially removed and re-glued. There is still a small difference which I think is due to the transom being slightly off so I may have to rework it. After reworking the starboard gunports The manual says 12 strakes per side are required to plank the hull. I think that this is a typo: the pictures show 15 strakes but I measured the mid frame to be 80mm suggesting 16 strakes of 5mm planks will be needed The first strake of the limewood planking is glued and pinned to each side. The forward end is tapered to half width from bulkhead 5 and the stern left untapered. And so planking continues... David


- 114 replies
-
- 11
-

-
- Vanguard Models
- Speedy
- (and 1 more)
-
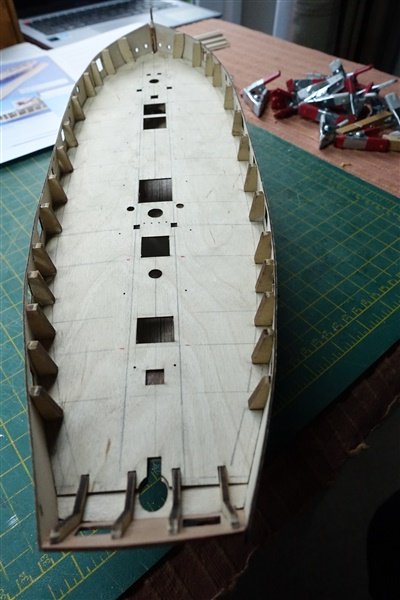
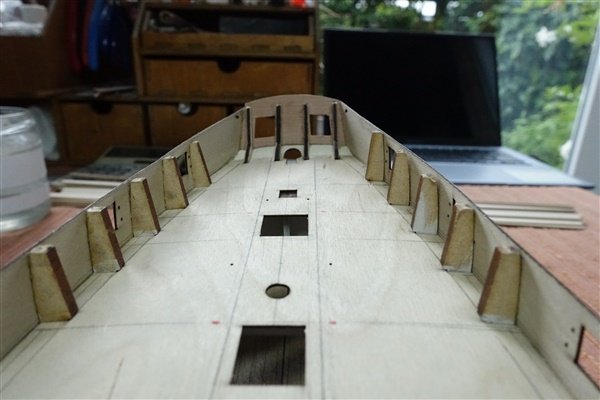
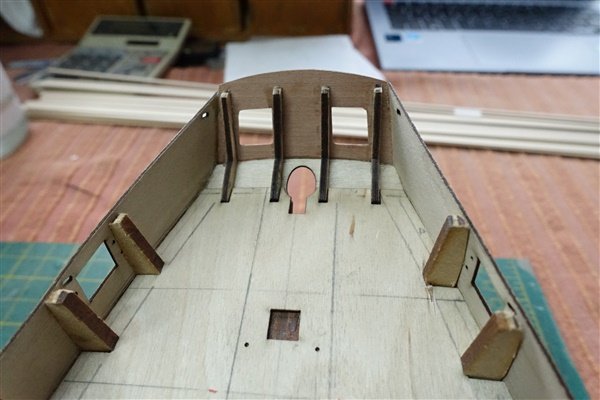
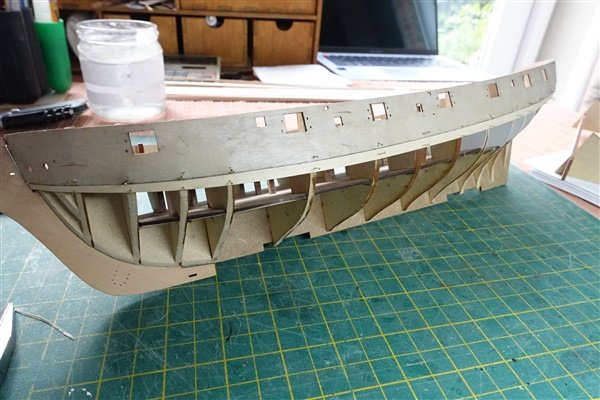
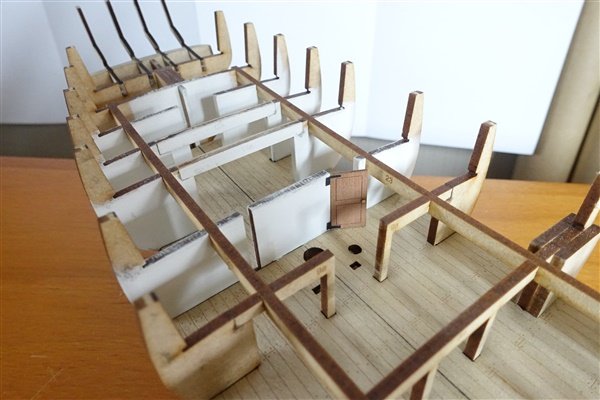
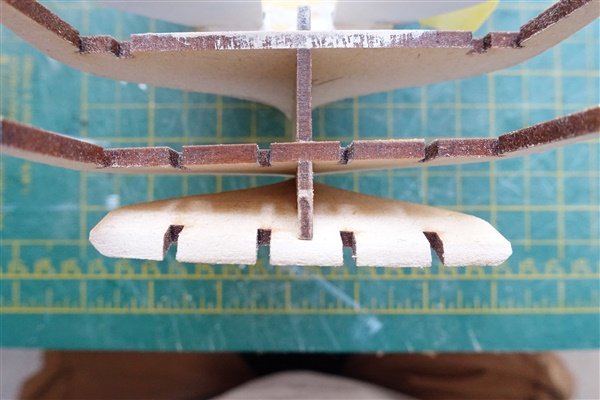
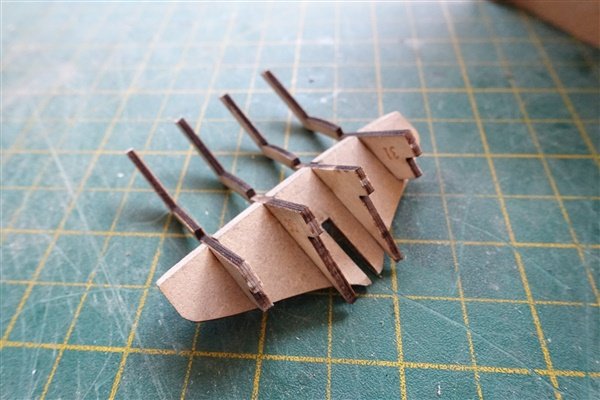
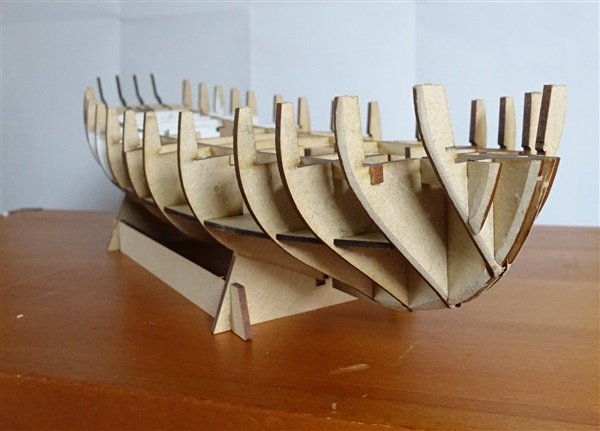
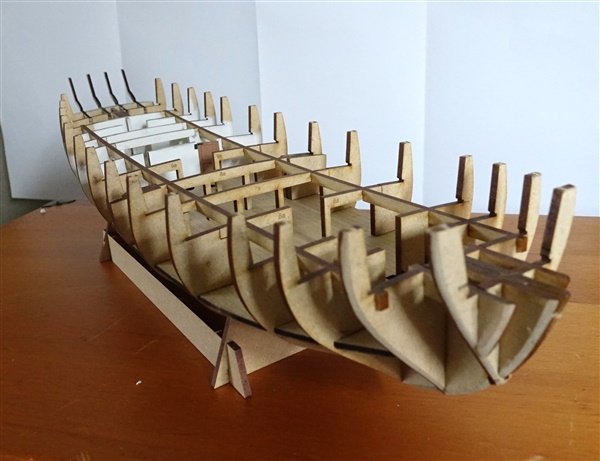
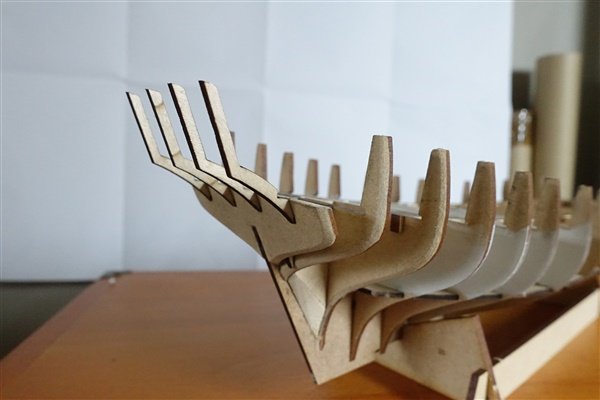
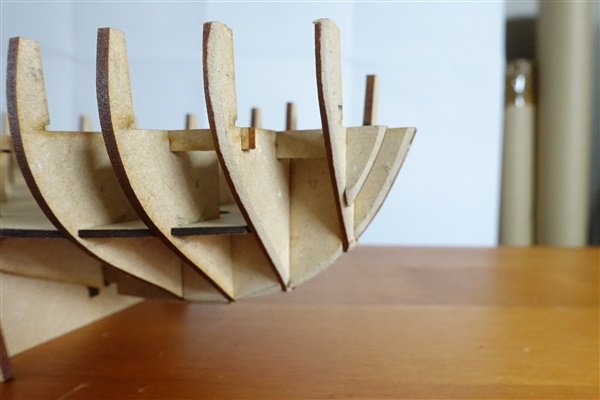
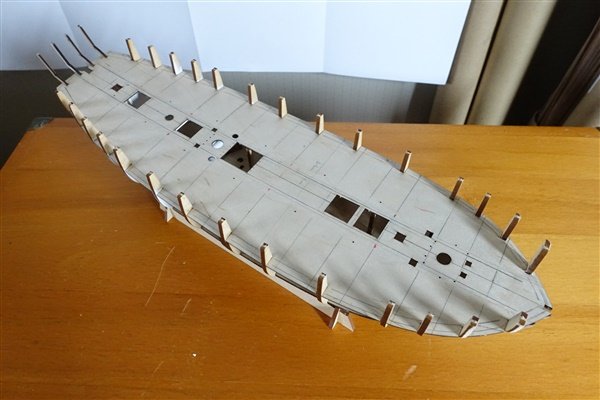
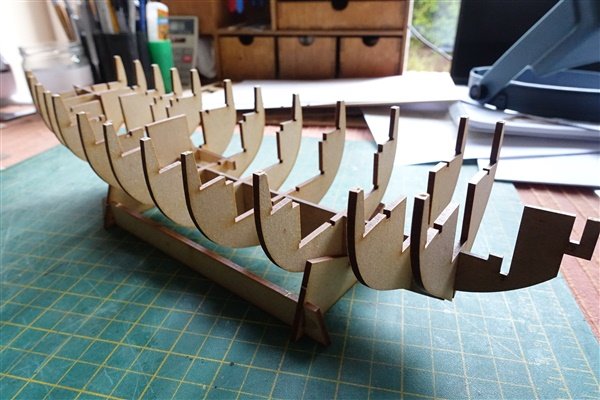
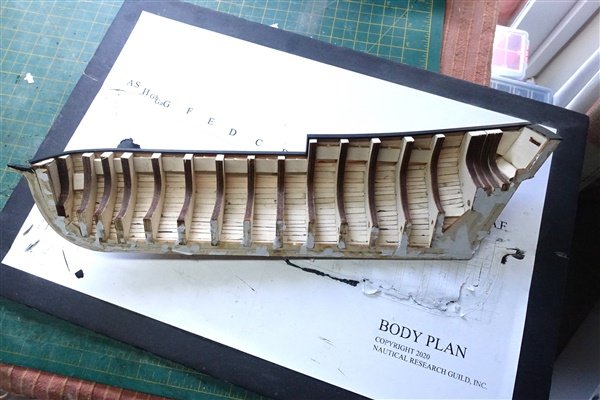
I’ve had a few weeks now to ponder the possible lower deck additions. I marked out where I thought the captain’s and lieutenant’s cabins should go on the bulkheads and you can see that it would mean a fair bit of alteration and possible weakening of the structure so I decided not to press on and left it at painting the after section off-white in case any part can be seen through the hatches. The frame is now completed with it’s various filler pieces and as expected, it went together perfectly with only one slight problem. I couldn’t get the stern bulkhead (16) to sit square to the false keel. I couldn't see why this should be so sanded back the false keel to get the bulkhead closer to parallel then checked the fit of the stern frames (30 & 31) which pulled the bulkhead into line. This was the only time I differed from the instructions. I built the stern section off the model, gluing the stern frames to the stern bulkhead first and then gluing the assembly to the rest of the hull. I have decided that I will not use the laser-engraved deck but plan to use maple planks so I did some initial planning and marking out on the main deck pattern before gluing it in place. I could maybe have done bit more fairing of the bulkheads and filler pieces prior to assembly but the MDF is so easy to shape that it's not critical. That's where the build sits for the moment. David

- 114 replies
-
- 11
-
-
- Vanguard Models
- Speedy
- (and 1 more)
-
Thanks for that Thuky. I'll take a look for it David
- 114 replies
-
- 1
-
-
- Vanguard Models
- Speedy
- (and 1 more)
-
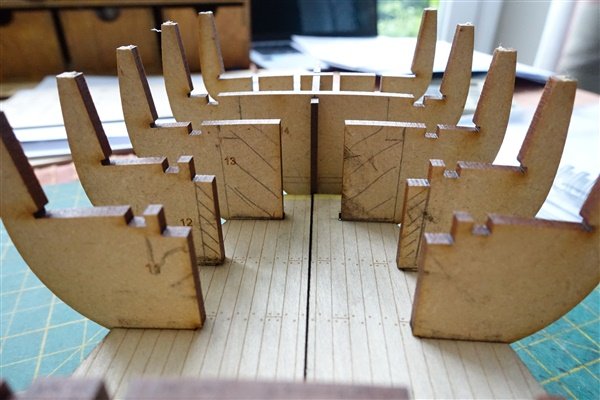
I said that I wouldn’t be starting Speedy until I got back from holiday but you know how it is, the box was there staring at me and I couldn’t resist a little look and one thing led to another…. I dry fitted bulkheads 4 -13 and the braces, parts 22 and then I began to wonder if it would be possible to add a little bit to the lower deck – maybe the Captain’s cabin. Based on the RMG plans, I think the cabin would sit from bulkhead 12 to between 14 and 15. It would mean cutting out a lot of 14 and adding a wall between 14 and 15. It would also affect the upper deck beams. I’m already going off the idea for where would it end – the officers’ and NCOs’ cabins, a stove? David
- 114 replies
-
- 3
-
-
- Vanguard Models
- Speedy
- (and 1 more)
-
Thanks very much Dan. Your Adder's looking great too. David
- 152 replies
-
- 2
-
-
- Vanguard Models
- Cutter
- (and 2 more)
-
Many thanks Chris, that's very kind of you and especially encouraging coming from the designer of this great little model. Thanks Craig. Really looking forward to Shetland. We've been to Scotland and many of the islands but this will be our first trip to Shetland. David
- 152 replies
-
- 2
-
-
- Vanguard Models
- Cutter
- (and 2 more)
-
Thanks very much for your kind words and compliments @Thukydides, @DaveBaxt, @No Idea and @DonSangria When I get back I'll try to take some shots with a better background David
- 152 replies
-
- 3
-
-
- Vanguard Models
- Cutter
- (and 2 more)
-
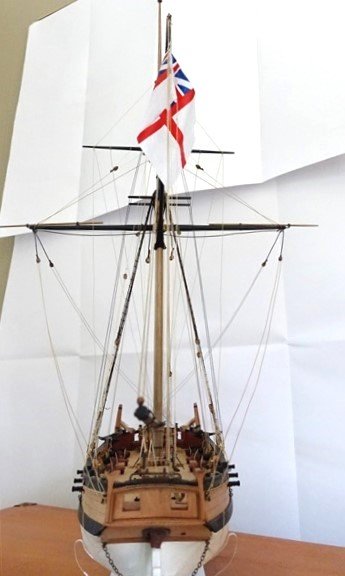
The Ensign has been painted by my daughter Kate and I have rigged it on a separate line. I used steam to set it and tried to impart some feeling of movement to it. I’m not sure if I’ve succeeded or whether I like the way it hangs. I’ll think about it for a while. Anyway that was the finishing touch and so my first effort of building a ship from Vanguard Models is complete. I like the way that the basic hull slots together so easily and the laser etched bulwarks and deck add to the simplicity of the build. Trial was fun to do and makes a lovely model I have already received my next ship, HMS Speedy, from Chris but I’m inclined to lay my own deck and bulwarks on this build. I’ve a few weeks to mull it over while on holiday in Shetland before making a start. Thanks to everyone for looking in and for all the helpful comments and support. David
- 152 replies
-
- 16
-

-
-
- Vanguard Models
- Cutter
- (and 2 more)
-
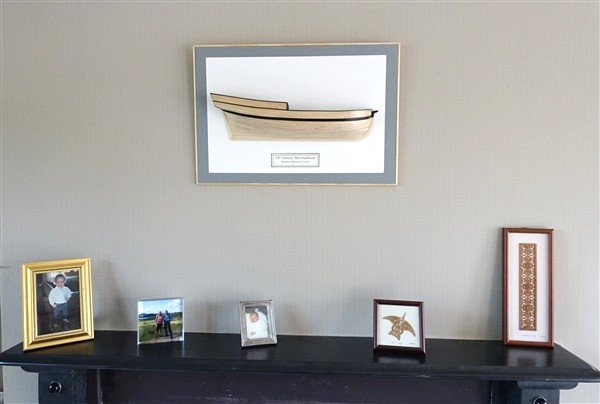
Just a final note now that the hull is mounted and taking up it’s place on the wall. To keep out excess dust I have covered the open top with black card supported by a simple framework on the open side. David
- 16 replies
-
- 7
-
-
- half hull
- Half Hull Planking Project
- (and 2 more)
-
Thanks Dan and welcome aboard. I'm following your Adder build with interest too David
-
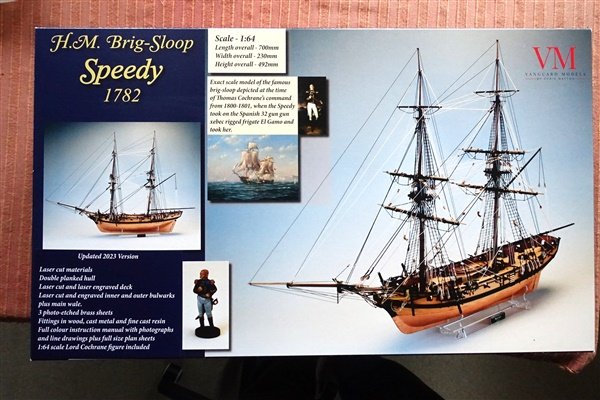
UPS delivered my HMS Speedy kit this morning and I'll be joining the long list of excellent builds of this lovely model. This is the updated 2023 version of the kit. I’ve started looking through previous Speedy logs and I’m making notes of points to look out for and things I want to change and new things I want to try. I’ll have a good read of the (substantial) kit manual but won’t start building in earnest until the end of May. I already know that I will be replacing the standard blocks and using Ropes of Scale for rigging and I want to try out some weathering techniques. Before then I have my NRG half hull to mount but for most of May I'll be on holiday with my wife in Shetland and taking in the Kingdom of Fife, Orkney and the north west of Scotland. Based on current weather forecasts there will probably be plenty of time to continue with my research while I’m away. Dunnock
- 114 replies
-
- 9
-
-
- Vanguard Models
- Speedy
- (and 1 more)
-
Thanks everyone for the likes and Chris, Thuky, Jacques and Ross for your very kind compliments David
- 16 replies
-
- 1
-
-
- half hull
- Half Hull Planking Project
- (and 2 more)
-
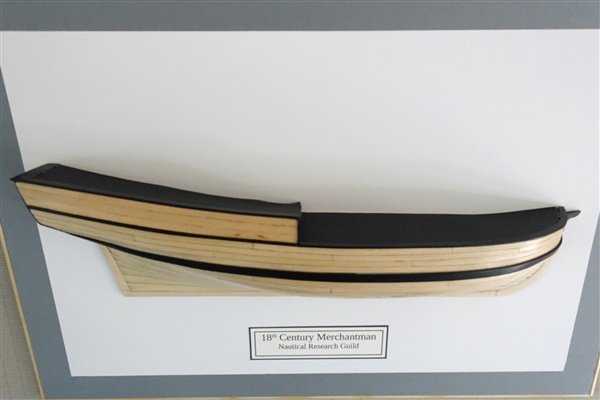
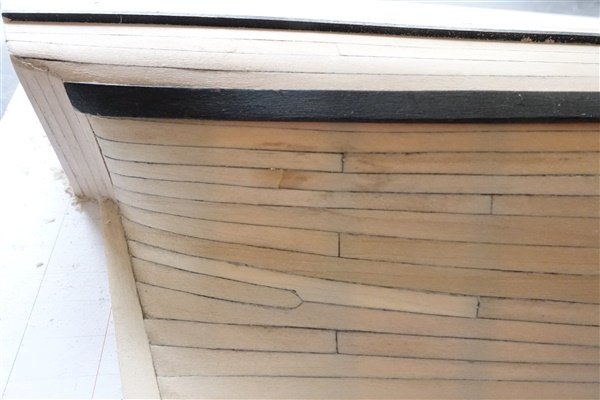
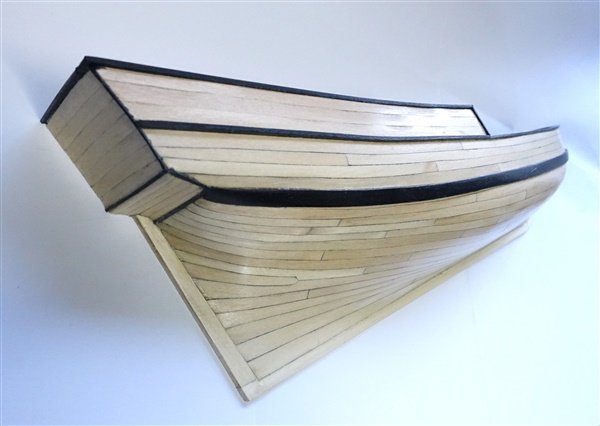
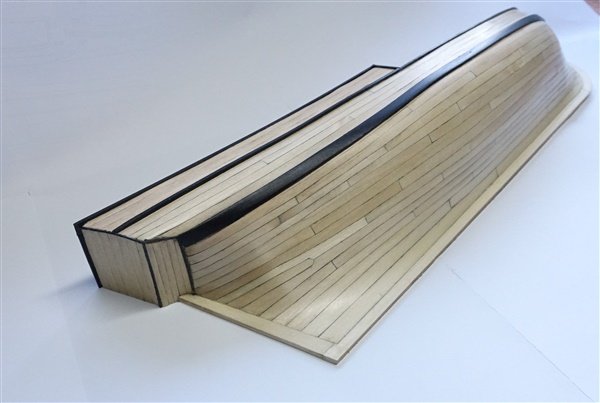
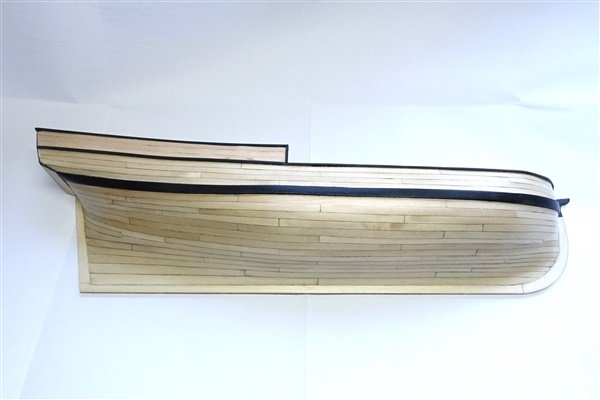
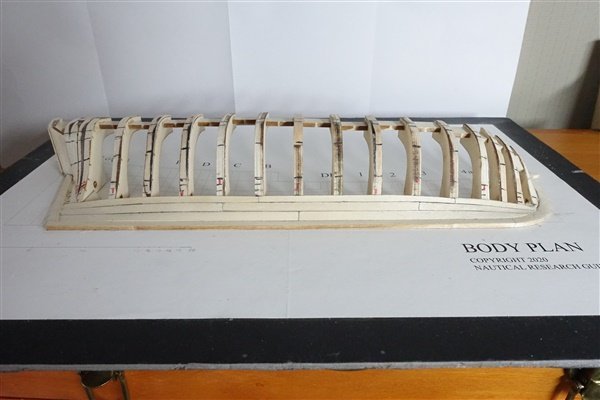
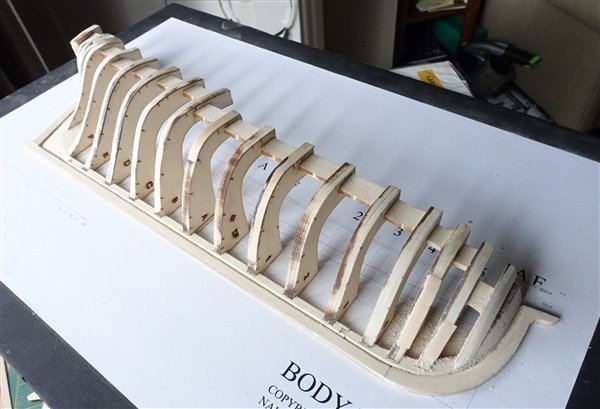
On the home straight. The four strakes above the wale are straightforward I made the plansheer from the basswood sheet. I placed the scarf joint a little further back than stated in the instructions, at frame 4 to balance the curve of each piece. At this point I ran out of sufficient sheet to finish the quarter deck outer planking and wale so used some stripwood I had in stock. The outer layer of the wale was cut from a sheet of 1.5mm boxwood. It took several soakings in hot water and bending to shape before it would lie easily around the bow section and I had to use a drop of CA gel to fix it at the stem. I sprung a couple of planks on the hull while clamping the after section of the wale but luckily they were easily re-fixed. The quarter deck rail and transom are made from lime stripwood and a trim of 1mm square section black boxwood completes the build. More sanding and 5 coats of shellac have been applied to finish off the hull. The hull was removed from the building board quite easily , helped by brushing IPA around the frames And the remains of the paper scraped and sanded away. Despite initial misgivings about whether I had miscalculated the position of the garboard and broad strakes, I'm pretty happy with the way it turned out and is a great improvement over my previous attempts at hull planking. So overall I enjoyed this project and learnt some useful lessons for future modelling. I think that in future I will stick to tapering and edge-bending for the inner layer but, even though more time consuming, I’ll persevere with the spiling technique on the outer layer in the hope of improving further. All that remains is to find a suitable permanent mounting board and frame and get permission to put it on show somewhere in the house. Next up will be Vanguard Models' HMS Speedy. Thanks all for taking the time to look in David
- 16 replies
-
- 7
-
-
-
- half hull
- Half Hull Planking Project
- (and 2 more)
-
Absolutely stunning Jason. It's good to see you back in the shipyard. David
-
Absolutely stunning BE. Your models and detailed logs are always an inspiration David
- 648 replies
-
- 3
-

-
-
- Indefatigable
- Vanguard Models
- (and 1 more)
-
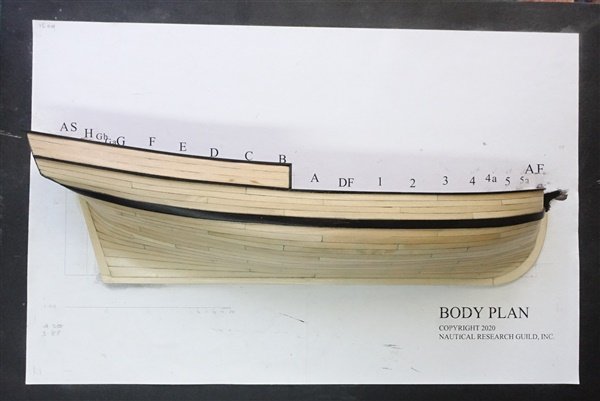
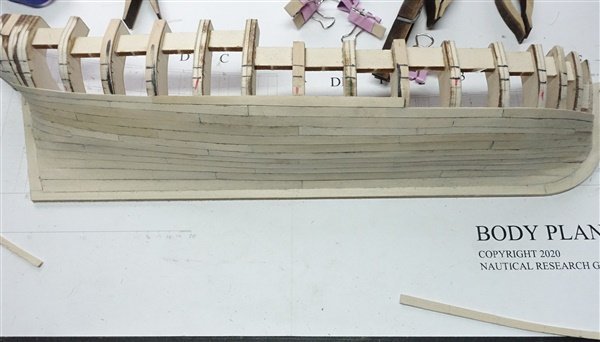
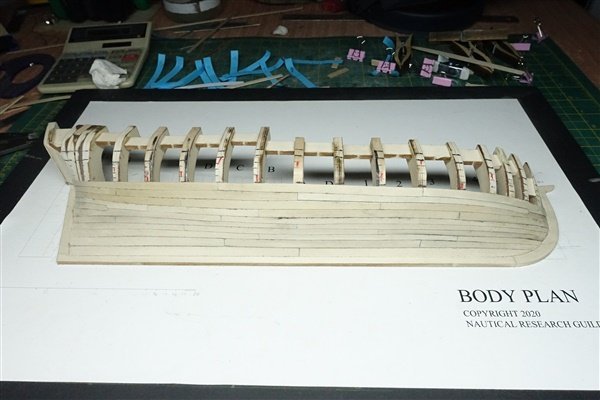
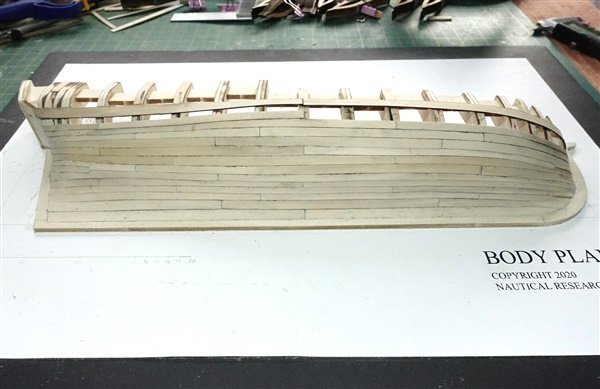
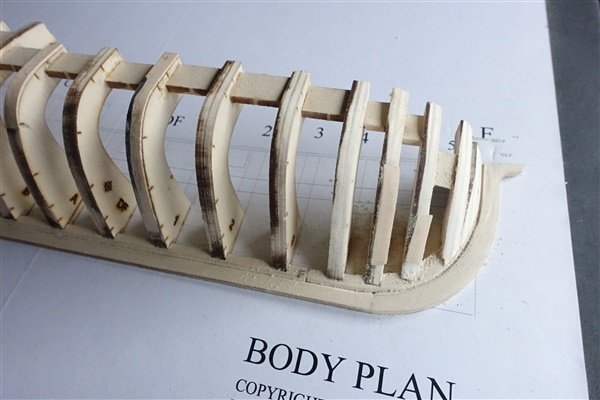
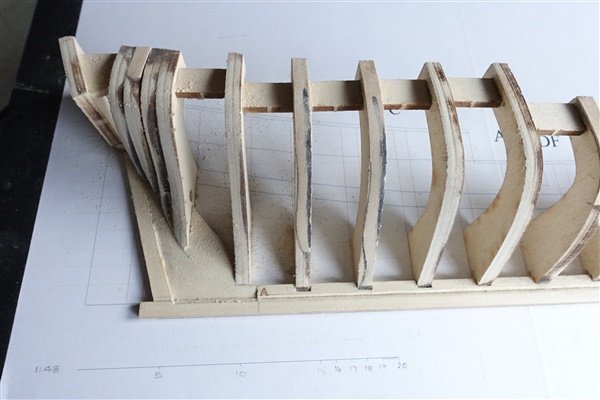
Planking continued slowly. Plenty of discarded planks and removal of poorly fitting ones but hull is now completed up to the first layer of the wale. A stealer was added at the stern at the junction of the first two bands of planking and a drop plank at the bow one strake further up. First layer of the wale Planking now complete up to the wale Looking at the hull overall, I think results have improved as I worked my way up the hull but that is the purpose of the excercise. There will be quite a lot of cleaning up to achieve a half decent result. It would have been better if I had sanded back frame 5a because it has caused a high spot at the bow. There is a similar situation at frame G. Maybe I can make these less obvious in finishing. The instructions say that now would be a good time to begin sanding so I will begin by scraping the hull followed by sanding with 120 and 200 grits. David


- 16 replies
-
- 7
-
-
- half hull
- Half Hull Planking Project
- (and 2 more)
-
Very nice rigging on the guns Andrew. Not horrified at all by the lack of hooks, just impressed that you attempted to rig such small blocks. David
-
Looking very nice Simon. Good recovery on the planking and the hull now has a very nice finish David
- 125 replies
-
- 2
-
-
- Trial
- Vanguard Models
- (and 1 more)
-
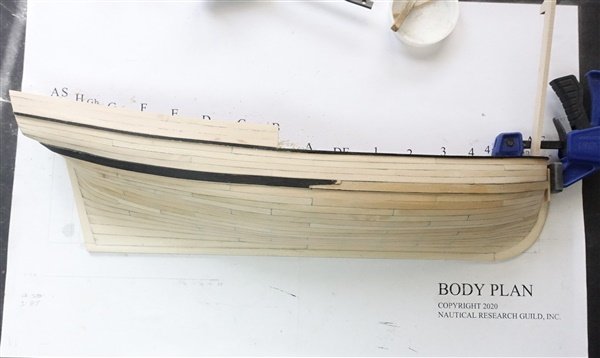
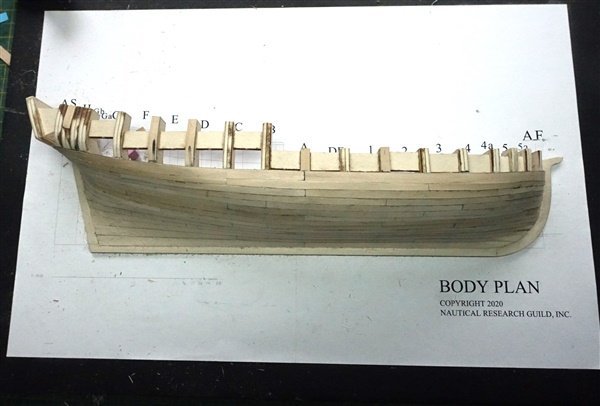
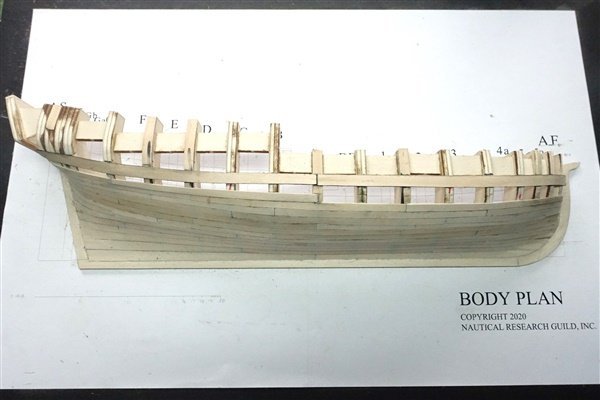
I laid out the tape for the garboard strake and although the line looked good to me, I found that when it came to cutting the strake out and fixing it, the forward end finished too high. I replaced it so that the strake finished just aft of frame 5 rather than forward of it. This position corresponds more closely to Toni’s build log. The broad strake was more or less a repeat of the garboard strake. Initially I made it too wide at the forward end, removed it, thinned it down and replaced it. Most of the planks have been removed, cleaned up and replaced at least once until I was happy with their fit and placement. Perhaps by the end of the build, I'll be getting it right first time! I have also installed the first strake of the first belt of planking. I think everything looks OK however, the bottom of the stern frames look higher up the deadwood than in the photos in the manual.
- 16 replies
-
- 5
-
-
- half hull
- Half Hull Planking Project
- (and 2 more)
-
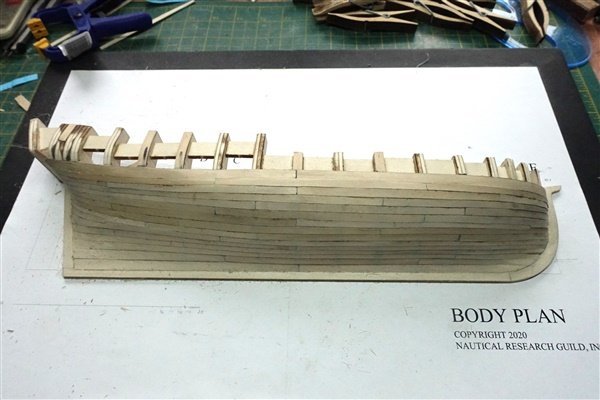
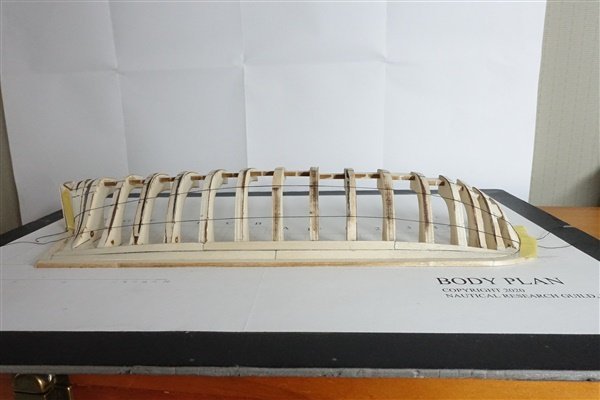
Thanks James that's a very nice model. Thanks Eric for the nice comment and for putting me right ... My apologies to Toni for making wrong assumptions I fitted the counter yesterday which highlighted the need for a bit more fairing at the stern and marked the position of the wale. I'll post some pictures later. David
- 16 replies
-
- 2
-
-
- half hull
- Half Hull Planking Project
- (and 2 more)
-
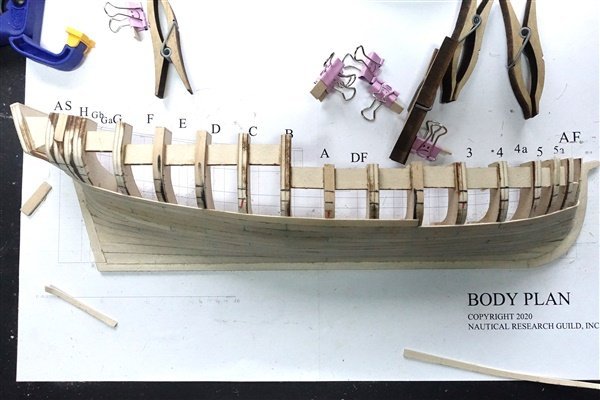
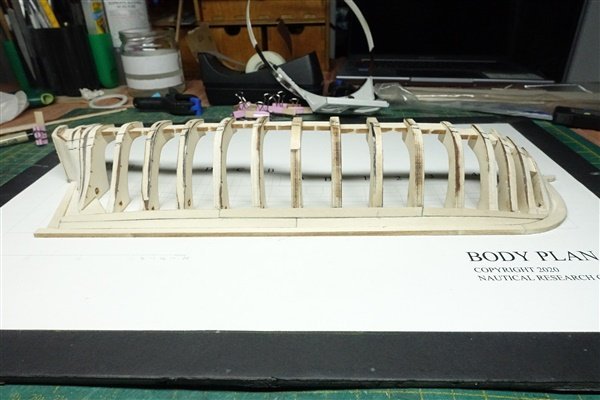
I’ve all but finished Vanguard Models’ HM Trial – just waiting for the flag painter (my daughter) to find time to paint the ensign – so I’ve resumed work on the half hull. No improvement in the weather but there’s not too much sawdust being created so I’m continuing indoors. As I work on the fairing, I’m finding that frames that I thought were OK turn out to be low. I don’t think that I have gone too far on the fairing because the back edges are untouched. I added shims to the lower parts of frames 4a and 5. I have also found that some of the brace pieces between frames are not as solid as I thought so I had to re-glue some of them. I think that a lot of the problem is that mounting the hull on foam-board as suggested is not a solid base. The foam-board is flexible and individual frames can move relative to the others. If I were to make another half hull model, I would use something more solid as a building board. I’m happy with the fairing which took a few hours over several days and I can now mark the wale and begin planking. David
- 16 replies
-
- 5
-
-
- half hull
- Half Hull Planking Project
- (and 2 more)
-
Thanks Andrew. I thought that the anchor ring was a bit under sized so made a new one. This necessitated drilling out the hole, by which time there is precious little shank left. If you go with the kit anchor ring, it will be more robust.
- 152 replies
-
- 2
-
-
- Vanguard Models
- Cutter
- (and 2 more)
-
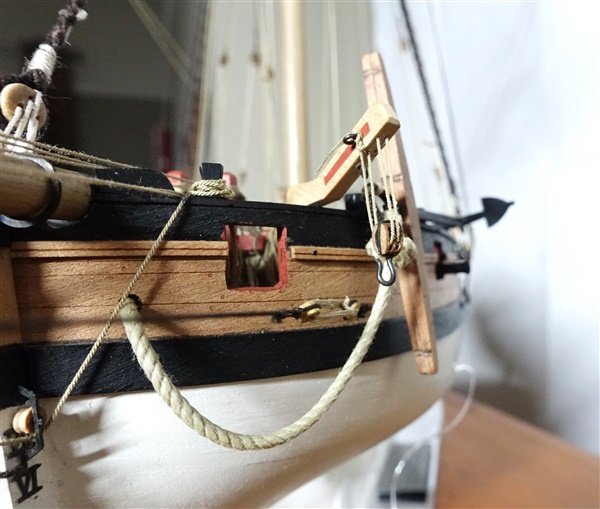
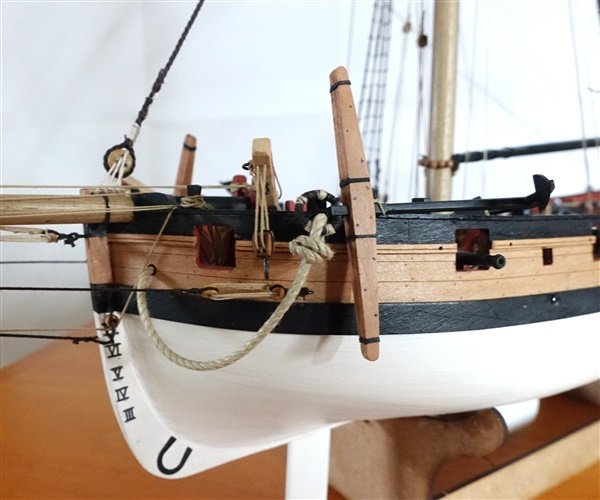
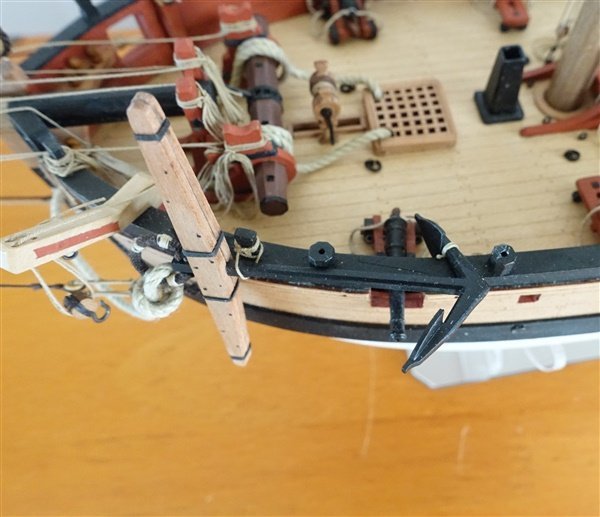
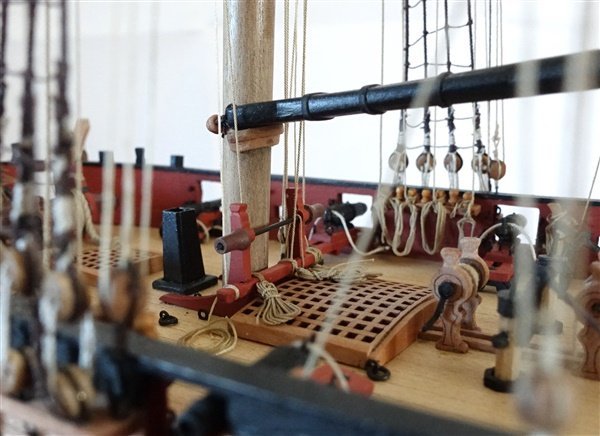
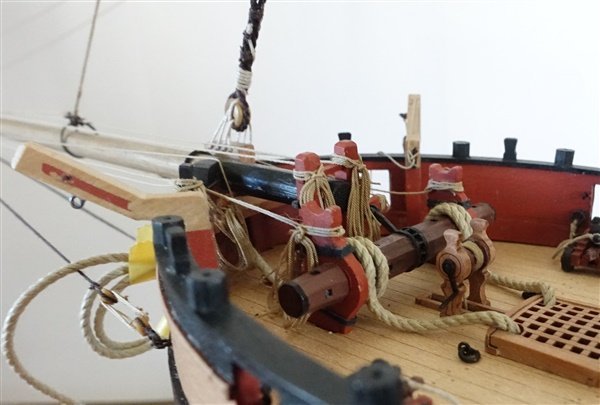
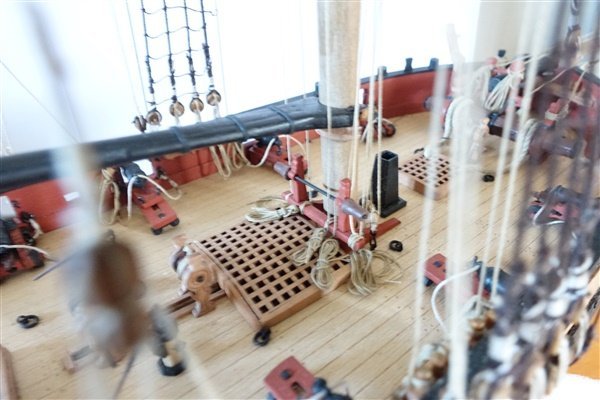
Thanks for the likes and all the very kind compliments. Anchors I attempted to make the anchors back in November but broke both of them when trying to fit the anchor rings. The replacements arrived soon after but left it a while before having another go. Despite being as careful as possible, I still broke another anchor when trying to insert the ring. Thankfully Chris had sent me three replacements and the final one was drilled out and the ring inserted without any damage. Puddening of the ring still took a lot of care. I used 0.45mm dark brown rope and 0.1mm thread for the seizings. The cat block is a 4mm double block with hook made from 0.7mm brass wire and blackened. The iron band is represented by heat shrink tubing. The cat block is rigged with 0.35mm rope. It is tied off at the inner eyebolt on the cathead and threads through the block and both sheaves in the cathead and tied off at a cleat on the inboard side of the cathead. The anchor is lashed to a convenient timberhead by the shank painter and at the arm. The ensign will be the final touch which will be added as soon as my Flag Maker has space in her busy schedule! Thanks for looking in David
- 152 replies
-
- 12
-
-
- Vanguard Models
- Cutter
- (and 2 more)
-
A quick update. I’ve spent the last few days making hanks and tidying the deck. I have used the method of wrapping rope around pins arranged in an elipse but have always had difficulty making the hanks hang realistically, especially thinner ropes. I now prefer the method published by @carlo_l How I make rope hanks, fast and easy technique - My JIG - Model Tips and Tricks and Making Jigs - Model Ship World™ although I change it slightly by tying off the hank and then making the loop. The coils are made in the normal way by laying rope down on the sticky side of masking tape and fixing with dilute pva. David

- 152 replies
-
- 12
-
-
- Vanguard Models
- Cutter
- (and 2 more)