HOLIDAY DONATION DRIVE - SUPPORT MSW - DO YOUR PART TO KEEP THIS GREAT FORUM GOING! (Only 20 donations so far - C'mon guys!)
×


desalgu
-
Posts
363 -
Joined
-
Last visited
Content Type
Profiles
Forums
Gallery
Events
Everything posted by desalgu
-
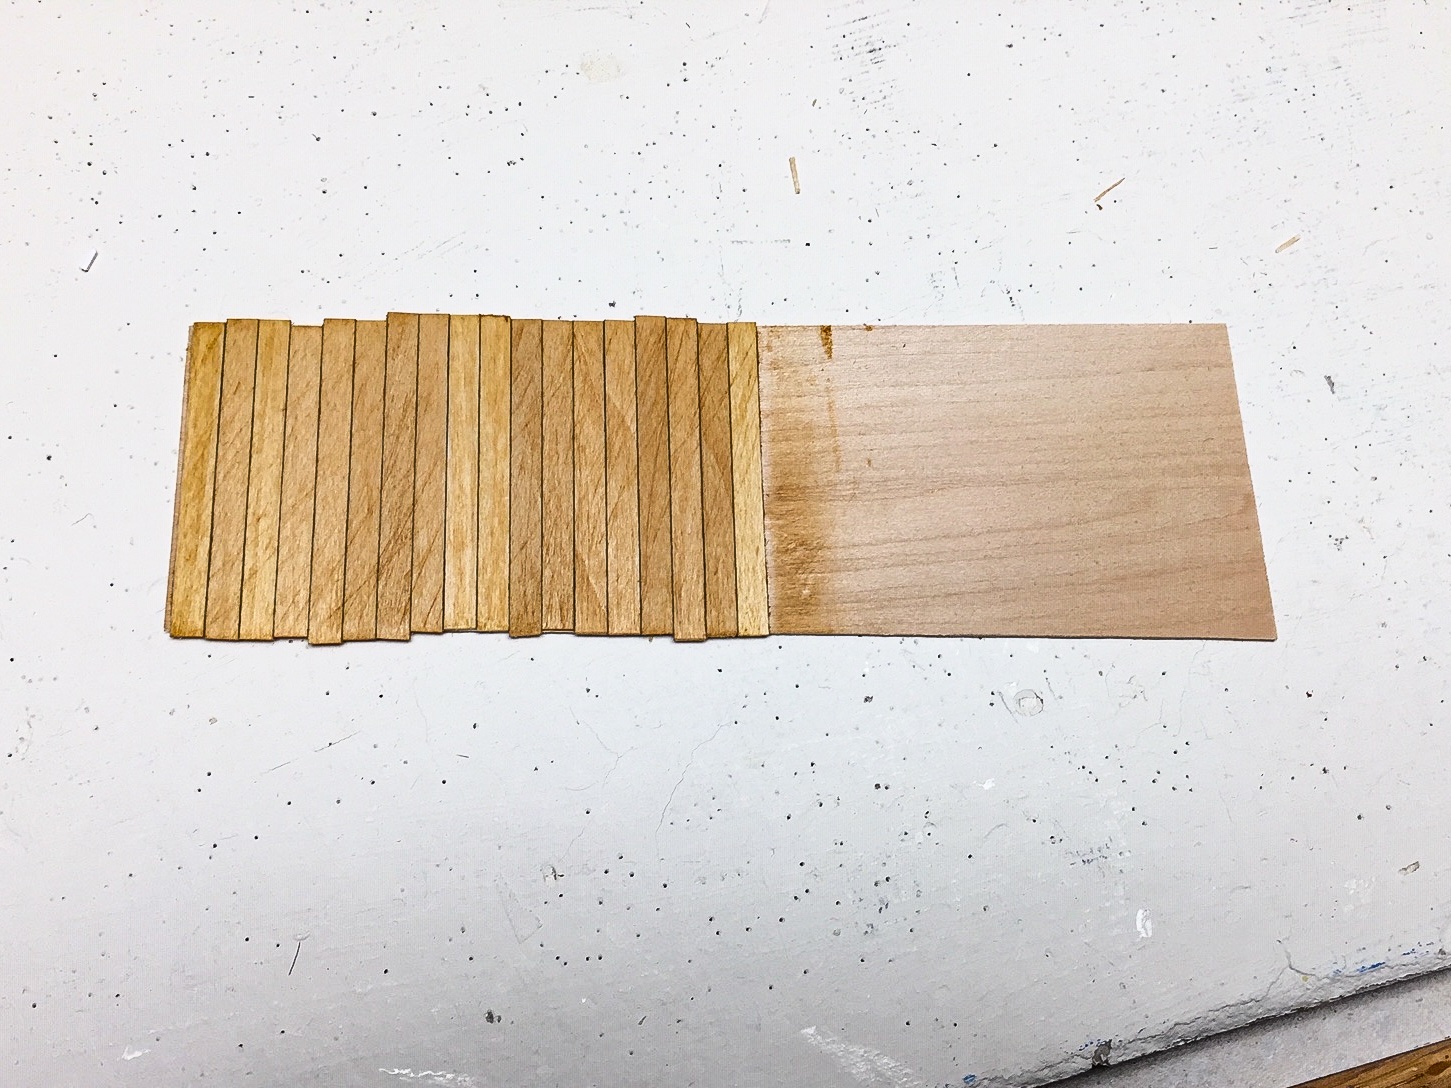
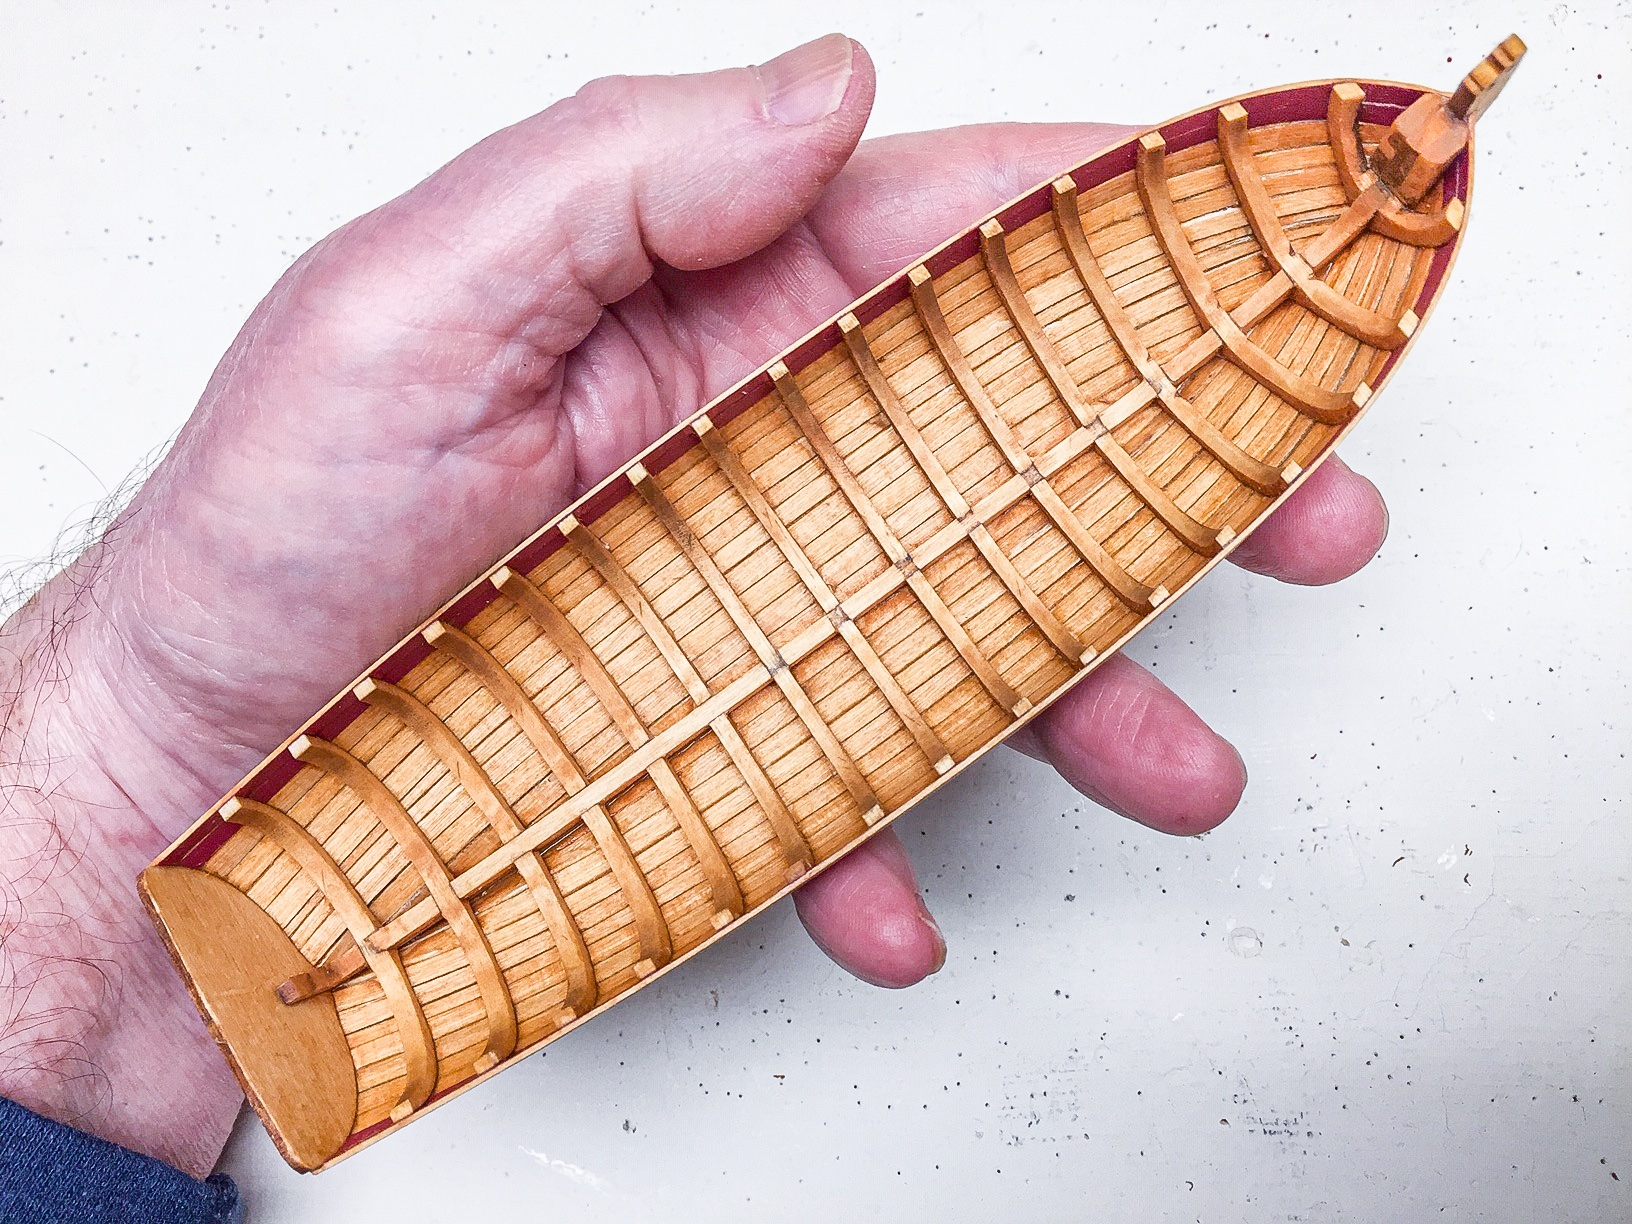
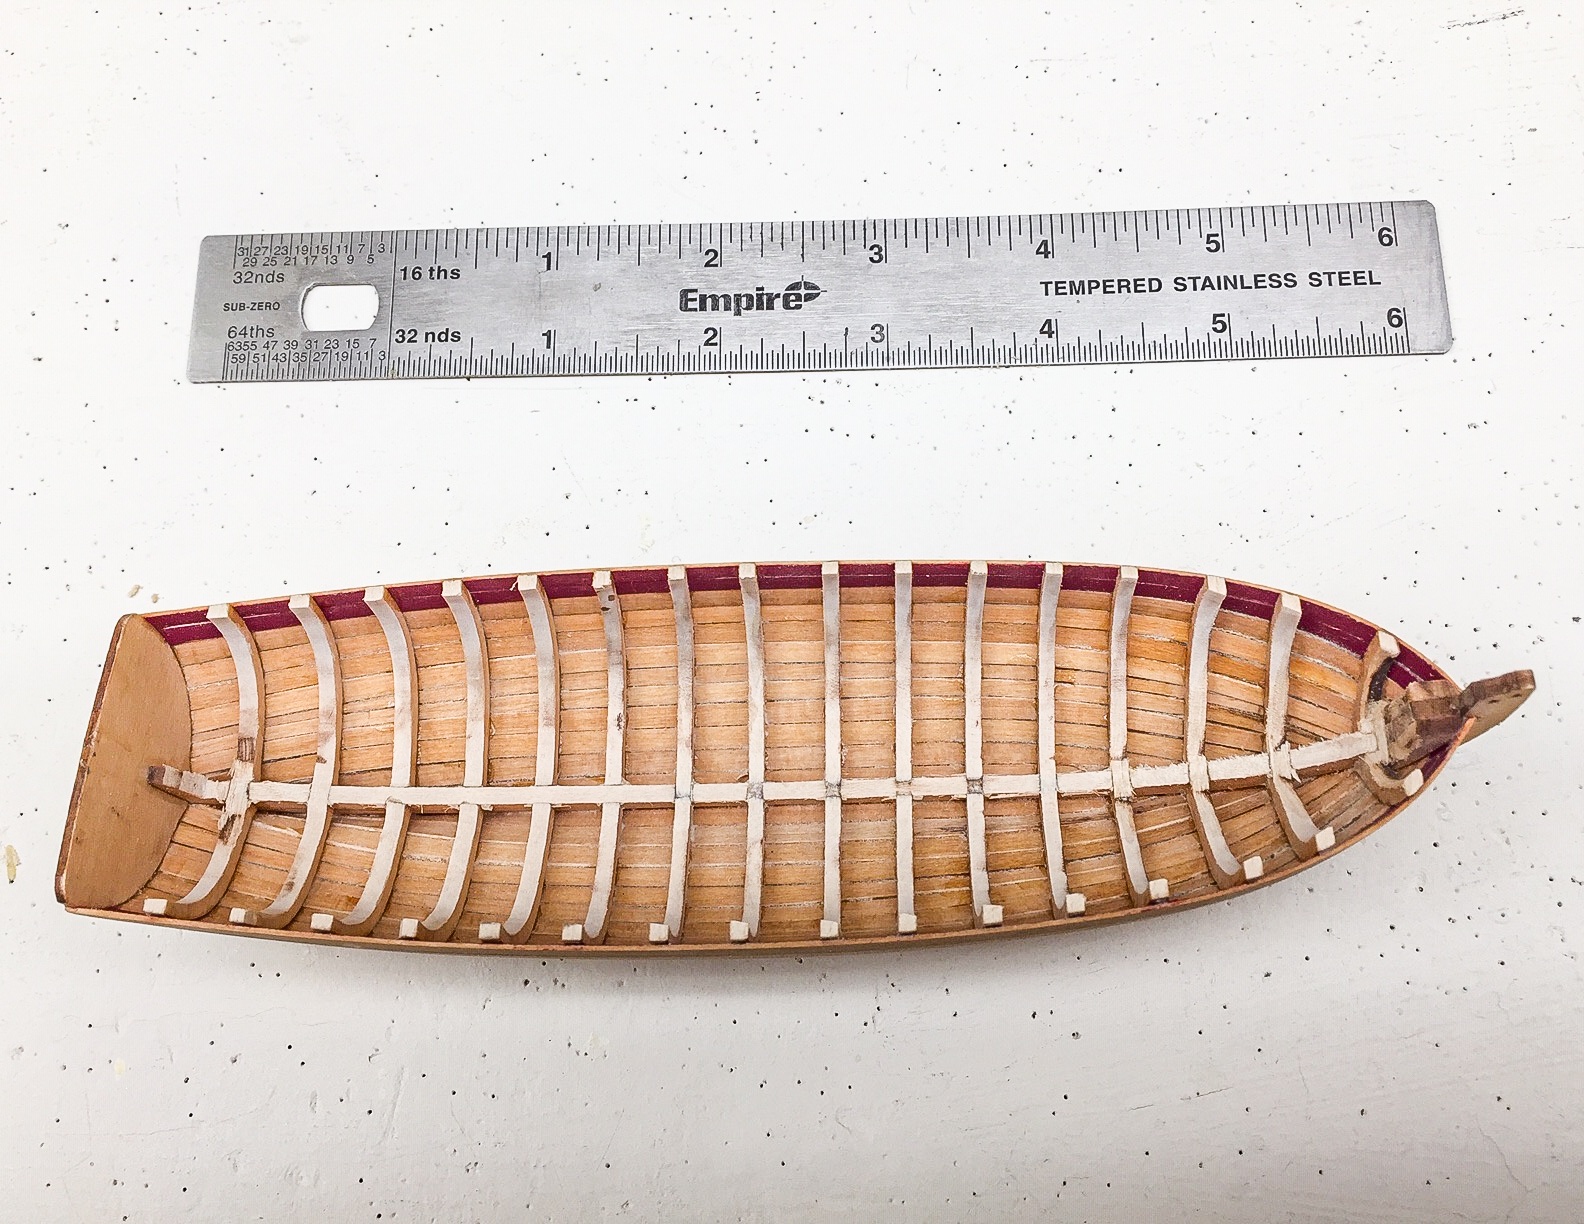
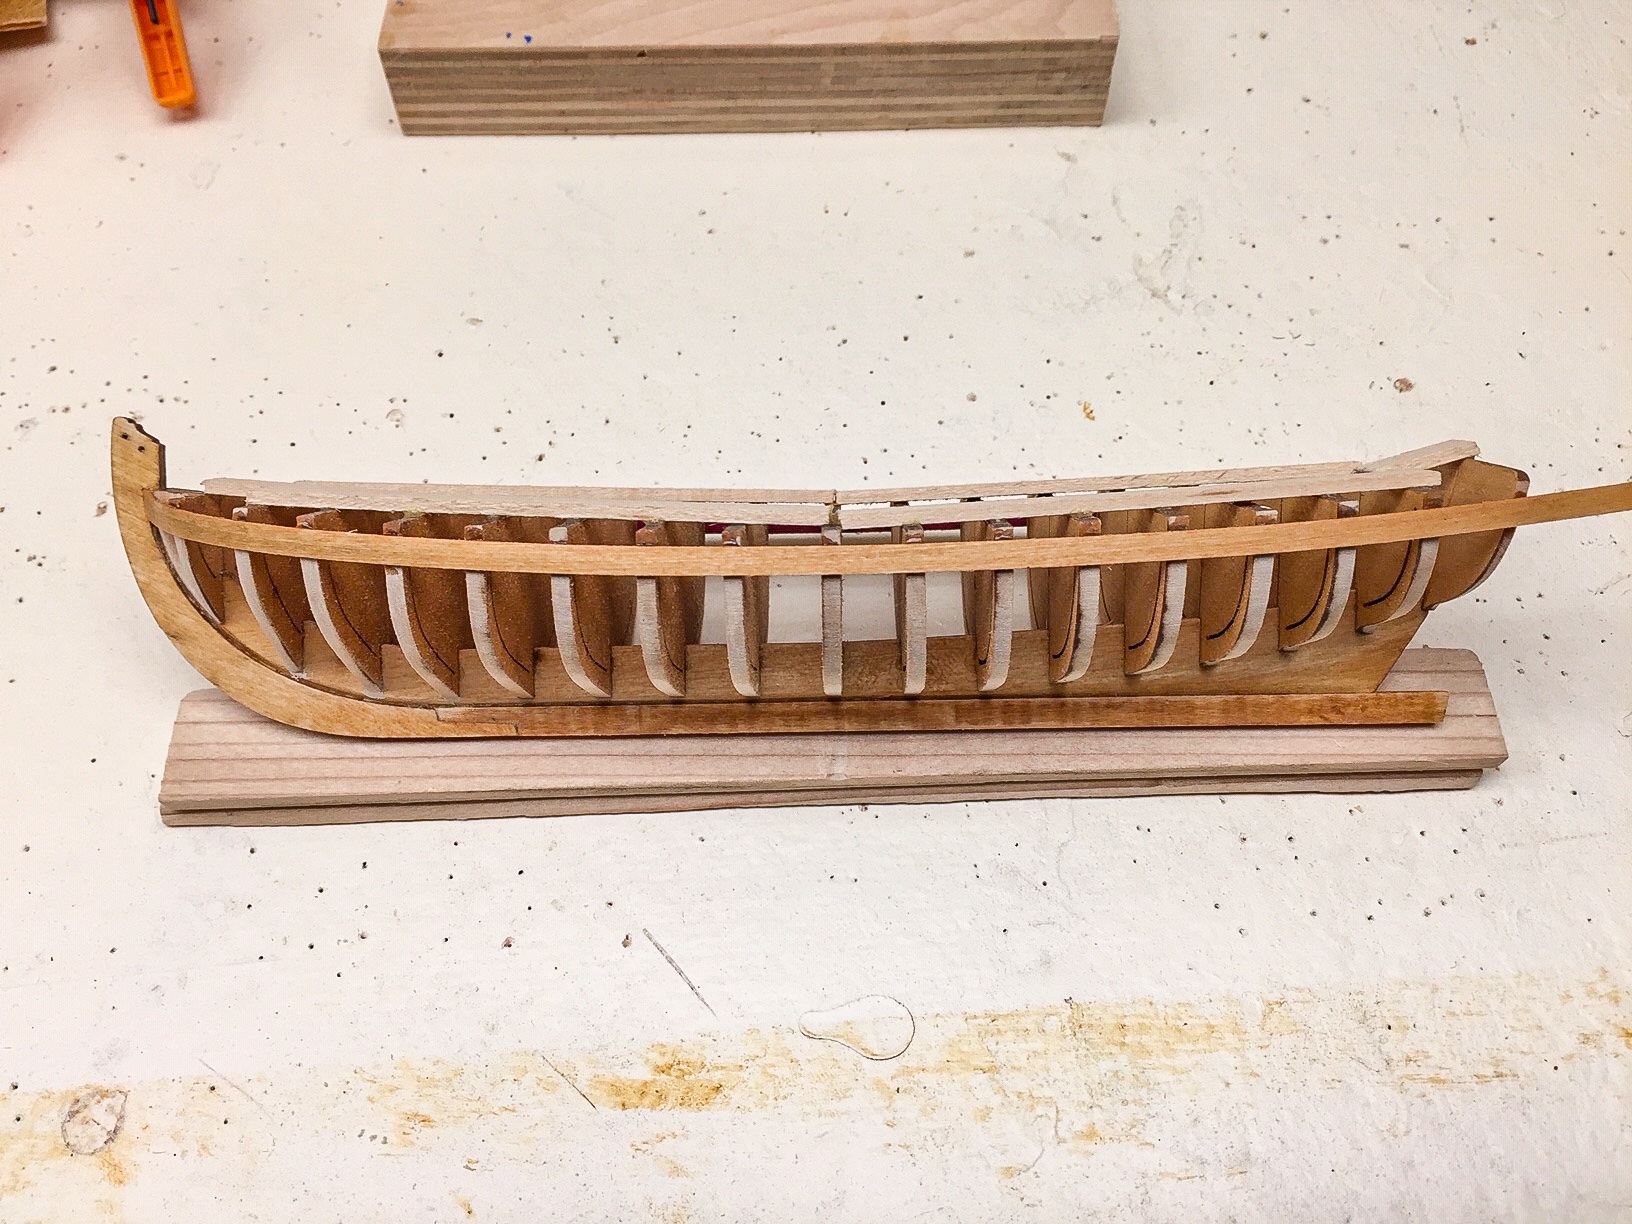
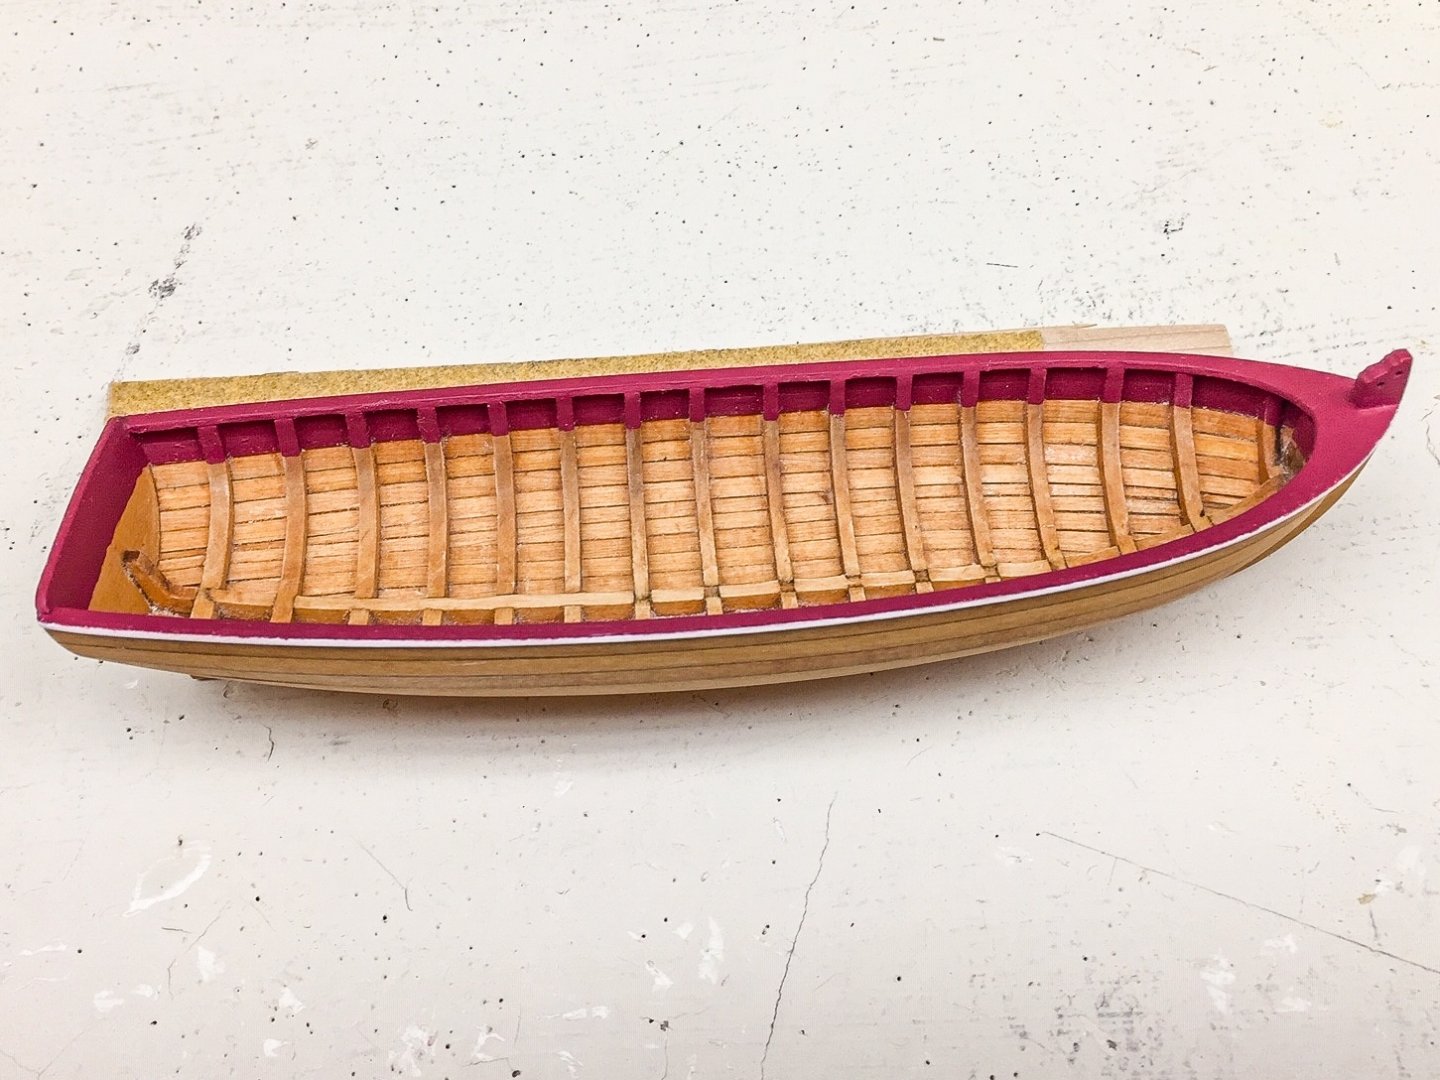
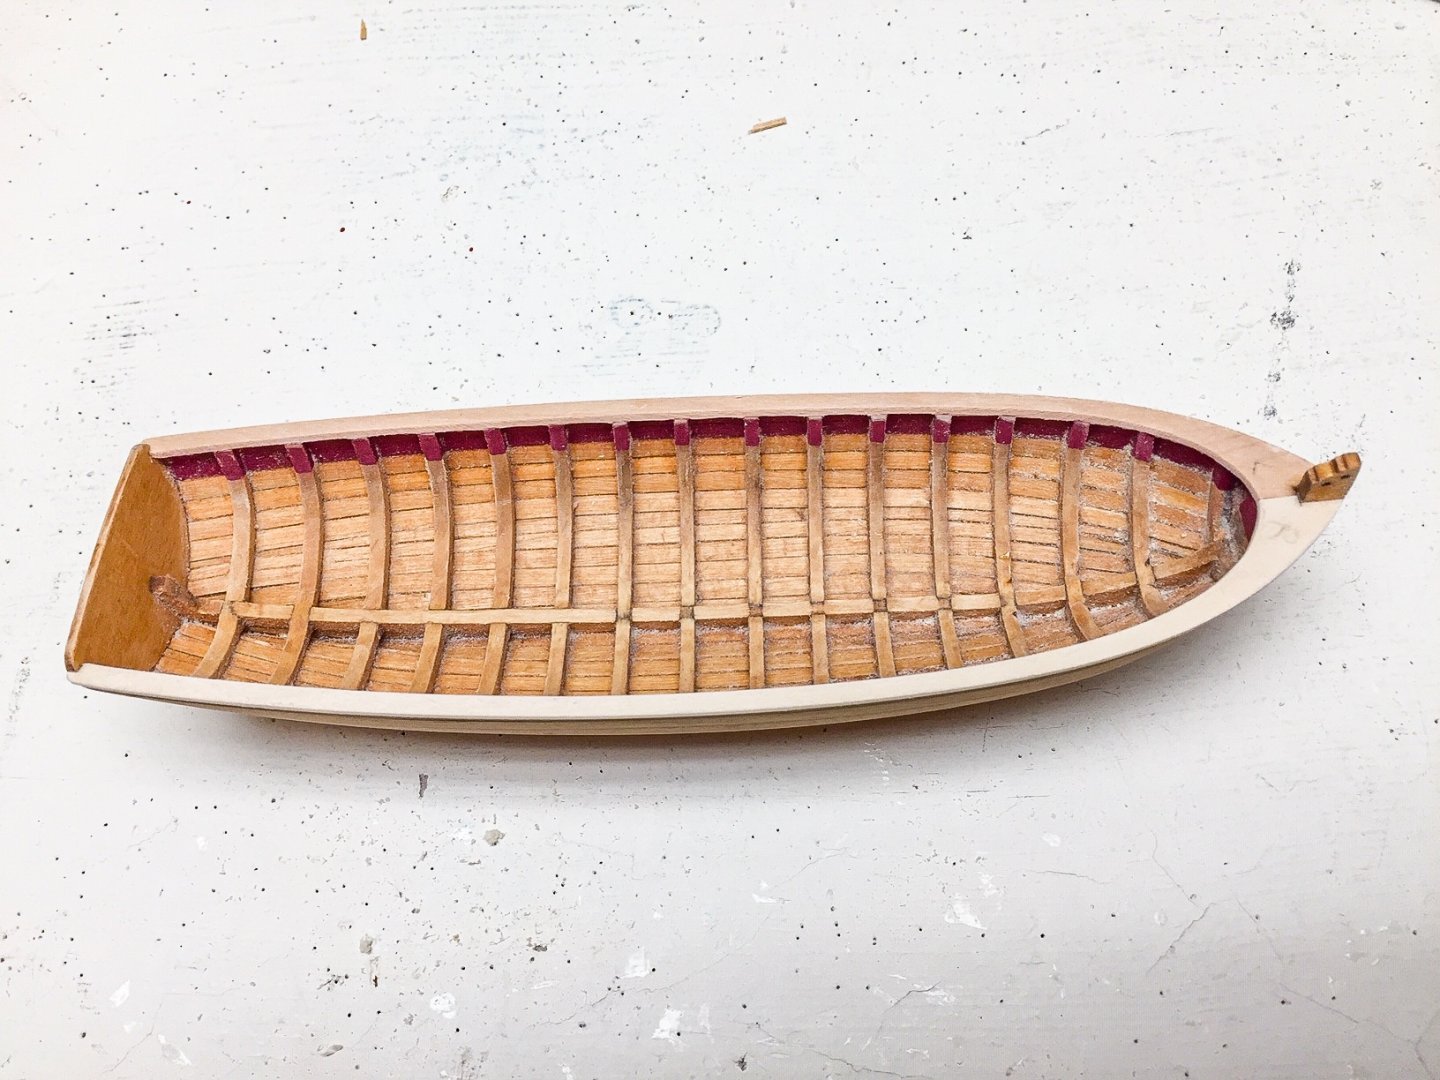
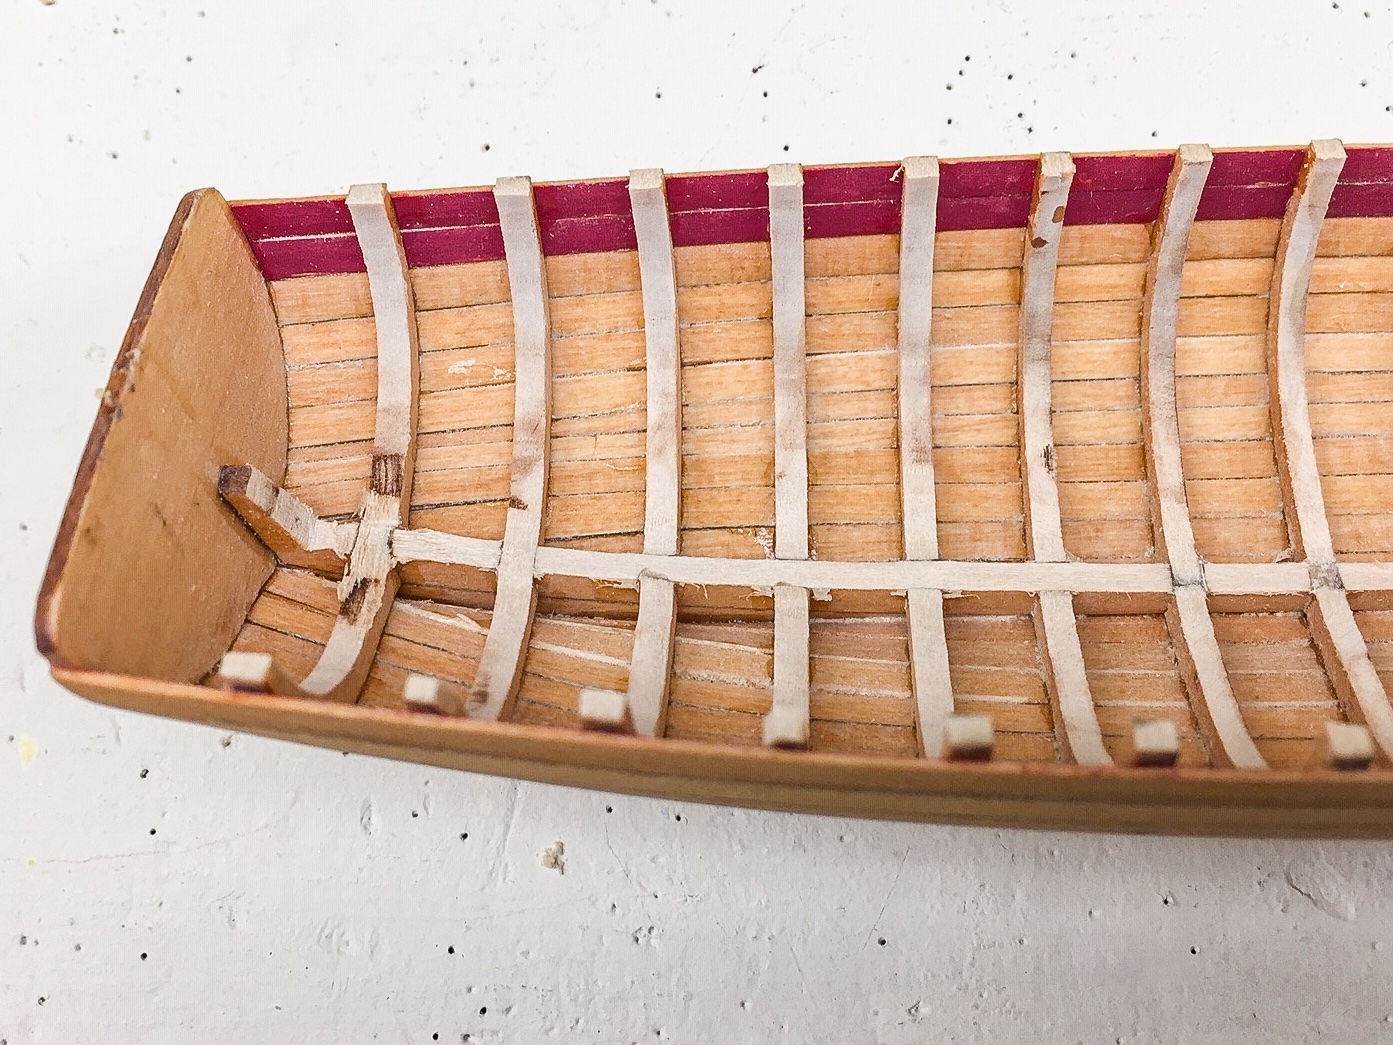
I added floorboards to the inside of the hull. I had a little trouble getting them aligned and parallel. Afterward I thought of a way I could have done this better. Isn't that always the way. I aligned them (or made them parallel) by eye, but I could have put small shims between them to keep the distance between floorboards the same. First photo shows the floorboards. Lighting in photo makes them look lighter than they actually are. Then I started working on patterns for the bow and stern platforms. I saw how the platforms have notches, and I knew basswood has a strong tendency to split. To avoid this problem, I glued the planking strips to a 1/32 sheet piece of basswood crossgrain. The planks run one direction, and the grain on the sheet runs 90 deg to them. Afterward I sanded bith sides so the total thickness was about 1/32". Laminating two pieces of basswood with wood grain 90 deg to each other reduces its tendency to split. It all but eliminates the problem. This is a common solution to the problem when building model airplanes with balsa. Balsa splits easily also. The 2nd photo below shows what this looks like.

- 55 replies
-
- 5
-

-
- 18th Century Longboat
- Model Shipways
- (and 1 more)
-
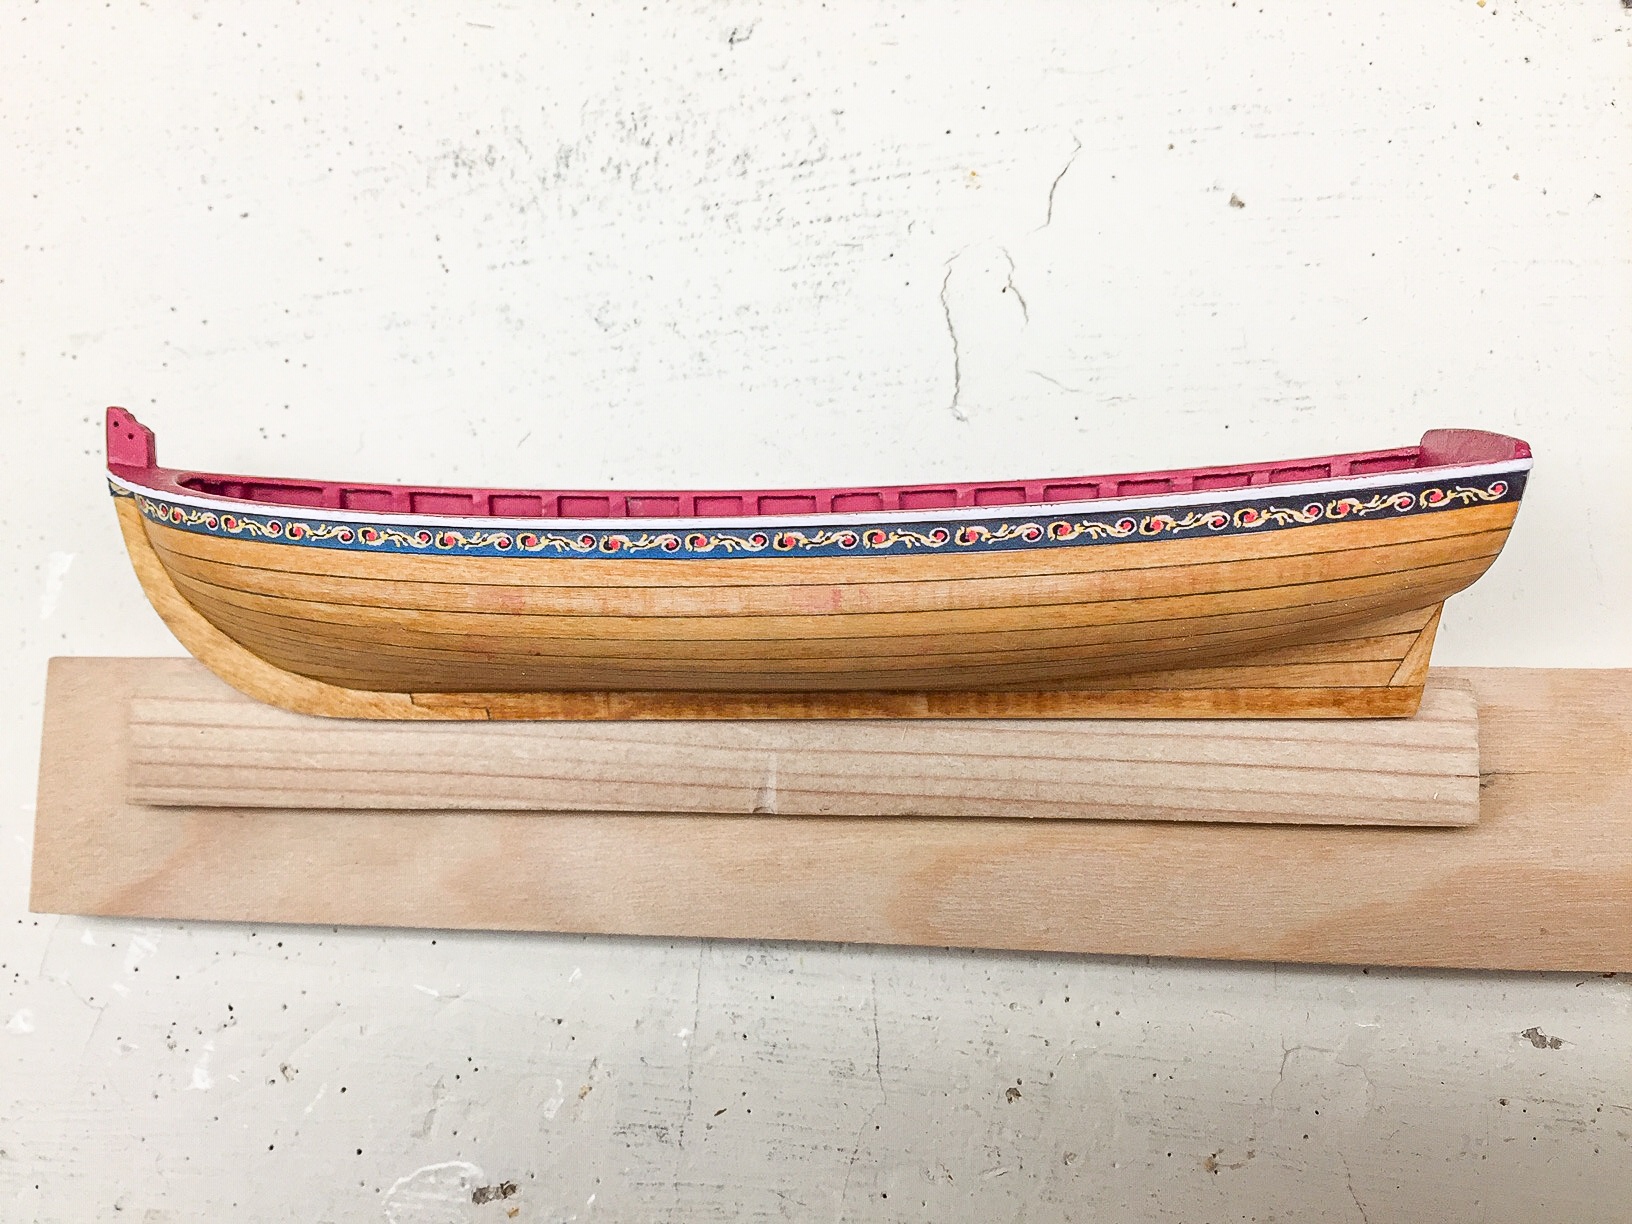
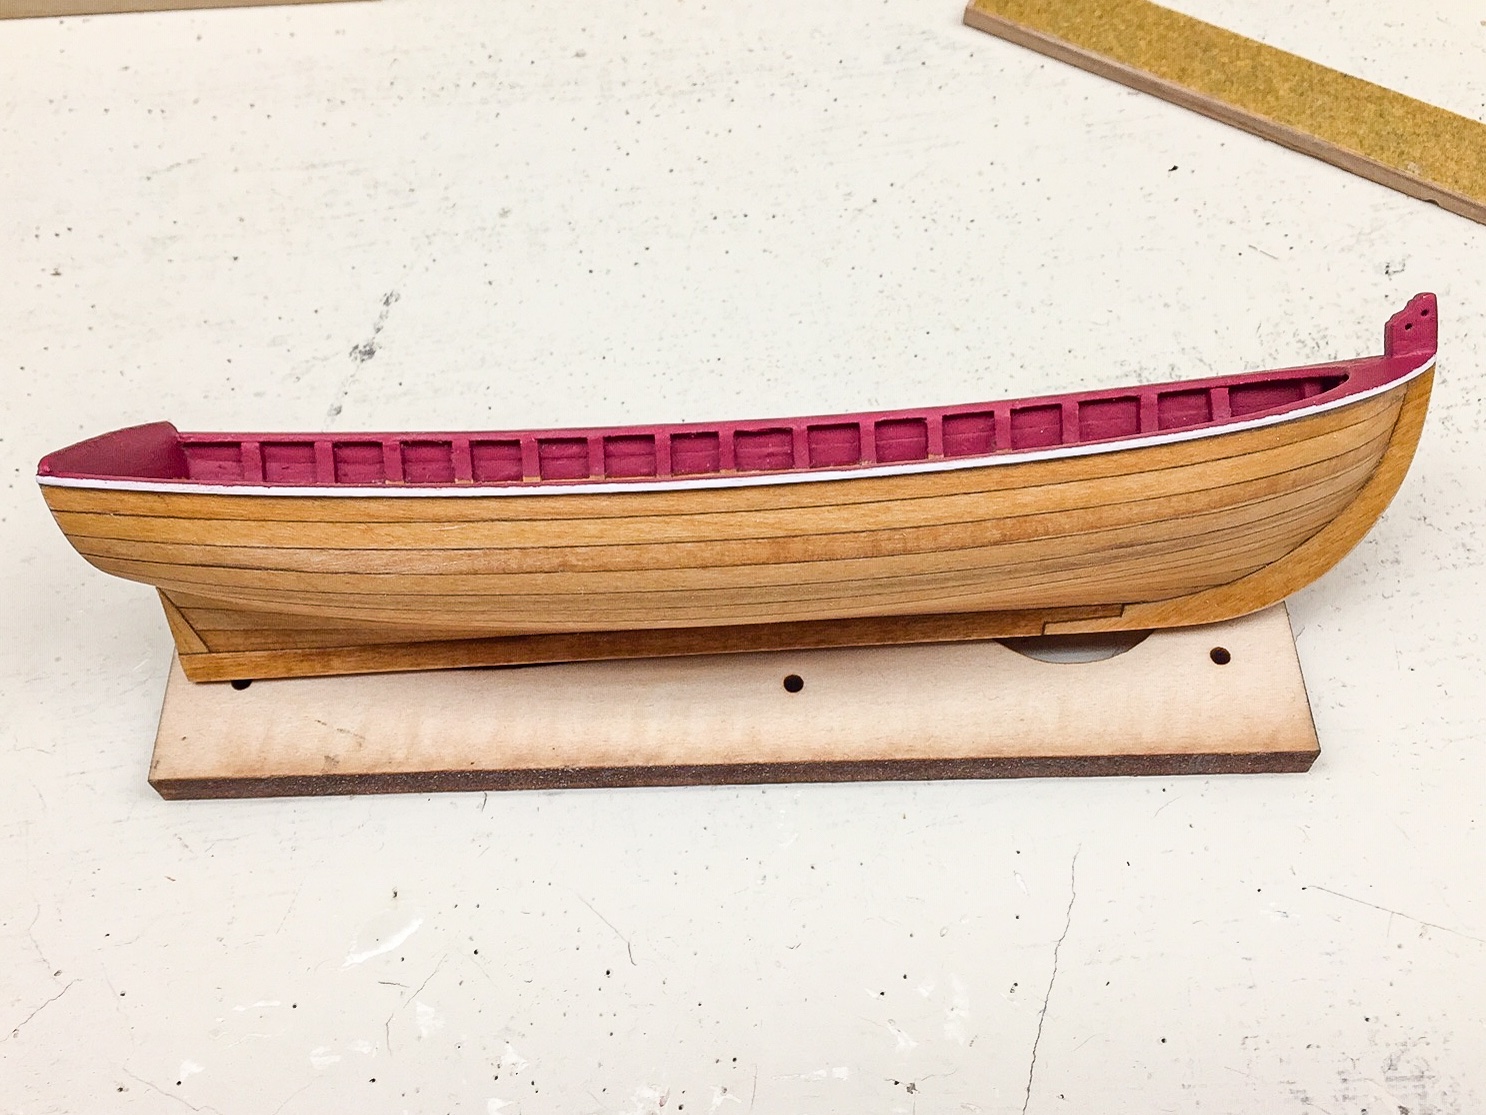
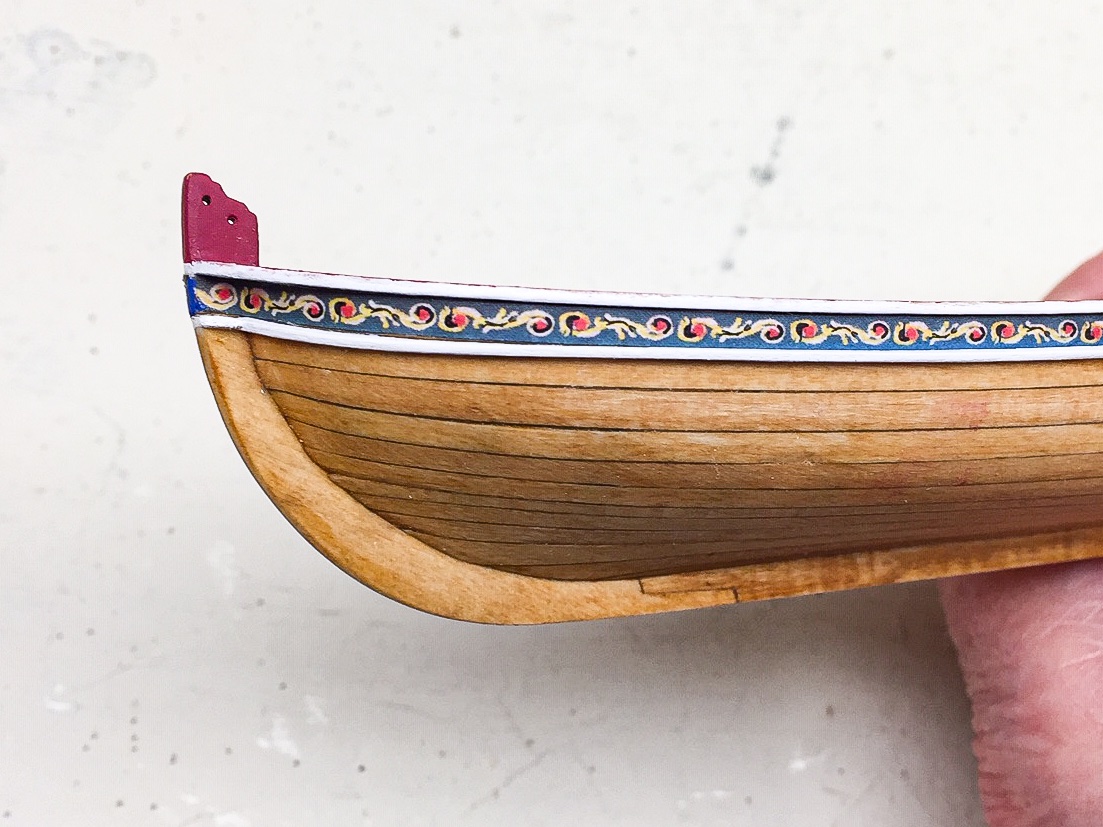
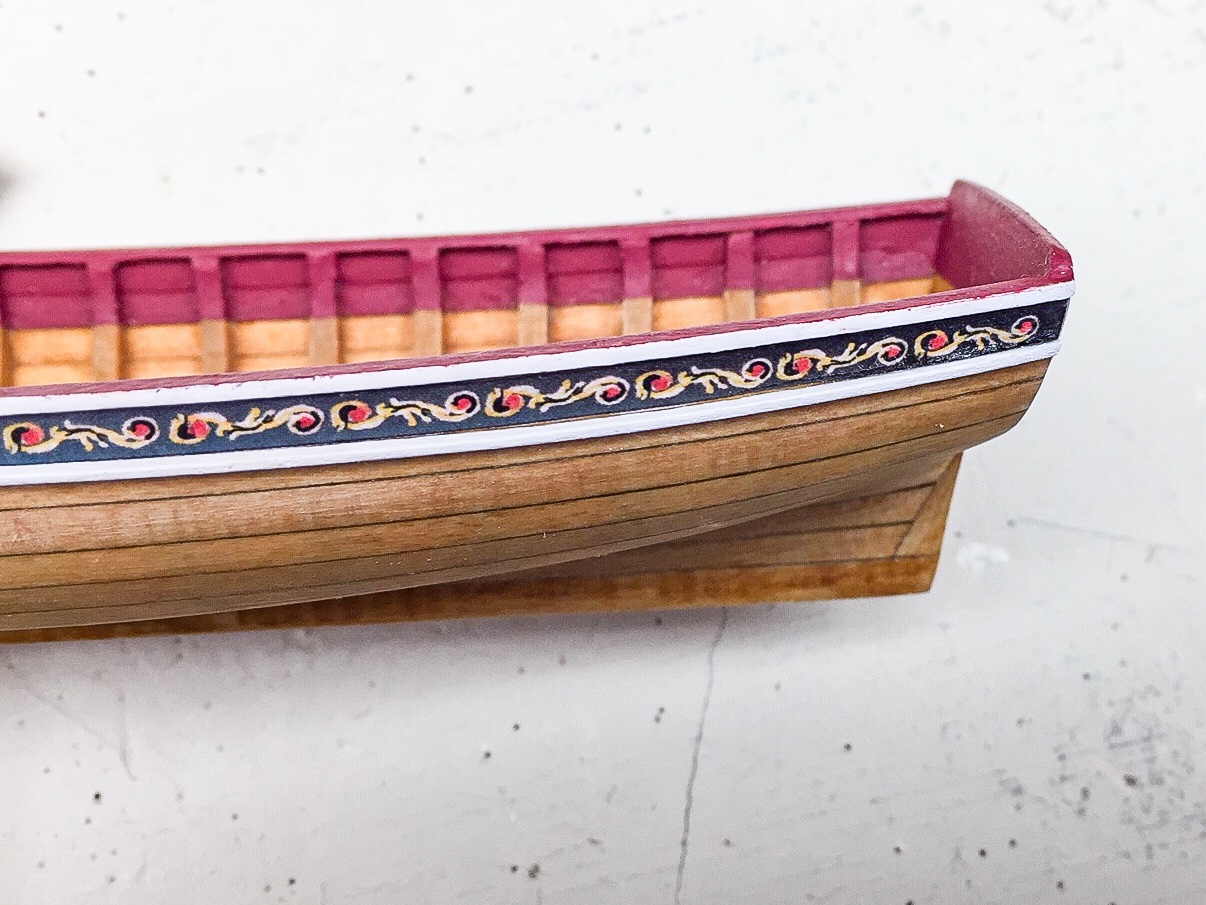
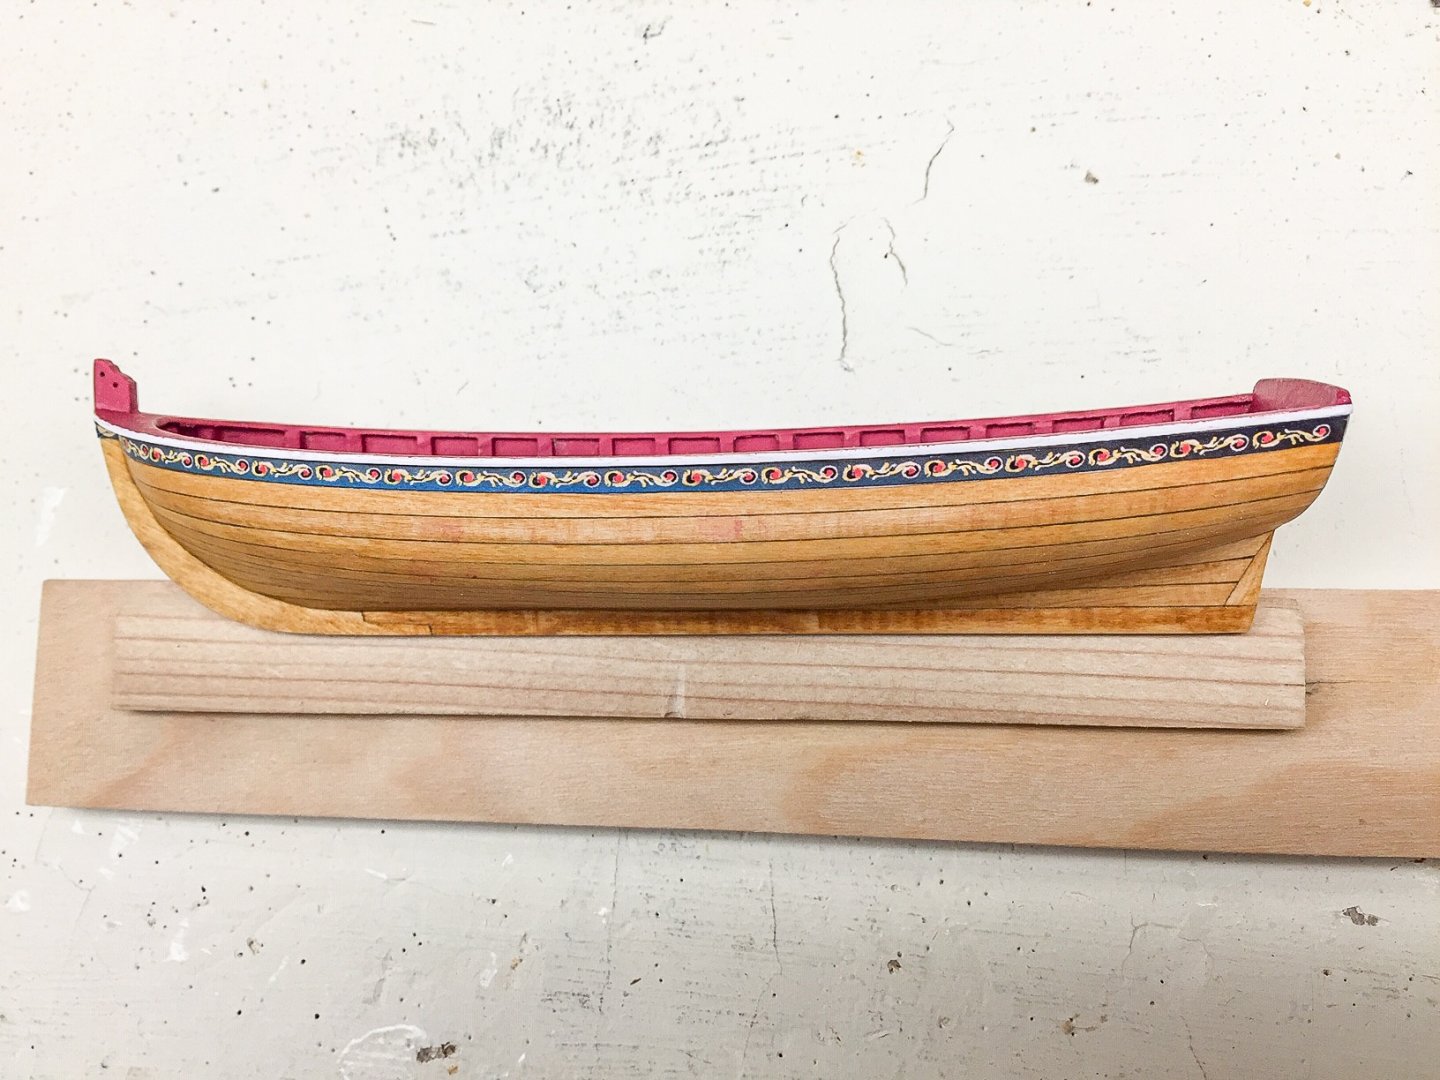
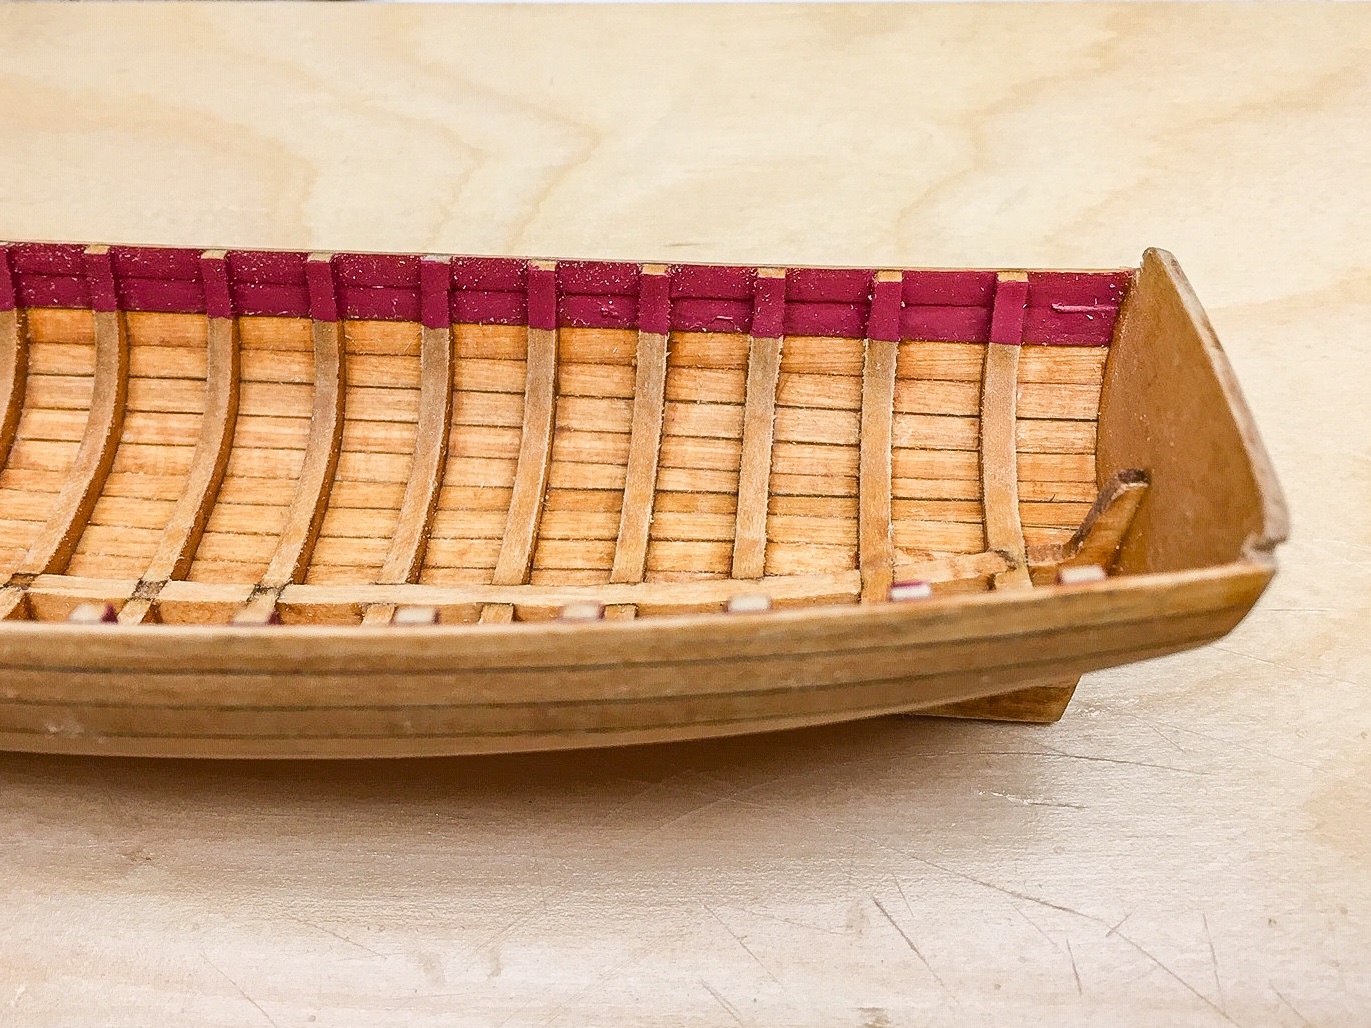
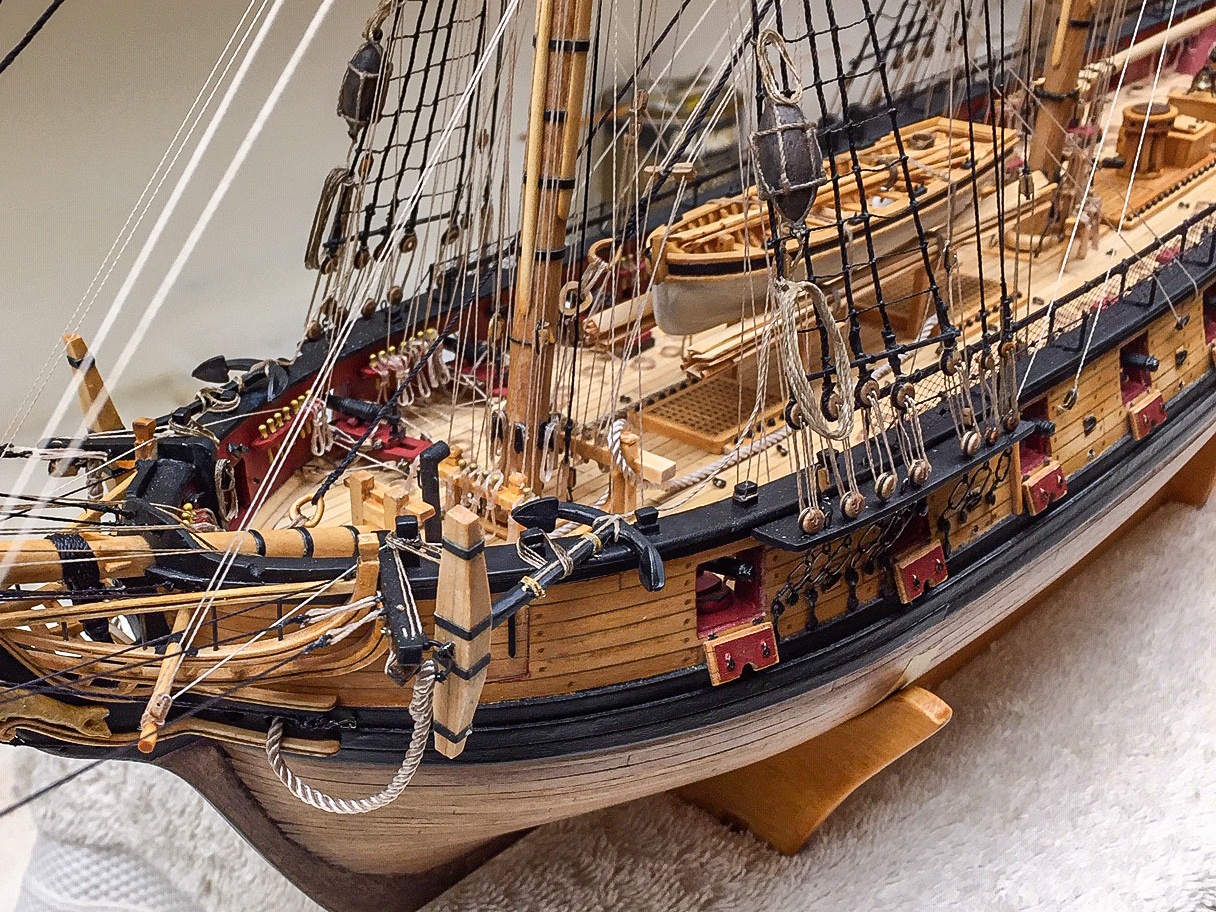
The next step is to add molding strips below the side friezes. I tried to round the 1/32" square strips on the two outside edges, and I painted them white before gluing to hull. After gluing to hull, I ended up sanding them slightly less than 1/32" so they matched up with the cap rail better. I added a little molding under the frieze on the bow stem. All this required quite a bit of touchup paint.
- 55 replies
-
- 7
-
-
- 18th Century Longboat
- Model Shipways
- (and 1 more)
-
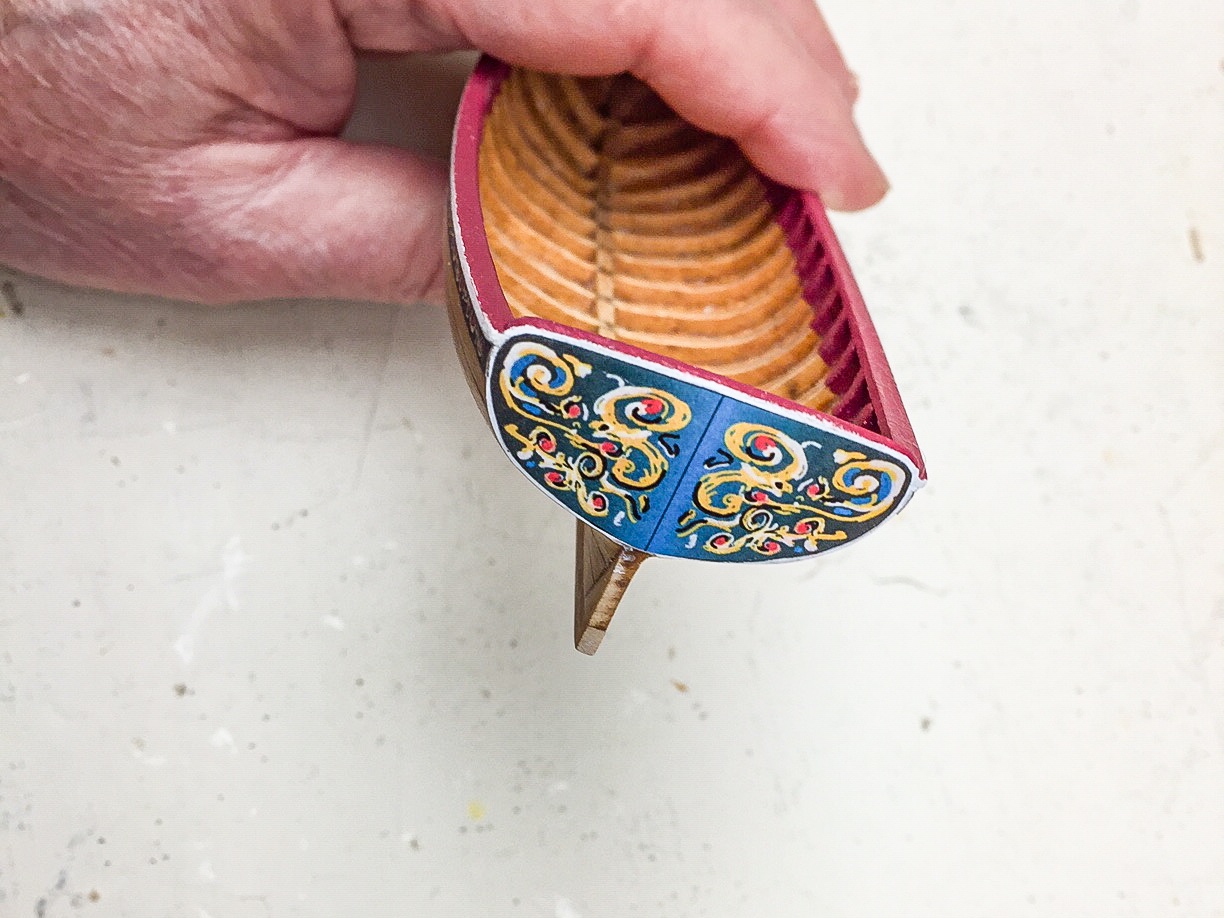
I had little trouble gluing on friezes along the side. I decided to use cement glue. I didn't like the idea of spray adhesive on such small strips of paper. It worked out fine. I suspect almost any type of glue could be used. The stern frieze was more difficult. It took several tries to get a pattern, and then a couple of tries to get the real one to fit. I'm very glad the kit included two copies of the stern frieze. Here's some pictues. For whatever reason, photo doesn't show the frieze continuing on to the tip of the bow, but it does.
- 55 replies
-
- 4
-
-
- 18th Century Longboat
- Model Shipways
- (and 1 more)
-
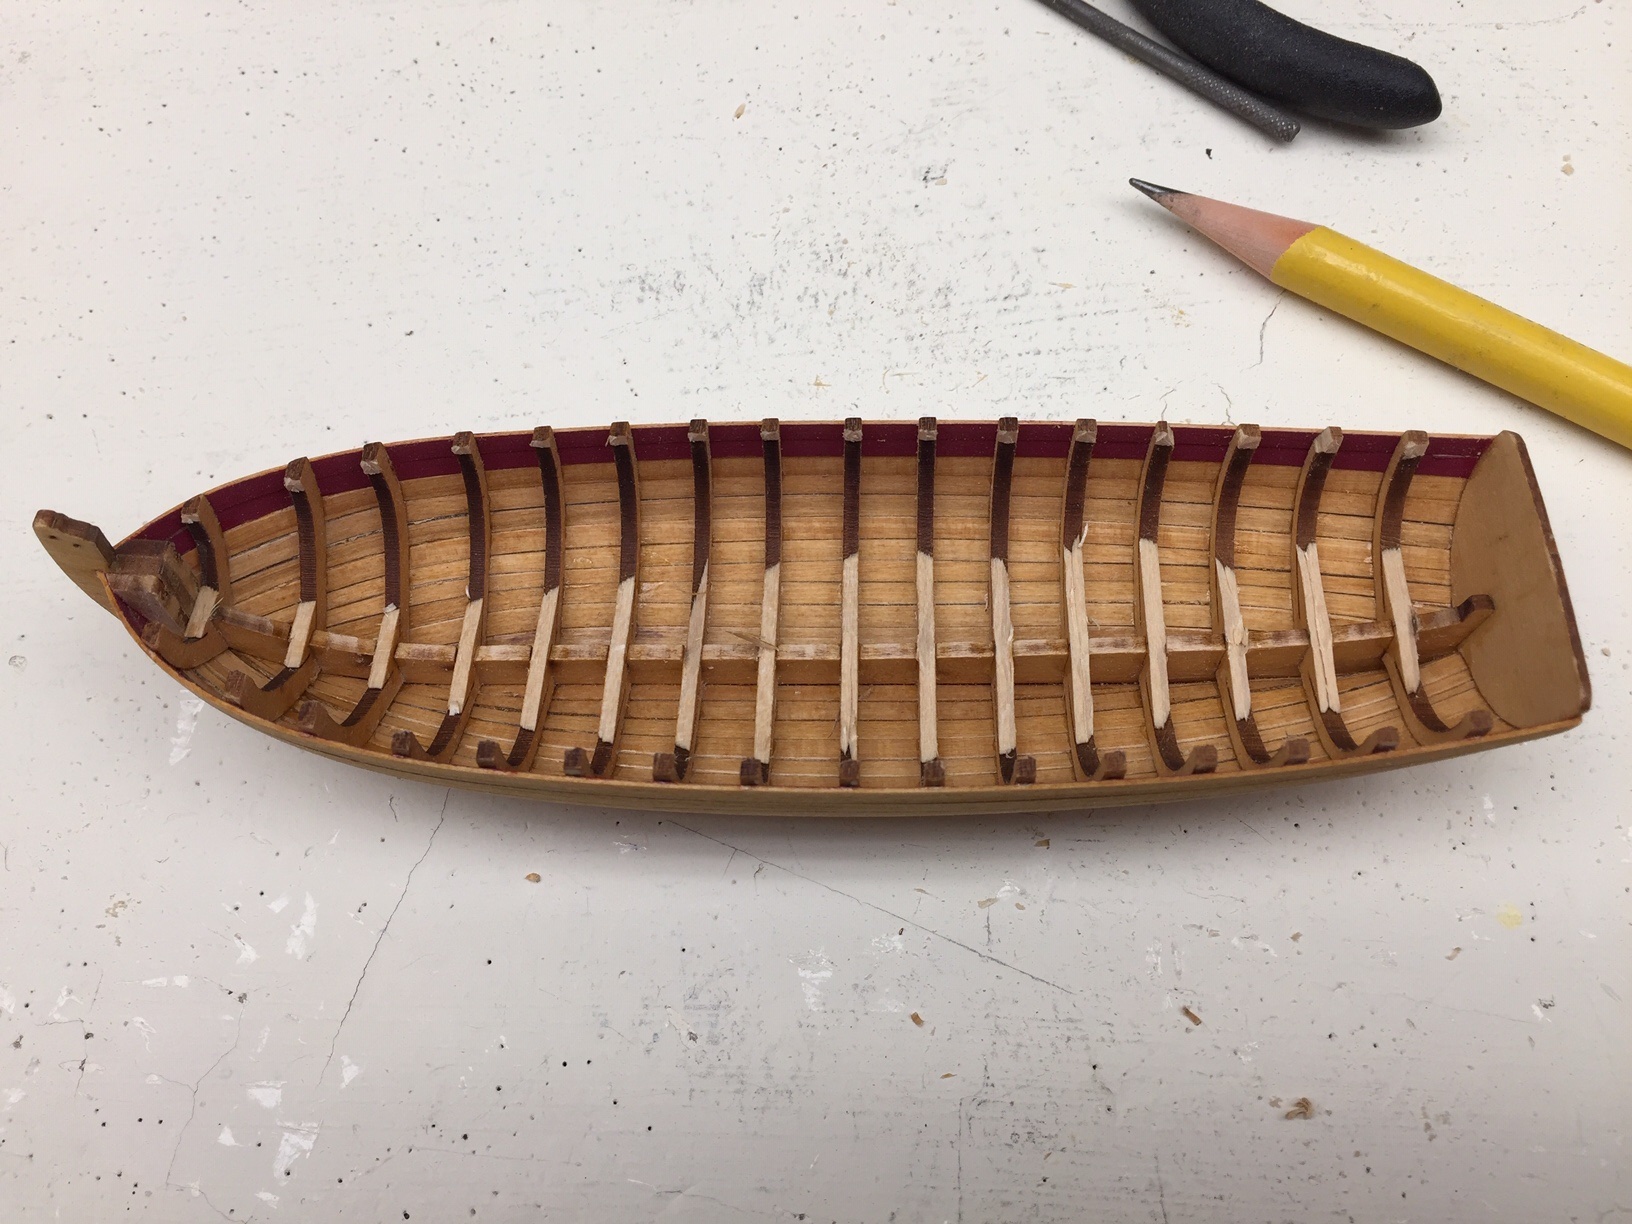
It's been a while since I added some photos, but I've been slowly working and making progress. These pictures show the cap rail after it's finished and painted. I don't think I got it quite as narrow as I should have, but I was starting to hit the inside frames and there's not a lot left on the outside of the hull.

- 55 replies
-
- 4
-
-
- 18th Century Longboat
- Model Shipways
- (and 1 more)
-
Beautiful ratlines!! And you managed the clove hitches. I'm impressed. I was not able to tie those knots, or I should say, I lost patience trying to learn and opted for simpler knot. I ended up just using overhand knots or loops. It worked, but closeups of yours sure look good. I believe they are a little straighter than what I ended up with. I'll have to give it another try on next boat. And once you get started, no matter what method, it goes faster than expected. Turned little too cold for me to work in garage, so haven't made any progress on display case. Need to wait until I can use table saw without getting too cold. I did find some remote controlled, battery powered LED lights for the case. I discovered you really need some lights on inside, and may have to modify the old case to add some.
- 950 replies
-
- 2
-
-

-
- syren
- model shipways
- (and 1 more)
-
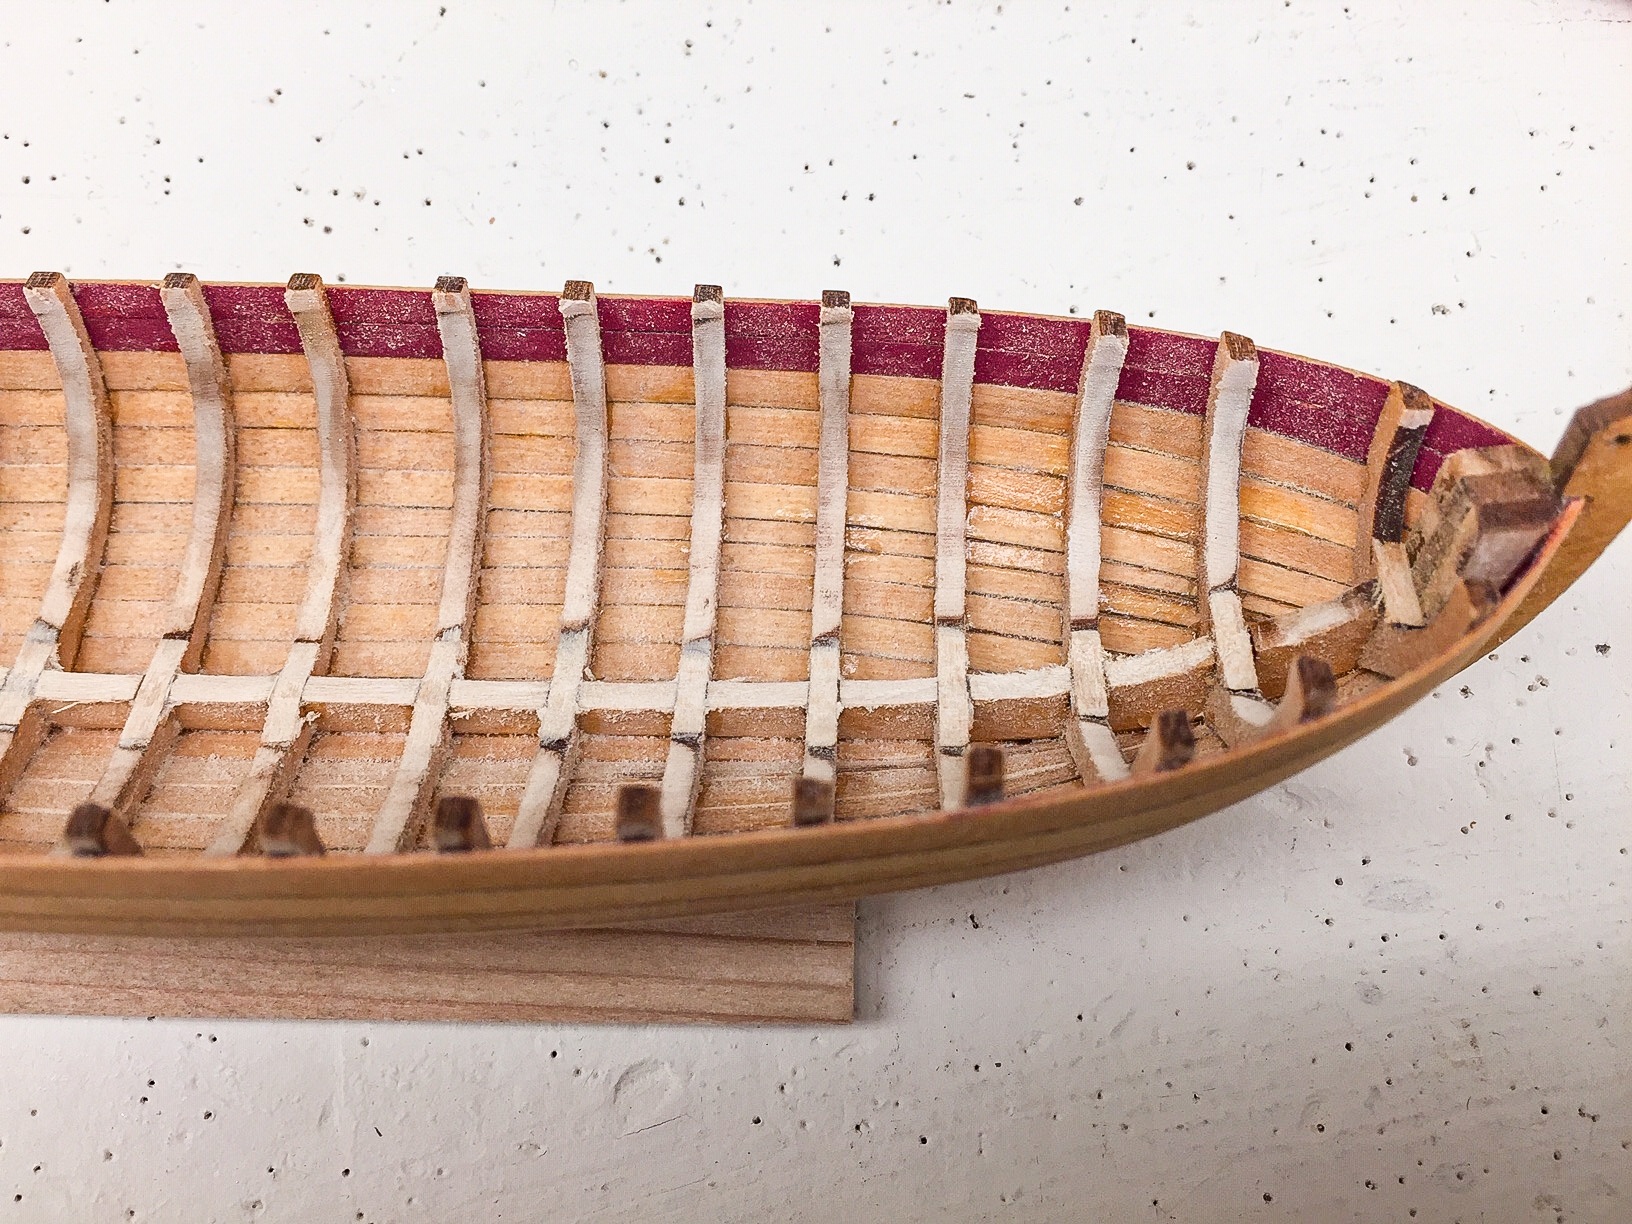
Here's cap rail glued on and partially sanded. I can make it a little narrower, but not as much as on plans. I didn't sand the frames thin enough. I'll sand cap rail as narrow as I can, until it almost hits the frames on the inside.
- 55 replies
-
- 3
-
-
- 18th Century Longboat
- Model Shipways
- (and 1 more)
-
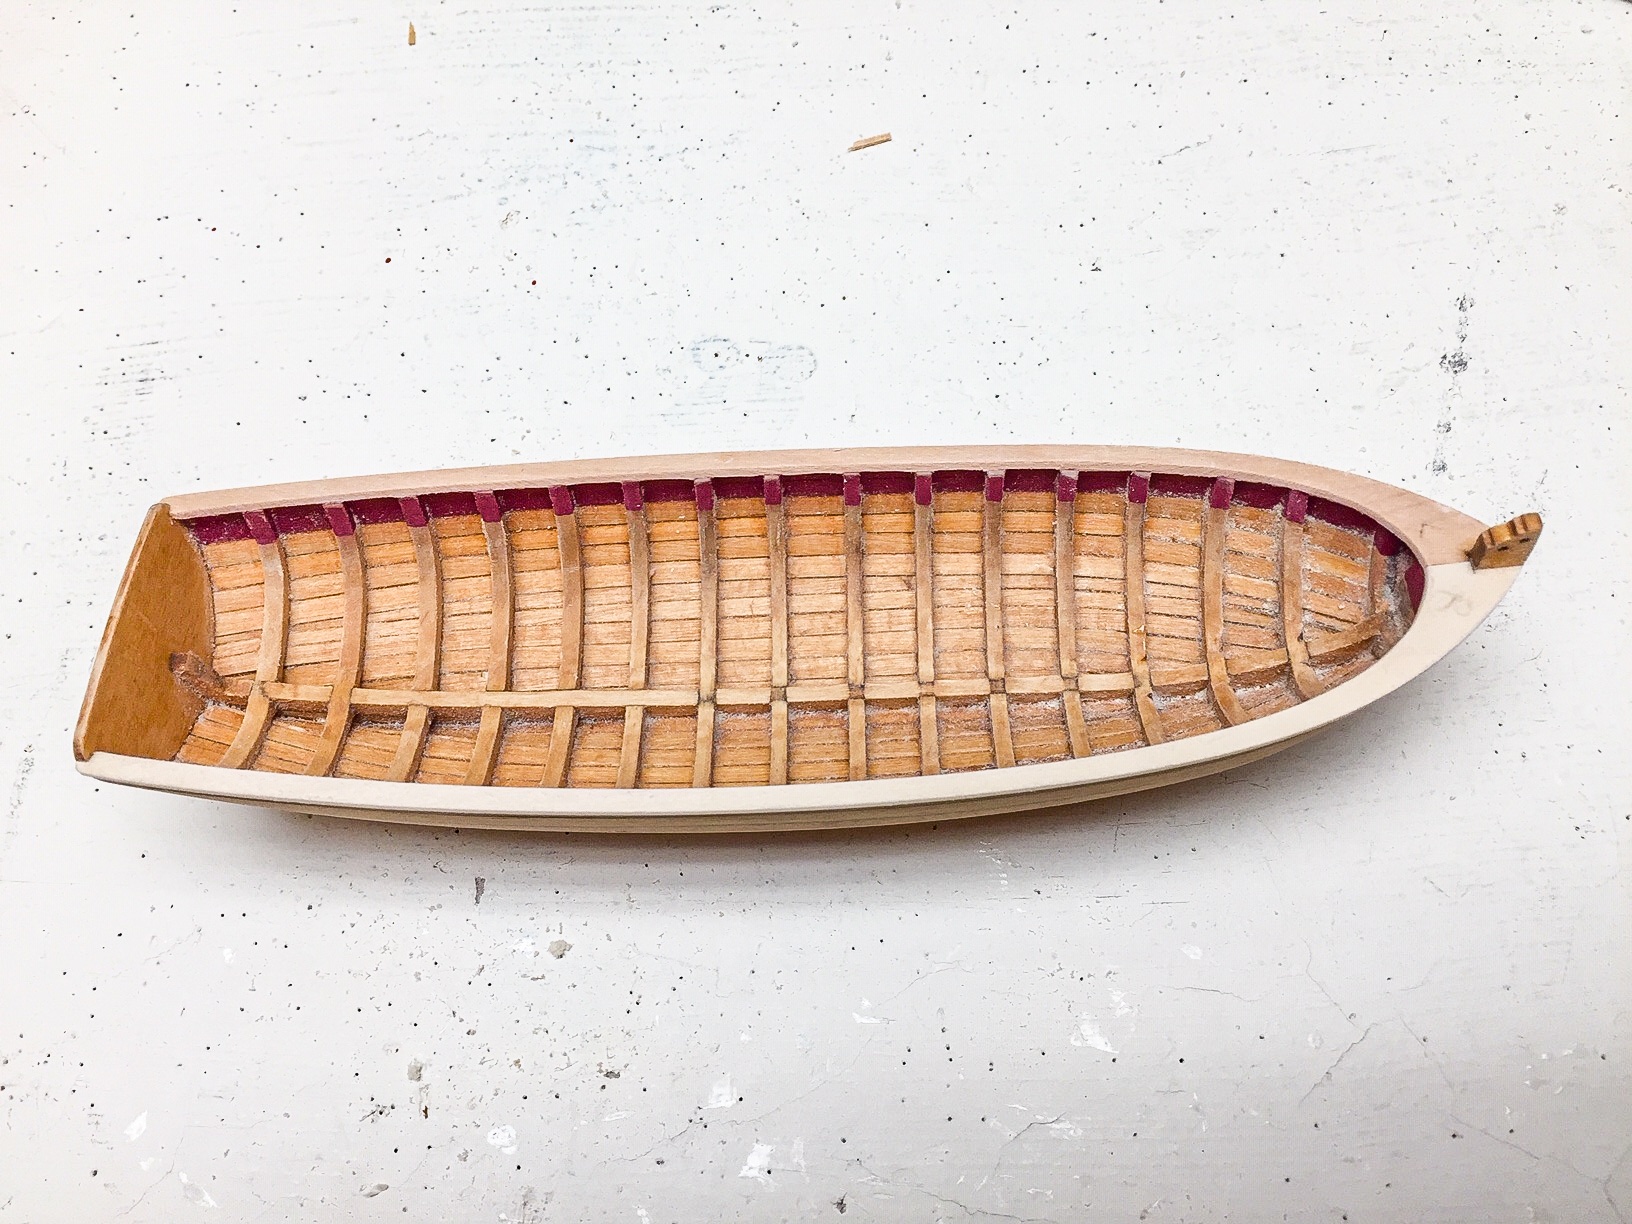
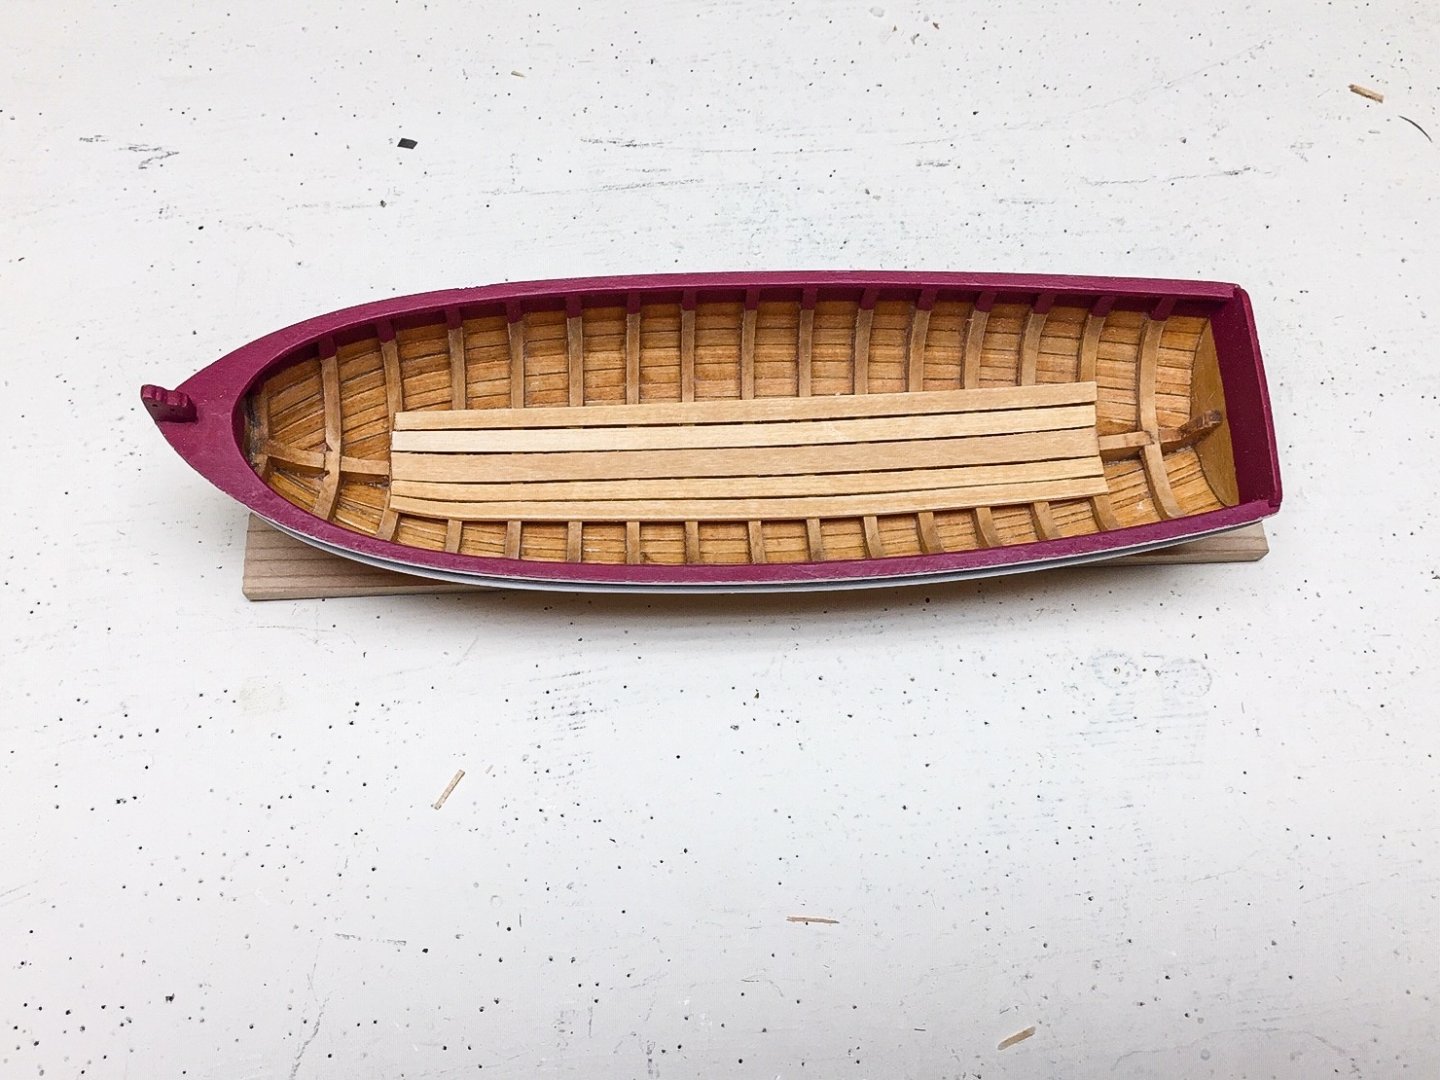
I decided to paint the inside of frames dark red now, before putting on the cap rail
- 55 replies
-
- 3
-
-
- 18th Century Longboat
- Model Shipways
- (and 1 more)
-
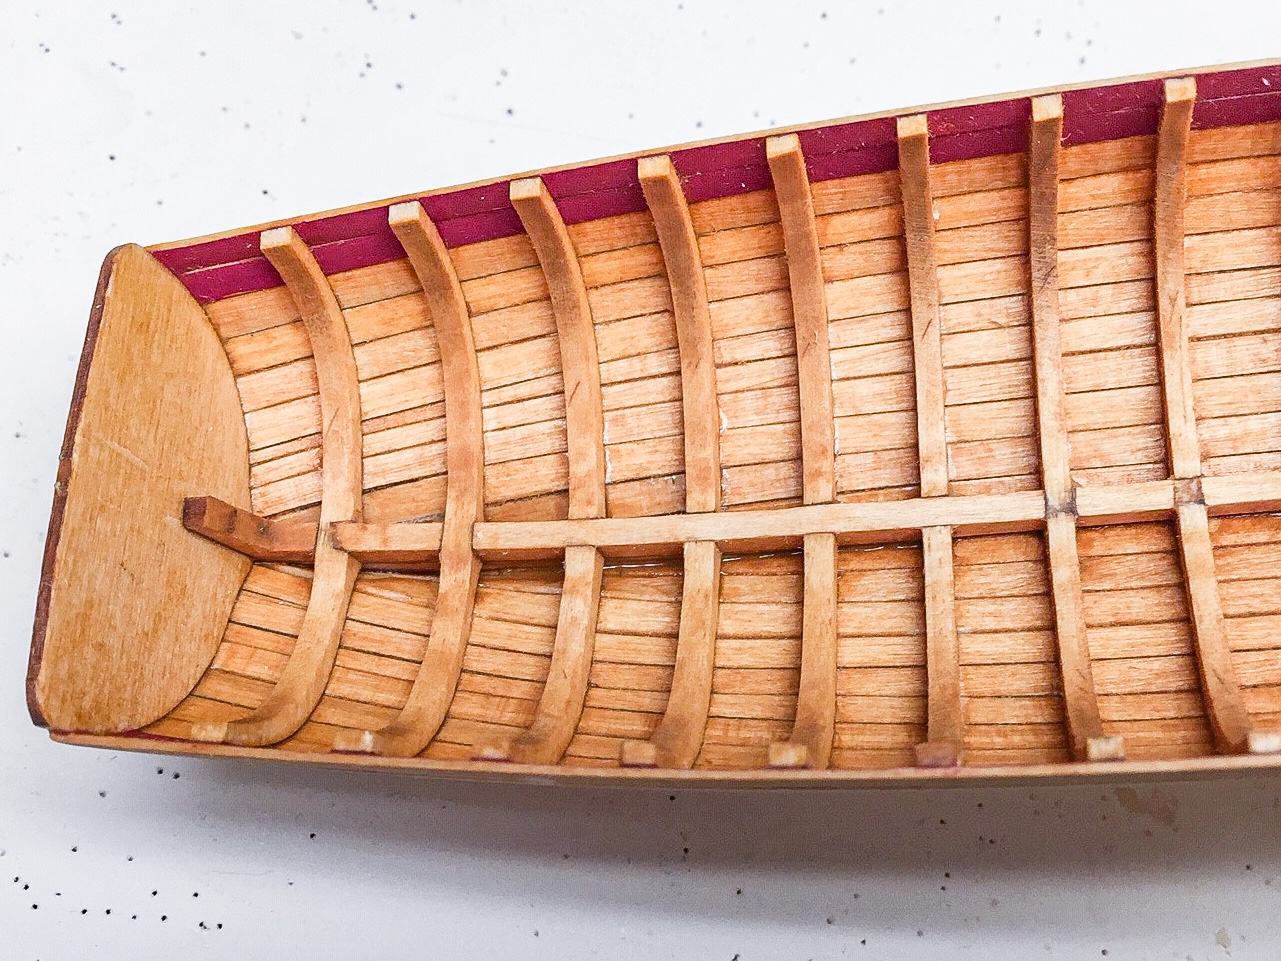
Making progress. I haven't seen many photos during sanding of hull interior, so thought I'd include some. Here's what it looks like after another session. I'm guessing at least one more session before I call it good enough.

- 55 replies
-
- 3
-
-
- 18th Century Longboat
- Model Shipways
- (and 1 more)
-
Here's what it looked like after first session working with Dremel tool and mini sander. BTW, my favorite cutting heads for Dremel are the structured tooth tungsten carbide cutters. I use the ball shaped one the most. These work great on balsa or basswood.

- 55 replies
-
- 4
-
-
- 18th Century Longboat
- Model Shipways
- (and 1 more)
-
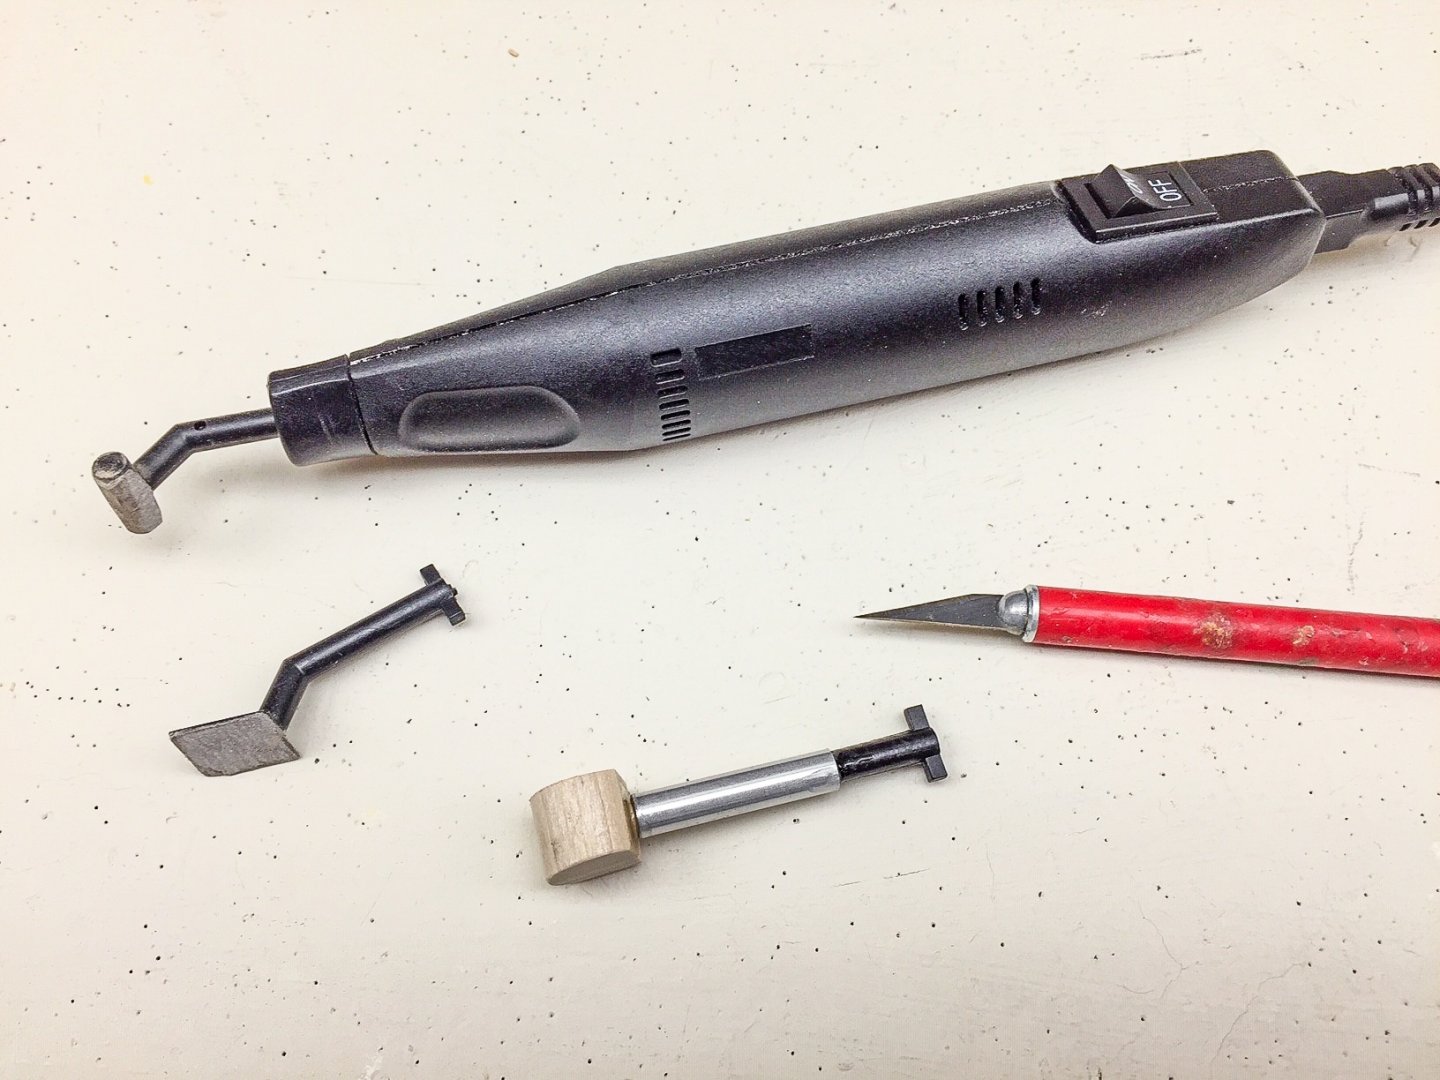
I wasn't sure what to use for sanding or removing wood inside the hull. I have a mini vibration sander that seemed to work, but it takes a long time to remove much wood. Also, the only rounded head provided with it has a pretty small radius. I also have a Dremel tool and have a lot of experience with it, but wasn't sure I wanted to try it on something this fragile. First I decided to make a new head with a larger radius. Tool and heads are shown in photo. But I forgot to match the length of my tool to the original heads. So...when it vibrated, instead of the head moving at most about 0.10", it was more like 0.5". Turned out this was good idea, but I didn't think it thru very good, and ended up with it not working. I could shorten the tool, but by now I didn't really need it. Turned out combination of Dremel and mini sander worked fine.
- 55 replies
-
- 3
-
-
- 18th Century Longboat
- Model Shipways
- (and 1 more)
-
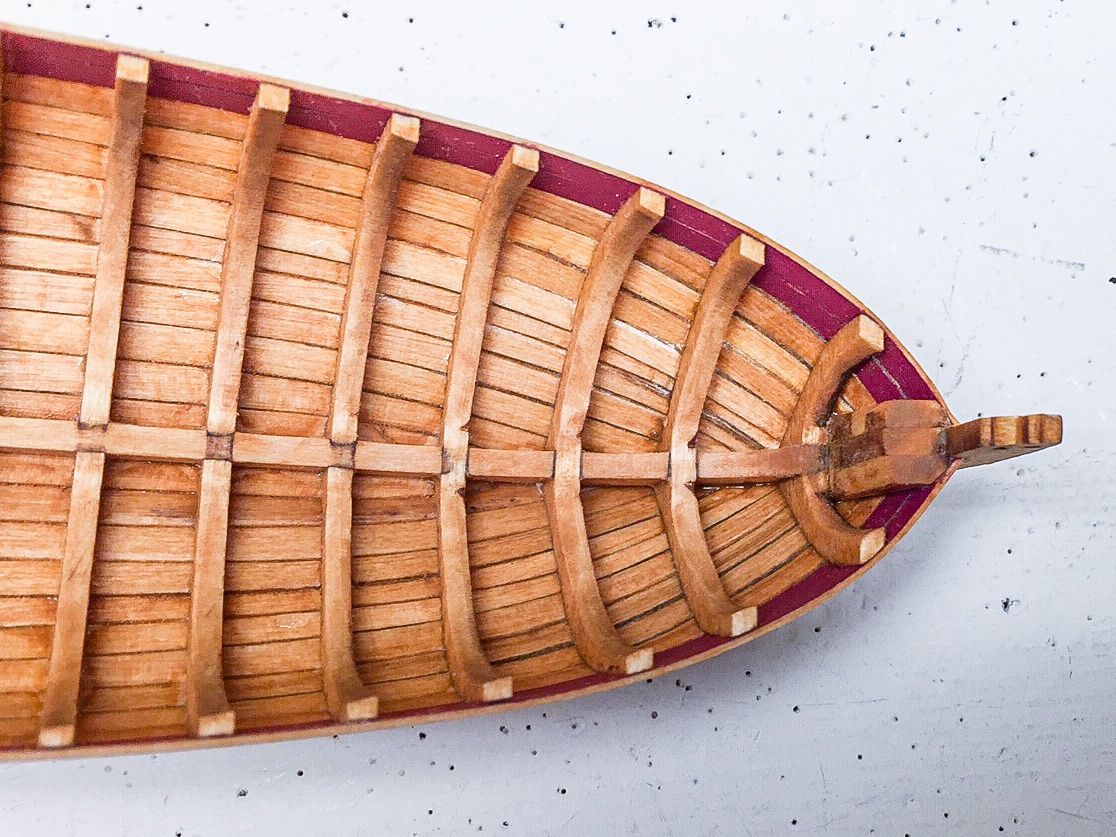
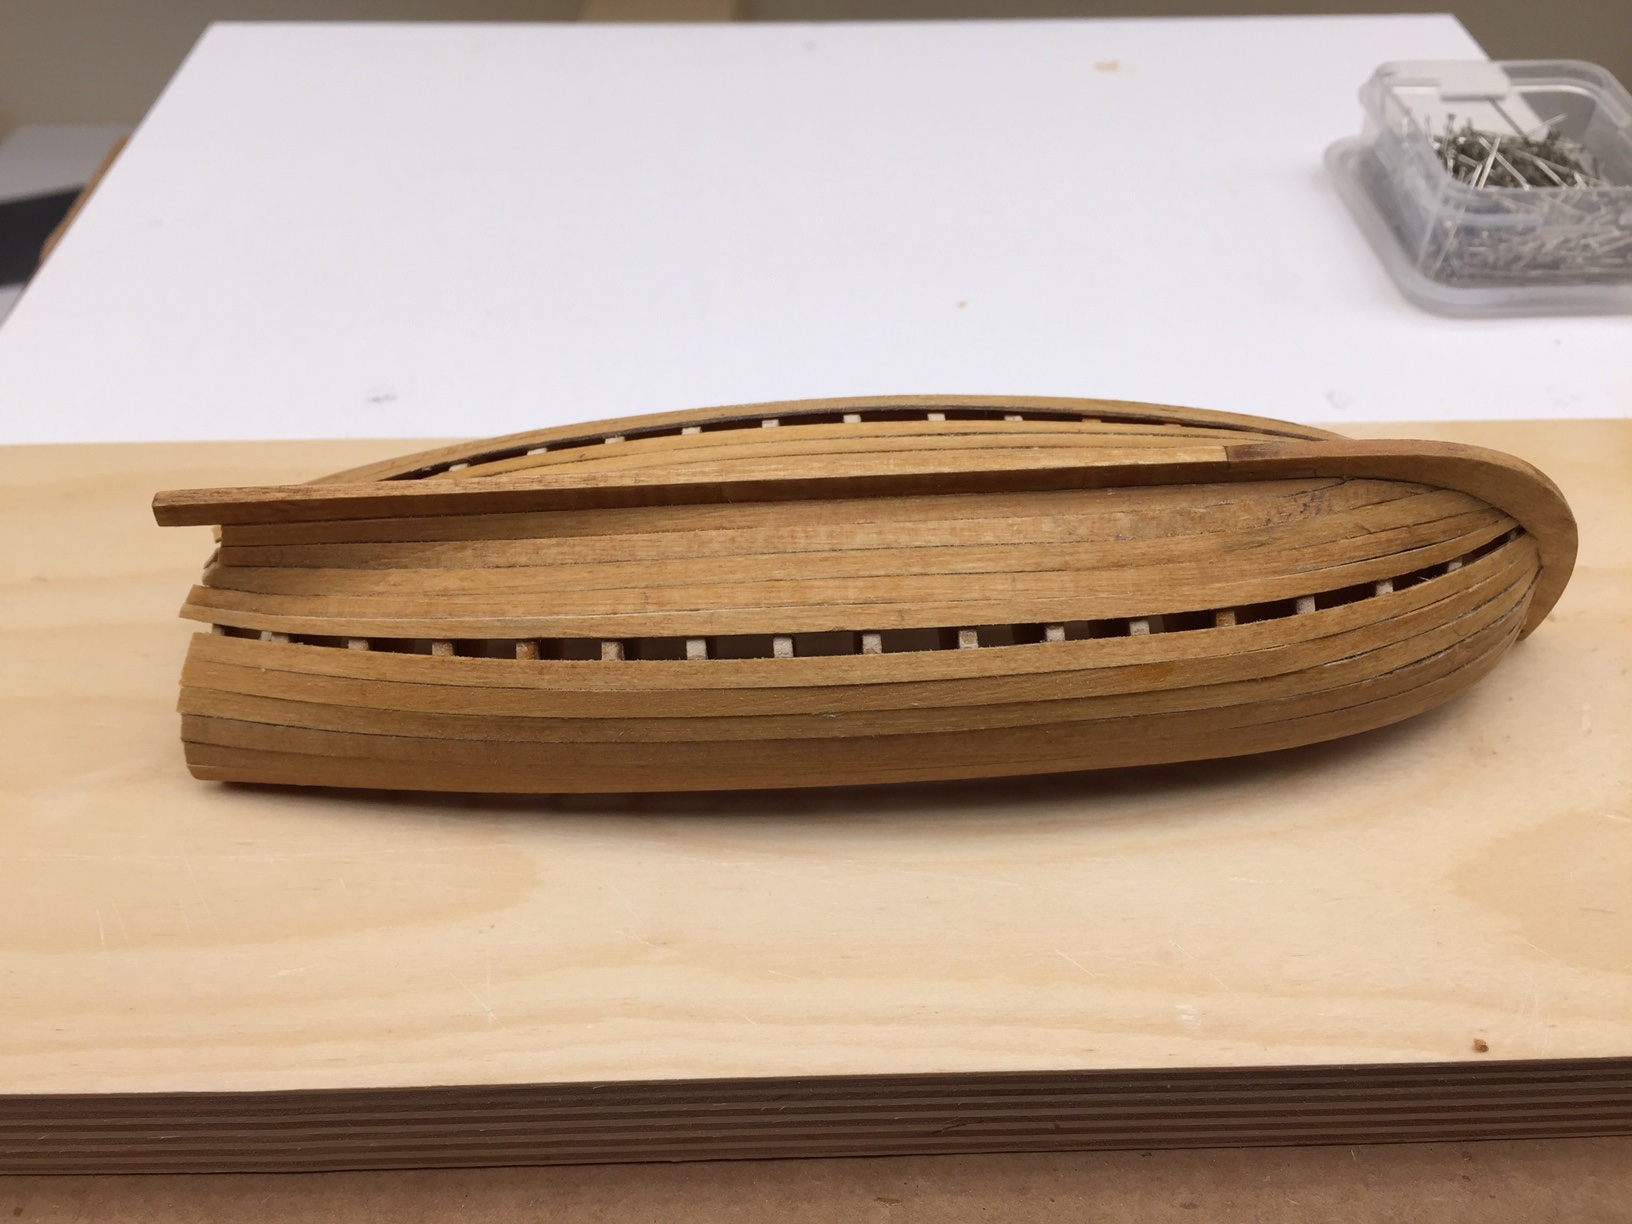
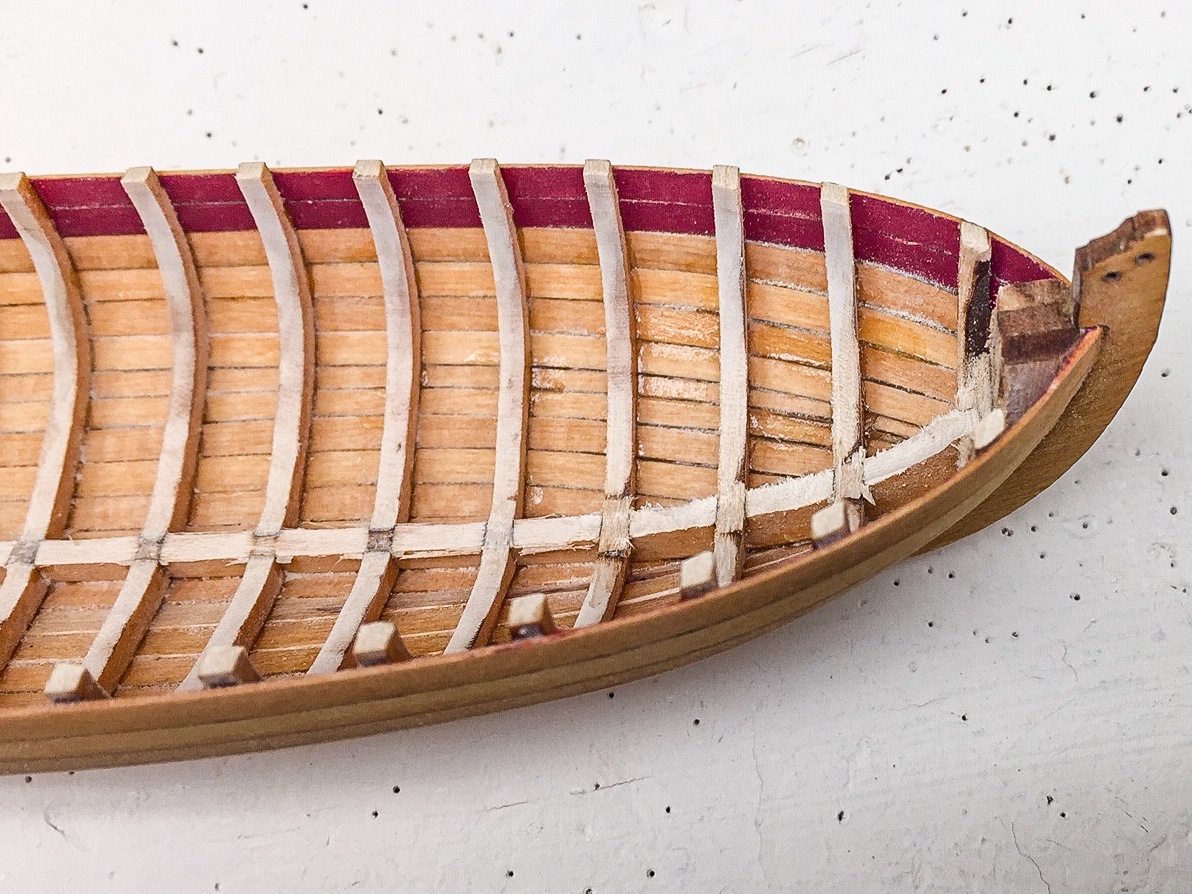
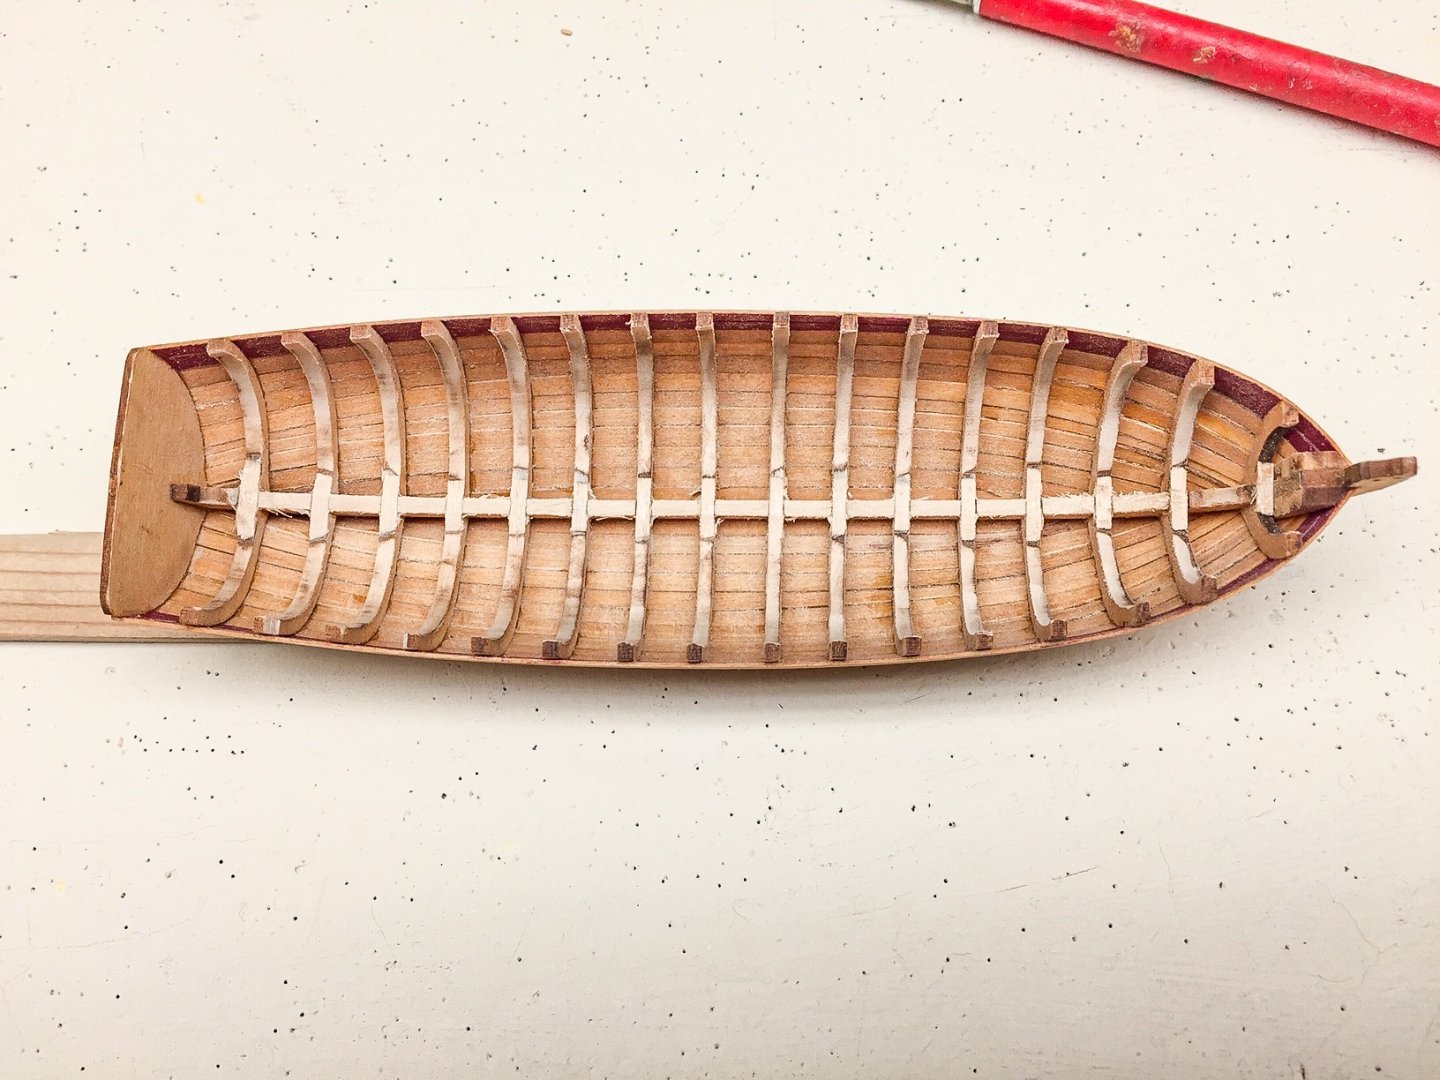
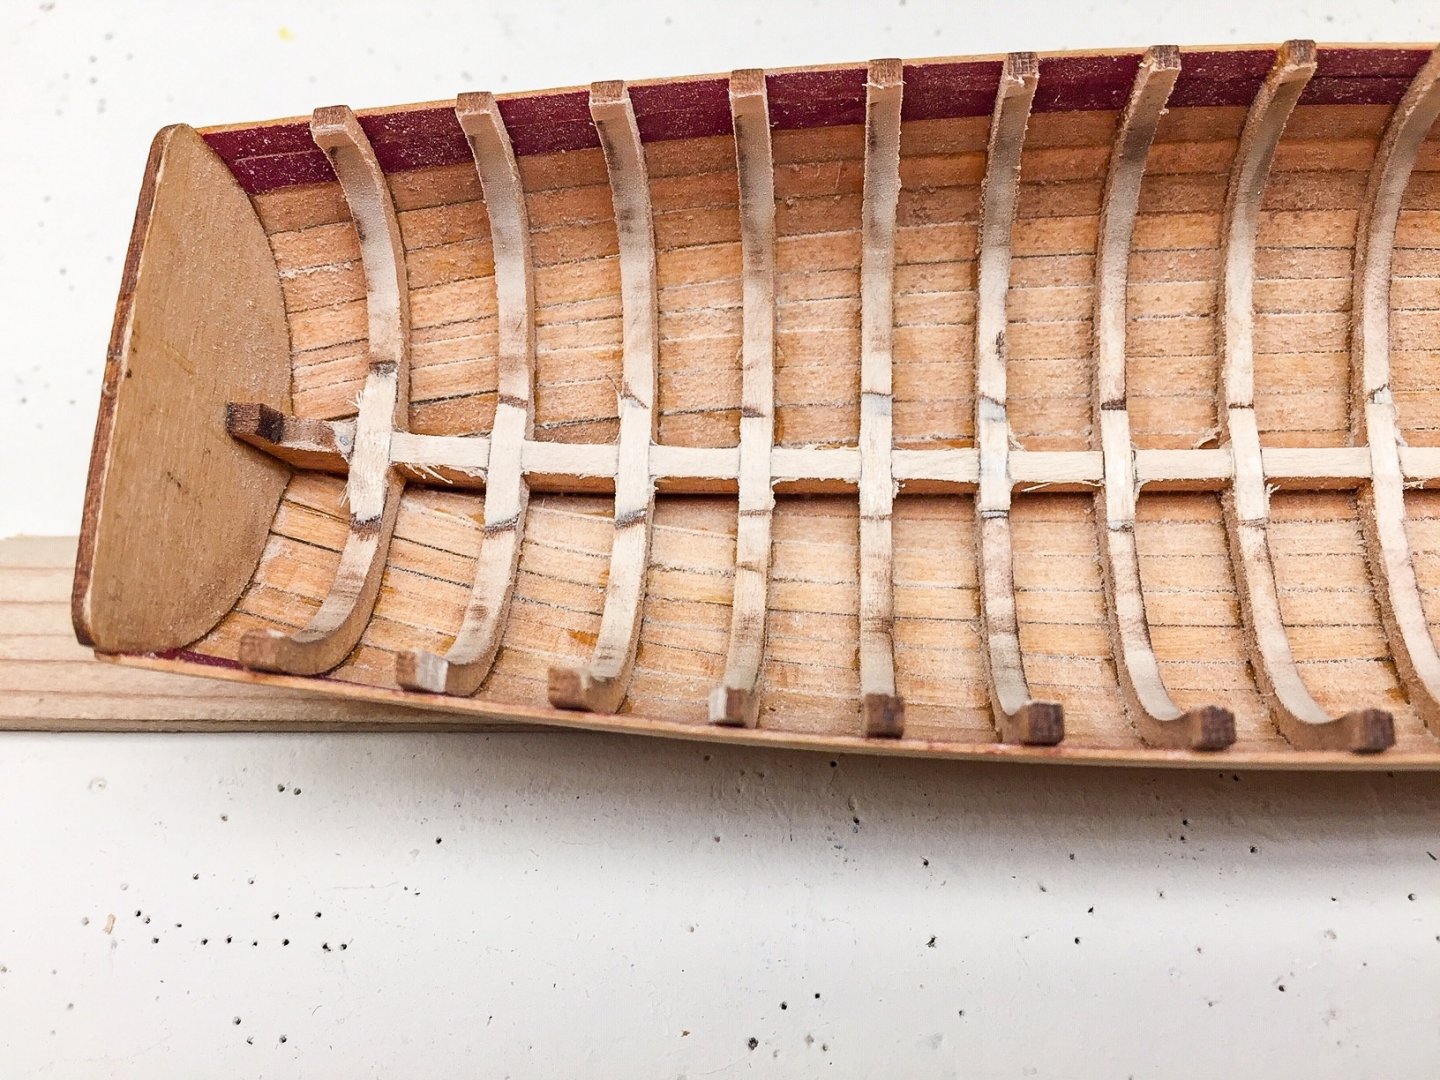
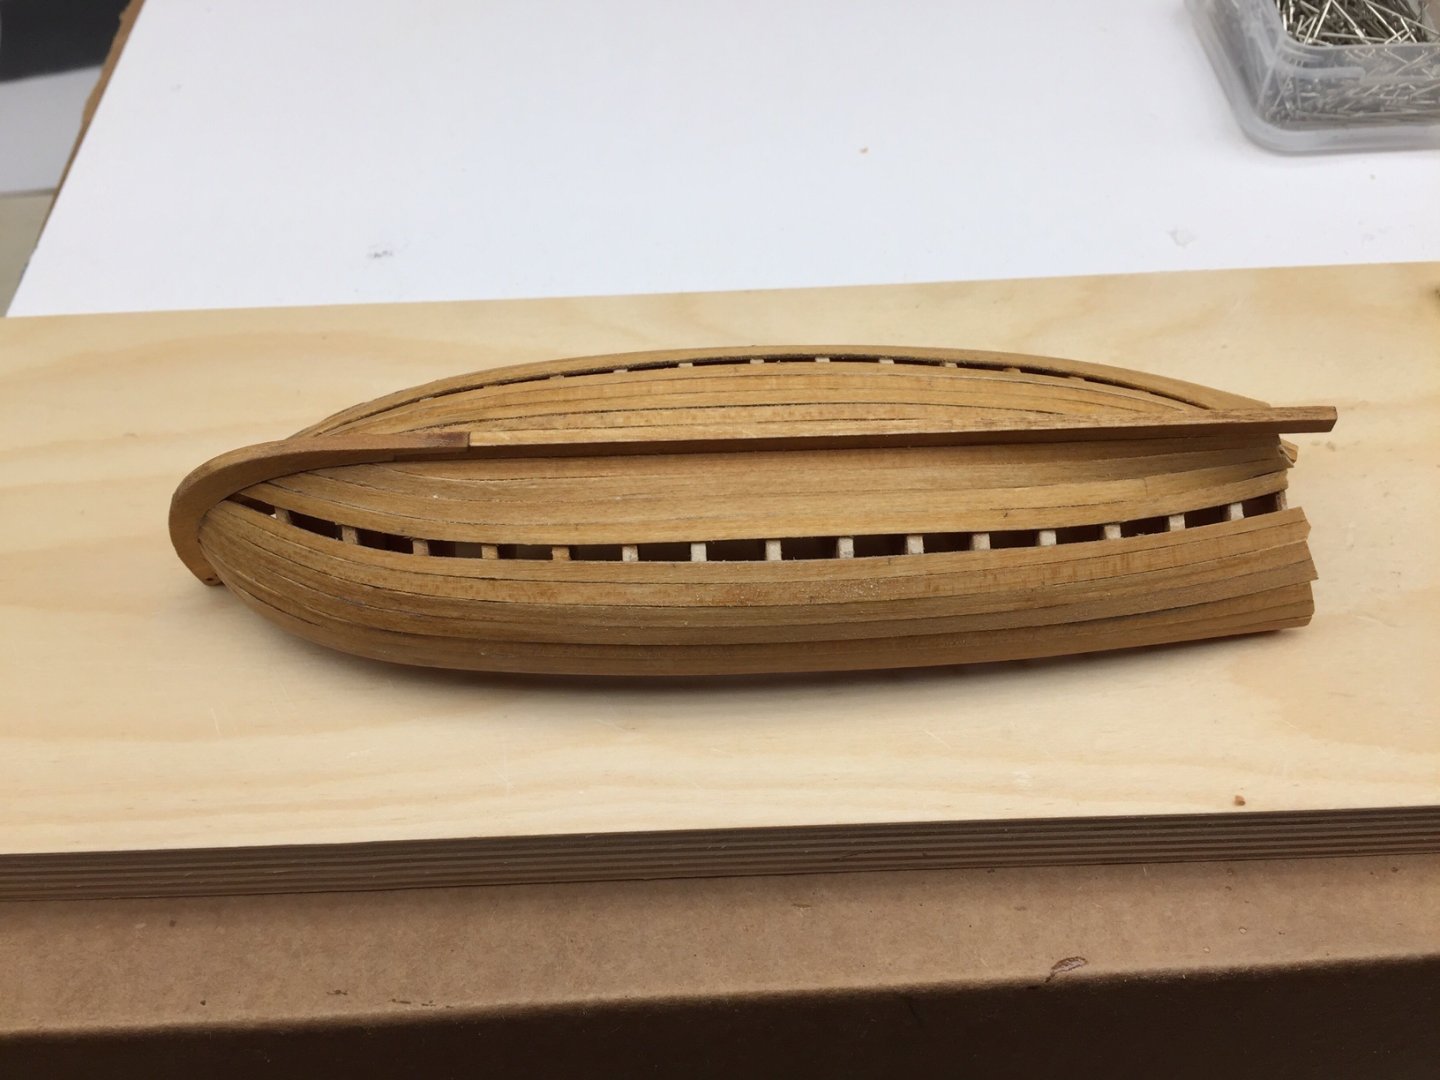
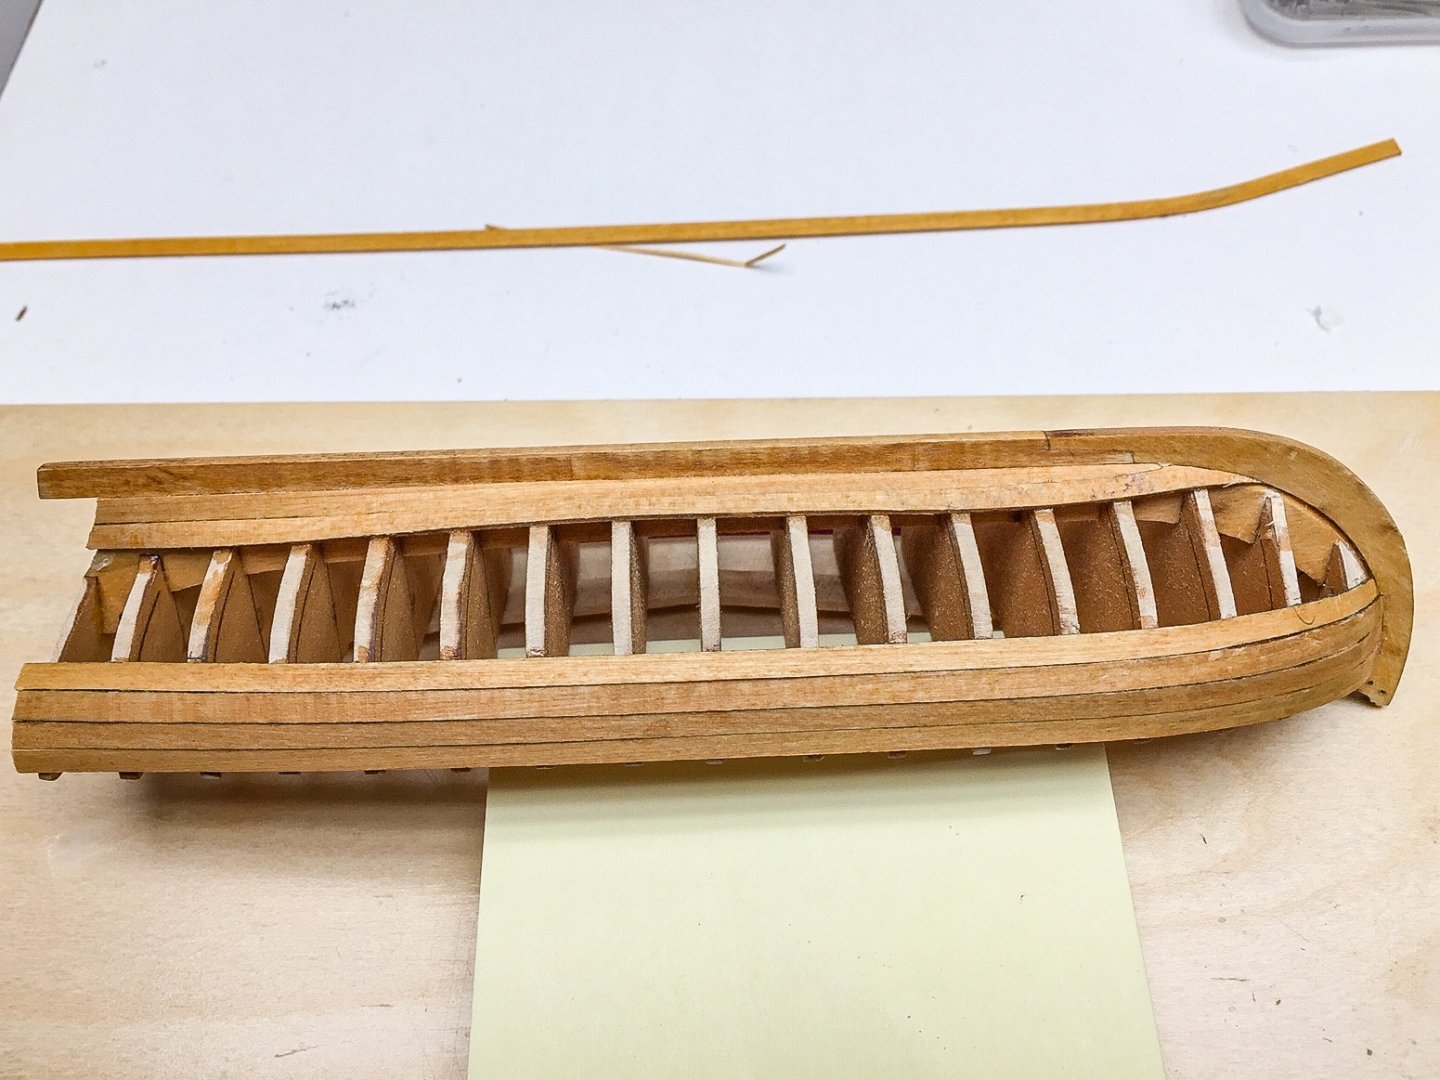
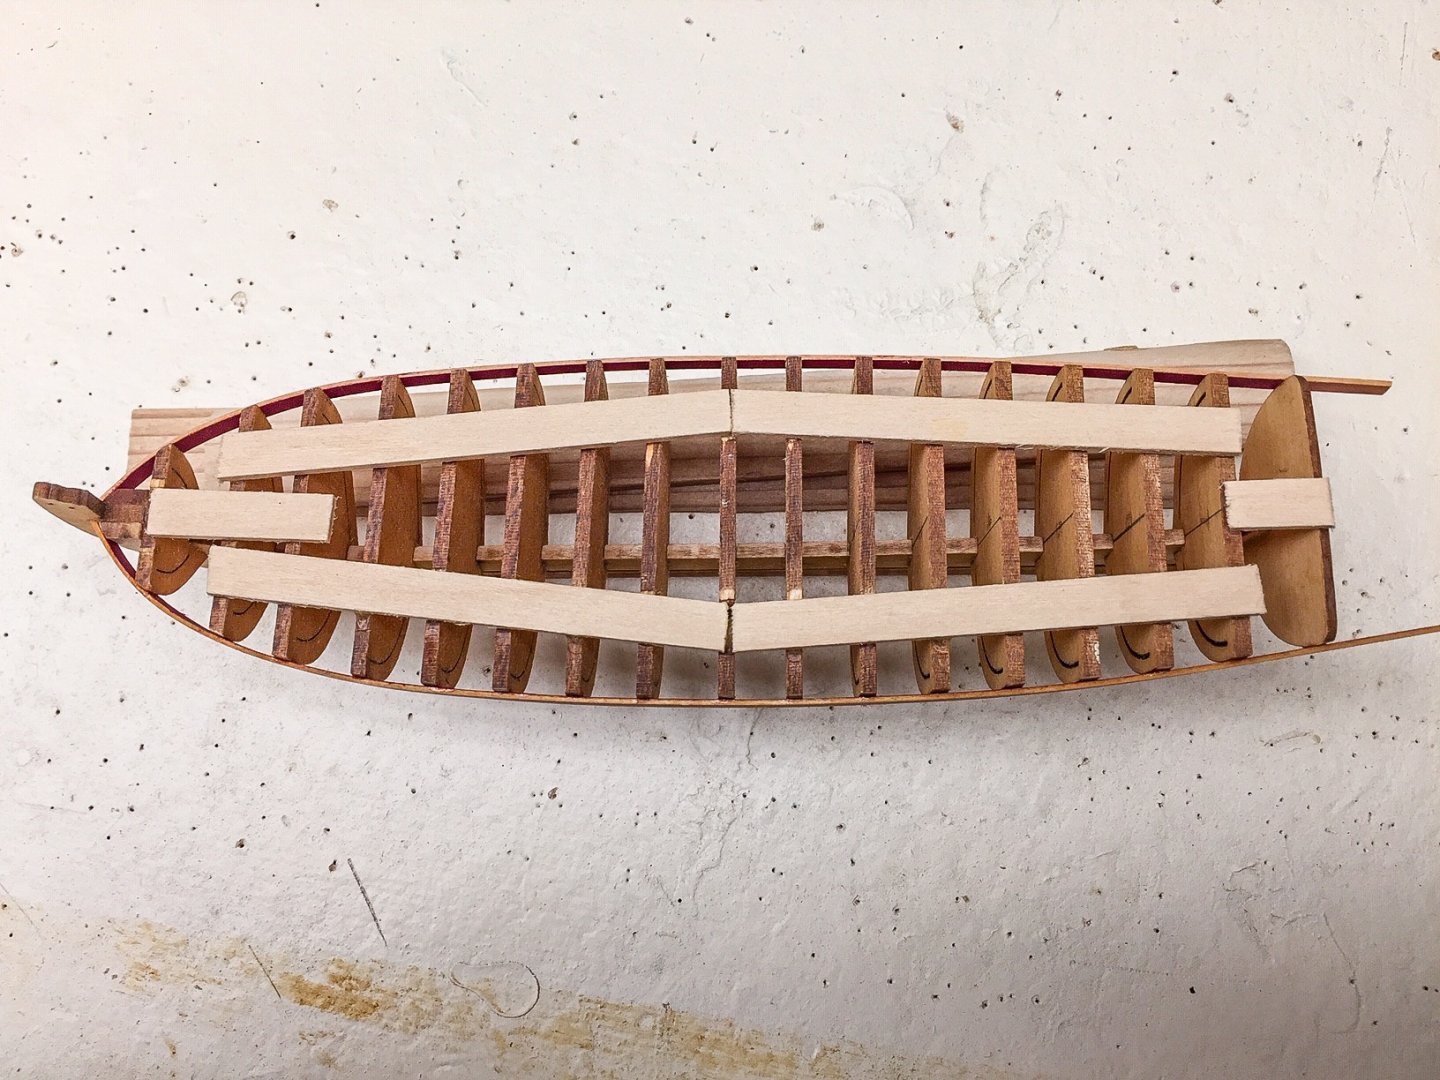
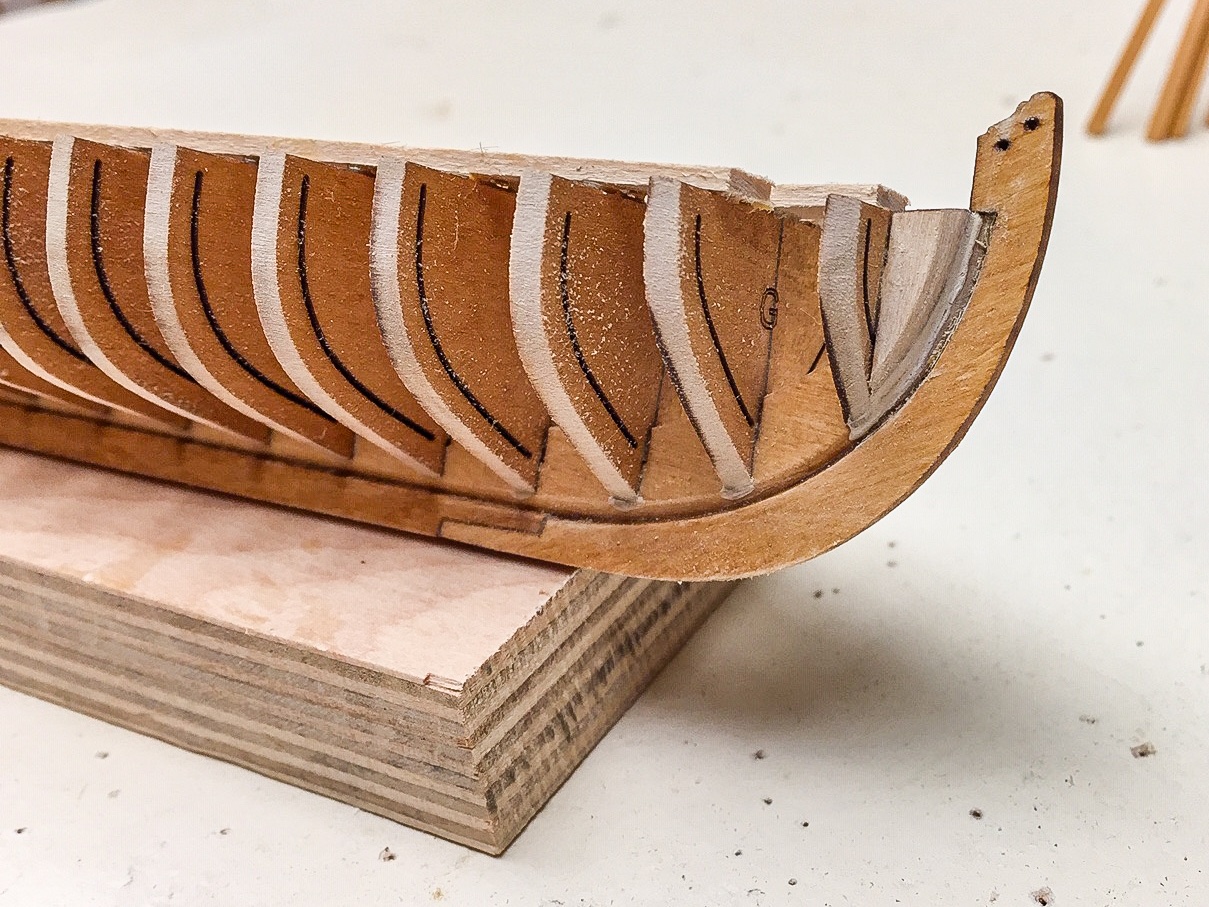
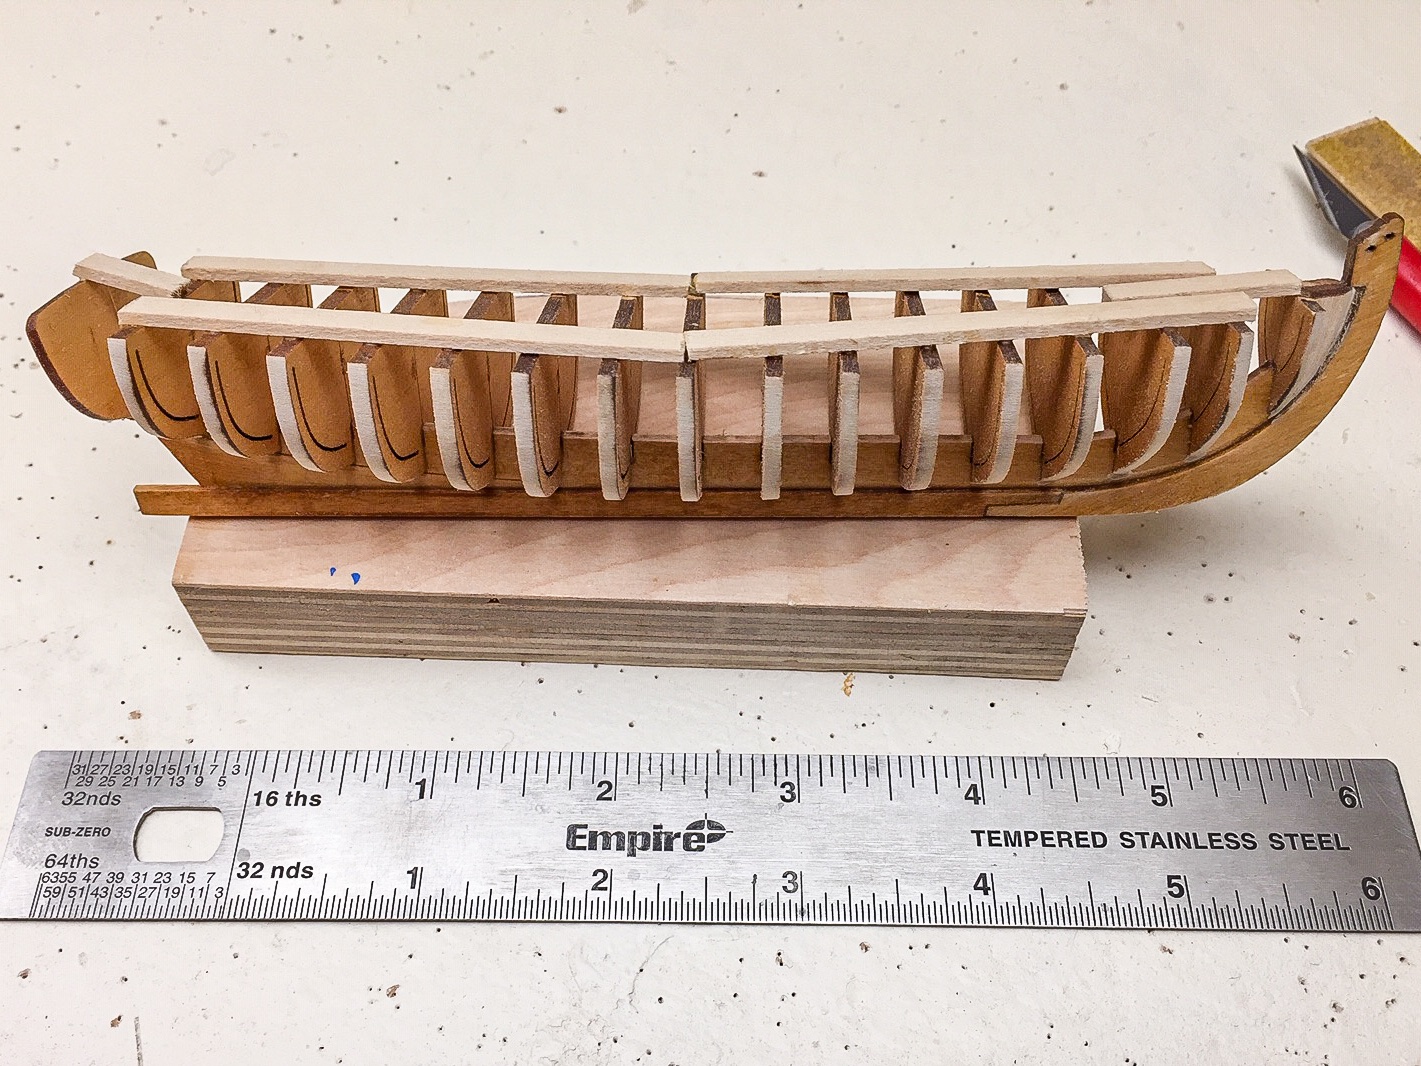
Removed centers of bulkheads leaving the frames. I used file like Chuck recommended for cutting the tabs at the top of the bulkheads, but also tried a xacto to make a wedge shaped cut. I found the xacto knife worked as good or better than the file for me (it has to be a new blade). I used xacto to score each bulkhead along the bottom just above the keel frame, and then used small pliers to twist and break off the center section. Here's what it looked like at that point.

- 55 replies
-
- 3
-
-
- 18th Century Longboat
- Model Shipways
- (and 1 more)
-
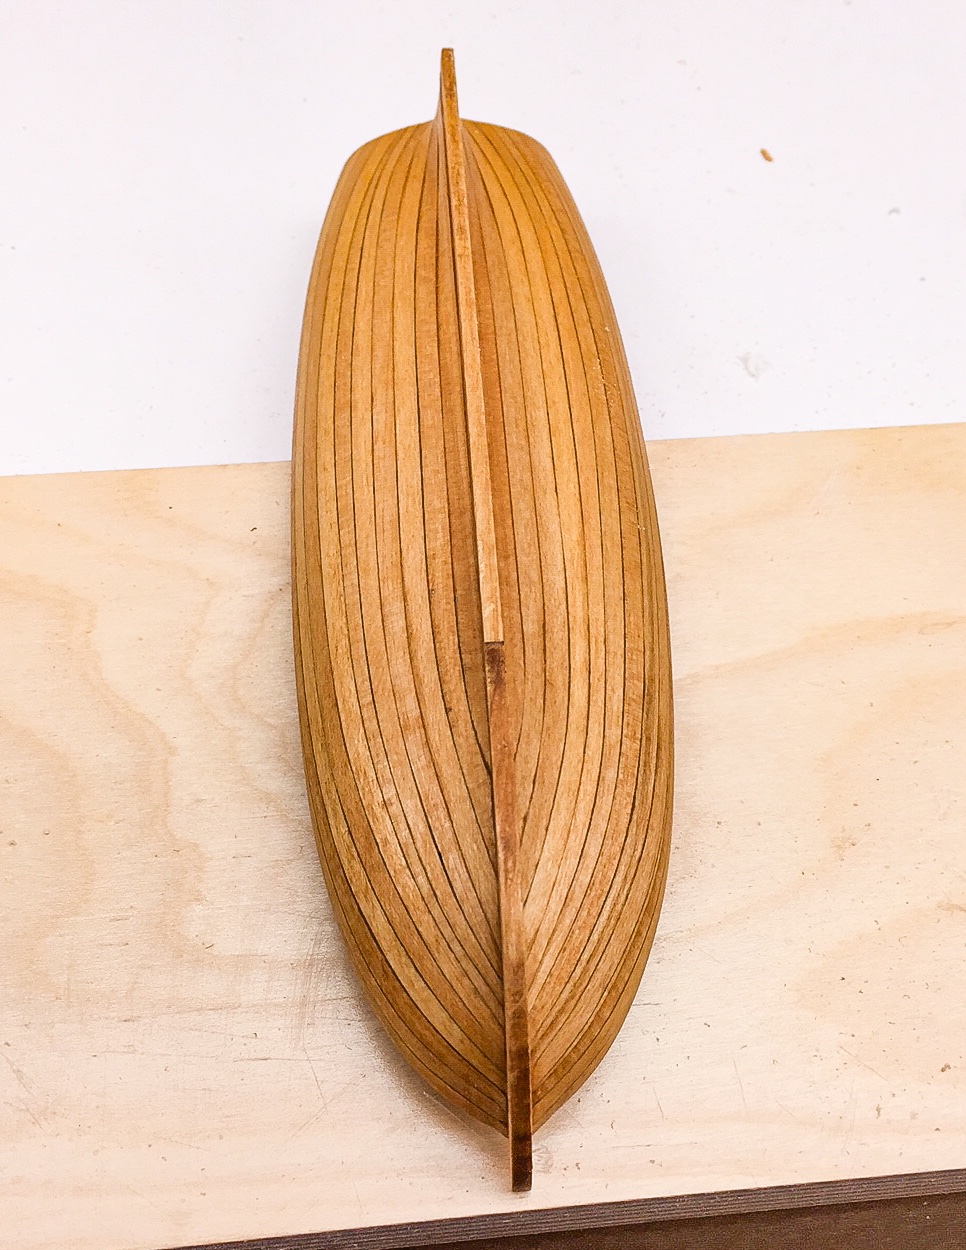
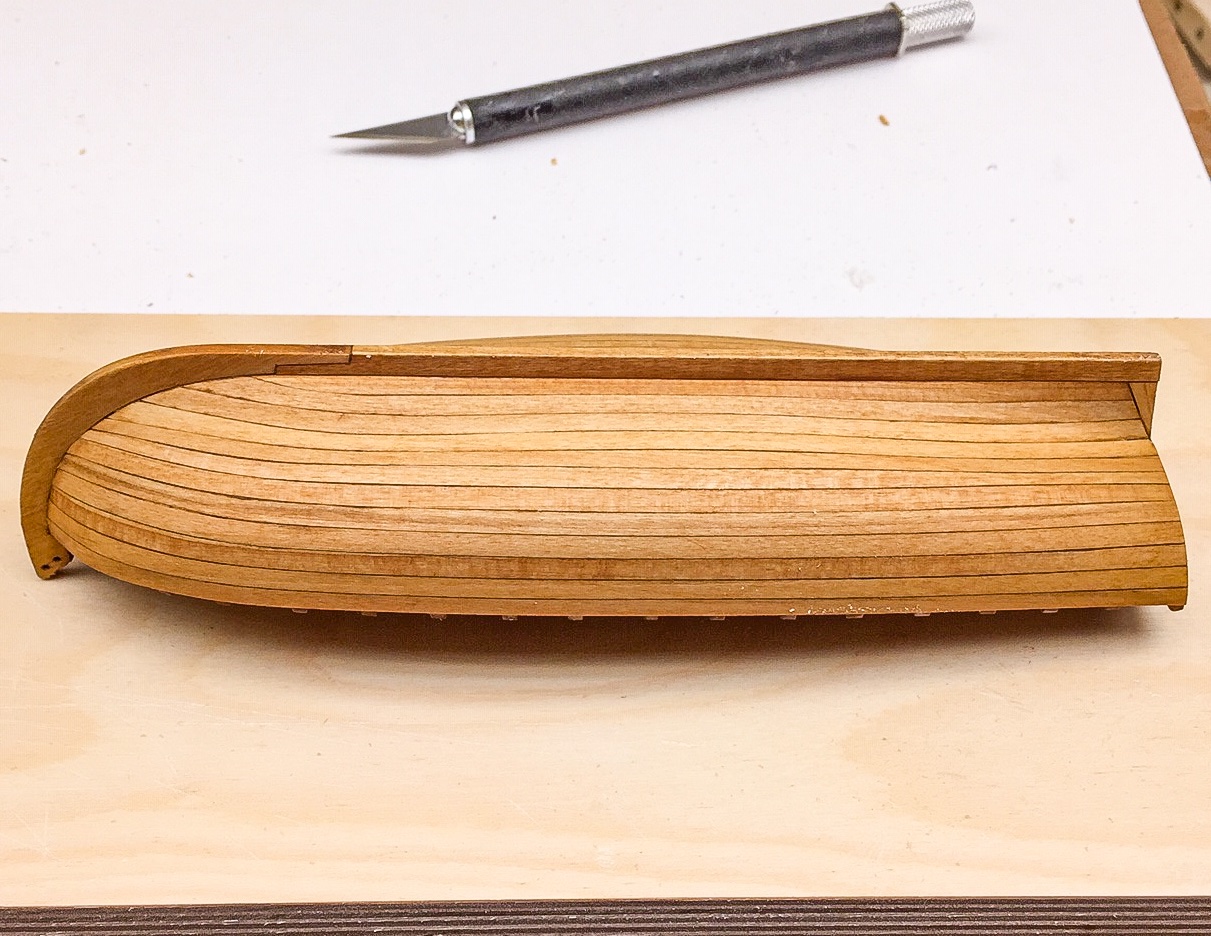
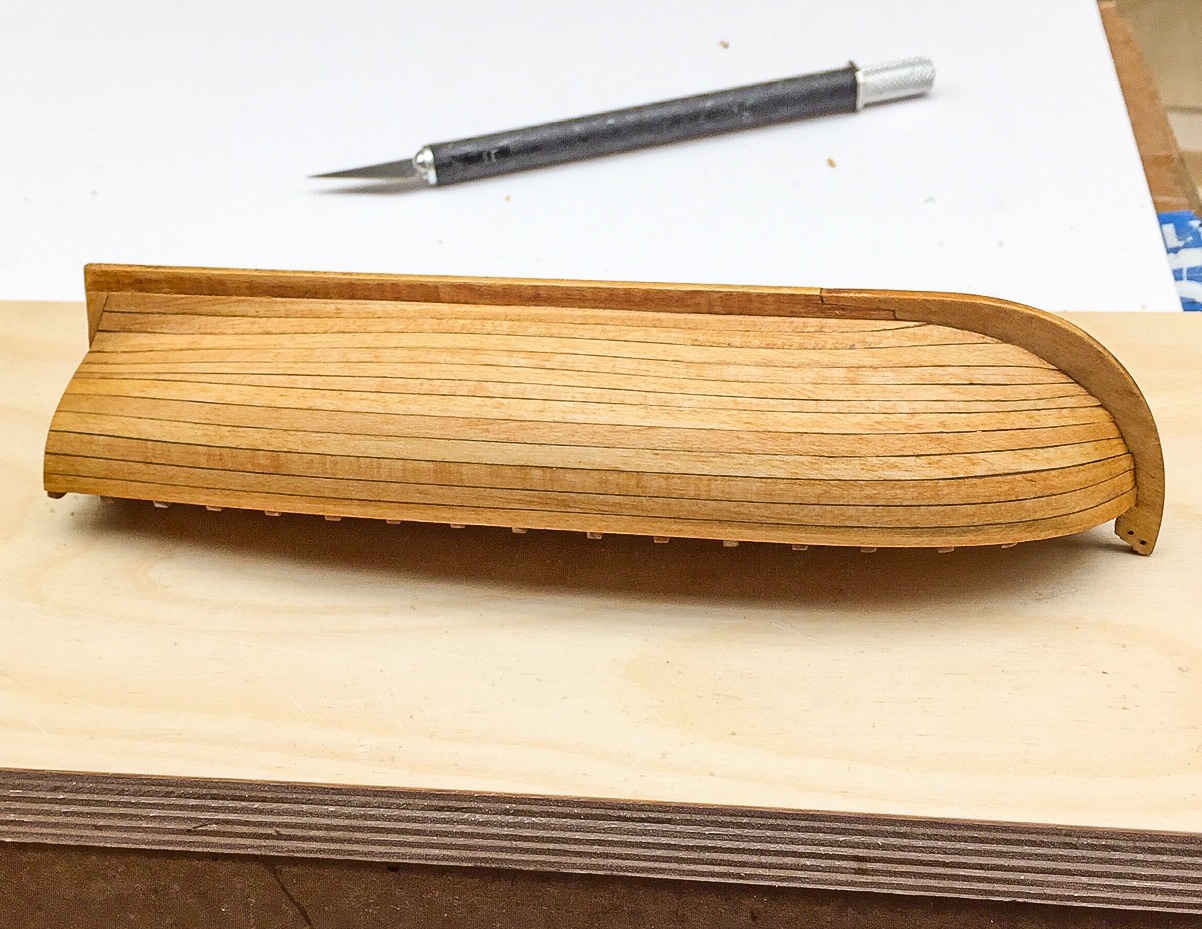
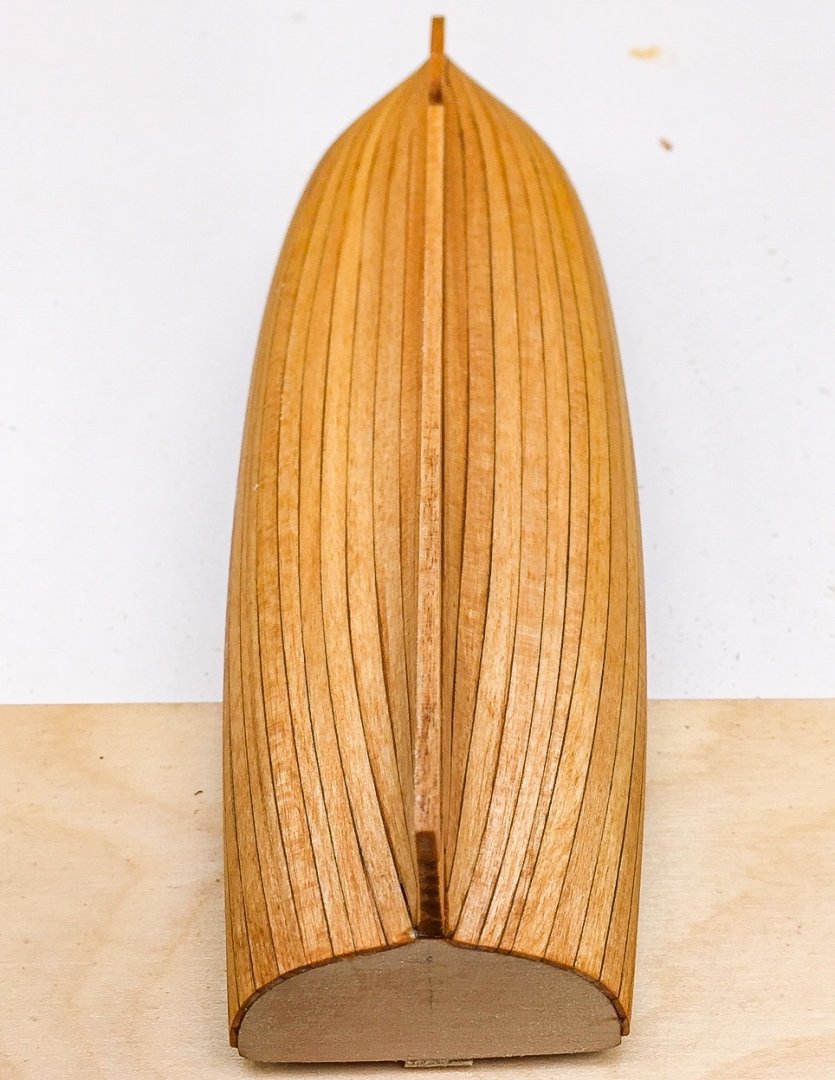
Planking is finished. It took a fair amount of sanding. I guess if I had done a better job of planking (bending and tapering planks more carefully), I wouldn't have had to sand as much. I found planking this small model more difficult than a larger model. But it was certainly a good learning experience. I also glued on stern post, which is just a small triangular piece of wood, and did a little more sanding. Then I put on stain to see what it would look like. I'm curious what anyone thinks about leaving hull stained instead of painting below waterline white. I've seen a lot of models painted white below the waterline. I'm guessing this is more scale than leaving it natural wood. I like some paint on a model as an accent, but I think I like the natural wood color, and it shows off planking for what that's worth.

- 55 replies
-
- 12
-
-
- 18th Century Longboat
- Model Shipways
- (and 1 more)
-
I'm down to the last plank on each side of hull.

- 55 replies
-
- 4
-
-
- 18th Century Longboat
- Model Shipways
- (and 1 more)
-
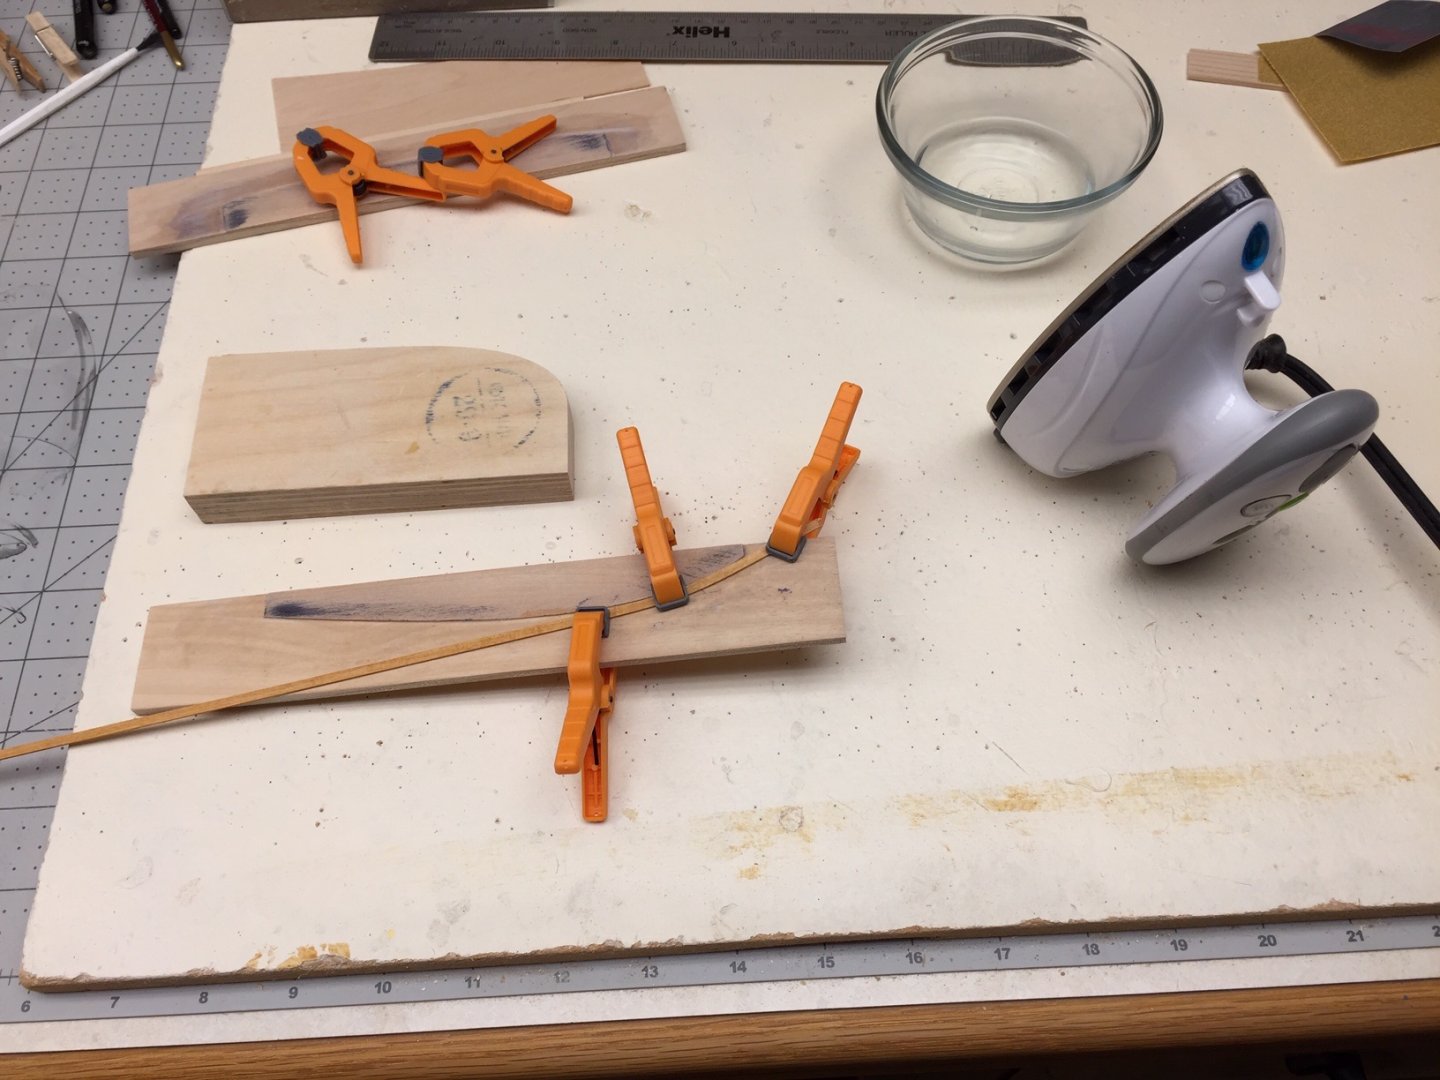
The wavy look in previous photo was also caused by changing dimensions in the open area. As I continued planking and starting measuring closely where I needed to taper, I realized it wasn't as even as I thought. For plank bending, I have some water in a little dish that I can dip my finger into. I dip into it, and rub it on the part of the plank that I want to bend. Then clamp one end of plank to a form and use the iron to heat and bend the plank around the form. When iron hits the little bit of water, it steams and makes it easier to bend the plank. Then I clamp the other end, and perhaps along the middle. If you let it cool and dry completely (overnight), it holds the shape real good. I've learned, though, that you only need to let it cool a little. When released from clamps, it will spring back a little, but you can bend it a little too much allowing for the spring back. Here's photo showing a form, water dish, clamps, and travel iron. This was a good little boat to practice on. I struggled a little at first, but it's gotten much easier now that I'm about done. Isn't this always the case!
- 55 replies
-
- 3
-
-
- 18th Century Longboat
- Model Shipways
- (and 1 more)
-
No need for you to be nervous about ratlines. They look worse than they are. And based on what you've done so far, which is extremely impressive, you'll do great. If I remember right mine are spaced about 1/4" apart. I love your rope eyes and cartharpins. When I was at this stage, I was having a hard time making they rope eyes. It got easier much later on. I did cartharpins the simple way. I'm wondering how you managed to get into the area and tie knots. I could get in there, but only to do simple overhand knots. I had little control over threads. I'm glad you are taking lots of detailed pictures. Once you get all the rigging done, it will be difficult to see all the details. I've been slowing cutting wood for display case and planking long boat. I'd never bent planks edgewise before, and didn't understand that you could even do it. On Syren planks were short enough that I forced edgewise bends as I glued them on. It worked, but I wasn't that happy about how I did it. So now I've learned new way of doing things thanks to your log and all the other info here.
- 950 replies
-
- 2
-
-
- syren
- model shipways
- (and 1 more)
-
I've been a bit distracted with a couple of other projects. Weather turned nice, so took advantage for some early yard work and golf. This time of year you have to take advantage when it warms up. Planking has been going slow. Each one has to be individually fit. The small size makes it more difficult for me to get planks curved right, and I've had to start over on a couple. Using a little water (no soaking), a travel iron, and forms work as good as anything. The hardest part for me is the twist near the stern. I've been using medium thickness CA to glue, and hand holding in place until it sets - 30 sec or so. On bow I put glue on only rabbit and first couple of bulkheads and hold plank until it sets. I also started putting a little glue along edge of plank in the bow area. I use straight pins to apply small amounts of glue. Then I put glue on maybe 6-9 bulkheads working aft, and hold plank in place until it sets. I keep doing this until stern is reached. If the plank fits halfway decent, it doesn't take long to glue. The work is bending and tapering the plank. The photo makes it look like the 2nd plank, the one next to garboard, has odd curvature to it, but I don't see this looking at the model. I used phone for photo and it might be some odd effect from wide angle lens. Perhaps I should use my good camera.
- 55 replies
-
- 4
-
-
- 18th Century Longboat
- Model Shipways
- (and 1 more)
-
I'm always so impressed with your craftsmanship. Love the wood mouse. It looks much better than what I did, especially in closeups. I wrapped thread around stay making a rough mouse shape, coated it in glue, and added a little paint. At the small scale it looks ok, but it doesn't look anything like yours in a closeup. Something new to try next time! Probably just me, but don't think the weave on mouse would show at this scale. It would be easy to overdo something like that. Also impressed with your lashing of hearts. Mine didn't come out as neat looking. Again, you don't notice it much except in closeups, but photos reveal all. Yours look neater with threads all in a row. Threads overlap on my lashings and ended up coated in CA. I really enjoy the photos. I'm so impressed with all the little details you are doing that I skipped over or took a shortcut. You're making great progress! I started cutting wood on a display case, but weather has been good, so I've been getting outside more and distracted from modeling.
- 950 replies
-
- 1
-
-
- syren
- model shipways
- (and 1 more)
-
Once again, thank you for helping me learn about forum and serving. I was pretty confused about serving, and there's big difference between seizing and serving. I had a hard enough time seizing lines! There is so much to learn, it will keep me busy forever. I think we are all inspiring each other to improve our model building. It really helps.
- 950 replies
-
- 1
-
-
- syren
- model shipways
- (and 1 more)
-
I can only echo others, fantastic! I sure wish I'd discovered these build logs a lot sooner. Your photos are great! Very impressed with how you served shrouds around masts. Until this forum I wasn't sure what serving meant. Chuck called it seizing a line, but it looks all the same to me. What kind of thread did you use? It looks a lot thinner or finer than what I used, and it looks a lot better than what I did. The ones around masts are very realistic. Your rope eyes are also excellent. I had a hard time with them, especially at first. In my case, I wrapped the pendant rope around the mast and seized it just like shrouds, and cut off the excess thread leaving pendant rope with eye. I did it this way not knowing any better, but it's a lot simpler than what you did. I ordered the TFFM books. They are a bit expensive, but any reference or text book is expensive. Once again, thank you for suggesting them. Question, where do you enter "current build", "completed build", and "on the shelf" information?
- 950 replies
-
- 1
-
-
- syren
- model shipways
- (and 1 more)
-
Finally glued on first planks. I used Chuck's idea of travel iron for heating and bending planks and it worked well. Hard part is figuring out how much to bend them and bending in the right direction. I did edgewise bend first, and then the bow curvature bend.

- 55 replies
-
- 6
-
-
- 18th Century Longboat
- Model Shipways
- (and 1 more)
-
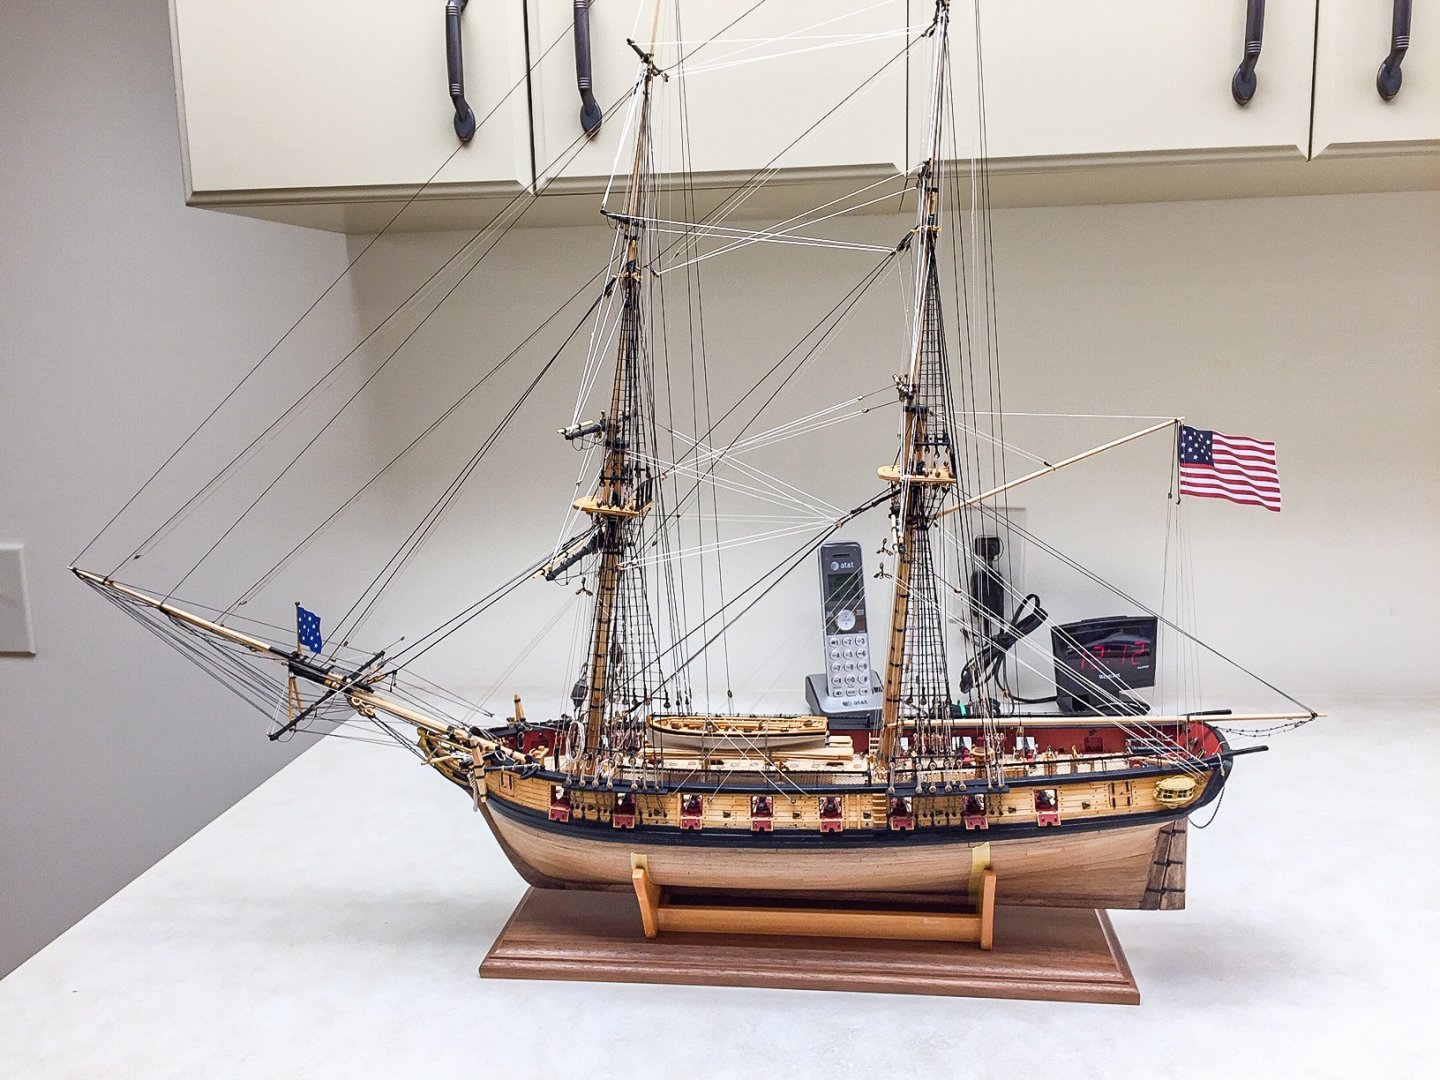
I finally added the flags, so am officially done. I made several american flags trying to get one look "right", and they all came out about the same even though I thought I was doing it a little different. I ended up selecting one that is a little smaller than the one in the kit. Just took a snapshot for now, and will take some "good" photos in a few days. Appreciate all the encouraging comments. There is a lot of detail on this model. No comparison to the first model ship I built a long time ago. On this one, I was learning as I went along. About the time I thought i was starting to get the hang of planking, cannons, rigging, or whatever, I was done. And then I'd start over learning something new. And now onto the display case. I got the report by Wes Marden and it has a lot of good ideas that I'll use. I like the way he does the base better than the case for my first model ship. I'll keep this log open so you can see what I end up with.
- 87 replies
-
- 12
-
-
Wow! Love your photos, and I'm still amazed at how nice the copper hull came out. It looks great. And every time I see gun ports, hammocks, and netting, it's impressive. I have no idea how you manage this going to grad school. Back then I was into model airplanes which are much simpler, but didn't have room or time for anything like that. I know exactly what you mean about photos showing everything. When I look at closeups of mine, I see all kinds of little mistakes, and some not so little. It looks better in person at "normal" size. The chains look great. I don't think I filled the gaps in wire on the chains either. I think I started doing that later when making some of the rings. Also, I can't thank you enough for the references. I have the last one you mentioned that just has drawings of rigging, and I've referred to it a few times building Syren. I will look into getting the others. It helps to have all the information you can get. I certainly wish I'd started using this forum a lot sooner.
- 950 replies
-
- 2
-
-
- syren
- model shipways
- (and 1 more)
-
I added the anchor buoys such as they are. They actually look better on model than in photo. When looking at model actual size, you don't see my mistakes as much as in photo. Every time I take a closeup photo I see mistakes or things I could have done better. Next time as they say! I'm thinking starting with a hardwood dowel and tapering it at both ends would have ended up with a better result. There is still the problem of the web-like rigging and keeping it straight on the buoy. It takes more skill and patience than I have right now (trying to learn more patience, ha!). Perhaps using sculpey (sp?) clay is even a better way. If the resulting buoy had a little texture or something that would grip rigging thread just a little, it would make doing the rigging web much easier.
-
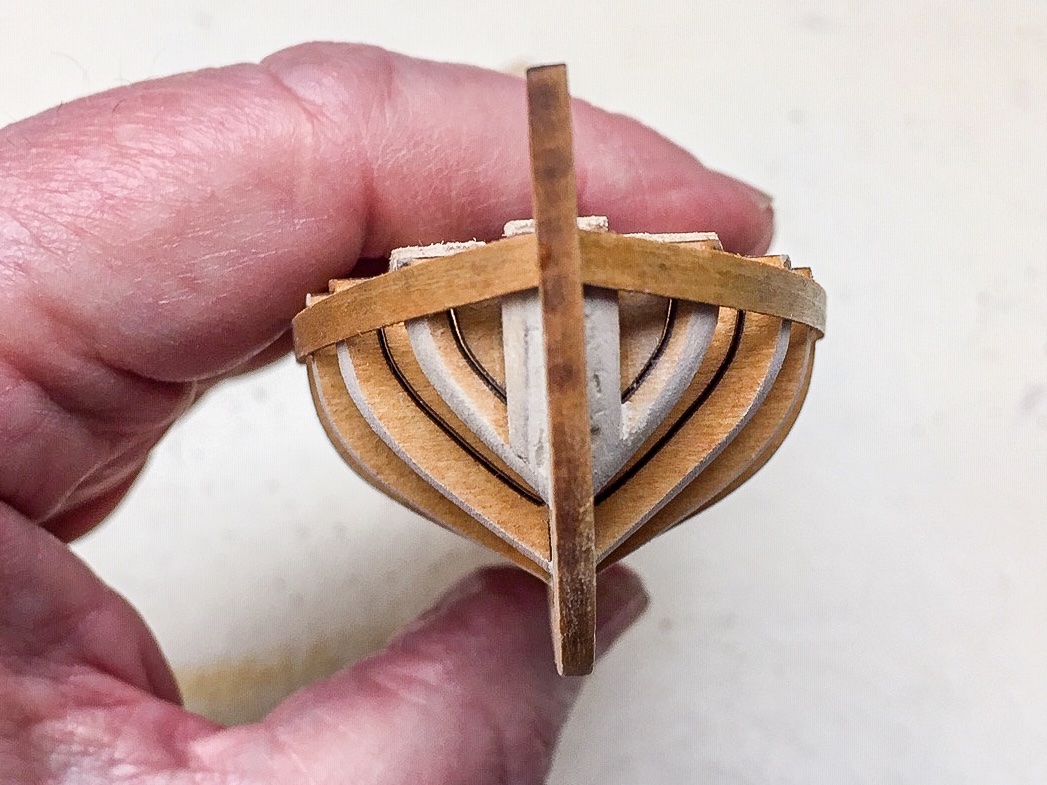
I added the extra bow fairings. Then I started to fair the bulkheads. I mostly used a sanding stick about half inch in width and about 6" long, and sanded with gentle pressure. It took a while especially in bow area. In the bow area I also used some small jewelers files. I think the bow is starting to look ok. I had to trim out some excess glue from the bow rabbit, and may need to trim and sand it some more. I'm to the point I need to make a test plank and see how it fits. But first I glued on the transom so I could get it faired in as well. I added a pin near the bottom to add a little strength and to hold it while glue was drying. And I added a temporary strengthener to the top. Hoping this will be strong enough to handle some gentle sanding while fairing.

- 55 replies
-
- 3
-
-
- 18th Century Longboat
- Model Shipways
- (and 1 more)