HOLIDAY DONATION DRIVE - SUPPORT MSW - DO YOUR PART TO KEEP THIS GREAT FORUM GOING! (Only 20 donations so far - C'mon guys!)
×


desalgu
-
Posts
363 -
Joined
-
Last visited
Content Type
Profiles
Forums
Gallery
Events
Everything posted by desalgu
-
I've got both anchors mounted and rigged. I waited to mount anchor buoys until I finished anchors. I'll do that next.
-
Very nice work as always. Your's always looks more precise or cleaner than mine. I've used CA technique for closing gaps in little wire fittings and it works. I used straight pins to apply small dabs of CA instead of toothpicks, but it's the same idea. And you are also right, plain flat black doesn't quite match the wire color. But you can thin it into a wash and I thought it looked fine. It helps that size is so small, you don't notice that it's not a perfect color match. Closeup photos make things look worse than they are. I didn't try doing it until further along with my Syren. I'd struggle with something like this and then later on figure out a better way to do it. But by then it's too late to go back, so I've got some inconsistencies as I was learning. Obviously I need to get some reference books. What is TFFM? And are there any other books you can recommend.
- 950 replies
-
- 2
-

-
- syren
- model shipways
- (and 1 more)
-
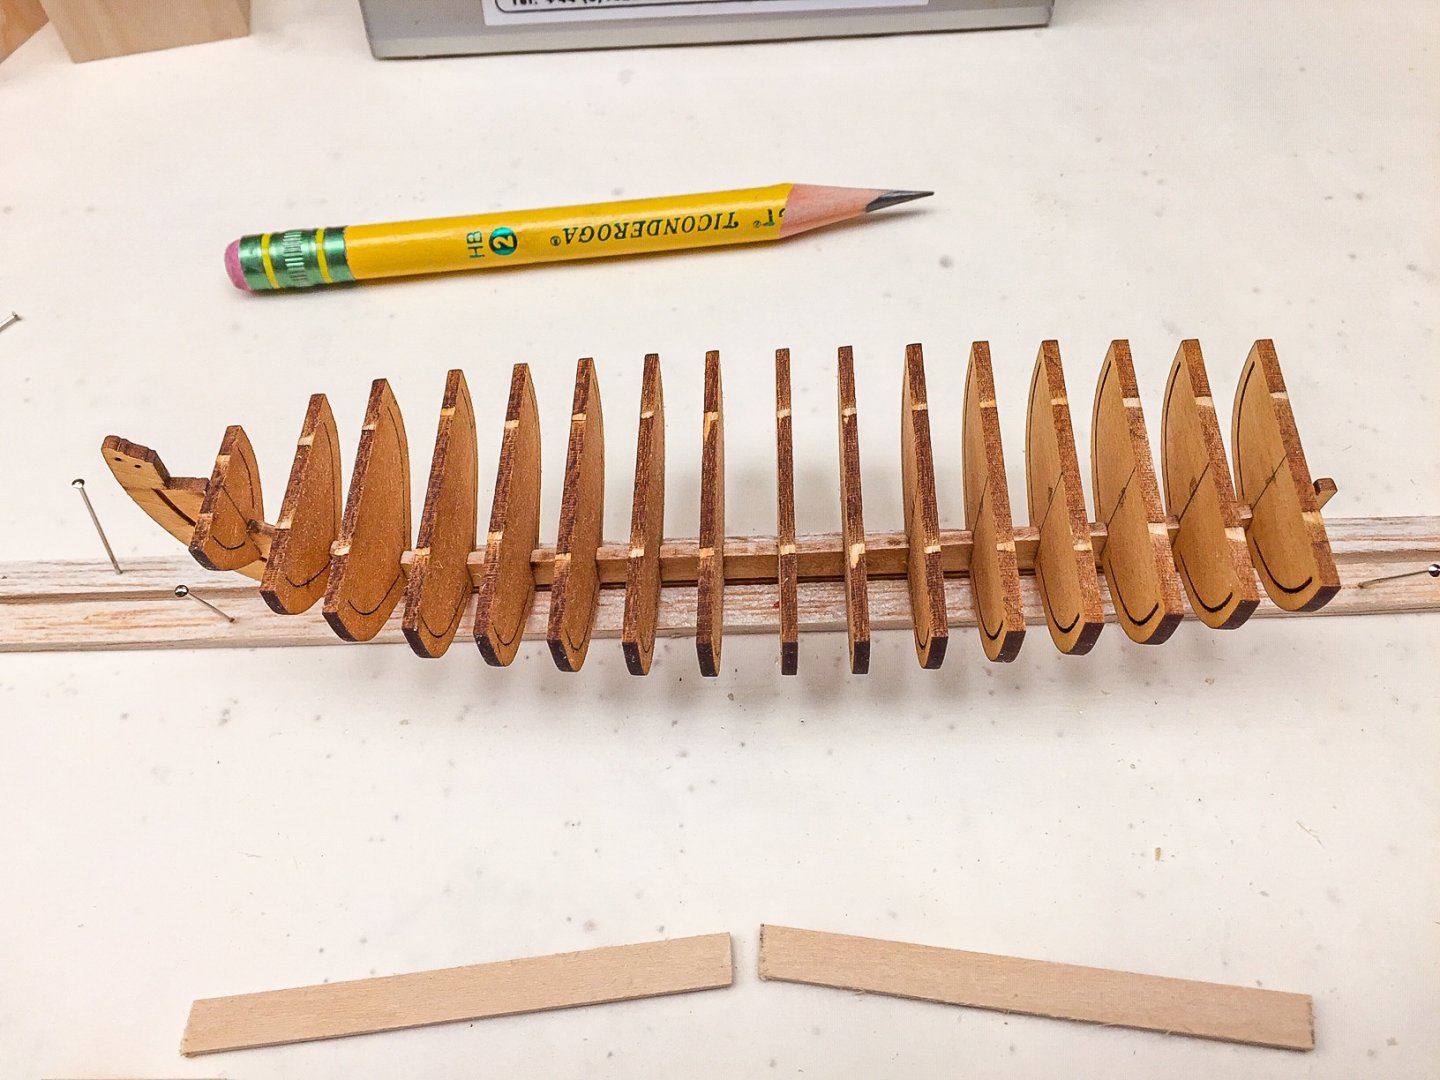
Before fairing I added some strips (scrap wood) along the top of the bulkheads to strengthen things before trying to fair bulkheads. I'm guessing it will still be pretty fragile, so it will require delicate sanding to fair things.
- 55 replies
-
- 6
-
-
- 18th Century Longboat
- Model Shipways
- (and 1 more)
-
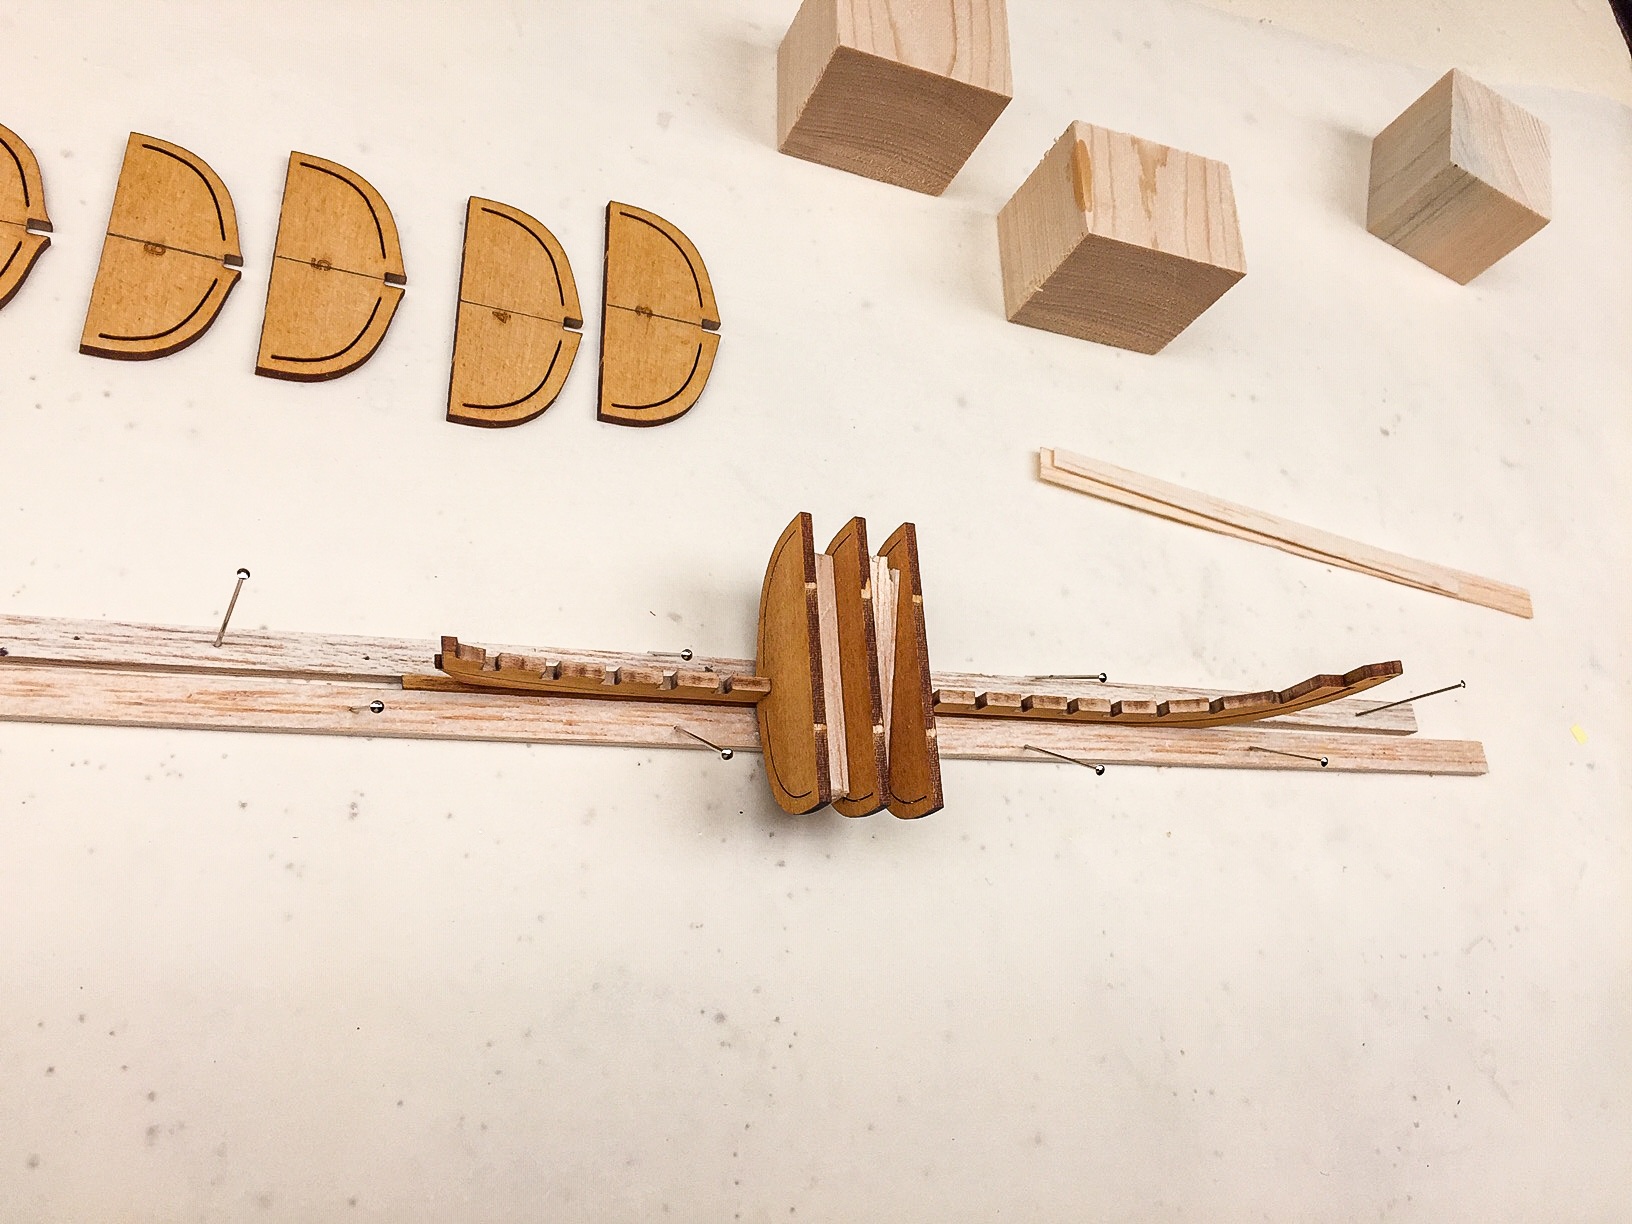
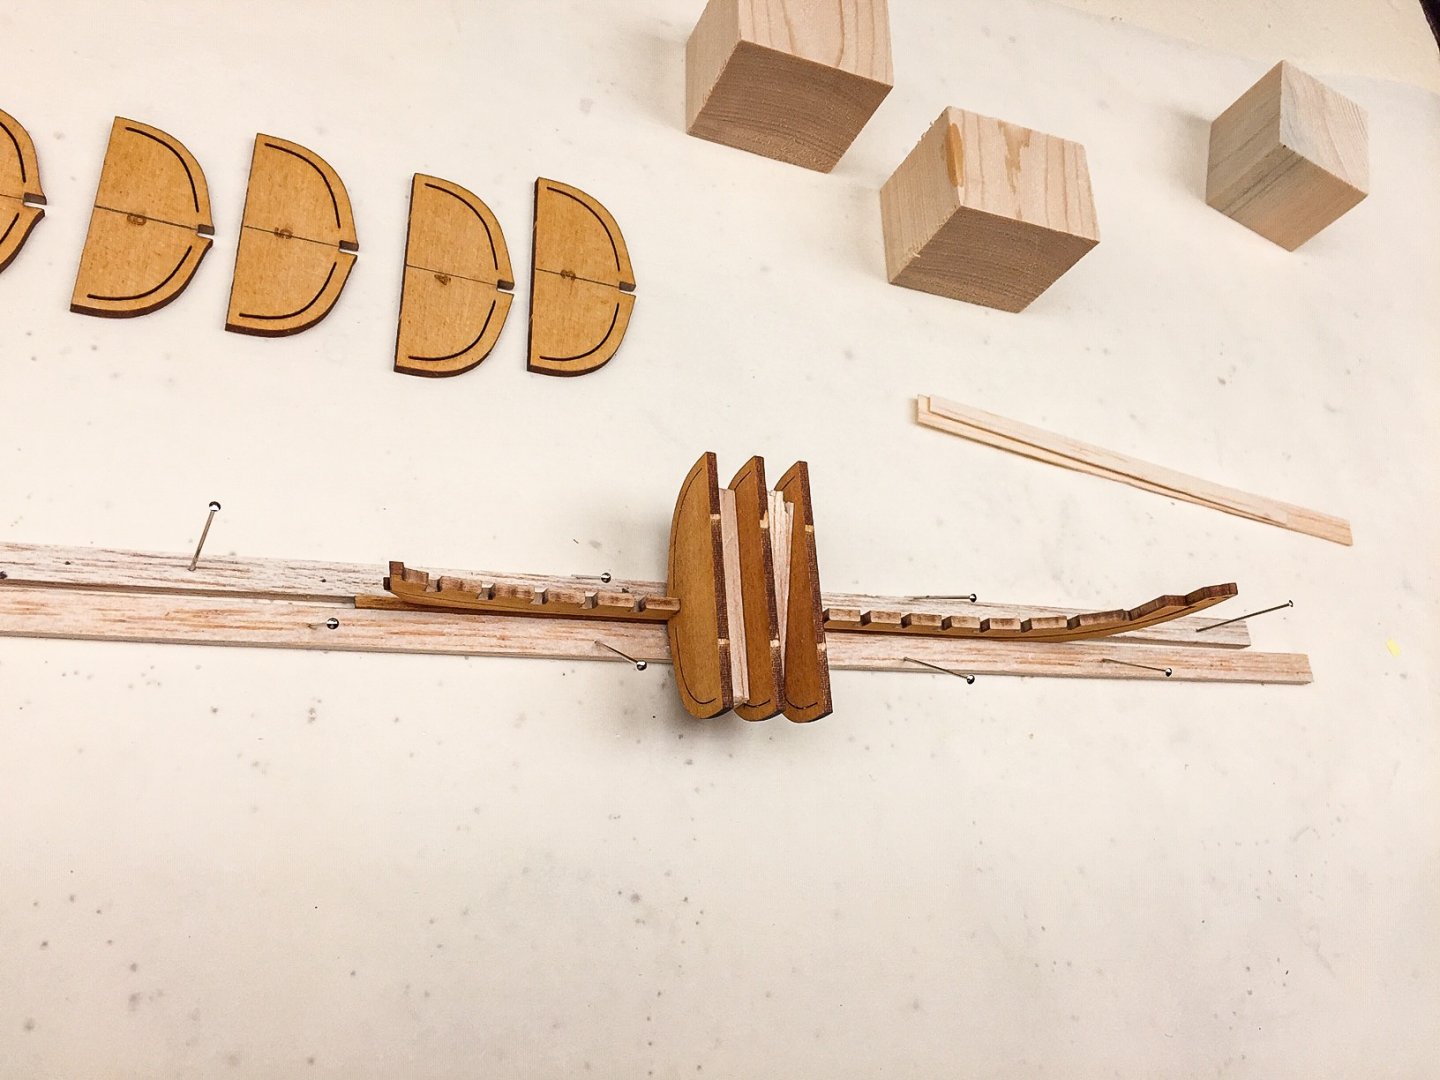
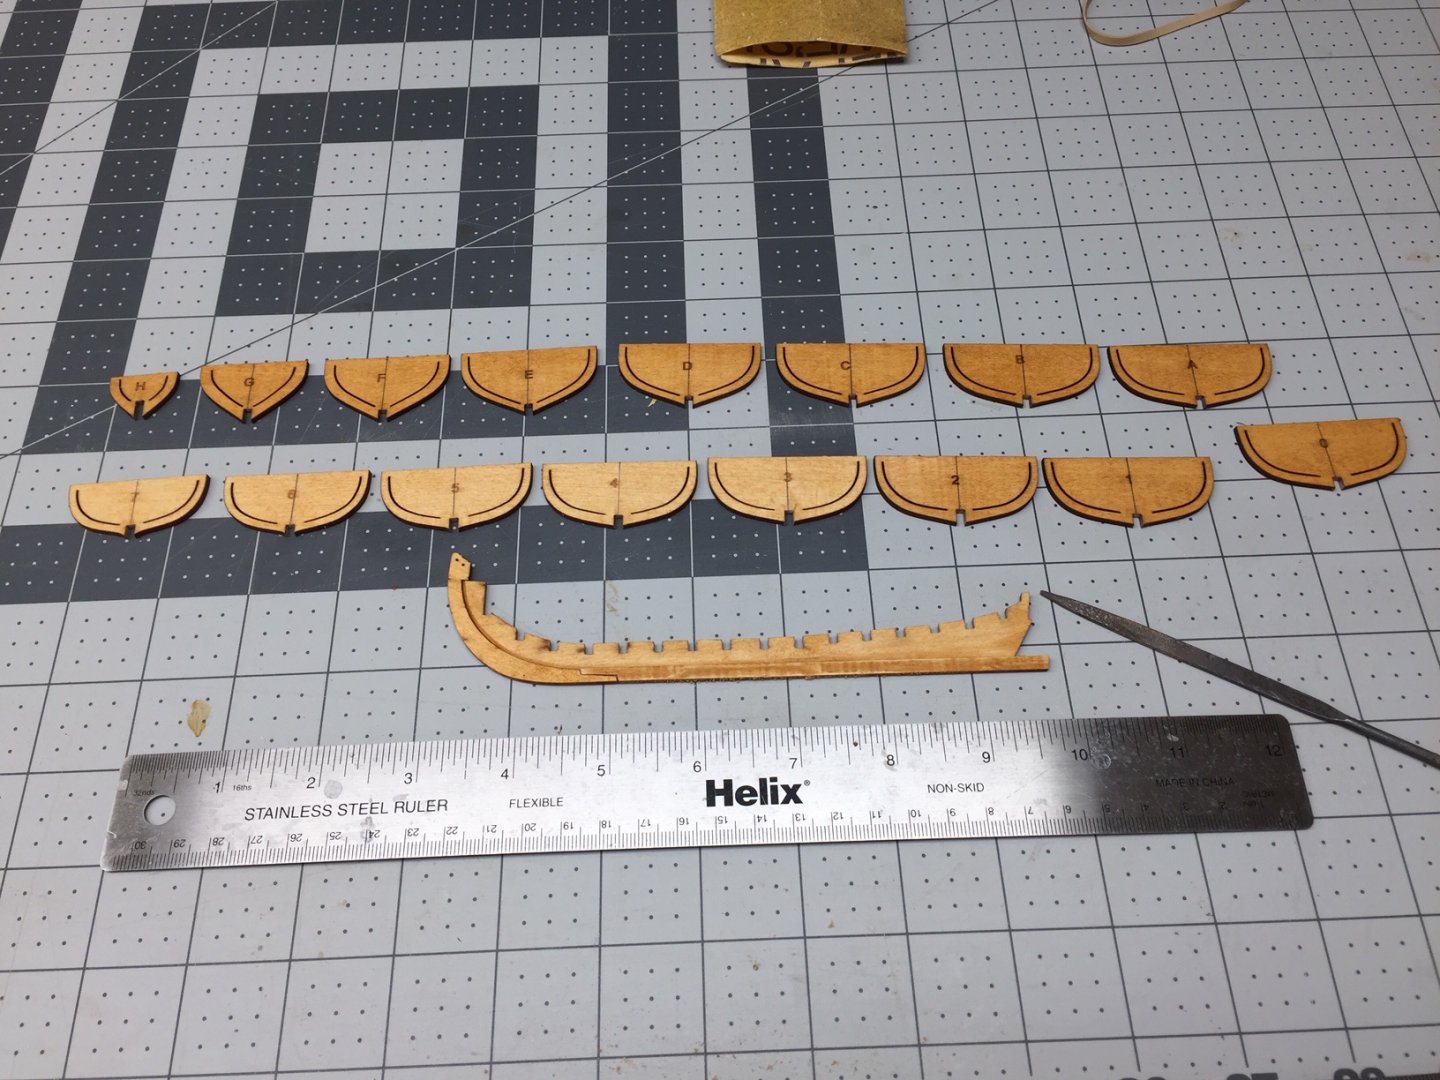
I started gluing the bulkheads to the frame. I put in the center one first ("0"), and tried to be careful getting it aligned. I used some little blocks I made on my table saw some years ago that I know are all 90 deg angles. Using these I got it aligned in two directions easily, but there was still the direction looking from the bow or front down the length of the keel. I put a small strip of wood along top of bulkhead and eyeballed it making it parallel to the building board. Once I got the first bulkhead in, I aligned all the others to it. I used some scrap balsa spacers between bulkheads, and eyeballed the view from the front keeping each bulkhead aligned with the others. I'm hoping this simple method will be accurate enough.
- 55 replies
-
- 3
-
-
- 18th Century Longboat
- Model Shipways
- (and 1 more)
-
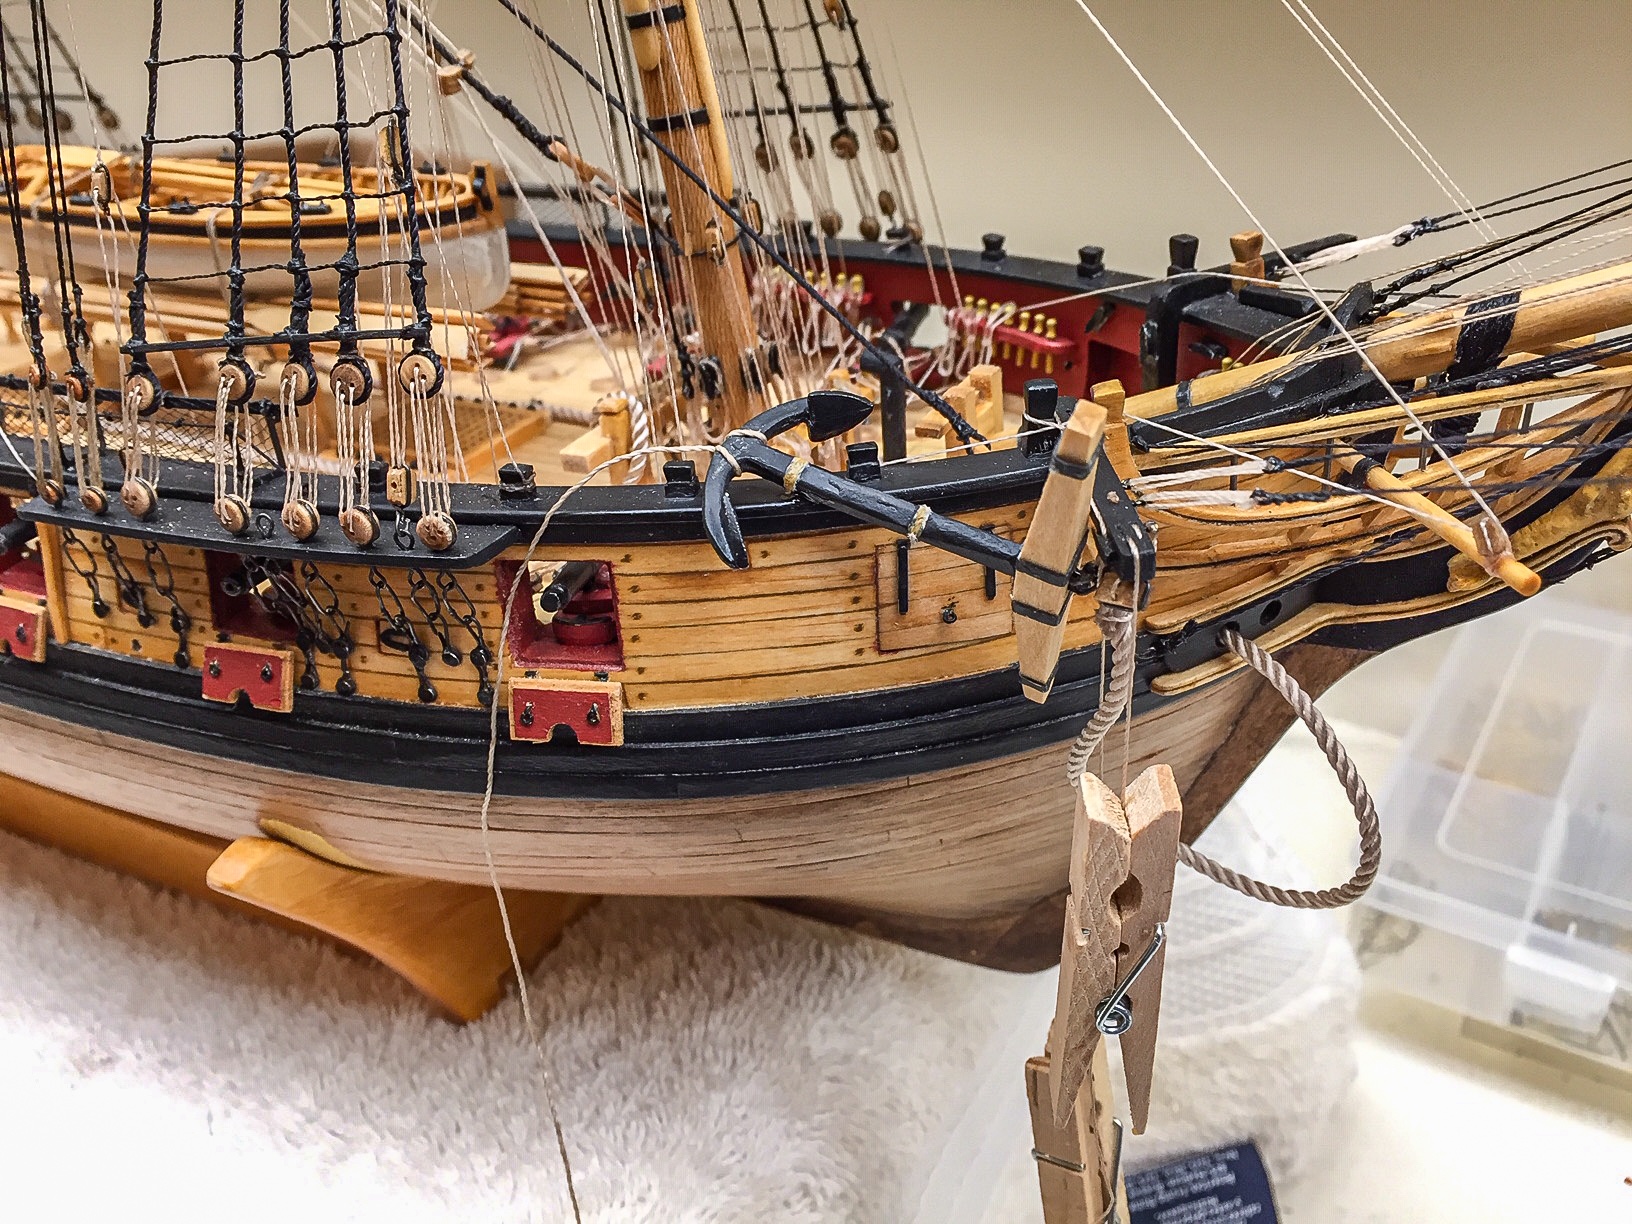
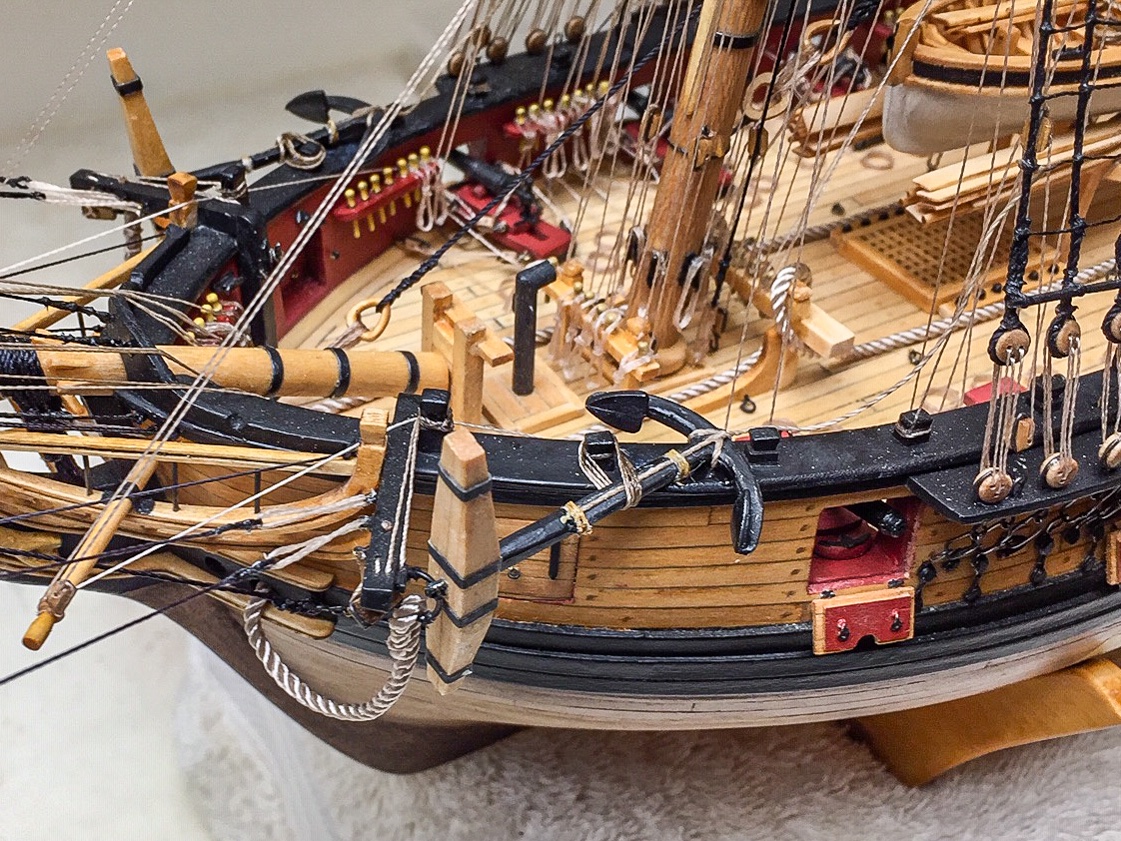
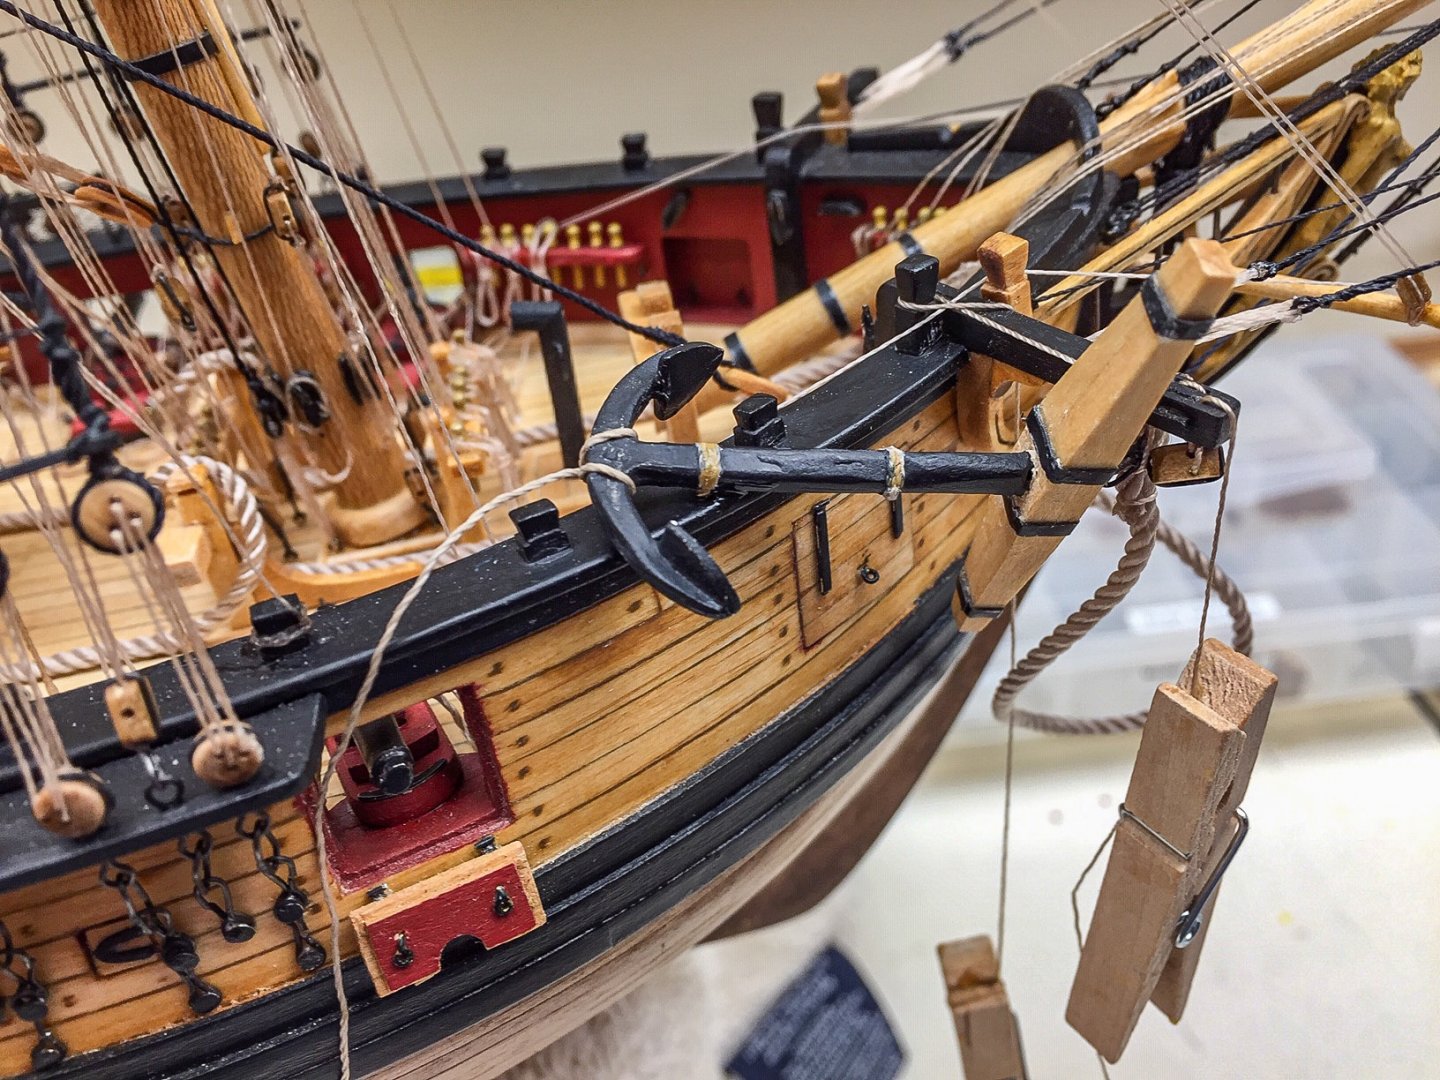
One thing I found out while getting ready to install anchors was that I should have put the anchor cable along the deck a long time ago, preferably before the masts were stepped. In my case, I didn't make a thru hole for the anchor hawser. My plan was to have a separate piece of anchor cable along the deck, and a separate piece coming out the hull to the anchor, faking that it continued thru the holes. This is same method used with rigging going thru sheaves on the hull. The problem is laying the anchor cable on the deck when there's a bunch of rigging in the way. I either missed the step in the manual to do this earlier (most likely knowing me), or it wasn't in there. Anyhow it was a rather tedious procedure to route the cable across the deck and try to get it in the appropriate holes. One side came out ok, the other wasn't that great, but it was the best I could do. I decided to change the order on installing anchors. It looked to me that the anchor rigging on the cathead would be easier to do before gluing on the anchor. It looked to me like a slight change in anchor position might make rigging difficult. So instead of gluing anchor first, I did temporary rigging on the cathead hooking it to the anchor ring. Then I positioned the anchor where I wanted it, trying to match photos in manual. When you get the anchor in position, the rigging is about as tight (or short) as you can get it, so you can't really see it. It really does hide the anchor rigging making me think the anchor rigging is a bit overkill, but it's in there. I used clothespins to keep some tension on the rigging lines while positioning. And now that I look at the photo, I can see I glued the anchor upside down. I was working so hard trying to get it on position, I overlooked it. One more thing to fix! I've sure gotten careless the past week.

-
Glad this log has been useful. If nothing else, it's a good review for me. The anchor repairs came out pretty good, so I'm going with them.
-
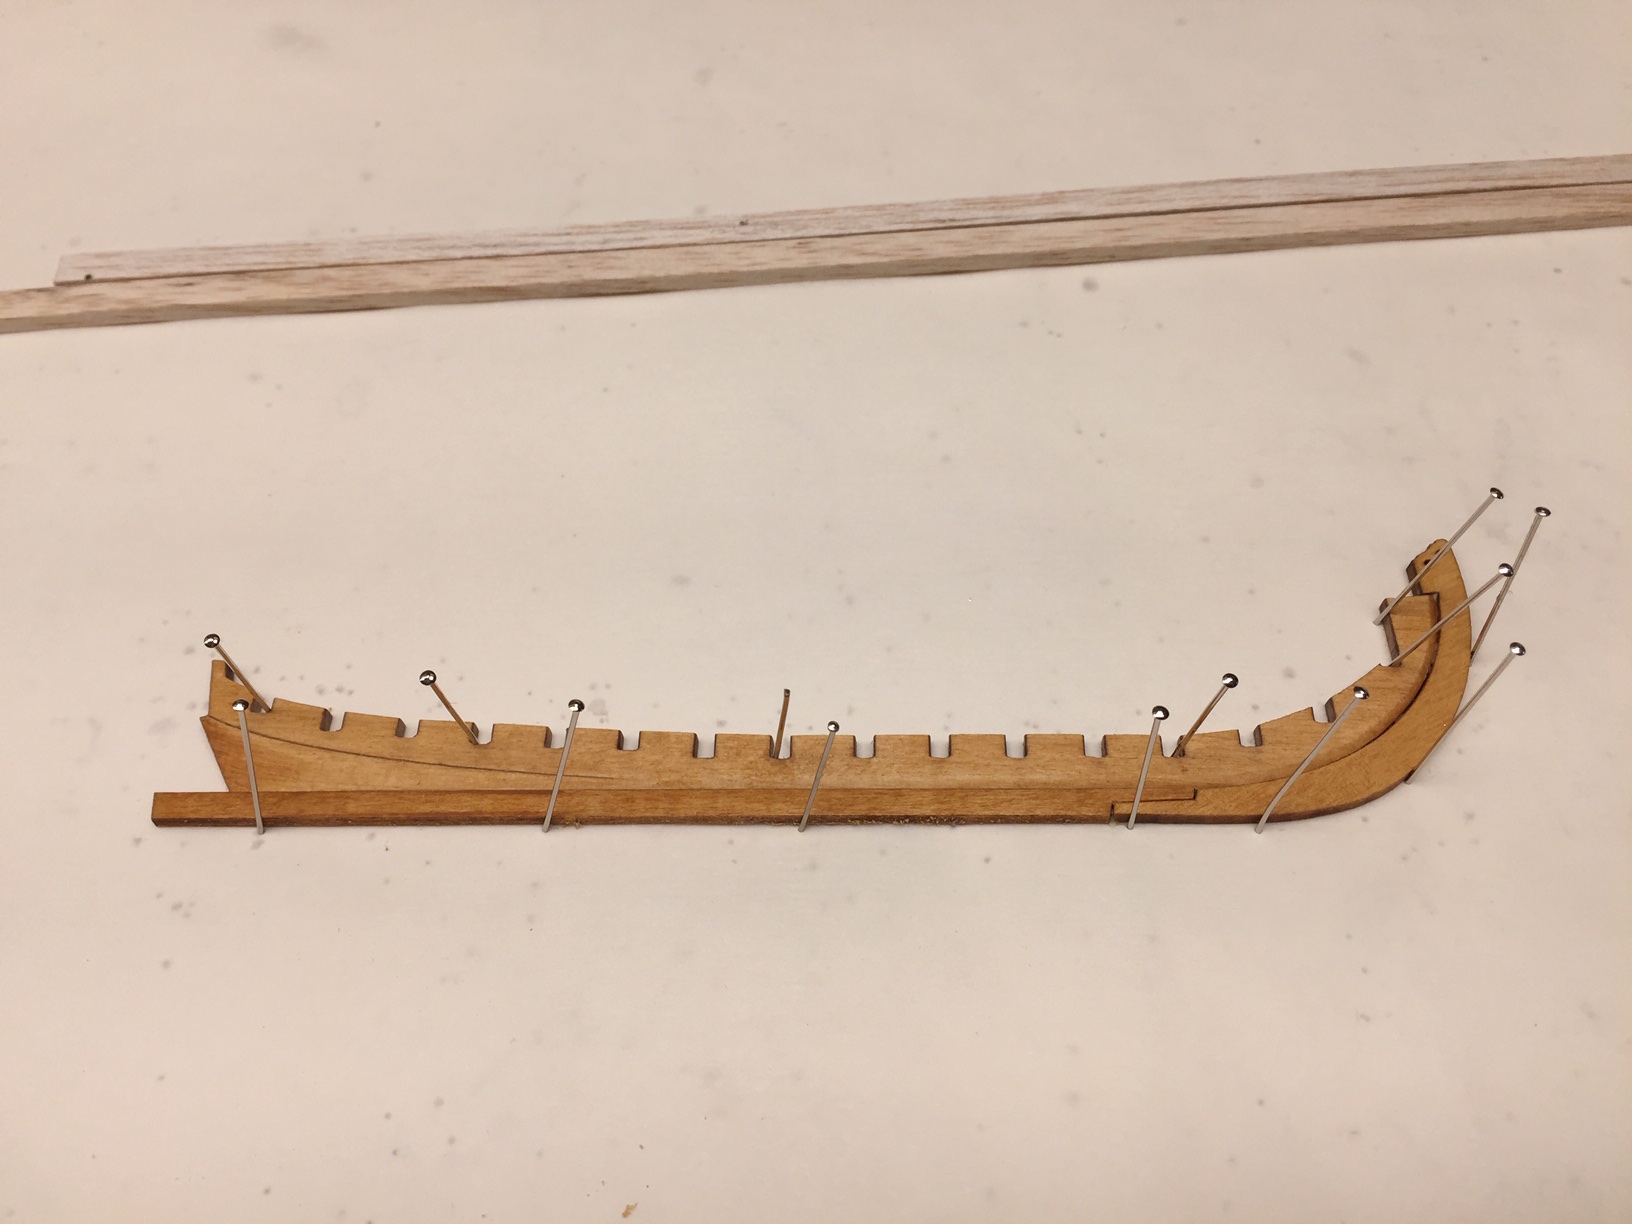
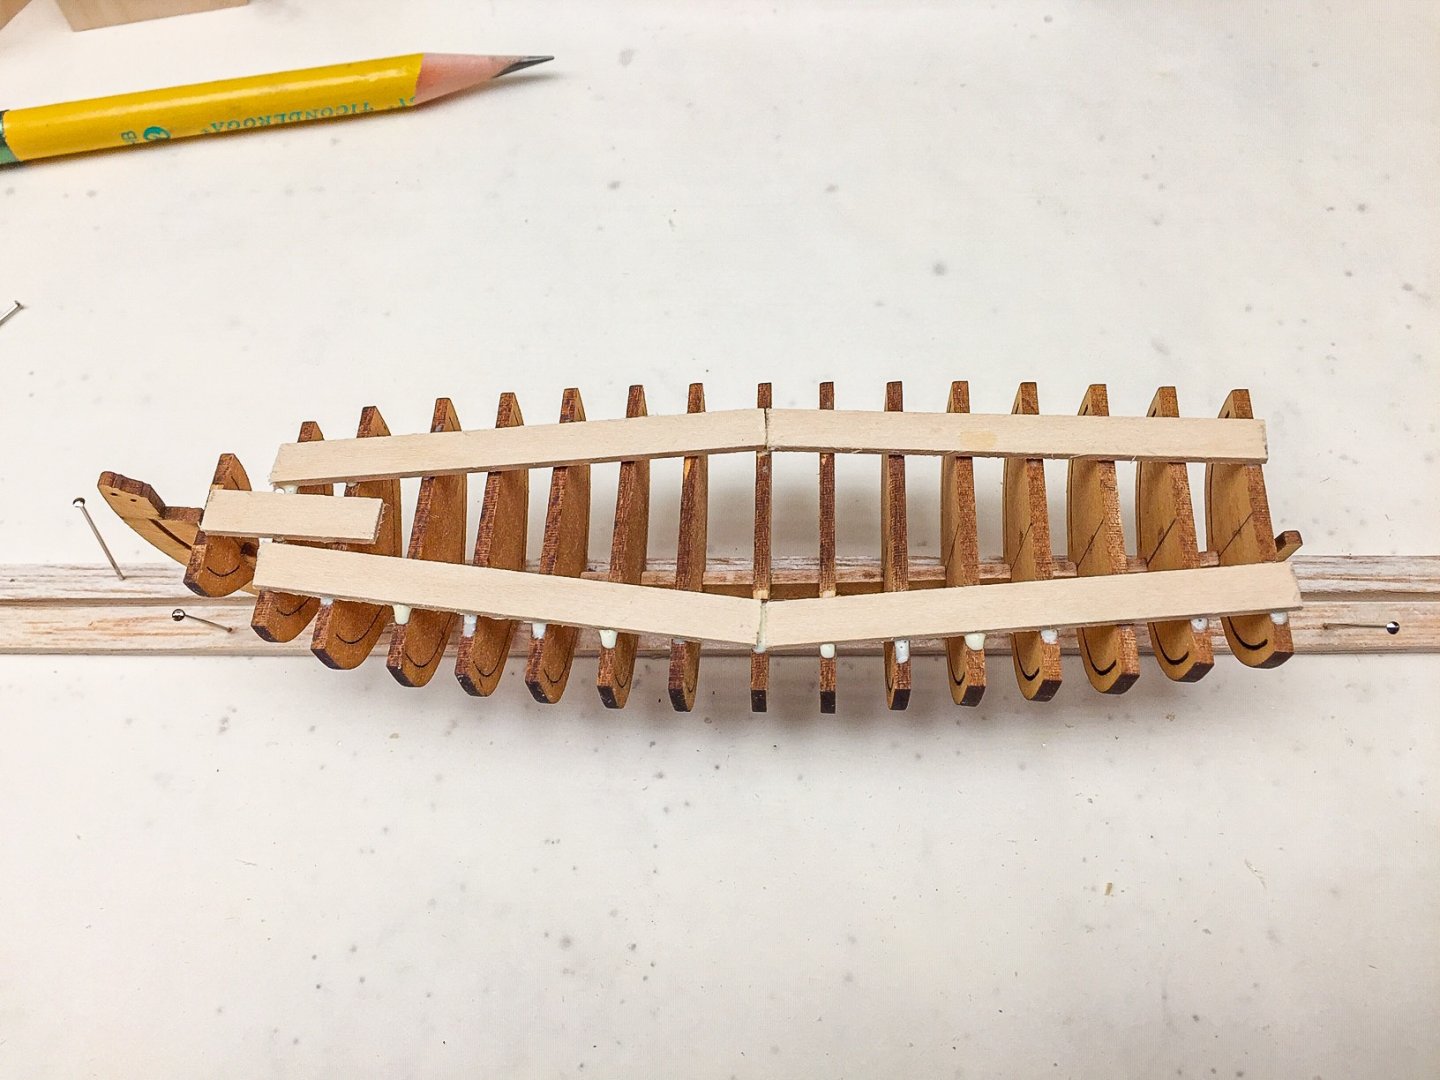
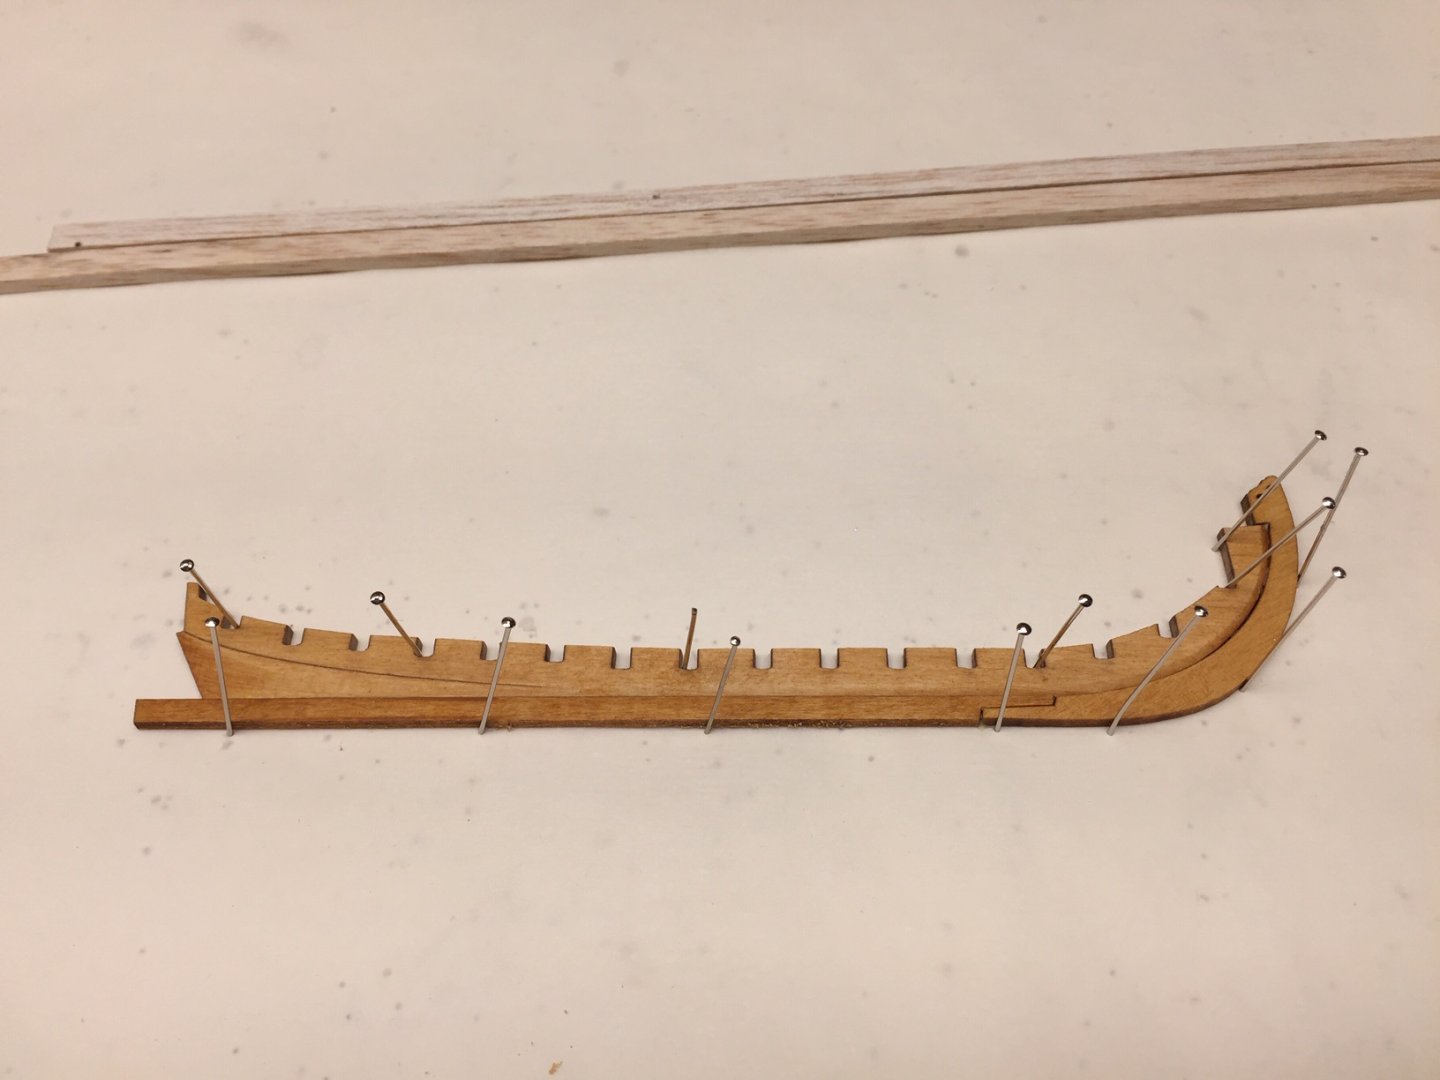
You can see in previous photo, I also drew centerlines on all the bulkheads which I hope will make alignment easier. Next I glued the frame to the keel pieces, and here I did something different from others. My background is model airplanes, and we use a building board that you can stick pins in to hold pieces together. Mine is old and something called celotex, which I believe is no longer available. Dad has told me suspended ceiling tiles work just as good and are readily available. The long boat is small, so you only need a small piece. Only requirement is it needs to be flat. Mine has a little texture to it, but is essentially flat. I put a piece of parchment paper over it, so glue won't stick. I'll use titebond to glue these pieces together and I know it doesn't stick to parchment. CA will stick a little to parchment, but you can usually peel it off. To hold pieces to the board I use straight pins. Almost any kind of pin will work. You can angle them to hold a piece firmly to the building board, and by angling them you can clamp two pieces together. It's simple and it works. Airplane builders have been doing this with balsa for 75 years. They sometimes pin directly thru balsa, but basswood is too hard to do this, plus it will split. Here's frame and keel pieces glued and pinned to the board. Not the greatest photo, but I think you can see my approach. You can barely see the rabbit in the photo. It's all along the edge, but mostly shows up near the bow.
- 55 replies
-
- 4
-
-
- 18th Century Longboat
- Model Shipways
- (and 1 more)
-
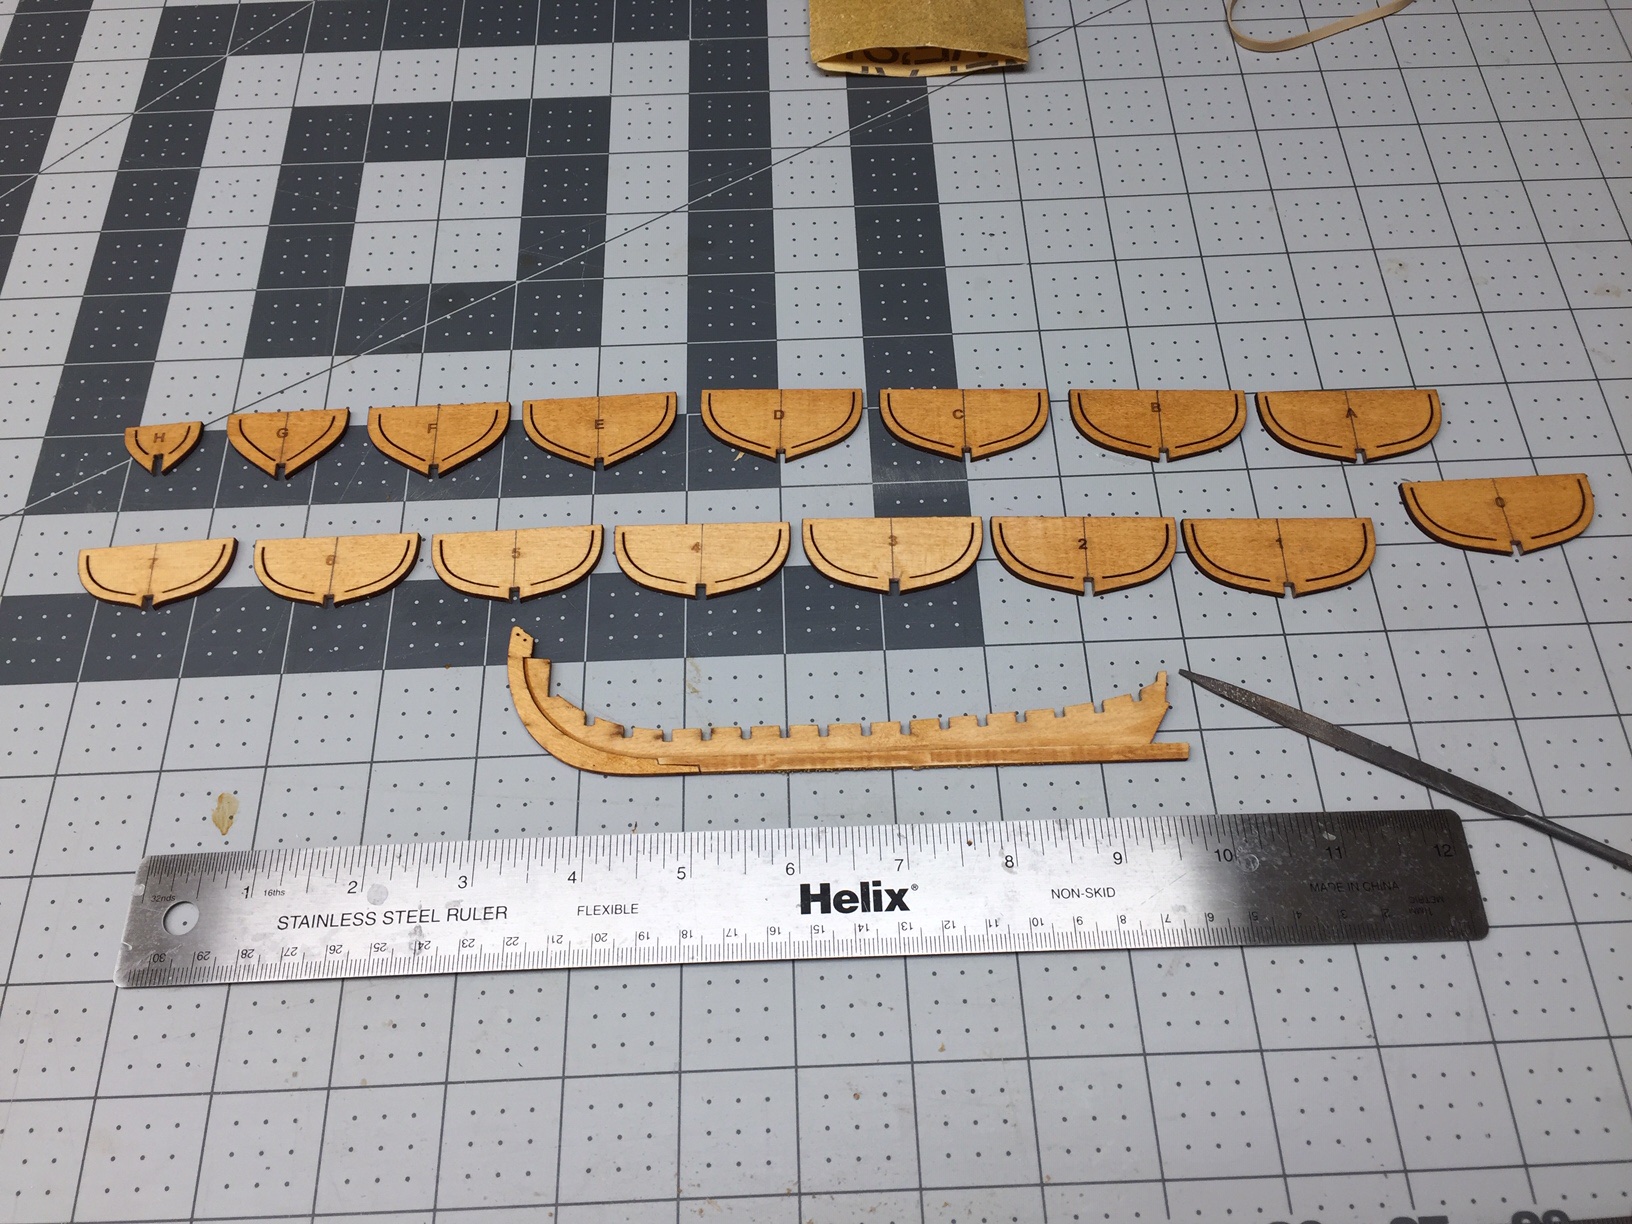
I started by sanding lightly sanding edges of frame and keel parts to remove laser char. I also beveled the edge along the bottom of the frame part which will form a rabbit when glued to the keel pieces. I used a file to remove char from the notches in bulkheads and frame. I also test fit the bulkheads. Most required a little extra filing to fit. A couple were a little loose, but I can shim them when I assemble. Then before gluing anything, I stained with "golden oak".
- 55 replies
-
- 3
-
-
- 18th Century Longboat
- Model Shipways
- (and 1 more)
-
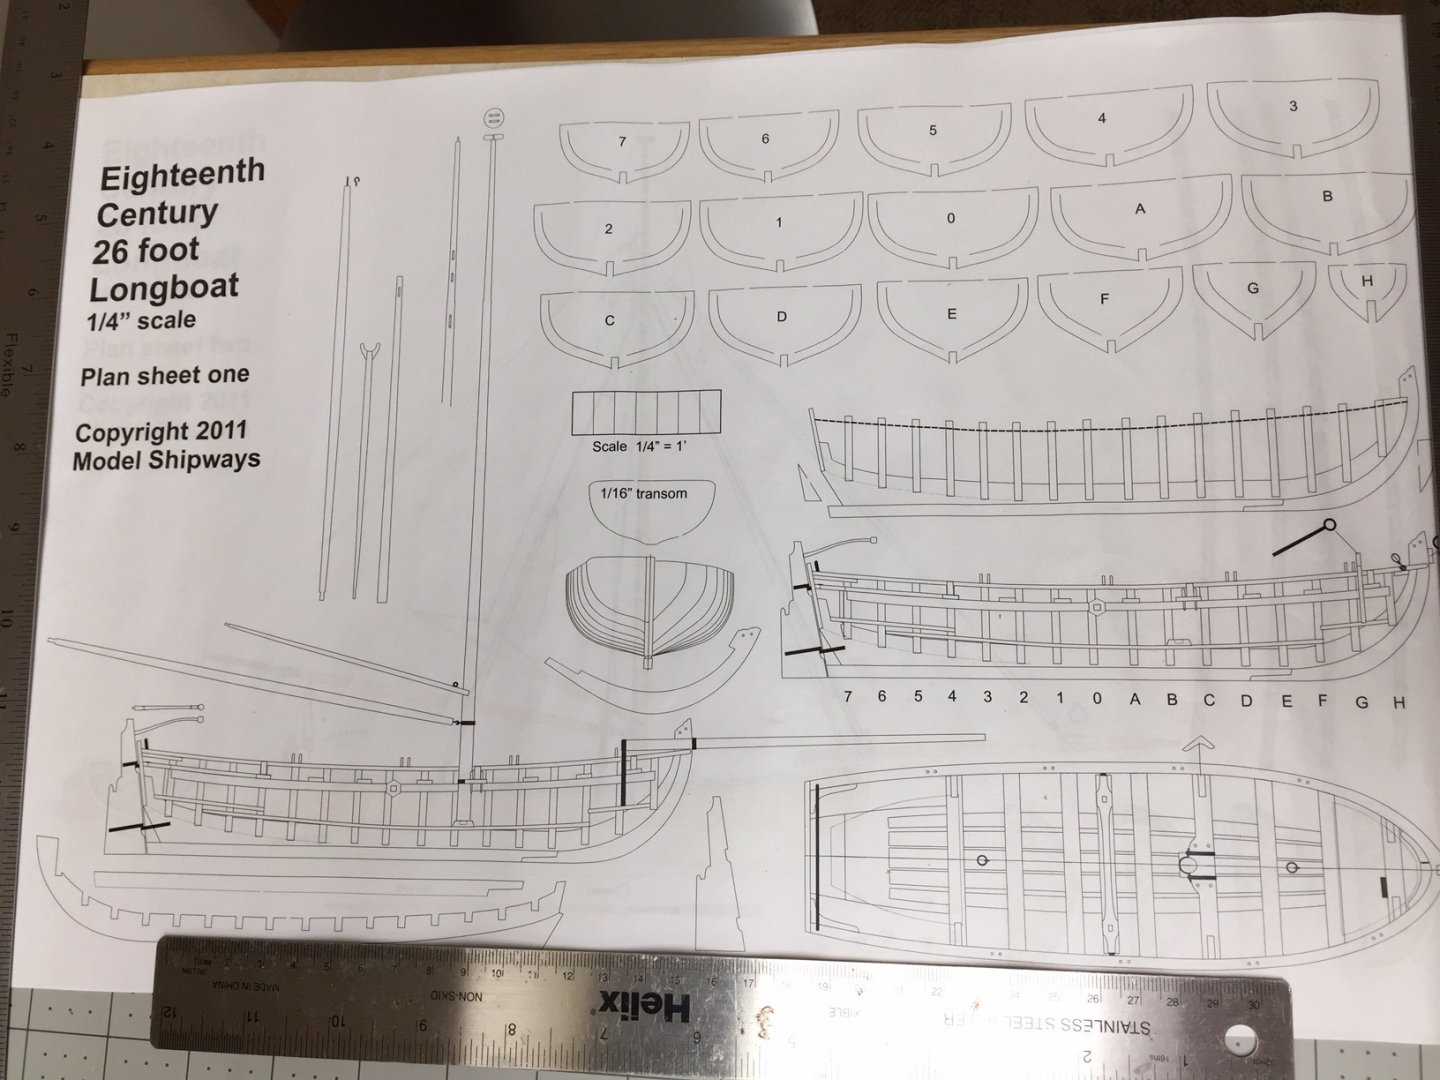
As I finish Syren, I decided to start on this kit that I bought some time ago. I've seen many build logs, so won't go into a lot of detail except on things that I did different. The first couple of photos are of the kit box and plans, so you can verify the kit that I am starting to build. I purchased from Model Shipways, and I believe it cost about $50.

- 55 replies
-
- 2
-
-
- 18th Century Longboat
- Model Shipways
- (and 1 more)
-
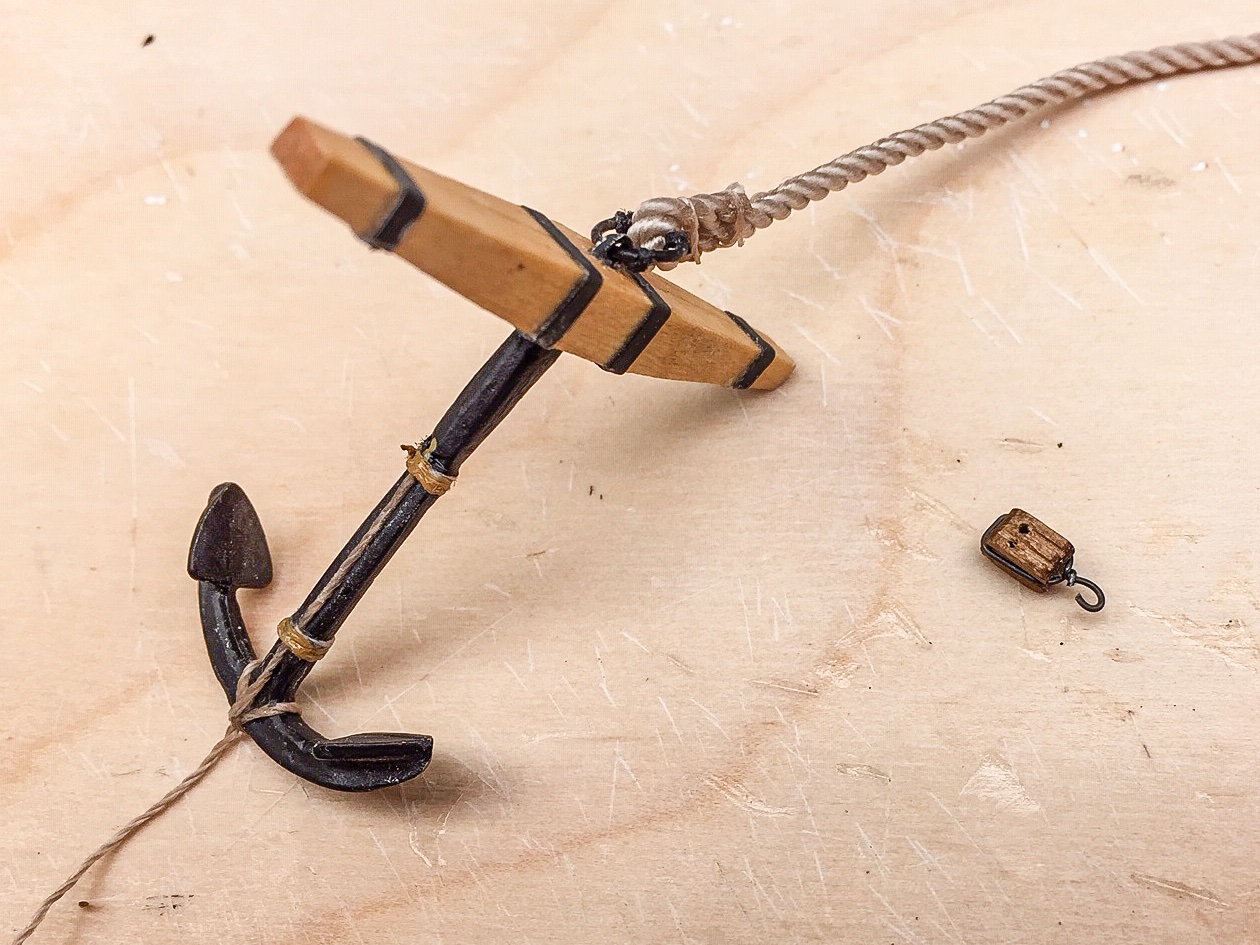
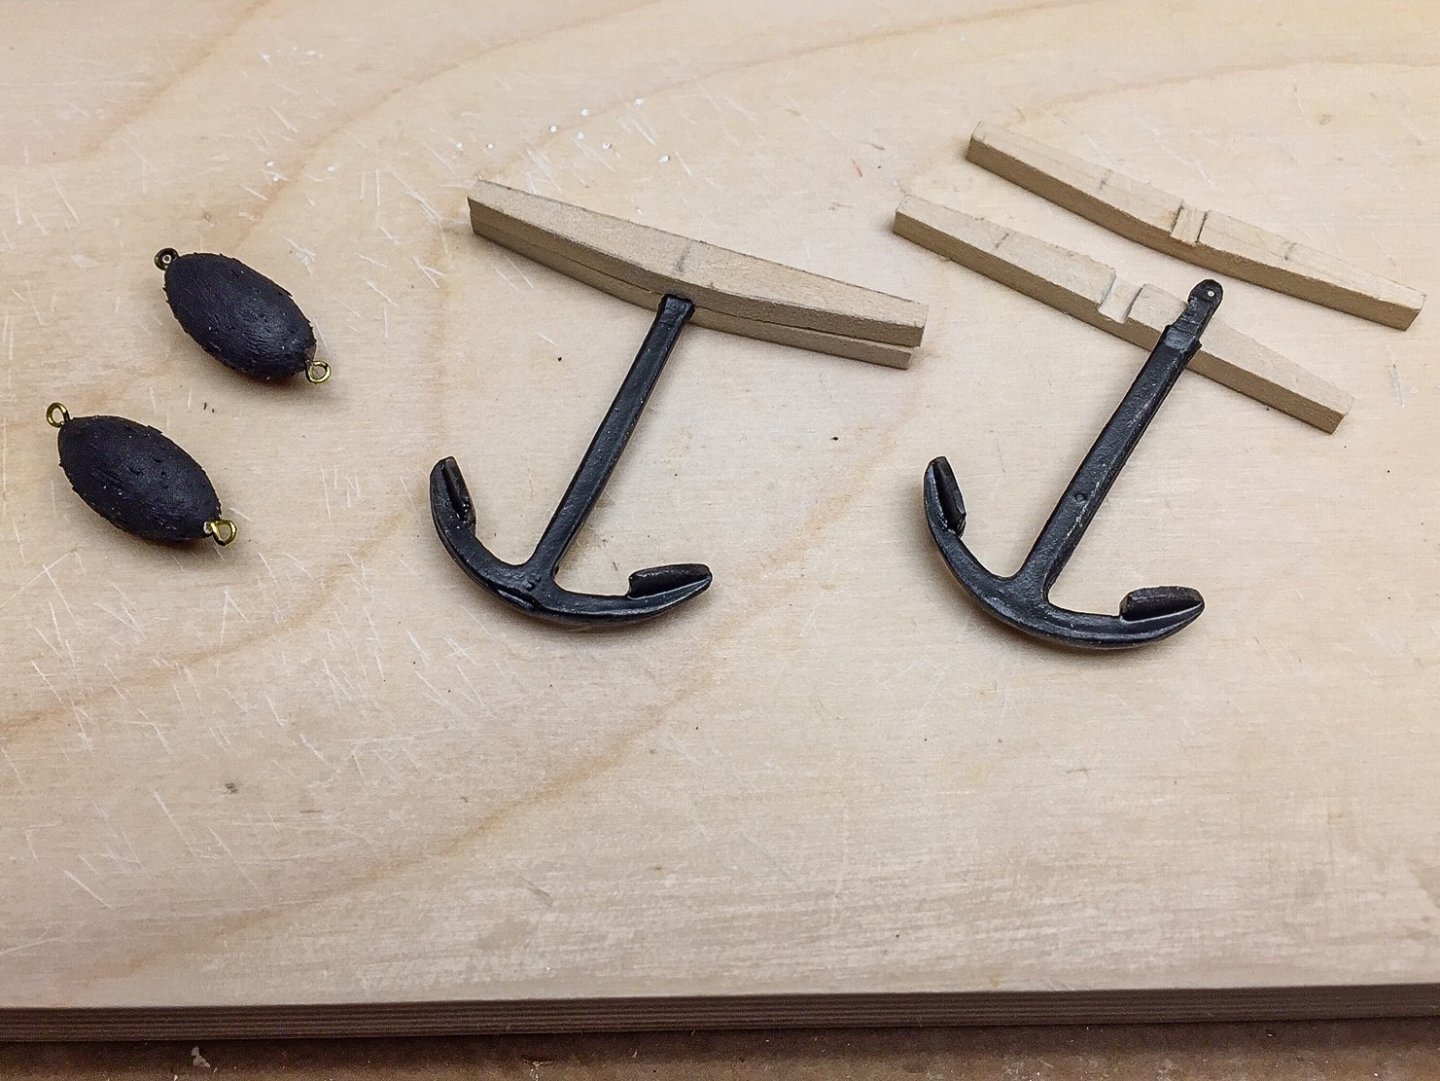
If anyone noticed the anchors in above photo, you'll note they are wrong. I was a complete bonehead and didn't pay enough attention to the plans. I think I got absorbed making the parts and forgot the big picture. The crosspiece should be perpendicular to the anchor prongs (or whatever they're called), not parallel. I realized the problem when I got ready to glue on the anchor. You can imagine what I was thinking. So what to do. Should remake it, but I'd already spent several days and hate doing something twice. I decided I try a quick and dirty fix, so bent the metal anchor part, rotating it 90 deg. It's soft metal, so it didn't break. But it left a twist up near the crosspiece, so I glued some small pieces of wood and sanded them to conform to the new orientation. I've added filler, and will sand some more. I think after painting it will look halfway decent. It's not like the metal anchor was very high quality to begin with. I've been stuck until I get this done.
-
I'm new to MSW and just wanted to let you know I really appreciate the effort you put into your build log. I don't have much experience with model ships yet, just finishing a 2nd one and the 1st one I've built in many years. Your log has been very helpful. I wish I'd looked at these build logs before I started the Syren. Now I know! I'll look at Chuck's plank bending method. On my last I used a bending iron you can buy and learned you just need to wet the strips and apply heat, but I didn't figure out how to do an edgewise bend, and didn't even know you needed one until halfway thru. Ended up forcing it, and it worked, but I knew there had to be a better way. Also never heard of Vanguard models, so will look them up as well as some of the tools you used. I can tell they would have been useful. Many thanks! You have no idea how helpful looking at this was.
- 55 replies
-
- 3
-
-
- lady nelson
- victory models
- (and 2 more)
-
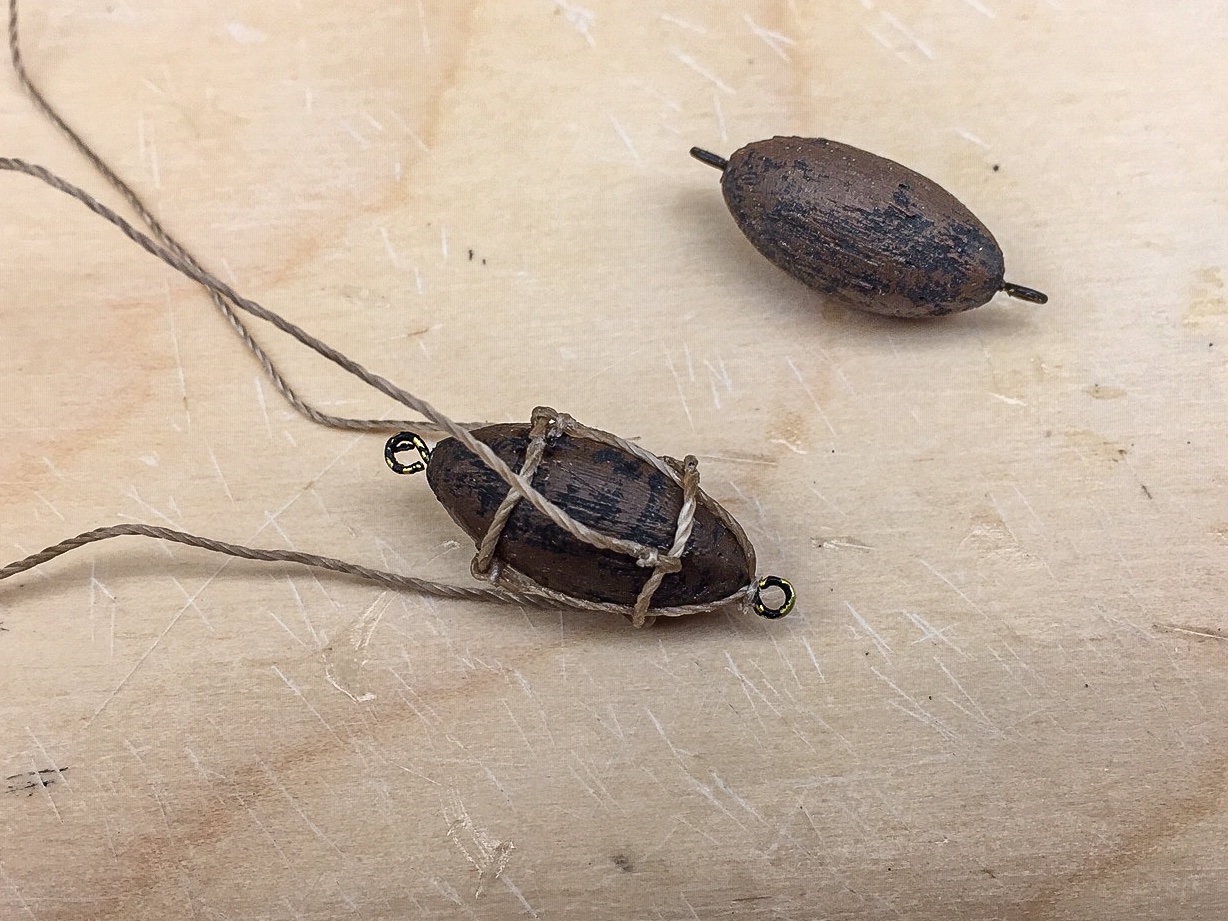
I really struggled with anchor buoys. Almost decided to start over, but not sure I could have done much better. I could have used a small lathe of some sort to turn them, but not sure how you work on something this small on a lathe. Thought about using drill motor, but the problem is how to hold onto it while turning. Even small nail would be too big. Any wire or nail small enough would not be strong enough, or that was my thinking. I have no experience turning small parts like this, and very little experience turning anything. So I shaped them by hand and thought I did pretty good until I starting rigging. Trying to attach web rigging was difficult for me. The buoys are a little slick and hard to hold, and rigging thread is a little stiff and won't lay down on the buoy. And then you have to try to keep the webbing aligned, and this I did poorly. It didn't help that the buoys were not perfectly round - "close enough" made it more difficult. Just to get thread glued on the buoy, I found I needed to make a small depression for the knot (eye) to sit in. A little CA in the depression and then the eye will stay there. I held ends of thread with the mini-clothespins I've used before to hold small parts. And I also held the buoy with a clothespin on one of the ringbolts. I worked around the buoy gluing one eye at a time. If I had gotten the depressions aligned, all would have been ok. But of course, I thought I had them aligned only to find out afterward that I didn't. There's definitely a good side and a bad side to each buoy. Photo shows the good side which I will mount to face outward. The other side will be against the ratlines, so it won't show.

-
I'm on the last chapter, anchors and flags. I'm trying to follow the manual. The anchors are pretty straightforward. I used scrap 1/8" basswood for the cross pieces - cutting, filing, and sanding to shape. I fought the 1/16" black sticky tape and ended up gluing it on. The sticky part doesn't work as it's gotten old. I remember it didn't stick that well when I used it on masts. I tried wrapping or serving the iron rings, but thread seemed too thick. I left it on, because it will hardly show when the anchor cable is attached. The anchor buoys were carved from scrap 3/8" square balsa pieces. I used xacto for rough shaping and sanded a lot by hand. Everything went ok until I tried to rig them. I've been fighting that, and have ended up gluing each knot and thread to the buoy, which is a slow process. But I'm getting there.

-
Thank you for bringing my attention to the little drawing of anchor rigging. Somehow I overlooked it. That rigging was hidden in the photos, but the drawing makes it clear. So far struggling with rigging buoy floats. It's a challenge.
- 950 replies
-
- 1
-
-
- syren
- model shipways
- (and 1 more)
-
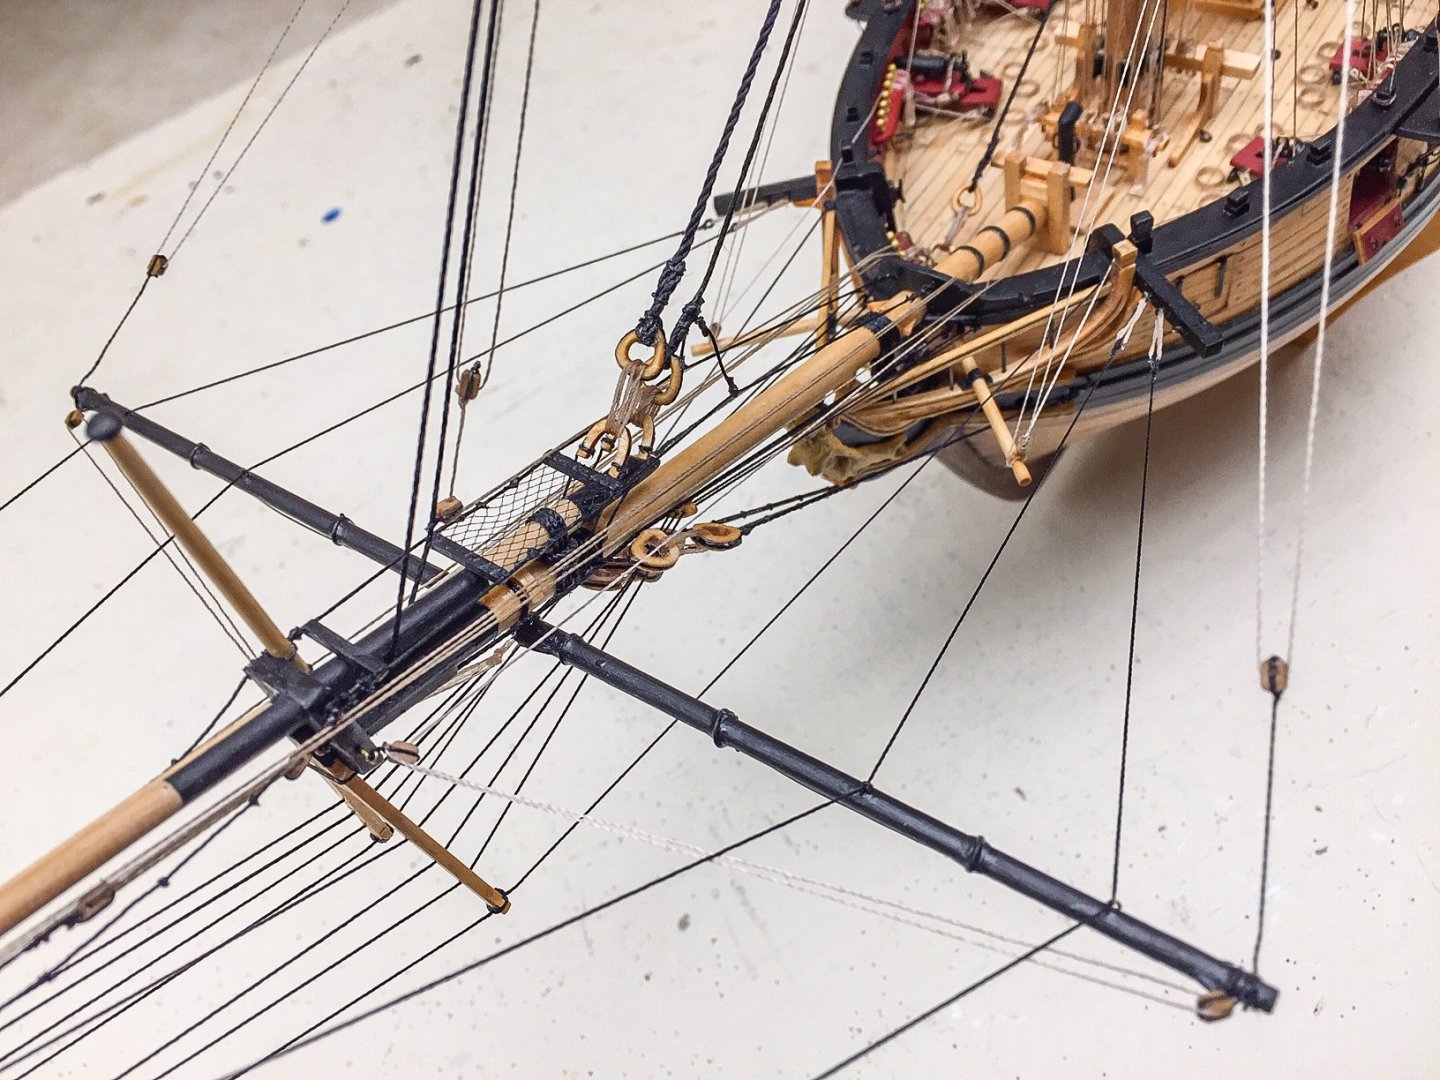
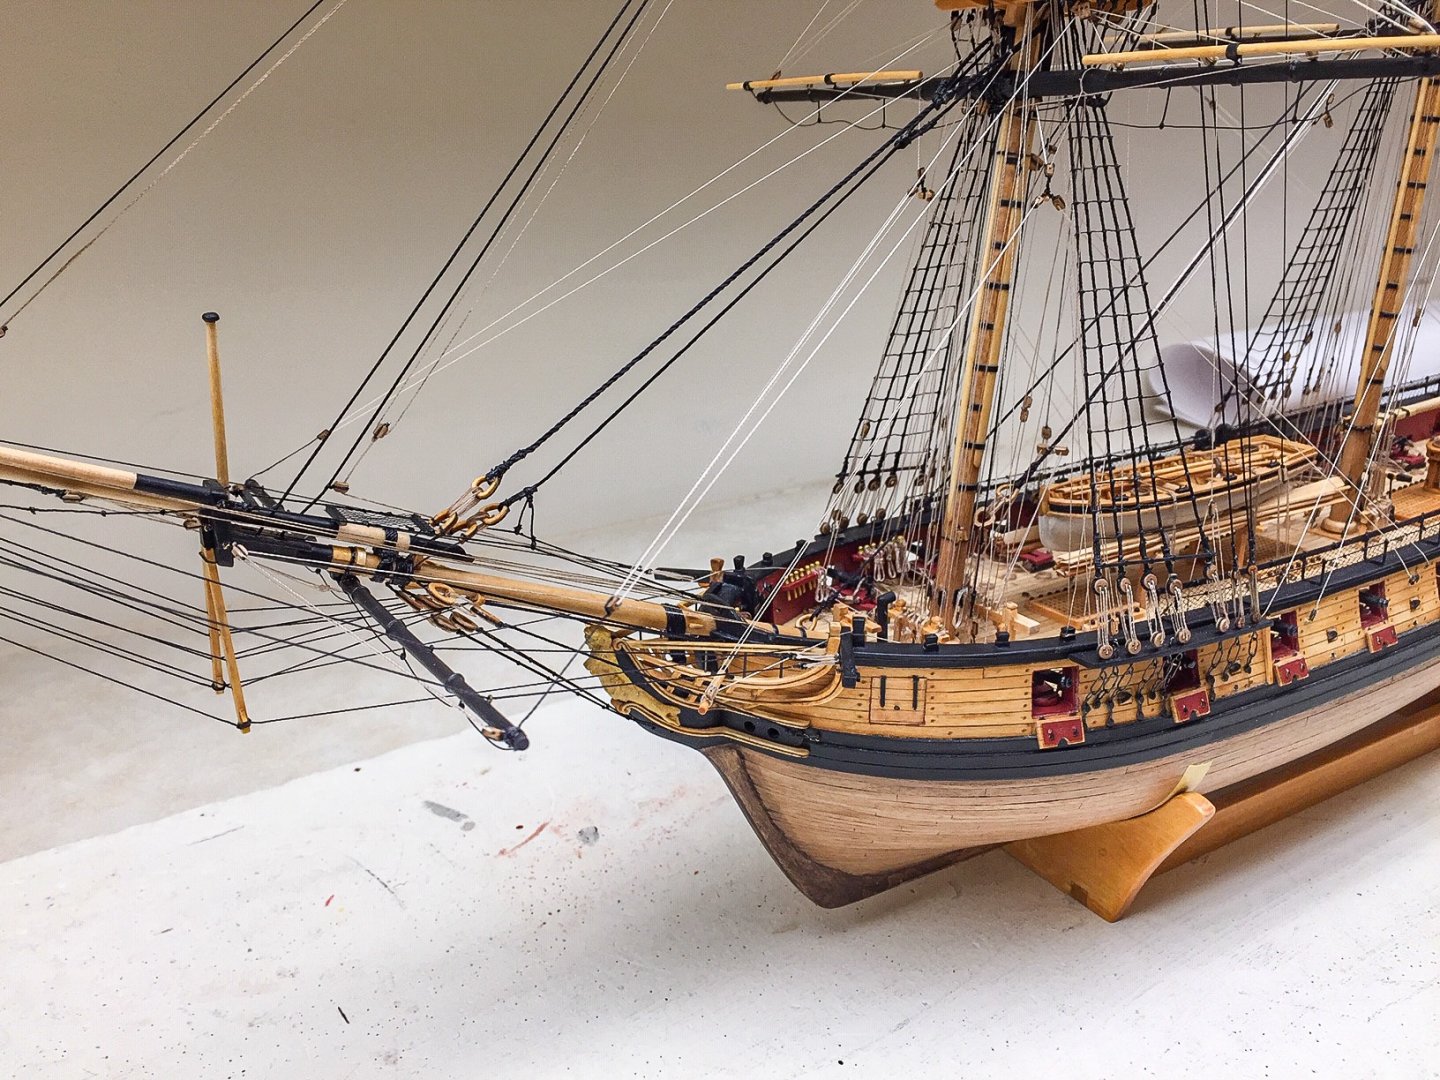
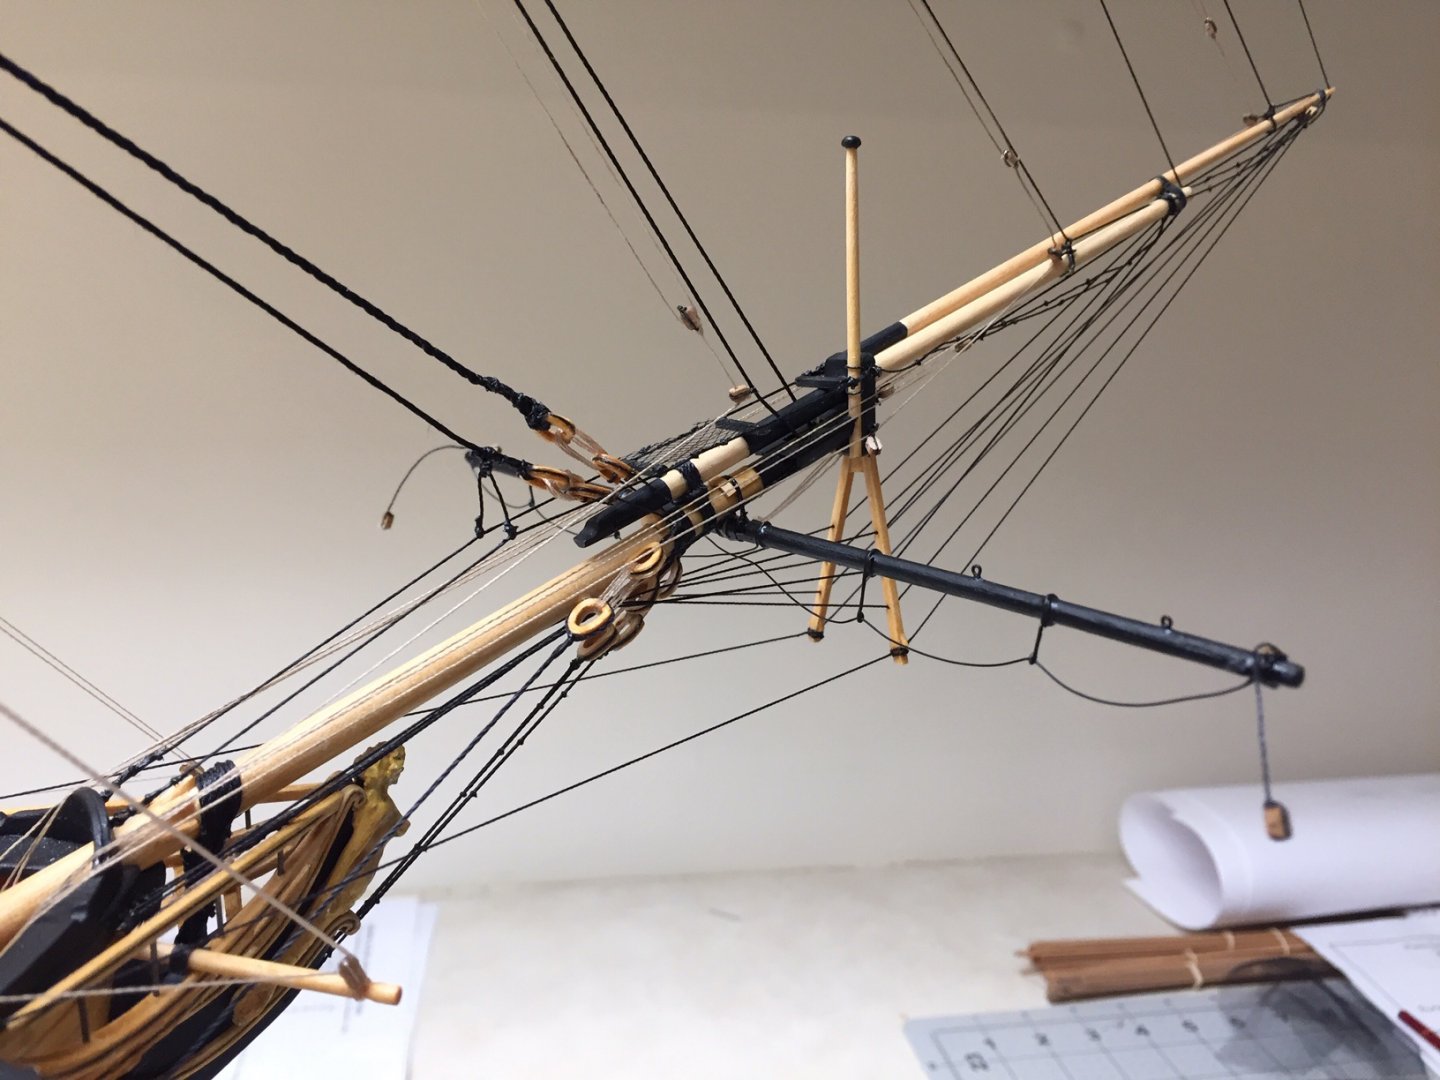
Finished the bowsprit rigging. I can see why you put the bowsprit yard on last, because it seemed like it kept hitting or touching it my fingers or hand all the time. No real problems other than I discovered a rigging line from a long time ago that got hung on a block instead of going straight down the bowsprit. Not easy to see, so no one will know but me (and you all now). Here's some pictures.

-
I agree, awesome!! Great research also, figuring out that this is the way they were likely done for real. For a model, your first ones were also excellent even if a little "classy" for an old sailing brig. I got a kick out of covering them with tissue. Reminds me of model airplanes! We are getting what feels like Canadian cold here in Kansas this week. I started anchors today. Looking ahead I'm a little confused by his rigging instructions, and there's nothing shown on the plans.
- 950 replies
-
- 1
-
-
- syren
- model shipways
- (and 1 more)
-
Beautiful mast coats!! I knew you would go the extra mile and add more detail. Your method is exactly the way I would have done it, except I wouldn't have thought of the extra little steps. I've done lots of little parts like this over the years for model airplanes. These little details are worth the effort. It's surprising how much it adds to the model, although the vast majority of people looking at it won't know the difference. But you and other modelers will. This is inspiring me to attempt another build. It really helps to see what others have done.
- 950 replies
-
- 3
-
-
- syren
- model shipways
- (and 1 more)
-
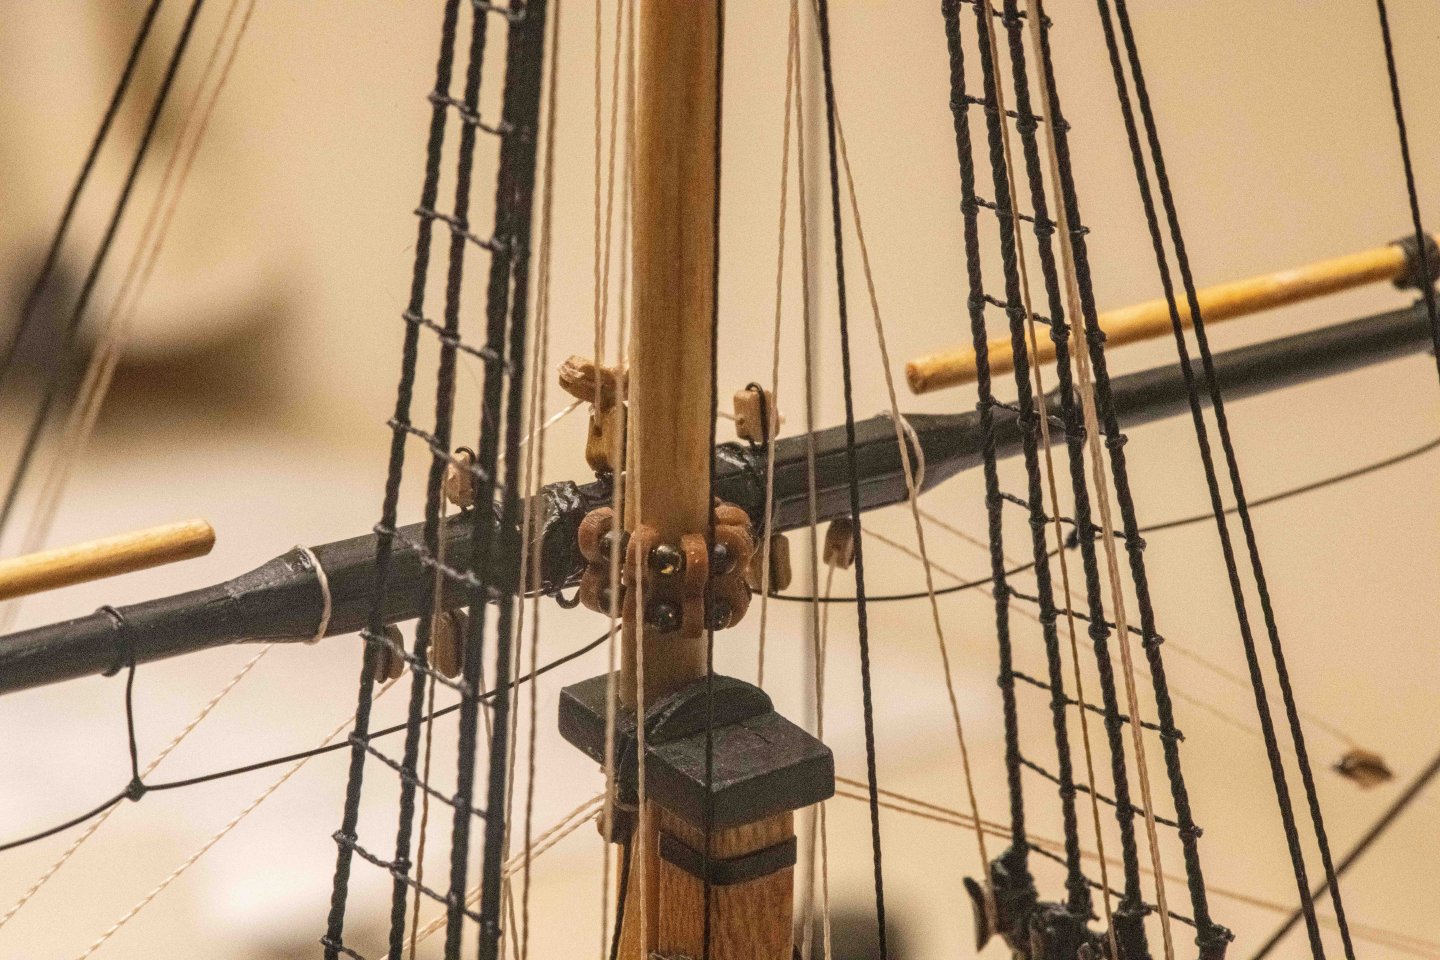
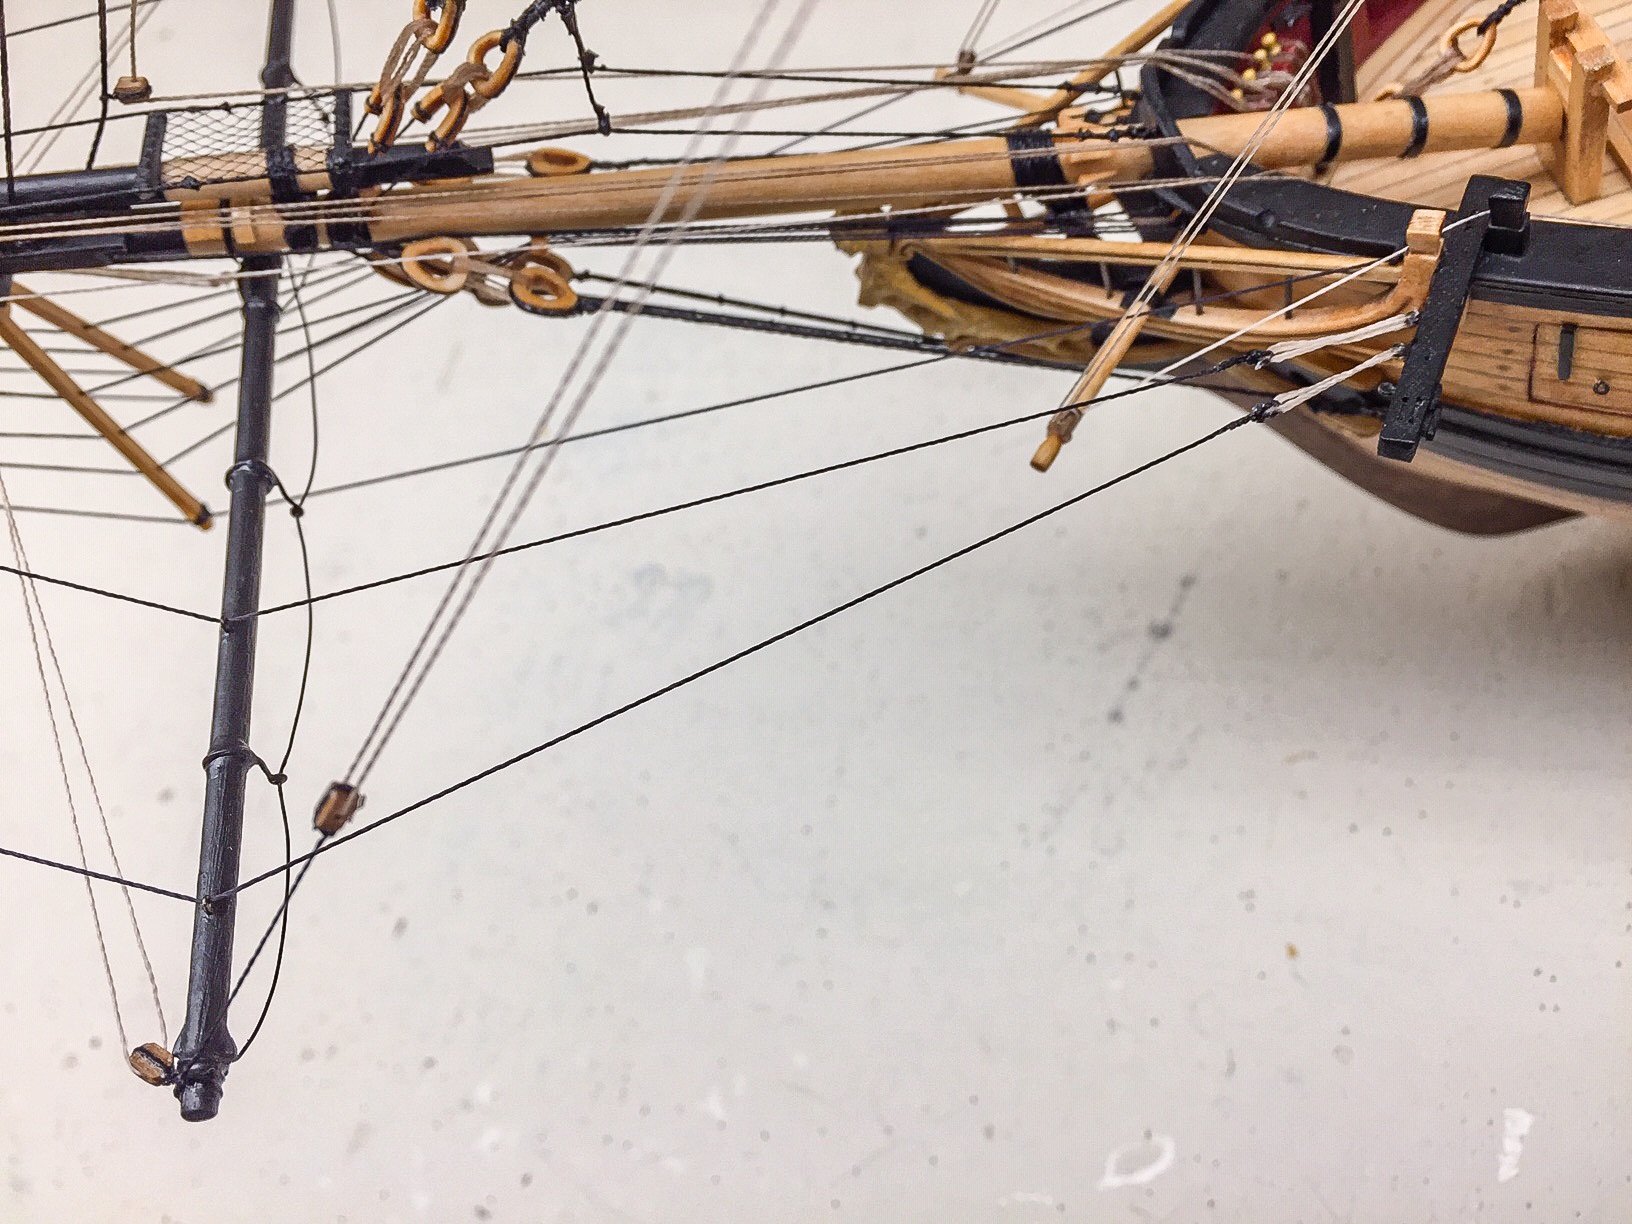
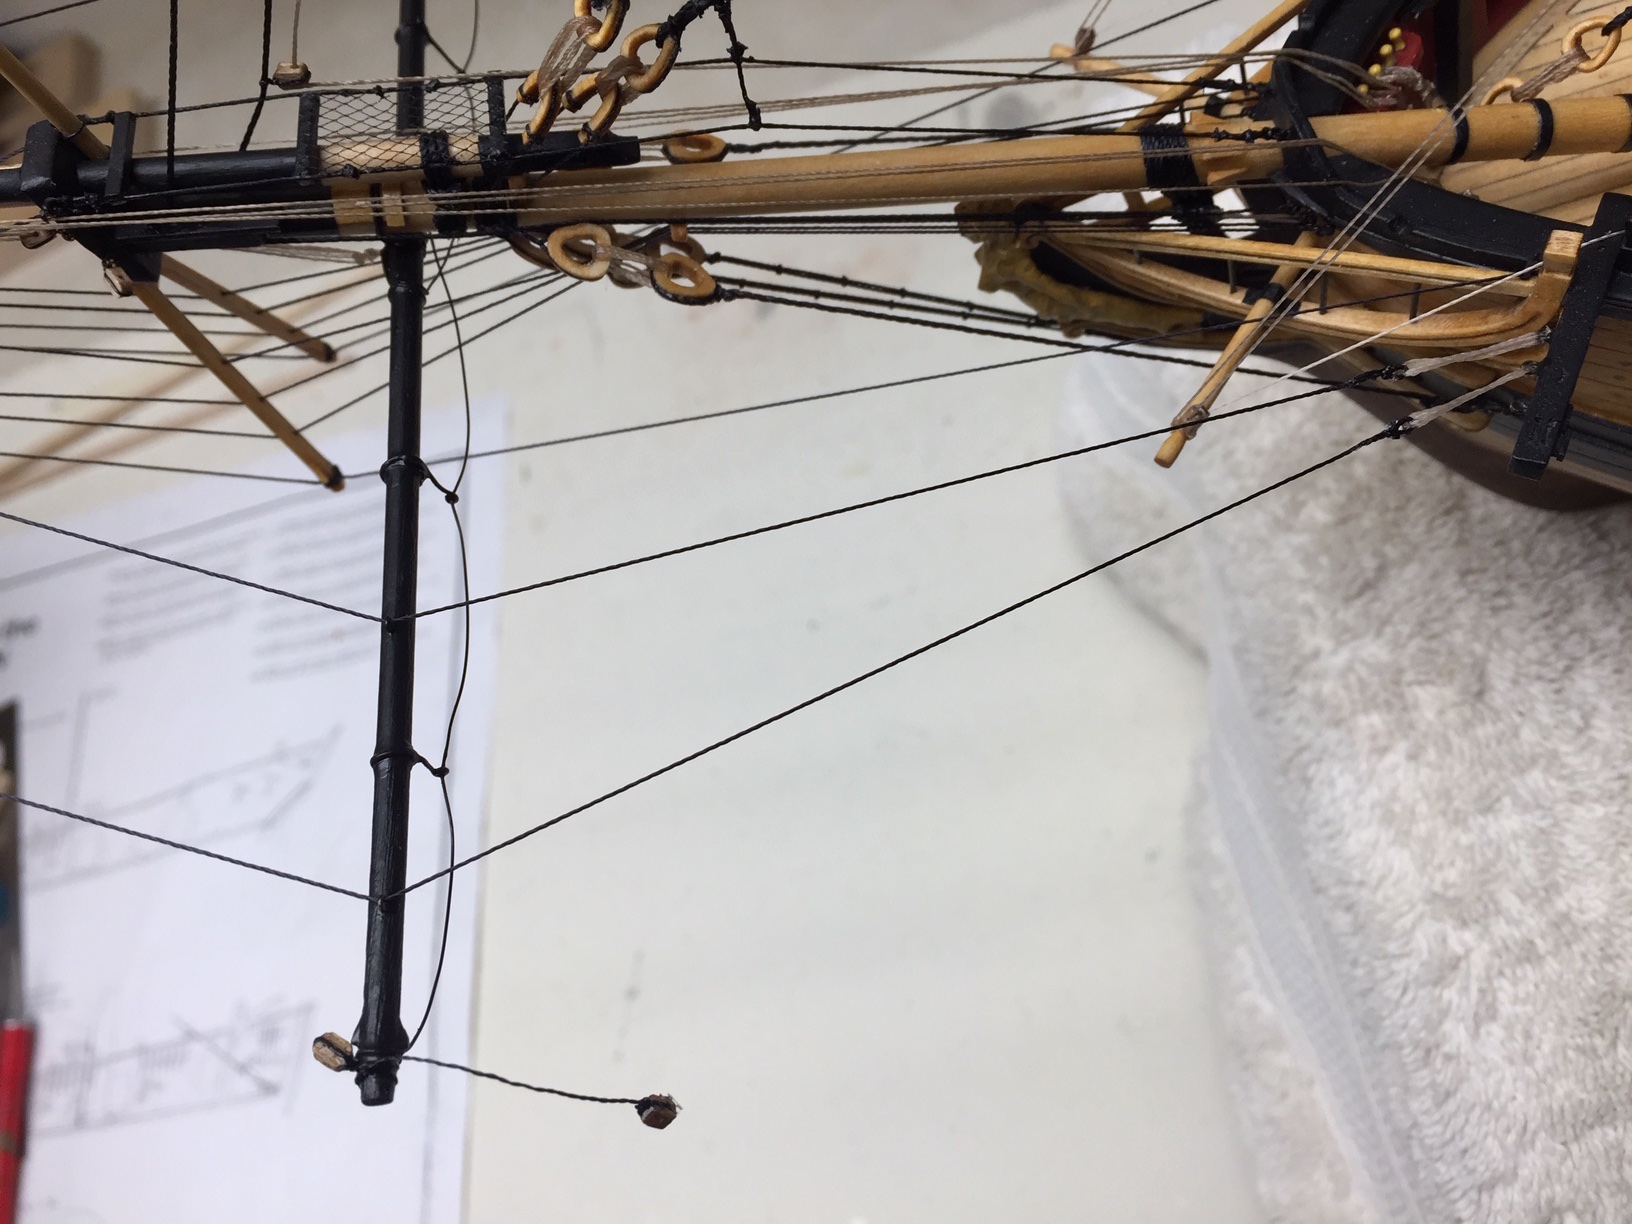
Did the jib guys today. I used a wire spacer to hold the black guy rope the proper space from the cathead eyebolt, so I could it's length correct. It also ensured the ropes would all be lashed the same distance from the cathead. It's same technique used to get the shroud deadeyes to line up (of course I still missed on one of those). The lashings on the guys are straightforward because they are exposed and you can easily reach them. You can see lashings to cathead on right side of photo.

-
There's another Syren build log that used blocks and rigging rope from "Syren Ship Model Company", but web site now says they are no longer going to sell rigging thread because they can't keep up with demand. I believe this is Chuck's company and I completely understand the huge demand and not being able to keep up. I'm not sure where to turn. Model Shipways sells other brands of rigging thread, so maybe they are of better quality than what was in the kit. I may order a little just to find out. I started with what was in the kit not knowing there were other better choices. It's not terrible, but I can see from what others have done, it does make a difference. I think a thread half the size of the 0.008, so about 0.004, would work better and only used for seizing ropes. Of course, my opinion is probably skewed because I had a hard time seizing ropes and ended up using one or two overhand knots. I never was able to wrap the seizing thread around the main thread, even when the main rope was a larger size. It was all too small. The knots I used don't look too bad, because I would trim off as much as I could with xacto. In some cases I just used one knot and then glued (ca) about quarter inch of the loose thread to the main thread and trimmed it, so ropes looked doubled up. A little touchup black paint and it looked pretty good, at least this scale. I struggled with the rigging. I built one other boat, but it was a long time ago, and it was not near as detailed as this one. Most of the lines are seized, but I often resorted to overhand knot around mast or yard. Based on my skills, I had to make it simpler. I'm rambling and these comments are a bit unorganized, but hope it helps a little.
-
Love your preliminary rigging above the mast platforms, especially the dark brown color. It looks a lot more realistic than rigging thread provided in the kit that I used. Your model is looking great. Also loved the photo with plans in the background. When I get finished, mind if I copy that idea? Your model is a definite step up from mine. The rigging thread and block upgrade alone is a big improvement. I keep finding little rigging mistakes that I've made after it's too late to do anything about it. I guess I'd go with making new mast coats to fit. I don't think wedges would look right, and agree that I don't think they'd use them on a real ship for this purpose. I don't have a lathe either, but would try to drill & file hole in small sheet of wood of the right thickness. And then cut the circular outline on jig saw (or hand coping saw). The rest would be a lot of hand sanding to shape. It might be possible to simulate lathe with drill motor, but I've not had much luck doing that except for sanding in a taper on a dowel or something simple like that. I think mast coats are too small for that approach. Your craftsmanship is so wonderful, I'm sure you'll be able to make good ones, probably better than what was in the kit!
- 950 replies
-
- 1
-
-
- syren
- model shipways
- (and 1 more)
-
Got the bowsprit yard finished today and mounted. It was made in a similar manner to the other yards. It took a couple of days to do foot ropes and attach eyebolts and blocks (I'm not too speedy). It is lashed to the bowsprit, and I also pinned it to strengthen the joint. I aligned the yard from the front by making it parallel to the other yards. I had to get down low to look up so I could see it's aligned. I got it perpendicular to the bowsprit (viewed from above) by aligning it to a handheld right triangle. It was all done by eyeball. I didn't try to measure anything, but it looks right. It was a bit awkward to do this at this stage of construction with lots of rigging in the way.
-
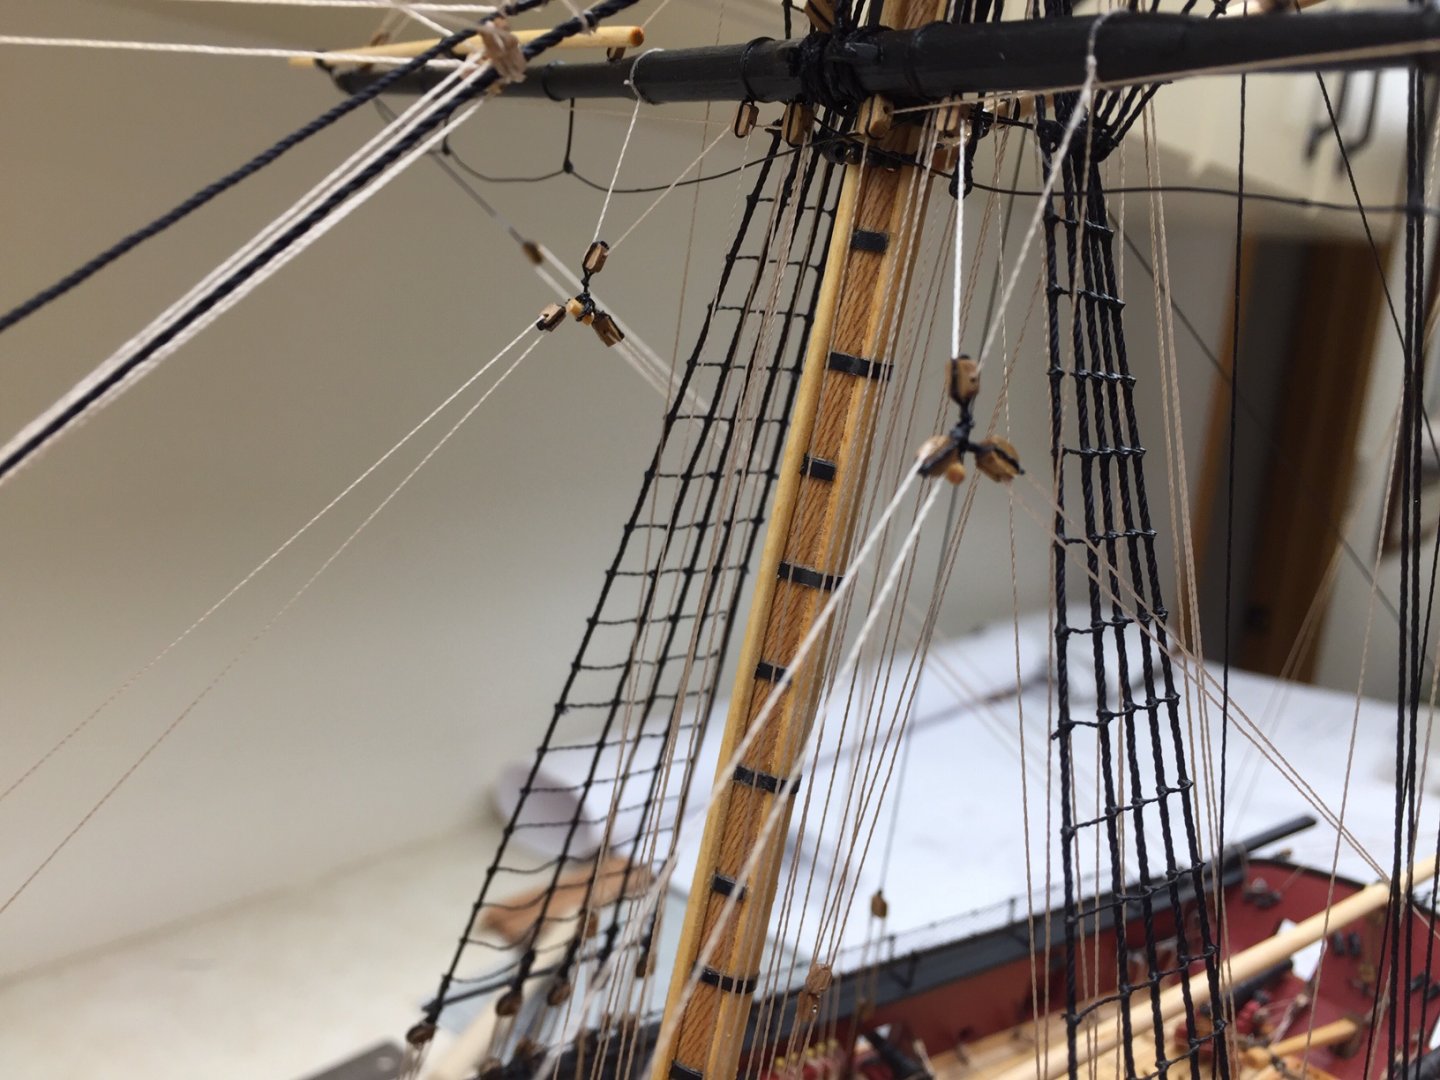
Finished the braces and sheets/clew/tack lines. The sheets, clew, and tack lines attach to a triple block "structure" for lack of a better term. First photo shows my triple blocks. Of course they don't look as good as those shown in the manual, but I've gotten used to that. The next two photos shows them rigged. They are suspended below the lower yards. I installed them by rigging all the lines thru the blocks without glueing anything. I used clothespins to provide a little tension on the loose end of the lines to make it easier to rig. I probably failed to mention this before, but using the small and regular sized clothespins to provide tension or weight on the loose ends of rigging is very useful and makes the task much easier. If you want a little more tension, add another clothespin. If you need less tension, use the little clothespins (I use these a lot). You have to have enough excess rigging line so you can attach clothespins, but it's worth it. Once all the lines are rigged thru the blocks, you can play with the tension on each one to move the triple blocks to just below the yard and a little in front of it (or wherever you want them). I used the photo in the manual and tried to position mine similarly. Then I glued the clew line first - the one that goes down to the base of the mast. With one line stabilized, it's easier to make final adjustments on the other two and glue those.

-
Here are a couple of photos of my model as of early Feb 2021. I have all the yards and rigging complete except for the lower mast braces and sheets/clews/tack lines. I'm starting to see some light at the end of the tunnel.


-
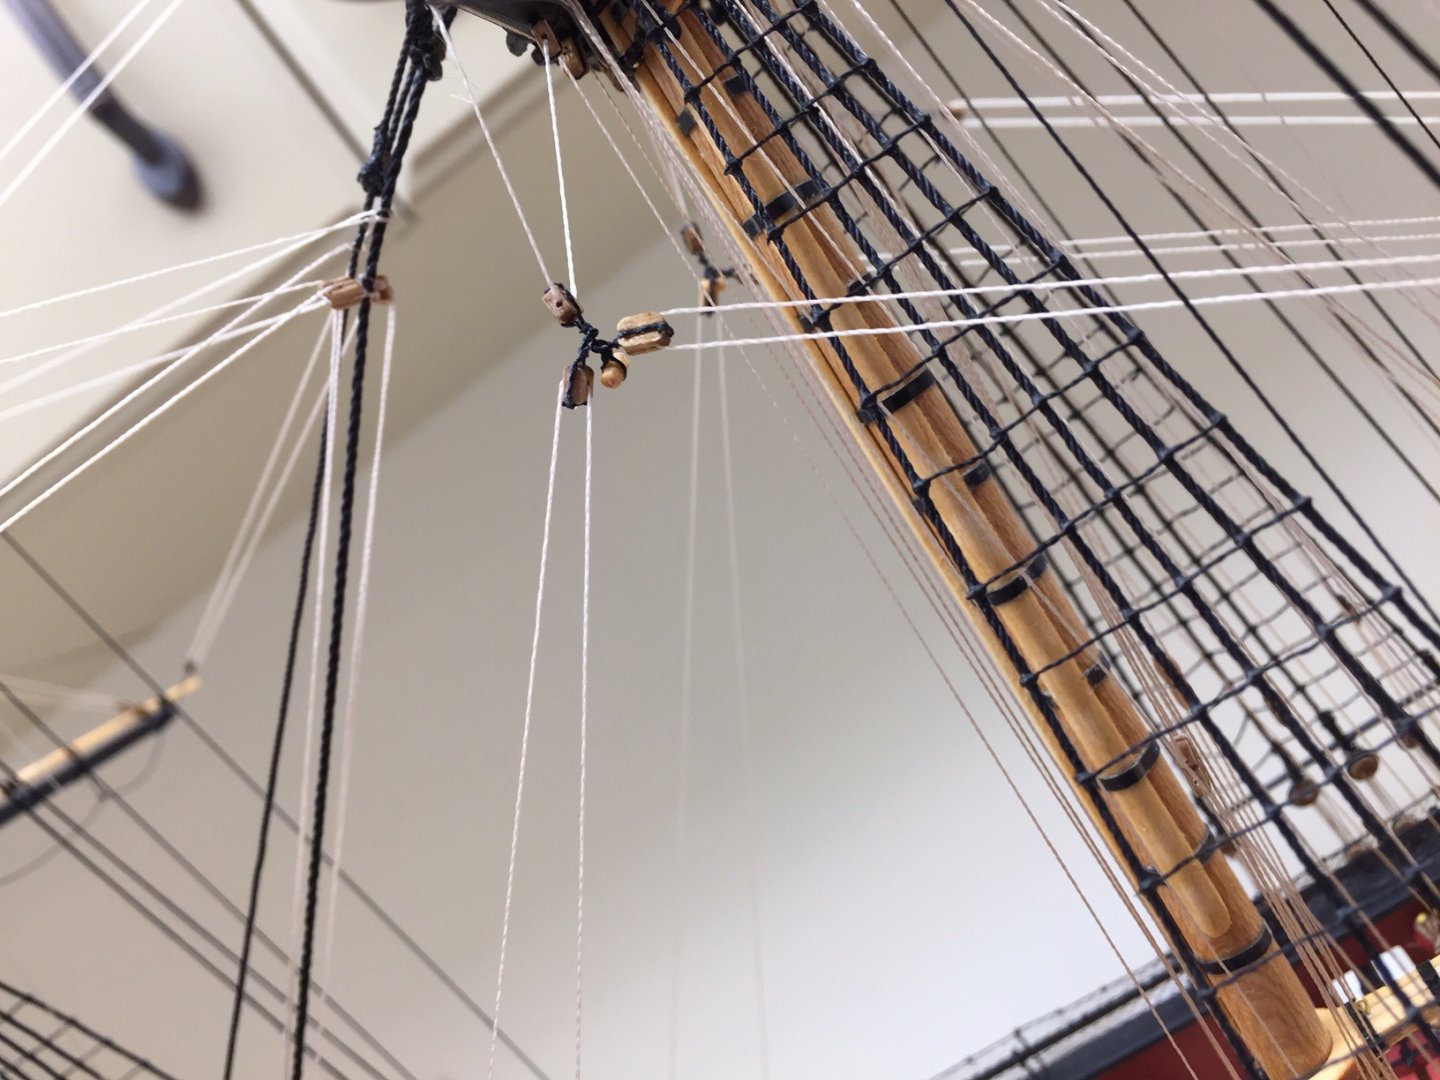
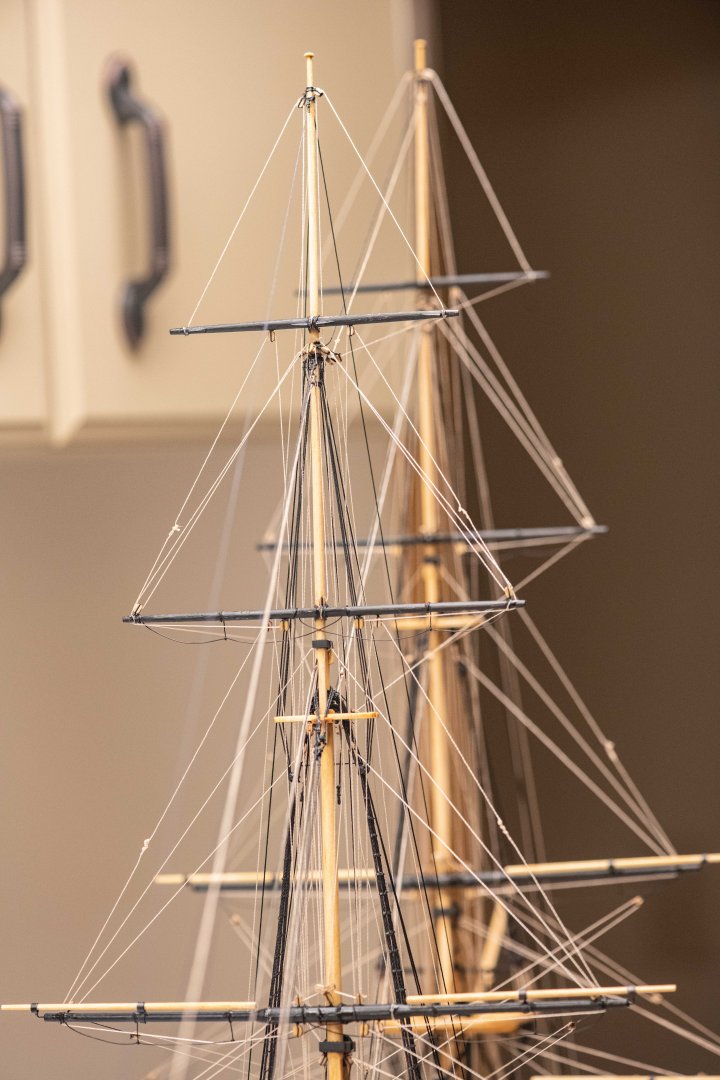
The upper yards are mounted with lashings and rigged in a similar manner. It gets a little simpler when you get to the royal yard. Here are some general comments about rigging the yards and how it went for me. The worst place to attach rigging along the deck are the eyebolts around the base of the mast. There are lines that come down and are lashed to these eyebolts. The fife rails and other stuff are in the way, so there is little access to them. It took a lot of tries to get lashing thru those eyebolts. It helps to stiffen the end of the rigging thread, but there's not much room to get tweezers or anything to maneuver the thread thru the holes. Another hard part for me was routing the rigging threads from the upper yards down to the deck. There are a lot of lines going to the deck, and invariably some are crossed. Sometimes I tried half dozen times to get it dropped down cleanly, and thought I had it right, and belayed it. And then later I saw that I had a couple of lines crossing. They are hard to see when they cross but don't pull on each other. When you put tension on the new line, if it crosses another and moves it, it's easy to see. But sometimes it doesn't move anything and you think it's ok, only to find out after it's too late, that it crossed something. My eyes aren't that great anymore, so it's hard for me to see this kind of stuff. As you add more rigging, it gets more difficult to belay on the deck. As more lines are added, and more belay pins are used, it gets crowded. I was usually able to belay without too much trouble, but then adding the rope coil was often a struggle, especially to keep them somewhat aligned. There was no room and other lines interfered. I did the best I could, but am not that happy with results. It seems like the lines coming down to the belay racks need something to keep them more organized. It's no wonder guys had a hard time "learning the ropes". I would have failed miserably! I got a bit confused about the belay pin numbers. I thought I saw a couple that were incorrect in the manual, or I should say, the plans and manual didn't agree. But I've never been sure about it, because it's hard to locate some of the belay pins on the plans. I know I did some of them wrong, because all of a sudden I'd need a pin that I'd already used. I usually found one close and used it, but once you get off, you are constantly adjusting. Sooner or later you can work yourself into a corner. The belay pins at the bottom of the masts get crowded. I believe there were some belay pins that had two lines going to them. At least that's what I ended up with.
-
Here are some additional photos of the topsail yard and rigging. The first shows the parrels around the mast. The topsail yards are the only ones that have parrels. I had to use one more bead and spacer than what the manual says. The kit provides plenty of extras. The 2nd photo shows the topsail clews and sheets which are between the lower and topsail yards. It also has another view of the 3-blocks used for the topsail jeer tie and buntlines. The 3rd photo shows the topsail braces extending from the ends of the yard.