


Bruma
-
Posts
179 -
Joined
-
Last visited
Content Type
Profiles
Forums
Gallery
Events
Posts posted by Bruma
-
-
-
Thank you, Shipman, I'm glad you like them!
No, I didn't paint them in situ. The tarpaulins (thank you for make me discover this new term, I'm still struggling with my English) are removable, so it was better to paint them away from the ship.Once modeled they retain their shape.What is your opinion about the lifeboat, jolly boat and captain's gig? Are you going to add a new boat to your model? What is the correct location for them? In my understanding they change position at least two times...I'm quite sure that mine is not right, but it was a bit too challenging to change the original location provided by Revell...- hof00 and FrankWouts
-
 2
2
-
Hello everyone. After a long pause, I'm back posting.
On 9/25/2020 at 12:47 PM, shipman said:Bruma, my confession is this.....I have at least three examples of this kit, plus all the accessories available. I've even made a dedicated build stand. BUT I haven't started it yet!!! I've spent an inordinate amount of time studying the model, photo's of the ship and all the build logs such as yours to see how people resolve what I see as kit issues and historical anachronisms. I can't see a way to depict bulwark details accurately...mainly the freeing ports and the white panels that run along both sides. These details will need addressing right at the beginning of the work. I'm still not happy and until I am, I'm not ready to proceed. I have all the important books and I feel my research has been as thorough as it's possible. I'd like to do justice to the kit and make it as accurate as I can. The ship as she is isn't what it could be; I've found hints that still give me doubts.
In the meantime, I've been looking at my shelf of shame. Prominently is the beginnings of my interpretation of the Airfix Bounty which I put a lot of time into some years ago. (The 1:87 scale is very inviting and the hull mouldings compare well to the AOTS book drawings). Again, there's not a lot of real evidence of her actual appearance. So on this one I decided to use a measure of conjecture and artistic licence. For instance, considering the mission she had....to transport live breadfruit seedlings. I decided the converted Captains cabin wouldn't have let enough light in. So I was intending to replace the rear deck grating with a glazed affair much like the skylight on the poop of the Victory. That may very well be wrong but to me at least it's plausible. So that looks like being revived into my winter project (and build log). Ultimately, I may adopt this attitude for the CS kit. Take care and stay well.
I know very well your feeling and there are many things I already did which do not satisfy me.
I started the build knowing my limitation, both in skills, time, money and information and I’m taking this journey as a learning adventure.
Bulwark details bothered me too. They can be addressed properly with a resin 3d printer. I’m quite good at digital modeling but I don’t have a resin 3d printer. So, no go for this option. Laser cutting small pieces of thin wood would have been my second option, but again I don’t have this machine in my arsenal. All the other option seemed to me too difficult and/or inaccurate, so I opted for close an eye on that detail.
Even with this big "poetical licenses", the amount of work needed to build the kit decently is overwhelming, sometimes scaring!
Let’s move on the build again.
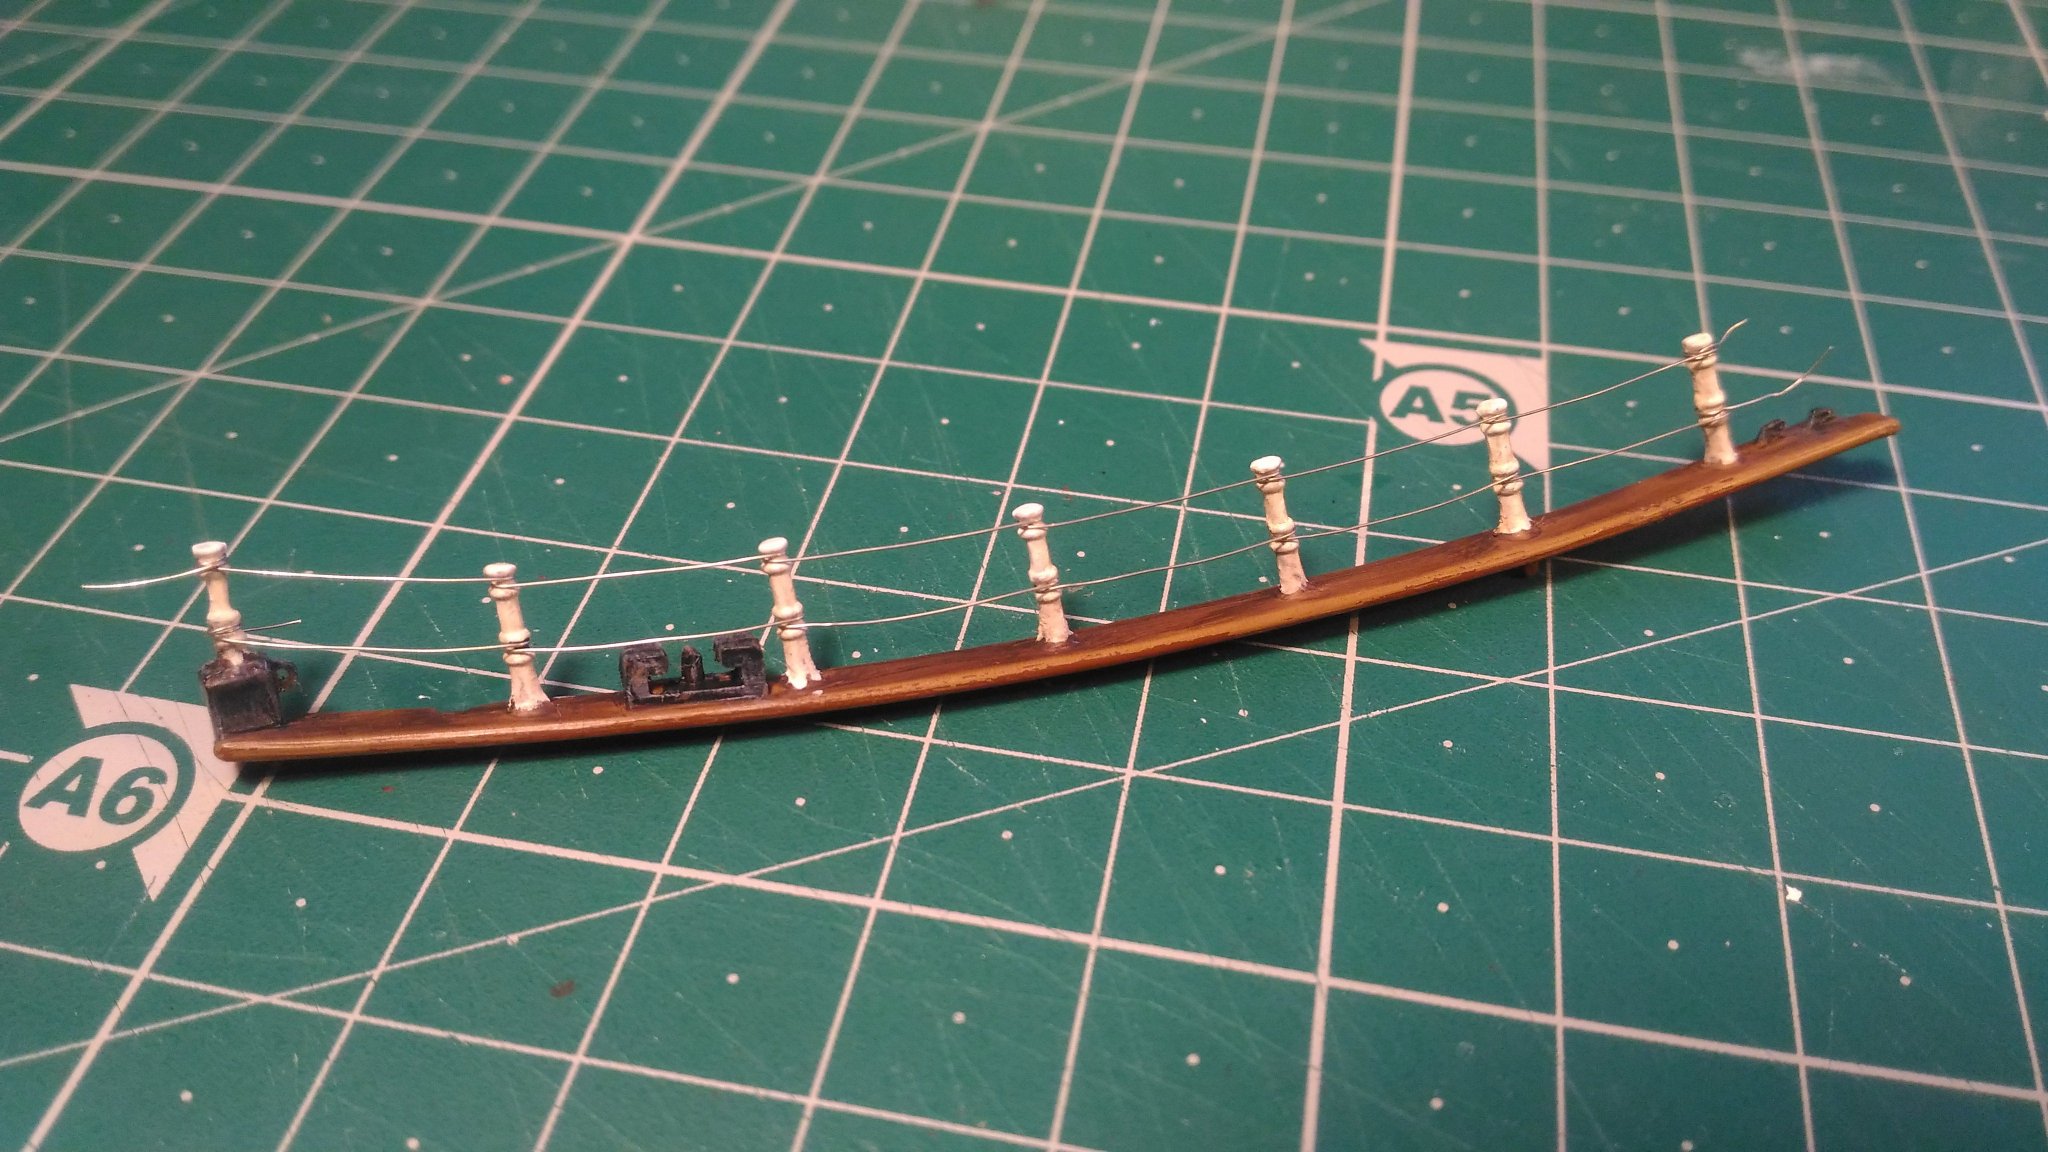
Davits and lifeboats.
The number, shape and position of lifeboats, jolly boat and captain’s gig are different in my two main source of information: Campbell’s plans and Longridge book.
So I decided to stick with the solution proposed by Revell.
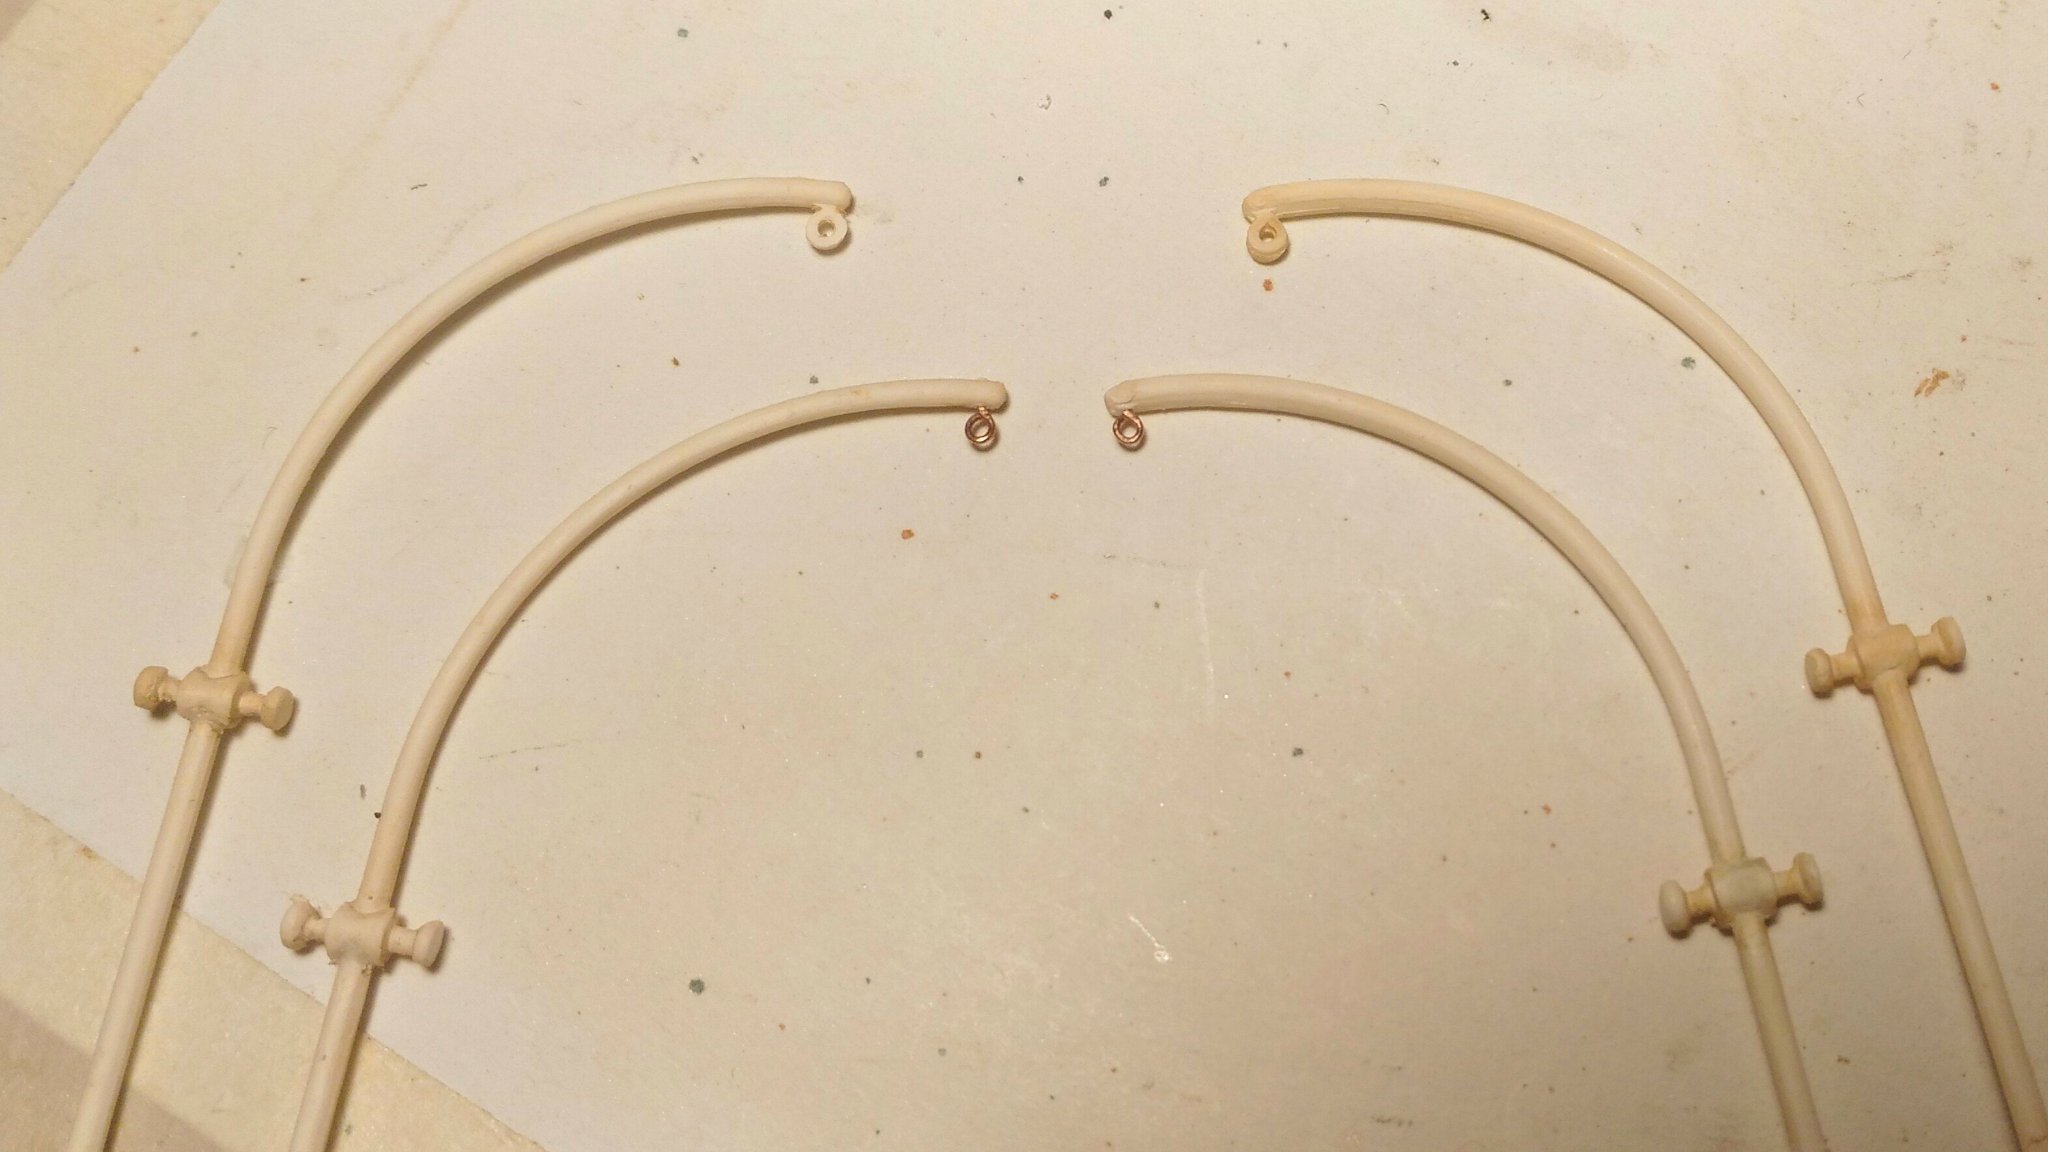
The davits were detailed with new and smaller eye bolts:

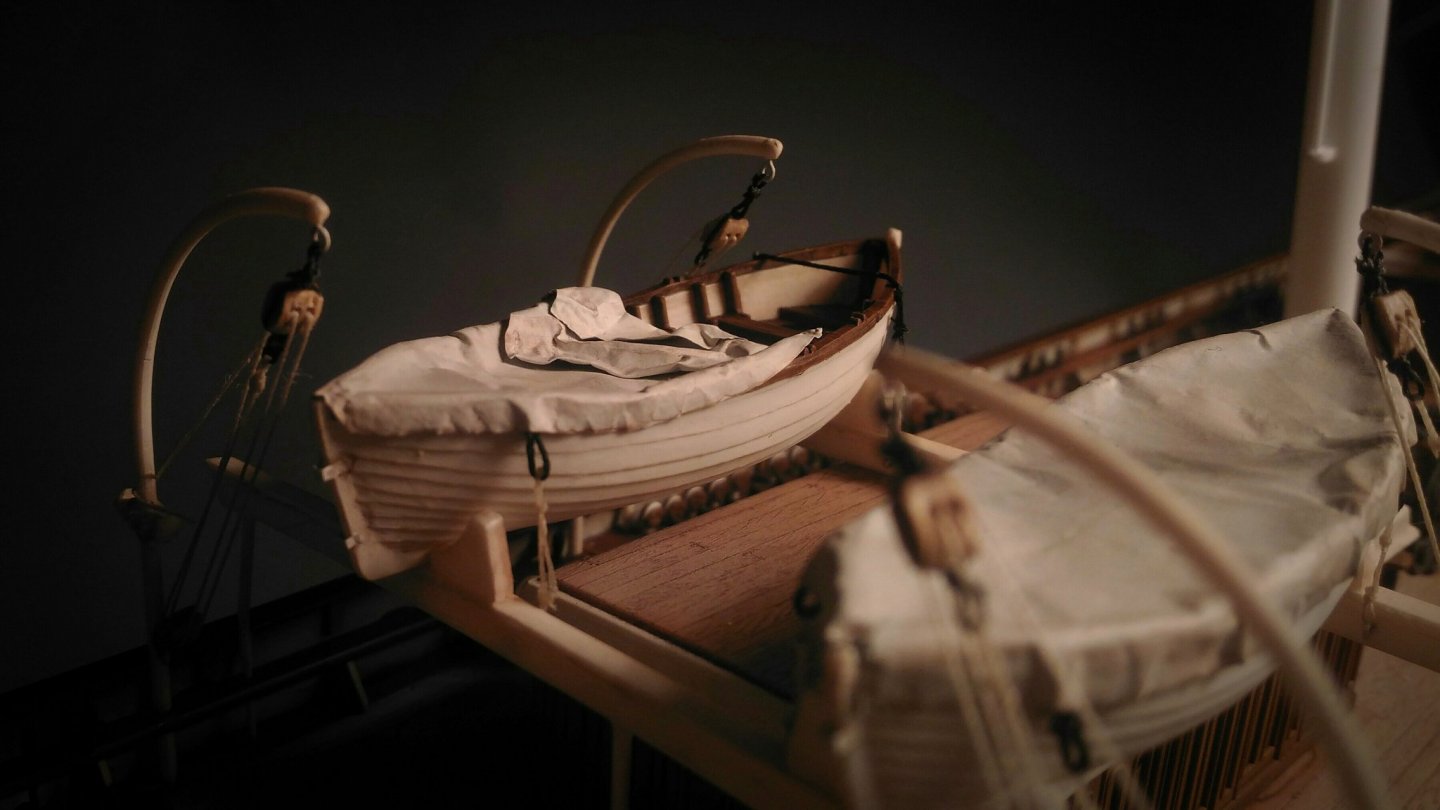
I decided to show the lifeboat covered, so the interior was not detailed that much. On the outside I added the holders for the rudder.
The canvas cover of the boats was a big headache: I didn’t want to use real canvas, the fabric texture was out of scale. After many tests, one evening I was looking my daughters eating her preferred yogurt and the metallic foil used as cover captured my attention.
I cleaned it, smoothed it out, cut in shape and modeled it on the boat to mimic real fabric.
This was the result:
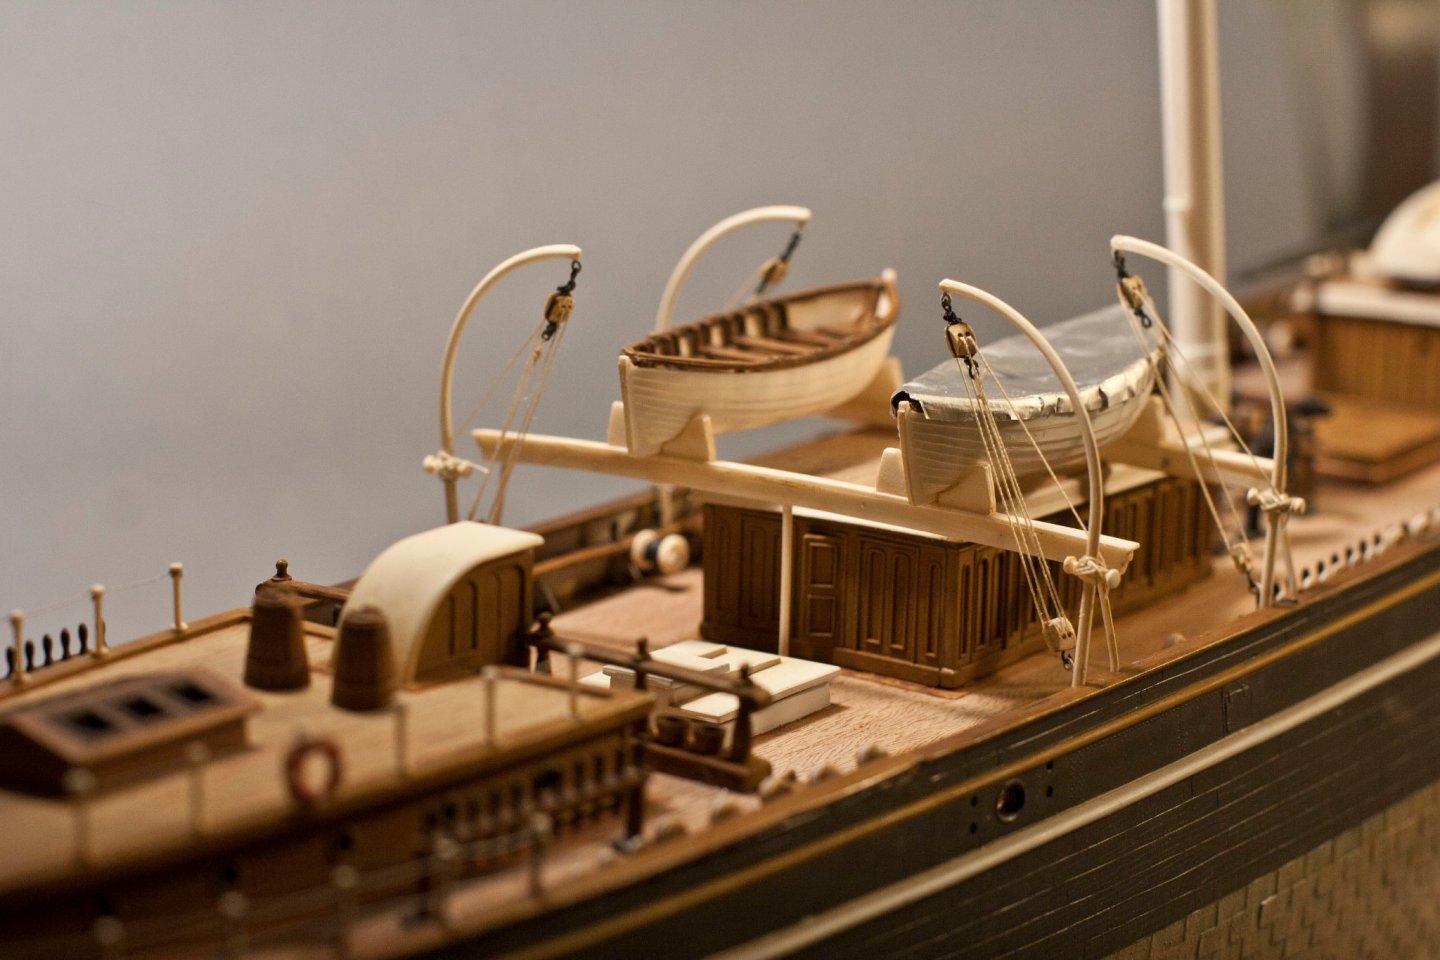
Happy with the look, I cut a new one, more carefully trimmed and I painted it with a basic white acrylic coat with my airbrush.
Some acrylic brown filters helped to make it a little more convincing and this is the result:
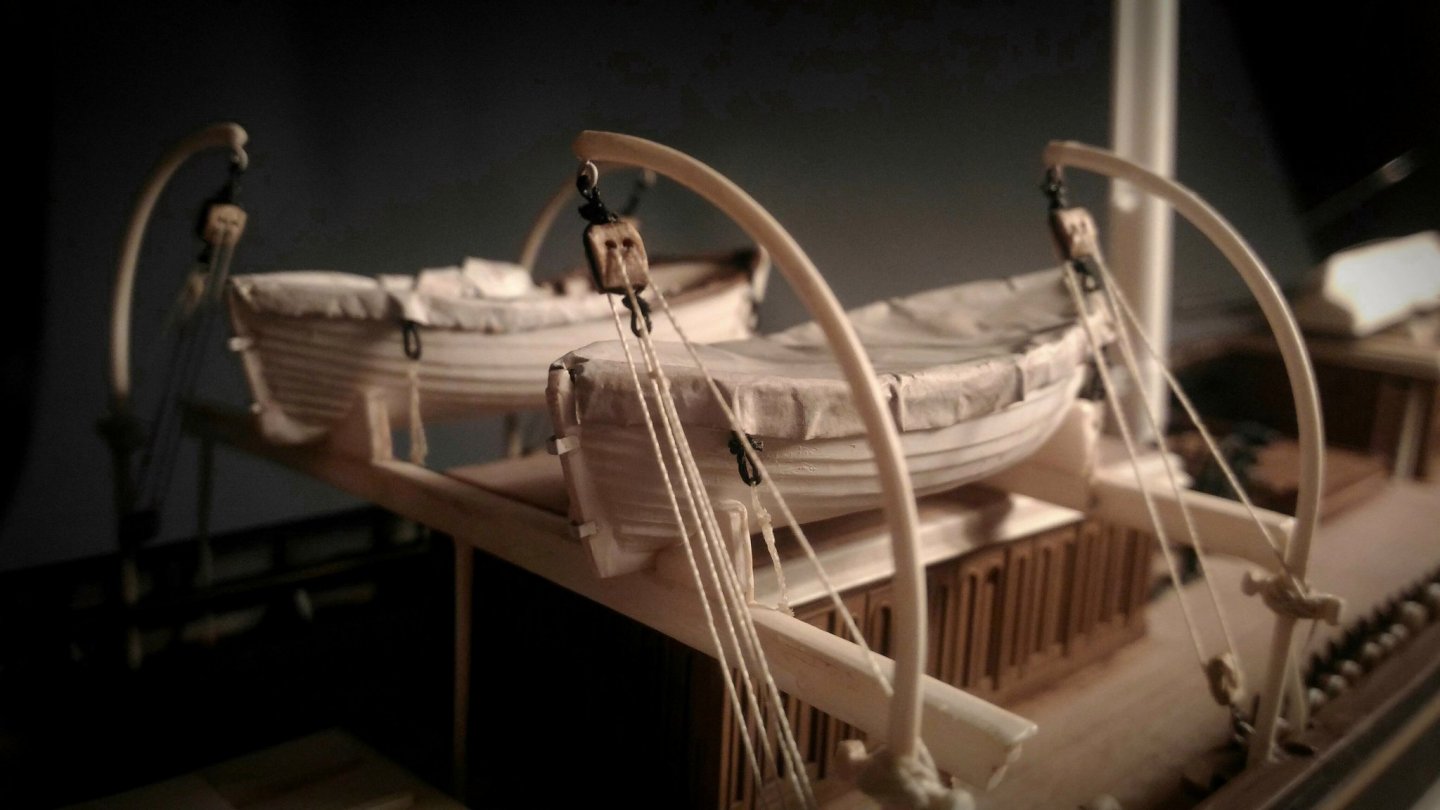
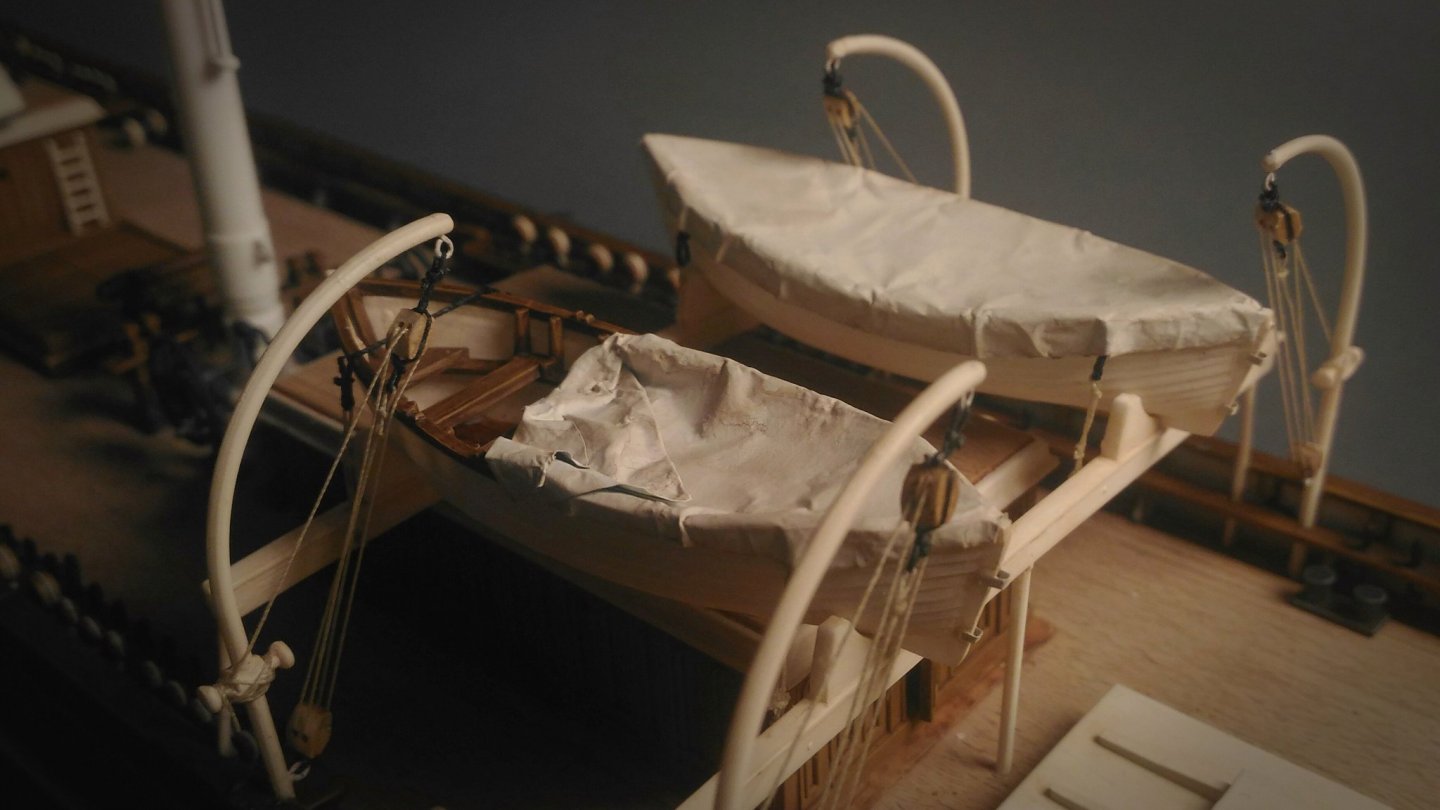
The davits are rigged with purchases at the best of my skills at that time.
Those one where the firs block and lines in my modeler’s life. Now, after hundreds of knots, I’m almost at the same level
")
Anyway, the result is far from being perfect, but it was at least above my expectations.
Thank you for your attention!
- Cirdan, gieb8688, FrankWouts and 3 others
-
6
-
On 9/11/2020 at 11:23 PM, shipman said:
Hi Bruma. I'd be tempted to make my own bowsprit and yards, the kit ones are very fragile.
I too got those decorative photo-etch thingies and also worried about glue everywhere. You made a tidy job of them.
The place you got them from also does proper scale drilled ball stanchions, which the brass wire threads through in a very convincing way. Of course if you wish to spend more than what the kit costs, the above items, plus scale brass belay pins and a range of blocks go a long way to reduce some if not all the outdated clunkiness of Ravels 60 year old moulding.
A well presented rendition of this basically good kit (with a bit of time and money) is a worthwhile endeavour and in my humble opinion is far more accurate than any of the wooden kits on the market.
I understand someone from Revel did visit and research the vessel in the mid 50's. In fact their very first hull moulding included the full row of port holes down each side. Those seem to be a throwback to the time she was a sea cadet training ship before coming out of the water for good.
Keep at it friend, you are doing fine.
I was tempted too, but at that time I had zero experience in wood modelling, and I was afraid to make major mistakes in a such important area.
The problem was just postponed: I decided to completely rebuild all the yard in wood and brass...
So now, with the little experience gained, I would probably build the bowsprit in wood too.
Thank you for the stanchions' suggestion, I know that items, but, as you mentioned, the price was a bit off my standard and I preferred to stick with the model's one.
As I understand, you build the very same model, is it possible to see your build somewhere? I'll be glad to admire her!On 9/12/2020 at 11:07 PM, Danstream said:Awesome work on this old kit. Looking forward to seeing more.
Dan
Thank you, Dan! I will soon post some more!
On 9/17/2020 at 8:06 PM, Vladimir_Wairoa said:i now see your mastering in painting Bruma, i like very much what are you doing with revel model. Vlad
Hey Vlad, no master here, just some humble attempt to make my model a bit less flat.
I'm so sorry for the delay in answering to your question about the dry brush on black and I saw you decided to stop working on your wonderful Cutty. Anyway, I assume you now get the point I was trying to describe.
This approach is particularly suited for small scale, but you might try a softer version on you Cutty! -
Well, unfortunately I completely miss the build log till now...
But now I'm recovering, reading all the pages till the end.
This is a wonderful job! A true inspiration for my ongoing humble attempt on the Cutty Sark.
Everything in you build is sharp and crisp, well detailed and with the right sense of scale.
The rigging and the sails in particular caught my attention, really nicely done!
Just one question about the anchors: why are they hanging freely? Aren't they suppose to be secure somehow to the hull?
-
17 hours ago, Vladimir_Wairoa said:
Thank you everyone.
@rwiederrich I did intended but the moment I setup the length without jibboom I realized it was merely a sweet dream. maybe foolish one: D
Why? Because she will be too long or too complex?
Anyway, you did a great job, and she looks fantastic even now! And... Who knows, maybe in the future you will come back to her and complete the rigging!
Thank you for sharing your journey! -
-
I'm so happy you try it!
That's a huge improvement! Now your carving job is properly enhanced, well done!
You really nailed the technique at your first try, it is very important to build it up layer by layer.
Now you did the first step: why don't you go further and try the same method on the hull with a medium gray? All the bolts, rivets and small detail will pop up, and if you don't like it, you can go back!
I like to use oil colors, they give you a lot of control, they are soft ad they dry slowly, so that you can really tune the effect.
Remember to make some test on spare parts first!
And after the dry brush, you will feel the need for washes and filters and you will never come back!
- Geowolf, mtaylor and Vladimir_Wairoa
-
3
-
I prefer the carved one!
For painting them you might consider some dry bruh in gold to highlight the details and add a little bit more of depth.
Wonderful job on the boat and on the platform, I really like the result!
Is the rigging of the davits complete? If so, it would be nice to add tension to some of those lines in my opinion.
Keep going! -
On 9/5/2020 at 12:13 AM, Cirdan said:
It's a very fine and beautiful work and it is hard to believe that this is your first model.
Cirdan, you are too kind, I really appreciate you comment, thank you!
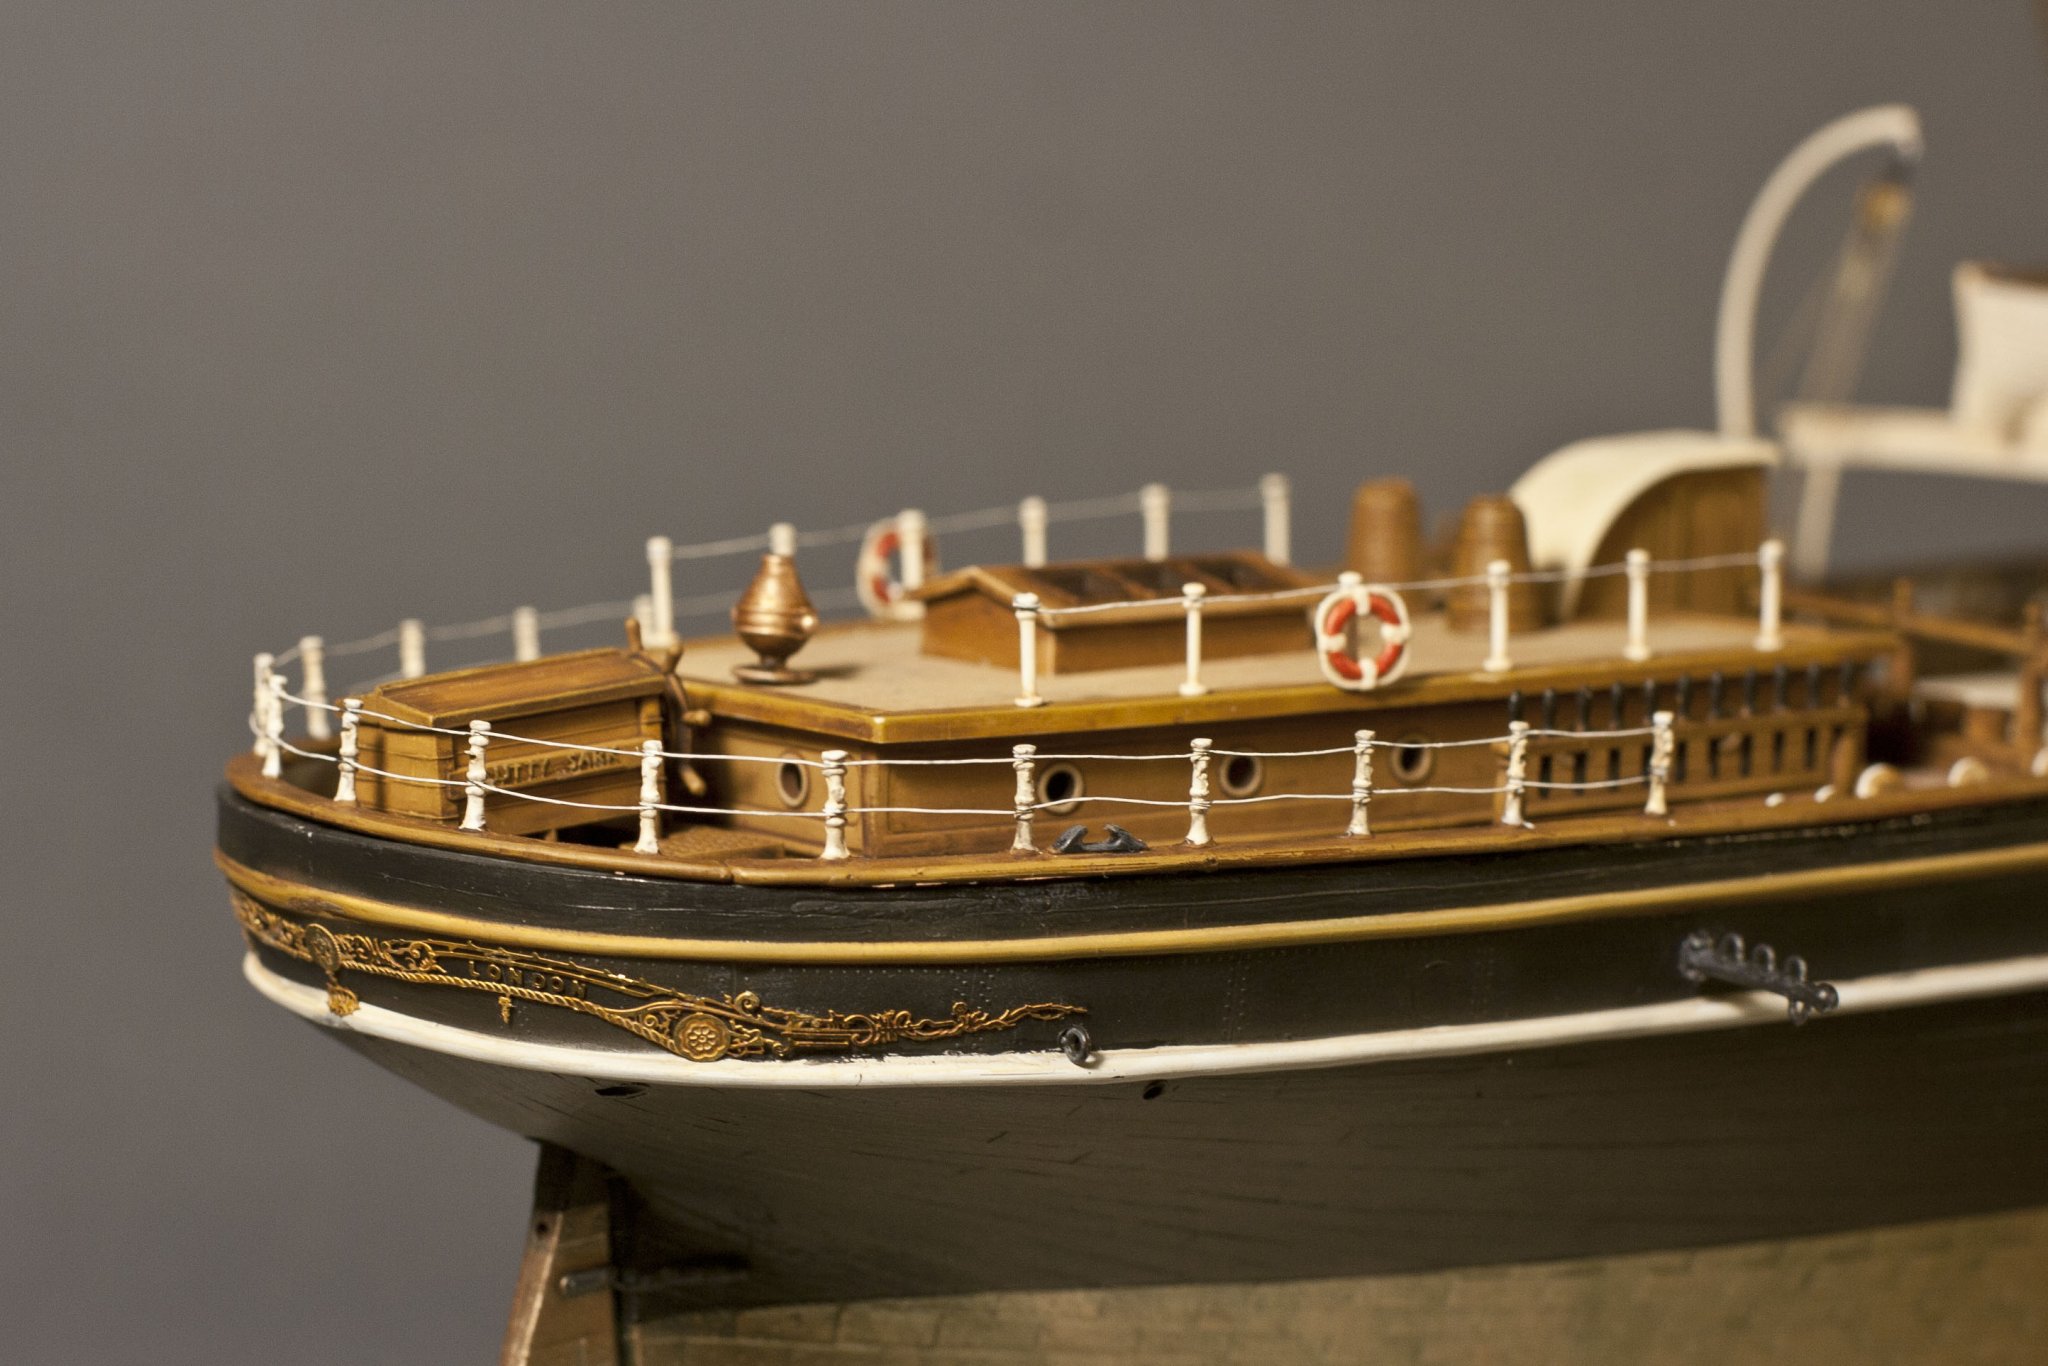
On 9/2/2020 at 7:23 PM, shipman said:The feature you mention on the ship as she is today is as depicted on the kit. To the rear of the poop 'monkey deck', just in front of the wheel, is another door/companion way. The kit doesn't include that. Apparently that was an addition during Portugese ownership. I can only assume this was retained to give a one way flow of visitors.
Thank you Shipman for pointing it out.
This feature is one of the many differences visible between the Underhill plans (included inside the Longridge book dedicated to the Cutty Sark) and the Campbell’s plans. Campbell shows a short companion way, while Underhill present the version proposed by Revell.
It would be nice to know what were the references used by Revell, they seem to be a mix of both.
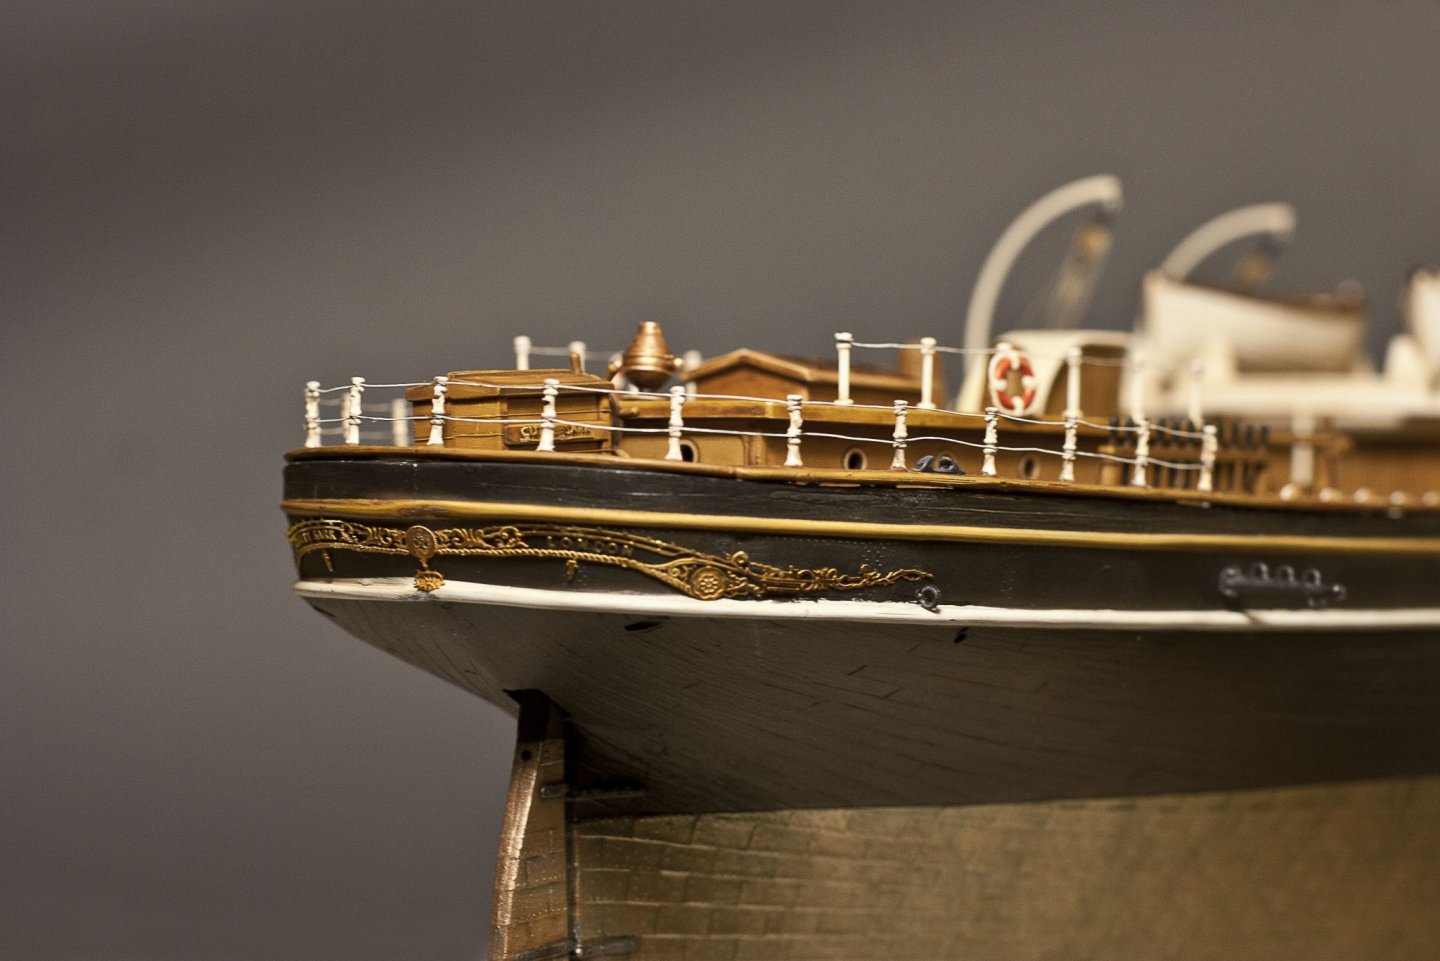
Bowsprit reinforcement and installation, railing, stern and bow decoration.
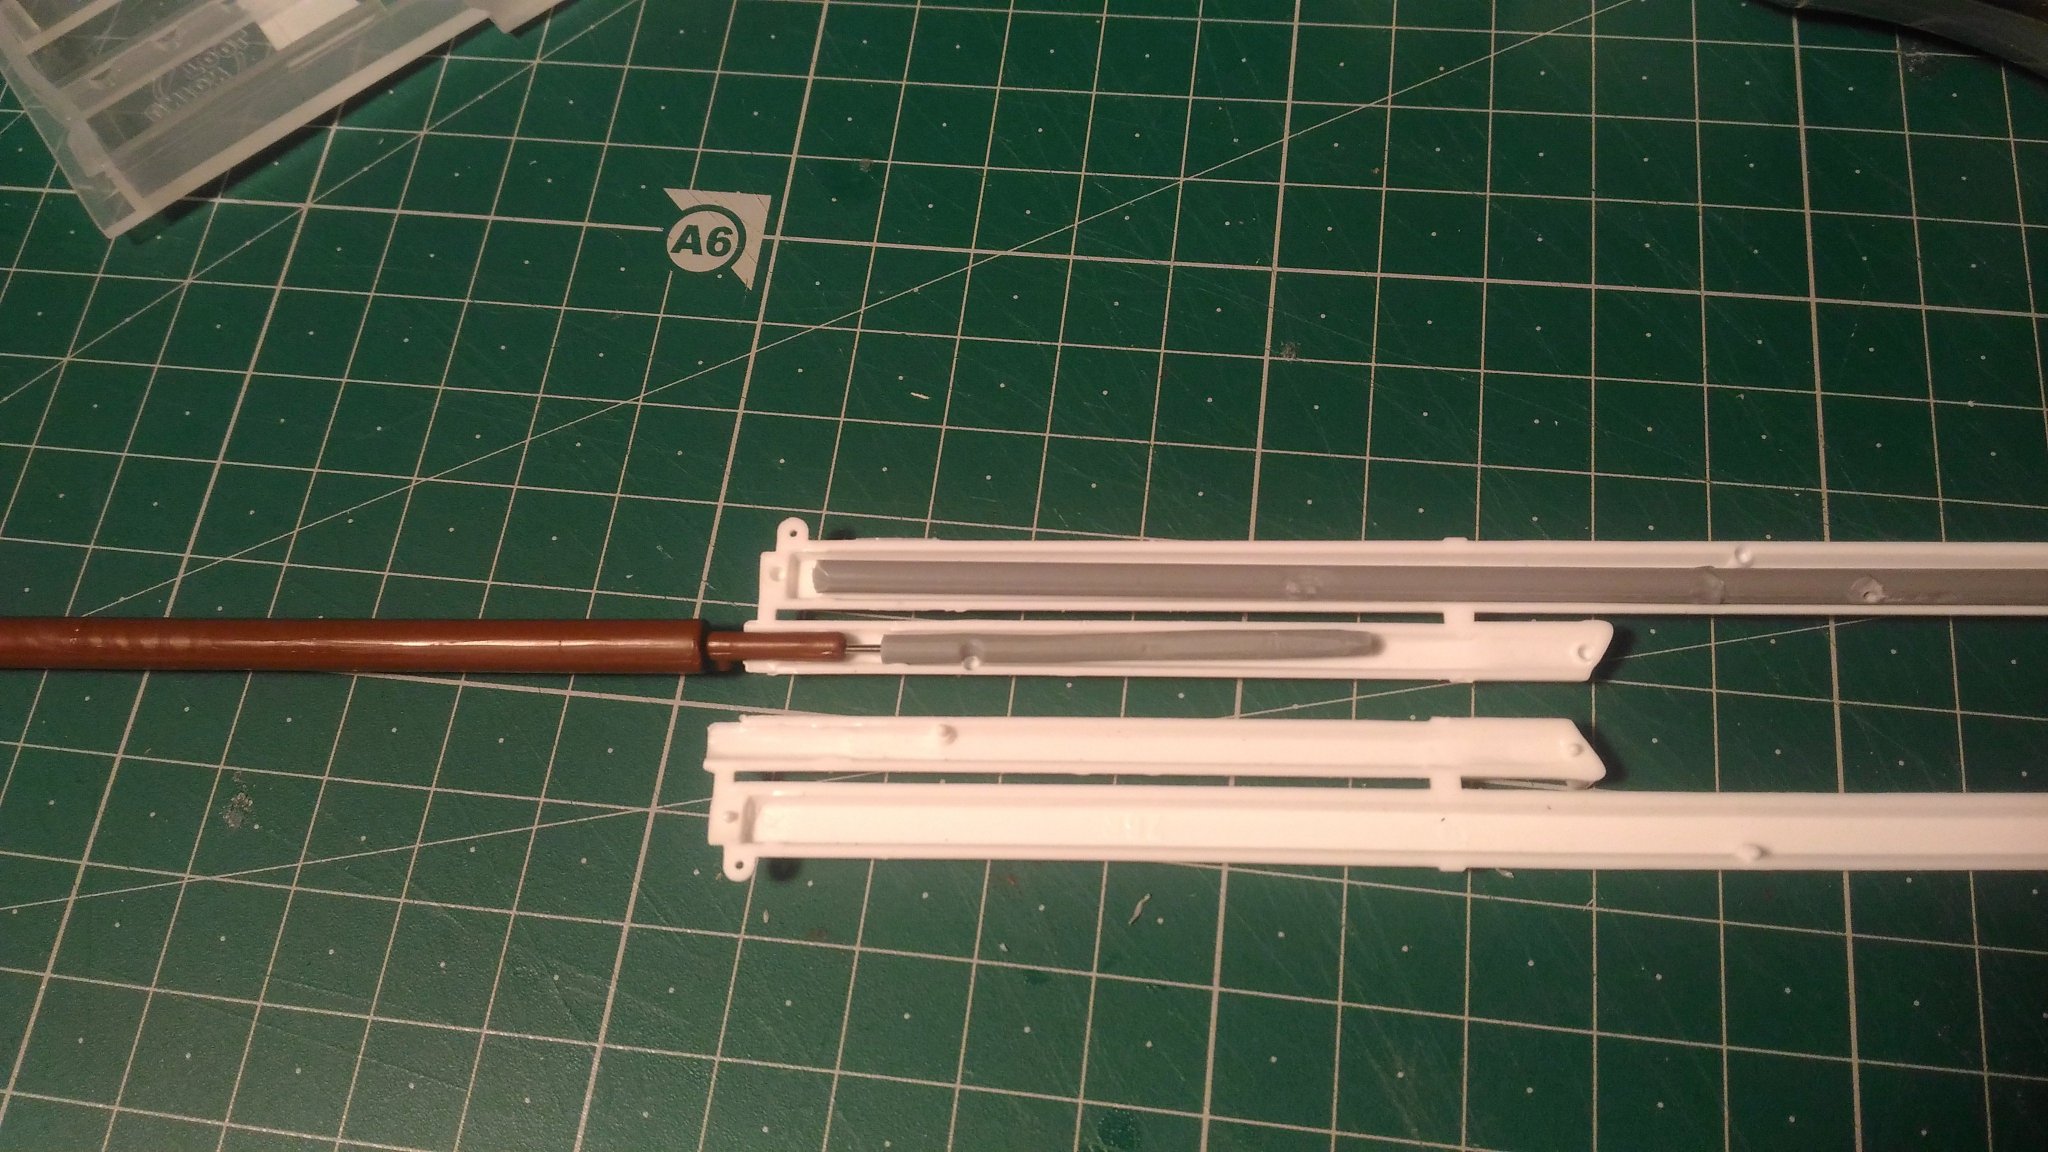
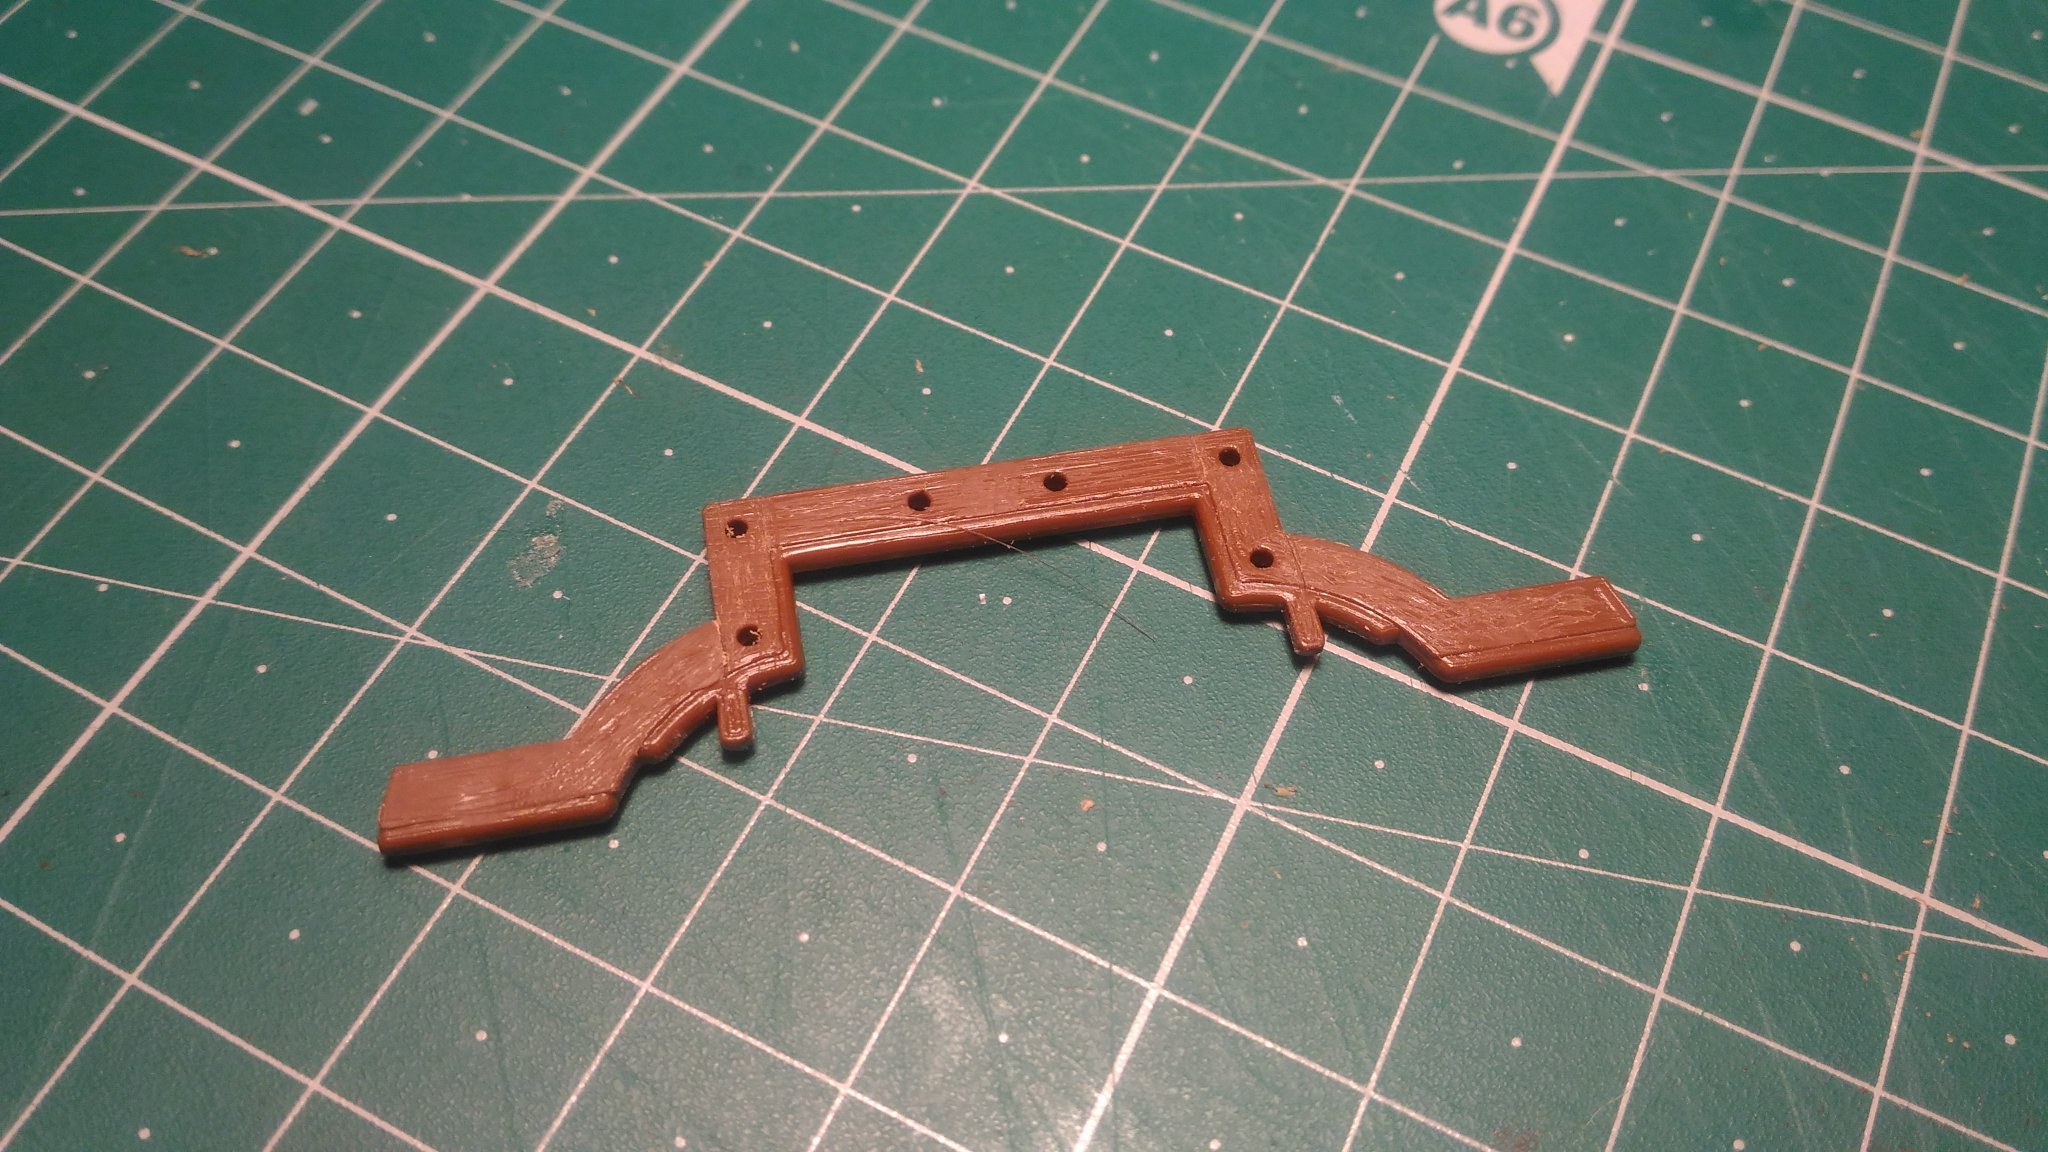
The bowsprit is quite weak. The innermost part is provided in two pieces, while the outermost spar is in one piece as shown below:
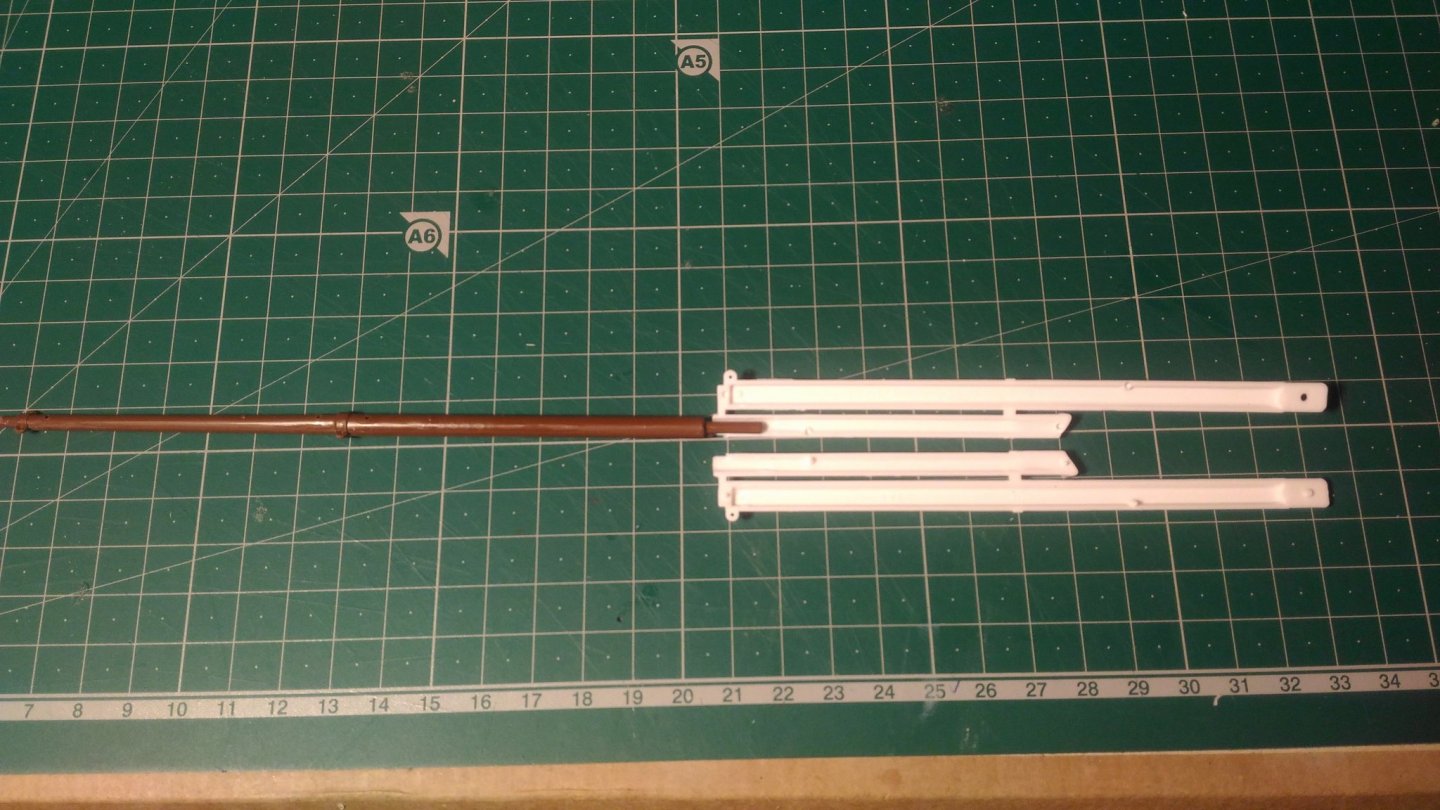
The junction is the weak point. Hoping to improve a bit this point I added some sprue inside the cavity, drilled holes inside the two pieces (gray and brown in the picture) and inserted a piece of spring steel inside.

The result is far from being perfect but at least it’s better than before.
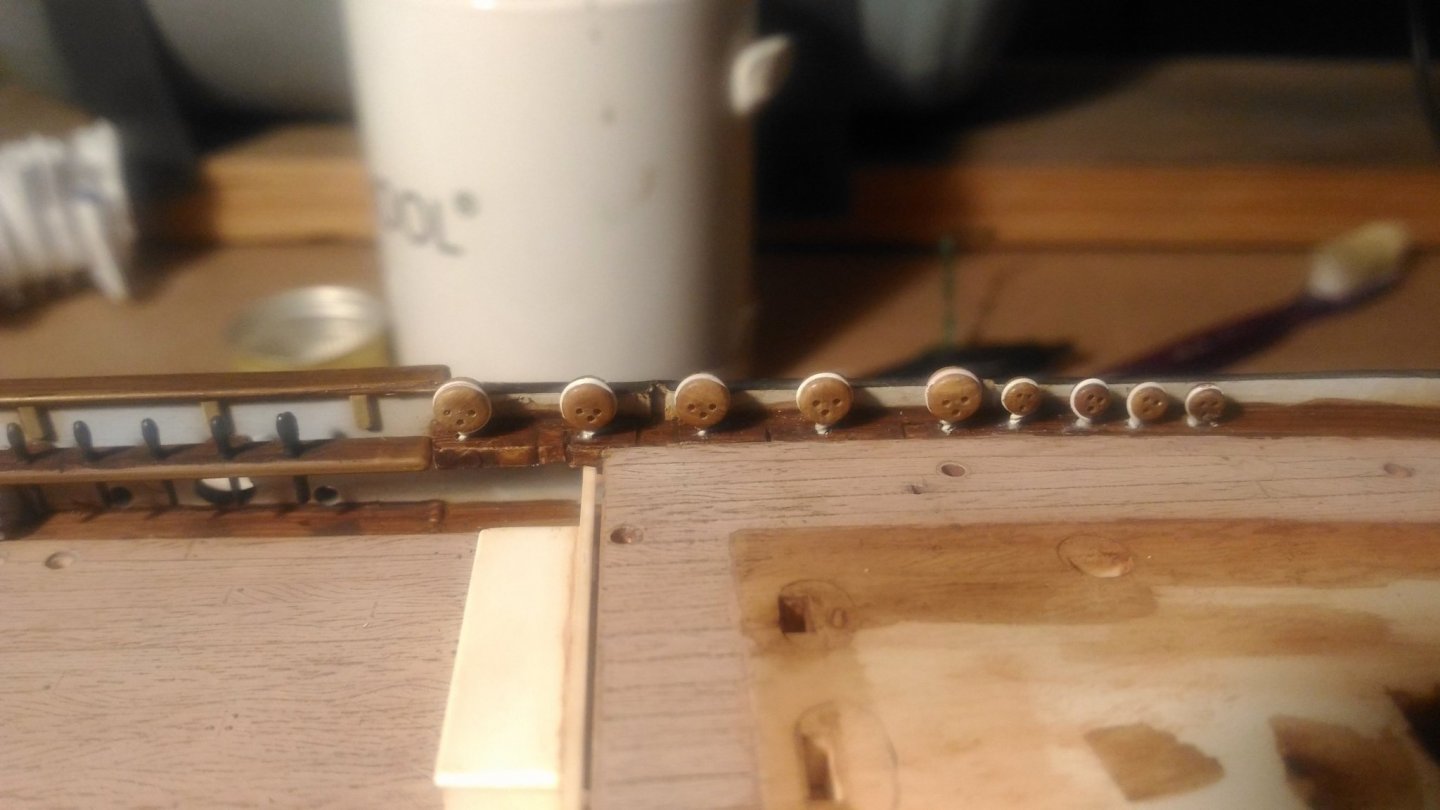
Railing:
The instruction suggest to use thread for the railing but I don’t like this solution. I opted instead for thin copper wire, twisted around the poles and painted in white.
Looking back at the result I’m just half happy: the rail are not that bad, but the poles provided by the kit looks too fat, I should have cut them from the base and rebuild them from scratch…
Anyway, they are there and now it’s too late to correct them.
This is a picture of the bow railing during the installation and painting process:
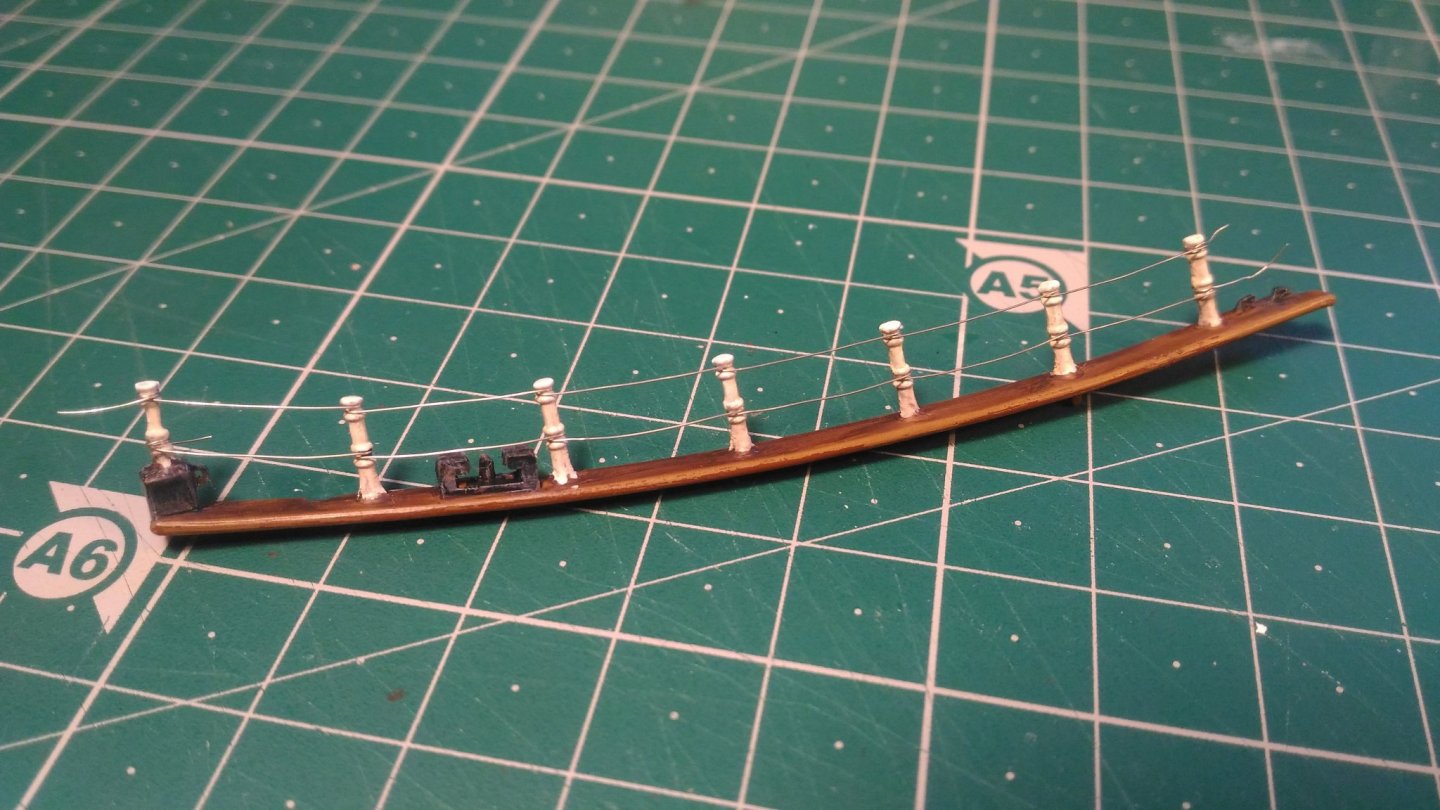
and here you can see the same piece installed:
In the above picture the home made handropes and relative eyebolts on the bowsprit are also visible. This feature is omitted by the kit but it’s easy to scratch build and worth to be added.
Decorations.
For the bow and stern decoration, the kit provide decals. I don’t like them, and so I searched for photo etched parts.
The photo etched plate includes decoration on both sides and the Cutty sark name on the wheel box.
The application was a bit challenging since I don’t want to have CA glue all over the places, but the end result is not that bad and I think they add some nice details.
Here they are for the stern:
Unfortunately the railing suffer some bending, fixed later on…
And here the bow:
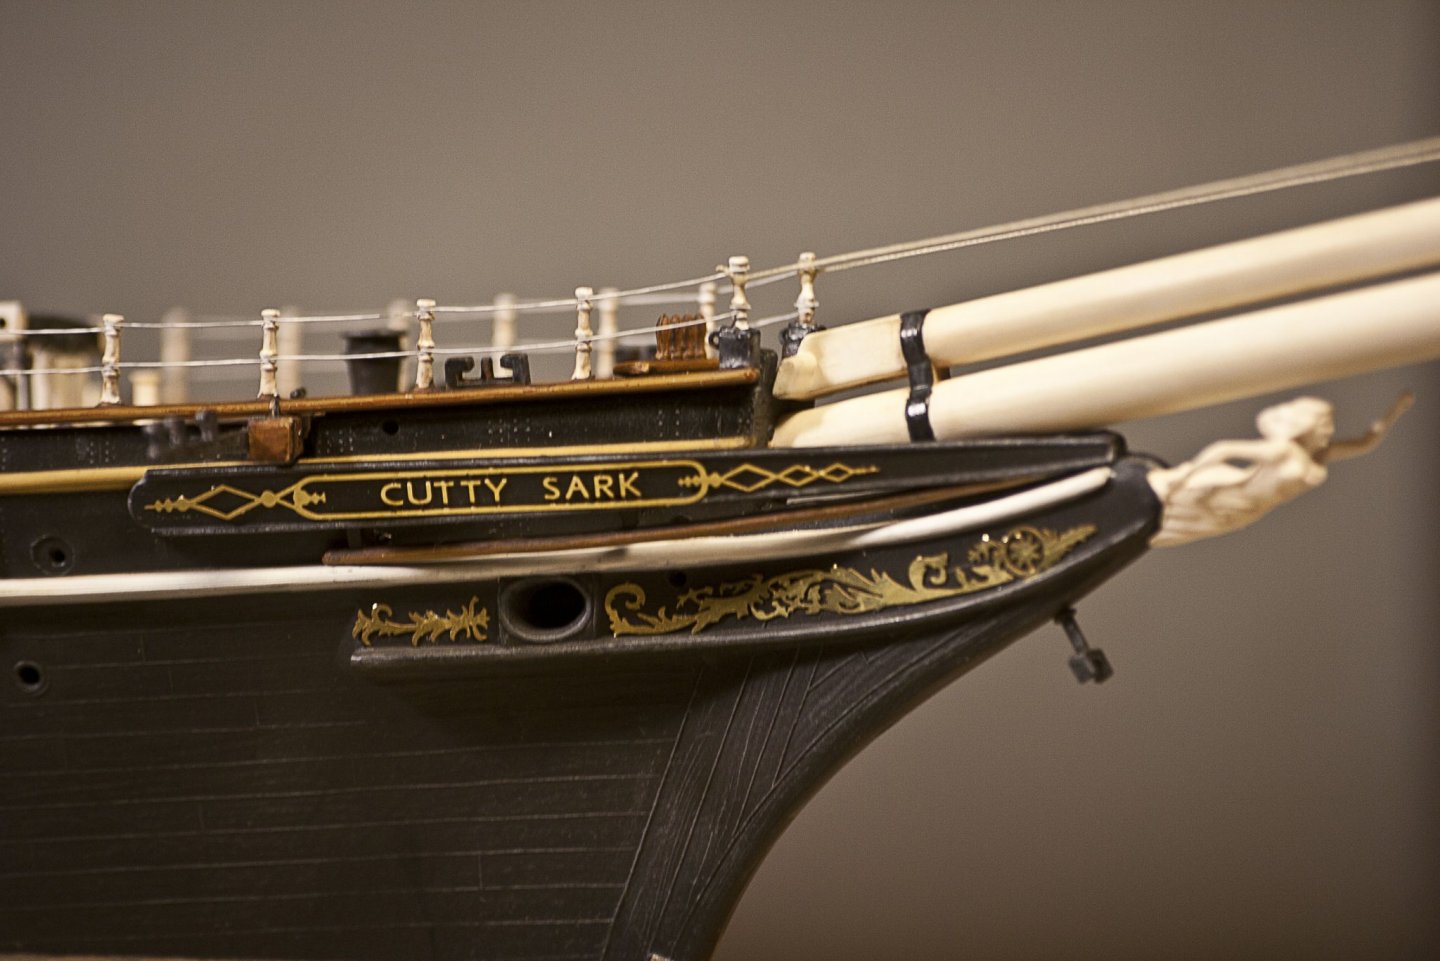
The forked outrigger visible in this picture is the one provided by the kit but it is out of scale and it was replaced with a scratch build one later on.
That’s all again.
Thank you all for your attention!
-
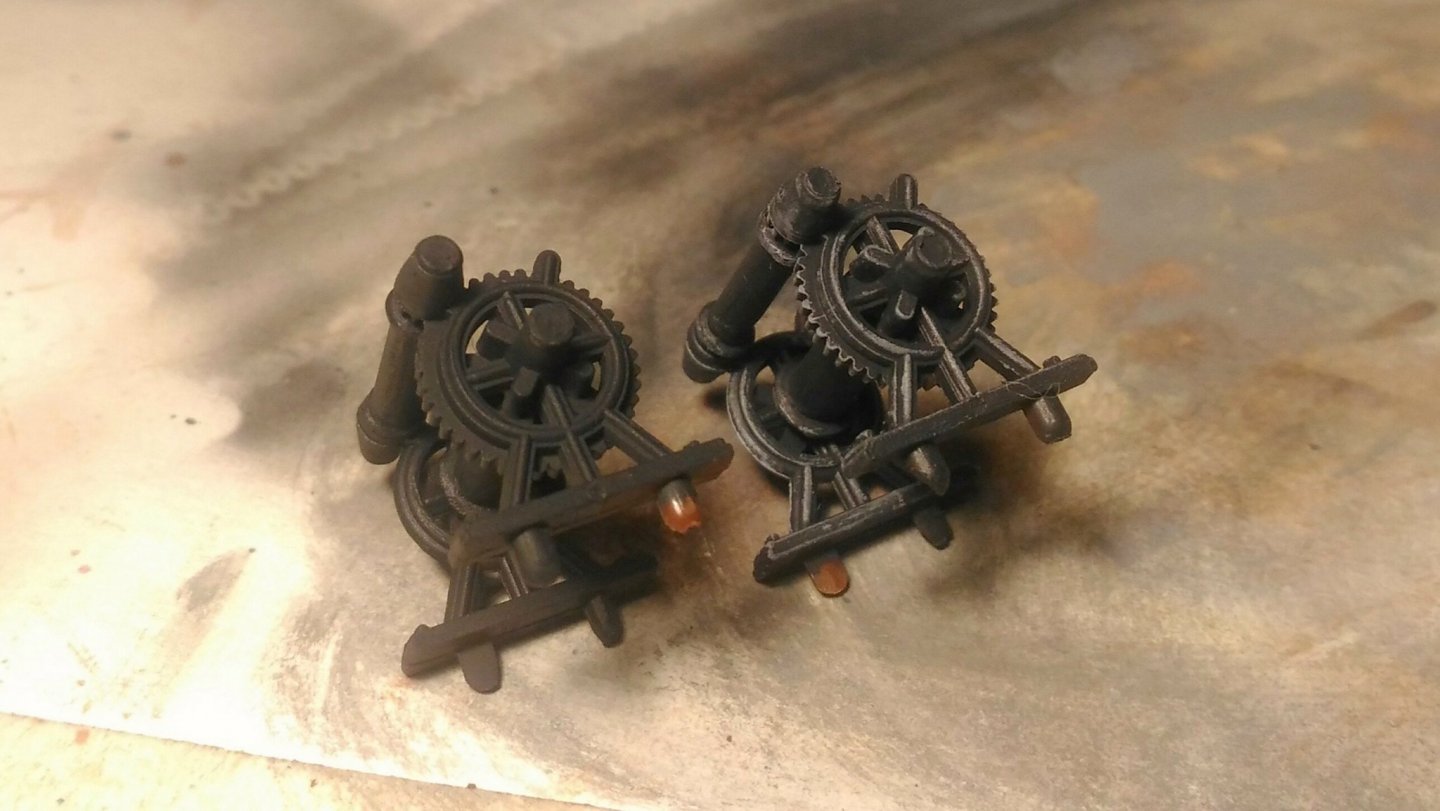
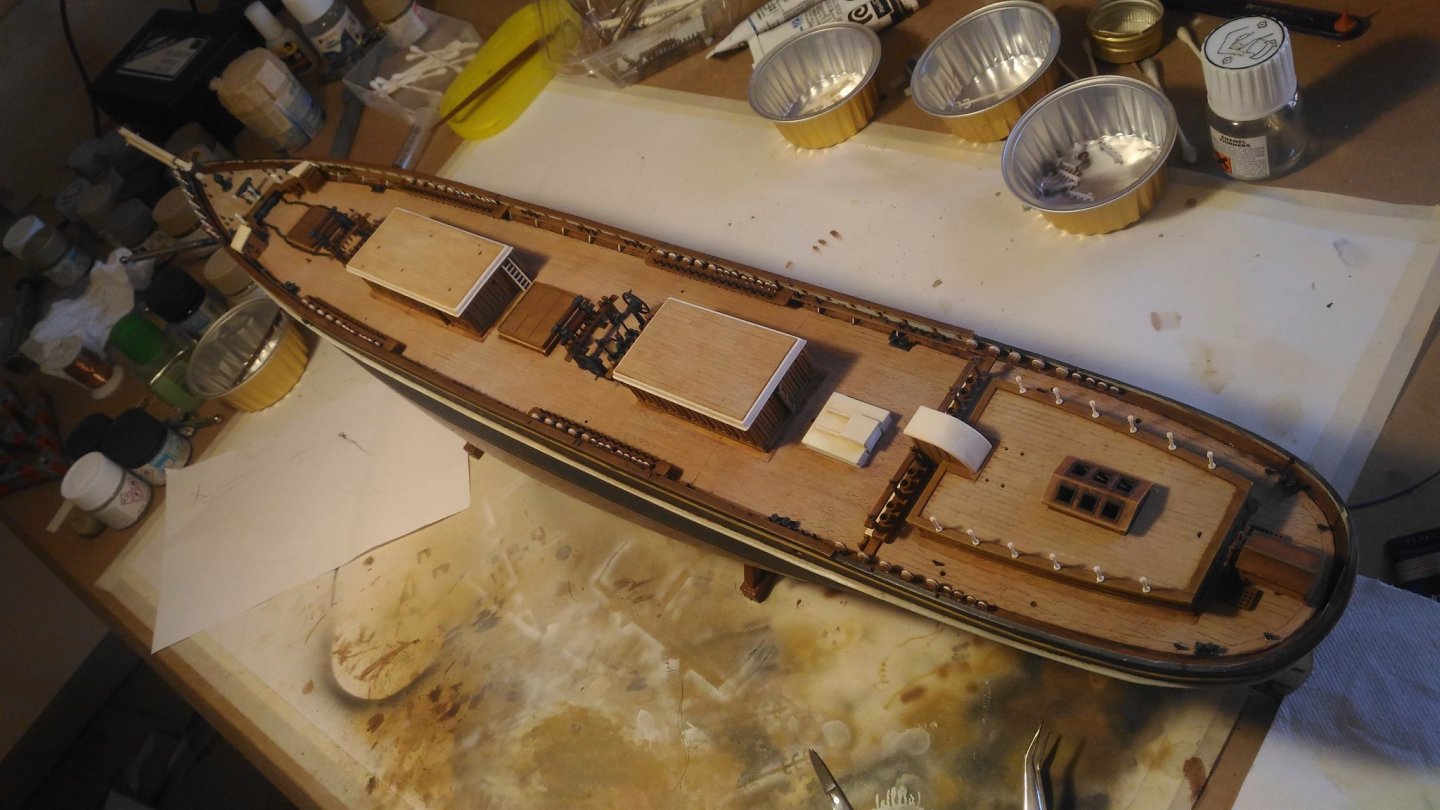
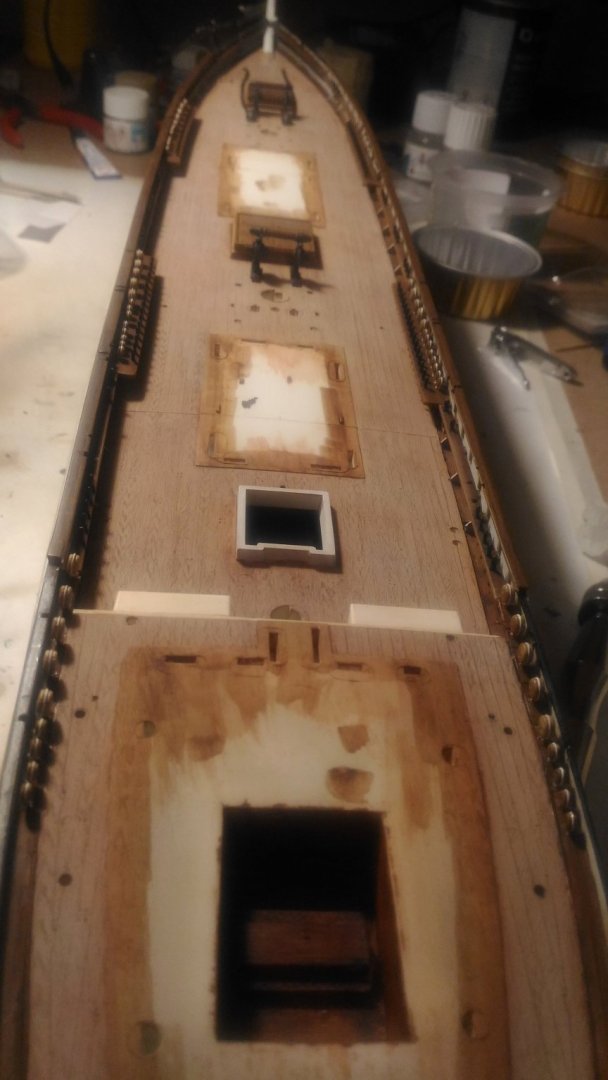
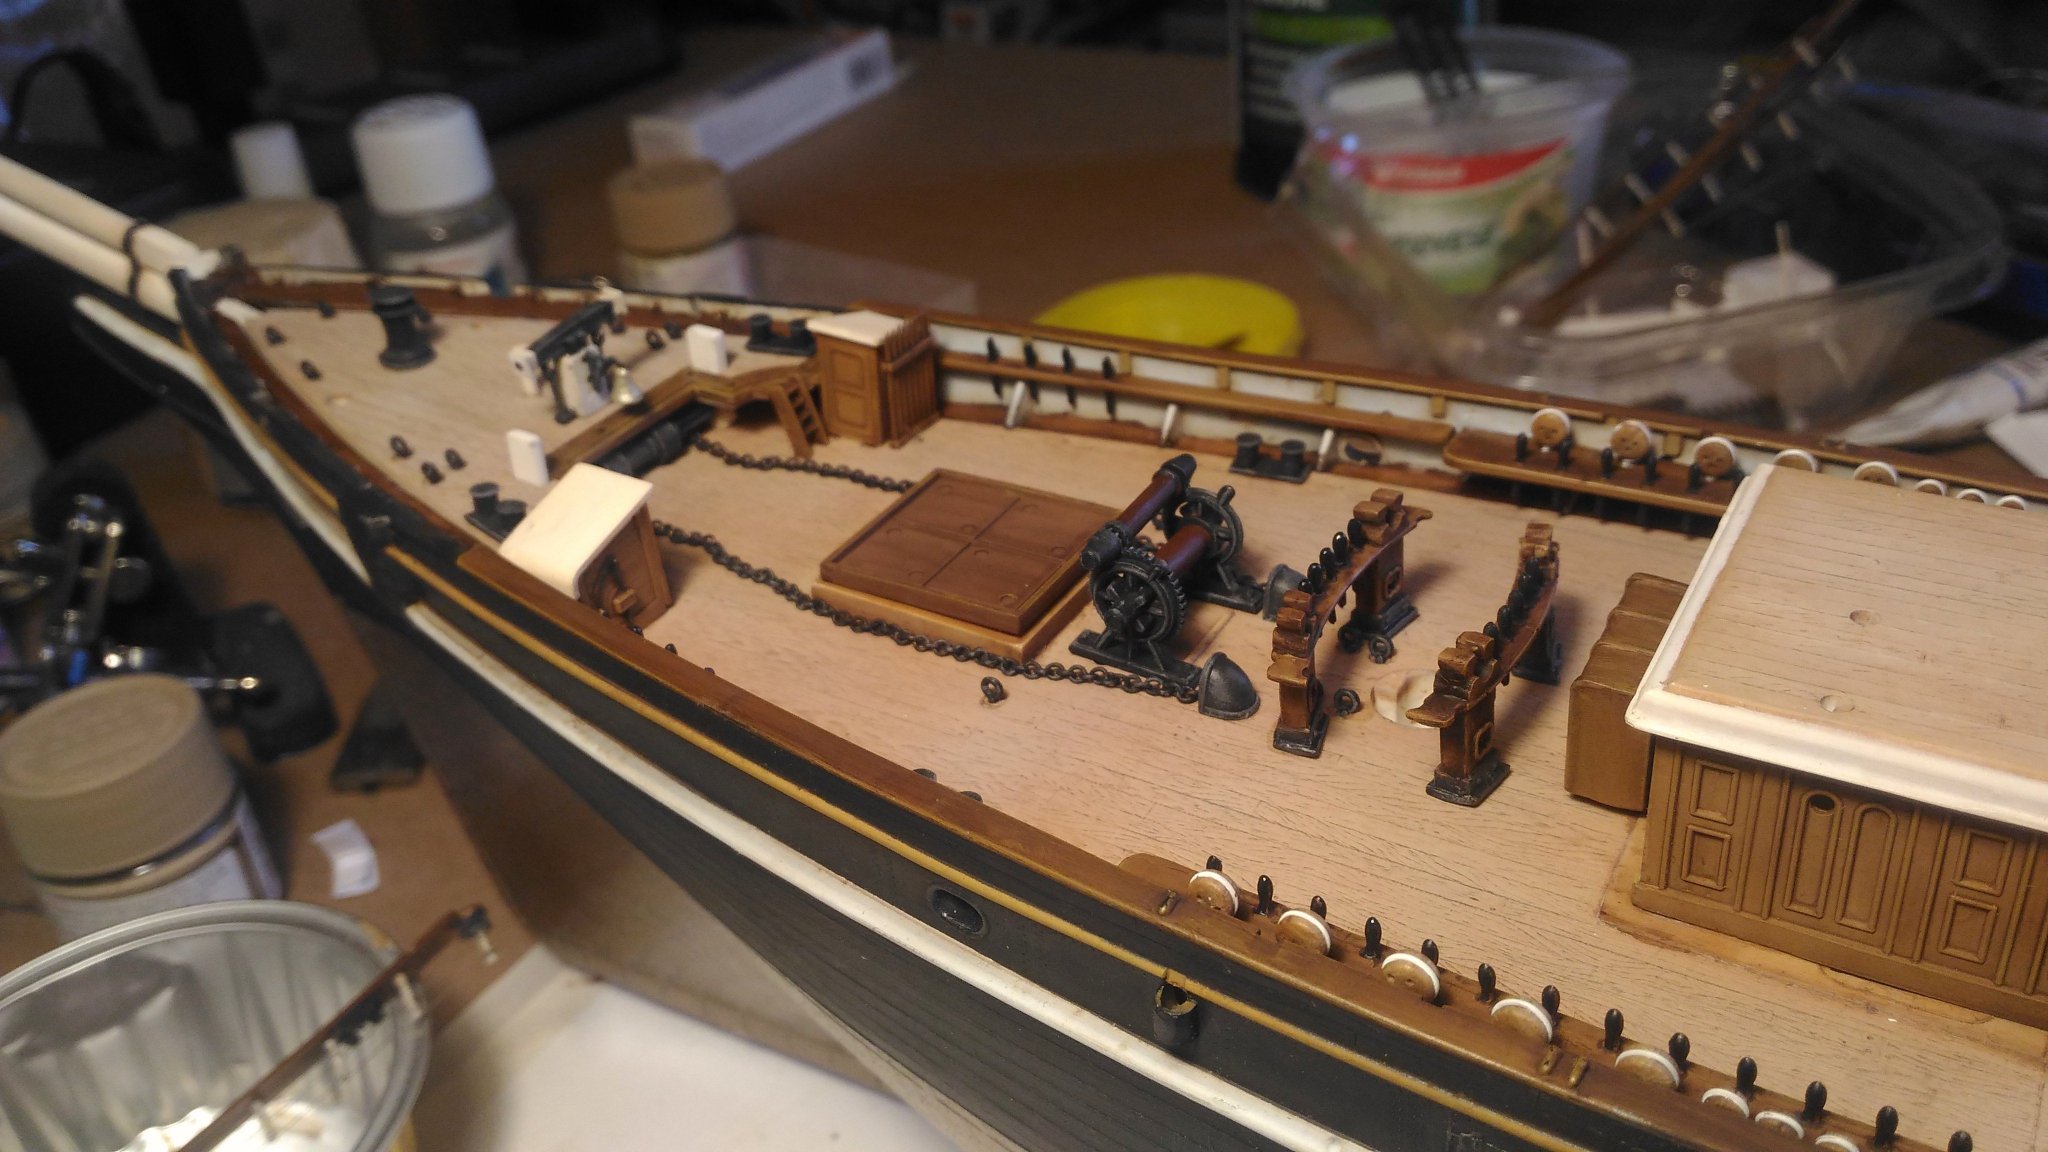
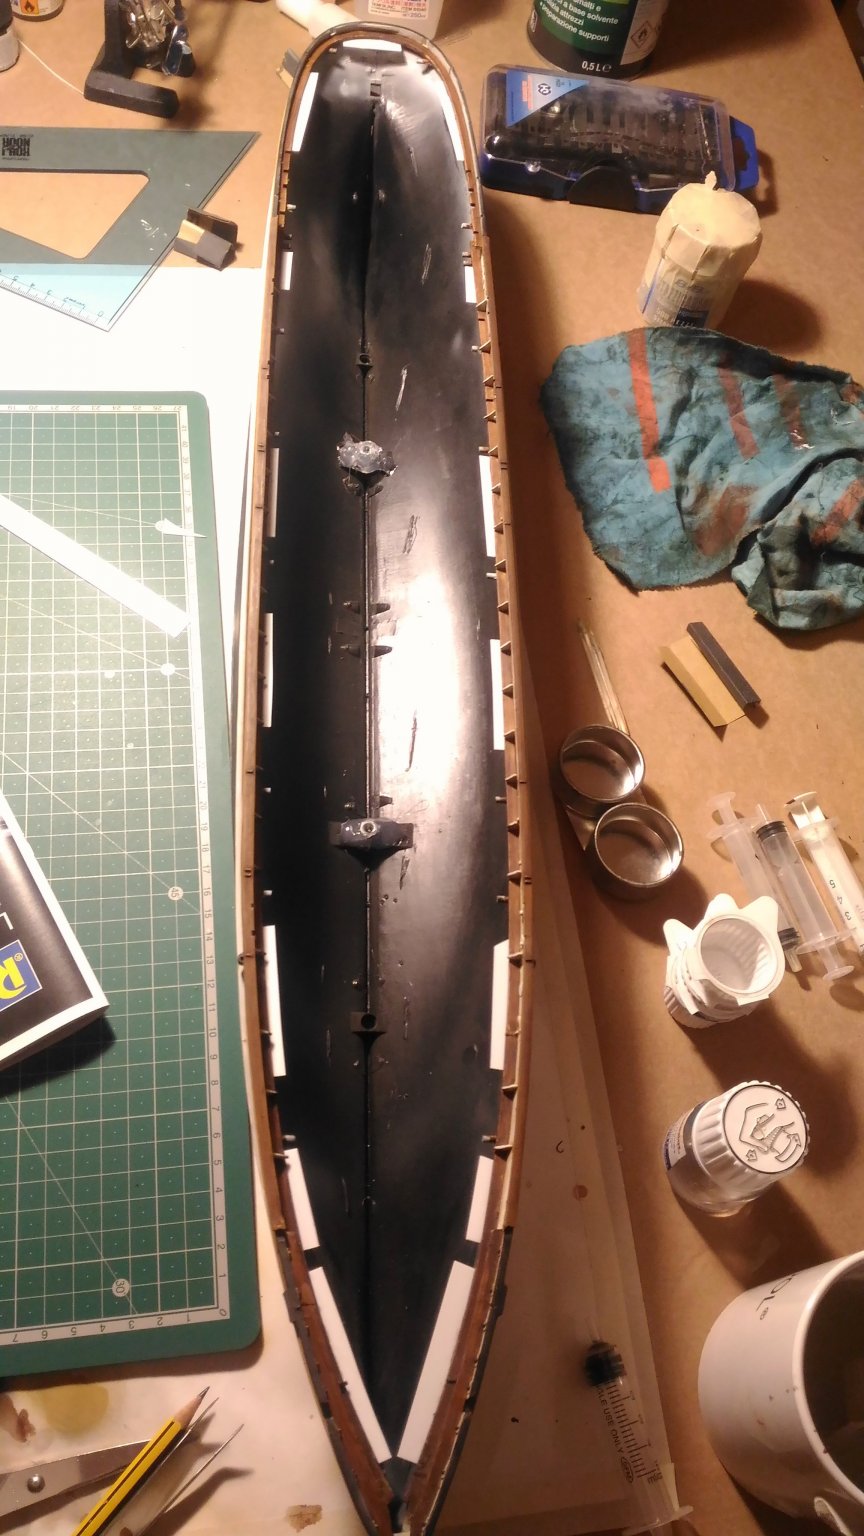
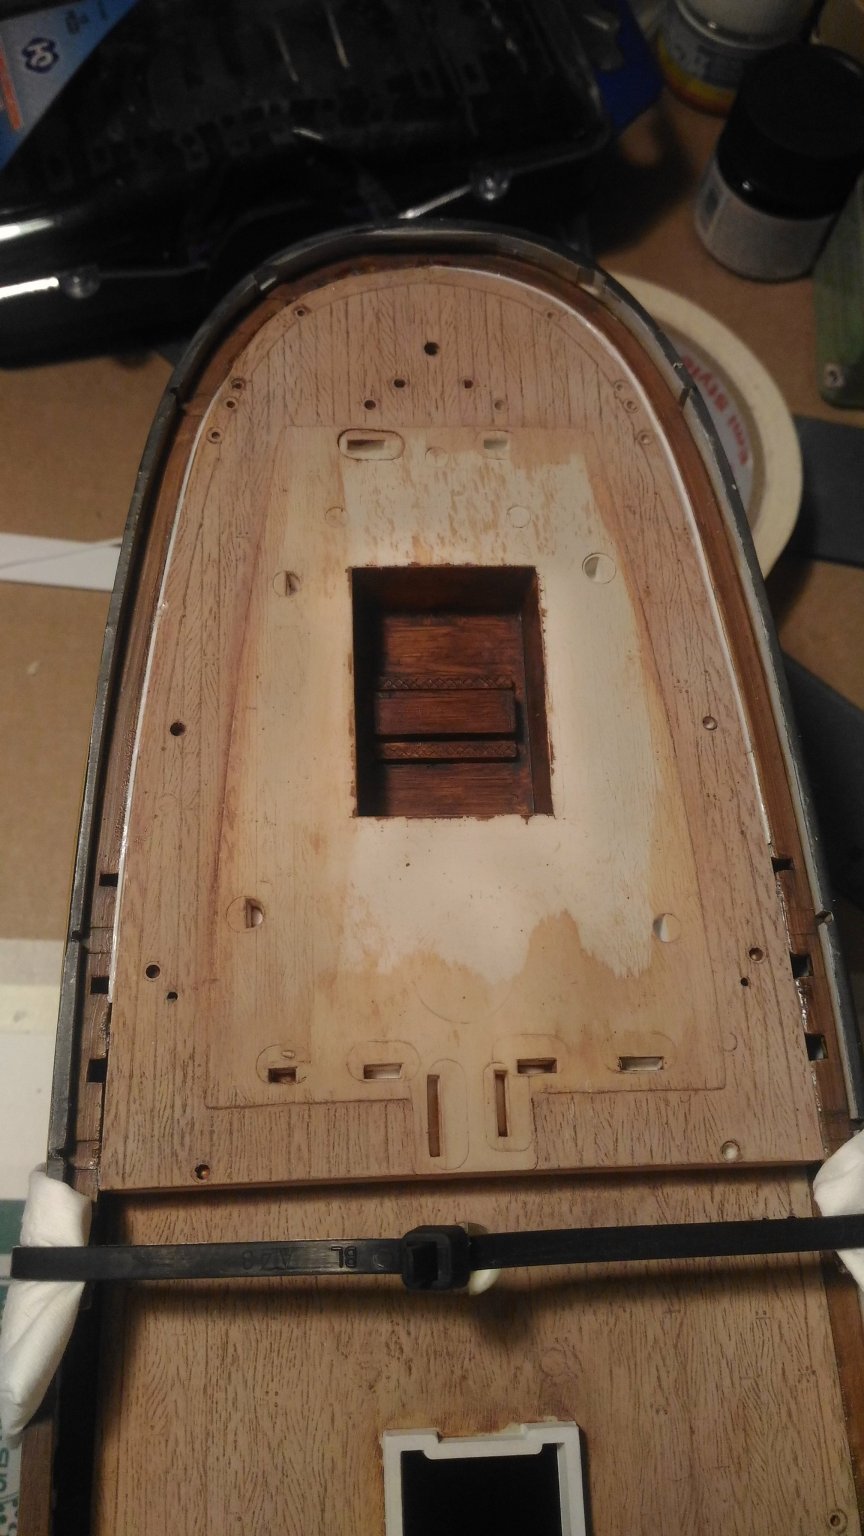
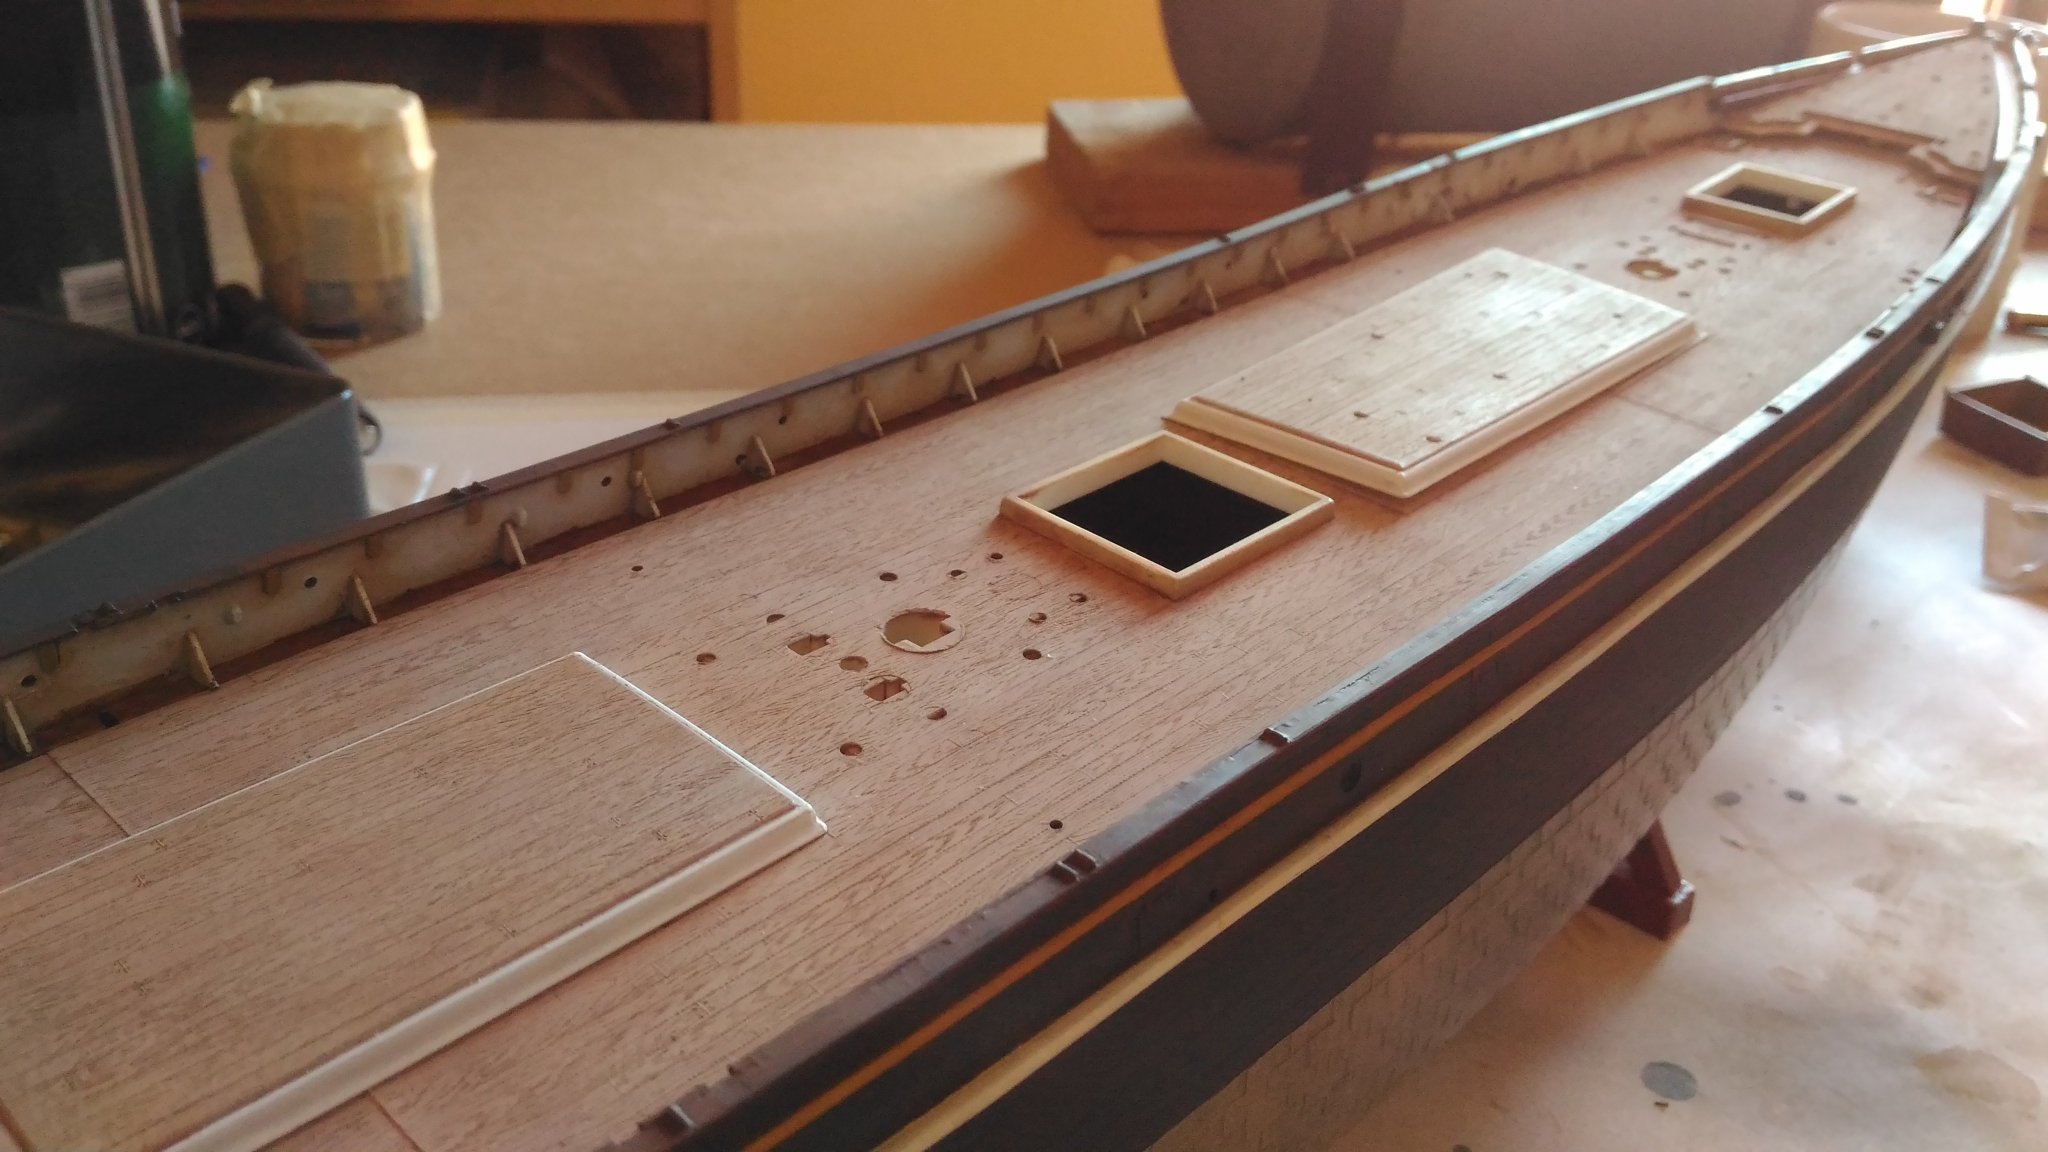
Deck fittings.
As mentioned before, the kit has a really nice level of detail but it suffers from flashes, extraction pins and warping, maybe due to old molds.
That’s why every piece of plastic needs a lot of love and time…
Here it is an example of a normal piece extracted from the sprue:
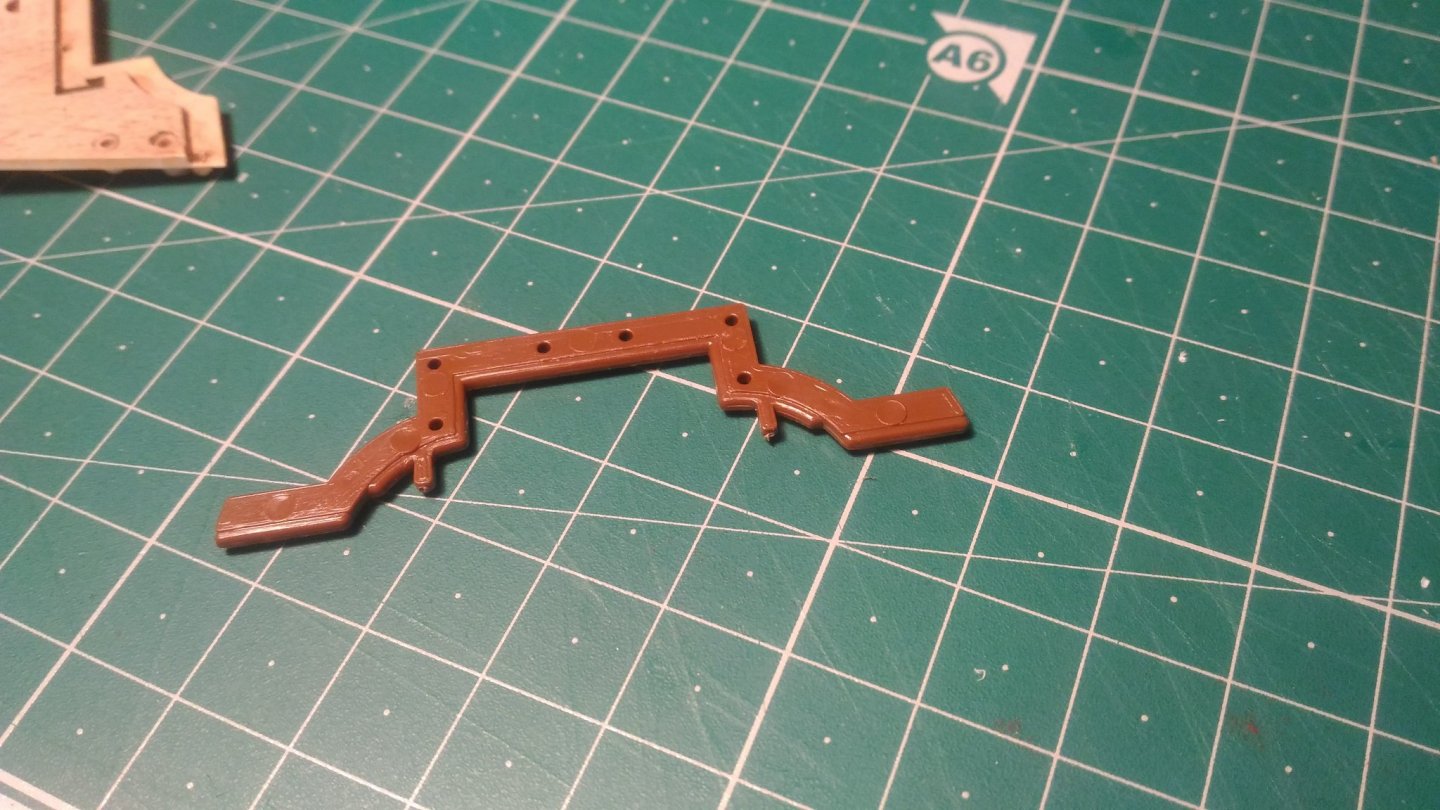
After some sanding and rescribing, the result is this:

Doing this process for a kit which has 698 parts, might drive you crazy… Nevertheless, it is necessary, especially if you plan to use washes and dry brush to give them a better look.
Here it is another example: the ladders:
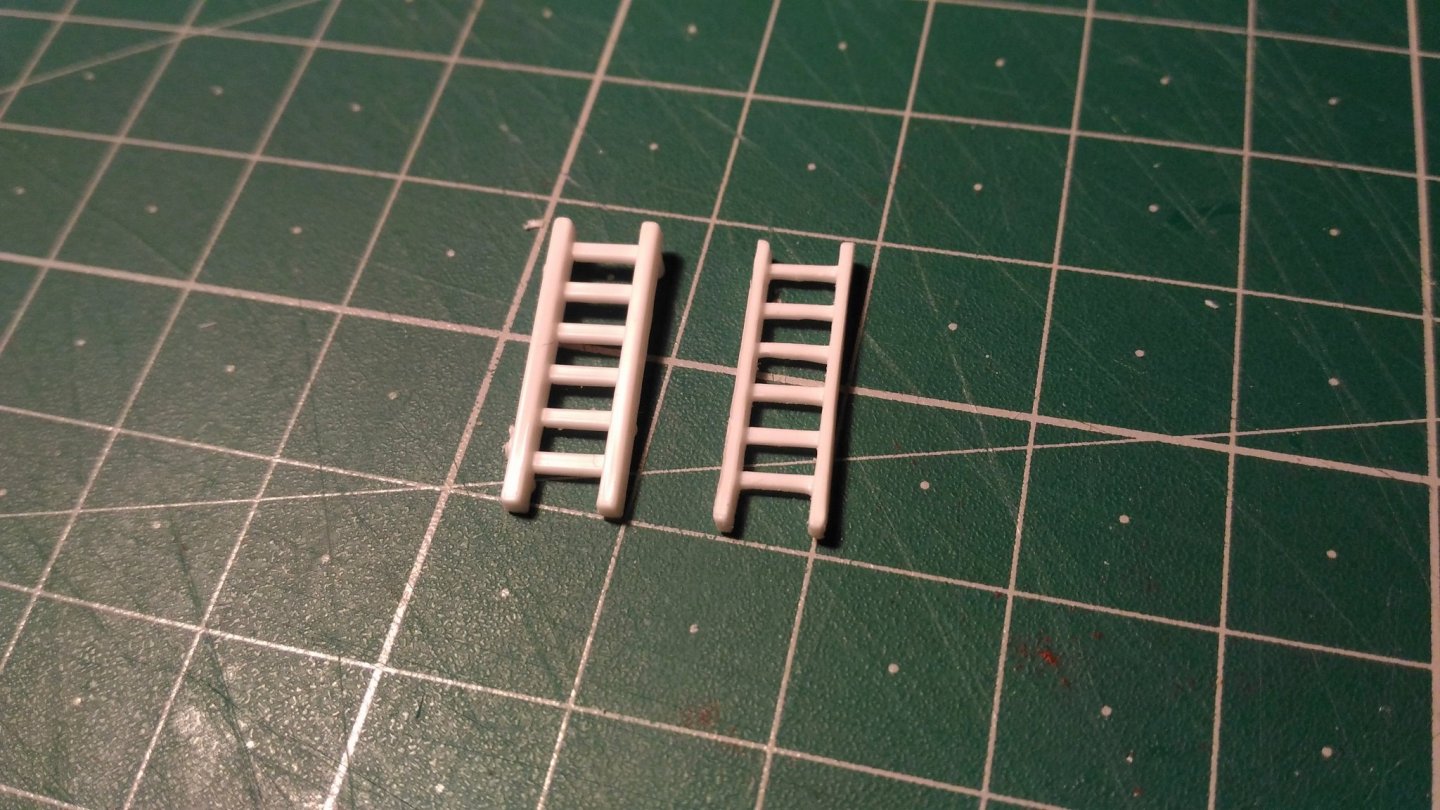
The painting has followed the same process described for the hull and the deck: first base layer with airbrush, filters, washes and dry brush with oils.
Here it is an example of the painting process applied to the winch:
When all the pieces were ready and painted, I have glued them on the deck.
Here it is the stern:
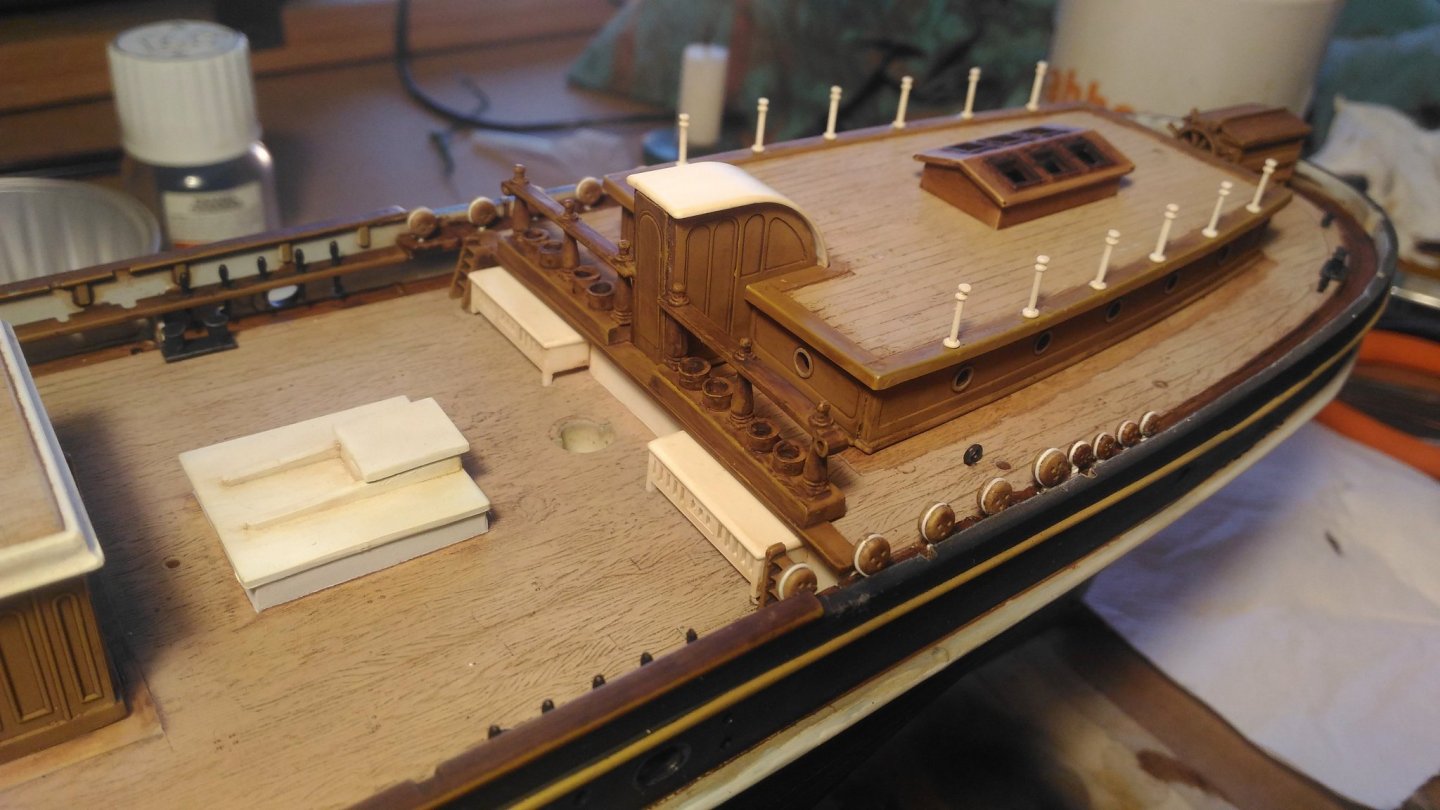
Small pieces of transparent plastic were added to the windows, in order to simulate the glasses.
It might be worth to mention that there is a discrepancy between the kit and the Campbell’s plans. In the drawings, the door of the poop deck is aligned with the wall, while the kit shows a protruded version.
Unfortunately, at the beginning my idea was to build an almost out of the box kit and I didn't make any improvement in this area. Now I regret my laziness, even if the modification is not that simple…
Here is the middle section, with pumps, winch and fife rail installed:
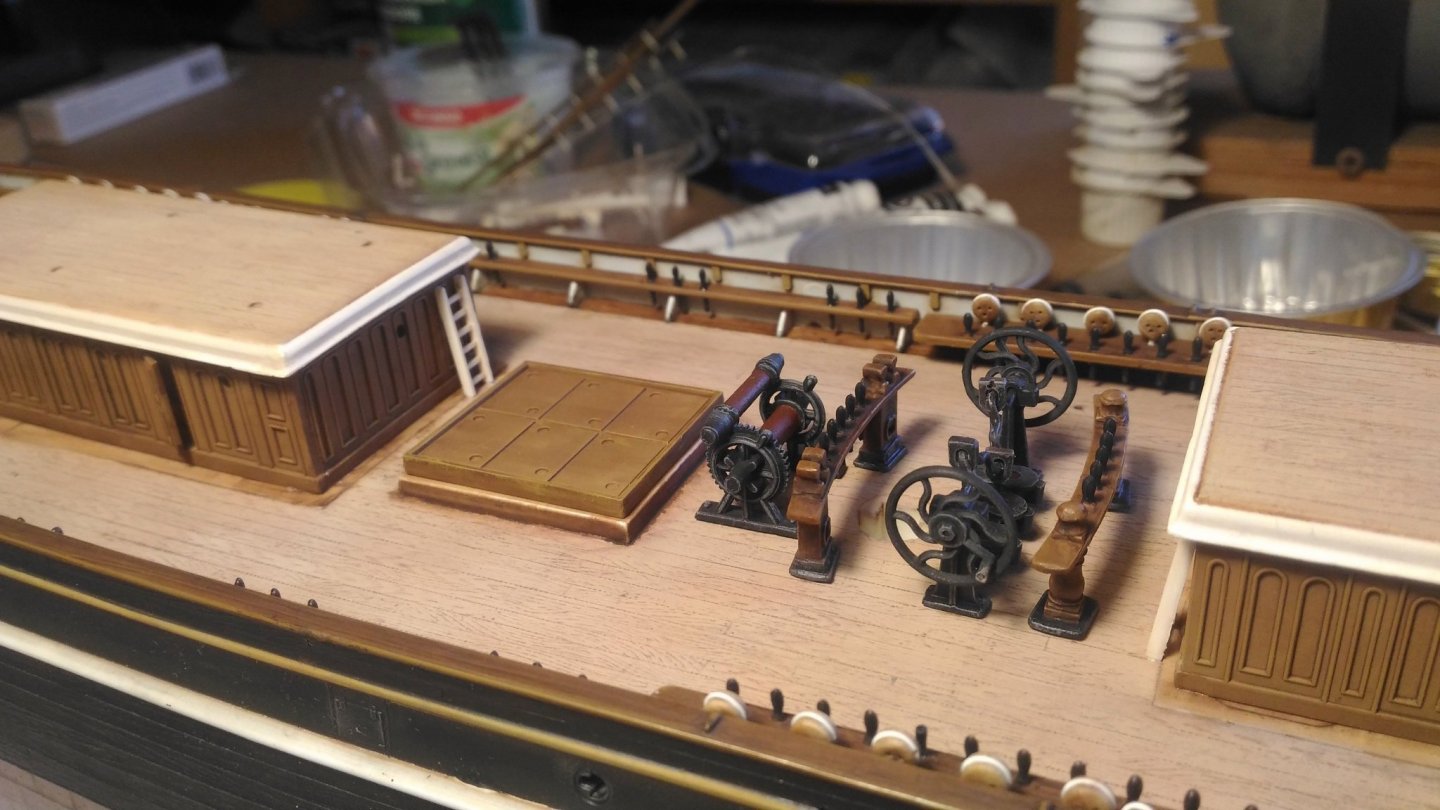
And here is the bow:
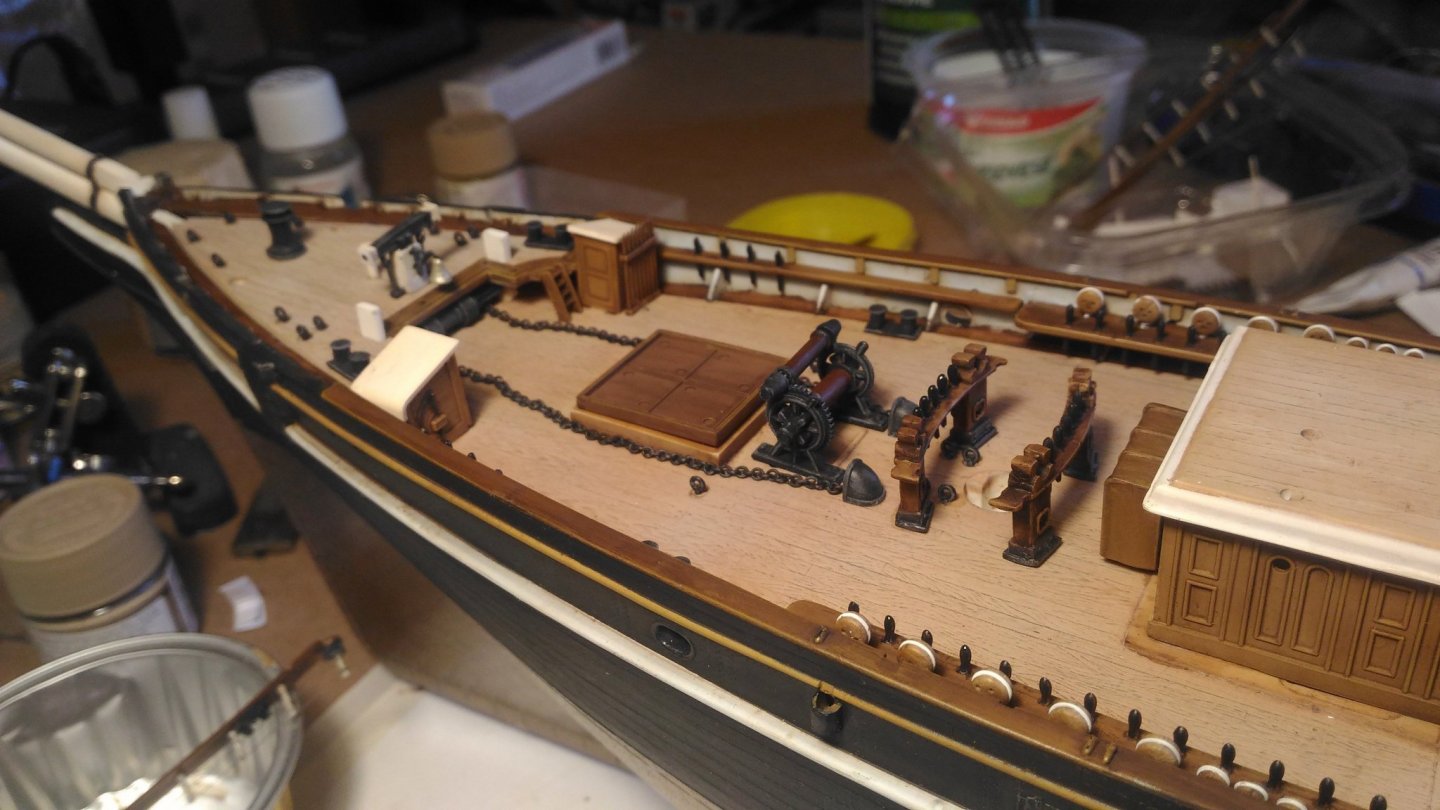
Gluing the fife rail at this stage (as suggested by the instruction) was a big mistake. They are very close to the masts and this area will be really crowded on the rigging phase. It would have been a better decision to add them later. Stupid move… At least I was smart enough to clear all the holes in the fife rail legs. This will prove to be very important later on.
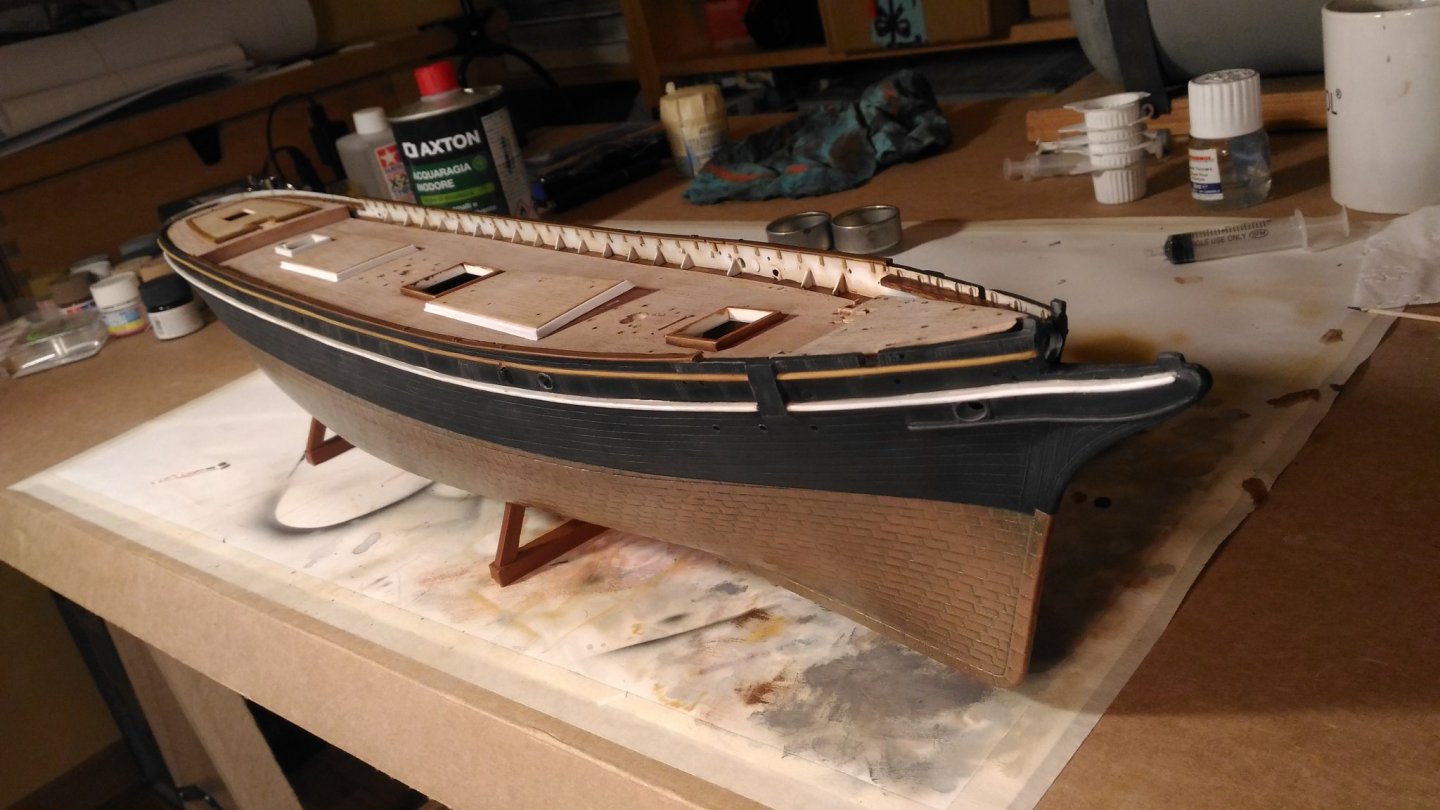
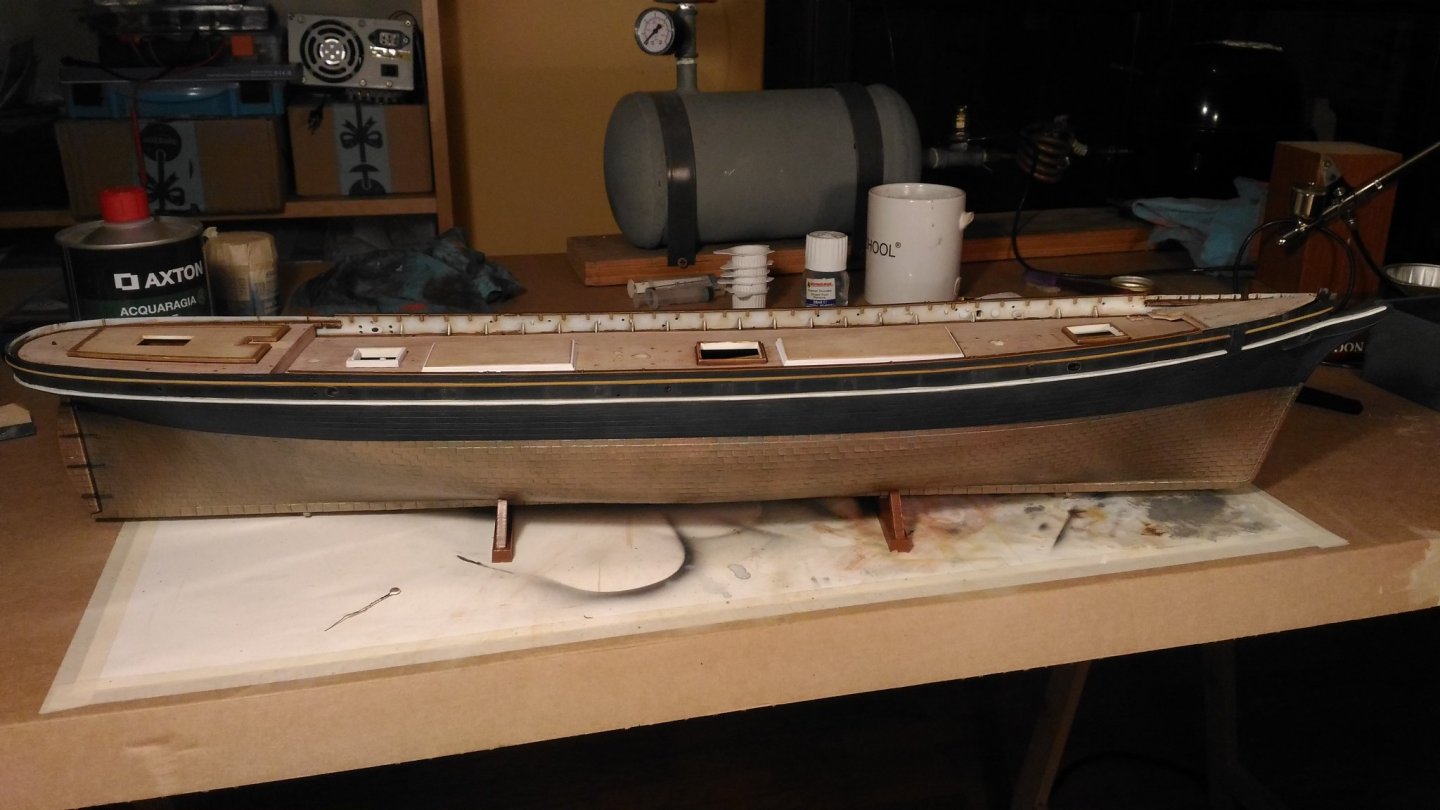
Finally, a global image of my Cutty Sark at this stage:
- Scottish Guy, shipman, FrankWouts and 1 other
-
4
-
On 8/28/2020 at 2:22 PM, Vladimir_Wairoa said:
Hi Bruma, thank you for great comment and good observation. first off, if you look ver carefully sou can see that curved planks should follow not only line of gunwales but also poop deck itself. therefore there is slight curvature discrepancy of stern towards end i am aware of and sharp eye sees it...even though i was correcting it. that pattern is something you may call laziness prbobably. as it was easiest how to finish it quickly. not really something to be followed, campbell panks are being straightened towards center and possibl cut narrow , buI just have basically enough after more than 3000 hours of building i consider it feature not design flaw :))) . there is wheelbox laying ot center anyway ao it is not visible at all anyway. i just have enough. i am finishing captains gig and that would be all.
need to move on as i do not have more energy . i will not even finish rudder at this stage as I dont have capacity to weld such big hinges...so i decided that will be done maybe next year . thanks for liking I believe there is always room for upgrading, but i learnt a lot on their mammoth
I completely understand your point. Thank you for clarifying the correct shapes on the deck planking.
As I am experiencing by myself, ship building is a long process and it can get boring from time to time.
Again, mine was not meant to be a critique to your great built! -
-
Vladimir, your Cutty Sark is growing wonderfully!
Looking at your last pictures, there is a detail that catch my attention: the stern deck planking pattern.
You mentioned, "Poop deck floor is properly curved along the gangway...and met in center/ probably not like prototype but...well..."
Why did you choose to use this specific pattern?
In Campbell's plans they are straight and parallel.
Just to clarify, mine is not a criticism, your planking is really nice and well done, especially in this difficult area. I'm now a Cutty Sark addicted and I would like to know it better, any source of information is welcome. ☺️ -
On 8/14/2020 at 3:11 PM, Cirdan said:
I saw your Model on Finescale Modeler in a more advanced stage and i'm lucky to see it here too. In fact it is one of the most beautiful Revell Cutty Sarks in the net. 👍
It will be one of my personal reference models for my own revell cutty sark some time in future.
Thank you Cirdan, you are too kind.
Be careful in taking my attempt as a guide: I’m a novice and I’m surely making a lot of mistakes!On 8/16/2020 at 8:17 PM, Vladimir_Wairoa said:Welcome to the cutty fanatics crowd here
happy continuation. Vlad
Thank you Vlad!
I’m following your Cutty Sark which is really a masterpiece!On 8/17/2020 at 12:30 AM, shipman said:It's such a shame Revell moulded the deck in two sections; the join is always an eye-sore. When I eventually get going on mine, I'm seriously considering making my own in one piece. Or cover it all with planking, either way it's a pain. I'm following your build and looking forward to seeing your progress.
Shipman: yes, it is really a shame. Especially if you think that space was not an issue: the box can perfectly handle the entire deck. And most of all, the details, which are really nice, are positive and not negative. This means that it is impossible to sand the junction without destroying all the details on the deck.
I was considering the replacement with a wooden deck but it is a little bit too expensive for my taste.
Time to move forward: next step was gluing the deck to the hull.
In order to ensure a stronger bond I added plastic strips on the hull.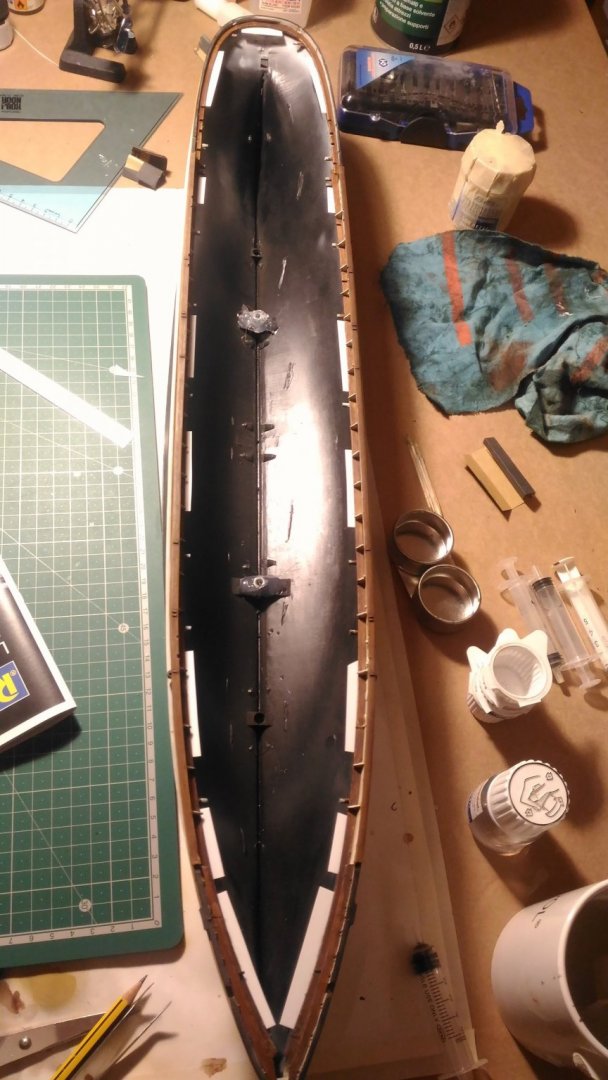
After many dry fit, I wasn’t able to perfectly fit the deck. On the stern there is a gap which I was unable to remove. I can’t say if the problem is due to my poor capabilities or in some mistakes in the kit, but the result is pretty evident.
In order to mitigate the problem I added a small plastic strip, which was painted later.
After that, I started working on the pin rails. After cleaning all the parts from mold lines (which are many and all over the places…) I reinforced them on the bottom side, in order to have a stronger bond.
The holes for the plastic shrouds needs to be filled. To drill the new holes for the wooden deadeyes I have used a scaled version of the Campbell’s plans which fit perfectly the model size. This scaling operation is really useful and it will be helpful in many other circumstances.It is also worth to mention that the location and the number of the plastic deadeyes provided by the kit is not correct, so be careful if you plan to use them as a placeholder for any upgrade.
Here is the main rail ready to be painted:
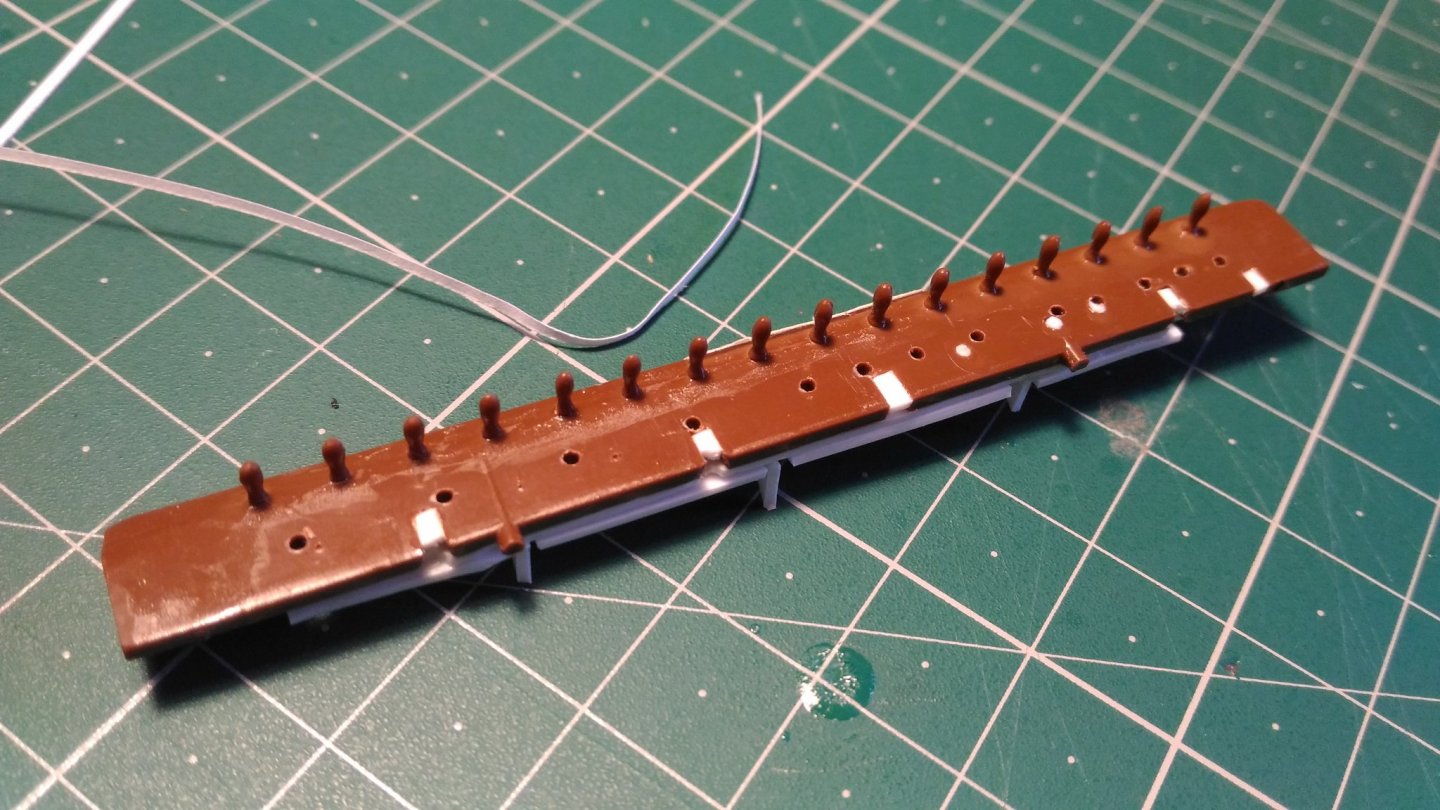
To secure the lower deadeye I used a small diameter copper wire, pre painted in white and twisted in the lower side. The twisted part pass trough the holes in the main rail and it is bent and glued in place.
Here you can see the main rail in place, painted and with all the relatives deadeyes (3 and 2 millimeters)
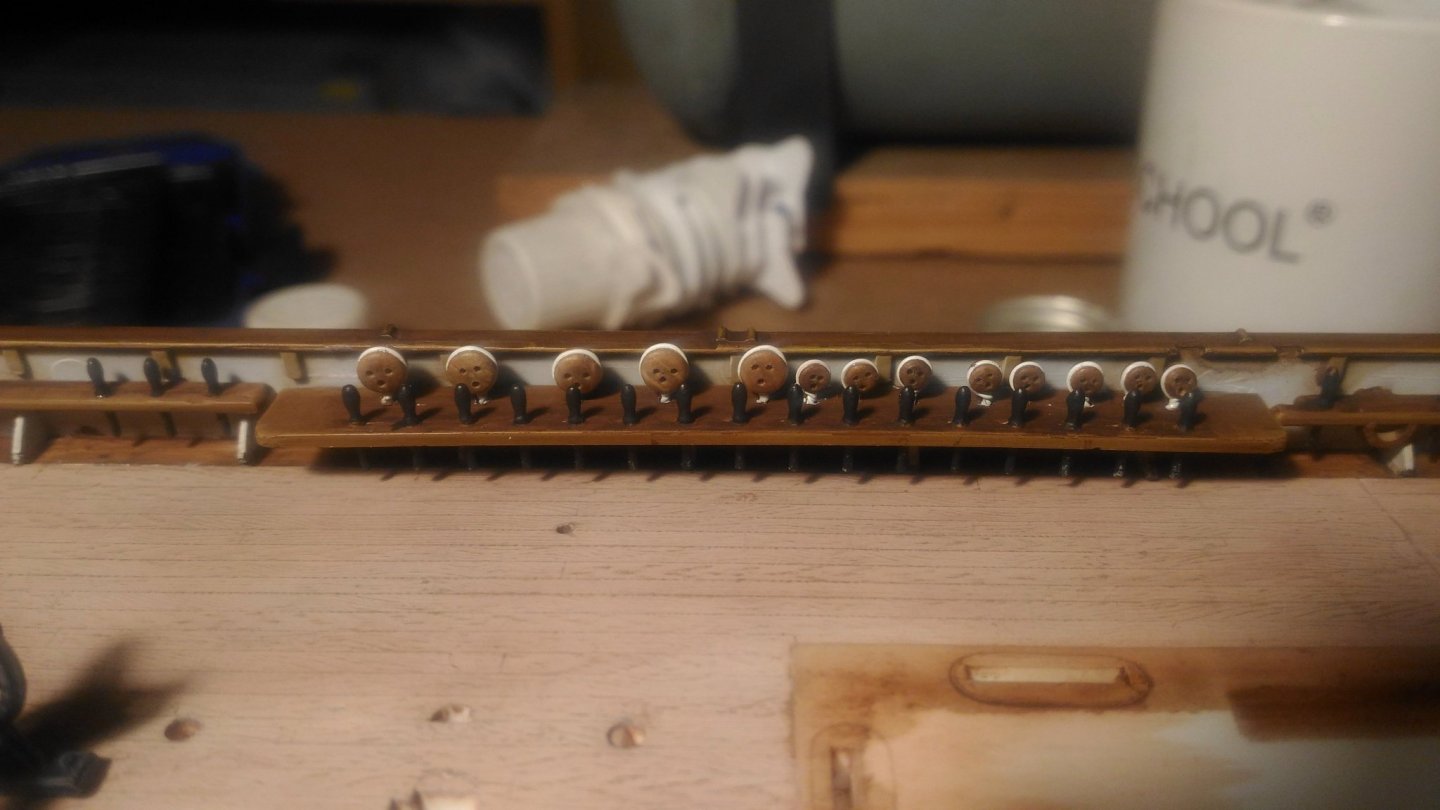
And here a view of the entire deck:
It was a long and time consuming job, but in the end I’m quite happy with the result.
Thank you all and see you next time!
Edit: typing errors...
- FrankWouts, gieb8688, Scottish Guy and 2 others
-
5
-
Hello everyone.
This is my first model ship and my first build log here.
English is not my native language, so sorry for any mistakes.
I started more than one year ago but I’ll start the log from the beginning, hoping to help other members not to do the same mistake I did.As suggested by the instructions, I started from the hull:

The base coat was made by airbrush, acrylic colors (gunze and tamiya), followed by oil filters, dry pastels and oil dry brush in order to simulate the wood planking and to highlight some details.
Tyre black was used for the hull, highlighted with gray. A mix of copper and gold, washed with green/blue oil were used for the Munz metal planking.
Buff, desert yellow and similar tones were used the base for the wood. Burnt umber filters helped to break the uniformity and bring the wood a better look (at least I hope…) and the details were highlighted by pastels and oils (remember that the detail are raised and not recessed in this old kit).That's it for now.
Hope you like it and don't be afraid to criticize!
-
I'm building the same kit and the rigging plans are difficult to understand, quite simplified and in some case just wrong…
I ended up by not using them at all.
The older instruction where a little bit better, at least they where understandable.
You can find them here: https://cuttysarkdrydock.wordpress.com/2011/09/23/the-cutty-sark-rigging-sheets/
In any case they are just a pale representation of what the real Cutty Sark was.
If you relly want to have a grasp of the real beauty and complexity, I suggest you the rigging plans from Campbell, they are available here:
https://shop.rmg.co.uk/products/cutty-sark-rigging-plan-50-x-70cm
But be aware: if you star to dig into the rigging of a tea clipper, you will never go back! 😂
Hope this can help and sorry for my bad english -
Thank you for your kind offer, I will surely need some help on the way.
As for the build log, I might open one here too, seeking from good advice by experienced members.
Till now, the only one in English is here:
http://cs.finescale.com/fsm/modeling_subjects/f/7/t/183268.aspx
I hope I’m not breaking forum’s rules, if so let me know and I will quickly delete the link.
The other one are in italian, my native tongue.
Again, all my respect for your wonderfull build! -
Marc,
I’m so happy to see some update on your Cutty Sark!
Your build is awesome, one of the best I ever seen.
I am building the Cutty Sark, a humble Revell plastic one, I frequently check your marvel to cross check informations and to find anwers to my own doubts.
Keep on going!
Marco -
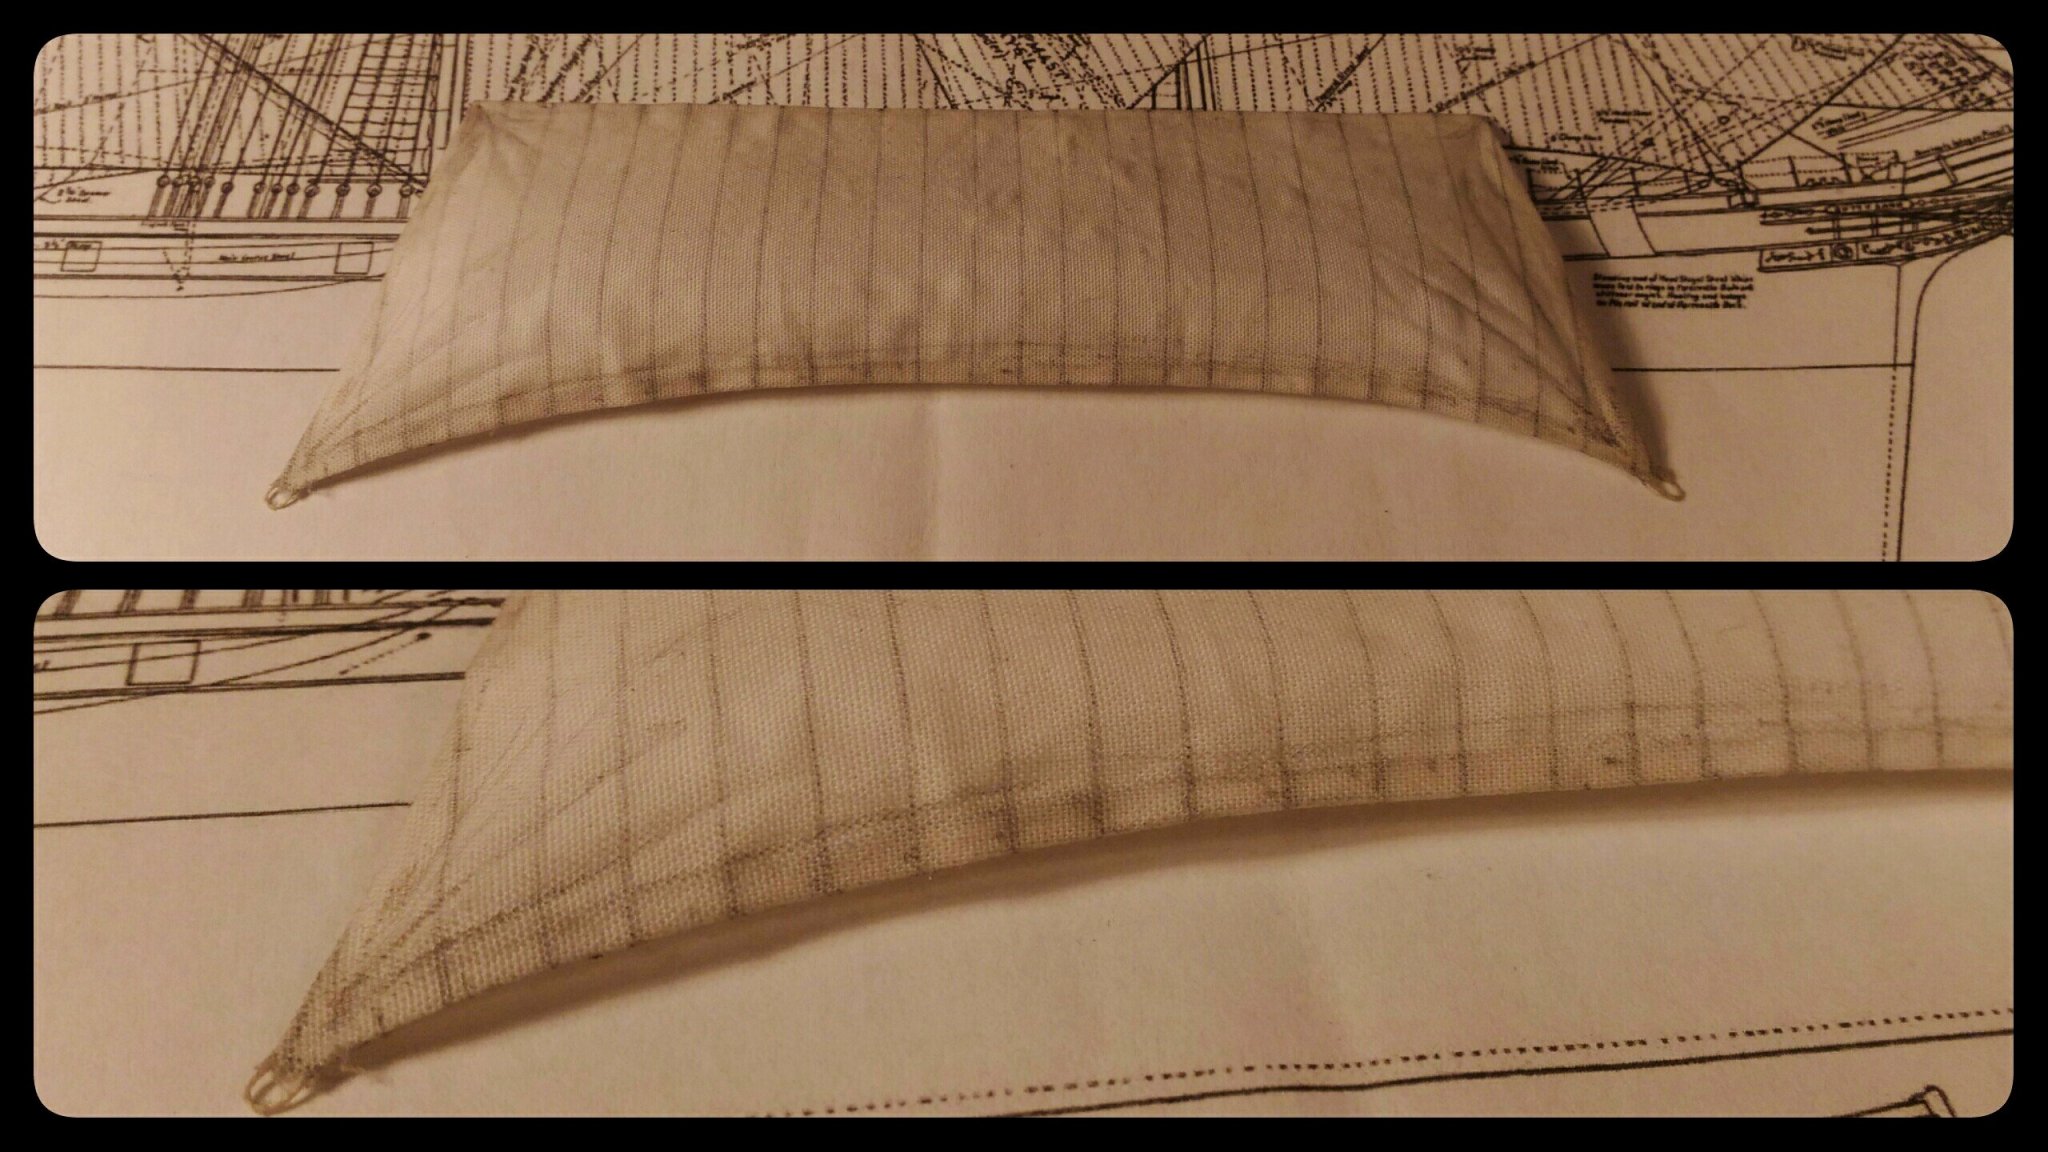
Hello everyone!
Inspired by this wonderful discussion and pushed by the will to put sails on my Cutty Sark, I made a quick test.
This is the fore royal sail. Many details are missing, it is just a test focused on the shape of the sail.
I want billowing sail curved in both directions, vertically and horizontally and I wasn’t able to get the shape right with paper. So I switched to fabric.
That’s the result: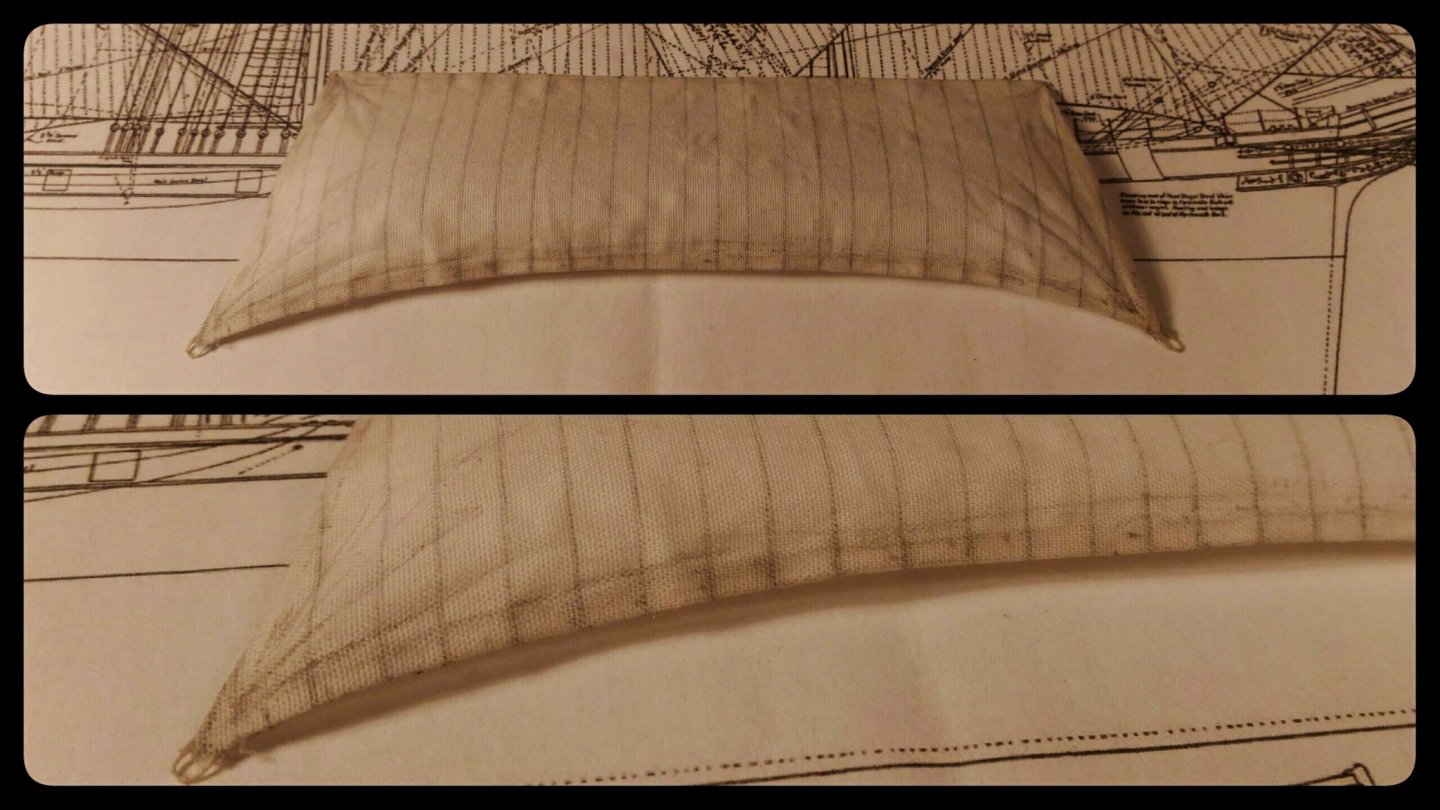
I like the overall shape and the translucency effect (sadly invisible in this picture without back light).
Unfortunately the texture of the fabric is out of scale e visible at close range.
Secondly they are still too thick…
I would like to try whit modelspan, but it seems to be impossible to find it, at least here in northern Italy.- rwiederrich and keelhauled
-
2
-
-
Hello everyone.
I'm building a 1/96 Cutty Sark from revell plastic kit and I'm trying to improuve the cathead area.
I would like stow the anchors on the sides of the ship, such as depicted in the picture below.But I miss some important information: how the two small chains (indicated with the arrows number 1 and 2) are secured to the cathead and to the side of the ship?There should be some sort of easy way to let the anchor go in case of emergency, but I can't figure out how!Campells plans shows this area and there is a sort of movable handle, called "Tumbler" wich seem to be the responsible for the quick release of the cat stopper chain (the number 1) but any image or description of this mechanism will be really appreciated.For the second chain things seem to be even more strange to me, since the plans show them tied to the bollard. Is this correct? And, if so, how should I tie the chain troughout the bollard?Thank you in advance for the help and sorry for my bad English.Marco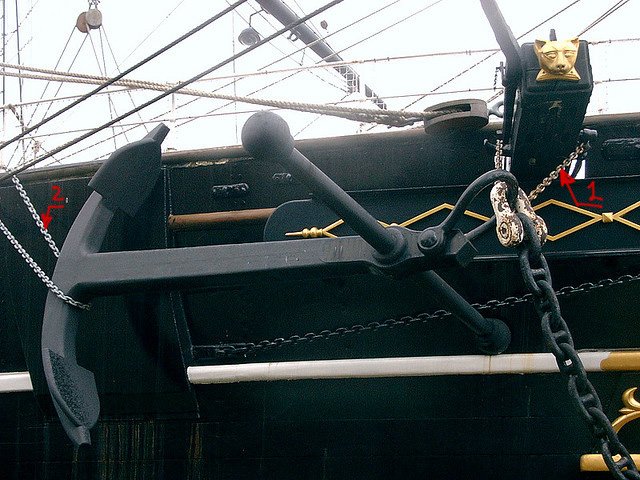
-
-
Hello again and sorry for the delay in answering.
Thank you both for your great contribution in solving this issue,
Now I know that I'm not completely wrong with my build and, as a plus, I know a little bit more this wonderful ship.
I think I will probably run the lifts outside the shrouds.
Surely this small detail will be lost when looking at the entire ship and the forest of spars and lines, but I know that if I made a mistake, my eyes will keep going there.
That's why I'am so thankful to you for helping me to sort it out!


Cutty Sark by Bruma - Revell - 1:96 - PLASTIC
in - Kit build logs for subjects built from 1851 - 1900
Posted
Thank you Cirdan, Too kind as always!
There are indeed some spare spars on the forward deckhouse, I will post some pics later on.
That's a really nice story, may I ask you the source of such a great info?
I like it for two reasons: first it helps us to better know Captain Woodget and secondly it means my paint job is at least plausible. 😅
Thank you!