
DONATION DRIVE - SUPPORT MSW - DO YOUR PART TO KEEP THIS GREAT FORUM GOING!
×


Egilman
-
Posts
4,379 -
Joined
-
Last visited
Content Type
Profiles
Forums
Gallery
Events
Everything posted by Egilman
-
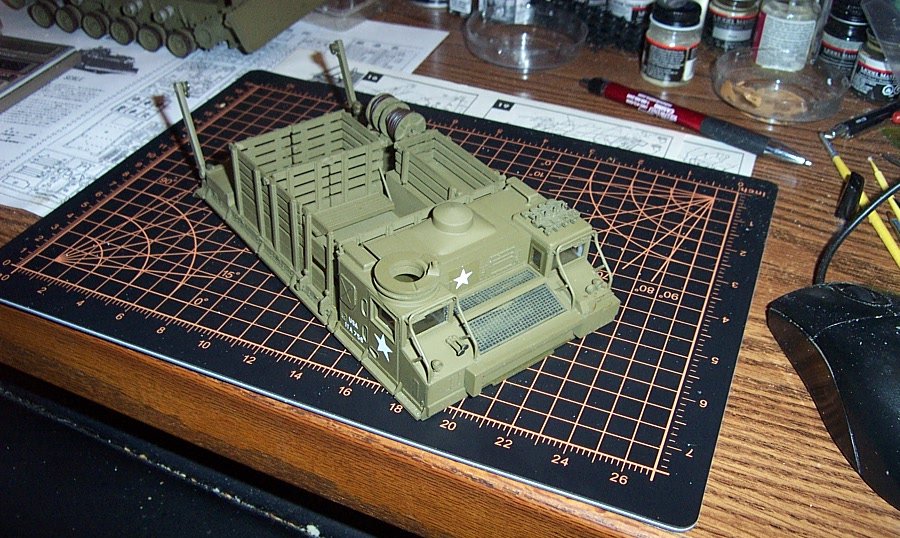
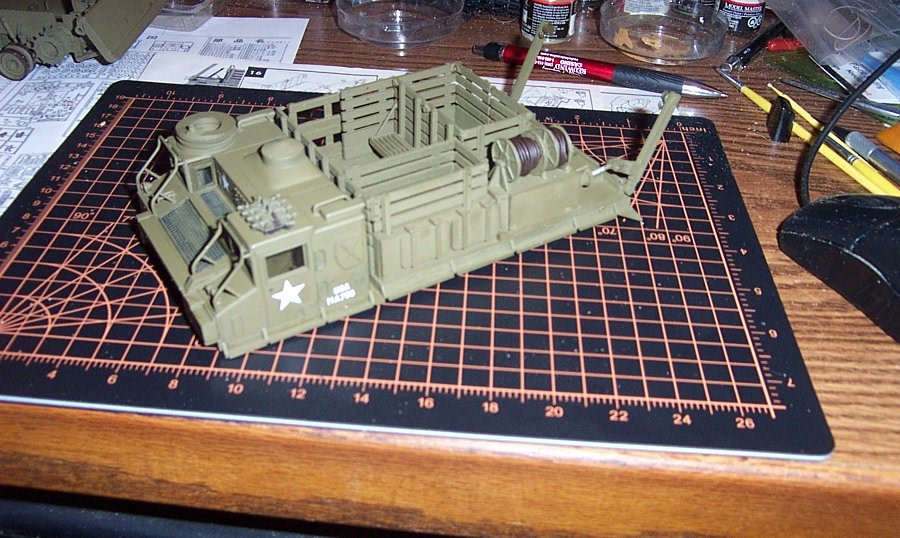
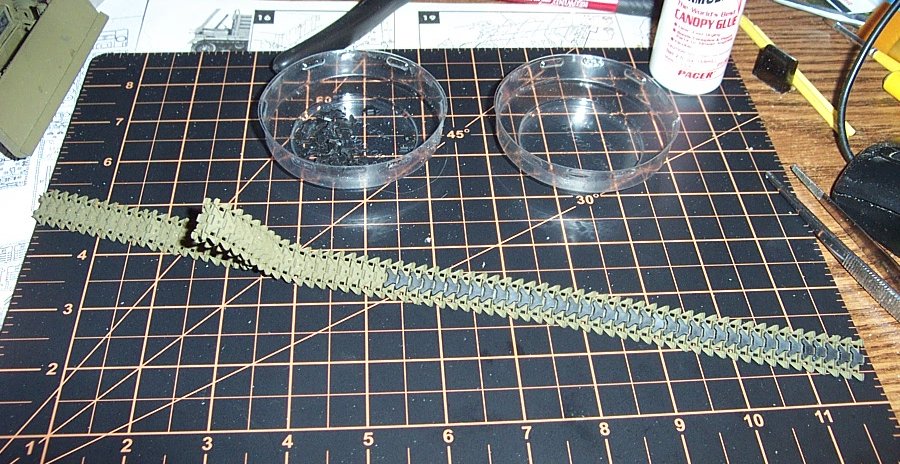
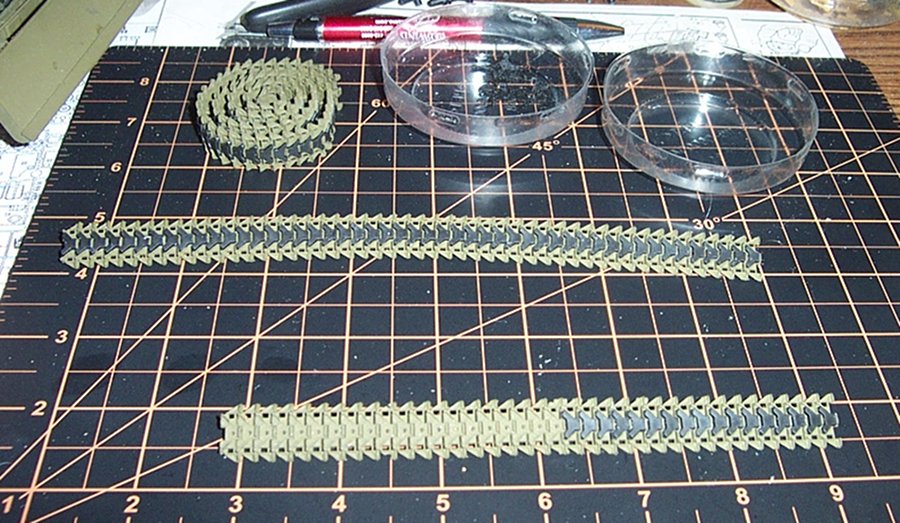
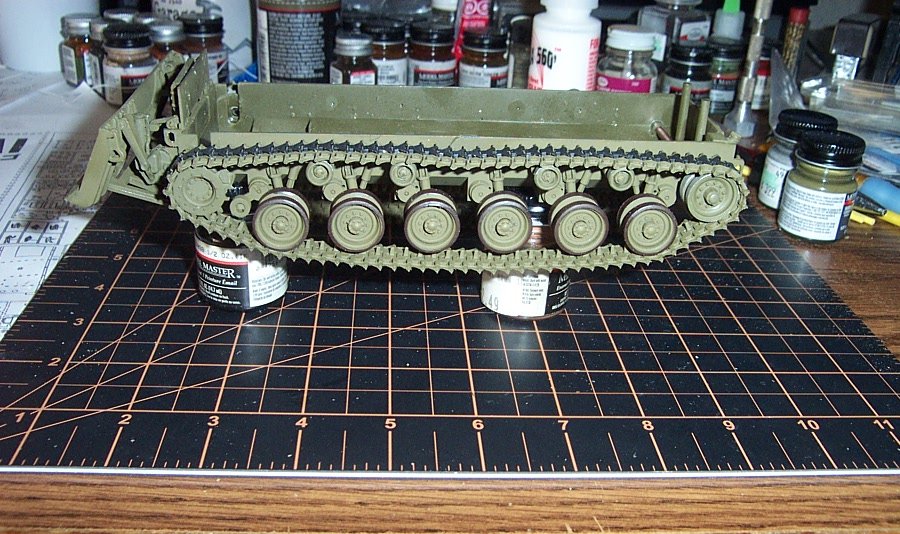
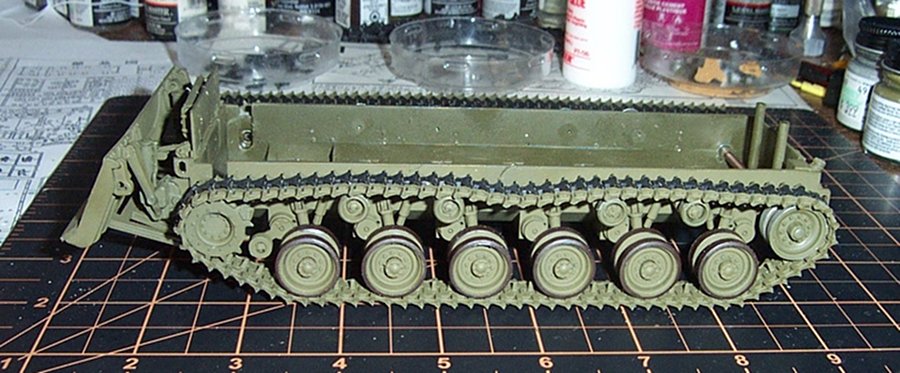
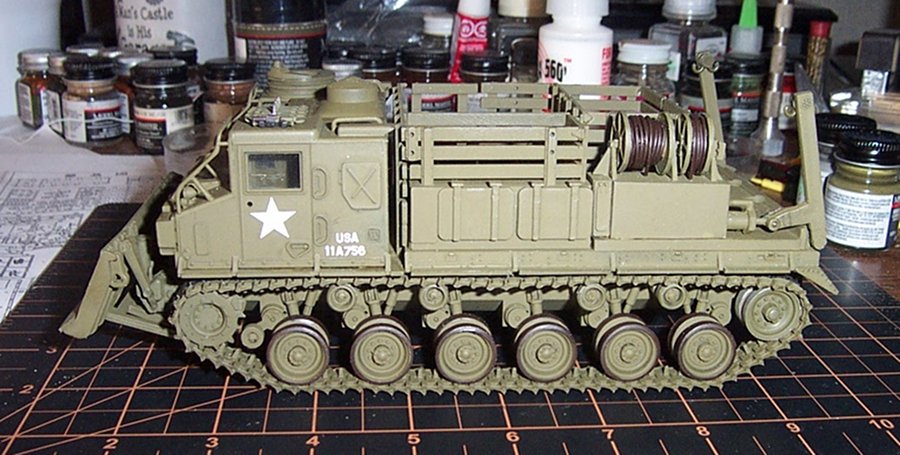
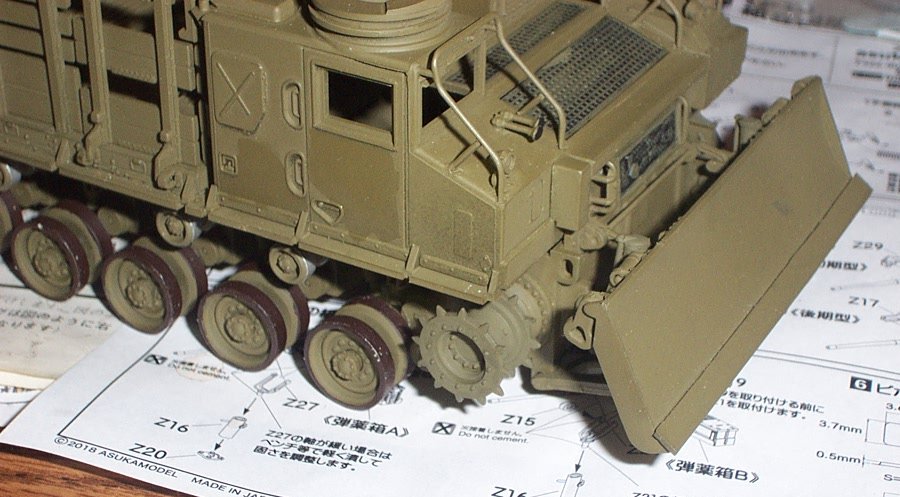
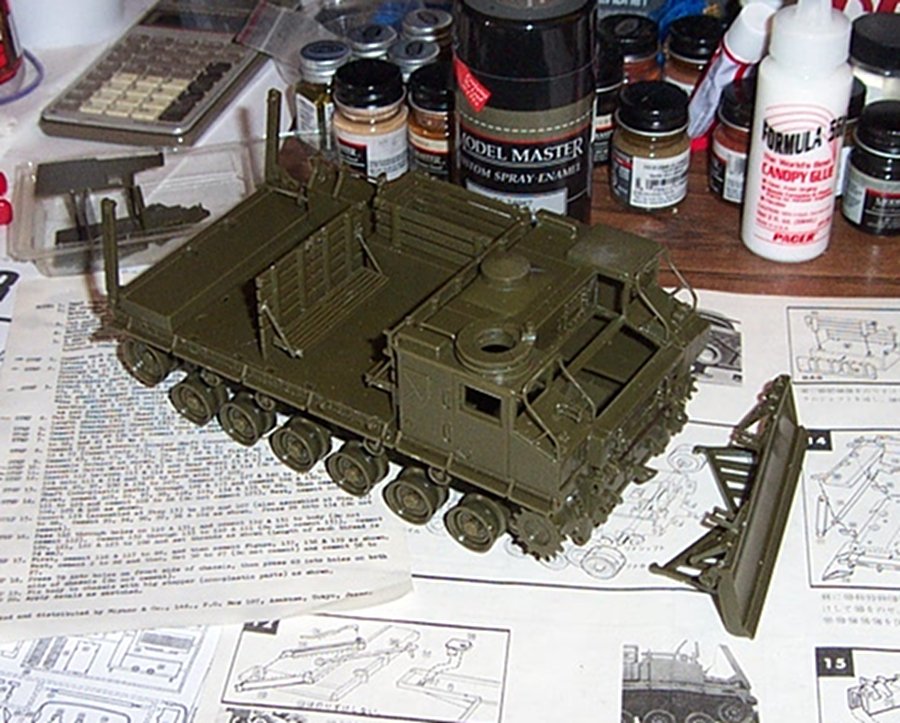
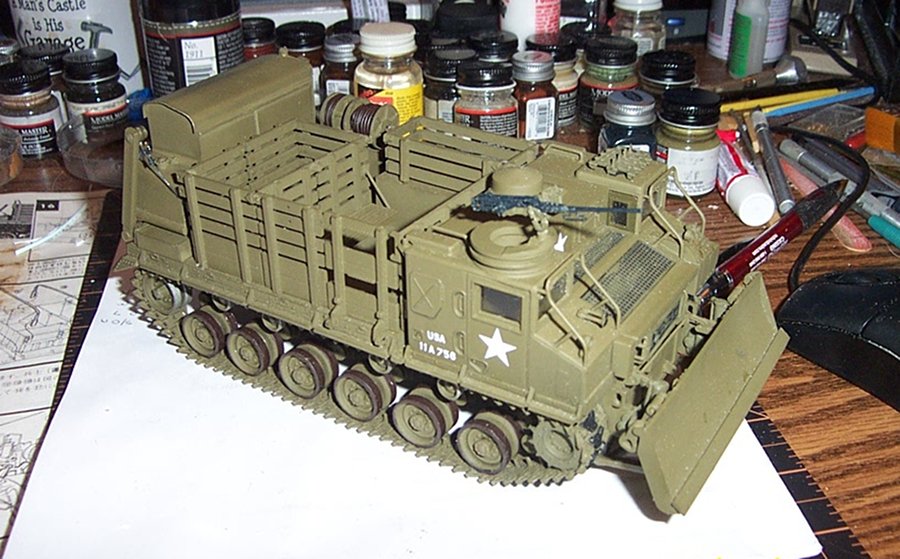
 Decals; I build my armor at it's issue point, markings wise it will only have the registration numbers and national insignias at this point, unit markings were the purveyance of the field commanders and his designates. There wasn't a uniform method of marking until around '43 and that wasn't strictly adhered to, this is why you see different colors for the national insignias, (yellow and white predominated but there was also blue and red and orange colors used) and the unit designations were all over the map a combination of symbols and alpha-numeric designations. A real hodge podge. This is why I prefer a simpler scheme and outside of dust and the occasional ding, no need for intense weathering. I know this isn't the norm for armor modeling where grit and grime is the rule, but it is what I like.... That being said, these vehicles didn't have much in the way of markings, even when they were in service..... Reg numbers and white stars were the norm..... Basic stars and designation number, In my research I found from an army manual dated 1995! that had an image of what the national insignia's should be on an M8 HST...... An 18" star on each door, a 12" star on the front engine cover plate, and a 24" star on the roof over the drivers compartment. Now as you can see, my model has the spare tracks on the drivers roof so the star would be obscured and on images of the real thing when the tracks were there the roof star was omitted as we see here...... And the designation numbers on the side. "11A" has been observed on every M8HST that served in the field. Doesn't matter where it served it had the "11A" number on it's side below the air cleaner covers. It has to be a type designation of some kind but I have found no explanation for it. I replicated it using single digits decals... The number is feax, in actual usage the numbers ran from 500- 899 so 756 is a viable number and probably was actually assigned to a real vehicle. I've seen photos of these with numbers on both sides of "756" but this usage is completely fictitious. Above the number was usually a "US ARMY" or a "USA" I used the shorter version cause I had a decal for it that fit the space. This is what you would see on a basic issued vehicle before the unit numbers/symbols were applied in the field. Tracks: The most tedious part of the build, they come in individual links that snap together pivoting on the interior pins on each link. the links are plain, representing the cast steel plate that makes them up. The rubber road pads are separate pieces that need to be glued to each track link..... One complete track, partially padded. Now most people use super glue to adhere the pads to the links, I found that SG is too brittle for the flexible vinyl pads and even after a short while they tend to fall off..... I chose Formula 560, the clear canopy glue to affix mine, it is white when applied, form fits to the parts and when dry is flexible and completely clear/invisible..... I have yet to have a track pad fall off yet..... On the upper left is one finished length of track and gluing up the final length of track pads.... Left side track mounted, now the way to mount these is to connect them all together and carefully hang them over the sprocket bogies, and road wheels using the rear idler wheel to tension the track as you slip the axel in.... It took me a couple of tries to get the right feel for it but when you do as you can see they fit beautifully, sag appropriately, and just look "right"....... And sitting on its tracks, you can see the distinct sag between the two middle return rollers just like the real thing... I like these tracks, a bit of a bore assembling, but terrific when complete, well worth the extra work... (especially as this is a custom application) Almost completed body on the almost completed chassis, as you can see the glass is in place reels installed great looking tracks , you can even get the hint of a slight forward lean while sitting on the tracks, (it's natural stance with the dozer blade installed) more to come, machine gun, antenna, and possibly a tarp for the body bows..... Final assembly and scratch building the M-18 Generator set coming up..... EG
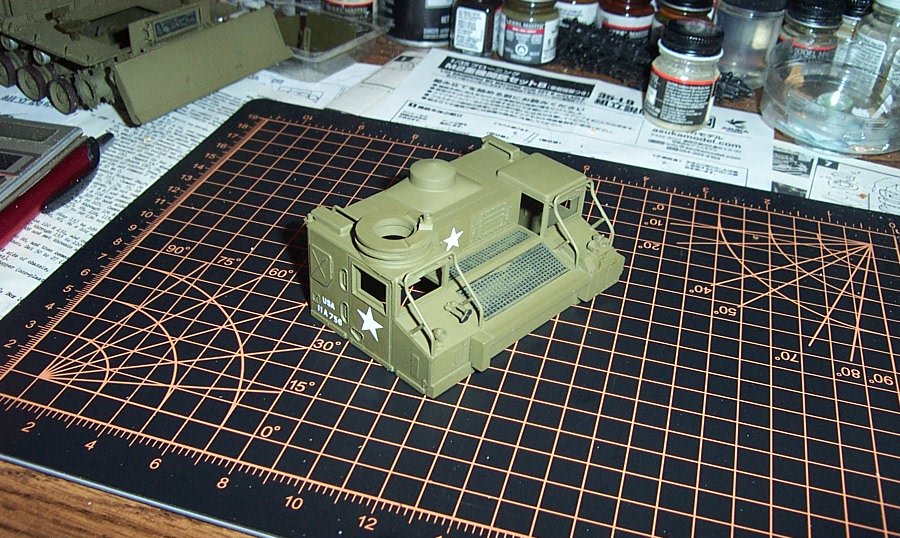

- 70 replies
-
- 11
-

-
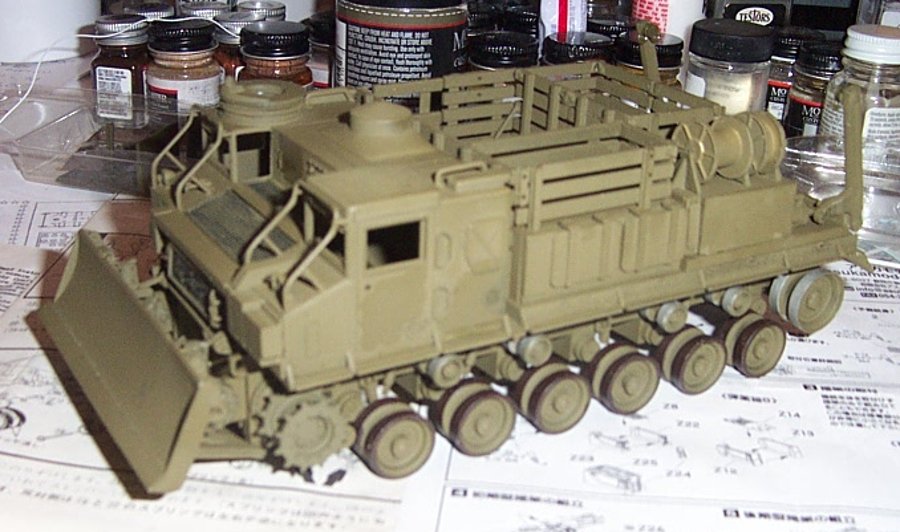
Paint has dried and cured, first a fitting to make sure everything is copacetic before I start on the details...... Still in subassemblies, fitted to make sure everything is straight and tight.... Right front view.... Left front view.... Closeup of bow & sprocket details.... Side details..... Skid lift & rear hull details...... And a low angle left quarter street level view...... Next up, Decals and Tracks.....

- 70 replies
-
- 11
-
-
Thank you Ken... I talked to Woody over at Archer several times before deciding on what I was going to do on the louvers. In 1/35 scale they are a difficult proposition. They are there, a prominent feature, under certain light conditions they disappear and under other conditions they stand out. But, I will cover them when I get into scratching the M-18.....
-
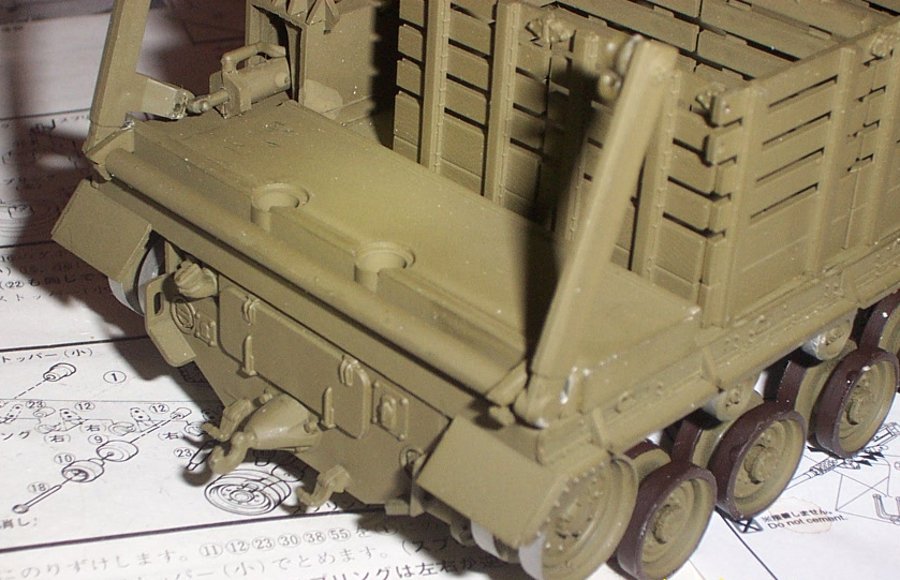
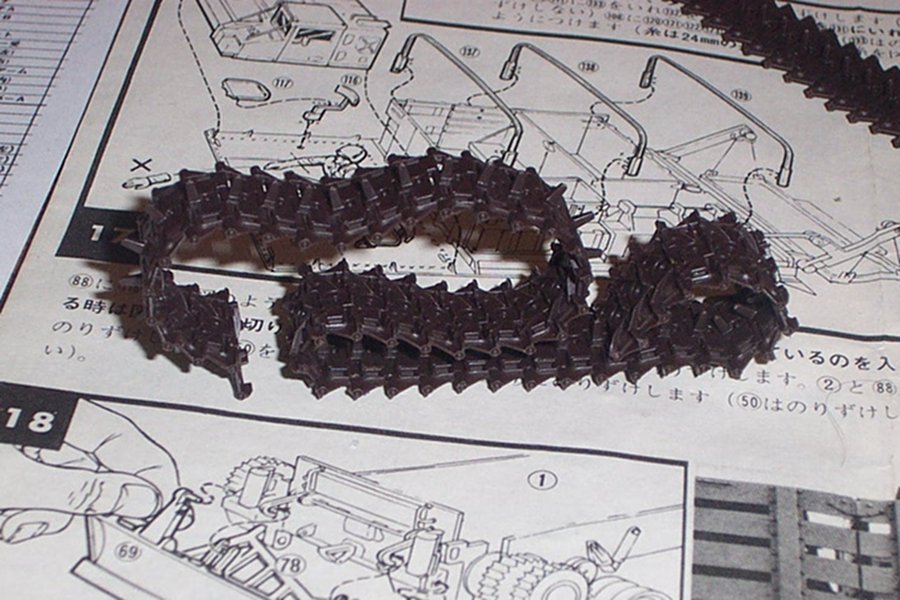
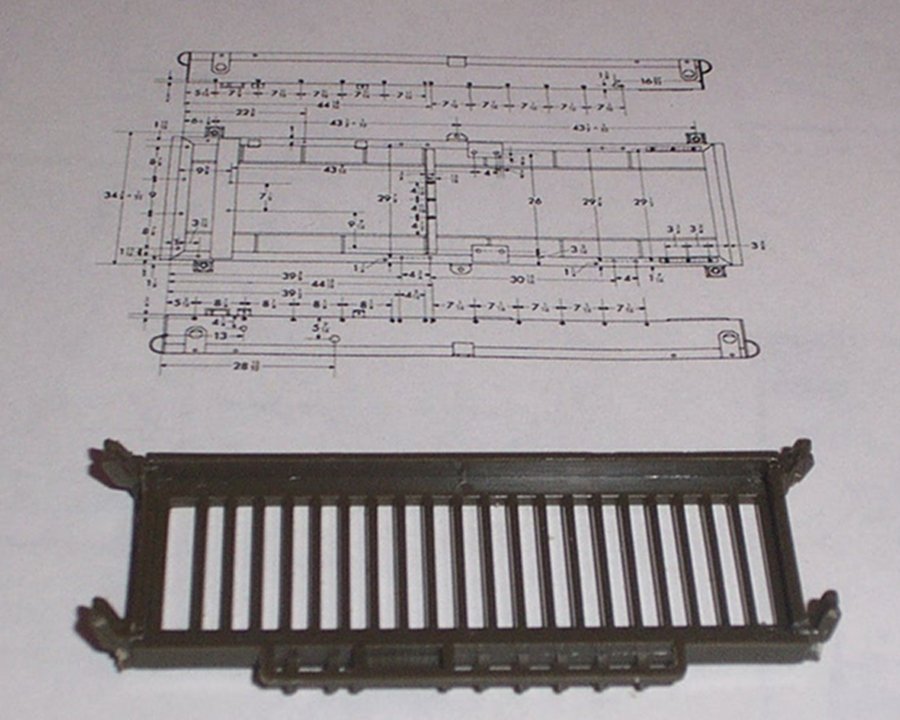
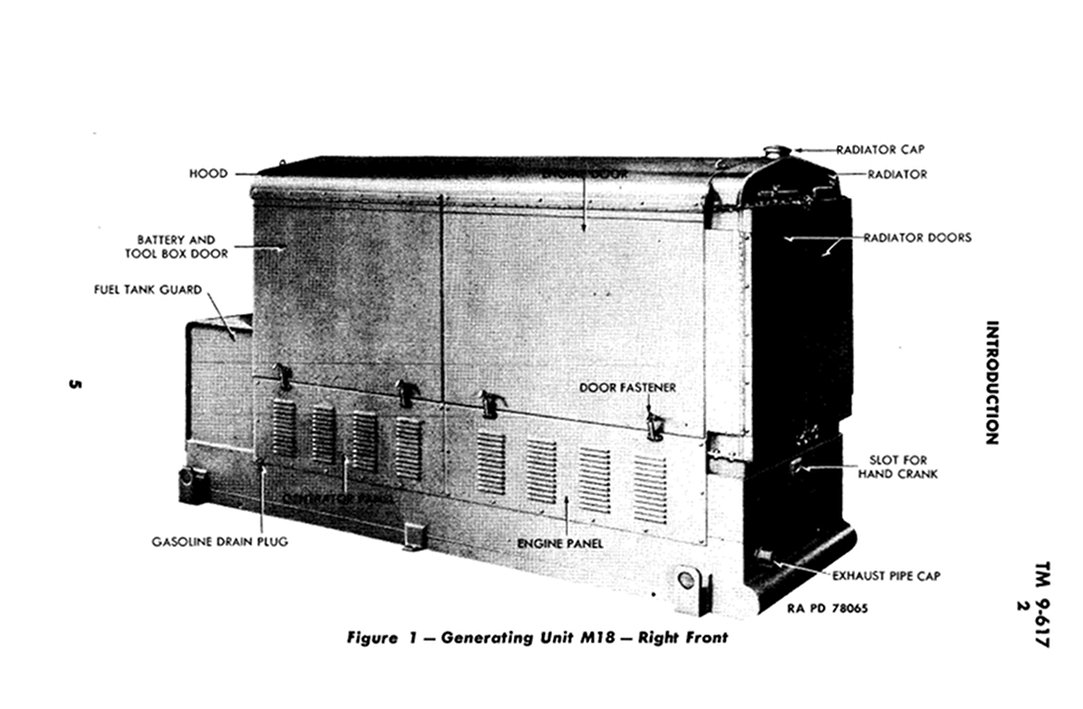
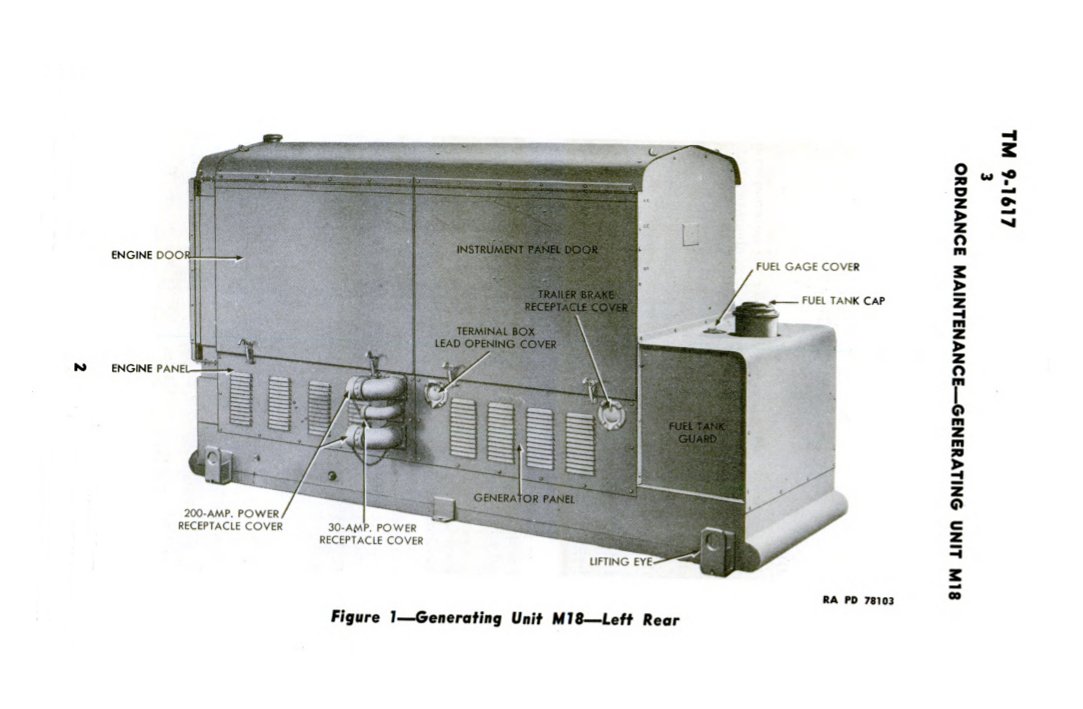
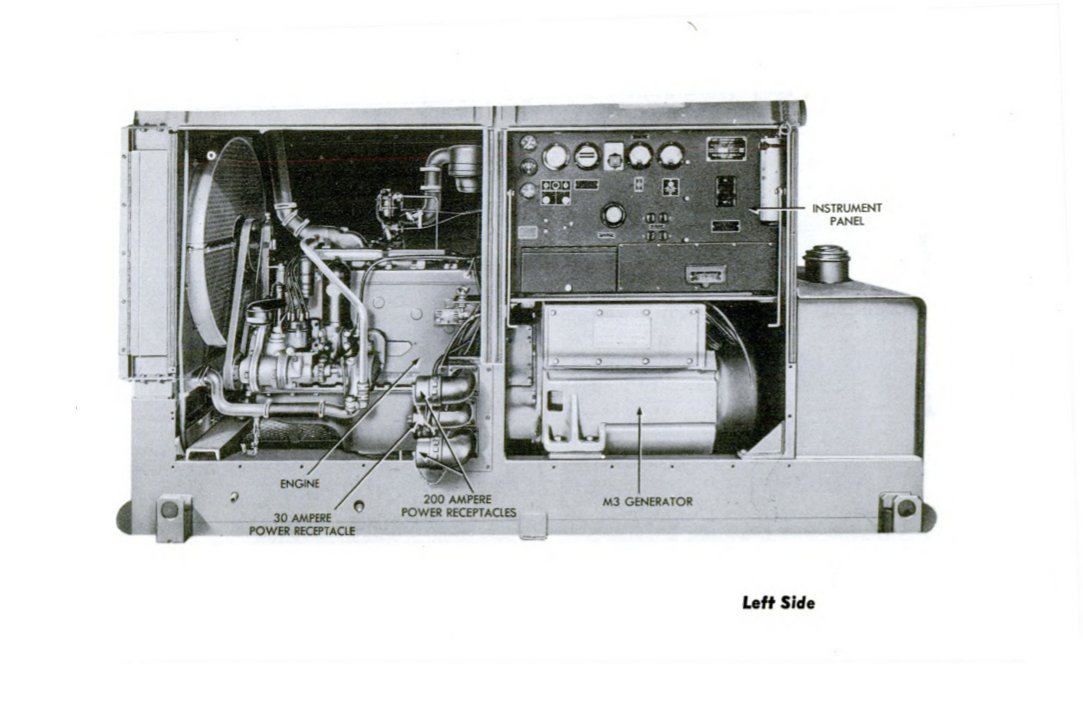
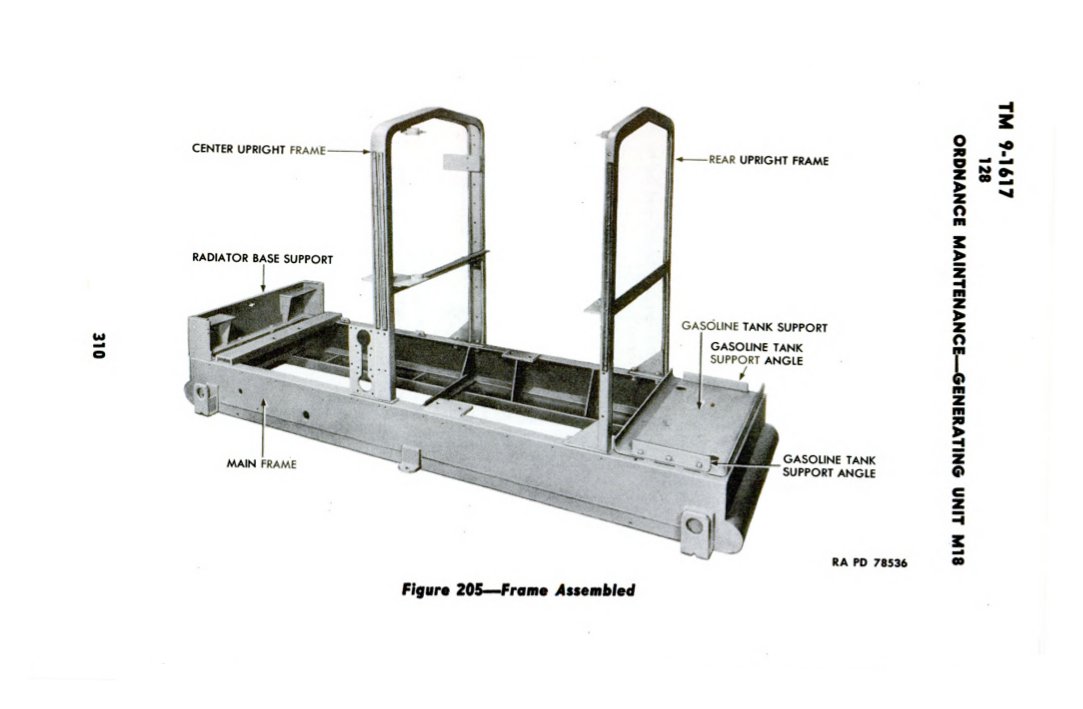
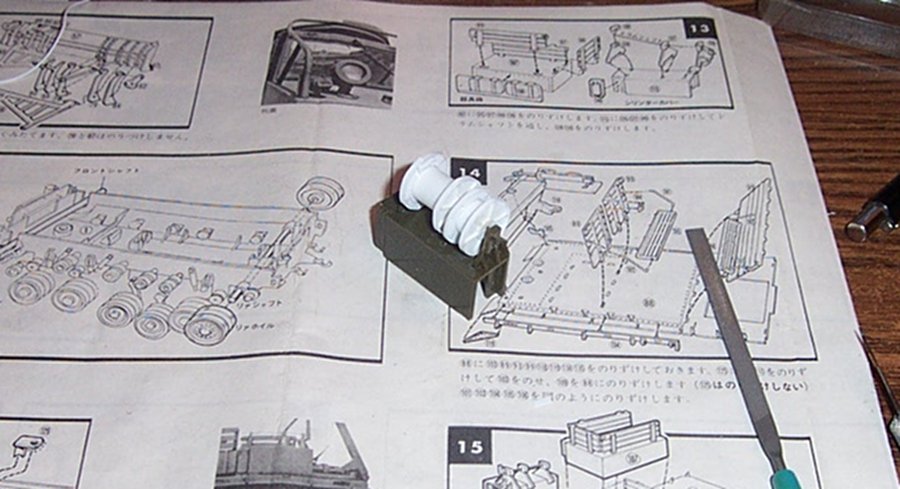
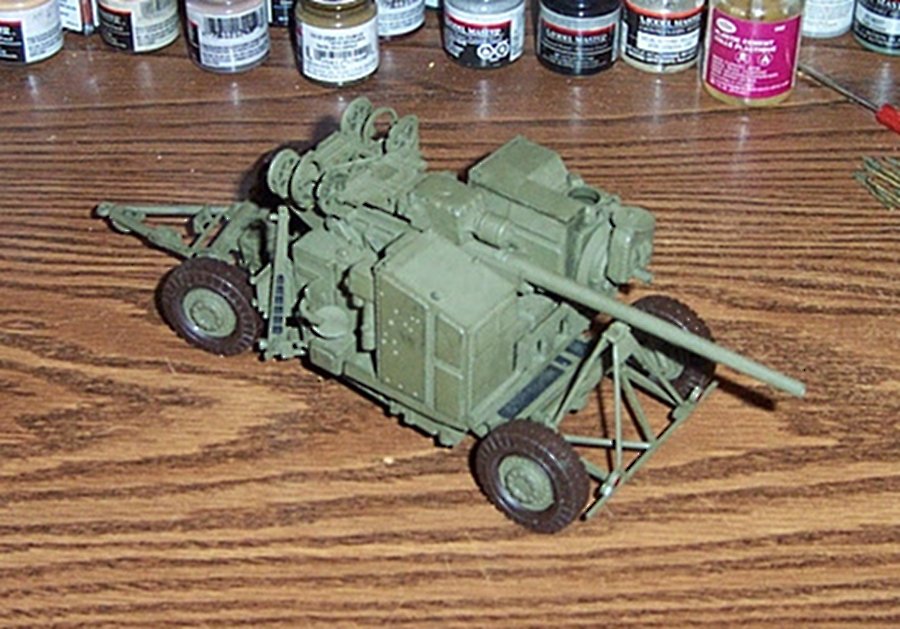
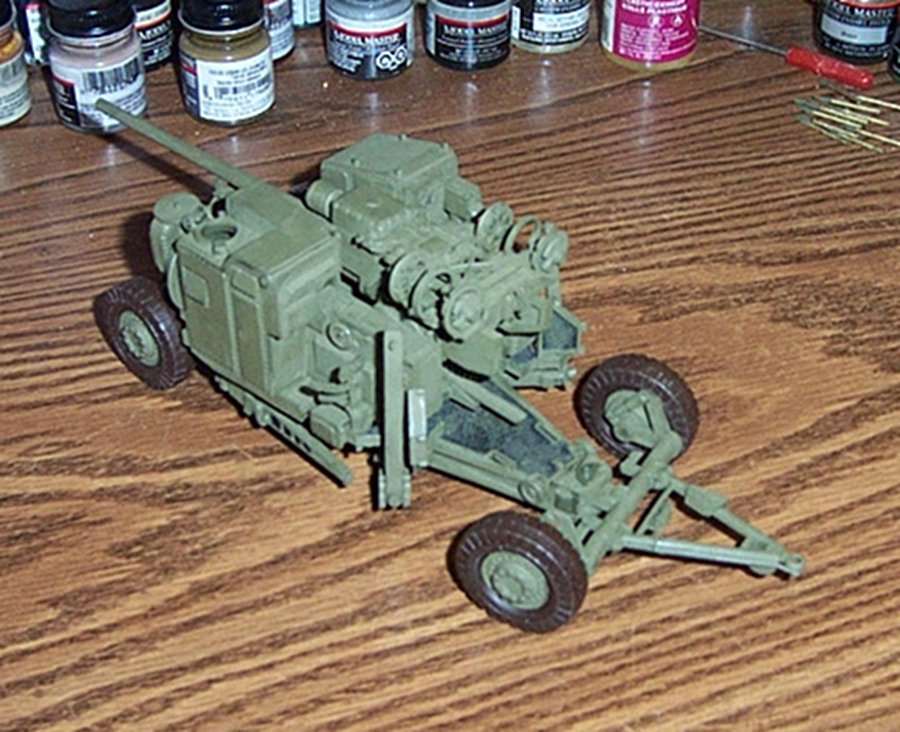
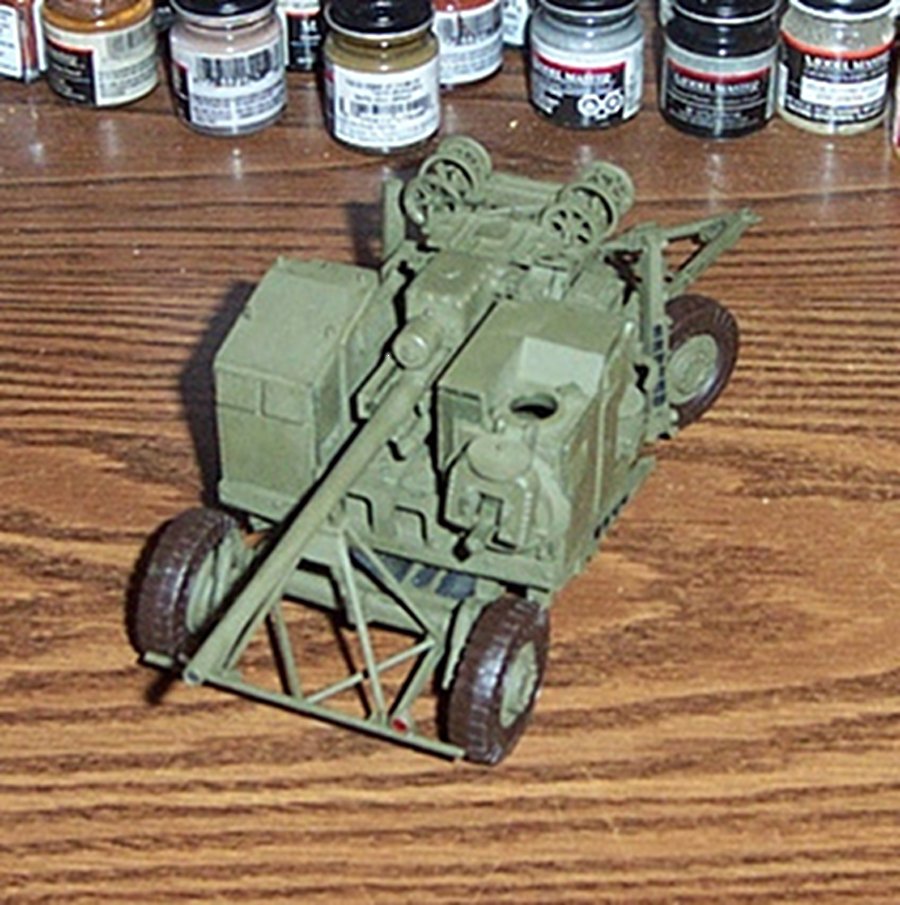
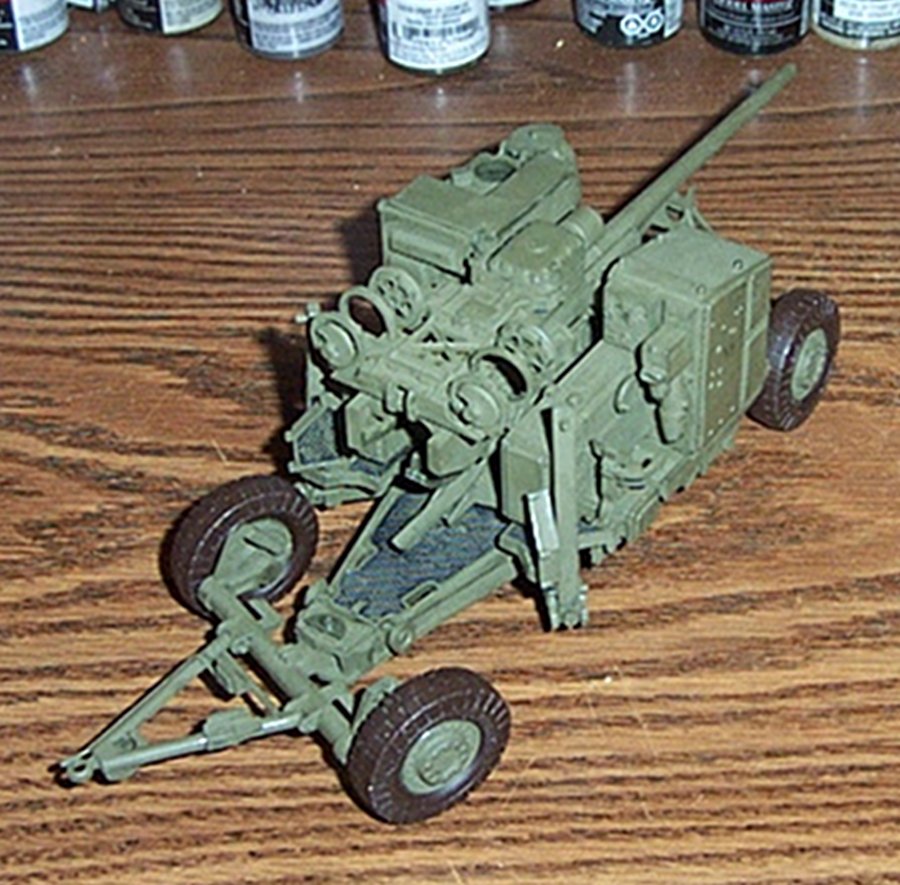
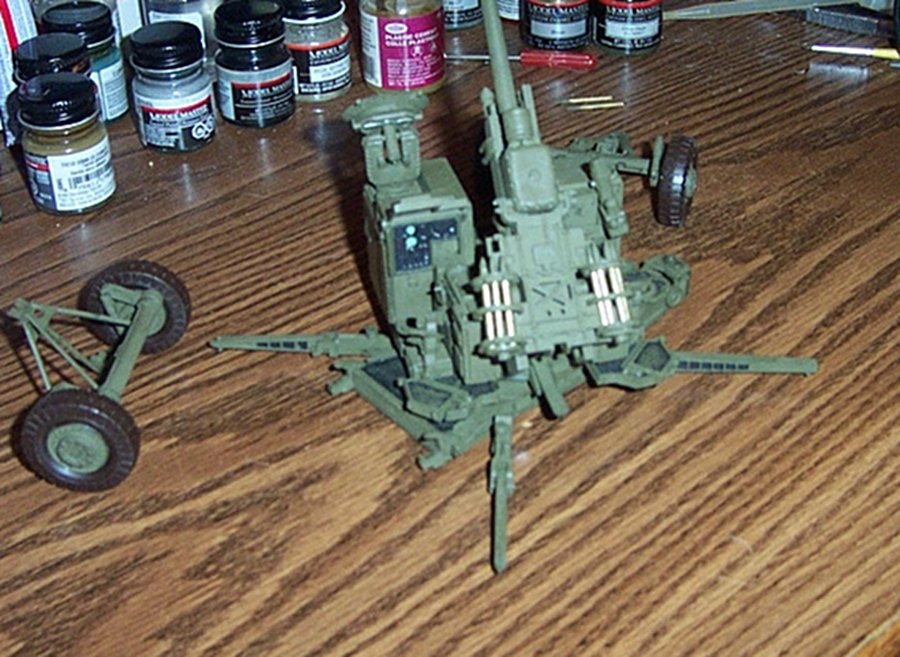
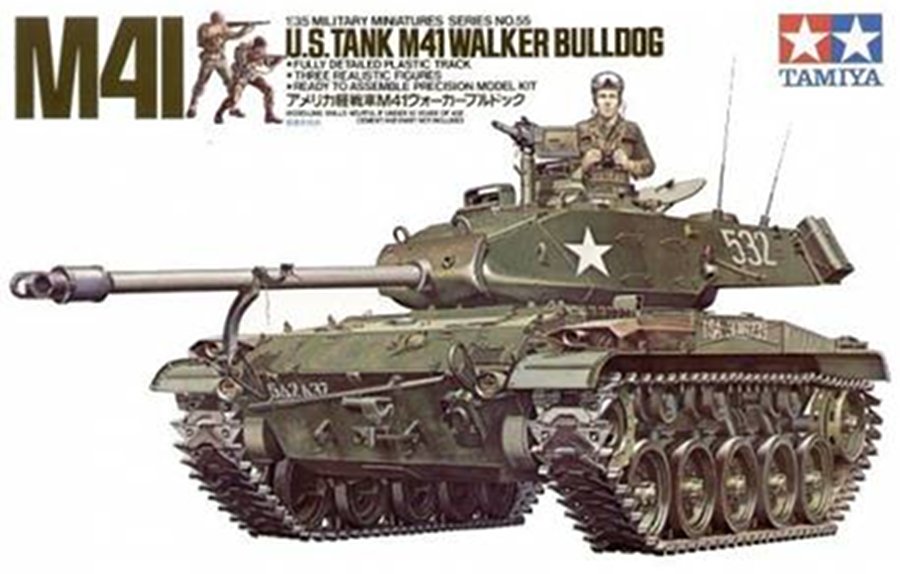
Final prepping for the second spray session, TRACKS! Two sets of AFV Club AF35046 T91E3 workable track.... (same track used on the M41 Walker Bulldog) The tracks are high pressure injection molded in individual links, 160+ links with separate rubber track shoes. My impression is it is lucky I needed two sets,the number of links with flash is high about 15% of the set, I tried to clean it off but unfortunately that didn't go so well, it is hard to distinguish the flash from the pivot pin so trimming the flash usually results in trimming the pin also. the track links cannot be forced together cause they come apart when it is time to bend them around the wheels. So essentially those flashed links are useless. It takes 87 links to make a single track for my M8, it would be less with an M41 so I guess they send extras. Good thing given the rate of unuseable links. One set assembled, the long length is what is needed to track one side. Very flexible, you do have to be careful as they will separate under pressure Looks and movement are very close to the real deal.... There is one more part missing from the kit. The M18 Generator that is usually carried on the back on the skid loader. Not all M8 HST's had a generator, in fact within a year and a half of entering service with the AA battalions the M18's were shifted to M7 generator trailers and the skid was used for personnel supplies or more ammo. An M18 Generator was a 30KW power supply, it was capable of powering a whole battery of M51's (4 guns) plus it's director (also mounted on an M7 trailer) This is why they discontinued carrying them on the back of the M8. But I'm building an example of the complete system as initially issued/used. So I need an M18 generator..... Luckily I have both the operators manual TM-9-617, (trailer mounted) and the depot repair manual TM-9-1617. Thank god I found them online because it is the only source of pictures of this particular piece of equipment. Also to my great enjoyment the depot manual has a scaled measured drawing of the base frame and a picture of the finished frame weldment. Now the resulting model has to be scaled to the model of course. (we do want it to fit don't we) which will be a tiny bit shorter than the dimensions called out in the print.... That is one of the vagaries of scratch-building for an already designed model you have to adjust what your adding to fit the model.... Right Front Left Rear Left side open panels Right side open panels Frame weldment Measured Drawing of the Frame.... Next, A basic idea of where we are at this point in the build....


- 70 replies
-
- 10
-
-
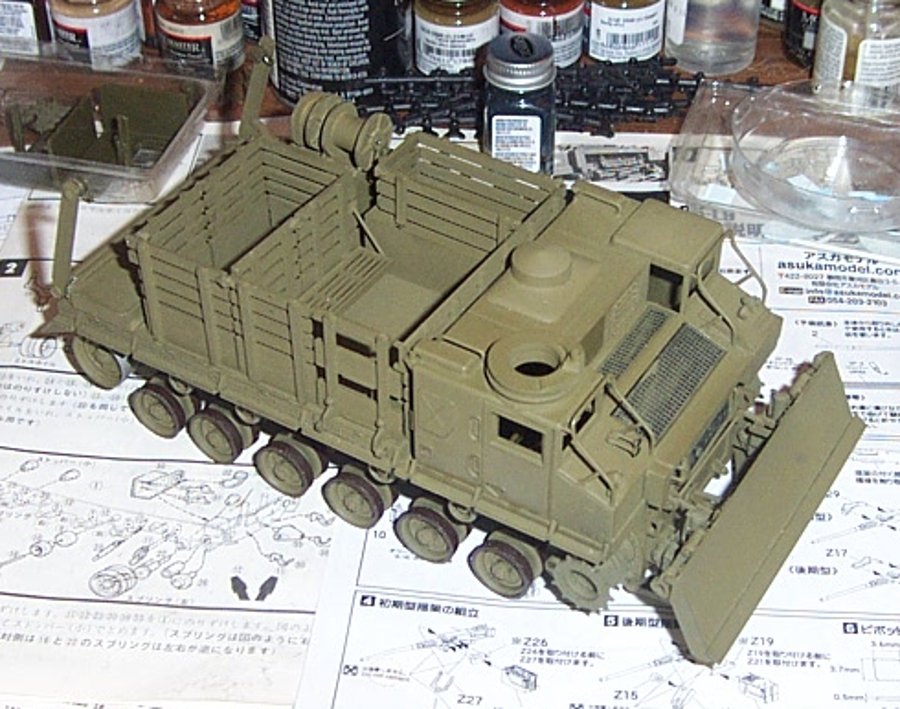
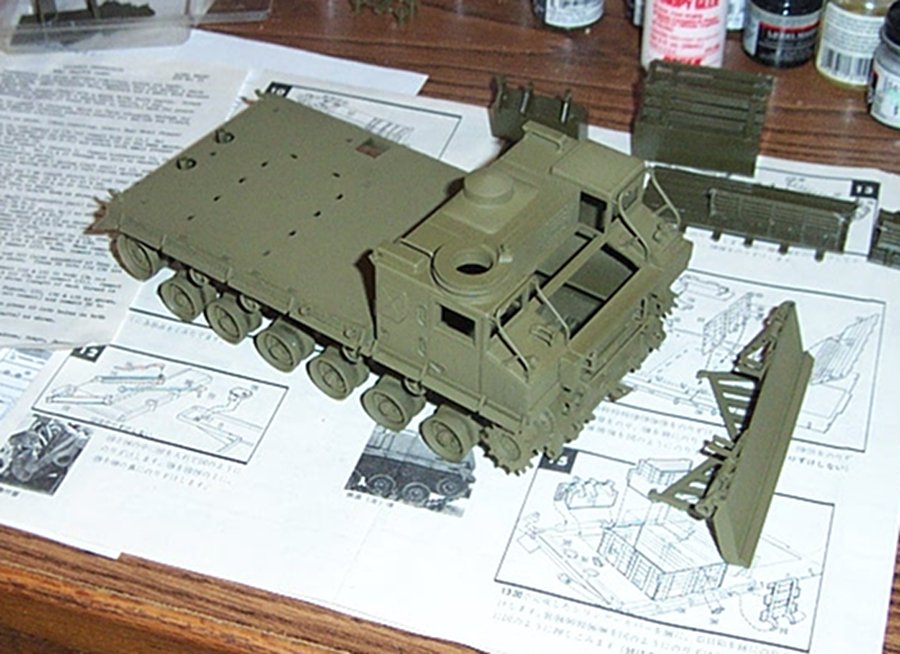
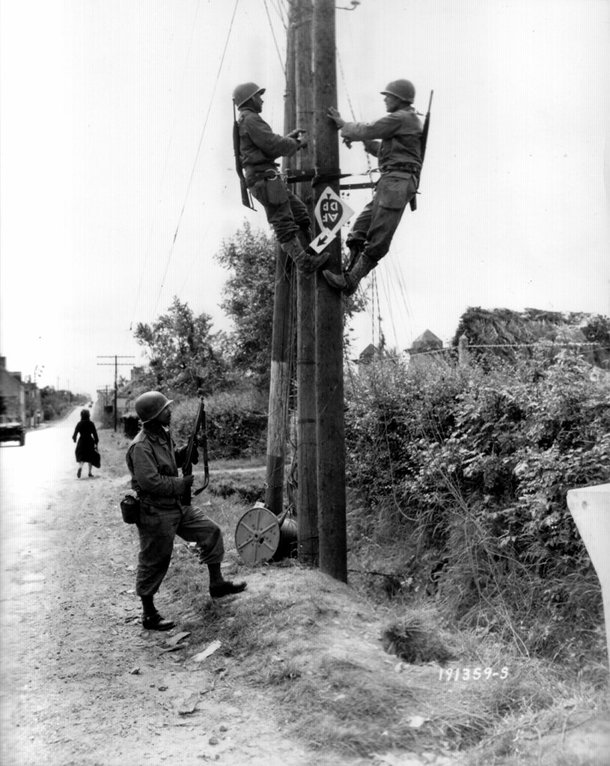
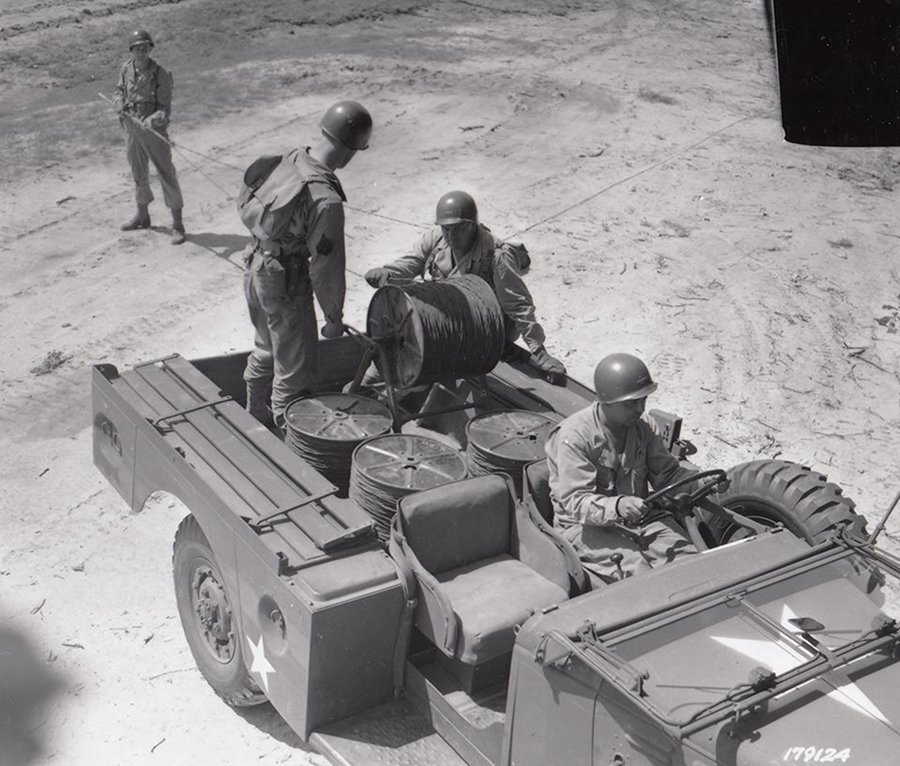
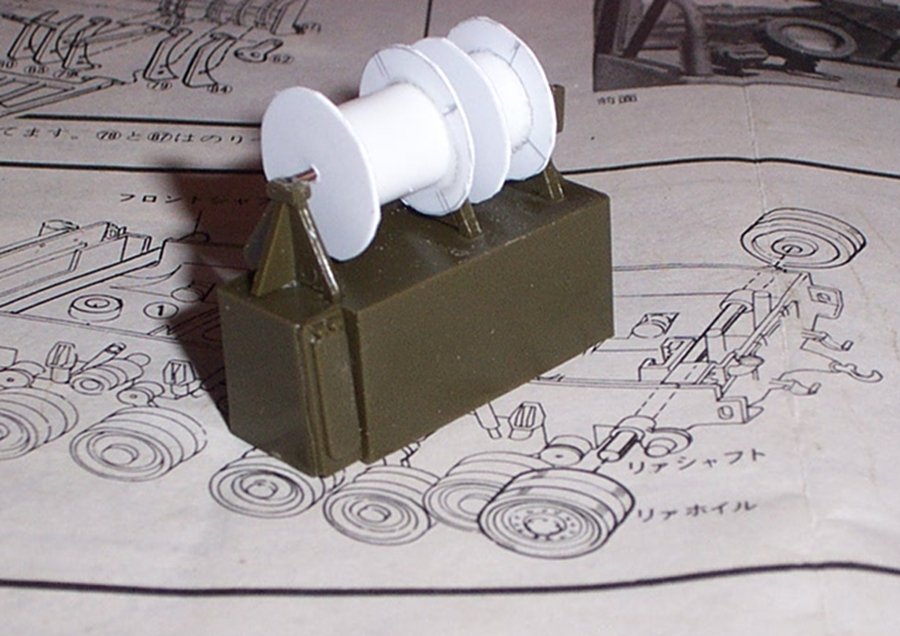
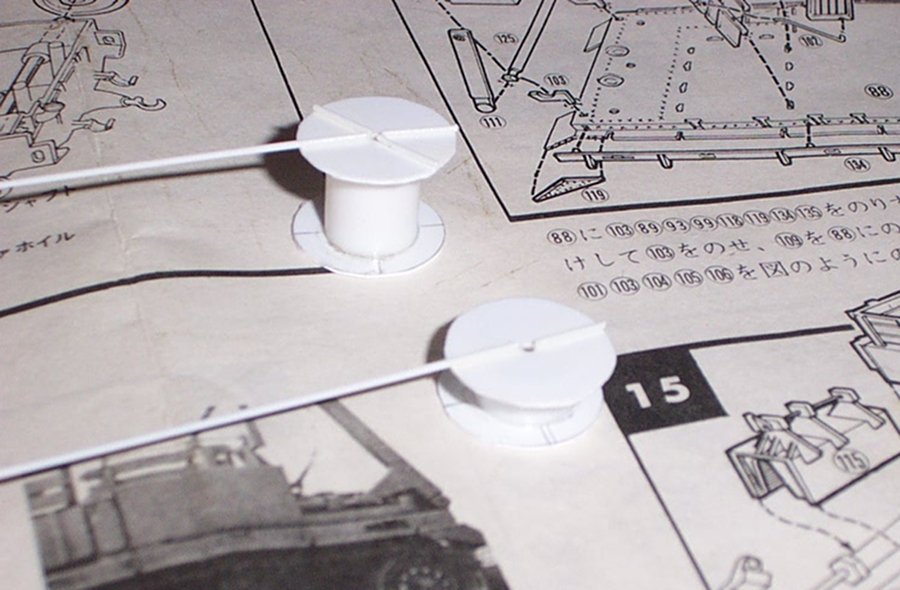
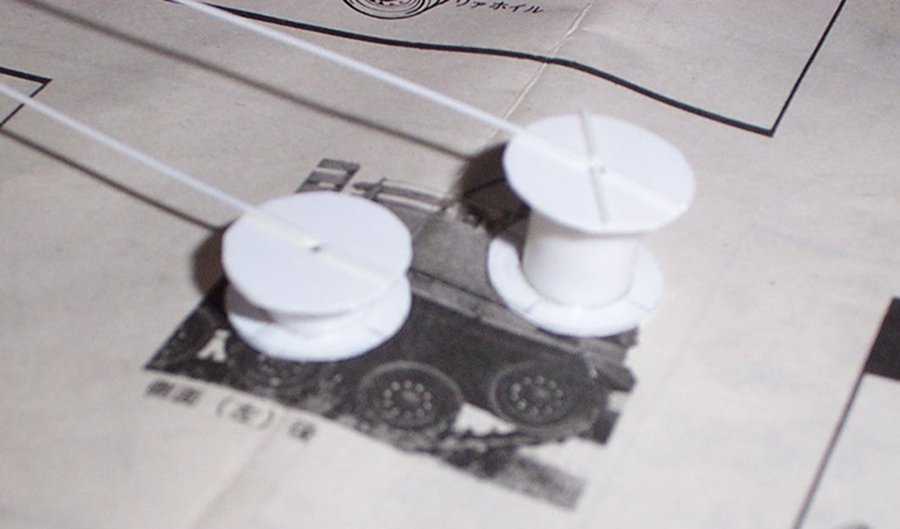
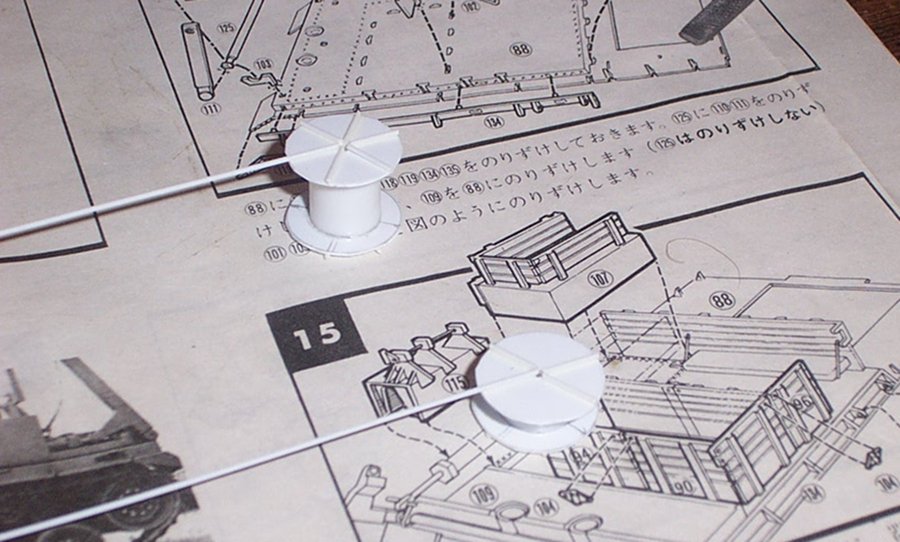
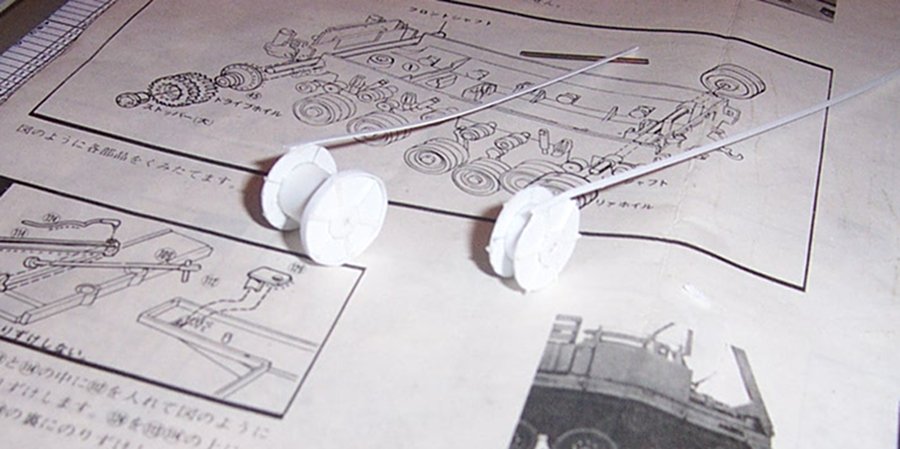
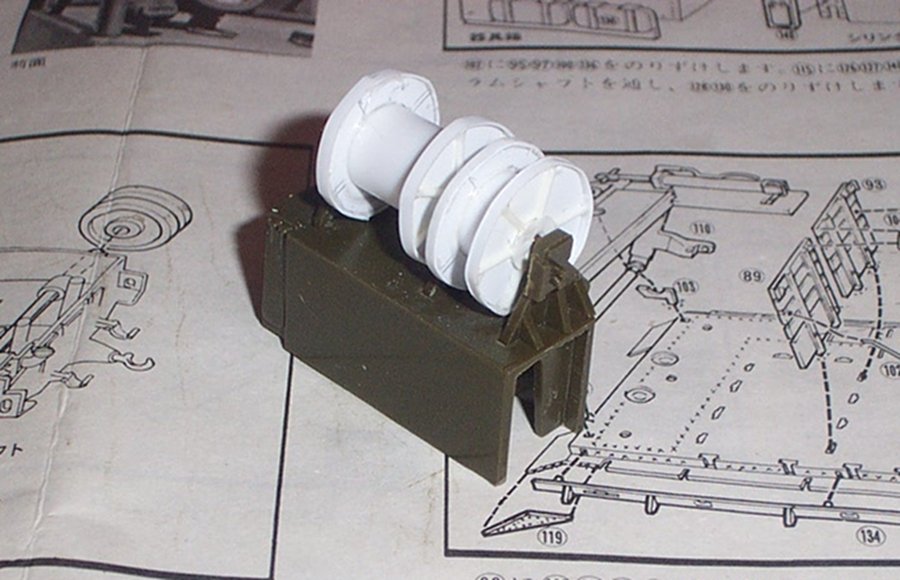
Final subassembly before paint.... And, as a teaser, A shot of the subject model at this stage of assembly. Still in subassemblies, just prefitted before paint to make sure everything fits the way it should. After this we will be in it's first drab dress.... Cab pre-fitted to the deck, deck fitted to the hull with some of the body superstructure fitted in place.... I built the blade as a subassembly cause like the front plate, there is a lot of detail that will not be readily seen once assembled.... And at this point a note. this kit is right up there on the accurate detail end of the scale, equal to ANYTHING produced today. I am very impressed at the level of detail and the crisp clean molding. I would recommend it to anyone as a fine example of the M8A1 HST. This effort by Nitto is far and away better than their M4 HST in accuracy and manufacture.... Unfortunately it is not manufactured anymore, but Bluetank has the Nitto molds and has re-released this kit several years ago, it is still available at a reasonable price, and makes a fine addition to any artillery prime mover lineup. Well, here she is, a new suit of clothes..... I pulled all the superstructure off the back as they need to be painted individually. There are underneath places that need painted which wouldn't happen with the body completely assembled.... Need to let the paint cure for 24 hours before I can do any details or touch-ups....... At this time I went thru the Kit from this point forward looking for any problem areas that may be laying in wait while the paint cured. Noticed that the M2 .50 cal was missing, the mount is here, what they call an ammo box is here but the gun is nowhere to be seen. All I can think of since the bags were sealed closed (mfgr. stapled) it must have fell off during bagging. OH Well! I went and found a replacement online... Asuka Browning M2 Machine Gun Set B w/Cradle. Said to be the best, better than resin & photoetch so I guess we will see. As I was prepping the remaining parts for spraying, I was looking at the body and thought something is missing....... but I couldn't quite put my finger on it.... Reels...... The M51 Skysweeper used two main sets of cabling, one set ran from the Generator to the Gun and the other from the Gun to the Director. And the kit has no reels....... So where do I find reference to period US Army cable reels???? Google doesn't help, it shows current reels and those commercially available, nothing WWII/Korea vintage..... So who in the US Army used Cable Reels? the Signal Corp of course! I searched on Signal corp operations and imagery and came up with two photos of what I needed to make.... France 1944, Signal Corps troops repairing the telephone system. A standard 22"dia cable reel is at the base of the pole. Korea 1952 I believe, telephone work at an airbase. four standard 22" cable reels in the back of a cable service truck. Making reels is fairly simple, two disks and a tube, 3/8ths tube and .020" sheet styrene cut in a 5/8th circle drilled thru the center to accept the rod...... Mounted in the Reel Holder, looks like they will suffice, but need more details. .025 styrene rod used to replicate the six stiffener spokes on the reel.... Showing the method of glueing the stiffeners in place using liquid cement...... Almost finished with the stiffeners, a simple six spoke pattern flush with the disk edge.... Inner bearing disks glued over the center of the spokes and drilled, and the beginnings of attaching the rims of the reels..... Mounted on the rod in the reel holders. Ready for final sanding and paint..... The wide reel held the power cable and the narrow one held the director cable. Now I need to find a suitable material to simulate the cables. Standard wire doesn't cut it.... Next up, more Painting and Assembly, Tracks and looking forward to the Generator set which is not included in the kit.....

- 70 replies
-
- 13
-
-
1931 Cadillac by CDW - FINISHED - JoHan - 1:25 Scale - PLASTIC
Egilman replied to CDW's topic in Non-ship/categorised builds
Everyone has their favorite method/material for stripping paint and chrome.... Some of them are nicer than others, but, old tried and true rules the day..... -
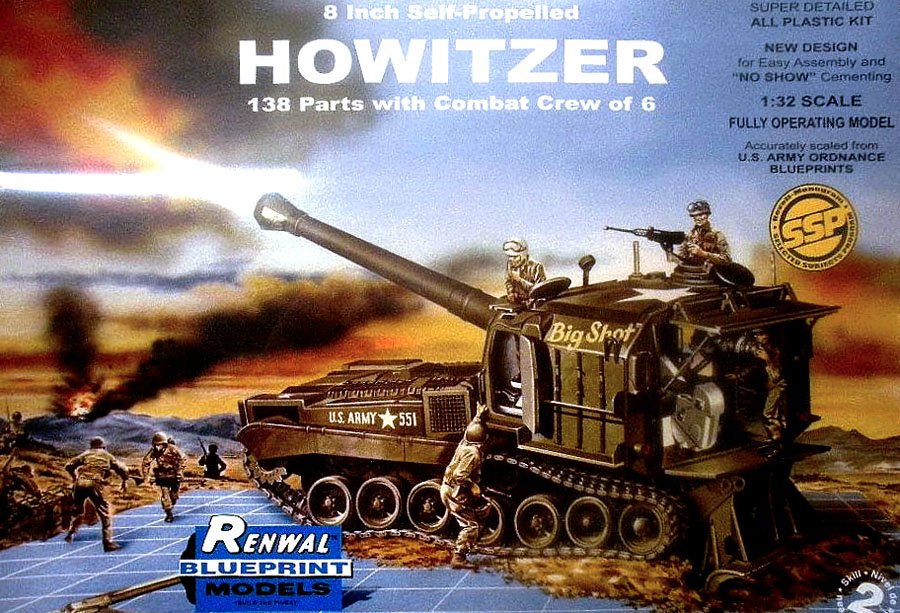
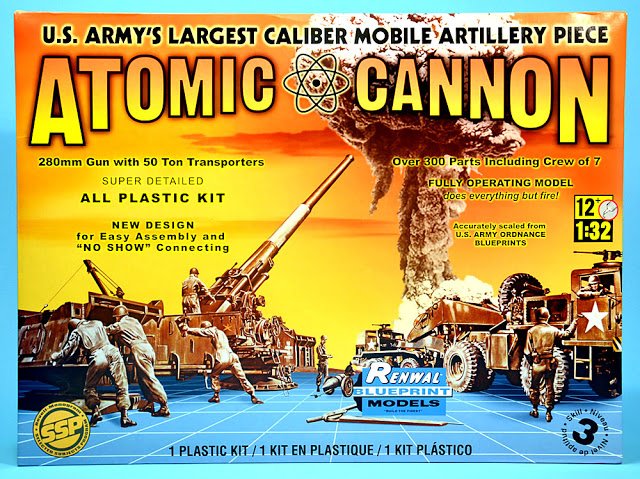
Renwal didn't do the M-8 they did quite a few but not the HST's. Nitto did the HST's with this one and an M-4 (which was wildly incorrect and out of scale to boot) They were doing things no one else was even thinking of like a 1/32 scale Atomic Annie.... (which is a HUGE kit, I have it in my stash) and of course what was considered the most detailed armor kit of the day.... (the kit that got me into modeling dreams) This of course is the revel re-release box art... I never got to build this one but it did set of my muse.... Then I saw this one... Again a re-release Revell box, but I have an original in my stash now. Revell acquired the Renwal molds way back in '76.... Only recently have they started re-releasing them..... Thankfully, they haven't changed them...
-
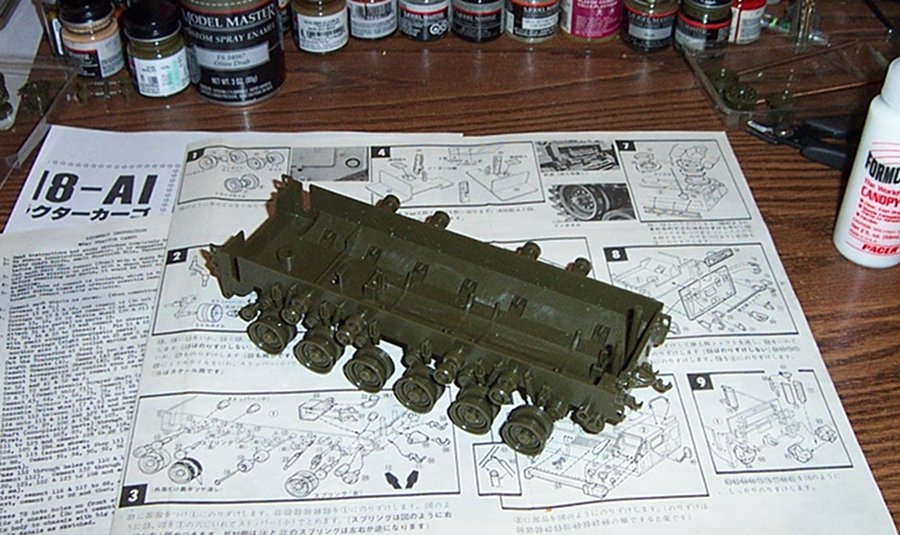
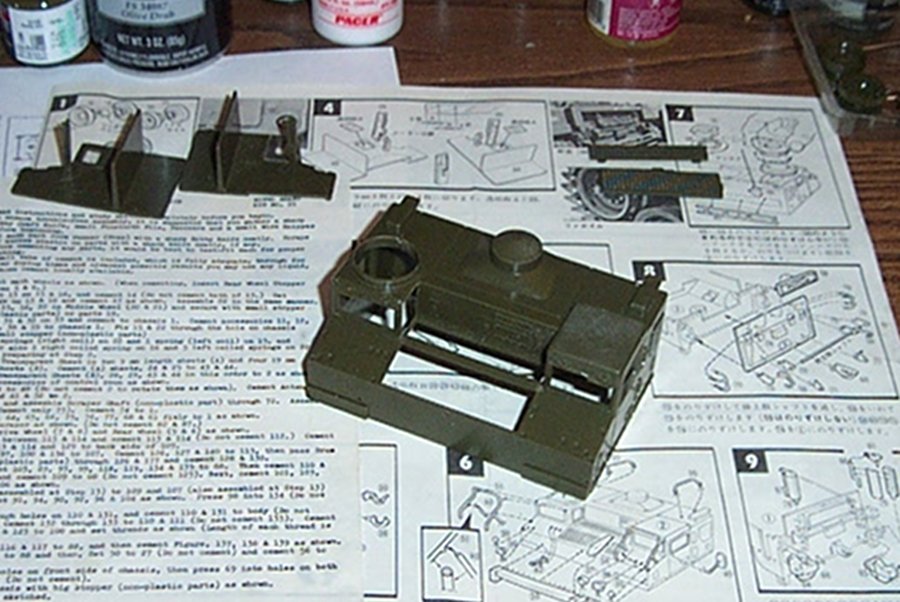
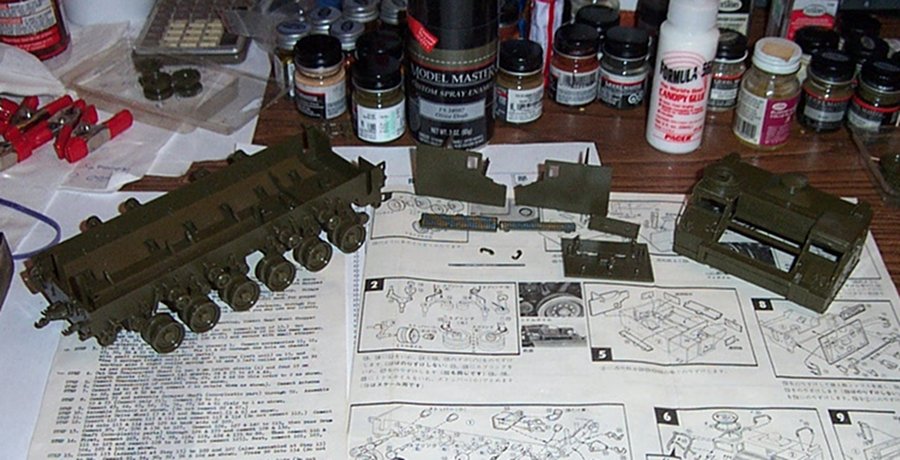
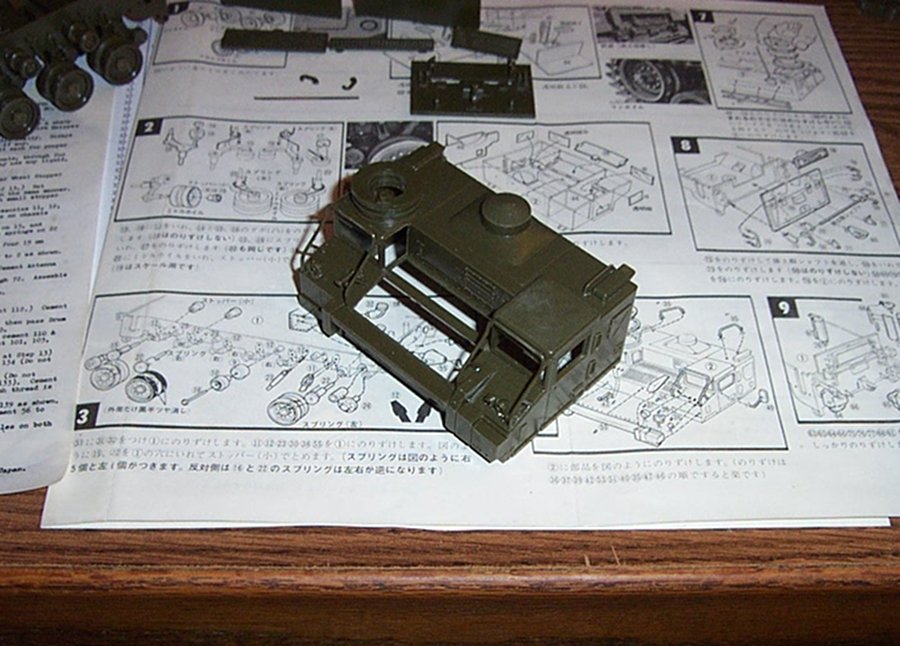
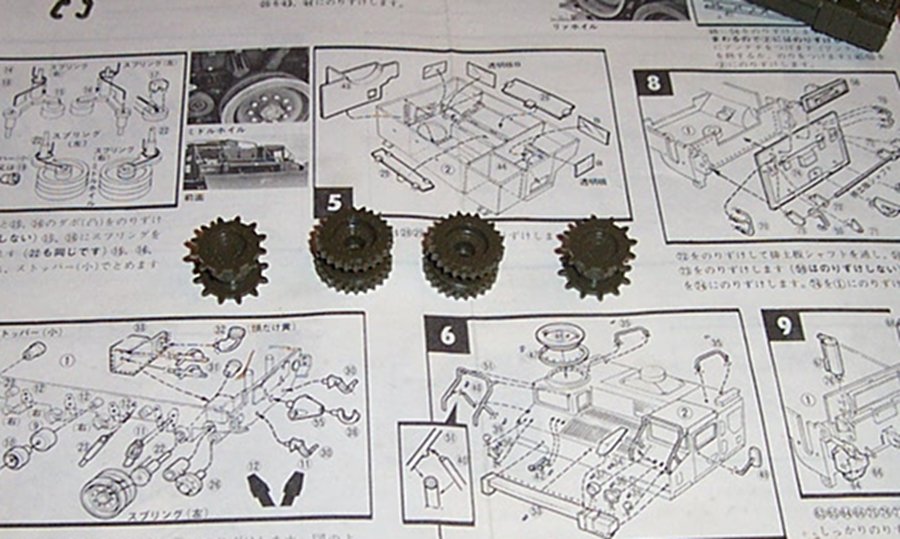
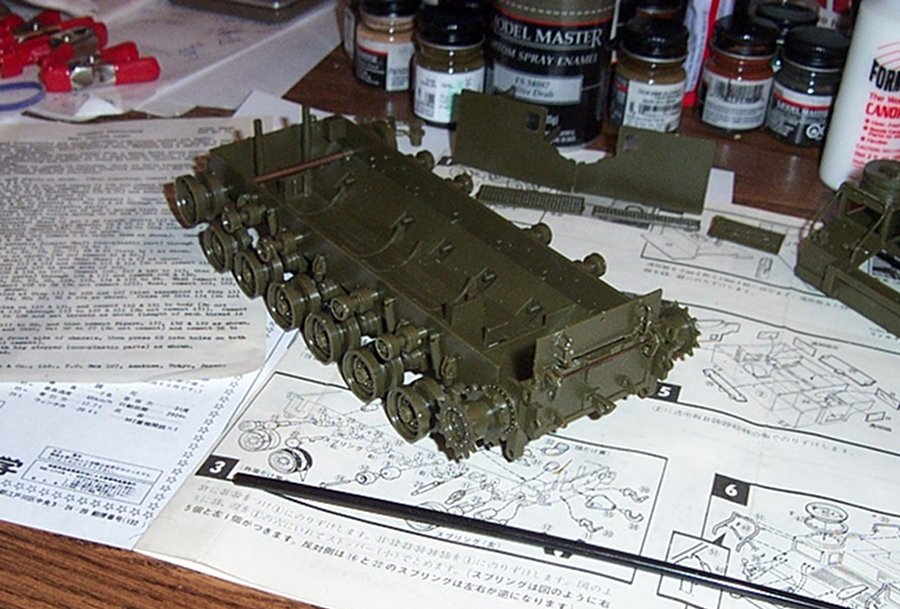
This kit has been out there for a while, initially it was a motorized kit and had full operating suspension and a true rubberband track. The kit I have has everything from the older kit except the electric motors and drives. Reading reviews of this kit numerous reviewers stated that one needed to acquire a Walker Bulldog kit (Tamiya) to get the correct sprocket for the track which would have to be aftermarket, and, more than one set because the M-8 has one more road wheel than the M-41 making the track lengths 15% longer... So I bought the M-41 and the two track sets.... As you can see it is a full blown M-8A1 with the T-48 Body and Dozer blade.... Perfect fit for my M-51 Skysweeper As I had been working on it, I decided to lock the operating suspension in place taking the ride height off the Tamiya M-41 hull.... Road wheels and return rollers on, unpainted, it's close to the point of painting it overall Olive Drab. I found out that the return rollers did not have rubber tires on them so they will be painted steel, the road wheels of course get a coat of rubber.... I build model armor as a series of sub-assemblies, Hull, Deck, Superstructure, Gun, Turret, Tracks etc. once the major subassemblies are done they are painted. (usually rattlecan for the base coat) US army vehicles of the period are painted the ubiquitous US Army Olive Drab overall as the base coat of paint from the manufacturer. The only markings being the registration number stenciled to the sides. (insignias and unit markings are added in the field) as I'm building I check what I have for decals and what is needed on the field units.... I don't build combat mud hogs or specific units so I need a clean set as an example of general usage to get the right look. So yesterday I spent half the day searching the internet for generic US Army stars & lettering, WWII/Korean war vintage in 1/35th scale. I settled on the Microscale #13-11 stars & letter/numbersets. One would be enough, but Microscale has a $20 minimum so I had to buy three sets. which is ok cause I have a number of old kits (and some new ones) that do not have US markings. (or what they do have sucks so bad I wouldn't embarrass myself by using them) Nitto unfortunately does not offer US markings in decals. or rather they don't include stars as depicted clearly in the box art. I checked this out with the M4 HST kit I also have and they provide the rising sun flag for the Japanese versions but no US Stars. (and the reg numbers would look like they were painted by hand with a small brush) Totally and completely unusable. Forward body, crew & engine compartments, upper left are the internal bulkheads, upper middle right are the engine compartment grilles, they will be hand painted black and dry brushed OD Green to show the grill structure. This pic shows the sub-assemblies at this point, Cab in the upper right glass installed in the bulkheads upper center and below that the incomplete front engine plate which gets mounted to the lower hull before painting. All that is left is the copper rod and hooks to be installed. Completed cab structure, all the little bits in place (those brush guards around the windows were a bear to get correct. the windows will be installed after the paint job. you'll notice the scuffed up look on the top of the drivers cab, it had three molded on track links that I had to take off, they were out of scale and looked like blobs besides they were upside down. with all the extra track links I have they will look much better and have the correct number of 4 links. Before you can paint the hull, we have to mount the idler wheel and sprockets. this is an image comparing the rubber track sprockets, (in the center) and the scale Tamiya M-41 sprockets. I had an issue with the scale sprockets cause they didn't mount to the axle the same way the operating sprocket does. The hole in the scale sprocket is too small, so I drilled it out a bit larger than the operating sprocket, cut off a 1/8th inch length of mocha straw pushed it into the hole which now slips over the axle with no play. A little Formula 560 to affix it all together and we are good to go... And finally the lower hull with the idlers & drive sprockets in place and a completed front bulkhead. At this point I would start mounting the hydraulics for the dozer blade and it would get a bit crowded so this is where the paint comes in..... More subassemblies coming...... EG
- 70 replies
-
- 10
-
-
1931 Cadillac by CDW - FINISHED - JoHan - 1:25 Scale - PLASTIC
Egilman replied to CDW's topic in Non-ship/categorised builds
Super Clean? -
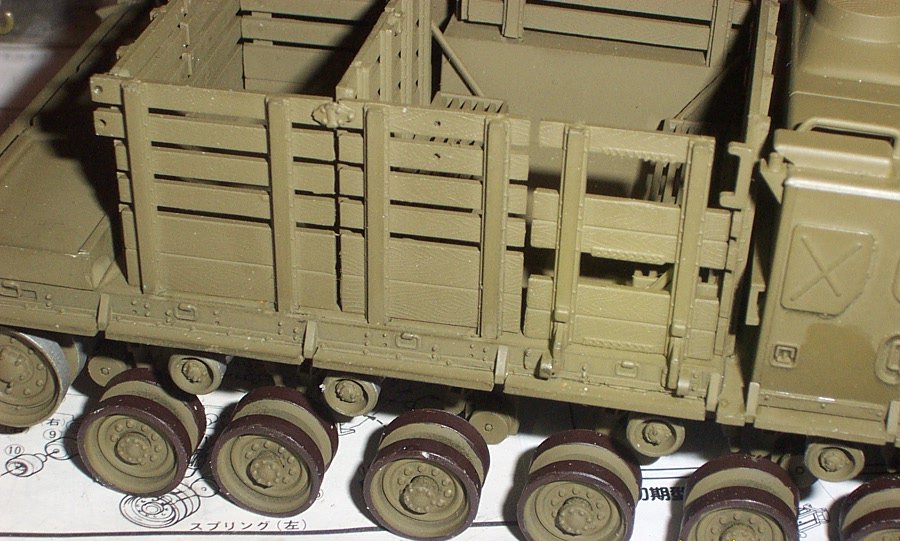
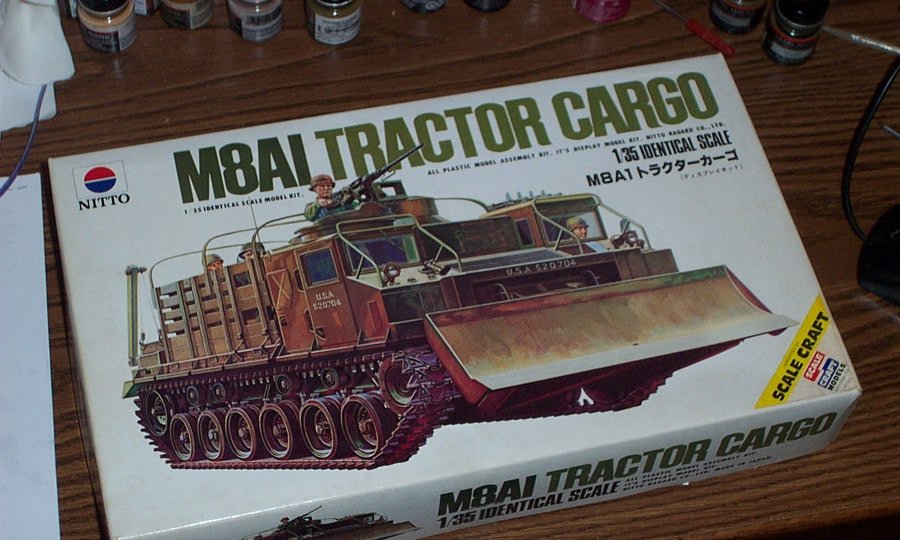
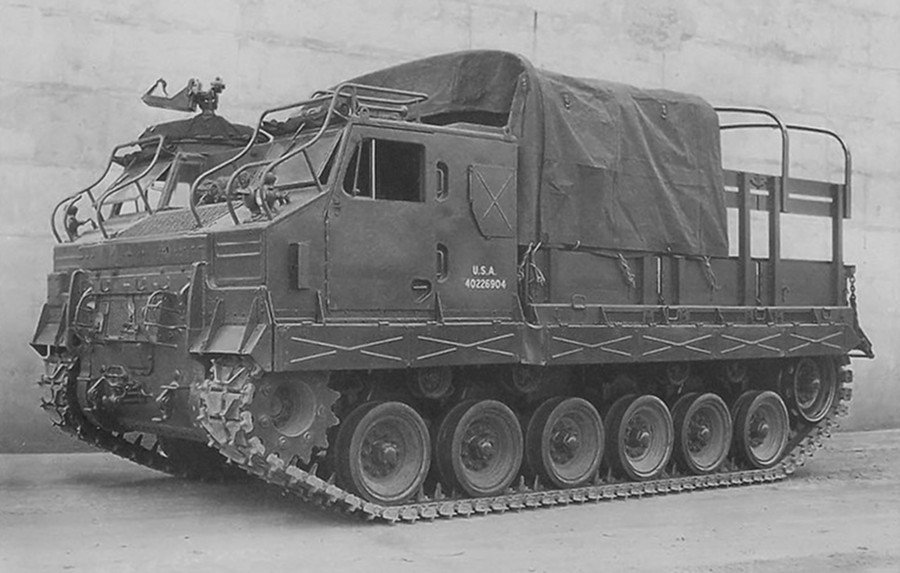
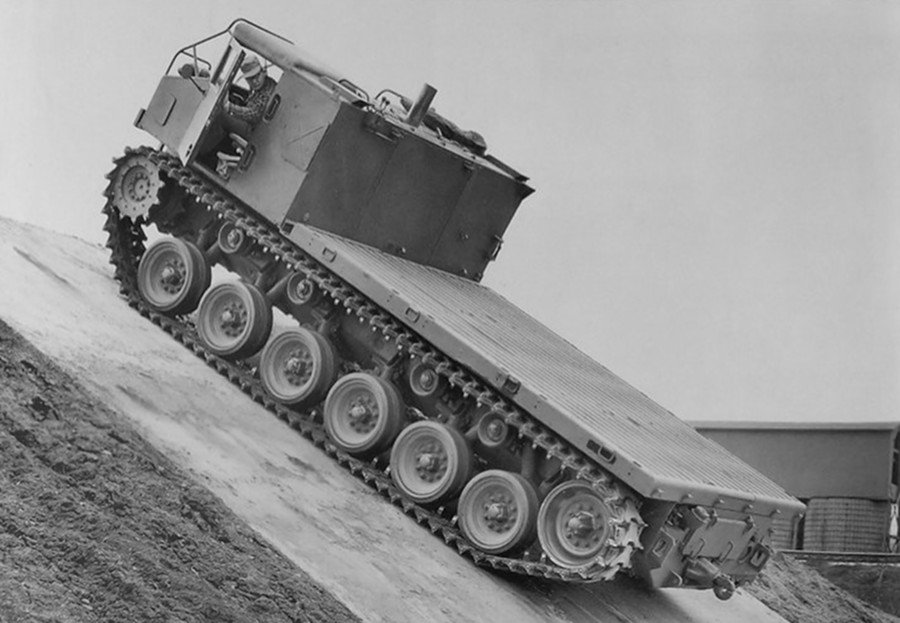
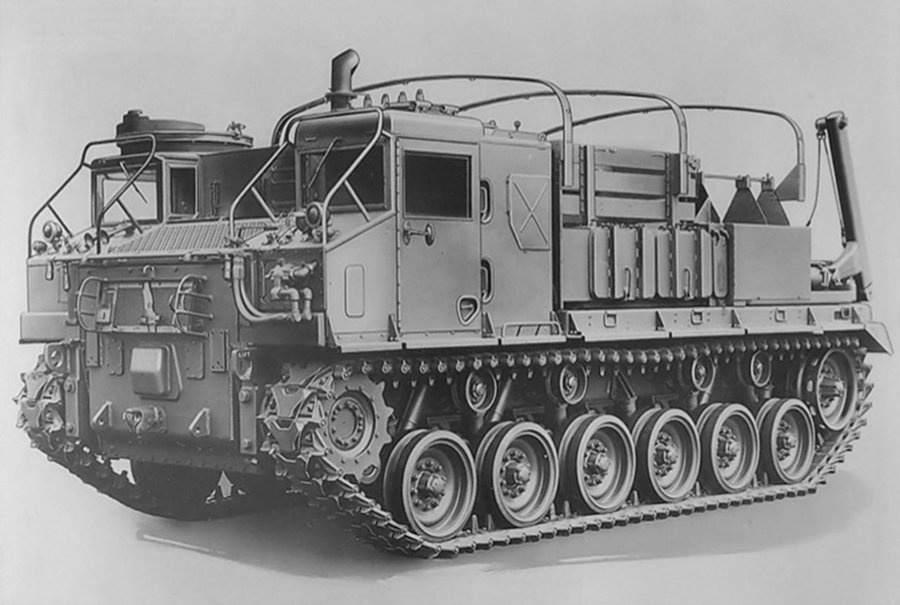
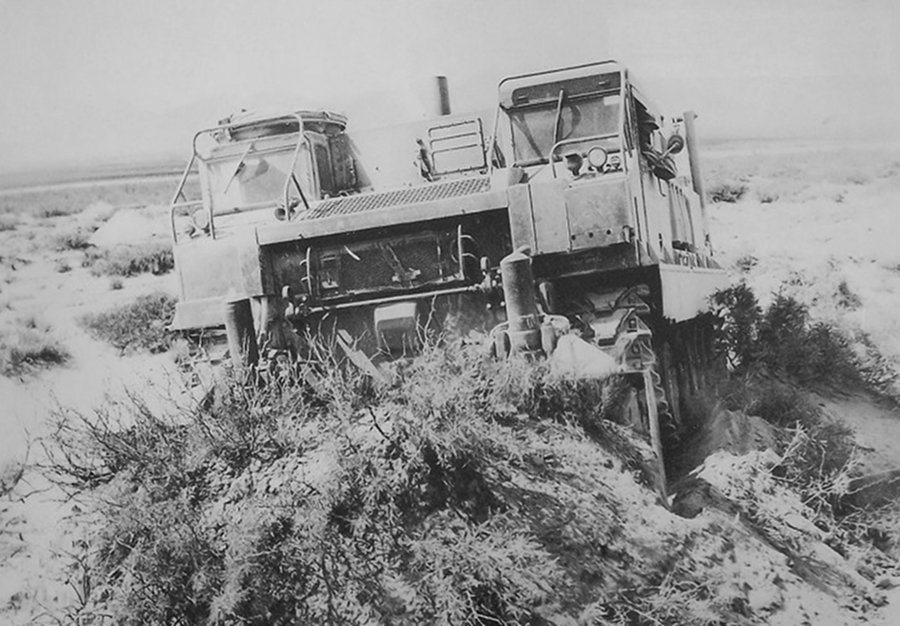
The M-8 HST started life as a test article. The T-43 HST. which was a new design utilizing the running gear of the M-24 Chaffee Light Tank. Of course the M-24 was well known to be underpowered for a tank (even a light one) and as such, the T-43 HST did not survive automotive command testing. It was then ordered that a completely new HST would be developed using the complete running gear of the newly designed M-41 Light Tank known as the Walker Bulldog. Designated the T-42, it was eventually accepted as the M-8 high speed Tractor in 1945 with two development versions, the M-8E1 and the M-8E2, the main difference being the engine and transmission combination....... The M-8E1 could be distinguished from the E2 by the sloped windshields..... M-8E1 with optional sandshields and general cargo body M-8E2 on the Allis-Chalmbers test track without a mission body... While standardized in 1945 the war had just ended and there were plenty of HST's to go around for a peacetime army so the design continued in development with the M-8E2 eventually being accepted as the current standard and authorised for production of 500 units designated as the M-8A1. The A1 had several body adaptations that could be made for it. Standard was a full length cargo body, much like the standard cargo bed of the M-35 truck. There was a specialized body specifically for the Skysweeper batteries. Known as the T-48 body, it has provisions for carrying the crew, the initial loadout of ammo, the cables needed to connect the gun to it's generator and directors and a skid hoist on the back which carried an M-18 30kw generating set to run the gun. It also had provision for the T-84E4 bulldozer blade, but this wasn't mounted on all vehicles..... M-8A1 as standardised with the T-48 skysweeper body, this unit also has the hydraulic connection for the dozer blade prominent below the drivers window....... The same unit as above with the dozer blade in action... Now, for the kit.... The Nitto 1/35 M8A1 HST
- 70 replies
-
- 10
-
-
Just a note, this is an already completed build log.... just posting it as requested...... :-)
-
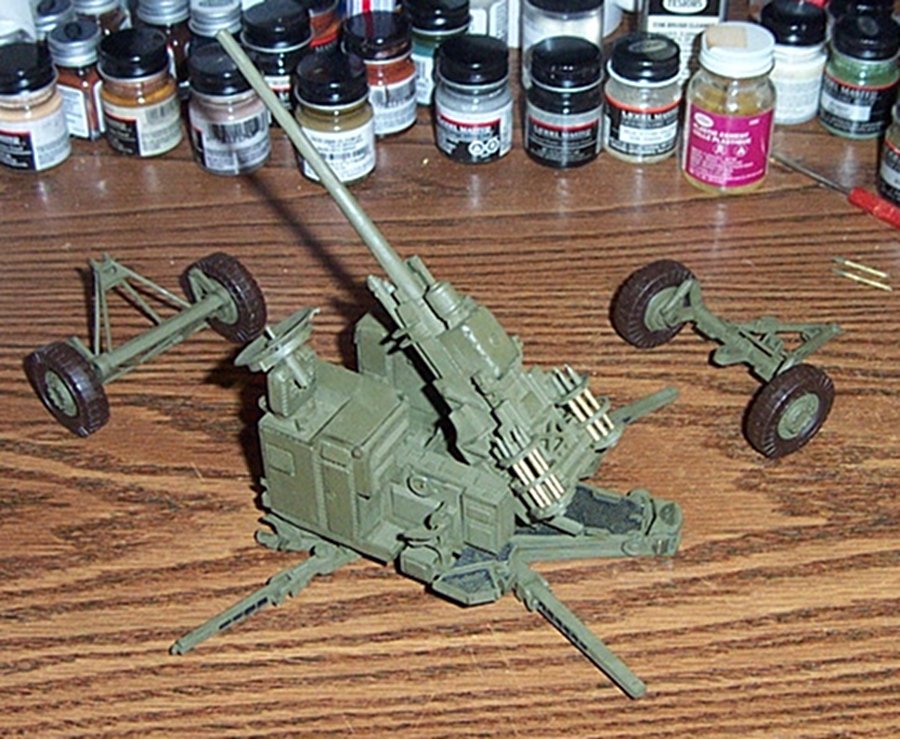
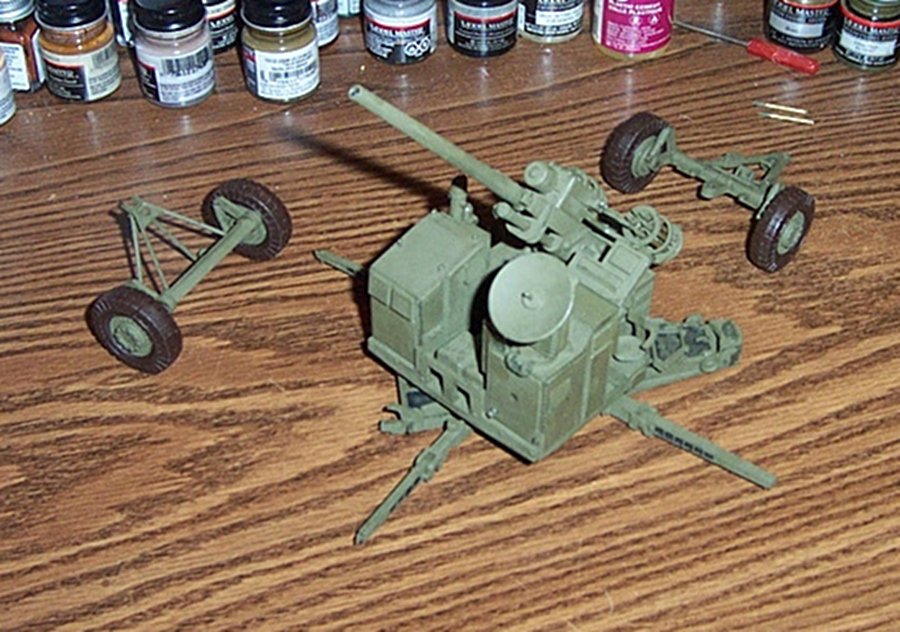
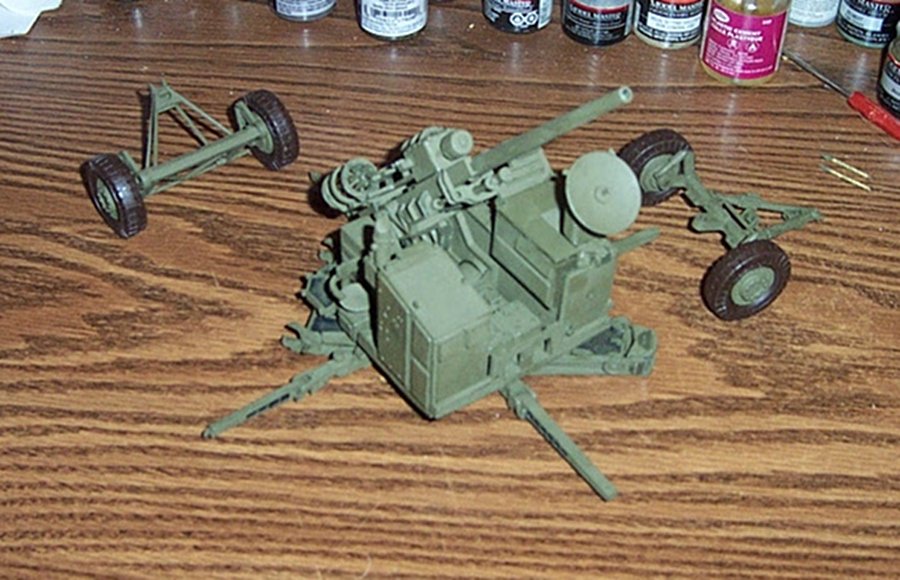
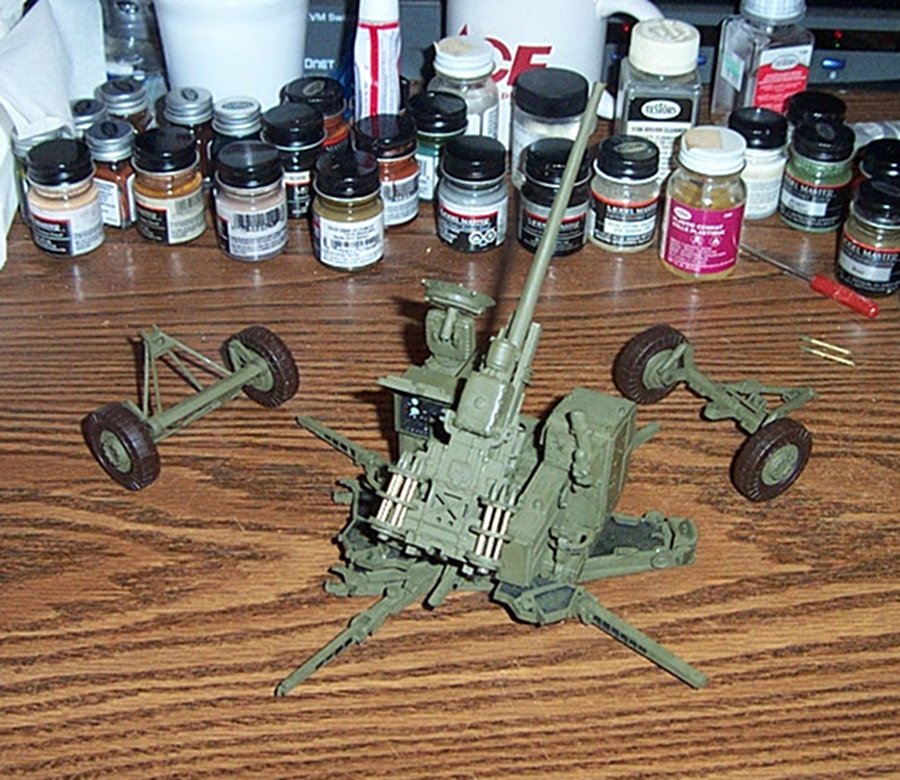
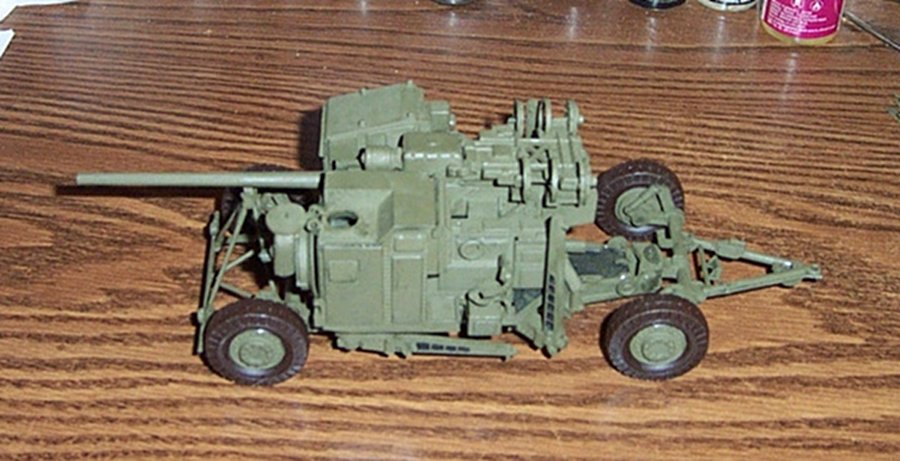
Well, my interest in this kit comes from it being the Prime Mover for the M-51 Skysweeper 75mm automatic anti aircraft gun... I built the Renwal 1/32nd scale Skysweeper earlier, (I don't have a build log for that, just images of the finished kit) and the M8A1 HST was the designated prime mover for all M-51's as issued. (please bear with me as I show you the motivation for the build) The Renwal Skysweeper, OOB...... Fairly nice kit, an old classic......... When I build artillery, I prefer to build it with it's prime mover, basically the vehicle that moved it around from location to location. It's like the German "88" and it's 8 ton semitrack to haul it around, the Long Tom had it's M4 HST.... Etc Etc etc.... That's the way I like my artillery and in as issued condition... (no muck, no grime, no damage maybe a little paint fade from sitting on the apron for a while but nothing major) Once the subject is chosen I do my research...... Next post, research......
-
Where did you get my portrait from?
-
All you could do is get the tracks, put some links together, and see if a pair will fit.... the Walker and M-8 were the only ones that used the T-91 track as far as I know........ There is also this option.... Armor Track Models..... (ebay) From what I understand the company is out of business but it does have the sprockets with the track.... I don't know how good they are, the AFV tracks are perfect and much simpler and are the ones I used..... I've decided to post the build log on the M-8 for those interested here in it's own listing..... since such is acceptable to the PTB's..... It's like anything else, not being a rivet counter, if the sprocket fits the spaces in the track, I would say go for it....
-
Thank you Chris...
-
1931 Cadillac by CDW - FINISHED - JoHan - 1:25 Scale - PLASTIC
Egilman replied to CDW's topic in Non-ship/categorised builds
That is downright gorgeous, can't wait to see it fully dressed and in the sun...... -
B-25J Mitchell by Tom E - Revell - 1:48 Scale - PLASTIC
Egilman replied to Tom E's topic in Non-ship/categorised builds
I think these will do the job..... The website is here.... Print/Scale They have them in the usual scales. I think that solves the bomb markings problem... Here's another set.... WBD48006 1:48 Warbird Decals - US WWII & Korean War Bomb & Rocket Markings #48006 That's from Sprue Bros, in stock.....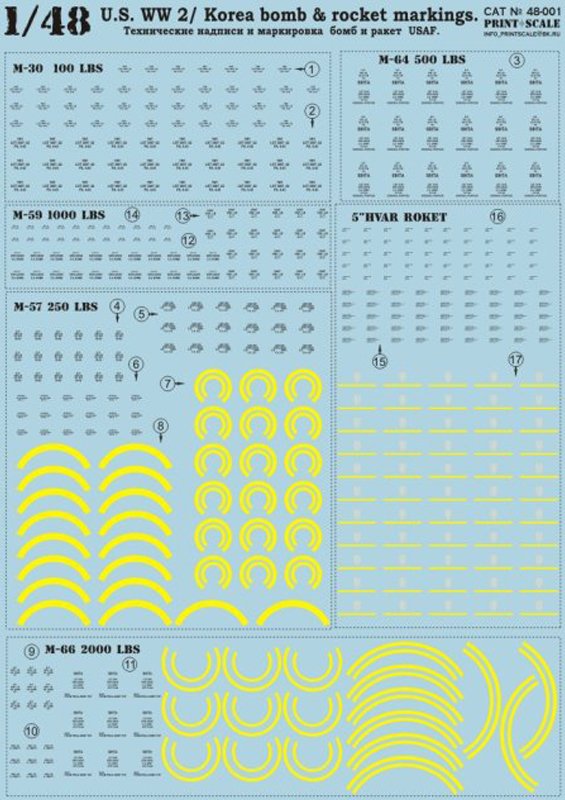
-
Question; If one had done a build log on another fora, and it was appropriate for this fora and there is interest, would it be okay to repost it here rather than redirect our brethren to brand "X" fora?
-
Been thinking about reposting it here..... there is some customizations and scratch building I did to it, and the research.... I built it to go along with my Renwal Skysweeper as it was the prime mover for the M-51.....
-
You need two things the proper aftermarket tracks and the proper drive sprocket to fit the tracks.... Tracks; Two sets of AFV Club AF35046 T91E3 workable track, you need two sets as the kit tracks are for the Tamiya Walker bulldog which has only five road wheels and your M-8 HST has six. You will also need the Tamiya walker bulldog kit itself for the drive sprocket to fit the tracks..... Both vehicles used the same suspension/track components, it was designed that way.....

-
B-25J Mitchell by Tom E - Revell - 1:48 Scale - PLASTIC
Egilman replied to Tom E's topic in Non-ship/categorised builds
It's easy to paint the nose of the bomb one color it can be done in several ways, my trick is to dip the nose vertically in some thinned yellow paint. Once that is dry, dip it again in some Olive Drab paint thinned the same way, just not quite as far into the paint as you did the yellow.... Leaves a nice yellow ring, the only difficult part is making sure you have it vertical on each dip.... -
It's an original Nitto.... And yeah, those are the rubber band tracks that were used for the motorized version..... Aren't worth the powder to blow them to hell.... And thank you for the compliment.... I did a build log about her a while back before I discovered this fora.... I can tell you how to fix it....

-
I have absolutely no doubt that your shoulder was stiff the next day.... :-) Been there done that....
-
When Browning first designed the ma duce, (based upon the very successful M-1918 .30 cal) the army ordered it tested in continuous fire until destruction.... any one care to guess how many rounds went down range before it finally decided to quit firing? .......... 32,687 before the action finally broke...... (the barrel of course was destroyed long before the action quit) It is considered the most reliable gas operated heavy machine gun ever manufactured.....
-
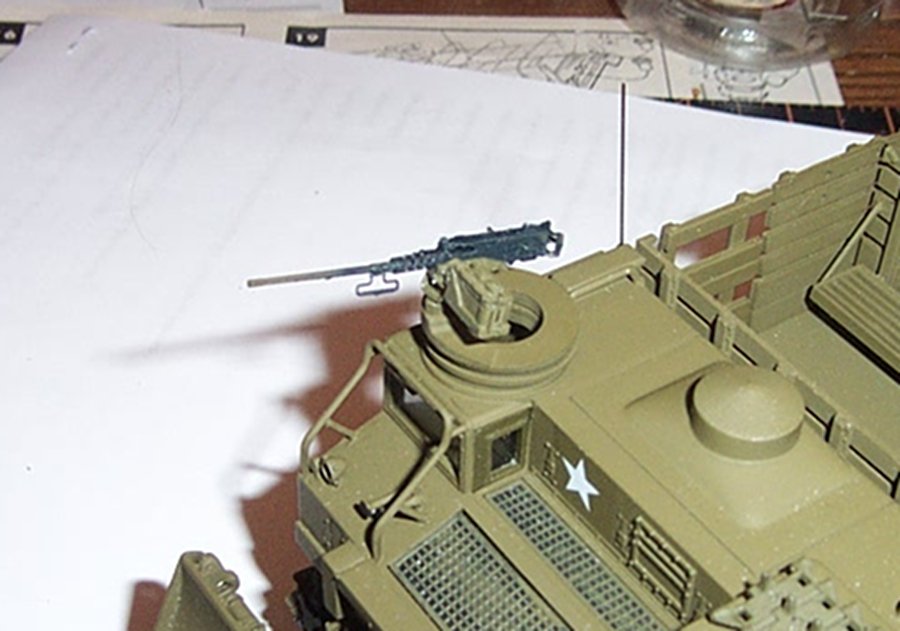
Well I can show mine.... I still hadn't touched up the barrel in this photo.... Post Korean war vintage.... that's MM gunmetal with steel lowlights and MM rubber grips everything else (pedestal mount and cradle) is standard OD green.... (there no PE on that gun btw)
- 324 replies
-
- 10
-