


Jim in KC
-
Posts
33 -
Joined
-
Last visited
Recent Profile Visitors
308 profile views


-
 GGibson reacted to a post in a topic:
Swift 1805 by Jim in KC - Artesania Latina - 1:50 scale - first wooden ship build - Virginia Pilot Boat
GGibson reacted to a post in a topic:
Swift 1805 by Jim in KC - Artesania Latina - 1:50 scale - first wooden ship build - Virginia Pilot Boat
-
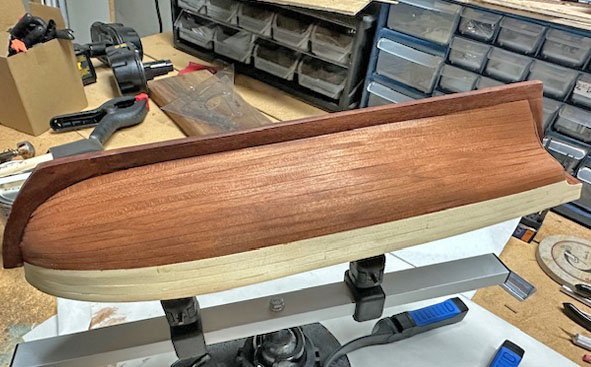
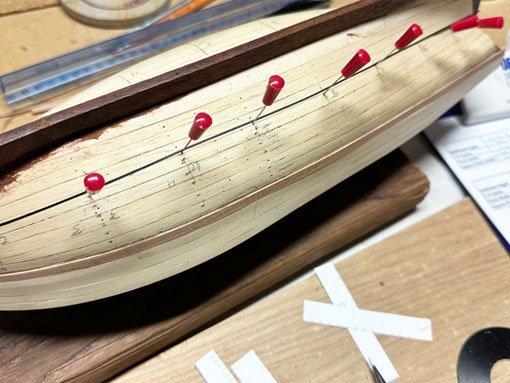
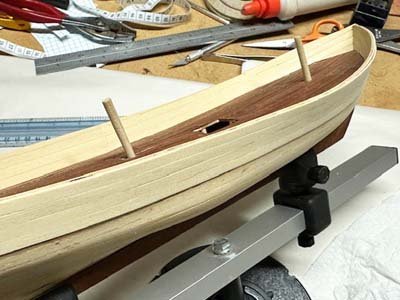
Well I've finished staining the hull, and I'm pleased with how it came out. I'm about done with the waterways. Getting the right curvature has proven much more difficult and time-consuming than I thought. Next, on to the stanchions. I got an answer to my question about waterways - among other things, since the stanchions ride on top, they prevent water from accumulating between the stanchions. I planked the deck over a year ago - I was pretty happy with it then, but my standards have increased considerably and it could be a lot better. Oh well, live and learn.

- 16 replies
-
- 1
-
-
- artesania latina
- first build
- (and 1 more)
-
mtaylor reacted to a post in a topic:
Did 18th and 19th century ships have flat weatherdecks?
-
Did 18th and 19th century ships have flat weatherdecks?
Jim in KC replied to Rushdie's topic in Nautical/Naval History
Thanks again - I really appreciate the information. So they are there for structural strengthening as well as for shedding water, and to have a gap would undercut the strengthening function.. -
Did 18th and 19th century ships have flat weatherdecks?
Jim in KC replied to Rushdie's topic in Nautical/Naval History
Thanks again for the information. I have another question. My kit has the waterways running unbroken from the stem to the stern. It seems to me that the waterways should be gapped at the scuppers so water can run out there. In looking at the completed logs for this build, two did gap the waterways at the scuppers while 3 or 4 did not. What do you think? By the way, I really appreciate you taking the time for this. -
mtaylor reacted to a post in a topic:
Did 18th and 19th century ships have flat weatherdecks?
-
mtaylor reacted to a post in a topic:
Did 18th and 19th century ships have flat weatherdecks?
-
GGibson reacted to a post in a topic:
Did 18th and 19th century ships have flat weatherdecks?
-
Did 18th and 19th century ships have flat weatherdecks?
Jim in KC replied to Rushdie's topic in Nautical/Naval History
Thanks for the information - I think I get it. Since the waterway planks run inside the stanchions, it channels water to the scuppers, preventing it from accumulating between the stanchions, right? -
GGibson reacted to a post in a topic:
Swift 1805 by Jim in KC - Artesania Latina - 1:50 scale - first wooden ship build - Virginia Pilot Boat
-
Did 18th and 19th century ships have flat weatherdecks?
Jim in KC replied to Rushdie's topic in Nautical/Naval History
I'm a newbie building n 1850 Swift pilot build. The deck definitely has a camber. Which leads to a related question. My kit calls for waterways - thin strips that run along the inside of the bulwarks. I'm not sure what these waterways are or were for in real life. Obviously it has something to do with draining water off the deck through the scuppers. But the deck is already rounded and the scuppers will be placed at the lowest point on the deck, so water should drain anyway. I was on a destroyer in the Navy - the weather decks were indeed cambered and water drained naturally through the scuppers - I don't remember it needing anything else. Can anyone enlighten me? -
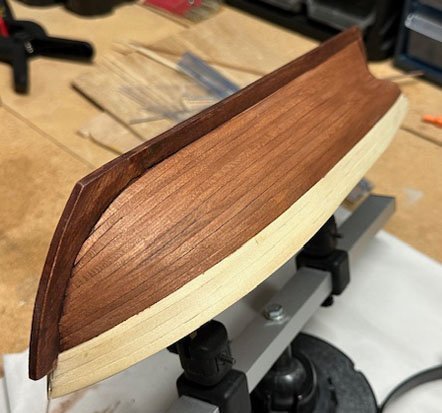
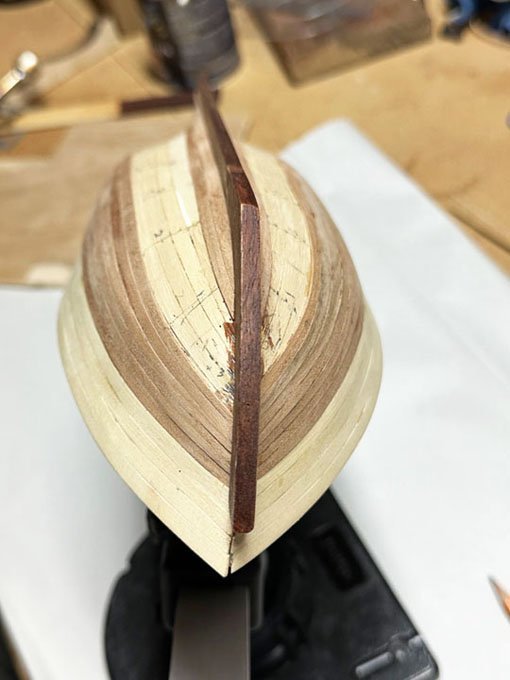
Well, I've finished the final planking, and sanded the hull down to get a smooth finish. I'm still working on the stern however - that's going to take some fitting of small carved pieces and probably some filling. Obviously I've made some mistakes but I'm satisfied with how its going in general for a first build. My plan is to stain the cherry wood with a dark cherry stain that I have tried out on scrap pieces. It will give the hull a color closer to the color of the keel. I have some cherry wood putty that I can use to fill where needed. After that it's on to waterways, bulwark stanchions, cap rail and belaying pin racks. I'm not sure what the waterways are or were for. Obviously it has something to do with draining water off the deck through the scuppers. But the deck is already rounded and the scuppers will be placed at the lowest point on the deck, so water should drain anyway. I was on a destroyer in the Navy and water drained naturally through the scuppers - I don't remember it needing anything else. Can anyone enlighten me?

- 16 replies
-
- 1
-
-
- artesania latina
- first build
- (and 1 more)
-
Hi Gregg, thanks for the heads-up. Im' going to edit them some to try to get them sharper.
-
Thanks Gregg. I guess there's no easier way to taper the planks. What I have been doing is to shave off the plank to where it's close and then sand from there. I have messed up a few plank by getting the taper uneven, with a bump or dip. If I try to fix it I usually taper too much, and if I just install it, the next plank won't fit all that well. I appreciate your advise.
-
ccoyle reacted to a post in a topic:
Swift 1805 by Jim in KC - Artesania Latina - 1:50 scale - first wooden ship build - Virginia Pilot Boat
-
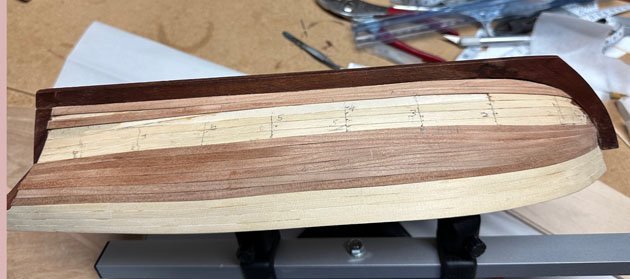
Well, planking is in progress. I'm using cherry wood 3/16" planks instead of the walnut veneer that came with the kit. I started by dividing each side of the hull into two sections, upper and lower. I also drew 8 vertical lines along the hull roughly corresponding to the frames. I calculated that at midships, frame 3, 4 and 5, twelve 3/16" planks would be needed on each side (excluding the garboard strake), six in each section. I calculated that frame 1 near the bow would need planks tapered to 1/8" wide. Consistent tapering has required some practice, and I still struggle with it. I am using a miniplane to shave the plank, but getting the plank installed in the vice with just the part that needs to be shaved above the vice is tricky, at least for me. After I installed six planks in the upper section on both starboard and port sides, I installed the garboard strake and one additional strake, which is where I am now.
- 16 replies
-
- 1
-
-
- artesania latina
- first build
- (and 1 more)
-
Thanks Gregg for responding to my log. Your Bluenose looks beautiful. I really like the look of your hull planking. I'm currently planking my Swift and I've been tapering the planks like you, but not as well. I've been using a 31/2 "miniplane. I fix the plank in my vise with with soft jaw pads but getting the plank positioned just right is difficult. As I've progressed, I have had to bend planks crosswise more. How did you taper your planks? I plan on not painting much if any - I want to show off the beauty of the wood. I am using cherry planks I bought instead of the thin walnut strips that came with the kit. But I am clearly going to need to do a lot of sanding and at least some filling. I saw that you used a Tamiya putty filler. Does that take stain? I know nothing of fillers - I've been thinking of using a Minwax wood filler. Any suggestions?
-
Chuck reacted to a post in a topic:
Swift 1805 by Jim in KC - Artesania Latina - 1:50 scale - first wooden ship build - Virginia Pilot Boat
-
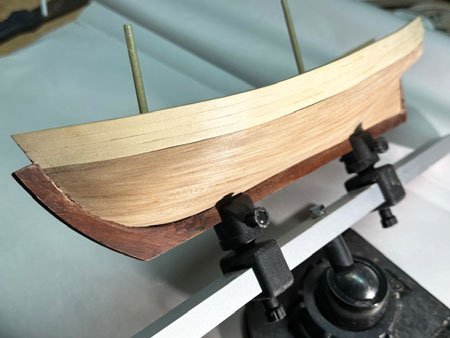
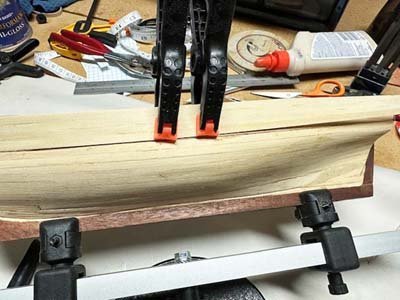
Well I'm back after almost another year. I just finished planking the outside of the bulwarks. I didn't like the cheap wood that came with the kit - it doesn't show the grain well and looks unnatural, so I'm using some 1/32 X 3/16 cedar planks I purchased, which I also used to plank the inner bulwarks. I used the techniques described in Chuck Passaro's planking videos to taper and bend the planks - thanks Chuck! I think it worked pretty well although I have some finishing sanding to do. Next I plank the hull. Again I don't particularly like the veneer strips it came with so I will try using 1/32 X 3/16 cherry planks stained with a black cherry stain.

- 16 replies
-
- 1
-
-
- artesania latina
- first build
- (and 1 more)
-
robert952 reacted to a post in a topic:
What kind of putty works filling in hull depressions?
-
robert952 reacted to a post in a topic:
What kind of putty works filling in hull depressions?
-
Thanks for the input. I have been thinking about using scrap wood to fill in where needed. The reason I thought of putty is that several finished 1850 Swift boats have mentioned using putty. See particularly the Swift by Stripehunter - I really like the way his hull looks after the second planking.
-
Thanks barkeater. I was thinking of some kind of modeling putty that would dry hard, could be sanded and also something that you could glue a plank to and would hold. Any ideas anyone?
-
I'm a newbie working on a 1850 Swift Pilot Boat. I'm about ready to do the second planking. The first is not terrible but there are some places that need evening out or smoothing the transition between the hull and the bulwarks. I've looked at all the finished models of this kit and several have used putty for this purpose. I've read ahead in this section about a year but didn't see anything specifically on this topic. Any recommendations?
-
I know it's been a lot of years since you finished this model so maybe you don't monitor this anymore, but I'm hoping I can still hear from you. I am really impressed with your final planking (among other things). You used some clear tape to make a template for curving the planks. What type of clear tape did you use and what did you write on it with - a marker? Could you tell me more about the process. I'm about to do the final planking on my first build, the early version of the Swift kit. Your hull looked really great. Here's my log: https://modelshipworld.com/topic/24292-swift-virginia-pilot-boat-1805-by-jim-in-kc-artesania-latina-150-scale-first-wooden-ship-build/