HOLIDAY DONATION DRIVE - SUPPORT MSW - DO YOUR PART TO KEEP THIS GREAT FORUM GOING! (Only 20 donations so far - C'mon guys!)
×

Salty Dog
-
Posts
236 -
Joined
-
Last visited
Content Type
Profiles
Forums
Gallery
Events
Everything posted by Salty Dog
-
 Thank you all for the nice words. Keeps me going. Thanks Carl! It's started. HMS Hood with Pontos PE set. Yves, there's no reason why you can't. Just don't paint the PE. It helps to spray a clear coat after thoroughly cleaning it, but not much. As you can see in my model, the brass is already turning. Eventually, it will look like a worn out penny! Bums me out. I wish it would stay nice and bright. Good luck and do it! Ed
- 34 replies
-
- 5
-

-
- mikasa
- wave models
- (and 2 more)
-
Thank you Carl and Lou. Actually my name is Ed haha. Don't know where Paul came from. I am doing the same thing with my next. No painted PE. I'll post some pics as the model comes along. Thank you again.
- 34 replies
-
- 3
-
-
- mikasa
- wave models
- (and 2 more)
-
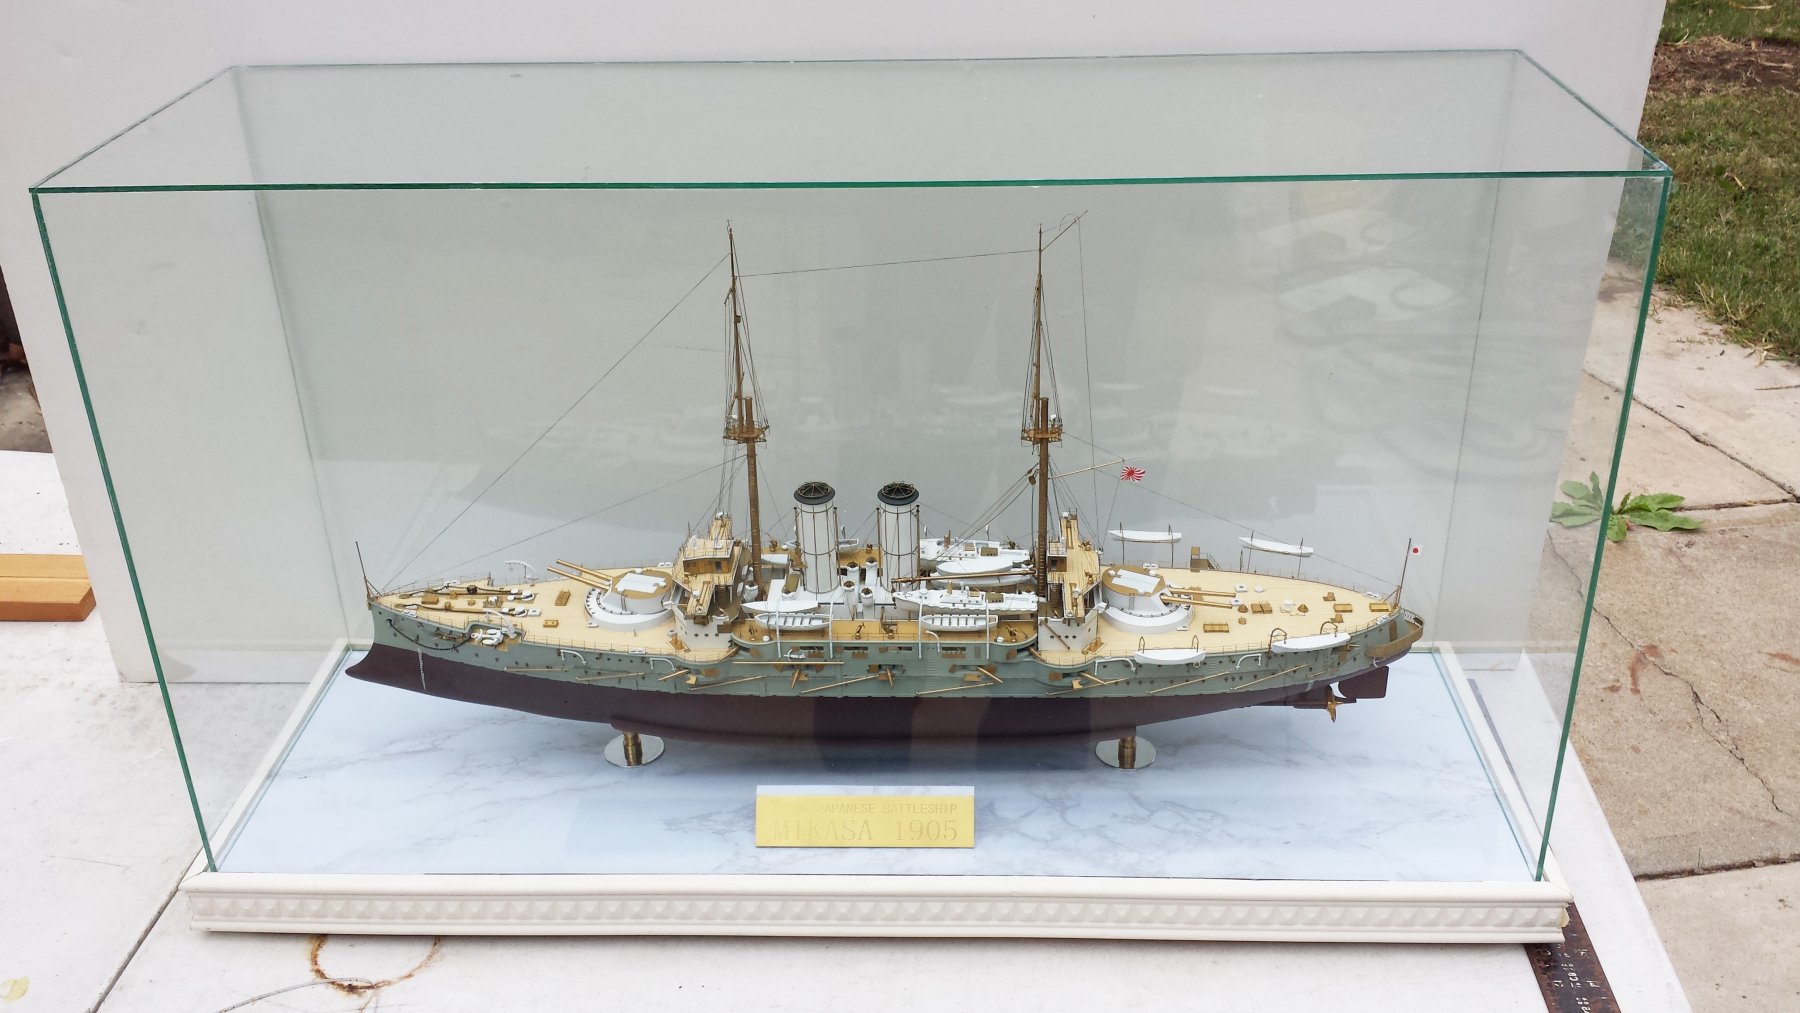
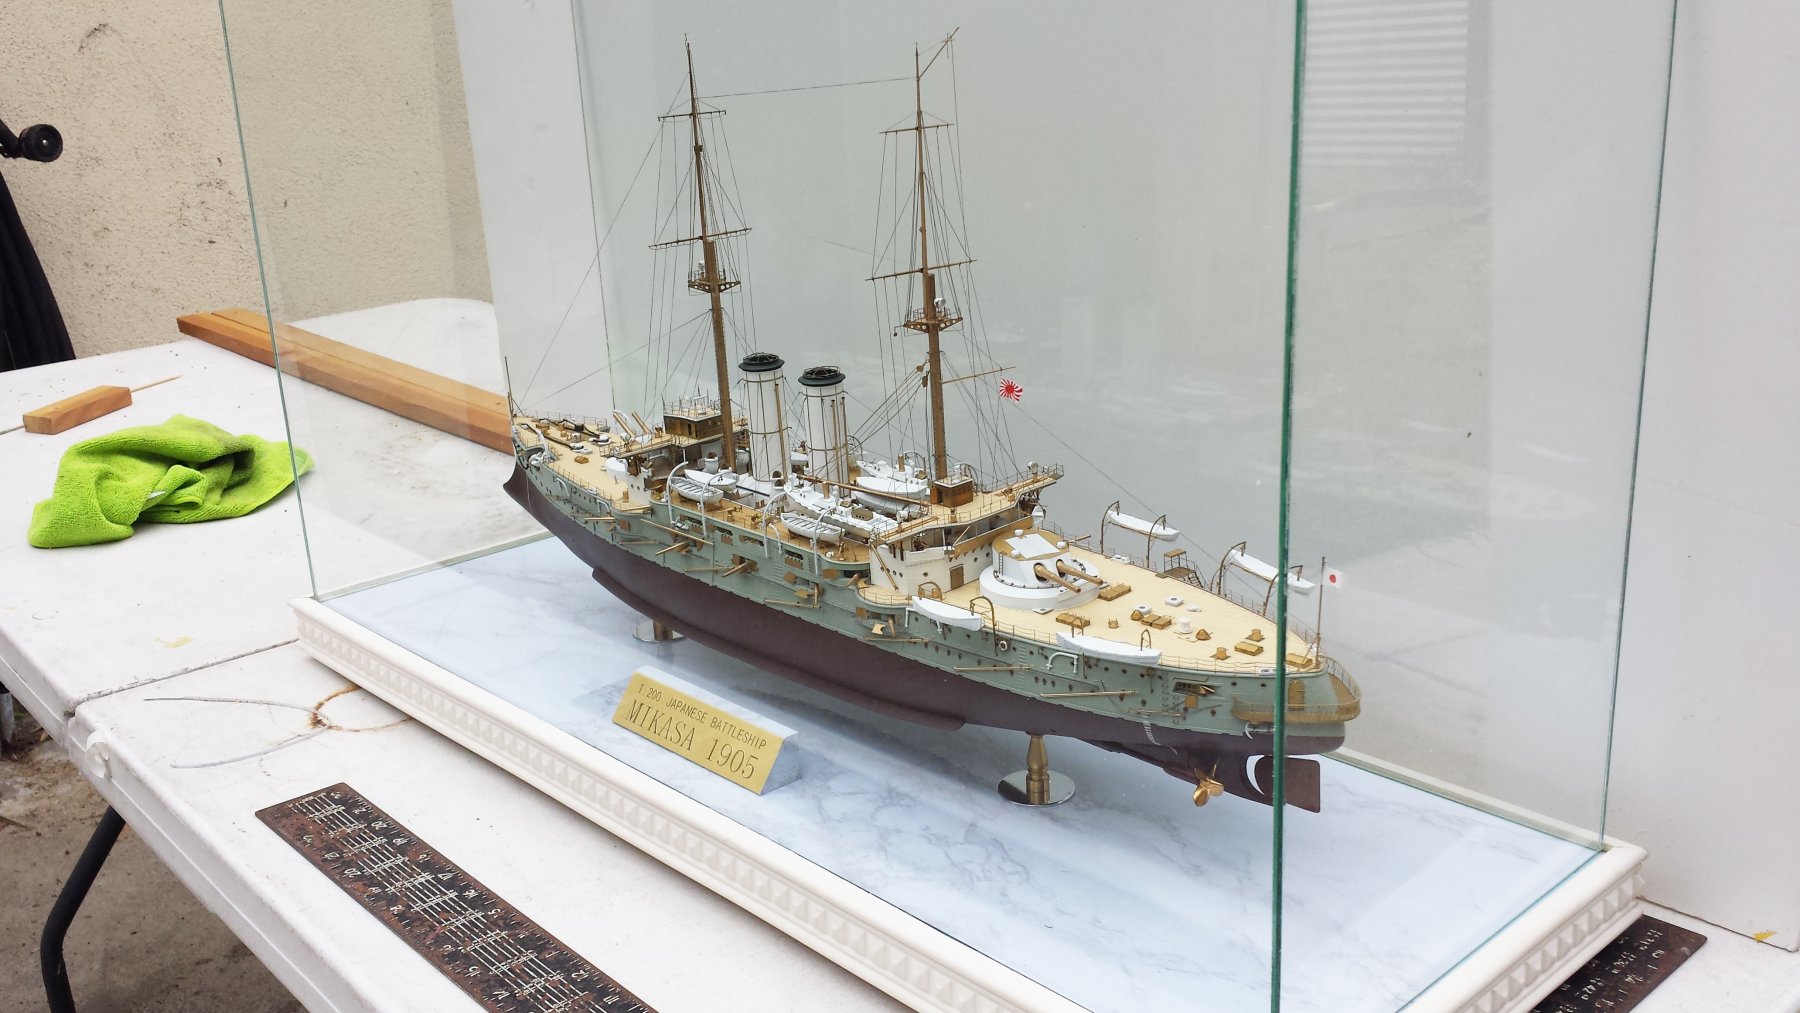
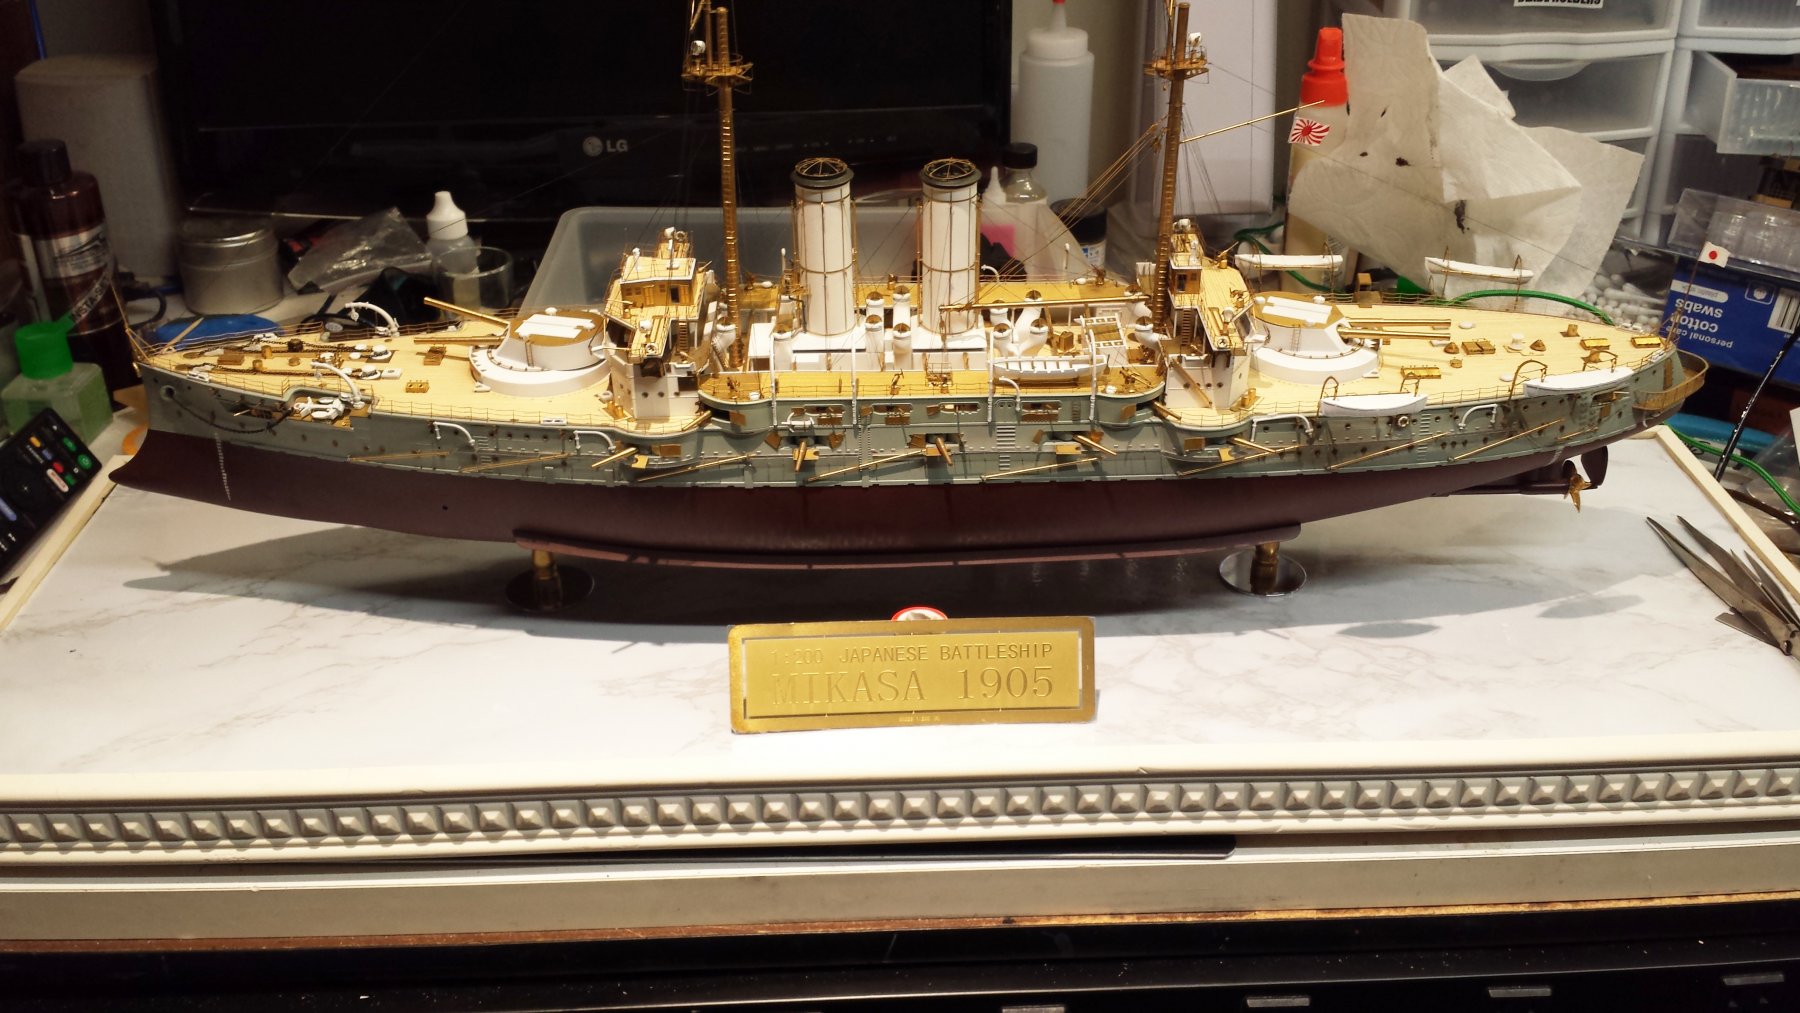
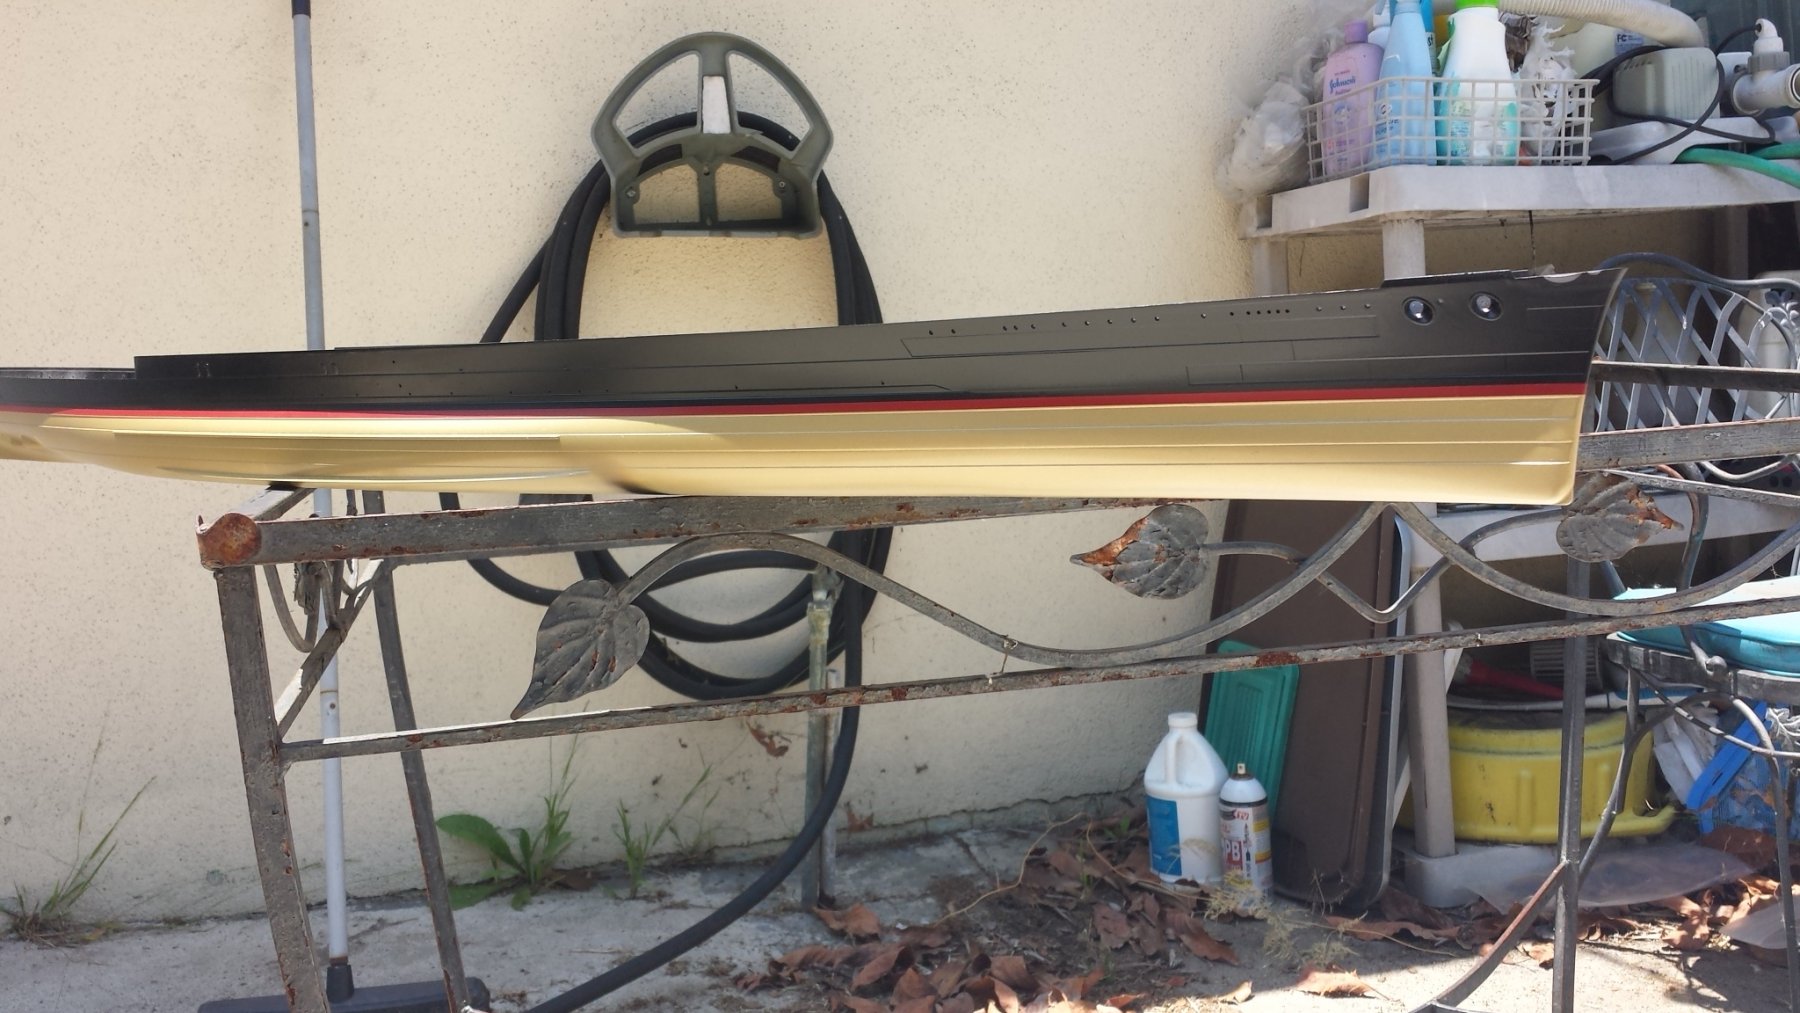
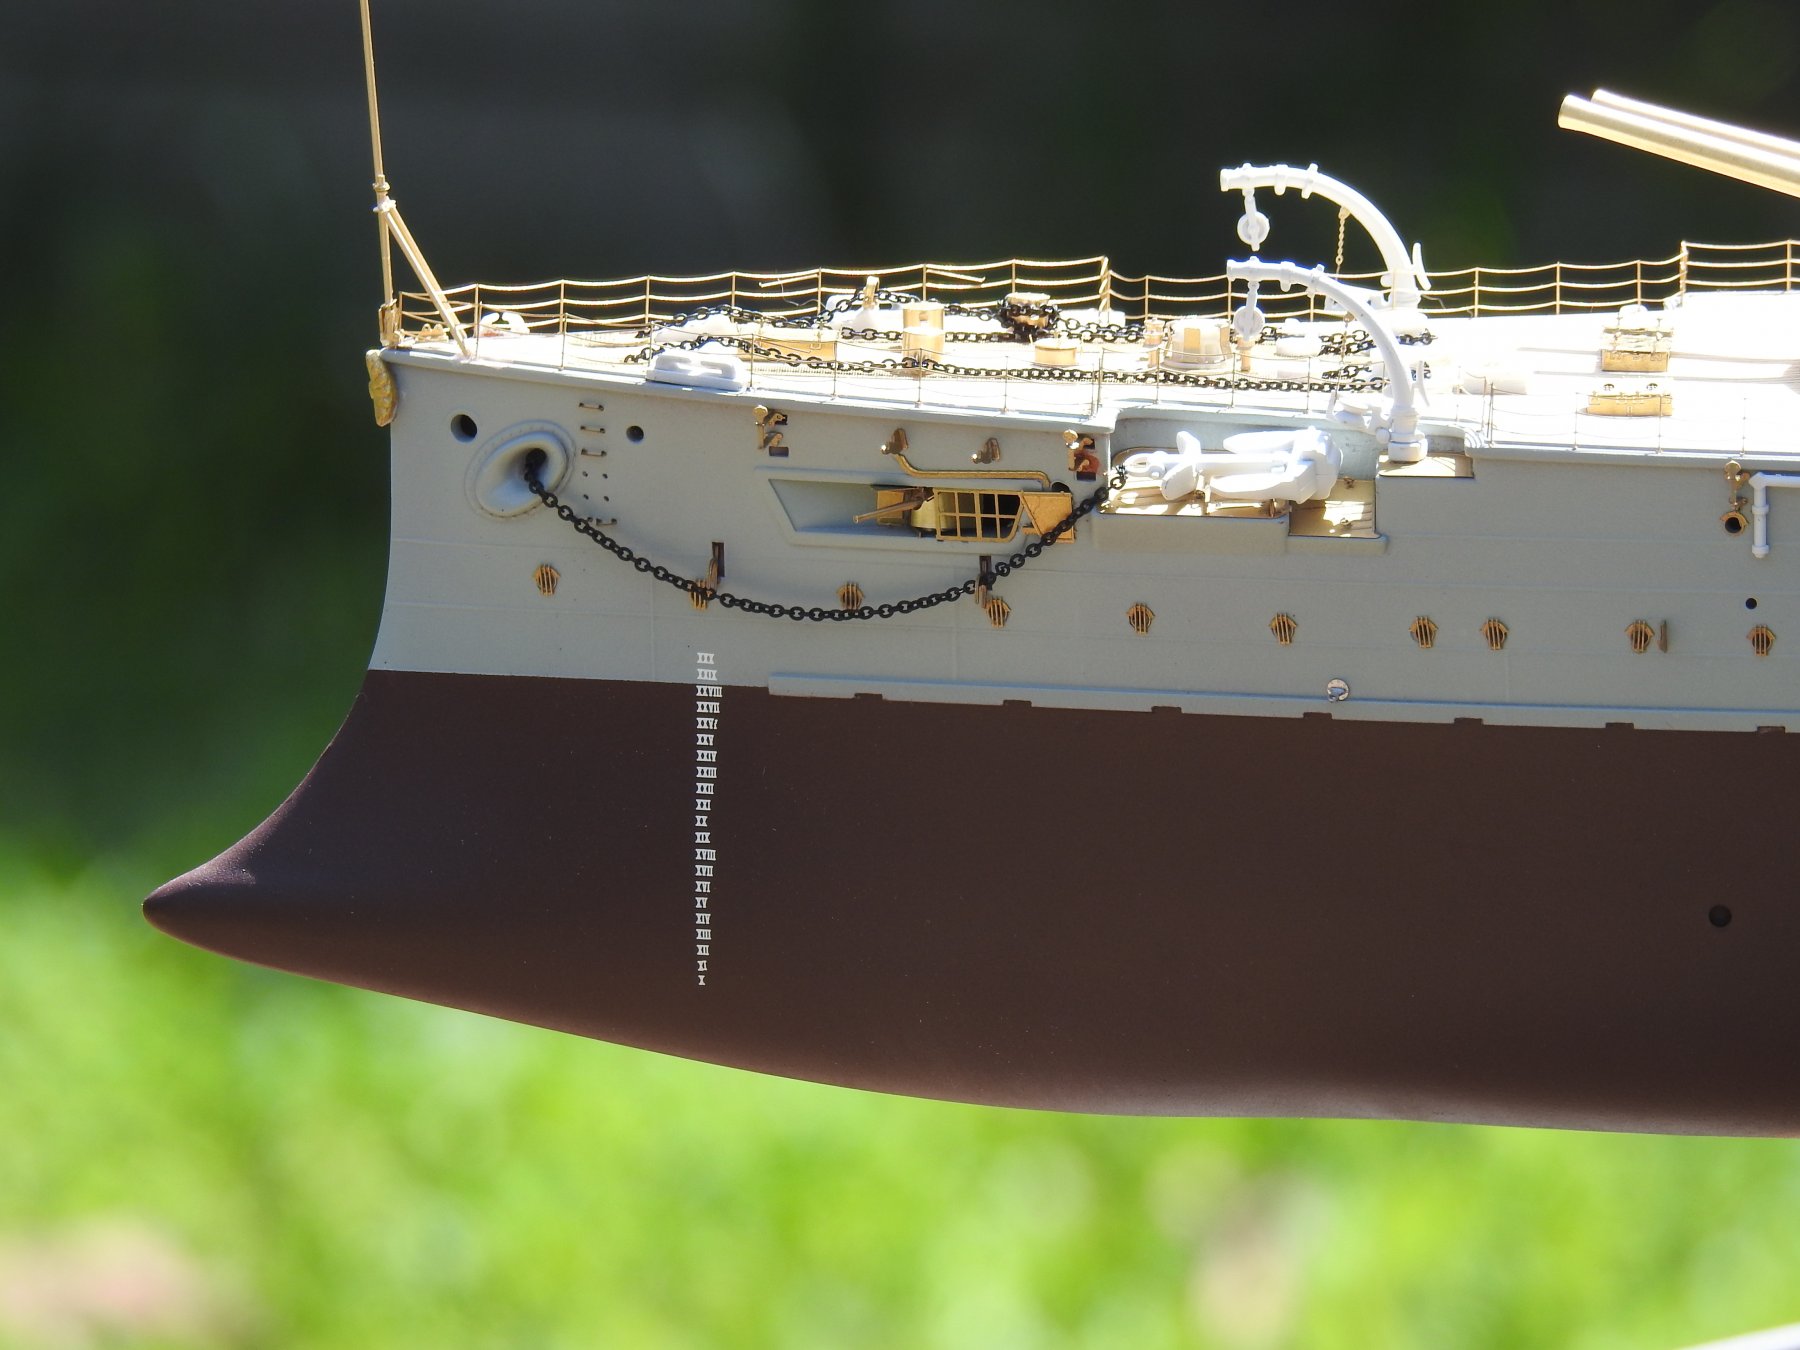
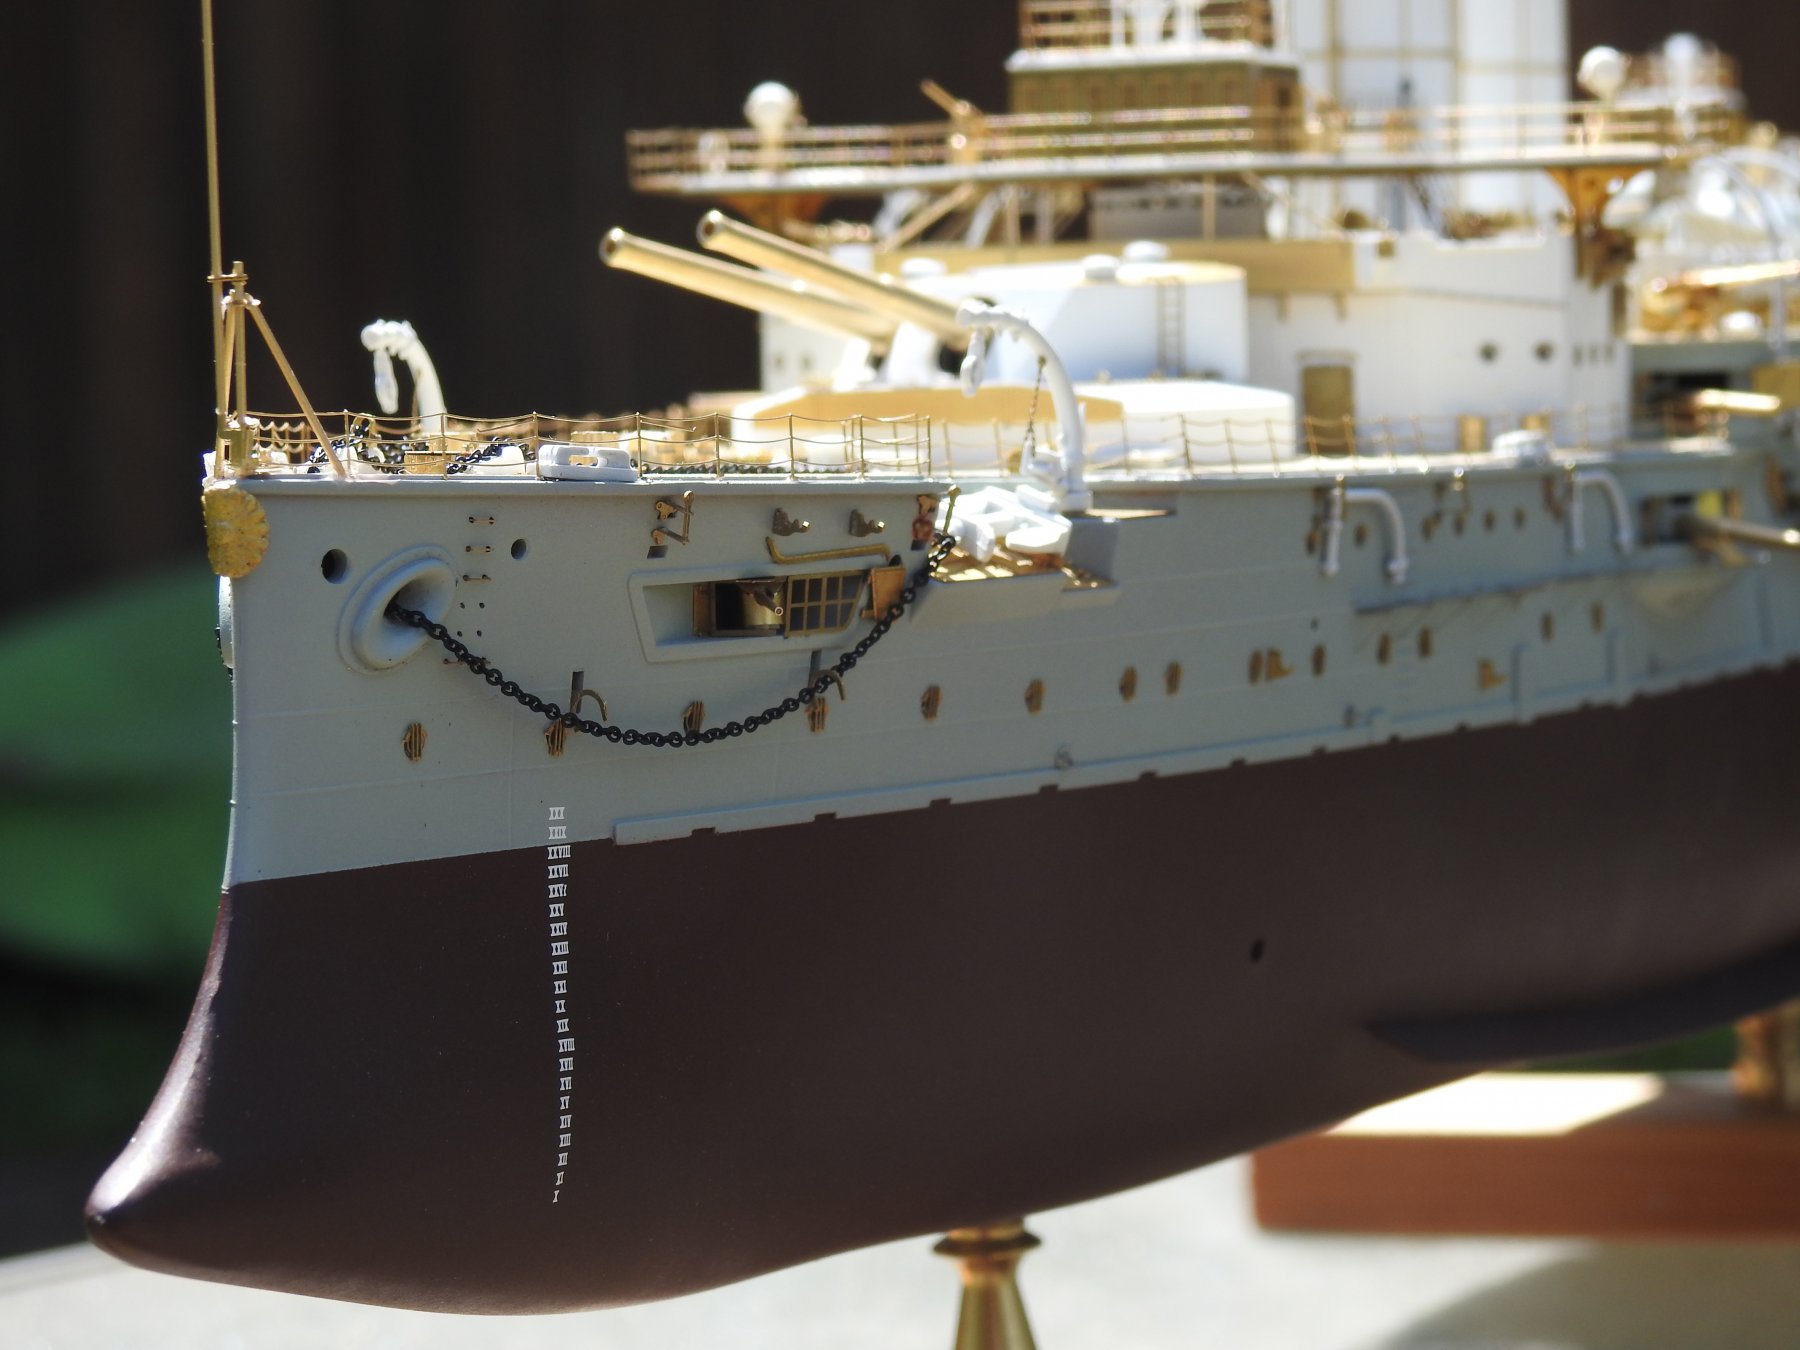
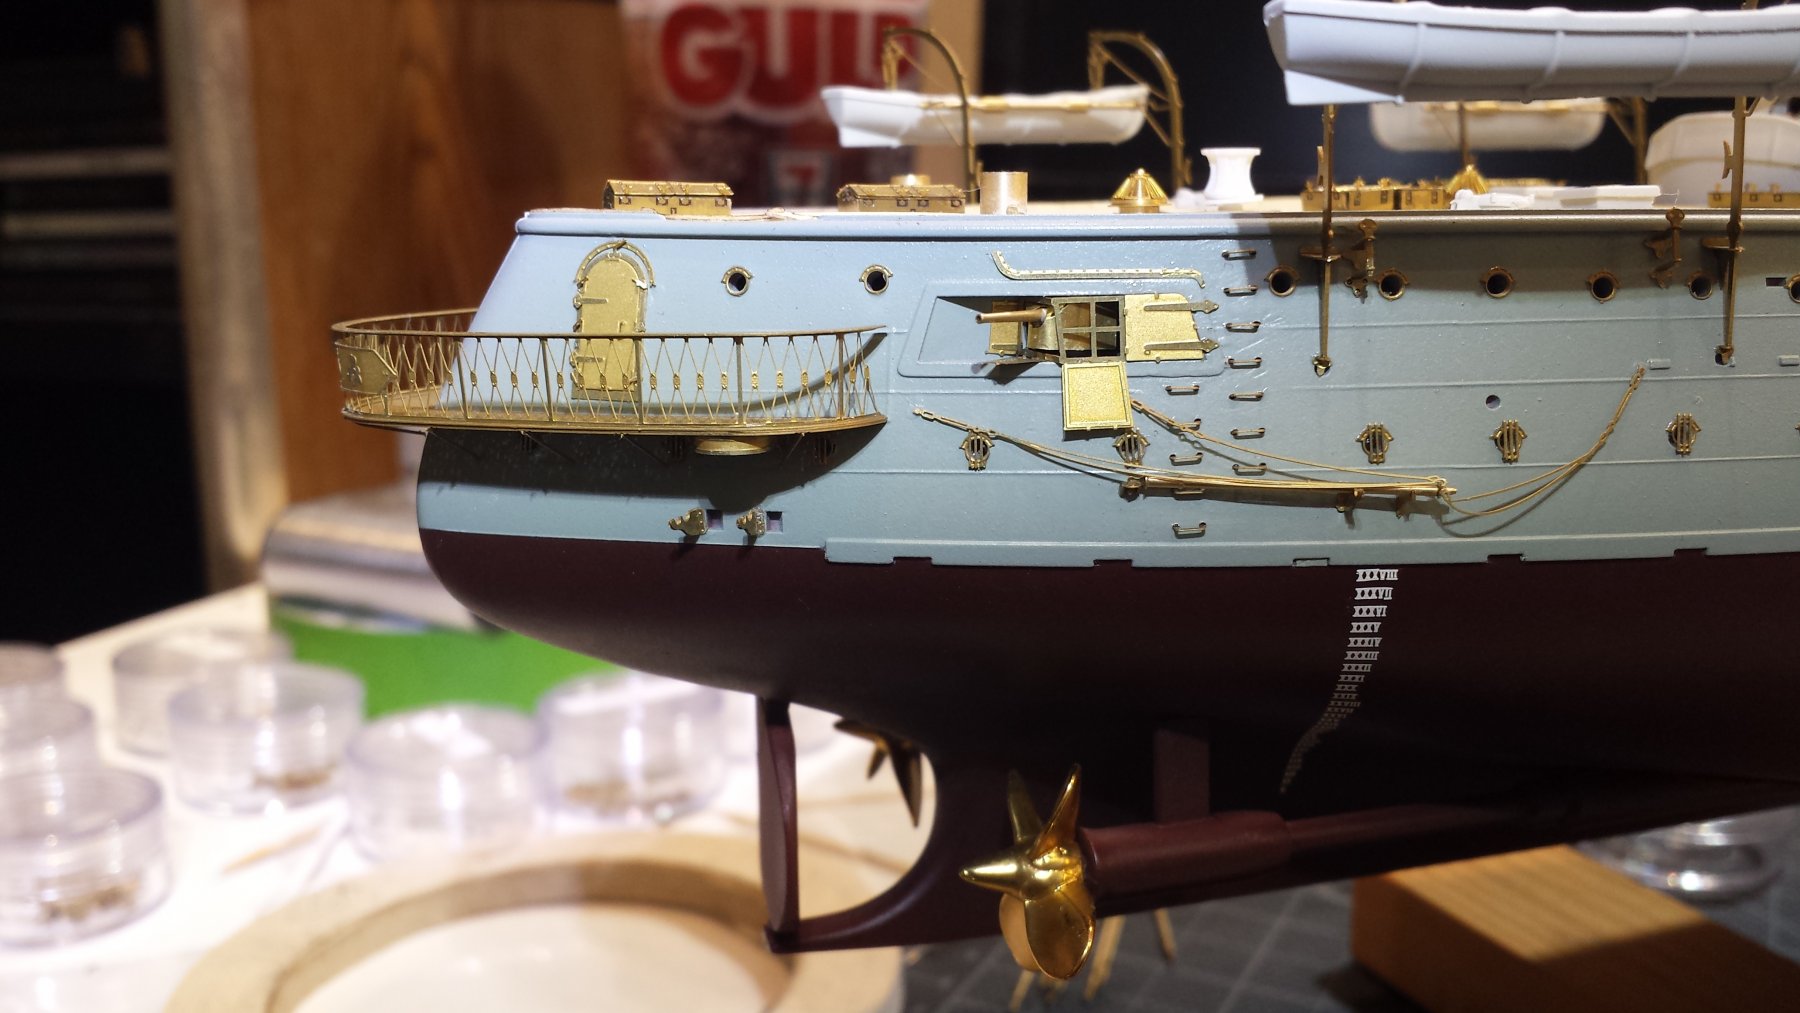
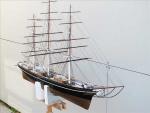
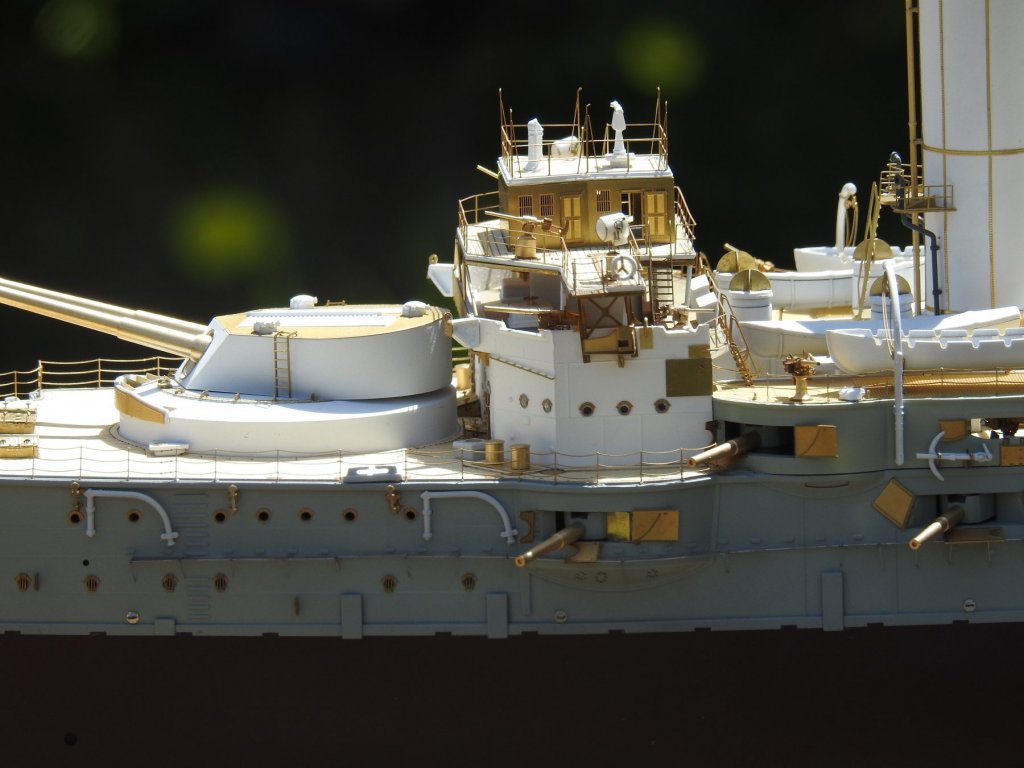
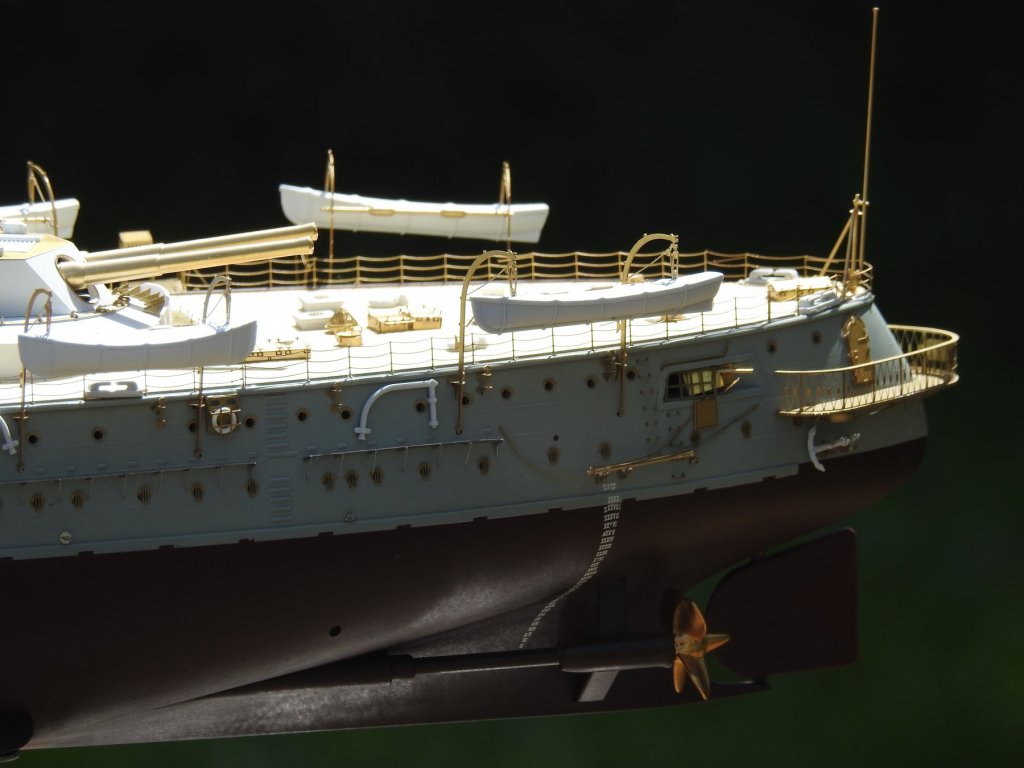
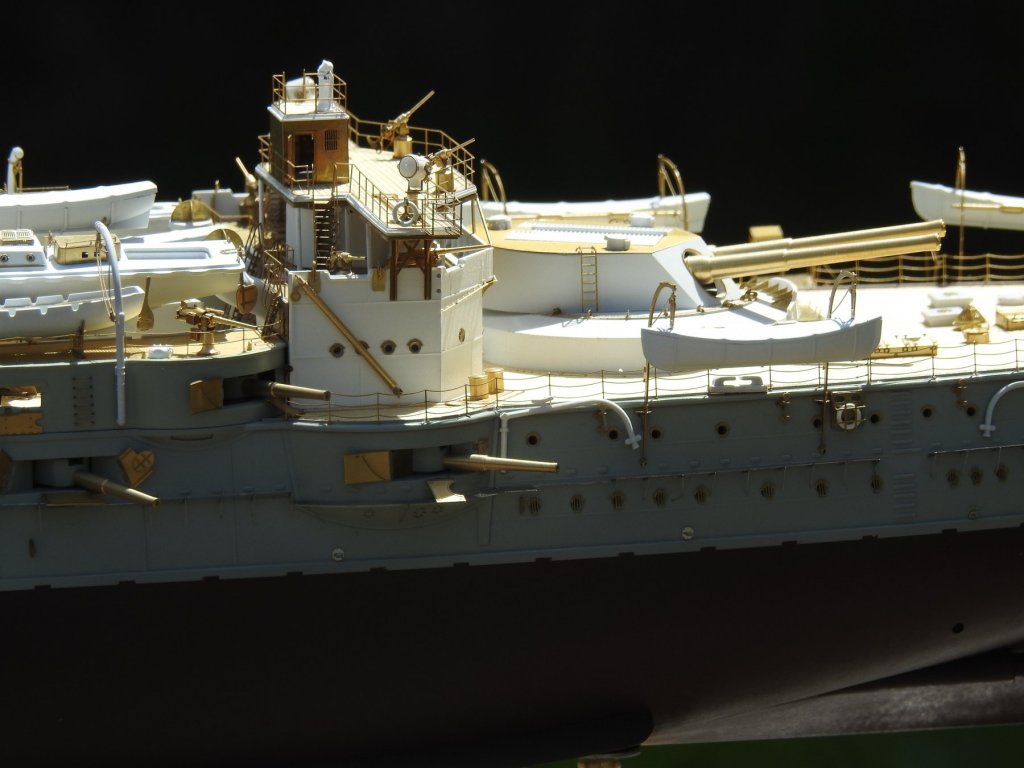
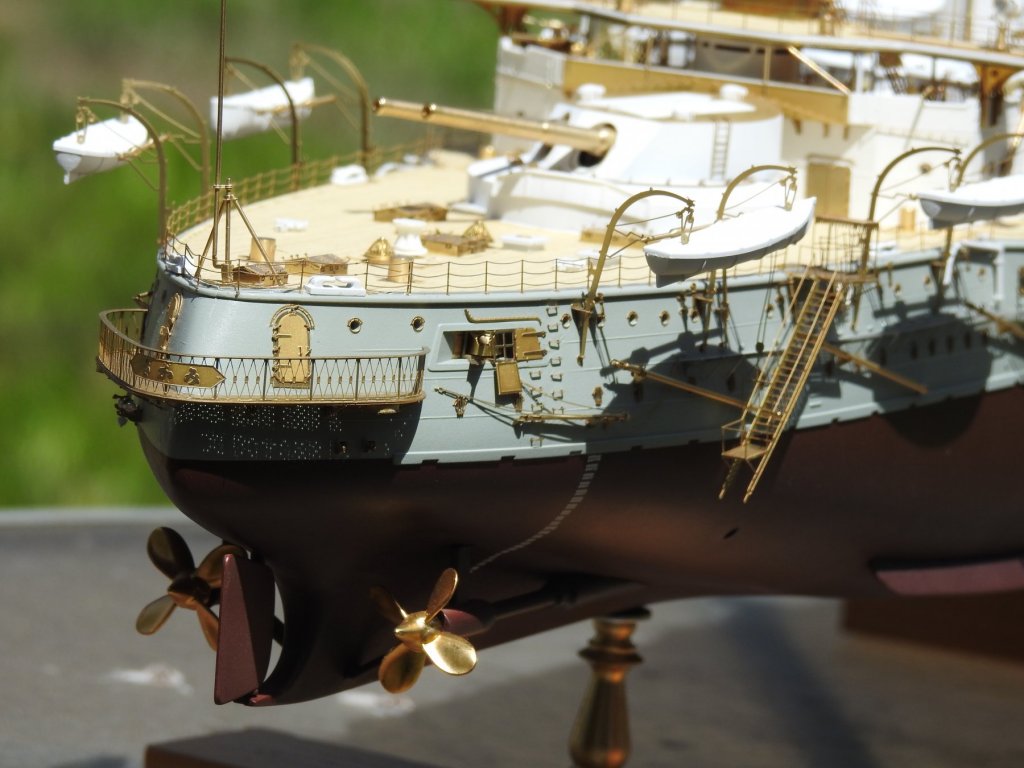
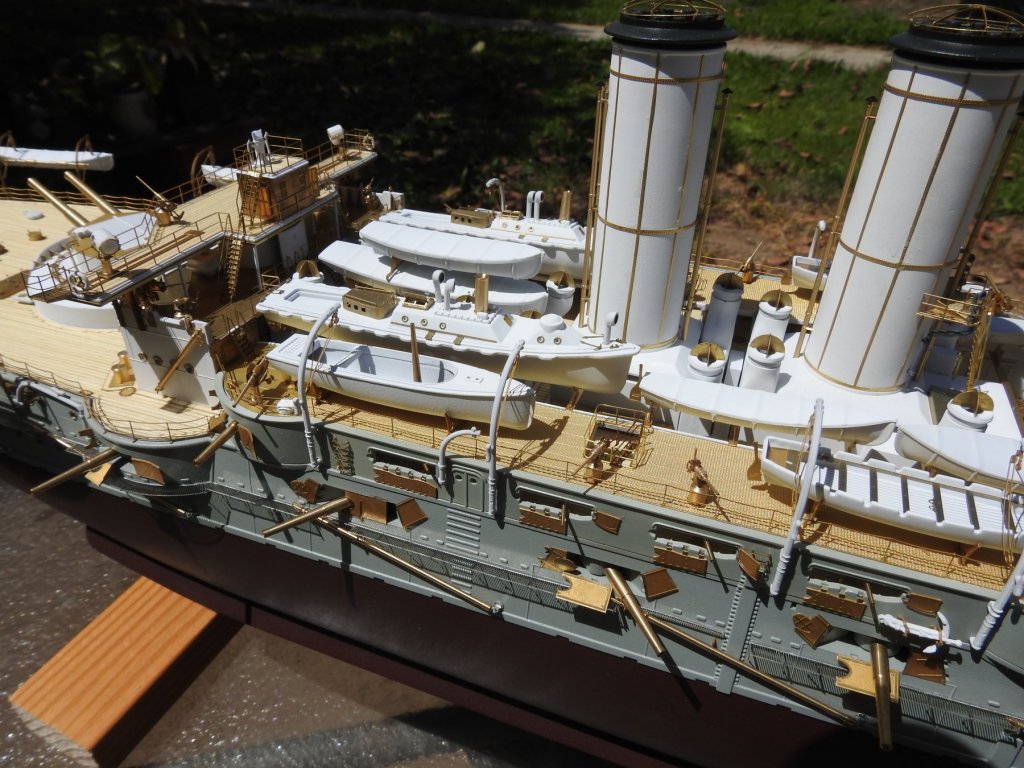
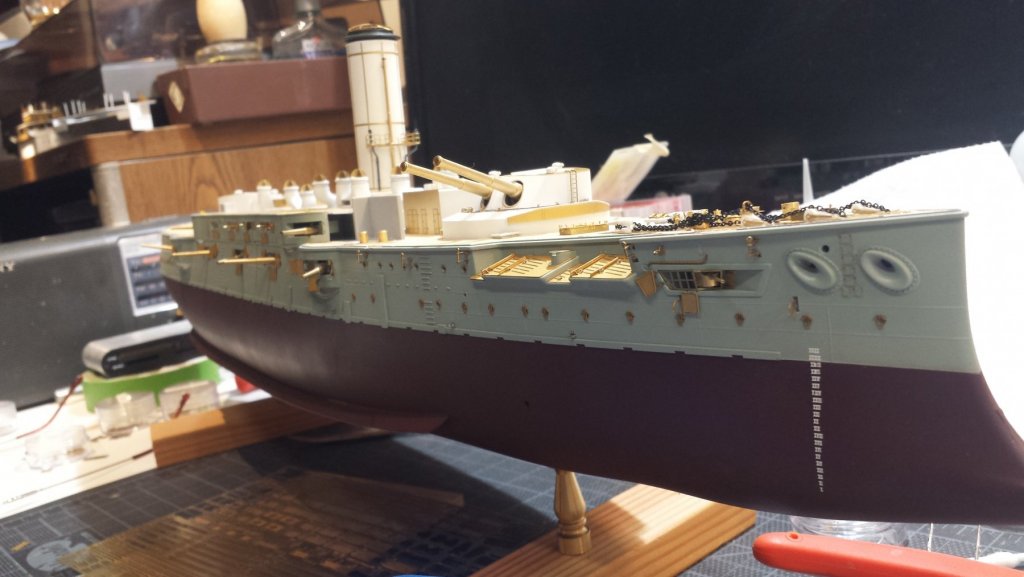
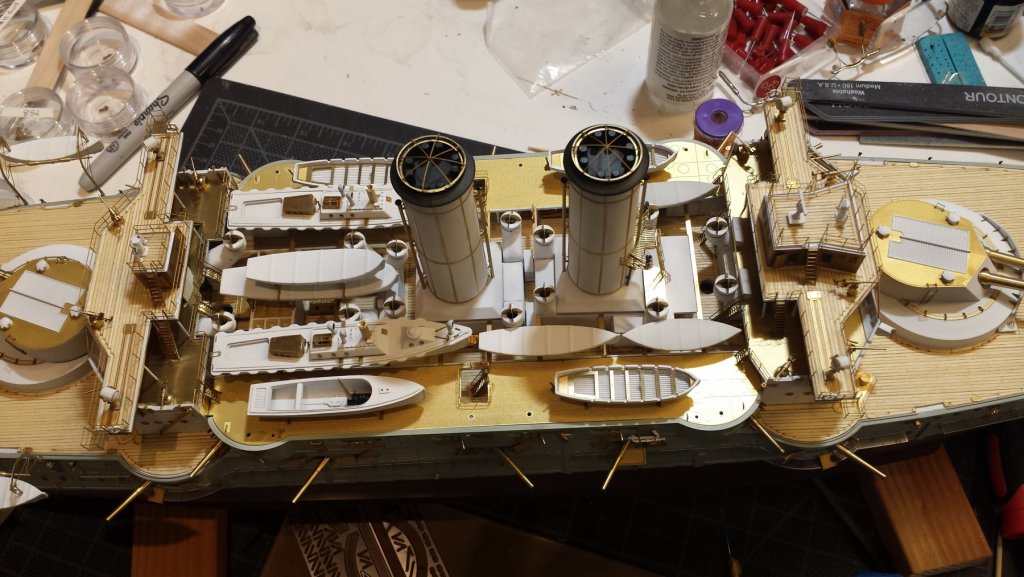
And....it's done! Worked on the placard today. Wanted it to match the base with the faux marble. Trimmed lose ends. Replace the boats that "fit". After adding some of the rigging, not all fit. They barely fit even without the rigging. Lots of things getting in the way. The boats smashed up against the superstructure, etc. The glass was a "pane". You really need to do all your calculations right. Then gluing it is very stressful. Typical glass cutters don't care about precision. They're used to cutting window glass that can be off by at least 1/8! I had to go back a couple of times. Finally got it as right as I can get. I love it! I've carried it around several times and it feels nice and solid. I had planned to add some angle stock to the corners and edges for support but it's totally unnecessary. Cleaning the silicone afterward was a nightmare! The base is totally non traditional to say the least. But since the model itself, with the unpainted PE is non traditional, I decided to keep it that way. I Like it. Hope you do too. The pedestals were solid brass drawer pulls haha. Again, I like them. I really loved working with the E Z line. Can't say how many times I snagged a line by accident and it just stretched....and stretched... and never popped off. Had it been typical line like on one of my wooden ships, it would have been a disaster. For such tiny scales, I think this stuff is the answer. Obviously, if I needed something "rope like", this would be out of the question. Anyway, I plan and taking better photographs later, but here are these for now. IT'S DONE!!!


- 34 replies
-
- 25
-
-

-
- mikasa
- wave models
- (and 2 more)
-
Thank you Paul! Although we do this kind of stuff for our own satisfaction and amusement, it wouldn't be HALF as satisfying without the compliments from others. It's what keeps ME going. Thank you again.
- 34 replies
-
- 4
-
-
- mikasa
- wave models
- (and 2 more)
-
I agree. I've built several on commission and it was too stressful. My biggest dilemma, is where the hell do you put them all when you're done?!
- 467 replies
-
- 3
-
-
- mikasa
- wave models
- (and 1 more)
-
I agree, if you're going to paint. But not if you want to show off the brass like I like to. I can't imagine placing so many!
- 345 replies
-
- 4
-
-
- graf zeppelin
- trumpeter
- (and 2 more)
-
Fantastic Greg! I don't think I've seen that many portholes since the Titanic! You know I like to leave my PE unpainted. I can't imagine the nightmare of placing all those brass portholes IF they are included. I'd like to build this too.
- 345 replies
-
- 3
-
-
- graf zeppelin
- trumpeter
- (and 2 more)
-
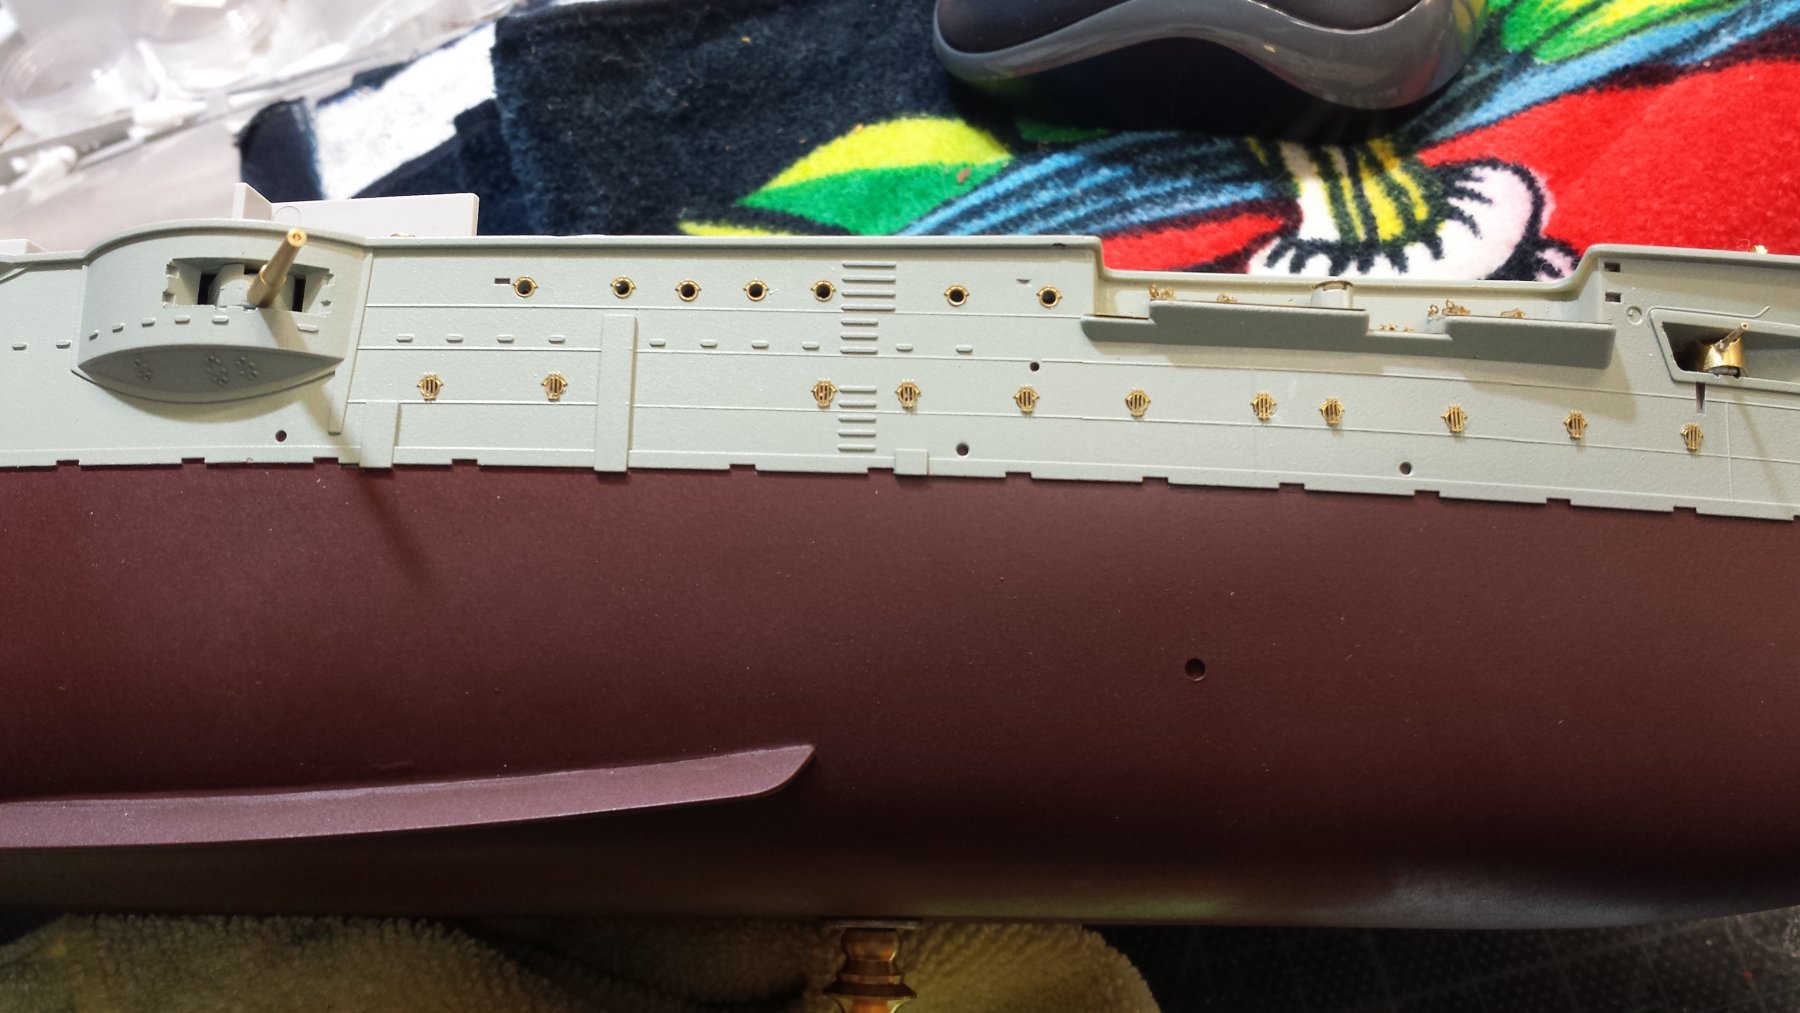
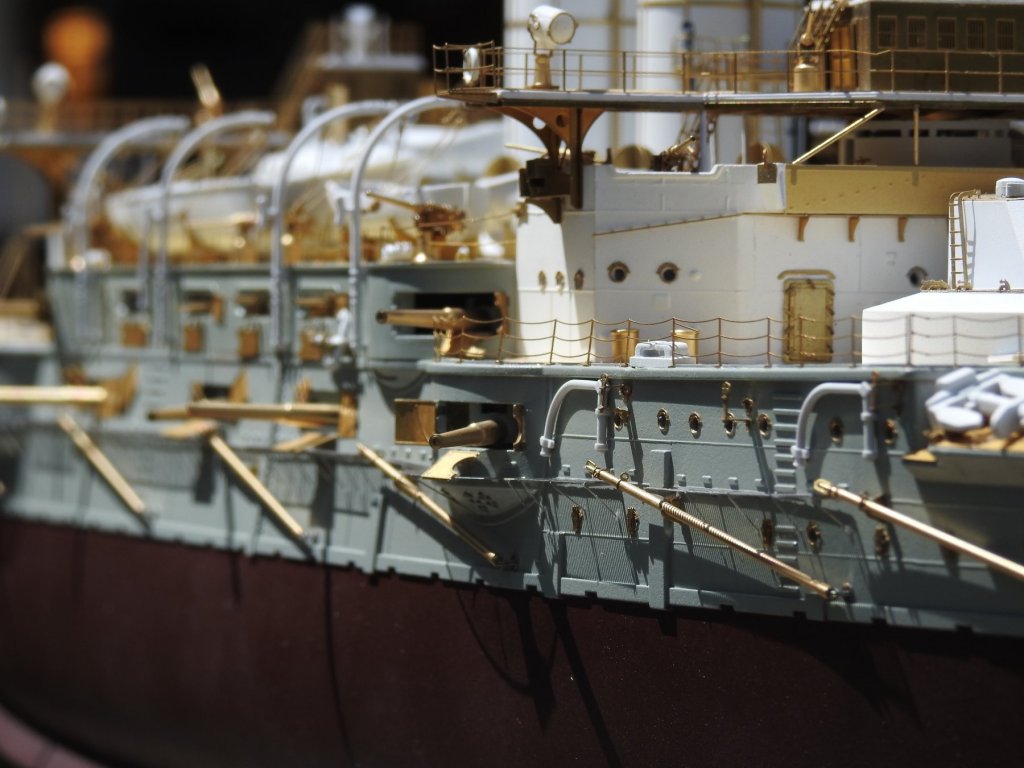
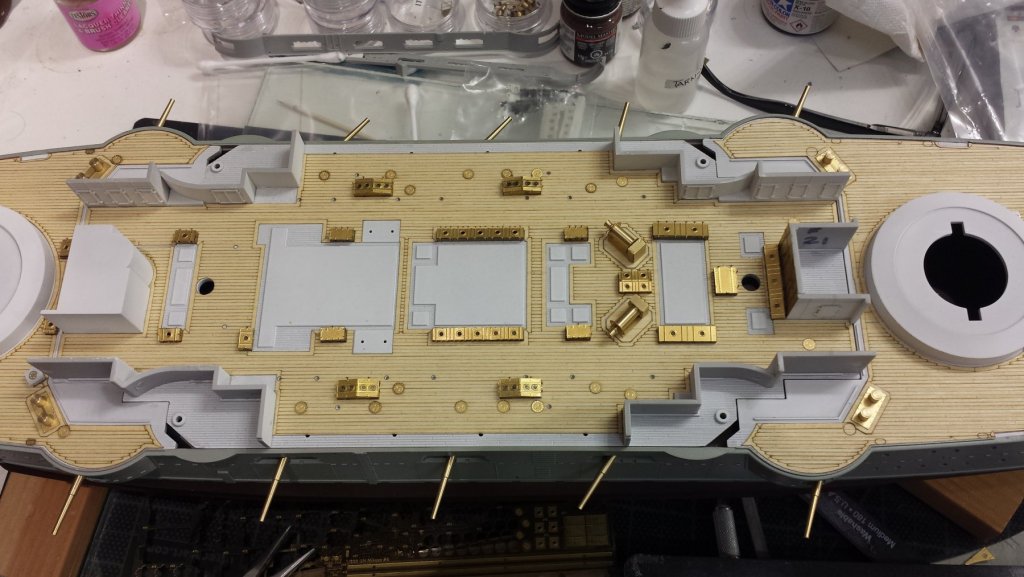
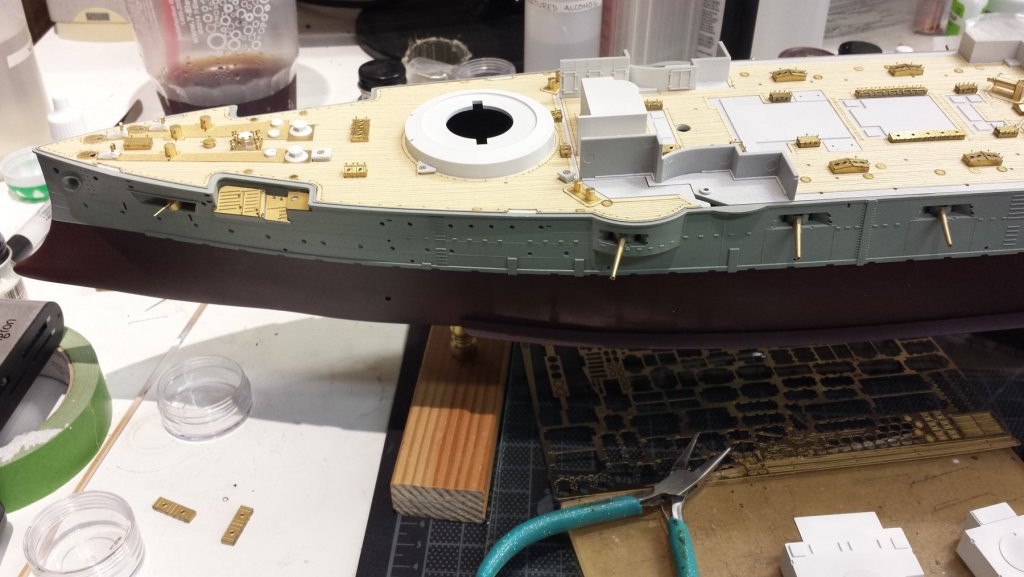
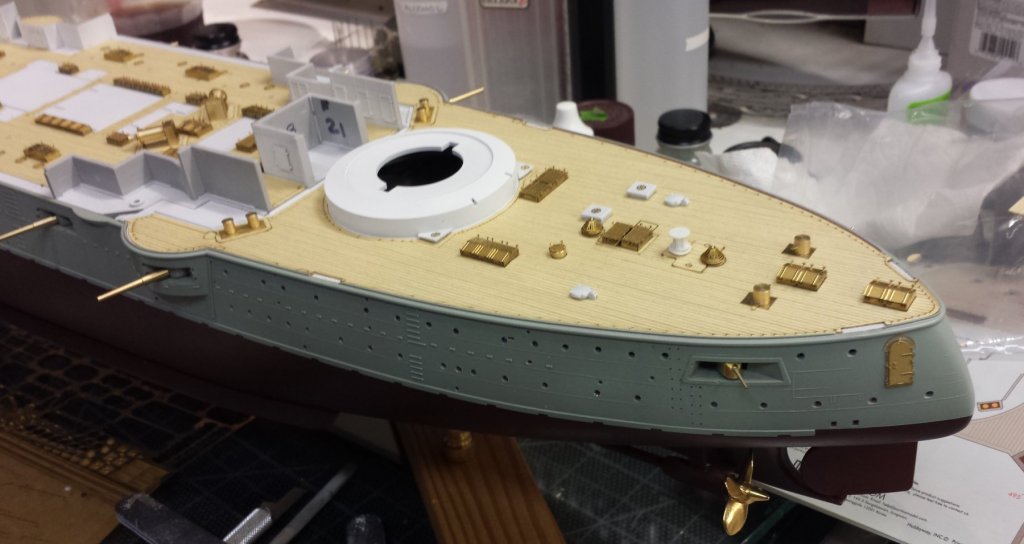
Hello again, So as I went to work on the base, I was not sure what to do. Because I planned to place the torpedo net only on one side, do I offset the ship itself so that the entire assembly, including the net, are right at the center of the base, or do I place the ship in the center, and allow the net to extend way past the other side of the model? I decided to place the ship right in the center, and when I saw how it looked, I decided the net was not going on. I wasn't crazy about it in the first place. Way to fragile and too "artificial" looking. So no net. Now I have to just button things up, replace as many lifeboats as will fit, and mount the name tag correctly. Hope you like it.

- 34 replies
-
- 17
-
-
- mikasa
- wave models
- (and 2 more)
-
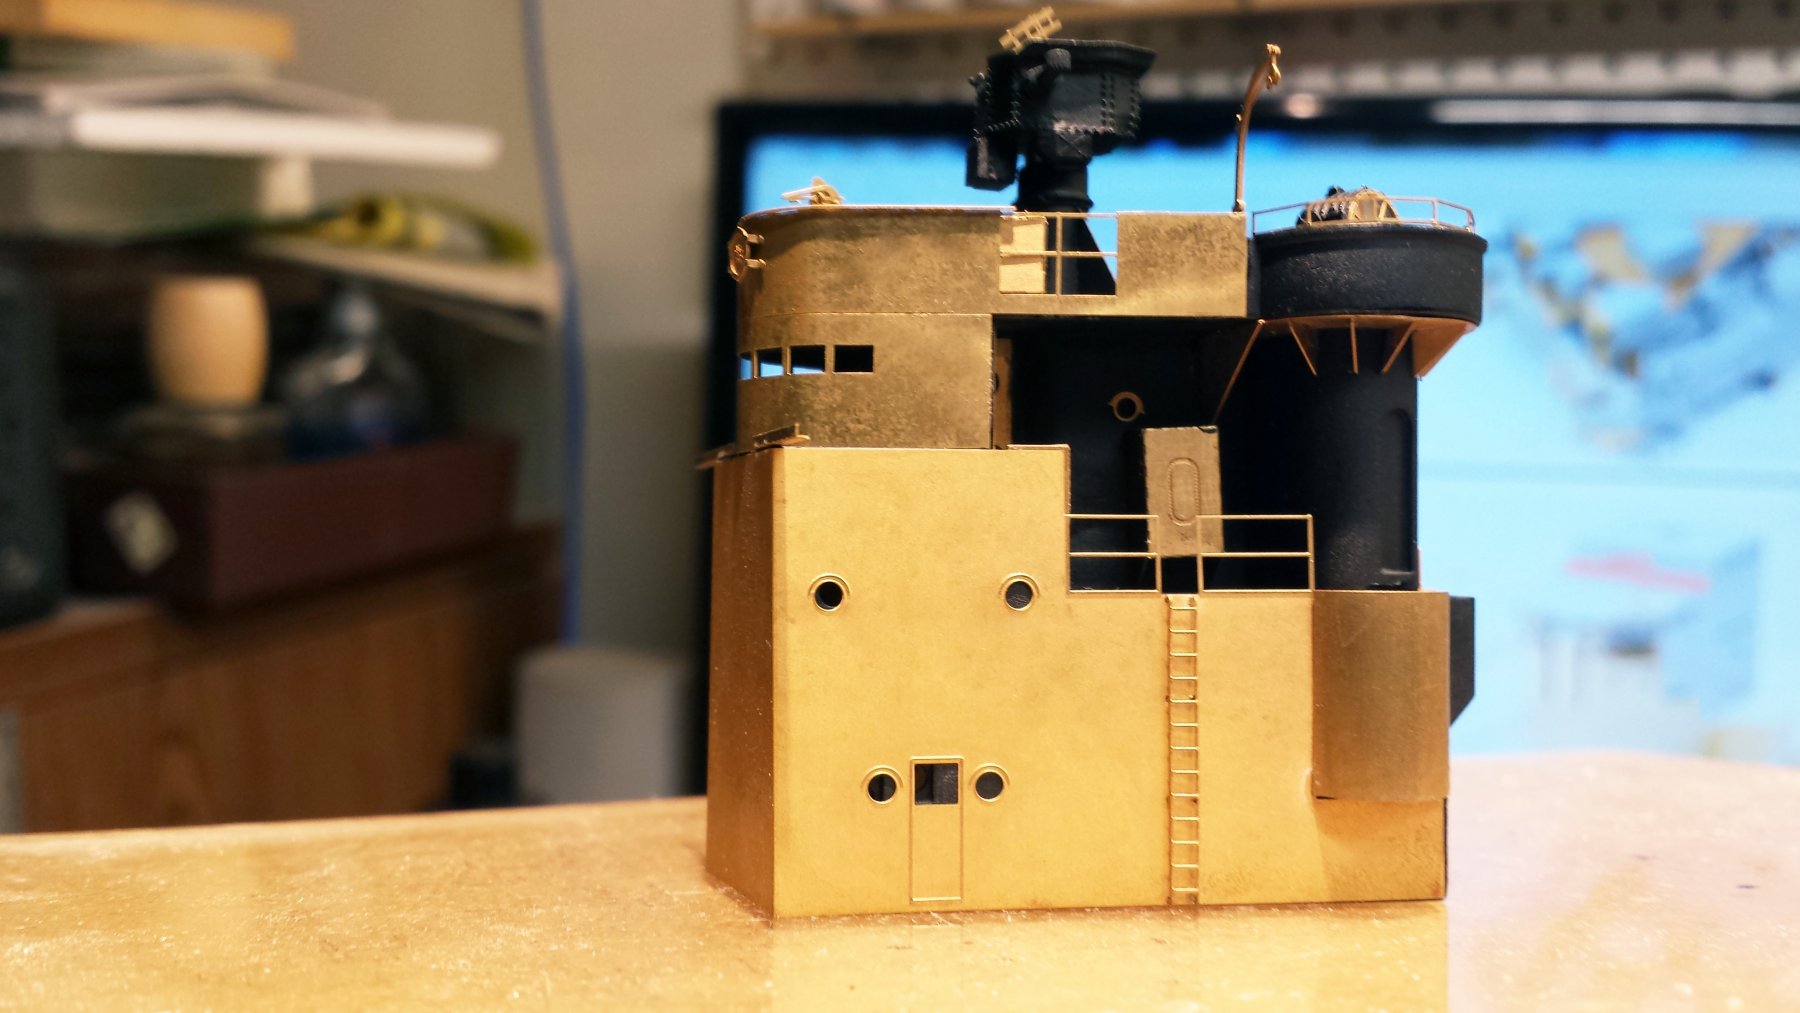
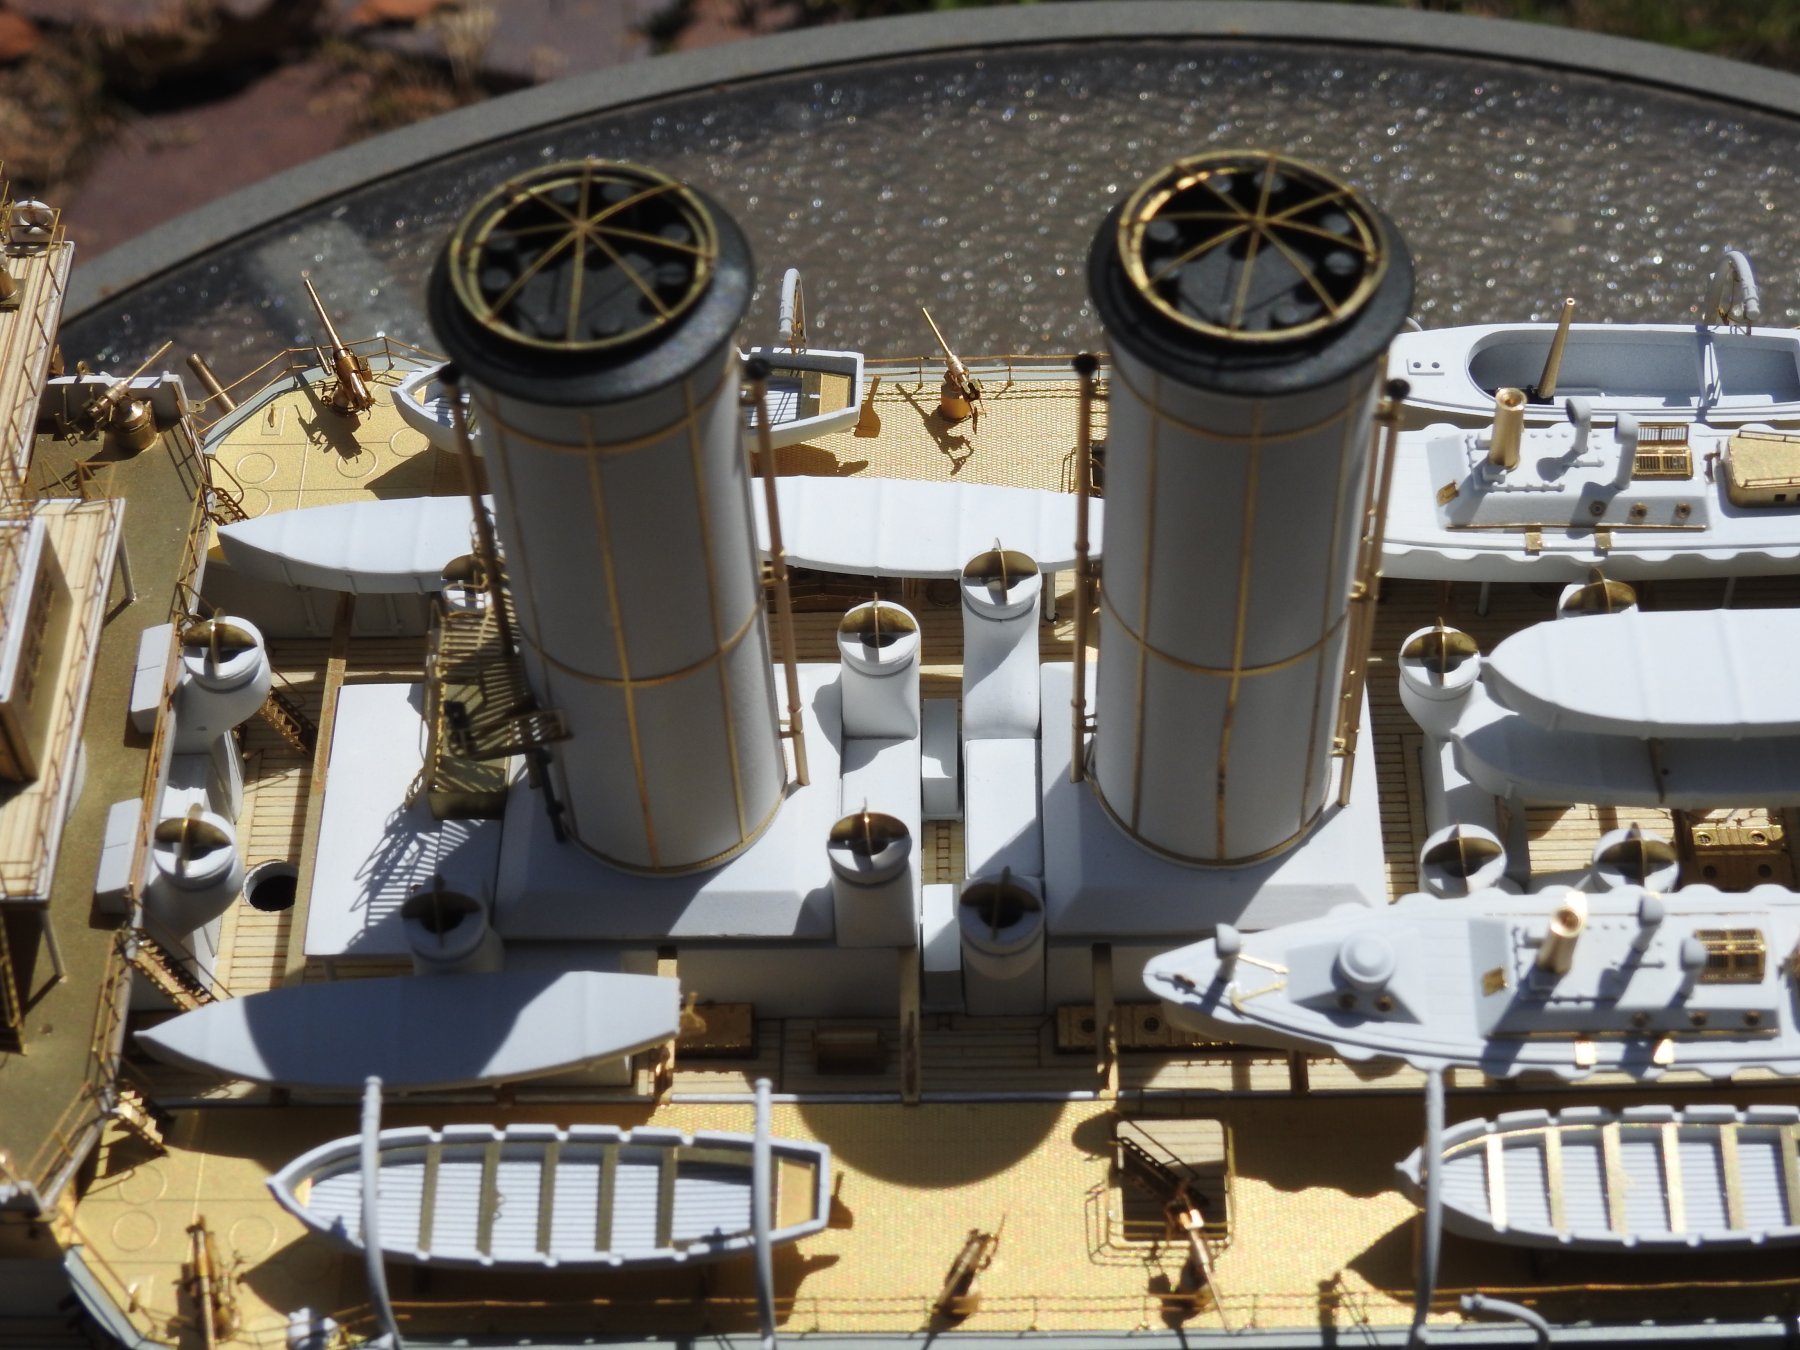
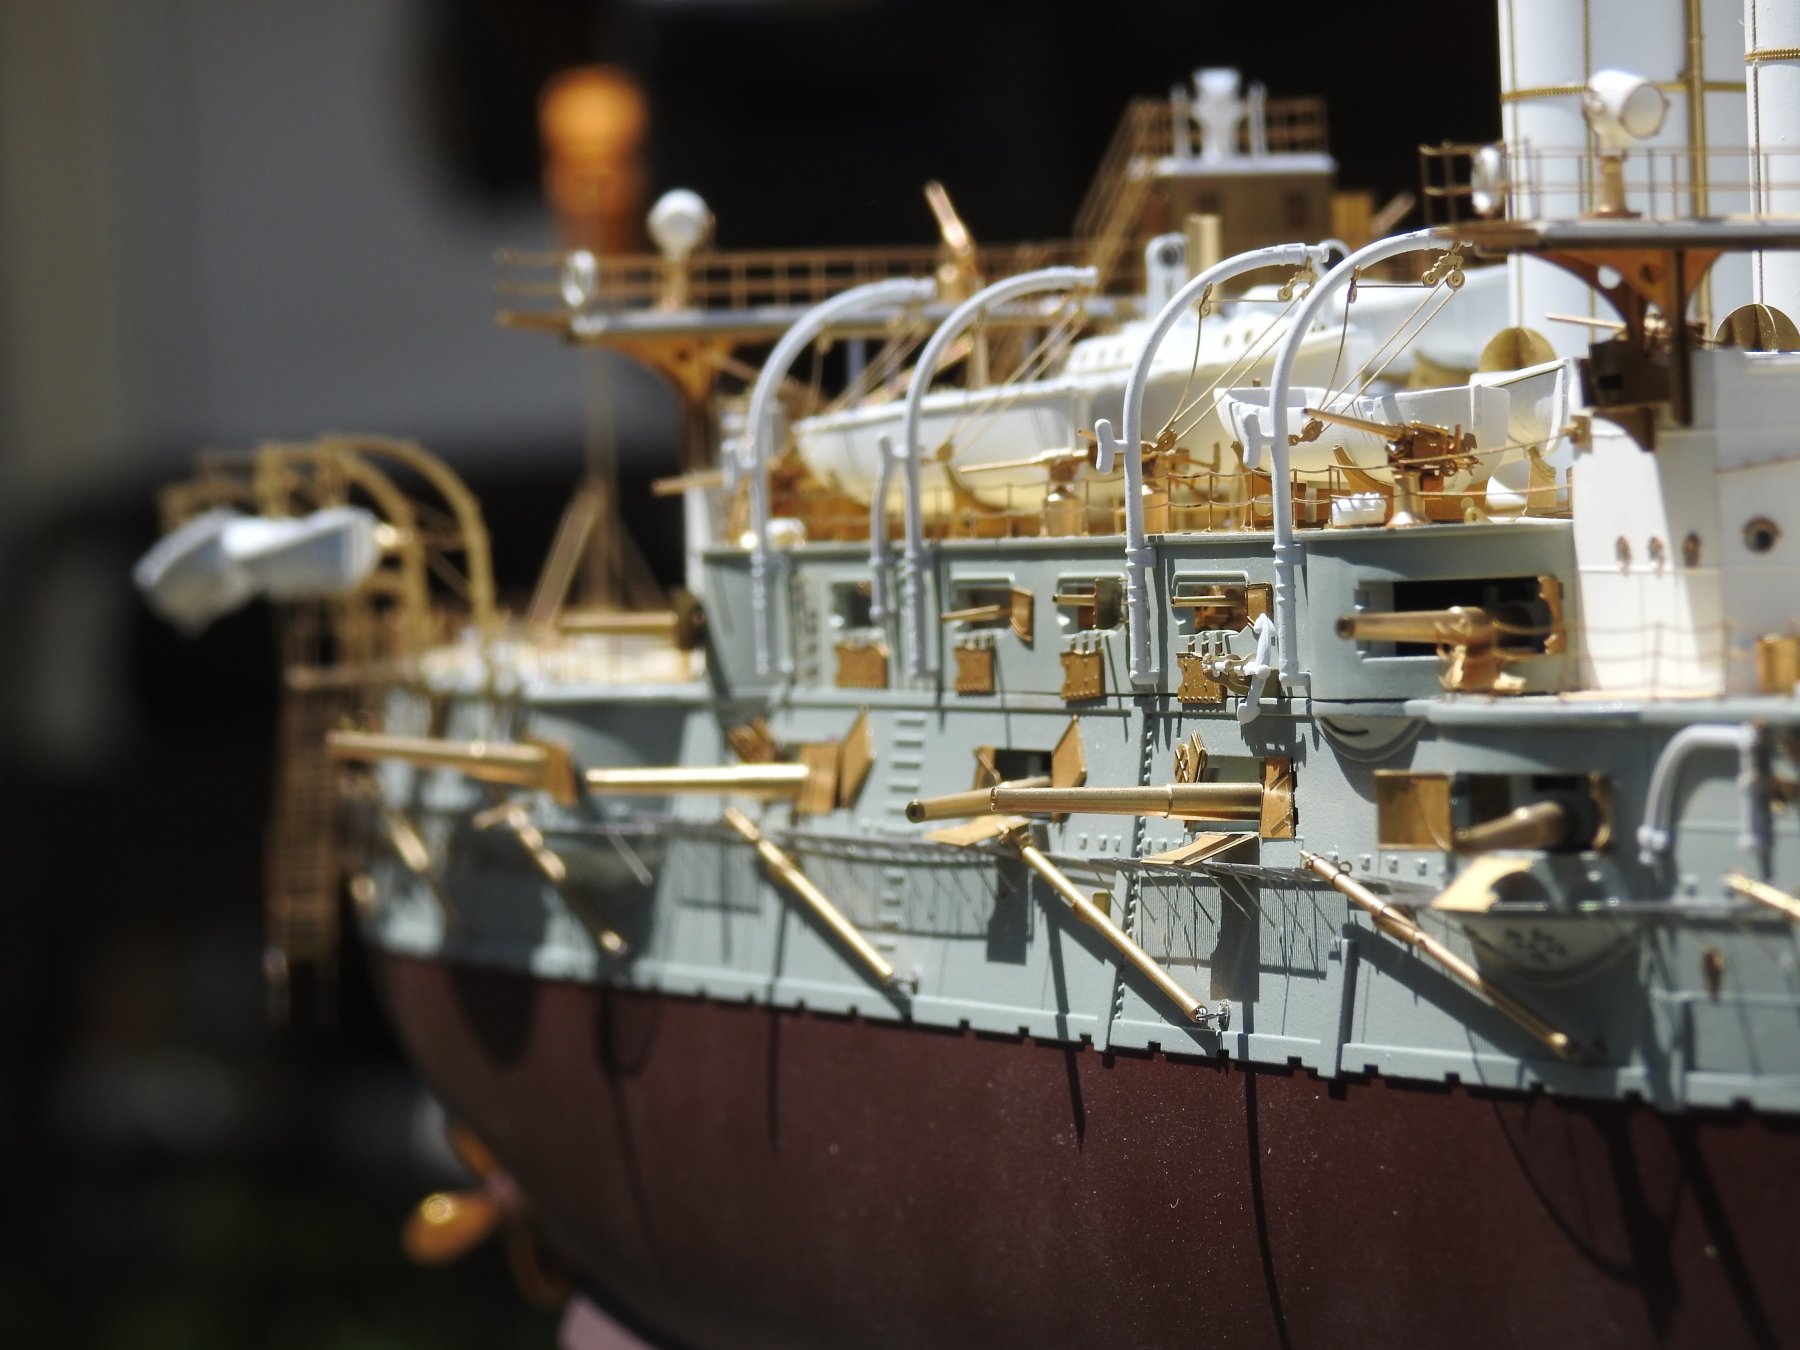
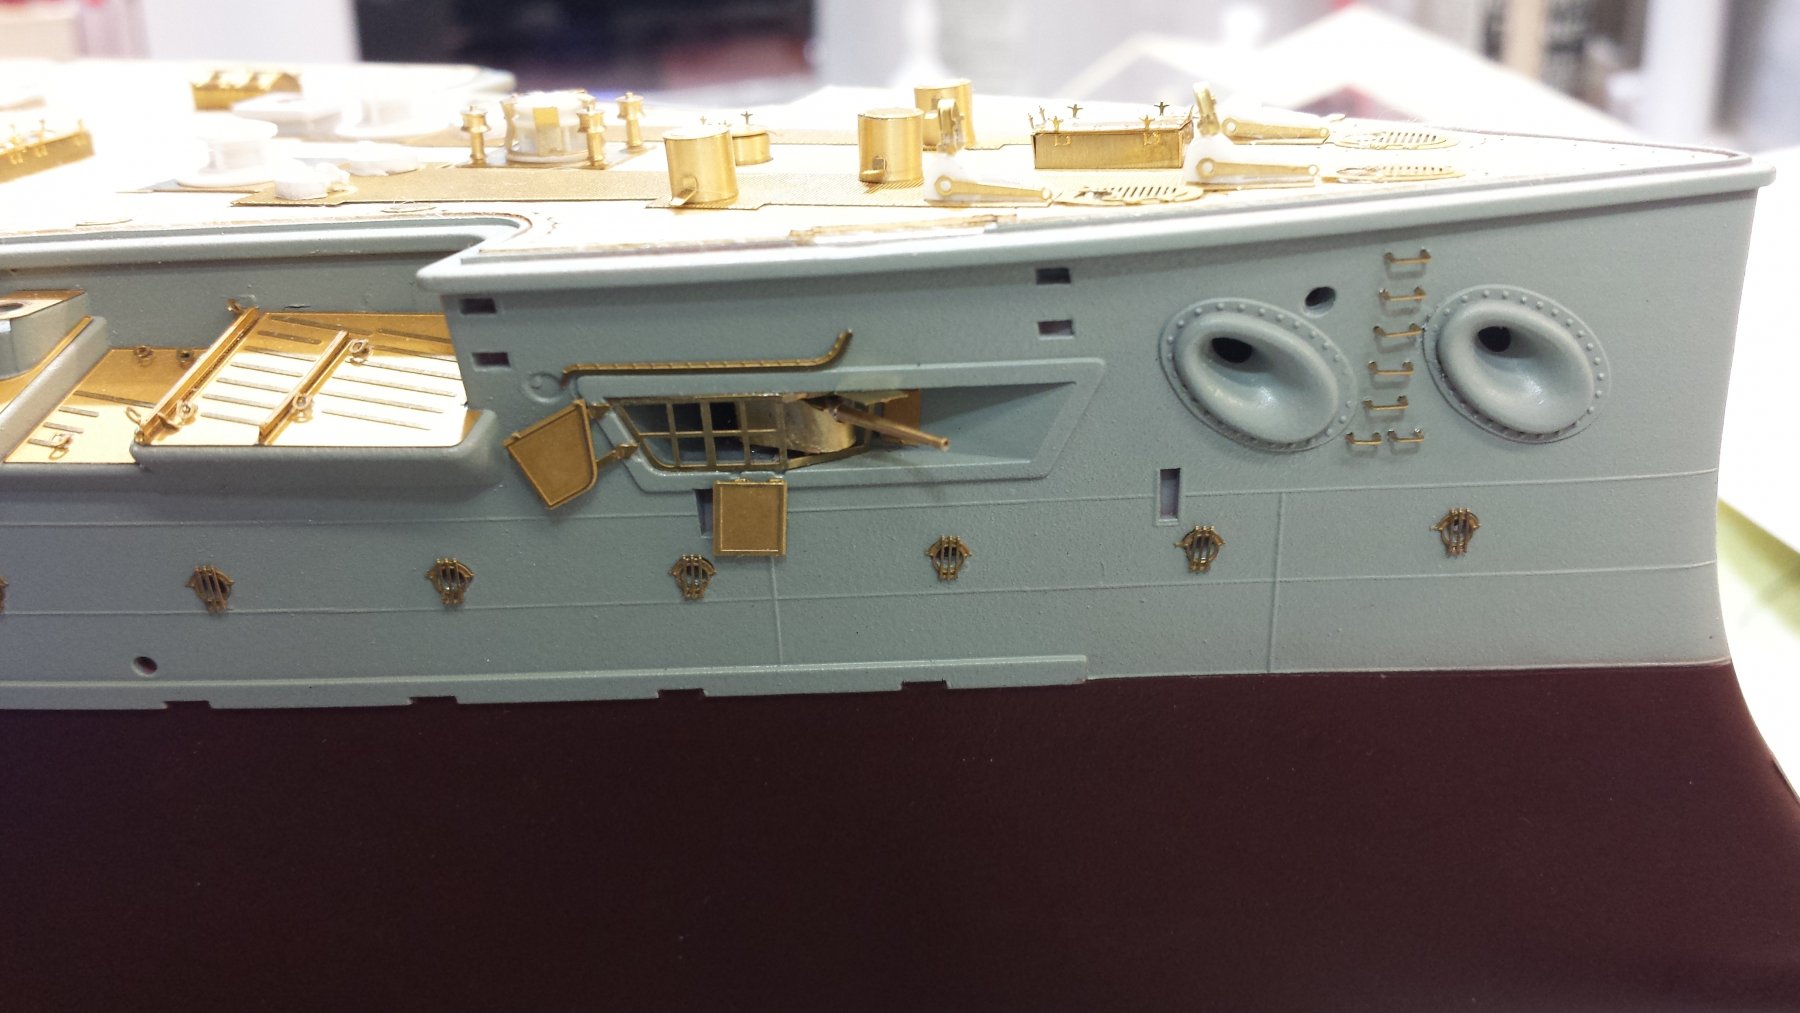
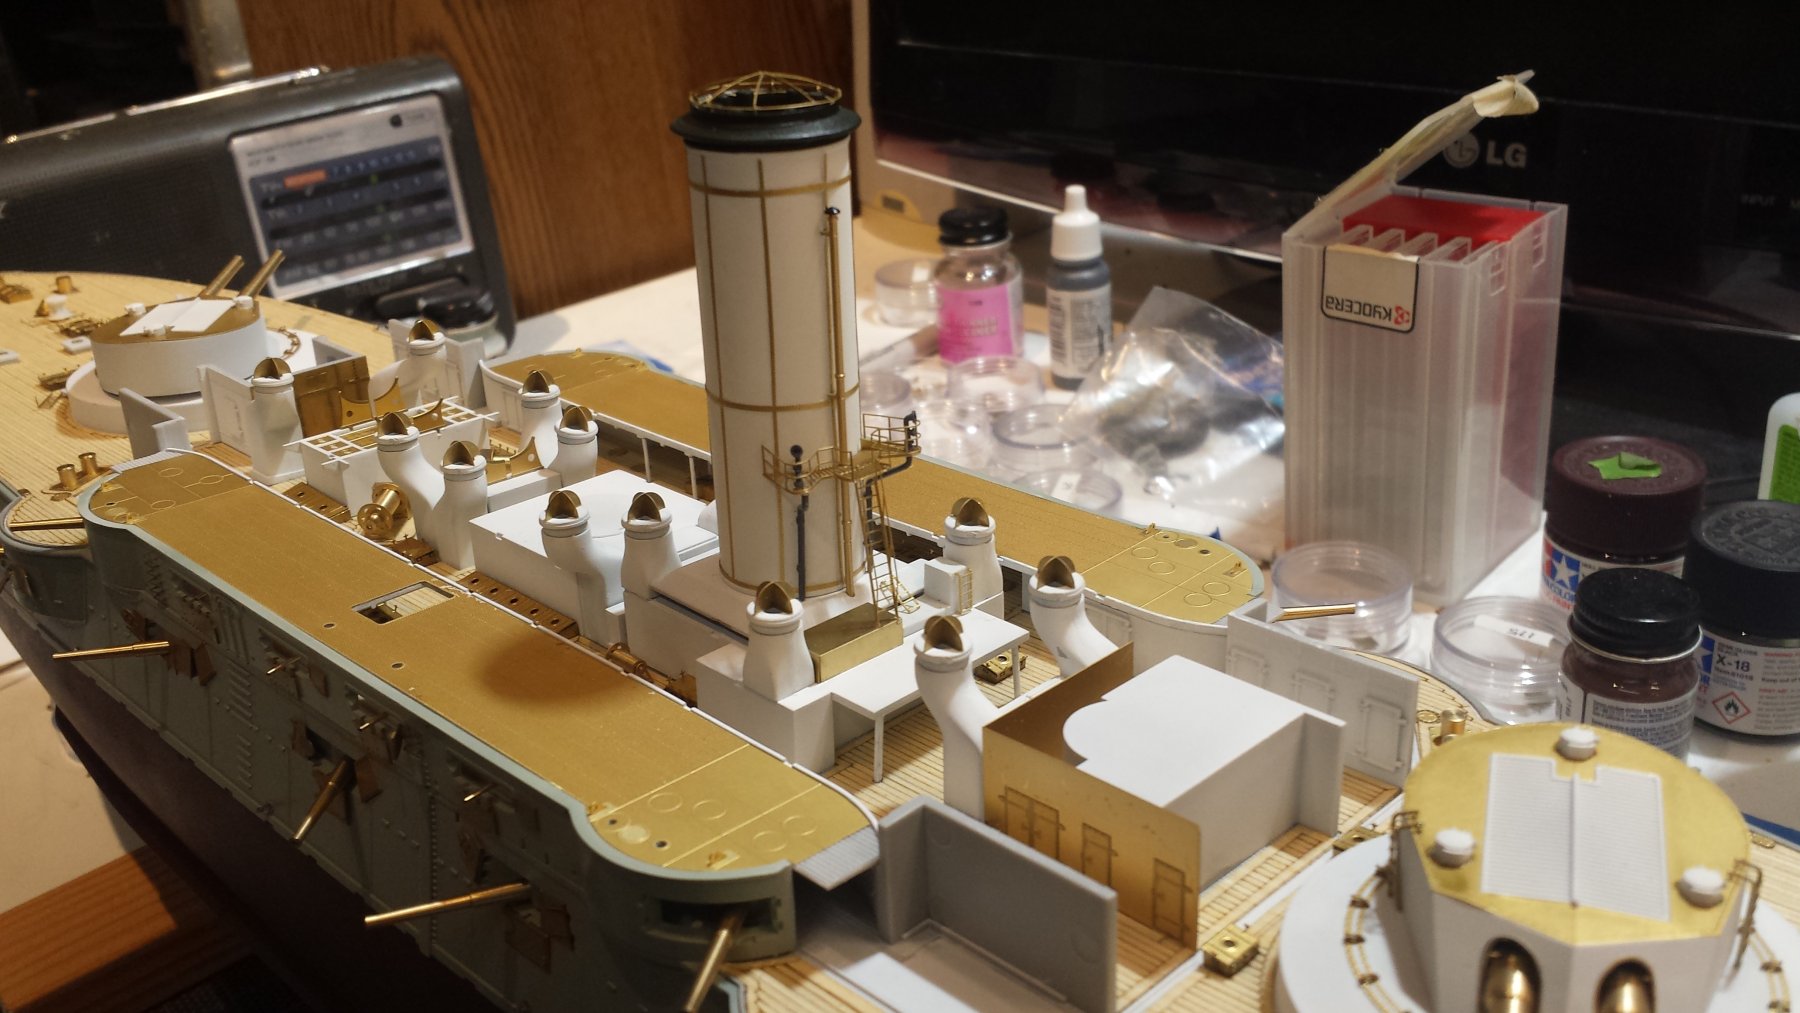
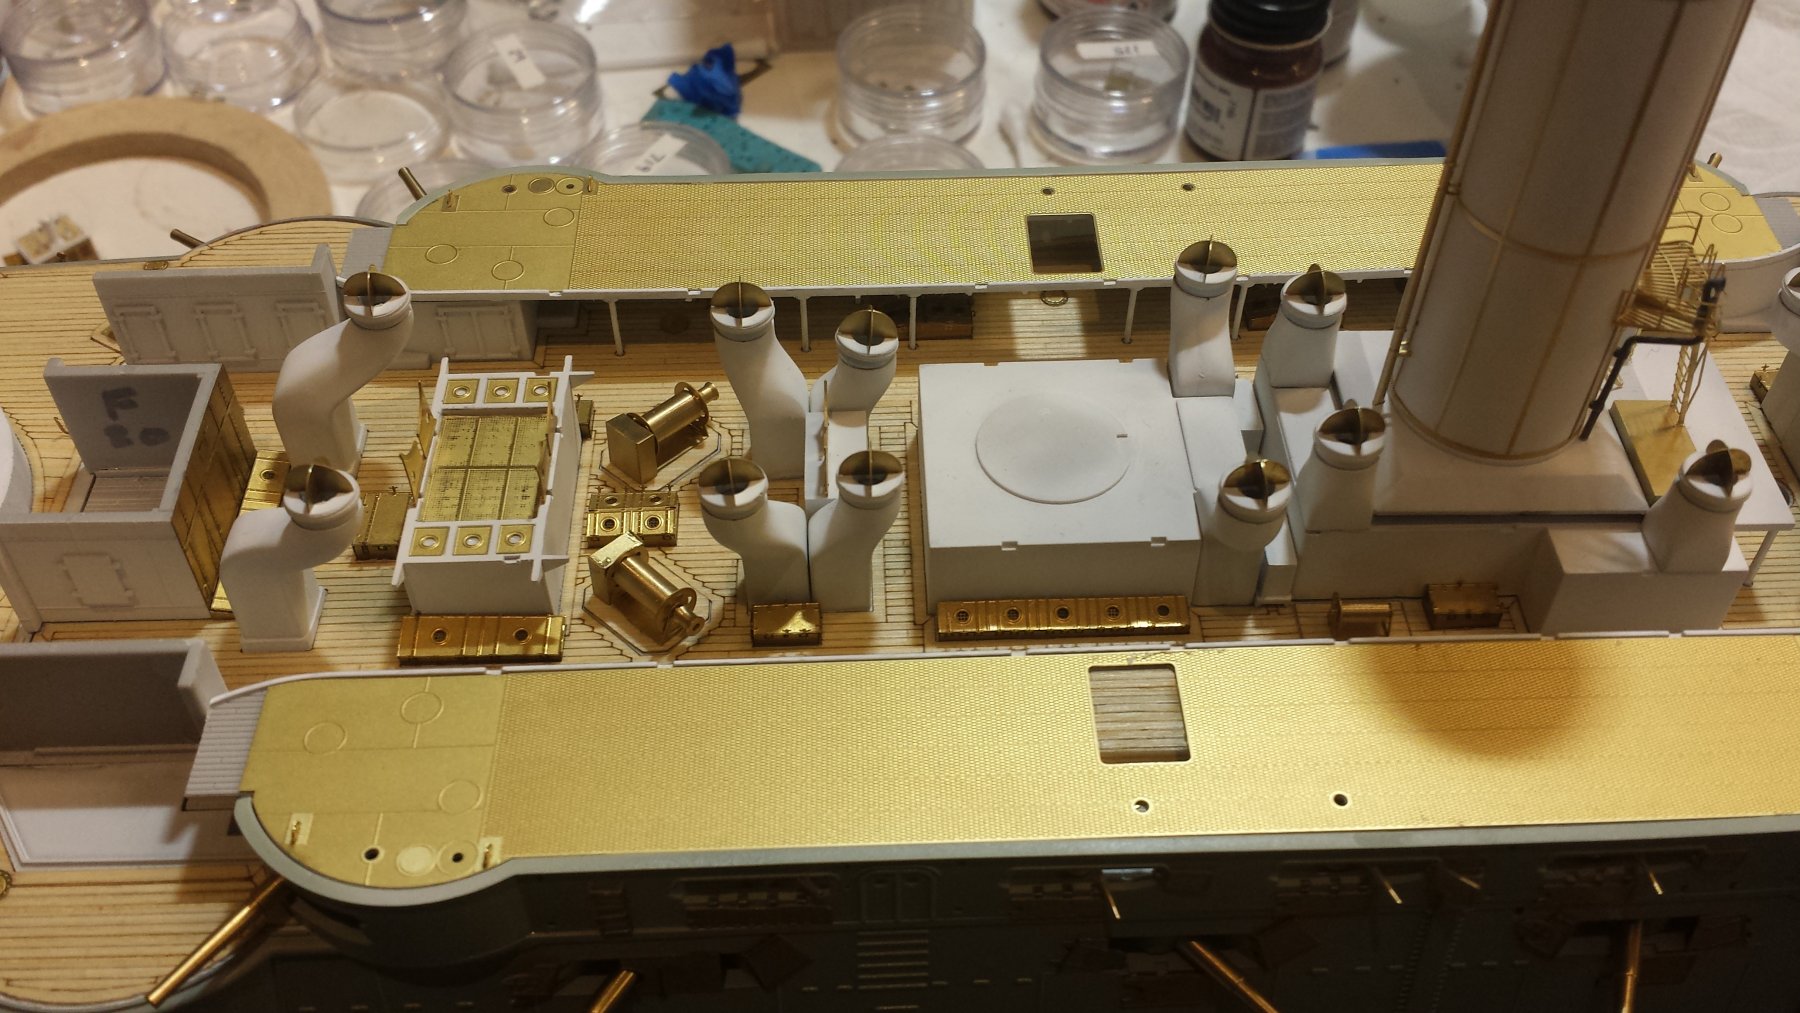
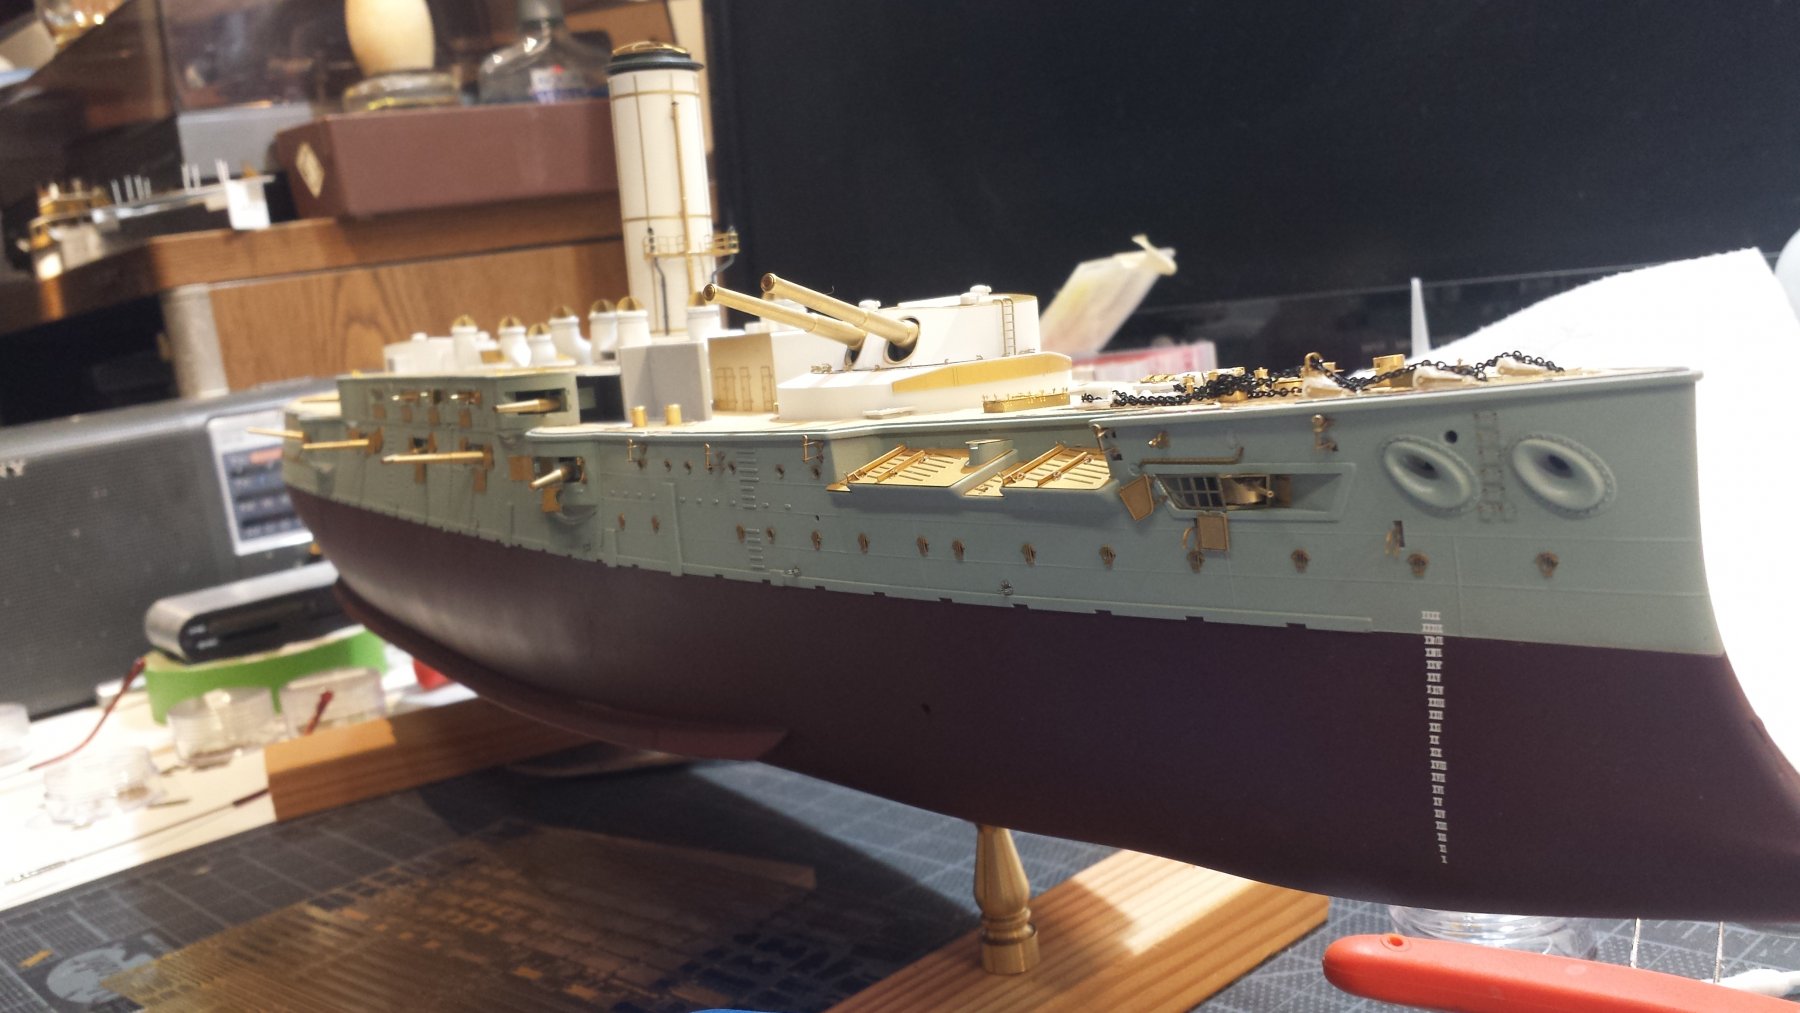
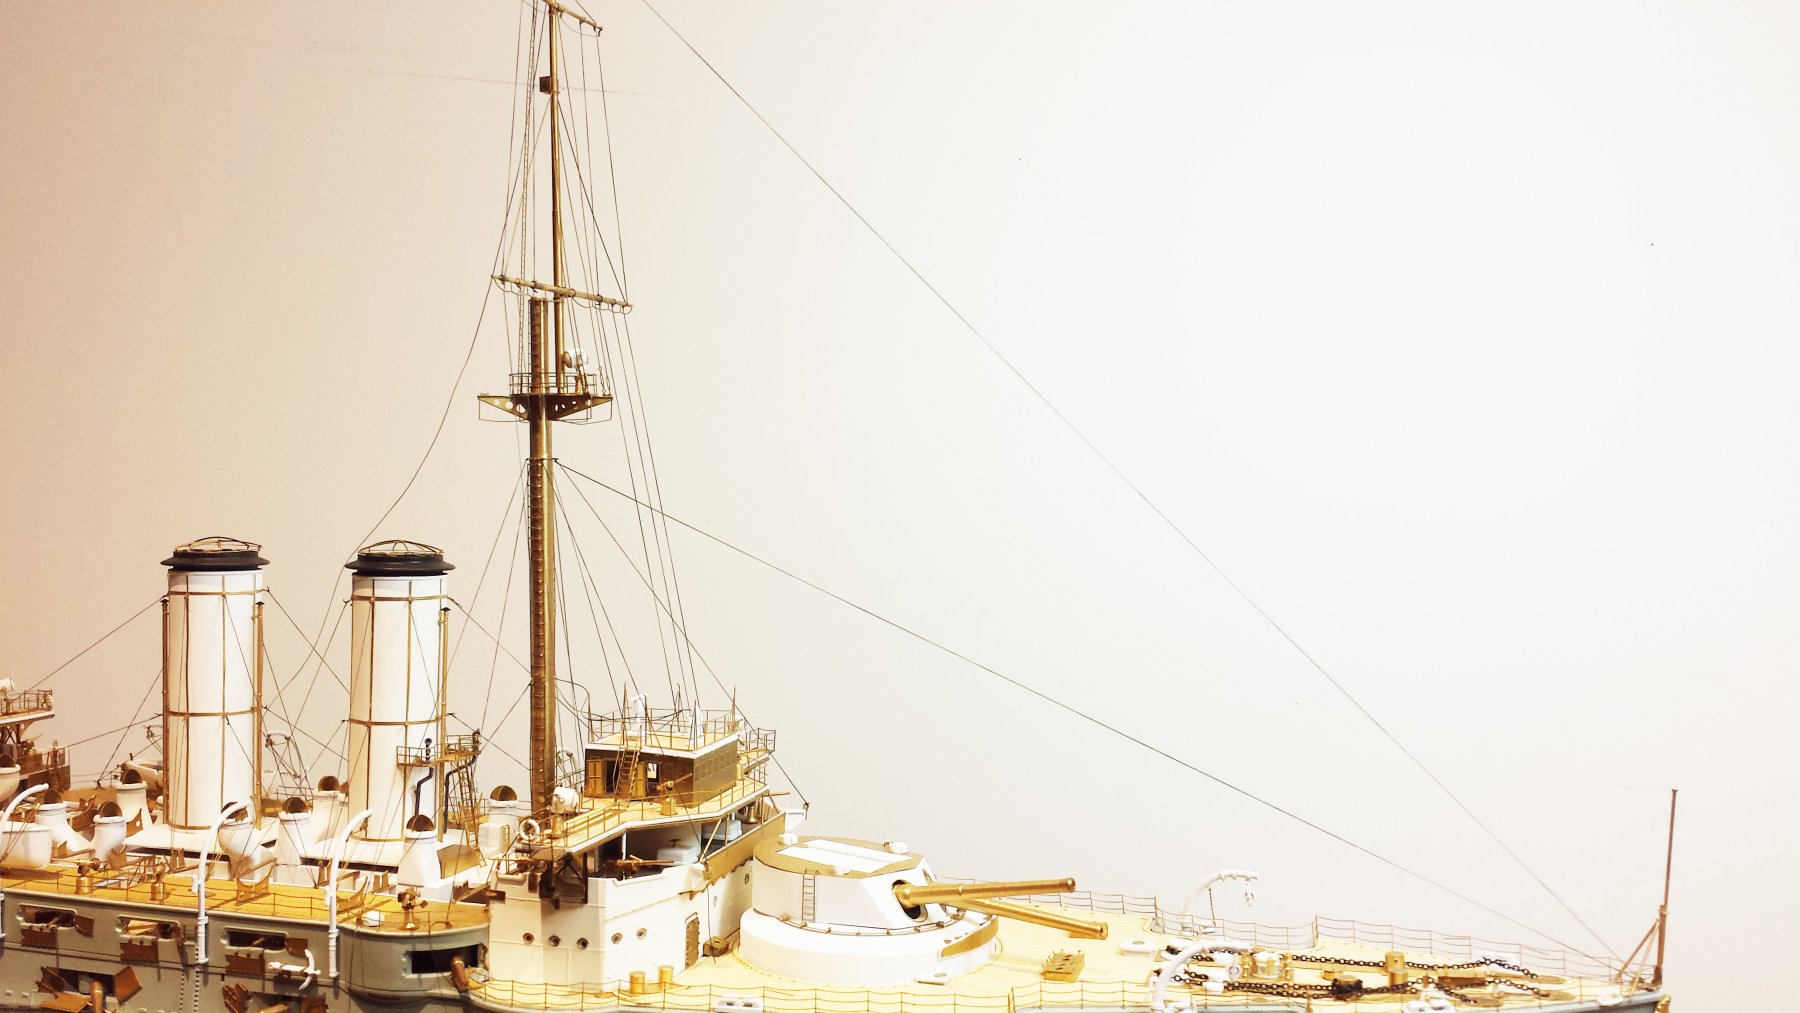
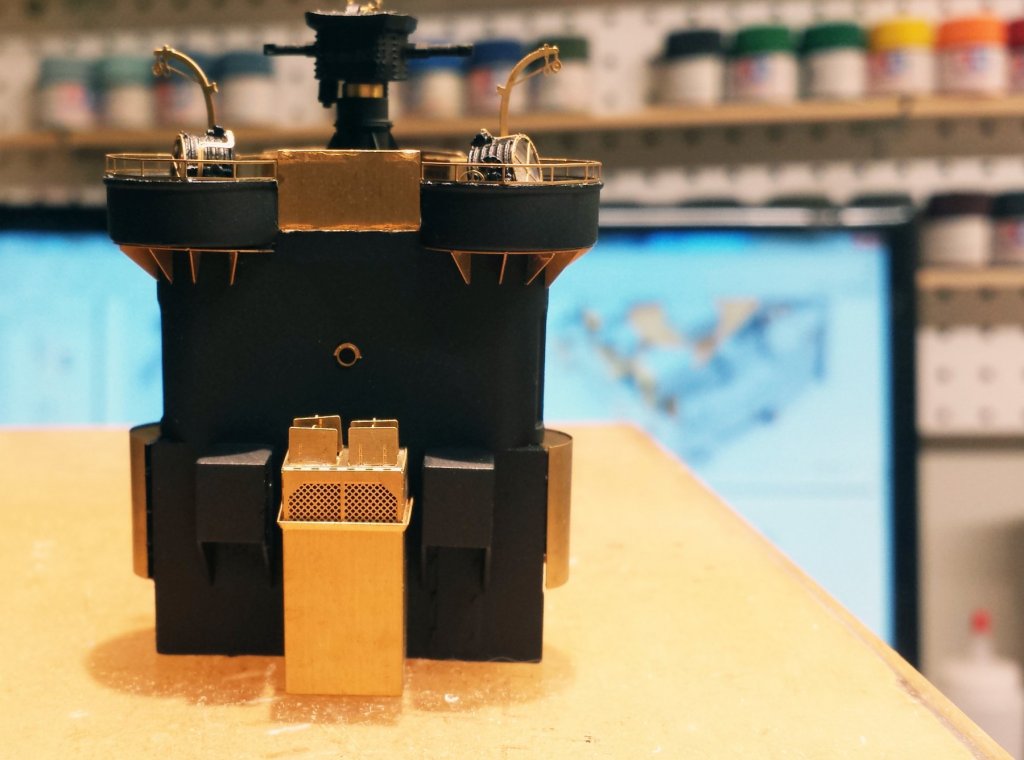
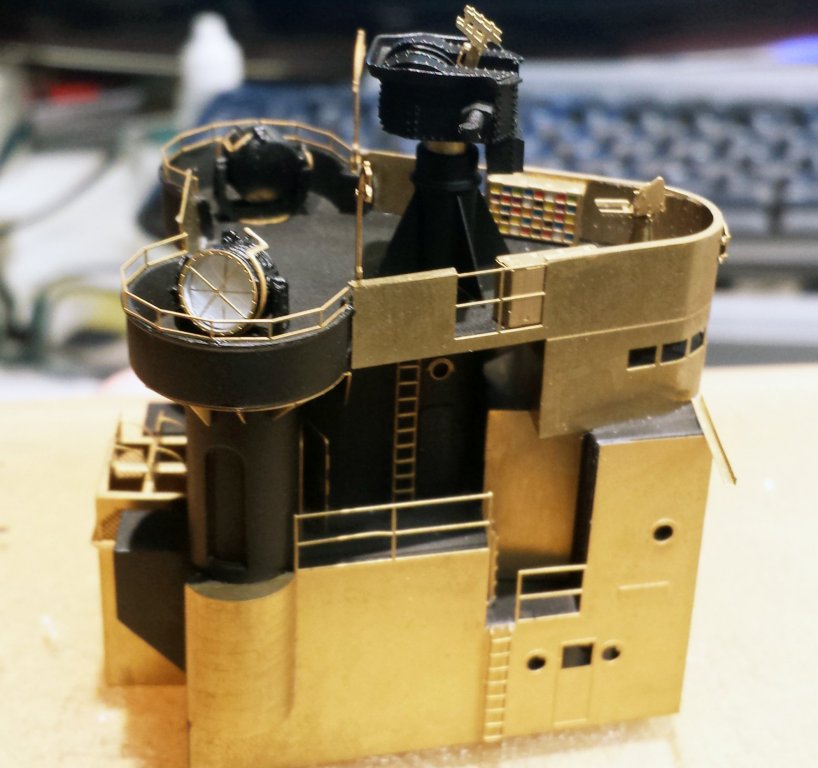
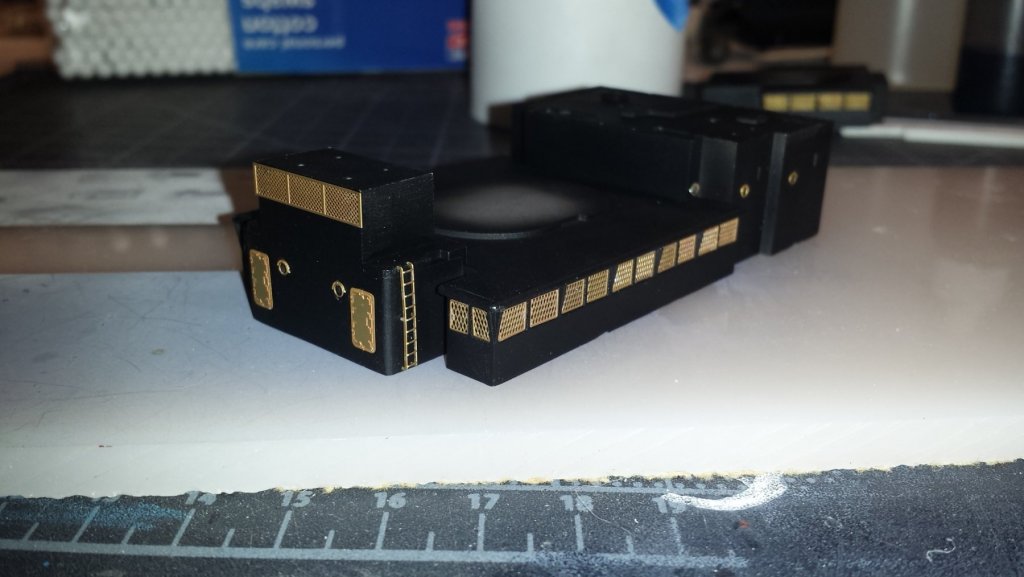
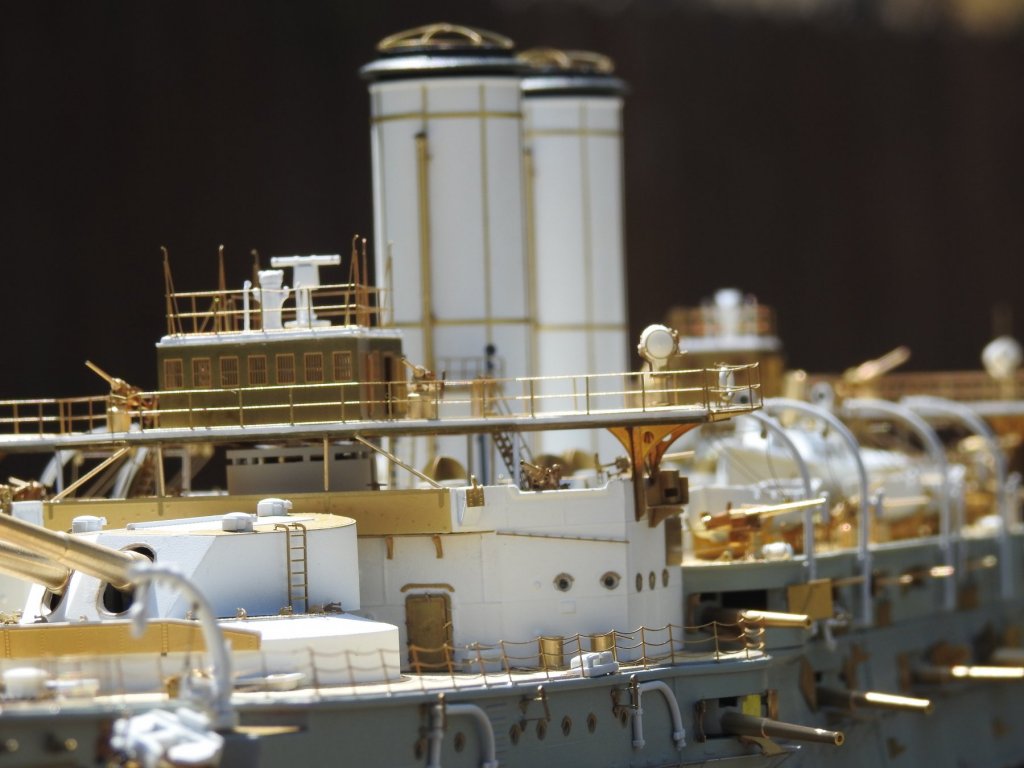
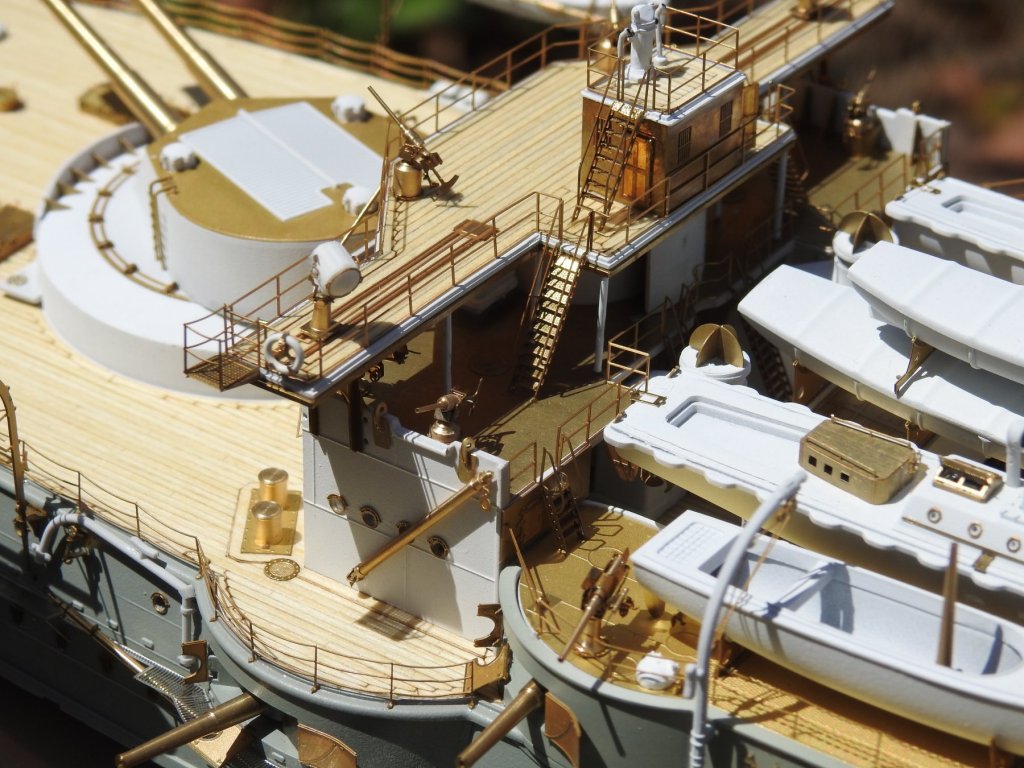
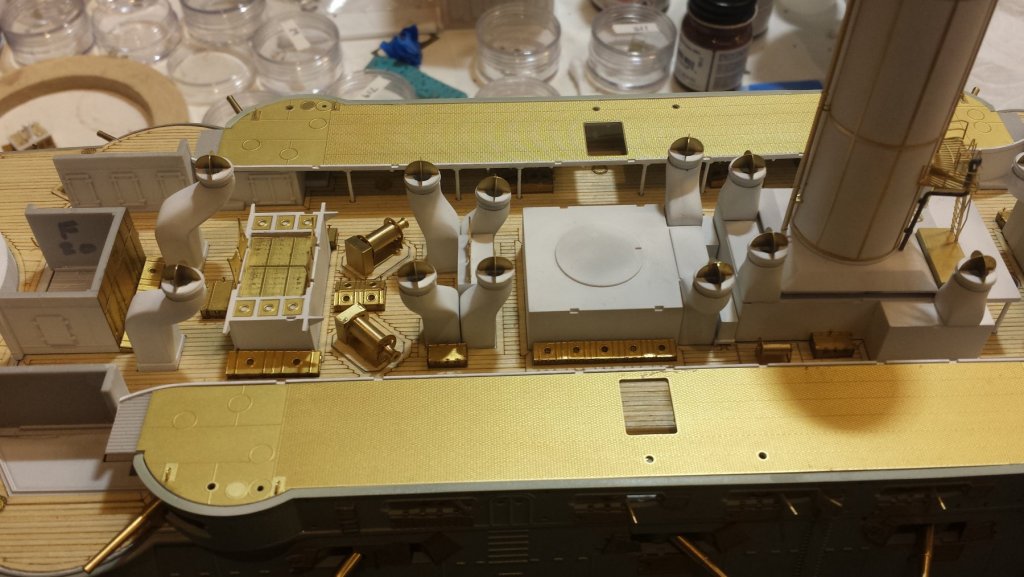
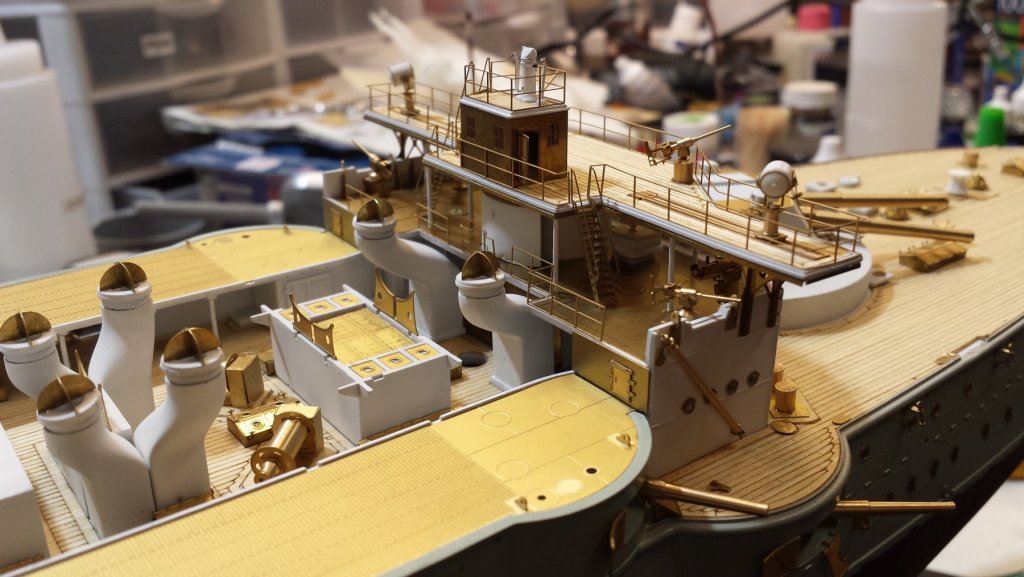
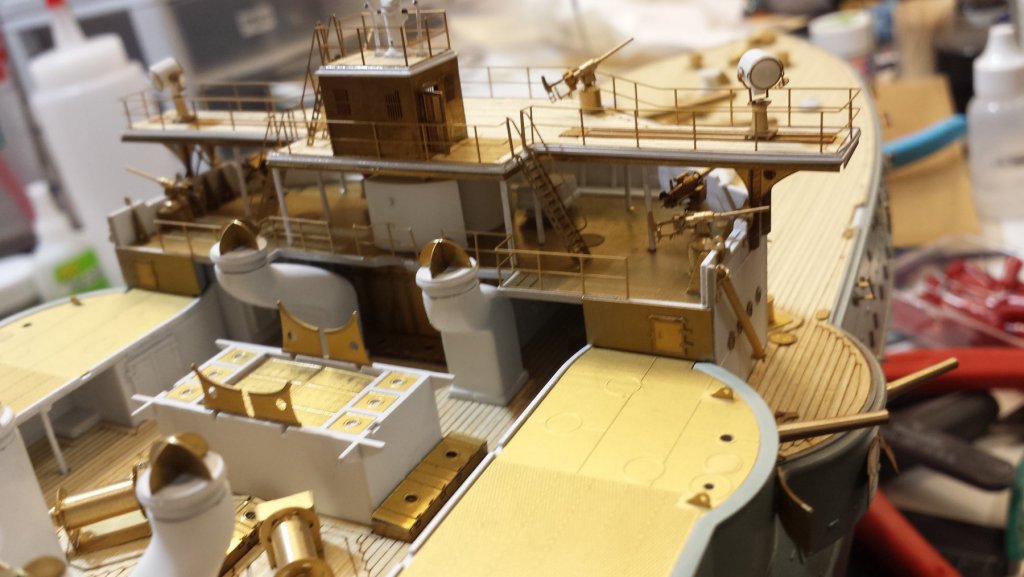
Hello all, I have been working on my Mikasa and today I worked on the display. I am going to do the torpedo nets AFTER it's in the case. It's too fragile to move around. In the meantime.... I thought I'd start a log on my next project which I recently started. I did some work on my HMS Hood. As per the Mikasa, I am NOT going to paint the PE. AND, I'm going to paint the ship in rainbow colors! Just kidding. But I am going to seriously deviate from your typical warship. It's going to be mostly black, except for the hull and the PE, which will be brass. When I was young, I fell in love with a 1/8 scale model of the John Player Special, made by Entex. I absolutely loved that black and gold. It's affected me throughout the years. Just love that brash contrast. So I will paint my Hood like that. Hope I don't offend too many, and most of all, I hope many like it. Tonight I worked on the "After Structure" as Pontos calls it. Here we go:


- 247 replies
-
- 17
-
-
You're right Greg. There is very little you can do to hid mistakes. The worst are the glue marks. I use extremely small amount of glue. Hard to see where. But if you barely touch or jostle the model, it never fails to knock something off with the classic "ting" sound as it does. PE is a real pain. I even installed black vinyl flooring in my workroom in the hopes that when I dropped something I could find it more easily. NOPE! Even then, good luck!
- 34 replies
-
- 6
-
-
- mikasa
- wave models
- (and 2 more)
-
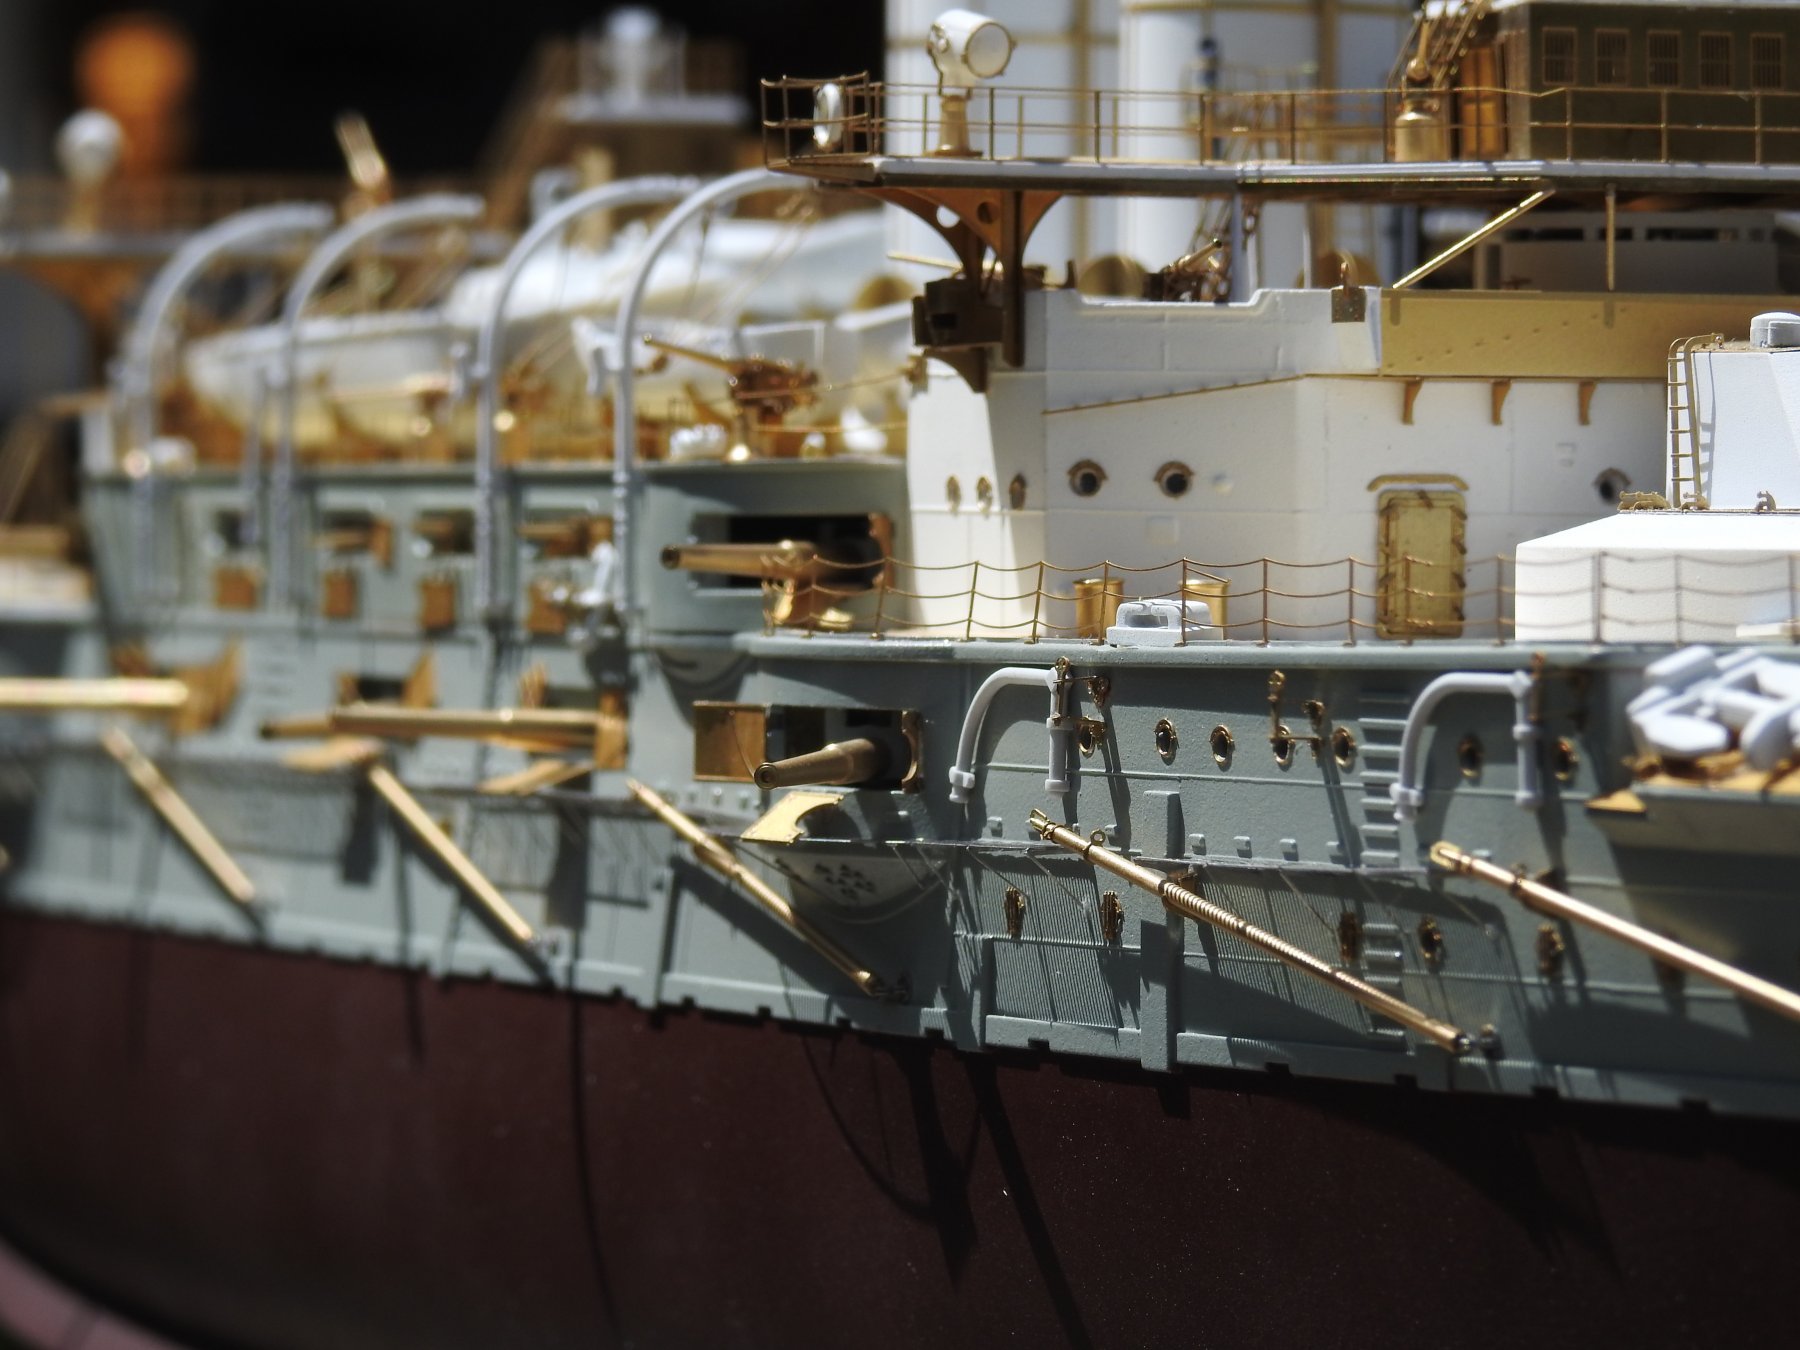
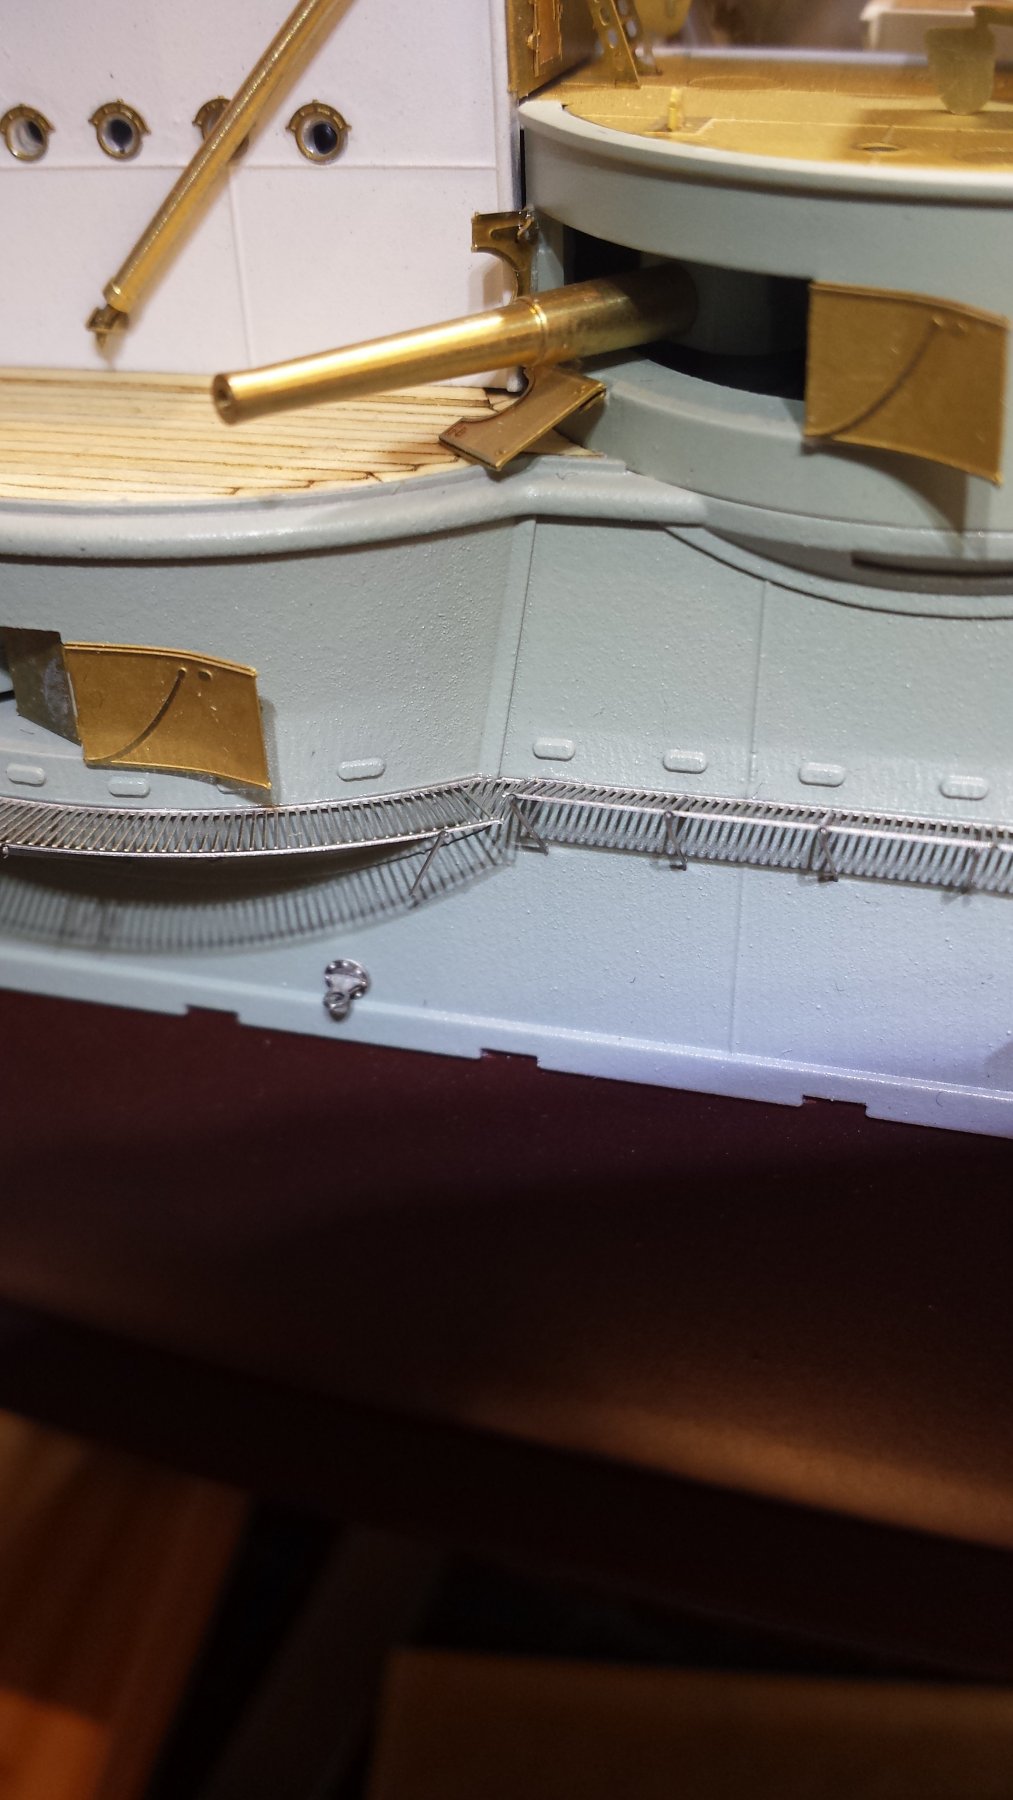
I figured you might have run into problems. A BIG reason I don't like to try to be super accurate. Although these PE kits are fantastic, they often don't get things right. If you build the model as Trumpeter instructs you to, no problem. If you build it with Pontos, lots of problems. If you try to be accurate, lots and lots of problems. I've been looking at any pictures of the actual ship, and just about everywhere you look, it doesn't match up with the model. I realize there are different versions according to years, but still. I'm going to work on my HMS Hood next, and I'm just going to have fun! Might **** off a lot of people, but not all. Here's early work on it.

- 467 replies
-
- 10
-
-
- mikasa
- wave models
- (and 1 more)
-
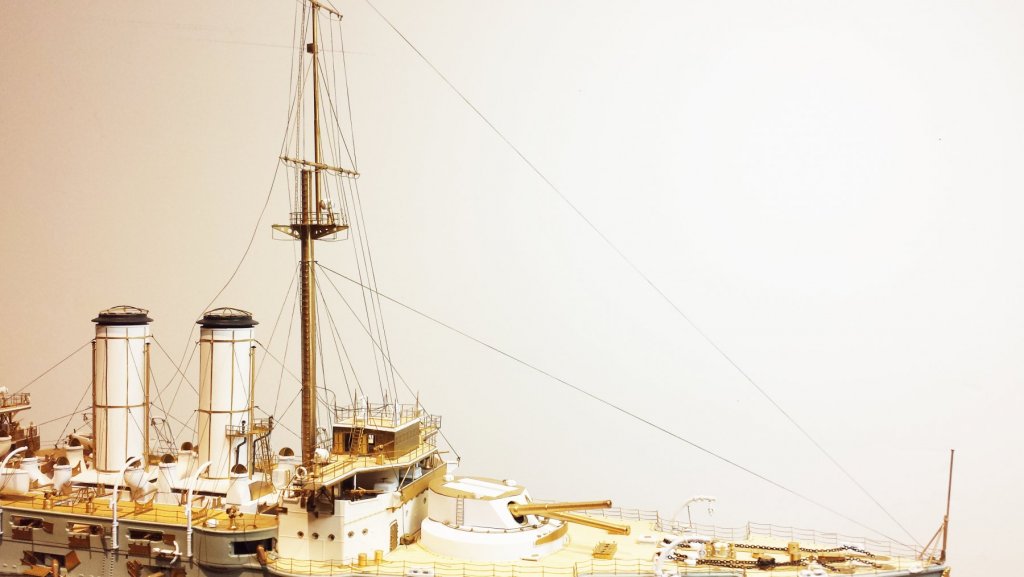
Hey CDW, did you have any trouble with the main derrick? Part number 18? It's impossible to rig that thing without interfering with other rigging. You'd have to thread other rigging through its rigging and vice versa for there to be no interference, at least on the model. After rigging the smoke stacks, there's nowhere for the derrick to go without tangling with other rigging. Same as when rigging the life boats. Some attachment points are located where the rigging would touch the boats, sometimes drape over them. I removed all the life boats to figure out how I"m going to place them so that they don't interfere with the rigging. How did you do?
- 467 replies
-
- 4
-
-
- mikasa
- wave models
- (and 1 more)
-
Thanks everyone. When I'm done with this, I think I'm working on my HMS Hood, with Pontos, UNPAINTED. The bummer is, no matter how well you take care of that brass, it always tarnishes. When I get it, I immediately de-grease it with denatured alcohol. Then I spray it with a clear lacquer. The minute you do that, it starts to lose it's brightness. It no longer looks shiny, but takes on a nice satin look. And in a short time, it starts to oxidize, slowly but surely. It really sucks. I have a couple of PE sets that are brand new, never touched and they are totally tarnished just by sitting in the box. If that happens, I Tarn-X them and they look great....for a while. Anyway, here's an update. I can see the light at the end of the tunnel. Barely! I worked for several hours and my eyes are very tired. Tackling the torpedo nets is last, aside from putting it in the display case.

- 34 replies
-
- 15
-
-
- mikasa
- wave models
- (and 2 more)
-
Thanks Craig! I'll look for that tubing. I even looked at some of the "crimps" for jewelry making and they were too large. I appreciate the info, and thanks very much for the kind words. Take care.
- 467 replies
-
- 5
-
-
- mikasa
- wave models
- (and 1 more)
-
Here are a few shots I took in the backyard just before I started with the masting.


- 34 replies
-
- 16
-
-
- mikasa
- wave models
- (and 2 more)
-
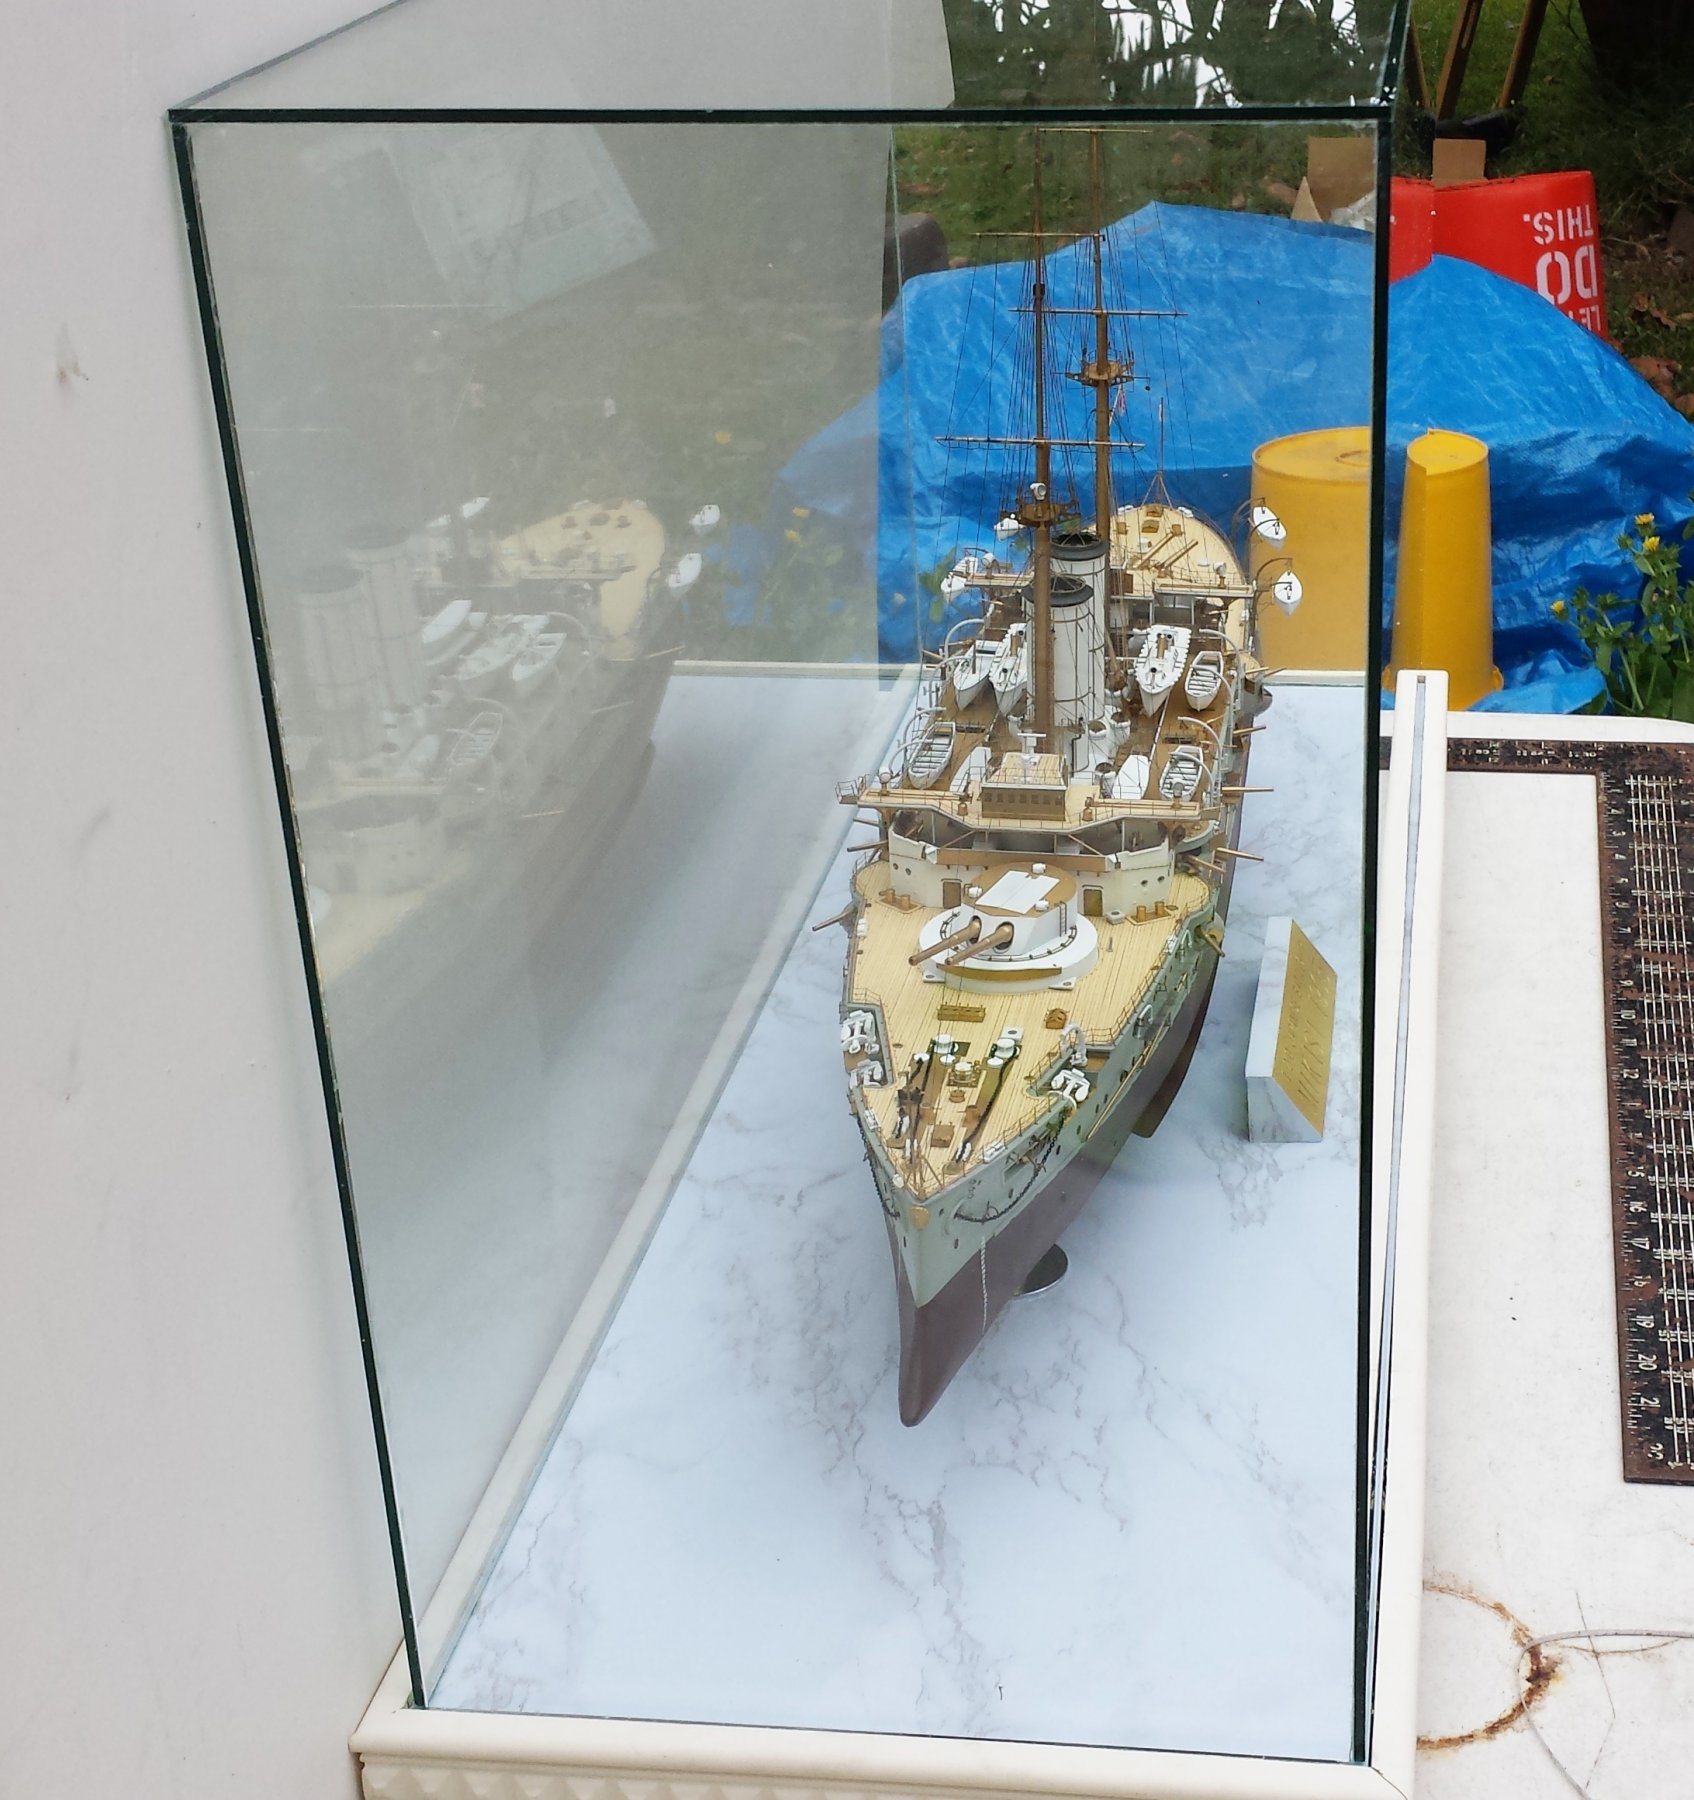
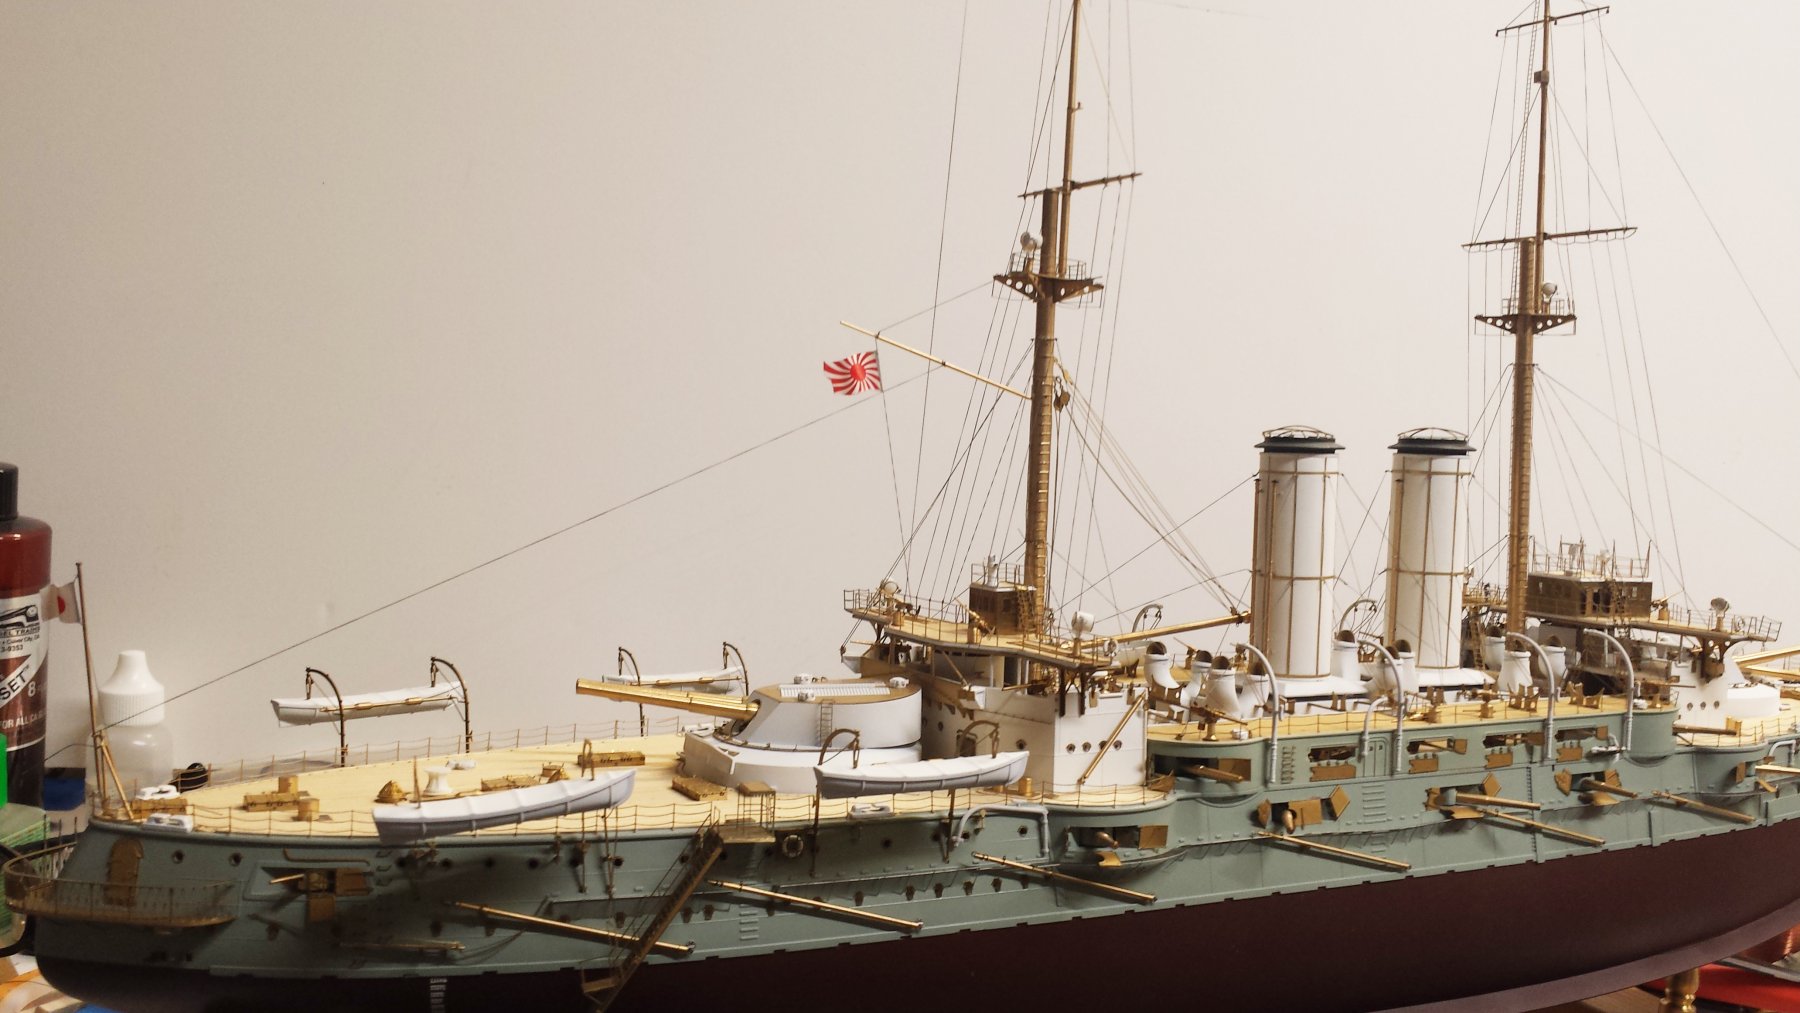
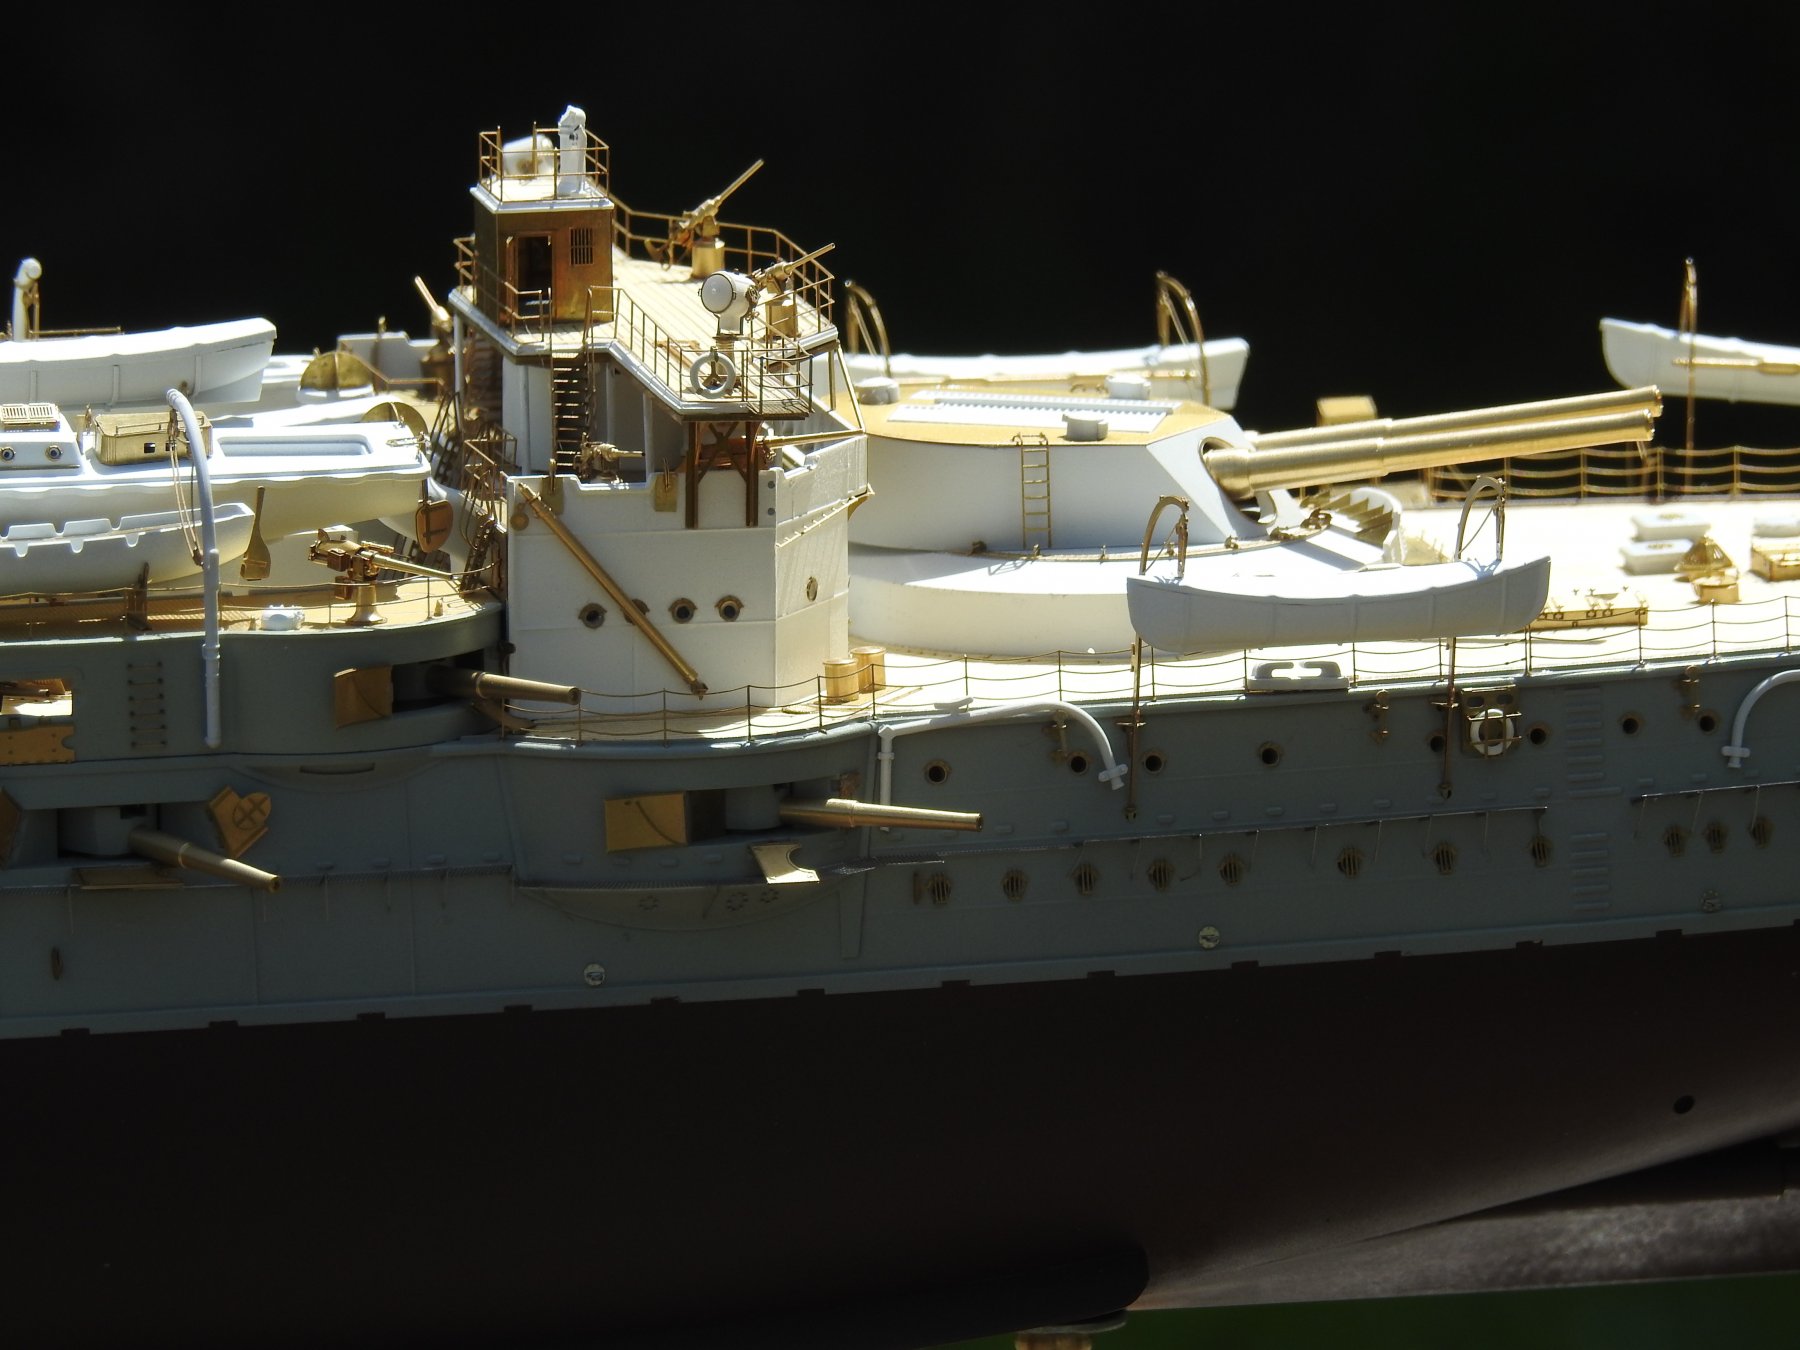
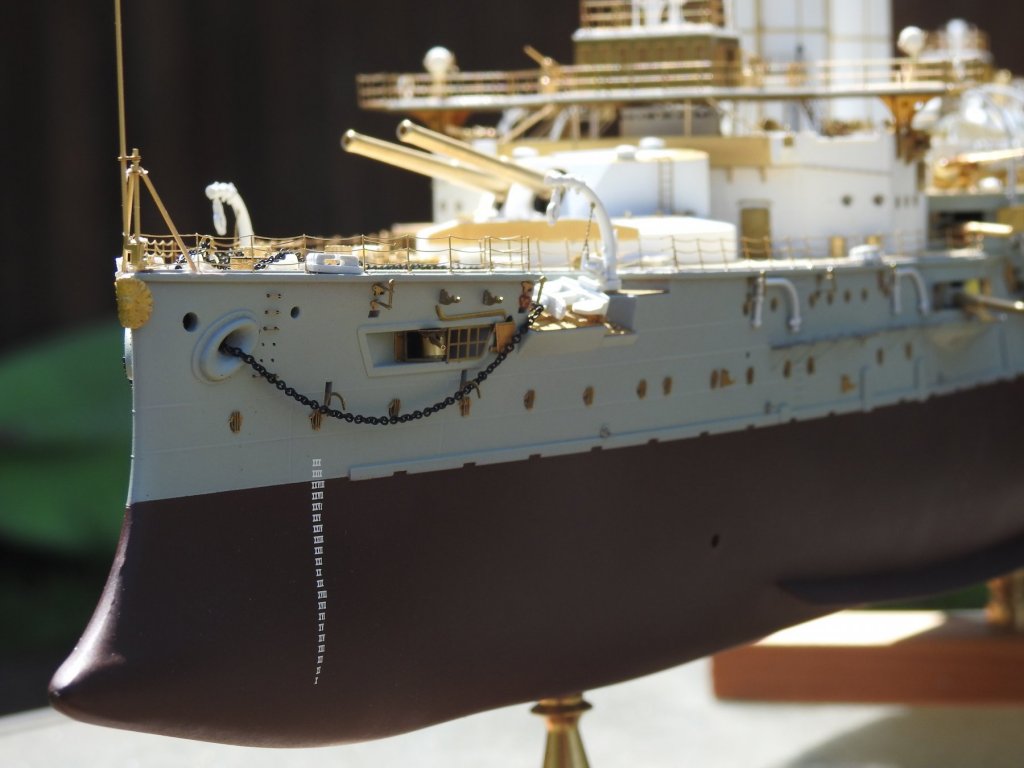
Hello all, I began this build about a year ago. I took several pictures during the progress of the build. Although it was not a true "log", it will show how it came along. I started a log on "another" website, and got very little interest, so I gave up. Recently I was looking at some of the ship builds here, and found CDW's Mikasa Log. He inspired me to continue on my Mikasa with his very detailed log. He was very helpful with some rigging tips and I posted some of my own rigging attempts. I figured I was hijacking his build log, so this is why I'm doing this. I hope you all enjoy what I've come up with. I decided NOT to paint the PE. I have built several kits with PE, and those that I painted, lost all the detail, all the wonderful, beautiful photo etch work that went on. The amount of work and incredible dedication that it takes to install this stuff, in my opinion, dims when it's painted. The pretty gold color of the brass is like jewelry. Even those that couldn't care less about a model ship, are drawn to it with "ooohs and ahhhs". I also like to mess around with my own colors. I just can't see making a bunch of gray ships that look like floating penitentiaries. So some might be highly offended by my interpretations. Sorry. Life's too short and I'm having fun. So here we go...


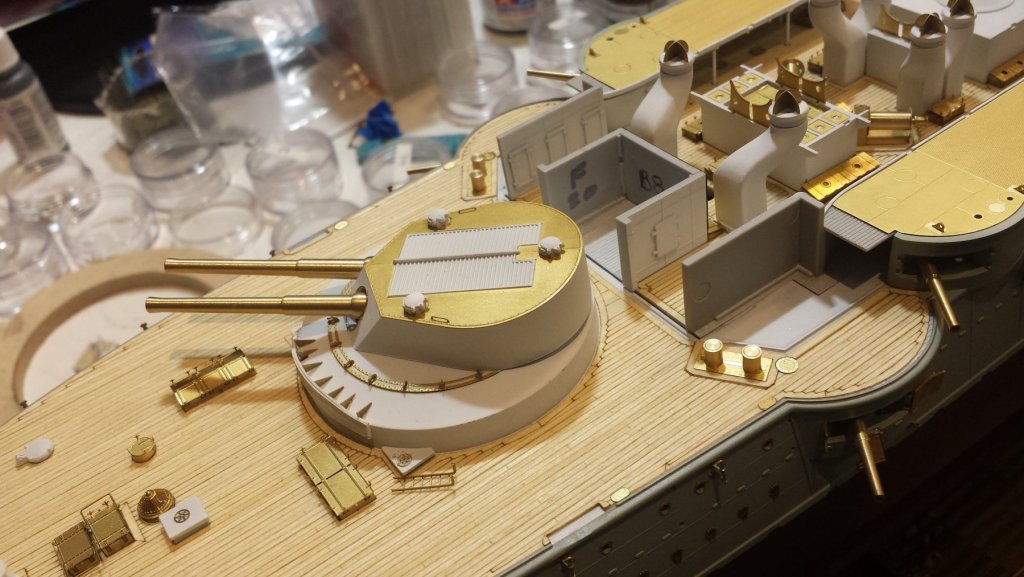


- 34 replies
-
- 20
-
-
- mikasa
- wave models
- (and 2 more)
-
Hi everyone, Last night as I'm falling asleep I thought "I'm hijacking CDW's (Craig?) build! I'm going to start my own. And voila, today a couple have suggested that. So I will start my own with older pictures of my "build". I didn't really make a formal build, but I did take a few pictures of the ship as a progressed. I will upload them. Craig, I thought about doing exactly what you're talking about to simulate turnbuckles, but I felt the scale would be wrong. I'm not a scale freak. Far from it, but every small tube I found seemed to big for this. I plan on doing something different. Haven't decided yet. Anyway, on to my own log! Thanks everyone.
- 467 replies
-
- 6
-
-
- mikasa
- wave models
- (and 1 more)
-
Formast almost completely installed. Working on the mainmast. Rigging in this scale is crazy, but since the scale is so small, you can't really make any "legit" knots, like you must do in wooden ships. Like ratlines and deadeyes.
- 467 replies
-
- 12
-
-
- mikasa
- wave models
- (and 1 more)
-
Thanks man. Pontos instructions suck! I had to completely tear down the main mast because it was assembled wrong and I couldn't tell by the pictures Pontos put in the manual. Lots and lots of errors and missing information.
- 467 replies
-
- 5
-
-
- mikasa
- wave models
- (and 1 more)
-
I ended up using some "extra" parts that I found on the frets. They work well and the others I'm going to "fake". I'm well on the way!

- 467 replies
-
- 10
-
-
-
- mikasa
- wave models
- (and 1 more)
-
Thanks for the response. I also did some research and probably saw the same stuff you saw. I wish there were "attachment points" one could order. I found a Northstar product of turnbuckles and eye bolts, but they are extinct. They are also 1/350, but I think they'd be find for this purpose. Going to have to figure out what to do. Thanks again.
- 467 replies
-
- 3
-
-
- mikasa
- wave models
- (and 1 more)
-
Fantastic work! I also am working on this same kit. How did you determine where and how to rig it? The Pontos kit has no mention of that whatsoever. Did you add your own parts? I'm almost done! Just down to the rigging. Hope to hear from you.
- 467 replies
-
- 3
-
-
- mikasa
- wave models
- (and 1 more)
-
Greg, you crazy! That's is some amazing work. I am very impressed with your rigging. I have built some plastic ships and have never added that kind of work and it really pays off. I can handle the wooden ship rigging because the plans are usually very thorough as to the placement of the lines, where with plastic ship models you are mostly left to your own devices and have to do some heavy duty researching if you want to achieve that kind of detail. I congratulate you for your dedication. On another note, please get yourself a nice airbrush. I read your commentary on it and I think your work would highly improve if you had a nice airbrush. I agree with the Iwata. It's a VERY nice airbrush. I highly recommend this one: https://www.amazon.com/Iwata-Medea-Eclipse-Action-Airbrush-Gravity/dp/B000BQKFAI/ref=sr_1_1?s=arts-crafts&ie=UTF8&qid=1475188655&sr=1-1&keywords=iwata+hp-cs. It's not a lot of money and the performance is fantastic. Whatever you choose, go with a gravity feed vs siphon. Much easier to clean and much less waste of materials. It does have a fine pattern and it's not great for large areas such as the hull. What I do is buy the Tamiya rattle cans. The typical color for the bottom of the ship is Hull Red. You get a couple of those cans and paint the big stuff with them, then move on to your airbrush. I works great. I will take a picture of something I recently painted that way so you can see it. Awesome job!
- 342 replies
-
- 6
-
-
- dreadnought
- zvezda
- (and 2 more)