DONATION DRIVE - SUPPORT MSW - DO YOUR PART TO KEEP THIS GREAT FORUM GOING!
×

.jpg.2c2c29e54623bd7b752bc2cdab599665.jpg)
Danstream
-
Posts
755 -
Joined
-
Last visited
Content Type
Profiles
Forums
Gallery
Events
Everything posted by Danstream
-
.thumb.jpg.c459ce4140b54c12eddb8eedfd446df3.jpg) Yes, it should be vertical, but did you know that it shouldn't be symmetrical? It had a section like that of a wing (flat on one side and curved on the other) to generate a lateral force and assist the pilot at take-off to use less rudder pedal. Of course in a model it is hardly visible and I am mentioning it just for fun. Keep up the good work with this icon. Cheers, Dan
Yes, it should be vertical, but did you know that it shouldn't be symmetrical? It had a section like that of a wing (flat on one side and curved on the other) to generate a lateral force and assist the pilot at take-off to use less rudder pedal. Of course in a model it is hardly visible and I am mentioning it just for fun. Keep up the good work with this icon. Cheers, Dan- 85 replies
-
- 11
-

-
Good progress on the Aluminum (paint and bare). Do not forget the darker panel where the exhaust shrouds are located. They were made of steel and had a darker, shiny finish. They were so distinctive and you can see them in any picture of a Mustang. I also think that the version D is the most graceful and handsome one. Dan
-
@Canute, thanks for your first hand piece of experience! In my note, I was focused on drag reduction, but of course the most significant improvement achieved by of B.L. control by blowing is to keep the flow attached at very high angle of attack making possible flying at low speed, lower than those possible without it, as you reported. But I am blown off at knowing that the slat system costed as much as 1,500 pounds!! Cheers, Dan
-
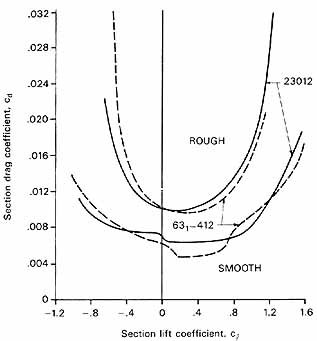
I am following with interest, I am probably the kind soul that enjoyed a discussion with @Egilman about this subject 🙂. I am sorry, but, with all respect, I need to comment few details about the description above, for the sake of precision. Definitely, aircraft from 1940 did not have the blowing systems described above. In addition, the blowing, sometimes referred as 'supercirculation' is not intended to reduce skin friction drag, but its purpose is to delay flow separation (hence to reduce the so called form or pressure drag) and not to maintain laminar boundary layer. Few example that I can easily remember that had this system (at the leading edge of the flaps) were the F-104 and the British Buccaneer, both having extremely high wing loading and the need to fly at high angle of attack at low speed. At very high speed, or at cruise, the angle of attack is very small and the blowing is not needed. Coming back to the Mustang, it had wings equipped with so-called 'laminar wing sections' that are sections studied by NACA displaying a shape that produced a favorable pressure profile which, in turn, delayed the natural transition from laminar to turbulent boundary layer. These were the 6-digits designation profiles like, for example, the NACA 654-415. North American did not implement strictly a NACA section but rather an in-house developed profile obtained by the same mathematical theory that NACA used for their 6-digits. The results and the mathematical theory were published by NACA and industries were made aware of them. The reduction of surface drag was completely passive and it was intended to increase the range or the top speed (which are closely interlinked). A bit of theory now. When air (or any fluid) flows over a smooth aerodynamic surface, it always starts as laminar. For high speed, after a very short distance, the boundary layer switches from laminar to turbulent, but this doesn't imply that the flow is detached. Flow is still attached, it follows the surface, but within the boundary layer, very close to the surface (for high speed we are talking of several mm) the flow doesn't follow parallel, ordered streamlines. With laminar sections, the region were the flow is laminar is stretched further back towards the trailing edge. The larger proportion of laminar over turbulent results, everything else being the same, in a smaller skin friction drag. (from: NACA Quest for Performance: The Evolution of Modern Aircraft, very interesting document, with little math that can be found on line) However, laminar boundary layers have also their negative points and one of the most important is that the flow is more prone to detach from the surface. Turbulent boundary layers are instead more robust and follow better the surface (see the paradox of the golf balls that with dimpled surface fly further than smooth balls). When the flow detaches from the surface, the form drag greatly increases. Sometimes, the laminar B.L. detaches and shortly after reattaches to the surface with a turbulent B.L. Often, it is desirable to have a turbulent B.L. because it follows better the curved surface of fairings (as in a golf ball) and rear portion of wings, especially in the areas where ailerons are located (I am sure you can remember aircraft having vortex vanes along the leading edge in front of the ailerons). The matter is governed by the numerous trade-offs and compromises that are at the base of the system design. In conclusion: Mustang had laminar sections to increase range and/or top speed. They worked with low angle of attack (or low lift coefficient which is the same thing). To work well, the surface of the wing needed to be smooth (see also included plot) and this was the reason for puttying rivets and gaps. However, it is also reported that small imperfections (like smashed insects or paint chipping) were responsible for having areas where the laminar B.L. switched to turbulent B.L. partly vanifying the purpose of these profiles. I am sorry for this long explanation, but the subject is not completely trivial and it is difficult to explain it in a succinct way, but a lot of sources are available on the web. I am particularly passionate about this subject that was part of my studies. I could provide reference textbooks to anyone interested to go deeper and I will be glad to discuss any comment or clarifications you might have. Best regards, Dan
-
Hi Roger, your description of what is going to happen in Florida is really scary. I read similar notes from other members of the forum that live in the affected areas. I hope it will be less violent than expected. Keep me updated and I wish you best of luck for this though moment. On a less serious topic, what you did on the hull of the model sounds good. I am going to apply a similar approach. Take great care, Dan
- 87 replies
-
- 1
-
-
- Lady Nelson
- Amati
- (and 1 more)
-
I am sorry to hear about your accident. But, hey, when it will be covered by paint I am sure it will be good. I am also counting on the paint to hide my mistakes. The planking of the deck that I am doing now is a much more pleasing and relaxing job. best regards, Dan
-
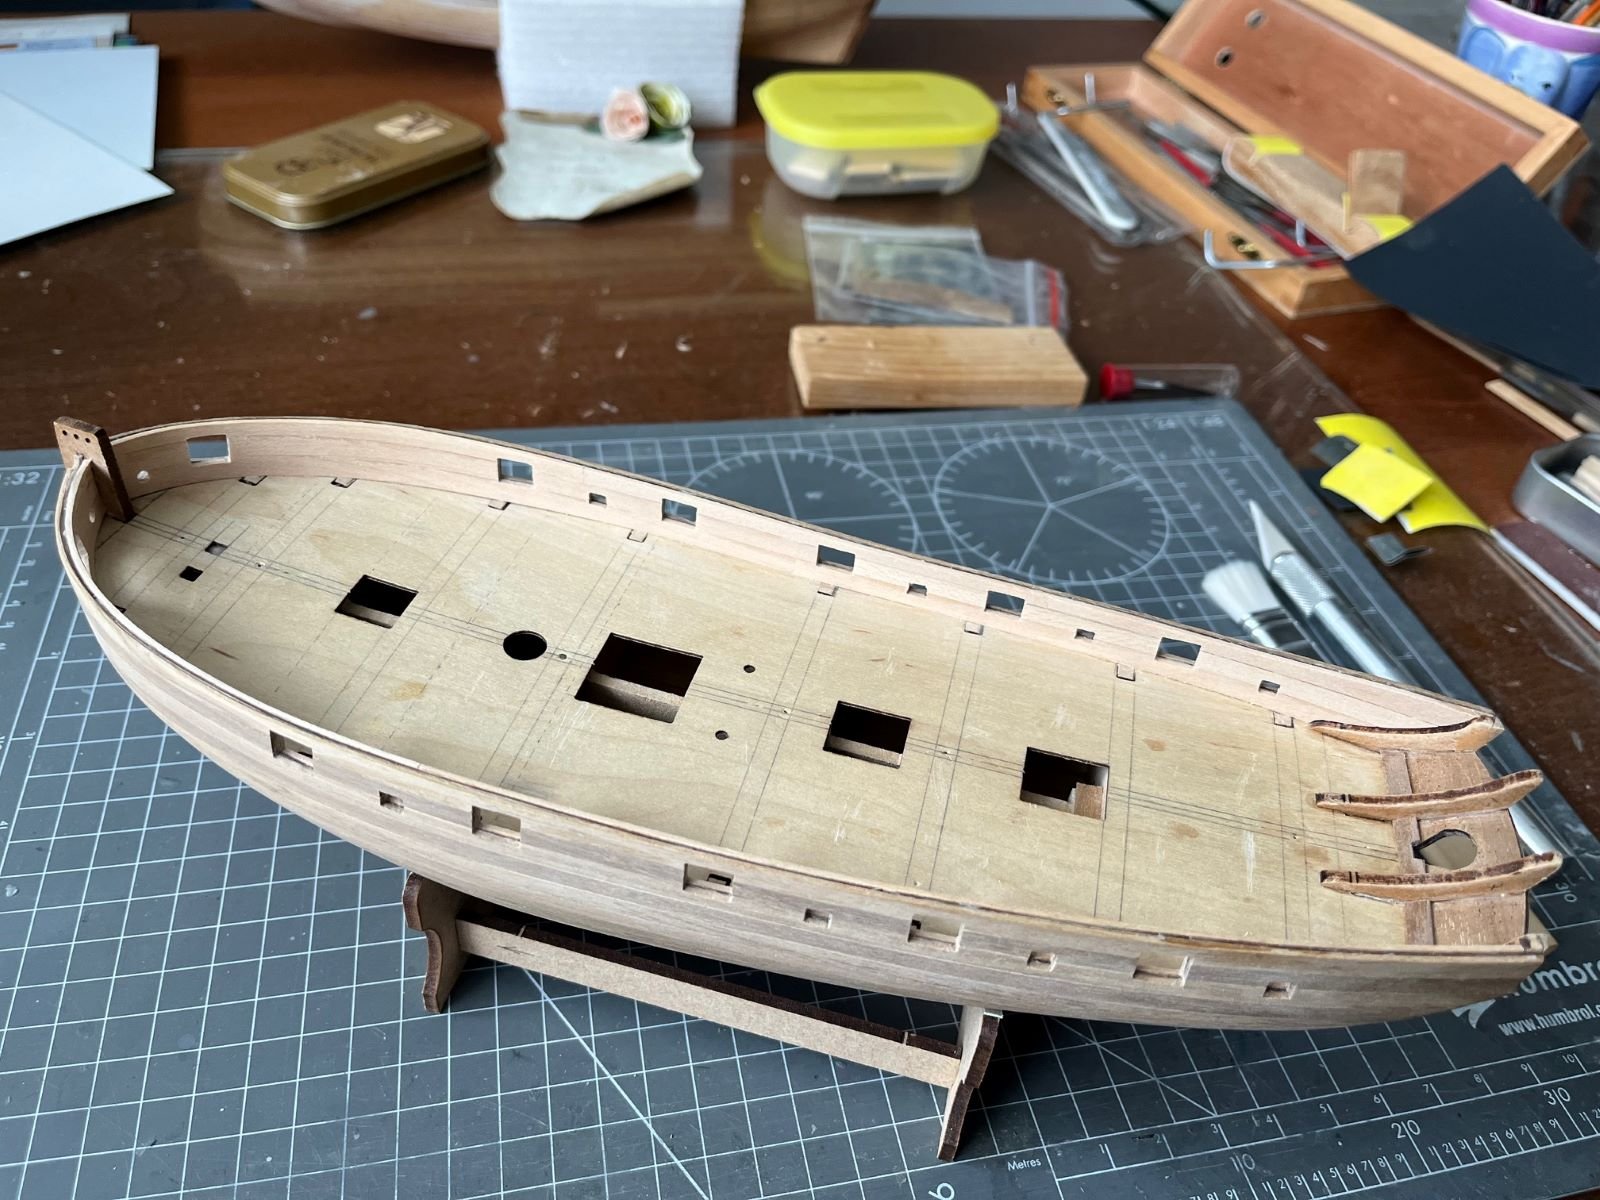
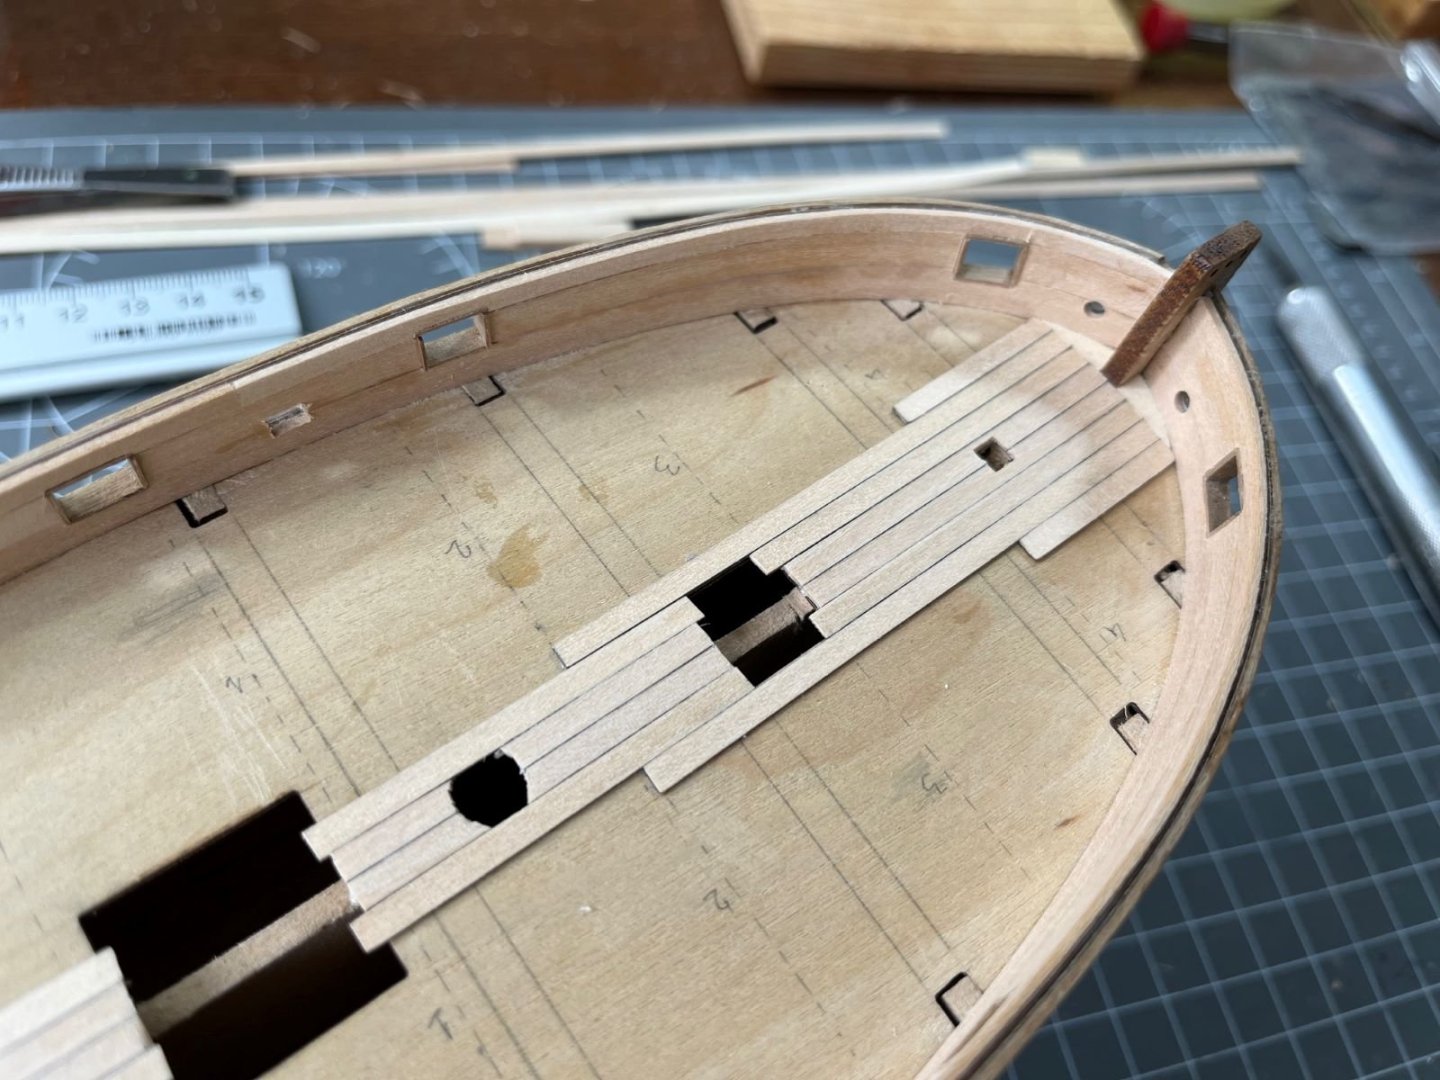
Hi, as anticipated, I started to frame the bulwark cutouts with walnut wood thin strips. I have mixed feelings about the results, I am till working on that: Meanwhile, I received the limewood strips the I ordered by mail, and started the planking of the deck. That's all for now, best regards, Dan


- 87 replies
-
- 5
-
-
- Lady Nelson
- Amati
- (and 1 more)
-
Beautiful model, with a lot of details to look at, neat workmanship, great representation of sails. Congratulations, Dan
-
I see your point. I don't know yet how I will solve it. Putting the model on its stand with a tilted waterline might look odd. I saw many models of cutters painted up to the wales, but I would like to avoid this a leave a bit of planking exposed. The other possibility, would be cheating and painting the waterline parallel to the keel. 🙃 Regards, Dan
- 39 replies
-
- 1
-
-
- Amati
- Victory Models
- (and 1 more)
-
Thanks Andrew! I ordered limewood strips 3x0.5 mm plus other various sizes. I like its color and little grain texture better to represent a discolored deck. Cheers, Dan
- 87 replies
-
- 1
-
-
- Lady Nelson
- Amati
- (and 1 more)
-
Doug, I love your model, it is really neat and sharp beside looking very realistic. Congrats, Dan
-
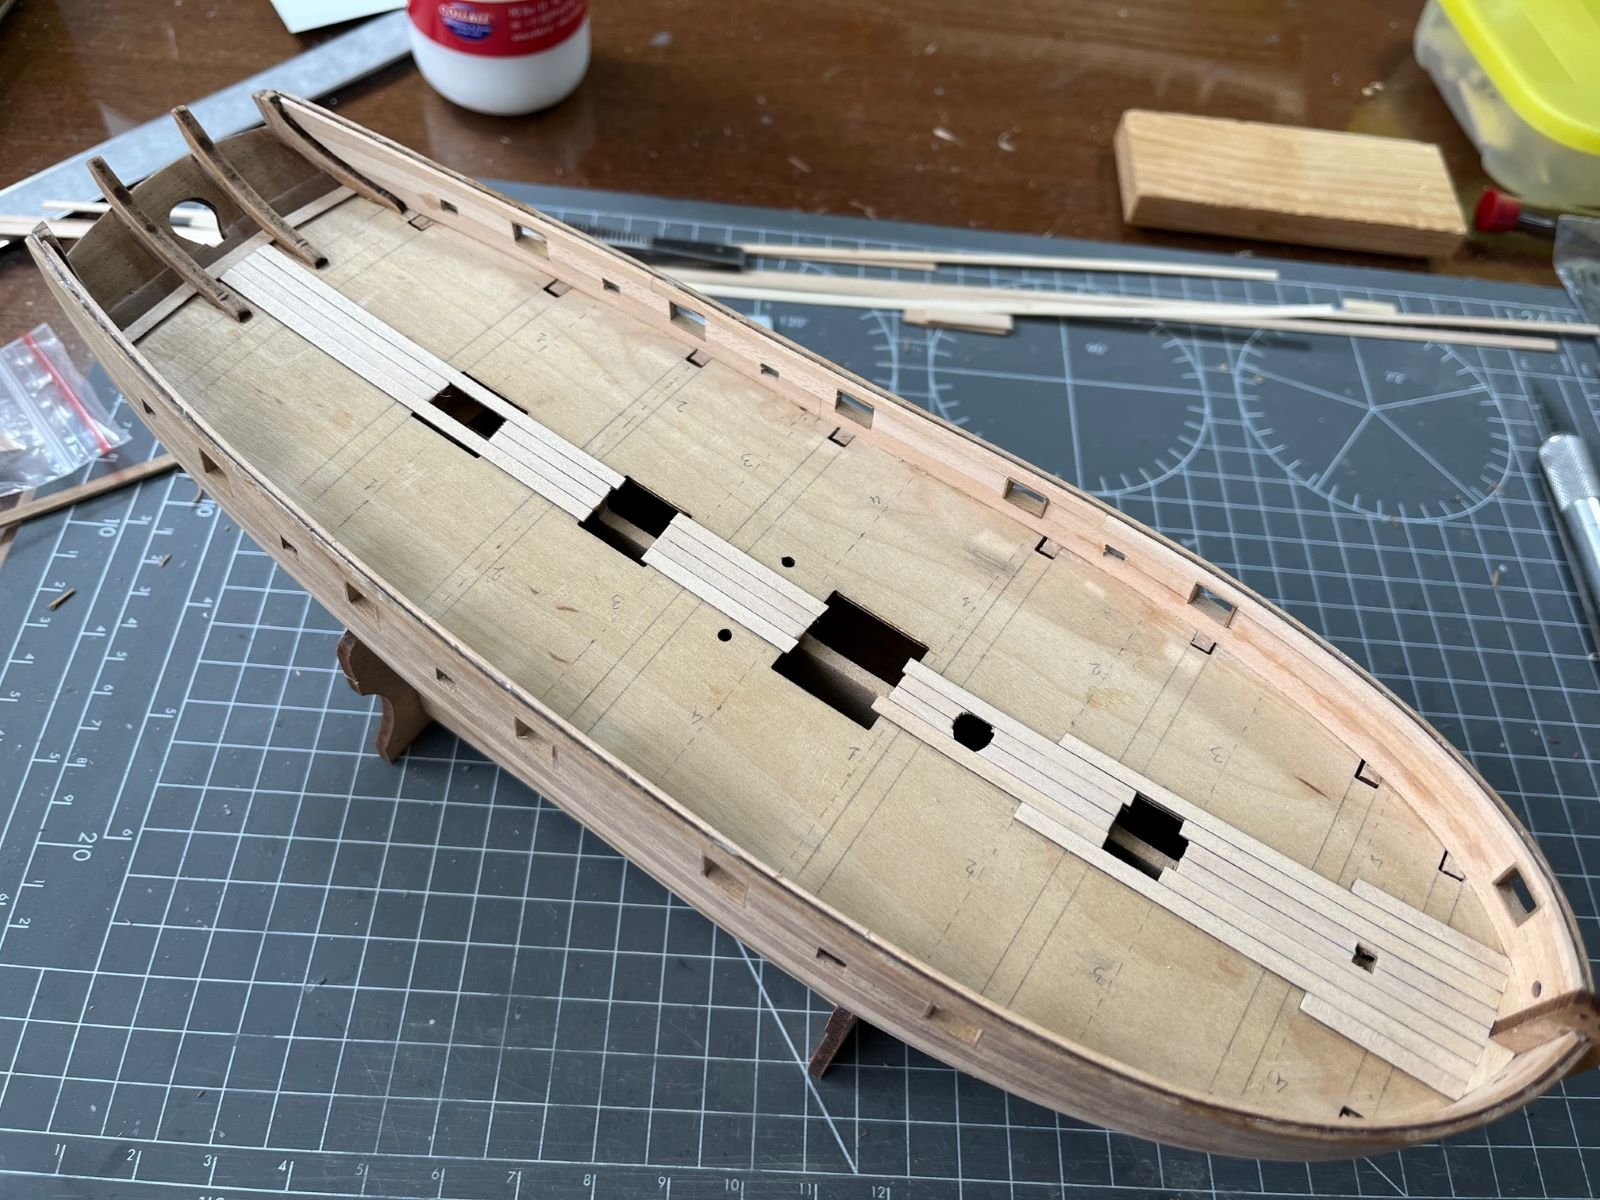
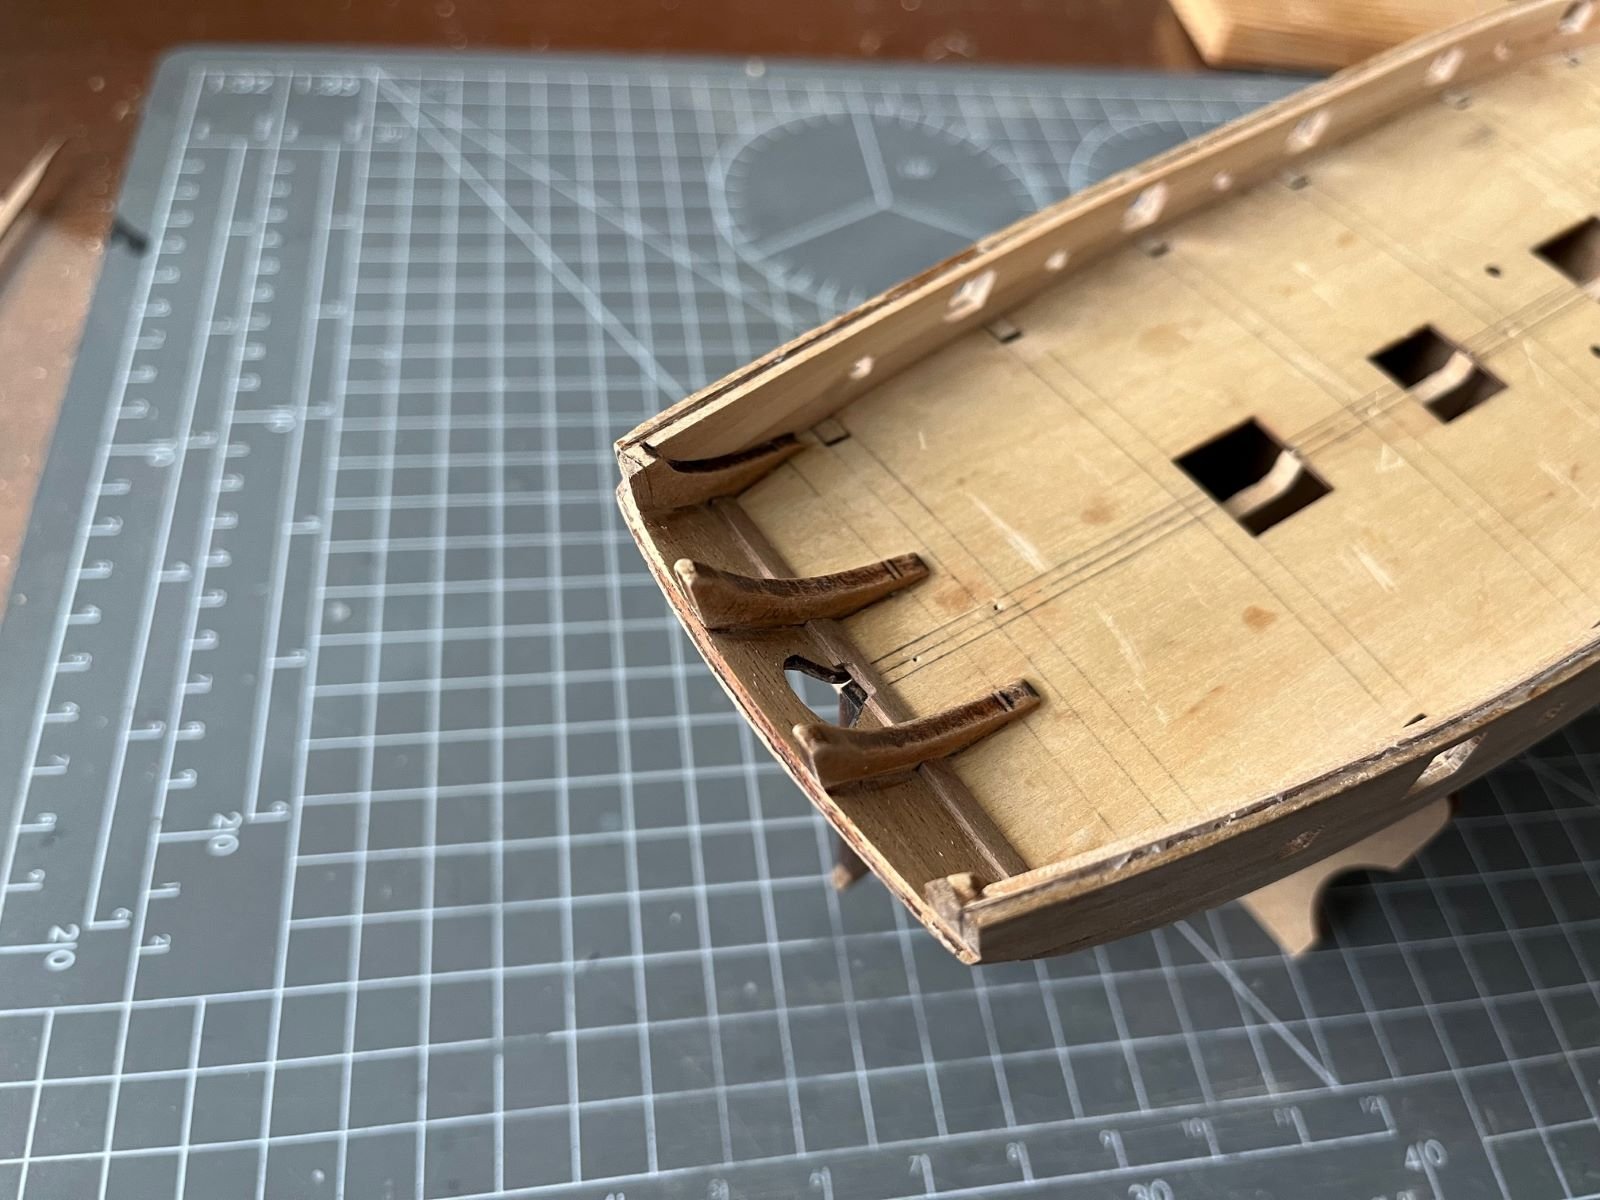
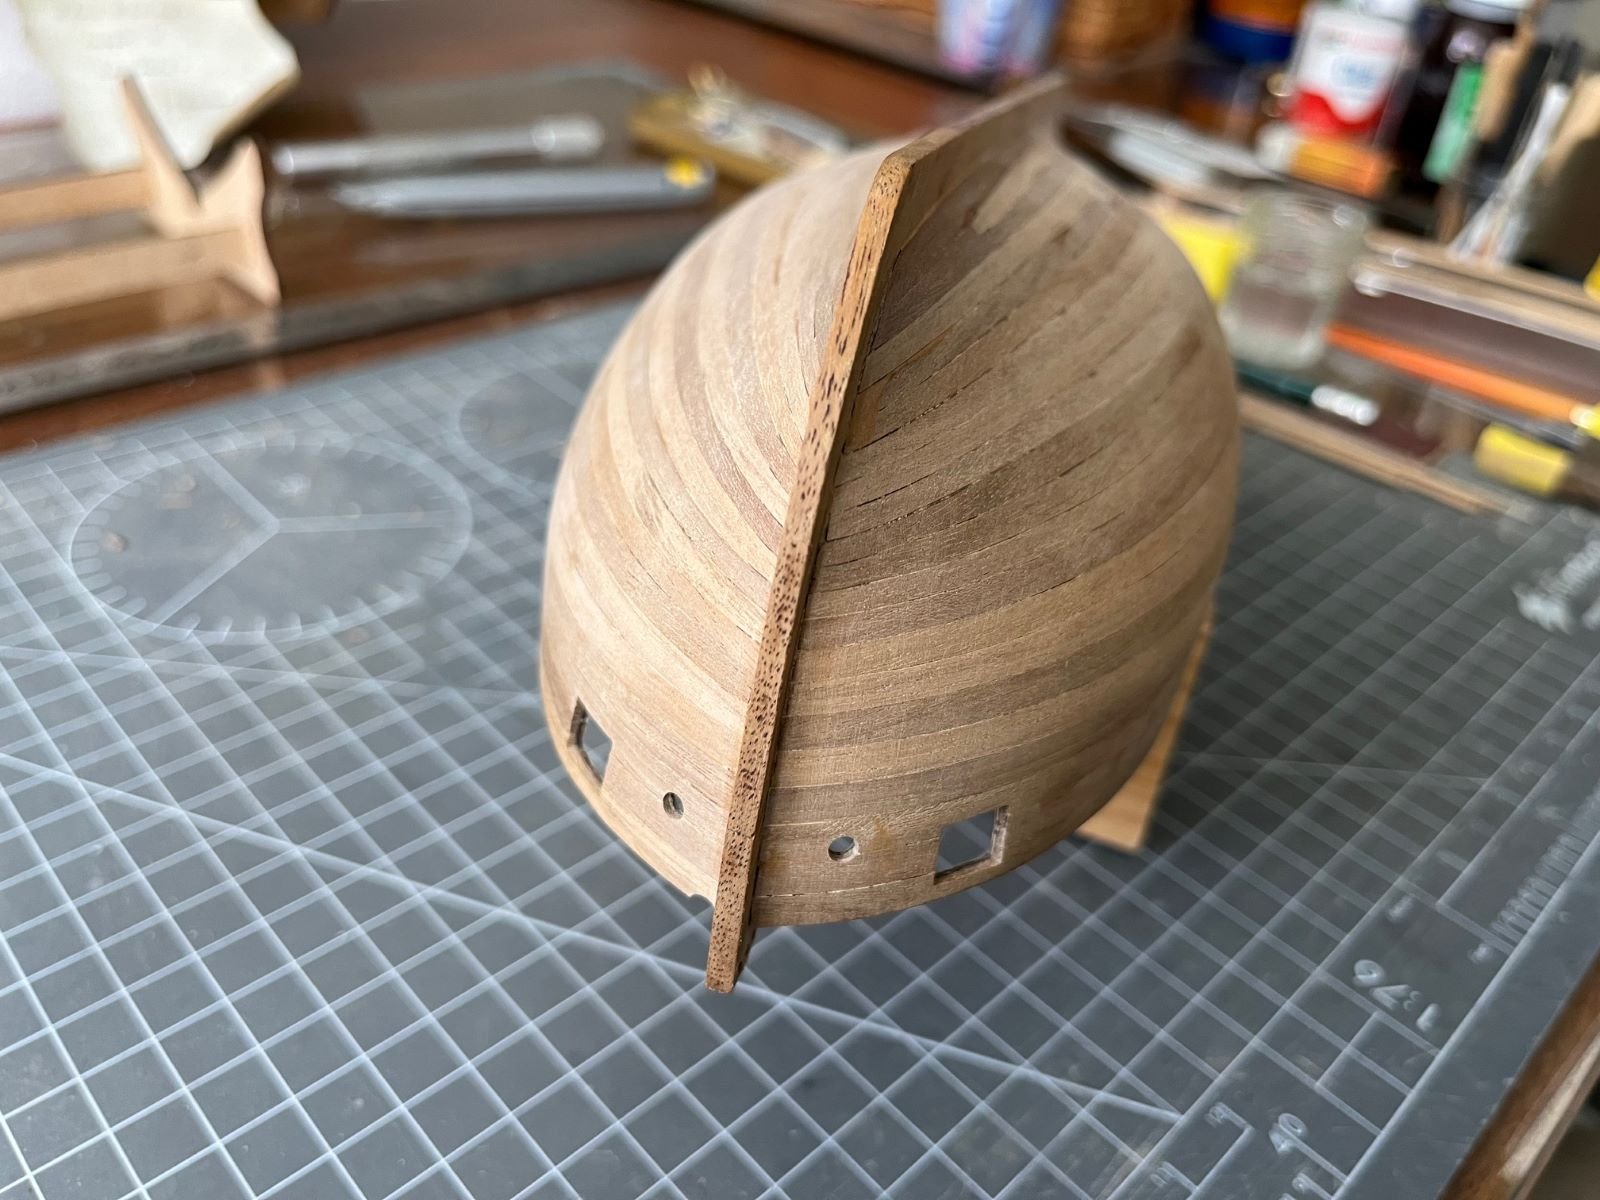
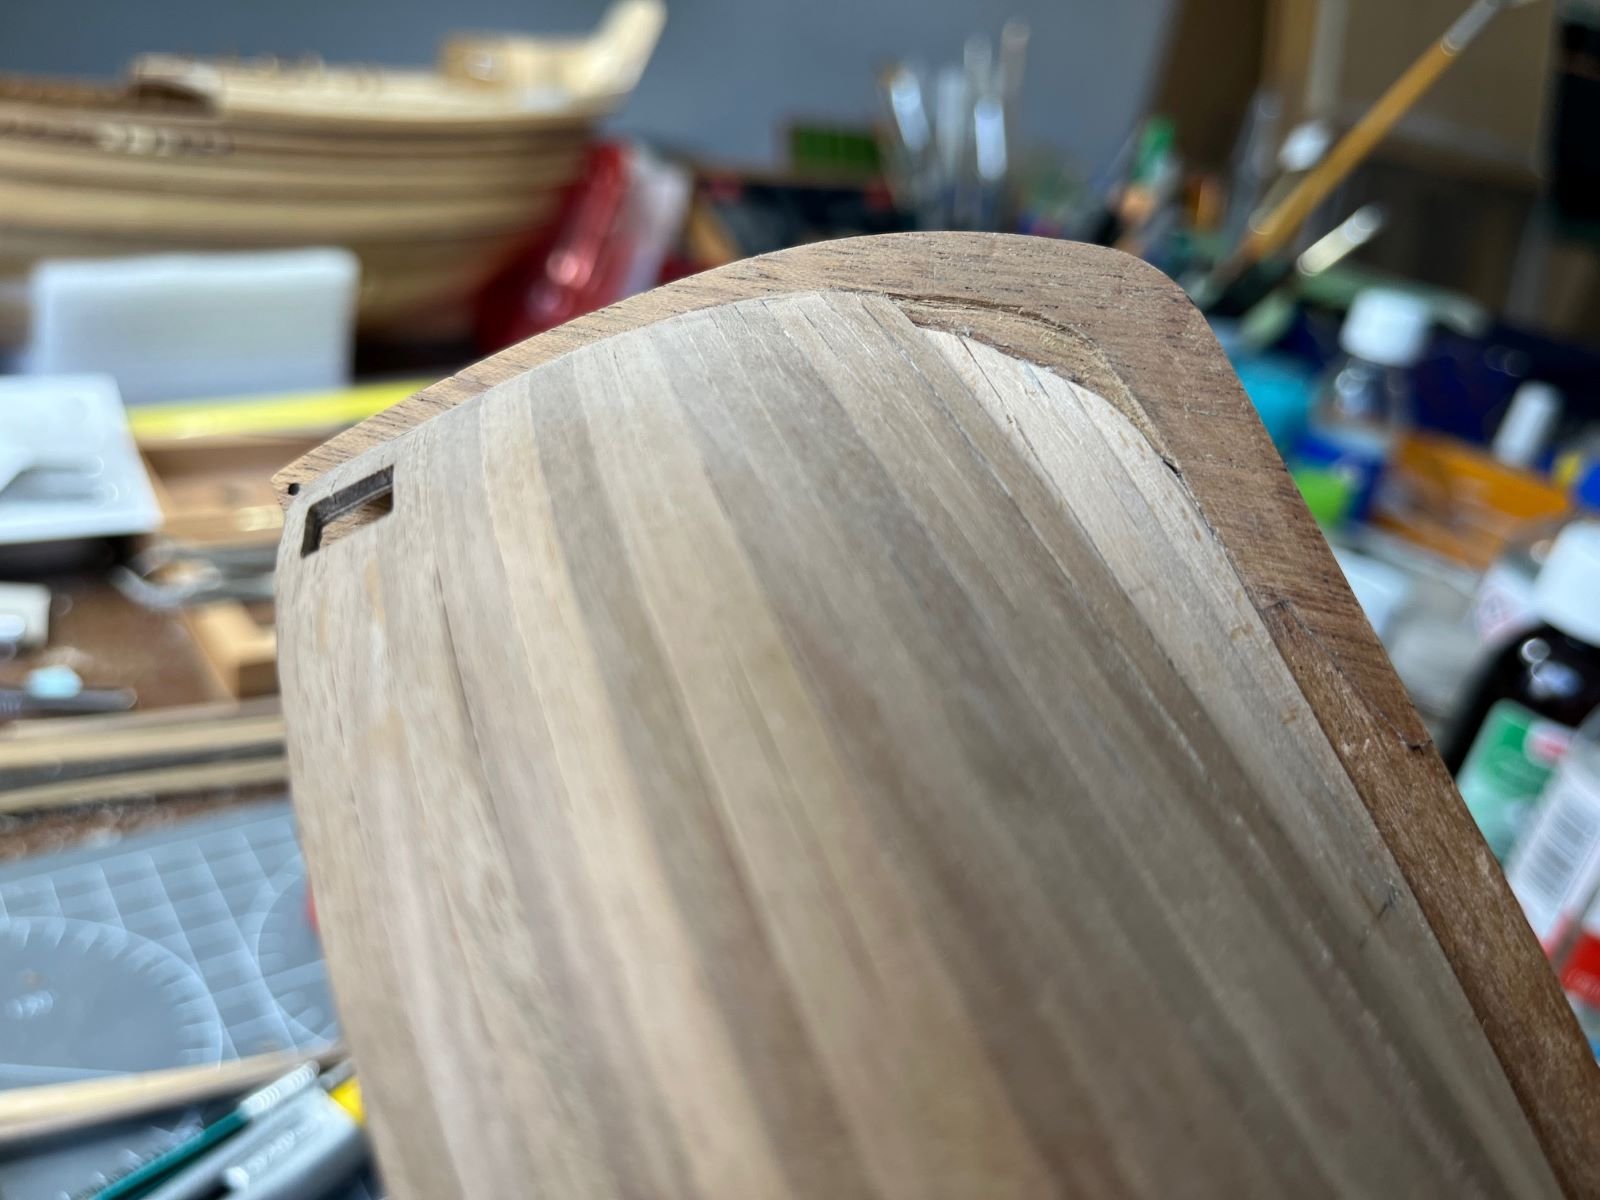
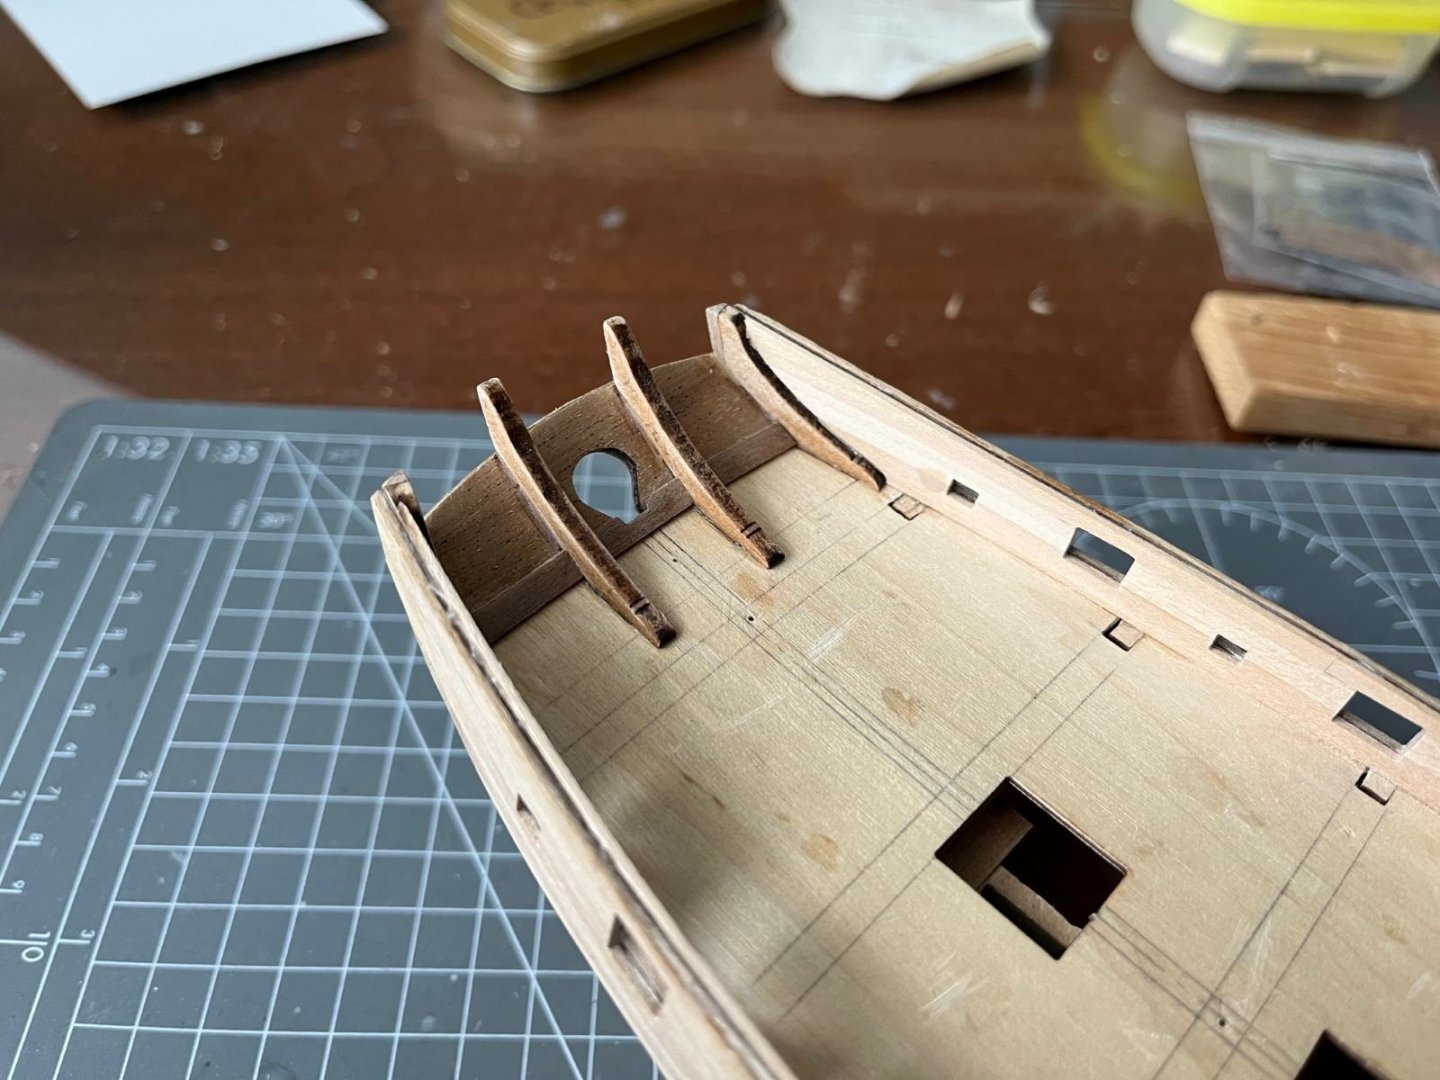
Hi, I finished covering the inner surfaces of the bulwarks with limewood strips. I am going to paint the interior of the bulwarks, hence I used limewood instead of the suggested walnut strips because the former is more pliable and easier to work with. I also opened the cutouts for the cannons and the oars while installing the strips. The shape of the cutouts came out ok, but not as sharp as I whished. Hence, I am thinking of framing their inner edge with thin walnut. Mating the upper part of the transom panel with its supports was not quite well defined and to improve it I added two small wedges to the outer supports. Now I am waiting for the material which I ordered to plank the deck because I didn't like the wood provided with the kit. Best regards, Dan


- 87 replies
-
- 4
-
-
- Lady Nelson
- Amati
- (and 1 more)
-
Good job so far. As very last sanding, you could try a wet very fine sanding using very fine grit (1000 or 2000) soaked with water. Without putting lot of pressure, let the paper do the work. As last step, before painting, I usually rub the model with a cotton (or paper) cloth soaked with alcohol (usually IPA) to remove the last dust and grease. Good luck, Dan
-
A challenging model, but without doubts a very interesting subject. About the NMF, please note that Russian planes of the time were overpainted with a transparent protective paint that muted a bit the appearance of bare metal. Good luck, Dan
-
Impressive model. The stance and the overall look resemble in every way a B-17. Congrats, Dan
-
Remove Tamiya paint
Danstream replied to JoniP's topic in Painting, finishing and weathering products and techniques
If they are their acrylic type, Tamiya paints can be removed by alcohol (IPA). I have done it several times in the past. Alcohol does not affect polystyrene plastic. Otherwise, I also used Mr Color Leveling Thinner. Please make a test on a small part first. Good luck, Dan -
Impressive details and workmanship, Andrew! I missed in the past this fine build of yours and went through it only recently. I found it brilliant and I am saving it for my future reference. Best regards, Dan
-
Great details and workmanship on the gun ports and overall. I was impressed by the details of your deck. May I ask which type of wood you used for the planking of the deck? Indeed, this is a trick that I used a lot for my plastic models. I will surely carry it over also for my ship build. Best regards, Dan
-
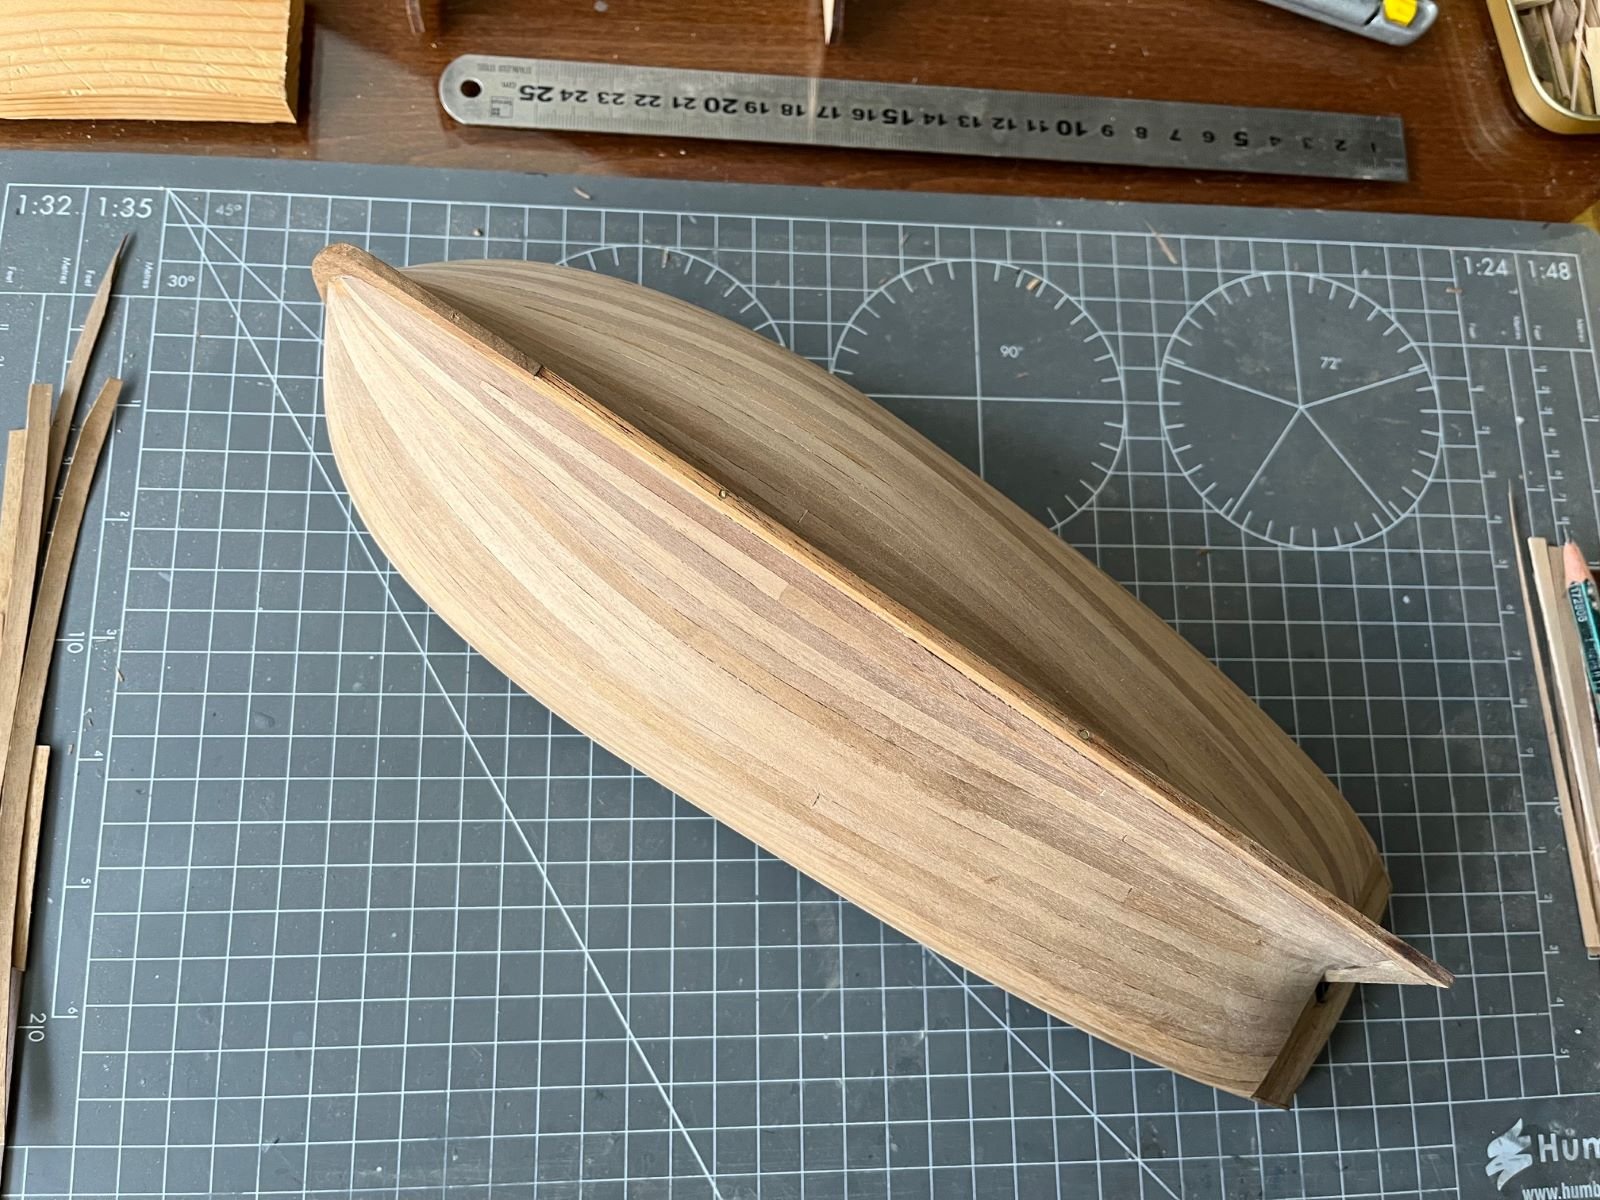
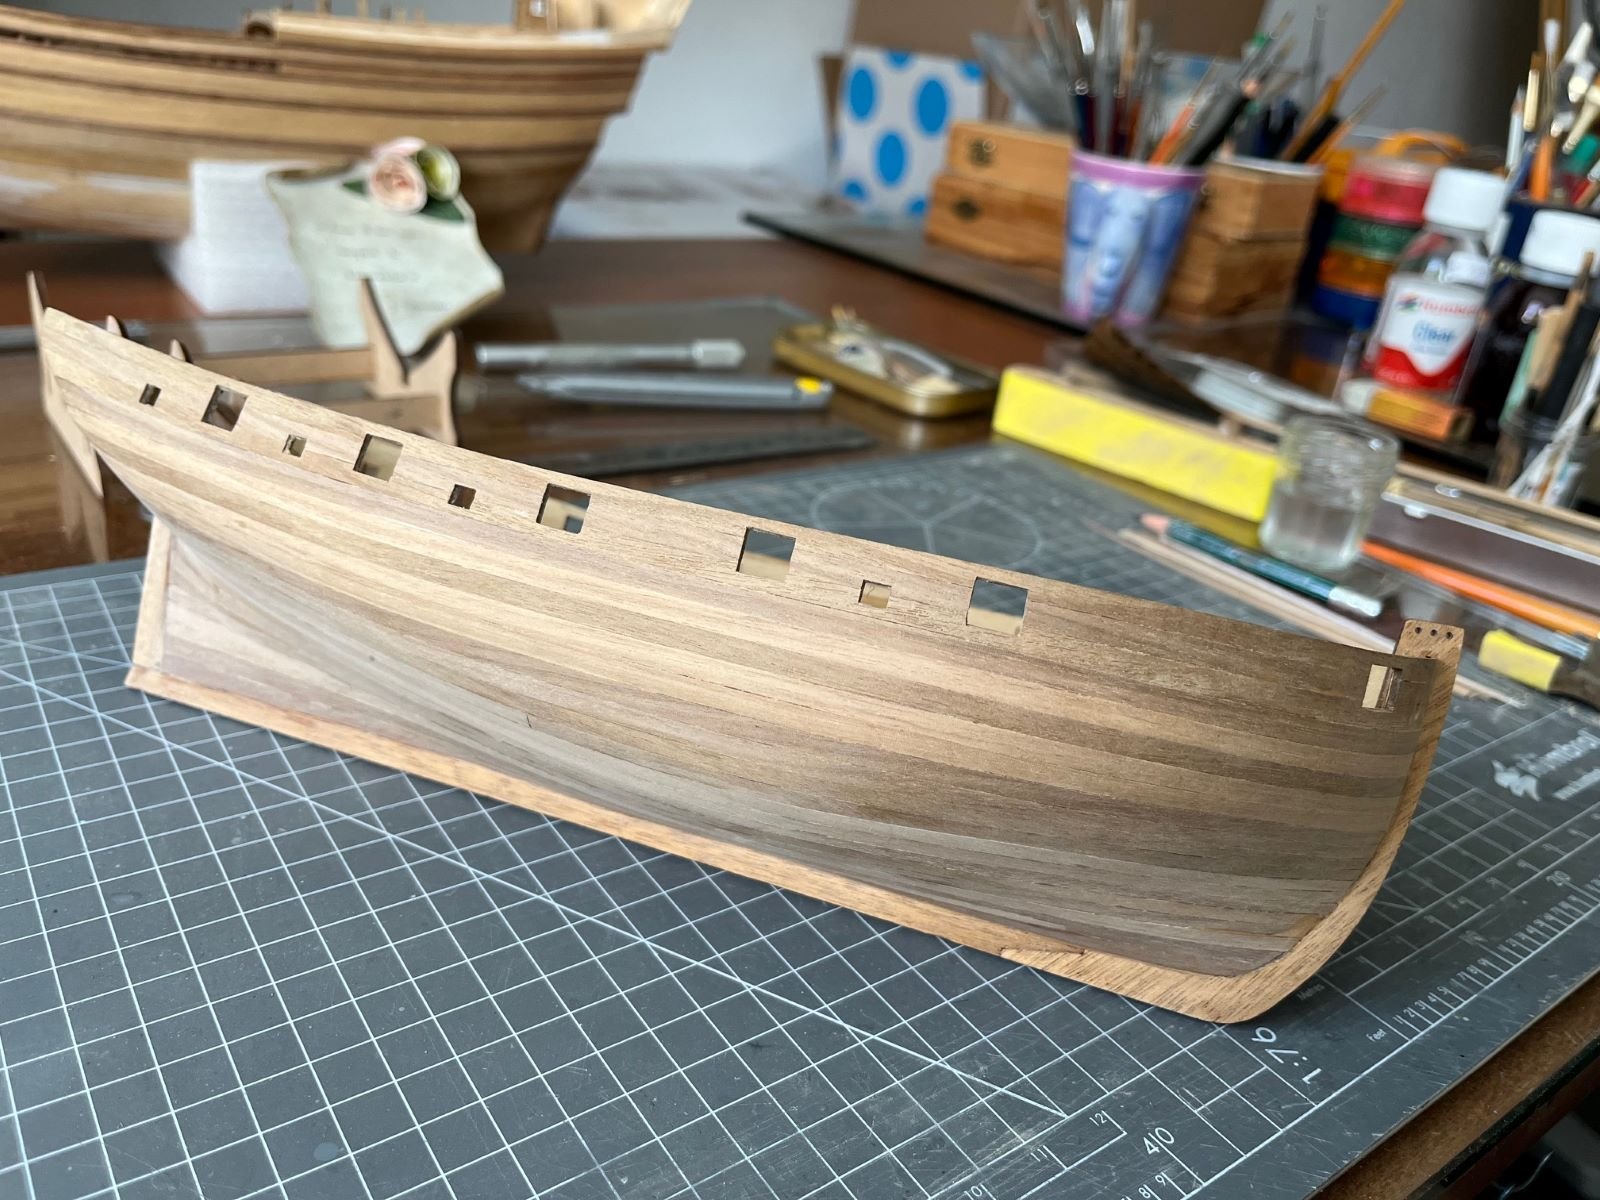
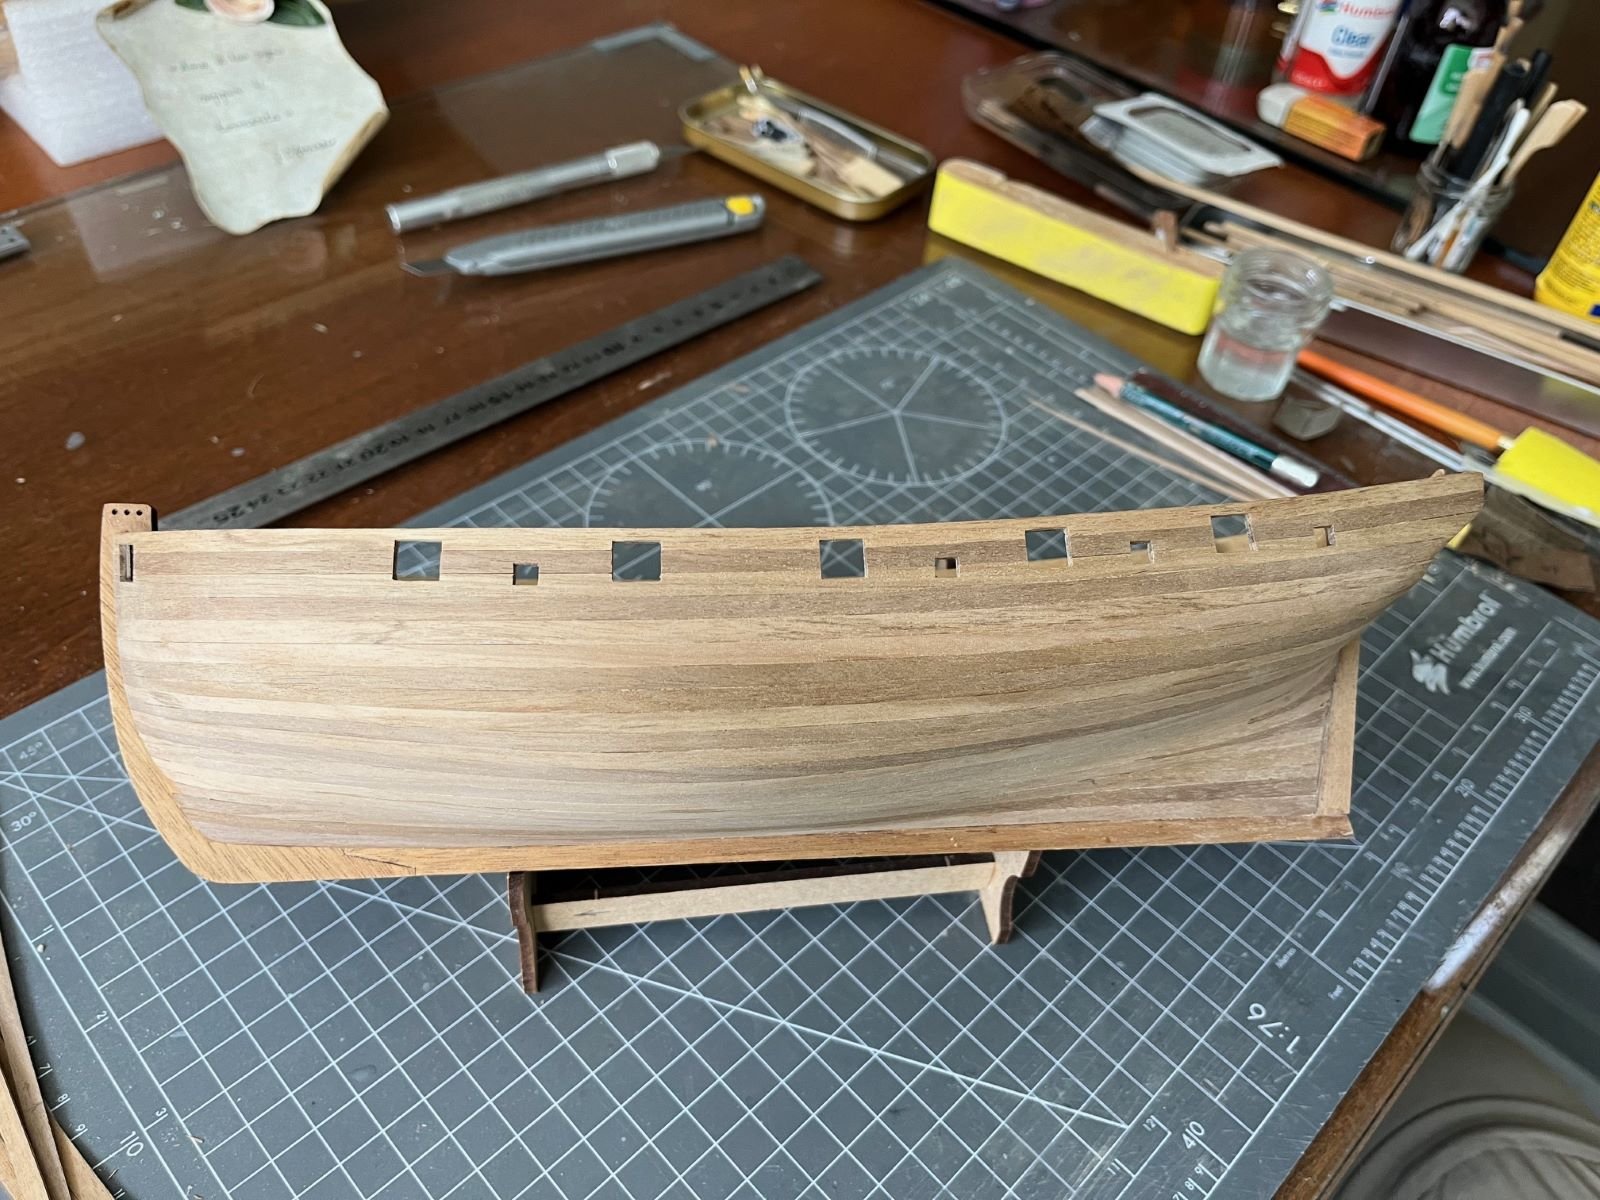
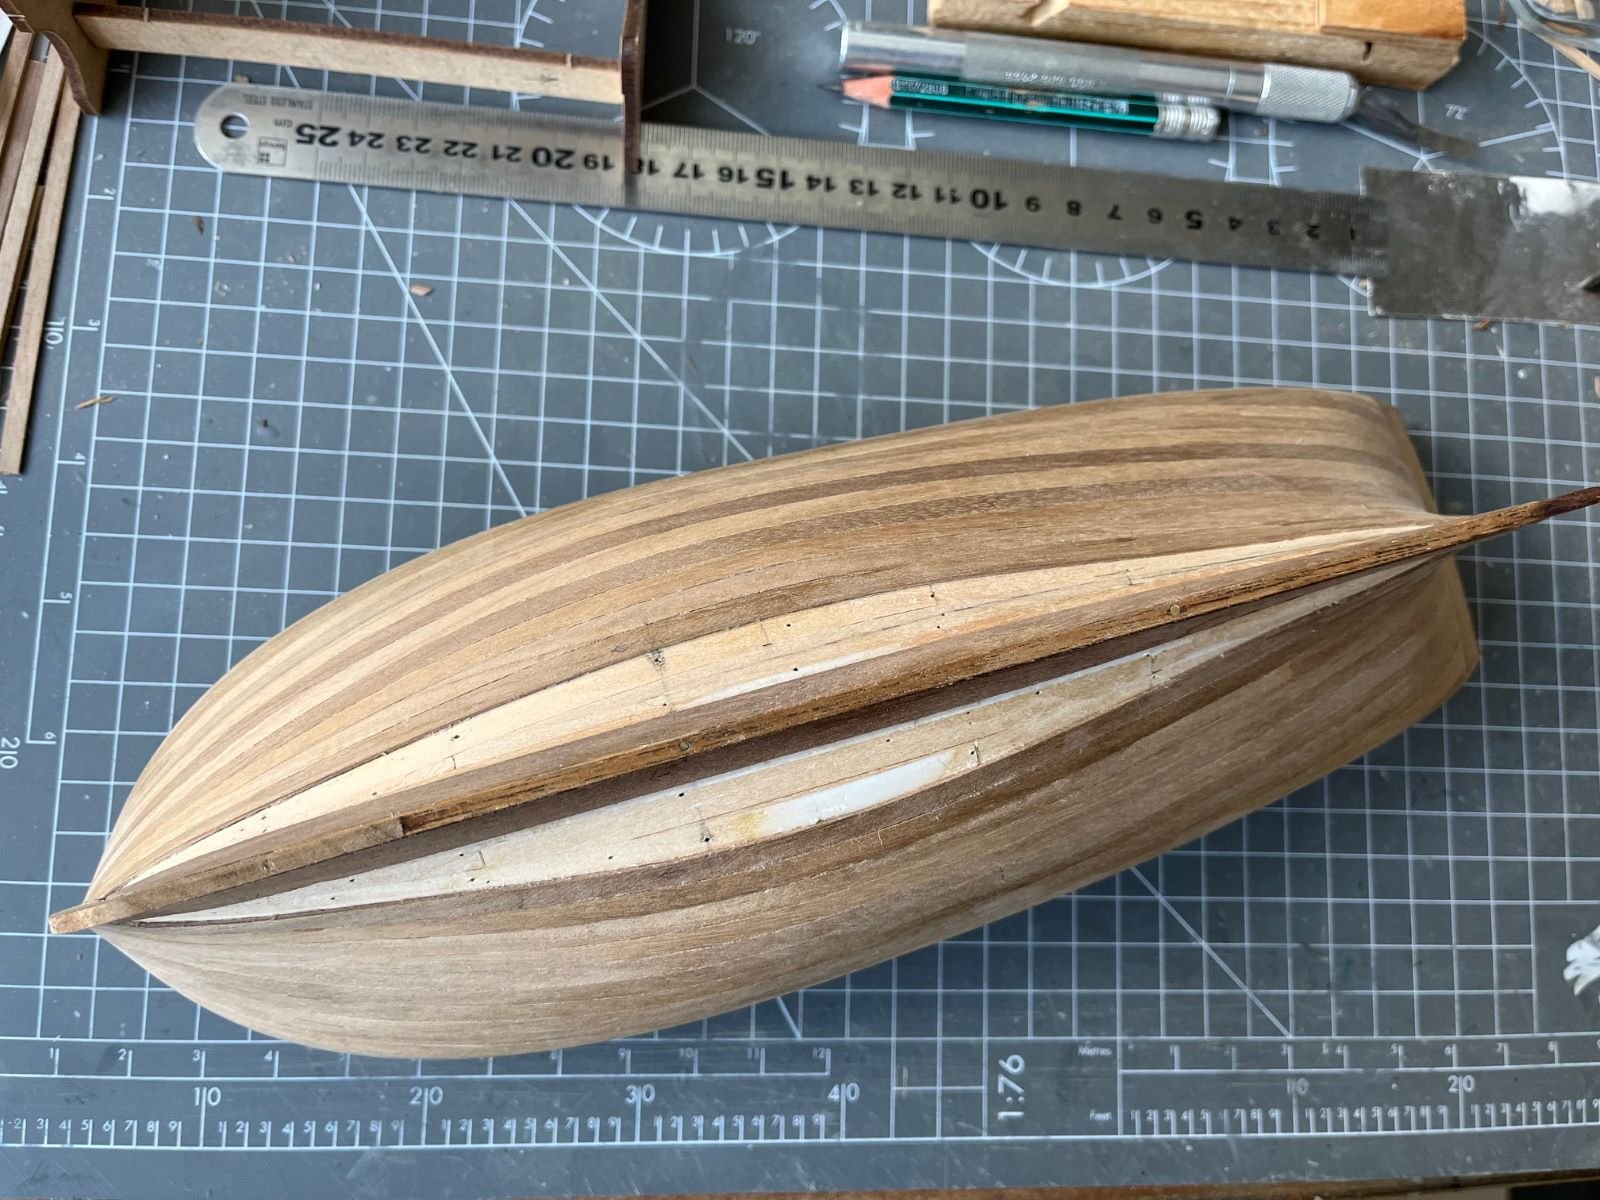
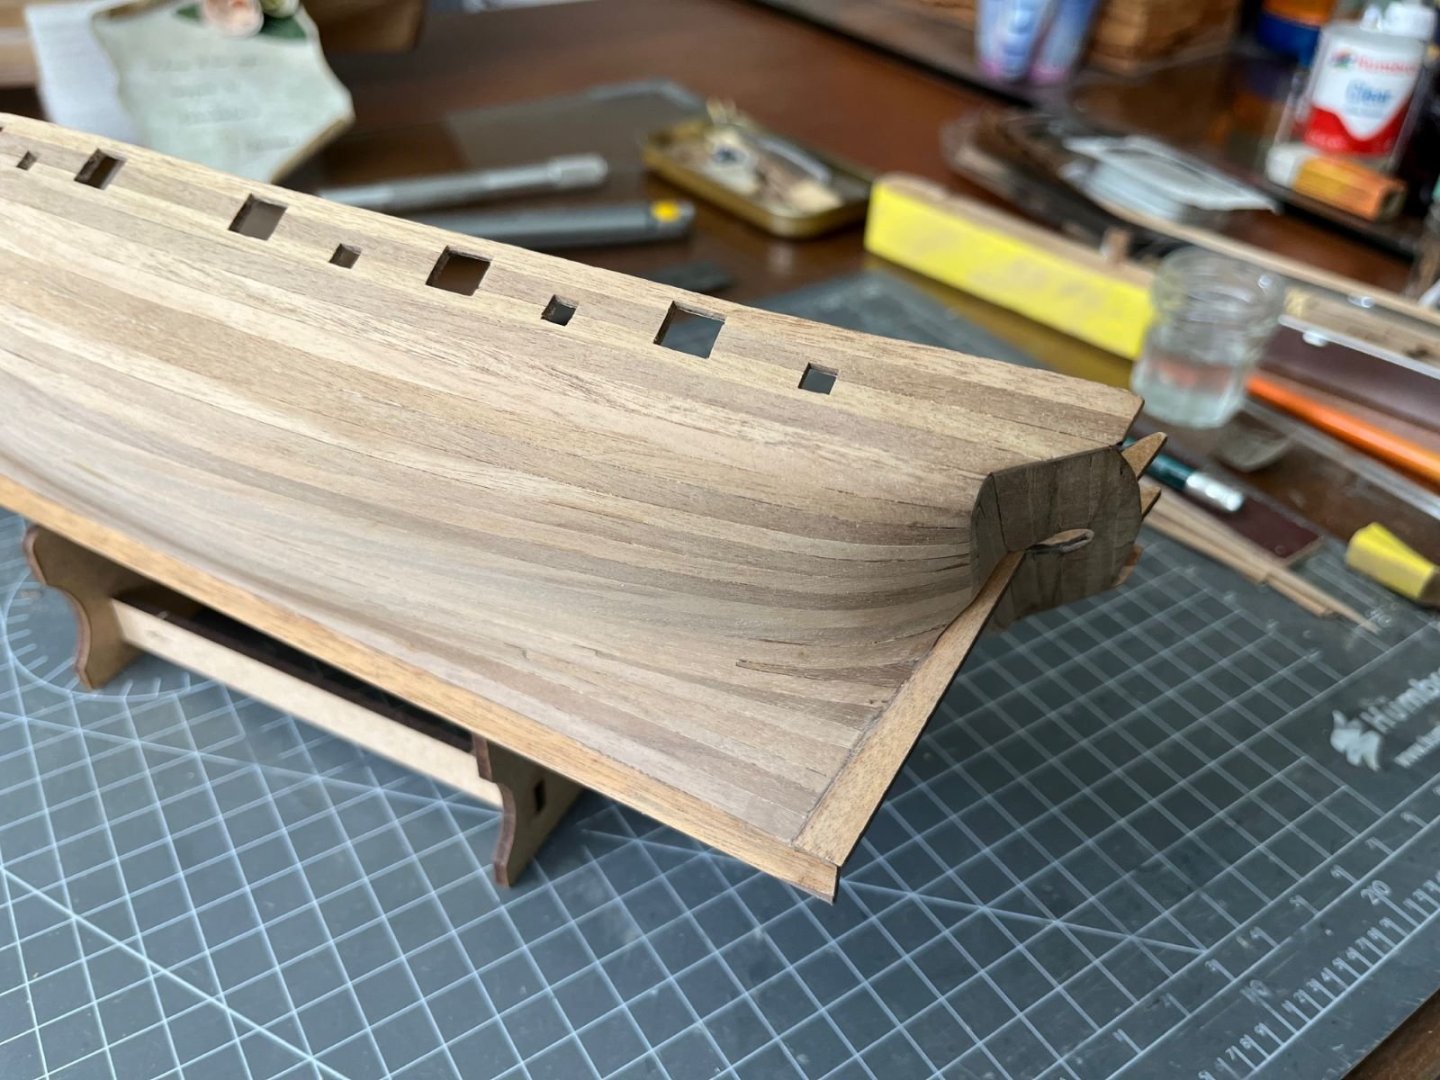
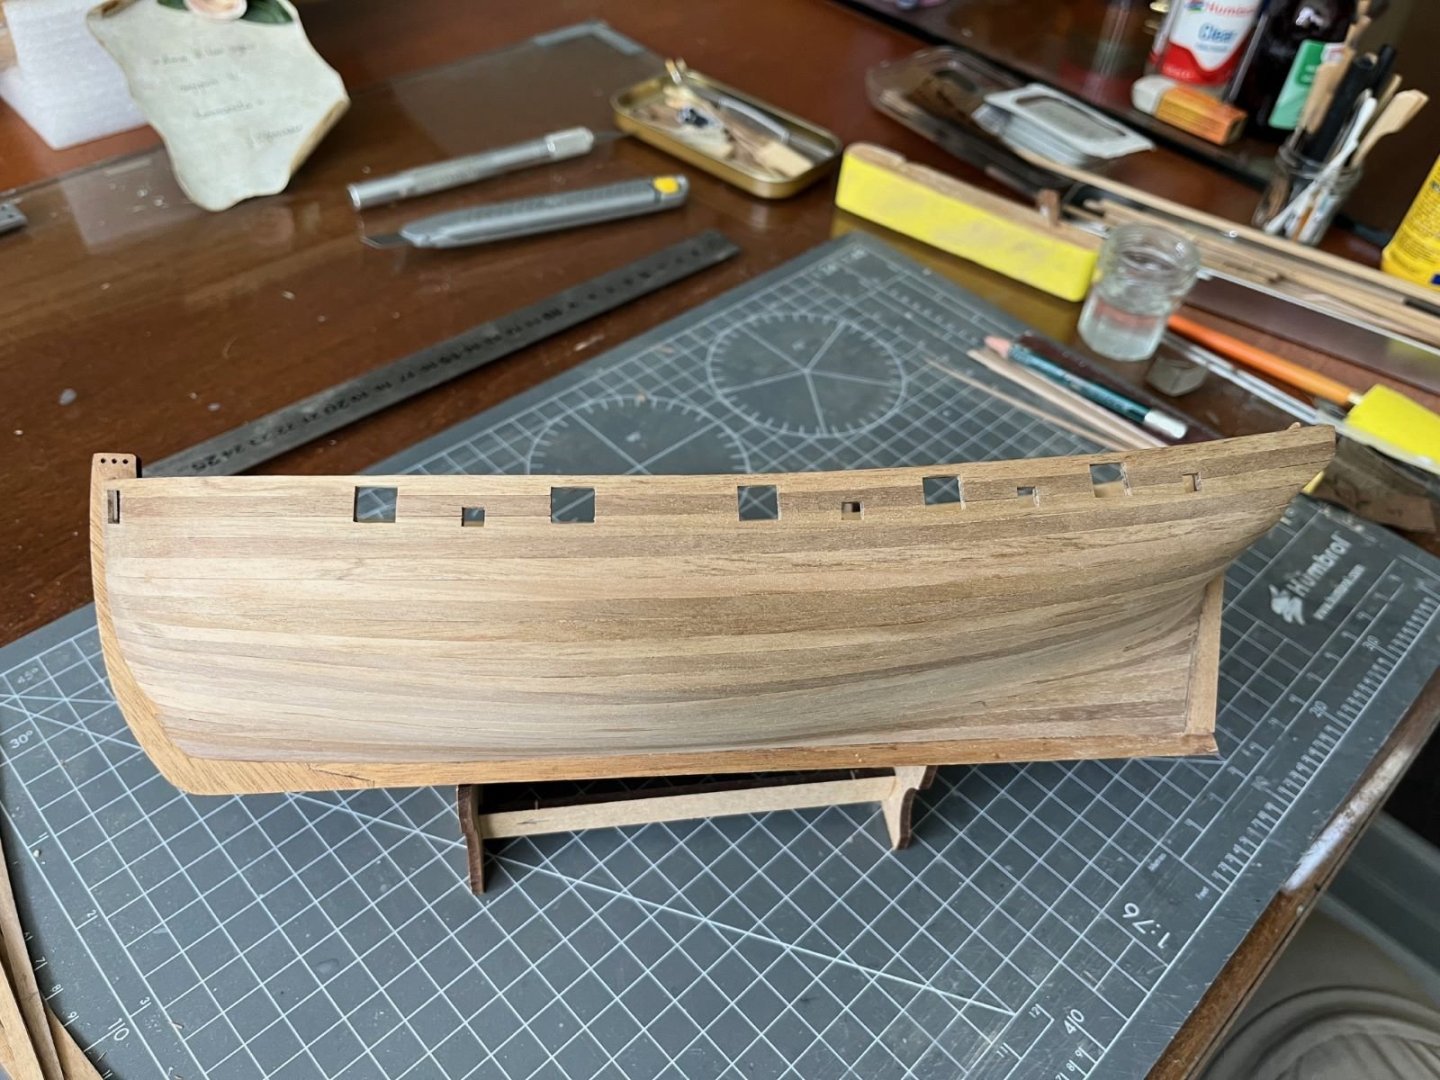
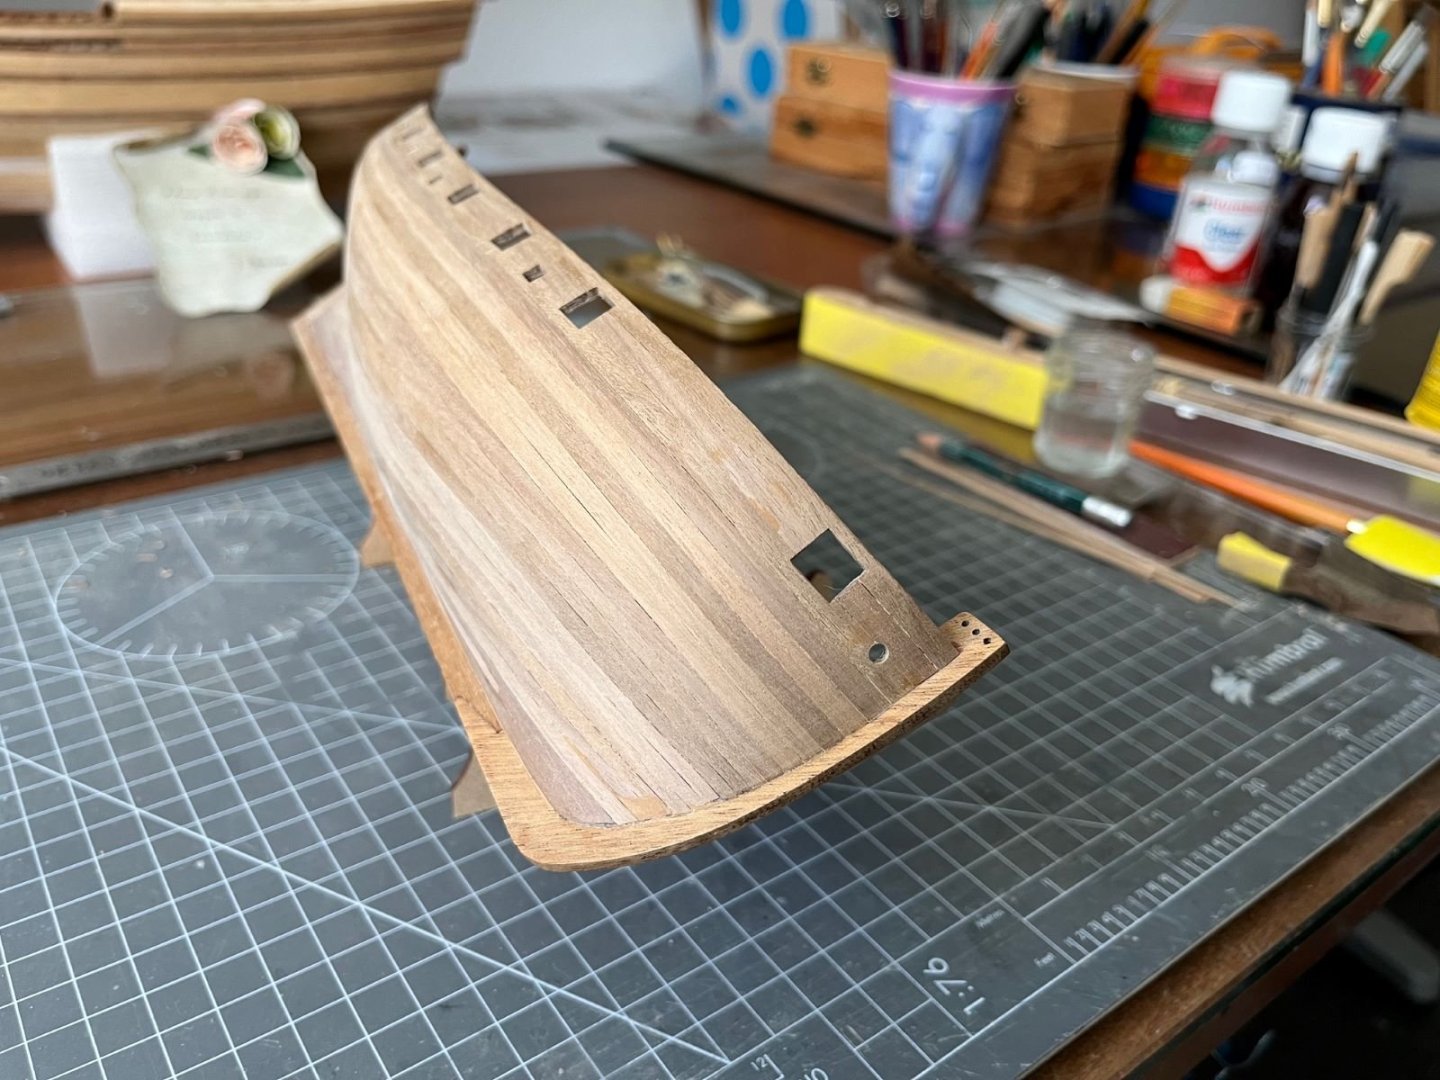
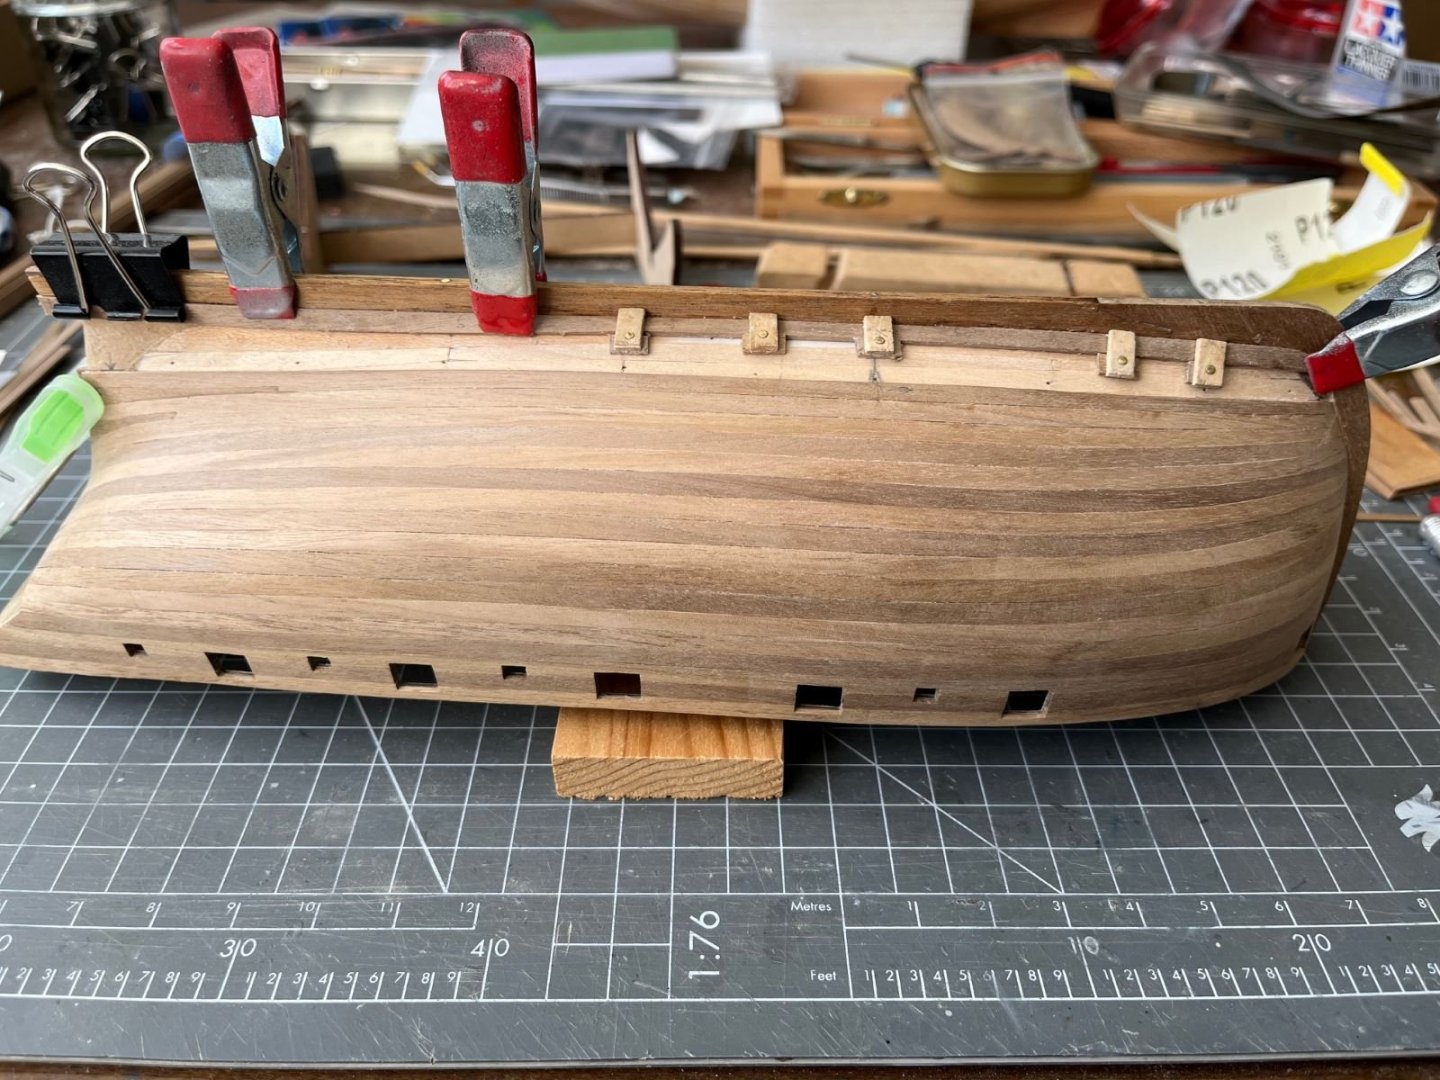
Hi, finally, I completed the second planking of the hull. This is the first time that I managed to arrive so far. It was a long process for me, but I arrived at the end with a reasonable result. It is not free from defects, as I will show below, but it is ok for me. Fortunately, the major defects are located on the bottom half of the hull where they can be hidden by the white paint. I am satisfied with the pattern of the strakes that I obtained, but on the bow, on both sides, at the points where I introduced the rabbets, I got a discontinuity of the smoothness of the hull surface which I had to correct with a bit of filler. As said, these will be hidden by the paint. Definitively, next time, I will carve a rabbet on the entire length of the bow. The strakes of the area of dead wood had to include three drop planks to cope with the spreading of the planks. The sides of the hull turned out quite alright: Next, I will cover with wood strips the inner sides of the bulwarks. That is all for now, thanks for following and best regards, Dan


- 87 replies
-
- 8
-
-
- Lady Nelson
- Amati
- (and 1 more)
-
Good luck with this new build. About single or double planking, if you haven't already seen it, have a look at some considerations given here: https://modelshipworld.com/topic/21306-double-planking-a-hull-pros-and-cons/ Best regards, Dan
-
This is also what I found to be a great advice. Following your work, best regards, Dan
-
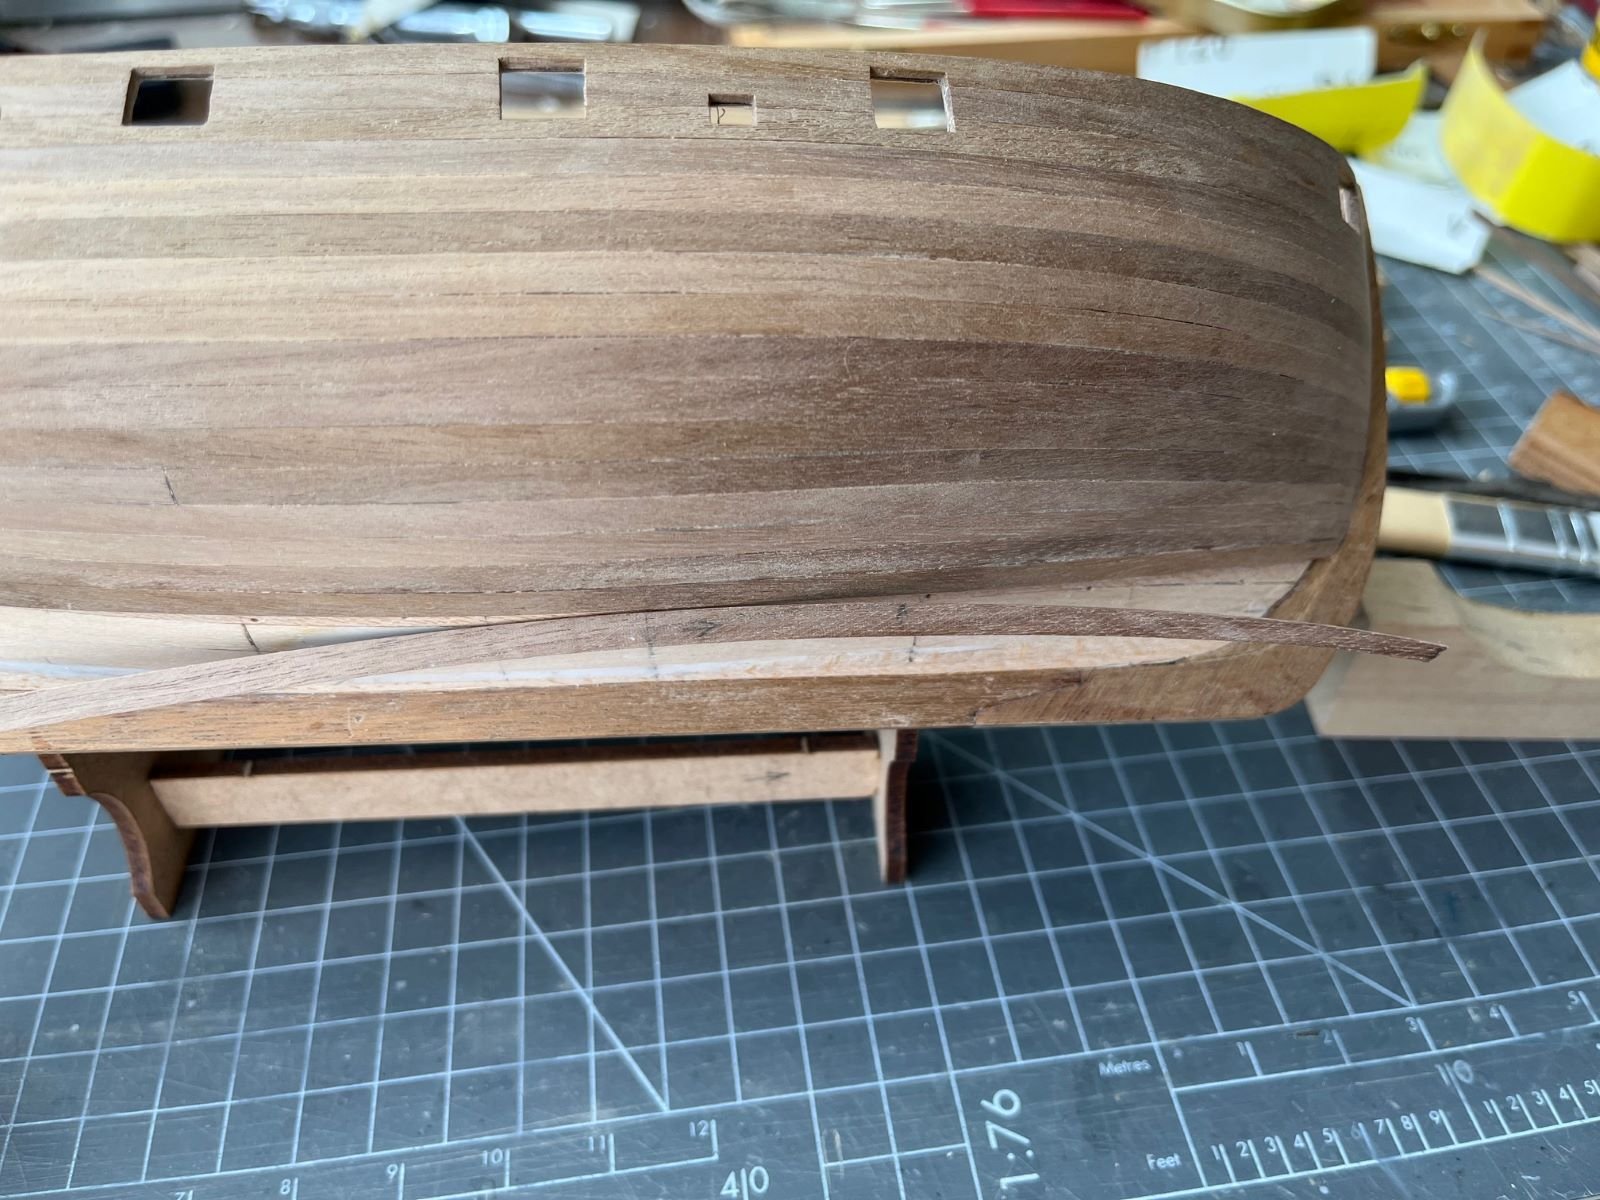
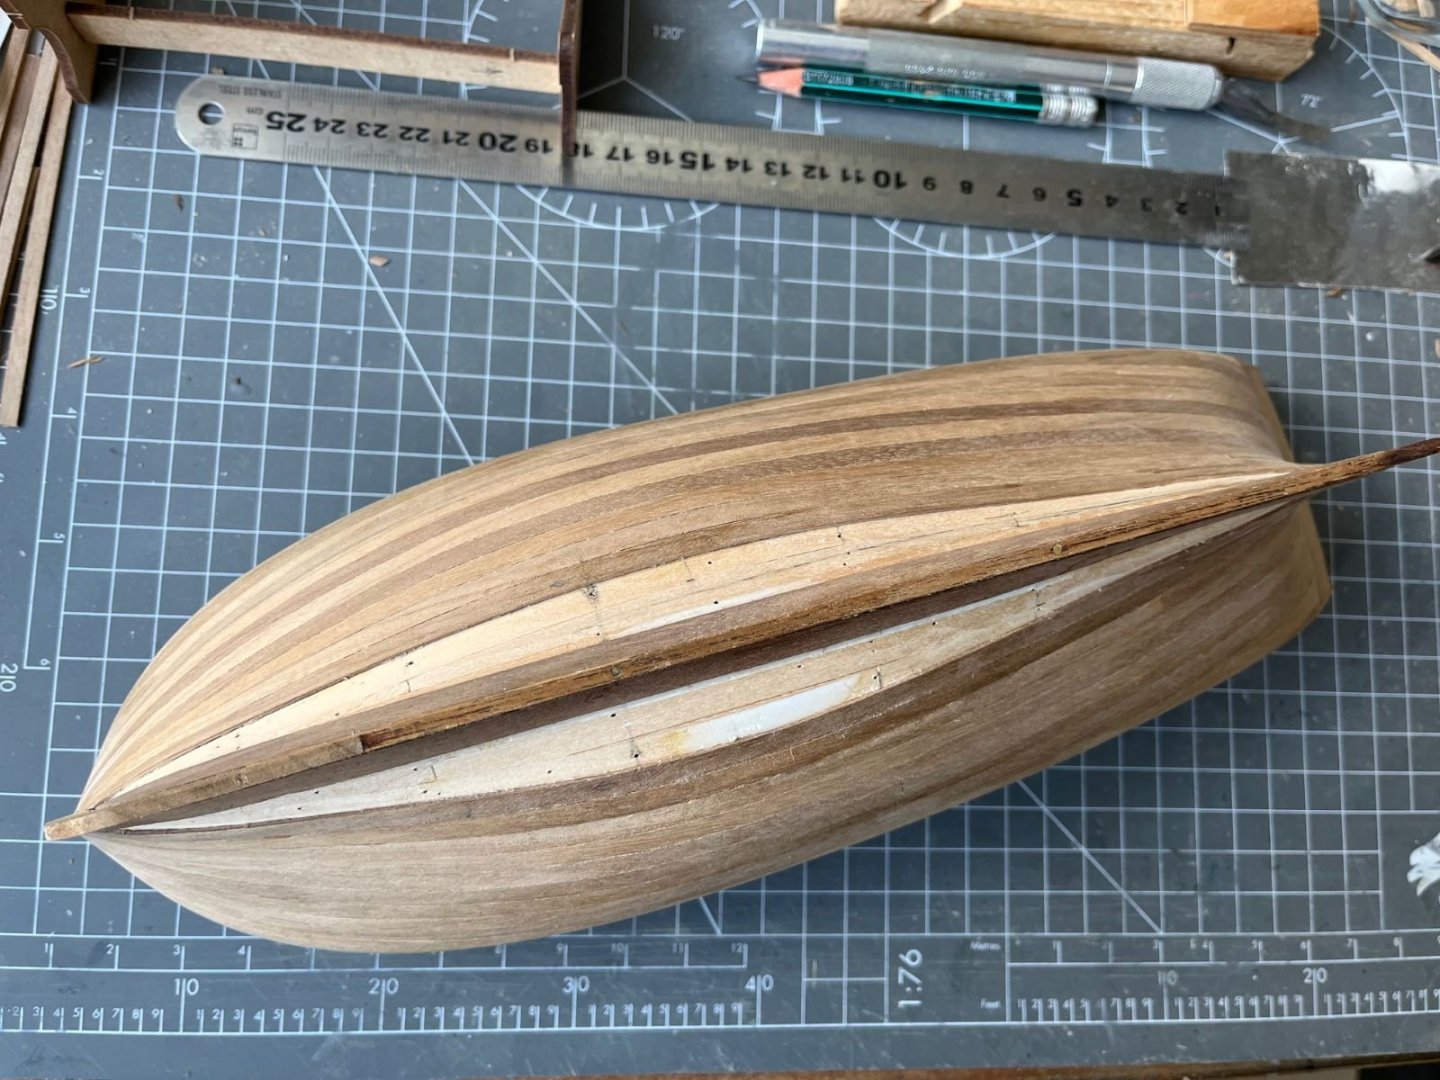
Hi, few more steps on the second planking. For the remaining part of the bow, a carved a small rabbet to help in defining the shape of the garboards. In retrospective, I realize that I should have carved a rabbet along the whole bow. I will keep it in mind for the next build. Following a recent comment above by @flyenrw,I am posting below a picture showing one of the strips which I edge bent (aka lateral bending) and ready to be glued. Before completing the last strakes, I decided to make the garboard first, being this one of the most critical part for me. This is the first garboard glued on: And finally, both garboards are on: Next, the last strakes will follow to complete the hull. Best regards, Dan


- 87 replies
-
- 6
-
-
- Lady Nelson
- Amati
- (and 1 more)
-
Thank you Roger for your comments. Yes, I visited with much interest your build log, being myself a newbie to the wooden ship modeling I appreciated your approach to the build. I figure it out looking at the point where the strakes start to refuse to follow the curvature of the hull. For each strakes, the point might be different. However, it is not an exact science and I proceed with incremental bending, i.e. I don't expect to get the final shape at the first try, but come back to bending where I find it necessary. Anyway, the flexibility of the wood stripe gives you a bit of scope for final adjustment. The fact that also the second planking is 1 mm thick (and not thinner) helps lateral bending the strips. Please keep in mind that I am not an expert modeler and I am learning during the build, but the steps that I follow are: - trim and taper the strip (I leave it longer at its two extremities for handling); - successive edge bending sessions until it fits reasonably; - trim the strip at the bow with its final length and give it its final shape; - bend it out of its plane with a normal hot iron bender as necessary to adapt it to the hull; - commit to gluing. Please, might more expert modelers give their opinion if something should be corrected in the above. That's correct, this is what I can also see from your pictures and that is the most important point for a first planking. I am slowly proceeding to the end, I will post more intermediate pictures of the remaining work. Best of luck, Dan
- 87 replies
-
- 3
-
-
- Lady Nelson
- Amati
- (and 1 more)