HOLIDAY DONATION DRIVE - SUPPORT MSW - DO YOUR PART TO KEEP THIS GREAT FORUM GOING! (Only 75 donations so far out of 49,000 members - C'mon guys!)
×

.jpg.2c2c29e54623bd7b752bc2cdab599665.jpg)
Danstream
-
Posts
747 -
Joined
-
Last visited
Content Type
Profiles
Forums
Gallery
Events
Everything posted by Danstream
-
.thumb.jpg.c459ce4140b54c12eddb8eedfd446df3.jpg) Spectacular! I could hardly tell this is a model. Details and finish are awesome. One thing (among many) that I find incredible is that the paint reflects light like a real car, with smooth and regular reflections. I can well believe that this is the closest thing to owning a real cabrio Porsche Carrera. Congrats, Dan
Spectacular! I could hardly tell this is a model. Details and finish are awesome. One thing (among many) that I find incredible is that the paint reflects light like a real car, with smooth and regular reflections. I can well believe that this is the closest thing to owning a real cabrio Porsche Carrera. Congrats, Dan -
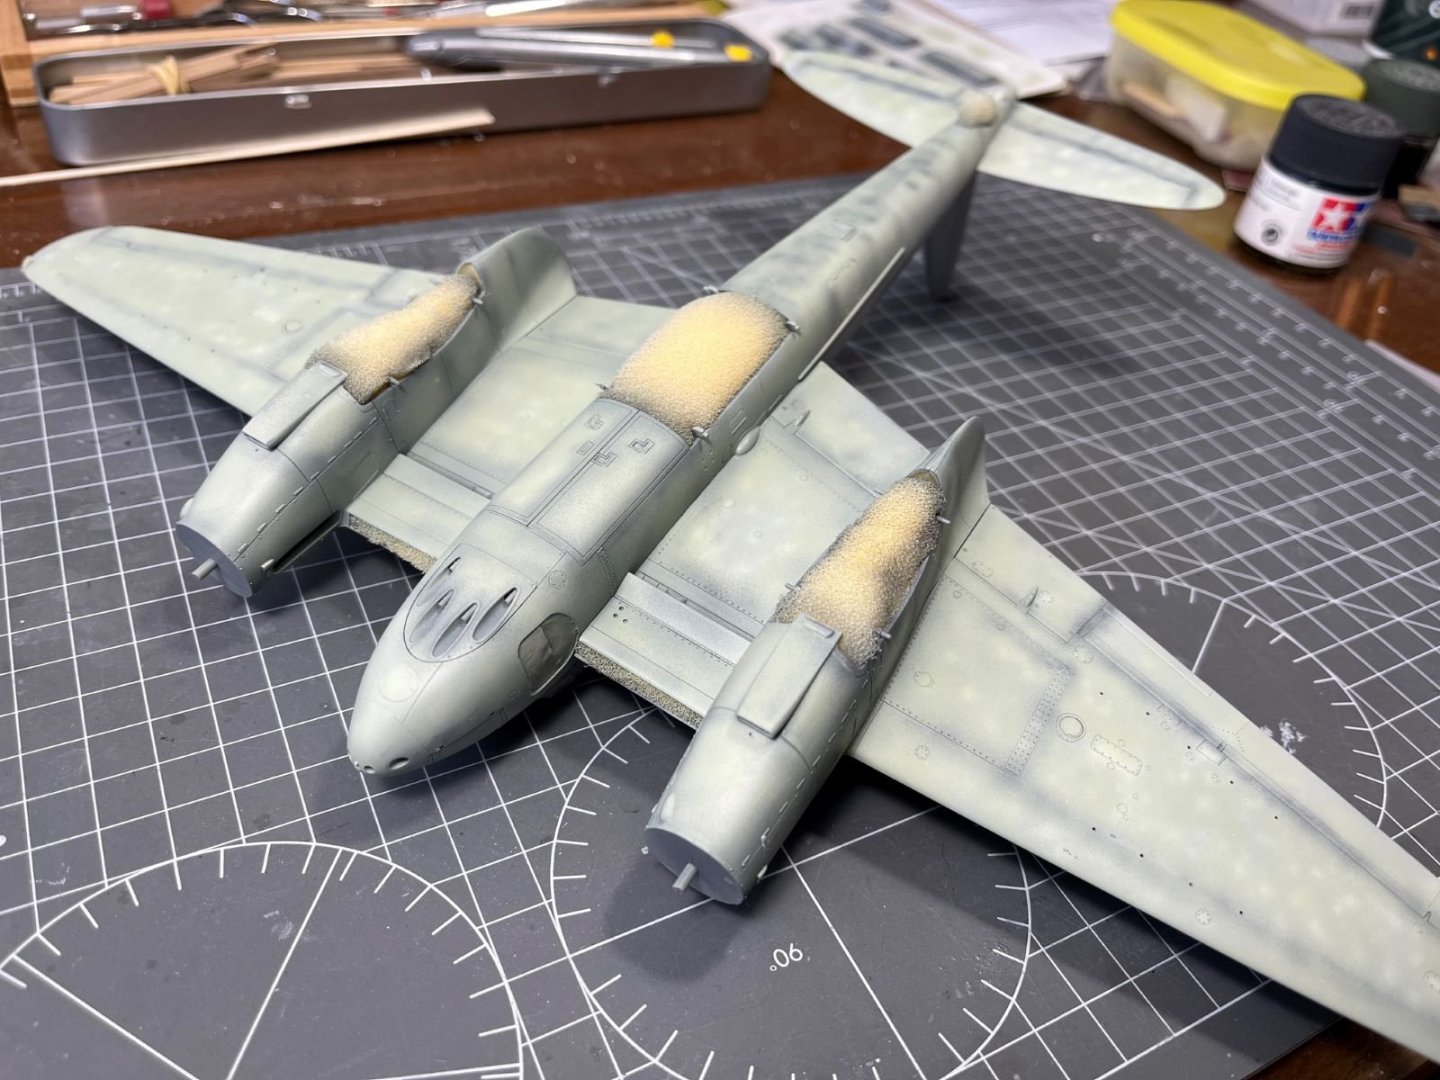
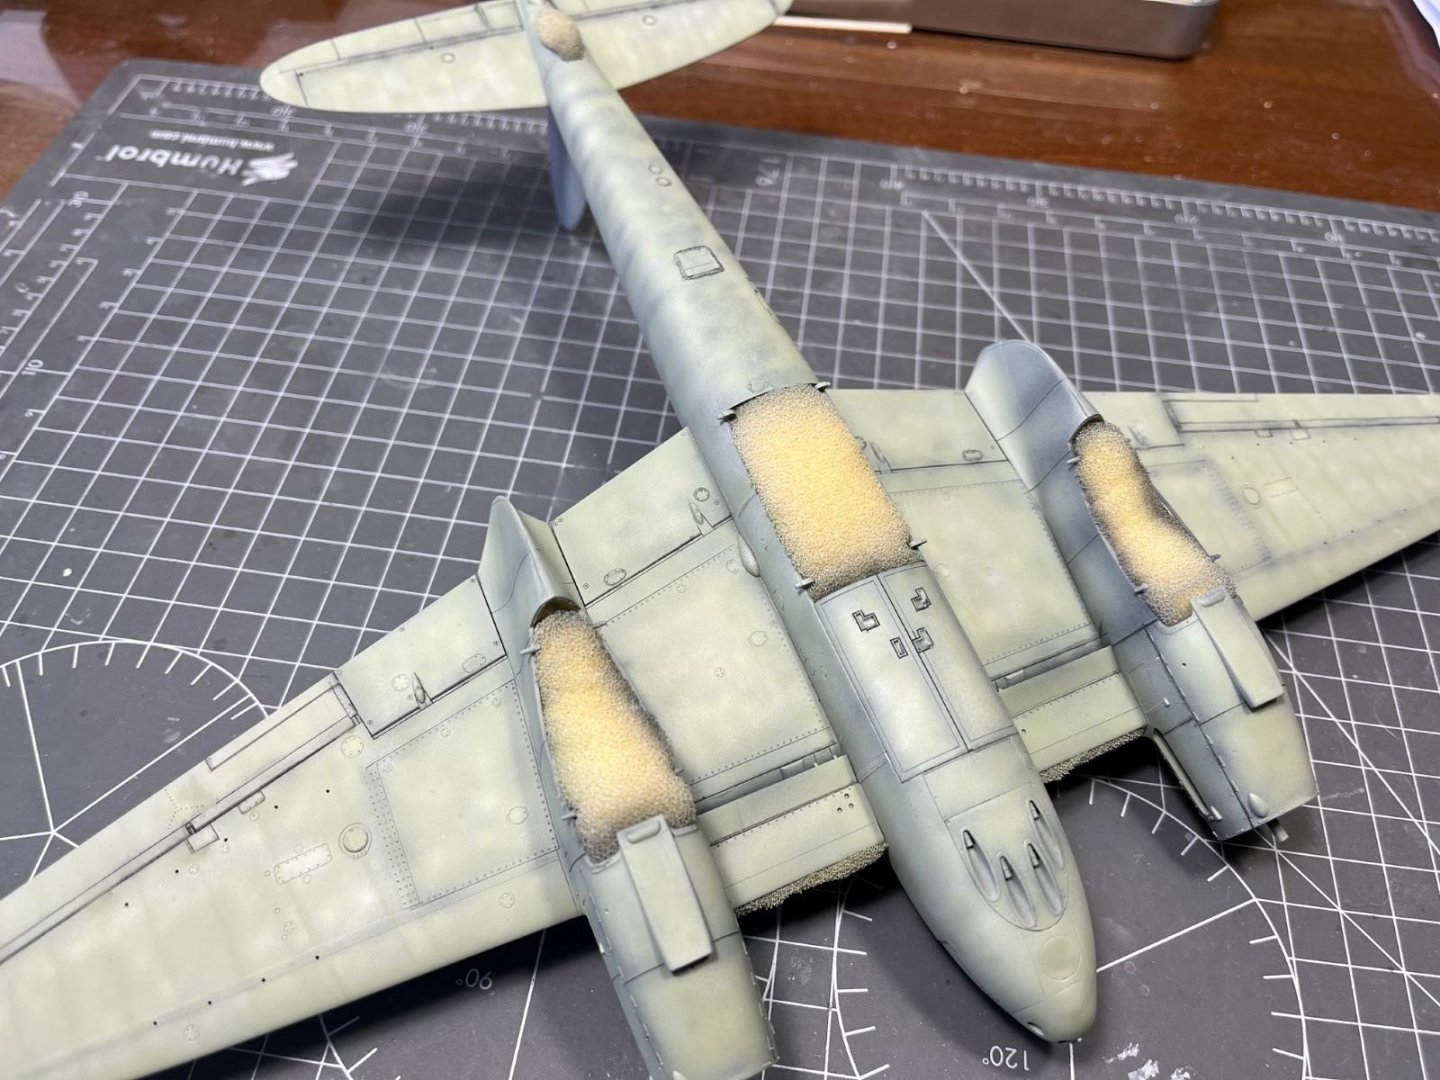
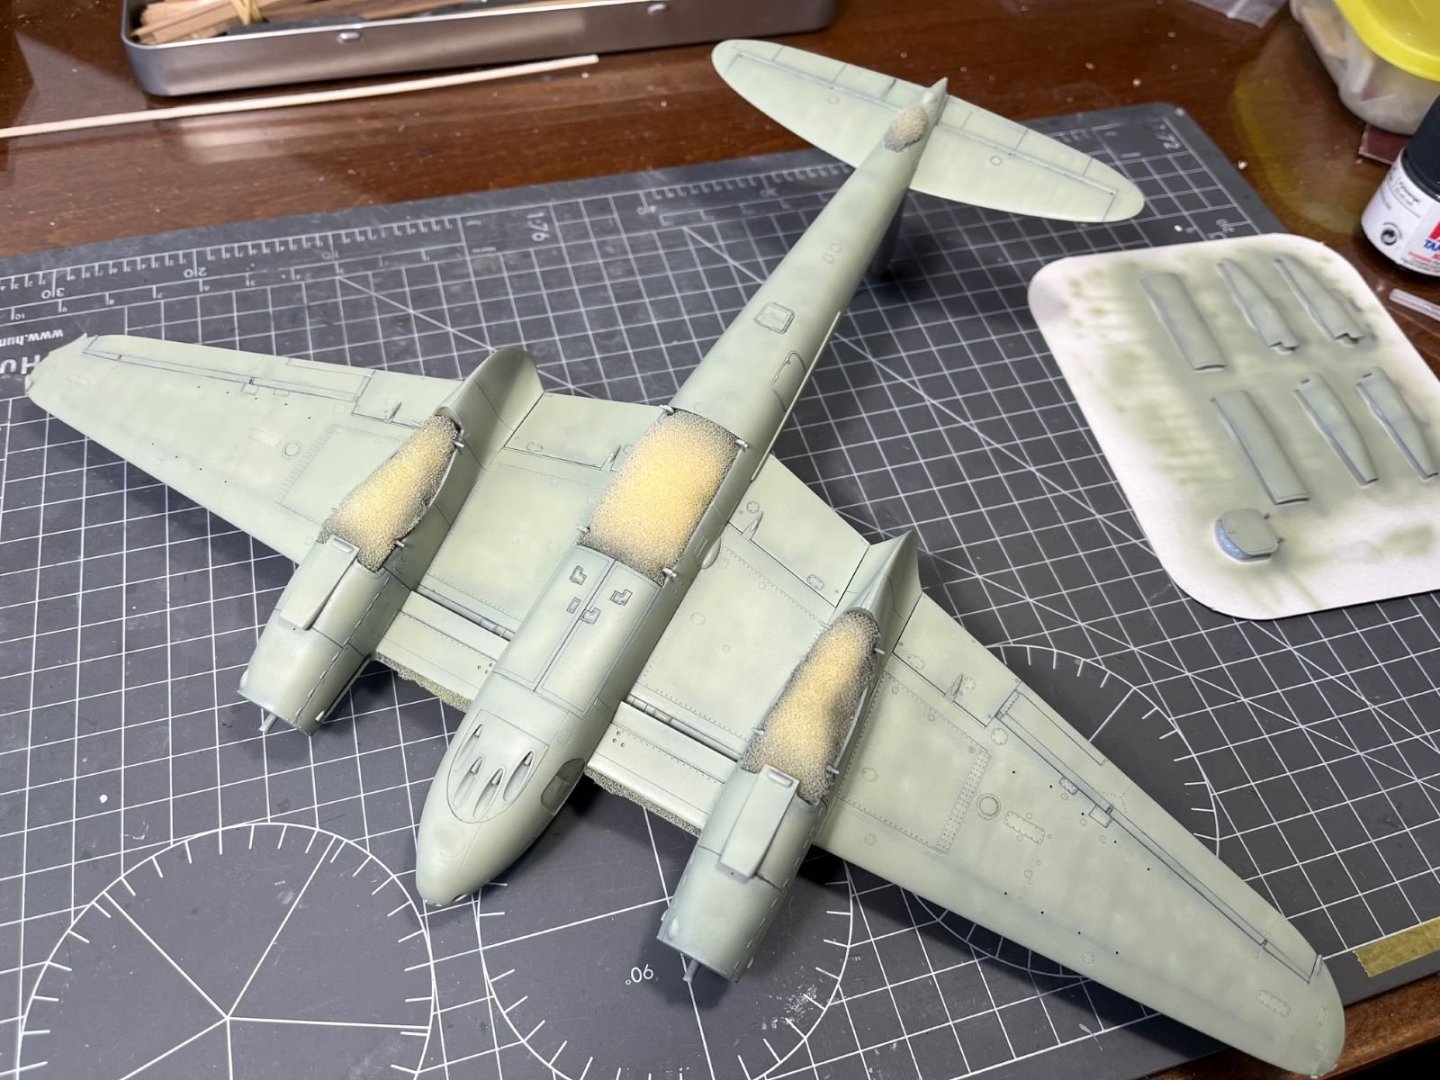
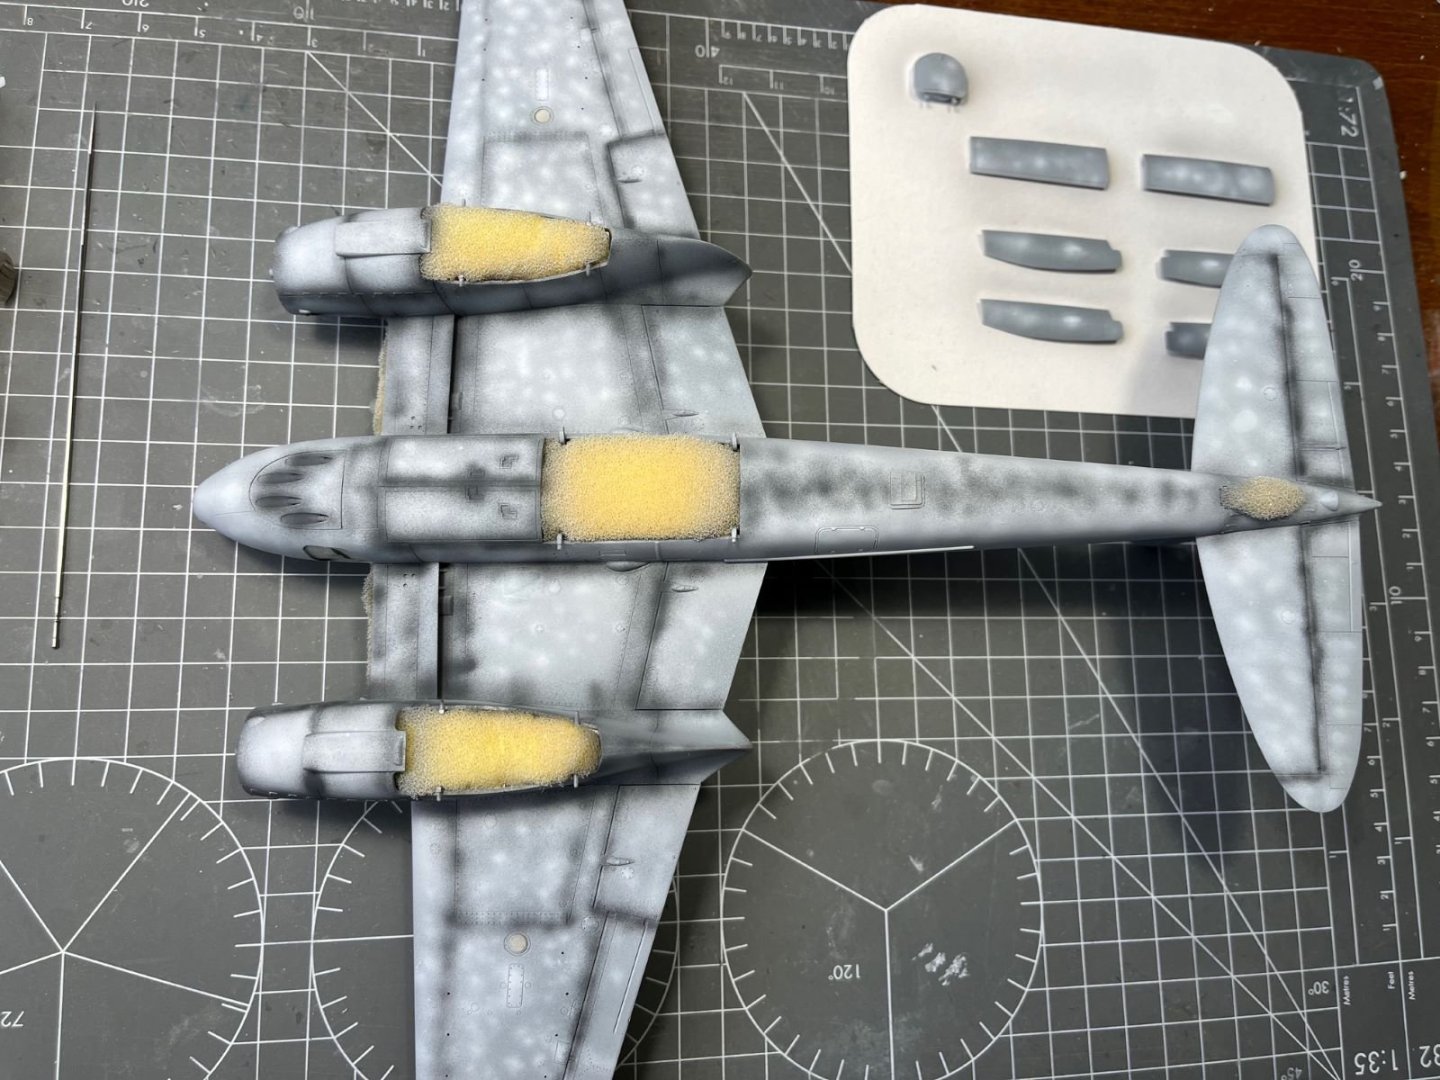
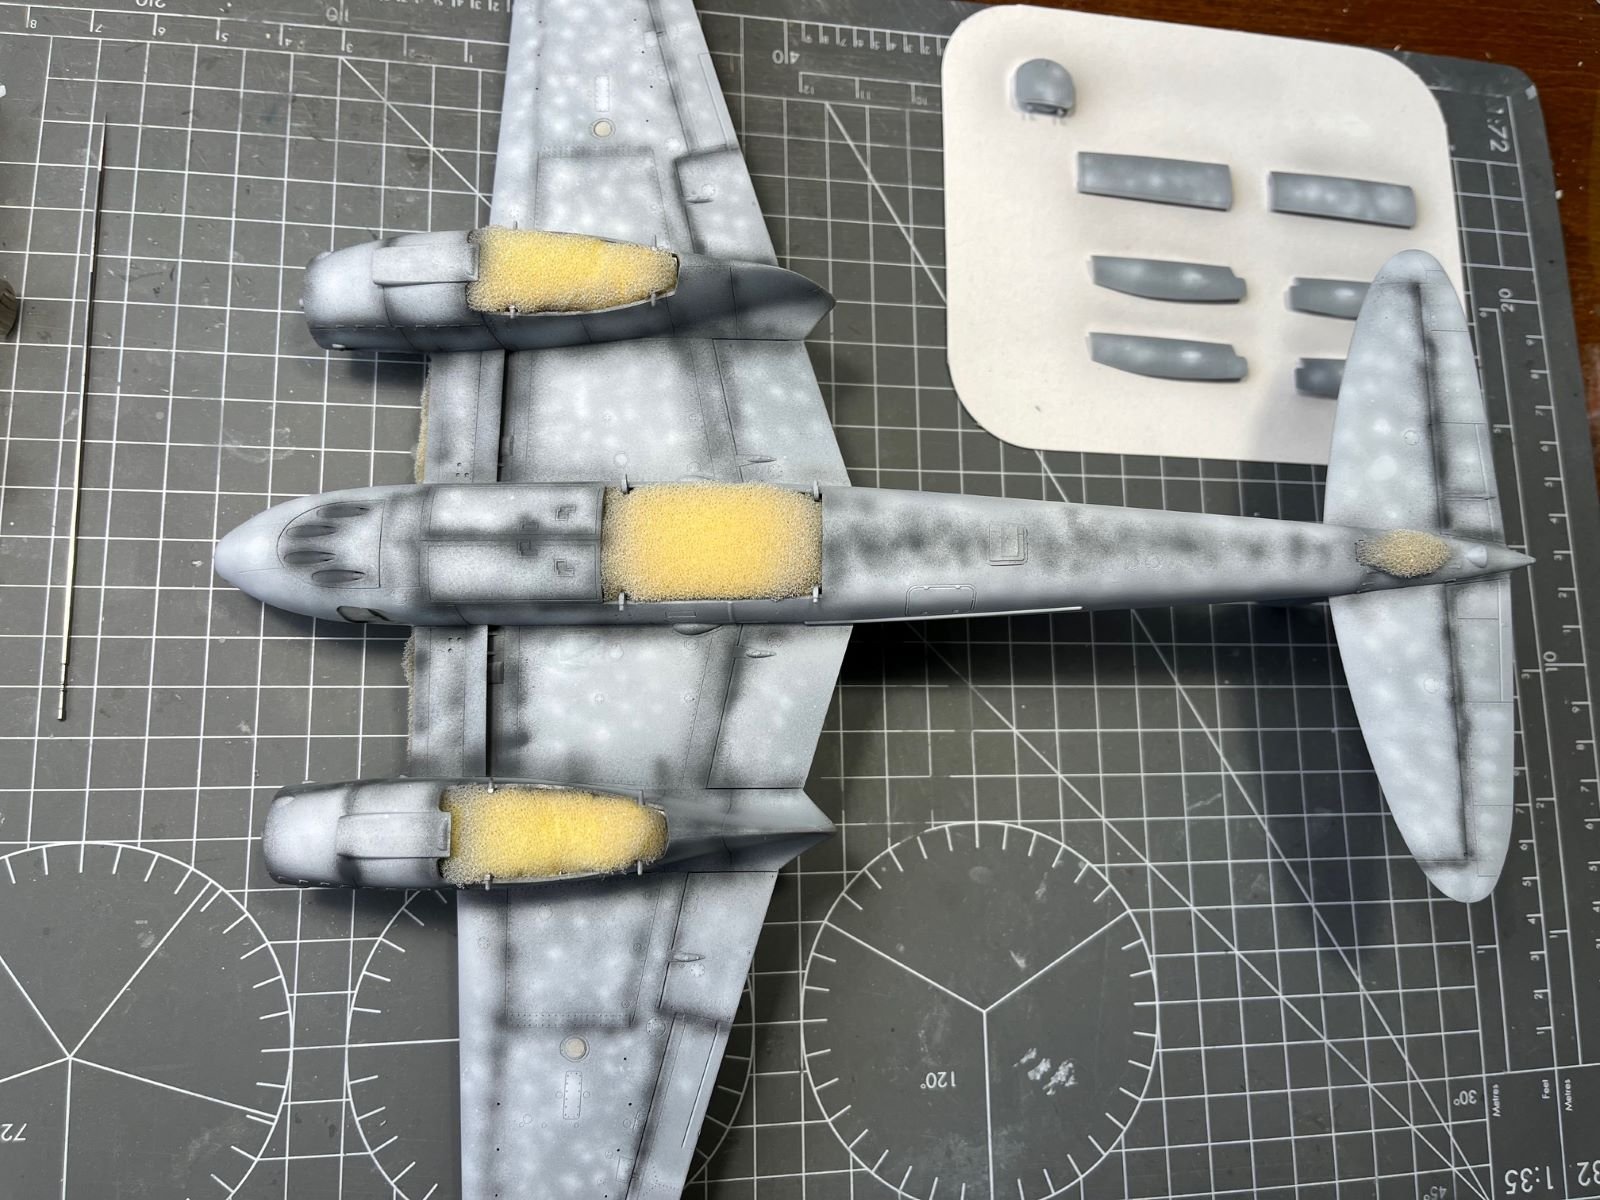
Hi gents, I started with spraying some colors. The lower surfaces had to be Sky color, hence I prepared a mix with Tamiya acrylics of 80% XF21 (Sky) and 20% XF2 (white) and sprayed first two diluted coats on them. Then, after a wet sanding with 1000 grit, I applied some mottles and strakes of pure XF21 and some preliminary Tamiya black panel liner along the main junctions: After that, I continued to spray the sky mix until I saturated enough the color but trying to keep some of the pre-shadow work visible. I think I am stopping here, also considering that the following clear coats will tend to reduce the difference between shades. The upper camouflage color will follow next. Thanks for following and best regards, Dan
- 81 replies
-
- 15
-

-

-
Nice work on those interiors. I always liked the lines of the Me-410. Looking forward to seeing how the build will proceed. Best regards, Dan
-
I could almost smell the odor of a new car! Dan
-
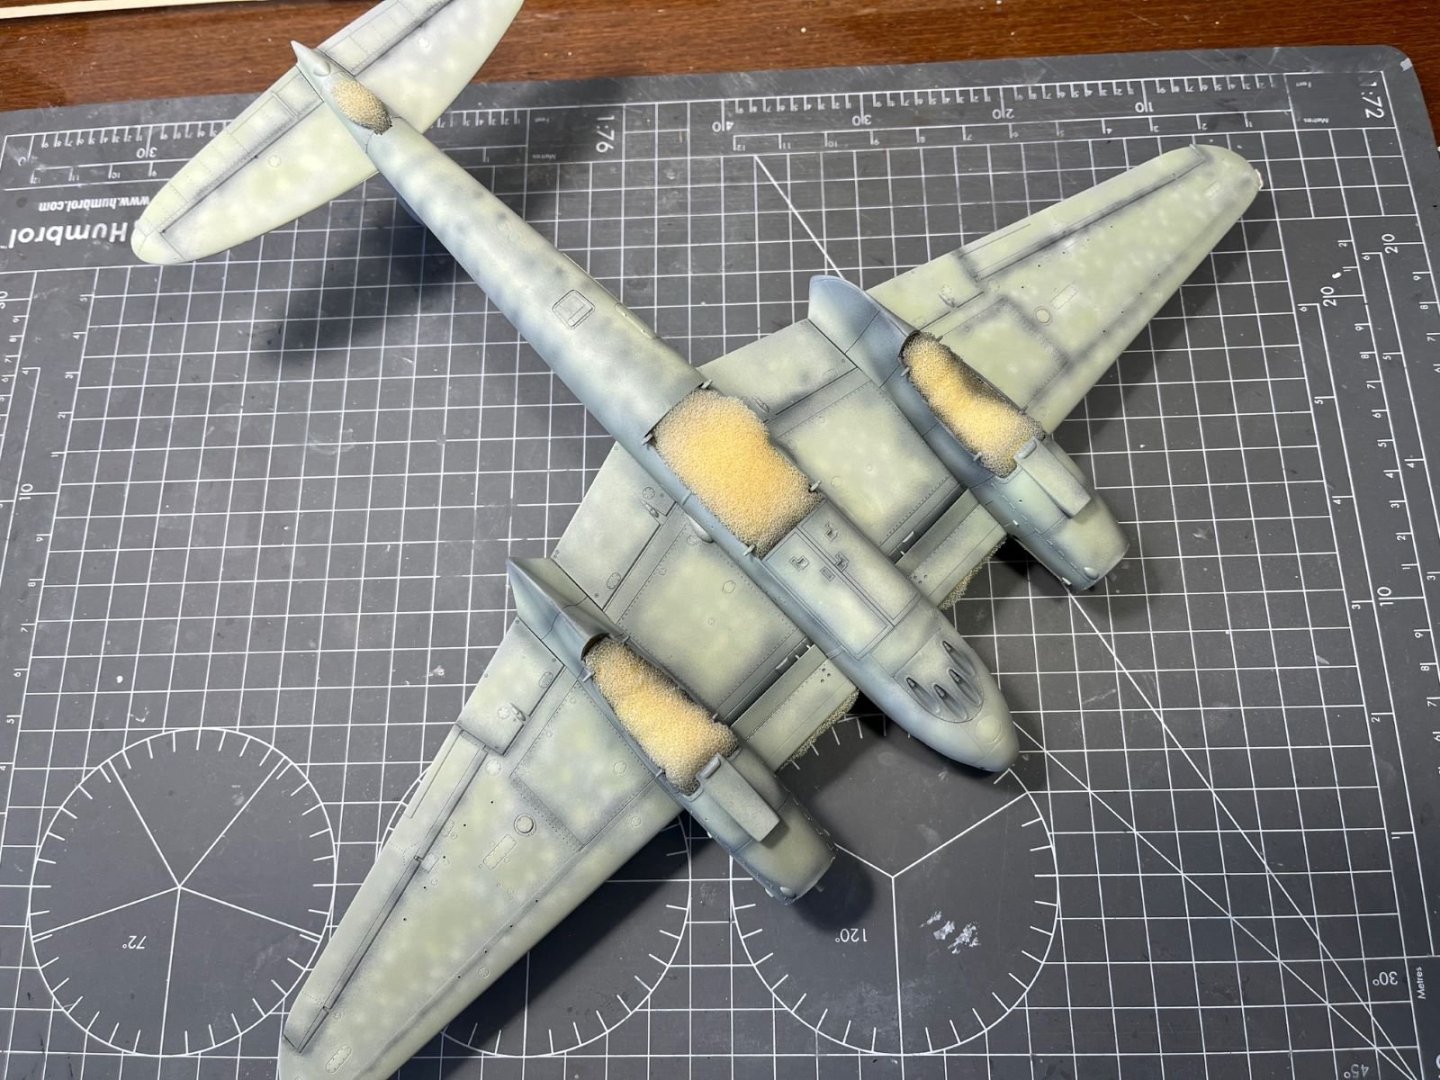
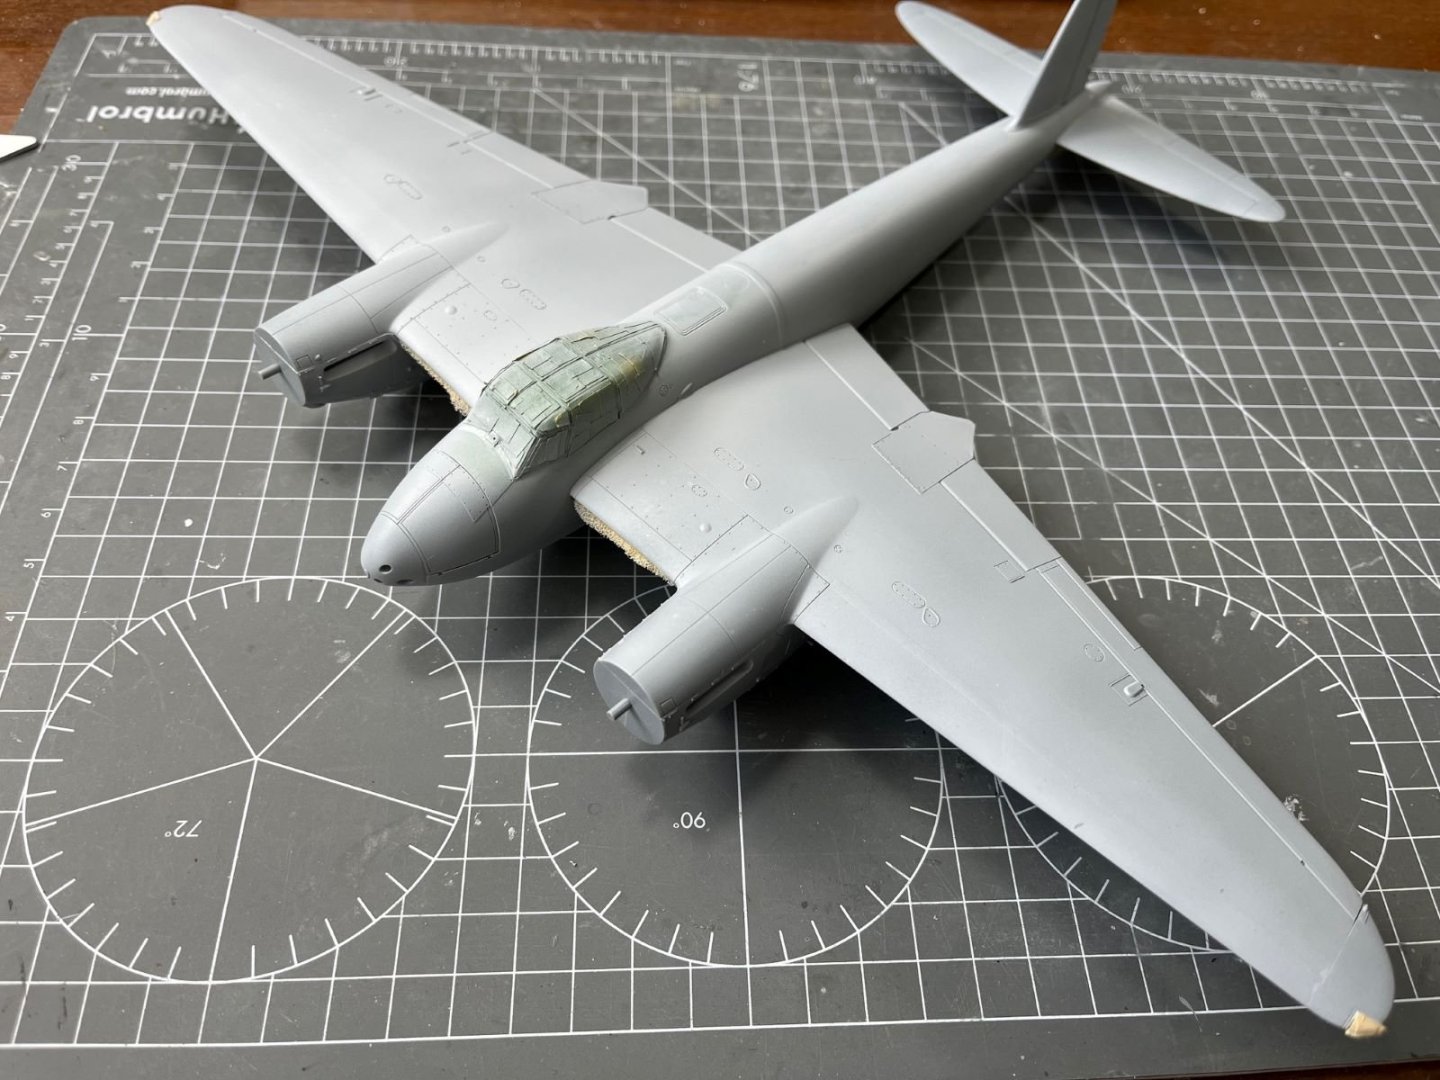
Hi, just a small update of my build. I assembled the main airframe parts together with no significant issues and the elegant lines of this aircraft eventually emerged. In preparation of painting, I coated everything with a light layer of Mr. Surfacer 1500. I started with painting the lower surfaces. In advance of the final RAF Sky color, to break its uniformity, I applied random mottles of white and dark gray: The actual Sky color will follow. Best regards, Dan
- 81 replies
-
- 12
-
-
Fantastic! It looks like a real car. The paintwork is really impressive, along with the rest. Cheers, Dan
-
Great Andy! I will be following your Mosquito build. I am sure your build will be faster than mine. Best regards, Dan
-
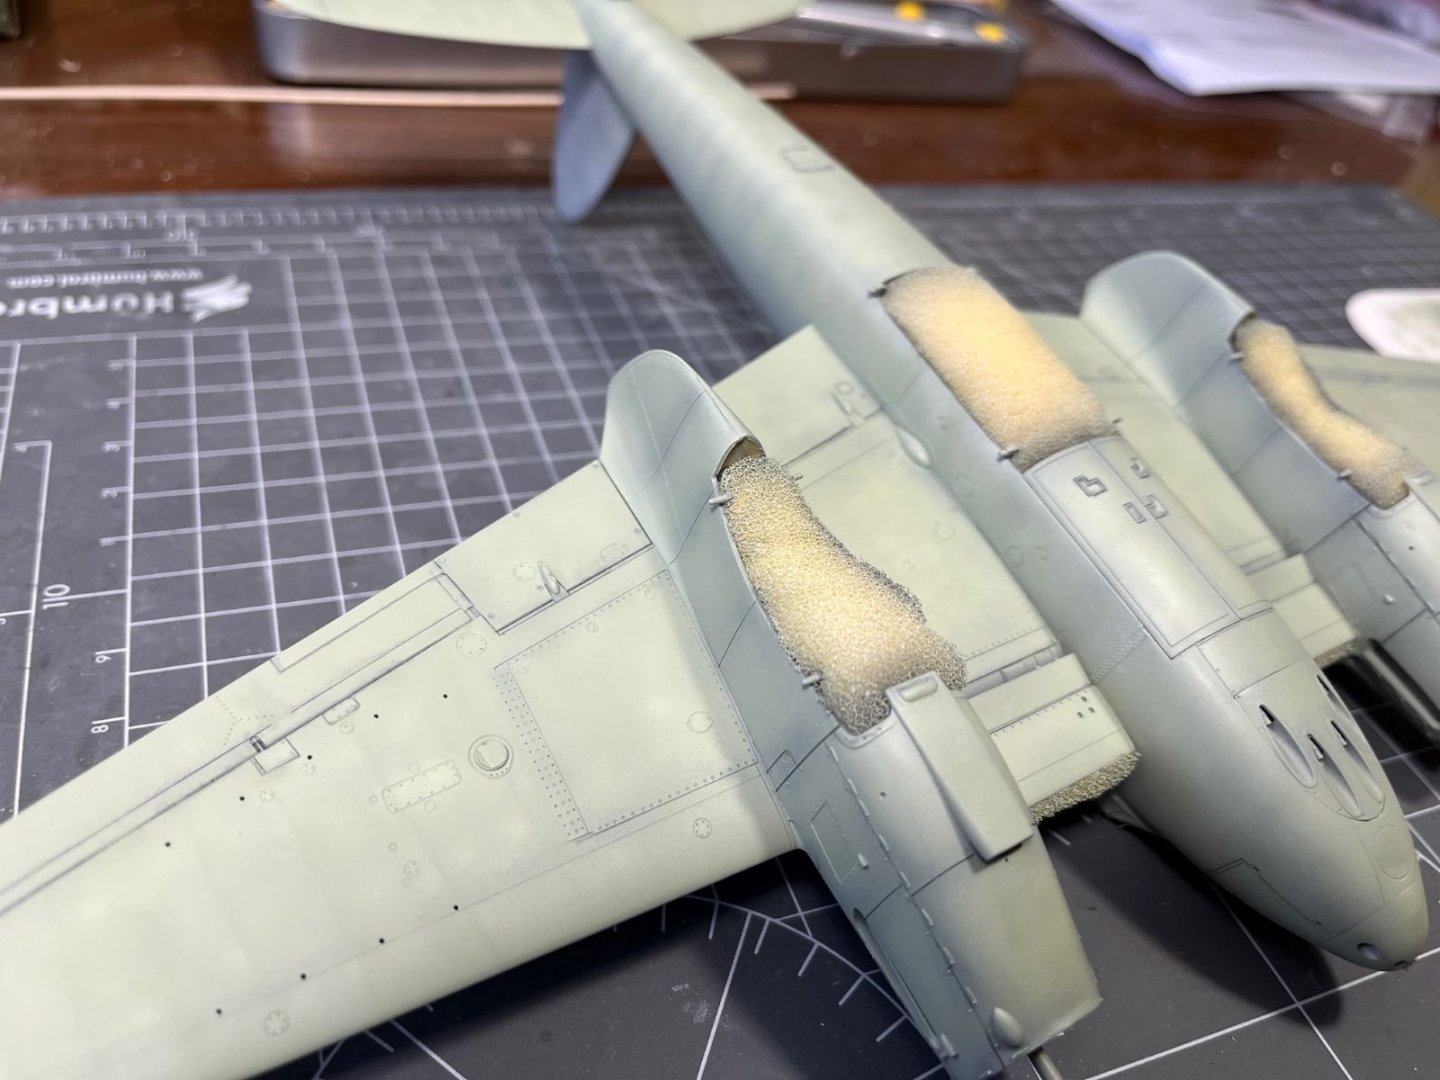
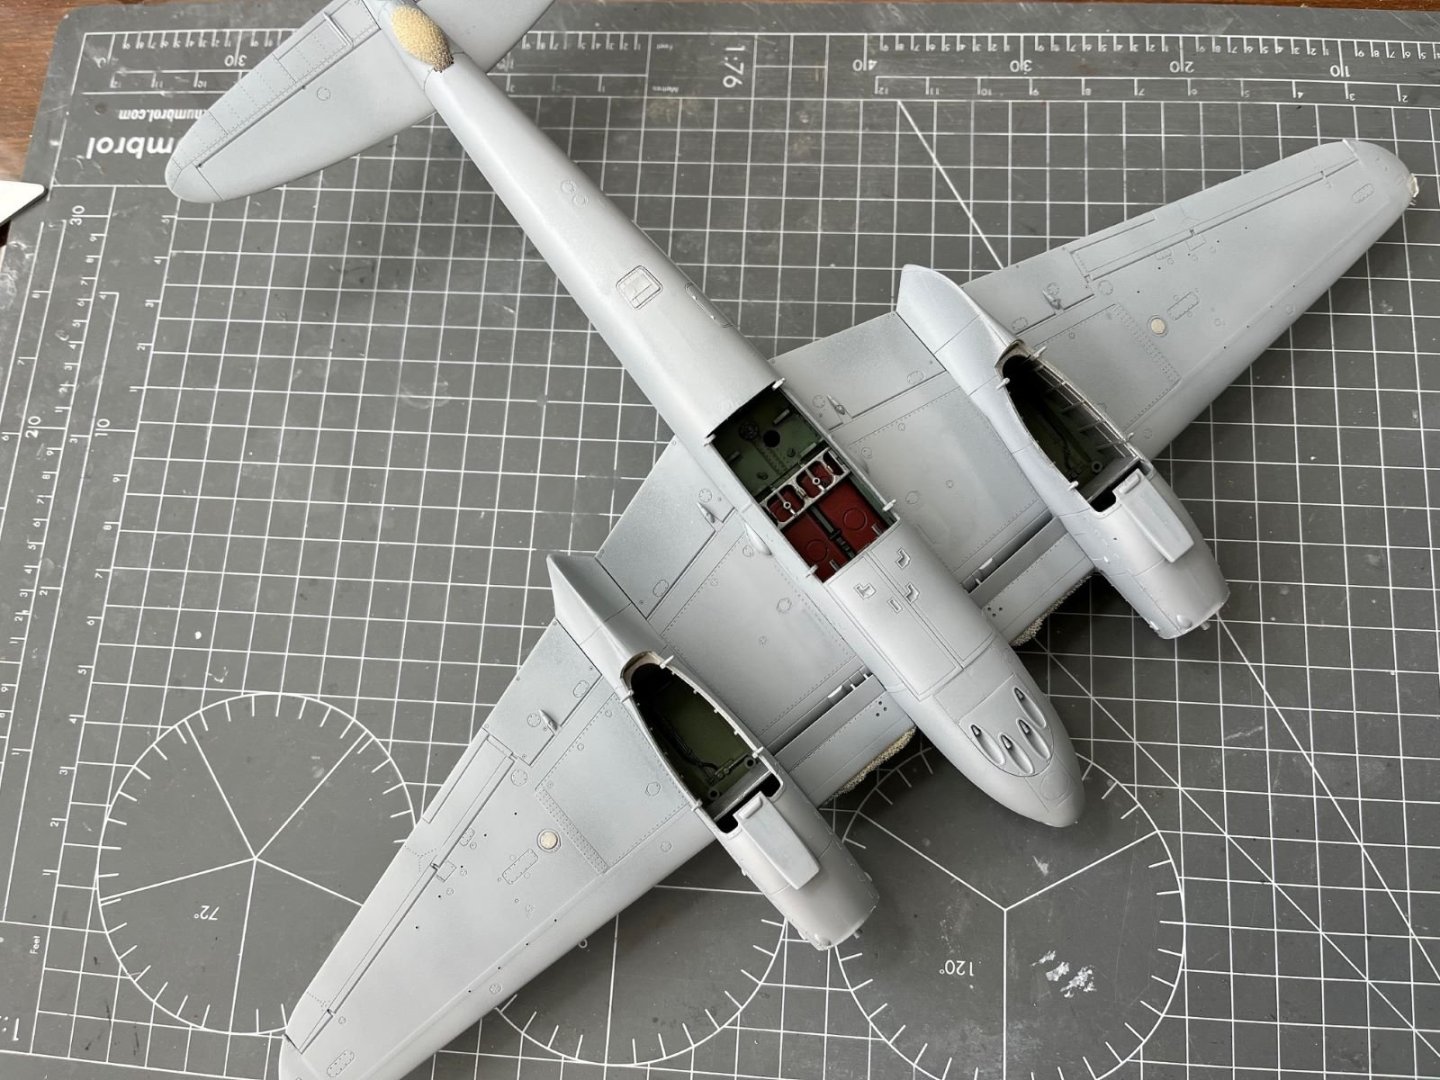
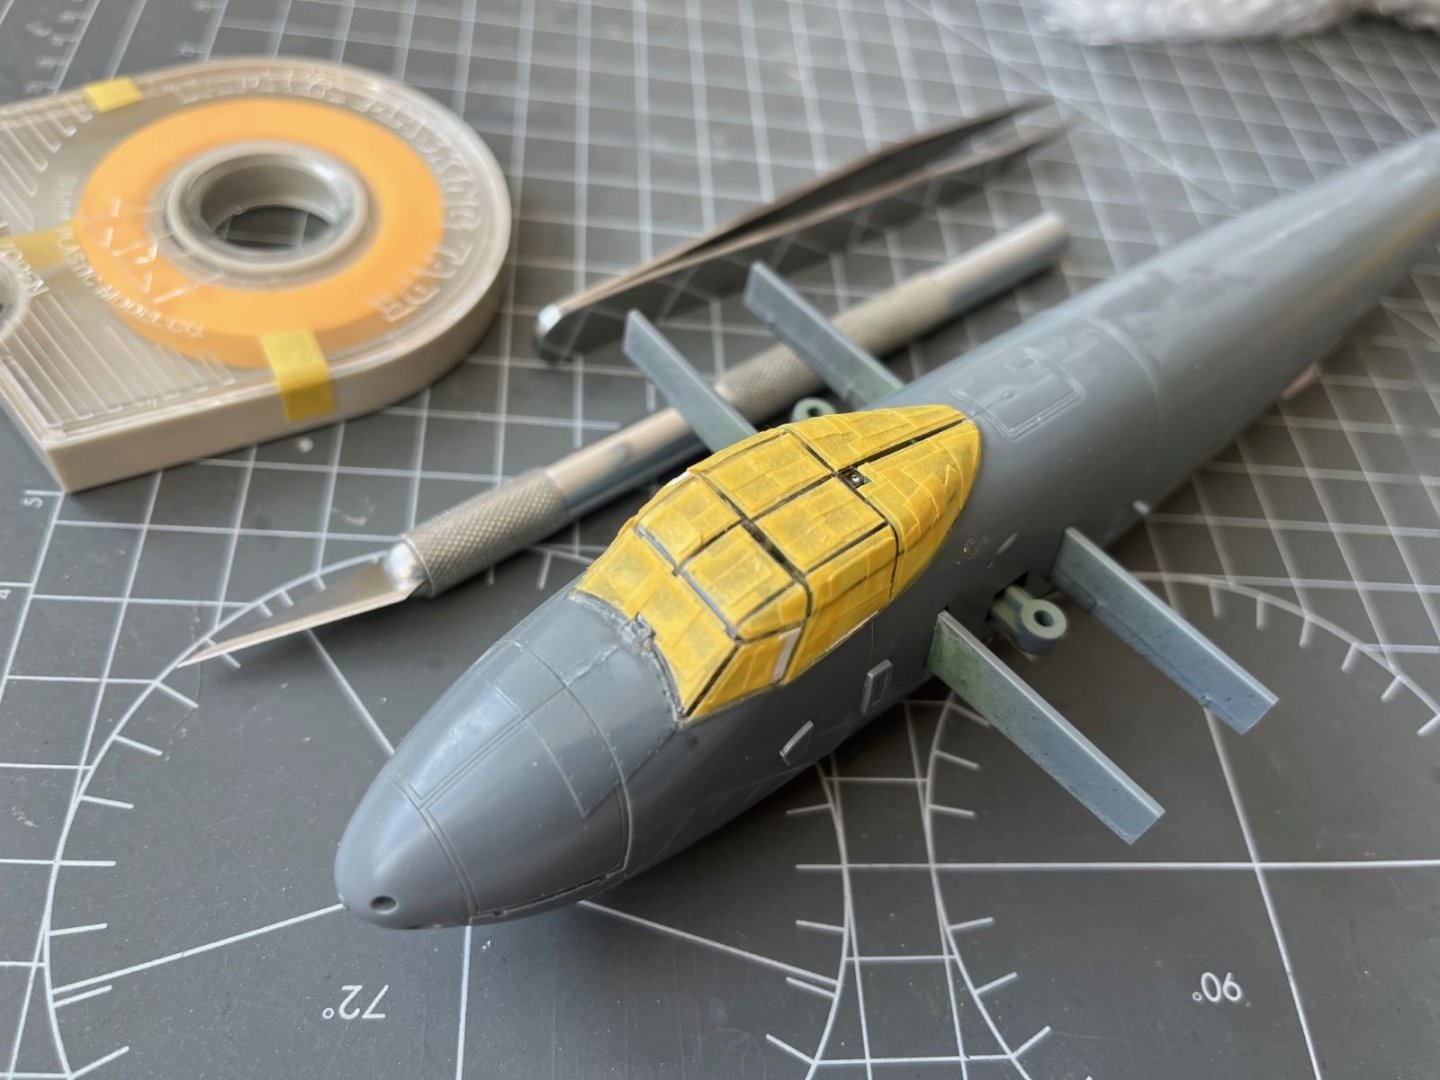
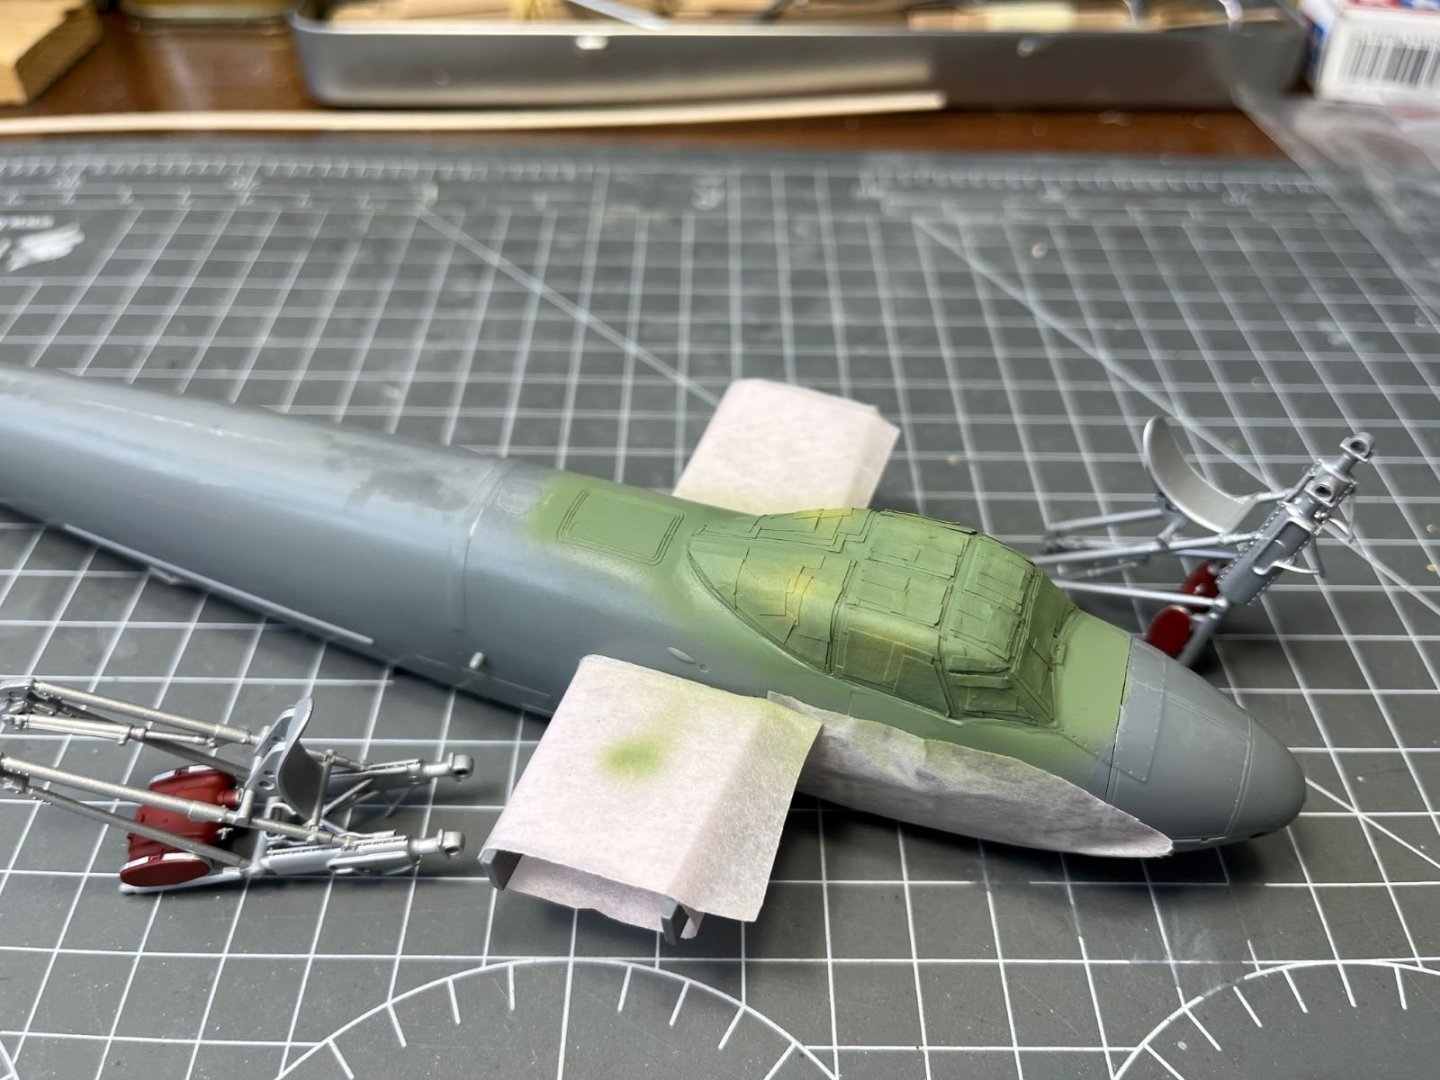
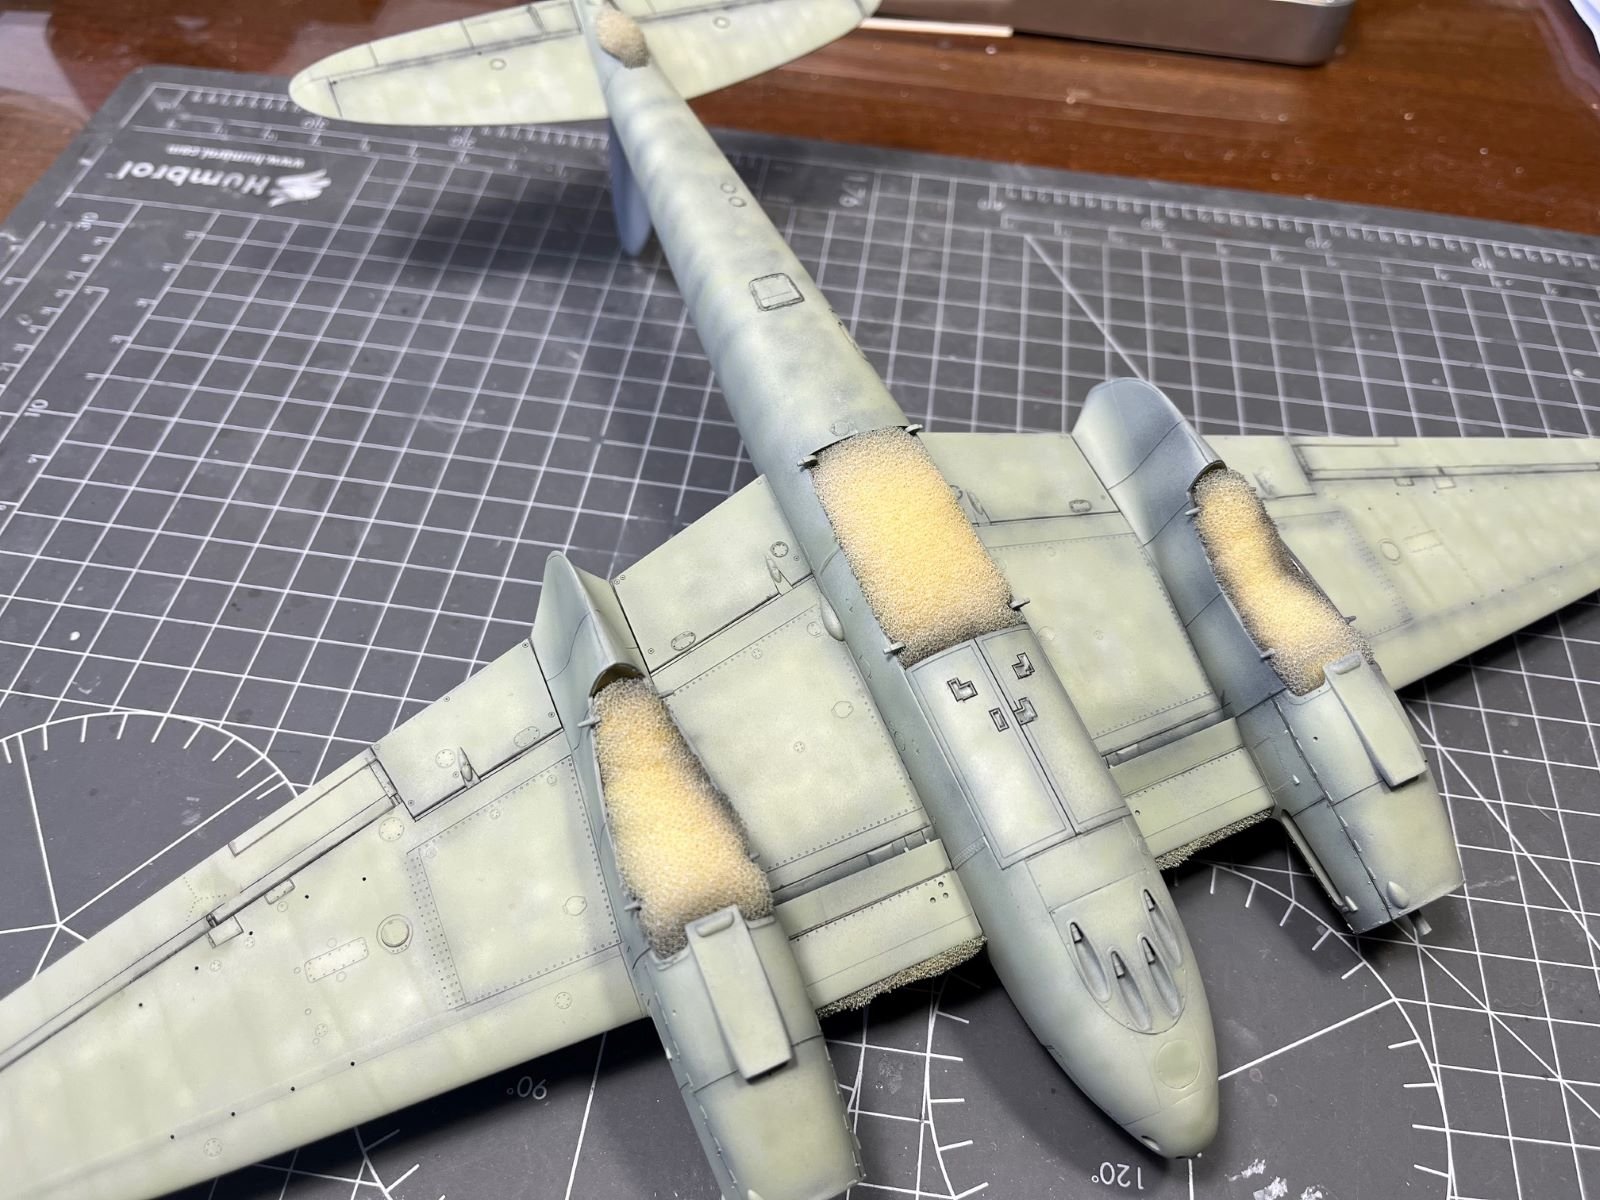
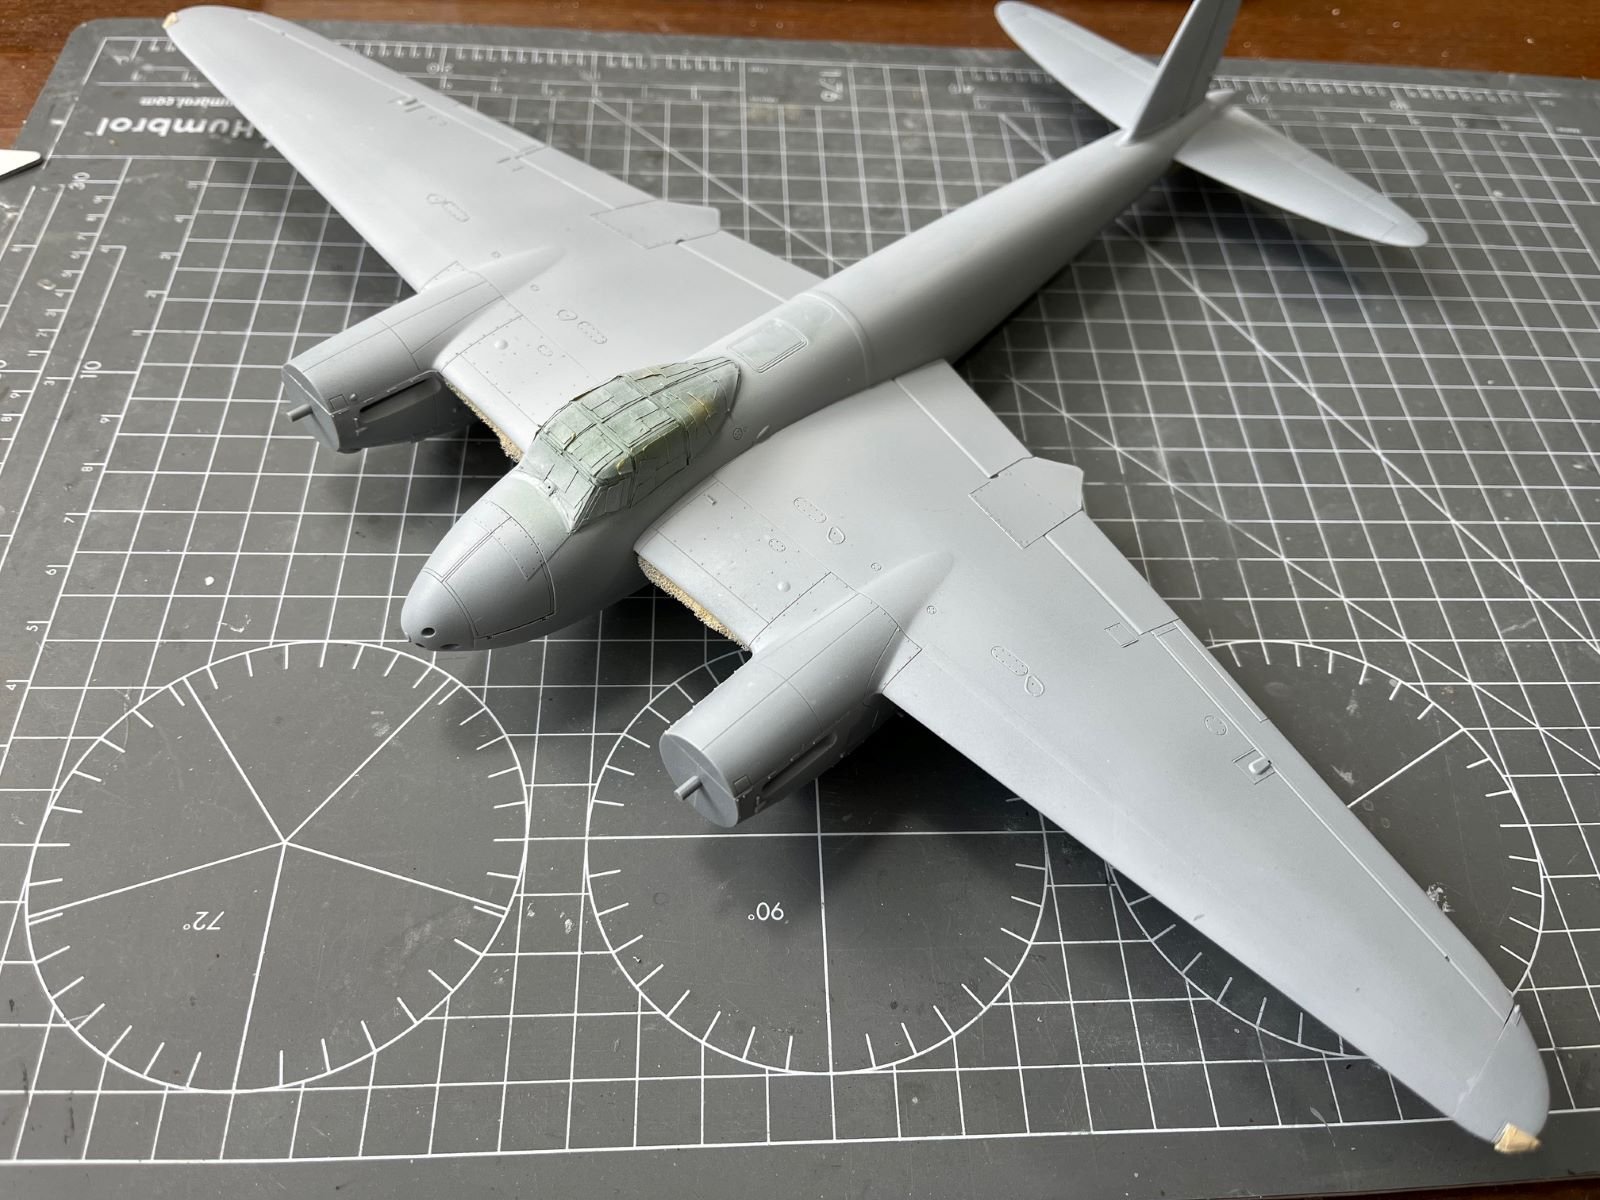
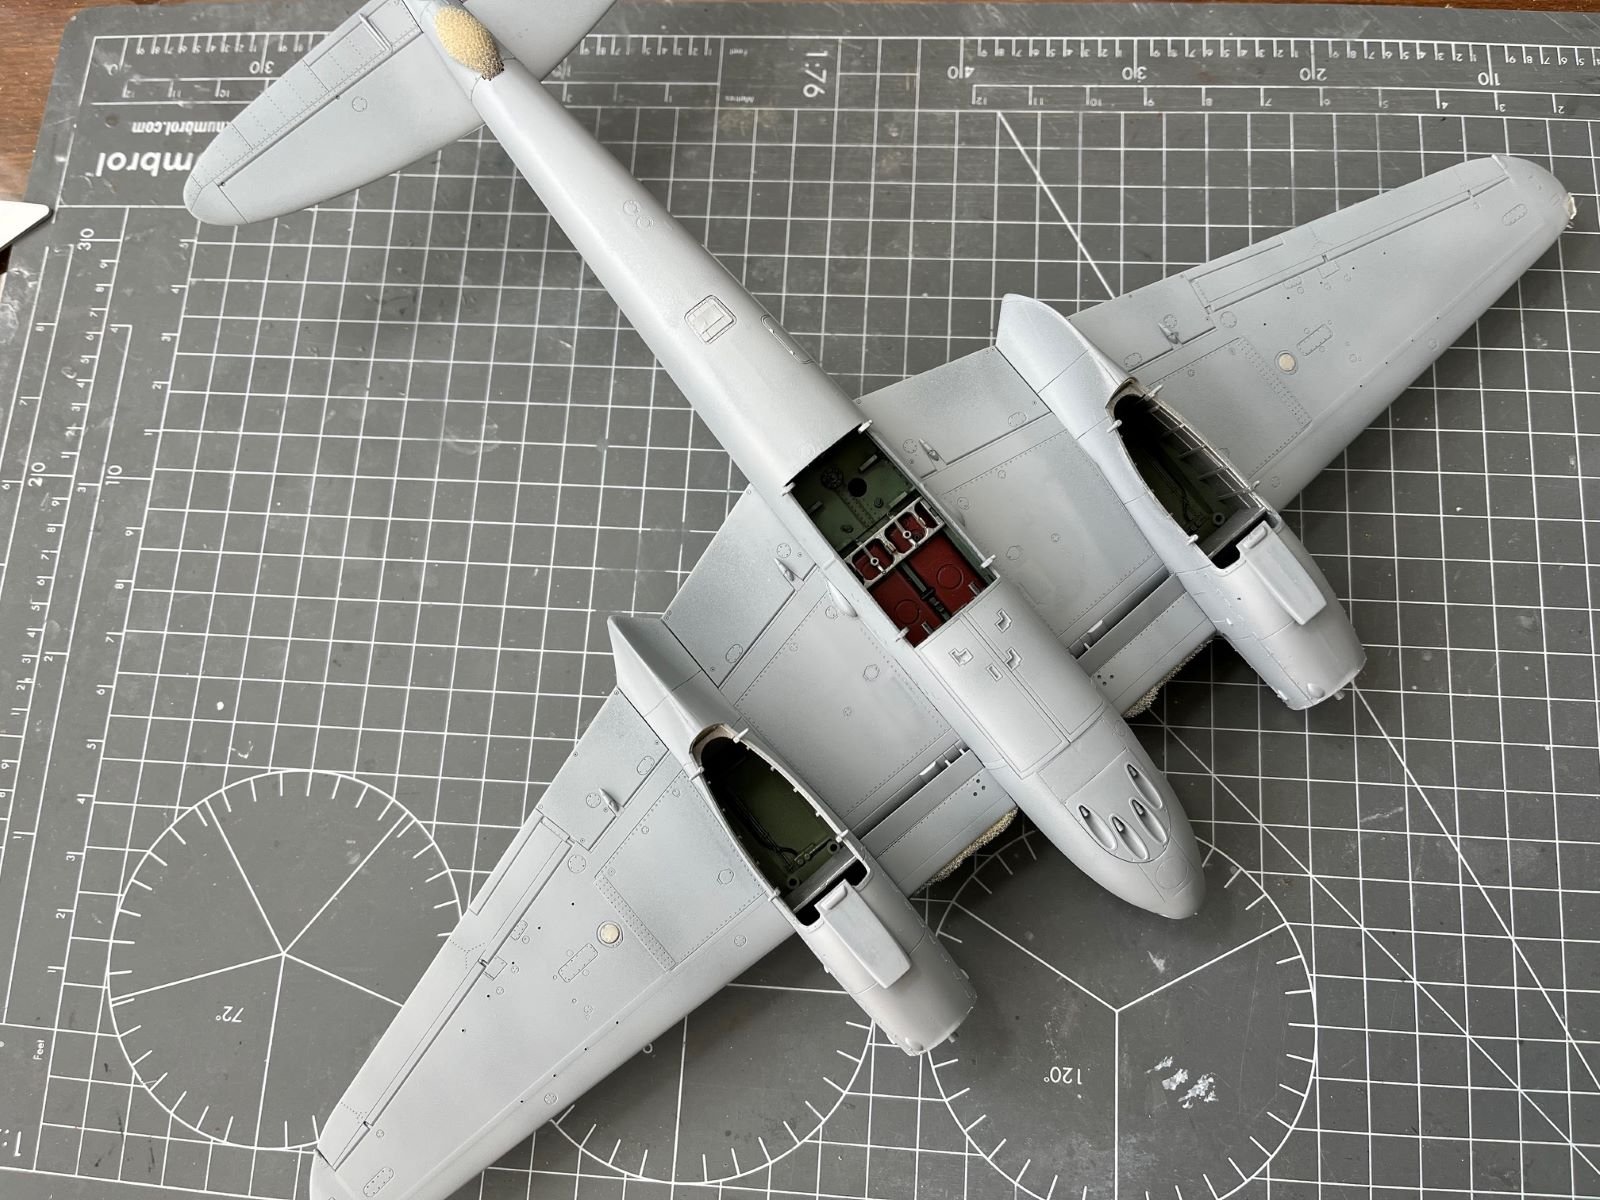
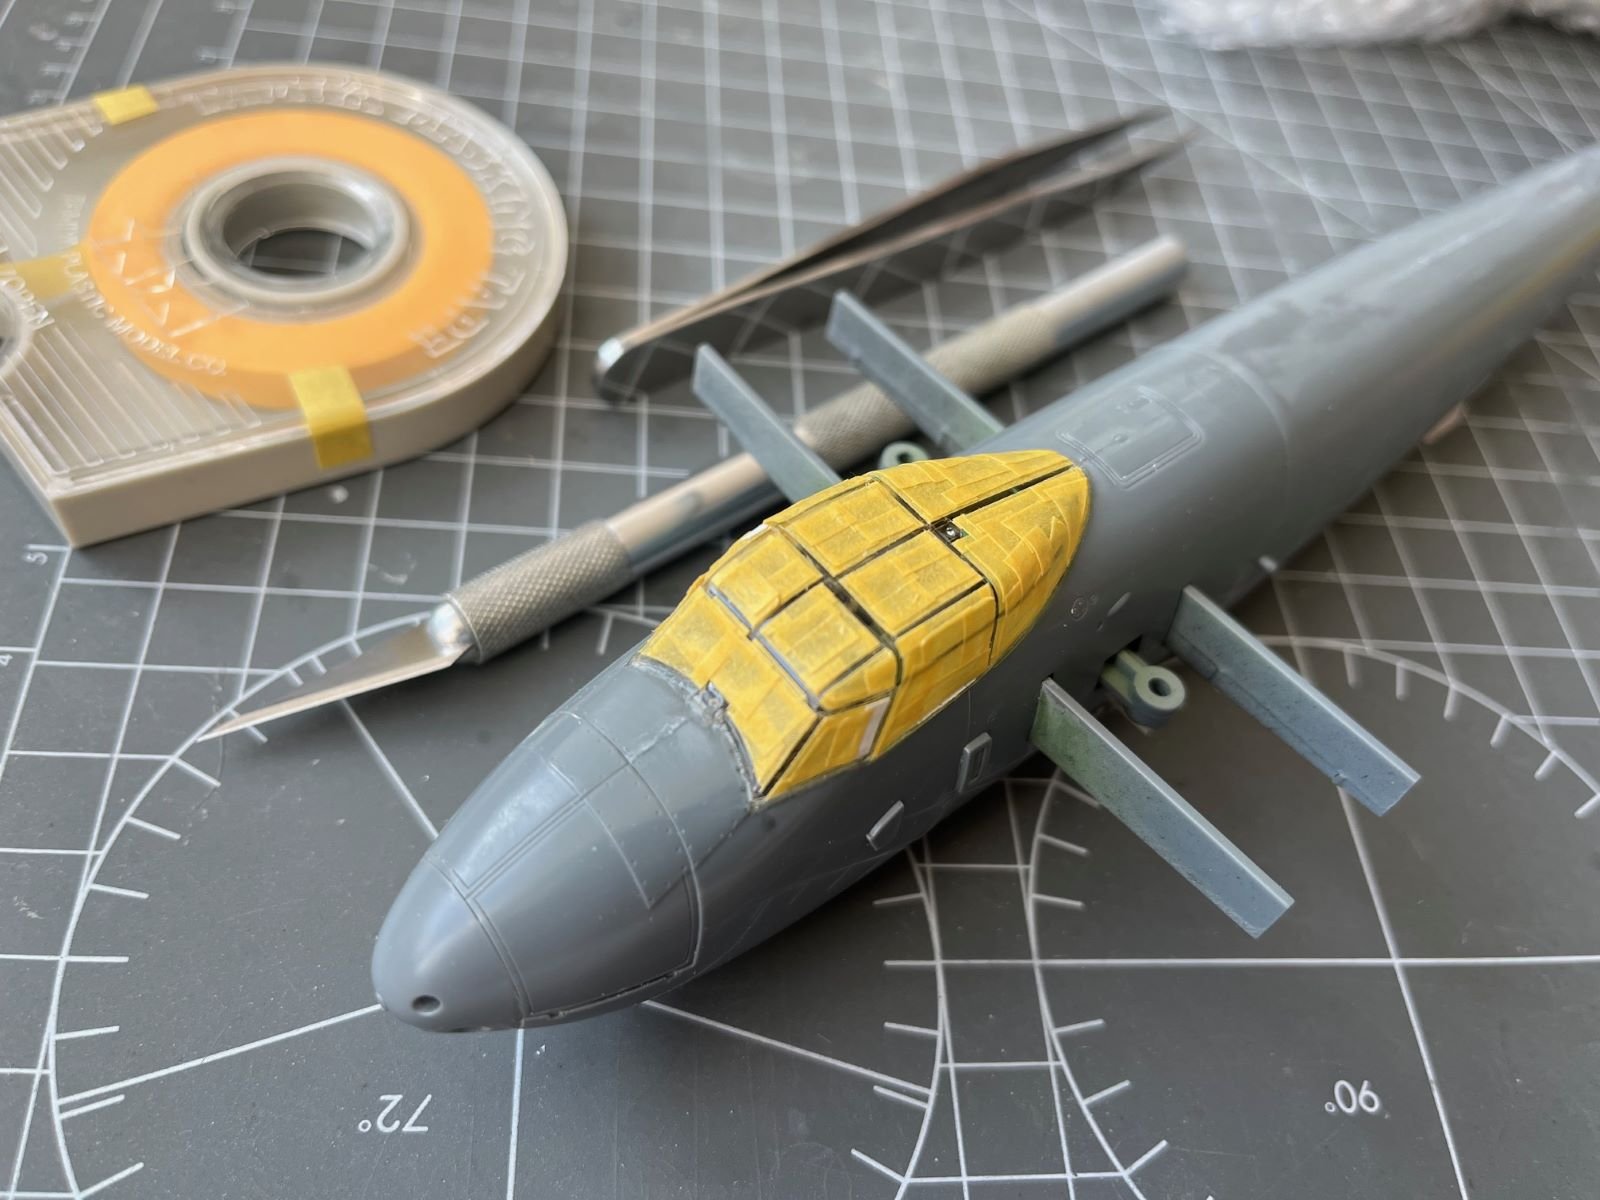
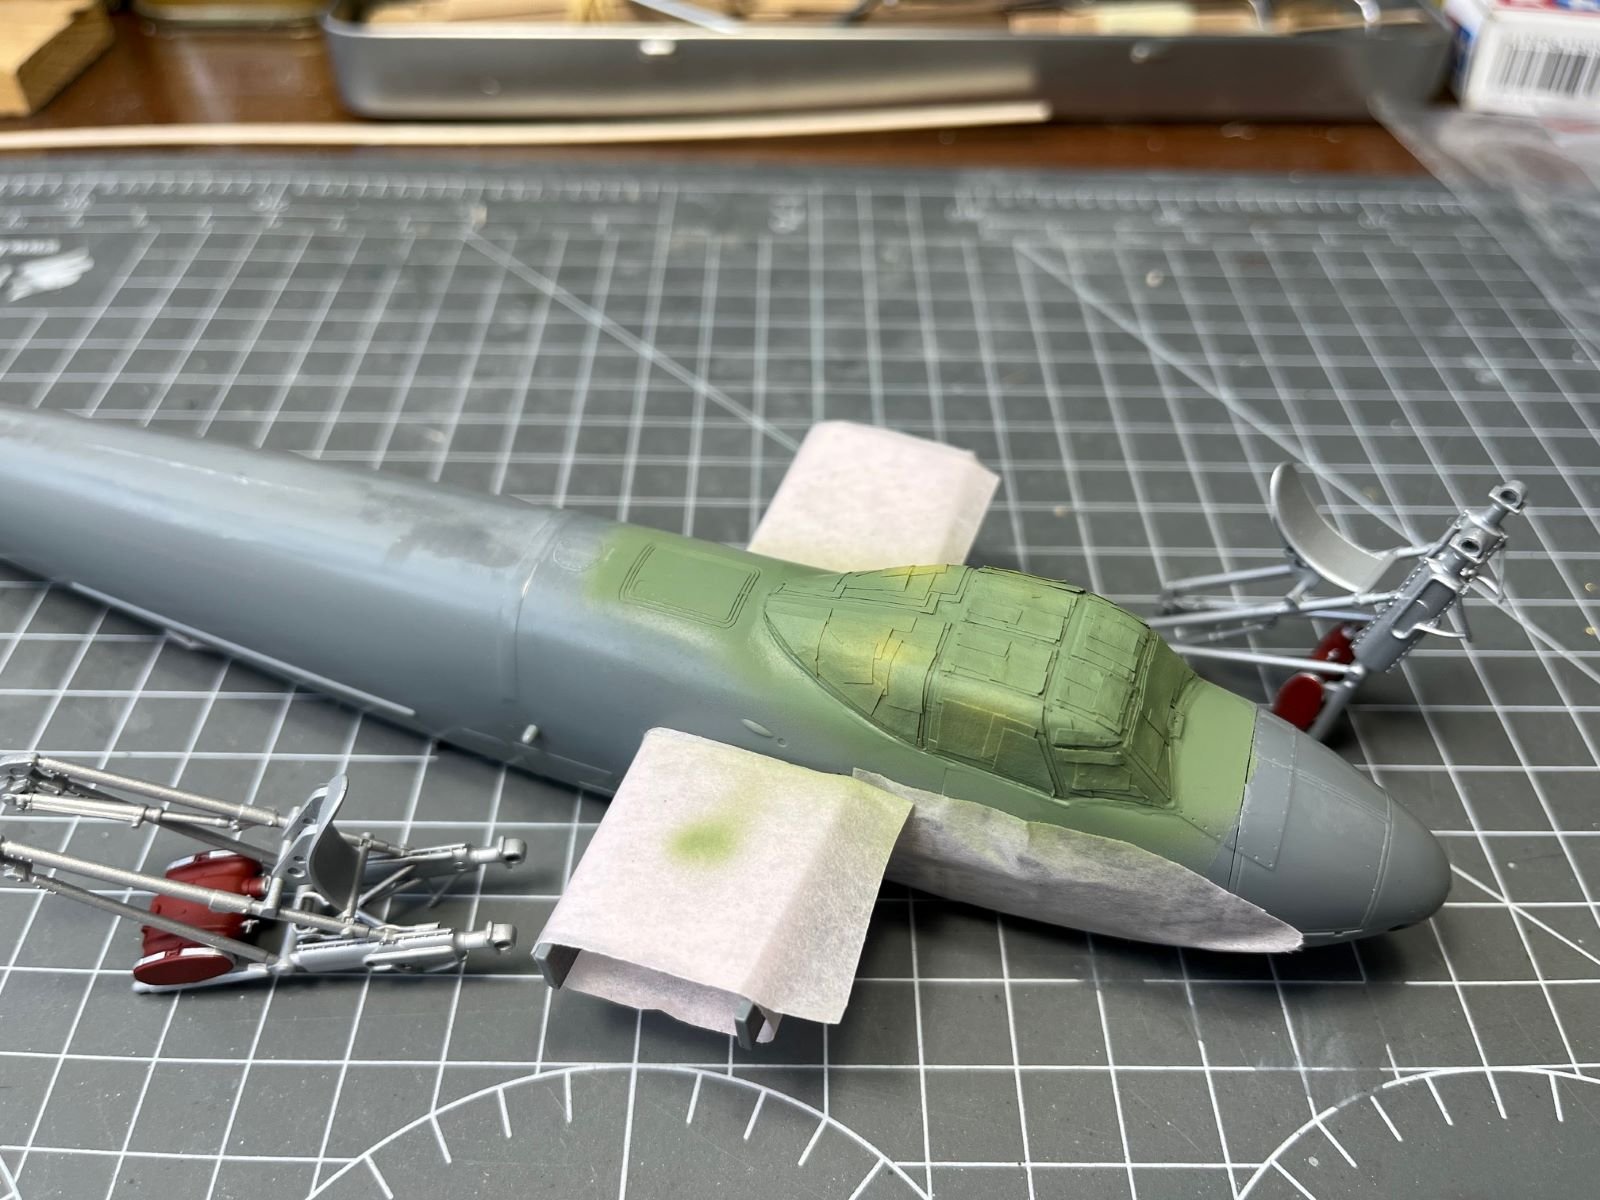
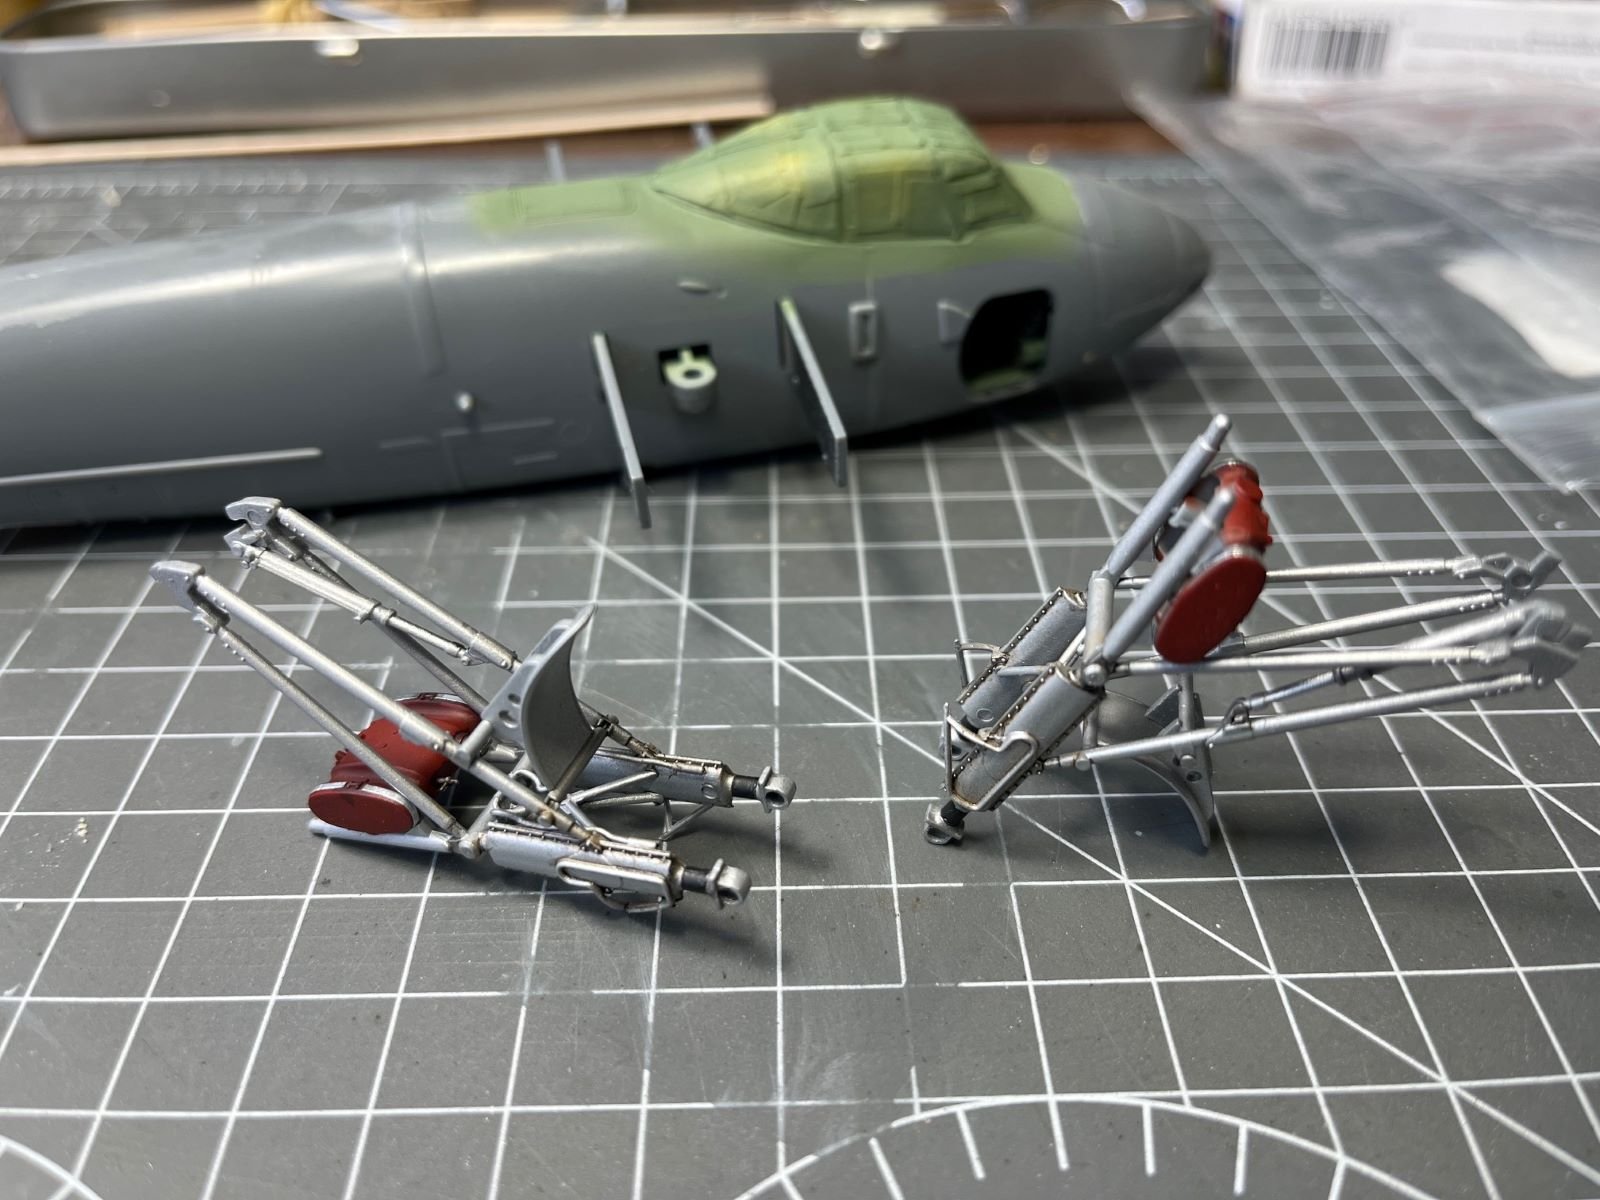
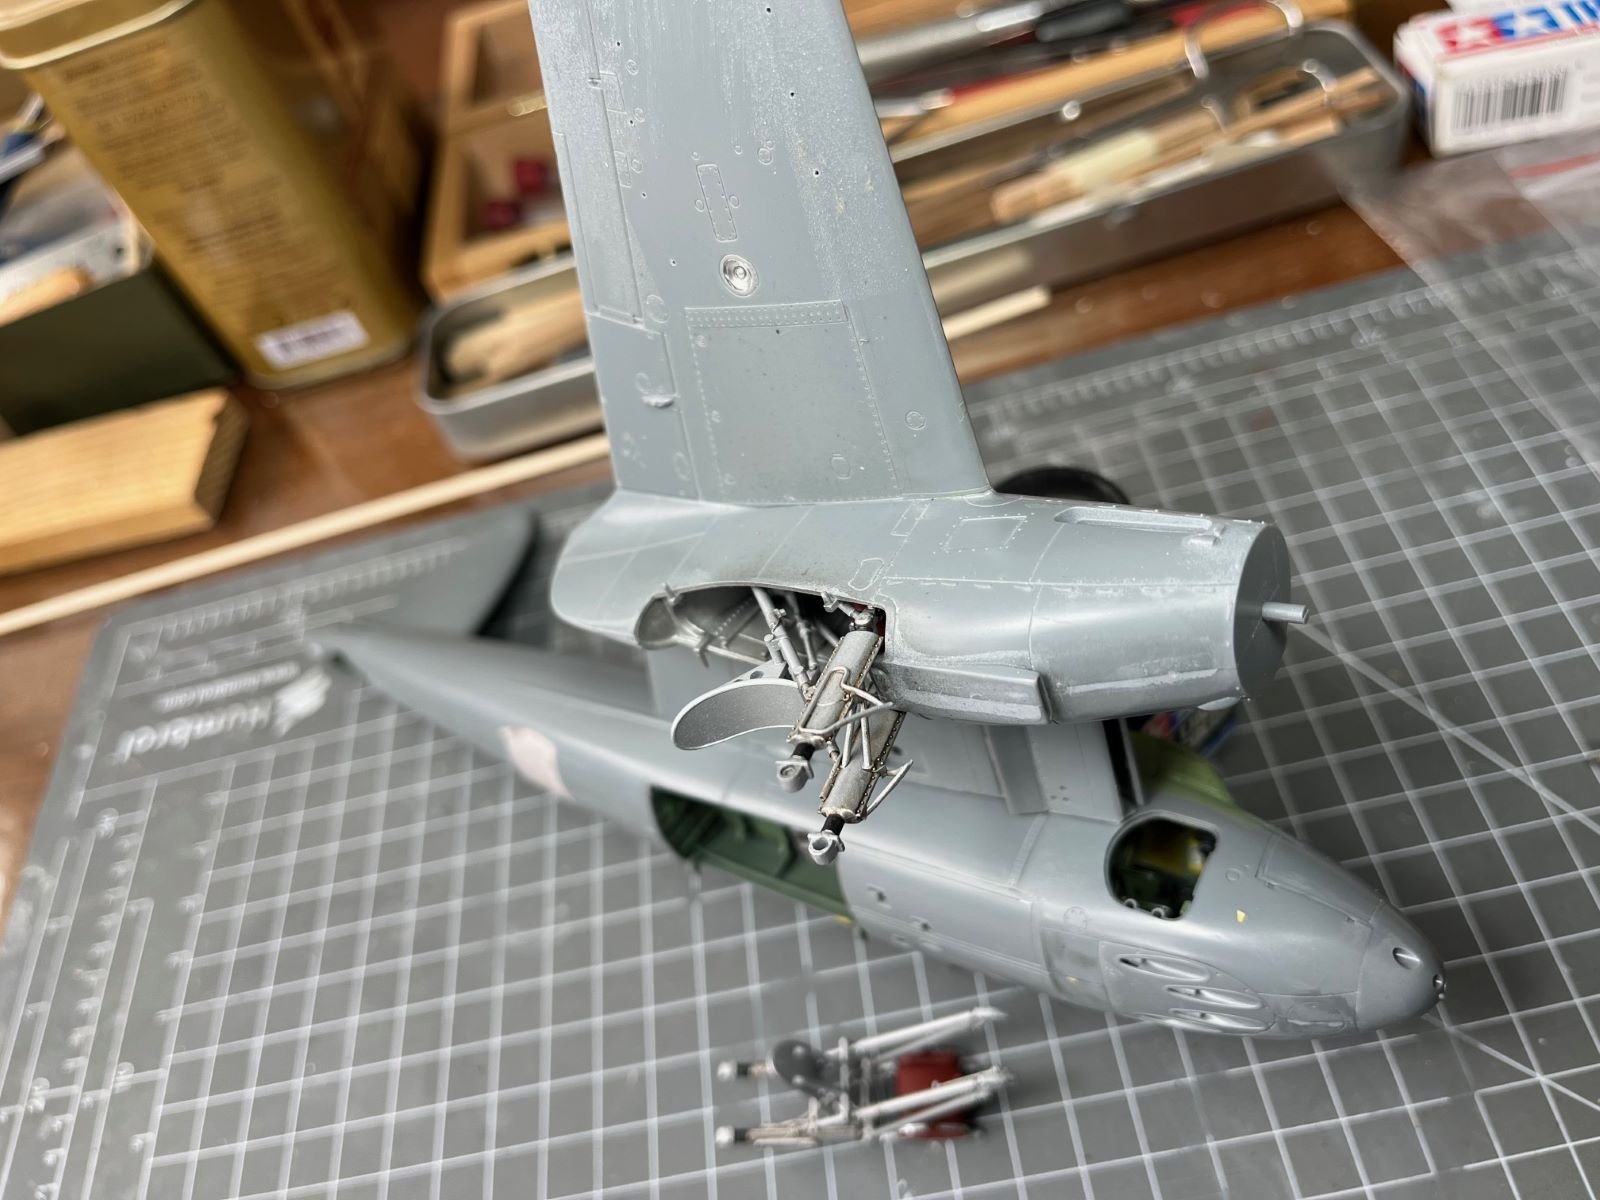
Dear all, after long time, I am back here resuming my halted Mosquito build. Before the interruption, I had to replace the kit plastic canopy by a vacuum-formed one by Squadron. After gluing it, I masked the transparent panes with Tamiya tape. This was quite a chore because of the soft details molded on the canopy which don't provide a well defined guide for the scalpel blade. After sealing the edges of the tapes with a clear coat, I sprayed the interior green on the canopy. This allowed me to check also the aspect of the bonding line, which resulted acceptable. At the same time, I also sprayed the final coats on the assembled landing gears, as shown above. After a clear coat, I added some weathering by brushing on some Tamiya panel accent black and brown liners: The complex structure of the gears where quite well rendered by Tamiya and I just added some tubing to it. I checked the gear posed inside the bay of the nacelle and it looks quite cool: That's all for now, the assembling of the main parts of the aeroplane will follow. Best regards, Dan


- 81 replies
-
- 20
-
-
-
I am sorry to hear that about your health! Get better soon Vossie, we are missing you. Warm greetings, Dan
- 714 replies
-
- 2
-
-
- lady nelson
- victory models
- (and 1 more)
-
Well done Andrew. A very nice model of this strange fighter. I guess that the Bristol F.2 Fighter might be in its genealogic line. Best regards, Dan
-
Hi Andrew, this will be a great build to follow. I love the this plane which I surely build sooner or later. The new Airfix rendition must be great and I believe you will do justice to it. Best regards, Dan
-
Hi Fritz, I haven't implemented in full the tapering that you mentioned, although I read about it as well. The instructions don't mention it either. Best regards, Dan
- 87 replies
-
- 2
-
-
- Lady Nelson
- Amati
- (and 1 more)
-
@ccoyle, thank you Chris for your comment which I appreciate. Thank you @AJohnson and @vossiewulf for your input about my question. I wouldn't mind to buy new components if they look better. However, the issue mentioned above about the barrels centering the port holes needs indeed to be considered. I will reflect upon it, but perhaps I should just go on as others have already done it. Thank you and best regards, Dan
- 87 replies
-
- 3
-
-
- Lady Nelson
- Amati
- (and 1 more)
-
Hi Mike, I haven't visited this forum for a while and I have seen your models only now. You made good progress on both and you got a nice result on you first model which was quite challenging. I will keep following, Dan
-
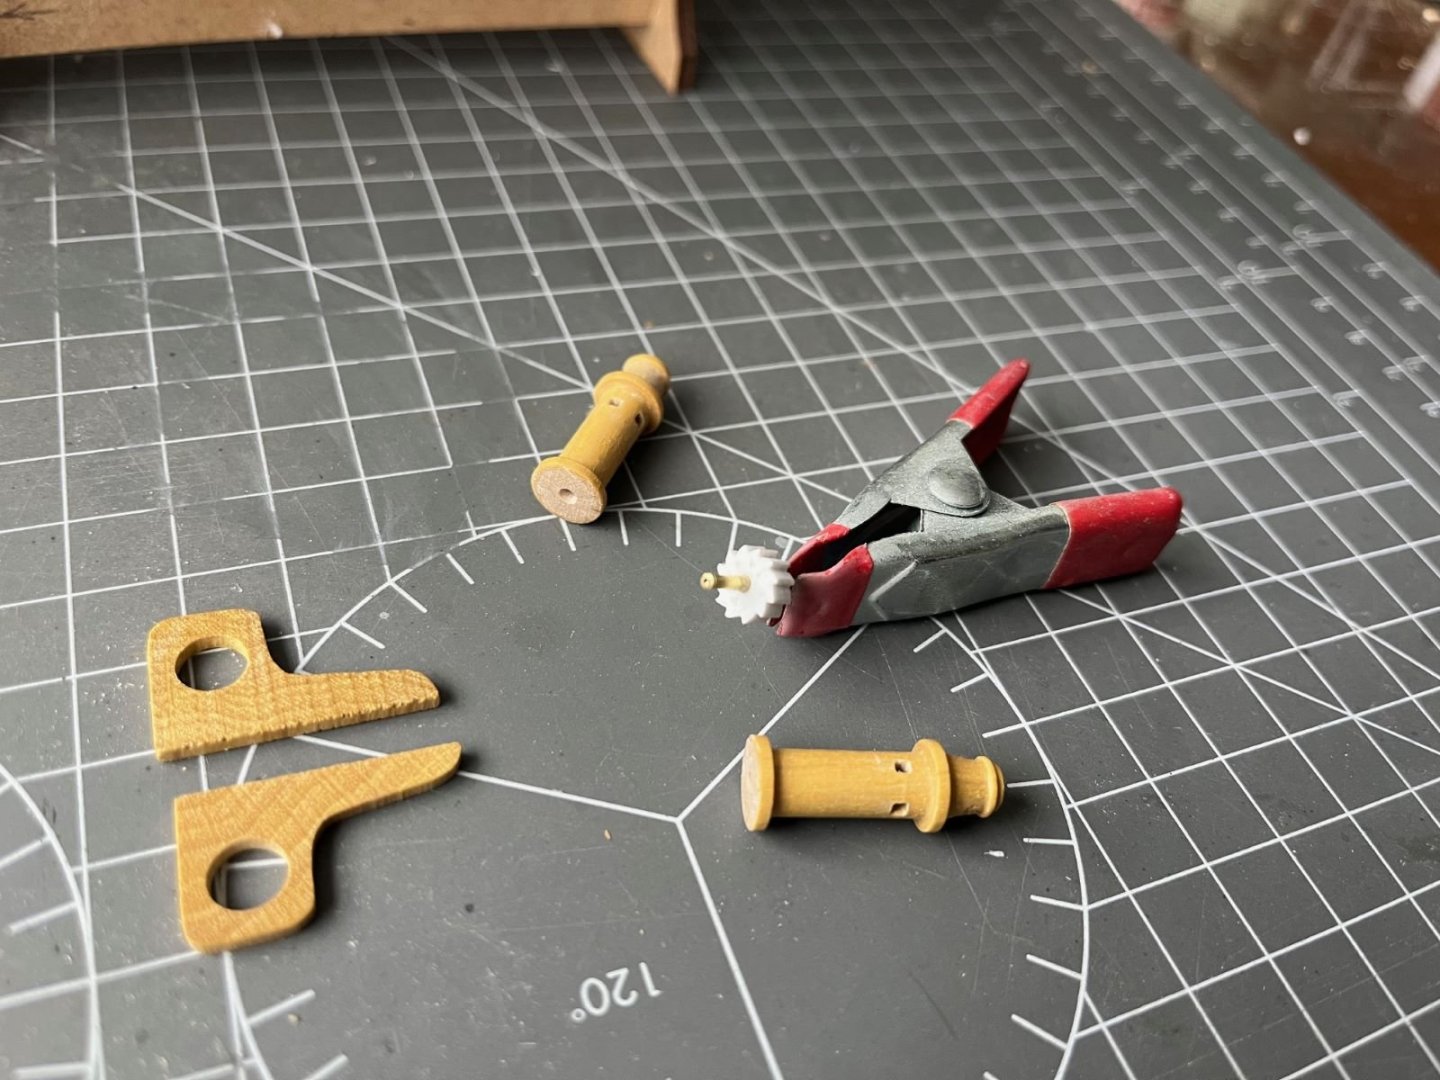
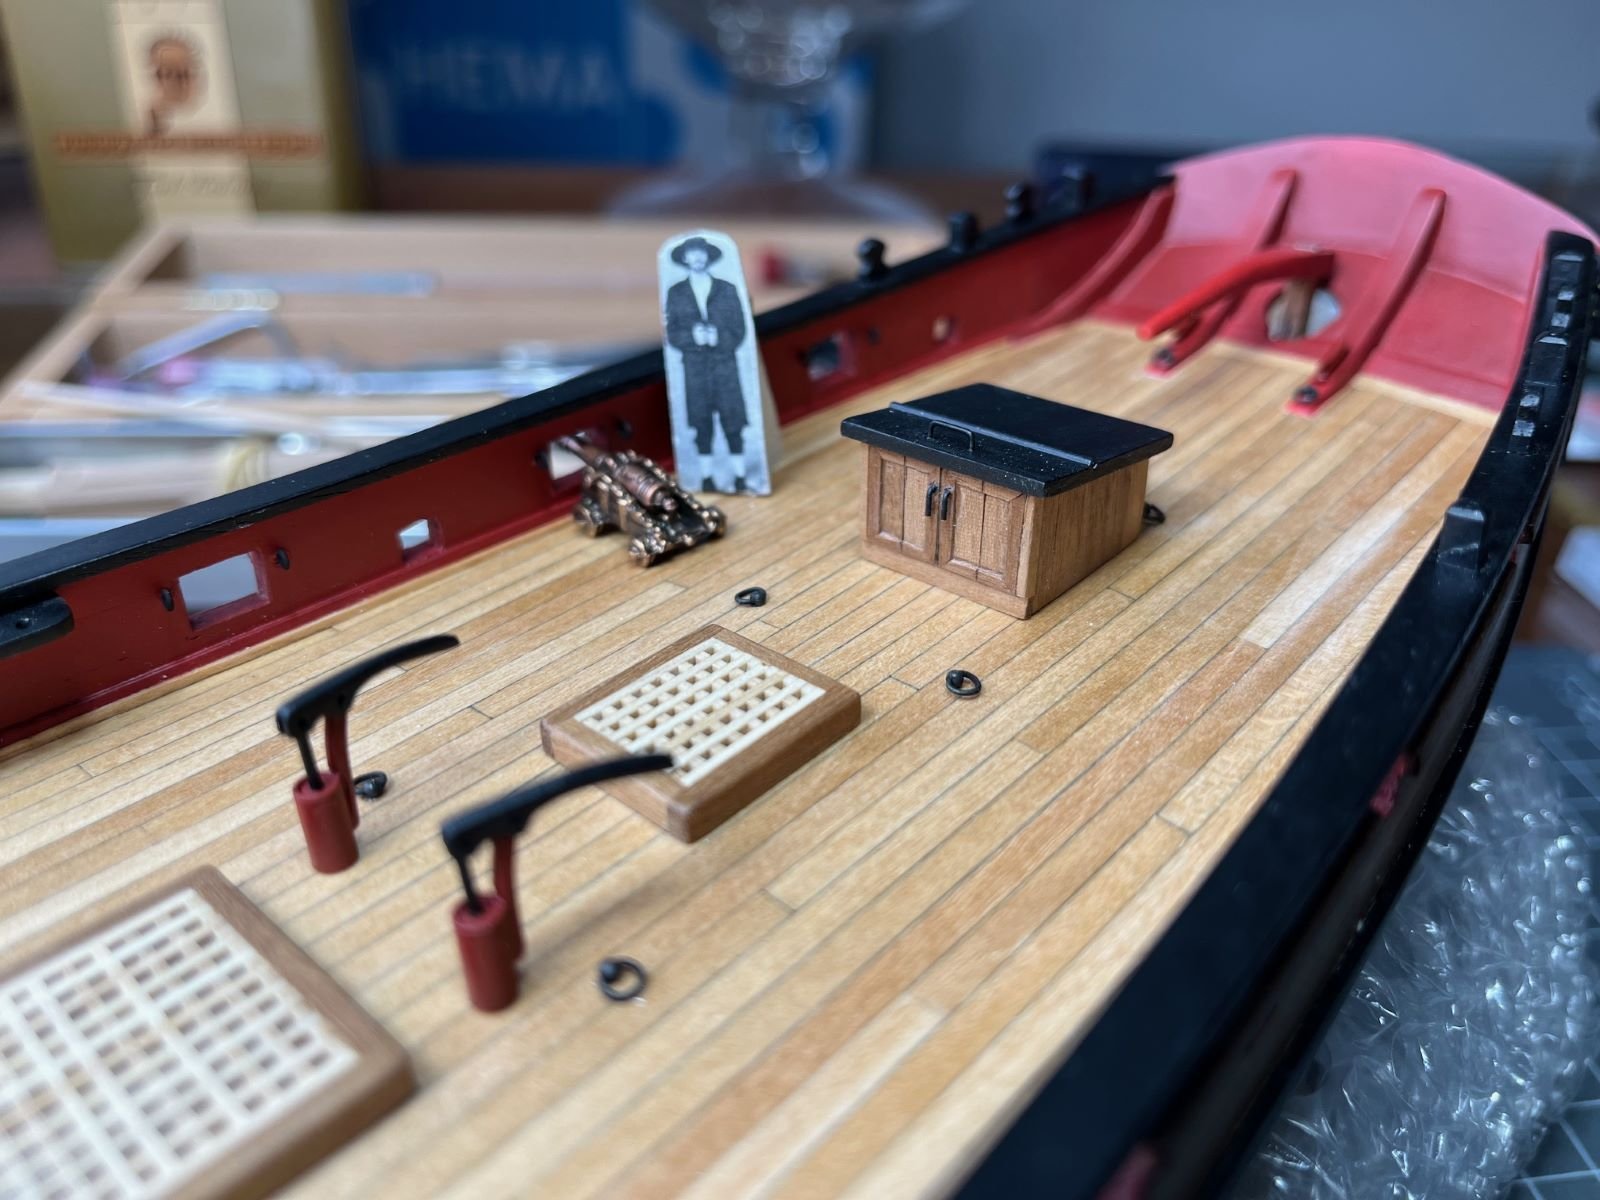
Hi, after a long absence, during which I tried to replicate the pumps on the deck, I am back with my final product. What bothered me most about the items provided with the kit was that the cylindrical parts are not circular, but have an oval shape (which is obviously a flaw of the mould). Hence, following the suggestion above from @vossiewulf and copying his design, I scratched build new pumps. However, I used different materials which I was more comfortable with. I obtained the body of the pump soldering a brass tube to a brass rod which was suitably shaped. The push rod is also made of brass. Other parts were done with styrene strips. Once assembled, this is how they look when placed on the deck: Painting followed: Not perfect and oversimplified, but I am satisfied with them. Next, I will be dealing with the cannons. The items coming with the kit, once freed from burrs, are quite nice, but I am a bit puzzled about their size. In fact, I have the impression that they are a bit undersized as I try to show in the following picture: The guy posed next to the cannon is about 1.66m tall (i.e. about 5.5 ft) and the cannon is barely touching his knees. It looks like a toy for him. Seen other problems encountered with the consistency of scale across this model, it could be that the entire model is not exactly 1:64 scale. Or it could be that my guy is too tall for his time. Is anyone in the forum have an opinion about that? I am pondering whether I should source bigger cannons. Thank you and best regards, Dan


- 87 replies
-
- 7
-
-
- Lady Nelson
- Amati
- (and 1 more)
-
Nice job on the planking of the hull. I like also the extra details that you have added to the model so far. I will be following with interest, kind regards, Dan
-
@vossiewulf, thanks for your comment. Indeed, I am considering how to scratch built them in a simple way. @glbarlow, thank you for your comments. I consulted many times your build log to get ideas for mine. Indeed, you are absolutely right about the incorrect scale of the bits. I already tried to shorten it a bit and to slim down its webs. However, the problem is not solved fully. But, at the moment, I am a bit annoyed about modifying parts and I need to go on with the build. I already halted my very first built of the 'Mayflower' because of the too many modifications that I introduced that slowed down it too much. I will see whether I will come back to it later.
- 87 replies
-
- 1
-
-
- Lady Nelson
- Amati
- (and 1 more)
-
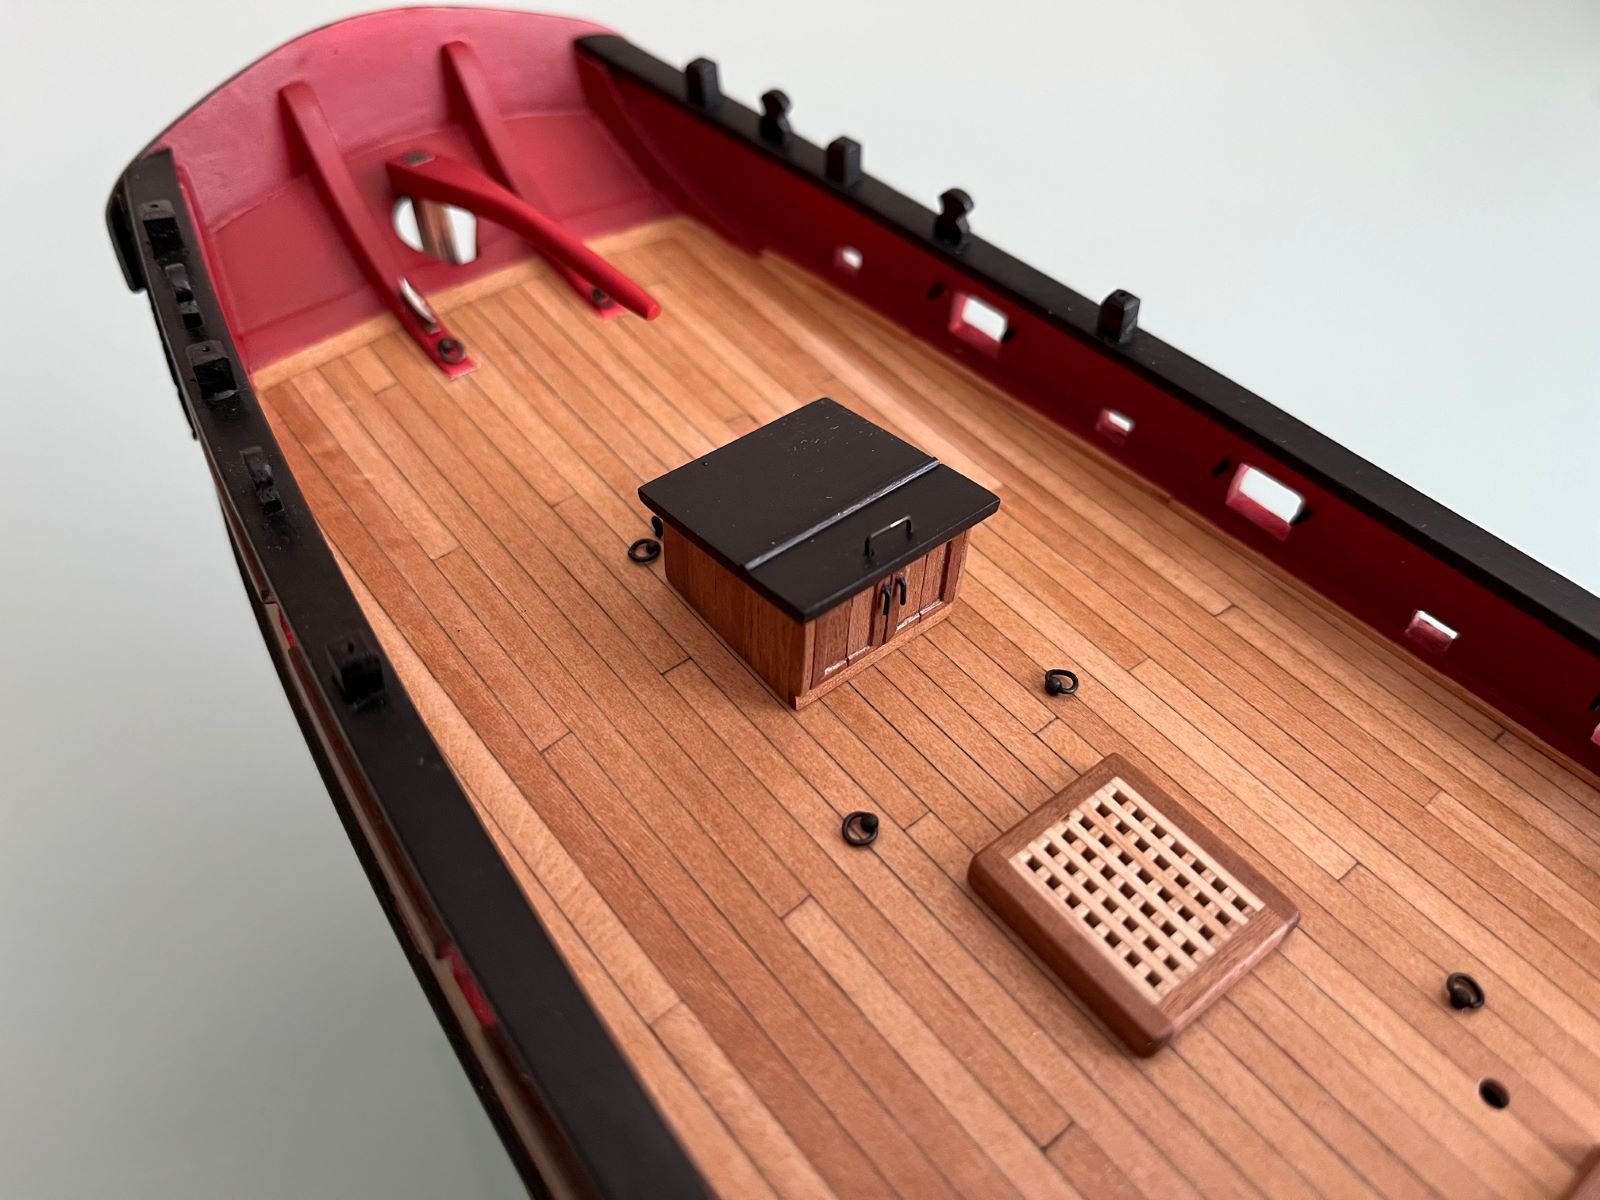
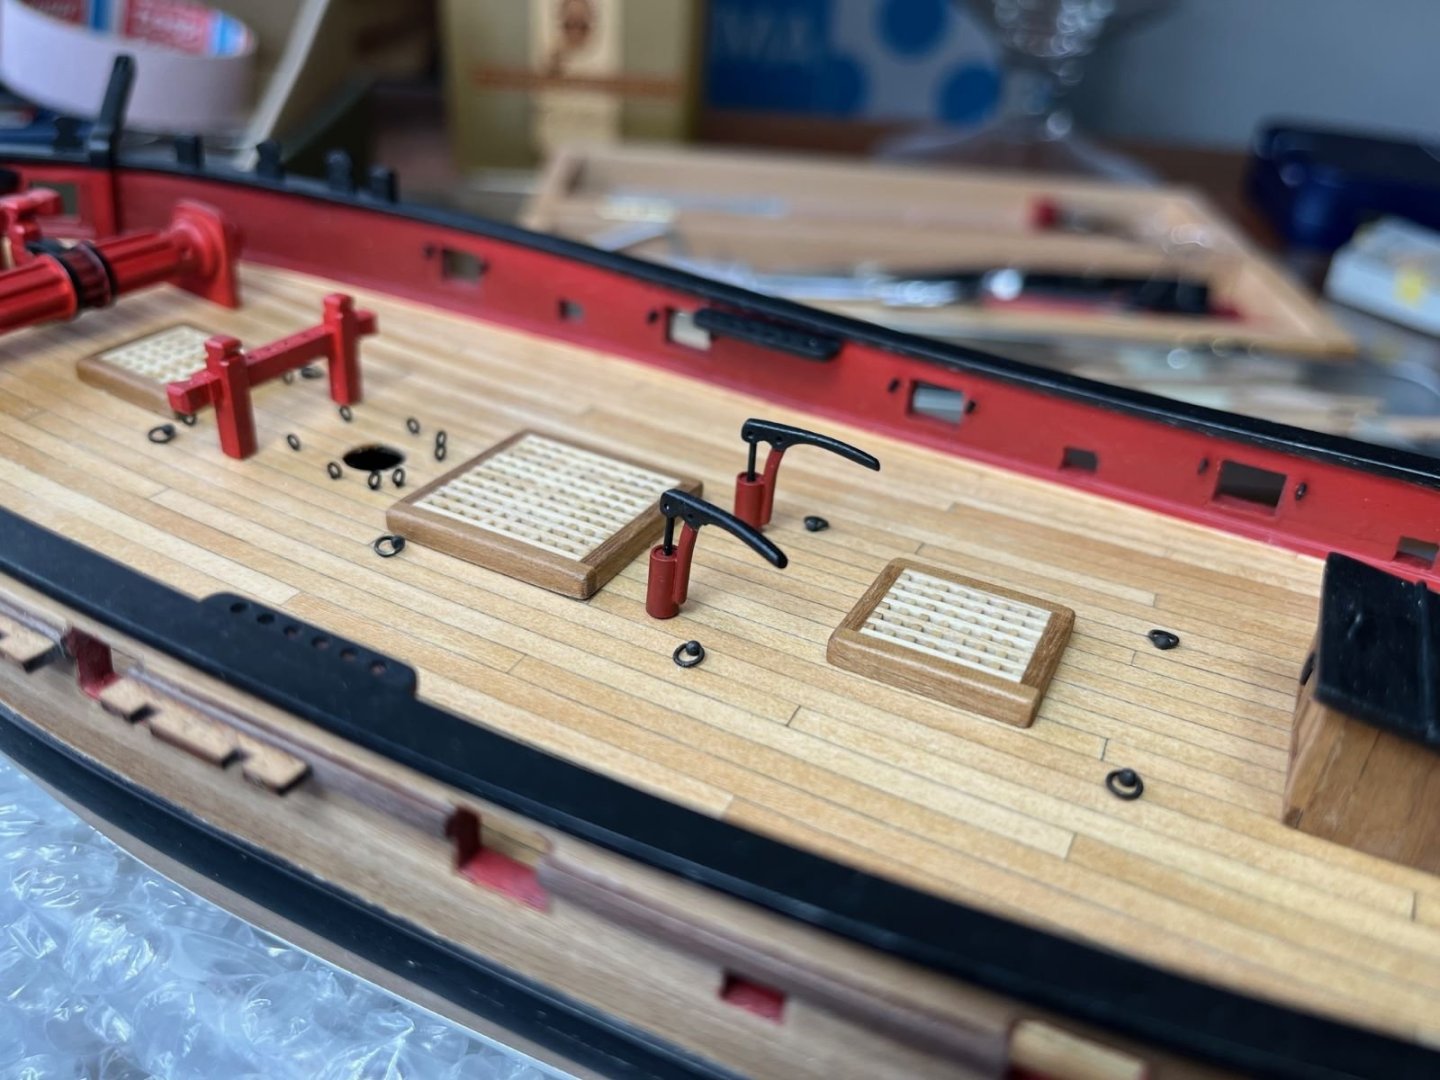
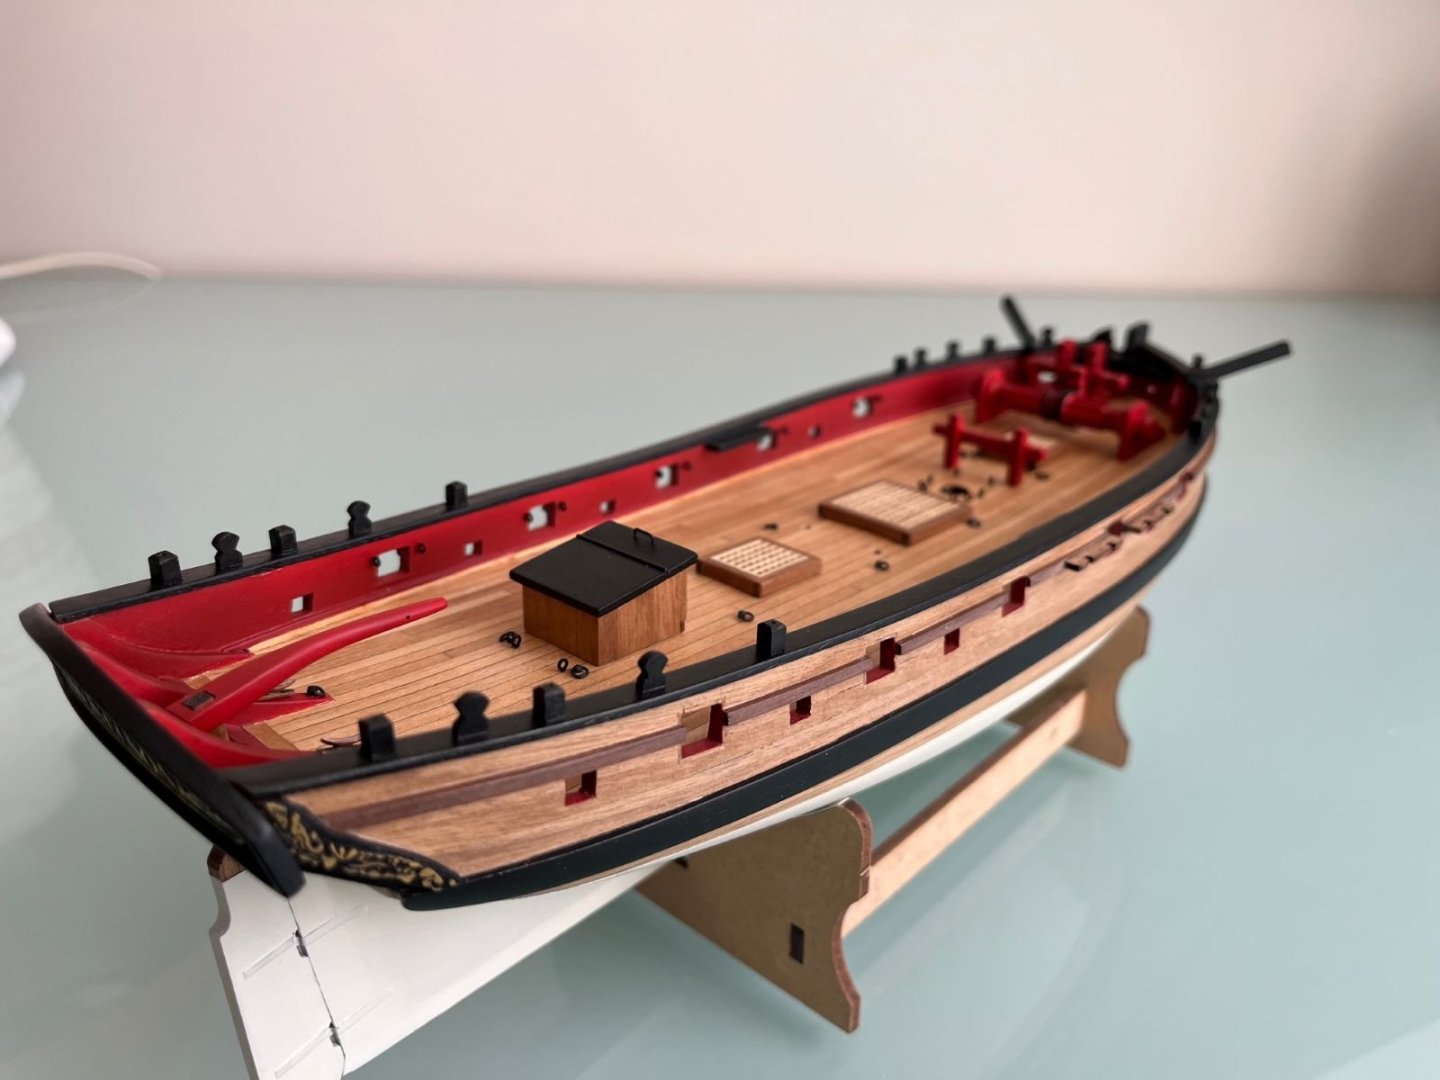
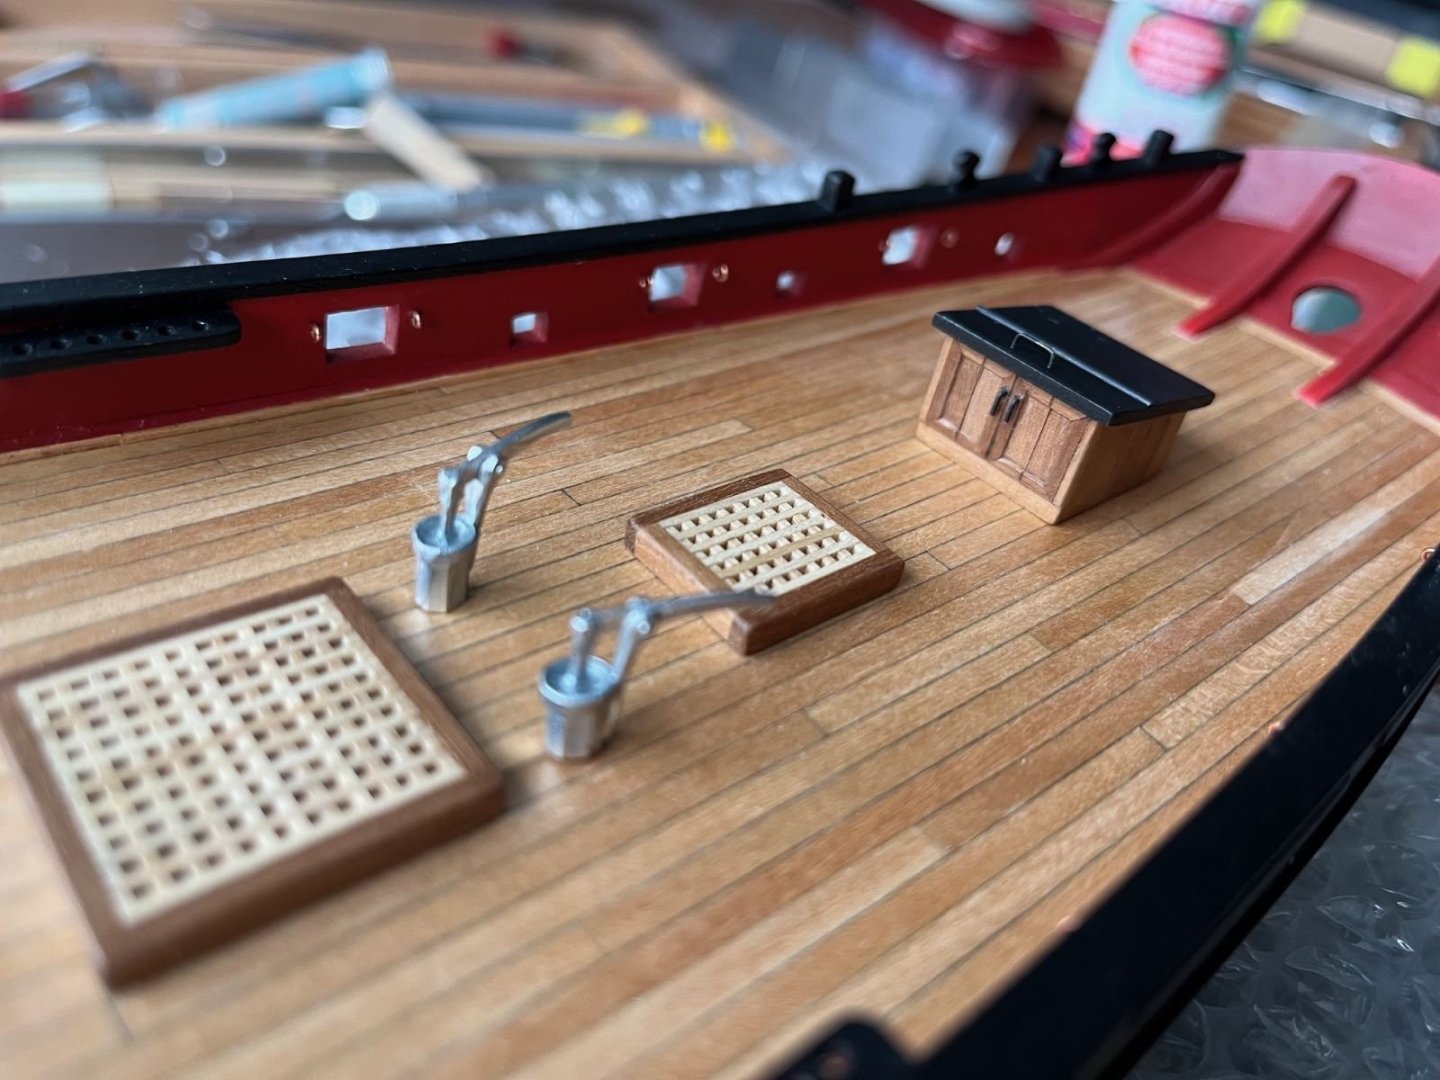
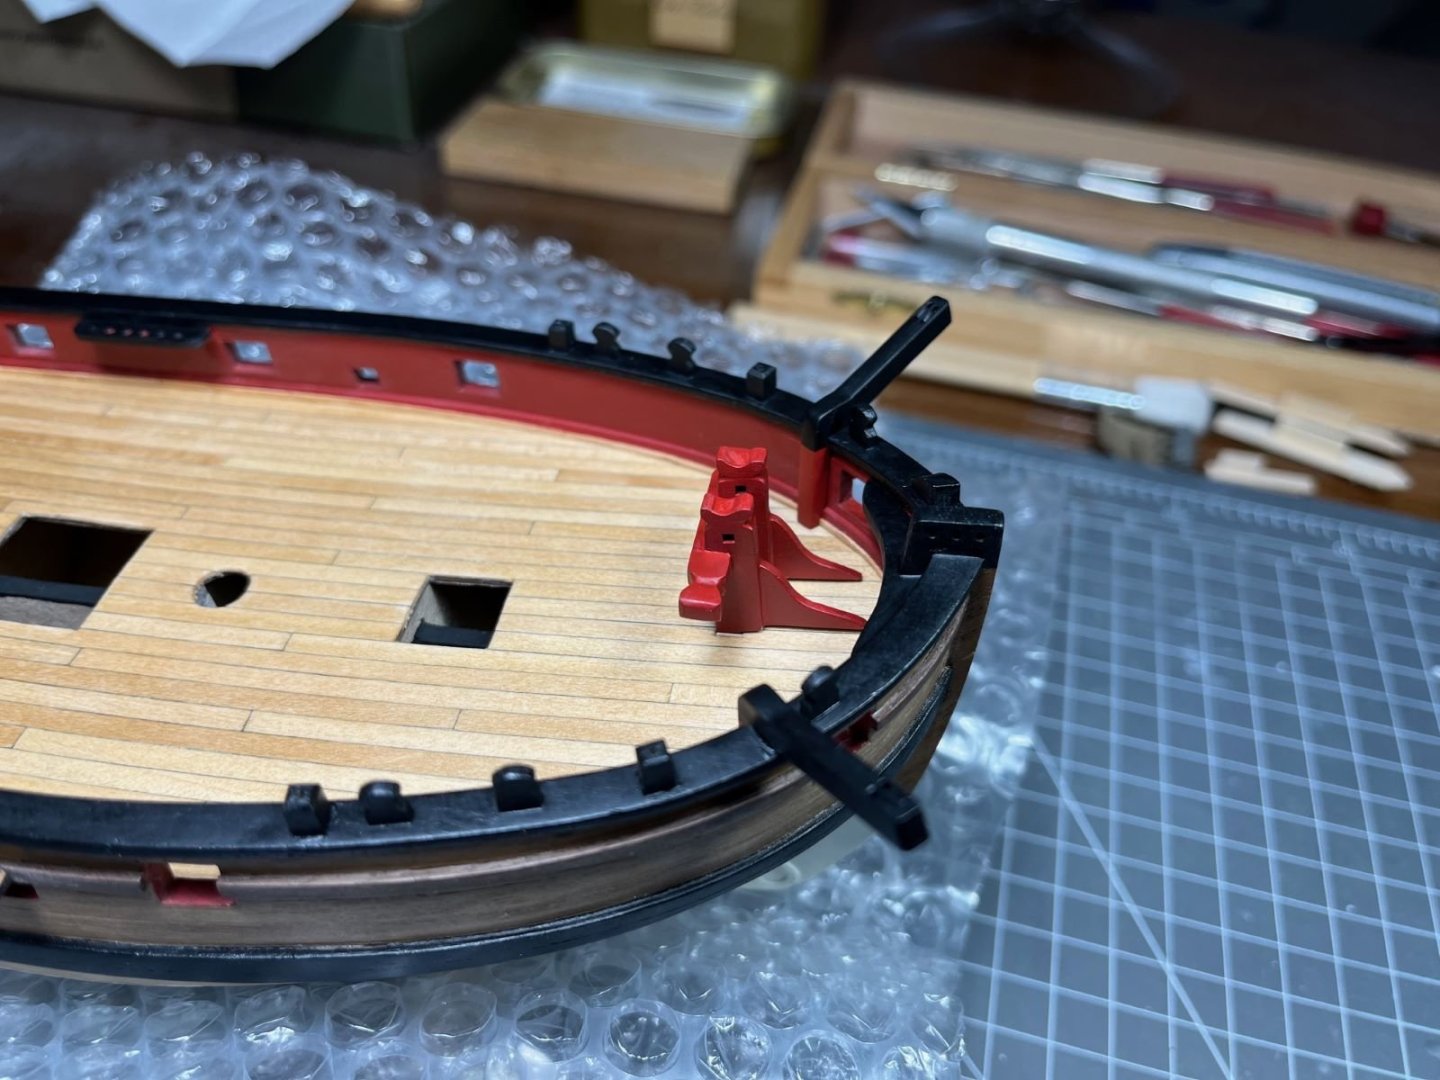
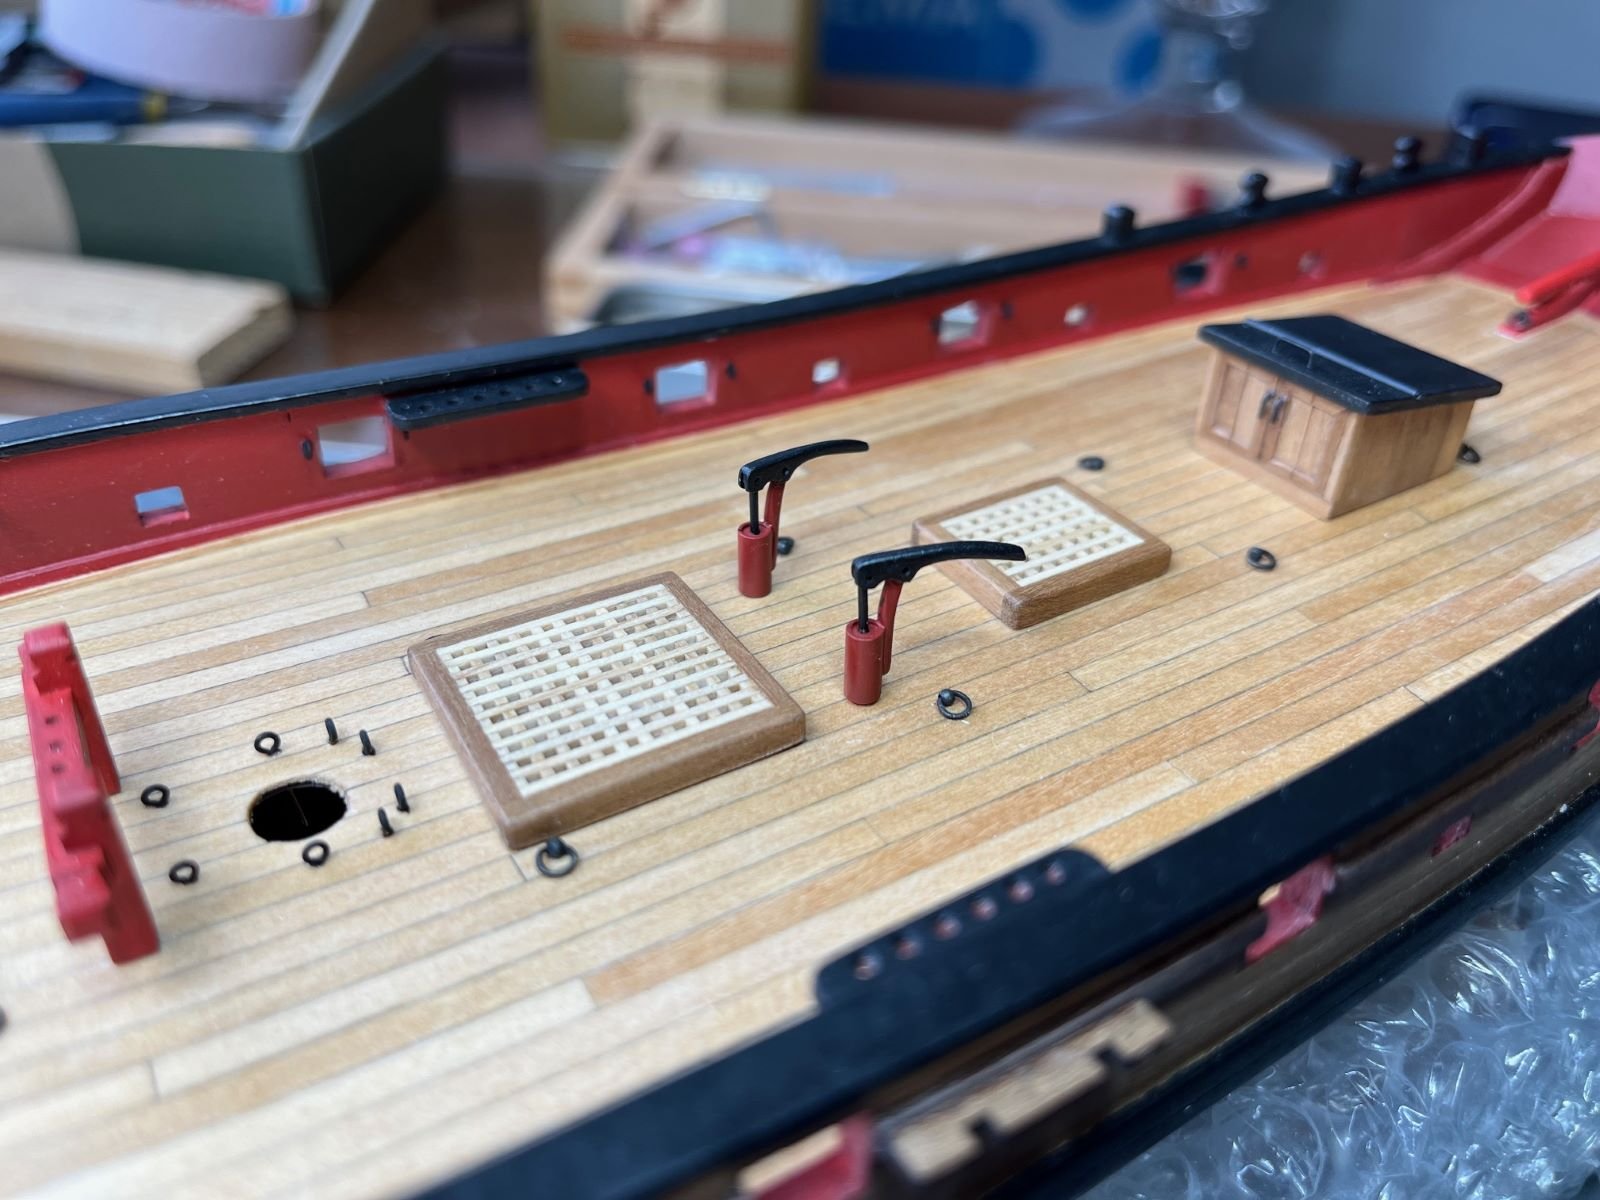
Hi all, I completed the elements of the deck furniture and glued them in place as shown below. The windlass needed some modifications as reported in previous posts and I scratch built an elementary ratchet-pawl mechanism. I also finalized the stern area with the new helm. Next, I should start working on the cannons and their carriages. I should also decide what to do with the hand pumps because I don't like the ones provided in the kit. I noticed that @vossiewulf scratch built his pumps in his log, but not having his skills, I need to figure out how to make a simpler version of them. Best regards, Dan
.thumb.jpg.30679492834f85433930c3723fa5da92.jpg)

- 87 replies
-
- 7
-
-
- Lady Nelson
- Amati
- (and 1 more)
-
Gary, this build of yours is amazing and a great source of techniques and ideas, although I doubt I will ever manage to emulate them in full. The construction of the curved caprail is one that I will refer in future. As I said in other builds of yours, you have an ability to reproduce miniaturized things with incredible realism. I keep following in awe from the back row. Best regards, Dan
-
Thank you @vossiewulf, @flyenrw, @Dr PR for your very kind messages! I appreciated your evaluations. Thanks also to those that hit the 'like' button! 🙏 Best regards, Dan
- 87 replies
-
- 1
-
-
- Lady Nelson
- Amati
- (and 1 more)
-
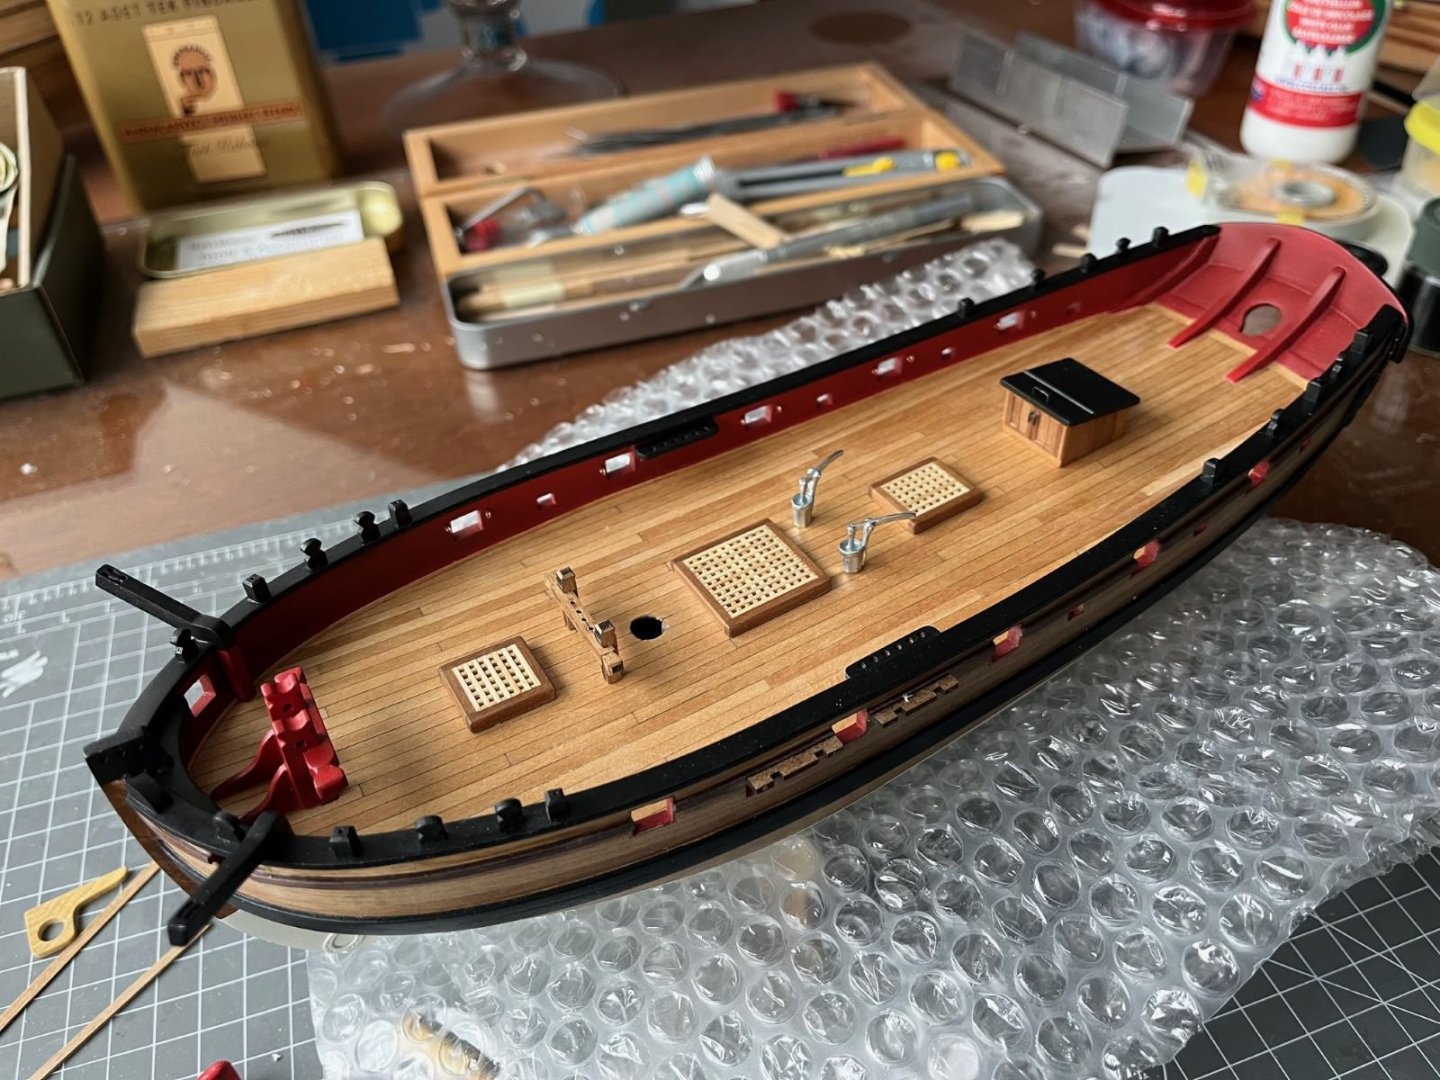
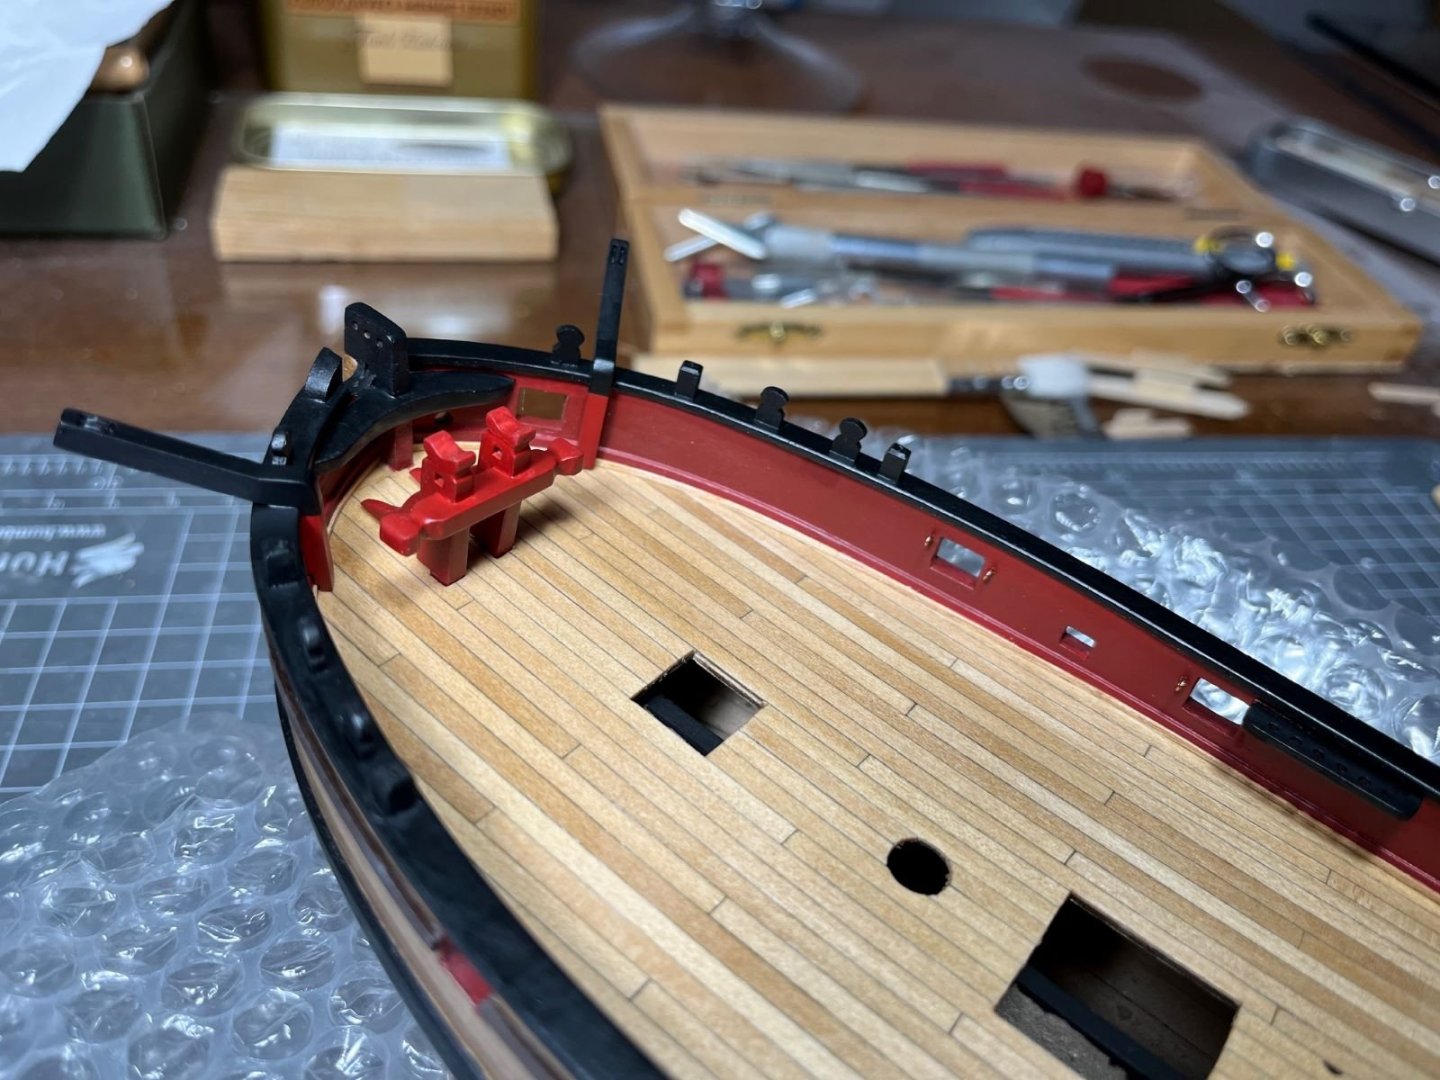
Hi, after weeks I am back to my Lady N. and after having glued the gratings, I started to populate her deck (but no glue yet). I embellished a bit the otherwise spartan companionway: I am still undecided whether I will keep the orientation of the picture above (which is the way indicated in the kit drawings) or rotate it by 180 deg with the doors facing stern. Then, I tackled the horizontal windlass, the model of which, as included in the kit, is a bit questionable. I followed what was done by @flyenrw in his build, i.e. I sourced a different model from the Amati catalog which is closer to the type seen in epoch models (longer with a slender shape). This type, though, is still functionally flawed, hence I had to taking it apart and introduce some modifications: After having squared the holes for the poles, I removed its central portion and built a ratchet wheel out of styrene cards. After re-assembling it, this is how it looks once posed in its location: Next, I will prime these new parts and paint them red. Best regards, Dan

- 87 replies
-
- 9
-
-
-
- Lady Nelson
- Amati
- (and 1 more)
-
Get better soon. Curious to see your new lathe. Good luck with it! Dan
- 714 replies
-
- 2
-
-
- lady nelson
- victory models
- (and 1 more)
-
Nice progress Mike. Indeed, the first scheme above is a bit challenging. I would have tackled it with a 'reverse mottling'. I know, it sounds late now, but you could paint everything with the sand color of the mottles and then stick on it blobs of blu-tack (or masking fluid). Then spray the green paints. If you go this way, before committing the model, I recommend to test it first on a scrap part. Good luck anyway and keep with the good working. Greetings, Dan
-
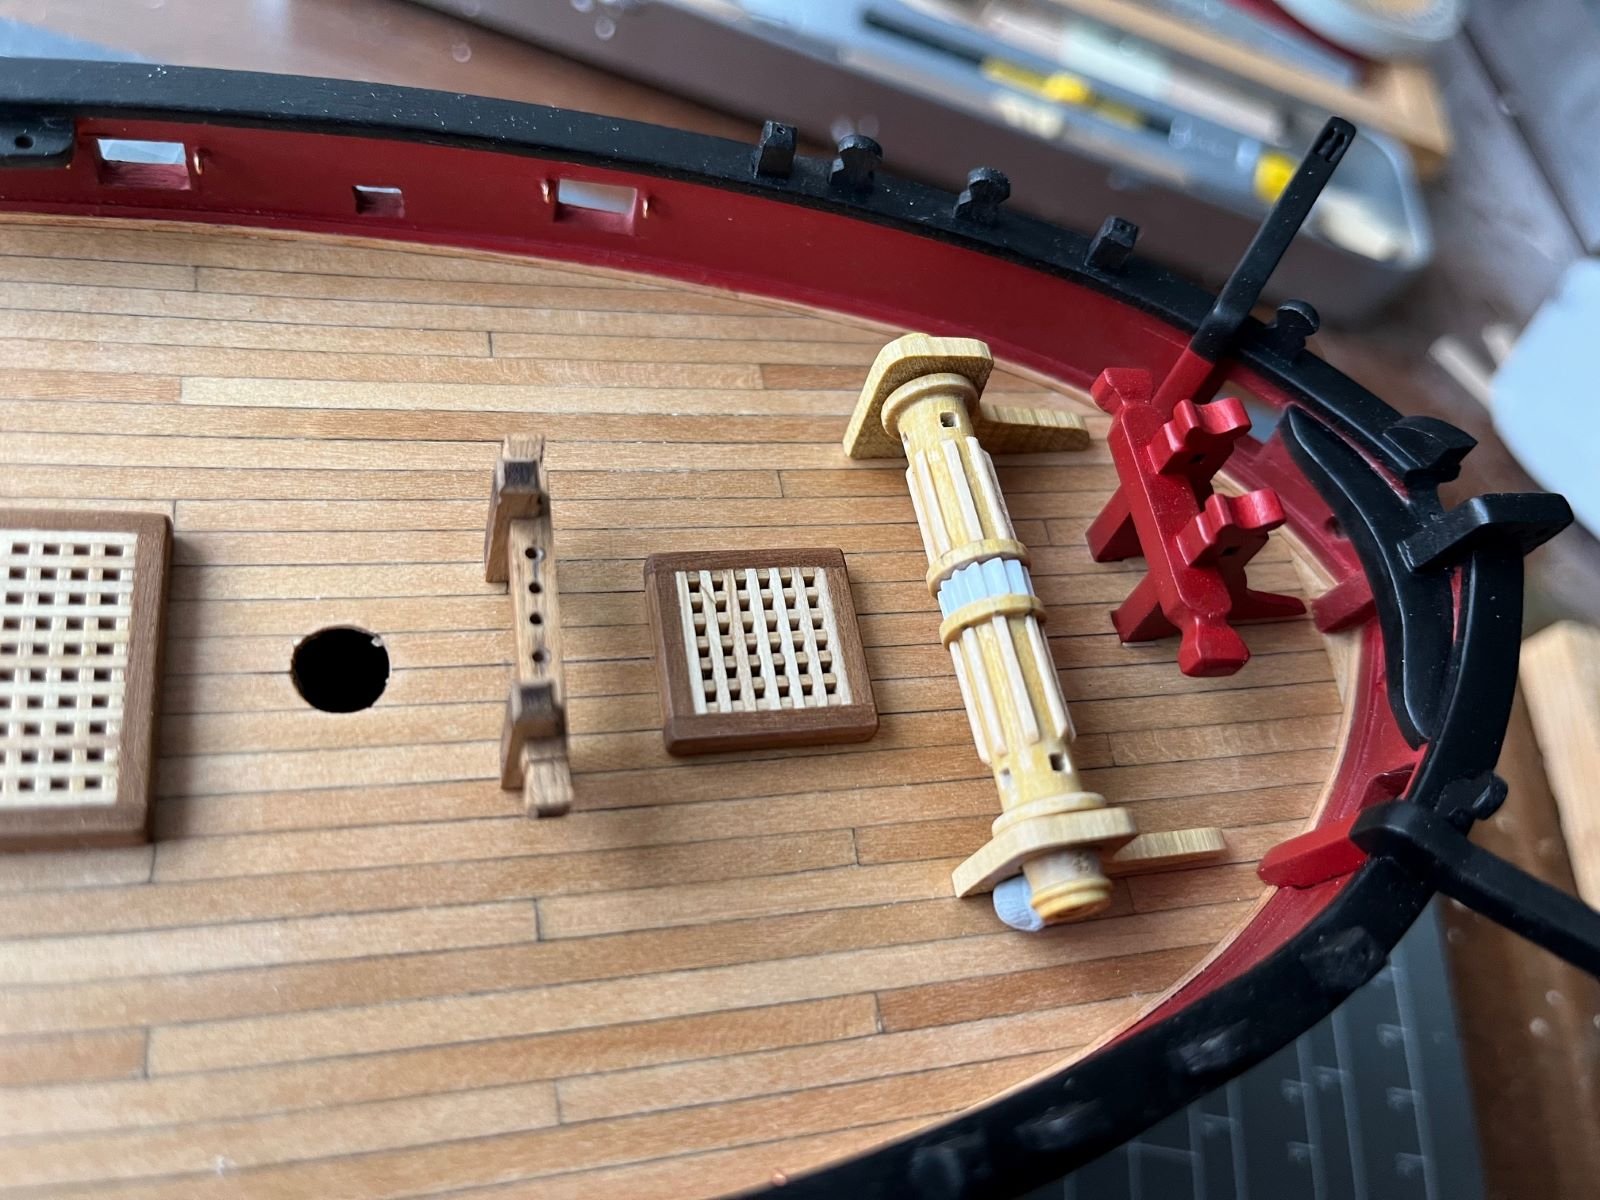
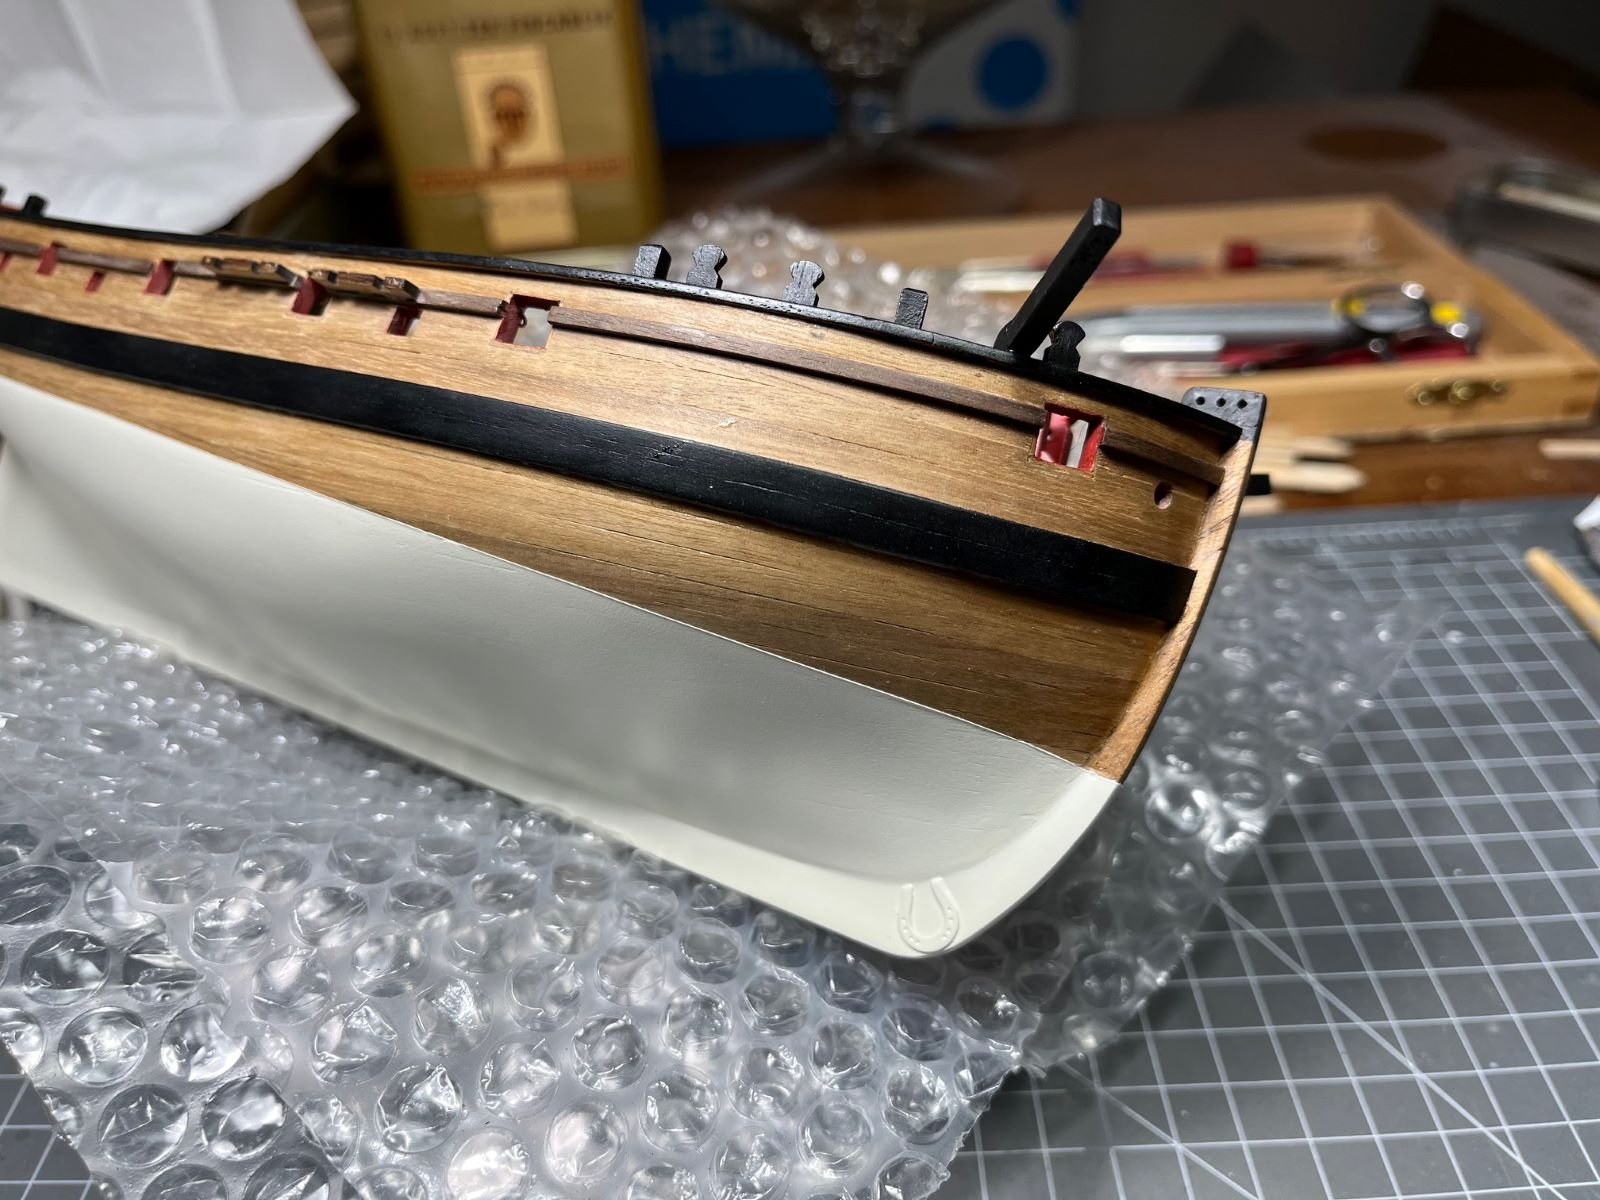
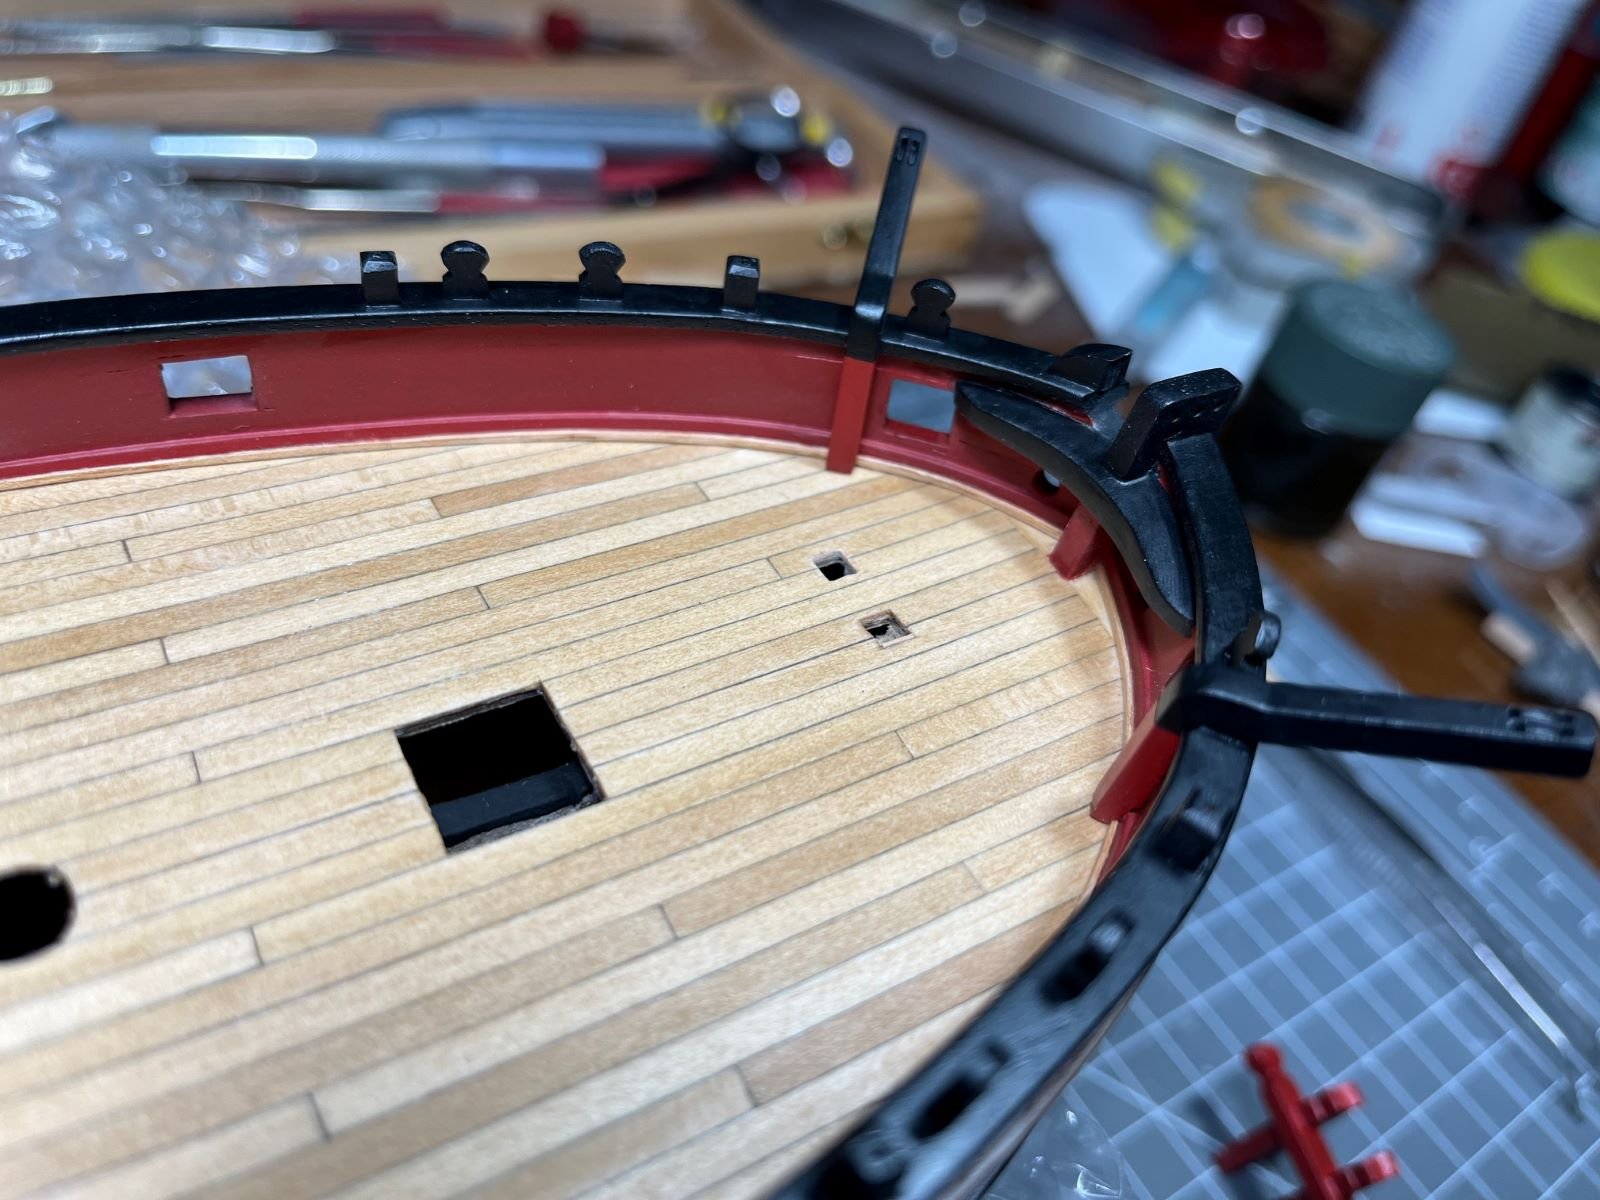
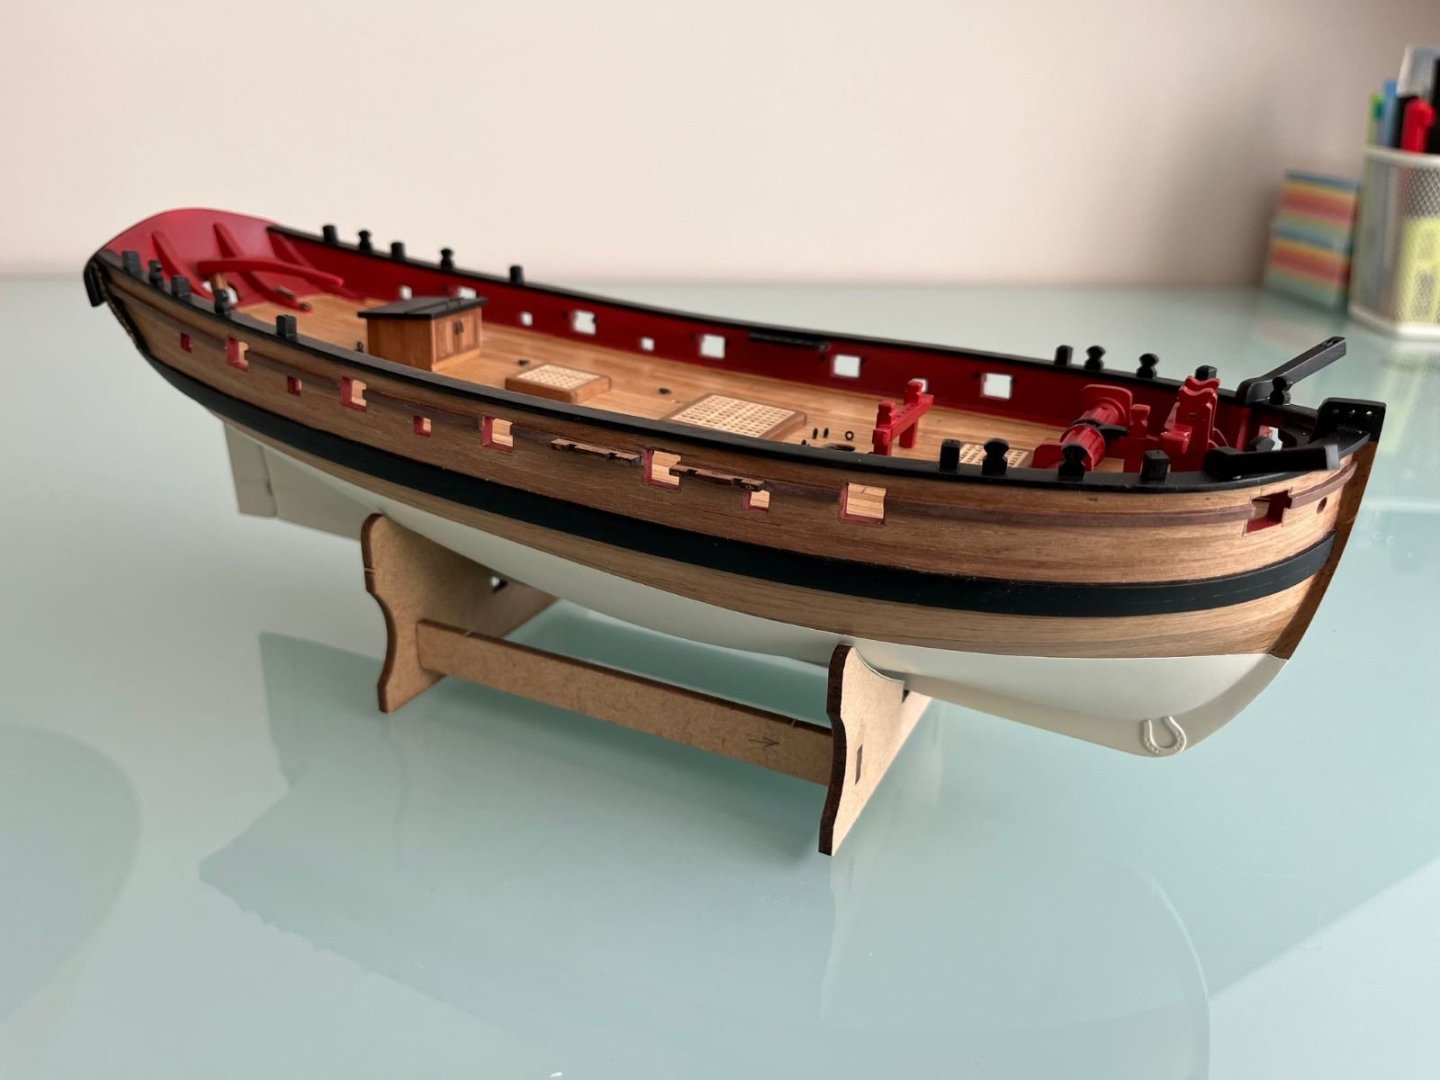
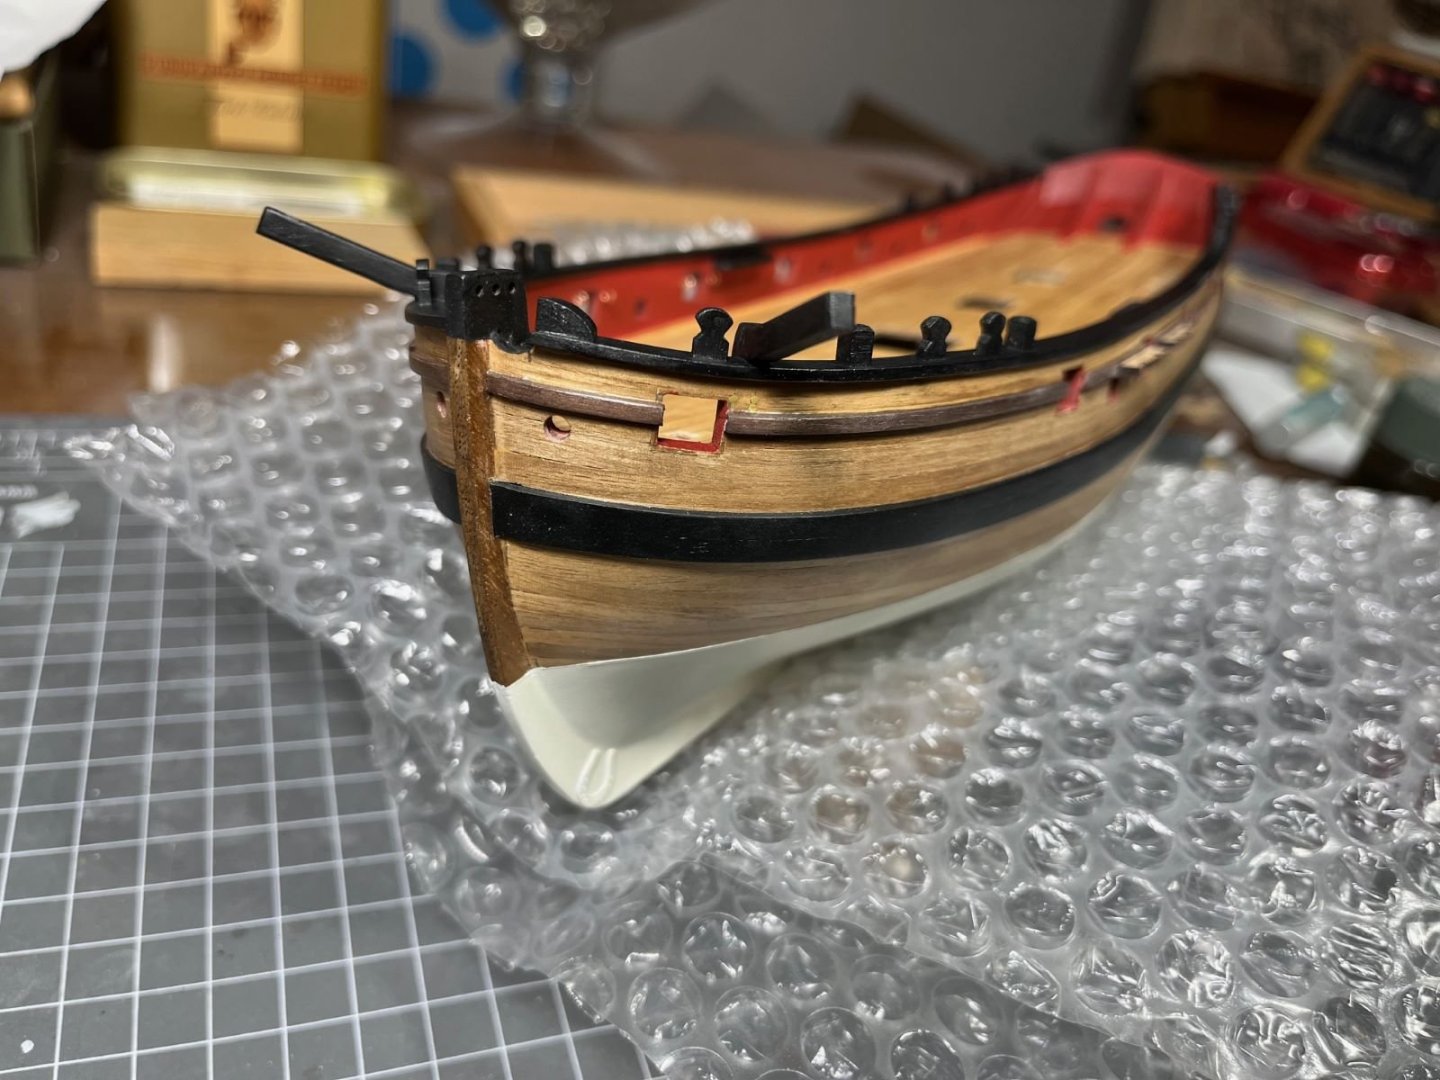
Finally, I am posting my first instalment of the year. It is just a small step, but I am posting it anyway. I corrected the overspray of the light grey paint that I had on the bow (there is still a small ridge along the demarcation of the paint that I have to correct). I also painted black the caprail with its accessories and mounted the two catheads the shaping of which fought me all the way because of the soft quality of the wood they are made of. The modified structure for supporting the bowsprit was also painted and now just dry fitted on its place: Next, I should install the horizontal windlass, but having ordered a different type from Amati, I need to wait a bit until I receive it. For the moment, will be working on the gratings. Greetings, Dan


- 87 replies
-
- 11
-
-
- Lady Nelson
- Amati
- (and 1 more)
-
You are proceeding at marching pace with your Lady and the details you are implementing one after the other are amazing to me. Instead, I am stuck with my models. Cheers, Dan.
- 714 replies
-
- 2
-
-
- lady nelson
- victory models
- (and 1 more)


.jpg.b1cc9a3c732e9b7078362661cd68960c.jpg)