
Mike_H
-
Posts
244 -
Joined
-
Last visited
2 Followers


-
 Mike_H reacted to a post in a topic:
Chris Watton and Vanguard Models news and updates Volume 2
Mike_H reacted to a post in a topic:
Chris Watton and Vanguard Models news and updates Volume 2
-
 thibaultron reacted to a post in a topic:
Chris Watton and Vanguard Models news and updates Volume 2
thibaultron reacted to a post in a topic:
Chris Watton and Vanguard Models news and updates Volume 2
-
Canute reacted to a post in a topic:
Chris Watton and Vanguard Models news and updates Volume 2
-
Mike_H reacted to a post in a topic:
Chris Watton and Vanguard Models news and updates Volume 2
-
chris watton reacted to a post in a topic:
Chris Watton and Vanguard Models news and updates Volume 2
-
Excellent Christmas and New Year. Both improved by the news that Vanguard M’s manufacturing output is to be seriously uprated. I suspect demand for Surprise will test that uprating! Will there be a chance to get to the front of the queue by pre-ordering?
-
Mike_H reacted to a post in a topic:
HMAV Bounty by AJohnson - Caldercraft - 1:64
-
hollowneck reacted to a post in a topic:
Chris Watton and Vanguard Models news and updates Volume 2
-
Canute reacted to a post in a topic:
Chris Watton and Vanguard Models news and updates Volume 2
-
thibaultron reacted to a post in a topic:
Chris Watton and Vanguard Models news and updates Volume 2
-
Nirvana reacted to a post in a topic:
Chris Watton and Vanguard Models news and updates Volume 2
-
AJohnson reacted to a post in a topic:
Chris Watton and Vanguard Models news and updates Volume 2
-
chris watton reacted to a post in a topic:
Chris Watton and Vanguard Models news and updates Volume 2
-
That's very exciting! And good news for us as customers and as folk who want to see the hobby prosper. You are going to be very busy preparing to launch Surprise, and then, I imagine, keeping up stock. Best of luck.
-
Mike_H reacted to a post in a topic:
Chris Watton and Vanguard Models news and updates Volume 2
-
Mike_H reacted to a post in a topic:
Chris Watton and Vanguard Models news and updates Volume 2
-
Mike_H reacted to a post in a topic:
Chris Watton and Vanguard Models news and updates Volume 2
-
Mike_H reacted to a post in a topic:
Chris Watton and Vanguard Models news and updates Volume 2
-
Mike_H reacted to a post in a topic:
HM Cutter Alert by flyer - Vanguard Models - scale 1:64 - naval cutter
-
Canute reacted to a post in a topic:
HMS Surprise 1796 (prototype) by James H - Vanguard Models - 1:64
-
I like her very much. Probably too much!
-
Mike_H reacted to a post in a topic:
HMAV Bounty by AJohnson - Caldercraft - 1:64
-
What you call a mule, Chris, I'd call a thoroughbred. She looks beautiful. My heart screams "I can't wait", my head says "you are going to take your time with this one, so waiting is good". Good thing I've got 4 months of travel planned in the next 6. I might just be able to wait!
-
Mike_H reacted to a post in a topic:
Chris Watton and Vanguard Models news and updates Volume 2
-
Looks absolutely stunning, and as you say, exceptionally sleek. I wanted this for my birthday in May this year - but next year will be just fine. I've alerted the Admiralty!
-
I see you've painted the hull - and despite the excellent quality of your planking, I think that's the right decision. My alert, fully rigged, sits next to the shipyard, and seeing the contrast in the colours, alongside the exceptional scroll decorations brings me great joy. And isn't that what it's all about? Keep up the excellent work!
-
Plus one vote for the template! Seems amazing to me that either the pear is sufficiently elastic or that the curvature in the vertical plane so slight that it will sit on the frames so well. But clearly it does!
-
Well this is excellent news! That and bigger, better and faster laser cutters I interrupted a holiday in the hope of hearing of progress - and boy what progress! Can't wait to order one.
-
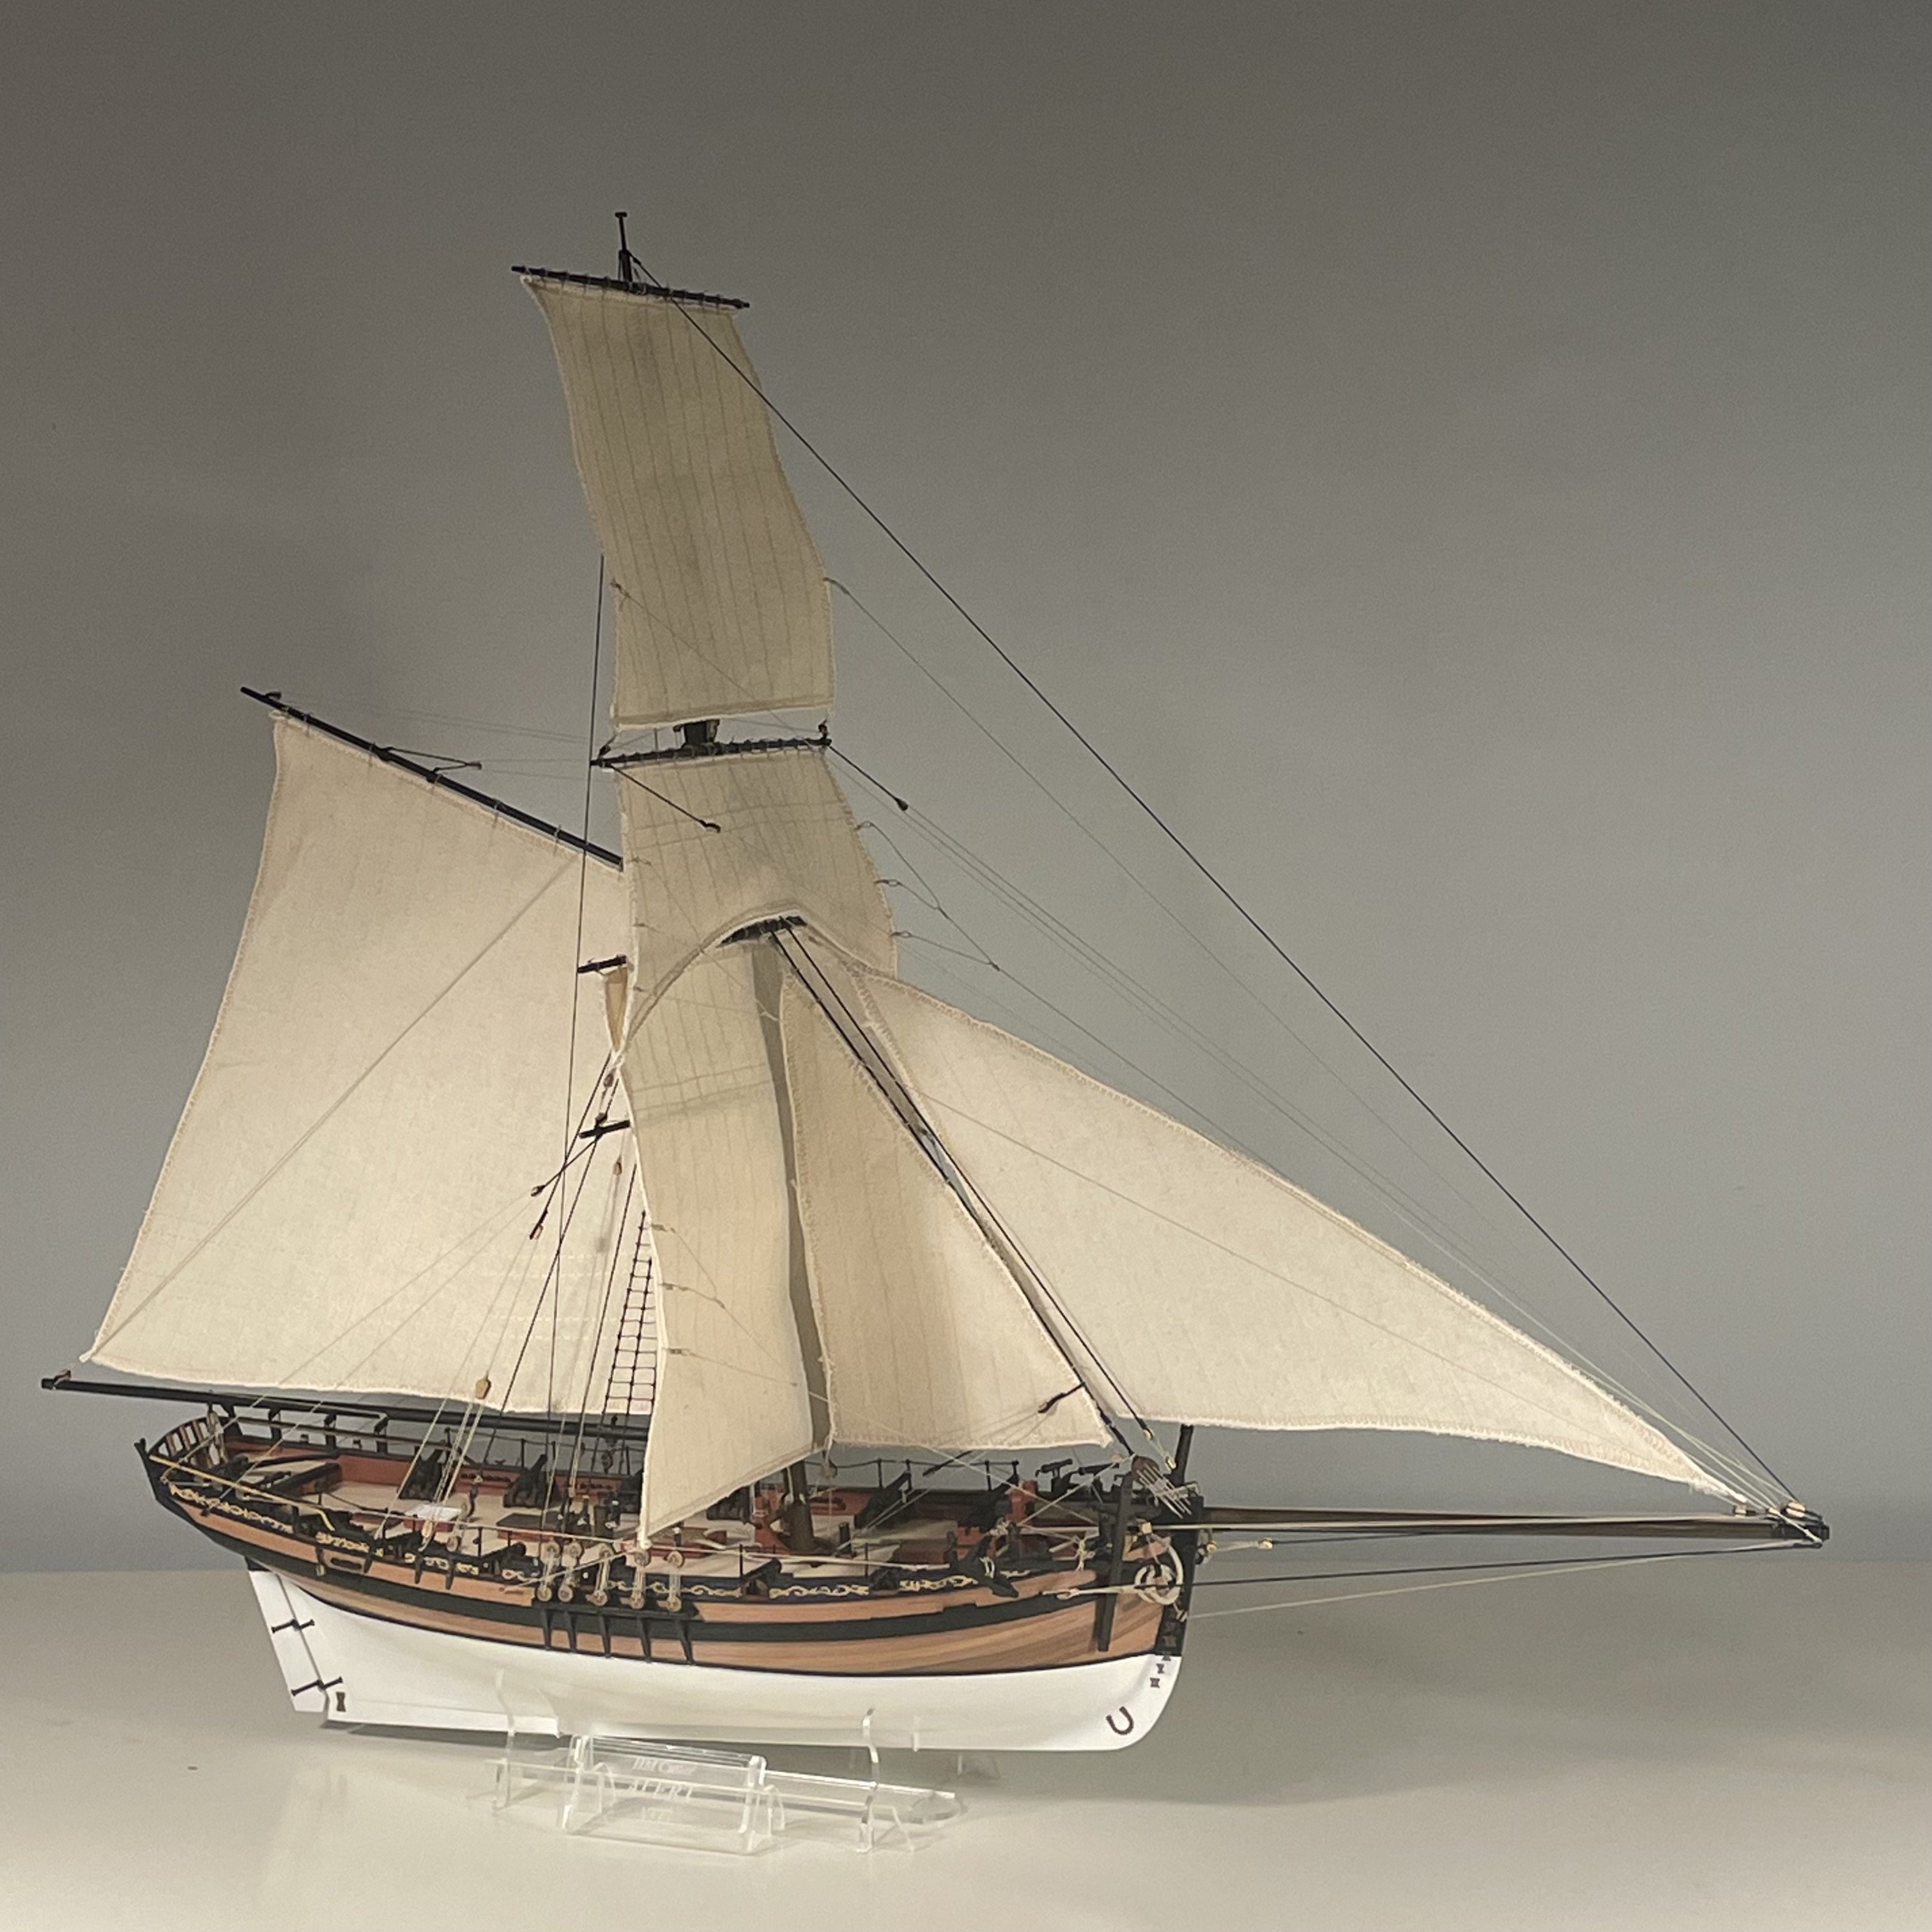
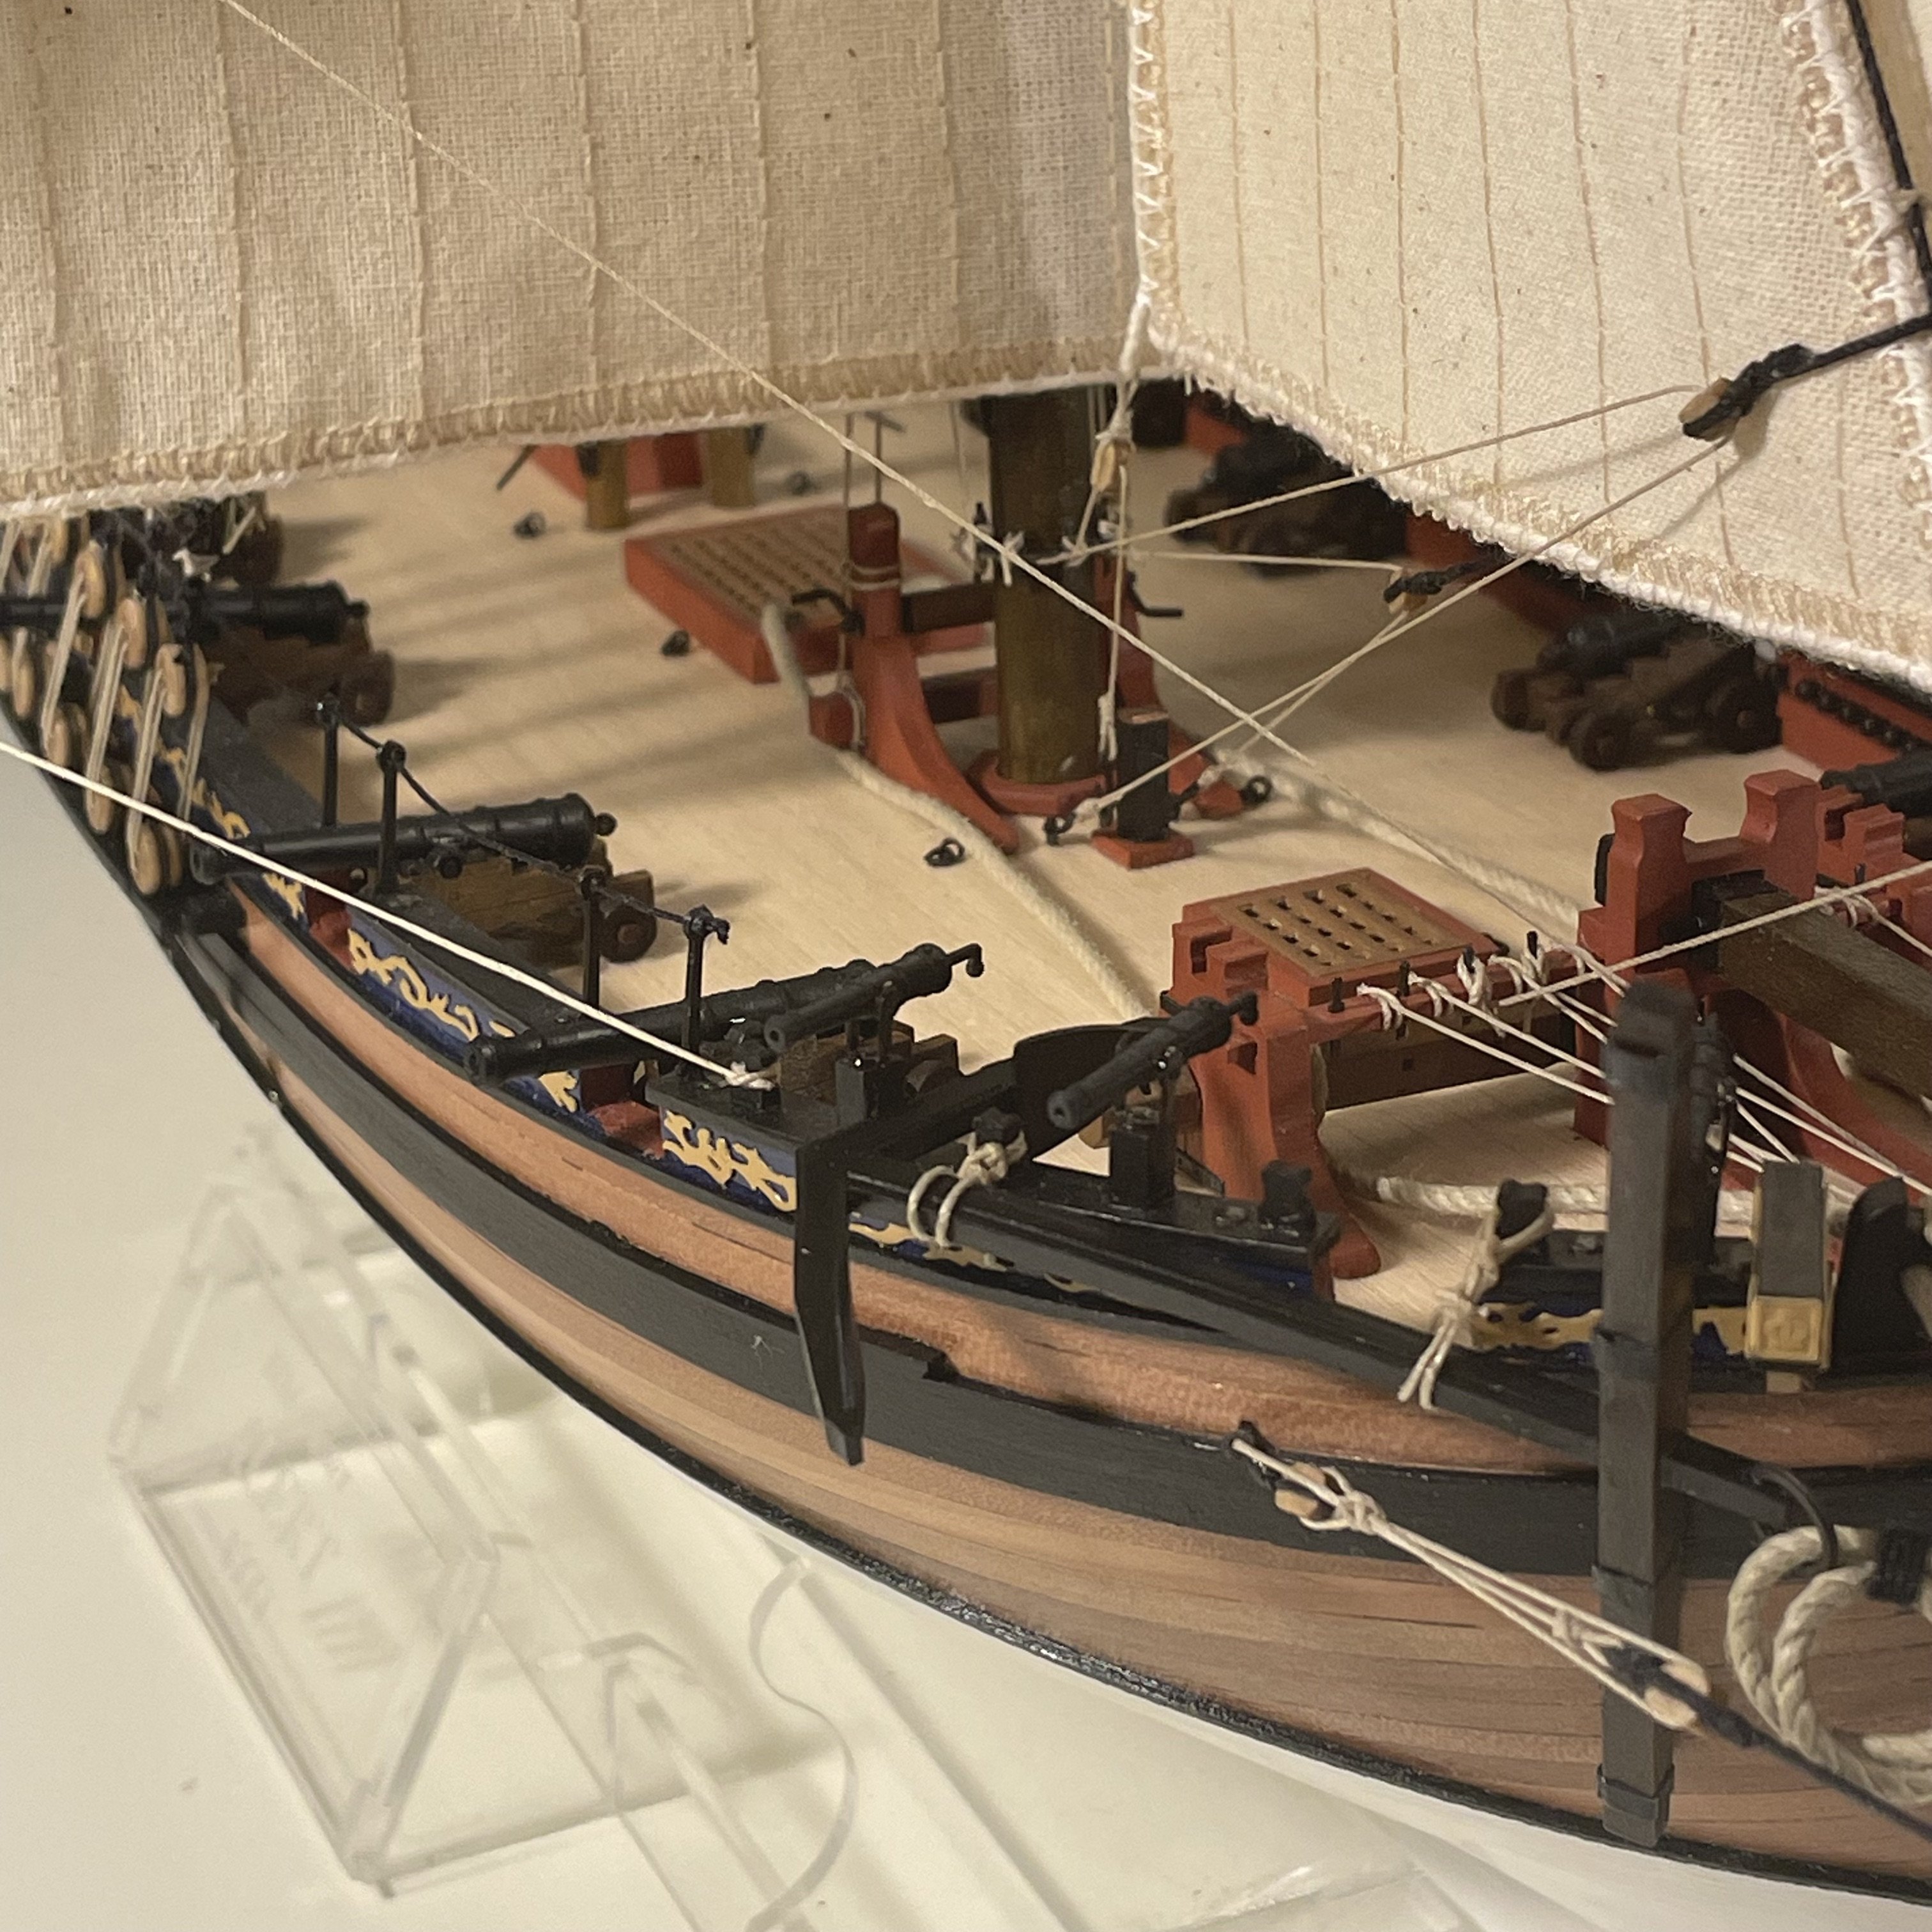
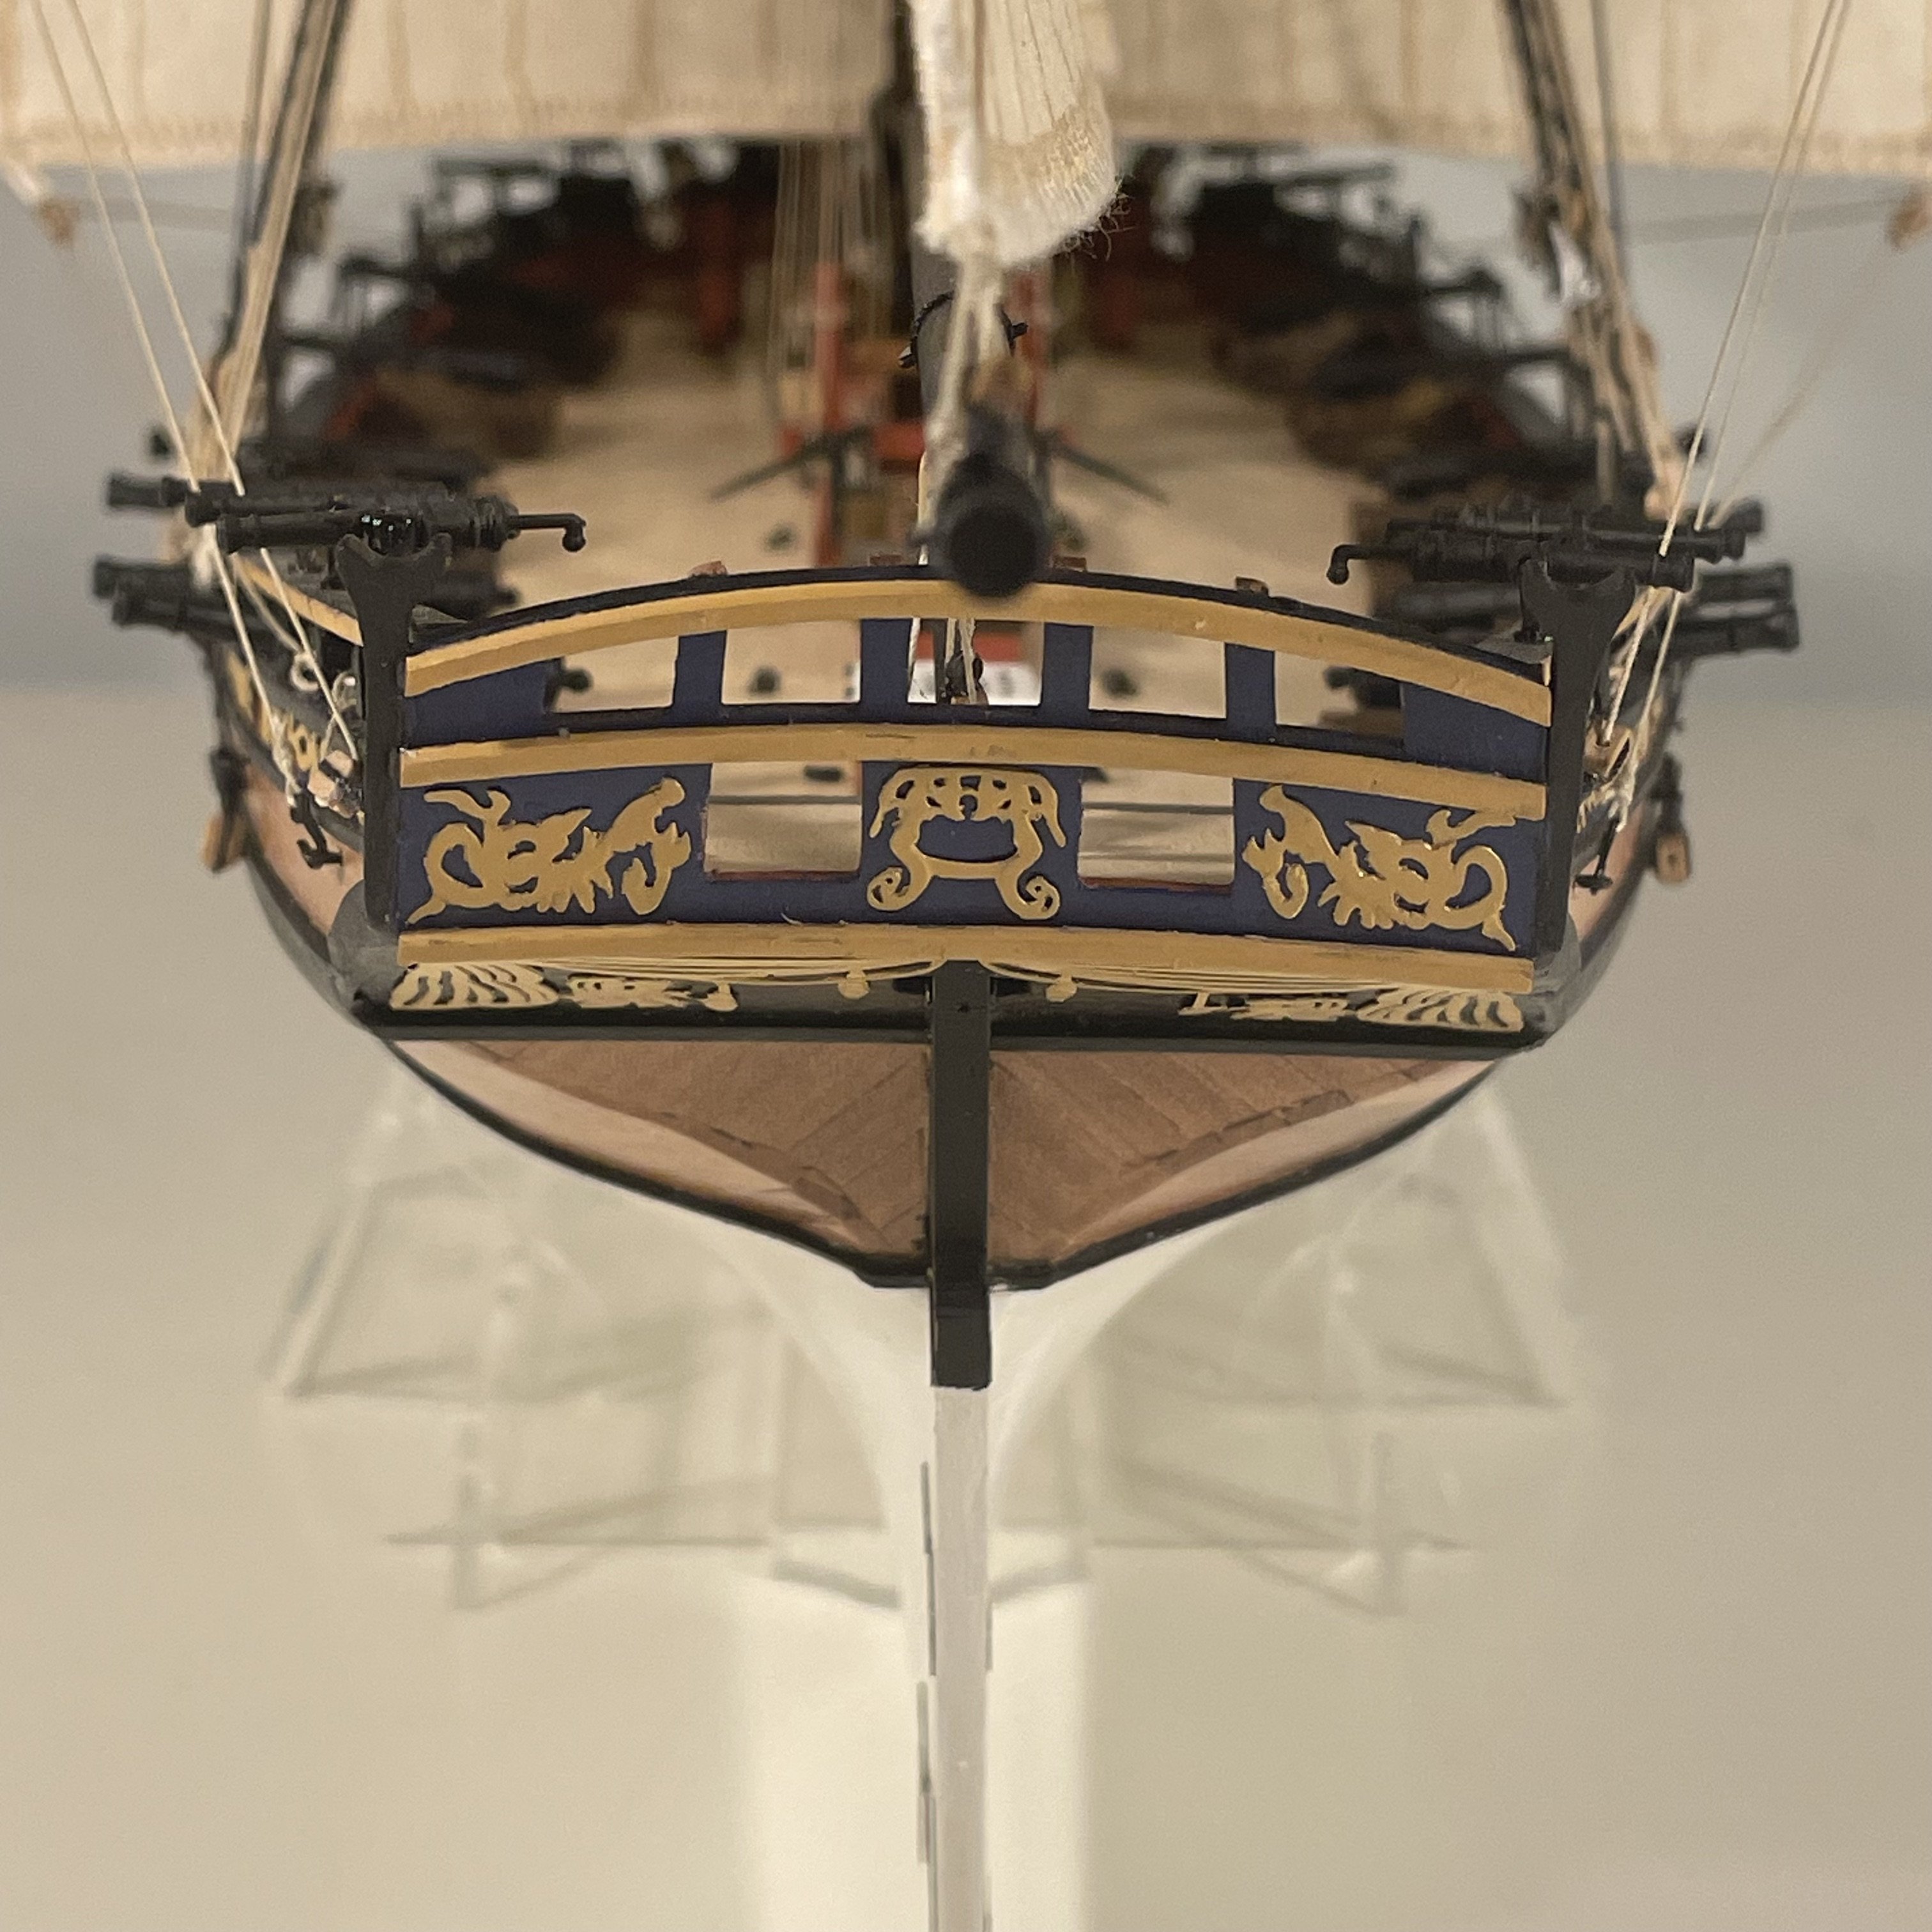
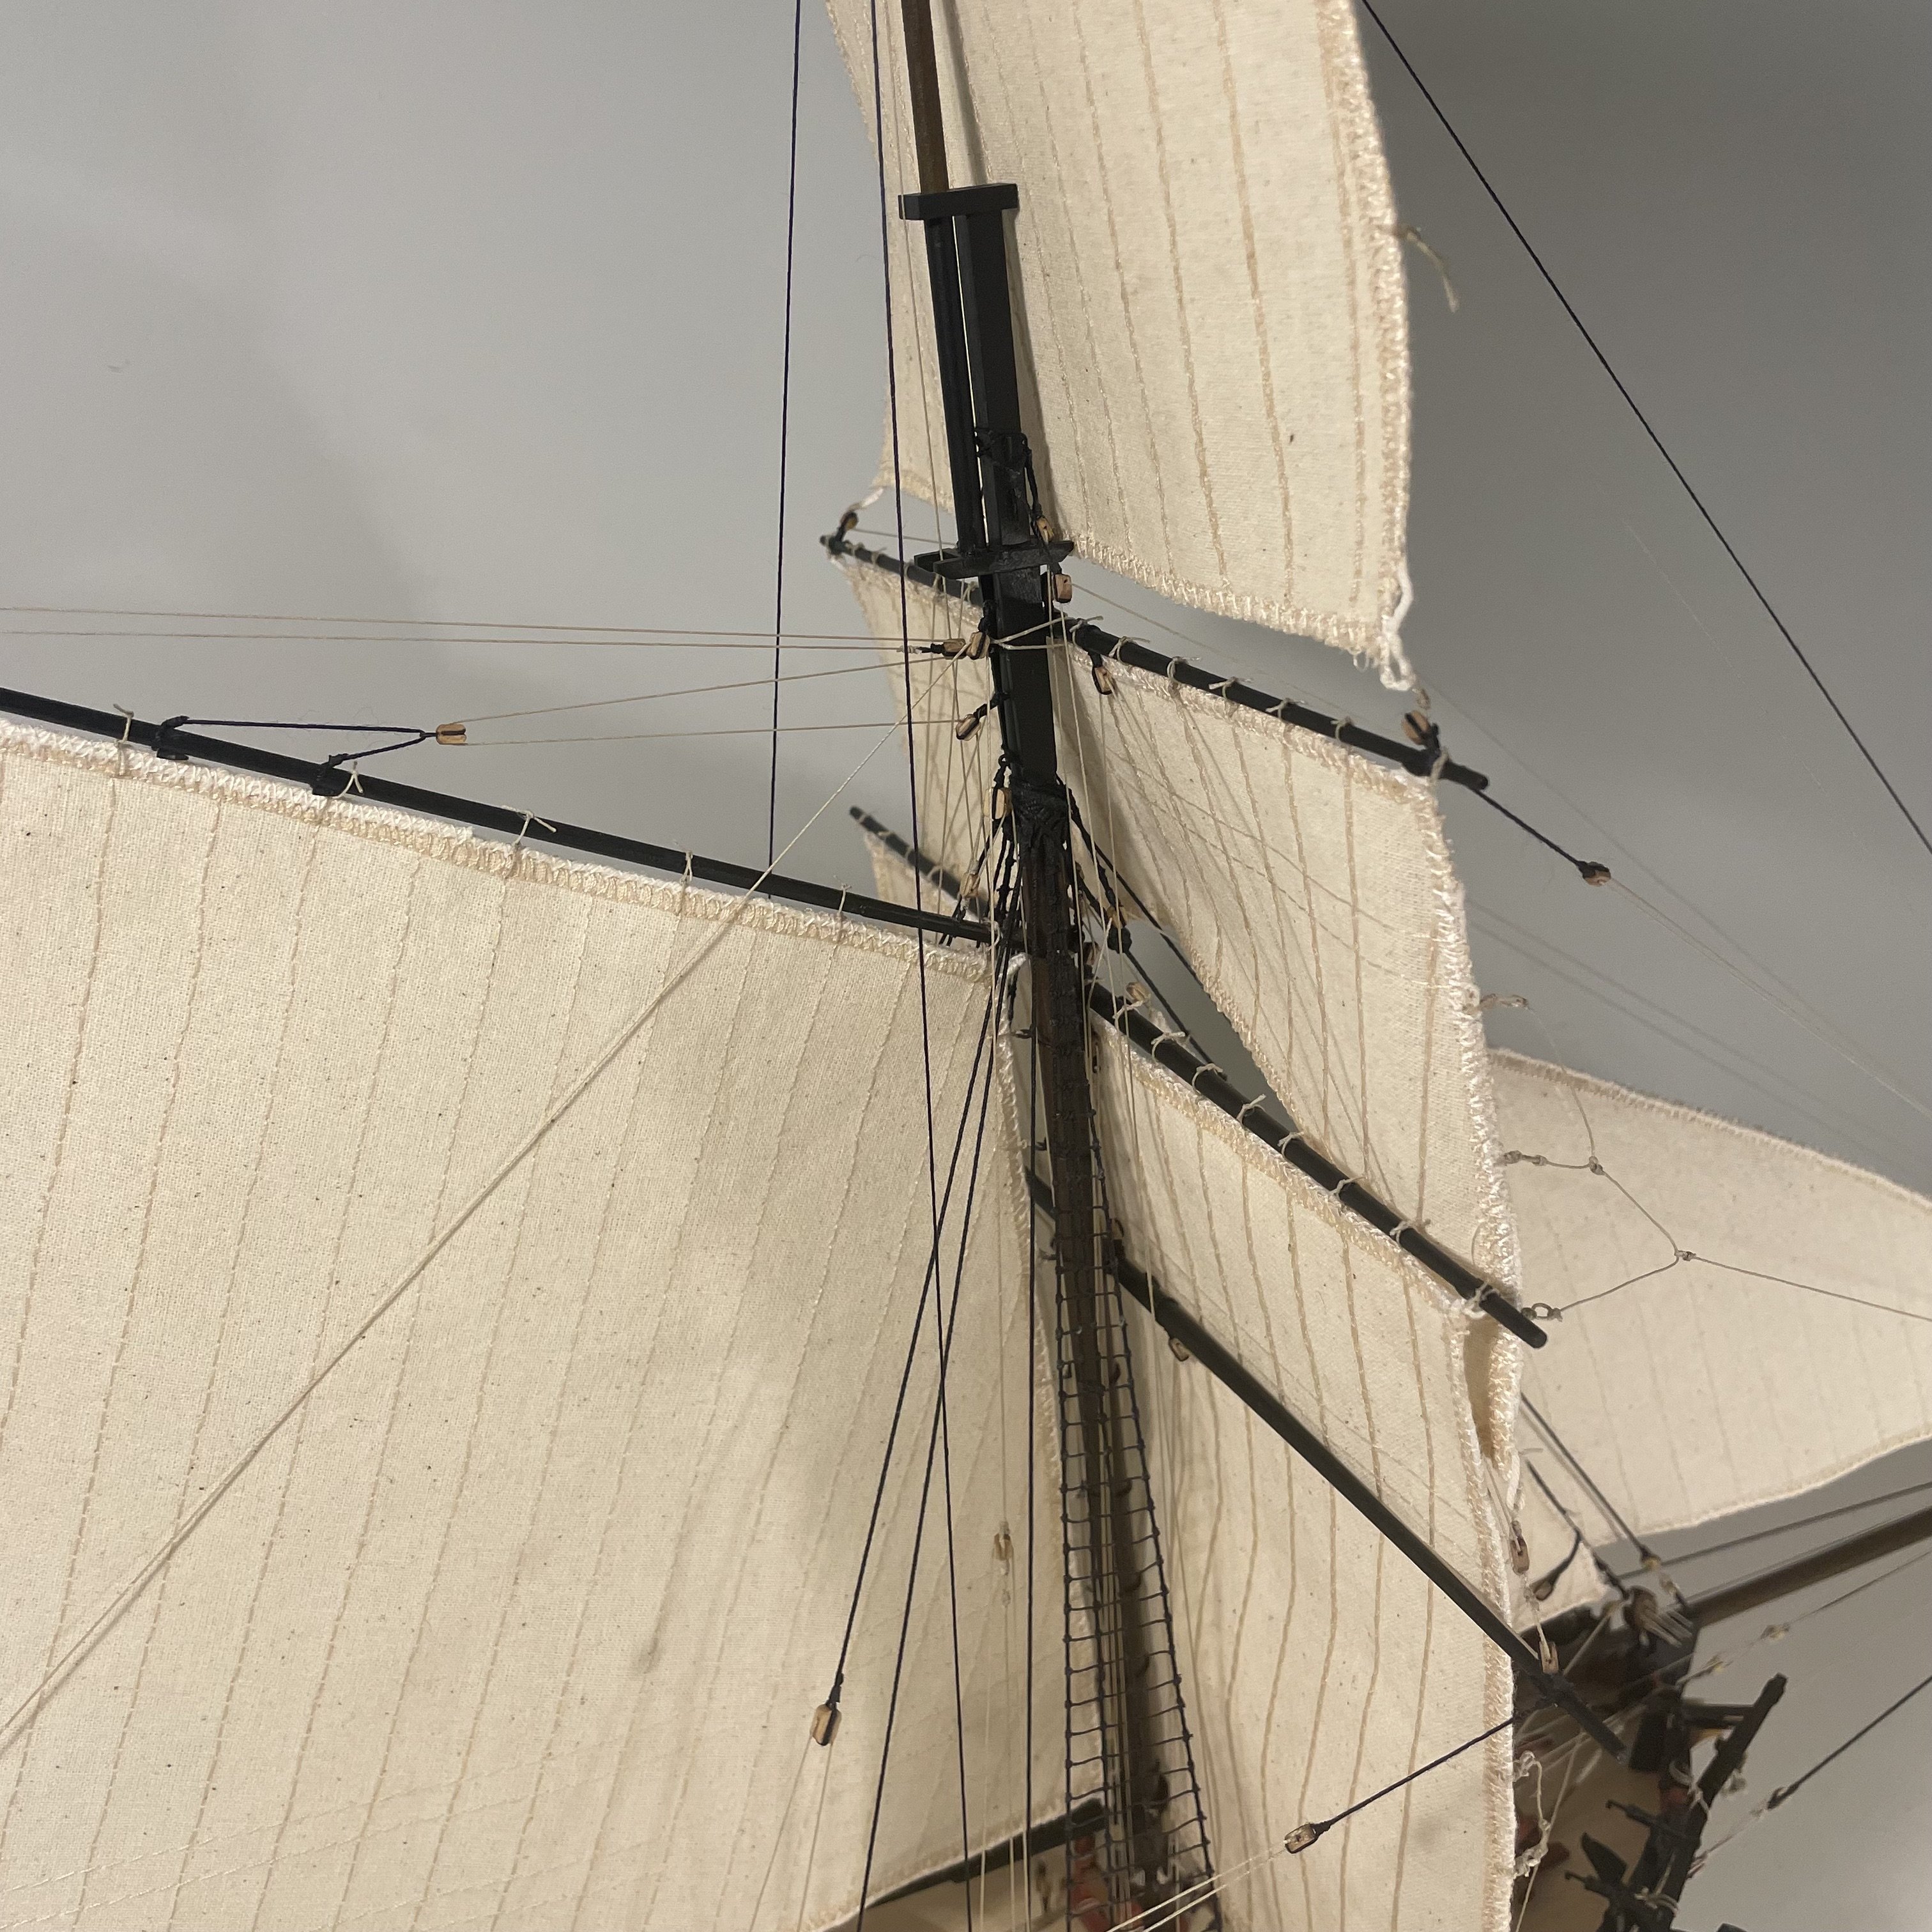
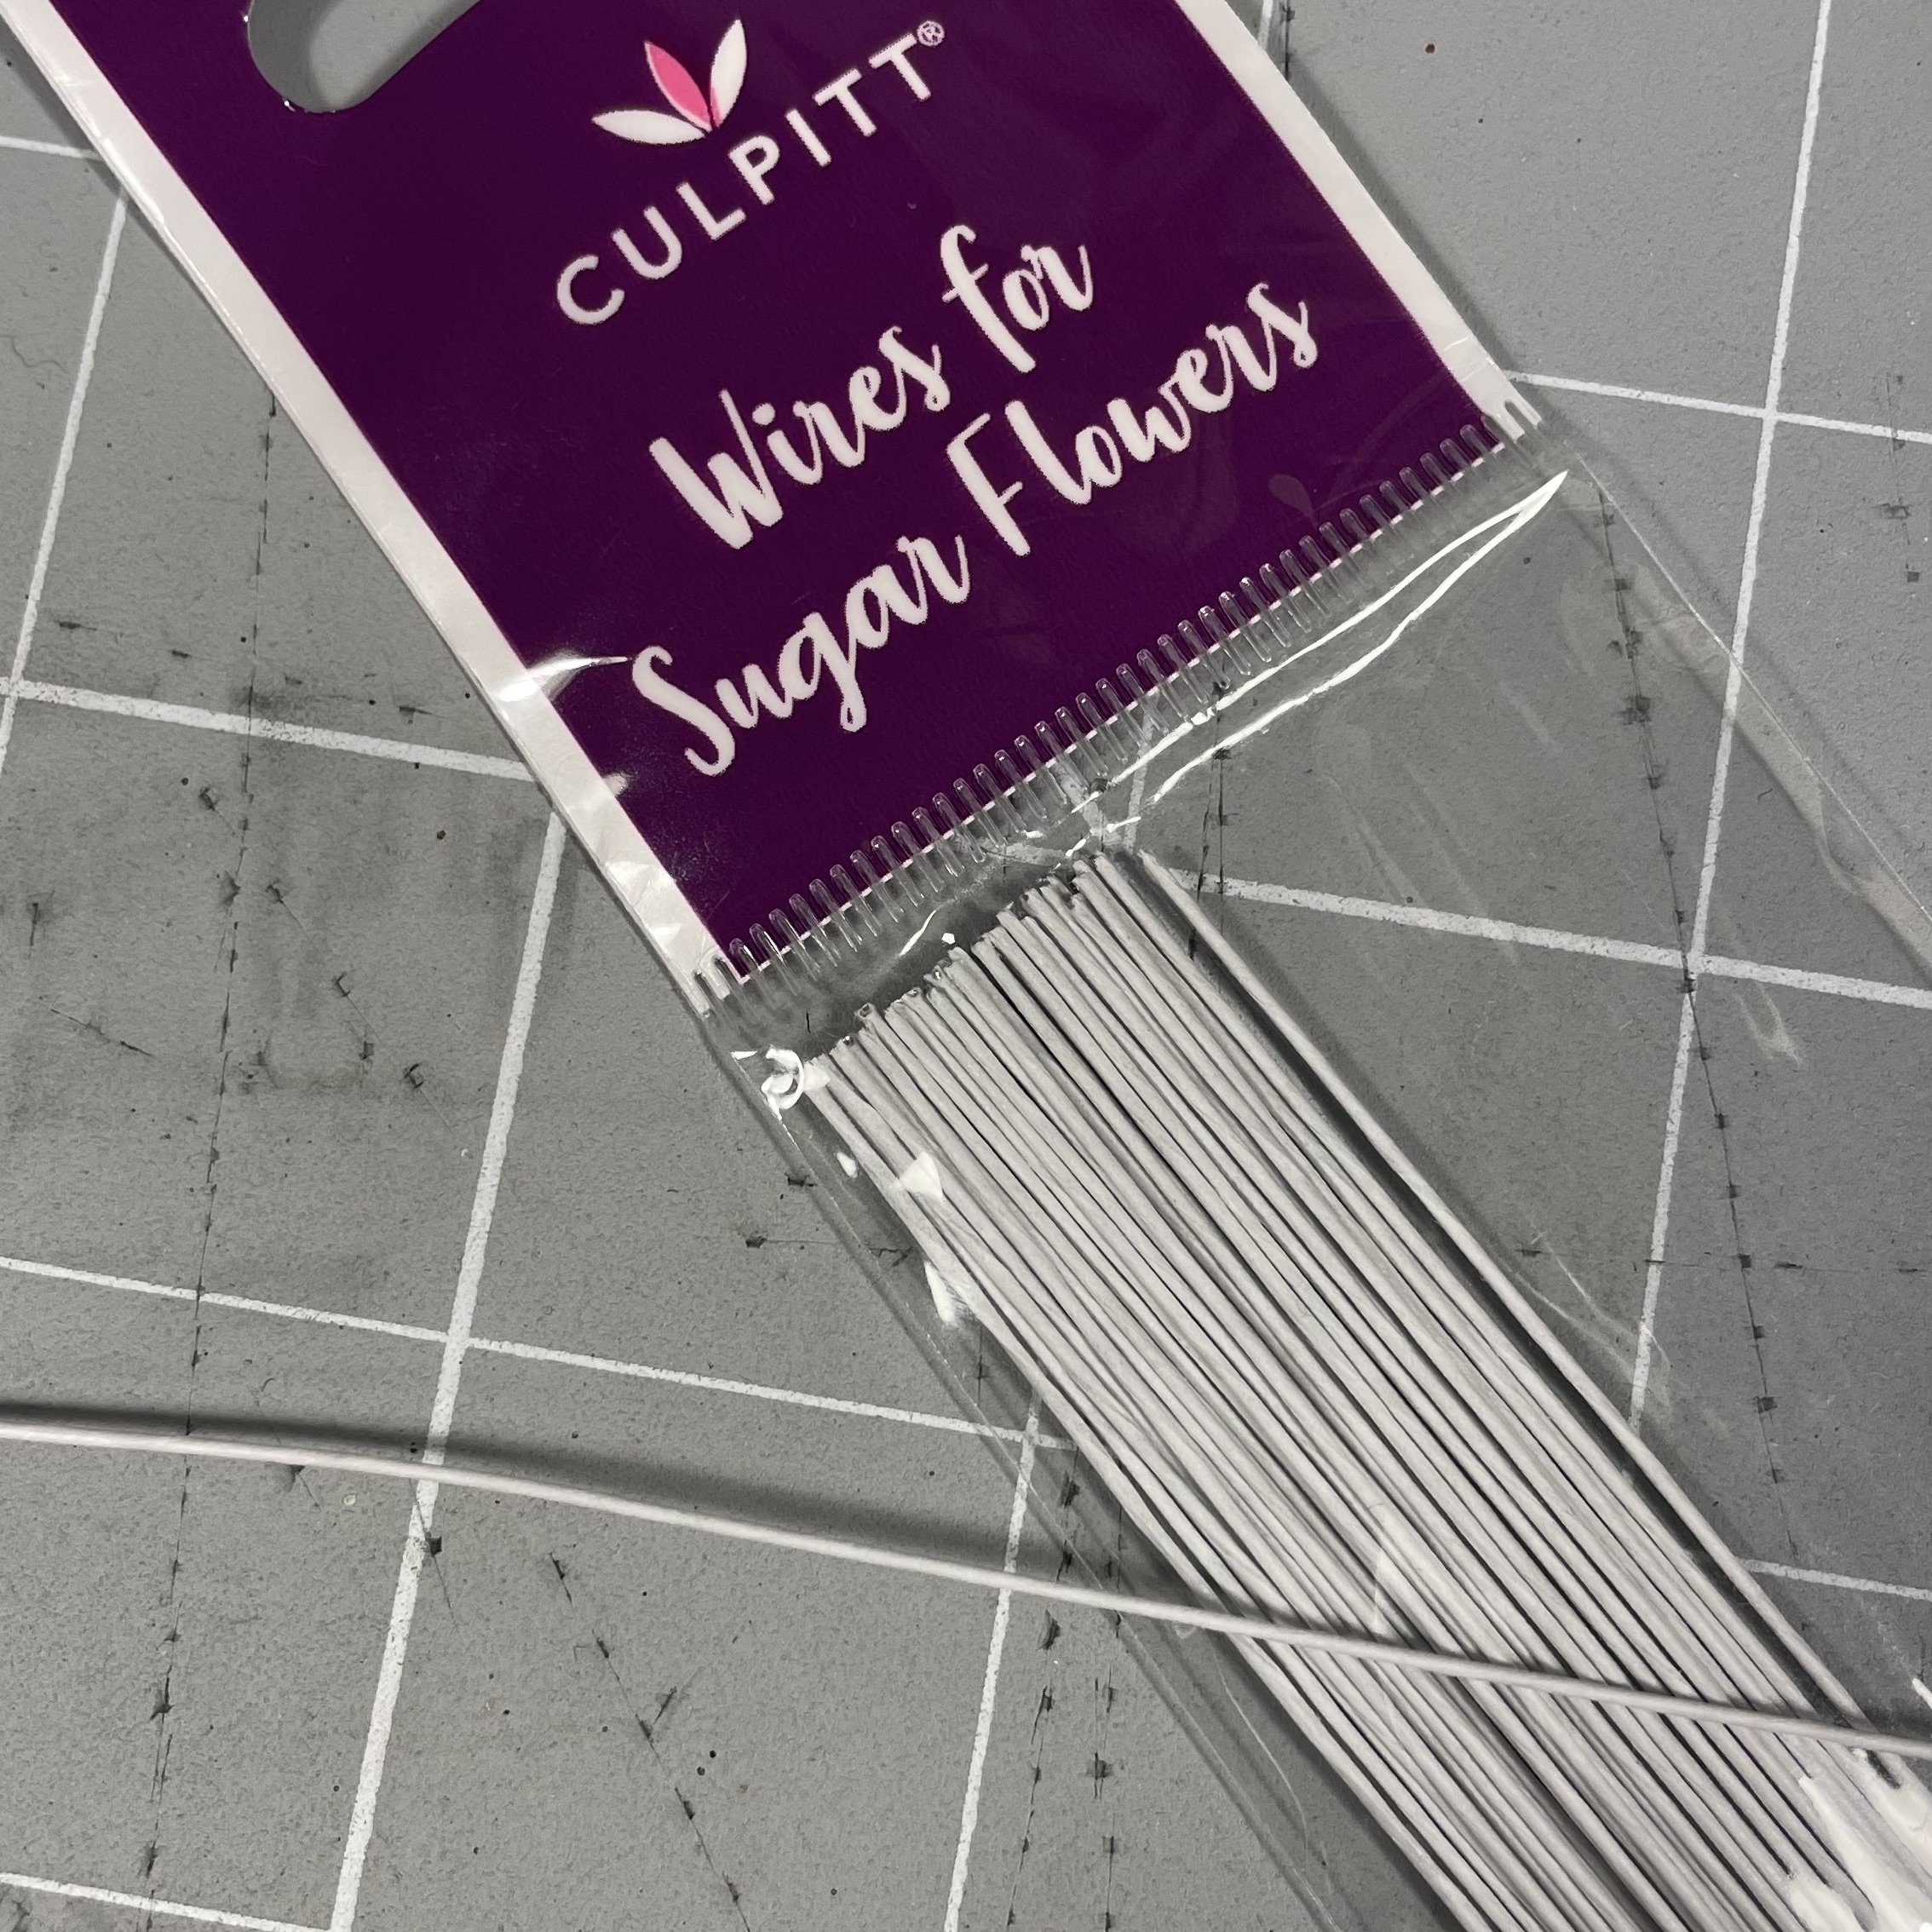
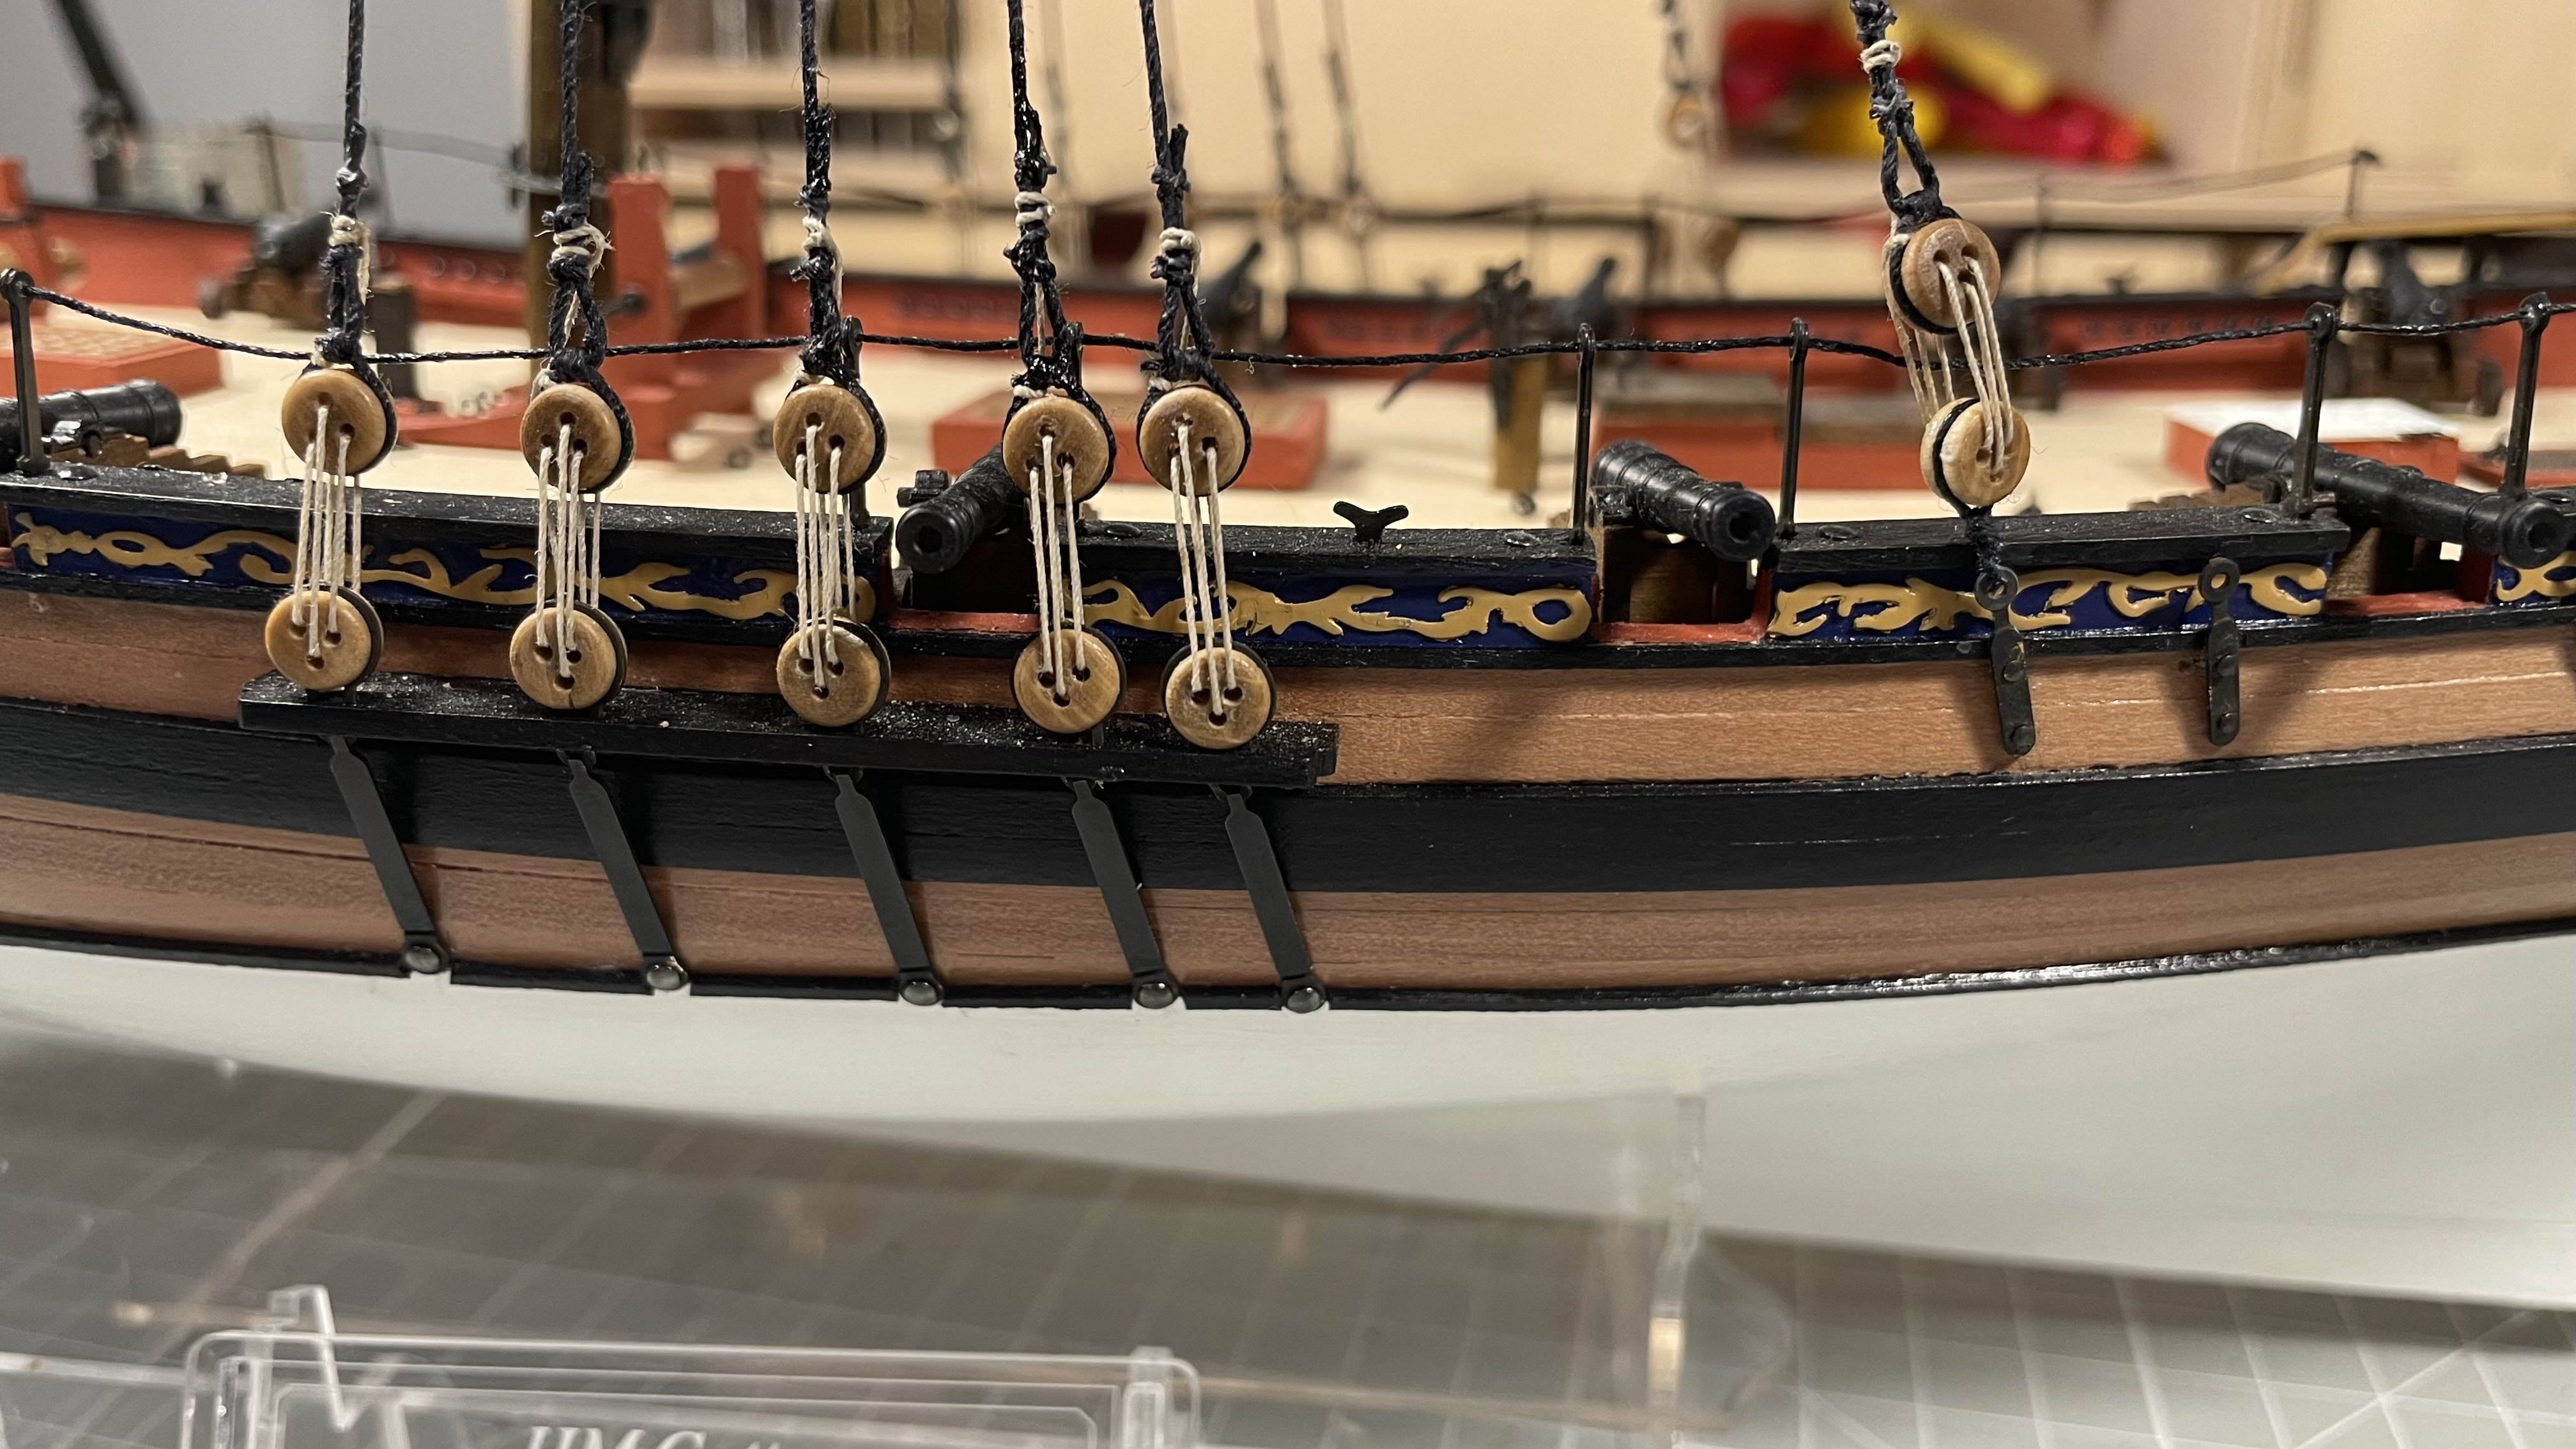
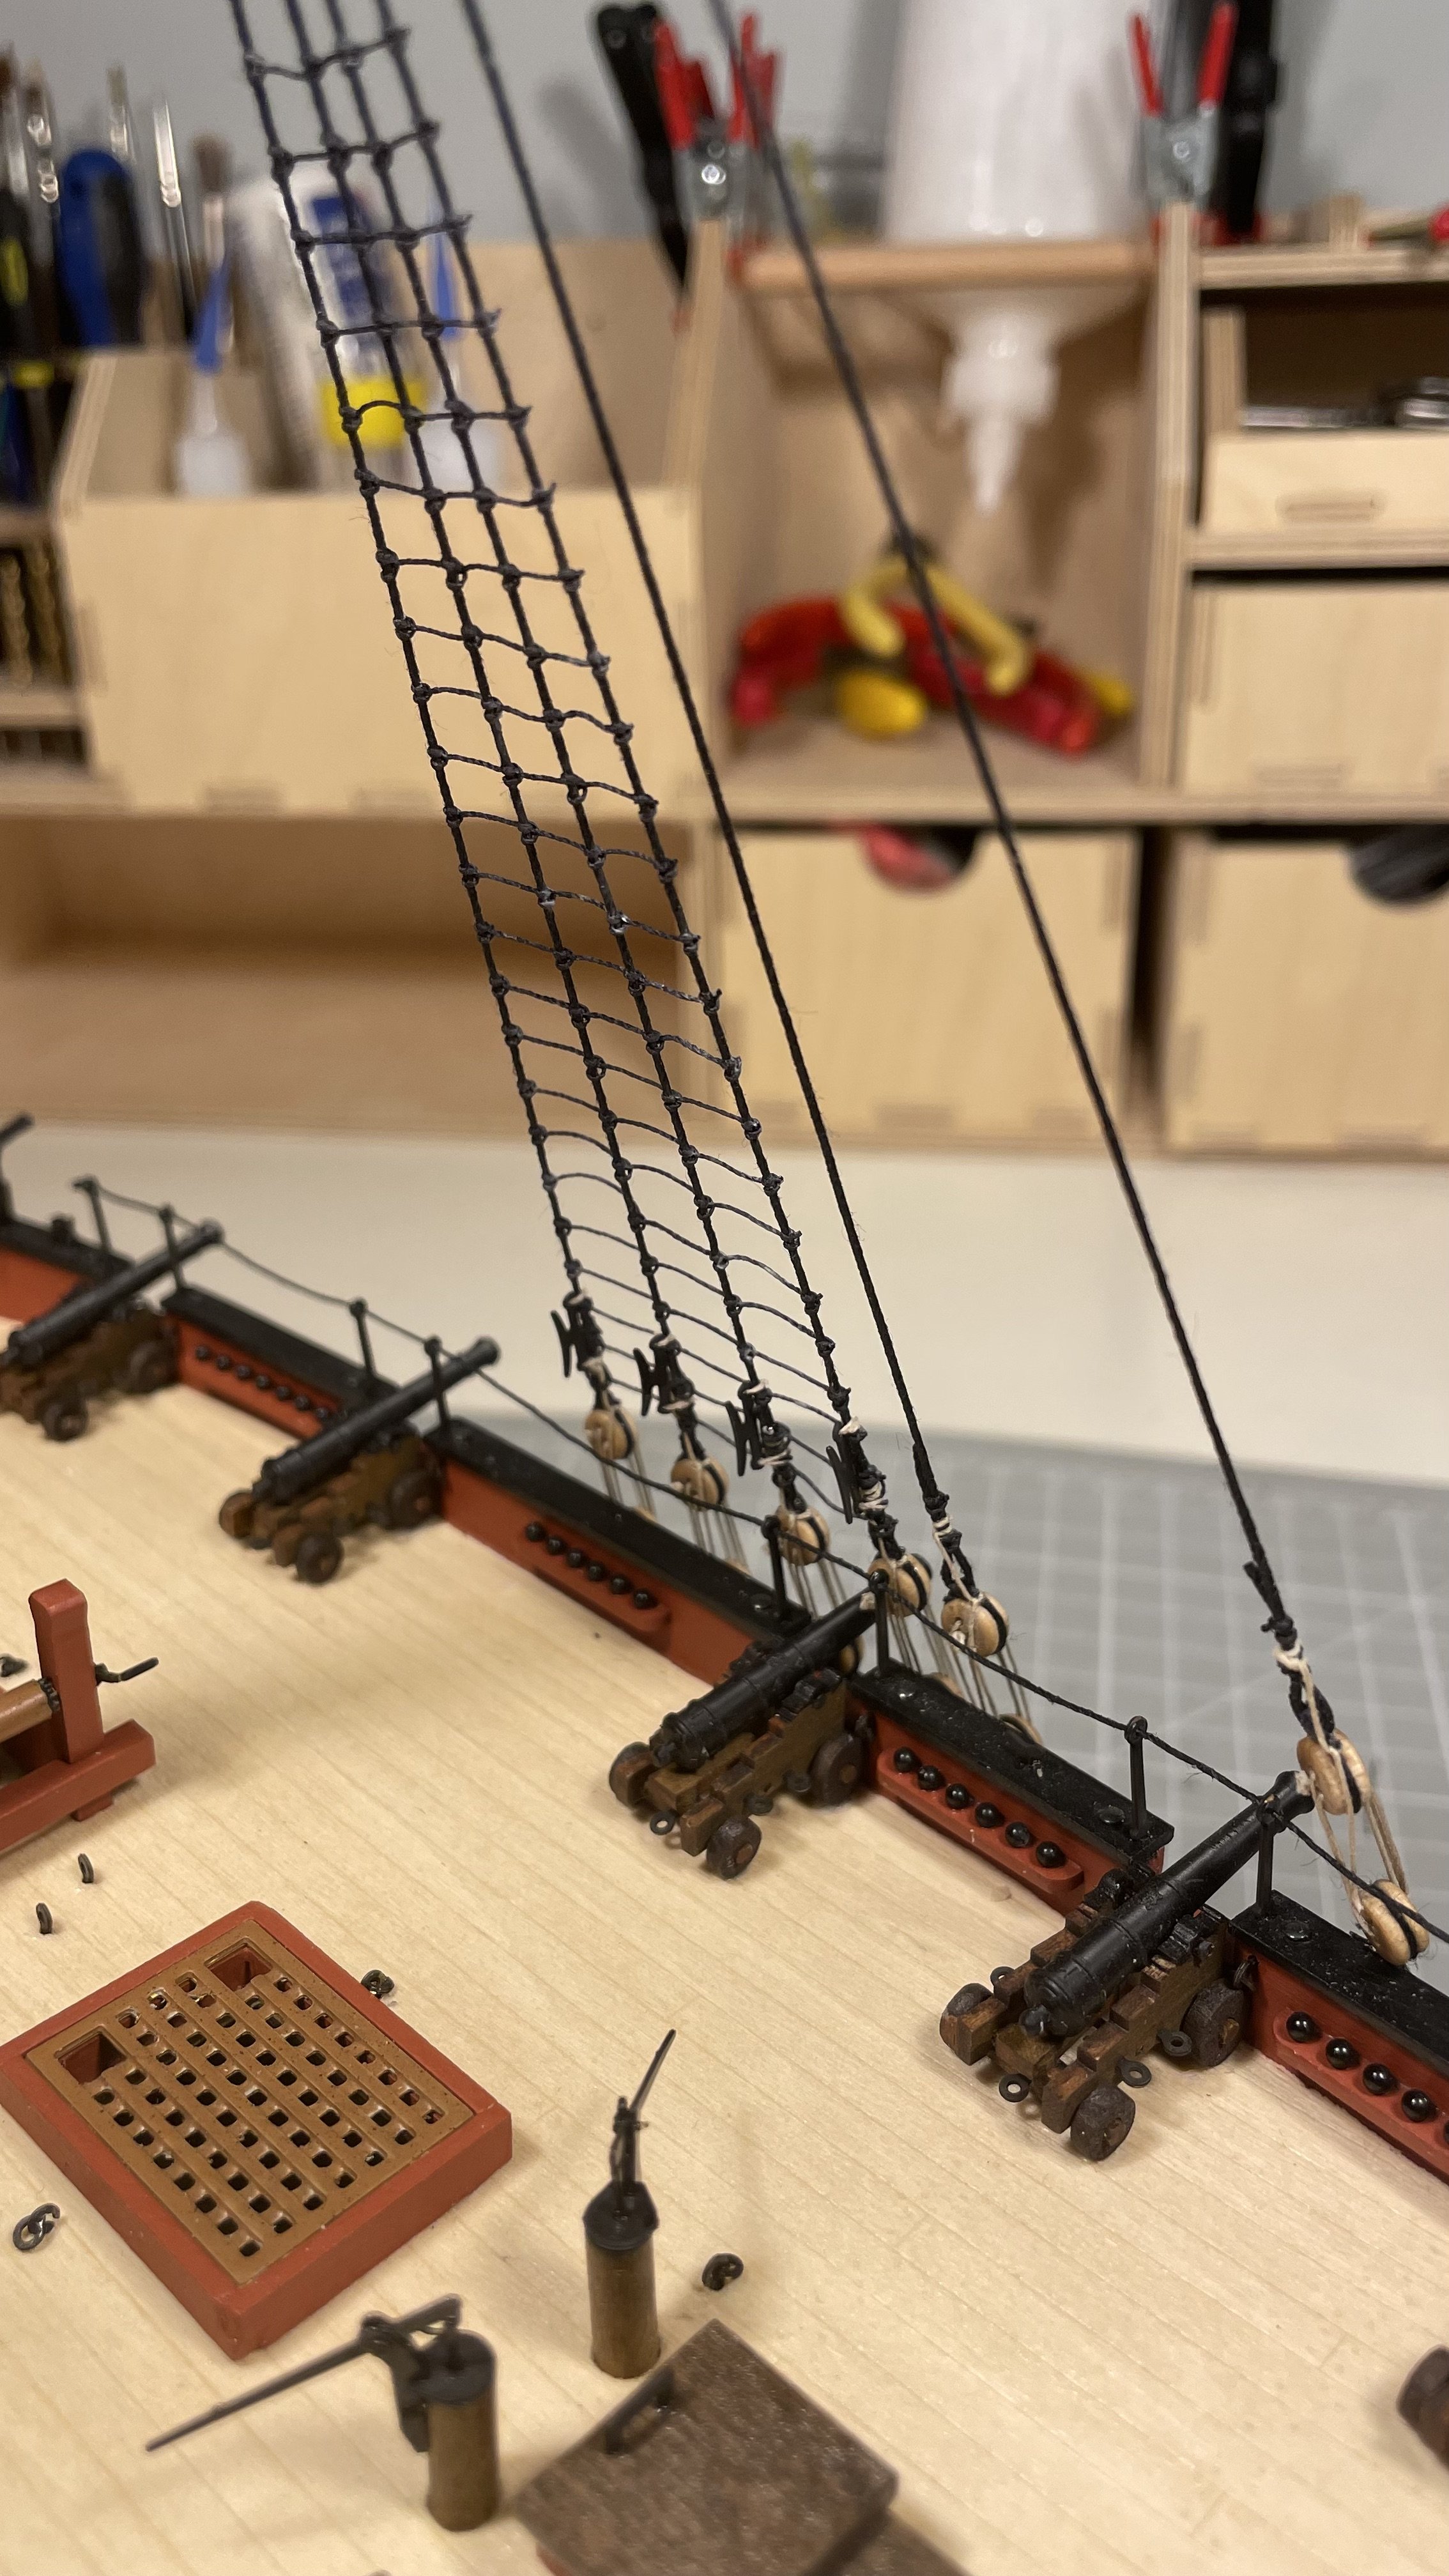
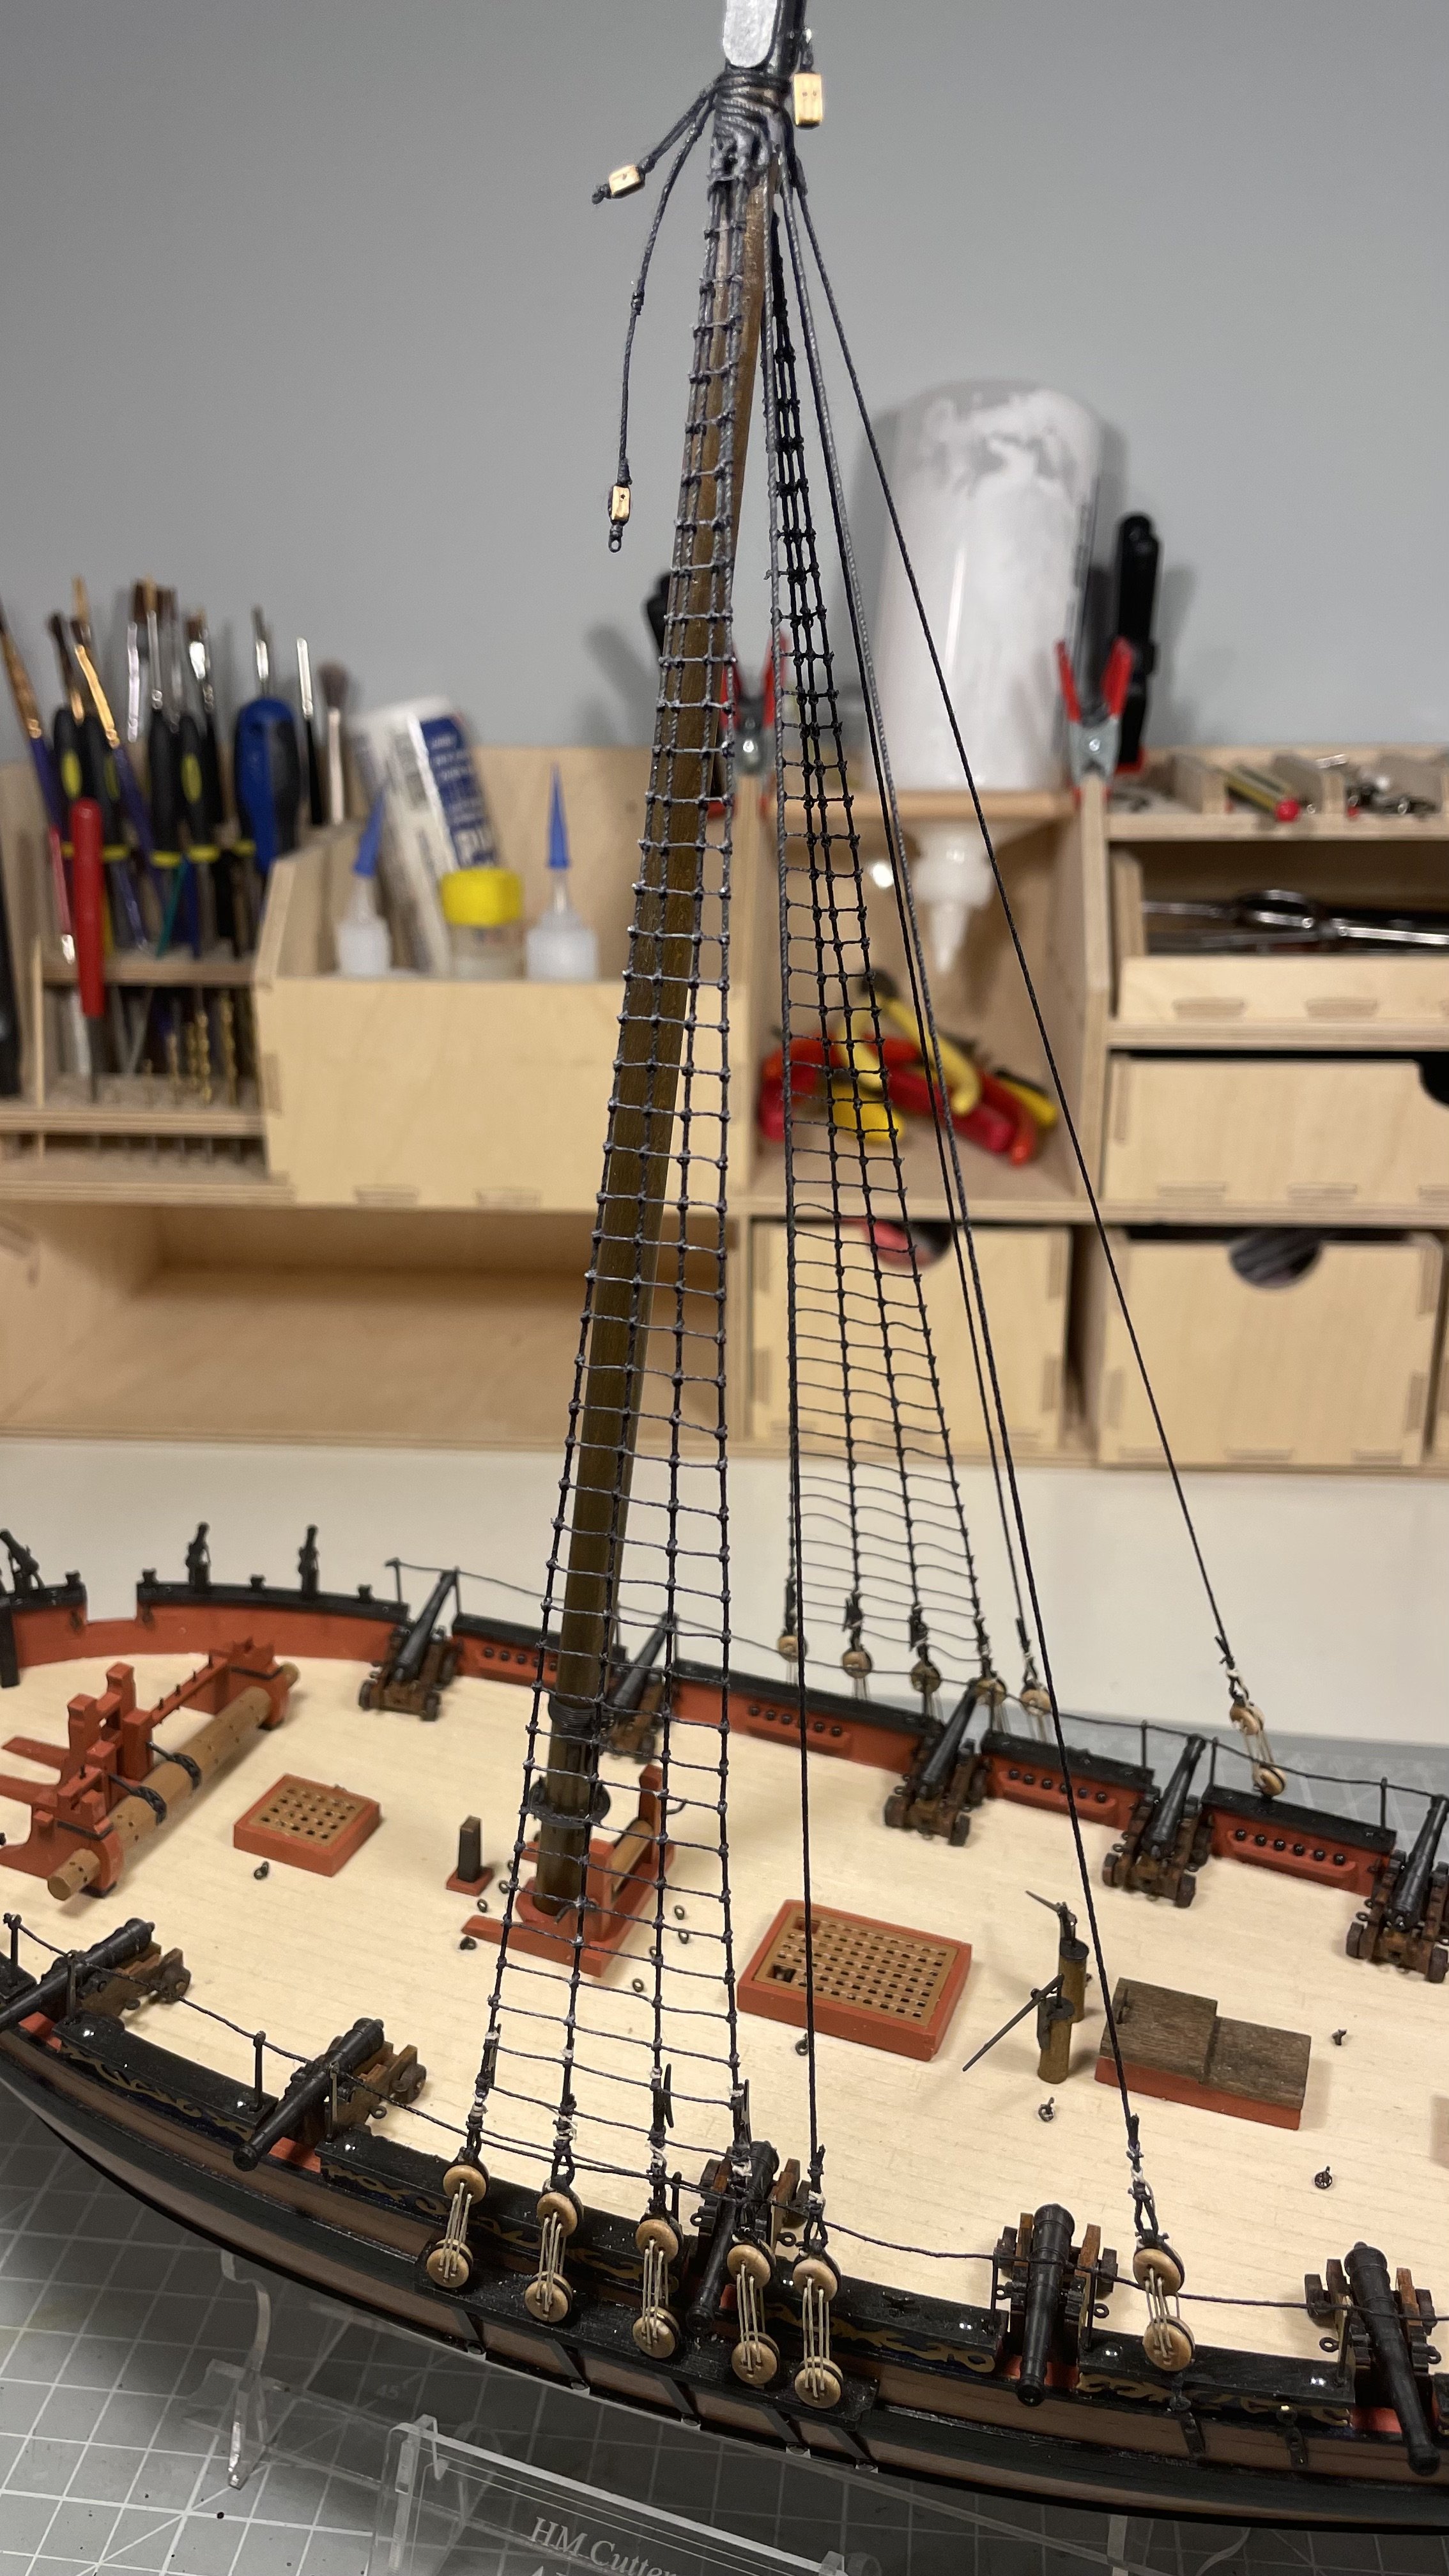
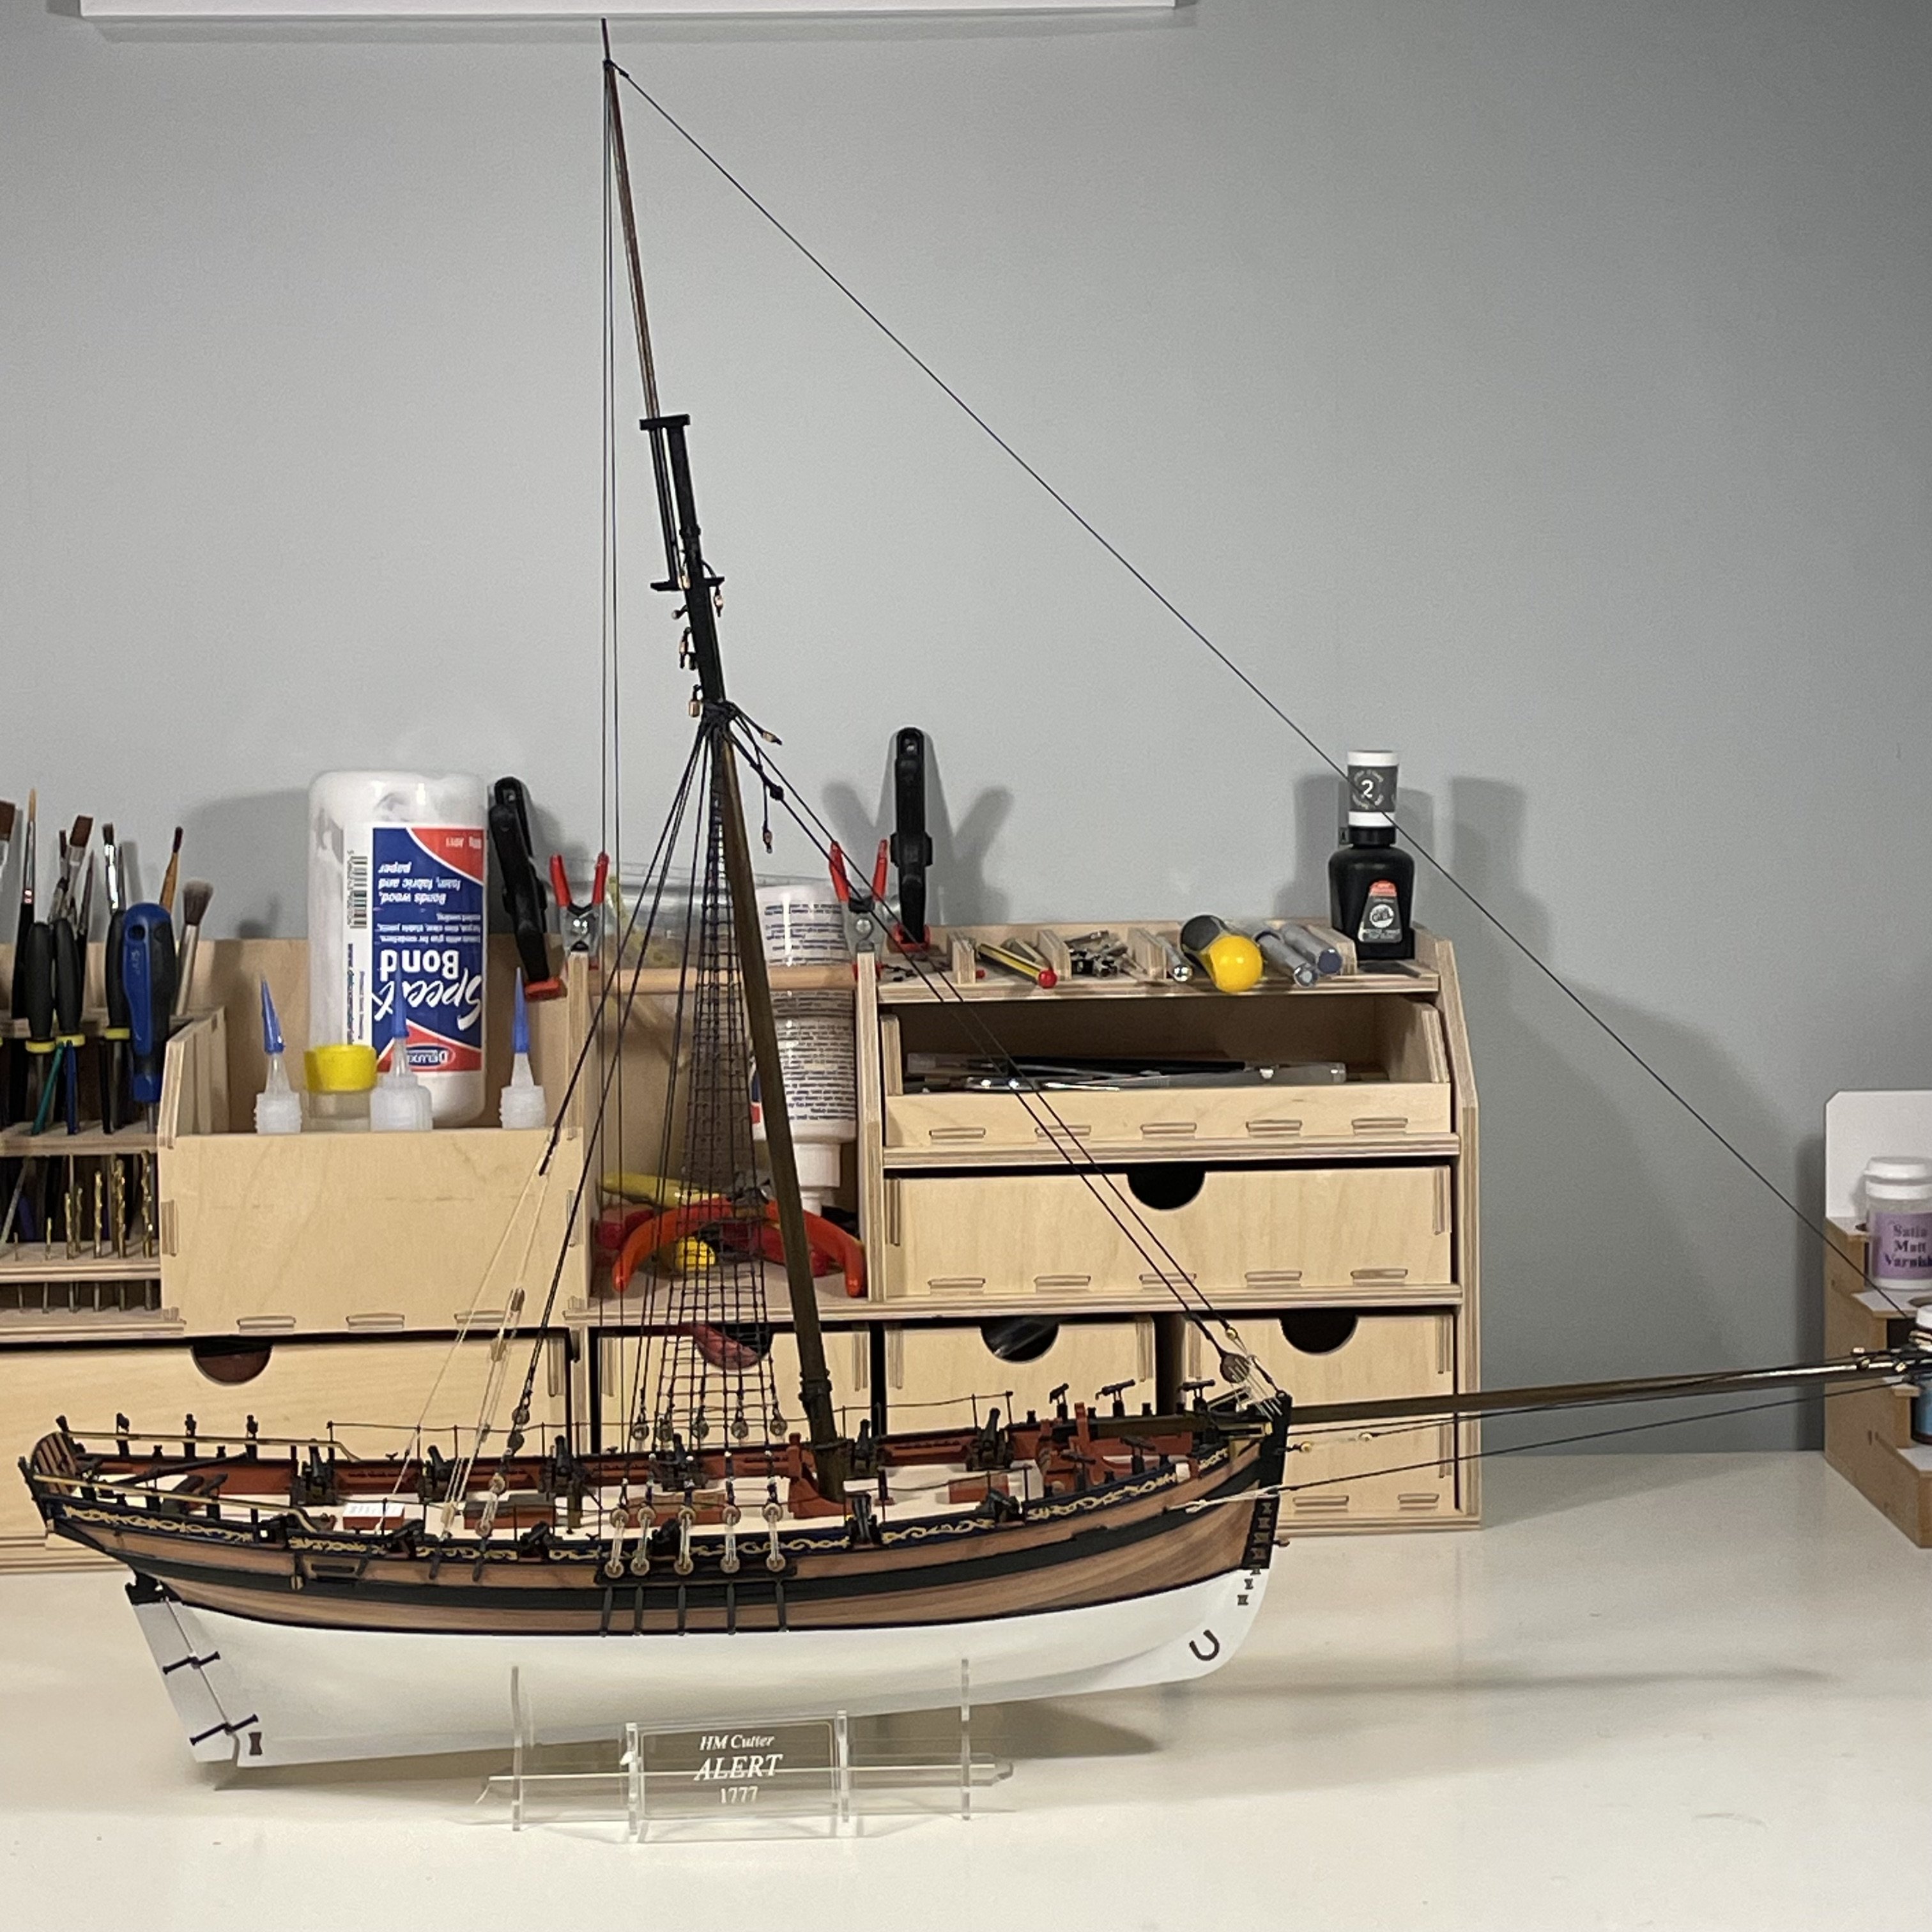
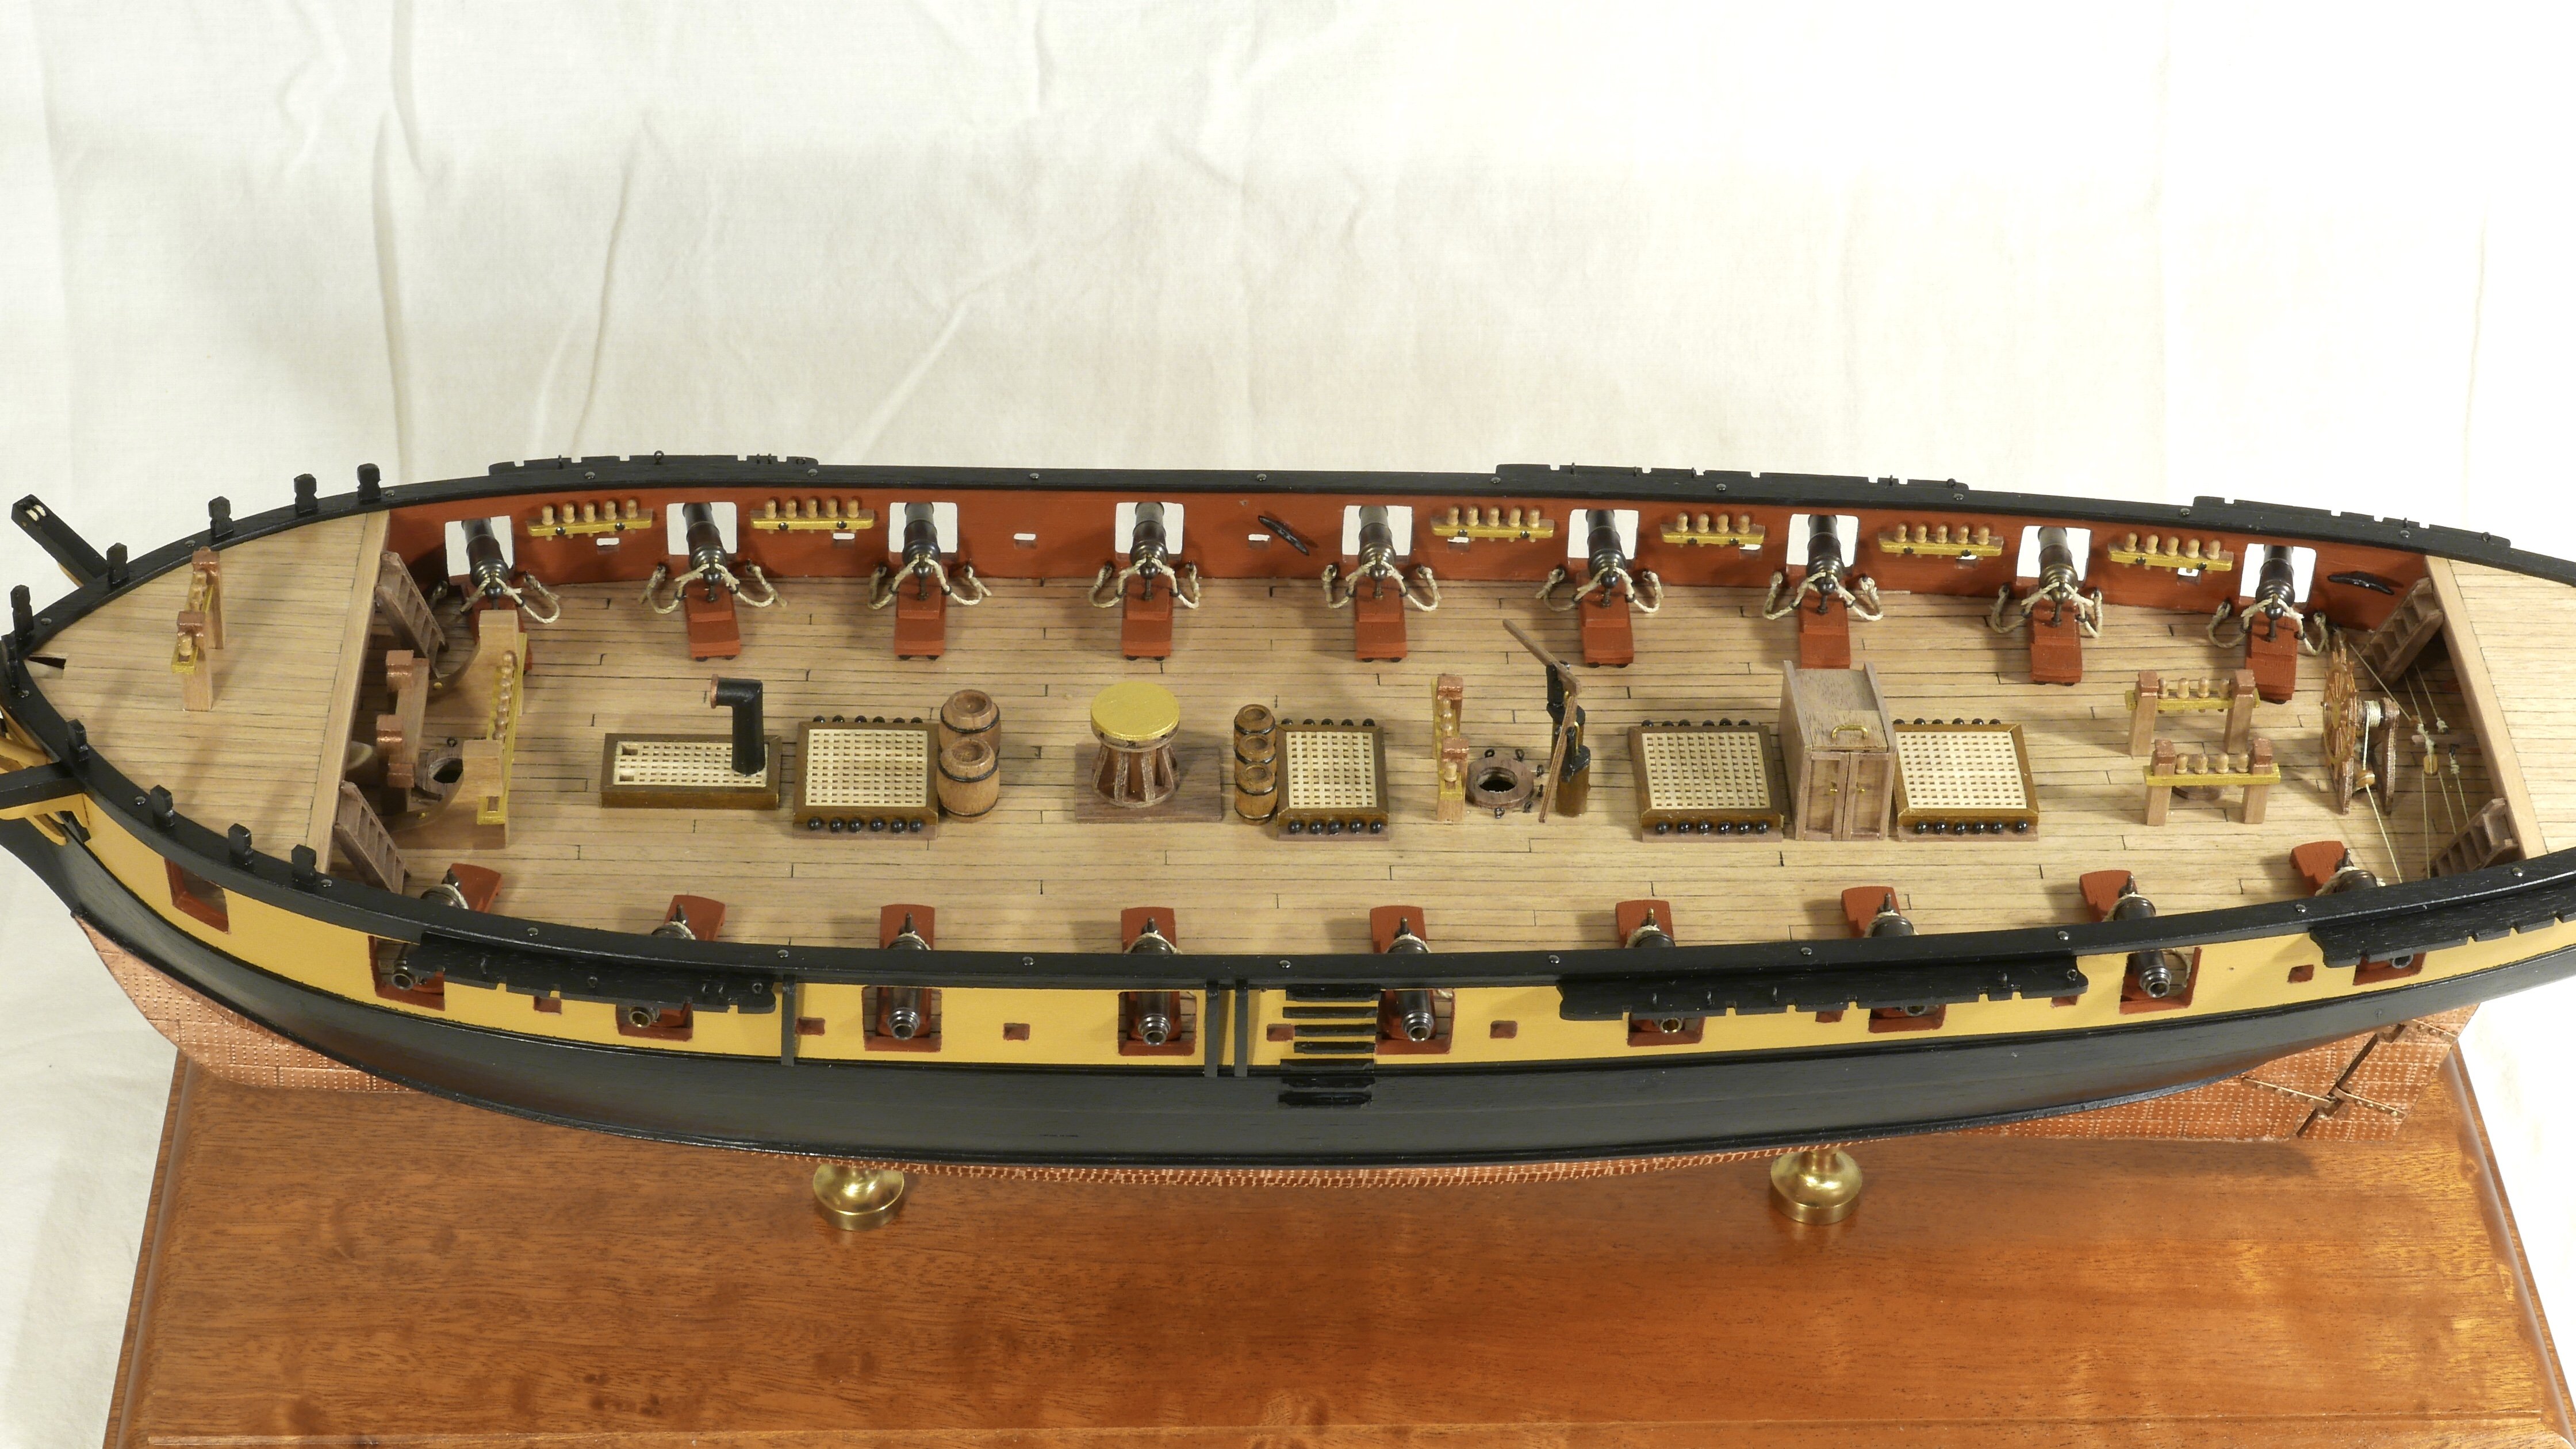
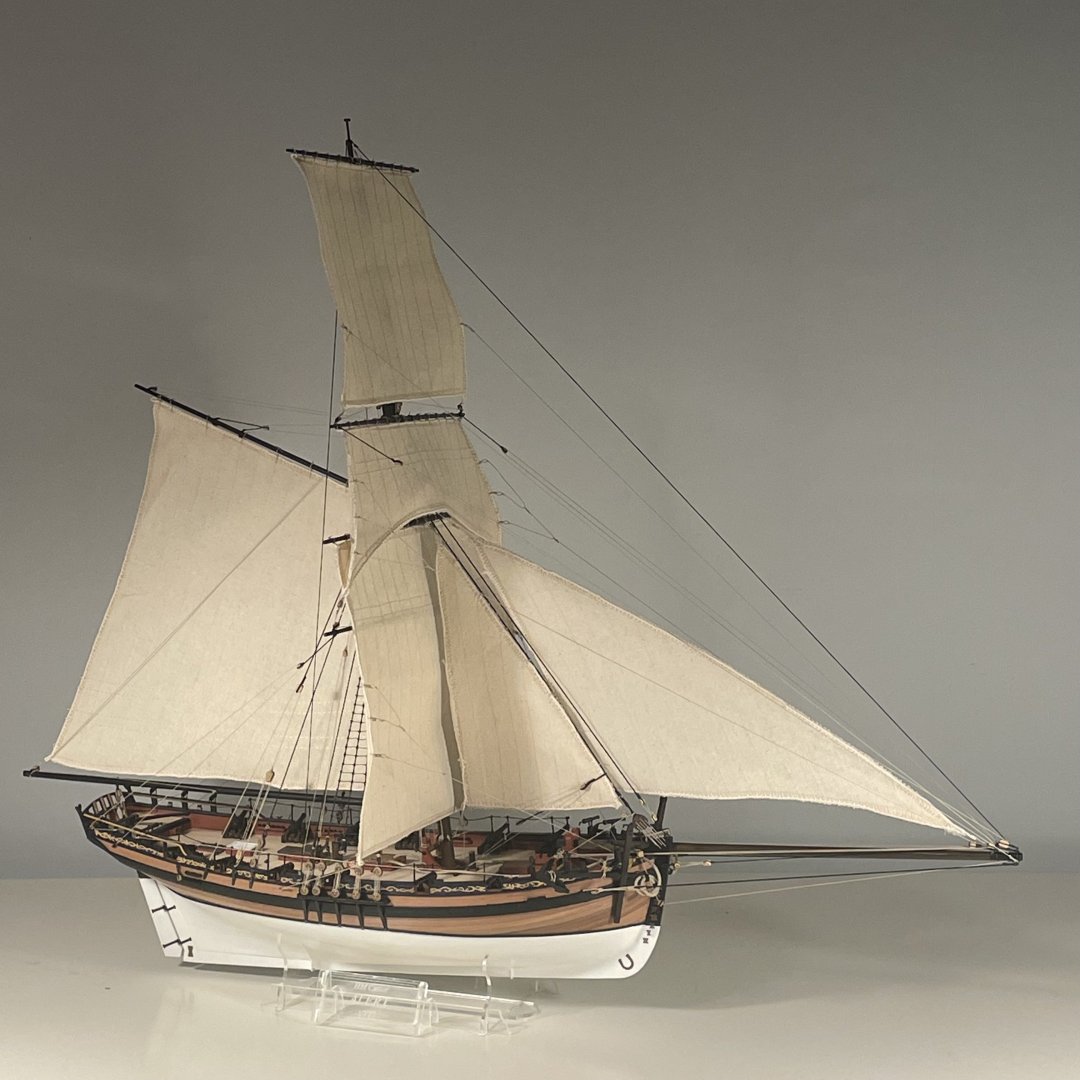
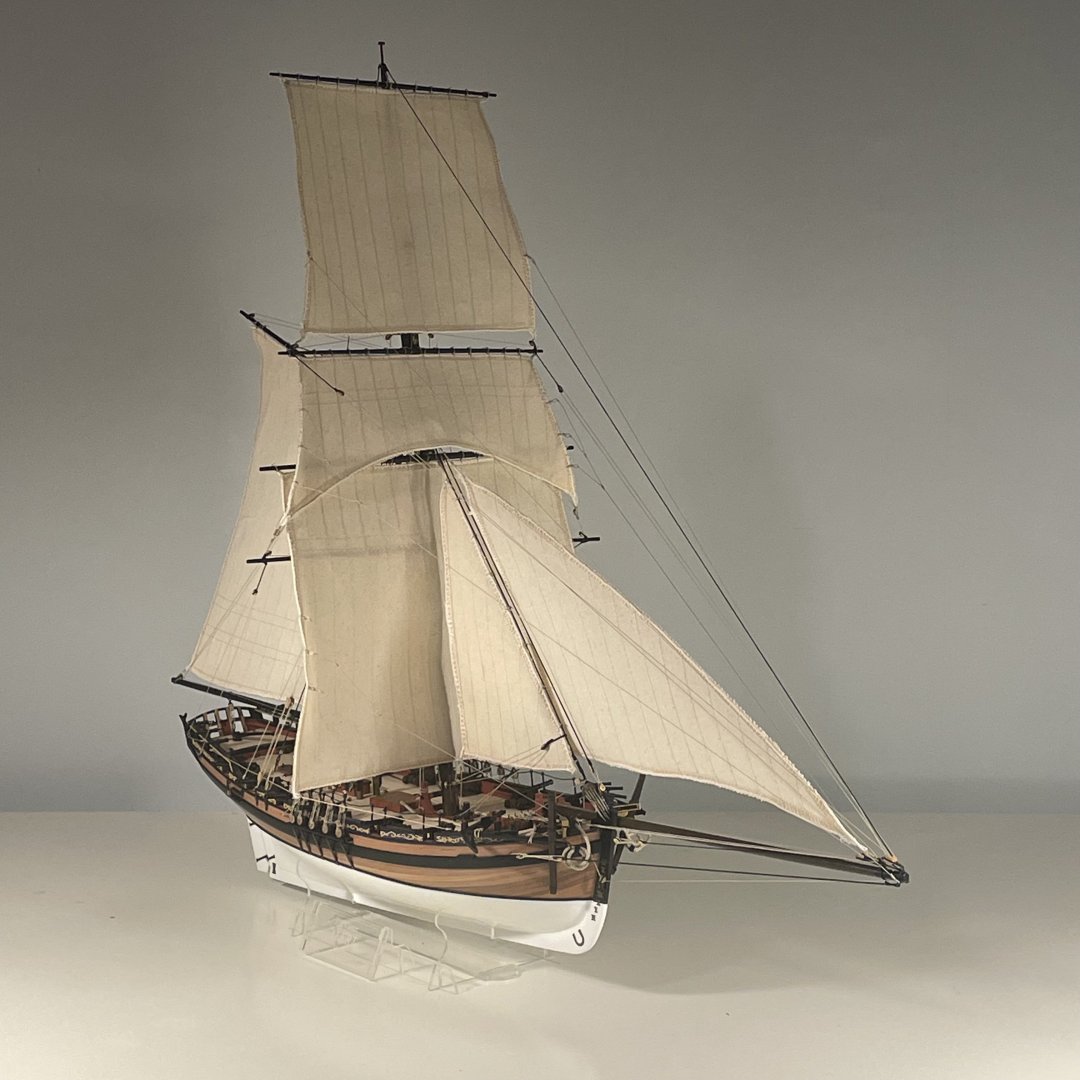
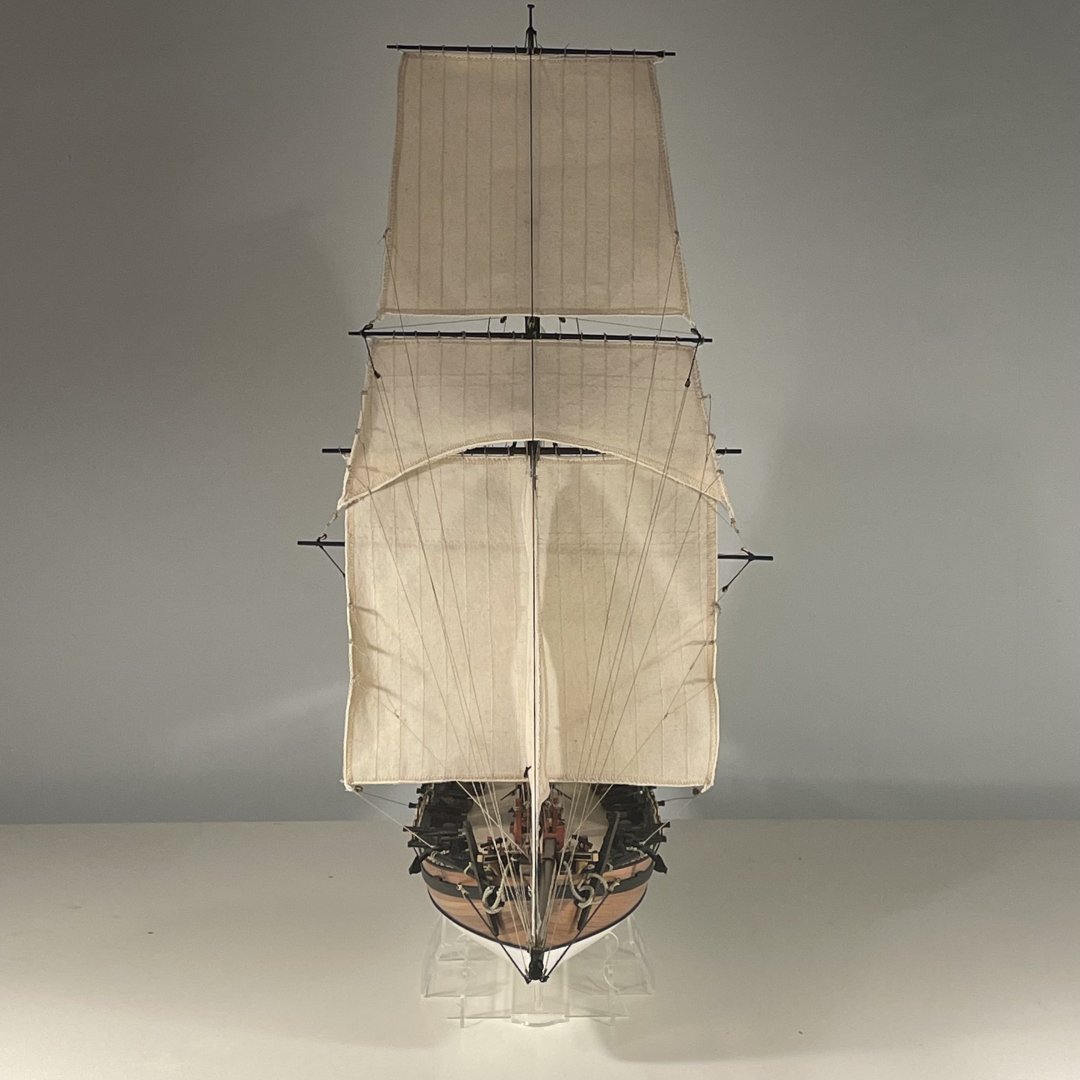
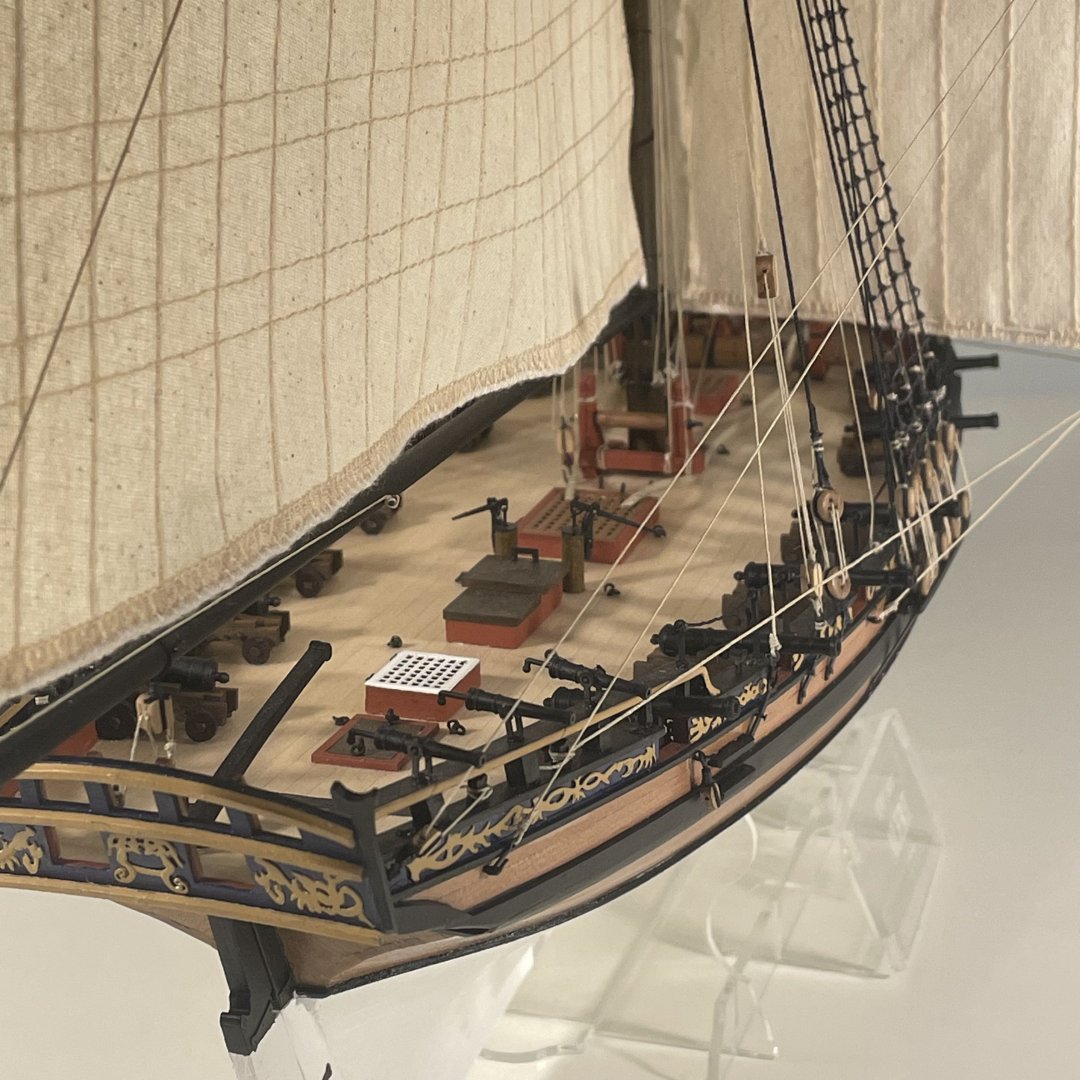
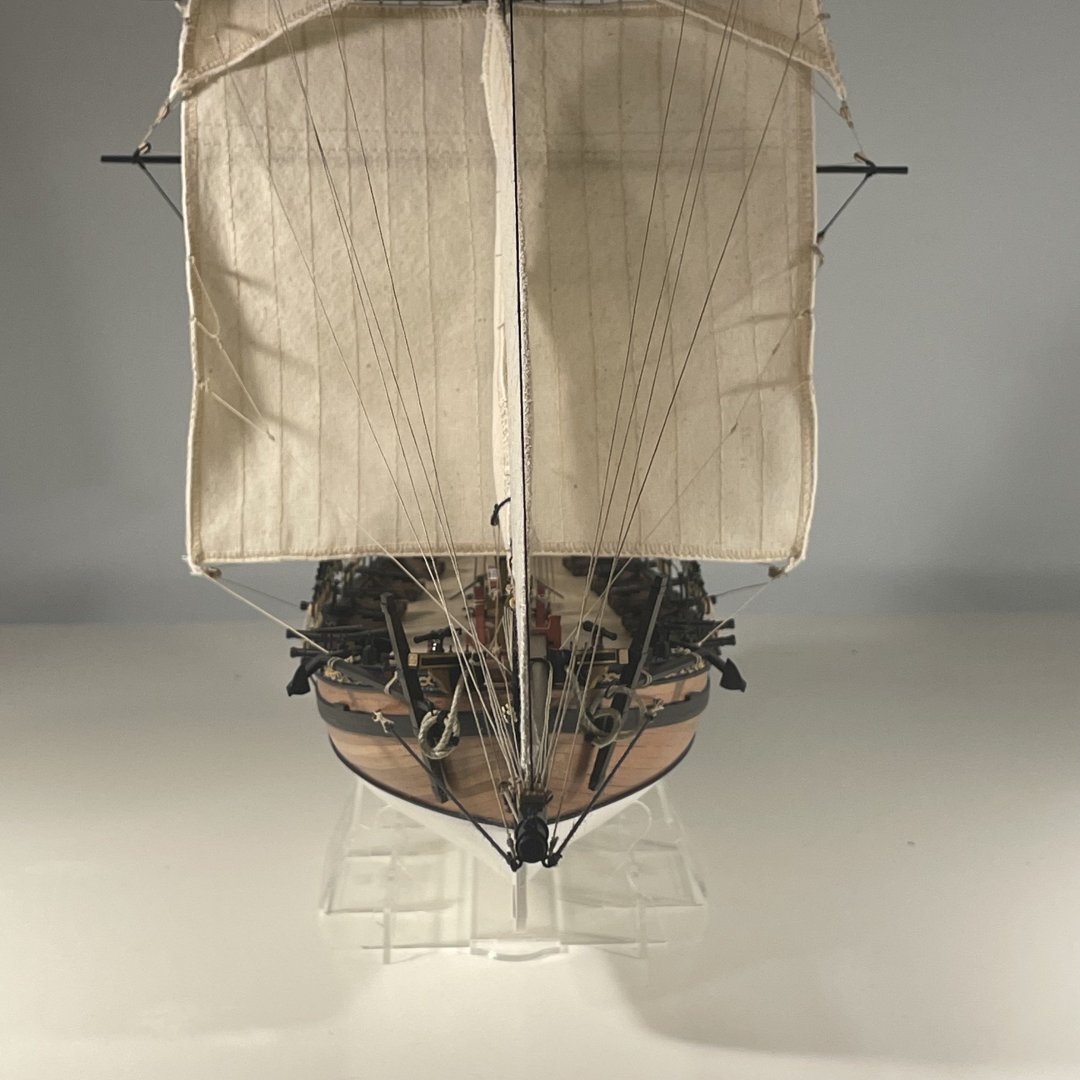
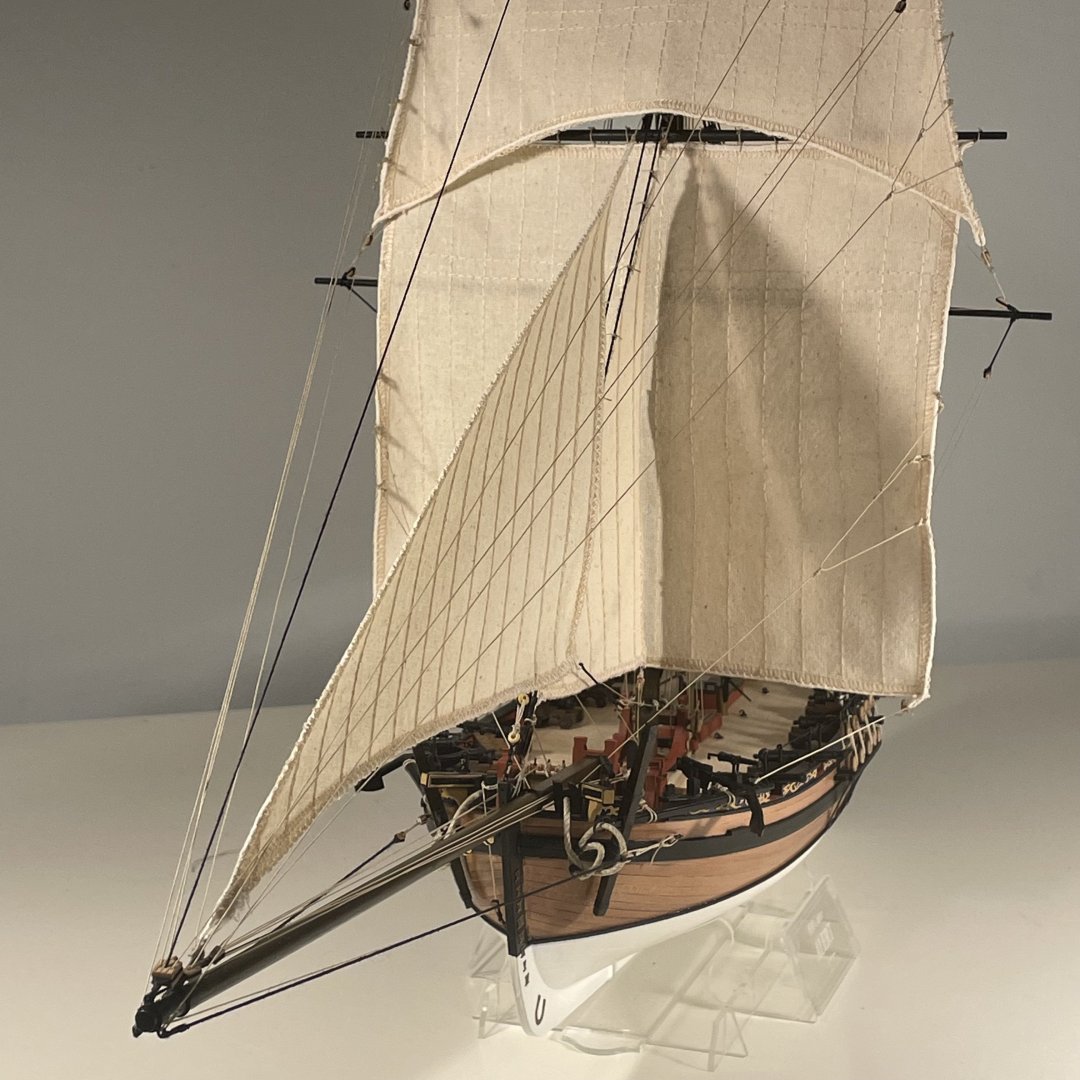
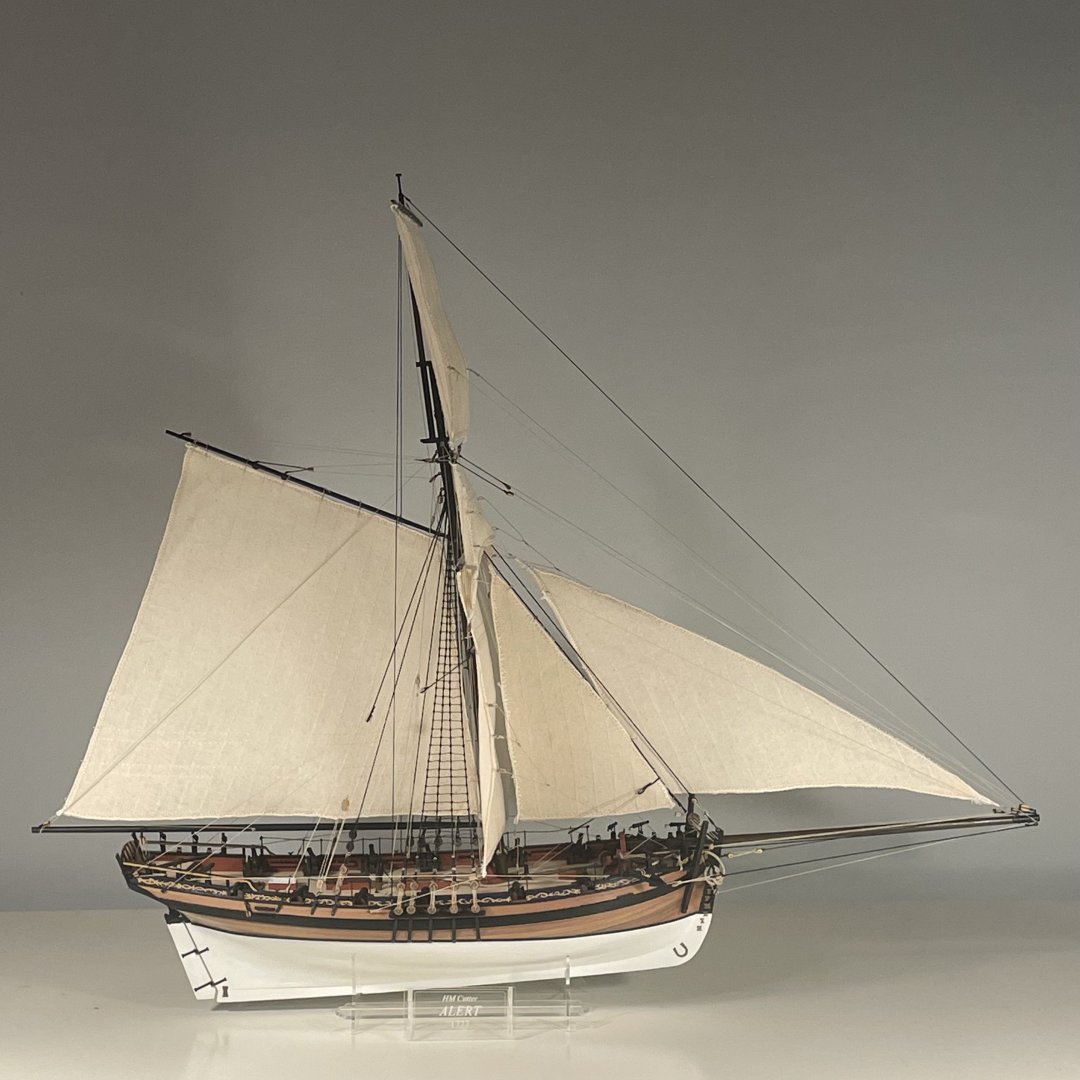
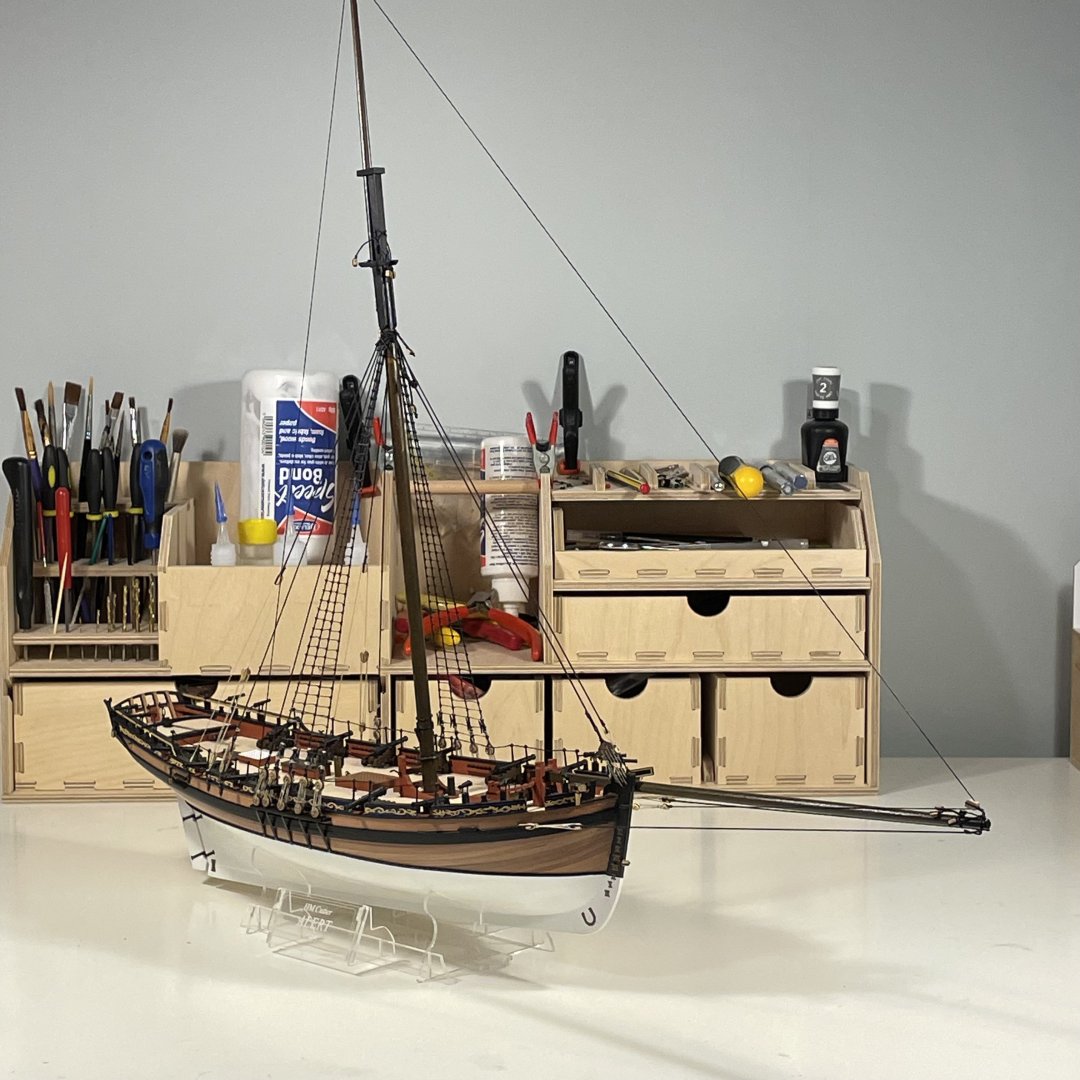
And so here she is, and probably finished! So, first of all some pics of the full rigging. The instruction book is pretty clear - though you have to combine the information for with, and without, sails. I used the sails exactly as supplied and rigged them all hauled tight. I am aware that sails are often not installed because first of all they are very hard to do accurately at scale, and also because they hide much of the work of the builder. As a modeller I accept both of those points, but feel they really are issues for the cognoscenti, the average slightly interested friend or family member will assume that a sailing ship should have sails. So, first for that reason, I rigged 'em. A secondary consideration is that the running rigging is literally superfluous if no sails are present, and in that regard having the sails has been a joy. The sails also speak to the whole purpose of these craft: they were very fast and very weatherly, carrying a truly prodigious area of canvas for such small craft And some details Shortly after I had rigged the square sail I realised that the tacks and sheets and the foot of the sail would not hang as they should so reflected on how to stiffen the sail athwartships. A stall at a Christmas market was selling florists wire for building wreaths, I bought a roll but it was shiny black. A few minutes of googling found the perfect refinement - white coated wire for sugar flowers. I was able to thread a wire - athwartships - through the hem along the foot of the sail. It works a treat in providing shape and stiffening. Sheets and tacks now run outboard as they should - though hardly along the graceful curves that they should. Given my time again I would think about stiffening along foot and leach of all the sails and perhaps more. But not this time. And a little reflection: She's a beautiful small vessel, showing a style quite different from the square-rigged ships we so often model from the late 18th and early 19th centuries. I think a single-masted rig should be on everyone's list to build and this kit worked ideally for me. The materials are beautiful to use and plentiful in quantity (though why anyone would dye their own 0.25 mm thread is beyond me - fortunately I had a large supply). The large A3 instruction manual is beautifully conceived and magnificently clear. It suffers a little in clarity through the revisions to the model, but the revisions are all welcome. The sails were provided for free, and apart from being slightly miss-cut, I was happy to use them as provided, and I really do think the sails are worth having My biggest uncertainty in the whole project concerned attachment of the lower yards to the mast, and of some of the rigging, all lower than the gaff. With sails rigged it's obvious that if the gaff is to be raised or lowered at any speed then for the rings holding the spanker to be able to descend or rise, the mast must be free of rigging. And surely it must be possible to deploy the spanker in a hurry - to chase or flee abruptly to windward, for example. I couldn't find an image of the Alert model in the Science Museum - but all the cutter rigs I could find online showed no obvious attachment of the lower yards to the mast - so I've not added any. I used simple trusses for the topsail and t'gallant yards, and I suppose the lower yards could have had light trusses swiftly removed before deploying the spanker, but I cannot see how parrels could have been used on those two. But in fact, one of the alleged defects of rigging sails - they hide details - is a virtue in that they hide the attachment of the yards. They also hide details I chose not to add - hanks and coils of rope attached to all the belaying points. The pins just struck me as too small to take hanks of rope, and the decks too crowded already with sails, for coils to look right. Some things in modelling just don't scale well - mainly things to do with rigging thread, in my experience! This was meant to be a sort of infill project before HMS Surprise hoves into view, where I could try a few things out (sails, bare planking) - and hone some skills (too many to mention). It was all that, but much more: rich in features, novel in rig, but above all, beautiful.


- 34 replies
-
- 10
-
-

-
- Alert
- Vanguard Models
- (and 1 more)
-
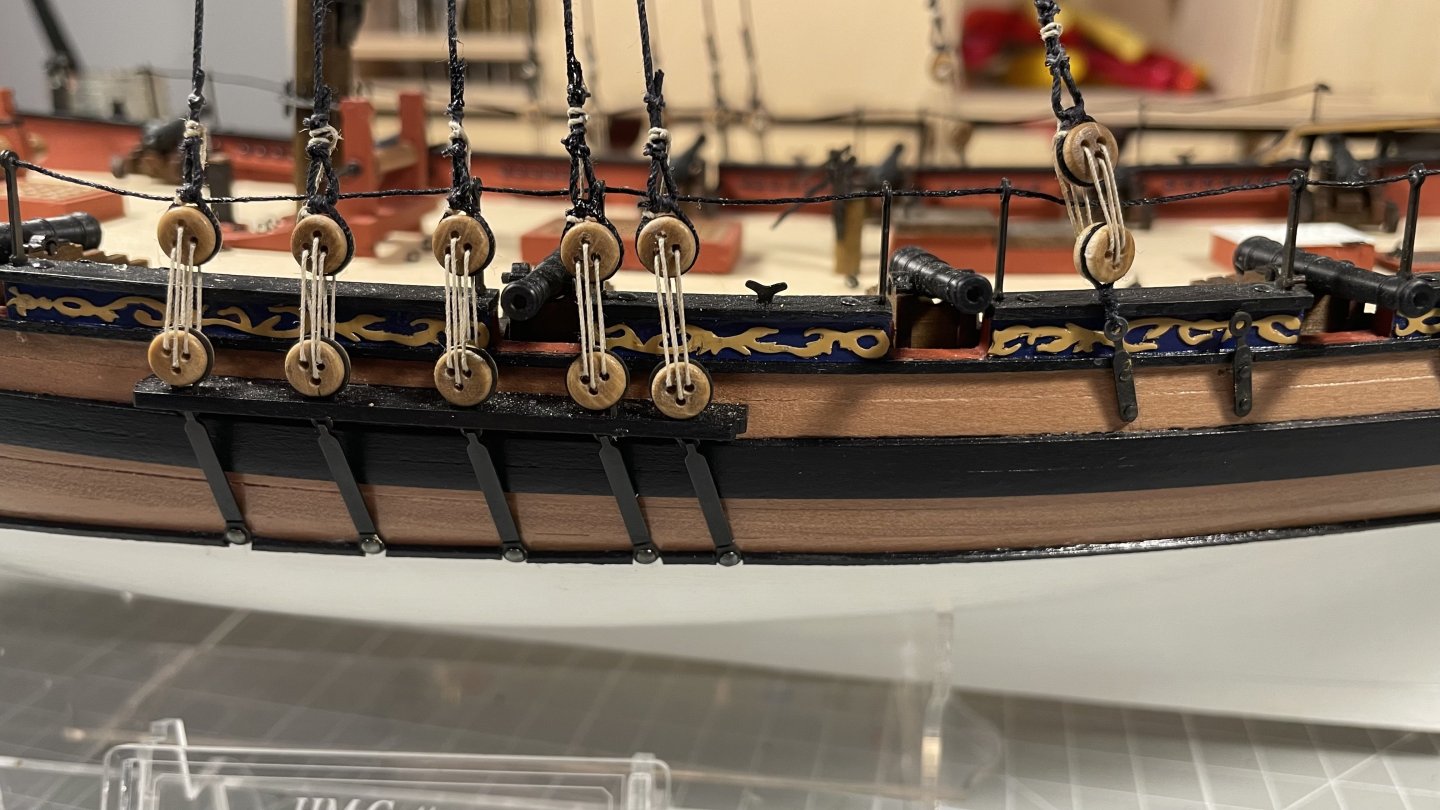
Have been back building - but not posting. So here is the first of a couple of updates. The standing rigging was reasonably straightforward . I built a jig to line the dead-eyes up while tensioning the shrouds, which meant I could tie throat seizings. Naturally managed to rig at least two of them with the eyes the wrong way round, but spotted it pretty quickly After about 100 clove-hitches my mojo returned and I rattled down the shrouds in a a couple of sittings. Am I weird for enjoying that? I space the ratlines at 5 mm, so 32 cm or 12.5" IRL. I've previously persuaded myself that that follows historical precedents. But I think 7 mm might look better. Once the stays are in you get some perspective of just how much sail these relatively small ships carried. And sails are the subject of the next post.


- 34 replies
-
- 9
-
-
-
- Alert
- Vanguard Models
- (and 1 more)
-
I very much prefer the one with rails, but well-understand why it's a pain to print. If you printed it with brackets, then a rail would be easy-enough to scratch, or could you print the rail and brackets as one piece and leave us to glue that to the stove proper? Anyway, I vote for rails.
-
That is what we want to hear! For a small business, cash-flow is king, and we need this small business to flourish. I seem to have missed the "dusty discussions". Shame (not!) 😆
-
Well, what fantastic news to return to. Waiting for HMS Surprise (as told by PO'B) is what has stopped me from building a frigate, so I will be all-in for this. My birthday is in May, so if you could have her released by then, that would be dandy, thanks!
-
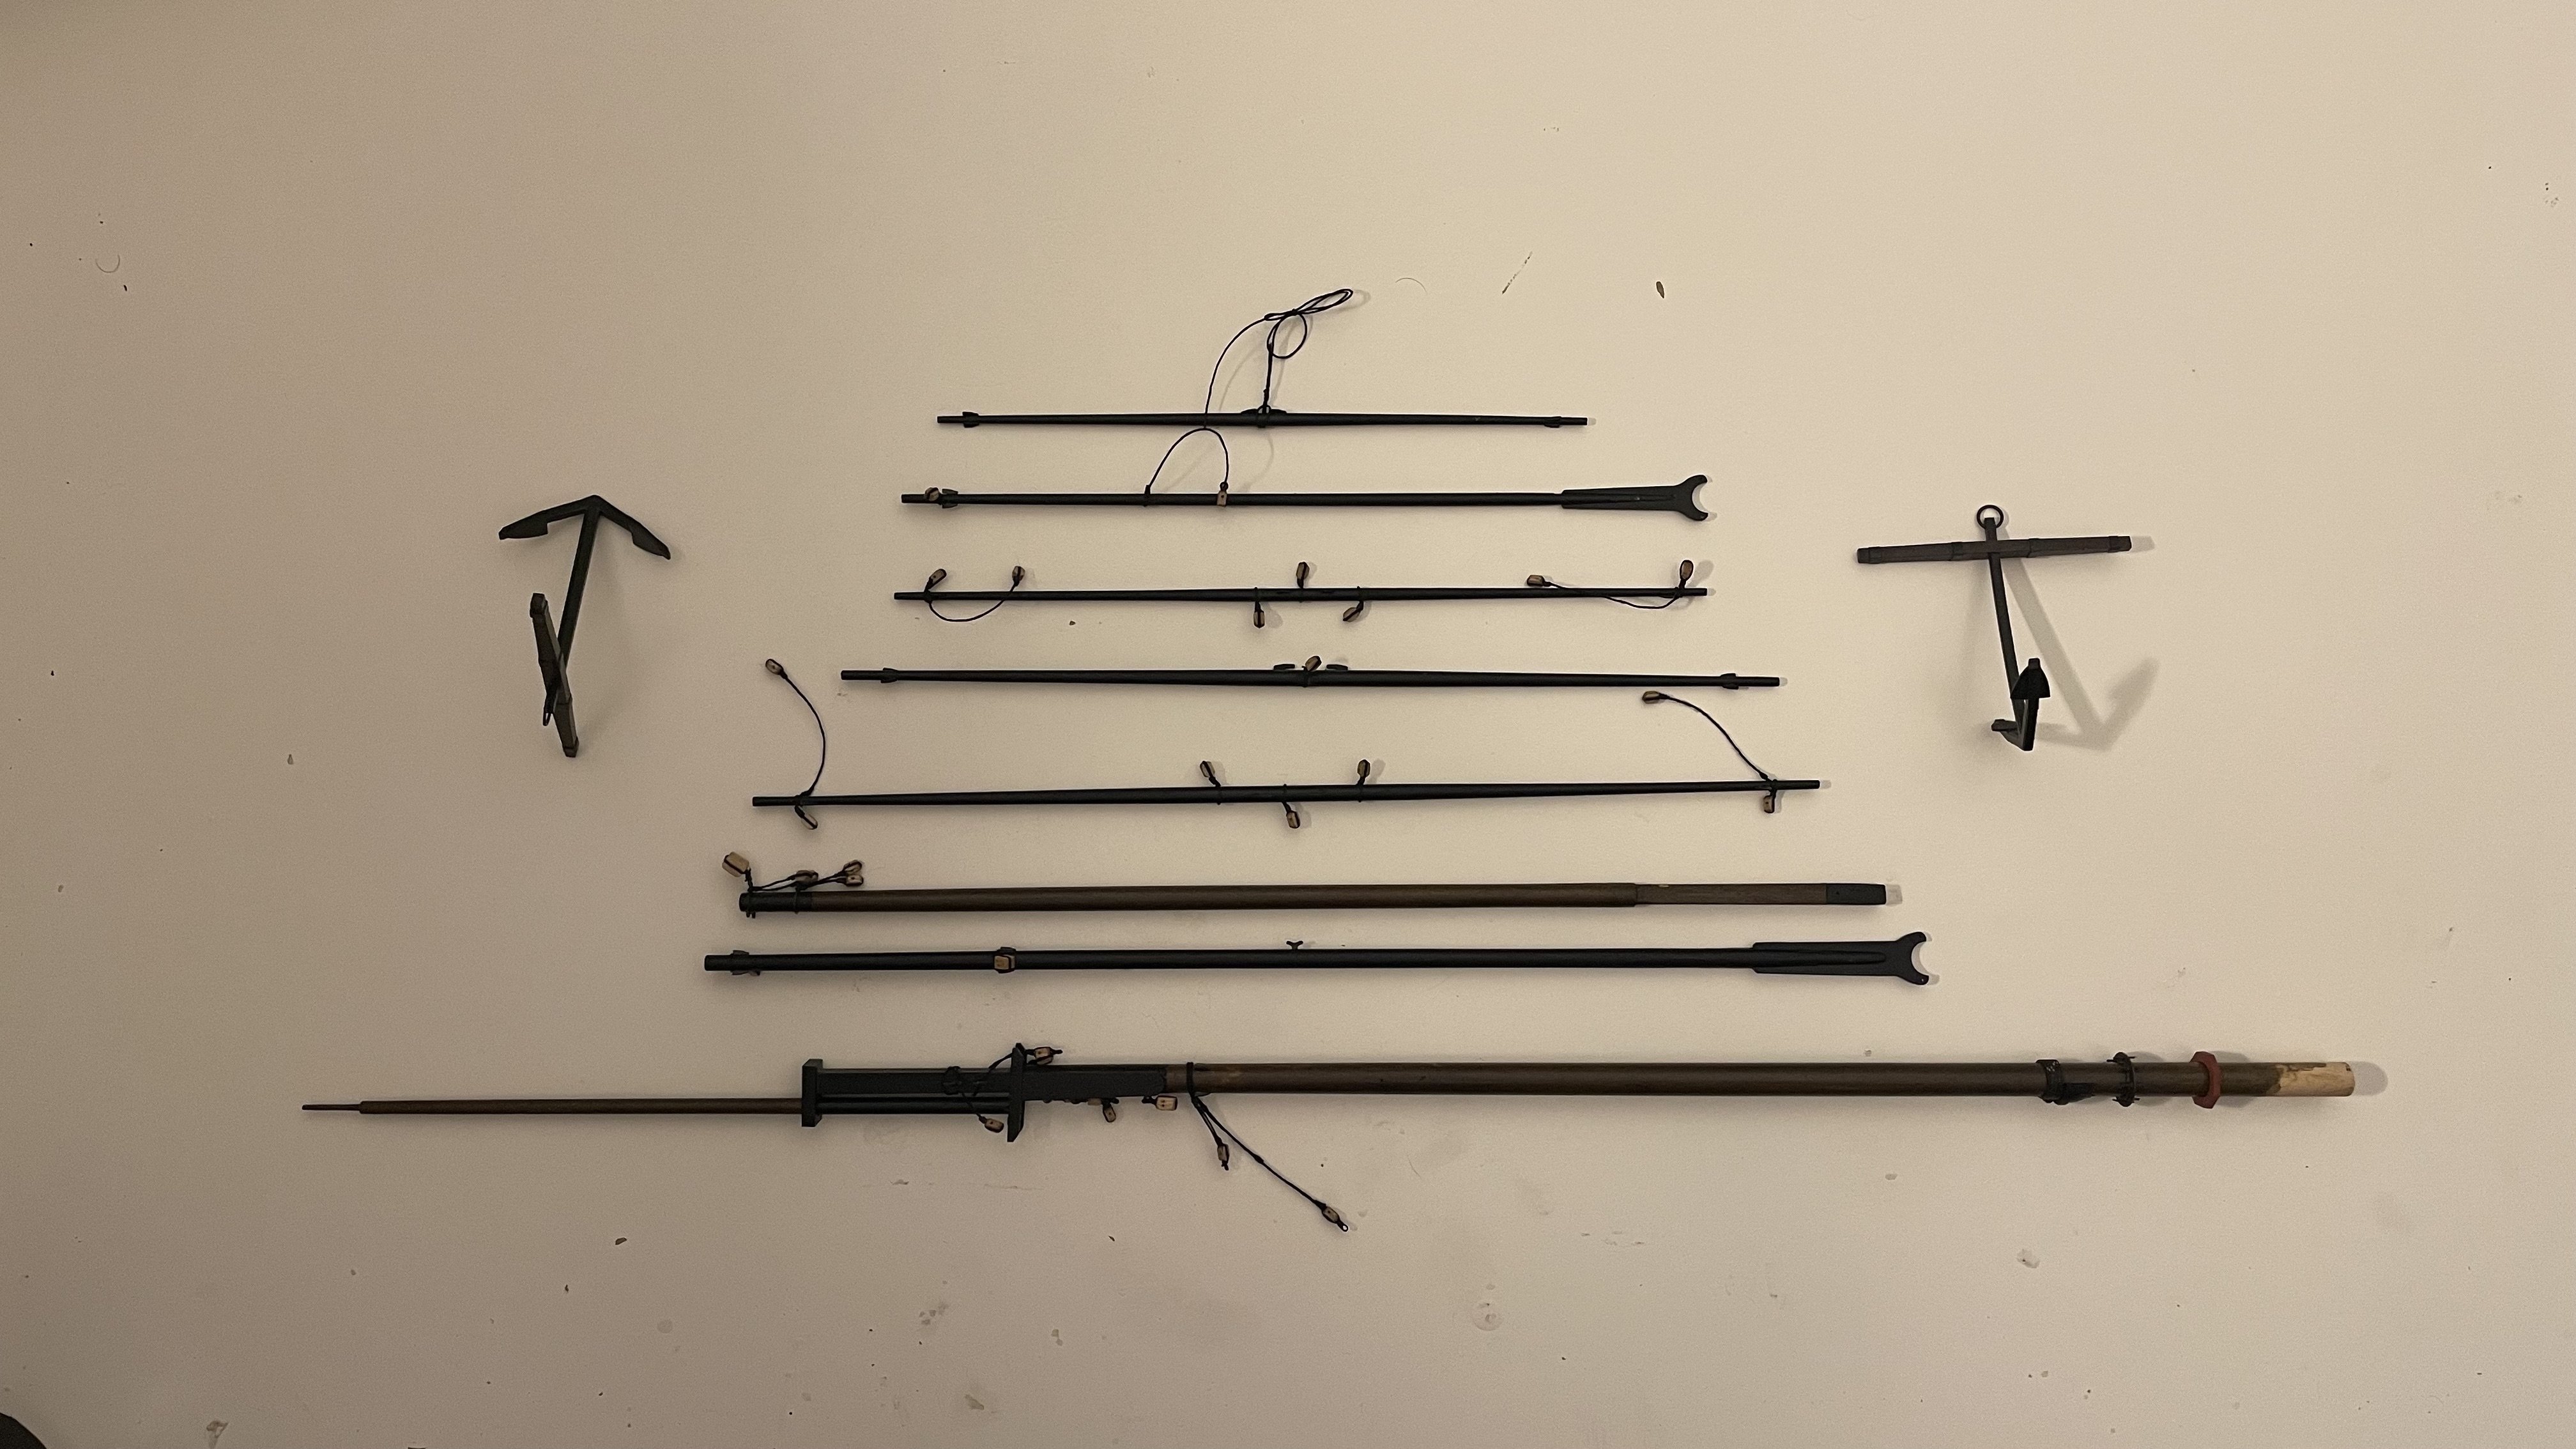
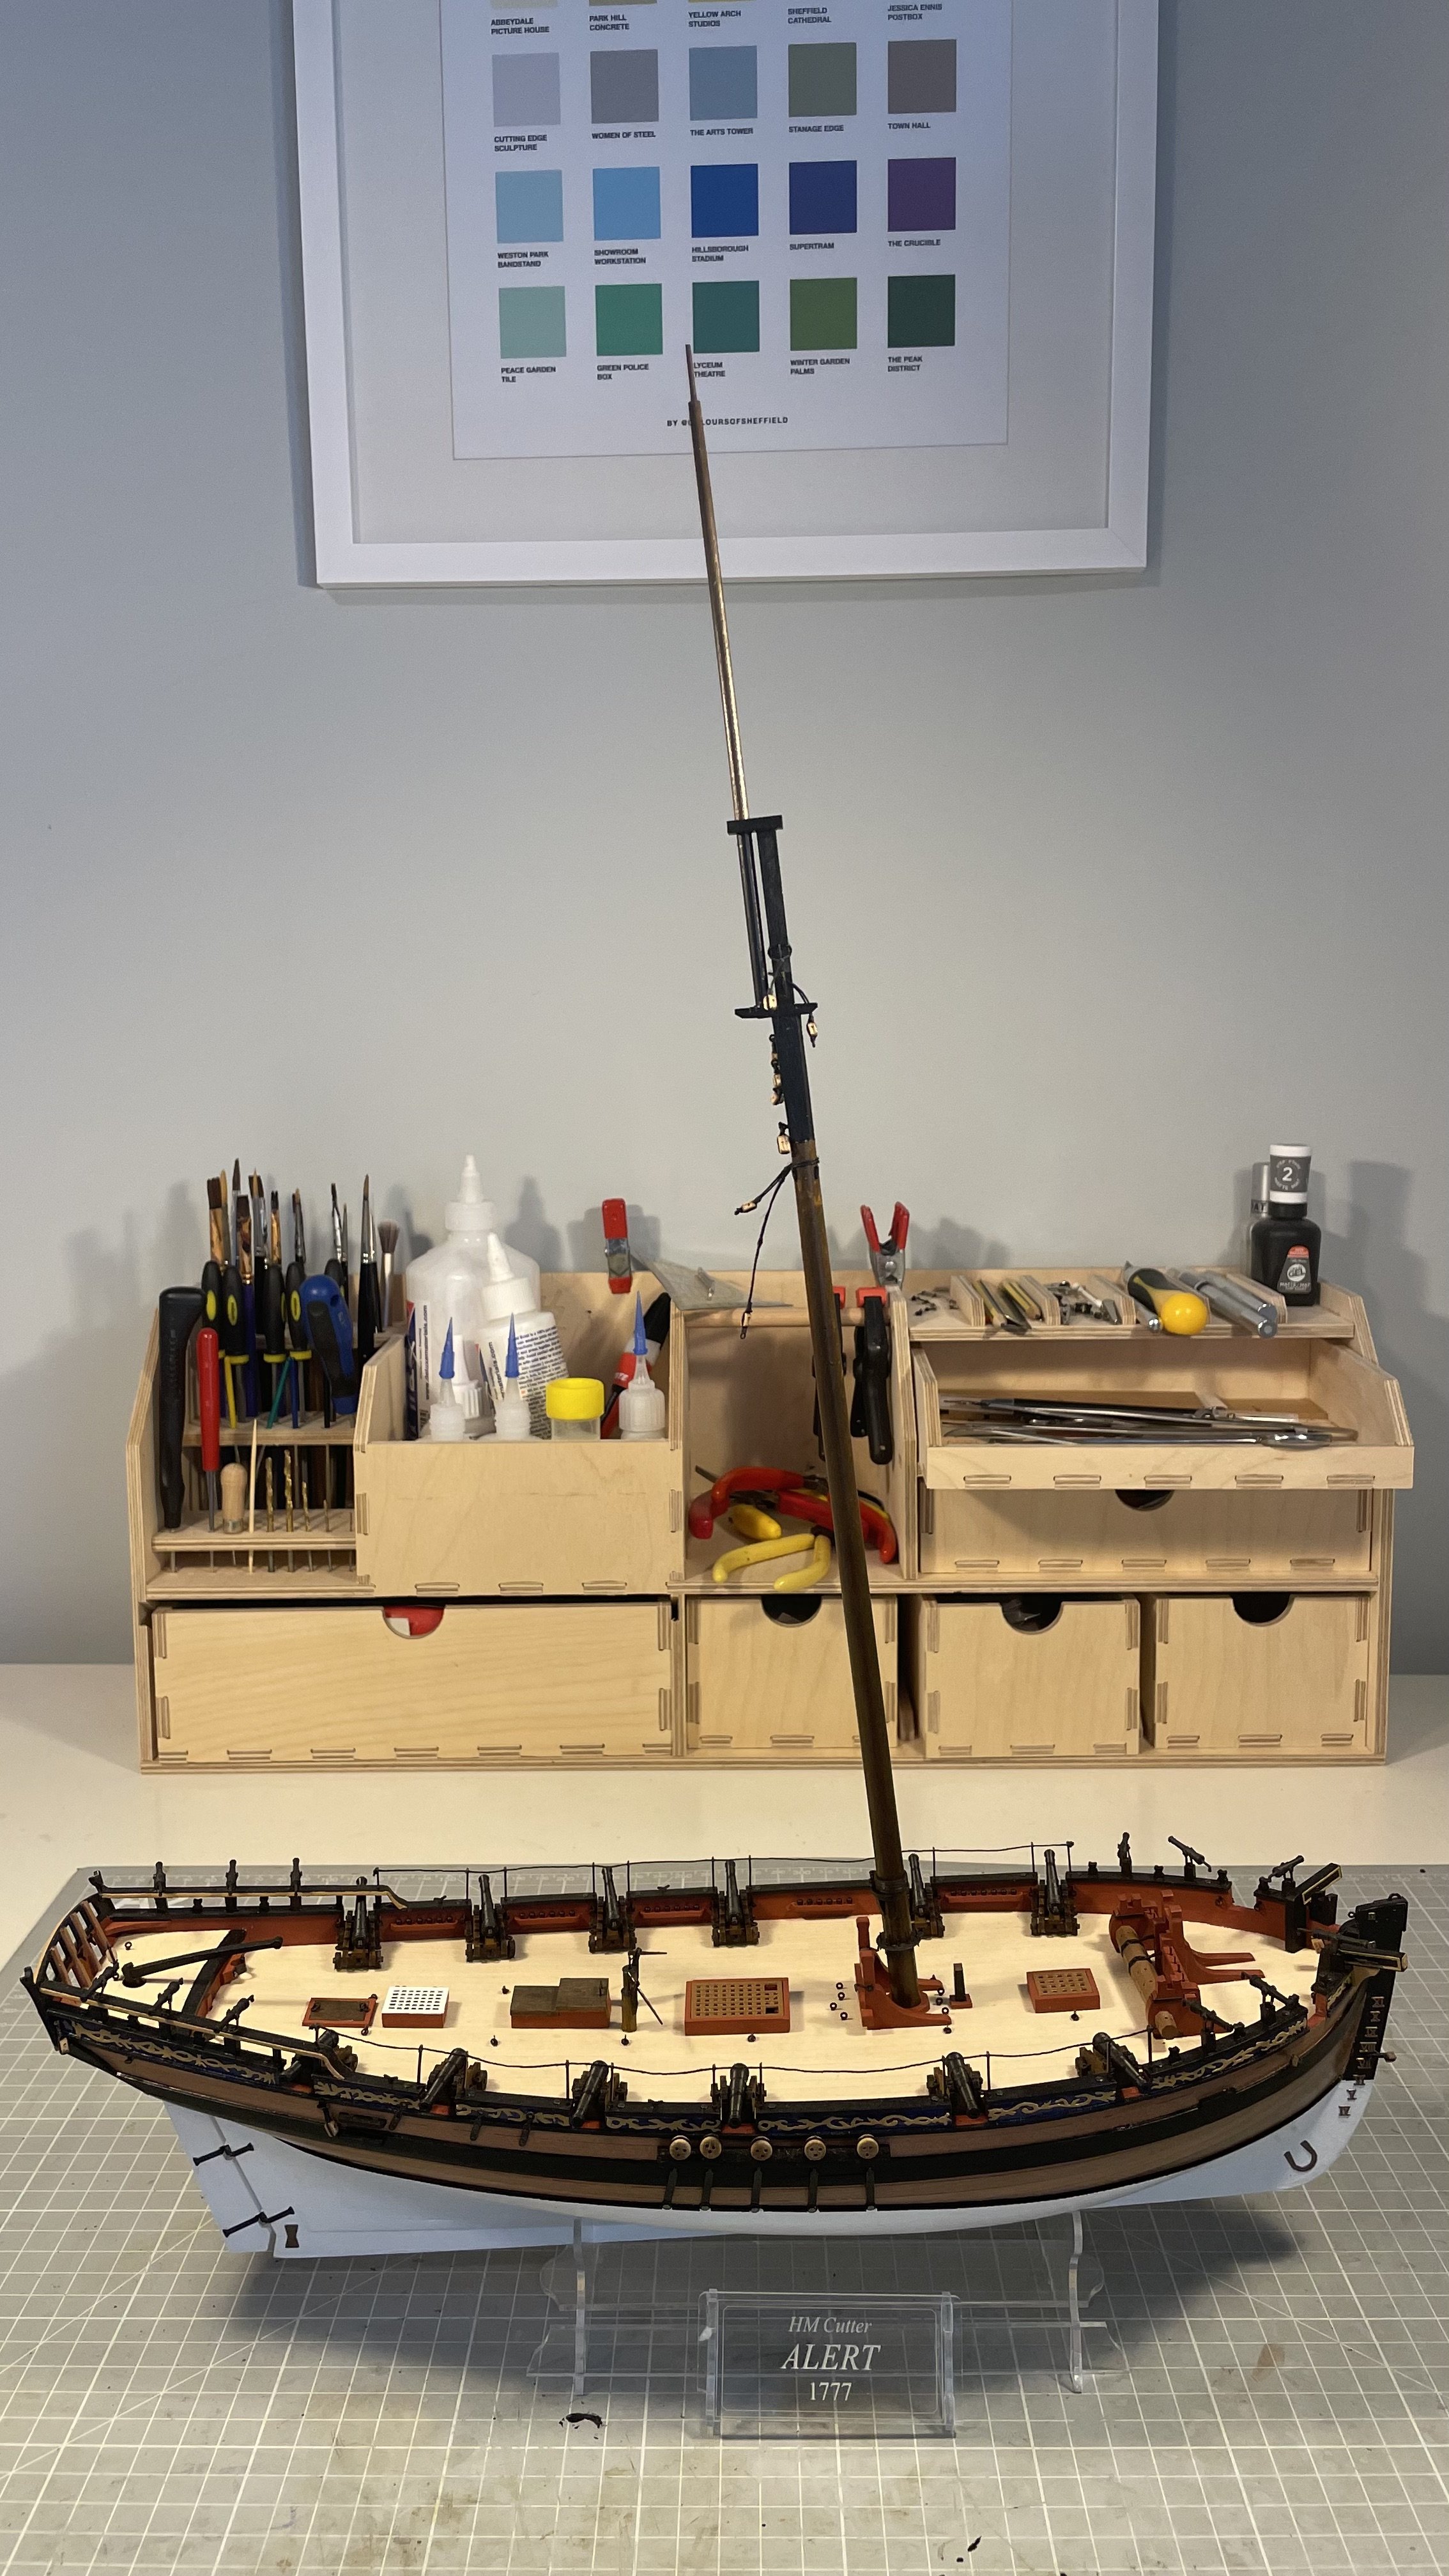
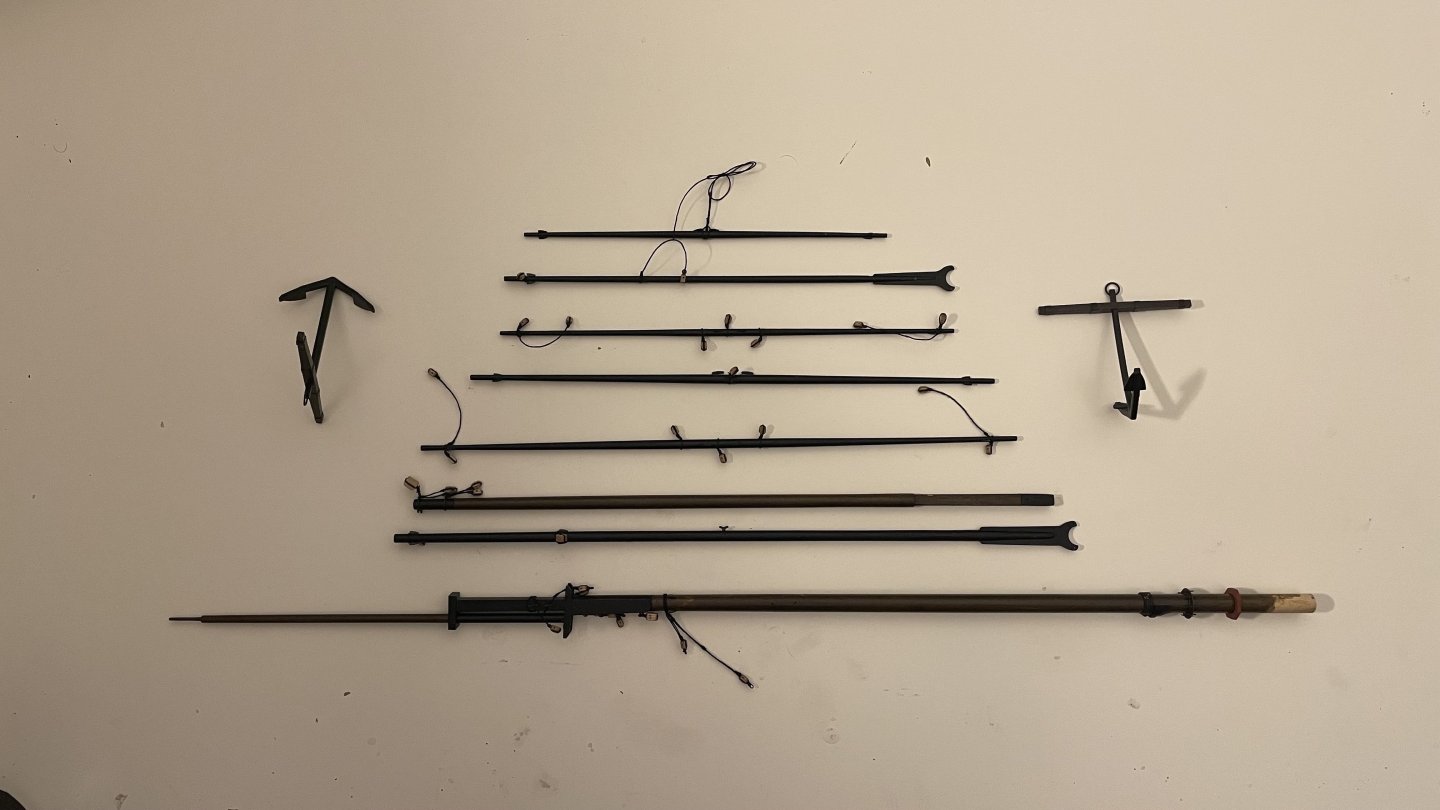
Just had a couple of weeks back in the shipyard, and made myself some spars. All pretty straightforward using the Proxxon mill and lathe. Only challenge of note is that the heel of the bowsprit is specified as 6 mm square but the opining in the bitts is 5 mm. Just meant I had to machine the bowsprit twice. I opted to paint the yards, booms and gaffs black and stain the masts with three coats of oak wood dye - these rather poor photos don't really show that , but I like the effect. Shrouds and standing rigging next - and a couple of hundred clove hitches for the ratlines. But that will wait until we find some sun. So more later.

- 34 replies
-
- 4
-
-
- Alert
- Vanguard Models
- (and 1 more)
-
Here, hear! I wonder also about swinging them from davits. Though I think I could scratch build the davits easily enough, would it make sense to offer davits of varying sizes as an (expensive) extra?