
Supplies of the Ship Modeler's Handbook are running out. Get your copy NOW before they are gone! Click on photo to order.
×


BANYAN
-
Posts
5,871 -
Joined
-
Last visited
Reputation Activity
-

 BANYAN reacted to rwiederrich in Great Republic 1853 by rwiederrich - FINISHED - four masted extreme clipper
Indeed.
The wrinkles, Oh the wrinkles. Forming wet paper over round/ovoidal surfaces is a tuff gig. (Unanticipated). I was overly positive...I think.
I've done this before...but the level of poor surface quality..just is no cutting it for the level of detail I'm working for.
I also tried the *Forced perspective*...comprising a layering effect , simulating folding canvas...even after hours of attempt and paint and such....the effect was far from convincing. Maybe on another model...one not going in the direction this ones going.
Sheesh.......
All that is left is to attempt the vacuum forming idea....if that becomes a complicated mess...then I am not spending another wasted minute.
I'll regain my focus and continue with the full set of sails as originally planned.
Rob
-
BANYAN reacted to RGL in SMS Seydlitz by Canute, Cog, Stein Gildberg & RGL - FINISHED - Hobbyboss - 1/350 - PLASTIC
A few more reference shots for you.
-
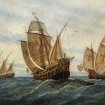
BANYAN reacted to Vegaskip in Ship paintings
Thanks mark. Here’s one I did yesterday
Swordfish dropping a practice torpedo, aimed at the Paddle Minesweeper HMS Glen Avon. Off the coast of Fife near Crail. Glen Avon and Usk, both ex excursion steamers were taken up by the RN. Based for a while at Granton, they were often used as 'target ship' for aircraft from the torpedo school at HMS Jackdaw, RNAS Crail.
W/C 16” X 11”
-
BANYAN reacted to Vegaskip in Ship paintings
Tornado GR4 of 617 Sqd at Craig a Barns near Dunkeld
Watercolour 16” X 12”
-
 BANYAN got a reaction from Oliver24 in Coloring the mast
Hi Oliver, as Mark points out some masts were painted, others not. To establish what the masts in your ship/model were you need to research the ship and see if there is a common way of doing things for that era in the form of regulations, contract requirements, or for other ship contemporary for the period. Some ship's logs are great as there are often entries such as stripping and varnishing the lower masts etc.
If painted, again need to know the normal practice for that period in a war/merchant ship (they often differed) and in latter times mast colours were often governed by the owners/shipping line etc.
If you decide to paint, as Mark points out, you can either paint or leave bare, or use different wood types to 'paint by wood' as some modellers call it. A lot of ship masts were simply varnished and the normal weathering of varnish (on a model) may be sufficient for your needs. if painting, sometimes you need to 'tone down' the hue of the colour of the paint a bit for the model to keep the paint in perspective to the model.
Basically you need to research the ship type, era etc a bit first so that some of the more experienced here can then provide some better, more specific advice.
-
 BANYAN got a reaction from popeye the sailor in HMS ROYAL KATHERINE 1664 by Doris - 1/55 - CARD
Lovely work Doris on the model and the dolphin support stand; and thanks for sharing the process.
cheers
Pat
-
BANYAN got a reaction from popeye the sailor in HMCSS Victoria 1855 by BANYAN - 1:72
Thanks guys, a learning curve but well worth the effort
Not long for the completed assembly Dave; a tad distracted with babysitting duties today.
cherers
Pat
-
 BANYAN got a reaction from dashi in HM Bark Endeavour by dashi - Caldercraft - scale 1:64 - 1768-71 - bashed kit
You're making very good progress Dashi; those yards look good. The boats look great nicely 'stowed' on deck and still leaves plenty of room to work around them.
cheers
Pat
-
 BANYAN got a reaction from DORIS in HMS ROYAL KATHERINE 1664 by Doris - 1/55 - CARD
Lovely work Doris on the model and the dolphin support stand; and thanks for sharing the process.
cheers
Pat
-
 BANYAN got a reaction from Piet in HMS ROYAL KATHERINE 1664 by Doris - 1/55 - CARD
Lovely work Doris on the model and the dolphin support stand; and thanks for sharing the process.
cheers
Pat
-
 BANYAN got a reaction from cog in HMCSS Victoria 1855 by BANYAN - 1:72
Thanks guys, a learning curve but well worth the effort
Not long for the completed assembly Dave; a tad distracted with babysitting duties today.
cherers
Pat
-
 BANYAN got a reaction from mtaylor in HMS ROYAL KATHERINE 1664 by Doris - 1/55 - CARD
Lovely work Doris on the model and the dolphin support stand; and thanks for sharing the process.
cheers
Pat
-
BANYAN reacted to DORIS in HMS ROYAL KATHERINE 1664 by Doris - 1/55 - CARD
Dear friends,
I am very grateful for your comments and support and do appreciate it a lot.
Your praise means a lot for me, dear Albert, thank you very much.
You are welcome.
And BTW, will you also take part in that Swimsuit Edition on MSW?😎
You are right, this kind of modeling clay does not change when baked at all. This is one of its advantages I like.
I am very honored and pleased you find inspiration in my work. I am also looking forward to your gorgeous work and great craftsmanship.
In fact it was quite difficult to achieve a good symmetry. Some parts I had to make again or correct.
Thank you dear Michael, and also the best to you and your family.
That was a small tourist boat on which we sailed to watch dolphins and sunset on vacation.
Here are some pics:
https://www.modelforum.cz/viewtopic.php?f=177&t=110763&start=570#p2136552
Thank you Rob, I am pleased you like my work.
Well, I do not have experience with "Sculptamold" so cannot compare. The clay I use is made in our country. It is called "modelit"or "modurit".
https://www.top-obaly.cz/produkt/modelovaci-hmota?gclid=Cj0KCQiAg_HhBRDNARIsAGHLV517ab3Wioqn5FWVfMxuxvfWpfaSwCPDVPIN0tXJS25g0FQBGNBfCZYaAl6_EALw_wcB#product-modelit-500-gramu
The clay does not change during hardening at all. Only its white colour gets tan - depending on temperature and length of baking.
All my sculptures are created individually, I prefer unique results. In addition, the front and rear pedestals are different in the shape. The front one is lower.
*********************************************
I have already finished rear pedestal and here are some pics from process and final result. So enjoy them.
Making back side, reinforcement added:
Before hardening:
After baking in the oven (temperature 120-130°C, baked about 40 minutes):
The pedestal (still warm) during final shaping according to the hull planking:
The final result after gilding - I used TS-21 Gold Tamiya spray.
-
BANYAN reacted to DORIS in HMS ROYAL KATHERINE 1664 by Doris - 1/55 - CARD
Well, even this is quite possible, cause i'm a very good swimmer and enjoy diving.😎
And here is a pedestal after hardening (in the oven at a temperature of about 130 ° C). I will create back side with reinforcement tomorrow and bring more pics from process.
-
BANYAN reacted to DORIS in HMS ROYAL KATHERINE 1664 by Doris - 1/55 - CARD
Thank you Mark, Druxey and Piet for your feedback and support, I appreciate your words a lot.
I have just started making rear support, it is much more difficult than I have expected, but step by step I will manage it. Here are first pics from process, you can also see there all my tools I use for modelling sculptures from clay ( except the main ones - my hands of course....). The dolphin supports will be stylized according to period models from museums.
BTW, I love dolphins and I have had an opportunity to cuddle and swim with them several times. I will never forget such amazing enjoyment.
Best regards
-
BANYAN reacted to cog in HMCSS Victoria 1855 by BANYAN - 1:72
making th drawings is most of the work though, well done
-
BANYAN reacted to EdT in Young America 1853 by EdT - FINISHED - extreme clipper
Thank you all for these comments and seasons greetings. Andre, if you were able to wade through all the posts, you have my admiration, to say nothing of thanks.
Its been a while since the last post, not because I am laying down on the job, but there has not been much interesting to show, unless you want to count ratlines. A couple hours a day "rattling down" is about my limit. I am starting to rig the yards shown in the last post and I will try to get some pictures of those posted soon.
Ed
-
BANYAN reacted to cog in RCN H-class destroyer by cog - FINISHED - Trumpeter - 1/350 - PLASTIC
thought to finish the railings today, but work had different plans. I've been tackled before I could even start ... ah well, there will be other days and weekends ... seydlitz needs to wait a wee bit longer
-
BANYAN reacted to Osmosis in SMS Seydlitz by Canute, Cog, Stein Gildberg & RGL - FINISHED - Hobbyboss - 1/350 - PLASTIC
The speed at which you are able to create all this superb detail is mind boggling.
-
BANYAN reacted to RGL in SMS Seydlitz by Canute, Cog, Stein Gildberg & RGL - FINISHED - Hobbyboss - 1/350 - PLASTIC
The three main superstructures are done, there is a fold out flybridge to go yet but I need to do stuff to the deck which will place them at risk
-
BANYAN reacted to dashi in HM Bark Endeavour by dashi - Caldercraft - scale 1:64 - 1768-71 - bashed kit
Yards:
Here's a pic of all the yards complete with blocks and parrels showing the relationship to each other in their respective order from driver boom/left to top sprit yard/right. Since this pic I've increased the length of the brace pendants slightly using Steel's length formula for each yard which is a fraction of the given yard in feet then converted to fathoms. If 2 pendants then divide that number by two which allows enough length for strapping of the block and thimble around the yard. As per a previous post the jeer and tye blocks are according to Steel's description and tables for a ship of 400 to 450 tons. The topmast tye blocks should be 6 mm so have trimmed two doubles for the yard and ordered more along with more 3 mm blocks which I need to complete the build.
Parrels are of 4 different types according to Steel, changing in size respective to their yards, it seems there is some lee way especially regarding the top gallants which can either be truck and rib or rope. Because according to Seel's tables the size of the gallant parrels are so small at only 8 inch which translates at 1/64 scale to 3mm I decided to opt for rope parrels. I would have done the same for the top sprit yard but it seems they are farely insistent that this be truck and rib so have used the kit supplied parts even though they are slightly over sized as I couldn't find or make anything smaller. Because the mizen top yard is on a pole it seems to be treated much the same as a gallant so am in 2 minds as to the parrel type, the size should be 11 inch which at 1/64 scale = 4.5 mm, the kit ribs are 7 mm so for now have gone with a rope parrel in keeping with the gallants.
Standing Rigging: I've re done the collars on the lower masts to bring it all inline with Steel as I did for the bowsprit. The fore mast shrouds, stays and futtoc staffs are fitted. The futtoc staff is made from .75 black cord put on the stretch and painted. These are then lashed below shrouds to where the catharpins will be lashed, the same distance below the top of the cross trees to the bottom of the cap. The futtoc staff does not extend to the fore most shroud due to it being abreast the mast and consequently not catherpinned. The fore most catharpin looks like it will chaff the mast and pull the shroud out of line so I might cross the first two catharpins so they clear the mast, however I can't find any reference to this being done!
Because I'm following the 'As fitted draft of 1768' Greenwich National Maritime Museum zaz7844, then the size and number of deadeyes on the channels differs from the kit and AOTS. The last two dead eyes on the fore and main channels I've reserved for the top mast back stays following Steels drawings; in the case of the fore mast my interpretation is: 2 pair of shrouds and one swifter per side; the main 3 pair of shrouds per side and the futtoc staff not extending to the aft most shroud as it has 4 catharpins and 6 shrouds.
Hope this makes sense as it took a lot to nut out but once I got my eye in reading Steel's descriptions and tables then for the most part it started to make sense. I still might have overlooked or misinterpreted something for which I apologize in advance.
Cheers dashi
-
 BANYAN got a reaction from Chuck Seiler in Deck gun cannons
The cheapest way is to make them yourself if you have the time. These can be turned up on a lathe from brass, alluminium or wood rod (stock); or, buy/make one master and cast the remainder of them?
If you are willing to buy, have a look at ship model accessories at the many hobby shops/retailers and they stock additional/replacement parts from some of the bigger mass produced kits. You may find something that looks a bit like the guns you need close to scale made from britannia/white metal. Not as nice as brass turned barrels but a lot cheaper - but as the saying goes "you gets what yous pays" - Buying cheap will most often mean they will look 'cheap' on the model also unless you put a lot of additional work into them.
cheers
Pat
-
BANYAN got a reaction from popeye the sailor in HMCSS Victoria 1855 by BANYAN - 1:72
Hi Dave and Carl; thanks for looking in and comments.
Dave, I drew the base artwork marking what I needed as etched on the underside or upper side, showing where I need holes etc. these were done to the required print/etch scale in TurboCAD and passed to the etcher who imported them and turned them direct into his 'negatives'. This is a screen grab of wwhat I drew up.
Many thanks again for organising the lasercut for me; it has worked out well with the PE fitting very well. Now to glue the assemblies together and add the 'dadoes'.
Carl, I finally caught up with a guy (Model Railroad community here in Melbourne) who had done some etching for my Endeavour and he did this job for me. I do so little that it is not worth the added expense/complication of learning yet another skill.
Still a bit more photoetch to be done for all the mast work etc, but that will come in due course Most of this is for the Rigmaiden Lanyards, purchase winches etc.
cheers
Pat
-
BANYAN got a reaction from DORIS in HMCSS Victoria 1855 by BANYAN - 1:72
Hi Dave and Carl; thanks for looking in and comments.
Dave, I drew the base artwork marking what I needed as etched on the underside or upper side, showing where I need holes etc. these were done to the required print/etch scale in TurboCAD and passed to the etcher who imported them and turned them direct into his 'negatives'. This is a screen grab of wwhat I drew up.
Many thanks again for organising the lasercut for me; it has worked out well with the PE fitting very well. Now to glue the assemblies together and add the 'dadoes'.
Carl, I finally caught up with a guy (Model Railroad community here in Melbourne) who had done some etching for my Endeavour and he did this job for me. I do so little that it is not worth the added expense/complication of learning yet another skill.
Still a bit more photoetch to be done for all the mast work etc, but that will come in due course Most of this is for the Rigmaiden Lanyards, purchase winches etc.
cheers
Pat
-
 BANYAN got a reaction from DaveRow in HMCSS Victoria 1855 by BANYAN - 1:72
Hi Dave and Carl; thanks for looking in and comments.
Dave, I drew the base artwork marking what I needed as etched on the underside or upper side, showing where I need holes etc. these were done to the required print/etch scale in TurboCAD and passed to the etcher who imported them and turned them direct into his 'negatives'. This is a screen grab of wwhat I drew up.
Many thanks again for organising the lasercut for me; it has worked out well with the PE fitting very well. Now to glue the assemblies together and add the 'dadoes'.
Carl, I finally caught up with a guy (Model Railroad community here in Melbourne) who had done some etching for my Endeavour and he did this job for me. I do so little that it is not worth the added expense/complication of learning yet another skill.
Still a bit more photoetch to be done for all the mast work etc, but that will come in due course Most of this is for the Rigmaiden Lanyards, purchase winches etc.
cheers
Pat