
Supplies of the Ship Modeler's Handbook are running out. Get your copy NOW before they are gone! Click on photo to order.
×


BANYAN
-
Posts
5,869 -
Joined
-
Last visited
Reputation Activity
-

 BANYAN reacted to mtaylor in Licorne 1755 by mtaylor - 3/16" scale - French Frigate - from Hahn plans - Version 2.0 - TERMINATED
I'm going to ignore the 2mm blocks on the guns. I've ordered 3mm and 4mm blocks from Chuck. I hope the 3's work but I'll with the 4's if I have to. What ever's left over will used for rigging (along with another order to Syren. Very slow going at present so no pictures or updates until the cannon are in place and rigged.
-
BANYAN reacted to shipmodel in SS Michelangelo 1962 by shipmodel - FINISHED - 1/350 scale
Hello again to all.
So, back to the Michelangelo. The ship's structure was completed last time and I began on the various detailed subassemblies. Since I already did a mock up of the main pool, I started with that.
Here is the best color photo of the pool that I could find. It is a bit low resolution, but looking carefully, it appears that the pool deck is raised two steps above deck level and is built of dark red planks that run athwartships. The light tan areas come and go in the photos, and are probably removable mats. There is a railing all around with solid benches along some portions of the deck edge. There are four stainless steel ladders into the pool. The slide is in the center, with its stairs to the port side.
The slide is a simple curve with raised edges. It is supported on one angled leg and the edge of the pool. The photo below is of the slide from the Promenade deck, but as far as I can tell all three slides are identical, except that this one has the slide to the starboard side. There are kiddie pools for each large pool, but they all different. Information from several photos had to be combined to get their final shapes and details.
Here is the mock up that I started with. Actually it is the second one, the first did not merit a photograph. This deck color is reasonably good, but the grain runs the wrong way and the half moon steps are too deep, so it had to be replaced. The pool insert needed some cleanup and repainting, but was salvageable.
The final deck was built up of three layers: a bottom lift of 0.030” styrene with only the space for the main pool cut out. The second was a layer of 0.020” plastic topped with a scribed sheet of cherry veneer. They had cutouts for the main pool, the steps, and the kiddie pool. This gave those features some depth.
The veneer was scribed by first cutting it to a rectangle on the table saw. It was taped to a cutting mat printed with 12 rows of dots every half inch. This is 1/24 inch, or almost exactly 1mm. A metal straightedge was laid along one row and a light pencil line was drawn across the wood. The graphite from the pencil was tattooed into the veneer by scribing along the line with the back of a #10 blade. With a coat of clear finish it came up to a nice warm red tone.
The layers were stacked and glued. The main pool was sanded and repainted, then dropped into its space and secured there. The kiddie pool had sections of two different heights surrounding it. They were painted off the deck and installed.
The vertical edge of the deck did not appear clearly in any of my photographs, so I went with a simple strip that created a lip around the deck surface. PE railings were cut, bent and fitted to the lip, then secured in the usual way. Some random streaks of lighter blue were squiggled on the bottom of the pool. I find that this looks a bit more convincing under water.
Here is the pool filled with 5-minute epoxy water. The ladders are 0.011” wire colored with non-buffing aluminum enamel. They were simply bent to a narrow ‘U’ and inserted into holes picked out with a needle and then hand drilled. I tried several different ways to get rungs on the ladders, but nothing worked to my satisfaction, so they were left off. The side benches have been curved and installed and are ready for painting.
The final element for the pool is the most complex, the slide. It started with a rough cutout like the one below. The curve of the sliding surface was sanded into it and it was painted with the aluminum before sheets of thin plastic were superglued to both sides.
The plastic was cut away to leave a raised lip around the sliding surface and a higher raised portion at the top to push off of. The rest of the plastic and the wood was ground off until the “Y” shape of the slide emerged. Then it was painted a slightly contrasting blue.
The back of the slide was notched for a polygonal platform whose shape was seen in another photograph, topped with a steel railing. A narrow style of PE ladder was bent up, painted and installed. After looking at this photo I realized that the handrails did not meet properly, so some very careful bending was needed before they did.
With that done, here is the slide and aft end of the pool. I think it matches reasonably closely to the first photo in this log. I do see, though, that during handling and construction the brown has come off the lower handrail.
After touchups the pool was temporarily dropped into place in the deck. It is not perfect, but I am not unhappy with how it looks.
And here is my second favorite President, come to check on the progress. With his approval it was removed and placed in secure storage.
More soon.
Dan
-
BANYAN reacted to AON in HMS Bellerophon 1786 by AON – scale 1:64 – 74-gun 3rd Rate Man of War - Arrogant-Class
Worked on it a bit more today and I have all the features on.
I am not happy with the cape and I can hear one special someone whispering the wings are much to large and would break off with the first wave impact.... but I wanted to see what it would look like.
So tomorrow I will work on the cape and cut the wings down to half size with no fold (simplified).2018-03-24 15.25.08.mp4
-
BANYAN reacted to RGL in USS Spruance DDG 111 by RGL - FINISHED - Trumpeter - PLASTIC
The first primer coat is on. Some sins which I thought were going to stand out like sore thumbs haven’t. There are a few gaps to fill and a few rough bits that will need a bit of sanding but overall, it OK.
-
BANYAN reacted to popeye the sailor in T78 Norden by popeye the Sailor - FINISHED - Billing Boats - 1:30
Kevin......no..I'm cutting them from the square plastic pieces that fits in the trays.
I can only get three out of each part.......but cutting out like this will make them look a bit more real. I will need to look up whatever fish this is and try painting them.
I have seen so much Walter....good to see you BTW I get a lot of my ideas from browsing through Hobby Lobby.......the bead dept......the jewelry dept mostly.
-
 BANYAN got a reaction from Jeronimo in Young America 1853 by EdT - FINISHED - extreme clipper
That looks incredible Ed, the level of detail you achieve at this scale is inspiring.
cheers
Pat
-
 BANYAN got a reaction from popeye the sailor in Captain Roy 1948 by russ - FINISHED - 1/48 scale - POB - Biloxi Lugger
Very nice paint finish so far Russ, you must have prepared that hull very nicely to achieve it. I can also recommend the frogtape, but I have also had good results with Tamiya tape.
cheers
Pat
-
 BANYAN got a reaction from Tecko in Wardell Bridge and boat by Tecko - 1:72 - diorama
That looks really good mate; excellent job on the smaller details - looks very 'authentic'.
cheers
Pat
-
 BANYAN got a reaction from mtaylor in Wardell Bridge and boat by Tecko - 1:72 - diorama
That looks really good mate; excellent job on the smaller details - looks very 'authentic'.
cheers
Pat
-
 BANYAN got a reaction from src in Captain Roy 1948 by russ - FINISHED - 1/48 scale - POB - Biloxi Lugger
Very nice paint finish so far Russ, you must have prepared that hull very nicely to achieve it. I can also recommend the frogtape, but I have also had good results with Tamiya tape.
cheers
Pat
-
 BANYAN got a reaction from paulsutcliffe in Wardell Bridge and boat by Tecko - 1:72 - diorama
That looks really good mate; excellent job on the smaller details - looks very 'authentic'.
cheers
Pat
-
 BANYAN got a reaction from Omega1234 in Wardell Bridge and boat by Tecko - 1:72 - diorama
That looks really good mate; excellent job on the smaller details - looks very 'authentic'.
cheers
Pat
-
BANYAN reacted to Tecko in Wardell Bridge and boat by Tecko - 1:72 - diorama
Thank you @Jack12477, @BANYAN, @oneslim, @druxey, @KeithAug, @GrantGoodale, @mtaylor, @Omega1234, and @*Hans* for your reactions.
Glad that you are liking the crane (one of my first toys as a child. A pulley-cable system ).
______________________________________________________
Used black cable and aluminium foil for the hydraulics.
Used pin heads for mounting bolts.
-
BANYAN got a reaction from mtaylor in Captain Roy 1948 by russ - FINISHED - 1/48 scale - POB - Biloxi Lugger
Very nice paint finish so far Russ, you must have prepared that hull very nicely to achieve it. I can also recommend the frogtape, but I have also had good results with Tamiya tape.
cheers
Pat
-
BANYAN reacted to russ in Captain Roy 1948 by russ - FINISHED - 1/48 scale - POB - Biloxi Lugger
The under body paint is complete. The water line is not as crisp as I would like, but I had to work on it quite a bit to get it looking half way decent. There are some areas right at the stern to correct, but that will not be a big deal. The color and finish seem okay. I just need to live with the water line for a while and see how I feel about it.
Russ
-
BANYAN reacted to russ in Captain Roy 1948 by russ - FINISHED - 1/48 scale - POB - Biloxi Lugger
Here some actual progress. I have two coats of dark red on the bottom. I just put this coat on a few minutes ago. It will darken slightly as it dries. Tomorrow I will lightly sand and give it another coat. The color is very close to the shade of red found on local boats so I am hopeful.
Russ
-
BANYAN reacted to AON in HMS Bellerophon 1786 by AON – scale 1:64 – 74-gun 3rd Rate Man of War - Arrogant-Class
Had my eye injection yesterday. At 10 week intervals now from 4 weeks. Hope to progress to 12 weeks and eventually be healed but that could be 5 to 8 years I am told. So yesterday was an painful day. Today I can see without tearing up or having a massive head/eye ache but I must stay out of dusty environments for 3 days so no shop time for me.
So I worked on my Marquette sculpture. Very first attempt. I must say this is fun. Looked through the house for an old wire cloths hanger but everything is plastic! So I used 12 gauge copper wire for the internal support. It seems to be holding up okay.
I have to work on the mane, tail, wings, and Bellerophon's head and cloak. That will be tomorrow and Sunday if necessary.
-
BANYAN reacted to RGL in USS Spruance DDG 111 by RGL - FINISHED - Trumpeter - PLASTIC
So much brass. I’ve dry fitted the stacks, but I think I’ll glue them before a primer coat, there are so many little bits that keep falling off I’d father get that done first.
-
BANYAN reacted to popeye the sailor in T78 Norden by popeye the Sailor - FINISHED - Billing Boats - 1:30
I meant to mention this the other day. I was at work and was doing the repair work on the trailer. they are equipped with GPS, and I was in the process of inspecting and updating the firmware. walking out of the trailer, I noticed a clump on the floor. I picked it up and found that it was a hair net......brown mesh and dirty, with a bit of damage to the mesh. fanning it out, after picking out some of the debris, I saw how small the mesh was. it made me think that it would be perfect for a fishing net. of course, it ended up on my tool box......but I forgot to bring it home, for further testing. today, we were in a local Wal Mart......I looked for one, but they didn't have the color I had found. we then went to the local grocery store, and I found a three pack in brown. I think by cutting off the elastic edging, it might be useful.........my testing continues
-
BANYAN reacted to KeithAug in Home Made Mini Mill
Thank you Derek, Allan, Richard and Bob. I'll keep the speed controller in mind for later in the build.
I made a start on the column. Its not the most exciting component but its accuracy is critical to accuracy of the mill. Specifically the axis of the column must sit perfectly at right angles to the base (and hence the x,y table. I'll come back to this point in a future post.
The first job was hacking out the 4 plates that will make up the column. Chopping through 3/8th inch plate with a hand hacksaw isn't that much fun (even in aluminium). I kept the two end plates together for initial machining hence 3 plates initially.
I planned to do most of my machining off my existing milling machine bed - thus eliminating any inaccuracies introduced by holding the components in a vice. I have a side stop strip for the bed (made previously). It clamps accurately in one of the "T' slots and its side faces were machined when in the slot. Anything butted up against the stop is truly parallel to the table.
All 3 plates for the top and back of the column were machined up against the stop with the front to back travel on the mill locked. This ensured all plates were exactly the same width. The ends of the plates were then faced off using the front to back travel, thus ensuring the squareness of the plates. The web was also machined parallel and square.
The top plates were then separated and dowel holes and location slots machined in. The dowel holes are to facilitate later machining operations and the slots are to ensure accurate assembly. The two plates were machined in tandem on the milling table to ensure they were identical.
The back plate was also slotted for location of the web and recesses were cut in the end to take the end plates.
I was pleased with the accuracy of the assembly. In the following photo the plates are held together by friction while I am suspending the assembly by the top plate.
I positioned the column next to the table to give an idea of the size of the mill.
Next I need to drill and tap the plates so I can bolt them together.
-
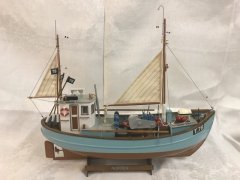 BANYAN got a reaction from Johnnyreg in T78 Norden by popeye the Sailor - FINISHED - Billing Boats - 1:30
She's a wonderful looking model Denis; great job on the detailing.
cheers
Pat
-
BANYAN got a reaction from popeye the sailor in T78 Norden by popeye the Sailor - FINISHED - Billing Boats - 1:30
She's a wonderful looking model Denis; great job on the detailing.
cheers
Pat
-
BANYAN got a reaction from popeye the sailor in USS Spruance DDG 111 by RGL - FINISHED - Trumpeter - PLASTIC
That's a lot of PE and superdetailing Greg; should look good all painted up. Are you using an etchent or product to provide a key for the primer on the PE or do you just shoot the primer on?
cheers
Pat
-
BANYAN got a reaction from mtaylor in T78 Norden by popeye the Sailor - FINISHED - Billing Boats - 1:30
She's a wonderful looking model Denis; great job on the detailing.
cheers
Pat
-
 BANYAN got a reaction from Canute in USS Spruance DDG 111 by RGL - FINISHED - Trumpeter - PLASTIC
That's a lot of PE and superdetailing Greg; should look good all painted up. Are you using an etchent or product to provide a key for the primer on the PE or do you just shoot the primer on?
cheers
Pat