Matrim
-
Posts
1,401 -
Joined
-
Last visited
Content Type
Profiles
Forums
Gallery
Events
Everything posted by Matrim
-
Caroline Alexanders 'The Bounty' Just bringing this thread to life again as I have just finished re-reading this book for the fourth time and, as ever, was so impressed by it so felt a slightly more detailed book review would be in order. There may be some people out there who don't know the story of the Mutiny on the Bounty. I suspect that most would not be members of this site. But to precis it the popular 'newspaper version' is that a small ship is sent by Britain to ferry bread plants from Tahiti to the West Indies as food for slaves. The occupants of this ship are faced with one of the cruellest tyrants in the British Navy a hang em and flog em utter b*stard who makes life a living hell for all concerned. Eventually the noble Mr Christian (Masters Mate and acting Lieutenant) has had enough and mutinies along with a sub set of the crew. Bligh is then put into a boat (and honourably not killed on the spot). Most of the Mutineers end up on Pitcairn island free to continue their questionable sexual practices (apparently the age of consent was 12 until recently) whereas Bligh managed to con the little launch without maps from memory on starvation rations half way across the world to safety. That is the 'standard' version as beloved by Hollywood and some fictional authors (I exclude the Mel Gibson film from this group) and is also the version smashed to pieces by this magnificent book, M(s) Alexander has really done her research not just on the mutiny but on what happened afterwards. It is quite obvious that as opposed to reading a memoir plus existing histories and using those she has instead poured over as many original sources as can be found so letters, memoirs, court evidence, private evidence to build up a very different picture to the popular version. Not only does she do this she also shows how the current popular legend was generated. She handles the voyage and mutiny itself by simply reporting on what happened and allowing the men to speak in their own voices as much as possible and does not attempt to interpret. It is when the captured mutineers return (having survived their own wrecking and incarceration in Pandora's Box) and are court martialled that the book kicks up a gear. The author shows a very deep understanding of not only the undercurrents of peoples relationships but also society (and notable society at sea) and its ways as opposed to what exists now. Her deft handling of the ever present 'interest' and the manipulation of the various parties is fascinating and it paints an impressive picture of the British Navy of the time. As an example of this (And her quote heavy style allowing the participants to speak as much as possible) here is a quote from the latter part of the book describing something mentioned in the kangaroo court assembled by Fletcher Christians brother. Bligh throughout comes across as a talented professional with the highest standards who expected his officers especially to have the same dedication, if these are not kept to then he also had a temper but not one which led to mass floggings quoting the book again Perhaps if anything Bligh was not hard enough as after reading the book you can almost see where the problems arose and how the crew felt they had some 'right' to do as they wished yet came across Captain Blighs almost magnificent dedication to duty. This was one man who under no circumstances would let personal weakness stop him doing what was right regardless as to the consequences. I have known people like him and feel like I know people like the other crew members and for a historical book to generate that degree of empathy for people who died hundreds of years ago is no small feat in itself. Anyway I don’t want to go on about this to long so please have a look if you have any interest in the period at all. I don't think you will be disappointed. As a final aside the Gibson film runs closest to this version and due to this book (first published around 2003?) several fictional authors have produced more recent works which match this 'understanding' of events so finally, perhaps, William Bligh is getting his true just deserts after centuries of lies..
-
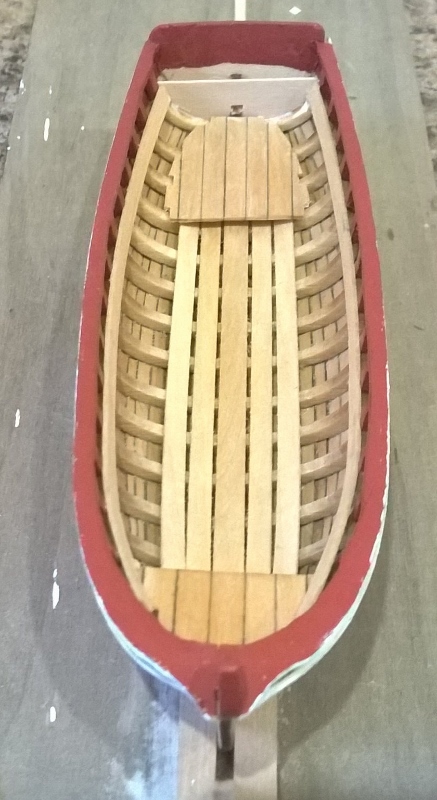
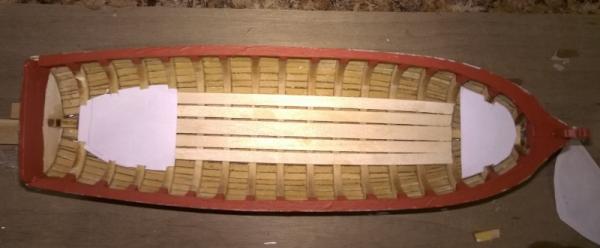
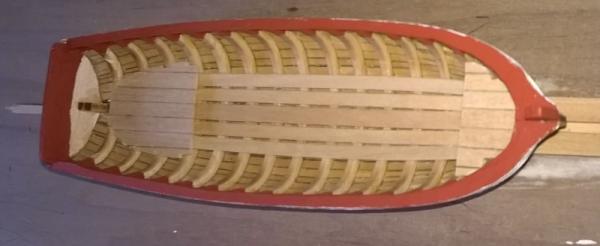
K moved on a little. I placed the floor planks in using the kit wood as that is paler than the hull planks but not as pale as Holly which is more representative of a furiously cleaned deck. Here are the planks and the stencils? for the platforms Then I added the platforms both with support underneath as they are a little flimsy otherwise. And then added the front of the shot locker.. Nice kit I am enjoying it though my work is not up to (a lot) of the other standards around here. My approach has always been 'incremental improvement' so as long as I do better than my last attempt then I am quite happy.

- 33 replies
-
- 8
-

-
- model shipways
- 18th century longboat
- (and 1 more)
-
Thanks. Next up I had to work through the waterline. I use an old 'trick' for this which is a coving laser. Next up datum marks are added to the hull. In this case at the bow and stern on both sides (where the measurement is simple) Then the key is to setup the hull firstly upside down and secondly even on either side so Horizontally (vertically does not matter). The laser is then lined up to the two known datum points and using a pencil (though since I am painting a marker pen would do just as well) the waterline is then marked on with this being repeated on the other side. What is nice about this is that as long as the hull is even on both sides the coving laser can adjust to hit both datum points evenly and it should generate a straight waterline. After the pencil mark is made masking tape is added as pencil lines will wobble slightly and this evens out any discrepancy. Once done check the two taped lines are around the same distance apart on both sides of the hull and that looking at the ship head on and from the bow the waterline looks straight. I always find this is the best check as it takes out any visual distortion from the curve of the hull and gives a good indication of the two sides hopefully matching. Then a layer of paint started going down...


- 33 replies
-
- 7
-
-
- model shipways
- 18th century longboat
- (and 1 more)
-
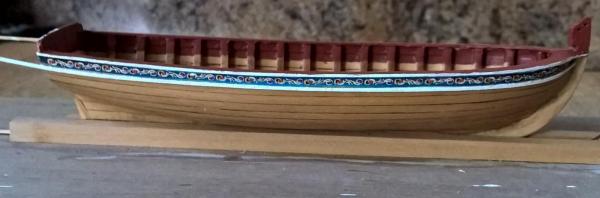
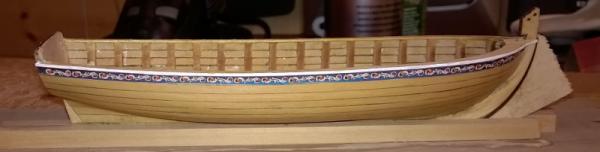
Not much of an update but here is the (first) run of red paint. Needs touching up in places. Plus the lower white rail with its first glue on.
- 33 replies
-
- 9
-
-
- model shipways
- 18th century longboat
- (and 1 more)
-
After sanding and fairing the inside I moved on to the cap rail. This caused me to hit an unexpected issue in that I appeared to have lost all the kits wood. Not one to let life's little challenges get in the way I instead used a spare piece of yellowheart (lovely wood...yellow) which I had left over from the Triton (it does a good impression of buff paint should you not want to erm paint). Anyway I thinned it down to the correct size and then glued my template to it using the always amazing Fixogum which was still working well 5 years after I bought the tube. I initially showed high stupidity levels by deciding to cut out my shape with the scroll saw. After the wood was banged furiously up and down and cracked due to its thin size I then resolved to use the instructions and use a scalpel instead. Once installed the longboat was doing a sterling impression of a ship with elephant ears so I then trimmed initially with a scapel and then with a dremel sander to something approximating the correct size. I think I should have faired the inside frames a little more aggressively as it comes out at around 4/32nds and should be more like 3/32nds. Before painting I applied some oil to the wood (see above posts) and then added the white paint to the side of the cap rail (pictured below) before attaching the stencil thingies. Finally I have just painted red section and also done the 1/32*1.32 strips white having found the kit wood behind the tool box. I prefer to paint then attach as I dont have the skill to paint something that thin in situ without painting everything else around it as well.... Hopefully I can get that done along with the waterline and white layer at the weekend. I have decided to paint the lower section white mainly because I did so much sanding it is almost translucent in places which is not a good look. Especially when the crew put their feet through the bottom so in the best traditions of a dodgy English yard I will hide that fact with paint and blame 'aggressive Scottish sea worm' for any damage when it is in use.

- 33 replies
-
- 8
-
-
- model shipways
- 18th century longboat
- (and 1 more)
-
K, question guys and gals. I have just placed the cap rail on and looking ahead I have to add some of the picture things once they have had artist stabalizer. After that painting the top section red and then much later staining the visible sections. Instead I am considering Staining what is in place now (some overlap with areas which will eventually be red) then painting the red and then adding the freizes. Does anyone have any opinions on this approach? All I can think is that the paint might differ in colour between stained and unstained (so I could stain the lot) or not take at all and staining might reduce the glue strength when more of the inboard works go in.... I am not certain..
- 33 replies
-
- 2
-
-
- model shipways
- 18th century longboat
- (and 1 more)
-
For my Triton deck planking I used 'actual' caulking and it worked surprisingly well. I used dark wood filler and then applied black dye to it. The planks were set up with a paper between them to leave a slight gap and then the 'caulking' was pasted in. Once down a light scrape took the excess off and then once dry the planks needed a better scrape/sand. I was pleased with the result. With this approach you need some extra meat in the plank depth to allow for the post calk scrape. I took the idea from Joh0868s Triton which gives an impressive view of the results..
-
Initial planking is finally complete. I had forgot how difficult it was (the Triton cross section was to easy going as a planking exercise). If I had to mark my efforts I would probably say a 'C' so I have loads of room for improvement as a plus it was better than my last kit endeavors though. I did find it easier when I started gluing to two-three bulkheads at a time as with the earlier efforts I glued the lot and used clamps to hold it down. This was less successful than the other method.. I also tried to use a pencil to line the planks but this rapidly mixed with the glue to make an unusual patina.. Soon cleared up after an initial sand So the next job is to finish sanding it smooth...


- 33 replies
-
- 8
-
-
- model shipways
- 18th century longboat
- (and 1 more)
-
Great, someone else whose planking is much better then my own...
- 100 replies
-
- 5
-
-
- model shipways
- 18th century longboat
- (and 1 more)
-
Lovely and your planking is much better than my own. I think I forgot how much I sucked at planking a hull.....
-
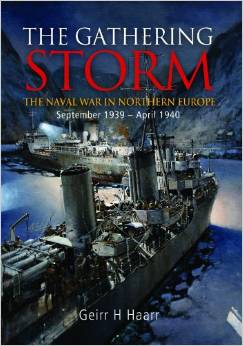
The Gathering Storm: The Naval War in Northern Europe, September 1939-April 1940 By Geirr H. Haarr Annapolis: Naval Institute Press, 2013 6-1/4” x 9-1/2”, hardcover, x + 550 pages Photographs, maps, notes, bibliography, index. $52.95 ISBN: 9781591143314 Haar’s book covers the initial naval conflict in the European theater of World War Two. The writing covers important developments prior to the outbreak of hostilities in September 1939. Events relating to submarine, merchant marine, surface navy, and naval aviation are described. The author presents Allied, Axis, and neutral actions during the period. Geographically, attention focuses on the Baltic and North seas. Some global events and expeditions are covered as they relate to events under discussion. Several key themes are contained within this book. Contrary to popular opinion, Haar presents the opening months of the war as anything but a ‘phony war.’ The British Royal Navy’s experience is described as a painful rebirth. Finally, the image of Germany’s Kriegsmarine is constantly presented as efficient, if still imperfect. Detailed descriptions of important events in the opening months of World War Two help debunk the image of a ‘phony war’ during this time. Extreme detail is provided for the most important occurrences, like the Altmark incident. A great level of detail is provided for more general developments as well. Diaries, war records, correspondence, official reports, and radio logs all help paint an intricate picture of a very active theater of war. As mentioned in Haar’s work, hostilities commenced within hours of war being declared and continued virtually unabated for the entire period under consideration. The British Royal Navy experienced a painful and difficult rebirth in the opening months of the Second World War. The Admiralty failed to adjust to new developments like advanced submarines and naval aviation. Warnings about German aggression were not heeded and a rapid mobilization of reserve naval forces took time the British could ill afford to waste. Adjusting to advanced submarine tactics cost the British dearly. Many merchantmen and several warships, including the aircraft carrier Courageous and the battleship Royal Oak, were lost. Increased defenses against aggressive German U-Boat tactics could have prevented this. British submarine actions and naval intelligence left a great deal to be desired. Hard earned lessons were rapidly taken to heart, however, and the British soon worked hard to regain naval supremacy in Northern Europe. Germany’s Kriegsmarine was well prepared for war with disciplined and well trained crews and officers. Personnel were proficient and familiar with modern technologies, tactics, and strategies. However, inadequate testing of German naval technologies, most notably submarine torpedoes, resulted in several missed opportunities to further cripple British naval might early in the war. Adolf Hitler’s policy of restricted submarine warfare at the outset of war, however, limited offensive capabilities. If this policy had been lifted, Germany could have crippled British naval might early in the war. Haar presents a balanced and well researched picture of the opening months of the naval conflict during World War Two. He presents convincing arguments without bias. A vast collection of photographs and other archival material help complete the image Haar creates. Information in the appendices is thoroughly researched and supports Haar’s arguments. All though a great deal of detail is presented, Haar does not lose site of the larger argument and constantly references back to his key arguments. Ivor R. Mollema East Carolina University
-
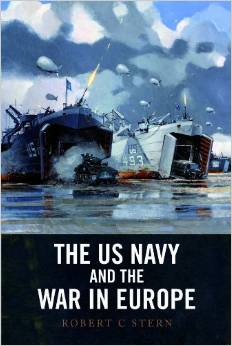
The US Navy and the War in Europe By Robert S. Stern Annapolis: Naval Institute Press, 2012 6-1/4” x 9-1/2”, hardcover, xiv + 306 pages Photographs, maps, notes, bibliography, index. $55.95 ISBN: 9781591148968 Robert C. Stern endeavors to bring attention to the efforts of the Atlantic campaigns of the United States Navy during World War Two in the book, The US Navy and the War in Europe. Believed to be overshadowed by the grand naval battles of the Pacific, Stern describes the efforts of thousands of ordinary men working in the Atlantic to ultimately achieve victory over Nazi Germany. Stern details the importance of the United States Navy to overcome vast shortages of resources in the Atlantic, as well as manage an allied partnership that was often strained, to achieve victory in Europe. These accomplishments, although often perceived by many as not being as renowned as those in the Pacific, are examples provided by Stern as he emphasizes the strategic importance of the United States Navy in the Atlantic to bringing about victory and the end of World War Two. The US Navy and the War in Europe is well developed in both research and structure. Stern manages to incorporate a vast array of resources to develop a chronological history of the ever changing role of the United States Navy in the Battle of the Atlantic and the war in Europe. Those unfamiliar with the history of this period will appreciate detailed events and important individuals involved throughout the course of the war, allowing for a broader understanding of the issues as they unfold. Presented information and references are cited throughout, albeit unconventionally, but are clearly identified within a detailed listing of the numerous sources and appendixes, allowing access for further research. Photographs and maps provide a sense of context, assisting the reader to better understand the involvement of the various individuals and vessels fighting in this theater. Stern has provided a quality resource for a general understanding of the United States Navy and its involvement in the Atlantic during World War Two. Although the resources are vast, the information presented sometimes leaves the reader wanting more. At times, certain events are detailed much more in depth than others, for example, when detailing the early struggles of the Navy to acquire vessels following the attack on Pearl Harbor. This aspect separates Stern’s work from being a general history of United States Naval involvement in the Atlantic from truly presenting and differentiating this war from that of the war in the Pacific. Stern’s goal was to amplify the discussion of the work of the United States Navy in the European theater, but it ultimately fails to meet this mark. Stern detracts from his intentions by not expanding upon available information and not capitalizing on the opportunity to present the incredible effort expended by so many that was necessary to turn the tide against Germany. Even so, Stern has still put together a very well researched and resourced historical piece that should appeal to general readers interested in the naval war in Europe. William S. Sassorossi East Carolina University
-
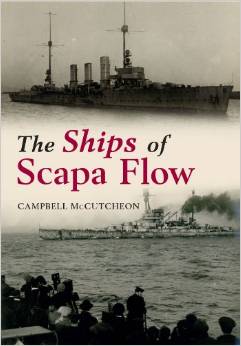
The Ships of Scapa Flow By Campbell McCutcheon Stroud: Amberley Publishing, 2013 6-1/2” x 9-1/2”, softcover, 96 pages Extensive photographs. $22.95 ISBN: 9781445633862 Distributed in the United States by Casemate Publishers, Havertown, Pennsylvania There are special places in the world that, due to the very nature of their geography, have stood witness to some of the most significant events in human history. Scapa Flow, nestled in Scotland’s Orkney Islands, is just such a place. As a natural deep-water harbor bounded by islands and strategically located at the entrance to the North Sea, Scapa Flow lends itself well to the historical roles it has played as an important naval base in both world wars and throughout the twentieth century. In The Ships of Scapa Flow, author Campbell McCutcheon employs historic photographs and postcards to take the reader on a visual tour of this special place in the North Atlantic. Through nearly 150 sepia-toned images, dozens of twentieth century vessels come to life, as do the hundreds of sailors who manned them. McCutcheon loosely follows chronological order as he examines and explains the situations that brought both German and British ships to Scapa. Whether disastrously sunk, deliberately scuttled, or diligently salvaged, the stories of these vessels shed light on a complex time in twentieth century naval history. Through well-chosen images and fairly thorough captions, McCutcheon details some of the major actions that define Scapa: the disastrous loss of the 804 men aboard HMS Vanguard, the legendary phantom fleets of World War I, and the vital salvage operations that continue today. McCutcheon does allude to Scapa Flow’s current status as a world-class diving destination; however, visual aids and input from the diving community is entirely absent and would have fleshed out a more complete character of Scapa Flow, not to mention improving the book as a resource for divers. Underwater imagery would have also strengthened and enhanced what is the beginning of an interesting study of the entire life of a ship. But even without such visuals, McCutcheon has offered some insight into the different scenarios that await modern vessels at the end of their primary service. The Ships of Scapa Flow demonstrates the ingenuity that humans are capable of when it comes to salvaging vessels in the cold, dark waters of Scapa Flow. Lacking an index, readers of The Ships of Scapa Flow can expect to refer back and forth in the text to keep up with the different ships’ accounts. A simple table, list, or timeline would have been welcome, particularly with the number of ships reviewed. And, although McCutcheon does credit postcard photographers throughout, the lack of a bibliography is a bit disappointing and limits (not eliminates) the book’s usefulness as a resource for researchers of Scapa Flow. Overall, The Ships of Scapa Flow is a good collection of compelling and historic photographs, augmented by brief narratives that tell some of the most interesting and unique histories of the area. Not a stand-alone resource, the book rather serves as an excellent introduction to the area’s rich maritime seascape. Stephanie Gandulla Thunder Bay National Marine Sanctuary
- 1 reply
-
- 2
-
-
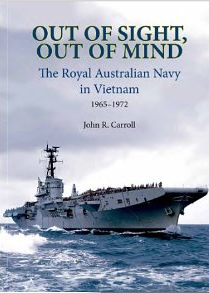
Out of Sight, Out of Mind: The Royal Australian Navy in Vietnam 1965-1972 By John R. Carroll Doral Center: Rosenberg Publishing, 2013 8-1/4” x 11-1/4”, softcover, 216 pages Photographs, diagrams, maps, appendices, notes, bibliography, index. $29.95 ISBN: 9781922013491 Distributed in the United States by International Specialized Book Services, Portland, Oregon John Carroll’s volume on the Royal Australian Navy’s support of Australian troops in Vietnam is welcome as a study of seaborne logistics—an area too frequently neglected for the tracers and blood that fascinates most readers. The author, a naval veteran of the conflict himself, traces the Royal Australian Navy from its initial commitment in 1965 to the last voyages home in March 1972. At the heart of his narrative lies HMAS Sydney, a Majestic-class carrier modified to serve as a troop transport, and her frequent escorts: the light carrier Melbourne and half-a-dozen destroyers and frigates. An appendix, with line drawings for each vessel, describes the ships, names their captains, and lists the deployments in which each vessel participated. Numerous photographs, many snapped by crew during their tours, enliven the pages. Several good quality maps support the narrative, as do three additional appendices. The bulk of the narrative builds upon frequent primary source quotations that often illustrate the potential danger, especially while unloading in ports, offered by underwater sappers, shore to river ambushes, and mines. Carroll stresses the difficulty of maintaining both security and alertness, insisting (quite correctly) that, even though the Royal Australian Navy avoided damage or losses, it did operate in a most dangerous environment. Carroll concludes with lengthy examinations of two issues that outlasted the war itself: herbicide exposure (the Agent Orange issue in the United States) and the Australian government’s refusal to allow benefits and entitlements to the crews involved in the Royal Australian Navy sealift. The struggle by veterans to achieve fiscal recognition is worth the study, especially in comparison to similar incidents in American history. Books dealing with seaborne logistics are in short supply, especially as related to long campaigns or wars. With Australia’s small commitment to Vietnam (relative to that of the United States, at any rate), Carroll managed to offer a rather complete examination of naval logistical operations. This makes Out of Sight, Out of Mind well worth perusing by those scholars of the maritime world who recall the old saw that amateurs study tactics while professionals study logistics. Wade G. Dudley East Carolina University
- 1 reply
-
- 2
-
-
East Anglia and its North Sea World in the Middle Ages Edited by David Bates and Robert Liddiard Woodbridge, Suffolk: The Boydell Press, 2013 7” x 10”, hardcover, xi + 349 pages Illustrations, maps, tables, notes, index. $99.00 ISBN: 9781843838463 or much of the Middle Ages, England was not yet unified. Instead, it was made up of several smaller kingdoms, one of which was East Anglia, now made up of Norfolk and Suffolk counties. East Anglia, unlike the rest of its English neighbors, had strong connections and cultural ties to other kingdoms along the North Sea, making it part of the North Sea world. In this book, editors Bates and Liddiard not only explore East Anglia in particular, but also successfully introduce how the North Sea can be studied in much the same way as the Mediterranean and Atlantic worlds. The book is based off papers from the 2010 East Anglia and the North Sea World Conference. The goal of the conference was to establish that the North Sea world, including the Baltic Sea to the east, could be studied using a similar model to studies from the Mediterranean and Atlantic Worlds. Northern Europe differed greatly from southern Europe in character and identity. Thus, studies specific to the Mediterranean world give no particular insight into the world of northern Europe. As Atlantic world studies continue, their focus is geared toward colonial and post-colonial effects in Europe, West Africa, and the Americas. This book introduces the North Sea as having a separate regional identity from the rest of Europe. Using the Annales approach, the editors examine how East Anglia fits in and represents the broader regional context. The chapters of the book offer an interdisciplinary look at East Anglia. Though history and archaeology are represented more than others, the fields of geography, art history, and architectural history are also represented. The book is divided into three parts which deal with overviews of East Anglia in the North Sea world, trade and economy, and cultural influences and links, respectively. From brooches and burials to churches and manuscripts, the chapters offer detailed and persuasive arguments, taking the micro to the macro and showing the connections East Anglia had to a broader North Sea character and identity. One large weakness the book suffers from is the lack of a general or political map of East Anglia. The maps that are present are chapter specific and, without any prior knowledge of East Anglia, readers can quickly become mired in the place names. Perhaps the largest weakness of the book is that the editors assume the reader already has some knowledge of northern European and East Anglian history during the Middle Ages. Thus, readers who are new students to the subject will find this text more confusing than helpful. For researchers and knowledgeable students, however, the book offers a wealth of cases studies specific to East Anglia. The book represents an interesting model of looking at East Anglia and the North Sea world, despite gaps in the early documentary and archaeological records. Researchers and students can hope that more studies like this will be published in the future, to further examine how the North Sea had its own identity and how East Anglia may have influenced other kingdoms in northern Europe. Adam K. Parker East Carolina University

-
Strategy and War Planning in the British Navy, 1887-1918 By Shawn T. Grimes Woodbridge, Suffolk: The Boydell Press, 2012 6-1/4” x 9-1/2”, hardcover, xiv + 263 pages Maps, appendices, notes, bibliography, index. $115.00 ISBN: 9781843836988 Shawn T. Grimes’ Strategy and War Planning in the British Navy, 1887-1918 examines previous historical attempts to study the Royal Navy’s development from 1887 to 1918, finding that many have neglected Great Britain’s strategic policy in the pre-war period. Grimes’ research reveals that previous Admiralty studies have focused mainly on the work of Admiral of the Fleet, Lord John A. Fisher, the man credited with initiating and overseeing the modern transformation of the Service as First Sea Lord prior to and during World War I. Grimes also illustrates that the focus of previous studies has been on the British rivalry with the Dual Alliance and the events of World War I, diminishing the Navy’s strategic transformation and technological evolution from the 1887 establishment of the Naval Intelligence Department up to Admiral Fisher’s appointment in 1904. Grimes extensively examines the Royal Navy’s evolution through multiple stages of strategic planning, illustrating that a visible transformation occurred from 1887, with the creation of the Naval Intelligence Department, to the end of World War I. He demonstrates that the Admiralty never neglected to examine the strategic, technological, and diplomatic conditions relevant to Great Britain’s naval design plans. Grimes confirms that the offensive planning trend, which began at the height of the Dual Alliance rivalry, played a key role in the overall development of British strategy. His research reveals that the Naval Intelligence Department took the lead in these plans, and that it is clear that Britain’s plans for waging a naval war were far from unorganized. In spite of prior criticism by historians of Britain’s ability to develop these plans, Grimes demonstrates that the accomplishments of Admiral Fisher and others associated with the Royal Navy’s strategic development are proof that for thirty years Britain’s war planning was legitimate and innovative; their leaders well aware of the potential of their sea defenses in the protection of Great Britain. In order to assess the quality and relevance of the Navy’s operational plans, Grimes evaluates the technological advances in ship design and strategy and the extensive testing that was carried out to authenticate the usefulness of new naval technology in a potential war with Germany. He argues that between 1905 and 1909, the original strategies that developed did not neglect strategic, diplomatic, technological, and operational realities, and in fact implemented naval maneuvers and exercises to test and evaluate new and developing strategies. Grimes’ examination of the inter-relationship between war plans and maneuvers in the British Navy reveals that the Admiralty recognized the importance of strategic operational planning under the direction of intellectual strategist George Ballard and Admiral Fisher in the 1887-1918 period. The Naval Intelligence Division, the Admiralty, and Admiral Fisher’s development of a strategic policy involved a unique strategy. This began with a planning trend initiated post-1888, saw construction in the late 1890s, and evolved in the event of a possible war with Germany in 1902. Grimes’ research demonstrates that this plan was strategically in place by 1912, two years earlier than many historians previously thought. As such, this book will appeal to anyone interested in naval or military history, as well as students and scholars of the British Navy. Ericha Sappington University of West Florida

-
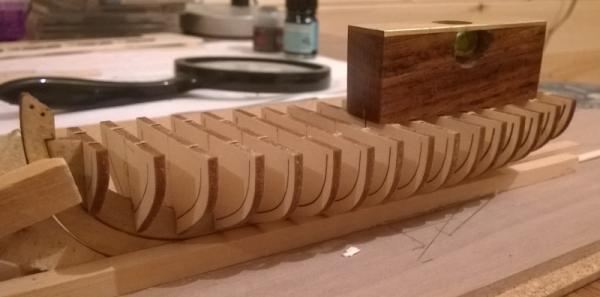
Bulkheads are up though considering the amount of contact between them and the keel I suspect movement would be possible without much force (which may prove useful if I knock anything out when sanding the bulkheads, plus there are a couple I am not quite certain if they are exactly where I want them..)
- 33 replies
-
- 7
-
-
- model shipways
- 18th century longboat
- (and 1 more)
-
You could use my cheat - allowing you can get the boat level and have the exact placing of one point of the waterline set the boat up then shine a coving laser at the marked point (ensuring the coving laser is also horizontal - most come with those bubble things anyway) then you can just draw along the laser line.
- 335 replies
-
- 2
-
-
- 18th century longboat
- Finished
- (and 1 more)
-
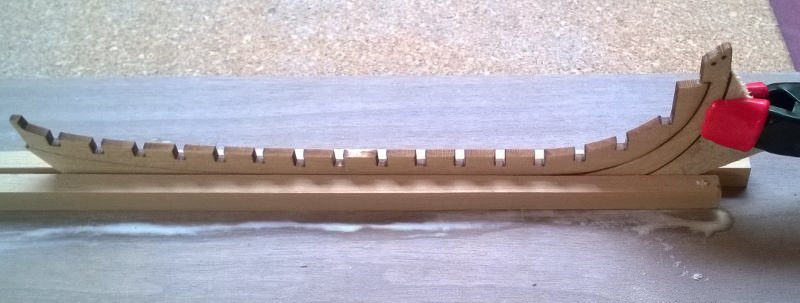
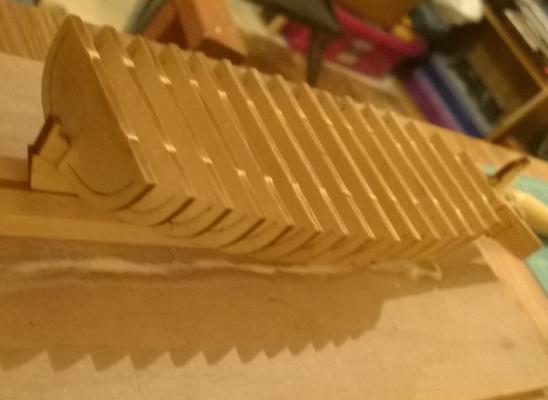
Gluing the false keel etc went okay as did its placement within the stand though the side pieces were slightly to large when the bulkheads were dry fitted so I added a small thin plank at the bottom to rise it slightly. First bulkhead going in with helpful set squares trying to ensure that at least some angles are at right angles. I will probably try and do two bulkheads an evening tidying the tops of the false keel as I go...


- 33 replies
-
- 8
-
-
- model shipways
- 18th century longboat
- (and 1 more)
-
One of the Admins has added you to the group so you should be able to access the plans now..
-
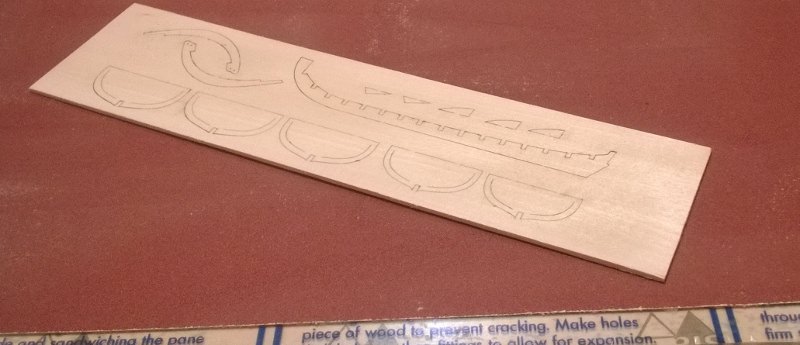
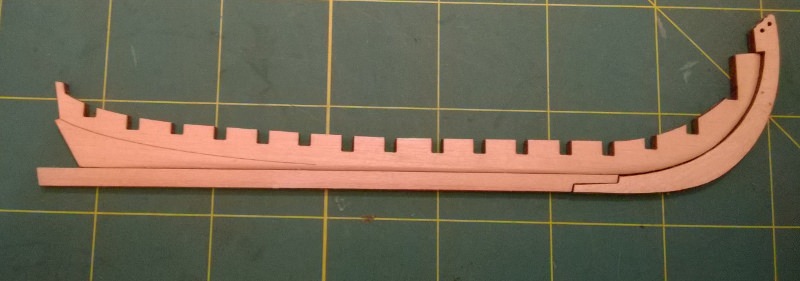
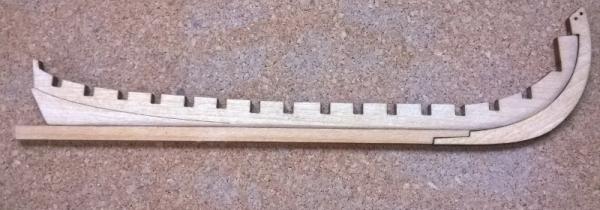
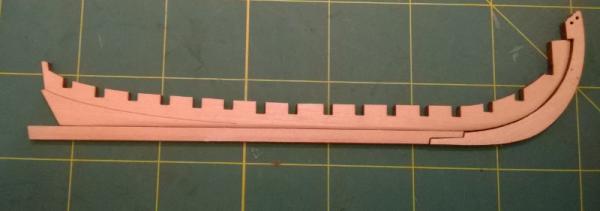
K, My workhouse is up and rather than jump straight into my scratch build I have decided to do some kit modelling (and workbench building) prior to moving to that. I liked this build because it is simple, attractive and does not take up a lot of space so ordered it from the USA even though the shipping cost more than the kit. I have not thought to closely about materials and might replace the planking though this will have to wait until I can get my Byrnes table saw and disk sander replaced as both died whilst in storage and are now spinning as fast as an amoebic hampster with just as much chance of cutting wood. Anyway following most other builds I started by gently sanding the thicker sheets to remove the odd burn mark from the laser cutting. For this I used a perspex sheet with some large A4 sized sanding sheets stuck to either side (the sanding paper came with one side 'sticky' for this very purpose). This allows one side to 'engage' with any surface and not slip around and also allows fairly even pressure to be applied across the piece sanded. Next I removed the false keel and related parts and removed any stubs caused by the connection to the parent piece with some gentle sanding followed by adding the bevel for the plank below the bearding line. All the pieces fit nicely together so far which is nice. Finally I flung up a rough and ready building board to 'support' the keel. This was simply two pieces of flat wood (that I had in my spares box fortunately as without my table saw I certainly cannot make new ones) and I scroll sawed out the connecting bit of the stem piece to help support that. Attractive eh!


- 33 replies
-
- 6
-
-
- model shipways
- 18th century longboat
- (and 1 more)
-
One of the admins has added you in so you should be able to access the plans now..
-
Though it is better to be exact when placing/sizing the frames you can adjust for slightly larger (or smaller frames) when you are placing them though you do need to know the exact sizes. If you measure the base of the frame with a micrometre type measure then that may help..