Matrim
-
Posts
1,401 -
Joined
-
Last visited
Content Type
Profiles
Forums
Gallery
Events
Everything posted by Matrim
-
The scarphs were indeed taken off the plans directly; they were on the sheer plan. I am pleased I did not have to guess the location...
-
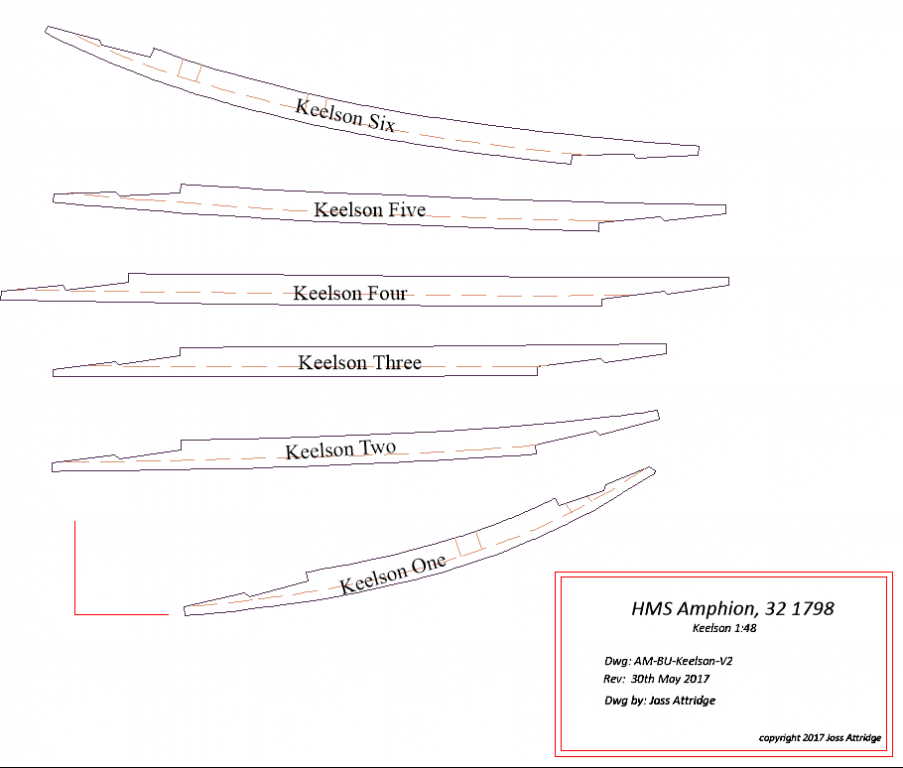
Next little update is the Keelson plan. I will do the Stemson Knee and Stemson on a seperate sheet later. Not particularly exciting admittedly. Plans have slowed as of late as I have been spending a lot of time on the deck of my Bounty. Unfortunately I am suspecting it has been too much time as I am getting the distinct impression I have gone overboard with the treenails. It might be the scale (1:64) makes it more intrusive than the Triton Cross section (1:48). I am hoping that when the holes are filled and the deck is caulked that it will not look quite so in your face but we will see..It currently looks a bit like that pinhead monster from that old horror film.
-
Many of the authors listed are good but some are better than others. For me Patrick o'Brien stands head and shoulders above the rest. I often try to decide why and I think it is realism. More than any other author POB's characters inhabit the period he is writing about. They have lives outside the navy and spend considerable time outside of the relevant ships. When I read POB it is the closest to what (probably) actually happened (especially as he grabbed most of his plots from actual events that occurred from the major Cochrane antics to Riou, Rowley etc. It even goes beyond the primary story streams as several of his sub-officers tales are lifted from the navy chronicles (i.e the Dillons tale of how he fought of several privateers in the first book). His character also make mistakes and have major weaknesses that other James Bond like heroes dont have. On the other hand people who are reading for castle building or continual excitement may found it a little gentle for their tastes. With O'Brien I would recommend reading the first chapter and if you like the interatcions between Jack and Maturin then you will love all of it. If that leaves you dry then stick the others. Of the others Hornblower is excellent though he is not as good at the 'world' as POB. He is the gold standard of pure heroic naval fiction. I loved Kent and Bolitho when I was a lad but when I grew up found his books were more generic than the above two. I have said before that you could replace the French with 'Zargling aliens' and the ships with space ships very easily and you would have a good sci-fi novel. Kent writes what I term as heroic fiction much like Sharpe. If you like that then good for you. I found that when I knew very little of naval sailing warfare that he seemed very knowledgeable when I knew more I was less impressed and realised how divorced from the world it actuallty is especially when I discovered POB. I have read several Kydds and they are okay but I have never felt the need to re-read any. Sean Thomas Russels books were an irritation to me. They swung more from heroic fiction to spy heroic fiction. I initially enjoyed the John Pearce series by David Donachie. Like Kidd the hero starts as a press ganged sailor and also like Kidd very rapidly indeed gets promoted. A curious side-plot with the Pearce books is that a large portion of the book is written from the perspective of his imcompetant first commander who thinks he is great but isnt. Donachie also likes name dropping a lot with more actual historical personages visiting (Nelson keeps popping up). As with most naval fiction the plots were too contrived to be realistic to my mind. Finally most of the authors above (with POB and Hornblower perhaps excepted) follow a very similar template. The officer above, of whatever rank, is usually incompetant and the hero will save the day against all odds. Which is fine but I have found a couple of books which go heavily against the grain of that in their structure the first is Alaric J Bonds 'His majesty's Ship' This is written in disconnected pov style so the chapters split from captain to officers to sailors to landsman to tell the story. I found it refreshingly different and it gave a much better picture of a naval ship than any other book read. (If you want a picture of a naval ship as an officer/gentleman would see it then POB wins by a country mile). The second is older and doesn't involve much fighting and is William Goldings 'To the Ends of the Earth' - this is a three parter concerning the voyage of a well educated man to take up a position in Australia on a naval ship of this period. It also has a good mini-series with a young Benedict Cumberbatch in the lead role which is well worth viewing. All my opinion and others tastes naturally may differ.
-
Santa Maria by ray111 - Mamoli - 1:50
Matrim replied to ray111's topic in - Kit subjects built Up to and including 1500 AD
I agree that when finishing off it is far better to use sand paper (preferably on a pad if you have one small enough). You get a better sweep and you are more likely to remove kinks and bumps. I have tried to shortcut hand tools a couple of times and (usually) ended up with a lump taken out of something that shouldn't. May I recommend for your next model (as you have gone past this now) that you consider using push pins for the second planking? You can push those underneath the outer layer so you wont get pin holes in the outer layer. It also allows you to keep it close to the plank above which can reduce (though not always on the bows) gaps springing open. i.e Also if you find you have slight gaps in the outside plank layer then you can hide these by using your finger to push white glue into the gap and then sanding. The glue absorbs the wood dust and it hides the gap. This works even better when you paint so it may not be so useful if you intend on staining or varnishing the outer planking. Anyway good luck with it.
-
thanks both, i will also add deadwood 5 to my list of things to check on before continuing..
-
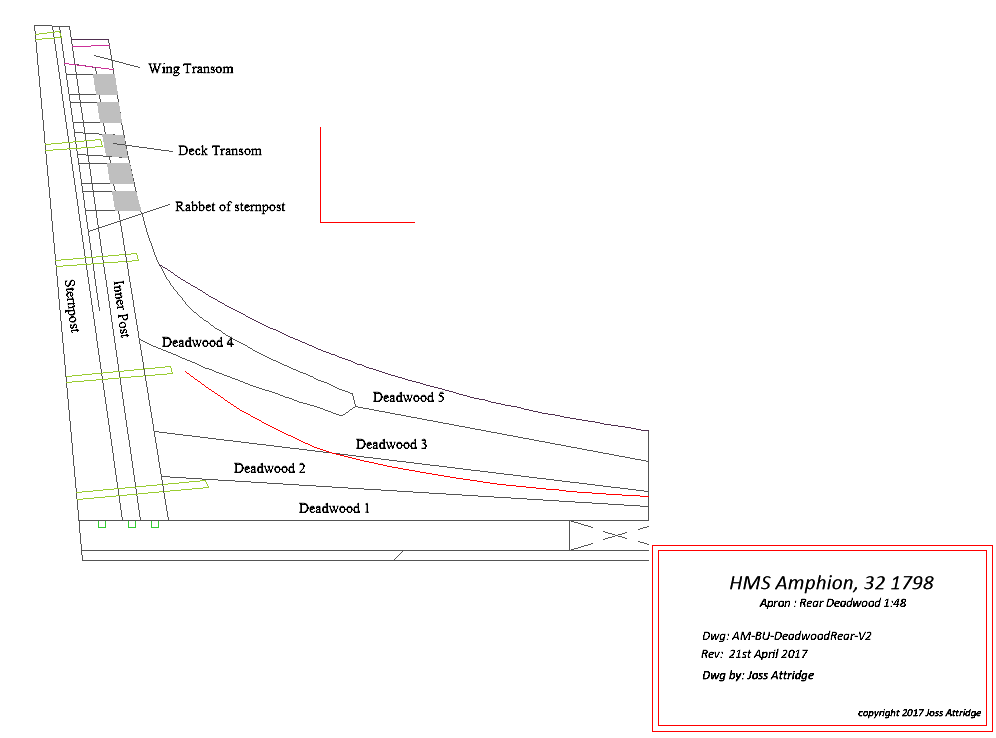
Onwards and upwards! Anyway I have adjusted the stem closer to Druxeys ever helpfull hints and have moved onto the rear deadwood. This is just a first attempt as I may play around with the tops of the sternposts slightly as I dont think I have enough detail on the plans to make an accurate attempt. The wing transom also looks a bit severe to my eyes but it is supposed to be at an angle so I may just have to check things through.
-
Naval Cannons, 1800 era
Matrim replied to Macymae's topic in Building, Framing, Planking and plating a ships hull and deck
The Caldercraft kits use the full gun. The only company I can recall that did not (and I dont have familiarity with that many...) is the plastic Airfix Victory which certainly used the cannon end on the lower deck guns on one of the earlier models. In any decent kit you can look through the gun embrasure and it would look strange not seeing the gun. On my Diana for example you can see a lot of the lower deck guns by looking through the hatches on deck as well on that kit I made the cannons up and rigged them even though they would only be partially seen it would be enough.. If spending the time scratch building then I suspect there is even less reason to 'simulate' the guns. -
Deck planking
Matrim replied to bluenose2's topic in Building, Framing, Planking and plating a ships hull and deck
I like holly for deck planking though you only get small amounts (for obvious reasons). It has a lovely white colour.. -
Just removed the photo which had a photographic studio copyright scrawled over the photo as it goes against site rules....I will make a wild guess that all the others were taken by yourselves and not randomly grabbed of the web...
-
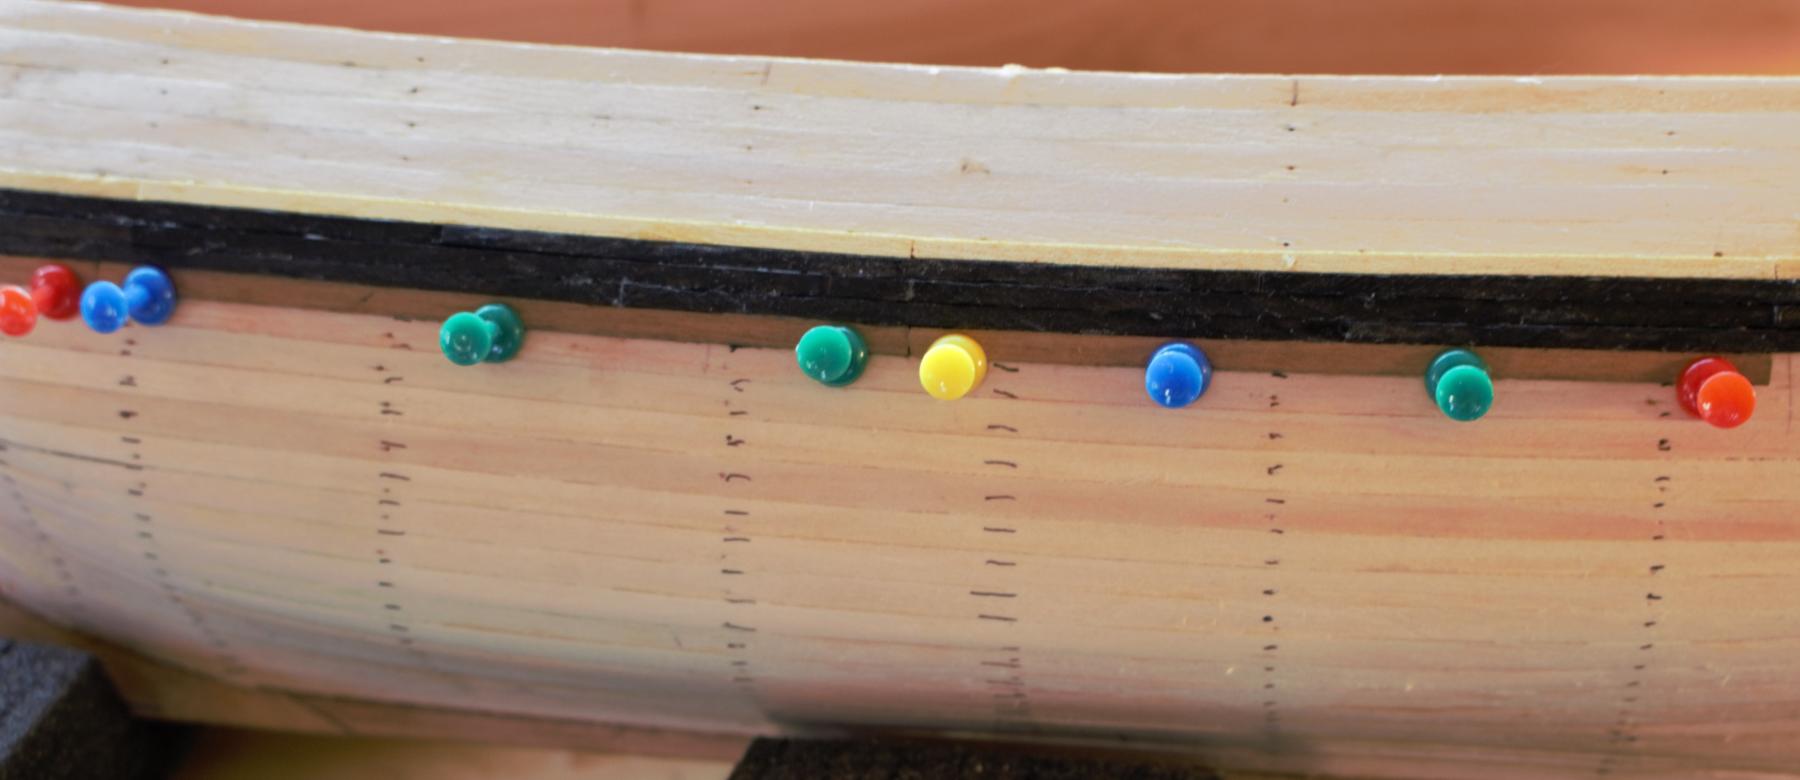
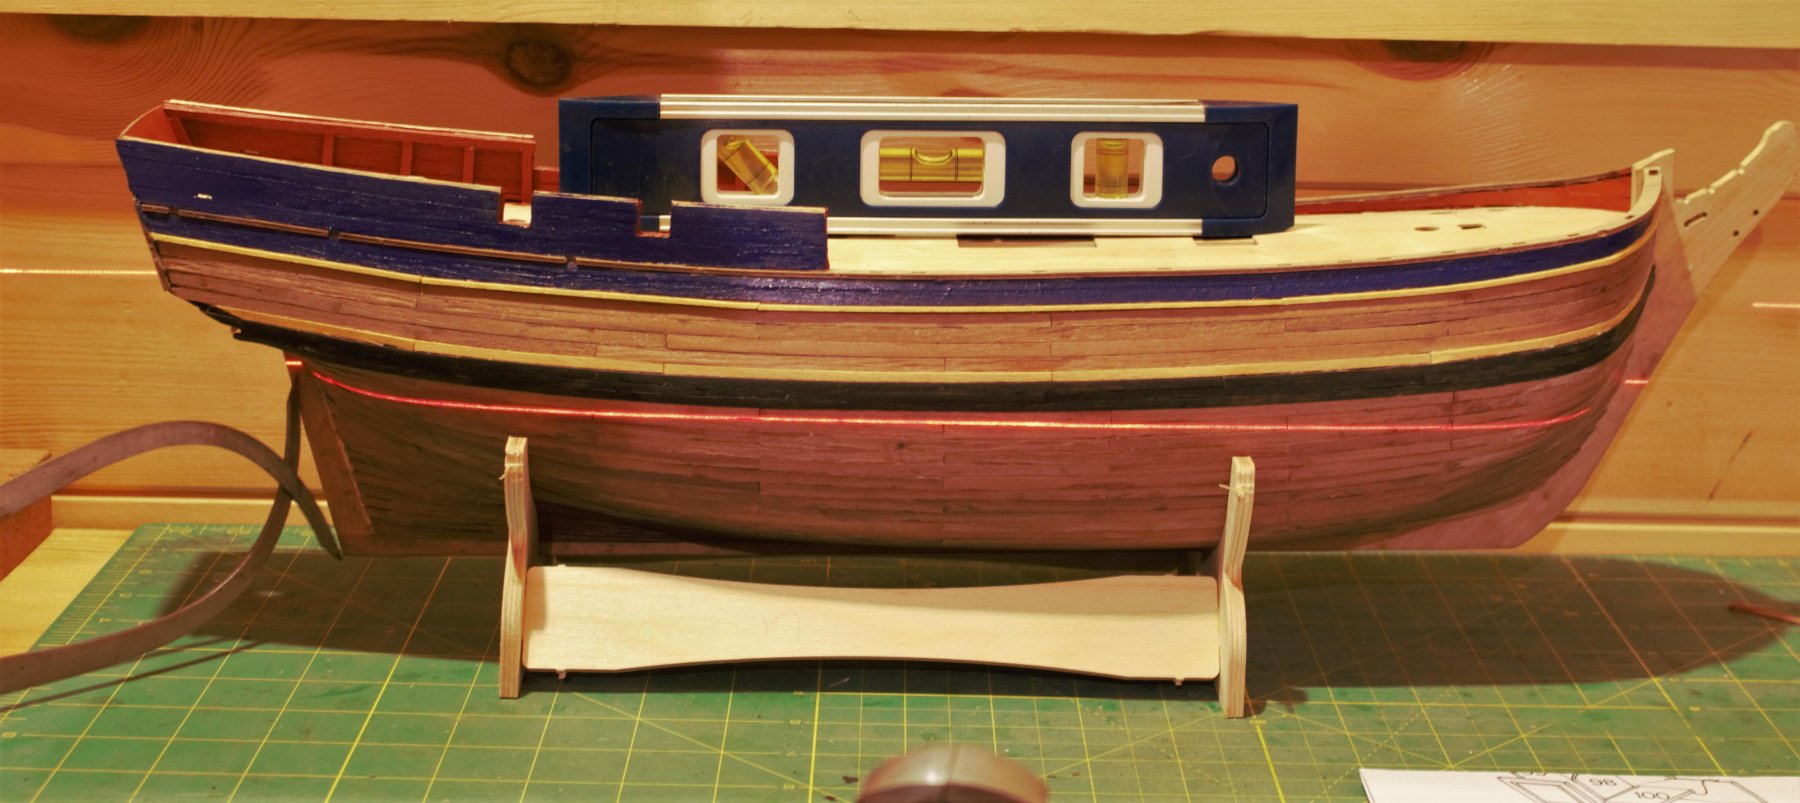
Put on the bulkheads and then looked at the waterline. I have had lots of difficulties in the past but finally have a method I am comfortable with. Firstly I mark onto the hull 2-3 locations taken from the plans and then use a coving laser to indicate a line between these points making sure the ship is as level as I can make it I then check the indicated line by using calipers against the plan which can then be placed directly agains the model to check the line Finally I use masking tape to indicate the line itself as it is easier to adjust around to the shape After that I used copper tape as an experiment. I have used it before on my Triton cross section and there had used the tape itself on one side and the tape plus paper backing on the other. Now of the two the version with the paper backing looked better but after three or so years started to come off whereas the tape on own lasted. I must admit to still not being entirely happy with the tape on own but think I can correct this later with smaller sections. My process here was to make a little jig to mark the plate size and to cut a strip of copper. I then used the jig to score the copper with the back of a scalpel. Once done I then used a ponce wheel to mark down the left and bottom sides of the plate. When attaching I eventually worked out it was better to keep continuous pressure and push down with the other hand. Any looseness causes slight wrinkles. My photos of that were not good so I will try and generate some better ones later. After this I have just started on the planking and here is a 'moody' (read unfocsed) shot of the deck with some king planks I had just cut. You will notice the lines across the deck, these approximate to the expected locations of the beams. I will do another post soon on the deck planking plan. Cheers for reading


- 38 replies
-
- 9
-

-
- bounty
- caldercraft
- (and 1 more)
-
I will adjust accordingly! Thanks for the info.. A lot of those lines were approximations dependant on the relevant books...
-
Thanks, a part of me does keep thinking how much stronger the end structure would be (and easier to make) if I just did it in one piece. I keep hitting that part of me on the head with a plank of wood to keep it in check..
-
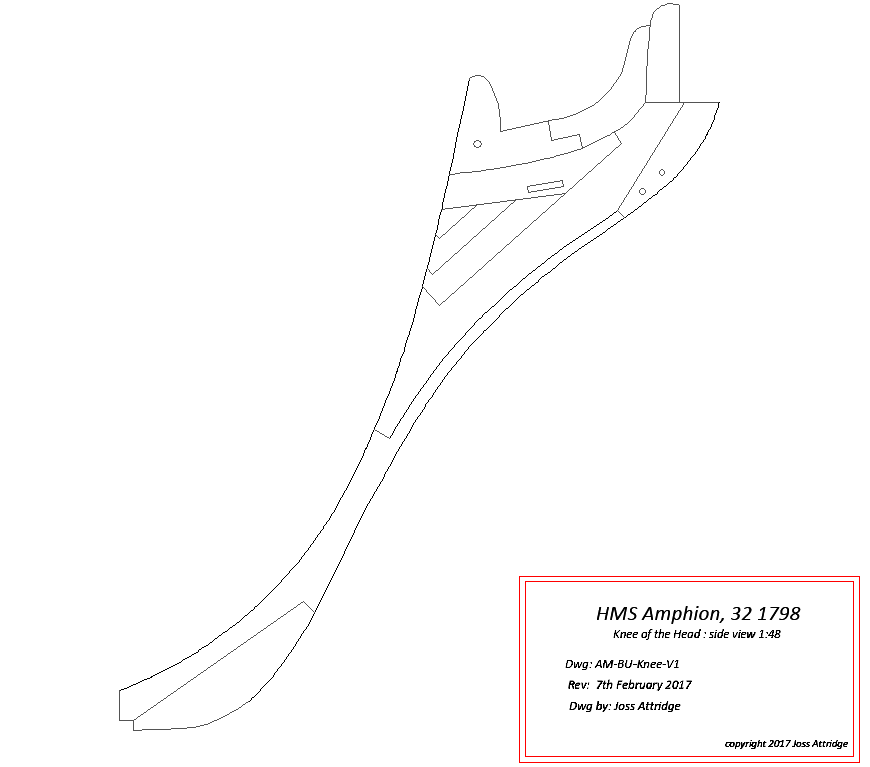
Madce an attempt at a knee of the head plan. May not go this approach (which requires more research) as I am still umming and aaing about different structures and possibly simplifying to make the construction easier. From what I have read so far there are several different ways of building this up so it is a matter of designer preference as to how...

-
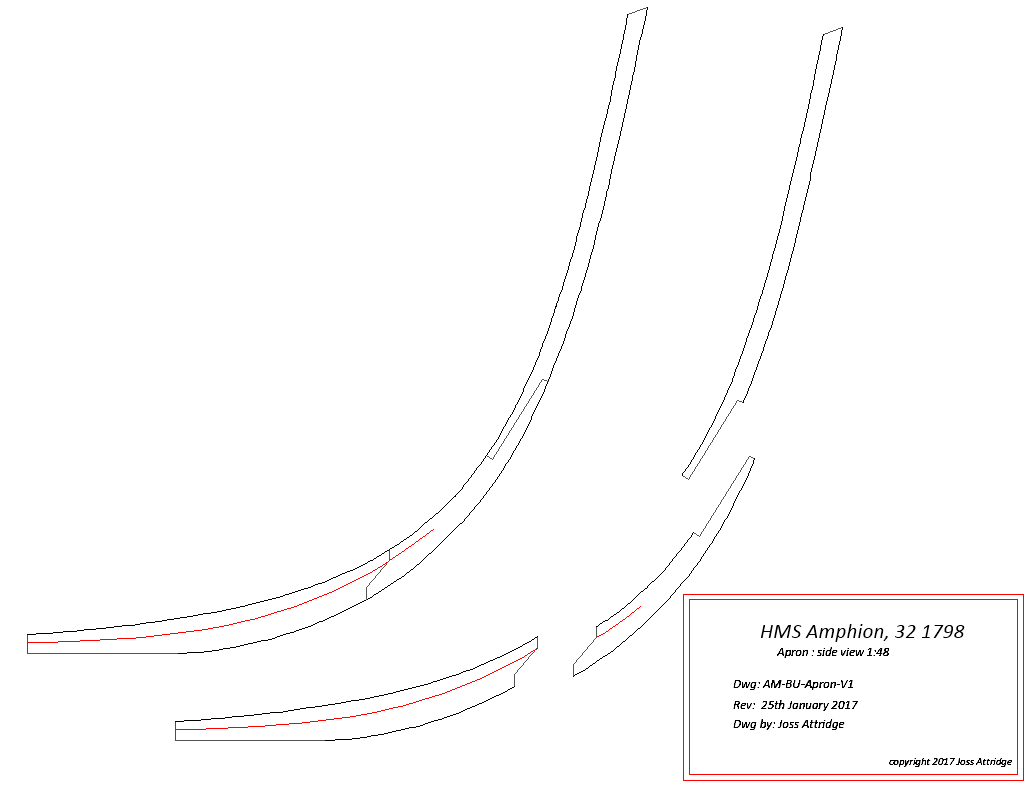
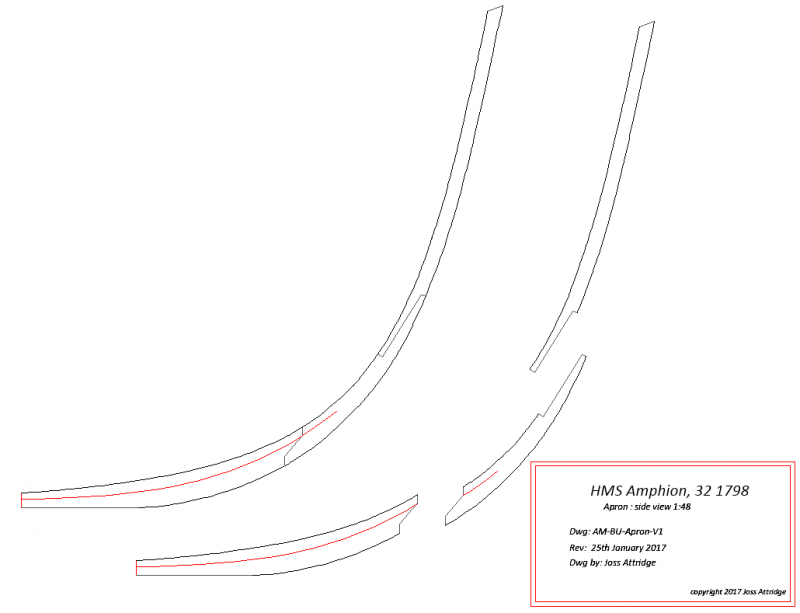
On the scarph the length was indicated by the plans and I always take the plans over other considerations (inlcuding Steel). I also (deliberately) flatten the scarph because it makes it easier to cut and join pieces together so is a simplification of actual practice to simplify building. Useful to know what it should be so thank you both. I have also looked around the various books and in the Swan and Euryalus the plans have the apron in two piece , labelled the apron. In the Naid the relevent section is in three pieces and the joints match shape and direction with the ones in mine with the lowest joint marked lower apron and the upper two upper apron. All the books have deadwood above the apron and all the books have the apron starting next to (but not exactly on) the upper line of the rising wood. So as far as I can tell (and lets face it we have several authors here so anything I say should be taken with a ton of salt if it in any way disagrees with posted pronouncements) this is the apron. I will try and move into more primary sources though (and still have not checked the other plans). Thanks all for your comments..
-
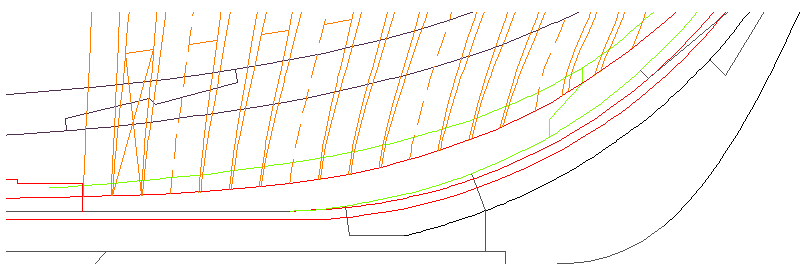
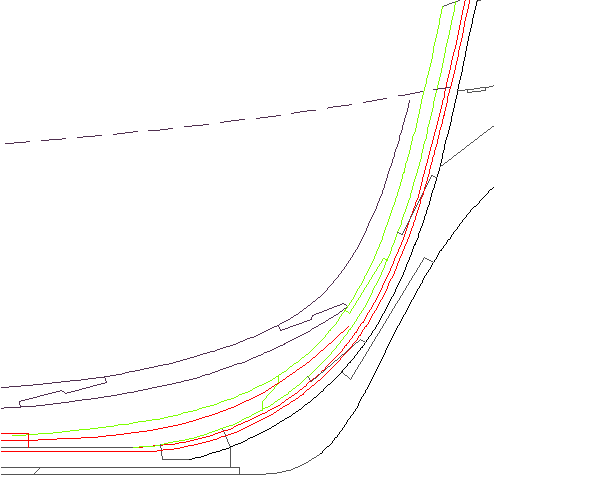
K here are some more 'global' plans. I have adjusted the colour of what is assumed to be the apron (above) to light green so it can be picked out amongst the surroundings easier. Second shot includes the cant frames but focuses more on the keel area than the above I am going to have to search through some of the paper plans though as I also decided to validate against the originals and on the sheer (at least) the upper joint does not occur. Therefore it is possible that the lower apron is very short and the upper quite long.. I shall have to go and drag out all the plans though as that joint will have occured on one of them otherwise it would not have been added to the master..
-
Edited the title so it matches forum rules.
-
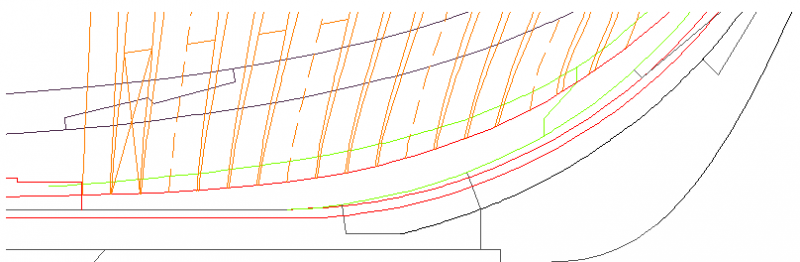
That would make logical sense except for the fact that the majority of the cant frames sit on that piece... When I get home tonight I will post a composite of all the relevant pieces of that section (apron, stem, keelson) which should help validate/deny...
-
Not decided yet so am continuing (at least until the spine of the ship is potentially done so the knee of the head, stern posts/rudder/rear deadwood) as an when really. Next shot is the side view of the apron Nothing very exciting though the split in three appears unusual (either that or other plans deliberately leave it at two to simplify the piece..) I considered doing a fron view but since that will involve various curves to fit I will eventually cut to sized wood and resize above and below the bearding line accordingly. Well that is the current plan and may change when tool comes to wood.. Cheers for reading as always. I may do the knee of the head side view next following the same setup mainly as that is relatively simple..
-
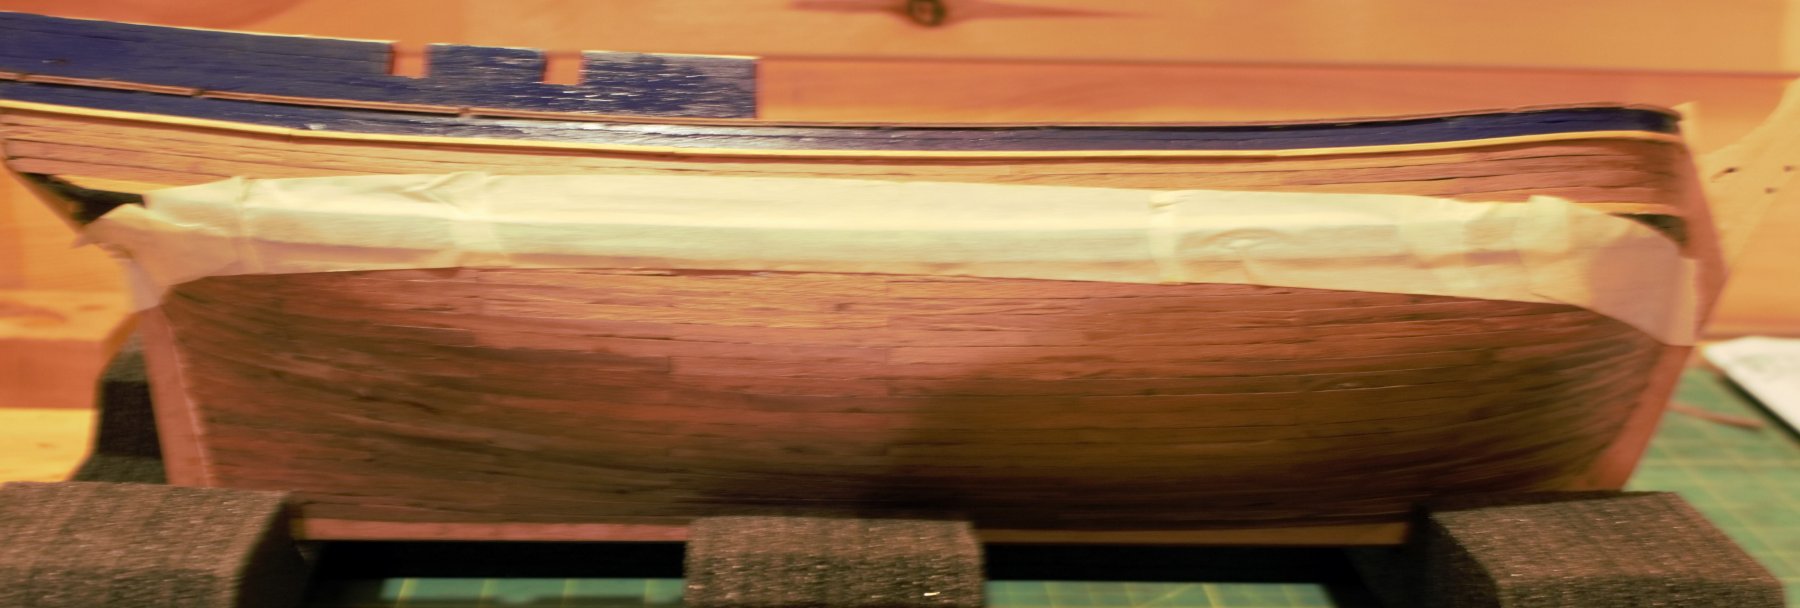
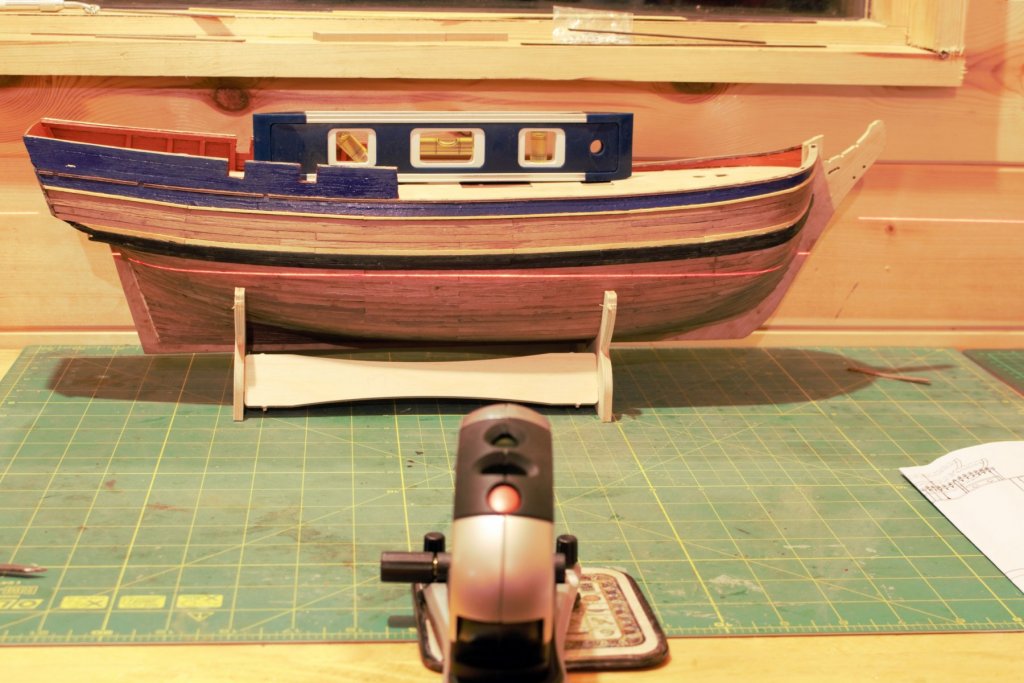
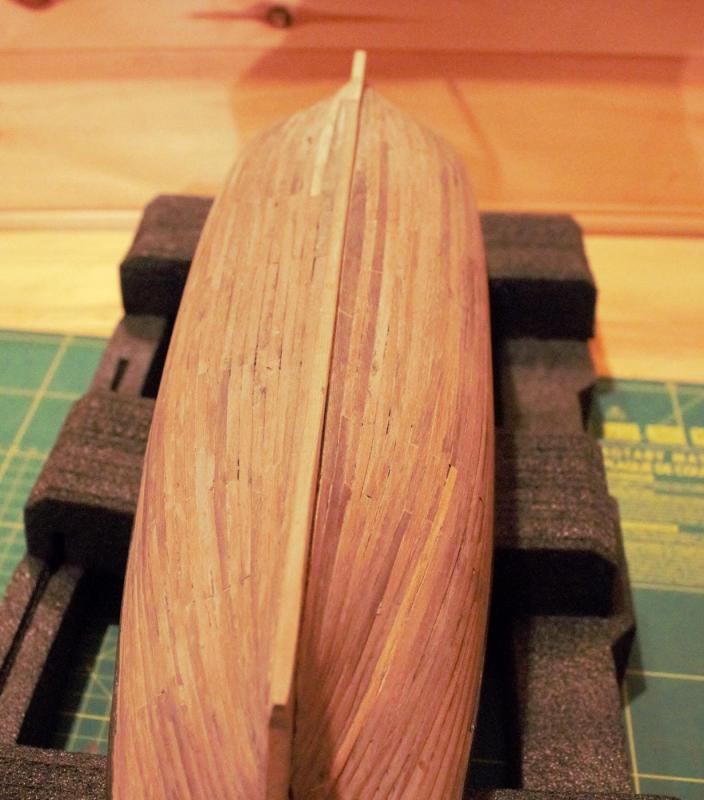
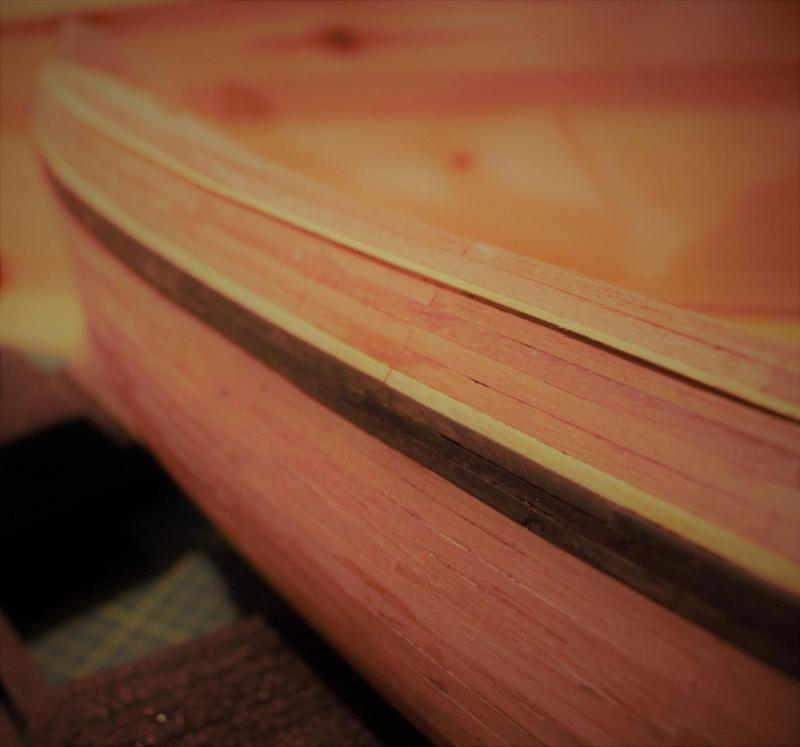
Initial set of hull planking is now done. Not 'brilliant' but much better than my usual attempts. Improvements are that I am getting better pre-shaping and (for once) actually managed to get continuous lines of planks without sticking a random central filler because I misjudged the shape (hoorah for pre-planning the strips). Here's a bottom view. And since the camera is a vicious critic here is a softer version that might match what it looks like for someone not staring at a 1mm gap like an abyss Next steps are to plank the rear facia. The plans don't call for it but I am doing so (with very thin planks of ebony) anyway.
- 38 replies
-
- 1
-
-
- bounty
- caldercraft
- (and 1 more)
-
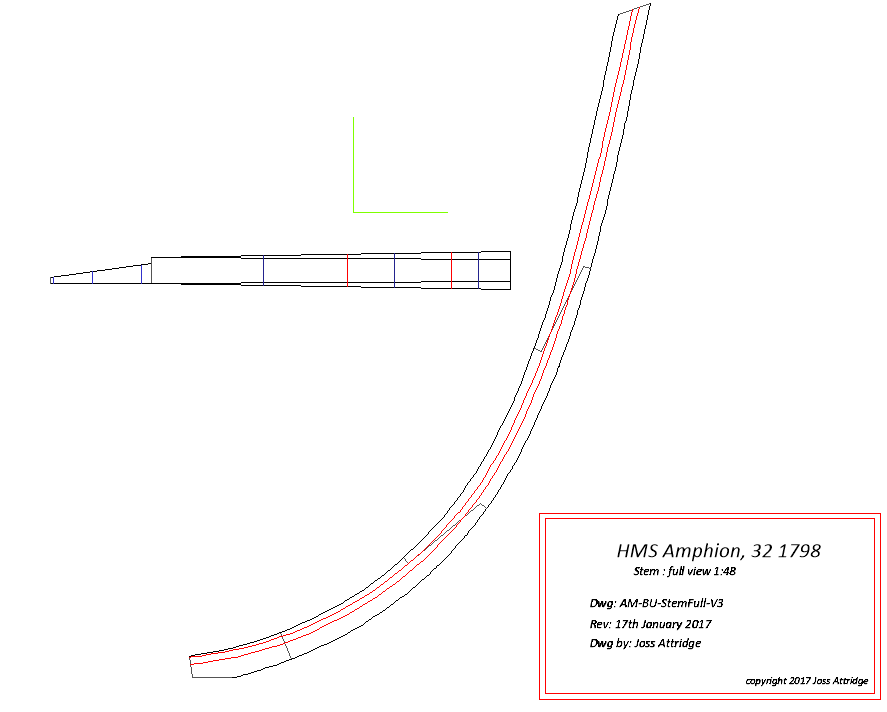
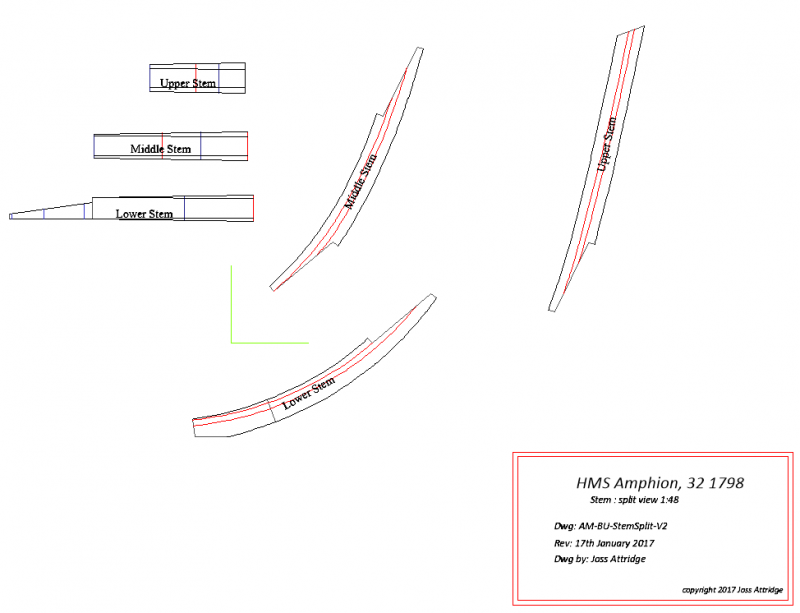
Just produced the Stem Plans. Not really certain of the best way to get the tapering on the plan so we'll have to see if this approach works or if it needs further adjustments.. I have enough to get started (and keep me busy a few months) so I might stop work on plans until my Bounty is out of the way and start when I start work on the build. Then again....hmm have to consider the pros and cons.

-
Dyson pure hot cool purifier
Matrim replied to Matrim's topic in Modeling tools and Workshop Equipment
I have a commerical air quaility monitor and, to be frank, I do not have a clue how it works (beyond it shines a laser over an air flow and counts obstructions sizes).. -
Had an email concerning one of these recently so I thought I would check it out. http://www.dyson.co.uk/fans-and-heaters/purifiers/dyson-pure-hot-cool-link/technology.aspx Couple of notes, Dyson is a very well known UK brand - if nothing else the owner is an inventor who actually makes stuff thqat works that Britain also exports so he is rather an asset. His stuff tends to be very well made but expensive. The machine fulfills three tasks. It purifiys the air (down to 0.1 micron and the dangerous stuff is between 0.1 and 0.5 microns), warms the air to a temperature you set (at which point it functions like a thermostat and switches off until needed again) or cools the air in summer. It also contains some measure of air cleanliness measures as it flags whether it regards the air as 'clean' or not. Finally it has wi-fi and can be controlled via an android/apple app so you can set the temperature and turn it on when you are not even in the room. Anyway my model arrived today so I switched on my air monitor to check it actually worked, set it up and left it on for an hour. When I returned to the shed I was pleased that A - the shed was toasty and B - the air was of good quality. Large particles were down to 34 (per square foot) which is good (if I run my other air filters they can generally get it down to 20 ish or less but as the large particles are not the dangerous ones I am not worried). Small particles were down to 300. The 'clean' air range is having 500 particles or less (and my house as a control location tends to have 300 as well). From there I lowered the temperature as it was a little too warm and then started table sawing some wood. My table saw is attached to a good dust hoover but you will still get 'escape' and throughout an evenings work the small dust levels never got above 400 and once cutting stopped dropped back down to 300 within 5 minutes or so. Therefore I am quite pleased with the its operation. I have several air filters/ suction systems as I am nervous about wood dust and this seemed to do an excellent job. If it was not based in my shed I would consider leaving it on all night to keep the temperature level and once I get a meter in might do that in winter to see how much electricity it actually piles through - the air heating will help control rust etc. K so that is the good now the bad. It is not cheap - the mid-large models are four hundred and ninety nine pounds and worse the filters cost fifty pounds each plus are not re-useable. That last point is important as if you get through a lot of those and it can be very expensive. The user guide states that running it for 12 hours a day over a year should get through a single filter but in a working environment with wood dust I am expecting that to be shorter. If it is 6 months then I will be quite happy, anything less than that and I will be less so. Finally I plan on using this as a background filter. Keeping different suction on power tools and use other air purifiers along with a dust mask when doing a lot of sawdust generating work. Once they have got the environment under control then this can be used as a means of controlling dust that has perhaps settled and is thrown up without being seen plus if you do not possess an air quality monitor then this does cover that job a little less transparently. You can of course put it in other rooms in the house if needed for cooling/ heating/purifying as well..
-
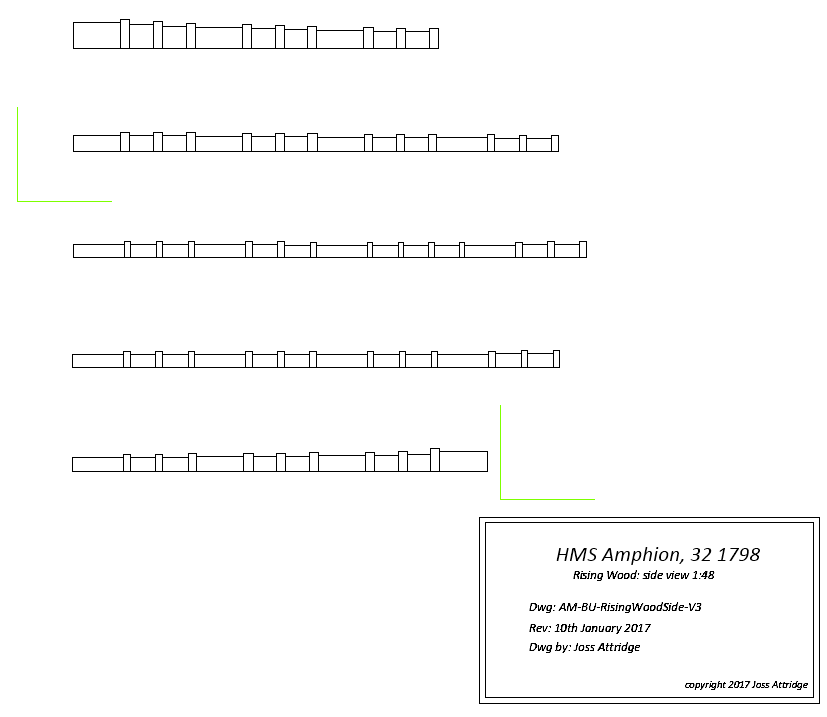
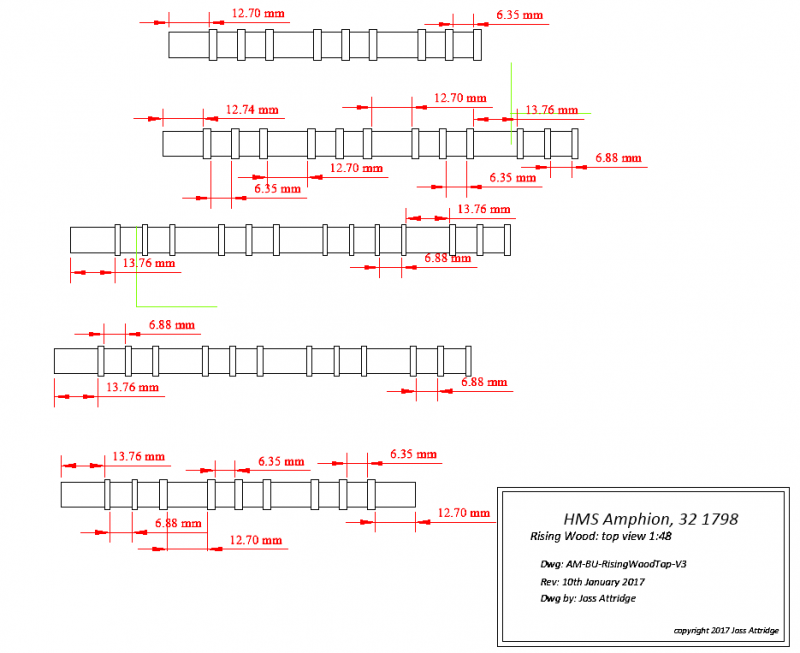
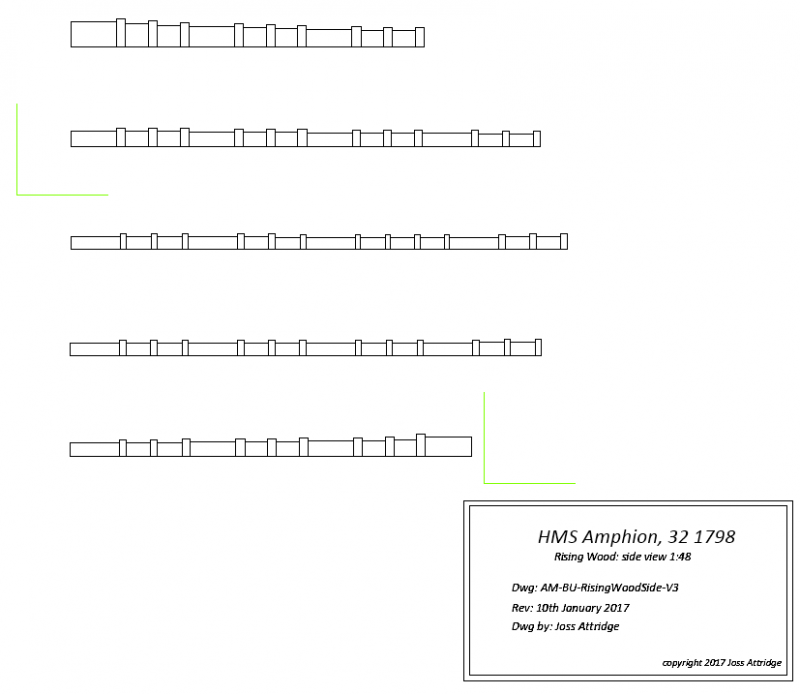
K, after the (much needed) assistance from Wayne and Druxey (see Rising wood thread currently around 2 higher than this). I have drawn out the rising wood though I had to redraw on the master plan first. As before I am using a simplified notch system to make it easier to seat the frames, As with a lot of things this will introduce its own complications though these will mainly occur when cross marking the relevant heights on the actual individual frame plans (the seat of the frame on the rising wood is usually angled so if it is not horizontal then it needs to be equally carefully marked as it wont be a default height above the bottom any more but will be higher (or lower) dependant on where the horizontal line was taken off of) Just to reiterate what was done a fresh buttock line was taken off of the body plan using the keel lines. This generated a line that sank veey close to the keel itself at the centerpoint but did not quite touch. Horizontal lines were then thrown up from here 6 inches (the base size of the notch) generating the plans above. As mentioned before another way of doing this include generating an angled rising wood section with no notches. I did not follow this path because I am happier with right angles and the notches will also help seat the frames at the correct location. Phew. Next up the much simpler stem and apron structures.
-
What is the kit? I am currently planking a Bounty and started with the wale then planked from the wale downwards (both side) and have just started with the wood above the wale. If your kit uses two layers of wood and you are on the first layer then it does not matter. If one layer of wood or you are on the second layer then planking the area that (may) be covered with copper plates first is helpful as it allows you to make your mistakes where they will be hidden. Leave visible wood as late as possible so then end model looks better...
- 1 reply
-
- 2
-
-
Wonderful work guys plus the 24 ft does match the current taper start location quite well so I wont have to re-draw. That was a quite interesting discussion for a point that turns out to validate the guestimate approach taken by many of us