HOLIDAY DONATION DRIVE - SUPPORT MSW - DO YOUR PART TO KEEP THIS GREAT FORUM GOING! (Only 75 donations so far out of 49,000 members - C'mon guys!)
×


Meriadoc Brandybuck
-
Posts
201 -
Joined
-
Last visited
Content Type
Profiles
Forums
Gallery
Events
Everything posted by Meriadoc Brandybuck
-
Thank you for reaching out to Mr. Mclaughlin and getting an update on the state of research and the challenges facing a further volume. I’ve been thinking about what could be done by aspiring scholars interested in picking up where the last volume left off, in collaboration with the author. The topic does remain sorely under-covered and stands as a glaring hole in our picture of the royal navy at the time, whose majority was made up of small patrolling or support craft. It occurs to me that a lot of the research from the American side of things can be gleaned from referencing Chapelle and other extant works, while the best record of actual hull forms from American vessels of the revolutionary war and into the Napoleonic era comes from British admiralty drafts of captured vessels. As for the French side of things, I imagine that again British admiralty drafts may be adequate to explore their input, though some research on the logic of their design and use would be necessary. I’m also curious of Mediterranean influences on French craft of this period, and a glimpse at xebeques frigates and tartane privateers may make sense. British designs (from a quick glance at nothing more than the Wikipedia list) seem to include successive batches of 6 lbr ship sloops not radically different from the designs arrived at by the end of the Seven Years’ War, plus attempts at developing an effective brig design (such as HMS Speedy) based around 4 pdrs for budget presence. Royal navy schooners seem to have mostly been built in Bermuda (such as the famous Pickle) and many schooners were purchased or used as captured, generally built in America even if captured from the French. A chapter or subchapter on Bermuda shipbuilding would probably be appropriate to include as well. A fact that strikes me is that the British Bermuda schooner classes were all rather smaller than most of the American “letter of marque” schooners we now call Baltimore clippers. Then there are the large populations of Cherokee and Cruzer class brig sloops and the smaller “gun brigs”, all an evolution in applying the carronade to amplify firepower for affordable omnipresence through small hulls and crews. There is a memorable image somewhere of a small carronade-armed brig playing an important role in the capture of a French 74, though I forget the details of the incident. A discussion of the impact of the carronade on naval warfare would be unavoidable, as sloops became primarily carronade-based platforms over time. A discussion of the development of fleet supply lighters and water tankers to support the Brest blockade and ships patrolling foreign stations may also be appropriate in such a volume, as they were small utility ships vital to the fleet (but difficult to market their own volume about). This is all no doubt known to Mr. McLaughlin and most of us interested in further research. I’m wondering if a different publisher could become interested in helping such a project along, if one or more intrepid contributors were able to help assemble the needed research and images. I wish I was in a better position to offer more than simple words! We have the ability to coordinate online across oceans, if only we could get the NMM and other institutions to send us all they have on the subject matter! Or upload it in a searchable way. -hard-headed Meriadoc
-
This is what I was thinking. I’d love to take on some of the burden but I live a long, long way from the NMM… -Meriadoc
-
Lovely flag! For what it’s worth- having to re-rig a split stay is at least a very authentic experience- frequently noted in ships’ logs matter of factly, but of course there would have been much colorful language expended in the effort to repair it. -Meriadoc
- 366 replies
-
- 1
-

-
- bellerophon
- victory models
- (and 2 more)
-
There is hope! Though not in the near future. In the meantime I found a book called Frigates, Sloops and Brigs by James Henderson focused on the Napoleonic period. It dates from the ‘70s. I ordered a copy, so I’ll see if it’s any good. -positive Meriadoc
-
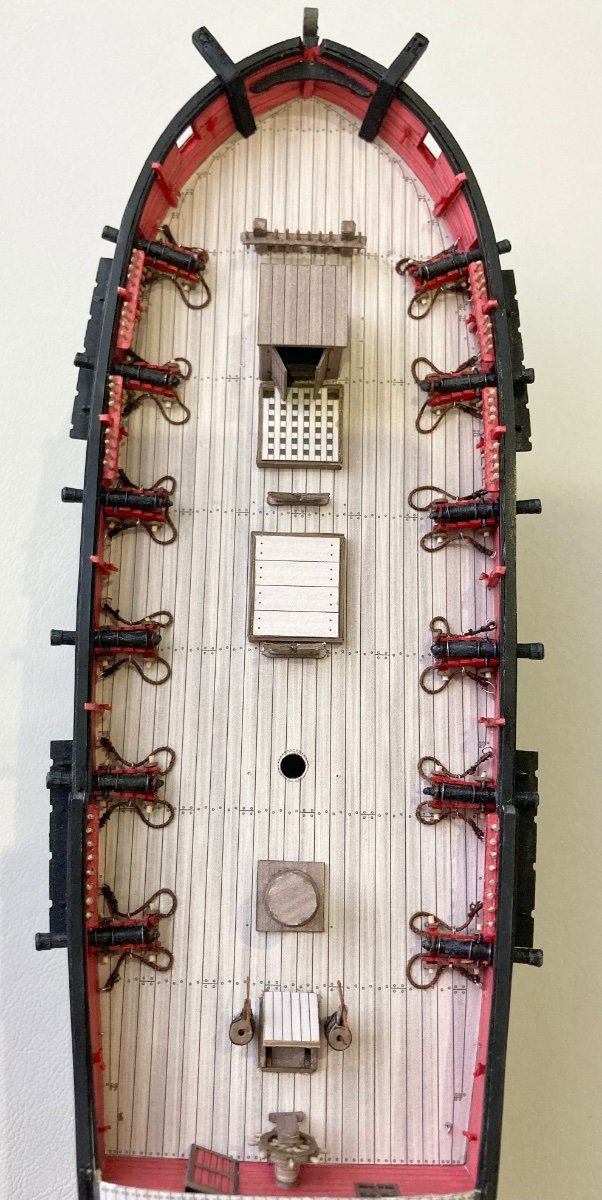
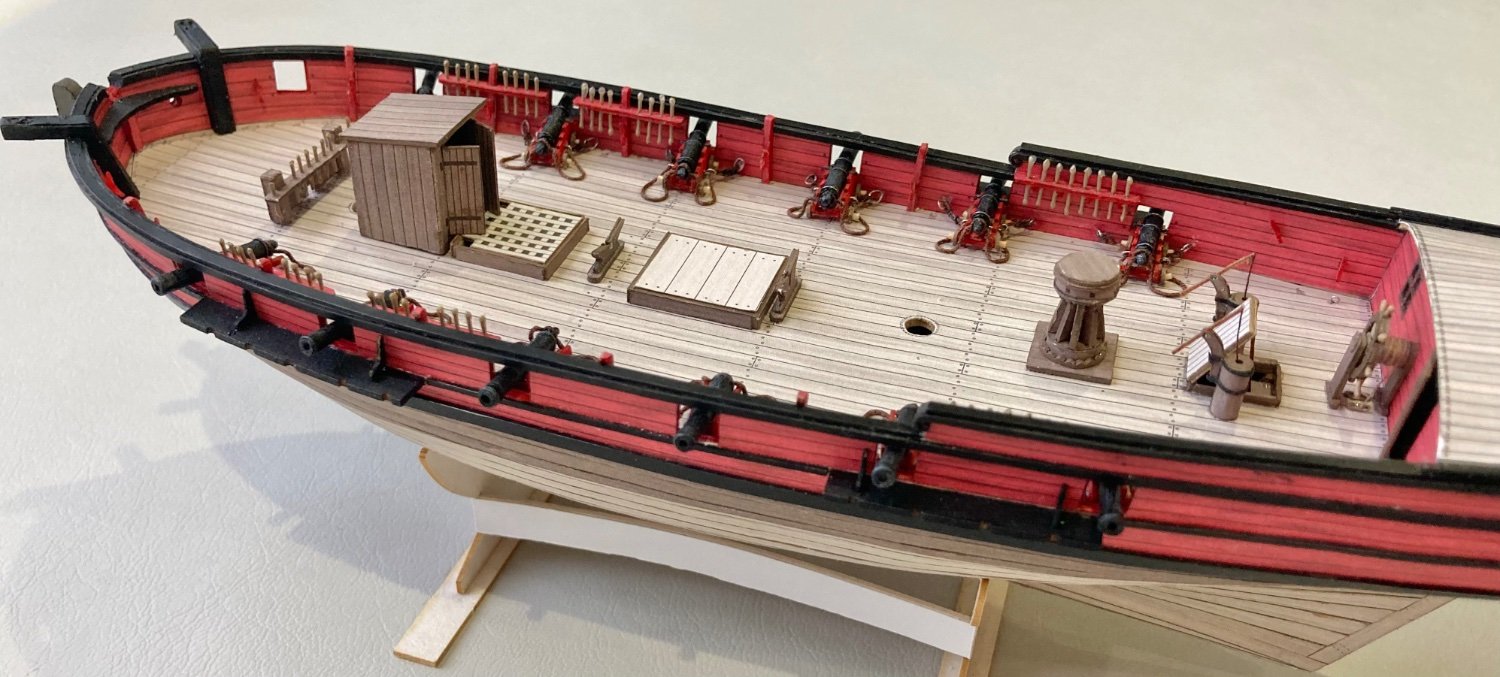
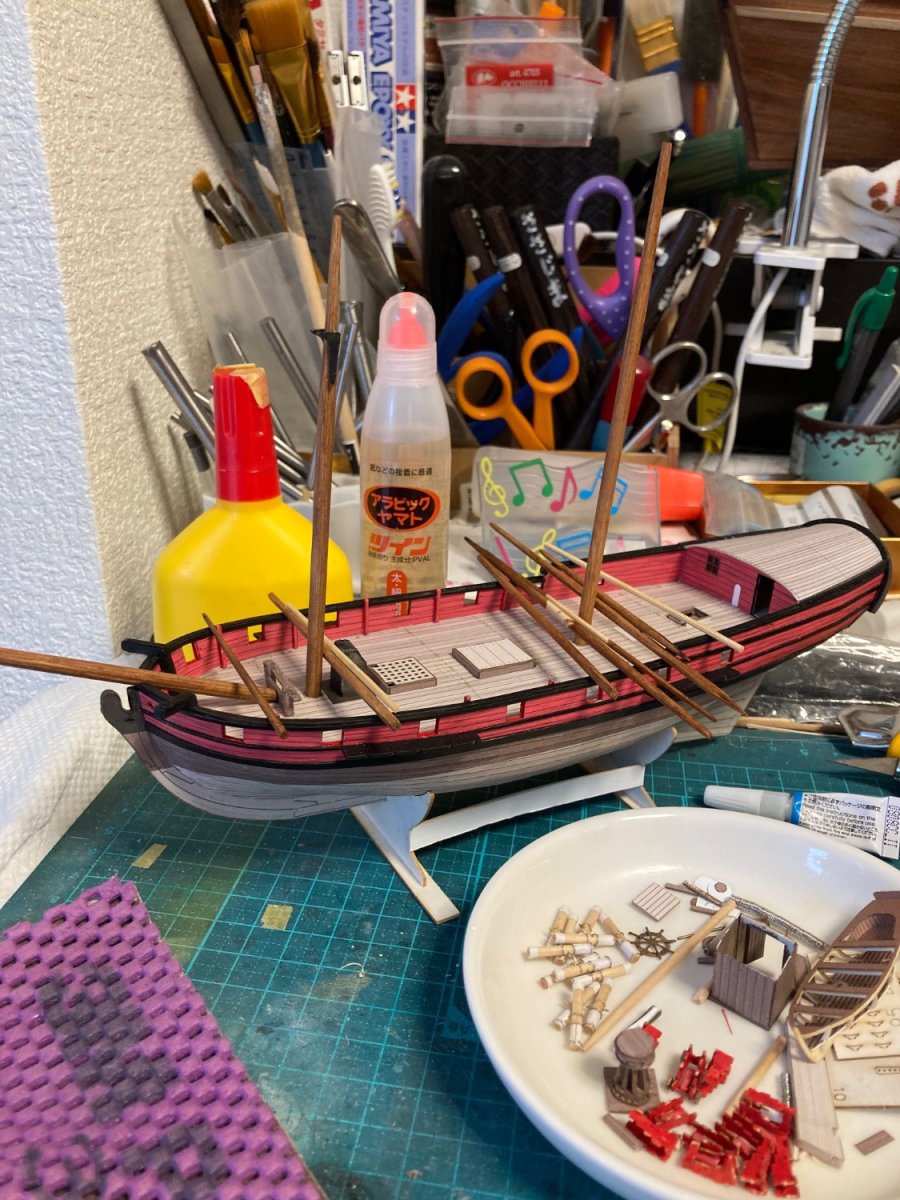
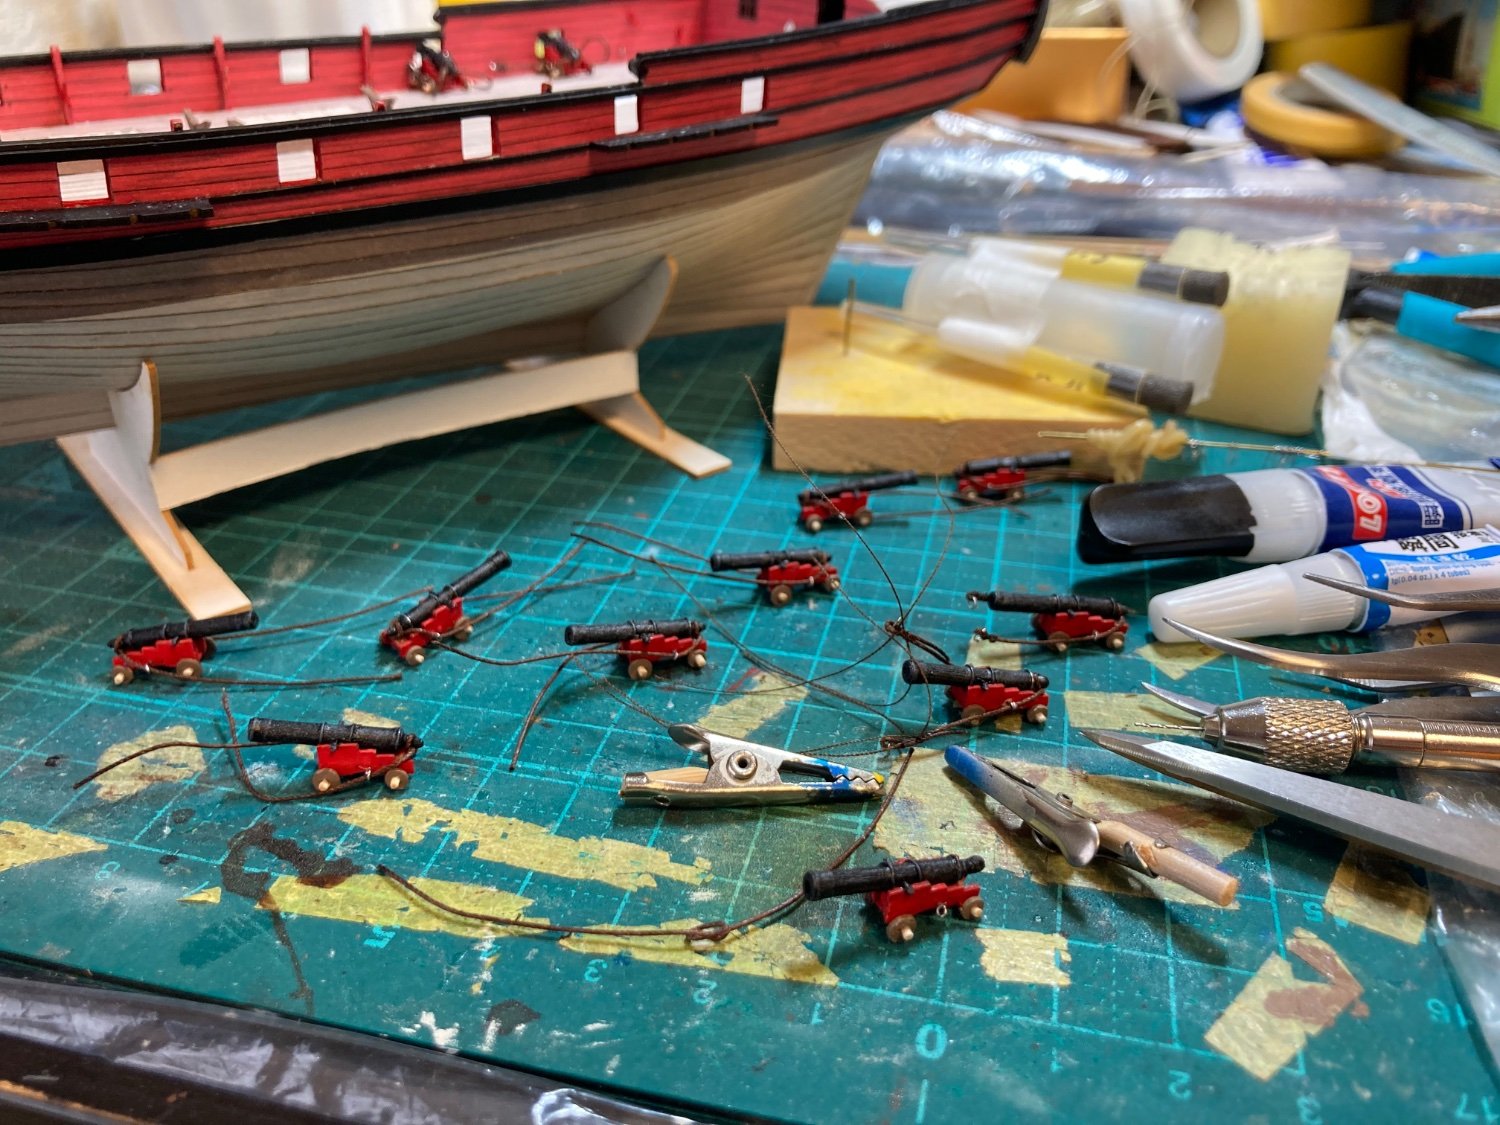
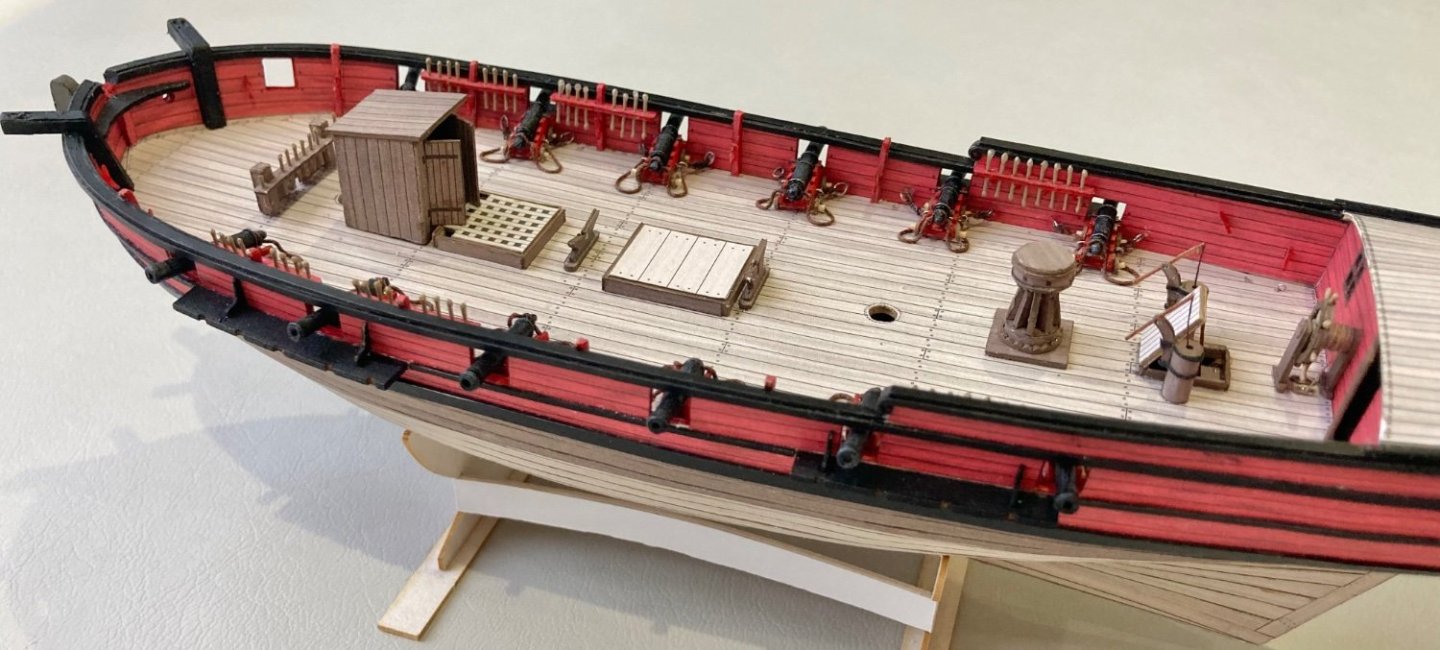
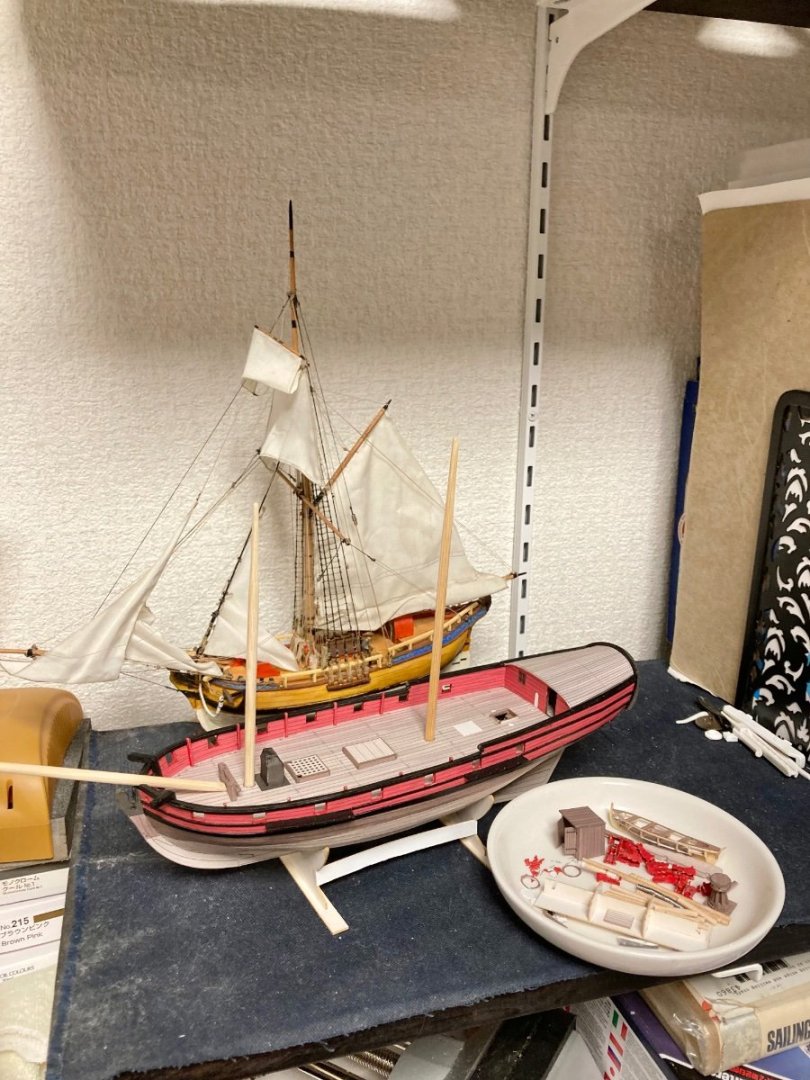
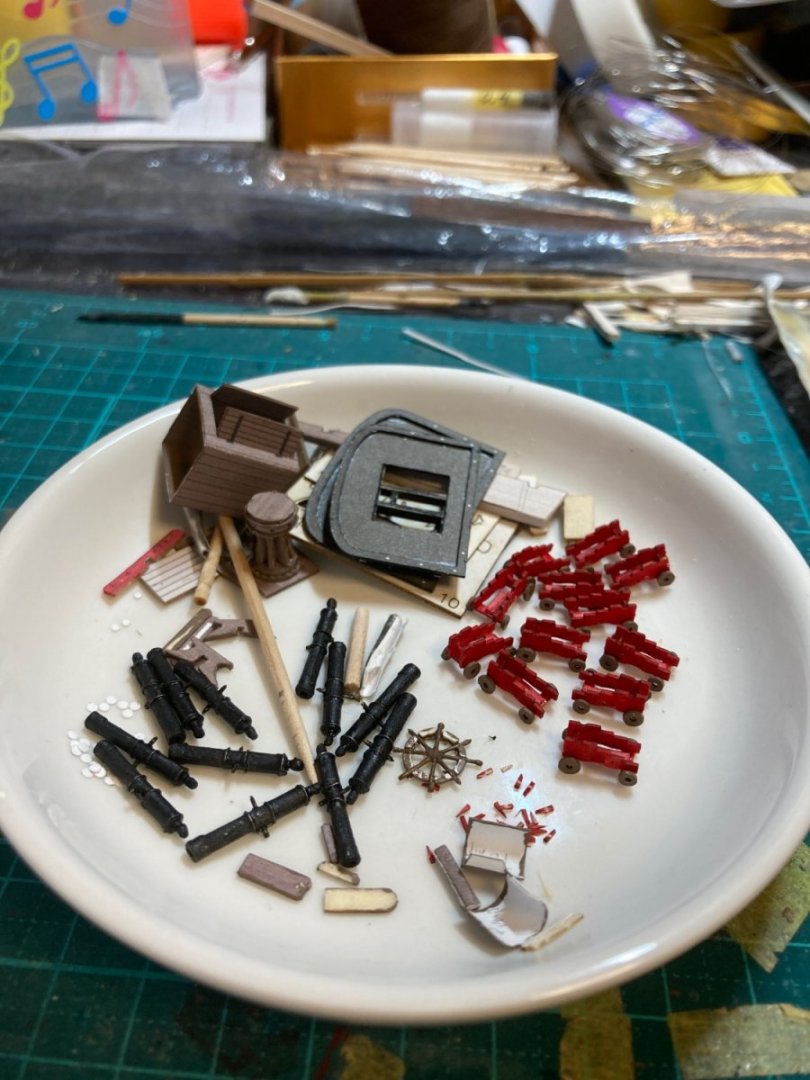
A small update. After much fiddling, I have finished all the principal deck fitting, except for the chimney which is ready to go and some deck cleats I need to double check. I added scale gravity to the carriage breeching ropes with pva, which worked better than expected. I refuse to do the training tackles (though the kit includes parts for them). You won’t be able to look too closely at the guns anyways with all the stunsails in the way. Note the highly imperfect rings and badly painted pins (won’t be visible when covered in rope). Next, I must strop all the deadeyes and get the masts finalized. Before I get too much further, I will be conducting sail experiments. Tips about modeling loosely clewed-up sails are very welcome. I have several kinds of cloth to compare for scale performance. -Meriadoc

-
So much energy to copy and cut out hundreds of parts in a day. What do you eat for breakfast? -Meriadoc
-
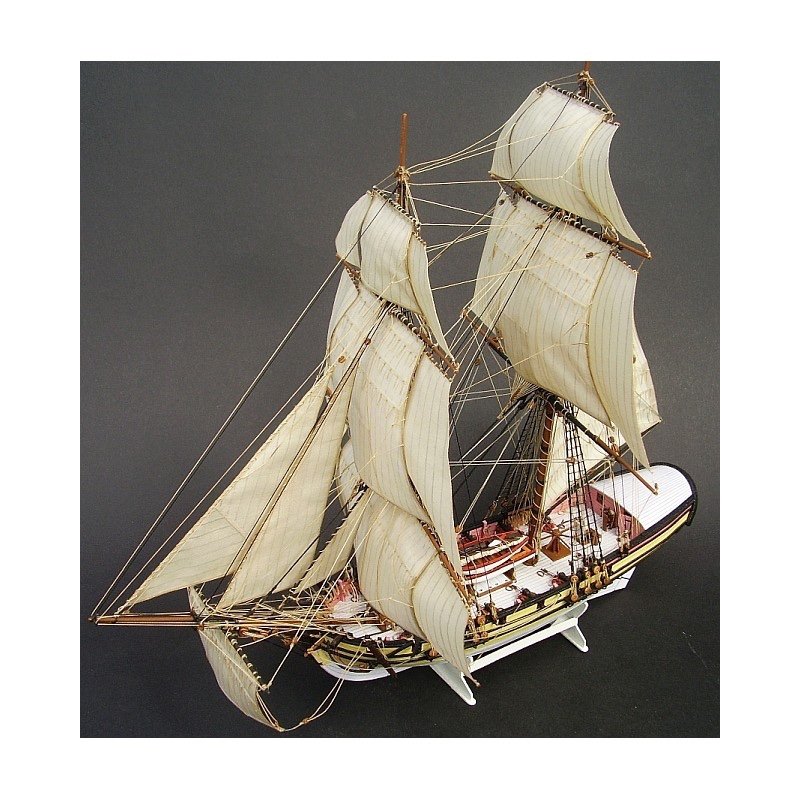
Thank you! I too have admired the legendary skill of Doris and her creations. She is an inspiration to us all. The first photo was ripped from the Seahorse website, and is of the original test model. I don’t know the exact fabric used, but it’s got to be soft cotton or linen. If you Google something like “seahorse Badger scratch” you can find the original build logs in English and Polish. -Meriadoc
-
Good thinking! Though, incidentally I was under the impression that the search field doesn’t work for strings of less than four characters. (Like searching “Fly” used to not turn up any of the HMS Fly logs.) edit: searching WAK works! -Meriadoc
-
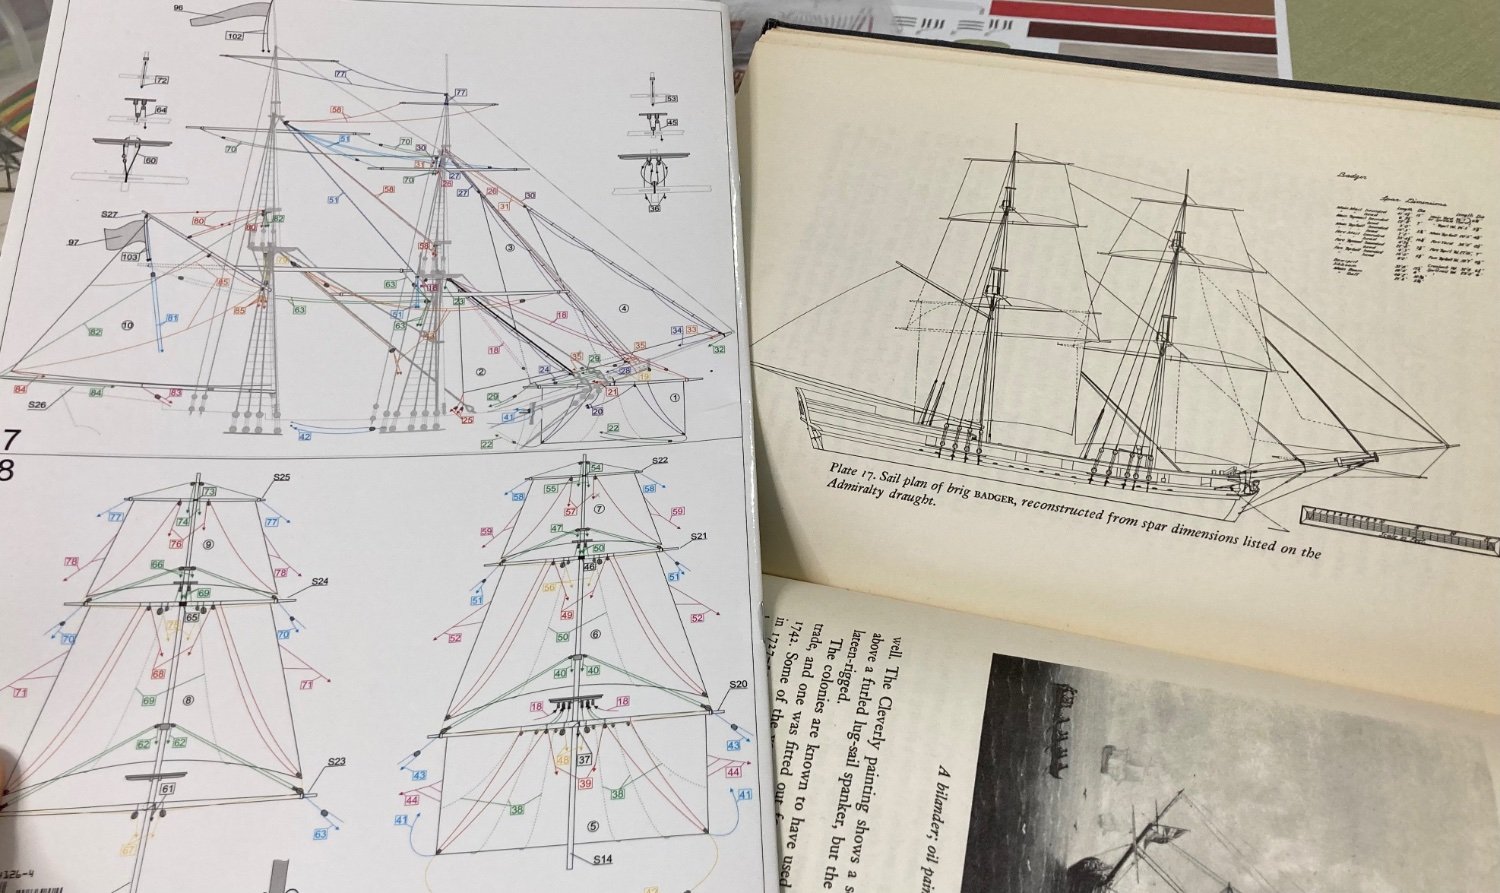
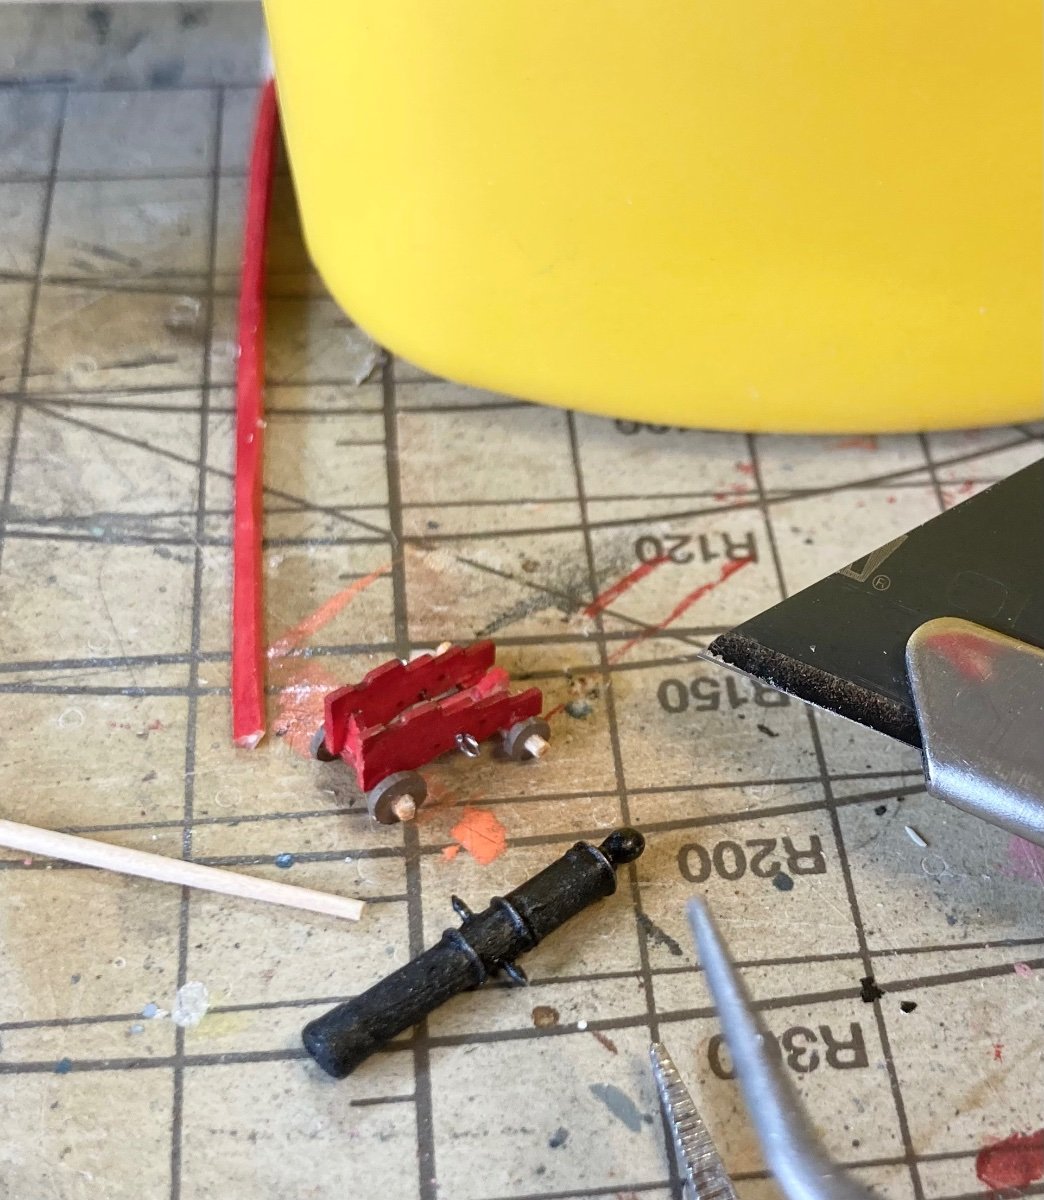
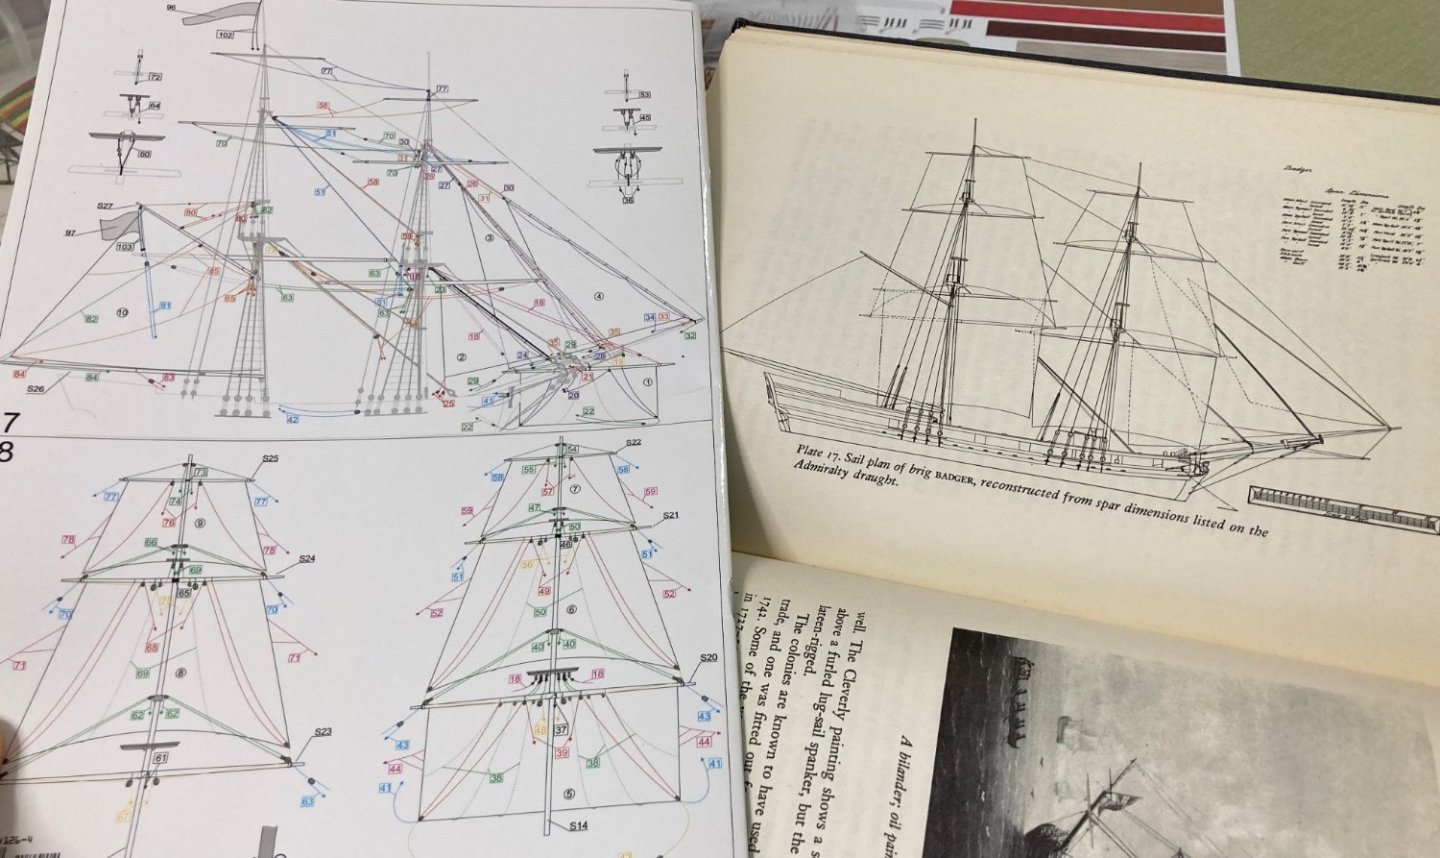
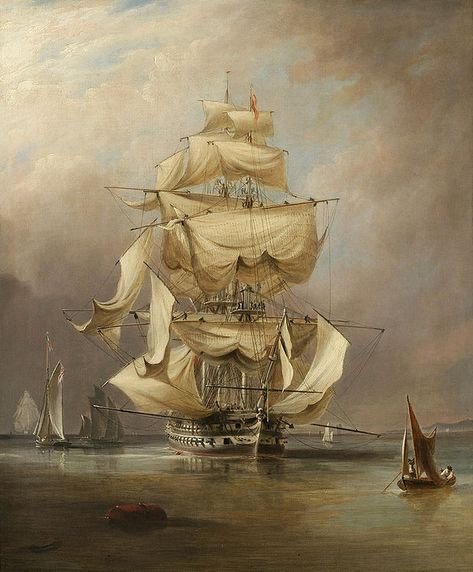
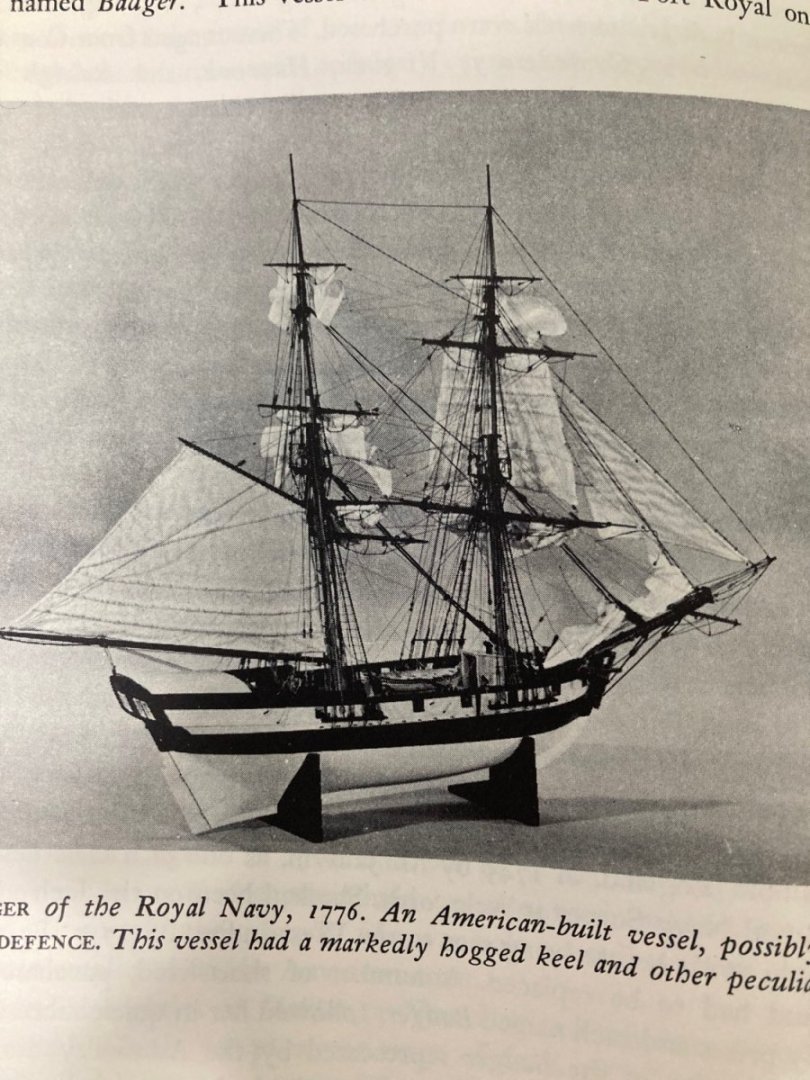
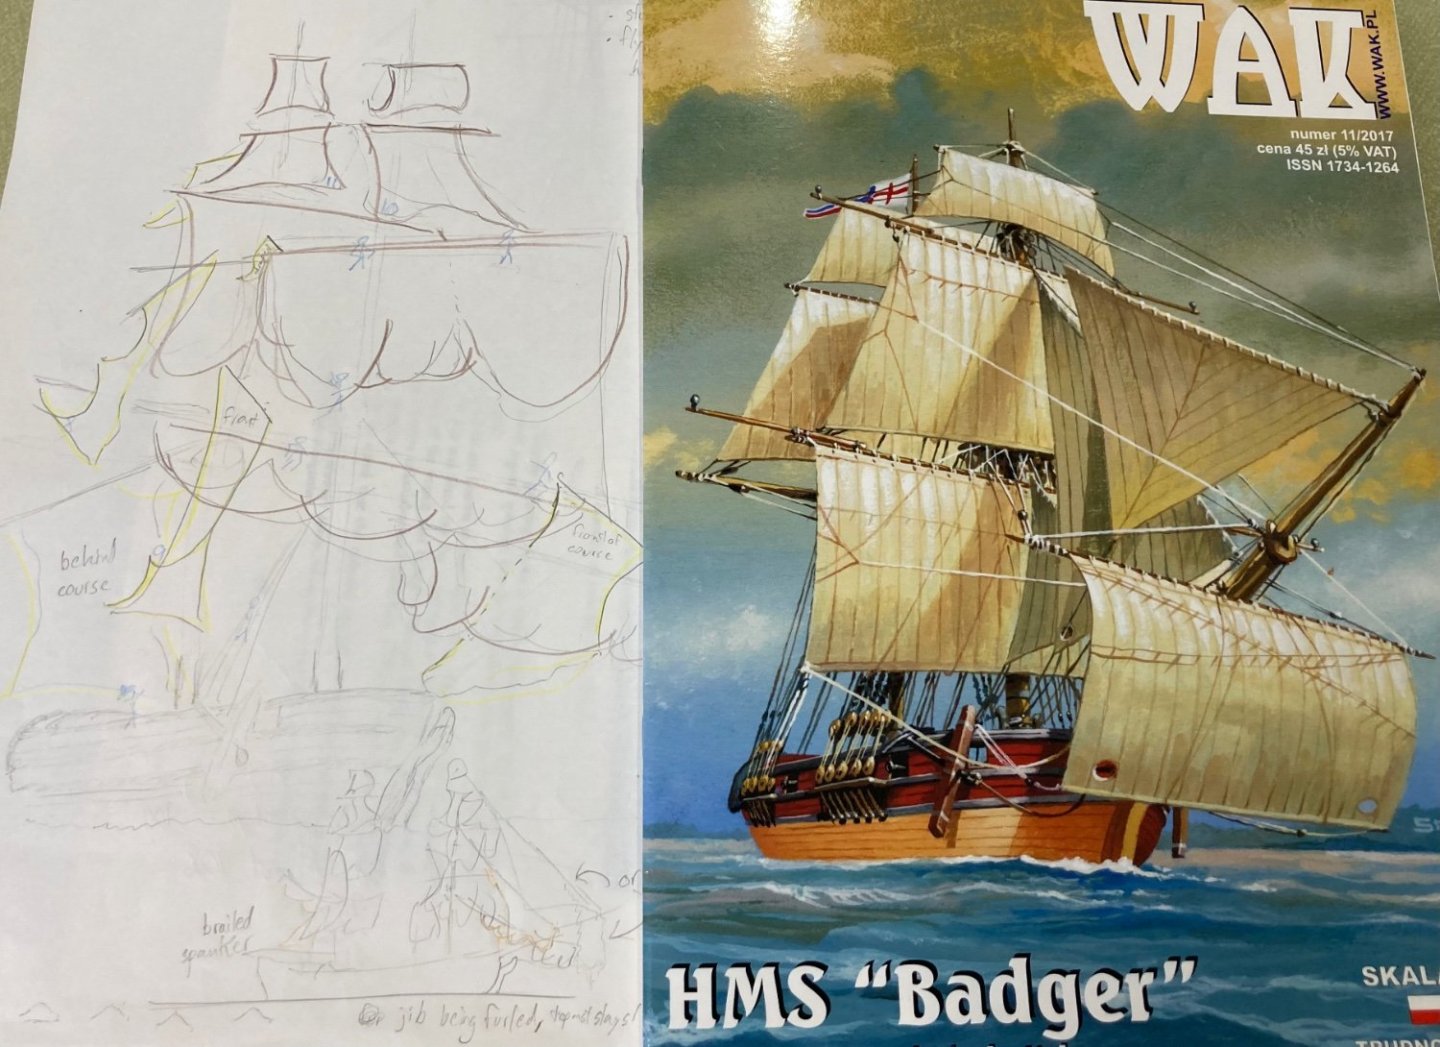
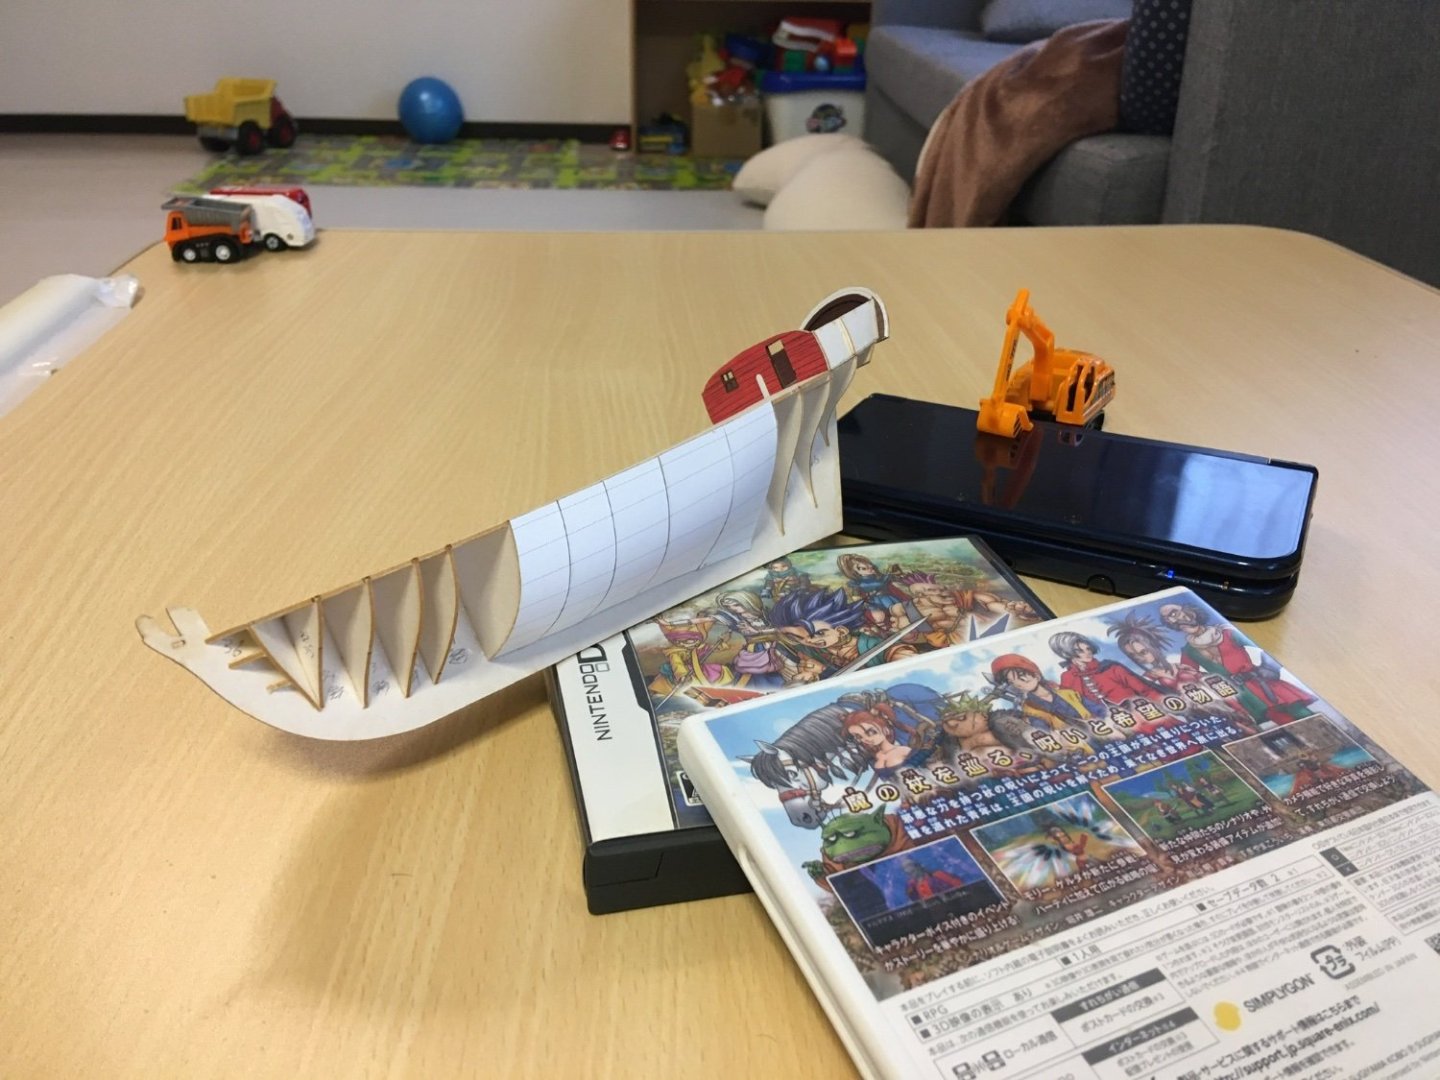
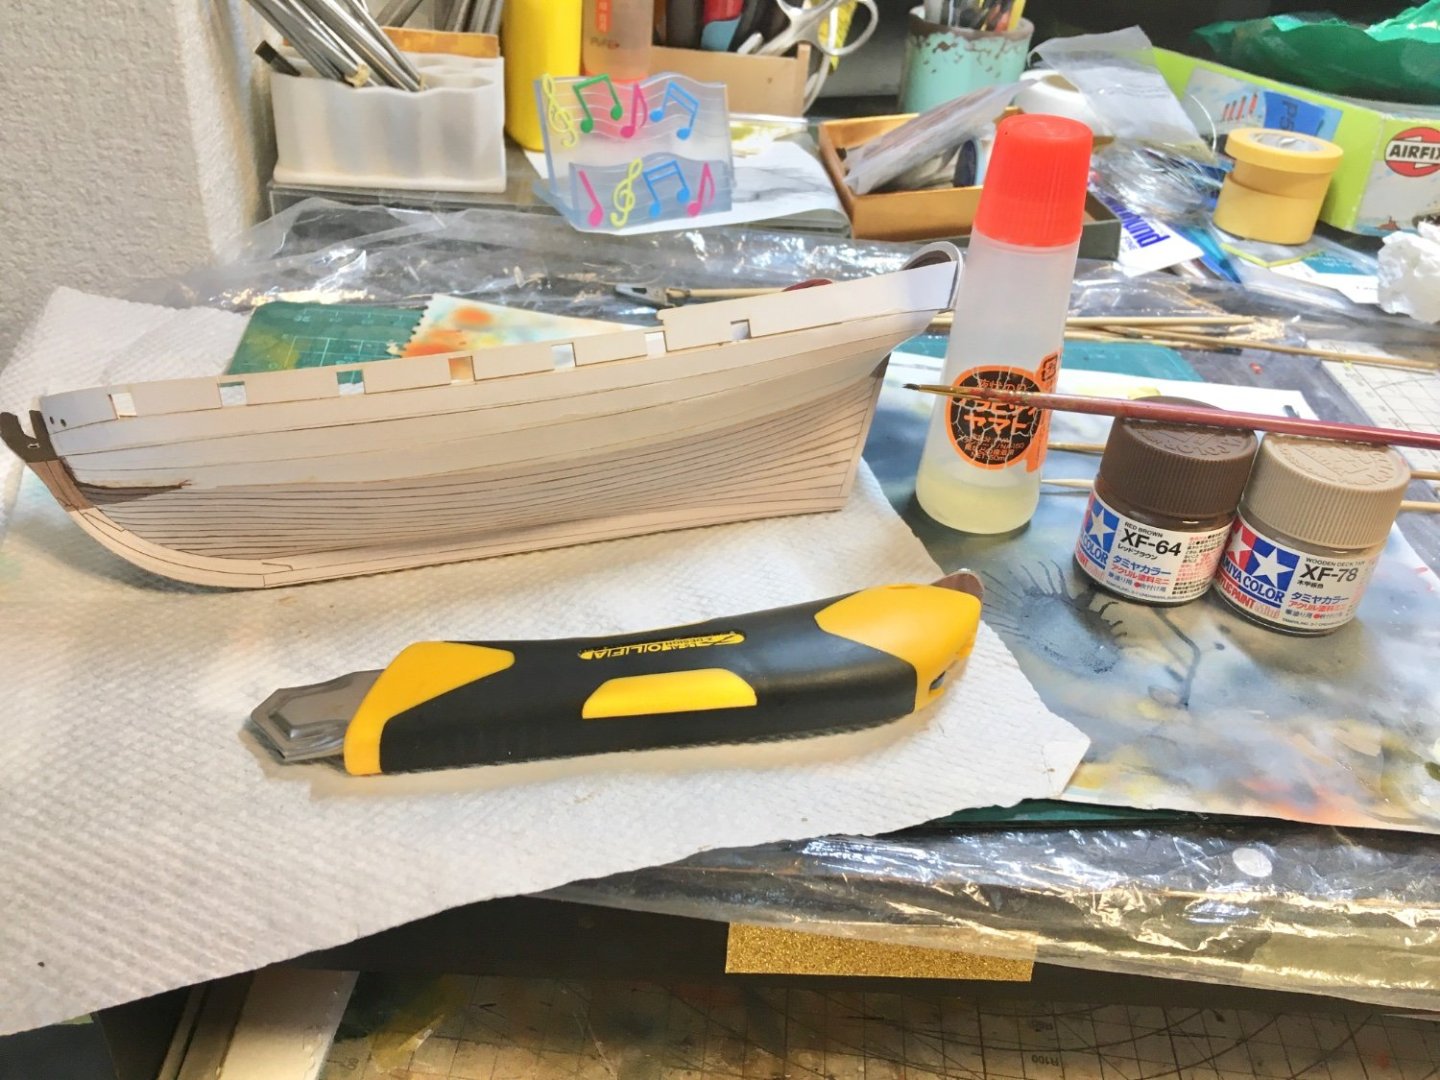
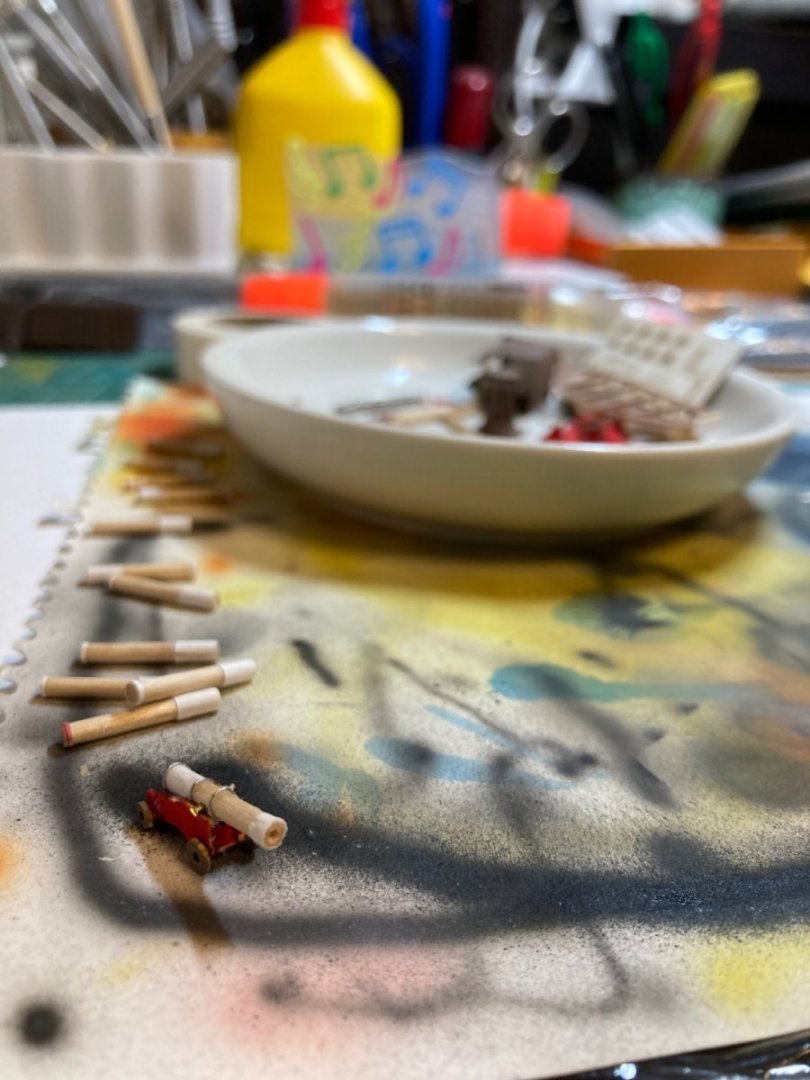
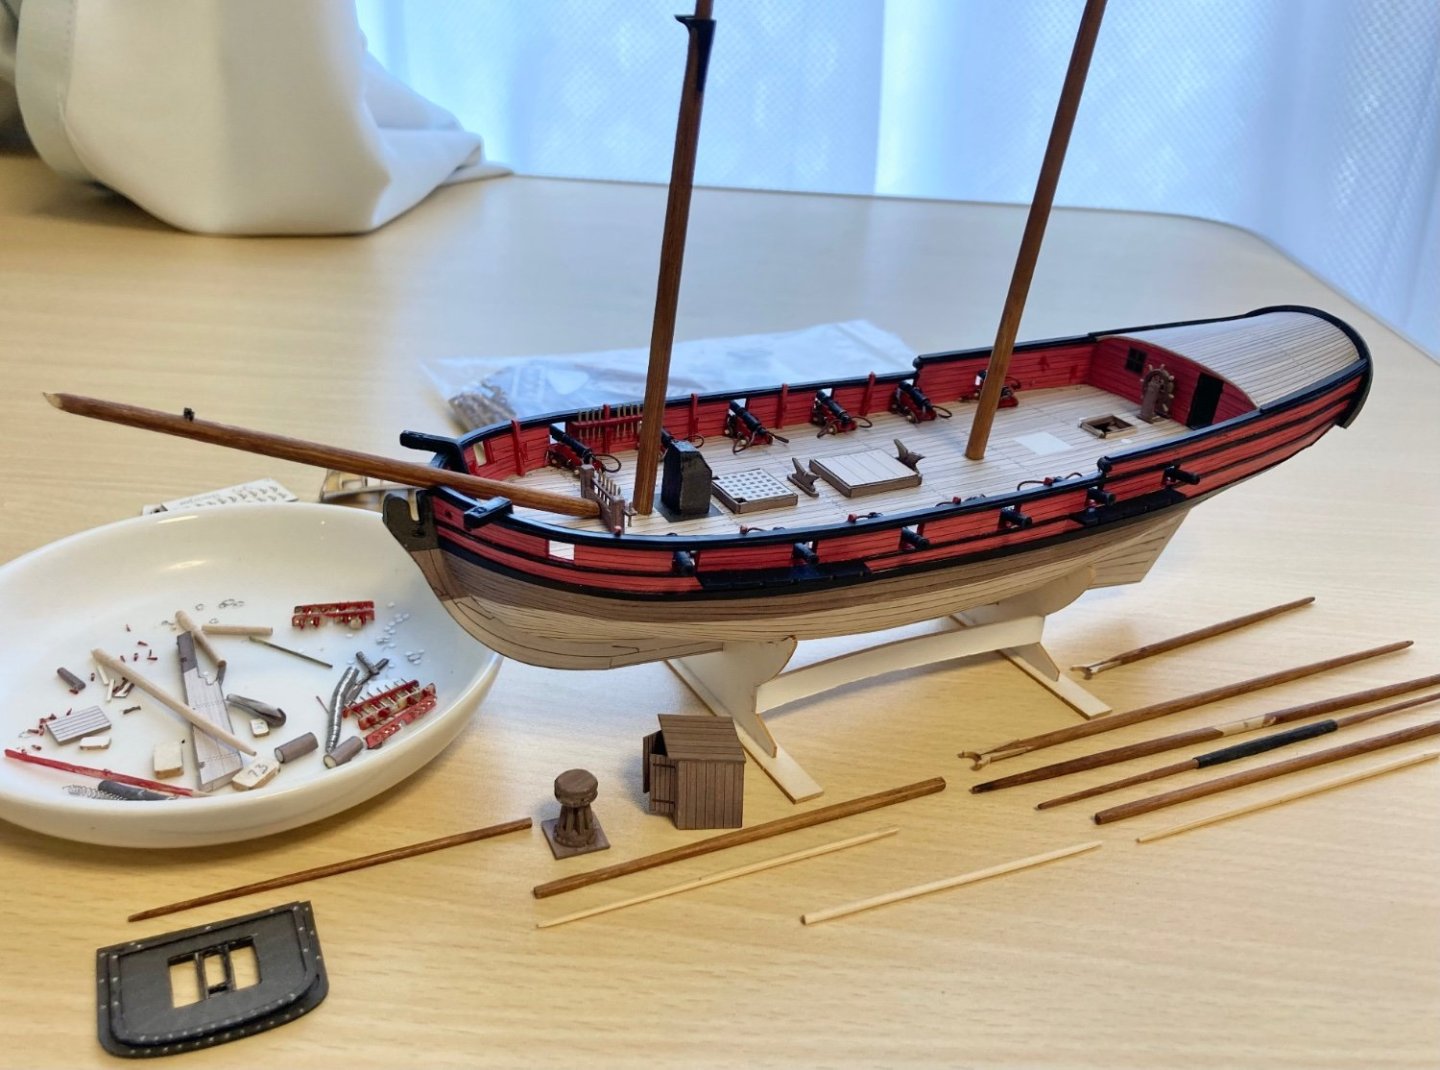
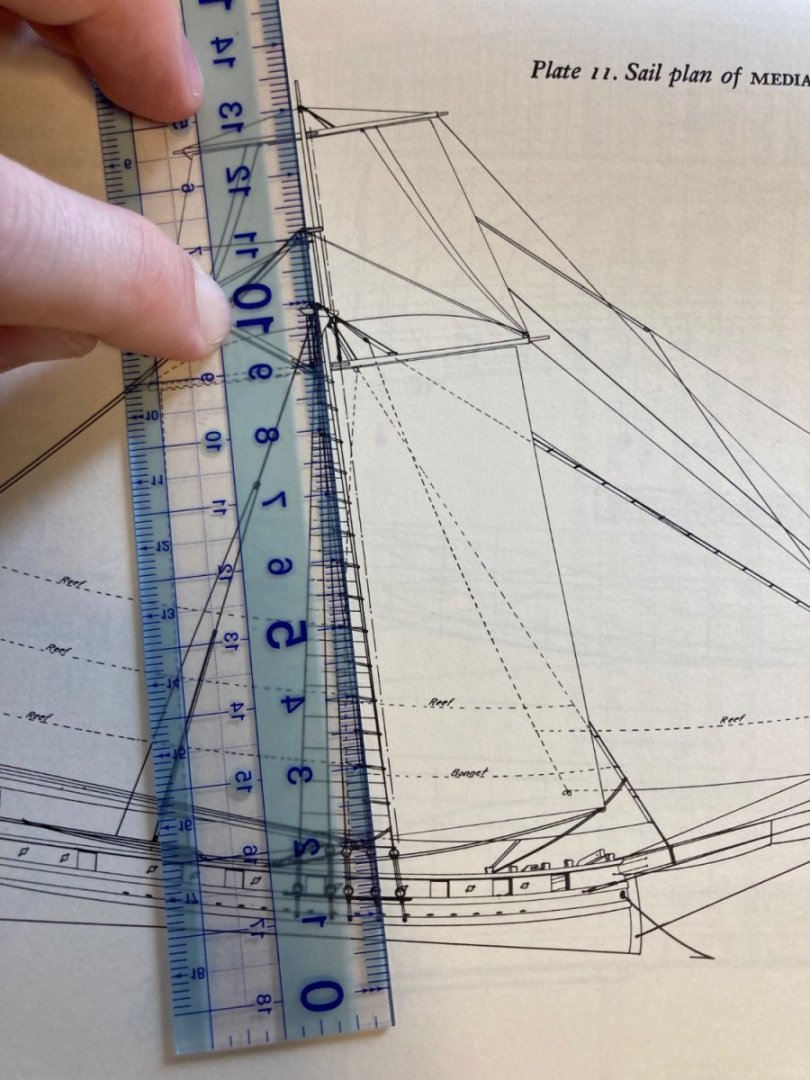
Hello, Do you ever see a painting of a ship and become struck with the magic, serenity, or majesty of the scene and wish to try to create something similar in a model? I had picked up this kit of the Badger from Seahorse, intending to keep it around as a back-burner project with no clear start date in mind. Something to piece together as I mulled over problems on more important projects: Months before that, I had found floating around the internet a 19th c. painting by one Richard Brydges Beechey of a ship of the line taking in her sails (HMS Asia of Navarino fame- and look at those stu’n’s’ls coming in): I saw this painting and thought, “wow, that would be a magnificent effect to pull off some hypothetical day when one has room for a giant fully-rigged ship of the line in one’s house and has mastered scale sail manipulation, scale gravity, and patience!” Then, for better or worse I realized I didn’t have to wait for some hypothetical day and could give it a go with the Badger; it has enough sails with the addition of some royals (likely enough for an ambitious commander to rig up), it’s in the stash, and I need experience so might as well try. And now this is my main project. This is not how this year was supposed to go. Before going much further, I want to talk about the ship. There is a well-known Jotika kit as well as the fantastic Seahorse paper kit I’m building. Plans and log excerpts from the ship are available in Nelson’s Ships by Peter Goodwin, while background history and even more plans are available in Howard I. Chapelle’s The Search for Speed Under Sail. You may have heard this ship introduced as Horatio Nelson’s first command, however that is almost certainly not quite the case, as Chapelle records. The Badger in the admiralty draft (lines taken June 1777, Portsmouth)-and thus in all the models- was indeed an effective patrol sloop which quite impressed Vice Admiral Gayton on the Caribbean station, but by October she was in a sorry state and he indicated in November correspondence that he would have her replaced with another vessel he had purchased. Young Nelson took command of “Badger” essentially at the start of the new year (‘78) and the logs indicate a refit is taking place at that time. After this point new things are mentioned in the log not mentioned before- royals as well as a spritsail topsail set on multiple occasions. It is never mentioned in the log, but we can be confident that the ship was replaced and the winter was spent transferring everything useful over to the newly purchased brig, whose name was now Badger, and she simply inherited the log and navy register position of the previous Badger. I think this was a common enough practice in the history of the navy, especially when it had to maintain numbers despite high wear & tear on a foreign station. The takeaway is that we have no idea what young Horatio Nelson’s Badger looked like exactly. But we know in astonishing detail what Lieutenant Everitt’s Badger looked like! Chapelle’s data include spar dimensions from the admiralty draft and a sail plan, which indeed differs from the lovely Seahorse plans. The kit plans generally have spars a bit too long and masts a bit too tall (and the boom is too short and the gaff too long). Book vs kit- not to scale: Below is a detailed model shown in Chapelle’s book: The main mast is to have a spread yard for the foot of the topsail on a rope horse (as opposed to putting the gaff and boom on a separate pole) and an improvised flying main course on a slightly smaller crojack- held in place only by the halyard. This disparity in spar sizes presented a bit of a dilemma but I’m thinking I will stick with the dimensions from the kit, as this project is much more about stunsail art than historical accuracy, and the differences are not drastic. (Definitely has nothing to do with the fact that I had already enthusiastically prepared some spars and am too lazy to go back and redo it in this case..) Furthermore, I’m nervous the visual effect I want to achieve might not work as well with the slightly smaller top-hamper- this entire project being one giant visual experiment after all. {Intermission music}🎵 So about building the actual ship. I started sticking the hull together in January. Goes together like a charm. Buy the laser-cut parts. Stick the frame together. Cover with paper cutouts for stability. Do your longitudinal strakes with gel CA applied only to frame edges. Final planking with printed paper (but you must edge-paint everything appropriately on the outer layer). Then it was time to do the wales, various deck fittings, and engineer cannons using toothpick shafts, paper layering, wire bands, and a glue drop for the ball. I dry brushed the guns lightly with dark grey, but forgot to add touchholes… The kit includes paper wedges to roll cannons with, but I found this concept to be unworkable with either thick or thin paper for 1/100 four-pounders, thus toothpicks were butchered for my guns. I’ve also been assembling the laser-cut blocks, preparing the masts and larger spars, and starting to think about scrap experiments to try to finesse the clewed-up sails and dangling stunsails. I made a rough plan to relate the visual effect of the painting inspiration to the actual ship I’m building with its particular spar anatomy. And I’m taking bets as to how long you think this will take to finish The nice thing is that this time, I don’t have to engineer the entire rig and belaying scheme from guesswork and low-budget research. Seahorse has it all planned; I just need to make a few additions. Those will be: -Flying royals (needed for visual effect) -Flying main course (will look nice and it’s even correct) -Stunsail inhauls (needed to achieve the dangly stunsails- for some reason these lines are absent from the Seahorse drawings) Wish me luck! -Meriadoc


- 20 replies
-
- 10
-
-

-
I got this book used about a year ago and plan on building at least one of the sloops he discusses. This book really does set a high bar for this sort of work that I hope to see followed up on. In particular, he does an admirable job explaining the physics that pertain to smaller warships and warships in general. Concepts like the problem of scaling down of two-dimensional sail plans to three-dimensional hull volumes and the need to obtain slight lee-helm when sailing upwind are well explained, as are their relevance to the design problems that had to be solved over the years. (Now I know why masts are raked!) If anyone knows how to contribute to the next batch of research and exposition in this vein (into the American Revolution and Napoleonic period) I’m all ears and would love to help. -Meriadoc
-
Sounds like lots of love and tacos going into the planking, which proceeds at a breakneck pace if we’re comparing it to wood bending. Meriadoc
-
Was that once a pikachu that has been rearranged in your planking strakes? Meriadoc
-
The nice part about not having a kit is you can spile the planks appropriately from the start. Or on the second layer. Or simply on the cabinet paper layer. Do you need to stabilize the frames with a thin paper layer like the Seahorse method? -Meriadoc
-
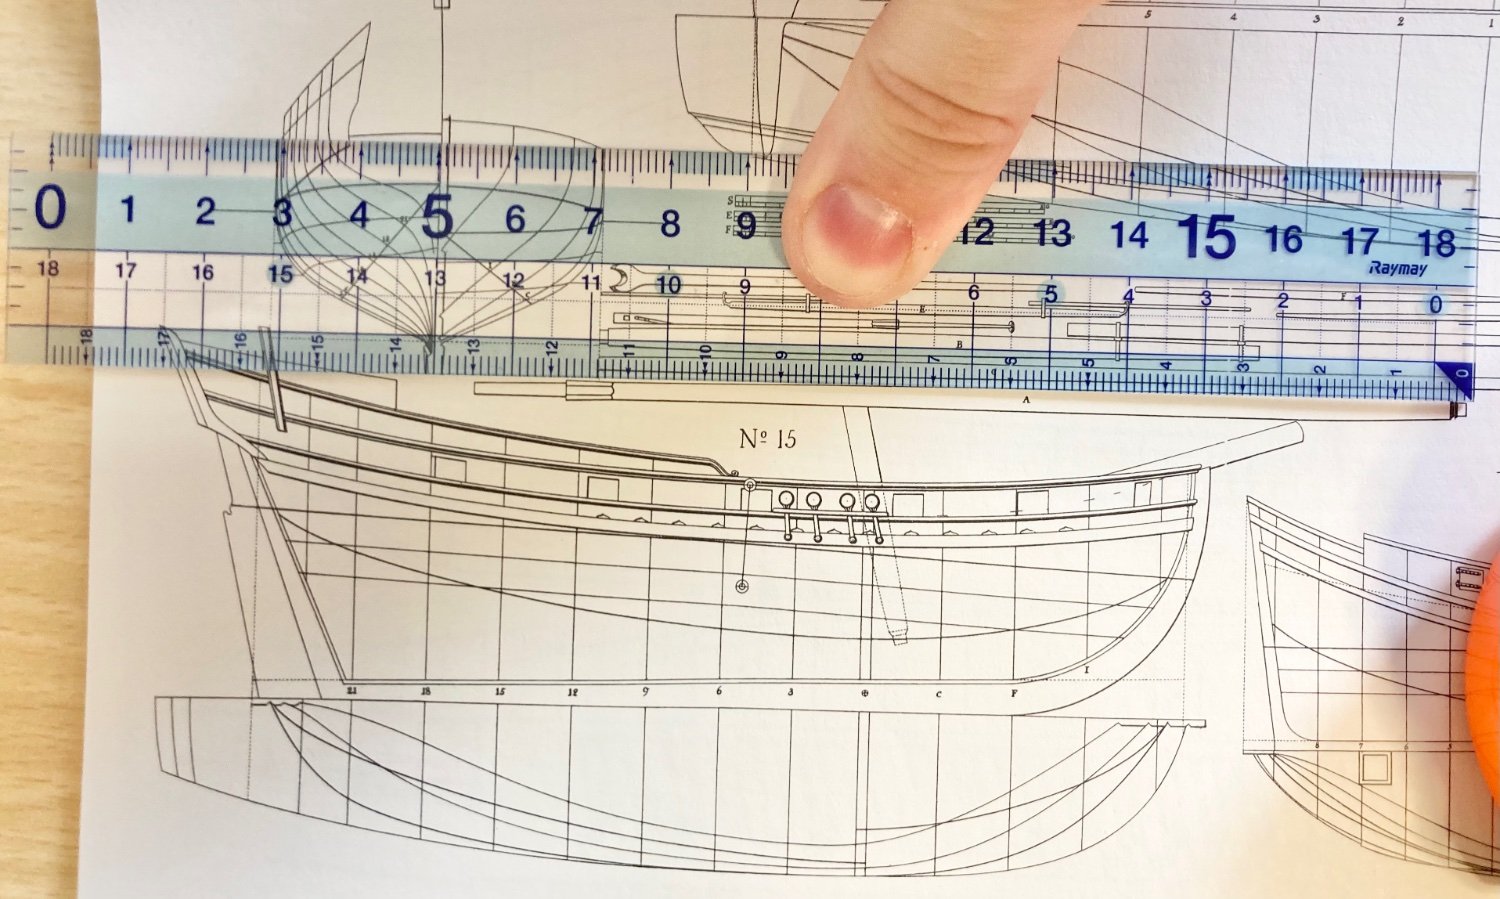
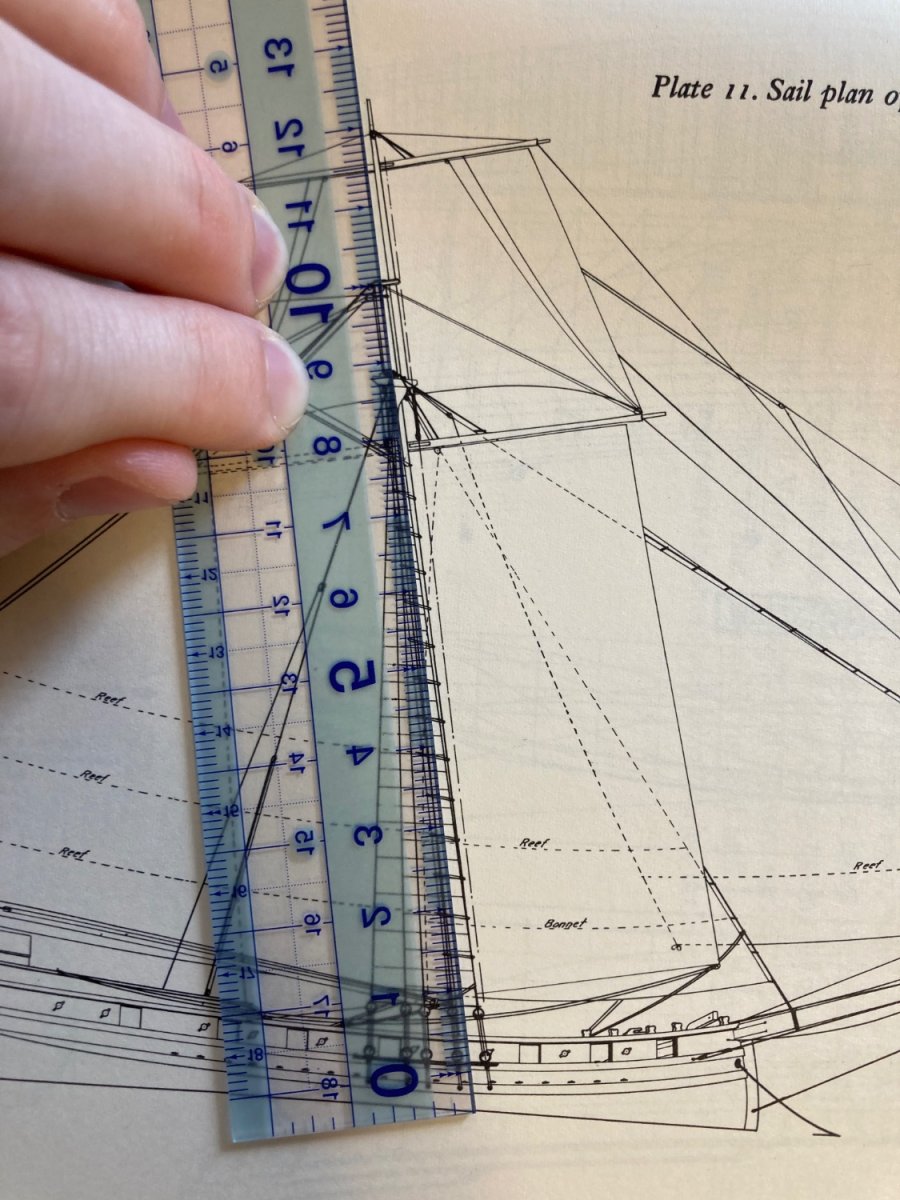
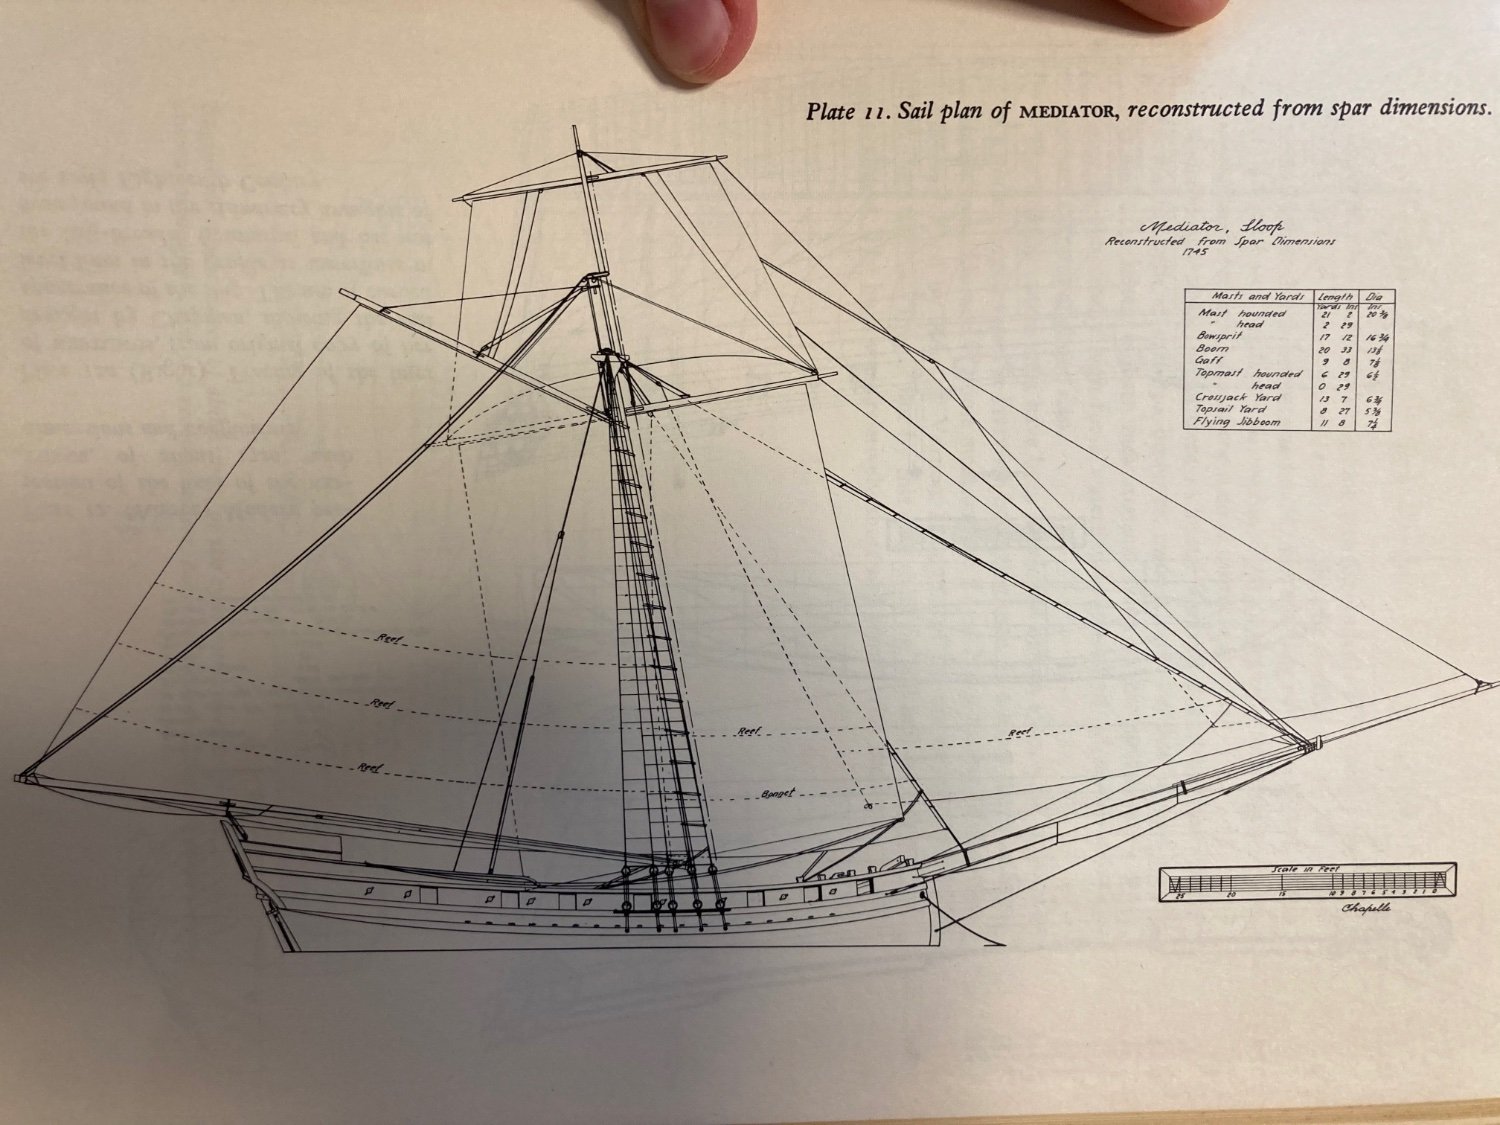
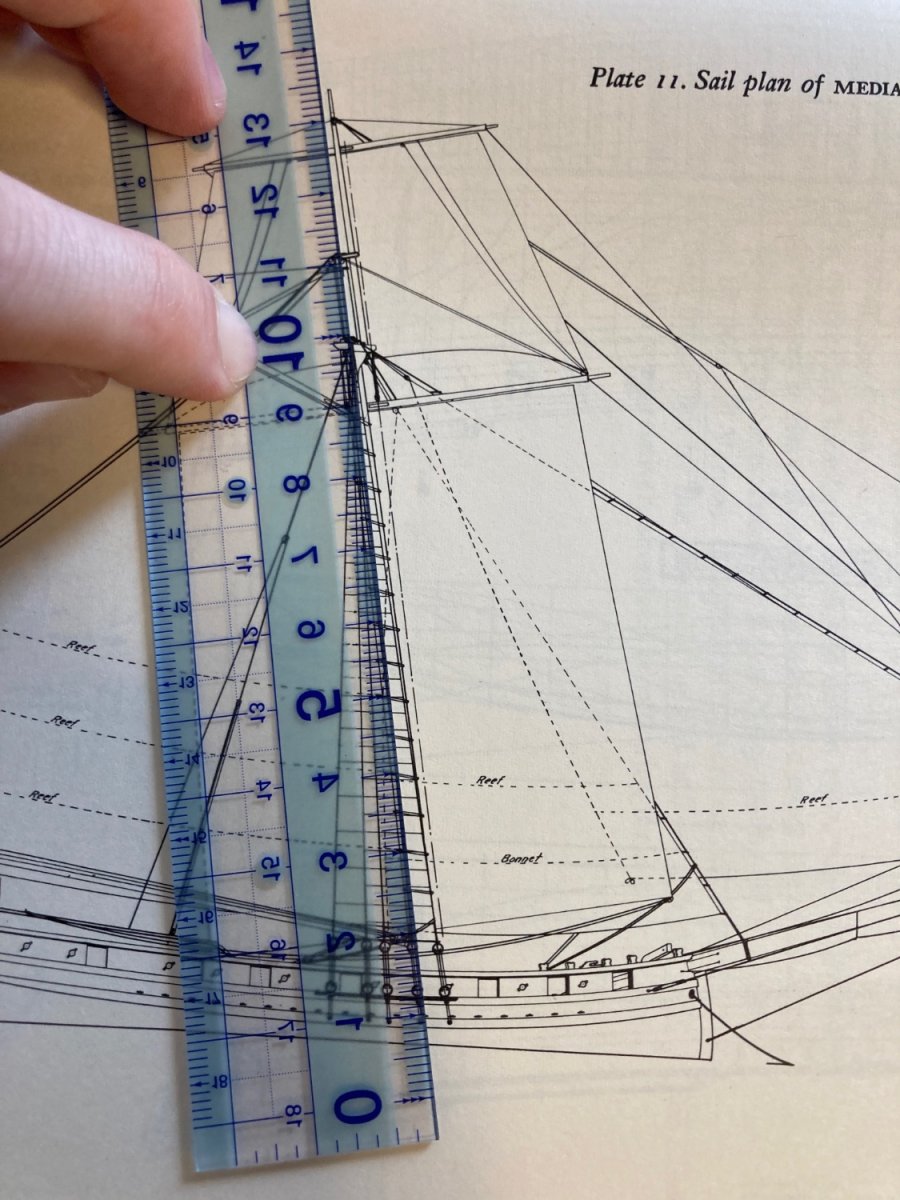
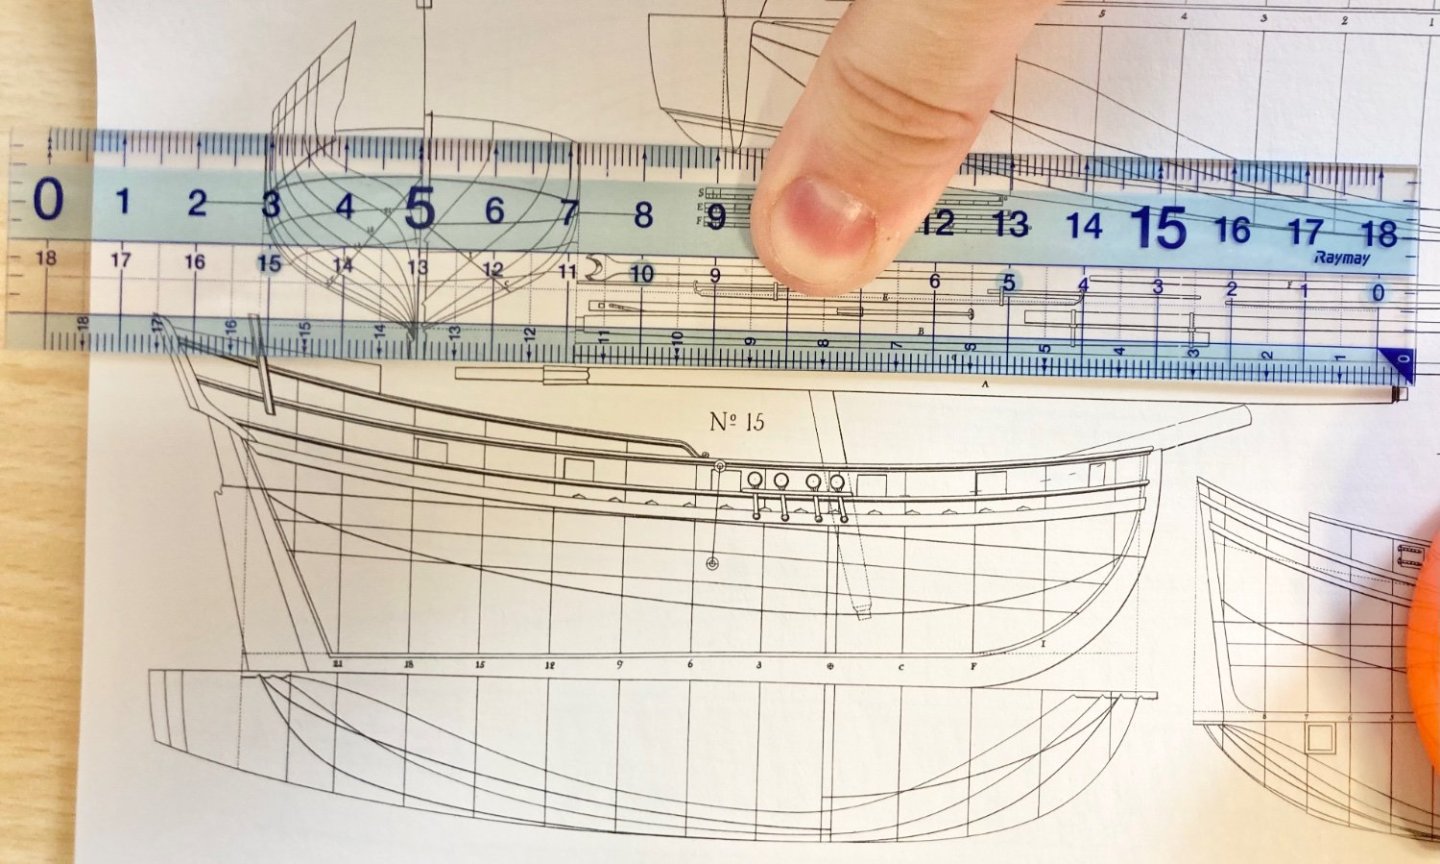
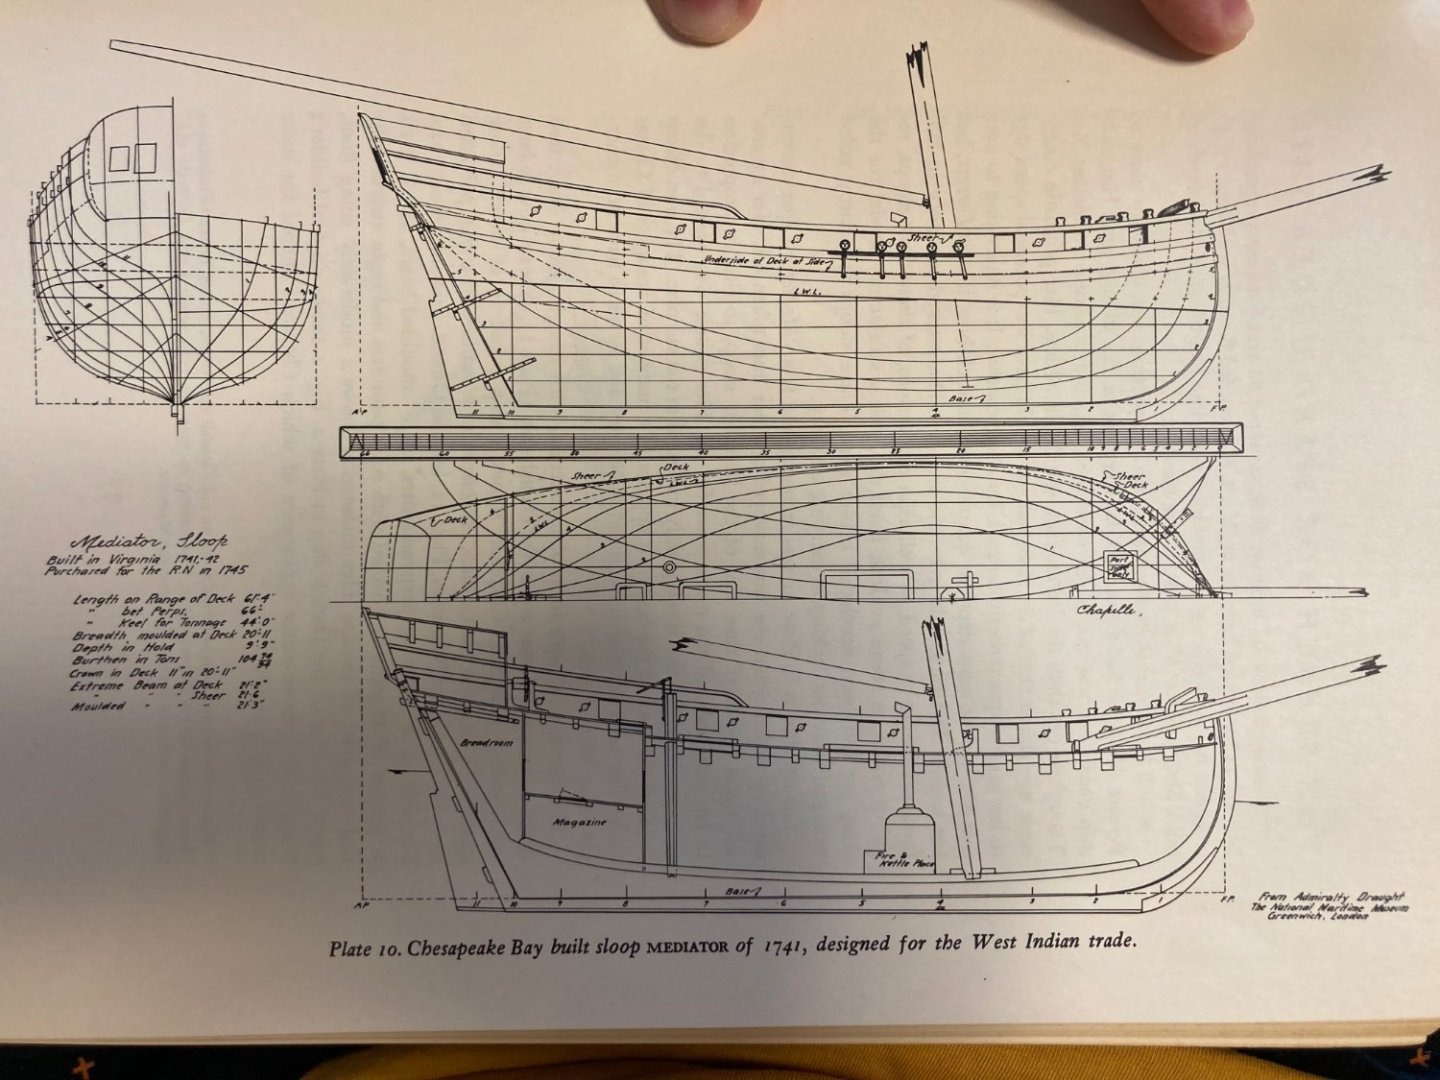
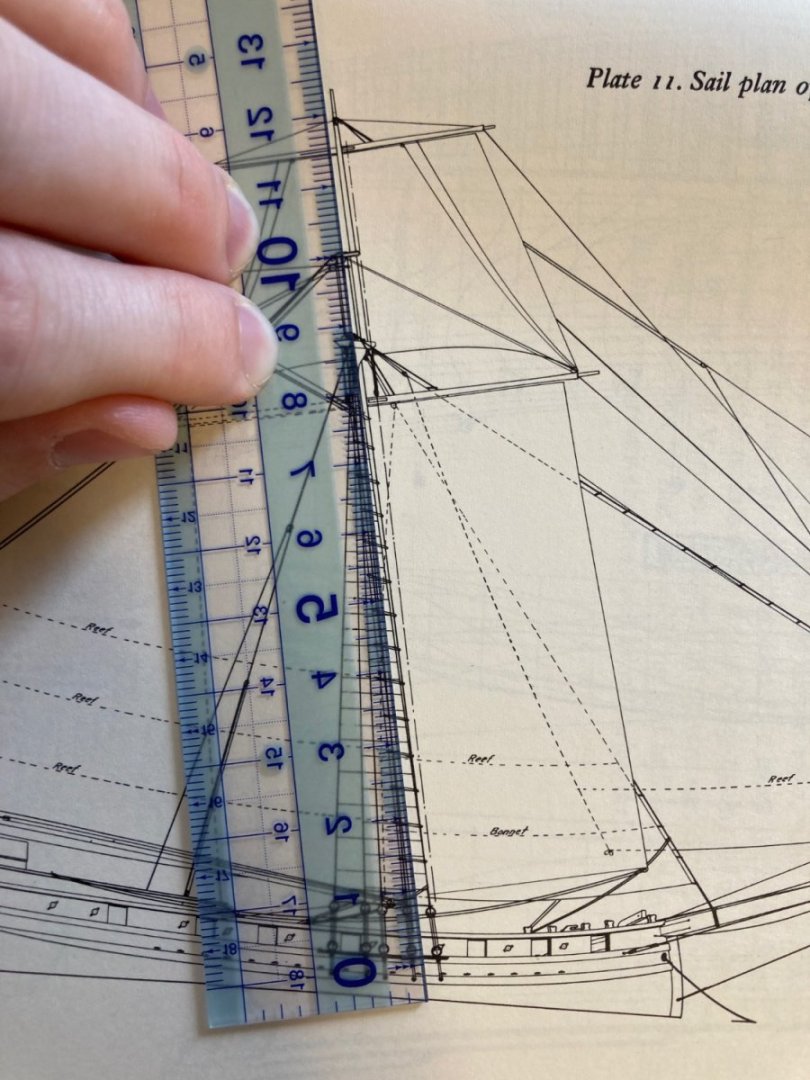
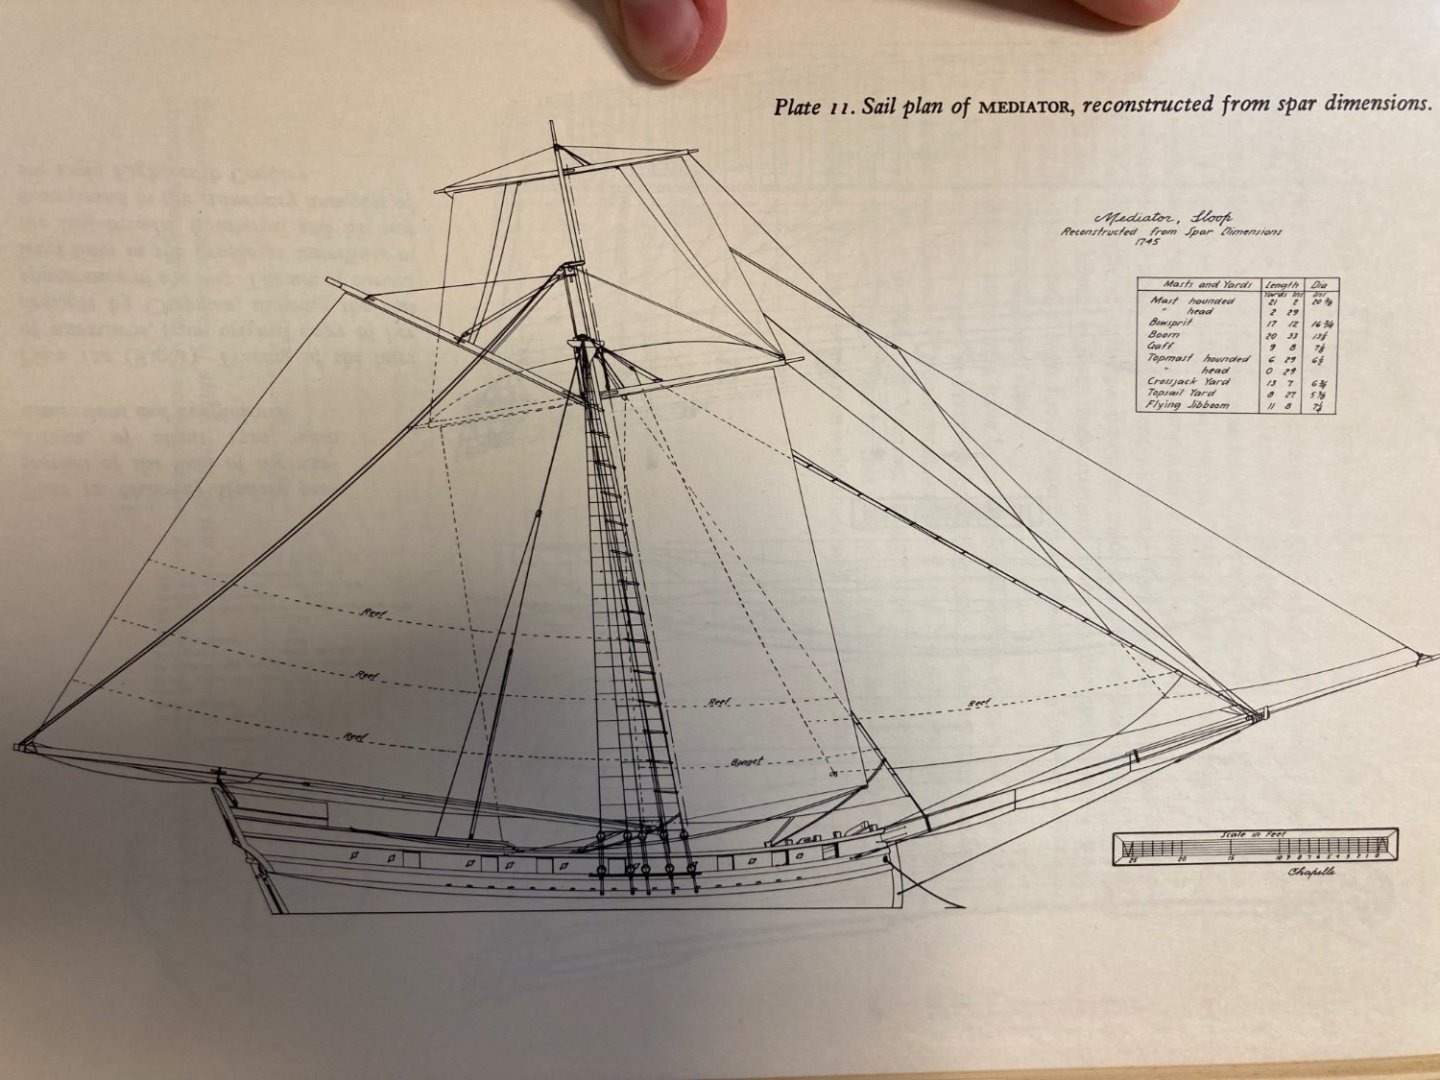
Of course in the end, the difficult decisions are yours to make. I however don’t believe historical sources consider mast length to be deck-top. Usually it is from the step on the keel or whatever position to the hounds or what have you. Deck-top is a more useful measurement for us modelmakers, but shipwrights thought differently. I did two quick case studies to demonstrate this. Hopefully they are clear. The easiest is right out of Chapman, the Bermuda sloop on plate LVII, no 15. It shows the actual mast right next to the lines of the ship. Here you can clearly see that the mast from step to top of hounds is about 120mm, whereas the breadth molded is visibly about 42mm. Close to 3 times but clearly that’s from the step to the hounds, where your top or cross trees would fit. The location of the step can be seen in the draft. I also looked at the Mediator sloop from Chapelle (Search for Speed Under Sail). The mast length hounded corresponds to 104 mm (63 ft at scale of ~1/185). If I measure from about the deck level to the hounds or top, I get 88mm (check above). 104mm does approximately agree if I guess about where the step should go: If you consider that these sloops were both speed demons and considerably larger (~60 plus ft length and ~21 ft beam) thus more stable based on internal volume per sail area, this represents an extreme upper limit to the mast proportions one might expect on a very small mid-18th c. packet sloop. I hope these examples help. The picture in Chapman finally helps me understand what “hounded” ought to mean. Now I’m wondering how over-proportioned my sloop ended up 😕 Whatever you decide to do with your rig, finish it and enjoy the process! -learning bit-by-bit Meriadoc
-
I believe they treated the wood with some sort of compound which did the trick, giving a brown color. I don’t know exactly what the elizabethans used. I have a book coming in the mail that might have the answer, but I’m sure someone around here knows. But probably just treated wood, dark brown and easy enough to simulate with cabinet paper. Wales seem to have been black but that could be extrapolating later practices inappropriately. There’s a few helpful galleon buffs around here who can probably tell you all you want and more if you bug them about it. Happy scratch building! -Meriadoc
-
Did you check the fridge? It must be hiding around your desk somehow. I like how you work. Clean design, well thought out ahead of time. Gives me ideas. I think I detect an error in your rigging plan though. The upper masts and spars look okay but the lower mast is almost certainly far too tall. You said you cross referenced other sloops, but the mast lengths listed in tables are notoriously confusing for modelers as they often include (and don’t always specify) the entire length from the step (on the keel) to the hounds (a difficult term to find a definition for) or the cap. Or the top. A common mistake is to forget to subtract the height of one’s spine/false keel, for example. Another point is that the smaller the ship, the less proportional sail area it can safely carry due to to the math of volume decreasing faster than area, so scaling down rigging plans or formulas that work for larger vessels doesn’t work, while this sloop is almost the smallest ship in Chapman’s book. You might try to compare sail area of similar sized vessels to inform your mast and spar figures. I hate to say all this as I know you’ve done an extraordinary job planning your rigging! However, I’m quite sure your lower mast has fallen victim to an error somewhere, either in the historic fuzziness of what is meant by lower mast dimensions in any particular record, or by forgetting to subtract for your model’s structure, or perhaps both. Loving how this build is progressing! -Meriadoc
-
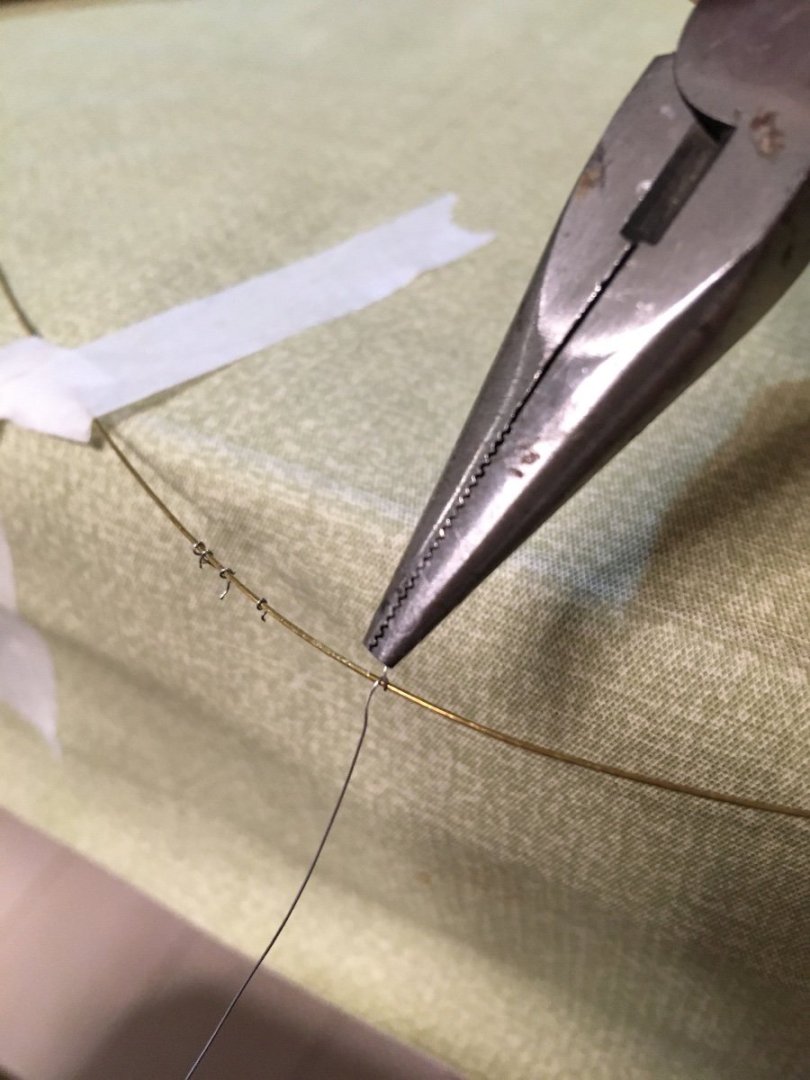
Bamboo is a good option for spars that will be under a lot of stress. (Got any old chopsticks?) In case it ever breaks again.. Meriadoc
- 366 replies
-
- 2
-
-
- bellerophon
- victory models
- (and 2 more)
-
Why, hello! I just wanted to reassure everyone that this build has not been abandoned. Over the last year I made some progress, getting the keel and beak and some of the trickier wales on. And the gallery. It’s hard to come back to this project now as I have evolved a bit as a modeler; I realize just how much of a “product” these kinds of kits are and how many corners they cut to make a kit cheap and attractive to lazy builders. It may make business sense, and to be fair this is one of their older and cheaper kits. However it is important for us as modelers to unlearn the myth of straight-cut planking; and plywood has no business in our ship models. At least for the visible parts. Still, I mean to finish this kit, slowly, with some more research. I look forward to the rigging stages. For some reason that seems to be my favorite part. I’ll be trying to phase in more work on the Revenge as I bounce between a few paper models and scratch builds, none of which are in a huge hurry. So look forward to more, sporadic posts! Long overdue, Meriadoc

-
The dry brushing on that bronze really looks convincing. I’ll have to do the same on my future guns. Meriadoc
-
Lovely sail work! Nice yard tackle. Where did you find that detail? I’ve never seen it before. Meriadoc
- 366 replies
-
- 2
-
-
- bellerophon
- victory models
- (and 2 more)
-
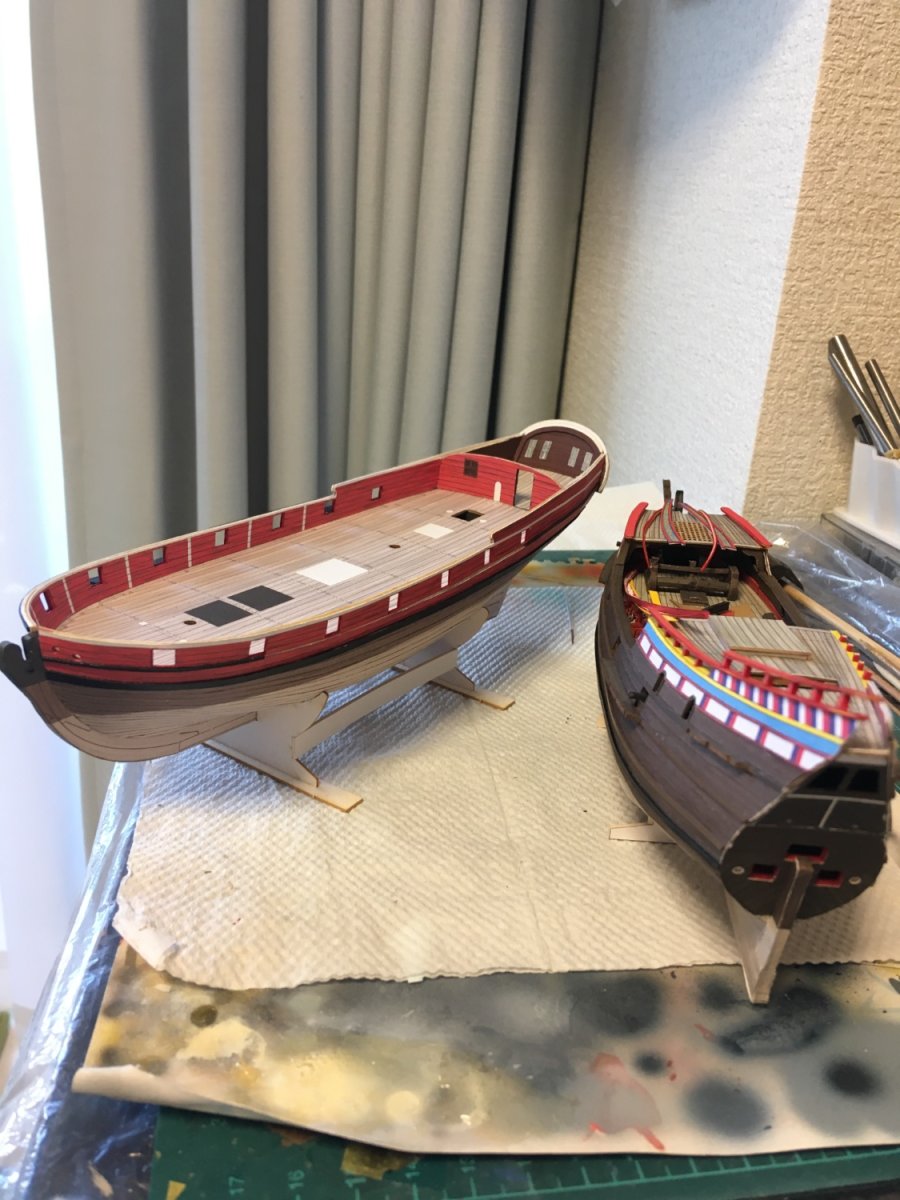
Thank you kindly for your compliments! I’m not entirely happy with the results I achieved compared to period paintings, but happy enough to want to try again with other subjects. The paintings are such a wonderful thing to have access to, serving as a sort of unphotographic record of nautical scenes from centuries not blessed with cameras, thus why not try to replicate some of their magic in our models? The “fluyt” that snuck into this build log is actually a sort of pinas, called a jacht apparently, and I have a build log for it if you are interested (though it’s been a slow go): https://modelshipworld.com/topic/32866-duyfken-by-meriadoc-brandybuck-seahorse-1100/#comment-950561 Meriadoc
-
Ocean Liner kits?
Meriadoc Brandybuck replied to Meriadoc Brandybuck's topic in Card and Paper Models
Hello, After some discussion, enthusiasm was found for building the Aquitania! ...if anyone can find a good set of lines plans for her frames. Nothing on Google or Taubman's that I can find. I thought of using the available deck plans to reverse engineer the hull shape, but that's an iffy prospect likely to cause many headaches. Anyone know anything I don't? Appreciating the help, Meriadoc -
Ocean Liner kits?
Meriadoc Brandybuck replied to Meriadoc Brandybuck's topic in Card and Paper Models
Still somewhat uplifting that that they haven't scrapped her. Maybe they're keeping her in mothball in case they ever do need a rapid fireproof transport. -
Ocean Liner kits?
Meriadoc Brandybuck replied to Meriadoc Brandybuck's topic in Card and Paper Models
Thanks for all the information! I see there is a Vaterland and several other offerings in the paper market, and lots of plans. I've known about the Airfix liners and built several of their warship kits in high school, but now everything comparable I have is in 1/700... I'll have to do some thinking. Cheers! Meriadoc -
Hello, My friend wants to work on an ocean liner project together, and I'm getting a few ideas. I'd like to avoid the ubiquitous Titanic, and probably want to go with some of the larger, later ships like the Queen Mary, Normandie, or such. Or the Imperator Class (later Berengaria, Majestic, and Leviathon). Does anyone know of any such large ocean liner kits available in card or, suitable plans to build from? I will rescale whatever I build to 1/700 and possibly 3D print most of the tiny parts. - Meriadoc