Glen McGuire
-
Posts
1,984 -
Joined
-
Last visited
Content Type
Profiles
Forums
Gallery
Events
Everything posted by Glen McGuire
-
I believe Mark is correct referring to the modeler as he. Based on the interview in the link below, Ebroin Song is a Korean sculptor/modeler. I watched his video on the battle of Midway-Akagi on Fire diorama and agree with everyone that his work is truly astounding! https://www.planetfigure.com/threads/interview-with-ebroin.241649/
-
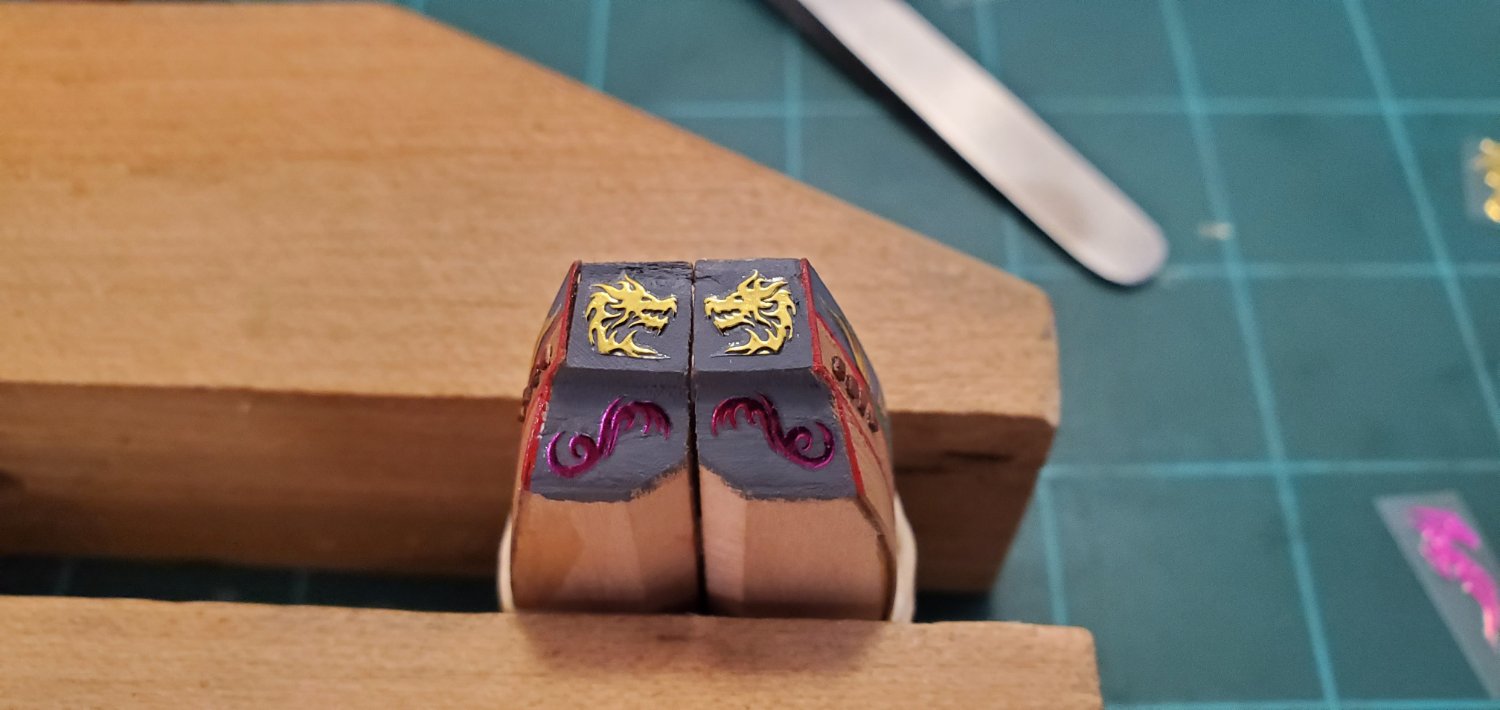
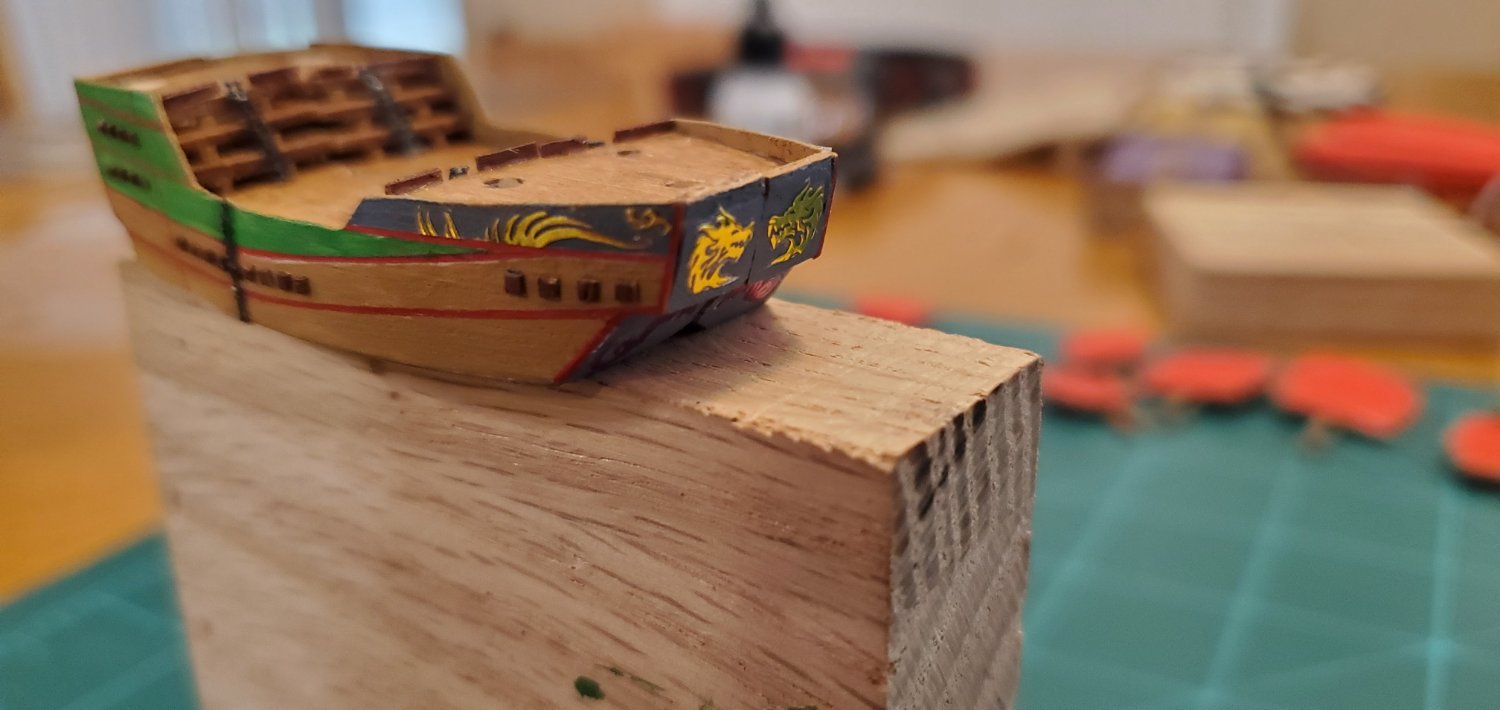
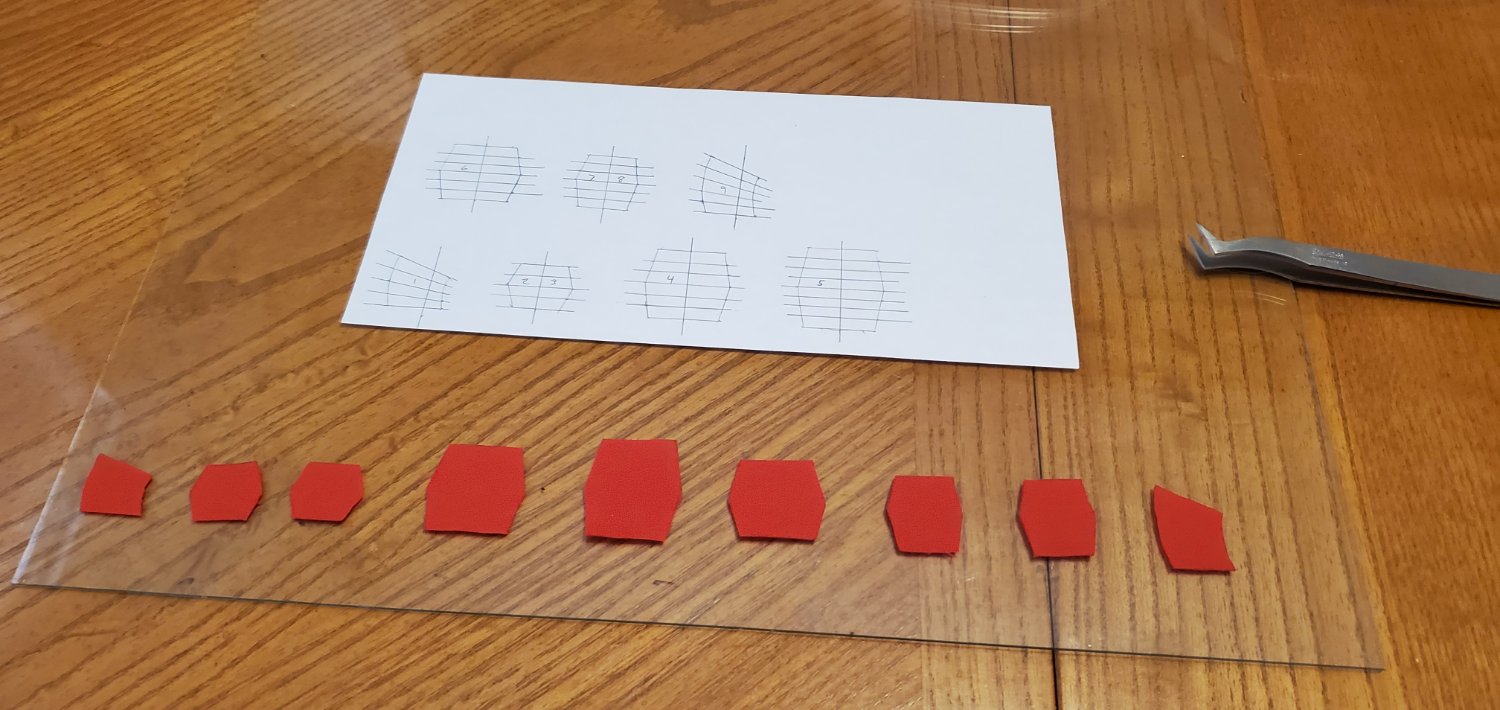
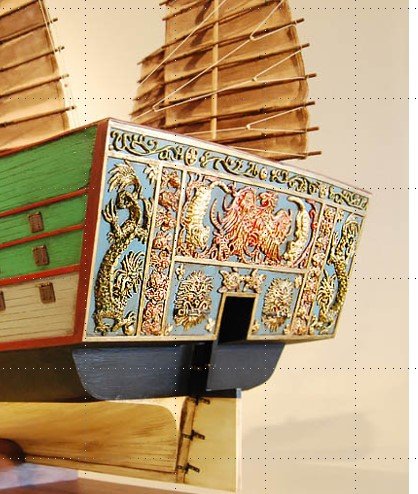
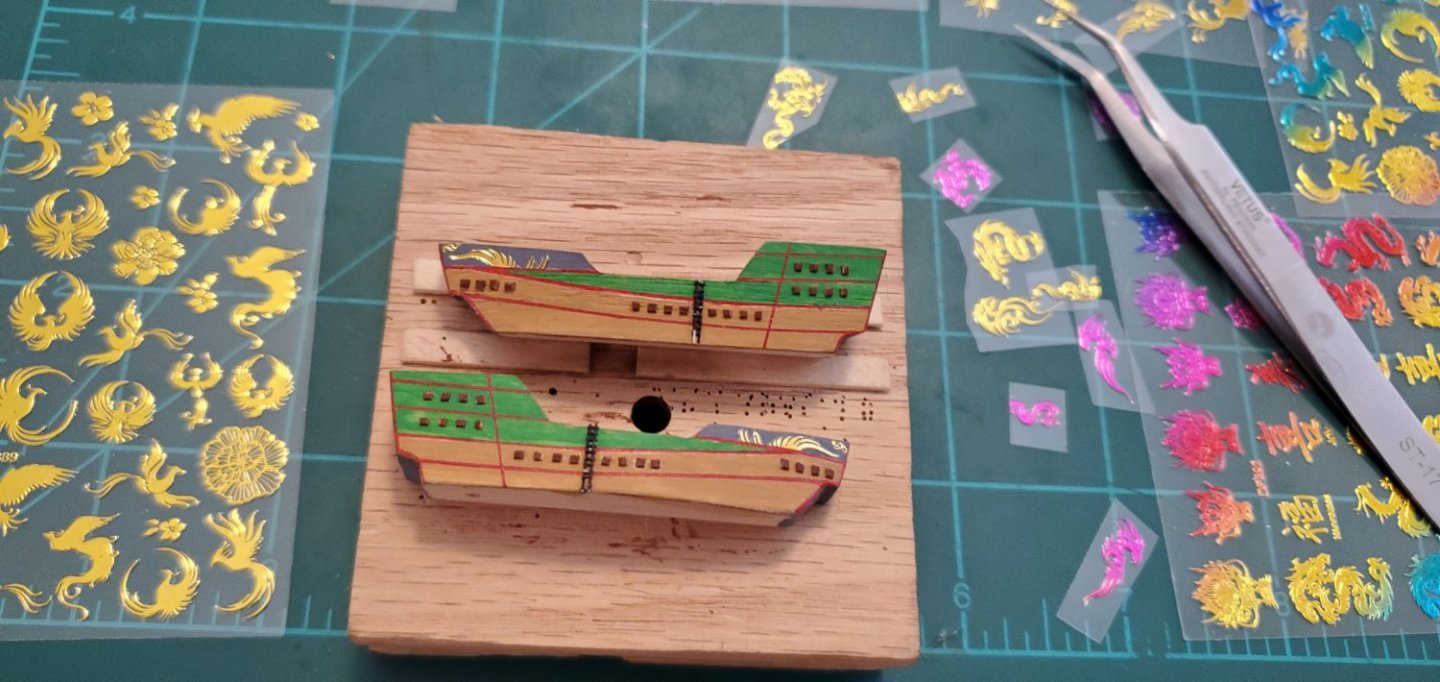
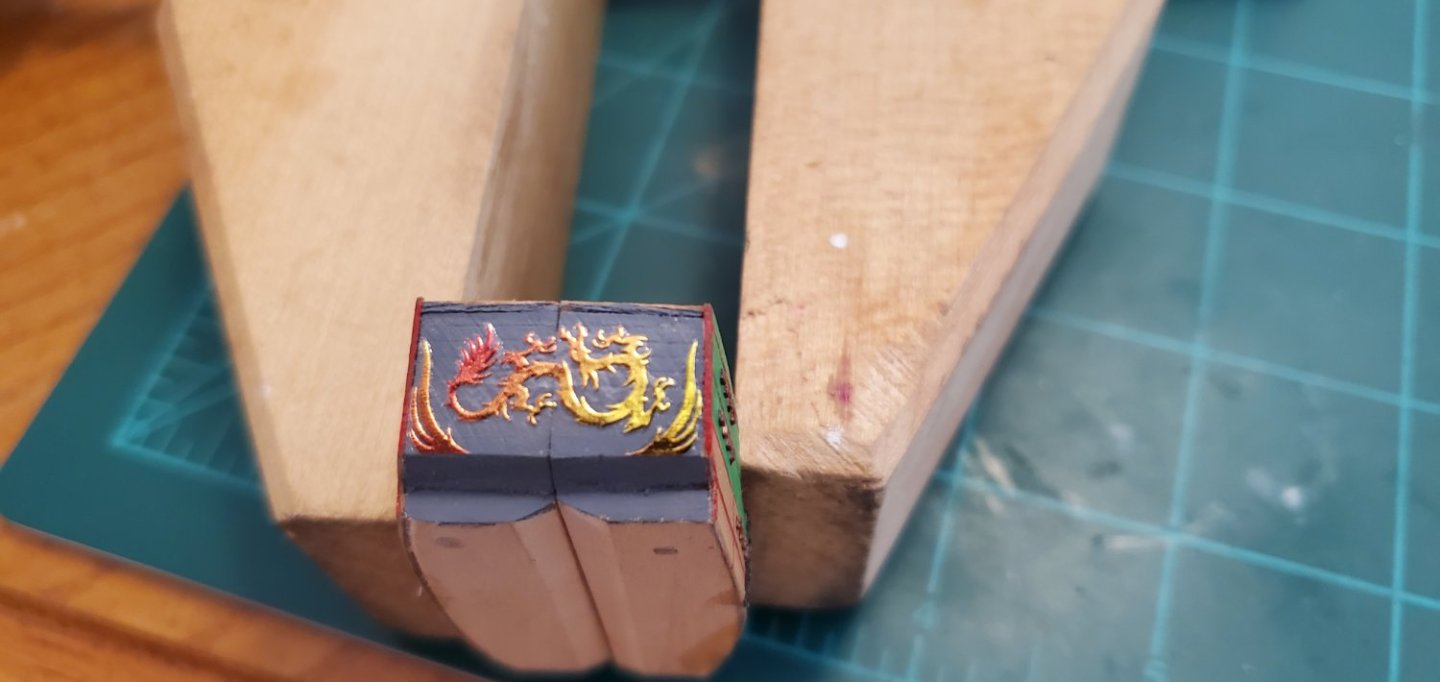
 Back to the ship project! The last thing I wanted to try and do for the treasure ship was come up with some representation of the elaborate, metallic Chinese artwork that the Model Shipyard model has on the bow, stern, and forward sides (see first 2 pics below). Obviously trying to paint something like that was entirely out of the question. So the first thing I did was try and find small designs from the labels of Chinese food and beverages. Fail. Then I saw a young lady with small, intricate designs on her fingernails. I asked her how she did that and she said “nail stamping”. So I youtubed it, bought a cheap stamping kit, and tried it out. I was able to get the design to transfer but could not get it applied straight or even. I made a freakin’ mess. So another fail. But then I found some tiny fingernail stickers/decals which sounded much easier. So I got a set with Chinese designs and the third time was the charm. I think the end result came out pretty good! It's just about time to see if we can put this whole thing together!!
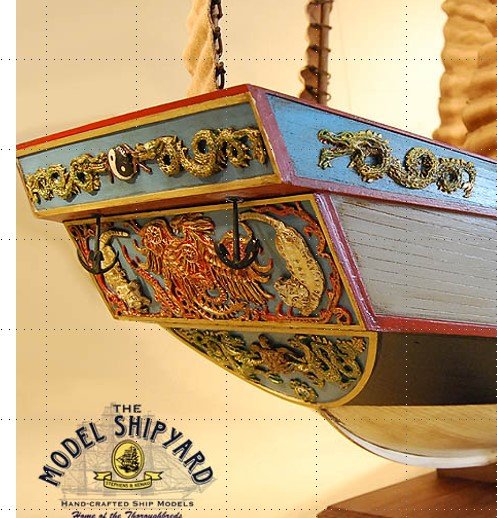


- 194 replies
-
- 9
-

-

-

-
- Bottle
- Treasure Fleet
- (and 3 more)
-
I've got the same setup on 3 sides. Unfortunately the fence on the fourth side is 5 strands of rusty barbed wire that is probably 50 years old. Whoever put up that fence used a lot of trees as posts and now those trees are 2 feet in diameter with the wires running thru the middle of their trunks. I patched the weakest spots so it should be good to hold my cows in place. Now if a large bull was determined to come visit, that would be another story!
- 194 replies
-
- 2
-
-
- Bottle
- Treasure Fleet
- (and 3 more)
-
Excellent presentation, Alva!! Beautiful job with the tight tolerances, the rigging, the background, the water, EVERYTHING!!! Enjoy your vacation!!!
-
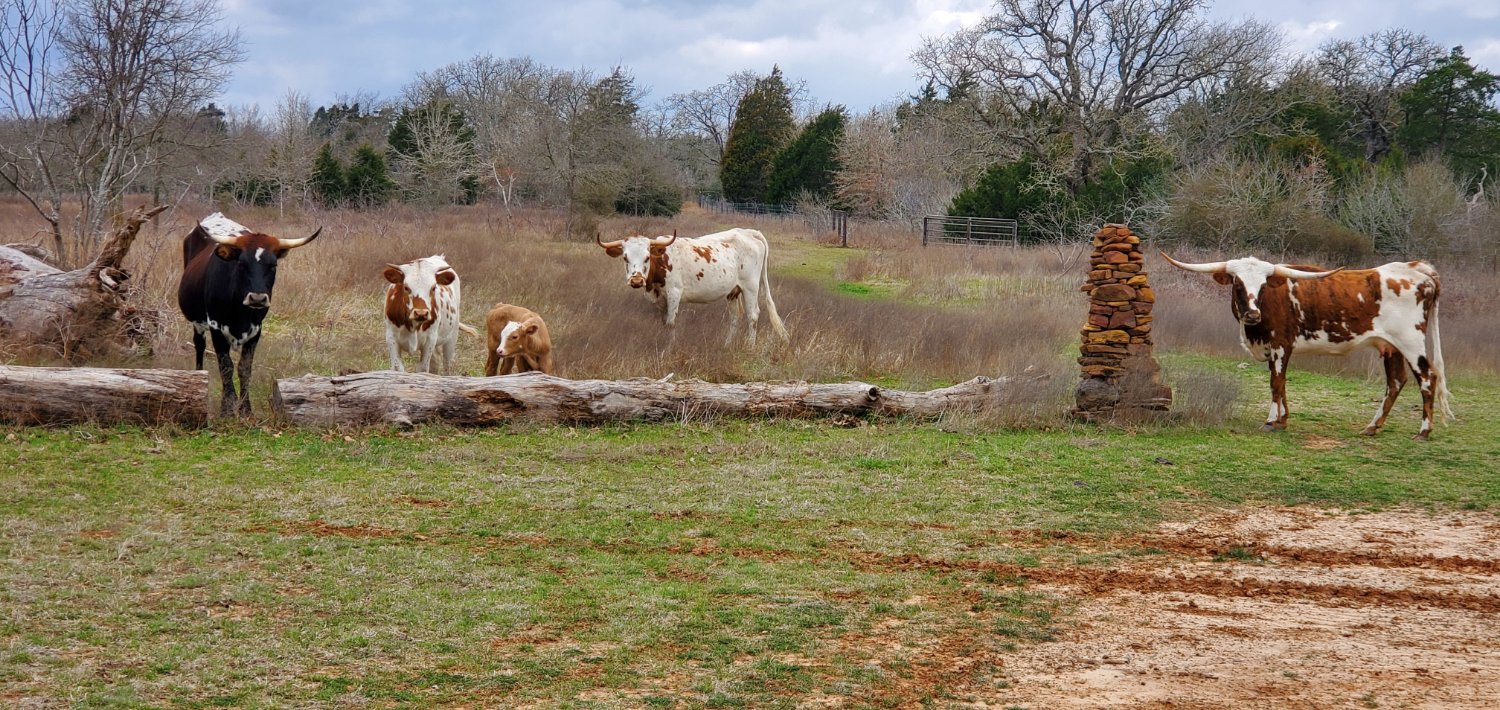
Funny you should ask those 2 questions, Keith. So here's the quick story on the longhorns: Being a University of Texas grad, I had this lifelong dream of owning my own small herd of longhorns. About 2 years ago, I bought 3 young longhorn heifers. I finally had my longhorn herd and was thrilled at fulfilling a lifelong dream. I was good with 3 and had no plans to increase the herd size. Seven months later, to my utter (or udder) shock, one of my heifers (Allison) had a calf. Unbeknownst to me and probably the seller (otherwise he would have charged more), she was pregnant when I bought her. OK. Now I had 4 longhorns. Not what I planned but it was pretty cool having a new calf to raise from birth. Eight months later, Dimples did not respect my fence as you said, and escaped into the neighbor's pasture where there was a nice herd of charolois cattle with a sizeable bull. Apparently she had a one night stand because 9 months later, out popped Shiloh. So he is actually half longhorn and half charolois. Fortunately, horns are a dominant trait and his are starting to pop out nicely. So the answers to your questions are no and no!! And the answer to what might be your next question is yes, I spent a lot of time fixing the fence!! Nobody has escaped in well over a year.
- 194 replies
-
- 3
-
-
- Bottle
- Treasure Fleet
- (and 3 more)
-
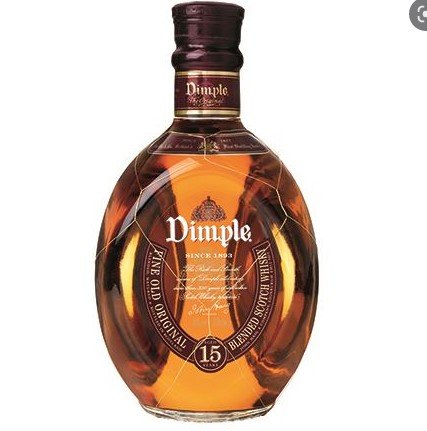
Dimples whiskey? I had not heard of that so I had to look it up. Very cool looking bottle! Maybe part of a future project!!
- 194 replies
-
- 4
-
-
- Bottle
- Treasure Fleet
- (and 3 more)
-
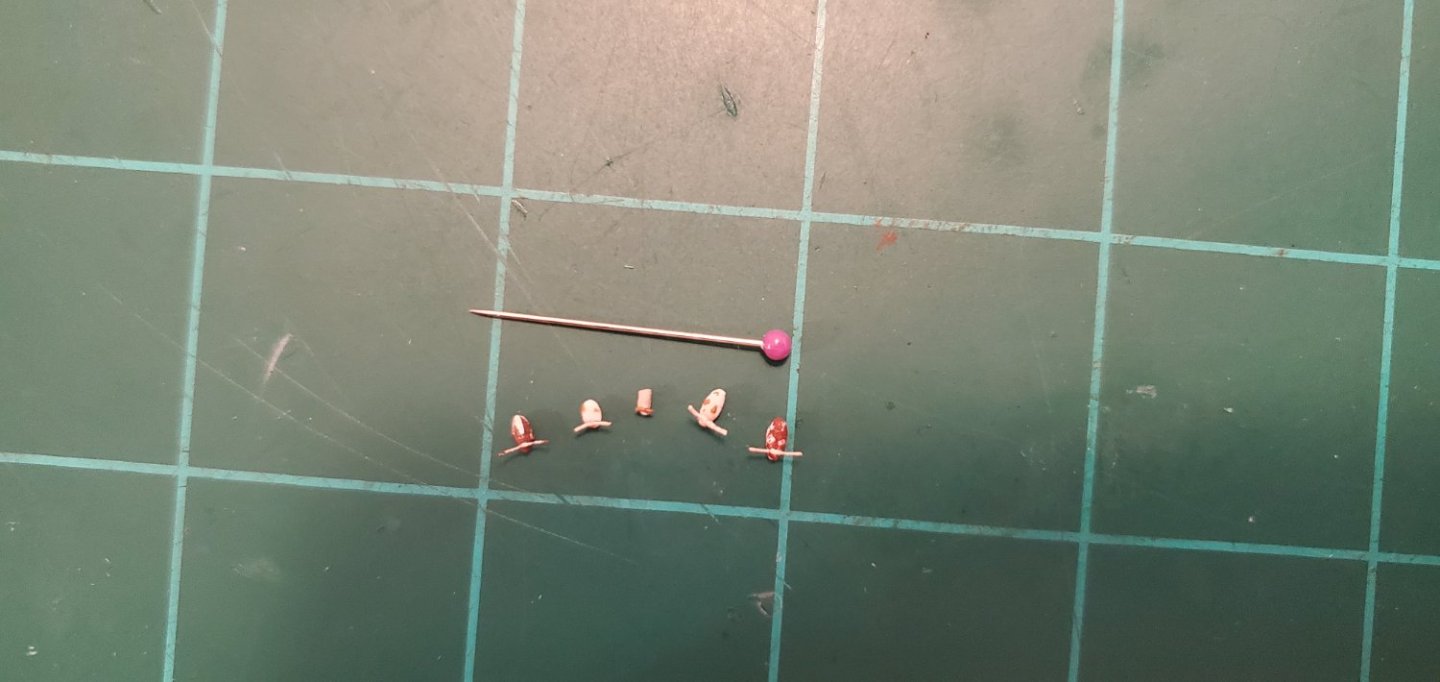
With the sails complete, time to circle back to the corrals and their animals. Based on Keith Black's suggestion about including my new calf Shiloh, I decided to go one step further and populate the ship with my entire small herd of longhorns. The first picture shows all of them about 6 months ago. From left to right, their names are Sweet Eileen, Rosanna, Shiloh, Allison, and Dimples. Allison is Rosanna's mom and Dimples is Shiloh's mom. Shiloh is the only male and is named after a nearby settlement from the 1800s. I will bestow Honorary Texan status on anyone that can figure out where the other 4 names came from (without googling)! Here's what I was able to do trying to make tiny versions of my longhorn family - same order left to right as in the above picture. They are made from tiny balls of clay with very fine wire for the horns. Since this is such a tough crowd at MSW, I know someone is going to ask where their legs are! 😃 Let's just say it's cud chewing time so they are all relaxed, lying on the ground, with legs folded underneath, enjoying their earlier meal for a second time!

- 194 replies
-
- 11
-
-
-
-
- Bottle
- Treasure Fleet
- (and 3 more)
-
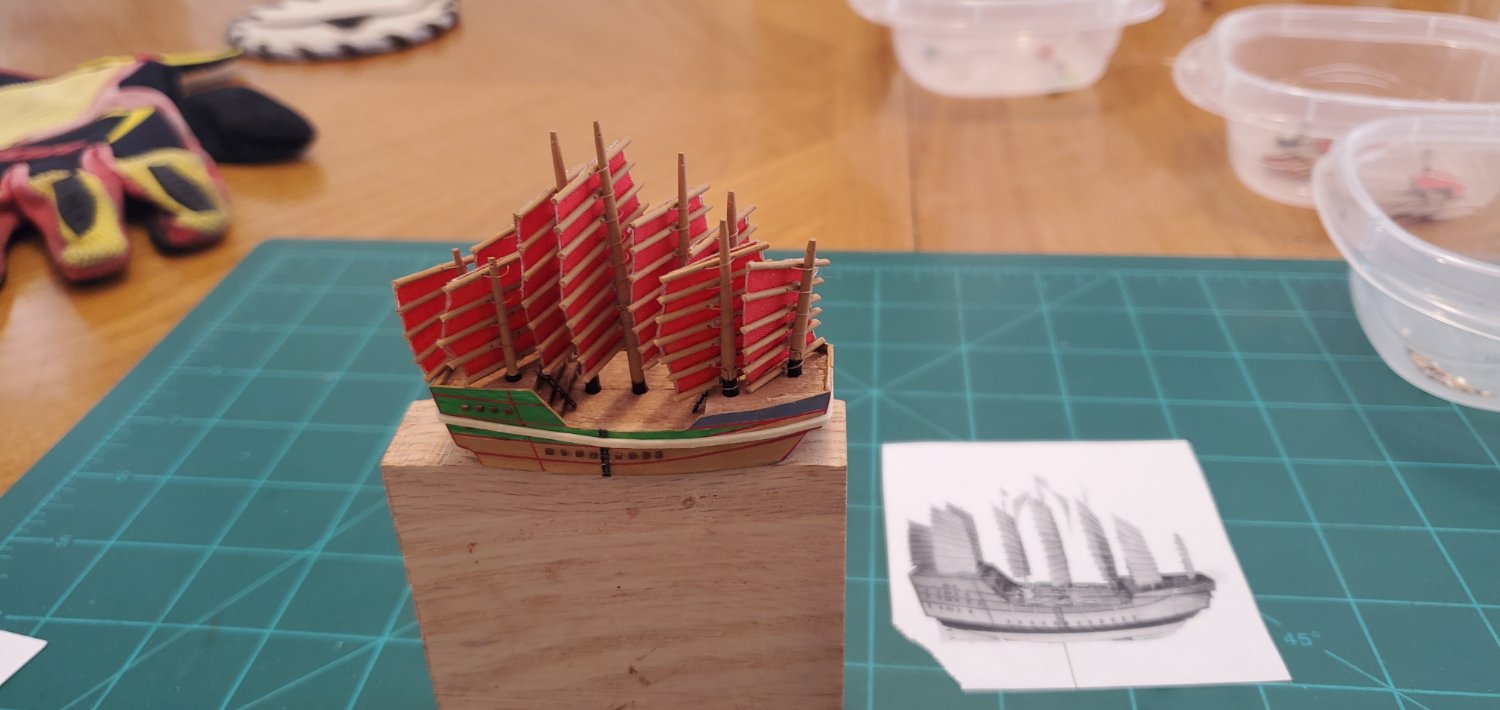
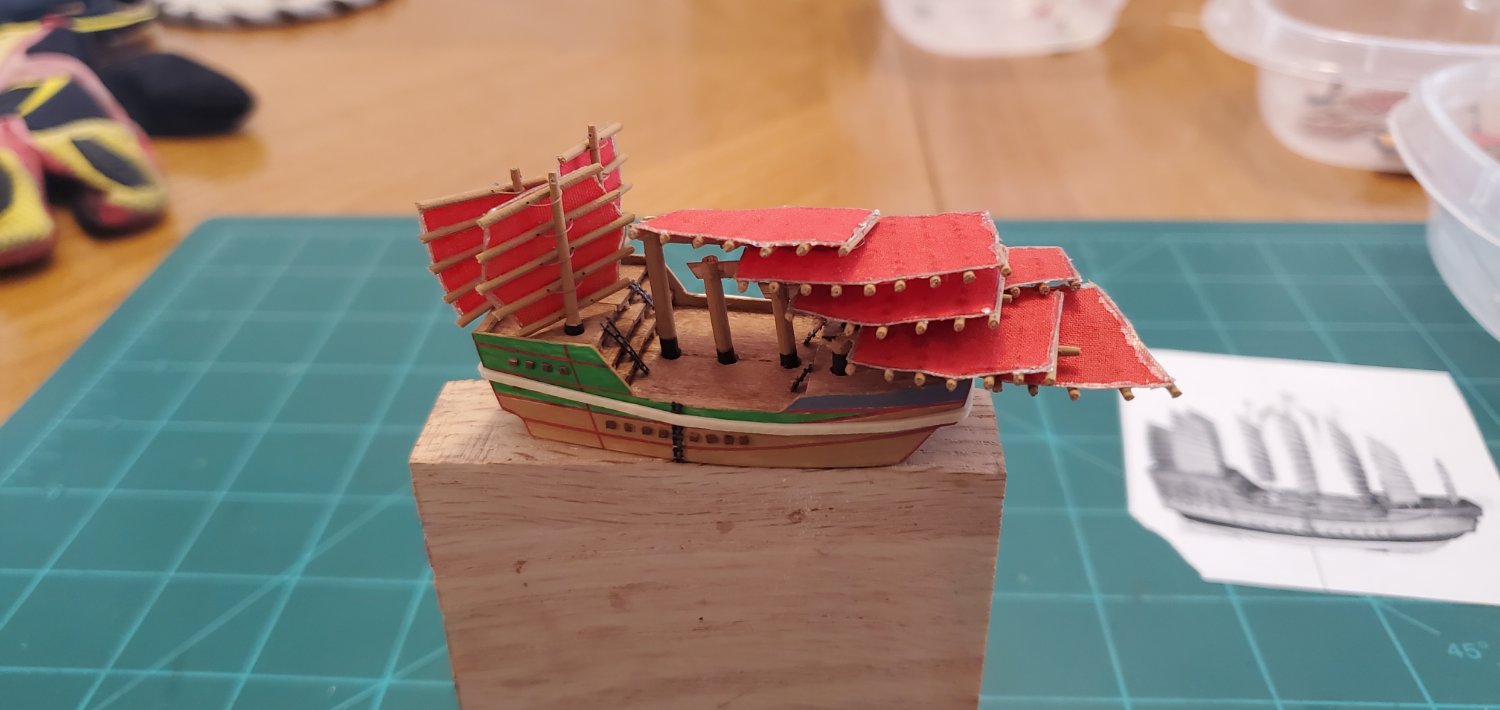
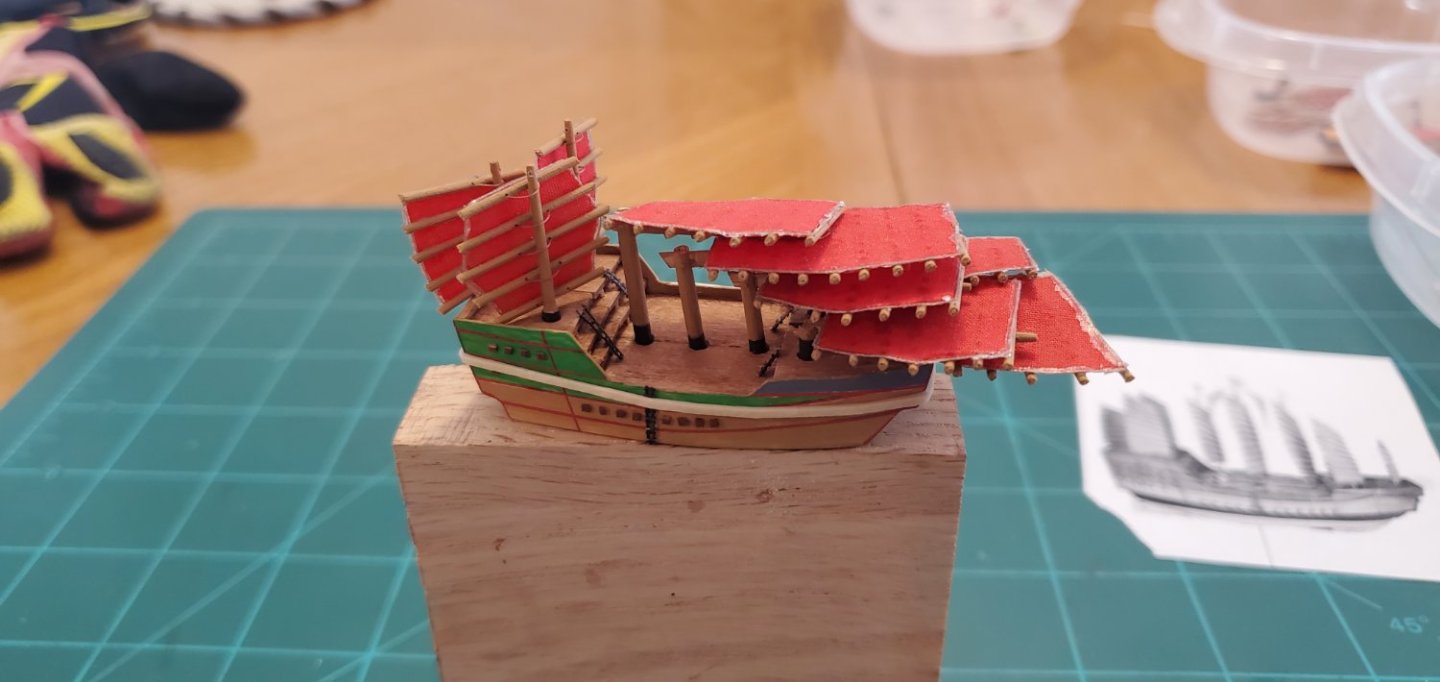
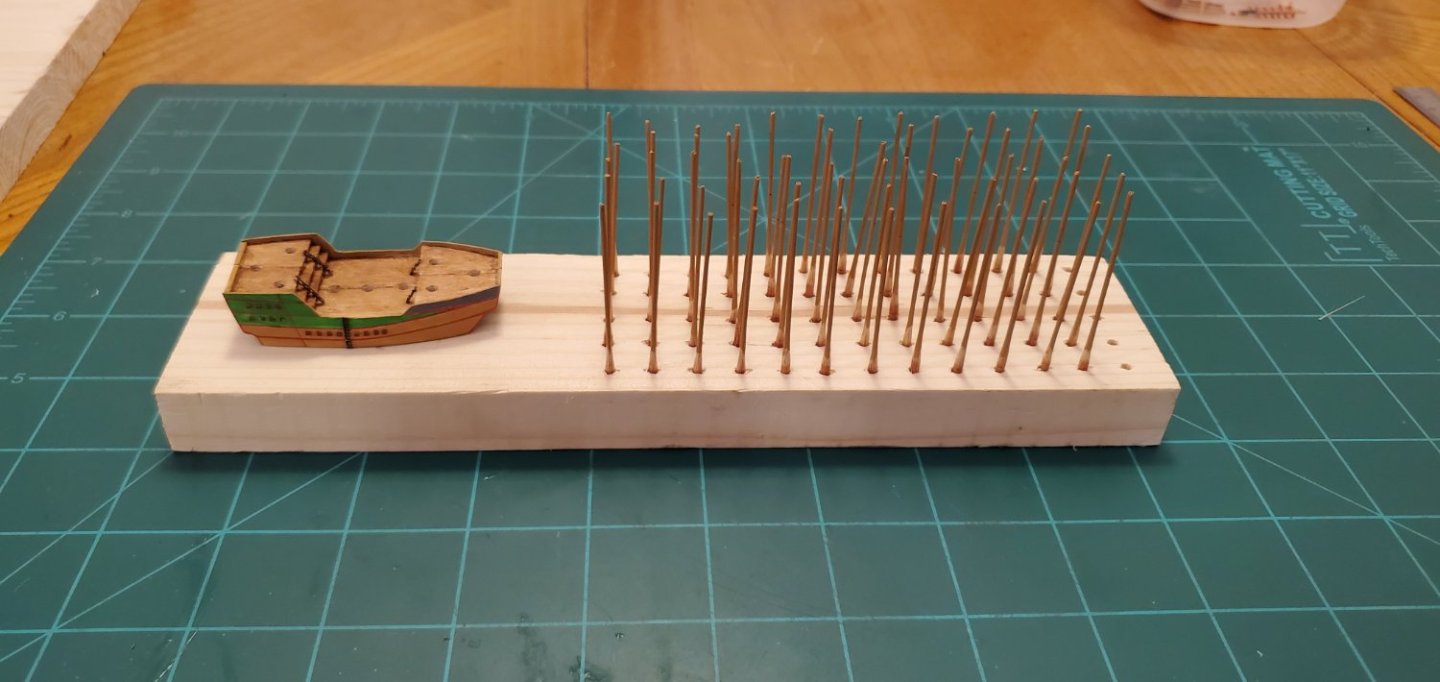
A couple of pics of the masts and sails dry-fitted into the hull.

- 194 replies
-
- 10
-
-
-
-
- Bottle
- Treasure Fleet
- (and 3 more)
-
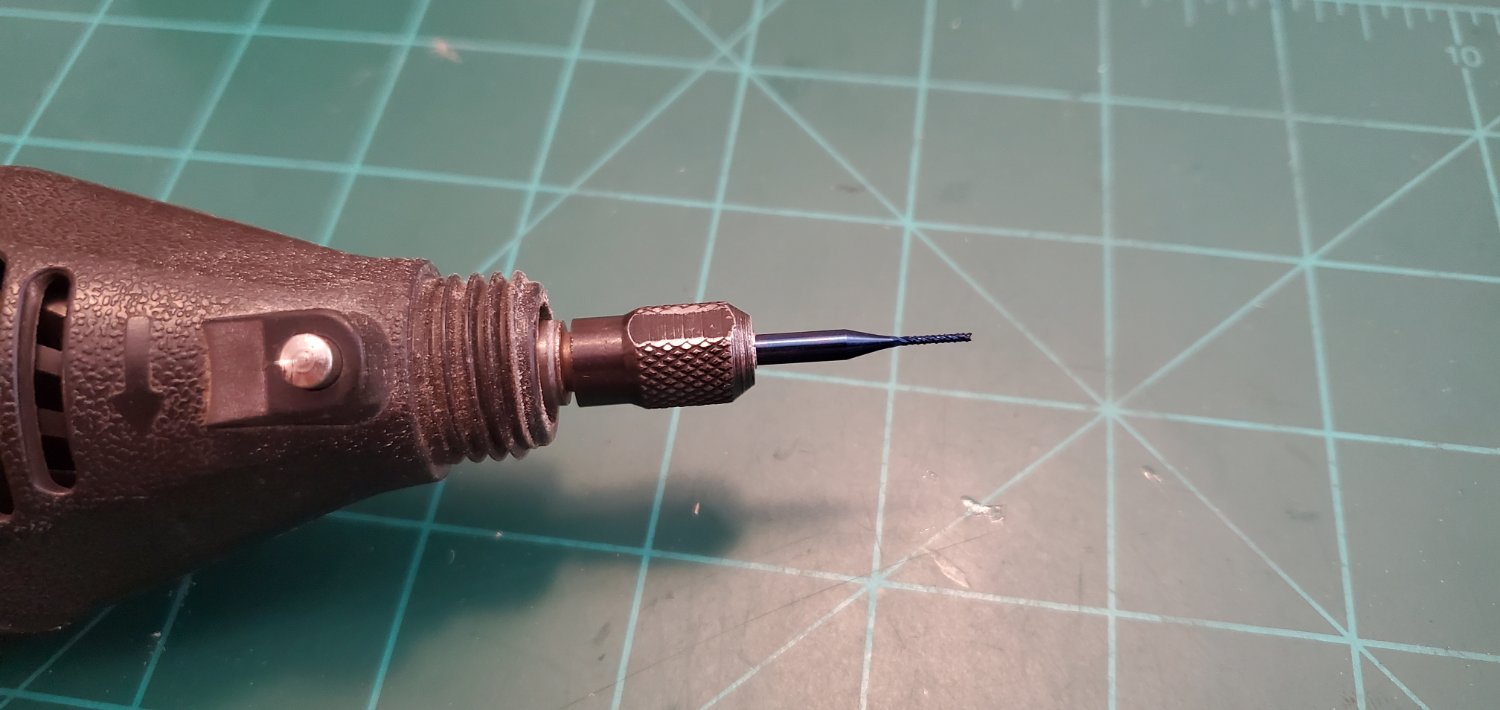
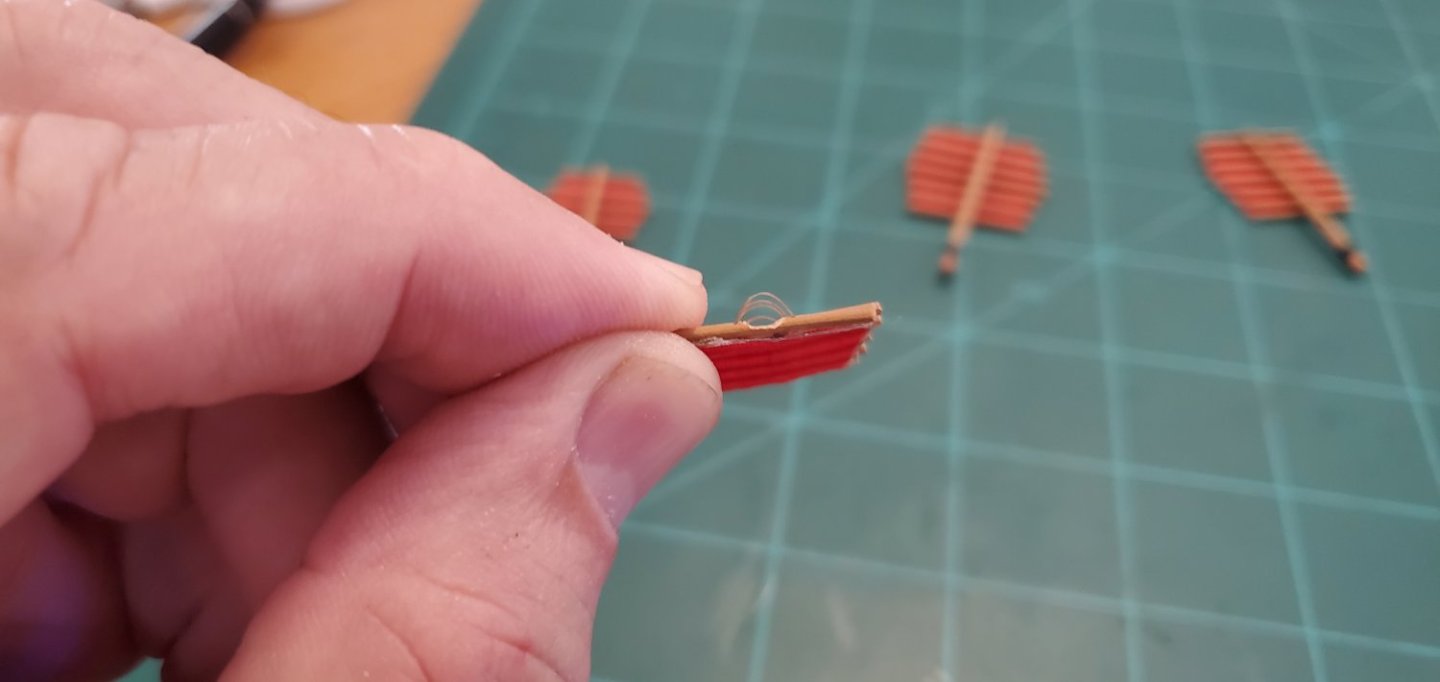
And here's where I discovered a screw-up. When I insert the mast thru the lashing loops, there needs to be some wiggle room because the sails have to be able to rotate, scrunch up, and slide up and down the mast a bit during the final assembly inside the bottle. In the first pic, you can see that the upper battens are loose where the mast tapers. Unfortunately, the lower loops were too tight and were getting hung up on the hinge. The lashing is tied with a knot behind the batten and is glued to the sail. So there's no way to rethread it. Also, I did not want to narrow the mast further and potentially weaken it. And I certainly did not want to start over. UGH!!! So after pacing around the house muttering about my lack of forethought, intelligence, and a few other things, I decided to see if I could add the needed wiggle room by carving out some of the batten. I grabbed my dremel and a small reamer bit and ever so carefully routed out a groove in the lower battens. I had to do the for all 6 of the masts that are hinged. Somehow I managed to do it without snagging the thread and ripping the whole thing to pieces! Hugh sigh of relief.


- 194 replies
-
- 8
-
-
-
- Bottle
- Treasure Fleet
- (and 3 more)
-
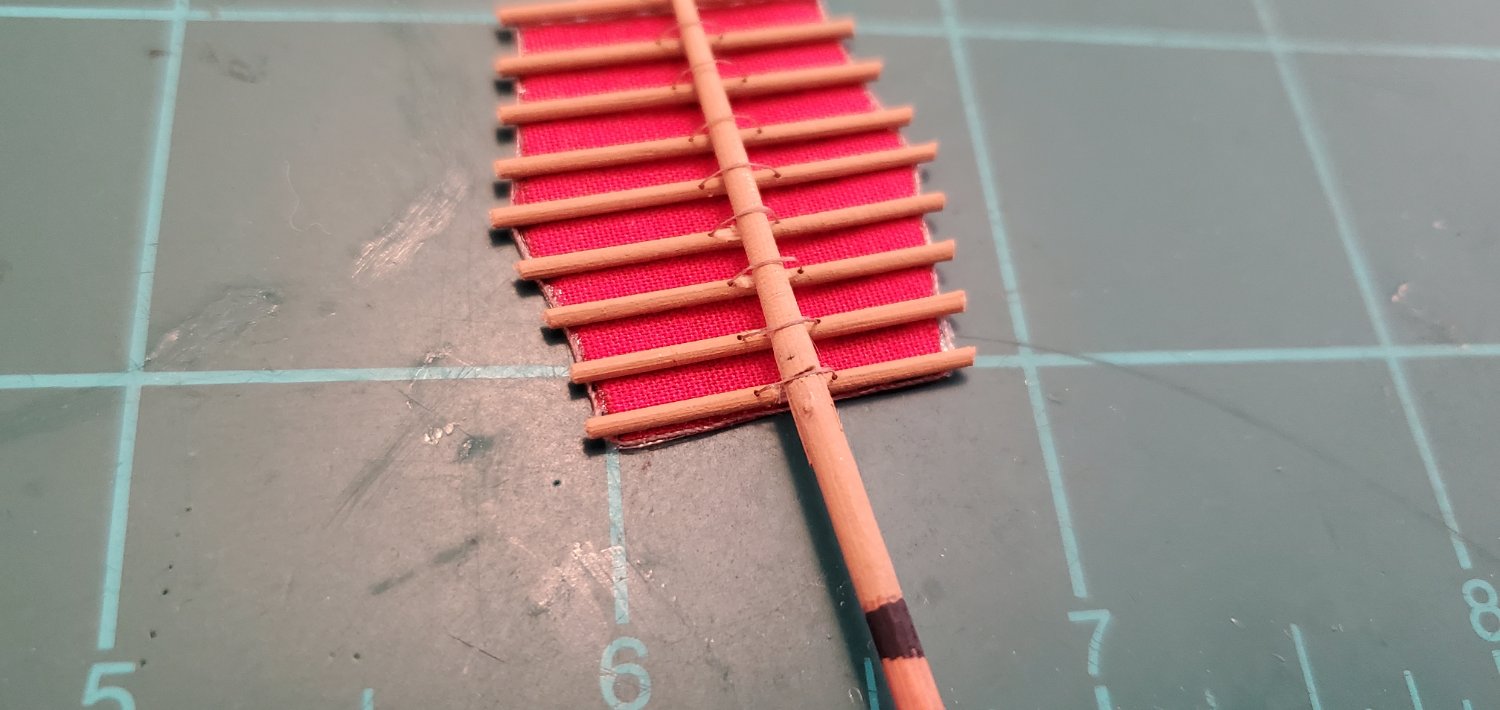
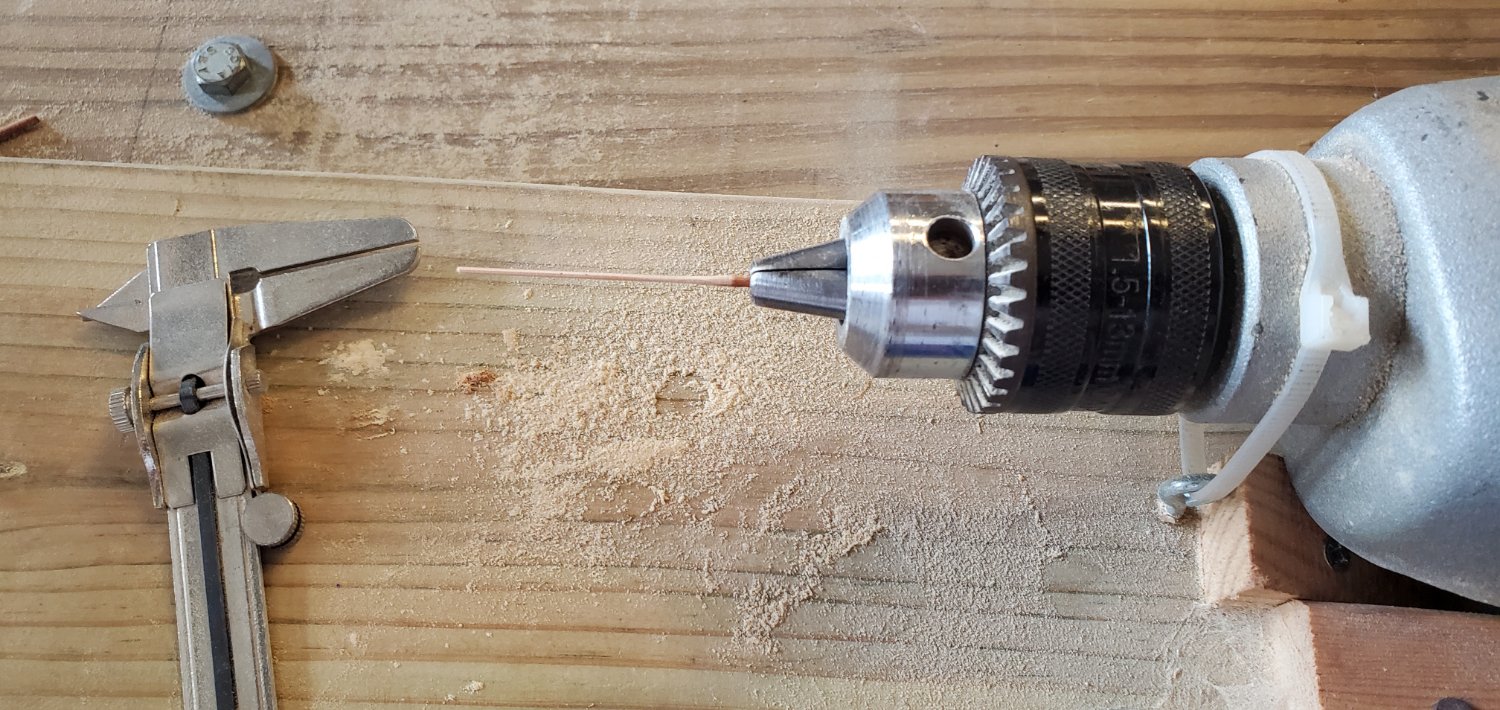
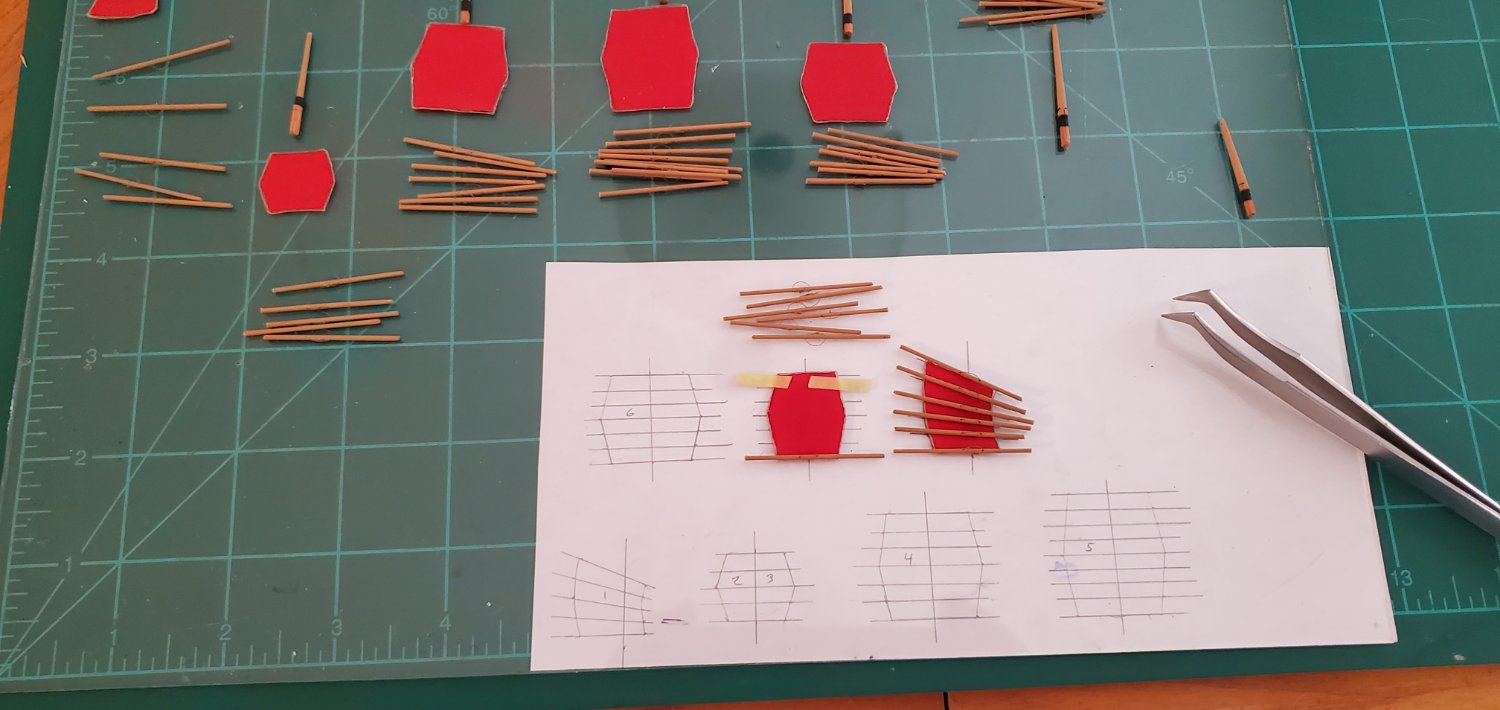
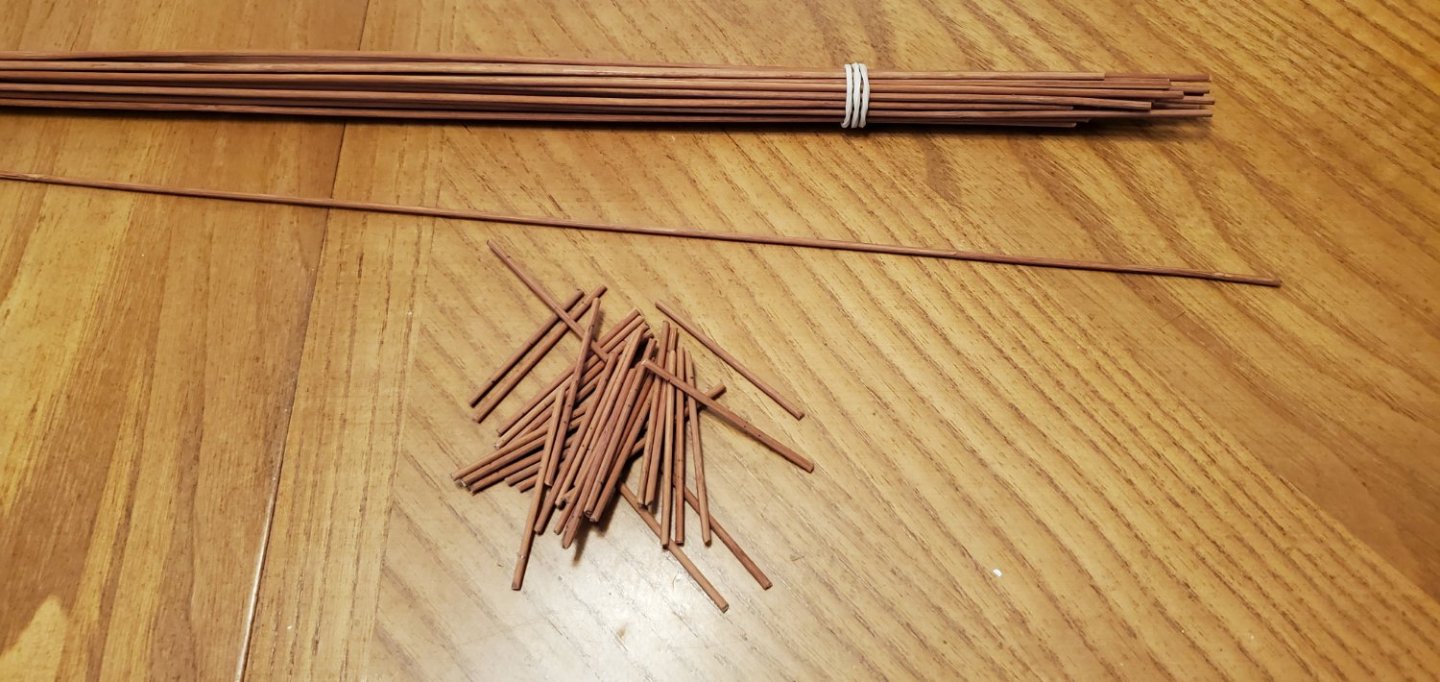
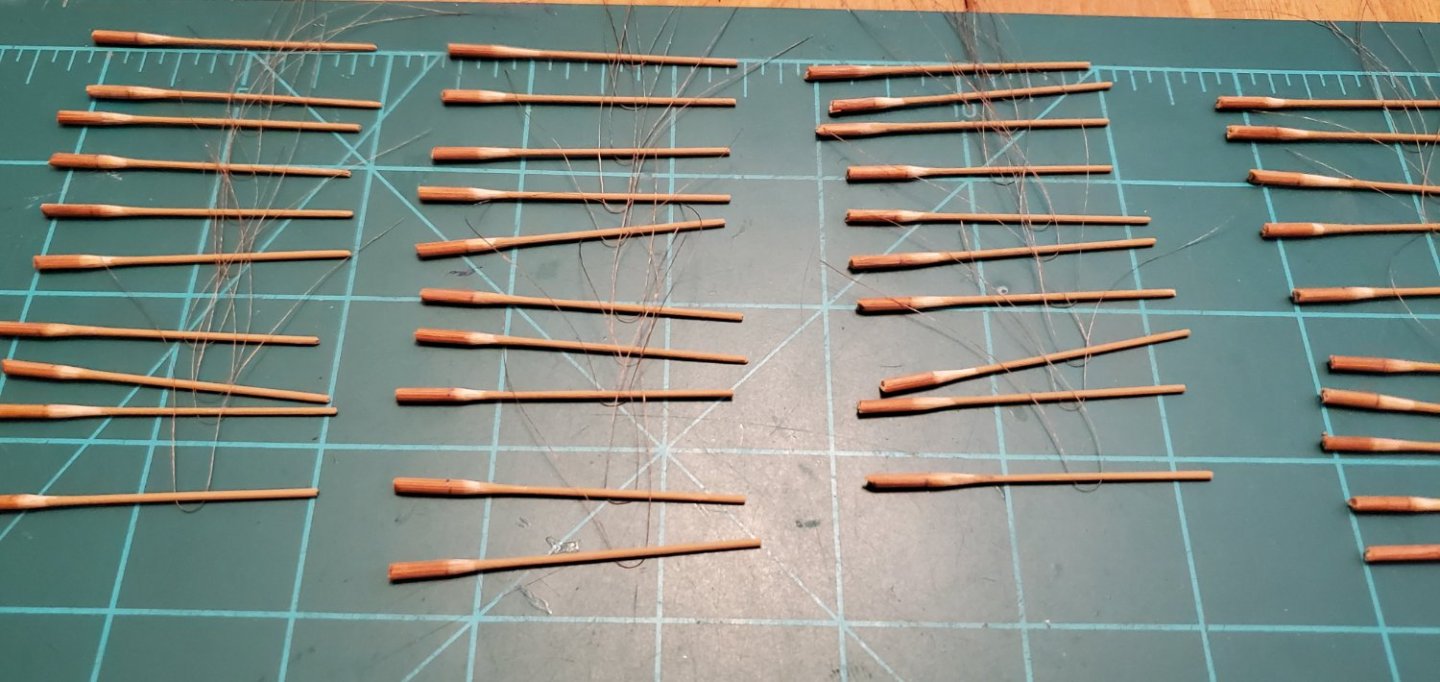
It was a sweatfest in the central Texas shipyard this week as my house AC went out last Sunday and I was not able to get it replaced till Saturday. Regardless, I was still able to get the battens made and complete the final assembly of the 9 sails. Here's the assembly line process: 1. For the battens I'm using these long, thin bamboo rods I scrounged from an old 70s-ish sliding door curtain. I cut them into 2" long pieces and drill 2 #80 holes in the middle for the lashing that will secure the sail to the mast. I need 60 of them. 2. Each rod is 3/32" in diameter. I put them on the drill lathe and sand down to 1/32" 3. Next is painting and then going back thru the tiny lashing holes with the #80 drill bit to open the holes back up. 4. Next is threading 4" pieces of fly tying thread (136D 6/0W) thru the lashing holes and then tying off a small loop with a knot. 5. Then I clip the fat ends off and glue the battens to the sails. After all the battens are glued in place, I go back and clip the ends to their proper length so they extend just past the edge of the sail.


- 194 replies
-
- 8
-
-
-
- Bottle
- Treasure Fleet
- (and 3 more)
-
Excellent work so far! You have chosen a very interesting subject! I will follow your build as I work on my own junk ship project (see link below)! And thank goodness for Google translate. 😃
-
Hopefully Grant has way more sense than me!! And hopefully he won't keep us in suspense for too much longer!
-
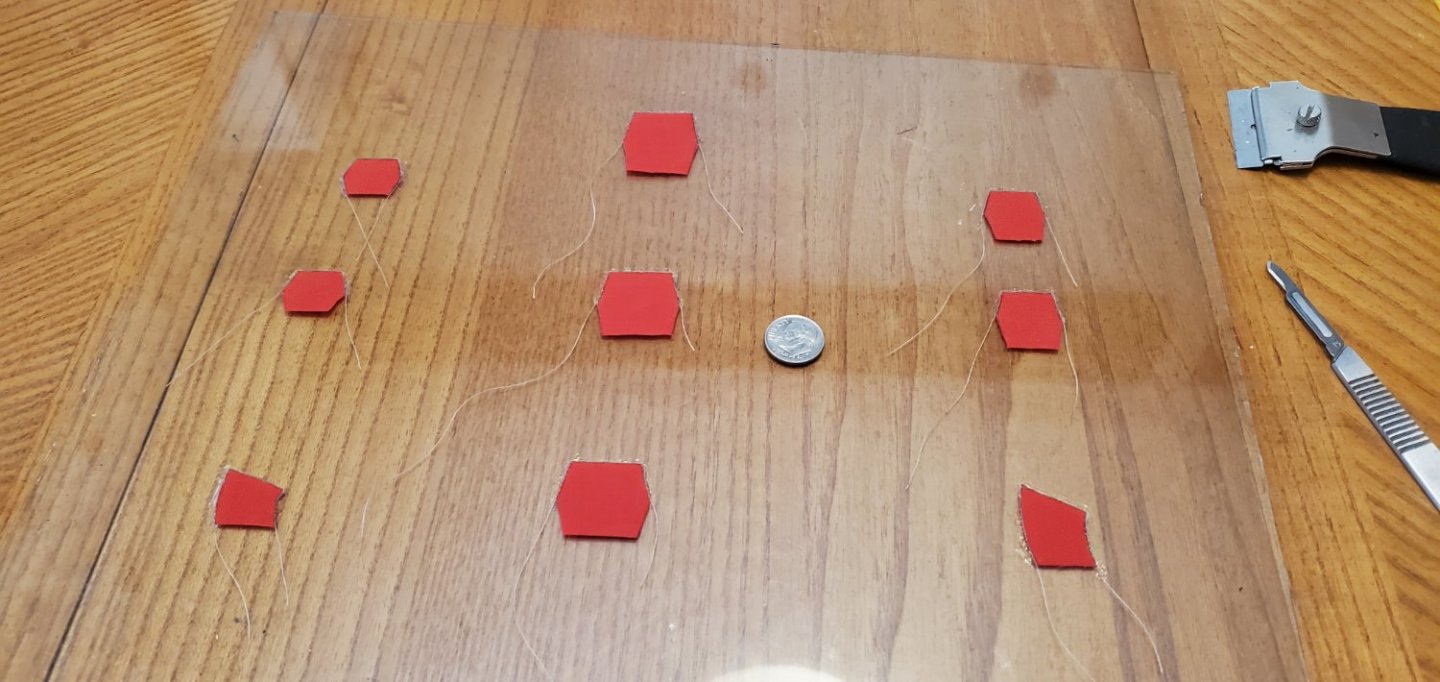
Sail making assembly line. As with the other ships, the sail material is red shirt cloth from Joana Fabrics with Gutermann silk thread glued to the edges for the bolt ropes.


- 194 replies
-
- 10
-
-
- Bottle
- Treasure Fleet
- (and 3 more)
-
Not sure about that, Roger. I have not come across any mention of scurvy prevention in my research for this. But I have read where the ancient Chinese were the first to construct ships with double hulls divided into separate watertight compartments which saved the ships from some battle damage and also allowed storage of fresh water for passengers and animals and tanks for keeping fish catches fresh. They also were the first to install a sternpost rudder attached to the outside of the ship that could be raised or lowered depending on how close to shore they wanted to get.
- 194 replies
-
- 4
-
-
- Bottle
- Treasure Fleet
- (and 3 more)
-
I think interesting and strangely weird is a good description of this whole project! As I said before, I told my son he is no longer allowed to suggest SIB subjects. He replied that all he did was suggest I do a junk ship - I'm the one that turned his idea into something ridiculous. Fair point!
- 194 replies
-
- 2
-

-
- Bottle
- Treasure Fleet
- (and 3 more)
-
Hey Mark - I would not put it past those rascally cows to do something like that, but the corn field is indeed on the forecastle where it belongs. The bow on the ship is so wide and so squared off that it looks more like a stern than a bow. It has confused me more often than I care to admit!
- 194 replies
-
- 2
-
-
- Bottle
- Treasure Fleet
- (and 3 more)
-
Epic!!! Keep your expectations low, Ian. Very, very low! I got a feeling they will be crude at best.
- 194 replies
-
- 2
-
-
- Bottle
- Treasure Fleet
- (and 3 more)
-
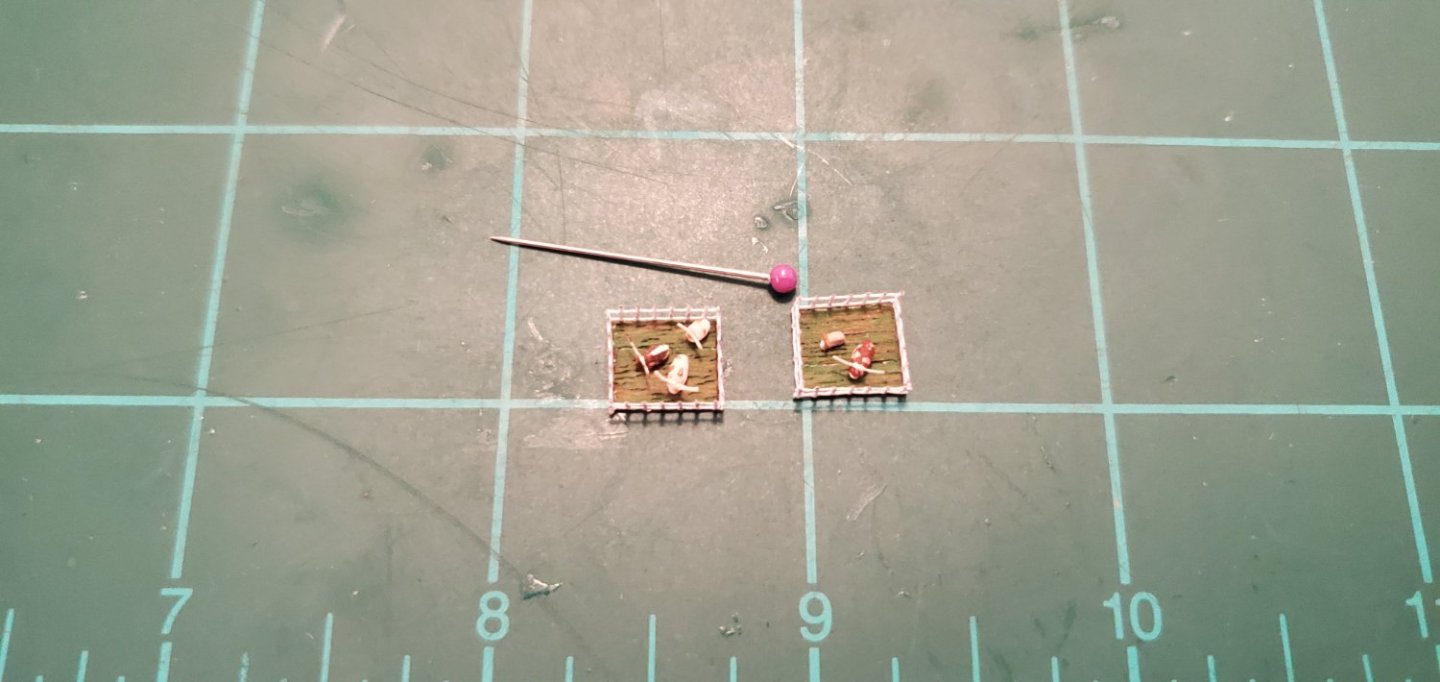
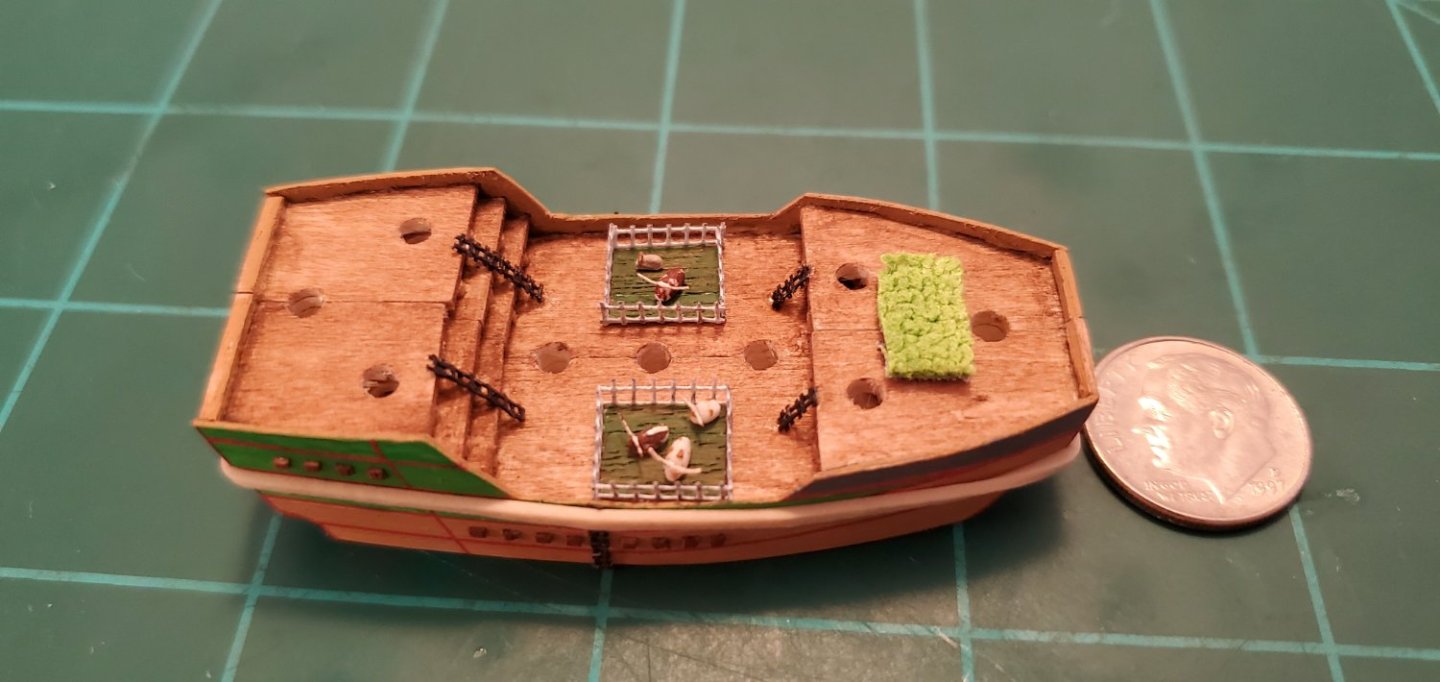
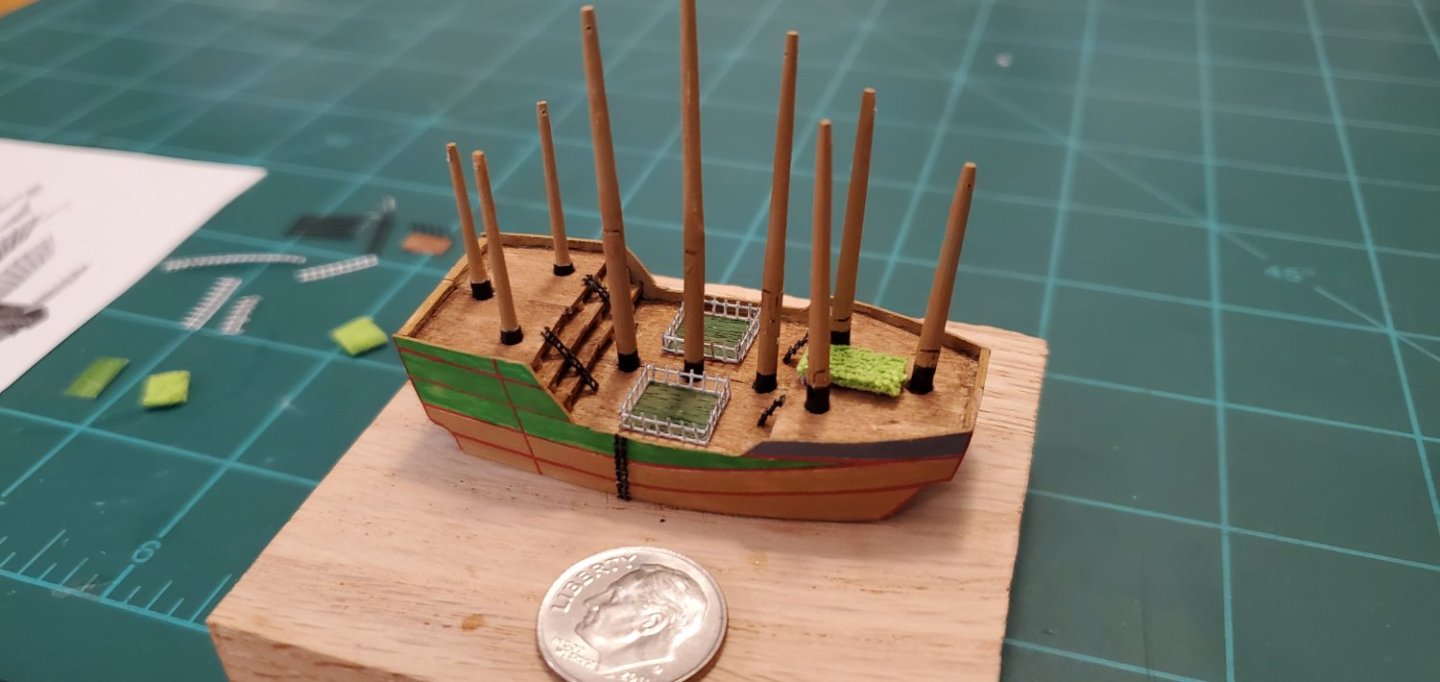
Not so fast on the sails. After finishing the ladders, I thought the window screen material might work well for the fencing around the cattle pens. So I decided to work on those. The Model Shipyard version has several pens for a variety of animals, but I'm going with just two for my herd of longhorns. The Model Shipyard version also shows a parcel of row crops being tended to on the forecastle. For that, I decided a piece of green microfiber cloth that I'd been using to clean computer/phone screens might work. I liked the color and texture of the microfiber, so it sacrificed a small piece of its corner for my treasure ship's row crops. The crops are probably a bit tall, but let's just say it's corn ready for harvest! So here's the hull with masts, ladders, cattle pens, and corn field dry-fitted. Now, it's on to the sails!


- 194 replies
-
- 8
-
-
-
- Bottle
- Treasure Fleet
- (and 3 more)
-
Majestic is the first word that popped into my mind seeing all 3 masts in place. Impressive work, Rob.
-
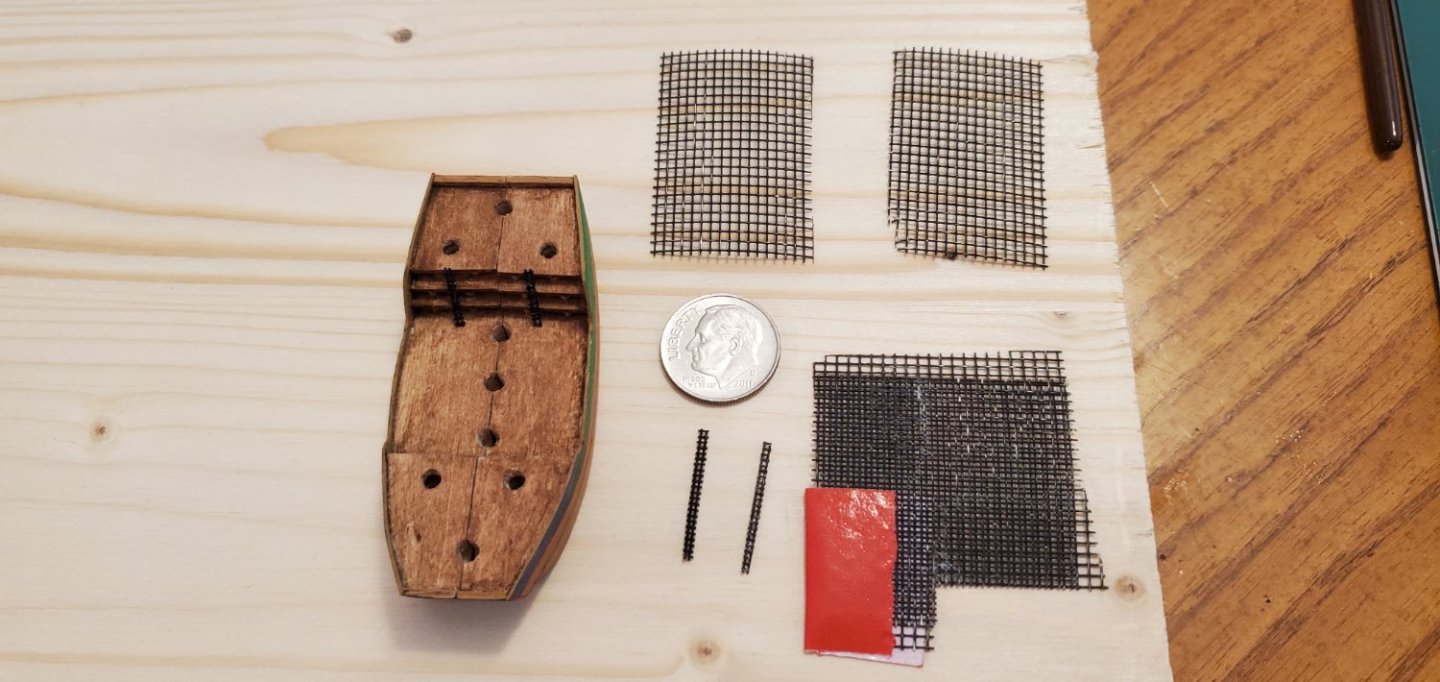
Well, the wire mesh idea for ladders was a fail. The weave of the mesh I ordered was too large - too much space between each square. I still tried cutting it into individual strips, to see how workable it was, but it promptly unraveled. I might try brushing some epoxy on it and then cutting again to see if it will work for a future build, but it's not going to work for this project. In the meantime, a neighbor was tossing out an old window screen and I thought, "hey, wait just a dang minute..." I grabbed it and cut a big swath out of the middle. The weave was still too large, but I came up with another idea. The screen was thin and flat, so I tried folding it over, staggering the squares, and gluing it to itself (which basically cut the size of the weave in half). I think it came out ok! Now, on to the sails...
- 194 replies
-
- 9
-
-
- Bottle
- Treasure Fleet
- (and 3 more)